restorative full-122
TRANSCRIPT

Full-Mouth Reconstruction Restoring Vertical Dimension, Speech, and Self-ConfidenceThomas J. Dwork, DMD
Is innovative as the founders of aesthetic dentistry were, I don’t believe they could have envisioned the state of affairs today. The ceramist/dentist team has the capability to regrow and rehabilitate decimated dentitions, and restorations are so vital that the human eye cannot distinguish them from natural teeth.
As a prosthodontist, I am frequently asked to restore to function and aesthetics severely broken down dentitions. Prior to our current “next-generation” adhesive dentistry, the treatment protocol called for multiple disciplines to gain retention for our conventionally cemented restorations. The periodontist was called upon for crown lengthening, and the endodontist was called upon for intentional pulp extirpation to provide for post-core retention. Now, with modern adhesives, if there is sufficient tooth structure, we are free to choose a metal-free option that is truly elegant and less invasive to the patient. With the myriad of veneer and three-quarter crown designs, we can restore while conserving tooth structure.
Caveat
As a prosthodontist, I see a great deal of dental re-treatment, so I am biased in that I believe that dentin adhesion is not a predictable process. I have replaced many recently placed veneers, and upon removal, the enamel bond is solid while the dentin bond is inconsistent. I don’t know whether this is due to occlusion, thermocycling, or poor technique, but it’s not consistent, so I prefer as much enamel to be preserved as possible for predictability.
Case Report
The case presented is a patient referred by a general dentist whom I had taught at the Atlantic Coast Research Clinic and at the Rosenthal Institute. The patient was a healthy 40-year-old male who was concerned with the loss of his teeth. He was beginning to experience pain in his jaw muscles, and he had been told about the significant wear of his teeth over the years. His general dentist was shocked at how severe his wear was for his age (Figure 1).
Dental History
The patient’s dental history consisted of minimal restorations and frequent recommendations for bite splints to address his grinding habit. He was aware of his habit, and he told us he was “grinding for comfort” and drank a lot of citrus drinks. He denied having bulimia or any acid reflux problems.
Figure 2. Preoperative smile. Figure 3. Occlusal view. Note severe breakdown with pink pulp visible.
Figure 4. Retracted view of centric occlusion. Note bite collapse. Figure 5. Preoperative maxillary occlusal view with severe dentin exposure.
Figure 6. Preoperative mandibular occlusal view with severe dentin exposure.His grinding habit—rhythmic clenching of muscles and vertical grinding—was visible as he sat in the dental chair. Chemical erosion was clearly a
component of his tooth destruction. The clinical exam revealed advanced wear on all teeth, but particularly on the cingula of the upper anterior teeth. Pulp horns were seen “pulsing” on a few of them. The gingiva was a victim of poor home care, but the bone support was healthy. Palpation of masticatory muscles revealed soreness everywhere, but pain was most evident in the masseters, particularly the left masseter. The joints were healthy. The pain in his jaw muscles provided the impetus to begin therapy (Figures 2 through 6).
Enlisting the Patient
I believed the success of this case would rely on our ability to slow or stop the parafunction during the day, and at night we could protect the patient with a nightguard. Furthermore, my job was to design an occlusion that was in harmony not
Figure 1. Preoperative smile, full face.

only with his function, but also his parafunction. He needed to accept his responsibilities. He was advised and understood that he had destroyed “God’s work.” Therefore, he certainly could ruin anything we put in! He was keenly aware of his habits and was willing to try to stop them. Home care instruction was also emphasized to improve the health of his periodontium.
Weakest Link
Clearly, the weakest link in his stomatognathic system was his teeth, exhibiting massive wear. Now the muscles were beginning to fatigue and cramp. Luckily, the periodontium was solid despite average-to-poor home care. The TMJs had withstood the abuse to this point, but they could be the next problem area. He was putting food on both sides of his mouth when chewing in order to vertically open his bite for comfort.
Game Plan
We would test out our new occlusion—opening the vertical and centric relation bite first—with a splint to be worn for 1 or 2 months, then try out the occlusion with the provisionals to see if he was comfortable there as well.
Occlusal Work-Up and Splint
For occlusal and vertical study, centric relation records were taken with a Lucia Jig and Futar D bite material (Kettenbach). The casts were mounted on a Hanau articulator utilizing a spring facebow. Looking at the wear patterns and the evident bite collapse, we knew we needed to open his vertical. A mandibular acrylic splint was fabricated on a simple hinge articulator because it was mounted at the vertical dimension we had selected; arc of closure was not an issue. The heat-processed acrylic splint was adjusted with a Leaf gauge to centric relation, and the anterior guidance was adjusted until smooth. There was no fermitis on the maxillary anterior teeth. We relined the splint intraorally with Snap Clear (Parkell) for added retention. (If the splint had been too tight or rocked, Fit Checker (GC America) could be used to find the offending areas and assist in seating.) The patient was asked to wear the splint as much as possible day and night, eating with it if possible.
We fabricated the splint (1) to see how destructive his parafunction habits were (I have seen splints crushed); (2) to see if the centric relation position and anterior guidance helped slow the parafunction, or if not, to see if the forces could be controlled; and (3) to see if he could tolerate the open vertical (which we knew would not be a problem).
Splint Evaluation
After wearing the lower splint with no difficulty and minimal wear, the patient reported that he stopped grinding but was still aware of some clenching. His muscles had relaxed, and overall he was more comfortable. We remounted the case and sent the casts to DaVinci laboratory for a wax-up for study and the provisional fabrication. The provisionals would be fabricated from a Siltech (Ivoclar Vivadent) putty matrix of the wax-up with Luxatemp (Zenith/DMG).
Aesthetic Evaluation
Our aesthetic evaluation began as taught by Spear, with central incisor incisal edge position. We evaluated his incisal edges with his lips at rest, and he had a reasonable 3-mm display of tooth below his lip. His central incisors were of average size (9 to 11 mm). We evaluated the E position of his smile line, which was also reasonable for him. The occlusal plane was within aesthetic limits, although we felt we could widen the narrow arch form to fill out the buccal corridors. We wanted to eliminate the canting and overlaps. He desired a “whiter smile.”
The Preparations
Figure 7. Occlusal view of preparations. Contacts are broken. Figure 8. Cast of maxillary preparations.
Figure 9. Cast of mandibular preparations. Figure 10. Posterior onlay preparations.The upper arch was prepared for porcelain onlays on the
posterior teeth and “taco” veneers or three-quarter crowns on the anterior teeth (Figure 7). On the anterior teeth, we tried to preserve as much enamel as possible. We chose stackable porcelain for lifelike aesthetics and minimal (0.5 mm) reduction on the facial aspect. The lingual surface of every maxillary anterior tooth had been worn beyond the cingulum and to the pulp due to parafunction and chemical erosion. We also wanted to eliminate overlaps and correct the cant, so the contacts were broken (Figures 8 through 10). The posterior teeth involved smoothing and creating a chamfer finish line for the Empress porcelain (Ivoclar Vivadent), with 0.8 mm reduction on the facial surface. Occlusal clearance was not as critical due to the degree of opening needed. Empress was chosen for its strength.
Figure 11. Approval of provisionals; smile aesthetics verified. Figure 12. Retracted view of provisionals; vertical, bite, and aesthetics verified.Impressions were taken with Impregum mixed by a Pentamix with
a Permadyne wash syringe (3M ESPE). Cord was used sparingly because most areas were at the gingival crest. The provisionals were made from B-1 Luxatemp utilizing a Siltech putty matrix made from the original lab wax-ups (Figures 11

and 12). Both upper and lower provisionals were final-cured out of the mouth. They were cemented with Optibond FL (Kerr), cleaned up, and light-cured. These provisional restorations would allow us to test the occlusion.
The response of the patient and his family and friends was immediate. The excellent provisionals produced confidence in our treatment approach. The majority of our adjustment period was designed to provide the anterior space he needed for his parafunctional habit. (“Getting his front teeth out the way” was the patient’s description of this process.) Once the patient was comfortable with the provisionals and we observed that he did not wear or damage them, we proceeded to the maxillary final restorations.
The laboratory fabricated the final veneers and onlays utilizing the provisionals as the template. The patient wanted a lighter shade 030.
Final Restorations
Figure 13. Posterior Empress onlays (daVinci Studios).We delivered the final restorations utilizing the Rosenthal Institute’s protocols. The maxillary provisionals were sliced individually and twisted off gently. I
utilized local anesthesia for patient comfort. After confirmation of fit on the master casts (Figure 13), the restorations were tried in the mouth with water to confirm fit. If a shade alteration is desired, a try-in paste may be used. The restorations were rinsed, porcelain-etched, silanated, painted with Optibond FL, and placed in a container shielded from light.
The preparations were cleaned with flour of pumice, Cavidry (The DFL Co) was applied, then they were microetched. Tissue “weeping” was controlled with copious rinsing with Superoxol. The teeth were treated with 37.5% phosphoric acid etch, Hurriseal (Beutlich Pharmaceuticals), Prime and Bond NT (DENTSPLY Caulk) with the wet bonding technique, and light-cured.
The cementing technique was a “rapid cementation” technique with multiple units done at one time. The cement (Variolink II; Ivoclar Vivadent) was loaded into the restoration, seated carefully, and the excess was cleaned off. Each unit was spot tacked, and the interproximal areas were cleaned with saws and Glide Floss (W.L. Gore and Associates) until immaculately clean and cement-free.
After final light-curing, the excess was cleaned off with composite scalers and scalpels. This is usually accomplished with minimal rotary instrumentation unless tissue hemorrhage requires an area to be prematurely cured before complete cleanup. Polishing cups finish the job.
The occlusion was adjusted against the lower provisionals on the lower unprepared arch. The palatal contour of the veneers was duplicated closely from our provisionals, and although it required some tweaking over time, no gross adjustment was necessary. The shallow guidance was in harmony with the patient’s functional and parafunctional envelope.
Figure 14. Postoperative occlusal view of maxillary arch. Figure 15. Postoperative occlusal view of mandibular arch.
Figure 16. Retracted side view. Note vertical change. Figure 17. Postoperative retracted view.
Figure 18. Postoperative mandibular veneers.The patient was overwhelmed with the result. Everyone was pleased. The translucency, internal coloration, and lifelike aesthetics—despite the very light
030 shade chosen—were remarkable. The protocol on the lower arch was identical, except we prepared the lower arch in segments to maintain our vertical and centric position, with the provisional restorations segmented (Figures 14

through 18).
Conclusion
In this case, the occlusion was established using provisional restorations over several months, and the provisionals served as a template for the final restorations. The shallow anterior guidance resulting from opening the vertical dimension helped protect the patient’s dentition against his parafunction, and the centric relation position stabilized his TM joints, which made his muscles comfortable. The anterior teeth were hollow ground to give him room for his parafunction as part of the final adjustments, for a long centric. Ultimately, a nightguard will protect him against his nocturnal parafunction.
Figure 19. Postoperative smile. Figure 20. Postoperative full face…delighted!The overall transformation for the patient was astounding. His mouth
was rejuvenated with modern metal-free restorations that “seemingly grow from the gums” (his words). After 6 months, he said he smiles more and shows his teeth to everyone. He has become a passionate emissary for modern dental technology (Figures 19 and 20).
Acknowledgment
The author would like to thank daVinci Studios for its exceptional work.
The Creation of an Ovate Pontic at the Time of ExtractionFrederic Berman, DMD

Replacing lost teeth has always been an aesthetic challenge, especially in fixed crown and bridge prosthetics. Over the years, there have been many designs that attempt to create pontics that are both (1) hygienic and (2) natural in appearance. The design of the ovate pontic gives us an opportunity to achieve both of these goals. This article will demonstrate the process to form a physiologic and aesthetic ovate pontic.
There are several methods that can be used to create an ovate pontic. If the tooth has already been extracted, we must create the pontic from the tissue after it has healed. This can be done with a laser or electrosurgery. In this article, we will demonstrate how to form the pontic immediately after the extraction. I have found it to be easier for the patient when the healing of the socket is directed to form the desired shape of the ovate pontic.
Case Report
The patient presented to the office with an extraction that had just been accomplished by the oral surgeon (Figure 1). During tooth extraction, every effort should be made to preserve the facial cortical plate of bone. This will allow for the creation of a more naturally placed pontic. Also, note that the correct positioning of the sutures helps to maintain the original gingival architecture.
Prior to the extraction, impressions had been taken for study models. From the models, we created a Siltec (Ivoclar Vivadent) putty mold (Figure 2). After preparing the adjacent teeth for inlays (Figure 3), we filled the Siltec with Luxatemp A-1 (Zenith DMG) and placed it back in the mouth over the prepared area. After allowing 1.5 minutes for initial set, we removed the putty mold. By adding Luxaflow (Zenith DMG), we can now create the ideal pontic shape (Figure 4). This should approximate the original shape of the extracted root and extend apically about 3 mm (Figure 5). It is important to ensure that the tissue side of the temporary is polished and smooth, which will allow for better cleansing and healing. The normal shrinkage of the tissue from the healing process will usually leave a depth of 1.5 mm (Figure 6). The protrusion of the temporary pontic into the socket will not impede clot formation or healing. Anything much deeper than this would create a hygienic problem for the patient. Eight to 10 weeks was allowed for healing before proceeding with the final impression.
The final bridge was fabricated by Frontier Laboratory using Targis-Vectris (Ivoclar Vivadent). Cementation can be accomplished with any resin bonding cement such as Nexus (Kerr) or Variolink (Ivoclar Vivadent). The result is shown in Figure 7.
Conclusion
This article has presented a technique for creating an ovate pontic at the time of tooth extraction, ensuring that the resulting pontic is both aesthetic and physiologically compatible with good oral hygiene.
Figure 1. Tooth extraction has been accomplished by the oral surgeon.
Figure 2. A Siltec putty mold (Ivoclar Vivadent) is created from study models.
Figure 3. The adjacent teeth are prepared for inlays.
Figure 4. Adding Luxaflow (Zenith DMG) to the putty mold creates the ideal pontic shape.
Figure 5. The Luxaflow approximates the shape of the extracted root and extends apically about 3 mm.
Figure 6. Normal tissue shrinkage during healing leaves a depth of 1.5 mm.

Aesthetic Correction of an Anterior Malocclusion With a Submicron-Filled Direct Composite ResinIan E. Shuman, DDS, FAGD
Direct composite resin has been used to enhance and create aesthetic improvements in a variety of situations. The evolution of materials science has created a plethora of exotic composite resins that can be applied in a simple manner for complex cases.1-3 Of these, the microhybrid composite resin has properties that combine the strength commonly found in less aesthetic hybrid composite systems with the beauty of microfill composite resins that have elevated restorative dentistry to an art form.4,5 These highly versatile materials have been especially useful in cases where adult patients are unwilling to undergo orthodontic treatment to correct a malocclusion but are still interested in improving their functional and aesthetic appearance.6
When considering alternative treatments, minimally invasive techniques such as whitening and direct bonding should always be considered first. Tooth whitening has become a popular technique for immediate tooth color improvement and can be accomplished as an in-office procedure producing dramatic results. This simple procedure can create an excellent “canvas” on which to sculpt and paint direct composite resin. Here, the challenge remains to do so using a simplified process for placing the aesthetic restorative materials.7
There are many excellent composite resins that have demonstrated their value in such procedures. The following case report uses Palfique Estelite (J. Morita USA), a submicron-filled composite resin, to correct an anterior malocclusion using a minimally invasive approach.
The Material
Palfique Estelite is a submicron-filled composite resin that has demonstrated the ability to restore aesthetic cases, providing lifelike results with excellent optical properties.8-11 This is possible because of its patented 0.2-µ “submicron” silica-zirconia spherical filler (82% by weight). These microspheres are responsible for the integrity and aesthetics of this technologically advanced composite, which offers the clinician high resistance to abrasion, minimal color change after polymerization, and a chameleon-like effect once applied. It is recommended for class I, V, and small class II restorations in the posterior dentition as well as restorations of all surfaces in the anterior dentition. Palfique Estelite is an excellent choice for cases such as large diastema closures and class IV restorations where strength, fracture-resistance, and aesthetics are necessary.
Case Report
Figure 1. The anterior maxillary dentition on presentation. Figure 2. The right anterior teeth display crowding, and the lateral incisor is in crossbite.
The patient, a 21-year-old female, presented with the request to improve her smile (Figure 1). The upper right lateral incisor was in crossbite with the lower right canine and was rotated distolingually, overlapping the distal margin of the right central incisor and displacing the upper right canine buccally (Figure 2). This apparent crowding created a food trap between the lateral and central incisors. As a result, carious lesions had developed in these areas. The patient had been given a number of different treatment plan options from several dentists that included orthodontic therapy, porcelain veneers, and extraction with implants. These options were rejected since she did not want to “wear braces or a retainer” and was not receptive to surgery or the expense of implants and veneers.
Figure 3. Study models are made to evaluate the case for treatment planning. Figure 4. The teeth are first prepared on the model.
Figure 5. The composite mock-up.To formulate a treatment plan, a comprehensive examination was conducted that included a complete intra/extraoral examination, a full series of
radiographs, and study models. It was determined that the malocclusion was isolated to the upper and lower right anterior dentition. In anterior malocclusions, if the occlusal discrepancy is isolated and the remainder of the occlusal function is harmonious, the final restorative result can be successful.12 If, however, traumatic occlusion or interference is not eliminated, then the restoration will likely fail.13,14 In order to predict a successful outcome, the teeth were prepared and corrected both functionally and aesthetically using study models (Fuji Rock EP Royal Blue, GC America) and shade A1 composite resin (Palfique Estelite paste)15,16 (Figures 3, 4, and 5).

During the consultation, it was explained to the patient that orthodontic intervention would be the best course of action, followed by any restorative needs. Because this was not an acceptable option, an alternative treatment plan was created that would restore the carious lesions, correct the aesthetics, and improve occlusal function.17-19 The corrected study models were used to demonstrate the following plan of action to the patient:
(1) At the initial treatment appointment, the upper anterior teeth would first be whitened as an in-office procedure.
(2) At the second appointment, the lower right canine would be adjusted to remove it from anterior crossbite.
(3) The right anterior teeth and right first premolar would be prepared and restored using a submicron- filled composite resin in a direct technique.
(4) The lingual surface of the upper right canine would be built up with composite resin to provide for canine disclusion and prevention of traumatic occlusal interferences that could potentially damage the restorations. It has been shown that an inclined plane with ideal mechanical advantage for correction of individual anterior tooth crossbite can often be custom-sculpted in resin composite and bonded in position.20-22
Figure 6. The carious lesions at the distal and mesial contacts of the central and lateral incisors are readily apparent.
Figure 7. The first stage prior to preparation will be the idealization of the right central incisor.
Figure 8. The right central incisor has been corrected to match the left central incisor by reducing the incisal edge and removing the prominent mesio-facial lobe due to rotation.
Figure 9. The facial enamel of the central and lateral incisors is prepared revealing significant carious lesions.
Figure 10. The decayed and unsupported enamel edges are removed using a 330 bur (Brasseler USA).
Figure 11. Remaining infected dentin is removed using a No. RA4 SmartPrep rotary polymer instrument (SS White).
At the first appointment, the teeth were whitened using Lightning (Den-Mat Corp), a 35% hydrogen peroxide whitening gel. The gel was applied to the upper anterior teeth in a single, 1-hour, in-office procedure with a curing unit as directed. The patient was also given Rembrandt home care whitening products (Den-Mat Corp) and instructed in their use. This system has been shown to be effective in maintaining and improving the whitening results.23,24 The whitened teeth now revealed greater contrast with the underlying carious lesions (Figure 6).
At the second appointment, the incisal edge of the right central incisor (Figure 7) was adjusted to the height of the left central incisor (Figure 8), and the prominent mesio-facial lobe was reduced. This effect produced an excellent starting point, setting up the case for a harmonious, aesthetic result. The facial enamel of the right central and lateral incisors was prepared, revealing significant carious lesions in both teeth (Figure 9). The decayed enamel and unsupported enamel were removed using a 330 bur (Brasseler USA, Figure 10), and the remaining infected dentin was removed using a No. RA4 SmartPrep rotary polymer instrument (SS White, Figure 11). Final preparations were then made.

Figure 12. The cavity preparations are restored using Palfique flowable shade A3.5, a dentin replacement composite.
Figure 13. The central incisor is initially restored using Palfique paste shade OA1, a dentin replacement.
Figure 14. The body of the lateral incisor is created using Palfique paste shade OA1, a dentin replacement.
Figure 15. Body shade A1 Palfique paste and a final incisal-shaded layer were used to restore the right central and lateral incisors.
Figure 16. A composite ramp was created on the lingual of the maxillary right canine to facilitate a cuspid-protected occlusion.
Figure 17. The patient before.
Aesthet
Figure 18. The patient after.The cavity preparations were restored using a “medium-flow” dentin replacement flowable composite (Palfique Flowable, J. Morita USA) in shade A3.5
(Figure 12). Flowable composites are preferable in the restoration of irregular cavity preparations since they have the ability to flow into the irregularities of these types of preparations.25-27 The facial surface of the central incisor was then restored using a dentin replacement composite in shade OA1 (Palfique Estelite), which was light-cured and recontoured with a diamond bur (Figure 13). In this system, the dentin replacement composites are simplified: the OA1 is used for A and B shades and the OA2 for the C and D shades. The lateral incisor was then restored beginning with shade OA1, layered, and light-cured in 2.0-mm increments (Figure 14). The central and lateral incisors were then completely restored using shade A1 for the body followed by an incisal shade as the final facial layer (Figure 15). The right canine and first premolar were restored last, using the same technique and shades, followed by the addition of a lingual composite ramp to create a cuspid-protected occlusion (Figure 16) and composite polishing.
The patient was thrilled with her new smile (Figures 17 and 18).

CONCLUSION
Today, there are many options for correcting malocclusions and restoring teeth to a pleasing aesthetic result. This article describes a simplified clinical method for the aesthetic correction of anterior teeth using a submicron-filled composite resin system, which was used to accomplish treatment goals in a minimally invasive manner.
Closiing a Large Central Diastema Using A Pressed CeramicRoss W. Nash, DDS
Orthodontic treatment is usually the best alternative for closing spaces. However, some situations do not lend themselves to tooth movement. Tooth size discrepancies can make total space closure impossible. Treatment with laminate veneers or full crowns can sometimes be used for aesthetic treatment when these situations occur. This article describes a clinical case where a pressed ceramic material was used to close a large diastema.
Case Report
Figure 1. The patient’s smile before treatment. Figure 2. Retracted frontal view showing diastemas and PFM crown.
Figure 3. Preoperative incisal view.A female patient in her middle 30s presented with an unusually large central diastema in the maxillary arch and small diastemas in the mandibular
anterior area. A porcelain-fused-to-metal crown had been used to restore the left central incisor, as seen in Figure 1 (the patient’s smile before treatment). The retracted frontal view (Figure 2) reveals that a very prominent labial frenum was attached near the incisal papilla between the central incisors. The teeth had a slightly orange hue. She exhibited class I stable occlusion and her general dental health was excellent. Except for the restored maxillary central incisor, she had no restorations in her dentition and no caries was present. Her periodontal condition also was very good. Some wear facets existed in the anterior region because of normal function, as can be seen in the incisal view in Figure 3.
The patient was entering a beauty contest and wished to have improved aesthetics in a very short time. The small mandibular spaces were not a concern to her, but she felt that the large maxillary diastema detracted from her appearance. She wished to have porcelain veneers placed on the rest of the teeth in her smile zone to improve the overall color and contour of her maxillary teeth.
Restorative Material
High-strength pressed ceramic crowns (Eris, Ivoclar Vivadent) were chosen for the 2 central incisors. The crowns would be overcontoured to close the central diastema. Eris veneers would be placed on the laterals, canines, and premolars to lighten the color and increase the facial contours.
Procedure
Figure 4. Laser treatment to remove labial frenum. Figure 5. Mesial half of right central incisorprepared for Eris crown.

Figure 6. Working model of prepared teeth, incisal view.The patient was anesthetized and the porcelain-fused-to-metal crown was removed from the left central incisor. A diode tissue contact laser (Biolase)
was used to reduce the labial frenum (Figure 4). The right central incisor was prepared by reducing 1.0 mm in the axial direction and 1.5 mm from the incisal. A rounded shoulder margin was prepared at the height of the tissue. In Figure 5, the mesial half of the tooth has been prepared. The teeth to receive veneers were prepared with 1.0 mm of facial and incisal reduction with rounded shoulder margins. The preparations were carried onto the occlusal surfaces of the second premolars. In Figure 6, the working model can be seen from the incisal view, and the preparations can be readily visualized.
A full-arch final impression was taken using a vinyl polysiloxane impression material. An opposing impression was also taken. An occlusal registration and a face bow transfer record were made for mounting the working models on a semiadjustable articulator (Denar, Waterpik). Provisional restorations were fabricated using a bisacrylic material. The crowns were cemented to place using a noneugenol temporary cement. The provisional veneers were cemented with a resin cement after spot-etching the preparations, rinsing, and drying.
Figure 7. Final restorations on the working model, facial view. Figure 8. Final restorations on the working model, incisal view.
Figure 9. Final restorations, internal etched surfaces. Figure 10. Close-up view of the Eris crowns.
Figure 11. Internal surfaces of Eris crowns.Digital photographs were sent to the dental laboratory (Dental Arts Signature Laboratory, Peoria, Ill) along with the written prescription requesting the
Eris restorations. The final restorations can be seen on the working model from the facial view in Figure 7 and from the incisal view in Figure 8. The etched internal surfaces of the restorations can be seen in Figure 9. A close-up view of one of the central incisor crowns is illustrated in Figure 10. Figure 11 shows the crowns from the internal angle. Notice the cantilevered surfaces that gently curve to the mesial from the incisal margins.
Placement
At the placement appointment, the patient was anesthetized, the provisional restorations were removed, and the preparations were thoroughly cleaned. The final restorations were tried in using a drop of water as a temporary luting agent. The fit and aesthetics were approved, and the restorations were removed, cleaned, and dried. Silane was placed on the internal surfaces of the restorations and allowed to remain for 30 seconds before drying with a stream of air.

Figure 12. Prepared teeth, facial view with retraction cord. Figure 13. Prepared teeth, incisal view with retraction cord.Retraction cord was placed in preparation for the restoration
placement, as can be seen from the facial view in Figure 12 and from the incisal view in Figure 13. The prepared teeth were treated for 15 seconds with 37% phosphoric acid gel to etch the enamel margins and remove the smear layer from the prepared dentin. The etching gel was thoroughly rinsed and the prepared teeth were left slightly moist for wet bonding. A one-step dentin and enamel bonding agent (Excite, Ivoclar Vivadent) was liberally applied to the etched surfaces and dried with a stream of air. A glossy surface remained, indicating that the hybrid layer had been formed on the dentin surfaces. A dual-curing composite resin luting agent (Variolink, Ivoclar Vivadent) was applied to the internal surfaces of the restorations, and they were seated on the prepared tooth surfaces. Excess luting agent was removed with a sable brush, and the resin luting agent was light-cured with a visible light-curing unit.
Excess luting resin was removed with a small carbide finishing bur in a high-speed handpiece, and the margins were polished using a rubber polishing cup in a slow-speed handpiece. Excess interproximal resin was removed with a diamond-coated metal strip, and the interproximal surfaces were polished with aluminum oxide coated strips. Articulating paper was used to check the occlusion, and slight adjustments were made using fine finishing diamonds, a 30-bladed carbide finishing bur, and porcelain polishing points and cups.
The Final Result
Figure 14. Final result, retracted facial view. Figure 15. Final result, incisal view.
Figure 16. The patient’s new smile.The final result can be seen from the facial view in Figure 14. Notice how the diastema was closed, with only a slight dark triangle at the
proximal/gingival area. Also note that the removal and healing of the labial frenum formed a pseudo-papilla, further improving the aesthetic result. The incisal view is seen in Figure 15. Here the improved arch form can be visualized. Figure 16 shows the patient’s new smile.
While she did not win the beauty contest, the patient was the first runner-up. She said that she attributed part of her success to the increased self-confidence resulting from her improved smile.
Conclusion
While orthodontic tooth movement is preferred in many cases where diastemas exist, restorative treatment can sometimes be used to improve aesthetics where tooth movement is not possible or not desired. High- strength all-ceramic materials that mimic natural tooth structure while providing enough strength for function are now available for cases such as this. The preceding case study illustrates a situation where the restorative option was chosen and a successful result was obtained.
Achieving Natural Posterior Anatomy With Ormocer TechnologyRichard D. Trushkowsky, DDS
There has been an increased use of resin composite for posterior restorations. This is due to increased desire by the patient for aesthetic restorations and by the dentist for minimally invasive techniques. However, one of the main drawbacks of composite restorations in the posterior region has been their tendency to form marginal gaps due to polymerization shrinkage. The marginal seal of a class II posterior composite decreases when the apical termination of the preparation is located at or below the cementoenamel junction. Microorganisms may invade these marginal gaps and cause recurrent decay, pulpal inflammation, and sensitivity. Marginal adaptation may be further reduced by mechanical and thermal stress. Polymerization shrinkage stress may be reduced by (1) altering the configuration factor, (2) the use of lining materials, or (3) slowing the rate of polymerization.
The Development of Ormocers
Ormocers (“ORganically MOdified CERamic”) were formulated in an attempt to overcome the problems created by polymerization shrinkage of conventional composites. Traditional composite filling materials have small molecules that lead to shrinkage during curing. Ormocer prepolymerized molecules, as represented by the material Admira (VOCO), which is used in this article’s case report, are up to 700 to 1,000 times larger. The end result is less shrinkage because the larger molecules present less space for shrinkage. The Ormocer is a 3-dimensionally cross-linked copolymer with a large “backbone” that is functionalized with polymerizable organic units, creating a 3-dimensional polymeric composite.

Filler particles are incorporated into this cross-linked inorganic and organic network matrix.1
The inorganic backbone consists of silicium dioxide (ceramic) and carries other elements. The silicium dioxide and barium-aluminum-silicate glass provide high radiopacity (200% aluminum). Because of its size and preshape (prepolymerized 3-dimensional structure), it strongly reduces polymerization shrinkage.2,3 Each inorganic backbone carries approximately 100 polymerizable organic groups. This overabundance of polymerization opportunities allows the Admira material to cure without residual monomer, creating greater biocompatibility.3 A silane coating of the fillers increases the adhesion between the organic and inorganic components in the Admira system. The coefficient of thermal expansion is very similar to natural tooth structure.
Case Report
Figure 1. Tooth No. 3 with an old composite demonstrating wear and discoloration. Figure 2. Close-up of tooth No. 3 with marginal degradation evident.
Figure 3. An inverted cone diamond stone is used to remove all of the old composite restoration.
Figure 4. Vococid (VOCO) is applied to the entire internal aspect of the preparation.
The patient presented with several older composites that had undergone attrition, almost exposing the underlying dentin. Tooth No. 3 was the first tooth that was selected for replacement of the existing occlusal-lingual composite (Figures 1 and 2). The composite was removed entirely with an inverted cone diamond (Figure 3). The tooth was isolated, pumiced, and then the entire cavity was etched with Vococid (VOCO), starting from the enamel margin (Figure 4). The enamel was etched for approximately 20 seconds and the dentin was etched for no more than 15 seconds. The etching gel was removed by high-speed vacuum and rinsed for approximately 20 seconds, then excess moisture was removed with a high-speed vacuum. Do not overdry the dentin surface; the dentin should remain slightly moist. The enamel should exhibit a chalk-white/matte appearance. If not, repeat the etching procedure.
Figure 5. Admira Bond (VOCO) is applied to all areas treated by the acid etchant.Admira Bond (VOCO) was dispensed by tilting the bottle and making sure the vent hole was upward. A Micro Tip (VOCO) was inserted into the
dispenser and allowed to soak. Alternately, Admira Bond can be dispensed into a mixing well and the applicator is thoroughly wet. The Admira Bond was lightly scrubbed in a thin layer on all prepared enamel and dentin surfaces with a disposable brush applicator (Figure 5). After allowing it to stand for 30 seconds, it was gently dispersed with an air syringe and polymerized with a halogen light for 20 seconds. Admira Flow (radiopaque) was then placed in a thin layer over the axial floor of the preparation. Admira Flow is a thixotropic material, so it flows under pressure but holds its shape prior to light-curing. The thin layer may serve to minimize voids under the restoration. According to the manufacturer, Admira has a reduced rate of release of residual monomers in comparison to conventional composites. This and its reduced cytotoxicity will minimize any sensitivity.4
Figure 6. The dentin shade selected is placed as the initial layer, with the formation of cusps and fossae.
Figure 7. The final layer (enamel) is placed, with the formation of cusps and fossae maintained.
The dentin layer was then placed and contoured. Admira can be shaped without slumping. Cusps, grooves, and fossae can be initiated 0.5 mm shy of the margins of the preparation (Figure 6). An interproximal carver (Premier or Hu-Friedy) and a Heliomolar P-I (Ivoclar Vivadent) were used to establish this anatomy. The final translucent layer was then applied and brought to final contour.5 Egg- and flame-shaped finishing burs (Posterior ETO Carbide Kit, Brasseler) were used to remove any excess overlying the margins. Rubber impregnated points can be used to bring the surface to final luster (ComposiPro OneStep Polishers, Brasseler, or PDQ Single-Step Polishers, Axis). The average particle size of 0.7 µm allows a readily achieved smooth surface.1
The final restoration demonstrates the chameleon effect and sculptability of the material (Figure 7).
Conclusion
Ormocers were developed in an attempt to overcome the problems associated with polymerization shrinkage of resin composite. This article has presented a case report in which an Ormocer material was used to provide an aesthetic,

functional posterior restoration.
Tooth Color Correction: First Things FirstTheodore P. Croll, DDS
Well-rendered, resin-bonded, custom-fabricated porcelain veneers have proven to be invaluable for imperceptible restoration of certain cosmetically prominent teeth. The appearance and optical properties of properly baked and glazed ceramic material mimic that of natural enamel, and many patients have enhanced oral health and greatly improved smiles because their dentists and the technicians they rely on have mastered the porcelain veneer technique. It should be recognized, however, that many tooth color abnormalities do not require treatment involving facial masking using bonded restorative materials. Often, tooth coloration defects can be eliminated and residual tooth color lightened as desired.
Dental bleaching and enamel microabrasion are 2 treatment methods that not only preserve tooth structure and are considerably less expensive than bonded restorations but also have proved to offer reliable and long-lasting tooth color improvement. This article describes tooth color correction for a child, a teenager, and an adult. Porcelain veneer restorations had been suggested for the older patients and as a future consideration for the child. Brief clinical protocols for enamel microabrasion and carbamide peroxide custom-tray home bleaching in combination with enamel microabrasion are offered.
TECHNIQUE
Enamel Microabrasion
Enamel microabrasion is analogous to dermabrasion on skin surfaces.1,2 Using a compound containing a mild concentration of hydrochloric acid and a fine-grit silicon carbide abrasive in a water-soluble gel, the enamel is reduced microscopically with a low-speed/high-torque gear-reduction handpiece. If the offending intrinsic tooth stain (dysmineralization or decalcification) does not penetrate deeply into the enamel surface, it is eliminated with insignificant and unrecognizable loss of tooth structure.
Two enamel microabrasion compounds are available commercially: PREMA compound (Premier Dental Products) and Opalustre (Ultradent Products). The enamel microabrasion procedure can be summarized as follows:
Diagnosis. Suspected superficial enamel coloration defects will be eliminated with microabrasion. Examples are isolated brown and white dysmineralization spots such as the ones seen with fluorosis. Although much enamel discoloration is attributed to excess fluoride intake in the years of amelogenesis, many superficial stains cannot be specifically identified as fluorosis. Idiopathic white/brown enamel dysmineralization is oftentimes a logical and more rational diagnosis. Incipient decalcification lesions are also easily eliminated with microabrasion.
Documentation. It is always useful to record a preoperative photograph for future documentation of treatment results.
Isolation. Using either the rubber dam or rubber dam substitute (OpalDam, Ultradent Products), teeth to be treated are isolated. Enamel microabrasion compounds contain a mild concentration of hydrochloric acid that can damage soft tissues with extended contact. (It is estimated that the risk is equivalent to that of 30% to 40% phosphoric acid used in resin-bonding procedures.)
Application of compound. Using a gear-reduction handpiece for high-torque, low-rpm application, the microabrasion compound is applied intermittently (10 to 15 seconds). Progress of treatment is determined with periodic water rinses and visual assessment. No anesthetic is required. It is often helpful to “jump-start” enamel reduction by using a slow-speed tapered diamond bur. Such initial mechanical reduction has been shown to hasten the procedure.
Assessment. Progress of treatment is evaluated and once the offending stain is eliminated, tooth surfaces are rinsed with water spray and covered with a topical fluoride gel (eg, Prevident, Colgate Oral Pharmaceuticals). The rubber dam or rubber dam substitute is removed.
Postoperative and long-term considerations. Tooth surfaces that have undergone enamel microabrasion have been shown to develop a smooth, lustrous texture.3-6 Using the scanning electron microscope, Donly, Segura, and others have identified and studied an “enamel glaze” of compacted amorphous mineral that characteristically gives a glass-like finish after treated teeth are subjected to the demineralization/remineralization phenomenon that continually occurs in the mouth.3-6 Segura et al have shown that microabraded tooth surfaces not only are more resistant to accumulation of dental plaque but also are less susceptible to dissolution to acid challenge.5,6 Results of enamel microabrasion are permanent. Discolored enamel is eliminated—not masked or merely optically altered.
Carbamide Peroxide Patient-Applied Dental Bleaching
Dental bleaching using vacuum-formed custom trays and hydrogen peroxide bleaching systems outside the dental office has become extremely popular since first described nearly 15 years ago.7-9 The method works well and usually the only complication is transient tooth sensitivity in some patients. A home-bleaching protocol is described as follows:
Stone model and tray preparation. A dental stone cast is poured into a full-arch alginate impression. The model is trimmed to a horseshoe shape with a thin border. Small reservoirs for extra bleaching solution in the tray can be produced by placing “plumping” material on the labial surfaces of teeth on the stone cast. Some dentists use light-cured resin material for this purpose. Mortite (Mortite, Inc), available at hardware stores, is a window-sealing material that also can be used to create excess space within the bleaching tray. Although such excess space does provide for additional bleaching solution, some dentists prefer trays without such reservoirs. After spraying the cast with silicon separating solution, 0.060-inch (5-inch x 5-inch precut sheets) soft vinyl tray material is vacuum-formed in the same manner as one would form a protective sports mouthguard. The 0.060-inch tray material is used for young patients because they tend to wear through the 0.035-inch material. Facial tray contours are cut around the free gingival/dental margins using scissors, a heat knife (Premier Dental Products), or manicuring clippers.
Patient instructions. The clinician needs to decide what type of bleaching solution is to be used (carbamide peroxide or hydrogen peroxide) and what concentration. My experience is that the lower-concentration bleaching solutions work well and tend to cause less tooth sensitivity. The patient is instructed to place a small amount of bleaching gel into each tooth segment in the tray. The tray is then seated in the mouth and excess gel is wiped away as it oozes out of the tray margins. The patient is advised to bleach either overnight or for a 2- to 4-hour period. Child patients must be assisted and supervised during dental bleaching.
Tooth sensitivity. Some patients experience tooth sensitivity during custom-tray home bleaching. The exact cause is unknown and clinical research is needed to clarify this problem and find a solution. I believe that tooth sensitivity during dental bleaching is not related to inflammation but could be associated with fluid dynamics. Just as gas inflates a balloon by exerting pressure internally, perhaps the oxygen molecules, diffusing through enamel and dentin, exert analogous pressure on nerve endings in the odontoblasts. As the pressure dissipates over time, the sensitivity subsides. Gingival irritation could possibly result from excess oxygen taken up in the soft tissues, also pressurizing nerve endings. Patients whose gingiva is uncomfortable during bleaching are advised to decrease the amount of solution placed in the trays. If a patient
has tooth sensitivity, daily bleaching time can be decreased or the trays can be used every other day. In some cases, ingested over-the-counter analgesics can be used. Other patients get relief by placing 1.1% neutral sodium fluoride gel (Prevident, Colgate Oral Pharmaceuticals) in the bleaching trays for 10-minute intermittent topical applications. Ultradent Products makes Opalescence PF, a bleaching solution containing potassium nitrate, which decreases discomfort for some patients.
REPORTS OF 3 PATIENTS
Case 1

Figure 1a. A 17-year-old with idiopathic brown and white enamel dysmineralization. Figure 1b. Slow-speed application of PREMA compound used for enamel microabrasion.
Figure 1c. Immediately after application of the microabrasion compound. Figure 1d. Bleaching solution injected into custom tray.
Figure 1e. Patient inserts custom tray containing bleaching solution. Figure 1f. Patient seen 3 months after completion of enamel microabrasion combined with 3 weeks of home bleaching.
A 17-year-old male had idiopathic white and brown enamel dysmineralization (Figure 1a). Consideration had been made at another dental office for porcelain veneer restoration of the central incisors, lateral incisors, and canine teeth in the maxilla. Using PREMA compound, enamel microabrasion was completed for the 4 maxillary incisors (Figures 1b and 1c). The patient then applied carbamide peroxide bleaching solution using a custom tray every day for 3 weeks (Figures 1d, 1e, and 1f).
Case 2
Figure 2a. A 25-year-old woman with unsightly brown enamel dysmineralization stain.
Figure 2b. Enamel microabrasion completed in one visit, using Opalustre compound.
Figure 2c. Two months after microabrasion, the enamel gives a smooth, lustrous appearance with no brown stain.
A 25-year-old woman was referred by a local oral surgeon who had recently extracted her third molars. The patient had brown enamel dysmineralization defects on the labial surfaces of the maxillary central incisors (Figure 2a). When the surgeon had questioned her about the “brown spots” on her front teeth, she responded that her dentist for years had been suggesting veneers for her 6 upper teeth to both rid her of the brown discoloration and to give the illusion of straighter teeth without orthodontic correction. She related that the minor dental crowding was of no concern to her, and even though she did not like the brown markings, she did not desire to have her enamel cut away. Using Opalustre microabrasion compound (Ultradent Products), the brown enamel dysmineralization stain was eliminated (Figures 2b and 2c). The patient declined the suggestion of home bleaching, saying, “I like the color of my teeth; I just didn’t like those brown spots.”

Case 3
Figure 3a. An 8-year-old girl with generalized idiopathic white and brown dysmineralization.
Figure 3b. Three months after enamel microabrasion using PREMA compound, followed by 5 weeks of home bleaching.
An 8-year-old girl was referred by another dentist. She had white and brown idiopathic dysmineralization of the maxillary incisors (Figure 3a). The referring dentist had told her parents that when she became an older teenager or adult, porcelain veneer restorations could improve her appearance but perhaps microabrasion and bleaching would be useful presently. He was right. PREMA compound was used to microabrade the incisors, followed by a 5-week course of custom-tray home bleaching using 10% carbamide peroxide solution (Figure 3b).
DISCUSSION
Enamel microabrasion and dental bleaching using carbamide peroxide or hydrogen peroxide solutions in custom-formed trays have been assigned separate dental insurance codes (03960 for bleaching of discolored teeth; 09970 for enamel microabrasion). Third-party coverage for these procedures is generally not available. Enamel microabrasion results are permanent because the superficial enamel lesion is removed, not masked. Bleaching results vary and some darkening of tooth shade is common in most patients within 3 to 5 years. Child patients and their parents should be told that bleaching results are not permanent, but the process can be renewed easily as the years go by.
CONCLUSION
Combining enamel microabrasion with dental bleaching has been a useful method for many patients.10-15 After eliminating superficial discoloration stains and creating a smooth surface texture to residual enamel, the underlying tooth coloration is then lightened, giving a bright, radiant appearance. In cases such as those described in this article, enamel microabrasion and dental bleaching should be the first treatment considerations for tooth color improvement.
A Conservative Aesthetic Solution for a Single Anterior Edentulous Space: The Fiber Reinforced Resin Fixed Partial Denture (CE symbol)Dino S. Javaheri, DMD
There is an increased patient demand for conservative dental treatment, improved aesthetics, and reduced expense. These requirements have lead to the development of new materials and techniques. Adhesive procedures and fiber- reinforced resin systems now allow clinicians to respond to different clinical situations, including replacement of a missing tooth. This article illustrates a restorative technique used for the treatment of a patient with a missing anterior tooth.
Background
The functional replacement of a missing tooth may be accomplished in a variety of ways. It is recognized, however, that the aesthetic replacement of a missing tooth can be a challenge for the clinician. Selection of the appropriate treatment modality is dependent on the evaluation of many objective and subjective factors, including aesthetics, occlusion, osseous and soft-tissue architecture, condition of the proximal teeth, and patient expectations. While the materials and techniques utilized in the fabrication of a restoration will directly influence the treatment outcome, proper planning and communication between the patient, restorative dentist, dental specialists, and laboratory technician are crucial to success.
The treating dentist and patient must consider other nonclinical factors to define the optimal treatment plan, including the treatment time, patient motivation and expectation, anticipated longevity of the restoration, possibility of complications, and cost.1 The selection of the most appropriate treatment plan is not always simple and should be guided by the desires of the patient and the professional expertise of the treating clinician.
One of the treatment options available for the replacement of a missing tooth is an adhesive, fiber-reinforced resin fixed partial denture (FPD).1,2 This is very similar to the established “Maryland” bridge technique but with a fiber-reinforced resin material. Traditionally, Maryland bridges use metal retaining wings to maintain a pontic, but these metal wings have been shown to be associated with long-term problems such as retention and discoloration of the abutment teeth.3-5 Although the fiber-reinforced resin FPD is a recent development, the preparation and fabrication guidelines are established. Preliminary investigations support the clinical application of this technique.2,6
These FPDs can be utilized in a variety of situations. One indication is when a patient expresses a desire for a conservative, nonmetal restoration. Other indications are primarily clinical, and include the following: (1) minimally restored abutment teeth ; (2) the pontic space is short (ie, 11 mm or less in the anterior maxilla or mandible); (3) placement of a full-coverage fixed partial denture would be unnecessarily aggressive; (4) patient age, osseous support, medical status, or acceptance precludes an implant option; (5) isolation and control of moisture, saliva, or blood can be achieved; and (6) an absence of heavy occlusal contacts or a severe parafuntional habit.7-10 In situations where these conditions do not exist, other restorative options must be considered.
Contraindications for a fiber-reinforced resin FPD are cases where sufficient tooth reduction is not possible to allow for proper fabrication of the restoration, mobile teeth (> class 1 mobility), and short clinical crowns (< 5 mm incisal to gingival distance).11,12
Materials
The first indirect resin systems, which were introduced in the 1980s, had several limitations, including color instability and a tendency to fracture when subjected to significant occlusal stress.13 Contemporary formulations have improved the mechanical characteristics of indirect resin systems.14,15 Polymerization shrinkage has been reduced, while flexural and tensile strength, the resistance to abrasion and fracture, and color stability have been improved. These indirect resin systems have been classified as CEROMERs (CERamic Optimized polyMERs), polyglass, or polymerceramic material.16 The preceding terms do not signify a new category of materials, but are marketing terms designed to give the impressions that these indirect resin systems are similar to porcelain systems.
Rather, these indirect resins should be considered as laboratory-processed microhybrid composites. They contain a combination of inorganic fillers and an organic polymer matrix in a 2:1 ratio.17 The filler is the primary determinant of the clinical and physiochemical properties of a composite resin. The submicron filler particles provide for surface characteristics such as good aesthetics, polishability, and wear resistance.
The use of fiber reinforcement increases the flexural strength of resin systems.18-20 The fiber can resist stress in different directions and also allows the restoration to retain flexibility so that the material does not become too brittle.21 This adds both flexural strength and fracture resistance to the restoration. The mechanical strength provided by fiber reinforcement is generated by the material’s ability to dissipate the tension lines and internal microfissures that would cause complete fracture of a more rigid material.22,23 Specifically, the fact that the fibers are not arranged longitudinally or in parallel but are instead woven in an alternating pattern increases the dispersion of the internal tension lines and thus provides fracture resistance.24 Also, when subjected to functional stress, the material exhibits a deformation capacity that is similar to that of a natural tooth, which also reduces the tendency to fracture at the interface between the restoration and tooth.25
Laboratory-processed, fiber-reinforced resin systems offer strong yet conservative restorations when compared to traditional ceramic and resin restorations. These systems provide the advantages of both direct composite resins and indirect porcelain restorations without being confined by the inherent disadvantages of either restoration alone.26 Resin systems alone do not have the strength for a multiple unit restoration. Porcelain wings are brittle and can fracture. Fiber reinforcement of a resin system provides both the strength and flexibility necessary for a restoration.
Case presentation

Figure 1. Patient presented with complaint of loose central incisor crown. Figure 2. The central incisor was deemed unrestorable due to caries, periodontal disease, and internal resorption.
A 30-year-old female patient presented with a loose crown on the maxillary right central incisor (Figure 1). The gingiva had receded and was inflamed, and the porcelain fused-to-metal crown was mobile. After removal of the crown, only a small post with subgingival tooth structure remained (Figure 2). There was caries on the remaining root structure. In addition, internal resorption was noted on the radiograph. The tooth was deemed unrestorable due to the caries, internal resorption, and poor crown-to-root ratio. Other than the unrestorable central incisor, all other teeth were in excellent condition. Occlusion was noncontributory since the patient had an anterior open bite.
The first consideration was the osseous support for the failing tooth. It is not uncommon to find significant bone loss associated with the failing tooth but not with the adjacent teeth. If the failing tooth is extracted, the bone level will be significantly more apical than what is observed for the adjacent teeth. This creates a very difficult aesthetic situation. One solution is to delay the extraction of the failing tooth so it can be orthodontically extruded. As this is accomplished over several months, the attachment apparatus of the unrestorable tooth is positioned coronally to a level matching the adjacent teeth. In this scenario, the aesthetic outcome will be improved.
Figure 3. A large, threaded post was placed as an anchor for orthodontic extrusion.
Figure 4. Composite buildup of the central incisor.
Figure 5. Orthodontic extrusion was completed to improve osseous and soft-tissue contour prior to extraction.
In the case presented here, the gingival margin on the buccal surface of the unrestorable tooth had receded, and extrusion was deemed necessary. To prepare the unrestorable tooth for extrusion, the existing post was removed and a large, threaded post was placed (Figure 3). A composite buildup was then placed around the post (Figure 4). The patient was referred to an orthodontist for extrusion of the unrestorable tooth. As the tooth was orthodontically extruded, the composite buildup was trimmed (Figure 5). Ultimately, the tooth was overextruded to allow for tissue retraction associated with extraction of the hopeless tooth. Upon completion of the orthodontic phase, the tooth was extracted.
A provisional restoration should be placed to extend into the socket to support the papillae form and to shape the soft tissue. This can be accomplished with either a temporary partial denture (also known as a stayplate or flipper) or a fixed bridge. A temporary partial denture is not as reliable, since it’s movement can adversely infringe on the papilla. In this case, after the extraction, a temporary fixed bridge was fabricated by using the preoperative model. Block-out material was added to the lingual surfaces of the adjacent teeth to create room for the retaining wings. In this case, no tooth reduction was necessary, since the patient had an anterior open bite.
A triple-tray vinyl polysiloxane impression was taken of the modified stone model. This impression was used as a stent to fabricate a provisional bridge. A chemically cured, bis-acryl composite material was placed into the stent and fitted onto the patient’s teeth. After 3 minutes, the impression stent and provisional bridge were removed. The provisional restoration was contoured, trimmed, and polished (Figure 6).

Figure 6. The temporary restoration was shaped to adapt tissue to ideal contour. Figure 7. An ovate pontic was shaped for aesthetic pontic emergence.After healing of the extraction site, a diode laser was used to
shape an ovate pontic site (Figure 7). This presents the illusion that the pontic is emerging from the tissue as would a natural tooth, with at least 1 mm of soft tissue remaining above the osseous crest.
Tooth preparation that provides adequate clearance for the retainer wings can require removal of 1.5 mm of tooth structure on 80% or more of the lingual surface area of the abutment teeth, with extension to the proximal surface adjacent to the pontic site. The finish lines on the lingual surface are extended to within 1 mm of the proximal line angle and the incisal edge. Cervically, the finish line should be 1 mm short of the cementoenamel junction or the free gingival margin, whichever is encountered first. For this patient, due to the open bite, no lingual reduction was necessary to provide room for the retaining wings. A 0.5-mm horizontal groove was placed in the middle of the lingual surface of the abutment teeth to assist in confirming a positive seat of the final restoration. In addition, a 0.5-mm-deep proximal box was placed just lingual to the proximal height of contour of the edentulous space to add strength at the connector site. The preparation was designed to allow seating of the bridge from the lingual.
A vinyl polysiloxane impression was taken and sent to the laboratory along with photographs, opposing models, and a bite registration.
Cementation
Figure 8. Final soft-tissue contour prior to placement of the restoration.Upon delivery of the final restoration from the laboratory, the FPD was evaluated on the die segment for proper fit. At the cementation visit, the patient
was anesthetized, and the provisional restoration was removed (Figure 8). The teeth were cleansed with a 2% chlorhexidine gluconate solution, and the restoration was tried in with a water soluble try-in paste to verify marginal fit and the aesthetic results. The occlusion was not verified during try-in to avoid stress on the restoration. The patient was shown the restoration and gave final consent.
To prepare the restoration for bonding, it was cleansed by applying a 35% phosphoric acid gel for 10 seconds. The acid was rinsed away, and the internal surfaces of the restoration were coated with silane ceramic primer for 60 seconds. A warm-air dryer was used to evaporate the excess liquid. One coat of a one-bottle adhesive system was applied to the internal surfaces of the FPD. The adhesive was air-thinned but not cured. A light-cured resin cement was applied to the wings of the FPD, which was then placed in a light-sealed container.
The tooth preparations were acid-etched with 35% phosphoric acid for 15 seconds. After rinsing the teeth, excess water was blotted dry, leaving a moist preparation. Three coats of the bonding agent were applied to each preparation. A warm-air dryer was used to evaporate the solvent and to avoid pooling of adhesive. The FPD was seated and held in place, and excess cement was removed with a brush. The restoration was spot-tacked on the lingual aspect with a 2-mm curing tip, and any remaining excess cement was removed. Glycerin gel was applied to all marginal areas to eliminate an uncured, oxygen-inhibited layer. Light activation was applied to polymerize the resin cement. The final cure was achieved with a plasma arc light applied for 10 seconds to the facial, incisal, and lingual surfaces of each abutment tooth.
Figure 9. The final fiber-reinforced resin bridge. Figure 10. Lingual view showing the retaining wings.Excess composite resin in the interproximal region was removed
with a No. 12 blade. A bur should not be used as this may create a ledge. The final polishing was achieved with composite polishing points and diamond polishing paste (Figures 9 and 10). Since the patient had an anterior open bite, no occlusal adjustment was required.
Conclusion
The evolution of aesthetic materials and restorative techniques enables clinicians to respond to patient demands for conservative restorations, satisfactory aesthetics, and reduced expense. The fiber-reinforced resin FPD technique should be considered as a treatment option for replacement of a missing tooth.
Acknowledgment
The author would like to thank Juan Gutierrez, CDT, of Terra Ceramics, San Ramon, Calif; Robert Cuenin, DDS (orthodontist), Danville, Calif; and Ali Alijanian, DDS (oral surgeon), Walnut Creek, Calif, for
Aesthetic Ceramic Posterior Inlays From Start to Finish

Juergen Manhart, DDS, PhD
Ceramic inlays and partial crowns are considered some of the most aesthetic posterior restorations available to dentistry, but excellent aesthetics is only one of the important components that has led to this restorative technique becoming increasingly popular. The outstanding biocompatibility of ceramic also promotes acceptance by the patient.
When they are adhesively luted, ceramic restorations permit dentists to use new methods for replacing lost tooth structure. Bonded high-strength ceramic restorations frequently avoid the necessity for a full crown since the severely weakened cusps are stabilized by the adhesive technique. Adhesive restorations do not require cavities to be prepared with mechanical retention, which allows minimally invasive preparations.
In comparison to composite inlays, where the material properties (eg, low modulus of elasticity, inferior wear resistance, lower shade stability) restrict the indications to small- to medium-sized cavities, ceramic inlays can be used for restoring large cavities in occlusally loaded posterior regions. Partial crowns replacing cusps or even full crowns are now feasible and have good long-term prognoses, owing to the excellent properties of ceramics. The low coefficient of thermal expansion and minimal mechanical distortion, which ceramics undergo when loaded, stress the bond to the tooth structure considerably less than composite restorations. This lowers the risk of marginal gap formation, which could result in secondary caries long-term. If the higher costs are ignored, ceramic inlays exhibit considerable advantages when restoring extensive defects.
A few rules must be strictly adhered to while preparing the cavity and while adhesively luting the restoration if this technique is to be successful long-term. If these guidelines are not heeded, the restorations may fail prematurely. Generally speaking, all patients provided with adhesive inlays should be highly motivated as far as oral hygiene is concerned and be very conscious of their teeth.
Clinical report
The following clinical case shows step-by-step how an insufficient amalgam filling is replaced with a ceramic inlay.
Figure 1. Preoperative view. Inadequate amalgam filling (viewed in a mirror).
Figure 2. As the amalgam severely shines through the enamel, the shade of the adjacent teeth was used for color analysis.
Figure 3. The amalgam filling has been removed.The preoperative status shows the tooth (viewed in a mirror) with an inadequate MOD amalgam filling with marginal gaps and very limited aesthetics
due to the grey metal and discolored areas shining through the enamel (Figure 1). Prior to commencing the treatment, the tooth was cleaned with a rotary prophylaxis brush and nonfluoride paste. The basic shade of the ceramic restoration was taken in daylight with a Vita shade guide and matched to the adjacent teeth. The shade could not have been taken with the affected tooth because the metal shining through the enamel made it impossible to analyze the shade accurately (Figure 2). The amalgam filling was removed using a high-speed, water-cooled handpiece and suction (Figure 3). Remains of the cement cavity lining and carious tooth structure were drilled out with a round-head bur. Any dentin that was simply discolored but felt hard when probed was left in place.
The basic shape of the cavity was prepared using a slightly tapered diamond with rounded tip. A minimum thickness of the inlay of 1.5 mm was provided for. All interior point and line angles were finished with round-tip finishing diamonds. Avoiding sharp line and point angles simplifies the fabrication of ceramic restorations without marginal imperfections and prevents stress concentrations that may cause fractures in the cavity. The side walls and floors of the approximal extensions were then finished using the SONICflex (KaVo) sonoabrasive preparation system with SONICflex prep ceram (KaVo) tips for adhesive inlays. The tips oscillate to remove the tooth structure, and because they are only diamond-coated on one side, they can be supported on the adjacent tooth to prepare the cavity precisely but without harming the adjacent tooth.
Once the cavity had been prepared with the SONICflex system, no chipped areas were observed along the margins. This is essential if the ceramic restoration is to fit precisely. At this point, several additional important guidelines for preparing cavities for ceramic inlays must be followed. The occlusal opening angle of the opposing walls should be approximately 10° to 12°. This is best achieved with slightly tapered finishing diamonds. The restoration must be at least 1.5 mm thick overall, since ceramic exhibits limited flexural and tensile strength values. (Pay particular attention to the central fissure.) If the restoration is not adequately thick, it may fracture, leading to premature failure. It is crucial to avoid overhanging and knife-edge areas around the cavity margin. Sharp, tapering inlay margins must be avoided, since they are prone to fracturing. The approximal cavosurface angle must not be less than 60°. Also, restoration margins should not coincide with static occlusal contact areas.

Figure 4. Taking an impression of the cavity. Figure 5. Placing and contouring a direct, light-curing temporary material.
Figure 6. Light-curing. Figure 7. The temporary restoration has been adjusted to the correct level.The mesial and distal preparation margins were exposed with
retraction cords, and the impression taken with polyether (Impregum, 3M ESPE, Figure 4). The inlay cavity was filled temporarily with direct, light-curing temporary filling material (Clip, VOCO) and roughly contoured with hand instruments (Figure 5). The temporary restoration was light-cured with a lamp (Figure 6), and the height of the restoration was adjusted with a finishing diamond, keeping the preparation margins intact (Figure 7).
Figure 8. Laboratory-fabricated Empress porcelain inlay. Figure 9. Isolating the teeth from the mouth with a rubber dam.Figure 8 is an occlusal view of the ceramic inlay (Empress, Ivoclar
Vivadent), fabricated by a dental technician on the master model. Once the temporary restoration had been removed and the cavity was cleaned thoroughly, the cavity was isolated with a rubber dam. A section of the cavity lining in the distal box was dislodged when the impression was removed (Figure 9). The rubber dam isolates the operating field from the oral cavity to enable the operator to work effectively and neatly, and it keeps the bonding area clean from contaminants such as saliva, blood, and crevicular fluid. Contamination of the enamel and dentin would significantly decrease the adhesive bond strength of the luting composite to the tooth structure and reduce the chances of producing a long-lasting restoration with optimum marginal integrity. In addition, the rubber dam protects the patient against irritating substances such as phosphoric acid and dentin bonding agent. The dam is an important aid that simplifies working procedures and enhances the quality of adhesive dentistry.
The restoration was tried in to check the precision of fit, ensuring that no sections of the rubber dam interfered with the fit of the inlay once it has been fully seated. The occlusion must never be checked during the try-in since this would risk fracturing the restoration. Also, inlays that jam on the cavity walls or proximal surfaces must not be pressed in with force, since this may cause microcracks that cannot be seen and may propagate under masticatory loading, thus causing the restoration to fail. If necessary, in such cases, premature areas must be relieved slightly.
Figure 10. Etching the inner surface of the restoration with 3% to 5% hydrofluoric acid for 60 seconds.
Figure 11. Applying the Bifix Ceramic Bond.
Once the ceramic inlay had been tried in properly, a trained assistant prepared it for luting. To ensure that the luting composite would bond well to the leucite-reinforced glass ceramic, its inner surface was etched for 60 seconds with 3% to 5% hydrofluoric acid (Figure 10). For this purpose, the inlay was fixed firmly to an application instrument with a sticky tip. It is advisable for the staff and patient to wear safety glasses when dealing with hydrofluoric acid. Etching creates retentive structures on the ceramic surface, which provides for micromechanical retention. The acid is rinsed off thoroughly with a jet of pure water before using compressed air/water spray to clean off the remains of acid and deposits released during etching. The restoration was then dried, and silane (Bifix Ceramic Bond, VOCO) was applied to further enhance the bond strength (Figure 11). The silane was allowed to react for 60 seconds before carefully blasting off the residual solvent with compressed air.
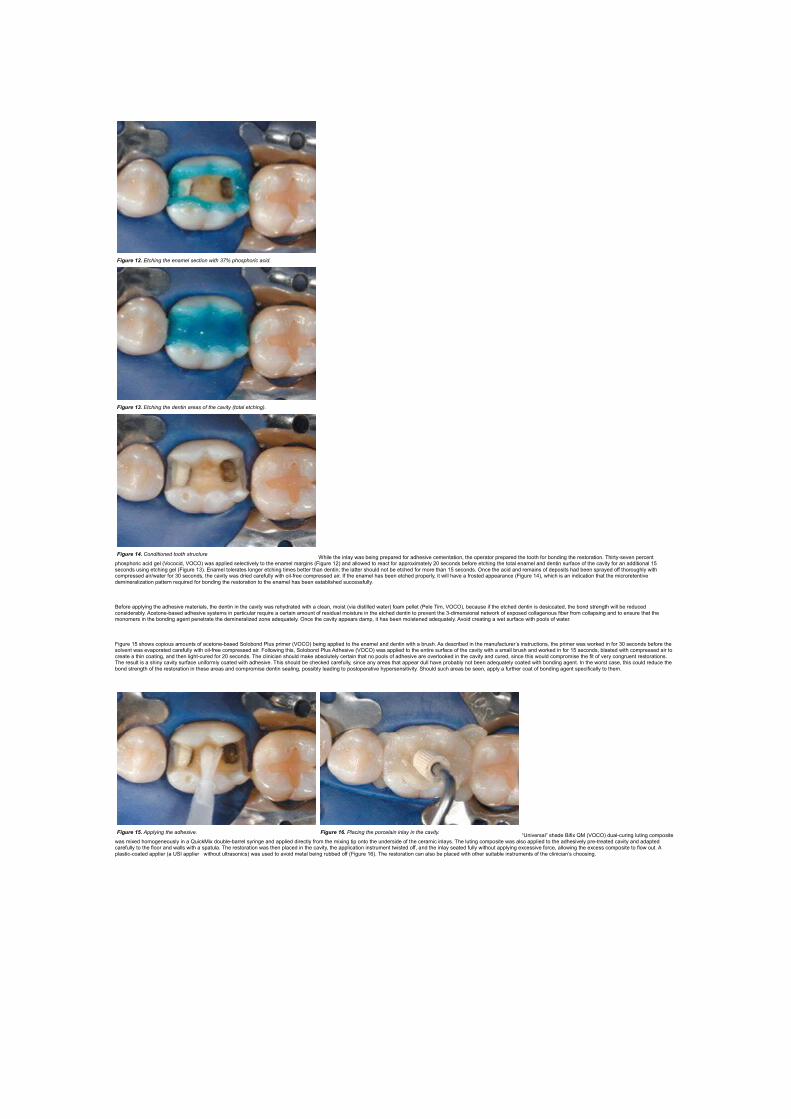
Figure 12. Etching the enamel section with 37% phosphoric acid.
Figure 13. Etching the dentin areas of the cavity (total etching).
Figure 14. Conditioned tooth structureWhile the inlay was being prepared for adhesive cementation, the operator prepared the tooth for bonding the restoration. Thirty-seven percent
phosphoric acid gel (Vococid, VOCO) was applied selectively to the enamel margins (Figure 12) and allowed to react for approximately 20 seconds before etching the total enamel and dentin surface of the cavity for an additional 15 seconds using etching gel (Figure 13). Enamel tolerates longer etching times better than dentin; the latter should not be etched for more than 15 seconds. Once the acid and remains of deposits had been sprayed off thoroughly with compressed air/water for 30 seconds, the cavity was dried carefully with oil-free compressed air. If the enamel has been etched properly, it will have a frosted appearance (Figure 14), which is an indication that the microretentive demineralization pattern required for bonding the restoration to the enamel has been established successfully.
Before applying the adhesive materials, the dentin in the cavity was rehydrated with a clean, moist (via distilled water) foam pellet (Pele Tim, VOCO), because if the etched dentin is desiccated, the bond strength will be reduced considerably. Acetone-based adhesive systems in particular require a certain amount of residual moisture in the etched dentin to prevent the 3-dimensional network of exposed collagenous fiber from collapsing and to ensure that the monomers in the bonding agent penetrate the demineralized zone adequately. Once the cavity appears damp, it has been moistened adequately. Avoid creating a wet surface with pools of water.
Figure 15 shows copious amounts of acetone-based Solobond Plus primer (VOCO) being applied to the enamel and dentin with a brush. As described in the manufacturer’s instructions, the primer was worked in for 30 seconds before the solvent was evaporated carefully with oil-free compressed air. Following this, Solobond Plus Adhesive (VOCO) was applied to the entire surface of the cavity with a small brush and worked in for 15 seconds, blasted with compressed air to create a thin coating, and then light-cured for 20 seconds. The clinician should make absolutely certain that no pools of adhesive are overlooked in the cavity and cured, since this would compromise the fit of very congruent restorations. The result is a shiny cavity surface uniformly coated with adhesive. This should be checked carefully, since any areas that appear dull have probably not been adequately coated with bonding agent. In the worst case, this could reduce the bond strength of the restoration in these areas and compromise dentin sealing, possibly leading to postoperative hypersensitivity. Should such areas be seen, apply a further coat of bonding agent specifically to them.
Figure 15. Applying the adhesive. Figure 16. Placing the porcelain inlay in the cavity.“Universal” shade Bifix QM (VOCO) dual-curing luting composite
was mixed homogeneously in a QuickMix double-barrel syringe and applied directly from the mixing tip onto the underside of the ceramic inlays. The luting composite was also applied to the adhesively pre-treated cavity and adapted carefully to the floor and walls with a spatula. The restoration was then placed in the cavity, the application instrument twisted off, and the inlay seated fully without applying excessive force, allowing the excess composite to flow out. A plastic-coated applier (a USI applier without ultrasonics) was used to avoid metal being rubbed off (Figure 16). The restoration can also be placed with other suitable instruments of the clinician’s choosing.

Figure 17. Prior to curing, excess luting composite must be removed from the proximal surfaces with a foam pellet.
Figure 18. The luting composite beneath the contact areas is removed with dental floss.
Before curing the luting composite, foam pellets (Pele Tim, VOCO) were used to remove excess material from the approximal areas (Figure 17) and along the occlusal inlay margins. The proximal contact areas were cleaned with Superfloss (Oral-B, Figure 18). Glycerine gel was applied around the luting joint to prevent an oxygen-inhibited layer forming on the surface of the luting composite during polymerization. Following this, the luting composite was cured using a curing lamp with an adequately high light intensity. Each accessible aspect of the restoration (occlusal, distolingual, mesiolingual, mesiobuccal, distobuccal, buccal, and lingual) was cured for 40 seconds with the curing lamp. The additional chemical curing mechanism of the dual-curing luting composite ensures that even those areas that cannot be accessed properly for light-curing actually polymerize sufficiently.
Figure 19. Checking and adjusting the static and dynamic occlusion. Figure 20. The restoration after finishing and polishing.Once the rubber dam had been removed, the minimal remains of
bonding resin and luting composite were carefully removed from the proximal areas with a sharp scaler and finishing strips. The gingival sulcus was probed carefully for remains of dentin bonding resin, which were removed where necessary. Since the restoration had been cleaned and the excess resin carefully removed prior to light-curing, finishing only involved minimal correction of the static and dynamic occlusion. This could only be carried out after adhesive cementation of the restoration to stabilize it and the use of articulating paper to analyze the occlusal premature contacts (Figure 19). The luting gap was high-lustre polished using flexible aluminium oxide disks (Sof-Lex, 3M ESPE), and the ceramic surface polished to a high lustre with diamond particle containing polishers, followed by diamond polishing paste on mounted foam polishers.
Figure 20 shows the finished restoration. The occlusal anatomy has been restored, and due to the chameleon effect, the shade of the ceramic inlay cannot be differentiated from that of the adjacent tooth structure. Finally, fluoride varnish (Bifluorid, VOCO) was applied to the tooth to protect the enamel adjacent to the restoration, which was unavoidably touched during conditioning and finishing.
Conclusion
Laboratory-fabricated ceramic inlays are sophisticated restorations that create top-quality aesthetics. Due to the excellent properties of ceramic materials and luting composites, even extensive occlusal load-bearing posterior cavities can now be provided with adhesive restorations with favorable long-term prognoses.