requisition and receiving course v7 - university of south ... · o blanket purchase order: “bpo...
TRANSCRIPT
Requisition and Receiving Course
PeopleSoft eProcurement Requisition and Receiving TrainingUSC Purchasing DepartmentRevised July 2016
Page 1
Welcome
• Overview
• Housekeeping
• Introduction of Presenters
• Introduction of Attendees

Page 2
Today’s Agenda• Chart of Accounts/Crosswalk
• Purchase Methods
• Creating Requisitions
• Creating a Purchase Requisition
o Item Descriptions
o Categories
o Suppliers
o Adding Comments and Attachments
• Types of Purchase Requisitions
• Reviewing a Purchase Order
• Exercise 1
• Managing Requisitions
• Add to Favorites
• Receiving
• Exercises 2 thru 6
• Follow- Up Activities
Page 3
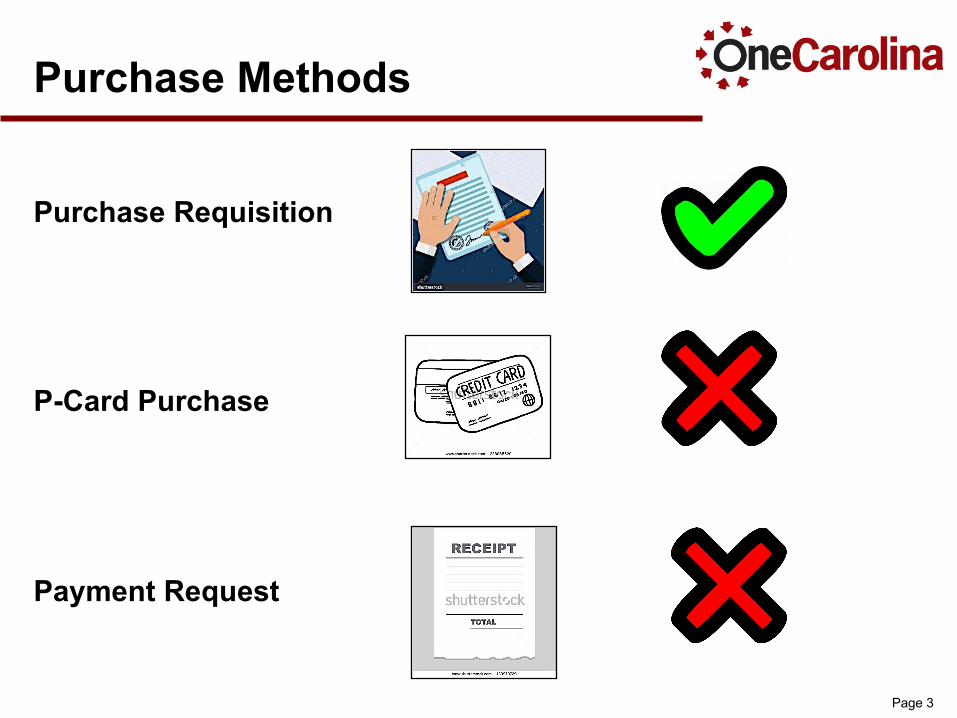
Purchase Methods
Purchase Requisition
P-Card Purchase
Payment Request

Page 4
Creating RequisitionsTo use a requisition for purchase:
• The requisition must be equal to or greater than $10,000.
Exceptions:
• All assets must use a purchase order ($5,000 or greater).
• All radioactive material must use a purchase order (no dollar limit).
• Suppliers that require a Purchase Order.
• Department requires a Purchase Order for validation of terms and conditions associated with the purchase.
• SC State Contract Items
• Any Construction related procurements
Page 5
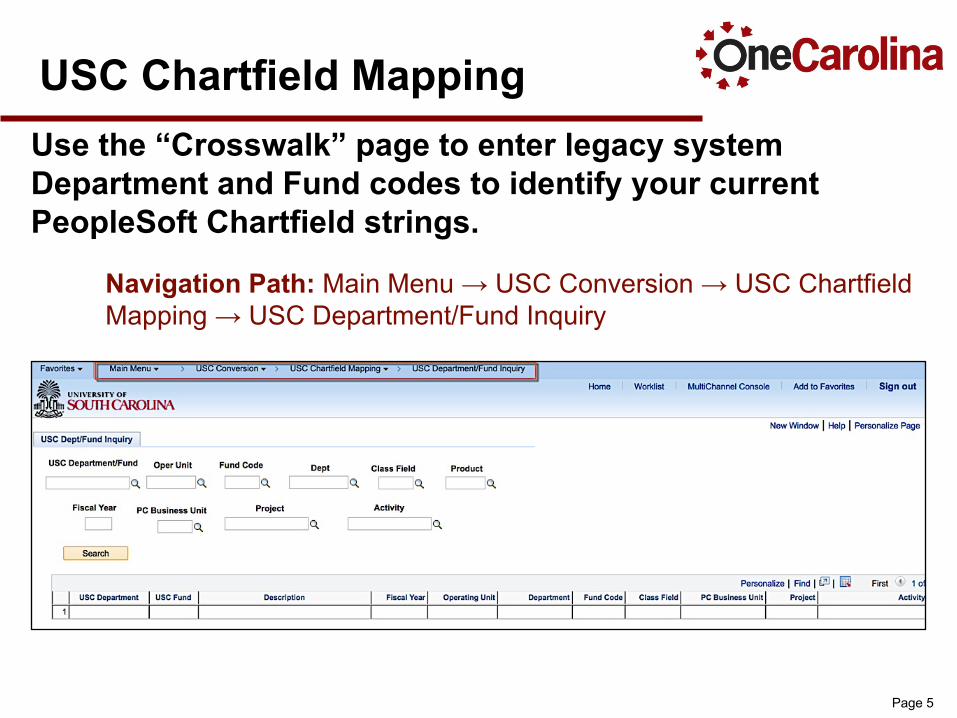
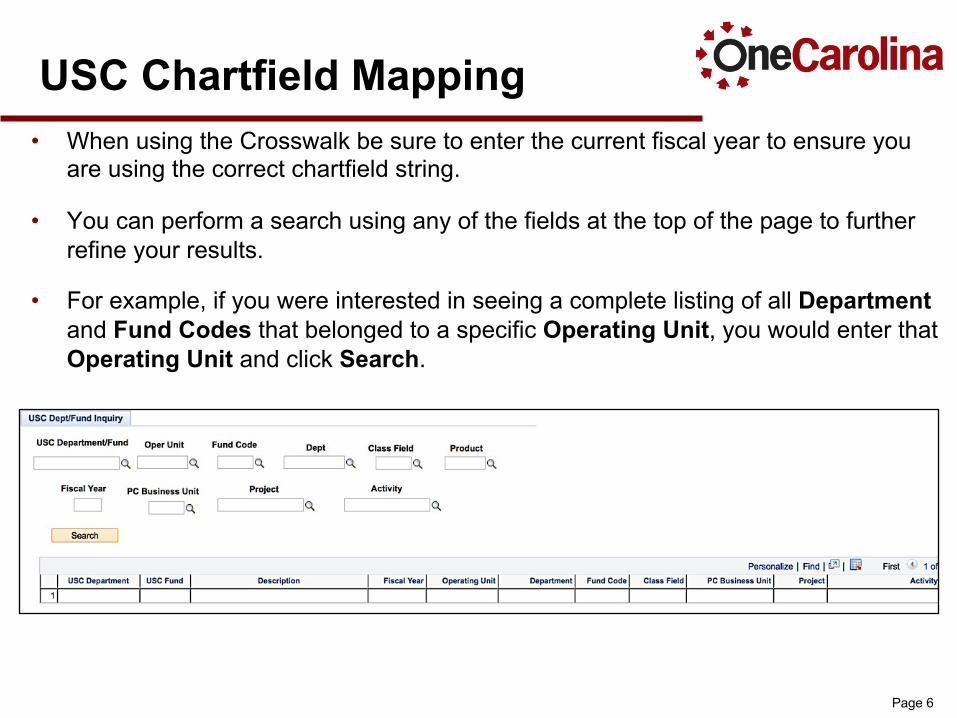
USC Chartfield MappingUse the “Crosswalk” page to enter legacy system Department and Fund codes to identify your current PeopleSoft Chartfield strings.
Navigation Path: Main Menu → USC Conversion → USC ChartfieldMapping → USC Department/Fund Inquiry
Page 6
USC Chartfield Mapping• When using the Crosswalk be sure to enter the current fiscal year to ensure you
are using the correct chartfield string.
• You can perform a search using any of the fields at the top of the page to further refine your results.
• For example, if you were interested in seeing a complete listing of all Departmentand Fund Codes that belonged to a specific Operating Unit, you would enter that Operating Unit and click Search.
Page 7
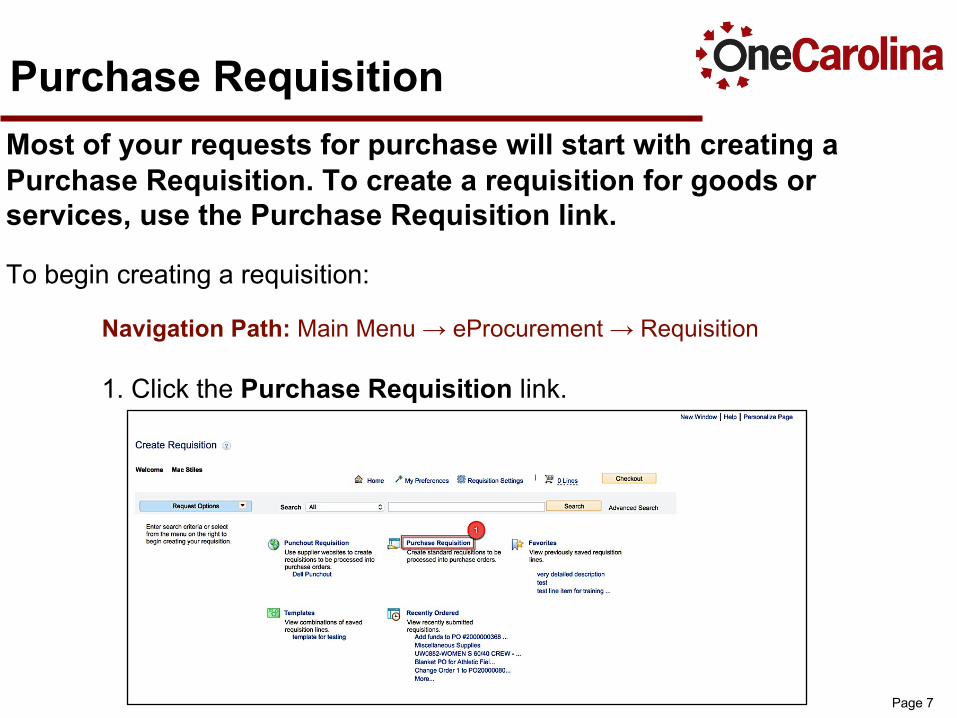
Purchase RequisitionMost of your requests for purchase will start with creating a Purchase Requisition. To create a requisition for goods or services, use the Purchase Requisition link.
To begin creating a requisition:
Navigation Path: Main Menu → eProcurement → Requisition
1. Click the Purchase Requisition link.
Page 8
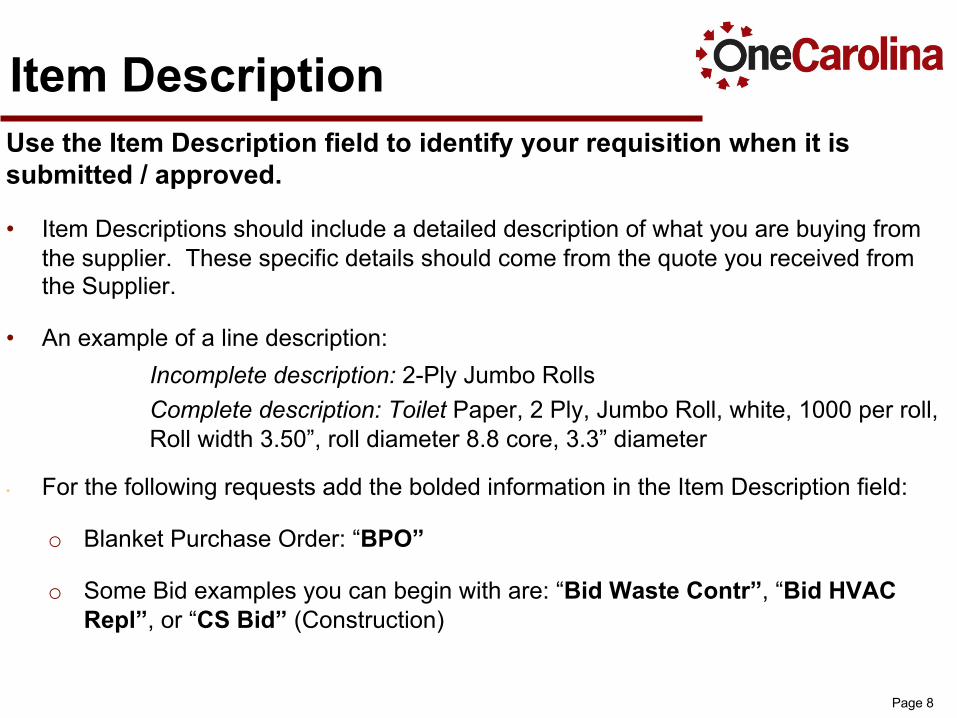
Item DescriptionUse the Item Description field to identify your requisition when it is submitted / approved.
• Item Descriptions should include a detailed description of what you are buying from the supplier. These specific details should come from the quote you received from the Supplier.
• An example of a line description: Incomplete description: 2-Ply Jumbo RollsComplete description: Toilet Paper, 2 Ply, Jumbo Roll, white, 1000 per roll, Roll width 3.50”, roll diameter 8.8 core, 3.3” diameter
• For the following requests add the bolded information in the Item Description field:
o Blanket Purchase Order: “BPO”
o Some Bid examples you can begin with are: “Bid Waste Contr”, “Bid HVAC Repl”, or “CS Bid” (Construction)
Page 9
Purchase Requisition Details
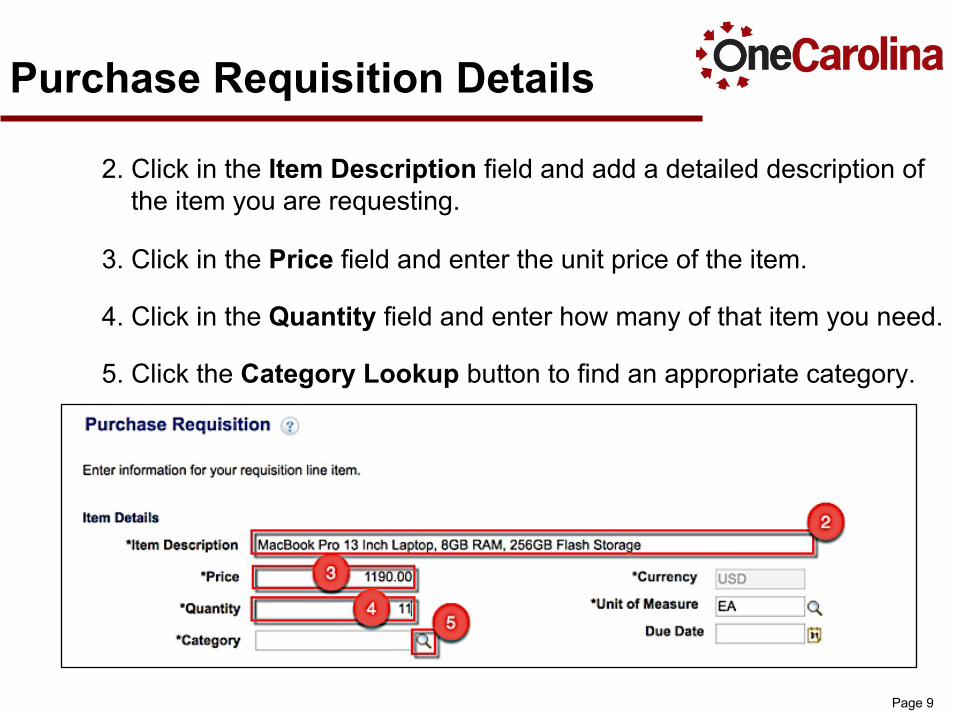
2. Click in the Item Description field and add a detailed description of the item you are requesting.
3. Click in the Price field and enter the unit price of the item.
4. Click in the Quantity field and enter how many of that item you need.
5. Click the Category Lookup button to find an appropriate category.
Page 10
Selecting a Category Use the Category Lookup button to search for a description of the item you are purchasing.Selecting the correct Category is important because it:
• Provides the correct expense account number, asset profile, and determine taxation and receipting for your purchases;
• Provides spending trend information to the Purchasing Department;
• They are used to identify a capital asset. o All Asset Categories can be selected within the sub-catalog containing the description “…>5K”.
o All Asset Category descriptions include the word “Asset”, making it easier to select the appropriate one.
o All Asset Category codes are 5-digits and the letter A. For example, Laboratory Equipment (Asset), 49000A.
Page 11
Selecting a Category
You can select a Category two ways:
• Category Tree
• “Find” button
Page 12
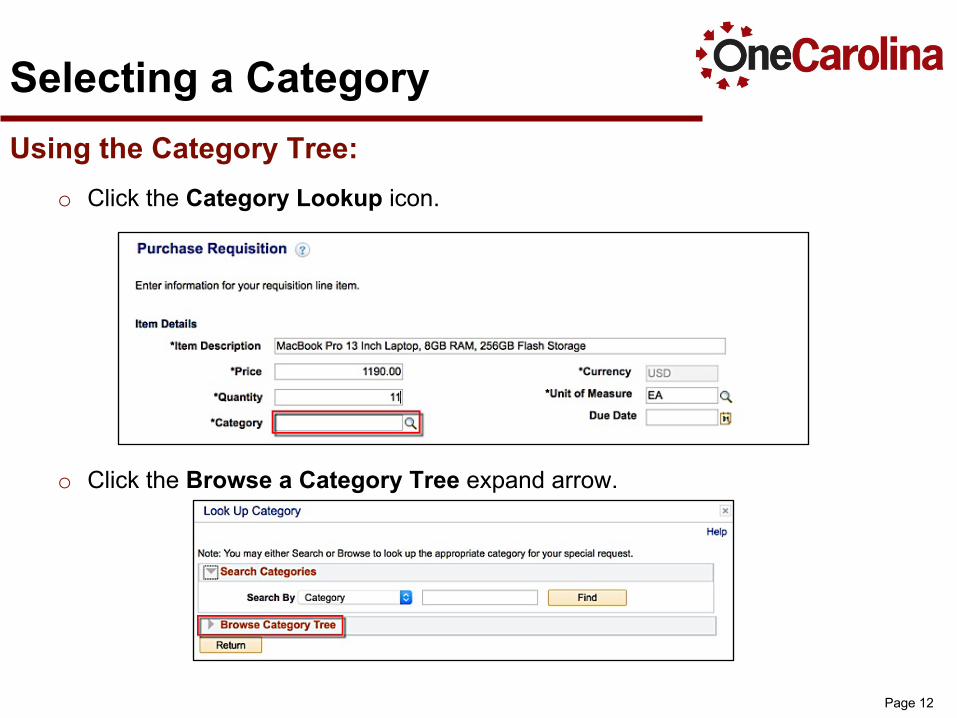
Selecting a Category Using the Category Tree:
o Click the Category Lookup icon.
o Click the Browse a Category Tree expand arrow.
Page 13
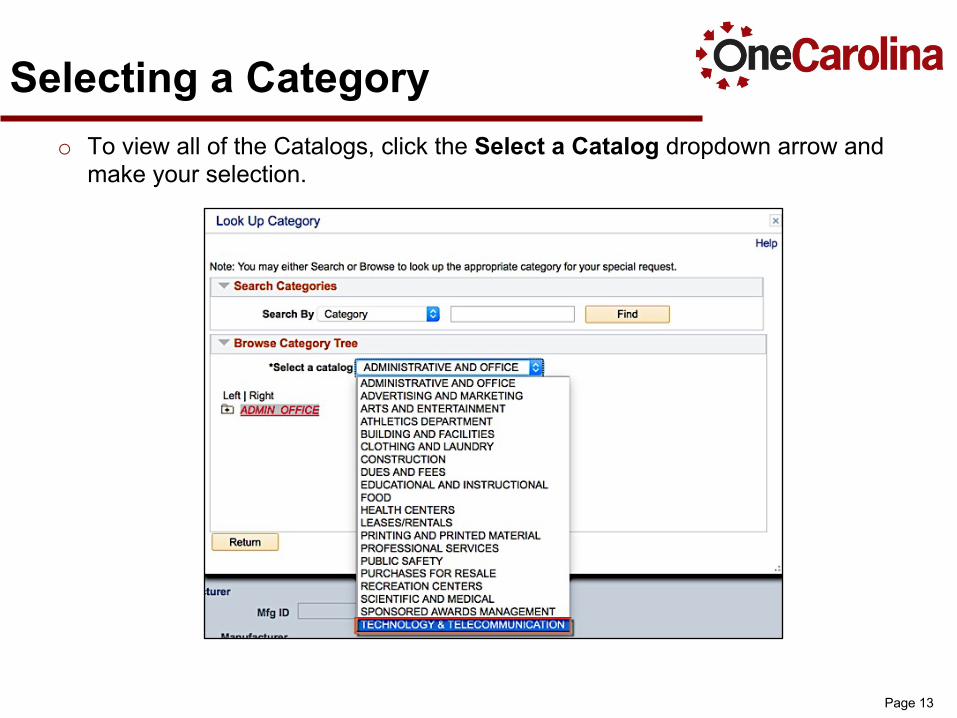
Selecting a Category o To view all of the Catalogs, click the Select a Catalog dropdown arrow and
make your selection.
Page 14
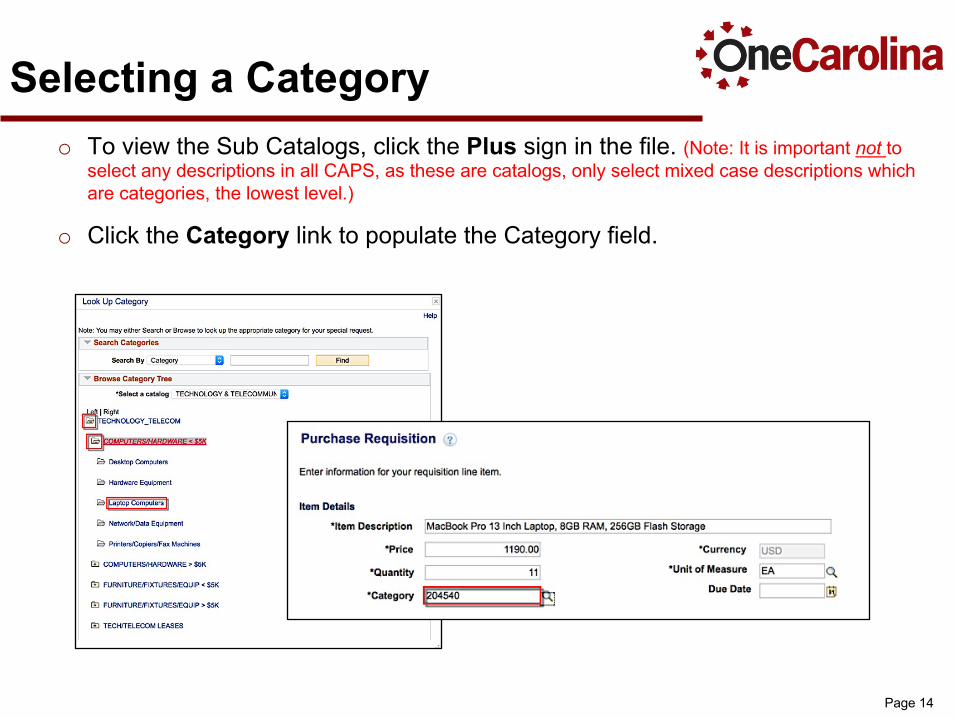
Selecting a Category o To view the Sub Catalogs, click the Plus sign in the file. (Note: It is important not to
select any descriptions in all CAPS, as these are catalogs, only select mixed case descriptions which are categories, the lowest level.)
o Click the Category link to populate the Category field.
Page 15
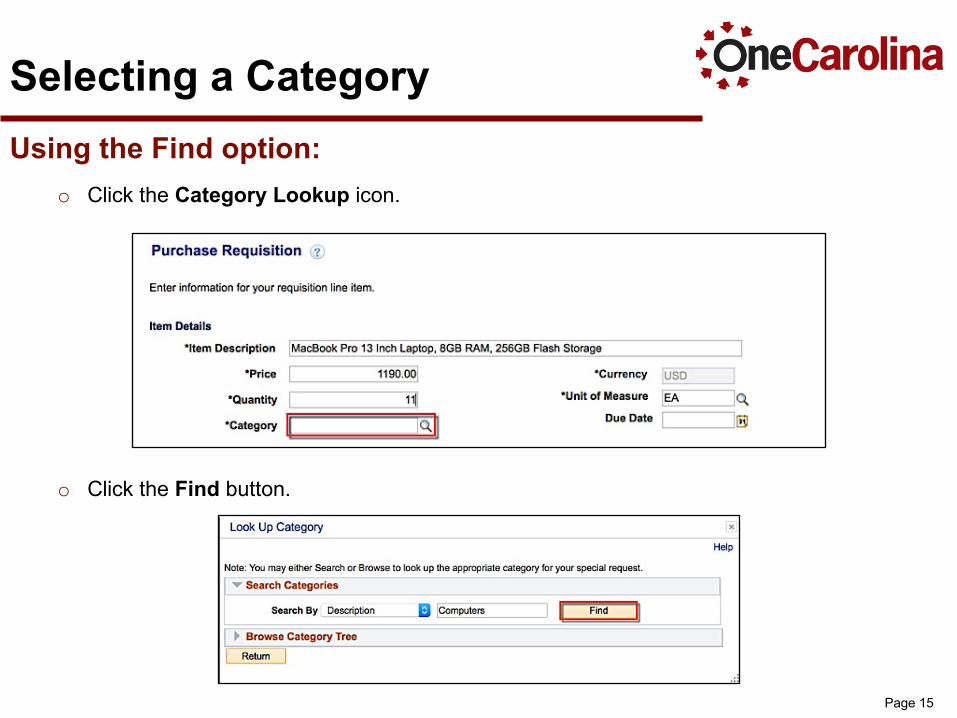
Selecting a Category Using the Find option:
o Click the Category Lookup icon.
o Click the Find button.
Page 16
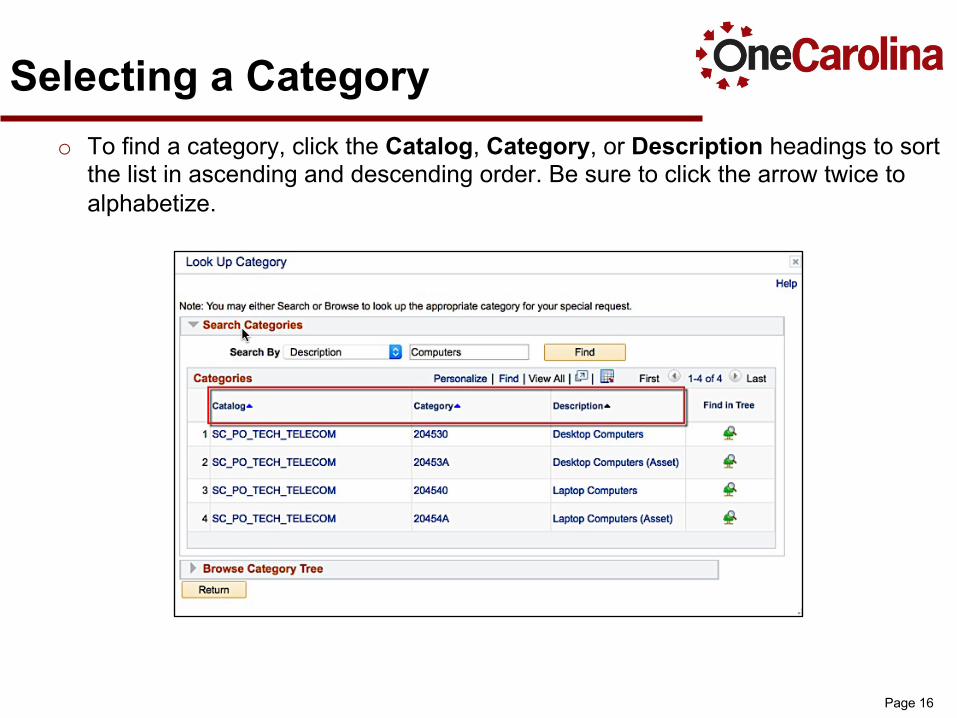
Selecting a Category o To find a category, click the Catalog, Category, or Description headings to sort
the list in ascending and descending order. Be sure to click the arrow twice to alphabetize.
Page 17
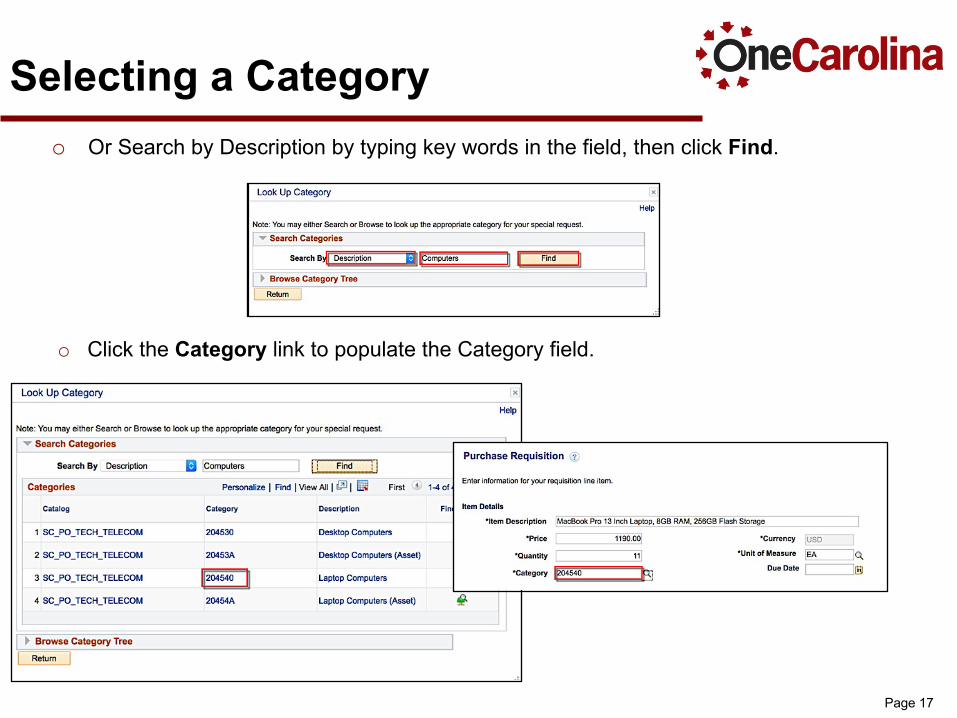
Selecting a Category o Or Search by Description by typing key words in the field, then click Find.
o Click the Category link to populate the Category field.
Page 18
Selecting a Due DateUse the Due Date on a requisition to indicate either:
• the delivery date expected to receive goods or services.
• the last effective date of the purchase order - especially blanket orders or grant-related procurement that have a finite expiration.
Page 19
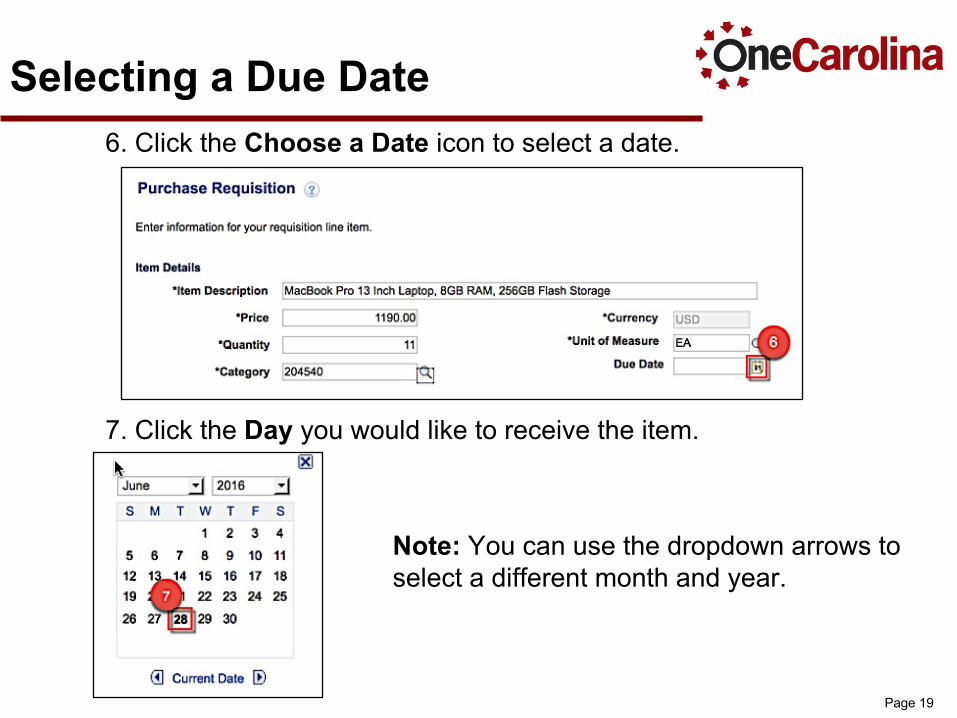
Selecting a Due Date6. Click the Choose a Date icon to select a date.
7. Click the Day you would like to receive the item.
Note: You can use the dropdown arrows to select a different month and year.
Page 20
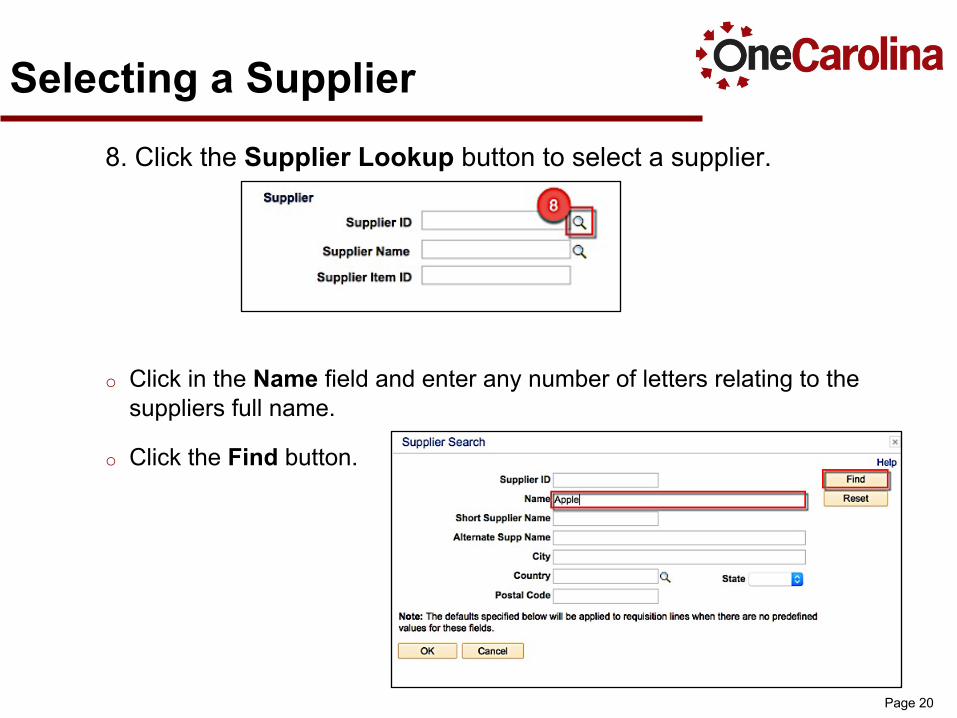
Selecting a Supplier8. Click the Supplier Lookup button to select a supplier.
o Click in the Name field and enter any number of letters relating to the suppliers full name.
o Click the Find button.

Page 21
Selecting a Suppliero Click the Supplier ID link to select a supplier.(Note: When selecting a
Supplier it is important to make sure you are selecting the correct location as many Suppliers have more than one.)
• As you can see, clicking the Supplier ID link populated the Supplier ID and Supplier Name fields.
Page 22
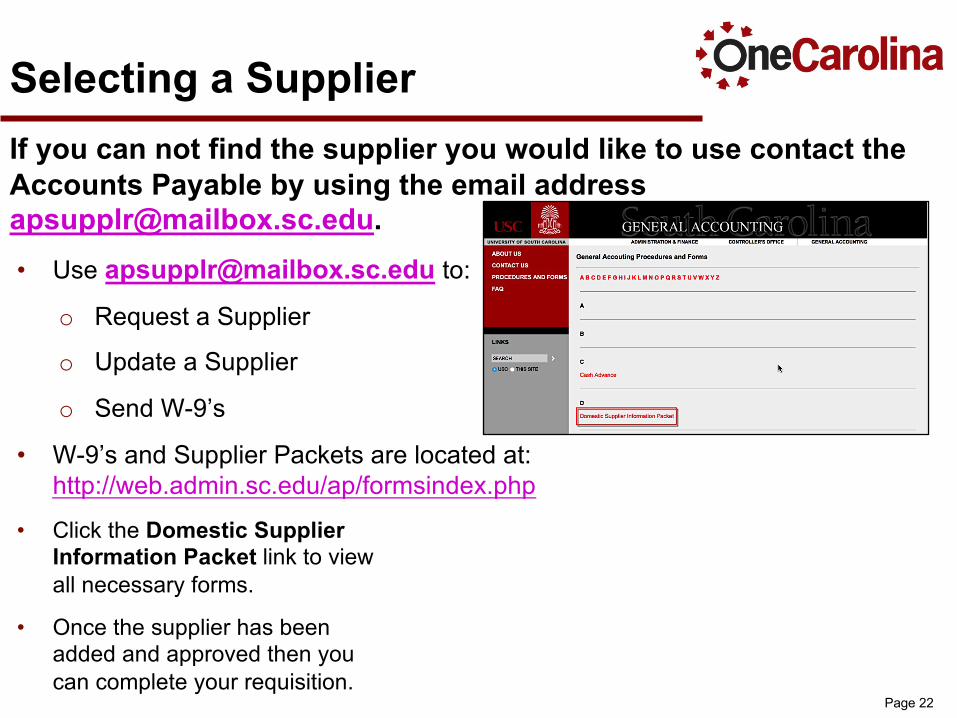
Selecting a SupplierIf you can not find the supplier you would like to use contact the Accounts Payable by using the email address [email protected].• Use [email protected] to:
o Request a Supplier
o Update a Supplier
o Send W-9’s
• W-9’s and Supplier Packets are located at: http://web.admin.sc.edu/ap/formsindex.php
• Click the Domestic Supplier Information Packet link to viewall necessary forms.
• Once the supplier has been added and approved then you can complete your requisition.
Page 23
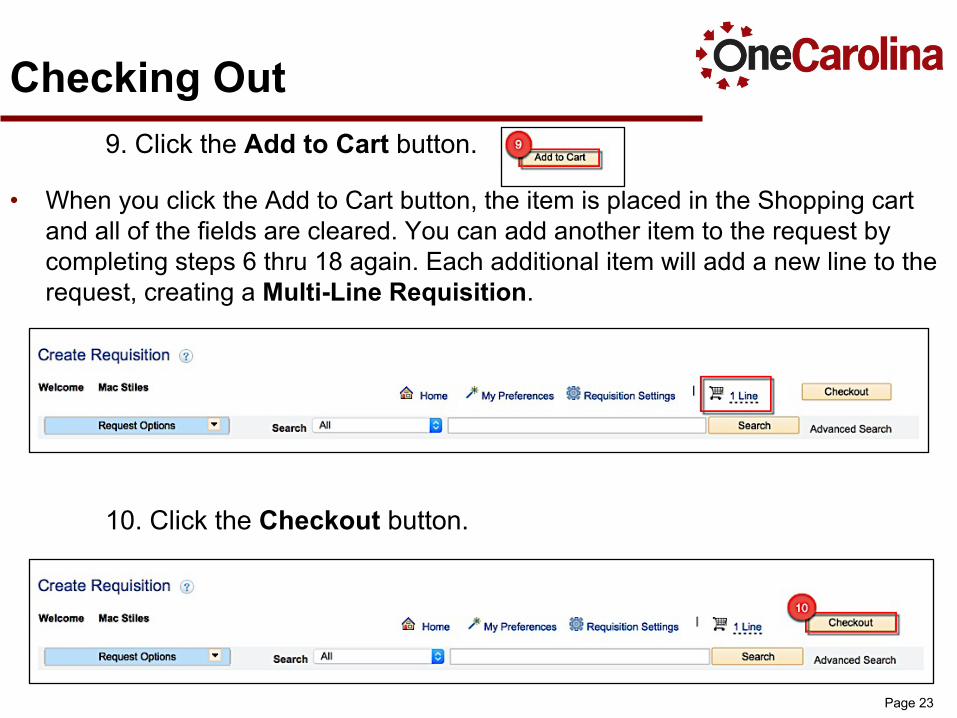
Checking Out9. Click the Add to Cart button.
• When you click the Add to Cart button, the item is placed in the Shopping cart and all of the fields are cleared. You can add another item to the request by completing steps 6 thru 18 again. Each additional item will add a new line to the request, creating a Multi-Line Requisition.
10. Click the Checkout button.
Page 24
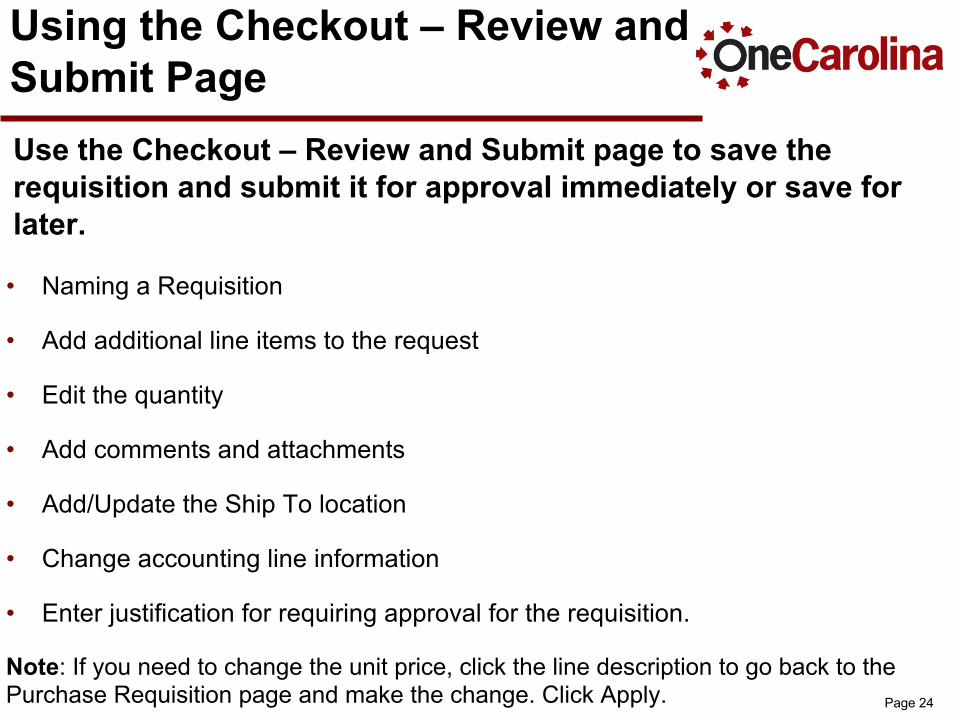
Using the Checkout – Review and Submit PageUse the Checkout – Review and Submit page to save the requisition and submit it for approval immediately or save for later.
• Naming a Requisition
• Add additional line items to the request
• Edit the quantity
• Add comments and attachments
• Add/Update the Ship To location
• Change accounting line information
• Enter justification for requiring approval for the requisition.
Note: If you need to change the unit price, click the line description to go back to the Purchase Requisition page and make the change. Click Apply.

Page 25
Naming the Requisition• Enter a description of the request to help identify this requisition as it flows
through the system.
11. Click in the Requisition Name field and enter a name that will help you identify the requisition quickly.
Page 26
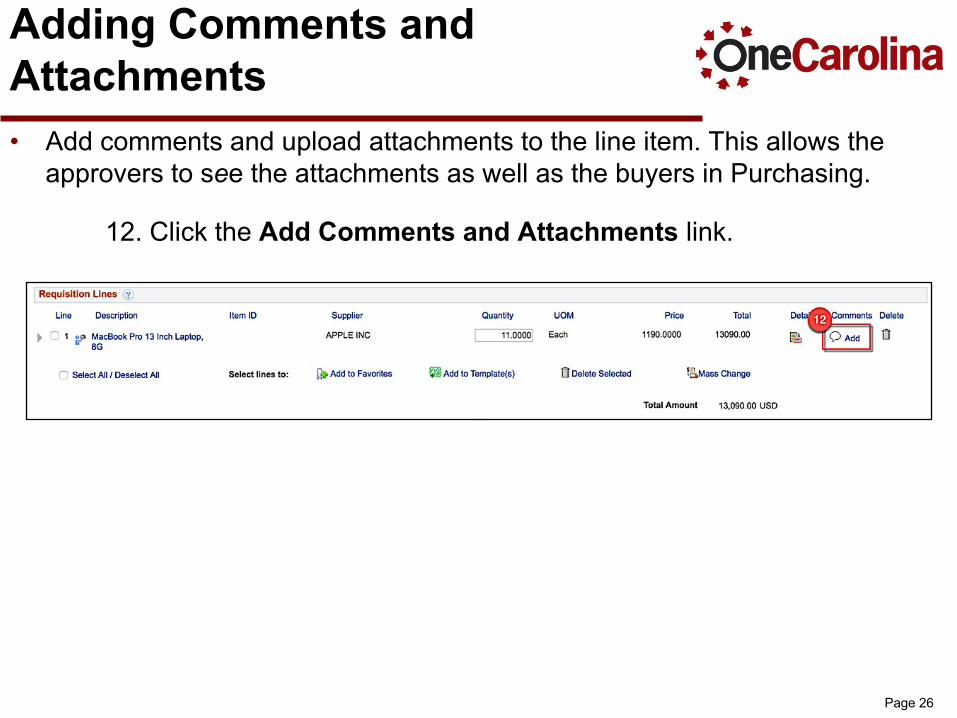
Adding Comments and Attachments• Add comments and upload attachments to the line item. This allows the
approvers to see the attachments as well as the buyers in Purchasing.
12. Click the Add Comments and Attachments link.
Page 27
Adding Comments and Attachments
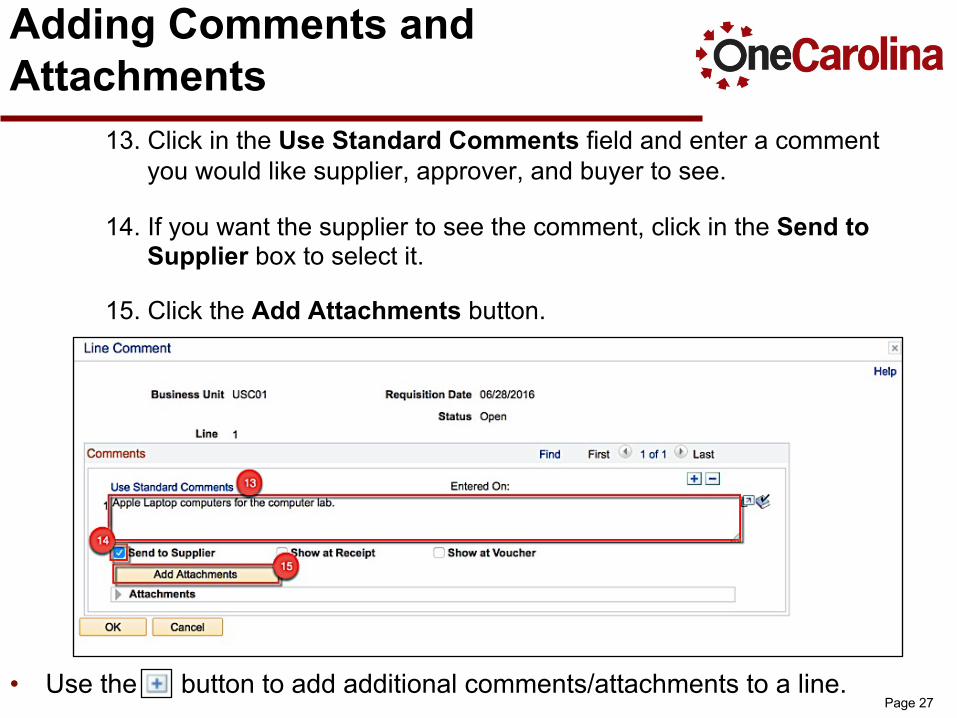
13. Click in the Use Standard Comments field and enter a comment you would like supplier, approver, and buyer to see.
14. If you want the supplier to see the comment, click in the Send to Supplier box to select it.
15. Click the Add Attachments button.
• Use the button to add additional comments/attachments to a line.
Page 28
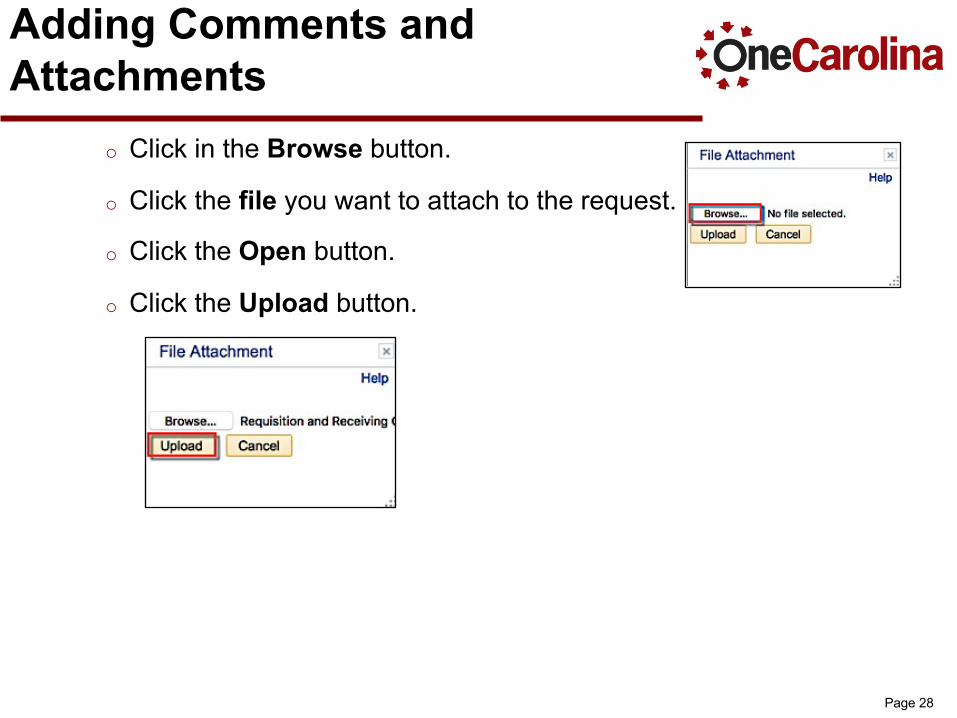
Adding Comments and Attachments
o Click in the Browse button.
o Click the file you want to attach to the request.
o Click the Open button.
o Click the Upload button.
Page 29
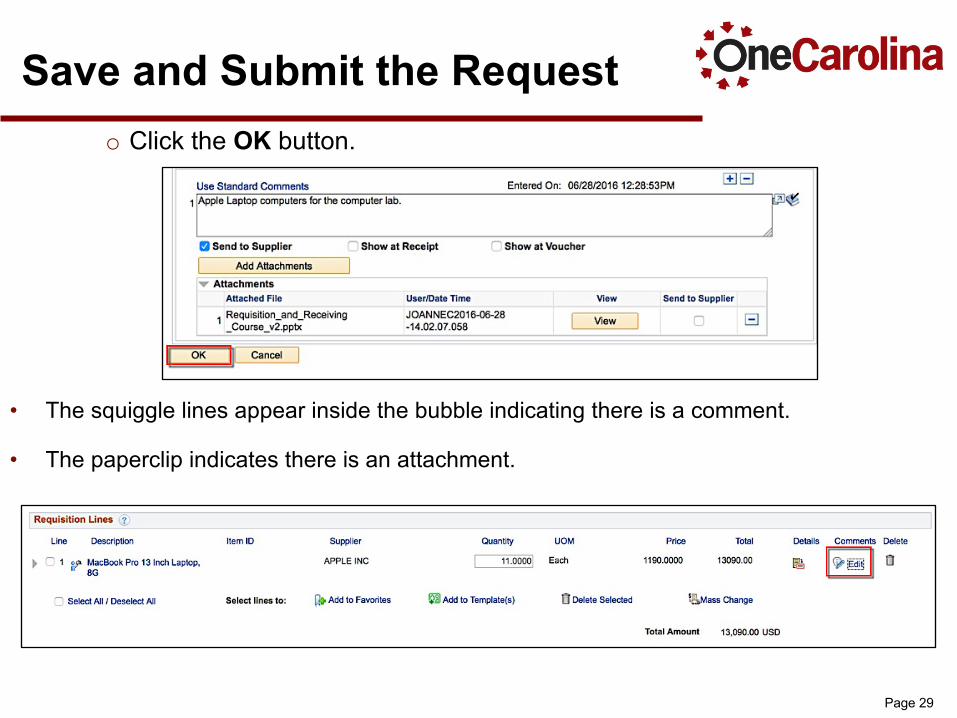
Save and Submit the Requesto Click the OK button.
• The squiggle lines appear inside the bubble indicating there is a comment.
• The paperclip indicates there is an attachment.

Page 30
Save and Submit the Request• Use the Ship To to display the organizations ship location that the supplier
should use for delivery for this requisition.
16. If not already defaulted to the correct delivery location, click the Ship To Lookup button and select one.
Page 31
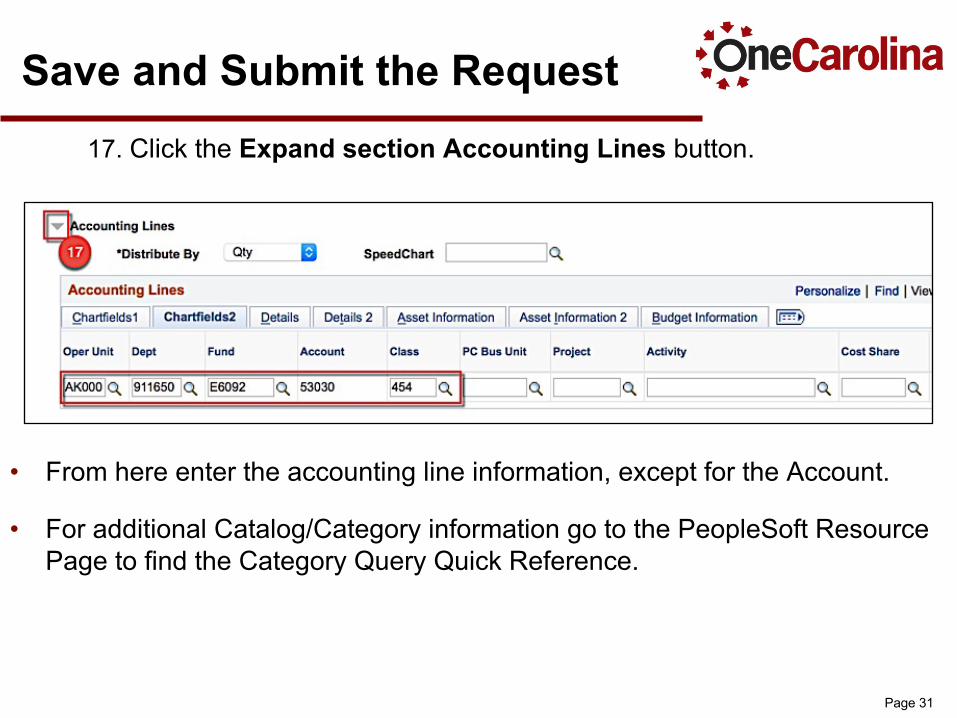
Save and Submit the Requesto 17. Click the Expand section Accounting Lines button.
• From here enter the accounting line information, except for the Account.
• For additional Catalog/Category information go to the PeopleSoft Resource Page to find the Category Query Quick Reference.
Page 32
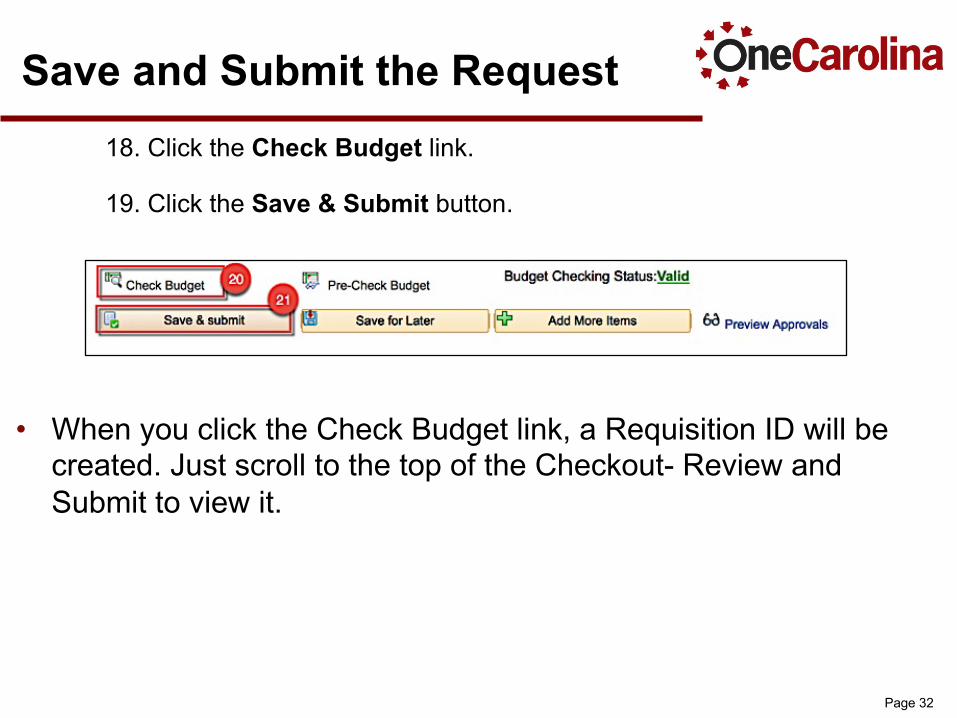
Save and Submit the Request18. Click the Check Budget link.
19. Click the Save & Submit button.
• When you click the Check Budget link, a Requisition ID will be created. Just scroll to the top of the Checkout- Review and Submit to view it.
Page 33
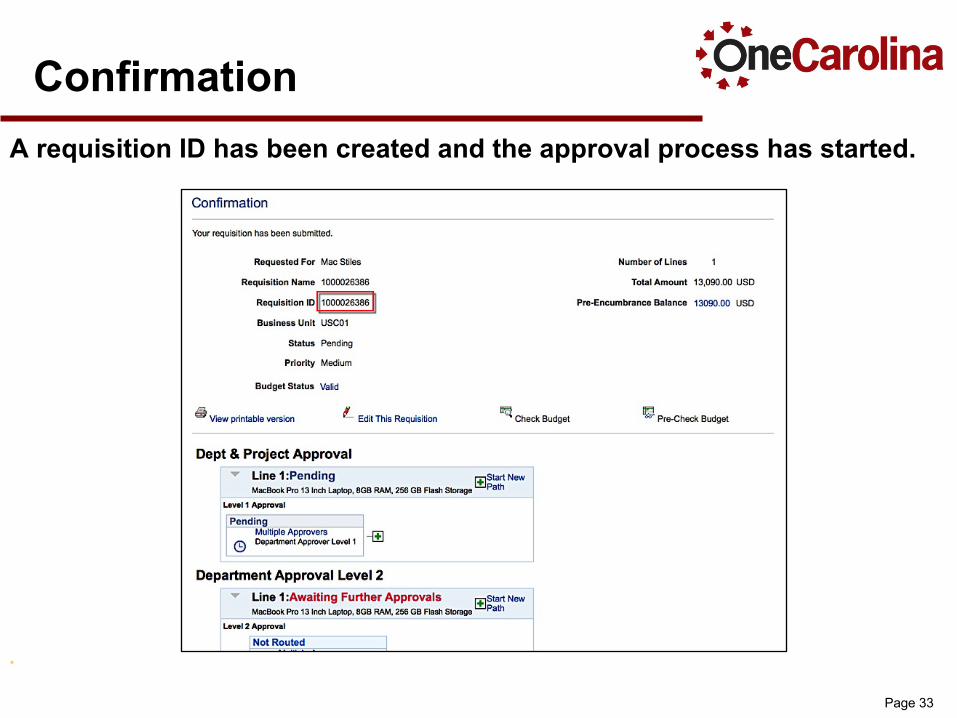
Confirmation A requisition ID has been created and the approval process has started.
•
Page 34
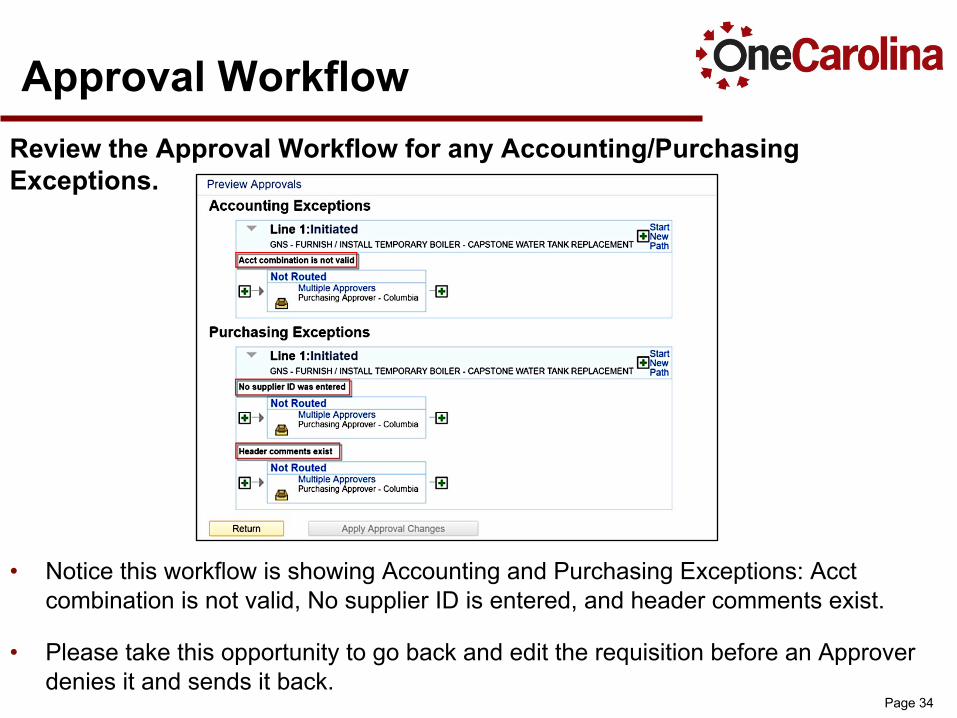
Approval Workflow Review the Approval Workflow for any Accounting/Purchasing Exceptions.
• Notice this workflow is showing Accounting and Purchasing Exceptions: Acct combination is not valid, No supplier ID is entered, and header comments exist.
• Please take this opportunity to go back and edit the requisition before an Approver denies it and sends it back.
Page 35
Types of Purchase RequisitionsToday we will create:
• Amount Only Purchase Requisition
• A Blanket Purchase Order
• Asset Purchase Requisition
• Project Funded Purchase Requisition with Cost Share
Page 36
Amount Only Purchase RequisitionCreating a Purchase Requisition for Amount Only.
• Scenarios for when to use Amount Only:
o Quantity of 1
o Services such as All Construction Services and Consulting Services
o All Blanket Purchase Orders
o SAM Office
• To create a request for Amount only follow Purchase Requisition steps 1 thru 3
• For Step 4, click in the Quantity field and enter a quantity of “1”.
Page 37
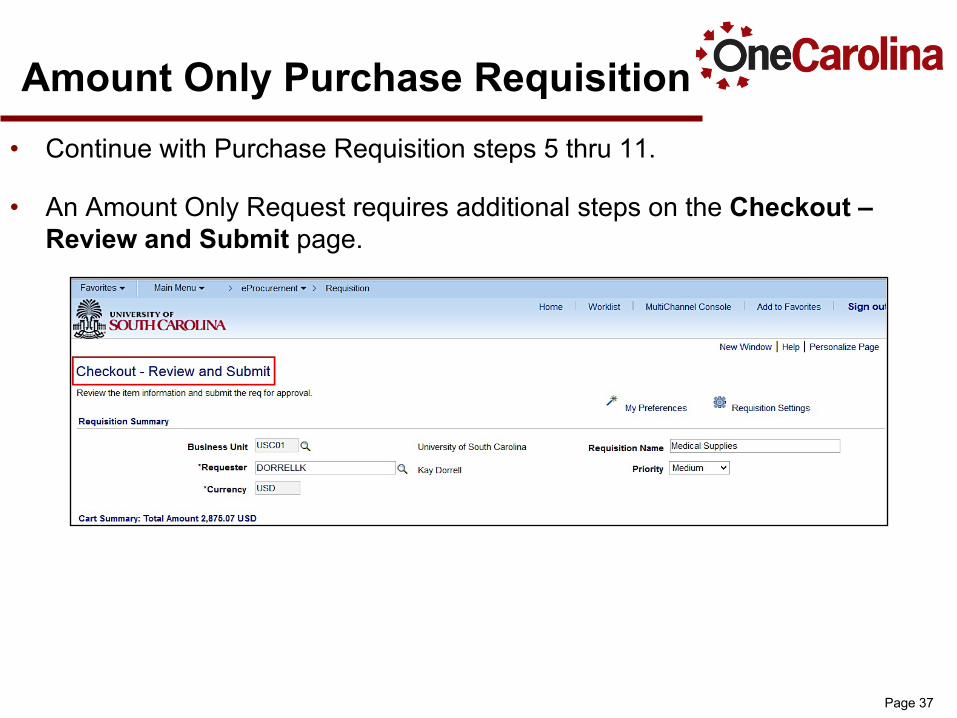
Amount Only Purchase Requisition• Continue with Purchase Requisition steps 5 thru 11.
• An Amount Only Request requires additional steps on the Checkout –Review and Submit page.
Page 38
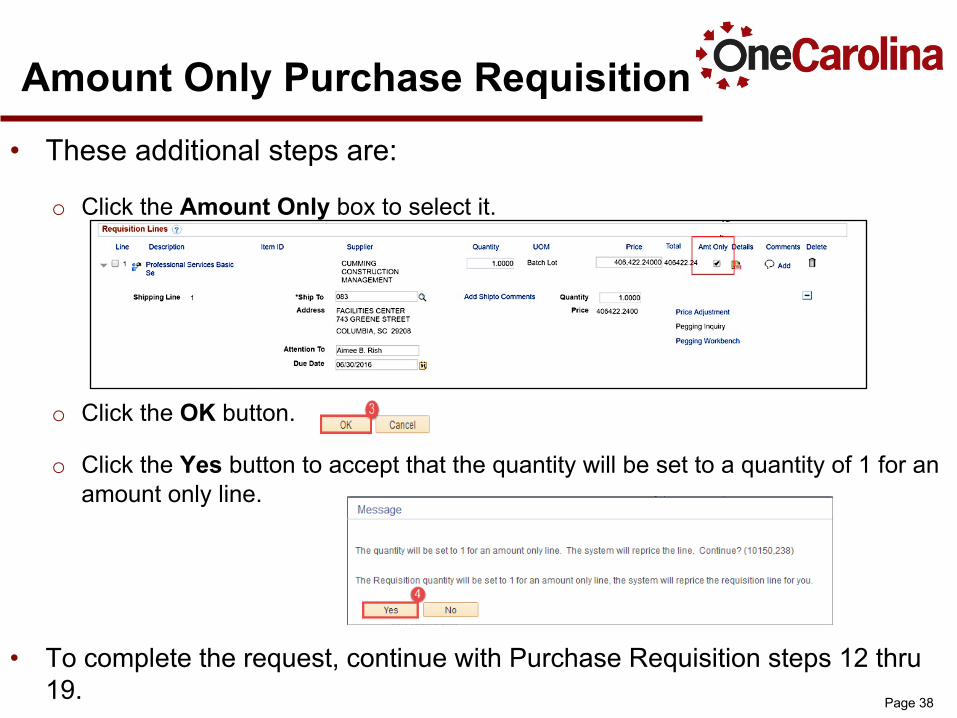
Amount Only Purchase Requisition• These additional steps are:
o Click the Amount Only box to select it.
o Click the OK button.
o Click the Yes button to accept that the quantity will be set to a quantity of 1 for an amount only line.
• To complete the request, continue with Purchase Requisition steps 12 thru 19.
Page 39
Blanket Purchase OrdersTo create a Blanket Purchase Order (BPO) using a Requisition:
• BPOs are valid for 1 year and will be closed out each fiscal year.
• Minimum of $10,000 per year or more.
• Minimum of 12 invoices/vouchers issued per Budget period/year each year.
• When creating the requisition, begin with “Blanket Order” then general description of the goods/services being purchased.
• BPO is to be charged to one Account or one Accounting Distribution line per line item.
Page 40
Blanket Purchase OrderCreating Blanket Purchase Order using Purchase Requisition.
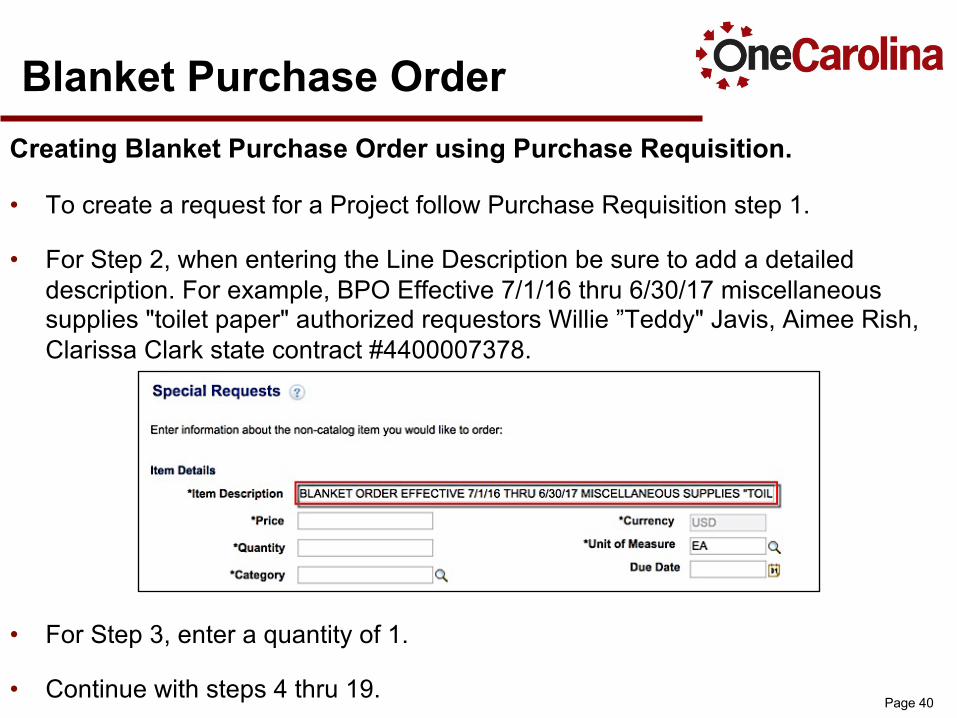
• To create a request for a Project follow Purchase Requisition step 1.
• For Step 2, when entering the Line Description be sure to add a detailed description. For example, BPO Effective 7/1/16 thru 6/30/17 miscellaneous supplies "toilet paper" authorized requestors Willie ”Teddy" Javis, Aimee Rish, Clarissa Clark state contract #4400007378.
• For Step 3, enter a quantity of 1.
• Continue with steps 4 thru 19.
Page 41
Asset Purchase RequisitionCreating a Purchase Requisition for an Asset.
• A Capital Asset is an item that is individually greater than $5,000, and expected to be depreciated for more than 2 years.
• All Asset Categories can be selected within the sub-catalog containing the description “...>5K”.
• All Asset Category descriptions include the word “Asset”, making it easier to select the appropriate one.
• To create a request for an Asset follow Purchase Requisition steps 1 thru 4.
• For Step 5, select an Asset Category code that has 5-digits and the letter A. For example, Laboratory Equipment (Asset), 49000A.
• Continue with Purchase Requisition steps 6 thru 19 to complete the request.
Page 42
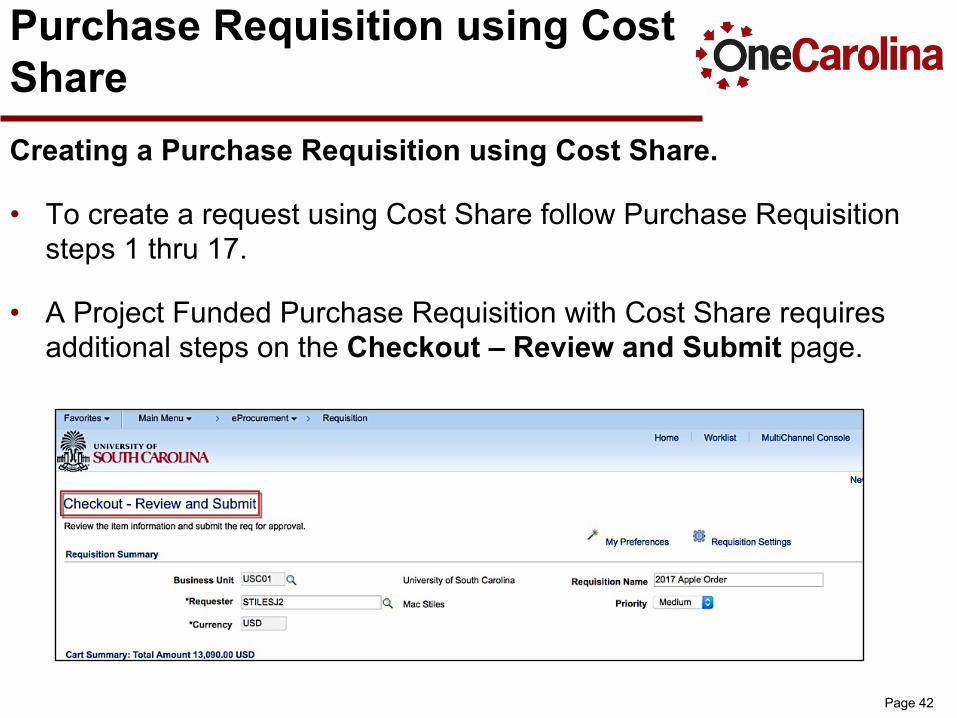
Purchase Requisition using Cost ShareCreating a Purchase Requisition using Cost Share.
• To create a request using Cost Share follow Purchase Requisition steps 1 thru 17.
• A Project Funded Purchase Requisition with Cost Share requires additional steps on the Checkout – Review and Submit page.
Page 43
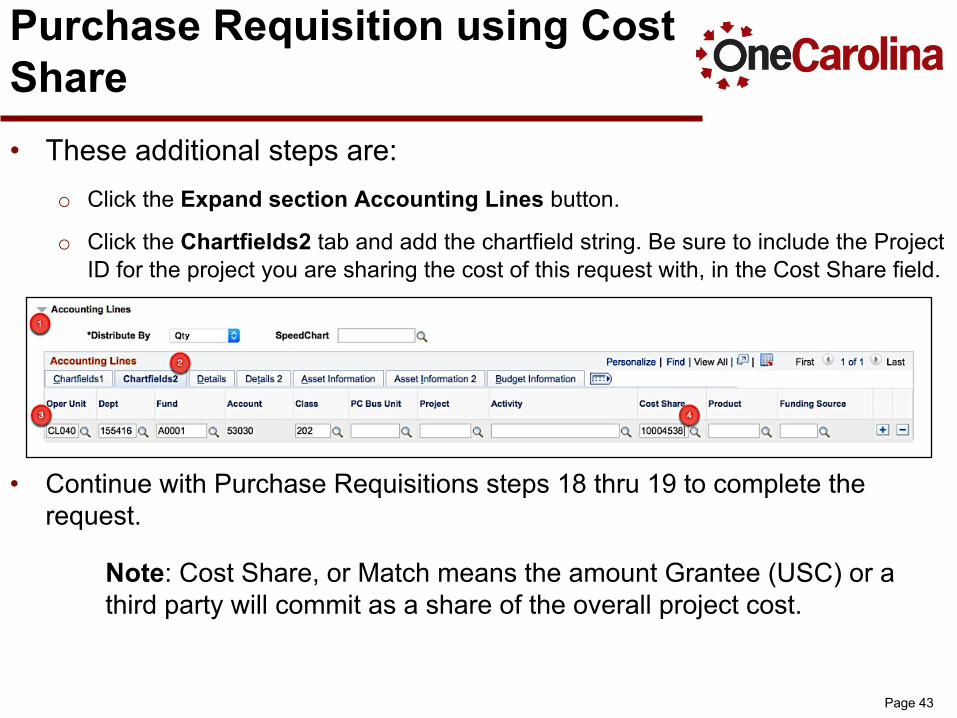
Purchase Requisition using Cost Share• These additional steps are:
o Click the Expand section Accounting Lines button.
o Click the Chartfields2 tab and add the chartfield string. Be sure to include the Project ID for the project you are sharing the cost of this request with, in the Cost Share field.
• Continue with Purchase Requisitions steps 18 thru 19 to complete the request.
Note: Cost Share, or Match means the amount Grantee (USC) or a third party will commit as a share of the overall project cost.
Page 44
Project Funded Purchase RequisitionCreating a Project Funded Purchase Requisition.
• To create a project funded purchase requisition follow Purchase Requisition steps 1 thru 17.
• A Project Funded Purchase Requisition with Cost Share requires additional steps on the Checkout – Review and Submit page.
Page 45
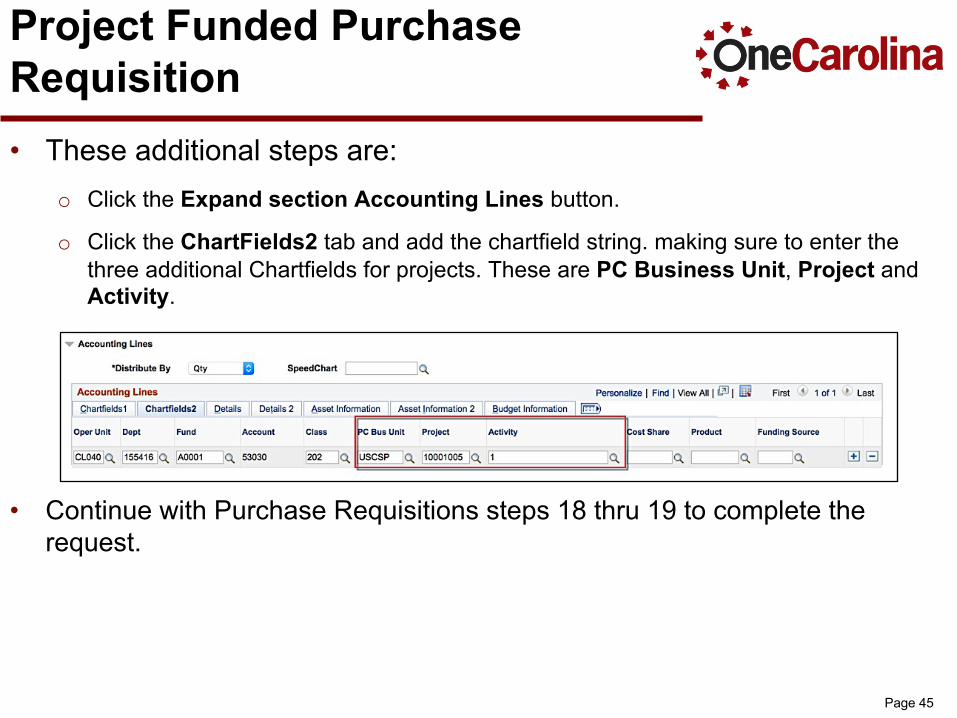
Project Funded Purchase Requisition• These additional steps are:
o Click the Expand section Accounting Lines button.
o Click the ChartFields2 tab and add the chartfield string. making sure to enter the three additional Chartfields for projects. These are PC Business Unit, Project and Activity.
• Continue with Purchase Requisitions steps 18 thru 19 to complete the request.

Page 46
Reviewing a Purchase OrderHere is an example of a Purchase Order. The highlighted data comes from the information entered on a requisition. For example, Line Description, Due Date, Ship To, and Comments.
Page 47
Time to Practice
Exercise #1
Creating a Quantity Based Requisition Line
Page 48
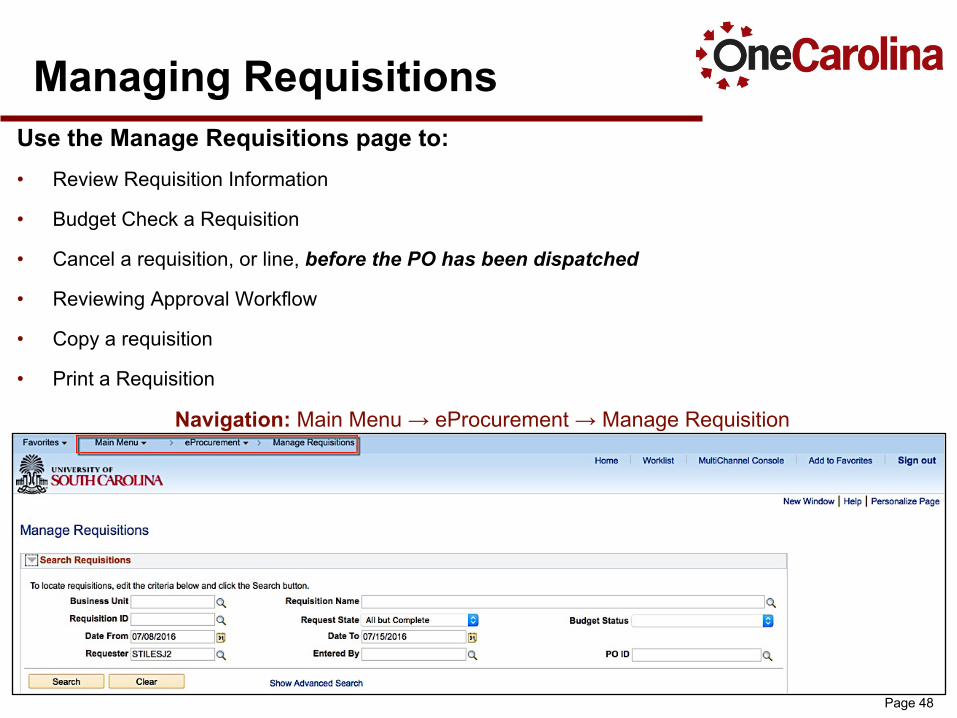
Managing RequisitionsUse the Manage Requisitions page to:• Review Requisition Information
• Budget Check a Requisition
• Cancel a requisition, or line, before the PO has been dispatched
• Reviewing Approval Workflow
• Copy a requisition
• Print a Requisition
Navigation: Main Menu → eProcurement → Manage Requisition
Page 49
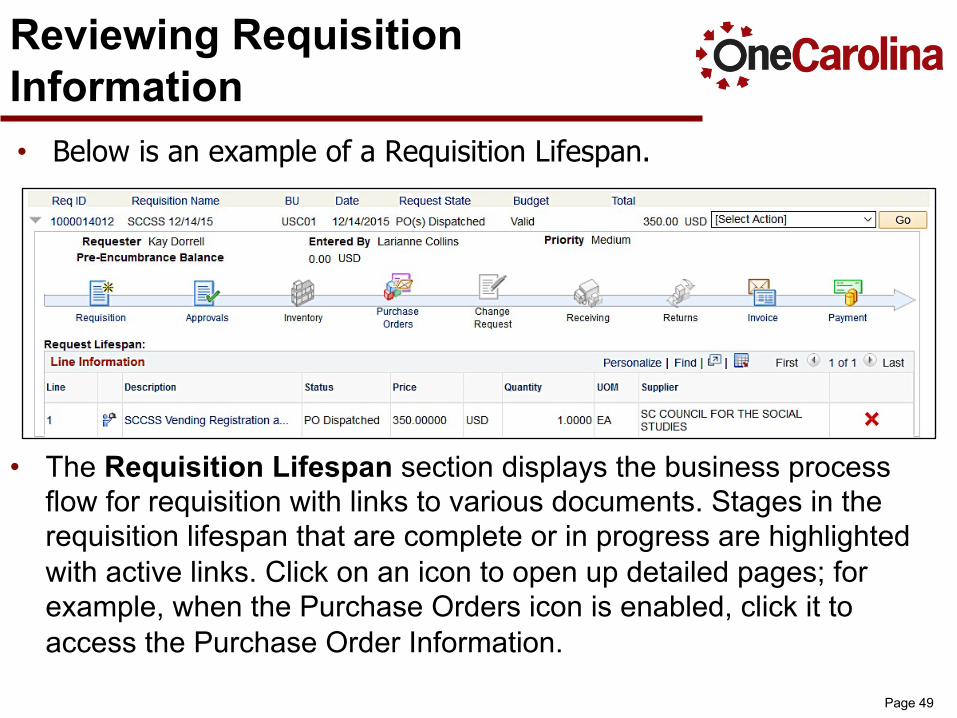
Reviewing Requisition Information • Below is an example of a Requisition Lifespan.
•
•
• The Requisition Lifespan section displays the business process flow for requisition with links to various documents. Stages in the requisition lifespan that are complete or in progress are highlighted with active links. Click on an icon to open up detailed pages; for example, when the Purchase Orders icon is enabled, click it to access the Purchase Order Information.
Page 50
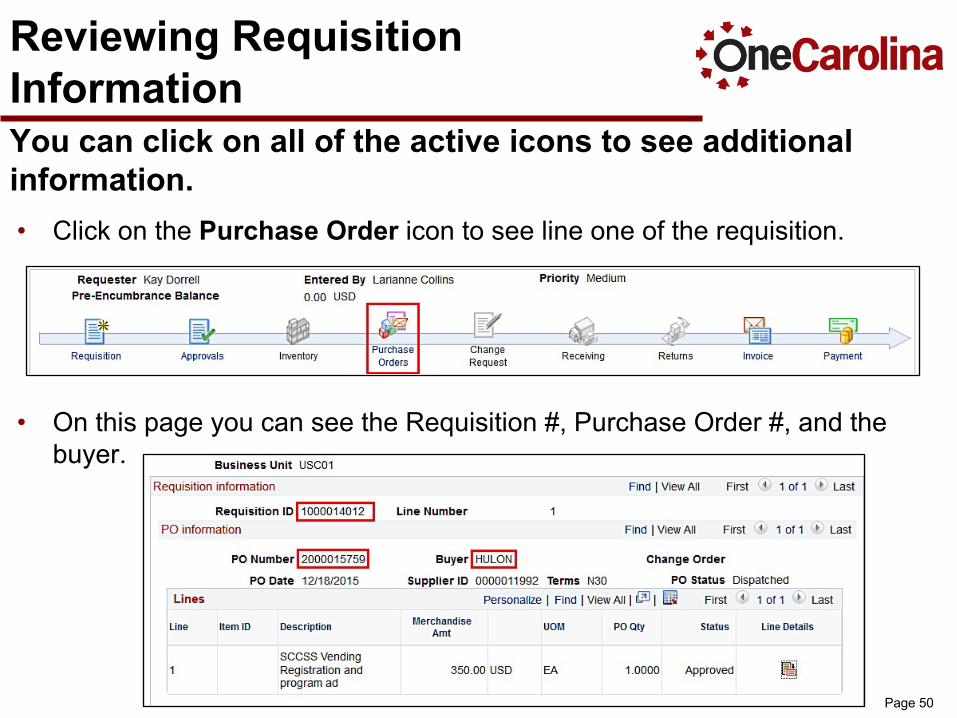
Reviewing Requisition InformationYou can click on all of the active icons to see additional information.• Click on the Purchase Order icon to see line one of the requisition.
• On this page you can see the Requisition #, Purchase Order #, and the buyer.
Page 51
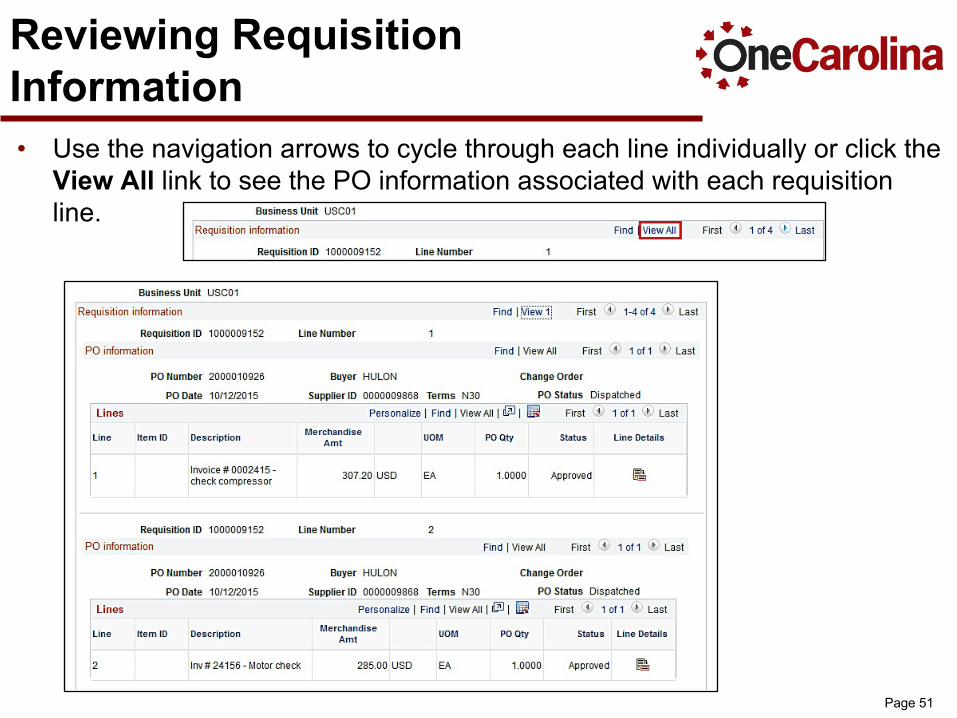
Reviewing Requisition Information• Use the navigation arrows to cycle through each line individually or click the
View All link to see the PO information associated with each requisition line.
Page 52
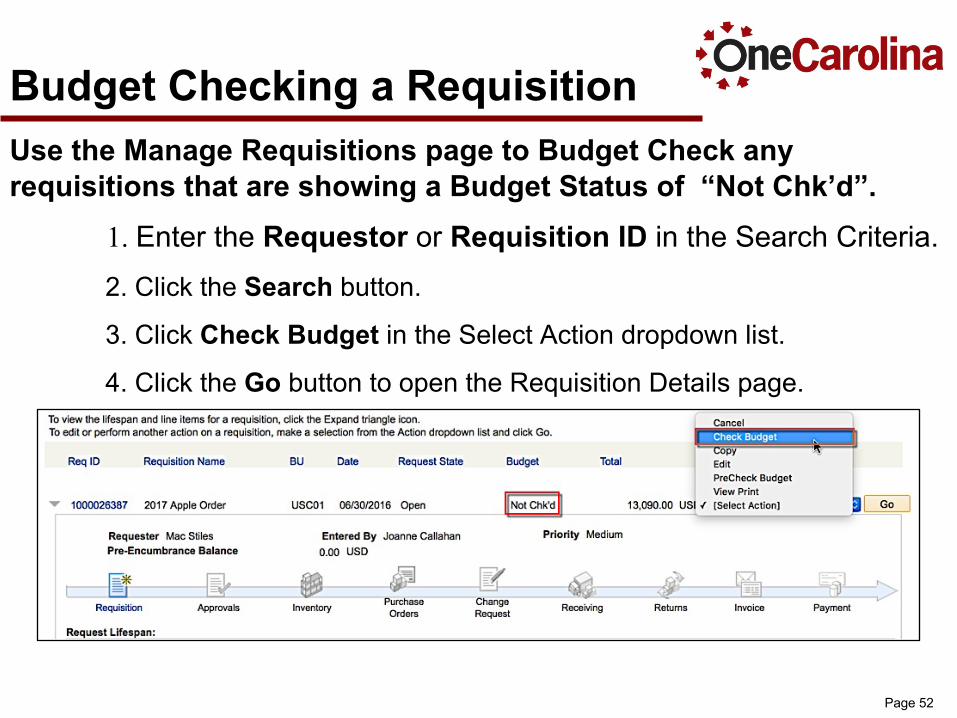
Budget Checking a RequisitionUse the Manage Requisitions page to Budget Check any requisitions that are showing a Budget Status of “Not Chk’d”.
1. Enter the Requestor or Requisition ID in the Search Criteria.2. Click the Search button.
3. Click Check Budget in the Select Action dropdown list.
4. Click the Go button to open the Requisition Details page.
Page 53
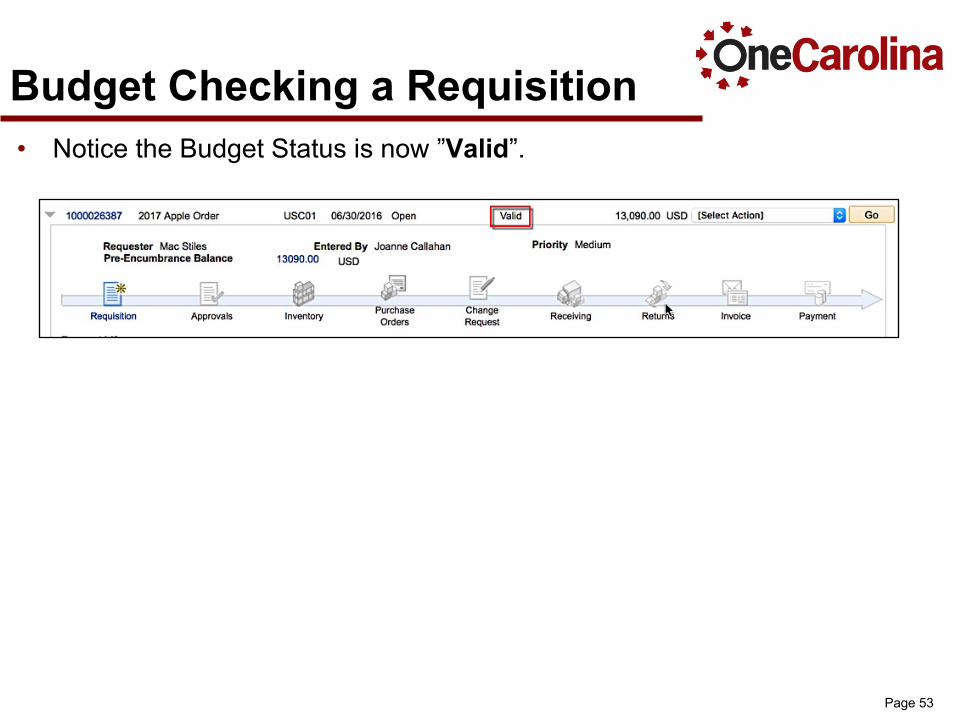
Budget Checking a Requisition• Notice the Budget Status is now ”Valid”.
Page 54
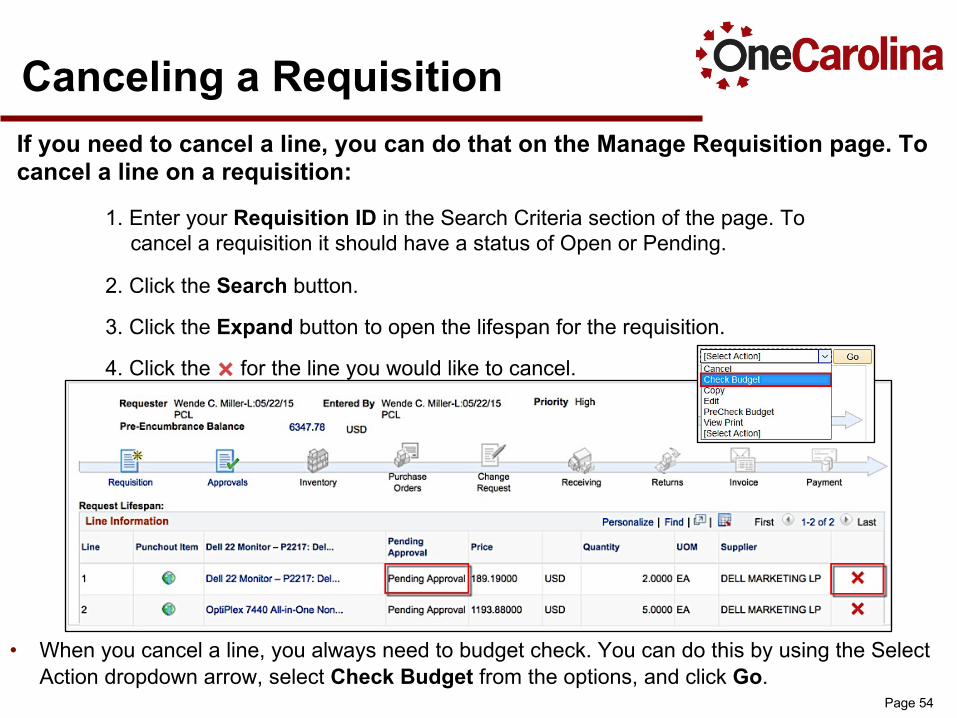
Canceling a RequisitionIf you need to cancel a line, you can do that on the Manage Requisition page. To cancel a line on a requisition:
1. Enter your Requisition ID in the Search Criteria section of the page. To cancel a requisition it should have a status of Open or Pending.
2. Click the Search button.
3. Click the Expand button to open the lifespan for the requisition.
4. Click the for the line you would like to cancel.
• When you cancel a line, you always need to budget check. You can do this by using the Select Action dropdown arrow, select Check Budget from the options, and click Go.

Page 55
Canceling a RequisitionTo Cancel a Requisition on the Manage Requisition page:
1. Enter the Requestor or Requisition ID in the Search Criteria.
2. Click the Search button.
3. Click Cancel in the Select Action dropdown list.
4. Click the Go button to open the Requisition Details page.
5. On the Requisition Details page, click the Cancel Requisition button.
Page 56
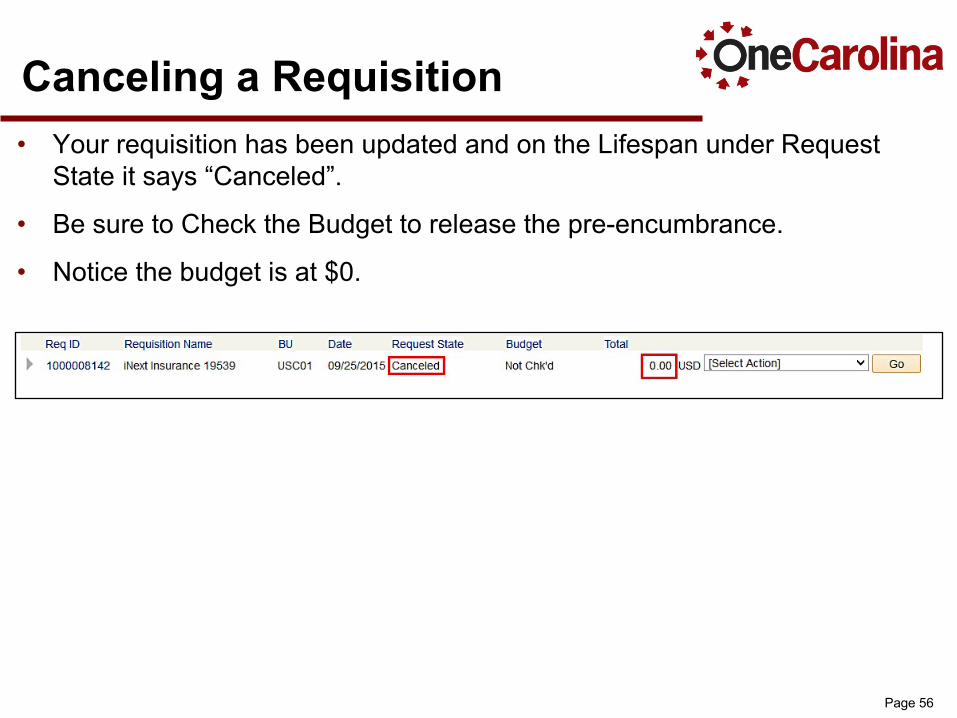
Canceling a Requisition• Your requisition has been updated and on the Lifespan under Request
State it says “Canceled”.
• Be sure to Check the Budget to release the pre-encumbrance.
• Notice the budget is at $0.
Page 57
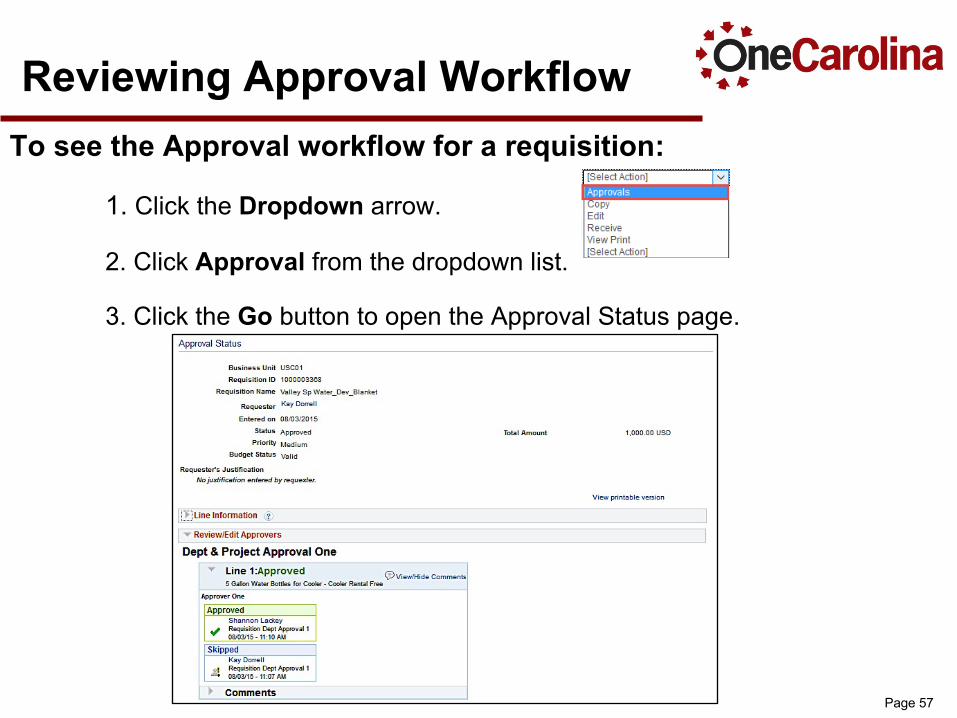
Reviewing Approval WorkflowTo see the Approval workflow for a requisition:
1. Click the Dropdown arrow.
2. Click Approval from the dropdown list.
3. Click the Go button to open the Approval Status page.
Page 58
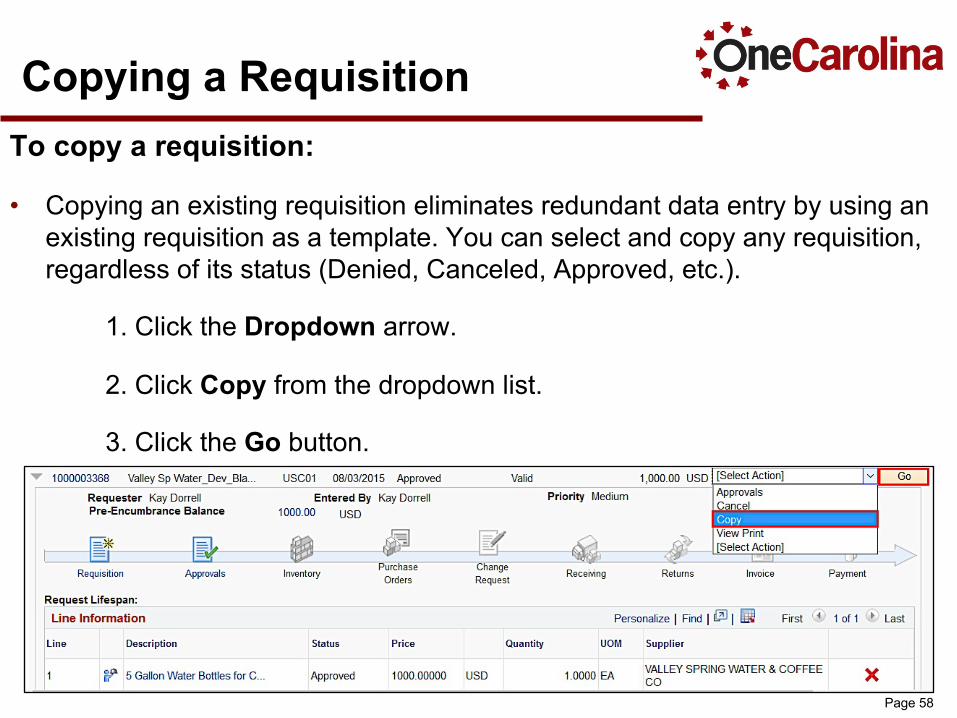
Copying a RequisitionTo copy a requisition:
• Copying an existing requisition eliminates redundant data entry by using an existing requisition as a template. You can select and copy any requisition, regardless of its status (Denied, Canceled, Approved, etc.).
1. Click the Dropdown arrow.
2. Click Copy from the dropdown list.
3. Click the Go button.
Page 59
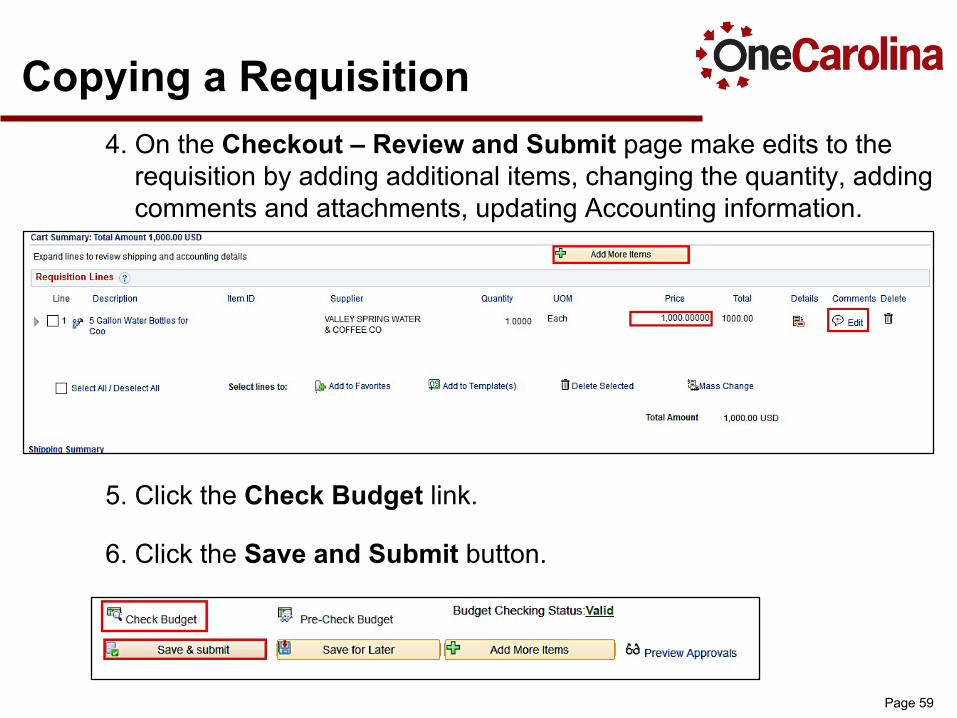
Copying a Requisition4. On the Checkout – Review and Submit page make edits to the
requisition by adding additional items, changing the quantity, adding comments and attachments, updating Accounting information.
5. Click the Check Budget link.
6. Click the Save and Submit button.

Page 60
Printing a RequisitionTo view a printout of requisition information:
1. Click the Dropdown arrow.
2. Click View Print from the dropdown list.
3. Click the Go button.

Page 61
Adding Pages to FavoritesThe My Favorites Feature in PeopleSoft allows you to store the most frequently used pages where you can access them in one single click.
● Determine the pages you would like to store in Favorites and navigate to eachspecific page.
● Once you have the page in view on your screen, click the Add to Favorites link.
Page 62
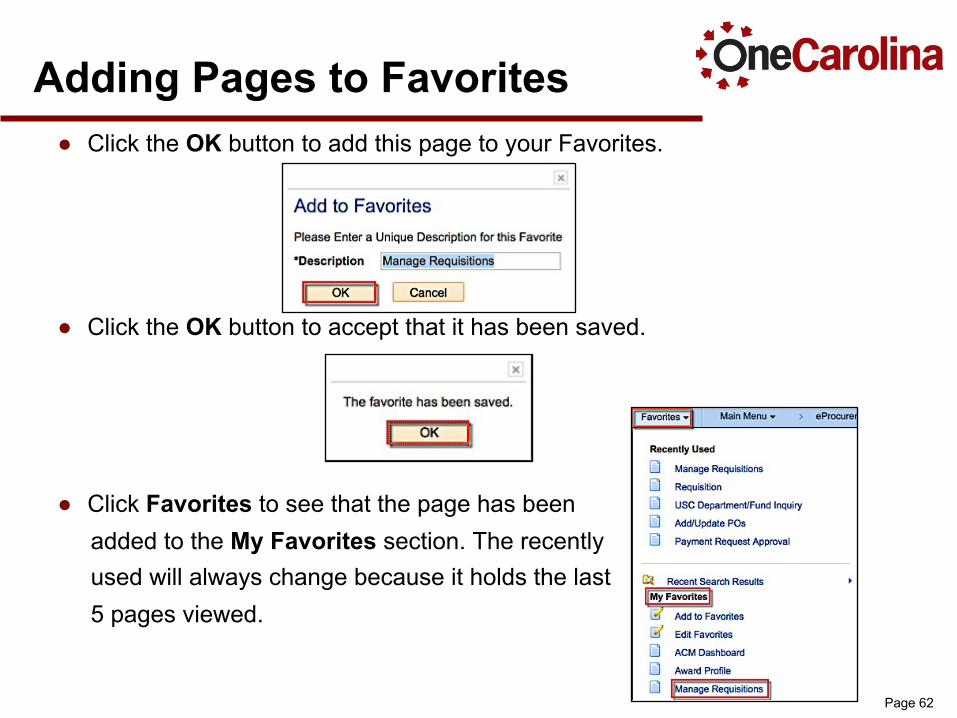
Adding Pages to Favorites● Click the OK button to add this page to your Favorites.
● Click the OK button to accept that it has been saved.
● Click Favorites to see that the page has beenadded to the My Favorites section. The recentlyused will always change because it holds the last5 pages viewed.
Page 63
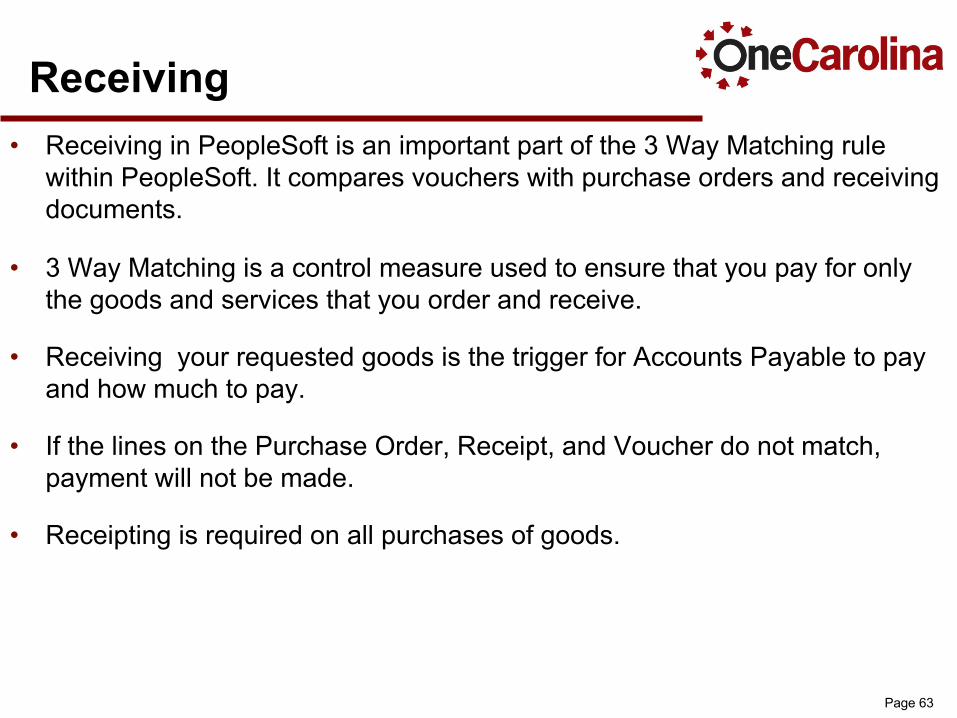
Receiving• Receiving in PeopleSoft is an important part of the 3 Way Matching rule
within PeopleSoft. It compares vouchers with purchase orders and receiving documents.
• 3 Way Matching is a control measure used to ensure that you pay for only the goods and services that you order and receive.
• Receiving your requested goods is the trigger for Accounts Payable to pay and how much to pay.
• If the lines on the Purchase Order, Receipt, and Voucher do not match, payment will not be made.
• Receipting is required on all purchases of goods.

Page 64
The Effect of a Category on Receiving Required• Goods require receiving. For example, supplies and
equipment.
• Services do not require receiving. For example, maintenance or repair of equipment.
• Sending in the invoice will be Accounts Payable’s cue to make payment.
Page 65
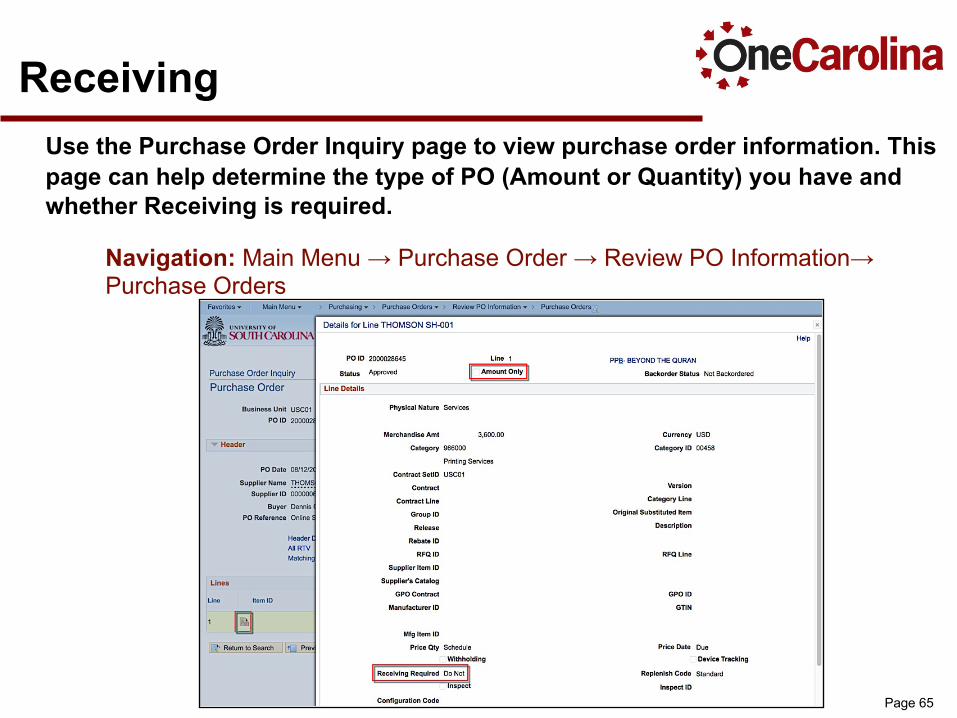
ReceivingUse the Purchase Order Inquiry page to view purchase order information. This page can help determine the type of PO (Amount or Quantity) you have and whether Receiving is required.
Navigation: Main Menu → Purchase Order → Review PO Information→ Purchase Orders

Page 66
ReceivingIf you are the Requisitioner or the individual who received the goods, you need to receive on the Add/Update Receipts page.
Navigation Path: Main Menu → Purchasing → Receipts → Add/Update Receipts
Follow the steps below to receive on this page:1. Click the Add a New Value tab and then click the Add button.
2. Click the Add button.
Page 67
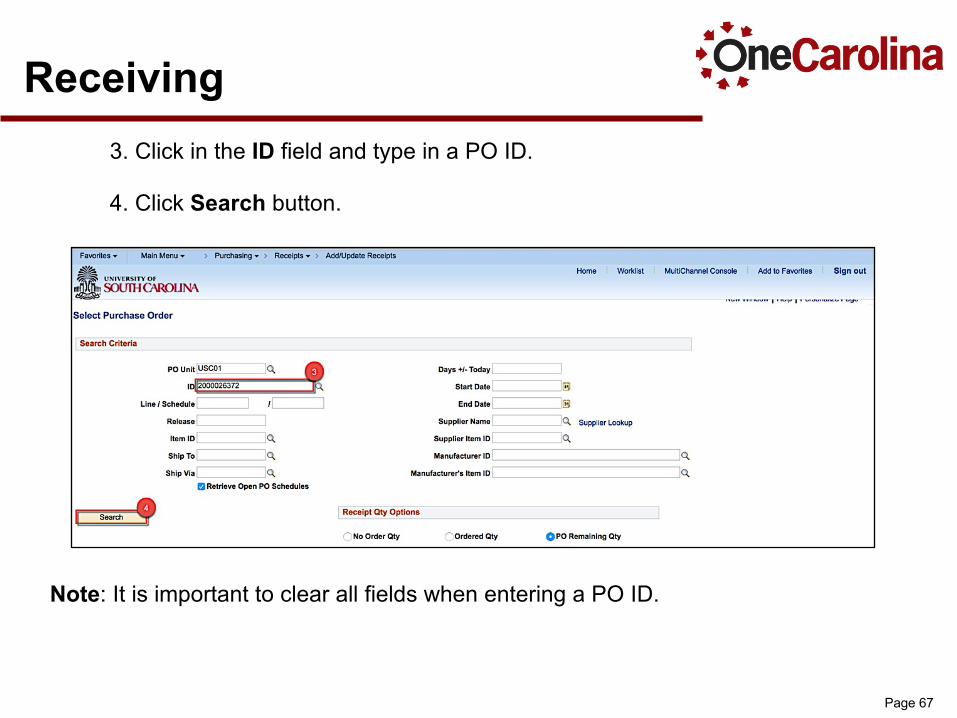
Receiving3. Click in the ID field and type in a PO ID.
4. Click Search button.
Note: It is important to clear all fields when entering a PO ID.
Page 68
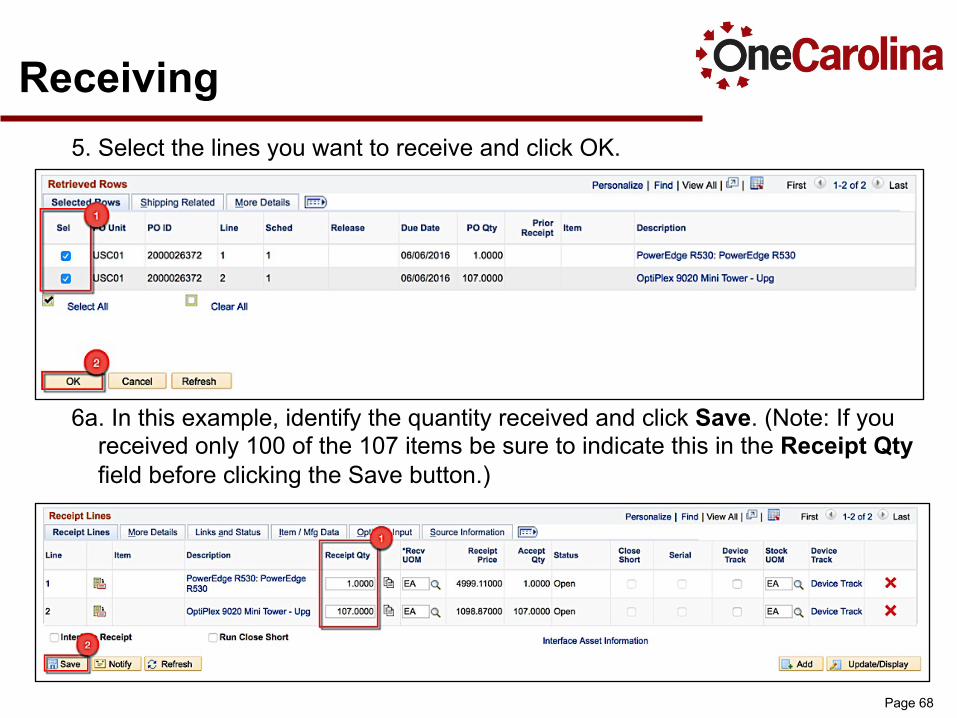
Receiving5. Select the lines you want to receive and click OK.
6a. In this example, identify the quantity received and click Save. (Note: If youreceived only 100 of the 107 items be sure to indicate this in the Receipt Qtyfield before clicking the Save button.)
Page 69
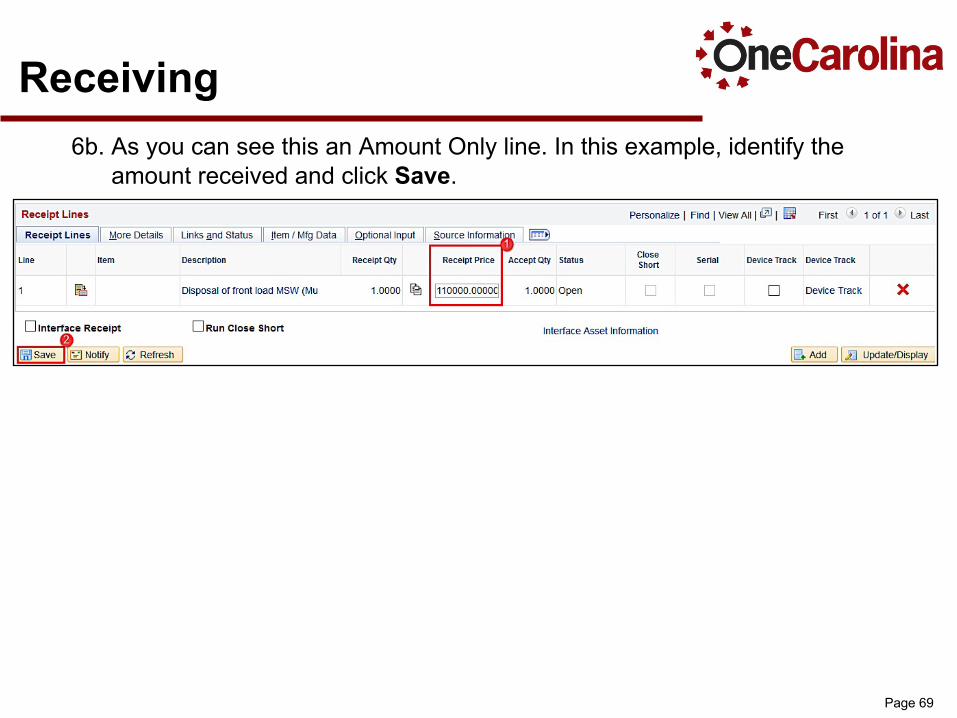
Receiving6b. As you can see this an Amount Only line. In this example, identify the
amount received and click Save.
Page 70
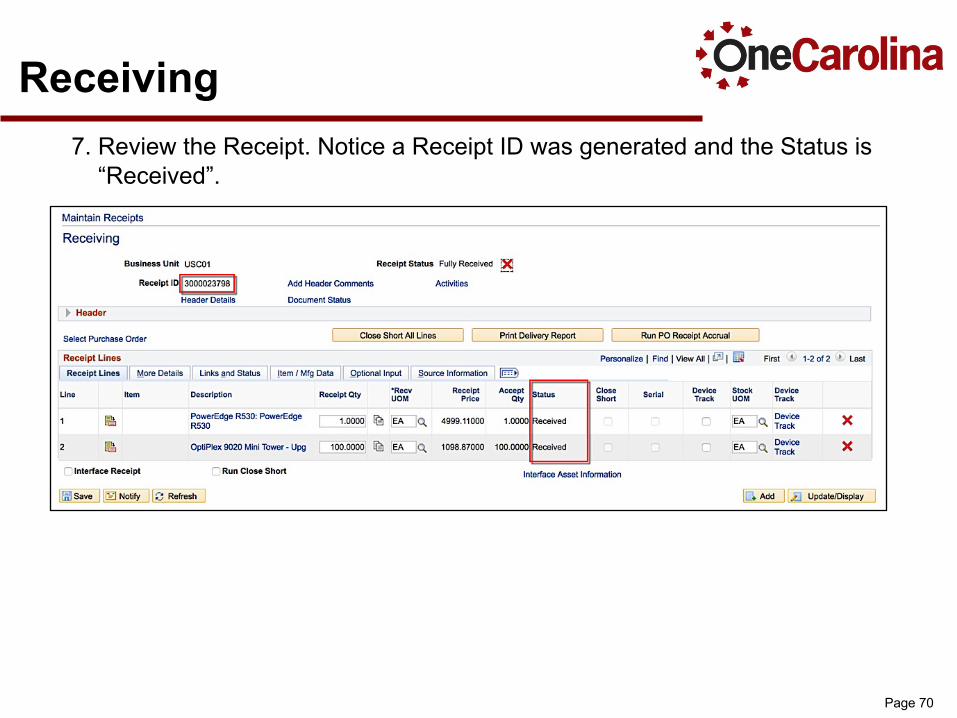
Receiving7. Review the Receipt. Notice a Receipt ID was generated and the Status is
“Received”.
Page 71
Time to Practice
Exercise #2
Editing an Existing Requisition with an Amount Only Line
Page 72
Time to Practice
Exercise #3
View the Approval Workflow for a Submitted Requisition
Page 73
Time to Practice
Exercise #4
Copy Existing Requisition into a New Requisition
Page 74
Time to Practice
Exercise #5
Cancel Original Requisition, Undo Cancel, and Budget Check
Page 75
Time to Practice
Exercise #6
View Print Details
Page 76
Time to Practice
Exercise #7
Creating a Receipt
Page 77
Follow- Up Activities• Prior to attending the Requisition Follow- Up webinar please
complete the following:o Review the UPK’s for ePro Requisition and Receiving
o View the Change Request Webinar recording
o View the Dell Punchout Webinar recording if applicable
o Prepare and send questions to [email protected] prior to the follow- up webinar
• Attend a Requisition Follow- Up webinar
Page 78
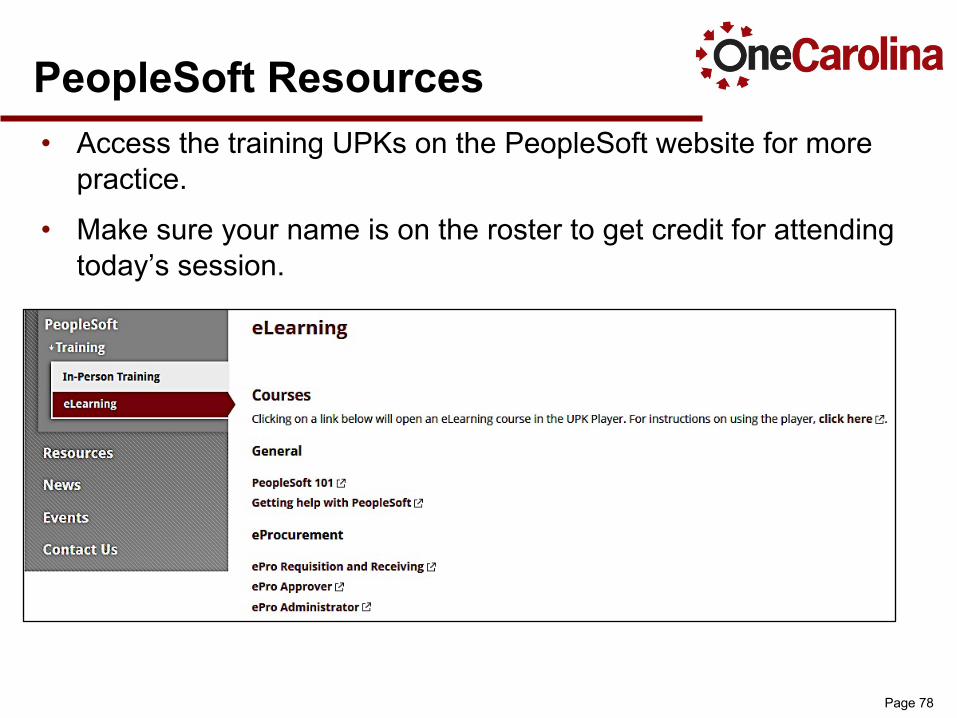
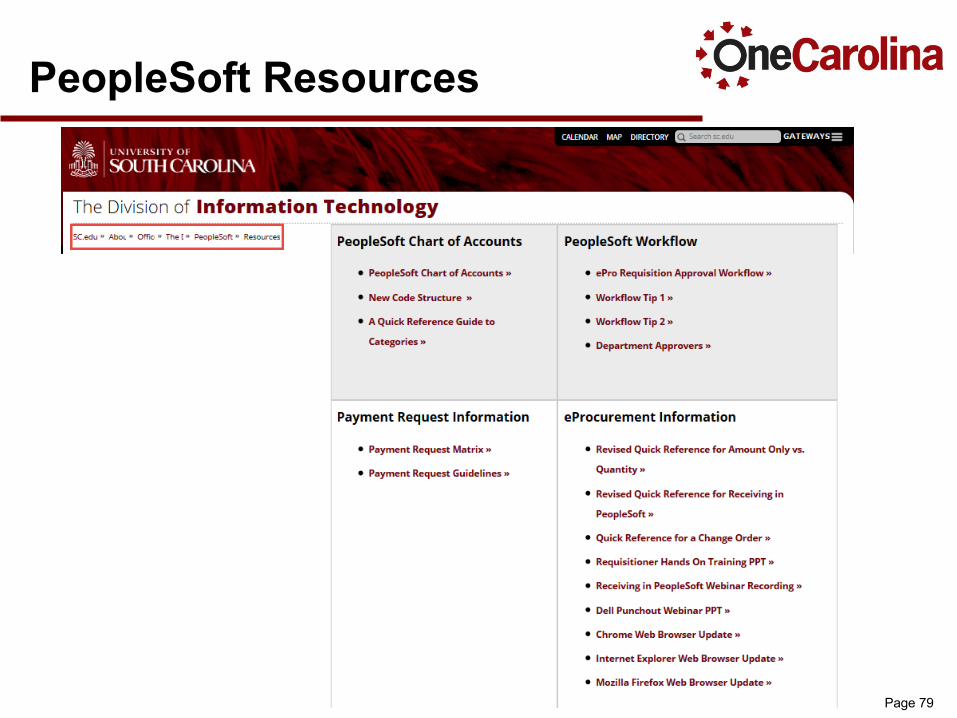
PeopleSoft Resources• Access the training UPKs on the PeopleSoft website for more
practice.
• Make sure your name is on the roster to get credit for attending today’s session.
Page 79
PeopleSoft Resources
Page 80
Questions…
● If you have questions regarding any specific content from this course or other departmental needs related to eProcurement, Requisitions, Purchase Orders, or Receipts, please e-mail [email protected].
● This presentation is also available to download on OneCarolina’sPeopleSoft Training webpage.
● If you have general questions or concerns about PeopleSoft training, please email them to [email protected].

Page 81
Thank You!