replacement voltage regulator - generator … · to get or obsolete regulators found on older...
TRANSCRIPT
FLIGHT SYSTEMS
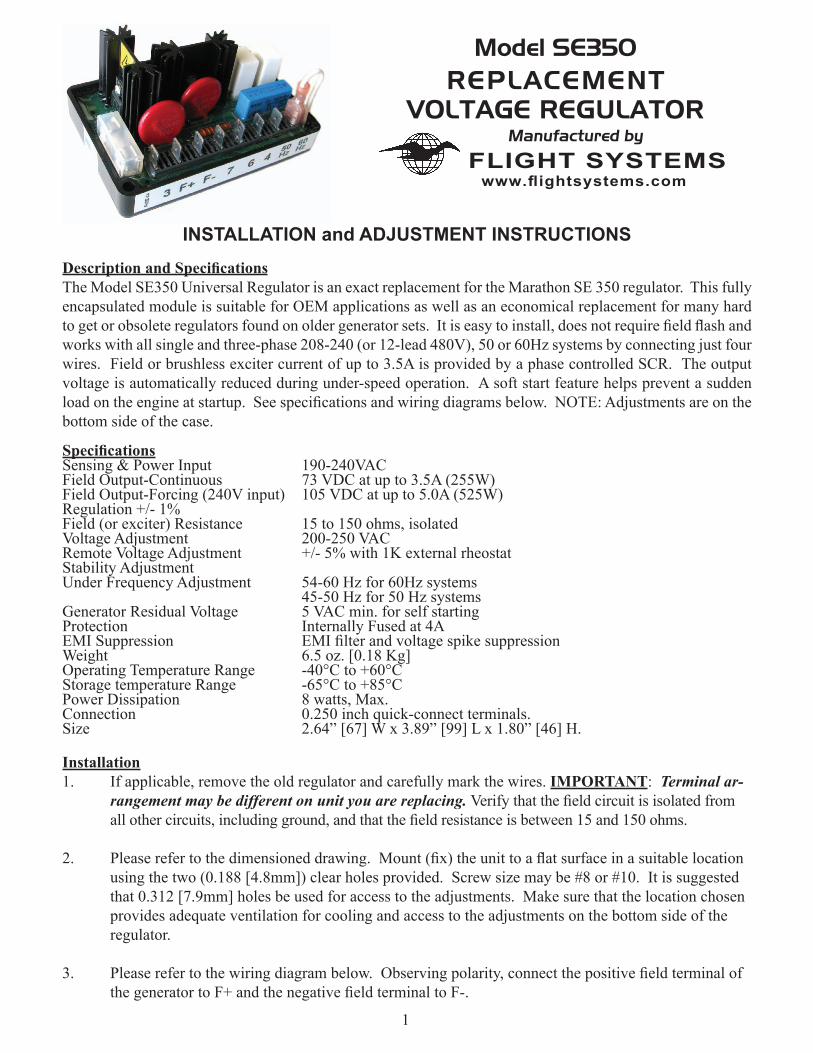
Model SE350 REPLACEMENT
VOLTAGE REGULATORManufactured by
www.flightsystems.com
INSTALLATION and ADJUSTMENT INSTRUCTIONS
Description and SpecificationsThe Model SE350 Universal Regulator is an exact replacement for the Marathon SE 350 regulator. This fully encapsulated module is suitable for OEM applications as well as an economical replacement for many hard to get or obsolete regulators found on older generator sets. It is easy to install, does not require field flash and works with all single and three-phase 208-240 (or 12-lead 480V), 50 or 60Hz systems by connecting just four wires. Field or brushless exciter current of up to 3.5A is provided by a phase controlled SCR. The output voltage is automatically reduced during under-speed operation. A soft start feature helps prevent a sudden load on the engine at startup. See specifications and wiring diagrams below. NOTE: Adjustments are on the bottom side of the case.
SpecificationsSensing & Power Input 190-240VACField Output-Continuous 73 VDC at up to 3.5A (255W)Field Output-Forcing (240V input) 105 VDC at up to 5.0A (525W)Regulation +/- 1%Field (or exciter) Resistance 15 to 150 ohms, isolatedVoltage Adjustment 200-250 VACRemote Voltage Adjustment +/- 5% with 1K external rheostatStability AdjustmentUnder Frequency Adjustment 54-60 Hz for 60Hz systems 45-50 Hz for 50 Hz systemsGenerator Residual Voltage 5 VAC min. for self startingProtection Internally Fused at 4AEMI Suppression EMI filter and voltage spike suppressionWeight 6.5 oz. [0.18 Kg]Operating Temperature Range -40°C to +60°CStorage temperature Range -65°C to +85°CPower Dissipation 8 watts, Max.Connection 0.250 inch quick-connect terminals.Size 2.64” [67] W x 3.89” [99] L x 1.80” [46] H.
Installation1. If applicable, remove the old regulator and carefully mark the wires. IMPORTANT: Terminal ar- rangement may be different on unit you are replacing. Verify that the field circuit is isolated from all other circuits, including ground, and that the field resistance is between 15 and 150 ohms.
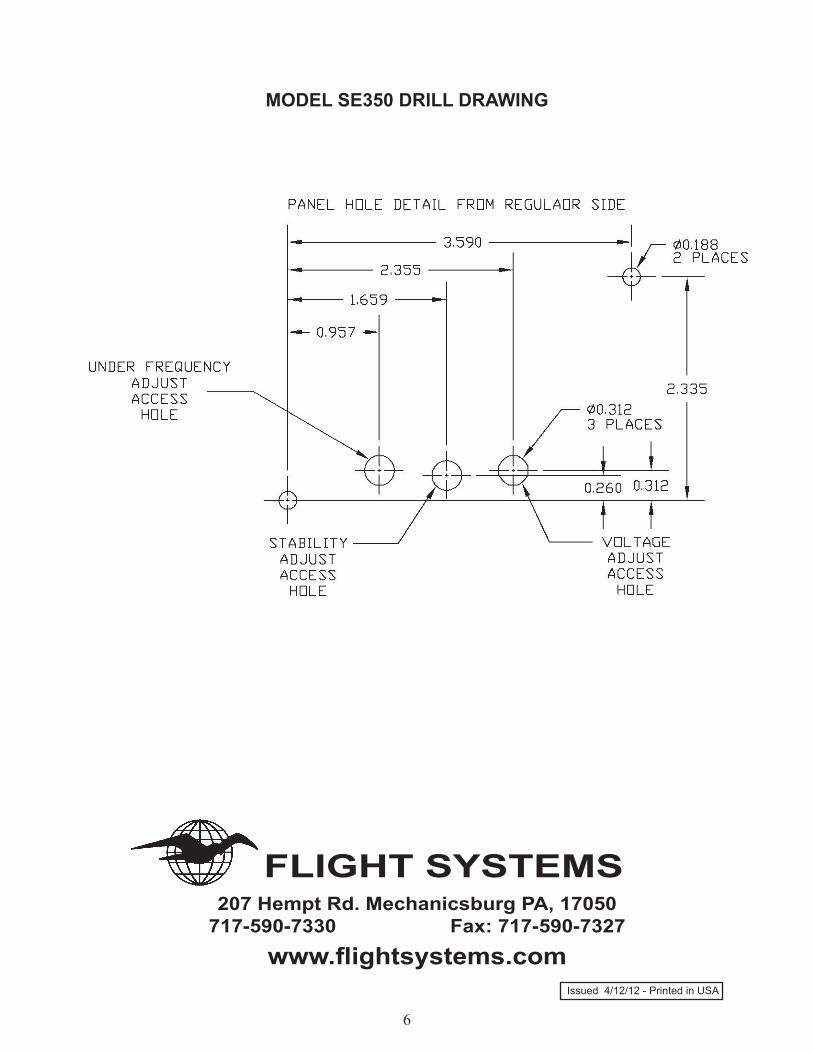
2. Please refer to the dimensioned drawing. Mount (fix) the unit to a flat surface in a suitable location using the two (0.188 [4.8mm]) clear holes provided. Screw size may be #8 or #10. It is suggested that 0.312 [7.9mm] holes be used for access to the adjustments. Make sure that the location chosen provides adequate ventilation for cooling and access to the adjustments on the bottom side of the regulator.
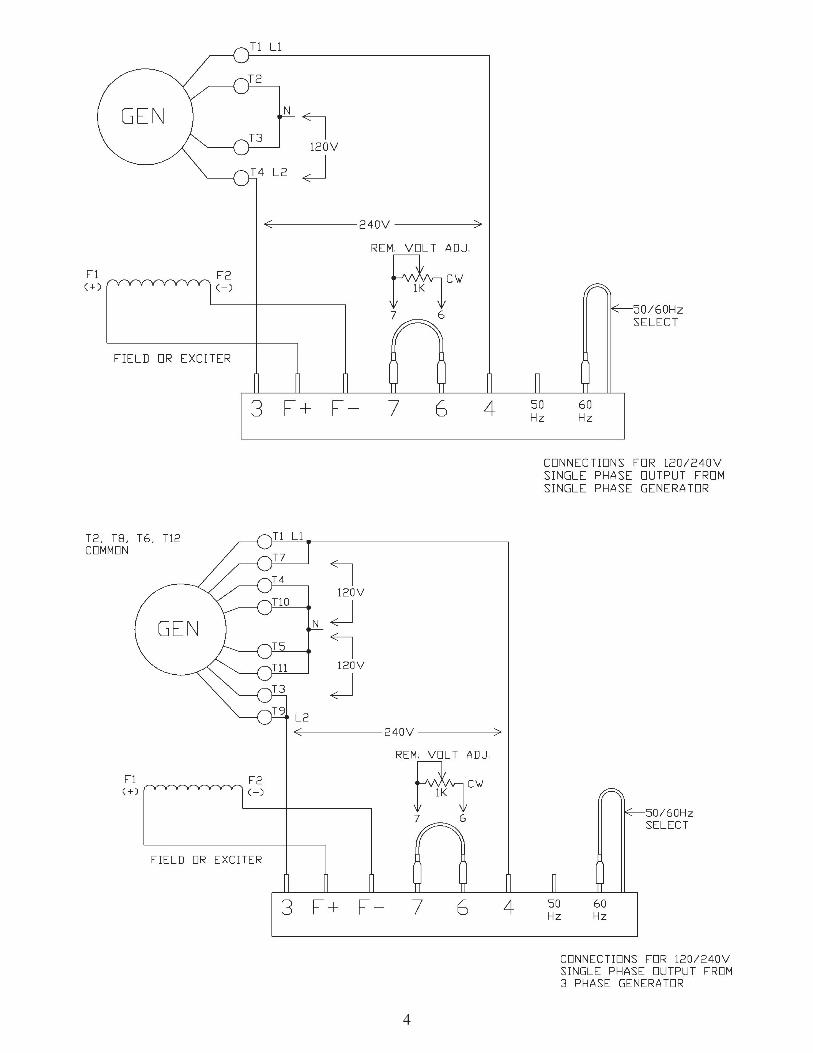
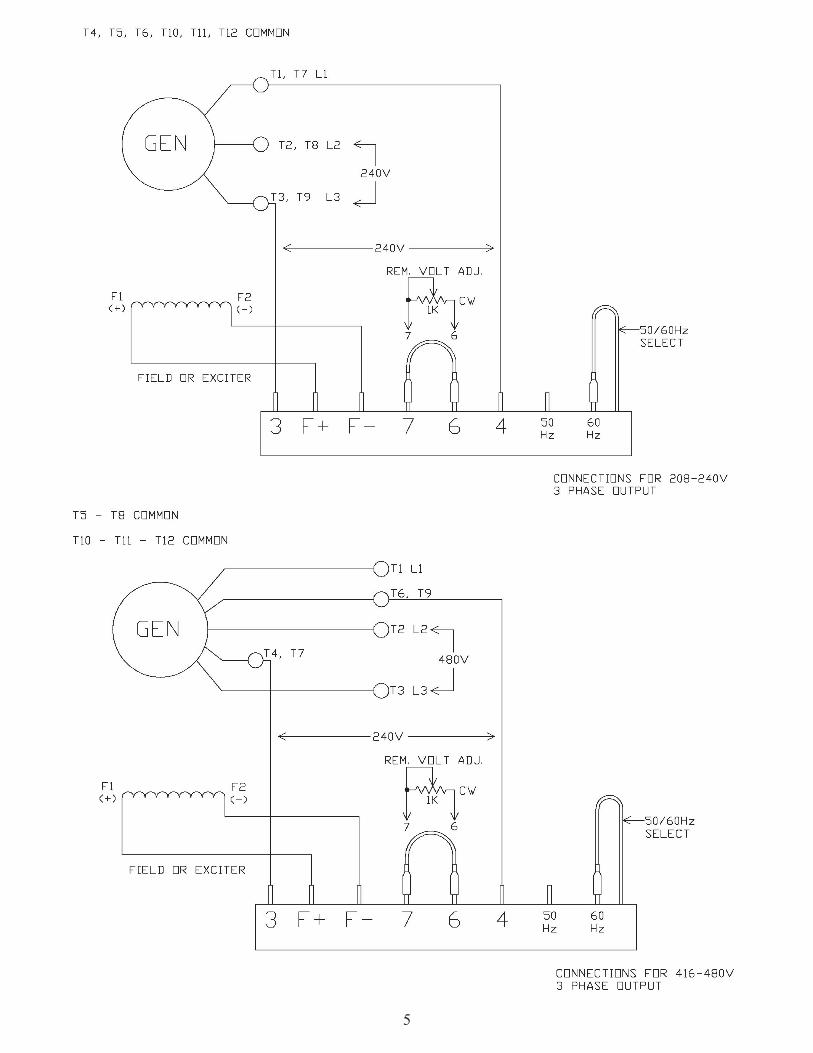
3. Please refer to the wiring diagram below. Observing polarity, connect the positive field terminal of the generator to F+ and the negative field terminal to F-.
1
NOTE: Connecting the field backwards may require re-flashing of the field due to reversal/loss of residual magnetism.
4. Connect terminals 3 and 4 to the proper points as shown in the wiring diagram below.
5. Connect the movable jumper to the 50Hz or 60Hz position as appropriate for your generator.
6. If desired, an external remote voltage adjustment rheostat may be added by connecting it in place of the jumper that is now connected between terminals 6 and 7. See illustration and adjustment instructions below.
CAUTION: Do not come in contact with any metal parts of the regulator, including the heat sink, as dangerous voltages are present when the generator is running.
AdjustmentVerify the wiring before proceeding with adjustment. Make sure that the 50/60Hz jumper is in the correct position for your system frequency. Turn the STAB pot full CCW. Start the generator and bring it up to rated operating speed (use the Hz function on your DVM). Adjust the VOLTS pot until the desired output voltage is obtained. The object of the STABILITY adjustment is to obtain the best dynamic response to changes to load without instability. Under no-load conditions, turn the STAB pot slowly CW until the output voltage starts to fluctuate, then CCW until it becomes stable. Repeat if necessary. To adjust the V/F RAMP, reduce the speed of the generator to 58 Hz (48 Hz for 50Hz systems). Turn the V/F pot CW until the AC voltage just starts to fall.
Optional Remote Voltage AdjustmentThe output voltage of the generator can be remotely adjusted by adding a 1K rheostat in place of the jumper connected between terminals 6 and 7. Before connecting the remote rheostat, follow all of the steps above for installation and adjustment. The rheostat should be wired so that its resistance decreases with clockwise rotation. See illustration. Perform output voltage adjustment as follows:
1. Set the remote rheostat at its mid point.
2. Start the generator and set the VOLTS pot on the regulator for the desired output voltage (208, 230, 240, etc.). The remote rheostat will now have an adjustment range of approximately +/- 6%.
Field FlashIn order for the regulator to start up automatically and build voltage, the residual voltage of the generator should be 5 VAC or higher. If a generator has not been used for a long period of time, has been apart or has had its field inadvertently reversed, it may have lost some or all of its residual magnetism. In this case, it may require field flashing. To flash the field, the generator must be stopped and the field leads disconnected. Momentarily connect the field leads to a 12 volt battery for 3-5 seconds, observing polarity (positive to F+, negative to F-). Repeat a few times. CAUTION: Do not come in contact with the field circuit because a high-voltage “kickback” will occur each time the circuit is interrupted.
2
WarrantyThe Model SE350 Replacement Regulator is warranted against defects in materials and workmanship for a period of two years from the date of shipment. This warranty does not cover damage caused by operation outside of ratings, misapplication or abuse. Flight Systems is not responsible for consequential damage to other equipment, loss of use, spoilage of product, labor or travel costs, or injury to personnel as a result of its use. Warranty service is limited to repair or replacement of product that we determine is defective, otherwise our standard repair rates will apply.
3
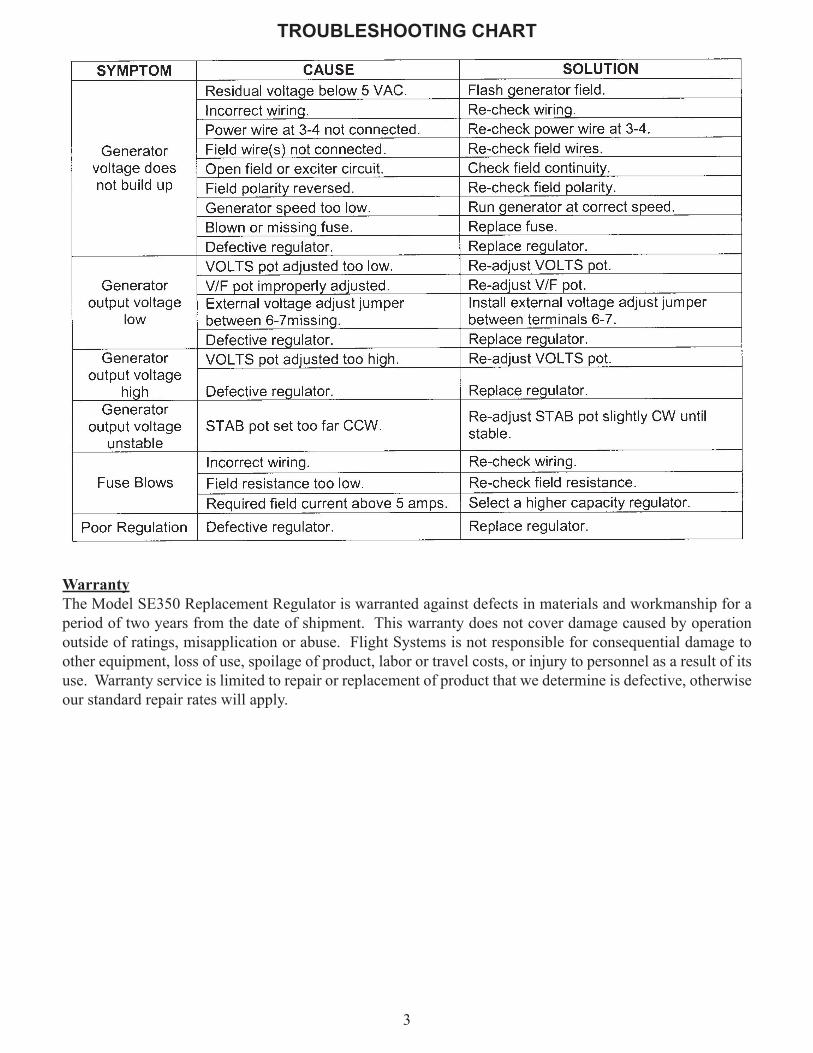
TROUbLESHOOTING CHART
4
5
FLIGHT SYSTEMS
Issued 4/12/12 - Printed in USA
MODEL SE350 DRILL DRAwING
6
207 Hempt Rd. Mechanicsburg PA, 17050717-590-7330 Fax: 717-590-7327
www.flightsystems.com