white paper - cadline community · white paper reference: geoserver osmm wms layer may 2017 01784...
TRANSCRIPT
White Paper Reference: GeoServer OSMM WMS Layer
May 2017
01784 419 922 www.cadline.co.uk [email protected]
In this White Paper, we will outline how to easily import OS MasterMap (OSMM) data into a PostGIS database
and publish that as a Web Map Service (WMS) with styling via GeoServer.
Objectives
Import OS MasterMap into PostGIS
Style OSMM using Style Layer Descriptors
Publish OSMM as WMS via GeoServer
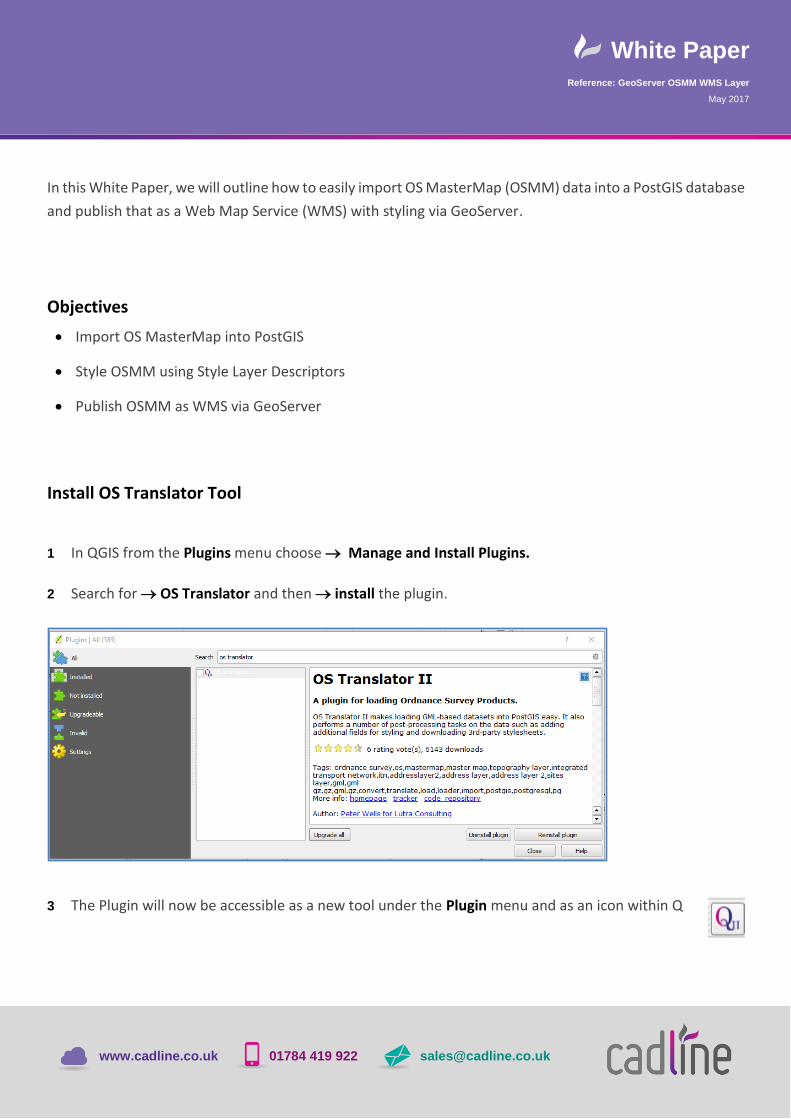
Install OS Translator Tool
1 In QGIS from the Plugins menu choose Manage and Install Plugins.
2 Search for OS Translator and then install the plugin.
3 The Plugin will now be accessible as a new tool under the Plugin menu and as an icon within Q

White Paper Reference: GeoServer OSMM WMS Layer
May 2017
01784 419 922 www.cadline.co.uk [email protected]
Create a PostGIS Database
1 Open PGAdmin
2 In the Object Browser select the Databases right click and choose New Database.
3 Give the New Database a Name e.g. OSMM and set the Privileges to be ALL.

White Paper Reference: GeoServer OSMM WMS Layer
May 2017
01784 419 922 www.cadline.co.uk [email protected]
4 To make the new database a spatial database run the following SQL:
CREATE EXTENSION postgis;
Upload OSMM into PostGIS
1 In QGIS choose to Connect to PostGIS.
2 Choose a New Connection and set the connection parameters as per the below.

White Paper Reference: GeoServer OSMM WMS Layer
May 2017
01784 419 922 www.cadline.co.uk [email protected]
3 In QGIS open the OS Translator II tool and specify the settings as per the below and run the upload.
4 In PGAdmin check that the OSMM tables have successfully been uploaded.
You have now successfully uploaded OSMM into your PostGIS database!

White Paper Reference: GeoServer OSMM WMS Layer
May 2017
01784 419 922 www.cadline.co.uk [email protected]
Create GeoServer Style Files
1 Open GeoServer and Choose Data Styles.
2 Choose to Add a new Style.
3 The SLD style files for OSMM are available to download from the link below. Open the link and save these
locally:
https://www.ordnancesurvey.co.uk/resources/carto-design/cartographic-stylesheets.html
4 Within the new Style in GeoServer scroll to the bottom of the Style page and choose Browse to
find the relevant SLD e.g. BoundaryLine

White Paper Reference: GeoServer OSMM WMS Layer
May 2017
01784 419 922 www.cadline.co.uk [email protected]
5 Open the SLD and then chose Upload and the contents of the SLD will be written into the new Style
file.
6 Before saving/submitting ensure you change the Name of the Style file or you will encounter the
following GeoServer message because the Name of the SLD is currently the name and physical location
of the uploaded SLD file.

White Paper Reference: GeoServer OSMM WMS Layer
May 2017
01784 419 922 www.cadline.co.uk [email protected]
7 Having changed the Name of the Style file, choose Validate and Preview to check the SLD is correct.
8 Now choose Submit and the new Style file will be created.
9 Repeat the above for all the SLD’s.
10 The only edit that you will need to make is for the Cartographic Symbol SLD as this utilises image files
stored as SVG in a folder. When you downloaded the SLD’s from the link above, you will also have
downloaded a osmmsymbols folder which contains all the symbols used for the Cartographic Symbols.
Save this folder to a relevant location e.g. D:/Data.

White Paper Reference: GeoServer OSMM WMS Layer
May 2017
01784 419 922 www.cadline.co.uk [email protected]
11 Now open the OSMM Topo – Cartographic Symbol Style file and edit the references to the SVG files
to be D:/Data/
12 Having made the change to all the Xlink references ensure you Submit the changes.
Create PostGIS Data Store
1 In GeoServer choose Data Stores Add New Store.

White Paper Reference: GeoServer OSMM WMS Layer
May 2017
01784 419 922 www.cadline.co.uk [email protected]
2 Choose to Add a new PostGIS Data Store and enter the details to connect to your PostGIS database.
Now you have created a New PostGIS data store you will have a list of the Database Tables within your OSMM
PostGIS Database.

White Paper Reference: GeoServer OSMM WMS Layer
May 2017
01784 419 922 www.cadline.co.uk [email protected]
Publish the PostGIS Layer
1 In GeoServer choose Data Layers Add a New Resource.
2 One by one choose to Publish your PostGIS OSMM tables by clicking Publish.
3 From the Publishing Tab choose the Style to be the new OSMM SLD style you created earlier.

White Paper Reference: GeoServer OSMM WMS Layer
May 2017
01784 419 922 www.cadline.co.uk [email protected]
4 Save your new Layer and repeat these steps to publish all the OSMM tables as layers within GeoServer.
5 To test that the Layers are correct choose Data Preview Layers and preview each of your new layers
in OpenLayers.
Create a Group Layer
1 In GeoServer choose Data Layer Groups Add a New Layer Group Resource.
2 Specify a Name and Title for the New Layer Group and then in the Layers section add the OSMM
Layers one by one.

White Paper Reference: GeoServer OSMM WMS Layer
May 2017
01784 419 922 www.cadline.co.uk [email protected]
3 Choose the required order in which you would like the individual components of the Group Layer to
be drawn.
4 Then finally update the Bounding Box based on the layers you have added.
5 Save the New Layer Group and to test that the Layers are correct choose Data Preview Layers and
preview the new Group Layer.

White Paper Reference: GeoServer OSMM WMS Layer
May 2017
01784 419 922 www.cadline.co.uk [email protected]
6 You can now use the WMS to add your styled OSMM data into the client application of your choice. For
example, below, I have added the WMS layer into the DynamicMaps webGIS – MapThat.
7 If required, you can edit the default styles provided by OS to make changes. For example you may wish
to change the building outlines from grey to black.
8 To do this, simply choose to edit the corresponding Style file, find the Style Code reference e.g.
Building Outline is the value of 2, and then edit the stroke colour as required. E.g. the default light
grey (#6a6a6a) could be changed to #000000 to represent a black line instead.

White Paper Reference: GeoServer OSMM WMS Layer
May 2017
01784 419 922 www.cadline.co.uk [email protected]
9 Save the changes and preview the Layer in Open Layers.