kimono jacket - sew carolinesewcaroline.com/.../2014/08/kimonojacketinstructionsandpattern.pdf ·...
TRANSCRIPT

KIMONO JACKETF R E E P A T T E R N + T U T O R I A L
w w w. s e w c a r o l i n e . c o m

AB O UT THE K I MO N O JACK ETSew your own stylish kimono jacket with minimal fabric and sewing time. This easy, breezy, and flowy jacket will look great as we transition our wardrobes to fall!
Voile, rayon, double gauze, chiffon, light weight jersey, or a linen blend. Anything with a really nice drape will sew beautifully.
TER MS O F US EThe FREE Kimono Jacket pattern is for personal use only and is copyrighted by law. You may sell items sewn with Sew Caroline Sewing Patterns on an in-home, small scale. The Kimono Jacket is not for commercial use and should not ever be mass-produced. If you have any questions about this, please contact Caroline at [email protected].
PATTER N S IZIN G
FAB R ICS TO US E
This is a generously fitting pattern for sizes small- large.
www.SewCaroline.com © Caroline Hulse

FAB R IC R EQ UIR EM ENTS :1.5 yards of 54”-60” wide fabric
T IP :Be sure to wash, dry and iron all fabric before proceeding to sew your kimono.
OTHER M ATER I ALS NEEDED :• Coordinating thread• Iron + Ironing board• Rotary cutter + mat OR dressmaker’s shears•3 yards of (at least) 1” wide trim for sleeves and hem (optional)
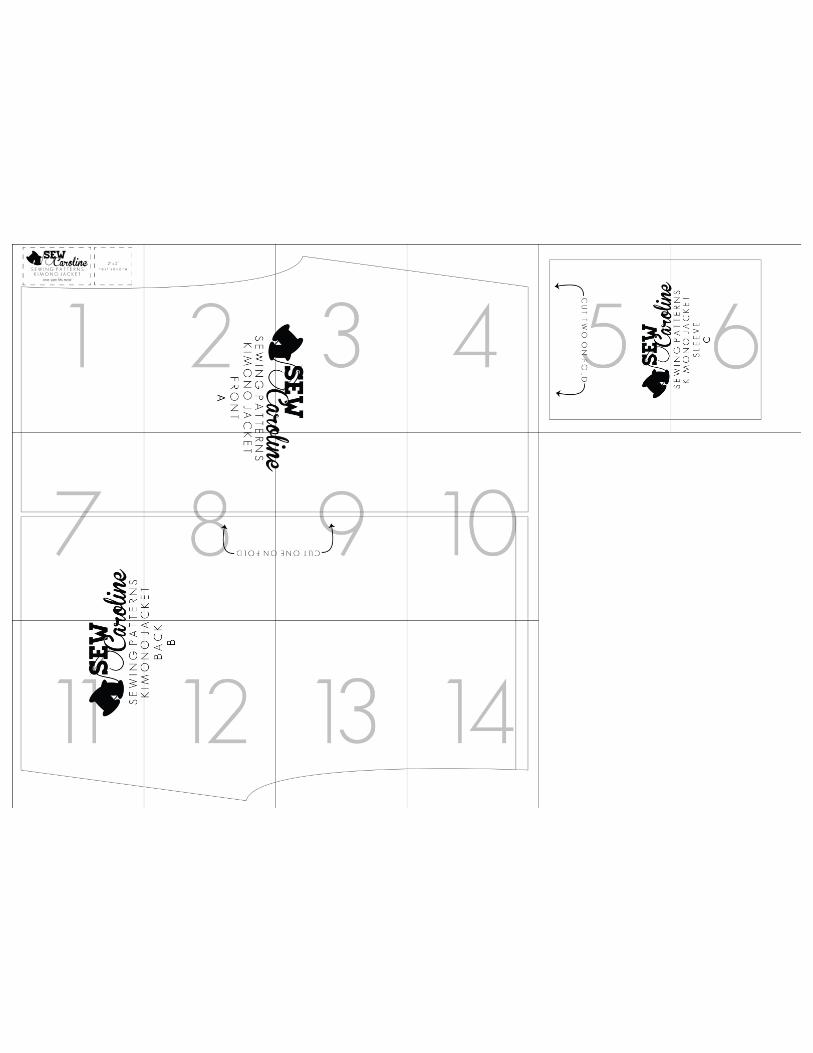
PR INT AND AS S EM B LE THE PATTER N :Using 8.5” x 11” paper, print the pattern pieces. Be sure to select “no page scaling” when print-ing so the pattern pieces will print true to size. You can check your page scaling with the 2” x 2” test-square and you can see how your pages should align on the first page of the pattern pieces PDF.
PATTER N P IECES IN CLUDED :Kimono FrontKimono BackSleeve
TO N OTE B EFO R E B EGINNIN G :• All fabric is pre-washed, dried, and ironed• Seam allowance is included on the pattern pieces and is 3/8” unless otherwise noted.
STEP O NE :
Layout your pattern pieces on top of your fabric and cut 2 Kimono Front (A) pieces (that mirror one another), 1 Kimono Back (B) piece (cut on the fold), and 2 Sleeve (C) pieces (these are rectangles that measure 11.25” x 8.5”).
T IP :Make sure your workspace is big enough! If you are working on a table, make sure all of your fabric is on top of the table so it does not begin to move mid-cutting.
www.SewCaroline.com © Caroline Hulse

www.SewCaroline.com © Caroline Hulse
STEP T WO :Lay the Kimono Back (B) piece right side up and lay the Kimono Top (A) pieces right sides down aligning the shoulder and side seams. Pin and sew these in place using a 3/8” seam allowance. You can usea regular sewing machine or overlock machine.
STEP THR EE :Take the sleeve (C) and place it right side up. Place your
trim right side down with the bottom edge aligned 3/4” from the long raw edge of the sleeve. Sew in place
at 1” (this will be approximately 1/4” from the edge of the trim.
STEP FO UR :Fold the seam allowance to the raw edge at 1/2” and press. Fold again at 1/2” and press. Top stitch along the folded edge for a clean finish. Press your trim away fromthe sleeve. Repeat this process for the other sleeve.When both sleeves have trim applied, fold them short endstogether, rigth sides facing and sew or overlock stitch alongthe short ends.
STEP F IV E :Turn your sleeve wrong side out and the Kimono right side out. Align the raw edge of the sleeve to
the raw edge of the sleeve inset on the Kimono.Right sides should be facing. Make sure the seam on
the sleeve is aligned with the side seam. Pin and sew/overlock in place. Repeat this for the other
sleeve and turn right side out.

www.SewCaroline.com © Caroline Hulse
STEP S I X :Apply trim to the bottom of the jacket using the same techniqe we used when applying the trimto the sleeves.
STEP S EV EN :With the remaining raw edges (around the open part of the jacket and the neck), you can either roll hem on your serger or sewing machine, OR fold and press towards the wrong side at 1/4” and then again at 1/4” and top stitch all the way around.
TA DA ! YOU ’RE FINISHED !
Let’s see what you made! Share on social media and be sure use the hashtag #sewcarolineKIMONO.
Be sure to tag me so I can see: @SewCaroline

1
K I M O N O J A C K E T
one size fits most
S E W I N G P A T T E R N S
2” x 2”
t e s t s q u a r e

2 K I M
O N
O J A
C K
E T
F R
O N
T
A
S E
W I N
G P
A T
T E
R N
S

3

4

5C
U T
T W
O O
N F
O L D

7K
I M
O N
O
J A
C K
E T
S E
W I N
G
P A
T T
E R
N S

8
K I M
O N
O J A
C K
E T
S E
W I N
G P
A T
T E
R N
S
C U T O N E O N F O L D
K I M
O N
O
J A
C K
E T
B A
C K

9C U T O N E O N F O L D

10

6
K I M
O N
O
J A
C K
E T
S L
E E
V E
C
S E
W I N
G
P A
T T
E R
N S
K I M
O N
O
J A
C K
E T
S L
E E
V E
C
S E
W I N
G
P A
T T
E R
N S

11K
I M
O N
O
J A
C K
E T
S E
W I N
G
P A
T T
E R
N S

12
K I M
O N
O
J A
C K
E T
B A
C K
B

13

14