bravo unpack guide - agilent€¦ · 3 bravo platform unpacking guide bravo platform unpacking...
TRANSCRIPT
Bravo Platform Unpacking Guide
This guide describes how to unpack the Bravo device from the shipping carton. Depending on the order, the shipment can include additional packages for the liquid- handling head, safety equipment, computer, and accessories.
Before you start
1 Shipping containers. Examine the container for any obvious external damage. If the container appears damaged, note on the carrier's bill of lading that there is apparent damage subject to inspection and test.
2 Site specifications. Ensure the installation site meets the requirements described in the Bravo Platform Site Preparation Checklist and Bravo Platform Safety and Installation Guide.
3 Tools and equipment. Ensure that you have the following:
• Scissors
• Cross- tip screwdriver
• Variable torque wrench that spans 9–22 in- lb (1–2.48 Nm)
• 2.5- mm and 3- mm hex wrenches
• 4- mm wrench
• 2.5- mm and 3- mm hex bits
• T10 (Torx) bit
• Cart for moving the Bravo device.
4 Personnel requirements. Make sure two people are available to unpack the Bravo device.
WARNING The Bravo device weighs approximately 52.1 kg (114.9 lb). Attempting to move the device without assistance could cause personal injury. Request assistance and use proper lifting techniques when lifting the Bravo device.
CAUTION Save the packing materials and shipping carton for potential future moves. Packing the Bravo device using other materials might damage the device and void your warranty.

Bravo Platform Unpacking Guide
2 Bravo Platform Unpacking Guide
Unpacking the carton
To unpack the Bravo device:
1 Cut the straps that secure the Bravo carton, and then open the top flaps of the carton.
2 Remove the three boxes on the top. The outer two are empty and are used for packing (1).
3 Open the middle box (2) and make sure you have the envelope containing the regulatory compliance documents (not shown) and the following items:
2
1
3
4
5
6
7
Item Description
3 y- main cover
4 Gripper fixed top- cover
5 x- rail cover
6 Tie- plate cover
7 Fasteners: 4 for replacing shipping bracket screws and 14 for installing the covers. The cover fastener package has two extra fasteners.

3
Bravo Platform Unpacking Guide
Bravo Platform Unpacking Guide
4 In the main carton, remove the foam block covering the Bravo device.
5 With two people, one on either side of the carton, grasp the carton at the edges and carefully lift the carton up and off of the Bravo device, leaving the Bravo device on the crate base. Note that there is an inner carton that also needs to be removed.
Figure Bravo outer and inner carton
6 Remove the plastic covering from the Bravo device (not shown).

Bravo Platform Unpacking Guide
4 Bravo Platform Unpacking Guide
Removing the shipping braces
To remove the shipping braces:
1 Remove the x- axis shipping brace:
a Loosen the nylon screws that hold the brace against the Bravo device, until they are flush with the nut (1).
b Using a 3- mm hex wrench, remove the four M4 x 25- mm SHCS and M4 flat washers that attach the brace to the x- axis rail (2).
1
2 2 2 2

5
Bravo Platform Unpacking Guide
Bravo Platform Unpacking Guide
c Being careful not to damage the flat- flex cable (3), slide the brace off of the Bravo device.
2 Using the torque wrench set to 21 in- lb (2.37 Nm) and the 3.0- mm hex bit, attach the two M4 x 12- mm rail- mounting screws (G5550- 01493), provided, on the outer- most holes to which the brace was attached (4). Add two drops Loctite 242, if available.
3 Using a wrench, remove the six nuts and three black bars holding the Bravo device to the crate base.
Note: You might need to use a 4- mm hex wrench to hold the protruding bolt in place while you loosen the nut.
3
44
Bravo Platform Unpacking Guide
6 Bravo Platform Unpacking Guide
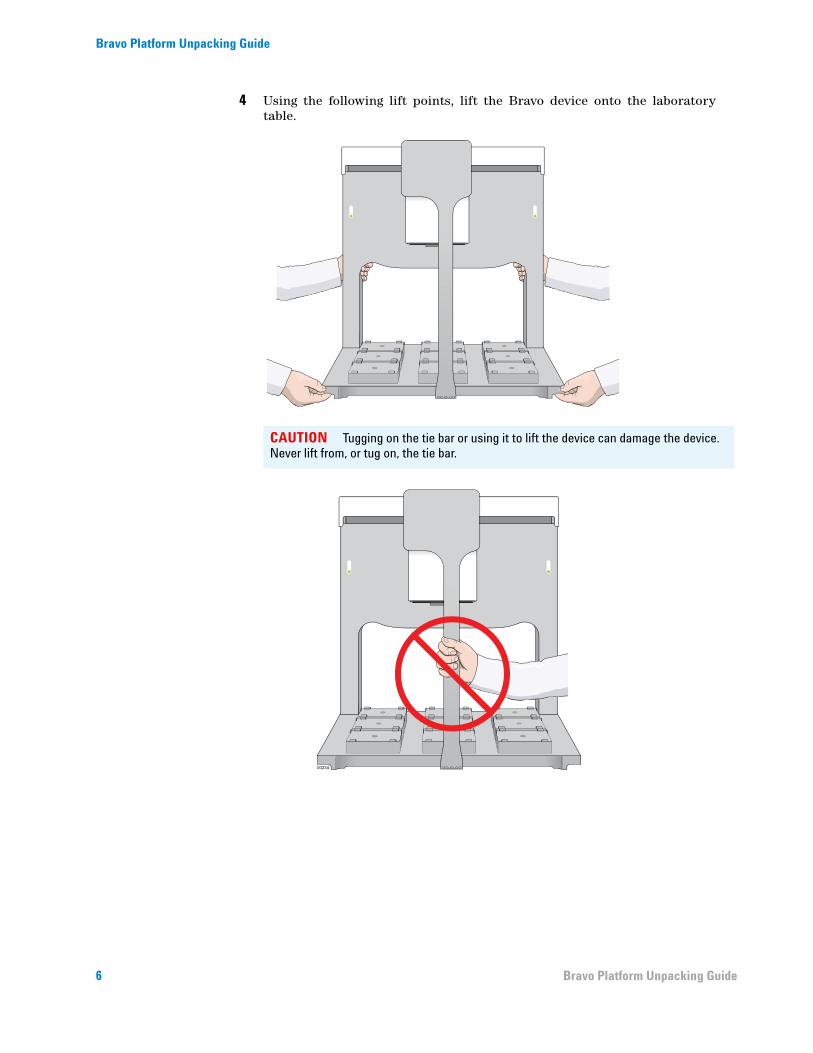
4 Using the following lift points, lift the Bravo device onto the laboratory table.
00233BravoProper lift
00233
CAUTION Tugging on the tie bar or using it to lift the device can damage the device. Never lift from, or tug on, the tie bar.
00234BravoImproper lift
00234

7
Bravo Platform Unpacking Guide
Bravo Platform Unpacking Guide
5 Remove the y- axis shipping brace at the front of the head mount:
IMPORTANT If you are also installing risers on the Bravo device, do not remove the y- axis brace until after you have installed the risers.
a Remove the four M3 SHCS and M3 split washers holding the brace to the y- axis rails.
b Firmly pull the brace down from its position.
6 Using the torque wrench set to 9 in- lb (1.02 Nm) and fitted with the 2.5- mm hex bit, attach the two M3 x 8- mm rail mounting screws (G5550-01487) to the underside of the Bravo arm provided with the Bravo device in the indicated positions, as the following figure shows. Add two drops Loctite 242, if available.

Bravo Platform Unpacking Guide
8 Bravo Platform Unpacking Guide
Installing the covers
To install the covers:
1 Carefully, position the x- main cover (1) in place over the top x- rail, ensuring no wiring or flat- flex cables are pinched between the top x- rail cover and back plate.
Using the torque wrench set to 9 in- lb (1.02 Nm) and fitted with the T10 bit, install the four M3 x 5- mm screws to secure it in place.
2 Carefully, position the y- main cover (2) in place over the top of the arm assembly, ensuring no wiring or flat- flex cables are pinched between the cover and mounting tabs.
Using the torque wrench set to 9 in- lb (1.02 Nm) and fitted with the T10 bit, install the four M3 x 5- mm screws to secure it in place.
00231Bravoremove cover
12

9
Bravo Platform Unpacking Guide
Bravo Platform Unpacking Guide
3 Carefully, position the gripper cover over the gripper assembly and slide it into place, ensuring no wiring or flat- flex cables are pinched.
Using the torque wrench set to 9 in- lb (1.02 Nm) and fitted with the T10 bit, install the four M3 x 5- mm screws to secure it in place.
4 Position the white face plate, which displays the Agilent logo, at the top of the Bravo tie bar. The face plate is held in place magnetically.
00223BravoBravo with computer

G5523-90000 Revision B, June 2017
Copyright© Agilent Technologies, Incorporated 2017All rights reserved
Inspecting the shipped items
Inspect all items for completeness and shipping damage. If an item is missing or defective on arrival, contact the Automation Solutions Business Center as soon as possible. In North America, call 1.800.227.9770. In other locations, contact your region's Agilent Technologies office: http://www.chem.agilent.com/en- US/ContactUS/Pages/ContactUs.aspx.
If you are an Agilent Field Service Engineer and you have questions, contact Channel Assist at http://intranet.chem.agilent.com/sites/partners/support/assist/default.htm.
About installation
See the Bravo Platform Safety and Installation Guide for instructions.
Accessing product user documentation
You can access the user documentation from the help menu within the VWorks software or online at www.agilent.com/chem/askb.
Contacting Agilent Technologies
Technical Support: 1.800.979.4811 (US) or +1.408.345.8011 (rest of world) [email protected]
Customer Service: 1.800.227.9770 (US and Canada) By country: http://www.agilent.com/en- us/contact- us/page
Documentation feedback: [email protected]
Web: http://www.agilent.com/en- us/products/automation- solutions