rbp-eia: collecting, processing,and handling venous, capillary, … · collecting, processing, and...
TRANSCRIPT

1
RRRBBBPPP---EEEIIIAAA:::Collecting, Processing,and HandlingVenous, Capillary, andBlood Spot Samples
June 2005

Collecting, Processing, and Handling Blood Samples
About PATH
PATH is an international, nonprofit organization that creates sustainable, culturally relevant solutions, enabling communities worldwide to break longstanding cycles of poor health. By collaborating with diverse public- and private-sector partners, PATH helps provide appropriate health technologies and vital strategies that change the way people think and act. PATH’s work improves global health and well-being.
Headquartered in Seattle, Washington, PATH has 18 offices in 13 countries. PATH currently works in more than 100 countries in the areas of reproductive health; vaccines and immunization; HIV, AIDS, and tuberculosis; and children’s health and nutrition.
For more information about PATH, visit our website at www.path.org.
Acknowledgements
The United States Agency for International Development supported the development of this test and manual under the HealthTech IV project, Cooperative Agreement Number SPH-A-00-01-00005, managed by PATH.
This manual was produced by PATH’s Vitamin A team. We would like to acknowledge Jeff Morgan, who contributed significantly to this document.
Copyright © 2005, Program for Appropriate Technology in Health (PATH). All rights reserved. The material in this manual may be freely used for educational or noncommercial purposes, provided that the material be accompanied by an acknowledgement line.

Collecting, Processing, and Handling Blood Samples
Table of Contents
INTRODUCTION ................................................................................................... 1
EQUIPMENT ......................................................................................................... 3
Venipuncture Equipment...............................................................................................................................3
Capillary Blood Collection Equipment.........................................................................................................4
Laboratory Processing Equipment ...............................................................................................................5Centrifuges ...................................................................................................................................................5Other Required Equipment...........................................................................................................................6
SAFETY AND INFECTION CONTROL................................................................. 8
Protect Yourself ..............................................................................................................................................8
Protect the Patient ..........................................................................................................................................8
BLOOD COLLECTION METHODS....................................................................... 9
General ............................................................................................................................................................9
Venipuncture...................................................................................................................................................9Precautions .................................................................................................................................................10Procedure for Vein Selection .....................................................................................................................10Performance of a Venipuncture..................................................................................................................11Order of Draw ............................................................................................................................................13Steps to Prevent a Hematoma.....................................................................................................................14Prolonged Tourniquet Application.............................................................................................................14
Serum and Plasma Processing.....................................................................................................................15Centrifugation and Separation of Serum and Plasma From Blood Cells ...................................................15Common Problems in Blood Specimen Processing ...................................................................................15
Capillary Collection......................................................................................................................................17Precautions .................................................................................................................................................18Fingerstick Procedure.................................................................................................................................18
Blood Spot Collection ...................................................................................................................................20Blood Collection Paper ..............................................................................................................................20Blood Spot Collection—Fingerstick Procedure .........................................................................................21Blood Spot Processing Using Capillary Tubes or Blood Collection Tubes ...............................................22Specimen Evaluation..................................................................................................................................22
Invalid Specimens and Possible Causes ......................................................................................................23

SPECIMEN HANDLING, STORAGE, AND SHIPPING .......................................26
Specimen Handling.......................................................................................................................................26Cold Chain Preservation.............................................................................................................................26Sensitivity to Heat ......................................................................................................................................27Sensitivity to Light .....................................................................................................................................27
Specimen Storage..........................................................................................................................................27Refrigerated Specimens..............................................................................................................................27Frozen Specimens.......................................................................................................................................27Specimen Deterioration With Improper Storage ........................................................................................27
Transportation of Blood Specimens ............................................................................................................28
PHLEBOTOMY VOCABULARY..........................................................................31
REFERENCES.....................................................................................................36
APPENDIX A: BLOOD COLLECTION TUBES AND COMMON USES..............38
APPENDIX B: NOMOGRAM FOR CONVERTING MAXIMUM RELATIVE CENTRIFUGAL FORCE......................................................................................43

Collecting, Processing, and Handling Blood Samples 1
Introduction
The PATH retinol binding protein (RBP) enzyme immunoassay (EIA) is designed to provide reliable results of vitamin A status in human populations. However, the laboratory results are only as good as the specimens received for testing. Quality laboratory results begin with proper collection and handling of the specimen submitted for analysis. This manual is intended to provide a guide to phlebotomists and to serve as a training aid in the proper methods of obtaining blood samples for analysis by the RBP-EIA. This manual is not intended as a stand-alone training guide for unqualified personnel without formal training in blood collection methods. All phlebotomists must receive formal training before attempting specimen collection from human subjects.
Blood specimens are categorized in two ways: by collection method and by specimen type. Specimen collection methods include venipuncture, where blood is collected by penetrating a vein with a needle and a collection apparatus or syringe, and by the skinor dermal method, which involves the collection of capillary blood after an incision is made in the skin with a lancet. Collection of blood from an artery is beyond the scope of this document.
Blood specimen types depend on the collection method and site of collection, the treatment at the time of collection, and the post-treatment processing as described in Table 1 below.
Commercially manufactured blood collection tubes are available with a wide variety of treatments and anticoagulants and are intended for producing specimens for routine and specialized testing. In addition to providing a label for entering the patient’s identification information, there is a color-coded stopper identification system to make the correct selection of tube for the required sample. A list of commercially manufactured blood collection tubes is found in Appendix A.
This guide provides an educational tool for the collection of blood for laboratory testing. It includes patient safety information and proper methods for collecting, handling, evaluating, transporting, and storing the various specimen types to ensure that quality specimens are used for laboratory analysis

2
Table 1. Types of Blood Samples Used in Laboratory Studies
Specimen Type
CollectionMethod
Description Use
Clottedblood
Venipuncture No anticoagulant added. For separation to use the serum portion.
Serum Venipuncture Clotted blood is allowed to stand for 20 to 30 minutes and then centrifuged. The upper portion is termed serum and does not contain fibrinogen.
Chemistry testing.
Serological testing.
Blood banking.
Whole blood
Venipuncture Obtained by using a collection tube containing anticoagulant which prevents the blood from clotting. Whole blood includes all cellular material and plasma.
For use in hematology testing and for separation by centrifuging to use the plasma portion.
Plasma Venipuncture Whole blood containing anticoagulant is centrifuged and the upper portion is termed plasma. Plasma contains fibrinogen.
Coagulation studies.
Plasma chemistries.
Capillaryblood
Fingerstick or heelstick
A combination of venous blood, arterial blood, and tissue fluid obtained by a skin puncture.
Used in children and infants, or where venipuncture cannot be performed. Specimens may be processed for serum, plasma, whole blood, or applied to special filter paper cards and used as dried blood spots.

Collecting, Processing, and Handling Blood Samples 3
Equipment
Collection of quality blood specimens from patients or subjects requires specific tools for obtaining the sample and for postcollection processing, handling, shipping, and storage.
Venipuncture Equipment
The following are needed for routine venipuncture (see Figure 1): Evacuated collection tubes—The tubes are designed to fill with a predetermined volume of blood by vacuum. The rubber stoppers are color-coded according to the additive that the tube contains. Various sizes are available. Blood should NEVERbe poured from one tube to another since the tubes can have different additives or coatings. Needles—The gauge number indicates the bore size: the larger the gauge number, the smaller the needle bore. Needles are available for evacuated systems and for use with a syringe, single draw, or butterfly system. Holder/adapter—For use with the evacuated collection system.Tourniquet—A latex or plastic strip with a Velcro closing used to cause blood to pool in the area and to enlarge the veins, making them easier to palpate. Wipe tourniquets off with alcohol and replace them frequently. Alcohol wipes—Wipes containing 70% isopropyl alcohol for disinfecting the skin before blood collection. Gauze sponges—For application on the site from which the needle is withdrawn.Adhesive bandages/tape—To protect the venipuncture site after collection. Needle disposal unit—Needles must NEVER be broken, bent, or recapped. Needles must be placed in a proper disposal unit IMMEDIATELY after their use.Gloves—Can be made of latex, rubber, vinyl, etc.; worn to protect the patient and the phlebotomist. Eye protection—To protect the phlebotomist from aerosols contaminating the eyes.Syringes—May be used in place of the evacuated collection tube for special circumstances.
4
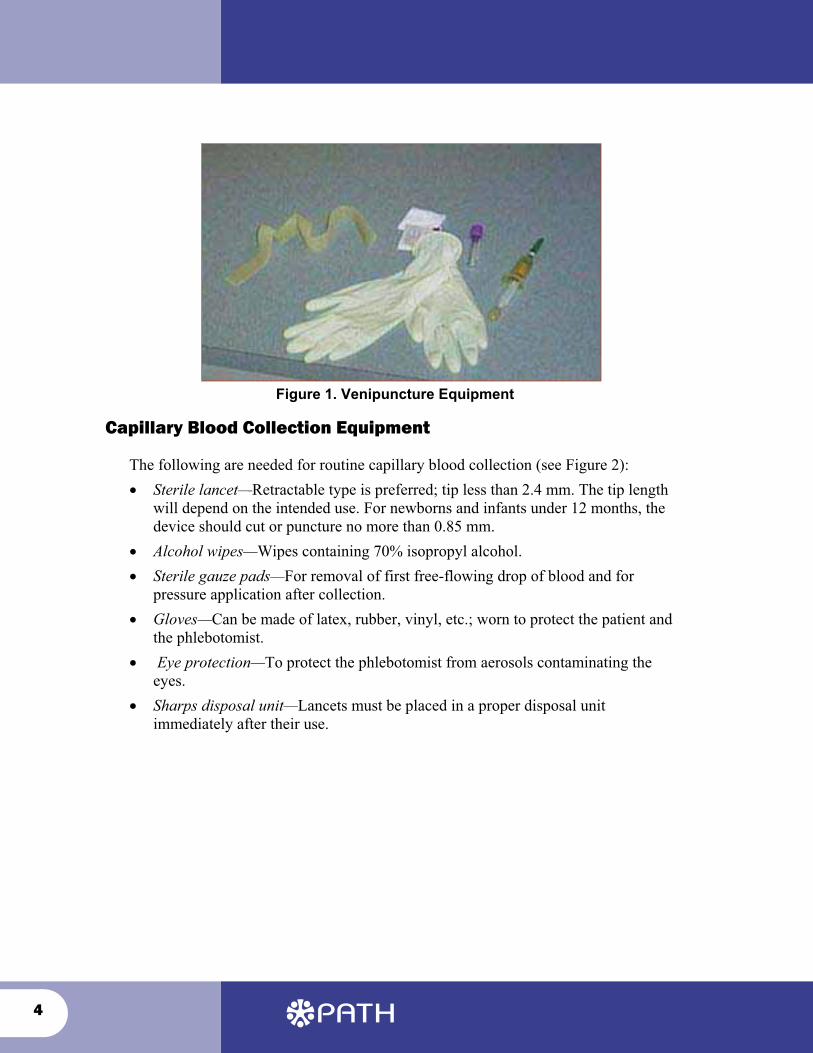
Figure 1. Venipuncture Equipment
Capillary Blood Collection Equipment
The following are needed for routine capillary blood collection (see Figure 2): Sterile lancet—Retractable type is preferred; tip less than 2.4 mm. The tip length will depend on the intended use. For newborns and infants under 12 months, the device should cut or puncture no more than 0.85 mm.Alcohol wipes—Wipes containing 70% isopropyl alcohol.Sterile gauze pads—For removal of first free-flowing drop of blood and for pressure application after collection. Gloves—Can be made of latex, rubber, vinyl, etc.; worn to protect the patient and the phlebotomist. Eye protection—To protect the phlebotomist from aerosols contaminating the eyes.Sharps disposal unit—Lancets must be placed in a proper disposal unit immediately after their use.

Collecting, Processing, and Handling Blood Samples 5
Figure 2. Capillary Blood Collection Equipment
Laboratory Processing Equipment
CentrifugesAn essential piece of laboratory equipment used for processing blood samples is the centrifuge. A centrifuge is a machine that rotates (spins) rapidly and uses centrifugal force to separate substances of different densities. Centrifugation is of primary importance in blood processing to separate plasma or serum fractions from blood cells. The preferred method for obtaining serum or plasma is to centrifuge the blood for 10 minutes at a relative centrifugal force (RCF) of 850–1000. A table for calculating RCF based on centrifuge radius and speed is presented in Appendix B. A common laboratory centrifuge is shown in Figure 3.
Figure 3. Laboratory Centrifuge

6
Other Required Equipment Additional supplies and equipment are required for blood collection, processing, and shipment. The table below and the following figures illustrate the supplies and essential uses.
Table 2. Other Required Supplies and Their Uses
Equipment or Supply Uses
Sharps disposal container (Figure 4)
Safe disposal of needles and lancets to prevent accidental sticks.
Test tube rack (Figure 5) Transporting blood to lab and for storage of samples.
Transfer pipettes (Figure 6) For separation of serum or plasma after centrifugation.
Cooler and cold packs (Figure 7)
For short-term storage or shipping serum or plasma samples.
Zipper-close plastic bag, desiccant packs, and humidity indicator (Figure 8)
Necessary supplies for proper holding and transportation of dried blood spots (see p. 18—Blood Spot Collection).
Figure 4. Sharps Disposal Container Figure 5. Test Tube Rack

Collecting, Processing, and Handling Blood Samples 7
Figure 6. . DisposableTransfer Pipettes
Figure 7. Cooler and Cold Packs
Figure 8. Zipper-Close Plastic Bag, DesiccantPacks, and Humidity Indicator

8
Safety and Infection Control
Because it is often impossible to know which might be infectious, all patient blood specimens are to be treated with standard precautions. Obtaining blood from subjects may involve contacts with patients with underlying infectious diseases so it is important to follow safety and infection control procedures during collection and handling of their specimens.
Protect Yourself Practice universal precautions: o Wear gloves and a laboratory coat or gown when handling blood/body fluids. o Change gloves after each patient or when contaminated. o Wash hands frequently. o Dispose of items in appropriate containers. Dispose of needles immediately upon removal from the patient’s vein. To avoid accidental needle puncture or splashing of contents, do not bend, break, recap, or resheath needles. Clean up any blood spills with a disinfectant such as freshly made 10% bleach. If you stick yourself with a contaminated needle: o Remove your gloves and dispose of them properly. o Squeeze puncture site to promote bleeding. o Wash the area well with soap and water. o Record the patient’s name and ID number. o Follow your institution’s guidelines regarding treatment and follow-up. o NOTE: The use of prophylactic zidovudine following blood exposure to HIV
has shown effectiveness (about 79%) in preventing seroconversion. Protect the Patient
Place blood collection equipment away from patients, especially children. Practice hygiene for the patient’s protection. When wearing gloves, change them between each patient and wash your hands frequently. Always wear a clean laboratory coat or gown. Never reuse blood collection equipment. The proper use of disposable needles, syringes, and lancets virtually eliminates transmission of bloodborne disease.

Collecting, Processing, and Handling Blood Samples 9
Blood Collection Methods
General
Properly collected specimens represent a very important step for the laboratory and laboratory testing. The laboratory results are only as good as the specimens received for testing. The method and volume of blood to be collected will depend on many factors, including:
The specimen requirements for the laboratory test. The volume of sample required for the laboratory test. The patient’s age (i.e., infant versus adult). Available equipment for obtaining the specimens. Accessibility of proper specimen processing and storage facilities.
The errors that can occur during the collection and handling of blood specimens are potentially numerous (e.g., inaccurate identification of specimens, the use of incorrect anticoagulants, the formation of hematomas, hemoconcentration). Reducing errors during blood collecting will result in biologically representative specimens that are comparable from one institution to another. A well-planned environment in which to perform venipunctures will increase the efficiency and accuracy of the phlebotomist. Phlebotomists need a complete assortment of equipment at their fingertips so they can judiciously select the most appropriate materials for each patient.
Blood collection methods include (1) venipuncture (penetrating a vein with a needle) with an evacuated tube system, syringe method, or butterfly infusion set; and (2) capillary blood system whereby the skin puncture is done with the use of a lancet. This section focuses on the methods for blood collection and provides in-depth information to ensure that laboratory results are representative of accurate patient values.
Venipuncture
Venipuncture is a collection method that should be performed exclusively by personnel who have received proper training. In many cases, on-the-job venipuncture training is given when there is a need for a phlebotomist. This training can be provided by another phlebotomist, a nurse, or a physician in the medical practice. Many area hospitals also offer on-the-job training in phlebotomy.
As a general rule, the volume of blood drawn should equal 2½ times the amount of serum plasma required. For example, to obtain 4 mL of serum or plasma, it is necessary to draw at least 10 mL of blood.

10
Precautions
Certain areas are to be avoided when choosing a site on the patient’s arm: Do not select a site above an indwelling IV.Do not select a site on the side of a mastectomy. Avoid areas of extensive scarring from burns and surgery; it is difficult to puncture the scar tissue and obtain a specimen. Avoid areas with hematomas; these may cause erroneous test results. If another site is not available, collect the specimen distal to the hematoma. Avoid edematous extremities; tissue fluid accumulation alters test results.
Procedure for Vein Selection
Palpate and trace the path of veins with the index finger. Arteries pulsate, are more elastic, and have a thick wall. Thrombosed veins lack resilience, feel cord-like, and roll easily. Select either the cephalic, basilic, or median cubital vein for best results (Figure 9).
Figure 9. Vein Locations in the Human Arm
If superficial veins are not readily apparent, you can force blood into the vein by massaging the arm from wrist to elbow; tapping the site with index and second finger; applying a warm, damp washcloth to the site for 5 minutes; or lowering the extremity over the bedside to allow the veins to fill.

Collecting, Processing, and Handling Blood Samples 11
Performance of a Venipuncture
The venipuncture procedure is complex, requiring both knowledge and skill to perform. Each phlebotomist generally establishes a routine that is comfortable for her or him. Several essential steps are required for every successful collection procedure:
Identify the patient correctly. Identification of the patient is crucial. The phlebotomist must ensure that the blood specimen is being drawn from the designated individual. Position the patient. The patient should sit in a chair, lie down, or sit up in bed. Hyperextend the patient’s arm. Examine the antecubital area of the arm and choose a prominent vein. The median cubital vein, located in the antecubital fossa, is generally the vein of choice, although other veins listed in Figure 9 may be used. Apply the tourniquet 3–4 inches above the selected puncture site. Do not place too tightly or leave on more than 2 minutes. The patient should make a fist without pumping the hand. Select the venipuncture site by palpating the area of arm vein location (Figure 10).
Figure 10. Palpation of Vein
Prepare the patient’s arm using an alcohol wipe. Cleanse in a circular fashion, beginning at the site and working outward. Allow to air dry. Grasp the patient’s arm firmly using your thumb to draw the skin taut and anchor the vein. The needle should form a 15–30 degree angle with the surface of the arm and should enter the skin with the bevel facing upward.Swiftly, but gently, insert the needle through the skin and into the lumen of the vein. If bloodflow is not immediate, avoid trauma and excessive probing for the veinIf withdrawing with conventional disposable syringes: o Using the plunger, gently withdraw 5–10 mL of whole blood from adults, 2–5
mL from children, and 0.5–2 mL from infants.

12
o Blood is then transferred to the appropriate tube or vial, depending on whether serum or plasma is required for the test (see Appendix A).
If withdrawing with vacuum systems: o Press forward on the tube to puncture the cap and allow the evacuated
collection tube to fill. o If multiple tubes are used, gently remove each tube from the holder/adapter
keeping the needle positioned within the vein (Figure 11) and insert the next tube as described above.
Figure 11. Correct Needle Position Within Vein
When the last tube to be drawn is filling, remove the tourniquet (Figure 12).
Figure 12. Remove Tourniquet Before Withdrawing Needle

Collecting, Processing, and Handling Blood Samples 13
Remove the needle from the patient’s arm using a swift backward motion. Press down on the gauze when the needle is out of the arm, applying adequate pressure to avoid formation of a hematoma (Figure 13).
Figure 13. Applying Pressure to Venipuncture Site
Dispose of contaminated materials and supplies using an appropriate disposal device. DO NOT RECAP NEEDLE. If breakage of a tube containing a collected sample should occur, avoid all contact with exposed skin and follow proper procedures for the cleanup and disposal of infectious waste. Mix the tube by inverting it several times and label all appropriate tubes at the patient’s bedside or the drawing area. Inspect the samples to assess the need for sample recollection and/or rejection. Deliver specimens promptly to the laboratory or processing area.
Order of Draw
Blood collection tubes must be drawn in a specific order to avoid cross-contamination of additives between tubes. The recommended order of draw is:

14
Steps to Prevent a Hematoma
Puncture only the uppermost wall of the vein. Remove the tourniquet before removing the needle. Use the major superficial veins. Make sure the needle fully penetrates the uppermost wall of the vein. (Partial penetration may allow blood to leak into the soft tissue surrounding the vein by way of the needle bevel). Apply pressure to the venipuncture site.
Prolonged Tourniquet Application
The primary effect is hemoconcentration of nonfilterable elements such as proteins. The hydrostatic pressure causes some water and filterable elements to leave the extracellular space and enter the venous blood. Significant increases can be found in total protein, aspartate aminotransferase (AST), total lipids, cholesterol, and iron. Affects packed cell volume and other cellular elements.

Collecting, Processing, and Handling Blood Samples 15
Serum and Plasma Processing
Centrifugation and Separation of Serum and Plasma From Blood Cells
Centrifugation is a method of separating solids from liquids using rotational forces. When blood is centrifuged, the heavier red cell portion is sent to the bottom of the test tube, leaving plasma (serum if the blood has clotted) as the top layer. An example is provided in Figure 14.
Figure 14. Components of Centrifuged Blood
For processing anticoagulated blood for plasma, centrifugation must be performed within 1 hour after collection, preferably in the original container. Serum is obtained by allowing the blood to clot in the original closed container at room temperature (generally 20–30 minutes). When the clot has formed, gently loosen it at the top with an applicator stick. Centrifugation for both serum and plasma is 10 minutes at an RCF of 850–1000 in the stoppered container.
Common Problems in Blood Specimen Processing
In the collection and processing of blood, several common specimen problems may be encountered which can affect the results of the assay. However, knowing how to prevent these problems will result in a high-quality specimen and a more reliable result. The table on the following page lists common problems and precautions.

16
Table 3. Specimen Processing Problems and Precautions
Problem Effect Precautions
Hemolysis Release of red blood cell contents into the sample, which can invalidate certain tests.
Avoid keeping the tourniquet on the patient’s arm for long periods of time.
Use needles 20-gauge or larger (22-gauge thin-wall needles are acceptable).
If using a syringe, avoid excessive pressure on the plunger.
Do not expel blood into a tube through the needle.
Do not shake blood in the container to mix anticoagulants.
Avoid prolonged contact of serum or plasma with blood cells; prompt centrifugation is essential.
Do not refrigerate freshly collected blood before clotting.
Do not freeze whole blood before centrifuging.
Lactescense Milky plasma or serum associated with samples collected 1–2 hours after a fatty meal. Neutral fats in the sample can interfere with the analysis.
Avoid drawing blood from patients who have eaten within 2 hours of collection.
Concentration changes
Changes in drawn blood samples from the original component concentrations that occur from evaporation or dilution.
Never rinse syringes or needles with saline or anticoagulant solutions before use.
Do not use liquid anticoagulants (exception: coagulation studies).
Do not allow blood to stand in open containers for prolonged periods of time before centrifugation.
Do not centrifuge blood in open containers.
Bacterial changes
Bacteria contaminating the specimen form ammonia or urea or can reduce the concentration of chemical components.
Use sterile blood-handling methods wherever possible.
Promptly process blood samples.
Store serum or plasma at refrigerator temperatures or freeze until analyzed.
Extravascularinterchange
Sample component changes due to movements of substances between cells and plasma or serum.
Promptly process blood samples by centrifugation.
Avoid hemolysis.

Collecting, Processing, and Handling Blood Samples 17
Serum and plasma must be visually examined after centrifugation to assess the quality and suitability of the sample for analysis. Figures 15 and 16 demonstrate common reasons for sample rejection for immunoassay analysis.
Figure 15. Hemolyzed (L) and Normal (R) Serum
Figure 16. Lipemic (L) and Normal (R) Serum
Capillary Collection

18
Precautions
The best locations for collecting capillary samples are the 3rd and 4th fingers of the nondominant hand and the edges of the heel (infants).
The following precautions apply to fingersticks. Heelstick collections for infants follow the same basic principles. See Figure 17 for approved heelstick collection sites.
Do not use the tip of the finger or the center of the finger.Avoid the side of the finger where there is less soft tissue, where vessels and nerves are located, and where the bone is closer to the surface. Avoid the 2nd (index) digit, which tends to have thicker, callused skin.Avoid the 5th digit, which tends to have less soft tissue overlying the bone.Avoid puncturing a finger that is cold, cyanotic, swollen, scarred, or covered with a rash.
Figure 17 Proper Heelstick Sites
Figure18. Proper and Improper Fingerstick Sites
Fingerstick Procedure1
The retractable lancet is used most often for safety reasons. The retractable lancet is spring-loaded and the lancet retracts into the body of the device after skin puncture. The recommended depth of puncture is 2.5 mm for adults, 2.0 mm for children, and 1.5 mm for infants less than 6 months of age. All lancets are sterile and for one-time use only.
Follow the procedure as outlined above for identifying the patient.
1 The same principle may be used for obtaining capillary blood by heelstick from infants. Refer to Figure 17 for proper heelstick sites.

Collecting, Processing, and Handling Blood Samples 19
Position the patient. The patient should sit in a chair, lie down, or sit up in bed. Hyperextend the patient’s arm. Massage the finger to increase the blood flow. This may be done by gentlysqueezing the finger from hand to fingertip 5 or 6 times. Do not overuse this maneuver as it may cause erroneous results due to concentration of tissue fluids. Cleanse fingertip with 70% isopropyl alcohol. Wipe dry with a clean, dry piece of gauze or cotton. Be sure that the finger is thoroughly dry, as blood will not well up and form a drop at the puncture site of a moist finger. If you are using a lancet, remove the lancet from its package and grasp the lancet between the thumb and forefinger. If you are using a finger puncture device, you will need to refer to the instructions for the device you are using. Using a sterile lancet, make a skin puncture just off the center of the finger pad. The puncture should be made perpendicular to the ridges of the fingerprint so that the drop of blood does not run down the ridges (Figures 18 and 19).
Figure 19. Fingerstick Method Using a Retractable Lancet
Wipe away the first drop of blood, which tends to contain excess tissue fluid. Collect drops of blood into the collection device by gently massaging the finger. Avoid excessive pressure that may squeeze tissue fluid into the drop of blood. If a capillary collection tube (Figure 20) is used and if the tube contains anticoagulant, cap, rotate, and invert the collection device to mix the blood collected.

20
Figure 20. Use of a Capillary Tube for Blood Collection
Have the patient hold a small gauze pad over the puncture site for several minutes to stop the bleeding. Dispose of contaminated materials/supplies in designated containers. Label all appropriate tubes at the patient’s bedside or the collection site. Deliver specimens promptly to the laboratory or processing area.
Blood Spot Collection
Blood spot collection on filter paper has several advantages over venipuncture and obtaining samples with capillary tubes, which makes it ideal for field-based research in human biology and health: 1. Collection requires only a simple finger prick and is relatively painless and
noninvasive.2. Samples do not have to be centrifuged, separated, or immediately frozen. 3. The filter paper matrix stabilizes blood so that most analytes do not degrade at
ambient temperatures for at least 2 weeks (and often longer). 4. Samples are easily stored and transported. 5. Multiple assays can be performed from a single drop of whole blood.
Blood Collection PaperAbsorbent filter paper is specially manufactured for blood spot collection. It is most important that special paper be used (see example in Figure 21) and not substituted with regular filter or blotting type paper. The main reason for this is that the paper must have very exact absorption characteristics if testing is to be valid and accurate.

Collecting, Processing, and Handling Blood Samples 21
Filter paper that is not manufactured specifically for blood collection tends to have highly variable absorption of blood, which will lead to erroneous results.
Figure 21. Schleicher & Schuell 903 Blood Collection Paper
NOTE: There are two main grades of blood collection paper: 903 (used mainly in the USA and Canada) and 2992 (used mainly in Europe). It is important that all samples be collected on the same grade of paper that is used for the blood spot standards in the laboratory.
Blood Spot Collection—Fingerstick Procedure
1. Follow the same steps as described in the previous section for fingerstick technique.
2. Wipe away the first drop of blood, which tends to contain excess tissue fluid. 3. Hold finger down over the first circle on the blood collection card, but do not
touch the circle, as shown in Figure 22.
Figure 22. Using a Blood Collection Card
4. When a full hanging drop of blood is formed, gently touch the blood drop inside the first circle.

22
5. Blood should be applied from only one side of the paper and appear as an even, uniform layer.
6. The recommended collection technique is to absorb the blood directly from the collection site onto the paper while watching the circle to ensure that it completely fills.
7. If needed, continue to apply blood drops onto open areas of the first circle until it is completely covered. Do not layer blood drops on top of one another. It is acceptable for blood to extend outside the circle.
8. Fill the first circle completely before going onto the second circle. 9. Fill the second circle completely, as above, before going on to the third circle, etc. 10. Completely fill all circles on the blood collection card. Failure to fill all circles
completely may result in a sample insufficient for testing. 11. After filling all of the circles completely, apply an adhesive bandage to the finger. 12. Label the blood collection card with the identification information required by the
protocol or laboratory. 13. Airdry the specimen for at least 3 to 4 hours on a flat, nonabsorbent surface in a
horizontal position.14. Do not allow the blood collection card to be exposed to direct sunlight or extreme
temperature or humidity.
Blood Spot Processing Using Capillary Tubes or Blood Collection Tubes
For applying blood using capillary tubes, touch the blood collection card to the end of the capillary tube and allow the blood to flow onto the paper while watching the circle to ensure that it completely fills.
Venous blood may be collected by needle and syringe for other purposes and dried blood spots may be prepared from tubes before the blood has clotted. In this case, the drawn blood can be simply spotted directly onto the collection paper (approximately 1 to 2 drops per circle or 50μL–100 μL). Layering successive drops of blood can cause incomplete or uneven saturation and incomplete filling of each circle.
Specimen Evaluation
Care must be taken to ensure that the dried blood spot is acceptable for testing. Refer to the figures below for evaluation of dried blood specimens and possible reasons for unacceptable samples.

Collecting, Processing, and Handling Blood Samples 23
Invalid Specimens and Possible Causes
1. Specimen quantity insufficient for testing. Potential causes include: Removing filter paper before blood has completely filled circle or before blood has soaked through to second side.Applying blood to filter paper with a capillary tube. Allowing filter paper to come in contact with gloved or ungloved hands or substances such as hand lotion or powder, either before or after blood specimen collection.
2. Specimen appears scratched or abraded. Potential causes include:Applying blood with a capillary tube or other device.
3. Specimen not dried before mailing. Potential causes include:Mailing specimen before drying for a minimum of 4 hours.

24
4. Specimen appears supersaturated. Potential causes include:Applying excess blood to filter paper, usually with a device. Applying blood to both sides of filter paper.
5. Specimen appears diluted, discolored, or contaminated. Potential causes include:
Squeezing or “milking” of area surrounding the puncture site. Allowing filter paper to come in contact with gloved or ungloved hands or substances such as alcohol, formula, antiseptic solutions, water, hand lotion or powder, etc., either before or after the blood specimen collection. Exposing blood spots to direct heat.
6. Specimen exhibits serum rings. Potential causes include:Not wiping alcohol from puncture site before making skin puncture. Allowing filter paper to come in contact with alcohol, hand lotion, etc.Squeezing area surrounding puncture site excessively. Drying specimen improperly. Applying blood to filter paper with capillary tube.

Collecting, Processing, and Handling Blood Samples 25
7. Specimen appears clotted or layered. Potential causes include:Touching the same circle on filter paper to blood drop several times. Filling circle on both sides of filter paper.
8. No blood. Caused by failure to obtain blood specimen.

26
Specimen Handling, Storage, and Shipping
Specimen Handling
Cold Chain Preservation The system used for keeping and distributing blood specimens in good condition is called the cold chain. This consists of a series of storage and transport links, all of which are designed to keep the samples at the correct temperature until they reach the testing laboratory. A typical cold chain system is shown below in Figure 23.
Figure 23. Typical Cold Chain System
Subject’s blood sample obtained
Processing for serum
Processing for plasma
Dried blood spot (DBS)
Clot 20–30 minutes at room temperature,
then centrifuge
Centrifuge within 1 hour of collection
Place DBS card in zippered plastic bag with desiccant and
humidity indicator
Dry DBS card
3–4 hours
Immediately transfer sample to a clean container
Store sample at 5°C ± 3°C until analyzed, or freeze at –20°C if analysis is delayed more than
For shipment: ship frozen in cold boxes

Collecting, Processing, and Handling Blood Samples 27
Sensitivity to Heat All blood samples are sensitive to heat. Excessive exposure to heat results in the breakdown of the components for analysis. Additionally, multiple freeze-thaw cycles of samples must be avoided as the sample may deteriorate.
Sensitivity to Light Some analytical components of blood are very sensitive to strong light. Although retinol is more sensitive to light than retinol binding protein, the effects of ultraviolet rays from strong sunlight may cause samples to lose reactivity in various degrees. Additionally, prolonged exposure of samples to fluorescent (neon) light can damage blood components as well. Care must be taken to keep blood samples covered and protected from strong light at all times.
Specimen Storage
Refrigerated SpecimensSerum or plasma specimens can be refrigerated at 5° ± 3°C if analysis is performed within 4 hours. It is essential to refrigerate the specimen as soon as it is separated from the cells. Specimens may be stored in glass or plastic tubes unless specifically instructed otherwise. Apply labels to the tube with ends overlapping to prevent detachment of label from tube during refrigeration.
Frozen SpecimensSerum or plasma specimens need to be frozen at –20°C if analysis is delayed for more than 4 hours. In these cases, it is essential to freeze the specimen as soon as it is separated from the cells. Always freeze specimens in plastic tubes unless specifically instructed otherwise. (Glass tubes are generally not acceptable because they can break as the sample expands during freezing.) Apply label to the tube so that label ends overlap (in order to prevent detachment of label from tube during freezing). Lay the tube in the freezer at a 45º angle (to avoid tube breakage caused by expansion during freezing).
Specimen Deterioration With Improper StorageDetermining when a specimen has become unusable for analysis is important for optimal specimen results. The table below provides information on deteriorated plasma and serum samples.

28
Table 4. Signs of Deterioration in Serum and Plasma Specimens
Cause Physical Characteristics Prevention
Bacterial contamination
Cloudy sample.
Foul odor from sample.
Sample appears mucoid.
Sediment in sample.
Pigment (yellow or green) in sample.
Maintain cold chain.
Keep samples capped during centrifugation.
Keep samples capped after serum/plasma is separated from cells.
Fungalcontamination
Filamentous “ball” of growth in sample.
Pinpoint dots of growth suspended in sample.
Sediment in sample.
Foul odor from sample.
Maintain cold chain.
Keep samples capped during centrifugation.
Keep samples capped after serum/plasma is separated from cells.
Anticoagulant deterioration (plasma samples)
Clot formation in sample. Maintain cold chain.
Assay plasma within 4 hours of collection.
Do not perform multiple freeze-thaw cycles on plasma samples.
Transportation of Blood Specimens
When it is necessary to ship specimens to a remote laboratory for testing, correct specimen packaging and transportation are of vital importance. The procedure listed below is recommended for proper handling and packaging of specimens to be shipped to a laboratory for analysis.
Prepare specimens for packaging:
o Place collected and labeled blood samples (tops secured) into a rack to provide stability during shipment.
o Place the rack containing the tubes in a large zippered plastic bag or similar sealable, nonbreakable container.
Obtain a styrofoam insulated shipping container.

Collecting, Processing, and Handling Blood Samples 29
Place absorbent material (sufficient to absorb the contents of all tubes if they are broken during transport) in the bottom of the box.
Next, insert a layer of frozen cold packs or dry ice.2
Then insert the package (the zippered plastic bag containing the tubes). (If you have more than one package, cold packs can be inserted between them to maintain temperature. Absorbent materials can also be placed between packages to protect them.)
On top of the package(s), place another layer of frozen cold packs or dry ice and cover with more absorbent material (Figure 24).
Figure 24. Packaging of Specimens
Include a shipping list (with sample identification numbers) in a zippered plastic bag on top of the absorbent material inside the top of the box. Include the name and telephone number of the person shipping the samples or a local contact person.
Secure the top of the styrofoam insulated shipping container with shipping tape.
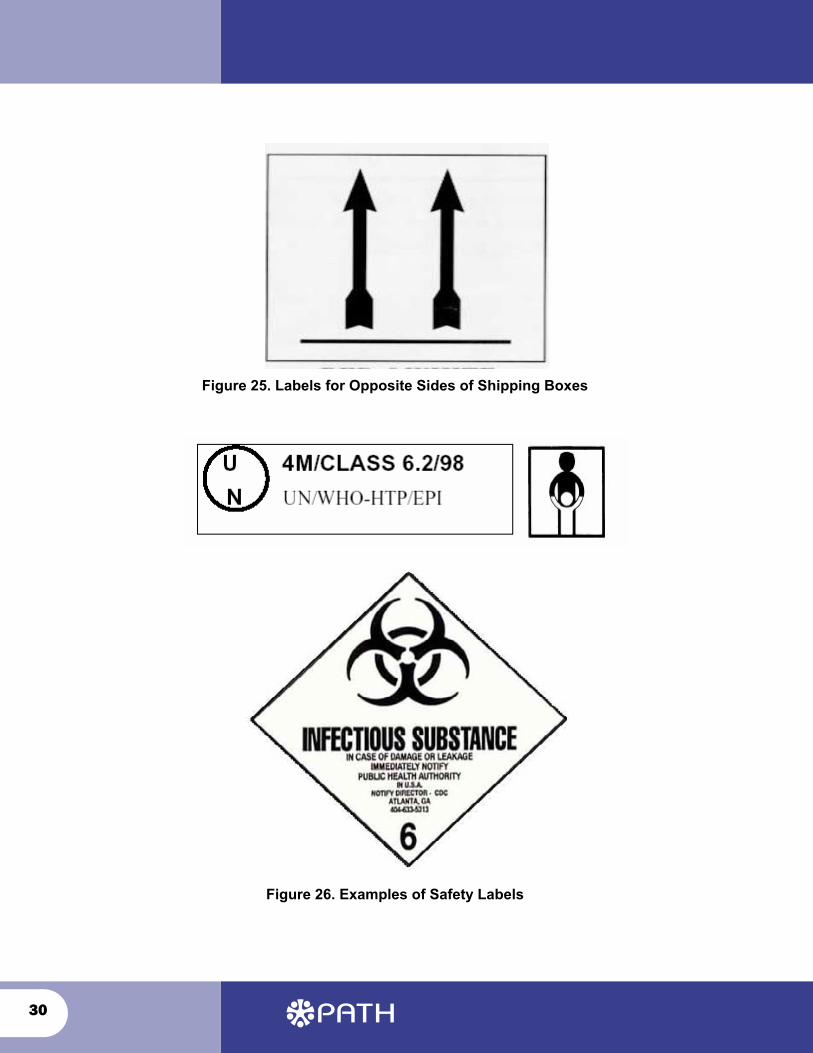
When preparing the box(es) for shipment, two up-arrows must be located on opposite sides of the box (Figure 25).
Label the box(es) in accordance with the safety requirements of the country of origin, including the labels shown below (Figure 26).
2 If the time between shipment and receipt of the container exceeds 48 hours, dry ice is recommended instead of cold packs to ensure that the samples remain frozen. Refer to EPI Equipment performance specifications and test procedures E4 & E11: Insulated Containers. Geneva: WHO; 1999.
LID
Absorbent Material
Cold Packs or Dry Ice
SPECIMENS
Cold Packs or Dry Ice
Lid Seam
Shipping Box
Absorbent Material
30
Figure 25. Labels for Opposite Sides of Shipping Boxes
Figure 26. Examples of Safety Labels

Collecting, Processing, and Handling Blood Samples 31
Phlebotomy Vocabulary
AntecubitalThat part of the arm opposing the elbow.
Anticoagulant Anticoagulant solutions used for the preservation of stored whole blood and blood fractions are acid citrate dextrose (ACD), citrate phosphate dextrose (CPD), citrate phosphate dextrose adenine (cPDA 1) and heparin. Anticoagulants used to prevent clotting of blood specimens for laboratory analysis include heparin, which works by potentiating the action of antithrombin III, which inactivates many coagulation proteins and slows the process of coagulation. Several other substances are available as anticoagulants, which make calcium ions unavailable to the clotting process, including EDTA (ethylenediamintetraacetic acid), citrate, and oxalate.
AntisepticA chemical compound that discourages the growth of microorganisms. By contrast, aseptic refers to the absence of microorganisms.
Basilic vein Large vein on the inner side of the biceps. Often chosen for intravenous injections and blood drawing.
Betadine™A popular trade-name of an iodine-containing topical antiseptic agent; povidone-iodine.
BloodThe fluid in the body that contains red cells and white cells as well as platelets, proteins, plasma, and other elements. It is transported throughout the body by the circulatory system. Arterial blood is the means by which oxygen and nutrients are transported to tissues; venous blood is the means by which carbon dioxide and metabolic by-products are transported for excretion.
Blood cell There are three main types of cells in the blood stream. The red cell, which carries oxygen; the white cell, which fights infections; and the platelet, which helps prevent bleeding. The correct balance between each cell type must be maintained for the body to remain healthy.

32
Blood clot The conversion of blood from a liquid form to solid through the process of coagulation. A thrombus is a clot which forms inside a blood vessel. If that clot moves inside the vessel it is referred to as an embolus (embolism).
Bloodborne pathogen Pathogens which are present in the blood stream and which may be passed to others.
CentrifugeA laboratory apparatus that separates mixed samples into homogenous component layers by spinning them at high speed.
CitrateA compound that is an intermediate in the citric acid cycle (Krebs cycle). Citrate chelates (binds) calcium ions, preventing blood clotting and, thus, is an effective anticoagulant.
ClotA semisolid mass of blood found inside or outside the body.
Coagulant The process of clot formation.
ContaminationThe soiling or pollution by inferior material, as by the introduction of organisms into a wound.
EdemaThe swelling of soft tissues as a result of excess water accumulation. It is often more prominent in the lower legs and feet toward the end of the day as a result of pooling of fluid from the upright position maintained during the day. Development of collateral circulation will result in a reduction of water accumulation.
EdtaEthylenediaminetetraacetate. A calcium chelating (binding) agent that is used as an anticoagulant for laboratory blood specimens.
EmbolusA sudden blockage of a blood vessel by a blood clot or some other obstruction which has been transported through blood vessels and lodged at a site too small for passage. Examples of emboli are a detached blood clot, a clump of bacteria, or other foreign material, such as air. Contrast to thrombus.

Collecting, Processing, and Handling Blood Samples 33
GaugeNeedle diameter is measured by gauge; the larger the needle diameter, the smaller the gauge. For example, a very large diameter needle (16 ga) may be used for hemodialysis, whereas a much smaller needle (23 ga) would be used to draw blood for laboratory testing.
HematomaA localized collection of blood within tissue due to leakage from the wall of a blood vessel, producing a bluish discoloration (ecchymosis) and pain.
HemoconcentrationA decrease in the fluid content of the blood (plasma) resulting in an increase in concentration. This is determined by an increase in the hematocrit. Caused by a filtration of plasma into body tissues and often created by dehydration.
Hemolyze The breaking of the red blood cell membrane releasing free hemoglobin into the circulating blood. In phlebotomy, this is usually the result of mechanical damage due to poor technique.
Lipemia, lipemic The presence of excess lipids in the blood imparting a milky appearance to the serum.
Lymphedema Lymphedema is a type of swelling which occurs in lymphatic tissue when excess fluid collects in the arms or legs because the lymph nodes or vessels are blocked or removed. Regarding phlebotomy, this can be a major complication of mastectomies.
Order of draw Terminology used to define the order in which blood sample tubes should be drawn using a multisample technique such as the Vacutainer™ System. The order of draw is necessary to prevent tube additive (e.g., anticoagulant) carryover into subsequently drawn tubes.
PalpateTo examine or feel by the hand. In relation to venipuncture, this technique is used to “feel” a vein which will tend to rebound when slight pressure is applied with the finger. The technique is used to help determine the size, depth, and direction of a vein. In relation to arterial punctures, this technique is used to determine the position and depth of an artery (see pulse).
Peripheral blood Blood obtained from the circulation away from the heart, such as from the fingertip, heel pad, earlobe, or from an antecubital vein.

34
PlasmaThe fluid portion of the blood in which the cellular components are suspended. Contrast to serum.
Povidone-iodineUsed as a topical antiseptic, this is a compound made by reacting iodine with povidone which slowly releases iodine. Same as Betadine™.
SclerosisA hardening, especially from inflammation and certain disease states. Though sclerosis may occur in many areas of the body, the term is most often associated with blood vessels.
SeroconversionThe development of detectable antibodies in the blood directed against an infectious agent. It normally takes some time for antibodies to develop after the initial exposure to the agent. Following seroconversion, a person tests positive in tests based on the presence of antibodies.
SerumReferring to blood, the clear liquid portion of blood that separates out after clotting has taken place. Since clotting has occurred, serum is fibrinogen deficient. Contrast to plasma.
ThrombusA thrombus is a blood clot that forms inside a blood vessel or cavity of the heart.
TourniquetIn regards to venipuncture, a constrictive band placed over an extremity to distend veins for the purpose of blood aspiration or intravenous injections. Materials used may be rubber, latex, or other synthetic elastic material. A blood pressure cuff may also be used.
Vacutainer™ An often generic term used to describe equipment used to automatically aspirate blood from a vessel by venipuncture. The concept was first devised and produced by Becton Dickinson under the trademark Vacutainer™.
Vacutainer™ holder A cylindrical shaped holder that accepts a Vacutainer™ tube on one end and a Vacutainer™ needle on the other. The holder, tube, and needle comprise the Vacutainer System™, used to draw multiple tubes of blood with one venipuncture.

Collecting, Processing, and Handling Blood Samples 35
Vacutainer ™ needle The needle used to attach to a Vacutainer™ holder. The needle has a male thread on one end which screws into the holder. The threaded end also has a large gauge needle enclosed by a rubber sheath. This needle will puncture the stopper of a Vacutainer™tube allowing blood to enter the tube. Upon withdrawal of this needle from the tube, the rubber sheath covers the needle bevel stopping the flow of blood. Thus, any number of tubes may be drawn with only a single venipuncture.
Vacutainer™ system The combination of a Vacutainer™ holder, needle, and sample tube which allows for a more automated method of drawing blood. When a multisample needle is used, the system will allow for the aspiration of any number of sample tubes with only one venipuncture.
Vacutainer ™ tube Blood sample tubes containing a vacuum. When the tube stopper is pierced by a Vacutainer™ needle which has been properly positioned in a vein, the vacuum draws blood into the tube.
VeinBlood vessels carrying blood to the heart. Blood contained within these vessels is generally bound with carbon dioxide which will be exchanged for oxygen in the lungs. The presence of carbon dioxide and the absence of oxygen accounts for the dark red appearance of the blood in venous circulation. The only exception to this is the pulmonary vein which is the vein returning to the heart from the lungs, this time with oxygenated blood (no carbon dioxide).
Venipuncture The puncture of a vein for any purpose.
VenousPertaining to the veins or blood passing through them.
Venous blood Blood contained within the veins.
Whole blood Blood from which none of the elements have been removed. It is usually referred to as that blood, collected from a donor and anticoagulated for the purpose of blood replenishment for a recipient.

36
References
BD Vacutainer Systems—preanalytical solutions. Becton, Dickinson, and Company website. 2004. Available at: http://www.bd.com/vacutainer/products/. Accessed May 12, 2005.
Clinical and Laboratory Standards Institute. Procedures for the Collection of Diagnostic Blood Specimens by Venipuncture (Approved Standard H3-A5) 5th ed. Wayne, PA: CLSI; 2003.
Davidshon I, Henry B. Todd-Sanford Clinical Diagnosis by Laboratory Methods, 14th
Ed. Philadelphia, PA: W.B. Saunders Co.; 1969.
Estey CA, Felder RA. Clinical evaluation of serial blood processing at point of care. Clinical Chemisty. 1997;43:360-362. Heller M, Krebs C. Clinical Handbook for Health Care Professionals.
Clifton Park, NY: Delmar Learning; 1997.
Hinchliffe RF, Anderson LM. Haemoglobin values in venous and skin puncture blood [letter; comment]. Archives of Disease in Childhood. 1996;75:170-171. Kovanda BM. Multiskilling: Point of Care Testing-Capillary Puncture for the
Health Care Professional. Clifton Park, NY: Delmar Learning; 1998.
Lehmann C. Saunders Manual of Clinical Laboratory Science. Philadelphia, PA: W.B. Saunders Co.; 1998.
Metler R, Ciesielski C, Ward J, Marcus R. HIV seroconversions in clinical laboratoryworkers following occupational exposure, United States. International Conference on AIDS. 1992;8:C296.
National Committee for Clinical Laboratory Standards. Laboratory Testing for Health Care Professionals (SC19-L). Wayne, PA: NCCLS; 1994.
National Committee for Clinical Laboratory Standards. Point-of-Care IVD Testing(Proposed Guideline AST2-P). Wayne, PA: NCCLS; 1995.
National Committee for Clinical Laboratory Standards. Procedures for the Collection of Diagnostic Blood Specimens by Skin Puncture. (Approved Standard H4-A3). 3rd ed. Wayne, PA: NCCLS; 1991.

Collecting, Processing, and Handling Blood Samples 37
National Committee for Clinical Laboratory Standards. Procedures for the Collection of Diagnostic Blood Specimens by Venipuncture (Approved Standard H3-A3). 3rd ed. Wayne, PA: NCCLS; 1991.
National Committee for Clinical Laboratory Standards. Procedures for the Handling and Processing of Blood Specimens (Approved Guideline H18-A). Wayne, PA: NCCLS; 1990.
National Committee for Clinical Laboratory Standards. Protection of Laboratory Workers from Infectious Disease Transmitted by Blood, Body Fluids, and Tissue(Tentative Guideline M29-T2). 2nd ed. Wayne, PA: NCCLS; 1991.
National Committee for Clinical Laboratory Standards. Protection of Laboratory Workers from Instrument Biohazards (Proposed Guideline I17-P). Wayne, PA: NCCLS; 1991. Schleicher & Schuell BioScience. 903® Specimen Collection Paper. Available at: http://www.schleicher-schuell.com. Accessed May 12, 2005.
Venipuncture Teaching Resource. Available at: http://venepuncture.20megsfree.com/index.html. Accessed May 12, 2005.
JMPV24065

38
Appendix A: Blood Collection Tubes and Common Uses
The following tables are provided to demonstrate the types of blood collection tubes that may be found in the laboratory and their intended use. The content represents the views of Becton Dickinson and Company.
Chemistry Tubes
Full Draw BD Vacutainer® Tubes
Tubes with Hemogard™ Closure
Tubes with Conventional Stopper
Additive Laboratory Use
Gold Red/Black
Clot activator and gel for serum separation.
BD Vacutainer® SST™ tube for serum determinations in chemistry. Tube inversions ensure mixing of clot activator with blood. Blood clotting time 30 minutes.
Light Green Green/Gray
Lithium heparin and gel for plasma separation.
BD Vacutainer® PST™ tube for plasma determinations in chemistry. Tube inversions prevent clotting.
Red Red
None (glass)
Clot activator (plastic tube with BD Hemogard™ closure).
For serum determinations in chemistry and serology. Glass serum tubes are recommended for blood banking. Plastic tubes contain clot activator and are notrecommended for blood banking. Tube inversions ensure mixing of clot activator with blood and clotting within 60 minutes.
Orange Gray/Yellow
Thrombin. For stat serum determinations in chemistry. Tube inversions ensure complete clotting which usually occurs in less than 5 minutes.
Royal Blue
Sodium heparin.
Na2EDTA.
None (serum tube).
For trace-element, toxicology and nutritional-chemistry determinations. Special stopper formulation provides low levels of trace elements (see package insert).

Collecting, Processing, and Handling Blood Samples 39
Green Green
Sodium heparin.
Lithium heparin.
For plasma determinations in chemistry. Tube inversions prevent clotting.
Gray Gray
Potassium oxalate/sodium fluoride.
Sodium fluoride/Na2
EDTA.
Sodium fluoride (serum tube).
For glucose determinations. Oxalate and EDTA anticoagulants will give plasma samples. Sodium fluoride is the antiglycolytic agent. Tube inversions ensure proper mixing of additive and blood.
Tan
Sodium heparin (glass).
K2EDTA (plastic).
For lead determinations. This tube is certified to contain less than .01μg/mL(ppm) lead. Tube inversions prevent clotting.
Chemistry Tubes
Partial Draw and Pediatric BD Vacutainer® Tubes
Partial-Draw Tubes (2 mL and 3 mL: 13 x 75 mm)
Small-VolumePediatricTubes (2 mL: 10.25 x 64 mm)
Additive Laboratory Use
Red Red
None. For serum determinations in chemistry and serology. Glass serum tubes are recommended for blood banking. Plastic tubes contain clot activator and are notrecommended for blood banking. Tube inversions ensure mixing of clot activator with blood and clotting within 60 minutes.
Green Green
Sodium heparin.
Lithium heparin.
For plasma determinations in chemistry. Tube inversions prevent clotting.

40
Hematology Tubes
Full Draw BD Vacutainer® Tubes
Tubes With Hemogard™ Closure
Tubes With Conventional Stopper
Additive Laboratory Use
Lavender Lavender
Liquid K3EDTA(glass).
Spray-dried K2EDTA (plastic).
K3EDTA for whole blood hematology determinations. K2EDTA for whole blood hematology determinations and immunohematology testing (ABO grouping, Rh typing, antibody screening). Tube inversions prevent clotting.
Hematology Tubes
Partial Draw and Pediatric BD Vacutainer® Tubes
Partial-Draw Tubes (2 mL and 3 mL: 13 x 75 mm)
Small-VolumePediatricTubes (2 mL: 10.25 x 64 mm)
Additive Laboratory Use
Lavender Lavender
Liquid K3EDTA(glass).
Spray-dried K2EDTA (plastic).
K3EDTA for whole blood hematology determinations. K2EDTA for whole blood hematology determinations and immunohematology testing (ABO grouping, Rh typing, antibody screening). Tube inversions prevent clotting.

Collecting, Processing, and Handling Blood Samples 41
Coagulation Tubes
Full Draw BD Vacutainer® Tubes
Tubes With Hemogard™ Closure
Tubes With Conventional Stopper
Additive Laboratory Use
Light Blue Light Blue
0.105 M sodium citrate ( 3.2%).
0.129 M sodium citrate (3.8%).
Citrate, theophylline,adenosine, dipyridamole (CTAD).
For coagulation determinations. NOTE: Certain tests may require chilled specimens. Follow your institution’s recommended procedures for collection and transport. CTAD for selected platelet function assays and routine coagulation determination. Tube inversions prevent clotting.
Coagulation Tubes
Pediatric Size BD Vacutainer® Tubes
Small-VolumePediatric Tubes (2 mL: 10.25 x 64 mm)
Additive Laboratory Use
Light Blue
0.105 M sodium citrate ( 3.2%).
0.129 M sodium citrate (3.8%).
For coagulation determinations. Tube inversions prevent clotting. NOTE: Certain tests may require chilled specimens. Follow your institution's recommended procedures for collection and transport of specimens.

42
Microbiology Tubes
Full Draw BD Vacutainer® Tubes
Tubes With Hemogard™ Closure
Tubes With Conventional Stopper
Additive Laboratory Use
Yellow
Sodium polyanethol sulfonate (SPS).
SPS for blood culture specimen collections in microbiology. Tube inversions prevent clotting.
Blood Banking Tubes
Full Draw BD Vacutainer® Tubes
Tubes With Hemogard™ Closure
Tubes With Conventional Stopper
Additive Laboratory Use
Red Red
None (glass). Glass serum tubes are recommended for blood banking. Plastic tubes contain clot activator and are not recommended for blood banking. Tube inversions ensure mixing of clot activator with blood and clotting within 60 minutes.
Yellow
Acid citrate dextrose additives (ACD): Solution A—22.0g/L trisodium citrate, 8.0 g/L citric acid, 24.5 g/L dextrose. Solution B—13.2g/L trisodium citrate, 4.8 g/L citric acid, 14.7 g/L dextrose.
ACD for use in blood bank studies, HLA phenotyping, DNA and paternity testing.
Pink
Spray-dried K2EDTA.
For whole blood hematology determinations and immunohematology testing (ABO grouping, Rh typing, antibody screening). Designed with special cross-match label for required patient information by the AABB. Tube inversions prevent clotting.
Becton, Dickinson and Company

Collecting, Processing, and Handling Blood Samples 43
Appendix B: Nomogram for Converting Maximum Relative Centrifugal Force
(RCF, i.e., g-force) to RPM
To convert maximum relative centrifugal force (RCF) to RPM:
Determine centrifuge’s radius of rotation (in mm) by measuring distance from center of centrifuge spindle to bottom of device when inserted into rotor. Lay a ruler or draw a line from radius value in right-hand column value that corresponds to the device’s maximum rated g-force. Then read the maximum value from column at left.