raven/pinpoint install guide - canary systems · airlink communications, inc. august 9, 2001 page 1...
TRANSCRIPT

AirLink Raven II CDPD Modem User’s Manual
AirLink Communications, Inc.
August 9, 2001
AirLinkCommunications

Copyright 2001 AirLink Communications, Inc. All Rights Reserved
Information in this document is subject to change without notice.
Copyright AirLink Communications, Inc, 1993-2001. All rights reserved.
Please send comments to:
email: [email protected]
Fax: 510-226-4299
Phone: 510-226-4200
Post: AirLink Communications, Inc.
Attention: Technical Publications Dept.
472 Kato Terrace
Fremont, CA 94539
AirLink Tech Support can be reached at 510-226-4200 Mon-Fri 9:00a-5:00p Pacific Time.

Copyright 2001 AirLink Communications, Inc. All Rights Reserved
Table of Contents
1. Introduction.....................................................................................................1 1.1 The CDPD Network.......................................................................................1 1.2 Modem LEDs: What They Mean ...................................................................2
2. Getting Started................................................................................................3 2.1 Contacting the CDPD Service Provider ........................................................3 2.2 Configuring the Modem.................................................................................3
2.2.1 Adding the Modem in Windows ..............................................................................4 2.2.2 Creating the PPP Connection..................................................................................8
2.3 Installing and Using Wireless ACE ............................................................14 2.4 Finding CDPD Service.................................................................................18
2.4.1 Registration Problems ...........................................................................................19 2.5 Troubleshooting ...........................................................................................20
3. Hardware Installation .................................................................................21 3.1 Mounting the Raven II ................................................................................21
4. Additional Information ...............................................................................26 4.1 Modem Technical Specifications .................................................................26 4.2 More Information.........................................................................................27


AirLink Communications, Inc. August 9, 2001 Page 1
AirLink Raven II CDPD Modem
User’s Manual
1. Introduction
This manual covers information for first-time setup and configuration of your AirLink CDPD Raven II Modem, as well as technical details on this modem.
For detailed information on specific modem parameters please read the AirLink Raven/PinPoint CDPD Modem User’s Manual. The parameters for the Raven II are at this time identical to those of the Raven.
Updates to this manual and other manuals may be obtained online at: http://ww.airlink.com/modems
What is CDPD?
CDPD is a technology used to transmit packet data over cellular voice networks. It is ideal for wireless applications. It is also more cost effective than circuit-switched cellular data for small amounts of data. It provides instantaneous response for data communications because there are no dialing delays. Built-in encryption maintains the security of the application data over the air.
1.1 The CDPD Network
Figure 1 – Raven II in CDPD Environment

AirLink Raven II CDPD Modem
Page 2 AirLink Communications, Inc.
The Raven's rugged form factor is ideal for industrial and commercial applications that require real-time communications. The Raven provides wireless data communications for a variety of applications, such as oil and gas monitoring, public safety, automated signs, financial transactions, and security systems. It works with Remote Telemetry Units (RTUs) from several manufacturers (configuration instructions are detailed in the Raven/PinPoint User’s Manual).
Front of Raven II Back of Raven II
1.2 Modem LEDs: What They Mean
When the modem is operating, the LEDs on the front panel provide the following information. (see Finding CDPD Service for more info):
LED Description
Chan The unit has acquired a valid CDPD channel (solid), or is scanning for CDPD channels (flashing).
Link A link has been established and a TEI (Temporary Equipment Identifier) has been assigned.
Reg The unit is registered on the CDPD network (solid), or has switched to a non-preferred side (flashing).
RSSI Flash patterns identify different RSSI levels in dBm:
-69 and up -70 to -79 -80 to -89 -90 to -99 -100 to -113
Solid ON [best reception] 300 ms (fast blink) 600 ms (medium blink) 1200 ms (slow blink) Off [worst reception]
TxRx The unit is transmitting/receiving blocks of data.
Err Block errors on the forward or reverse channels.
Pwr The unit is powered on.

User’s Manual
AirLink Communications, Inc. August 9, 2001 Page 3
2. Getting Started This section covers:
• Getting an IP address from a CDPD Service Provider.
• Setting up Windows to configure the modem with Wireless ACE.
• Reading the lights on the modem to ensure your connection is working.
2.1 Contacting the CDPD Service Provider
The first step you must take before using your AirLink modem, is to contact a CDPD Service Provider in your area. You will need to obtain the following information from your Service Provider (or carrier):
• You need a CDPD account for each modem. The carrier will provide an IP address for each account. You will need to give them the modem’s Equipment ID (EID) which can be found on the label on top of the modem.
The IP address is a valid Internet address and is matched up with your unique EID.
• Ask about Side Preference - Does your Service Provider provide service on the A-side or B-side? Is there another CDPD Service Provider in your area?
If you have CDPD service on one side only and will not be using the modem outside this area, set the side preference to A only or B only.
If the modem will be used in other areas and you want to use any other CDPD service that is available, set your modem to "A-side preferred or "B-side preferred." Ask your Service Provider about the costs of using CDPD services other than them.
WARNING: Sometimes there are additional costs if you use a side other than your carrier’s.
2.2 Configuring the Modem
Now that you have the IP address and Side Preference for your modem, you will need to hook it up to a PC to configure the Raven II with the correct parameters.
There are two ways to accomplish this:
1. Use AT commands via a Terminal emulation program to configure the modem (see Raven/PinPoint User’s Manual for further instructions on this method).
2. Use Wireless ACE on a Windows computer to configure the modem. This is the recommended method that is detailed in this manual.

AirLink Raven II CDPD Modem
Page 4 AirLink Communications, Inc.
Wireless ACE needs a Dial-Up Networking (PPP) connection to talk to the modem via Windows. Before configuring the PPP connection, first do the following:
• Verify no other modems are installed that will conflict with your AirLink modem, and verify there are no applications running that will interfere with the COM port you are using. (See Adding the Modem for more information.)
• TCP/IP must be installed on the system. Verify this by checking Control Panel→→→→Network.
• Dial-Up Networking must be installed which provides the PPP connection for communicating with your AirLink modem. You can verify this by checking:
Control Panel→→→→ Add/Remove Programs→→→→ Windows Setup→→→→ Communications→→→→ Dial-Up Networking
It should have a black checkmark next to it. If not, check the box. You may be prompted for your Windows CD to install DUN. After installation, you may have to reboot.
• Ensure you have a disk labeled "Modem Utilities" (or you have previously installed another AirLink Product from a CD).
Otherwise you will be directed to various website links in this manual for finding the files you will need.
Each of the following sections will walk you through how to do the above, step-by-step, and get your Raven II working so you can begin using it.
The Dial-Up Networking (PPP) configuration in this manual uses Windows ME (Millennium Edition) setup screens for examples. This setup is very similar to a Windows 95/98 configuration.
For precise instructions on a particular Operating System setup please check the Appendix of the Raven/PinPoint User’s Manual (available online at http://www.airlink.com/modems and select the Raven II support page), or go to our website instructions at http://www.airlink.com/help and select the Operating System you are installing on for step-by-step instructions online.
2.2.1 Adding the Modem in Windows
Your computer must have Windows ME (or some other version of Windows for using Wireless ACE) and the computer must have an available serial (COM) port to which you will attach your Raven II.
Important: Ensure the serial or COM port you will be using on your computer is available. Below are the items you can check so that your AirLink modem will work properly in Windows.
• Do you have any software running that uses a COM port? Confirm that the Windows computer that you are using does not have any software loaded that may interfere with the COM port you're going to use. For example, HotSync - software used for communicating with the

User’s Manual
AirLink Communications, Inc. August 9, 2001 Page 5
PalmPilot can occupy the COM port even if you do not have your PalmPilot connected to that COM port at this time.
Check any software that loads when your computer starts up - any software that appears as an icon on your Windows Taskbar - and Disable/Exit any applications that normally use a COM port.
• Do you have another modem installed? Older internal modems can cause COM port conflicts. PC Card (PCMCIA) modems in laptops can switch the COM port number of your built-in COM port. For example, your built-in COM port is COM1, but when you install your PC Card modem, that modem becomes COM1 and your built-in COM port becomes COM2.
Remove your PC Card modem until you verify your AirLink Modem is working, or ensure your internal modem won't be conflicting with the COM port your AirLink modem is attached to.
• Infrared ports on laptops/desktops may cause similar conflicts. They too can change the COM port number, or sometimes “share an interrupt” with an existing COM port which can cause your serial port not to work (since the IR port is usually active by default). Check your BIOS settings or computer manual to disable this port, or ensure it will not be conflicting.
Now setup the Raven II on the computer:
1. Plug in the AC adapter and attach it to the modem. Verify the Pwr light is lit.
2. Attach the antenna to the modem.
3. Connect the PC to the modem with a standard DB-9 male connector for the modem end, and a DB-9 or DB-25 on the other end for the PC. The cable wiring should be straight through, not a null-modem cable. (This cable may be provided with your modem.)
4. If you have previously installed another AirLink product (like ATS) from a CD, then skip to step 6.
Insert your “Modem Utilities” disk into the computer. (Or download the Windows modem driver from http://www.airlink.com/modems.)
5. Copy the file mdmarlnk.inf to the Windows' INF directory. Usually this is "C:\Windows\Inf".
NOTE: This is a hidden directory and you will not see it with a default configuration. Turn on the ability to view hidden files in your Windows Explorer to see the directory. Select "Show all files" under View→→→→Folder Options→→→→View.
6. Open Control Panel→→→→Modems→→→→Add. This brings up the "Install New Modem" dialog box.
7. Select Other then Next. This changes the dialog box.
8. Select "Don’t detect my modem….", then Next.

AirLink Raven II CDPD Modem
Page 6 AirLink Communications, Inc.
9. A driver information database is built and a list of modems is displayed. From the list of manufacturers, select AirLink. This should display and highlight AirLink CDPD Modem.
10. Select Next. This should display a list of available COM ports.
11. Select the appropriate one, usually COM1, then Next.
12. You should see a dialog box telling you that "Your modem has been set up successfully". Select Finish.
13. A list of installed modems will be displayed. AirLink CDPD Modem should be one of them.

User’s Manual
AirLink Communications, Inc. August 9, 2001 Page 7
14. Select the AirLink CDPD Modem from the list, then select Properties.
15. In the "AirLink CDPD Modem Properties" dialog box, set the Maximum Speed to the desired setting. The default is 9600.
Note: If this is your first time setting up the modem, leave this setting at 9600 for now. Otherwise, be sure to set the speed to whatever speed you have configured the modem for.

AirLink Raven II CDPD Modem
Page 8 AirLink Communications, Inc.
16. Select the Connection tab and set the Connection Preferences to:
Data bits: 8 Parity: None Stop bits: 1
Uncheck (disable) “Wait for dial tone before dialing.”
17. Select Port Settings. You should see the Advanced Port Settings dialog. Check the box for Use FIFO buffer if appropriate. If the button is enabled, it is probably appropriate.
18. Select OK. You should go back to the Connection tab.
19. Select Advanced. You should see the Advanced Connection Settings dialog.
20. Set Use Flow Control and Hardware, then select OK. Only hardware flow control is available.
21. Select OK on the "AirLink CDPD Modem Properties" dialog box.
22. Select Close on the "Modem Properties" dialog box.
2.2.2 Creating the PPP Connection
This section details the configuration of the Windows Dial-Up Networking PPP Connection.
1. Select Start→→→→Settings→→→→Dial-Up Networking.
If Dial-Up Networking is not installed, please go to Control Panel→→→→ Add/Remove Programs→→→→ Windows Setup→→→→ Communications→→→→ Dial-Up Networking and check the box next to it. During this installation, you may be prompted for your Windows CD and have to reboot afterwards.

User’s Manual
AirLink Communications, Inc. August 9, 2001 Page 9
2. Double-click on the Make New Connection icon.
3. In the "Make New Connection" dialog box, type in the connection name: CDPD Modem PPP
Note: The PPP connection name is important as Wireless ACE will look for this entry name later.
4. For “Select a device” choose: AirLink CDPD Modem.
5. Select Next.
6. Make the following selections:
Area code = (leave it blank)
Telephone number = PPPP (this is not a typo)
Country code = United States of America (unless you live somewhere else)
7. Select Next.
8. Select Finish.
You should now have a new icon in the "Dial-Up Networking" window named "CDPD Modem PPP."
9. Right-click on the new icon and select Properties from the menu.
10. It should display the contents of the "General" tab. Ensure that Use country code and area code is not checked (disabled).

AirLink Raven II CDPD Modem
Page 10 AirLink Communications, Inc.
11. Select the "Server Types" tab. Make the following selections:
Type of Dial-Up Server = PPP: Internet, Windows 2000/NT, Windows ME.
Uncheck (disable) all the other options except for TCP/IP.
12. Click on the TCP/IP Settings button.

User’s Manual
AirLink Communications, Inc. August 9, 2001 Page 11
13. Leave Server assigned IP address and Server assigned name server addresses checked.
14. (optional) If you will be using your modem as an internet connection for browsing websites, using FTP, etc., you will need Domain Name Service (DNS) servers listed here.
To enter the addresses, check (enable) Specify name server addresses and enter the IP address of the Primary DNS and Secondary DNS servers.
If you are unsure about where to obtain these numbers, contact your system administrator or CDPD Service Provider.
15. Uncheck (disable) Use IP header compression.
16. Select the "Security" tab.

AirLink Raven II CDPD Modem
Page 12 AirLink Communications, Inc.
17. Clear the User Name, Password and Domain field.
18. Uncheck (disable) all of the other options.
19. Select the "Scripting" tab.
20. Uncheck (disable) Start terminal screen minimized.
21. Select the "Dialing" tab.
22. Uncheck (disable) Enable idle disconnect, also uncheck Disconnect when connection may not be needed.

User’s Manual
AirLink Communications, Inc. August 9, 2001 Page 13
23. Select OK.
Now you may test the PPP connection you have created if you wish. Otherwise you will be configuring Wireless ACE to startup your PPP connection automatically, later in the manual.
1. Double-click on the "CDPD Modem PPP" icon in the Dial-Up Networking window.
2. You should see a "Connect To" dialog box. Verify the following settings:
User name and Password are blank.
Phone number = PPP (note that three P's appear here even though four were entered earlier. That is normal with Windows Millennium Edition.)
3. Select Connect. You should see a "Connecting to CDPD Modem PPP" dialog box.
Windows will establish a PPP session with the modem. When it succeeds, it will display the Dial Up Networking icon on the right of the Windows task bar (the two small computers)at the bottom of the screen.
Double-click on this icon for connection status information.
Hovering over it (moving the mouse there but not clicking) causes Windows to display reports on the number of bytes sent and received.
If you fail to establish a connection, review your settings starting with the Configuring the Modem section. A list of error messages and quick solutions are listed in the Troubleshooting section.
Proceed to the next section on Wireless ACE to setup your modem with it’s IP address and Side Preference so you can begin using it.

AirLink Raven II CDPD Modem
Page 14 AirLink Communications, Inc.
2.3 Installing and Using Wireless ACE
This section walks through installing Wireless ACE and then using it to initially configure your modem.
Before proceeding with installing and using Wireless ACE, you must first have configured the Dial-Up Networking connection on your system. (See Configuring the Modem for details.)
Wireless ACE (or ACE) is a Windows-based utility that is used for configuring or checking status on your AirLink CDPD Modem either locally or remotely. ACE needs a PPP connection to talk to the modem over a serial port (a local connection). This is required for initial configuration of a modem.
Note: Some of AirLink’s other products will install Wireless ACE along with it. If another AirLink product is installed, check to see if you see a Wireless ACE icon in its Program Group. This installation assumes Wireless ACE was only provided with the “Modem Utilities”disk.
1. Insert the "Modem Utilities" disk.
2. Go to Start→→→→Run and type in A:\acesetup.exe
3. You'll be prompted for the default directory C:\ACE, hit Enter and this installs Wireless ACE to C:\ACE on your hard drive.
Note: If you download ACE from the AirLink website, it will be in the form of a ZIP file, in which case the contents should be extracted to C:\ACE. (You can download the file from http://www.airlink.com/ace)
4. Start Wireless ACE by double-clicking on ace.exe (or creating a shortcut for it). You should see the following...
Note that the Reg (Registered) light is red, and occasionally the Link light turns red. The modem is trying to register on the CDPD network and cannot because it doesn't have a valid IP address yet.
If you see a picture of the modem with a red X, it means Wireless ACE cannot communicate with the modem. Check that:
• The modem is On.
• The cable is properly installed.
• The antenna is on securely.
• Dial-Up Networking has established a connection to the modem.
• If you are on a LAN, ensure your machine’s IP address is not in the 10.x.x.x network (e.g.: 10.0.0.1 or 10.1.23.5, etc.)
• If you receive an Error 629 or Error 630 while connecting to the modem with DUN, ensure there is nothing else on the COM port - software like HotSync, internal modems, or PC Card (PCMCIA)

User’s Manual
AirLink Communications, Inc. August 9, 2001 Page 15
modems. Also ensure you are set for the correct baud rate. Default is 9600.
• see the Troubleshooting section for more.
5. Select the Maximize button (the arrows button). This causes Wireless ACE to display its Status Screen.
6. Select Tools→→→→Communications Options. This causes ACE to display the Communications Options Dialog box.
7. Select Local Host (PPP Direct to Modem) radio button, ensure either “Only for Local” or “For Local and Remote Modems” is selected in the AutoDial-Up (Window DUN) box.
8. Select the OK button.

AirLink Raven II CDPD Modem
Page 16 AirLink Communications, Inc.
9. Select the Configuration button. This causes Wireless ACE to display its Configuration Screen:
10. Change the modem password. The default password is 12345. You need to change the password to your modem. Passwords can be case sensitive and include numbers. Use Options→→→→Change Modem Password... or Ctrl-H. The password can be up to eight characters in length.
11. Double-click on the New Value column for each of the following to change it:
• Side Preference – enter the side preference that your CDPD Service Provider gave you. This is important so you are not overcharged for "roaming" to another CDPD carrier.
The CDPD RF channels are divided into side A and side B. This enables two carriers to provide service in the same area.
The choices are:
1 = A only 2 = B only 3 = A preferred

User’s Manual
AirLink Communications, Inc. August 9, 2001 Page 17
4 = B preferred • Device IP Address – enter the IP address you were given from
your CDPD Service Provider.
12. If you know of other parameters you have to change, you may do so now. Otherwise go to step 13.
Note: If you change the COM port speed, reset the modem before connecting to it at a different speed. If the baud rate is changed, it will have to be changed in both “CDPD Modem PPP” properties and Control Panel→→→→Modems→→→→Airlink CDPD Modem→→→→Properties.
(See AT command reference for details on other parameters.)
13. Select Write to Modem to send the updated information to the modem. You'll be prompted for your new password that you entered earlier.
If you did not change it, then the default modem password is 12345. It is highly recommended that you do change your password (Use Ctrl-H to change it).
14. Reset your modem when prompted to do so.
15. When the modem comes back up in ACE, click on the Status button to see that the modem is properly registering now.
The next section covers some information on reading the lights on the front of your modem and verifying your modem is operating.

AirLink Raven II CDPD Modem
Page 18 AirLink Communications, Inc.
2.4 Finding CDPD Service
When the modem is reset, it will start searching for CDPD service on the side specified. The only LED that will be on is the power On LED. The lights will do two quick sweeps from right to left as a self-check.
Scanning - The modem will scan all the channels on the side, sort the channels by the signal strength (RSSI) and begin searching for CDPD service starting with the highest RSSI, the strongest signal. The Chan LED will be flashing while it scans.
AirLinkCom m unications
ChanLin
kReg TxR
xRSSI
ErrReset
CDPD Raven II
Pwr
Acquiring Channel - When the modem finds a CDPD channel and acquires synchronization, the Chan LED will be solid on. The RSSI LED might be solid on, fast blinking, slowing blinking or off, depending on the signal strength.
AirLinkCom m unications
ChanLin
kReg TxR
xRSSI
ErrReset
CDPD Raven II
Pwr
Establishing a Link - Once the modem acquires a CDPD channel, it will request a Temporary Equipment Identifier (TEI), resolve the link parameters, and establish the link layer connection. Once these steps are accomplished, the Link LED will be illuminated. The TxRx LED will flash briefly during this time.
AirLinkCom m unications
ChanLin
kReg TxR
xRSSI
ErrReset
CDPD Raven II
Pwr

User’s Manual
AirLink Communications, Inc. August 9, 2001 Page 19
Registering - After acquiring a link, the modem will perform an encryption key exchange, and register its IP Address. If the registration is successful, the Reg LED will be turned on. Again, the TxRx LED will flash briefly during this time.
AirLinkCom m unications
ChanLin
kReg TxR
xRSSI
ErrReset
CDPD Raven II
Pwr
If the Reg light flashes then this is indicating your side preference is set for either “A-side preferred” or “B-side preferred” and that the modem has switched to the non-preferred side. The modem will de-register after ten minutes or so and go back to the preferred side. If there is still no service on the preferred side, it will switch back to the non-preferred side and continue this pattern forever.
Setting your modem to a “preferred” side preference (or the wrong side preference) can incur additional charges on your CDPD bill when the modem uses the side that your provider does not use.
2.4.1 Registration Problems
If the registration was unsuccessful, the Chan, Link, and RSSI LEDs will blink off while the modem scans to another channel. When the modem finds another CDPD channel, the preceding sequence will repeat. If the modem is never able to register successfully:
• The modem can be configured with the wrong side preference. Recheck the Side Preference setting in the modem.
• The authentication parameters might need to be reset.
Please contact AirLink Tech Support and we will contact your CDPD Service Provider to have them verify that your IP address is valid and to reset your authentication parameters. Be prepared to provide us your modem's EID, too.

AirLink Raven II CDPD Modem
Page 20 AirLink Communications, Inc.
2.5 Troubleshooting
Error 629 or Error 630 Ensure you are set for the correct baud rate. Default modem speed is 9600. Check Properties for "CDPD Modem PPP", select Configure and ensure the speed matches what your modem speed is set for.
OR
Ensure there are no other applications running that use the serial (COM) port that your AirLink modem is using.
Software like HotSync (for the PalmPilot), internal modems, PC Card (PCMCIA) modems, or IR ports, may interfere. (See Adding the Modem in Windows for more information.)
OR
Check that the modem or cable is not loose or disconnected.
No Power light Incorrect wiring for power, no power or bad power strip.
Only Chan light flashing (no Link light, etc.)
No CDPD Service in your area, or cellular antenna is not on, or the modem has the wrong side preference, or move the modem towards a window. (See Finding CDPD Service.)
Chan light flashes, goes on solid, Link light comes on, but not Reg, then lights turn off, Chan light flashes and cycle repeats.
The modem is trying to register on the CDPD network but cannot.
• Check to make sure a valid IP address is entered in the Device IP Address field in the modem.
• The credentials may need to be reset. Contact AirLink Tech Support who will contact your CDPD Service Provider.
Modem resets (power stays on)
ATZ will reset the modem. Check your app to make sure it is not sending an ATZ.
Modem power cycles on/off Wrong AC adapter, or not enough power to the modem, or bad wiring. At least a 12V 300mA adapter is necessary.

User’s Manual
AirLink Communications, Inc. August 9, 2001 Page 21
3. Hardware Installation This section details the hardware specs of the Raven II and mounting it with other hardware, the power requirements, mounting bracket, etc.
3.1 Mounting the Raven II
The Raven II should be mounted in a position that allows easy routing and access for the cables. There should be no binding or sharp corners in the cable routes. The Raven II should be mounted so that the LEDs on the front panel can be easily seen for ease of operational verification.
The snap-in mounting bracket (part number 100-170-1006) is installed using #8 or #10 screws. Press the Raven down firmly into the bracket and note that both sides have locked into the groove on the Raven II case.
Figure 1 - Raven II Mounted in Mounting Bracket
Note: The tie-wrap is if the modem needs to be really secure, as in a vehicle or in shipping. In stationary applications, as in a box that sits out in a pasture with a solar cell, etc., the tie-wrap is not necessary.

AirLink Raven II CDPD Modem
Page 22 AirLink Communications, Inc.
Figure 2- Snap-in Mounting Bracket

User’s Manual
AirLink Communications, Inc. August 9, 2001 Page 23
Connecting the antenna
Install an appropriate external cellular antenna. Connect the antenna to the external jack of the bulkhead jack adapter with an appropriate RF cable. Connect the Raven antenna jack to the interior bulkhead jack with an appropriate RF cable.
Connecting the serial cable
Connect the RTU/PLC meter serial port to the Raven serial port with a DB-9 male connector.
Grounding the Raven Case
The exterior Raven II case should be connected to the enclosure ground which should be connected to the battery or power source negative terminal. This is best accomplished with a grounding strap under one of the mounting bracket screws to the enclosure grounding bar.
Connecting the power cable
The power cable positive lead should be connected to the battery or power source positive terminal. The power cable negative lead should be connected to the battery or power source negative terminal. The Raven II has an internal polysilicon circuit breaker that opens at 0.5 to 1.0 amps of current.
Insert the power connector into the Raven II power receptacle.
Figure 3 - Raven II Back Panel
AirLink Raven II CDPD Modem
Page 24 AirLink Communications, Inc.
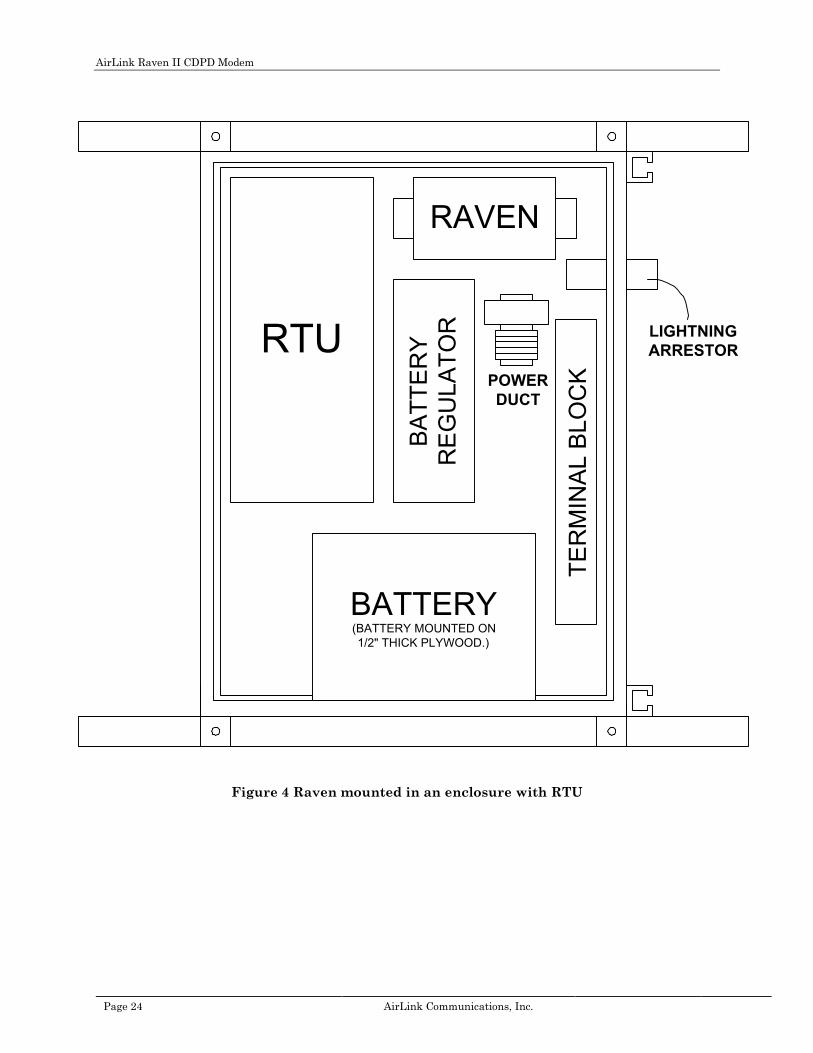
Figure 4 Raven mounted in an enclosure with RTU
RTU
RAVEN
BATT
ERY
REG
ULA
TOR
TER
MIN
AL B
LOC
KPOWERDUCT
LIGHTNINGARRESTOR
BATTERY(BATTERY MOUNTED ON1/2" THICK PLYWOOD.)

User’s Manual
AirLink Communications, Inc. August 9, 2001 Page 25
Figure 5 - RTU to Raven II setup
Figure 6 - Power Connections
COAXCABLE
LighteningArrestor
(MOUNTED INPANEL)
Antenna
OUTSIDEANTENNA CABLERTU SERIAL
PORTSERIALPORT TNCCDPD
ModemCABLE
TO EXTERNALPOWER SOURCE
(AC/DC)
POWER CONVERTERVOLTAGE REGULATOR
12 VDC
12VBATTERY
RTU
CDPDMODEM
FUSES
1A
DC + DC -
+
+
GND
GND
+ -

AirLink Raven II CDPD Modem
Page 26 AirLink Communications, Inc.
4. Additional Information
4.1 Modem Technical Specifications
Physical Characteristics Novatel Wireless CDPD Modem NRM6832
Weight: < 1 lb. Integrated TCP/IP
Full Duplex
Size: 5.1" x 3" x 1" Transmit Power
600 mW
Status LEDs: Power Transmit 824-849 MHz
Channel Acquired Receive 869-894 MHz
Link Status RF Protocol CDPD 1.1
Network Registration Airlink Data Rate
19.2 Kbps
RSSI Serial Protocols
AT Commands, PPP, SLIP
Transmit/Receive RTU Protocol conversions
Modbus, BSAP, DNP, Others
Block Errors
RF Antenna Connector Power Requirements
50 Ohm TNC Input Voltage 9 VDC to 30 VDC
Input Current
30mA to 450mA
Serial Interface Typical Receive 50mA at 12 VDC
RS-232 DB-9F Typical Transmit
280mA at 12 VDC
1200-38,400 bps
Environmental Warranty
Operating Temperature Range: -30°C to 70°C
(10% duty cycle above 60°C)
Software 1 year updates & feature enhancements
Humidity: 5% - 95% Non-condensing Hardware 1 year parts and labor
Extended warranties available

User’s Manual
AirLink Communications, Inc. August 9, 2001 Page 27
4.2 More Information
The AirLink Raven/PinPoint CDPD Modem User's Manual contains in-depth details on modem parameters, Windows 2000 and NT 4.0 installations, and Modbus configuration, upgrading modem firmware, and more.
The User's Manual is available online at http://www.airlink.com/modems, and selecting the Raven II support page.
(If you are using another AirLink product, you may have a copy of the manual on your computer already. For example, check the "ATS\Utilities\Manuals" folder for RavenPinPointManual.pdf if you have ATS installed. You will need need Adobe Acrobat Reader installed first (under Extras folder on your CD or www.adobe.com) in order to read the document.)
For an updated version of this manual: www.airlink.com/modems
Frequently Asked Questions on AirLink Products:
www.airlink.com/faq
Additional AirLink Product Information: www.airlink.com/products
Online help (Win 2000, NT PPP setup, etc.): www.airlink.com/help
For additional technical assistance: [email protected]
For additional product information: [email protected]

AirLink Raven II CDPD Modem
Page 28 AirLink Communications, Inc.