rapidmap geocortex html5 viewer manual
TRANSCRIPT
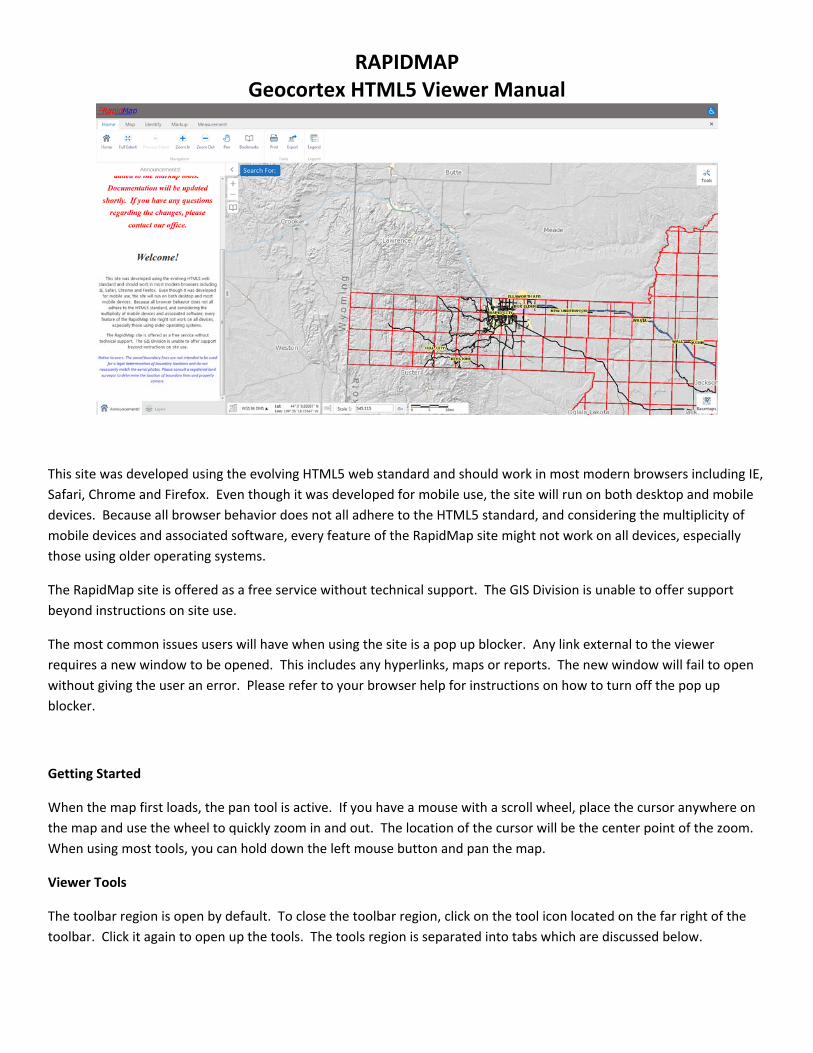
RAPIDMAP Geocortex HTML5 Viewer Manual
This site was developed using the evolving HTML5 web standard and should work in most modern browsers including IE,
Safari, Chrome and Firefox. Even though it was developed for mobile use, the site will run on both desktop and mobile
devices. Because all browser behavior does not all adhere to the HTML5 standard, and considering the multiplicity of
mobile devices and associated software, every feature of the RapidMap site might not work on all devices, especially
those using older operating systems.
The RapidMap site is offered as a free service without technical support. The GIS Division is unable to offer support
beyond instructions on site use.
The most common issues users will have when using the site is a pop up blocker. Any link external to the viewer
requires a new window to be opened. This includes any hyperlinks, maps or reports. The new window will fail to open
without giving the user an error. Please refer to your browser help for instructions on how to turn off the pop up
blocker.
Getting Started
When the map first loads, the pan tool is active. If you have a mouse with a scroll wheel, place the cursor anywhere on
the map and use the wheel to quickly zoom in and out. The location of the cursor will be the center point of the zoom.
When using most tools, you can hold down the left mouse button and pan the map.
Viewer Tools
The toolbar region is open by default. To close the toolbar region, click on the tool icon located on the far right of the
toolbar. Click it again to open up the tools. The tools region is separated into tabs which are discussed below.

Getting Around Tools (Home tab)
This will open a panel on the left side of the map; the home panel contains the Rapid City‐Pennington
County GIS Division data disclaimer. This area can also serve as an announcement page for upcoming changes
or downtimes.
Full Extent zooms the display to the full extent of the map.
Previous Extent moves the display to the previous location and zoom level of the map.
Zoom in/Zoom out allows you to zoom in and out by drawing a box on the map.
Pan allows you to click and drag the map around. This tool is active by default.
Bookmarks allow you to jump to a predefined map extent from the dropdown menu or to create your
own bookmarks of any map extent.
Print allows you to create a pdf file suitable for printing with legend and disclaimer. Export creates
an image of what is showing on the map; it does not contain a legend.
When the print button is clicked, you can choose the Layout from two options. The Output Format is set
to pdf. Set the Map Scale to either the current extent or you can use the current scale, which is listed at the
bottom of the map. There are also options to change the Title and add Map Notes. At the bottom is a Lock print
preview with map option, which is checked by default. If you zoom out slightly on the map it will show the
bounding box that is currently set to print. Unchecking the lock print preview allows you to shift the map so that
the print is set exactly to the area you want. The screen below shows what the print preview looks like.
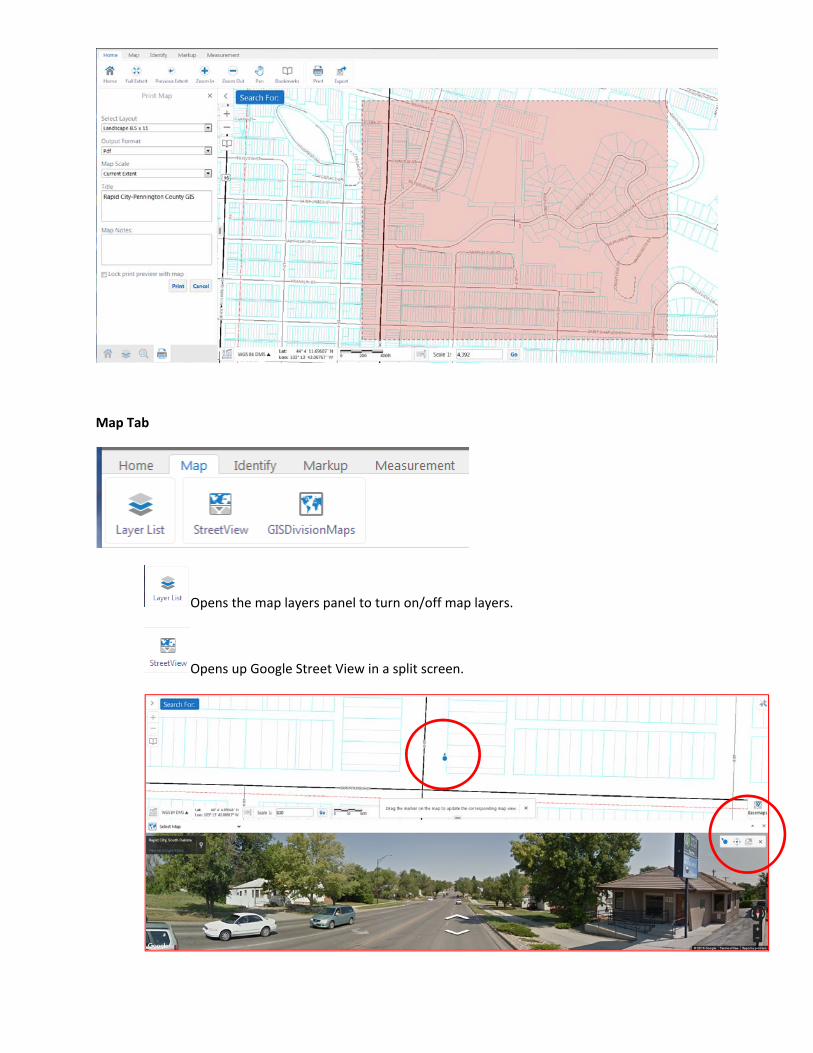
Map Tab
Opens the map layers panel to turn on/off map layers.
Opens up Google Street View in a split screen.

You will need to be zoomed into a close location on the map before you open Street View. The blue
pointer on the map shows the direction you are looking. You can drag the blue pointer on the map ‐
Street View will update with the new location. To close the street view window click the ‘x’ in the upper
right corner of its window.
Opens the GIS Division’s webpage with additional pdf maps that you download and print.
Identify Tab ENHANCEMENTS MADE TO THIS FEATURE
Identify data at a particular point anywhere on the map. Any layer that is currently visible directly
beneath the point will be listed in the results pane on the left side of the map.
Identify data by drawing a segmented shape over an area on the map. Any layer that is currently
visible beneath the polygon will be listed in the results pane on the left side of the map.
Identify data by drawing a rectangle over an area on the map. Any layer that is currently visible
beneath the rectangle will be listed in the results pane on the left side of the map.
With this new version, highlighting of identified features is now available. When you first identify a
feature or features below is what you will see in the results panel on the left side of the screen.

All results are now grouped so you don’t have to scroll through everything to find the information you
are looking for. Just click on the carrot symbol (>) for the result you are looking for and it will highlight
all those features and present the information in the results panel. See below image.
In the image above I have 6 parcels identified. 5 look like they are highlighted in red and one in blue.
The one parcel is blue because my mouse cursor is hovering over that result in the results panel. If you
scroll through the results and hover the cursor over those the map will change to show which parcel you
are currently hovering over. If you move your cursor out of the results panel than all results will just
show in red. To remove the red highlighting, just click on the back arrow at the top of the results panel.
These 3 buttons work only with parcels ‐ they have been designed
to identify parcels and highlight them on the map. Parcel point will identify a single parcel where the
map is clicked. Parcel polygon will identify parcels by drawing a segmented shape over an area on the
map. To add more parcels to the already identified parcels, click on the tool again. To clear all parcel
results and all parcels highlighted on the map, click on the Clear Parcels button.
Markup Tab ENHANCEMENTS MADE TO THIS FEATURE

With each of the above tools, click on the button to activate it, then click the styles button to select
color, line style, symbol shape, etc. A new feature with this version is more markup styles and custom
ones as well. Click the drawing tool you want or the text and then click on Styles. By default it will give
you a few options to choose from. You now have the option to change the Type of Style to ‘Create your
own Style’. That will change the options for you. After you select everything you want, click done and
then you want to place your drawing or text on the map.
Click on the Edit button to edit any existing drawing or text on the map. Click on the markup to increase
or decrease size, rotate or grab the markup and move its position. You can also change the style of the
markup. To save any changes, click anywhere on the map other than on the markup.
Click on Erase to remove a single markup or text. Click the button to activate it and then click on the
markup you wish to remove.
Click on the Clear button to remove all markups.
Measurement Tab
Draws a straight line on the map to display distance. Click to activate tool, then single click to
start the line and for each new segment, and double click to end the line. The total length of the line will
be displayed on the map along with the length of each segment. Unit default is set to Feet but can be
changed on the fly by selecting the upper drop down box and choosing the unit of measurement you
want.
Draws a polygon on the map to display length of each line and the total area of the polygon. Click
to activate tool, then single click to start polygon and to add additional points to shape the polygon,
then double click to end. The length of each line segment will be displayed along with the area. Area
default unit is set to Acres. Length and Area units can be changed using the two drop down boxes on
the toolbar.
Click on Erase to remove an individual line or polygon. Click to activate then click on the drawing you
want to remove.
Click on Clear to remove all drawings.
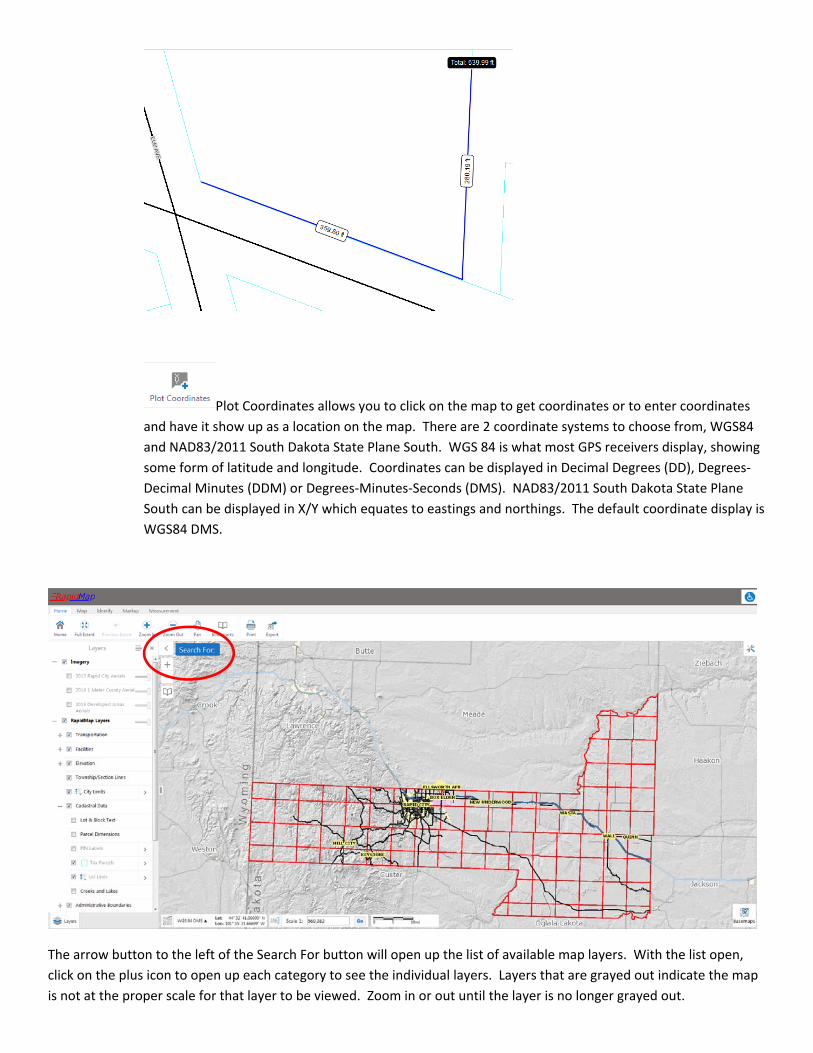
Plot Coordinates allows you to click on the map to get coordinates or to enter coordinates
and have it show up as a location on the map. There are 2 coordinate systems to choose from, WGS84
and NAD83/2011 South Dakota State Plane South. WGS 84 is what most GPS receivers display, showing
some form of latitude and longitude. Coordinates can be displayed in Decimal Degrees (DD), Degrees‐
Decimal Minutes (DDM) or Degrees‐Minutes‐Seconds (DMS). NAD83/2011 South Dakota State Plane
South can be displayed in X/Y which equates to eastings and northings. The default coordinate display is
WGS84 DMS.
The arrow button to the left of the Search For button will open up the list of available map layers. With the list open,
click on the plus icon to open up each category to see the individual layers. Layers that are grayed out indicate the map
is not at the proper scale for that layer to be viewed. Zoom in or out until the layer is no longer grayed out.

Search For button. Clicking on this button will show the available searches. Click the search you want and it will
appear in the left side panel. For each search, enter the information and click on Search. If there are results,
they will show up in the results panel. Click on the result to zoom to it on the map. Some searches may return
more than one result.
In the bottom right hand corner of the map is a button called Basemaps. Clicking on this will open up a panel
with the available imagery. Imagery will only show on the map when you are at the proper scale. Click on the image
Map not at proper scale to view these layers
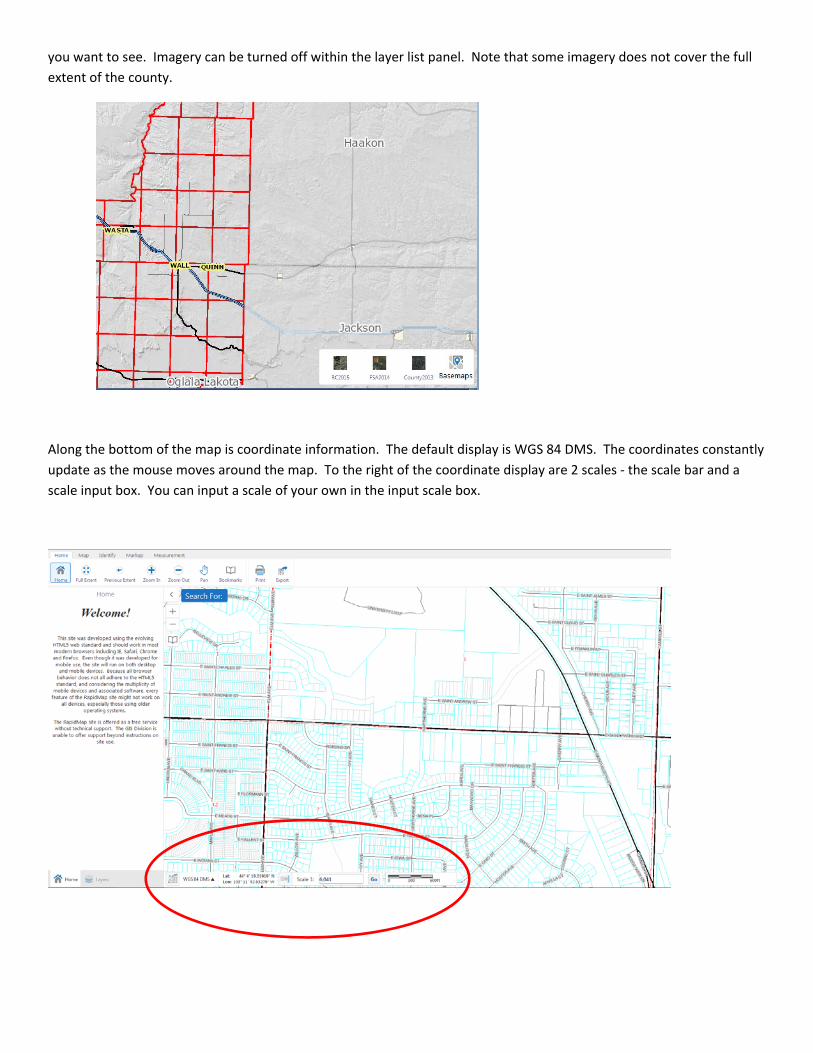
you want to see. Imagery can be turned off within the layer list panel. Note that some imagery does not cover the full
extent of the county.
Along the bottom of the map is coordinate information. The default display is WGS 84 DMS. The coordinates constantly
update as the mouse moves around the map. To the right of the coordinate display are 2 scales ‐ the scale bar and a
scale input box. You can input a scale of your own in the input scale box.
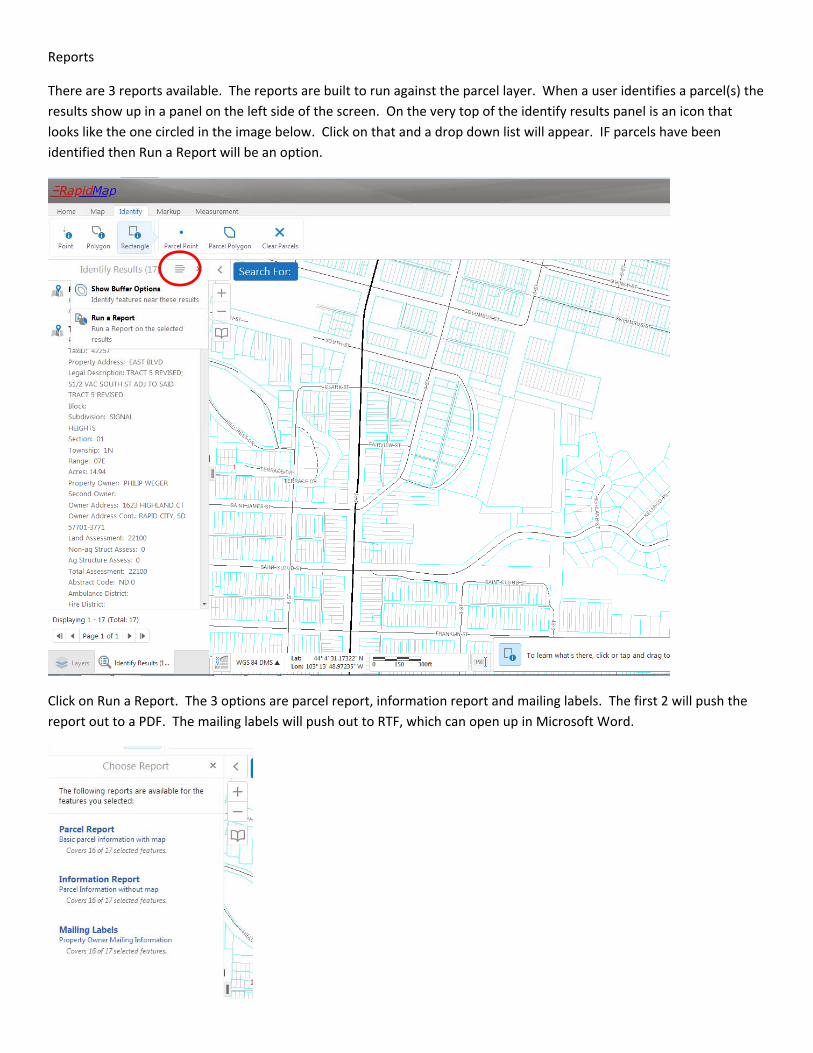
Reports
There are 3 reports available. The reports are built to run against the parcel layer. When a user identifies a parcel(s) the
results show up in a panel on the left side of the screen. On the very top of the identify results panel is an icon that
looks like the one circled in the image below. Click on that and a drop down list will appear. IF parcels have been
identified then Run a Report will be an option.
Click on Run a Report. The 3 options are parcel report, information report and mailing labels. The first 2 will push the
report out to a PDF. The mailing labels will push out to RTF, which can open up in Microsoft Word.