· pdf filerisaconnection rapid interactive ... column connection checks ... column web...
TRANSCRIPT

RISAConnection
Rapid Interactive Structural Analysis for Connections
Version 2.0 - General Reference
26632 Towne Centre Drive, Suite 210
Foothill Ranch, California 92610
(949) 951-5815
(949) 951-5848 (FAX)
www.risatech.com

Copyright 2012 by RISA Technologies, LLC All rights reserved. No portion of the contents of this
publication may be reproduced or transmitted in any means without the express written permission
of RISA Technologies, LLC.
We have done our best to insure that the material found in this publication is both useful and
accurate. However, please be aware that errors may exist in this publication, and that RISA
Technologies, LLC makes no guarantees concerning accuracy of the information found here or in
the use to which it may be put.

Table of Contents
General Reference Manual I
Table of Contents
Before You Begin ..................................................... 1
Overview .............................................................. 1
Program Capabilities ............................................ 1
System Requirements ........................................... 2
License Agreement ............................................... 2
Technical Support ................................................ 3
Installation ............................................................ 3
Application Interface ............................................... 4
Menus and Toolbars ............................................. 4
Shortcut Keys ....................................................... 5
Connection View .................................................. 5
Project Explorer ................................................... 7
Connection Properties .......................................... 7
Connection Modeling Process ............................... 11
Creating a Project ............................................... 11
Creating a Connection ........................................ 11
Available Connections ....................................... 13
Customizing RISAConnection .............................. 14
Preferences ......................................................... 14
DXF Export ............................................................ 16
Exporting DXF Files .......................................... 16
Global Parameters ................................................. 18
Description ......................................................... 18
Solution .............................................................. 18
Graphic Display ..................................................... 20
3D View Controls .............................................. 20
2D View Controls .............................................. 21
Reports View ...................................................... 21
Plot Options ........................................................ 22
RISAFloor and RISA-3D Integration .................. 24
Connection Grouping ......................................... 24
Grouping Behavior ............................................. 25
Loading/Load Combinations .............................. 28
Solving Connections .......................................... 29
Viewing Results (in RISAConnection) .............. 29
Viewing Results (in RISAFloor or RISA-3D) ... 31
Round-tripping between RISAFloor/RISA-3D and
RISAConnection ................................................ 31
Results .................................................................... 32
Member Information .......................................... 32
Design Checks ................................................... 33
Sign Convention .................................................... 34
Axial Load ......................................................... 34
Beam Shear ........................................................ 34
Beam Moment ................................................... 34
Story Shear ........................................................ 34
Stability and Geometry Checks ........................... 36
Erection Stability ............................................... 36
Rotational Ductility ........................................... 36
Bolt Geometry Restrictions ............................... 37
Material Checks .................................................... 39
Shear Yield Strength .......................................... 39
Shear Rupture Strength ...................................... 39
Plate Tension Yield............................................ 40
Tension Rupture ................................................ 40
Block Shear Strength ......................................... 40
Plate Tearout ...................................................... 41
Plate Flexural Yielding ...................................... 42
Plate Flexural Rupture ....................................... 44
Plate Flexural Buckling ..................................... 44
Plate Compression Buckling .............................. 46
Bolt Checks ............................................................ 47
Bolt Group Eccentricity ..................................... 47
Slip Critical Considerations ............................... 48
Bolt Shear Strength ............................................ 48
Bolt Tensile Strength ......................................... 49
Bolt Bearing Strength ........................................ 51
Weld Calculations ................................................. 55
Weld Geometry .................................................. 55
Base Material Strength ...................................... 56

Table of Contents
II RISAConnection v2.0
Elastic Weld Strength ......................................... 57
ICR Weld Strength ............................................. 58
Non-Eccentric Fillet Weld Strength ................... 59
PJP Weld Strength .............................................. 60
CJP Weld Strength ............................................ 61
Weld Size Limitations ........................................ 61
Coped Beam Checks .............................................. 63
Calculation of Snet (Net Section Modulus) ......... 63
Flexural Rupture Strength .................................. 63
Local Web Buckling Strength ............................ 63
Lateral Torsional Buckling Strength .................. 64
Limitations ......................................................... 65
Column Connection Checks .................................. 66
Force Distribution .............................................. 66
Column Flange Bending (Shear Connections) ... 67
Column Flange Bending (Mom Connections).... 68
Column Flexural Yielding .................................. 68
Column Web Yielding (Shear Connections) ...... 70
Column Web Yielding (Moment Connections).. 71
Column Web Crippling (Shear Connections) .... 73
Column Web Buckling (Mom Connections) ..... 73
Column Web Crippling ...................................... 74
Column Panel Zone Shear ................................. 75
Design Checks for Moment Connections ............ 77
Required Flange Force ....................................... 77
End Plate Moment Checks ................................. 77
Axial Force in Moment Connections ................. 81
Vertical Brace Connections .................................. 82
Diagonal Brace Connection ............................... 82
Chevron Brace Connection ................................ 82
Analysis Methodology ....................................... 83
Limitations ......................................................... 83
Gusset Plate Design ........................................... 85
Printing .................................................................. 87
Print Preview ..................................................... 87
Units ....................................................................... 89
Technical Support ................................................. 90

Before You Begin
General Reference Manual 1
Before You Begin
Welcome to the RISAConnection General Reference manual. Please read this topic prior to installing the program and
pay particular attention to the License Agreement. If you agree to the terms of the license then read the Installation
section and install the program. If you are a first time user of RISAConnection it would be beneficial to browse through
this manual to become familiar with the interface and connection design capabilities.
Overview
RISAConnection is a hot-rolled steel connection design program that allows you to design many types of connections for
different hot rolled shapes and configurations. The program utilizes multiple graphical views with a tabular input
location to make connection modeling straightforward and efficient. After configuring your connection, the program will
give detailed calculations for all of the different connection failure modes complete with full calculation values that you
can verify quickly and easily.
All design checks are done per the requirements and provisions of the AISC 360-05 (13th Edition) Steel Code. The
program will calculate the analysis results and design code checks for both the LRFD and ASD design methods. For the
End Plate Moment Connection, the program will also sometimes reference the AISC Steel Design Guide 4, 2nd Edition.
Program Capabilities
RISAConnection can model the following shear connections:
Wide flange column to beam and girder to beam shear connections using connectors made up of:
o Single angles
o Double angles
o End plates
o Shear tabs
Wide flange column and beam shear tab splices.
RISAConnection can model the following moment connections:
Wide flange column to beam extended end plate connections
Wide flange column to beam flange plate moment connections
Wide flange column and beam end plate splices
Wide flange column and beam flange plate splices
RISAConnection can model the following brace connections:
Single or double angle diagonal vertical brace connections with wide flange columns and beams
Single or double angle chevron vertical brace connections with wide flange beams
The program designs based on the AISC 360-05 specification for both ASD and LRFD.

Before You Begin
2 RISAConnection v2.0
System Requirements
Minimum
Windows XP SP3\Vista SP2\Windows 7 SP1
DirectX 9.0c or later
Two or three button mouse
Recommended
As much extended RAM as possible
License Agreement
END-USER LICENSE AGREEMENT FOR RISA TECHNOLOGIES, LLC® SOFTWARE
The RISAConnection software product (SOFTWARE PRODUCT) includes computer software, the associated media,
any printed materials, and any electronic documentation. By installing, copying or otherwise using the SOFTWARE
PRODUCT, you agree to be bound by the terms of this agreement. If you do not agree with the terms of this agreement
RISA Technologies, LLC is unwilling to license the SOFTWARE PRODUCT to you. In such event you must delete any
installations and destroy any copies of the SOFTWARE PRODUCT and return the SOFTWARE PRODUCT to RISA
Technologies, LLC within 60 days of purchase for a full refund.
Copyright 2012 by RISA Technologies, LLC. All rights reserved. The SOFTWARE PRODUCT is protected by United
States copyright laws and various international treaties. All rights not specifically granted under this agreement are
reserved by RISA TECHNOLOGIES, LLC.
1. SOFTWARE LICENSE. The SOFTWARE PRODUCT is licensed, not sold. All right, title and interest is and
remains vested in RISA TECHNOLOGIES, LLC. You may not rent, lease, or lend the SOFTWARE PRODUCT. You
are specifically granted a license to the use of this program on no more than one CPU at any given time. The Network
Version of the SOFTWARE PRODUCT is licensed for simultaneous use on a certain maximum number of network
stations that varies on a per license basis. As part of the license to use the SOFTWARE PRODUCT, the program user
acknowledges the reading, understanding and acceptance of all terms of this agreement. The SOFTWARE PRODUCT
may not be reviewed, compared or evaluated in any manner in any publication without expressed written consent of
RISA Technologies, LLC. You may not disassemble, decompile, reverse engineer or modify in any way the
SOFTWARE PRODUCT. If the SOFTWARE PRODUCT was purchased at a discounted price for educational purposes
it may in no event be used for professional design purposes. The terms of this license agreement are binding in
perpetuity.
2. DISCLAIMER. We intend that the information contained in the SOFTWARE PRODUCT be accurate and reliable,
but it is entirely the responsibility of the program user to verify the accuracy and applicability of any results obtained
from the SOFTWARE PRODUCT. The SOFTWARE PRODUCT is intended for use by professional engineers and
architects who possess an understanding of structural mechanics. In no event will RISA Technologies, LLC or its
officers be liable to anyone for any damages, including any lost profits, lost savings or lost data. In no event will RISA
Technologies, LLC or its officers be liable for incidental, special, punitive or consequential damages or professional
malpractice arising out of or in connection with the usage of the SOFTWARE PRODUCT, even if RISA Technologies,
LLC or its officers have been advised of or should be aware of the possibility of such damages. RISA
TECHNOLOGIES' entire liability shall be limited to the purchase price of the SOFTWARE PRODUCT.
3. LIMITED WARRANTY. RISA Technologies, LLC warrants that the SOFTWARE PRODUCT will operate but does
not warrant that the SOFTWARE PRODUCT will operate error free or without interruption. RISA Technologies sole
obligation and your exclusive remedy under this warranty will be to receive software support from RISA Technologies,
LLC via telephone, email or fax. RISA Technologies, LLC shall only be obligated to provide support for the most recent
version of the SOFTWARE PRODUCT. If your version of the SOFTWARE PRODUCT is not the most recent version
RISA Technologies, LLC shall have no obligation to provide support in any form. Except as stated above the
SOFTWARE PRODUCT is provided without warranty, express or implied, including without limitation the implied
warranties of merchantability and fitness for a particular purpose.

Before You Begin
General Reference Manual 3
4. PROTECTION DEVICE. In the event the SOFTWARE PRODUCT requires the use of a PROTECTION DEVICE
to operate, you are specifically prohibited from attempting to bypass the functionality of the PROTECTION DEVICE by
any means. If the PROTECTION DEVICE becomes broken or inoperable it should be returned to RISA Technologies,
LLC for a replacement. The replacement will not be provided if RISA Technologies, LLC can not affirm that the broken
PROTECTION DEVICE was originally provided by RISA Technologies, LLC for use with the SOFTWARE
PRODUCT. A lost or stolen PROTECTION DEVICE will not be replaced by RISA Technologies, LLC.
5. TERMINATION. RISA Technologies, LLC may terminate your right to use the SOFTWARE PRODUCT if you fail
to comply with the terms and conditions of this agreement. In such event you must delete any installations and destroy
any copies of the SOFTWARE PRODUCT and promptly return the SOFTWARE PRODUCT to RISA Technologies.
6. CHOICE OF LAW. By entering into this Agreement in accordance with Paragraph 1, above, you have agreed to the
exclusive jurisdiction of the State and Federal courts of the State of California, USA for resolution of any dispute you
have relating to the SOFTWARE PRODUCT or related goods and services provided by RISA Technologies, LLC. All
disputes therefore shall be resolved in accordance with the laws of the State of California, USA and all parties to this
Agreement expressly agree to exclusive jurisdiction within the State of California, USA. No choice of law rules of any
jurisdiction apply.
"RISA" as applied to structural engineering software is a trademark of RISA Technologies, LLC.
Technical Support
Complete program support is available to registered owners of RISAConnection and is included in the purchase price.
This support is provided for the life of the program. The "life of the program" is defined as the time period for which that
version of the program is the current version. In other words. whenever a new version of RISAConnection is released,
the life of the previous version is considered to be ended.Technical support is a limited resource; first priority will always
be given to those clients who are current on their maintenance.
See Technical Support for a list of your support options.
Installation
To install RISAConnection please follow these instructions:
1. Put the RISAConnection CD in your computer CD drive.
2. If the CD starts automatically go to step 4. If the CD does not start after 10 seconds click the Windows Start
button and select Run.
3. In the Run dialog box type "d:\launch" (where "d" is the label of your CD drive) and then click the OK button.
4. Follow the on-screen directions.
For more in-depth installation instructions, please visit our website at: http://www.risatech.com/s_licensing.html

Application Interface
4 RISAConnection v2.0
Application Interface
Modeling features in RISAConnection may be accessed through the Main menu, Window toolbar, shortcut keystrokes,
and the Connection Properties spreadsheet. You may use any or all of these vehicles to interact with the software. The
Main menu has the tools required to create new models, save, print, Global Parameters, and viewing options. The
Window toolbar contains many of the same options as the Main menu but can be accessed slightly easier with just one
click. The shortcut keys provide a fast way to access features should you use the program often enough to make them
familiar to you. Finally, the Connection Properties spreadsheet contains all the user-input data to model your connection.
These features are discussed in the sections below.
Menus and Toolbars
Title Bar
The bar along the top of the screen is called the Title bar, which displays the name of the file that is currently open. The
three buttons on the far right side of the Title bar are used to control the main window. The left button will
shrink the main application window to a button on the Taskbar. The middle button will shrink or maximize the window
on your screen. The right button will close the file, prompting you to save changes if necessary.
Main Menu
Just beneath the Title bar is the Main menu. These menus provide access to all of the program features. Clicking on each
of these options will open windows to display sub-menus that contain more options that you may choose from. Please
see Units, Global Parameters, 2D Views, and 3D View for more information on these options.
Note:
The Solve option is only available when working on a RISAConnection model that is integrated with RISAFloor
and/or RISA-3D. Otherwise, the connections are solved automatically.
Window Toolbar
Below the Main menu is the Window toolbar which provides easy access to many of the same options as from the Main
menu. If you are not sure what a button does hold the mouse cursor over the button and a tool tip will explain the button.
Button Function
Starts a new project
Adds a connection to the current project
Opens a previously created project
Saves the current project
Saves the current connection information as the default for
future connections of the same type. This also creates a
default file to store this information.
Prints the current Connection View
Previews the current print

Application Interface
General Reference Manual 5
Button Function
Copy the connection
Undo and redo previous changes
Opens the Plot Options dialog
Opens the Global Parameters dialog
Opens the Units dialog
Gives different viewing options for the 3D view
Switches the Connection View between 3D, 2D and Report
view
Toggles the transparency of the 3D view
Opens the help file within the program
Solves the current Connection, Group, or the entire Project.
These buttons are only available if the RISAConnection file
is integrated with a RISAFloor and/or RISA-3D model.
Shortcut Keys
The following keys (or key combinations) can be accessed as shortcuts to help speed up your modeling.
Shortcut Key Action
CRTL + O Open a File
CRTL + S Save a File
F1 Access Help Menu
F2 Switch to a 2D View
F3 Switch to a 3D View
Connection View
The Connection View provides options for viewing both the graphical display of the connection (in 2D or 3D view) and
also viewing the result output report.
Graphical Display

Application Interface
6 RISAConnection v2.0
Results Report
3D View
This view allows you to move your connection around and view it from all sides and angles. If you click on a specific
connection element in this view it will highlight in the Connection Properties section. See the Graphic Display topic for
more information.
2D View
Viewing the model in 2D allows you to see each of the components of the connection, complete with dimensions, bolt
holes and some assembly views.
If you click on a specific connection element or dimension, that element or dimension will highlight in the Connection
Properties section. See the Graphic Display topic for more information.

Application Interface
General Reference Manual 7
Reports
The Reports section shows all the results from the program, including component properties and design checks. See the
Graphic Display topic and the design checks topics for more information.
Project Explorer
The Project Explorer shows the current project along with a list of all the connections in the project file.
Connection Properties
The Connection Properties gives ability to define all of the parameters for the connection. Modifying this data
automatically updates the design check calculations in standalone mode. If integrated with RISAFloor and/or RISA-3D,
then you must re-solve the connection after changes.
Note:
If using RISAConnection integration with RISAFloor and/or RISA-3D, some of these fields are grayed out in
certain scenarios. For more information on this see the RISAFloor and RISA-3D Integration topic.
Application Interface
8 RISAConnection v2.0
Connection
The Connection Title allows you to give your connection a specific name. The Connection Type gives a quick
description of the components of the connection.
Connection Category
The Connection Category allows you to define the connection type (bolted vs welded) and orientation.
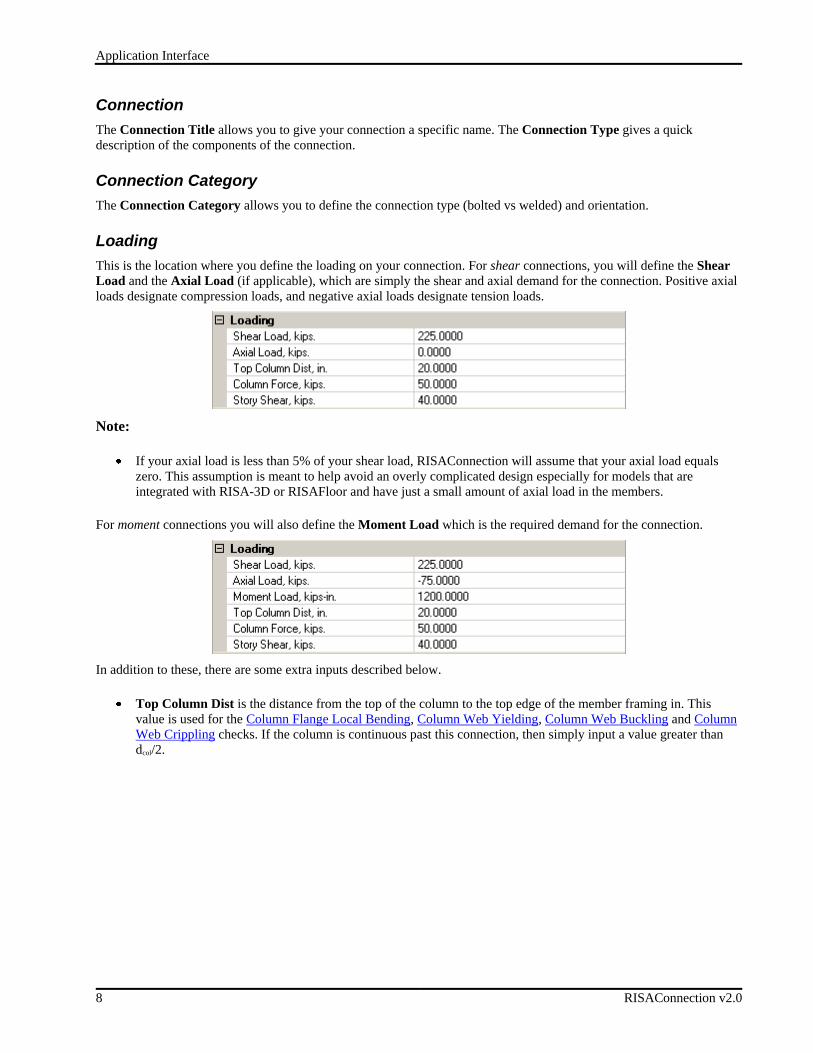
Loading
This is the location where you define the loading on your connection. For shear connections, you will define the Shear
Load and the Axial Load (if applicable), which are simply the shear and axial demand for the connection. Positive axial
loads designate compression loads, and negative axial loads designate tension loads.
Note:
If your axial load is less than 5% of your shear load, RISAConnection will assume that your axial load equals
zero. This assumption is meant to help avoid an overly complicated design especially for models that are
integrated with RISA-3D or RISAFloor and have just a small amount of axial load in the members.
For moment connections you will also define the Moment Load which is the required demand for the connection.
In addition to these, there are some extra inputs described below.
Top Column Dist is the distance from the top of the column to the top edge of the member framing in. This
value is used for the Column Flange Local Bending, Column Web Yielding, Column Web Buckling and Column
Web Crippling checks. If the column is continuous past this connection, then simply input a value greater than
dcol/2.

Application Interface
General Reference Manual 9
Column Force is axial force in the column at the location of the connection. This is used in the Column Panel
Zone Shear check.
Story Shear is the shear force in the column at the location of the connection. This is used in the Column Panel
Zone Shear check.
Components
The Components section is a location where you can input specific details about the different connection components.
This is where you define member sections, materials, bolt information, weld information and other specifics. Most of
these items are self-explanatory. Here are some details of the inputs.
Sections:
o In the Shape Selection dialog you can now choose which shape library you wish to use. This allows
access to all of the RISA foreign shapes databases. Note that RISAConnection will NOT read in shapes
from the AISC_BACKUP database.

Application Interface
10 RISAConnection v2.0
Hole Types:
Hole Type Explanation STD Standard holes
OVS Oversize holes
SSLH Short-slotted holes with the long
dimension horizontal.
SSLV Short-slotted holes with the long
dimension vertical.
LSLH Long-slotted holes with the long
dimension horizontal.
LSLV Long-slotted holes with the long
dimension vertical.
*See Table J3.3 of the AISC 360-05 for the nominal hole dimensions for both imperial and metric units.
Slip Critical:
o If you have a slip-critical design consideration, choose which type of faying surface you have (Class A or
Class B). This will define the mean slip coefficient for Eq J3-4 from the AISC 360-05 specification.
o The Hole Types used for slip critical connections define whether the connection should be designed for
slip as a serviceability limit state or a strength limit state. Connections with standard holes and transverse
slotted holes are designed for slip as a serviceability limit state. Connections with oversized holes and
vertical slotted holes are designed for slip as a strength limit state.
Assembly
The Assembly section is where you define other required dimensions such as: coping dimensions, edge distances,
clearances, etc. Many of these values can be changed manually. Some of these values have maximum values that if you
exceed that value we will use the maximum value. Other values are grayed out, meaning their value is dependent on
other dimensional properties of the connection.
Notice that for all of the input, a more detailed explanation will be displayed in the display at the lower right corner of
the screen.
Try clicking around in the various input cells to see this display change.
Here are some specific assembly details.
Beam Vert Offset (for Girder/Beam connections): This value is positive if the beam is set downward from the
girder and is negative if the beam is set upward from the girder.
Angle Vertical Position (for Girder/Beam connections): This value is not allowed to smaller than the top coped
depth of the beam. There is no check that the angle doesn't foul the bottom flange.
Auto-Update Connections (for Vertical Brace Connections): This option (Yes or No) tells the program whether
you wish to completely reconfigure the Gusset to Beam and the Gusset to Column (diagonal brace connection
only) connections. By stating Yes the program will completely optimize your connection AND reset everything
for that connection each time you make a geometry change. By stating No the program will not modify these
connections. Thus, if you are starting from scratch and just inputting the initial geometry information, keep this
option on Yes to get optimized connections. However, once your connection is mostly laid out, switch this to No
to save your connection information. When bringing a connection from RISAFloor or RISA-3D this option will
default to No. When starting a connection from scratch this option will default to Yes.

Connection Modeling
General Reference Manual 11
Connection Modeling Process
RISAConnection is set up to consider multiple connections within a single project file. The idea is that an entire structure
could have all of it's connections in the same file. Each connection within the project is named something unique to let
the designer know where this connection exists in the structure.
Note:
This procedure is for standalone use only. For information on using RISAConnection integration see the
RISAFloor and RISA-3D Integration topic.
Creating a Project
Creating a new project in RISAConnection is as easy as pressing or going to File-New-Project:
Once the project is added it shows up in the Project Explorer.
Now you can modify the Global Parameters information into the Global Parameters dialog to be appropriate for
your project.
Creating a Connection
Once the project has been created, the next step is to add individual connections. To add a connection simply press the
Add New Connection button or right-click the project in the Project Explorer and choose Add Connection:

Connection Modeling
12 RISAConnection v2.0
This opens up the Create New Connection dialog:
The Connection Category allows you to narrow down your selection options in the Connection Type. Here you can see
all of the available connections in the program.
The Connection Name allows you to give the connection a unique name and either add this connection to the current
project or create a new project with this connection in it. Press OK and the connection will be added.
Once added, connections will show up under the project in the Project Explorer. Here we can right-click the individual
connections to cut, copy, paste, rename or delete the connection.

Connection Modeling
General Reference Manual 13
Thus, if you have several connections that are very similar you can create an initial connection and simply copy that
connection and make minor revisions.
Available Connections
The Available Connections section provides a list of the connections currently supported in the program and is only a
viewer.

Customizing RISAConnection
14 RISAConnection v2.0
Customizing RISAConnection
You may customize several of the default parameters, and Preference options in RISAConnection. In this way you can
modify the program so that it best suits you and your work processes. The Preferences option on the Tools menu
provides you control over the behavior of the software. All customization may be defined or redefined at any time.
Preferences
Preferences options may be accessed by selecting Preferences from the Tools menu and are divided into the sections
described below.
General Tab
The General tab of the Preferences dialog contains options that are generally straightforward and can be easily set to
customize the program with every new model you create.
The Show Expanded Properties for Components checkbox allows the user the option to expand the component
information in the Connection Properties input. If this box is checked, the Components section of Connection
Properties will expand to show all the section properties of your selected element (Column, Beam, Plate, etc.). If
not checked, this section will condense down to just the editable properties (shape, material, etc.).
The Display Feet, Inched in the Results Using Fractions checkbox allows the user control over the display of
the results. If this is checked, results will display in fraction format. If it is unchecked, then they will be displayed
in decimal format.
The Open Global Parameters After New Project Creation checkbox controls whether or not the Global
Parameters dialog box is automatically displayed to you when you start a new Project file. If this is left
unchecked, then this dialog will not automatically open when you start a new model.
The Print only "Summary" of all design checks provides a way to only print the summary view of a report. If
this box is unchecked then any report printing will print the expanded view showing all variables and equations
for each check.
The New Connection options allow the user to set what is displayed to you after a new Project is created. You
can choose to show the entire Project ( the main window will display thumbnails of each Connection that you
have created) or automatically create a New Connection for you which you can then build into your Project.

Customizing RISAConnection
General Reference Manual 15
The Decimal Places entries allow the user control over the number of decimals that are shown in the Property
Grid (Connection Properties spreadsheet) and the dimension values shown in the Reports and Views.
The Path to Steel Shapes Databases shows where the program is looking for the shapes databases that it reads
into the program. If your databases are not located in this path, you must either change the patch or move the
databases to this directory.
Report Logo Tab
The Report Logo tab of the Preferences dialog contains options for the user to upload a company logo to include with
the printed output. This image will then be displayed at the top of the design report.

Customizing RISAConnection
16 RISAConnection v2.0
DXF Export
You may export 2D Views of connections as DXF files. This feature provides compatibility with any other program that
can read DXF files. This includes most major CAD programs.
Exporting DXF Files
You can export the connection by going to File-Export:
You can select to Export a single Connection, or you can export all the connections from entire project.
The Single Connection will create a 2D drawing for each 2D View available for that connection. Each view is framed
inside a box and the Connection title view name is shown. All the elements are described with labels.
The All Connections option will create 2D drawings for each 2D View available for every connection. Each view is
framed and the connection title and view name is shown. Each connection will be shown in a vertical array. All the
elements are described with labels.
Customizing RISAConnection
General Reference Manual 17
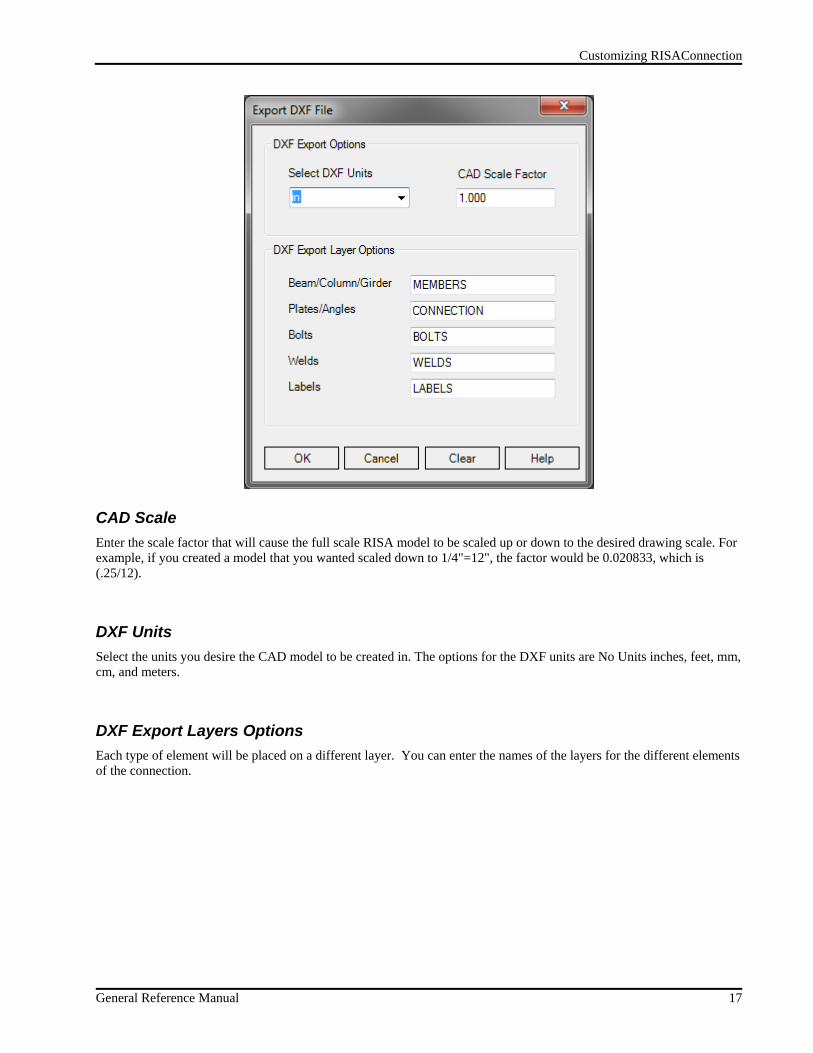
CAD Scale
Enter the scale factor that will cause the full scale RISA model to be scaled up or down to the desired drawing scale. For
example, if you created a model that you wanted scaled down to 1/4"=12", the factor would be 0.020833, which is
(.25/12).
DXF Units
Select the units you desire the CAD model to be created in. The options for the DXF units are No Units inches, feet, mm,
cm, and meters.
DXF Export Layers Options
Each type of element will be placed on a different layer. You can enter the names of the layers for the different elements
of the connection.

Global Parameters
18 RISAConnection v2.0
Global Parameters
The Global Parameters dialog is used to define information that influences the entire model and its solution in an overall
(global) manner, including all the connections within a project.
To access the Global Parameters dialog, click on the Global button from the Main menu, or the Global icon
from the Window toolbar.
Description
The entries under the Description tab are used to enter descriptive information such as a Title for the current project, the
Name of the designer and a Job Number.
Solution
The Solution tab contains options which affect how the connections in the current project will be analyzed /designed.

Global Parameters
General Reference Manual 19
Design Method
All design calculations in RISAConnection are performed per the AISC 360-05 specification, as well as additional AISC
material (Design Manual, Design Guides, etc.)
You may choose whether you want the connections designed using ASD or LRFD.
Note:
If working in an integrated model with RISAFloor and/or RISA-3D, the Design Method will be grayed out and
based on the settings from the RISAFloor or RISA-3D model.
When entering loads in to the Loading input, be sure that they include the appropriate factors for the design
method chosen.
Bolt Group Analysis Method
The design of bolt groups with eccentric loading can be handled via the Instantaneous Center of Rotation Method or
the Elastic Method.
For information on both methods see the AISC 360-05 Manual, Page 7-6 and the Bolt Group Eccentricity topic.
Weld Analysis Method
The design of welds with eccentric loading can be handled via the Instantaneous Center of Rotation Method or the
Elastic Method.
For information on both methods see the AISC 360-05 Manual, Page 8-9 and the Weld Calculations topic.
Consider Bolt Hole Deformation
This checkbox defines whether deformation at bolt holes at service load is a design consideration or not. If this is
checked it means it is a design consideration. If not, it is not a design consideration. This impacts the Bolt Bearing
Strength equations. See the Bolt Bearing Strength topic for more information.
Check Rotational Ductility
TheRotational Ductilitycheckbox gives an option whether or not to check shear connections for the ability to rotate,
thus verifying a "pinned" connection assumption.
Check Weld Filler Metal Matching (CJP/PJP Weld Checks)
This checkbox gives an option whether or not to check the weld material against the base material per the AWS. See the
CJP Weld Strength section for more information.

Graphic Display
20 RISAConnection v2.0
Graphic Display
RISAConnection allows you to graphically view your connection in two- and three- dimensional views. Below, the
functionality that is available within each of these views is explained.
3D View Controls
To view the 3D view, simply click the 3D View tab in the Connection View. This view will allow you to see the
connection from all sides by simply clicking and dragging the mouse. All of the elements in the connection are drawn
/modified in real time. Therefore, if you update a member size, or change the clip angle, you will see this update in the
3D View.
Mouse Controls
Left-Click: If you left-click a component in the 3D view it will highlight that element in the Connection
Properties. This points you directly to where that component is located and provides quick access for modifying
properties related to it.
Left-Click Hold and Drag: This allows you to dynamically rotate your connection to view from all sides.
Right-Click and Hold: This will allow you to move your connection around via panning.
Middle Mouse Wheel Scroll: This will allow you to zoom in and out for your connection.
Middle Mouse Wheel Click: This will snap your connection back into the initial isometric view.

Graphic Display
General Reference Manual 21
2D View Controls
To view the 2D view, simply click the 2D View tab in the Connection View. This view allows you to use the tabs across
the top of the screen to see the different connection components in various individual 2D Views. These dimensioned
views allow you to double click the dimensions to show where this value is located in the Connection Properties. This
makes it very easy to change a dimension or property in a 2D view. There are also some component views available
simply for viewing the connection assemblies.
Reports View
This view is available to show all of the output of the program. There are two main windows available: Members and
Results (either LRFD or ASD, depending on the code chosen in Global Parameters). These reports are shown in real
time. Therefore, whenever a property of the connection is changed, the program updates the result reports for this
change.
Members
The Members Report view shows detailed properties of all of the components in the connection. Tabs within the report
allow you to switch between these components for member properties, hole dimensions, coping and material
information.

Graphic Display
22 RISAConnection v2.0
In this example we have an end plate moment connection. Thus, we see tabs for each element in the connection,
including the bolts for the connection. These are simply a presentation of properties of the connection. There are no
engineering calculations used in these values.
Results
The Results Reports gives all of the design checks for the connection, as well as material properties for each
component. These design checks are listed with the required strength, provided strength, unity check and whether the
connection passed that specific check. A red FAILED message will clearly alert you if you have a connection check that
is not passing. In addition to a list of unity checks for each connection you can also click on the individual check to get a
detailed calculation complete with explanation of each variable in that check.
For more information/details on a specific design calculation, please see the specific check topic in the Help menu.
Plot Options
Plot Options settings provide both 2D and 3D viewing options.

Graphic Display
General Reference Manual 23
3D View Tab
Use Perspective Projection - This option puts the connection into an architectural perspective view.
Rotate View - This animates the connection view for graphical purposes.
View Mode - This gives a normal rendered view versus a transparent type view.
Highlight on the Fly - With this checkbox if you scroll over the connection it will highlight the specific part of
the connection you are scrolling over.
2D View Tab
Show Grid - This selection gives an option for how you want to view the background of the two-dimensional
view.
Highlight on the Fly- With this checkbox if you scroll over the connection it will highlight the specific part of
the connection you are scrolling over.

RISAFloor and RISA-3D Integration
24 RISAConnection v2.0
RISAFloor and RISA-3D Integration
RISAConnection has the ability to integrate with RISAFloor and RISA-3D. The integration involves importing all
geometry, member sizes, design specifications, and loading into RISAConnection seamlessly from RISAFloor and/or
RISA-3D.
To learn how to take the model into RISAConnection, view the RISAConnection Integration topic within the
RISAFloor or RISA-3D help file. This portion of the help file will explain how everything works on the
RISAConnection side.
When first coming into RISAConnection from RISAFloor or RISA-3D you will see that the file is populated with all of
the VALID connections. Thus, only connections that RISAConnection can actually design will be brought over.
The act of invoking RISAConnection from RISAFloor or RISA-3D will create a RISAConnection file (with a .rcn
extension) that will have the same name as the RISAFloor or RISA-3D model and will be located in the same directory.
See the RISAConnection Integration topic within the RISAFloor and RISA-3D help file for more information on
connection limitations.
Connection Grouping
Once you have imported your information in RISAConnection, you will see that the connections are grouped in the
Project Explorer.
The groups in RISAConnection are based on the Connection Rules from RISAFloor and RISA-3D. Within each
Connection Rule, however, there are also groupings based on whether the members are lateral vs gravity and whether a
column/beam connection frames into the web or flange of the column. Therefore, a single connection rule could
potentially create as many as four groupings in RISAConnection.

RISAFloor and RISA-3D Integration
General Reference Manual 25
A Lateral member is a member that has been defined in RISAFloor as Lateral, or is a 3D-only member.
A Gravity member is a member defined in RISAFloor as Gravity.
Grouping Behavior
In the Project Explorer there are three levels: Project level, Group level, and Connection level. These levels are nested
within each other and allow you to change design and connection properties quickly and easily. There are also properties
that can only be changed within RISAFloor or RISA-3D. Here we will discuss these different connection property
categories and how to use them properly.
RISAFloor and RISA-3D Level
Items that can only be modified from RISAFloor or RISA-3D
Design Method (ASD or LRFD).
Grouping of Connections: If you wish to move a connection to a different connection group then you must go
into RISAFloor or RISA-3D and modify that member end's Connection Rule.
Properties that are defined within the Connection Rules of RISAFloor or RISA-3D. These currently consist of
whether the connections are welded or bolted to each other. If you wish change from bolted to welded or vice
versa you must also do this within RISAFloor or RISA-3D.
If you wish to modify any of these properties you need to go back to the RISAFloor or RISA-3D model, make the
change, and then re-export to RISAConnection.
Project Level
When you click the project label in the Project Explorer, the Project Properties are then shown.
Here you can update information in the Project Description fields and some of the options from the Global Parameters
- Solution tab.

RISAFloor and RISA-3D Integration
26 RISAConnection v2.0
Note:
When you click the Project in the Project Explorer the left screen shows all of the groups in the project and
gives a representative view of each.
Group Level
When you click on a Group in the Project Explorer then the Group Properties are shown.
In the Group Properties you can modify connection properties for all of the connections within this group at one time.
The grayed out properties are properties brought over directly from RISAFloor and RISA-3D; these properties can not be
edited in RISAConnection.
If an item is labeled -Various- it means that there are multiple values in this field for the different connections in this
group.

RISAFloor and RISA-3D Integration
General Reference Manual 27
Note:
If you have changed individual connection properties and then go back to the group, changes here will overwrite
any of those individual connection changes.
When you click a Group in the Project Explorer the left screen shows all of the connections graphically in that
group.
Connection Level
When you click on an individual connection, that connection's properties are shown.
The grayed out properties within an individual connection may be either RISAFloor/3D controlled, Project level
controlled, or Group level controlled. You must go up to those levels to change these properties for these connections.

RISAFloor and RISA-3D Integration
28 RISAConnection v2.0
Loading/Load Combinations
All load combinations from RISAFloor and RISA-3D that have the Connection checkbox selected in the Load
Combinations spreadsheet will be brought into RISAConnection. There is a Load Combination drop-down in the
upper-right hand corner. This drop down is only available when looking at an individual connection. You can scroll
through the load combinations and viewing the loading and results for each.
When you are viewing a specific load combination then you can see the forces for the connection in the Loading section.
For moment connections you can also see the Top Column Dist, Column Force and Story Shear values that are
brought over from the RISAFloor or RISA-3D model as well. These forces are only available for viewing.
Note:

RISAFloor and RISA-3D Integration
General Reference Manual 29
When you click an individual connection, the Load Combination menu jumps to the LC which produces the
worst case code check.
The Column Force and Story Shear values are only considered for RISA-3D load combinations.
Solving Connections
Once you get the connections configured properly you need to solve the model. You can solve the model by connection,
by group or for the entire project. Every load combination from RISAFloor and RISA-3D will be solved each time.
There are three different ways to access solving options:
1. From the Solve dropdown menu:
2. From the Windows toolbar:
3. From the right-click menu in the Project Explorer (right-clicking the Project line will solve the entire project,
the Group line solves the group, and an individual connection solves that connection only).
Note:
If you are using RISAConnection as a standalone program then these solve buttons have no use because the
model is re-solved automatically each time a change is made.
Viewing Results (in RISAConnection)
Once you have a connection, a group, or the entire project solved you will be able to view results via the Project
Explorer or Reports tab.
Project Explorer
The Project Explorer gives a summary of the design results for the project. Each connection gives a Pass or Fail
notification, along with the Max UC and the LC that produced it.
The Group will state "Pass" if all of the connections within the group passes. It will state "Fail" otherwise.

RISAFloor and RISA-3D Integration
30 RISAConnection v2.0
If a property is changed then the connections whose properties are affected will be invalidated. If you modify a single
connection then the results for that connection will be invalidated and an (N/A) will be shown.
In this scenario you can simply re-solve that connection to get results again.
If you invalidate a group property then that will invalidate all of the connections within that group. If you invalidate a
project property, then it will invalidate all connections in the project.
Reports
The Report view gives the unity checks for the load combination shown in the Load Combination dropdown. The load
combination selected by default is the one that produced the worst case unity check value. The Reports section will
show which Limit State produced this value.
If the connection you are viewing has its results invalidated by changing a connection property, then this message will be
shown:

RISAFloor and RISA-3D Integration
General Reference Manual 31
If this message is shown then the results shown are invalid. Pressing this message has the effect of solving that
individual connection for all load combinations. The program will then give valid results for this connection.
Viewing Results (in RISAFloor or RISA-3D)
Once you have your connections configured properly you can take those results back to RISAFloor and RISA-3D to be
viewed in the Connection Results browser and graphically. To do this you must have the RISAFloor or RISA-3D model
opened and solved.
Choose File-Export Connection Results.
Round-tripping between RISAFloor/RISA-3D and RISAConnection
The RISAFloor/RISA-3D and RISAConnection integration is meant to be used for multiple roundtrips. Items to note
with this integration:
Any items that are controlled by RISAFloor or RISA-3D will be overwritten in the RISAConnection file EVERY
time the RISAFloor or RISA-3D model sends results to RISAConnection. This includes loading, section sizes,
connection types, etc.
Items that are controlled by RISAConnection will NOT be overwritten by RISA-3D or RISAFloor. If you have
modified a connection in RISAConnection, these changes will be saved. An exception occurs if you modify the
Connection Rule for a particular member end. In this scenario, the new connections defaults will overwrite your
changes.
To go back and forth between the different programs you must make sure that the files are in the same directory
and have the same file name (with different file extensions). You can move files around to work on them
separately, but they must be located together to take advantage of the integration. If you move or rename the
RISAConnection file, then the next time RISAFloor or RISA-3D tries to interact with RISAConnection it will
simply create a new file.
Member sections used when round-tripping MUST be saved to the shapes databases. Section that are only saved
to the RISAFloor or RISA-3D file can not be read into RISAConnection. Sections that are saved in the
AISC_BACKUP can not be read either. Connections that have sections saved only to the file or only to the
AISC_BACKUP directory will not be designed.
Results
32 RISAConnection v2.0
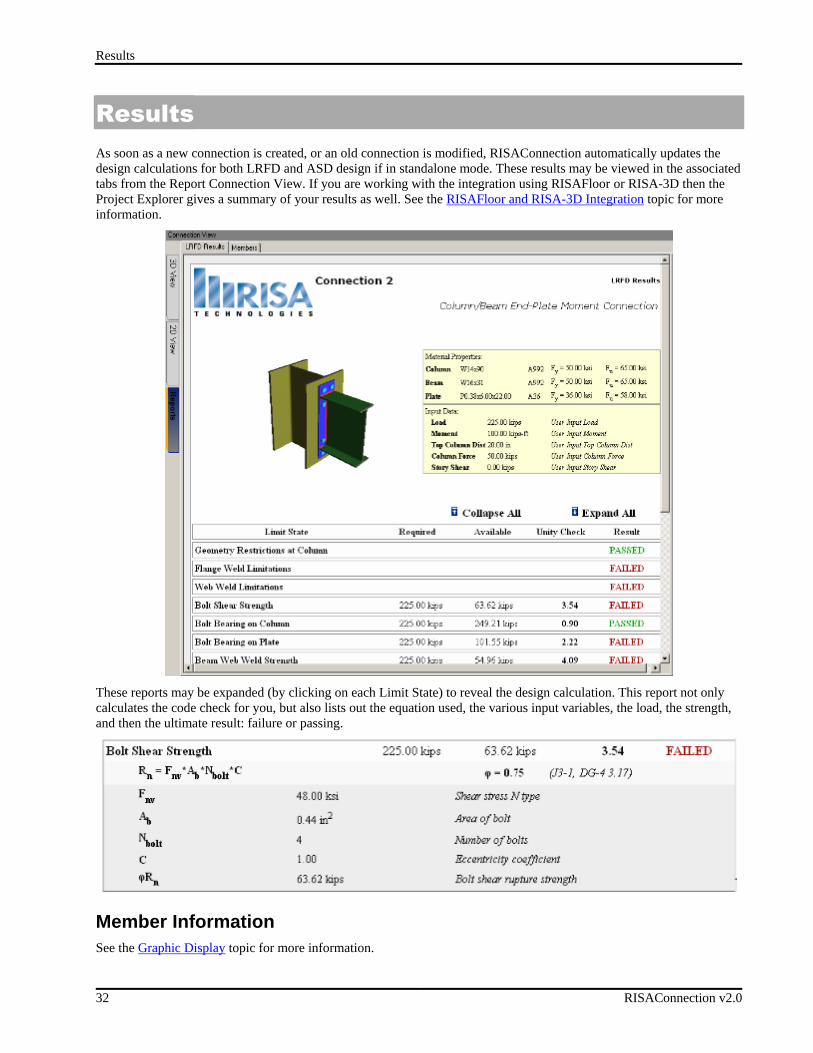
Results
As soon as a new connection is created, or an old connection is modified, RISAConnection automatically updates the
design calculations for both LRFD and ASD design if in standalone mode. These results may be viewed in the associated
tabs from the Report Connection View. If you are working with the integration using RISAFloor or RISA-3D then the
Project Explorer gives a summary of your results as well. See the RISAFloor and RISA-3D Integration topic for more
information.
These reports may be expanded (by clicking on each Limit State) to reveal the design calculation. This report not only
calculates the code check for you, but also lists out the equation used, the various input variables, the load, the strength,
and then the ultimate result: failure or passing.
Member Information
See the Graphic Display topic for more information.

Results
General Reference Manual 33
Design Checks
For a detailed explanation of the specific design check see the table of contents to locate it in this manual.

Sign Convention
34 RISAConnection v2.0
Sign Convention
RISAConnection uses a sign convention as shown in the image below:
Axial Load
A positive axial load designates compression while a negative axial load designates tension. This is the same load
convention used in RISA-3D and RISAFloor, so any loads brought over from the integration shall stay consistent.
Note:
If your axial load is less than 5% of your shear load, RISAConnection will assume that your axial load equals
zero. This assumption is meant to help avoid an overly complicated design especially for models that are
integrated with RISA-3D or RISAFloor and have just a small amount of axial load in the members.
Beam Shear
A downward load on the beam creates a positive shear in the connection. However, the sign of the shear load does not
affect the calculated capacity of the connection. This could be over conservative for beams with only the top flange
coped when it is subjected to a negative shear load. It could be under conservative for beams with only the bottom flange
coped when it is subjected to a negative shear load.
Beam Moment
The sign convention for beams with an end moment would normally result in a negative moment under gravity loads.
The sign of beam moments do change the capacity calculations for the connection. In particular, the column's ability to
resist the concentrated flange forces are affected by which flange is in tension or compression as well as the distance
between the applied flange force and the top of the column.
Note:
This sign convention agrees with the RISA-3D sign convention for moments, but is the opposite of RISAFloor's
sign convention for moment.
Story Shear
A positive story shear will counteract the panel zone shear caused by a negative end moment in the beam..

Sign Convention
General Reference Manual 35
Note:
There are cases where the story shear will actually increase the shear demand in the panel zone. This is more
likely to happen in cases where the positive bending moment caused by lateral forces is not enough to counteract
the negative bending moment due to gravity forces. RISAConnection does take these rare cases into account.

Stability and Geometry Checks
36 RISAConnection v2.0
Stability and Geometry Checks
This section focuses on checks concerned with stability, ductility and geometry restrictions.
Erection Stability
RISAConnection provides checks for erection stability, as prescribed in the AISC 13th Edition Manual. The following
checks are performed:
Double Angle Shear Connection
A warning is given if angle length does not exceed 1/2 of the T dimension of the supported beam. See AISC 13th Edition
Manual, Page 10-8.
End-Plate Shear Connection
A warning is given if plate length does not exceed 1/2 of the T dimension of the supported beam. See AISC 13th Edition
Manual, Page 10-49.
Shear Tab (Single-Plate) Connection
A warning is given if plate length does not exceed 1/2 of the T dimension of the supported beam. See AISC 13th Edition
Manual, Page 10-104.
Single Angle Shear Connection
A warning is given if angle length does not exceed 1/2 of the T dimension of the supported beam. See AISC 13th Edition
Manual, Page 10-123.
Rotational Ductility
RISAConnection provides checks for rotational ductility for shear connections, as prescribed in the AISC 13th Edition
Manual. These checks are only done when enabled through the Global Parameters dialog.
For additional advice on this topic, please see the RISA News website: www.risanews.com. Type in Search keywords:
Rotational Ductility.
The following checks are performed:
Double Angle Shear Connection
A warning is given if angle thickness exceeds 5/8". See AISC 13th Edition Manual, Page 10-9.
End-Plate Shear Connection
A warning is given if plate thickness exceeds 5/8". See AISC 13th Edition Manual, Page 10-49

Stability and Geometry Checks
General Reference Manual 37
Shear Tab (Single-Plate) Connection
Weld strength and bolt shear strength are compared against the following limit states. If none of these limit states exceed
both the weld strength and the bolt shear strength then a warning is given:
1. Plate yielding due to bending
2. Bolt bearing
3. Bolt slip
For reference see AISC 13th Edition Manual, Page 9-13
Single Angle Shear Connection
No rotational ductility checks are done for single angle connections.
Bolt Geometry Restrictions
In these checks the program will check bolt spacing and edge distances against code prescribed minimums and
maximums. These are checked for each element that is bolted in the program. Thus, this check will be given for each
bolted element in a connection. When we do these checks we do them for both the member and the connector. We will
check the worst case between the member and the connector.
Check Minimum Bolt Spacing
Section J3.3 of the AISC 360-05 specification gives a minimum spacing of 2 2/3*d. Thus, we will check both vertical
and horizontal spacing of bolts against this minimum.
Check Maximum Bolt Spacing
Section J3.5 of the AISC 360-05 specification gives a maximum spacing requirement for bolts. The program considers
the members in the connection NOT subject to corrosion, thus uses a maximum distance of 24*thickness of thinner plate
or 12 inches. J3.5(b) is not considered within the program.

Stability and Geometry Checks
38 RISAConnection v2.0
Check Minimum Edge Distance
Section J3.4 of the AISC 360-05 specification gives minimum edge distance requirements. This provision considers both
Table J3.4 and J3.5, depending on the type of hole. Thus, the program combines the values from both Table J3.4 and
J3.5 for checking minimum edge distance.
Regarding sheared edges versus rolled edges, the program makes this assumption:
All plate elements (shear tabs, end plates, flange plates, etc.) assume minimum edge distances based on sheared
edges.
All wide flanges and angles (and any other rolled shapes) assume minimum edge distances based on rolled or
thermally cut edges.
Note that this check will only give detailed information if the minimum edge distance requirement was not met.
Check Maximum Edge Distance
Section J3.5 of the AISC 360-05 specification gives a maximum edge distance of 12*thickness of connected part not to
exceed 6 inches. Note that this check will only give detailed information if the maximum edge distance requirement was
not met.
Limitation
The program does not do any checks for Entering and Tightening Clearances per Tables 7-16 and 7-17 of the AISC 13th
edition manual. Thus, you will have to verify these dimensions manually.

Stability and Geometry Checks
General Reference Manual 39
Material Checks
These material checks are common to many different connection types.
Shear Yield Strength
Shear yielding occurs over the gross cross section of elements in shear, such as shear tabs. The shear yielding capacity is
calculated per AISC 360-05 section J4.2.
A special case occurs when considering the beam web shear yielding. In this case the shear yielding capacity is
calculated per AISC 360-05 section G2.1. The capacity is calculated per equation G2-1 and the Cv values are calculated
using G2-2, G2-3, G2-4 and G2-5.
Axial Loads
If you have applied axial loads (compression or tension) in addition to shear loads, the required load of the connecting
element at the beam will be calculated as the resultant force created by the axial load and the shear load. This resultant
force (R) will be divided by the available shear yield capacity to give the Unity Check value in the results report. This
conservative approach was taken from the Steel Design Handbook by Akbar R. Tamboli.
Shear Rupture Strength
Shear rupture occurs over the net cross section of elements in shear, such as shear tabs. The shear rupture capacity is
calculated per the AISC 360-05 section J4.2.
Axial Loads
If you have applied axial loads (compression or tension) in addition to shear loads, the required load of the connecting
element at the beam will be calculated as the resultant force created by the axial load and the shear load. This resultant

Stability and Geometry Checks
40 RISAConnection v2.0
force (R) will be divided by the available shear rupture capacity to give the Unity Check value in the results report. This
conservative approach was taken from the Steel Design Handbook by Akbar R. Tamboli.
Plate Tension Yield
Tensile yielding occurs over the gross cross section of elements in tension such as flange plates in a moment connection.
The tensile yielding capacity is calculated per the AISC Specification J4.1.
Tension Rupture
Tensile rupture occurs over an effective cross section of elements in tension such as flange plates in a moment
connection. This effective area is taken as the minimum of the net area, or 85% of the gross area. The tensile rupture
capacity is calculated per the AISC Specification J4.1.
For the braces in vertical brace connections a shear lag factor is included per AISC 360-05, Section D3.
Block Shear Strength
Block shear is a combination of tensile rupture, and either shear yielding or shear rupture. The program checks both
types of block shear per the AISC 360-05 section J4.3.

Stability and Geometry Checks
General Reference Manual 41
Note:
When multiple rows of bolts are present for a block shear calculation, a Ubs value of 0.5 is used. Otherwise this
value is taken as 1.0.
Plate Tearout
This failure mode is calculated as block shear using an "inside" perimeter rather than an "outside" perimeter.
Axial Loads
If you have applied a tensile axial force in addition to shear loads, the required load of the connecting element at the
beam will be calculated as the resultant force created by the axial load and the shear load. This resultant force (R) will be
divided by the available block shear capacity to give the Unity Check value in the results report. This conservative
approach was taken from the Steel Design Handbook by Akbar R. Tamboli.
Gusset Plates
On gusset plates where the free edge of the tearout portion is not perendicular to the direction of force an effective shear
area is used. This program ignores the minimum amount of shear area nessecary in order to produce a symmetric tearout
pattern. See the dialog below.

Stability and Geometry Checks
42 RISAConnection v2.0
Plate Flexural Yielding
Flexural yielding occurs in elements of shear connections which take moment due to eccentricity. This effect is
negligible, and is therefore ignored for clip angles and end plates. This effect also does not affect moment connections,
since eccentricity may be ignored. The program does check flexural yielding for shear tabs, as it can be a controlling
failure mode for extended configurations.

Stability and Geometry Checks
General Reference Manual 43
This check is not required if allof the following conditions are met:
The shear tab is bolted to the beam.
Only one row of bolts is present.
There are between 2 and 9 bolts present.
The bolts are less than 3.5" (horizontally) from the face of support.
No oversized or long slotted holes are used.
A horizontal edge distance equal to twice the bolt diameter is present on both the beam and the shear tab.
The thickness of either the beam web or the plate is thin enough to produce ductile behavior.
A minimum vertical edge distance is met for both the plate and beam (if coped).
No axial force is present in the beam.
For more information, see the AISC 13th Edition Manual, page 10-101.
The design check for flexural yielding is outlined in the AISC 13th Edition Manual, page 10-103.
Note:
The modified bolt ICR coefficient from the design procedure is omitted. Ductility checks are performed to ensure
that this is acceptable.
Axial Loads
If you have applied an axial force in addition to the shear load, the Plate Flexural Yielding check will change slightly to
take into account the combined effects of the axial and shear interaction. When this is the case, the capacities will be
determined from the appropriate code sections (please see below) and the Unity Check value is determined from the
following equations:
Tension Loads
If you have a tensile axial load applied along with a shear load, the Plate Flexural Yielding check will calculate the axial
(tensile) capacity per equation J4-1 of the AISC 13th edition.
Compression Loads
If you have a compressive axial load applied along with a shear load, the Plate Flexural Yielding check will calculate the
axial (compressive) capacity per section J4.4 of the AISC 13th edition. Note that this section checks the KL/r value in
order to determine the capacity equation. For this check, RISAConnection uses the following:

Stability and Geometry Checks
44 RISAConnection v2.0
Plate Flexural Rupture
Flexural rupture is a check exclusive to extended shear tab connections. For more information see Flexural Yielding, and
the AISC 13th Edition Manual, page 9-6.
Axial Loads
If you have applied a tensile axial force in addition to the shear load, the Plate Flexural Rupture check will change
slightly to take into account the combined effects of the axial and shear interaction. When this is the case, the tensile
capacity will be determined from equation J4-2 and the Unity Check value is determined from the following equations:
Plate Flexural Buckling
Flexural buckling is a check exclusive to extended shear tab connections. For more information see Flexural Yielding,
and the double coped procedure from the AISC 13th Edition Manual, page 9-8.

Stability and Geometry Checks
General Reference Manual 45
Axial Loads
If you have applied a compressive axial force in addition to the shear load, the Plate Flexural Buckling check will change
slightly to take into account the combined effects of the axial and shear interaction. When this is the case, the
compressive capacity will be determined per section J4.4 of the AISC 13th edition. Note that this section checks the KL/r
value in order to determine the capacity equation. For this check, RISAConnection uses the following:
The Unity Check value is then determined from the following equations:

Stability and Geometry Checks
46 RISAConnection v2.0
Plate Compression Buckling
Compression yielding occurs over the gross cross section of elements in compression such as the shear plate or clip angle
under compressive axial loads. The compression buckling capacity is calculated per the AISC Specification J4.4.
Compression buckling is not checked by the program. If the KL/r of the element exceeds 25, a warning is given that the
compression element is slender. See AISC Specification J4.4.

Bolt & Material Design Checks
General Reference Manual 47
Bolt Checks
These bolts checks are common to many different connection types.
Bolt Group Eccentricity
When bolt groups are subjected to shear loads that are eccentric to the centroid of the bolt group, then bolt group
eccentricity is introduced. To account for this eccentricity, the AISC 13th Edition Manual provides two different
methods: the Instantaneous Center of Rotation method (IC method) and the Elastic Method. These are given as options
in Global Parameters - Solution tab. Information on these methods are found on pages 7-6 through 7-9 in the 13th edition
manual and most steel design textbooks.
The IC method is used to compute the values in Tables 7-7 through 7-14, thus program values can be compared to these
tables.
The Ex value given is the horizontal distance from the face of the supporting member to the centroid of the bolt
group.
The Ey value given is the vertical distance between the centerline of the beam and the centroid of the bolt group.
The Ang value given is the angle between the X axis and the resultant load (resultant of the shear and axial
loads).
Once this coefficient is computed it is used in the Bolt Shear Strength check.
Generally the Elastic method is more conservative than the IC method.

Bolt & Material Design Checks
48 RISAConnection v2.0
Note:
The shear tabs for moment connections do not consider any eccentricities, thus this section will not be included in
these connections. This is because moment connections have the rotational restraint in the flanges, thus not
allowing the rotation to occur that is typical in a simple shear connection.
Slip Critical Considerations
This check is calculated per equation J3-4 of the AISC 360-05 (13th Edition) Steel Code.
The bolts can be considered slip critical if you select Slip Critical Class A or Class B listed in the Components Bolts
section.
Strength vs. Serviceability
The program will use serviceability limit state for standard holes (STD) or slots transverse to the direction of load
(SSLH, LSLH). The program will select required strength level if the hole is oversized (OVS) or slots are parallel to the
direction of the load (SSLV, LSLV).
If the holes are defined with contradicting hole types, the program will use required strength level. For example if the
beam bolts use a standard hole, and the attached clip angle uses oversized holes, required strength level will be used.
Combined Tension and Shear
When a slip-critical connection is subjected to a tension load in addition to the shear load, the program will also calculate
the ks factor per section J3.9 and apply this factor to the available slip resistance per equation J3-4.
Axial Loads
If you have applied axial loads (compression or tension) in addition to shear loads, the required load at the beam bolts
will be calculated as the resultant force created by the axial load and the shear load. This resultant force (R) will be
divided by the available slip critical capacity per equation J3-4 to give the Unity Check value in the results report.
Slip Critical Calculations
Bolt Shear Strength
This shear capacity check is calculated per section J3.6 (shear only or shear and compression) or J3.7 (combined tension
and shear) of the AISC 360-05 (13th Edition) Steel Code. Expand this section of the design report and RISAConnection
will provide you with the exact equation, code reference, listed variables, as well as the code check value and pass or
failure notification.

Bolt & Material Design Checks
General Reference Manual 49
Shear Connections
Note:
The Eccentricity Coefficient, C is calculated in the Bolt Group Eccentricity check, as explained above.
If you have applied a compressive axial load in addition to the shear load, the required load at the beam bolts will
be calculated per section J3.6 as the resultant force created by the axial load and the shear load. This resultant
force (R) will be divided by the available bolt shear capacity per equation J3-1 to give the Unity Check value in
the results report.
If you have applied a tensile axial load in addition to the shear load, the required load at the beam bolts will be
calculated per section J3.7 as the resultant force created by the axial load and the shear load. This resultant force
(R) will be divided by the available bolt shear capacity per equation J3-2 to give the Unity Check value in the
results report.
Moment Connections
If this check is part of a moment connection (End Plate or Flange Plate Moment Connection), the check will also convert
the allowable shear strength to an allowable moment and check this against the user input Moment Load.
Note:
The Eccentricity Coefficient, C is calculated in the Bolt Group Eccentricity check, as explained above.
Bolt Tensile Strength
If your connection has tensile axial load but no shear load, the bolt tensile capacity check is calculated for column or
girder bolts in tension per section J3.6 of the AISC 360-05 (13th Edition) Steel Code. Expand this section of the design

Bolt & Material Design Checks
50 RISAConnection v2.0
report and RISAConnection will provide you with the exact equation, code reference, listed variables, as well as the code
check value and pass or failure notification.
Verify No Prying Action in Shear Connections
If your connection has tensile axial load, the bolt tensile capacity check does not include bolt prying, but assumes that
this is not an issue. This check will confirm or negate this assumption. If your connection fails this check, you will need
to account for the addition prying forces in your bolt tension checks manually.
Check #1: Minimum Thickness
The first check compares the thickness of the angle leg or plate to the tmin value per page 9-10 of the AISC 360-05 (13th
Edition). If the thickness of the connecting element is less than the tmin value, the check will fail.
Check #2: Bolt Strength
The second check compares the available strength of the bolts to the total force on the bolts (including prying forces).
These prying forces are calculated per the questions on page 9-12 of the AISC 360-05 (13th Edition).

Bolt & Material Design Checks
General Reference Manual 51
Note:
This tensile check does not account for the eccentricity between the axial load in the beam and the centerline of
the bolt group on the column/girder. Therefore, all bolts are assumed to share equal amounts of tensile load.
Bolt Bearing Strength
This check is calculated per section J3.10 of the AISC 360-05 (13th Edition) Steel Code. Expand this section of the
design report and RISAConnection will provide you with the exact equations, code reference, listed variables, as well as
the code check value and pass or failure notification.

Bolt & Material Design Checks
52 RISAConnection v2.0
Shear Connections without Axial Loads
Rn_spacing and Rn_edge are taken as the minimum value of the Tear Out and Bearing calculations. These equations are
reported in the variable explanation. The spacing variables Lc_edge and Lc-spacing are described below:
Note:
RISAConnection considers all three equations in this section (J3-6a through J3-6c) for the Bolt Bearing checks.
The program distinguishes between the three equations based on the user input Bolt Hole Deformation selection
(in the Solution tab of Global Parameters) and the Hole Type selection in the Components section of Connection
Properties.
Shear Connections with Axial Loads
When axial load is introduced into the connection, the bolt bearing limit state check becomes much more complicated.
The direction of the resultant force (axial and shear resultant) affects the direction of the bearing and RISAConnection
takes this into account when calculating the edge distances.
Bolt Edge Distances
Any given layout of bolts can consist of up to four bolt edge group distances.
Bolts type A - Corner edge bolts (will be present in all bolted connections)
Bolts type B - Side edge bolts (will be present in some connections)
Bolts type C - Bottom edge bolts (will be present in some connections)
Bolts type D - Inside bolts (only will be present when all other bolt types are present)
Please see the image below for an example of this:

Bolt & Material Design Checks
General Reference Manual 53
Bolt Hole Diameters
The Bolt Bearing limit state will display three bolt hole diameter values: dv, dh, and d. These allow the program to
properly calculate edge distances when slotted bolt holes are present.
dv is the vertical diameter of the bolt hole
dh is the horizontal diameter of the bolt hole
d is the distance from the center of the bolt to the edge of the hole in the direction of the bearing force
Therefore, if you have a standard bolt hole, dh = dv and d = 0.5*dv = 0.5*dh. But if you have a slotted hole, the program
will calculate d using the following formula:

Bolt & Material Design Checks
54 RISAConnection v2.0
Total Bearing Strength
RISAConnection will calculate the individual capacity of each bolt based on their edge distance and then sum them to
obtain the total bolt bearing strength.
Note:
RISAConnection considers all three equations in this section (J3-6a through J3-6c) for the Bolt Bearing checks.
The program distinguishes between the three equations based on the user input Bolt Hole Deformation selection
(in the Solution tab of Global Parameters) and the Hole Type selection in the Components section of Connection
Properties.
If the connection has slotted holes, it will determine the direction of the bearing force as the direction of the
resultant force (axial and shear resultant). If the angle between the resultant force and the horizontal is less than
or equal to 45 degrees, the program will assume that the direction of the bearing force is in the direction of the
axial force (parallel to the beam). If the angle between the resultant force and the horizontal is more than 45
degrees, the program will assume that the direction of the bearing force is in the direction of the shear force
(perpendicular to the beam).
If you have applied axial loads (compression or tension) in addition to shear loads, the required load at the beam
bolts will be calculated as the resultant force created by the axial load and the shear load. This resultant force (R)
will be divided by the available bolt bearing capacity per equation J3-6 to give the Unity Check value in the
results report.
Moment Connections
If this check is part of a moment connection (End Plate or Flange Plate Moment Connection), the check will also convert
the allowable shear strength to an allowable moment and check this against the user input Moment Load.

Weld Calculations
General Reference Manual 55
Weld Calculations
This topic is specific to welding geometry, base material strengths, weld strengths and all other welding considerations.
Weld Geometry
The weld geometry for each connection is locked by the program. In order to make the connection property inputs easier
these geometries may not be altered. The geometries used are industry standard, and illustrated by the AISC.
Double Angle Shear Connection
The weld to support is illustrated in Figure 10-4c of the AISC 13th Edition Manual.
The weld to beam is illustrated in Figure 10-4b of the AISC 13th Edition Manual.
When axial tension is present in the beam, the weld configuration of a single vertical weld on each clip angle (at the
support) is inadequate, as that weld would have to resist the tension via torsion in the weld throat. Because no adequate
methodology for the torsional strength of weld exists, the program will automatically place a weld on the bottom of the
clip angles as well. The capacity of the weld is then taken as double that of a single clip angle shear connection.
When multiple Double Angle Shear Connections are grouped together (i.e. multiple connections are part of the same
Connection Rule from an integrated RISA-3D model), if any connection has an axial tension in its beam for any load
combination then all of the Connections in that group will receive the L-shaped weld configuration.
End-Plate Shear Connection
The weld to beam is illustrated in Figure 10-6 of the AISC 13th Edition Manual.
When axial tension is present in the beam, the weld configuration of a single vertical weld on each side of the end-plate
is inadequate, as those weld would have to resist the tension via torsion in the weld throat. Because no adequate
methodology for the torsional strength of weld exists, the program will automatically place a weld on the bottom of the
plate as well.
When multiple End-Plate Shear Connections are grouped together (i.e. multiple connections are part of the same
Connection Rule from an integrated RISA-3D model), if any connection has an axial tension in its beam for any load
combination then all of the Connections in that group will receive the C-shaped weld configuration.
Shear Tab (Single-Plate)Connection
The weld to support is illustrated in Figure 10-11 of the AISC 13th Edition Manual.
Single Angle Shear Connection
The weld to support is illustrated in Figure 10-13c of the AISC 13th Edition Manual.
The weld to beam is illustrated in Figure 10-13b of the AISC 13th Edition Manual.
Vertical Brace Connections
Vertical Brace Connections consist of a number of sub-connections:
Gusset to Brace
A fillet weld is placed along the entire perimeter of brace/gusset overlap. If an end-weld is not specified by the user then
it is not included. The weld can also be specified as Balanced.

Weld Calculations
56 RISAConnection v2.0
Gusset to Beam, Gusset to Column
The gusset can be directly welded to the beam/column, or clip angles may be used. When clip angles are specified they
are given a C-shaped weld at the beam/column in order to accommodate the significant axial forces that such
connections typically experience. See the Double Angle Shear Connection topic above for more explanation on this.
Beam to Column
The beam to column connection is treated as an ordinary shear connection in the program, with one exception. When
Double Clip Angle is specified the clip angles receive a C-shaped weld in order to accommodate the significant axial
forces that such connections typically experience.
Base Material Strength
Fillet Welds
The base material at the location of a weld may have less strength than the weld itself. In this case it will control the
overall strength of the welded connection. In order to account for that the program uses a weld strength reduction factor
(α).
D = Fillet weld leg size
Fu = Base material rupture strength
n = Number of welds at base material location. For a connector such as a shear tab that is double fillet welded (one on
each side) this would be 2.
t = Base material thickness
FEXX = Electrode strength, including reduction factors specified in notes to Table 8-3 on Page 8-29 of the AISC 13th
Edition Manual.
α is calculated for each base of each fillet weld, and the smaller of the two α values for that fillet weld is used as a
strength reduction coefficient for the weld strength. This formula is a rearrangement of the formula shown on Page 9-5 of
the AISC 13th Edition Manual.
Note:
An additional 1.5 multiplier is applied to the denominator of the above equation for the flange welds on moment
connections (excluding splices). This accounts for the weld's additional strength when loaded in that direction.
Partial Joint Penetration (PJP) Welds
The base material proration factor (α) is calculated as shown below:
Φbase = Base Material Strength Reduction Factor per AISC 360-05, Table J2.5
Fy = Base Material Yield Strength
Φweld = Weld Material Strength Reduction Factor per AISC 360-05, Table J2.5
FEXX = Electrode strength

Weld Calculations
General Reference Manual 57
Elastic Weld Strength
Welds may be analyzed using an elastic force distribution or an Instantaneous Center of Rotation force distribution
method. You can control which method is used through the Global Parameters.
Note:
Out-of-Plane eccentricity from face of support is ignored for shear connections when a moment connection is
also present.
Double Angle Shear Connection
The design of the weld between the angle and the column is complex due to the compression block between the two
angles bearing on each other through the beam web. The AISC 13th Edition Manual offers a formula for elastic design of
this weld (Page 10-11) which is derived in Blodgett's "Design of Welded Structures" Section 5.4. This formula is used to
calculate the weld strength for the double angle to support connection. Out-of-plane eccentricity is ignored.
When axial tension is present in the beam the geometry of the weld is modified as explained in Weld Geometry. Axial
compression in the beam is ignored for the weld to the support.
The design of the weld between the angles and the beam uses the procedure detailed on page 8-12 of the AISC 13th
Edition Manual. In-Plane eccentricity is taken as the distance between the COG (center of gravity) of the weld group,
and the face of the support. The polar moment of inertia is taken from Blodgett's "Design of Welded Structures", Section
7.4.8, Table 5 (C-shaped weld). Additionally, any rotational moment caused by axial force in the beam is considered, to
result in a net rotational stress.
The rotational stress is combined with the uniform stresses caused by shear and axial force in the beam, then a resultant
is determined using the square root of the sum of the squares. This resultant stress is compared against the fillet weld
strength per AISC Specification equation J2-4, conservatively assuming a load angle (θ) of zero.
End-Plate Shear Connection
The design of the weld between the end-plate and the column is considered to have virtually zero eccentricity, so
therefore if no axial loads are present in the beam then the traditional equation for longitudinally loaded fillet welds
applies. See AISC Specification equation J2-4. The same applies for the weld between the end-plate and the beam.
When axial tension is present in the beam the geometry of the weld is modified as explained in Weld Geometry. Axial
compression in the beam is ignored for all welds.
When axial tension is present in the beam, the out-of-plane uniform and rotational stresses are calculated and combined
(r0). This stress is then combined with the in-plane stress (ru) caused by the shear load to form a maximum 3-dimensional
resultant stress (r3d). This 3-dimensional resultant stress is compared against the fillet weld strength per
AISC Specification equation J2-4, conservatively assuming a load angle (θ) of zero.
Shear Tab Connection
The design of the weld between the shear tab and the support uses the method listed on page 8-12 of the AISC 13th
Edition Manual. A polar moment of inertia of L3/12 is used, and the out of plane stress is combined with the in-plane
stress using the square root of the sum of the squares. This stress is compared against the fillet weld strength per
AISC Specification equation J2-4, conservatively assuming an angle (θ) of zero.
The design of the weld between the shear tab and the beam uses the procedure detailed on page 8-12 of the AISC 13th
Edition Manual. In-Plane eccentricity is taken as the distance between the COG (center of gravity) of the weld group,
and the face of the support. The polar moment of inertia is taken from Blodgett's "Design of Welded Structures", Section
7.4.8, Table 5 (C-shaped weld). The rotational stress is combined with the shear stress using the square root of the sum
of the squares. This stress is compared against the fillet weld strength per AISC Specification equation J2-4, assuming an
angle (θ) of zero.

Weld Calculations
58 RISAConnection v2.0
Single Angle Shear Connection
The design of the weld between a single angle and the support uses the procedure detailed on page 8-12 of the AISC 13th
Edition Manual. The polar moment of inertia is taken from Blodgett's "Design of Welded Structures", Section 7.4.8,
Table 5 (L-shaped weld). The rotational stress is combined with the shear stress, then a resultant is determined using the
square root of the sum of the squares. This resultant stress (ru) is compared against the fillet weld strength per
AISC Specification equation J2-4, conservatively assuming an angle (θ) of zero. Out-of-plane eccentricity is ignored.
Axial compression in the beam is ignored for the weld to the support. When axial tension is present in the beam, the
program calculates the net out-of-plane tension stress (r0) at every location along the weld. Net compression stresses are
ignored. This out-of-plane stress is combined with the in-plane stress (ru) using the square root of the sum of the squares
to determine the maximum 3-dimensional resultant stress (r3d). This 3-dimensional resultant stress is compared against
the fillet weld strength per AISC Specification equation J2-4, conservatively assuming a load angle (θ) of zero. Out-of-
plane eccentricity is ignored.
The design of the weld between the angle and the beam uses the procedure detailed on page 8-12 of the AISC 13th
Edition Manual. In-Plane eccentricity is taken as the distance between the COG (center of gravity) of the weld group,
and the face of the support. The polar moment of inertia is taken from Blodgett's "Design of Welded Structures", Section
7.4.8, Table 5 (C-shaped weld). Additionally, any rotational moment caused by axial force in the beam is considered, to
result in a net rotational stress.
The rotational stress is combined with the uniform stresses caused by shear and axial force in the beam, then a resultant
is determined using the square root of the sum of the squares. This resultant stress is compared against the fillet weld
strength per AISC Specification equation J2-4, conservatively assuming a load angle (θ) of zero.
ICR Weld Strength
Welds may be analyzed using an elastic force distribution or an Instantaneous Center of Rotation force distribution
method. You can control which method is used through the Global Parameters. The procedure by which the program
calculates the eccentricity coefficient is outlined in the AISC Specification, Section J2.4.
Note:
Out-of-Plane eccentricity from face of support is ignored for shear connections when a moment connection is
also present.
The eccentricity modification factor (C) is calculated using the analytical procedure (as opposed to being
interpolated from tables).
Double Angle Shear Connection
Due to the complexity of the compression block between the two angles bearing on each other through the beam web,
there is currently no industry-accepted method of doing an instantaneous center of rotation for the weld between the
angles and the support. Therefore, this weld is always designed using the Elastic method, even if Instantaneous Center of
Rotation was specified in the Global Parameters.
The design of the weld between the angles and the beam uses the method outlined on page 8-10 of the AISC 13th Edition
Manual. The eccentricity is taken to be in-plane, and is calculated as the distance between the COG (center of gravity) of
the weld group and the face of the support. If axial force is present in the beam then it is considered in the calculation of
C, and the weld strength is compared against the resultant load.
End-Plate Shear Connection
When axial tension is present in the beam the design of the weld between the beam and the end-plate uses the method
outlined on page 8-10 of the AISC 13th Edition Manual. The eccentricity is taken to be out-of-plane.
For all other circumstances and welds, see Elastic Weld Strength of end-plate connection.

Weld Calculations
General Reference Manual 59
Shear Tab Connection
The design of the weld between the shear tab and the support uses the method outlined on page 8-10 of the AISC 13th
Edition Manual. The eccentricity is taken to be out-of-plane.
The design of the weld between the shear tab and the beam uses the method outlined on page 8-10 of the AISC 13th
Edition Manual. The eccentricity is taken to be in-plane, and is calculated as the distance between the COG (center of
gravity) of the weld group and the face of the support.
Single Angle Shear Connection
The design of the weld between the single angle and the support uses the method outlined on page 8-10 of the AISC 13th
Edition Manual. The eccentricity is taken to be in-plane, and out-of-plane eccentricity from the face of support is
ignored. If axial tension is present in the beam then the weld is designed using the Elastic method, even if Instantaneous
Center of Rotation was specified in the Global Parameters.
The design of the weld between the angle and the beam uses the method outlined on page 8-10 of the AISC 13th Edition
Manual. The eccentricity is taken to be in-plane, and is calculated as the distance between the COG (center of gravity) of
the weld group and the face of the support. If axial force is present in the beam then it is considered in the calculation of
C, and the weld strength is compared against the resultant load.
Non-Eccentric Fillet Weld Strength
Some welds have no eccentricity, so they do not need to be designed per elastic or ICR methods. These welds are
designed using AISC Specification Eqn J2-4. An appropriate value of θ is considered for each weld calculation.
Flange Plate Moment Connections
The weld between the flange plate and the column is considered to have no eccentricity.
Extended End-Plate Moment Connections
For Extended End Plate moment connections the horizontal fillet distance of the beam (k1) is not counted for the 'inside'
flange fillet welds, as it is impossible to weld in these locations.
If a fillet weld is specified between the beam web and the end plate, it is designed considering the recommendations of
AISC Design Guide #4 (2nd Edition) Section 2.1. This results in an "effective" weld length equal to the distance between
the inside compression bolts and the mid-depth of the beam. The weld must also have a minimum size to develop the full
tensile capacity of the beam web. This is checked in Weld Limitations.
Splice Connections (Shear and Moment)
Splice connections ignore all eccentricity from both shear and axial loads. When the ICR method is chosen the capacity
is calculated using method outlined on page 8-10 of the AISC 13th Edition Manual. When the Elastic method is chosen
the capacity is calculated using the method listed on page 8-12 of the AISC 13th Edition Manual.
Note:
Weld demand force is taken as zero for flange welds on moment splices which have net compression on both
flanges. This is based on the assumption that the welds would not be relied upon to transfer the net compressive
force from one member to another.
Vertical Brace Connections
Most eccentricities are ignored for Vertical Brace Connections as they are proportioned per the Uniform Force Method
to eliminate all eccentricities.

Weld Calculations
60 RISAConnection v2.0
Gusset to Brace Connection
Per AISC 360-05, Section J1.7, the effects of eccentricity are ignored on this connection.
Gusset to Beam, Gusset to Column
For directly welded connections the axial (transverse) force is neglected on the fillet weld if it results in net compression.
Per the AISC 13th Edition Manual, Page 13-11, the weld is designed for a peak stress of 1.25 times the average stress. In
other words, a 0.80 reduction factor is applied to the strength.
For clip angle connections the eccentricity between the axial (transverse) force and the CG of each C-shaped weld,
which results in a prying effect, is considered. The eccentricity due to shear (longitudinal) force is ignored.
Beam to Column
This connection is treated the same as a simple shear connection, with the exception of the altered Weld Geometry on the
Double Clip Angle connection. For the Double Clip Angle connection the in-plane eccentricity effects on the weld to
support are ignored, as it is assumed that the beam cannot shift vertically to allow the angles to rotate towards each other.
PJP Weld Strength
PJP (partial joint penetration) welds are sized using an "effective throat". The AISC Specification has requirements for
minimum effective throat thicknesses listed in Table J2.3. The program compares the specified effective throat against
the thicknesses of the materials, and lists the weld as 'failing' if it does not comply.
The filler metal matching as described for CJP welds is also checked, however an electrode strength that has less than the
matching value is also acceptable, per Table 2.5 from the AISC Specification.
Strength Reduction Factor
The strength reduction factor on PJP welds which are not loaded in pure shear or pure tension is interpolated as an
effective factor as shown below:
Φeff = Φv + (Φt - Φv)(sin θ)1.5
Where:
Φv = Strength Reduction Factor for PJP Welds in Shear per AISC 360-05, Table J2.5
Φt = Strength Reduction Factor for PJP Welds in Tension or Compression per AISC 360-05, Table J2.5
θ = Angle between weld longitudinal axis and resultant load
Moment Connections
For moment connections, the force on the weld is always normal to the weld axis, and is always in tension or
compression. The strength of the weld is determined per Eqn J2-3 from the AISC Specification, using the appropriate
values from Table J2.5.
Vertical Brace Connections
For vertical brace connections the weld strength is compared against the resultant force regardless of whether the
transverse force is a tension or compression. Since AISC 360-05 specifies different strength reduction factors (Φ, Ω) for
longitudinal versus transverse loading, RISAConnection calculates an effective factor based on interpolation.
Per the AISC 13th Edition Manual, Page 13-11, the weld is designed for a peak stress of 1.25 times the average stress. In
other words, a 0.80 reduction factor is applied to the strength.

Weld Calculations
General Reference Manual 61
CJP Weld Strength
CJP (complete joint penetration) welds are designed to develop the full strength of the base material. The metal used for
the electrode must "match" the base material metal per the American Welding Society. The program compares the beam,
column, and connector materials to the specified weld electrode to determine compatibility. If the materials are not
compatible then the weld is considered 'failing'. The most stringent combination of base material/weld electrode is
considered.
For an abbreviated list of matching metals, see the AISC Specification J2.6.
Weld Size Limitations
RISAConnection limits welds based on AISC limitations. A warning is provided if the welds violate these limitations.
Maximum Fillet Weld Size
Fillet welds are limited to a maximum size in order to maintain appropriate shelf dimensions. This is in the
AISC specification section J2.2b. For a graphical representation of this requirement see the AISC 13th Edition Manual,
page 8-18. The maximum weld size is checked for the following welds:
Single and Double Angles welded to support
Single and Double Angles welded to beam
End-plate welded to support
Minimum Fillet Weld Size
Fillet welds are limited to a minimum size in order to prevent rapid cooling of the weld, which results in a loss in
ductility. This is covered in the AISC Specification, Table J2.4. The limitation is based on the thickness of the thinner
part joined. The minimum weld size is checked for all welds.
Minimum Fillet Weld Length
Fillet welds are limited to a minimum length of four times their nominal size. This is covered in the AISC Specification
section J2.2b. The minimum weld length is checked for all welds.
Note:
Weld Calculations
62 RISAConnection v2.0
The weld return shown on single angles welded to a support is ignored for this check.
Maximum Fillet Weld Length
Fillet welds are limited by RISAConnection to a maximum length of 100 times their leg dimension. The program is not
currently configured to identify "end-loaded" welds, so this is a conservative limitation to avoid Eqn J2-1 from the AISC
Specification. The maximum weld length is checked for all welds.
Maximum Flange/Web Thickness
Fillet welds may only be used for Extended End-Plate Moment Connections on beams which have flanges/beams not
greater than 3/8" thick. For more information see AISC Design Guide #4 (2nd Edition), page 18.
Beam Web Development
Fillet welds must be sized to develop the full strength of the beam web in tension near the inside bolts for Extended End-
Plate Moment Connections. For more information see AISC Design Guide #4 (2nd Edition), page 18.
Effective Throat
See PJP Weld Strength.
Filler Metal Matching
See CJP Weld Strength.

Coped Beam Considerations
General Reference Manual 63
Coped Beam Checks
These checks are specifically for coped beams.
Calculation of Snet (Net Section Modulus)
The Net Section Modulus is used in most of the strength calculations for coped beams. These are calculated
automatically by the program based on the beam section properties and the depth and length of the cope as specified in
the Assembly portion of the Connection Properties. These calculations should closely match the values reported in AISC
13th Edition Manual Table 9-2.
Flexural Rupture Strength
The nominal Flexural Rupture Strength of the member is determined by multiplying the ultimate stress of the beam
material by the net section modulus of the member. Since rupture is a less ductile failure mode, a phi factor of 0.75 and
an Omega of 2.0 are used to determine the design strength for this failure state.
These code check procedure is based on guidelines given in the AISC 13th edition Steel Construction Manual.
Specifically Chapter 9 - Connections and sub-category titled Connecting Elements Subject to Flexure. This can be found
on page 9-6 of the manual.
Local Web Buckling Strength
The webs of coped beams have reduced strength to resist location buckling because they are not stiffened by the coped
flange. This failure state is determined by multiplying the critical buckling stress by the net section modulus. This
buckling is judged to be a more ductile limit state than rupture and has, therefore, been given a phi factor of 0.90 and an
Omega factor of 1.67.

Coped Beam Considerations
64 RISAConnection v2.0
These code check procedure is based on guidelines given in the AISC 13th edition Steel Construction Manual.
Specifically Chapter 9 - Connections and sub-category titled Connecting Elements Subject to Flexure. This can be found
on page 9-7 of the manual.
Flexural Yielding Strength
Flexural yielding of the beam is not considered as it's own code check. However, the critical buckling stress Fcr from the
Local Buckling Strength calculation is limited to a maximum value of Fy. Therefore, the web buckling strength
calculations effectively checks the flexural yielding limit state as well.
Lateral Torsional Buckling Strength
Most of the time the beam will be coped only at the top flange. However, the program calculations will take into account
the more unusual case when both flanges are coped. The equations used to calculate the critical buckling stress will be
based on the lateral-torsional buckling limit state rather than web local buckling.
This code check procedure is based on guidelines given in the AISC 13th edition Steel Construction Manual.
Specifically Chapter 9 - Connections and sub-category titled Connecting Elements Subject to Flexure. This can be found
on page 9-8 of the manual.

Coped Beam Considerations
General Reference Manual 65
Flexural Yielding Strength
Flexural yielding of the beam is not considered as it's own code check. However, the critical buckling stress Fcr from the
Lateral-Torsional Buckling Strength calculation is limited to a maximum value of Fy. Therefore, the web buckling
strength calculations effectively checks the flexural yielding limit state as well.
Limitations
Effect of Bolt Holes on Net Section Modulus Calculation: The presence of bolt holes in the web of the beam
do not affect the RISAConnection calculations of the net section modulus. One could make an argument that they
should be included, though AISC's design examples do not reduce Snet based on the presence of these bolt holes.
Web Local Buckling of Beams Coped at Both Flanges: RISAConnection does not currently calculate the web
local buckling limit state for beams coped at both flanges. Instead the lateral-torsional buckling of the web is
assumed to control.
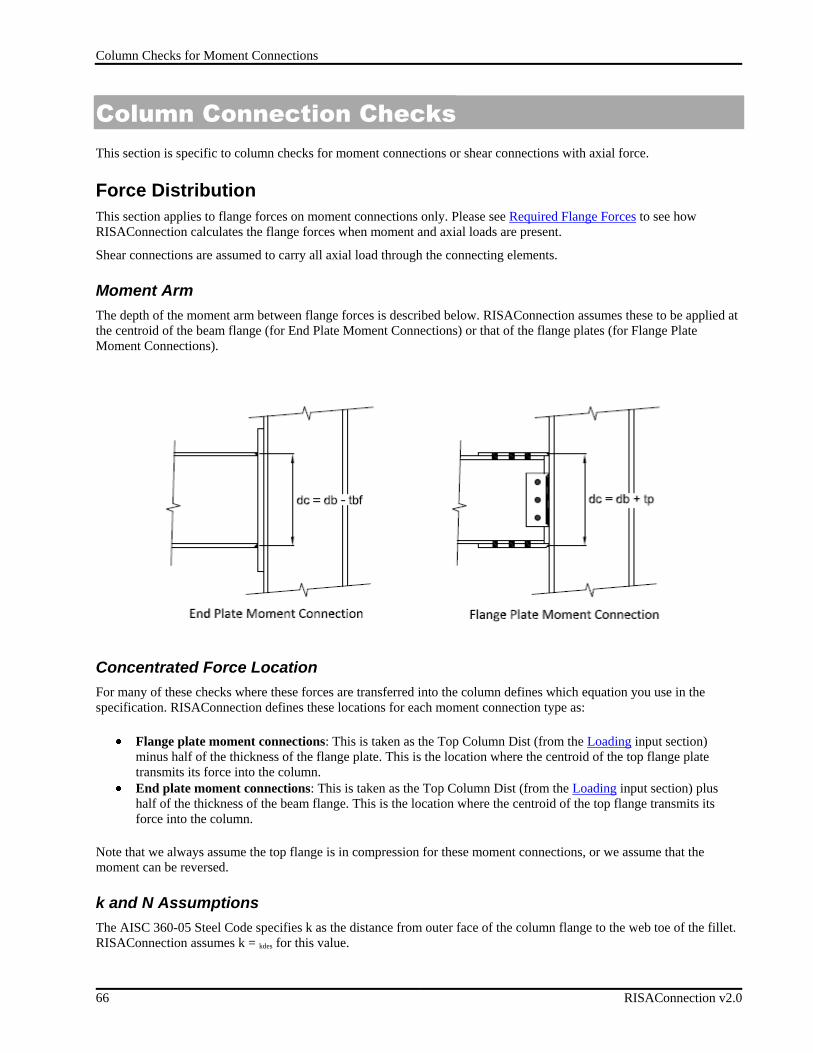
Column Checks for Moment Connections
66 RISAConnection v2.0
Column Connection Checks
This section is specific to column checks for moment connections or shear connections with axial force.
Force Distribution
This section applies to flange forces on moment connections only. Please see Required Flange Forces to see how
RISAConnection calculates the flange forces when moment and axial loads are present.
Shear connections are assumed to carry all axial load through the connecting elements.
Moment Arm
The depth of the moment arm between flange forces is described below. RISAConnection assumes these to be applied at
the centroid of the beam flange (for End Plate Moment Connections) or that of the flange plates (for Flange Plate
Moment Connections).
Concentrated Force Location
For many of these checks where these forces are transferred into the column defines which equation you use in the
specification. RISAConnection defines these locations for each moment connection type as:
Flange plate moment connections: This is taken as the Top Column Dist (from the Loading input section)
minus half of the thickness of the flange plate. This is the location where the centroid of the top flange plate
transmits its force into the column.
End plate moment connections: This is taken as the Top Column Dist (from the Loading input section) plus
half of the thickness of the beam flange. This is the location where the centroid of the top flange transmits its
force into the column.
Note that we always assume the top flange is in compression for these moment connections, or we assume that the
moment can be reversed.
k and N Assumptions
The AISC 360-05 Steel Code specifies k as the distance from outer face of the column flange to the web toe of the fillet.
RISAConnection assumes k = kdes for this value.

Column Checks for Moment Connections
General Reference Manual 67
N is defined as the bearing length of the applied force. Therefore this value differs based on the weld type specified to
connect the beam flange to the column or end plate. RISAConnection uses the following assumptions when calculating
this value:
Column Flange Bending (Shear Connections)
This column flange bending capacity check is calculated per section J10.1 of the AISC 360-05 (13th Edition) Steel Code.
Expand this section of the design report and RISAConnection will provide you with the exact equation, code reference,
listed variables, as well as the code check value and pass or failure notification.
Top of Column Distance
Per section J10.1 of AISC 360-05, the available strength shall be reduced if the force application is at a distance less than
10*tf from the end of the member. This can be addressed in RISAConnection by adjusting the user input Top Column

Column Checks for Moment Connections
68 RISAConnection v2.0
Distance in the Loading section of Connection Properties. Please see the Concentrated Force Location section for more
information on how this location is calculated.
For instance, if Concentrated Force Location < 10*tf, RISAConnection will reduce Rn by 0.5.
Note:
This is only checked in Shear Connections if the connection includes a tensile axial load.
Column Flange Bending (Moment Connections)
This moment capacity check applies to the Beam Flange Plate Moment Connection. This check is calculated per section
J10.1 of the AISC 360-05 (13th Edition) Steel Code. Expand this section of the design report and RISAConnection will
provide you with the exact equation, code reference, listed variables, as well as the code check value and pass or failure
notification. See the Moment Arm section for more information on how this value is calculated.
Top of Column Distance
Per section J10.1 of AISC 360-05, the available strength shall be reduced if the force application is at a distance less than
10*tf from the end of the member. This can be addressed in RISAConnection by adjusting the user input Top Column
Distance in the Loading section of Connection Properties. Please see the Concentrated Force Location section for more
information on how this location is calculated.
For instance, if Concentrated Force Location < 10*tf, RISAConnection will reduce Rn by 0.5.
Column Flexural Yielding
This check applies to the End Plate Moment Connection. This check is calculated per Section 3.12.15 and Table 3.4 of
the AISC Steel Design Guide 4 (Second Edition). Expand this section of the design report and RISAConnection will
provide you with the exact equation, code reference, listed variables, as well as the code check value and pass or failure
notification.

Column Checks for Moment Connections
General Reference Manual 69
This check contains some complicated geometry to approximate the yield line pattern. Below are explanations of some
of the more complicated terms.

Column Checks for Moment Connections
70 RISAConnection v2.0
Note:
RISAConnection assumes the column flange is unstiffened.
Column Web Yielding (Shear Connections)
This column flange yielding capacity check is calculated per section J10.2 of the AISC 360-05 (13th Edition) Steel Code.
Expand this section of the design report and RISAConnection will provide you with the exact equation, code reference,
listed variables, as well as the code check value and pass or failure notification.
Top of Column Distance
Per section J10.2 of AISC 360-05, there are two equations that apply to this check: J10-2 and J10-3. RISAConnection
calculates the Concentrated Force Location to see which of these equations applies. Please see the Concentrated Force
Location section for more information on how this location is calculated.

Column Checks for Moment Connections
General Reference Manual 71
Therefore, if the Concentrated Force Location > dbeam, RISAConnection will use equation J10-2. If the Concentrated
Force Location ≤ dbeam, RISAConnection will use equation J10-3.
Note:
This is only checked in Shear Connections if the connection includes an axial load.
Column Web Yielding (Moment Connections)
This check applies to both Beam Flange Moment Connections and End Plate Moment Connections but is calculated
slightly differently for each type of check.
Flange Plate Moment Connection
For Flange Plate Moment Connections, this check is calculated per section J10.2 of the AISC 360-05 (13th Edition)
Steel Code. Expand this section of the design report and RISAConnection will provide you with the exact equation, code
reference, listed variables, as well as the code check value and pass or failure notification. See the Moment Arm section
for more information on how this value is calculated.
End Plate Moment Connection
For End Plate Moment Connections, section J10.2 of the AISC 360-05 (13th Edition) Steel Code is not as clear.
Therefore, RISAConnection instead references the AISC Design Guide 4, 2nd Edition which references the AISC 2nd
Edition LRFD code.

Column Checks for Moment Connections
72 RISAConnection v2.0
This code has a much clearer reference to End Plate Moment connections and assumes a larger projection, as shown in
the image below.
Expand this section of the design report and RISAConnection will provide you with the exact equation, code reference,
listed variables, as well as the code check value and pass or failure notification. See the Moment Arm section for more
information on how this value is calculated.
Top of Column Distance
Per section J10.2 of AISC 360-05, there are two equations that apply to this check: J10-2 and J10-3. RISAConnection
calculates the Concentrated Force Location to see which of these equations applies. Please see the Concentrated Force
Location section for more information on how this location is calculated.
Therefore, if the Concentrated Force Location > dbeam, RISAConnection will use equation J10-2. If the Concentrated
Force Location ≤ dbeam, RISAConnection will use equation J10-3.

Column Checks for Moment Connections
General Reference Manual 73
Column Web Crippling (Shear Connections)
This column web crippling capacity check is calculated per section J10.3 of the AISC 360-05 (13th Edition) Steel Code.
Expand this section of the design report and RISAConnection will provide you with the exact equation, code reference,
listed variables, as well as the code check value and pass or failure notification.
There are three equations that come into play for this check. When the concentrated compressive force to be resisted is
applied at a distance from the member end that is greater than or equal to dcol/2 use equation J10-4. If this distance is less
than dcol/2, then use either J10-5a or J10-5b. Please see the Concentrated Force Location section for more information on
how this location is calculated.
The differentiation between equations J10-5a and J10-5b depends on the ratio of bearing length to overall depth of the
beam (N/d). See the Column Moment Checks topic for information on calculating N. If N/d <= 0.2, then equation J10-5a
is used. If N/d > 0.2, then equation J10-5b is used.
The program will perform all of these dimensional checks and use the appropriate equation automatically.
Note:
This is only checked in Shear Connections if the connection includes a compressive axial load.
Column Web Buckling (Moment Connections)
This check applies to both Beam Flange Moment Connections and End Plate Moment Connections. This check is
calculated per section J10.5 of the AISC 360-05 (13th Edition) Steel Code. Expand this section of the design report and
RISAConnection will provide you with the exact equation, code reference, listed variables, as well as the code check
value and pass or failure notification. See the Moment Arm section for more information on how this value is calculated.

Column Checks for Moment Connections
74 RISAConnection v2.0
Top of Column Distance
Per section J10.5 of AISC 360-05, the available strength shall be reduced by 50% if the force application is at a distance
less than half the depth of the column. RISAConnection refers to this value as the Concentrated Force Location and is
calculated per the user input Top Column Distance. Please see the Concentrated Force Location section for more
information on how this location is calculated.
For instance, if Concentrated Force Location < 0.5*dbeam, RISAConnection will reduce Rn by 0.5.
Column Web Crippling
Web crippling is local buckling that occurs when the web is slender (i.e. h/tw is large). The behavior is more restrained
when the point load is applied away from the ends of the member. Because of this there are separate equations for when
a concentrated transverse load is located near or away from the end of the member. This limit state is to be checked at
each location where a concentrated force is applied transverse to the axis of a member.
AISC 360-05 Specification section J10.3 gives the capacity equations to consider column web crippling.
There are three equations that come into play for this check. When the concentrated compressive force to be resisted is
applied at a distance from the member end that is greater than or equal to dcol/2 use equation J10-4. If this distance is less
than dcol/2, then use either J10-5a or J10-5b. This location where this compressive force occurs is defined earlier in this
topic.

Column Checks for Moment Connections
General Reference Manual 75
The differentiation between equations J10-5a and J10-5b depends on the ratio of bearing length to overall depth of the
beam (N/d). See information earlier in this topic for information on calculating N. If N/d <= 0.2, then equation J10-5a is
used. If N/d > 0.2, then equation J10-5b is used.
The program will perform all of these dimensional checks and use the appropriate equation automatically.
Column Panel Zone Shear
Column web panel zone shear is a phenomenon that occurs when double-concentrated forces are applied to a member. A
moment connection's beam flange forces creates these double concentrated forces.
These forces cause a shear to the web panel zone that we are checking here.
There are four equations from the AISC 360-05 specification that are used, equations J10-9, J10-10, J10-11 and J10-12.
The program assumes that the effect of panel-zone deformation on frame stability is not considered in the analysis, thus
equations J10-11 and J10-12 are never used. Whether to use J10-9 or J10-10 depends on the axial force in the column at
the location of the connection. This force is input in the Loading section. If this force is <= 0.4*Pc then J10-9 is used. If
Pr > 0.4*Pc, then J10-10 is used.

Column Checks for Moment Connections
76 RISAConnection v2.0
Story Shear
The actual demand panel zone shear that occurs can be reduced by the story shear coming into the panel zone.
This story shear is also an input in the Loading section. If there is story shear, then the program calculates an Mequivas the
design demand. This is a reduced demand based on a reduced panel zone shear due to this story shear. Because the code
checks are based on converting the capacities into equivalent moment capacities, the same must be done for the moment
demand in this case.
RISAConnection will take all of the inputs, perform the applicable checks and use the appropriate equation.

Design Checks for Moment Connections
General Reference Manual 77
Design Checks for Moment Connections
These checks are unique to certain types of moment connections. Moment checks that are standard bolt and material
checks, see the Bolt & Material Checks topic. For weld information, see the Weld Checks topic.
Required Flange Force
All moment connections can resist axial, shear, and moment forces. The axial and moment force is converted into a
Required Flange Force (Tension and Compression) which is reported at the top of the results Report. This value
(sometimes tension, sometimes compression) is then compared to the Available capacity of each limit state in the Unity
Check value.
The Required Flange Force is calculated as:
End Plate Moment Checks
These checks are specific only to end plate moment connections. There are several checks for plate failure in an end-
plate moment connection. These checks are outlined below. All design procedures and equation references below are
taken from AISC Design Guide #4, 2nd Edition.
Bolt Moment Strength (no prying)
This check is calculated for the bolts in tension on the End Plate Moment Connection. Expand this section of the design
report and RISAConnection will provide you with the exact equation, code reference, listed variables, as well as the code
check value and pass or failure notification.

Design Checks for Moment Connections
78 RISAConnection v2.0
The moment capacity for this check is based on Bolt Tensile Strength from section J3.6 of the AISC 360-05 (13th
Edition) Steel Code and the Bolt Tension Strength equation 3.7 from the AISC Steel Design Guide 4 (Second Edition).
The moment arm variables, h0and h1are described in the image below.
Note:
Currently, the program considers no prying action in the Bolt Tension check.

Design Checks for Moment Connections
General Reference Manual 79
Verify Bolt Prying Assumption
The Bolt Moment Strength check assumes that there is no prying forces induced by the end plate. To make sure this
assumption works this check verifies that we are in an area considered "thick plate behavior".
This check is covered in the AISC Design Guide #4 "Extended End-Plate Moment Connections", 2nd edition, Copyright
2003 in Section 3.3. We check both the end plate and the column flange for "thick" plate behavior.
Fnp - The no-prying bolt tension rupture strength, found in the Bolt Moment Strength check.
Fpl - The end plate bending strength, found in the End Plate Flexural Yielding check.
Fcf - The column flange flexural strength, found in the Column Flexural Yielding check.
If any of these checks fail, then the no prying assumption is not valid. Thus, you will have to manually consider prying
for the bolt tension checks.
End Plate Flexural Yielding
The program uses the procedure from Section 3.3, as well as the appropriate tables at the end of Chapter 3 in order to
determine an end-plate bending strength, and a no-prying bolt tension rupture strength.
If the plate bending strength exceeds 110% of the bolt rupture strength then thick-plate behavior is confirmed and a code
check is given based on the other failure modes of the connection.
Note:
The program will not give code checks to end plates which experience thin-plate behavior. If this behavior is
reported, increase the thickness of the end plate.

Design Checks for Moment Connections
80 RISAConnection v2.0
End Plate Shear Yielding
The extended portion of the end-plate is checked against shear yielding due to out-of-plane shear (the flange force of the
beam). See Eqn 3.12.
End Plate Shear Rupture
The extended portion of the end-plate is checked against shear rupture due to out-of-plane shear (the flange force of the
beam). See Eqn 3.13.

Design Checks for Moment Connections
General Reference Manual 81
End Plate Moment Connection Limitations
Currently, the program is limited to End Plate Moment Connections with exactly 8 bolts.
Axial Force in Moment Connections
When an axial force is added to a moment connection, it is assumed that this axial force is carried entirely by the flanges
(Please seeRequired Flange Force). Therefore, the axial force will not affect the shear checks for the moment connection.
Note:
There are cases where the axial force will actually REDUCE the design checks on a moment connection. This
can happen for flange force failure modes that are not valid for both tension and compression. Example: Flange
Local Bending (which is valid only for the tension flange) combined with a compressive axial force in the beam,
or Web Buckling (which is valid only for the compression flange).

Design Checks for Moment Connections
82 RISAConnection v2.0
Vertical Brace Connections
The Vertical Brace Connections are intended for braces in the vertical plane, or as truss connections. Below is a list of
currently implemented Vertical Brace Connections:
Diagonal Brace
Chevron Brace
Diagonal Brace Connection
The diagonal brace configuration supports braces framing into a column both above and below a beam. Braces framing
into the opposite side of the column must be modeled as a separate connection. Each Diagonal Brace Connection
consists of four connections, illustrated below:
Brace-to-Gusset Connection (Bolted or Welded)
Gusset-to-Column Connection (Double Clip Angle or Direct Weld)
Gusset-to-Beam Connection (Double Clip Angle or Direct Weld)
Beam-to-Column Connection (Shear Tab or Double Clip Angle)
Chevron Brace Connection
The chevron brace configuration supports two braces framing into a beam from opposite directions. Braces framing into
the opposite side of the beam (above vs below) must be modeled as a separate connection. Each Chevron Brace
Connection consists of three connections, illustrated below:
Left Brace-to-Gusset Connection (Bolted or Welded)
Right Brace-to-Gusset Connection (Bolted or Welded)
Gusset-to-Beam Connection (Double Clip Angle or Direct Weld)

Design Checks for Moment Connections
General Reference Manual 83
Analysis Methodology
The program uses the Uniform Force Method to determine the distribution of forces within the gusset. This determines
the forces on all of the sub-connections (i.e. Gusset to Beam) as well. For more information on this method see the
AISC 13th Edition Manual, Page 13-3.
Limitations
Below is the list of current limitations. These limitations will be steadily stripped out in future releases of
RISAConnection.
Beam Member
The beam must be a wide flange
The beam must connect to the face of the column (i.e. no continuous beams allowed)
The beam must be horizontal (not sloped)
The beam cannot be skewed with respect to the column or brace
The web of the beam is not checked for buckling/crippling due to vertical forces from the gusset(s)
In Chevron Brace connections the interaction of forces from a chevron above the beam and a chevron below that
same beam are ignored. Each Chevron Brace connection is treated independently.
Column Member
The column must be a wide flange
The column must be vertical (not sloped)
The gusset(s) and beam must frame perpendicular to the web or flange of the column (not skewed)
The web of the column is not checked for buckling/crippling due to the horizontal forces from the gusset(s)
The web of the column is not checked for knifing or localized bending due to horizontal forces from the gusset(s)
framing into the web.
In Vertical Brace connections the interaction of forces from a diagonal brace on the right side of the column and a
diagonal brace on the left side of that same column are ignored. Each Vertical Brace connection is treated
independently.

Design Checks for Moment Connections
84 RISAConnection v2.0
Brace Member
The brace member must be a single angle or a double angle shape
The brace must form at least a 10 degree angle with the beam axis
The brace must form at least a 10 degree angle with the vertical axis
The brace must lie in the plane of both the beam and the column
Gusset Plate
The gusset plate must be rectangular in overall shape
The size of the gusset plate must obey the geometry restrictions dictated by the Uniform Force Method.
Geometry Restrictions
The centroids of all members in the connection must intersect at one common point (the work point)
The connections between the gusset plate and the beam/column must be centered on the gusset plate.

Design Checks for Moment Connections
General Reference Manual 85
The aspect ratio (Length/Width) of the gusset plate must satisfy the equation shown on Page 13-3 of the
AISC 13th Edition Manual, thereby ensuring that no connection interfaces experience an in-plane moment. When
manually adjusting the Length of the gusset plate in a connection the program will automatically adjust its width
to satisfy this Uniform Force Method requirement, and vice versa.
Gusset Plate Design
The Whitmore section is a design term used to indicate the portion of the gusset plate that is effective in resisting the
tension or compression forces transferred to it by the vertical brace. As shown below (and in Figure 9-1 of the AISC 13th
edition manual), the Whitmore section assumes that the gusset plate stress spreads out at a 30 degree angle from the first
point of connection (along the line of the brace force). It then terminates at the last point of connection between the brace
and gusset. This length is then defined as the width of the Whitmore Section.
Special Cases
The calculation of the Whitmore width is straight forward when the width remains entirely within the gusset. In cases,
where the widths extends into the beam or column, RISAConnection follows the recommendations given in a Modern
Steel Construction article written by Thornton and Lini. This includes methods for accounting for different material
strengths
In cases where the geometry of the plate produces an eccentricity in the Whitmore section, RISAConnection will
conservatively use a reduced effective width(see Figure 8 of the Thornton and Lini article).
Tension Checks
The Whitmore section will be checked against both yield and rupture. With the width of the section as described above
and the thickness of the section equal to the thickness of the gusset plate (or beam / column if a portion of the Whitmore
section extends into the beam / column).
Compression Checks
For compression, the gusset plate code check requires that Whitmore Section be viewed as an equivalent column. The
width of the column is merely the width of the Whitmore section as discussed above. However, the compression checks
also require an equivalent unbraced length KL for buckling checks. Currently the unbraced length used for the gusset
compression checks is the unbraced length at the center of the whitmore section (L2 as shown in the image below). A
future revision of this code check will change this to be an average of L1, L2 and L3.

Design Checks for Moment Connections
86 RISAConnection v2.0
The K value used for the Gusst plate will be assumed to be 0.50 for gussets that are supported along two edges and 1.2
for gussets supported along only one edge (i.e. Chevron brace configurations).

Printing
General Reference Manual 87
Printing
RISAConnection gives the ability to print out all of the information in the Connection View. Going to File- Print will
bring up the Printing dialog. This will allow you to print whatever is currently showing in the connection view.
Print Preview
Going to File - Print Preview or pressing the Print Preview button will open the Print Preview dialog.
Report Print Preview
This dialog allows you to preview the current print and make modifications to the header and footer. This is done by
pressing the Page Setup button. This dialog gives paper orientation options, margin selections and options for what
is to be viewed for the Header and Footer information.
Note:
The three Header and Footer selections give options for what to show in the left, center and right side of the
headers and footers respectively.

Printing
88 RISAConnection v2.0
Once these settings have been chosen properly, pressing the Print button will print your output.
Graphic Print Preview
The graphic print preview gives the view shown in the Connection View window and applies a header to it.

Units
General Reference Manual 89
Units
The Units dialog allows the user to set the units designation for the project. You can work with Imperial units (Kips,
inches, etc.) or Metric units (KN, meters, etc.), or any combination of the two. To access this dialog, simply click the
Units button from the Main menu or the Units icon from the Window toolbar.
Note:
Units can be changed at any time during modeling and the current units will be converted to the new units.

Technical Support
90 RISAConnection v2.0
Technical Support
Technical support is an important part of the RISAConnection package. There is no charge for technical support for all
licensed owners of the current version of RISAConnection. Technical support is very important to the staff at RISA
Technologies. We want our users to be able to reach us when they are having difficulties with the program. However,
this service is not to be used as a way to avoid learning the program or learning how to perform structural modeling in
general.
Hours: 6AM to 5PM Pacific Standard Time, Monday through Friday
Before contacting technical support, you should typically do the following:
1. Please search the Help File or General Reference Manual. Most questions asked about RISAConnection are
already answered in the Help File or General Reference Manual. Use the table of contents or index to find
specific topics and appropriate sections. We go to great lengths to provide extensive written and on-line
documentation for the program. We do this in order to help you understand the features and make them easier to
use.
2. If you have access to the Internet, you can visit our website at www.risatech.com and check out our Downloads
and Support section for release notes, updates, downloads, and frequently asked questions. We list known issues
and product updates that you can download. So, if you think the program is in error you should see if the problem
is listed and make sure you have the latest release. The FAQ (Frequently Asked Questions) section may also
address your question.
3. Make sure you understand the problem, and make sure your question is related to the program or structural
modeling. Technical Support does not include free engineering consulting.
4. Take a few minutes to experiment with the problem to try to understand and solve it.
For all modeling support questions, please be prepared to send us your model input file via email or postal mail. We
often will need to have your model in hand to debug a problem or answer your questions.
Email: [email protected]: This method is the best way to send us a model you would like help with. Most
email packages support the attachment of files. The input file you would send will have a *.rcn extension. Make sure you
tell us your name, company name, Key ID, phone number, and give a sufficient problem description.
Phone Support:(949) 951-5815: You can also call. But keep in mind that this works best only if your question is not
model specific and therefore doesn't require us to look at your file.

Index
General Reference Manual i
Index
2
2D View, 6
3
3D View, 6
A
Application Interface, 4
Assembly, 10
Axial Force in Moment Connections, 82
B
Base Material, 57
Block Shear Strength, 41
Bolt Bearing Strength, 52
Bolt Geometry Restrictions, 38
Bolt Group Eccentricity, 48
Bolt Moment Strength, 78
Bolt Shear Strength, 49
Bolt Tensile Strength, 50
C
Chevron Vertical Brace, 83
CJP Weld Strength, 62
Column Flange Bending, 69
Column Flange Bending in Shear Connections, 68
Column Flexural Yielding, 69
Column Moment Connection Checks, 67
Column Panel Zone Shear, 76
Column Web Buckling, 74
Column Web Crippling, 75
Column Web Crippling in Shear Connections, 74
Column Web Yielding, 72
Column Web Yielding in Shear Connections, 71
Complete Joint Penetration, 62
Components, 9
Compression Buckling, 47
Concentrated Force Location, 67
Connection Category, 8
Connection Grouping, 25
Connection Modeling Process, 12
Connection Properties, 7
Connection View, 5
Coped Beam Checks, 64
Creating a Connection, 12
Creating a Project, 12
Customizing RISAConnection, 15
D
Description Tab, 19
Design Checks, 34
Diagonal Vertical Brace, 83
DXF Export, 17
E
Effective Throat, 63
Elastic Weld Strength, 58
End Plate Flexural Yielding, 80
End Plate Moment Checks, 78
End Plate Shear Rupture, 81
End Plate Shear Yielding, 81
Erection Stability, 37
F
Filler Metal, 63
Fillet Weld, 60

Index
ii RISAConnection v2.0
Flange Plate Tension Yield, 41
Flexural Buckling, 45
Flexural Rupture, 45
Flexural Rupture Strength, 64
Flexural Yielding, 43
G
Geometry Checks, 37
Global Parameters, 19
Graphic Display, 21
Graphic Print Preview, 89
I
ICR Weld Strength, 59
Installation, 3
K
k and N Assumptions, 67
L
Lateral Torsional Buckling Strength, 65
License Agreement, 2
Loading, 8
Loading/Load Combinations, 29
Local Web Buckling Strength, 64
M
Maximum Bolt Spacing, 38
Maximum Edge Distance, 39
Menus and Toolbars, 4
Minimum Bolt Spacing, 38
Minimum Edge Distance, 39
Moment Arm, 67
N
Net Section Modulus, 64
Non-Eccentric Weld Strength, 60
O
Overview, 1
P
Partial Joint Penetration, 61
PJP Weld Strength, 61
Plate Tearout, 42
Plot Options, 23
Preferences, 15
Print Preview, 88
Printing, 88
Program Capabilities, 1
Project Explorer, 7
R
Report Print Preview, 88
Reports, 7
Required Flange Force, 78
Results, 33
RISAFloor and RISA-3D Integration, 25
Rotational Ductility, 37
Round-tripping, 32
S
Shear Rupture Strength, 40
Shear Yield Strength, 40
Shortcut Keys, 5
Sign Convention, 35
Slip Critical Considerations, 49
Snet, 64
Solution Tab, 19

Index
General Reference Manual iii
Solving Connections, 30
Stability, 37
Story Shear, 77
Strength vs. Serviceability, 49
System Requirements, 1
T
Technical Support, 3, 91
Tension Rupture, 41
Tension Yield, 41
Top of Column Distance, 67
U
Units, 90
V
Verify Bolt Prying, 80
Verify No Prying Action in Shear Connections, 51
Vertical Brace Connections, 83
W
Web Development, 63
Weld, 56
Weld Geometry, 56
Weld Size Limits, 62
Weld Strength, 58
Whitmore Section, 86