r m cpap s6 - fisiocarebrasil.com.br s6... · 2 nasal cpap therapy should be used with caution in...
TRANSCRIPT
CLINICIAN’S MANUAL
Reorder number: 218021/5 01 07
RESMED CPAP S6 ™
RESMED
CLINICIAN’S MANUAL
Reorder number: 218021/5 01 07
RESMED CPAP S6 ™
Protected by: EP(DE,FR,GB) 0088761, JP 1697822, US 4944310, US 5199424, US 5522382. Other patents pending.
Copyright subsists in ResMed products. AutoScan, Bubble Cushion, HumidAire, Mirage, SmartStart and Ultra Mirage are trademarks of ResMed
Ltd.
© 2001 ResMed Ltd. All rights reserved.
• ResMed Corp
14040 Danielson Street
Poway CA 92064-6857 USA
Tel: +1 (858) 746 2400
or 1-800-424-0737 (toll free)
Fax: +1 (858) 746 2900
Email: [email protected]
• ResMed Asia Pacific
97 Waterloo Road North Ryde
NSW 2113 Australia
Tel: +61 (2) 9886 5000
or 1 800 658 189 (toll free)
Fax: +61 (2) 9889 1471
Email: [email protected]
• ResMed (UK) Limited
67b Milton Park Abingdon
Oxfordshire OX14 4RX
UK
Tel: +44 (1235) 862 997
Fax: +44 (1235) 831 336
Email: [email protected]
• ResMed GmbH & Co. KG
Rudolfstraße 10
D-41068 Mönchengladbach
Germany
Tel: +49 (0) 2161-3521-0
Fax: +49 (0) 2161-3521-299
Email: [email protected]
• ResMed SA
Parc de la Bandonnière
2, rue Maurice Audibert
69800 Saint-Priest France
Tel: +33 (0) 4 37 251 251
Fax: +33 (0) 4 37 251 260
Email: [email protected]
• ResMed Sweden AB
Industrigatan 2
S-461 37 Trollhättan
Sweden
Tel: +46 520 420 110
Fax: +46 520 397 15
Email: [email protected]
• ResMed Singapore Pte Ltd
57 Ubi Ave 1
#07-09 Ubi Centre
Singapore 408936
Tel: +65 284 7177
Fax: +65 284 7787
Email: [email protected]
• ResMed NZ Ltd
PO Box 51-048
Pakuranga Auckland
New Zealand
Tel:+64 25 737 633
Fax:+64 9 239 0193
Email: [email protected]
• ResMed Malaysia Sdn Bhd
Unit 4.04, Wisma BICMA Lot 2,
Jalan 243/51A 46100 Petaling Jaya
Selangor D.E. Malaysia
Tel: +60 3 7877 1068
Fax: +60 3 7877 6099
Email: [email protected]
DISTRIBUTED BY:
MANUFACTURED BY:
ResMed Ltd 97 Waterloo Road North Ryde NSW 2113 Australia Tel: +61 (2) 9886 5000 or 1 800 658 189 (toll free) Fax: +61 (2) 9878 0120
Internet
English www.resmed.com Français www.resmed.fr Deutsch www.resmed.de
Español www.resmed.com/spanish Svenska www.resmed.com/swedish
CO
NTE
NTS
CONTENTS
MEDICAL INFORMATION . . . . . . . . . . . . . . . . . . . . . . . . . . . . . . . . . . 1DEFINITION OF TERMS 1INDICATED USE 1CONTRAINDICATIONS 1WARNINGS 3PRECAUTIONS 4OXYGEN USE 4ADVERSE EFFECTS 4
RESMED CPAP S6 SERIES . . . . . . . . . . . . . . . . . . . . . . . . . . . . . . . . . 5
SETTING UP THE RESMED CPAP S6 . . . . . . . . . . . . . . . . . . . . . . . . . . 7ASSEMBLING THE DEVICE 7SETTING UP FOR PATIENT USE 11
USING THE RESMED CPAP S6. . . . . . . . . . . . . . . . . . . . . . . . . . . . . . 19
CALIBRATION . . . . . . . . . . . . . . . . . . . . . . . . . . . . . . . . . . . . . . . . . . 21
CLEANING & MAINTENANCE . . . . . . . . . . . . . . . . . . . . . . . . . . . . . . . 23
SERVICING. . . . . . . . . . . . . . . . . . . . . . . . . . . . . . . . . . . . . . . . . . . . 25
TROUBLESHOOTING . . . . . . . . . . . . . . . . . . . . . . . . . . . . . . . . . . . . . 26
ACCESSORIES/SPARE PARTS . . . . . . . . . . . . . . . . . . . . . . . . . . . . . . . . 29
SPECIFICATIONS . . . . . . . . . . . . . . . . . . . . . . . . . . . . . . . . . . . . . . . . 31
INDEX . . . . . . . . . . . . . . . . . . . . . . . . . . . . . . . . . . . . . . . . . . . . . . . 35
iii

iv
MED
ICAL
INFO
RMAT
ION
MEDICAL INFORMATIONDEFINITION OF TERMS
This manual contains special terms and icons that appear in the margins.
!
WARNING Alerts you to possible injury.
!
PRECAUTION Explains special measures for the safe and effective use of the device.
i
NOTE Is an informative or helpful note.
INDICATED USE
The ResMed CPAP S6 system is intended for the treatment of obstructive sleep apnoea (OSA) in adult patients.
CONTRAINDICATIONS
Nasal CPAP therapy must not be used in patients with the following conditions:
• pneumothorax or pneumomediastinum
• decompensated cardiac failure or hypotension, particularly if associated with intravascular volume depletion (risk of further hypotension or reduction in cardiac output)
• pneumoencephalus, recent trauma or surgery (for example, pituitary or nasal) that may have produced cranio-nasopharyngeal fistula (risk of entry of air or other material into the cranial cavity)
• otitis media or perforated ear drum
• massive epistaxis.
1
2
Nasal CPAP therapy should be used with caution in patients with the following conditions:
• existing respiratory failure (risk of increased work of breathing, due either to incomplete reversal of upper airway obstruction or to breathing at high lung volume, leading to worsening respiratory failure)
• emphysematous bullae, or past history of pneumothorax (risk of pneumothorax)
• previous history of massive epistaxis (risk of recurrence)
• acute sinusitis.
The clinician should assess on a case-by-case basis the relative risks and benefits of CPAP therapy in such a subject. When assessing the relative risks and benefits, the clinician should understand that the ResMed CPAP S6 unit can be set to deliver pressures up to 20 cmH2O. In the unlikely event of certain fault conditions, static pressures of up to 35 cmH2O are possible. If it is believed that such a pressure could present a risk to a particular patient, then this device must not be used.
As with all fixed pressure and autotitrating CPAP units, the ResMed CPAP S6 unit may not work:
• in the presence of severe mask leaks; furthermore, in the case of leaks in excess of 0.7 L/sec, some or all reported parameters may be inaccurate, and either insufficient or excess pressure may be delivered in some cases
• with patients who breathe predominantly or exclusively through the mouth, due to loss of pressure via the mouth; furthermore, some or all reported parameters may be inaccurate, and either insufficient or excess pressure may be delivered in some cases
• in patients with lung disease, because the ResMed CPAP S6 system will treat only the upper airway obstruction, and there may be residual hypoxaemia or hypoventilation due to the lung disease
• in patients with particularly high nasal resistance.
For patients with limited respiratory capacity during sleep (eg emphysema; reduced central drive; neuromuscular, chest wall or lung parenchymal disease; and similar conditions), the use of the SmartStart/Stop feature may not be advisable. If the unit is stopped inadvertently by this feature (due to leak, for example) the patient may not breathe strongly enough to restart the unit.
MED
ICAL
INFO
RMAT
ION
WARNINGSThe following are general warnings. Specific warnings appear next to the relevant instructions in the manual.
!
WARNING • THIS IS NOT A LIFE SUPPORT DEVICE. It may stop operating due to power interruption or a device fault.
• Explosion hazard—do not use in the vicinity of flammable anaesthetics.
• Special care should be exercised in patients who may be dehydrated, or may become dehydrated, for example as a result of fluid restriction or diuretic therapy, including changes or inadvertent changes in therapy.
• If there is any doubt about the likely effect of positive pressure on cardiac output in a particular patient, the patient’s immediate blood pressure and heart rate response to therapy should be assessed, at the highest intended pressure setting for the patient. Symptoms of faintness or dizziness should be monitored over the first few minutes of therapy.
• If, during therapy, particularly on commencing therapy each night, the patient feels faint or lightheaded, they should immediately discontinue therapy and seek medical advice.
• The air flow for breathing produced by this device can be as much as 6oC (11oF) higher than the temperature of the room. Caution should be exercised if the room temperature is warmer than 32oC (90oF).
• ResMed CPAP devices have been designed and manufactured to provide optimum performance using ResMed mask systems. Other mask systems may be used. However, swings and delivered pressure with non-ResMed masks may be different from those with ResMed masks. If in doubt, measure delivered pressure at the mask. Masks with extremely low exhaust vent flow (less than 15 L/min at 4 cm H2O) may cause somewhat greater temperature rises in the delivered air than normally expected.Use of non-ResMed masks may also affect the SmartStart and SmartStop fea-tures of the CPAP device.
• Inadvertent triggering of SmartStop in high leak situations is more likelyin masks with particularly high exhaust vent flow rates. It is important toconfirm that SmartStart works correctly in these masks when the leak hasreduced somewhat, so that therapy is restarted promptly.
• When the combined flow resistance of the mask and tubing system is toohigh, the device may not SmartStop when the mask is off the face andmay continue to log usage hours.
• Do not enable SmartStart when using a mask with an anti-asphyxia valve, such as the Mirage Full Face Mask.
• A mask should not be worn unless the machine is turned on and operating properly. The vent holes associated with the mask should never be blocked.
3
4
Explanation: this device is intended to be used with special masks which have vent holes to allow continuous flow of air out of the mask. When the device is turned on and functioning properly, new air from the device flushes the exhaled air out through the mask vent holes. However, when the device is not operating, insufficient fresh air will be provided through the mask, and the exhaled air may be rebreathed. Rebreathing of exhaled air for longer than several minutes can, in some circumstances, lead to suffocation.
• At low pressures, the flow through the exhalation ports may be inadequate to clear all exhaled gas from the tubing. Some inconsequential rebreathing may occur.
PRECAUTIONS
The following are general precautions. Specific precautions appear next to the relevant instructions in the manual.
!
PRECAUTION • The patient should never open the ResMed CPAP S6 case. There are no user serviceable parts inside. Repairs and internal servicing should only be performed by an authorised service agent.
OXYGEN USE
!
WARNING • If oxygen is used with this device, the oxygen flow must be turned off when the device is not operating. Explanation: when the device is not in operation and the oxygen flow is left on, oxygen delivered into the air delivery tubing may accumulate within the device enclosure and create a risk of fire.
• Oxygen supports combustion. Oxygen should not be used while smoking or in the presence of an open flame.
i
NOTE At a fixed rate of supplemental oxygen flow, the inhaled oxygen concentration will vary, depending on the pressure settings, patient breathing pattern, mask selection and leak rate.
ADVERSE EFFECTS
The following adverse effects may arise during the course of CPAP treatment: headache; middle ear or sinus discomfort; chest pain; dryness of the nose, mouth or throat; bloating; skin irritation due to sensitivity to the materials in the mask system.
RESM
ED C
PAP
S6 S
ERIE
S
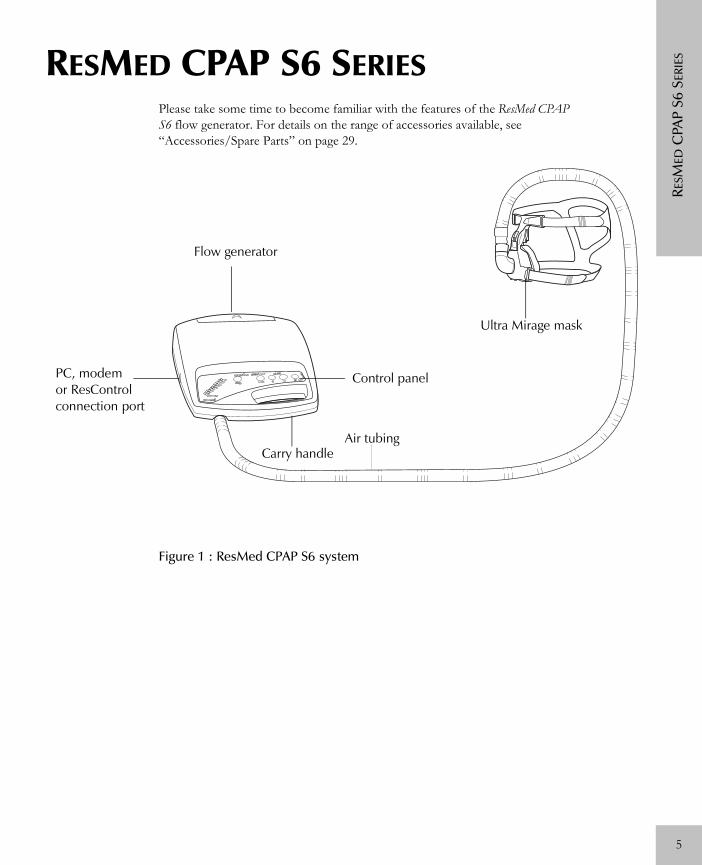
RESMED CPAP S6 SERIESPlease take some time to become familiar with the features of the ResMed CPAP S6 flow generator. For details on the range of accessories available, see “Accessories/Spare Parts” on page 29.Figure 1 : ResMed CPAP S6 system
Air tubingCarry handle
Flow generator
Control panelPC, modem
Ultra Mirage mask
or ResControlconnection port
5

6
SETT
ING
UP
THE
RESM
ED C
PAP
S6
SETTING UP THE RESMED CPAP S6ASSEMBLING THE DEVICE
1 Check that you have the following items (see Figure 1, ResMed CPAP S6 system, on page 5):
• a ResMed CPAP S6 flow generator unit
• a power cord
• ResMed air tubing
• a mask system (supplied separately)
2 Place the flow generator on a table near the head of the bed.
!
PRECAUTION Be careful to place it where it cannot be bumped and where someone will not trip over the power cord.
i
NOTE The flow generator may be placed on the floor beside or underneath the patient’s bed. However, you should ensure that the area is free from dust and clear of bedding , clothes or any other objects that could block the air inlet.
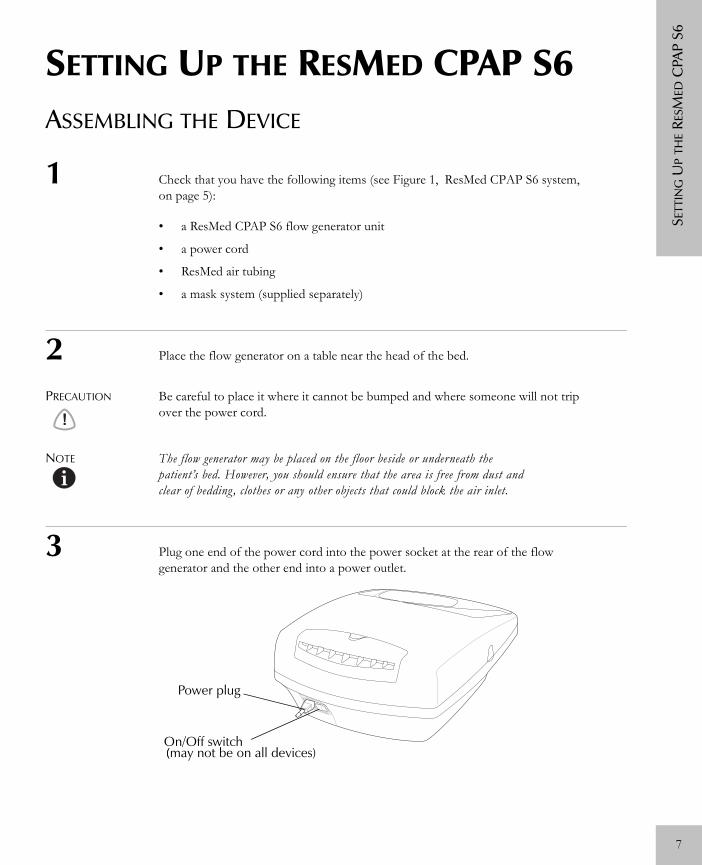
3 Plug one end of the power cord into the power socket at the rear of the flow generator and the other end into a power outlet.
Power plug
On/Off switch(may not be on all devices)(
7
8
!
WARNING Make sure the power cord and plug are in good condition and the equipment is not damaged.
4 Assemble the mask system according to the user instructions supplied with the mask.
!
WARNING • ResMed CPAP devices have been designed and manufactured to provide optimum performance using ResMed mask systems. Other mask systems may be used. However, swings and delivered pressure with non-ResMed masks may be different from those with ResMed masks. If in doubt, measure delivered pressure at the mask. Masks with extremely low exhaust vent flow (less than 15 L/min at 4 cm H2O) may cause somewhat greater temperature rises in the delivered air than normally expected.Use of non-ResMed masks may also affect the SmartStart and SmartStop fea-tures of the CPAP device.
• Inadvertent triggering of SmartStop in high leak situations is more likely inmasks with particularly high exhaust vent flow rates. It is important toconfirm that SmartStart works correctly in these masks when the leak hasreduced somewhat, so that therapy is restarted promptly.
• When the combined flow resistance of the mask and tubing system is toohigh, the device may not SmartStop when the mask is off the face andmay continue to log usage hours.
SETT
ING
UP
THE
RESM
ED C
PAP
S6
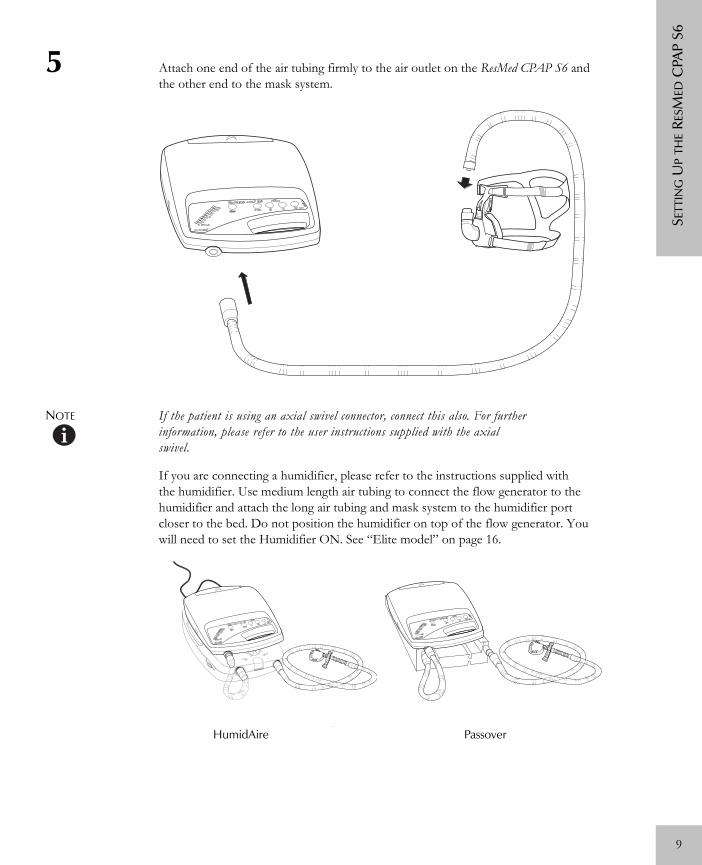
5 Attach one end of the air tubing firmly to the air outlet on the ResMed CPAP S6 and the other end to the mask system.
i
NOTE If the patient is using an axial swivel connector, connect this also. For further information, please refer to the user instructions supplied with the axial swivel.
If you are connecting a humidifier, please refer to the instructions supplied with the humidifier. Use medium length air tubing to connect the flow generator to the humidifier and attach the long air tubing and mask system to the humidifier port closer to the bed. Do not position the humidifier on top of the flow generator. You will need to set the Humidifier ON. See “Elite model” on page 16.
HumidAire Passover
9
10
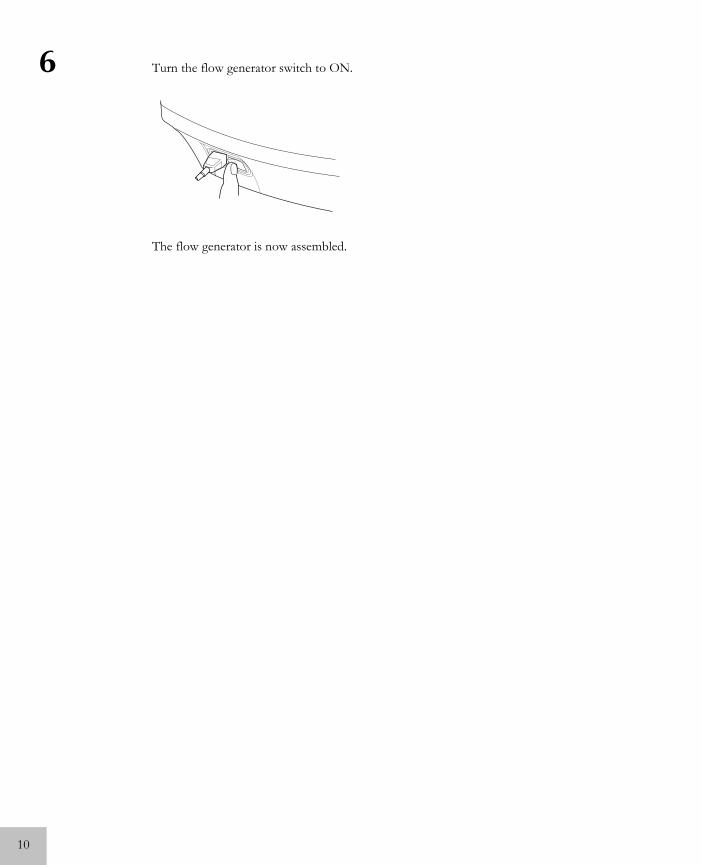
6 Turn the flow generator switch to ON.
The flow generator is now assembled.
SETT
ING
UP
THE
RESM
ED C
PAP
S6
SETTING UP FOR PATIENT USE
LIGHTWEIGHT, PLUS AND ELITE MODELS
Before the flow generator may be used by the patient, you need to set up or enable the following functions:
• Hour Meter
• Treatment Pressure
• Delay Timers
• Start Pressure
• Real-time Clock, SmartStart and Humidifier option (Elite model only, see “Elite model” on page 16).
You may adjust the settings directly on the flow generator or use a ResControl™ clinical control unit or AutoScan™ software to set up these functions remotely.
i
NOTE A ResControl provides remote setting of Start Pressure, Treatment Pressure, Delay Timers, SmartStart and Humidifier options when it is connected to a ResMed CPAP S6 using the port on the side of the flow generator. ResControl can also display leak and pressure measurements while the flow generator is operating. For further details, please refer to the ResControl Clinician’s Manual.For the ResMed CPAP S6 Plus and Elite models, you can use AutoScan software (versions 3.0 or later) to adjust the Start Pressure, Treatment Pressure, Delay Timers and the Real-time Clock. You can also enable SmartStart and humidifier use and erase stored compliance data. Your computer can be interfaced to the flow generator via cable connection. To obtain a clinical interface kit, please contact your ResMed representative.
SULLIVAN® UCU1 and UCU2 control units are not compatible with the ResMed CPAP S6 Elite model enhanced compliance software. These control units cannot be used to change pressure settings on the Elite model. Both UCU1 and UCU2 control units do function correctly to change pressure settings on the ResMed CPAP S6 Plus model. Note, however, that the control unit will identify the flow generator as a SULLIVAN V Plus rather than a ResMed CPAP S6 Plus.
RESETTING THE HOUR METER
The ResMed CPAP S6 is equipped with an Hour Meter that displays the total number of hours the motor has been running, providing an indication of compliance. The Hour Meter is on the underside of the flow generator.
11

12
The Hour Meter should be reset to zero when the flow generator is given to a patient.
i
NOTE You should reset the Hour Meter before setting the Treatment Pressure or Start Pressure.
To reset the Hour Meter:
1. Hold down the Start, 5 minute and 10 minute buttons while you turn on the main power switch at the rear of the flow generator. Keep the buttons pressed until the Start, 5 minute and 10 minute buttons illuminate.
2. Press the Stop and 20 minute buttons together and then release them. The motor will start running.
i
NOTE At this point, if you press the Start, 5 minute or 10 minute buttons alone, it may interfere with the flow generator’s pressure calibration. If one of these buttons has been pressed by mistake, all factory defaults will need to be recalibrated. See “Calibration” on page 21.
3. Press the 20 minute button to reset the Hour Meter.
Foam pad
Hour Meter(Plus and Elite only)
Carry handle
Air outlet
SETT
ING
UP
THE
RESM
ED C
PAP
S6
4. Press the Stop button to revert to normal operating mode or turn the flow generator off.
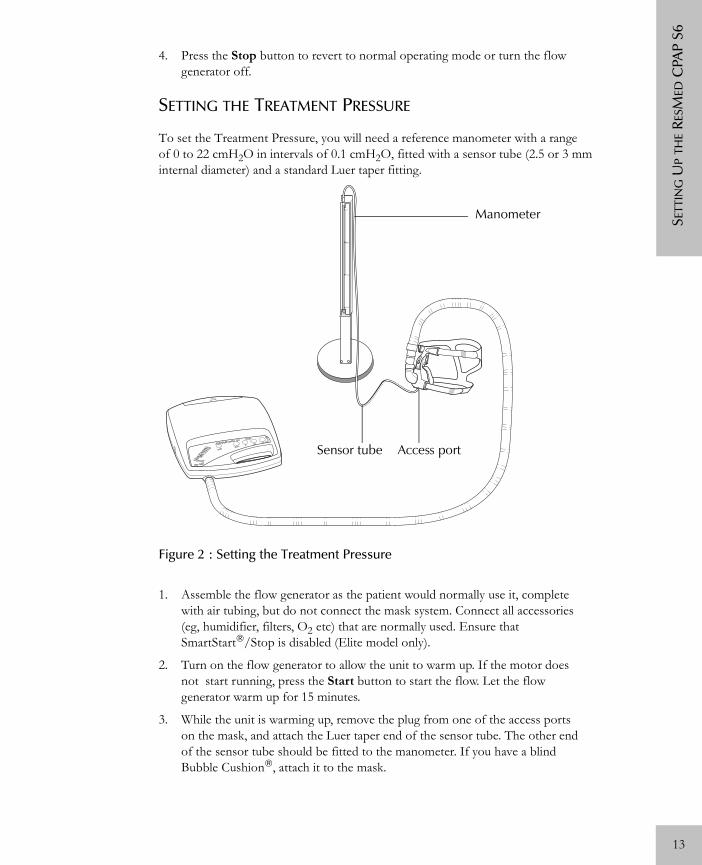
SETTING THE TREATMENT PRESSURE
To set the Treatment Pressure, you will need a reference manometer with a range of 0 to 22 cmH2O in intervals of 0.1 cmH2O, fitted with a sensor tube (2.5 or 3 mm internal diameter) and a standard Luer taper fitting.
Figure 2 : Setting the Treatment Pressure
1. Assemble the flow generator as the patient would normally use it, complete with air tubing, but do not connect the mask system. Connect all accessories (eg, humidifier, filters, O2 etc) that are normally used. Ensure that SmartStart®/Stop is disabled (Elite model only).
2. Turn on the flow generator to allow the unit to warm up. If the motor does not start running, press the Start button to start the flow. Let the flow generator warm up for 15 minutes.
3. While the unit is warming up, remove the plug from one of the access ports on the mask, and attach the Luer taper end of the sensor tube. The other end of the sensor tube should be fitted to the manometer. If you have a blind Bubble Cushion®, attach it to the mask.
100
0
200
300
Manometer
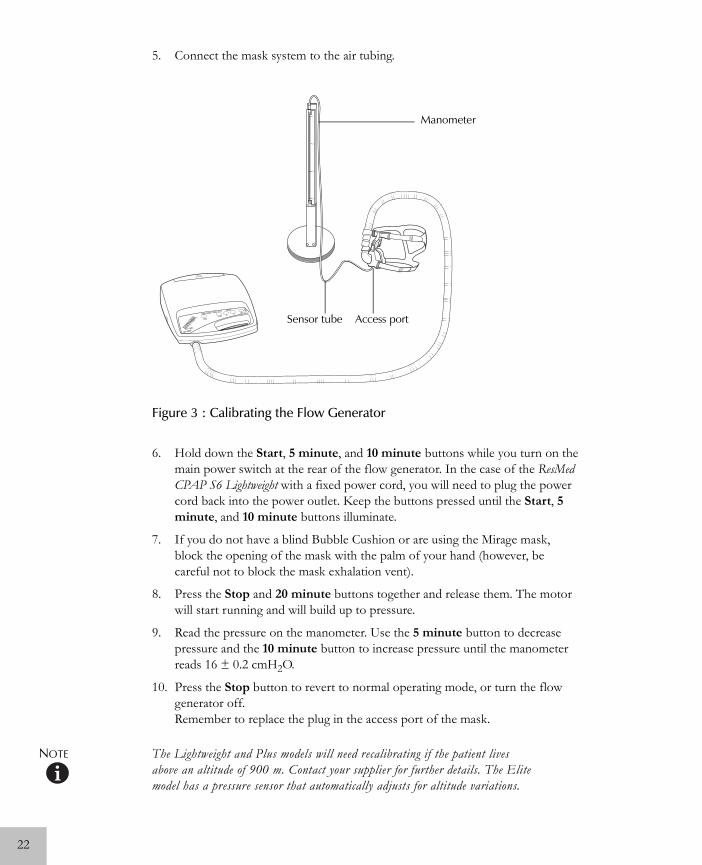
Sensor tube Access port
13
14
4. When the motor has been running for 15 minutes, press the Stop button to stop the flow and turn off the main power switch at the rear of the flow generator. In the case of the ResMed CPAP S6 Lightweight with a fixed power cord, you will need to unplug the power cord from the power outlet to do this.
5. Connect the mask system to the air tubing.
6. Hold down the Start and 20 minute buttons while you turn on the main power switch at the rear of the flow generator. In the case of the ResMed CPAP S6 Lightweight with a fixed power cord, you will need to plug the power cord back into the power outlet. Keep the buttons pressed until the Start and 20 minute buttons illuminate. The motor will start running and will build up to the current pressure setting.
7. If you do not have a blind Bubble Cushion, or are using the Mirage® Mask, you will need to block the opening of the mask with the palm of your hand (however, be careful not to block the mask exhalation vent).
8. Read the pressure on the manometer. Use the 5 minute button to decrease pressure and the 10 minute button to increase pressure. Alternatively, you may wish to set the pressure to 10 cmH2O by pressing the Start button.
i
NOTE The Hour Meter on the underside of the flow generator will display the Treatment Pressure while in pressure setting mode. However, a manometer should be used when accurate pressure setting is required.
9. Press the Stop button to revert to normal operating mode.Remember to replace the plug in the access port of the mask.
i
NOTE The Elite model uses a pressure sensor to accurately determine the treatment pressure at the patient’s mask. If a leak should occur, the flow generator will automatically increase the air flow slightly to maintain the treatment pressure at the set level. There is no need to program this feature.
LIMITING THE DELAY TIMER
The Delay Timer starts treatment very gently while the patient falls asleep and slowly increases to full operating pressure over a selected time period. You can limit the delay times available to the patient. The delay times are 0 (no) minutes, 5 minutes, 10 minutes and 20 minutes.
1. Hold down the 5 minute and 10 minute buttons while you turn on the main power switch at the rear of the flow generator. Keep the buttons pressed until the Stop and Start buttons illuminate. Some other buttons may also light up.
2. The lit buttons indicate which delay times are available. Press the 20 minute button to add delay times and the Start button to remove them.
3. Press the Stop button to revert to normal operating mode. If this is not done, the SmartStart/SmartStop function may not work optimally.
SETT
ING
UP
THE
RESM
ED C
PAP
S6
i
NOTE During operation, if the patient presses a delay button that has been disabled, it will activate the next enabled delay. For example, if the 20 minute delay has been disabled, pressing the 20 minute delay button will activate the 10 minute delay. If all the time delays have been disabled, pressing any of the delay buttons will start the flow generator.
SETTING THE START PRESSURE
The Start Pressure is the pressure at which the flow generator starts when the Delay Timer is used. To set the Start Pressure, you will need a reference manometer with a range of 0 to 22 cmH2O in intervals of 0.1 cmH2O, fitted with a sensor tube (2.5 or 3 mm internal diameter) and a standard Luer taper fitting.
1. Assemble the flow generator as the patient would normally use it, complete with air tubing, but do not connect the mask system. Connect all accessories (eg, humidifier, filters, O2 etc) that are normally used. Ensure that SmartStart/Stop (Elite model only) is disabled (see Figure 2, Setting the Treatment Pressure, on page 13).
2. Turn on the flow generator to allow the unit to warm up. If the motor does not start running, press the Start button to start the flow. Let the flow generator warm up for 15 minutes.
3. While the unit is warming up, remove the plug from one of the access ports on the mask and insert the Luer taper end of the sensor tube. The other end of the sensor tube should be fitted to the manometer. If you have a blind Bubble Cushion, attach it to the mask.
4. When the motor has been running for 15 minutes, press the Stop button to stop the flow and turn off the main power switch at the rear of the flow generator. In the case of the ResMed CPAP S6 Lightweight with a fixed power cord, you will need to unplug the power cord from the power outlet to do this.
5. Connect the mask system to the air tubing.
6. Hold down the 5 minute and 20 minute buttons while you turn on the main power switch at the rear of the flow generator. In the case of the ResMed CPAP S6 Lightweight with a fixed power cord, you will need to plug the power cord back into the power outlet. Keep the buttons pressed until the 5 minute and 20 minute buttons illuminate. The motor will start running and will build up to the current Start Pressure setting.
7. If you do not have a blind Bubble Cushion, or are using the Mirage Mask, you will need to block the opening of the mask with the palm of your hand (however, be careful not to block the mask vent).
8. Read the pressure on the manometer. To adjust the Start Pressure, use the 5 minute button to decrease pressure and the 10 minute button to increase pressure. If you wish to set the Start Pressure to 4.0 cmH2O, press the Start button.
9. Press the Stop button to revert to normal operating mode.Remember to replace the plug in the access port of the mask.
15
16
ELITE MODEL
SETTING THE REAL-TIME CLOCK
The Real-time Clock helps determine compliance and must be set before the flow generator is given to the patient. To set the clock:
1. Hold down the Start and 5 minute buttons while you turn on the main power switch at the rear of the flow generator. Keep the buttons pressed until the Start and 5 minute buttons illuminate.
2. The Hour Meter on the underside of the flow generator will display the currently set time. Press the 5 minute button to change the hours and press the Start button to change the minutes.
3. Press the Stop button to revert to normal operating mode, or turn the power off.
4. The clock battery has a five year life span. If you are using the flow generator to monitor patient compliance, be sure to contact ResMed to have the battery replaced before the end of the battery life span. If the Real-time Clock is not set, it will still record compliance information but the hours of usage may be allocated to the wrong date when viewing with AutoScan.
i
NOTE If you are using AutoScan software (versions 3.0 or later), you may download the date and time on your computer to the flow generator (see your AutoScan Clinician’s Manual).
ENABLING SMARTSTART®
When SmartStart is enabled on the Elite model, the flow generator will automatically start when the patient breathes into the mask and automatically stop when the patient removes the mask.
!
WARNING Do not enable SmartStart when using a mask with an anti-asphyxia valve, such as the Mirage Full Face Mask.
To enable SmartStart:
1. Hold down the Start, 5 minute and 20 minute buttons while you turn on the main power switch at the rear of the flow generator. Keep the buttons pressed until the pressure display lights come on.
2. Press the Start button to enable/disable SmartStart. If the Start button is lit, then SmartStart is enabled. If the Start button is not lit, then SmartStart is disabled.
3. Press the Stop button to revert to normal operating mode, or turn the power off. If this is not done, the SmartStart/SmartStop function may not work optimally.
SETT
ING
UP
THE
RESM
ED C
PAP
S6
USING A HUMIDIFIER
i
NOTE Set the pressure after connecting the humidifier.
If the patient is using a humidifier, then the Humidifier option must be set to ON.
1. Hold down the Start, 5 minute and 20 minute buttons while you turn on the main power switch at the rear of the flow generator. Keep the buttons pressed until the pressure display lights come on.
2. Press the 20 minute button to adjust the Humidifier setting. If the 20 minute button is lit, then the Humidifier setting is ON. If the 20 minute button is not lit, then the Humidifier setting is OFF.
3. Press the Stop button to revert to normal operating mode, or turn the power off. If this is not done, the SmartStart/SmartStop function may not work optimally.
DOWNLOADING COMPLIANCE DATA
The Elite model records up to 365 nights of patient compliance data that can be downloaded. Please refer to your AutoScan software manual for details.
17

18
USI
NG
TH
E RE
SMED
CPA
P S6
USING THE RESMED CPAP S61 The flow generator should be assembled beside the patient’s bed with the air tubing and mask system connected. (See “Assembling the Device” on page 7.)
2 Have the patient lie down in bed and put the mask on. Arrange the air tubing so that it will move freely if the patient turns in his sleep.
!
WARNING Do not leave long lengths of air tubing around the top of the bed; they may twist around the patient’s head or neck while sleeping.
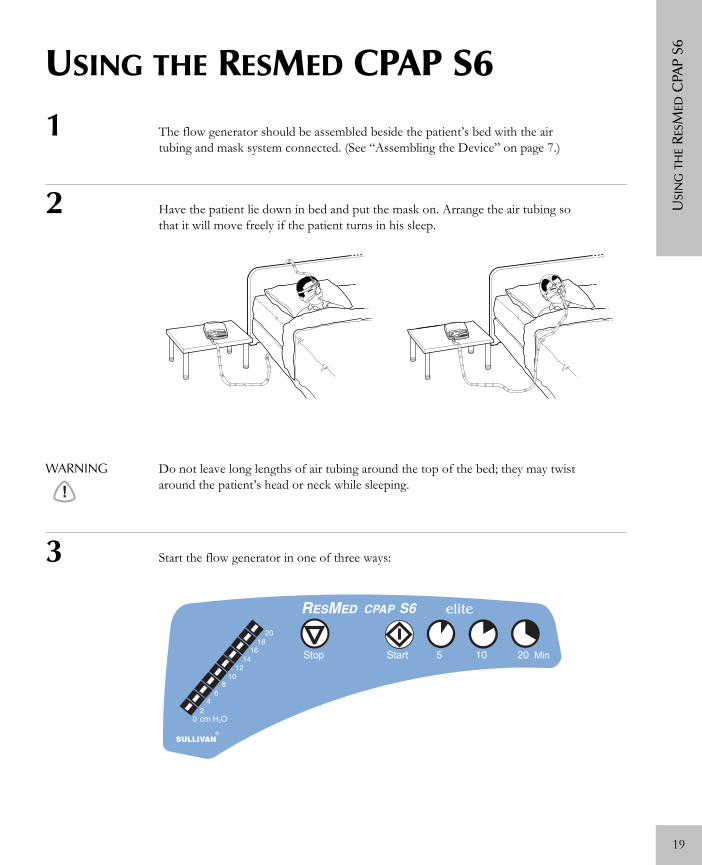
3 Start the flow generator in one of three ways:
19
20
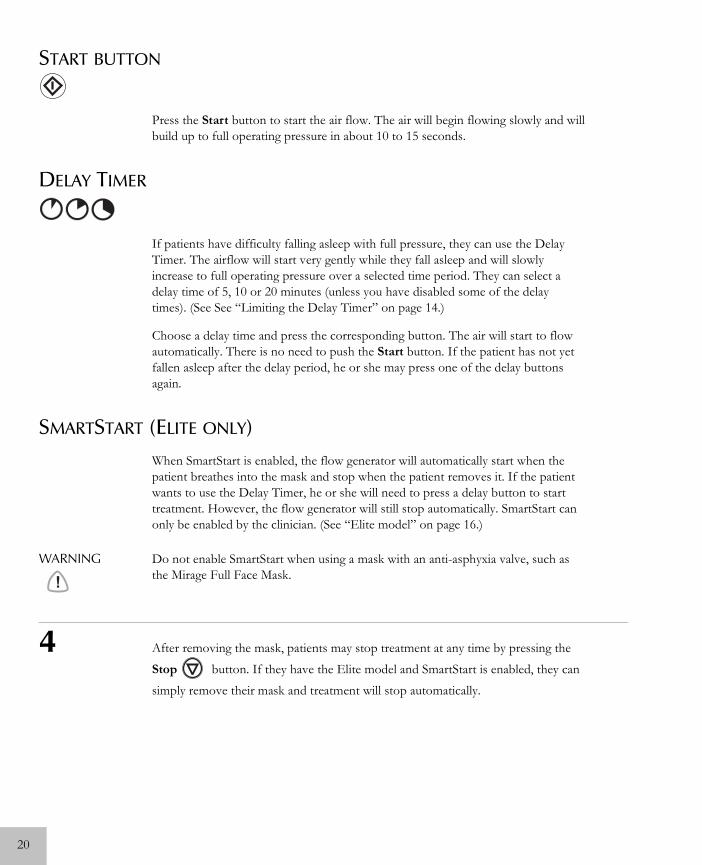
START BUTTON
Press the Start button to start the air flow. The air will begin flowing slowly and will build up to full operating pressure in about 10 to 15 seconds.
DELAY TIMER
If patients have difficulty falling asleep with full pressure, they can use the Delay Timer. The airflow will start very gently while they fall asleep and will slowly increase to full operating pressure over a selected time period. They can select a delay time of 5, 10 or 20 minutes (unless you have disabled some of the delay times). (See See “Limiting the Delay Timer” on page 14.)
Choose a delay time and press the corresponding button. The air will start to flow automatically. There is no need to push the Start button. If the patient has not yet fallen asleep after the delay period, he or she may press one of the delay buttons again.
SMARTSTART (ELITE ONLY)When SmartStart is enabled, the flow generator will automatically start when the patient breathes into the mask and stop when the patient removes it. If the patient wants to use the Delay Timer, he or she will need to press a delay button to start treatment. However, the flow generator will still stop automatically. SmartStart can only be enabled by the clinician. (See “Elite model” on page 16.)
!
WARNING Do not enable SmartStart when using a mask with an anti-asphyxia valve, such as the Mirage Full Face Mask.
4 After removing the mask, patients may stop treatment at any time by pressing the Stop button. If they have the Elite model and SmartStart is enabled, they can simply remove their mask and treatment will stop automatically.

CAL
IBRA
TIO
N
CALIBRATIONThe flow generator is factory calibrated before delivery and will not require periodic calibration for home use. If you suspect you have altered the calibration while resetting the Hour Meter (see Note on page 12), we recommend you check the calibration and adjust as required.
i
NOTE Some countries require all medical equipment to have a periodic service and calibration. Please check the regulations in your country.
QUICK CHECK
To check the calibration of the flow generator:
1. Set the treatment pressure to 16 cmH2O using the Hour Meter display on the bottom of the flow generator. (To do this, see “Setting the Treatment Pressure” on page 13.)
2. Measure the pressure at the mask using an accurate manometer. If the delivered pressure differs more than 0.5 cmH2O from 16 cmH2O, you will need to re-calibrate the flow generator.
ADJUSTING THE CALIBRATION
To calibrate the flow generator you will need a reference manometer with a range of 0 to 22 cmH2O in intervals of 0.1 cmH2O, fitted with a sensor tube (2.5 or 3 mm internal diameter) and a standard Luer taper fitting.
1. Assemble the flow generator as the patient would normally use it, complete with air tubing, but do not connect the mask system. Connect all accessories (eg, humidifier, filters, O2 etc) that are normally used. Ensure that SmartStart/Stop is disabled (Elite model only).
2. Turn on the flow generator to allow the unit to warm up. If the motor does not start running, press the Start button to start the flow. Let the flow generator warm up for 15 minutes.
3. While the unit is warming up, remove the plug from one of the access ports on the mask, and attach the Luer taper end of the sensor tube. The other end of the sensor tube should be fitted to the manometer. If you have a blind Bubble Cushion, attach it to the mask.
4. When the motor has been running for 15 minutes, press the Stop button to stop the flow and turn off the main power switch at the rear of the flow generator. In the case of the ResMed CPAP S6 Lightweight with a fixed power cord, you will need to unplug the power cord from the power outlet to do this.
21
22
5. Connect the mask system to the air tubing.
Figure 3 : Calibrating the Flow Generator
6. Hold down the Start, 5 minute, and 10 minute buttons while you turn on the main power switch at the rear of the flow generator. In the case of the ResMed CPAP S6 Lightweight with a fixed power cord, you will need to plug the power cord back into the power outlet. Keep the buttons pressed until the Start, 5 minute, and 10 minute buttons illuminate.
7. If you do not have a blind Bubble Cushion or are using the Mirage mask, block the opening of the mask with the palm of your hand (however, be careful not to block the mask exhalation vent).
8. Press the Stop and 20 minute buttons together and release them. The motor will start running and will build up to pressure.
9. Read the pressure on the manometer. Use the 5 minute button to decrease pressure and the 10 minute button to increase pressure until the manometer reads 16 ± 0.2 cmH2O.
10. Press the Stop button to revert to normal operating mode, or turn the flow generator off.Remember to replace the plug in the access port of the mask.
i
NOTE The Lightweight and Plus models will need recalibrating if the patient lives above an altitude of 900 m. Contact your supplier for further details. The Elite model has a pressure sensor that automatically adjusts for altitude variations.
100
0
200
300
Manometer
Sensor tube Access port

CLE
ANIN
G &
MAI
NTE
NAN
CE
CLEANING & MAINTENANCE
DAILY
Disconnect the air tubing and hang it out of direct sunlight, as the tubing may harden and crack over time.
Clean the mask according to the user instructions supplied with it.
If you are using a humidifier, clean it according to the instructions in the manual supplied with it.
WEEKLY
Hand wash the air tubing with mild detergent and drip dry. Hand wash the mask and headgear according to the user instructions supplied with them.
PERIODICALLY
The exterior of the flow generator should be cleaned with a damp cloth and mild detergent.
!
WARNING • The mask and air tubing are subject to normal wear and tear. Inspect them regularly for damage.
• Beware of electric shock. Do not immerse the flow generator or power cord in water. Always unplug the flow generator before cleaning and be sure that it is dry before plugging it back in.
REPLACING THE AIR FILTER STRIPS
The ResMed CPAP S6 filter is intended for use with the ResMed CPAP S6 flow generator to filter the air delivered during CPAP treatment.
!
WARNING Do NOT wash the air filter strips. The air filter strips are not washable or reusable.
23
24
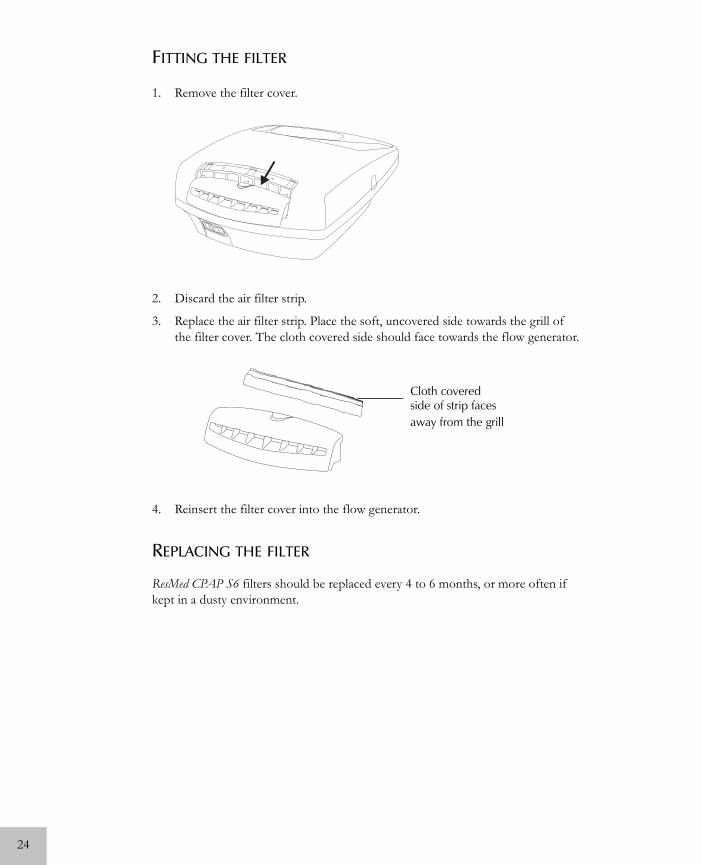
FITTING THE FILTER
1. Remove the filter cover.
2. Discard the air filter strip.
3. Replace the air filter strip. Place the soft, uncovered side towards the grill of the filter cover. The cloth covered side should face towards the flow generator.
4. Reinsert the filter cover into the flow generator.
REPLACING THE FILTER
ResMed CPAP S6 filters should be replaced every 4 to 6 months, or more often if kept in a dusty environment.
Cloth covered side of strip faces away from the grill
SERV
ICIN
G
SERVICINGAll ResMed CPAP S6 series flow generators are designed to give years of trouble-free operation.
They will not require regular servicing if they are cleaned and maintained according to the instructions in this manual.
If you feel that your unit is not performing properly, follow the directions in “Self-testing (Plus and Elite Models)” below and “Troubleshooting” on page 26.
If it is still not working properly, consult your equipment supplier or take it to an authorised service agent.
!
PRECAUTION Inspection and repair should only be performed by an authorised service agent.
Under no circumstances should you attempt to service or repair the unit yourself.
SELF-TESTING (PLUS AND ELITE MODELS)You may conduct a self-test to check whether the flow generator’s software and hardware are running correctly.
1. Hold down the Stop, Start and 5 minute buttons while you turn on the main power switch at the rear of the flow generator. Keep the buttons pressed until the Stop or Start buttons illuminate. The flow generator is now in self-testing mode. The Hour Meter on the underside of the flow generator will show tESt.
2. One at a time, press the Stop, Start, 5 minute, 10 minute and 20 minute buttons. Each time, the corresponding button should illuminate.
3. Press the 20 minute button again. This will initiate three further tests. The motor should start, the lights on the pressure display should cycle upwards, and the Hour Meter should show a repeating cycle of 1111, 2222, 3333, 4444, etc.
4. Turn the flow generator off at the main power switch. When next switched on, the flow generator will revert to normal operating mode.
25
26
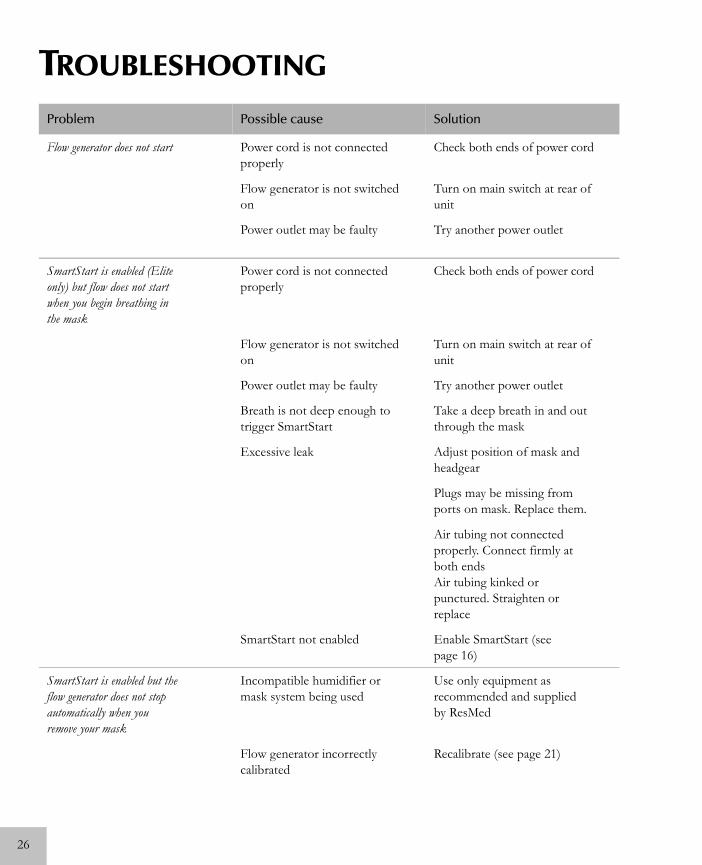
TROUBLESHOOTING
Problem Possible cause Solution
Flow generator does not start Power cord is not connected properly
Check both ends of power cord
Flow generator is not switched on
Turn on main switch at rear of unit
Power outlet may be faulty Try another power outlet
SmartStart is enabled (Elite only) but flow does not start when you begin breathing in the mask
Power cord is not connected properly
Check both ends of power cord
Flow generator is not switched on
Turn on main switch at rear of unit
Power outlet may be faulty Try another power outlet
Breath is not deep enough to trigger SmartStart
Take a deep breath in and out through the mask
Excessive leak Adjust position of mask and headgear
Plugs may be missing from ports on mask. Replace them.
Air tubing not connected properly. Connect firmly at both endsAir tubing kinked or punctured. Straighten or replace
SmartStart not enabled Enable SmartStart (see page 16)
SmartStart is enabled but the flow generator does not stop automatically when you remove your mask
Incompatible humidifier or mask system being used
Use only equipment as recommended and supplied by ResMed
Flow generator incorrectly calibrated
Recalibrate (see page 21)

TRO
UBL
ESH
OO
TIN
G
SmartStart not enabled Enable SmartStart (see page 16)
Treatment pressure seems low Delay Timer is in use Wait for air pressure to build up gradually, or press the Start button to start immediately
Air filter strips are dirty Replace air filter strips
Air tubing is kinked or punctured
Straighten or replace air tubing
Air tubing is not connected properly
Check and tighten both ends of the air tubing
Plugs missing from mask ports Replace plugs
Pressures required for treatment may have changed
Adjust pressures
Air leaking around nose and eyes
Nasal cushion not fitted properly onto mask frame
Fit cushion properly
Mask and headgear straps not positioned correctly
Adjust position of mask and headgear (Note: tighter is not always better!)
Plugs missing from mask ports Replace plugs
Nasal cushion is torn or distorted
Replace cushion
Mask may need to be refitted Refit mask system
Problem Possible cause Solution
27

28
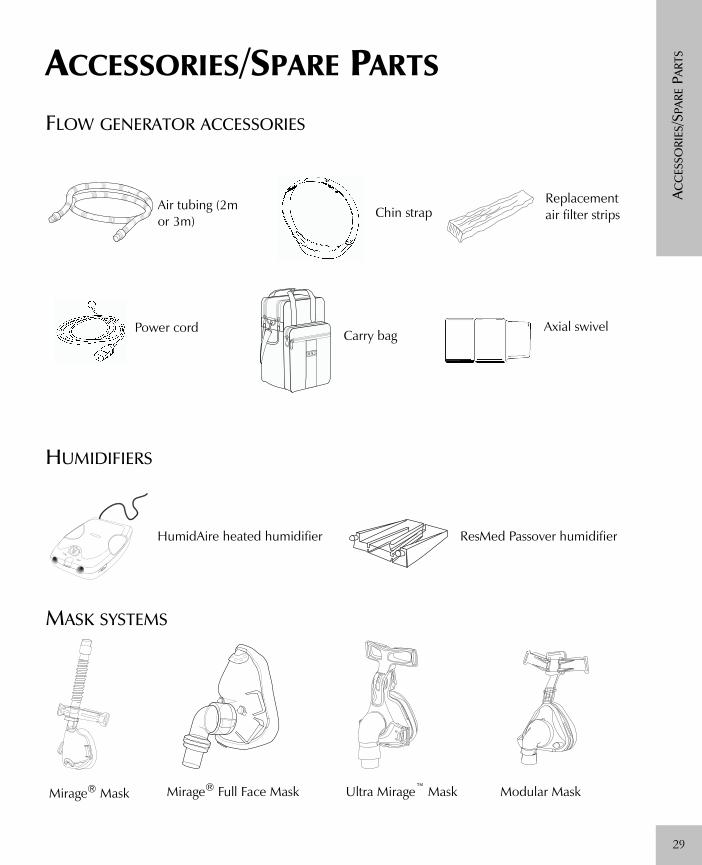
ACC
ESSO
RIES
/SPA
RE P
ARTS
ACCESSORIES/SPARE PARTSFLOW GENERATOR ACCESSORIES
HUMIDIFIERS
MASK SYSTEMS
Air tubing (2m or 3m)
Power cord
Replacement Chin strap
Carry bag
air filter strips
Axial swivel
ResMed Passover humidifierHumidAire heated humidifier
Mirage® Mask Mirage® Full Face Mask Ultra Mirage™ Mask Modular Mask
29

30

SPEC
IFIC
ATIO
NS
SPECIFICATIONSRESMED CPAP S6 FLOW GENERATORS
PERFORMANCE
Operating pressure range: 4–20 cmH2O
DIMENSIONS (H X W X D)110 mm x 240 mm x 290 mm
WEIGHT
1.77 kg
i
NOTE Weight may vary slightly depending on model and country.
POWER SUPPLY
Input range: 110–240 V, 50–60 Hz, 120 VA
HOUSING CONSTRUCTION
Injection molded plastic
AIR FILTER STRIPS
Filter strip: Two layered, powder bonded, polyester open cell foam.
ENVIRONMENTAL RATINGS
Temperature limits: Operating +5°C to +40°C; storage -20°C to +60°C
Humidity limits: Operating, 15 to 95% RH (non-condensing); storage, up to 95% RH (non-condensing)
31
32
AIR TUBING
Flexible Hytrel plastic, 2m or 3m length
IEC 601-1 CLASSIFICATIONS
Class II
Type CF
i
NOTE The manufacturer reserves the right to change these specifications without notice.
GLOSSARY
Attention, consult accompanying documents/Attention, consulter les documents d’accompagnement
Class II (double insulated)/Classe II (double isolation)
Type CF Applied Part/ Partie appliquée du type CF
SPEC
IFIC
ATIO
NS
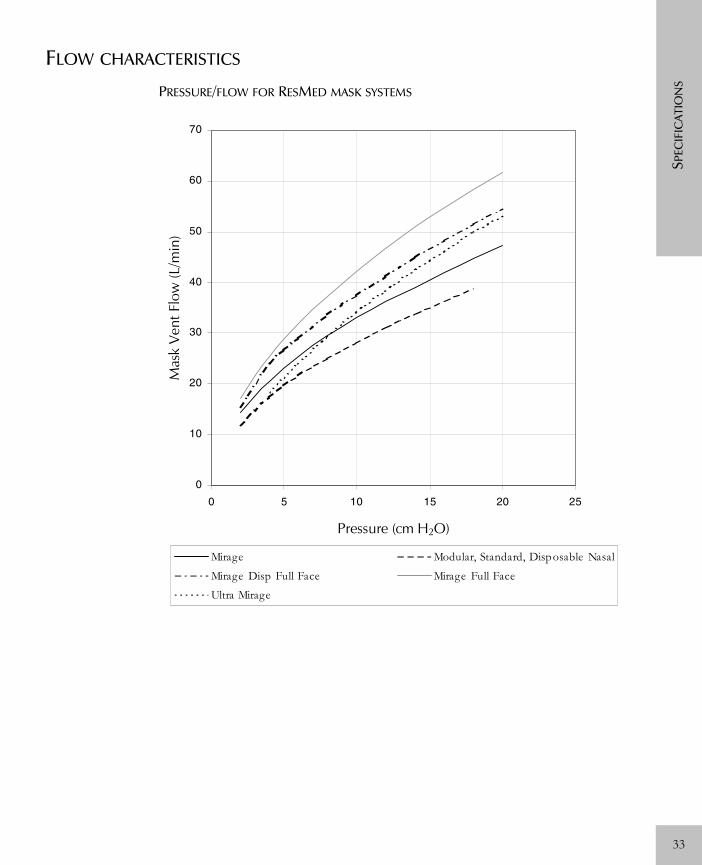
FLOW CHARACTERISTICS PRESSURE/FLOW FOR RESMED MASK SYSTEMS
0
10
20
30
40
50
60
70
0 5 10 15 20 25
Pressure (cm H2O)
Mas
k V
ent F
low
(L/m
in)
Mirage Modular, Standard, Disposable Nasal
Mirage Disp Full Face Mirage Full FaceUltra Mirage
33

34

IND
EX
INDEXAAccessories 29Adjusting settings using AutoScan 11Adverse Effects 4Air filter strips
Composition 31Assembling the device 7
CCleaning and Maintenance 23Contraindications 1
DDelay Timer
Limiting 14Downloading compliance data 17
EElite
Downloading compliance data 17Real-time Clock 16Self-testing 25SmartStart 16, 20Turning on Humidifier option 17
GGlossary 32
HHour Meter
Resetting 11Humidifier
Setting up 17
IIndicated Use 1
MMedical information 1
PPlus
Adjusting settings using AutoScan 11Self-testing 25
Precautions 4
RReal-time Clock
Setting 16
Resetting the Hour Meter 11ResMed CPAP S6
Assembly 7Dimensions 31Power supply 31Setting up 7Setting up for patient use 11Weight 31
SSelf-testing 25Servicing 25Setting up for patient use 11SmartStart
Enabling 16Specifications 31Start Pressure
Setting 15Starting the flow generator 19
Delay Timer 20SmartStart 20Start button 20
Stopping treatment 20
TTreatment Pressure
Setting 13Troubleshooting 26
UUsing the ResMed CPAP S6 19
WWarnings 3
35

36