quick guide: measurement partner quick guide … · measurement partner field app quick guide ......

1
ËBR-2314---&Î BR 2314–13 Measurement Partner Field App Quick Guide To Connect an Analyzer to MP Field App You will Need: Hand-held Analyzer Type 2250, Type 2250-L or Type 2270 USB Wi-Fi Dongle UL-1050 (preferred)* Smartphone (iOS or Android™) A PC with connection to the Internet Summary of Things to Do: 1) Register for a Brüel & Kjær account or log in if you already have one and sign in to MP Cloud 2) Pair your analyzer with your account 3) Set up your smartphone 4) Wirelessly connect your analyzer to your smartphone 5) Measure and annotate 6) Merge your annotations with Measurement Partner Suite (MPS) 1 Register (or Log in) and Sign in to MP Cloud 1) Download and install the latest version of Measurement Partner Suite BZ-5503: If MPS is already installed, click . If the software is out of date, click the Download button. To install MPS for the first time, please visit www.bksv.com and navigate to Service > User Support > Downloads > 2270/2250 Software > Measurement Partner Suite BZ-5503 and follow the on- screen instructions. 2) Open MPS, click Get started with MP Cloud on the Introduction screen and follow the on-screen instructions. (Click Sign in if you already have an account.) 3) When you have confirmed your account details and accepted the terms and conditions, you can exit your browser and return to MPS. 4) Back in MPS, click Sign in to MP Cloud and follow the on-screen instructions. 5) Connect to the MP Cloud archives you want to access. 2 Pair the Analyzer with MP Cloud 1) Connect the analyzer directly to the PC using Mini USB Cable AO-1494 (G1–3) or Micro USB Cable AO-1494 (G4) (or LAN or WLAN connection; see MPS Online Help or analyzer’s user manual for more information). Ensure that the analyzer is using software version 4.5 or later (see MPS Online Help for more information). 2) Right-click the analyzer’s serial number in the DEVICES node (the analyzer’s serial number can be found directly above the lower tripod mounting thread). 3) Click Pair Instrument with Cloud Account. When your analyzer is paired, a confirmation window will pop up. 4) Click OK. 3 Set Up Your Smartphone 1) Download and install the latest version of Measurement Partner Field App from App Store SM for iOS or Google Play™ for Android™. 2) Open MP Field App and log in to your MP Cloud account by tapping: , Log in to MP Cloud and following the on-screen instructions or , Log in to MP Cloud and following the on-screen instructions The Cloud icon changes to when connected to MP Cloud. 4 Connect the Analyzer to the Smartphone Using a Smartphone Hotspot Smartphone: 1) Create a personal hotspot (consult your smartphone help for instructions). Analyzer: 2) Switch on the analyzer. 3) Plug in Wi-Fi Dongle UL-1050 (preferred). 4) Tap Main Menu > Preferences > Network and set: Set IP Address to Automatically. Available Networks to the hotspot you set up. Ensure that Preferences >Remote Access >Web Server is set to Enabled. Smartphone: 5) Tap to open the Instruments screen. 6) Tap your analyzer's serial number to connect, then tap Done. Please note: For subsequent uses, MP Field App will recognize your analyzer and connect automatically. However, the smartphone may assign a different IP address to the analyzer. If so, repeat steps 5 and 6. If the analyzer is not on the Instrument list, tap and enter the analyzer's IP address (found on the analyzer at Main Menu > Preferences > Network > IP Address). 5 Measure and Annotate Analyzer: 1) Set up your analyzer as you normally would for the type of measurement you want to make. Smartphone: 2) On the Measurement screen ( ), tap to open and close the Measurement Control Panel. 3) Use the Start (and Pause ), Reset and Save icons as you normally would when using the analyzer. While measuring, the instantaneous LAF is displayed. 4) Annotate your measurement using the Note , GPS , Commentary , Camera and Video icons. The measurement is stored on your analyzer and will upload the data according to how you have set up the analyzer (see the analyzer’s user manual, Chapters 6 and 7, for more information). Annotations made using MP Field App must be uploaded from your smartphone and merged with MPS. 6 Merge Your Annotations To merge the annotations in the field, via MP Cloud: MP Field App: 1) Either tap or wait for automatic synchronization to take place. Please note: During automatic synchronization the icon changes to Annotations will remain in the annotation list until they have been merged with their corresponding data using MPS Automatic synchronization of annotations is enabled by default but can be disabled by changing Settings > Sync automatically Back in the Office in MPS: (The user in the office must be signed in to the same MP Cloud account and the target archive must be connected and linked to MP Cloud) 2) Click to begin synchronizing. The Merge Annotations dialog will open. 3) Complete the Merge Annotations dialog: Confirm their default destinations (check the Merge checkbox) Browse to a different project in MPS (click or right-click the anno- tation and select Browse) Navigate to a folder on your computer (right-click the annotation and click Move to folder) Delete (right-click the annotation and click Delete) Click the OK button to confirm your choices. * Or CF WLAN Card UL-1019 or Ethernet CF Card UL-1016 (G1–3). See analyzer user manual (BE 1713 or BE 1766) for additional setup information. QR code for iOS QR code for Android™ Hint: You may need to zoom in to use the QR codes on screen.

Upload: phamdang

Post on 29-Aug-2018

232 views

Category:

Documents


0 download

TRANSCRIPT

ËBR-2314---&Î BR2314–13

Measurement Partner Field App Quick Guide

To Connect an Analyzer to MP Field App You will Need:• Hand-held Analyzer Type 2250, Type 2250-L

or Type 2270• USB Wi-Fi Dongle UL-1050 (preferred)*• Smartphone (iOS or Android™)• A PC with connection to the InternetSummary of Things to Do:1) Register for a Brüel & Kjær account or log in if you already have one

and sign in to MP Cloud2) Pair your analyzer with your account3) Set up your smartphone4) Wirelessly connect your analyzer to your smartphone5) Measure and annotate6) Merge your annotations with Measurement Partner Suite (MPS)

1 Register (or Log in) and Sign in to MP Cloud1) Download and install the latest version of Measurement Partner Suite

BZ-5503:– If MPS is already installed, click . If the software is out of date,

click the Download button. – To install MPS for the first time, please visit www.bksv.com and

navigate to Service > User Support > Downloads > 2270/2250 Software > Measurement Partner Suite BZ-5503 and follow the on-screen instructions.

2) Open MPS, click Get started with MP Cloud on the Introduction screen and follow the on-screen instructions.(Click Sign in if you already have an account.)

3) When you have confirmed your account details and accepted the terms and conditions, you can exit your browser and return to MPS.

4) Back in MPS, click Sign in to MP Cloud and follow the on-screen instructions.

5) Connect to the MP Cloud archives you want to access.

2 Pair the Analyzer with MP Cloud1) Connect the analyzer directly to the PC using Mini USB Cable AO-1494

(G1–3) or Micro USB Cable AO-1494 (G4) (or LAN or WLAN connection; see MPS Online Help or analyzer’s user manual for more information).Ensure that the analyzer is using software version 4.5 or later (see MPS Online Help for more information).

2) Right-click the analyzer’s serial number in the DEVICES node (the analyzer’s serial number can be found directly above the lower tripod mounting thread).

3) Click Pair Instrument with Cloud Account.When your analyzer is paired, a confirmation window will pop up.

4) Click OK.

3 Set Up Your Smartphone1) Download and install the latest version of Measurement Partner Field

App from App StoreSM for iOS or Google Play™ for Android™.†

2) Open MP Field App and log in to your MP Cloud account by tapping:– , Log in to MP Cloud and following the on-screen instructions or– , Log in to MP Cloud and following the on-screen instructionsThe Cloud icon changes to when connected to MP Cloud.

* Or CF WLAN Card UL-1019 or Ethernet CF Card UL-1016 (G1–3). See analyzer usermanual (BE 1713 or BE 1766) for additional setup information.

† QR code for iOS QR code for Android™

Hint: You may need to zoom in to use the QR codes on screen.

4 Connect the Analyzer to the SmartphoneUsing a Smartphone HotspotSmartphone:1) Create a personal hotspot (consult your smartphone help for

instructions).Analyzer:2) Switch on the analyzer.3) Plug in Wi-Fi Dongle UL-1050 (preferred).4) Tap Main Menu > Preferences > Network and set:

– Set IP Address to Automatically.– Available Networks to the hotspot you set up.Ensure that Preferences >Remote Access >Web Server is set to Enabled.

Smartphone:5) Tap to open the Instruments screen.6) Tap your analyzer's serial number to connect, then tap Done.Please note: For subsequent uses, MP Field App will recognize your analyzer

and connect automatically. However, the smartphone may assign a different IP address to the analyzer. If so, repeat steps 5 and 6.

If the analyzer is not on the Instrument list, tap and enter the analyzer's IP address (found on the analyzer at Main Menu > Preferences > Network > IP Address).

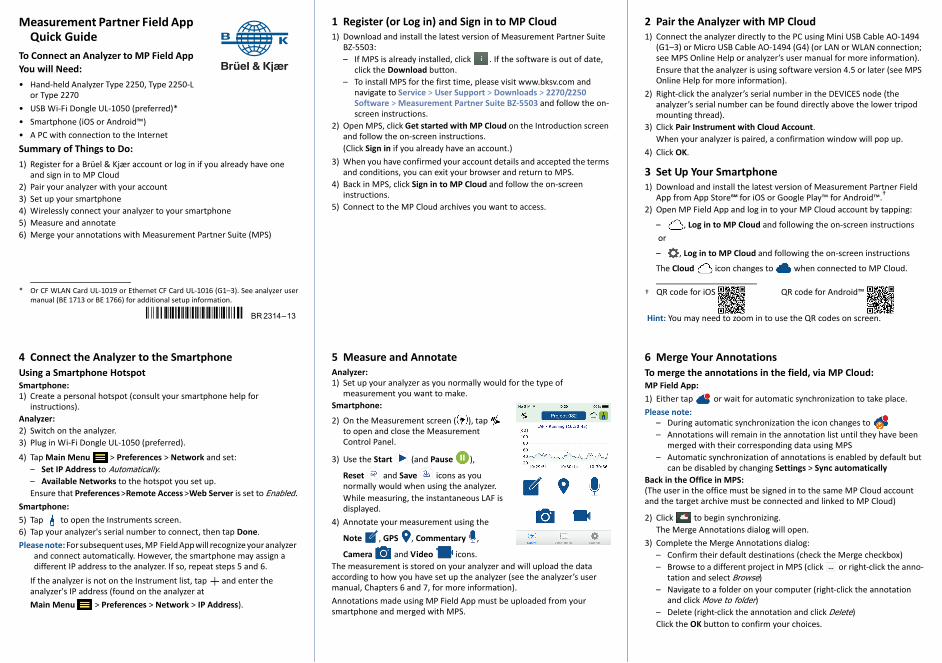
5 Measure and AnnotateAnalyzer:1) Set up your analyzer as you normally would for the type of

measurement you want to make.Smartphone:2) On the Measurement screen ( ), tap

to open and close the Measurement Control Panel.

3) Use the Start (and Pause ),

Reset and Save icons as you normally would when using the analyzer.While measuring, the instantaneous LAF is displayed.

4) Annotate your measurement using the

Note , GPS , Commentary ,

Camera and Video icons.The measurement is stored on your analyzer and will upload the data according to how you have set up the analyzer (see the analyzer’s user manual, Chapters 6 and 7, for more information).Annotations made using MP Field App must be uploaded from your smartphone and merged with MPS.

6 Merge Your AnnotationsTo merge the annotations in the field, via MP Cloud:MP Field App:1) Either tap or wait for automatic synchronization to take place.Please note:

– During automatic synchronization the icon changes to – Annotations will remain in the annotation list until they have been

merged with their corresponding data using MPS– Automatic synchronization of annotations is enabled by default but

can be disabled by changing Settings > Sync automaticallyBack in the Office in MPS: (The user in the office must be signed in to the same MP Cloud account and the target archive must be connected and linked to MP Cloud)

2) Click to begin synchronizing.The Merge Annotations dialog will open.

3) Complete the Merge Annotations dialog: – Confirm their default destinations (check the Merge checkbox)– Browse to a different project in MPS (click or right-click the anno-

tation and select Browse)– Navigate to a folder on your computer (right-click the annotation

and click Move to folder)– Delete (right-click the annotation and click Delete)Click the OK button to confirm your choices.