query builder webinar - medtechglobal.com · query builder webinar 2 2. building a query 1. open...
TRANSCRIPT
Query Builder Webinar
1
Medtech Query Builder
Webinar 1. Query Builder Screen
Opening the Query Builder screen
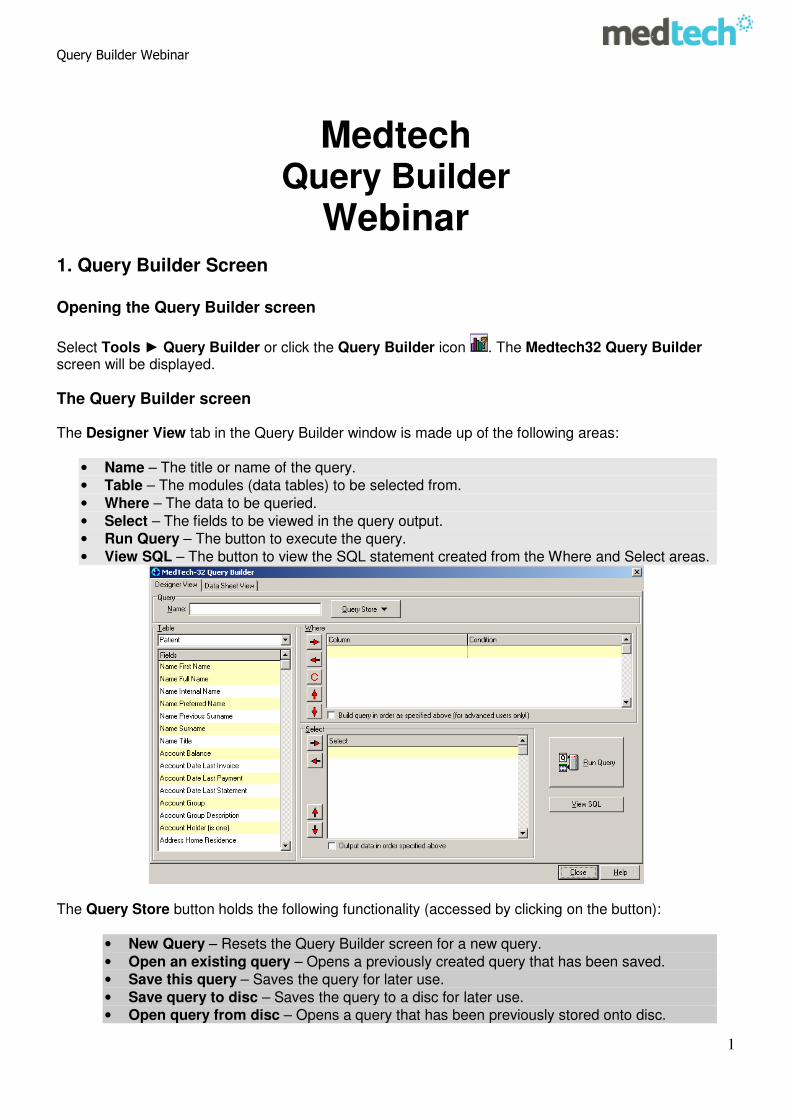
Select Tools ► Query Builder or click the Query Builder icon . The Medtech32 Query Builder screen will be displayed.
The Query Builder screen The Designer View tab in the Query Builder window is made up of the following areas:
• Name – The title or name of the query.
• Table – The modules (data tables) to be selected from.
• Where – The data to be queried.
• Select – The fields to be viewed in the query output.
• Run Query – The button to execute the query.
• View SQL – The button to view the SQL statement created from the Where and Select areas.
The Query Store button holds the following functionality (accessed by clicking on the button):
• New Query – Resets the Query Builder screen for a new query.
• Open an existing query – Opens a previously created query that has been saved.
• Save this query – Saves the query for later use.
• Save query to disc – Saves the query to a disc for later use.
• Open query from disc – Opens a query that has been previously stored onto disc.

Query Builder Webinar
2
2. Building a Query
1. Open the Query Builder screen using the steps above.
2. Enter the title of the query into the Name field.
To organise your queries and to ensure you are using the correct working queries in the future, add your initials in front of the query name.
3. From the Table dropdown list, select the module (or window) in Medtech32 that data is to be retrieved from.
4. Highlight a required field within the table list and choose the
5. Click the Add field to where condition icon . The highlighted field will be moved into the Where box.
6. Whilst the field is still highlighted in the Where box, click the Define the condition on the
selected field icon or double click the field. The Query Builder Condition window will be displayed.
7. Select the requirements from the Condition and Value dropdown lists. E.g. In the example below
the Condition is ‘Equal To’ and the Value is ‘Female’.

Query Builder Webinar
3
8. Repeat the steps 3 – 7 until all of the criteria required for the query have been selected and moved into the Where box.
9. Define the fields to be displayed on the report by highlighting the appropriate item from the Table
list and clicking the Add field to select / output icon . The highlighted item will be moved into the Select box.
Ticking the box “Output data in order specified above” will ensure that the output is listed in the A to Z or 1 to 100+ order, based on the first field in the Select section.
10. Repeat step 9 until all of the fields to be viewed on the report have been highlighted and moved into the Select box.
11. Save the query by clicking the Query Store button followed by Save this query. An Information
window will be displayed.
12. Click OK or press Enter.

Query Builder Webinar
4
13. Click on the Run Query button.
14. The Data Sheet View tab will display the results. Click the Print button to print the results if required.
3. Types of Queries There are three main types of Query Builder Reports that can be run: List Queries, Count Queries and Merge Queries
• List Query
A list query is when a list of information is sought from defined criteria, e.g. a list of all female patients over the age of 65 as shown in the example above.
• Count Query
The count query will take the criteria defined and numerically count the number of values. It is possible to add field values to the count to appear as a spreadsheet. 1. Use the Count Function Table and Count Occurrence Field to show a total within the Select
portion of the query builder.
.

Query Builder Webinar
5
.
2. Count function must be the last value in the Select section of the query builder. The following
error message will appear if this condition is not satisfied. Use button within the Select section to move Count Function to the bottom.
3. Output data in order specified above” tick box cannot be used when you have Count Function count occurrence as the only entry in the Select section. The following error message will appear if this condition is not satisfied.
Data Sheet View
When the count function is chosen from the Table dropdown and there are less than two field values in the select section, the query builder enables two other views; Spread Sheet View and Chart View. Spread Sheet View

Query Builder Webinar
6
Chart View (Bar Chart)
Chart View (Pie Chart)
Chart View (Stacked Chart)
To select Bar, Pie or Stacked Graphs, select the associated radio buttons as highlighted.

Query Builder Webinar
7
Merge Query The merge query takes information from the list query and using the ID for Merge field from the patient table, merges information into a letter, an alert, a recall or a task for each patient. A sample is displayed below of a query built on the following criteria: Registered female patients aged 45 to 50 with no mammogram within last 12 months. Also displayed is the output based on the criteria defined.
You can use an existing List query as a base for the Merge query. Use Query Store to open an existing query.
Notice how once the query is run the Merge button on the Data Sheet View tab becomes enabled. To merge the information into a letter:
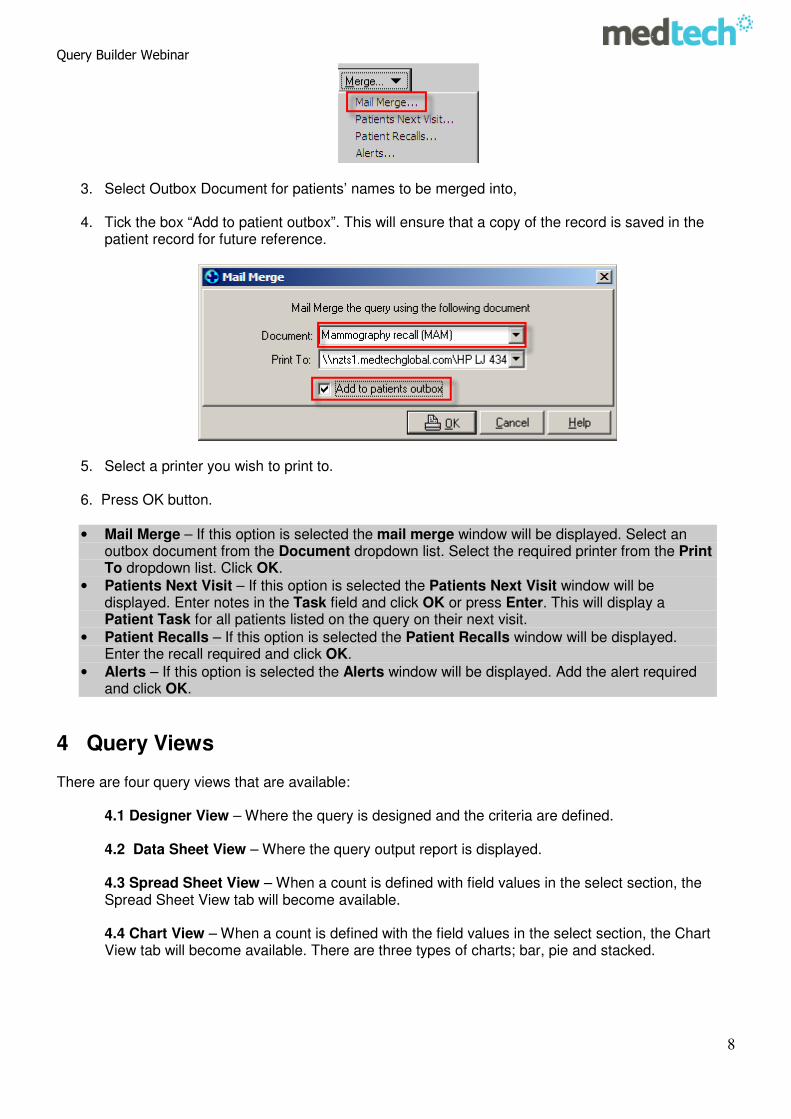
1. Click the Merge button. 2. Select the merge option required, i.e. Mail Merge to merge into Outbox Document
Query Builder Webinar
8
3. Select Outbox Document for patients’ names to be merged into, 4. Tick the box “Add to patient outbox”. This will ensure that a copy of the record is saved in the
patient record for future reference.
5. Select a printer you wish to print to. 6. Press OK button.
• Mail Merge – If this option is selected the mail merge window will be displayed. Select an
outbox document from the Document dropdown list. Select the required printer from the Print To dropdown list. Click OK.
• Patients Next Visit – If this option is selected the Patients Next Visit window will be displayed. Enter notes in the Task field and click OK or press Enter. This will display a Patient Task for all patients listed on the query on their next visit.
• Patient Recalls – If this option is selected the Patient Recalls window will be displayed. Enter the recall required and click OK.
• Alerts – If this option is selected the Alerts window will be displayed. Add the alert required and click OK.
4 Query Views There are four query views that are available:
4.1 Designer View – Where the query is designed and the criteria are defined. 4.2 Data Sheet View – Where the query output report is displayed. 4.3 Spread Sheet View – When a count is defined with field values in the select section, the Spread Sheet View tab will become available. 4.4 Chart View – When a count is defined with the field values in the select section, the Chart View tab will become available. There are three types of charts; bar, pie and stacked.

Query Builder Webinar
9
5. Exporting Query Data To export the output of a Query, use the Export button found in the Datasheet and Spreadsheet view. Data can be saved as .CSV (comma separated value) file and then viewed as Excel spreadsheet.
1. Click Export button and select Save to disk option.
2. Navigate to the folder where you would like to save the query outcome and click Save button.
6. Using the Query Store The Query Store option provides the following options: New query, Open an existing query, Save this query, Save query to disk, Open query from disk.
New Query If you already have a query open and wish to start building a new query, use the New query option from the Query Store drop down menu.
Open an Existing Query
1. Open the Query Builder screen. 2. Click the Query Store button. 3. Select Open an Existing Query. 4. The Query Builder Open window will be displayed. 5. Highlight the query to be opened. 6. Click OK. The Query Builder window will display the pre-saved criteria. 7. Click the Run Query button. The Data Sheet View will be displayed.
Delete a Saved Query
1. Open the Query Builder screen.

Query Builder Webinar
10
2. Click the Query Store button.
3. Select Open an existing query. 4. Highlight the query to be deleted. 5. Click the Delete button. The query will be removed.
Save A Query 1. Open the Query Builder screen. 2. Click the Query Store button. 3. Select Save this query.
4. Click Ok.
You can re-use existing queries. Open an existing query, modify and save it with a new name. This way you will keep the existing query and use it as a base for your new query.

Query Builder Webinar
11
Useful Query Builders We have included a number of useful query builders on the following pages.
Patients Not Enrolled
List Reg patients not seen since date

Query Builder Webinar
12
List patients with 12+ Consultations
Care Plus Count