pulse connect secure virtual appliance on microsoft azure · pulse connect secure virtual appliance...
TRANSCRIPT

`
Pulse Connect Secure
Virtual Appliance on
Microsoft Azure Deployment Guide
Release 9.0R3
Document Revision 1.2
Published Date March 2019

Pulse Connect Secure Virtual Appliance on Microsoft Azure - Deployment Guide
© 2019 Pulse Secure, LLC. All rights reserved 2
Pulse Secure, LLC
2700 Zanker Road,
Suite 200 San Jose
CA 95134
https://www.pulsesecure.net
Pulse Secure and the Pulse Secure logo are trademarks of Pulse Secure, LLC in the United States. All other
trademarks, service marks, registered trademarks, or registered service marks are the property of their
respective owners.
Pulse Secure, LLC assumes no responsibility for any inaccuracies in this document. Pulse Secure, LLC reserves
the right to change, modify, transfer, or otherwise revise this publication without notice.
Products made or sold by Pulse Secure or components thereof might be covered by one or more of the
following patents that are owned by or licensed to Pulse Secure: U.S. Patent Nos. 5,473,599, 5,905,725,
5,909,440, 6,192,051, 6,333,650, 6,359,479, 6,406,312, 6,429,706, 6,459,579, 6,493,347, 6,538,518, 6,538,899,
6,552,918, 6,567,902, 6,578,186, and 6,590,785.
Pulse Connect Secure Virtual Appliance on Microsoft Azure - Deployment Guide
The information in this document is current as of the date on the title page.
END USER LICENSE AGREEMENT
The Pulse Secure product that is the subject of this technical documentation consists of (or is intended for use
with) Pulse Secure software. Use of such software is subject to the terms and conditions of the End User License
Agreement (“EULA”) posted at https://www.pulsesecure.net. By downloading, installing or using such software,
you agree to the terms and conditions of that EULA.

Pulse Connect Secure Virtual Appliance on Microsoft Azure - Deployment Guide
© 2019 Pulse Secure, LLC. All rights reserved 3
Revision History
Revision and
Date
Added/Updated
/Removed
Remarks
1.0, September 2018 None No changes to the document from the previous release.
1.1 December 2018 Added “Deploying PCS
Active-Active Cluster using
Virtual Traffic Manager in
Microsoft Azure “section
Added vTM integration section
1.2 March 2019 Updated the “Overview”,
“Deploying PCS Active-
Active Cluster using
Virtual Traffic Manager in
Microsoft Azure“ and
“Limitations” sections

Pulse Connect Secure Virtual Appliance on Microsoft Azure - Deployment Guide
© 2019 Pulse Secure, LLC. All rights reserved 4
Table of Contents
Revision History ............................................................................................................................................................................3
Overview ................................................................................................................................................................................................9
About This Guide ..........................................................................................................................................................................9
Assumptions ..................................................................................................................................................................................9
Pulse Connect Secure on Azure Marketplace ...............................................................................................................................10
Prerequisites and System Requirements on Azure Marketplace .....................................................................................10
Deploying Pulse Connect Secure on Azure Marketplace ....................................................................................................10
Basic Configuration ....................................................................................................................................................................................11
Network Settings ........................................................................................................................................................................................12
Instance Configuration ..............................................................................................................................................................................13
Summary Step .............................................................................................................................................................................................14
Pulse Connect Secure on Microsoft Azure Cloud ........................................................................................................................15
Prerequisites and System Requirements on Azure .............................................................................................................16
Steps to Deploy Pulse Connect Secure on Azure .................................................................................................................16
Upload Pulse Connect Secure Virtual Appliance Image to Azure Web Portal ...............................................................16
Upload Azure Resource Manager Template to Azure Account .........................................................................................19
Deploying Pulse Connect Secure on Azure using Azure Portal ................................................................................................21
Deploying PCS on New Virtual Network ..................................................................................................................................21
Deployment on VM with Three NIC Cards ............................................................................................................................................21
Deployment on VM with Two NIC Cards ...............................................................................................................................................25
Deploying PCS on an Existing Virtual Network ......................................................................................................................28
Deployment on VM with Three NIC Cards ............................................................................................................................................28
Deployment on VM with Two NIC Cards ...............................................................................................................................................32
Deploying Pulse Connect Secure on Azure using Azure CLI .....................................................................................................35
Pulse Connect Secure Provisioning Parameters ..........................................................................................................................37
Provisioning Pulse Connect Secure with Predefined Configuration ........................................................................................38
Configuring Licenses on the Pulse Connect Secure Appliance .................................................................................................39
Pulse License Server in Corporate Network ..........................................................................................................................39
Pulse License Server in Cloud Network ..................................................................................................................................39
Adding Authentication Code in PCS Admin Console ..........................................................................................................................40
Including Authentication Code in ARM Template ...............................................................................................................................40
Deploying PCS Active-Active Cluster using Virtual Traffic Manager in Microsoft Azure ......................................................41
Deploying Two PCS EC2 instances Using ARM Template ..................................................................................................................41
Forming the Active-Active Cluster ...........................................................................................................................................................41
Deploying Virtual Traffic Manager EC2 Instance in the External Subnet of PCS in Microsoft Azure ......................................42
Setting Up and Configuring vTM for External Users ..........................................................................................................................48
Accessing the Pulse Connect Secure Virtual Appliance ..............................................................................................................52
Accessing the Pulse Connect Secure Virtual Appliance as an Administrator .................................................................52
Accessing the Pulse Connect Secure Virtual Appliance as an End User .........................................................................53
Accessing the Pulse Connect Secure Virtual Appliance using SSH Console ..................................................................53
On Linux and Mac OSX..............................................................................................................................................................................53

Pulse Connect Secure Virtual Appliance on Microsoft Azure - Deployment Guide
© 2019 Pulse Secure, LLC. All rights reserved 5
On Windows ................................................................................................................................................................................................53
System Operations ..............................................................................................................................................................................55
Network Configuration .......................................................................................................................................................................55
IP Address Assignment for Internal, External and Management Interfaces ...................................................................55
IP Addressing Modes ...................................................................................................................................................................55
Modifying Network Parameters After Deployment ..............................................................................................................56
Controlling the Selection of Internal, External and Management Interfaces .................................................................56
Decommissioning Pulse Connect Secure ......................................................................................................................................57
Delete Entire Resource Group that the Pulse Connect Secure Is In ................................................................................57
Delete Pulse Connect Secure and Resource It Uses, but not the Other Resources in Resource Group ................58
Pricing .....................................................................................................................................................................................................59
Limitations .............................................................................................................................................................................................59
Not Qualified .........................................................................................................................................................................................60
Troubleshooting ...................................................................................................................................................................................60
Frequently Asked Questions .............................................................................................................................................................61
FAQ1: I am unable to connect to my backend resources through L3 VPN ....................................................................61
Testing the Connection to CentOS System ..........................................................................................................................................63
Testing the Connection to On-premise Resource ..............................................................................................................................66
FAQ2: Users are unable to access internet resources when connected to a VPN tunnel on an Azure-based PCS 67
Appendix A: Network Security Group (NSG) ..................................................................................................................................68
Appendix B: Pulse Connect Secure Resource Manager Template...........................................................................................72
parameters ....................................................................................................................................................................................72
variables .........................................................................................................................................................................................75
resources .......................................................................................................................................................................................76
outputs ...........................................................................................................................................................................................79
Appendix C: Pulse Connect Secure Resource Manager Template for an Existing Virtual Network .................................80
parameters ....................................................................................................................................................................................80
variables .........................................................................................................................................................................................83
resources .......................................................................................................................................................................................84
outputs ...........................................................................................................................................................................................86
References .............................................................................................................................................................................................87
Requesting Technical Support ..........................................................................................................................................................87

Pulse Connect Secure Virtual Appliance on Microsoft Azure - Deployment Guide
© 2019 Pulse Secure, LLC. All rights reserved 6
List of Figures
Figure 1: Pulse Connect Secure on Microsoft Azure ...................................................................................................................15
Figure 2: Marketplace .........................................................................................................................................................................10
Figure 3: Published Pulse Secure Images ......................................................................................................................................10
Figure 4: Basic Configuration Settings ............................................................................................................................................11
Figure 5: Subnets .................................................................................................................................................................................12
Figure 6: Network Settings .................................................................................................................................................................13
Figure 7: Instance Configuration ......................................................................................................................................................13
Figure 8: Configuration Validation ...................................................................................................................................................14
Figure 9: Terms of Use ........................................................................................................................................................................14
Figure 10: Deployment in Progress .................................................................................................................................................15
Figure 11: Storage Account - pcsgoldenstore ...............................................................................................................................18
Figure 12: Container master .............................................................................................................................................................18
Figure 13: Upload Pulse Connect Secure Virtual Appliance Image ..........................................................................................19
Figure 14: Templates ...........................................................................................................................................................................19
Figure 15: Add Template ....................................................................................................................................................................20
Figure 16: Template – General Information ..................................................................................................................................20
Figure 17: Add ARM Template ..........................................................................................................................................................21
Figure 18: Custom Deployment on VM with Three NIC Cards – New Virtual Network ........................................................22
Figure 19: Deployment Succeeded ..................................................................................................................................................23
Figure 20: PCS Management Public IP ............................................................................................................................................24
Figure 21: PCS External Public IP .....................................................................................................................................................24
Figure 22: Custom Deployment on VM with Two NIC Cards – New Virtual Network ...........................................................25
Figure 23: Deployment Succeeded ..................................................................................................................................................26
Figure 24: PCS External Public IP .....................................................................................................................................................27
Figure 25: Custom Deployment on VM with Three NIC Cards – Existing Virtual Network ..................................................28
Figure 26: Deployment Succeeded ..................................................................................................................................................30
Figure 27: PCS Management Public IP ............................................................................................................................................30
Figure 28: PCS External Public IP .....................................................................................................................................................31
Figure 29: Custom Deployment on VM with Two NIC Cards – Existing Virtual Network .....................................................32
Figure 30: Deployment Succeeded ..................................................................................................................................................33
Figure 31: PCS External Public IP .....................................................................................................................................................34
Figure 32: Pulse Configuration Server in Corporate Network ...................................................................................................38
Figure 33: Pulse License Server in a Corporate Network ...........................................................................................................39
Figure 34: Pulse License Server in Cloud Network ......................................................................................................................39
Figure 35: Enter Authentication Code .............................................................................................................................................40
Figure 36: Deploying PCS A-A Cluster Topology Diagram ..........................................................................................................41
Figure 37: PCS A-A Cluster Status ....................................................................................................................................................42
Figure 38: Azure Marketplace > Pulse Secure vTM ......................................................................................................................42
Figure 39: vTM Editions Available in Azure Marketplace ............................................................................................................43
Figure 40: Configuration Wizard .......................................................................................................................................................44

Pulse Connect Secure Virtual Appliance on Microsoft Azure - Deployment Guide
© 2019 Pulse Secure, LLC. All rights reserved 7
Figure 41: Add Load Balancing Rule ................................................................................................................................................45
Figure 42: Pulse Secure vTM Login Page ........................................................................................................................................48
Figure 43: Create Traffic Pool ............................................................................................................................................................48
Figure 44: SSL and UDP Pools ..........................................................................................................................................................49
Figure 45: Session Persistency Class ...............................................................................................................................................49
Figure 46: Create Virtual Server........................................................................................................................................................50
Figure 47: Virtual Servers to Handle SSL and UDP Traffic ..........................................................................................................50
Figure 48: Pulse Secure vTM Home Page Showing Services and Event Logs ........................................................................51
Figure 49: Pulse Management Interface.........................................................................................................................................52
Figure 50: Pulse External Interface ..................................................................................................................................................53
Figure 51: Resource in Corporate Network ...................................................................................................................................53
Figure 52: Putty Configuration – Basic Options ............................................................................................................................54
Figure 53: Putty Configuration – SSH Authentication ..................................................................................................................54
Figure 54: System Operations...........................................................................................................................................................55
Figure 55: Delete Resource Group ..................................................................................................................................................58
Figure 56: Boot Diagnostics ...............................................................................................................................................................60
Figure 57: Pulse Connect Secure on Microsoft Azure .................................................................................................................61
Figure 58: Virtual Network in a Resource Group (OnPremRG) .................................................................................................62
Figure 59: Subnets in the Virtual Network .....................................................................................................................................62
Figure 60: VPN Tunneling Connection Profile ...............................................................................................................................63
Figure 61: Use Role Mapping ............................................................................................................................................................63
Figure 62: Public IP of PCS External Interface ...............................................................................................................................63
Figure 63: Client Connection .............................................................................................................................................................64
Figure 64: tcpdump and ping responses .......................................................................................................................................64
Figure 65: Route Table ........................................................................................................................................................................65
Figure 66: Subnet Association ..........................................................................................................................................................65
Figure 67: Successful Packets Transmission .................................................................................................................................65
Figure 68: Route Table ........................................................................................................................................................................66
Figure 69: Subnet Association ..........................................................................................................................................................66
Figure 70: Successful Packets Transmission .................................................................................................................................66
Figure 71: Virtual Machine with two NIC cards Connecting to VNet1 and Vnet2 .................................................................68
Figure 72: Virtual Machine with two NICs Connecting to Subnet1 and Subnet2..................................................................68
Figure 73: Virtual Machine VM-1 can Access Resources in VM-2 and Vice Versa.................................................................68
Figure 74: Traffic Filtering by MS Azure Network Support Group ............................................................................................69
Figure 75: NSG External, Internal and Management Subnets...................................................................................................69
Figure 76: NSG External - Inbound Rules .......................................................................................................................................70
Figure 77: NSG External - Outbound Rules ...................................................................................................................................70
Figure 78: NSG Internal - Inbound Rules ........................................................................................................................................70
Figure 79: NSG Internal - Outbound Rules ....................................................................................................................................71
Figure 80: NSG Management - Inbound Rules .............................................................................................................................71
Figure 81: NSG Management - Outbound Rules ..........................................................................................................................71
Figure 82: Custom Deployment ........................................................................................................................................................72
Pulse Connect Secure Virtual Appliance on Microsoft Azure - Deployment Guide
© 2019 Pulse Secure, LLC. All rights reserved 8
Figure 83: Custom Deployment ........................................................................................................................................................80

Pulse Connect Secure Virtual Appliance on Microsoft Azure - Deployment Guide
© 2019 Pulse Secure, LLC. All rights reserved 9
Overview
About This Guide
This guide helps in deploying the Pulse Connect Secure Virtual Appliance on Microsoft Azure. Beginning 9.0R3
release, Pulse Connect Secure is made available in Azure Marketplace. This document also describes how a
Pulse Connect Secure administrator manually upload the Pulse Connect Secure Virtual Appliance image into
Microsoft Azure storage account. And, once the image is available in the Azure storage account, how the Pulse
Connect Secure administrator can deploy Pulse Connect Secure on Microsoft Azure.
Assumptions
The basic understanding of deployment models of Pulse Connect Secure on a data center and basic experience
in using Microsoft Azure is needed for the better understanding of this guide.

Pulse Connect Secure Virtual Appliance on Microsoft Azure - Deployment Guide
© 2019 Pulse Secure, LLC. All rights reserved 10
Pulse Connect Secure on Azure Marketplace
Prerequisites and System Requirements on Azure Marketplace
To deploy the Pulse Connect Secure Virtual Appliance on Azure Marketplace, you need the following:
• A Microsoft Azure account
• Access to the Microsoft Azure portal (https://portal.azure.com)
• Pulse Connect Secure licenses *
Note:
* Pulse Connect Secure Virtual Appliance, by default, has two-users license. This release supports licensing with
License server located at corporate network and licensing through Pulse Cloud Licensing Service (PCLS) server.
For licensing through PCLS, administrator needs to obtain Authentication Code from Pulse Secure Support and
apply it in the Pulse Connect Secure admin console.
Note: From release 9.0R1 onwards, PCS supports VM with 2-NICs model and 3-NICs model for deployment.
Deploying Pulse Connect Secure on Azure Marketplace
1. Log into Azure portal and navigate to Azure Marketplace by clicking Create a resource.
Figure 1: Marketplace
2. Search with keyword Pulse Secure.
Figure 2: Published Pulse Secure Images
Azure Marketplace contains the following two Pulse Connect Secure SKUs:
• Pulse Connect Secure-BYOL 2 NIC
• Pulse Connect Secure BYOL 3 NIC

Pulse Connect Secure Virtual Appliance on Microsoft Azure - Deployment Guide
© 2019 Pulse Secure, LLC. All rights reserved 11
3. Select Pulse Connect Secure BYOL 3 NIC and click Create. In this section, 3-NICs model is chosen as
example.
Basic Configuration
4. In the Basic Configuration step, enter the following parameters and click OK:
• VM name: Name of the Pulse Connect Secure to be deployed. Virtual name can be only lower-
case letters and numbers, and must be 1-9 characters long.
• SSH public key: Copy and paste an RSA public key in the single-line format or the multi-line
PEM format. This key is used to access PCS via SSH. The SSH keys are generated using ssh-
keygen on Linux and OS X, or PuTTyGen on Windows. For details about generating the SSH key
pairs, refer:
For Windows: https://docs.microsoft.com/en-us/azure/virtual-machines/linux/ssh-from-windows
For MacOS and Linux: https://docs.microsoft.com/en-us/azure/virtual-machines/linux/mac-create-ssh-
• Resource group: Name of the resource group to be deployed.
Figure 3: Basic Configuration Settings

Pulse Connect Secure Virtual Appliance on Microsoft Azure - Deployment Guide
© 2019 Pulse Secure, LLC. All rights reserved 12
Network Settings
5. In the Network Settings configuration step, enter the following parameters:
• Virtual Network:
▪ Select an existing virtual network from the list or
▪ Create a new virtual network. Specify the virtual network name and the address space.
• Subnets: Four subnets – external, internal, management and tunnel subnets - are auto-
populated with names and address prefix values. Make any changes if required.
Figure 4: Subnets

Pulse Connect Secure Virtual Appliance on Microsoft Azure - Deployment Guide
© 2019 Pulse Secure, LLC. All rights reserved 13
• Public IP name and DNS prefix for the External and Management interfaces are auto-
populated. Make any changes if required.
Note that in a 2-NICs model, Public IP name and DNS prefix name for the External and Internal
interfaces are auto-populated.
Figure 5: Network Settings
Instance Configuration
6. In the Instance Configuration step, enter the following parameters:
• Pulse Connect Secure VM Size: Specify the size of VM. By default, 1x Standard DS3-v2 is set for
3-NICs model and 1x Standard DS2-v2 is set for 2-NICs model.
• Diagnostic storage account: Storage account for the Virtual Machine’s diagnostics
• Pulse Connect Secure Config Data: Provisioning parameters in an XML format. Refer the
section ‘‘Pulse Connect Secure Provisioning Parameters ’
Note: Ensure that the attribute “accept-license-agreement” in pulse-config is set to “y”.
Figure 6: Instance Configuration

Pulse Connect Secure Virtual Appliance on Microsoft Azure - Deployment Guide
© 2019 Pulse Secure, LLC. All rights reserved 14
Summary Step
7. In the Summary step, once the final validation is complete, click OK.
Figure 7: Configuration Validation
8. Finally, in the Terms of Use page, accept the terms and click Create.
Figure 8: Terms of Use

Pulse Connect Secure Virtual Appliance on Microsoft Azure - Deployment Guide
© 2019 Pulse Secure, LLC. All rights reserved 15
9. Wait for a few minutes while it creates all the resources. This completes deploying PCS on Azure
Marketplace.
Figure 9: Deployment in Progress
Note: For L3 connectivity, make sure that "<PCS VM name>-UDR" is properly associated with the subnet
where Backend/Protected resources are connected. For example:
• If PCS internal, external and management interfaces are connected to subnet1, subnet2 and
subnet3 respectively and Backend/Protected resources are in subnet5, then we need to
associate <PCS VM name>-UDR to subnet5.
• If Backend/Protected resources are in Datacenter or in different virtual network, then associate
<PCS VM name>-UDR to GatewaySubnet.
Pulse Connect Secure on Microsoft Azure Cloud
As depicted in the below diagram, a remote user can use Pulse Connect Secure to securely access cloud resources
as well as corporate resources. To access corporate resources, the Pulse Connect Secure administrator needs to
ensure that site-to-site VPN is already established between Azure and corporate network.
Figure 10: Pulse Connect Secure on Microsoft Azure

Pulse Connect Secure Virtual Appliance on Microsoft Azure - Deployment Guide
© 2019 Pulse Secure, LLC. All rights reserved 16
Prerequisites and System Requirements on Azure
To deploy the Pulse Connect Secure Virtual Appliance on Azure, you need the following:
• A Microsoft Azure account
• Access to the Microsoft Azure portal (https://portal.azure.com)*
• Pulse Connect Secure Virtual Appliance Image (.vhd file)
• Azure Resource Manager template (ARM template)
• Pulse Connect Secure licenses **
• Site-to-Site VPN between Azure and the corporate network (optional)
Note: This is needed only if the Pulse Connect Secure users need to access corporate resources.
• Pulse License Server (optional)**
o Located at corporate network, accessible through site-to-site VPN
• Pulse Connect Secure configuration in XML format (optional)
• The following systems are qualified in 9.0R1 release:
▪ DS2 – 2-core
▪ DS3 – 4-core
▪ DS4 – 8-core
Note:
* Pulse Connect Secure Virtual Appliance can be deployed only through Azure Resource Manager
(ARM) style. It does not support deployment in classic style.
** Pulse Connect Secure Virtual Appliance, by default, has two-users license. This release supports
licensing with License server located at corporate network and licensing through Pulse Cloud
Licensing Service (PCLS) server. For licensing through PCLS, administrator needs to obtain
Authentication Code from Pulse Secure Support and apply it in the Pulse Connect Secure admin
console.
Note: From release 9.0R1 onwards, PCS supports VM with 2-NICs model and 3-NICs model for deployment.
Steps to Deploy Pulse Connect Secure on Azure
Below are the one-time activities to be followed to deploy Pulse Connect Secure on Azure.
• Upload Pulse Connect Secure Virtual Appliance Image to Azure Web Portal
• Upload Azure Resource Manager Template to Azure Account
Below are the steps to be followed for each deployment of Pulse Connect Secure.
• Deploying Pulse Connect Secure on Azure using Azure Portal
• Deploying Pulse Connect Secure on Azure using Azure CLI
Upload Pulse Connect Secure Virtual Appliance Image to Azure Web Portal
This section shows the steps to upload the Pulse Connect Secure Virtual Appliance image to Azure web portal.
To upload Pulse Connect Secure Virtual Appliance image to Azure web portal, do the following:
1. Visit the Pulse Secure support site www.pulsesecure.net and download the Azure PCS image file (ps-pcs-
azure-psa-v-<releaseno>-<buildno>-package.zip) which is in the zipped format.
2. Unzip the file and look for the Pulse Connect Secure Virtual Appliance vhd image.
3. Log in to the Azure portal.

Pulse Connect Secure Virtual Appliance on Microsoft Azure - Deployment Guide
© 2019 Pulse Secure, LLC. All rights reserved 17
4. Click New and create a storage account named ‘pcsgoldenstore’ under the resource group named
‘pcsgoldenstoreRG’.

Pulse Connect Secure Virtual Appliance on Microsoft Azure - Deployment Guide
© 2019 Pulse Secure, LLC. All rights reserved 18
Figure 11: Storage Account - pcsgoldenstore
5. Inside the pcsgoldenstore storage account, click on Blobs and create a container with access type as
‘Container’ named ‘master’.
Figure 12: Container master

Pulse Connect Secure Virtual Appliance on Microsoft Azure - Deployment Guide
© 2019 Pulse Secure, LLC. All rights reserved 19
6. Inside the ‘master’ blob, click on upload to upload the Pulse Connect Secure Virtual Appliance image. Inside
the ‘Upload blob’, select the Blob type as Page blob and click on Upload.
Figure 13: Upload Pulse Connect Secure Virtual Appliance Image
Upload Azure Resource Manager Template to Azure Account
The Azure Resource Manager (ARM) template is a JSON-based file, which has instructions for Azure Fabric on all
the resources that need to be created on Azure while running this script. More details on the ARM template can
be found at https://docs.microsoft.com/en-us/azure/azure-resource-manager/resource-manager-create-first-
template.
Pulse Secure provides two sample Azure template files each for three NIC cards and two NIC cards, namely
“pulsesecure-pcs-3-nics.zip” and “pulsesecure-pcs-3-nics-existing-vnet.zip”, and “pulsesecure-pcs-2-nics.zip” and
“pulsesecure-pcs-2-nics-existing-vnet.zip”. Users can modify the template to make it suitable for their need. Here
are the steps to upload the template to Azure Portal.
1. Unzip the pulsesecure-pcs-3-nics.zip file / pulsesecure-pcs-2-nics.zip file to get azuredeploy.json.
2. Log in to the Azure portal.
3. Click on More services and select Templates.
Figure 14: Templates

Pulse Connect Secure Virtual Appliance on Microsoft Azure - Deployment Guide
© 2019 Pulse Secure, LLC. All rights reserved 20
4. In the Templates page, click Add to add template.
Figure 15: Add Template
5. Provide a suitable name and description for the template.
Figure 16: Template – General Information

Pulse Connect Secure Virtual Appliance on Microsoft Azure - Deployment Guide
© 2019 Pulse Secure, LLC. All rights reserved 21
6. Copy the contents of azuredeploy.json and paste it in the template section.
Figure 17: Add ARM Template
Deploying Pulse Connect Secure on Azure using Azure
Portal
Before proceeding with the deployment, refer the following sections:
• Upload Pulse Connect Secure Virtual Appliance Image to Azure
• Upload Azure Resource Manager Template to Azure Account
Pulse Connect Secure can be deployed on:
• a new Virtual network or
• an already existing Virtual network
Deploying PCS on New Virtual Network
This section describes deployment with three NIC cards and two NIC cards.
Deployment on VM with Three NIC Cards
To deploy Pulse Connect Secure on Azure using the Azure portal, do the following:
1. Select the template file created in section ‘Upload Azure Resource Manager Template to Azure account’ and
click Deploy.
Note: Before proceeding with deployment, ensure that the attribute “accept-license-agreement” in
pulse-config is set to “y”.

Pulse Connect Secure Virtual Appliance on Microsoft Azure - Deployment Guide
© 2019 Pulse Secure, LLC. All rights reserved 22
Figure 18: Custom Deployment on VM with Three NIC Cards – New Virtual Network
2. Fill or modify the following parameters:
▪ Resource group: Specify the resource group name in which Pulse Connect Secure needs to be
deployed
▪ Location: Region where resource group needs to be created
▪ PCS Storage Account Name: Storage account name where the Pulse Connect Secure Virtual
Appliance image is available
▪ PCS Storage Account Resource Group: Resource group of where the Pulse Connect Secure Virtual
Appliance image is copied
▪ PCS Image Location URI: URI to Pulse Connect Secure Virtual Appliance Image
▪ PCSVM Name: Name of the Pulse Connect Secure Virtual instance
▪ PCS Config: Provisioning parameters in an XML format. Refer the section ‘Pulse Connect Secure
Provisioning Parameters’
▪ SSH Public Key: This key is used to access PCS via SSH. The SSH keys are generated using ssh-keygen
on Linux and OS X, or PuTTyGen on Windows. For details about generating the SSH key pairs, refer:
For Windows: https://docs.microsoft.com/en-us/azure/virtual-machines/linux/ssh-from-windows
For MacOS and Linux: https://docs.microsoft.com/en-us/azure/virtual-machines/linux/mac-create-ssh-
keys
Pulse Connect Secure Virtual Appliance on Microsoft Azure - Deployment Guide
© 2019 Pulse Secure, LLC. All rights reserved 23
▪ DNS Label Prefix Ext: Prefix for the external interface DNS label
▪ DNS Label Prefix Mgmt: Prefix for the management interface DNS label
▪ Vnet Address Space: Virtual network address space
▪ Internal Subnet: Subnet from which Pulse Connect Secure internal interface needs to lease IP
▪ External Subnet: Subnet from which Pulse Connect Secure external interface needs to lease IP
▪ Management Subnet: Subnet from which Pulse Connect Secure management interface needs to
lease IP
▪ Tunnel Subnet: Subnet which will be configured as tunnel IP pool in the Pulse Connect Secure VPN
Profile
3. Agree to the Azure licensing terms and click Purchase.
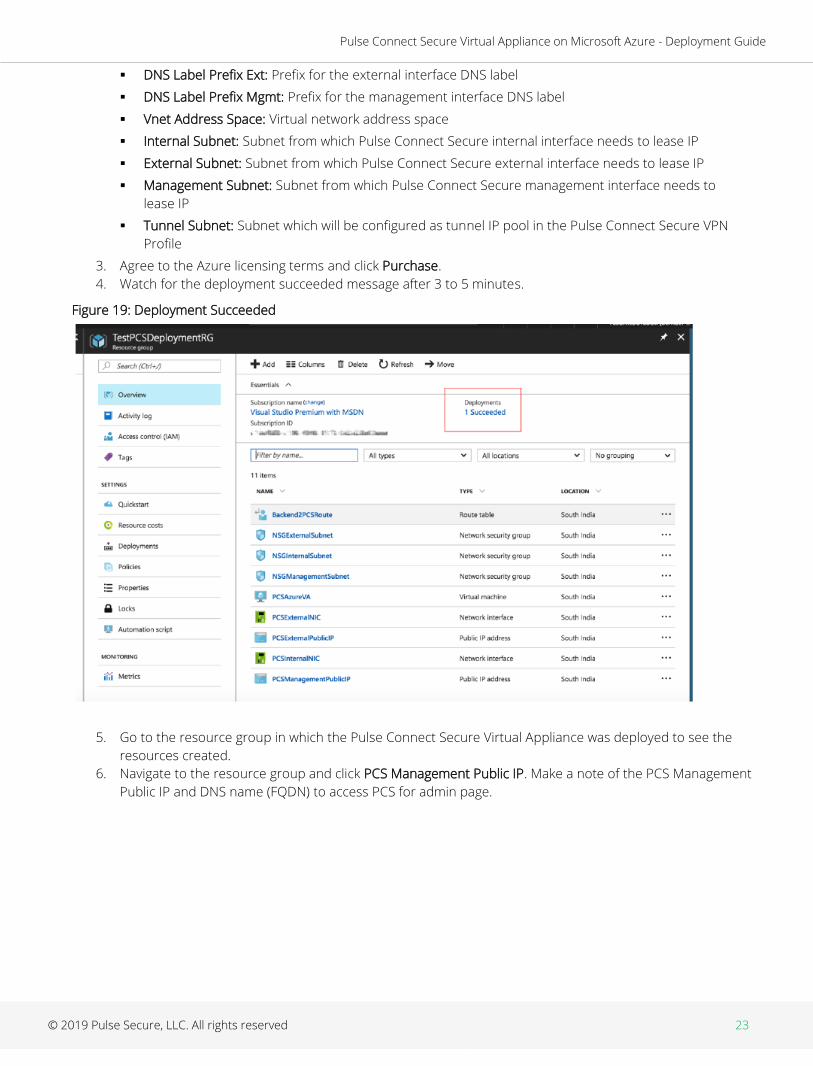
4. Watch for the deployment succeeded message after 3 to 5 minutes.
Figure 19: Deployment Succeeded
5. Go to the resource group in which the Pulse Connect Secure Virtual Appliance was deployed to see the
resources created.
6. Navigate to the resource group and click PCS Management Public IP. Make a note of the PCS Management
Public IP and DNS name (FQDN) to access PCS for admin page.

Pulse Connect Secure Virtual Appliance on Microsoft Azure - Deployment Guide
© 2019 Pulse Secure, LLC. All rights reserved 24
Figure 20: PCS Management Public IP
7. Click PCS External Public IP and note down the PCS External Public IP and DNS name (FQDN) to access PCS
for end user page.
Figure 21: PCS External Public IP
Note: Azure allows static as well as dynamic assignment of IP addresses to the network interfaces. The mode
of IP assignment (static/dynamic) can be mentioned in the Azure Resource Manage template file. The current
JSON template uses the dynamic method of allotting IP addresses to the network interfaces.

Pulse Connect Secure Virtual Appliance on Microsoft Azure - Deployment Guide
© 2019 Pulse Secure, LLC. All rights reserved 25
Deployment on VM with Two NIC Cards
To deploy Pulse Connect Secure on Azure using the Azure portal, do the following:
1. Select the template file created in section ‘Upload Azure Resource Manager Template to Azure account’ and
click Deploy.
Note: Before proceeding with deployment, ensure that the attribute “accept-license-agreement” in
pulse-config is set to “y”.
Figure 22: Custom Deployment on VM with Two NIC Cards – New Virtual Network
2. Fill or modify the following parameters:
▪ Resource group: Specify the resource group name in which Pulse Connect Secure needs to be
deployed
▪ Location: Region where resource group needs to be created
▪ PCS Storage Account Name: Storage account name where the Pulse Connect Secure Virtual
Appliance image is available
▪ PCS Storage Account Resource Group: Resource group of where the Pulse Connect Secure Virtual
Appliance image is copied
▪ PCS Image Location URI: URI to Pulse Connect Secure Virtual Appliance Image
▪ PCSVM Name: Name of the Pulse Connect Secure Virtual instance

Pulse Connect Secure Virtual Appliance on Microsoft Azure - Deployment Guide
© 2019 Pulse Secure, LLC. All rights reserved 26
▪ PCS Config: Provisioning parameters in an XML format. Refer the section ‘Pulse Connect Secure
Provisioning Parameters’
▪ SSH Public Key: This key is used to access PCS via SSH. The SSH keys are generated using ssh-keygen
on Linux and OS X, or PuTTyGen on Windows. For details about generating the SSH key pairs, refer:
For Windows: https://docs.microsoft.com/en-us/azure/virtual-machines/linux/ssh-from-windows
For MacOS and Linux: https://docs.microsoft.com/en-us/azure/virtual-machines/linux/mac-create-ssh-
keys
▪ DNS Label Prefix Ext: Prefix for the external interface DNS label
▪ Vnet Address Space: Virtual network address space
▪ Internal Subnet: Subnet from which Pulse Connect Secure internal interface needs to lease IP
▪ External Subnet: Subnet from which Pulse Connect Secure external interface needs to lease IP
▪ Tunnel Subnet: Subnet which will be configured as tunnel IP pool in the Pulse Connect Secure VPN
Profile
3. Agree to the Azure licensing terms and click Purchase.
4. Watch for the deployment succeeded message after 3 to 5 minutes.
Figure 23: Deployment Succeeded
5. Go to the resource group in which the Pulse Connect Secure Virtual Appliance was deployed to see the
resources created.

Pulse Connect Secure Virtual Appliance on Microsoft Azure - Deployment Guide
© 2019 Pulse Secure, LLC. All rights reserved 27
6. Click PCS External Public IP and note down the PCS External Public IP and DNS name (FQDN) to access PCS
for end user page.
Figure 24: PCS External Public IP
Note: Azure allows static as well as dynamic assignment of IP addresses to the network interfaces. The mode
of IP assignment (static/dynamic) can be mentioned in the Azure Resource Manage template file. The current
JSON template uses the dynamic method of allotting IP addresses to the network interfaces.

Pulse Connect Secure Virtual Appliance on Microsoft Azure - Deployment Guide
© 2019 Pulse Secure, LLC. All rights reserved 28
Deploying PCS on an Existing Virtual Network
This section describes deployment with three NIC cards and two NIC cards.
Deployment on VM with Three NIC Cards
To deploy Pulse Connect Secure on Azure using the Azure portal, do the following:
1. Select the template file “pulsesecure-pcs-3-nics-existing-vnet” created in the section ‘Upload Azure Resource
Manager Template to Azure account’ and click Deploy.
Note: Before proceeding with deployment, ensure that the attribute “accept-license-agreement” in
pulse-config is set to “y”.
Figure 25: Custom Deployment on VM with Three NIC Cards – Existing Virtual Network

Pulse Connect Secure Virtual Appliance on Microsoft Azure - Deployment Guide
© 2019 Pulse Secure, LLC. All rights reserved 29
2. Fill or modify the following parameters:
▪ Resource group: Specify the resource group name in which Pulse Connect Secure needs to be
deployed
▪ Location: Region where resource group needs to be created
▪ PCS Storage Account Name: Storage account name where the Pulse Connect Secure Virtual
Appliance image is available
▪ PCS Storage Account Resource Group: Resource group of where the Pulse Connect Secure Virtual
Appliance image is copied
▪ PCS Image Location URI: URI to Pulse Connect Secure Virtual Appliance Image
▪ PCS VM Name: Name of the Pulse Connect Secure Virtual instance
▪ PCS Config: Provisioning parameters in XML format. Refer ‘Pulse Connect Secure Provisioning
Parameters’
▪ SSH Public Key: This key is used to access PCS via SSH. The SSH keys are generated using ssh-keygen
on Linux and OS X, or PuTTyGen on Windows. For details about generating the SSH key pairs, refer:
For Windows: https://docs.microsoft.com/en-us/azure/virtual-machines/linux/ssh-from-windows
For MacOS and Linux: https://docs.microsoft.com/en-us/azure/virtual-machines/linux/mac-create-ssh-
keys
▪ DNS Label Prefix Ext: Prefix for the external interface DNS label
▪ DNS Label Prefix Mgmt: Prefix for the management interface DNS label
▪ Resource Group Name of Existing Virtual Network: Resource Group name of the Virtual network
▪ Existing Vnet Name: Virtual network name
▪ Existing Internal Subnet: Subnet from which the Pulse Connect Secure internal interface needs to
lease IP
▪ Existing External Subnet: Subnet from which the Pulse Connect Secure external interface needs to
lease IP
▪ Existing Management Subnet: Subnet from which the Pulse Connect Secure management interface
needs to lease IP
▪ Existing Tunnel Subnet: Subnet which will be configured as the tunnel IP pool in the Pulse Connect
Secure VPN Profile
3. Agree to the Azure licensing terms and click Purchase.

Pulse Connect Secure Virtual Appliance on Microsoft Azure - Deployment Guide
© 2019 Pulse Secure, LLC. All rights reserved 30
4. Watch for the deployment succeeded message after 3 to 5 minutes.
Figure 26: Deployment Succeeded
5. Go to the resource group in which the Pulse Connect Secure Virtual appliance was deployed to see the
resources created.
6. Navigate to the resource group and click PCS Management Public IP. Make a note of the PCS Management
Public IP and DNS name (FQDN) to access PCS for admin page.
Figure 27: PCS Management Public IP

Pulse Connect Secure Virtual Appliance on Microsoft Azure - Deployment Guide
© 2019 Pulse Secure, LLC. All rights reserved 31
7. Click PCS External Public IP and note down the PCS External Public IP and DNS name (FQDN) to access PCS
for end user page.
Figure 28: PCS External Public IP
Note: Azure allows static as well as dynamic assignment of the IP addresses to the network interfaces. The
mode of IP assignment (static/dynamic) can be mentioned in the Azure Resource Manage template file. The
current JSON template uses dynamic method of allotting IP addresses to the network interfaces.
Pulse Connect Secure Virtual Appliance on Microsoft Azure - Deployment Guide
© 2019 Pulse Secure, LLC. All rights reserved 32
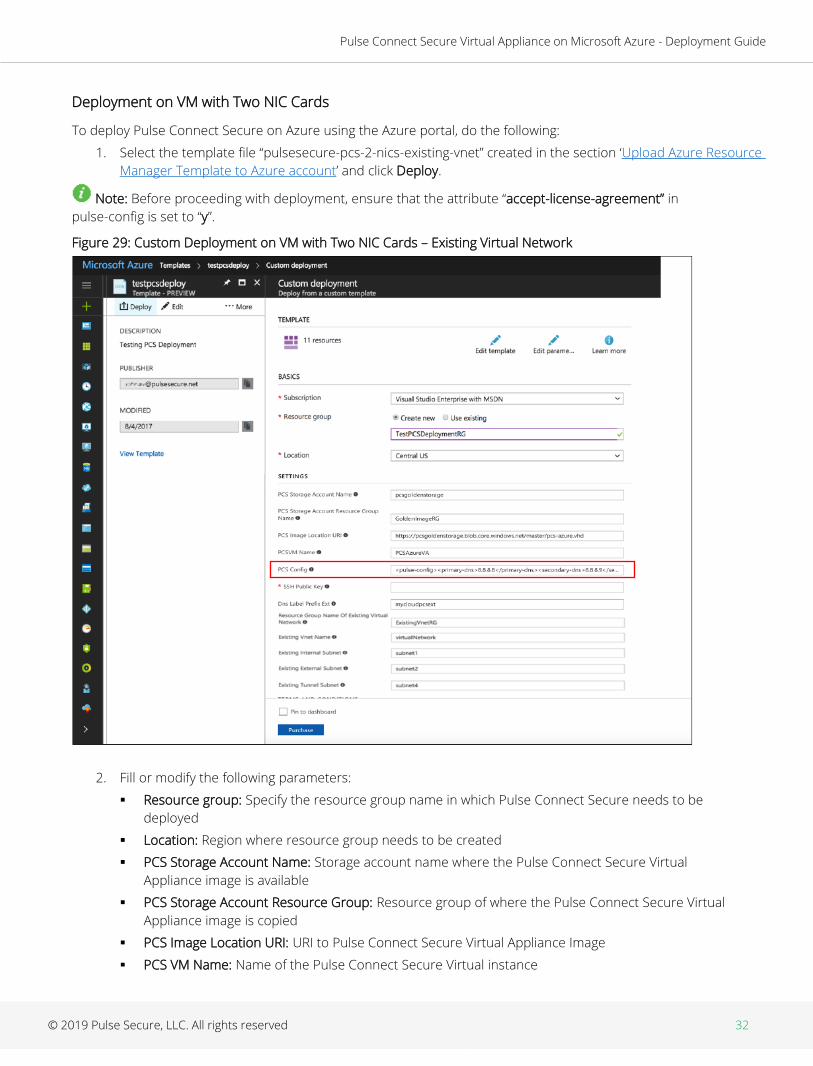
Deployment on VM with Two NIC Cards
To deploy Pulse Connect Secure on Azure using the Azure portal, do the following:
1. Select the template file “pulsesecure-pcs-2-nics-existing-vnet” created in the section ‘Upload Azure Resource
Manager Template to Azure account’ and click Deploy.
Note: Before proceeding with deployment, ensure that the attribute “accept-license-agreement” in
pulse-config is set to “y”.
Figure 29: Custom Deployment on VM with Two NIC Cards – Existing Virtual Network
2. Fill or modify the following parameters:
▪ Resource group: Specify the resource group name in which Pulse Connect Secure needs to be
deployed
▪ Location: Region where resource group needs to be created
▪ PCS Storage Account Name: Storage account name where the Pulse Connect Secure Virtual
Appliance image is available
▪ PCS Storage Account Resource Group: Resource group of where the Pulse Connect Secure Virtual
Appliance image is copied
▪ PCS Image Location URI: URI to Pulse Connect Secure Virtual Appliance Image
▪ PCS VM Name: Name of the Pulse Connect Secure Virtual instance

Pulse Connect Secure Virtual Appliance on Microsoft Azure - Deployment Guide
© 2019 Pulse Secure, LLC. All rights reserved 33
▪ PCS Config: Provisioning parameters in XML format. Refer ‘Pulse Connect Secure Provisioning
Parameters’
▪ SSH Public Key: This key is used to access PCS via SSH. The SSH keys are generated using ssh-keygen
on Linux and OS X, or PuTTyGen on Windows. For details about generating the SSH key pairs, refer:
For Windows: https://docs.microsoft.com/en-us/azure/virtual-machines/linux/ssh-from-windows
For MacOS and Linux: https://docs.microsoft.com/en-us/azure/virtual-machines/linux/mac-create-ssh-
keys
▪ DNS Label Prefix Ext: Prefix for the external interface DNS label
▪ Resource Group Name of Existing Virtual Network: Resource Group name of the Virtual network
▪ Existing Vnet Name: Virtual network name
▪ Existing Internal Subnet: Subnet from which the Pulse Connect Secure internal interface needs to
lease IP
▪ Existing External Subnet: Subnet from which the Pulse Connect Secure external interface needs to
lease IP
▪ Existing Tunnel Subnet: Subnet which will be configured as the tunnel IP pool in the Pulse Connect
Secure VPN Profile
3. Agree to the Azure licensing terms and click Purchase.
4. Watch for the deployment succeeded message after 3 to 5 minutes.
Figure 30: Deployment Succeeded

Pulse Connect Secure Virtual Appliance on Microsoft Azure - Deployment Guide
© 2019 Pulse Secure, LLC. All rights reserved 34
5. Go to the resource group in which the Pulse Connect Secure Virtual appliance was deployed to see the
resources created.
6. Click PCS External Public IP and note down the PCS External Public IP and DNS name (FQDN) to access PCS
for end user page.
Figure 31: PCS External Public IP
Note: Azure allows static as well as dynamic assignment of the IP addresses to the network interfaces. The
mode of IP assignment (static/dynamic) can be mentioned in the Azure Resource Manage template file. The
current JSON template uses dynamic method of allotting IP addresses to the network interfaces.

Pulse Connect Secure Virtual Appliance on Microsoft Azure - Deployment Guide
© 2019 Pulse Secure, LLC. All rights reserved 35
Deploying Pulse Connect Secure on Azure using Azure
CLI
Before proceeding with the deployment, refer Upload Pulse Connect Secure Virtual Appliance Image to Azure.
1. Download and Install Azure CLI from https://azure.github.io/projects/clis.
2. Visit www.pulsesecure.net and download the ps-pcs-azure-psa-v-<releaseno>-<buildno>-package.zip file.
3. Unzip the file and look for the pulsesecure-pcs-3-nics.zip file. Unzip the file to get azuredeploy.json
4. Ensure that parameters section has correct default values:
▪ PCS Storage Account Name: Storage account name where the Pulse Connect Secure Virtual
Appliance image is available
▪ PCS Storage Account Resource Group: Resource group where the Pulse Connect Secure Virtual
Appliance image is copied
▪ PCS Image Location URI: URI to the Pulse Connect Secure Virtual Appliance Image
▪ PCS VM Name: Name of the Pulse Connect Secure Virtual instance
▪ PCS Config: Provisioning parameters in an XML format. Refer “Pulse Connect Secure Provisioning
Parameters”
▪ DNS Label Prefix Ext: Prefix for the external interface DNS label
▪ DNS Label Prefix Mgmt: Prefix for the management interface DNS label
▪ Vnet Address Space: Virtual network address space
▪ Internal Subnet: Subnet from which the Pulse Connect Secure internal interface needs to lease IP
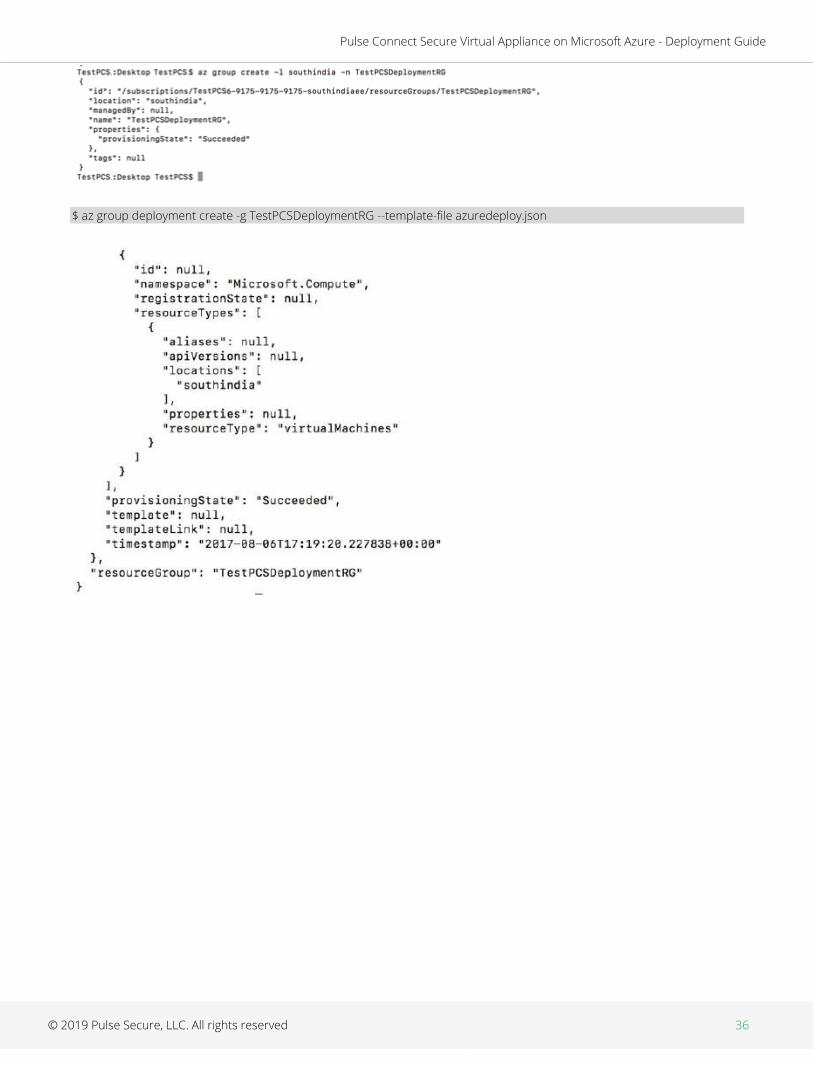
5. To deploy Pulse Connect Secure using Azure CLI, run the following commands
$ az login
$ az group create -l <location> -n <resource group name>
$ az group deployment create -g <resource group name> --template-file <json file name>
For example:
$ az login
$ az group create -l southindia -n TestPCSDeploymentRG
Pulse Connect Secure Virtual Appliance on Microsoft Azure - Deployment Guide
© 2019 Pulse Secure, LLC. All rights reserved 36
$ az group deployment create -g TestPCSDeploymentRG --template-file azuredeploy.json

Pulse Connect Secure Virtual Appliance on Microsoft Azure - Deployment Guide
© 2019 Pulse Secure, LLC. All rights reserved 37
Pulse Connect Secure Provisioning Parameters
Provisioning parameters are those parameters which are required during the deployment of a virtual appliance.
Pulse Connect Secure accepts the following parameters as provisioning parameters in the XML format.
"<pulse-config>
<primary-dns>8.8.8.8</primary-dns>
<secondary-dns>8.8.8.9</secondary-dns>
<wins-server>1.1.1.1</wins-server>
<dns-domain>psecure.net</dns-domain>
<admin-username>admin</admin-username>
<admin-password>password</admin-password>
<cert-common-name>va1.psecure.net</cert-common-name>
<cert-random-text>fdsfpisonvsfnms</cert-random-text>
<cert-organisation>Psecure Org</cert-organisation>
<config-download-url><value></config-download-url>
<config-data><value></config-data>
<auth-code-license><value></auth-code-license>
<enable-license-server>n</enable-license-server>
<accept-license-agreement>n</accept-license-agreement>
<enable-rest>n</enable-rest>
</pulse-config>",
The below table depicts the details of xml file.
# Parameter Name Type Description
1 primary-dns IP address Primary DNS for Pulse Connect Secure
2 secondary-dns IP address Secondary DNS for Pulse Connect Secure
3 wins-server IP address Wins server for Pulse Connect Secure
4 dns-domain string DNS domain of Pulse Connect Secure
5 admin-username string admin UI user name
6 admin-password string admin UI password
7 cert-common-name string Common name for the self-signed certificate
generation. This certificate is used as the
device certificate of Pulse Connect Secure
Random text for the self-certificate generation
Organization name for the self-signed
certificate generation
8 cert-random-text string
9 cert-organization string
10 config-download-url String URL Http based URL where XML based Pulse
Connect Secure configuration can be found.
During provisioning, Pulse Connect Secure
fetches this file and comes up with preloaded
configuration. XML based configuration can
be present in another VM in Azure cloud or at
corporate network which is accessible for
Pulse Connect Secure through site to site VPN
between Azure and corporate data center
11 config-data string base64 encoded XML based Pulse Connect
Secure configuration
12 auth-code-license string Authentication code that needs to be
obtained from Pulse Secure
13 enable-license-server string If set to ‘y’, PCS will be deployed as a License
server.

Pulse Connect Secure Virtual Appliance on Microsoft Azure - Deployment Guide
© 2019 Pulse Secure, LLC. All rights reserved 38
If set to ‘n’, PCS will be deployed as a normal
server.
14 accept-license-agreement string This value is passed to the instance for
configuration at the boot time. By default, this
value is set to ‘n’. This value must be set to ‘y’.
15 enable-rest string If set to ‘y’, REST API access for the
administrator user is enabled.
Note: In the above list of parameters, primary dns, dns domain, admin username, admin password, cert-
random name, cert-random text, cert-organization and accept-license-agreement are mandatory parameters.
The other parameters are optional parameters.
Provisioning Pulse Connect Secure with Predefined
Configuration
The Pulse Connect Secure Virtual Appliance can be provisioned on Azure with a pre-defined Pulse Connect Secure
configuration. The provisioning can be done in the following two ways:
• Pulse Connect Secure administrator needs to provide the location of the XML-based
configuration as a provisioning parameter. Refer ‘Pulse Connect Secure Provisioning
Parameters’ for details about the Pulse Connect Secure specific provisioning parameters.
Pulse Connect Secure configuration can be kept on Azure VM or on a machine located in the corporate
network. If it is in the corporate network, the Pulse Connect Secure administrator needs to ensure that
site-to-site VPN between Azure to corporate network is already established so that Pulse Connect
Secure can access the machine located in the corporate network.
• Pulse Connect Secure administrator provides the configuration data encoded in the base64
encoded xml in the ARM template.
Figure 32: Pulse Configuration Server in Corporate Network

Pulse Connect Secure Virtual Appliance on Microsoft Azure - Deployment Guide
© 2019 Pulse Secure, LLC. All rights reserved 39
Configuring Licenses on the Pulse Connect Secure
Appliance
By default, two-user licenses are provided. To add more licenses, the Pulse Connect Secure administrator needs
to leverage the Pulse License server.
The Pulse License server can be made available in:
• corporate network
• cloud network
Pulse License Server in Corporate Network
Figure 33: Pulse License Server in a Corporate Network
Pulse License Server in Cloud Network
In Pulse Connect Secure 8.3R3, the Pulse Connect Secure virtual machines (VM) are enabled to provision
licenses through the Pulse Cloud Licensing Service (PCLS). For this, administrator needs to obtain an
Authentication code from Pulse Secure Support and apply it in Download Licenses page of PCS admin console.
The PCS also periodically sends heartbeat messages to PCLS for auditing purposes.
The Authentication code can also be specified in the ARM template. When PCS comes up, it automatically
fetches the Authentication code.
• Adding Authentication Code in PCS Admin Console
• Including Authentication Code in ARM Template
Figure 34: Pulse License Server in Cloud Network

Pulse Connect Secure Virtual Appliance on Microsoft Azure - Deployment Guide
© 2019 Pulse Secure, LLC. All rights reserved 40
Adding Authentication Code in PCS Admin Console
To add Authentication code:
1. Go to System > Configuration > Licensing > Download Licenses.
2. Under On demand license downloads, enter the Authentication code in the text box.
3. Click on Download and Install.
Figure 35: Enter Authentication Code
Including Authentication Code in ARM Template
To include Authentication code in the ARM template:
1. In the ARM template, go to the PCSConfig section.
2. For the element <auth-code-license>, enter the Authentication code as the content.
3. Save the template.
For details about the license configuration, refer to License Configuration Guide.
Pulse Connect Secure Virtual Appliance on Microsoft Azure - Deployment Guide
© 2019 Pulse Secure, LLC. All rights reserved 41
Deploying PCS Active-Active Cluster using Virtual Traffic
Manager in Microsoft Azure
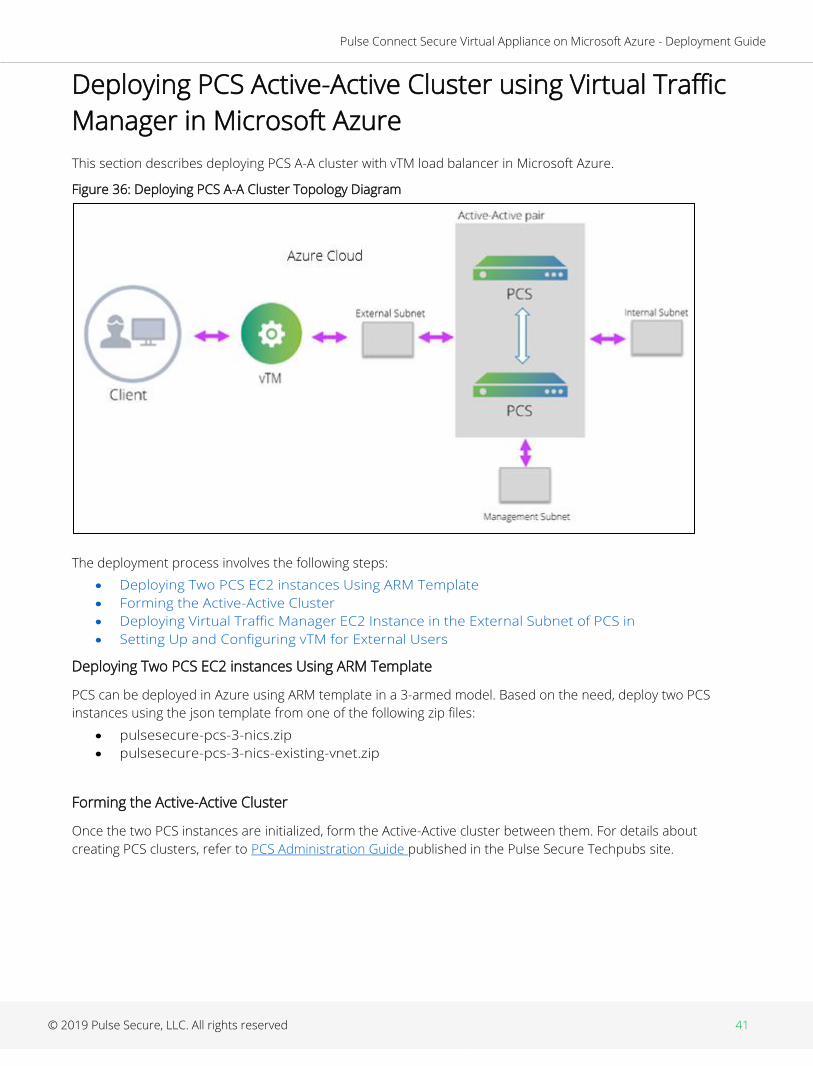
This section describes deploying PCS A-A cluster with vTM load balancer in Microsoft Azure.
Figure 36: Deploying PCS A-A Cluster Topology Diagram
The deployment process involves the following steps:
• Deploying Two PCS EC2 instances Using ARM Template
• Forming the Active-Active Cluster
• Deploying Virtual Traffic Manager EC2 Instance in the External Subnet of PCS in
• Setting Up and Configuring vTM for External Users
Deploying Two PCS EC2 instances Using ARM Template
PCS can be deployed in Azure using ARM template in a 3-armed model. Based on the need, deploy two PCS
instances using the json template from one of the following zip files:
• pulsesecure-pcs-3-nics.zip
• pulsesecure-pcs-3-nics-existing-vnet.zip
Forming the Active-Active Cluster
Once the two PCS instances are initialized, form the Active-Active cluster between them. For details about
creating PCS clusters, refer to PCS Administration Guide published in the Pulse Secure Techpubs site.

Pulse Connect Secure Virtual Appliance on Microsoft Azure - Deployment Guide
© 2019 Pulse Secure, LLC. All rights reserved 42
Figure 37: PCS A-A Cluster Status
Deploying Virtual Traffic Manager EC2 Instance in the External Subnet of PCS in Microsoft Azure
Virtual Traffic Manager can be deployed through either Azure Marketplace or Azure CLI.
Deploying Virtual Traffic Manager through Marketplace includes the following steps:
To deploy through Marketplace, follow the below steps:
1. Search and select Pulse Secure vTM in Azure Marketplace.
Figure 38: Azure Marketplace > Pulse Secure vTM

Pulse Connect Secure Virtual Appliance on Microsoft Azure - Deployment Guide
© 2019 Pulse Secure, LLC. All rights reserved 43
2. Select the required deployment model and click Create.
Figure 39: vTM Editions Available in Azure Marketplace
3. In the wizard that follows, provide the required configuration details:
▪ Cluster name
▪ License type
▪ Authentication details
▪ Virtual Network and Subnet settings
▪ Resource group
▪ Location information
In the Network Settings tab, select the Virtual Network and Traffic Manager Subnet matching PCS’s Vnet
and External Subnet.

Pulse Connect Secure Virtual Appliance on Microsoft Azure - Deployment Guide
© 2019 Pulse Secure, LLC. All rights reserved 44
Figure 40: Configuration Wizard
Pulse Connect Secure Virtual Appliance on Microsoft Azure - Deployment Guide
© 2019 Pulse Secure, LLC. All rights reserved 45
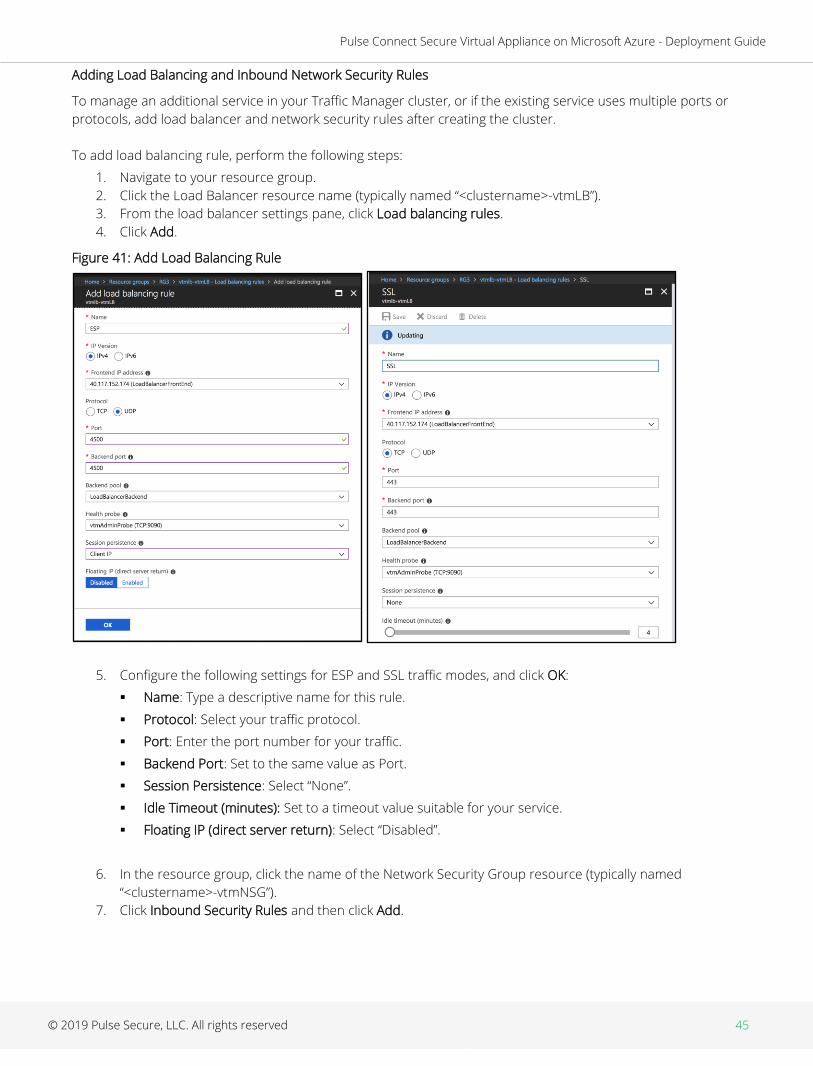
Adding Load Balancing and Inbound Network Security Rules
To manage an additional service in your Traffic Manager cluster, or if the existing service uses multiple ports or
protocols, add load balancer and network security rules after creating the cluster.
To add load balancing rule, perform the following steps:
1. Navigate to your resource group.
2. Click the Load Balancer resource name (typically named “<clustername>-vtmLB”).
3. From the load balancer settings pane, click Load balancing rules.
4. Click Add.
Figure 41: Add Load Balancing Rule
5. Configure the following settings for ESP and SSL traffic modes, and click OK:
▪ Name: Type a descriptive name for this rule.
▪ Protocol: Select your traffic protocol.
▪ Port: Enter the port number for your traffic.
▪ Backend Port: Set to the same value as Port.
▪ Session Persistence: Select “None”.
▪ Idle Timeout (minutes): Set to a timeout value suitable for your service.
▪ Floating IP (direct server return): Select “Disabled”.
6. In the resource group, click the name of the Network Security Group resource (typically named
“<clustername>-vtmNSG”).
7. Click Inbound Security Rules and then click Add.

Pulse Connect Secure Virtual Appliance on Microsoft Azure - Deployment Guide
© 2019 Pulse Secure, LLC. All rights reserved 46
Figure 42: Inbound Security Rules
8. Configure the following settings:
▪ Name: Type a descriptive name for this rule.
▪ Priority: Enter the desired priority number. The higher the priority number, the lower the priority
over other rules.
▪ Source: Select “Any”.
▪ Protocol: Select your traffic protocol.
▪ Source Port Range: Leave this setting as the default “*”.
▪ Destination: Select “Any”.
▪ Destination Port Range: Enter the port number or range for your traffic.
▪ Action: Select “Allow”.
9. Click OK to save the rule.
Pulse Secure Virtual Traffic Manager Initial Configuration
A newly created Virtual Traffic Manager requires some basic information to function normally.
Use the Initial Configuration wizard by entering the URL of the Admin UI into your Web browser. Provide the
following details:
• Administrator password for the instance
• Confirmation to the terms and conditions
• Time zone settings for the appliance
• Login credentials for master admin user to log in to the Administration server and SSH console
• Licensing option
Figure 43: Pulse Secure vTM Initial Configuration Wizard

Pulse Connect Secure Virtual Appliance on Microsoft Azure - Deployment Guide
© 2019 Pulse Secure, LLC. All rights reserved 47
For additional details, and to deploy vTM though Azure CLI, follow the steps in the section “Creating a Traffic
Manager Instance on Azure EC2” in Pulse Secure Virtual Traffic Manager: Cloud Services Installation and Getting
Started Guide. Make sure that vTM is deployed on the external network of PCS.

Pulse Connect Secure Virtual Appliance on Microsoft Azure - Deployment Guide
© 2019 Pulse Secure, LLC. All rights reserved 48
Setting Up and Configuring vTM for External Users
Once the vTM EC2 instance is deployed, set up the instance using the Initial Configuration wizard. For details,
refer Pulse Secure Virtual Traffic Manager: Cloud Services Installation and Getting Started Guide.
The Pulse Secure vTM Administrator login prompt appears.
Figure 44: Pulse Secure vTM Login Page
Next step is to set up the vTM for the external users using traffic pools and load balancing virtual servers. Traffic
pool is the group that will bind to virtual server for load balancing. In an Active-Active Cluster scenario, traffic
pool comprises cluster nodes. We need to create two separate traffic pools, each for SSL(L7) and ESP(L3) traffic
modes.
Create Service Pool
In the Services tab, select Pools and create new pool by adding external IPs of cluster nodes along with port
number. Also, select appropriate monitor from the drop-down options.
Complete these steps for SSL and UDP. For details, refer to the section “Creating PCS Pools” in Load Balancing
PCS with vTM Deployment Guide.
Figure 45: Create Traffic Pool
Pulse Connect Secure Virtual Appliance on Microsoft Azure - Deployment Guide
© 2019 Pulse Secure, LLC. All rights reserved 49
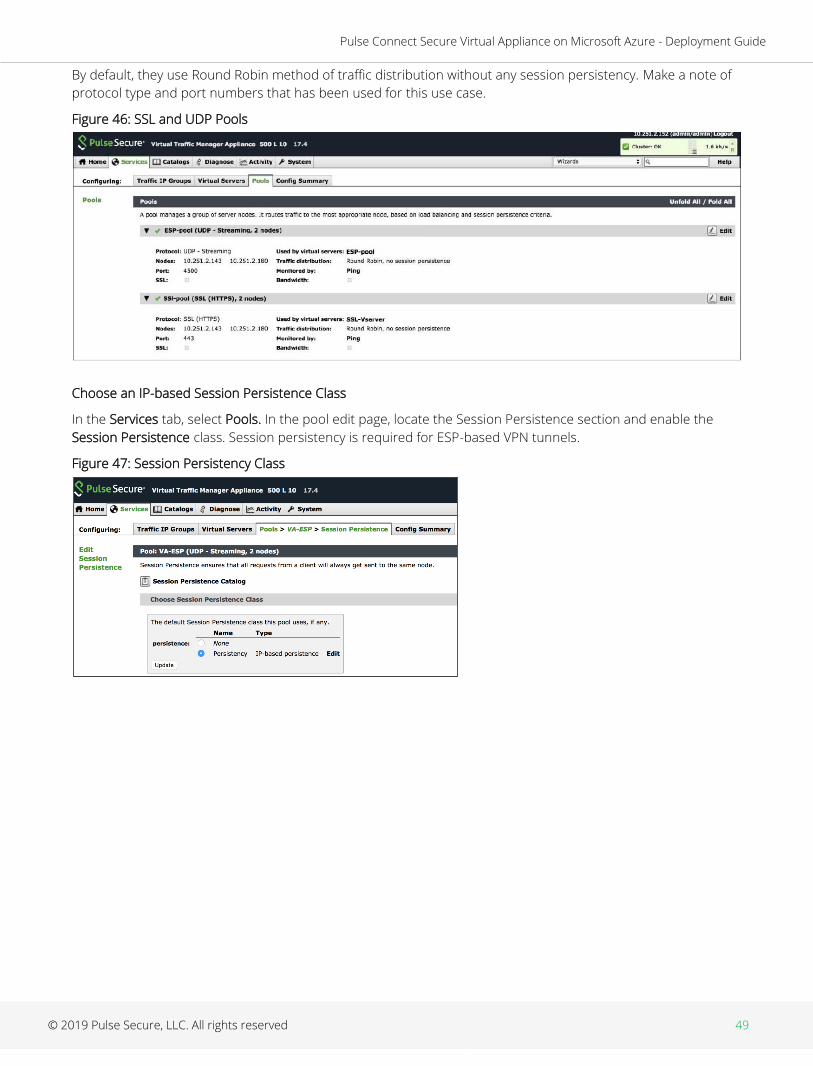
By default, they use Round Robin method of traffic distribution without any session persistency. Make a note of
protocol type and port numbers that has been used for this use case.
Figure 46: SSL and UDP Pools
Choose an IP-based Session Persistence Class
In the Services tab, select Pools. In the pool edit page, locate the Session Persistence section and enable the
Session Persistence class. Session persistency is required for ESP-based VPN tunnels.
Figure 47: Session Persistency Class

Pulse Connect Secure Virtual Appliance on Microsoft Azure - Deployment Guide
© 2019 Pulse Secure, LLC. All rights reserved 50
Create Virtual Servers
In the Services tab, select Virtual Servers and create a new virtual server by selecting protocol type and traffic
pools. You need to create separate virtual servers to handle both SSL and UDP traffic. Each virtual server
balances traffic across the pool of the same protocol type.
For details, refer to the section “Creating Virtual Server” in Load Balancing PCS with vTM Deployment Guide.
Figure 48: Create Virtual Server
Figure 49: Virtual Servers to Handle SSL and UDP Traffic
Pulse Connect Secure Virtual Appliance on Microsoft Azure - Deployment Guide
© 2019 Pulse Secure, LLC. All rights reserved 51
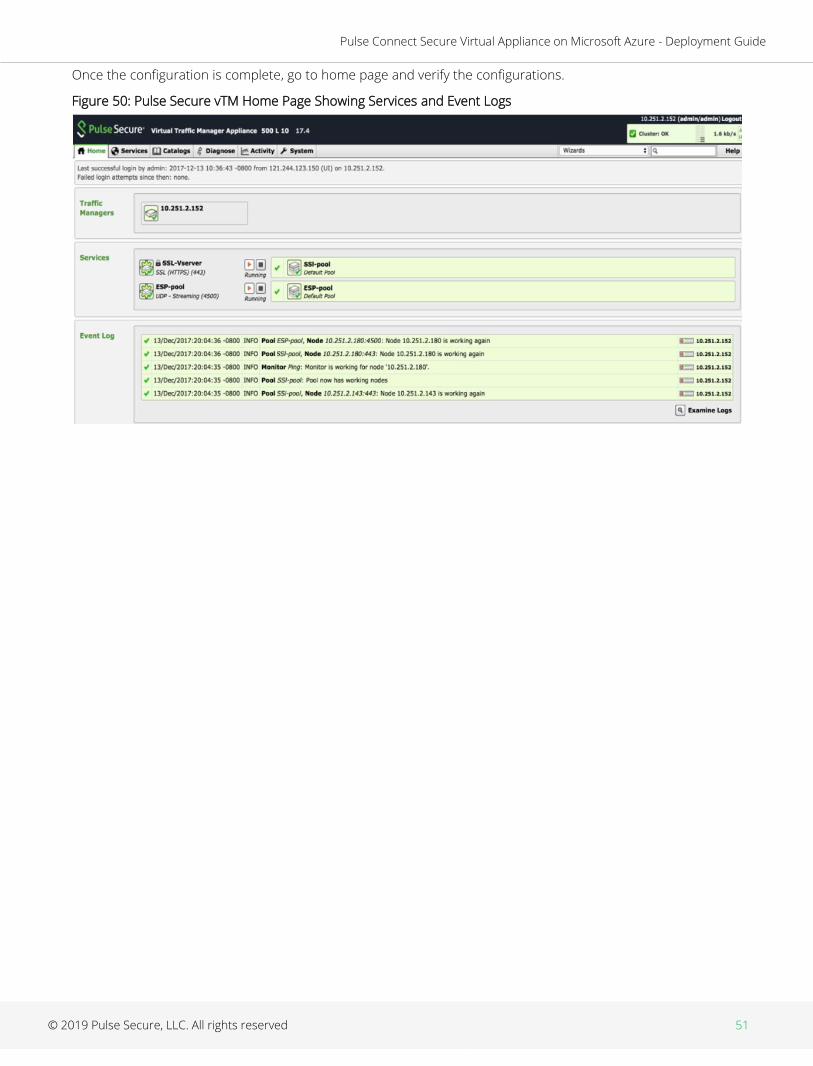
Once the configuration is complete, go to home page and verify the configurations.
Figure 50: Pulse Secure vTM Home Page Showing Services and Event Logs

Pulse Connect Secure Virtual Appliance on Microsoft Azure - Deployment Guide
© 2019 Pulse Secure, LLC. All rights reserved 52
Accessing the Pulse Connect Secure Virtual Appliance
The Pulse Connect Secure appliance can be accessed:
• as an administrator
• as an end user
• using SSH console
Accessing the Pulse Connect Secure Virtual Appliance as an Administrator
To access the Pulse Connect Secure Virtual Appliance as an administrator, copy the IP address from the Pulse
Management Interface resource.
Figure 51: Pulse Management Interface
Use the credentials provided in the provisioning parameters to log in as the administrator. The default PCS admin
UI user configured in the azuredeploy.json config file is: user ‘admin’ and password ‘password’.
The administrator can configure Active Directory located in the corporate network for user authentication. The
Pulse Connect Secure Virtual Appliance administrator can check troubleshooting tools provided in the Pulse
Connect Secure admin UI (System->Maintenance->Troubleshooting), to verify whether Pulse Connect Secure is
able to reach other cloud resources as well as corporate resources. For this, Azure network administrator needs
to ensure that all other resources have Pulse Connect Secure Internal interface as its default gateway.
Pulse Connect Secure Virtual Appliance on Microsoft Azure - Deployment Guide
© 2019 Pulse Secure, LLC. All rights reserved 53
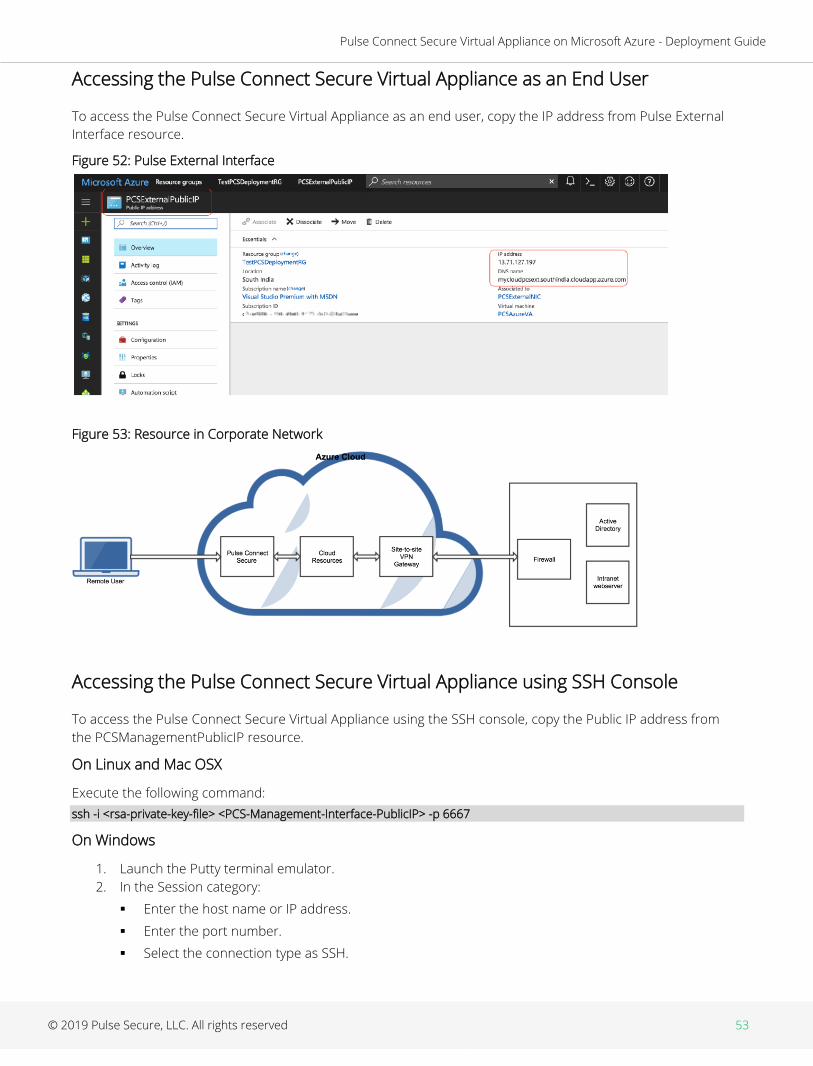
Accessing the Pulse Connect Secure Virtual Appliance as an End User
To access the Pulse Connect Secure Virtual Appliance as an end user, copy the IP address from Pulse External
Interface resource.
Figure 52: Pulse External Interface
Figure 53: Resource in Corporate Network
Accessing the Pulse Connect Secure Virtual Appliance using SSH Console
To access the Pulse Connect Secure Virtual Appliance using the SSH console, copy the Public IP address from
the PCSManagementPublicIP resource.
On Linux and Mac OSX
Execute the following command:
ssh -i <rsa-private-key-file> <PCS-Management-Interface-PublicIP> -p 6667
On Windows
1. Launch the Putty terminal emulator.
2. In the Session category:
▪ Enter the host name or IP address.
▪ Enter the port number.
▪ Select the connection type as SSH.

Pulse Connect Secure Virtual Appliance on Microsoft Azure - Deployment Guide
© 2019 Pulse Secure, LLC. All rights reserved 54
Figure 54: Putty Configuration – Basic Options
3. Select Connection > SSH > Auth. Click Browse and select the private key file for authentication.
Figure 55: Putty Configuration – SSH Authentication

Pulse Connect Secure Virtual Appliance on Microsoft Azure - Deployment Guide
© 2019 Pulse Secure, LLC. All rights reserved 55
System Operations
The Azure VA portal provides Start, Restart and Stop operations to control the Virtual Appliance connection.
Figure 56: System Operations
On the Azure portal top menu bar:
• Click Start to start a VM
• Click Stop to stop the VM
• Click Restart to restart the VM
The corresponding CLI commands are:
Start a VM
az vm start --resource-group myResourceGroup --name myVM
Stop a VM
az vm stop --resource-group myResourceGroup --name myVM
Restart a VM
az vm restart --resource-group myResourceGroup --name myVM
Network Configuration
IP Address Assignment for Internal, External and Management Interfaces
Each interface in Azure can have private and public IP addresses. Sample Azure Templates provided by Pulse
Connect Secure creates the Pulse Connect Secure Virtual Appliance with public and private IP addresses for
external and management interfaces and only private IP address for internal interface. More details about IP
address types on Azure can be seen at: https://docs.microsoft.com/en-us/azure/virtual-network/virtual-network-
ip-addresses-overview-arm
IP Addressing Modes
When Pulse Connect Secure gets deployed by using the sample templates provided by Pulse Secure, Pulse
Connect Secure comes up with multiple interfaces. If you take an example of a template “pulsesecure-pcs-3-
nics.zip” provided by Pulse Secure, you notice the following things.

Pulse Connect Secure Virtual Appliance on Microsoft Azure - Deployment Guide
© 2019 Pulse Secure, LLC. All rights reserved 56
PCS external interface and PCS management interface are having both Public and Private IP addresses. In the
below code snippet, observe the network interface getting created with two IP addresses - private IP address
and public IP address. Highlighted section points to private IP allocation method and Public IP address getting
assigned to NIC.
1. "type": "Microsoft.Network/networkInterfaces",
2. "name": "[variables('pcsExtNic')]",
3. ---------------
4. ---------------
5. "properties": {
6. "privateIPAllocationMethod": "Dynamic",
7. "privateIPAddressVersion": "IPv4",
8. "publicIPAddress": {
9. "id": "[resourceId('Microsoft.Network/publicIPAddresses',variables('publicIPAddr1'))]"
},
If you want to have control on the IP assigned to Network Interface, then you need to change the attribute
“privateIPAllocationMethod” from “Dynamic” to “Static”. Also, you need to add an attribute called
“privateIPAddress” which holds the static IP address. When you are assigning static IP address, make sure that it
is not in the reserved IP category.
1. "ipConfigurations": [{
2. "name": "ipconfig2",
3. "properties": {
4. "privateIPAllocationMethod": "Static",
5. "privateIPAddressVersion": "IPv4",
6. "privateIPAddress": "[variables('privateIPExternal')]",
7. }
8. }]
Modifying Network Parameters After Deployment
Since Networking Infrastructure is provided by Azure, a PCS admin cannot change Networking configuration
after deployment. Hence, both admin UI and ssh does not support changing network configuration.
Controlling the Selection of Internal, External and Management Interfaces
Sample Azure Template, provided by Pulse Secure, requests Azure fabric to create three Network Interfaces.
While running this template, Azure fabric creates interfaces named eth0, eth1 and eth2 and attaches them to
PCS Virtual Interface.
So, the question is, among eth0, eth1 and eth2 which network interface will become external, internal or
management interface? Below table answers this question.
Interface Name PCS Interface
eth0 internal interface
eth1 external interface
eth2 management interface
Then, question is how you can control the order of network interfaces named eth0, eth1 and eth2 created
through Azure Template?. Azure supports two types of interfaces: primary and secondary. Only one primary
interface can be present on a VM.

Pulse Connect Secure Virtual Appliance on Microsoft Azure - Deployment Guide
© 2019 Pulse Secure, LLC. All rights reserved 57
For more details of primary and secondary interface, see https://docs.microsoft.com/en-us/azure/virtual-
network/virtual-network-network-interface-addresses.
The Pulse Connect Secure Virtual Appliance is qualified with internal interface as primary and other two are
secondary. In the following code snippet, three network interfaces get assigned to VM. These three NICs with ID
“nic1”, “nic2” and “nic3” are internally mapped to ‘eth0’, ‘eth1’, and ‘eth2’ respectively.
1. "networkProfile": {
2. "networkInterfaces": [{
3. "id": “nic1”,
4. "properties": {
5. "primary": true
6. }
7. }, {
8. "id": “nic2”,
9. "properties": {
10. "primary": false
11. }
12. }, {
13. "id": “nic3”,
14. "properties": {
15. "primary": false
16. }
17. }]
18. },
PCS converts eth0 to int0, eth1 to ext0 and eth2 to mgmt0. This means, the network interface with ID nic1 will be
internal interface, nic2 will be external interface and nic3 will be management interface.
The below table depicts this scenario well:
Interface Name PCS Interface Network ID
eth0 internal interface (int0) nic1
eth1 external interface (ext0) nic2
eth2 management interface (mgmt0) nic3
Suppose if you make ‘nic2’ as primary, then the order may not be maintained, and it is difficult to predict which
interface will become internal interface of PCS. As a best practice, always assign ‘primary’ to the first network
interface which will become internal interface of PCS.
Decommissioning Pulse Connect Secure
When deploying Pulse Connect Secure, if you have selected the option “Use existing resource group”, then follow
the steps mentioned in the section Delete Pulse Connect Secure and Resource It Uses, but not the Other
Resources in Resource Group. Else if you have selected the option “New resource group” then follow the steps
mentioned in the section Delete Entire Resource Group that the Pulse Connect Secure Is In.
Delete Entire Resource Group that the Pulse Connect Secure Is In
1. Log into Azure portal.
2. Navigate to Resource Groups.
3. Click on the resource group where Pulse Connect Secure is in.
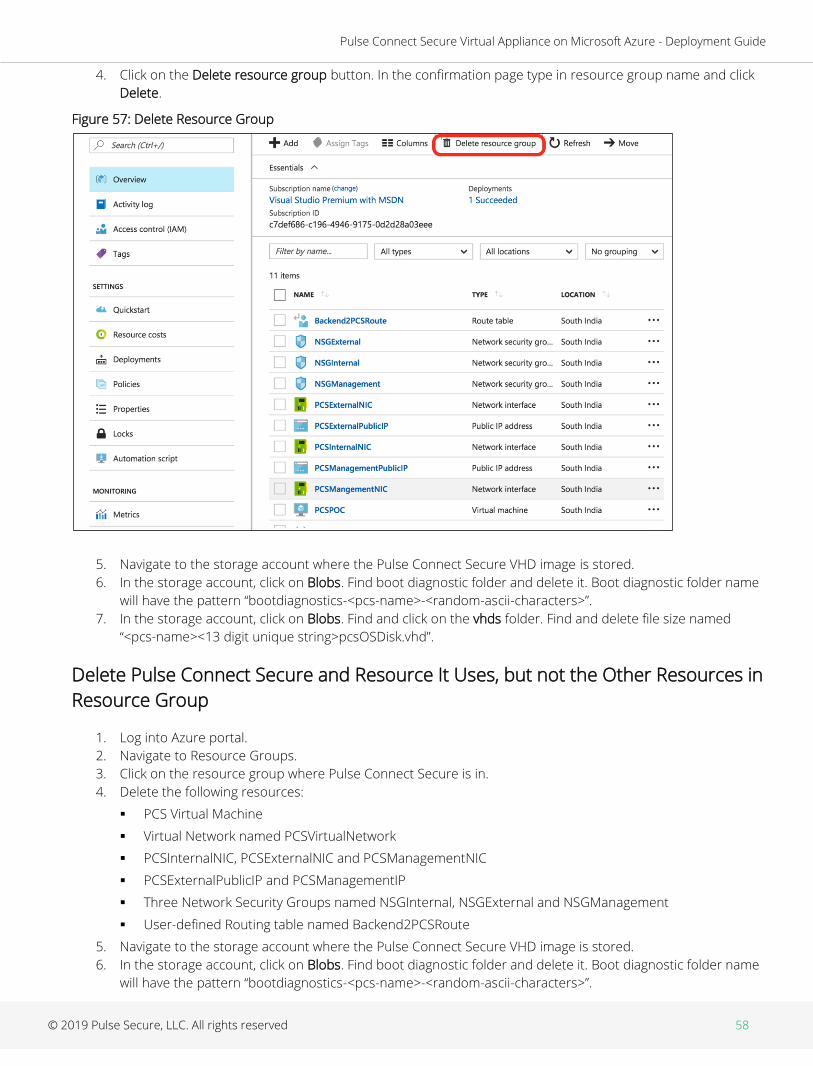
Pulse Connect Secure Virtual Appliance on Microsoft Azure - Deployment Guide
© 2019 Pulse Secure, LLC. All rights reserved 58
4. Click on the Delete resource group button. In the confirmation page type in resource group name and click
Delete.
Figure 57: Delete Resource Group
5. Navigate to the storage account where the Pulse Connect Secure VHD image is stored.
6. In the storage account, click on Blobs. Find boot diagnostic folder and delete it. Boot diagnostic folder name
will have the pattern “bootdiagnostics-<pcs-name>-<random-ascii-characters>”.
7. In the storage account, click on Blobs. Find and click on the vhds folder. Find and delete file size named
“<pcs-name><13 digit unique string>pcsOSDisk.vhd”.
Delete Pulse Connect Secure and Resource It Uses, but not the Other Resources in
Resource Group
1. Log into Azure portal.
2. Navigate to Resource Groups.
3. Click on the resource group where Pulse Connect Secure is in.
4. Delete the following resources:
▪ PCS Virtual Machine
▪ Virtual Network named PCSVirtualNetwork
▪ PCSInternalNIC, PCSExternalNIC and PCSManagementNIC
▪ PCSExternalPublicIP and PCSManagementIP
▪ Three Network Security Groups named NSGInternal, NSGExternal and NSGManagement
▪ User-defined Routing table named Backend2PCSRoute
5. Navigate to the storage account where the Pulse Connect Secure VHD image is stored.
6. In the storage account, click on Blobs. Find boot diagnostic folder and delete it. Boot diagnostic folder name
will have the pattern “bootdiagnostics-<pcs-name>-<random-ascii-characters>”.

Pulse Connect Secure Virtual Appliance on Microsoft Azure - Deployment Guide
© 2019 Pulse Secure, LLC. All rights reserved 59
7. In the storage account, click on Blobs. Find and click on the vhds folder. Find and delete file size named
“<pcs-name><13-digit unique string>pcsOSDisk.vhd”.
Pricing
The cost of running this product is combination of License cost and Azure infrastructure cost. It will be very
difficult to find out Azure infrastructure cost for this product as it may vary with Regions/Country/Time. Hence, it
is recommended to use “Azure Calculator”, which is available online, to calculate the cost of running this product.
Here are resources that are created during deployment.
Resources Category Chargeable
PCS VM (Standard_DS3_V2) Compute Yes
Virtual Network with four subnets Networking No
Three NIC cards named PCSInternalNIC,
PCSExternalNIC and PCSManagementNIC
Networking No
Two static Public IPs name PCSExternalPublicIP
and PCSManagementIP
Networking Yes
Three Network Security Groups named
NSGInternal, NSGExternal and
NSGManagement.
Networking No
User Defined Routing table named
Backend2PCSRoute
Networking No
Boot diagnostic file under existing storage
account (Less than 5MB)
Storage Yes
File size of 40GB in the existing storage
account under Blobs and container VHDs
named “<pcs-name><13 digit unique
string>pcsOSDisk.vhd”
Storage Yes
Limitations
The following list of Pulse Connect Secure features are not supported in this release:
• VLAN tagging
• IPv6 capabilities
• Layer 3 Tunnel IP pool assignment via DHCP
• Layer 2 functionality like ARP Cache and ND Cache
• Deployment of Pulse Connect Secure as license server on Azure
• Virtual Ports
• Multicast capabilities
• Bandwidth management

Pulse Connect Secure Virtual Appliance on Microsoft Azure - Deployment Guide
© 2019 Pulse Secure, LLC. All rights reserved 60
Not Qualified
The following list of Pulse Connect Secure features are not qualified in this release:
• Pulse Connect Secure and Pulse One interaction
• Pulse Connect Secure and PWS interaction
• IF-MAP support
Troubleshooting
Pulse Connect Secure emits booting logs at a specified storage. You can check the storage details of the boot
diagnostic logs as shown below:
Figure 58: Boot Diagnostics

Pulse Connect Secure Virtual Appliance on Microsoft Azure - Deployment Guide
© 2019 Pulse Secure, LLC. All rights reserved 61
Frequently Asked Questions
This section provides solution for the frequently asked questions.
FAQ1: I am unable to connect to my backend resources through L3 VPN
Solution: The solution describes the configuration required in the Azure Virtual Network and PCS to connect to
the On-premise network through the L3 VPN connection.
The following network topology shows two networks, Azure Virtual Network and On-premise network, with Site-
to-Site connectivity between them.
Figure 59: Pulse Connect Secure on Microsoft Azure
Before proceeding with the configuration, prepare a configuration checklist that will be handy during the
configuration.
Azure Virtual Network Resource group name: OnPremRG
Virtual Network name: VirtualNetwork
Virtual Network address space: 10.250.0.0/16
Subnets:
Subnet1: 10.250.0.0/24
Subnet2: 10.250.1.0/24
Subnet3: 10.250.2.0/24
Subnet4: 10.250.3.0/24
.
.
.
.
Subnet10: 10.250.10.0/24
Subnet11: 10.250.11.0/24
Subnet12: 10.250.12.0/24
Subnet13: 10.250.13.0/24
PCS Internal interface connected to Subnet10 (10.250.10.0/24)
PCS External interface connected to Subnet11 (10.250.11.0/24)
PCS Management interface connected to Subnet12 (10.250.12.0/24)
PCS VPN pool connected to Subnet13 (10.250.13.0/24)

Pulse Connect Secure Virtual Appliance on Microsoft Azure - Deployment Guide
© 2019 Pulse Secure, LLC. All rights reserved 62
CentOS system IP address: 10.250.0.4 connected to Subnet1 (10.250.0.0)
Public IP address: 104.211.245.193
VPN Pool address space: 10.250.13.0/24
On-premise network On-premise Network address space: 10.170.0.0/23
AD Server IP address: 10.170.0.5
The Azure Vnet with address space 10.250.0.0/16 has four subnets - Subnet10 to Subnet12 - connected to PCS’s
Internal, External and Management interfaces respectively, and Subnet13 connected to PCS VPN pool.
The CentOS system is connected to Subnet1.
Figure 60: Virtual Network in a Resource Group (OnPremRG)
Figure 61: Subnets in the Virtual Network

Pulse Connect Secure Virtual Appliance on Microsoft Azure - Deployment Guide
© 2019 Pulse Secure, LLC. All rights reserved 63
Log in to PCS admin console and configure the VPN tunneling connection profile. The VPN pool has the range
10.250.13.10 to 10.250.13.20 in subnet13.
Figure 62: VPN Tunneling Connection Profile
Create a user for this VPN tunnel policy and define the role mapping rule.
Figure 63: Use Role Mapping
Testing the Connection to CentOS System
1. Note down the public IP address / FQDN of PCS’s External interface.
Figure 64: Public IP of PCS External Interface

Pulse Connect Secure Virtual Appliance on Microsoft Azure - Deployment Guide
© 2019 Pulse Secure, LLC. All rights reserved 64
2. From client, connect to PCS.
Figure 65: Client Connection
3. Once connected, on the CentOS system run tcpdump to capture the icmp traffic. And from the client
system, ping to CentOS system.
Figure 66: tcpdump and ping responses
The following is observed:
▪ The CentOS system shows echo request and echo reply messages.
▪ The ICMP request is from 10.250.13.10, which is the tunnel IP.
▪ The client system shows the “Request timed out” messages.
▪ The packet is sent out from the CentOS system, but it is not forwarded to the PCS Internal interface.

Pulse Connect Secure Virtual Appliance on Microsoft Azure - Deployment Guide
© 2019 Pulse Secure, LLC. All rights reserved 65
The solution is to add a route that forwards any packet in the tunnel IP address range 10.150.13.0/24 to
PCS Internal interface. And associate the route to subnet (Subnet1) connected to the CentOS system.
Figure 67: Route Table
Figure 68: Subnet Association
Wait for some time and observe that the packets are transmitted successfully.
Figure 69: Successful Packets Transmission
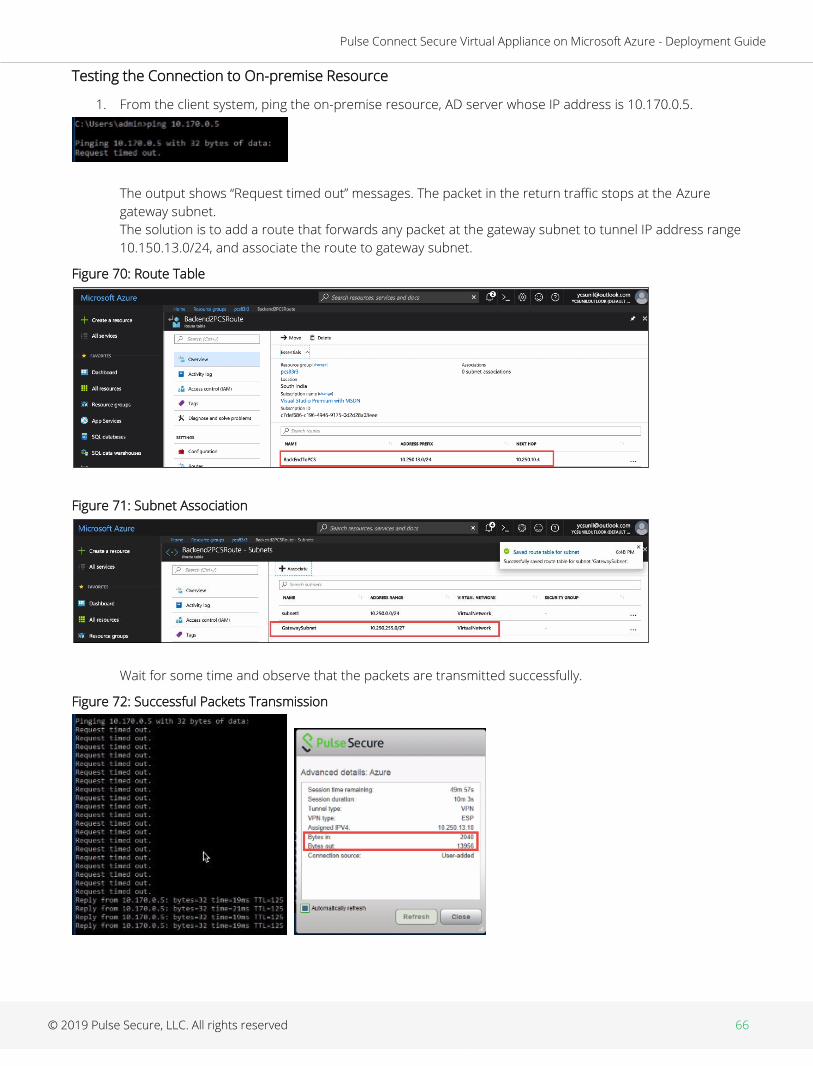
Pulse Connect Secure Virtual Appliance on Microsoft Azure - Deployment Guide
© 2019 Pulse Secure, LLC. All rights reserved 66
Testing the Connection to On-premise Resource
1. From the client system, ping the on-premise resource, AD server whose IP address is 10.170.0.5.
The output shows “Request timed out” messages. The packet in the return traffic stops at the Azure
gateway subnet.
The solution is to add a route that forwards any packet at the gateway subnet to tunnel IP address range
10.150.13.0/24, and associate the route to gateway subnet.
Figure 70: Route Table
Figure 71: Subnet Association
Wait for some time and observe that the packets are transmitted successfully.
Figure 72: Successful Packets Transmission

Pulse Connect Secure Virtual Appliance on Microsoft Azure - Deployment Guide
© 2019 Pulse Secure, LLC. All rights reserved 67
FAQ2: Users are unable to access internet resources when connected to a VPN
tunnel on an Azure-based PCS
Cause: When end user launches Pulse Client, connects to PCS in Azure and tries to access internet, PCS
forwards the received packets (src ip: tunnel-ip, dest-ip: internet) through its internal interface. These packets
reach Azure hidden Network Load Balancing (NLB). Azure hidden NLB drops these packets because it sees there
is no NIC in the VNET with source IP as tunnel IP, the src-ip of the packet coming out of PCS is ‘Client tunnel IP’.
Solution:
Option 1: Create a custom route to forward internet traffic to Virtual Network gateway instead of default Azure
hidden NLB. This solution might increase cost, as IPSEC channel between Azure and Data Center is used for
internet traffic as well. More information on how to modify the default internet route can be found here
https://docs.microsoft.com/en-us/azure/virtual-network/virtual-networks-udr-overview#default-route
Option 2: In Azure, add a NAT device and route outgoing PCS packets to NAT.

Pulse Connect Secure Virtual Appliance on Microsoft Azure - Deployment Guide
© 2019 Pulse Secure, LLC. All rights reserved 68
Appendix A: Network Security Group (NSG)
Microsoft Azure has a limitation where virtual machine with multiple network interfaces cannot connect to
different Virtual Networks (VNETs). For example, a VM with two NIC cards, NIC1 and NIC2, will not be able to
connect to Vnet1 and Vnet2 respectively.
Figure 73: Virtual Machine with two NIC cards Connecting to VNet1 and Vnet2
Microsoft Azure supports a virtual machine with multiple NICs to connect to different Subnets under a same
Virtual Network. For example, a VM with two NICs, NIC1 and NIC2, can connect to ‘Subnet1’ and ‘Subnet2’ where
these subnets exist under a same Virtual Network respectively.
Figure 74: Virtual Machine with two NICs Connecting to Subnet1 and Subnet2
Azure provides isolation between different Vnets. But it does not provide the same kind of isolation when it
comes to subnets in the same Vnet. For example, consider a Vnet has two subnets, Subnet1 and Subnet2. And
consider two VMs, VM-1 and VM-2, which are connected to Subnet1 and Subnet2 respectively. In this scenario
VM-1 can access the resources from VM-2 and vice versa.
Figure 75: Virtual Machine VM-1 can Access Resources in VM-2 and Vice Versa

Pulse Connect Secure Virtual Appliance on Microsoft Azure - Deployment Guide
© 2019 Pulse Secure, LLC. All rights reserved 69
Application isolation is an important concern in enterprise environments, as enterprise customers seek to
protect various environments from unauthorized or unwanted access. To achieve the traffic isolation between
subnets, go for an option of filtering traffic using “Network Security Group” provided by Azure.
Figure 76: Traffic Filtering by MS Azure Network Support Group
Pulse Connect Secure, when provisioned through the ARM template provided by Pulse Secure, creates four
subnets under a virtual network named “PCSVirtualNetwork”. The four Subnets are:
1. PCSInternalSubnet
2. PCSExternalSubnet
3. PCSManagementSubnet
4. PCSTunnelVPNPoolSubnet
Along with above mentioned subnets, create the following three Network Security Groups (NSG) policies:
1. NSGExternalSubnet
2. NSGInternalSubnet
3. NSGManagementSubnet
Figure 77: NSG External, Internal and Management Subnets
In Network Security Group (NSG) we need to create policies for Inbound and outbound traffic.
1. The list of NSG Inbound/Outbound rules created “NSGExternalSubnet” are:

Pulse Connect Secure Virtual Appliance on Microsoft Azure - Deployment Guide
© 2019 Pulse Secure, LLC. All rights reserved 70
Figure 78: NSG External - Inbound Rules
Figure 79: NSG External - Outbound Rules
2. The list of NSG Inbound/Outbound rules created “NSGInternalSubnet” are:
Figure 80: NSG Internal - Inbound Rules

Pulse Connect Secure Virtual Appliance on Microsoft Azure - Deployment Guide
© 2019 Pulse Secure, LLC. All rights reserved 71
Figure 81: NSG Internal - Outbound Rules
3. The list of NSG Inbound/Outbound rules created “NSGManagementSubnet” are:
Figure 82: NSG Management - Inbound Rules
Figure 83: NSG Management - Outbound Rules

Pulse Connect Secure Virtual Appliance on Microsoft Azure - Deployment Guide
© 2019 Pulse Secure, LLC. All rights reserved 72
Appendix B: Pulse Connect Secure Resource Manager
Template
Pulse Secure provides sample Azure template files to deploy the Pulse Connect Secure Virtual Appliance on
Azure. Users can modify this to make it suitable for their need. Visit https://www.pulsesecure.net and download
the pulsesecure-pcs-3-nics.zip file, and unzip it to get azuredeploy.json.
This template creates a new PCS with 3 NICs, Vnet, four subnets, NSG policies attached to PCS internal, external
and management subnets and user-defined routes on the PCS internal subnet to ensure PCS is used as default
gateway for L3 tunnel. All 3 NICs of PCS are configured with dynamic IP configuration and enabled IP forwarding.
Public IPs are attached to the PCS external and management NIC.
The template has following sections:
parameters This section defines the parameters used for deploying PCS on Azure. It contains
parameter name, its default value and the mouse-over help text that is displayed when
mouse is placed over the parameter in Azure Web portal. The parameters defined here are
displayed in the Custom Deployment page of Azure portal.
variables This section defines variables that will be used in the functions defined in the resources
section.
resources This section defines resource types that are deployed or updated in a resource group.
outputs This section defines the public IP address and FQDN returned after successful deployment
of PCS on Azure.
parameters
Figure 84: Custom Deployment

Pulse Connect Secure Virtual Appliance on Microsoft Azure - Deployment Guide
© 2019 Pulse Secure, LLC. All rights reserved 73
PCS Storage Account Name: This is the name of the PCS Storage Account where the PCS Azure vhd image is
stored.
PCS Storage Account Resource Group Name: The is the name of the PCS Storage Account Resource Group
where the PCS Azure vhd image is stored.
PCS Image Location URI: The is the URL to the location where PCS Azure vhd image is stored.
PCS VM Name: This is the name given to PCS Virtual Appliance.
SSH Public Key: This is an RSA public key that is used to access Pulse Connect Secure via SSH.
PCS Config: This section contains provisioning parameters that are required during the deployment of a Virtual
Appliance. An XML-based configuration file can be present in another Virtual Machine in Azure cloud or in the
corporate network which is accessible for Pulse Connect Secure through site-to-site VPN between Azure and the
corporate data center.
Pulse Connect Secure accepts the following parameters as provisioning parameters:
• primary-dns
• secondary-dns
• wins-server
• dns-domain
• username
• ssh-publickey
• cert-common-name
• cert-random-text

Pulse Connect Secure Virtual Appliance on Microsoft Azure - Deployment Guide
© 2019 Pulse Secure, LLC. All rights reserved 74
• cert-organization
• config-download-url
• config-data
• auth-code-license
• enable-license-server
• accept-license-agreement
• enable-rest
For details about these parameters, see Pulse Connect Secure Provisioning Parameters.
DNS Label Prefix Ext: This is the prefix for External Interface DNS label.
DNS Label Prefix Mgmt: This is the prefix for Management Interface DNS label.
VNet Address Space: This is a Virtual Network address space.
Internal Subnet: Subnet from which Pulse Connect Secure Internal Interface needs to lease IP.
External Subnet: Subnet from which Pulse Connect Secure External Interface needs to lease IP.

Pulse Connect Secure Virtual Appliance on Microsoft Azure - Deployment Guide
© 2019 Pulse Secure, LLC. All rights reserved 75
Management Subnet: Subnet from which Pulse Connect Secure Management Interface needs to lease IP.
Tunnel Subnet: Subnet which will be configured as Tunnel IP pool in Pulse Connect Secure VPN profile.
variables
PCS Virtual Network: This is the variable associated with the PCS Virtual Network.
PCS Internal Subnet: This is the variable associated with the Subnet from which Pulse Connect Secure Internal
Interface needs to lease IP.
PCS External Subnet: This is the variable associated with the Subnet from which Pulse Connect Secure External
Interface needs to lease IP
PCS Management Subnet: This is the variable associated with the Subnet from which Pulse Connect Secure
Management Interface needs to lease IP.
PCS Tunnel VPN Pools Subnet: This is the variable associated with the Subnet which will be configured as Tunnel
IP pool in Pulse Connect Secure VPN Profile.
Backend to PCS Route: This creates route table for accessing the backend resources in Pulse Connect Secure
Internal Interface.
PCS Internal Private IP: This is the private IP address of the Internal IP.
PCS Internal NIC: This is network interface card of PCS Internal network.
PCS External NIC: This is network interface card of PCS External network.
PCS Management NIC: This is network interface card of PCS Management network.

Pulse Connect Secure Virtual Appliance on Microsoft Azure - Deployment Guide
© 2019 Pulse Secure, LLC. All rights reserved 76
PCS External Public IP: This is public IP address assigned to PCS External Subnet.
PCS Management Public IP: This is public IP address assigned to PCS Management Subnet.
Public IP Address Type: This variable is defined as static IP.
NSG Internal Subnet: This variable defines Network Security Group’s Internal Subnet policy.
NSG External Subnet: This variable defines Network Security Group’s External Subnet policy.
NSG Management Subnet: This variable defines Network Security Group’s Management Subnet policy.
VM Name: This variable defines PCS Virtual Machine name.
VM Size: This variable defines PCS Virtual Machine size. It is 4 cores, 144MB memory.
Virtual Network ID: This variable defines PCS Virtual Network name.
API Version
resources
publicIPAddresses/publicIPAddr1: This block is responsible for creating public IP address which is static in
nature. This is used for external interface IP address of PCS.
publicIPAddresses/publicIPAddr2: This block is responsible for creating public IP address which is static in
nature. This is used for management interface IP address of PCS.
virtualNetworks/pcvnetname: This block is responsible for creating PCS Virtual Network name. The creation of

Pulse Connect Secure Virtual Appliance on Microsoft Azure - Deployment Guide
© 2019 Pulse Secure, LLC. All rights reserved 77
PCS Virtual Network name depends on:
• Backend to PCS route
• NSG Internal Subnet
• NSG External Subnet
• NSG Management Subnet
virtualNetworks/pcsVnetIntSubnet: This block is responsible for creating subnet. The created subnet is applied
to PCS Internal interface.
virtualNetworks/pcsVnetExtSubnet: This block is responsible for creating subnet. The created subnet is applied
to PCS External interface.
virtualNetworks/pcsVnetMgmtSubnet: This block is responsible for creating subnet. The created subnet is
applied to PCS Management interface.
virtualNetworks/pcsVnetTunnelPool: This block is responsible for creating tunnel pool. The created tunnel pool is
applied to PCS Tunnel Pool.
routeTables/routeTableName: This block is responsible for creating route table. The created route table is used
for accessing the backend resources in PCS Internal interface.
networkInterfaces/pcsExtNic: This block is responsible for creating network interface. The created network
interface is applied to network interface card of PCS External interface. The creation of this network interface
depends on:
• PCS Virtual Network name
• Public IP address of External Subnet
networkInterfaces/pcsMgmtNic: This block is responsible for creating network interface. The created network
interface is applied to network interface card of PCS Management interface. The creation of this network
interface depends on:
• PCS Virtual Network name
• Public IP address of Management Subnet
networkInterfaces/pcsIntNic: This block is responsible for creating network interface. The created network
interface is applied to network interface card of PCS Internal interface. The creation of this network interface
depends on:

Pulse Connect Secure Virtual Appliance on Microsoft Azure - Deployment Guide
© 2019 Pulse Secure, LLC. All rights reserved 78
• PCS Virtual Network name
virtualMachines/PCSVmName: This block is responsible for creating Virtual Machine name. The created Virtual
machine name is applied to PCS Virtual Machine. The creation of PCS Virtual Machine name depends on:
• Network Interface Card of PCS Internal interface
• Network Interface Card of PCS External interface
• Network Interface Card of PCS Management interface
networkSecurityGroups/nsgExt: This block is responsible for creating policy. The created policy is applied to
Network Security Group’s External interface.
The following security rules can be defined:
• allowHTTPS
• allowHTTP
• allowPTP
• allowESP
• allowIKEv2
• denyAll
• denyInternalSubnet
• denyManagementSubnet
• denyPoolRange
networkSecurityGroups/nsgMgmt: This block is responsible for creating policy. The created policy is applied to
Network Security Group’s Management interface.
The following security rules can be defined:
• allowHTTPS
• allowHTTP
• allowCustomSSH
• allowDMI
• denyAll
• denyInternalSubnet
• denyExternalSubnet
networkSecurityGroups/nsgInt: This block is responsible for creating policy. The created policy is applied to
Network Security Group’s Internal interface.

Pulse Connect Secure Virtual Appliance on Microsoft Azure - Deployment Guide
© 2019 Pulse Secure, LLC. All rights reserved 79
The following security rules can be defined:
• denyExternalSubnet
• allow-custom-ssh
outputs
The outputs section defines the public IP address and FQDN that is displayed on successful deployment of PCS
on Azure.

Pulse Connect Secure Virtual Appliance on Microsoft Azure - Deployment Guide
© 2019 Pulse Secure, LLC. All rights reserved 80
Appendix C: Pulse Connect Secure Resource Manager
Template for an Existing Virtual Network
Pulse Secure provides sample Azure template files to deploy Pulse Connect Secure Virtual Appliance on Azure.
Users can modify this to make it suitable for their need. Visit https://www.pulsesecure.net and download the
pulsesecure-pcs-3-nics.zip file, and unzip it to get azuredeploy.json.
This template creates a new PCS with 3 NICs, Vnet, four subnets, NSG policies attached to PCS internal, external
and management subnets and user-defined routes on the PCS internal subnet to ensure PCS is used as default
gateway for L3 tunnel. All 3 NICs of PCS are configured with dynamic IP configuration and enabled IP forwarding.
Public IPs are attached to the PCS external and management NIC.
The template has following sections:
parameters This section defines the parameters used for deploying PCS on Azure. It contains
parameter name, its default value and the mouse-over help text that is displayed when
mouse is placed over the parameter in Azure Web portal. The parameters defined here are
displayed in the Custom Deployment page of Azure portal.
variables This section defines variables that will be used in the functions defined in the resources
section.
resources This section defines resource types that are deployed or updated in a resource group.
outputs This section defines the public IP address and FQDN returned after successful deployment
of PCS on Azure.
parameters
Figure 85: Custom Deployment
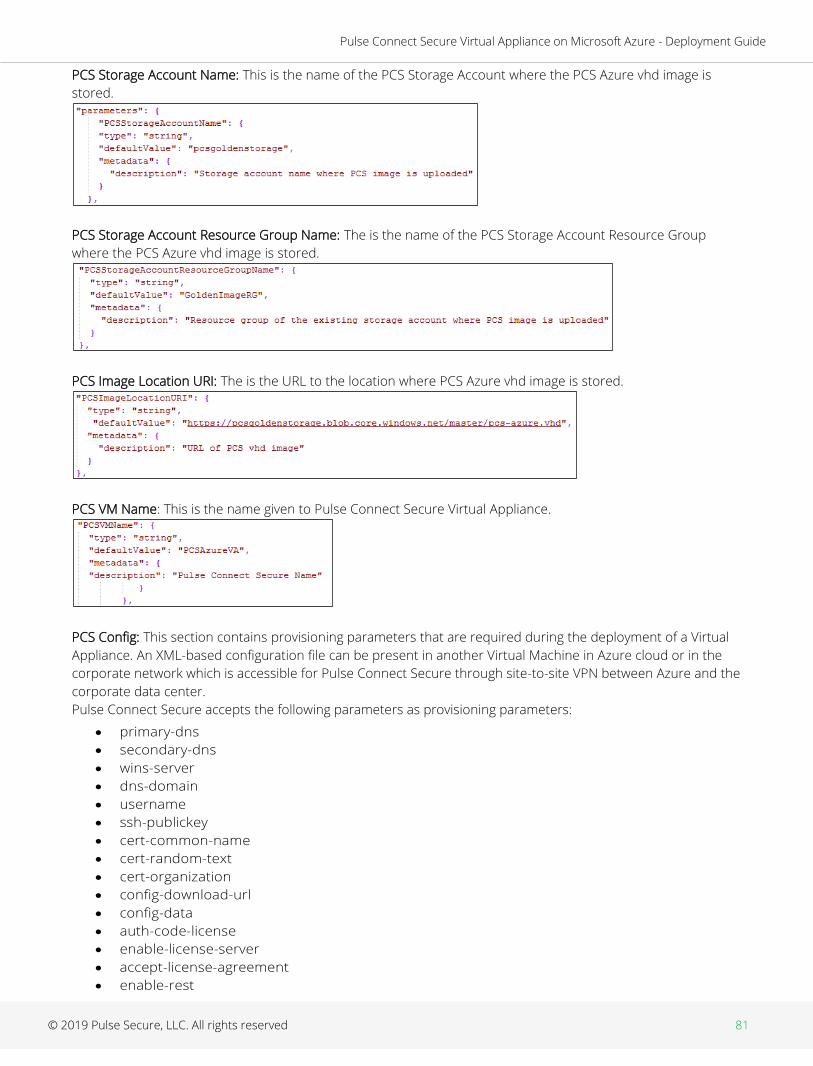
Pulse Connect Secure Virtual Appliance on Microsoft Azure - Deployment Guide
© 2019 Pulse Secure, LLC. All rights reserved 81
PCS Storage Account Name: This is the name of the PCS Storage Account where the PCS Azure vhd image is
stored.
PCS Storage Account Resource Group Name: The is the name of the PCS Storage Account Resource Group
where the PCS Azure vhd image is stored.
PCS Image Location URI: The is the URL to the location where PCS Azure vhd image is stored.
PCS VM Name: This is the name given to Pulse Connect Secure Virtual Appliance.
PCS Config: This section contains provisioning parameters that are required during the deployment of a Virtual
Appliance. An XML-based configuration file can be present in another Virtual Machine in Azure cloud or in the
corporate network which is accessible for Pulse Connect Secure through site-to-site VPN between Azure and the
corporate data center.
Pulse Connect Secure accepts the following parameters as provisioning parameters:
• primary-dns
• secondary-dns
• wins-server
• dns-domain
• username
• ssh-publickey
• cert-common-name
• cert-random-text
• cert-organization
• config-download-url
• config-data
• auth-code-license
• enable-license-server
• accept-license-agreement
• enable-rest
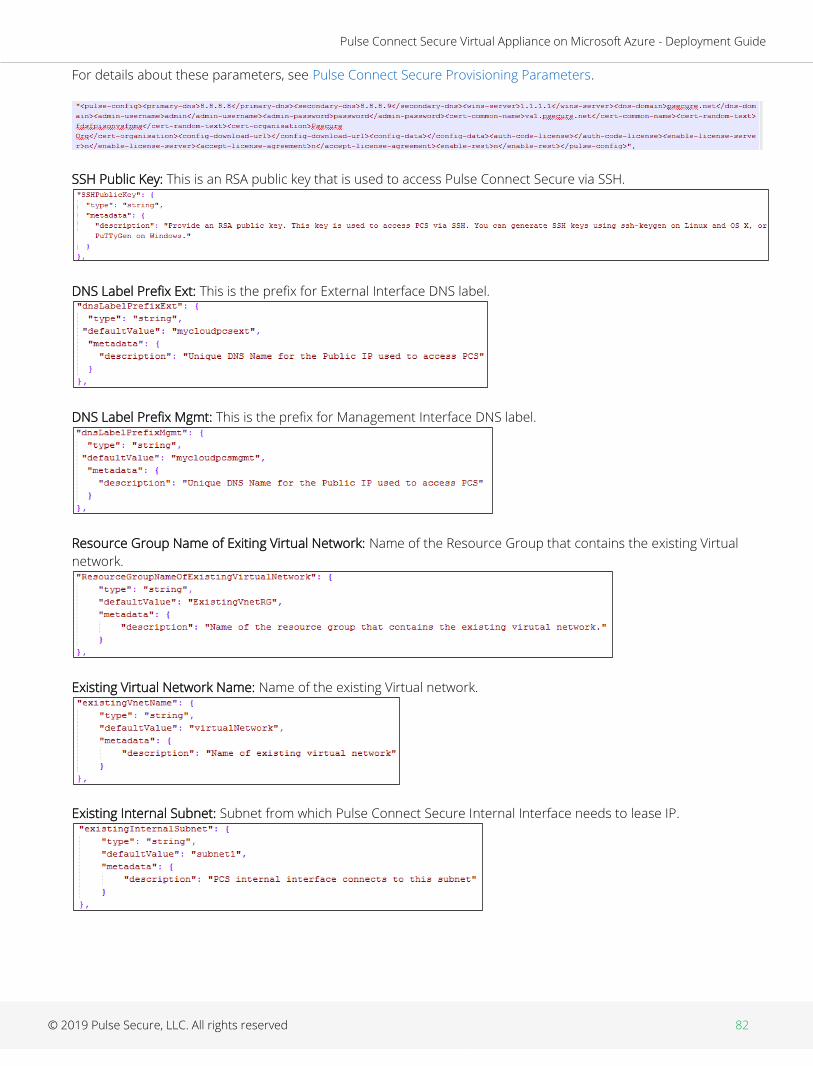
Pulse Connect Secure Virtual Appliance on Microsoft Azure - Deployment Guide
© 2019 Pulse Secure, LLC. All rights reserved 82
For details about these parameters, see Pulse Connect Secure Provisioning Parameters.
SSH Public Key: This is an RSA public key that is used to access Pulse Connect Secure via SSH.
DNS Label Prefix Ext: This is the prefix for External Interface DNS label.
DNS Label Prefix Mgmt: This is the prefix for Management Interface DNS label.
Resource Group Name of Exiting Virtual Network: Name of the Resource Group that contains the existing Virtual
network.
Existing Virtual Network Name: Name of the existing Virtual network.
Existing Internal Subnet: Subnet from which Pulse Connect Secure Internal Interface needs to lease IP.
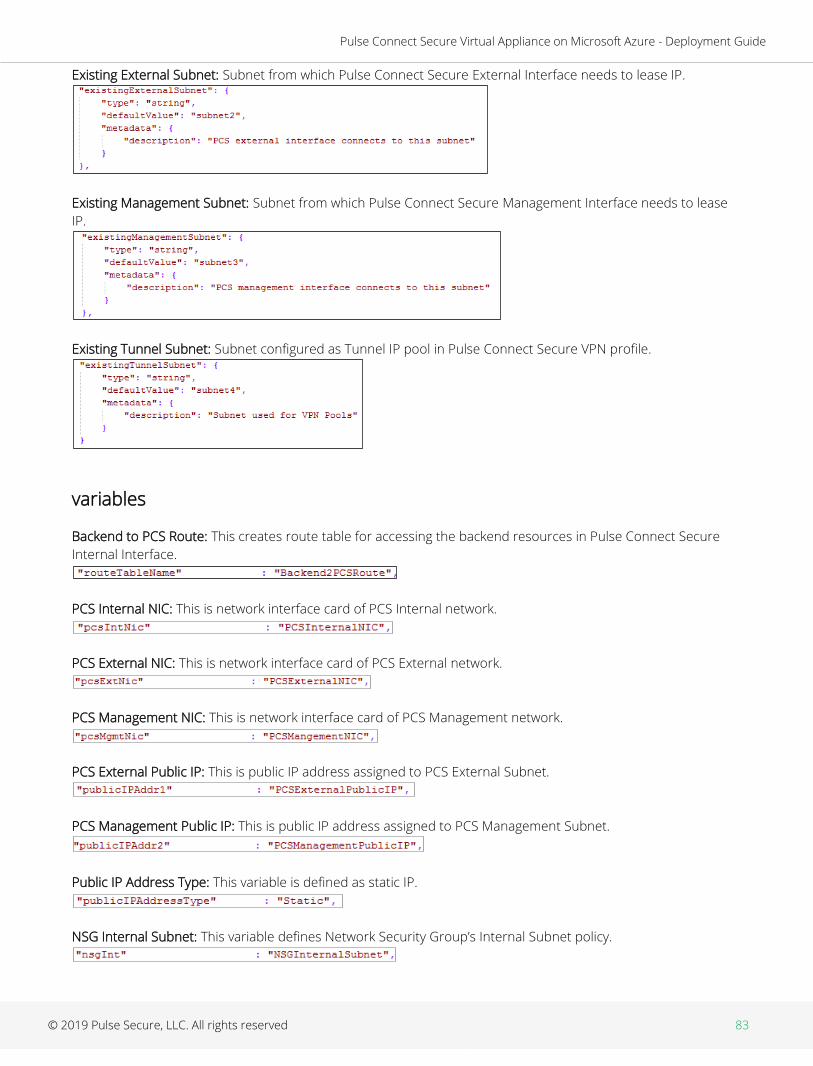
Pulse Connect Secure Virtual Appliance on Microsoft Azure - Deployment Guide
© 2019 Pulse Secure, LLC. All rights reserved 83
Existing External Subnet: Subnet from which Pulse Connect Secure External Interface needs to lease IP.
Existing Management Subnet: Subnet from which Pulse Connect Secure Management Interface needs to lease
IP.
Existing Tunnel Subnet: Subnet configured as Tunnel IP pool in Pulse Connect Secure VPN profile.
variables
Backend to PCS Route: This creates route table for accessing the backend resources in Pulse Connect Secure
Internal Interface.
PCS Internal NIC: This is network interface card of PCS Internal network.
PCS External NIC: This is network interface card of PCS External network.
PCS Management NIC: This is network interface card of PCS Management network.
PCS External Public IP: This is public IP address assigned to PCS External Subnet.
PCS Management Public IP: This is public IP address assigned to PCS Management Subnet.
Public IP Address Type: This variable is defined as static IP.
NSG Internal Subnet: This variable defines Network Security Group’s Internal Subnet policy.

Pulse Connect Secure Virtual Appliance on Microsoft Azure - Deployment Guide
© 2019 Pulse Secure, LLC. All rights reserved 84
NSG External Subnet: This variable defines Network Security Group’s External Subnet policy.
NSG Management Subnet: This variable defines Network Security Group’s Management Subnet policy.
VM Size: This variable defines PCS Virtual Machine size. It is 4 cores, 144MB memory.
Virtual Network ID: This variable defines PCS Virtual Network name.
API Version
resources
publicIPAddresses/publicIPAddr1: This block is responsible for creating public IP address which is static in
nature. This is used for external interface IP address of PCS.
publicIPAddresses/publicIPAddr2: This block is responsible for creating public IP address which is static in
nature. This is used for management interface IP address of PCS.
networkSecurityGroups/nsgExt: This block is responsible for creating policy. The created policy is applied to
Network Security Group’s External interface.
The following security rules can be defined:
• allowHTTPS
• allowHTTP
• allowPTP
• allowESP
• allowIKEv2
• denyAll
• denyInternalSubnet
• denyManagementSubnet

Pulse Connect Secure Virtual Appliance on Microsoft Azure - Deployment Guide
© 2019 Pulse Secure, LLC. All rights reserved 85
• denyPoolRange
networkSecurityGroups/nsgMgmt: This block is responsible for creating policy. The created policy is applied to
Network Security Group’s Management interface.
The following security rules can be defined:
• allowHTTPS
• allowHTTP
• allowCustomSSH
• allowDMI
• denyAll
• denyInternalSubnet
• denyExternalSubnet
networkSecurityGroups/nsgInt: This block is responsible for creating policy. The created policy is applied to
Network Security Group’s Internal interface.
The following security rules can be defined:
• denyExternalSubnet
• allow-custom-ssh
routeTables/routeTableName: This block is responsible for creating route table. The created route table is used
for accessing the backend resources in PCS Internal interface.
networkInterfaces/pcsExtNic: This block is responsible for creating network interface. The created network
interface is applied to network interface card of PCS External interface. The creation of this network interface
depends on:
• PCS Virtual Network name
• Public IP address of External Subnet
networkInterfaces/pcsMgmtNic: This block is responsible for creating network interface. The created network
interface is applied to network interface card of PCS Management interface. The creation of this network
interface depends on:
• PCS Virtual Network name
• Public IP address of Management Subnet
networkInterfaces/pcsIntNic: This block is responsible for creating network interface. The created network
interface is applied to network interface card of PCS Internal interface. The creation of this network interface

Pulse Connect Secure Virtual Appliance on Microsoft Azure - Deployment Guide
© 2019 Pulse Secure, LLC. All rights reserved 86
depends on:
• PCS Virtual Network name
virtualMachines/PCSVmName: This block is responsible for creating Virtual Machine name. The created Virtual
machine name is applied to PCS Virtual Machine. The creation of PCS Virtual Machine name depends on:
• Network Interface Card of PCS Internal interface
• Network Interface Card of PCS External interface
• Network Interface Card of PCS Management interface
outputs
The outputs section defines the public IP address and FQDN that is displayed on successful deployment of PCS
on Azure.

Pulse Connect Secure Virtual Appliance on Microsoft Azure - Deployment Guide
© 2019 Pulse Secure, LLC. All rights reserved 87
References
Microsoft Azure documentation: https://docs.microsoft.com/en-us/azure/
Requesting Technical Support
Technical product support is available through the Pulse Secure Global Support Center (PSGSC). If you have a
support contract, then file a ticket with PSGSC.
• Product warranties—for product warranty information, visit https://www.pulsesecure.net.