pulse connect secure virtual appliance on amazon web services€¦ · pulse connect secure virtual...
TRANSCRIPT

`
Pulse Connect Secure
Virtual Appliance on
Amazon Web Services Deployment Guide
Release 9.0R1
Release 9.0R1
Document Revision 1.2
Published Date June 2018

Pulse Connect Secure Virtual Appliance on Amazon Web Services - Deployment Guide
© 2018 Pulse Secure, LLC. All rights reserved 2
Pulse Secure, LLC
2700 Zanker Road,
Suite 200 San Jose
CA 95134
https://www.pulsesecure.net
Pulse Secure and the Pulse Secure logo are trademarks of Pulse Secure, LLC in the United States. All other
trademarks, service marks, registered trademarks, or registered service marks are the property of their
respective owners.
Pulse Secure, LLC assumes no responsibility for any inaccuracies in this document. Pulse Secure, LLC reserves
the right to change, modify, transfer, or otherwise revise this publication without notice.
Products made or sold by Pulse Secure or components thereof might be covered by one or more of the
following patents that are owned by or licensed to Pulse Secure: U.S. Patent Nos. 5,473,599, 5,905,725,
5,909,440, 6,192,051, 6,333,650, 6,359,479, 6,406,312, 6,429,706, 6,459,579, 6,493,347, 6,538,518, 6,538,899,
6,552,918, 6,567,902, 6,578,186, and 6,590,785.
Pulse Connect Secure Virtual Appliance on Amazon Web Services - Deployment Guide
The information in this document is current as of the date on the title page.
END USER LICENSE AGREEMENT
The Pulse Secure product that is the subject of this technical documentation consists of (or is intended for use
with) Pulse Secure software. Use of such software is subject to the terms and conditions of the End User License
Agreement (“EULA”) posted at https://www.pulsesecure.net. By downloading, installing or using such software,
you agree to the terms and conditions of that EULA.

Pulse Connect Secure Virtual Appliance on Amazon Web Services - Deployment Guide
© 2018 Pulse Secure, LLC. All rights reserved 3
Table of Contents
Overview ................................................................................................................................................................................................7
About This Guide ..........................................................................................................................................................................7
Assumptions ..................................................................................................................................................................................7
Prerequisites and System Requirements .......................................................................................................................................7
Pulse Connect Secure on Amazon Web Services .................................................................................................................8
Supported Platform Systems .....................................................................................................................................................8
Steps to Deploy Pulse Connect Secure on AWS ...........................................................................................................................8
Registering the AMI ......................................................................................................................................................................9
Prerequisites................................................................................................................................................................................................9
Deploying Pulse Connect Secure on AWS using AWS Portal .....................................................................................................10
Deploying PCS on New Virtual Private Cloud .........................................................................................................................10
Deployment on VM with Three NIC Cards ............................................................................................................................................10
Deployment on VM with Two NIC Cards ...............................................................................................................................................12
Deploying PCS on an Existing Virtual Private Cloud .............................................................................................................14
Deployment on VM with Three NIC Cards ............................................................................................................................................14
Deployment on VM with Two NIC Cards ...............................................................................................................................................16
Deploying PCS as a License Server ..........................................................................................................................................18
Deploying PCS Active-Active Cluster using Virtual Traffic Manager in AWS ....................................................................19
Deploying Two PCS EC2 instances Using CloudFormation Template ............................................................................................20
Forming the Active-Active Cluster ...........................................................................................................................................................20
Deploying Virtual Traffic Manager EC2 Instance in the External Subnet of PCS in AWS ...........................................................21
Setting Up and Configuring vTM for External Users ..........................................................................................................................22
Pulse Connect Secure Provisioning Parameters ..........................................................................................................................26
Provisioning Pulse Connect Secure with Predefined Configuration ........................................................................................27
Configuring Licenses on the Pulse Connect Secure Appliance .................................................................................................28
Pulse License Server in Corporate Network ..........................................................................................................................28
Pulse License Server in Cloud Network ..................................................................................................................................28
Adding Authentication Code in PCS Admin Console ..........................................................................................................................29
Including Authentication Code in CloudFormation Template ..........................................................................................................29
Accessing the Pulse Connect Secure Virtual Appliance as an Administrator ........................................................................30
Accessing the Pulse Connect Secure Virtual Appliance as an End User .................................................................................30
Accessing the Pulse Connect Secure Virtual Appliance using SSH Console ..........................................................................31
On Linux and Mac OSX..............................................................................................................................................................................31
On Windows ................................................................................................................................................................................................31
System Operations ..............................................................................................................................................................................33
Network Configuration .......................................................................................................................................................................33
IP Address Assignment for Internal, External and Management Interfaces ...................................................................33
IP Addressing Modes ...................................................................................................................................................................33
Modifying Network Parameters After Deployment ..............................................................................................................33
Controlling the Selection of Internal, External and Management Interfaces .................................................................34
Decommissioning Pulse Connect Secure ......................................................................................................................................35
Pulse Connect Secure Virtual Appliance on Amazon Web Services - Deployment Guide
© 2018 Pulse Secure, LLC. All rights reserved 4
Pricing .....................................................................................................................................................................................................35
Limitations .............................................................................................................................................................................................35
Troubleshooting ...................................................................................................................................................................................36
Frequently Asked Questions .............................................................................................................................................................37
FAQ1: Packets transmitted from PCS Internal Interface are getting dropped by AWS Virtual Gateway in L3 traffic. .........37
Appendix A: Security Group (SG) ......................................................................................................................................................40
Appendix B: Pulse Connect Secure CloudFormation Template ...............................................................................................44
Parameters ....................................................................................................................................................................................44
Resources .......................................................................................................................................................................................46
Outputs ...........................................................................................................................................................................................48
Appendix C: Pulse Connect Secure CloudFormation Template for an Existing Virtual Private Cloud .............................49
Parameters ....................................................................................................................................................................................49
Resources .......................................................................................................................................................................................51
Outputs ...........................................................................................................................................................................................52
References .............................................................................................................................................................................................53
Requesting Technical Support ..........................................................................................................................................................53

Pulse Connect Secure Virtual Appliance on Amazon Web Services - Deployment Guide
© 2018 Pulse Secure, LLC. All rights reserved 5
List of Figures
Figure 1: Pulse Connect Secure on AWS ........................................................................................................................................8
Figure 2: Create New Stack ................................................................................................................................................................10
Figure 3: Upload Template ................................................................................................................................................................11
Figure 4: Specify Details for New Virtual Private Cloud ...............................................................................................................11
Figure 5: New VPC ................................................................................................................................................................................12
Figure 6: Create New Stack ................................................................................................................................................................12
Figure 7: Upload Template ................................................................................................................................................................13
Figure 8: Specify Details for New Virtual Private Cloud ...............................................................................................................13
Figure 9: New VPC ................................................................................................................................................................................14
Figure 10: Create New Stack .............................................................................................................................................................14
Figure 11: Upload Template ..............................................................................................................................................................15
Figure 12: Specify Details for Existing Virtual Private Cloud ......................................................................................................15
Figure 13: Create New Stack .............................................................................................................................................................16
Figure 14: Upload Template ..............................................................................................................................................................16
Figure 15: Specify Details for Existing Virtual Private Cloud ......................................................................................................17
Figure 16: Create New Stack .............................................................................................................................................................18
Figure 17: Upload Template ..............................................................................................................................................................18
Figure 18: Specify Details for Existing Virtual Private Cloud ......................................................................................................19
Figure 19: Deploying PCS A-A Cluster Topology Diagram ..........................................................................................................19
Figure 20: PCS A-A Cluster Status ....................................................................................................................................................20
Figure 21: AWS Marketplace > Pulse Secure vTM ........................................................................................................................21
Figure 22: vTM Editions Available in AWS Marketplace ...............................................................................................................21
Figure 23: 1-Click Launch Tab ...........................................................................................................................................................22
Figure 24: Pulse Secure vTM Login Page ........................................................................................................................................22
Figure 25: Create Traffic Pool ............................................................................................................................................................23
Figure 26: SSL and UDP Pools ..........................................................................................................................................................23
Figure 27: Session Persistency Class ...............................................................................................................................................24
Figure 28: Create Virtual Server........................................................................................................................................................24
Figure 29: Virtual Servers to Handle SSL and UDP Traffic ..........................................................................................................25
Figure 30: Pulse Secure vTM Home Page Showing Services and Event Logs ........................................................................25
Figure 31: Pulse Configuration Server in Corporate Network ...................................................................................................27
Figure 32: Pulse License Server in a Corporate Network ...........................................................................................................28
Figure 33: Pulse License Server in Cloud Network ......................................................................................................................28
Figure 34: Enter Authentication Code .............................................................................................................................................29
Figure 35: Accessing PCS Virtual Appliance ...................................................................................................................................30
Figure 36: Pulse External Interface ..................................................................................................................................................30
Figure 37: Resource in Corporate Network ...................................................................................................................................31
Figure 38: Putty Configuration – Basic Options ............................................................................................................................32

Pulse Connect Secure Virtual Appliance on Amazon Web Services - Deployment Guide
© 2018 Pulse Secure, LLC. All rights reserved 6
Figure 39: Putty Configuration – SSH Authentication ..................................................................................................................32
Figure 40: System Operations...........................................................................................................................................................33
Figure 41: Delete Stack .......................................................................................................................................................................35
Figure 42: Boot Diagnostics ...............................................................................................................................................................36
Figure 43: System Logs .......................................................................................................................................................................36
Figure 44: Topology diagram .............................................................................................................................................................37
Figure 45: Subnets ...............................................................................................................................................................................37
Figure 46: Route Table ........................................................................................................................................................................38
Figure 47: Routes .................................................................................................................................................................................38
Figure 48: Route Table ........................................................................................................................................................................39
Figure 49: Routes .................................................................................................................................................................................39
Figure 50: Virtual Machine with two NICs Connecting to VPC1 and VPC2 .............................................................................40
Figure 51: Virtual Machine with two NICs Connecting to Subnet1 and Subnet2..................................................................40
Figure 52: Virtual Machine VM-1 can Access Resources in VM-2 and Vice Versa.................................................................40
Figure 53: Traffic Filtering by AWS Support Group ......................................................................................................................41
Figure 54: SG External, Internal and Management Subnets......................................................................................................41
Figure 55: Stack-PCSvExtSG - Inbound Rules ................................................................................................................................42
Figure 56: Stack-PCSvExtSG - Outbound Rules.............................................................................................................................42
Figure 57: Stack-PCSvIntSG - Inbound Rules .................................................................................................................................42
Figure 58: Stack-PCSvIntSG - Outbound Rules .............................................................................................................................43
Figure 59: Stack-PCSvMgmtSG - Inbound Rules ...........................................................................................................................43
Figure 60: Stack-PCSvMgmtSG - Outbound Rules .......................................................................................................................43
Pulse Connect Secure Virtual Appliance on Amazon Web Services - Deployment Guide
© 2018 Pulse Secure, LLC. All rights reserved 7
Overview
About This Guide
This guide helps in deploying the Pulse Connect Secure Virtual Appliance on Amazon Web Services (AWS). In this
release, Pulse Connect Secure is not made available in AWS Market Place. Instead, a Pulse Connect Secure
administrator needs to manually upload the Pulse Connect Secure Virtual Appliance image (AMI) into AWS
storage account. Once the AMI package is available in the AWS storage account, the Pulse Connect Secure
administrator can deploy Pulse Connect Secure on AWS in the cloud.
Assumptions
The basic understanding of deployment models of Pulse Connect Secure on a data center and basic experience
in using AWS is needed for the better understanding of this guide.
Prerequisites and System Requirements
To deploy the Pulse Connect Secure Virtual Appliance on AWS, you need the following:
• An AWS account
• Access to the AWS portal (https://console.aws.amazon.com/)*
• Pulse Connect Secure Virtual Appliance Image (.ami file)
• AWS CloudFormation template
• Pulse Connect Secure licenses **
• Site-to-Site VPN between AWS and the corporate network (optional)
Note: This is needed only if the Pulse Connect Secure users need to access corporate resources.
• Pulse License Server (optional)**
o Located at corporate network, accessible through site-to-site VPN
• Pulse Connect Secure configuration in XML format (optional)
Note:
* Pulse Connect Secure Virtual Appliance can be deployed only through AWS CloudFormation style.
** In this release, Pulse Connect Secure Virtual Appliance, by default, has one evaluation license. This
release supports licensing with License server located at corporate network.
Pulse Connect Secure Virtual Appliance on Amazon Web Services - Deployment Guide
© 2018 Pulse Secure, LLC. All rights reserved 8
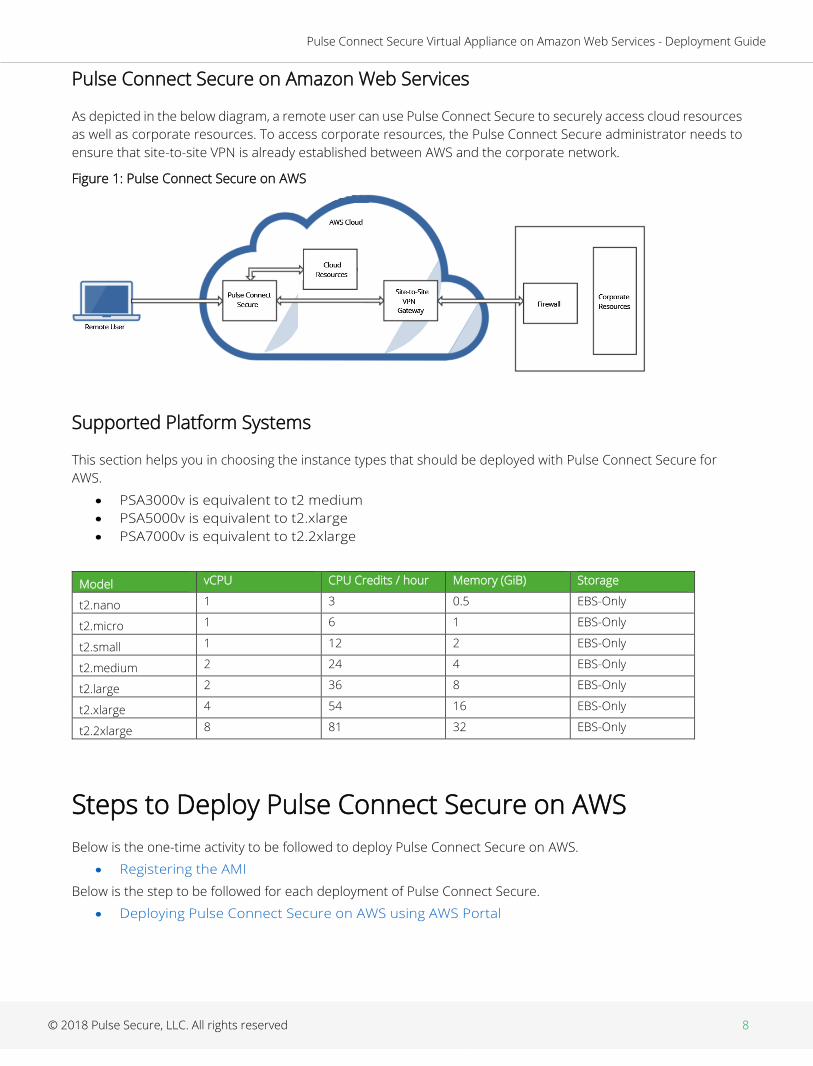
Pulse Connect Secure on Amazon Web Services
As depicted in the below diagram, a remote user can use Pulse Connect Secure to securely access cloud resources
as well as corporate resources. To access corporate resources, the Pulse Connect Secure administrator needs to
ensure that site-to-site VPN is already established between AWS and the corporate network.
Figure 1: Pulse Connect Secure on AWS
Supported Platform Systems
This section helps you in choosing the instance types that should be deployed with Pulse Connect Secure for
AWS.
• PSA3000v is equivalent to t2 medium
• PSA5000v is equivalent to t2.xlarge
• PSA7000v is equivalent to t2.2xlarge
Model vCPU CPU Credits / hour Memory (GiB) Storage
t2.nano 1 3 0.5 EBS-Only
t2.micro 1 6 1 EBS-Only
t2.small 1 12 2 EBS-Only
t2.medium 2 24 4 EBS-Only
t2.large 2 36 8 EBS-Only
t2.xlarge 4 54 16 EBS-Only
t2.2xlarge 8 81 32 EBS-Only
Steps to Deploy Pulse Connect Secure on AWS
Below is the one-time activity to be followed to deploy Pulse Connect Secure on AWS.
• Registering the AMI
Below is the step to be followed for each deployment of Pulse Connect Secure.
• Deploying Pulse Connect Secure on AWS using AWS Portal

Pulse Connect Secure Virtual Appliance on Amazon Web Services - Deployment Guide
© 2018 Pulse Secure, LLC. All rights reserved 9
Registering the AMI
This section describes the steps to register the AMI.
Prerequisites
• AWS command line should be configured on the host.
• the image should be available locally on the host.
To register AMI, do the following:
1. Download PCS Xen image which is in zip format from Pulse support site and unzip the file.
2. Install AWS CLI on the client machine. For the software and installation details, refer the link
https://aws.amazon.com/cli/.
3. Copy PCS Xen image on the client machine.
4. Create Amazon S3 bucket and VM Import service role by following the procedures mentioned in
https://docs.aws.amazon.com/vm-import/latest/userguide/vmimport-image-import.html#vmimport-iam-
permissions
5. Upload the PCS Xen image to AWS S3 bucket by typing the following command:
aws s3 cp <image> s3://<bucket>/<folder>/<imagename>
where, bucket and folders are created in the desired S3 location.
6. Create a snapshot by doing the following:
a. Prepare a container json file by entering the details:
$ cat container.json
{
"Description": "fill-description",
"Format": "raw",
"UserBucket": {
"S3Bucket": "bucket-name-where-image-is-uploaded",
"S3Key": " path of image: <folder>/<imagename>"
}
}
b. After preparing container.json appropriately, run the following command:
aws ec2 import-snapshot --description “<description>" --disk-container file:container.json --region <your-ec2-
region>
This command will return a json file describing the status. Make a note of the “ImportTaskId” field from
the json output.
c. Monitor the progress by running the following command:
aws ec2 describe-import-snapshot-tasks --region <your-ec2-region> --import-task-ids <import-task-id>
Monitor the progress until the “status:Completed” message appears, and a snapshotId is added in the
json output. Make note of the “SnapshotId”.
7. Register an AMI from the snapshot by running the following command:
aws ec2 register-image --description “<description>" --architecture x86_64 --name <image-name> --block-device-
mappings DeviceName="/dev/xvda",Ebs={SnapshotId=<snapshot-id>} --virtualization-type hvm --root-device-name
"/dev/xvda" --region <your-ec2-region>
This completes AMI registration.

Pulse Connect Secure Virtual Appliance on Amazon Web Services - Deployment Guide
© 2018 Pulse Secure, LLC. All rights reserved 10
Deploying Pulse Connect Secure on AWS using AWS
Portal
Once the access to the AMI file and CloudFormation template is obtained as mentioned in the above section,
proceed with the Pulse Connect Secure deployment.
Pulse Connect Secure can be deployed:
• on a new Virtual Private Cloud or
• on an already existing Virtual Private Cloud
• as a license server
• using vTM as load balancer
Deploying PCS on New Virtual Private Cloud
This section describes PCS deployment with three NIC cards and two NIC cards.
Deployment on VM with Three NIC Cards
To deploy Pulse Connect Secure on AWS using the AWS portal, do the following:
1. Select AWS Services > CloudFormation and click Create new stack.
Figure 2: Create New Stack
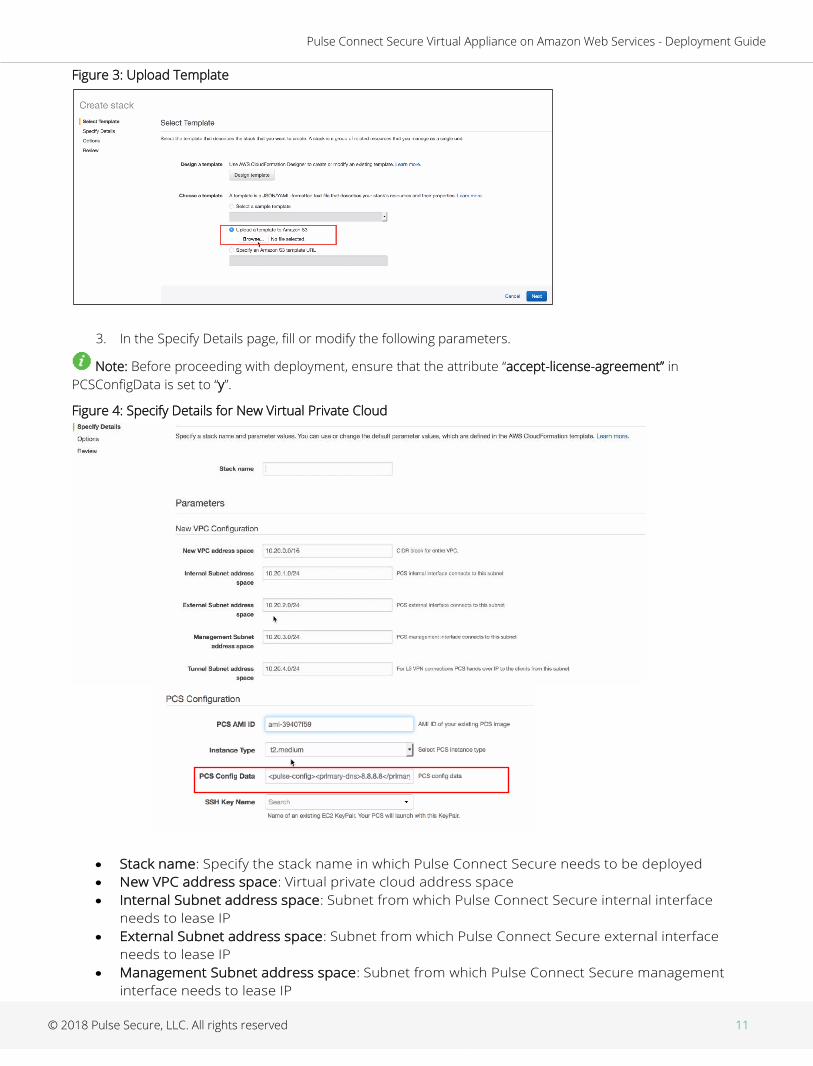
2. Select Upload a template to Amazon S3. Click Browse and select “pulsesecure-pcs-3-nics-new-network.json”
template file for the new VPC. Then click Next.
Pulse Connect Secure Virtual Appliance on Amazon Web Services - Deployment Guide
© 2018 Pulse Secure, LLC. All rights reserved 11
Figure 3: Upload Template
3. In the Specify Details page, fill or modify the following parameters.
Note: Before proceeding with deployment, ensure that the attribute “accept-license-agreement” in
PCSConfigData is set to “y”.
Figure 4: Specify Details for New Virtual Private Cloud
• Stack name: Specify the stack name in which Pulse Connect Secure needs to be deployed
• New VPC address space: Virtual private cloud address space
• Internal Subnet address space: Subnet from which Pulse Connect Secure internal interface
needs to lease IP
• External Subnet address space: Subnet from which Pulse Connect Secure external interface
needs to lease IP
• Management Subnet address space: Subnet from which Pulse Connect Secure management
interface needs to lease IP

Pulse Connect Secure Virtual Appliance on Amazon Web Services - Deployment Guide
© 2018 Pulse Secure, LLC. All rights reserved 12
• Tunnel Subnet address space: Subnet which will be configured as tunnel IP pool in the Pulse
Connect Secure VPN Profile
• PCS AMI ID: ID of the uploaded AMI file
• Instance Type: Size of the instance – t2.medium or t2.large
• PCS Config Data: Provisioning parameters in an XML format
• SSH Key Name: This key is used to access PCS via SSH. The SSH keys are generated using ssh-
keygen on Linux and OS X, or PuTTyGen on Windows. For details about generating the SSH key
pairs, refer http://docs.aws.amazon.com/AWSEC2/latest/UserGuide/ec2-key-pairs.html.
4. Review the specified details and click Create. Observe the deployed PCS in a few minutes.
Figure 5: New VPC
Deployment on VM with Two NIC Cards
To deploy Pulse Connect Secure on AWS using the AWS portal, do the following:
1. Select AWS Services > CloudFormation and click Create new stack.
Figure 6: Create New Stack

Pulse Connect Secure Virtual Appliance on Amazon Web Services - Deployment Guide
© 2018 Pulse Secure, LLC. All rights reserved 13
2. Select Upload a template to Amazon S3. Click Browse and select “pulsesecure-pcs-2-nics-new-network.json”
template file for the new VPC. Then click Next.
Figure 7: Upload Template
3. In the Specify Details page, fill or modify the following parameters.
Note: Before proceeding with deployment, ensure that the attribute “accept-license-agreement” in
PCSConfigData is set to “y”.
Figure 8: Specify Details for New Virtual Private Cloud
• Stack name: Specify the stack name in which Pulse Connect Secure needs to be deployed
• New VPC address space: Virtual private cloud address space
• Internal Subnet address space: Subnet from which Pulse Connect Secure internal interface
needs to lease IP
• External Subnet address space: Subnet from which Pulse Connect Secure external interface
needs to lease IP
• Tunnel Subnet address space: Subnet which will be configured as tunnel IP pool in the Pulse

Pulse Connect Secure Virtual Appliance on Amazon Web Services - Deployment Guide
© 2018 Pulse Secure, LLC. All rights reserved 14
Connect Secure VPN Profile
• PCS AMI ID: ID of the uploaded AMI file
• Instance Type: Size of the instance – t2.medium or t2.large
• PCS Config Data: Provisioning parameters in an XML format
• SSH Key Name: This key is used to access PCS via SSH. The SSH keys are generated using ssh-
keygen on Linux and OS X, or PuTTyGen on Windows. For details about generating the SSH key
pairs, refer http://docs.aws.amazon.com/AWSEC2/latest/UserGuide/ec2-key-pairs.html.
4. Review the specified details and click Create. Observe the deployed PCS in a few minutes.
Figure 9: New VPC
Deploying PCS on an Existing Virtual Private Cloud
This section describes PCS deployment with three NIC cards and two NIC cards.
Deployment on VM with Three NIC Cards
To deploy Pulse Connect Secure on AWS using the AWS portal, do the following:
1. Select AWS Services > CloudFormation and click Create new stack.
Figure 10: Create New Stack

Pulse Connect Secure Virtual Appliance on Amazon Web Services - Deployment Guide
© 2018 Pulse Secure, LLC. All rights reserved 15
2. Select Upload a template to Amazon S3. Click Browse and select “pulsesecure-pcs-3-nics-existing-vpc.json”
template file for existing VPC. Then click Next.
Figure 11: Upload Template
3. In the Specify Details page, fill or modify the following parameters.
Note: Before proceeding with deployment, ensure that the attribute “accept-license-agreement” in
PCSConfigData is set to “y”.
Figure 12: Specify Details for Existing Virtual Private Cloud
• Stack name: Specify the stack name in which Pulse Connect Secure needs to be deployed
• Existing VPC ID: Virtual private cloud ID
• Internal Subnet ID: Subnet from which Pulse Connect Secure internal interface needs to lease
IP
• External Subnet ID: Subnet from which Pulse Connect Secure external interface needs to lease
IP

Pulse Connect Secure Virtual Appliance on Amazon Web Services - Deployment Guide
© 2018 Pulse Secure, LLC. All rights reserved 16
• Management Subnet ID: Subnet from which Pulse Connect Secure management interface
needs to lease IP
• Tunnel Subnet ID: Subnet which will be configured as tunnel IP pool in the Pulse Connect
Secure VPN Profile
• PCS AMI ID: ID of the uploaded AMI file
• Instance Type: Size of the instance – t2.medium or t2.large
• PCS Config Data: Provisioning parameters in an XML format
• SSH Key Name: This key is used to access PCS via SSH. The SSH keys are generated using ssh-
keygen on Linux and OS X, or PuTTyGen on Windows. For details about generating the SSH key
pairs, refer http://docs.aws.amazon.com/AWSEC2/latest/UserGuide/ec2-key-pairs.html
4. Review the specified details and click Create. Observe the deployed PCS in a few minutes.
Deployment on VM with Two NIC Cards
To deploy Pulse Connect Secure on AWS using the AWS portal, do the following:
1. Select AWS Services > CloudFormation and click Create new stack.
Figure 13: Create New Stack
2. Select Upload a template to Amazon S3. Click Browse and select “pulsesecure-pcs-2-nics-existing-vpc.json”
template file for existing VPC. Then click Next.
Figure 14: Upload Template

Pulse Connect Secure Virtual Appliance on Amazon Web Services - Deployment Guide
© 2018 Pulse Secure, LLC. All rights reserved 17
3. In the Specify Details page, fill or modify the following parameters.
Note: Before proceeding with deployment, ensure that the attribute “accept-license-agreement” in
PCSConfigData is set to “y”.
Figure 15: Specify Details for Existing Virtual Private Cloud
• Stack name: Specify the stack name in which Pulse Connect Secure needs to be deployed
• Existing VPC ID: Virtual private cloud ID
• Internal Subnet ID: Subnet from which Pulse Connect Secure internal interface needs to lease
IP
• External Subnet ID: Subnet from which Pulse Connect Secure external interface needs to lease
IP
• Tunnel Subnet ID: Subnet which will be configured as tunnel IP pool in the Pulse Connect
Secure VPN Profile
• PCS AMI ID: ID of the uploaded AMI file
• Instance Type: Size of the instance – t2.medium or t2.large
• PCS Config Data: Provisioning parameters in an XML format
• SSH Key Name: This key is used to access PCS via SSH. The SSH keys are generated using ssh-
keygen on Linux and OS X, or PuTTyGen on Windows. For details about generating the SSH key
pairs, refer http://docs.aws.amazon.com/AWSEC2/latest/UserGuide/ec2-key-pairs.html
4. Review the specified details and click Create. Observe the deployed PCS in a few minutes.

Pulse Connect Secure Virtual Appliance on Amazon Web Services - Deployment Guide
© 2018 Pulse Secure, LLC. All rights reserved 18
Deploying PCS as a License Server
To deploy Pulse Connect Secure on AWS as a license server, do the following:
1. Select AWS Services > CloudFormation and click Create new stack.
Figure 16: Create New Stack
2. Select Upload a template to Amazon S3. Click Browse and select “pulsesecure-pcs-3-nics-existing-vpc.json”
template file for existing VPC. Then click Next.
Figure 17: Upload Template

Pulse Connect Secure Virtual Appliance on Amazon Web Services - Deployment Guide
© 2018 Pulse Secure, LLC. All rights reserved 19
3. In the Specify Details page, edit the PCS Config Data text box to enable PCS as license server by setting the
enable-license-server attribute to y as follows.
<enable-license-server>y</enable-license-server>
Figure 18: Specify Details for Existing Virtual Private Cloud
Deploying PCS Active-Active Cluster using Virtual Traffic Manager in AWS
This section describes deploying PCS A-A cluster with vTM load balancer in AWS.
Figure 19: Deploying PCS A-A Cluster Topology Diagram

Pulse Connect Secure Virtual Appliance on Amazon Web Services - Deployment Guide
© 2018 Pulse Secure, LLC. All rights reserved 20
The deployment process involves the following steps:
• Deploying Two PCS EC2 instances Using CloudFormation Template
• Forming the Active-Active Cluster
• Deploying Virtual Traffic Manager EC2 Instance in the External Subnet of PCS in AWS
• Setting Up and Configuring vTM for External Users
Deploying Two PCS EC2 instances Using CloudFormation Template
PCS can be deployed in AWS using CloudFormation template in a 3-armed model. Based on the need, deploy
two PCS instances using one of the following templates:
• pulsesecure-pcs-3-nics-new-network.json
• pulsesecure-pcs-3-nics-existing-vpc.json
Forming the Active-Active Cluster
Once the two PCS instances are initialized, form the Active-Active cluster between them. For details about
creating PCS clusters, refer to PCS Administration Guide published in the Pulse Secure Techpubs site.
Figure 20: PCS A-A Cluster Status

Pulse Connect Secure Virtual Appliance on Amazon Web Services - Deployment Guide
© 2018 Pulse Secure, LLC. All rights reserved 21
Deploying Virtual Traffic Manager EC2 Instance in the External Subnet of PCS in AWS
Virtual Traffic Manager can be deployed through either AWS Marketplace or AWS CLI.
To deploy through Marketplace, follow the below steps:
1. Search and select Pulse Secure vTM in AWS Marketplace.
Figure 21: AWS Marketplace > Pulse Secure vTM
2. Select the required vTM variant and AWS region, and click Continue.
Figure 22: vTM Editions Available in AWS Marketplace

Pulse Connect Secure Virtual Appliance on Amazon Web Services - Deployment Guide
© 2018 Pulse Secure, LLC. All rights reserved 22
3. Under the 1-Click Launch tab, update the following required details:
▪ EC2 instance type
▪ VPC setting
▪ Security group
In the VPC Settings tab, select the VPC and subnet matching PCS’s VPC and external subnet.
Figure 23: 1-Click Launch Tab
To deploy vTM though AWS CLI, follow the steps in the section “Creating a Traffic Manager Instance on Amazon
EC2” in Pulse Secure Virtual Traffic Manager: Cloud Services Installation and Getting Started Guide. Make sure
that vTM is deployed on the external network of PCS.
Setting Up and Configuring vTM for External Users
Once the vTM EC2 instance is deployed, set up the instance using the Initial Configuration wizard. For details,
refer Pulse Secure Virtual Traffic Manager: Cloud Services Installation and Getting Started Guide.
The Pulse Secure vTM Administrator login prompt appears.
Figure 24: Pulse Secure vTM Login Page

Pulse Connect Secure Virtual Appliance on Amazon Web Services - Deployment Guide
© 2018 Pulse Secure, LLC. All rights reserved 23
Next step is to set up the vTM for the external users using traffic pools and load balancing virtual servers. Traffic
pool is the group that will bind to virtual server for load balancing. In an Active-Active Cluster scenario, traffic
pool comprises cluster nodes. We need to create two separate traffic pools, each for SSL(L7) and ESP(L3) traffic
modes.
Create Service Pool
In the Services tab, select Pools and create new pool by adding external IPs of cluster nodes along with port
number. Also, select appropriate monitor from the drop-down options.
Complete these steps for SSL and UDP. For details, refer to the section “Creating PCS Pools” in Load Balancing
PCS with vTM Deployment Guide.
Figure 25: Create Traffic Pool
By default, they use Round Robin method of traffic distribution without any session persistency. Make a note of
protocol type and port numbers that has been used for this use case.
Figure 26: SSL and UDP Pools

Pulse Connect Secure Virtual Appliance on Amazon Web Services - Deployment Guide
© 2018 Pulse Secure, LLC. All rights reserved 24
Choose an IP-based Session Persistence Class
In the Services tab, select Pools. In the pool edit page, locate the Session Persistence section and enable the
Session Persistence class. Session persistency is required for ESP-based VPN tunnels.
Figure 27: Session Persistency Class
Create Virtual Servers
In the Services tab, select Virtual Servers and create a new virtual server by selecting protocol type and traffic
pools. You need to create separate virtual servers to handle both SSL and UDP traffic. Each virtual server
balances traffic across the pool of the same protocol type.
For details, refer to the section “Creating Virtual Server” in Load Balancing PCS with vTM Deployment Guide.
Figure 28: Create Virtual Server

Pulse Connect Secure Virtual Appliance on Amazon Web Services - Deployment Guide
© 2018 Pulse Secure, LLC. All rights reserved 25
Figure 29: Virtual Servers to Handle SSL and UDP Traffic
Once the configuration is complete, go to home page and verify the configurations.
Figure 30: Pulse Secure vTM Home Page Showing Services and Event Logs

Pulse Connect Secure Virtual Appliance on Amazon Web Services - Deployment Guide
© 2018 Pulse Secure, LLC. All rights reserved 26
Pulse Connect Secure Provisioning Parameters
Provisioning parameters are those parameters which are required during the deployment of a virtual appliance.
Pulse Connect Secure accepts the following parameters as provisioning parameters in the XML format.
<pulse-config>
<primary-dns><value></primary-dns>
<secondary-dns><value></secondary-dns>
<wins-server><value></wins-server>
<dns-domain><value></dns-domain>
<admin-username><value></admin-username>
<admin-password><value></admin-password>
<cert-common-name><value></cert-common-name>
<cert-random-text><value></cert-random-text>
<cert-organisation><value></cert-organisation>
<config-download-url><value></config-download-url>
<config-data><value></config-data>
<auth-code-license><value></auth-code-license>
<enable-license-server><value></enable-license-server>
<accept-license-agreement><value></accept-license-agreement >
<enable-rest><value></enable-rest>
</pulse-config>
The below table depicts the details of the xml file.
# Parameter Name Type Description
1 primary-dns IP address Primary DNS for Pulse Connect Secure
2 secondary-dns IP address Secondary DNS for Pulse Connect Secure
3 wins-server IP address Wins server for Pulse Connect Secure
4 dns-domain string DNS domain of Pulse Connect Secure
5 admin-username string admin UI user name
6 admin-password string admin UI password
7 cert-common-name string Common name for the self-signed certificate
generation. This certificate is used as the device
certificate of Pulse Connect Secure
Random text for the self-certificate generation
Organization name for the self-signed certificate
generation
8 cert-random-text string
9 cert-organization string
10 config-download-url String URL Http based URL where XML based Pulse Connect
Secure configuration can be found. During
provisioning, Pulse Connect Secure fetches this
file and comes up with preloaded configuration.
XML based configuration can be present in
another VM in AWS cloud or at corporate
network which is accessible for Pulse Connect
Secure through site to site VPN between AWS
and corporate data center
11 config-data string base64 encoded XML based Pulse Connect
Secure configuration
12 auth-code-license string Authentication code that needs to be obtained
from Pulse Secure
13 enable-license-
server
string If set to ‘y’, PCS will be deployed as a License
server.

Pulse Connect Secure Virtual Appliance on Amazon Web Services - Deployment Guide
© 2018 Pulse Secure, LLC. All rights reserved 27
If set to ‘n’, PCS will be deployed as a normal
server.
14 accept-license-
agreement
string This value is passed to the instance for
configuration at the boot time. By default, this
value is set to “n”. This value must be set to “y”.
15 enable-rest string If set to ‘y’, REST API access for the administrator
user is enabled.
Note: In the above list of parameters, primary dns, dns domain, admin username, admin password, cert-
random name, cert-random text, cert-organization and accept-license-agreement are mandatory
parameters. The other parameters are optional parameters.
Provisioning Pulse Connect Secure with Predefined
Configuration
The Pulse Connect Secure Virtual Appliance can be provisioned on AWS with a predefined Pulse Connect Secure
configuration. The provisioning can be done in the following two ways:
• Pulse Connect Secure administrator needs to provide the location of the XML-based
configuration as a provisioning parameter. Refer ‘Pulse Connect Secure Provisioning
Parameters’ for details about the Pulse Connect Secure specific provisioning parameters.
Pulse Connect Secure configuration can be kept on AWS or on a machine located in the corporate
network. If it is in the corporate network, the Pulse Connect Secure administrator needs to ensure that
site-to-site VPN between AWS to corporate network is already established so that Pulse Connect Secure
can access the machine located in the corporate network.
• Pulse Connect Secure administrator provides the configuration data encoded in the base64
encoded xml in the CloudFormation template.
Figure 31: Pulse Configuration Server in Corporate Network

Pulse Connect Secure Virtual Appliance on Amazon Web Services - Deployment Guide
© 2018 Pulse Secure, LLC. All rights reserved 28
Configuring Licenses on the Pulse Connect Secure
Appliance
In this release, evaluation licenses are provided. To add more licenses, the Pulse Connect Secure administrator
needs to leverage the Pulse License server.
The Pulse License server can be made available in the corporate network
Pulse License Server in Corporate Network
Figure 32: Pulse License Server in a Corporate Network
Pulse License Server in Cloud Network
In 8.3R3, the Pulse Connect Secure virtual machines (VM) are enabled to provision licenses through the Pulse
Cloud Licensing Service (PCLS). For this, administrator needs to obtain an Authentication code from Pulse Secure
Support and apply it in Download Licenses page of PCS admin console. The PCS also periodically sends
heartbeat messages to PCLS for auditing purposes.
The Authentication code can also be specified in the CloudFormation template. When PCS comes up, it
automatically fetches the Authentication code.
• Adding Authentication Code in PCS Admin Console
• Including Authentication Code in CloudFormation Template
Figure 33: Pulse License Server in Cloud Network
Pulse Connect Secure Virtual Appliance on Amazon Web Services - Deployment Guide
© 2018 Pulse Secure, LLC. All rights reserved 29
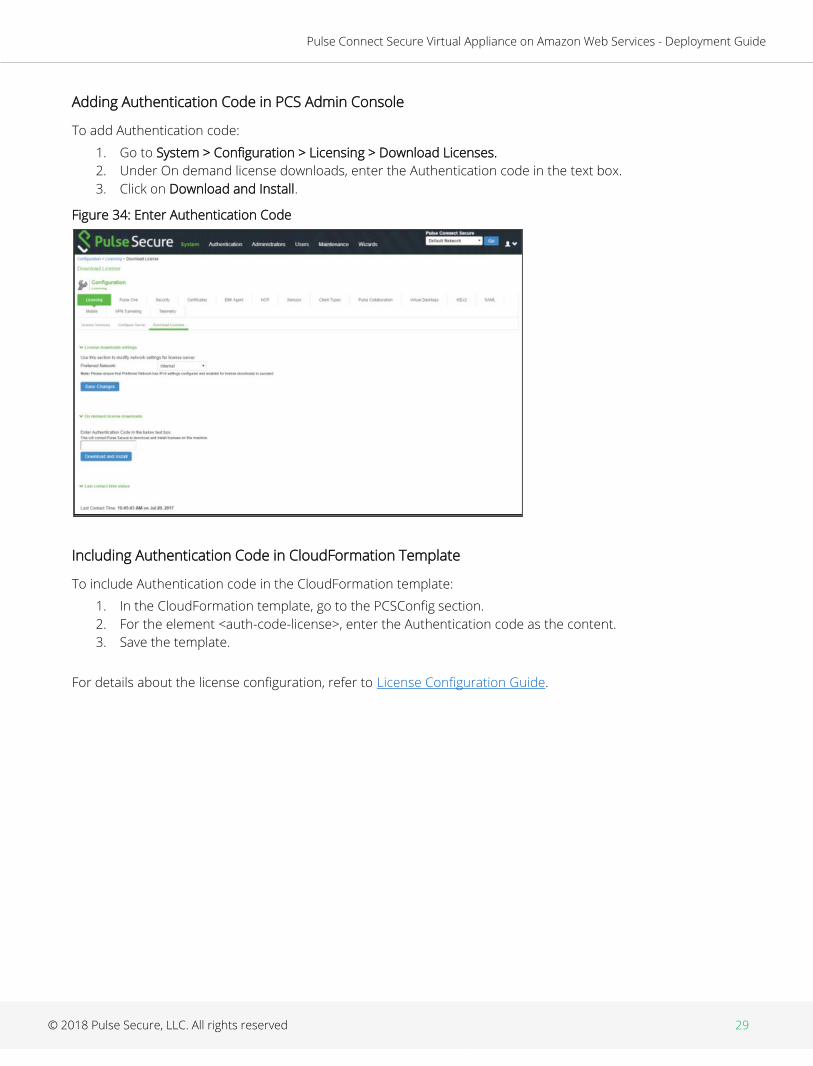
Adding Authentication Code in PCS Admin Console
To add Authentication code:
1. Go to System > Configuration > Licensing > Download Licenses.
2. Under On demand license downloads, enter the Authentication code in the text box.
3. Click on Download and Install.
Figure 34: Enter Authentication Code
Including Authentication Code in CloudFormation Template
To include Authentication code in the CloudFormation template:
1. In the CloudFormation template, go to the PCSConfig section.
2. For the element <auth-code-license>, enter the Authentication code as the content.
3. Save the template.
For details about the license configuration, refer to License Configuration Guide.

Pulse Connect Secure Virtual Appliance on Amazon Web Services - Deployment Guide
© 2018 Pulse Secure, LLC. All rights reserved 30
Accessing the Pulse Connect Secure Virtual Appliance
as an Administrator
In the AWS portal, navigate to CloudFormation section. Select the stack where PCS is deployed and then click on
the ‘Outputs’ tab. Note down the PCS management, internal and external address from the table as shown in
Figure 35.
Figure 35: Accessing PCS Virtual Appliance
Use the credentials provided in the provisioning parameters to log in as the administrator. The default PCS admin
UI user configured in the CloudFormation config file is: user ‘admin’ and password ‘password’.
The administrator can configure Active Directory located in the corporate network for user authentication. The
Pulse Connect Secure Virtual Appliance administrator can check troubleshooting tools provided in the Pulse
Connect Secure admin UI (System->Maintenance->Troubleshooting), to verify whether Pulse Connect Secure is
able to reach other cloud resources as well as corporate resources. For this, AWS network administrator needs to
ensure that all other resources have Pulse Connect Secure Internal interface as its default gateway.
Accessing the Pulse Connect Secure Virtual Appliance
as an End User
After successfully deploying PCS on AWS, go to the Outputs section and copy the Pulse External Interface details.
Figure 36: Pulse External Interface

Pulse Connect Secure Virtual Appliance on Amazon Web Services - Deployment Guide
© 2018 Pulse Secure, LLC. All rights reserved 31
Figure 37: Resource in Corporate Network
Accessing the Pulse Connect Secure Virtual Appliance
using SSH Console
To access the Pulse Connect Secure Virtual Appliance using the SSH console, copy the Public IP address from
the PCSManagementPublicIP resource.
On Linux and Mac OSX
Execute the following command:
ssh -i <rsa-public-key-file> <PCS-Management-Interface-PublicIP> -p 6667
On Windows
1. Launch the Putty terminal emulator.
2. In the Session category:
▪ Enter the host name or IP address.
▪ Enter the port number.
▪ Select the connection type as SSH.

Pulse Connect Secure Virtual Appliance on Amazon Web Services - Deployment Guide
© 2018 Pulse Secure, LLC. All rights reserved 32
Figure 38: Putty Configuration – Basic Options
3. Select Connection > SSH > Auth. Click Browse and select the private key file for authentication.
Figure 39: Putty Configuration – SSH Authentication

Pulse Connect Secure Virtual Appliance on Amazon Web Services - Deployment Guide
© 2018 Pulse Secure, LLC. All rights reserved 33
System Operations
The AWS portal provides Start, Restart Stop and Terminate operations to control the Virtual Appliance
connection.
Figure 40: System Operations
On the AWS portal, select AWS Services > Launch Instance. From the Actions menu, select Instance State.
• Click Start to start a VM
• Click Stop to stop the VM
• Click Restart to restart the VM
• Click Terminate to terminate the VM
Network Configuration
IP Address Assignment for Internal, External and Management Interfaces
Each interface in AWS can have private and public IP addresses. Sample CloudFormation Templates provided by
Pulse Connect Secure creates the Pulse Connect Secure Virtual Appliance with public and private IP addresses
for external and management interfaces and only private IP address for internal interface. More details about IP
address types on AWS can be seen at: https://docs.aws.amazon.com/AmazonVPC/latest/UserGuide/vpc-ip-
addressing.html
IP Addressing Modes
When Pulse Connect Secure gets deployed by using the sample templates provided by Pulse Secure, Pulse
Connect Secure comes up with multiple interfaces. If you take an example of a template “pulsesecure-pcs-3-
nics.zip” provided by Pulse Secure, you notice the following things.
PCS external interface and PCS management interface have both Elastic and Private IP addresses.
Modifying Network Parameters After Deployment
Since Networking Infrastructure is provided by AWS, a PCS admin cannot change Networking configuration after
deployment. Hence, both admin UI and ssh do not support changing network configuration.

Pulse Connect Secure Virtual Appliance on Amazon Web Services - Deployment Guide
© 2018 Pulse Secure, LLC. All rights reserved 34
Controlling the Selection of Internal, External and Management Interfaces
Sample CloudFormation template, provided by Pulse Secure, requests AWS fabric to create three Network
Interfaces. While running this template, AWS fabric creates interfaces named eth0, eth1 and eth2 and attaches
them to PCS Virtual Interface.
So, the question is, among eth0, eth1 and eth2 which network interface will become external, internal or
management interface? Below table answers this question.
Interface Name PCS Interface
eth0 internal interface
eth1 external interface
eth2 management interface
Then, question is how you can control the order of network interfaces named eth0, eth1 and eth2 created
through CloudFormation template?
The Pulse Connect Secure Virtual Appliance is qualified with internal interface as primary and other two are
secondary. In the following code snippet, three network interfaces get assigned to VM. These three NICs with ID
“nic1”, “nic2” and “nic3” are internally mapped to ‘eth0’, ‘eth1’, and ‘eth2’ respectively.
"EC2Instance": {
"Type": "AWS::EC2::Instance",
"Properties": {
"ImageId": {"Ref": "PCSImageAMIId"},
"KeyName": {"Ref": "KeyName"},
"InstanceType": {"Ref": "InstanceType"},
"NetworkInterfaces": [
{"NetworkInterfaceId": {"Ref": "Eth0"}, "DeviceIndex": "0"},
{"NetworkInterfaceId": {"Ref": "Eth1"}, "DeviceIndex": "1"},
{"NetworkInterfaceId": {"Ref": "Eth2"}, "DeviceIndex": "2"}
],
"Tags" : [
{"Key": "Name",
"Value": {"Fn::Join": [ "-", [ { "Ref": "AWS::StackName" }, "PCSvAWS" ] ] }
}
],
"UserData": {"Fn::Base64": {"Fn::Join": ["", [{"Ref": "PCSConfigData"}]]}}
}
},
PCS converts eth0 to int0, eth1 to ext0 and eth2 to mgmt0. This means, the network interface with ID nic1 will be
internal interface, nic2 will be external interface and nic3 will be management interface.
The below table depicts this scenario well:
Interface Name PCS Interface Network ID
eth0 internal interface nic1
eth1 external interface nic2
eth2 management interface nic3

Pulse Connect Secure Virtual Appliance on Amazon Web Services - Deployment Guide
© 2018 Pulse Secure, LLC. All rights reserved 35
Decommissioning Pulse Connect Secure
To decommission Pulse Connect Secure, perform the following steps:
1. Select AWS Services > CloudFormation.
2. Click Actions. From the drop-down list displayed, select Delete Stack.
Figure 41: Delete Stack
Pricing
The cost of running this product is combination of License cost and AWS infrastructure cost. It will be very
difficult to find out AWS infrastructure cost for this product as it may vary with Regions/Country/Time. Hence, we
recommend using “AWS Calculator” which is available online to calculate the cost of running this product.
https://calculator.s3.amazonaws.com/index.html
Here are resources that are created during deployment. Highlighted ones are chargeable in AWS.
Resources Category Chargeable
PCS VM (t2.medium / t2.xlarge / t2.2xlarge) Compute Yes
Virtual Private Cloud with four subnets Networking No
Three NICs named PCSInternalNIC, PCSExternalNIC and
PCSManagementNIC
Networking No
Three Elasti Public IPs for internal, external and management
interfaces
Networking Yes
Three Security Groups named SGInternal, SGExternal and
SGManagement
Networking No
Route table Networking No
PCS IMG file of size 40GB in S3 bucket Storage Yes
PCS Snapshot file of size 40GB in Elastic block store Storage Yes
Limitations
The following list of Pulse Connect Secure features are not supported in this release:
• IP address (private) of the interfaces should not be changed
• IPV6 is not supported

Pulse Connect Secure Virtual Appliance on Amazon Web Services - Deployment Guide
© 2018 Pulse Secure, LLC. All rights reserved 36
Troubleshooting
Pulse Connect Secure emits booting logs at a specified storage. You can check the storage details of the boot
diagnostic logs as shown below:
1. Select AWS Services > Instances > Launch Instance.
2. From the list displayed, select Instance Settings > Get System Log.
Figure 42: Boot Diagnostics
The system logs window is displayed.
Figure 43: System Logs

Pulse Connect Secure Virtual Appliance on Amazon Web Services - Deployment Guide
© 2018 Pulse Secure, LLC. All rights reserved 37
Frequently Asked Questions
FAQ1: Packets transmitted from PCS Internal Interface are getting dropped by AWS Virtual Gateway in
L3 traffic.
Cause: The packets are dropped because the source IP and MAC address are not matching and the transit
routing is not supported.
Solution:
The following topology shows PCS Virtual Network in AWS Cloud connected to NAT device which in turn is
connected to AWS Virtual Gateway. The AWS Virtual Gateway has the connectivity to Data Center. Here, the
packets received from the PCS Internal interface are source NATed and then sent to the AWS Virtual Gateway.
Figure 44: Topology diagram
The AWS VPC has four subnets – subnet1 to subnet3 connected to PCS’s Internal, External, and Management
interfaces respectively, and subnet4 connected to NAT device.
Figure 45: Subnets
Route Tables in AWS for Source NATing
In the VPC, two route tables are created. The first route table is associated with the three subnets, subnet1 to
subnet 3, that are connected to the PCS’s three interfaces.

Pulse Connect Secure Virtual Appliance on Amazon Web Services - Deployment Guide
© 2018 Pulse Secure, LLC. All rights reserved 38
Figure 46: Route Table
This route table has three routes. The Rules for these routes define to which destination the packets should be
routed.
10.251.0.0/18 This is the VPC local route which is created by default when the VPC is created.
0.0.0.0 If the packet is destined to the internet, then the packet is routed to internet gateway.
10.170.0.0/23 If the packet is destined to the on-premise network, then the packet is routed to the NAT device.
Figure 47: Routes

Pulse Connect Secure Virtual Appliance on Amazon Web Services - Deployment Guide
© 2018 Pulse Secure, LLC. All rights reserved 39
The second route table is associated with subnet4 that is connected to the NAT device.
Figure 48: Route Table
This route table has four routes.
10.251.0.0/18 This is the VPC local route which is created by default when the VPC is created.
0.0.0.0 If the packet is destined to the internet, then the packet is routed to internet gateway.
10.170.0.0/23 If the packet is destined to the on-premise network, then the packet is routed to AWS Virtual
Gateway.
172.21.0.0/24 The response packet received from the Data Center will have tunnel IP of End Point as the
destination IP. So, if the packet is destined to the tunnel IP port, the packet is routed to the PCS
Internal interface.
Figure 49: Routes

Pulse Connect Secure Virtual Appliance on Amazon Web Services - Deployment Guide
© 2018 Pulse Secure, LLC. All rights reserved 40
Appendix A: Security Group (SG)
AWS has a limitation where virtual machine with multiple network interfaces cannot connect to different Virtual
Private Cloud (VPCs). For example, a VM with two NICs, NIC1 and NIC2, will not be able to connect to VPC1 and
VPC2 respectively.
Figure 50: Virtual Machine with two NICs Connecting to VPC1 and VPC2
AWS supports a virtual machine with multiple NICs to connect to different Subnets under a same Virtual Private
Cloud. For example, a VM with two NICs, NIC1 and NIC2, can connect to ‘Subnet1’ and ‘Subnet2’ where these
subnets exist under a same Virtual Private Cloud respectively.
Figure 51: Virtual Machine with two NICs Connecting to Subnet1 and Subnet2
AWS provides isolation between different VPCs. But it does not provide the same kind of isolation when it comes
to subnets in the same VPC. For example, consider a VPC has two subnets, Subnet1 and Subnet2. And consider
two VMs, VM-1 and VM-2, which are connected to Subnet1 and Subnet2 respectively. In this scenario VM-1 can
access the resources from VM-2 and vice versa.
Figure 52: Virtual Machine VM-1 can Access Resources in VM-2 and Vice Versa

Pulse Connect Secure Virtual Appliance on Amazon Web Services - Deployment Guide
© 2018 Pulse Secure, LLC. All rights reserved 41
Application isolation is an important concern in enterprise environments, as enterprise customers seek to
protect various environments from unauthorized or unwanted access. To achieve the traffic isolation between
subnets, go for an option of filtering traffic using “Security Group” provided by AWS.
Figure 53: Traffic Filtering by AWS Support Group
Pulse Connect Secure, when provisioned through the CloudFormation template provided by Pulse Secure,
creates four subnets under a virtual private cloud named “PCSVirtualNetwork”. The four Subnets are:
1. PCSInternalSubnet
2. PCSExternalSubnet
3. PCSManagementSubnet
4. PCSTunnelVPNPoolSubnet
Along with above mentioned subnets, create the following three Security Groups (SG) policies:
1. SGExternalSubnet
2. SGInternalSubnet
3. SGManagementSubnet
Figure 54: SG External, Internal and Management Subnets

Pulse Connect Secure Virtual Appliance on Amazon Web Services - Deployment Guide
© 2018 Pulse Secure, LLC. All rights reserved 42
In Security Group (SG) we need to create policies for Inbound and outbound traffic.
1. The list of SG Inbound/Outbound rules created “Stack-PCSvExtSG” are:
Figure 55: Stack-PCSvExtSG - Inbound Rules
Figure 56: Stack-PCSvExtSG - Outbound Rules
2. The list of SG Inbound/Outbound rules created “Stack-PCSvIntSG” are:
Figure 57: Stack-PCSvIntSG - Inbound Rules

Pulse Connect Secure Virtual Appliance on Amazon Web Services - Deployment Guide
© 2018 Pulse Secure, LLC. All rights reserved 43
Figure 58: Stack-PCSvIntSG - Outbound Rules
3. The list of SG Inbound/Outbound rules created “Stack-PCSvMgmtSG” are:
Figure 59: Stack-PCSvMgmtSG - Inbound Rules
Figure 60: Stack-PCSvMgmtSG - Outbound Rules

Pulse Connect Secure Virtual Appliance on Amazon Web Services - Deployment Guide
© 2018 Pulse Secure, LLC. All rights reserved 44
Appendix B: Pulse Connect Secure CloudFormation
Template
Pulse Secure provides sample CloudFormation template files to deploy the Pulse Connect Secure Virtual
Appliance on AWS. Users can modify this to make it suitable for their need. Visit https://www.pulsesecure.net
and download the pulsesecure-pcs-3-nics.zip file, and unzip it to get pulsesecure-pcs-3-nics-new-network.json.
This template creates a new PCS with 3 NICs, VPC, four subnets, security group policies attached to PCS internal,
external and management subnets and user-defined routes on the PCS internal subnet to ensure PCS is used as
default gateway for L3 tunnel. All 3 NICs of PCS are configured with dynamic IP configuration and enabled IP
forwarding. Public IPs are attached to the PCS external and management NIC.
The template has following sections:
Parameters This section defines the parameters used for deploying PCS on AWS. It contains parameter
name, its default value and the mouse-over help text that is displayed when mouse is
placed over the parameter in AWS Web portal. The parameters defined here are displayed
in the Custom Deployment page of AWS portal.
Resources This section defines resource types that are deployed or updated in a resource group.
Outputs This section defines the public IP address, private IP address and primary private IP
address returned after successful deployment of PCS on AWS.
Parameters
Key Name: This is the name of the PCS Storage Account where the PCS VA image (.ami file) is stored.
PCS Image AMI ID: This is the ID of the uploaded AMI file.
Instance Type: This specifies the size of the instance – t2.medium or t2.large

Pulse Connect Secure Virtual Appliance on Amazon Web Services - Deployment Guide
© 2018 Pulse Secure, LLC. All rights reserved 45
PCS Config Data: This section contains provisioning parameters that are required during the deployment of a
Virtual Appliance. An XML-based configuration file can be present in another Virtual Machine in AWS cloud or in
the corporate network which is accessible for Pulse Connect Secure through site-to-site VPN between AWS and
the corporate data center.
Pulse Connect Secure accepts the following parameters as provisioning parameters:
• primary-dns
• secondary-dns
• wins-server
• dns-domain
• admin-username
• admin-password
• cert-common-name
• cert-random-text
• cert-organization
• config-download-url
• config-data
• auth-code-license
• enable-license-server
• accept-license-agreement
• enable-rest
For details about these parameters, see Pulse Connect Secure Provisioning Parameters.
VPC CIDR: It is a valid CIDR range of the form x.x.x.x/x for entire VPC.
Internal Subnet CIDR: Subnet from which Pulse Connect Secure Internal Interface needs to lease IP.
External Subnet CIDR: Subnet from which Pulse Connect Secure External Interface needs to lease IP.

Pulse Connect Secure Virtual Appliance on Amazon Web Services - Deployment Guide
© 2018 Pulse Secure, LLC. All rights reserved 46
Management Subnet CIDR: Subnet from which Pulse Connect Secure Management Interface needs to lease IP.
Tunnel Subnet CIDR: Subnet which will be configured as Tunnel IP pool in Pulse Connect Secure VPN profile.
Resources
VPC:
IntSubnet: This block is responsible for creating subnet. The created subnet is applied to PCS Internal interface.
ExtSubnet: This block is responsible for creating subnet. The created subnet is applied to PCS External interface.
MgmtSubnet: This block is responsible for creating subnet. The created subnet is applied to PCS Management
interface.
TunnelSubnet: This block is responsible for creating tunnel pool. The created tunnel pool is applied to PCS
Tunnel Pool.
InternetGateway:
AttachGateway:
PublicSubnetRouteTable:

Pulse Connect Secure Virtual Appliance on Amazon Web Services - Deployment Guide
© 2018 Pulse Secure, LLC. All rights reserved 47
PublicSubnetRoute:
ExtSubnetRouteTableAssociation:
MgmtSubnetRouteTableAssociation:
EIP1:
EIPAssoc1:
EIP2:
EIPAssoc2:
PCSvExternalSecurityGroup:
PCSvInternalSecurityGroup:
PCSvManagementSecurityGroup:
EC2Instance:
Eth0:
Eth1:

Pulse Connect Secure Virtual Appliance on Amazon Web Services - Deployment Guide
© 2018 Pulse Secure, LLC. All rights reserved 48
Eth2:
Outputs
The Outputs section defines the public IP address, private IP address and primary private IP address that is
displayed on successful deployment of PCS on AWS.

Pulse Connect Secure Virtual Appliance on Amazon Web Services - Deployment Guide
© 2018 Pulse Secure, LLC. All rights reserved 49
Appendix C: Pulse Connect Secure CloudFormation
Template for an Existing Virtual Private Cloud
Pulse Secure provides sample CloudFormation template files to deploy Pulse Connect Secure Virtual Appliance
on AWS. Users can modify this to make it suitable for their need. Visit https://www.pulsesecure.net and
download the pulsesecure-pcs-3-nics.zip file, and unzip it to get pulsesecure-pcs-3-nics-existing-vpc.json.
This template creates a new PCS with 3 NICs, VPC, four subnets, security group policies attached to PCS internal,
external and management subnets and user-defined routes on the PCS internal subnet to ensure PCS is used as
default gateway for L3 tunnel. All 3 NICs of PCS are configured with dynamic IP configuration and enabled IP
forwarding. Public IPs are attached to the PCS external and management NIC.
The template has following sections:
Parameters This section defines the parameters used for deploying PCS on AWS. It contains parameter
name, its default value and the mouse-over help text that is displayed when mouse is
placed over the parameter in AWS Web portal. The parameters defined here are displayed
in the Custom Deployment page of AWS portal.
Resources This section defines resource types that are deployed or updated in a resource group.
Outputs This section defines the public IP address and FQDN returned after successful deployment
of PCS on AWS.
Parameters
Key Name: This is the name of the PCS Storage Account where the PCS VA image (.ami file) is stored.
PCS Image AMI ID: This is the ID of the uploaded AMI file.
Instance Type: This specifies the size of the instance – t2.medium or t2.large
Pulse Connect Secure Virtual Appliance on Amazon Web Services - Deployment Guide
© 2018 Pulse Secure, LLC. All rights reserved 50
PCS Config Data: This section contains provisioning parameters that are required during the deployment of a
Virtual Appliance. An XML-based configuration file can be present in another Virtual Machine in AWS cloud or in
the corporate network which is accessible for Pulse Connect Secure through site-to-site VPN between AWS and
the corporate data center.
Pulse Connect Secure accepts the following parameters as provisioning parameters:
• primary-dns
• secondary-dns
• wins-server
• dns-domain
• admin-username
• admin-password
• cert-common-name
• cert-random-text
• cert-organization
• config-download-url
• config-data
• auth-code-license
• enable-license-server
• accept-license-agreement
• enable-rest
For details about these parameters, see Pulse Connect Secure Provisioning Parameters.
VPCID: This is the ID of the existing VPC.
SubnetIntID: This is the ID of the subnet to which PCS Internal interface connects.
SubnetExtId: This is the ID of the subnet to which PCS External interface connects.
SubnetMgmtId: This is the ID of the subnet to which PCS Management interface connects.

Pulse Connect Secure Virtual Appliance on Amazon Web Services - Deployment Guide
© 2018 Pulse Secure, LLC. All rights reserved 51
Resources
EIP1:
EIPAssoc1:
EIP2:
EIPAssoc2:
PCSvExternalSecurityGroup:
PCSvInternalSecurityGroup:
PCSvManagementSecurityGroup:
EC2Instance:
Eth0:
Eth1:
Eth2:

Pulse Connect Secure Virtual Appliance on Amazon Web Services - Deployment Guide
© 2018 Pulse Secure, LLC. All rights reserved 52
Outputs
The Outputs section defines the public IP address, private IP address and primary private IP address that is
displayed on successful deployment of PCS on AWS.

Pulse Connect Secure Virtual Appliance on Amazon Web Services - Deployment Guide
© 2018 Pulse Secure, LLC. All rights reserved 53
References
AWS documentation: https://aws.amazon.com/documentation/
Requesting Technical Support
Technical product support is available through the Pulse Secure Global Support Center (PSGSC). If you have a
support contract, then file a ticket with PSGSC.
• Product warranties—for product warranty information, visit https://www.pulsesecure.net.