pruning landscape trees and shrubs - institute of...
TRANSCRIPT

CIR853
Pruning Landscape Trees and Shrubs1
Edward F. Gilman and Robert J. Black2
1. This document is Circular 853 (MG087), Environmental Horticulture Department, Florida Cooperative Extension Service, Institute of Food and Agricultural Sciences, University of Florida. This document supersedes The Woody Ornamentalist, Vol. 14, No. 7 (published July 1989) and Special Series #2, SS-ORH-902, both titled Pruning Ornamental Trees and Shrubs. This information supports Environmental Landscape Management, i.e., landscape design and management for environmental horticulture. Publication date: June 1990. Reviewed: August 1994. Revised June 2005.
2. Edward F. Gilman, professor; Robert J. Black, professor emeritus, Environmental Horticulture Department, Cooperative Extension Service, Institute of Food and Agricultural Sciences, University of Florida, Gainesville FL 32611. For more information, contact your county Cooperative Extension Service office.
The Institute of Food and Agricultural Sciences (IFAS) is an Equal Opportunity Institution authorized to provide research, educational information and other services only to individuals and institutions that function with non-discrimination with respect to race, creed, color, religion, age, disability, sex, sexual orientation, marital status, national origin, political opinions or affiliations. U.S. Department of Agriculture, Cooperative Extension Service, University of Florida, IFAS, Florida A. & M. University Cooperative Extension Program, and Boards of County Commissioners Cooperating. Larry Arrington, Dean
Pruning is the removal of plant parts, typically shoots, branches, fronds and flowers to improve health, control growth or influence fruiting, flowering or appearance. Roots can also be pruned and removed if they circle close to or are resting against the trunk. Pruning should be a routine part of home-ground maintenance and not delayed until the landscape is overgrown. Overgrown plants can be tall and leggy with little foliage close to the ground, and cannot be pruned to desired size in a single pruning without severely damaging the plants. These plants should be pruned back gradually over a period of several years.
The objective of this document is to present pruning techniques for Florida trees, shrubs and palms. The need for pruning, timing, types of pruning, tree pruning, shrub pruning and tools are discussed separately. Specific examples will support the pruning concepts.
Minimize Pruning Needs with Proper Plant Selection
Proper tree selection at the nursery can eliminate early pruning requirements (Figure 1). Defects such as clustered branches can begin in the nursery and they should be corrected there. Shade trees should meet Florida #1 standards or better, and have one dominant trunk. Those with more than one trunk will have to be pruned soon after planting.
Why Prune?
Proper plant selection can eliminate much of the pruning requirements in today's landscapes. Unfortunately, plants are frequently placed in the landscape according to their current size and shape, not the size which the plant is likely to attain in five or more years. The homeowner or landscape manager soon finds it necessary to clip or prune plants frequently to keep them within bounds. For instance, frequent pruning is assured when photinia shrubs are selected as foundation plants, since this plant can quickly grow to 25-30' tall. Utilizing a low-growing, compact shrub in such a location would greatly reduce or eliminate required pruning. It is less time
Archival copy: for current recommendations see http://edis.ifas.ufl.edu or your local extension office.

Pruning Landscape Trees and Shrubs 2
Figure 1. High quality medium and large-maturing shade trees have one dominant leader (left), whereas poor quality trees have several codominant stems (right).
consuming and less costly to select and install the proper sized plant than to choose one which will require frequent, timely pruning. Ask your nurseryman or consult a reliable source for growth rate and size of desirable plant species. If a plant needs to be pruned several times each year to control size, it may be the wrong species for that location. Many prunings can be eliminated by proper plant selection and this can save space in landfills by reducing the volume of yard waste.
Plants may be pruned for a number of reasons. Determine why you are pruning a plant before beginning.
Maintain or Improve Health or Vigor
Removal of dead, dying or damaged branches and diseased and insect infested plant parts is an effective way to limit the spread of decay, disease and insects to other portions of the plant or to neighboring plants. For example, if several branch tips are infested with aphids or scale, prune and discard the affected shoots. This can be an effective alternative to spraying insecticides if the infestation is small and localized. Weekly checking is often necessary to detect a disease or an infestation in the early stages.
Control Plant Size and Form
A common objective of pruning is to maintain or develop a desired size or form. However, this can be largely eliminated by installing the proper species or
cultivar and by not over fertilizing. Many compact and dwarf shrubs are now available at retail garden centers. Selective pruning can shape plants or produce either a thin or thick canopy. A thinner canopy edge will allow more light penetration and help keep interior leaves on the plant. Root pruning can be used to slow plant growth, producing a more compact plant. Prune one half the root system, wait 4-6 weeks, then prune the other half. Root pruning should be scheduled so roots will be watered thoroughly to keep the soil moist for 4-6 weeks following root pruning.
Training Young Plants
There are several reasons to train plants. Pruning young trees so they have good branch structure can dramatically influence their long-term health, function and longevity. Snipping branch ends on young shrubs encourages branching and fullness, which are frequently desirable characteristics of landscape plants.
Branch spacing and arrangement and the ultimate structural strength and safety of a tree can be controlled by selectively removing or shortening branches on a young plant (Figure 2).
Figure 2. (A) Desirable form and branching pattern on a young, large-sized shade tree such as live oak, mahogany, or southern magnolia. Major limbs are spaced apart along the trunk, not clustered at the same point on the trunk. (B) Desirable form on a young, small-sized patio tree such as dogwood, trumpet tree, or frangipani. Major limbs can be spaced closer together on the trunk.
Encourage only one central trunk to develop by removing or reducing the length of competing, upright trunks or branches (Figure 3).
Archival copy: for current recommendations see http://edis.ifas.ufl.edu or your local extension office.

Pruning Landscape Trees and Shrubs 3
Figure 3. Reduce the length of (subordinate) leader a using a reduction cut to encourage leader b to grow faster. Remove leader c back to the trunk. After pruning, the tip of leader b should be much higher than the tops of all other stems. This technique will help leader b become the dominant trunk by slowing growth on competing leaders and allowing more sunlight to reach b. In most cases on large-maturing trees, branches in the lower 15 to 20 feet of the tree should be kept smaller than half the trunk diameter using this technique. Those same branches should not be allowed to grow up into the tree to become a permanent part of the canopy. Notice that branches are spaced along the trunk.
This should begin within the first 2-3 years after planting. Tree training continues for 20 or more years on large-maturing species. Frequent light prunings several times each year encourage faster growth and prevent undesirable sprouting compared to one heavy pruning each year. Pruning trees every year or two results in a nicer tree than waiting 4 or 5 years in between pruning sessions. In all but the highest maintenance landscapes, do not attempt to dramatically alter the natural form; instead, choose a species which has more of a natural tendency to grow into the desired form. For example, a river birch, red maple or tabebuia would be better suited as a shade tree in a narrow vertical space than would live oak.
Plants can be pruned into different shapes such as balls, squares, rectangles or animal figures to create special effects. This practice (topiary) has become popular in recent years, but plants pruned in this manner become focal points and should be used sparingly in most landscapes. Topiaries can be grown by planting a small-leaved plant such as boxwood, yaupon holly or natal plum and training the plant into a specific form. Another technique utilizes a wire mesh frame which is packed tightly with sphagnum
moss. Appropriate plant species including begonias, ivy and creeping fig can be planted in the sphagnum, forming a fully grown topiary in several months to two years.
The practice of growing plants against a wall (espalier) or on a trellis requires frequent pinching and pruning. Plants trained in this manner are specimen plants and not all plants are adaptable to this pruning technique. Pyracantha, sea grape, Fatshedra, magnolia, yaupon holly, loquat and others make excellent espalier plants.
Plants which many consider as large shrubs such as photinia, wax myrtle and pittosporum can be trained into small trees by gradually removing over a period of 1-3 years, all the foliage and small branches from the lower portion of one or more stems. Small branches left along the lower trunk will build trunk caliper and create a sturdier tree. The longer they remain on the trunk, the thicker and stronger the trunk becomes.
Influence Flowering and Fruit Production
Larger fruit on certain species can be produced by selectively removing flowers or developing fruits. Those remaining will be larger. Light pruning helps to maintain annual flowering and fruiting on fruit trees. Severe pruning on plants which flower on current season's growth such as crape myrtle will generally stimulate vegetative growth and produce fewer, but larger flower clusters. Pinching new vegetative growth during the growing season will stimulate growth of lateral shoots which on species which flower terminally (e.g. azalea, cassia, crape myrtle) will increase the number of blossoms produced. Remove developing seed heads on crape myrtle to promote a second and perhaps a third flower display.
Safety Pruning
The manner in which stems are attached to each other and to the trunk influences the structural strength of the tree. Remove branches with bark inclusions having narrow V-shaped crotches in favor of wider-angled U-shaped crotches (Figure 4).
Archival copy: for current recommendations see http://edis.ifas.ufl.edu or your local extension office.

Pruning Landscape Trees and Shrubs 4
Figure 4. (A) Remove or reduce limbs with bark inclusions. They are poorly attached to the tree and can split from the tree as they grow older. Included bark is bark that is squeezed between stems. The union of the two stems appears as a "V." (B) Retain limbs with raised bark at the union of the stems. The crotch between these stems appears as a "U" and represents a strong union between stems.
Large decayed, broken, cracked or poorly attached tree limbs should be recognized and promptly removed by a professional before they fall. Remove dead branches and branch stubs since they can lead to serious trunk decay (Figure 5). Periodic tree inspection by a professionally trained tree specialist (arborist) can help prevent these situations from developing into unsafe conditions.
Figure 5. Proper removal of a dead branch. Do not cut into the swollen collar growing around the dead branch. This will injure the trunk, since the collar is composed of trunk tissue.
Rejuvenate Old Plants
Sometimes a shrub which is not growing well despite receiving adequate light, water and nutrients can be invigorated or "shocked" into growing by severe pruning. Typically, the plant either dies or
begins growing vigorously in response to this drastic treatment.
Pruning at Transplanting
Shoot pruning for the purpose of compensating for root loss at transplanting is not recommended. Prune only to remove dead, diseased, crossed, rubbing or broken branches. About one year after transplanting, begin pruning to develop appropriate form and structure.
When to Prune
Trees and shrubs can be lightly pruned anytime. To minimize reduction of next year's flowers, prune spring-flowering plants such as azaleas, spireas, trumpet trees and dogwoods in late spring before the flower buds set for the next season (Table 1). These plants set their flower buds on the previous season's growth and the buds over winter on this older growth. For example, dogwoods and azaleas form flower buds in July for the following year's flower display. Pruning or pinching between the end of the flower display and late spring would not reduce the number of flower buds set. Pinching the new shoots on azalea anytime from several weeks after they begin elongating through May will encourage lateral branching. Each of these laterals is likely to develop a flower bud. Thus the pinched plant produces many more flowers the following year, than an unpinched plant (Figure 6). Pruning between July and the flower display would remove flower buds and reduce the flower display but should not affect the health of the plant.
Figure 6. Pinching new spring or early summer growth on plants which flower on subsequent shoot growth will encourage more flower bud formation for next year's flower display. Azalea respond well to pinching.
Archival copy: for current recommendations see http://edis.ifas.ufl.edu or your local extension office.
Pruning Landscape Trees and Shrubs 5
Plants that produce flowers on current season's growth such as abelia, crape myrtle, hibiscus and rose are usually pruned while dormant or just before the spring growth flush (Table 2). Developing shoots can be pinched to encourage lateral branching which will enhance the flower display. Moderate to severe pruning may encourage production of fewer but larger blossoms or blossom clusters.
It is best to prune trees such as oaks, mahogany, black olives, hickory, and other large shade trees during the dormant season or just following a growth flush. They can be pruned at other times, but avoid pruning when trees are emerging from dormancy or entering dormancy.
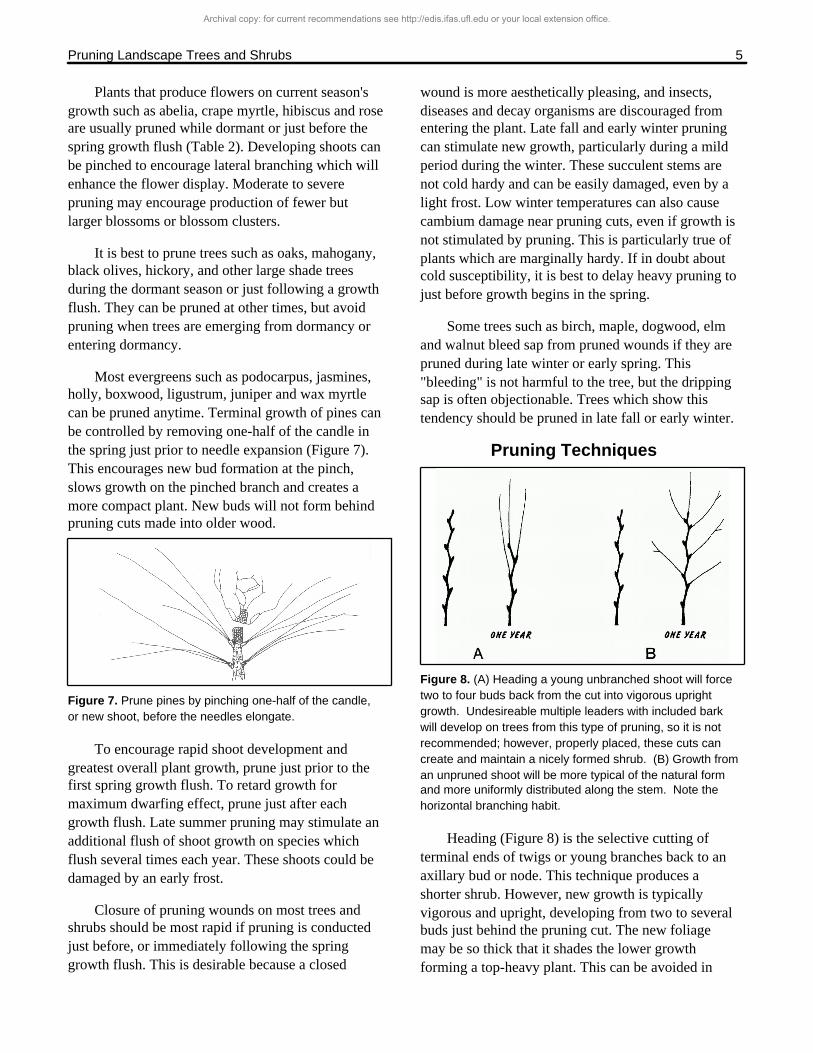
Most evergreens such as podocarpus, jasmines, holly, boxwood, ligustrum, juniper and wax myrtle can be pruned anytime. Terminal growth of pines can be controlled by removing one-half of the candle in the spring just prior to needle expansion (Figure 7). This encourages new bud formation at the pinch, slows growth on the pinched branch and creates a more compact plant. New buds will not form behind pruning cuts made into older wood.
Figure 7. Prune pines by pinching one-half of the candle, or new shoot, before the needles elongate.
To encourage rapid shoot development and greatest overall plant growth, prune just prior to the first spring growth flush. To retard growth for maximum dwarfing effect, prune just after each growth flush. Late summer pruning may stimulate an additional flush of shoot growth on species which flush several times each year. These shoots could be damaged by an early frost.
Closure of pruning wounds on most trees and shrubs should be most rapid if pruning is conducted just before, or immediately following the spring growth flush. This is desirable because a closed
wound is more aesthetically pleasing, and insects, diseases and decay organisms are discouraged from entering the plant. Late fall and early winter pruning can stimulate new growth, particularly during a mild period during the winter. These succulent stems are not cold hardy and can be easily damaged, even by a light frost. Low winter temperatures can also cause cambium damage near pruning cuts, even if growth is not stimulated by pruning. This is particularly true of plants which are marginally hardy. If in doubt about cold susceptibility, it is best to delay heavy pruning to just before growth begins in the spring.
Some trees such as birch, maple, dogwood, elm and walnut bleed sap from pruned wounds if they are pruned during late winter or early spring. This "bleeding" is not harmful to the tree, but the dripping sap is often objectionable. Trees which show this tendency should be pruned in late fall or early winter.
Pruning Techniques
Figure 8. (A) Heading a young unbranched shoot will force two to four buds back from the cut into vigorous upright growth. Undesireable multiple leaders with included bark will develop on trees from this type of pruning, so it is not recommended; however, properly placed, these cuts can create and maintain a nicely formed shrub. (B) Growth from an unpruned shoot will be more typical of the natural form and more uniformly distributed along the stem. Note the horizontal branching habit.
Heading (Figure 8) is the selective cutting of terminal ends of twigs or young branches back to an axillary bud or node. This technique produces a shorter shrub. However, new growth is typically vigorous and upright, developing from two to several buds just behind the pruning cut. The new foliage may be so thick that it shades the lower growth forming a top-heavy plant. This can be avoided in
Archival copy: for current recommendations see http://edis.ifas.ufl.edu or your local extension office.

Pruning Landscape Trees and Shrubs 6
shrubs by heading shoots to several different heights (Figure 9).
Figure 9. Heading shrubs is cutting back terminal shoots to a bud or node. (A) Heading all shoots to the same height produces a leggy, top-heavy shrub. (B) Heading shoots to several different levels poduces a more natural, fuller-looking shrub.
Heading (stubbing) trees is rarely warranted in landscape sites. Never "hat-rack" a landscape tree, i.e., cut all branches back to about the same length without regard for their location (Figure 10).
Figure 10. Never "hat-rack" a tree by heading back all branches to an indiscriminate location.
This type of pruning has no place in horticulture and is not recommended. When heading trees or shrubs, make the cut on a slight slant 1/4 inch above a healthy bud (Figure 11). The bud should be facing the direction preferred for new growth.
Figure 11. Proper pruning angle. "A" is a correct cut, "B" is too slanted, "C" is too far from the bud, "D" is too close to the bud.
Thinning (Figure 12) is the complete removal of branches back to lateral branches, the main trunk, or in shrubs, to the ground. Thinning gives a plant an open appearance and can encourage new growth inside the crown depending on how the plant is thinned. If thinning is heavy, interior sprouts will develop. If the plant is lightly thinned, interior shoots
are not likely to develop. This technique is used primarily on shrubs to make the canopy appear more open and see through. It contrasts to hedging or heading to the same spot on all branches which gives a shrub a manicured, controlled appearance. Trees can be thinned to increase light penetration, encouraging turf and shrub growth beneath the tree. Trees with properly thinned crowns also resist wind damage better than unpruned trees. This is a specialized technique best performed by a professional arborist. Removing live branches from mature trees can cause stress on the tree and harm it. Consider other alternatives first.
Figure 12. (A) Thinning shrubs is the complete removal of branches back to a lateral or the main trunk, or to the ground. (B) Proper thinning of shade trees removes branches at the edge of the canopy to create an open canopy.
Pruning Shrubs
The first step in pruning a shrub is to remove all dead, diseased, or injured branches. Pruning shears and saws can be dipped in a weak alcohol solution (1 part to 9 parts water) to prevent spread of disease between plants. Remove branches that cross or touch each other and those which look out of place. If the
Archival copy: for current recommendations see http://edis.ifas.ufl.edu or your local extension office.

Pruning Landscape Trees and Shrubs 7
shrub is still too dense or large, remove some of the oldest branches. Head back excessively long branches to a bud or lateral branch that is 6 to 12 inches below the desirable plant height. If the shrub is 2 to 3' too tall, heading (Figure 9) and thinning (Figure 12) may be desirable. Cut each branch separately to different lengths with hand pruners. This will maintain a neat informal shrub with a natural shape. Plants sheared into various geometric shapes produce a formality not suitable for many modern, natural landscapes. See the following section on hedge pruning for a discussion of formal pruning.
A properly pruned shrub is a work of art and beauty and does not look as if it has been pruned. Pruning cuts should not be visible, but located inside the plant, covered up by remaining foliage.
Rejuvenation of Shrubs
Rejuvenation is a drastic method of pruning old shrubs that have become much too large or have a large amount of non-flowering wood. On single-stem shrubs such as ligustrum and gardenia, rejuvenation is carried out over a period of 2-3 years by severe thinning out to the basic limb framework (Figure 13). One-third to one-half of the old growth is removed each year.
Figure 13. Rejuvenation on single stem shrubs is carried out by pruning much of the older branches and stems back to the basic framework.
Multiple stem shrubs are rejuvenated by cutting back all stems at ground level over a period of 3 years (Figure 14). Remove 1/3 of the old, mature stems the first year. The second year remove 1/2 of the remaining old stems and head back long shoots growing from the previous year's pruning cuts. The third season remove the remaining old wood and head back the long new shoots.
Figure 14. Rejuvenation of multiple stem shrubs. (A) First year, remove 1/3 of old, mature stems near ground level. (B) Second year, remove 1/2 of the remaining old stems and head back long regenerated shoots from last year's growth. (C) Third year, remove the remaining old stems and head back the long new shoots. (D) Growth at the end of the third season (rejuvenated shrub).
The best time for rejuvenation is in late winter or early spring, just before growth begins. Large, old shrubs should not be rejuvenated during late summer,
as new growth will be stimulated and possibly killed by cold weather in the winter.
Pruning cane-type shrubs such as nandina and mahonia is best done on a 2 or 3-year cycle. The tallest canes are pruned to a stub 3"-6" above the soil line during the first spring, just as growth begins. By the second spring, last year's medium sized canes have grown to become tall canes and should be cut back to a 3" stub. Canes from the first year's pruning have already begun to grow and are one to three feet tall by now. In the third spring, the canes which were the shortest in the first spring are now fairly tall and can be cut back. In this way, there is always foliage near the ground and the shrubs can be kept from becoming leggy. Cut nandina canes generally will not flower during the growing season following pruning.
Pruning Trees
First, prune out dead, diseased or broken twigs and branches. After studying the tree form, select the best spaced and positioned permanent branches and remove or shorten others on young trees. Permanent branches should be spaced between 6-24 inches apart on the trunk, depending on the ultimate mature size of the tree. For trees that remain small at maturity, 6" spacing is adequate; whereas, for oaks and other large shade trees, 18-24" spacing is best (Figure 15). Next, remove fast growing suckers at the base of and along the trunks. Sprouts along branches should be left intact in most cases. They typically indicate a struggling tree attempting to grow its way to health.
Trees should be pruned to one dominant leader (stem) after locating the straightest and best leader to retain (Figure 3 and Figure 17).
Archival copy: for current recommendations see http://edis.ifas.ufl.edu or your local extension office.

Pruning Landscape Trees and Shrubs 8
Figure 15. Shorten limbs a, b, and c because they are growing into the upper third of the canopy and they originate from the bottom half of the tree (left). Most, if not all, of these shortened limbs will eventually be removed from the tree as it grows in the landscape. They were shortened using reduction cuts (center). If the lateral branch left after making a reduction cut is too long, also shorten the lateral branch with a reduction cut (bottom detail). This essentially results in making two reduction cuts to accomplish subordination of a limb. Branch d was shortened because it was forming a codominant stem in the upper canopy (center).
Figure 16.
Figure 17. In forming the tree over a two-year period, remove lateral branches that grow upright. They will compete with the leader and form a weak, multiple-leadered tree.
Most shade trees can be grown in this form when they are young, but the growth habit of some species will change to a multi-leader spreading form as they mature. There should be no narrow forks or branches leaving the trunk at an acute angle (Figure 18). If there are, then reduce their length cutting back to a lateral branch at least half the diameter of the removed stem. Reduce length of stems and branches with bark inclusions (Figure 17).
Figure 18. Branches that are small in relation to the trunk are well attached (left). Those that are the same size are not as well attached (center and right). Forked trunks can be dangerous. One of the forks should be reduced in length.
Removing Large Tree Branches
Figure 19. Removing a tree branch over 1 1/2" diameter. First cut at "A" until saw binds, then cut at "B" 2-4" beyond "A" until the branch falls, then cut at "C", outside of the branch collar (see Figure 19).
Large branches that are too heavy to be held with your hand (those 1-1/2" or larger in diameter) require three separate cuts to prevent trunk bark stripping. The first cut is made on the lower side of the branch about 15 inches away from the trunk and as far up through the branch as possible before the branch weight binds the saw (Figure 19). The second cut is made downward from the top of the branch a few inches from the first cut to cause the limb to split cleanly between the two cuts without tearing the bark. The remaining stub is easily supported with one hand while it is cut from the tree. This cut should begin on the outside of the branch bark ridge and end just outside of the trunk collar swelling on the lower side of the branch (Figure 20). This is usually
Archival copy: for current recommendations see http://edis.ifas.ufl.edu or your local extension office.
Pruning Landscape Trees and Shrubs 9
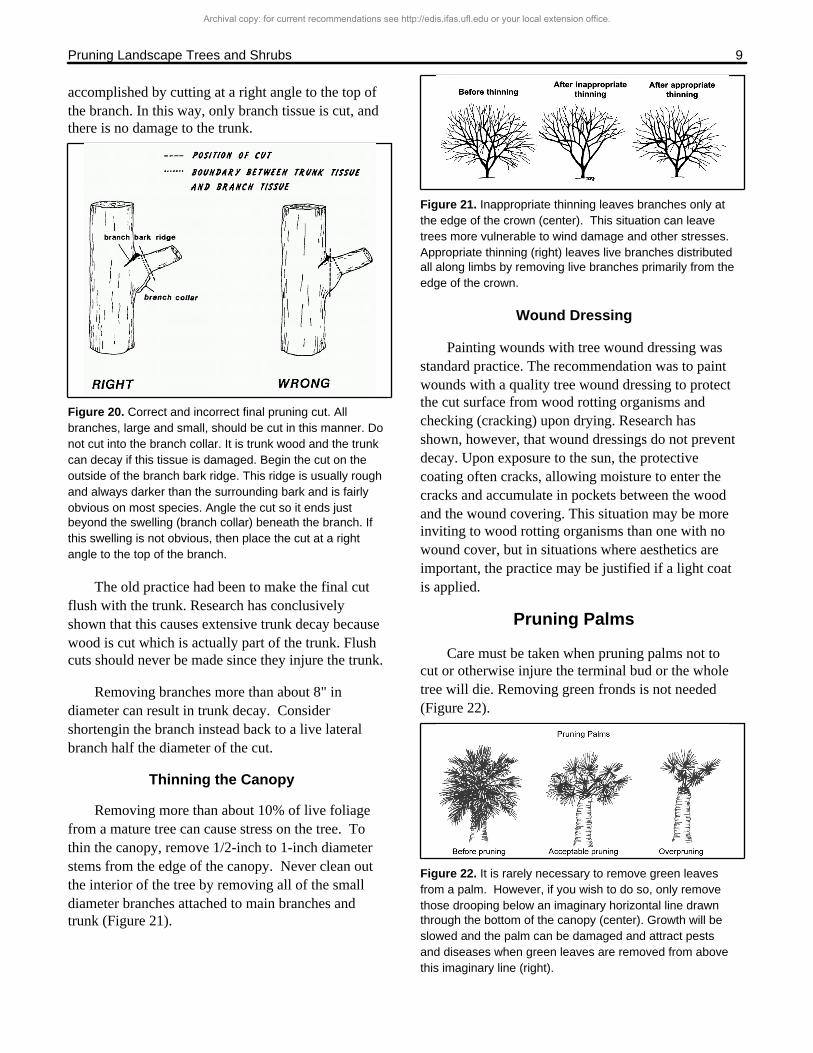
accomplished by cutting at a right angle to the top of the branch. In this way, only branch tissue is cut, and there is no damage to the trunk.
Figure 20. Correct and incorrect final pruning cut. All branches, large and small, should be cut in this manner. Do not cut into the branch collar. It is trunk wood and the trunk can decay if this tissue is damaged. Begin the cut on the outside of the branch bark ridge. This ridge is usually rough and always darker than the surrounding bark and is fairly obvious on most species. Angle the cut so it ends just beyond the swelling (branch collar) beneath the branch. If this swelling is not obvious, then place the cut at a right angle to the top of the branch.
The old practice had been to make the final cut flush with the trunk. Research has conclusively shown that this causes extensive trunk decay because wood is cut which is actually part of the trunk. Flush cuts should never be made since they injure the trunk.
Removing branches more than about 8" in diameter can result in trunk decay. Consider shortengin the branch instead back to a live lateral branch half the diameter of the cut.
Thinning the Canopy
Removing more than about 10% of live foliage from a mature tree can cause stress on the tree. To thin the canopy, remove 1/2-inch to 1-inch diameter stems from the edge of the canopy. Never clean out the interior of the tree by removing all of the small diameter branches attached to main branches and trunk (Figure 21).
Figure 21. Inappropriate thinning leaves branches only at the edge of the crown (center). This situation can leave trees more vulnerable to wind damage and other stresses. Appropriate thinning (right) leaves live branches distributed all along limbs by removing live branches primarily from the edge of the crown.
Wound Dressing
Painting wounds with tree wound dressing was standard practice. The recommendation was to paint wounds with a quality tree wound dressing to protect the cut surface from wood rotting organisms and checking (cracking) upon drying. Research has shown, however, that wound dressings do not prevent decay. Upon exposure to the sun, the protective coating often cracks, allowing moisture to enter the cracks and accumulate in pockets between the wood and the wound covering. This situation may be more inviting to wood rotting organisms than one with no wound cover, but in situations where aesthetics are important, the practice may be justified if a light coat is applied.
Pruning Palms
Care must be taken when pruning palms not to cut or otherwise injure the terminal bud or the whole tree will die. Removing green fronds is not needed (Figure 22).
Figure 22. It is rarely necessary to remove green leaves from a palm. However, if you wish to do so, only remove those drooping below an imaginary horizontal line drawn through the bottom of the canopy (center). Growth will be slowed and the palm can be damaged and attract pests and diseases when green leaves are removed from above this imaginary line (right).
Archival copy: for current recommendations see http://edis.ifas.ufl.edu or your local extension office.

Pruning Landscape Trees and Shrubs 10
Old leaves that persist on palms such as the Washington palm can be removed, as they often harbor insects and rodents and may become a fire hazard.
When palms with large, heavy fronds such as the Royal palm shed their heavy leaves, they can damage property and injure people. If they are growing where falling leaves may be hazardous, remove leaves before they drop.
Large fruits of coconut palms can be dangerous to pedestrians and automobiles passing beneath the palm. Prevent formation of fruits by removing the flower stalks. Flower stalks on christmas palm and others can be left on the palm to take advantage of the ornamental characteristics of the fruit.
Hedge Pruning
The method of pruning hedges depends on the type of hedge desired. Informal hedges generally consist of a row of closely planted shrubs which are allowed to develop into their natural shape. Annual pruning consists of thinning and heading just enough to maintain desired height and width.
The desired appearance of a formal hedge is a hard outline of foliage from the top of the hedge to the ground. Two important factors to remember when pruning formal hedges are (1) hedges should be clipped while the new growth is green and succulent and (2) plants should be trimmed so the base of the hedge is wider than the top (Figure 23). Hedges pruned with a narrow base will lose lower leaves and branches because of insufficient light. This condition will worsen with age resulting in sparse growth at ground level and an unattractive hedge which does not give desired privacy.
Flowering hedges grown formally should be sheared after they have bloomed since more frequent shearing reduces number of blooms. If the blooms are of secondary importance, pruning may be conducted at any time.
Figure 23. Plants pruned as a solid hedge should be wider at the bottom than the top.
Pruning Tools
Figure 24. Pruning tools. (A) Hand pruners are used to cut branches less than 1/4 inch in diameter. (B) Hedge shears are used to shear formal hedges. (C) Extension pruners can reach higher.
Basic tools used in pruning are hand pruner, loppers, hedge shears and saws (Figure 24). Hand
pruners are used for small branch and twig cleanup, pruning saws for larger branches and hedge shears to trim closely clipped formal hedges only. Both shears and saws are available on poles which are handy to prune difficult to reach branches. Loppers should not be used for pruning on live shrubs and trees since they damage the collar on the trunk.
Tools should be kept sharp for easier cutting without injuring surrounding tissue. Injured tissues are susceptible to disease and decay, which can lead to long-term health problems for the plant.
Archival copy: for current recommendations see http://edis.ifas.ufl.edu or your local extension office.

Pruning Landscape Trees and Shrubs 11
Table 1. Winter and spring flowering plants which can be pruned after flowering but before flower buds form for next year's show.*
Shrubsazaleas spireas
some hydrangea Indian hawthorn
banana shrub wisteria
camellia star and saucer magnolia
Trees
dogwoods redbudfringe tree magnolias
african tulip-tree
* The only effect from pruning at other times is a reduction in the number of flower buds.
Table 2. Plants producing flowers on current season's growth which can be pruned during the dormant season.*
Shrubs
allamanda plumbago
abelia thryllis
hibiscus golden dew-drop
oleander bouganvillea
rose vitex
Treesfrangipani acacia
bottle brush golden rain tree
cassia princess-flower
royal poinciana crape myrtle
jacaranda
* Structural pruning to correct forks and multiple stems can be done at any time.
Archival copy: for current recommendations see http://edis.ifas.ufl.edu or your local extension office.