protect hitachi unified compute platform for oracle ... · veritas netbackup veritas netbackup...
TRANSCRIPT

June 2018
By
Protect Hitachi Unified Compute Platform and Oracle Database 12c using Hitachi Data Instance Director, Veritas NetBackup, and Hitachi Content Platform
Amol Bhoite
Reference Architecture Guide

FeedbackHitachi Vantara welcomes your feedback. Please share your thoughts by sending an email message to [email protected]. To assist the routing of this message, use the paper number in the subject and the title of this white paper in the text.
Revision History
Revision Changes Date
AS-565-00 Initial release December 2016
AS-565-01 Added automation shell script to take HDID Snapshot, mount snapshot to mount server, and RMAN backup to Hitachi Content Platform using Veritas NetBackup.
January 2017
AS-565-02 Added official product naming and details for Brocade switches. May 2017
MK-SL-072-00 Updated branding to Hitachi Vantara June 8, 2018

Table of ContentsSolution Overview 2
High-level Concepts 2
Solution Benefits 3
High Level Infrastructure 3
Key Solution Components 5
Hitachi Virtual Storage Platform G Series Family 6
Hitachi Storage Virtualization Operating System 6
Brocade Switches 7
Hitachi Data Instance Director 7
Veritas NetBackup 7
Hitachi Content Platform 7
Red Hat Enterprise Linux 8
Oracle Database With the Real Application Clusters Option 8
Solution Design 8
Storage Architecture 9
SAN Architecture 17
Network Architecture 19
Deploy the Solution 21
Solution Execution 47
Engineering Validation 63
Test Methodology 63
Test Results 65

1
Protect Hitachi Unified Compute Platform and Oracle Database 12c using Hitachi Data Instance Director, Veritas NetBackup, and Hitachi Content PlatformReference Architecture Guide
Use this reference architecture guide to design a solution with Hitachi Data Instance Director (HDID) to protect Hitachi Unified Compute Platform for non-multitenant Oracle Database 12c with Oracle Real Application Clusters (RAC) in a single-site environment. This explains how to use Veritas NetBackup to backup a snapshot of Hitachi Thin Image mount of Oracle Database 12c to Hitachi Content Platform (HCP) for intensive data protection, recovery, and retention.
This environment uses integrated servers, storage systems, and network with storage software in a converged solution for Oracle. It provides reliability, high availability, scalability, and performance while processing small-scale to large-scale OLTP workloads. The dedicated servers run Oracle Database 12c Release 1 with the Oracle Real Application Cluster option. The operating system is Red Hat Enterprise Linux 6.6.
This solution for your oracle environment uses Microsoft® Windows Server® 2012 R2 virtual machines (VM) to run the following in this solution:
One Data Instance Director master node
One Data Instance Director repository node
One NetBackup master node
Validation of the best practices in this solution was with Oracle Database 12c, Hitachi Virtual Storage Platform G600 (VSP G600), Veritas NetBackup 7.7.3, and Hitachi Content Platform. However, this solution works for all storage systems and Oracle versions supported by the following:
Hitachi Data Instance Director
Hitachi Content Platform
Veritas NetBackup (specific versions)
This document is for the following audience:
Database administrators
Storage administrators
Backup administrators
IT professionals with the responsibility of backing up, restoring and recovering, or disaster database recovery of an Oracle Database solution
1

2
To use this best practice guide, you need familiarity with the following:
Storage area networks
Hitachi Content Platform
Hitachi Data Instance Director
Hitachi Thin Image
Veritas NetBackup
Oracle Database administration
Oracle Database 12c Release 1 with the Oracle RAC option
Red Hat Enterprise Linux
Note — These practices were developed in a lab environment. Many things affect production environments beyond prediction or duplication in a lab environment. Follow recommended practice by conducting proof-of-concept testing for acceptable results before implementing this solution in your production environment. Test the implementation in a non-production, isolated test environment that otherwise matches your production environment.
Solution OverviewThis solution describes Hitachi Unified Compute Platform for Oracle Database protection solution to do the following:
Perform an Oracle Database 12c backup with Hitachi Thin Image snapshot, and perform a backup mount on the proxy server using Hitachi Data Instance Director.
Perform an Oracle Database 12c restore, and recovery operations using Hitachi Data Instance Director.
Perform an Oracle Database 12c backup from a proxy server to Hitachi Content Platform using Veritas NetBackup.
Perform a restore and recovery operations on the application or production host from Hitachi Content Platform storage using Veritas NetBackup.
High-level ConceptsThese are the high-level concepts covered by this reference architecture:
Backup Oracle database with scheduled snapshot and mount Hitachi thin image snapshot on the proxy server using Hitachi Data Instance Director.
Backup Hitachi Thin image mounted snapshot from proxy server to Hitachi Content Platform using Veritas NetBackup.
Perform restore and recovery of an Oracle database using Hitachi Data Instance Director REVERT operation and recover Oracle database with manual steps.
Perform restore and recovery of an Oracle database from Hitachi Content Platform through Veritas NetBackup directly to application or production host.
2

3
Solution BenefitsThese are the benefits of using this solution:
Protect Oracle database against disasters.
Perform disaster recovery and operational recovery on the primary site with zero RPO for a server failure.
Create frequent or temporary backups of the data without affecting the primary server.
Back up data that is too large to complete in the allocated time.
Prevent data loss or data integrity issues.
To reduce load on the production server, use a proxy server for Oracle database movement.
Enable IT organizations and cloud service providers to store, share, synchronize, protect, preserve, analyze and retrieve file data from a single system. Address future data change and growth.
High Level Infrastructure Figure 1 on page 4 shows the high-level infrastructure for this solution.
3

4
Figure 1
4

5
Key Solution ComponentsThe key solution components for this solution are in Table 1, “Hardware Components,” on page 5 and Table 2, “Software Components,” on page 6.
TABLE 1. HARDWARE COMPONENTS
Hardware Detailed Description Version Quantity
Hitachi Virtual Storage Platform G600
2 controllers
8 × 16 Gb/s Fibre Channel ports per controller
16 backend SAS ports
256 GB cache memory
64 × 1.2 TB 10k RPM SAS hard disk drives (HDD)
16 × 1.6 TB flash memory drives (FMD)
83-01-03-40/00 1
Virtual machines running on virtualization platform
3 virtual machine running Microsoft® Windows Server® 2012 (x86_64) for Hitachi Data Instance Director
2 vCPU
8 GB RAM
1 virtual machine running Microsoft Windows Server 2012 for Veritas NetBackup master server
1
Server for Hitachi Content Platform access node
Server runs VMware ESXi 6.0 to host a virtual machine
1 virtual machine for Hitachi Content Platform storage access node
16 vCPU
64 GB RAM
7.2.2.6 1
Hitachi Content Platform storage node
2 half system nodes
6 TB HDD, with a total of 168 TB per node
10 GbE Ethernet SFP+ SR Optical
4 × 1GbE Management port
2.1.0.11 1
Brocade 6510 switch 48 port Fibre Channel 16 Gb/s switch 7.4.1b 1
Brocade VDX 6740 48 port 10 GbE switch 5.0.1d 2
5

6
Hitachi Virtual Storage Platform G Series FamilyThe Hitachi Virtual Storage Platform G series family enables the seamless automation of the data center. It has a broad range of efficiency technologies that deliver maximum value while making ongoing costs more predictable. You can focus on strategic projects and to consolidate more workloads while using a wide range of media choices.
The benefits start with Hitachi Storage Virtualization Operating System RF. This includes an all new enhanced software stack that offers up to three times greater performance than our previous midrange models, even as data scales to petabytes.
Virtual Storage Platform G series offers support for containers to accelerate cloud-native application development. Provision storage in seconds, and provide persistent data availability, all the while being orchestrated by industry leading container platforms. Moved these workloads into an enterprise production environment seamlessly, saving money while reducing support and management costs.
This solution uses Virtual Storage Platform G600, which supports Oracle Real Application Clusters.
Hitachi Storage Virtualization Operating SystemHitachi Storage Virtualization Operating System (SVOS) spans and integrates multiple platforms. It integrates storage system software to provide system element management and advanced storage system functions. Used across multiple platforms, Storage Virtualization Operating System includes storage virtualization, thin provisioning, storage service level controls, dynamic provisioning, and performance instrumentation.
TABLE 2. SOFTWARE COMPONENTS
Software Version Function
Hitachi Storage Navigator N/A Storage management suite
Hitachi Command Suite 8 Storage management suite
Hitachi Data Instance Director 5.3 Data protection software
Microsoft® Windows Server® 2012 R2 Enterprise Microsoft host
Microsoft Windows Server 2012 R2 Standard Virtual machines
Red Hat Enterprise Linux 6.6 Operating system for Oracle RAC
Oracle ASM 12c Release 1 (12.1.0.2.0) Oracle ASM
Oracle Database 12c Release 1 (12.1.0.2.0) Oracle Database system
Hitachi Dynamic Provisioning VSP G600 Storage license
Hitachi Thin Image VSP G600 Storage license
Veritas NetBackup Master Server 7.7.3 Master Server
Veritas NetBackup Media Server 7.7.3 Media Server
Veritas NetBackup Client 7.7.3 Client
Hitachi Content Platform — Virtual Machine System
7.2.2.6 Virtual machine with Content Platform installed and configured
Hitachi Content Platform S10 - 7.2.2 Long term storage
6

7
Storage Virtualization Operating System includes standards-based management software on a Hitachi Command Suite (HCS) base. This provides storage configuration and control capabilities for you.
Storage Virtualization Operating System uses Hitachi Dynamic Provisioning (HDP) to provide wide striping and thin provisioning. Dynamic Provisioning provides one or more wide-striping pools across many RAID groups. Each pool has one or more dynamic provisioning virtual volumes (DP-VOLs) without initially allocating any physical space. Deploying Dynamic Provisioning avoids the routine issue of hot spots that occur on logical devices (LDEVs).
To enable essential management and optimization functions, this solution uses Hitachi Storage Navigator, a part of Storage Virtualization Operating System. Storage Navigator runs on most browsers. A command line interface is available.
Hitachi Vantara recommends the use of multiple dedicated dynamic provisioning pools for different types of Oracle data. This avoids intermixing different types of data I/O, which benefits performance during peak database operations.
Brocade SwitchesBrocade Switches Brocade and Hitachi Vantara partner to deliver storage networking and data center solutions. These solutions reduce complexity and cost, as well as enable virtualization and cloud computing to increase business agility.
The solution uses the following Brocade products:
Brocade 6510, a 48 port Fibre Channel 16 Gb/s switch
Brocade VDX 6740, a 48 port 10 GbE switch
Hitachi Data Instance DirectorHitachi Data Instance Director provides a modern, holistic approach to data protection, recovery, and retention.
Data Instance Director has a unique work flow-based policy engine, presented in a white board-style user interface. It helps you to map copy data management processes to business priorities. Data Instance Director includes a wide range of fully integrated storage-based and host-based incremental-forever data capture capabilities. These can be combined into complex workflows to automate and simplify copy data management.
Veritas NetBackupVeritas NetBackup supports a variety of platforms, which include Microsoft® Windows®, UNIX, and Linux systems. NetBackup includes the following server and the client software:
The master server manages backups, archives, and restores. The master server is responsible for media and device selection for NetBackup. Typically, the master server contains the NetBackup catalog. The catalog contains the internal databases that contain the information about NetBackup backups and configuration.
Media servers provide additional storage by allowing NetBackup to use attached storage devices. Media servers can also increase performance by disturbing the network load. Media servers can be referred to as device hosts.
Client software resides on the computers that contain data to back up. Servers also contain client software, and can be backed up.
NetBackup accommodates multiple servers that work together under the administrative control of one NetBackup master server. This combination of managed and unmanaged services let you build, deploy, and manage applications any way you like.
Hitachi Content PlatformHitachi Content Platform (HCP) provides distributed object storage for advanced unstructured data storage management. This helps you address challenges of ever-growing volumes of unstructured file storage. Divide a single Content Platform into multiple virtual object stores, secure access to each store, and uniquely configure each store for a particular workload.
7

8
Eliminate storage silos using Content Platform with a single object storage infrastructure. This supports a wide range of data types, applications, and users with different service level needs in enterprise and cloud environments.
Hitachi Content Platform archives fixed content to provide the following:
Ensure content integrity, authenticity, security, completeness, and accessibility over the long term, in accordance with relevant laws and regulations.
Offer fast, online access to content.
Allow integrated searching and indexing of the archive, including search of file contents.
Support business continuity, data recovery, compliance search, and retention needs.
Scale horizontally to support multiple applications and content types.
Scales vertically to support continued data growth.
Red Hat Enterprise LinuxRed Hat Enterprise Linux delivers military-grade security, 99.999% uptime, support for business-critical workloads, and so much more. Ultimately, the platform helps you reallocate resources from maintaining the status quo to tackling new challenges.
Oracle Database With the Real Application Clusters Option Oracle Database has a multi-tenant architecture so you can consolidate many databases quickly and manage them as a cloud service. Oracle Database also includes in-memory data processing capabilities for analytical performance. Additional database innovations deliver efficiency, performance, security, and availability. Oracle Database comes in two editions: Enterprise Edition and Standard Edition 2.
Oracle Real Application Clusters (Oracle RAC) is a clustered version of Oracle Database. It is based on a comprehensive high-availability stack that can be used as the foundation of a database cloud system, as well as a shared infrastructure. This ensures high availability, scalability, and agility for any application.
Solution DesignThis describes the infrastructure to protect Hitachi Unified Compute Platform for Oracle Database 12c with the Real Application Cluster option using Hitachi Data Instance Director, Veritas NetBackup, and Hitachi Content Platform.
Specific infrastructure configuration includes the following:
Oracle RAC Servers
Configure two server nodes as an Oracle Real Application Cluster.
Proxy (mount) Server, NetBackup Media server, Oracle Server
Configure one Oracle RAC node as a proxy server (mount machine), which is also a NetBackup media server and Oracle server.
Storage System
Map LDEVs to each port that is presented to the server as LUNs.
SAN Connection
Connect each 16 Gb/s Fibre Channel HBA port to the storage front-end ports through a switched SAN fabric.
8

9
Hitachi Data Instance Director nodes and Veritas NetBackup Master Server Virtual Machines
Hitachi Data Instance Director Master Node
Install one Data Instance Director master node on the virtual machine.
Hitachi Data Instance Director Repository Node
Install and configure one Data Instance Director repository node on the virtual machine.
Veritas NetBackup Master Server
Install and configure one Veritas NetBackup master server on the virtual machine.
Hitachi Content Platform Virtual Machine Access Node and Hitachi Content Platform Storage Node
Hitachi Content Platform Virtual Machine Storage Access Node
Configure one Hitachi Content Platform virtual machine to add, access Hitachi Content Platform storage nodes and to create a tenant configuration.
Note — Hitachi Vantara recommends configuring a VMware vSphere High Availability cluster for the Hitachi Content Platform virtual machine. A vSphere High Availability cluster lets a collection of VMware ESXi hosts work together to optimize their levels of availability.
Hitachi Content Platform Storage Node
Install and configure two Hitachi Content Platform storage nodes, and add these to the Hitachi Content Platform virtual machine.
Storage ArchitectureThis describes the storage architecture for this solution. It takes into consideration Hitachi Vantara and Oracle recommended practices for the deployment of database storage design.
Storage Configuration
Create the following storage pools using Hitachi Dynamic Provisioning on Hitachi Virtual Storage Platform G600, as shown in Figure 2 on page 10:
Operating system pool using two HDD groups configured as RAID-5 (3D+1P)
Dynamic tiering pool with 30 virtual volumes (VVols) using four FMD groups using Hitachi Accelerated Flash configured as RAID-10 (2D+2D)
Dynamic provisioning pool with 24 VVols using three HDD groups configured as RAID-6 (6D+2P)
Hitachi Thin Image (HTI) pool using four HDD groups configured as RAID-6 (6D+2P)
9

10
Figure 2
10

11
Environment Diagram
Figure 3 shows environment diagram of Hitachi Unified Compute Platform for Oracle Database 12c protection solution using Hitachi Data Instance Director, Veritas NetBackup, and Hitachi Content Platform (HCP) using Hitachi Thin Image (HTI) snapshots.
Figure 3
Table 3 shows the storage pool configuration used for this solution.
TABLE 3. STORAGE POOL CONFIGURATION
Pool ID hdid-os-sas-pool-01 hdid-ora-fmd-pool-01 hdid-ora-sas-pool-01 hdid-ti-sas-pool-01
Pool Type Dynamic Provisioning
Dynamic Provisioning
Dynamic Provisioning
Thin Image Provisioning
RAID Group 3-1 – 3-2 4-1 – 4-4 5-1 – 5-3 6-1 – 6-4
RAID Level RAID-5 (3D+1P) RAID-10 (2D+2D) RAID-6 (6D+2P) RAID-6 (6D+2P)
Drive Type 1.2 TB 10k RPM SAS Drive
1.6 TB Flash Module Drive (FMD)
1.2 TB 10k RPM SAS Drive
1.2 TB 10k RPM SAS Drive
Number of Drives
8 16 24 32
Pool Capacity
9.6 TB 12.8 TB 21.6TB 28.8 TB
11

12
Table 4, “Storage Pool Configuration,” shows the logical storage configuration used in this solution. Table 5, “520H B4 Server Blade Specifications on Hitachi Compute 2500,” shows the server blade specifications used on Hitachi Compute Blade 2500. Table 6, “520H B4 Server Blade Specifications on Hitachi Compute Blade 500,” shows the server blade specifications used on Hitachi Compute Blade 500.
TABLE 4. STORAGE POOL CONFIGURATION
Pool ID hdid-os-sas-pool-01 hdid-ora-fmd-pool-01 hdid-ora-sas-pool-01 hdid-ti-sas-pool-01
Number of VVols
3 30 24 N/A
VVol Size 200GB 400GB 200GB N/A
Purpose Operating System Oracle
OLTP Application Tablespaces
Oracle
System
Sysaux
Undo
Temp
Redo Logs
Parameter file
Password file
Oracle Cluster Registry
Voting Disk
Hitachi Thin Image snapshot images
Storage Port
1A, 2A, 1B, 2B, 1C, 2C, 1D, 2D, 3C, 4C, 3D, 4D 1A, 2A
TABLE 5. 520H B4 SERVER BLADE SPECIFICATIONS ON HITACHI COMPUTE 2500
Server Form Size Server Name Role CPU Core
RAM Blade
Node1 Half-Width size hdid-hcp-oracle-01 Oracle RAC node 16 256 GB 6
Node2 Half-Width size hdid-hcp-oracle-02 Oracle RAC node 16 256 GB 9
Node3 Half-Width size hdid-mount-host Mount host, Veritas NetBackup media server, and Oracle host
16 256 GB 10
12

13
Figure 4 shows the infrastructure for the 2-socket server used in this solution.
Figure 4
Database Layout
The database layout design uses recommended practices for Hitachi Data Instance Director for use with Oracle Database 12c. Configuration details in this document are for the tested environment. However, your production environment may vary.
Table 7, “Oracle RAC ASM Disk Group and Oracle Database File Structure,” on page 14 provides the recommended files system and database file structure for a Hitachi Data Instance Director environment to protect Hitachi Unified Compute Platform for Oracle Database 12c. The descriptions of the Oracle RAC ASM disk groups, the Oracle Database, and the Oracle node ASM disk groups (proxy server) file structure follow the table.
Note — For recommendations concerning Oracle file location prior to Hitachi Data Instance Director backup and Data Instance Director block storage requirements, and restrictions or limitations with your environment, refer to Hitachi Data Instance Director User Guide or Protecting Oracle12c with Hitachi Data Instance Director in a Single Site Best Practice Guide (AS-431-00 or later, PDF).
TABLE 6. 520H B4 SERVER BLADE SPECIFICATIONS ON HITACHI COMPUTE BLADE 500
Form Size Server Name Role CPU Core RAM
Half-Width size HV01 Hosts for Hitachi Data Instance Director virtual machines and NetBackup Master virtual machine
24 384 GB
13

14
This is the Oracle RAC ASM disk groups and Oracle Database file structure description:
OCRDG — Disk group contains Oracle Clusterware and Oracle RAC database configuration information.
REDO01 — Disk group contains redo log group 1.
REDO02 — Disk group contains redo log group 2.
FRADG — Disk group contains archived redo logs and flashback logs. It also contains a control file.
DATADG — Disk group contains system data files that are created during database creation with Oracle Database Configuration Assistant utility. Disk group also contains an Oracle parameter file (spfile), which is a shared file between two oracle RAC nodes. Disk group also contains the Oracle password file.
APPDG — Disk group contains application data files including small and big tablespaces.
This is the Oracle node ASM disk groups (proxy server) description:
OCRDG — Disk group contains Oracle Clusterware and Oracle RAC database configuration information.
TABLE 7. ORACLE RAC ASM DISK GROUP AND ORACLE DATABASE FILE STRUCTURE
Database Files OCRDG Disk Group
REDO01 Disk Group
REDO02 Disk Group
FRADG Disk Group
DATADG Disk Group
APPDG Disk Group
Oracle Cluster Registry and Voting Disks
X
Parameter file X
Password file X
Control files X
Redo log file X X
Archive log files X
System data files X
Application small and big data files
X
14

15
Table 8 shows LUNs, operating system disks, and Oracle ASM disk mappings for Oracle Database.
TABLE 8. LUNS, OPERATING SYSTEM DISKS, AND ORACLE ASM DISK MAPPINGS
LDEVs LUN Pool Operating System Device
ASM Disk ASMDG Purpose
0:02:10 0 ora-boot-db-1 /dev/sda1 N/A N/A Operating system and Oracle software binaries for the first Oracle database server in a two-node Oracle RAC Database
0:02:11 0 ora-boot-db-2 /dev/sda1 N/A N/A Operating system and Oracle software binaries for the second Oracle database server in a two-node Oracle RAC Database
0:02:12 - 0:02:16
1 - 5 ora-data-1 - ora-data-5
/dev/sdb - /dev/sdf
OCR_0000 - OCR_004
OCR Oracle Cluster Registry and Voting Disk
0:02:17 6 ora-data-6 /dev/sdg1 REDODG01_0000 REDODG01 Online REDO log group
0:02:18 7 ora-data-7 /dev/sdh1 REDODG02_0000 REDODG02 Online REDO log group
00:02:1F - 00:02:2C
14 - 24 ora-data-14 - ora-data-27
/dev/sdo1 - /dev/sdz1
FRADG_0000 - FRADG_0011
FRADG Flash Recovery Area
0:02:19 - 00:02:2C
8 - 13 ora-data-8 - ora-data-13
/dev/sdi1 - /dev/sdn1
DATADG_0000 - DATADG_0005
DATADG Sys
Sysaux
Undo
Temp
0:01:12 - 00:01:2D
30-57 ora-fm-data-03 - ora-fmd-data-32
/dev/sdae1 - /dev/sdaz1,
/dev/sdba1 - /dev/sdbf1
DATAFMD_0000 - DATAFMD_00029
APPDG Application Data
15

16
Table 9, “Oracle Configuration,” on page 16 shows the Oracle ASM configuration. Table 10, “Oracle ASM LUN Count,” on page 16 shows LUN count for the Oracle RAC database.
0:00:21 0 ora-boot-db-2 /dev/sda1 N/A N/A Operating system and Oracle software binaries for the One node Oracle RAC which is also a Proxy node for a Hitachi Thin Image mount operation
0:00:22 1 ora-ocr-proxy-1 -
ora-ocr-proxy-5
/dev/sdb OCR_0000 - OCR_004
OCR Oracle Cluster Registry and Voting Disk
TABLE 9. ORACLE CONFIGURATION
Environment Set to This
RAC configuration Yes
ASM Yes - Oracle 2 Node RAC Database
TABLE 10. ORACLE ASM LUN COUNT
ASM File Group
LUN Count for a Two Node Oracle RAC LUN Count for a One Node Oracle RAC for Hitachi Thin Image, Proxy Server, and NetBackup Media Server
OCRDG 5 5
DATADG 10 N/A
APPDG 30
REDO1DG 1
REDO2DG 1
FRADG 12
TABLE 8. LUNS, OPERATING SYSTEM DISKS, AND ORACLE ASM DISK MAPPINGS (CONTINUED)
LDEVs LUN Pool Operating System Device
ASM Disk ASMDG Purpose
16
17
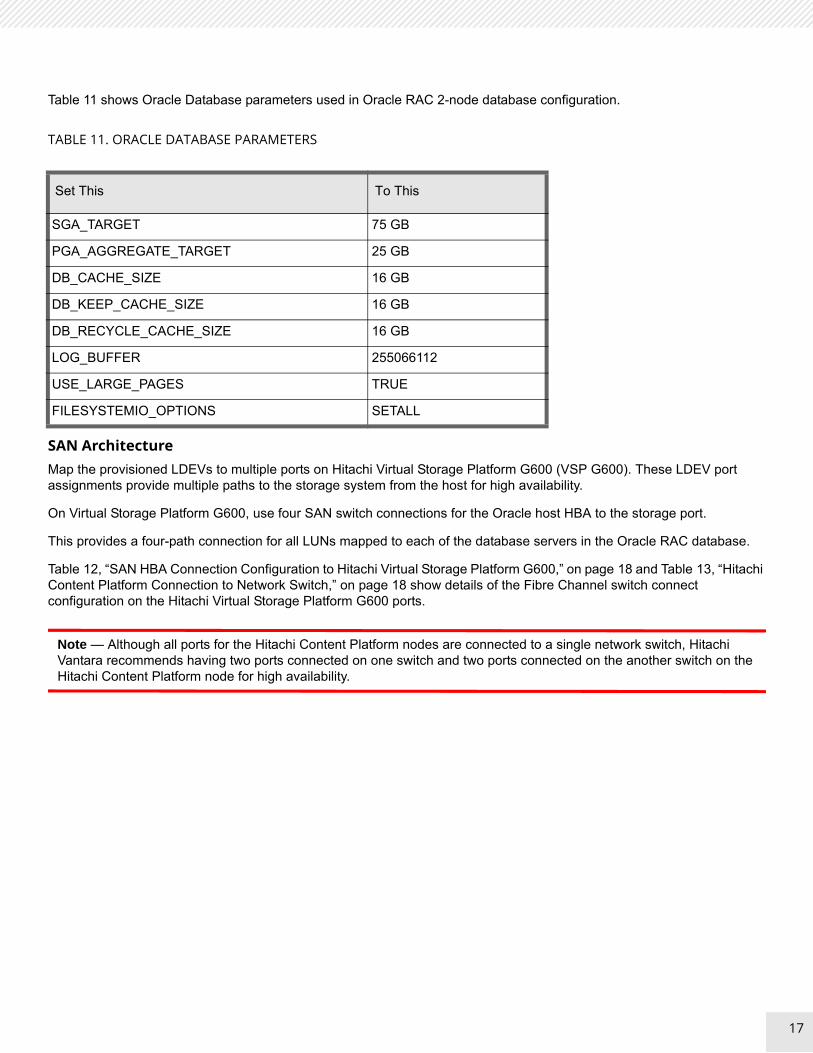
Table 11 shows Oracle Database parameters used in Oracle RAC 2-node database configuration.
SAN ArchitectureMap the provisioned LDEVs to multiple ports on Hitachi Virtual Storage Platform G600 (VSP G600). These LDEV port assignments provide multiple paths to the storage system from the host for high availability.
On Virtual Storage Platform G600, use four SAN switch connections for the Oracle host HBA to the storage port.
This provides a four-path connection for all LUNs mapped to each of the database servers in the Oracle RAC database.
Table 12, “SAN HBA Connection Configuration to Hitachi Virtual Storage Platform G600,” on page 18 and Table 13, “Hitachi Content Platform Connection to Network Switch,” on page 18 show details of the Fibre Channel switch connect configuration on the Hitachi Virtual Storage Platform G600 ports.
Note — Although all ports for the Hitachi Content Platform nodes are connected to a single network switch, Hitachi Vantara recommends having two ports connected on one switch and two ports connected on the another switch on the Hitachi Content Platform node for high availability.
TABLE 11. ORACLE DATABASE PARAMETERS
Set This To This
SGA_TARGET 75 GB
PGA_AGGREGATE_TARGET 25 GB
DB_CACHE_SIZE 16 GB
DB_KEEP_CACHE_SIZE 16 GB
DB_RECYCLE_CACHE_SIZE 16 GB
LOG_BUFFER 255066112
USE_LARGE_PAGES TRUE
FILESYSTEMIO_OPTIONS SETALL
17

18
TABLE 12. SAN HBA CONNECTION CONFIGURATION TO HITACHI VIRTUAL STORAGE PLATFORM G600
Host HBA Storage Host Group Switch Zone Storage Port
hdid-hcp-oracle-01 HBA1-1 CB2500_229_B6_HBA1_1 CB2500_229_B6_HBA1_1_ASE_42_33_3C CL3-C
HBA1-2 CB2500_229_B6_HBA1_2 CB2500_229_B6_HBA1_2_ASE_42_33_4C CL4-C
HBA2-1 CB2500_229_B6_HBA2_1 CB2500_229_B6_HBA2_1_ASE_42_33_3D CL3-D
HBA2-2 CB2500_229_B6_HBA2_2 CB2500_229_B6_HBA2_2_ASE_42_33_4D CL4-D
hdid-hcp-oracle-02 HBA1-1 CB2500_229_B9_HBA1_1 CB2500_229_B9_HBA1_1_ASE_42_33_1C CL1-C
HBA1-2 CB2500_229_B9_HBA1_2 CB2500_229_B9_HBA1_2_ASE_42_33_2C CL2-C
HBA1-1 CB2500_229_B9_HBA2_1 CB2500_229_B9_HBA2_1_ASE_42_33_1D CL1-D
HBA1-2 CB2500_229_B9_HBA2_2 CB2500_229_B8_HBA2_2_ASE_42_33_2D CL2-D
hdid-mount-host HBA1-1 CB2500_229_B10_HBA1_1 CB2500_229_B10_HBA1_1_ASE_42_33_1A CL1-A
HBA1-2 CB2500_229_B10_HBA1_2 CB2500_229_B10_HBA1_2_ASE_42_33_2A CL2-A
HBA2-1 CB2500_229_B10_HBA2_1 CB2500_229_B10_HBA2_1_ASE_42_33_1B CL1-B
HBA2-2 CB2500_229_B10_HBA2_2 CB2500_229_B10_HBA2_2_ASE_42_33_2B CL2-B
Hypervisor HBA1_1 CB500_11_HBA1_1 CB500_11_HBA1_1_ASE_42_33_1A Command Device
TABLE 13. HITACHI CONTENT PLATFORM CONNECTION TO NETWORK SWITCH
Storage Hitachi Content Platform port
Switch Switch Port
Hitachi Content Platform Node1 Port 1 Brocade VDX 6740 7
Port 2 11
Port 3 12
Port 4 21
Hitachi Content Platform Node2 Port 5 Brocade VDX 6740 7
Port 6 11
Port 7 12
Port 8 21
18

19
Network ArchitectureThis architecture requires the following separate networks:
Private Network (also called cluster interconnect) — This network must be scalable. In addition, it must meet the low latency needs of the network traffic generated by the cache synchronization of Oracle Real Application Clusters and inter-node communication among the nodes in the cluster.
Public Network — This network provides client connections to the applications and Oracle Real Application Clusters.
Hitachi Vantara recommends using pairs of 10 Gb/s NICs for the cluster interconnect network and public network.
Each server blade in this reference architecture has a quad port 10 Gb/s onboard NIC. The NIC ports have interconnected links to the two internal 10 Gb/s Ethernet switches in the chassis.
Observe these points when configuring private and public networks in your Oracle Real Application Cluster environment:
For each server in the clusterware configuration, use at least two identical, high-bandwidth, low-latency NICs for the interconnection.
Use NIC bonding to provide failover and load balancing of interconnections within a server.
Set all NICs to full duplex mode.
Use at least two public NICs for client connections to the application and database.
Use at least two private NICs for the cluster interconnection.
Physical Network Configuration
Figure 5 shows the network configuration for the Hitachi Data Instance Director (HDID) environment. It uses Oracle Real Application Cluster (RAC) nodes, Veritas NetBackup, and Hitachi Thin Image (HTI).
Figure 5
19

20
Table 14, “Network Configuration,” on page 20 shows the network configuration and Table 15, “Virtual IP and Scan Name Configuration,” on page 20 shows virtual IP address and SCAN name configuration used when testing the environment. Table 16, “Hitachi Content Platform Storage and Access Node Configuration,” on page 20 has the Hitachi Content Platform configuration used when testing. Your values may be different.
TABLE 14. NETWORK CONFIGURATION
Server NIC Ports NIC Bond VLAN/Subnet IP Address Network
Database Server 1 (Blade 6) B6NIC-0 Bond1 208 192.168.208.22 Private
B6-NIC-1 Private
B6-NIC-2 Bond100 167 172.17.167.242 Public
B6-NIC-3 Public
Database Server 2 (Blade 9) B9NIC-0 Bond1 208 192.168.208.23 Private
B9-NIC-1 Private
B9-NIC-2 Bond100 167 172.17.167.243 Public
B9-NIC-3 Public
Oracle host, Veritas NetBackup media server, proxy server for Hitachi Thin Image mount host (Blade 10)
B10-NIC-1 - 208 192.168.208.24 Private
B10-NIC-3 - 167 172.17.167.246 Public
TABLE 15. VIRTUAL IP AND SCAN NAME CONFIGURATION
Server Virtual IP Scan Name - hdid-oracle-scan
Database Server 1 (Blade 6) 172.17.167.244 172.17.167.145
172.17.167.146
172.17.167.147
Database Server 2 (Blade 9) 172.17.167.245
TABLE 16. HITACHI CONTENT PLATFORM STORAGE AND ACCESS NODE CONFIGURATION
Hitachi Content Platform Module Management IP Data Access IP VIP
Node1 — HCPS10-1 Server Module 1 172.17.252.116 172.17.167.118 172.17.167.120
Server Module 2 172.17.252.154 172.17.167.119 172.17.167.122
20

21
Deploy the SolutionDeploying this solution requires doing the following procedures:
1. See “Deploy Hitachi Data Instance Director” on page 22.
(1) “Install the Hitachi Data Instance Director Master Node and Repository Note” on page 22
(2) “Create the Hitachi Data Instance Director Master Node” on page 22
(3) “Define the Hitachi Data Instance Director Policy” on page 24
(4) “Define Hitachi Data Instance Director Data Flow ” on page 26
(5) “Distribute and Activate Hitachi Data Instance Director” on page 27
2. Prepare Hitachi Content Platform or Hitachi Command Suite
If Deploying with Hitachi Content Platform
i. “Install Hitachi Content Platform ” on page 28
ii. “Add Hitachi Content Platform Storage Nodes to the Hitachi Content Platform Access Node” on page 28
iii. “Set Up a Hitachi Content Platform Tenant” on page 30
iv. “Set Up a Hitachi Content Platform Tenant Data Access User Account” on page 31
If Deploying with Hitachi Cloud Services
“Deploy Hitachi Cloud Services” on page 32
3. Deploy Veritas NetBackup: System
(1) “Set Up Veritas NetBackup Master Server ” on page 32
(2) “Set Up Veritas NetBackup Media Server ” on page 32
(3) “Set Up Veritas NetBackup Client” on page 33
4. Deploy Veritas NetBackup Cloud Connector
(1) “Configure Veritas NetBackup Cloud Storage Server ” on page 33
(2) “Configure a Disk Pool” on page 36
(3) “Configure a Storage Unit ” on page 38
(4) “Add Media Servers to the Cloud Storage Server” on page 39
(5) “Configure Policies” on page 40
Node1 — HCPS10-2 Server Module 1 172.17.252.120 172.17.167.194 172.17.167.123
Server Module 2 172.17.252.122 172.17.167.195 172.17.167.211
Hitachi Content Platform virtual machine storage access node
172.17.252.112
TABLE 16. HITACHI CONTENT PLATFORM STORAGE AND ACCESS NODE CONFIGURATION
Hitachi Content Platform Module Management IP Data Access IP VIP
21

22
5. Tune NetBackup with Hitachi Cloud Storage
“Tunable Parameters ” on page 44
“Disk Pool Properties” on page 45
“Storage Unit Properties” on page 45
“Global Attributes” on page 46
“Media Server Scalable Storage Properties” on page 46
“Storage Unit Properties” on page 45
Your checklist might vary based on your environment. More information about each of these procedures follows.
Deploy Hitachi Data Instance Director
To deploy Hitachi Data Instance Director in this solution, do these procedures.
Install the Hitachi Data Instance Director Master Node and Repository Note
The Hitachi Data Instance Director Installation Guide, User Guide, and other documentation are located in the documentation folder of the DVD and ISO image. Refer to the Installation Contents of the Hitachi Data Instance Director User’s Guide for software and hardware details.
Deploy the master node on a virtual machine running Microsoft® Windows Server® in a network. You can deploy a second passive master node on a virtual machine running Windows Server in a failover cluster.
A site might have more than one repository node. The repositories work together to allow searches or restores that pull data from several repositories.
Create the Hitachi Data Instance Director Master Node
Connect to the Hitachi Data Instance Director master node, which is installed on a virtual machine running Microsoft® Windows Server® 2012 R2 on Hitachi Compute Blade 500.
22
23
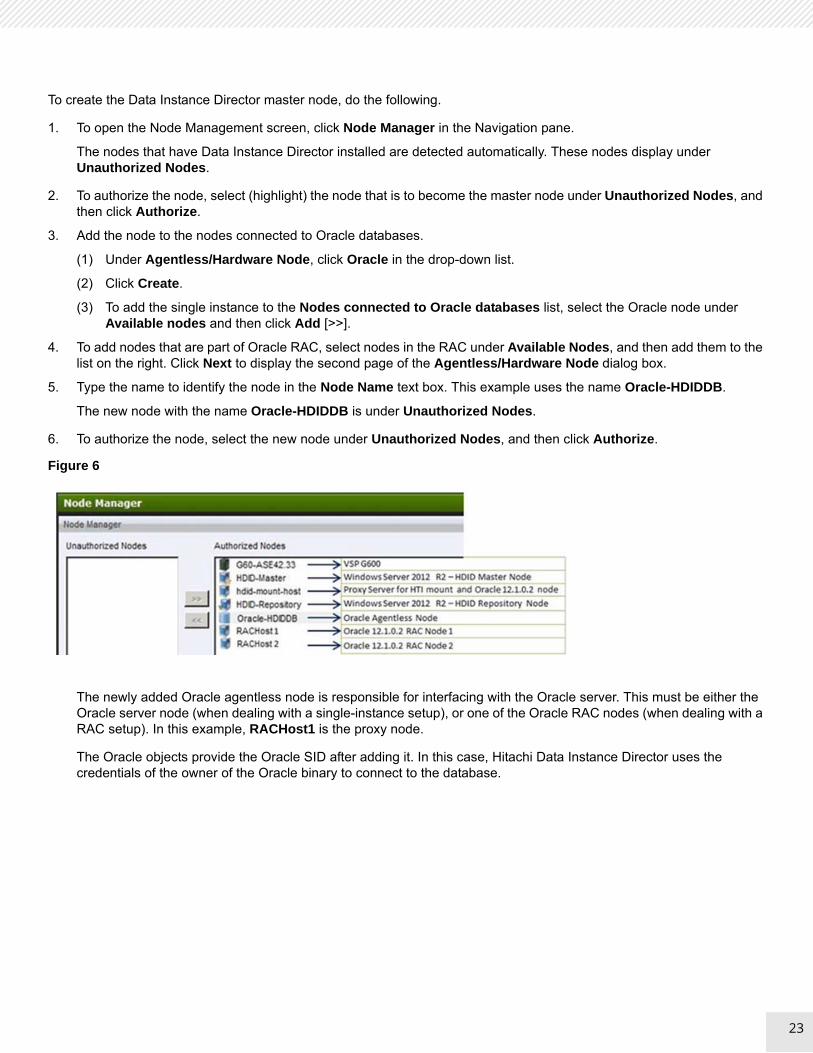
To create the Data Instance Director master node, do the following.
1. To open the Node Management screen, click Node Manager in the Navigation pane.
The nodes that have Data Instance Director installed are detected automatically. These nodes display under Unauthorized Nodes.
2. To authorize the node, select (highlight) the node that is to become the master node under Unauthorized Nodes, and then click Authorize.
3. Add the node to the nodes connected to Oracle databases.
(1) Under Agentless/Hardware Node, click Oracle in the drop-down list.
(2) Click Create.
(3) To add the single instance to the Nodes connected to Oracle databases list, select the Oracle node under Available nodes and then click Add [>>].
4. To add nodes that are part of Oracle RAC, select nodes in the RAC under Available Nodes, and then add them to the list on the right. Click Next to display the second page of the Agentless/Hardware Node dialog box.
5. Type the name to identify the node in the Node Name text box. This example uses the name Oracle-HDIDDB.
The new node with the name Oracle-HDIDDB is under Unauthorized Nodes.
6. To authorize the node, select the new node under Unauthorized Nodes, and then click Authorize.
Figure 6
The newly added Oracle agentless node is responsible for interfacing with the Oracle server. This must be either the Oracle server node (when dealing with a single-instance setup), or one of the Oracle RAC nodes (when dealing with a RAC setup). In this example, RACHost1 is the proxy node.
The Oracle objects provide the Oracle SID after adding it. In this case, Hitachi Data Instance Director uses the credentials of the owner of the Oracle binary to connect to the database.
23

24
7. Click Finish.
Figure 7
Define the Hitachi Data Instance Director Policy
A policy defines data classifications and data operations.
To create a new storage policy type for Oracle RAC databases, do the following.
1. To open the Policy Definition screen and define a policy, click Policy Definition in the navigation pane.
2. Choose the Attributes for the Hitachi Data Instance Director database to be included.
Included databases the databases that are replicated and mounted.
(1) Under Backup Mode, click Online.
(2) Under Databases, select HDIDDB from Available databases, and then click Include.
Figure 8
24

25
3. Define the data operation.
Use the Operation palette (right of the screen) to define the data operation.
(1) Drag the Replicate symbol to the Operation palette.
(2) Attach the Snapshot symbol to the Replicate symbol.
(3) Attach the Mount symbol to the Snapshot symbol.
(4) Under Schedules, choose the name HDIDDB-Schedule for the Replicate, Snapshot and Mount operation.
Figure 9
(5) Name the script as an attribute.
i. Click the Attributes tab for the Mount symbol.
ii. In the Scripts area, select the After mount check box.
iii. In the Scripts area, type the script name in the text box. Use this name for the script, which is found in /opt/Hitachi/HDID/scripts on the hdid-mount-host machine:
NetBackup-Oracle-Full_Backup.sh
Figure 10
25

26
Define Hitachi Data Instance Director Data Flow
Assign the snapshot policy to the Oracle-HDIDDB agentless node connected to the Oracle database server or Oracle RAC.
To define the Hitachi Data Instance Director data flow, do the following.
1. To open the Data Flow screen, click Data Flow in the Navigation pane.
The Source palette, on the left, contains the source nodes, movers, and destination nodes. Replicating and mounting of an Oracle database requires you only to specify the Oracle server agentless node.
2. Drag the Oracle-HDIDDB source node to the Defined-Data Flow palette.
3. From the Mover pallet, select the Batch symbol ( ).
4. From the Destination palette, under Hitachi Block Storage, select the Hitachi Virtual Storage Platform G600 (VSP G600) storage as a target storage for the replicate and mount operation. In this example, the VSP G600 is labeled G600-ASE42.33.
The VSP G600 storage is where the Oracle RAC nodes are present.
Figure 11
5. In the Defined-Data Flow palette, select the Oracle-HDIDDB-SnapshotAndMount Dataflow symbol to display a list of defined policies on the Policies to assign locally tab below the workspace.
6. Click the Oracle-HDIDDB-Policy check box and the Snapshot check box to assign them to the Oracle-HDIDDB-SnapshotAndMount Dataflow.
7. For the Virtual Storage Platform G600 storage (G600-ASE-42.33 in this example), do the following on the Oracle-HDIDDB-Policy Replicate tab:
(1) For Target Storage, select the Hitachi Thin Image storage pool ti-hdid-hcp-pool.
(2) For Replication Type, click the Refreshed Snapshot option.
8. On the Oracle-HDIDDB-Policy HTI Snapshot Mount tab, do the following:
(1) For Mount Type, click the Proxy Backup option.
(2) For Mount Host, click hdid-mount-host.
Figure 12 on page 27 shows the complete data flow process.
26

27
Figure 12
Distribute and Activate Hitachi Data Instance Director
To distribute and activate Hitachi Data Instance Director, do the following.
1. From the tool bar, click the Save and Compile button. The Rules Compilation dialog box displays.
2. After the compiling the policy, click Distribute Rules.
This distributes the rules, and activates the policy.
Deploy Hitachi Content Platform
To deploy Hitachi Content Platform, perform the following procedures.
You can skip the procedures to deploy Hitachi Content Platform if you will integrate Veritas NetBackup with off-premises Hitachi Cloud Services.
27

28
Install Hitachi Content Platform
To install Hitachi Content Platform, do the following.
1. Apply Hitachi Content Platform pre-installation requirements and tasks.
2. Install the appliance operating system.
3. Install Hitachi Content Platform.
For complete details on installing Hitachi Content Platform, refer to Hitachi Content Platform: Installing an HCP System.
Add Hitachi Content Platform Storage Nodes to the Hitachi Content Platform Access Node
Repeat this process to add both Hitachi Content Platform storage nodes to the Hitachi Content Platform access node.
To add a Hitachi Content Platform storage node to the Hitachi Content Platform access node, do the following.
1. Add a storage node to the access node.
Repeat this for both storage nodes.
(1) Using the System Management Console (SMC) for Hitachi Content Platform, from the Hardware menu, click Add Node.
(2) From the Connection tab on Add Node, supply the following and then click Next:
Username
Password
Domain Name
The Hitachi Content Platform node name and serial number display on the Name tab.
Figure 13
(3) On the Name tab, click Next.
(4) On the Storage Settings tab, to add node under the Content Platform pool, click Add to existing storage pool, and click Next.
On the Review tab, a summary displays.
28

29
(5) To add the node to the Hitachi Content Platform pool, click Finish.
Figure 14
Repeat this procedure to add the second Hitachi Content Platform node.
2. Verify both Hitachi Content Platform nodes are added. On the System Management Console (SMC). Click the Hardware menu and then click Nodes. Both nodes should display, as in Figure 15.
Figure 15
3. Enable tiering on the Hitachi Content Platform node. From the System Management Console, click Storage, then Service Plans, and then click Add Tier.
29

30
Figure 16
Set Up a Hitachi Content Platform Tenant
To set up a Hitachi Content Platform tenant, do the following.
1. Using the System Management Console (SMC), click Tenants, and then Create Tenant.
2. Do the following for the new tenant:
(1) Configure the following for the tenant:
Tenant name
Hard quota
Soft quota
Namespace quota
(2) Enable the features you want.
(3) Provide credentials for the tenant's initial security account.
(4) Click Create Tenant.
Figure 17
30

31
3. Enable management through APIs for the tenant.
(1) In the SMC, select the tenant that you created.
(2) On the Overview tab, click the tenant URL. In Figure 17, the tenant URL shown is the one used during testing the environment (https://nbu.hcp.hds.com:8000). Your tenant URL will be different.
(3) From the Security tab, click Management API, and then select the Enabled Management through APIs check box.
Figure 18
Set Up a Hitachi Content Platform Tenant Data Access User Account
To set up a user account for tenant data access for Veritas NetBackup on Hitachi Content Platform, do the following.
1. Using the Tenant Management Console, from the Create a data access user for NetBackup menu, click Create User Account.
2. Complete the following:
Username
Full name
Password
3. Select the Allow namespace management check box.
4. Assign the roles as needed.
31

32
Figure 19
Deploy Hitachi Cloud Services
You can skip this procedure if you will integrate Veritas NetBackup with an on premise Hitachi Content Platform.
Visit Cloud Services to learn more about Hitachi Cloud Services.
To register with Hitachi Cloud Services, send an email message to [email protected]
Deploy Veritas NetBackup System
To deploy Veritas NetBackup, perform the following procedures.
Set Up Veritas NetBackup Master Server
This deployment uses a platform running Microsoft® Windows Server®.
To install Veritas NetBackup Master Server, run the setup and follow the wizard.
Set Up Veritas NetBackup Media Server
After installing Veritas NetBackup Master Server, install NetBackup Media Server. Depending on your requirements, you can install one or more media servers.
This installation is on a Linux platform, which is also a Hitachi Data Instance Director proxy server and Oracle server.
Note — The NetBackup Master Server and Media Server should have same time zone and system time.
32

33
Set Up Veritas NetBackup Client
A Veritas NetBackup client is a NetBackup component where source data resides for backup.
Deploy Veritas NetBackup Cloud Connector
To deploy Veritas NetBackup Cloud Connector, perform the following procedures.
Configure Veritas NetBackup Cloud Storage Server
To configure Veritas NetBackup Cloud Storage Server, do the following.
1. Start the Cloud Storage Server Configuration Wizard.
(1) Using NetBackup Administration Console, do the following:
Click Master Server on the left pane.
Click Configure Cloud Storage Server on the right pane.
(2) Click Hitachi in the list of cloud storage providers and click Next (Figure 20 on page 33).
Figure 20
33

34
2. Add the cloud storage.
(1) In Cloud Storage Provider, click Add Cloud Storage.
(2) Add this configuration information.
i. Service host: Enter the fully qualified domain name of Hitachi Content Platform or Hitachi Command Suite tenant.
ii. Service Endpoint: Leave blank.
iii. HTTP Port: 80 (default)
iv. HTTPS Port: 443 (default)
v. Storage Server Name: Enter the logical name you wish to use in NetBackup for this Hitachi Content Platform or Hitachi Command Suite tenant.
Note — When configuring an Amazon S3-compatible cloud provider like Hitachi Content Platform, Veritas recommends that storage server names should be logical names and should not match a physical host name.
vi. Endpoint Access Style: Path Style (leave as is)
vii. Region Settings Tab: Do not enter any region settings.
viii. When finished, click OK.
Figure 21
34

35
(3) Choose a media server name hosting Veritas NetBackup. You will add this storage server to the additional media server later.
(4) Type the Hitachi Content Platform or Hitachi Command Suite tenant user name in Base64-encoded format into the Access key ID text box. This is the tenant data access user created in the previous step.
(5) Type the Hitachi Content Platform or Hitachi Command Suite tenant user's password in MD5-hashed format into the Secret access key text box.
3. Make the advanced settings.
(1) Click Advanced Settings. The Advanced Server Configuration dialog box opens.
(2) Determine what to do with the Use SSL check box.
The Use SSL check box is selected by default.
Leave the check box selected if the following is true:
You are connecting to Hitachi Cloud Services.
You are connecting to Hitachi Content Platform and you have installed a certificate signed by a trusted certificate authority on Hitachi Content Platform.
Uncheck (clear) the check box if the following is true:
You are connecting to Hitachi Content Platform and Hitachi Content Platform is using the self-signed certificate generated by the Hitachi Content Platform system.
Note — It may be possible to install a Hitachi Content Platform self-signed certificate on your Veritas NetBackup media server or servers in order to establish a trusted SSL connection between NetBackup and Hitachi Content Platform using self-signed certificates. However, that procedure is outside of the scope of this document.
(3) Determine what to do with the Use Proxy Server check box.
The Use Proxy Server check box is not selected by default.
Select this check box only if you require a proxy to connect with Hitachi Content Platform or Hitachi Command Suite.
(4) Click OK to continue.
(5) In the wizard, click Next.
4. Make the compression and encryption settings.
(1) Determine the encryption setting.
By default, the Encryption check box is not selected.
Select this check box only if you want to encrypt data before sending it to Hitachi Content Platform or Hitachi Command Suite.
(2) Click Next.
The Cloud Storage Server Configuration Summary displays.
35

36
5. Verify that cloud storage server configuration settings are correct and click Next.
Figure 22
6. To continue to the Disk Pool Configuration wizard, when prompted, click Next.
Configure a Disk Pool
Use the Disk Pool Configuration wizard to define a disk pool.
To define a disk pool, do the following.
1. Create a bucket.
On the first page of the Disk Pool wizard, you are prompted to select a storage server volume to add to the disk pool. The list of available volumes should be empty.
(1) Click Add New Volume. The Create Buckets dialog box opens.
(2) In the Create Buckets dialog box, type the name of the bucket (nbubucket) to be created.
(3) Click Add.
This is the name of the bucket or namespace to create in your Hitachi Content Platform or Hitachi Command Suite tenant where Veritas NetBackup files will be stored.
Note —The bucket or namespace is created with the tenant's default quota amount allocated. Ensure that the namespace has adequate quota for your needs.
36

37
Figure 23
The recommendation is that you optimize the Hitachi Content Platform namespace for access by cloud protocols. This optimization is done by default for Hitachi Command Suite namespaces.
2. If this is a Hitachi Content Platform namespace, optimize it for access by cloud protocols from the Tenant Management Console.
(1) From the Tenant Management Console, click Namespaces, click <namespace> , click Settings, and then click Optimization.
(2) Click the Optimized for cloud protocols only option.
(3) Click Update Settings.
3. In the Disk Pool wizard, provide additional information about the new pool.
(1) Give your disk pool a name.
(2) Leave high water mark and low water mark at the default values.
(3) Leave the Limit I/O streams check box unselected.
(4) Click Next.
37

38
(5) Confirm your choices and click Next.
(6) To continue with configuring a storage unit, select the Create a storage unit check box and click Next.
Figure 24
Configure a Storage Unit
Do this procedure on the Storage Unit Creation page of the Disk Pool wizard.
To configure a storage unit, do the following.
1. Type the Storage Unit Name.
2. Under Media Server, click the Use any available media server to transport data option.
3. Set the Maximum concurrent jobs for your cloud storage unit.
4. Set the Maximum fragment size in megabytes.
5. Click Next.
See “Tune Veritas NetBackup with Hitachi Cloud Storage” on page 44 for more details on these properties.
38

39
Figure 25
Add Media Servers to the Cloud Storage Server
To add media servers to the cloud storage server, do the following.
1. In the Veritas NetBackup Administration Console, click to expand Media and Device Management, then click to expand Credentials, and then click Storage Servers.
2. In the Storage Servers area, double-click the cloud storage server you created in the previous steps.
3. On the Media Servers tab of the Change Storage Server dialog box, select the media servers you want to have access to with this cloud storage server.
Because you clicked Use any available media server to transport data in the storage unit settings, all the media servers that you select here are used by policies that use the storage unit you created.
39

40
Figure 26
Configure Policies
In order to back up objects from Veritas NetBackup to Hitachi Content Platform, create a policy.
To create a backup policy, do the following.
1. Using the Veritas NetBackup Administration Console, click Master Server in the upper left pane and click Create Policy.
2. Click the option for the type of backup policy you need to create. For this solution, click the Oracle option, and then click Next.
3. Type a Policy name and, under Selection, click the option for the policy type to be created.
40

41
Figure 27
4. Click Add and add the new Oracle client.
Figure 28
5. Specify backup selection and backup type.
In this example, the whole database is selected with Full Backup and Differential Incremental Backup as a backup type. Backup settings can be changed or configured, based on your environment.
6. Specify the following as needed in your environment:
A schedule backup window
Backup frequency and retention policy
Backup scheduled windows
7. To create the policy, click Finish.
41

42
8. Set the storage unit.
(1) Click the Attributes tab.
(2) Under Destination, click the nbuhcppool-stu storage unit for Policy storage.
Figure 29
9. Set the backup selection
(1) Click the Attributes tab
(2) Under Backup Selections, click New to add the script present on hdid-mount-host.
Figure 30
This solution uses the script NetBackup-Run-HDID-Schedule.sh to trigger a Hitachi Data Instance Director policy to do the following:
Backup the Oracle database using Hitachi Thin Image
Mount the Thin Image snapshot mounted on the mount host
42

43
This is NetBackup-Run-HDID-Schedule.sh:
#!/bin/bash
# Description: NetBackup-Run-HDID-Schedule.sh: This script is used to trigger HDID policy to backup Oracle RAC database using Hitachi thin image and mount the Hitachi thin image snapshot. The 'After Mount' script NetBackup-Oracle_Full_Backup.sh in the HDID policy to back up mounted Oracle database to HCP using NetBackup
ssh hdid-hcp-oracle-02 '/opt/Hitachi/HDID/bin/triggerbackup -p HDIDDB-Policy' >> /oracle/Oracle-BackupLogs/$(date +"%m_%d_%Y_%H_%M_%S")_HDID_TriggerBackup.log
#End of Script
The output from NetBackup-Run-HDID-Schedule.sh is logged in the destination log directory.
When the policy trigger using NetBackup-Run-HDID-Schedule.sh is successful, Data Instance Director does the following:
Displays this message: Activated 1 backup operation
Starts to execute this policy
[root@hdid-mount-host]# cat /oracle/Oracle/BackupLogs/01_19_2017_07_45_41_HDID_TriggerBackup.log
Activated 1 backup operation
The Data Instance Director policy that uses NetBackup-Oracle_Full_Backup.sh, a different script, runs after mounting (see “Define the Hitachi Data Instance Director Policy,” starting on page 24). The difference is that the policy using NetBackup-Oracle_Full_Backup.sh does the backup of the Thin Image snapshot mount of the Oracle database to Hitachi Content Platform using Veritas NetBackup.
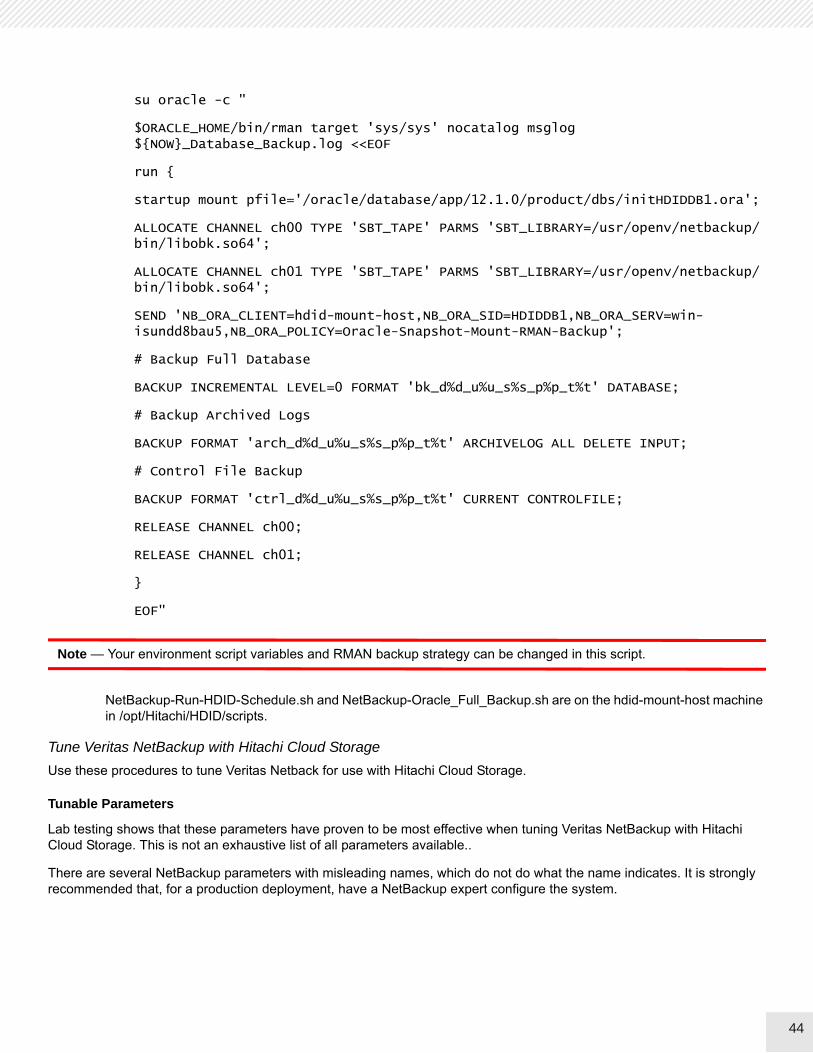
This is NetBackup-Oracle_Full_Backup.sh, which is used in the Data Instance Director policy after mounting (Figure 10 on page 25).
#!/bin/bash
# Description: NetBackup-Oracle_Full_Backup.sh : This script is used to backup Oracle database Hitachi Thin Image snapshot mount to HCP storage
#Export Oracle variables
ORACLE_HOME=/oracle/database/app/12.1.0/product
ORACLE_SID=HDIDDB1
ORACLE_TARGET_INIT_FILE=$ORACLE_HOME/dbs/init$ORACLE_SID.ora
NOW=/oracle/Oracle-BackupLogs/$(date +"%m_%d_%Y_%H_%M_%S")
export ORACLE_HOME ORACLE_SID ORACLE_TARGET_INIT_FILE NOW
#Mount the HTI snapshot Oracle database and take RMAN full backup
43
44
su oracle -c "
$ORACLE_HOME/bin/rman target 'sys/sys' nocatalog msglog ${NOW}_Database_Backup.log <<EOF
run {
startup mount pfile='/oracle/database/app/12.1.0/product/dbs/initHDIDDB1.ora';
ALLOCATE CHANNEL ch00 TYPE 'SBT_TAPE' PARMS 'SBT_LIBRARY=/usr/openv/netbackup/bin/libobk.so64';
ALLOCATE CHANNEL ch01 TYPE 'SBT_TAPE' PARMS 'SBT_LIBRARY=/usr/openv/netbackup/bin/libobk.so64';
SEND 'NB_ORA_CLIENT=hdid-mount-host,NB_ORA_SID=HDIDDB1,NB_ORA_SERV=win-isundd8bau5,NB_ORA_POLICY=Oracle-Snapshot-Mount-RMAN-Backup';
# Backup Full Database
BACKUP INCREMENTAL LEVEL=0 FORMAT 'bk_d%d_u%u_s%s_p%p_t%t' DATABASE;
# Backup Archived Logs
BACKUP FORMAT 'arch_d%d_u%u_s%s_p%p_t%t' ARCHIVELOG ALL DELETE INPUT;
# Control File Backup
BACKUP FORMAT 'ctrl_d%d_u%u_s%s_p%p_t%t' CURRENT CONTROLFILE;
RELEASE CHANNEL ch00;
RELEASE CHANNEL ch01;
}
EOF"
Note — Your environment script variables and RMAN backup strategy can be changed in this script.
NetBackup-Run-HDID-Schedule.sh and NetBackup-Oracle_Full_Backup.sh are on the hdid-mount-host machine in /opt/Hitachi/HDID/scripts.
Tune Veritas NetBackup with Hitachi Cloud Storage
Use these procedures to tune Veritas Netback for use with Hitachi Cloud Storage.
Tunable Parameters
Lab testing shows that these parameters have proven to be most effective when tuning Veritas NetBackup with Hitachi Cloud Storage. This is not an exhaustive list of all parameters available..
There are several NetBackup parameters with misleading names, which do not do what the name indicates. It is strongly recommended that, for a production deployment, have a NetBackup expert configure the system.
44

45
Disk Pool Properties
These are tuning suggestions for the disk pool properties.
Limit I/O Streams. Select to limit the number of read and write jobs for each volume in the disk pool. A job may read backup images or write backup images. By default, there is no limit. It is recommended that no limit be set, as there is only one volume in a cloud disk pool.
Storage Unit Properties
These are tuning suggestions for the storage unit properties.
Maximum Concurrent Jobs. This is the maximum number of jobs that can run concurrently for a particular storage unit. Each job may take multiple connections to the storage unit, so the maximum jobs is one factor in total concurrent connections, but is not the only factor.
For cloud storage the maximum number of concurrent HTPP connections, set it equal to the following:
Maximum concurrent jobs × maximum HTTP connections per job
Calculate the maximum connections per job by the following:
(WRITE_BUFFER_SIZE)/(Chunk size)
Use these numbers in your calculations:
The Hitachi Content Platform chunk size is 256 MB. The default WRITE_BUFFER_SIZE is 1024 MB. By default, there may be up to 4 HTTP connections per job.
The Hitachi Command Suite chunk size is 1 MB. The default WRITE_BUFFER_SIZE is 100 MB. By default, there may be up to 100 HTTP connections per job.
Tune the maximum concurrent jobs and WRITE_BUFFER_SIZE to get the correct balance of NetBackup jobs and concurrent connections. The chunk size is not tunable.
Maximum Fragment Size. The fragment, in this case, refers to a directory in the Hitachi Content Platform or Hitachi Command Suite bucket. By setting this value, you can control the maximum number of objects (Veritas NetBackup Cloud Connector chunks) that may be stored in any one directory.
If you are connecting NetBackup to Hitachi Command Suite, the chunk size is 1 MB. So, setting the maximum fragment size to 1000 MB results in 1000 files per directory.
If connecting to Hitachi Content Platform, the chunk size is 256 MB. So, setting the maximum fragment size to 256000 MB results in 1000 files per directory.
In Hitachi Data System testing, backup performance was notably faster when using larger numbers for testing. NetBackup would not store more than 1000 objects (chunks) in a directory, so it is recommended that you set this to 1000 × chunk size.
45

46
Global Attributes
These are tuning suggestions for the global attributes.
Maximum jobs per client. This setting applies to how many jobs can run on any single client at a time.
Setting this too high may overwhelm your clients. Setting this too low negatively affects performance if you are operating with small number of clients.
If you are doing performance testing and want to reach the maximum number of jobs, set this to the following, at least:
(Maximum concurrent jobs)/(number of clients).
In a production environment, set this to the number appropriate for your least capable client.
Media Server Scalable Storage Properties
These are tuning suggestions for the media server scalable storage properties.
Total available bandwidth. This property allows you to limit the bandwidth consumed by a media server for cloud storage jobs. The value is specified in kilobytes per second. For best performance, specify the speed of your connection to the Hitachi Content Platform or Hitachi Command Suite.
Change this setting to 1,048,576 KB/s when installed on a 10 GbE network. The default value of 102,400 KB/s is appropriate for a 1 GbE network.
Lower settings may be appropriate for connections over a WAN.
Maximum concurrent jobs. This limits the number of jobs the media server can run for a cloud storage server target.
The actual maximum number of concurrent jobs is the sum of this property for each individual media server, not to exceed the number in the maximum concurrent jobs storage unit property, described above.
The sum of all the media server settings should be equal to or greater than the storage unit setting, if performance testing.
Storage Server Properties
These are tuning suggestions for the storage server properties.
The prefix for Hitachi Command Suite properties is HT. The prefix for Hitachi Content Platform properties is HCP.
Media Servers. Select the media servers that are able to run jobs for the storage server. Only media servers that support the cloud connector (7.7+) appear in the list.
RITE_BUFFER_SIZE and READ_BUFFER_SIZE. These are very important settings, as they control the amount of write buffer and read buffer a job can consume. This number, divided by the chunk size for the storage server type, determines how many individual HTTP connections or threads a single job utilizes.
For Hitachi Content Platform, with a chunk size 256 MB, this number defaults to 1073741824, which allows 4 connections per job.
For Hitachi Command Suite, with a chunk size 1 MB, this number defaults to 104857600, which allows 100 connections per job.
46

47
Solution ExecutionExecution of this solution consists of the following procedures:
“Backup Oracle — Hitachi Data Instance Director Scheduled Snapshot (Hitachi Thin Image), Mount on Proxy Server” on page 47
“Restore (Revert) Oracle Database Using Hitachi Data Instance Director and Recover Oracle Database with Manual Steps” on page 49
“Backup 'Hitachi Thin Image Snapshot mount' from Proxy Server (hdid-mount-host) to Hitachi Content Platform using Veritas NetBackup” on page 52
“Restore and Recover Backup (Oracle database) From Hitachi Content Platform Storage Through NetBackup Directly to the Application Host (hdid-hcp-oracle-02) ” on page 56
Backup Oracle — Hitachi Data Instance Director Scheduled Snapshot (Hitachi Thin Image), Mount on Proxy Server
This is how to backup Oracle database with a scheduled snapshot with Hitachi Thin Image on Hitachi Data Instance Director.
Snapshot and Mount
Hitachi Data Instance Director leverages Hitachi snapshot technology to create fast and space-efficient backups of Oracle databases. When used on Oracle databases, a snapshot for Hitachi Data Instance Director is available for Oracle databases in non-ASM, ASM, standalone, and RAC configurations.
A storage snapshot is a backup copy created at a particular point in time. Snapshots do not require an initial copy, as they are not stored as physical copies of blocks. They are stored as pointers to the blocks that existed when creating the snapshot. Because of this tight physical relationship, the snapshot is maintained on the same storage array as the original data.
The snapshot operation is used to trigger snapshots of entire volumes. Snapshots can be accessed using the Restore screen, where they can be mounted or used for reverting a volume to a previous state.
Ordinarily, when a snapshot is performed, the state of the snapshot consists of the exact state of the file system at the point in time at which the snapshot was triggered. This can be problematic when the snapshot is eventually restored, as some applications that were running at the time may not, for example, have flushed all their memory file buffers, and their data files on disk could be in an inconsistent state.
To resolve this, request certain applications to quiesce into a safe state prior to a snapshot being triggered, and then to restore their previous active state after the snapshot is triggered. This ensures their state during the snapshot is consistent and that they can run as expected if the snapshot is restored.
The mount option allows you to expose volumes or mount the selected snapshot or replication. This operation may take several minutes to complete. Hitachi Data Instance Director supports infrastructure to mount snapshots on the destination Oracle database.
The Hitachi Thin Image snapshot and mount of the Thin Image snapshot on the proxy server operation are executed based on the policy and schedule defined in the policy. See Deploy Hitachi Data Instance Director.
Log Manager allows you to filter, view, and manage Data Instance Director application logs. Hitachi Thin Image snapshot and mount operation logs of Oracle can be seen in Log Manager.
47

48
Figure 31
On the Storage – Managed Storage screen, expand the tree for the policy Oracle-HDIDDB to see the snapshot, replicate, and mount details within this policy.
Once mounting a snapshot on the host, you can view all database files that are available in the mounted snapshot. In this case, all the ASM disk groups are shown mounted on hdid-mount-host host.
Figure 32
For ASM snapshots, clicking Mount in directory mounts the snapshot on the ASM instance. You must have Oracle ASM configured on the mount host.
48

49
Once the mount operation completes, connect using the grid credentials and check the status of the diskgroups that are mounted on the proxy server (hdid-mount-host). You will find that diskgroups are in mounted state.
SQL> select name,STATE from v$asm_diskgroup;
NAME STATE
------------------------------ ----------- -
OCR MOUNTED
FRADG MOUNTED
REDODG02 MOUNTED
REDODG01 MOUNTED
DATADG MOUNTED
APPDG MOUNTED
When a Thin Image snapshot is mounted using Mount at original location, the snapshot (disk groups) will have the same disk group name as the original database at the asmcmd command prompt. This number will be incremented if multiple snapshots are mounted to the same host.
Note — Snapshots cannot be mounted on the production server at the original location, because the location is already occupied by the original production database disk groups. If the original disk group is dropped, then you can only mount a snapshot at the original location. If we mount a snapshot at the original location, even after the location is already occupied by original production database disk groups, disk group names are mounted appended with "00000."
Restore (Revert) Oracle Database Using Hitachi Data Instance Director and Recover Oracle Database with Manual Steps
This is how to restore and recover an Oracle database using Hitachi Data Instance Director manually.
Perform Oracle Database Restore Using Hitachi Data Instance Director Revert
It is possible to revert (restore database) using a Hitachi Thin Image snapshot to a database server with Hitachi Data Instance Director. This describes the steps to perform complete recovery while the database is not open. You can recover all damaged data files in one operation.
This option allows the snapshot to be used to revert the volume or volumes to a prior state, destroying any changes to data on those volumes that were made subsequent to the selected snapshot event. The revert operation may take several minutes to complete.
You can perform a revert from the Storage – Managed Storage screen or the Restore – Browse Backups and Snapshot screen, by right-clicking the required snapshot and clicking Revert from the menu.
The Revert Warning and Confirmation dialog box displays. To ensure you do not accidentally perform a revert, the text REVERT must be typed in uppercase prior to clicking OK.
49

50
The database is shut down prior to the reversion. Once reversion is complete, the database must be restarted manually by the database administrator, who needs to choose how to recover the database, such as point-in-time or last known point, among others.
Figure 33
Note — Clicking Revert overwrites the original database and destroys all data in that database.
Perform Complete Oracle Database Recovery with Manual Recovery Steps
Typically, a complete recovery of the database is performed when you want to revert an Oracle database to a baseline during an upgrade. The V$RECOVER_FILE view indicates which files need recovery. When a complete database recovery is performed, all available redo logs are used to recover the database to the current SCN.
Depending on the circumstances, the whole database or individual tablespaces or data files can be recovered.
The procedure assumes the following are available:
The current control file
Backups of all needed data files
All necessary archived redo logs
To do a complete recovery using revert, do the following.
1. Identify the most recent database Hitachi Thin Image snapshot for the damaged database files.
2. Revert the Hitachi Thin Image snapshot of the Oracle database.
(1) Start the revert operation.
Database goes down after revert operation if database is in open state.
[oracle@hdid-hcp-oracle-01]$ srvctl status database -d HDIDDB
Instance HDIDDB1 is not running on node hdid-hcp-oracle-01
Instance HDIDDB2 is not running on node hdid-hcp-oracle-02
50

51
(2) Connect to the database with administrator privileges. Then start a new instance and mount, but do not open the database, with this command:
SQL> startup mount
This is the result:
ORACLE instance started.
Total System Global Area 8.1336E+10 bytes
Fixed Size 5294184 bytes
Variable Size 8589936536 bytes
Database Buffers 7.2478E+10 bytes
Redo Buffers 263139328 bytes
Database mounted.
(3) Issue a statement to recover the database. Enter the following recover commands.
SQL> RECOVER AUTOMATIC DATABASE;
The response is this:
Media recovery complete.
If no archived redo logs are required for complete media recovery, then the database applies all necessary online redo log files and terminates recovery.
3. After recovery terminates, open the database for use with this command:
SQL> ALTER DATABASE OPEN;
The response is the following:
Database altered.
[oracle@hdid-hcp-oracle-01]$ srvctl status database -d HDIDDB
Instance HDIDDB1 is running on node hdid-hcp-oracle-01
Instance HDIDDB2 is not running on node hdid-hcp-oracle-02
[oracle@hdid-hcp-oracle-01]$ srvctl start instance -d HDIDDB -i HDIDDB2
[oracle@hdid-hcp-oracle-01]$ srvctl status database -d HDIDDB
Instance HDIDDB1 is running on node hdid-hcp-oracle-01
Instance HDIDDB2 is running on node hdid-hcp-oracle-02
51

52
Hitachi Data Instance Director Operations Influence on Oractle ASM Disk Groups
This is the influence of Hitachi Data Instance Director operations on Oracle ASM disk groups.
SNAPSHOT — Hitachi Data Instance Director, using the Hitachi Thin Image snapshot, takes a snapshot of the disk groups, including data files, redo logs, and archive log files.
MOUNT — Use this to mount snapshots on the Oracle ASM configured mount host.
REVERT — Hitachi Data Instance Director, using the Hitachi Thin Image revert operation, reverts disk groups, including data files only.
Figure 34 shows the Hitachi Data Instance Director snapshot, and revert operations.
Figure 34
Backup 'Hitachi Thin Image Snapshot mount' from Proxy Server (hdid-mount-host) to Hitachi Content Platform using Veritas NetBackup
You can execute an Oracle Database backup operation based on a schedule in Veritas NetBackup, or it can run following the HDIDDB-Schedule defined for the Hitachi Thin Image snapshot replication mount operation.
For this example on backing up an Oracle database to the Hitachi Content Platform storage, the following is true:
The mount host is hdid-mount-host.
HDIDDB is an Oracle database.
The backup script is NetBackup-Oracle-Full_Backup.sh, found at /opt/Hitachi/HDID/scripts on the hdid-mount-host machine.
52

53
This operation backs up an Oracle database from the mount host (hdid-mount-host) to the Hitachi Content Platform storage, following the HDIDDB-Schedule.
Note — To have a consistent database backup image, the script in database goes into mount state during the backup operation.
To make a backup from the proxy server to Hitachi Content Platform using Veritas NetBackup, do the following.
1. From the NetBackup Administration Console, click Activity Monitor. The window lists the backup jobs of the backup operation.
Figure 35
2. To view details of the backup operation, click the backup operation ID to open the Job Details dialog box. On the Detailed Status tab, the status window provides details of the backup operation.
53

54
Figure 36
Verify Backup from Cloud Storage on Hitachi Content Platform
This is the procedure to carried out on the alternate Oracle client machine or on the source machine (hdid-hcp-oracle-02) machine.
To verify the backup from cloud storage on Hitachi Content Platform, do the following.
1. Install Veritas NetBackup Client on the Oracle client machine.
2. Create the No.Restrictions file on the NetBackup master server. The master server will allow the restore of data from the backup of one client to an alternate client only if you create this file.
The NetBackup master server runs Microsoft® Windows Server® (win-isundd8bau5).The file path is the following:
C:\Program Files\Veritas\NetBackup\db\altnames\No.Restrictions
In case of a UNIX (Linux) operation system, path changes to this:
/usr/openv/netbackup/db/altnames/No.Restrictions
3. Generate a security certificate for the Oracle client machine. This is needed to access the backup details and certain operations on the Oracle client machine.
Note — Generating a security certificate is a one-time activity.
54

55
Run the following command on the master server, depending on your environment:
Microsoft Windows Server:
install_path\NetBackup\bin\admincmd\bpnbaz -ProvisionCert client_name
UNIX (Linux):
/usr/openv/netbackup/bin/admincmd/bpnbaz -ProvisionCert client_name
The master server responds with the following. When asked if you want to continue, respond with this: y
c:\Program Files\Veritas\NetBackup\bin\admincmd>bpnbaz.exe -ProvisionCert hdid-hcp-oracle-02
You will have to restart NetBackup services on configured NetBackup hosts after the command comp
Do you want to continue(y/n)y
Setting up security on target host: hdid-hcp-oracle-02 - Certificate deployed successfully
The file: DeploySecurityCerts.progress has been updated in the current directory with results of
Operation completed successfully.
4. Browse the Oracle backups by running below command on the Oracle client machine,
/usr/openv/netbackup/bin/bplist -S <master server> - C <Oracle source client name> -t 4 -l -R /
This command lists Oracle database backups on the Hitachi Content Platform storage with the hdid-mount-host host. The following is an example list.
oracle@hdid-hcp-oracle-02 bin]$ ./bplist -S win-isundd8bau5 -C hdid-mount-host -t 4 -I -R /
/ctrl_dHDIDDB_u0grihgfd_s16_p1_t925417965
/arch_dHDIDDB_u08rihgd0_s8_p1_t925417888
/arch_dHDIDDB_u0crihgd0_s12_p1_t925417888
/arch_dHDIDDB_u0frihgd0_s15_p1_t925417888
/arch_dHDIDDB_u0brihgd0_s11_p1_t925417888
/arch_dHDIDDB_u0drihgd0_s13_p1_t925417888
/arch_dHDIDDB_u0arihgd0_s10_p1_t925417888
/arch_dHDIDDB_u09rihgd0_s9_p1_t925417888
/arch_dHDIDDB_u0erihgd0_s14_p1_t925417888
/arch_dHDIDDB_u07rihgcv_s7_p1_t925417887
/bk_dHDIDDB_u05rihg89_s5_p1_t925417737
/bk_dHDIDDB_u06rihg89_s6_p1_t925417737
55
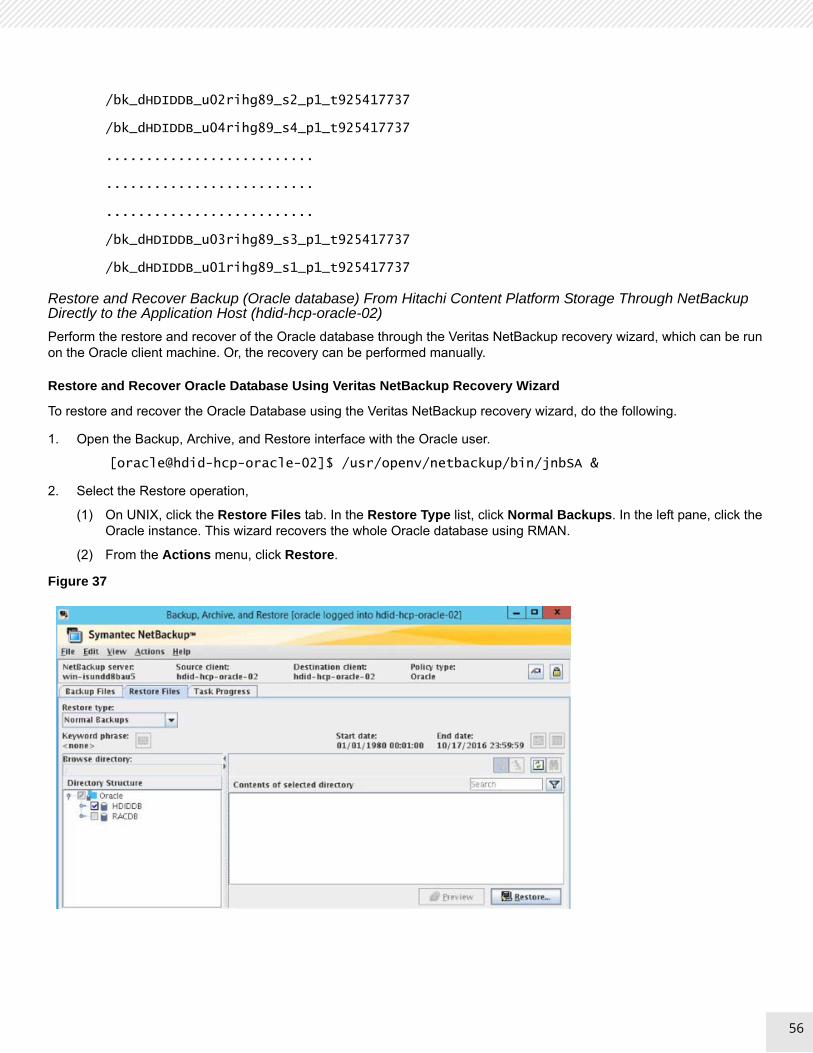
56
/bk_dHDIDDB_u02rihg89_s2_p1_t925417737
/bk_dHDIDDB_u04rihg89_s4_p1_t925417737
..........................
..........................
..........................
/bk_dHDIDDB_u03rihg89_s3_p1_t925417737
/bk_dHDIDDB_u01rihg89_s1_p1_t925417737
Restore and Recover Backup (Oracle database) From Hitachi Content Platform Storage Through NetBackup Directly to the Application Host (hdid-hcp-oracle-02)
Perform the restore and recover of the Oracle database through the Veritas NetBackup recovery wizard, which can be run on the Oracle client machine. Or, the recovery can be performed manually.
Restore and Recover Oracle Database Using Veritas NetBackup Recovery Wizard
To restore and recover the Oracle Database using the Veritas NetBackup recovery wizard, do the following.
1. Open the Backup, Archive, and Restore interface with the Oracle user.
[oracle@hdid-hcp-oracle-02]$ /usr/openv/netbackup/bin/jnbSA &
2. Select the Restore operation,
(1) On UNIX, click the Restore Files tab. In the Restore Type list, click Normal Backups. In the left pane, click the Oracle instance. This wizard recovers the whole Oracle database using RMAN.
(2) From the Actions menu, click Restore.
Figure 37
56

57
(3) Provide target Oracle database logon credentials.
(4) Select the Restore check box and the Recover check box.
Figure 38
(5) Click Use most recent backup set. You can specify a different backup to restore, based on the required backup set.
(6) Select the Recover to last committed transaction check box to recover the Oracle database to last committed transactions. Otherwise, you can select recover the Oracle database to a point in time limits.
(7) To start the restore and recovery of an Oracle database select the Run immediately after finishing wizard check box and click Save as to store the script at the operating system location.
(8) Using the stored script, manually perform the restore and recovery operation.
57

58
Figure 39
3. To view progress of an Oracle database restore and recovery, click Yes on the next screen of the wizard.
Restore and Recover an Oracle Database Manually Using Veritas NetBackup
This example uses the following values. Use the values for your environment.
Master Server — win-isundd8bau5
Oracle source client — hdid-hcp-oracle-02
To manually restore and recover an Oracle database using Veritas NetBackup, do the following.
1. Browse the Oracle backups by running the bplist command either on the master server or the Oracle destination client:
oracle@hdid-hcp-oracle-02 bin]$ ./bplist -S win-isundd8bau5 -C hdid-mount-host -t 4 -I -R /
2. From the output, find the name of the controlfile backuppiece starting with the following:
ctrl_dHDIDDB_u0grihgfd_s16_p1_t925417965
Using this information, you can inform RMAN and NetBackup exactly which control file that NetBackup needs to restore.
58

59
3. In nomount mode, restore the control file.
SQL> startup nomount
The system responds with the following:
ORACLE instance started.
Total System Global Area 8.1068E+10 bytes
Fixed Size 7653432 bytes
Variable Size 3.4628E+10 bytes
Database Buffers 4.6171E+10 bytes
Redo Buffers 260780032 bytes
4. Run the rman command to restore the control file to a temporary location without affecting your production location.
RMAN> run {
ALLOCATE CHANNEL ch00
TYPE 'SBT_TAPE'
PARMS 'SBT_LIBRARY=/usr/openv/netbackup/bin/libobk.so64';
SEND 'NB_ORA_SERV=win-isundd8bau5, NB_ORA_CLIENT=hdid-mount-host';
restore controlfile to '/home/oracle/NetBackup/Oracle/cntrl.bak' from 'ctrl_dHDIDDB_u0grihgfd_s16_p1_t925417965';
release channel ch00;
}
using target database control file instead of recovery catalog
The system responds with the following:
allocated channel: ch00
channel ch00: SID=7921 instance=RACDB1 device type=SBT_TAPE
channel ch00: Veritas NetBackup for Oracle - Release 7.7.3 (2016051915)
sent command to channel: ch00
Starting restore at 17-OCT-16
channel ch00: restoring control file
channel ch00: restore complete, elapsed time: 00:00:55
Finished restore at 17-OCT-16
released channel: ch00
5. Check the /home/oracle/NetBackup/Oracle/ directory to make sure the control file is restored (cntrl.bak).
59

60
6. Replicate the control file:
RMAN> run
{
replicate controlfile from '/home/oracle/NetBackup/Oracle/cntrl.bak';
}
The system responds with the following:
allocated channel: ORA_DISK_1
channel ORA_DISK_1: SID=7921 instance=HDIDDB1 device type=DISK
replicating control file
input file name=/home/oracle/NetBackup/Oracle/cntrl.bak
output file name=+FRADG/HDIDDB/CONTROLFILE/current.256.923642647
7. Mount the Oracle database.
SQL> alter database mount;
The system responds with the following:
Database mounted.
8. Run the restore script at the /home/oracle/NetBacupRestore location through the NetBackup restore wizard.
RMAN> RUN {
ALLOCATE CHANNEL ch00
2>
3> TYPE 'SBT_TAPE'
4> PARMS 'SBT_LIBRARY=/usr/openv/netbackup/bin/libobk.so64';
5> ALLOCATE CHANNEL ch01
6> TYPE 'SBT_TAPE'
7> PARMS 'SBT_LIBRARY=/usr/openv/netbackup/bin/libobk.so64';
8> SEND 'NB_ORA_SERV=win-isundd8bau5, NB_ORA_CLIENT=hdid-mount-host';
9> RESTORE DATABASE;
10> RECOVER DATABASE;
11> RELEASE CHANNEL ch00;
12> RELEASE CHANNEL ch01;
13> }
60

61
The system responds with the following:
using target database control file instead of recovery catalog
allocated channel: ch00
channel ch00: SID=367 instance=HDIDDB1 device type=SBT_TAPE
channel ch00: Veritas NetBackup for Oracle - Release 7.7.3 (2016051915)
allocated channel: ch01
channel ch01: SID=373 instance=HDIDDB1 device type=SBT_TAPE
channel ch01: Veritas NetBackup for Oracle - Release 7.7.3 (2016051915)
sent command to channel: ch00
sent command to channel: ch01
Starting restore at 17-OCT-16
Starting implicit crosscheck backup at 17-OCT-16
Finished implicit crosscheck backup at 17-OCT-16
searching for all files in the recovery area
cataloging files...
cataloging done
List of Cataloged Files
=======================
File Name: +FRADG/HDIDDB/ARCHIVELOG/2016_10_17/thread_1_seq_49.490.925434045
File Name: +FRADG/HDIDDB/ARCHIVELOG/2016_10_17/thread_1_seq_50.492.925444823
..........................
..........................
File Name: +FRADG/HDIDDB/ARCHIVELOG/2016_10_16/thread_1_seq_48.488.925423713
channel ch00: starting datafile backup set restore
channel ch00: specifying datafile(s) to restore from backup set
61

62
channel ch00: restoring datafile 00004 to +DATADG/HDIDDB/DATAFILE/undotbs1.267.925349353
channel ch00: reading from backup piece bk_dHDIDDB_u03rihg89_s3_p1_t925417737
channel ch01: starting datafile backup set restore
channel ch01: specifying datafile(s) to restore from backup set
channel ch01: restoring datafile 00006 to +DATADG/HDIDDB/DATAFILE/users.266.925349353
channel ch01: reading from backup piece bk_dHDIDDB_u05rihg89_s5_p1_t925417737
channel ch00: piece handle=bk_dHDIDDB_u03rihg89_s3_p1_t925417737 tag=TAG20161016T202856
channel ch00: restored backup piece 1
channel ch00: restore complete, elapsed time: 00:01:05
channel ch00: starting datafile backup set restore
channel ch00: specifying datafile(s) to restore from backup set
..........................
..........................
channel ch01: restoring datafile 00001 to +DATADG/HDIDDB/DATAFILE/system.265.925349257
channel ch01: reading from backup piece bk_dHDIDDB_u01rihg89_s1_p1_t925417737
channel ch00: piece handle=bk_dHDIDDB_u02rihg89_s2_p1_t925417737 tag=TAG20161016T202856
channel ch00: restored backup piece 1
channel ch00: restore complete, elapsed time: 00:01:05
channel ch01: piece handle=bk_dHDIDDB_u01rihg89_s1_p1_t925417737 tag=TAG20161016T202856
channel ch01: restored backup piece 1
channel ch01: restore complete, elapsed time: 00:01:05
Finished restore at 17-OCT-16
Starting recover at 17-OCT-16
starting media recovery
archived log for thread 1 with sequence 35 is already on disk as file +FRADG/HDIDDB/ARCHIVELOG/2016_10_16/thread_1_seq_35.469.925380113
..........................
..........................
62
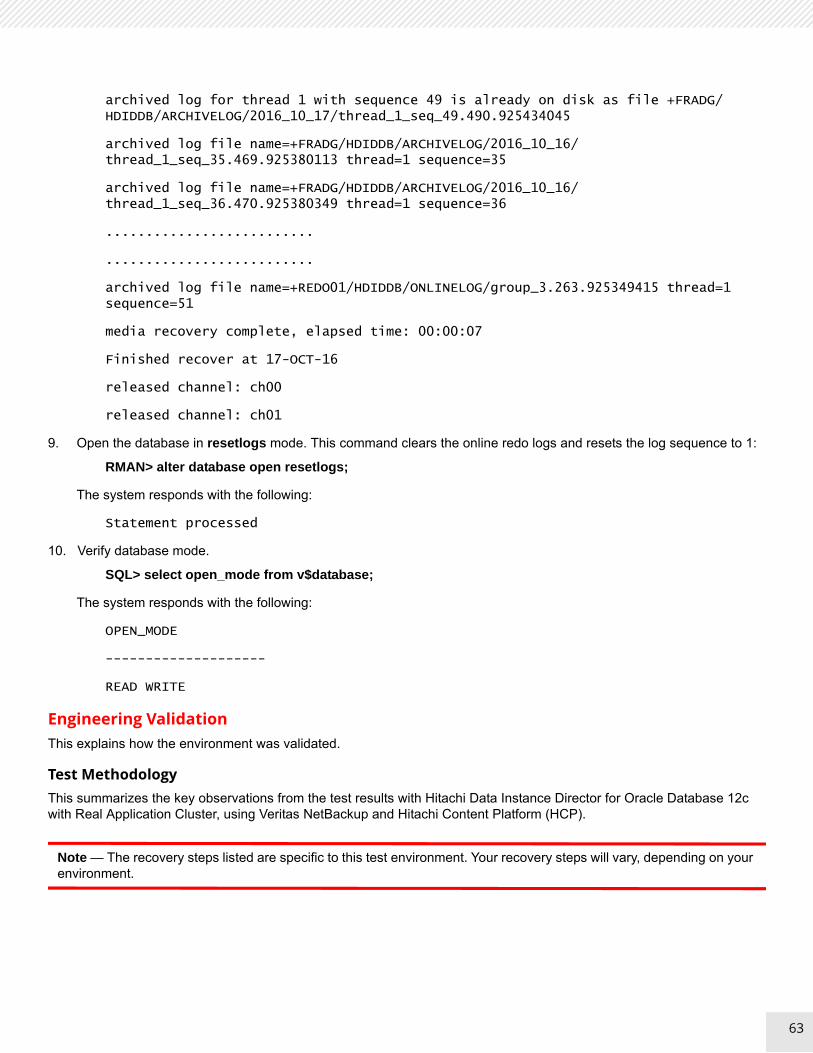
63
archived log for thread 1 with sequence 49 is already on disk as file +FRADG/HDIDDB/ARCHIVELOG/2016_10_17/thread_1_seq_49.490.925434045
archived log file name=+FRADG/HDIDDB/ARCHIVELOG/2016_10_16/thread_1_seq_35.469.925380113 thread=1 sequence=35
archived log file name=+FRADG/HDIDDB/ARCHIVELOG/2016_10_16/thread_1_seq_36.470.925380349 thread=1 sequence=36
..........................
..........................
archived log file name=+REDO01/HDIDDB/ONLINELOG/group_3.263.925349415 thread=1 sequence=51
media recovery complete, elapsed time: 00:00:07
Finished recover at 17-OCT-16
released channel: ch00
released channel: ch01
9. Open the database in resetlogs mode. This command clears the online redo logs and resets the log sequence to 1:
RMAN> alter database open resetlogs;
The system responds with the following:
Statement processed
10. Verify database mode.
SQL> select open_mode from v$database;
The system responds with the following:
OPEN_MODE
--------------------
READ WRITE
Engineering ValidationThis explains how the environment was validated.
Test MethodologyThis summarizes the key observations from the test results with Hitachi Data Instance Director for Oracle Database 12c with Real Application Cluster, using Veritas NetBackup and Hitachi Content Platform (HCP).
Note — The recovery steps listed are specific to this test environment. Your recovery steps will vary, depending on your environment.
63

64
Database Configuration
These are the details of the configuration information of ASM database for a two-node Oracle Real Application Cluster.
[oracle@hdid-hcp-oracle-02]$ srvctl config database -d HDIDDB
Database unique name: HDIDDB
Database name: HDIDDB
Oracle home: /oracle/database/app/12.1.0/product
Oracle user: oracle
Spfile: +DATADG/HDIDDB/PARAMETERFILE/spfile.1238.925880877
Password file: +DATADG/HDIDDB/PASSWORD/pwdhdiddb.1244.925880549
Domain:
Start options: open
Stop options: immediate
Database role: PRIMARY
Management policy: AUTOMATIC
Server pools:
Disk Groups: DATADG,APPDG,REDO01,REDO02
Mount point paths:
Services:
Type: RAC
Start concurrency:
Stop concurrency:
OSDBA group: oinstall
OSOPER group: oper
Database instances: HDIDDB1,HDIDDB2
Configured nodes: hdid-hcp-oracle-01,hdid-hcp-oracle-02
Database is administrator managed
Test Case 1: Backup Oracle — Hitachi Data Instance Director Scheduled Snapshot (Hitachi Thin Image), Mount on Proxy Server
This test case validates performing an online database backup using Hitachi Data Instance Director and mount operation.
Test Case 2: Restore (Revert) Oracle database Using Hitachi Data Instance Director and Recover Oracle Database with Manual Steps
This test case validates the complete recovery of an Oracle Database using the Hitachi Data Instance Director REVERT operation and manual recovery steps.
64

65
Test Case 3: Backup Hitachi Thin Image Snapshot Mount From a Proxy Server (hdid-mount-host) to Hitachi Content Platform Using Veritas NetBackup
This test case validates performing an offline database backup using NetBackup to Hitachi Content Platform.
Test Case 4: Restore and Recover Backup (Oracle database) From Hitachi Content Platform Through Veritas NetBackup Directly to the Application Host
This test case validates the complete database restore and recovery of an Oracle Database, using the Veritas NetBackup restore and recover operation.
Test ResultsThese are the test results of protecting Hitachi Unified Compute Platform for Oracle Database 12c with Hitachi Data Instance Director, Veritas NetBackup, and Hitachi Content Platform.
TABLE 17. TEST EXECUTION SUMMARY
Test case Result
Backup Oracle - Hitachi Data Instance Director Scheduled snapshot (Hitachi Thin Image), mount on the proxy server
Success
Restore (Revert) Oracle database using Hitachi Data Instance Director and Recover Oracle Database with manual steps
Success
Backup 'Hitachi Thin Image Snapshot mount' from proxy server to Hitachi Content Platform using Veritas NetBackup
Success
Restore and recover backup (Oracle database) from Hitachi Content Platform through NetBackup directly to application host
Success
65

For More InformationHitachi Vantara Global Services offers experienced storage consultants, proven methodologies and a comprehensive services portfolio to assist you in implementing Hitachi products and solutions in your environment. For more information, see the Services website.
Demonstrations and other resources are available for many Hitachi products. To schedule a live demonstration, contact a sales representative or partner. To view on-line informational resources, see the Resources website.
Hitachi Academy is your education destination to acquire valuable knowledge and skills on Hitachi products and solutions. Our Hitachi Certified Professional program establishes your credibility and increases your value in the IT marketplace. For more information, see the Hitachi Vantana Training and Certification website.
For more information about Hitachi products and services, contact your sales representative, partner, or visit the Hitachi Vantara website.

1
Corporate Headquarters2845 Lafayette StreetSanta Clara, CA 96050-2639 USAwww.HitachiVantara.com | community.HitachiVantara.com
Regional Contact InformationAmericas: +1 408 970 1000 or [email protected], Middle East and Africa: +44 (0) 1753 618000 or [email protected] Pacific: +852 3189 7900 or [email protected]
Hitachi Vantara
© Hitachi Vantara Corporation, 2018. All rights reserved. HITACHI is a trademark or registered trademark of Hitachi, Ltd. VSP is a trademark or registered trademark of Hitachi Vantara Corporation. Microsoft and Windows Server are trademarks or registered trademarks of Microsoft Corporation. All other trademarks, service marks, and company names are properties of their respective owners
Notice: This document is for informational purposes only, and does not set forth any warranty, expressed or implied, concerning any equipment or service offered or to be offered by Hitachi Vantara Corporation.
MK-SL-072-00, June 2018