professional development quick start guide · career education addendum ... 8 | professional...
TRANSCRIPT
Professional Development
Quick Start Guide


Copyright © Edgenuity Inc Professional Development Quick Start Guide | edgenuity.com | 1
ContentsLogin Information .............................................................................................................................2Check Plugins ..................................................................................................................................2Update Your Password and User Information .......................................................................................3Enroll a Student ...............................................................................................................................4Selected Student Section ..................................................................................................................5Archive and Re-enable a Student’s Account .........................................................................................6Preview Course Content in the Web Administrator .................................................................................7Assign Courses ................................................................................................................................8View Courses in the Virtual Classroom.................................................................................................9Create a User Group .........................................................................................................................10Adding a Course to a User Group .......................................................................................................11View & Edit Options ..........................................................................................................................12View & Edit Options, continued ..........................................................................................................13Course Actions .................................................................................................................................14Customize a Student’s Course ............................................................................................................15Gradebook .......................................................................................................................................16Reviewing Projects from the Gradebook ...............................................................................................17Dashboard .......................................................................................................................................18Progress Reports ..............................................................................................................................19Course Documents ...........................................................................................................................20Support .........................................................................................................................................20Teacher Resources ...........................................................................................................................21Additional User Requirements ............................................................................................................22Downloading Zipped Files ..................................................................................................................22Installing Software Applications Locally ...............................................................................................23Uploading Files from the Virtual Classroom ..........................................................................................23Career Education Addendum .............................................................................................................24Customization ..................................................................................................................................24Frequently Asked Questions ...............................................................................................................25

2 | Professional Development Quick Start Guide | edgenuity.com Professional Development Quick Start Guide | edgenuity.com | 3
Login InformationEducator Login: http://learn.edgenuity.com/educatorStudent Login: http://learn.edgenuity.com/student
Check Plugins1. On the login page for the Web Administrator click the Check Plugins link
a. The Virtual Classroom login page has a Check Plugins link that performs the same action
2. A window will open with required plugins listed with the required version, version found on the computer, and the status of each plugin
3. Any plugins that do not meet the minimum requirements will have a red X next to them
4. Click the name of the indicated plugin to be directed to the download/installation site for that plugin
Copyright © Edgenuity Inc.2 | Professional Development Quick Start Guide | edgenuity.com Professional Development Quick Start Guide | edgenuity.com | 3
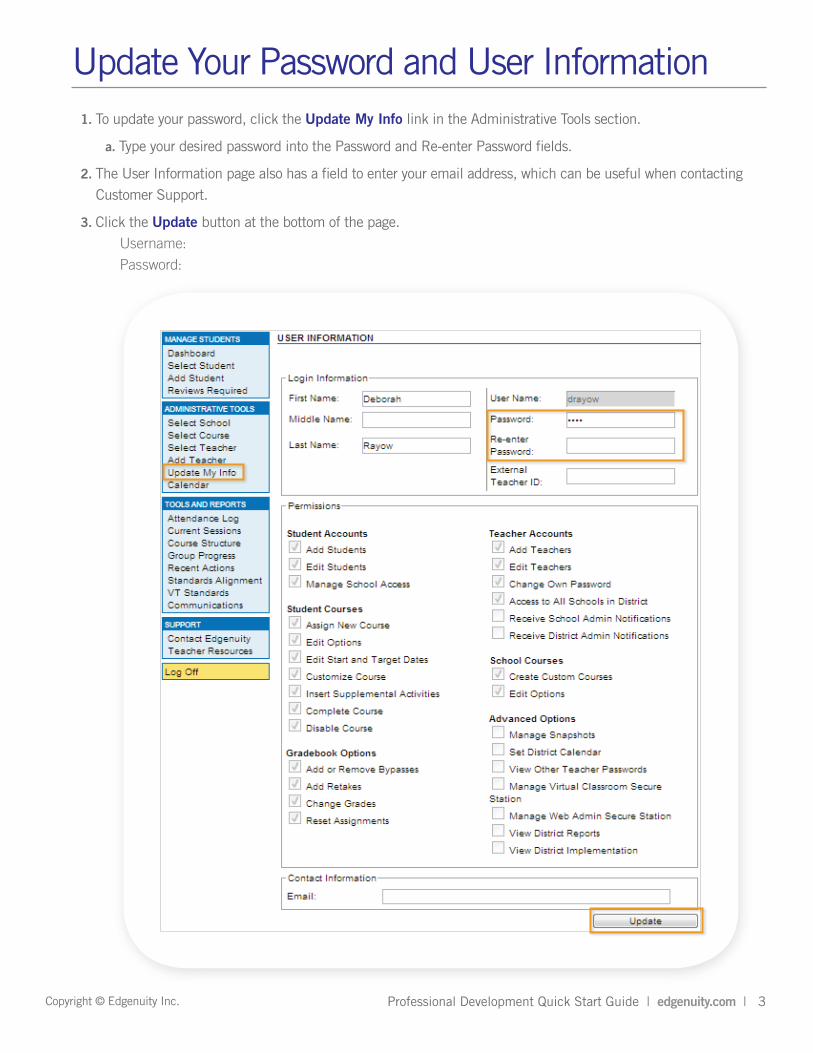
1. To update your password, click the Update My Info link in the Administrative Tools section.
a. Type your desired password into the Password and Re-enter Password fields.
2. The User Information page also has a field to enter your email address, which can be useful when contacting Customer Support.
3. Click the Update button at the bottom of the page.Username:
Password:
Update Your Password and User Information
4 | Professional Development Quick Start Guide | edgenuity.com Professional Development Quick Start Guide | edgenuity.com | 5
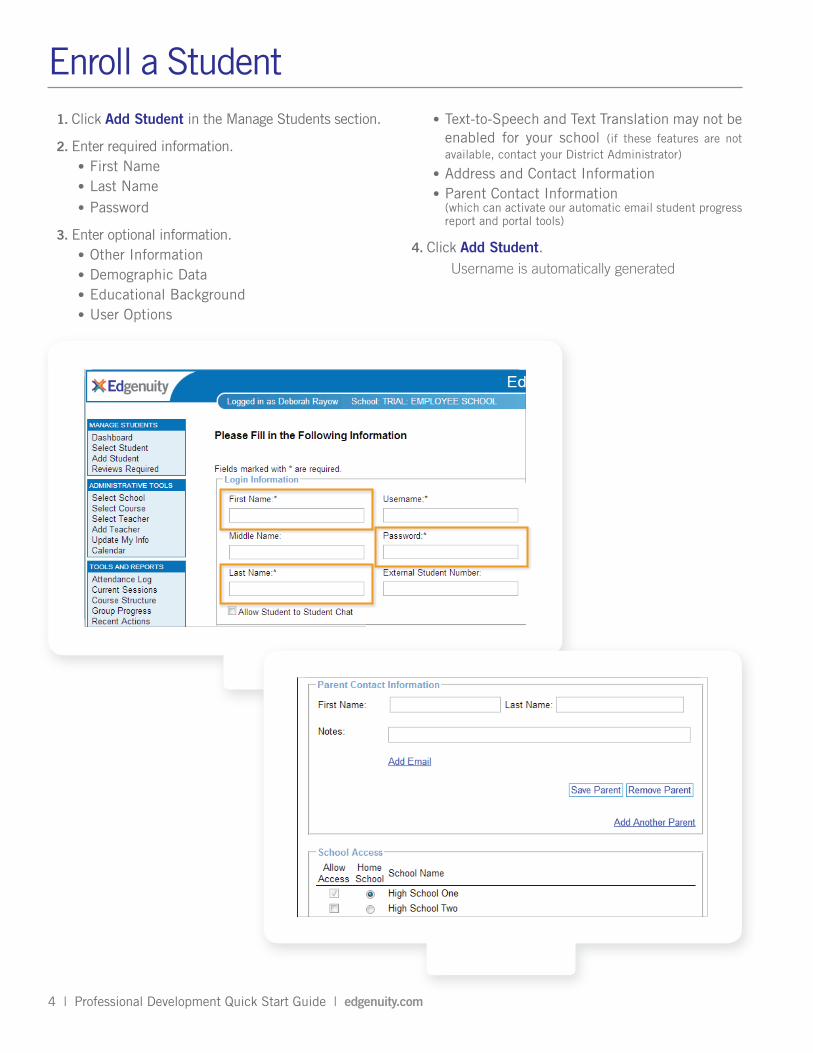
1. Click Add Student in the Manage Students section.
2. Enter required information.•First Name•Last Name•Password
3. Enter optional information.•Other Information•Demographic Data•Educational Background•User Options
•Text-to-Speech and Text Translation may not be enabled for your school (if these features are not available, contact your District Administrator)
•Address and Contact Information•Parent Contact Information
(which can activate our automatic email student progress report and portal tools)
4. Click Add Student.Username is automatically generated
Enroll a Student
Copyright © Edgenuity Inc.4 | Professional Development Quick Start Guide | edgenuity.com Professional Development Quick Start Guide | edgenuity.com | 5
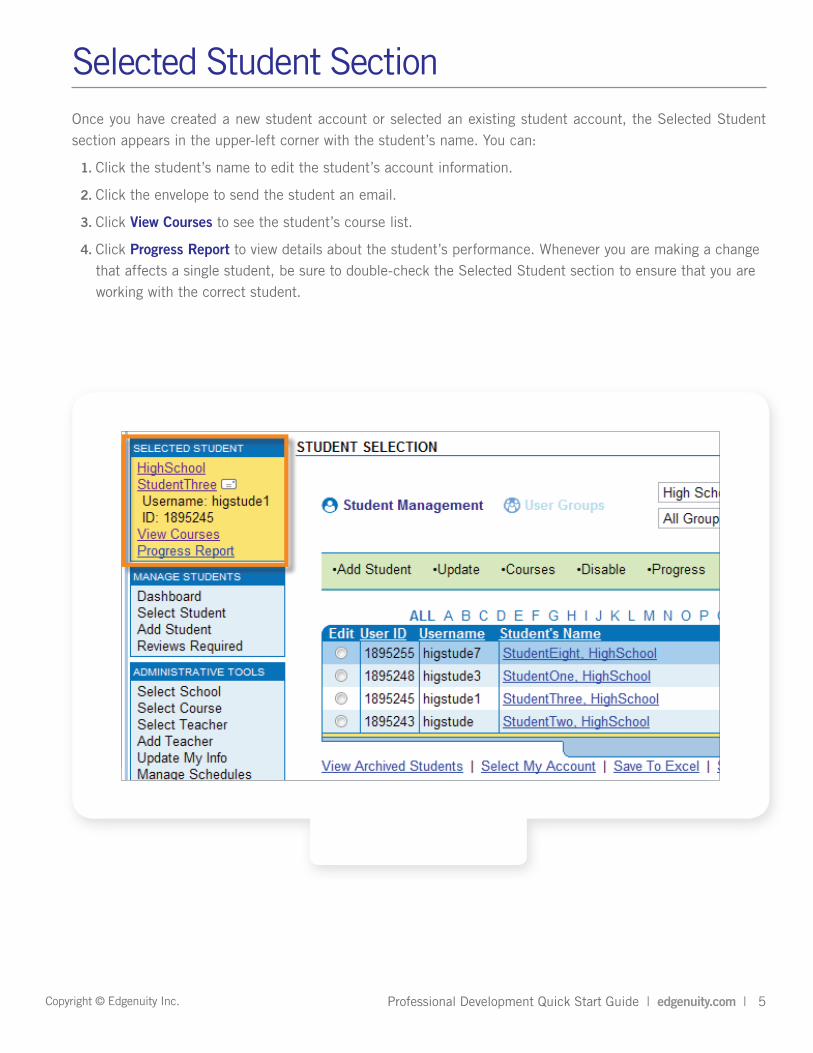
Once you have created a new student account or selected an existing student account, the Selected Student section appears in the upper-left corner with the student’s name. You can:
1. Click the student’s name to edit the student’s account information.
2. Click the envelope to send the student an email.
3. Click View Courses to see the student’s course list.
4. Click Progress Report to view details about the student’s performance. Whenever you are making a change that affects a single student, be sure to double-check the Selected Student section to ensure that you are working with the correct student.
Selected Student Section
6 | Professional Development Quick Start Guide | edgenuity.com Professional Development Quick Start Guide | edgenuity.com | 7
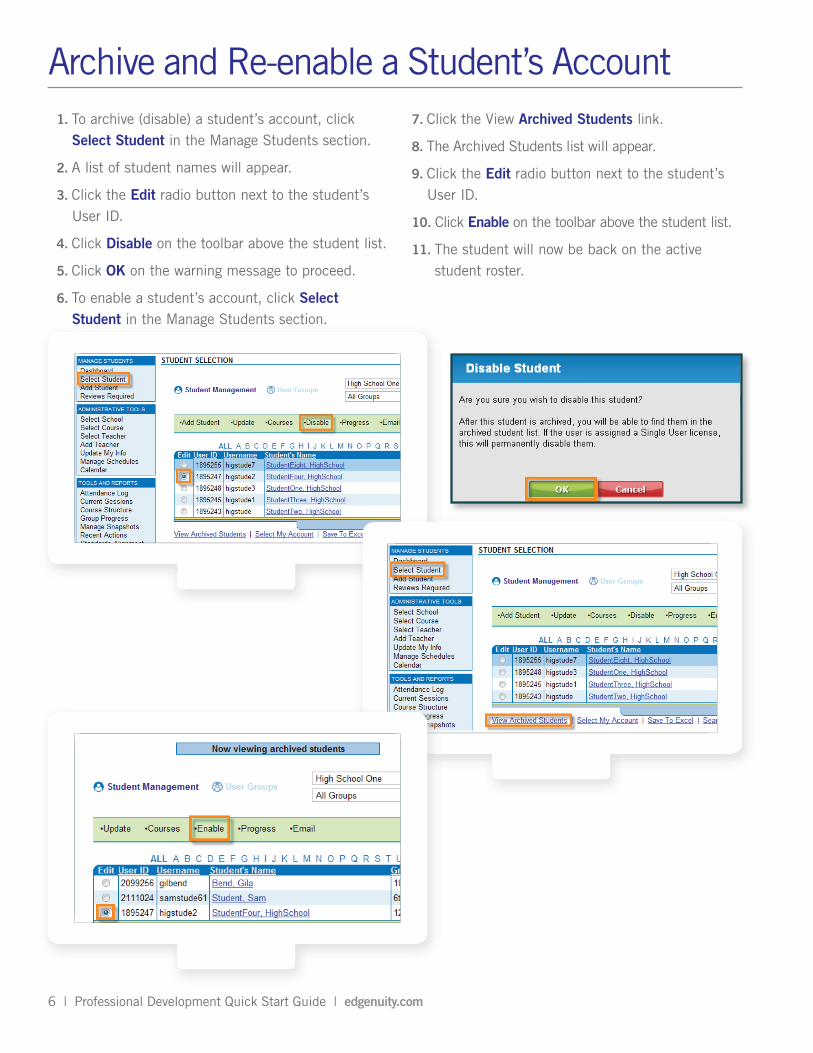
1. To archive (disable) a student’s account, click Select Student in the Manage Students section.
2. A list of student names will appear.
3. Click the Edit radio button next to the student’s User ID.
4. Click Disable on the toolbar above the student list.
5. Click OK on the warning message to proceed.
6. To enable a student’s account, click Select Student in the Manage Students section.
7. Click the View Archived Students link.
8. The Archived Students list will appear.
9. Click the Edit radio button next to the student’s User ID.
10. Click Enable on the toolbar above the student list.
11. The student will now be back on the active student roster.
Archive and Re-enable a Student’s Account
Copyright © Edgenuity Inc.6 | Professional Development Quick Start Guide | edgenuity.com Professional Development Quick Start Guide | edgenuity.com | 7
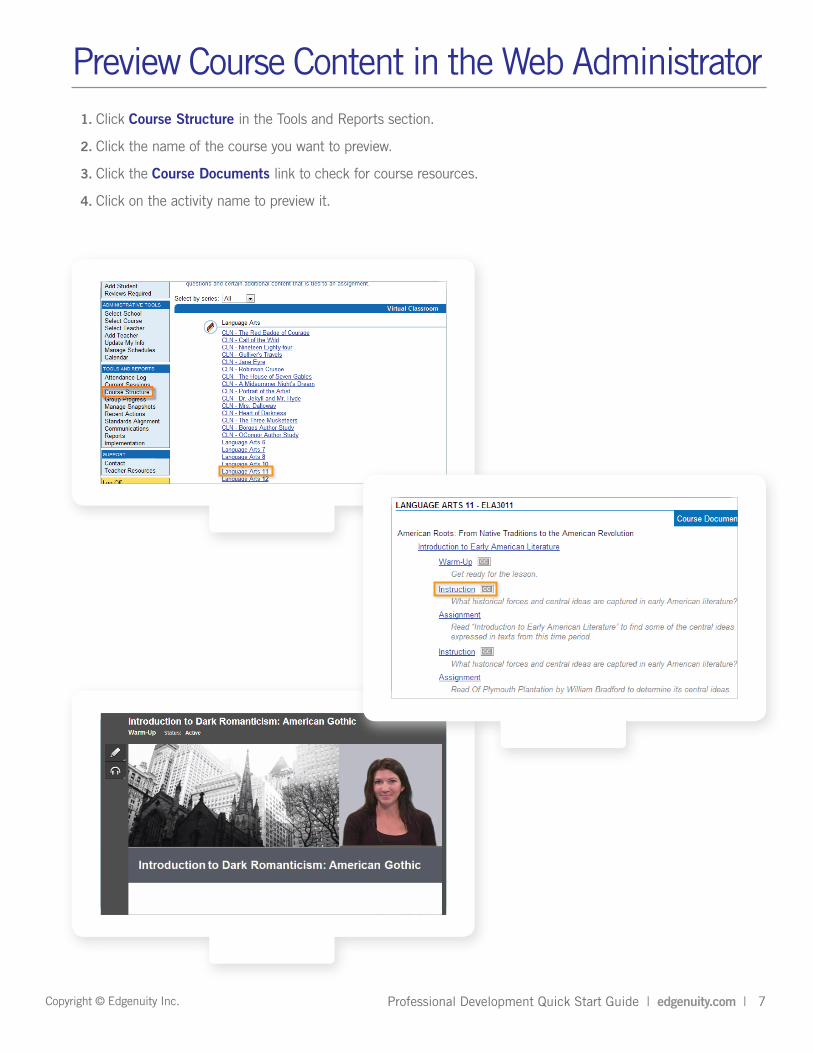
1. Click Course Structure in the Tools and Reports section.
2. Click the name of the course you want to preview.
3. Click the Course Documents link to check for course resources.
4. Click on the activity name to preview it.
Preview Course Content in the Web Administrator
8 | Professional Development Quick Start Guide | edgenuity.com Professional Development Quick Start Guide | edgenuity.com | 9
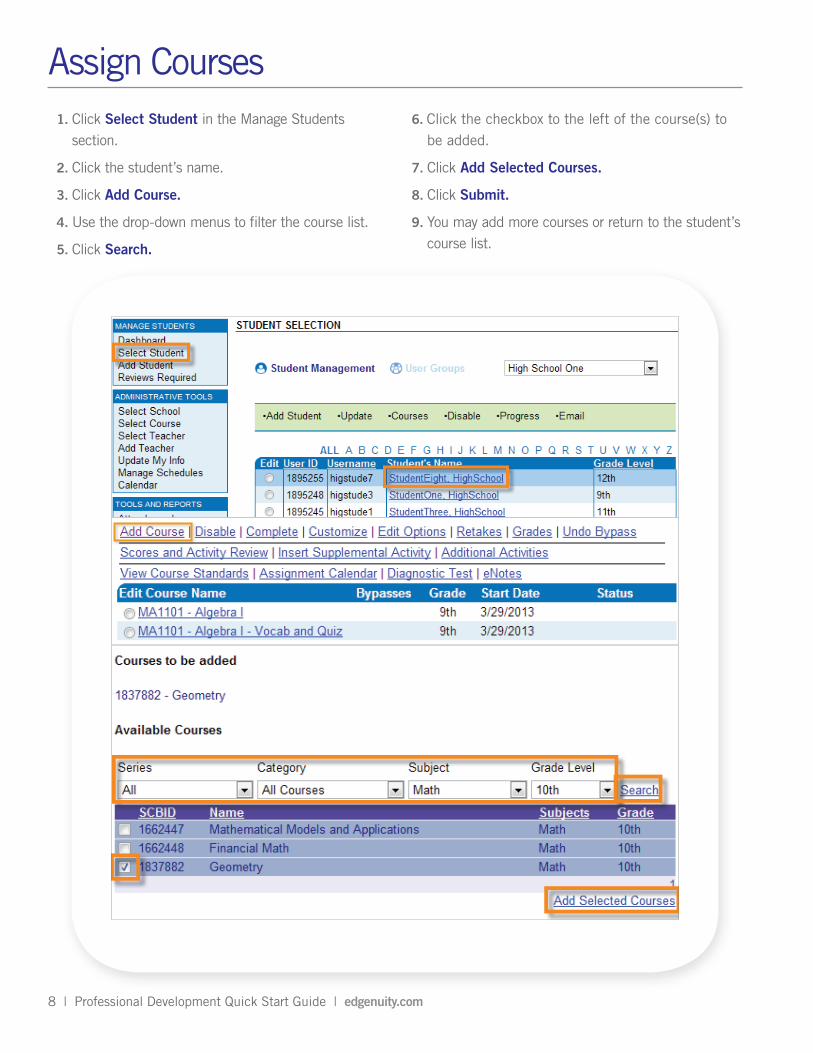
1. Click Select Student in the Manage Students section.
2. Click the student’s name.
3. Click Add Course.
4. Use the drop-down menus to filter the course list.
5. Click Search.
6. Click the checkbox to the left of the course(s) to be added.
7. Click Add Selected Courses.
8. Click Submit.
9. You may add more courses or return to the student’s course list.
Assign Courses
Copyright © Edgenuity Inc.8 | Professional Development Quick Start Guide | edgenuity.com Professional Development Quick Start Guide | edgenuity.com | 9
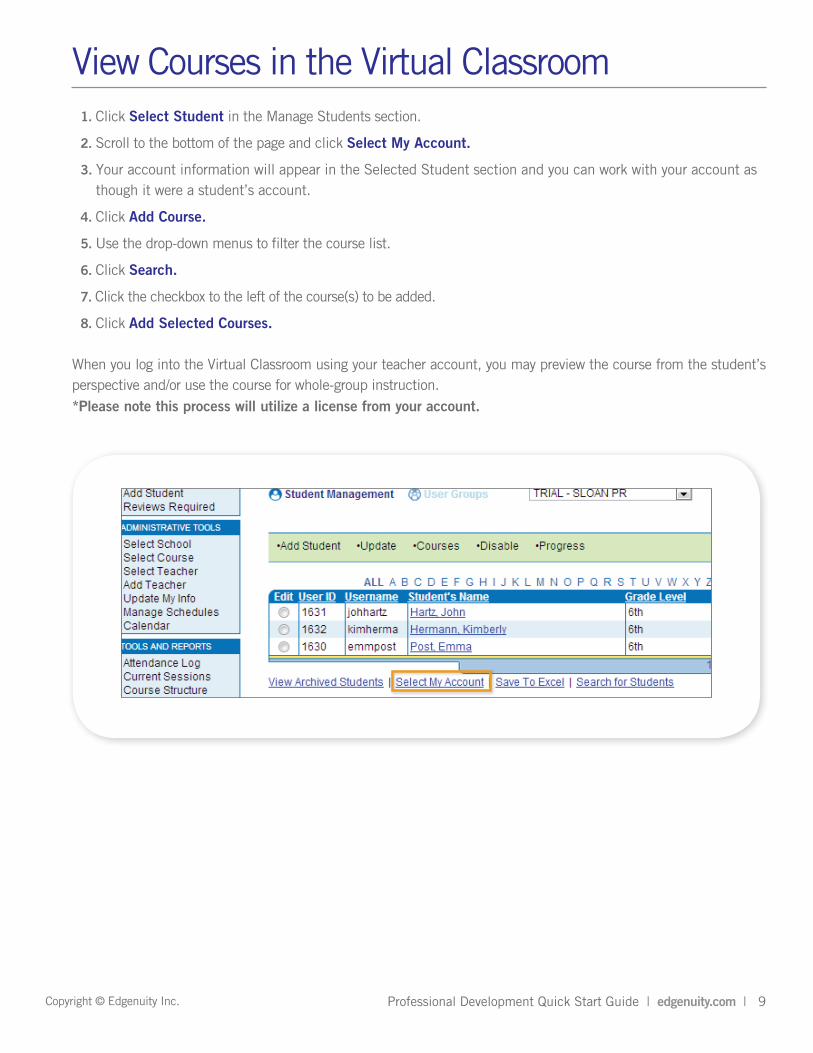
1. Click Select Student in the Manage Students section.
2. Scroll to the bottom of the page and click Select My Account.
3. Your account information will appear in the Selected Student section and you can work with your account as though it were a student’s account.
4. Click Add Course.
5. Use the drop-down menus to filter the course list.
6. Click Search.
7. Click the checkbox to the left of the course(s) to be added.
8. Click Add Selected Courses.
When you log into the Virtual Classroom using your teacher account, you may preview the course from the student’s perspective and/or use the course for whole-group instruction.*Please note this process will utilize a license from your account.
View Courses in the Virtual Classroom

10 | Professional Development Quick Start Guide | edgenuity.com Professional Development Quick Start Guide | edgenuity.com | 11
1. Click Select Student in the Manage Students section.
2. Click User Groups.
3. Click Create New Group.a. Note that the taskbar has turned pink and that
the Edit column now has checkboxes (multiple selection) rather than radio buttons (single selection)
4. Name the group.
5. Click Add Group.
6. Click User Groups again.a. Note that the taskbar has turned pink and that
the Edit column now has checkboxes (multiple selection) rather than radio buttons (single selection)
7. Click the checkbox(es) next to the students who are to be added to the group.
a. You can select one student at a time or select multiple students
b. To locate students more easily, try the alphabet at the top (to filter by last name) or use the Search for Students link at the bottom
8. Hover over the Add to Group link and click the user group to which you would like to add the selected students.
Create a User Group
Copyright © Edgenuity Inc.10 | Professional Development Quick Start Guide | edgenuity.com Professional Development Quick Start Guide | edgenuity.com | 11
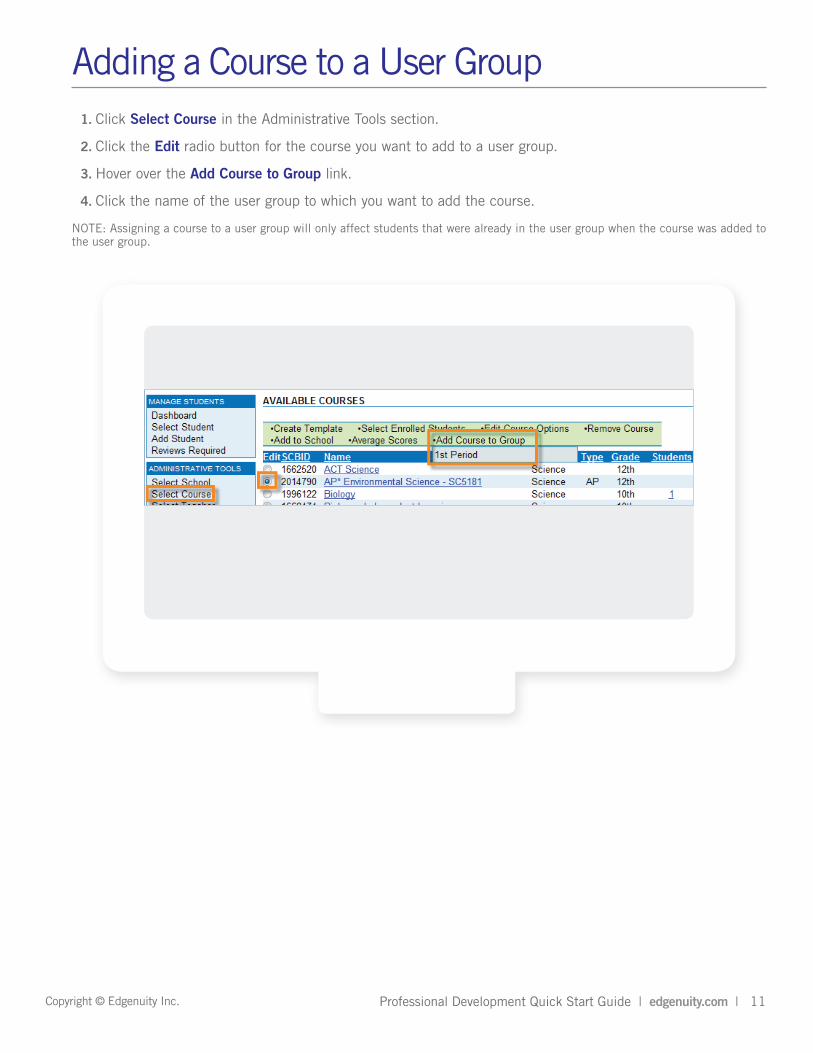
1. Click Select Course in the Administrative Tools section.
2. Click the Edit radio button for the course you want to add to a user group.
3. Hover over the Add Course to Group link.
4. Click the name of the user group to which you want to add the course.
NOTE: Assigning a course to a user group will only affect students that were already in the user group when the course was added to the user group.
Adding a Course to a User Group
12 | Professional Development Quick Start Guide | edgenuity.com Professional Development Quick Start Guide | edgenuity.com | 13
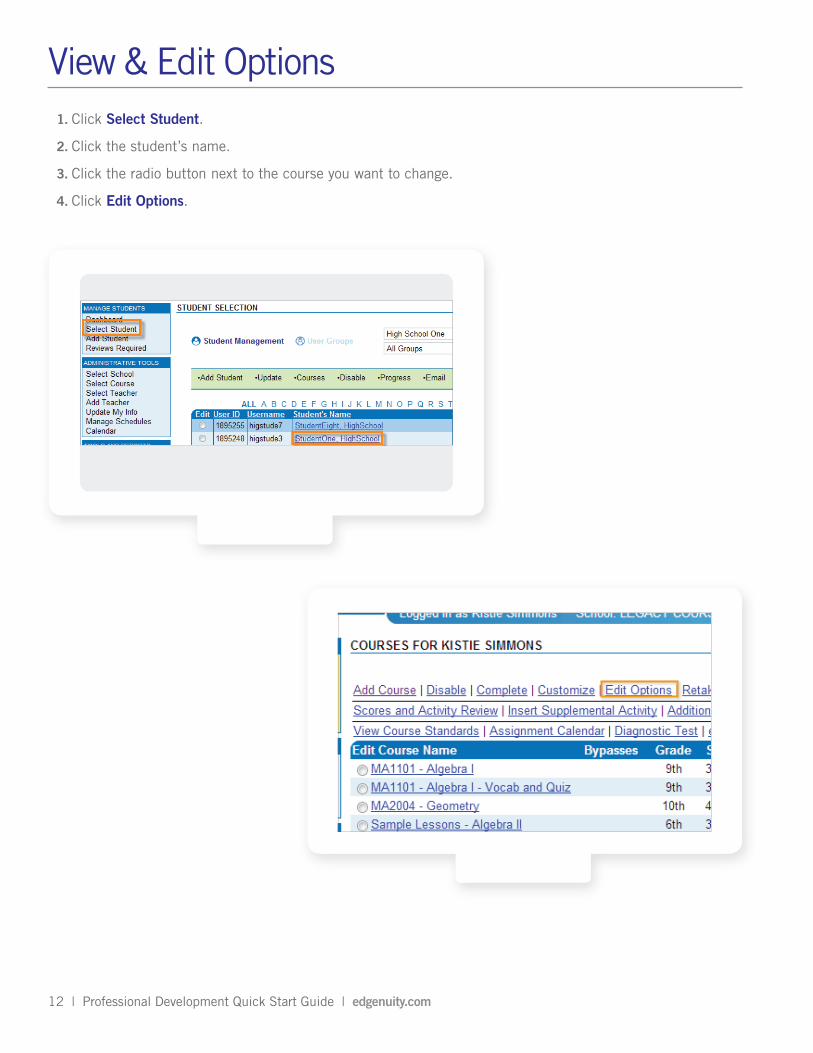
1. Click Select Student.
2. Click the student’s name.
3. Click the radio button next to the course you want to change.
4. Click Edit Options.
View & Edit Options
Copyright © Edgenuity Inc.12 | Professional Development Quick Start Guide | edgenuity.com Professional Development Quick Start Guide | edgenuity.com | 13
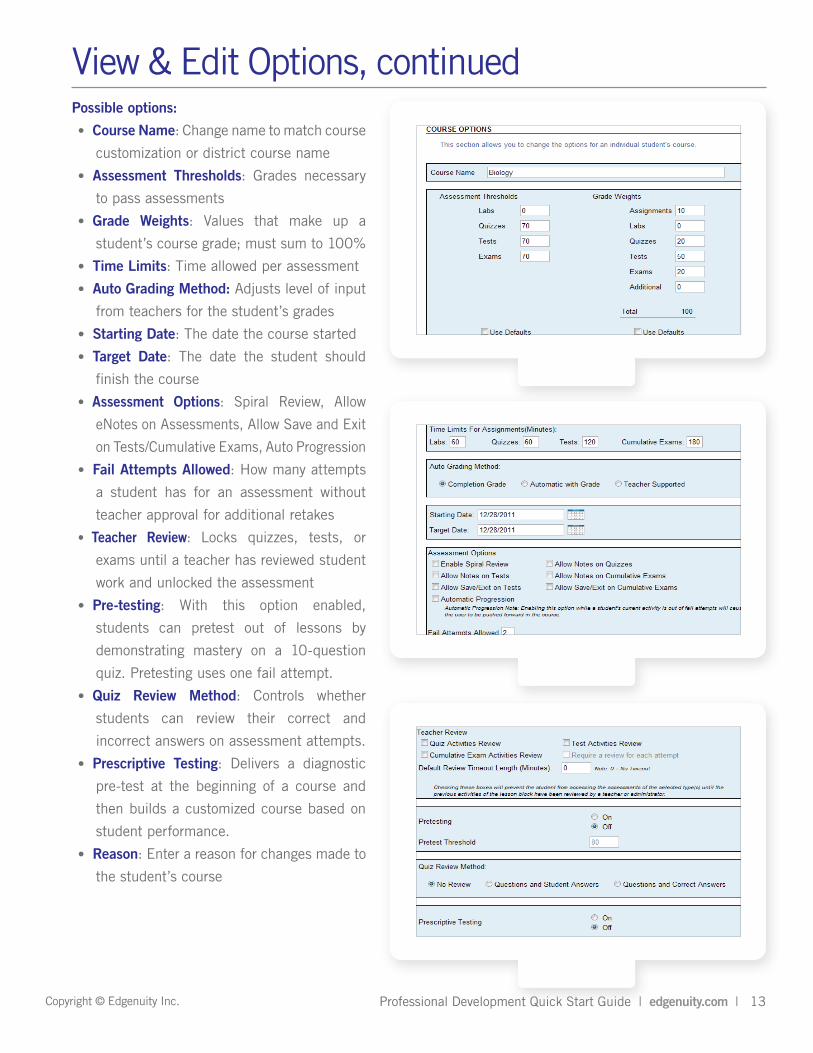
View & Edit Options, continuedPossible options:
•Course Name: Change name to match course
customization or district course name
•Assessment Thresholds: Grades necessary
to pass assessments
•Grade Weights: Values that make up a
student’s course grade; must sum to 100%
•Time Limits: Time allowed per assessment
•Auto Grading Method: Adjusts level of input
from teachers for the student’s grades
•Starting Date: The date the course started
•Target Date: The date the student should
finish the course
•Assessment Options: Spiral Review, Allow
eNotes on Assessments, Allow Save and Exit
on Tests/Cumulative Exams, Auto Progression
•Fail Attempts Allowed: How many attempts
a student has for an assessment without
teacher approval for additional retakes
•Teacher Review: Locks quizzes, tests, or
exams until a teacher has reviewed student
work and unlocked the assessment
•Pre-testing: With this option enabled,
students can pretest out of lessons by
demonstrating mastery on a 10-question
quiz. Pretesting uses one fail attempt.
•Quiz Review Method: Controls whether
students can review their correct and
incorrect answers on assessment attempts.
•Prescriptive Testing: Delivers a diagnostic
pre-test at the beginning of a course and
then builds a customized course based on
student performance.
•Reason: Enter a reason for changes made to
the student’s course
14 | Professional Development Quick Start Guide | edgenuity.com Professional Development Quick Start Guide | edgenuity.com | 15
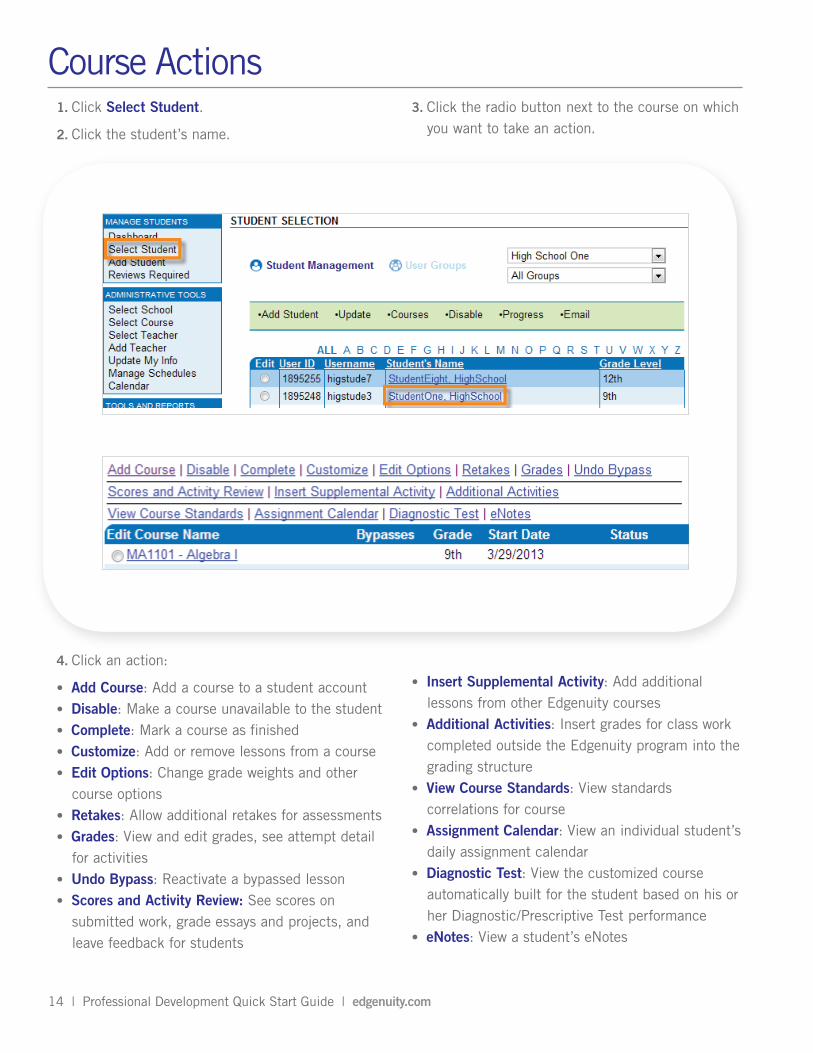
1. Click Select Student.
2. Click the student’s name.
3. Click the radio button next to the course on which you want to take an action.
Course Actions
4. Click an action:
•Add Course: Add a course to a student account•Disable: Make a course unavailable to the student•Complete: Mark a course as finished•Customize: Add or remove lessons from a course•Edit Options: Change grade weights and other
course options•Retakes: Allow additional retakes for assessments•Grades: View and edit grades, see attempt detail
for activities•Undo Bypass: Reactivate a bypassed lesson•Scores and Activity Review: See scores on
submitted work, grade essays and projects, and leave feedback for students
•Insert Supplemental Activity: Add additional lessons from other Edgenuity courses
•Additional Activities: Insert grades for class work completed outside the Edgenuity program into the grading structure
•View Course Standards: View standards correlations for course
•Assignment Calendar: View an individual student’s daily assignment calendar
•Diagnostic Test: View the customized course automatically built for the student based on his or her Diagnostic/Prescriptive Test performance
•eNotes: View a student’s eNotes
Copyright © Edgenuity Inc.14 | Professional Development Quick Start Guide | edgenuity.com Professional Development Quick Start Guide | edgenuity.com | 15
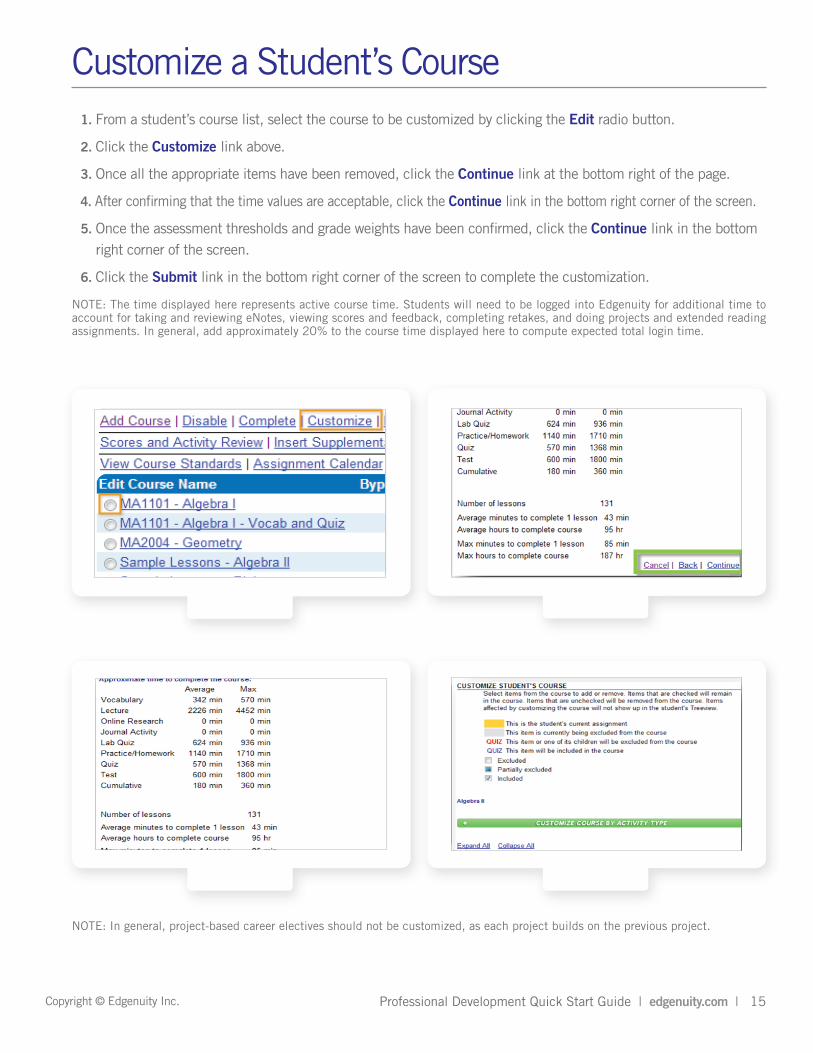
Customize a Student’s Course1. From a student’s course list, select the course to be customized by clicking the Edit radio button.
2. Click the Customize link above.
3. Once all the appropriate items have been removed, click the Continue link at the bottom right of the page.
4. After confirming that the time values are acceptable, click the Continue link in the bottom right corner of the screen.
5. Once the assessment thresholds and grade weights have been confirmed, click the Continue link in the bottom right corner of the screen.
6. Click the Submit link in the bottom right corner of the screen to complete the customization.
NOTE: The time displayed here represents active course time. Students will need to be logged into Edgenuity for additional time to account for taking and reviewing eNotes, viewing scores and feedback, completing retakes, and doing projects and extended reading assignments. In general, add approximately 20% to the course time displayed here to compute expected total login time.
NOTE: In general, project-based career electives should not be customized, as each project builds on the previous project.
16 | Professional Development Quick Start Guide | edgenuity.com Professional Development Quick Start Guide | edgenuity.com | 17
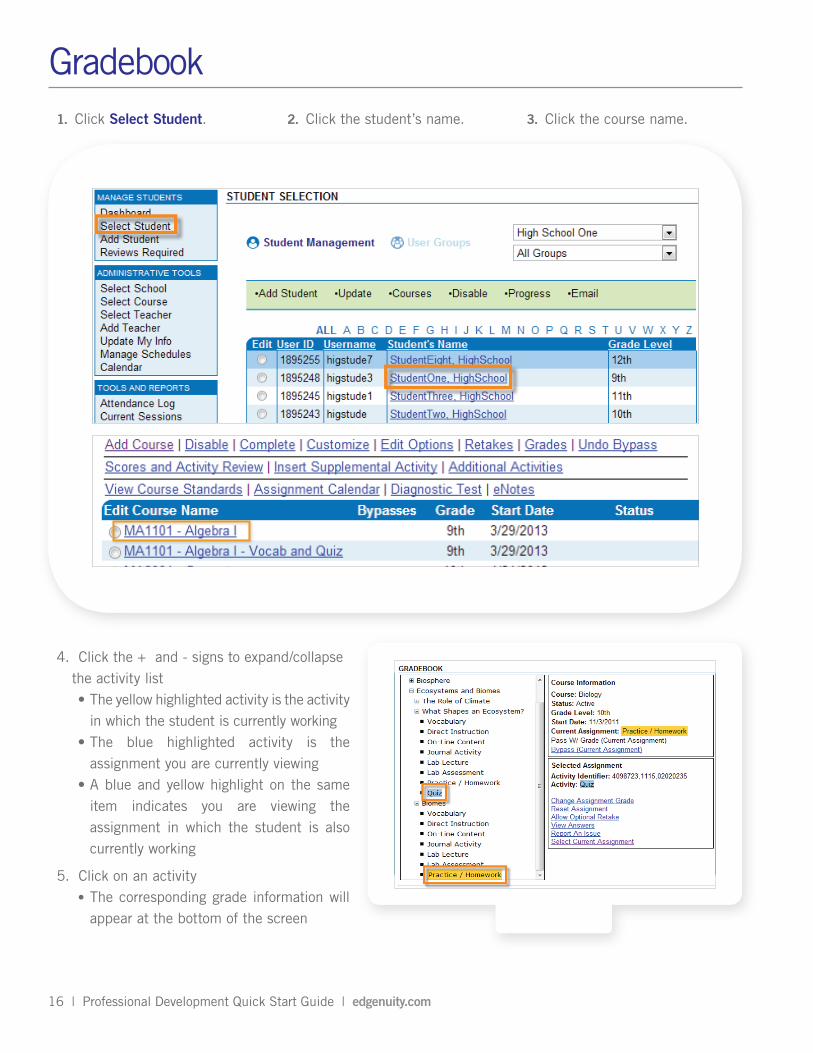
1. Click Select Student. 2. Click the student’s name. 3. Click the course name.
4. Click the + and - signs to expand/collapse the activity list•Theyellowhighlightedactivityistheactivity
in which the student is currently working•The blue highlighted activity is the
assignment you are currently viewing•Ablueandyellowhighlightonthesame
item indicates you are viewing the assignment in which the student is also currently working
5. Click on an activity •The corresponding grade information will
appear at the bottom of the screen
Gradebook
Copyright © Edgenuity Inc.16 | Professional Development Quick Start Guide | edgenuity.com Professional Development Quick Start Guide | edgenuity.com | 17
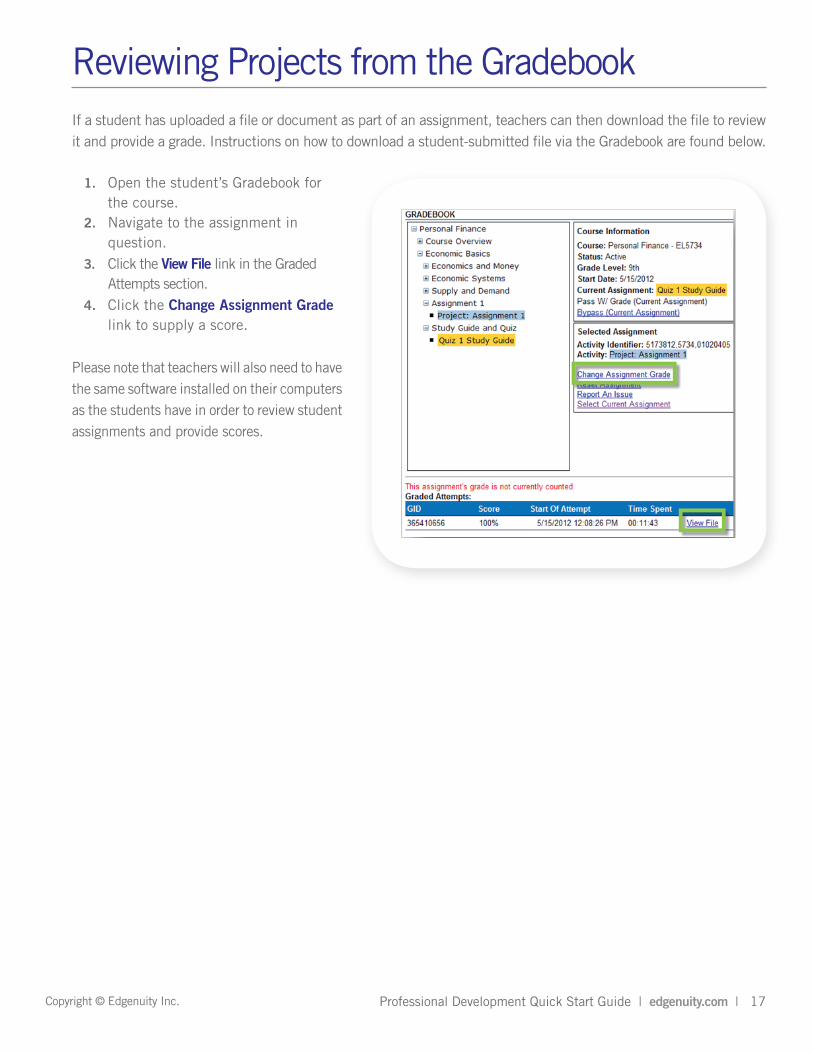
Reviewing Projects from the GradebookIf a student has uploaded a file or document as part of an assignment, teachers can then download the file to review it and provide a grade. Instructions on how to download a student-submitted file via the Gradebook are found below.
1. Open the student’s Gradebook for the course.
2. Navigate to the assignment in question.
3. Click the View File link in the Graded Attempts section.
4. Click the Change Assignment Grade link to supply a score.
Please note that teachers will also need to have the same software installed on their computers as the students have in order to review student assignments and provide scores.
18 | Professional Development Quick Start Guide | edgenuity.com Professional Development Quick Start Guide | edgenuity.com | 19
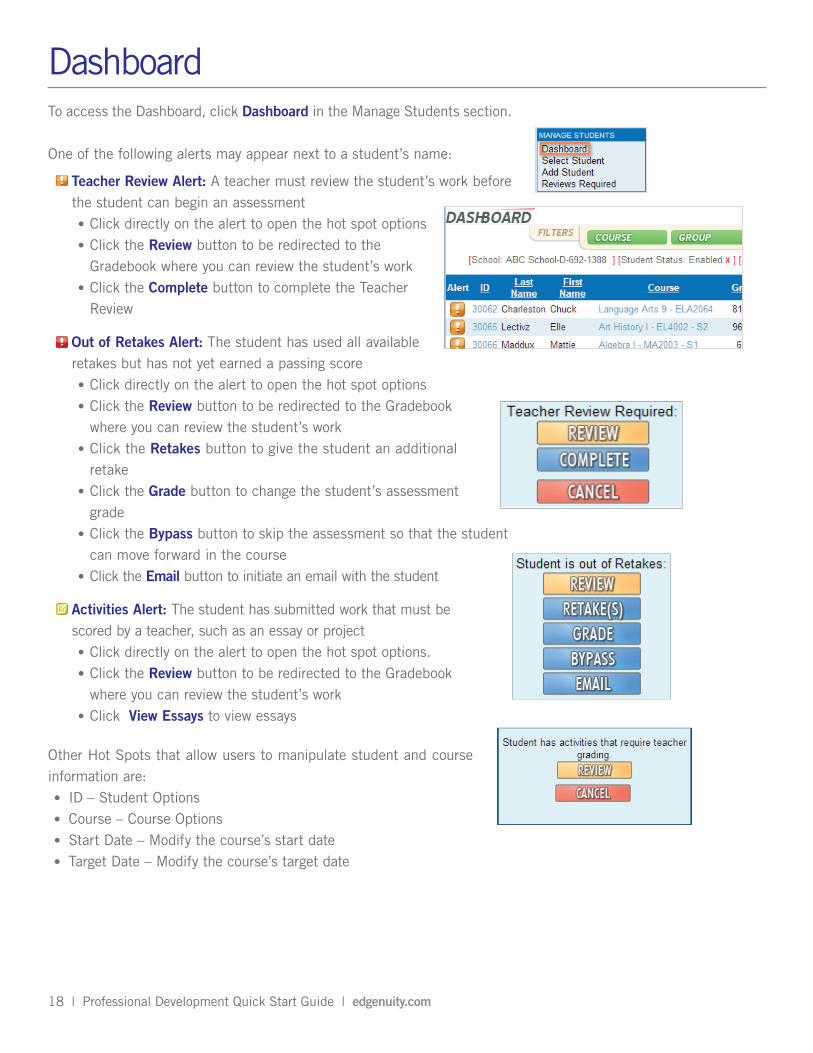
DashboardTo access the Dashboard, click Dashboard in the Manage Students section.
One of the following alerts may appear next to a student’s name:
1. Teacher Review Alert: A teacher must review the student’s work before the student can begin an assessment•Click directly on the alert to open the hot spot options •Click the Review button to be redirected to the
Gradebook where you can review the student’s work•Click the Complete button to complete the Teacher
Review
2. Out of Retakes Alert: The student has used all available retakes but has not yet earned a passing score•Click directly on the alert to open the hot spot options •Click the Review button to be redirected to the Gradebook
where you can review the student’s work•Click the Retakes button to give the student an additional
retake•Click the Grade button to change the student’s assessment
grade•Click the Bypass button to skip the assessment so that the student
can move forward in the course•Click the Email button to initiate an email with the student
3. Activities Alert: The student has submitted work that must be scored by a teacher, such as an essay or project•Click directly on the alert to open the hot spot options.•Click the Review button to be redirected to the Gradebook
where you can review the student’s work•Click View Essays to view essays
Other Hot Spots that allow users to manipulate student and course information are: •ID – Student Options•Course – Course Options•Start Date – Modify the course’s start date•Target Date – Modify the course’s target date
Copyright © Edgenuity Inc.18 | Professional Development Quick Start Guide | edgenuity.com Professional Development Quick Start Guide | edgenuity.com | 19
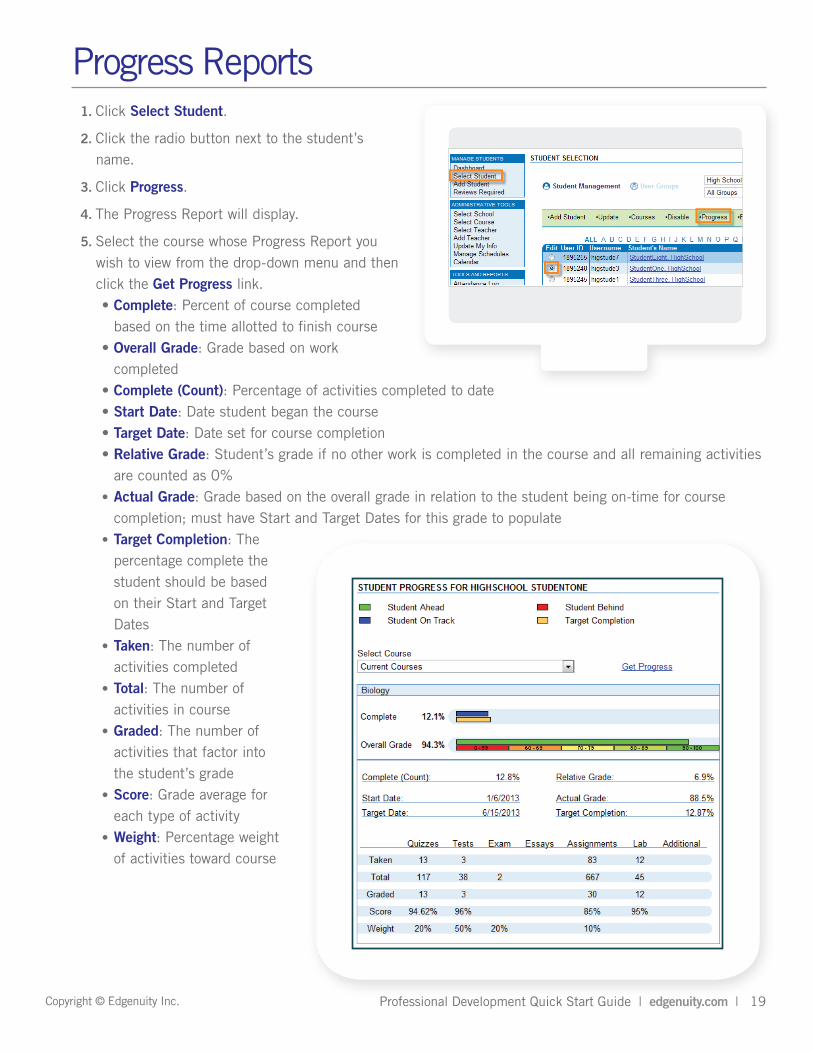
Progress Reports1. Click Select Student.
2. Click the radio button next to the student’s name.
3. Click Progress.
4. The Progress Report will display.
5. Select the course whose Progress Report you wish to view from the drop-down menu and then click the Get Progress link.•Complete: Percent of course completed
based on the time allotted to finish course•Overall Grade: Grade based on work
completed•Complete (Count): Percentage of activities completed to date•Start Date: Date student began the course•Target Date: Date set for course completion•Relative Grade: Student’s grade if no other work is completed in the course and all remaining activities
are counted as 0%•Actual Grade: Grade based on the overall grade in relation to the student being on-time for course
completion; must have Start and Target Dates for this grade to populate•Target Completion: The
percentage complete the student should be based on their Start and Target Dates
•Taken: The number of activities completed
•Total: The number of activities in course
•Graded: The number of activities that factor into the student’s grade
•Score: Grade average for each type of activity
•Weight: Percentage weight of activities toward course
20 | Professional Development Quick Start Guide | edgenuity.com Professional Development Quick Start Guide | edgenuity.com | 21
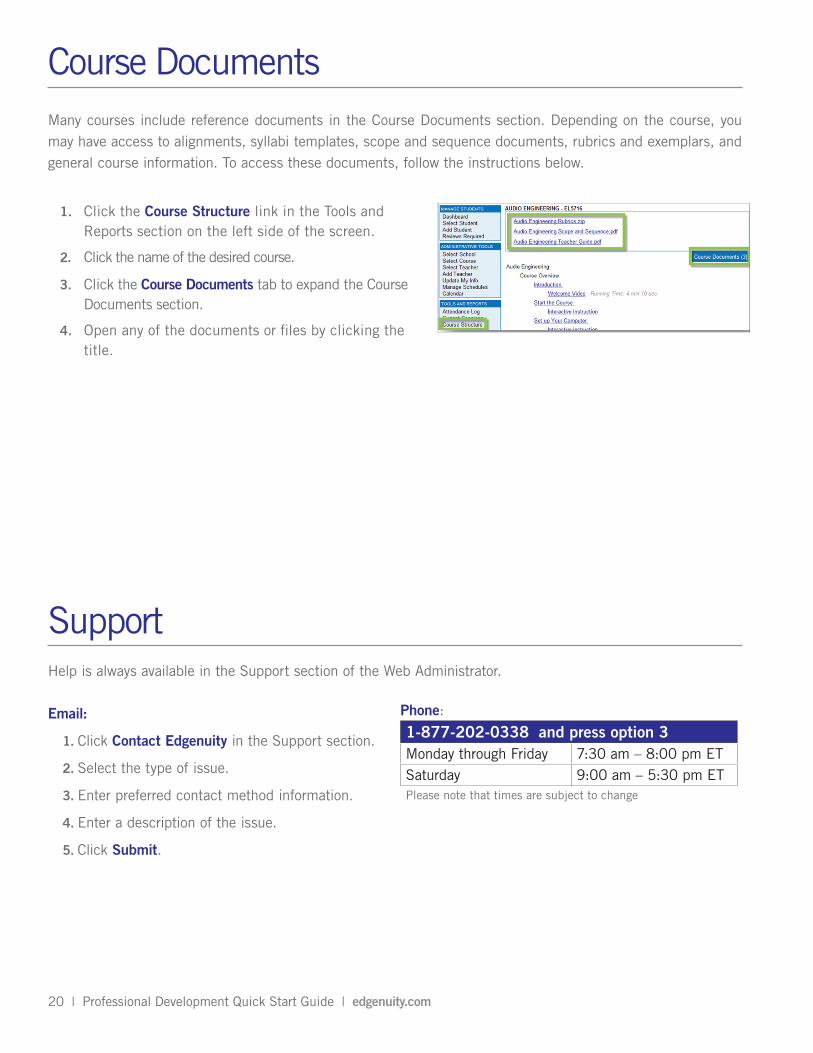
Course DocumentsMany courses include reference documents in the Course Documents section. Depending on the course, you may have access to alignments, syllabi templates, scope and sequence documents, rubrics and exemplars, and general course information. To access these documents, follow the instructions below.
1. Click the Course Structure link in the Tools and Reports section on the left side of the screen.
2. Click the name of the desired course.
3. Click the Course Documents tab to expand the Course Documents section.
4. Open any of the documents or files by clicking the title.
Support Help is always available in the Support section of the Web Administrator.
Email:
1. Click Contact Edgenuity in the Support section.
2. Select the type of issue.
3. Enter preferred contact method information.
4. Enter a description of the issue.
5. Click Submit.
Phone:
1-877-202-0338 and press option 3Monday through Friday 7:30 am – 8:00 pm ETSaturday 9:00 am – 5:30 pm ETPlease note that times are subject to change
Copyright © Edgenuity Inc.20 | Professional Development Quick Start Guide | edgenuity.com Professional Development Quick Start Guide | edgenuity.com | 21
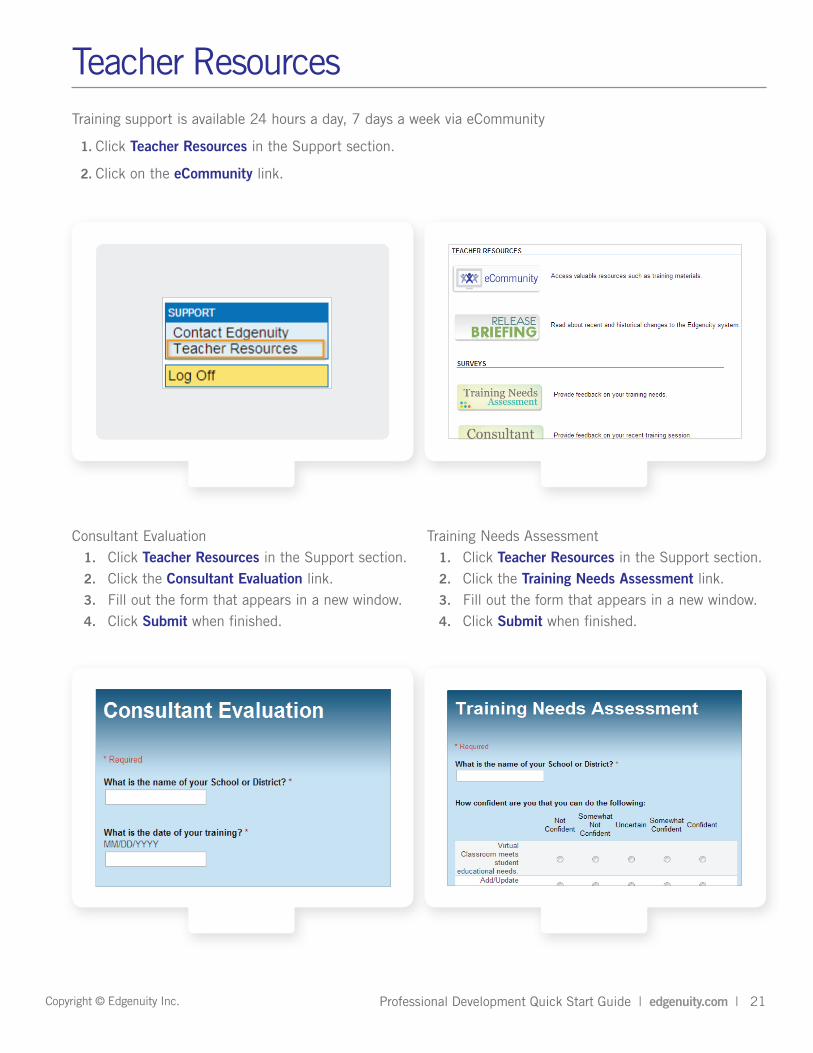
Teacher ResourcesTraining support is available 24 hours a day, 7 days a week via eCommunity
1. Click Teacher Resources in the Support section.
2. Click on the eCommunity link.
Consultant Evaluation1. Click Teacher Resources in the Support section.2. Click the Consultant Evaluation link.3. Fill out the form that appears in a new window.4. Click Submit when finished.
Training Needs Assessment1. Click Teacher Resources in the Support section.2. Click the Training Needs Assessment link.3. Fill out the form that appears in a new window.4. Click Submit when finished.
22 | Professional Development Quick Start Guide | edgenuity.com Professional Development Quick Start Guide | edgenuity.com | 23
Requirements for Career ElectivesAlong with the general system requirements for students to effectively utilize the Edgenuity platform, students must also have sufficient access rights on the computer(s) they are using in order to perform the following:
1. Download zipped files from within the course.
2. Install software applications locally.
3. Create files and folders.
4. Save files from one session to the next.
The Course Overview Section of each Career Electives course provides students with instructions on how to perform these tasks. This guide will provide instructions on downloading zipped files and installing software applications locally.
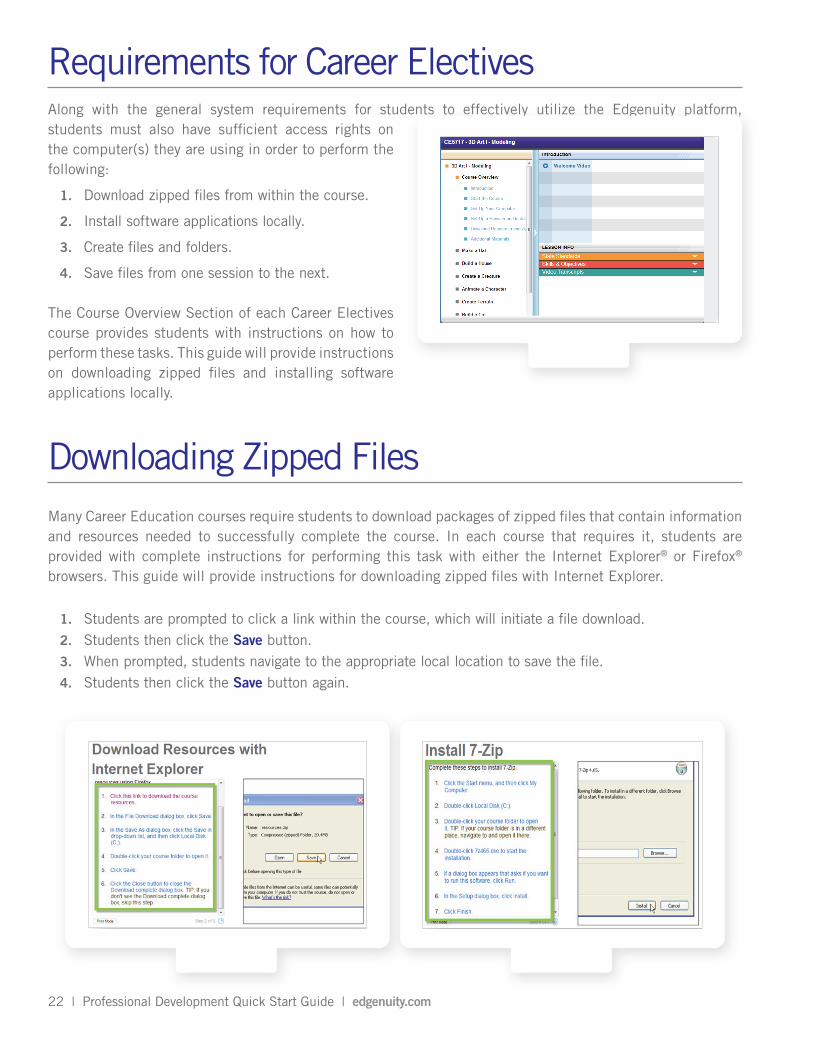
Downloading Zipped FilesMany Career Education courses require students to download packages of zipped files that contain information and resources needed to successfully complete the course. In each course that requires it, students are provided with complete instructions for performing this task with either the Internet Explorer® or Firefox® browsers. This guide will provide instructions for downloading zipped files with Internet Explorer.
1. Students are prompted to click a link within the course, which will initiate a file download. 2. Students then click the Save button.3. When prompted, students navigate to the appropriate local location to save the file.4. Students then click the Save button again.
Copyright © Edgenuity Inc.22 | Professional Development Quick Start Guide | edgenuity.com Professional Development Quick Start Guide | edgenuity.com | 23
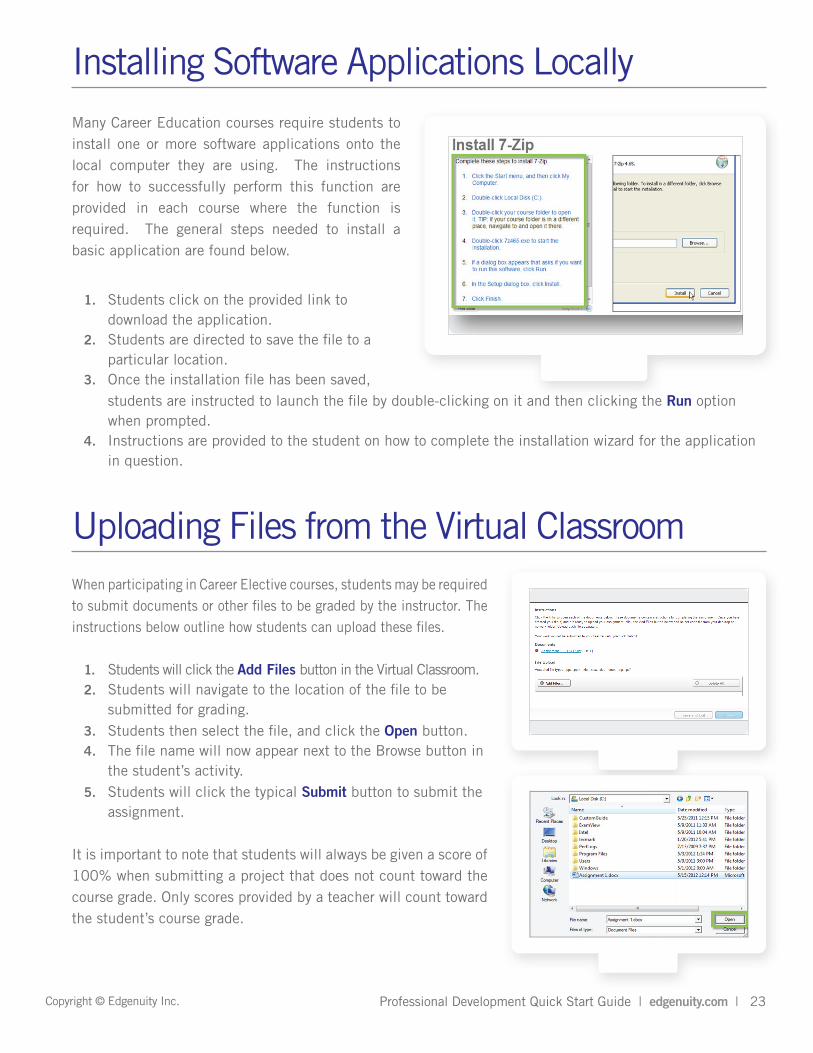
Installing Software Applications LocallyMany Career Education courses require students to install one or more software applications onto the local computer they are using. The instructions for how to successfully perform this function are provided in each course where the function is required. The general steps needed to install a basic application are found below.
1. Students click on the provided link to download the application.
2. Students are directed to save the file to a particular location.
3. Once the installation file has been saved, students are instructed to launch the file by double-clicking on it and then clicking the Run option when prompted.
4. Instructions are provided to the student on how to complete the installation wizard for the application in question.
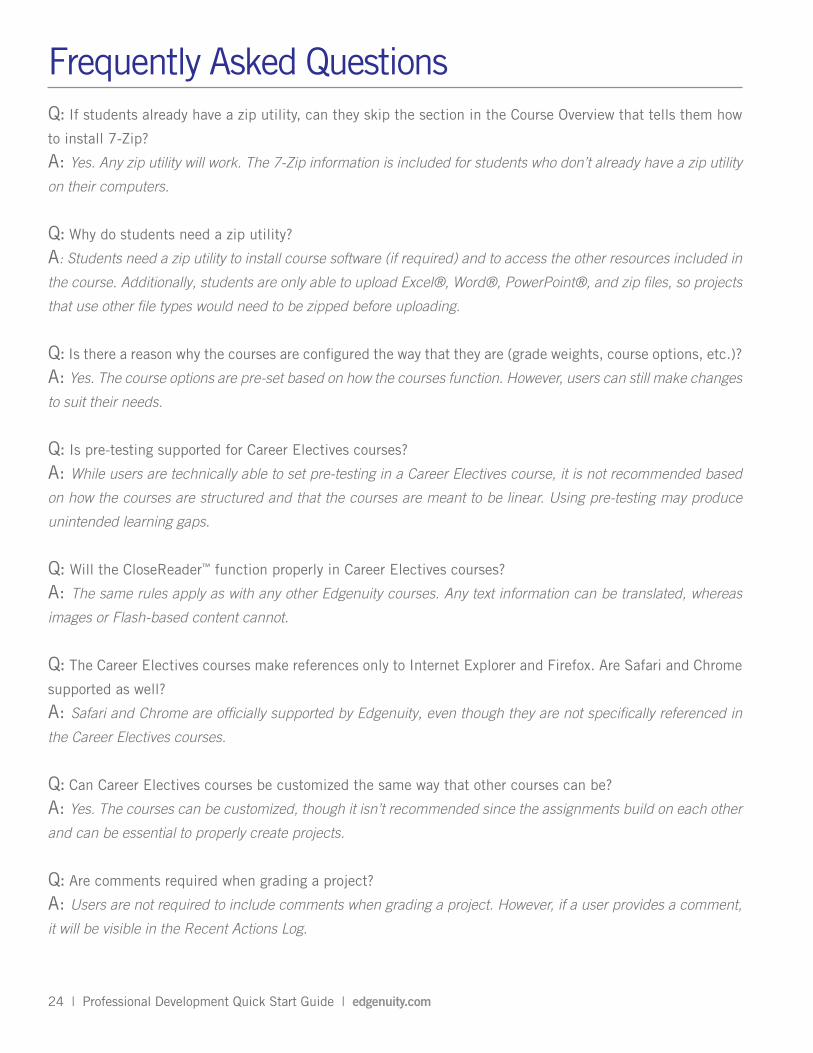
Uploading Files from the Virtual ClassroomWhen participating in Career Elective courses, students may be required to submit documents or other files to be graded by the instructor. The instructions below outline how students can upload these files.
1. Students will click the Add Files button in the Virtual Classroom.2. Students will navigate to the location of the file to be
submitted for grading.3. Students then select the file, and click the Open button.4. The file name will now appear next to the Browse button in
the student’s activity.5. Students will click the typical Submit button to submit the
assignment.
It is important to note that students will always be given a score of 100% when submitting a project that does not count toward the course grade. Only scores provided by a teacher will count toward the student’s course grade.
24 | Professional Development Quick Start Guide | edgenuity.com Professional Development Quick Start Guide | edgenuity.com | 25
Frequently Asked QuestionsQ: If students already have a zip utility, can they skip the section in the Course Overview that tells them how
to install 7-Zip?
A: Yes. Any zip utility will work. The 7-Zip information is included for students who don’t already have a zip utility
on their computers.
Q: Why do students need a zip utility?
A: Students need a zip utility to install course software (if required) and to access the other resources included in
the course. Additionally, students are only able to upload Excel®, Word®, PowerPoint®, and zip files, so projects
that use other file types would need to be zipped before uploading.
Q: Is there a reason why the courses are configured the way that they are (grade weights, course options, etc.)?
A: Yes. The course options are pre-set based on how the courses function. However, users can still make changes
to suit their needs.
Q: Is pre-testing supported for Career Electives courses?
A: While users are technically able to set pre-testing in a Career Electives course, it is not recommended based
on how the courses are structured and that the courses are meant to be linear. Using pre-testing may produce
unintended learning gaps.
Q: Will the CloseReader™ function properly in Career Electives courses?
A: The same rules apply as with any other Edgenuity courses. Any text information can be translated, whereas
images or Flash-based content cannot.
Q: The Career Electives courses make references only to Internet Explorer and Firefox. Are Safari and Chrome
supported as well?
A: Safari and Chrome are officially supported by Edgenuity, even though they are not specifically referenced in
the Career Electives courses.
Q: Can Career Electives courses be customized the same way that other courses can be?
A: Yes. The courses can be customized, though it isn’t recommended since the assignments build on each other
and can be essential to properly create projects.
Q: Are comments required when grading a project?
A: Users are not required to include comments when grading a project. However, if a user provides a comment,
it will be visible in the Recent Actions Log.

Copyright © Edgenuity Inc.24 | Professional Development Quick Start Guide | edgenuity.com Professional Development Quick Start Guide | edgenuity.com | 25
Notes________________________________________________________________________________________________________________________________________________________________________________________________________________________________________________________________________________________________________________________________________________________________________________________________________________________________________________________________________________________________________________________________________________________________________________________________________________________________________________________________________________________________________________________________________________________________________________________________________________________________________________________________________________________________________________________________________________________________________________________________________________________________________________________________________________________________________________________________________________________________________________________________________________________________________________________________________________________________________________________________________________________________________________________________________________________________________________________________________________________________________________________________________________________________________________________________________________________________________________________________________________________________________________________________________________________________________________________________________________________________________________________________________________________________________________________________________________________________________________________________________________________________________________________________________________________________________________________________________________________________________________________________________________________________________________________________________________________________________________________________________________________________________________________________________________________________