powershell ebook (3) - ms sql tips - sql server tips ... · pdf filepowershell ebook (3) ......
TRANSCRIPT

PowerShell eBook (3)by Tobias Weltner
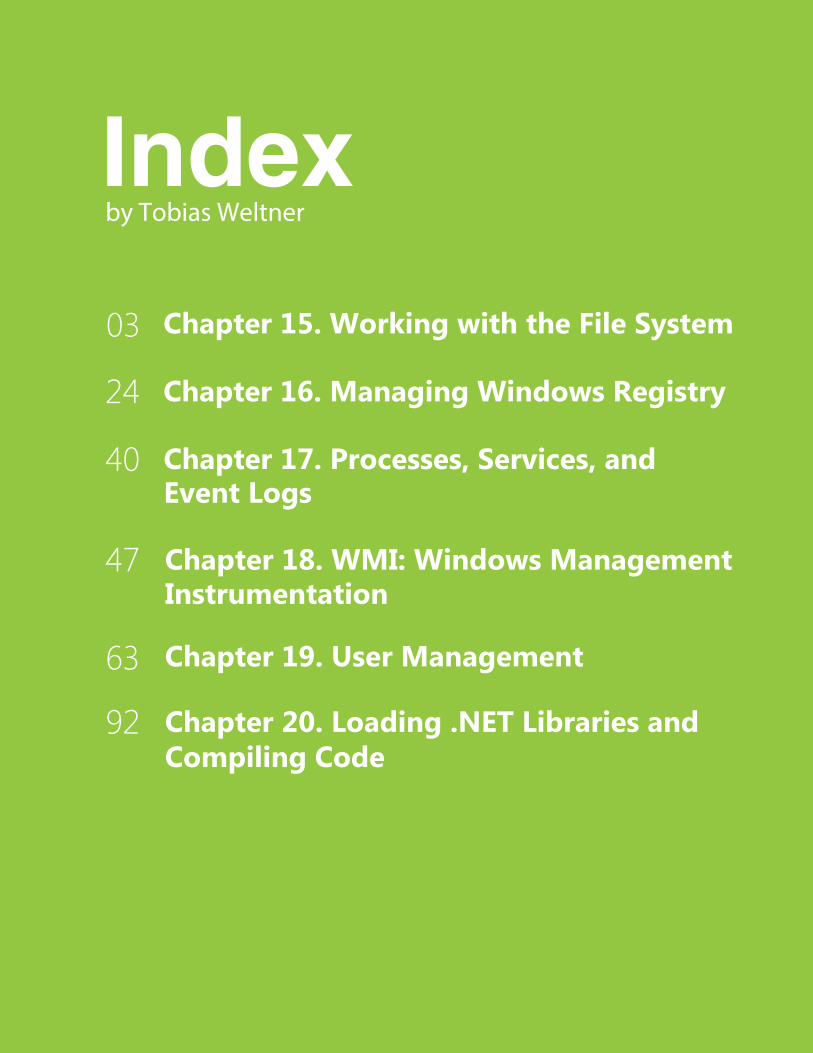
Indexby Tobias Weltner
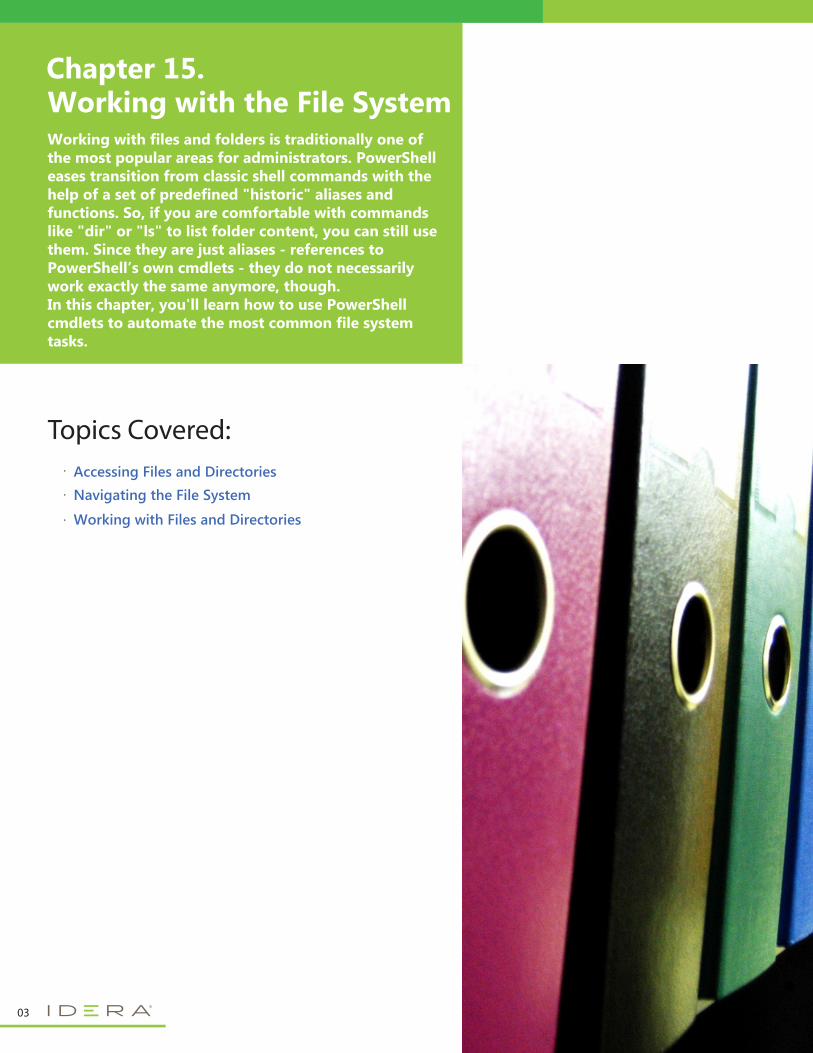
Chapter 15. Working with the File System
Chapter 16. Managing Windows Registry
Chapter 17. Processes, Services, and Event Logs
InstrumentationChapter 18. WMI: Windows Management
Chapter 19. User Management
Chapter 20. Loading .NET Libraries and Compiling Code
03
24
40
47
63
92
03
Working with files and folders is traditionally one of the most popular areas for administrators. PowerShell eases transition from classic shell commands with the help of a set of predefined "historic" aliases and functions. So, if you are comfortable with commands like "dir" or "ls" to list folder content, you can still use them. Since they are just aliases - references to PowerShell’s own cmdlets - they do not necessarily work exactly the same anymore, though.In this chapter, you'll learn how to use PowerShell cmdlets to automate the most common file system tasks.
Working with the File System
Topics Covered:Accessing Files and Directories·
Navigating the File System
Working with Files and Directories
·
·
Chapter 15.
04
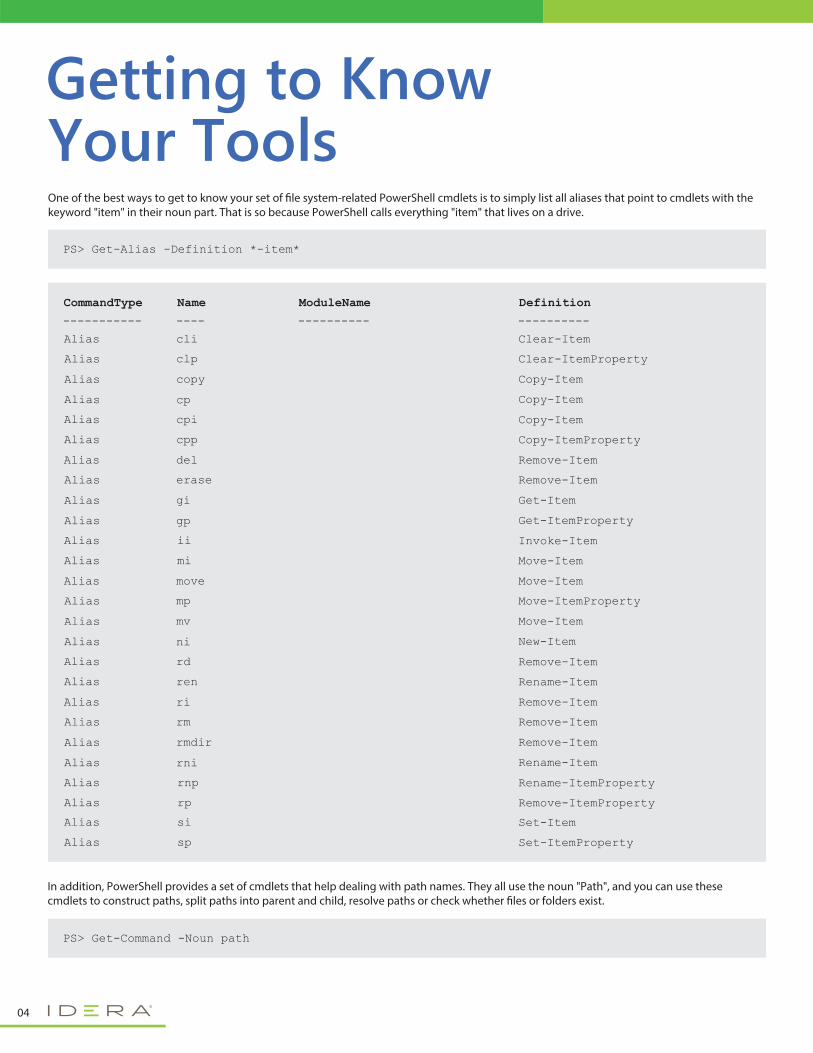
Getting to KnowYour ToolsOne of the best ways to get to know your set of �le system-related PowerShell cmdlets is to simply list all aliases that point to cmdlets with the keyword "item" in their noun part. That is so because PowerShell calls everything "item" that lives on a drive.
In addition, PowerShell provides a set of cmdlets that help dealing with path names. They all use the noun "Path", and you can use these cmdlets to construct paths, split paths into parent and child, resolve paths or check whether �les or folders exist.
PS> Get-Alias -Definition *-item*
PS> Get-Command -Noun path
CommandType Name ModuleName Definition
Alias
Alias
Alias
Alias
Alias cpi
cp
copy Copy-Item
Copy-Item
Copy-Item
Alias cpp Copy-ItemProperty
clp Clear-ItemProperty
cli Clear-Item
Alias
Alias
Alias
Alias
Alias ii
gp
gi Get-Item
Get-ItemProperty
Invoke-Item
Alias mi Move-Item
erase Remove-Item
del Remove-Item
----------- ---------- --------------
Alias
Alias
Alias
Alias
Alias rd
ni
mv Move-Item
New-Item
Remove-Item
Alias ren Rename-Item
mp Move-ItemProperty
move Move-Item
Alias
Alias
Alias
Alias
Alias rnp
rni
rmdir Remove-Item
Rename-Item
Rename-ItemProperty
Alias rp Remove-ItemProperty
Alias si Set-Item
Alias sp Set-ItemProperty
rm Remove-Item
ri Remove-Item
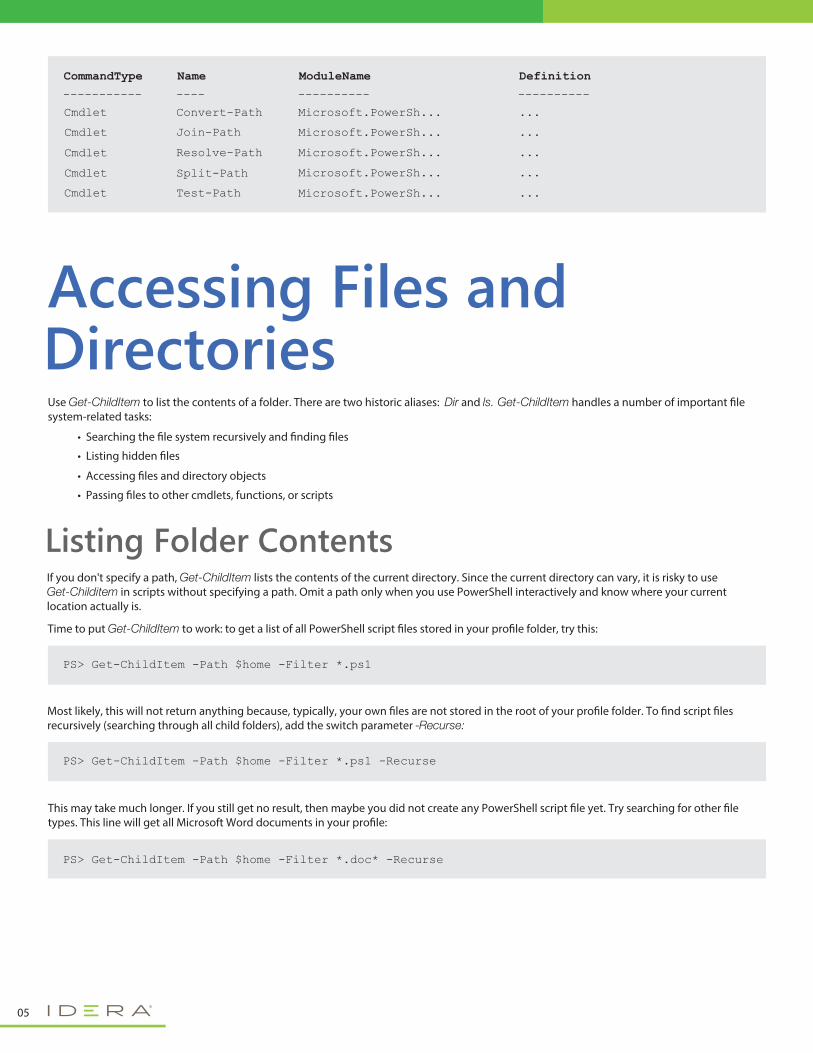
Accessing Files and DirectoriesUse Get-ChildItem to list the contents of a folder. There are two historic aliases: Dir and ls. Get-ChildItem handles a number of important �le system-related tasks:
If you don't specify a path, Get-ChildItem lists the contents of the current directory. Since the current directory can vary, it is risky to use Get-Childitem in scripts without specifying a path. Omit a path only when you use PowerShell interactively and know where your current location actually is.
Time to put Get-ChildItem to work: to get a list of all PowerShell script �les stored in your pro�le folder, try this:
Most likely, this will not return anything because, typically, your own �les are not stored in the root of your pro�le folder. To �nd script �les recursively (searching through all child folders), add the switch parameter -Recurse:
• Searching the �le system recursively and �nding �les
• Listing hidden �les
• Accessing �les and directory objects
• Passing �les to other cmdlets, functions, or scripts
PS> Get-ChildItem -Path $home -Filter *.ps1
PS> Get-ChildItem -Path $home -Filter *.ps1 -Recurse
This may take much longer. If you still get no result, then maybe you did not create any PowerShell script �le yet. Try searching for other �le types. This line will get all Microsoft Word documents in your pro�le:
PS> Get-ChildItem -Path $home -Filter *.doc* -Recurse
05
CommandType Name ModuleName Definition
Cmdlet
Cmdlet
Cmdlet
Cmdlet
Cmdlet Test-Path
Split-Path
Resolve-Path Microsoft.PowerSh...
Microsoft.PowerSh...
Microsoft.PowerSh...
Join-Path Microsoft.PowerSh...
Convert-Path Microsoft.PowerSh...
...
...
...
...
...
----------- ---------- --------------
Listing Folder Contents
In addition to -Filter, there is a parameter that seems to work very similar: -Include:
PS> Get-ChildItem $home -Include *.ps1 -Recurse
You'll see some dramatic speed di�erences, though: -Filter works signi�cantly faster than -Include.
You also see functional di�erences because -Include only works right when you also use the -Recurse parameter.
The reason for these di�erences is the way these parameters work. -Filter is implemented by the underlying drive provider, so it is retrieving only those �les and folders that match the criteria in the �rst place. That's why -Filter is fast and e�cient. To be able to use -Filter, though, the drive provider must support it.
-Include on the contrary is implemented by PowerShell and thus is independent of provider implementations. It works on all drives, no matter which provider is implementing that drive. The provider returns all items, and only then does -Include �lter out the items you want. This is slower but universal. -Filter currently only works for �le system drives. If you wanted to select items on Registry drives like HKLM:\ or HKCU:\, you must use -Include.
PS> (Measure-Command {Get-ChildItem $home -Filter *.ps1 -Recurse}).TotalSeconds
4,6830099
PS> (Measure-Command {Get-ChildItem $home -Include *.ps1 -Recurse}).TotalSeconds
28,1017376
PS> Get-ChildItem -Path $home -Filter *.doc* -Recurse -ea 0
When searching folders recursively, you may run into situations where you do not have access to a particular subfolder. Get-ChildItem then raises an exception but continues its search. To hide such error messages, add the common parameter -Erroraction SilentlyContinue which is present in all cmdlets, or use its short form -ea 0:
PS> Get-ChildItem c:\, d:\ -Filter *.log -Recurse -ea 0
The -Path parameter accepts multiple comma-separated values, so you could search multiple drives or folders in one line. This would �nd all .log-�les on drives C:\ and D:\ (and takes a long time because of the vast number of folders it searches):
PS> Get-ChildItem -Path $env:windir -Name
If you just need the names of items in one directory, use the parameter -Name:
PS> Get-ChildItem -Path $env:windir | Select-Object -ExpandProperty FullName
To list only the full path of �les, use a pipeline and send the results to Select-Object to only select the content of the FullName property:
06
Choosing the Right Parameters
AttentionSome characters have special meaning to PowerShell, such as square brackets or wildcards such as '*'. If you want PowerShell to ignore special characters in path names and instead take the path literally, use the -LiteralPath parameter instead of -Path.
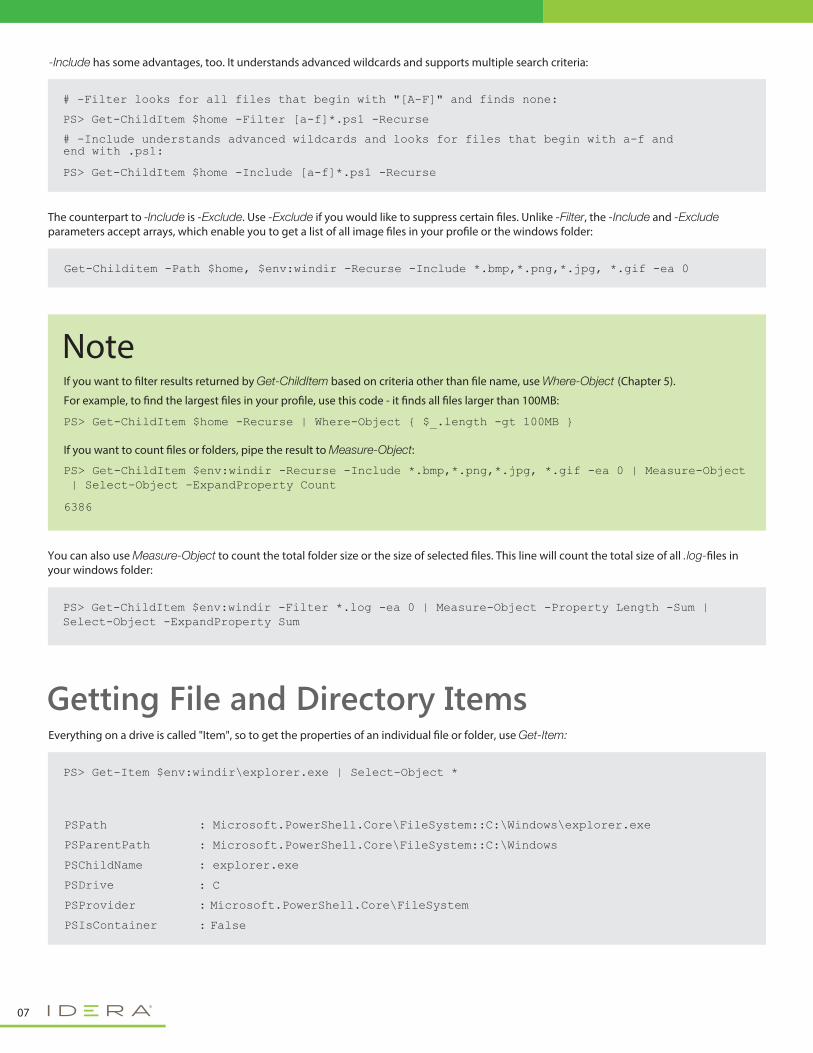
-Include has some advantages, too. It understands advanced wildcards and supports multiple search criteria:
The counterpart to -Include is -Exclude. Use -Exclude if you would like to suppress certain �les. Unlike -Filter, the -Include and -Exclude parameters accept arrays, which enable you to get a list of all image �les in your pro�le or the windows folder:
You can also use Measure-Object to count the total folder size or the size of selected �les. This line will count the total size of all .log-�les in your windows folder:
Get-Childitem -Path $home, $env:windir -Recurse -Include *.bmp,*.png,*.jpg, *.gif -ea 0
PS> Get-ChildItem $env:windir -Filter *.log -ea 0 | Measure-Object -Property Length -Sum | Select-Object -ExpandProperty Sum
Everything on a drive is called "Item", so to get the properties of an individual �le or folder, use Get-Item:
PSPath : Microsoft.PowerShell.Core\FileSystem::C:\Windows\explorer.exe
PSParentPath : Microsoft.PowerShell.Core\FileSystem::C:\Windows
PSChildName : explorer.exe
PSDrive : C
PSProvider : Microsoft.PowerShell.Core\FileSystem
PSIsContainer : False
PS> Get-Item $env:windir\explorer.exe | Select-Object *
# -Filter looks for all files that begin with "[A-F]" and finds none:
PS> Get-ChildItem $home -Filter [a-f]*.ps1 -Recurse
PS> Get-ChildItem $home -Include [a-f]*.ps1 -Recurse
# -Include understands advanced wildcards and looks for files that begin with a-f andend with .ps1:
Getting File and Directory Items
NoteIf you want to �lter results returned by Get-ChildItem based on criteria other than �le name, use Where-Object (Chapter 5).
If you want to count �les or folders, pipe the result to Measure-Object:
For example, to �nd the largest �les in your pro�le, use this code - it �nds all �les larger than 100MB:
PS> Get-ChildItem $home -Recurse | Where-Object { $_.length -gt 100MB }
PS> Get-ChildItem $env:windir -Recurse -Include *.bmp,*.png,*.jpg, *.gif -ea 0 | Measure-Object | Select-Object -ExpandProperty Count
6386
07
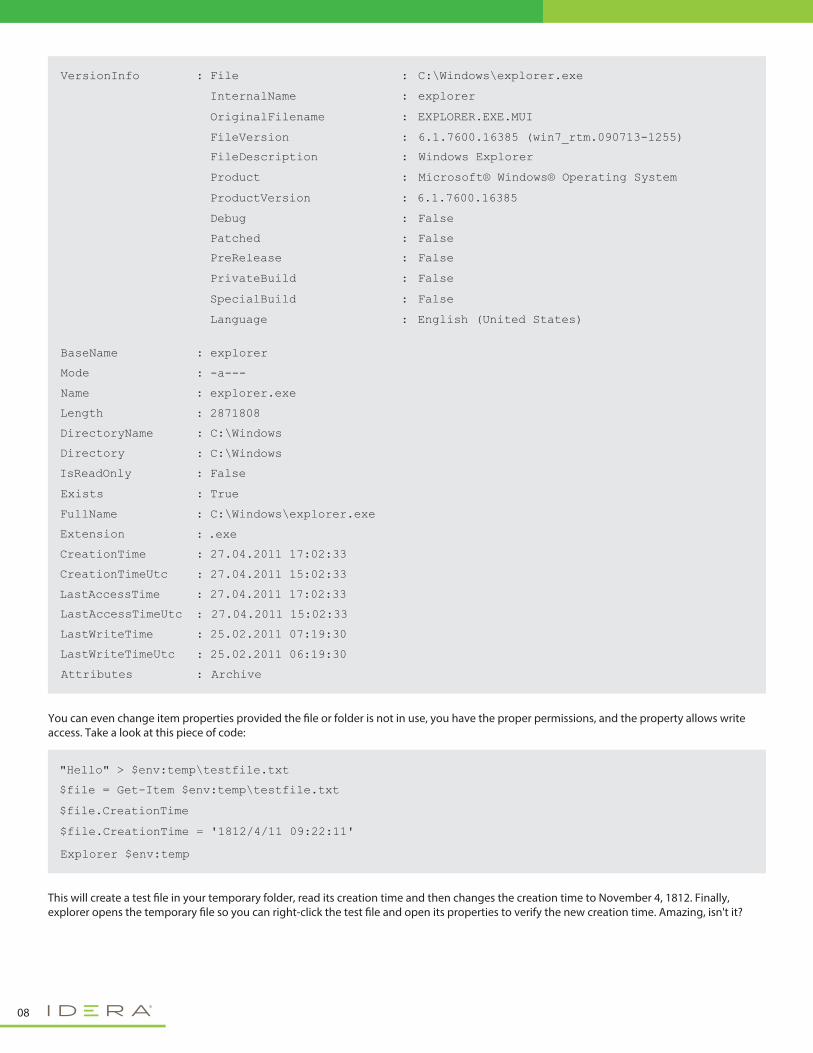
You can even change item properties provided the �le or folder is not in use, you have the proper permissions, and the property allows write access. Take a look at this piece of code:
This will create a test �le in your temporary folder, read its creation time and then changes the creation time to November 4, 1812. Finally, explorer opens the temporary �le so you can right-click the test �le and open its properties to verify the new creation time. Amazing, isn't it?
"Hello" > $env:temp\testfile.txt
$file = Get-Item $env:temp\testfile.txt
$file.CreationTime
$file.CreationTime = '1812/4/11 09:22:11'
Explorer $env:temp
: File : C:\Windows\explorer.exe
InternalName : explorer
OriginalFilename : EXPLORER.EXE.MUI
FileVersion : 6.1.7600.16385 (win7_rtm.090713-1255)
FileDescription : Windows Explorer
Product : Microsoft® Windows® Operating System
ProductVersion : 6.1.7600.16385
Debug : False
Patched : False
PreRelease : False
PrivateBuild : False
SpecialBuild : False
Language : English (United States)
BaseName : explorer
Mode : -a---
Name : explorer.exe
Length : 2871808
DirectoryName : C:\Windows
Directory : C:\Windows
IsReadOnly : False
Exists : True
FullName : C:\Windows\explorer.exe
Extension : .exe
CreationTime : 27.04.2011 17:02:33
CreationTimeUtc : 27.04.2011 15:02:33
LastAccessTime : 27.04.2011 17:02:33
LastAccessTimeUtc : 27.04.2011 15:02:33
LastWriteTime : 25.02.2011 07:19:30
LastWriteTimeUtc : 25.02.2011 06:19:30
Attributes : Archive
VersionInfo
08
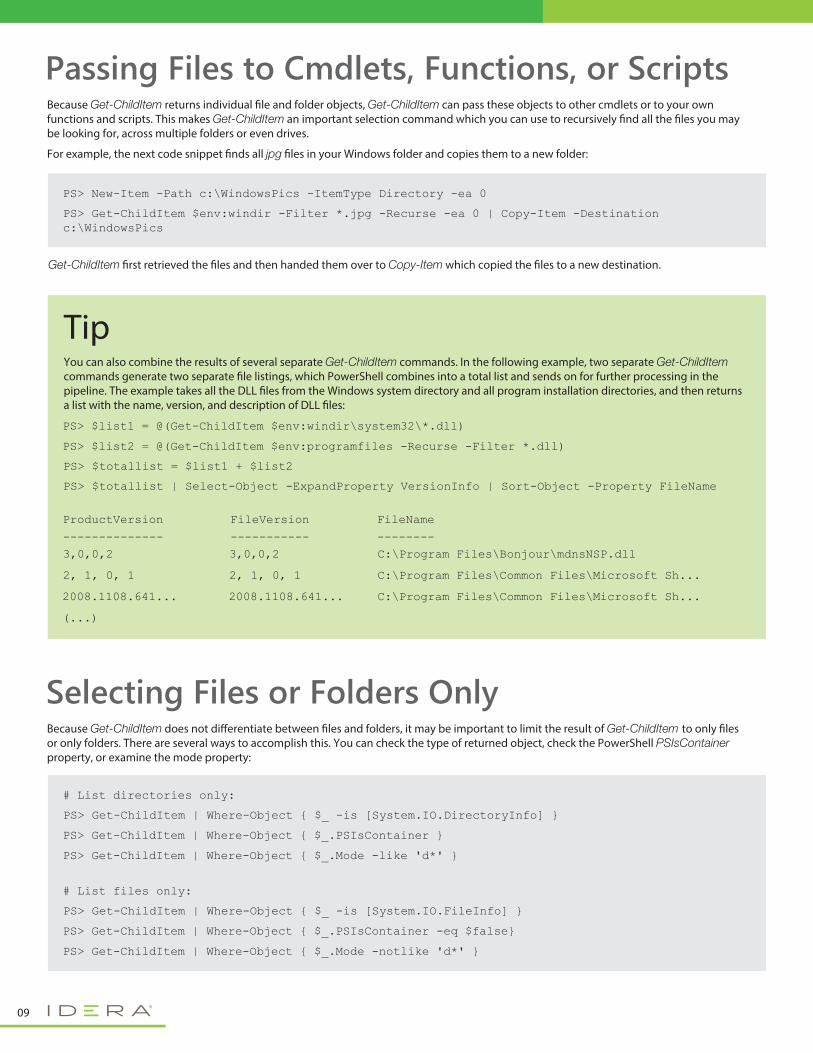
Because Get-ChildItem returns individual �le and folder objects, Get-ChildItem can pass these objects to other cmdlets or to your own functions and scripts. This makes Get-ChildItem an important selection command which you can use to recursively �nd all the �les you may be looking for, across multiple folders or even drives.
For example, the next code snippet �nds all jpg �les in your Windows folder and copies them to a new folder:
Get-ChildItem �rst retrieved the �les and then handed them over to Copy-Item which copied the �les to a new destination.
PS> New-Item -Path c:\WindowsPics -ItemType Directory -ea 0
PS> Get-ChildItem $env:windir -Filter *.jpg -Recurse -ea 0 | Copy-Item -Destination c:\WindowsPics
Passing Files to Cmdlets, Functions, or Scripts
Because Get-ChildItem does not di�erentiate between �les and folders, it may be important to limit the result of Get-ChildItem to only �les or only folders. There are several ways to accomplish this. You can check the type of returned object, check the PowerShell PSIsContainer property, or examine the mode property:
# List directories only:
PS> Get-ChildItem | Where-Object { $_ -is [System.IO.DirectoryInfo] }
PS> Get-ChildItem | Where-Object { $_.PSIsContainer }
PS> Get-ChildItem | Where-Object { $_.Mode -like 'd*' }
# List files only:
PS> Get-ChildItem | Where-Object { $_ -is [System.IO.FileInfo] }
PS> Get-ChildItem | Where-Object { $_.PSIsContainer -eq $false}
PS> Get-ChildItem | Where-Object { $_.Mode -notlike 'd*' }
Selecting Files or Folders Only
TipYou can also combine the results of several separate Get-ChildItem commands. In the following example, two separate Get-ChildItem commands generate two separate �le listings, which PowerShell combines into a total list and sends on for further processing in the pipeline. The example takes all the DLL �les from the Windows system directory and all program installation directories, and then returns a list with the name, version, and description of DLL �les:
PS> $list1 = @(Get-ChildItem $env:windir\system32\*.dll)
PS> $list2 = @(Get-ChildItem $env:programfiles -Recurse -Filter *.dll)
PS> $totallist = $list1 + $list2
PS> $totallist | Select-Object -ExpandProperty VersionInfo | Sort-Object -Property FileName
ProductVersion
3,0,0,2 3,0,0,2 C:\Program Files\Bonjour\mdnsNSP.dll
2, 1, 0, 1 2, 1, 0, 1 C:\Program Files\Common Files\Microsoft Sh...
2008.1108.641...
(...)
2008.1108.641... C:\Program Files\Common Files\Microsoft Sh...
--------------
FileVersion FileName
----------- --------
09
Navigating the FileSystem
Where-Object can �lter �les according to other criteria as well. For example, use the following pipeline �lter if you'd like to locate only �les that were created after May 12, 2011:
PS> Get-ChildItem $env:windir | Where-Object { $_.CreationTime -gt [datetime]::Parse("May 12, 2011") }
You can use relative dates if all you want to see are �les that have been changed in the last two weeks:
PS> Get-ChildItem $env:windir | Where-Object { $_.CreationTime -gt (Get-Date).AddDays(-14) }
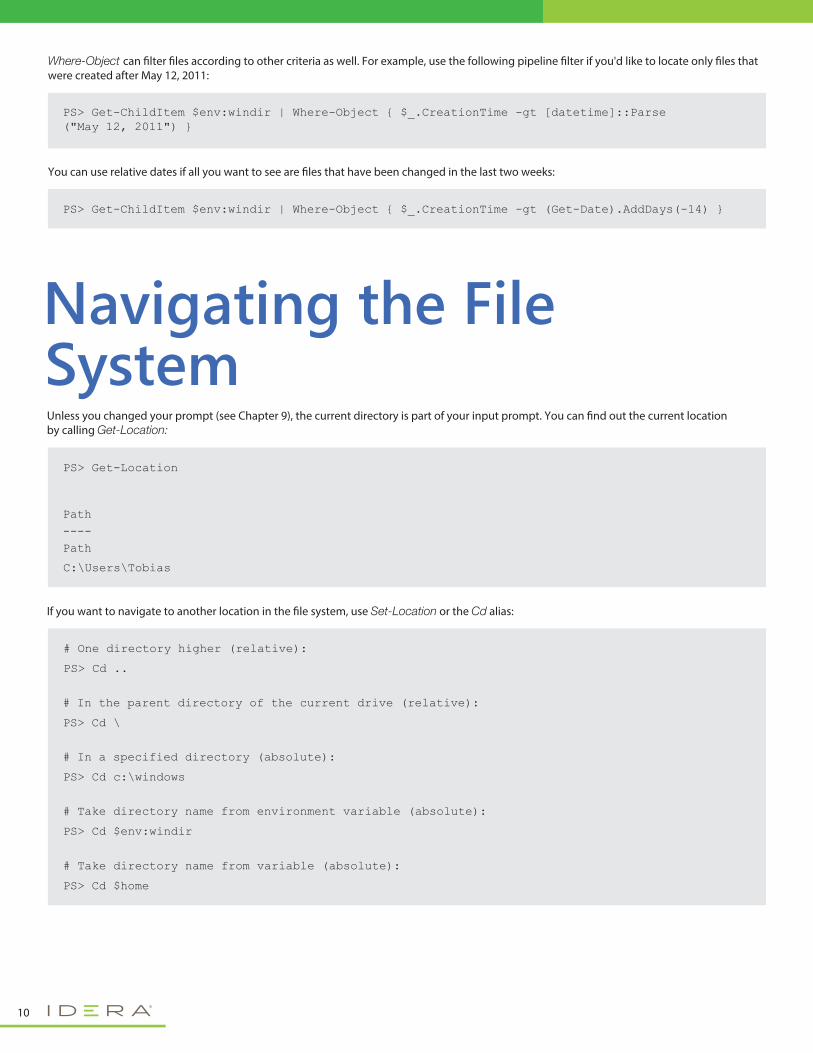
Unless you changed your prompt (see Chapter 9), the current directory is part of your input prompt. You can �nd out the current location by calling Get-Location:
PS> Get-Location
Path
Path
C:\Users\Tobias
----
If you want to navigate to another location in the �le system, use Set-Location or the Cd alias:
# One directory higher (relative):
PS> Cd ..
# In the parent directory of the current drive (relative):
PS> Cd \
# In a specified directory (absolute):
PS> Cd c:\windows
# Take directory name from environment variable (absolute):
PS> Cd $env:windir
# Take directory name from variable (absolute):
PS> Cd $home
10
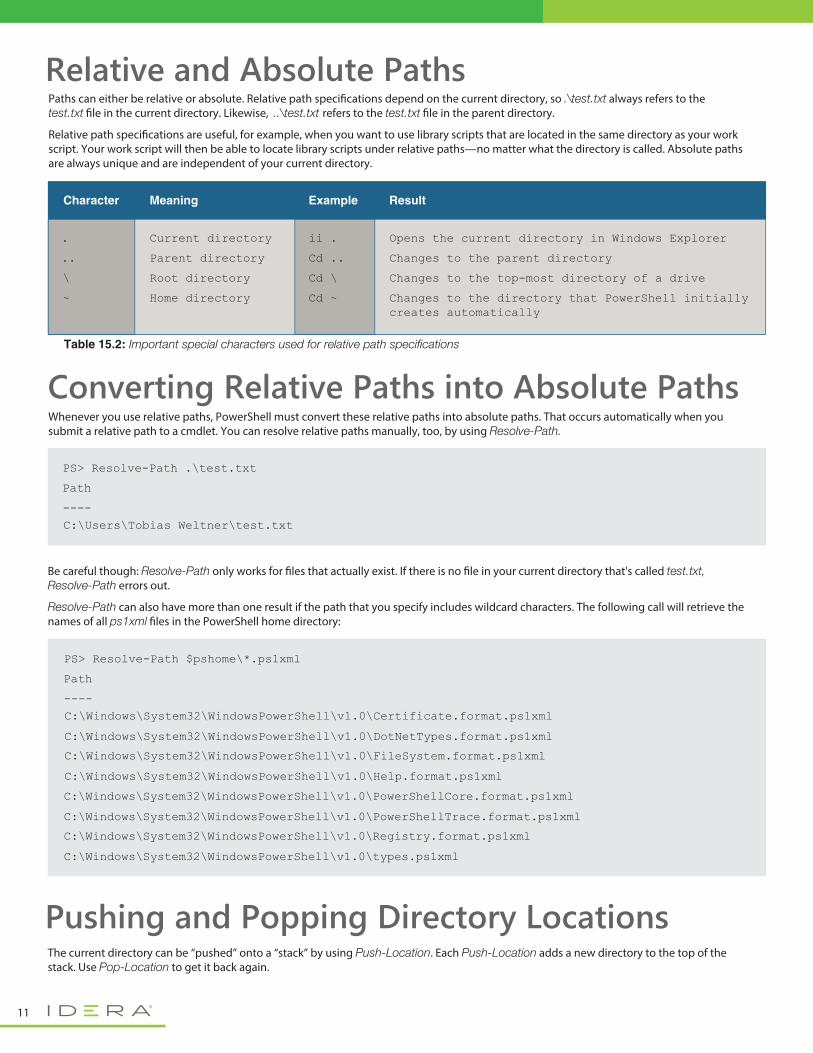
PS> Resolve-Path .\test.txt
Path
C:\Users\Tobias Weltner\test.txt
----
PS> Resolve-Path $pshome\*.ps1xml
Path
C:\Windows\System32\WindowsPowerShell\v1.0\Certificate.format.ps1xml
C:\Windows\System32\WindowsPowerShell\v1.0\DotNetTypes.format.ps1xml
C:\Windows\System32\WindowsPowerShell\v1.0\FileSystem.format.ps1xml
C:\Windows\System32\WindowsPowerShell\v1.0\Help.format.ps1xml
C:\Windows\System32\WindowsPowerShell\v1.0\PowerShellCore.format.ps1xml
C:\Windows\System32\WindowsPowerShell\v1.0\PowerShellTrace.format.ps1xml
C:\Windows\System32\WindowsPowerShell\v1.0\Registry.format.ps1xml
C:\Windows\System32\WindowsPowerShell\v1.0\types.ps1xml
----
Paths can either be relative or absolute. Relative path speci�cations depend on the current directory, so .\test.txt always refers to the test.txt �le in the current directory. Likewise, ..\test.txt refers to the test.txt �le in the parent directory.
Relative path speci�cations are useful, for example, when you want to use library scripts that are located in the same directory as your work script. Your work script will then be able to locate library scripts under relative paths—no matter what the directory is called. Absolute paths are always unique and are independent of your current directory.
Whenever you use relative paths, PowerShell must convert these relative paths into absolute paths. That occurs automatically when you submit a relative path to a cmdlet. You can resolve relative paths manually, too, by using Resolve-Path.
Be careful though: Resolve-Path only works for �les that actually exist. If there is no �le in your current directory that's called test.txt, Resolve-Path errors out.
Resolve-Path can also have more than one result if the path that you specify includes wildcard characters. The following call will retrieve the names of all ps1xml �les in the PowerShell home directory:
The current directory can be “pushed” onto a “stack” by using Push-Location. Each Push-Location adds a new directory to the top of the stack. Use Pop-Location to get it back again.
Relative and Absolute Paths
Converting Relative Paths into Absolute Paths
Pushing and Popping Directory Locations
11
Table 15.2: Important special characters used for relative path specifications
. Current directory ii . Opens the current directory in Windows Explorer
.. Parent directory Cd .. Changes to the parent directory
\ Root directory Cd \ Changes to the top-most directory of a drive
~ Home directory Cd ~ Changes to the directory that PowerShell initially creates automatically
Character Meaning Example Result
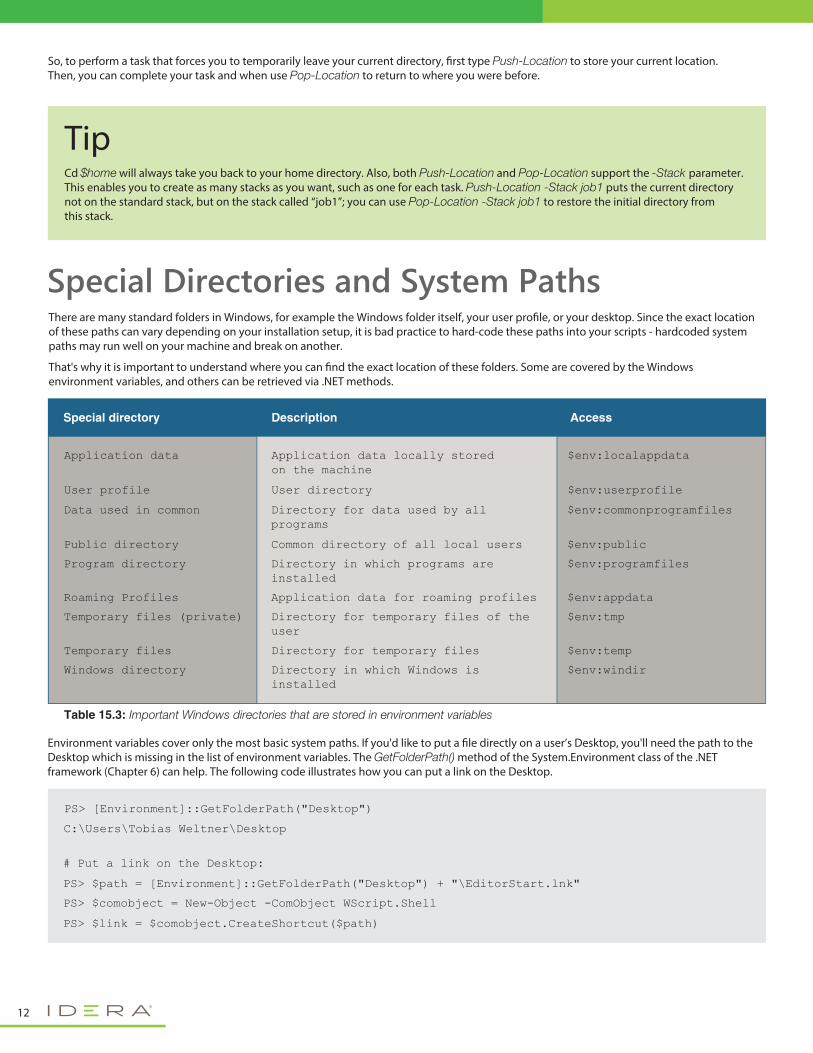
PS> [Environment]::GetFolderPath("Desktop")
C:\Users\Tobias Weltner\Desktop
# Put a link on the Desktop:
PS> $path = [Environment]::GetFolderPath("Desktop") + "\EditorStart.lnk"
PS> $comobject = New-Object -ComObject WScript.Shell
PS> $link = $comobject.CreateShortcut($path)
So, to perform a task that forces you to temporarily leave your current directory, �rst type Push-Location to store your current location. Then, you can complete your task and when use Pop-Location to return to where you were before.
There are many standard folders in Windows, for example the Windows folder itself, your user pro�le, or your desktop. Since the exact location of these paths can vary depending on your installation setup, it is bad practice to hard-code these paths into your scripts - hardcoded system paths may run well on your machine and break on another.
That's why it is important to understand where you can �nd the exact location of these folders. Some are covered by the Windows environment variables, and others can be retrieved via .NET methods.
Environment variables cover only the most basic system paths. If you'd like to put a �le directly on a user’s Desktop, you'll need the path to the Desktop which is missing in the list of environment variables. The GetFolderPath() method of the System.Environment class of the .NET framework (Chapter 6) can help. The following code illustrates how you can put a link on the Desktop.
Special Directories and System Paths
TipCd $home will always take you back to your home directory. Also, both Push-Location and Pop-Location support the -Stack parameter. This enables you to create as many stacks as you want, such as one for each task. Push-Location -Stack job1 puts the current directory not on the standard stack, but on the stack called “job1”; you can use Pop-Location -Stack job1 to restore the initial directory from this stack.
12
Table 15.3: Important Windows directories that are stored in environment variables
Application data Application data locally stored on the machine
$env:localappdata
User profile User directory $env:userprofile
Data used in common Directory for data used by all programs
$env:commonprogramfiles
Public directory Common directory of all local users $env:public
Program directory Directory in which programs are installed
$env:programfiles
Roaming Profiles Application data for roaming profiles $env:appdata
Temporary files (private) Directory for temporary files of the user
$env:tmp
Temporary files Directory for temporary files $env:temp
Windows directory Directory in which Windows is installed
$env:windir
Special directory Description Access
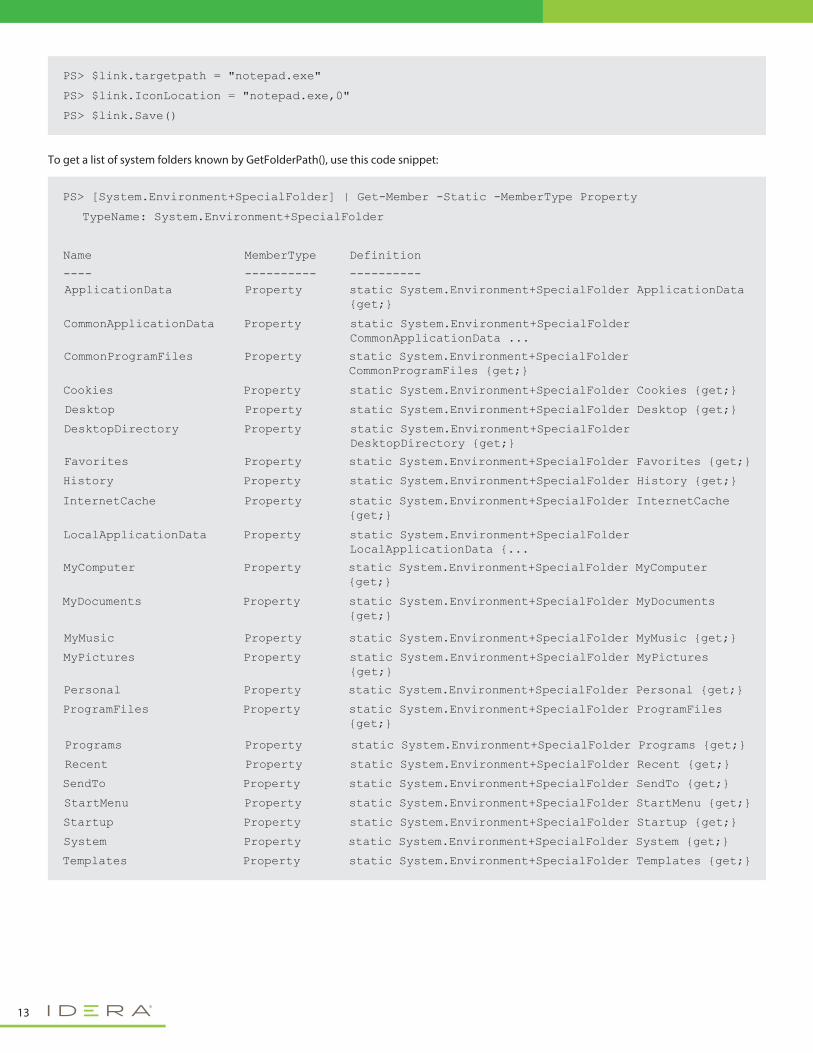
PS> $link.targetpath = "notepad.exe"
PS> $link.IconLocation = "notepad.exe,0"
PS> $link.Save()
PS> [System.Environment+SpecialFolder] | Get-Member -Static -MemberType Property
TypeName: System.Environment+SpecialFolder
Name MemberType Definition
ApplicationData Property static System.Environment+SpecialFolder ApplicationData {get;}
CommonApplicationData Property static System.Environment+SpecialFolder CommonApplicationData ...
CommonProgramFiles Property static System.Environment+SpecialFolder CommonProgramFiles {get;}
Cookies Property static System.Environment+SpecialFolder Cookies {get;}
Desktop Property static System.Environment+SpecialFolder Desktop {get;}
DesktopDirectory Property static System.Environment+SpecialFolder DesktopDirectory {get;}
Favorites Property static System.Environment+SpecialFolder Favorites {get;}
History Property static System.Environment+SpecialFolder History {get;}
InternetCache Property static System.Environment+SpecialFolder InternetCache {get;}
LocalApplicationData Property static System.Environment+SpecialFolder LocalApplicationData {...
MyComputer Property static System.Environment+SpecialFolder MyComputer {get;}
MyDocuments Property static System.Environment+SpecialFolder MyDocuments {get;}
MyMusic Property static System.Environment+SpecialFolder MyMusic {get;}
MyPictures Property static System.Environment+SpecialFolder MyPictures {get;}
Personal Property static System.Environment+SpecialFolder Personal {get;}
ProgramFiles Property static System.Environment+SpecialFolder ProgramFiles {get;}
Programs Property static System.Environment+SpecialFolder Programs {get;}
Recent Property static System.Environment+SpecialFolder Recent {get;}
SendTo Property static System.Environment+SpecialFolder SendTo {get;}
StartMenu Property static System.Environment+SpecialFolder StartMenu {get;}
Startup Property static System.Environment+SpecialFolder Startup {get;}
System Property static System.Environment+SpecialFolder System {get;}
Templates Property static System.Environment+SpecialFolder Templates {get;}
---- ---------- ----------
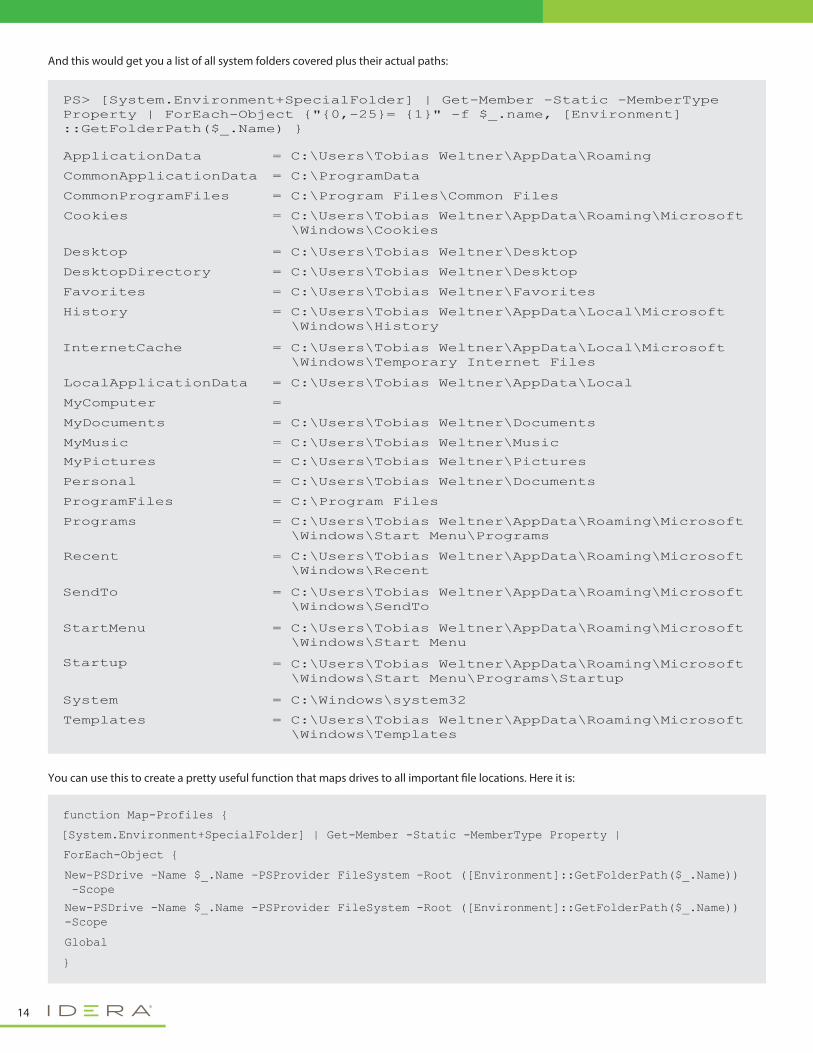
To get a list of system folders known by GetFolderPath(), use this code snippet:
13
function Map-Profiles {
[System.Environment+SpecialFolder] | Get-Member -Static -MemberType Property |
ForEach-Object {
New-PSDrive -Name $_.Name -PSProvider FileSystem -Root ([Environment]::GetFolderPath($_.Name)) -Scope
New-PSDrive -Name $_.Name -PSProvider FileSystem -Root ([Environment]::GetFolderPath($_.Name)) -Scope
Global
}
PS> [System.Environment+SpecialFolder] | Get-Member -Static -MemberType Property | ForEach-Object {"{0,-25}= {1}" -f $_.name, [Environment]::GetFolderPath($_.Name) }
ApplicationData = C:\Users\Tobias Weltner\AppData\Roaming
CommonApplicationData = C:\ProgramData
CommonProgramFiles = C:\Program Files\Common Files
Cookies = C:\Users\Tobias Weltner\AppData\Roaming\Microsoft \Windows\Cookies
Desktop = C:\Users\Tobias Weltner\Desktop
DesktopDirectory = C:\Users\Tobias Weltner\Desktop
Favorites = C:\Users\Tobias Weltner\Favorites
Recent = C:\Users\Tobias Weltner\AppData\Roaming\Microsoft \Windows\Recent
SendTo = C:\Users\Tobias Weltner\AppData\Roaming\Microsoft \Windows\SendTo
StartMenu = C:\Users\Tobias Weltner\AppData\Roaming\Microsoft \Windows\Start Menu
Startup = C:\Users\Tobias Weltner\AppData\Roaming\Microsoft \Windows\Start Menu\Programs\Startup
System = C:\Windows\system32
Templates = C:\Users\Tobias Weltner\AppData\Roaming\Microsoft \Windows\Templates
History = C:\Users\Tobias Weltner\AppData\Local\Microsoft \Windows\History
LocalApplicationData = C:\Users\Tobias Weltner\AppData\Local
MyComputer =
MyDocuments = C:\Users\Tobias Weltner\Documents
MyMusic = C:\Users\Tobias Weltner\Music
MyPictures = C:\Users\Tobias Weltner\Pictures
Personal = C:\Users\Tobias Weltner\Documents
ProgramFiles = C:\Program Files
Programs = C:\Users\Tobias Weltner\AppData\Roaming\Microsoft \Windows\Start Menu\Programs
InternetCache = C:\Users\Tobias Weltner\AppData\Local\Microsoft \Windows\Temporary Internet Files
And this would get you a list of all system folders covered plus their actual paths:
You can use this to create a pretty useful function that maps drives to all important �le locations. Here it is:
14

}
Map-Profiles
PS> Get-ChildItem cookies:
PS> Get-ChildItem cookies: | del -WhatIf
When you run this function, it adds a bunch of new drives. You can now easily take a look at your browser cookies - or even get rid of them:
PS> If ((Test-Path $profile) -eq $false) { New-Item $profile -ItemType File -Force }
PS> Notepad $profile
PS> $path = [Environment]::GetFolderPath("Desktop") + "\file.txt"
PS> $path
C:\Users\Tobias Weltner\Desktop\file.txt
Note that all custom drives are added only for your current PowerShell session. If you want to use them daily, make sure you add Map-Profiles and its call to your pro�le script:
Path names are plain-text, so you can set them up any way you like. To put a �le onto your desktop, you could add the path segments together using string operations:
PS> $path = Join-Path ([Environment]::GetFolderPath("Desktop")) "test.txt"
PS> $path
C:\Users\Tobias Weltner\Desktop\test.txt
A more robust way is using Join-Path because it keeps track of the backslashes:
PS> $path = [System.IO.Path]::Combine([Environment]::GetFolderPath("Desktop"), "test.txt")
PS> $path
C:\Users\Tobias Weltner\Desktop\test.txt
Or, you can use .NET framework methods:
PS> Get-ChildItem desktop:
You can check content of your desktop:
PS> Get-PSDrive
And if you'd like to see all the drives accessible to you, run this command:
Constructing Paths
15
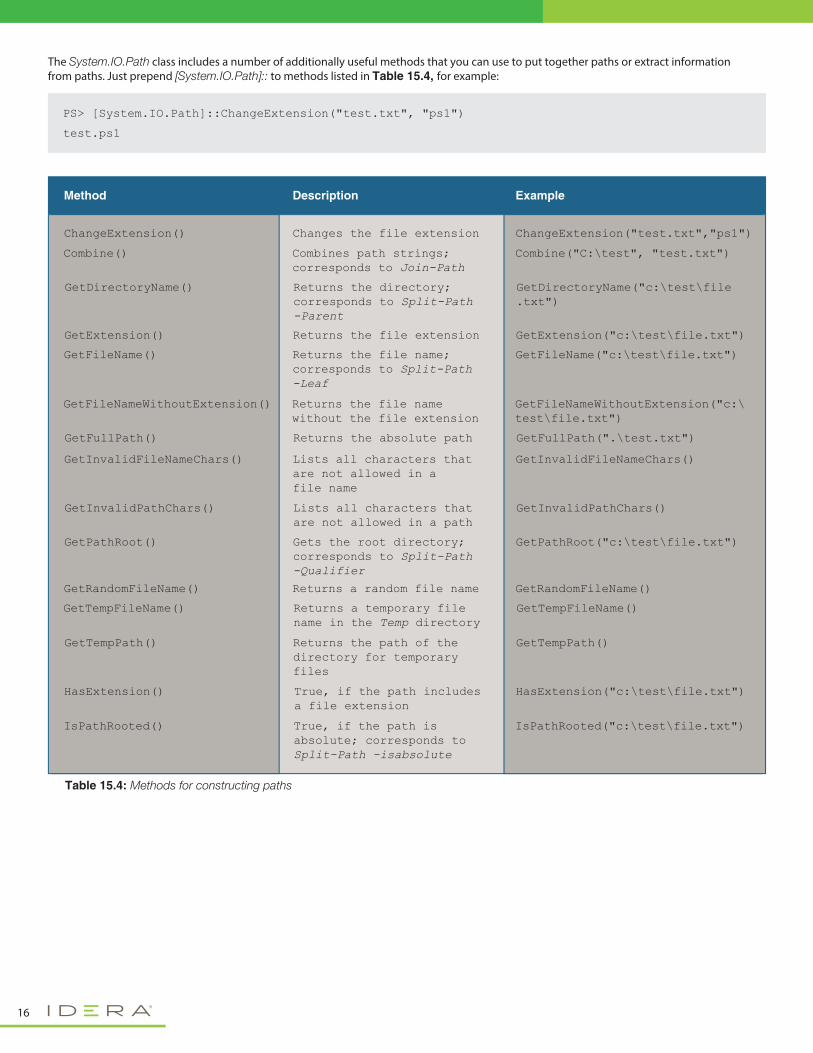
PS> [System.IO.Path]::ChangeExtension("test.txt", "ps1")
test.ps1
The System.IO.Path class includes a number of additionally useful methods that you can use to put together paths or extract information from paths. Just prepend [System.IO.Path]:: to methods listed in Table 15.4, for example:
16
Table 15.4: Methods for constructing paths
ChangeExtension() Changes the file extension ChangeExtension("test.txt","ps1")
Combine() Combines path strings; corresponds to Join-Path
Combine("C:\test", "test.txt")
GetDirectoryName() Returns the directory; corresponds to Split-Path -Parent
GetDirectoryName("c:\test\file.txt")
GetExtension() Returns the file extension GetExtension("c:\test\file.txt")
GetFileName() Returns the file name; corresponds to Split-Path -Leaf
GetFileName("c:\test\file.txt")
GetFileNameWithoutExtension() Returns the file name without the file extension
GetFileNameWithoutExtension("c:\test\file.txt")
GetFullPath() Returns the absolute path GetFullPath(".\test.txt")
GetInvalidFileNameChars() Lists all characters that are not allowed in a file name
GetInvalidFileNameChars()
GetInvalidPathChars() Lists all characters that are not allowed in a path
GetInvalidPathChars()
GetPathRoot() Gets the root directory; corresponds to Split-Path -Qualifier
GetPathRoot("c:\test\file.txt")
GetRandomFileName() Returns a random file name GetRandomFileName()
GetTempFileName() Returns a temporary file name in the Temp directory
GetTempFileName()
GetTempPath() Returns the path of the directory for temporary files
GetTempPath()
HasExtension() True, if the path includes a file extension
HasExtension("c:\test\file.txt")
IsPathRooted() True, if the path is absolute; corresponds to Split-Path -isabsolute
IsPathRooted("c:\test\file.txt")
Method Description Example

Working with Files and Directories
# "md" is the predefined function and creates new directories:
PS> md Test1
Directory: Microsoft.PowerShell.Core\FileSystem::C:\users\Tobias Weltner
Mode
---- ------------- ------ ----
LastWriteTime Length Name
d---- 12.10.2011 17:14 Test1
# "New-Item" can do that, too, but takes more effort:
PS> New-Item Test2 -ItemType Directory
Directory: Microsoft.PowerShell.Core\FileSystem::C:\users\Tobias Weltner
Mode
---- ------------- ------ ----
LastWriteTime Length Name
d---- 12.10.2011 17:14 Test2
The cmdlets Get-ChildItem and Get-Item can get you �le and directory items that already exist. In addition, you can create new �les and directories, rename them, �ll them with content, copy them, move them, and, of course, delete them.
The easiest way to create new directories is to use the Md function, which invokes the cmdlet New-Item internally and speci�es as -ItemType parameter the Directory value:
Creating New Directories
TipYou can also create several sub-directories in one step as PowerShell automatically creates all the directories that don't exist yet in the speci�ed path:
Three folders will be created with one line.
PS> md test\subdirectory\somethingelse
17
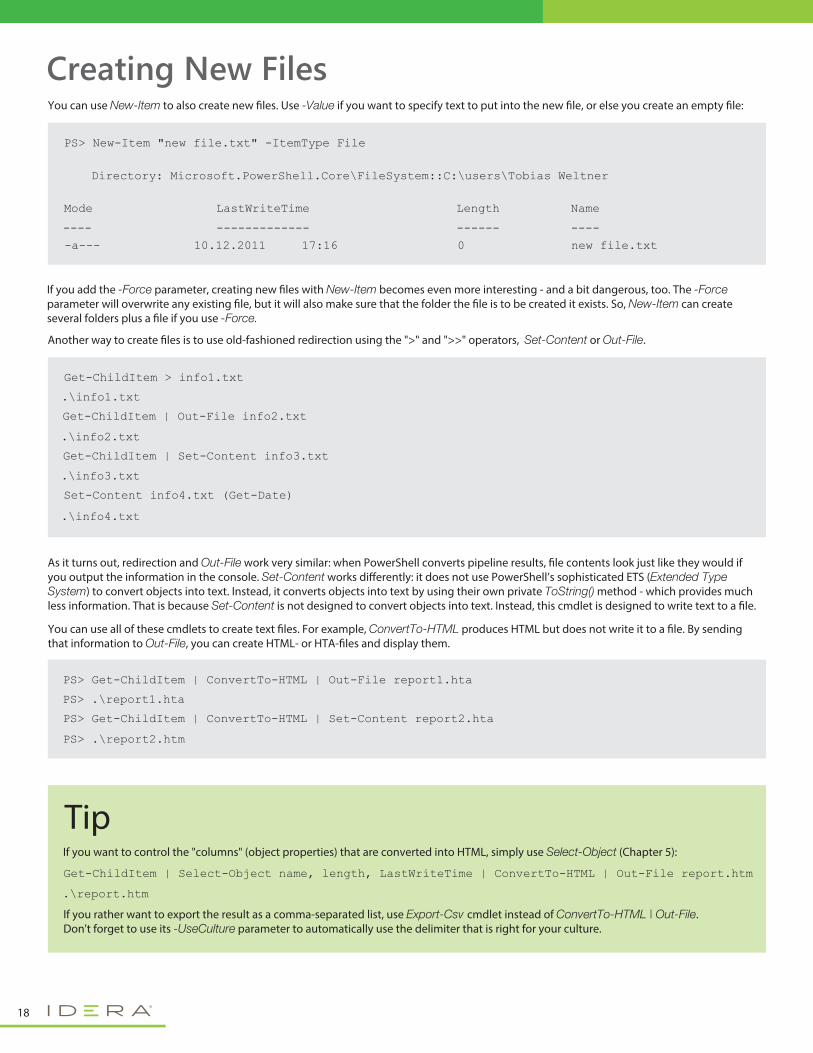
PS> New-Item "new file.txt" -ItemType File
Directory: Microsoft.PowerShell.Core\FileSystem::C:\users\Tobias Weltner
Mode
---- ------------- ------ ----
LastWriteTime Length Name
-a--- 10.12.2011 17:16 new file.txt0
Get-ChildItem > info1.txt
.\info1.txt
Get-ChildItem | Out-File info2.txt
.\info2.txt
Get-ChildItem | Set-Content info3.txt
.\info3.txt
Set-Content info4.txt (Get-Date)
.\info4.txt
You can use New-Item to also create new �les. Use -Value if you want to specify text to put into the new �le, or else you create an empty �le:
If you add the -Force parameter, creating new �les with New-Item becomes even more interesting - and a bit dangerous, too. The -Force parameter will overwrite any existing �le, but it will also make sure that the folder the �le is to be created it exists. So, New-Item can create several folders plus a �le if you use -Force.
Another way to create �les is to use old-fashioned redirection using the ">" and ">>" operators, Set-Content or Out-File.
PS> Get-ChildItem | ConvertTo-HTML | Out-File report1.hta
PS> .\report1.hta
PS> Get-ChildItem | ConvertTo-HTML | Set-Content report2.hta
PS> .\report2.htm
As it turns out, redirection and Out-File work very similar: when PowerShell converts pipeline results, �le contents look just like they would if you output the information in the console. Set-Content works di�erently: it does not use PowerShell’s sophisticated ETS (Extended Type System) to convert objects into text. Instead, it converts objects into text by using their own private ToString() method - which provides much less information. That is because Set-Content is not designed to convert objects into text. Instead, this cmdlet is designed to write text to a �le.
You can use all of these cmdlets to create text �les. For example, ConvertTo-HTML produces HTML but does not write it to a �le. By sending that information to Out-File, you can create HTML- or HTA-�les and display them.
Creating New Files
TipIf you want to control the "columns" (object properties) that are converted into HTML, simply use Select-Object (Chapter 5):
If you rather want to export the result as a comma-separated list, use Export-Csv cmdlet instead of ConvertTo-HTML | Out-File. Don't forget to use its -UseCulture parameter to automatically use the delimiter that is right for your culture.
Get-ChildItem | Select-Object name, length, LastWriteTime | ConvertTo-HTML | Out-File report.htm
.\report.htm
18
PS> Get-Content $env:windir\windowsupdate.log
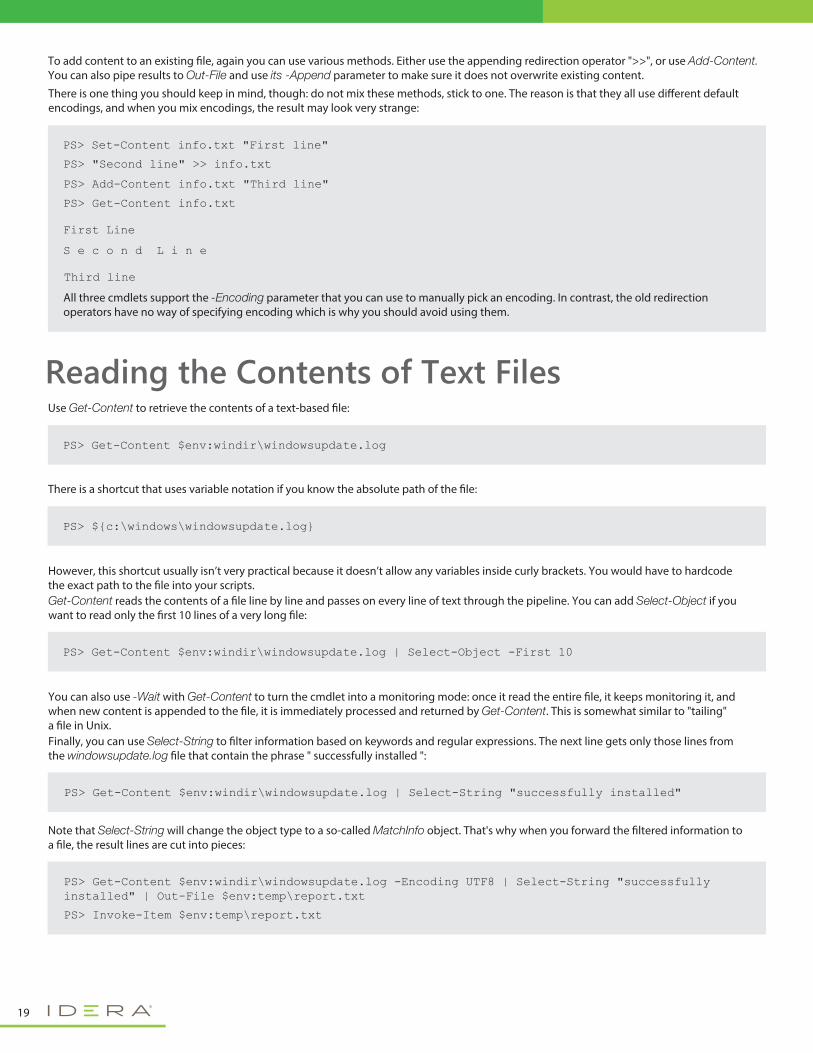
Use Get-Content to retrieve the contents of a text-based �le:
PS> ${c:\windows\windowsupdate.log}
There is a shortcut that uses variable notation if you know the absolute path of the �le:
PS> Get-Content $env:windir\windowsupdate.log | Select-Object -First 10
However, this shortcut usually isn’t very practical because it doesn’t allow any variables inside curly brackets. You would have to hardcode the exact path to the �le into your scripts. Get-Content reads the contents of a �le line by line and passes on every line of text through the pipeline. You can add Select-Object if you want to read only the �rst 10 lines of a very long �le:
PS> Get-Content $env:windir\windowsupdate.log | Select-String "successfully installed"
You can also use -Wait with Get-Content to turn the cmdlet into a monitoring mode: once it read the entire �le, it keeps monitoring it, and when new content is appended to the �le, it is immediately processed and returned by Get-Content. This is somewhat similar to "tailing" a �le in Unix.Finally, you can use Select-String to �lter information based on keywords and regular expressions. The next line gets only those lines from the windowsupdate.log �le that contain the phrase " successfully installed ":
PS> Get-Content $env:windir\windowsupdate.log -Encoding UTF8 | Select-String "successfully installed" | Out-File $env:temp\report.txt
PS> Invoke-Item $env:temp\report.txt
Note that Select-String will change the object type to a so-called MatchInfo object. That's why when you forward the �ltered information to a �le, the result lines are cut into pieces:
Reading the Contents of Text Files
To add content to an existing �le, again you can use various methods. Either use the appending redirection operator ">>", or use Add-Content. You can also pipe results to Out-File and use its -Append parameter to make sure it does not overwrite existing content.
There is one thing you should keep in mind, though: do not mix these methods, stick to one. The reason is that they all use di�erent default encodings, and when you mix encodings, the result may look very strange:
All three cmdlets support the -Encoding parameter that you can use to manually pick an encoding. In contrast, the old redirection operators have no way of specifying encoding which is why you should avoid using them.
PS> Set-Content info.txt "First line"
PS> "Second line" >> info.txt
PS> Add-Content info.txt "Third line"
PS> Get-Content info.txt
First Line
S e c o n d L i n e
Third line
19
PS> Get-Content $env:windir\windowsupdate.log -Encoding UTF8 | Select-String "successfully installed" | Select-Object -ExpandProperty Line | Out-File $env:temp\report.txt
PS> Invoke-Item $env:temp\report.txt
To turn the results delivered by Select-String into real text, make sure you pick the property Line from the MatchInfo object which holds the text line that matched your keyword:
PS> Copy-Item $home\*.ps1 ([Environment]::GetFolderPath("Desktop"))
Move-Item and Copy-Item perform moving and copying operations. You may use wildcard characters with them. The following line copies all PowerShell scripts from your home directory to the Desktop:
PS> Get-ChildItem -Filter *.ps1 -Recurse | Copy-Item -Destination ([Environment]::GetFolderPath("Desktop"))}
Use Get-Childitem to copy recursively. Let it �nd the PowerShell scripts for you, and then pass the result on to Copy-Item: Before you run this line you should be aware that there may be hundreds of scripts, and unless you want to completely clutter your desktop, you may want to �rst create a folder on your desktop and then copy the �les into that folder.
Use Import-Csv if you want to process information from comma-separated lists in PowerShell. For example, you could export an Excel spreadsheet as CSV-�le and then import the data into PowerShell. When you use Get-Content to read a CSV-�le, you'd see the plain text. A much better way is to use Import-CSV. It honors the delimiter and returns objects. Each column header turns into an object property.
To successfully import CSV �les, make sure to use the parameter -UseCulture or -Delimiter if the list is not comma-separated. Depending on your culture, Excel may have picked a di�erent delimiter than the comma, and -UseCulture automatically uses the delimiter that Excel used.
Processing Comma-Separated Lists
Moving and Copying Files and Directories
PS> Set-Content $env:temp\testfile.txt "Hello,this,is,an,enumeration"
# file opens in notepad:
PS> Invoke-Item $env:temp\testfile.txt
# file opens in Excel now:
PS> Rename-Item $env:temp\testfile.txt testfile.csv
PS> Invoke-Item $env:temp\testfile.csv
Use Rename-Item if you want to rename �les or folders. Renaming �les or folders can be dangerous, so do not rename system �les or else Windows may stall.
Renaming Files and Directories
20
PS> Get-ChildItem | ForEach-Object { Rename-Item $_.Name $_.Name.Replace('-temporary', '') }
Because Rename-Item can be used as a building block in the pipeline, it provides simple solutions to complex tasks. For example, if you wanted to remove the term “-temporary” from a folder and all its sub-directories, as well as all the included �les, this instruction will su�ce:
PS> Get-ChildItem | Where-Object { $_.Name -like "*-temporary" } | ForEach-Object { Rename-Item $_.Name $_.Name.replace('-temporary', '') }
This line would now rename all �les and folders, even if the term '"-temporary" you're looking for isn't even in the �le name. So, to speed things up and avoid errors, use Where-Object to focus only on �les that carry the keyword in its name:
When you look at the di�erent code examples, note that ForEach-Object is needed only when a cmdlet cannot handle the input from the upstream cmdlet directly. In these situations, use ForEach-Object to manually feed the incoming information to the appropriate cmdlet parameter. Most �le system-related cmdlets are designed to work together. That's why Rename-Item knows how to interpret the output from Get-ChildItem. It is "Pipeline-aware" and does not need to be wrapped in ForEach-Object.
PS> Get-ChildItem | $_.Name -like '*-temporary' } | Rename-Item { $_.Name.replace('-temporary', '') }
Rename-Item even accepts a script block, so you could use this code as well:
Bulk Renames
# Create an example file:
PS> $file = New-Item testfile.txt -ItemType file
# There is no write protection:
PS> $file.isReadOnly
False
# Activate write protection:
PS> $file.isReadOnly = $true
PS> $file.isReadOnly
True
# Write-protected file may be deleted only by using the –Force parameter:
PS> del testfile.txt
+ del <<<< testfile.txt
PS> del testfile.txt -Force
Remove-Item : Cannot remove item C:\Users\Tobias Weltner\testfile.txt: Not enough permission to perform operation.
At line:1 char:4
Use Remove-Item or the Del alias to remove �les and folders. If a �le is write-protected, or if a folder contains data, you'll have to con�rm the operation or use the -Force parameter.
Deleting Files and Directories
21
# Create a test directory:
md testdirectory
# Create a file in the directory:
PS> Set-Content .\testdirectory\testfile.txt "Hello"
# Delete directory:
PS> del testdirectory
Confirm
The item at "C:\Users\Tobias Weltner\Sources\docs\testdirectory" has children and the Recurse parameter was not specified. If you continue, all children will be removed with the item. Are you sure you want to continue? [Y] Yes [A] Yes to All [N] No [K] No to All [H] Suspend [?] Help (default is "Y"):
Directory: Microsoft.PowerShell.Core\FileSystem::C:\Users\Tobias Weltner\Sources\docs
Mode
---- ------------- ------ ----
LastWriteTime Length Name
d---- 13.10.2011 13:31 testdirectory
PS> Get-Childitem ([Environment]::GetFolderPath('Recent')) | Remove-Item -WhatIf
You can as well put this in one line, too:
PS> Remove-Item testdirectory -Recurse
To delete folders without con�rmation, add the parameter -Recurse:
PS> $recents = [Environment]::GetFolderPath('Recent')
PS> Remove-Item $recents\*.* -WhatIf
PowerShell requests con�rmation whenever you attempt to delete a folder that is not empty. Only the deletion of empty folders does not require con�rmation:
Use wildcard characters if you want to delete a folder content but not the folder itself. This line, for example, will empty the Recent folder that keeps track of �les you opened lately and - over time - can contain hundreds of lnk-�les. Because deleting �les and folders is irreversible, be careful. You can always simulate the operation by using -WhatIf to see what happens - which is something you should do often when you work with wildcards because they may a�ect many more �les and folders than you initially thought.
This however would also delete subfolders contained in your Recent folder because Get-ChildItem lists both �les and folders.If you are convinced that your command is correct, and that it will delete the correct �les, repeat the statement without -WhatIf. Or, you could use -Confirm instead to manually approve or deny each delete operation.
Deleting Directory Contents
Deleting Directories Plus Content
22
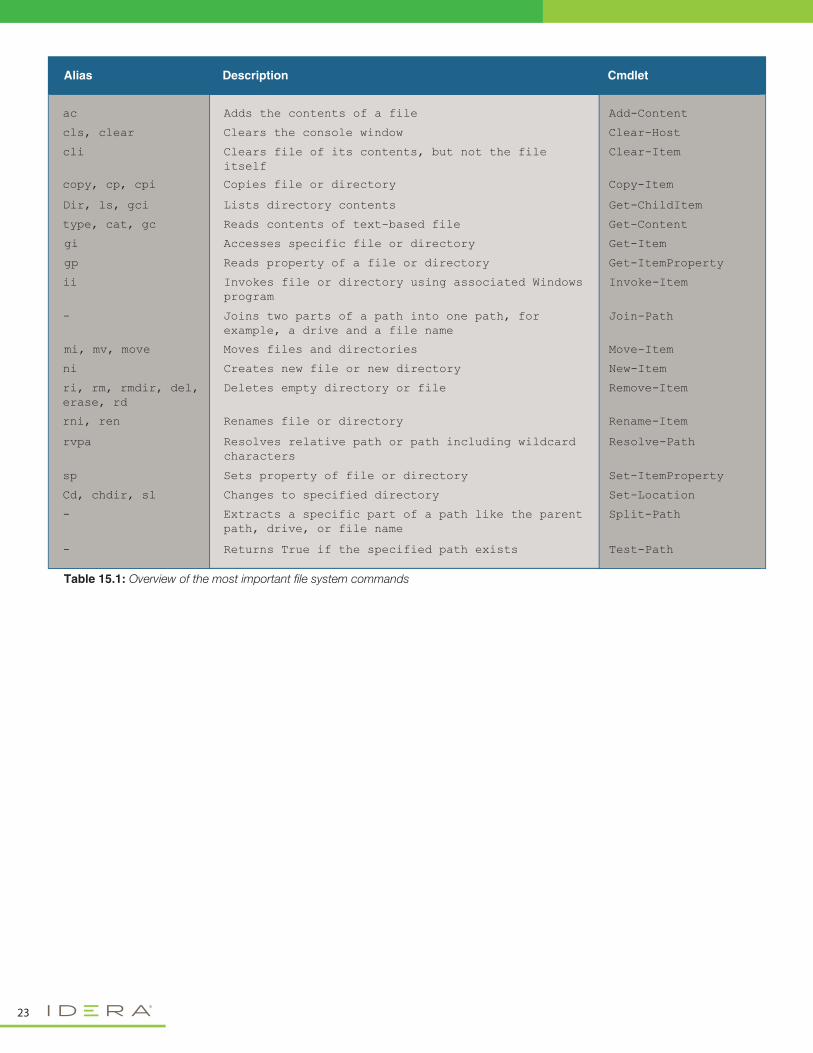
Table 15.1: Overview of the most important file system commands
ac Adds the contents of a file Add-Content
cls, clear Clears the console window Clear-Host
cli Clears file of its contents, but not the file itself
Clear-Item
copy, cp, cpi Copies file or directory Copy-Item
Dir, ls, gci Lists directory contents Get-ChildItem
type, cat, gc Reads contents of text-based file Get-Content
gi Accesses specific file or directory Get-Item
rni, ren Renames file or directory Rename-Item
rvpa Resolves relative path or path including wildcard characters
Resolve-Path
sp Sets property of file or directory Set-ItemProperty
Cd, chdir, sl Changes to specified directory Set-Location
- Extracts a specific part of a path like the parent path, drive, or file name
Split-Path
- Returns True if the specified path exists Test-Path
gp Reads property of a file or directory Get-ItemProperty
mi, mv, move Moves files and directories Move-Item
ni Creates new file or new directory New-Item
ri, rm, rmdir, del, erase, rd
Deletes empty directory or file Remove-Item
ii Invokes file or directory using associated Windows program
Invoke-Item
- Joins two parts of a path into one path, for example, a drive and a file name
Join-Path
Alias Description Cmdlet
23
24
Thanks to PowerShells universal "Provider" concept, you can navigate the Windows Registry just as you would the file system. In this chapter, you will learn how to read and write Registry keys and Registry values.
Managing Windows Registry
Topics Covered:Using Providers·
Searching for Keys
Searching for Values
Reading One Registry Value
·
·
·
Reading Multiple Registry Values·
Reading Multiple Keys and ValuesCreating Registry Keys
Deleting Registry Keys
·
·
·Creating Values
Securing Registry Keys
·
·
Chapter 16.
Using Providers
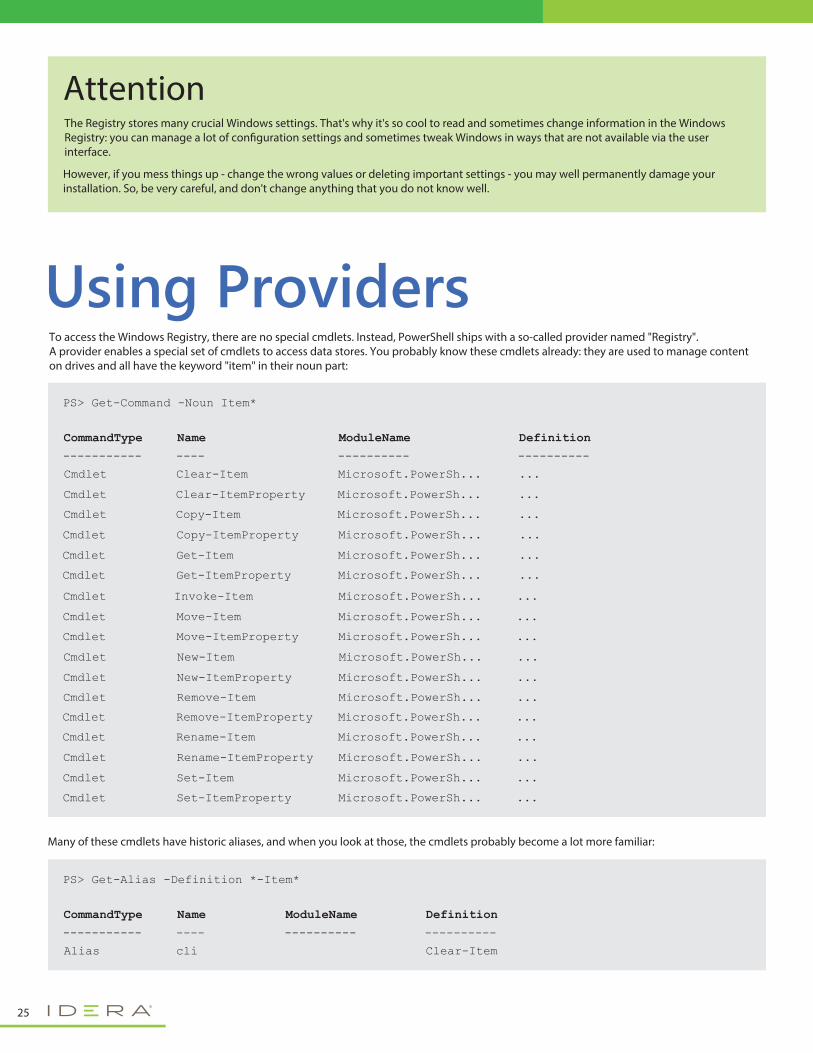
PS> Get-Command -Noun Item*
CommandType Name ModuleName Definition
Cmdlet Clear-Item Microsoft.PowerSh... ...
Cmdlet Clear-ItemProperty Microsoft.PowerSh... ...
----------- ---------- --------------
Cmdlet Copy-Item Microsoft.PowerSh... ...
Cmdlet Copy-ItemProperty Microsoft.PowerSh... ...
Cmdlet Get-Item Microsoft.PowerSh... ...
Cmdlet Get-ItemProperty Microsoft.PowerSh... ...
Cmdlet Invoke-Item Microsoft.PowerSh... ...
Cmdlet Move-Item Microsoft.PowerSh... ...
Cmdlet Move-ItemProperty Microsoft.PowerSh... ...
Cmdlet New-Item Microsoft.PowerSh... ...
Cmdlet New-ItemProperty Microsoft.PowerSh... ...
Cmdlet Remove-Item Microsoft.PowerSh... ...
Cmdlet Remove-ItemProperty Microsoft.PowerSh... ...
Cmdlet Rename-Item Microsoft.PowerSh... ...
Cmdlet Rename-ItemProperty Microsoft.PowerSh... ...
Cmdlet Set-Item Microsoft.PowerSh... ...
Cmdlet Set-ItemProperty Microsoft.PowerSh... ...
To access the Windows Registry, there are no special cmdlets. Instead, PowerShell ships with a so-called provider named "Registry". A provider enables a special set of cmdlets to access data stores. You probably know these cmdlets already: they are used to manage content on drives and all have the keyword "item" in their noun part:
PS> Get-Alias -Definition *-Item*
CommandType Name ModuleName Definition
Alias cli Clear-Item
----------- ---------- --------------
Many of these cmdlets have historic aliases, and when you look at those, the cmdlets probably become a lot more familiar:
AttentionThe Registry stores many crucial Windows settings. That's why it's so cool to read and sometimes change information in the Windows Registry: you can manage a lot of con�guration settings and sometimes tweak Windows in ways that are not available via the user interface.
However, if you mess things up - change the wrong values or deleting important settings - you may well permanently damage your installation. So, be very careful, and don't change anything that you do not know well.
25
Name Capabilities Drives
Alias
Environment
FileSystem
Function
Registry ShouldProcess
ShouldProcess
Filter, ShouldProcess {C, E, S, D}
{Function}
{HKLM, HKCU}
ShouldProcess {Env}
ShouldProcess {Alias}
---- ------------------
Get-PSProvider
Alias clp Clear-ItemProperty
Alias copy Copy-Item
Alias cp Copy-Item
Alias cpi Copy-Item
Alias cpp Copy-ItemProperty
Alias del Remove-Item
Alias erase Remove-Item
Alias gi Get-Item
Alias gp Get-ItemProperty
Alias ii Invoke-Item
Alias mi Move-Item
Alias move Move-Item
Alias mp Move-ItemProperty
Alias mv Move-Item
Alias ni New-Item
Alias rd Remove-Item
Alias ren Rename-Item
Alias ri Remove-Item
Alias rm Remove-Item
Alias rmdir Remove-Item
Alias rni Rename-Item
Alias rnp Rename-ItemProperty
Alias rp Remove-ItemProperty
Alias si Set-Item
Alias sp Set-ItemProperty
Get-PSProvider gets a list of all available providers. Your list can easily be longer than in the following example. Many PowerShell extensions add additional providers. For example, the ActiveDirectory module that ships with Windows Server 2008 R2 (and the RSAT tools for Windows 7) adds a provider for the Active Directory. Microsoft SQL Server (starting with 2007) comes with an SQLServer provider.
Available Providers
Dir HKLM:\Software
Thanks to the "Registry" provider, all of these cmdlets (and their aliases) can also work with the Registry. So if you wanted to list the keys of HKEY_LOCAL_MACHINE\Software, this is how you'd do it:
26
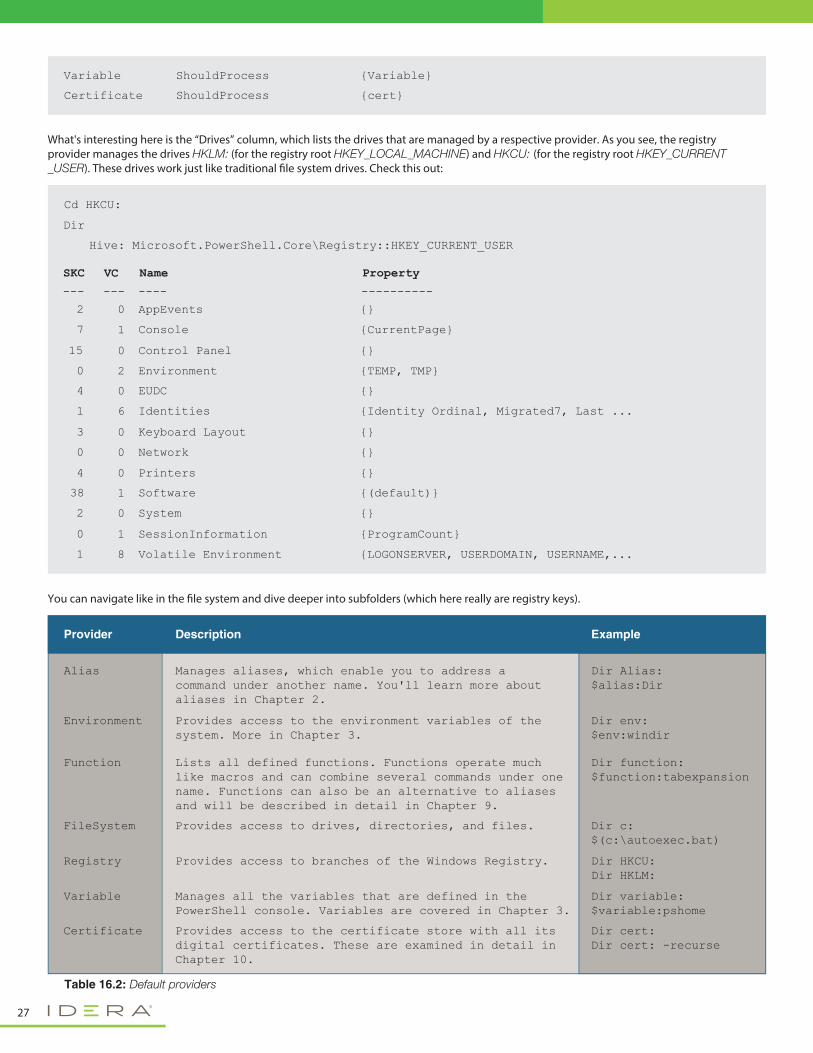
Variable
Certificate ShouldProcess {cert}
ShouldProcess {Variable}
SKC Name Property
2 AppEvents {}
---
VC
0
--- --------------
Cd HKCU:
Dir
Hive: Microsoft.PowerShell.Core\Registry::HKEY_CURRENT_USER
7 Console {CurrentPage}1
15 Control Panel {}0
0 Environment {TEMP, TMP}2
4 EUDC {}0
1 Identities {Identity Ordinal, Migrated7, Last ...6
3 Keyboard Layout {}0
0 Network {}0
4 Printers {}0
38 Software {(default)}1
2 System {}0
0 SessionInformation {ProgramCount}1
1 Volatile Environment {LOGONSERVER, USERDOMAIN, USERNAME,...8
What's interesting here is the “Drives” column, which lists the drives that are managed by a respective provider. As you see, the registry provider manages the drives HKLM: (for the registry root HKEY_LOCAL_MACHINE) and HKCU: (for the registry root HKEY_CURRENT_USER). These drives work just like traditional �le system drives. Check this out:
27
Table 16.2: Default providers
You can navigate like in the �le system and dive deeper into subfolders (which here really are registry keys).
ri, rm, rmdir, del, erase, rd
Description
Alias Manages aliases, which enable you to address a command under another name. You'll learn more about aliases in Chapter 2.
Dir Alias: $alias:Dir
Environment Provides access to the environment variables of the system. More in Chapter 3.
Dir env: $env:windir
Function Lists all defined functions. Functions operate much like macros and can combine several commands under one name. Functions can also be an alternative to aliases and will be described in detail in Chapter 9.
Dir function:$function:tabexpansion
FileSystem Provides access to drives, directories, and files. Dir c:$(c:\autoexec.bat)
Registry Provides access to branches of the Windows Registry. Dir HKCU:Dir HKLM:
Variable Manages all the variables that are defined in the PowerShell console. Variables are covered in Chapter 3.
Dir variable:$variable:pshome
Certificate Provides access to the certificate store with all its digital certificates. These are examined in detail in Chapter 10.
Dir cert:Dir cert: -recurse
Provider Example
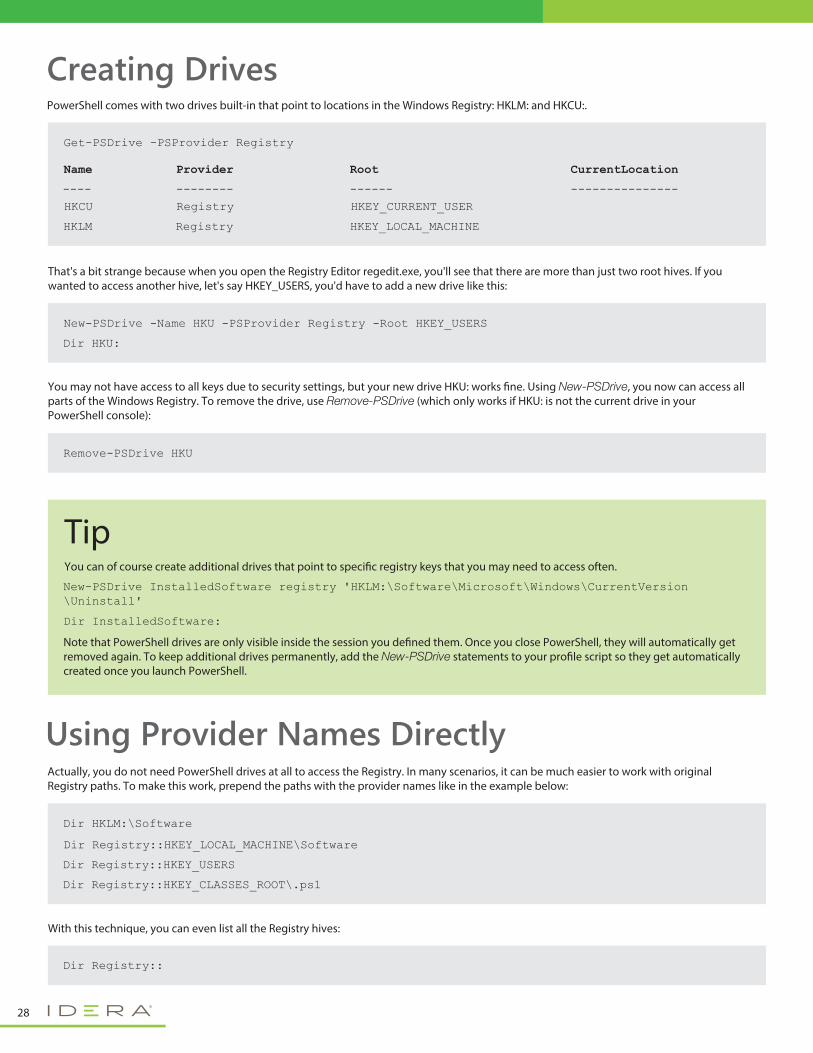
PowerShell comes with two drives built-in that point to locations in the Windows Registry: HKLM: and HKCU:.
Creating Drives
Get-PSDrive -PSProvider Registry
Name
---- -------- ------ ---------------
Provider Root CurrentLocation
HKCU Registry HKEY_CURRENT_USER
HKLM Registry HKEY_LOCAL_MACHINE
Actually, you do not need PowerShell drives at all to access the Registry. In many scenarios, it can be much easier to work with original Registry paths. To make this work, prepend the paths with the provider names like in the example below:
Using Provider Names Directly
Dir HKLM:\Software
Dir Registry::HKEY_LOCAL_MACHINE\Software
Dir Registry::HKEY_CLASSES_ROOT\.ps1
Dir Registry::HKEY_USERS
With this technique, you can even list all the Registry hives:
Dir Registry::
That's a bit strange because when you open the Registry Editor regedit.exe, you'll see that there are more than just two root hives. If you wanted to access another hive, let's say HKEY_USERS, you'd have to add a new drive like this:
New-PSDrive -Name HKU -PSProvider Registry -Root HKEY_USERS
Dir HKU:
You may not have access to all keys due to security settings, but your new drive HKU: works �ne. Using New-PSDrive, you now can access all parts of the Windows Registry. To remove the drive, use Remove-PSDrive (which only works if HKU: is not the current drive in your PowerShell console):
Remove-PSDrive HKU
TipYou can of course create additional drives that point to speci�c registry keys that you may need to access often.
Note that PowerShell drives are only visible inside the session you de�ned them. Once you close PowerShell, they will automatically get removed again. To keep additional drives permanently, add the New-PSDrive statements to your pro�le script so they get automatically created once you launch PowerShell.
New-PSDrive InstalledSoftware registry 'HKLM:\Software\Microsoft\Windows\CurrentVersion\Uninstall'
Dir InstalledSoftware:
28
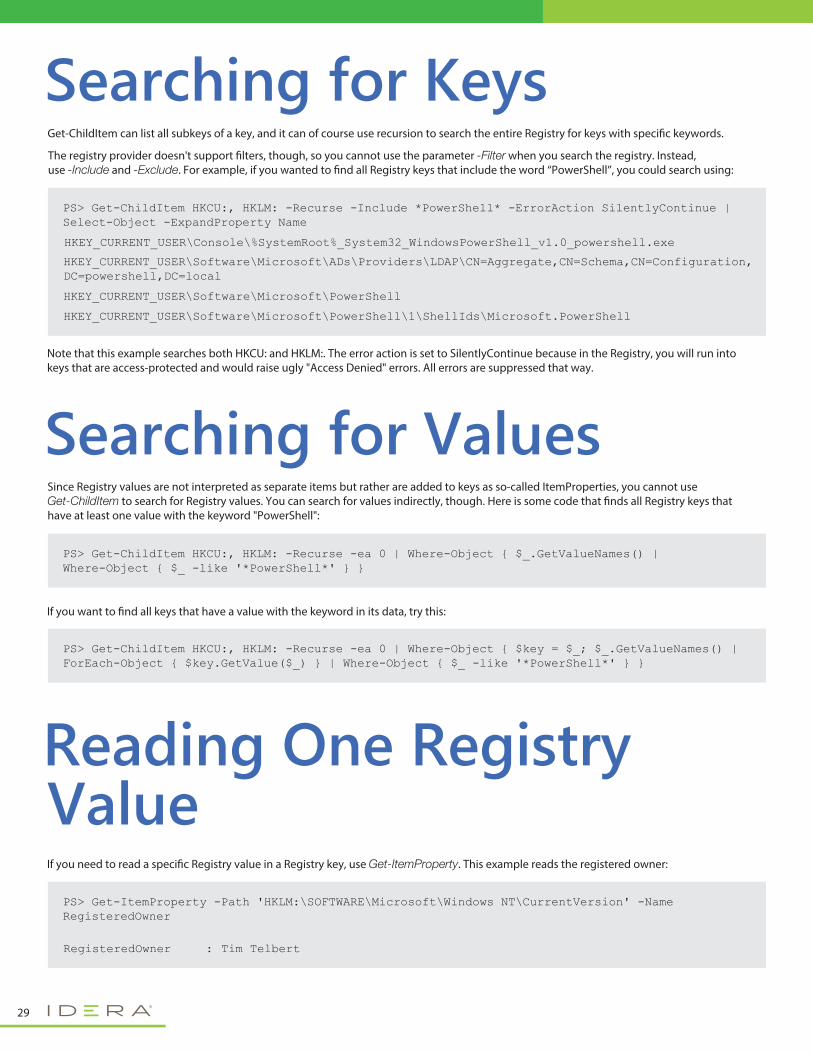
Searching for KeysGet-ChildItem can list all subkeys of a key, and it can of course use recursion to search the entire Registry for keys with speci�c keywords.
The registry provider doesn't support �lters, though, so you cannot use the parameter -Filter when you search the registry. Instead, use -Include and -Exclude. For example, if you wanted to �nd all Registry keys that include the word “PowerShell”, you could search using:
Note that this example searches both HKCU: and HKLM:. The error action is set to SilentlyContinue because in the Registry, you will run into keys that are access-protected and would raise ugly "Access Denied" errors. All errors are suppressed that way.
PS> Get-ChildItem HKCU:, HKLM: -Recurse -Include *PowerShell* -ErrorAction SilentlyContinue | Select-Object -ExpandProperty Name
HKEY_CURRENT_USER\Console\%SystemRoot%_System32_WindowsPowerShell_v1.0_powershell.exe
HKEY_CURRENT_USER\Software\Microsoft\ADs\Providers\LDAP\CN=Aggregate,CN=Schema,CN=Configuration,DC=powershell,DC=local
HKEY_CURRENT_USER\Software\Microsoft\PowerShell
HKEY_CURRENT_USER\Software\Microsoft\PowerShell\1\ShellIds\Microsoft.PowerShell
Searching for ValuesSince Registry values are not interpreted as separate items but rather are added to keys as so-called ItemProperties, you cannot use Get-ChildItem to search for Registry values. You can search for values indirectly, though. Here is some code that �nds all Registry keys that have at least one value with the keyword "PowerShell":
If you want to �nd all keys that have a value with the keyword in its data, try this:
PS> Get-ChildItem HKCU:, HKLM: -Recurse -ea 0 | Where-Object { $_.GetValueNames() | Where-Object { $_ -like '*PowerShell*' } }
Reading One Registry ValueIf you need to read a speci�c Registry value in a Registry key, use Get-ItemProperty. This example reads the registered owner:
PS> Get-ItemProperty -Path 'HKLM:\SOFTWARE\Microsoft\Windows NT\CurrentVersion' -Name RegisteredOwner
RegisteredOwner Tim Telbert :
PS> Get-ChildItem HKCU:, HKLM: -Recurse -ea 0 | Where-Object { $key = $_; $_.GetValueNames() | ForEach-Object { $key.GetValue($_) } | Where-Object { $_ -like '*PowerShell*' } }
29
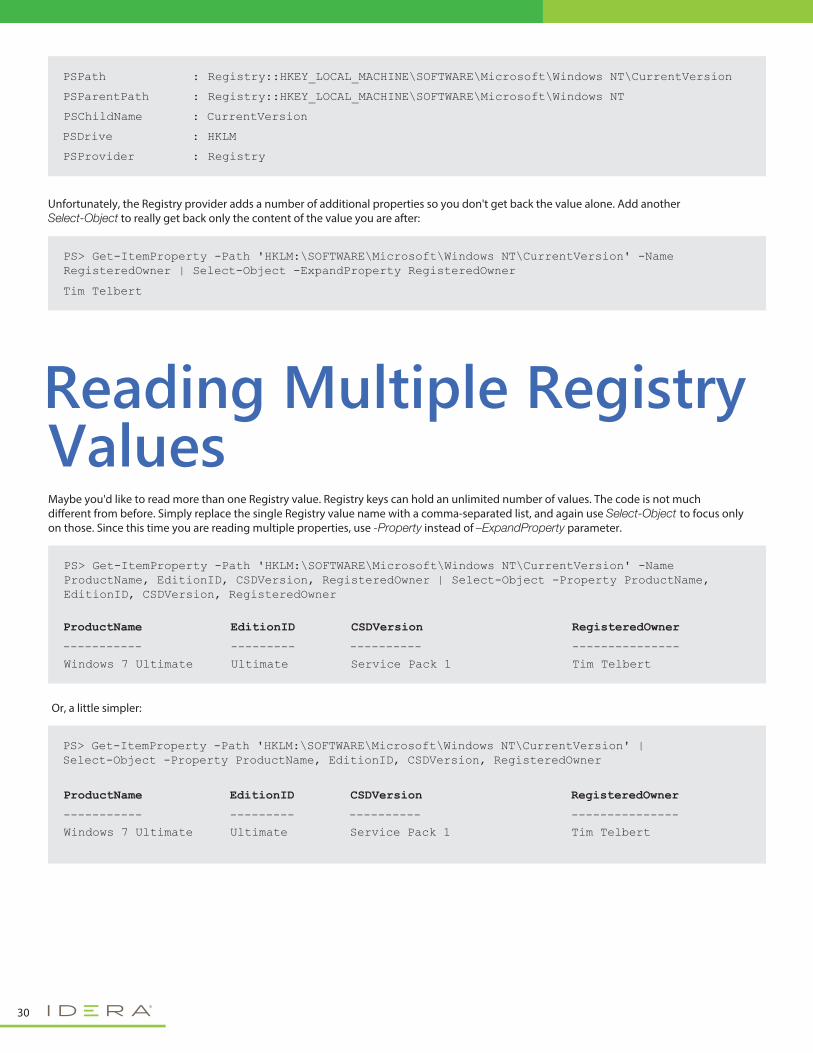
PS> Get-ItemProperty -Path 'HKLM:\SOFTWARE\Microsoft\Windows NT\CurrentVersion' -Name ProductName, EditionID, CSDVersion, RegisteredOwner | Select-Object -Property ProductName, EditionID, CSDVersion, RegisteredOwner
ProductName
----------- --------- ---------- ---------------
EditionID CSDVersion RegisteredOwner
Windows 7 Ultimate Ultimate Service Pack 1 Tim Telbert
PS> Get-ItemProperty -Path 'HKLM:\SOFTWARE\Microsoft\Windows NT\CurrentVersion' | Select-Object -Property ProductName, EditionID, CSDVersion, RegisteredOwner
ProductName
----------- --------- ---------- ---------------
EditionID CSDVersion RegisteredOwner
Windows 7 Ultimate Ultimate Service Pack 1 Tim Telbert
ValuesReading Multiple Registry
Maybe you'd like to read more than one Registry value. Registry keys can hold an unlimited number of values. The code is not much di�erent from before. Simply replace the single Registry value name with a comma-separated list, and again use Select-Object to focus only on those. Since this time you are reading multiple properties, use -Property instead of –ExpandProperty parameter.
Or, a little simpler:
Unfortunately, the Registry provider adds a number of additional properties so you don't get back the value alone. Add another Select-Object to really get back only the content of the value you are after:
PS> Get-ItemProperty -Path 'HKLM:\SOFTWARE\Microsoft\Windows NT\CurrentVersion' -Name RegisteredOwner | Select-Object -ExpandProperty RegisteredOwner
Tim Telbert
PSPath Registry::HKEY_LOCAL_MACHINE\SOFTWARE\Microsoft\Windows NT\CurrentVersion :
PSParentPath Registry::HKEY_LOCAL_MACHINE\SOFTWARE\Microsoft\Windows NT :
PSChildName CurrentVersion :
PSDrive HKLM :
PSProvider Registry :
30
Reading Multiple Keys and Values
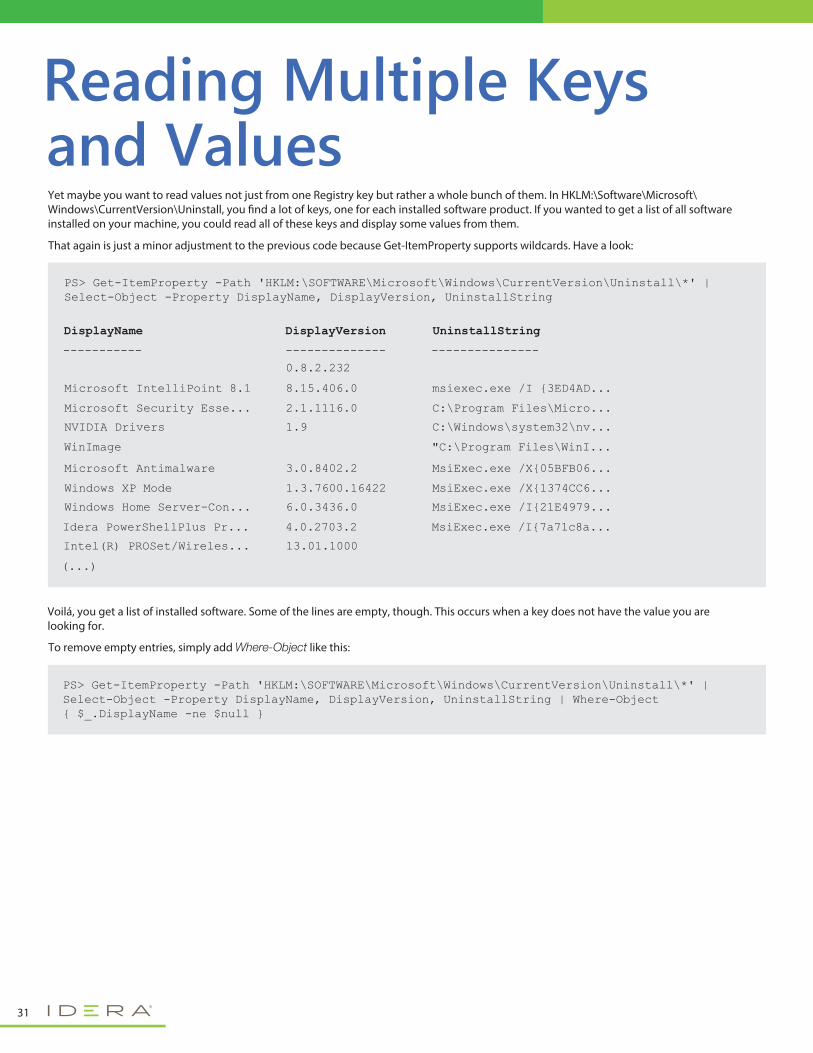
PS> Get-ItemProperty -Path 'HKLM:\SOFTWARE\Microsoft\Windows\CurrentVersion\Uninstall\*' | Select-Object -Property DisplayName, DisplayVersion, UninstallString
DisplayName
----------- -------------- ---------------
DisplayVersion UninstallString
0.8.2.232
Microsoft IntelliPoint 8.1 8.15.406.0 msiexec.exe /I {3ED4AD...
Microsoft Security Esse... 2.1.1116.0 C:\Program Files\Micro...
NVIDIA Drivers 1.9 C:\Windows\system32\nv...
WinImage "C:\Program Files\WinI...
Microsoft Antimalware 3.0.8402.2 MsiExec.exe /X{05BFB06...
Windows XP Mode 1.3.7600.16422 MsiExec.exe /X{1374CC6...
Windows Home Server-Con... 6.0.3436.0 MsiExec.exe /I{21E4979...
Idera PowerShellPlus Pr... 4.0.2703.2 MsiExec.exe /I{7a71c8a...
Intel(R) PROSet/Wireles... 13.01.1000
(...)
Yet maybe you want to read values not just from one Registry key but rather a whole bunch of them. In HKLM:\Software\Microsoft\Windows\CurrentVersion\Uninstall, you �nd a lot of keys, one for each installed software product. If you wanted to get a list of all software installed on your machine, you could read all of these keys and display some values from them.
PS> Get-ItemProperty -Path 'HKLM:\SOFTWARE\Microsoft\Windows\CurrentVersion\Uninstall\*' | Select-Object -Property DisplayName, DisplayVersion, UninstallString | Where-Object { $_.DisplayName -ne $null }
31
That again is just a minor adjustment to the previous code because Get-ItemProperty supports wildcards. Have a look:
Voilá, you get a list of installed software. Some of the lines are empty, though. This occurs when a key does not have the value you are looking for.
To remove empty entries, simply add Where-Object like this:
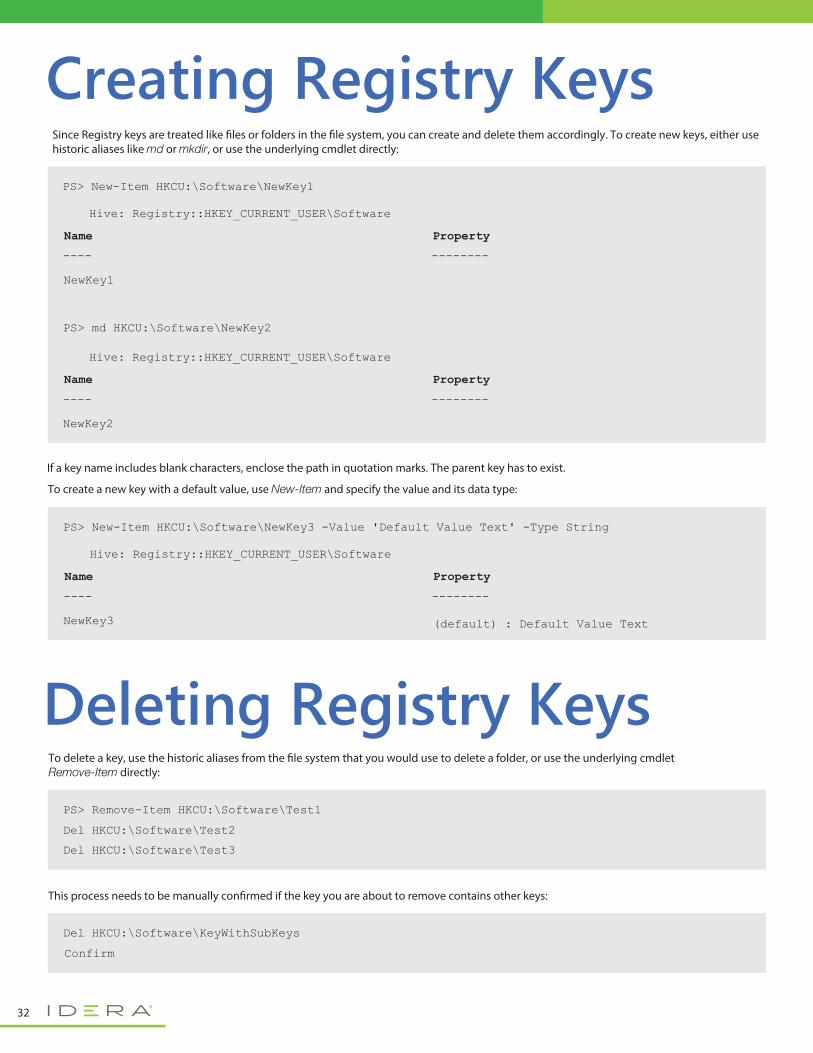
Creating Registry KeysSince Registry keys are treated like �les or folders in the �le system, you can create and delete them accordingly. To create new keys, either use historic aliases like md or mkdir, or use the underlying cmdlet directly:
If a key name includes blank characters, enclose the path in quotation marks. The parent key has to exist.
PS> New-Item HKCU:\Software\NewKey1
Name
---- --------
Property
NewKey1
Name
---- --------
Property
NewKey2
PS> md HKCU:\Software\NewKey2
Hive: Registry::HKEY_CURRENT_USER\Software
Hive: Registry::HKEY_CURRENT_USER\Software
Deleting Registry KeysTo delete a key, use the historic aliases from the �le system that you would use to delete a folder, or use the underlying cmdlet Remove-Item directly:
PS> Remove-Item HKCU:\Software\Test1
Del HKCU:\Software\Test2
Del HKCU:\Software\Test3
This process needs to be manually con�rmed if the key you are about to remove contains other keys:
Del HKCU:\Software\KeyWithSubKeys
Confirm
PS> New-Item HKCU:\Software\NewKey3 -Value 'Default Value Text' -Type String
Name
---- --------
Property
NewKey3 (default) : Default Value Text
Hive: Registry::HKEY_CURRENT_USER\Software
32
To create a new key with a default value, use New-Item and specify the value and its data type:
Creating Values
Use the –Recurse parameter to delete such keys without manual con�rmation:
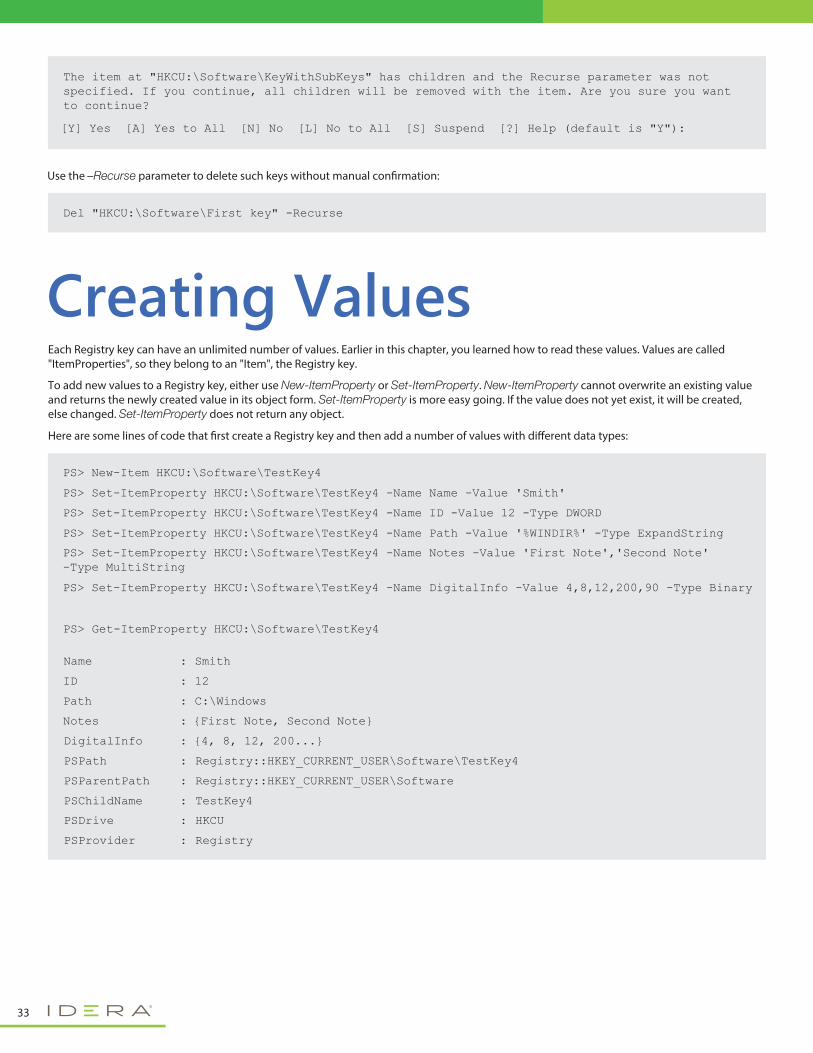
Each Registry key can have an unlimited number of values. Earlier in this chapter, you learned how to read these values. Values are called "ItemProperties", so they belong to an "Item", the Registry key.
To add new values to a Registry key, either use New-ItemProperty or Set-ItemProperty. New-ItemProperty cannot overwrite an existing value and returns the newly created value in its object form. Set-ItemProperty is more easy going. If the value does not yet exist, it will be created, else changed. Set-ItemProperty does not return any object.
Here are some lines of code that �rst create a Registry key and then add a number of values with di�erent data types:
Del "HKCU:\Software\First key" -Recurse
The item at "HKCU:\Software\KeyWithSubKeys" has children and the Recurse parameter was not specified. If you continue, all children will be removed with the item. Are you sure you want to continue?
[Y] Yes [A] Yes to All [N] No [L] No to All [S] Suspend [?] Help (default is "Y"):
PS> Get-ItemProperty HKCU:\Software\TestKey4
PS> New-Item HKCU:\Software\TestKey4
PS> Set-ItemProperty HKCU:\Software\TestKey4 -Name Name -Value 'Smith'
PS> Set-ItemProperty HKCU:\Software\TestKey4 -Name ID -Value 12 -Type DWORD
PS> Set-ItemProperty HKCU:\Software\TestKey4 -Name Path -Value '%WINDIR%' -Type ExpandString
PS> Set-ItemProperty HKCU:\Software\TestKey4 -Name Notes -Value 'First Note','Second Note' -Type MultiString
PS> Set-ItemProperty HKCU:\Software\TestKey4 -Name DigitalInfo -Value 4,8,12,200,90 -Type Binary
Name Smith :
ID 12 :
Path C:\Windows :
Notes {First Note, Second Note} :
DigitalInfo {4, 8, 12, 200...} :
PSPath Registry::HKEY_CURRENT_USER\Software\TestKey4 :
PSParentPath Registry::HKEY_CURRENT_USER\Software :
PSChildName TestKey4 :
PSDrive HKCU :
PSProvider Registry :
33
md HKCU:\Software\Testkey4
Path
---- ----- ------
Owner Access
Microsoft.PowerShell.Core\Registr...
TobiasWeltne-PC\Tobias Weltner TobiasWeltne-PC\Tobias Weltner A...
Get-Acl HKCU:\Software\Testkey
PS> [System.Enum]::GetNames([System.Security.AccessControl.RegistryRights])
QueryValues
SetValue
CreateSubKey
Securing Registry Keys
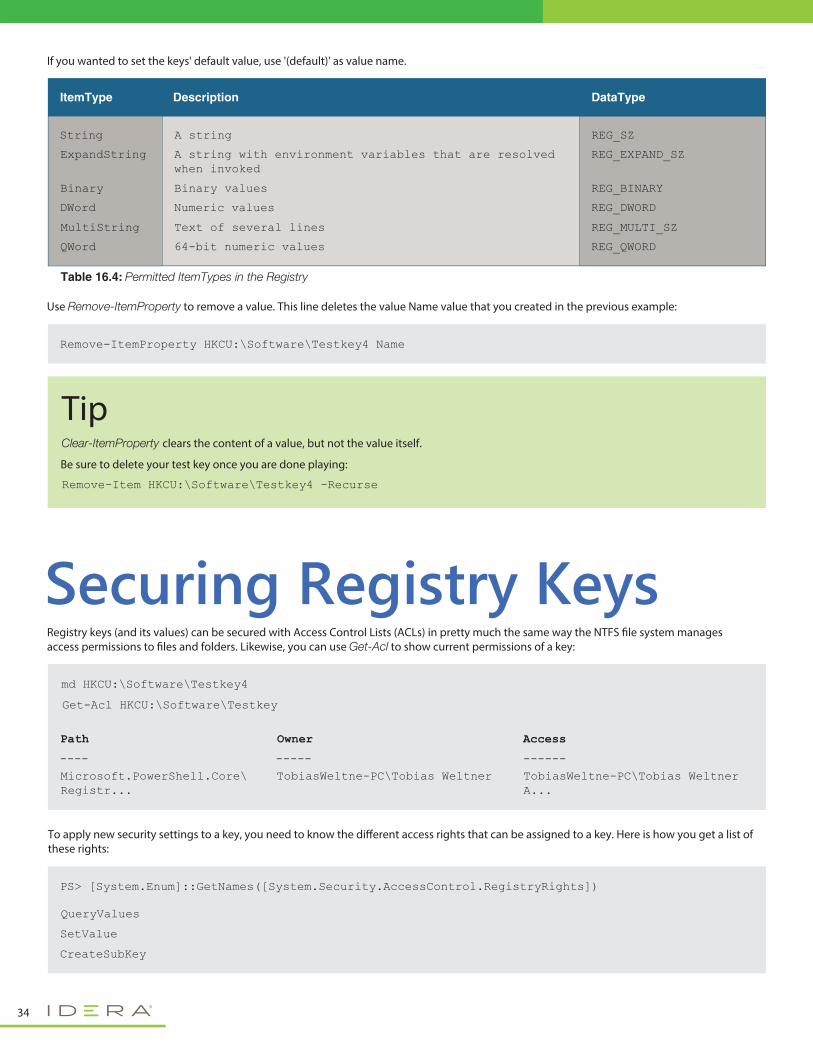
If you wanted to set the keys' default value, use '(default)' as value name.
Use Remove-ItemProperty to remove a value. This line deletes the value Name value that you created in the previous example:
Registry keys (and its values) can be secured with Access Control Lists (ACLs) in pretty much the same way the NTFS �le system manages access permissions to �les and folders. Likewise, you can use Get-Acl to show current permissions of a key:
To apply new security settings to a key, you need to know the di�erent access rights that can be assigned to a key. Here is how you get a list of these rights:
Remove-ItemProperty HKCU:\Software\Testkey4 Name
TipClear-ItemProperty clears the content of a value, but not the value itself.
Be sure to delete your test key once you are done playing:
Remove-Item HKCU:\Software\Testkey4 -Recurse
34
Table 16.4: Permitted ItemTypes in the Registry
Description
String A string REG_SZ
ExpandString A string with environment variables that are resolved when invoked
REG_EXPAND_SZ
Binary Binary values REG_BINARY
DWord Numeric values REG_DWORD
MultiString Text of several lines REG_MULTI_SZ
QWord 64-bit numeric values REG_QWORD
ItemType DataType
EnumerateSubKeys
Notify
CreateLink
Delete
ReadPermissions
WriteKey
ExecuteKey
ReadKey
ChangePermissions
TakeOwnership
FullControl
$acl = Get-Acl HKCU:\Software\Testkey
$acl.Owner
scriptinternals\TobiasWeltner
$me = [System.Security.Principal.NTAccount]"$env:userdomain\$env:username"
$acl.SetOwner($me)
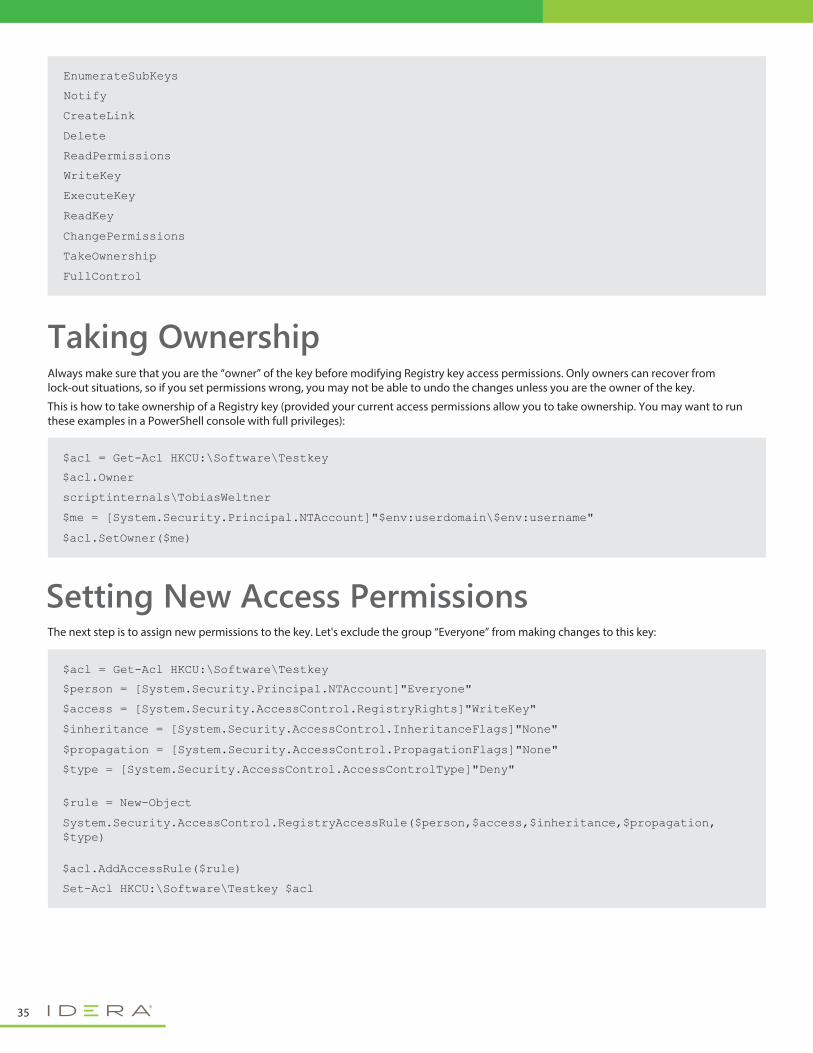
Always make sure that you are the “owner” of the key before modifying Registry key access permissions. Only owners can recover from lock-out situations, so if you set permissions wrong, you may not be able to undo the changes unless you are the owner of the key.
This is how to take ownership of a Registry key (provided your current access permissions allow you to take ownership. You may want to run these examples in a PowerShell console with full privileges):
Taking Ownership
$acl = Get-Acl HKCU:\Software\Testkey
$person = [System.Security.Principal.NTAccount]"Everyone"
$access = [System.Security.AccessControl.RegistryRights]"WriteKey"
$inheritance = [System.Security.AccessControl.InheritanceFlags]"None"
$propagation = [System.Security.AccessControl.PropagationFlags]"None"
$type = [System.Security.AccessControl.AccessControlType]"Deny"
$rule = New-Object
System.Security.AccessControl.RegistryAccessRule($person,$access,$inheritance,$propagation,$type)
$acl.AddAccessRule($rule)
Set-Acl HKCU:\Software\Testkey $acl
The next step is to assign new permissions to the key. Let's exclude the group “Everyone” from making changes to this key:
Setting New Access Permissions
35
md HKCU:\Software\Testkey\subkey
New-Item : Requested Registry access is not allowed.
At line:1 char:34
+ param([string[]]$paths); New-Item <<<< -type directory -path $paths
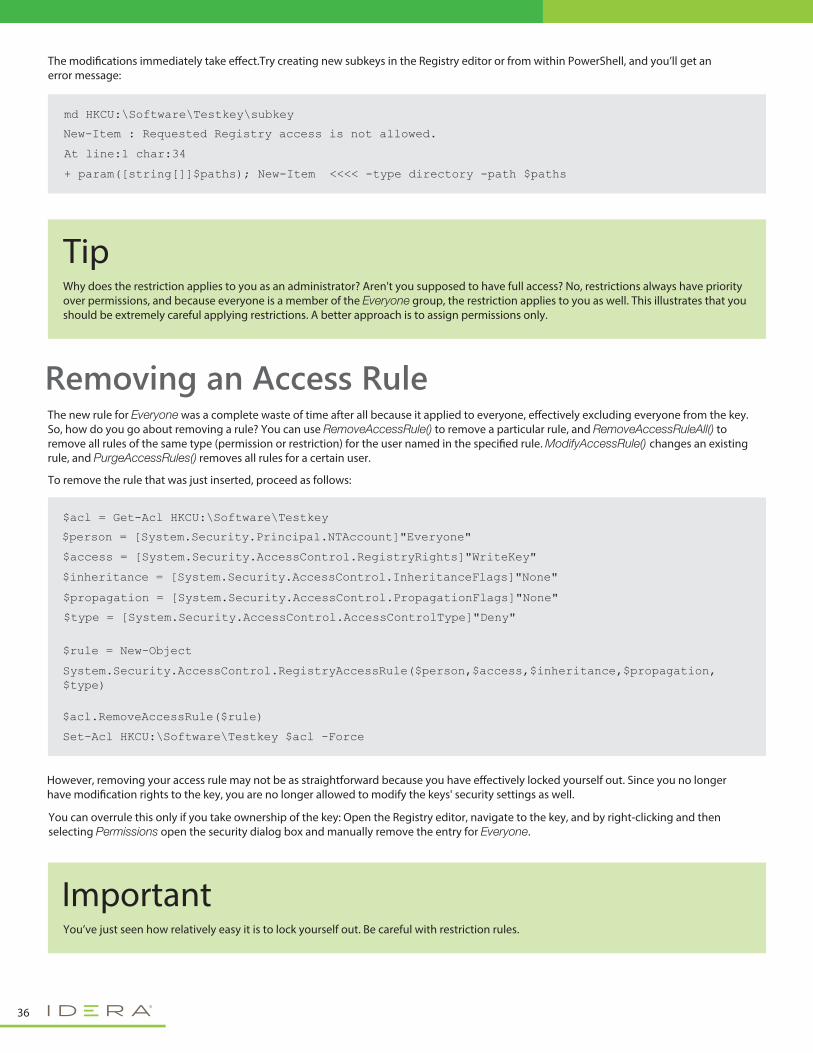
The modi�cations immediately take e�ect.Try creating new subkeys in the Registry editor or from within PowerShell, and you’ll get an error message:
$acl = Get-Acl HKCU:\Software\Testkey
$person = [System.Security.Principal.NTAccount]"Everyone"
$access = [System.Security.AccessControl.RegistryRights]"WriteKey"
$inheritance = [System.Security.AccessControl.InheritanceFlags]"None"
$propagation = [System.Security.AccessControl.PropagationFlags]"None"
$type = [System.Security.AccessControl.AccessControlType]"Deny"
$rule = New-Object
System.Security.AccessControl.RegistryAccessRule($person,$access,$inheritance,$propagation,$type)
$acl.RemoveAccessRule($rule)
Set-Acl HKCU:\Software\Testkey $acl -Force
The new rule for Everyone was a complete waste of time after all because it applied to everyone, e�ectively excluding everyone from the key. So, how do you go about removing a rule? You can use RemoveAccessRule() to remove a particular rule, and RemoveAccessRuleAll() to remove all rules of the same type (permission or restriction) for the user named in the speci�ed rule. ModifyAccessRule() changes an existing rule, and PurgeAccessRules() removes all rules for a certain user.
To remove the rule that was just inserted, proceed as follows:
However, removing your access rule may not be as straightforward because you have e�ectively locked yourself out. Since you no longer have modi�cation rights to the key, you are no longer allowed to modify the keys' security settings as well.
You can overrule this only if you take ownership of the key: Open the Registry editor, navigate to the key, and by right-clicking and then selecting Permissions open the security dialog box and manually remove the entry for Everyone.
Removing an Access Rule
TipWhy does the restriction applies to you as an administrator? Aren't you supposed to have full access? No, restrictions always have priority over permissions, and because everyone is a member of the Everyone group, the restriction applies to you as well. This illustrates that you should be extremely careful applying restrictions. A better approach is to assign permissions only.
ImportantYou’ve just seen how relatively easy it is to lock yourself out. Be careful with restriction rules.
36
SKC Name Property
0 0 Subkey {}
---
VC
0
--- --------------
md hkcu:\software\Testkey2\Subkey
Hive: Microsoft.PowerShell.Core\Registry::HKEY_CURRENT_USER\software\Testkey2
Set-ItemProperty HKCU:\Software\Testkey2 Value1 "Here is text"
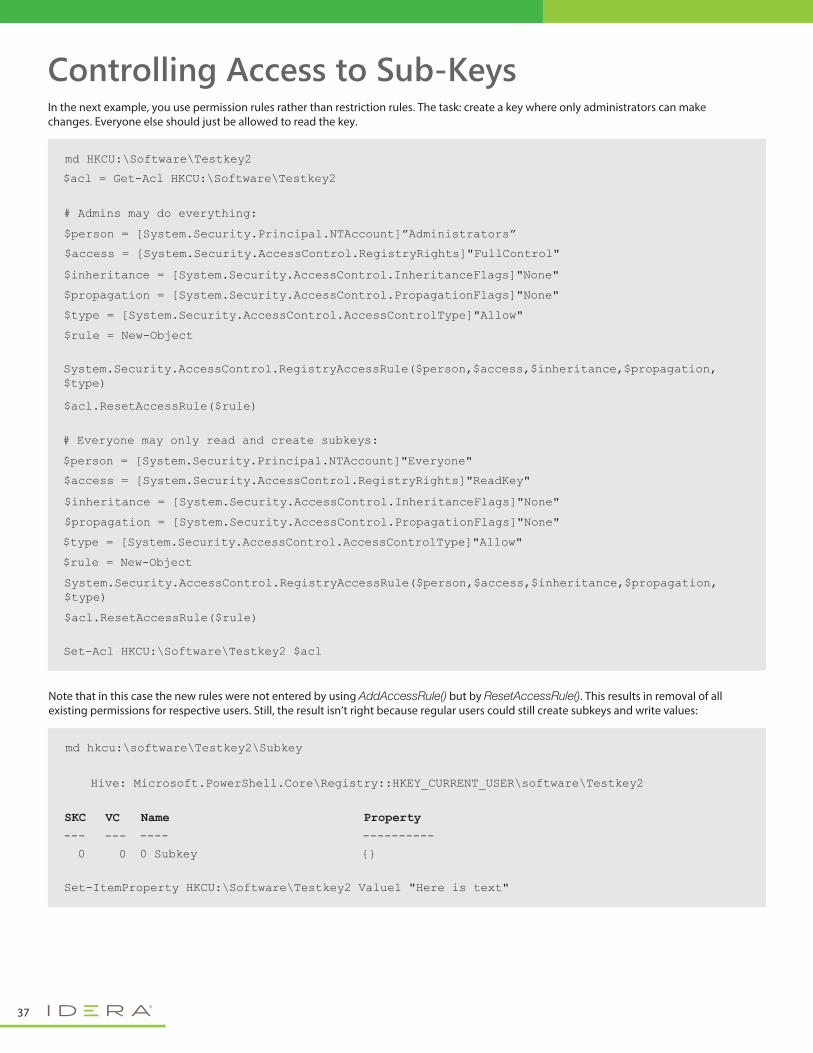
Note that in this case the new rules were not entered by using AddAccessRule() but by ResetAccessRule(). This results in removal of all existing permissions for respective users. Still, the result isn’t right because regular users could still create subkeys and write values:
md HKCU:\Software\Testkey2
$acl = Get-Acl HKCU:\Software\Testkey2
# Admins may do everything:
$person = [System.Security.Principal.NTAccount]”Administrators”
$access = [System.Security.AccessControl.RegistryRights]"FullControl"
$inheritance = [System.Security.AccessControl.InheritanceFlags]"None"
$propagation = [System.Security.AccessControl.PropagationFlags]"None"
$type = [System.Security.AccessControl.AccessControlType]"Allow"
$rule = New-Object
# Everyone may only read and create subkeys:
$person = [System.Security.Principal.NTAccount]"Everyone"
$access = [System.Security.AccessControl.RegistryRights]"ReadKey"
$inheritance = [System.Security.AccessControl.InheritanceFlags]"None"
$propagation = [System.Security.AccessControl.PropagationFlags]"None"
$type = [System.Security.AccessControl.AccessControlType]"Allow"
$rule = New-Object
System.Security.AccessControl.RegistryAccessRule($person,$access,$inheritance,$propagation,$type)
$acl.ResetAccessRule($rule)
Set-Acl HKCU:\Software\Testkey2 $acl
System.Security.AccessControl.RegistryAccessRule($person,$access,$inheritance,$propagation,$type)
$acl.ResetAccessRule($rule)
In the next example, you use permission rules rather than restriction rules. The task: create a key where only administrators can make changes. Everyone else should just be allowed to read the key.
Controlling Access to Sub-Keys
37
del HKCU:\Software\Testkey2
md HKCU:\Software\Testkey2
$acl = Get-Acl HKCU:\Software\Testkey2
$acl = Get-Acl HKCU:\Software\Testkey2
$acl.SetAccessRuleProtection($true, $false)
Set-Acl HKCU:\Software\Testkey2 $acl
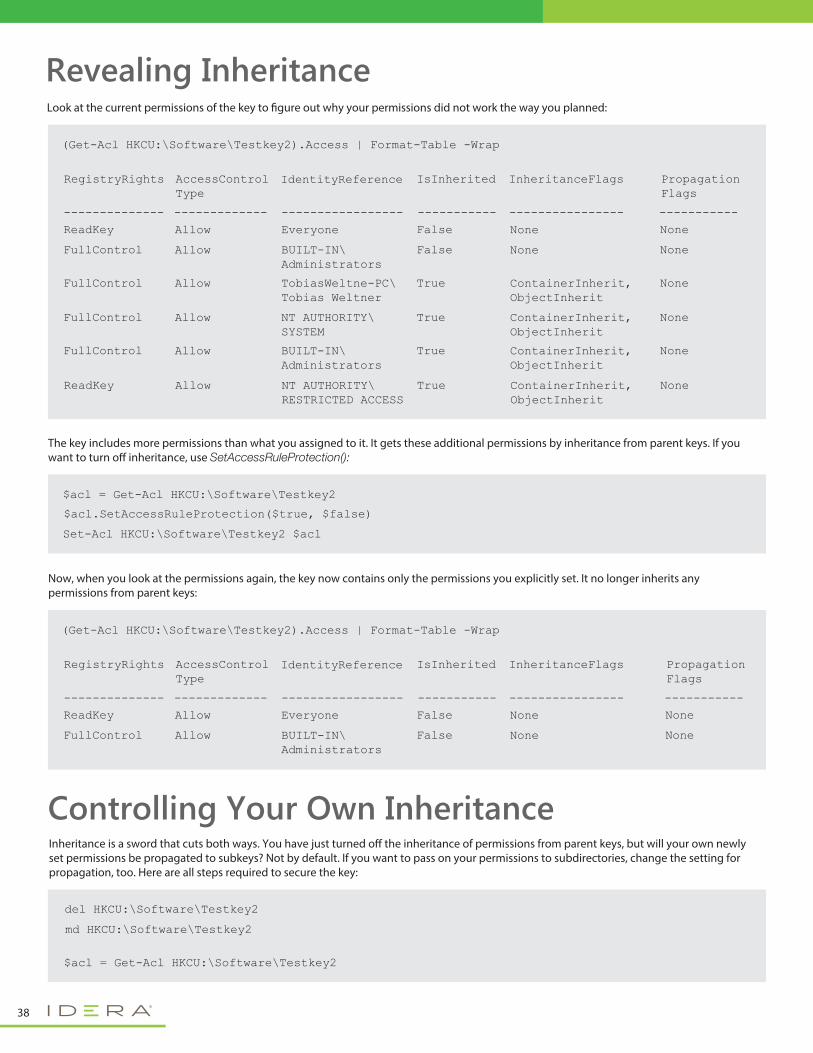
The key includes more permissions than what you assigned to it. It gets these additional permissions by inheritance from parent keys. If you want to turn o� inheritance, use SetAccessRuleProtection():
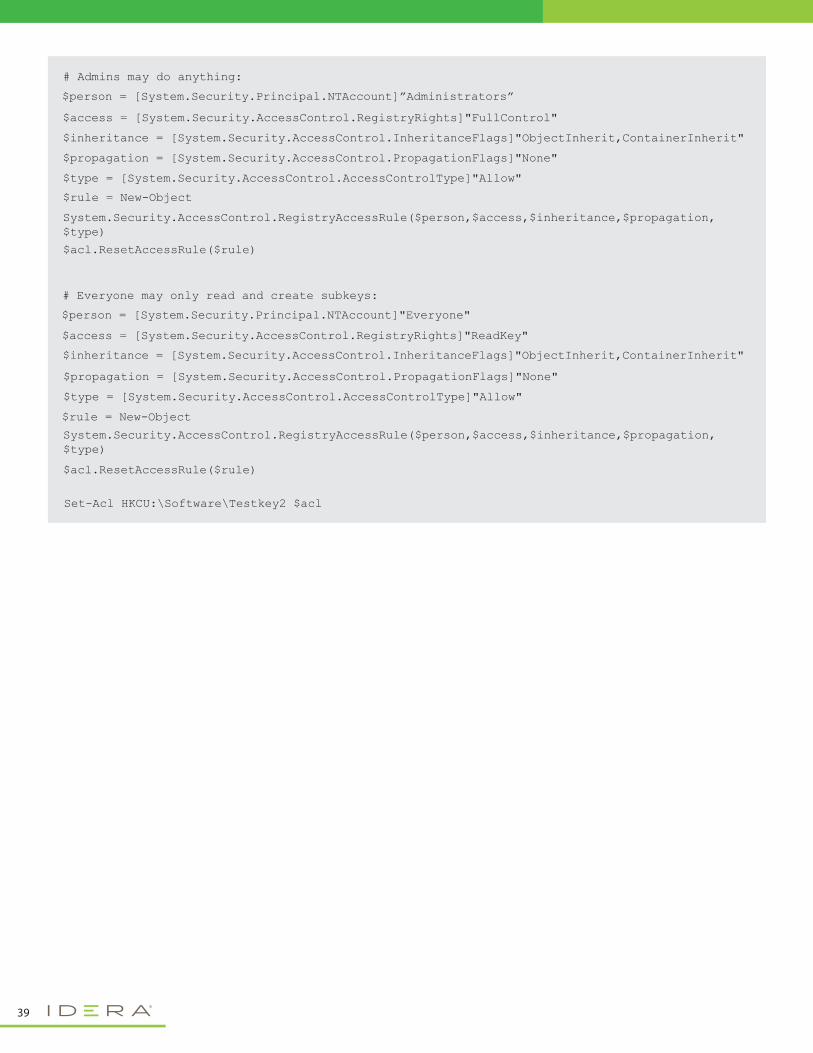
Inheritance is a sword that cuts both ways. You have just turned o� the inheritance of permissions from parent keys, but will your own newly set permissions be propagated to subkeys? Not by default. If you want to pass on your permissions to subdirectories, change the setting for propagation, too. Here are all steps required to secure the key:
(Get-Acl HKCU:\Software\Testkey2).Access | Format-Table -Wrap
RegistryRights
ReadKey Allow Everyone False None None
FullControl Allow BUILT-IN\Administrators
False None None
FullControl Allow TobiasWeltne-PC\Tobias Weltner
True ContainerInherit,ObjectInherit
None
FullControl Allow NT AUTHORITY\SYSTEM
True ContainerInherit,ObjectInherit
None
FullControl Allow BUILT-IN\Administrators
True ContainerInherit,ObjectInherit
None
ReadKey Allow NT AUTHORITY\RESTRICTED ACCESS
True ContainerInherit,ObjectInherit
None
-------------- ------------- ----------------- ----------- ---------------- -----------
AccessControlType
IdentityReference IsInherited InheritanceFlags PropagationFlags
Look at the current permissions of the key to �gure out why your permissions did not work the way you planned:
(Get-Acl HKCU:\Software\Testkey2).Access | Format-Table -Wrap
RegistryRights
ReadKey Allow Everyone False None None
FullControl Allow BUILT-IN\Administrators
False None None
-------------- ------------- ----------------- ----------- ---------------- -----------
AccessControlType
IdentityReference IsInherited InheritanceFlags PropagationFlags
Now, when you look at the permissions again, the key now contains only the permissions you explicitly set. It no longer inherits any permissions from parent keys:
Revealing Inheritance
Controlling Your Own Inheritance
38
# Admins may do anything:
$person = [System.Security.Principal.NTAccount]”Administrators”
$access = [System.Security.AccessControl.RegistryRights]"FullControl"
$inheritance = [System.Security.AccessControl.InheritanceFlags]"ObjectInherit,ContainerInherit"
$propagation = [System.Security.AccessControl.PropagationFlags]"None"
$type = [System.Security.AccessControl.AccessControlType]"Allow"
$rule = New-Object
System.Security.AccessControl.RegistryAccessRule($person,$access,$inheritance,$propagation,$type)
$acl.ResetAccessRule($rule)
$person = [System.Security.Principal.NTAccount]"Everyone"
$access = [System.Security.AccessControl.RegistryRights]"ReadKey"
$inheritance = [System.Security.AccessControl.InheritanceFlags]"ObjectInherit,ContainerInherit"
$propagation = [System.Security.AccessControl.PropagationFlags]"None"
$type = [System.Security.AccessControl.AccessControlType]"Allow"
$rule = New-Object
System.Security.AccessControl.RegistryAccessRule($person,$access,$inheritance,$propagation,$type)
$acl.ResetAccessRule($rule)
Set-Acl HKCU:\Software\Testkey2 $acl
# Everyone may only read and create subkeys:
39
40
In your daily work as an administrator, you will probably often deal with applications (processes), services, and event logs so let's take some of the knowledge you gained from the previous chapters and play with it. The examples and topics covered in this chapter are meant to give you an idea of what you can do. By no means are they a complete list of what you can do. They will provide you with a great starting point, though.
Processes, Services, and Event Logs
Topics Covered:Working with Processes·
Managing Services
Reading and Writing Event Logs
·
·
Chapter 17.
PS> Get-Process | Select-Object Name, Description, Company, MainWindowTitle
Name
---- ----------- ------- ---------------
Description Company MainWindowTitle
AppleMobileDevic...
conhost Console Window Host Microsoft Corpor...
csrss
csrss
DataCardMonitor DataCardMonitor... Huawei Technolog... DataCardMonitor
Dropbox Dropbox Dropbox, Inc.
dwm Desktop Window M... Microsoft Corpor...
(...)
Every application that is running is represented by a so-called "process". To view all running processes, use Get-Process cmdlet.
PS> Get-Process
This will list all running processes on the local machine, not just yours. So if other people are logged onto your box, their processes may also show up in that list. However, unless you have local Administrator privileges, you can only access limited properties of processes you did not launch yourself.
That's why Get-Process throws a number of exceptions when you try and list the executable �les of all running processes. Exceptions occur either when there is no executable for a given process (namely System and Idle), or if you do not have permission to see them:
PS> Get-Process -FileVersionInfo
Process objects returned from Get-Process contain a lot more information that you can see when you pipe the result to Select-Object and have it display all object properties:
You can then examine the object properties available, and put together your own reports by picking the properties that you need:
PS> Get-Process | Select-Object *
To hide error messages and focus only on the information you are able to retrieve, use the common parameter -ErrorAction SilentlyContinue which is available in every cmdlet - or its short form -ea 0:
PS> Get-Process -FileVersionInfo -ErrorAction SilentlyContinue
PS> Get-Process -FileVersionInfo -ea 0
Working with Processes
41
When you do that, you'll notice that there may be blank lines. They occur when a process object has no information for the particular property you selected. For example, the property MainWindowTitle represents the text in the title bar of an application window. So, if a process has no application window, MainWindowTitle is empty.
You can use the standard pipeline cmdlets to take care of that. Use Where-Object to �lter out processes that do not meet your requirements. For example, this line will get you only processes that do have an application window:
PS> Get-Process | Where-Object { $_.MainWindowTitle -ne '' } | Select-Object Description, MainWindowTitle, Name, Company
Description
----------- --------------- ---- -------
MainWindowTitle Name Company
DataCardMonitor... DataCardMonitor DataCardMonitor Huawei Technolog...
Remote Desktop C... storage1 - Remot... mstsc Microsoft Corpor...
Windows PowerShell Windows PowerShell powershell Microsoft Corpor...
Microsoft Office... eBook_Chap17_V2.... WINWORD Microsoft Corpor...
Each Process object contains methods and properties. Many properties may be read as well as modi�ed, and methods can be executed like commands. This allows you to control many �ne settings of processes. For example, you can speci�cally raise or lower the priority of a process. The next statement lowers the priority of all Notepads:
Accessing Process Objects
PS> Get-Process notepad | ForEach-Object { $_.PriorityClass = "BelowNormal" }
Launching applications from PowerShell is pretty straight-forward: simply enter the name of the program you want to run, and press ENTER:
Launching New Processes (Applications)
PS> notepad
PS> regedit
PS> ipconfig
Here are some more examples of using pipeline cmdlets to re�ne the results returned by Get-Process. Can you decipher what these lines would do?
PS> Get-Process | Where-Object { $_.StartTime -gt (Get-Date).AddMinutes(-180)}
PS> @(Get-Process notepad -ea 0).Count
PS> Get-Process | Measure-Object -Average -Maximum -Minimum -Property PagedSystemMemorySize
TipNote that you can also retrieve information about processes by using WMI:
WMI will get you even more details about running processes.
Note that even with Get-Process, you can authenticate. Establish an IPC network connection to the target machine, and use this connection for authentication. Here is an example:
Both Get-Process and Get-WmiObject support the parameter -ComputerName, so you can use both to retrieve processes remotely from other machines. However, only Get-WmiObject also supports the parameter -Credential so you can authenticate. Get-Process always uses your current identity, and unless you are Domain Administrator or otherwise have local Administrator privileges at the target machine, you will get an Access Denied error.
PS> Get-WmiObject Win32_Process
PS> net use \\someRemoteMachine Password /USER:domain\username
42
This works great, but eventually you'll run into situations where you cannot seem to launch an application. PowerShell might complain that it would not recognize the application name although you know for sure that it exists.
When this happens, you need to specify the absolute or relative path name to the application �le. That can become tricky because in order to escape spaces in path names, you have to quote them, and in order to run quoted text (and not echo it back), you need to prepend it with an ampersand. The ampersand tells PowerShell to treat the text as if it was a command you entered.
So if you wanted to run Internet Explorer from its standard location, this is the line that would do the job:
When you run applications from within PowerShell, these are the rules to know:
You'll notice that PowerShell now waits for the Notepad to close again before it accepts new commands.
Whenever you need to launch a new process and want more control, use Start-Process. This cmdlet has a number of bene�ts over launching applications directly. First of all, it is a bit smarter and knows where a lot of applications are stored. It can for example �nd iexplore.exe without the need for a path:
Using Start-Process
PS> Start-Process iexplore.exe
Second, Start-Process supports a number of parameters that allow you to control window size, synchronous or asynchronous execution or even the user context an application is using to run. For example, if you wanted PowerShell to wait for a window-based application so a script could execute applications in a strict order, use -Wait parameter:
PS> Start-Process notepad -Wait
& 'C:\Program Files\Internet Explorer\iexplore.exe'
ImportantStart-Process has just one limitation: it cannot return the results of console-based applications back to you. Check this out:
This will store the result of ipconfig in a variable. The same done with Start-Process yields nothing:
Instead, they are always output to the console. So if you want to read information from console-based applications, do not use Start-Process.
That's because Start-Process by default runs every command synchronously, so ipconfig runs in its own new console window which is visible for a split-second if you look carefully. But even if you ask Start-Process to run the command in no new console, results are never returned:
PS> $result = ipconfig
PS> $result = Start-Process ipconfig
PS> $result = Start-Process ipconfig -NoNewWindow
43
Environment variable $env:path: All folders listed in $env:path are special. Applications stored inside these folders can be launched by name only. You do not need to specify the complete or relative path. That's the reason why you can simply enter notepad and press ENTER to launch the Win dows Editor, or run commands like ping or ipconfig.
Escaping Spaces: If the path name contains spaces, the entire path name needs to be quoted. Once you quote a path, though, it becomes a string (text), so when you press ENTER, PowerShell happily echoes the text back to you but won't start the application. Whenever you quote paths, you need to prepend the string with "&" so PowerShell knows that you want to launch something.
Synchronous and asynchronous execution: when you run a console-based application such as ipconfig.exe or netstat.exe, it shares the console with PowerShell so its output is displayed in the PowerShell console. That's why PowerShell pauses until console-based applications �nished. Window-based applications such as notepad.exe or regedit.exe use their own windows for output. Here, PowerShell continues immediately and won't wait for the application to complete.
If you must kill a process immediately, use Stop-Process and specify either the process ID, or use the parameter -Name to specify the process name. This would close all instances of the Notepad:
Stopping processes this way shouldn’t be done on a regular basis: since the application is immediately terminated, it has no time to save unsaved results (which might result in data loss), and it cannot properly clean up (which might result in orphaned temporary �les and inaccurate open DLL counters). Use it only if a process won't respond otherwise. Use –WhatIf to simulate. Use –Confirm when you want to have each step con�rmed.
To close a process nicely, you can close its main window (which is the automation way of closing the application window by a mouse click). Here is a sample that closes all instances of notepad:
Services are basically processes, too. They are just executed automatically and in the background and do not necessarily require a user logon. Services provide functionality usually not linked to any individual user.
Table 17.1: Cmdlets for managing services
Stopping Processes
PS> Stop-Process -Name Notepad
Use Get-Service to list all services and check their basic status.
Examining Services
PS> Get-Service
You can also check an individual service and �nd out whether it is running or not:
PS> Get-Service Spooler
PS> Get-Process Notepad -ea 0 | ForEach-Object { $_.CloseMainWindow() }
Managing Services
44
Description
Get-Service Lists services
New-Service Registers a service
Restart-Service Stops a service and then restarts it. For example, to allow modifications of settings to take effect
Resume-Service Resumes a stopped service
Set-Service Modifies settings of a service
Start-Service Starts a service
Stop-Service Stops a service
Suspend-Service Suspends a service
Cmdlet
PS> Get-WmiObject Win32_Service -Filter 'StartMode="Auto" and Started=False' | Select-Object DisplayName, ExitCode
DisplayName
----------- --------
ExitCode
Microsoft .NET Framework NGEN v4.0.30319_X86 0
Microsoft .NET Framework NGEN v4.0.30319_X64 0
Google Update Service (gupdate) 0
Net Driver HPZ12 0
Pml Driver HPZ12 0
Software Protection 0
Windows Image Acquisition (WIA) 0
To start, stop, temporarily suspend, or restart a service, use the corresponding cmdlets. You can also use Get-Service to select the services �rst, and then pipe them to one of the other cmdlets. Just note that you may need local administrator privileges to change service properties.
Starting, Stopping, Suspending, and ResumingServices
PS> Stop-Service Spooler
Since WMI includes more information that Get-Service, you could �lter for all services set to start automatically that are not running. By examining the service ExitCode property, you'd �nd services that did initialization tasks and �nished ok (exit code is 0) or that crashed (exit code other than 0):
If a service has dependent services, it cannot be stopped unless you also specify -Force.
PS> Stop-Service Spooler -Force
Note that you can use WMI to �nd out more information about services, and also manage services on remote machines:
PS> Get-WmiObject Win32_Service -ComputerName Storage1 -Credential Administrator
Reading and WritingEvent LogsEvent logs are the central place where applications as well as the operating system log all kinds of information grouped into the categories Information, Warning, and Error. PowerShell can read and write these log �les. To �nd out which log �les exist on your machine, use Get-EventLog with the parameter -List:
PS> Get-EventLog -List
45
To write your own entries to one of the event logs, you �rst need to register an event source (which acts like your "sender" address). To register an event source, you need local administrator privileges. Make sure you open PowerShell with full administrator rights and use this line to add a new event source called "PowerShellScript" to the Application log:
Writing Entries to the Event Log
PS> New-EventLog -LogName Application -Source PowerShellScript
Or you can open the system dialog to view your new event entry that way:
PS> Show-EventLog
And of course you can remove your event source if this was just a test and you want to get rid of it again (but you do need administrator privileges again, just like when you created the event source):
PS> Remove-EventLog -Source PowerShellScript
Note that an event source must be unique and may not exist already in any other event log. To remove an event source, use Remove-EventLog with the same parameters as above, but be extremely careful. This cmdlet can wipe out entire event logs.
Once you have registered your event source, you are ready to log things to an event log. Logging (writing) event entries no longer necessarily requires administrative privileges. Since we added the event source to the Application log, anyone can now use it to log events. You could for example use this line inside of your logon scripts to log status information:
You can now use Get-EventLog to read back your entries:
PS> Write-EventLog -LogName Application -Source PowerShellScript -EntryType Information -EventId 123 -Message 'This is my first own event log entry'
To list the content of one of the listed event logs, use -LogName instead. This lists all events from the System event log:
PS> Get-EventLog -LogName System
And this line gets you all error and warning entries that have the keyword "Time" in its message:
PS> Get-EventLog -LogName System -EntryType Error, Warning -Message *Time* | Select-Object TimeWritten, Message
Dumping all events is not a good idea, though, because this is just too much information. In order to �lter the information and focus on what you want to know, take a look at the column headers. If you want to �lter by the content of a speci�c column, look for a parameter that matches the column name. This line gets you the latest 20 errors from the System event log:
PS> Get-EventLog -LogName System -EntryType Error -Newest 20
PS> Get-EventLog -LogName Application -Source PowerShellScript
Index
163833 Nov 14 10:47 Information PowerShellScript 123 This is...----- ---- --------- ------ ---------- -------
Time EntryType Source InstanceID Message
46
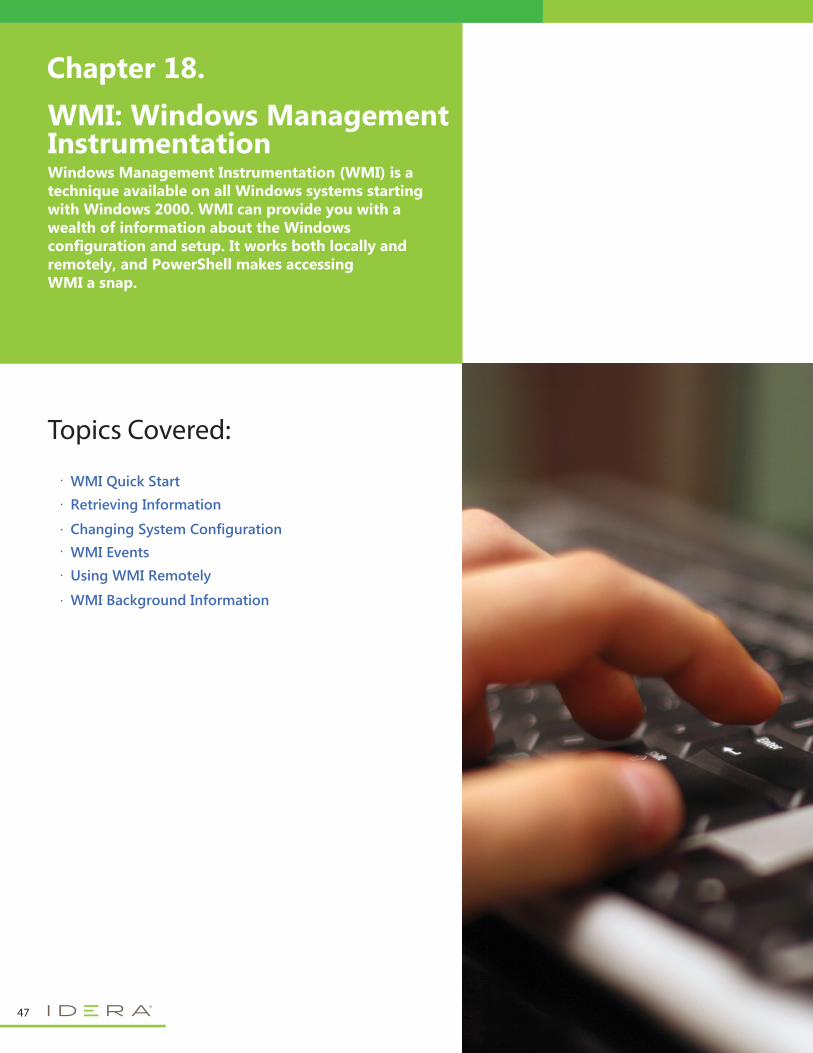
47
Windows Management Instrumentation (WMI) is a technique available on all Windows systems starting with Windows 2000. WMI can provide you with a wealth of information about the Windows configuration and setup. It works both locally and remotely, and PowerShell makes accessing WMI a snap.
WMI: Windows ManagementInstrumentation
Topics Covered:
WMI Quick Start·
Retrieving Information
Changing System Configuration
·
·WMI Events·
Using WMI Remotely
WMI Background Information
·
·
Chapter 18.
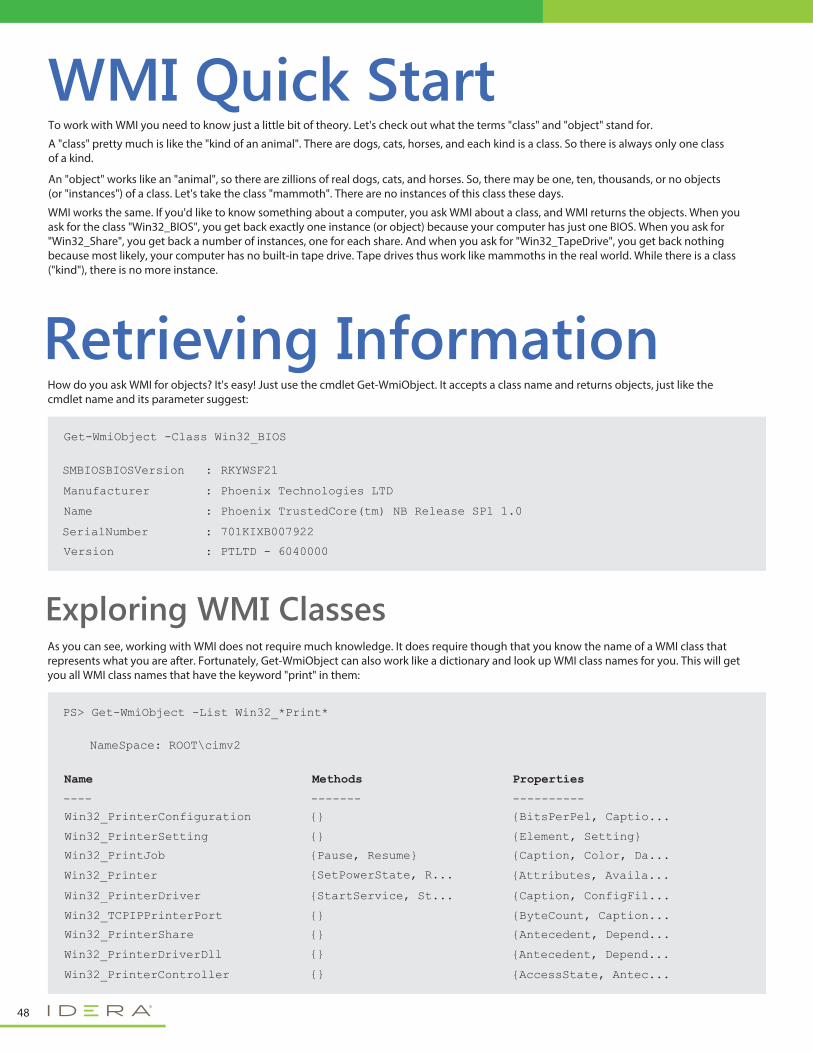
WMI Quick Start
Retrieving Information
PS> Get-WmiObject -List Win32_*Print*
NameSpace: ROOT\cimv2
Name
---- ------- ----------
Methods Properties
Win32_PrinterConfiguration {} {BitsPerPel, Captio...
Win32_PrinterSetting {} {Element, Setting}
Win32_PrintJob {Pause, Resume} {Caption, Color, Da...
Win32_Printer {Attributes, Availa...{SetPowerState, R...
Win32_PrinterDriver {StartService, St... {Caption, ConfigFil...
Win32_TCPIPPrinterPort {} {ByteCount, Caption...
Win32_PrinterShare {} {Antecedent, Depend...
Win32_PrinterDriverDll {Antecedent, Depend...{}
Win32_PrinterController {AccessState, Antec...{}
To work with WMI you need to know just a little bit of theory. Let's check out what the terms "class" and "object" stand for.
A "class" pretty much is like the "kind of an animal". There are dogs, cats, horses, and each kind is a class. So there is always only one class of a kind.
How do you ask WMI for objects? It's easy! Just use the cmdlet Get-WmiObject. It accepts a class name and returns objects, just like the cmdlet name and its parameter suggest:
An "object" works like an "animal", so there are zillions of real dogs, cats, and horses. So, there may be one, ten, thousands, or no objects (or "instances") of a class. Let's take the class "mammoth". There are no instances of this class these days.
WMI works the same. If you'd like to know something about a computer, you ask WMI about a class, and WMI returns the objects. When you ask for the class "Win32_BIOS", you get back exactly one instance (or object) because your computer has just one BIOS. When you ask for "Win32_Share", you get back a number of instances, one for each share. And when you ask for "Win32_TapeDrive", you get back nothing because most likely, your computer has no built-in tape drive. Tape drives thus work like mammoths in the real world. While there is a class ("kind"), there is no more instance.
Get-WmiObject -Class Win32_BIOS
SMBIOSBIOSVersion RKYWSF21 :
Manufacturer Phoenix Technologies LTD :
Name Phoenix TrustedCore(tm) NB Release SP1 1.0 :
SerialNumber 701KIXB007922 :
Version PTLTD - 6040000 :
As you can see, working with WMI does not require much knowledge. It does require though that you know the name of a WMI class that represents what you are after. Fortunately, Get-WmiObject can also work like a dictionary and look up WMI class names for you. This will get you all WMI class names that have the keyword "print" in them:
Exploring WMI Classes
48
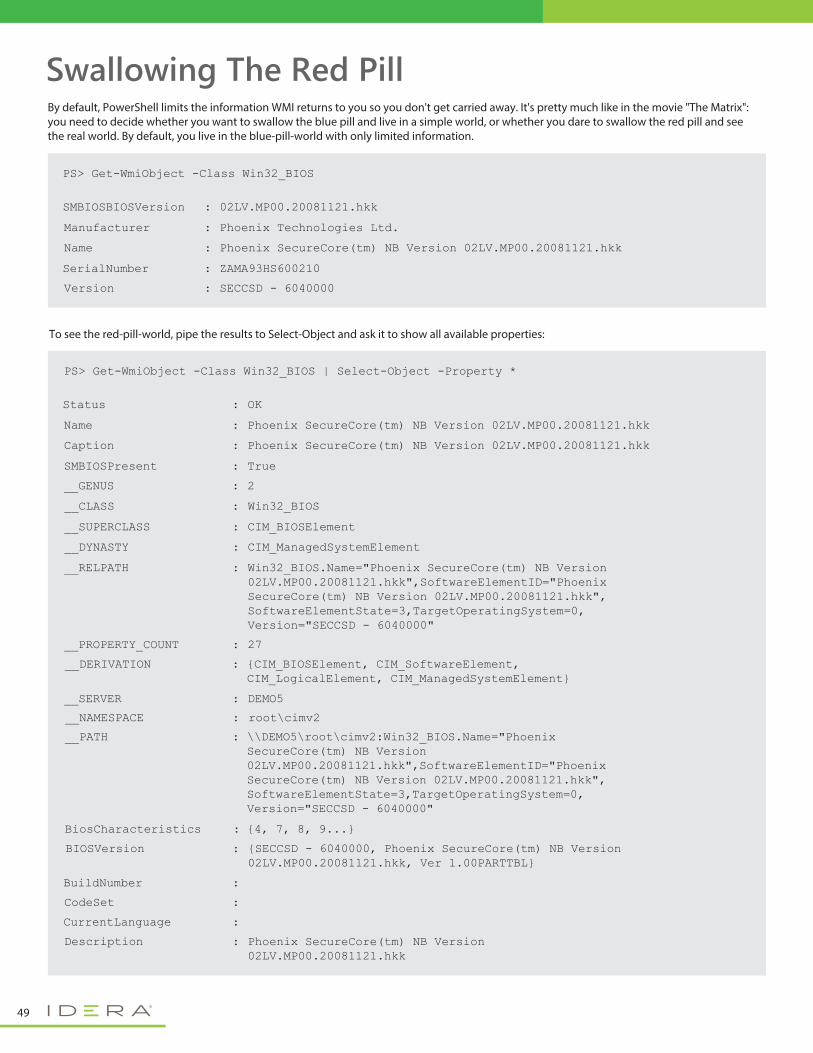
PS> Get-WmiObject -Class Win32_BIOS
SMBIOSBIOSVersion 02LV.MP00.20081121.hkk :
Manufacturer Phoenix Technologies Ltd. :
Name Phoenix SecureCore(tm) NB Version 02LV.MP00.20081121.hkk :
SerialNumber ZAMA93HS600210 :
Version SECCSD - 6040000 :
By default, PowerShell limits the information WMI returns to you so you don't get carried away. It's pretty much like in the movie "The Matrix": you need to decide whether you want to swallow the blue pill and live in a simple world, or whether you dare to swallow the red pill and see the real world. By default, you live in the blue-pill-world with only limited information.
PS> Get-WmiObject -Class Win32_BIOS | Select-Object -Property *
Status OK :
Name Phoenix SecureCore(tm) NB Version 02LV.MP00.20081121.hkk :
Caption Phoenix SecureCore(tm) NB Version 02LV.MP00.20081121.hkk :
SMBIOSPresent True :
__GENUS 2 :
__CLASS Win32_BIOS :
__SUPERCLASS CIM_BIOSElement :
__DYNASTY CIM_ManagedSystemElement :
__RELPATH Win32_BIOS.Name="Phoenix SecureCore(tm) NB Version 02LV.MP00.20081121.hkk",SoftwareElementID="PhoenixSecureCore(tm) NB Version 02LV.MP00.20081121.hkk",SoftwareElementState=3,TargetOperatingSystem=0,Version="SECCSD - 6040000"
:
__PROPERTY_COUNT 27 :
__SERVER DEMO5 :
__DERIVATION {CIM_BIOSElement, CIM_SoftwareElement,CIM_LogicalElement, CIM_ManagedSystemElement}
:
BiosCharacteristics {4, 7, 8, 9...} :
BIOSVersion {SECCSD - 6040000, Phoenix SecureCore(tm) NB Version02LV.MP00.20081121.hkk, Ver 1.00PARTTBL}
Phoenix SecureCore(tm) NB Version02LV.MP00.20081121.hkk
:
__PATH \\DEMO5\root\cimv2:Win32_BIOS.Name="PhoenixSecureCore(tm) NB Version02LV.MP00.20081121.hkk",SoftwareElementID="PhoenixSecureCore(tm) NB Version 02LV.MP00.20081121.hkk",SoftwareElementState=3,TargetOperatingSystem=0,Version="SECCSD - 6040000"
:
__NAMESPACE root\cimv2 :
BuildNumber :
CodeSet :
CurrentLanguage :
Description :
To see the red-pill-world, pipe the results to Select-Object and ask it to show all available properties:
Swallowing The Red Pill
49
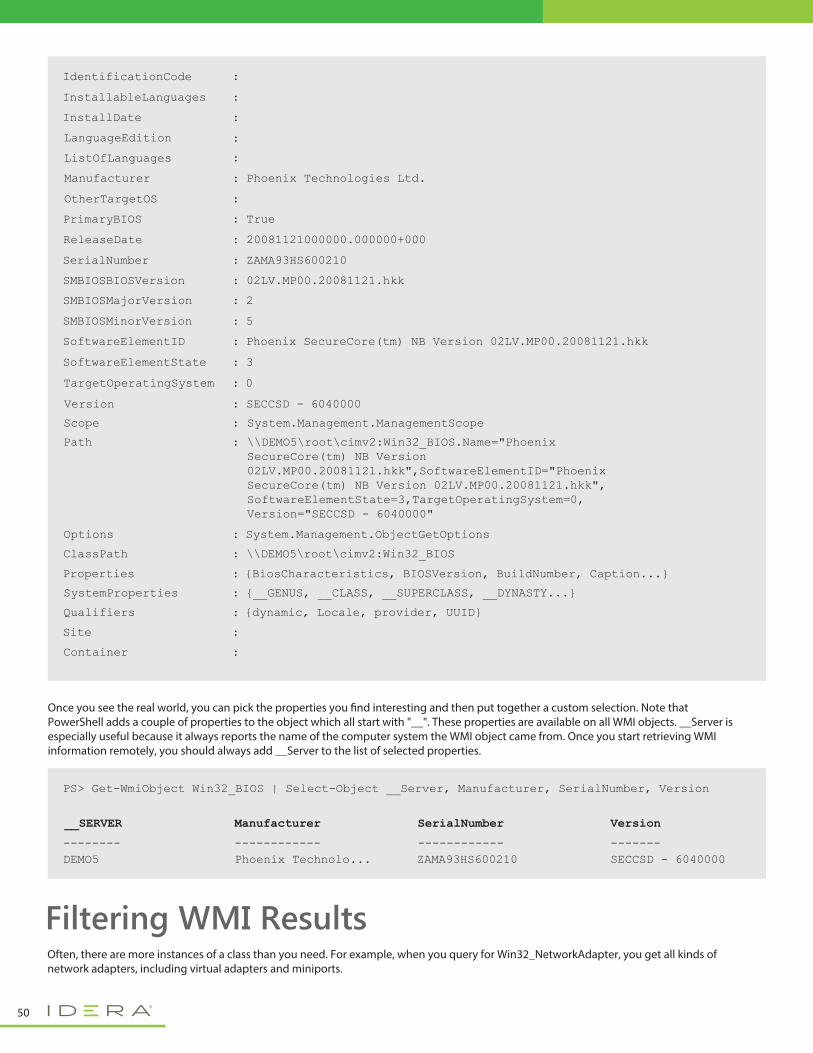
PS> Get-WmiObject Win32_BIOS | Select-Object __Server, Manufacturer, SerialNumber, Version
__SERVER
-------- ------------ ------------ -------
Manufacturer SerialNumber Version
DEMO5 Phoenix Technolo... ZAMA93HS600210 SECCSD - 6040000
Once you see the real world, you can pick the properties you �nd interesting and then put together a custom selection. Note that PowerShell adds a couple of properties to the object which all start with "__". These properties are available on all WMI objects. __Server is especially useful because it always reports the name of the computer system the WMI object came from. Once you start retrieving WMI information remotely, you should always add __Server to the list of selected properties.
IdentificationCode :
InstallableLanguages :
InstallDate :
ListOfLanguages
:LanguageEdition
:
Manufacturer Phoenix Technologies Ltd. :
OtherTargetOS :
PrimaryBIOS True :
ReleaseDate 20081121000000.000000+000 :
SerialNumber ZAMA93HS600210 :
SMBIOSBIOSVersion 02LV.MP00.20081121.hkk :
SMBIOSMajorVersion
SMBIOSMinorVersion
2 :
5 :
SoftwareElementID Phoenix SecureCore(tm) NB Version 02LV.MP00.20081121.hkk :
SoftwareElementState 3 :
Version SECCSD - 6040000 :
Options System.Management.ObjectGetOptions :
ClassPath \\DEMO5\root\cimv2:Win32_BIOS
{BiosCharacteristics, BIOSVersion, BuildNumber, Caption...}
:
Path \\DEMO5\root\cimv2:Win32_BIOS.Name="PhoenixSecureCore(tm) NB Version02LV.MP00.20081121.hkk",SoftwareElementID="PhoenixSecureCore(tm) NB Version 02LV.MP00.20081121.hkk",SoftwareElementState=3,TargetOperatingSystem=0,Version="SECCSD - 6040000"
:
Scope System.Management.ManagementScope :
Properties :
SystemProperties {__GENUS, __CLASS, __SUPERCLASS, __DYNASTY...} :
Qualifiers {dynamic, Locale, provider, UUID} :
Site :
Container :
TargetOperatingSystem 0 :
Often, there are more instances of a class than you need. For example, when you query for Win32_NetworkAdapter, you get all kinds of network adapters, including virtual adapters and miniports.
Filtering WMI Results
50
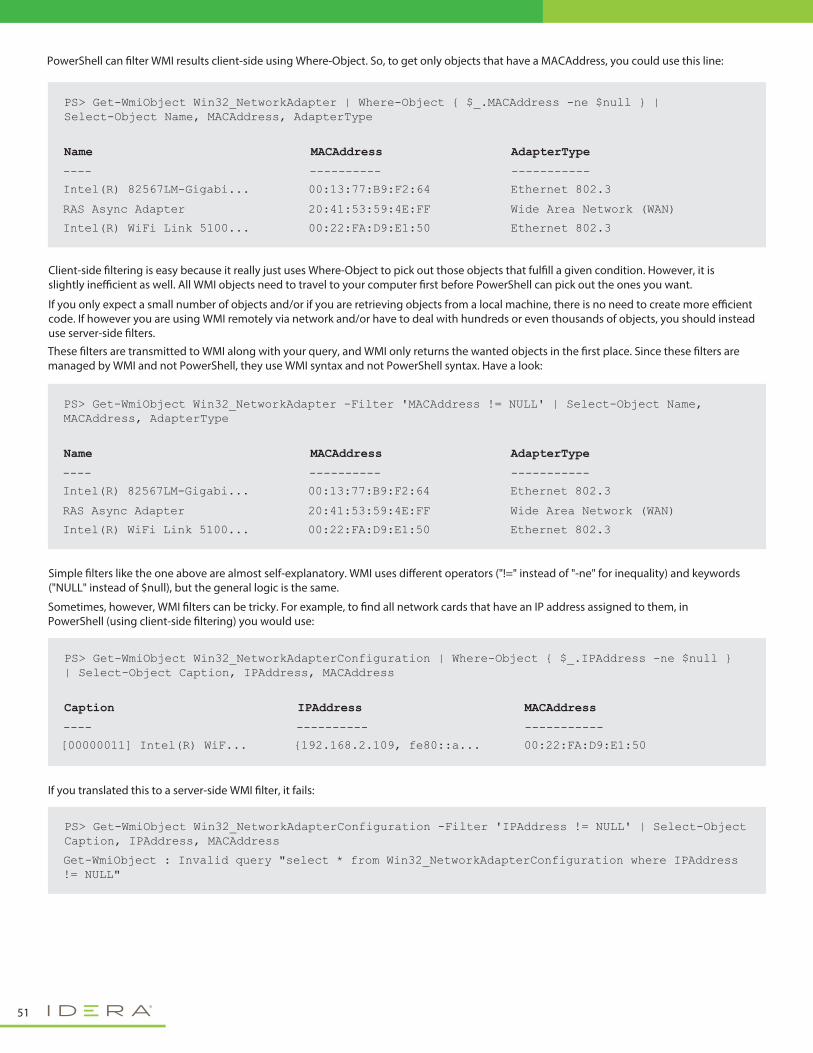
PS> Get-WmiObject Win32_NetworkAdapterConfiguration -Filter 'IPAddress != NULL' | Select-Object Caption, IPAddress, MACAddress
Get-WmiObject : Invalid query "select * from Win32_NetworkAdapterConfiguration where IPAddress != NULL"
If you translated this to a server-side WMI �lter, it fails:
PS> Get-WmiObject Win32_NetworkAdapter | Where-Object { $_.MACAddress -ne $null } | Select-Object Name, MACAddress, AdapterType
Name
---- ---------- -----------
MACAddress AdapterType
Intel(R) 82567LM-Gigabi... 00:13:77:B9:F2:64 Ethernet 802.3
RAS Async Adapter 20:41:53:59:4E:FF Wide Area Network (WAN)
Intel(R) WiFi Link 5100... 00:22:FA:D9:E1:50 Ethernet 802.3
PS> Get-WmiObject Win32_NetworkAdapter -Filter 'MACAddress != NULL' | Select-Object Name, MACAddress, AdapterType
Name
---- ---------- -----------
MACAddress AdapterType
Intel(R) 82567LM-Gigabi... 00:13:77:B9:F2:64 Ethernet 802.3
RAS Async Adapter 20:41:53:59:4E:FF Wide Area Network (WAN)
Intel(R) WiFi Link 5100... 00:22:FA:D9:E1:50 Ethernet 802.3
PowerShell can �lter WMI results client-side using Where-Object. So, to get only objects that have a MACAddress, you could use this line:
Client-side �ltering is easy because it really just uses Where-Object to pick out those objects that ful�ll a given condition. However, it is slightly ine�cient as well. All WMI objects need to travel to your computer �rst before PowerShell can pick out the ones you want.
If you only expect a small number of objects and/or if you are retrieving objects from a local machine, there is no need to create more e�cient code. If however you are using WMI remotely via network and/or have to deal with hundreds or even thousands of objects, you should instead use server-side �lters.
These �lters are transmitted to WMI along with your query, and WMI only returns the wanted objects in the �rst place. Since these �lters are managed by WMI and not PowerShell, they use WMI syntax and not PowerShell syntax. Have a look:
PS> Get-WmiObject Win32_NetworkAdapterConfiguration | Where-Object { $_.IPAddress -ne $null } | Select-Object Caption, IPAddress, MACAddress
Caption
---- ---------- -----------
IPAddress MACAddress
[00000011] Intel(R) WiF... {192.168.2.109, fe80::a... 00:22:FA:D9:E1:50
Simple �lters like the one above are almost self-explanatory. WMI uses di�erent operators ("!=" instead of "-ne" for inequality) and keywords ("NULL" instead of $null), but the general logic is the same.
Sometimes, however, WMI �lters can be tricky. For example, to �nd all network cards that have an IP address assigned to them, in PowerShell (using client-side �ltering) you would use:
51
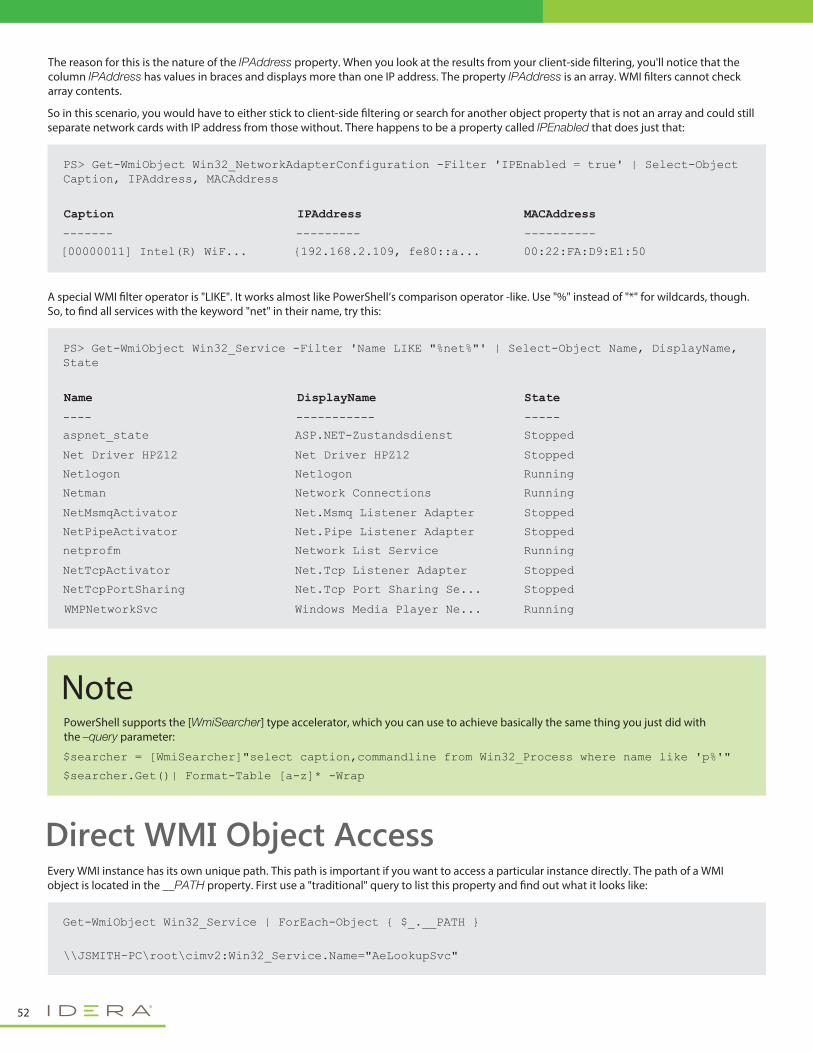
Get-WmiObject Win32_Service | ForEach-Object { $_.__PATH }
\\JSMITH-PC\root\cimv2:Win32_Service.Name="AeLookupSvc"
PS> Get-WmiObject Win32_Service -Filter 'Name LIKE "%net%"' | Select-Object Name, DisplayName, State
Name
---- ----------- -----
DisplayName State
aspnet_state ASP.NET-Zustandsdienst Stopped
Net Driver HPZ12 Net Driver HPZ12 Stopped
Netlogon Netlogon Running
Netman Network Connections Running
NetMsmqActivator Net.Msmq Listener Adapter Stopped
NetPipeActivator Net.Pipe Listener Adapter Stopped
netprofm Network List Service Running
NetTcpActivator Net.Tcp Listener Adapter Stopped
NetTcpPortSharing Net.Tcp Port Sharing Se... Stopped
WMPNetworkSvc Windows Media Player Ne... Running
A special WMI �lter operator is "LIKE". It works almost like PowerShell’s comparison operator -like. Use "%" instead of "*" for wildcards, though. So, to �nd all services with the keyword "net" in their name, try this:
PS> Get-WmiObject Win32_NetworkAdapterConfiguration -Filter 'IPEnabled = true' | Select-Object Caption, IPAddress, MACAddress
Caption
------- --------- ----------
IPAddress MACAddress
[00000011] Intel(R) WiF... {192.168.2.109, fe80::a... 00:22:FA:D9:E1:50
The reason for this is the nature of the IPAddress property. When you look at the results from your client-side �ltering, you'll notice that the column IPAddress has values in braces and displays more than one IP address. The property IPAddress is an array. WMI �lters cannot check array contents.
So in this scenario, you would have to either stick to client-side �ltering or search for another object property that is not an array and could still separate network cards with IP address from those without. There happens to be a property called IPEnabled that does just that:
Every WMI instance has its own unique path. This path is important if you want to access a particular instance directly. The path of a WMI object is located in the __PATH property. First use a "traditional" query to list this property and �nd out what it looks like:
Direct WMI Object Access
NotePowerShell supports the [WmiSearcher] type accelerator, which you can use to achieve basically the same thing you just did with the –query parameter:
$searcher = [WmiSearcher]"select caption,commandline from Win32_Process where name like 'p%'"
$searcher.Get()| Format-Table [a-z]* -Wrap
52
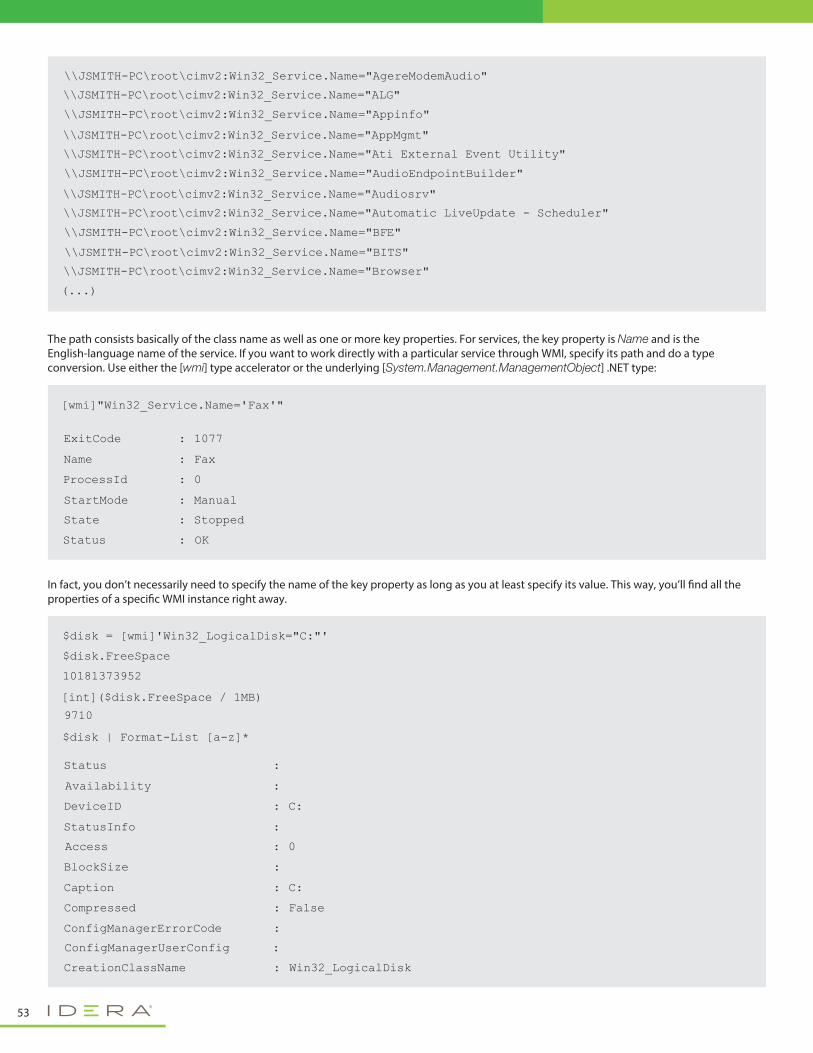
\\JSMITH-PC\root\cimv2:Win32_Service.Name="AgereModemAudio"
\\JSMITH-PC\root\cimv2:Win32_Service.Name="ALG"
\\JSMITH-PC\root\cimv2:Win32_Service.Name="Appinfo"
\\JSMITH-PC\root\cimv2:Win32_Service.Name="AppMgmt"
\\JSMITH-PC\root\cimv2:Win32_Service.Name="Ati External Event Utility"
\\JSMITH-PC\root\cimv2:Win32_Service.Name="AudioEndpointBuilder"
\\JSMITH-PC\root\cimv2:Win32_Service.Name="Audiosrv"
\\JSMITH-PC\root\cimv2:Win32_Service.Name="Automatic LiveUpdate - Scheduler"
\\JSMITH-PC\root\cimv2:Win32_Service.Name="BFE"
\\JSMITH-PC\root\cimv2:Win32_Service.Name="BITS"
\\JSMITH-PC\root\cimv2:Win32_Service.Name="Browser"
(...)
[wmi]"Win32_Service.Name='Fax'"
ExitCode 1077 :
Name Fax :
ProcessId 0 :
StartMode Manual :
State Stopped :
Status OK :
The path consists basically of the class name as well as one or more key properties. For services, the key property is Name and is the English-language name of the service. If you want to work directly with a particular service through WMI, specify its path and do a type conversion. Use either the [wmi] type accelerator or the underlying [System.Management.ManagementObject] .NET type:
$disk = [wmi]'Win32_LogicalDisk="C:"'
$disk.FreeSpace
Status :
Availability :
DeviceID C: :
StatusInfo :
Access 0 :
BlockSize :
Caption C: :
Compressed False :
ConfigManagerErrorCode :
ConfigManagerUserConfig :
CreationClassName :
10181373952
[int]($disk.FreeSpace / 1MB)
9710
$disk | Format-List [a-z]*
Win32_LogicalDisk
In fact, you don’t necessarily need to specify the name of the key property as long as you at least specify its value. This way, you’ll �nd all the properties of a speci�c WMI instance right away.
53
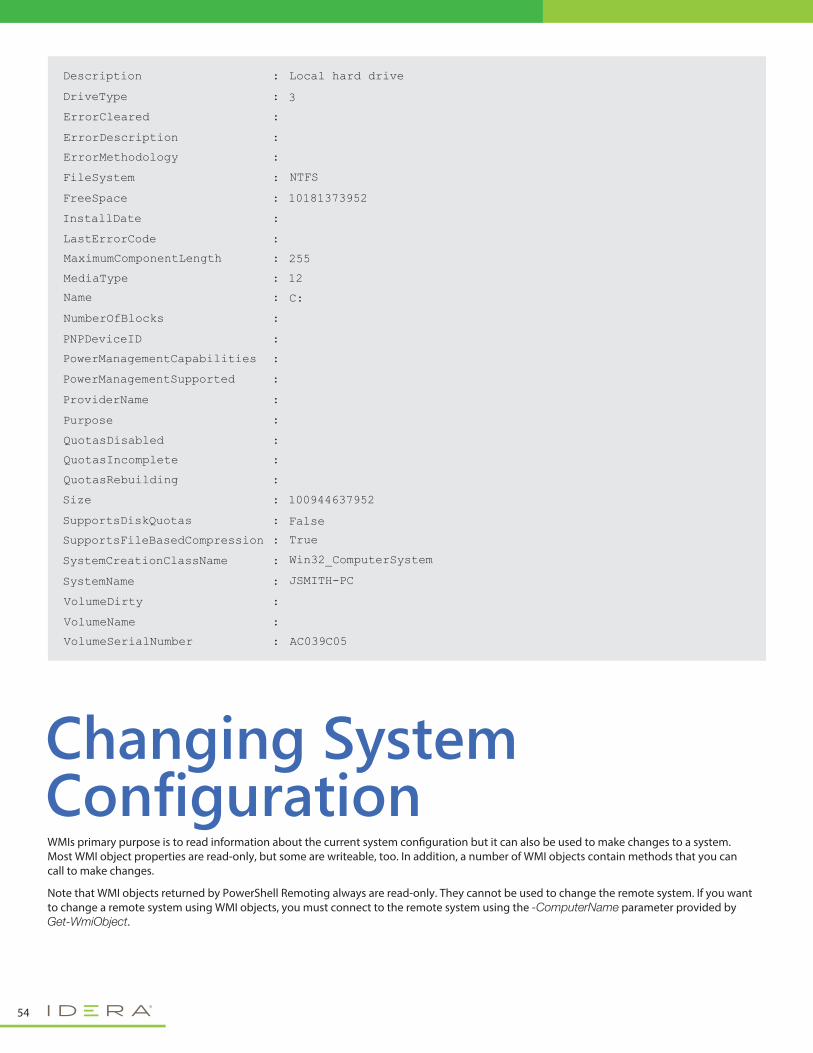
WMIs primary purpose is to read information about the current system con�guration but it can also be used to make changes to a system. Most WMI object properties are read-only, but some are writeable, too. In addition, a number of WMI objects contain methods that you can call to make changes.
Note that WMI objects returned by PowerShell Remoting always are read-only. They cannot be used to change the remote system. If you want to change a remote system using WMI objects, you must connect to the remote system using the -ComputerName parameter provided by Get-WmiObject.
Changing SystemConfiguration
Description :
DriveType :
ErrorCleared :
ErrorDescription :
ErrorMethodology
NTFS
:
FileSystem :
FreeSpace 10181373952 :
InstallDate :
LastErrorCode :
MaximumComponentLength :
MediaType : 12
255
Name :
NumberOfBlocks
C:
:
PNPDeviceID :
PowerManagementCapabilities :
PowerManagementSupported :
ProviderName :
Purpose :
QuotasDisabled :
QuotasIncomplete :
QuotasRebuilding :
Size :
SupportsDiskQuotas :
SupportsFileBasedCompression :
SystemCreationClassName :
SystemName :
VolumeDirty :
VolumeName :
VolumeSerialNumber : AC039C05
Local hard drive
3
100944637952
False
True
Win32_ComputerSystem
JSMITH-PC
54
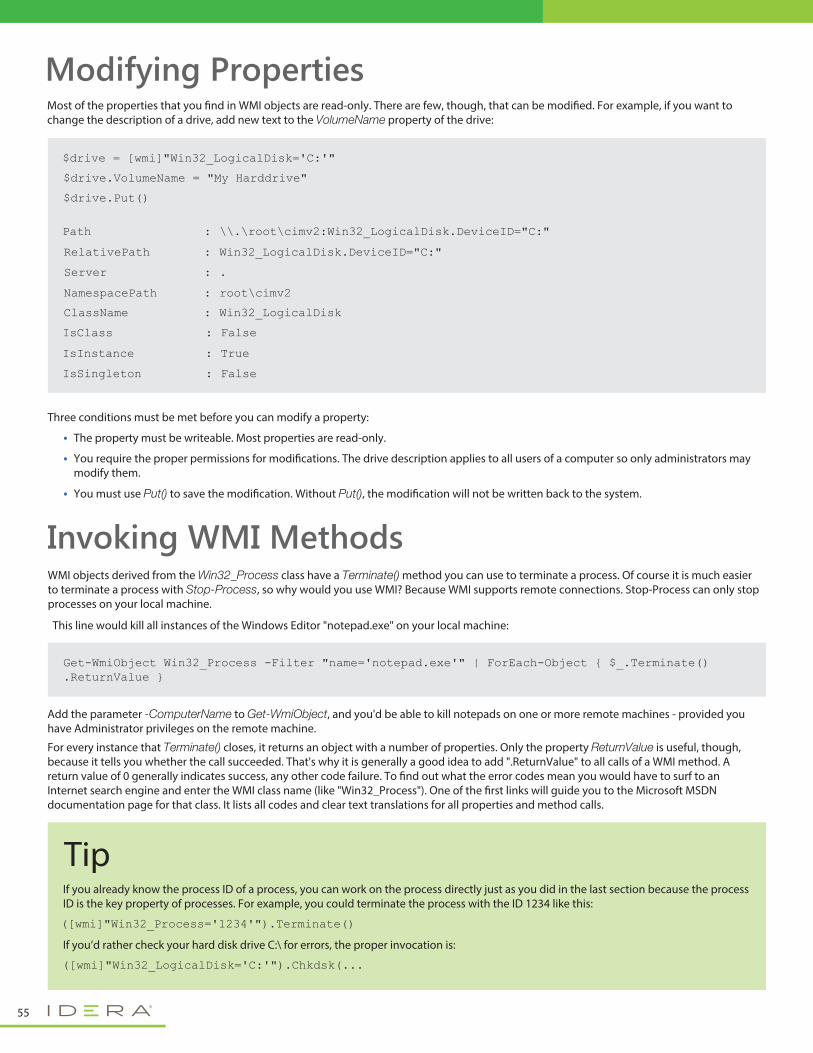
Most of the properties that you �nd in WMI objects are read-only. There are few, though, that can be modi�ed. For example, if you want to change the description of a drive, add new text to the VolumeName property of the drive:
Modifying Properties
WMI objects derived from the Win32_Process class have a Terminate() method you can use to terminate a process. Of course it is much easier to terminate a process with Stop-Process, so why would you use WMI? Because WMI supports remote connections. Stop-Process can only stop processes on your local machine.
Add the parameter -ComputerName to Get-WmiObject, and you'd be able to kill notepads on one or more remote machines - provided you have Administrator privileges on the remote machine.
For every instance that Terminate() closes, it returns an object with a number of properties. Only the property ReturnValue is useful, though, because it tells you whether the call succeeded. That's why it is generally a good idea to add ".ReturnValue" to all calls of a WMI method. A return value of 0 generally indicates success, any other code failure. To �nd out what the error codes mean you would have to surf to an Internet search engine and enter the WMI class name (like "Win32_Process"). One of the �rst links will guide you to the Microsoft MSDN documentation page for that class. It lists all codes and clear text translations for all properties and method calls.
This line would kill all instances of the Windows Editor "notepad.exe" on your local machine:
Invoking WMI Methods
Get-WmiObject Win32_Process -Filter "name='notepad.exe'" | ForEach-Object { $_.Terminate().ReturnValue }
$drive = [wmi]"Win32_LogicalDisk='C:'"
$drive.VolumeName = "My Harddrive"
Path \\.\root\cimv2:Win32_LogicalDisk.DeviceID="C:" :
RelativePath Win32_LogicalDisk.DeviceID="C:" :
Server . :
IsClass False :
IsInstance True :
IsSingleton False :
NamespacePath root\cimv2 :
ClassName Win32_LogicalDisk :
$drive.Put()
TipIf you already know the process ID of a process, you can work on the process directly just as you did in the last section because the process ID is the key property of processes. For example, you could terminate the process with the ID 1234 like this:
If you’d rather check your hard disk drive C:\ for errors, the proper invocation is:
([wmi]"Win32_Process='1234'").Terminate()
([wmi]"Win32_LogicalDisk='C:'").Chkdsk(...
55
Three conditions must be met before you can modify a property:
The property must be writeable. Most properties are read-only.
You require the proper permissions for modi�cations. The drive description applies to all users of a computer so only administrators may modify them.
You must use Put() to save the modi�cation. Without Put(), the modi�cation will not be written back to the system.
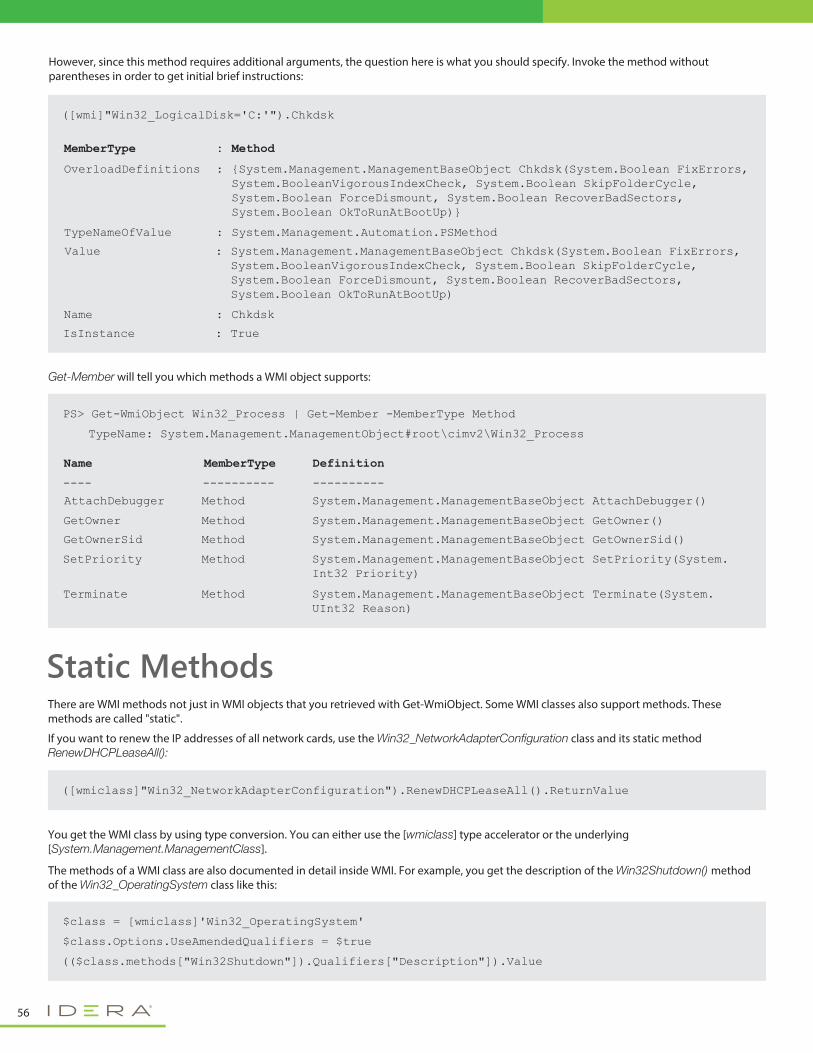
However, since this method requires additional arguments, the question here is what you should specify. Invoke the method without parentheses in order to get initial brief instructions:
Get-Member will tell you which methods a WMI object supports:
There are WMI methods not just in WMI objects that you retrieved with Get-WmiObject. Some WMI classes also support methods. These methods are called "static".
If you want to renew the IP addresses of all network cards, use the Win32_NetworkAdapterConfiguration class and its static method RenewDHCPLeaseAll():
Static Methods
([wmiclass]"Win32_NetworkAdapterConfiguration").RenewDHCPLeaseAll().ReturnValue
You get the WMI class by using type conversion. You can either use the [wmiclass] type accelerator or the underlying [System.Management.ManagementClass].
The methods of a WMI class are also documented in detail inside WMI. For example, you get the description of the Win32Shutdown() method of the Win32_OperatingSystem class like this:
$class = [wmiclass]'Win32_OperatingSystem'
$class.Options.UseAmendedQualifiers = $true
(($class.methods["Win32Shutdown"]).Qualifiers["Description"]).Value
PS> Get-WmiObject Win32_Process | Get-Member -MemberType Method
Name
---- ---------- ----------
MemberType Definition
AttachDebugger Method System.Management.ManagementBaseObject AttachDebugger()
GetOwner Method System.Management.ManagementBaseObject GetOwner()
GetOwnerSid Method System.Management.ManagementBaseObject GetOwnerSid()
SetPriority Method System.Management.ManagementBaseObject SetPriority(System.Int32 Priority)
Terminate Method System.Management.ManagementBaseObject Terminate(System.UInt32 Reason)
TypeName: System.Management.ManagementObject#root\cimv2\Win32_Process
([wmi]"Win32_LogicalDisk='C:'").Chkdsk
MemberType Method :
OverloadDefinitions {System.Management.ManagementBaseObject Chkdsk(System.Boolean FixErrors, System.BooleanVigorousIndexCheck, System.Boolean SkipFolderCycle, System.Boolean ForceDismount, System.Boolean RecoverBadSectors, System.Boolean OkToRunAtBootUp)}
:
TypeNameOfValue System.Management.Automation.PSMethod :
Value System.Management.ManagementBaseObject Chkdsk(System.Boolean FixErrors, System.BooleanVigorousIndexCheck, System.Boolean SkipFolderCycle, System.Boolean ForceDismount, System.Boolean RecoverBadSectors, System.Boolean OkToRunAtBootUp)
:
Name Chkdsk :
IsInstance True :
56
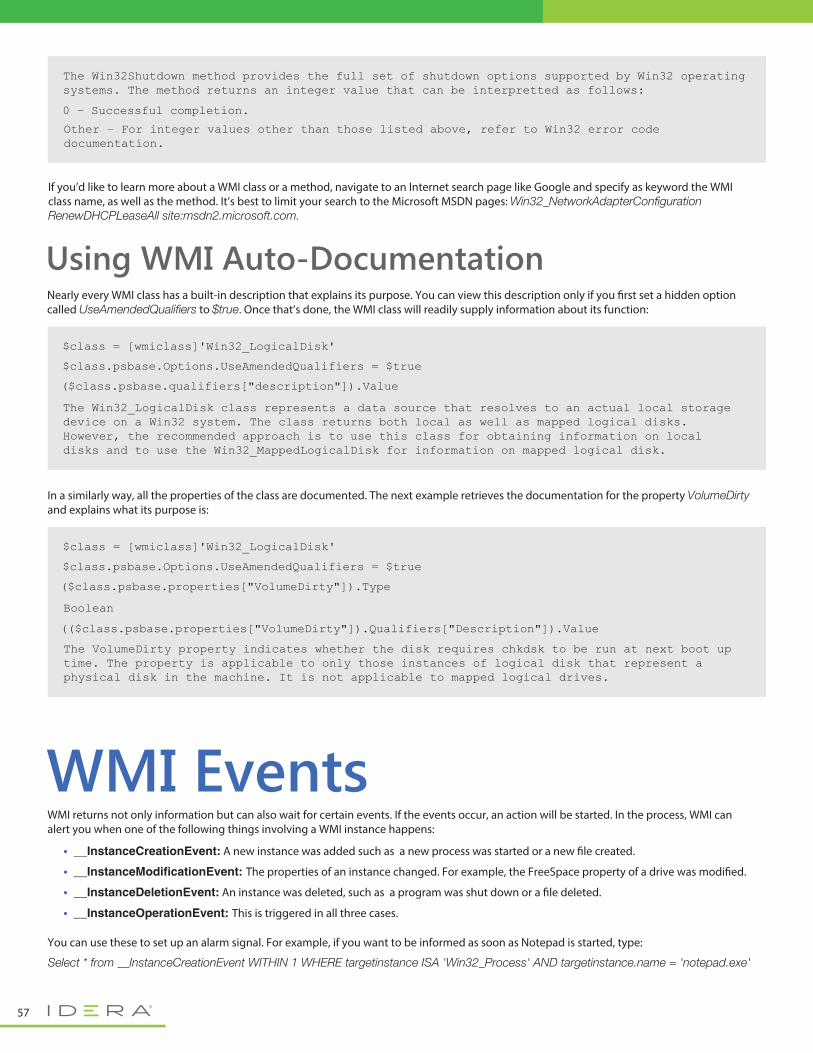
If you’d like to learn more about a WMI class or a method, navigate to an Internet search page like Google and specify as keyword the WMI class name, as well as the method. It’s best to limit your search to the Microsoft MSDN pages: Win32_NetworkAdapterConfiguration RenewDHCPLeaseAll site:msdn2.microsoft.com.
Nearly every WMI class has a built-in description that explains its purpose. You can view this description only if you �rst set a hidden option called UseAmendedQualifiers to $true. Once that’s done, the WMI class will readily supply information about its function:
Using WMI Auto-Documentation
$class = [wmiclass]'Win32_LogicalDisk'
$class.psbase.Options.UseAmendedQualifiers = $true
($class.psbase.qualifiers["description"]).Value
The Win32_LogicalDisk class represents a data source that resolves to an actual local storage device on a Win32 system. The class returns both local as well as mapped logical disks. However, the recommended approach is to use this class for obtaining information on local disks and to use the Win32_MappedLogicalDisk for information on mapped logical disk.
In a similarly way, all the properties of the class are documented. The next example retrieves the documentation for the property VolumeDirty and explains what its purpose is:
WMI returns not only information but can also wait for certain events. If the events occur, an action will be started. In the process, WMI can alert you when one of the following things involving a WMI instance happens:
You can use these to set up an alarm signal. For example, if you want to be informed as soon as Notepad is started, type:
Select * from __InstanceCreationEvent WITHIN 1 WHERE targetinstance ISA 'Win32_Process' AND targetinstance.name = 'notepad.exe'
$class = [wmiclass]'Win32_LogicalDisk'
$class.psbase.Options.UseAmendedQualifiers = $true
($class.psbase.properties["VolumeDirty"]).Type
Boolean
(($class.psbase.properties["VolumeDirty"]).Qualifiers["Description"]).Value
The VolumeDirty property indicates whether the disk requires chkdsk to be run at next boot up time. The property is applicable to only those instances of logical disk that represent a physical disk in the machine. It is not applicable to mapped logical drives.
The Win32Shutdown method provides the full set of shutdown options supported by Win32 operating systems. The method returns an integer value that can be interpretted as follows:
0 – Successful completion.
Other – For integer values other than those listed above, refer to Win32 error code documentation.
WMI Events
57
__InstanceCreationEvent: A new instance was added such as a new process was started or a new �le created.
__InstanceModificationEvent: The properties of an instance changed. For example, the FreeSpace property of a drive was modi�ed.
__InstanceDeletionEvent: An instance was deleted, such as a program was shut down or a �le deleted.
__InstanceOperationEvent: This is triggered in all three cases.
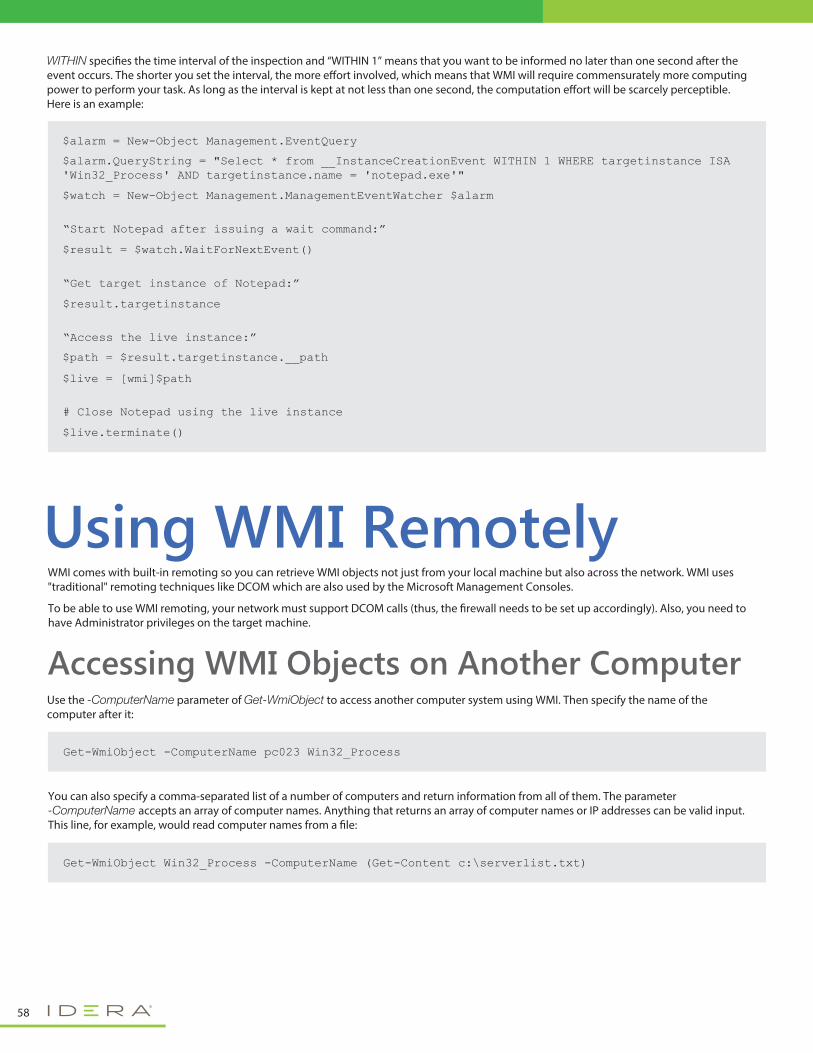
Accessing WMI Objects on Another ComputerUse the -ComputerName parameter of Get-WmiObject to access another computer system using WMI. Then specify the name of the computer after it:
Get-WmiObject -ComputerName pc023 Win32_Process
You can also specify a comma-separated list of a number of computers and return information from all of them. The parameter -ComputerName accepts an array of computer names. Anything that returns an array of computer names or IP addresses can be valid input. This line, for example, would read computer names from a �le:
Get-WmiObject Win32_Process -ComputerName (Get-Content c:\serverlist.txt)
WITHIN speci�es the time interval of the inspection and “WITHIN 1” means that you want to be informed no later than one second after the event occurs. The shorter you set the interval, the more e�ort involved, which means that WMI will require commensurately more computing power to perform your task. As long as the interval is kept at not less than one second, the computation e�ort will be scarcely perceptible. Here is an example:
WMI comes with built-in remoting so you can retrieve WMI objects not just from your local machine but also across the network. WMI uses "traditional" remoting techniques like DCOM which are also used by the Microsoft Management Consoles.
To be able to use WMI remoting, your network must support DCOM calls (thus, the �rewall needs to be set up accordingly). Also, you need to have Administrator privileges on the target machine.
$alarm = New-Object Management.EventQuery
$alarm.QueryString = "Select * from __InstanceCreationEvent WITHIN 1 WHERE targetinstance ISA 'Win32_Process' AND targetinstance.name = 'notepad.exe'"
$watch = New-Object Management.ManagementEventWatcher $alarm
“Access the live instance:”
$path = $result.targetinstance.__path
$live = [wmi]$path
“Start Notepad after issuing a wait command:”
$result = $watch.WaitForNextEvent()
“Get target instance of Notepad:”
$result.targetinstance
# Close Notepad using the live instance
$live.terminate()
Using WMI Remotely
58
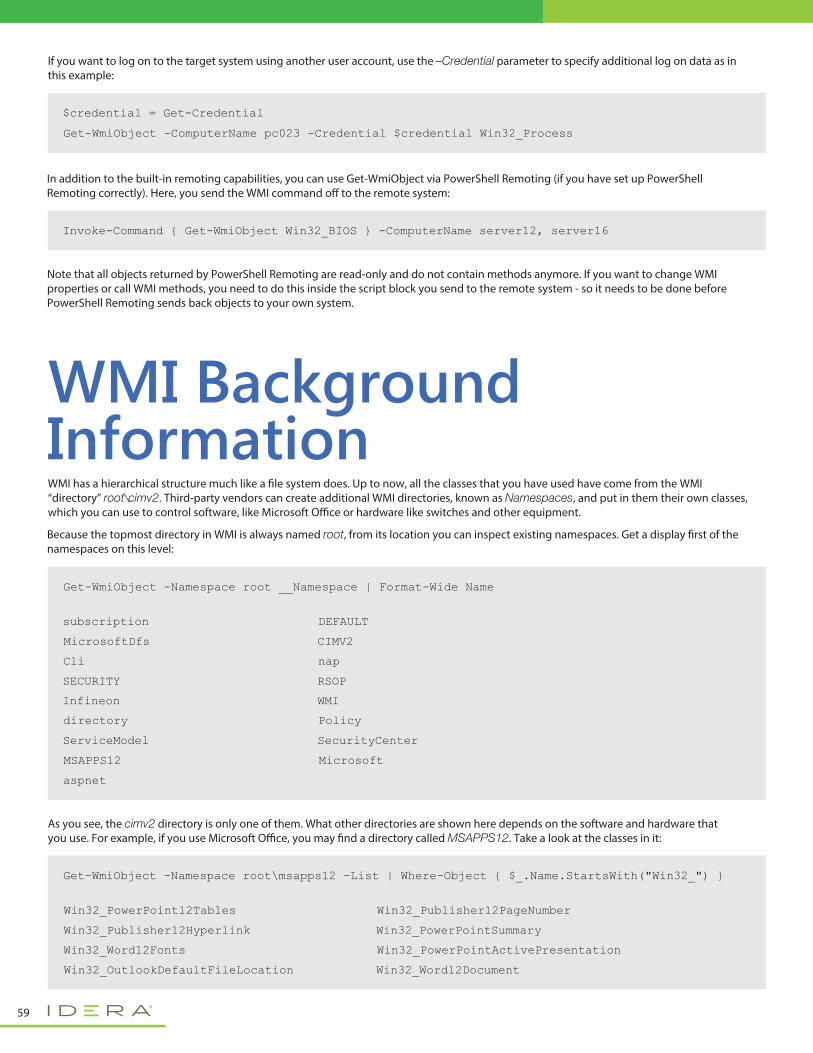
Get-WmiObject -Namespace root __Namespace | Format-Wide Name
subscription DEFAULT
MicrosoftDfs CIMV2
Cli nap
SECURITY RSOP
Infineon WMI
directory Policy
ServiceModel SecurityCenter
MSAPPS12 Microsoft
aspnet
Get-WmiObject -Namespace root\msapps12 -List | Where-Object { $_.Name.StartsWith("Win32_") }
Win32_PowerPoint12Tables Win32_Publisher12PageNumber
Win32_Publisher12Hyperlink Win32_PowerPointSummary
Win32_Word12Fonts Win32_PowerPointActivePresentation
Win32_OutlookDefaultFileLocation Win32_Word12Document
If you want to log on to the target system using another user account, use the –Credential parameter to specify additional log on data as in this example:
$credential = Get-Credential
Get-WmiObject -ComputerName pc023 -Credential $credential Win32_Process
In addition to the built-in remoting capabilities, you can use Get-WmiObject via PowerShell Remoting (if you have set up PowerShell Remoting correctly). Here, you send the WMI command o� to the remote system:
Note that all objects returned by PowerShell Remoting are read-only and do not contain methods anymore. If you want to change WMI properties or call WMI methods, you need to do this inside the script block you send to the remote system - so it needs to be done before PowerShell Remoting sends back objects to your own system.
WMI has a hierarchical structure much like a �le system does. Up to now, all the classes that you have used have come from the WMI “directory” root\cimv2. Third-party vendors can create additional WMI directories, known as Namespaces, and put in them their own classes, which you can use to control software, like Microsoft O�ce or hardware like switches and other equipment.
Because the topmost directory in WMI is always named root, from its location you can inspect existing namespaces. Get a display �rst of the namespaces on this level:
As you see, the cimv2 directory is only one of them. What other directories are shown here depends on the software and hardware that you use. For example, if you use Microsoft O�ce, you may �nd a directory called MSAPPS12. Take a look at the classes in it:
Invoke-Command { Get-WmiObject Win32_BIOS } -ComputerName server12, server16
WMI Background Information
59
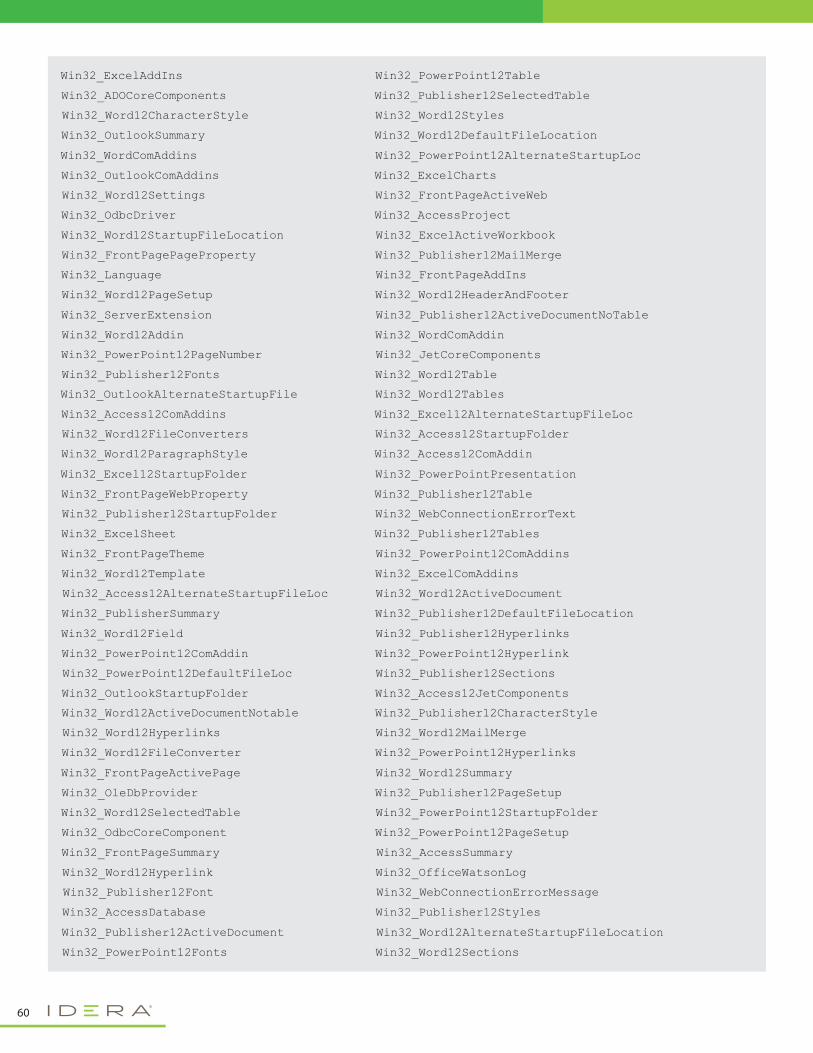
Win32_ExcelAddIns Win32_PowerPoint12Table
Win32_ADOCoreComponents Win32_Publisher12SelectedTable
Win32_Word12CharacterStyle Win32_Word12Styles
Win32_OutlookSummary Win32_Word12DefaultFileLocation
Win32_WordComAddins Win32_PowerPoint12AlternateStartupLoc
Win32_OutlookComAddins Win32_ExcelCharts
Win32_Word12Settings Win32_FrontPageActiveWeb
Win32_OdbcDriver Win32_AccessProject
Win32_Word12StartupFileLocation Win32_ExcelActiveWorkbook
Win32_FrontPagePageProperty Win32_Publisher12MailMerge
Win32_Language Win32_FrontPageAddIns
Win32_Word12PageSetup Win32_Word12HeaderAndFooter
Win32_ServerExtension Win32_Publisher12ActiveDocumentNoTable
Win32_Word12Addin Win32_WordComAddin
Win32_PowerPoint12PageNumber Win32_JetCoreComponents
Win32_Publisher12Fonts Win32_Word12Table
Win32_OutlookAlternateStartupFile Win32_Word12Tables
Win32_Access12ComAddins Win32_Excel12AlternateStartupFileLoc
Win32_Word12FileConverters Win32_Access12StartupFolder
Win32_Word12ParagraphStyle Win32_Access12ComAddin
Win32_Excel12StartupFolder Win32_PowerPointPresentation
Win32_FrontPageWebProperty Win32_Publisher12Table
Win32_Publisher12StartupFolder Win32_WebConnectionErrorText
Win32_ExcelSheet Win32_Publisher12Tables
Win32_FrontPageTheme Win32_PowerPoint12ComAddins
Win32_Word12Template Win32_ExcelComAddins
Win32_Access12AlternateStartupFileLoc Win32_Word12ActiveDocument
Win32_PublisherSummary Win32_Publisher12DefaultFileLocation
Win32_Word12Field Win32_Publisher12Hyperlinks
Win32_PowerPoint12ComAddin Win32_PowerPoint12Hyperlink
Win32_PowerPoint12DefaultFileLoc Win32_Publisher12Sections
Win32_OutlookStartupFolder Win32_Access12JetComponents
Win32_Word12ActiveDocumentNotable Win32_Publisher12CharacterStyle
Win32_Word12Hyperlinks Win32_Word12MailMerge
Win32_Word12FileConverter Win32_PowerPoint12Hyperlinks
Win32_FrontPageActivePage Win32_Word12Summary
Win32_OleDbProvider Win32_Publisher12PageSetup
Win32_Word12SelectedTable Win32_PowerPoint12StartupFolder
Win32_OdbcCoreComponent Win32_PowerPoint12PageSetup
Win32_FrontPageSummary Win32_AccessSummary
Win32_Word12Hyperlink Win32_OfficeWatsonLog
Win32_Publisher12Font Win32_WebConnectionErrorMessage
Win32_AccessDatabase Win32_Publisher12Styles
Win32_Publisher12ActiveDocument Win32_Word12AlternateStartupFileLocation
Win32_PowerPoint12Fonts Win32_Word12Sections
60
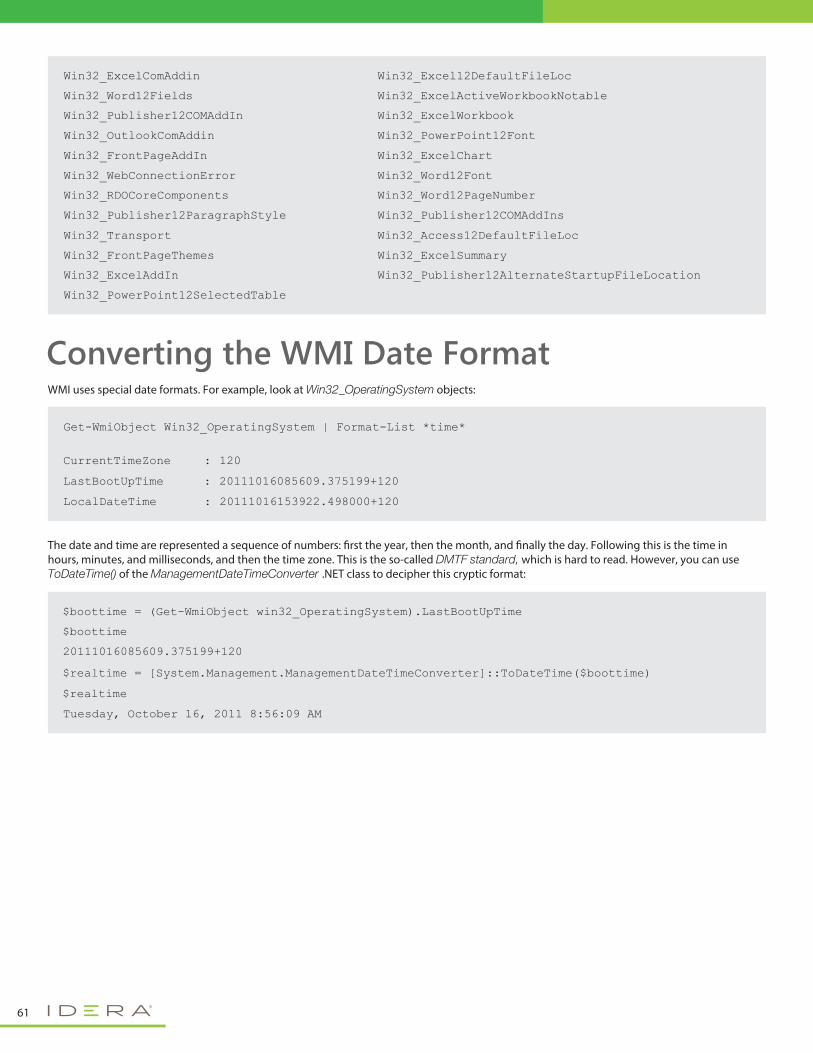
Win32_ExcelComAddin Win32_Excel12DefaultFileLoc
Win32_Word12Fields Win32_ExcelActiveWorkbookNotable
Win32_Publisher12COMAddIn Win32_ExcelWorkbook
Win32_OutlookComAddin Win32_PowerPoint12Font
Win32_FrontPageAddIn Win32_ExcelChart
Win32_WebConnectionError Win32_Word12Font
Win32_RDOCoreComponents Win32_Word12PageNumber
Win32_Publisher12ParagraphStyle Win32_Publisher12COMAddIns
Win32_Transport Win32_Access12DefaultFileLoc
Win32_FrontPageThemes Win32_ExcelSummary
Win32_ExcelAddIn Win32_Publisher12AlternateStartupFileLocation
Win32_PowerPoint12SelectedTable
$boottime = (Get-WmiObject win32_OperatingSystem).LastBootUpTime
$boottime
20111016085609.375199+120
$realtime = [System.Management.ManagementDateTimeConverter]::ToDateTime($boottime)
$realtime
Tuesday, October 16, 2011 8:56:09 AM
Get-WmiObject Win32_OperatingSystem | Format-List *time*
CurrentTimeZone 120 :
LastBootUpTime 20111016085609.375199+120 :
LocalDateTime 20111016153922.498000+120 :
WMI uses special date formats. For example, look at Win32_OperatingSystem objects:
The date and time are represented a sequence of numbers: �rst the year, then the month, and �nally the day. Following this is the time in hours, minutes, and milliseconds, and then the time zone. This is the so-called DMTF standard, which is hard to read. However, you can use ToDateTime() of the ManagementDateTimeConverter .NET class to decipher this cryptic format:
Converting the WMI Date Format
61
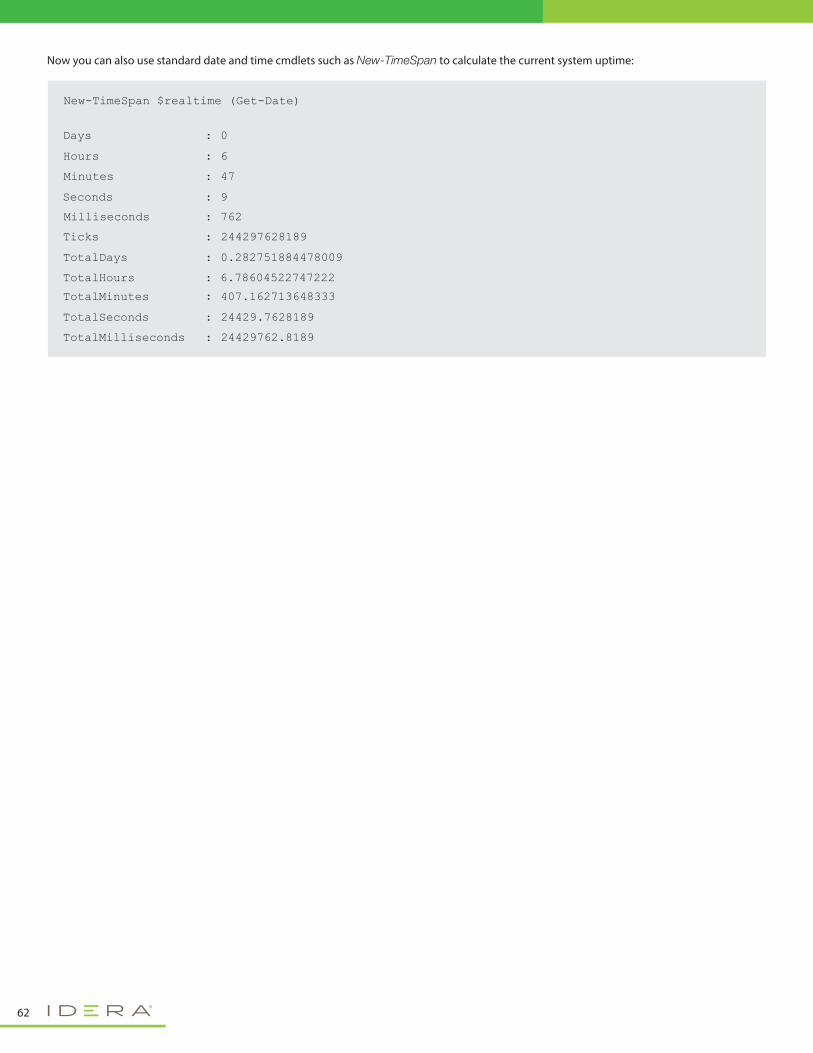
New-TimeSpan $realtime (Get-Date)
Days 0 :
Hours 6 :
Minutes 47 :
Ticks 244297628189 :
TotalDays 0.282751884478009 :
TotalHours 6.78604522747222 :
TotalMinutes 407.162713648333 :
TotalSeconds 24429.7628189 :
TotalMilliseconds 24429762.8189 :
Seconds 9 :
Milliseconds 762 :
Now you can also use standard date and time cmdlets such as New-TimeSpan to calculate the current system uptime:
62

63
User administration in the Active Directory was a dark spot in PowerShell Version 1. Microsoft did not ship any cmdlets to manage AD user accounts or other aspects in Active Directory. That's why the 3rd party vendor Quest stepped in and published a free PowerShell Snap-In with many useful AD cmdlets. Over the years, this extension has grown to become a de-facto standard, and many
User Management
Topics Covered:Connecting to a Domain·
Accessing a Container
Accessing Individual Users or Groups
Reading and Modifying Properties
·
·
·
Invoking Methods·
Creating New Objects·
Chapter 19.

64
PowerShell scripts use Quest AD cmdlets. You can freely download this extension from the Quest website.Beginning with PowerShell Version 2.0, Microsoft finally shipped their own AD management cmdlets. They are included with Server 2008 R2 and also available for download as "RSAT tools (remote server administration toolkit). The AD cmdlets are part of a module called "ActiveDirectory". This module is installed by default when you enable the Domain Controller role on a server. On a member server or client with installed RSAT tools, you have to go to control panel and enable that feature first.
This chapter is not talking about either one of these extensions. It is introducing you to the build-in low level support for ADSI methods. They are the beef that makes these two extensions work and can be called directly, as well.
Don't get me wrong: if you work a lot with the AD, it is much easier for you to get one of the mentioned AD extensions and use cmdlets for your tasks. If you (or your scripts) just need to get a user, change some attributes or determine group membership details, it can be easier to use the direct .NET framework methods shown in this chapter. They do not introduce dependencies: your script runs without the need to either install the Quest toolkit or the RSAT tools.
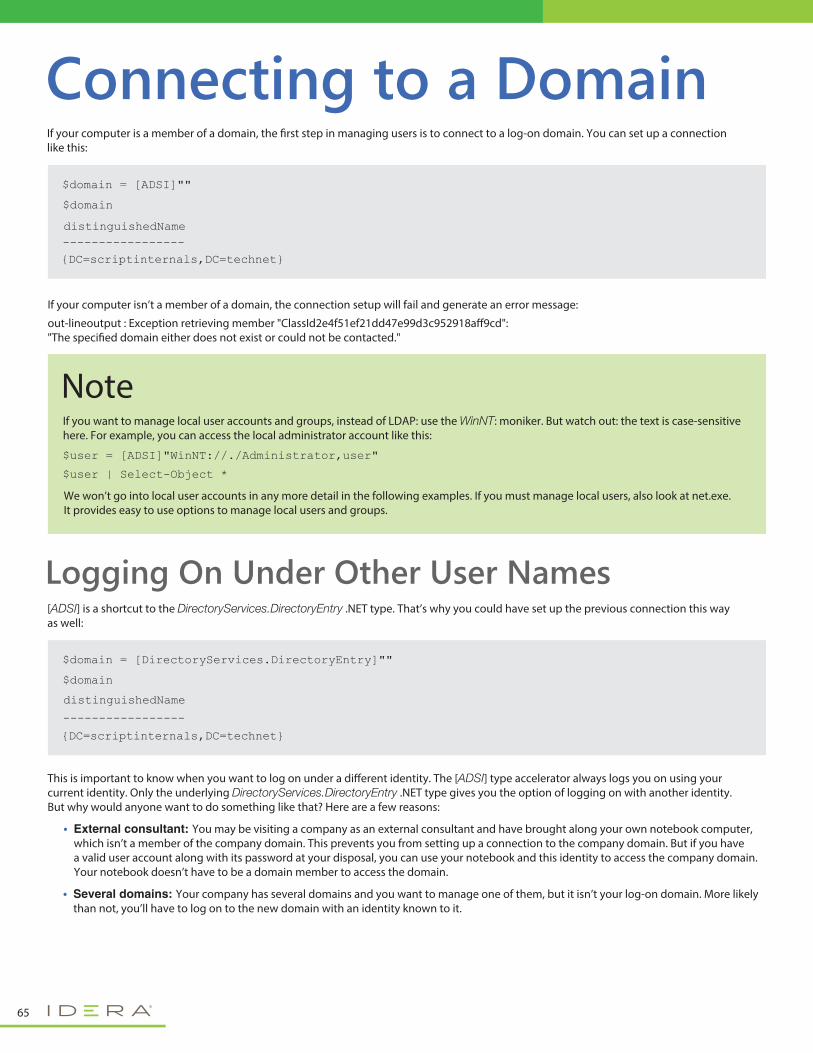
Connecting to a Domain$domain = [ADSI]""
$domain
distinguishedName-----------------{DC=scriptinternals,DC=technet}
If your computer is a member of a domain, the �rst step in managing users is to connect to a log-on domain. You can set up a connection like this:
If your computer isn’t a member of a domain, the connection setup will fail and generate an error message:
out-lineoutput : Exception retrieving member "ClassId2e4f51ef21dd47e99d3c952918a�9cd": "The speci�ed domain either does not exist or could not be contacted."
$domain = [DirectoryServices.DirectoryEntry]""
$domain
distinguishedName
{DC=scriptinternals,DC=technet}
-----------------
[ADSI] is a shortcut to the DirectoryServices.DirectoryEntry .NET type. That’s why you could have set up the previous connection this way as well:
This is important to know when you want to log on under a di�erent identity. The [ADSI] type accelerator always logs you on using your current identity. Only the underlying DirectoryServices.DirectoryEntry .NET type gives you the option of logging on with another identity. But why would anyone want to do something like that? Here are a few reasons:
Logging On Under Other User Names
NoteIf you want to manage local user accounts and groups, instead of LDAP: use the WinNT: moniker. But watch out: the text is case-sensitive here. For example, you can access the local administrator account like this:
We won’t go into local user accounts in any more detail in the following examples. If you must manage local users, also look at net.exe. It provides easy to use options to manage local users and groups.
$user = [ADSI]"WinNT://./Administrator,user"
$user | Select-Object *
65
External consultant: You may be visiting a company as an external consultant and have brought along your own notebook computer, which isn’t a member of the company domain. This prevents you from setting up a connection to the company domain. But if you have a valid user account along with its password at your disposal, you can use your notebook and this identity to access the company domain. Your notebook doesn’t have to be a domain member to access the domain.
Several domains: Your company has several domains and you want to manage one of them, but it isn’t your log-on domain. More likely than not, you’ll have to log on to the new domain with an identity known to it.
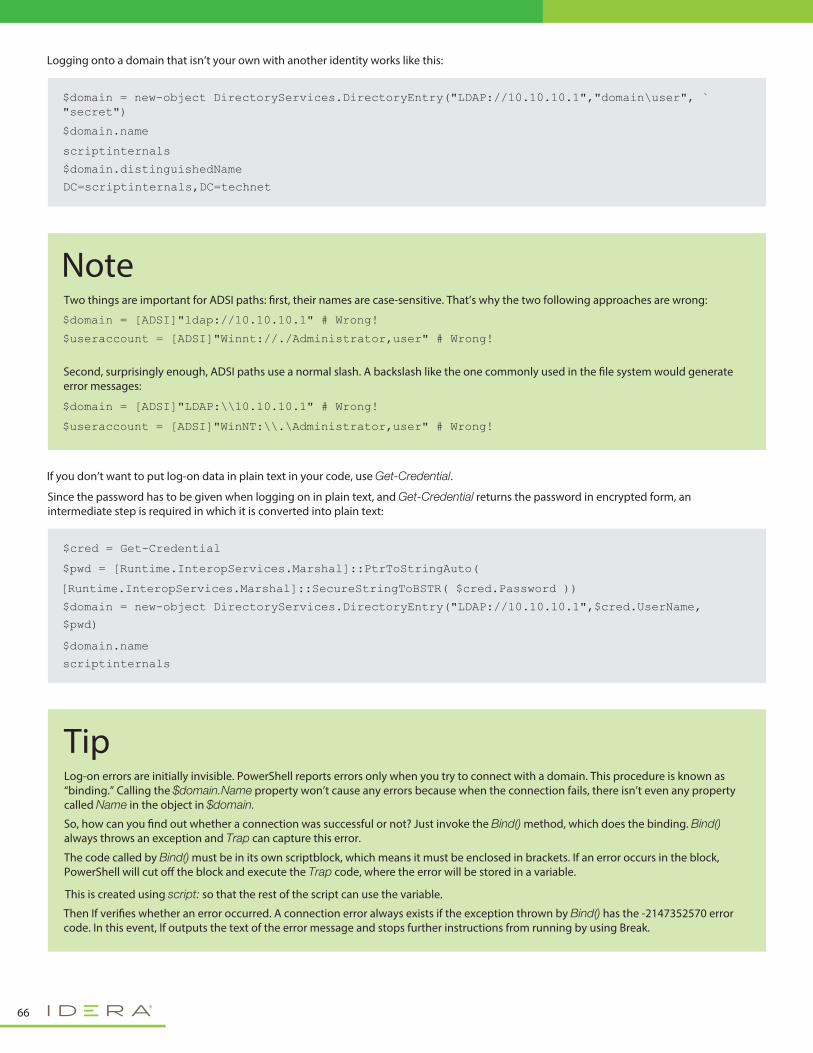
$domain = new-object DirectoryServices.DirectoryEntry("LDAP://10.10.10.1","domain\user", `"secret")
$domain.name
scriptinternals
DC=scriptinternals,DC=technet
$domain.distinguishedName
$cred = Get-Credential
$pwd = [Runtime.InteropServices.Marshal]::PtrToStringAuto(
[Runtime.InteropServices.Marshal]::SecureStringToBSTR( $cred.Password ))
$pwd)
$domain = new-object DirectoryServices.DirectoryEntry("LDAP://10.10.10.1",$cred.UserName,
scriptinternals
$domain.name
NoteTwo things are important for ADSI paths: �rst, their names are case-sensitive. That’s why the two following approaches are wrong:
Second, surprisingly enough, ADSI paths use a normal slash. A backslash like the one commonly used in the �le system would generate error messages:
$domain = [ADSI]"ldap://10.10.10.1" # Wrong!
$useraccount = [ADSI]"Winnt://./Administrator,user" # Wrong!
$domain = [ADSI]"LDAP:\\10.10.10.1" # Wrong!
$useraccount = [ADSI]"WinNT:\\.\Administrator,user" # Wrong!
TipLog-on errors are initially invisible. PowerShell reports errors only when you try to connect with a domain. This procedure is known as “binding.” Calling the $domain.Name property won’t cause any errors because when the connection fails, there isn’t even any property called Name in the object in $domain.
So, how can you �nd out whether a connection was successful or not? Just invoke the Bind() method, which does the binding. Bind() always throws an exception and Trap can capture this error.
The code called by Bind() must be in its own scriptblock, which means it must be enclosed in brackets. If an error occurs in the block, PowerShell will cut o� the block and execute the Trap code, where the error will be stored in a variable.
This is created using script: so that the rest of the script can use the variable.
Then If veri�es whether an error occurred. A connection error always exists if the exception thrown by Bind() has the -2147352570 error code. In this event, If outputs the text of the error message and stops further instructions from running by using Break.
66
Logging onto a domain that isn’t your own with another identity works like this:
If you don’t want to put log-on data in plain text in your code, use Get-Credential.
Since the password has to be given when logging on in plain text, and Get-Credential returns the password in encrypted form, an intermediate step is required in which it is converted into plain text:
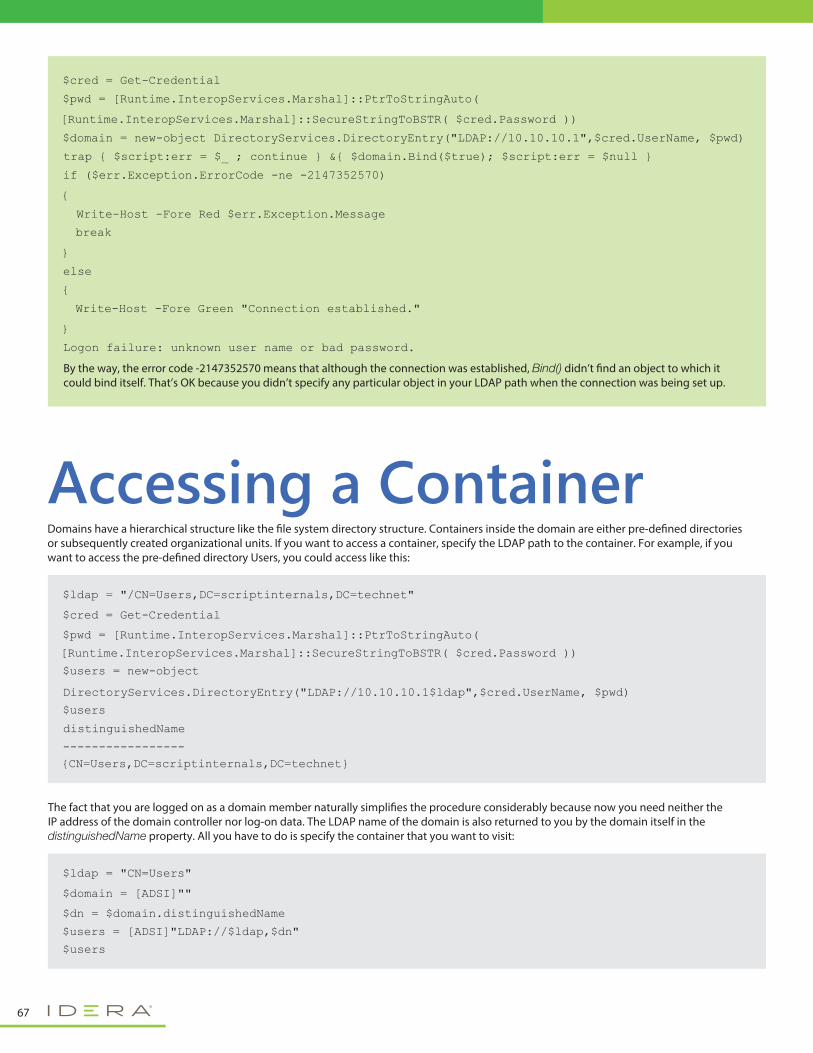
Domains have a hierarchical structure like the �le system directory structure. Containers inside the domain are either pre-de�ned directories or subsequently created organizational units. If you want to access a container, specify the LDAP path to the container. For example, if you want to access the pre-de�ned directory Users, you could access like this:
The fact that you are logged on as a domain member naturally simpli�es the procedure considerably because now you need neither the IP address of the domain controller nor log-on data. The LDAP name of the domain is also returned to you by the domain itself in the distinguishedName property. All you have to do is specify the container that you want to visit:
Accessing a Container
$ldap = "CN=Users"
$domain = [ADSI]""
$dn = $domain.distinguishedName
$users
$users = [ADSI]"LDAP://$ldap,$dn"
$ldap = "/CN=Users,DC=scriptinternals,DC=technet"
$cred = Get-Credential
$pwd = [Runtime.InteropServices.Marshal]::PtrToStringAuto(
$users = new-object
[Runtime.InteropServices.Marshal]::SecureStringToBSTR( $cred.Password ))
$users
distinguishedName
{CN=Users,DC=scriptinternals,DC=technet}-----------------
DirectoryServices.DirectoryEntry("LDAP://10.10.10.1$ldap",$cred.UserName, $pwd)
$cred = Get-Credential
$pwd = [Runtime.InteropServices.Marshal]::PtrToStringAuto(
[Runtime.InteropServices.Marshal]::SecureStringToBSTR( $cred.Password ))
$domain = new-object DirectoryServices.DirectoryEntry("LDAP://10.10.10.1",$cred.UserName, $pwd)
trap { $script:err = $_ ; continue } &{ $domain.Bind($true); $script:err = $null }
if ($err.Exception.ErrorCode -ne -2147352570)
{
Write-Host -Fore Red $err.Exception.Message
break
}
else
{
Write-Host -Fore Green "Connection established."
}
Logon failure: unknown user name or bad password.
By the way, the error code -2147352570 means that although the connection was established, Bind() didn’t �nd an object to which it could bind itself. That’s OK because you didn’t specify any particular object in your LDAP path when the connection was being set up.
67
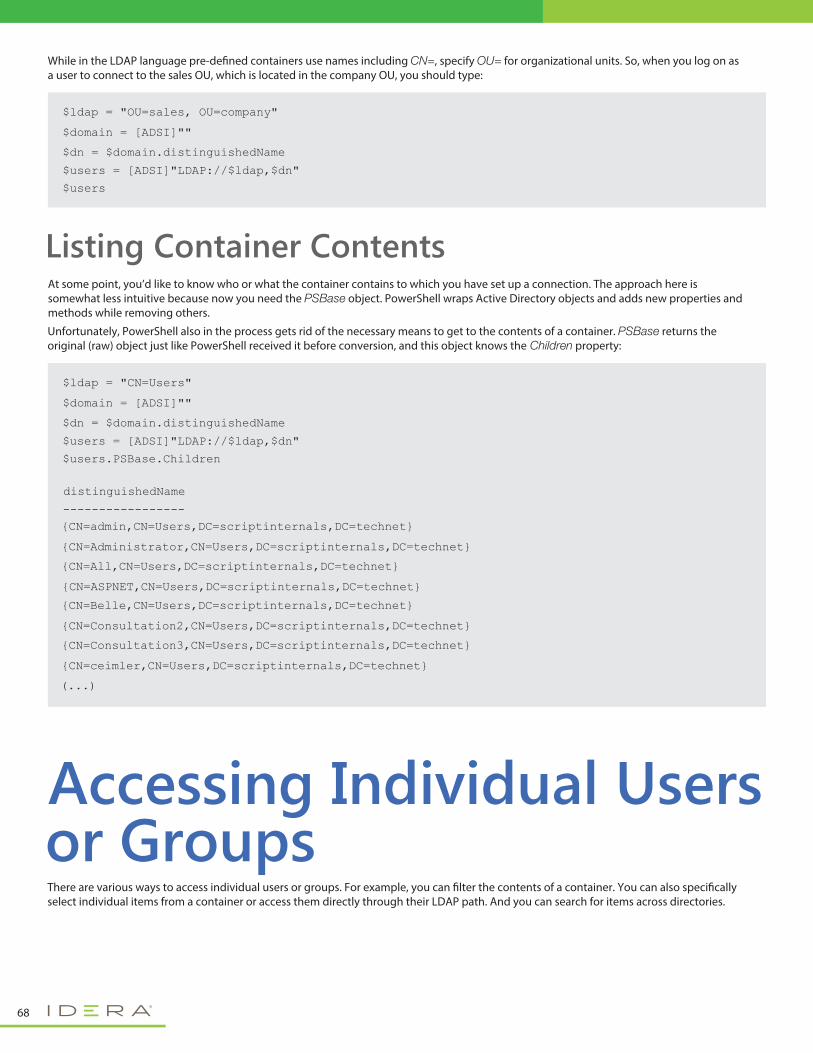
At some point, you’d like to know who or what the container contains to which you have set up a connection. The approach here is somewhat less intuitive because now you need the PSBase object. PowerShell wraps Active Directory objects and adds new properties and methods while removing others.
Unfortunately, PowerShell also in the process gets rid of the necessary means to get to the contents of a container. PSBase returns the original (raw) object just like PowerShell received it before conversion, and this object knows the Children property:
Listing Container Contents
There are various ways to access individual users or groups. For example, you can �lter the contents of a container. You can also speci�cally select individual items from a container or access them directly through their LDAP path. And you can search for items across directories.
Accessing Individual Usersor Groups
While in the LDAP language pre-de�ned containers use names including CN=, specify OU= for organizational units. So, when you log on as a user to connect to the sales OU, which is located in the company OU, you should type:
$ldap = "OU=sales, OU=company"
$domain = [ADSI]""
$dn = $domain.distinguishedName
$users
$users = [ADSI]"LDAP://$ldap,$dn"
$ldap = "CN=Users"
$domain = [ADSI]""
$dn = $domain.distinguishedName
$users.PSBase.Children
$users = [ADSI]"LDAP://$ldap,$dn"
distinguishedName
{CN=admin,CN=Users,DC=scriptinternals,DC=technet}
{CN=Administrator,CN=Users,DC=scriptinternals,DC=technet}
{CN=All,CN=Users,DC=scriptinternals,DC=technet}
{CN=ASPNET,CN=Users,DC=scriptinternals,DC=technet}
{CN=Belle,CN=Users,DC=scriptinternals,DC=technet}
{CN=Consultation2,CN=Users,DC=scriptinternals,DC=technet}
{CN=Consultation3,CN=Users,DC=scriptinternals,DC=technet}
{CN=ceimler,CN=Users,DC=scriptinternals,DC=technet}
(...)
-----------------
68
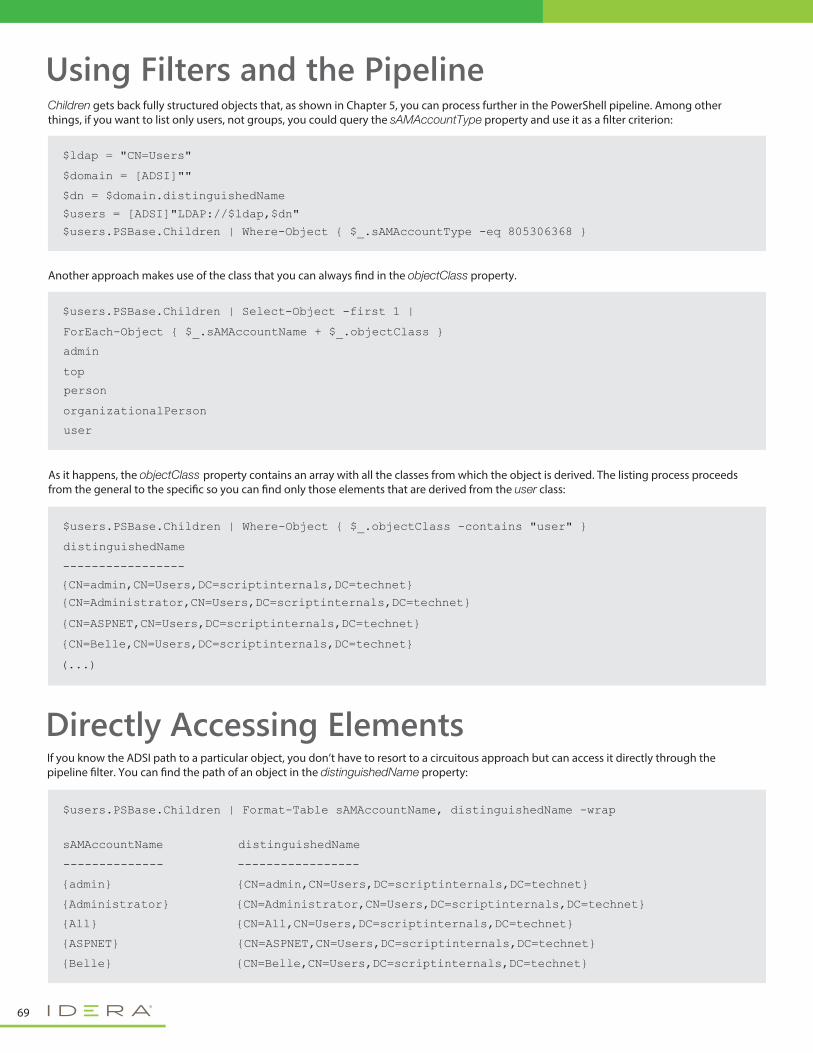
$users.PSBase.Children | Format-Table sAMAccountName, distinguishedName -wrap
sAMAccountName distinguishedName
-------------- -----------------
{admin} {CN=admin,CN=Users,DC=scriptinternals,DC=technet}
{Administrator} {CN=Administrator,CN=Users,DC=scriptinternals,DC=technet}
{All} {CN=All,CN=Users,DC=scriptinternals,DC=technet}
{ASPNET} {CN=ASPNET,CN=Users,DC=scriptinternals,DC=technet}
{Belle} {CN=Belle,CN=Users,DC=scriptinternals,DC=technet}
Children gets back fully structured objects that, as shown in Chapter 5, you can process further in the PowerShell pipeline. Among other things, if you want to list only users, not groups, you could query the sAMAccountType property and use it as a �lter criterion:
Using Filters and the Pipeline
$ldap = "CN=Users"
$domain = [ADSI]""
$dn = $domain.distinguishedName
$users.PSBase.Children | Where-Object { $_.sAMAccountType -eq 805306368 }
$users = [ADSI]"LDAP://$ldap,$dn"
$users.PSBase.Children | Select-Object -first 1 |
ForEach-Object { $_.sAMAccountName + $_.objectClass }
admin
top
person
organizationalPerson
user
If you know the ADSI path to a particular object, you don’t have to resort to a circuitous approach but can access it directly through the pipeline �lter. You can �nd the path of an object in the distinguishedName property:
Directly Accessing Elements
As it happens, the objectClass property contains an array with all the classes from which the object is derived. The listing process proceeds from the general to the speci�c so you can �nd only those elements that are derived from the user class:
$users.PSBase.Children | Where-Object { $_.objectClass -contains "user" }
distinguishedName
-----------------
{CN=Administrator,CN=Users,DC=scriptinternals,DC=technet}
{CN=admin,CN=Users,DC=scriptinternals,DC=technet}
{CN=ASPNET,CN=Users,DC=scriptinternals,DC=technet}
{CN=Belle,CN=Users,DC=scriptinternals,DC=technet}
(...)
69
Another approach makes use of the class that you can always �nd in the objectClass property.
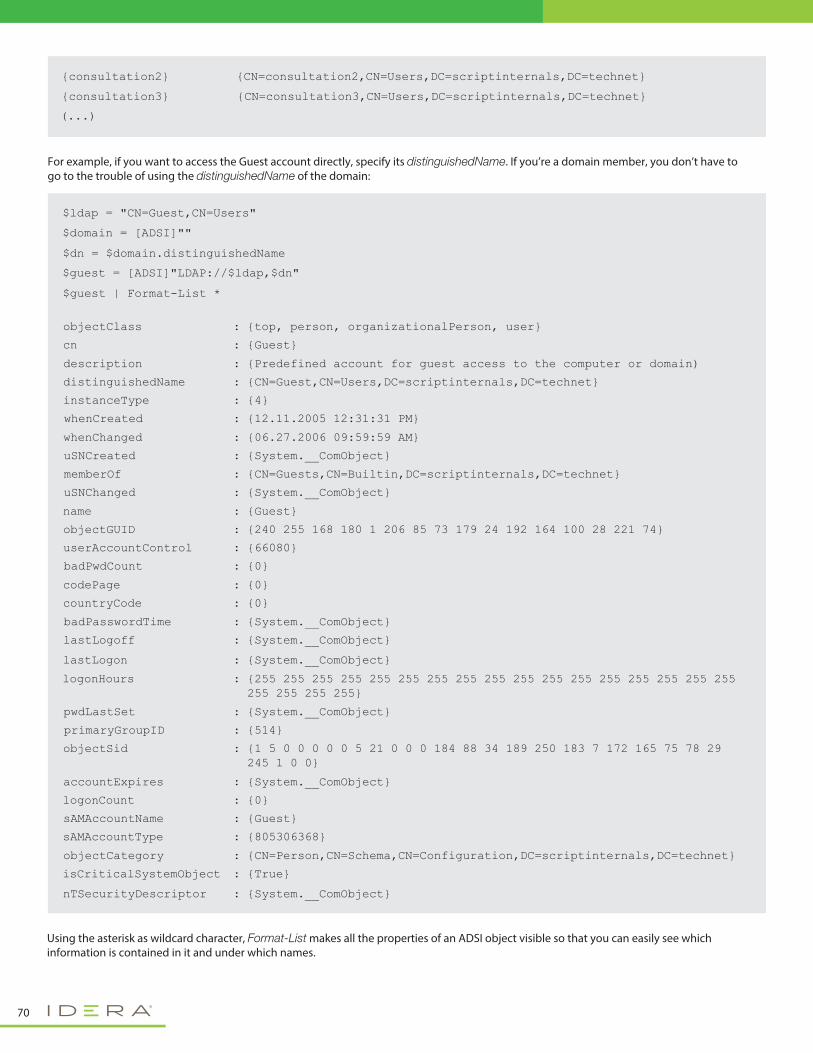
$ldap = "CN=Guest,CN=Users"
$domain = [ADSI]""
$dn = $domain.distinguishedName
$guest = [ADSI]"LDAP://$ldap,$dn"
$guest | Format-List *
objectClass {top, person, organizationalPerson, user}:
cn {Guest}:
description {Predefined account for guest access to the computer or domain):
distinguishedName {CN=Guest,CN=Users,DC=scriptinternals,DC=technet}:
instanceType {4}:
whenCreated {12.11.2005 12:31:31 PM}:
whenChanged {06.27.2006 09:59:59 AM}:
uSNCreated {System.__ComObject}:
memberOf {CN=Guests,CN=Builtin,DC=scriptinternals,DC=technet}:
uSNChanged {System.__ComObject}:
name {Guest}:
objectGUID {240 255 168 180 1 206 85 73 179 24 192 164 100 28 221 74}:
userAccountControl {66080}:
badPwdCount {0}:
codePage {0}:
countryCode {0}:
badPasswordTime {System.__ComObject}:
lastLogoff {System.__ComObject}:
logonHours {255 255 255 255 255 255 255 255 255 255 255 255 255 255 255 255 255 255 255 255 255}
:
pwdLastSet {System.__ComObject}:
primaryGroupID {514}:
objectSid {1 5 0 0 0 0 0 5 21 0 0 0 184 88 34 189 250 183 7 172 165 75 78 29 245 1 0 0}
:
accountExpires {System.__ComObject}:
logonCount {0}:
sAMAccountName {Guest}:
sAMAccountType {805306368}:
objectCategory {CN=Person,CN=Schema,CN=Configuration,DC=scriptinternals,DC=technet}:
isCriticalSystemObject {True}:
lastLogon {System.__ComObject}:
nTSecurityDescriptor {System.__ComObject}:
{consultation2} {CN=consultation2,CN=Users,DC=scriptinternals,DC=technet}
{consultation3} {CN=consultation3,CN=Users,DC=scriptinternals,DC=technet}
(...)
Using the asterisk as wildcard character, Format-List makes all the properties of an ADSI object visible so that you can easily see which information is contained in it and under which names.
For example, if you want to access the Guest account directly, specify its distinguishedName. If you’re a domain member, you don’t have to go to the trouble of using the distinguishedName of the domain:
70
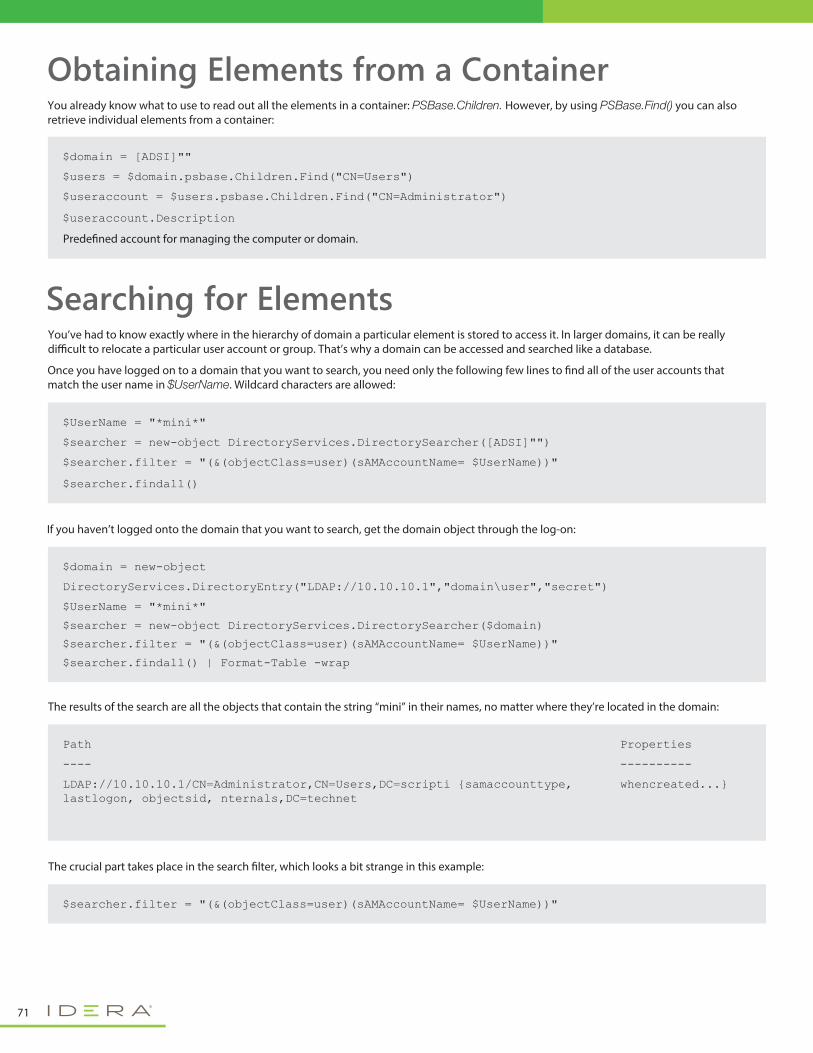
You already know what to use to read out all the elements in a container: PSBase.Children. However, by using PSBase.Find() you can also retrieve individual elements from a container:
$domain = [ADSI]""
$users = $domain.psbase.Children.Find("CN=Users")
$useraccount = $users.psbase.Children.Find("CN=Administrator")
$useraccount.Description
Prede�ned account for managing the computer or domain.
$UserName = "*mini*"
$searcher = new-object DirectoryServices.DirectorySearcher([ADSI]"")
$searcher.filter = "(&(objectClass=user)(sAMAccountName= $UserName))"
$searcher.findall()
Obtaining Elements from a Container
You’ve had to know exactly where in the hierarchy of domain a particular element is stored to access it. In larger domains, it can be really di�cult to relocate a particular user account or group. That’s why a domain can be accessed and searched like a database.
Once you have logged on to a domain that you want to search, you need only the following few lines to �nd all of the user accounts that match the user name in $UserName. Wildcard characters are allowed:
$domain = new-object
DirectoryServices.DirectoryEntry("LDAP://10.10.10.1","domain\user","secret")
$UserName = "*mini*"
$searcher = new-object DirectoryServices.DirectorySearcher($domain)
$searcher.filter = "(&(objectClass=user)(sAMAccountName= $UserName))"
$searcher.findall() | Format-Table -wrap
Path
----
Properties
----------
LDAP://10.10.10.1/CN=Administrator,CN=Users,DC=scripti {samaccounttype, lastlogon, objectsid, nternals,DC=technet
whencreated...}
If you haven’t logged onto the domain that you want to search, get the domain object through the log-on:
The results of the search are all the objects that contain the string “mini” in their names, no matter where they’re located in the domain:
$searcher.filter = "(&(objectClass=user)(sAMAccountName= $UserName))"
The crucial part takes place in the search �lter, which looks a bit strange in this example:
Searching for Elements
71
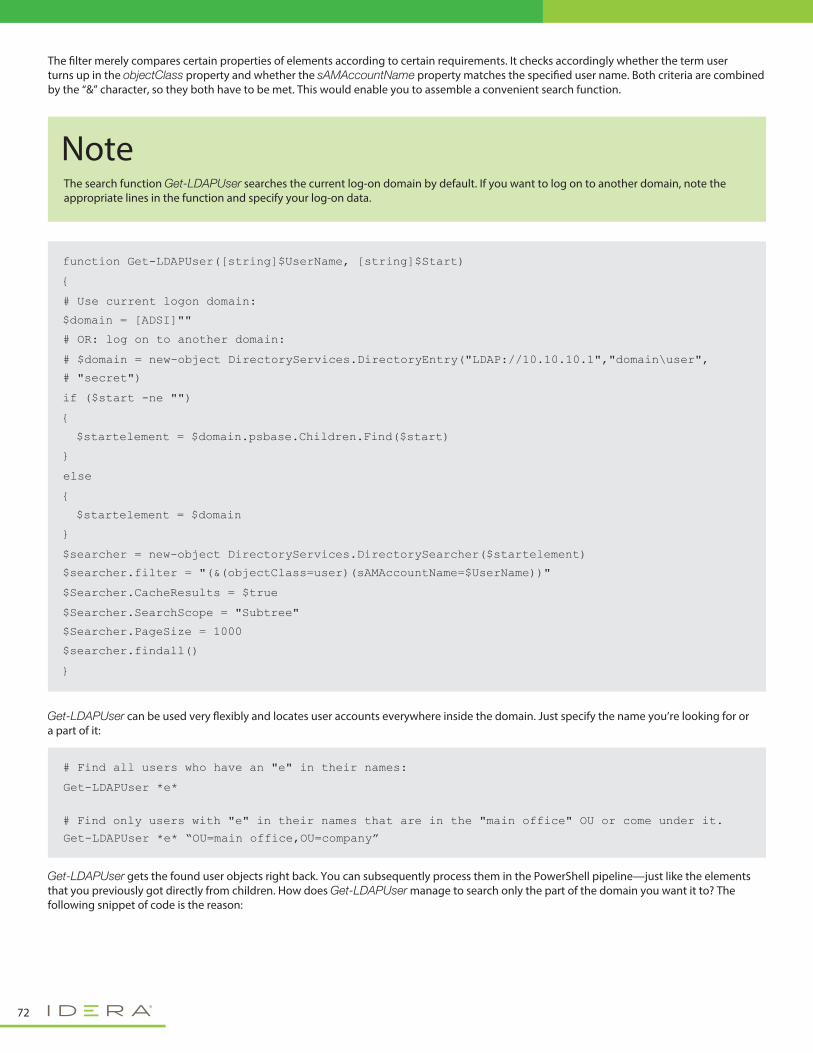
Get-LDAPUser can be used very �exibly and locates user accounts everywhere inside the domain. Just specify the name you’re looking for or a part of it:
Get-LDAPUser gets the found user objects right back. You can subsequently process them in the PowerShell pipeline—just like the elements that you previously got directly from children. How does Get-LDAPUser manage to search only the part of the domain you want it to? The following snippet of code is the reason:
# Find all users who have an "e" in their names:
Get-LDAPUser *e*
# Find only users with "e" in their names that are in the "main office" OU or come under it.
Get-LDAPUser *e* “OU=main office,OU=company”
function Get-LDAPUser([string]$UserName, [string]$Start)
{
# Use current logon domain:
$domain = [ADSI]""
# OR: log on to another domain:
# $domain = new-object DirectoryServices.DirectoryEntry("LDAP://10.10.10.1","domain\user",
# "secret")
if ($start -ne "")
{
$startelement = $domain.psbase.Children.Find($start)
}
else
{
$startelement = $domain
}
$searcher = new-object DirectoryServices.DirectorySearcher($startelement)
$searcher.filter = "(&(objectClass=user)(sAMAccountName=$UserName))"
$Searcher.CacheResults = $true
$Searcher.SearchScope = "Subtree"
$Searcher.PageSize = 1000
$searcher.findall()
}
The �lter merely compares certain properties of elements according to certain requirements. It checks accordingly whether the term user turns up in the objectClass property and whether the sAMAccountName property matches the speci�ed user name. Both criteria are combined by the “&” character, so they both have to be met. This would enable you to assemble a convenient search function.
NoteThe search function Get-LDAPUser searches the current log-on domain by default. If you want to log on to another domain, note the appropriate lines in the function and specify your log-on data.
72
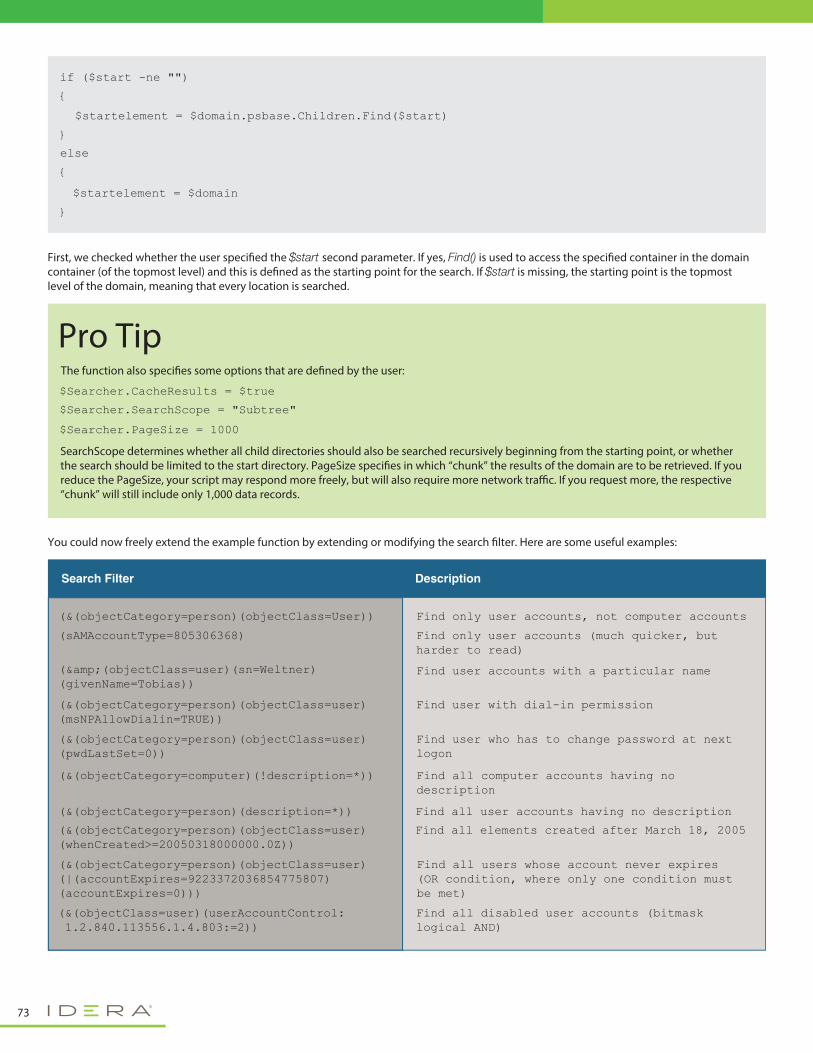
First, we checked whether the user speci�ed the $start second parameter. If yes, Find() is used to access the speci�ed container in the domain container (of the topmost level) and this is de�ned as the starting point for the search. If $start is missing, the starting point is the topmost level of the domain, meaning that every location is searched.
You could now freely extend the example function by extending or modifying the search �lter. Here are some useful examples:
if ($start -ne "")
{
$startelement = $domain.psbase.Children.Find($start)
}
$startelement = $domain
}
else
{
Pro TipThe function also speci�es some options that are de�ned by the user:
SearchScope determines whether all child directories should also be searched recursively beginning from the starting point, or whether the search should be limited to the start directory. PageSize speci�es in which “chunk” the results of the domain are to be retrieved. If you reduce the PageSize, your script may respond more freely, but will also require more network tra�c. If you request more, the respective “chunk” will still include only 1,000 data records.
$Searcher.CacheResults = $true
$Searcher.SearchScope = "Subtree"
$Searcher.PageSize = 1000
73
Description
(&(objectCategory=person)(objectClass=User)) Find only user accounts, not computer accounts
(sAMAccountType=805306368) Find only user accounts (much quicker, but harder to read)
(&(objectClass=user)(sn=Weltner)(givenName=Tobias))
Find user accounts with a particular name
(&(objectCategory=person)(objectClass=user)(msNPAllowDialin=TRUE))
Find user with dial-in permission
(&(objectCategory=person)(objectClass=user)(pwdLastSet=0))
(&(objectCategory=computer)(!description=*)) Find all computer accounts having no description
Find user who has to change password at next logon
Search Filter
(&(objectCategory=person)(description=*)) Find all user accounts having no description
(&(objectCategory=person)(objectClass=user)(whenCreated>=20050318000000.0Z))
Find all elements created after March 18, 2005
(&(objectCategory=person)(objectClass=user)(|(accountExpires=9223372036854775807)(accountExpires=0)))
Find all users whose account never expires (OR condition, where only one condition must be met)
(&(objectClass=user)(userAccountControl: 1.2.840.113556.1.4.803:=2))
Find all disabled user accounts (bitmask logical AND)
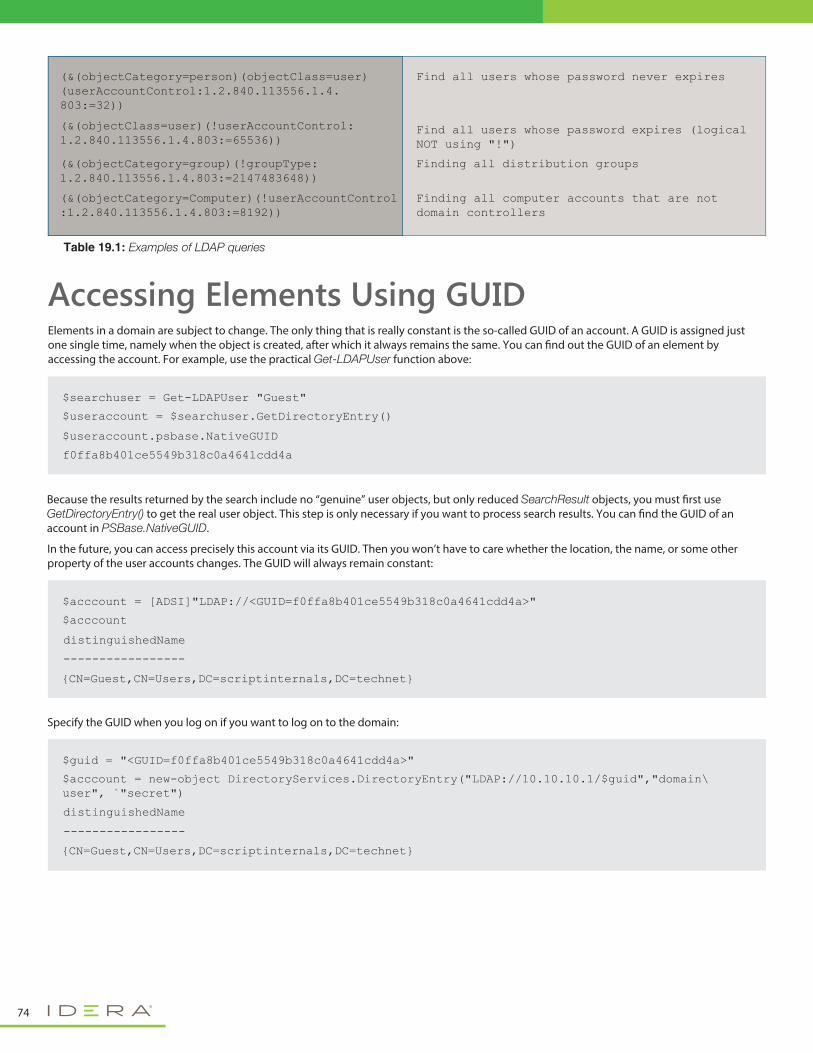
Table 19.1: Examples of LDAP queries
$searchuser = Get-LDAPUser "Guest"
$useraccount = $searchuser.GetDirectoryEntry()
$useraccount.psbase.NativeGUID
f0ffa8b401ce5549b318c0a4641cdd4a
$acccount = [ADSI]"LDAP://<GUID=f0ffa8b401ce5549b318c0a4641cdd4a>"
$acccount
distinguishedName
-----------------
{CN=Guest,CN=Users,DC=scriptinternals,DC=technet}
Elements in a domain are subject to change. The only thing that is really constant is the so-called GUID of an account. A GUID is assigned just one single time, namely when the object is created, after which it always remains the same. You can �nd out the GUID of an element by accessing the account. For example, use the practical Get-LDAPUser function above:
Because the results returned by the search include no “genuine” user objects, but only reduced SearchResult objects, you must �rst use GetDirectoryEntry() to get the real user object. This step is only necessary if you want to process search results. You can �nd the GUID of an account in PSBase.NativeGUID.
In the future, you can access precisely this account via its GUID. Then you won’t have to care whether the location, the name, or some other property of the user accounts changes. The GUID will always remain constant:
$guid = "<GUID=f0ffa8b401ce5549b318c0a4641cdd4a>"
$acccount = new-object DirectoryServices.DirectoryEntry("LDAP://10.10.10.1/$guid","domain\user", `"secret")
distinguishedName
{CN=Guest,CN=Users,DC=scriptinternals,DC=technet}
-----------------
Specify the GUID when you log on if you want to log on to the domain:
Accessing Elements Using GUID
74
(&(objectCategory=person)(objectClass=user)(userAccountControl:1.2.840.113556.1.4.803:=32))
Find all users whose password never expires
(&(objectClass=user)(!userAccountControl:1.2.840.113556.1.4.803:=65536))
Find all users whose password expires (logical NOT using "!")
(&(objectCategory=group)(!groupType:1.2.840.113556.1.4.803:=2147483648))
Finding all distribution groups
(&(objectCategory=Computer)(!userAccountControl:1.2.840.113556.1.4.803:=8192))
Finding all computer accounts that are not domain controllers
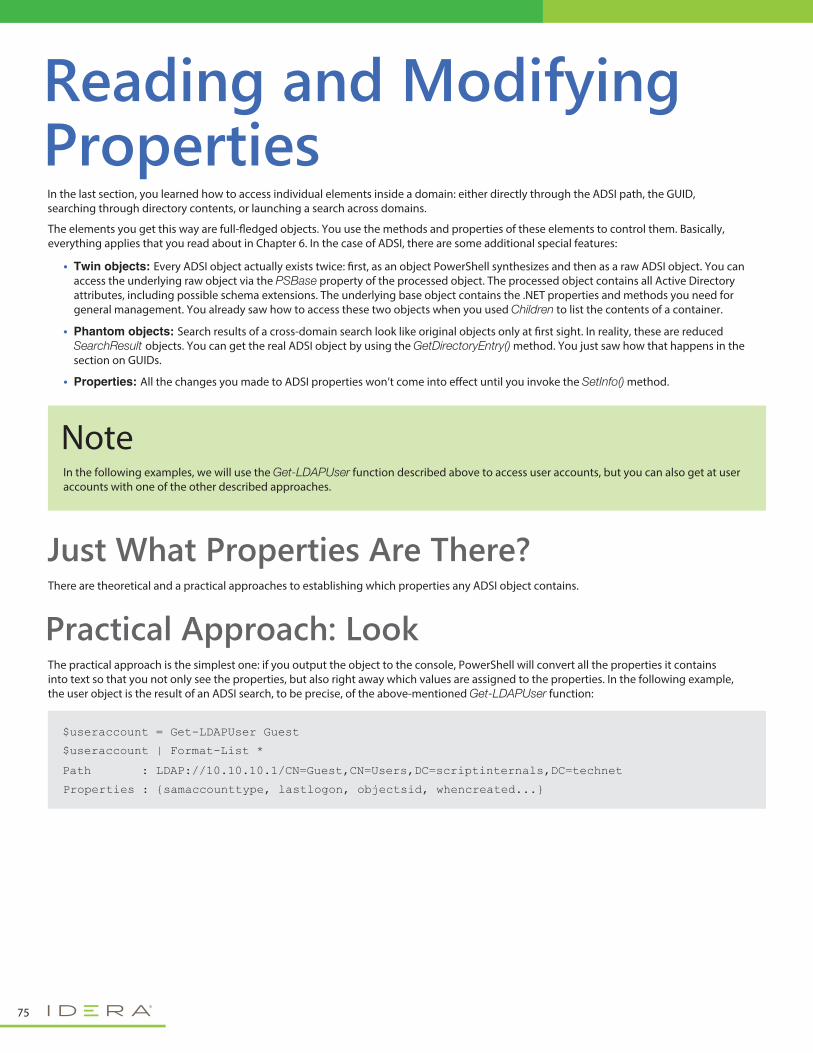
In the last section, you learned how to access individual elements inside a domain: either directly through the ADSI path, the GUID, searching through directory contents, or launching a search across domains.
The elements you get this way are full-�edged objects. You use the methods and properties of these elements to control them. Basically, everything applies that you read about in Chapter 6. In the case of ADSI, there are some additional special features:
Reading and ModifyingProperties
$useraccount = Get-LDAPUser Guest
$useraccount | Format-List *
Path : LDAP://10.10.10.1/CN=Guest,CN=Users,DC=scriptinternals,DC=technet
Properties : {samaccounttype, lastlogon, objectsid, whencreated...}
There are theoretical and a practical approaches to establishing which properties any ADSI object contains.
Just What Properties Are There?
The practical approach is the simplest one: if you output the object to the console, PowerShell will convert all the properties it contains into text so that you not only see the properties, but also right away which values are assigned to the properties. In the following example, the user object is the result of an ADSI search, to be precise, of the above-mentioned Get-LDAPUser function:
Practical Approach: Look
NoteIn the following examples, we will use the Get-LDAPUser function described above to access user accounts, but you can also get at user accounts with one of the other described approaches.
75
Twin objects: Every ADSI object actually exists twice: �rst, as an object PowerShell synthesizes and then as a raw ADSI object. You can access the underlying raw object via the PSBase property of the processed object. The processed object contains all Active Directory attributes, including possible schema extensions. The underlying base object contains the .NET properties and methods you need for general management. You already saw how to access these two objects when you used Children to list the contents of a container.
Phantom objects: Search results of a cross-domain search look like original objects only at �rst sight. In reality, these are reduced SearchResult objects. You can get the real ADSI object by using the GetDirectoryEntry() method. You just saw how that happens in the section on GUIDs.
Properties: All the changes you made to ADSI properties won’t come into e�ect until you invoke the SetInfo() method.
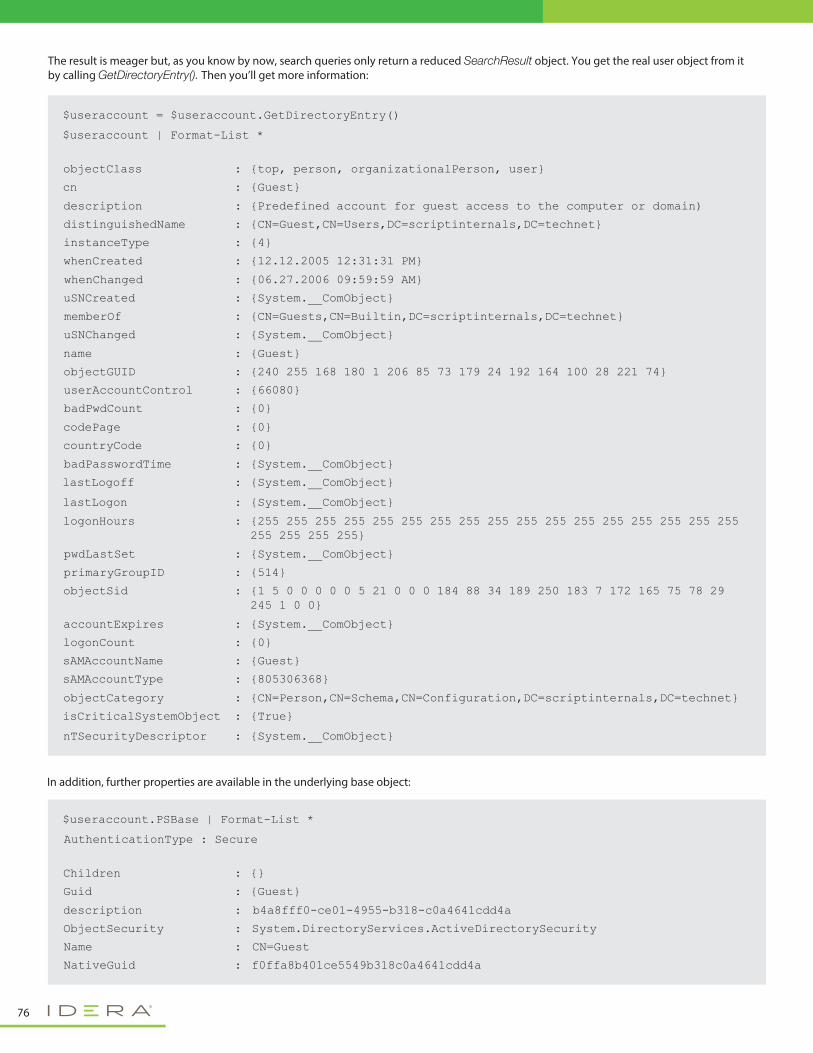
{top, person, organizationalPerson, user}
$useraccount = $useraccount.GetDirectoryEntry()
$useraccount | Format-List *
objectClass :
cn {Guest}:
description {Predefined account for guest access to the computer or domain):
distinguishedName {CN=Guest,CN=Users,DC=scriptinternals,DC=technet}:
instanceType {4}:
whenCreated {12.12.2005 12:31:31 PM}:
whenChanged {06.27.2006 09:59:59 AM}:
uSNCreated {System.__ComObject}:
memberOf {CN=Guests,CN=Builtin,DC=scriptinternals,DC=technet}:
uSNChanged {System.__ComObject}:
name {Guest}:
objectGUID {240 255 168 180 1 206 85 73 179 24 192 164 100 28 221 74}:
userAccountControl {66080}:
badPwdCount {0}:
codePage {0}:
countryCode {0}:
badPasswordTime {System.__ComObject}:
lastLogoff {System.__ComObject}:
logonHours {255 255 255 255 255 255 255 255 255 255 255 255 255 255 255 255 255 255 255 255 255}
:
pwdLastSet {System.__ComObject}:
primaryGroupID {514}:
objectSid {1 5 0 0 0 0 0 5 21 0 0 0 184 88 34 189 250 183 7 172 165 75 78 29 245 1 0 0}
:
accountExpires {System.__ComObject}:
logonCount {0}:
sAMAccountName {Guest}:
sAMAccountType {805306368}:
objectCategory {CN=Person,CN=Schema,CN=Configuration,DC=scriptinternals,DC=technet}:
isCriticalSystemObject {True}:
lastLogon {System.__ComObject}:
nTSecurityDescriptor {System.__ComObject}:
$useraccount.PSBase | Format-List *
AuthenticationType : Secure
Children {}:
Guid {Guest}:
description b4a8fff0-ce01-4955-b318-c0a4641cdd4a:
ObjectSecurity System.DirectoryServices.ActiveDirectorySecurity:
Name CN=Guest:
NativeGuid f0ffa8b401ce5549b318c0a4641cdd4a:
In addition, further properties are available in the underlying base object:
The result is meager but, as you know by now, search queries only return a reduced SearchResult object. You get the real user object from it by calling GetDirectoryEntry(). Then you’ll get more information:
76
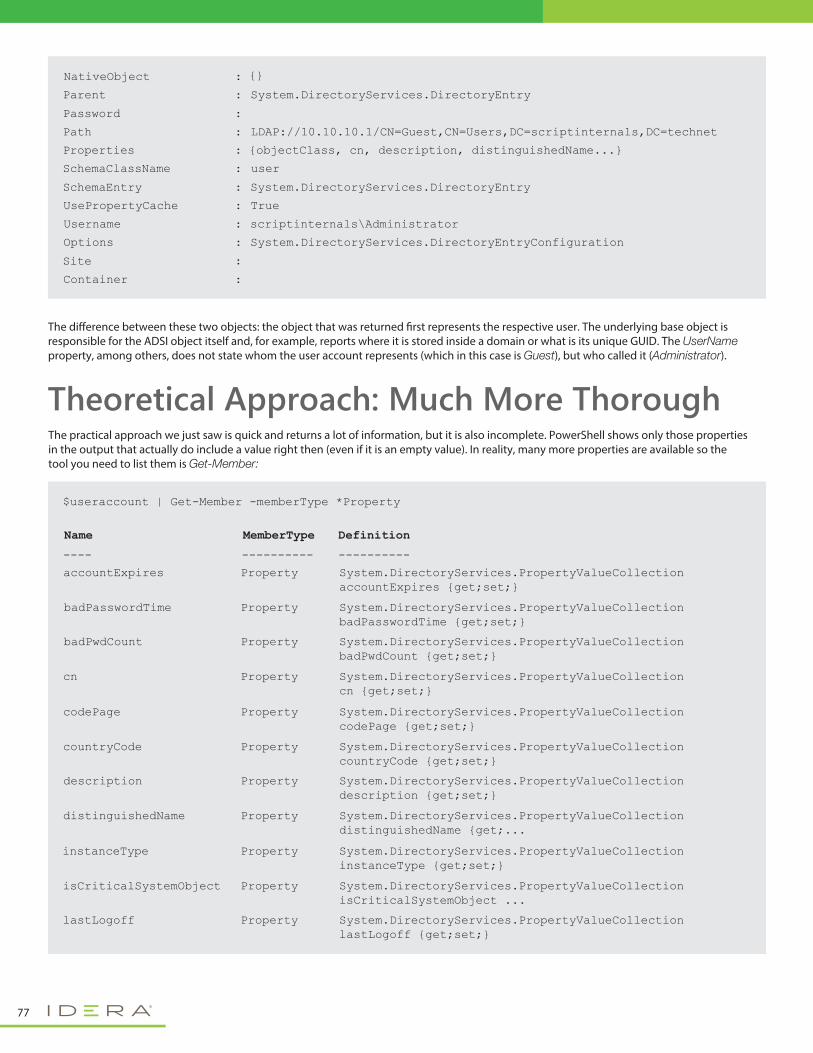
NativeObject {}:
Parent System.DirectoryServices.DirectoryEntry:
Password :
Path LDAP://10.10.10.1/CN=Guest,CN=Users,DC=scriptinternals,DC=technet:
Properties {objectClass, cn, description, distinguishedName...}:
SchemaClassName user:
SchemaEntry System.DirectoryServices.DirectoryEntry:
UsePropertyCache True:
Username scriptinternals\Administrator:
Options System.DirectoryServices.DirectoryEntryConfiguration:
Site :
Container :
$useraccount | Get-Member -memberType *Property
Name
---- ---------- ----------
MemberType Definition
accountExpires Property System.DirectoryServices.PropertyValueCollection accountExpires {get;set;}
badPasswordTime Property System.DirectoryServices.PropertyValueCollection badPasswordTime {get;set;}
badPwdCount Property System.DirectoryServices.PropertyValueCollection badPwdCount {get;set;}
cn Property System.DirectoryServices.PropertyValueCollection cn {get;set;}
codePage Property System.DirectoryServices.PropertyValueCollection codePage {get;set;}
countryCode Property System.DirectoryServices.PropertyValueCollection countryCode {get;set;}
description Property System.DirectoryServices.PropertyValueCollection description {get;set;}
distinguishedName Property System.DirectoryServices.PropertyValueCollection distinguishedName {get;...
instanceType Property System.DirectoryServices.PropertyValueCollection instanceType {get;set;}
isCriticalSystemObject Property System.DirectoryServices.PropertyValueCollection isCriticalSystemObject ...
lastLogoff Property System.DirectoryServices.PropertyValueCollection lastLogoff {get;set;}
The di�erence between these two objects: the object that was returned �rst represents the respective user. The underlying base object is responsible for the ADSI object itself and, for example, reports where it is stored inside a domain or what is its unique GUID. The UserName property, among others, does not state whom the user account represents (which in this case is Guest), but who called it (Administrator).
The practical approach we just saw is quick and returns a lot of information, but it is also incomplete. PowerShell shows only those properties in the output that actually do include a value right then (even if it is an empty value). In reality, many more properties are available so the tool you need to list them is Get-Member:
Theoretical Approach: Much More Thorough
77
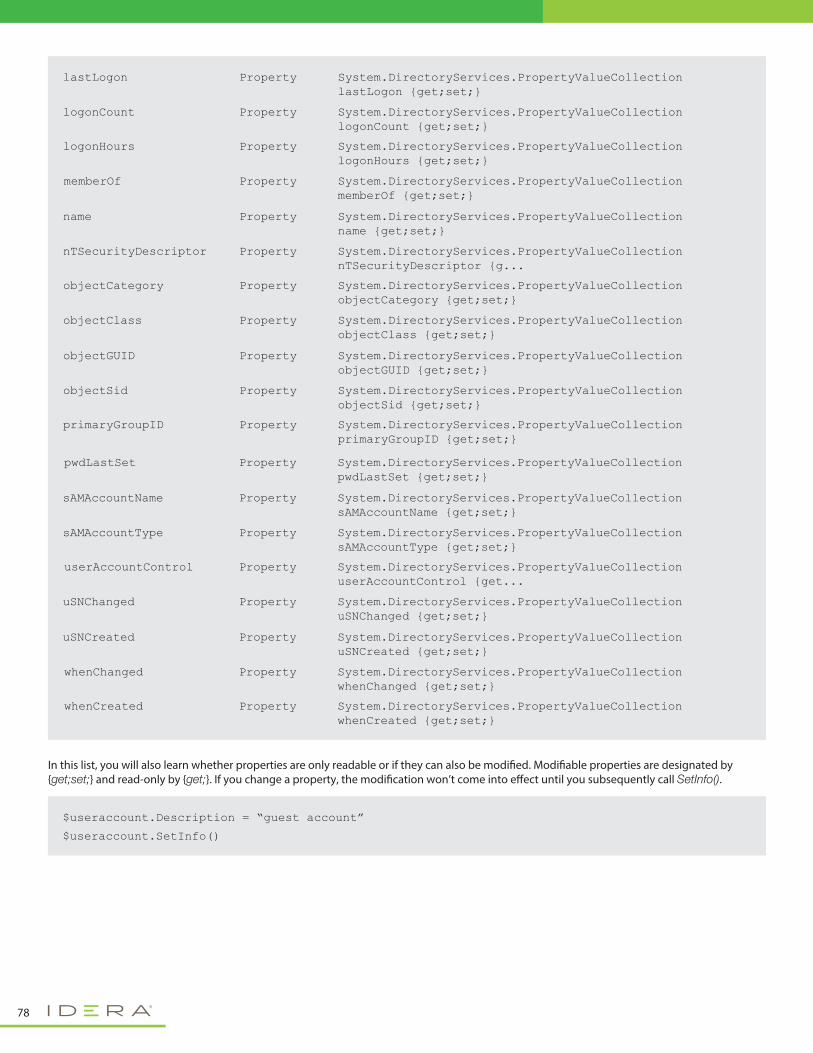
lastLogon Property System.DirectoryServices.PropertyValueCollection lastLogon {get;set;}
logonCount Property System.DirectoryServices.PropertyValueCollection logonCount {get;set;}
logonHours Property System.DirectoryServices.PropertyValueCollection logonHours {get;set;}
memberOf Property System.DirectoryServices.PropertyValueCollection memberOf {get;set;}
name Property System.DirectoryServices.PropertyValueCollection name {get;set;}
nTSecurityDescriptor Property System.DirectoryServices.PropertyValueCollection nTSecurityDescriptor {g...
objectCategory Property System.DirectoryServices.PropertyValueCollection objectCategory {get;set;}
objectClass Property System.DirectoryServices.PropertyValueCollection objectClass {get;set;}
objectGUID Property System.DirectoryServices.PropertyValueCollection objectGUID {get;set;}
objectSid Property System.DirectoryServices.PropertyValueCollection objectSid {get;set;}
primaryGroupID Property System.DirectoryServices.PropertyValueCollection primaryGroupID {get;set;}
pwdLastSet Property System.DirectoryServices.PropertyValueCollection pwdLastSet {get;set;}
sAMAccountName Property System.DirectoryServices.PropertyValueCollection sAMAccountName {get;set;}
sAMAccountType Property System.DirectoryServices.PropertyValueCollection sAMAccountType {get;set;}
userAccountControl Property System.DirectoryServices.PropertyValueCollection userAccountControl {get...
uSNChanged Property System.DirectoryServices.PropertyValueCollection uSNChanged {get;set;}
uSNCreated Property System.DirectoryServices.PropertyValueCollection uSNCreated {get;set;}
whenChanged Property System.DirectoryServices.PropertyValueCollection whenChanged {get;set;}
whenCreated Property System.DirectoryServices.PropertyValueCollection whenCreated {get;set;}
$useraccount.Description = “guest account”
$useraccount.SetInfo()
In this list, you will also learn whether properties are only readable or if they can also be modi�ed. Modi�able properties are designated by {get;set;} and read-only by {get;}. If you change a property, the modi�cation won’t come into e�ect until you subsequently call SetInfo().
78
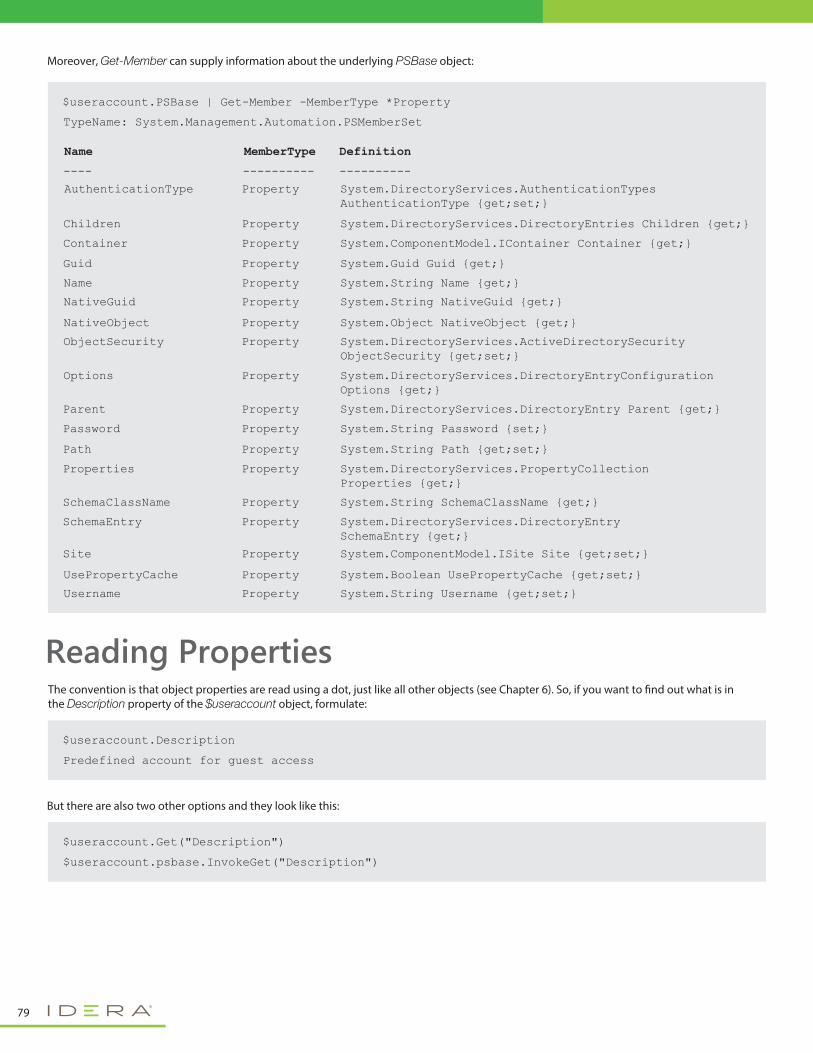
The convention is that object properties are read using a dot, just like all other objects (see Chapter 6). So, if you want to �nd out what is in the Description property of the $useraccount object, formulate:
Reading Properties
$useraccount.PSBase | Get-Member -MemberType *Property
Name
---- ---------- ----------
MemberType Definition
AuthenticationType Property System.DirectoryServices.AuthenticationTypes AuthenticationType {get;set;}
Children Property System.DirectoryServices.DirectoryEntries Children {get;}
Container Property System.ComponentModel.IContainer Container {get;}
Guid Property System.Guid Guid {get;}
Name Property System.String Name {get;}
NativeGuid Property System.String NativeGuid {get;}
NativeObject Property System.Object NativeObject {get;}
ObjectSecurity Property System.DirectoryServices.ActiveDirectorySecurity ObjectSecurity {get;set;}
Path Property System.String Path {get;set;}
Properties Property System.DirectoryServices.PropertyCollection Properties {get;}
SchemaClassName Property System.String SchemaClassName {get;}
SchemaEntry Property System.DirectoryServices.DirectoryEntry SchemaEntry {get;}
Site Property System.ComponentModel.ISite Site {get;set;}
UsePropertyCache Property System.Boolean UsePropertyCache {get;set;}
Username Property System.String Username {get;set;}
Options Property System.DirectoryServices.DirectoryEntryConfiguration Options {get;}
Parent Property System.DirectoryServices.DirectoryEntry Parent {get;}
Password Property System.String Password {set;}
TypeName: System.Management.Automation.PSMemberSet
$useraccount.Description
Predefined account for guest access
But there are also two other options and they look like this:
$useraccount.Get("Description")
$useraccount.psbase.InvokeGet("Description")
Moreover, Get-Member can supply information about the underlying PSBase object:
79
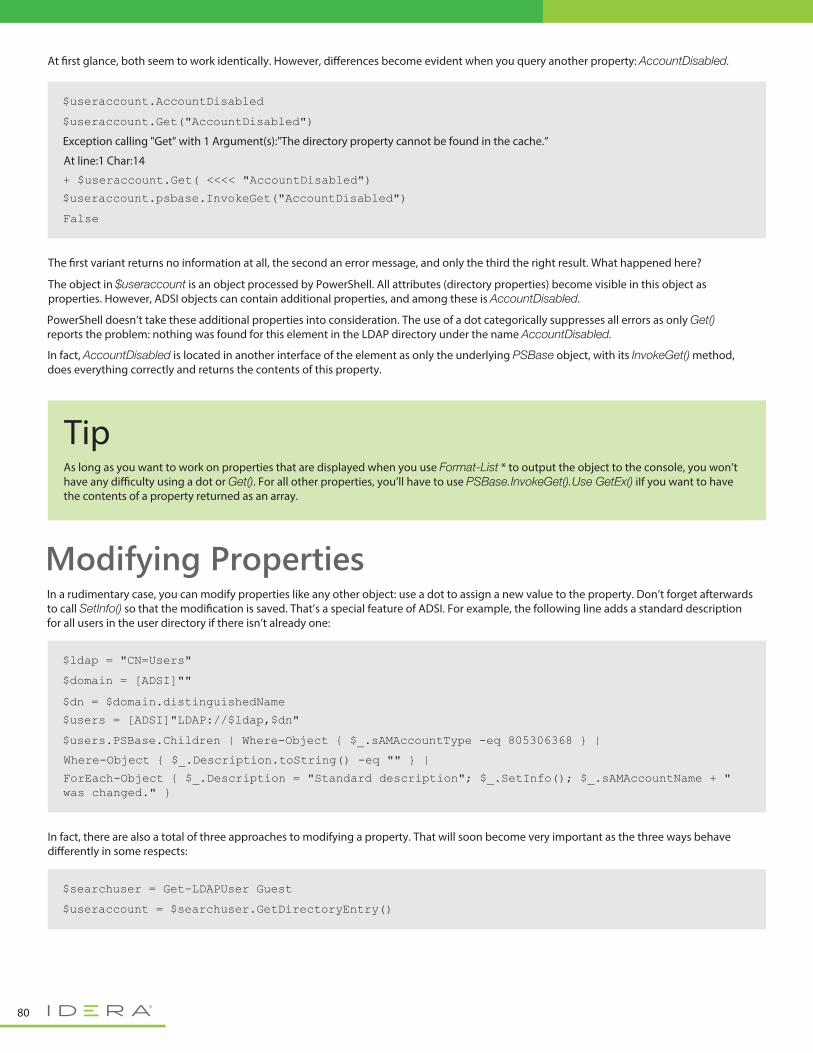
Modifying Properties
At �rst glance, both seem to work identically. However, di�erences become evident when you query another property: AccountDisabled.
The �rst variant returns no information at all, the second an error message, and only the third the right result. What happened here?
The object in $useraccount is an object processed by PowerShell. All attributes (directory properties) become visible in this object as properties. However, ADSI objects can contain additional properties, and among these is AccountDisabled.
PowerShell doesn’t take these additional properties into consideration. The use of a dot categorically suppresses all errors as only Get() reports the problem: nothing was found for this element in the LDAP directory under the name AccountDisabled.
In fact, AccountDisabled is located in another interface of the element as only the underlying PSBase object, with its InvokeGet() method, does everything correctly and returns the contents of this property.
In a rudimentary case, you can modify properties like any other object: use a dot to assign a new value to the property. Don’t forget afterwards to call SetInfo() so that the modi�cation is saved. That’s a special feature of ADSI. For example, the following line adds a standard description for all users in the user directory if there isn’t already one:
In fact, there are also a total of three approaches to modifying a property. That will soon become very important as the three ways behave di�erently in some respects:
$useraccount.AccountDisabled
$useraccount.Get("AccountDisabled")
+ $useraccount.Get( <<<< "AccountDisabled")
False
$useraccount.psbase.InvokeGet("AccountDisabled")
Exception calling "Get" with 1 Argument(s):"The directory property cannot be found in the cache.”
At line:1 Char:14
$ldap = "CN=Users"
$domain = [ADSI]""
$dn = $domain.distinguishedName
$users.PSBase.Children | Where-Object { $_.sAMAccountType -eq 805306368 } |
$users = [ADSI]"LDAP://$ldap,$dn"
Where-Object { $_.Description.toString() -eq "" } |
ForEach-Object { $_.Description = "Standard description"; $_.SetInfo(); $_.sAMAccountName + " was changed." }
$searchuser = Get-LDAPUser Guest
$useraccount = $searchuser.GetDirectoryEntry()
TipAs long as you want to work on properties that are displayed when you use Format-List * to output the object to the console, you won’t have any di�culty using a dot or Get(). For all other properties, you’ll have to use PSBase.InvokeGet().Use GetEx() iIf you want to have the contents of a property returned as an array.
80
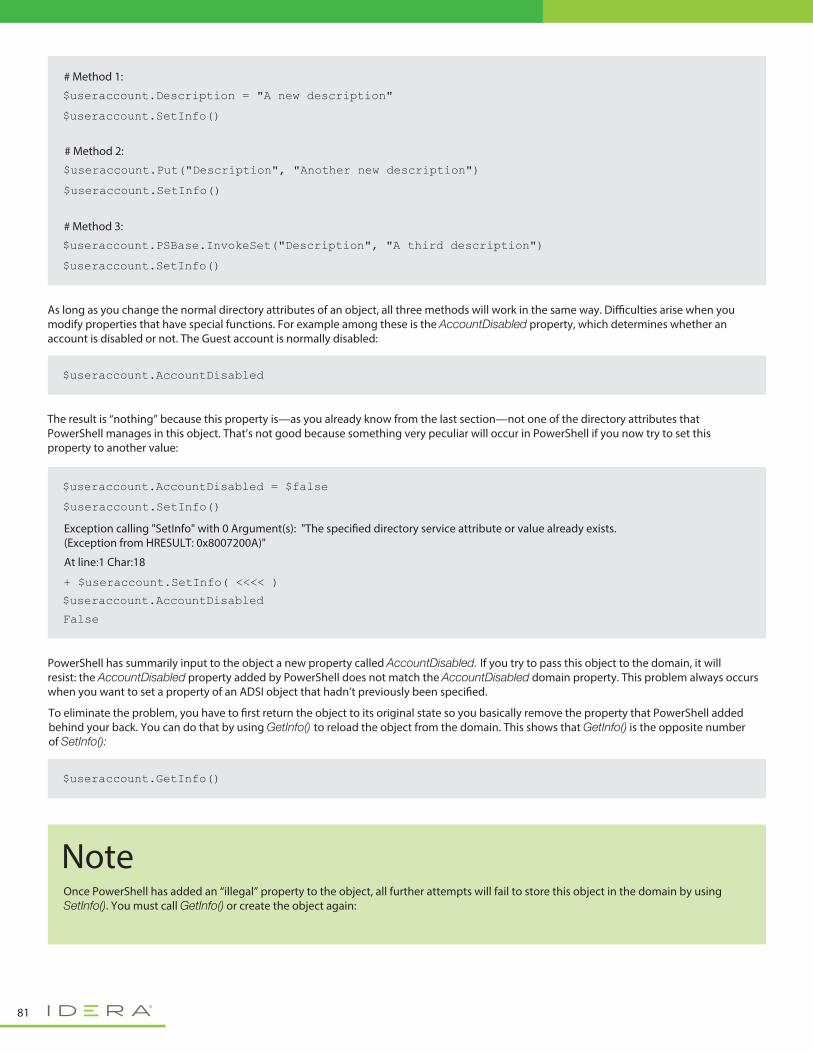
As long as you change the normal directory attributes of an object, all three methods will work in the same way. Di�culties arise when you modify properties that have special functions. For example among these is the AccountDisabled property, which determines whether an account is disabled or not. The Guest account is normally disabled:
The result is “nothing” because this property is—as you already know from the last section—not one of the directory attributes that PowerShell manages in this object. That’s not good because something very peculiar will occur in PowerShell if you now try to set this property to another value:
PowerShell has summarily input to the object a new property called AccountDisabled. If you try to pass this object to the domain, it will resist: the AccountDisabled property added by PowerShell does not match the AccountDisabled domain property. This problem always occurs when you want to set a property of an ADSI object that hadn’t previously been speci�ed.
To eliminate the problem, you have to �rst return the object to its original state so you basically remove the property that PowerShell added behind your back. You can do that by using GetInfo() to reload the object from the domain. This shows that GetInfo() is the opposite number of SetInfo():
$useraccount.AccountDisabled = $false
$useraccount.SetInfo()
+ $useraccount.SetInfo( <<<< )
$useraccount.AccountDisabled
False
Exception calling "SetInfo" with 0 Argument(s): "The speci�ed directory service attribute or value already exists. (Exception from HRESULT: 0x8007200A)"
At line:1 Char:18
$useraccount.SetInfo()
$useraccount.Description = "A new description"
# Method 1:
$useraccount.SetInfo()
$useraccount.Put("Description", "Another new description")
# Method 2:
$useraccount.SetInfo()
$useraccount.PSBase.InvokeSet("Description", "A third description")
# Method 3:
$useraccount.AccountDisabled
$useraccount.GetInfo()
NoteOnce PowerShell has added an “illegal” property to the object, all further attempts will fail to store this object in the domain by using SetInfo(). You must call GetInfo() or create the object again:
81
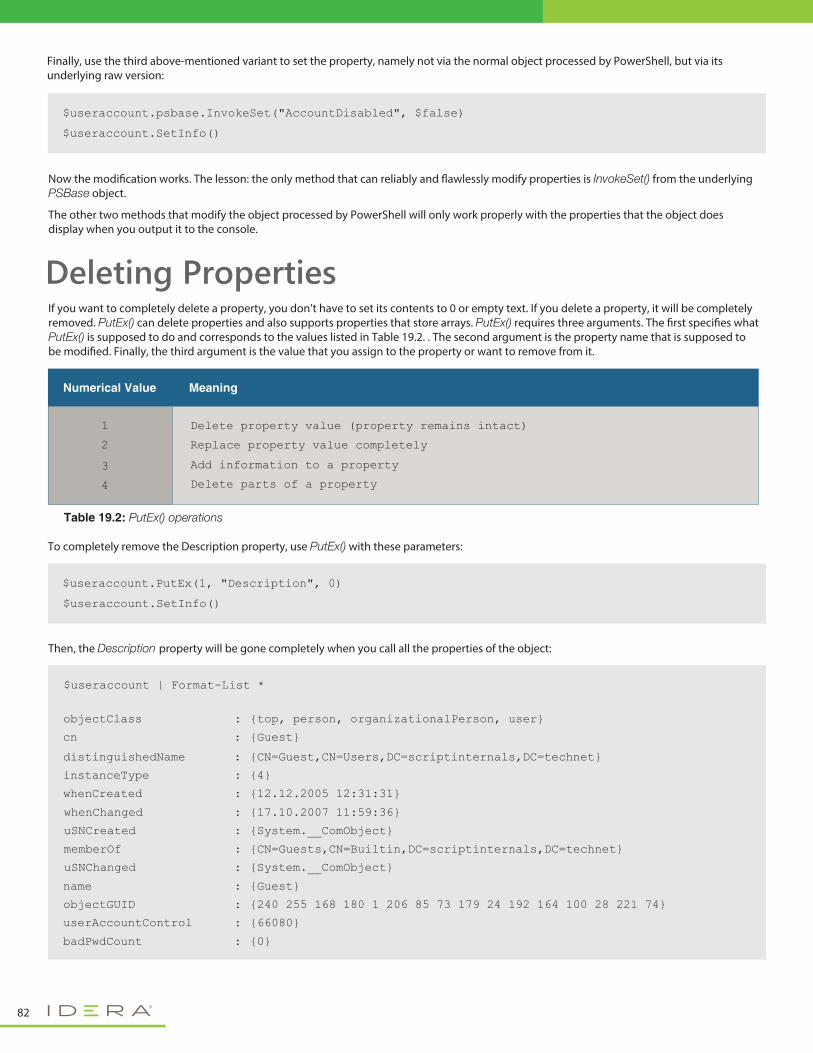
$useraccount | Format-List *
objectClass {top, person, organizationalPerson, user}:
cn {Guest}:
distinguishedName {CN=Guest,CN=Users,DC=scriptinternals,DC=technet}:
instanceType {4}:
whenCreated {12.12.2005 12:31:31}:
whenChanged {17.10.2007 11:59:36}:
uSNCreated {System.__ComObject}:
memberOf {CN=Guests,CN=Builtin,DC=scriptinternals,DC=technet}:
uSNChanged {System.__ComObject}:
name {Guest}:
objectGUID {240 255 168 180 1 206 85 73 179 24 192 164 100 28 221 74}:
userAccountControl {66080}:
badPwdCount {0}:
Deleting Properties
Finally, use the third above-mentioned variant to set the property, namely not via the normal object processed by PowerShell, but via its underlying raw version:
Now the modi�cation works. The lesson: the only method that can reliably and �awlessly modify properties is InvokeSet() from the underlying PSBase object.
The other two methods that modify the object processed by PowerShell will only work properly with the properties that the object does display when you output it to the console.
To completely remove the Description property, use PutEx() with these parameters:
Then, the Description property will be gone completely when you call all the properties of the object:
Table 19.2: PutEx() operations
If you want to completely delete a property, you don’t have to set its contents to 0 or empty text. If you delete a property, it will be completely removed. PutEx() can delete properties and also supports properties that store arrays. PutEx() requires three arguments. The �rst speci�es what PutEx() is supposed to do and corresponds to the values listed in Table 19.2. . The second argument is the property name that is supposed to be modi�ed. Finally, the third argument is the value that you assign to the property or want to remove from it.
$useraccount.psbase.InvokeSet("AccountDisabled", $false)
$useraccount.SetInfo()
$useraccount.PutEx(1, "Description", 0)
$useraccount.SetInfo()
82
Meaning
1 Delete property value (property remains intact)
Replace property value completely
Add information to a property
Delete parts of a property
2
3
4
Numerical Value
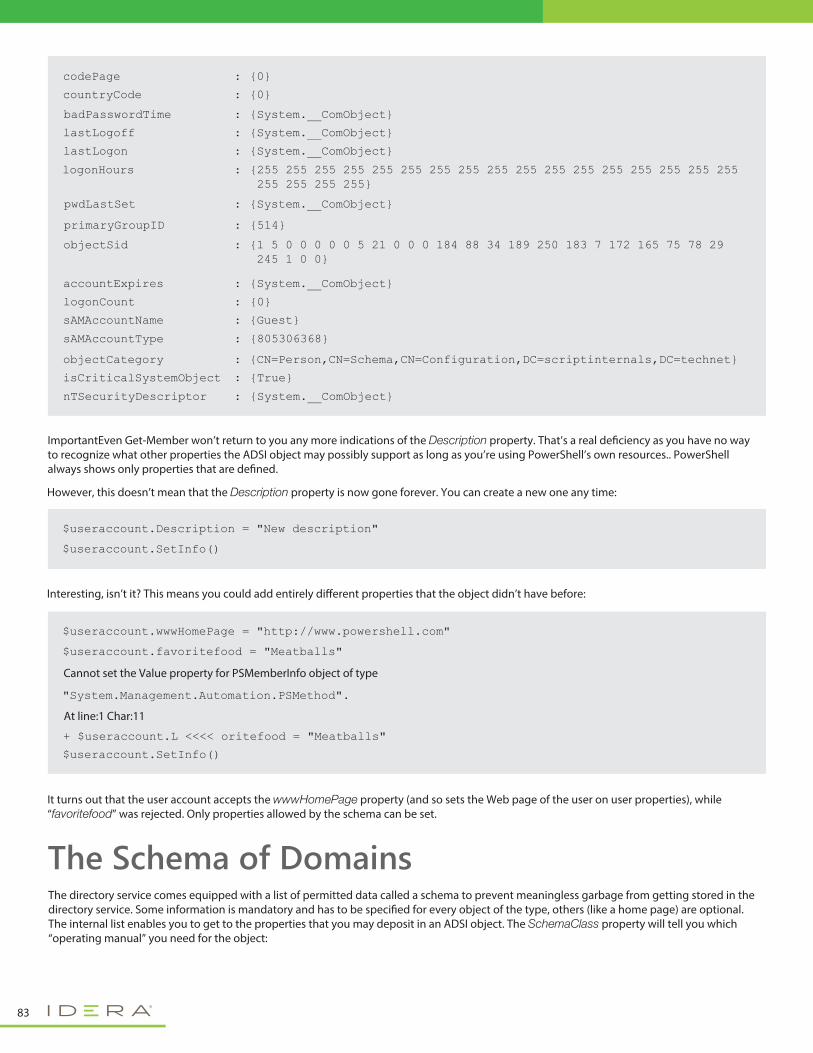
codePage {0}:
countryCode {0}:
badPasswordTime {System.__ComObject}:
lastLogoff {System.__ComObject}:
lastLogon {System.__ComObject}:
logonHours {255 255 255 255 255 255 255 255 255 255 255 255 255 255 255 255 255 255 255 255 255}
:
pwdLastSet {System.__ComObject}:
primaryGroupID {514}:
objectSid {1 5 0 0 0 0 0 5 21 0 0 0 184 88 34 189 250 183 7 172 165 75 78 29 245 1 0 0}
:
accountExpires {System.__ComObject}:
logonCount {0}:
sAMAccountName {Guest}:
sAMAccountType {805306368}:
objectCategory {CN=Person,CN=Schema,CN=Configuration,DC=scriptinternals,DC=technet}:
isCriticalSystemObject {True}:
nTSecurityDescriptor {System.__ComObject}:
$useraccount.wwwHomePage = "http://www.powershell.com"
$useraccount.favoritefood = "Meatballs"
+ $useraccount.L <<<< oritefood = "Meatballs"
"System.Management.Automation.PSMethod".
$useraccount.SetInfo()
Cannot set the Value property for PSMemberInfo object of type
At line:1 Char:11
The Schema of DomainsThe directory service comes equipped with a list of permitted data called a schema to prevent meaningless garbage from getting stored in the directory service. Some information is mandatory and has to be speci�ed for every object of the type, others (like a home page) are optional. The internal list enables you to get to the properties that you may deposit in an ADSI object. The SchemaClass property will tell you which “operating manual” you need for the object:
ImportantEven Get-Member won’t return to you any more indications of the Description property. That’s a real de�ciency as you have no way to recognize what other properties the ADSI object may possibly support as long as you’re using PowerShell’s own resources.. PowerShell always shows only properties that are de�ned.
However, this doesn’t mean that the Description property is now gone forever. You can create a new one any time:
Interesting, isn’t it? This means you could add entirely di�erent properties that the object didn’t have before:
It turns out that the user account accepts the wwwHomePage property (and so sets the Web page of the user on user properties), while “favoritefood” was rejected. Only properties allowed by the schema can be set.
$useraccount.Description = "New description"
$useraccount.SetInfo()
83
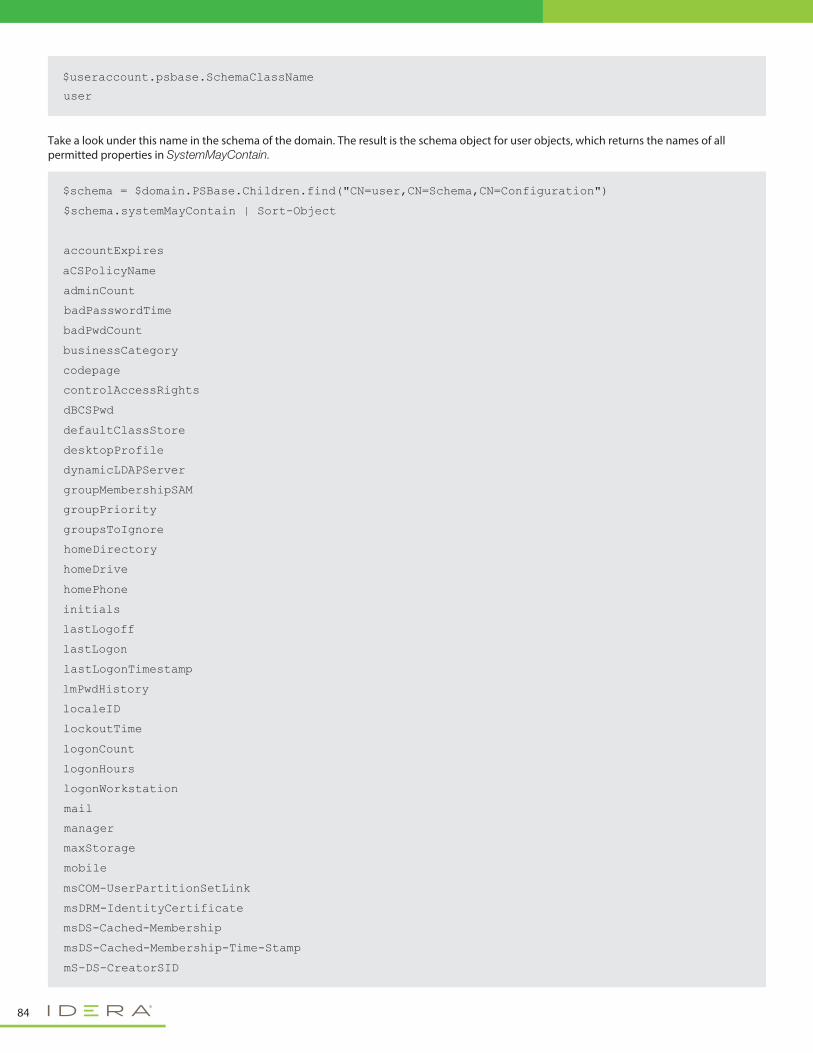
$schema = $domain.PSBase.Children.find("CN=user,CN=Schema,CN=Configuration")
$schema.systemMayContain | Sort-Object
accountExpires
aCSPolicyName
adminCount
badPasswordTime
badPwdCount
businessCategory
codepage
controlAccessRights
dBCSPwd
defaultClassStore
desktopProfile
dynamicLDAPServer
groupMembershipSAM
groupPriority
groupsToIgnore
homeDirectory
homeDrive
homePhone
initials
lastLogoff
lastLogon
lastLogonTimestamp
lmPwdHistory
localeID
lockoutTime
logonCount
logonHours
logonWorkstation
manager
maxStorage
mobile
msCOM-UserPartitionSetLink
msDRM-IdentityCertificate
msDS-Cached-Membership
msDS-Cached-Membership-Time-Stamp
mS-DS-CreatorSID
Take a look under this name in the schema of the domain. The result is the schema object for user objects, which returns the names of all permitted properties in SystemMayContain.
$useraccount.psbase.SchemaClassName
user
84
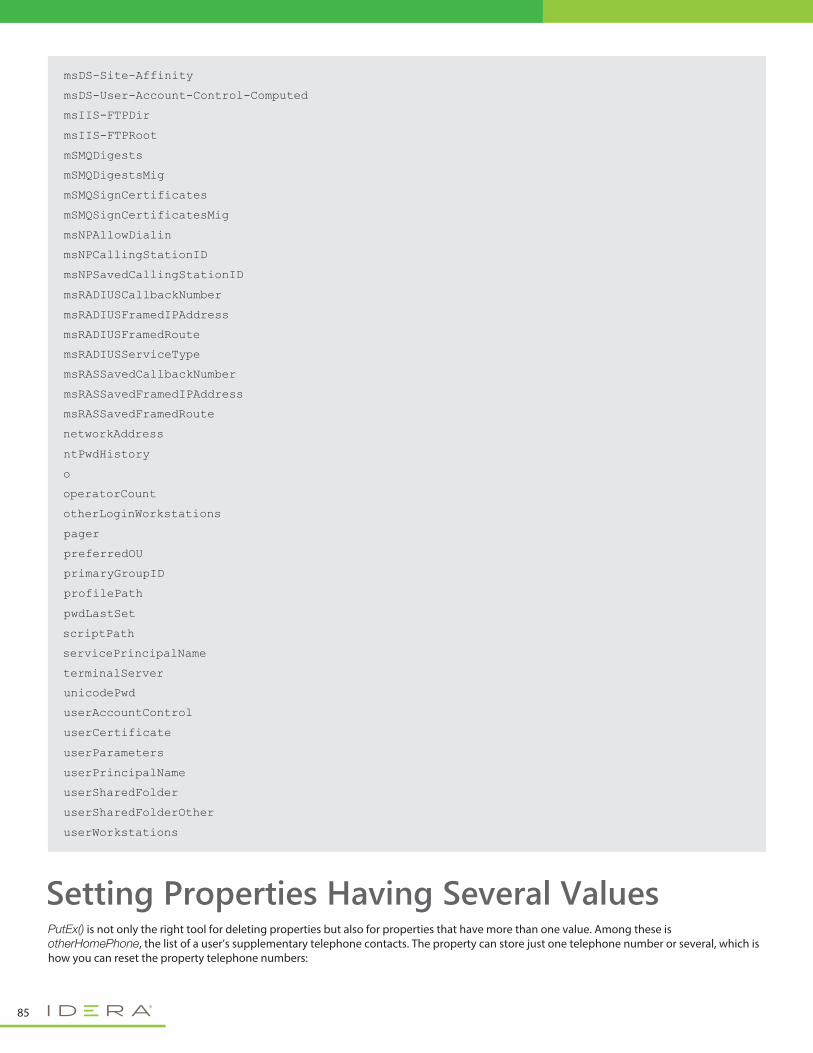
msDS-Site-Affinity
msDS-User-Account-Control-Computed
msIIS-FTPDir
msIIS-FTPRoot
mSMQDigests
mSMQDigestsMig
mSMQSignCertificates
mSMQSignCertificatesMig
msNPAllowDialin
msNPCallingStationID
msNPSavedCallingStationID
msRADIUSCallbackNumber
msRADIUSFramedIPAddress
msRADIUSFramedRoute
msRADIUSServiceType
msRASSavedCallbackNumber
msRASSavedFramedIPAddress
msRASSavedFramedRoute
networkAddress
ntPwdHistory
o
operatorCount
otherLoginWorkstations
pager
preferredOU
primaryGroupID
profilePath
pwdLastSet
scriptPath
servicePrincipalName
terminalServer
unicodePwd
userAccountControl
userCertificate
userParameters
userPrincipalName
userSharedFolder
userSharedFolderOther
userWorkstations
PutEx() is not only the right tool for deleting properties but also for properties that have more than one value. Among these is otherHomePhone, the list of a user’s supplementary telephone contacts. The property can store just one telephone number or several, which is how you can reset the property telephone numbers:
Setting Properties Having Several Values
85
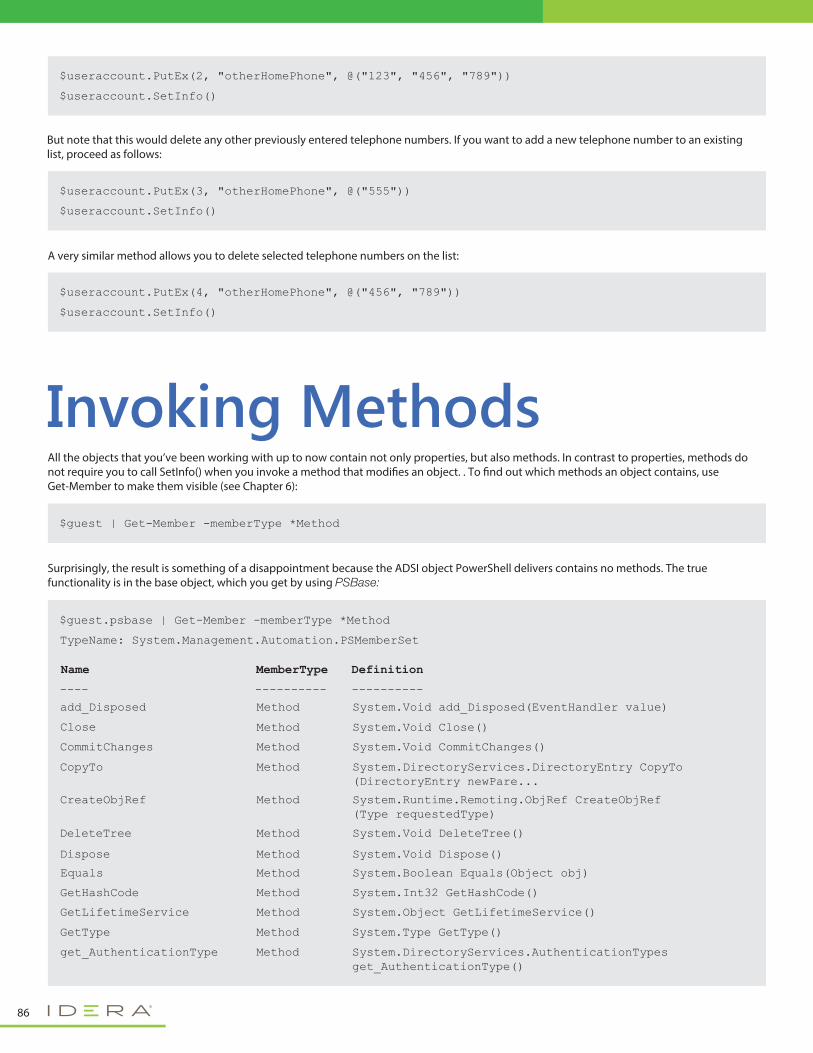
But note that this would delete any other previously entered telephone numbers. If you want to add a new telephone number to an existing list, proceed as follows:
$useraccount.PutEx(2, "otherHomePhone", @("123", "456", "789"))
$useraccount.SetInfo()
$useraccount.PutEx(3, "otherHomePhone", @("555"))
$useraccount.SetInfo()
A very similar method allows you to delete selected telephone numbers on the list:
$useraccount.PutEx(4, "otherHomePhone", @("456", "789"))
$useraccount.SetInfo()
All the objects that you’ve been working with up to now contain not only properties, but also methods. In contrast to properties, methods do not require you to call SetInfo() when you invoke a method that modi�es an object. . To �nd out which methods an object contains, use Get-Member to make them visible (see Chapter 6):
Surprisingly, the result is something of a disappointment because the ADSI object PowerShell delivers contains no methods. The true functionality is in the base object, which you get by using PSBase:
$guest | Get-Member -memberType *Method
Invoking Methods
$guest.psbase | Get-Member -memberType *Method
Name
---- ---------- ----------
MemberType Definition
add_Disposed Method System.Void add_Disposed(EventHandler value)
Close Method System.Void Close()
CommitChanges Method System.Void CommitChanges()
CopyTo Method System.DirectoryServices.DirectoryEntry CopyTo(DirectoryEntry newPare...
CreateObjRef Method System.Runtime.Remoting.ObjRef CreateObjRef(Type requestedType)
DeleteTree Method System.Void DeleteTree()
Dispose Method System.Void Dispose()
Equals Method System.Boolean Equals(Object obj)
GetHashCode Method System.Int32 GetHashCode()
GetLifetimeService Method System.Object GetLifetimeService()
GetType Method System.Type GetType()
get_AuthenticationType Method System.DirectoryServices.AuthenticationTypes get_AuthenticationType()
TypeName: System.Management.Automation.PSMemberSet
86
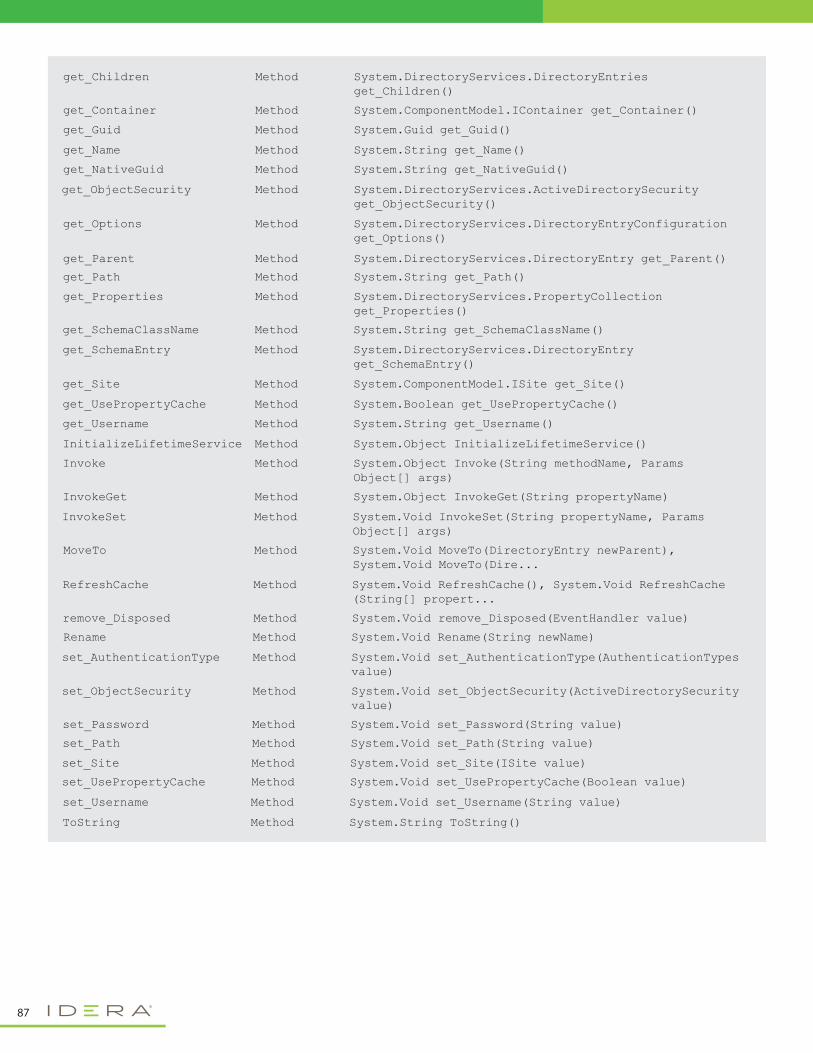
get_Children Method System.DirectoryServices.DirectoryEntries get_Children()
get_Container Method System.ComponentModel.IContainer get_Container()
get_Guid Method System.Guid get_Guid()
get_Name Method System.String get_Name()
get_NativeGuid Method System.String get_NativeGuid()
get_ObjectSecurity Method System.DirectoryServices.ActiveDirectorySecurity get_ObjectSecurity()
get_Site Method System.ComponentModel.ISite get_Site()
get_UsePropertyCache Method System.Boolean get_UsePropertyCache()
get_Username Method System.String get_Username()
InitializeLifetimeService Method System.Object InitializeLifetimeService()
Invoke Method System.Object Invoke(String methodName, Params Object[] args)
InvokeGet Method System.Object InvokeGet(String propertyName)
InvokeSet Method System.Void InvokeSet(String propertyName, Params Object[] args)
MoveTo Method System.Void MoveTo(DirectoryEntry newParent), System.Void MoveTo(Dire...
RefreshCache Method System.Void RefreshCache(), System.Void RefreshCache(String[] propert...
remove_Disposed Method System.Void remove_Disposed(EventHandler value)
Rename Method System.Void Rename(String newName)
set_AuthenticationType Method System.Void set_AuthenticationType(AuthenticationTypes value)
set_ObjectSecurity Method System.Void set_ObjectSecurity(ActiveDirectorySecurity value)
set_Password Method System.Void set_Password(String value)
set_Path Method System.Void set_Path(String value)
set_Site Method System.Void set_Site(ISite value)
set_UsePropertyCache Method System.Void set_UsePropertyCache(Boolean value)
set_Username Method System.Void set_Username(String value)
ToString Method System.String ToString()
get_Options Method System.DirectoryServices.DirectoryEntryConfiguration get_Options()
get_Parent Method System.DirectoryServices.DirectoryEntry get_Parent()
get_Path Method System.String get_Path()
get_Properties Method System.DirectoryServices.PropertyCollection get_Properties()
get_SchemaClassName Method System.String get_SchemaClassName()
get_SchemaEntry Method System.DirectoryServices.DirectoryEntry get_SchemaEntry()
87

$useraccount.SetPassword("New password")
$useraccount.ChangePassword("Old password", "New password")
function Get-LDAPGroup([string]$UserName, [string]$Start)
{
# Use current logon domain:
$domain = [ADSI]""
# OR: log on to another domain:
# $domain = new-object DirectoryServices.DirectoryEntry("LDAP://10.10.10.1","domain\user",# "secret")
if ($start -ne "")
{
$startelement = $domain.psbase.Children.Find($start)
}
Exception calling "SetPassword" with 1 Argument(s):
At line:1 Char:22
+ $realuser.SetPassword( <<<< "secret")
"The password does not meet the password policy requirements.
Check the minimum password length, password complexity and password
history requirements. (Exception from HRESULT: 0x800708C5)"
The password of a user account is an example of information that isn’t stored in a property. That’s why you can’t just read out user accounts. Instead, methods ensure the immediate generation of a completely con�dential hash value out of the user account and that it is deposited in a secure location. You can use the SetPassword() and ChangePassword() methods to change passwords:
SetPassword() requires administrator privileges and simply resets the password.
That can be risky because in the process you lose access to all your certi�cates outside a domain, including the crucial certi�cate for the Encrypting File System (EFS), though it’s necessary when users forget their passwords. ChangePassword doesn’t need any higher level of permission because con�rmation requires giving the old password.
When you change a password, be sure that it meets the demands of the domain. Otherwise, you’ll be rewarded with an error message like this one:
Methods also set group memberships. Of course, the �rst thing you need is the groups in which a user becomes a member. That basically works just like user accounts as you could specify the ADSI path to a group to access the group. Alternatively, you can use a universal function that helpfully picks out groups for you:
Changing Passwords
Controlling Group Memberships
NoteHere, too, the de�ciencies of Get-Member become evident when it is used with ADSI objects because Get-Member suppresses both methods instead of displaying them. You just have to “know” that they exist.
88

else
{
$startelement = $domain
}
$searcher = new-object DirectoryServices.DirectorySearcher($startelement)
$searcher.filter = "(&(objectClass=group)(sAMAccountName=$UserName))"
$Searcher.CacheResults = $true
$Searcher.SearchScope = "Subtree"
$Searcher.PageSize = 1000
$searcher.findall()
}
$admin = (Get-LDAPGroup "Domain Admins").GetDirectoryEntry()
$admin.member
CN=Tobias Weltner,CN=Users,DC=scriptinternals,DC=technet
CN=Markus2,CN=Users,DC=scriptinternals,DC=technet
CN=Belle,CN=Users,DC=scriptinternals,DC=technet
CN=Administrator,CN=Users,DC=scriptinternals,DC=technet
$guest = (Get-LDAPUser Guest).GetDirectoryEntry()
$guest.memberOf
CN=Guests,CN=Builtin,DC=scriptinternals,DC=technet
There are two sides to group memberships. Once you get the user account object, the memberOf property will return the groups in which theuser is a member:
In Which Groups Is a User a Member?
The other way of looking at it starts out from the group: members are in the Member property in group objects:
Which Users Are Members of a Group?
To add a new user to a group, you need the group object as well as (at least) the ADSI path of the user, who is supposed to become a member. To do this, use Add():
Adding Users to a Group
NoteGroups on their part can also be members in other groups. So, every group object has not only the Member property with its members, but also MemberOf with the groups in which this group is itself a member.
89
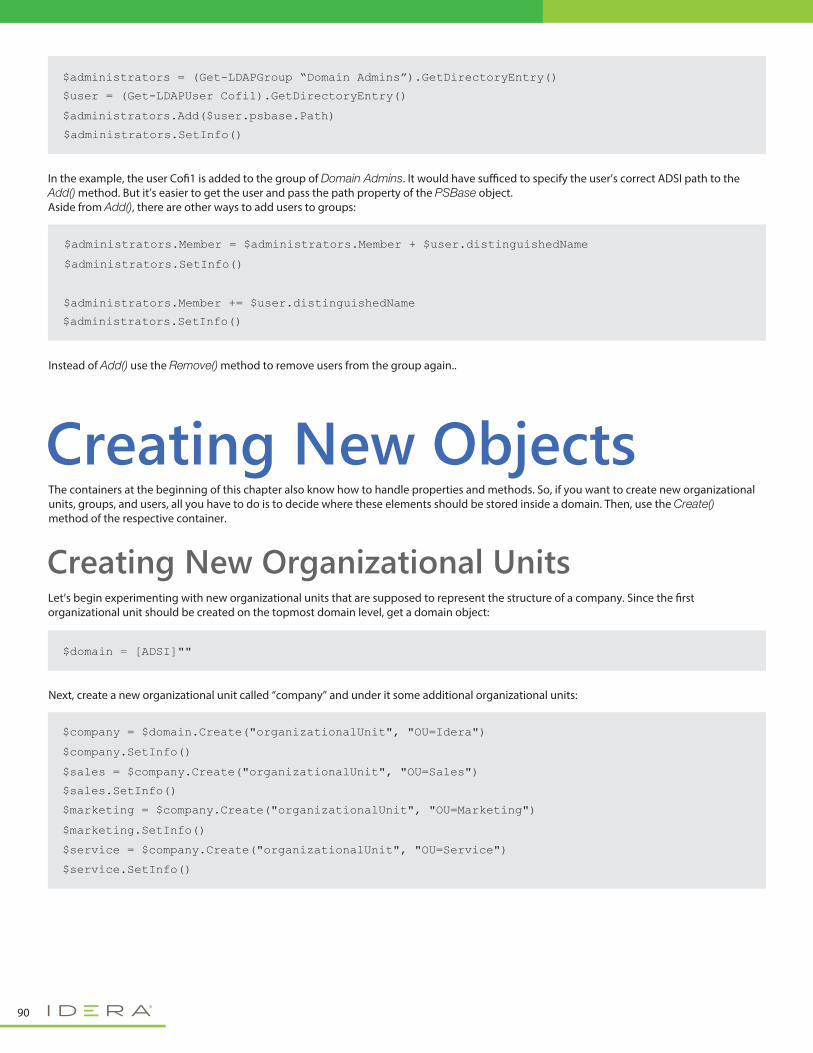
$company = $domain.Create("organizationalUnit", "OU=Idera")
$company.SetInfo()
$sales = $company.Create("organizationalUnit", "OU=Sales")
$sales.SetInfo()
$marketing = $company.Create("organizationalUnit", "OU=Marketing")
$marketing.SetInfo()
$service = $company.Create("organizationalUnit", "OU=Service")
$service.SetInfo()
Creating New Objects
$administrators.Member = $administrators.Member + $user.distinguishedName
$administrators.SetInfo()
$administrators.Member += $user.distinguishedName
$administrators.SetInfo()
$administrators = (Get-LDAPGroup “Domain Admins”).GetDirectoryEntry()
$user = (Get-LDAPUser Cofi1).GetDirectoryEntry()
$administrators.Add($user.psbase.Path)
$administrators.SetInfo()
Instead of Add() use the Remove() method to remove users from the group again..
In the example, the user Co�1 is added to the group of Domain Admins. It would have su�ced to specify the user’s correct ADSI path to the Add() method. But it’s easier to get the user and pass the path property of the PSBase object.Aside from Add(), there are other ways to add users to groups:
The containers at the beginning of this chapter also know how to handle properties and methods. So, if you want to create new organizational units, groups, and users, all you have to do is to decide where these elements should be stored inside a domain. Then, use the Create() method of the respective container.
$domain = [ADSI]""
Let’s begin experimenting with new organizational units that are supposed to represent the structure of a company. Since the �rst organizational unit should be created on the topmost domain level, get a domain object:
Next, create a new organizational unit called “company” and under it some additional organizational units:
Creating New Organizational Units
90
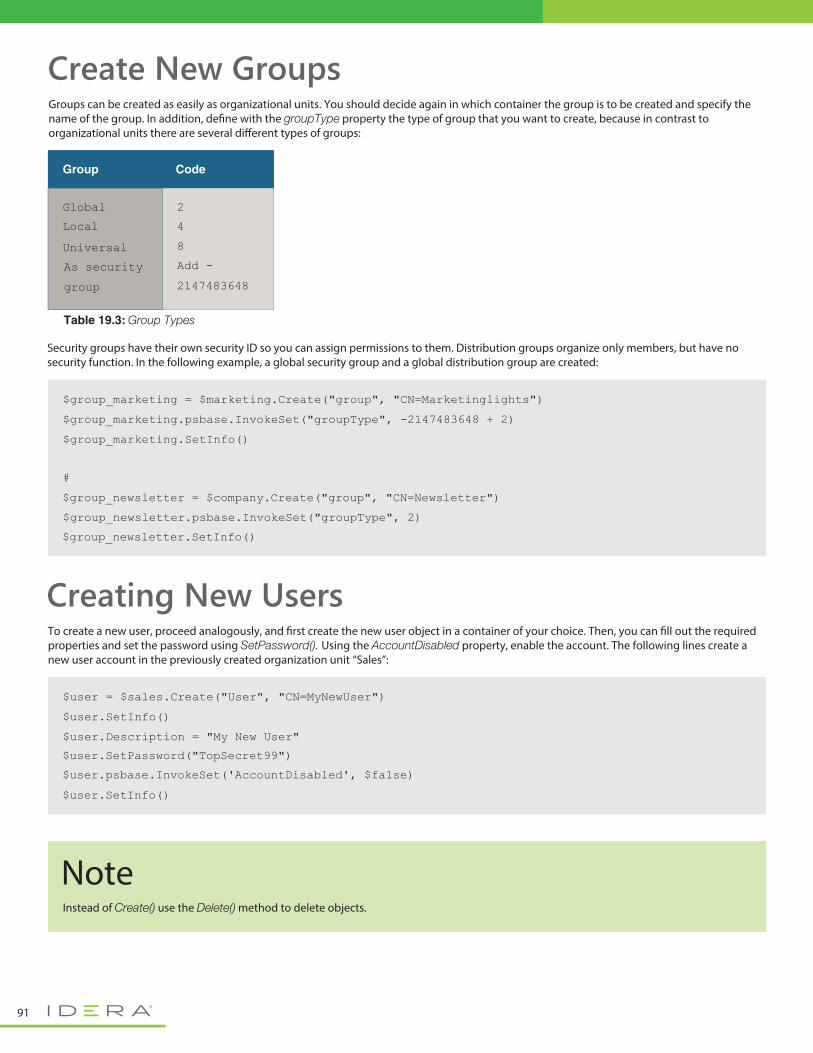
$user = $sales.Create("User", "CN=MyNewUser")
$user.SetInfo()
$user.Description = "My New User"
$user.SetPassword("TopSecret99")
$user.psbase.InvokeSet('AccountDisabled', $false)
$user.SetInfo()
$group_marketing = $marketing.Create("group", "CN=Marketinglights")
$group_marketing.psbase.InvokeSet("groupType", -2147483648 + 2)
$group_marketing.SetInfo()
#
$group_newsletter = $company.Create("group", "CN=Newsletter")
$group_newsletter.psbase.InvokeSet("groupType", 2)
$group_newsletter.SetInfo()
Table 19.3: Group Types
Groups can be created as easily as organizational units. You should decide again in which container the group is to be created and specify the name of the group. In addition, de�ne with the groupType property the type of group that you want to create, because in contrast to organizational units there are several di�erent types of groups:
Security groups have their own security ID so you can assign permissions to them. Distribution groups organize only members, but have no security function. In the following example, a global security group and a global distribution group are created:
Create New Groups
To create a new user, proceed analogously, and �rst create the new user object in a container of your choice. Then, you can �ll out the required properties and set the password using SetPassword(). Using the AccountDisabled property, enable the account. The following lines create a new user account in the previously created organization unit “Sales”:
Creating New Users
NoteInstead of Create() use the Delete() method to delete objects.
91
Code
Global 2
4
8
Add -
Local
Universal
As security
2147483648group
Group
92
Since PowerShell is layered on the .NET Framework, you already know from Chapter 6 how you can use .NET code in PowerShell to make up for missing functions. In this chapter, we’ll take up this idea once again. You’ll learn about the options PowerShell has for creating command extensions on the basis of the .NET Framework. You should be able to even create your own cmdlets at the end of this chapter.
Loading .NET Libraries andCompiling Code
Topics Covered:
Loading .NET Libraries·
Creating New .NET Libraries·
Chapter 20.
Loading .NET Libraries
Creating New .NETLibraries
Many functionalities of the .NET Framework are available right in PowerShell. For example, the following two lines su�ces to set up a dialog window:
In Chapter 6, you learned in detail about how this works and what an “assembly” is. PowerShell used Add-Type to load a system library and was then able to use the classes from it to call a static method like MsgBox().
That’s extremely useful when there is already a system library that o�ers the method you’re looking for, but for some functionality even the .NET Framework doesn’t have any right commands. For example, you have to rely on your own resources if you want to move text to the clipboard. The only way to get it done is to access the low-level API functions outside the .NET Framework.
As soon as you need more than just a few lines of code or access to API functions to implement the kinds of extensions you want, it makes sense to write the extension directly in .NET program code. The following example shows how a method called CopyToClipboard() might look in VB.NET. The VB.NET code is assigned to the $code variable as plain text:
Add-Type -assembly Microsoft.VisualBasic
[Microsoft.VisualBasic.Interaction]::MsgBox("Do you agree?", "YesNoCancel,Question", "Question")
$code = @'
Imports Microsoft.VisualBasic
Imports System
Public Class Utility
Namespace ClipboardAddon
Private Declare Function OpenClipboard Lib "user32" (ByVal hwnd As Integer) As Integer
Private Declare Function EmptyClipboard Lib "user32" () As Integer
Private Declare Function CloseClipboard Lib "user32" () As Integer
Private Declare Function GlobalAlloc Lib "kernel32" (ByVal wFlags As Integer, ByVal dwBytes As Integer) As Integer
Private Declare Function SetClipboardData Lib "user32"(ByVal wFormat As Integer, ByVal hMem As Integer) As Integer
Private Declare Function GlobalLock Lib "kernel32" (ByVal hMem As Integer) As Integer
Private Declare Function GlobalUnlock Lib "kernel32" (ByVal hMem As Integer) As Integer
Private Declare Function lstrcpy Lib "kernel32" (ByVal lpString1 As Integer, ByVal lpString2 As String) As Integer
Public Sub CopyToClipboard(ByVal text As String)
Dim result As Boolean = False
Dim mem As Integer = GlobalAlloc(&H42, text.Length + 1)
Dim lockedmem As Integer = GlobalLock(mem)
lstrcpy(lockedmem, text)
If GlobalUnlock(mem) = 0 Then
93
You have to �rst compile the code before PowerShell can execute it. Compilation is a translation of your source code into machine-readable intermediate language (IL). There are two options here.
To compile the source code and make it a type that you can use, feed the source code to Add-Type and specify the programming language the source code used:
Alternatively, methods can also be static. For example, MsgBox() in the �rst example is a static method. To call static methods, you need neither New-Object nor any instances. Static methods are called directly through the class in which they are de�ned.
If you would rather use CopyToClipboard() as a static method, all you need to do is to make a slight change to your source code. Replace this line:
Now, you can derive an object from your new type and call the method CopyToClipboad(). Done!
$object = New-Object ClipboardAddon.Utility
$object.CopyToClipboard(“Hi Everyone!”)
In-Memory Compiling
If OpenClipboard(0) Then
EmptyClipboard()
result = SetClipboardData(1, mem)
CloseClipboard()
End If
End If
End Sub
End Class
End Namespace
'@
$type = Add-Type -TypeDefinition $code -Language VisualBasic
Public Sub CopyToClipboard(ByVal text As String)
Type this line instead:
Public Shared Sub CopyToClipboard(ByVal text As String)
TipYou might be wondering why in your custom type, you needed to use New-Object �rst to get an object. With MsgBox() in the previous example, you could call that method directly from the type.
CopyToClipboard() is created in your source code as a dynamic method, which requires you to �rst create an instance of the class, and that’s exactly what New-Object does. Then the instance can call the method.
94
DLL Compilation
PS> $code = @'
Imports Microsoft.VisualBasic
Imports System
Public Class Utility
Namespace ClipboardAddon
Private Declare Function OpenClipboard Lib "user32" (ByVal hwnd As Integer) As Integer
Private Declare Function EmptyClipboard Lib "user32" () As Integer
Private Declare Function CloseClipboard Lib "user32" () As Integer
Private Declare Function GlobalAlloc Lib "kernel32" (ByVal wFlags As Integer, ByVal dwBytes As Integer) As Integer
Private Declare Function SetClipboardData Lib "user32"(ByVal wFormat As Integer, ByVal hMem As Integer) As Integer
Private Declare Function GlobalLock Lib "kernel32" (ByVal hMem As Integer) As Integer
Private Declare Function GlobalUnlock Lib "kernel32" (ByVal hMem As Integer) As Integer
Private Declare Function lstrcpy Lib "kernel32" (ByVal lpString1 As Integer, ByVal lpString2 As String) As Integer
Public Shared Sub CopyToClipboard(ByVal text As String)
Dim result As Boolean = False
Dim mem As Integer = GlobalAlloc(&H42, text.Length + 1)
Dim lockedmem As Integer = GlobalLock(mem)
lstrcpy(lockedmem, text)
If GlobalUnlock(mem) = 0 Then
If OpenClipboard(0) Then
EmptyClipboard()
result = SetClipboardData(1, mem)
CloseClipboard()
End If
End If
End Sub
End Class
End Namespace
PS> Add-Type -TypeDefinition $code -Language VisualBasic -OutputType Library -OutputAssembly
c:\powershell\extension.dll
'@
Once you have compiled your source code, then you can immediately call the method like this:
With Add-Type, you can even compile and generate �les. In the previous example, your source code was compiled in-memory on the �y. What if you wanted to protect your intellectual property somewhat and compile a DLL that your solution would then load?
Here is how you create your own DLL (make sure the folder c:\powershell exists, or else create it or change the output path in the command below):
[ClipboardAddon.Utility]::CopyToClipboard(“Hi Everyone!”)
95

PS> Add-Type -Path C:\powershell\extension.dll
PS> [Clipboardaddon.utility]::CopyToClipboard("Hello World!")
After you run these commands, you should �nd a �le called c:\powershell\extension.dll with the compiled content of your code. If not, try this code in a new PowerShell console. Your experiments with the in-memory compilation may have interfered.
To load and use your DLL from any PowerShell session, go ahead and use this code:
You can even compile and create console applications and windows programs that way - although that is an edge case. To create applications, you better use a speci�c development environment like Visual Studio.
96