power injection guidelines - angiodynamics.com · release the clamp and aspirate to confi rm blood...

1
USA > 14 Plaza Drive, Latham, NY 12110 > tel: 800-772-6446 > fax: 518-798-1360 > Canada tel: 800-268-0184 International > Haaksbergweg 75 (Margriettoren), 1101 BR, Amsterdam Z-O > The Netherlands tel: +31 (0)20 753 2949 > fax: +31 (0)20 753 2939 CONTRAINDICATIONS: Smart Port CT should not be implanted in the presence of known or suspected infections, bacteremia, septicemia and peritonitis, or in patients who have exhibited prior intolerance to the materials of construction, or patients whose body size or tissue is insufficient to accommodate the size of the port or catheter. WARNINGS AND PRECAUTIONS: Please see package insert for complete list of warnings and precautions. POTENTIAL COMPLICATIONS: Consult package insert for a complete list of potential complications. CAUTION: Federal (USA) law restricts these devices to sale by or on the order of a physician. www.angiodynamics.com The following is a brief summary of important risk information for the Smart Port power-injectable port line. For detailed information on the categories referenced, please consult the instructions for use packaged with each device. Observe all instructions prior to use. Failure to do so may result in patient complications. INDICATION FOR USE: The Smart Port CT power injectable port line is indicated for any patient requiring repeated access of the vascular system for delivery of medications, nutritional supplementation, fluids, blood, blood products, sampling of blood and power injection of contrast media for imaging. Use of non Y site LifeGuard Safety Infusion Set (size = 20Ga or 19Ga) is indicated for power injection of contrast media. For power injection of contrast media, maximum recommended infusion rate is 5ml/sec. Power Injection Guidelines REFER TO DIRECTIONS FOR USE FOR COMPLETE INSTRUCTIONS. PRODUCT USAGE IDENTIFICATION OF A SMART PORT POWER INJECTABLE PORT POWER INJECTION USE AND MAINTENANCE *AngioDynamics, the AngioDynamics logo, Smart Port and LifeGuard are trademarks and/or registered trademarks of AngioDynamics, an affiliate or a subsidiary. © 2013 AngioDynamics, Inc. MLC 240 Rev C 02/13 The Smart Port * power-injectable port is intended to facilitate frequent blood sampling or the delivery of medications, nutritions, blood products and power injection of contrast media for imaging. Access is performed by percutaneous needle insertion using an anticoring (huber point) needle. Each Smart Port power-injectable port is packaged with a Smart Port Patient Education Packet that includes a Smart Port Patient Information Booklet, Smart Port Patient Identification Card, a Key Ring Card and Patient ID Bracelet. The patient should receive these items at the time the port is implanted. POWER-INJECTABLE PORTS 1. The clinician should first review the patient chart to ensure that the patient has a Smart Port implanted port that is indicated for power injection of contrast media. The patient should have a Smart Port Patient Identification Card, Smart Port Patient Information Guide or Smart Port Key Ring Card Note: The completed patient identification card should be given to the patient, who should be instructed to carry it at all times. 2. The Smart Port Implanted Port should be accessed with a 19 or 20 gauge non y-site LifeGuard * Safety Infusion Set for injection of contrast media. The tubing on the safety needle should be clamped. 3. Remove the injection cap attached to the end of the LifeGuard Safety Infusion Set. 4. Attach a 10 mL or larger syringe to the luer hub end of the LifeGuard Safety Infusion Set, release the clamp and aspirate to confirm blood return. Note: Absence of blood return or a poor blood return can be a sign of a potential complication such as occlusion, kinking, breakage, Pinch- Off Syndrome, fibrin formation, thrombosis or malposition. This should be evaluated prior to catheter usage. A blood return should be present prior to usage of device. Note: Testing aspiration for simulated blood return is 0.5 mL/sec. After each delivery of medications or fluid: Flush with at least 20 mL of normal saline followed by 3–5 mL of heparinized saline solution. After blood withdrawal: Flush with a minimum of 10 mL of saline followed by 3–5 mL of heparinized saline solution. 5. Flush the Smart Port Implantable Port with 10–20 mL 0.9% normal saline. The device should flush without resistance. Warning: Not assessing patency may result in device failure. 6. Close the clamp of the LifeGuard Safety Infusion Set tubing. 7. Remove the syringe from the LifeGuard Safety Infusion Set. 8. Attach the power injection tubing per manufacturer’s recommendations to the luer hub end of the LifeGuard Safety Infusion Set. Release the clamp. 9. Set the power injection machine per manufacturer’s recommendations for a maximum pressure of 300 psi. 10. Perform the study. Do not exceed 5 mL/sec or 300 psi during injection of contrast dye. 11. Close the clamp. Disengage the power injection tubing from the luer hub end of the LifeGuard Safety Infusion Set. 12. Place a new injection cap on the LifeGuard Safety Infusion Set luer hub. 13. Flush the Smart Port Implantable Port with 10–20 mL 0.9% normal saline. 14. Flush the Smart Port Implantable Port with 3–5 mL of 10–100 units/mL heparinized saline. Actual amount and strength depends on facility policy. Access the Port OPERATING LIFEGUARD SAFETY INFUSION SET Port not in use: 3–5 mL of heparinized saline solution should be administered every four weeks. After power injection of contrast media: Flush with 10–20 mL normal saline, followed by 3–5 mL of heparinized saline solution. Figure 2 Figure 2a Figure 2b Figure 1 Grasp the wings with thumb and middle finger, placing your index finger on top of the needle head. Insert needle perpendicular to the port. Advance needle through the skin and the septum until it makes contact with the bottom of the reservoir. Raise the needle trap to a 90° angle. Using your non- dominant hand, grasp the needle stick guard and hold down firmly (Figure 2). While holding the needlestick guard firmly, grasp the flexible wings and pull upward until the needle is completely encapsulated in the needle trap. Note: The needle trap allows for visual confirmation that the needle is fully encapsulated and safe. Additionally, you may feel or hear it lock into the safe position (Figure 2a). Flip the needlestick guard toward the needle trap. Dispose in Sharps Container port (Figure 2b). De-Access the Port

Upload: hangoc

Post on 10-Feb-2019

213 views

Category:

Documents


0 download

TRANSCRIPT

USA > 14 Plaza Drive, Latham, NY 12110 > tel: 800-772-6446 > fax: 518-798-1360 > Canada tel: 800-268-0184International > Haaksbergweg 75 (Margriettoren), 1101 BR, Amsterdam Z-O > The Netherlands tel: +31 (0)20 753 2949 > fax: +31 (0)20 753 2939

CONTRAINDICATIONS: Smart Port CT should not be implanted in the presence of known or suspected infections, bacteremia, septicemia and peritonitis, or in patients who have exhibited prior intolerance to the materials of construction, or patients whose body size or tissue is insuffi cient to accommodate the size of the port or catheter.

WARNINGS AND PRECAUTIONS: Please see package insert for complete list of warnings and precautions. POTENTIAL COMPLICATIONS: Consult package insert for a complete list of potential complications.

CAUTION: Federal (USA) law restricts these devices to sale by or on the order of a physician.

www.angiodynamics.com

The following is a brief summary of important risk information for the Smart Port power-injectable port line. For detailed information on the categories referenced, please consult the instructions for use packaged with each device. Observe all instructions prior to use. Failure to do so may result in patient complications.

INDICATION FOR USE: The Smart Port CT power injectable port line is indicated for any patient requiring repeated access of the vascular system for delivery of medications, nutritional supplementation, fl uids, blood, blood products, sampling of blood and power injection of contrast media for imaging. Use of non Y site LifeGuard Safety Infusion Set (size = 20Ga or 19Ga) is indicated for power injection of contrast media. For power injection of contrast media, maximum recommended infusion rate is 5ml/sec.

Power Injection Guidelines

REFER TO DIRECTIONS FOR USE FOR COMPLETE INSTRUCTIONS.

PRODUCT USAGE

IDENTIFICATION OF A SMART PORT POWER INJECTABLE PORT

POWER INJECTION

USE AND MAINTENANCE

*AngioDynamics, the AngioDynamics logo, Smart Port and LifeGuard are trademarks and/or registered trademarks of AngioDynamics, an affi liate or a subsidiary. © 2013 AngioDynamics, Inc. MLC 240 Rev C 02/13

The Smart Port* power-injectable port is intended to facilitate frequent blood sampling or the delivery of medications, nutritions, blood products and power injection of contrast media for imaging. Access is performed by percutaneous needle insertion using an anticoring (huber point) needle.

Each Smart Port power-injectable port is packaged with a Smart Port Patient Education Packet that includes a Smart Port Patient Information Booklet, Smart Port Patient Identifi cation Card, a Key Ring Card and Patient ID Bracelet. The patient should receive these items at the time the port is implanted.

POWER-INJECTABLE PORTS

1. The clinician should fi rst review the patient chart to ensure that the patient has a Smart Port implanted port that is indicated for power injection of contrast media. The patient should have a Smart Port Patient Identifi cation Card, Smart Port Patient Information Guide or Smart Port Key Ring CardNote: The completed patient identifi cation card should be given to the patient, who should be instructed to carry it at all times.

2. The Smart Port Implanted Port should be accessed with a 19 or 20 gauge non y-site LifeGuard* Safety Infusion Set for injection of contrast media. The tubing on the safety needle should be clamped.

3. Remove the injection cap attached to the end of the LifeGuard Safety Infusion Set.

4. Attach a 10 mL or larger syringe to the luer hub end of the LifeGuard Safety Infusion Set, release the clamp and aspirate to confi rm blood return.Note: Absence of blood return or a poor blood return can be a sign of a potential complication such as occlusion, kinking, breakage, Pinch-Off Syndrome, fi brin formation, thrombosis or malposition. This should be evaluated prior to catheter usage. A blood return should be present prior to usage of device. Note: Testing aspiration for simulated blood return is0.5 mL/sec.

After each delivery of medications or fl uid: Flush with at least 20 mL of normalsaline followed by 3–5 mL of heparinizedsaline solution.

After blood withdrawal: Flush with a minimum of 10 mL of saline followed by3–5 mL of heparinized saline solution.

5. Flush the Smart Port Implantable Port with 10–20 mL 0.9% normal saline. The device should fl ush without resistance. Warning: Not assessing patency may result in device failure.

6. Close the clamp of the LifeGuard Safety InfusionSet tubing.

7. Remove the syringe from the LifeGuard Safety Infusion Set.

8. Attach the power injection tubing per manufacturer’s recommendations to the luer hub end of the LifeGuard Safety Infusion Set. Release the clamp.

9. Set the power injection machine per manufacturer’s recommendations for a maximum pressure of 300 psi.

10. Perform the study. Do not exceed 5 mL/sec or 300 psi during injection of contrast dye.

11. Close the clamp. Disengage the power injection tubing from the luer hub end of the LifeGuard Safety Infusion Set.

12. Place a new injection cap on the LifeGuard Safety Infusion Set luer hub.

13. Flush the Smart Port Implantable Port with 10–20 mL 0.9% normal saline.

14. Flush the Smart Port Implantable Port with 3–5 mL of 10–100 units/mL heparinized saline. Actual amount and strength depends onfacility policy.
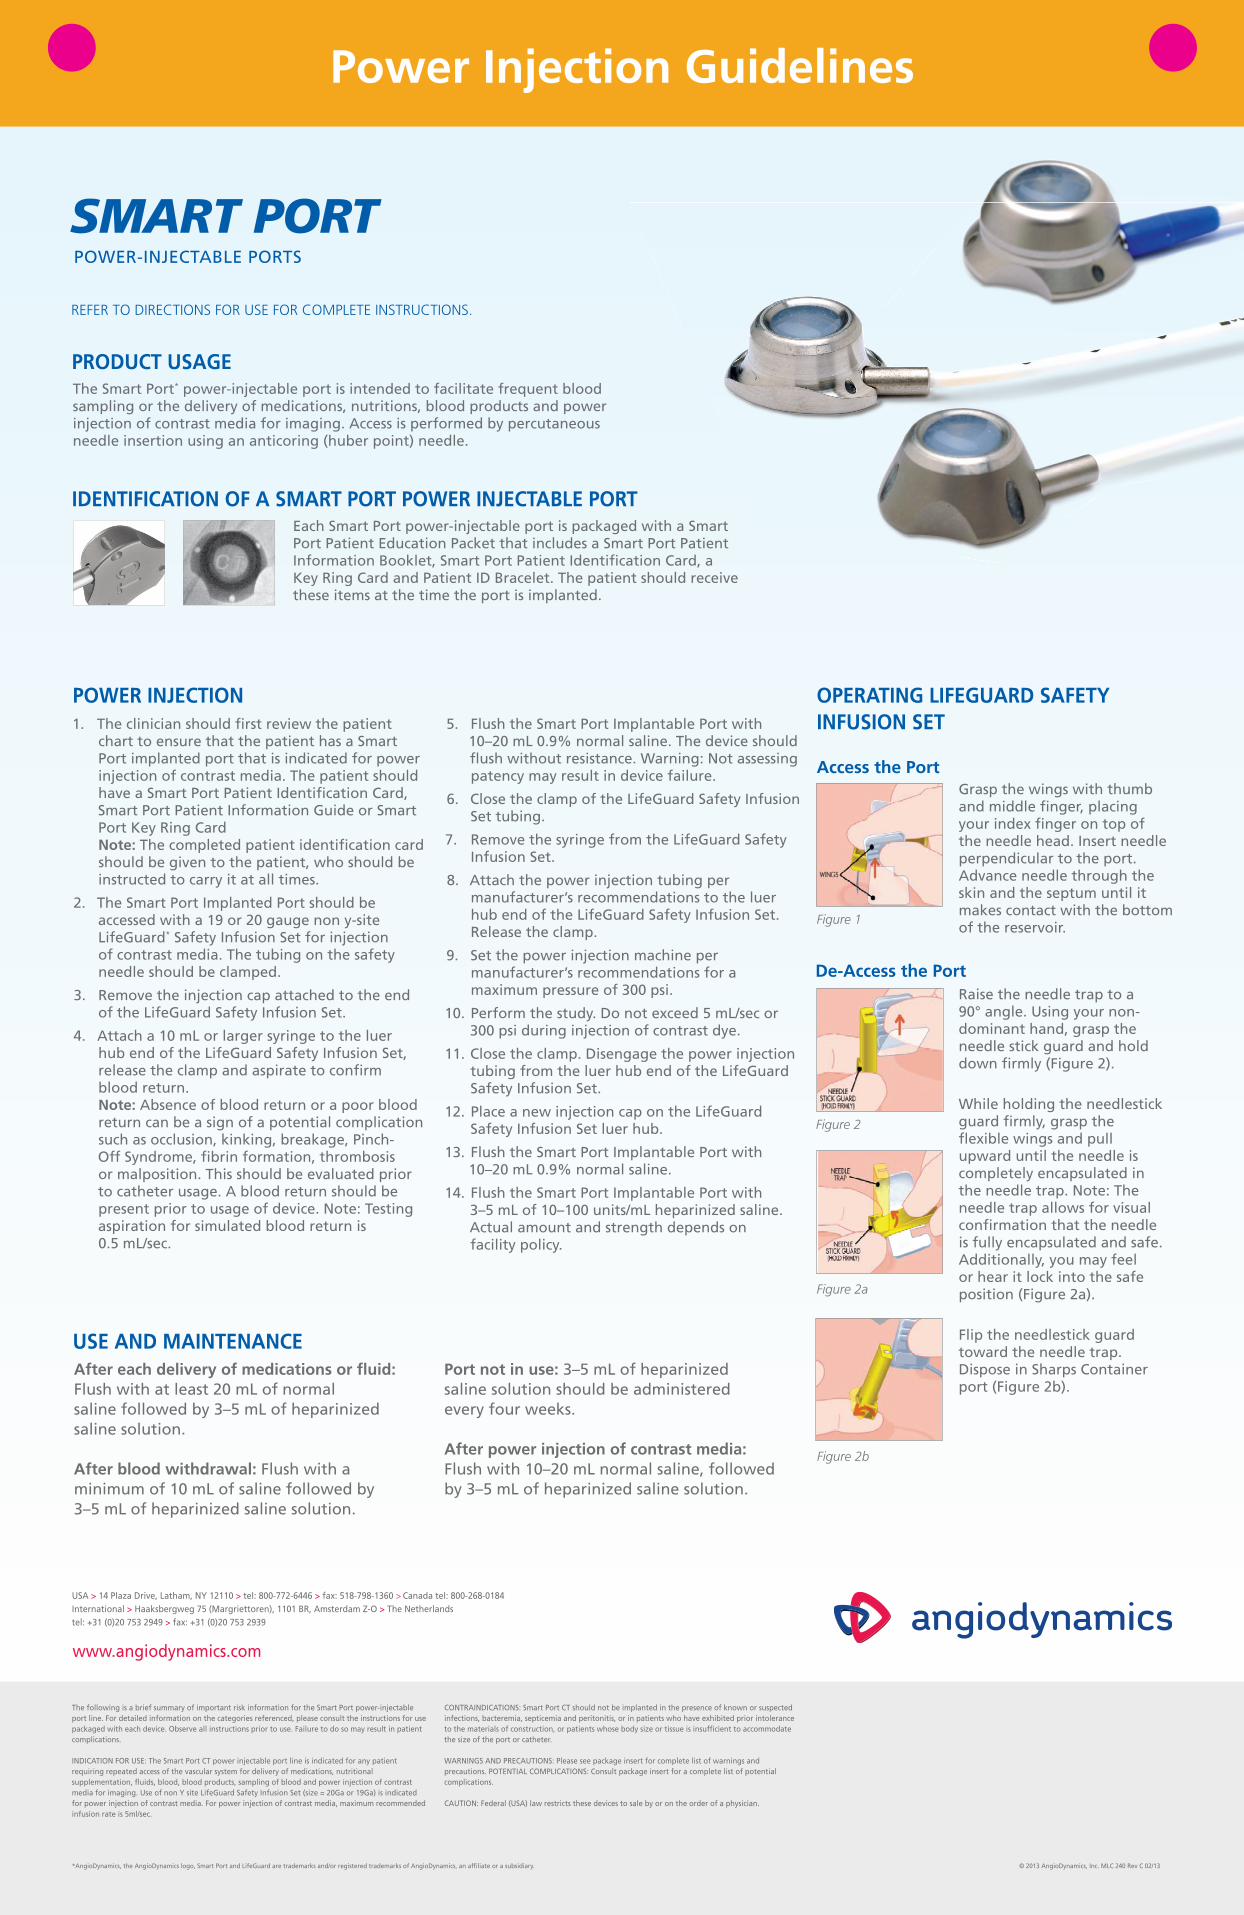
Access the Port

OPERATING LIFEGUARD SAFETYINFUSION SET

Port not in use: 3–5 mL of heparinizedsaline solution should be administeredevery four weeks.

After power injection of contrast media:Flush with 10–20 mL normal saline, followedby 3–5 mL of heparinized saline solution.

Figure 2

Figure 2a

Figure 2b

Figure 1

Grasp the wings with thumb and middle fi nger, placing your index fi nger on top of the needle head. Insert needle perpendicular to the port. Advance needle through the skin and the septum until it makes contact with the bottom of the reservoir.

Raise the needle trap to a 90° angle. Using your non-dominant hand, grasp the needle stick guard and hold down fi rmly (Figure 2).

While holding the needlestick guard fi rmly, grasp the fl exible wings and pull upward until the needle is completely encapsulated in the needle trap. Note: The needle trap allows for visual confi rmation that the needle is fully encapsulated and safe. Additionally, you may feel or hear it lock into the safe position (Figure 2a).

Flip the needlestick guard toward the needle trap. Dispose in Sharps Container port (Figure 2b).

De-Access the Port