popular woodworking _202 february 2013
TRANSCRIPT

February 2013 ■ #202
Wipe-on Finish Myths Debunked Review: Veritas Marking Knife
popularwoodworking.com
Carolina CellaretteNo-fuss Dovetails & Details
FnL1 0
3 0084
01 CUYr
VyBNZW
RpYQ9H
cmVnb3
J5IEtydW
Vn 02 Z
XIAULY
GbAQxM
C40Ajg
wATEFV
VBDLUE
M 03 M
Dc0OD
A4MDEz
NTU1lQ
==
74808 013550 5
02
US $6.99
Display until March 4, 2013
Japanese ChiselsTough Steel, Incredible Edge
Arkansas StonesStay Sharp – Naturally
Greene & Greene:Beautiful & BuildableUltimate Bungalow Bed
Fast Fix for Uneven Legs Table Saw Trick CuresAge-Old Problem
Shell, Stone & Metal InlaySimple Techniques, Stunning Results
c1_1302_PWM_Cover.indd US1c1_1302_PWM_Cover.indd US1 12/4/12 10:11 AM12/4/12 10:11 AM

15357
13POP
®
G0732ONLY $79500
Motor: 11⁄2 HP, 110V/220V, 11.5A/5.7A, single-phase, pre-wired 110V
Encapsulated blade for improved dust collection Front /rear locking fence Fence scales on left and right side of blade Independent-side blade guard Miter gauge Extruded
aluminum fence
Cogged V-belt
MADE IN TAIWAN
FREE 10" CARBIDE-TIPPED BLADE
Motor: 2 HP, 110V/220V, single-phase, TEFC Precision-ground cast iron table size: 17" sq. Table tilt: 45º R, 10º L Cutting capacity/throat: 161⁄4" Max. cutting height: 121⁄8" Blade size: 1311⁄2" L (1⁄8"–1" W) Blade speeds: 1700 & 3500 FPM Quick release blade tension lever Approx. shipping weight: 342 lbs. (G0513),
346 lbs. (G0513P)
INCLUDES DELUXE EXTRUDED ALUMINUM FENCE,MITER GAUGE & 1⁄2" BLADE
MADE IN TAIWAN
ALSO AVAILABLE IN GRIZZLY GREEN
G0513 HEAVY-DUTY 17" BANDSAW ONLY$89500
G0513P ONLY $89500
G0555P ONLY $52500
Motor: 1 HP, TEFC, 110V / 220V single-phase, 1725 RPM 4" dust port Cutting cap./throat: 131⁄2" Max. cutting height: 6" Overall size: 661⁄2"H x 263⁄8"W
x 301⁄4"D Precision-ground cast iron
table: 14"x 14" Table height: 435⁄16", Tilt: 45°
R, 15° L Blade speeds:
1500 & 3200 FPM Blade size: 921⁄2" - 931⁄2"
(1⁄8" to 3⁄4"wide) Approx. shipping
weight: 196 lbs.
W
MADE IN TAIWAN
INCLUDES BOTH REGULAR &
DADO BLADE INSERTS
Motor: 2 HP, 110V/220V, single-phase Precision-ground cast iron table with wings
measures 27" x 40" Arbor: 5⁄8" Arbor speed: 3850 RPM Capacity: 31⁄8" @ 90º,
23⁄16" @ 45º Rip capacity: 30" R, 12" L Quick change
riving knife Cast iron trunnions Approx. shipping
weight: 404 lbs.
G0715P ONLY $79500
DIAL ANGLE SCALE FOR SPINDLE TILT
Motor: 3 HP or 5 HP, 240V, single-phase Precision-ground cast iron table size with
wings: 27" x 48" Arbor: 5⁄8" Cutting capacity: 255⁄8" R, 8" L Max. depth of cut: 3" @ 90º, 21⁄8" @ 45º Approx. shipping weight: 550 lbs. (G1023RLW), 542 lbs.
(G1023RLWX)
FREE 10" CARBIDE-TIPPED BLADE
MADE IN TAIWAN
G1023RLW 3 HPONLY $135000
G1023RLWX 5 HP ONLY $139500
MADE IN TAIWAN
MADE IN ISO 9001 FACTORY!
G0555LX ONLY $54500
Motor: 1 HP, 110V/220V, single-phase, TEFC, 1725 RPM
Amps: 11A/5.5A Table size: 14" x 14" x 11⁄2" Table tilt: 45° R 10° L Floor to table height: 43" Cutting capacity/throat: 131⁄2" Maximum cutting height: 6" Blade size: 931⁄2" (1⁄8" to 3⁄4" wide) Approximate shipping
weight: 246 lbs.
Motor: 3 HP, 220V, single-phase, TEFC
Precision-ground cast iron table size: 263⁄4" x 19"
Table tilt: 45º R, 5º L Cutting capacity/throat: 181⁄4" Max. cutting height: 12"
Blade size: 143" L (1⁄8"–11⁄4" W) Blade speeds: 1700 & 3500 FPM Approx. shipping weight: 460 lbs.
(G0514X), 496 lbs. (G0514XF)
(G0514X ONLY)
G0514X ONLY $149500
ALSO AVAILABLE
G0514XF W/FOOT BRAKE ONLY $139500
DELUXE RE-SAW FENCE INCLUDED
*To maintain machine warranty, 440V operation requires additional conversion time and a $250 fee. Please contact technical service for complete information before ordering.
3 HP, Single-Phase
G0691 ONLY $142500
Motor: 3 HP, 220V, single-phase Leeson®
Table size w/extension: (G0690)27" x 40" (G0691) 27" x 743⁄4" Table height from floor: 34" Arbor speed: 4,300 RPM Max. dado width: 13⁄16" Max. depth of cut @ 90°: 31⁄8", @ 45°: 23⁄16" Overall dimensions: (G0690) 62"L x 41"W x 40"H
(G0691) 82"L x 41"W x 40"H Approx. shipping
weight: 542 lbs.
(G0690), 572 lbs. (G0691)
3 HP, Single-Phase
G0690 ONLY $132500
INCLUDES 10" X 40T BLADE AND H3308 PUSHSTICK
c2_1302_PWM_FPAds.indd c2c2_1302_PWM_FPAds.indd c2 11/28/12 12:56 PM11/28/12 12:56 PM

FREE CATALOG
Sanding motor: 11⁄2 HP, 110V, single-phase Conveyor feed rate: variable,
2–12 FPM Max. stock size: 36" W
x 41⁄2" thick Min. board length: 6" Sanding drum size: 4" Drum speed: 4000 FPM Dust port: 21⁄2" Cast iron platen Sandpaper: 3" W Approx. shipping
weight: 328 lbs.
INDEPENDENT DUST
COLLECTION WITH DUST BAG
TABLE MOVES
UP & DOWN
G0458ONLY $89500
Motor: 11⁄2 HP, 110/220V, single-phase, TEFC, 3450 RPM, prewired 110V
Airflow capacity: 775 CFM at 1.08" SP Max. static pressure: 10" Intake port: 6" with
included 5" optional port Filtration: 99.9% at
0.2–2 microns Overall dimensions: 381⁄4" W x
651⁄2" H x 231⁄4" D 220V operation requires P0703P088 220V
conversion kit. Wiring procedures must be completed by an electrician or other qualified personnel. See manual for details.Approx. shipping weight: 216 lbs
ONLY 651⁄2" TALL!
MADE IN TAIWAN G0703PONLY $79500
Motor: 3 HP, 220V, single-phase, TEFC Precision-ground cast iron table size: 13" x 60" Fence: 53⁄8" x 311⁄4" Cutterhead dia.: 33⁄4" Cutterhead speed: 4950 RPM Bevel jointing: 45º, 90º, 135º Max. depth of cut: 1⁄8" Max. rabbeting depth: 3⁄8" Approx. shipping
weight: 838 lbs.
Motor: 3 HP, 220V, single-phase, TEFC Precision-ground cast iron table size: 9" x 721⁄2" Max. depth of cut: 1⁄8" Max. rabbeting depth: 1⁄2"
CHOOSE EITHER 4 HSS
KNIVES OR SPIRAL
CUTTERHEAD MODEL
PARALLELOGRAM
TABLE ADJUSTMENT
Motor: 3 HP, 220V, single-phase Precision-ground cast iron table size: 15" x 20" Min. stock thickness: 3⁄16" Min. stock length: 8" Max. cutting depth
6" wide board: 1⁄8" Max. cutting depth full
width: 3⁄32" Feed rate: 16 & 30 FPM Cutterhead speed:
5000 RPM Approx. shipping weight:
662 lbs. (G0453P), 666lbs. (G0453PX)
FREE SAFETY PUSH
BLOCKS
FREE SAFETY
PUSH BLOCKS
MADE IN ISO 9001
FACTORY!
G0706 ONLY $249500
4 KNIFE CUTTERHEAD
G0656P ONLY $82500
SPIRAL CUTTERHEAD
G0656PX ONLY $122500
G0453P ONLY $109500
WITH SPIRAL CUTTERHEAD
G0453PX ONLY $169500
Motor: 11⁄2 HP, 220V, single-phase, 1720 RPM Cast iron sanding disc size: 15" Cast iron table size:
12" x 20" Table tilt: +15° to – 45º Floor to table
height: 375⁄8" Dust port: 21⁄2" Approx. shipping weight:
216 lbs.
FEATURES BUILT-IN MOTOR BRAKE
& STORAGE CABINET WITH SHELF
MADE IN TAIWAN
G0719 ONLY $87500
EASY MOUNTING WALL
BRACKET & LOCKING THUMB
SCREW SECURES DUST
COLLECTOR IN PLACE!
SPECIAL WALL
MOUNT DESIGN!
G0710 ONLY $17500
Motor: 5 HP, 220V, single-phase Jointer table size: 14" x 591⁄2" Cutterhead dia.: 31⁄8" Cutterhead speed: 5034 RPM Max. jointer depth of cut: 1⁄8" Max. width of cut: 12" Planer feed rate: 22 FPM Max. planer depth of cut: 1⁄8" Max. planer cutting height: 8" Planer table size: 121⁄4" x 231⁄8" Approx. shipping weight: 734 lbs.
(G0633), 704 lbs. (G0634XP), 750 lbs. (G0634Z)
FREE SAFETY
PUSH
BLOCKS
CARBIDE
INSERT SPIRAL
CUTTERHEAD!
W
OOD MAGAZINE
W
OOD MAGAZINE
A P P R O V E DA P P R O V E D
MADE IN TAIWAN
NEW END-
MOUNTED FENCE
ALSO AVAILABLE IN GRIZZLY GREEN
G0633 JOINTER/PLANER ONLY $199500
G0634Z SPIRAL CUTTERHEAD MODEL ONLY $259500
G0634XP ONLY $229500
Cutterhead dia.: 3" Cutterhead speed:
5000 RPM Cuts per
minute: 20,000
Approx. shipping weight: 498 lbs. (G0656P), 500 lbs. (G0656PX)
CHOOSE EITHER 3 KNIFE OR
SPIRAL CUTTERHEAD MODEL
Motor: 1 HP, 120V/240V, prewired 120V Amps: 7A/3.5A (main motor) Intake size: 4" Bag size (dia. x depth):
131⁄2" x 24" Balanced steel,
radial fin impeller Air suction cpacity: 537 CFM Max. static pressure: 7.2" Approx. shipping
weight: 51 lbsMADE IN TAIWAN
CARD #57 or go to PWFREEINFO.COM
c2_1302_PWM_FPAds.indd 1c2_1302_PWM_FPAds.indd 1 11/28/12 12:57 PM11/28/12 12:57 PM

Make It Available In Thin & Full KerfDesigns For Every Table & Chop Miter Saw!
HOW CAN THE BEST GENERALPURPOSE SAW BLADE GET
EVEN BETTER?
Introducing the Premier Fusion saw blade in both Thin and Full Kerf design.
Now woodworkers have a superior general purpose blade for both the
table and chop miter saw in the shop and for the lower horsepowered
saw on the job site. The New Thin Kerf combines the advanced Premier
Fusion features with a thinner kerf design to provide a fl awless fi nish
while reducing material waste, which makes it the ideal choice for
lowered powered saws.
Freud’s patent-pending Premier Fusion Saw
Blade is the most technologically advanced
blade on the market with a radical new “Fusion”
tooth design that combines a double side grind
with a 30 degree Hi-ATB to produce a glass-
smooth, chip-free top and bottom surface while
ripping and crosscutting.
The unique Fusion tooth design,
combined with Freud-made TiCo™ Hi-Density
Carbide, superior anti-vibration design and patented
Perma-SHIELD® non-stick coating create the
ultimate general purpose saw blade with fl awless
cutting performance.
Choose from four blades in the Full Kerf Premier Fusion
series – 8”, 10”, 12” and 14” or try the new Thin Kerf 10”
Premier Fusion. Use a Premier Fusion blade once and
you’ll be convinced.
Red saw blades and router bits are a registered trademark of Freud America, Inc. ©2012
Check out Freud’s facebook page and download our FREE monthly woodworking plan!
www.freudtools.com1-800-472-7307
Freud’s Fusion Tooth Design vs. Others
Item #P410
www.facebook.com/Freudtools
Item #P410T
CARD #67 or go to PWFREEINFO.COM
c2_1302_PWM_FPAds.indd 2c2_1302_PWM_FPAds.indd 2 11/28/12 12:57 PM11/28/12 12:57 PM
FE ATURES
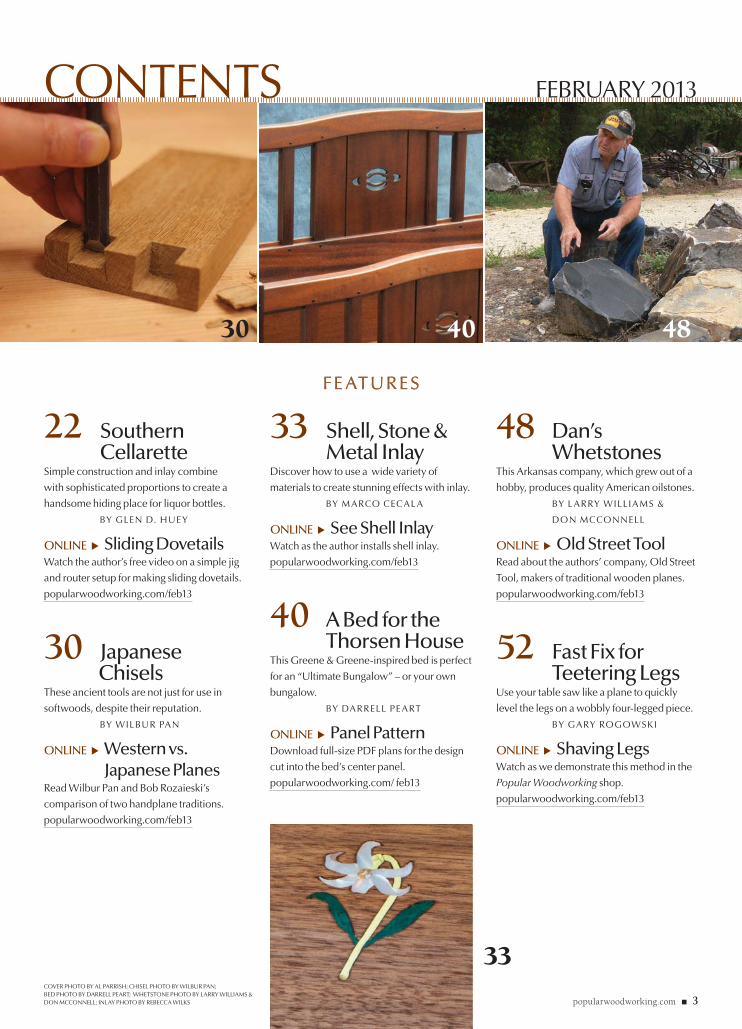
CONTENTS FEBRUARY 2013
popularwoodworking.com ■ 3
FE ATURES
22 Southern Cellarette
Simple construction and inlay combine
with sophisticated proportions to create a
handsome hiding place for liquor bottles.
BY GLEN D. HUEY
ONLINE u Sliding DovetailsWatch the author’s free video on a simple jig
and router setup for making sliding dovetails.
popularwoodworking.com/feb13
30 Japanese Chisels
These ancient tools are not just for use in
softwoods, despite their reputation.
BY WILBUR PAN
ONLINE u Western vs. Japanese Planes
Read Wilbur Pan and Bob Rozaieski’s
comparison of two handplane traditions.
popularwoodworking.com/feb13
33 Shell, Stone & Metal Inlay
Discover how to use a wide variety of
materials to create stunning effects with inlay.
BY MARCO CECALA
ONLINE u See Shell InlayWatch as the author installs shell inlay.
popularwoodworking.com/feb13
40 A Bed for the Thorsen House
This Greene & Greene-inspired bed is perfect
for an “Ultimate Bungalow” – or your own
bungalow.
BY DARRELL PEART
ONLINE u Panel PatternDownload full-size PDF plans for the design
cut into the bed’s center panel.
popularwoodworking.com/ feb13
48 Dan’s Whetstones
This Arkansas company, which grew out of a
hobby, produces quality American oilstones.
BY LARRY WILLIAMS &
DON MCCONNELL
ONLINE u Old Street ToolRead about the authors’ company, Old Street
Tool, makers of traditional wooden planes.
popularwoodworking.com/feb13
52 Fast Fix for Teetering Legs
Use your table saw like a plane to quickly
level the legs on a wobbly four-legged piece.
BY GARY ROGOWSKI
ONLINE u Shaving LegsWatch as we demonstrate this method in the
Popular Woodworking shop.
popularwoodworking.com/feb13
COVER PHOTO BY AL PARRISH; CHISEL PHOTO BY WILBUR PAN; BED PHOTO BY DARRELL PEART; WHETSTONE PHOTO BY LARRY WILLIAMS & DON MCCONNELL; INLAY PHOTO BY REBECCA WILKS
30 40 48
33
03_1302_PWM_TOC.indd 303_1302_PWM_TOC.indd 3 11/27/12 4:40 PM11/27/12 4:40 PM
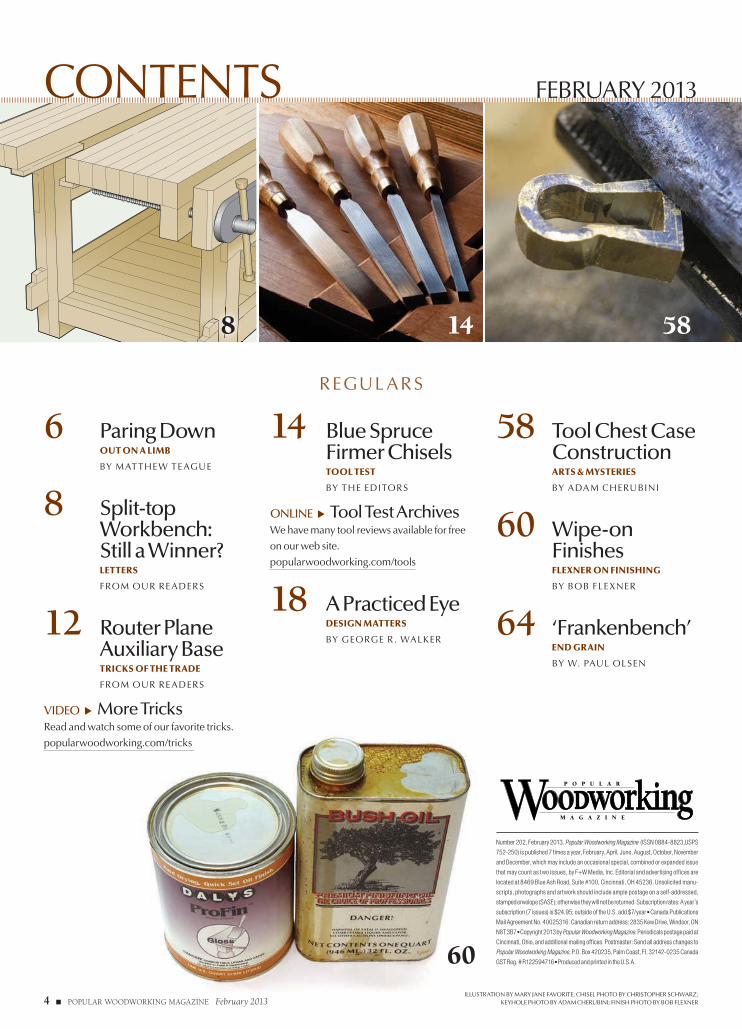
REGUL ARS
14 Blue Spruce Firmer Chisels
TOOL TEST
BY THE EDITORS
ONLINE u Tool Test ArchivesWe have many tool reviews available for free
on our web site.
popularwoodworking.com/tools
18 A Practiced Eye DESIGN MATTERS
BY GEORGE R. WALKER
58 Tool Chest Case Construction
ARTS & MYSTERIES
BY ADAM CHERUBINI
60 Wipe-on Finishes
FLEXNER ON FINISHING
BY BOB FLEXNER
64 ‘Frankenbench’ END GRAIN
BY W. PAUL OLSEN
CONTENTS FEBRUARY 2013
ILLUSTRATION BY MARY JANE FAVORITE; CHISEL PHOTO BY CHRISTOPHER SCHWARZ; KEYHOLE PHOTO BY ADAM CHERUBINI; FINISH PHOTO BY BOB FLEXNER
Number 202, February 2013. Popular Woodworking Magazine (ISSN 0884-8823,USPS
752-250) is published 7 times a year, February, April, June, August, October, November
and December, which may include an occasional special, combined or expanded issue
that may count as two issues, by F+W Media, Inc. Editorial and advertising offices are
located at 8469 Blue Ash Road, Suite #100, Cincinnati, OH 45236. Unsolicited manu-
scripts, photographs and artwork should include ample postage on a self-addressed,
stamped envelope (SASE); otherwise they will not be returned. Subscription rates: A year’s
subscription (7 issues) is $24.95; outside of the U.S. add $7/year ■ Canada Publications
Mail Agreement No. 40025316. Canadian return address: 2835 Kew Drive, Windsor, ON
N8T 3B7 ■ Copyright 2013 by Popular Woodworking Magazine. Periodicals postage paid at
Cincinnati, Ohio, and additional mailing offices. Postmaster: Send all address changes to
Popular Woodworking Magazine, P.O. Box 420235, Palm Coast, FL 32142-0235 Canada
GST Reg. # R122594716 ■ Produced and printed in the U.S.A.
8 14 58
60
4 ■ POPULAR WOODWORKING MAGAZINE February 2013
6 Paring Down OUT ON A LIMB
BY MAT THEW TEAGUE
8 Split-top Workbench: Still a Winner?
LETTERS
FROM OUR READERS
12 Router Plane Auxiliary Base
TRICKS OF THE TRADE
FROM OUR READERS
VIDEO u More TricksRead and watch some of our favorite tricks.
popularwoodworking.com/tricks
03_1302_PWM_TOC.indd 403_1302_PWM_TOC.indd 4 11/27/12 4:41 PM11/27/12 4:41 PM

CARD #17 or go to PWFREEINFO.COM
c2_1302_PWM_FPAds.indd 5c2_1302_PWM_FPAds.indd 5 11/28/12 12:57 PM11/28/12 12:57 PM
OUT ON A LIMB BY MATTHEW TEAGUE, EDITOR
6 ■ POPULAR WOODWORKING MAGAZINE February 2013
I’ve got router planes and shoulder planes, cabinet scrapers, draw-knives and shaves to tackle most
any task, but chisels are my particular kink. It’s something about their decep-tive simplicity. In one sense they’re just pieces of steel with handles attached; but they are also endlessly complex tools that must be engineered to gracefully marry the size, shape and weight of the blade – and of course the quality of the steel – with a handle that lends the tool balance and also fi ts your particular hand in just the right way. I’m a sucker for them, and I can’t seem to get enough.
I amassed the bulk of my chisels in the previous century, before the advent of high-end modern models and when you could still pick up a solid Sweet-heart-era Stanley 750 for 10 bucks or an Everlasting for twice that. As such, my collection is a ramshackle lot of well over 100 chisels. I’ve got my go-to favorites, all of which live within easy reach of my workbench, but others are tucked away in draw-ers and I haven’t used them in years. There are a few I never even bothered to tune up, and loose blades and han-dles seem to pop up whenever I scour the nooks and crannies of my shop in search of a misplaced tool.
But in truth, I got along pretty well with only the workmanlike fi ve-piece set of blue-handled chisels that my col-lege roommate left in the laundry room when he moved out years ago. And a few years later I did just fi ne with the basic four-piece set of 750s that Lonnie Bird was kind enough to pass down to me. Adding the 1⁄8" T. H. Witherby for tight spots and the crisp, long-handled 11⁄2" Charles Buck for paring only made work easier and more enjoyable. I guess I could have stopped there. And gotten
rid of the outliers. But with chisels as with beers, buying more always seems like a good idea.
Finally, 10 years ago, when building furniture became the primary means by which I fed my children and my mort-gage broker, I realized that owning yet another chisel was a luxury I could do without. There was brief backsliding over a pair of Japanese fi shtail chisels that are great for dovetailing (when I remember that I have them), but for the most part I stayed clean.
I even tested out some of the modern chisels that began to sur-face with the boutique toolmaking boom that came along shortly after the Internet. I fell in love with a few of them. But I refrained; I and my checkbook were wooed by the well-worn handles and patinated blades of vintage tools.
But when it came time to pack up for Woodworking in America last October, I found myself sort-
ing through well over a dozen chisels trying to decide on the right combination to take on the road. And as much as I love them all, I’ll admit to longing for a clean, full set of modern chisels.
In the coming months I’ll take a closer look at some of the modern chisels that have caught my eye. And I’m
sure I’ll soon buy a set. But I can’t pretend that new chisels will make me a better woodworker. They’re a luxury, like a good micro-brew or a high-end guitar. But you know as well as I do: Keith Richards would sound better on a dime-store ukulele than Sonny Bono would sound on a 1959 Gibson Les Paul. It’s what you bring to the tool, not what the tool brings to you. PWM
PHOTO BY THE AUTHOR
Paring DownFEBRUARY 2013, VOL. 33, NO. 1
popularwoodworking.com
EDITORIAL OFFICES 513-531-2690
PUBLISHER & GROUP EDITORIAL DIRECTOR ■ Kevin Ireland
[email protected], x11407
EDITOR ■ Matthew [email protected], x11007
SENIOR ART DIRECTOR ■ Daniel T. [email protected], x11396
EXECUTIVE EDITOR ■ Robert W. [email protected], x11327
EXECUTIVE EDITOR ■ Megan Fitzpatrickmegan.fi [email protected], x11348
SENIOR EDITOR ■ Steve [email protected], x11238
ONLINE COMMUNITY MANAGER ■ Tom [email protected], x11008
CONTRIBUTING EDITORS ■ Adam Cherubini, Bob Flexner, Glen D. Huey,
Christopher Schwarz
PHOTOGRAPHER ■ Al Parrish
F+W MEDIA, INC.
CHAIRMAN & CEO ■ David Nussbaum
CFO ■ James Ogle
PRESIDENT ■ David Blansfi eld
CHIEF DIGITAL OFFICER ■ Chad Phelps
VICE PRESIDENT, E-COMMERCE ■ Lucas Hilbert
SENIOR VICE PRESIDENT, OPERATIONS ■ Phil Graham
COMMUNICATIONS DIRECTOR ■ Stacie Berger
GROUP MARKETING DIRECTOR ■ Kate Rados
ADVERTISING
VICE PRESIDENT, SALES ■ Dave Davel
ADVERTISING DIRECTOR ■ Don Schroder331 N. Arch St., Allentown, PA 18104TEL. 610-821-4425; FAX. 610-821-7884
ADVERTISING SALES COORDINATOR ■ Connie Kostrzewa
TEL. 715-445-4612 [email protected]
NEWSSTAND
For newsstand sales, contact Scott T. Hill:[email protected]
SUBSCRIPTION SERVICES: Subscription inquiries, orders and address changes can be made at popularwoodworking.com (click on “Customer Service”). Or by mail: Popular Woodworking Magazine, P.O. Box 420235, Palm Coast, FL 32142-0235. Or call 386-246-3369. Include your address with all inquiries. Allow 6 to 8 weeks for delivery.
NEWSSTAND DISTRIBUTION: Curtis Circulation Co., 730 River Road, New Milford, NJ 07646. PHONE: 201-634-7400. FAX: 201-634-7499.
BACK ISSUES are available. Call 800-258-0929 for pricing or visit popularwoodworking.com. Send check or money order to: Popular Woodworking Magazine Back Issues, F+W Media Products, 700 E. State St., Iola, WI 54990. Please specify publication, month and year.
Copyright ©2013 by F+W Media Inc. All rights reserved. Popular Woodworking Magazine is a registered trademark of F+W Media.
06_1302_PWM_OOL.indd 606_1302_PWM_OOL.indd 6 11/27/12 4:42 PM11/27/12 4:42 PM

CARD #35 or go to PWFREEINFO.COM CARD #14 or go to PWFREEINFO.COM
06_1302_PWM_OOL.indd 706_1302_PWM_OOL.indd 7 11/27/12 4:42 PM11/27/12 4:42 PM
8 ■ POPULAR WOODWORKING MAGAZINE February 2013
LETTERS FROM OUR READERS
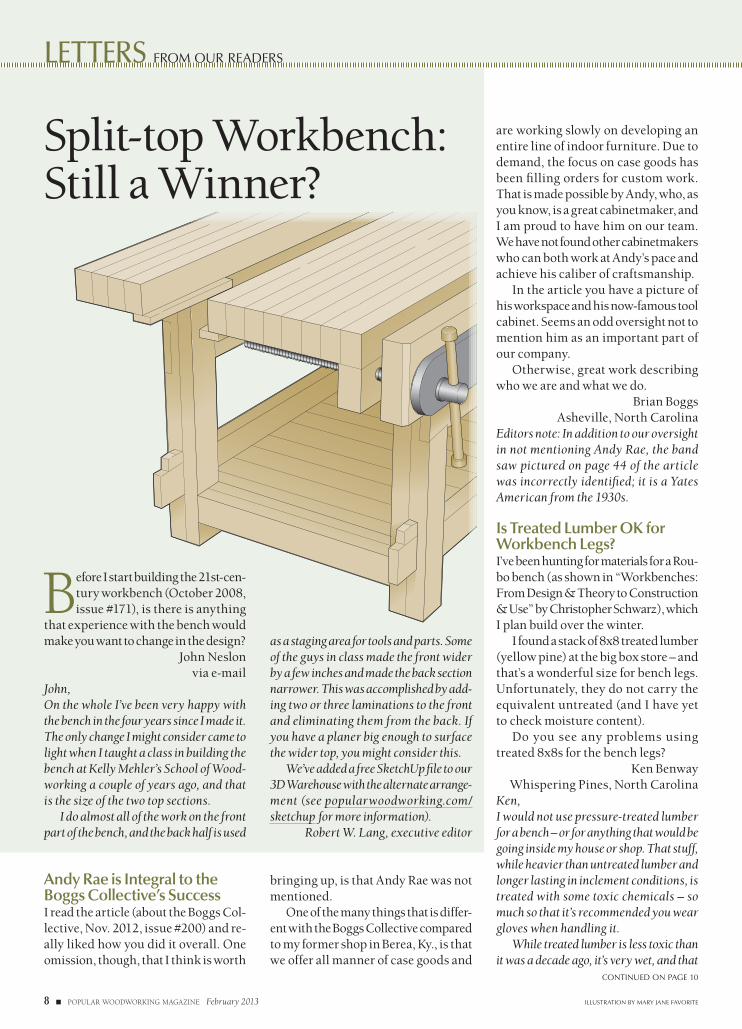
Split-top Workbench: Still a Winner?
Andy Rae is Integral to theBoggs Collective’s SuccessI read the article (about the Boggs Col-lective, Nov. 2012, issue #200) and re-ally liked how you did it overall. One omission, though, that I think is worth
CONTINUED ON PAGE 10
ILLUSTRATION BY MARY JANE FAVORITE
bringing up, is that Andy Rae was not mentioned.
One of the many things that is differ-ent with the Boggs Collective compared to my former shop in Berea, Ky., is that we offer all manner of case goods and
are working slowly on developing an entire line of indoor furniture. Due to demand, the focus on case goods has been fi lling orders for custom work. That is made possible by Andy, who, as you know, is a great cabinetmaker, and I am proud to have him on our team. We have not found other cabinetmakers who can both work at Andy’s pace and achieve his caliber of craftsmanship.
In the article you have a picture of his workspace and his now-famous tool cabinet. Seems an odd oversight not to mention him as an important part of our company.
Otherwise, great work describing who we are and what we do.
Brian BoggsAsheville, North Carolina
Editors note: In addition to our oversight in not mentioning Andy Rae, the band saw pictured on page 44 of the article was incorrectly identifi ed; it is a Yates American from the 1930s.
Is Treated Lumber OK for Workbench Legs?I’ve been hunting for materials for a Rou-bo bench (as shown in “Workbenches: From Design & Theory to Construction & Use” by Christopher Schwarz), which I plan build over the winter.
I found a stack of 8x8 treated lumber (yellow pine) at the big box store – and that’s a wonderful size for bench legs. Unfortunately, they do not carry the equivalent untreated (and I have yet to check moisture content).
Do you see any problems using treated 8x8s for the bench legs?
Ken BenwayWhispering Pines, North Carolina
Ken,I would not use pressure-treated lumber for a bench – or for anything that would be going inside my house or shop. That stuff, while heavier than untreated lumber and longer lasting in inclement conditions, is treated with some toxic chemicals – so much so that it’s recommended you wear gloves when handling it.
While treated lumber is less toxic than it was a decade ago, it’s very wet, and that
Before I start building the 21st-cen-tury workbench (October 2008, issue #171), is there is anything
that experience with the bench would make you want to change in the design?
John Neslonvia e-mail
John,On the whole I’ve been very happy with the bench in the four years since I made it. The only change I might consider came to light when I taught a class in building the bench at Kelly Mehler’s School of Wood-working a couple of years ago, and that is the size of the two top sections.
I do almost all of the work on the front part of the bench, and the back half is used
as a staging area for tools and parts. Some of the guys in class made the front wider by a few inches and made the back section narrower. This was accomplished by add-ing two or three laminations to the front and eliminating them from the back. If you have a planer big enough to surface the wider top, you might consider this.
We’ve added a free SketchUp fi le to our 3D Warehouse with the alternate arrange-ment (see popularwoodworking.com/sketchup for more information).
Robert W. Lang, executive editor
08_1302_PWM_Letters.indd 808_1302_PWM_Letters.indd 8 11/27/12 4:44 PM11/27/12 4:44 PM

This $6,000 Workshop Could Be Yours!WORKSHOP
MAKEOVERGIVEAWAY
Enter for your chance to WIN A COMPLETE SHOP that features ALL you see here.
Complete prizes and contest rules are also available at www.popwood.com/winshop
www.popwood.com/winshopPopular Woodworking Magazine’s “WORKSHOP MAKEOVER GIVEAWAY” SWEEPSTAKES: These are only abbreviated rules. The “Workshop Makeover Giveaway” Sweep-
stakes is subject to Offi cial Rules available during promotion period (Jan. 1, 2013-May 31, 2013) at www.popwood.com/winshop. See Offi cial Rules for complete entry
details and prize descriptions. NO PURCHASE OR SUBSCRIPTION NECESSARY TO ENTER OR WIN. Must be a legal resident of the U.S. or Canada (excluding Quebec) who
has reached the age of majority in the participant’s jurisdiction of residence to enter. One Grand Prize–Woodworker’s Home Work shop valued at US $6,000. Odds
of winning depend on number of entries. Void in Quebec and where prohibited. Sponsor: F+W Media, Inc., 10151 Carver Rd., Suite 200, Blue Ash, OH 45242 USA.
ENTER ONLINE TODAY!
ENTRY DEADLINE: Midnight, Eastern Standard Time, May 31, 2013
The WORKSHOP MAKEOVER GIVEAWAY is sponsored by:
ENTER NOW!
1-1/2-HP DUST COLLECTOR
K-BODY® REVO™ EXTENDER KIT
JWP-16OS
BPC-H34
JJ-6CSDX
KRK2450
DC-1100VX-CK
KRX2450
JWBS-14DXPRO
LMU2004
6" JOINTER
K-BODY® REVO™ FRAMING KIT
14" BAND SAW
24-4" LIGHT DUTY STEP-OVER
CLAMPS
JPS-10
BTB30A
10" PROSHOP TABLE SAW
BAR CLAMP ASSORTMENT WITH MOBILE
RACK
16" PLANER
4-PC “H” STYLE PIPE CLAMP SET
c2_1302_PWM_FPAds.indd 9c2_1302_PWM_FPAds.indd 9 11/28/12 12:57 PM11/28/12 12:57 PM
10 ■ POPULAR WOODWORKING MAGAZINE February 2013
LETTERS CONTINUED FROM PAGE 8
Letters & CommentsAt popularwoodworking.com/letters you’ll fi nd reader questions and comments, as well as our editors’ responses.
We want to hear from you.Popular Woodworking Magazine welcomes comments from readers. Published cor-respondence may be edited for length or style. All published letters become the prop-erty of Popular Woodworking Magazine.
Send your questions and comments via e-mail to [email protected], or by mail to 8469 Blue Ash Road, Suite 100, Cincinnati, OH 45236.
ONLINE EXTRAS
Customer ServiceHow can I contact customer service with questions regarding my subscription, including a lost or damaged issue?Visit popularwoodworking.com/customerservice. Or write to Popular Woodworking Magazine, P.O. Box 421751, Palm Coast, FL 32142-1751. Or, if you prefer the telephone, call 1-877-860-9140 (U.S. & Canada), 386-246-3369 (International) and a customer service representative will be happy to help you.
When does my subscription expire?The date of your subscription expiration appears on your magazine mailing label, above your name. The date indicates the last issue in your subscription.
Can I get back issues of Popular Woodworking and Woodworking Magazine?Back issues are available while supplies last. Visit popularwoodworking.com/backissues. Or if you know the exact month and year of the issue you want, call our customer service department toll-free at 855-840-5118 to order.
What if I want more information about the projects and tools I read about in Popular Woodworking Magazine? For all editorial questions, please write to Popular Woodworking Magazine, 8469 Blue Ash Road, Suite 100, Cincinnati, OH 45236. Or e-mail [email protected].
Does Popular Woodworking Magazine offer group discounts?Group discounts are available by special arrangement with the publisher. For more details, send an e-mail to Debbie Paolello at [email protected] or call 513-531-2690 x11296.
Our Privacy Promise to YouWe make portions of our customer list available to carefully screened companies that offer products and services we believe you may enjoy. If you do not want to receive offers and/or information, please let us know by contacting us at:
List Manager, F+W Media, Inc.10151 Carver Road, Suite 200Blue Ash, OH 45242
Safety NoteSafety is your responsibility. Manufacturers place safety devices on their equipment for a reason. In many photos you see in Popular Woodworking Magazine, these have been removed to provide clarity. In some cases we’ll use an awkward body position so you can better see what’s being demonstrated. Don’t copy us. Think about each procedure you’re going to perform beforehand.
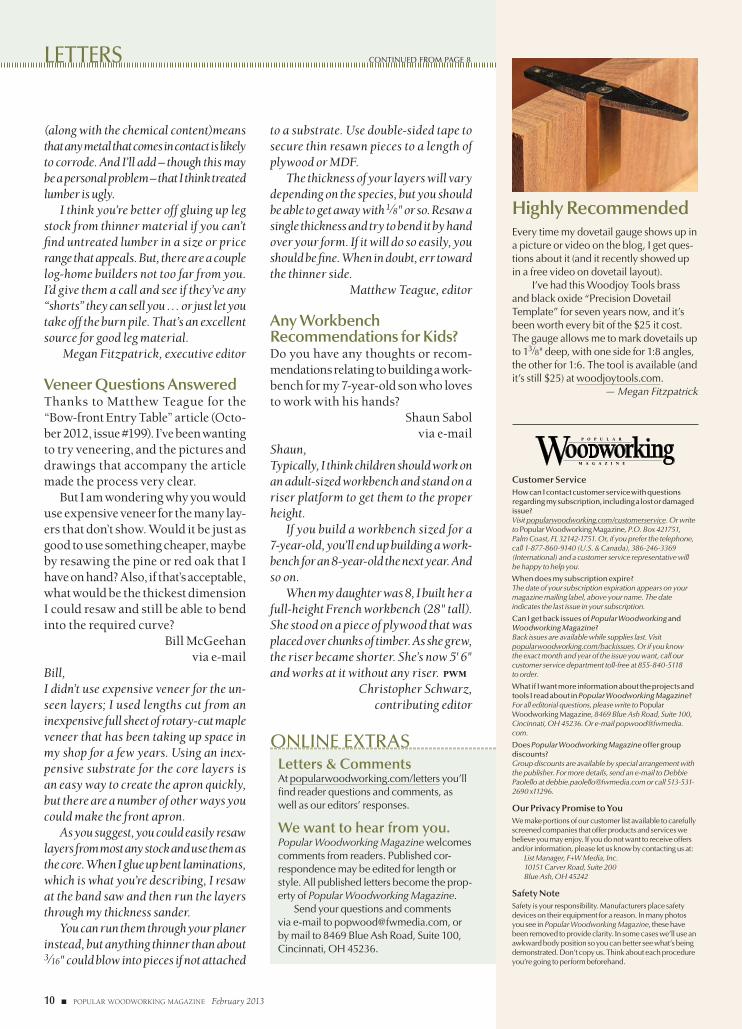
Highly RecommendedEvery time my dovetail gauge shows up in a picture or video on the blog, I get ques-tions about it (and it recently showed up in a free video on dovetail layout).
I’ve had this Woodjoy Tools brass and black oxide “Precision Dovetail Template” for seven years now, and it’s been worth every bit of the $25 it cost. The gauge allows me to mark dovetails up to 13⁄8" deep, with one side for 1:8 angles, the other for 1:6. The tool is available (and it’s still $25) at woodjoytools.com.
— Megan Fitzpatrick
(along with the chemical content)means that any metal that comes in contact is likely to corrode. And I’ll add – though this may be a personal problem – that I think treated lumber is ugly.
I think you’re better off gluing up leg stock from thinner material if you can’t fi nd untreated lumber in a size or price range that appeals. But, there are a couple log-home builders not too far from you. I’d give them a call and see if they’ve any “shorts” they can sell you … or just let you take off the burn pile. That’s an excellent source for good leg material.
Megan Fitzpatrick, executive editor
Veneer Questions AnsweredThanks to Matthew Teague for the “Bow-front Entry Table” article (Octo-ber 2012, issue #199). I’ve been wanting to try veneering, and the pictures and drawings that accompany the article made the process very clear.
But I am wondering why you would use expensive veneer for the many lay-ers that don’t show. Would it be just as good to use something cheaper, maybe by resawing the pine or red oak that I have on hand? Also, if that’s acceptable, what would be the thickest dimension I could resaw and still be able to bend into the required curve?
Bill McGeehanvia e-mail
Bill,I didn’t use expensive veneer for the un-seen layers; I used lengths cut from an inexpensive full sheet of rotary-cut maple veneer that has been taking up space in my shop for a few years. Using an inex-pensive substrate for the core layers is an easy way to create the apron quickly, but there are a number of other ways you could make the front apron.
As you suggest, you could easily resaw layers from most any stock and use them as the core. When I glue up bent laminations, which is what you’re describing, I resaw at the band saw and then run the layers through my thickness sander.
You can run them through your planer instead, but anything thinner than about 3⁄16" could blow into pieces if not attached
to a substrate. Use double-sided tape to secure thin resawn pieces to a length of plywood or MDF.
The thickness of your layers will vary depending on the species, but you should be able to get away with 1⁄8" or so. Resaw a single thickness and try to bend it by hand over your form. If it will do so easily, you should be fi ne. When in doubt, err toward the thinner side.
Matthew Teague, editor
Any Workbench Recommendations for Kids?Do you have any thoughts or recom-mendations relating to building a work-bench for my 7-year-old son who loves to work with his hands?
Shaun Sabolvia e-mail
Shaun,Typically, I think children should work on an adult-sized workbench and stand on a riser platform to get them to the proper height.
If you build a workbench sized for a 7-year-old, you’ll end up building a work-bench for an 8-year-old the next year. And so on.
When my daughter was 8, I built her a full-height French workbench (28" tall). She stood on a piece of plywood that was placed over chunks of timber. As she grew, the riser became shorter. She’s now 5' 6" and works at it without any riser. PWM
Christopher Schwarz, contributing editor
08_1302_PWM_Letters.indd 1008_1302_PWM_Letters.indd 10 11/27/12 4:44 PM11/27/12 4:44 PM

1-800-327-2520
Made in Maine, USA
From Kitchens to Heirlooms... ...Leigh Jigs Make Dovetails Easy.
Leigh Super JigsSee the video leighjigs.com
Incredibly accurateIncredibly accurate
CARD #38 or go to PWFREEINFO.COM
CARD #22 or go to PWFREEINFO.COM
CARD #29 or go to PWFREEINFO.COM CARD #91 or go to PWFREEINFO.COM
08_1302_PWM_Letters.indd 1108_1302_PWM_Letters.indd 11 11/27/12 4:44 PM11/27/12 4:44 PM
Easy Way to Square a Table Saw’s Miter Gauge The stock miter gauge supplied with table saws is notoriously inaccurate. However, a precise way to square the miter gauge is also one of the easiest.
To confirm that my miter gauge is square (assuming the miter slot is parallel to the blade), I attach two rare earth magnets about 22" apart into the right-hand miter slot. The magnets are
attached to the edge of the slot so they extend vertically above the table surface.
Next, I set a carpenter’s square be-tween the miter gauge’s fence extension and the two magnets. It works best to fi rst align the square with the magnets, then, holding the square to prevent it from moving, align the miter gauge fence extension to the square.
This procedure owes its precision to the accuracy and long baselines of the carpenter’s square, so the magnets should be placed close to the ends of the long leg of the square.
Bill WellsOlympia, Washington
TRICKS OF THE TRADE EDITED BY STEVE SHANESY
12 ■ POPULAR WOODWORKING MAGAZINE February 2013
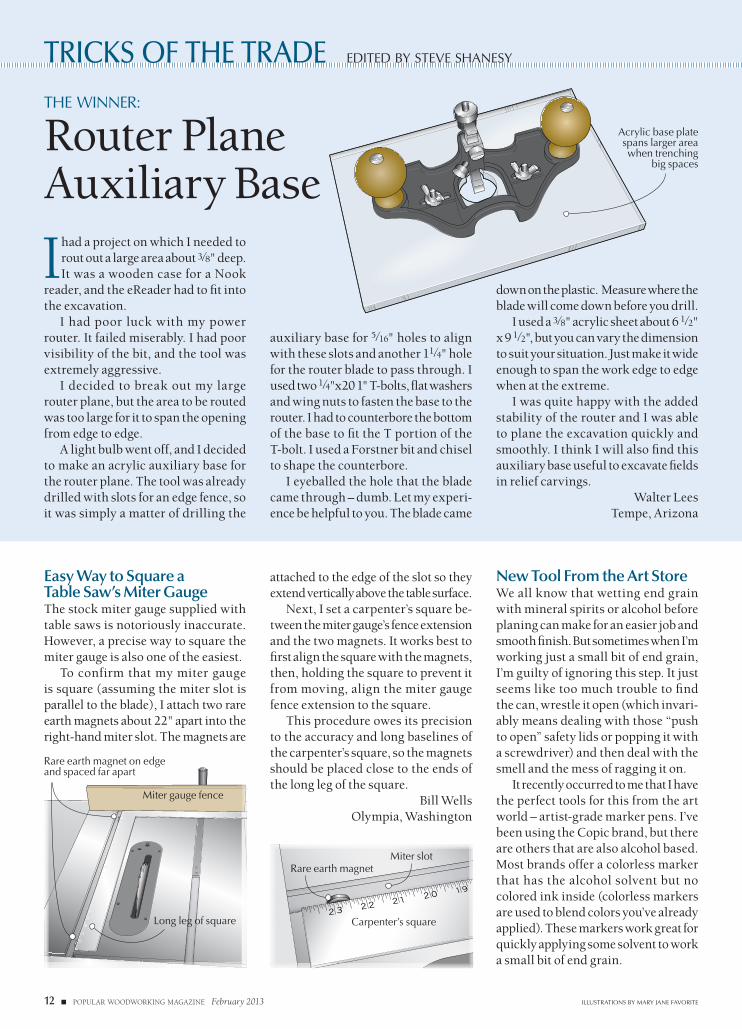
I had a project on which I needed to rout out a large area about 3⁄8" deep. It was a wooden case for a Nook
reader, and the eReader had to fi t into the excavation.
I had poor luck with my power router. It failed miserably. I had poor visibility of the bit, and the tool was extremely aggressive.
I decided to break out my large router plane, but the area to be routed was too large for it to span the opening from edge to edge.
A light bulb went off, and I decided to make an acrylic auxiliary base for the router plane. The tool was already drilled with slots for an edge fence, so it was simply a matter of drilling the
THE WINNER:
ILLUSTRATIONS BY MARY JANE FAVORITE
auxiliary base for 5⁄16" holes to align with these slots and another 11⁄4" hole for the router blade to pass through. I used two 1⁄4"x20 1" T-bolts, fl at washers and wing nuts to fasten the base to the router. I had to counterbore the bottom of the base to fi t the T portion of the T-bolt. I used a Forstner bit and chisel to shape the counterbore.
I eyeballed the hole that the blade came through – dumb. Let my experi-ence be helpful to you. The blade came
down on the plastic. Measure where the blade will come down before you drill.
I used a 3⁄8" acrylic sheet about 6 1⁄2" x 9 1⁄2", but you can vary the dimension to suit your situation. Just make it wide enough to span the work edge to edge when at the extreme.
I was quite happy with the added stability of the router and I was able to plane the excavation quickly and smoothly. I think I will also fi nd this auxiliary base useful to excavate fi elds in relief carvings.
Walter LeesTempe, Arizona
New Tool From the Art StoreWe all know that wetting end grain with mineral spirits or alcohol before planing can make for an easier job and smooth fi nish. But sometimes when I’m working just a small bit of end grain, I’m guilty of ignoring this step. It just seems like too much trouble to fi nd the can, wrestle it open (which invari-ably means dealing with those “push to open” safety lids or popping it with a screwdriver) and then deal with the smell and the mess of ragging it on.
It recently occurred to me that I have the perfect tools for this from the art world – artist-grade marker pens. I’ve been using the Copic brand, but there are others that are also alcohol based. Most brands offer a colorless marker that has the alcohol solvent but no colored ink inside (colorless markers are used to blend colors you’ve already applied). These markers work great for quickly applying some solvent to work a small bit of end grain.
Router Plane Auxiliary Base
Acrylic base plate spans larger area when trenching
big spaces
Miter slot
Miter gauge fence
Rare earth magnet on edge and spaced far apart
Long leg of square Carpenter’s square
Rare earth magnet
12_1302_PWM_Tricks.indd 1212_1302_PWM_Tricks.indd 12 11/27/12 4:45 PM11/27/12 4:45 PM
popularwoodworking.com ■ 13
For links to all online extras, go to:■ popularwoodworking.com/feb13
TRICKS ONLINE: We post tricks from the past and fi lm videos of some Tricks of the Trade in use in our shop. They’re available online, free. Visit popularwoodworking.com/tricks to read and watch.
Our products are available online at:■ ShopWoodworking.com
Cash and prizes for your tricks and tips!Each issue we publish woodworking tips from our readers. Next issue’s winner receives a $250 gift certifi cate from Lee Val-ley Tools, good for any item in the catalog or on the web site (leevalley.com). (The tools pictured below are for illustration only, and are not part of the prize.)
Runners-up each receive a check for $50 to $100. When submitting a trick, include your mailing address and phone number. All accepted entries become the property of Popular Woodworking Maga-zine. Send your trick by e-mail to [email protected], or mail it to Tricks of the Trade, Popular Woodworking Magazine, 8469 Blue Ash Road, Suite 100, Cincinnati, OH 45236.
ONLINE EXTRAS
heating takes a minute or so, including the microwaving, and it’s all done dry. Use a meat thermometer fi rst to check how long it takes to warm up the bag to 120˚ F and note the time for future use.
Instead of buying a commercial heating bag, I used an old clean sock and fi lled it with uncooked rice, then close the sock’s opening by sewing a hem.
Charles MakCalgary, Alberta
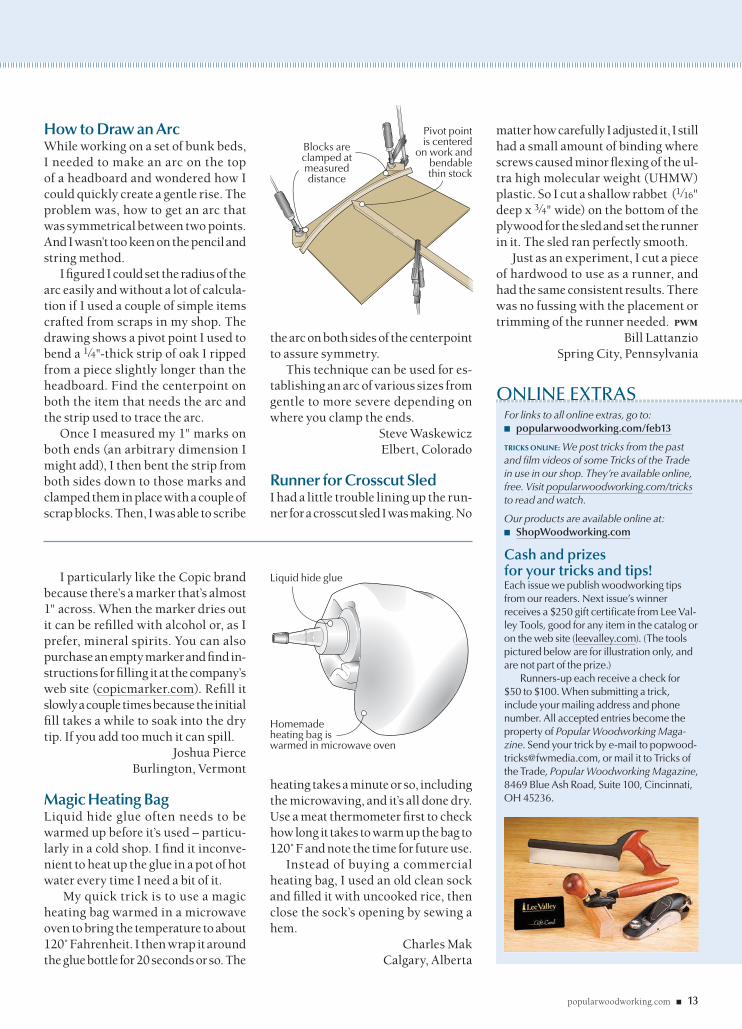
How to Draw an ArcWhile working on a set of bunk beds, I needed to make an arc on the top of a headboard and wondered how I could quickly create a gentle rise. The problem was, how to get an arc that was symmetrical between two points. And I wasn’t too keen on the pencil and string method.
I fi gured I could set the radius of the arc easily and without a lot of calcula-tion if I used a couple of simple items crafted from scraps in my shop. The drawing shows a pivot point I used to bend a 1⁄4"-thick strip of oak I ripped from a piece slightly longer than the headboard. Find the centerpoint on both the item that needs the arc and the strip used to trace the arc.
Once I measured my 1" marks on both ends (an arbitrary dimension I might add), I then bent the strip from both sides down to those marks and clamped them in place with a couple of scrap blocks. Then, I was able to scribe
the arc on both sides of the centerpoint to assure symmetry.
This technique can be used for es-tablishing an arc of various sizes from gentle to more severe depending on where you clamp the ends.
Steve WaskewiczElbert, Colorado
Runner for Crosscut SledI had a little trouble lining up the run-ner for a crosscut sled I was making. No
matter how carefully I adjusted it, I still had a small amount of binding where screws caused minor fl exing of the ul-tra high molecular weight (UHMW) plastic. So I cut a shallow rabbet (1⁄16" deep x 3⁄4" wide) on the bottom of the plywood for the sled and set the runner in it. The sled ran perfectly smooth.
Just as an experiment, I cut a piece of hardwood to use as a runner, and had the same consistent results. There was no fussing with the placement or trimming of the runner needed. PWM
Bill LattanzioSpring City, Pennsylvania
I particularly like the Copic brand because there’s a marker that’s almost 1" across. When the marker dries out it can be refi lled with alcohol or, as I prefer, mineral spirits. You can also purchase an empty marker and fi nd in-structions for fi lling it at the company’s web site (copicmarker.com). Refi ll it slowly a couple times because the initial fi ll takes a while to soak into the dry tip. If you add too much it can spill.
Joshua PierceBurlington, Vermont
Magic Heating Bag Liquid hide glue often needs to be warmed up before it’s used – particu-larly in a cold shop. I fi nd it inconve-nient to heat up the glue in a pot of hot water every time I need a bit of it.
My quick trick is to use a magic heating bag warmed in a microwave oven to bring the temperature to about 120˚ Fahrenheit. I then wrap it around the glue bottle for 20 seconds or so. The
Liquid hide glue
Homemade heating bag is warmed in microwave oven
Blocks are clamped at measured distance
Pivot point is centered
on work and bendable thin stock
12_1302_PWM_Tricks.indd 1312_1302_PWM_Tricks.indd 13 12/4/12 10:12 AM12/4/12 10:12 AM
TOOL TEST BY THE STAFF
14 ■ POPULAR WOODWORKING MAGAZINE February 2013
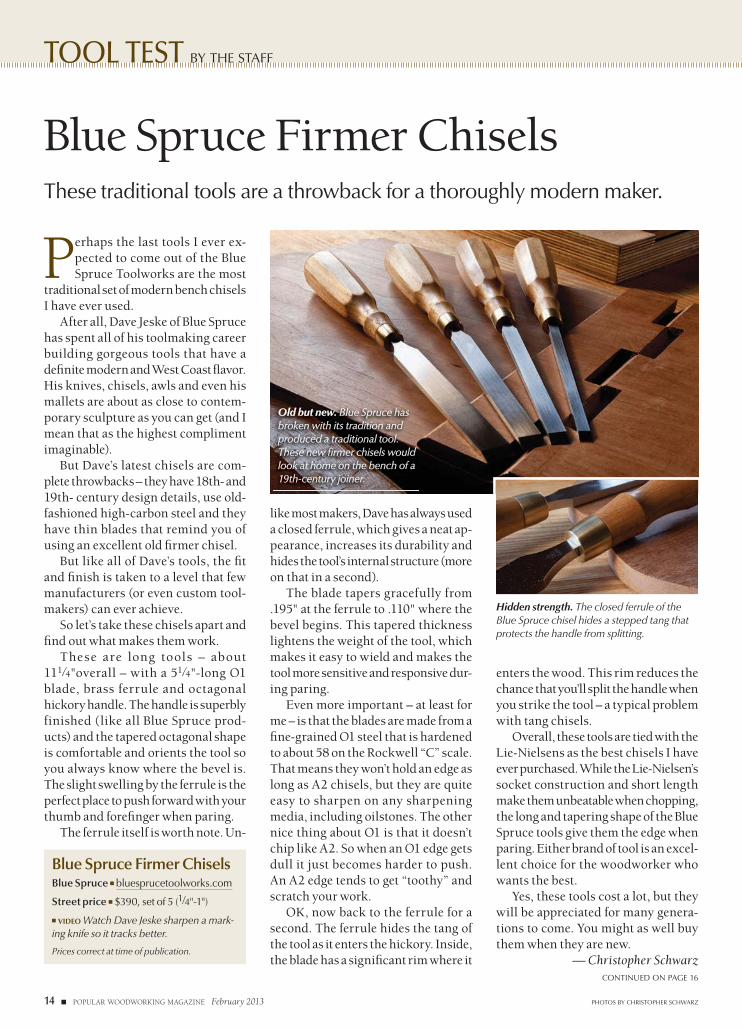
Perhaps the last tools I ever ex-pected to come out of the Blue Spruce Toolworks are the most
traditional set of modern bench chisels I have ever used.
After all, Dave Jeske of Blue Spruce has spent all of his toolmaking career building gorgeous tools that have a defi nite modern and West Coast fl avor. His knives, chisels, awls and even his mallets are about as close to contem-porary sculpture as you can get (and I mean that as the highest compliment imaginable).
But Dave’s latest chisels are com-plete throwbacks – they have 18th- and 19th- century design details, use old-fashioned high-carbon steel and they have thin blades that remind you of using an excellent old fi rmer chisel.
But like all of Dave’s tools, the fi t and fi nish is taken to a level that few manufacturers (or even custom tool-makers) can ever achieve.
So let’s take these chisels apart and fi nd out what makes them work.
These are long tools – about 111⁄4"overall – with a 51⁄4"-long O1 blade, brass ferrule and octagonal hickory handle. The handle is superbly finished (like all Blue Spruce prod-ucts) and the tapered octagonal shape is comfortable and orients the tool so you always know where the bevel is. The slight swelling by the ferrule is the perfect place to push forward with your thumb and forefi nger when paring.
The ferrule itself is worth note. Un-
like most makers, Dave has always used a closed ferrule, which gives a neat ap-pearance, increases its durability and hides the tool’s internal structure (more on that in a second).
The blade tapers gracefully from .195" at the ferrule to .110" where the bevel begins. This tapered thickness lightens the weight of the tool, which makes it easy to wield and makes the tool more sensitive and responsive dur-ing paring.
Even more important – at least for me – is that the blades are made from a fi ne-grained O1 steel that is hardened to about 58 on the Rockwell “C” scale. That means they won’t hold an edge as long as A2 chisels, but they are quite easy to sharpen on any sharpening media, including oilstones. The other nice thing about O1 is that it doesn’t chip like A2. So when an O1 edge gets dull it just becomes harder to push. An A2 edge tends to get “toothy” and scratch your work.
OK, now back to the ferrule for a second. The ferrule hides the tang of the tool as it enters the hickory. Inside, the blade has a signifi cant rim where it
enters the wood. This rim reduces the chance that you’ll split the handle when you strike the tool – a typical problem with tang chisels.
Overall, these tools are tied with the Lie-Nielsens as the best chisels I have ever purchased. While the Lie-Nielsen’s socket construction and short length make them unbeatable when chopping, the long and tapering shape of the Blue Spruce tools give them the edge when paring. Either brand of tool is an excel-lent choice for the woodworker who wants the best.
Yes, these tools cost a lot, but they will be appreciated for many genera-tions to come. You might as well buy them when they are new.
— Christopher Schwarz
Blue Spruce Firmer ChiselsThese traditional tools are a throwback for a thoroughly modern maker.
PHOTOS BY CHRISTOPHER SCHWARZ
CONTINUED ON PAGE 16
Blue Spruce Firmer ChiselsBlue Spruce ■ bluesprucetoolworks.com
Street price ■ $390, set of 5 (1⁄4"-1")
■ VIDEO Watch Dave Jeske sharpen a mark-ing knife so it tracks better.
Prices correct at time of publication.
Old but new.Old but new. Blue Spruce has Blue Spruce has broken with its tradition and broken with its tradition and produced a traditional tool. produced a traditional tool. These new fi rmer chisels would These new fi rmer chisels would look at home on the bench of a look at home on the bench of a 19th-century joiner.19th-century joiner.
Hidden strength. The closed ferrule of the Blue Spruce chisel hides a stepped tang that protects the handle from splitting.
14_1302_PWM_ToolTest.indd 1414_1302_PWM_ToolTest.indd 14 11/27/12 4:46 PM11/27/12 4:46 PM

For building cabinets and fi ne furniture, nothing beats Forrest saw blades.
Craftsmen appreciate the way our blades deliver smooth, quiet cuts without splintering, scratching, or tearouts. They know our unique grade C-4 micrograin carbide, proprietary manufacturing process, and hand straightening produce exceptional results. In fact, independent tests rate us #1 for rip cuts and crosscuts.
“From the fi rst cut on, I realized that this blade was a bargain at any price! Nothing else I have cuts comparably.” Calvin Brodie, Spanaway, WA
Forrest Quality Shows Woodworker II—Best rated, all-purpose blade for rips and crosscuts.
Chop Master—Perfect for tight, per-fectly cut miter joints without splinters.
Order from any Forrest dealer or retailer, online, or by calling directly. Our blades are manufactured in the U.S.A. and backed by our 30-day, money-back guarantee.
www.ForrestBlades.com1-800-733-7111 (In NJ, call 973-473-5236)
Woodworker IIFine Woodworking
Chop MasterWoodshop News
Duraline Hi-ATWoodshop News
Dado KingWood Magazine
© 2012 Forrest Manufacturing Code PW
If you are in awoodworking business…
this could be the mostvaluable tool in your
office.sm
Please call1-800-321-9841
for your 750 page catalog AND mention code pw0113
FREEto woodworking
businesses.Visit us at
pro.woodworker.com/pw0113CARD #54 or go to PWFREEINFO.COM
CARD #23 or go to PWFREEINFO.COM
CARD #13 or go to PWFREEINFO.COM
14_1302_PWM_ToolTest.indd 1514_1302_PWM_ToolTest.indd 15 12/5/12 2:07 PM12/5/12 2:07 PM
TOOL TEST CONTINUED FROM PAGE 14
16 ■ POPULAR WOODWORKING MAGAZINE February 2013
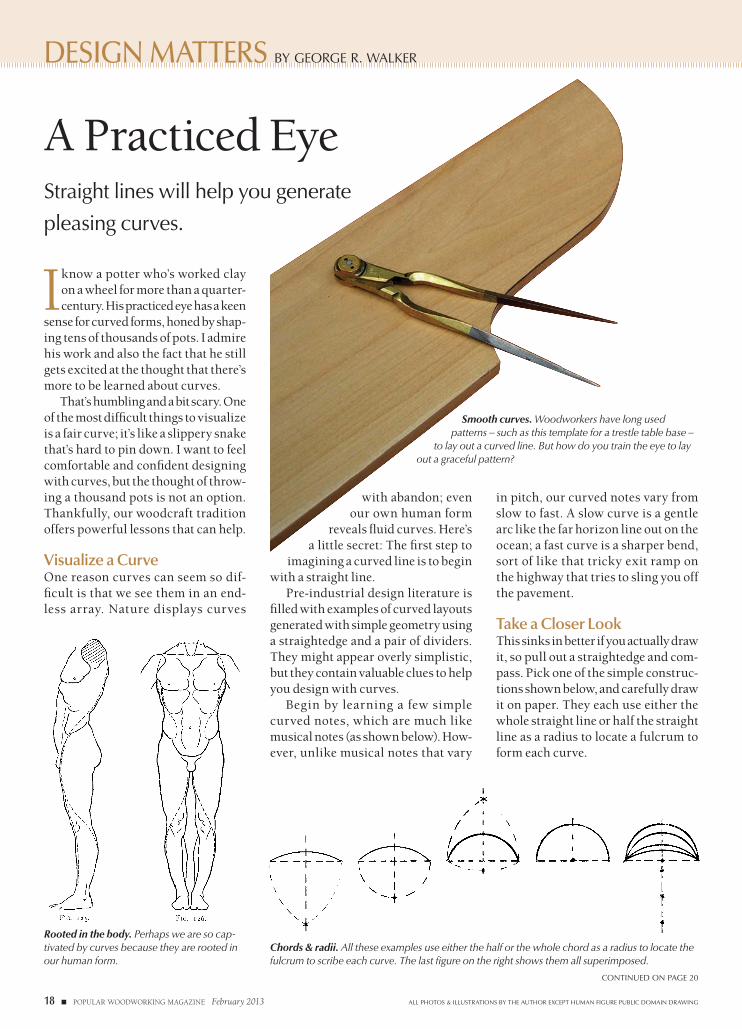
Spear-point marking knives are my favorite marking knives because they’re a good all-around choice for most layout tasks in the shop. Because a spear-point knife has two bevels and a fl at back, it can easily register against a guide on either the right or left side – very handy when marking dovetails. And the fl at back means you don’t have to rotate the tool to use it up against a guide (as you do with an X-Acto knife); that means you can sneak a thin spear-point into the smallest of spaces.
Spear-points are, however, a bit tricky to sharpen, and the point is easily
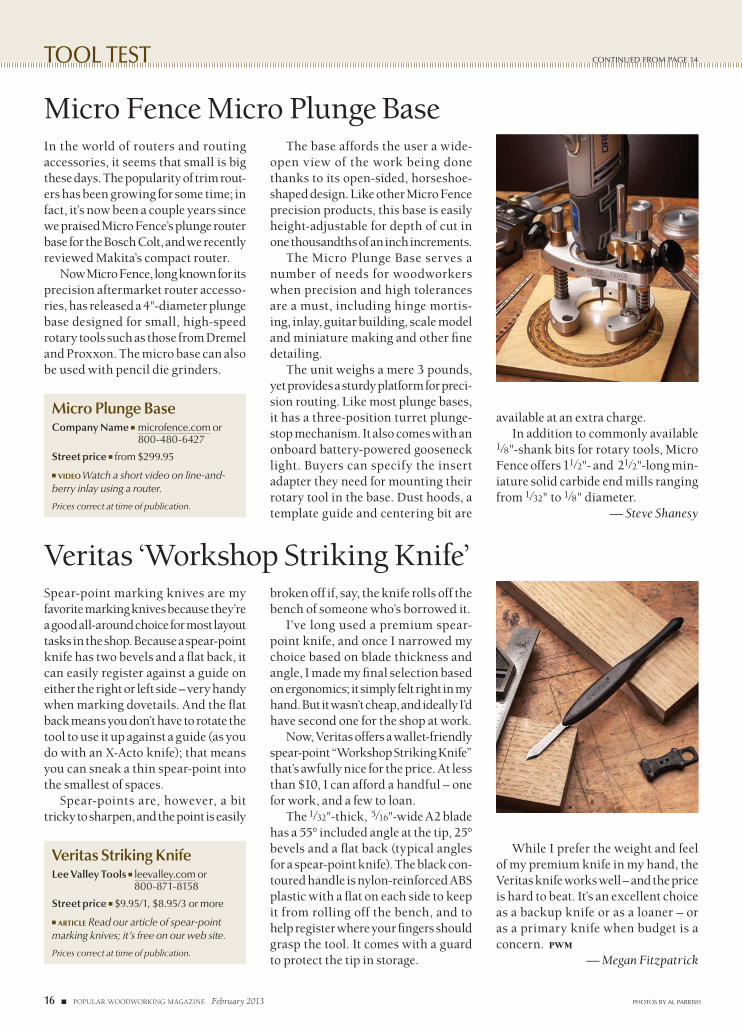
In the world of routers and routing accessories, it seems that small is big these days. The popularity of trim rout-ers has been growing for some time; in fact, it’s now been a couple years since we praised Micro Fence’s plunge router base for the Bosch Colt, and we recently reviewed Makita’s compact router.
Now Micro Fence, long known for its precision aftermarket router accesso-ries, has released a 4"-diameter plunge base designed for small, high-speed rotary tools such as those from Dremel and Proxxon. The micro base can also be used with pencil die grinders.
broken off if, say, the knife rolls off the bench of someone who’s borrowed it.
I’ve long used a premium spear-point knife, and once I narrowed my choice based on blade thickness and angle, I made my fi nal selection based on ergonomics; it simply felt right in my hand. But it wasn’t cheap, and ideally I’d have second one for the shop at work.
Now, Veritas offers a wallet-friendly spear-point “Workshop Striking Knife” that’s awfully nice for the price. At less than $10, I can afford a handful – one for work, and a few to loan.
The 1⁄32"-thick, 5⁄16"-wide A2 blade has a 55° included angle at the tip, 25° bevels and a fl at back (typical angles for a spear-point knife). The black con-toured handle is nylon-reinforced ABS plastic with a fl at on each side to keep it from rolling off the bench, and to help register where your fi ngers should grasp the tool. It comes with a guard to protect the tip in storage.
The base affords the user a wide-open view of the work being done thanks to its open-sided, horseshoe-shaped design. Like other Micro Fence precision products, this base is easily height-adjustable for depth of cut in one thousandths of an inch increments.
The Micro Plunge Base serves a number of needs for woodworkers when precision and high tolerances are a must, including hinge mortis-ing, inlay, guitar building, scale model and miniature making and other fi ne detailing.
The unit weighs a mere 3 pounds, yet provides a sturdy platform for preci-sion routing. Like most plunge bases, it has a three-position turret plunge-stop mechanism. It also comes with an onboard battery-powered gooseneck light. Buyers can specify the insert adapter they need for mounting their rotary tool in the base. Dust hoods, a template guide and centering bit are
While I prefer the weight and feel of my premium knife in my hand, the Veritas knife works well – and the price is hard to beat. It’s an excellent choice as a backup knife or as a loaner – or as a primary knife when budget is a concern. PWM
— Megan Fitzpatrick
available at an extra charge. In addition to commonly available
1⁄8"-shank bits for rotary tools, Micro Fence offers 11⁄2"- and 21⁄2"-long min-iature solid carbide end mills ranging from 1⁄32" to 1⁄8" diameter.
— Steve Shanesy
Micro Fence Micro Plunge Base
Veritas ‘Workshop Striking Knife’
Veritas Striking KnifeLee Valley Tools ■ leevalley.com or
800-871-8158
Street price ■ $9.95/1, $8.95/3 or more
■ ARTICLE Read our article of spear-point marking knives; it’s free on our web site.
Prices correct at time of publication.
Micro Plunge BaseCompany Name ■ microfence.com or
800-480-6427
Street price ■ from $299.95
■ VIDEO Watch a short video on line-and-berry inlay using a router.
Prices correct at time of publication.
PHOTOS BY AL PARRISH
14_1302_PWM_ToolTest.indd 1614_1302_PWM_ToolTest.indd 16 11/27/12 4:47 PM11/27/12 4:47 PM

TOUGH Dries Natural
Color, No Foam
GLUE
www.gorillatough.com
For the Toughest Jobs on Planet Earth®
©2013 The Gorilla Glue Company
Gorilla Wood Glue’s premium formula creates a cross-linking bond to provide superior strength with a Type II water resistance, indoors and out.
MADEiNUSA
To request a brochure, DVD, and laser engraved and cut samples visit epiloglaser.com/popwood today.
Systems Starting at $7,995
Laser Engraving &Cutting Systems
CARD #18 or go to PWFREEINFO.COM CARD #56 or go to PWFREEINFO.COM
14_1302_PWM_ToolTest.indd 1714_1302_PWM_ToolTest.indd 17 11/27/12 4:47 PM11/27/12 4:47 PM
DESIGN MATTERS BY GEORGE R. WALKER
18 ■ POPULAR WOODWORKING MAGAZINE February 2013
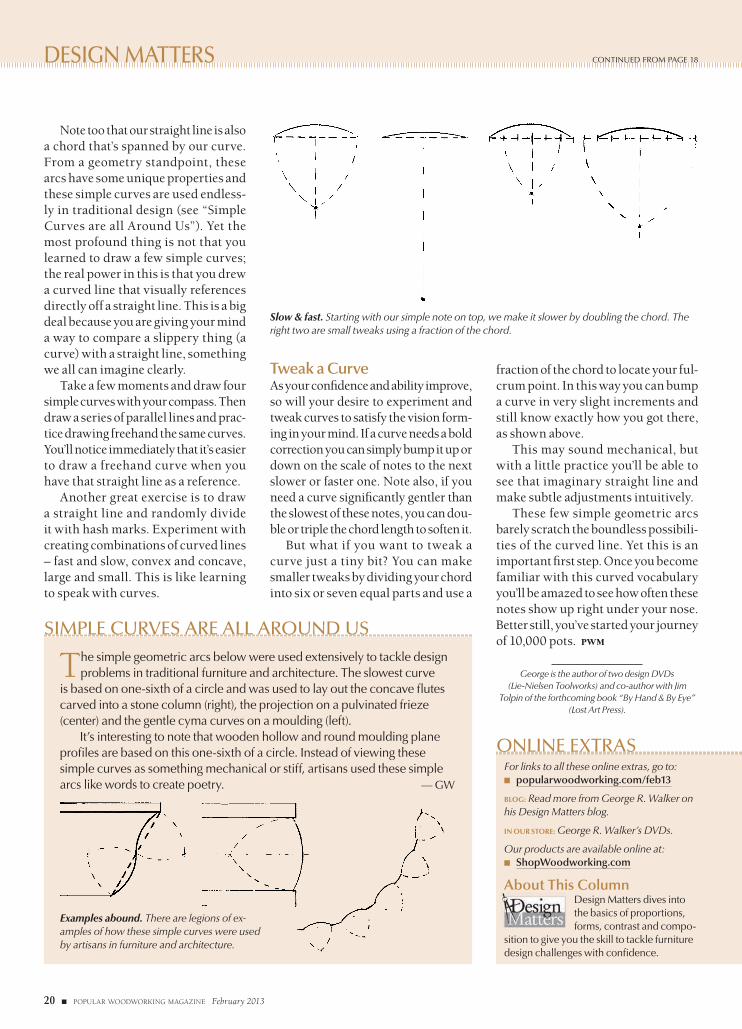
I know a potter who’s worked clay on a wheel for more than a quarter-century. His practiced eye has a keen
sense for curved forms, honed by shap-ing tens of thousands of pots. I admire his work and also the fact that he still gets excited at the thought that there’s more to be learned about curves.
That’s humbling and a bit scary. One of the most diffi cult things to visualize is a fair curve; it’s like a slippery snake that’s hard to pin down. I want to feel comfortable and confi dent designing with curves, but the thought of throw-ing a thousand pots is not an option. Thankfully, our woodcraft tradition offers powerful lessons that can help.
Visualize a CurveOne reason curves can seem so dif-fi cult is that we see them in an end-less array. Nature displays curves
A Practiced EyeStraight lines will help you generate
pleasing curves.
ALL PHOTOS & ILLUSTRATIONS BY THE AUTHOR EXCEPT HUMAN FIGURE PUBLIC DOMAIN DRAWING
CONTINUED ON PAGE 20
Smooth curves. Woodworkers have long used patterns – such as this template for a trestle table base –
to lay out a curved line. But how do you train the eye to lay out a graceful pattern?
Rooted in the body. Perhaps we are so cap-tivated by curves because they are rooted in our human form.
with abandon; even our own human form
reveals fl uid curves. Here’s a little secret: The fi rst step to
imagining a curved line is to begin with a straight line.
Pre-industrial design literature is fi lled with examples of curved layouts generated with simple geometry using a straightedge and a pair of dividers. They might appear overly simplistic, but they contain valuable clues to help you design with curves.
Begin by learning a few simple curved notes, which are much like musical notes (as shown below). How-ever, unlike musical notes that vary
in pitch, our curved notes vary from slow to fast. A slow curve is a gentle arc like the far horizon line out on the ocean; a fast curve is a sharper bend, sort of like that tricky exit ramp on the highway that tries to sling you off the pavement.
Take a Closer LookThis sinks in better if you actually draw it, so pull out a straightedge and com-pass. Pick one of the simple construc-tions shown below, and carefully draw it on paper. They each use either the whole straight line or half the straight line as a radius to locate a fulcrum to form each curve.
Chords & radii. All these examples use either the half or the whole chord as a radius to locate the fulcrum to scribe each curve. The last fi gure on the right shows them all superimposed.
18_1302_PWM_DM.indd 1818_1302_PWM_DM.indd 18 11/27/12 4:48 PM11/27/12 4:48 PM

______
“Sliding Table Top”Free Shipping! The Precison Router Table's large, smooth sliding, extruded aluminum top makes difficult routing easy and exact. Variable opening inserts in "rock solid" fixed cast-iron. Split fence & dust hood. #9463 .........................$469.95
“Route 66”66 piece carbide tipped router bit set includes straight, round over, chamfer, cove... 30 total profiles! Wood storage box can be wall mounted. 1/2" shank #8383.............$189.951/4" shank #6083.............$189.95
See our top selling router tables, bits & jigs at MLCSwoodworking.com“Cabinet Making Set”Six 1/2" shank carbide tipped router bits make classic kitchen and fine furniture cabinet raised panels and drawers.
Undercutter #8389...$119.95Standard #8387....$114.95
“Don’t Stand Stock On Edge”Rout wide stock FLAT on the table with tall bits in horizontal position! The Horizontal Benchtop Router Table is perfect for raised panels and mortise and tenon. The miter T-track accepts accessory tops.
#9767...........................$179.95
“Tilting Top”Accessory top tilts up to 45˚. Create offset angles that cannot be
cut on a regular router table. #9764.......$59.95
“Mortising Top”Accessory top. A safer and easier way to cut mortise and tenon joints. #9766.......$79.95
1-800-533-9298PROFESSIONAL ROUTER BITS & WOODWORKING PRODUCTS
FREE SHIPPING!IN CONTIGUOUS USA P.O. BOX 165 PM, HV, PA, 19006 ®2012
“When Any Old Joint Won’t Do...”The Fast Joint System with matching templates makes creative, custom joinery simple. Includes the jig, joint templates, clamps, bushings and router bits. See the 20 Template Set online.
4 Template Set #9411.....$169.95 11 Template Set #9422....$269.95
CARD #81 or go to PWFREEINFO.COM
c2_1302_PWM_FPAds.indd 19c2_1302_PWM_FPAds.indd 19 11/28/12 12:57 PM11/28/12 12:57 PM
DESIGN MATTERS CONTINUED FROM PAGE 18
20 ■ POPULAR WOODWORKING MAGAZINE February 2013
fraction of the chord to locate your ful-crum point. In this way you can bump a curve in very slight increments and still know exactly how you got there, as shown above.
This may sound mechanical, but with a little practice you’ll be able to see that imaginary straight line and make subtle adjustments intuitively.
These few simple geometric arcs barely scratch the boundless possibili-ties of the curved line. Yet this is an important fi rst step. Once you become familiar with this curved vocabulary you’ll be amazed to see how often these notes show up right under your nose. Better still, you’ve started your journey of 10,000 pots. PWM
George is the author of two design DVDs (Lie-Nielsen Toolworks) and co-author with Jim
Tolpin of the forthcoming book “By Hand & By Eye” (Lost Art Press).
For links to all these online extras, go to:■ popularwoodworking.com/feb13
BLOG: Read more from George R. Walker on his Design Matters blog.
IN OUR STORE: George R. Walker’s DVDs.
Our products are available online at:■ ShopWoodworking.com
About This ColumnDesign Matters dives into the basics of proportions, forms, contrast and compo-
sition to give you the skill to tackle furniture design challenges with confi dence.
ONLINE EXTRAS
The simple geometric arcs below were used extensively to tackle design problems in traditional furniture and architecture. The slowest curve
is based on one-sixth of a circle and was used to lay out the concave fl utes carved into a stone column (right), the projection on a pulvinated frieze (center) and the gentle cyma curves on a moulding (left).
It’s interesting to note that wooden hollow and round moulding plane profi les are based on this one-sixth of a circle. Instead of viewing these simple curves as something mechanical or stiff, artisans used these simple arcs like words to create poetry. — GW
SIMPLE CURVES ARE ALL AROUND US
Slow & fast. Starting with our simple note on top, we make it slower by doubling the chord. The right two are small tweaks using a fraction of the chord.
Examples abound. There are legions of ex-amples of how these simple curves were used by artisans in furniture and architecture.
Note too that our straight line is also a chord that’s spanned by our curve. From a geometry standpoint, these arcs have some unique properties and these simple curves are used endless-ly in traditional design (see “Simple Curves are all Around Us”). Yet the most profound thing is not that you learned to draw a few simple curves; the real power in this is that you drew a curved line that visually references directly off a straight line. This is a big deal because you are giving your mind a way to compare a slippery thing (a curve) with a straight line, something we all can imagine clearly.
Take a few moments and draw four simple curves with your compass. Then draw a series of parallel lines and prac-tice drawing freehand the same curves. You’ll notice immediately that it’s easier to draw a freehand curve when you have that straight line as a reference.
Another great exercise is to draw a straight line and randomly divide it with hash marks. Experiment with creating combinations of curved lines – fast and slow, convex and concave, large and small. This is like learning to speak with curves.
Tweak a Curve As your confi dence and ability improve, so will your desire to experiment and tweak curves to satisfy the vision form-ing in your mind. If a curve needs a bold correction you can simply bump it up or down on the scale of notes to the next slower or faster one. Note also, if you need a curve signifi cantly gentler than the slowest of these notes, you can dou-ble or triple the chord length to soften it.
But what if you want to tweak a curve just a tiny bit? You can make smaller tweaks by dividing your chord into six or seven equal parts and use a
18_1302_PWM_DM.indd 2018_1302_PWM_DM.indd 20 11/27/12 4:48 PM11/27/12 4:48 PM

800-472-6950
800-472-6950
Woodline.com - your complete source for
at 25% off list prices.Quality Carbide Router Bits,
Shaper Cutters & More
LaVergne, TN
Great Carbide BitsGreat Prices
For sales promotions and
upcoming events
For creating forms, arcs and curves, the CMT
safe and accurate.39”, 47” & 78” lengths
$61.99.
TMP-1000Do you have
our latest catalog?
Request one or view
it online.E A S Y O R D E R I N G ! 2 4 H O U R S A D A Y , 7 D A Y S A W E E K
1-800-472-6950 or order online at www.woodline.com
2012
Q U A L I T Y C A R B I D E R O U T E R B I T S , S H A P E R C U T T E R S& S O M U C H M O R E !
I N C L U D I N G
What can we help you make today?
Woodline.com - your new source for
WL-2055$69
FREE instructions
online
What can we help you make today?Plantation Shutters couldn’t be easier...
or more economical!
No table saw? No worries... with the TrueTrac™ Saw System!
Watch it in action!
TrueTrac™ SPECIALWhile supplies last!
Buy a TrueTrac™Model 570TPC
or 105TPCand receive a FREECMT 7¼” Saw Blade.
Wood Gear Clock Kit $249
WL-WCK-DPW Walnut Kit
Pin Router
CARD #50 or go to PWFREEINFO.COM
c2_1302_PWM_FPAds.indd 21c2_1302_PWM_FPAds.indd 21 11/28/12 12:57 PM11/28/12 12:57 PM
22 ■ POPULAR WOODWORKING MAGAZINE February 2013
22_1302_PWM_Cellaret.indd 2222_1302_PWM_Cellaret.indd 22 11/28/12 12:43 PM11/28/12 12:43 PM
popularwoodworking.com ■ 23OPENING PHOTO BY AL PARRISH; STEP PHOTOS BY THE AUTHOR; ILLUSTRATIONS BY ROBERT W. LANG FROM THE AUTHOR’S MODEL
B Y G L E N D. H U E Y
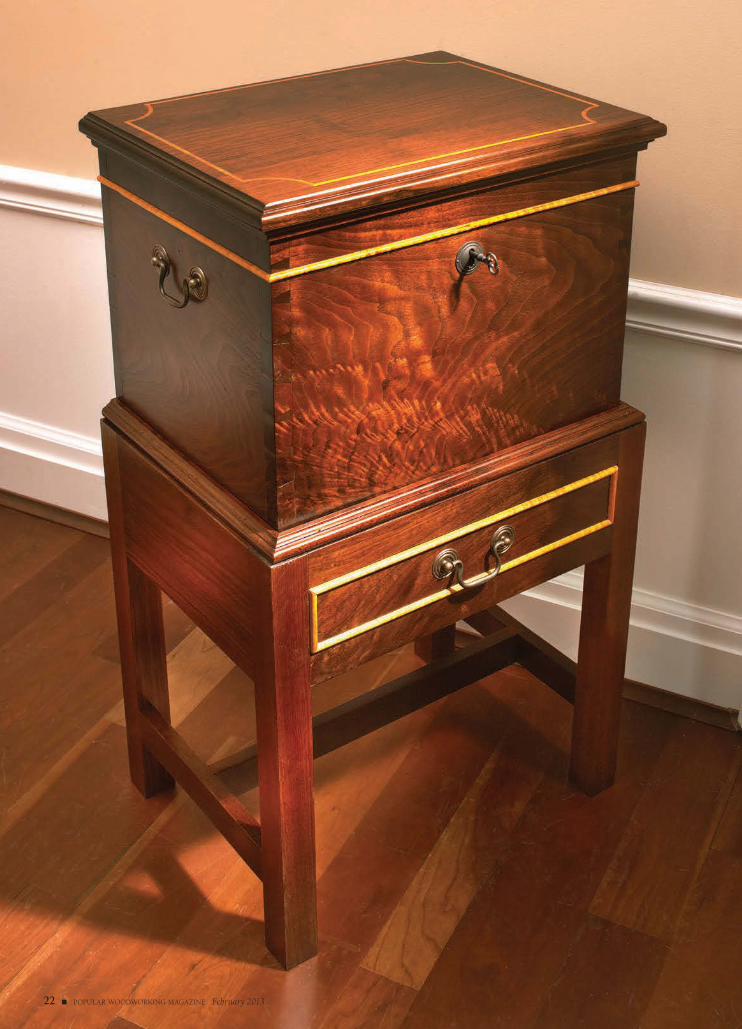
Combine simple construction and sophisticated proportions.
In 1760, Dutch gin bottles made their way to the Colonies. Soon thereafter, the fi rst known example of a lidded
box designed to hold those gin bottles was built. Many of the bottle boxes, gin boxes or cellarettes, as they are known, have their origin in the Roanoke River basin area – cellarettes were not pro-duced in major southeastern centers such as Baltimore and Charleston, S.C. Examples, however, are found through-out the North Carolina back country and as far west as middle Tennessee, where the furniture design changes into sugar chests.
Cellarettes and sugar chests share many characteristics, but there are dis-tinct differences between them. Sugar chests are generally a single unit with the box and legs attached to one an-other, whereas the box portion of a cellarette is not attached to its base (you never knew when spirits would need to be hidden from unexpected guests). Also, a cellarette interior is partitioned to hold 12 or 16 bottles. A sugar chest is typi-cally divided into two or three compartments.
This cellarette is based on a piece originally constructed in Bertie County, N.C., in the last quarter of the 18th century. It is part of a group of cellarettes built by Micajah Wilkes – as published in 2009 in Thomas Newburn and James Melchor’s “WH Cabinetmaker – A Southern Mys-tery Solved” (Legacy Ink Publishing).
Get Boxed inThe box of the cellarette is through-dovetailed at all four corners and sits on a base. You could build the base then build a properly sized box to fi t, but because dovetails are more challenging than mortise-and-tenon joinery, I built the box fi rst then built my base to size. The top and bottom are attached to the completed box, then the lid is sawn free.
To begin, mill your box front, back and sides to thickness and size then lay
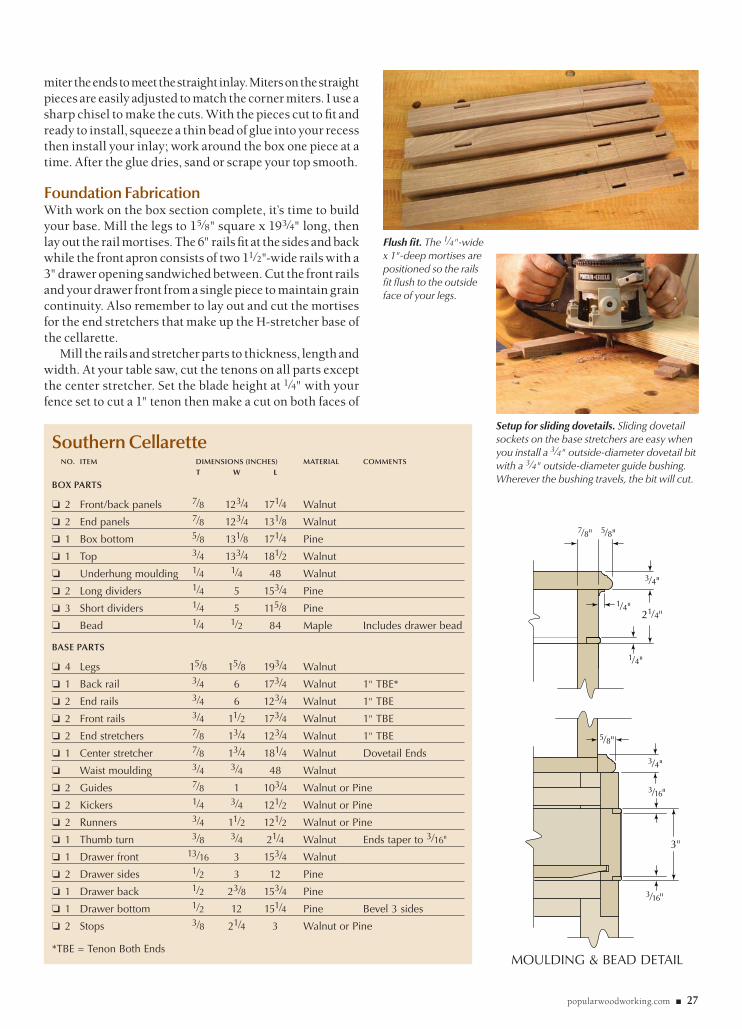
out your dovetails – tails in the front and back panels with pins on the ends. I’m a pins-fi rst builder, so I began on the end panels. Use a dovetail saw to cut and defi ne eight pins with two half-pins at the outside edges. From here you can remove waste through traditional methods, or power up the process as I did using a router and straight bit.
Power extraction begins with an auxiliary fence clamped fl ush with your panel’s end. This supports your router as you work. Adjust the depth of cut so your bit just reaches your scribeline then rout away the waste between the pins without dinging them. The waste that’s left after routing is easily removed using a saw. Because the dovetail sock-ets are too narrow for most fl ush-cut saws, use a hacksaw blade. Hold the
blade tight to the socket bottom as you cut to complete the pins in the two end panels.
Next, transfer the pin layout onto your tail boards. Here you can use a band saw or handsaw to defi ne your tails; with eight tails, you should just leave your transfer lines for a snug fi t. Remove the waste using a mallet and chisels, then fi t the joint. Tweak your fi t as needed to achieve a snug joint.
When you’re sure your box goes together, lay out and cut dados for the bottle dividers. On your bench, position your
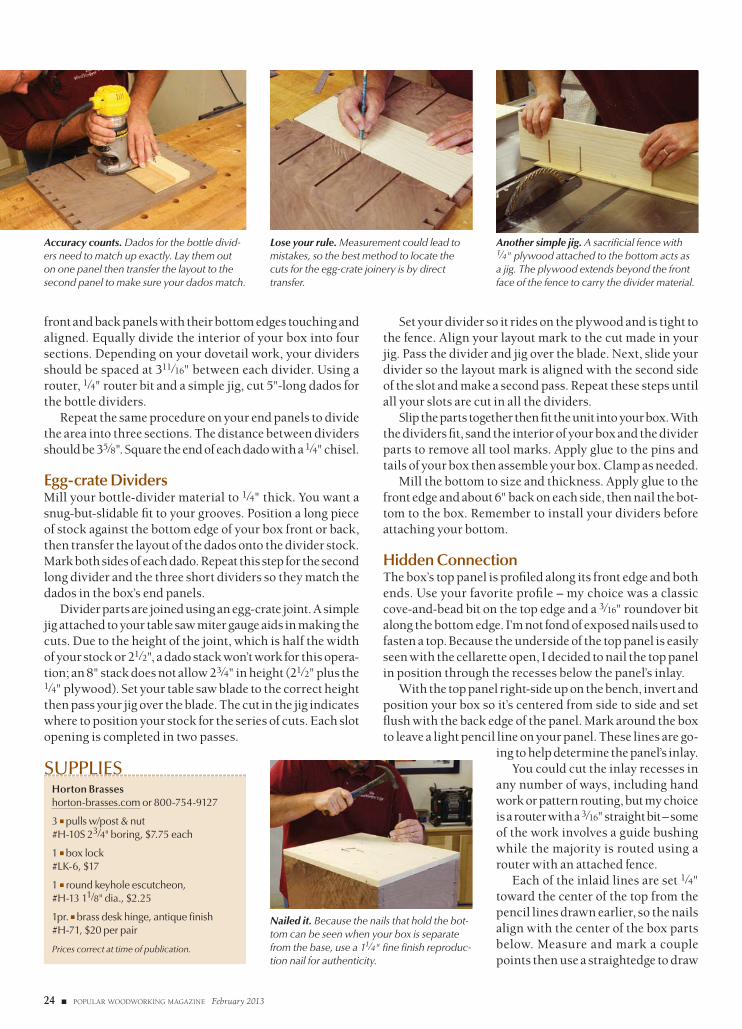
Quick work. A sacrifi cial support and a router with a straight bit easily hogs away waste from between your dovetail pins.
Simple jig for layout transfer. A 90° jig holds the pin board as you transfer your layout to the tail board.
Southern Cellarette
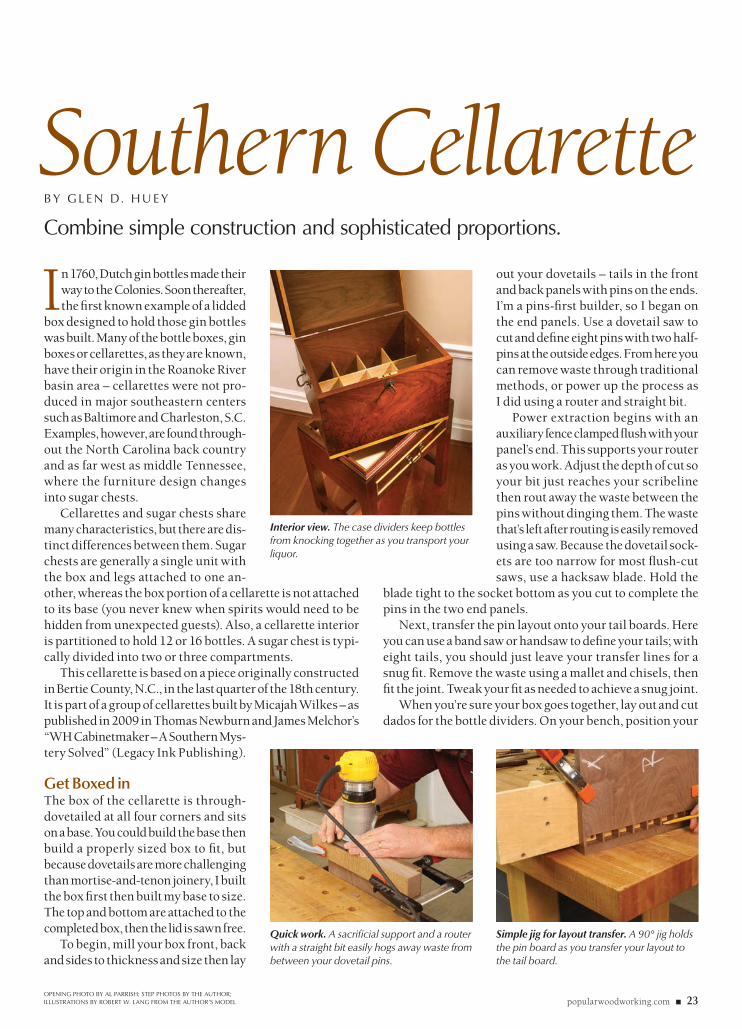
Interior view. The case dividers keep bottles from knocking together as you transport your liquor.
22_1302_PWM_Cellaret.indd 2322_1302_PWM_Cellaret.indd 23 11/28/12 12:43 PM11/28/12 12:43 PM
24 ■ POPULAR WOODWORKING MAGAZINE February 2013
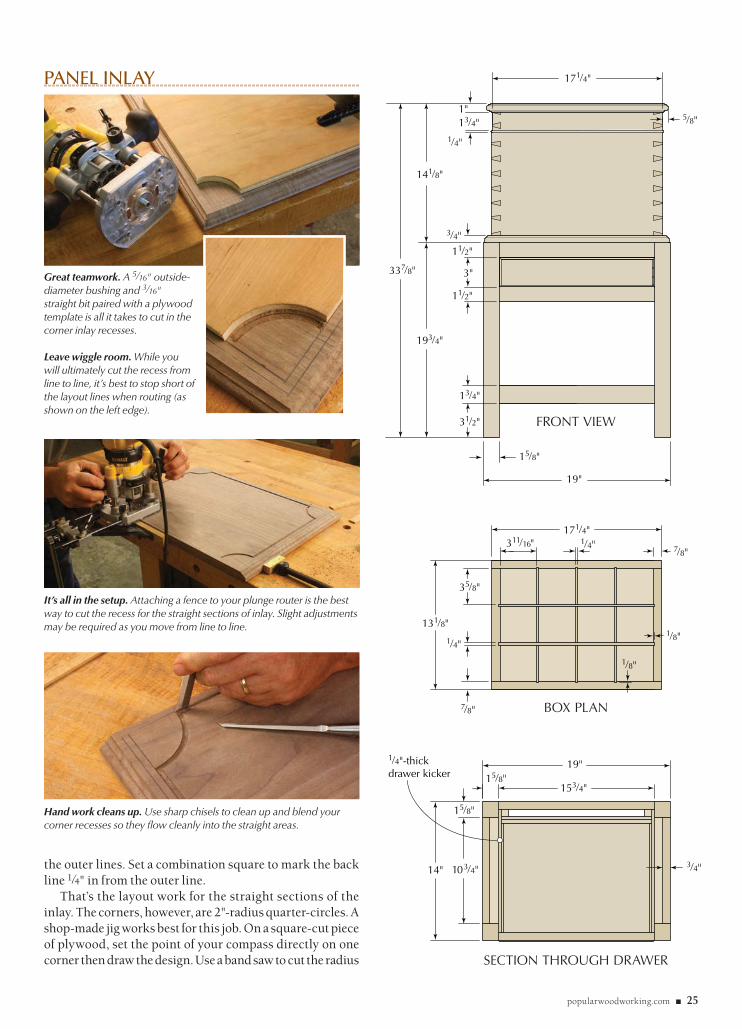
front and back panels with their bottom edges touching and aligned. Equally divide the interior of your box into four sections. Depending on your dovetail work, your dividers should be spaced at 311⁄16" between each divider. Using a router, 1⁄4" router bit and a simple jig, cut 5"-long dados for the bottle dividers.
Repeat the same procedure on your end panels to divide the area into three sections. The distance between dividers should be 35⁄8". Square the end of each dado with a 1⁄4" chisel.
Egg-crate Dividers Mill your bottle-divider material to 1⁄4" thick. You want a snug-but-slidable fi t to your grooves. Position a long piece of stock against the bottom edge of your box front or back, then transfer the layout of the dados onto the divider stock. Mark both sides of each dado. Repeat this step for the second long divider and the three short dividers so they match the dados in the box’s end panels.
Divider parts are joined using an egg-crate joint. A simple jig attached to your table saw miter gauge aids in making the cuts. Due to the height of the joint, which is half the width of your stock or 21⁄2", a dado stack won’t work for this opera-tion; an 8" stack does not allow 23⁄4" in height (21⁄2" plus the 1⁄4" plywood). Set your table saw blade to the correct height then pass your jig over the blade. The cut in the jig indicates where to position your stock for the series of cuts. Each slot opening is completed in two passes.
Set your divider so it rides on the plywood and is tight to the fence. Align your layout mark to the cut made in your jig. Pass the divider and jig over the blade. Next, slide your divider so the layout mark is aligned with the second side of the slot and make a second pass. Repeat these steps until all your slots are cut in all the dividers.
Slip the parts together then fi t the unit into your box. With the dividers fi t, sand the interior of your box and the divider parts to remove all tool marks. Apply glue to the pins and tails of your box then assemble your box. Clamp as needed.
Mill the bottom to size and thickness. Apply glue to the front edge and about 6" back on each side, then nail the bot-tom to the box. Remember to install your dividers before attaching your bottom.
Hidden ConnectionThe box’s top panel is profi led along its front edge and both ends. Use your favorite profi le – my choice was a classic cove-and-bead bit on the top edge and a 3⁄16" roundover bit along the bottom edge. I’m not fond of exposed nails used to fasten a top. Because the underside of the top panel is easily seen with the cellarette open, I decided to nail the top panel in position through the recesses below the panel’s inlay.
With the top panel right-side up on the bench, invert and position your box so it’s centered from side to side and set fl ush with the back edge of the panel. Mark around the box to leave a light pencil line on your panel. These lines are go-
ing to help determine the panel’s inlay.You could cut the inlay recesses in
any number of ways, including hand work or pattern routing, but my choice is a router with a 3⁄16" straight bit – some of the work involves a guide bushing while the majority is routed using a router with an attached fence.
Each of the inlaid lines are set 1⁄4" toward the center of the top from the pencil lines drawn earlier, so the nails align with the center of the box parts below. Measure and mark a couple points then use a straightedge to draw
Lose your rule. Measurement could lead to mistakes, so the best method to locate the cuts for the egg-crate joinery is by direct transfer.
Another simple jig. A sacrifi cial fence with 1⁄4" plywood attached to the bottom acts as a jig. The plywood extends beyond the front face of the fence to carry the divider material.
Nailed it. Because the nails that hold the bot-tom can be seen when your box is separate from the base, use a 11⁄4" fi ne fi nish reproduc-tion nail for authenticity.
Horton Brasseshorton-brasses.com or 800-754-9127
3 ■ pulls w/post & nut#H-10S 23⁄4" boring, $7.75 each
1 ■ box lock #LK-6, $17
1 ■ round keyhole escutcheon, #H-13 11⁄8" dia., $2.25
1pr. ■ brass desk hinge, antique fi nish #H-71, $20 per pair
Prices correct at time of publication.
SUPPLIES
Accuracy counts. Dados for the bottle divid-ers need to match up exactly. Lay them out on one panel then transfer the layout to the second panel to make sure your dados match.
22_1302_PWM_Cellaret.indd 2422_1302_PWM_Cellaret.indd 24 11/28/12 12:43 PM11/28/12 12:43 PM
popularwoodworking.com ■ 25
the outer lines. Set a combination square to mark the back line 1⁄4" in from the outer line.
That’s the layout work for the straight sections of the inlay. The corners, however, are 2"-radius quarter-circles. A shop-made jig works best for this job. On a square-cut piece of plywood, set the point of your compass directly on one corner then draw the design. Use a band saw to cut the radius
1⁄4"
5⁄8"
337⁄8"
193⁄4"
3⁄4"
1"
141⁄8"
11∕2"
3"
11∕2"
19"
15⁄8"
31∕2"
13⁄4"
171⁄4"
13⁄4"
1⁄4"
1⁄4"
171⁄4"
131⁄8"
7⁄8"
7⁄8"311⁄16"
35⁄8"
1⁄8"
1⁄8"
19"
14"
15⁄8"
15⁄8"153⁄4"
103⁄4" 3⁄4"
1⁄4"-thick drawer kicker
Great teamwork. A 5⁄16" outside-diameter bushing and 3⁄16" straight bit paired with a plywood template is all it takes to cut in the corner inlay recesses.
Leave wiggle room. While you will ultimately cut the recess from line to line, it’s best to stop short of the layout lines when routing (as shown on the left edge).
It’s all in the setup. Attaching a fence to your plunge router is the best way to cut the recess for the straight sections of inlay. Slight adjustments may be required as you move from line to line.
Hand work cleans up. Use sharp chisels to clean up and blend your corner recesses so they fl ow cleanly into the straight areas.
FRONT VIEW
BOX PLAN
SECTION THROUGH DRAWER
PANEL INLAY
22_1302_PWM_Cellaret.indd 2522_1302_PWM_Cellaret.indd 25 11/28/12 12:44 PM11/28/12 12:44 PM
26 ■ POPULAR WOODWORKING MAGAZINE February 2013
then clean to your line using a spindle sander. Position the jig so that the two adjacent lines are just covered then add a couple clamps to hold everything secure.
Set the router’s depth of cut, then rout the quarter-circle. You can see a completed corner on the “Panel Inlay” photos on the previous page. It’s better to stay slightly away from your layout lines as shown on the left than it is to touch the line as shown on the right. The extra spacing makes the straight work easier. Complete all four corners.
Remove the bushing and install a fence attachment to cut the straight inlay recesses. Set the depth of cut, then rout your lines between the quarter-circles. If it is necessary to make adjustments for any line, do so. You have a little wiggle room.
Clean up any corner work with a sharp chisel.
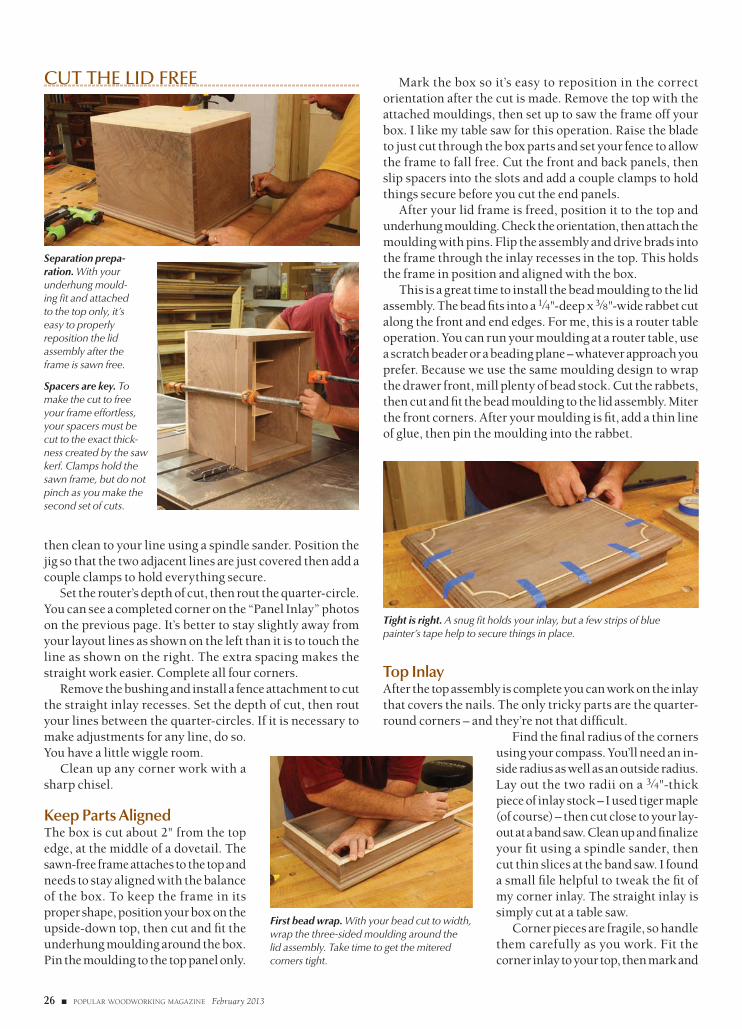
Keep Parts AlignedThe box is cut about 2" from the top edge, at the middle of a dovetail. The sawn-free frame attaches to the top and needs to stay aligned with the balance of the box. To keep the frame in its proper shape, position your box on the upside-down top, then cut and fi t the underhung moulding around the box. Pin the moulding to the top panel only.
Mark the box so it’s easy to reposition in the correct orientation after the cut is made. Remove the top with the attached mouldings, then set up to saw the frame off your box. I like my table saw for this operation. Raise the blade to just cut through the box parts and set your fence to allow the frame to fall free. Cut the front and back panels, then slip spacers into the slots and add a couple clamps to hold things secure before you cut the end panels.
After your lid frame is freed, position it to the top and underhung moulding. Check the orientation, then attach the moulding with pins. Flip the assembly and drive brads into the frame through the inlay recesses in the top. This holds the frame in position and aligned with the box.
This is a great time to install the bead moulding to the lid assembly. The bead fi ts into a 1⁄4"-deep x 3⁄8"-wide rabbet cut along the front and end edges. For me, this is a router table operation. You can run your moulding at a router table, use a scratch beader or a beading plane – whatever approach you prefer. Because we use the same moulding design to wrap the drawer front, mill plenty of bead stock. Cut the rabbets, then cut and fi t the bead moulding to the lid assembly. Miter the front corners. After your moulding is fi t, add a thin line of glue, then pin the moulding into the rabbet.
Separation prepa-ration. With your underhung mould-ing fi t and attached to the top only, it’s easy to properly reposition the lid assembly after the frame is sawn free.
Spacers are key. To make the cut to free your frame effortless, your spacers must be cut to the exact thick-ness created by the saw kerf. Clamps hold the sawn frame, but do not pinch as you make the second set of cuts.
CUT THE LID FREE
Tight is right. A snug fi t holds your inlay, but a few strips of blue painter’s tape help to secure things in place.
Top InlayAfter the top assembly is complete you can work on the inlay that covers the nails. The only tricky parts are the quarter-round corners – and they’re not that diffi cult.
Find the fi nal radius of the corners using your compass. You’ll need an in-side radius as well as an outside radius. Lay out the two radii on a 3⁄4"-thick piece of inlay stock – I used tiger maple (of course) – then cut close to your lay-out at a band saw. Clean up and fi nalize your fi t using a spindle sander, then cut thin slices at the band saw. I found a small fi le helpful to tweak the fi t of my corner inlay. The straight inlay is simply cut at a table saw.
Corner pieces are fragile, so handle them carefully as you work. Fit the corner inlay to your top, then mark and
First bead wrap. With your bead cut to width, wrap the three-sided moulding around the lid assembly. Take time to get the mitered corners tight.
22_1302_PWM_Cellaret.indd 2622_1302_PWM_Cellaret.indd 26 11/28/12 12:44 PM11/28/12 12:44 PM
popularwoodworking.com ■ 27
1⁄4"
1⁄4"
3⁄4"
3⁄4"
5⁄8"
5⁄8"7⁄8"
3⁄16"
3⁄16"
3"
21⁄4"
miter the ends to meet the straight inlay. Miters on the straight pieces are easily adjusted to match the corner miters. I use a sharp chisel to make the cuts. With the pieces cut to fi t and ready to install, squeeze a thin bead of glue into your recess then install your inlay; work around the box one piece at a time. After the glue dries, sand or scrape your top smooth.
Foundation FabricationWith work on the box section complete, it’s time to build your base. Mill the legs to 15⁄8" square x 193⁄4" long, then lay out the rail mortises. The 6" rails fi t at the sides and back while the front apron consists of two 11⁄2"-wide rails with a 3" drawer opening sandwiched between. Cut the front rails and your drawer front from a single piece to maintain grain continuity. Also remember to lay out and cut the mortises for the end stretchers that make up the H-stretcher base of the cellarette.
Mill the rails and stretcher parts to thickness, length and width. At your table saw, cut the tenons on all parts except the center stretcher. Set the blade height at 1⁄4" with your fence set to cut a 1" tenon then make a cut on both faces of
Southern Cellarette NO. ITEM DIMENSIONS (INCHES) MATERIAL COMMENTS T W L
BOX PARTS
❏ 2 Front/back panels 7⁄8 123⁄4 171⁄4 Walnut
❏ 2 End panels 7⁄8 123⁄4 131⁄8 Walnut
❏ 1 Box bottom 5⁄8 131⁄8 171⁄4 Pine
❏ 1 Top 3⁄4 133⁄4 181⁄2 Walnut
❏ Underhung moulding 1⁄4 1⁄4 48 Walnut
❏ 2 Long dividers 1⁄4 5 153⁄4 Pine
❏ 3 Short dividers 1⁄4 5 115⁄8 Pine
❏ Bead 1⁄4 1⁄2 84 Maple Includes drawer bead
BASE PARTS
❏ 4 Legs 15⁄8 15⁄8 193⁄4 Walnut
❏ 1 Back rail 3⁄4 6 173⁄4 Walnut 1" TBE*
❏ 2 End rails 3⁄4 6 123⁄4 Walnut 1" TBE
❏ 2 Front rails 3⁄4 11⁄2 173⁄4 Walnut 1" TBE
❏ 2 End stretchers 7⁄8 13⁄4 123⁄4 Walnut 1" TBE
❏ 1 Center stretcher 7⁄8 13⁄4 181⁄4 Walnut Dovetail Ends
❏ Waist moulding 3⁄4 3⁄4 48 Walnut
❏ 2 Guides 7⁄8 1 103⁄4 Walnut or Pine
❏ 2 Kickers 1⁄4 3⁄4 121⁄2 Walnut or Pine
❏ 2 Runners 3⁄4 11⁄2 121⁄2 Walnut or Pine
❏ 1 Thumb turn 3⁄8 3⁄4 21⁄4 Walnut Ends taper to 3⁄16"
❏ 1 Drawer front 13⁄16 3 153⁄4 Walnut
❏ 2 Drawer sides 1⁄2 3 12 Pine
❏ 1 Drawer back 1⁄2 23⁄8 153⁄4 Pine
❏ 1 Drawer bottom 1⁄2 12 151⁄4 Pine Bevel 3 sides
❏ 2 Stops 3⁄8 21⁄4 3 Walnut or Pine
*TBE = Tenon Both Ends
Flush fi t. The 1⁄4"-wide x 1"-deep mortises are positioned so the rails fi t fl ush to the outside face of your legs.
Setup for sliding dovetails. Sliding dovetail sockets on the base stretchers are easy when you install a 3⁄4" outside-diameter dovetail bit with a 3⁄4" outside-diameter guide bushing. Wherever the bushing travels, the bit will cut.
MOULDING & BEAD DETAIL
22_1302_PWM_Cellaret.indd 2722_1302_PWM_Cellaret.indd 27 11/28/12 12:44 PM11/28/12 12:44 PM
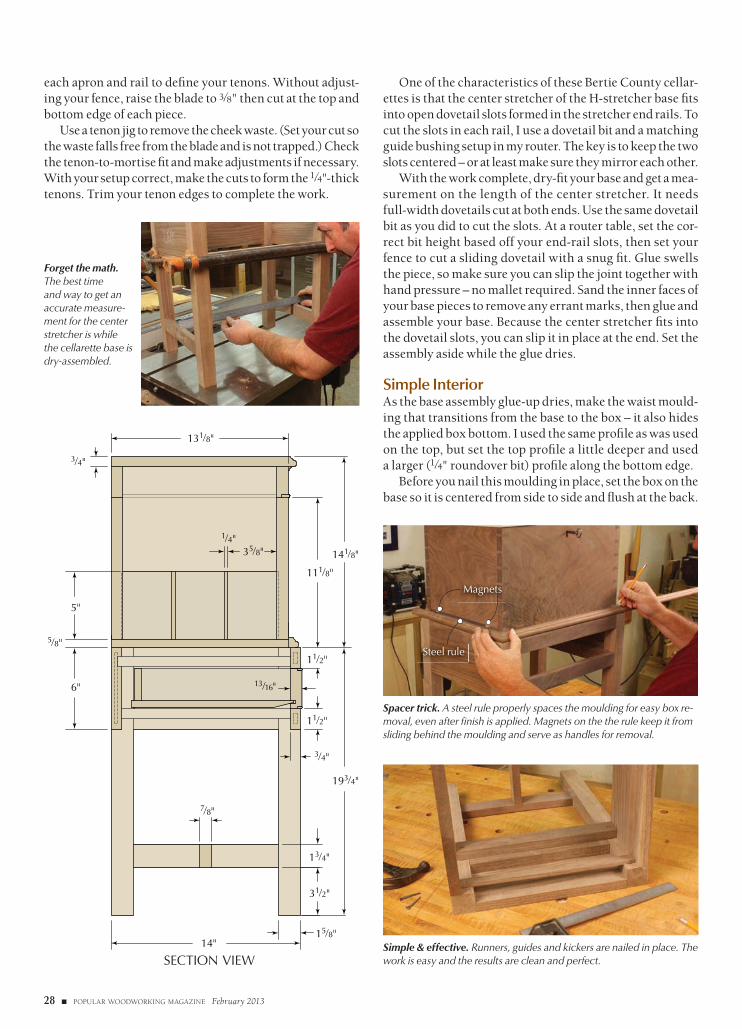
28 ■ POPULAR WOODWORKING MAGAZINE February 2013
131⁄8"
3⁄4"
1⁄4"35⁄8"
111⁄8"
5"
6"
3⁄4"
11∕2"
11∕2"
13⁄16"
14"15⁄8"
31∕2"
13⁄4"
193⁄4"
141⁄8"
7⁄8"
5⁄8"
each apron and rail to defi ne your tenons. Without adjust-ing your fence, raise the blade to 3⁄8" then cut at the top and bottom edge of each piece.
Use a tenon jig to remove the cheek waste. (Set your cut so the waste falls free from the blade and is not trapped.) Check the tenon-to-mortise fi t and make adjustments if necessary. With your setup correct, make the cuts to form the 1⁄4"-thick tenons. Trim your tenon edges to complete the work.
SECTION VIEW
Spacer trick. A steel rule properly spaces the moulding for easy box re-moval, even after fi nish is applied. Magnets on the the rule keep it from sliding behind the moulding and serve as handles for removal.
Simple & effective. Runners, guides and kickers are nailed in place. The work is easy and the results are clean and perfect.
Forget the math. The best time and way to get an accurate measure-ment for the center stretcher is while the cellarette base is dry-assembled.
One of the characteristics of these Bertie County cellar-ettes is that the center stretcher of the H-stretcher base fi ts into open dovetail slots formed in the stretcher end rails. To cut the slots in each rail, I use a dovetail bit and a matching guide bushing setup in my router. The key is to keep the two slots centered – or at least make sure they mirror each other.
With the work complete, dry-fi t your base and get a mea-surement on the length of the center stretcher. It needs full-width dovetails cut at both ends. Use the same dovetail bit as you did to cut the slots. At a router table, set the cor-rect bit height based off your end-rail slots, then set your fence to cut a sliding dovetail with a snug fi t. Glue swells the piece, so make sure you can slip the joint together with hand pressure – no mallet required. Sand the inner faces of your base pieces to remove any errant marks, then glue and assemble your base. Because the center stretcher fi ts into the dovetail slots, you can slip it in place at the end. Set the assembly aside while the glue dries.
Simple InteriorAs the base assembly glue-up dries, make the waist mould-ing that transitions from the base to the box – it also hides the applied box bottom. I used the same profi le as was used on the top, but set the top profi le a little deeper and used a larger (1⁄4" roundover bit) profi le along the bottom edge.
Before you nail this moulding in place, set the box on the base so it is centered from side to side and fl ush at the back.
Steel rule
Magnets
22_1302_PWM_Cellaret.indd 2822_1302_PWM_Cellaret.indd 28 11/28/12 12:44 PM11/28/12 12:44 PM
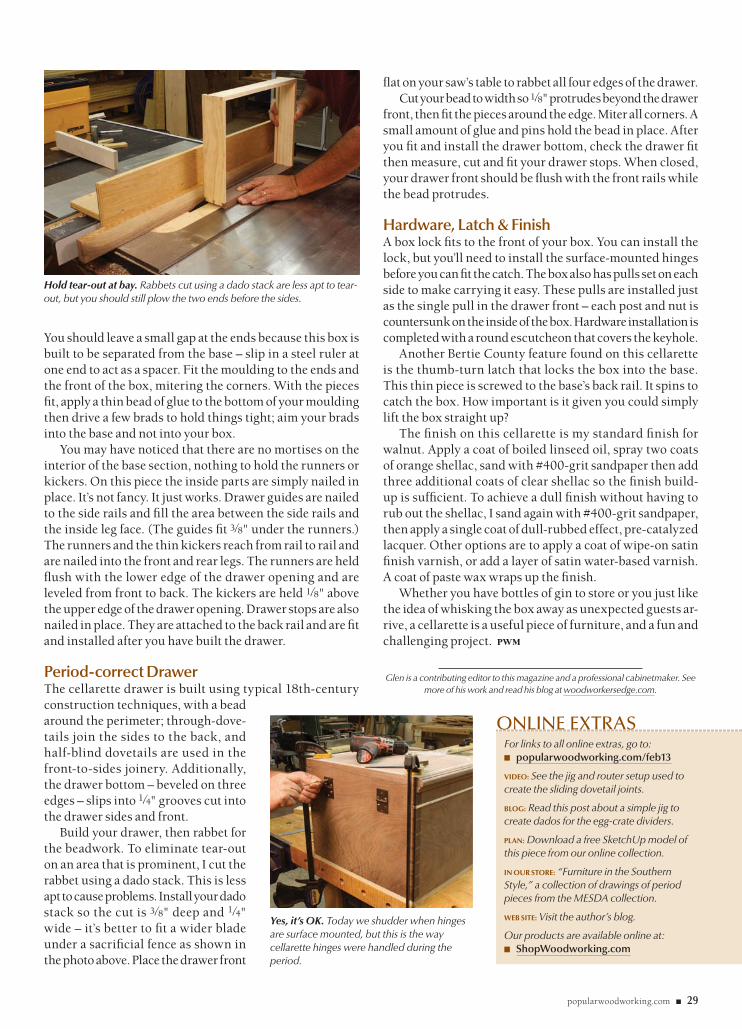
popularwoodworking.com ■ 29
For links to all online extras, go to:■ popularwoodworking.com/feb13
VIDEO: See the jig and router setup used to create the sliding dovetail joints.
BLOG: Read this post about a simple jig to create dados for the egg-crate dividers.
PLAN: Download a free SketchUp model of this piece from our online collection.
IN OUR STORE: “Furniture in the Southern Style,” a collection of drawings of period pieces from the MESDA collection.
WEB SITE: Visit the author’s blog.
Our products are available online at:■ ShopWoodworking.com
ONLINE EXTRAS
You should leave a small gap at the ends because this box is built to be separated from the base – slip in a steel ruler at one end to act as a spacer. Fit the moulding to the ends and the front of the box, mitering the corners. With the pieces fi t, apply a thin bead of glue to the bottom of your moulding then drive a few brads to hold things tight; aim your brads into the base and not into your box.
You may have noticed that there are no mortises on the interior of the base section, nothing to hold the runners or kickers. On this piece the inside parts are simply nailed in place. It’s not fancy. It just works. Drawer guides are nailed to the side rails and fi ll the area between the side rails and the inside leg face. (The guides fi t 3⁄8" under the runners.) The runners and the thin kickers reach from rail to rail and are nailed into the front and rear legs. The runners are held fl ush with the lower edge of the drawer opening and are leveled from front to back. The kickers are held 1⁄8" above the upper edge of the drawer opening. Drawer stops are also nailed in place. They are attached to the back rail and are fi t and installed after you have built the drawer.
Period-correct DrawerThe cellarette drawer is built using typical 18th-century construction techniques, with a bead around the perimeter; through-dove-tails join the sides to the back, and half-blind dovetails are used in the front-to-sides joinery. Additionally, the drawer bottom – beveled on three edges – slips into 1⁄4" grooves cut into the drawer sides and front.
Build your drawer, then rabbet for the beadwork. To eliminate tear-out on an area that is prominent, I cut the rabbet using a dado stack. This is less apt to cause problems. Install your dado stack so the cut is 3⁄8" deep and 1⁄4" wide – it’s better to fi t a wider blade under a sacrifi cial fence as shown in the photo above. Place the drawer front
fl at on your saw’s table to rabbet all four edges of the drawer. Cut your bead to width so 1⁄8" protrudes beyond the drawer
front, then fi t the pieces around the edge. Miter all corners. A small amount of glue and pins hold the bead in place. After you fi t and install the drawer bottom, check the drawer fi t then measure, cut and fi t your drawer stops. When closed, your drawer front should be fl ush with the front rails while the bead protrudes.
Hardware, Latch & FinishA box lock fi ts to the front of your box. You can install the lock, but you’ll need to install the surface-mounted hinges before you can fi t the catch. The box also has pulls set on each side to make carrying it easy. These pulls are installed just as the single pull in the drawer front – each post and nut is countersunk on the inside of the box. Hardware installation is completed with a round escutcheon that covers the keyhole.
Another Bertie County feature found on this cellarette is the thumb-turn latch that locks the box into the base. This thin piece is screwed to the base’s back rail. It spins to catch the box. How important is it given you could simply lift the box straight up?
The fi nish on this cellarette is my standard fi nish for walnut. Apply a coat of boiled linseed oil, spray two coats of orange shellac, sand with #400-grit sandpaper then add three additional coats of clear shellac so the fi nish build-up is suffi cient. To achieve a dull fi nish without having to rub out the shellac, I sand again with #400-grit sandpaper, then apply a single coat of dull-rubbed effect, pre-catalyzed lacquer. Other options are to apply a coat of wipe-on satin fi nish varnish, or add a layer of satin water-based varnish. A coat of paste wax wraps up the fi nish.
Whether you have bottles of gin to store or you just like the idea of whisking the box away as unexpected guests ar-rive, a cellarette is a useful piece of furniture, and a fun and challenging project. PWM
Glen is a contributing editor to this magazine and a professional cabinetmaker. See more of his work and read his blog at woodworkersedge.com.
Hold tear-out at bay. Rabbets cut using a dado stack are less apt to tear-out, but you should still plow the two ends before the sides.
Yes, it’s OK. Today we shudder when hinges are surface mounted, but this is the way cellarette hinges were handled during the period.
22_1302_PWM_Cellaret.indd 2922_1302_PWM_Cellaret.indd 29 11/28/12 12:44 PM11/28/12 12:44 PM
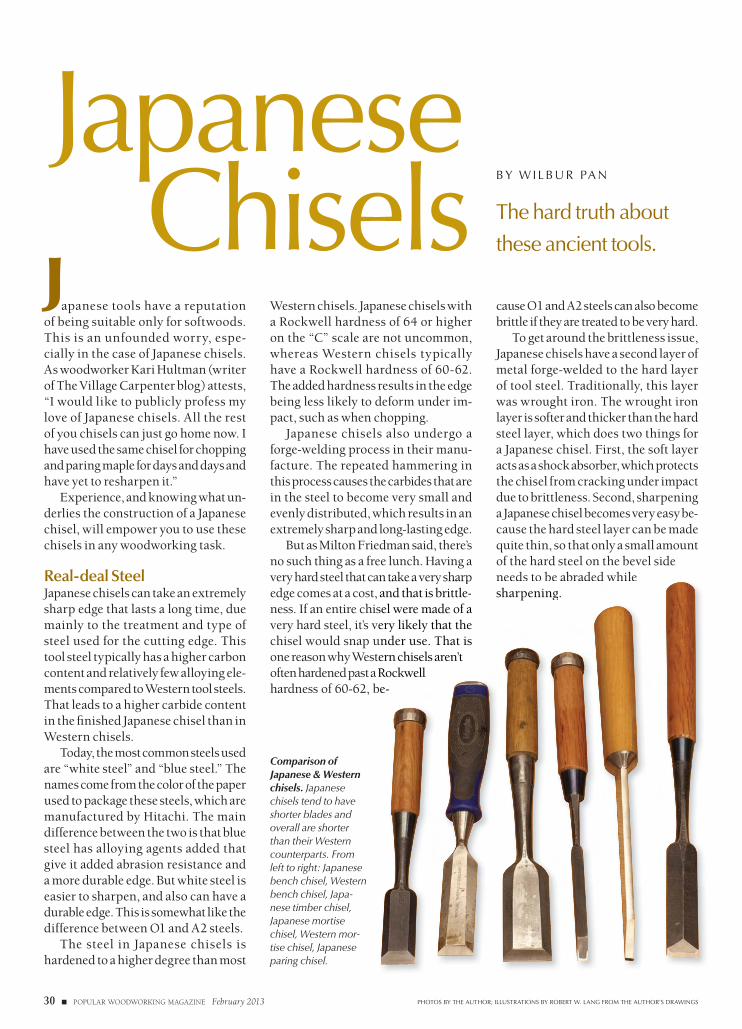
30 ■ POPULAR WOODWORKING MAGAZINE February 2013
Japanese tools have a reputation
of being suitable only for softwoods. This is an unfounded worry, espe-cially in the case of Japanese chisels. As woodworker Kari Hultman (writer of The Village Carpenter blog) attests, “I would like to publicly profess my love of Japanese chisels. All the rest of you chisels can just go home now. I have used the same chisel for chopping and paring maple for days and days and have yet to resharpen it.”
Experience, and knowing what un-derlies the construction of a Japanese chisel, will empower you to use these chisels in any woodworking task.
Real-deal SteelJapanese chisels can take an extremely sharp edge that lasts a long time, due mainly to the treatment and type of steel used for the cutting edge. This tool steel typically has a higher carbon content and relatively few alloying ele-ments compared to Western tool steels. That leads to a higher carbide content in the fi nished Japanese chisel than in Western chisels.
Today, the most common steels used are “white steel” and “blue steel.” The names come from the color of the paper used to package these steels, which are manufactured by Hitachi. The main difference between the two is that blue steel has alloying agents added that give it added abrasion resistance and a more durable edge. But white steel is easier to sharpen, and also can have a durable edge. This is somewhat like the difference between O1 and A2 steels.
The steel in Japanese chisels is hardened to a higher degree than most
PHOTOS BY THE AUTHOR; ILLUSTRATIONS BY ROBERT W. LANG FROM THE AUTHOR’S DRAWINGS
Japanese cause O1 and A2 steels can also become brittle if they are treated to be very hard.
To get around the brittleness issue, Japanese chisels have a second layer of metal forge-welded to the hard layer of tool steel. Traditionally, this layer was wrought iron. The wrought iron layer is softer and thicker than the hard steel layer, which does two things for a Japanese chisel. First, the soft layer acts as a shock absorber, which protects the chisel from cracking under impact due to brittleness. Second, sharpening a Japanese chisel becomes very easy be-cause the hard steel layer can be made quite thin, so that only a small amount of the hard steel on the bevel side needs to be abraded while sharpening.
B Y W I L B U R PA N
The hard truth about
these ancient tools.
Western chisels. Japanese chisels with a Rockwell hardness of 64 or higher on the “C” scale are not uncommon, whereas Western chisels typically have a Rockwell hardness of 60-62. The added hardness results in the edge being less likely to deform under im-pact, such as when chopping.
Japanese chisels also undergo a forge-welding process in their manu-facture. The repeated hammering in this process causes the carbides that are in the steel to become very small and evenly distributed, which results in an extremely sharp and long-lasting edge.
But as Milton Friedman said, there’s no such thing as a free lunch. Having a very hard steel that can take a very sharp edge comes at a cost, and that is brittle-ness. If an entire chisel were made of a very hard steel, it’s very likely that the chisel would snap under use. That is one reason why Western chisels aren’t often hardened past a Rockwell hardness of 60-62, be-
needs to be abraded while sharpening.
n take a very sharpand that is brittle-
sel were made of aery likely that the
under use. That isern chisels aren’t Rockwell
be-
Comparison of Japanese & Western chisels. Japanese chisels tend to have shorter blades and overall are shorter than their Western counterparts. From left to right: Japanese bench chisel, Western bench chisel, Japa-nese timber chisel, Japanese mortise chisel, Western mor-tise chisel, Japanese paring chisel.
Chisels
30_1302_PWM_JapChisels.indd 3030_1302_PWM_JapChisels.indd 30 11/28/12 12:52 PM11/28/12 12:52 PM
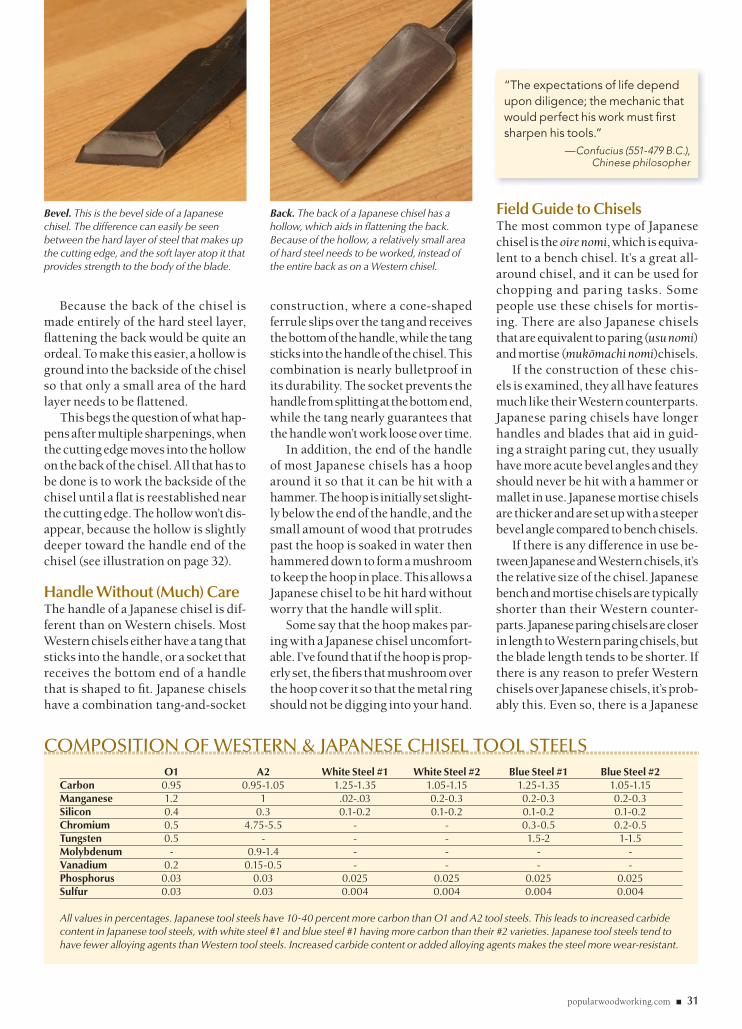
popularwoodworking.com ■ 31
Because the back of the chisel is made entirely of the hard steel layer, fl attening the back would be quite an ordeal. To make this easier, a hollow is ground into the backside of the chisel so that only a small area of the hard layer needs to be fl attened.
This begs the question of what hap-pens after multiple sharpenings, when the cutting edge moves into the hollow on the back of the chisel. All that has to be done is to work the backside of the chisel until a fl at is reestablished near the cutting edge. The hollow won’t dis-appear, because the hollow is slightly deeper toward the handle end of the chisel (see illustration on page 32).
Handle Without (Much) CareThe handle of a Japanese chisel is dif-ferent than on Western chisels. Most Western chisels either have a tang that sticks into the handle, or a socket that receives the bottom end of a handle that is shaped to fi t. Japanese chisels have a combination tang-and-socket
O1 A2 White Steel #1 White Steel #2 Blue Steel #1 Blue Steel #2Carbon 0.95 0.95-1.05 1.25-1.35 1.05-1.15 1.25-1.35 1.05-1.15Manganese 1.2 1 .02-.03 0.2-0.3 0.2-0.3 0.2-0.3Silicon 0.4 0.3 0.1-0.2 0.1-0.2 0.1-0.2 0.1-0.2Chromium 0.5 4.75-5.5 - - 0.3-0.5 0.2-0.5Tungsten 0.5 - - - 1.5-2 1-1.5Molybdenum - 0.9-1.4 - - - -Vanadium 0.2 0.15-0.5 - - - -Phosphorus 0.03 0.03 0.025 0.025 0.025 0.025Sulfur 0.03 0.03 0.004 0.004 0.004 0.004
All values in percentages. Japanese tool steels have 10-40 percent more carbon than O1 and A2 tool steels. This leads to increased carbide content in Japanese tool steels, with white steel #1 and blue steel #1 having more carbon than their #2 varieties. Japanese tool steels tend to have fewer alloying agents than Western tool steels. Increased carbide content or added alloying agents makes the steel more wear-resistant.
COMPOSITION OF WESTERN & JAPANESE CHISEL TOOL STEELS
Back. The back of a Japanese chisel has a hollow, which aids in fl attening the back. Because of the hollow, a relatively small area of hard steel needs to be worked, instead of the entire back as on a Western chisel.
Bevel. This is the bevel side of a Japanese chisel. The difference can easily be seen between the hard layer of steel that makes up the cutting edge, and the soft layer atop it that provides strength to the body of the blade.
construction, where a cone-shaped ferrule slips over the tang and receives the bottom of the handle, while the tang sticks into the handle of the chisel. This combination is nearly bulletproof in its durability. The socket prevents the handle from splitting at the bottom end, while the tang nearly guarantees that the handle won’t work loose over time.
In addition, the end of the handle of most Japanese chisels has a hoop around it so that it can be hit with a hammer. The hoop is initially set slight-ly below the end of the handle, and the small amount of wood that protrudes past the hoop is soaked in water then hammered down to form a mushroom to keep the hoop in place. This allows a Japanese chisel to be hit hard without worry that the handle will split.
Some say that the hoop makes par-ing with a Japanese chisel uncomfort-able. I’ve found that if the hoop is prop-erly set, the fi bers that mushroom over the hoop cover it so that the metal ring should not be digging into your hand.
Field Guide to ChiselsThe most common type of Japanese chisel is the oire nomi, which is equiva-lent to a bench chisel. It’s a great all-around chisel, and it can be used for chopping and paring tasks. Some people use these chisels for mortis-ing. There are also Japanese chisels that are equivalent to paring (usu nomi) and mortise (mukomachinomi)chisels.
If the construction of these chis-els is examined, they all have features much like their Western counterparts. Japanese paring chisels have longer handles and blades that aid in guid-ing a straight paring cut, they usually have more acute bevel angles and they should never be hit with a hammer or mallet in use. Japanese mortise chisels are thicker and are set up with a steeper bevel angle compared to bench chisels.
If there is any difference in use be-tween Japanese and Western chisels, it’s the relative size of the chisel. Japanese bench and mortise chisels are typically shorter than their Western counter-parts. Japanese paring chisels are closer in length to Western paring chisels, but the blade length tends to be shorter. If there is any reason to prefer Western chisels over Japanese chisels, it’s prob-ably this. Even so, there is a Japanese
“The expectations of life depend upon diligence; the mechanic that would perfect his work must fi rst sharpen his tools.”
—Confucius (551-479 B.C.), Chinese philosopher
30_1302_PWM_JapChisels.indd 3130_1302_PWM_JapChisels.indd 31 11/28/12 12:52 PM11/28/12 12:52 PM
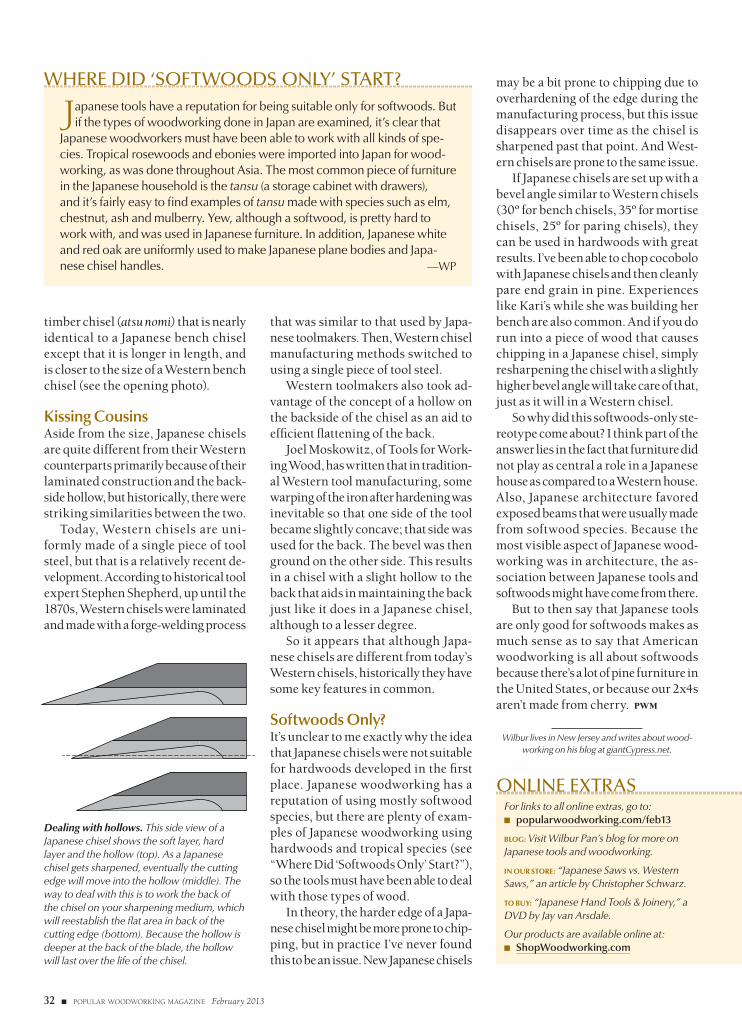
32 ■ POPULAR WOODWORKING MAGAZINE February 2013
timber chisel (atsu nomi) that is nearly identical to a Japanese bench chisel except that it is longer in length, and is closer to the size of a Western bench chisel (see the opening photo).
Kissing CousinsAside from the size, Japanese chisels are quite different from their Western counterparts primarily because of their laminated construction and the back-side hollow, but historically, there were striking similarities between the two.
Today, Western chisels are uni-formly made of a single piece of tool steel, but that is a relatively recent de-velopment. According to historical tool expert Stephen Shepherd, up until the 1870s, Western chisels were laminated and made with a forge-welding process
that was similar to that used by Japa-nese toolmakers. Then, Western chisel manufacturing methods switched to using a single piece of tool steel.
Western toolmakers also took ad-vantage of the concept of a hollow on the backside of the chisel as an aid to effi cient fl attening of the back.
Joel Moskowitz, of Tools for Work-ing Wood, has written that in tradition-al Western tool manufacturing, some warping of the iron after hardening was inevitable so that one side of the tool became slightly concave; that side was used for the back. The bevel was then ground on the other side. This results in a chisel with a slight hollow to the back that aids in maintaining the back just like it does in a Japanese chisel, although to a lesser degree.
So it appears that although Japa-nese chisels are different from today’s Western chisels, historically they have some key features in common.
Softwoods Only?It’s unclear to me exactly why the idea that Japanese chisels were not suitable for hardwoods developed in the fi rst place. Japanese woodworking has a reputation of using mostly softwood species, but there are plenty of exam-ples of Japanese woodworking using hardwoods and tropical species (see “Where Did ‘Softwoods Only’ Start?”), so the tools must have been able to deal with those types of wood.
In theory, the harder edge of a Japa-nese chisel might be more prone to chip-ping, but in practice I’ve never found this to be an issue. New Japanese chisels
may be a bit prone to chipping due to overhardening of the edge during the manufacturing process, but this issue disappears over time as the chisel is sharpened past that point. And West-ern chisels are prone to the same issue.
If Japanese chisels are set up with a bevel angle similar to Western chisels (30º for bench chisels, 35º for mortise chisels, 25º for paring chisels), they can be used in hardwoods with great results. I’ve been able to chop cocobolo with Japanese chisels and then cleanly pare end grain in pine. Experiences like Kari’s while she was building her bench are also common. And if you do run into a piece of wood that causes chipping in a Japanese chisel, simply resharpening the chisel with a slightly higher bevel angle will take care of that, just as it will in a Western chisel.
So why did this softwoods-only ste-reotype come about? I think part of the answer lies in the fact that furniture did not play as central a role in a Japanese house as compared to a Western house. Also, Japanese architecture favored exposed beams that were usually made from softwood species. Because the most visible aspect of Japanese wood-working was in architecture, the as-sociation between Japanese tools and softwoods might have come from there.
But to then say that Japanese tools are only good for softwoods makes as much sense as to say that American woodworking is all about softwoods because there’s a lot of pine furniture in the United States, or because our 2x4s aren’t made from cherry. PWM
Wilbur lives in New Jersey and writes about wood-working on his blog at giantCypress.net.
For links to all online extras, go to:■ popularwoodworking.com/feb13
BLOG: Visit Wilbur Pan’s blog for more on Japanese tools and woodworking.
IN OUR STORE: “Japanese Saws vs. Western Saws,” an article by Christopher Schwarz.
TO BUY: “Japanese Hand Tools & Joinery,” a DVD by Jay van Arsdale.
Our products are available online at:■ ShopWoodworking.com
ONLINE EXTRAS
Japanese tools have a reputation for being suitable only for softwoods. But if the types of woodworking done in Japan are examined, it’s clear that
Japanese woodworkers must have been able to work with all kinds of spe-cies. Tropical rosewoods and ebonies were imported into Japan for wood-working, as was done throughout Asia. The most common piece of furniture in the Japanese household is the tansu (a storage cabinet with drawers), and it’s fairly easy to fi nd examples of tansu made with species such as elm, chestnut, ash and mulberry. Yew, although a softwood, is pretty hard to work with, and was used in Japanese furniture. In addition, Japanese white and red oak are uniformly used to make Japanese plane bodies and Japa-nese chisel handles. —WP
WHERE DID ‘SOFTWOODS ONLY’ START?
Dealing with hollows. This side view of a Japanese chisel shows the soft layer, hard layer and the hollow (top). As a Japanese chisel gets sharpened, eventually the cutting edge will move into the hollow (middle). The way to deal with this is to work the back of the chisel on your sharpening medium, which will reestablish the fl at area in back of the cutting edge (bottom). Because the hollow is deeper at the back of the blade, the hollow will last over the life of the chisel.
30_1302_PWM_JapChisels.indd 3230_1302_PWM_JapChisels.indd 32 11/28/12 12:52 PM11/28/12 12:52 PM
popularwoodworking.com ■ 33
I N L A YI come to the fi eld of woodworking
with an unfair advantage. I grew up in a family jewelry business and did
a lot of detail work from an early age. So it’s no surprise that when I started making furniture I was drawn to the detailed work of marquetry and inlay. Even a simple inlay can make an oth-erwise plain piece of furniture more appealing. It can also serve as the per-fect fi nal touch on a near-masterpiece.
PHOTOS BY REBECCA WILKS
Shell, Stone & Metal
B Y M A R C O C E CA L A
Learn a straightforward
approach to creating
stunning details.
Using a combination of materials – from wood to more exotic materials such as shell, stone and metal – endless effects can be obtained. The work can be done with tools found in most shops and the results are beautiful.
I’ll guide you through the straight-forward process of installing a shell inlay. I’ll break down the steps required to achieve great results, even if you’ve never tried your hand at inlay before.
Inlays dress it up. Shown here (clockwise), a gold mother-of-pearl escutcheon on a jewelry box, a pair of fl ower inlays – one in abalone and reconstituted stone, the other in mother-of-pearl, brass and reconsti-tuted stone – and a smoothing plane with white, pink and gold mother-of-pearl and brass inlays.
33_1302_PWM_ShellStoneMetalInlay.indd 3333_1302_PWM_ShellStoneMetalInlay.indd 33 11/28/12 1:02 PM11/28/12 1:02 PM

34 ■ POPULAR WOODWORKING MAGAZINE February 2013
For the most part, metal and stone are applied using the same methods; I’ll explain the few differences as we go. You will be surprised by how much effect you get with the addition of inlay to your projects.
Design Made EasyThere is no need to be a great artist to produce pleasing inlays. Books and web resources will give you plenty of design ideas. While you are learning you should choose a design with crisp lines and pieces that are not too small; simple is better.
The inlay should also be sized to fi t the scale of the piece. If it is placed high or low on a larger piece, it can be positioned in order to be more easily seen. Start by drawing your design on tracing paper. Make a copy and trace it one or two more times to refi ne the design.
As you will learn, there are several opportunities throughout the process to improve the look of an inlay or save a piece that chips or breaks. Until the cavity is routed in the wood, the design of the inlay can be changed.
PatternOnce you’re happy with the design, make at least four copies of it. Cut the individual pieces outside the lines so you can see the entire piece. I cut on a self-healing cutting mat available at fabric stores. To attach the pieces of paper to shell or stone, use medium-viscosity cyanoacrylate (CA) glue. For metals, use epoxy. The heat from saw-ing will loosen the paper from metal if you use CA glue. For more on glues, see “Choosing Adhesives for Inlay Work” on page 35.
There is no need to try to plan a de-sign around material. When you have
fi nished the drawing, suspend your notion of what things should look like and survey the available materials.
To visualize how shell patterns will look after cutting, you can take a copy of the pattern and cut out a window of the fi nished piece in the design and move it around on the material. This can help you decide which section of a piece of patterned material to use.
Choose Your MaterialsAs long as you can shape, fl atten and polish it, you can make any material part of an inlay design. Wood is the easi-est to work with, and it can be combined with other materials or used alone.
The most popular inlay material is shell. The wide range of types and colors of shell allow the artist to use it for an entire design.
The art of inlaying stone, called pi-etra dure, it is both diffi cult and time-
START WITH THE DESIGN
Make multiples. Whether your own or a bor-rowed design, having multiple copies makes it easier to cut out the smaller inlay sections.
Take inventory. Arrange the pieces loosely to verify that you have them all and that they appear as you envisioned.
Cut a window. Cut right on the line to create a viewing window. Then lay the window over the shell and adjust the position to your liking. Here, choosing the right section of stone cre-ates an instant vein for the leaf.
Glue it down. Take the actual pattern removed from the design (shown above) and attach it to the shell using CA glue.
Posture is everything. Cut out the stone using a fretsaw held at about shoulder height. Use a light grip and work to keep the blade vertical. While most patterns are forgiving, aim for splitting the line as you cut.
33_1302_PWM_ShellStoneMetalInlay.indd 3433_1302_PWM_ShellStoneMetalInlay.indd 34 11/28/12 1:02 PM11/28/12 1:02 PM
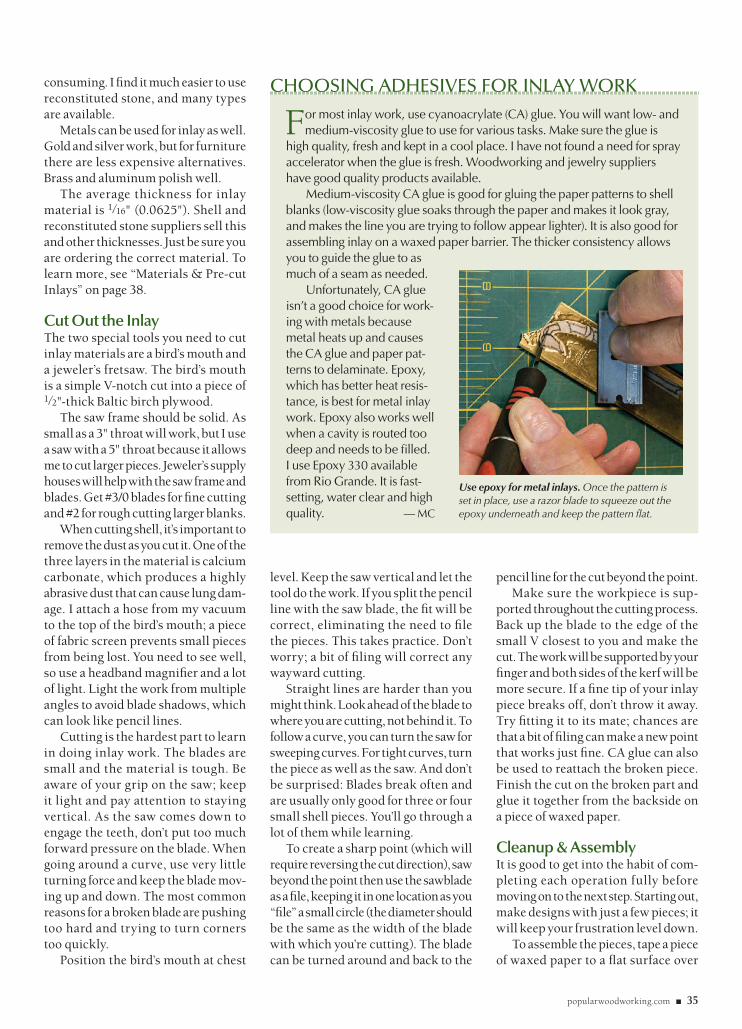
popularwoodworking.com ■ 35
For most inlay work, use cyanoacrylate (CA) glue. You will want low- and medium-viscosity glue to use for various tasks. Make sure the glue is
high quality, fresh and kept in a cool place. I have not found a need for spray accelerator when the glue is fresh. Woodworking and jewelry suppliers have good quality products available.
Medium-viscosity CA glue is good for gluing the paper patterns to shell blanks (low-viscosity glue soaks through the paper and makes it look gray, and makes the line you are trying to follow appear lighter). It is also good for assembling inlay on a waxed paper barrier. The thicker consistency allows you to guide the glue to as much of a seam as needed.
Unfortunately, CA glue isn’t a good choice for work-ing with metals because metal heats up and causes the CA glue and paper pat-terns to delaminate. Epoxy, which has better heat resis-tance, is best for metal inlay work. Epoxy also works well when a cavity is routed too deep and needs to be fi lled. I use Epoxy 330 available from Rio Grande. It is fast-setting, water clear and high quality. — MC
CHOOSING ADHESIVES FOR INLAY WORK
Use epoxy for metal inlays. Once the pattern is set in place, use a razor blade to squeeze out the epoxy underneath and keep the pattern fl at.
consuming. I fi nd it much easier to use reconstituted stone, and many types are available.
Metals can be used for inlay as well. Gold and silver work, but for furniture there are less expensive alternatives. Brass and aluminum polish well.
The average thickness for inlay material is 1⁄16" (0.0625"). Shell and reconstituted stone suppliers sell this and other thicknesses. Just be sure you are ordering the correct material. To learn more, see “Materials & Pre-cut Inlays” on page 38.
Cut Out the InlayThe two special tools you need to cut inlay materials are a bird’s mouth and a jeweler’s fretsaw. The bird’s mouth is a simple V-notch cut into a piece of 1⁄2"-thick Baltic birch plywood.
The saw frame should be solid. As small as a 3" throat will work, but I use a saw with a 5" throat because it allows me to cut larger pieces. Jeweler’s supply houses will help with the saw frame and blades. Get #3/0 blades for fi ne cutting and #2 for rough cutting larger blanks.
When cutting shell, it’s important to remove the dust as you cut it. One of the three layers in the material is calcium carbonate, which produces a highly abrasive dust that can cause lung dam-age. I attach a hose from my vacuum to the top of the bird’s mouth; a piece of fabric screen prevents small pieces from being lost. You need to see well, so use a headband magnifi er and a lot of light. Light the work from multiple angles to avoid blade shadows, which can look like pencil lines.
Cutting is the hardest part to learn in doing inlay work. The blades are small and the material is tough. Be aware of your grip on the saw; keep it light and pay attention to staying vertical. As the saw comes down to engage the teeth, don’t put too much forward pressure on the blade. When going around a curve, use very little turning force and keep the blade mov-ing up and down. The most common reasons for a broken blade are pushing too hard and trying to turn corners too quickly.
Position the bird’s mouth at chest
level. Keep the saw vertical and let the tool do the work. If you split the pencil line with the saw blade, the fi t will be correct, eliminating the need to fi le the pieces. This takes practice. Don’t worry; a bit of fi ling will correct any wayward cutting.
Straight lines are harder than you might think. Look ahead of the blade to where you are cutting, not behind it. To follow a curve, you can turn the saw for sweeping curves. For tight curves, turn the piece as well as the saw. And don’t be surprised: Blades break often and are usually only good for three or four small shell pieces. You’ll go through a lot of them while learning.
To create a sharp point (which will require reversing the cut direction), saw beyond the point then use the sawblade as a fi le, keeping it in one location as you “fi le” a small circle (the diameter should be the same as the width of the blade with which you’re cutting). The blade can be turned around and back to the
pencil line for the cut beyond the point. Make sure the workpiece is sup-
ported throughout the cutting process. Back up the blade to the edge of the small V closest to you and make the cut. The work will be supported by your fi nger and both sides of the kerf will be more secure. If a fi ne tip of your inlay piece breaks off, don’t throw it away. Try fi tting it to its mate; chances are that a bit of fi ling can make a new point that works just fi ne. CA glue can also be used to reattach the broken piece. Finish the cut on the broken part and glue it together from the backside on a piece of waxed paper.
Cleanup & AssemblyIt is good to get into the habit of com-pleting each operation fully before moving on to the next step. Starting out, make designs with just a few pieces; it will keep your frustration level down.
To assemble the pieces, tape a piece of waxed paper to a fl at surface over
33_1302_PWM_ShellStoneMetalInlay.indd 3533_1302_PWM_ShellStoneMetalInlay.indd 35 11/28/12 1:03 PM11/28/12 1:03 PM
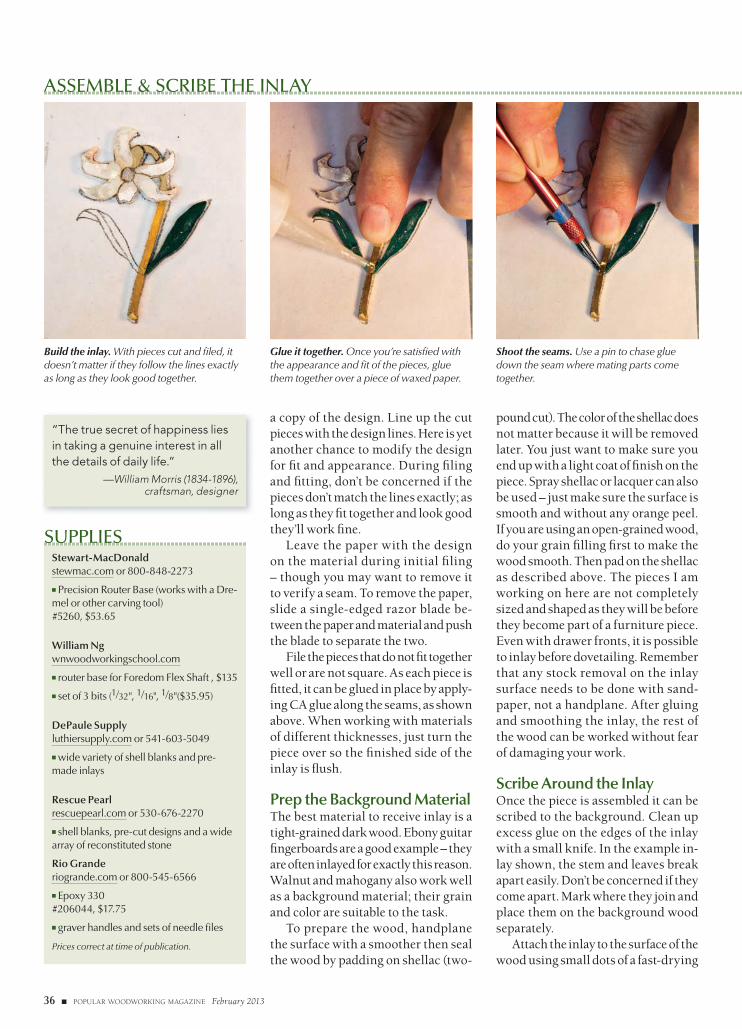
ASSEMBLE & SCRIBE THE INLAY
Build the inlay. With pieces cut and fi led, it doesn’t matter if they follow the lines exactly as long as they look good together.
Glue it together. Once you’re satisfi ed with the appearance and fi t of the pieces, glue them together over a piece of waxed paper.
Shoot the seams. Use a pin to chase glue down the seam where mating parts come together.
36 ■ POPULAR WOODWORKING MAGAZINE February 2013
a copy of the design. Line up the cut pieces with the design lines. Here is yet another chance to modify the design for fi t and appearance. During fi ling and fi tting, don’t be concerned if the pieces don’t match the lines exactly; as long as they fi t together and look good they’ll work fi ne.
Leave the paper with the design on the material during initial fi ling – though you may want to remove it to verify a seam. To remove the paper, slide a single-edged razor blade be-tween the paper and material and push the blade to separate the two.
File the pieces that do not fi t together well or are not square. As each piece is fi tted, it can be glued in place by apply-ing CA glue along the seams, as shown above. When working with materials of different thicknesses, just turn the piece over so the fi nished side of the inlay is fl ush.
Prep the Background MaterialThe best material to receive inlay is a tight-grained dark wood. Ebony guitar fi ngerboards are a good example – they are often inlayed for exactly this reason. Walnut and mahogany also work well as a background material; their grain and color are suitable to the task.
To prepare the wood, handplane the surface with a smoother then seal the wood by padding on shellac (two-
pound cut). The color of the shellac does not matter because it will be removed later. You just want to make sure you end up with a light coat of fi nish on the piece. Spray shellac or lacquer can also be used – just make sure the surface is smooth and without any orange peel. If you are using an open-grained wood, do your grain fi lling fi rst to make the wood smooth. Then pad on the shellac as described above. The pieces I am working on here are not completely sized and shaped as they will be before they become part of a furniture piece. Even with drawer fronts, it is possible to inlay before dovetailing. Remember that any stock removal on the inlay surface needs to be done with sand-paper, not a handplane. After gluing and smoothing the inlay, the rest of the wood can be worked without fear of damaging your work.
Scribe Around the InlayOnce the piece is assembled it can be scribed to the background. Clean up excess glue on the edges of the inlay with a small knife. In the example in-lay shown, the stem and leaves break apart easily. Don’t be concerned if they come apart. Mark where they join and place them on the background wood separately.
Attach the inlay to the surface of the wood using small dots of a fast-drying
Stewart-MacDonaldstewmac.com or 800-848-2273
■ Precision Router Base (works with a Dre-mel or other carving tool) #5260, $53.65
William Ng wnwoodworkingschool.com
■ router base for Foredom Flex Shaft , $135
■ set of 3 bits (1⁄32", 1⁄16", 1⁄8"($35.95)
DePaule Supply luthiersupply.com or 541-603-5049
■ wide variety of shell blanks and pre-made inlays
Rescue Pearl rescuepearl.com or 530-676-2270
■ shell blanks, pre-cut designs and a wide array of reconstituted stone
Rio Granderiogrande.com or 800-545-6566
■ Epoxy 330 #206044, $17.75
■ graver handles and sets of needle fi les
Prices correct at time of publication.
SUPPLIES
“The true secret of happiness lies in taking a genuine interest in all the details of daily life.”
—William Morris (1834-1896), craftsman, designer
33_1302_PWM_ShellStoneMetalInlay.indd 3633_1302_PWM_ShellStoneMetalInlay.indd 36 11/28/12 1:03 PM11/28/12 1:03 PM
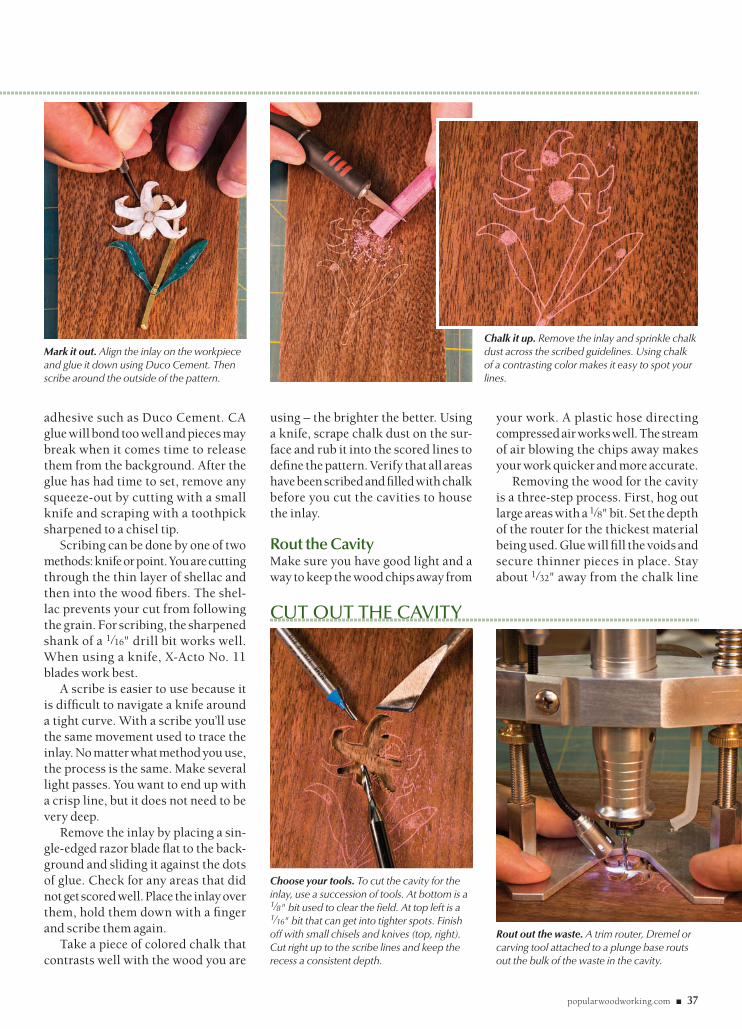
popularwoodworking.com ■ 37
adhesive such as Duco Cement. CA glue will bond too well and pieces may break when it comes time to release them from the background. After the glue has had time to set, remove any squeeze-out by cutting with a small knife and scraping with a toothpick sharpened to a chisel tip.
Scribing can be done by one of two methods: knife or point. You are cutting through the thin layer of shellac and then into the wood fi bers. The shel-lac prevents your cut from following the grain. For scribing, the sharpened shank of a 1⁄16" drill bit works well. When using a knife, X-Acto No. 11 blades work best.
A scribe is easier to use because it is diffi cult to navigate a knife around a tight curve. With a scribe you’ll use the same movement used to trace the inlay. No matter what method you use, the process is the same. Make several light passes. You want to end up with a crisp line, but it does not need to be very deep.
Remove the inlay by placing a sin-gle-edged razor blade fl at to the back-ground and sliding it against the dots of glue. Check for any areas that did not get scored well. Place the inlay over them, hold them down with a fi nger and scribe them again.
Take a piece of colored chalk that contrasts well with the wood you are
using – the brighter the better. Using a knife, scrape chalk dust on the sur-face and rub it into the scored lines to defi ne the pattern. Verify that all areas have been scribed and fi lled with chalk before you cut the cavities to house the inlay.
Rout the CavityMake sure you have good light and a way to keep the wood chips away from
your work. A plastic hose directing compressed air works well. The stream of air blowing the chips away makes your work quicker and more accurate.
Removing the wood for the cavity is a three-step process. First, hog out large areas with a 1⁄8" bit. Set the depth of the router for the thickest material being used. Glue will fi ll the voids and secure thinner pieces in place. Stay about 1⁄32" away from the chalk line
CUT OUT THE CAVITY
Mark it out. Align the inlay on the workpiece and glue it down using Duco Cement. Then scribe around the outside of the pattern.
Chalk it up. Remove the inlay and sprinkle chalk dust across the scribed guidelines. Using chalk of a contrasting color makes it easy to spot your lines.
Rout out the waste. A trim router, Dremel or carving tool attached to a plunge base routs out the bulk of the waste in the cavity.
Choose your tools. To cut the cavity for the inlay, use a succession of tools. At bottom is a 1⁄8" bit used to clear the fi eld. At top left is a 1⁄16" bit that can get into tighter spots. Finish off with small chisels and knives (top, right). Cut right up to the scribe lines and keep the recess a consistent depth.
33_1302_PWM_ShellStoneMetalInlay.indd 3733_1302_PWM_ShellStoneMetalInlay.indd 37 11/28/12 1:03 PM11/28/12 1:03 PM
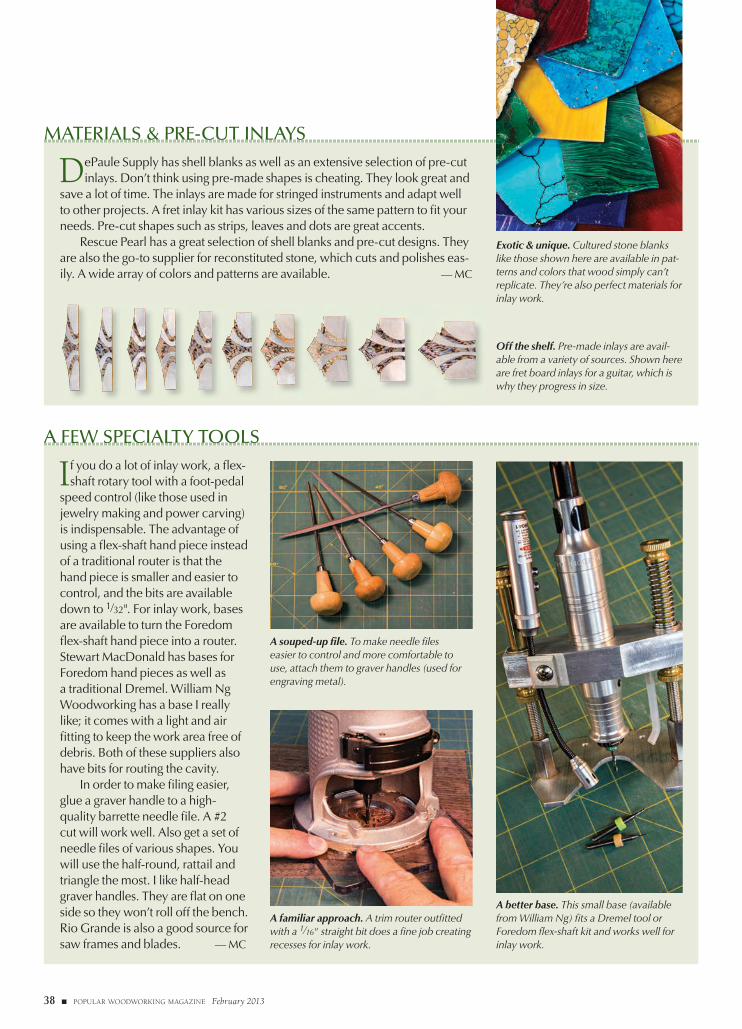
38 ■ POPULAR WOODWORKING MAGAZINE February 2013
Sidebar Fractions1⁄2"1⁄4" 3⁄4"1⁄8" 3⁄8" 5⁄8" 7⁄8"1⁄16" 3⁄16" 5⁄16" 7⁄16" 9⁄16" 11⁄16"1⁄32" 3⁄32" 5⁄32" 7⁄32" 9⁄32" 11⁄32"1⁄64" 3⁄64" 5⁄64" 7⁄64" 9⁄64" 11⁄64"
If you do a lot of inlay work, a fl ex-shaft rotary tool with a foot-pedal
speed control (like those used in jewelry making and power carving) is indispensable. The advantage of using a fl ex-shaft hand piece instead of a traditional router is that the hand piece is smaller and easier to control, and the bits are available down to 1⁄32". For inlay work, bases are available to turn the Foredom fl ex-shaft hand piece into a router. Stewart MacDonald has bases for Foredom hand pieces as well as a traditional Dremel. William Ng Woodworking has a base I really like; it comes with a light and air fi tting to keep the work area free of debris. Both of these suppliers also have bits for routing the cavity.
In order to make fi ling easier, glue a graver handle to a high-quality barrette needle fi le. A #2 cut will work well. Also get a set of needle fi les of various shapes. You will use the half-round, rattail and triangle the most. I like half-head graver handles. They are fl at on one side so they won’t roll off the bench. Rio Grande is also a good source for saw frames and blades. — MC
A FEW SPECIALTY TOOLS
A better base. This small base (available from William Ng) fi ts a Dremel tool or Foredom fl ex-shaft kit and works well for inlay work.
A souped-up fi le. To make needle fi les easier to control and more comfortable to use, attach them to graver handles (used for engraving metal).
A familiar approach. A trim router outfi tted with a 1⁄16" straight bit does a fi ne job creating recesses for inlay work.
DePaule Supply has shell blanks as well as an extensive selection of pre-cut inlays. Don’t think using pre-made shapes is cheating. They look great and
save a lot of time. The inlays are made for stringed instruments and adapt well to other projects. A fret inlay kit has various sizes of the same pattern to fi t your needs. Pre-cut shapes such as strips, leaves and dots are great accents.
Rescue Pearl has a great selection of shell blanks and pre-cut designs. They are also the go-to supplier for reconstituted stone, which cuts and polishes eas-ily. A wide array of colors and patterns are available. — MC
MATERIALS & PRE-CUT INLAYS
Exotic & unique. Cultured stone blanks like those shown here are available in pat-terns and colors that wood simply can’t replicate. They’re also perfect materials for inlay work.
Off the shelf. Pre-made inlays are avail-able from a variety of sources. Shown here are fret board inlays for a guitar, which is why they progress in size.
33_1302_PWM_ShellStoneMetalInlay.indd 3833_1302_PWM_ShellStoneMetalInlay.indd 38 11/28/12 1:03 PM11/28/12 1:03 PM
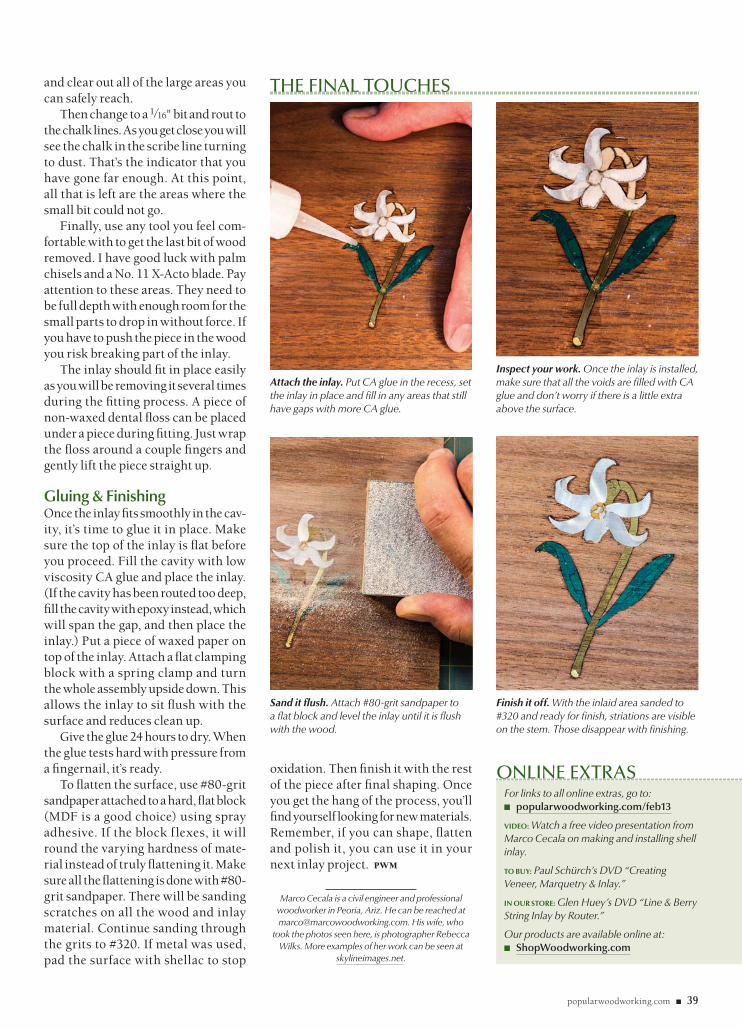
popularwoodworking.com ■ 39
Attach the inlay. Put CA glue in the recess, set the inlay in place and fi ll in any areas that still have gaps with more CA glue.
Inspect your work. Once the inlay is installed, make sure that all the voids are fi lled with CA glue and don’t worry if there is a little extra above the surface.
For links to all online extras, go to:■ popularwoodworking.com/feb13
VIDEO: Watch a free video presentation from Marco Cecala on making and installing shell inlay.
TO BUY: Paul Schürch’s DVD “Creating Veneer, Marquetry & Inlay.”
IN OUR STORE: Glen Huey’s DVD “Line & Berry String Inlay by Router.”
Our products are available online at:■ ShopWoodworking.com
ONLINE EXTRAS
THE FINAL TOUCHES
Sand it fl ush. Attach #80-grit sandpaper to a fl at block and level the inlay until it is fl ush with the wood.
Finish it off. With the inlaid area sanded to #320 and ready for fi nish, striations are visible on the stem. Those disappear with fi nishing.
and clear out all of the large areas you can safely reach.
Then change to a 1⁄16" bit and rout to the chalk lines. As you get close you will see the chalk in the scribe line turning to dust. That’s the indicator that you have gone far enough. At this point, all that is left are the areas where the small bit could not go.
Finally, use any tool you feel com-fortable with to get the last bit of wood removed. I have good luck with palm chisels and a No. 11 X-Acto blade. Pay attention to these areas. They need to be full depth with enough room for the small parts to drop in without force. If you have to push the piece in the wood you risk breaking part of the inlay.
The inlay should fi t in place easily as you will be removing it several times during the fi tting process. A piece of non-waxed dental fl oss can be placed under a piece during fi tting. Just wrap the fl oss around a couple fi ngers and gently lift the piece straight up.
Gluing & FinishingOnce the inlay fi ts smoothly in the cav-ity, it’s time to glue it in place. Make sure the top of the inlay is fl at before you proceed. Fill the cavity with low viscosity CA glue and place the inlay. (If the cavity has been routed too deep, fi ll the cavity with epoxy instead, which will span the gap, and then place the inlay.) Put a piece of waxed paper on top of the inlay. Attach a fl at clamping block with a spring clamp and turn the whole assembly upside down. This allows the inlay to sit fl ush with the surface and reduces clean up.
Give the glue 24 hours to dry. When the glue tests hard with pressure from a fi ngernail, it’s ready.
To fl atten the surface, use #80-grit sandpaper attached to a hard, fl at block (MDF is a good choice) using spray adhesive. If the block flexes, it will round the varying hardness of mate-rial instead of truly fl attening it. Make sure all the fl attening is done with #80-grit sandpaper. There will be sanding scratches on all the wood and inlay material. Continue sanding through the grits to #320. If metal was used, pad the surface with shellac to stop
oxidation. Then fi nish it with the rest of the piece after fi nal shaping. Once you get the hang of the process, you’ll fi nd yourself looking for new materials. Remember, if you can shape, fl atten and polish it, you can use it in your next inlay project. PWM
Marco Cecala is a civil engineer and professional woodworker in Peoria, Ariz. He can be reached at [email protected]. His wife, who
took the photos seen here, is photographer Rebecca Wilks. More examples of her work can be seen at
skylineimages.net.
33_1302_PWM_ShellStoneMetalInlay.indd 3933_1302_PWM_ShellStoneMetalInlay.indd 39 11/28/12 1:03 PM11/28/12 1:03 PM
40 ■ POPULAR WOODWORKING MAGAZINE February 2013
R ecently I joined a group whose primary goal is to restore the Thorsen House, one of the “Ultimate Bunga-lows” designed by Charles and Henry Greene. In fact, I am on the board of directors of the Friends of the Thorsen House. Our purpose is to raise funds for a seismic retrofi t to the house (it sits atop the Hayward fault), but there are several smaller projects going on, too.
PHOTOS BY THE AUTHOR; ILLUSTRATIONS BY ROBERT W. LANG FROM THE AUTHOR’S DRAWINGS
A Bed for The Thorsen House
B Y DA R R E L L P E A RT
Make a Greene & Greene-style bed
with simplifi ed construction.
Greene style. So I volunteered to design and build a twin XL bed.
While this was a tremendous thrill and honor, it was also intimidating. I never would have dreamed that I would design and build a piece of furniture for one of Greene & Greene’s Ultimate Bungalows.
I decided to use khaya (an African mahogany) to fi t in with the house and
The original furniture resides in the Huntington Museum in San Marino, Calif. One of our goals is to eventually reproduce all the original furniture and populate the house with related pieces. The Greenes never designed a bed for the house. Because it is a fra-ternity house (and has been for nearly 70 years) there are a lot of beds in the house now, but none in the Greene &
40_1302_PWM_ThorsenBed.indd 4040_1302_PWM_ThorsenBed.indd 40 11/28/12 1:06 PM11/28/12 1:06 PM

popularwoodworking.com ■ 41
existing furniture. And I kept things simple enough for the fraternity broth-ers to replicate – so they could in turn furnish the other bedrooms.
The Thorsen furniture is, for the most part, more restrained than designs from the other Ultimate Bungalows. This does not mean the designs are unsophisticated – they have more than their share of complexity and subtle fi nessing. I attempted to keep my design outwardly simple yet throw in a bit of fi nessing as well.
There was no original bedroom furniture for the house, so I based my design in part on the Thorsen House plant stand (available in the book “Shop Drawings for Greene & Greene Fur-niture”). I started by borrowing the stand’s scroll pattern to use as a cut out in the center panel. Using a common centerline I radiated the pattern’s arches outwardly to telegraph to the upper rail. I also spaced the spindles to radiate out from the center. I set the height of this fi rst bed so the mattress would be level in height to the original plant stand. This is lower than the standard height of a bed. You might add 3" or 4" to the length of the legs to bring it to typical height (and the plans can be modifi ed to fi t any size mattress).
Mortises FirstLet’s jump right in and get to the join-ery. First, mill all the parts for the bed to the sizes indicated on the cutlist (page 45), but leave the tongues (the pieces between the spindles and the rails) and center panel pieces about 1⁄16" oversized in thickness. Be sure to mill extra scrap parts on which to test joinery. I’ll share my method for mortise-and-tenon joints; if, however, you have a preferred approach, go ahead and use it.
To start, construct the two mor-tising templates shown at top right. Templates such as these are quick and easy to make. They are not meant for long-term use though; I usually make them from scrap material and throw them away when I am done.
All the tenons are 3⁄4" thick, with the top rail tenon at 11⁄2" wide and the
mid and lower rail tenons at 4" wide. To make the corresponding 3⁄4" mortise, use a router with a 5⁄8"-diameter guide bushing and 1⁄2"-diameter upcut spiral bit. Doing the math then, the opening in the template guide needs to be 1⁄8" larger in both directions. I like to ex-tend the platform of the template out 2" for suffi cient router base support. With all that in mind, cut four pieces of 3⁄4" material to exactly 7⁄8" wide x 2" long. Next cut two pieces of the same material to exactly 2" x 81⁄8" long, then two more pieces again 2" wide but this time only 55⁄8" long.
Assemble and glue the two template platforms. As you can see above, the 2"-long pieces all line up with the ends of the longer 2" wide pieces to form the routing slot in the space between. If everything goes as planned you should have an opening in the smaller template of 7⁄8" x 15⁄8" and an opening of 7⁄8" x 41⁄8" for the larger mortise.
To fi nish them off, attach the tem-plates to a registration block (with screws only) that is exactly 11⁄2" thick and fl ush against one long edge. This should position the mortise dead center in the thickness of the leg.
Set up a plunge router with a 1⁄2" spi-ral upcut bit and a 5⁄8" guide bushing to a cutting depth of 1" (factor in the thick-ness of the template). Routers plates do not necessarily center guide bushings on the bit. They can actually be off by quite a bit. For the sake of accuracy, using a guide bushing with a matched precision line-up pin can be helpful.
In a bench vise, using scrap leg material, clamp the stock against the
registration block and rout a test cut. Adjust the position of the registration block to center the mortise on the leg. Centering is important, so be precise here.
Referring to the “Leg Elevations” drawing (page 43), lay out the lines that represent the top and the bot-tom edge of each mortise (make sure to mark on the 17⁄8" face). Center the opening of the template on the layout lines, clamp and rout. For consistency, make a spacer to locate the mortises in the same positions on the legs. Once all the mortises are routed, square the corners with a chisel.
For the tenons, set up a dado stack in the table saw. Using a sled equipped with a large stop-block, set up and cut the cheeks and shoulders of the face side on test material. Make sure to back up the cut with scrap material to avoid blow out. Once a good fi t with the mortises is achieved, go ahead and make the face side cuts in all the rails.
Mortises on demand. These jigs, combined with router guide bushings, ensure consis-tent-sized mortises in multiple locations.
Under control. The spacer locates the template the identical distance from the end of each leg.
Smart setup. The vertical block attached to the sled allows the tenons to be machined vertically without adjusting the blade height.
40_1302_PWM_ThorsenBed.indd 4140_1302_PWM_ThorsenBed.indd 41 11/28/12 1:06 PM11/28/12 1:06 PM
17⁄8"
11∕2"
1∕2"
11∕2"
3⁄8"
3⁄8"
1"
3⁄8"
321∕2"
53⁄8"
51⁄16"
1∕2"
1∕2"
51⁄16"
57⁄16"
HEADBOARD SECTION
321∕2"
11∕2"
17⁄8" 341∕4"
381⁄4"
2"
83⁄4"
57⁄16"
51∕16"
53⁄8"
51⁄16"
33⁄4" 1"213⁄16" 1"115⁄16" 1"
23⁄8"
1⁄8"61⁄4"
4"
4"
11∕2"
2"
2113⁄16"
341∕4"
33⁄4" 1"213⁄16" 1"115⁄16" 1"
23⁄8"
1⁄8"
61⁄4"3⁄4"
2"
3∕8"83⁄4"
3∕8"
57⁄16"
51∕16"
4"
HEADBOARD ELEVATION
FOOTBOARD ELEVATION
42 ■ POPULAR WOODWORKING MAGAZINE February 2013
Leaving the blade the same height and referring to the drawings, re-adjust the stop-block and make the cuts to produce the width of the tenon.
Templates for CurvesWhen making pattern templates, I draw them in CAD then use the drawings to
have them cut out on a CNC machine. Because a CNC is not a common work-shop tool, I will go through it the old-fashioned way: the way I did it back in the B.C. (before computers) era.
The arcs, both on the bottom and the top of the rail, share the same cen-terline as do the arcs on the top half of
the scroll pattern. To produce the arcs, make two separate templates (top of rail and bottom of rail). Each outline contains an upliftedcenter arc as well as smaller arcs on either side that are tangent to both the center arc and the straight line that extends out to the legs.
First, cut out the template material
40_1302_PWM_ThorsenBed.indd 4240_1302_PWM_ThorsenBed.indd 42 11/28/12 1:06 PM11/28/12 1:06 PM
popularwoodworking.com ■ 43
to about 14" x 40" on either 1⁄2"- or 3⁄4"-thick ply. Both top and bottom out-lines will be laid out on this one piece. Referring to the “Rail Pattern” drawing at right, plot out the beginning and end points for each arc – the points where each arc connects tangentially with the adjoining arc or line.
Next set up trammel points with a pencil and adjust them to the radius of one of the arcs. Strike arcs from the end points of the selected radius. Where the arcs intersect is then the centerline for that arc. Go ahead and use the trammel points to draw the start and stop points of the arc. Repeat this process for all the arcs. Last, draw in the straight lines that extend out to the legs.
Start with the lower outline. The fi rst step (while the opposing edge is still straight) is to cut the straight lines in the lower outline using the table saw, then use a spindle sander or drum end of an edge sander to shape the radii. Next, fl ush-trim the straight lines in the upper outline with a router and straightedge. Finish off the outline with a sanding block to blend any discrepancies.
To rout the lower outline on the rail, set up the template with blocks and
toggle clamps. Make sure to correctly orient the tenons and line up the stock fl ush with the straight part of the tem-plate and at the end with the shoulder line. Mark the outline and band saw the waste, leaving 1⁄16"-1⁄8" of material. Us-ing a fl ush-trim top-bearing bit, clamp the stock in place and rout the outline.
To rout the top outline, start by drawing a line exactly 2" back from the
just-routed lower face. Line up the mark with the edge of the template and the shoulder as before. Pencil in the outline and again cut away the waste. Reposi-tion the toggle clamps and secure the stock, then fl ush trim to the outline.
Lifts, Faux Tenons & PlugsThe bottom rails of both the head and foot boards feature a small cloudlift. To
2113⁄16"
4"
4"
17⁄8" 17⁄8"
519⁄32"519⁄32"
1"
1"
11∕2"
923⁄32"
3⁄4"
4"
11∕2"
923⁄32"
3⁄4"321∕2"
LEG ELEVATIONS
Jig generation. A plywood pattern allows the curved rails to be trimmed safely to consistent shape and size.
Ramp up. Extra length at the beginning and end of the curved pattern guarantees a good cut with the router.
Ramp down. The extra width of the pattern provides room for placing clamps and keeps your hands a safe distance from the bit.
PATTERN ROUTING
RAIL PATTERN
341∕2"
R=27"
R=415⁄8"
R=435⁄8"
R=25"
71⁄16" 4" 123⁄8"3⁄4"
14"
40"
71⁄16" 323⁄32"1215⁄16"
13⁄4"
115⁄32"
11⁄16"
Head
Foot
40_1302_PWM_ThorsenBed.indd 4340_1302_PWM_ThorsenBed.indd 43 11/28/12 1:07 PM11/28/12 1:07 PM
44 ■ POPULAR WOODWORKING MAGAZINE February 2013
Need a lift? The offset in the router table fenc-es forms the straight edge and inside curve of the cloudlift shape.
True to form. Shape the lower edge of the bottom rails using the form as a guide. Then fl ip the form so both ends match.
Pack a punch. These special punch-es work with a drill bit to remove waste, and four sharp edges to make a square recess for plugs.
1∕2"
1∕2"
1∕2"
1∕2"
1⁄4"
1∕2"
1∕2"
Top of leg
At rails
1⁄4"
1⁄4" x 1⁄4" plugs 3⁄8"
1∕2"
Spindle
3⁄16" x 3⁄16" plugs
Upper & lower rails
PLUG LOCATIONS
and punch the square holes. You may opt for punching the square holes in the rails after the dry-fi t of the spindles to confi rm their location.
Grooves for Panels & TonguesA groove down the exact center of the bottom edge of the top rail and the up-per edge of the lower rail will serve to house the center panel and will also house an exposed tongue. The spin-dles will then saddle the tongue. The center panel is three sequenced pieces cut from the same board. The 1⁄8" gap between the pieces allows for wood movement and makes for an interesting design feature.
Before routing the groove, fi rst set your router table up with a 3⁄8" upcut-spiral bit and make a test cut running scrap material against the fence. This bit will be used later to rout the saddle on the ends of the spindles. Measure the width of this cut precisely and de-fault to it for the 3⁄8"-wide dimension for the groove.
An old trick to ensure precise center registration is to make two passes with a smaller bit (or blade) from opposing sides. With this in mind, set up a router with a 1⁄4" slot cutter; use scrap rail material of the same thickness to make test cuts until a 3⁄8"-wide (matched to previous test cut) x 1⁄2"-deep groove is achieved.
Go ahead and rout the groove into the top edge of the lower rail and the bottom edge of the top rail. Be sure to stop the cut shy of the top rail tenon. Using a chisel, square up the rounded corner left in the end of the groove in the top rail. Referring to the cutlist, you can now mill the center panel and tongue material to match the 3⁄8" thick-ness of the groove.
Before you break down the router setup, add a 1⁄8" wing cutter to the 1⁄4" cutter (the 1⁄2" depth stays the same). On the inside of the headboard legs, mark a line 1⁄8" in from the bottom two mortises. This is the space where the bottom headboard panel will go. Using the centering method of routing from both sides, use scrap material to adjust the cut to the thickness of the lower panel material. Then rout between the
SHAPE THE CLOUDLIFT
make the template, start by cutting a piece of 1⁄2"-thick ply material to 57⁄16" (the exact width of the rail) x about 20". Next, set up a router table with a 1⁄2" straight cutting bit (1⁄4" radius). Align the outfeed fence with the top dead center of the bit and drop the infeed side back exactly 1⁄8". Mark a stop line 61⁄16" from the end of the ply. Run the template material past the bit and stop at the line. This forms the fi rst half of the cloudlift shape. To fi nish the shape, use a spindle sander to carefully form the connecting radius.
Next, clamp the template even with the rail (on three sides) and fl ush-trim the shape. Flip the template end for
end then rout the other half of the rail.Although the working tenons are 3⁄4"
wide, for the purpose of aesthetics, the faux tenons are only 1⁄2" wide. Referring to the previous layouts for mortises, transfer the marks to the opposing 17⁄8" face. Rout as before using the same 5⁄8" collar and template, but this time use a 1⁄4" upcut-spiral bit set to a depth of about 5⁄8". This will produce a 1⁄2"-wide mortise for the faux tenons. Finish off by squaring up the corners.
From the drawing below, mark out the centerlines for the ebony plug holes. Using a square hole punch or a hollow chisel from a mortising machine, regis-ter the tool on the centerlines and drill
40_1302_PWM_ThorsenBed.indd 4440_1302_PWM_ThorsenBed.indd 44 11/28/12 1:07 PM11/28/12 1:07 PM
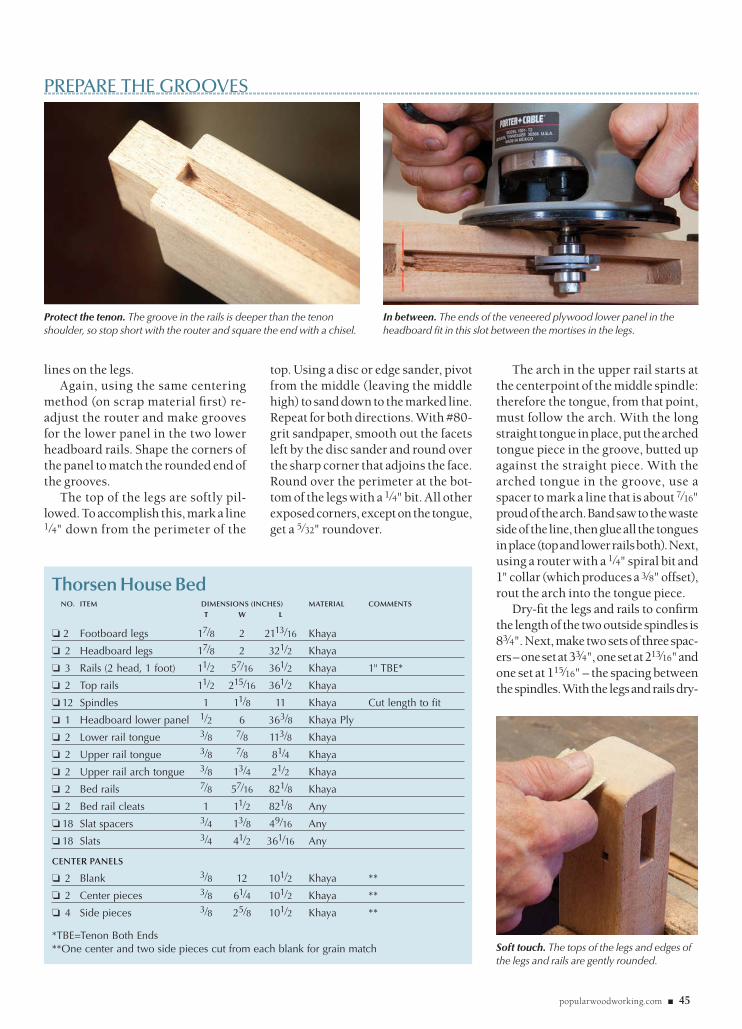
popularwoodworking.com ■ 45
top. Using a disc or edge sander, pivot from the middle (leaving the middle high) to sand down to the marked line. Repeat for both directions. With #80-grit sandpaper, smooth out the facets left by the disc sander and round over the sharp corner that adjoins the face. Round over the perimeter at the bot-tom of the legs with a 1⁄4" bit. All other exposed corners, except on the tongue, get a 5⁄32" roundover.
The arch in the upper rail starts at the centerpoint of the middle spindle: therefore the tongue, from that point, must follow the arch. With the long straight tongue in place, put the arched tongue piece in the groove, butted up against the straight piece. With the arched tongue in the groove, use a spacer to mark a line that is about 7⁄16" proud of the arch. Band saw to the waste side of the line, then glue all the tongues in place (top and lower rails both). Next, using a router with a 1⁄4" spiral bit and 1" collar (which produces a 3⁄8" offset), rout the arch into the tongue piece.
Dry-fi t the legs and rails to confi rm the length of the two outside spindles is 83⁄4". Next, make two sets of three spac-ers – one set at 33⁄4", one set at 213⁄16" and one set at 115⁄16" – the spacing between the spindles. With the legs and rails dry-
Protect the tenon. The groove in the rails is deeper than the tenon shoulder, so stop short with the router and square the end with a chisel.
In between. The ends of the veneered plywood lower panel in the headboard fi t in this slot between the mortises in the legs.
Soft touch. The tops of the legs and edges of the legs and rails are gently rounded.
lines on the legs.Again, using the same centering
method (on scrap material fi rst) re-adjust the router and make grooves for the lower panel in the two lower headboard rails. Shape the corners of the panel to match the rounded end of the grooves.
The top of the legs are softly pil-lowed. To accomplish this, mark a line 1⁄4" down from the perimeter of the
PREPARE THE GROOVES
Thorsen House Bed NO. ITEM DIMENSIONS (INCHES) MATERIAL COMMENTS T W L
❏ 2 Footboard legs 17⁄8 2 2113⁄16 Khaya
❏ 2 Headboard legs 17⁄8 2 321⁄2 Khaya
❏ 3 Rails (2 head, 1 foot) 11⁄2 57⁄16 361⁄2 Khaya 1" TBE*
❏ 2 Top rails 11⁄2 215⁄16 361⁄2 Khaya
❏ 12 Spindles 1 11⁄8 11 Khaya Cut length to fi t
❏ 1 Headboard lower panel 1⁄2 6 363⁄8 Khaya Ply
❏ 2 Lower rail tongue 3⁄8 7⁄8 113⁄8 Khaya
❏ 2 Upper rail tongue 3⁄8 7⁄8 81⁄4 Khaya
❏ 2 Upper rail arch tongue 3⁄8 13⁄4 21⁄2 Khaya
❏ 2 Bed rails 7⁄8 57⁄16 821⁄8 Khaya
❏ 2 Bed rail cleats 1 11⁄2 821⁄8 Any
❏ 18 Slat spacers 3⁄4 13⁄8 49⁄16 Any
❏ 18 Slats 3⁄4 41⁄2 361⁄16 Any
CENTER PANELS
❏ 2 Blank 3⁄8 12 101⁄2 Khaya **
❏ 2 Center pieces 3⁄8 61⁄4 101⁄2 Khaya **
❏ 4 Side pieces 3⁄8 25⁄8 101⁄2 Khaya **
*TBE=Tenon Both Ends**One center and two side pieces cut from each blank for grain match
40_1302_PWM_ThorsenBed.indd 4540_1302_PWM_ThorsenBed.indd 45 11/28/12 1:07 PM11/28/12 1:07 PM
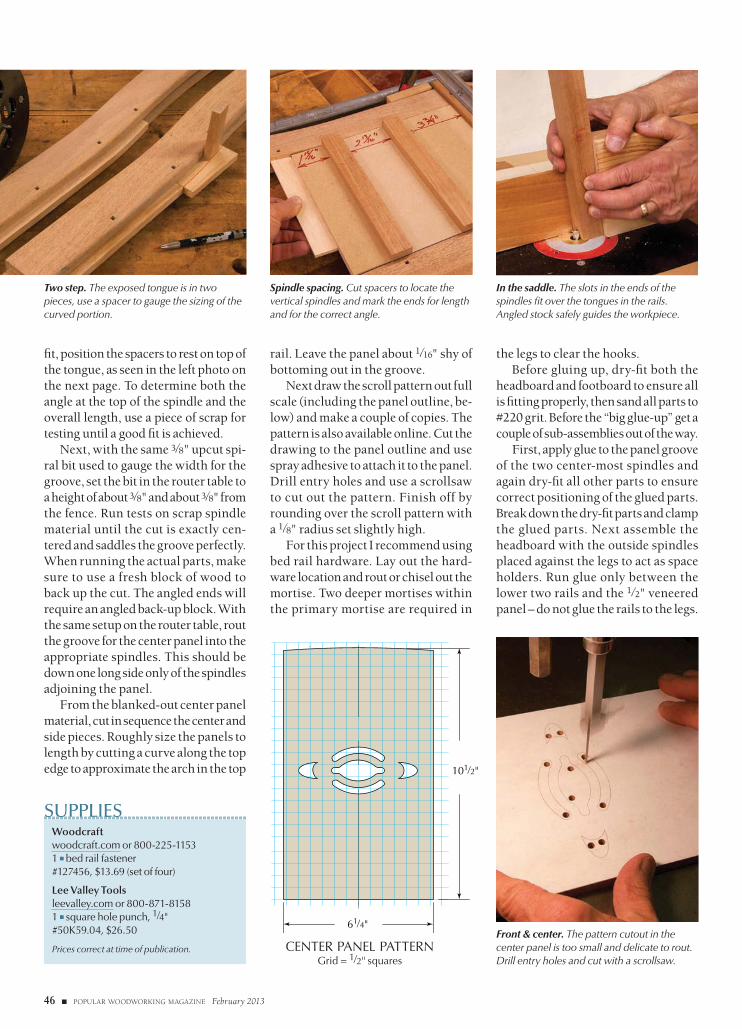
46 ■ POPULAR WOODWORKING MAGAZINE February 2013
fi t, position the spacers to rest on top of the tongue, as seen in the left photo on the next page. To determine both the angle at the top of the spindle and the overall length, use a piece of scrap for testing until a good fi t is achieved.
Next, with the same 3⁄8" upcut spi-ral bit used to gauge the width for the groove, set the bit in the router table to a height of about 3⁄8" and about 3⁄8" from the fence. Run tests on scrap spindle material until the cut is exactly cen-tered and saddles the groove perfectly. When running the actual parts, make sure to use a fresh block of wood to back up the cut. The angled ends will require an angled back-up block. With the same setup on the router table, rout the groove for the center panel into the appropriate spindles. This should be down one long side only of the spindles adjoining the panel.
From the blanked-out center panel material, cut in sequence the center and side pieces. Roughly size the panels to length by cutting a curve along the top edge to approximate the arch in the top
the legs to clear the hooks.Before gluing up, dry-fi t both the
headboard and footboard to ensure all is fi tting properly, then sand all parts to #220 grit. Before the “big glue-up” get a couple of sub-assemblies out of the way.
First, apply glue to the panel groove of the two center-most spindles and again dry-fi t all other parts to ensure correct positioning of the glued parts. Break down the dry-fi t parts and clamp the glued parts. Next assemble the headboard with the outside spindles placed against the legs to act as space holders. Run glue only between the lower two rails and the 1⁄2" veneered panel – do not glue the rails to the legs.
61⁄4"
101⁄2"
CENTER PANEL PATTERNGrid = 1⁄2" squares
rail. Leave the panel about 1⁄16" shy of bottoming out in the groove.
Next draw the scroll pattern out full scale (including the panel outline, be-low) and make a couple of copies. The pattern is also available online. Cut the drawing to the panel outline and use spray adhesive to attach it to the panel. Drill entry holes and use a scrollsaw to cut out the pattern. Finish off by rounding over the scroll pattern with a 1⁄8" radius set slightly high.
For this project I recommend using bed rail hardware. Lay out the hard-ware location and rout or chisel out the mortise. Two deeper mortises within the primary mortise are required in
Front & center. The pattern cutout in the center panel is too small and delicate to rout. Drill entry holes and cut with a scrollsaw.
In the saddle. The slots in the ends of the spindles fi t over the tongues in the rails. Angled stock safely guides the workpiece.
SUPPLIESWoodcraft woodcraft.com or 800-225-11531 ■ bed rail fastener#127456, $13.69 (set of four)
Lee Valley Toolsleevalley.com or 800-871-81581 ■ square hole punch, 1⁄4"#50K59.04, $26.50
Prices correct at time of publication.
Two step. The exposed tongue is in two pieces, use a spacer to gauge the sizing of the curved portion.
Spindle spacing. Cut spacers to locate the vertical spindles and mark the ends for length and for the correct angle.
40_1302_PWM_ThorsenBed.indd 4640_1302_PWM_ThorsenBed.indd 46 11/28/12 1:07 PM11/28/12 1:07 PM
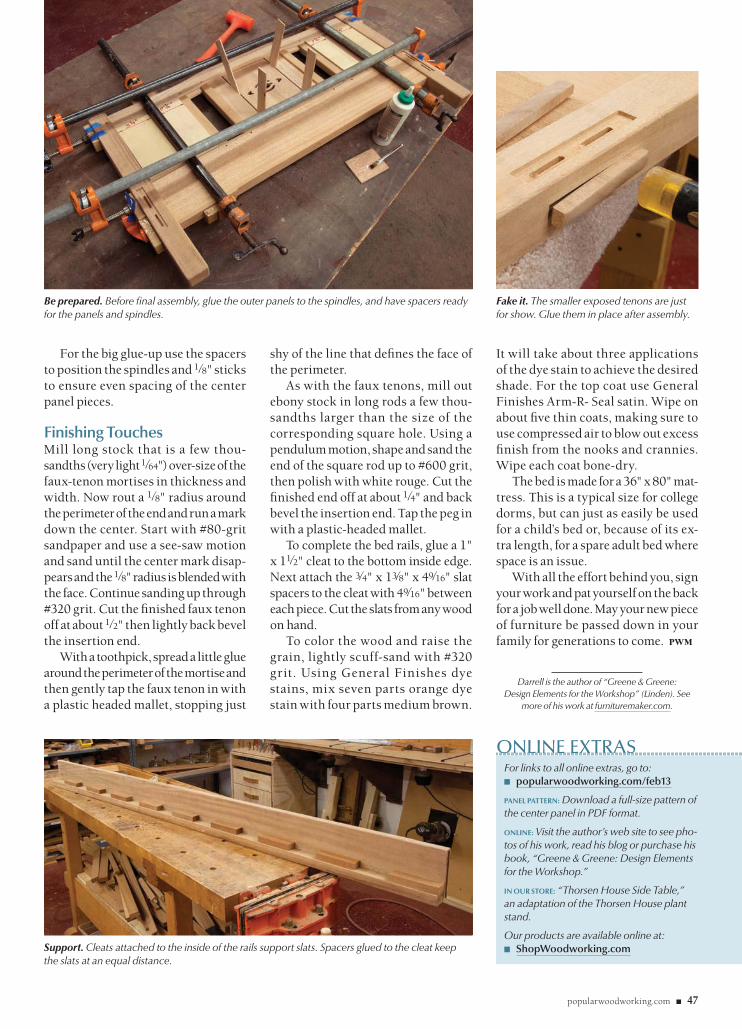
popularwoodworking.com ■ 47
ONLINE EXTRASFor links to all online extras, go to:■ popularwoodworking.com/feb13
PANEL PATTERN: Download a full-size pattern of the center panel in PDF format.
ONLINE: Visit the author’s web site to see pho-tos of his work, read his blog or purchase his book, “Greene & Greene: Design Elements for the Workshop.”
IN OUR STORE: “Thorsen House Side Table,” an adaptation of the Thorsen House plant stand.
Our products are available online at:■ ShopWoodworking.com
For the big glue-up use the spacers to position the spindles and 1⁄8" sticks to ensure even spacing of the center panel pieces.
Finishing TouchesMill long stock that is a few thou-sandths (very light 1⁄64") over-size of the faux-tenon mortises in thickness and width. Now rout a 1⁄8" radius around the perimeter of the end and run a mark down the center. Start with #80-grit sandpaper and use a see-saw motion and sand until the center mark disap-pears and the 1⁄8" radius is blended with the face. Continue sanding up through #320 grit. Cut the fi nished faux tenon off at about 1⁄2" then lightly back bevel the insertion end.
With a toothpick, spread a little glue around the perimeter of the mortise and then gently tap the faux tenon in with a plastic headed mallet, stopping just
shy of the line that defi nes the face of the perimeter.
As with the faux tenons, mill out ebony stock in long rods a few thou-sandths larger than the size of the corresponding square hole. Using a pendulum motion, shape and sand the end of the square rod up to #600 grit, then polish with white rouge. Cut the fi nished end off at about 1⁄4" and back bevel the insertion end. Tap the peg in with a plastic-headed mallet.
To complete the bed rails, glue a 1" x 11⁄2" cleat to the bottom inside edge. Next attach the 3⁄4" x 13⁄8" x 49⁄16" slat spacers to the cleat with 49⁄16" between each piece. Cut the slats from any wood on hand.
To color the wood and raise the grain, lightly scuff-sand with #320 grit. Using General Finishes dye stains, mix seven parts orange dye stain with four parts medium brown.
It will take about three applications of the dye stain to achieve the desired shade. For the top coat use General Finishes Arm-R- Seal satin. Wipe on about fi ve thin coats, making sure to use compressed air to blow out excess fi nish from the nooks and crannies. Wipe each coat bone-dry.
The bed is made for a 36" x 80" mat-tress. This is a typical size for college dorms, but can just as easily be used for a child’s bed or, because of its ex-tra length, for a spare adult bed where space is an issue.
With all the effort behind you, sign your work and pat yourself on the back for a job well done. May your new piece of furniture be passed down in your family for generations to come. PWM
Darrell is the author of “Greene & Greene: Design Elements for the Workshop” (Linden). See
more of his work at furnituremaker.com.
Support. Cleats attached to the inside of the rails support slats. Spacers glued to the cleat keep the slats at an equal distance.
Be prepared. Before fi nal assembly, glue the outer panels to the spindles, and have spacers ready for the panels and spindles.
Fake it. The smaller exposed tenons are just for show. Glue them in place after assembly.
40_1302_PWM_ThorsenBed.indd 4740_1302_PWM_ThorsenBed.indd 47 11/28/12 1:10 PM11/28/12 1:10 PM
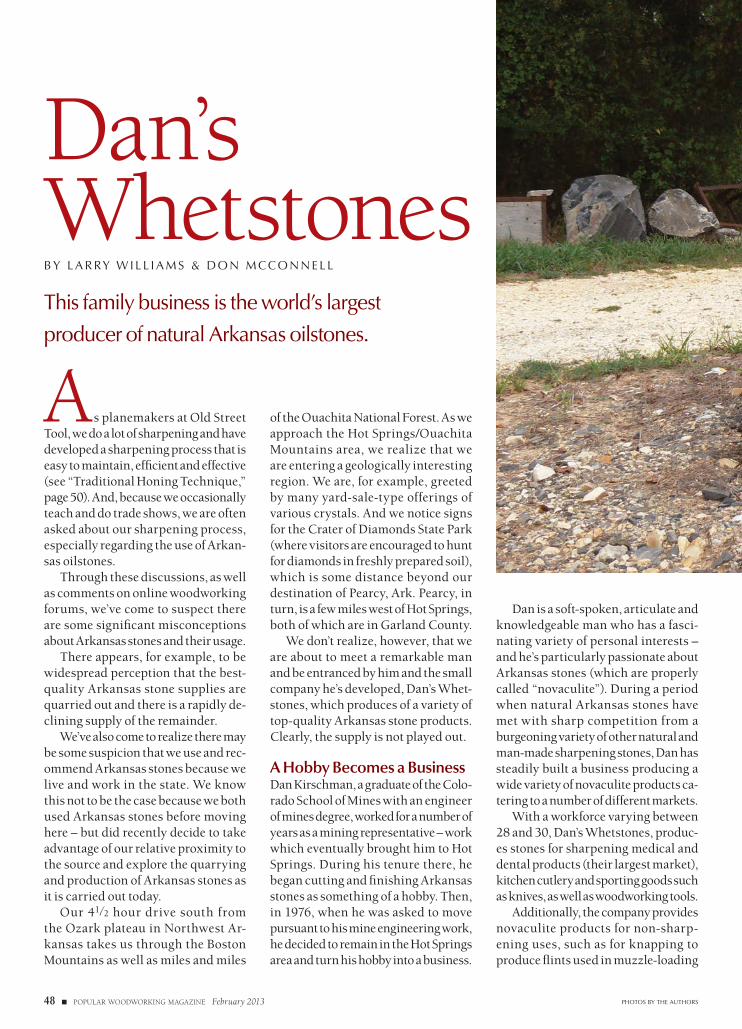
48 ■ POPULAR WOODWORKING MAGAZINE February 2013
As planemakers at Old Street Tool, we do a lot of sharpening and have developed a sharpening process that is easy to maintain, effi cient and effective (see “Traditional Honing Technique,” page 50). And, because we occasionally teach and do trade shows, we are often asked about our sharpening process, especially regarding the use of Arkan-sas oilstones.
Through these discussions, as well as comments on online woodworking forums, we’ve come to suspect there are some signifi cant misconceptions about Arkansas stones and their usage.
There appears, for example, to be widespread perception that the best-quality Arkansas stone supplies are quarried out and there is a rapidly de-clining supply of the remainder.
We’ve also come to realize there may be some suspicion that we use and rec-ommend Arkansas stones because we live and work in the state. We know this not to be the case because we both used Arkansas stones before moving here – but did recently decide to take advantage of our relative proximity to the source and explore the quarrying and production of Arkansas stones as it is carried out today.
Our 41⁄2 hour drive south from the Ozark plateau in Northwest Ar-kansas takes us through the Boston Mountains as well as miles and miles
of the Ouachita National Forest. As we approach the Hot Springs/Ouachita Mountains area, we realize that we are entering a geologically interesting region. We are, for example, greeted by many yard-sale-type offerings of various crystals. And we notice signs for the Crater of Diamonds State Park (where visitors are encouraged to hunt for diamonds in freshly prepared soil), which is some distance beyond our destination of Pearcy, Ark. Pearcy, in turn, is a few miles west of Hot Springs, both of which are in Garland County.
We don’t realize, however, that we are about to meet a remarkable man and be entranced by him and the small company he’s developed, Dan’s Whet-stones, which produces of a variety of top-quality Arkansas stone products. Clearly, the supply is not played out.
A Hobby Becomes a BusinessDan Kirschman, a graduate of the Colo-rado School of Mines with an engineer of mines degree, worked for a number of years as a mining representative – work which eventually brought him to Hot Springs. During his tenure there, he began cutting and fi nishing Arkansas stones as something of a hobby. Then, in 1976, when he was asked to move pursuant to his mine engineering work, he decided to remain in the Hot Springs area and turn his hobby into a business.
Dan is a soft-spoken, articulate and knowledgeable man who has a fasci-nating variety of personal interests – and he’s particularly passionate about Arkansas stones (which are properly called “novaculite”). During a period when natural Arkansas stones have met with sharp competition from a burgeoning variety of other natural and man-made sharpening stones, Dan has steadily built a business producing a wide variety of novaculite products ca-tering to a number of different markets.
With a workforce varying between 28 and 30, Dan’s Whetstones, produc-es stones for sharpening medical and dental products (their largest market), kitchen cutlery and sporting goods such as knives, as well as woodworking tools.
Additionally, the company provides novaculite products for non-sharp-ening uses, such as for knapping to produce fl ints used in muzzle-loading
PHOTOS BY THE AUTHORS
Dan’s WhetstonesB Y L A R RY W I L L I A M S & D O N M C C O N N E L L
This family business is the world’s largest
producer of natural Arkansas oilstones.
48_1302_PWM_DansWhetstones.indd 4848_1302_PWM_DansWhetstones.indd 48 11/28/12 1:12 PM11/28/12 1:12 PM
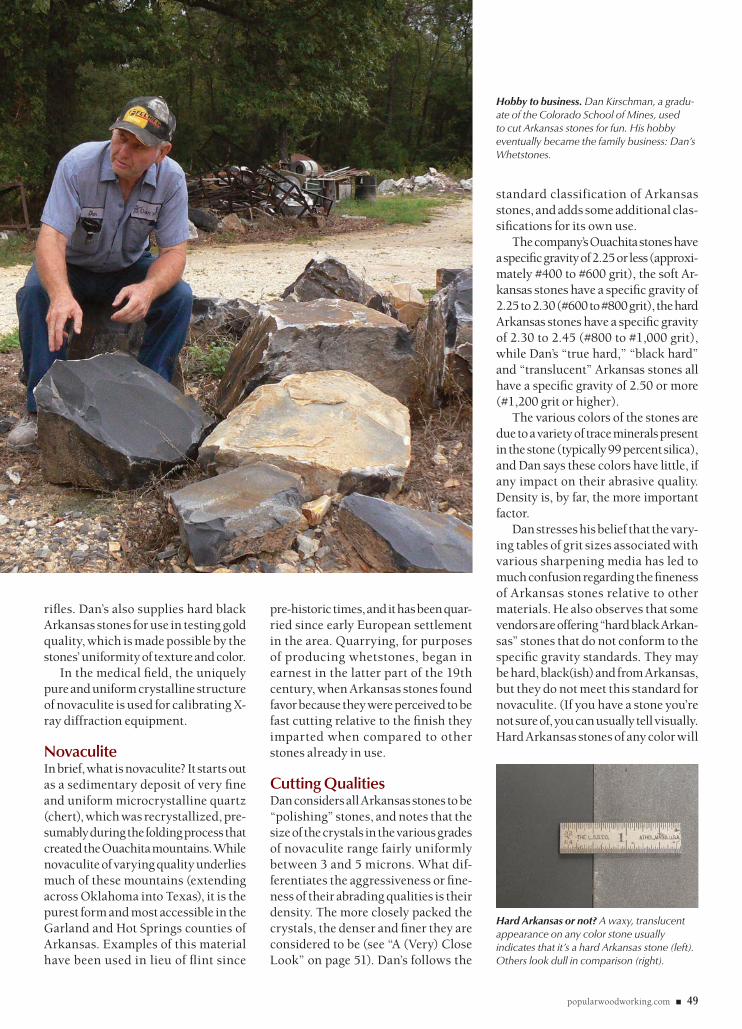
popularwoodworking.com ■ 49
rifl es. Dan’s also supplies hard black Arkansas stones for use in testing gold quality, which is made possible by the stones’ uniformity of texture and color.
In the medical fi eld, the uniquely pure and uniform crystalline structure of novaculite is used for calibrating X-ray diffraction equipment.
NovaculiteIn brief, what is novaculite? It starts out as a sedimentary deposit of very fi ne and uniform microcrystalline quartz (chert), which was recrystallized, pre-sumably during the folding process that created the Ouachita mountains. While novaculite of varying quality underlies much of these mountains (extending across Oklahoma into Texas), it is the purest form and most accessible in the Garland and Hot Springs counties of Arkansas. Examples of this material have been used in lieu of fl int since
pre-historic times, and it has been quar-ried since early European settlement in the area. Quarrying, for purposes of producing whetstones, began in earnest in the latter part of the 19th century, when Arkansas stones found favor because they were perceived to be fast cutting relative to the fi nish they imparted when compared to other stones already in use.
Cutting QualitiesDan considers all Arkansas stones to be “polishing” stones, and notes that the size of the crystals in the various grades of novaculite range fairly uniformly between 3 and 5 microns. What dif-ferentiates the aggressiveness or fi ne-ness of their abrading qualities is their density. The more closely packed the crystals, the denser and fi ner they are considered to be (see “A (Very) Close Look” on page 51). Dan’s follows the
standard classification of Arkansas stones, and adds some additional clas-sifi cations for its own use.
The company’s Ouachita stones have a specifi c gravity of 2.25 or less (approxi-mately #400 to #600 grit), the soft Ar-kansas stones have a specifi c gravity of 2.25 to 2.30 (#600 to #800 grit), the hard Arkansas stones have a specifi c gravity of 2.30 to 2.45 (#800 to #1,000 grit), while Dan’s “true hard,” “black hard” and “translucent” Arkansas stones all have a specifi c gravity of 2.50 or more (#1,200 grit or higher).
The various colors of the stones are due to a variety of trace minerals present in the stone (typically 99 percent silica), and Dan says these colors have little, if any impact on their abrasive quality. Density is, by far, the more important factor.
Dan stresses his belief that the vary-ing tables of grit sizes associated with various sharpening media has led to much confusion regarding the fi neness of Arkansas stones relative to other materials. He also observes that some vendors are offering “hard black Arkan-sas” stones that do not conform to the specifi c gravity standards. They may be hard, black(ish) and from Arkansas, but they do not meet this standard for novaculite. (If you have a stone you’re not sure of, you can usually tell visually. Hard Arkansas stones of any color will
Hobby to business. Dan Kirschman, a gradu-ate of the Colorado School of Mines, used to cut Arkansas stones for fun. His hobby eventually became the family business: Dan’s Whetstones.
Hard Arkansas or not? A waxy, translucent appearance on any color stone usually indicates that it’s a hard Arkansas stone (left). Others look dull in comparison (right).
48_1302_PWM_DansWhetstones.indd 4948_1302_PWM_DansWhetstones.indd 49 11/28/12 1:12 PM11/28/12 1:12 PM
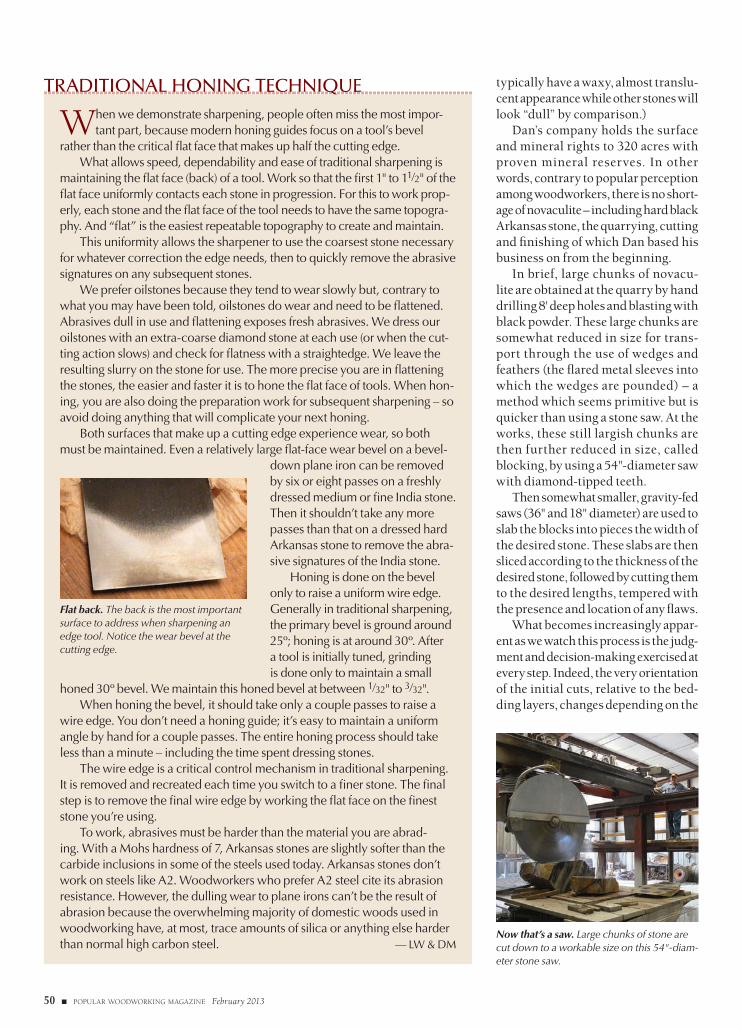
50 ■ POPULAR WOODWORKING MAGAZINE February 2013
TRADITIONAL HONING TECHNIQUE typically have a waxy, almost translu-cent appearance while other stones will look “dull” by comparison.)
Dan’s company holds the surface and mineral rights to 320 acres with proven mineral reserves. In other words, contrary to popular perception among woodworkers, there is no short-age of novaculite – including hard black Arkansas stone, the quarrying, cutting and fi nishing of which Dan based his business on from the beginning.
In brief, large chunks of novacu-lite are obtained at the quarry by hand drilling 8' deep holes and blasting with black powder. These large chunks are somewhat reduced in size for trans-port through the use of wedges and feathers (the fl ared metal sleeves into which the wedges are pounded) – a method which seems primitive but is quicker than using a stone saw. At the works, these still largish chunks are then further reduced in size, called blocking, by using a 54"-diameter saw with diamond-tipped teeth.
Then somewhat smaller, gravity-fed saws (36" and 18" diameter) are used to slab the blocks into pieces the width of the desired stone. These slabs are then sliced according to the thickness of the desired stone, followed by cutting them to the desired lengths, tempered with the presence and location of any fl aws.
What becomes increasingly appar-ent as we watch this process is the judg-ment and decision-making exercised at every step. Indeed, the very orientation of the initial cuts, relative to the bed-ding layers, changes depending on the
When we demonstrate sharpening, people often miss the most impor-tant part, because modern honing guides focus on a tool’s bevel
rather than the critical fl at face that makes up half the cutting edge.What allows speed, dependability and ease of traditional sharpening is
maintaining the fl at face (back) of a tool. Work so that the fi rst 1" to 11⁄2" of the fl at face uniformly contacts each stone in progression. For this to work prop-erly, each stone and the fl at face of the tool needs to have the same topogra-phy. And “fl at” is the easiest repeatable topography to create and maintain.
This uniformity allows the sharpener to use the coarsest stone necessary for whatever correction the edge needs, then to quickly remove the abrasive signatures on any subsequent stones.
We prefer oilstones because they tend to wear slowly but, contrary to what you may have been told, oilstones do wear and need to be fl attened. Abrasives dull in use and fl attening exposes fresh abrasives. We dress our oilstones with an extra-coarse diamond stone at each use (or when the cut-ting action slows) and check for fl atness with a straightedge. We leave the resulting slurry on the stone for use. The more precise you are in fl attening the stones, the easier and faster it is to hone the fl at face of tools. When hon-ing, you are also doing the preparation work for subsequent sharpening – so avoid doing anything that will complicate your next honing.
Both surfaces that make up a cutting edge experience wear, so both must be maintained. Even a relatively large fl at-face wear bevel on a bevel-
down plane iron can be removed by six or eight passes on a freshly dressed medium or fi ne India stone. Then it shouldn’t take any more passes than that on a dressed hard Arkansas stone to remove the abra-sive signatures of the India stone.
Honing is done on the bevel only to raise a uniform wire edge. Generally in traditional sharpening, the primary bevel is ground around 25º; honing is at around 30º. After a tool is initially tuned, grinding is done only to maintain a small
honed 30º bevel. We maintain this honed bevel at between 1⁄32" to 3⁄32".When honing the bevel, it should take only a couple passes to raise a
wire edge. You don’t need a honing guide; it’s easy to maintain a uniform angle by hand for a couple passes. The entire honing process should take less than a minute – including the time spent dressing stones.
The wire edge is a critical control mechanism in traditional sharpening. It is removed and recreated each time you switch to a fi ner stone. The fi nal step is to remove the fi nal wire edge by working the fl at face on the fi nest stone you’re using.
To work, abrasives must be harder than the material you are abrad-ing. With a Mohs hardness of 7, Arkansas stones are slightly softer than the carbide inclusions in some of the steels used today. Arkansas stones don’t work on steels like A2. Woodworkers who prefer A2 steel cite its abrasion resistance. However, the dulling wear to plane irons can’t be the result of abrasion because the overwhelming majority of domestic woods used in woodworking have, at most, trace amounts of silica or anything else harder than normal high carbon steel. — LW & DM
Flat back. The back is the most important surface to address when sharpening an edge tool. Notice the wear bevel at the cutting edge.
Now that’s a saw. Large chunks of stone are cut down to a workable size on this 54"-diam-eter stone saw.
48_1302_PWM_DansWhetstones.indd 5048_1302_PWM_DansWhetstones.indd 50 11/28/12 1:13 PM11/28/12 1:13 PM
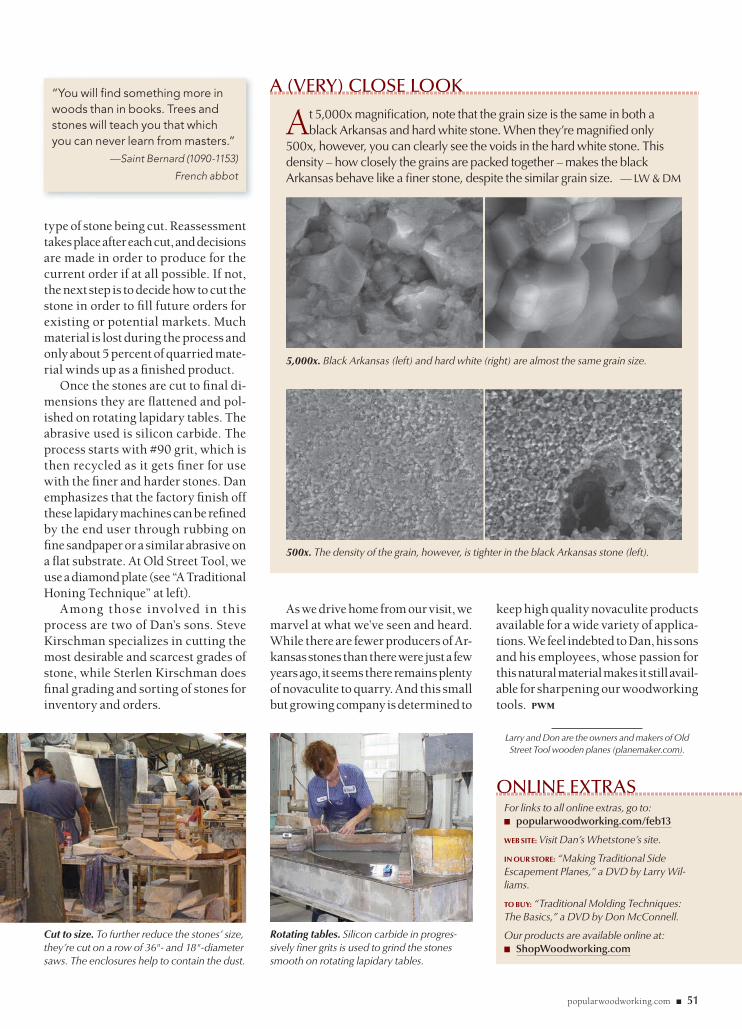
popularwoodworking.com ■ 51
type of stone being cut. Reassessment takes place after each cut, and decisions are made in order to produce for the current order if at all possible. If not, the next step is to decide how to cut the stone in order to fi ll future orders for existing or potential markets. Much material is lost during the process and only about 5 percent of quarried mate-rial winds up as a fi nished product.
Once the stones are cut to fi nal di-mensions they are fl attened and pol-ished on rotating lapidary tables. The abrasive used is silicon carbide. The process starts with #90 grit, which is then recycled as it gets fi ner for use with the fi ner and harder stones. Dan emphasizes that the factory fi nish off these lapidary machines can be refi ned by the end user through rubbing on fi ne sandpaper or a similar abrasive on a fl at substrate. At Old Street Tool, we use a diamond plate (see“A Traditional Honing Technique” at left).
Among those involved in this process are two of Dan’s sons. Steve Kirschman specializes in cutting the most desirable and scarcest grades of stone, while Sterlen Kirschman does fi nal grading and sorting of stones for inventory and orders.
As we drive home from our visit, we marvel at what we’ve seen and heard. While there are fewer producers of Ar-kansas stones than there were just a few years ago, it seems there remains plenty of novaculite to quarry. And this small but growing company is determined to
For links to all online extras, go to:■ popularwoodworking.com/feb13
WEB SITE: Visit Dan’s Whetstone’s site.
IN OUR STORE: “Making Traditional Side Escapement Planes,” a DVD by Larry Wil-liams.
TO BUY: “Traditional Molding Techniques: The Basics,” a DVD by Don McConnell.
Our products are available online at:■ ShopWoodworking.com
ONLINE EXTRAS
At 5,000x magnifi cation, note that the grain size is the same in both a black Arkansas and hard white stone. When they’re magnifi ed only
500x, however, you can clearly see the voids in the hard white stone. This density – how closely the grains are packed together – makes the black Arkansas behave like a fi ner stone, despite the similar grain size. — LW & DM
A (VERY) CLOSE LOOK
keep high quality novaculite products available for a wide variety of applica-tions. We feel indebted to Dan, his sons and his employees, whose passion for this natural material makes it still avail-able for sharpening our woodworking tools. PWM
Larry and Don are the owners and makers of Old Street Tool wooden planes (planemaker.com).
Cut to size. To further reduce the stones’ size, they’re cut on a row of 36"- and 18"-diameter saws. The enclosures help to contain the dust.
Rotating tables. Silicon carbide in progres-sively fi ner grits is used to grind the stones smooth on rotating lapidary tables.
5,000x. Black Arkansas (left) and hard white (right) are almost the same grain size.
500x. The density of the grain, however, is tighter in the black Arkansas stone (left).
“You will fi nd something more in woods than in books. Trees and stones will teach you that which you can never learn from masters.”
—Saint Bernard (1090-1153)
French abbot
48_1302_PWM_DansWhetstones.indd 5148_1302_PWM_DansWhetstones.indd 51 11/28/12 1:13 PM11/28/12 1:13 PM
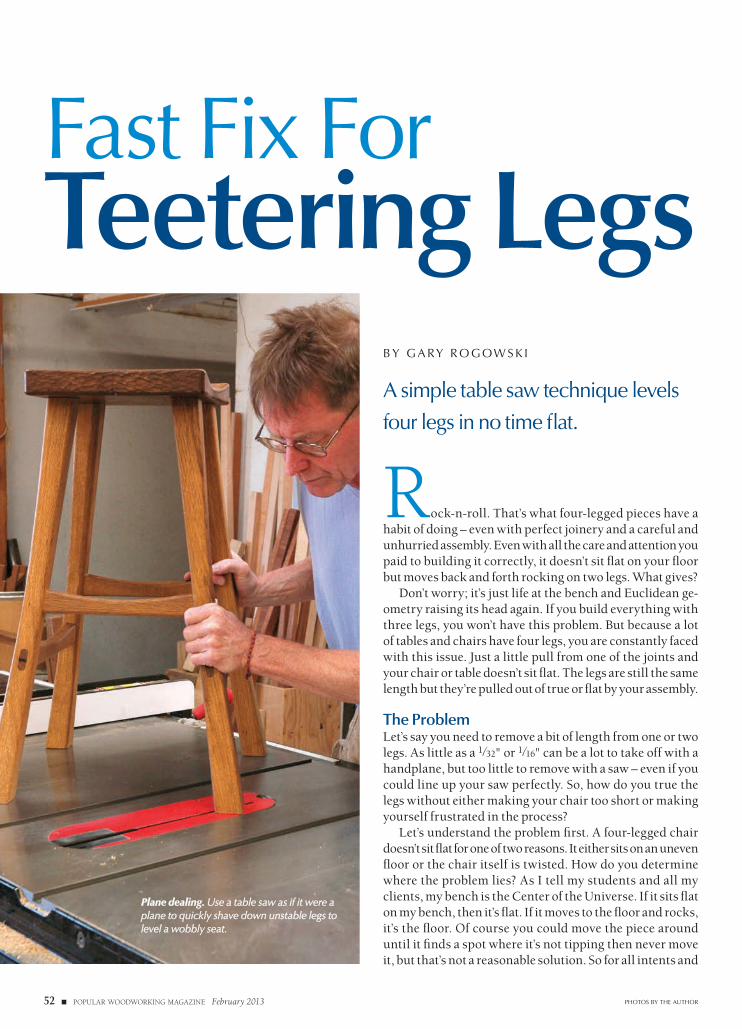
52 ■ POPULAR WOODWORKING MAGAZINE February 2013 PHOTOS BY THE AUTHOR
Fast Fix For Teetering Legs
Rock-n-roll. That’s what four-legged pieces have a habit of doing – even with perfect joinery and a careful and unhurried assembly. Even with all the care and attention you paid to building it correctly, it doesn’t sit fl at on your fl oor but moves back and forth rocking on two legs. What gives?
Don’t worry; it’s just life at the bench and Euclidean ge-ometry raising its head again. If you build everything with three legs, you won’t have this problem. But because a lot of tables and chairs have four legs, you are constantly faced with this issue. Just a little pull from one of the joints and your chair or table doesn’t sit fl at. The legs are still the same length but they’re pulled out of true or fl at by your assembly.
The ProblemLet’s say you need to remove a bit of length from one or two legs. As little as a 1⁄32" or 1⁄16" can be a lot to take off with a handplane, but too little to remove with a saw – even if you could line up your saw perfectly. So, how do you true the legs without either making your chair too short or making yourself frustrated in the process?
Let’s understand the problem fi rst. A four-legged chair doesn’t sit fl at for one of two reasons. It either sits on an uneven fl oor or the chair itself is twisted. How do you determine where the problem lies? As I tell my students and all my clients, my bench is the Center of the Universe. If it sits fl at on my bench, then it’s fl at. If it moves to the fl oor and rocks, it’s the fl oor. Of course you could move the piece around until it fi nds a spot where it’s not tipping then never move it, but that’s not a reasonable solution. So for all intents and
B Y G A RY R O G OW S K I
A simple table saw technique levels
four legs in no time fl at.
Plane dealing.Plane dealing. Use a table saw as if it were a Use a table saw as if it were a plane to quickly shave down unstable legs to plane to quickly shave down unstable legs to level a wobbly seat.level a wobbly seat.
52_1302_PWM_TruingLegs.indd 5252_1302_PWM_TruingLegs.indd 52 11/28/12 1:18 PM11/28/12 1:18 PM
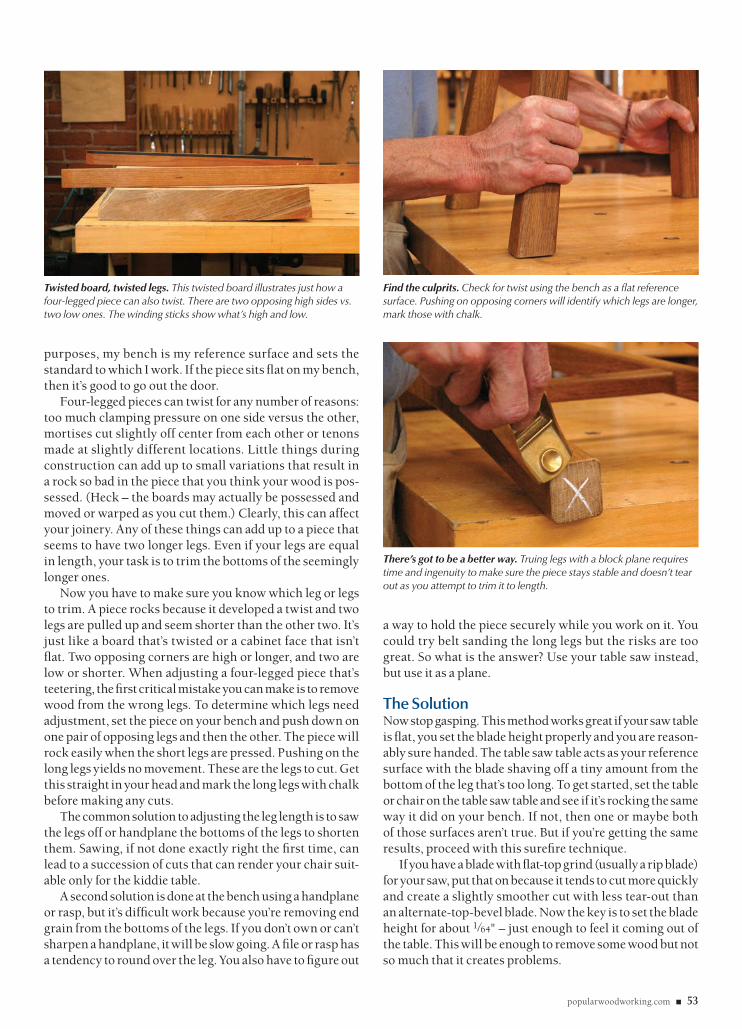
popularwoodworking.com ■ 53
purposes, my bench is my reference surface and sets the standard to which I work. If the piece sits fl at on my bench, then it’s good to go out the door.
Four-legged pieces can twist for any number of reasons: too much clamping pressure on one side versus the other, mortises cut slightly off center from each other or tenons made at slightly different locations. Little things during construction can add up to small variations that result in a rock so bad in the piece that you think your wood is pos-sessed. (Heck – the boards may actually be possessed and moved or warped as you cut them.) Clearly, this can affect your joinery. Any of these things can add up to a piece that seems to have two longer legs. Even if your legs are equal in length, your task is to trim the bottoms of the seemingly longer ones.
Now you have to make sure you know which leg or legs to trim. A piece rocks because it developed a twist and two legs are pulled up and seem shorter than the other two. It’s just like a board that’s twisted or a cabinet face that isn’t fl at. Two opposing corners are high or longer, and two are low or shorter. When adjusting a four-legged piece that’s teetering, the fi rst critical mistake you can make is to remove wood from the wrong legs. To determine which legs need adjustment, set the piece on your bench and push down on one pair of opposing legs and then the other. The piece will rock easily when the short legs are pressed. Pushing on the long legs yields no movement. These are the legs to cut. Get this straight in your head and mark the long legs with chalk before making any cuts.
The common solution to adjusting the leg length is to saw the legs off or handplane the bottoms of the legs to shorten them. Sawing, if not done exactly right the fi rst time, can lead to a succession of cuts that can render your chair suit-able only for the kiddie table.
A second solution is done at the bench using a handplane or rasp, but it’s diffi cult work because you’re removing end grain from the bottoms of the legs. If you don’t own or can’t sharpen a handplane, it will be slow going. A fi le or rasp has a tendency to round over the leg. You also have to fi gure out
Find the culprits. Check for twist using the bench as a fl at reference surface. Pushing on opposing corners will identify which legs are longer, mark those with chalk.
a way to hold the piece securely while you work on it. You could try belt sanding the long legs but the risks are too great. So what is the answer? Use your table saw instead, but use it as a plane.
The SolutionNow stop gasping. This method works great if your saw table is fl at, you set the blade height properly and you are reason-ably sure handed. The table saw table acts as your reference surface with the blade shaving off a tiny amount from the bottom of the leg that’s too long. To get started, set the table or chair on the table saw table and see if it’s rocking the same way it did on your bench. If not, then one or maybe both of those surfaces aren’t true. But if you’re getting the same results, proceed with this surefi re technique.
If you have a blade with fl at-top grind (usually a rip blade) for your saw, put that on because it tends to cut more quickly and create a slightly smoother cut with less tear-out than an alternate-top-bevel blade. Now the key is to set the blade height for about 1⁄64" – just enough to feel it coming out of the table. This will be enough to remove some wood but not so much that it creates problems.
Twisted board, twisted legs. This twisted board illustrates just how a four-legged piece can also twist. There are two opposing high sides vs. two low ones. The winding sticks show what’s high and low.
There’s got to be a better way. Truing legs with a block plane requires time and ingenuity to make sure the piece stays stable and doesn’t tear out as you attempt to trim it to length.
52_1302_PWM_TruingLegs.indd 5352_1302_PWM_TruingLegs.indd 53 11/28/12 1:18 PM11/28/12 1:18 PM
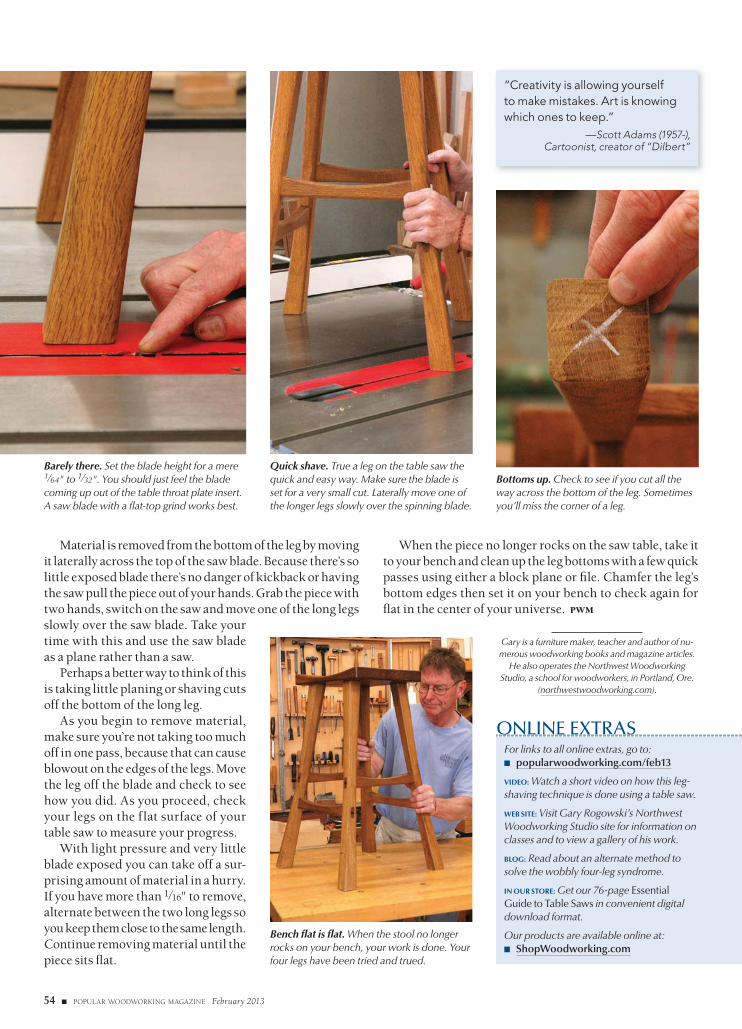
54 ■ POPULAR WOODWORKING MAGAZINE February 2013
Material is removed from the bottom of the leg by moving it laterally across the top of the saw blade. Because there’s so little exposed blade there’s no danger of kickback or having the saw pull the piece out of your hands. Grab the piece with two hands, switch on the saw and move one of the long legs slowly over the saw blade. Take your time with this and use the saw blade as a plane rather than a saw.
Perhaps a better way to think of this is taking little planing or shaving cuts off the bottom of the long leg.
As you begin to remove material, make sure you’re not taking too much off in one pass, because that can cause blowout on the edges of the legs. Move the leg off the blade and check to see how you did. As you proceed, check your legs on the flat surface of your table saw to measure your progress.
With light pressure and very little blade exposed you can take off a sur-prising amount of material in a hurry. If you have more than 1⁄16" to remove, alternate between the two long legs so you keep them close to the same length. Continue removing material until the piece sits fl at.
When the piece no longer rocks on the saw table, take it to your bench and clean up the leg bottoms with a few quick passes using either a block plane or fi le. Chamfer the leg’s bottom edges then set it on your bench to check again for fl at in the center of your universe. PWM
Gary is a furniture maker, teacher and author of nu-merous woodworking books and magazine articles.
He also operates the Northwest Woodworking Studio, a school for woodworkers, in Portland, Ore.
(northwestwoodworking.com).
For links to all online extras, go to:■ popularwoodworking.com/feb13
VIDEO: Watch a short video on how this leg-shaving technique is done using a table saw.
WEB SITE: Visit Gary Rogowski’s Northwest Woodworking Studio site for information on classes and to view a gallery of his work.
BLOG: Read about an alternate method to solve the wobbly four-leg syndrome.
IN OUR STORE: Get our 76-page Essential Guide to Table Saws in convenient digital download format.
Our products are available online at:■ ShopWoodworking.com
ONLINE EXTRAS
Bench fl at is fl at. When the stool no longer rocks on your bench, your work is done. Your four legs have been tried and trued.
Bottoms up. Check to see if you cut all the way across the bottom of the leg. Sometimes you’ll miss the corner of a leg.
Quick shave. True a leg on the table saw the quick and easy way. Make sure the blade is set for a very small cut. Laterally move one of the longer legs slowly over the spinning blade.
Barely there. Set the blade height for a mere 1⁄64" to 1⁄32". You should just feel the blade coming up out of the table throat plate insert. A saw blade with a fl at-top grind works best.
“Creativity is allowing yourself to make mistakes. Art is knowing which ones to keep.”
—Scott Adams (1957-), Cartoonist, creator of “Dilbert”
52_1302_PWM_TruingLegs.indd 5452_1302_PWM_TruingLegs.indd 54 11/28/12 1:18 PM11/28/12 1:18 PM

SKU: U2926Retail Price: $24.99
with Glen Huey
There are a lot of router bits available – and with good reason: Routers can do a lot of different things in your shop. Edge details, inlay, joinery – there are hundreds of ways to use a router. In Router Joinery & Techniques, host Glen Huey shows you some of his favorite router applications. Along with those mentioned above, Glen also shows how to cut circles with a router, do pattern work, create rule joints and dovetails and much more. If you’re ready to push your router skills to the next level, this DVD is the one for you.
This and many more Popular Woodworking DVDs are available at ShopWoodworking.com or call (855) 840-5118 to order
Valid until 2/28/2013
Hand tools for the serious woodworker32 33rd St. Brooklyn, NY 11232 www.toolsforworkingwood.com
OLIVER MACHINERY DEALERHARDWOOD PLYWOOD
CUSTOM RAISED PANEL DOORSCUSTOM PLANK HRDWD FLOORING
THIN CRAFTWOODEXOTIC LUMBER
UPSSpecials
Above prices are for 100' quantities of kilndried roughlumber sold by the Bd. Ft. FOB Mayodan, NC. Call forquantity discounts. Other sizes and grades available.
Above prices are 20 bd. ft. bundles of clearkilndriedlumber 3"-10" wide • 3'-5' long (Randomwidths & lengths) Surfaced 2 sides or rough.Delivered UPS prepaid in the Continental U.S.
STEVE WALL LUMBER CO.Quality Hardwoods and Woodworking machinery For The Craftsman
and Educational Institutions
Send $1.00 For Lumber CatalogPrices Subject to Change Without Notice
STEVE H. WALLLUMBER CO.
BOX 287MAYODAN, N.C. 27027
336-427-06371-800-633-4062
FAX 336-427-7588Email: [email protected]: www.walllumber.com
Ash .............................. 4/4 Select $ 2.60 ........................................ $ 94.00Basswood ................... 4/4 Select $ 1.95 ........................................ $ 80.00Birch ............................ 4/4 Select $ 3.55 ........................................ $ 108.00Butternut ..................... 4/4 1C $ 2.95 ........................................ $ 88.00Cherry ......................... 4/4 Select $ 4.90 ........................................ $ 117.00Hickory - Pecan .......... 4/4 Select $ 3.00 ........................................ $ 100.00Mahogany (Genuine) .. 4/4 Select $ 4.70 ........................................ $ 112.00Maple (Hard) ............... 4/4 Select $ 3.45 ........................................ $ 108.00Maple (Soft) ................ 4/4 Select $ 2.50 ........................................ $ 88.00Poplar ......................... 4/4 Select $ 1.80 ........................................ $ 78.00Red Oak ...................... 4/4 Select $ 2.70 ........................................ $ 96.00Walnut ......................... 4/4 Select $ 4.90 ........................................ $ 115.00White Oak ................... 4/4 Select $ 2.70 ........................................ $ 96.00Cedar (Aromatic Red) . 4/4 1C+Btr. $ 1.80 ........................................ $ 78.00Cypress ....................... 4/4 Select $ 2.60 ........................................ $ 90.00White Pine ................... 4/4 F.G. $ 1.25 ........................................ $ 70.00Yellow Pine ................. 4/4 Clear $ 2.30 ........................................ $ 82.00
SEE OUR
CATALOG ON
THE WEB!
CARD #10 or go to PWFREEINFO.COM CARD #47 or go to PWFREEINFO.COM
CARD #45 or go to PWFREEINFO.COM
52_1302_PWM_TruingLegs.indd 5552_1302_PWM_TruingLegs.indd 55 11/28/12 1:19 PM11/28/12 1:19 PM

WOODWORKER’S MARKETPLACE
56 ■ POPULAR WOODWORKING MAGAZINE February 2013
Hands on Instruction for All Skill Levels
Mario Rodriguez - Alan Turner
For more info on Courses:215.849.5174
PhiladelphiaFurnitureWorkshop
PhiladelphiaFurnitureWorkshop.com
Watch what you want,any time you wantwith a 6-month subscription.
You’ll get instant access to every woodworking video Popular
Woodworking Magazine produces. New videos added regularly!
SUBSCRIBE NOW AT shopclass.popularwoodworking.com
CARD #70 or go to PWFREEINFO.COM
CARD #74 or go to PWFREEINFO.COM
THE FURNITURE INSTITUTE of MASSACHUSETTS
Study with Philip C. Lowe Classes range from 1 day to 1 week and 2 and 3 year mastery programs.
See new class schedule on: (978) 922-0615 www.furnituremakingclasses.com
CARD #16 or go to PWFREEINFO.COM
Old English Academyof Fine Woodworking
Michael J. Gray MasterHands on Instruction for Groups
& IndividualsWeekend Classes Year RoundP.O. Box 772 Selmer, TN 38375
www.oefcc.comLearn the Fundamentals of Woodworking from an Old World Master
CARD #34 or go to PWFREEINFO.COM
CraftsmanStudio.com
FREE SHIPPING ON ONLINE ORDERS - SEE WEBSITE FOR DETAILS - 888-500-9093
Authorized dealers forAuriou, Lie-Nielsen,Shapton, Veritas & TANOS systainers®
TOOLS TO BRING OUTTHE BEST IN YOUR WORK
TORK
CARD #5 or go to PWFREEINFO.COM
100+ HardwoodsHand selected orders100 woods in stockExpert knowledge100% satisfaction
www.101woods.comNo one has a better website for ordering wood:
800-423-2450800-423-2450
CARD #53 or go to PWFREEINFO.COM
CARD #2 or go to PWFREEINFO.COM
CARD #26 or go to PWFREEINFO.COM
CARD #48 or go to PWFREEINFO.COM
Learn from the past, build a future.
800.282.7201 ext. 7441
and week long classes in the summer with Award Winning Hands-on Instruction.
Learn from the past, build a future.
CARD #79 or go to PWFREEINFO.COM
56_1302_PWM_MktplClassifieds.indd 5656_1302_PWM_MktplClassifieds.indd 56 11/28/12 1:21 PM11/28/12 1:21 PM

popularwoodworking.com ■ 57
WOODWORKER’S MARKETPLACE
Books
WE HAVE A WIDE VARIETY of woodworkingbooks - from small projects, to home improve-ment, to enhancing your woodworking skills, and more! To see our full line of books, please visit our web site at ShopWoodworking.com!
Finishing Supplies & EquipmentBLOXYGEN SAVES LEFTOVER FINISHES - Prevent Oxygen or Moisture damage. www.bloxygen.com or (888) 810-8311.
WOODFINISHSUPPLY.COM -- SHELLAC.NET
Large Shellac Flake Selection - Brushes - Dyes BEHLEN Finishing Supplies - Stains - Aerosols RENAISSANCE Wax. 877-245-5611
Hand ToolsDI LEGNO WOODSHOP SUPPLY Quality woodworking hand tools at an affordable price. www.dlws.com or 1-412-331-1236.
WWW.JIMBODETOOLS.COM The Largest Antique Tool Website on Earth! Fine Antique Woodworking Tools of every kind.845-505-8665.
Kits & PlansWORLD CLASS CHESS BOARD PLANS. Read our reviews, our boards are the fi nest out there. Now available in meticulously detailed plans. www.summerville-newengland.com
FULL SIZE FURNITURE LAYOUTS Drawn by Philip C. Lowe. 978-922-0615. 116 Water St, Beverly, MA 01915. www.furnituremakingclasses.com
Schools/InstructionJOHN C. CAMPBELL FOLK SCHOOL, Brass-town, NC. Courses for all skill levels. Week-long and weekend classes year-round, taught by nationally known instructors. Friendly, sup-portive environment. Comfortable, on-campus housing. Delicious meals served three times a day. www.folkschool.org. 800/365-5724.
FRED WILBUR TEACHES DECORATIVE and architectural woodcarving using traditional methods. Please consult www.FrederickWilbur-woodcarver.com for schedule and information. Contact Fred at [email protected] or write to P O Box 425, Lovingston, VA 22949.
PRIVATE CLASSES with woodworking author in the Great Smoky Mountains- All skill levels- www.GregoryPaolini.com (828) 627- 3948
THE ACANTHUS WORKSHOP, LLC Traditional woodworking education with lead instructor, Charles Bender, using conventional hand tools and modern machinery. Call 610-970-5862 or visit www.acanthus.com.
THE SCHOOL AT ANNAPOLIS WOODWORKS, Davidsonville, MD.Turning, Carving, Furniture Making, etc. Weeklong and Weekend classes for all skill levels.www.annapoliswoodworks.com 301-922-0649
Seat Weaving SuppliesCHAIR CANE & SPLINT, Shaker tape, fi ber & natural rush. Complete line of basketweaving supplies. Royalwood Ltd., 517-WW Woodville Rd, Mansfi eld, OH 44907. 800-526-1630. www.royalwoodltd.com.
Classifi ed rate is $6.00 per word, 15-word minimum. Order must be accompanied by payment; ads are non-commissionable. Send to: Popular Woodworking Magazine, 10151 Carver Road, Suite 200, Blue Ash, OH 45242 or Don Schroder, [email protected]. Phone: 610-821-4425, Fax: 610-821-7884.
ADVERTISER’S INDEX PAGE # CARD # WEB ADDRESS
Acanthus Workshop 57 1 acanthus.com
Apprenticeshop, The 56 74 apprenticeshop.org
Beall Tool Company 56 2 bealltool.com
Bloxygen 57 3 bloxygen.com
Craftsman Plans 56 - craftsmanplans.com
Craftsman Studio 56 5 craftsmanstudio.com
Di Legno Woodshop Supply 57 6 dlws.com
EBAC industrial Products 55 10 ebacusa.com
Epilog Laser 17 56 epiloglaser.com
Forrest Mfg. 15 13 forrestblades.com
Franklin International 7 14 titebond.com
Frederick Wilbur Woodcarver 57 15 frederickwilbur-woodcarver.com
Freud America 2 67 freudtools.com
Furniture Institute of Massachusetts 57 16 furnituremakingclasses.com
General International USA 5 17 general.ca
Gorilla Glue 17 18 gorillaglue.com
Gregory Paolini Designs 57 19 gregorypaolini.com
Grizzly Industrial Cvr 2, 1 57 grizzly.com
Harbor Freight 63 76 harborfreight.com
Highland Woodworker, The 11 91 thehighlandwoodworker.com
Highland Woodworking 11 22 highlandwoodworking.com
Infi nity Tools 15 23 infi nitytools.com
Jim Bode Tools 57 24 jimbodetools.com
John Campbell Folk School 57 - folkschool.org
Keller & Company 56 26 kellerdovetail.com
Lake Erie Toolworks 56 70 lakeerietoolworks.com
Leigh Industries 11 - leighjigs.com
Lie-Nielsen Toolworks 11 29 lie-nielsen.com
MLCS 19 81 mlcswoodworking.com
Old English 56 34 www.oefcc.com
Oneida Air Systems 7 35 oneida-air.com
Philadelphia Furniture Workshop 56 - philadelphiafurnitureworkshop.com
Powermatic Cvr 4 58 powermatic.com
RadarCarve 11 38 radarcarve.net
Royalwood Ltd. 57 - royalwoodltd.com
School at Annapolis Woodworks 57 43 annapoliswoodworks.com
Shellac.net 57 90 shellac.net
Summerville-New England, LLC 57 91 summerville-newengland.com
Tools for Working Wood 55 45 toolsforworkingwood.com
University of Rio Grande 56 79 rio.edu
Wall Lumber 55 47 walllumber.com
Whitechapel Ltd. 56 48 whitechapel-ltd.com
Woodcraft Cvr 3 49 woodcraft.com
Woodfi nder 56 - woodfi nder.com
Woodline 21 50 woodline.com
Woodworker’s Source 56 53 woodworkerssource.com
Woodworker’s Supply 15 54 woodworker.com
CLASSIFIED
PAGE # CARD # WEB ADDRESS
56_1302_PWM_MktplClassifieds.indd 5756_1302_PWM_MktplClassifieds.indd 57 11/28/12 1:21 PM11/28/12 1:21 PM
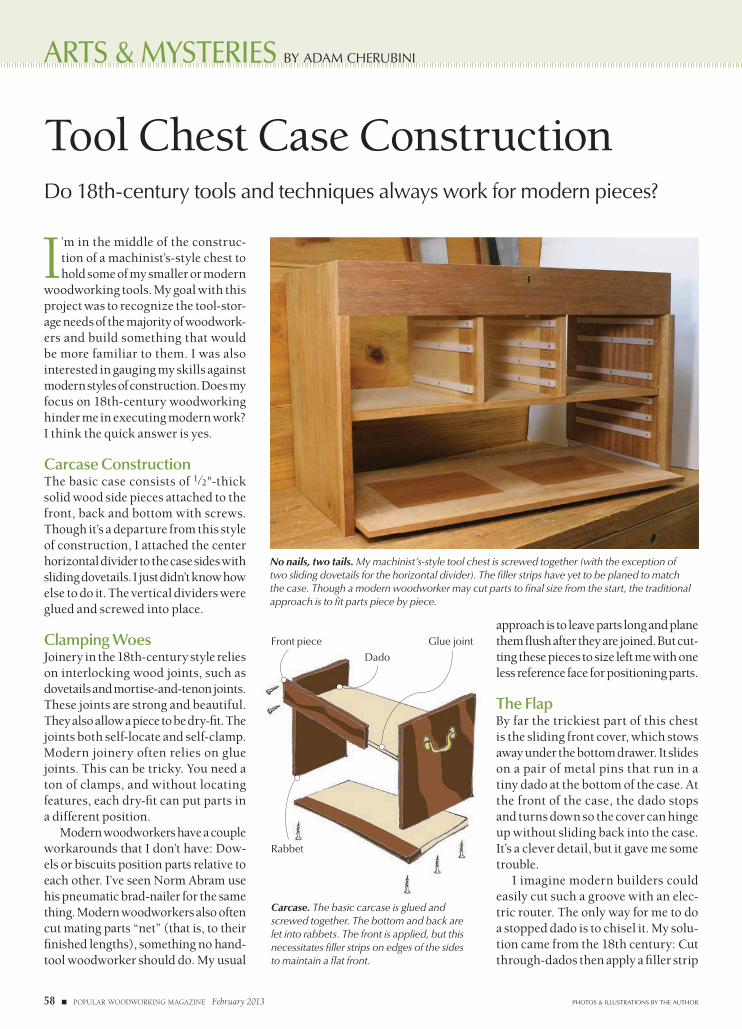
ARTS & MYSTERIES BY ADAM CHERUBINI
58 ■ POPULAR WOODWORKING MAGAZINE February 2013
I’m in the middle of the construc-tion of a machinist’s-style chest to hold some of my smaller or modern
woodworking tools. My goal with this project was to recognize the tool-stor-age needs of the majority of woodwork-ers and build something that would be more familiar to them. I was also interested in gauging my skills against modern styles of construction. Does my focus on 18th-century woodworking hinder me in executing modern work? I think the quick answer is yes.
Carcase ConstructionThe basic case consists of 1⁄2"-thick solid wood side pieces attached to the front, back and bottom with screws. Though it’s a departure from this style of construction, I attached the center horizontal divider to the case sides with sliding dovetails. I just didn’t know how else to do it. The vertical dividers were glued and screwed into place.
Clamping WoesJoinery in the 18th-century style relies on interlocking wood joints, such as dovetails and mortise-and-tenon joints. These joints are strong and beautiful. They also allow a piece to be dry-fi t. The joints both self-locate and self-clamp. Modern joinery often relies on glue joints. This can be tricky. You need a ton of clamps, and without locating features, each dry-fi t can put parts in a different position.
Modern woodworkers have a couple workarounds that I don’t have: Dow-els or biscuits position parts relative to each other. I’ve seen Norm Abram use his pneumatic brad-nailer for the same thing. Modern woodworkers also often cut mating parts “net” (that is, to their fi nished lengths), something no hand-tool woodworker should do. My usual
approach is to leave parts long and plane them fl ush after they are joined. But cut-ting these pieces to size left me with one less reference face for positioning parts.
The FlapBy far the trickiest part of this chest is the sliding front cover, which stows away under the bottom drawer. It slides on a pair of metal pins that run in a tiny dado at the bottom of the case. At the front of the case, the dado stops and turns down so the cover can hinge up without sliding back into the case. It’s a clever detail, but it gave me some trouble.
I imagine modern builders could easily cut such a groove with an elec-tric router. The only way for me to do a stopped dado is to chisel it. My solu-tion came from the 18th century: Cut through-dados then apply a fi ller strip
Tool Chest Case ConstructionDo 18th-century tools and techniques always work for modern pieces?
PHOTOS & ILLUSTRATIONS BY THE AUTHOR
No nails, two tails. My machinist’s-style tool chest is screwed together (with the exception of two sliding dovetails for the horizontal divider). The fi ller strips have yet to be planed to match the case. Though a modern woodworker may cut parts to fi nal size from the start, the traditional approach is to fi t parts piece by piece.
Carcase. The basic carcase is glued and screwed together. The bottom and back are let into rabbets. The front is applied, but this necessitates fi ller strips on edges of the sides to maintain a fl at front.
Front piece
Rabbet
Glue joint
Dado
58_1302_PWM_A&M.indd 5858_1302_PWM_A&M.indd 58 11/28/12 1:24 PM11/28/12 1:24 PM
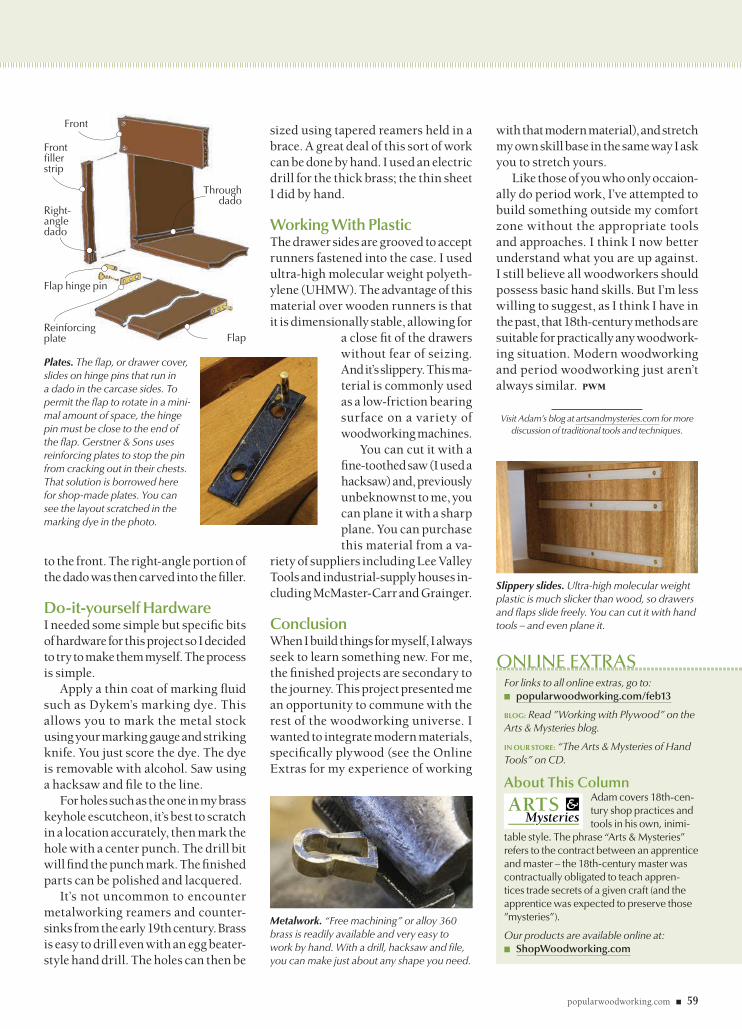
popularwoodworking.com ■ 59
Plates. The fl ap, or drawer cover, slides on hinge pins that run in a dado in the carcase sides. To permit the fl ap to rotate in a mini-mal amount of space, the hinge pin must be close to the end of the fl ap. Gerstner & Sons uses reinforcing plates to stop the pin from cracking out in their chests. That solution is borrowed here for shop-made plates. You can see the layout scratched in the marking dye in the photo.
to the front. The right-angle portion of the dado was then carved into the fi ller.
Do-it-yourself HardwareI needed some simple but specifi c bits of hardware for this project so I decided to try to make them myself. The process is simple.
Apply a thin coat of marking fl uid such as Dykem’s marking dye. This allows you to mark the metal stock using your marking gauge and striking knife. You just score the dye. The dye is removable with alcohol. Saw using a hacksaw and fi le to the line.
For holes such as the one in my brass keyhole escutcheon, it’s best to scratch in a location accurately, then mark the hole with a center punch. The drill bit will fi nd the punch mark. The fi nished parts can be polished and lacquered.
It’s not uncommon to encounter metalworking reamers and counter-sinks from the early 19th century. Brass is easy to drill even with an egg beater-style hand drill. The holes can then be
sized using tapered reamers held in a brace. A great deal of this sort of work can be done by hand. I used an electric drill for the thick brass; the thin sheet I did by hand.
Working With PlasticThe drawer sides are grooved to accept runners fastened into the case. I used ultra-high molecular weight polyeth-ylene (UHMW). The advantage of this material over wooden runners is that it is dimensionally stable, allowing for
a close fi t of the drawers without fear of seizing. And it’s slippery. This ma-terial is commonly used as a low-friction bearing surface on a variety of woodworking machines.
You can cut it with a fi ne-toothed saw (I used a hacksaw) and, previously unbeknownst to me, you can plane it with a sharp plane. You can purchase this material from a va-
riety of suppliers including Lee Valley Tools and industrial-supply houses in-cluding McMaster-Carr and Grainger.
ConclusionWhen I build things for myself, I always seek to learn something new. For me, the fi nished projects are secondary to the journey. This project presented me an opportunity to commune with the rest of the woodworking universe. I wanted to integrate modern materials, specifi cally plywood (see the Online Extras for my experience of working
with that modern material), and stretch my own skill base in the same way I ask you to stretch yours.
Like those of you who only occaion-ally do period work, I’ve attempted to build something outside my comfort zone without the appropriate tools and approaches. I think I now better understand what you are up against. I still believe all woodworkers should possess basic hand skills. But I’m less willing to suggest, as I think I have in the past, that 18th-century methods are suitable for practically any woodwork-ing situation. Modern woodworking and period woodworking just aren’t always similar. PWM
Visit Adam’s blog at artsandmysteries.com for more discussion of traditional tools and techniques.
For links to all online extras, go to:■ popularwoodworking.com/feb13
BLOG: Read ”Working with Plywood” on the Arts & Mysteries blog.
IN OUR STORE: “The Arts & Mysteries of Hand Tools” on CD.
About This ColumnAdam covers 18th-cen-tury shop practices and tools in his own, inimi-
table style. The phrase “Arts & Mysteries” refers to the contract between an apprentice and master – the 18th-century master was contractually obligated to teach appren-tices trade secrets of a given craft (and the apprentice was expected to preserve those ”mysteries”).
Our products are available online at:■ ShopWoodworking.com
ONLINE EXTRAS
Metalwork. “Free machining” or alloy 360 brass is readily available and very easy to work by hand. With a drill, hacksaw and fi le, you can make just about any shape you need.
Slippery slides. Ultra-high molecular weight plastic is much slicker than wood, so drawers and fl aps slide freely. You can cut it with hand tools – and even plane it.
Front
Front fi ller strip
Right-angle dado
Flap hinge pin
Reinforcing plate Flap
Through dado
58_1302_PWM_A&M.indd 5958_1302_PWM_A&M.indd 59 11/28/12 1:24 PM11/28/12 1:24 PM
FLEXNER ON FINISHING BY BOB FLEXNER
60 ■ POPULAR WOODWORKING MAGAZINE February 2013
It’s probably fair to say that a major-ity, or at least a large minority, of woodworkers use a fi nish they can
wipe on and off the wood. No expensive spray gun; not even any brush cleanup. Simple.
At least the application is simple. But these fi nishes have been made the most complex and confusing of all fi nishes by manufacturers striving for an edge (they want to convince you they have something special) and writers who either buy into the marketing or simply don’t know what they are talking about.
Wipe-on Finish BasicsThere are four primary types of wipe-on fi nishes:• Oil (boiled linseed and tung)• Wiping varnish (alkyd or polyure-thane varnish thinned about half with mineral spirits)• Blends of oil and varnish (thinned or not)• Gel varnish (alkyd or polyurethane varnish in a “gel” consistency).
Each of these fi nishes can be wiped or brushed, or even sprayed, on the wood and then wiped off.
Oils and blends of oil and varnish don’t harden well, so all of the excess has to be wiped off or the surface will remain sticky.
Wiping varnish can be wiped off, or it can be left damp or wet on the wood to build faster because it dries hard.
Gel varnish also dries hard but you can’t leave a thick layer without getting streaks or brush marks, so it’s better to wipe off the excess.
All of these fi nishes can be combined (and also thinned with mineral spirits) in any proportion, with these caveats: Adding oil to varnish means the fi nish can’t dry hard, so all the excess has to be wiped off, and adding any of the liq-
uid fi nishes (or thinner) to gel varnish reduces the gel quality of the product.
I think this is pretty simple. But all kinds of problems are introduced by inaccurate labeling, marketing and descriptions. I’m going to discuss three: Labeling a thinned varnish “tung oil,” claiming that the product polymerizes and calling varnish “resin.”
Tung OilTung oil is harvested from the nut of the tung tree, which is native to China but is now grown in other parts of the world. It’s more water-resistant than linseed oil and replaced linseed oil around the turn of the 20th century as the oil ingredient in exterior varnishes.
These varnishes, and all varnishes at the time, were made by cooking one of these oils with a natural resin, such as amber, copal or kauri, which are all fossilized sap from pine trees.
By the 1960s tung oil was being mar-keted as a complete fi nish in itself. But tung oil has problems. It dries consid-
erably slower than boiled linseed oil, it doesn’t look or feel nice until five or more coats are applied and sanded between each, and it never gets hard, so no build can be achieved. Tung oil is not used very often as a fi nish.
To overcome the problems while keeping the positive-sounding exotic name, manufacturers began selling thinned varnish and oil/varnish blends and calling the product “tung oil.” This dishonest labeling has created all sorts of confusion in the marketplace and among writers who aren’t paying at-tention.
Polymerization ExplainedSome manufacturers claim their oils or varnishes “polymerize.” This is a big-sounding word that makes the fi nish seem special. But polymerization is simply the way all oils and varnishes cure when exposed to oxygen in the air. Individual molecules in the fi nish crosslink or hook up with each other chemically.
Wipe-on FinishesHow can something so simple be made so hard to understand?
PHOTOS BY THE AUTHOR
CONTINUED ON PAGE 62
Finish test. Oils and oil/varnish blends dry soft and wrinkled. Wiping varnish dries hard and smooth. So the easy test is to put a puddle on a non-porous surface such as the top of the can and see how the puddle dries. Both of these products claim to be oil, but Daly’s Profi n is clearly varnish.
60_1302_PWM_Flexner.indd 6060_1302_PWM_Flexner.indd 60 11/28/12 1:26 PM11/28/12 1:26 PM

c2_1302_PWM_FPAds.indd 61c2_1302_PWM_FPAds.indd 61 11/28/12 12:58 PM11/28/12 12:58 PM
FLEXNER ON FINISHING CONTINUED FROM PAGE 60
62 ■ POPULAR WOODWORKING MAGAZINE February 2013
So the claim that a fi nish polymer-izes is meaningless for distinguishing one oil or varnish from another.
The ingredient in oils and varnishes that makes them dry within a reason-able time is a catalyst called a “drier.” The drier speeds the introduction of oxygen, and thus the polymerization and curing. It’s the absence of a drier in tung oil that explains the slower drying.
The difference between raw linseed oil, which takes weeks or months to dry, and “boiled” linseed oil, which dries overnight when all the excess is wiped off, is the drier added to boiled linseed oil. Both oils polymerize.
One way you know there are driers in salad bowl fi nishes, which are wiping varnishes, is that they dry within hours.
Despite all oils and varnishes drying by polymerization, some manufactur-ers still try for an edge. Here are three examples.
Watco has long claimed that its Dan-
ish Oil polymerizes “in” the wood, im-plying better protection – that is, water resistance. Back in the 1970s I bought into this until I learned from sad expe-rience that the important quality was how thick the fi nish is on the surface. Oil/varnish blends like Watco can’t be built up, so they aren’t very protective.
Tried & True oil finishes don’t contain driers, so they dry extremely slowly. They are essentially raw linseed oil. Why would anyone use such a slow-drying fi nish? Because the word “po-lymerize” in the marketing has made them think the fi nish is somehow better.
Southerland Welles also claims “polymerizing” to market its tung-oil product. But rather than simply ex-posing the raw oil to air for a while as Tried & True does, Southerland Welles cooks the tung oil in inert gases – no oxygen. So the chemistry of the oil changes. It thickens so much that it has to be thinned to be useful, and it
dries very rapidly when exposed to air, even though it doesn’t contain driers.
Tru-Oil, marketed for gunstocks, is also this type of fi nish.
Resin, Drying & HardeningSo how do confused writers explain the differences in drying and harden-ing? They use the vague term “resin.” There’s oil, and the more resin added, the faster and harder the drying.
But you can’t just add resin to oil and change it. Think of dropping amber jewelry into oil. It will sink.
Varnish is made by cooking oil with a resin, including synthetic alkyd and polyurethane resins. This changes the chemistry, causing the fi nish to dry hard. It’s not the amount of resin used, it’s the cooking of the two substances that makes varnish.
So why not use the word “varnish” instead of “resin?” Everyone under-stands varnish. Why make something so simple so hard? PWM
Bob Flexner is author of “Flexner on Finishing” and “Wood Finishing 101.”
For links to all online extras, go to:■ popularwoodworking.com/feb13
ARTICLES: You’ll fi nd many free fi nishing articles on our web site.
IN OUR STORE: “Flexner on Finishing” – 12 years of updated columns illustrated with beautiful full-color images, and “Wood Finishing 101.”
Our products are available online at:■ ShopWoodworking.com
ONLINE EXTRAS
Two tung oils. Both of these products claim to be tung oil. Old Masters’ (left) clearly is. McCloskey’s (right) clearly isn’t. It’s varnish.
Watco watermarks. Watco Danish Oil claims better protection because the fi nish polymerizes “in” the wood. Here, I left puddles of water on three coats of dried Watco for just more than a minute. It’s clear that resis-tance to water penetration is very minimal.
Very poor drying. Tried & True oil fi nishes are little more than raw linseed oil. Because I save almost all my tests, I still have a glass plate with Tried & True Varnish Oil, which has been exposed to air for 16 years. The fi nish is still soft and sticky.
Resin in oil. Varnish is not made by simply adding resin to oil. The two have to be cooked to change the chemistry. Here you see a piece of amber resin dropped into some raw linseed oil. The resin just sinks to the bot-tom, as you would expect.
60_1302_PWM_Flexner.indd 6260_1302_PWM_Flexner.indd 62 11/28/12 1:26 PM11/28/12 1:26 PM

LIMIT 1 - Only available with qualifying minimum purchase (excludes gift value). Coupon good at our stores or website or by phone. Cannot be used with other discount, coupon or prior purchase. Offer good while supplies last. Shipping & Handling charges may apply if not picked up in-store. Original coupon must be presented. Non-transferable. Valid through 5/8/13. Limit one coupon per customer per day.
HARBOR FREIGHT TOOLSQuality Tools at Ridiculously Low Prices
LIFETIME WARRANTYON ALL HAND TOOLS!
FACTORY DIRECT TO YOU!
How does Harbor Freight Tools sell high quality tools at such ridiculously low prices? We buy direct from the factories who also supply the major brands and sell direct to you. It's just that simple! See for yourself at one of our 400 Stores Nationwide and use this 20% Off Coupon on one of our 7,000 products*, plus pick up a Free 1" x 25 Ft. Tape Measure, a $5.99 value . We stock Shop Equipment, Hand Tools, Tarps, Compressors, Air & Power Tools, Woodworking Tools, Welders, Tool Boxes, Generators, and much more.
Nobody Beats Our Quality, Service and Price!
Over• 20 Million Satisfi ed Customers!1 Year Competitor's Low Price Guarantee• No Hassle Return Policy!• 100% Satisfaction Guaranteed!• Over 400 Stores Nationwide•
LIMIT 7 - Good at our stores or website or by phone. Cannot be used with other discount or coupon or prior purchases after 30 days from original purchase with original receipt. Offer good while supplies last. Non-transferable. Original coupon must be presented. Valid through 5/8/13. Limit one coupon per customer per day.
LIMIT 3 - Good at our stores or website or by phone. Cannot be used with other discount or coupon or prior purchases after 30 days from original purchase with original receipt. Offer good while supplies last. Non-transferable. Original coupon must be presented. Valid through 5/8/13. Limit one coupon per customer per day.
LIMIT 3 - Good at our stores or website or by phone. Cannot be used with other discount or coupon or prior purchases after 30 days from original purchase with original receipt. Offer good while supplies last. Non-transferable. Original coupon must be presented. Valid through 5/8/13. Limit one coupon per customer per day.
LIMIT 4 - Good at our stores or website or by phone. Cannot be used with other discount or coupon or prior purchases after 30 days from original purchase with original receipt. Offer good while supplies last. Non-transferable. Original coupon must be presented. Valid through 5/8/13. Limit one coupon per customer per day.
LIMIT 5 - Good at our stores or website or by phone. Cannot be used with other discount or coupon or prior purchases after 30 days from original purchase with original receipt. Offer good while supplies last. Non-transferable. Original coupon must be presented. Valid through 5/8/13. Limit one coupon per customer per day.
LIMIT 5 - Good at our stores or website or by phone. Cannot be used with other discount or coupon or prior purchases after 30 days from original purchase with original receipt. Offer good while supplies last. Non-transferable. Original coupon must be presented. Valid through 5/8/13. Limit one coupon per customer per day.
LIMIT 4 - Good at our stores or website or by phone. Cannot be used with other discount or coupon or prior purchases after 30 days from original purchase with original receipt. Offer good while supplies last. Non-transferable. Original coupon must be presented. Valid through 5/8/13. Limit one coupon per customer per day.
LIMIT 5 - Good at our stores or website or by phone. Cannot be used with other discount or coupon or prior purchases after 30 days from original purchase with original receipt. Offer good while supplies last. Non-transferable. Original coupon must be presented. Valid through 5/8/13. Limit one coupon per customer per day.
LIMIT 7 - Good at our stores or website or by phone. Cannot be used with other discount or coupon or prior purchases after 30 days from original purchase with original receipt. Offer good while supplies last. Non-transferable. Original coupon must be presented. Valid through 5/8/13. Limit one coupon per customer per day.
LIMIT 8 - Good at our stores or website or by phone. Cannot be used with other discount or coupon or prior purchases after 30 days from original purchase with original receipt. Offer good while supplies last. Non-transferable. Original coupon must be presented. Valid through 5/8/13. Limit one coupon per customer per day.
LIMIT 5 - Good at our stores or website or by phone. Cannot be used with other discount or coupon or prior purchases after 30 days from original purchase with original receipt. Offer good while supplies last. Non-transferable. Original coupon must be presented. Valid through 5/8/13. Limit one coupon per customer per day.
LIMIT 9 - Good at our stores or website or by phone. Cannot be used with other discount or coupon or prior purchases after 30 days from original purchase with original receipt. Offer good while supplies last. Non-transferable. Original coupon must be presented. Valid through 5/8/13. Limit one coupon per customer per day.
LIMIT 3 - Good at our stores or website or by phone. Cannot be used with other discount or coupon or prior purchases after 30 days from original purchase with original receipt. Offer good while supplies last. Non-transferable. Original coupon must be presented. Valid through 5/8/13. Limit one coupon per customer per day.
LIMIT 5 - Good at our stores or website or by phone. Cannot be used with other discount or coupon or prior purchases after 30 days from original purchase with original receipt. Offer good while supplies last. Non-transferable. Original coupon must be presented. Valid through 5/8/13. Limit one coupon per customer per day.
LIMIT 1 - Save 20% on any one item purchased at our stores or website or by phone. *Cannot be used with other discount, coupon, gift cards, Inside Track Club membership, extended service plans or on any of the following: compressors, generators, tool storage or carts, welders, fl oor jacks, Towable Ride-on Trencher (Item 65162), open box items, in-store event or parking lot sale items. Not valid on prior purchases after 30 days from original purchase date with original receipt. Non-transferrable. Original coupon must be presented. Valid through 5/8/13. Limit one coupon per customer per day.
SUPER
COUPON!
SUPER
COUPON!
SUPER
COUPON!
SUPER
COUPON!
SUPER
COUPON!
SUPER
COUPON!
SUPER
COUPON!
SUPER
COUPON!
SUPER
COUPON!
OFFOFF2020%%
ANY SINGLE ITEM!
FREE!FREE!WITH MINIMUM PURCHASE OF $9.99
SUPER
COUPON!
SUPER
COUPON!
SUPER
COUPON!
SUPER
COUPON!
SUPER
COUPON!
SUPER
COUPON!
12" RATCHET BAR CLAMP/
SPREADER
$199
LOT NO. 46807 /68975/69221/
69222
REG. PRICE $5.4 9
Item 46807 shown
SAVE 63%
SAVE 50%
REG. PRICE $9 .99 $499
LOT NO. 92471
12" COMBINATION SQUARE SET
$8999 REG. PRICE $149 .99
OSCILLATING SPINDLE SANDER
LOT NO. 95088/69257SAVE
$60Item
95088shown
SAVE 50%
3 GALLON, 100 PSI OILLESS PANCAKE AIR COMPRESSOR
LOT NO. 95275/69486 /60637
REG. PRICE
$79.99 $3999 Item 95275
shown
SAVE $100
2 HP INDUSTRIAL 5 MICRON DUST
COLLECTOR LOT NO. 97869
$14999 REG. PRICE
$249 .99
$6999 REG. PRICE
$139.99 LOT NO. 68048 /69227
Item 68048 shown
RAPID PUMP® 3 TON HEAVY DUTY STEEL FLOOR JACK
WEIGHS 74 LBS.
SAVE $70
Item 92655 shown
500 LB. CAPACITY ALUMINUM CARGO
CARRIER LOT NO.
92655/69688/60771
REG. PRICE $129 .99 $6999
SUPER
COUPON!
SAVE $60 LOT NO. 98194/69684
1 2" DOUBLE-BEVEL SLIDING COMPOUND
MITER SAW WITH LASER GUIDE
$11999 REG. PRICE
$199 .99
Item 69684 shown
p
NEW!NEW!
SAVE $80
SAVE 33%
18 VOLT CORDLESS 1/2" DRILL/DRIVER
WITH KEYLESS CHUCK
LOT NO. 68850
$3999 REG. PRICE $59.99
18V NiCd batteryand charger
included.
NEW!NEW! SAVE 33%
REG. PRICE
$14.99 $999
FLUORESCENT WORK LIGHT
LOT NO. 92079
SAVE $90
60" WORKBENCH WITH FOUR DRAWERS
$13999 REG. PRICE $229 .99
LOT NO. 93454 /69054
Item 93454 shown
16" VARIABLE SPEED SCROLL SAW
REG. PRICE $79.99 $5999
SAVE 25%
LOT NO. 93012
SAVE 40%
MEDIUMLOT NO. 68496
X-LARGELOT NO. 68498 /
37052/97583
NITRILE GLOVES PACK OF 100
$599 YOUR CHOICE!
REG. PRICE $9.99
5 MIL. THICKNESS
LARGELOT NO. 68497 /
37051/97582
Item 68498 shown
80 PIECE ROTARY TOOL KIT
LOT NO. 69451/68986/97626/
REG. PRICE $24 .99
$699 Item 69451
shown
SAVE 72%
1" x 25 FT. TAPE MEASURE
REG. PRICE $5.99
Item 47737shown
ITEM 47737/69080/69030/69031
GRAND OPENINGS
Huntington Park, CALa Mirada, CA
St. Louis, MORichmond, VA
N. Hollywood, CASan Jose, CA
Brookfi eld, CTMadison Heights, MI
hft_popwoodworking_0113_M-REG18907.indd 1 11/13/12 12:01:09 PM
CARD #76 or go to PWFREEINFO.COM
c2_1302_PWM_FPAds.indd 63c2_1302_PWM_FPAds.indd 63 11/28/12 12:58 PM11/28/12 12:58 PM
END GRAIN BY W. PAUL OLSEN
64 ■ POPULAR WOODWORKING MAGAZINE February 2013
I’ve dreamed about my Workbench for years. It will be solid maple, top to bottom. It will have traditional
face and tail vises, with a sliding dead-man between. The top? Two 31⁄2"-thick laminated slabs separated by a set of four individual tool trays – like Robert Lang put on his 21st-century Bench (October 2008, issue #171).
I have considered every detail. Length and height? Check. Finish? Check. Round or square dog holes? Decided. Leg construction? Solid wood, fl ush with the front edge of the top to facilitate clamping.
Late in January of last year, my wife found me sitting in my unheated shop, staring into the void that my Work-bench will one day occupy. “Having fun?” she asked, grinning from ear to ear. She knew I was thinking about my Workbench.
Now, my beautiful wife is not a woodworker, but she does love me. And she knows my poor table saw has been moonlighting as a work surface for a long time. So when she heard me remark that I really should build a workbench, she got an idea. With great secrecy, she visited her favorite online retailer (the same one where she orders most of her books and kids’ toys) and typed “workbench” into the search bar.
Behold! The site presented a set of pre-fabricated bench legs, made of structural foam plastic resins. The advertising copy promised a bench in an hour: Just add plywood and 2x4s! So with great excitement she blew the birthday budget and clicked “Buy.”
And that’s how on my 38th birthday I came to be sitting alone, shivering in my workshop. And that’s how she knew I was thinking about my Workbench.
She was brimming over with pride – she just knew she had gotten me something great! How could I tell her the truth? My solid maple Workbench could never have plastic legs!
She soon retreated into the house, but her radiant joy lingered. Like fi ne dust, it began to settle. It landed on my grandfather’s old jack plane. That plane is ugly, but it works, and it connects me to him. It lighted on the quilt rack I’m making for Mom to hold hand-stitched quilts my great-grandmother made. It settled upon a scrap from the rocking horse I made for my three children.
I began to realize that the reason I love woodworking is because it con-nects me to my world and the people around me in mystical ways. Ways given voice by a plane skirting along a board. Ways magically displayed by my daughter as she drapes long shav-ings across her hair like Nellie Oleson’s curls. Ways inexpressible.
This year, I received my true birth-day gift sitting alone in my grey, unlit shop, pondering how to tell my wife that I can’t use the gift she had so proudly given. I realized that I could use those legs.
Except, as it turns out, my solid maple Workbench is made of South-ern yellow pine, because I can’t afford maple right now. It is too tall, because I couldn’t really shorten those plastic legs. And it has some scabbed-on sur-faces to facilitate clamping, because the structural foam plastic resin legs couldn’t be made truly fl ush.
Maybe it’s an ugly Frankenbench, but it works great. And every time I use it, I remember my true 38th birthday gift: a new appreciation that I work the wood for the connections it cre-ates. PWM
Paul lives in Wildwood, Miss., and looks forward to the day he can retire (almost three decades from now) and spend more time in his shop making toys,
furniture and whatever else strikes his fancy.
PHOTO BY THE AUTHOR
‘Frankenbench’A dream deferred –
and that’s just fi ne.
For links to all online extras, go to:■ popularwoodworking.com/feb13
IN OUR STORE: You’ll fi nd books, DVDs and downloadable plans for many workbenches in our store.
Our products are available online at:■ ShopWoodworking.com
ONLINE EXTRAS
64_1302_PWM_EndGrain.indd 6464_1302_PWM_EndGrain.indd 64 11/28/12 1:27 PM11/28/12 1:27 PM

For A Free Catalog Or To Find Your Local Woodcraft Store, Visit woodcraft.com Or Call 800-225-1153. 13PW02P For Information On Woodcraft Retail Franchise Opportunities, Call 1-855-923-7326 Or Visit woodcraftfranchise.com
®
“A QUANTUM leap in woodturning makes everything else obsolete.”– Scott Phillips, The American Woodshop on PBS
Introducing The Innovative New Easy Chuck™ From Easy Wood Tools™
™)
™
Step up to the Easy Chuck, and see what innovation is all about – welcome a game changing evolution in woodturning technology! Featuring patent pending Easy Chuck Snap Lock Technology (SLT™), Easy Jaws™ system and an integrated Zoom Ring™, we guarantee you the Easy Chuck will change the way you view woodturning chucks.
The combination of Snap-Lock Technology and Easy Jaws system allows for simple and quick jaw changes. Securing a workpiece with the Easy Chuck has never been easier, thanks to the innovative Zoom Ring™ technology.
154689 Easy Chuck W/13/8
154768 ½" Easy Reach Dovetail
CARD #49 or go to PWFREEINFO.COM
c2_1302_PWM_FPAds.indd c3c2_1302_PWM_FPAds.indd c3 11/28/12 12:58 PM11/28/12 12:58 PM

© 2 0 1 3 W a l t e r M e i e r ( M a n u f a c t u r i n g ) I n c . A l l R i g h t s R e s e r v e d . T h e c o l o r G O L D i s a r e g i s t e r e d t r a d e m a r k o f W a l t e r M e i e r ( M a n u f a c t u r i n g ) I n c .
IMAGINATION IN A CLASS OF ITS OWN
VISIT: POWERMATIC.COM TO LEARN MORE
Introducing the all-new 15" bandsaw from Powermatic. The PM1500 packs all the features of a larger bandsaw into a size that is perfect for your workshop.
TENSION RELEASEBlade tension release with electrical interlock prevents the bandsaw from starting when the blade is de-tensioned or released.
WHEELSSolid cast iron upper and lower wheels create the momentum needed for heavy resaw.
SIDE PLATEOversized side plate can be used in the horizontal or vertical position.
CARD #58 or go to PWFREEINFO.COM
c2_1302_PWM_FPAds.indd c4c2_1302_PWM_FPAds.indd c4 11/28/12 12:58 PM11/28/12 12:58 PM