plumbers installation handbook.pdf
DESCRIPTION
Plumbers installation handbookTRANSCRIPT
Plumber’s Installation Handbook PP
FA
1© 2003 PPFA. All rights reserved.
INTRODUCTIONThis installation Handbook is preparedthrough the voluntary efforts of the membersof the Plastic Pipe and Fittings Association.The Plastic Pipe and Fittings Association(PPFA) is the trade association ofmanufacturers of plastic pipe and fittings,producers of raw materials used in them, andsuppliers of related products and services tothe plastic pipe and fittings industry. PPFAprovides a full range of association servicesfor its members and the industry.
The Handbook is organized in sections basedon the application or end use for each type ofplastic piping, namely, Drain, Waste and Vent(DWV); Water Service Piping; Hot and ColdWater Distribution; and Sewer and Drains.
PURPOSE and SCOPEThe purpose of the Handbook is to provideplumbers and other interested persons with asingle publication that describes plastic pipeproducts and many of the generally acceptedinstallation practices for plastic pipe andfittings currently being utilized in the UnitedStates. It does not contain all of theinformation needed for comprehensiveplumbing design and practices using plasticpiping. While PPFA has attempted to collectand describe the most widely used, generallyaccepted installation techniques, there areundoubtedly some that were not included inthis Handbook. Subsequent editions mayadd, drop, amend, or revise practicescontained herein.
It should be clearly understood that neitherPPFA nor its members recommend anysingle (or even all) installation practicedescribed in this Handbook for any specificapplication or system. Both practicalconsiderations and logic preclude suchrecommendations because of the wide
variety of products and the considerablevariation in circumstances surrounding theinstallation of these products. Accordingly,any plumber or other installer must refer firstto the manufacturer’s installation instructionsand recommendations for the product orproducts being used. Any inconsistency ordiscrepancy between thoserecommendations and instructions and thematerial in this Handbook must be resolvedin favor of the manufacturer’s installationrecommendations or instructions.
We urge you to read and study allinformation available to you on plastic piping.
Plastic piping is used extensively in theplumbing field for DWV, water service, hotand cold-water distribution systems, sewers,and drains. Learn to recognize and comparethe various types of plastic pipe and tubing.The general term “plastic pipe” is no moredefinitive than saying “metal pipe.” Just asyou recognize cast iron, galvanized steel,copper, stainless steel, and brass, you willwant to become familiar with the differentkinds of plastic pipe and the advantageseach offers.
Tools designed exclusively for use withplastic piping are available. We suggest thatyou secure brochures from your supplierscovering these tools. They contribute greatlyto the ease and precision of the installation.
Neither PPFA nor its members make anywarranties or representations whatsoever,either stated or implied, relative to the fitnessof any product, materials, or proceduresreferred to in this Handbook for any particularpurpose or use. Many of the products in thisHandbook are interrelated, and we stronglysuggest you read it in its entirety before youbegin working with plastic pipe and fittings.
Plumber’s Installation Handbook
PP
FA
2 © 2003 PPFA. All rights reserved.
Plumbing codes & product standardsIt is well known that plumbing codes weredeveloped to protect the health and welfareof the communities by preventingcontamination of the water supply andproviding for the proper disposal ofwastewater. These plumbing codes set forthmany requirements for acceptable productsand usually reference those productstandards applicable to them.
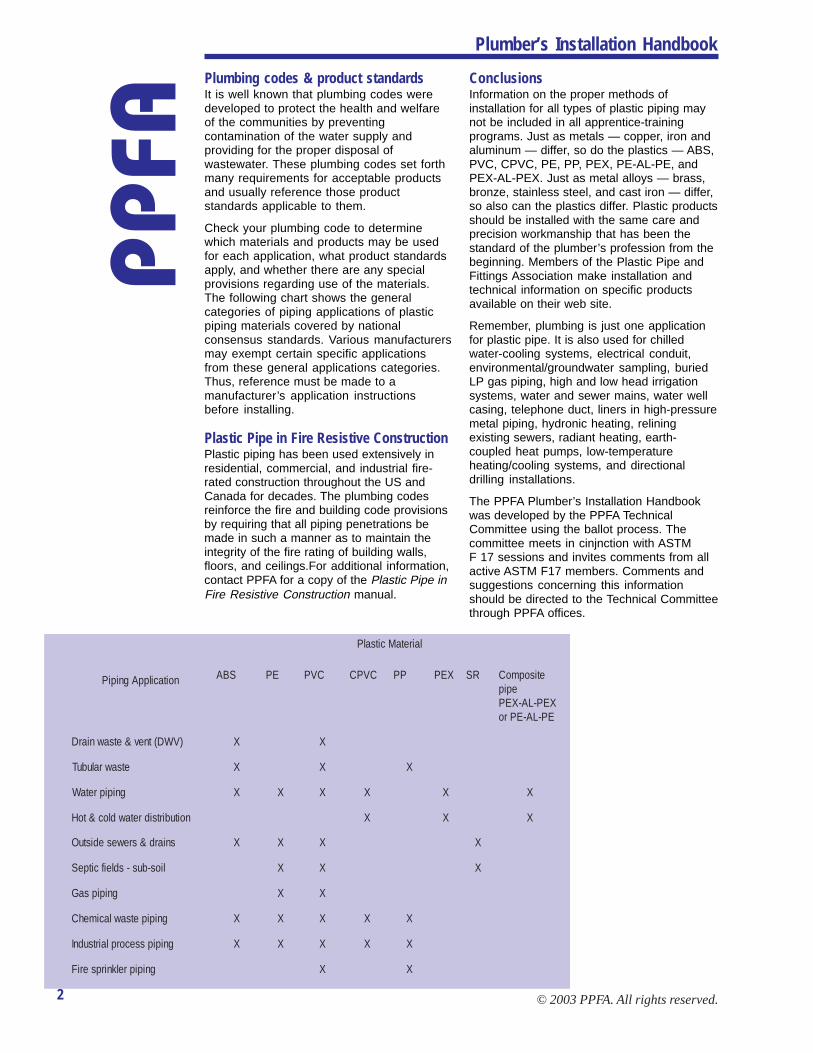
Check your plumbing code to determinewhich materials and products may be usedfor each application, what product standardsapply, and whether there are any specialprovisions regarding use of the materials.The following chart shows the generalcategories of piping applications of plasticpiping materials covered by nationalconsensus standards. Various manufacturersmay exempt certain specific applicationsfrom these general applications categories.Thus, reference must be made to amanufacturer’s application instructionsbefore installing.
Plastic Pipe in Fire Resistive ConstructionPlastic piping has been used extensively inresidential, commercial, and industrial fire-rated construction throughout the US andCanada for decades. The plumbing codesreinforce the fire and building code provisionsby requiring that all piping penetrations bemade in such a manner as to maintain theintegrity of the fire rating of building walls,floors, and ceilings.For additional information,contact PPFA for a copy of the Plastic Pipe in
ConclusionsInformation on the proper methods ofinstallation for all types of plastic piping maynot be included in all apprentice-trainingprograms. Just as metals — copper, iron andaluminum — differ, so do the plastics — ABS,PVC, CPVC, PE, PP, PEX, PE-AL-PE, andPEX-AL-PEX. Just as metal alloys — brass,bronze, stainless steel, and cast iron — differ,so also can the plastics differ. Plastic productsshould be installed with the same care andprecision workmanship that has been thestandard of the plumber’s profession from thebeginning. Members of the Plastic Pipe andFittings Association make installation andtechnical information on specific productsavailable on their web site.
Remember, plumbing is just one applicationfor plastic pipe. It is also used for chilledwater-cooling systems, electrical conduit,environmental/groundwater sampling, buriedLP gas piping, high and low head irrigationsystems, water and sewer mains, water wellcasing, telephone duct, liners in high-pressuremetal piping, hydronic heating, reliningexisting sewers, radiant heating, earth-coupled heat pumps, low-temperatureheating/cooling systems, and directionaldrilling installations.
The PPFA Plumber’s Installation Handbookwas developed by the PPFA TechnicalCommittee using the ballot process. Thecommittee meets in cinjnction with ASTMF 17 sessions and invites comments from allactive ASTM F17 members. Comments andsuggestions concerning this informationshould be directed to the Technical Committeethrough PPFA offices.
Fire Resistive Construction manual.
noitacilppAgnipiP
lairetaMcitsalP
SBA EP CVP CVPC PP XEP RS etisopmoCepip
XEP-LA-XEPEP-LA-EPro
)VWD(tnev&etsawniarD X X
etsawralubuT X X X
gnipipretaW X X X X X X
noitubirtsidretawdloc&toH X X X
sniard&srewesedistuO X X X X
lios-bus-sdleifcitpeS X X X
gnipipsaG X X
gnipipetsawlacimehC X X X X X
gnipipssecorplairtsudnI X X X X X
gnipiprelknirpseriF X X
Plumber’s Installation Handbook PP
FA
3© 2003 PPFA. All rights reserved.
DWV piping – generalA word of caution is essential: You mustcheck your local plumbing code to be surethat the product you have chosen is approvedby your code. Do not assume that every pipingproduct sold by a supplier has been locallyapproved.
Whether you have chosen ABS-DWV, ABS-DWV cellular core, PVC-DWV or PVC-DWVcellular core piping, you have chosen a widelyused product. These products, while made ofdifferent plastic materials, are similar in bothinstallation procedures and service abilities.
Mixing ABS and PVC pipe and fittings withinthe same system is not recommended.However, joining ABS and PVC is possiblewhen connecting building sewers to buildingdrains. Consult your local code official and theproduct manufacturers for specificinstructions.
DWV piping - storage and handlingStorage on the job site should always be onlevel support in a shaded area. If shade is notavailable, a suitable substitute, such asbuilding felt or a tarp, should be used. Fittingsshould be stored in their shipping cartons or“rough” sorted into cardboard boxes. This willnot only protect them from exposure to thesun but will help keep them clean. Pipe andfittings should be kept free of dust, dirt, and oilat all times.
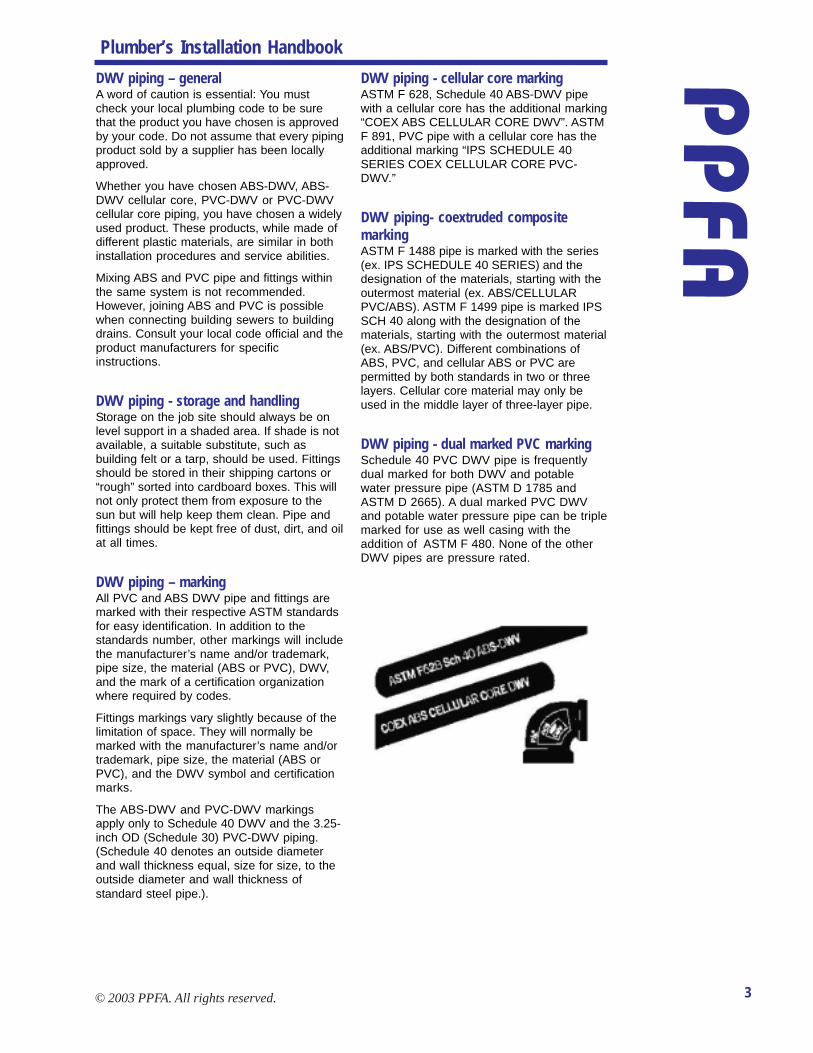
DWV piping – markingAll PVC and ABS DWV pipe and fittings aremarked with their respective ASTM standardsfor easy identification. In addition to thestandards number, other markings will includethe manufacturer’s name and/or trademark,pipe size, the material (ABS or PVC), DWV,and the mark of a certification organizationwhere required by codes.
Fittings markings vary slightly because of thelimitation of space. They will normally bemarked with the manufacturer’s name and/ortrademark, pipe size, the material (ABS orPVC), and the DWV symbol and certificationmarks.
The ABS-DWV and PVC-DWV markingsapply only to Schedule 40 DWV and the 3.25-inch OD (Schedule 30) PVC-DWV piping.(Schedule 40 denotes an outside diameterand wall thickness equal, size for size, to theoutside diameter and wall thickness of
DWV piping - cellular core markingASTM F 628, Schedule 40 ABS-DWV pipewith a cellular core has the additional marking“COEX ABS CELLULAR CORE DWV”. ASTMF 891, PVC pipe with a cellular core has theadditional marking “IPS SCHEDULE 40SERIES COEX CELLULAR CORE PVC-DWV.”
DWV piping- coextruded compositemarkingASTM F 1488 pipe is marked with the series(ex. IPS SCHEDULE 40 SERIES) and thedesignation of the materials, starting with theoutermost material (ex. ABS/CELLULARPVC/ABS). ASTM F 1499 pipe is marked IPSSCH 40 along with the designation of thematerials, starting with the outermost material(ex. ABS/PVC). Different combinations ofABS, PVC, and cellular ABS or PVC arepermitted by both standards in two or threelayers. Cellular core material may only beused in the middle layer of three-layer pipe.
DWV piping - dual marked PVC markingSchedule 40 PVC DWV pipe is frequentlydual marked for both DWV and potablewater pressure pipe (ASTM D 1785 andASTM D 2665). A dual marked PVC DWVand potable water pressure pipe can be triplemarked for use as well casing with theaddition of ASTM F 480. None of the otherDWV pipes are pressure rated.
standard steel pipe.).
Plumber’s Installation Handbook
PP
FA
4 © 2003 PPFA. All rights reserved.
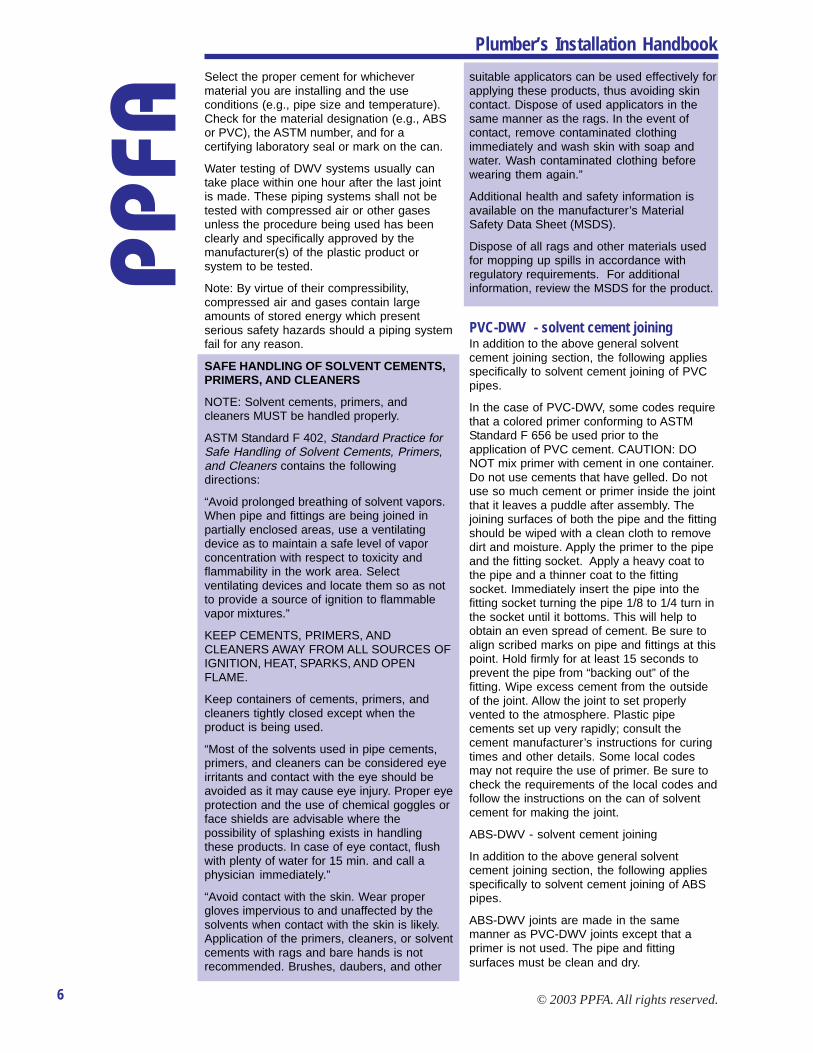
DWV Piping – cuttingPlastic DWV may be cut with pipe cutters,any crosscut saw, or a power saw equippedwith a carbide tip blade or an abrasive blade.Special wheels made to cut plastic pipes areavailable for all standard cutters andlightweight, quick adjusting cutters designedexclusively for plastic piping are available.
A square cut is essential to insure jointintegrity with socket fittings. Under nocircumstances should you try to offset asolvent cement joint by bias cutting ordeflecting the pipe. Use of a power saw onlarge jobs, or a miter box on small jobs, willinsure consistently square cuts. If neither isavailable, scribe the pipe and cut to the mark.Do not attempt to force your saw. If the cut isnot square, face it off with a file. Wipe awayall saw and file shavings before applyingcement to the pipe or fitting.
Pipe cutters should be sharp and wellmaintained. Cutters and cutter wheelspreviously used on metal should NOT beused. They exert excessive pressure, bothinternally and externally, causing largershoulders and burrs that must later beremoved. Pipe should always be reamedboth internally and externally to remove burrs,
DWV Piping - Joining
Solvent Cement Joining— GeneralPlastic PVC and ABS DWV pipe and fittingsare generally joined with solvent cements thattemporarily soften the joining surfaces. Thisbrief softening period enables the installer toseat the pipe into the interference fit designedin the sockets of plastic fittings. The softenedsurfaces then fuse together. Joint strengthdevelops as the solvents evaporate. Whenfully cured, the resulting joint is stronger thanthe pipe itself.
You will be referred to thesejoining instructions several timesin this handbook.With the exception of the priming step, theinstructions for solvent cementing all types of
shoulders, and ragged edges. External burrscan cause faulty joints. Several types ofreamers and deburring tools are available forthis purpose. Power reamers are availablefor shops or large projects, but a pocketknifeor file can also be used.
tcudorP/lairetaM dradnatSMTSA eltiT
SBA 1662D )SBA(eneryts-eneidatuB-elirtinolyrcAtneVdna,etsaW,niarDcitsalP04eludehcS
sgnittiFdnaepiP
CVP 5662D ,niarDcitsalP)CVP()edirolhClyniV(yloPsgnittiFdnaepiPtneVdna,etsaW
DOhcni-52.3CVP 9492D ,etsaW,niarDCVPretemaiDedistuO"52.3sgnittiFdnaepiPtneVdna
SBAeroCralulleC 826F )SBA(eneryts-eneidatuB-elirtinolyrcAtneVdna,etsaW,niarDcitsalP04eludehcS
eroCralulleCahtiwepiP
CVPerocralulleC 198F citsalP)CVP()edirolhClyniV(yloPdedurtxeoCeroCralulleCahtiwepiP
etisopmoCdedurtxeoCCVP/SBA
8841F epiPetisopmoCdedurtxeoC
etisopmoCdedurtxeoCSBA/CVP-VWD
9941F dna,etsaW,niarDetisopmoCdedurtxeoC)VWD(epiPtneV
DWV Piping - ASTM Standards
Plumber’s Installation Handbook PP
FA
5© 2003 PPFA. All rights reserved.
PVC and ABS piping are similar.
In addition to these general solvent cementjoining guidelines, there are additionalguidelines specific to solvent cement joiningof PVC and ABS piping.
Since ABS and PVC DWV pipes are madefrom two completely different plasticcompounds, each requires a different cement.Look for the correct standard numbers on themanufacturer’s label before making the joint.Do not use combination cements, aerosolcements, or other cement types that do notmeet these ASTM standards. The applicableASTM standards of the cements and primersto be utilized with each of these plasticsystems are as follows:
The selection of a proper applicator forapplying cements and primers is important.Small cans of cement are usually equippedwith a dauber affixed to the lid. For larger pipesizes, natural bristle brushes or rollers shouldbe used. The width of the brush or rollershould always be at least ½ the diameter ofthe pipe being joined to assure sufficient
application of the cement. Solvent cementsfor both ABS and PVC piping are available in4 oz. to one-gallon cans. Cement that islumpy or too thick to flow easily should bediscarded. Cans must be sealed when notin use as the cement quickly thickens andhardens. Do not use cements outside thetemperature range recommended by thecement manufacturer.
Before making a solvent cement joint in aplastic DWV system, the pipe and fittingsmust be clean and free of water, oil, soil orother debris. Also, success is assured onlywhen interference fit exists between pipe andfittings. The pipe should make an interferencefit with the fitting socket 1/3 to 2/3 into thesocket when dry fitting the pipe.
Fittings to be aligned should be carefullymarked for position before applying cement toassure proper alignment in the final assembly.Always use the proper fittings for makingchanges in direction. Do not place strain onpipe or fittings.
Do not attempt to heat and bend DWV piping.
The curing time required toachieve full joint strengthwill vary depending on theweather conditions,temperature and humidity,the pipe size, theapplication technique, thecement being used, andthe degree of interferencefit between pipe and fitting.All solvent cements do notreact and cure the same.Some plastic pipe andfittings applications usesolvent cements thatrequire longer or shorterdrying periods. Fast-,medium-, and slow-dryingcements are available toassist in offsetting weather
noitacilppA/lairetaM MTSAnoitacificepS
eltiT
sgnittiFdnepiPVWD-SBA 5322D -elirtinolyrcAroftnemectnevloSepiPcitsalP)SBA(enerytS-eneidatuB
sgnittiFdna
dnaepiPVWD-CVPsgnittiF
4652D lyniV(yloProfsntemeCtnevloSsmetsySgnipiPcitsalP)CVP()edirolhC
*remirPCVP *656F tnemeCtnevloSniesUrofsremirP)CVP()edirolhClyniV(yloPfostnioJ
*sgnittiFdnaepiPcitsalP
* Some codes require the use of a primer.
conditions.
Plumber’s Installation Handbook
PP
FA
6 © 2003 PPFA. All rights reserved.
Select the proper cement for whichevermaterial you are installing and the useconditions (e.g., pipe size and temperature).Check for the material designation (e.g., ABSor PVC), the ASTM number, and for acertifying laboratory seal or mark on the can.
Water testing of DWV systems usually cantake place within one hour after the last jointis made. These piping systems shall not betested with compressed air or other gasesunless the procedure being used has beenclearly and specifically approved by themanufacturer(s) of the plastic product orsystem to be tested.
Note: By virtue of their compressibility,compressed air and gases contain largeamounts of stored energy which presentserious safety hazards should a piping systemfail for any reason.
SAFE HANDLING OF SOLVENT CEMENTS,PRIMERS, AND CLEANERS
NOTE: Solvent cements, primers, andcleaners MUST be handled properly.
ASTM Standard F 402, Standard Practice forSafe Handling of Solvent Cements, Primers,and Cleaners contains the followingdirections:
“Avoid prolonged breathing of solvent vapors.When pipe and fittings are being joined inpartially enclosed areas, use a ventilatingdevice as to maintain a safe level of vaporconcentration with respect to toxicity andflammability in the work area. Selectventilating devices and locate them so as notto provide a source of ignition to flammablevapor mixtures.”
KEEP CEMENTS, PRIMERS, ANDCLEANERS AWAY FROM ALL SOURCES OFIGNITION, HEAT, SPARKS, AND OPENFLAME.
Keep containers of cements, primers, andcleaners tightly closed except when theproduct is being used.
“Most of the solvents used in pipe cements,primers, and cleaners can be considered eyeirritants and contact with the eye should beavoided as it may cause eye injury. Proper eyeprotection and the use of chemical goggles orface shields are advisable where thepossibility of splashing exists in handlingthese products. In case of eye contact, flushwith plenty of water for 15 min. and call aphysician immediately.”
“Avoid contact with the skin. Wear propergloves impervious to and unaffected by thesolvents when contact with the skin is likely.Application of the primers, cleaners, or solventcements with rags and bare hands is notrecommended. Brushes, daubers, and other
suitable applicators can be used effectively forapplying these products, thus avoiding skincontact. Dispose of used applicators in thesame manner as the rags. In the event ofcontact, remove contaminated clothingimmediately and wash skin with soap andwater. Wash contaminated clothing beforewearing them again.”
Additional health and safety information isavailable on the manufacturer’s MaterialSafety Data Sheet (MSDS).
Dispose of all rags and other materials usedfor mopping up spills in accordance withregulatory requirements. For additionalinformation, review the MSDS for the product.
PVC-DWV - solvent cement joiningIn addition to the above general solventcement joining section, the following appliesspecifically to solvent cement joining of PVCpipes.
In the case of PVC-DWV, some codes requirethat a colored primer conforming to ASTMStandard F 656 be used prior to theapplication of PVC cement. CAUTION: DONOT mix primer with cement in one container.Do not use cements that have gelled. Do notuse so much cement or primer inside the jointthat it leaves a puddle after assembly. Thejoining surfaces of both the pipe and the fittingshould be wiped with a clean cloth to removedirt and moisture. Apply the primer to the pipeand the fitting socket. Apply a heavy coat tothe pipe and a thinner coat to the fittingsocket. Immediately insert the pipe into thefitting socket turning the pipe 1/8 to 1/4 turn inthe socket until it bottoms. This will help toobtain an even spread of cement. Be sure toalign scribed marks on pipe and fittings at thispoint. Hold firmly for at least 15 seconds toprevent the pipe from “backing out” of thefitting. Wipe excess cement from the outsideof the joint. Allow the joint to set properlyvented to the atmosphere. Plastic pipecements set up very rapidly; consult thecement manufacturer’s instructions for curingtimes and other details. Some local codesmay not require the use of primer. Be sure tocheck the requirements of the local codes andfollow the instructions on the can of solventcement for making the joint.
ABS-DWV - solvent cement joining
In addition to the above general solventcement joining section, the following appliesspecifically to solvent cement joining of ABSpipes.
ABS-DWV joints are made in the samemanner as PVC-DWV joints except that aprimer is not used. The pipe and fittingsurfaces must be clean and dry.
Plumber’s Installation Handbook PP
FA
7© 2003 PPFA. All rights reserved.
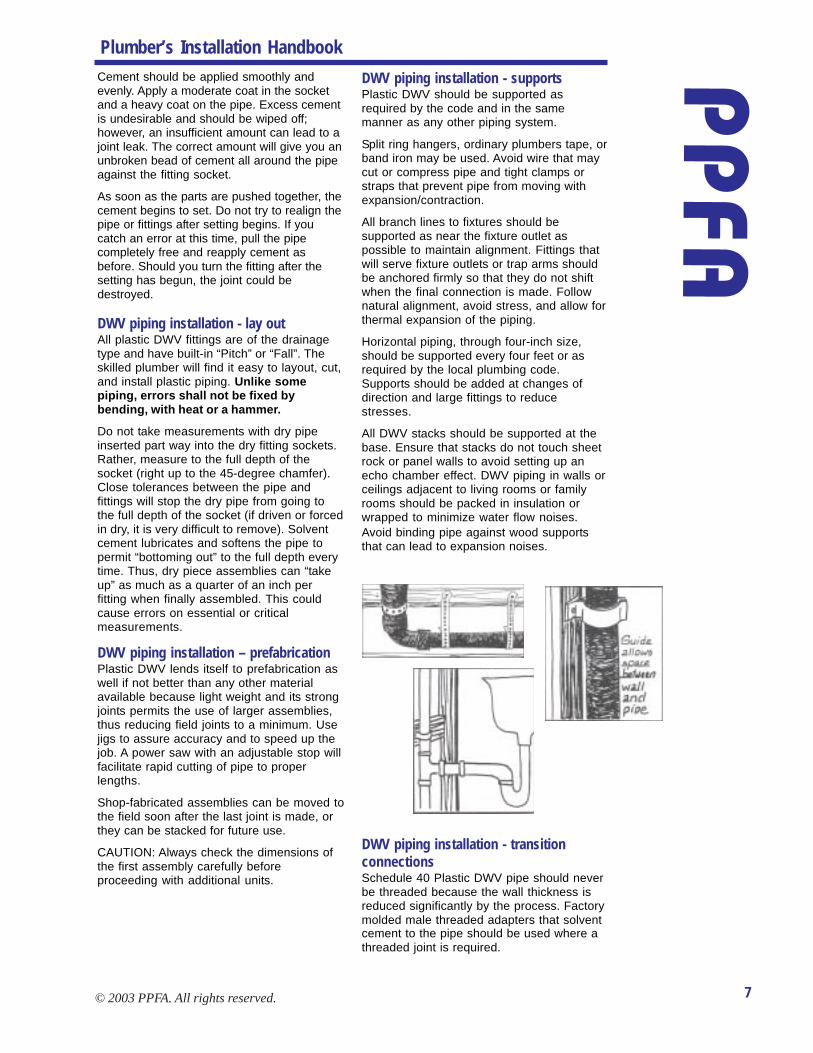
DWV piping installation - supportsPlastic DWV should be supported asrequired by the code and in the samemanner as any other piping system.
Split ring hangers, ordinary plumbers tape, orband iron may be used. Avoid wire that maycut or compress pipe and tight clamps orstraps that prevent pipe from moving withexpansion/contraction.
All branch lines to fixtures should besupported as near the fixture outlet aspossible to maintain alignment. Fittings thatwill serve fixture outlets or trap arms shouldbe anchored firmly so that they do not shiftwhen the final connection is made. Follownatural alignment, avoid stress, and allow forthermal expansion of the piping.
Horizontal piping, through four-inch size,should be supported every four feet or asrequired by the local plumbing code.Supports should be added at changes ofdirection and large fittings to reducestresses.
All DWV stacks should be supported at thebase. Ensure that stacks do not touch sheetrock or panel walls to avoid setting up anecho chamber effect. DWV piping in walls orceilings adjacent to living rooms or familyrooms should be packed in insulation orwrapped to minimize water flow noises.
Cement should be applied smoothly andevenly. Apply a moderate coat in the socketand a heavy coat on the pipe. Excess cementis undesirable and should be wiped off;however, an insufficient amount can lead to ajoint leak. The correct amount will give you anunbroken bead of cement all around the pipeagainst the fitting socket.
As soon as the parts are pushed together, thecement begins to set. Do not try to realign thepipe or fittings after setting begins. If youcatch an error at this time, pull the pipecompletely free and reapply cement asbefore. Should you turn the fitting after thesetting has begun, the joint could bedestroyed.
DWV piping installation - lay outAll plastic DWV fittings are of the drainagetype and have built-in “Pitch” or “Fall”. Theskilled plumber will find it easy to layout, cut,and install plastic piping. Unlike somepiping, errors shall not be fixed bybending, with heat or a hammer.
Do not take measurements with dry pipeinserted part way into the dry fitting sockets.Rather, measure to the full depth of thesocket (right up to the 45-degree chamfer).Close tolerances between the pipe andfittings will stop the dry pipe from going tothe full depth of the socket (if driven or forcedin dry, it is very difficult to remove). Solventcement lubricates and softens the pipe topermit “bottoming out” to the full depth everytime. Thus, dry piece assemblies can “takeup” as much as a quarter of an inch perfitting when finally assembled. This couldcause errors on essential or criticalmeasurements.
DWV piping installation – prefabricationPlastic DWV lends itself to prefabrication aswell if not better than any other materialavailable because light weight and its strongjoints permits the use of larger assemblies,thus reducing field joints to a minimum. Usejigs to assure accuracy and to speed up thejob. A power saw with an adjustable stop willfacilitate rapid cutting of pipe to properlengths.
Shop-fabricated assemblies can be moved tothe field soon after the last joint is made, orthey can be stacked for future use.
CAUTION: Always check the dimensions ofthe first assembly carefully beforeproceeding with additional units.
Avoid binding pipe against wood supportsthat can lead to expansion noises.
DWV piping installation - transitionconnectionsSchedule 40 Plastic DWV pipe should neverbe threaded because the wall thickness isreduced significantly by the process. Factorymolded male threaded adapters that solventcement to the pipe should be used where athreaded joint is required.
Plumber’s Installation Handbook
PP
FA
8 © 2003 PPFA. All rights reserved.
Codes require transition from one material toanother only through use of approvedadapters or joints. Your supplier should havea selection of plastic adapters. In addition,some codes approve clamped, flexibleconnectors or hubless couplings as adaptersbetween cast iron and plastic piping.
Some thread sealants may have an adverseeffect on some plastics. Use only thread tapeor thread sealants formulated for plasticpiping. Thread sealants or plumber’s puttyare not necessary on P-trap union joints orslip joints since the threads do not providethe seal.
Joints between plastic pipe and cast ironhubs can be made with caulked lead wool.Although the plastic pipe can be set directlyinto a CI HUB, a plastic hub adapter isrecommended. The hub adapter has a beadon the end of the spigot. This bead providesa seat at the bottom of the hub to retain theoakum in the joint. The joint should be filledwith oakum as for metal pipe, and the leadwool caulked in the usual manner.
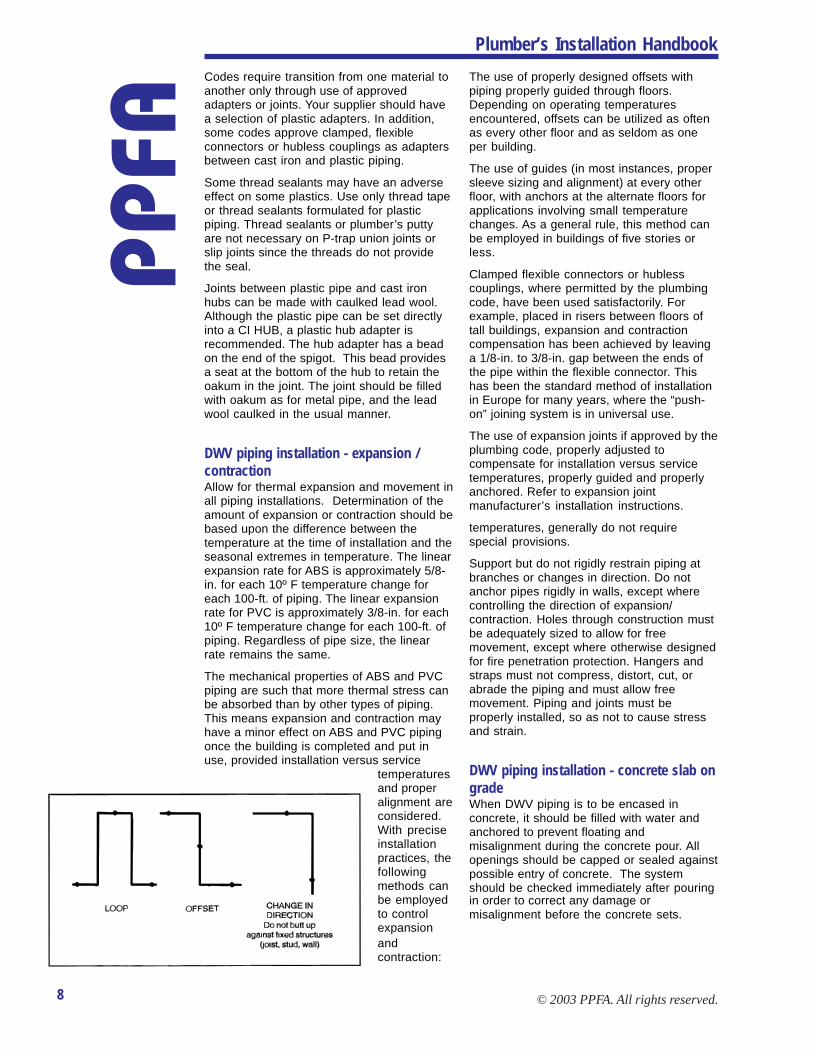
DWV piping installation - expansion /contractionAllow for thermal expansion and movement inall piping installations. Determination of theamount of expansion or contraction should bebased upon the difference between thetemperature at the time of installation and theseasonal extremes in temperature. The linearexpansion rate for ABS is approximately 5/8-in. for each 10º F temperature change foreach 100-ft. of piping. The linear expansionrate for PVC is approximately 3/8-in. for each10º F temperature change for each 100-ft. ofpiping. Regardless of pipe size, the linearrate remains the same.
The mechanical properties of ABS and PVCpiping are such that more thermal stress canbe absorbed than by other types of piping.This means expansion and contraction mayhave a minor effect on ABS and PVC pipingonce the building is completed and put inuse, provided installation versus service
temperaturesand properalignment areconsidered.With preciseinstallationpractices, thefollowingmethods canbe employedto controlexpansion
The use of properly designed offsets withpiping properly guided through floors.Depending on operating temperaturesencountered, offsets can be utilized as oftenas every other floor and as seldom as oneper building.
The use of guides (in most instances, propersleeve sizing and alignment) at every otherfloor, with anchors at the alternate floors forapplications involving small temperaturechanges. As a general rule, this method canbe employed in buildings of five stories orless.
Clamped flexible connectors or hublesscouplings, where permitted by the plumbingcode, have been used satisfactorily. Forexample, placed in risers between floors oftall buildings, expansion and contractioncompensation has been achieved by leavinga 1/8-in. to 3/8-in. gap between the ends ofthe pipe within the flexible connector. Thishas been the standard method of installationin Europe for many years, where the “push-on” joining system is in universal use.
The use of expansion joints if approved by theplumbing code, properly adjusted tocompensate for installation versus servicetemperatures, properly guided and properlyanchored. Refer to expansion jointmanufacturer’s installation instructions.
temperatures, generally do not requirespecial provisions.
Support but do not rigidly restrain piping atbranches or changes in direction. Do notanchor pipes rigidly in walls, except wherecontrolling the direction of expansion/contraction. Holes through construction mustbe adequately sized to allow for freemovement, except where otherwise designedfor fire penetration protection. Hangers andstraps must not compress, distort, cut, orabrade the piping and must allow freemovement. Piping and joints must beproperly installed, so as not to cause stressand strain.
DWV piping installation - concrete slab ongradeWhen DWV piping is to be encased inconcrete, it should be filled with water andanchored to prevent floating andmisalignment during the concrete pour. Allopenings should be capped or sealed againstpossible entry of concrete. The systemshould be checked immediately after pouring
andcontraction:
in order to correct any damage ormisalignment before the concrete sets.
Plumber’s Installation Handbook PP
FA
9© 2003 PPFA. All rights reserved.
DWV Piping – other considerationsAir admittance valves (AAVs) - generalThe air admittance valve is a product thatsimplifies drainage and waste venting incommercial and residential applications. It isa one-way valve designed to allow air toenter the plumbing drainage system whennegative pressures develop in the pipingsystem. The device closes by gravity andseals the vent terminal at zero differentialpressure (no flow conditions) and underpositive internal pressures. The purpose ofan air admittance valve is to provide amethod of allowing air to enter the plumbingdrainage system without the use of a ventextended to open air and to prevent sewergases from escaping into a building.
Installating air admittance valvesThe AAV comes with an adapter that allowssolvent welding on 1-1/2” or 2” pipes. Theadapter meets the dimensional requirementsof pertinent ASTM standards and is suitablefor installation on PVC or ABS pipes. ApplyTeflon ® tape to threads on valve beforejoining. Do not use pipe dope.
The AAV must be installed in a vertical plumbposition after rough in. It shall be installed aminimum of 4” (102 mm) above thehorizontal branch of the drain or fixture drainbeing vented and in accessible locationswhich permit free movement of air into thevalve. For example, under a sink or lavatory,in attic spaces, in a plumbing case, in a falseceiling or wall by using a recess box.
When installed in an attic, the AAV must be aminimum of 6” above insulation material.
For installation in areas with temperaturerange from -40º F and +150º F a minimum ofone open pipe vent shall extend to the openair for every building plumbing drainagesystem.
DWV piping installation - undergroundFor underground line installations, whether ina building drain, branch lines, or a sewer,good installation practices should befollowed.
Grade all trench bottoms free of stone andpockets and for continuous, uniform supportfill holes or depressions with clean, well-tamped material. Do not set pipe on bricks,concrete or wood blocks. Install pipe onproper grade with full, continuous support.Backfill along sides of pipe with selected fillfree of stones, clods, or frozen lumps. Tampbackfill carefully to protect pipe alignment.Then backfill on top of pipe with selected fill(free of rock, stone, cement, and other hardmaterials) to a depth of 12 inches. The trenchcan then be backfilled in a conventionalmanner.
DWV piping installation - freezingWhen it is necessary to protect traps andfixtures from freezing, do not use alcohol orpetroleum products. Use only approvedplastic pipe antifreeze packaged for thispurpose or one of the following solutions:
� Sixty percent, by weight, of glycerin inwater.� Twenty-two percent, by weight, ofmagnesium chloride in water.� Strong saturated solutions of commontable salt (sodium chloride).
Plumber’s Installation Handbook
PP
FA
10 © 2003 PPFA. All rights reserved.
Water Service Piping - generalA word of caution is essential: You mustcheck your local plumbing code to be surethat the product you have chosen is approvedby your code. Do not assume that everypiping product sold by a supplier has beenlocally approved.
Plastic water piping usage has beenincreasing since the 1950’s in this countryand around the world. This can be attributedto code acceptance, and excellentperformance along with economics.
“Water Service Piping,” as used in thissection, refers to the cold-water service linefrom the water meter, water main, water well,or street right-of-way to the house or building.It is not intended to cover either water mainsor the distribution piping within the building.
Plastic water service piping is available in PE(polyethylene), PVC (polyvinyl chloride), PEX(cross-linked polyethylene), CPVC(chlorinated poly vinyl chloride) and PE-AL-PE composite. Depending on the type ofmaterial and product selected, the availablepressure ratings range from 80 psi to over315 psi. Actual pressures encountered areusually between 35 psi and 125 psi.However, population growth and extensionsof municipal water systems tend to requireconstantly increasing pressures. The pipesselected should have some allowances forincreases in pressure. Many plumbing codesand water utilities require a minimum of 160psi pressure rated pipe for water servicepiping connected to municipal watersystems.
PVC and CPVC pipe are referred to as “rigid”and are shipped in straight lengths. Smallersizes of CPVC are also available in coils. PE,PEX, and composite pipe are referred to as“flexible” and are normally shipped in coils.
Because there are several kinds of plasticpiping designed for and suitable for waterservice piping, a variety of joining methodsare used. For additional informationregarding the joining of specific materials,please see the Handbook or themanufacturer’s instructions for that specificmaterial.
The installer must exercise care in selectingthe proper material for the application. Allplastic piping is economical. Local codes,availability, and local practices typically
Water Service Piping Water Service Piping - storage andhandlingFlexible piping (PE, PEX, and composite) isnormally shipped in coils that are available in100-foot increments. Coils can be stacked upto ten high without crushing or damaging.Coils should never be allowed to be exposedto fire or excessive heat. During installation,do not drag the piping over rough terrain andavoid contact with sharp objects that couldgouge or cut the piping.
Rigid piping (ABS, PVC, and CPVC) isnormally available in 10' and 20' lengths.CPVC is also available in 50' and 100' coils.
Most plastic pipe should be stored inside orunder cover. However, some materials suchas UV stabilized PE do not require insidestorage. See manufacturer’s instructions fordetails.
Water Service Piping - markingMarkings on plastic water pipe shouldcomply with the requirements of therespective standard under which theparticular piping is manufactured. Generally,the standards require that the pipe markingbe spaced at intervals of not more than 24inches on some pipes and 5 feet on otherpipes. Water piping standards requiremarking only on one side of the pipe.
Most standards require that the markingsinclude:
1. Manufacturer’s name or trademark andproduction code2. The ASTM pipe, fitting, or system standardnumber3. Type of plastic material and its ASTMdesignation4. Nominal pipe (or tube) size5. Schedule (40, 80, 120) or SDR6. Pressure ratings at 73 ºF (or othertemperature)7. The seal or mark of the laboratory thatevaluates the product for use in potable water
govern the choice of piping material andproduct standard.
systems8. For ASTM D 2239 Pipe Test Categorymarking required
Plumber’s Installation Handbook PP
FA
11© 2003 PPFA. All rights reserved.
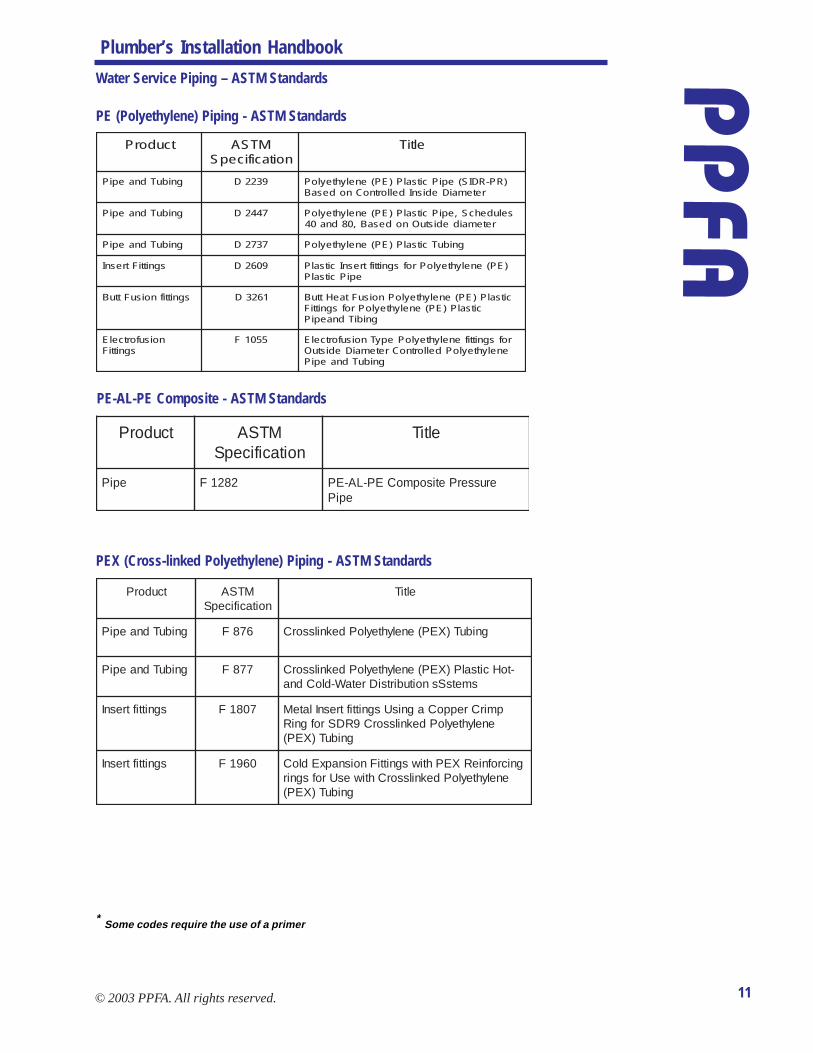
Water Service Piping – ASTM Standards
tcudorP MTSAnoitacificepS
eltiT
gnibuTdnaepiP 9322D )RP-RDIS(epiPcitsalP)EP(enelyhteyloPretemaiDedisnIdellortnoCnodesaB
gnibuTdnaepiP 7442D seludehcS,epiPcitsalP)EP(enelyhteyloPretemaidedistuOnodesaB,08dna04
gnibuTdnaepiP 7372D gnibuTcitsalP)EP(enelyhteyloP
sgnittiFtresnI 9062D )EP(enelyhteyloProfsgnittiftresnIcitsalPepiPcitsalP
sgnittifnoisuFttuB 1623D citsalP)EP(enelyhteyloPnoisuFtaeHttuBcitsalP)EP(enelyhteyloProfsgnittiF
gnibiTdnaepiP
noisufortcelEsgnittiF
5501F rofsgnittifenelyhteyloPepyTnoisufortcelEenelyhteyloPdellortnoCretemaiDedistuO
gnibuTdnaepiP
PE (Polyethylene) Piping - ASTM Standards
tcudorP MTSAnoitacificepS
eltiT
epiP 2821F erusserPetisopmoCEP-LA-EPepiP
PE-AL-PE Composite - ASTM Standards
* Some codes require the use of a primer
PEX (Cross-linked Polyethylene) Piping - ASTM Standards
tcudorP MTSAnoitacificepS
eltiT
gnibuTdnaepiP 678F gnibuT)XEP(enelyhteyloPdeknilssorC
gnibuTdnaepiP 778F -toHcitsalP)XEP(enelyhteyloPdeknilssorCsmetsSsnoitubirtsiDretaW-dloCdna
sgnittiftresnI 7081F pmirCreppoCagnisUsgnittiftresnIlateMenelyhteyloPdeknilssorC9RDSrofgniR
gnibuT)XEP(
sgnittiftresnI 0691F gnicrofnieRXEPhtiwsgnittiFnoisnapxEdloCenelyhteyloPdeknilssorChtiwesUrofsgnir
gnibuT)XEP(
Plumber’s Installation Handbook PPFA
1© 2003 PPFA. All rights reserved.
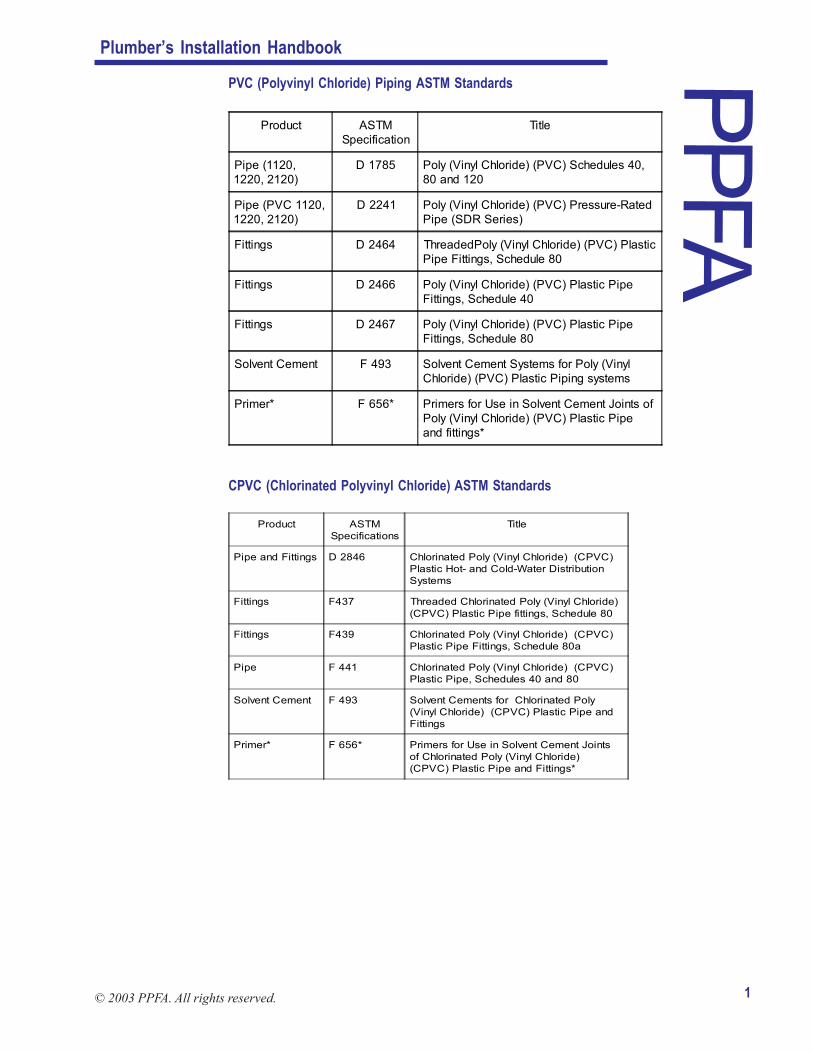
PVC (Polyvinyl Chloride) Piping ASTM Standards
CPVC (Chlorinated Polyvinyl Chloride) ASTM Standards
Product ASTMSpecification
Title
Pipe (1120,1220, 2120)
D 1785 Poly (Vinyl Chloride) (PVC) Schedules 40,80 and 120
Pipe (PVC 1120,1220, 2120)
D 2241 Poly (Vinyl Chloride) (PVC) Pressure-RatedPipe (SDR Series)
Fittings D 2464 ThreadedPoly (Vinyl Chloride) (PVC) PlasticPipe Fittings, Schedule 80
Fittings D 2466 Poly (Vinyl Chloride) (PVC) Plastic PipeFittings, Schedule 40
Fittings D 2467 Poly (Vinyl Chloride) (PVC) Plastic PipeFittings, Schedule 80
Solvent Cement F 493 Solvent Cement Systems for Poly (VinylChloride) (PVC) Plastic Piping systems
Primer* F 656* Primers for Use in Solvent Cement Joints ofPoly (Vinyl Chloride) (PVC) Plastic Pipeand fittings*
Product ASTMSpecifications
Title
Pipe and Fittings D 2846 Chlorinated Poly (Vinyl Chloride) (CPVC)Plastic Hot- and Cold-Water DistributionSystems
Fittings F437 Threaded Chlorinated Poly (Vinyl Chloride)(CPVC) Plastic Pipe fittings, Schedule 80
Fittings F439 Chlorinated Poly (Vinyl Chloride) (CPVC)Plastic Pipe Fittings, Schedule 80a
Pipe F 441 Chlorinated Poly (Vinyl Chloride) (CPVC)Plastic Pipe, Schedules 40 and 80
Solvent Cement F 493 Solvent Cements for Chlorinated Poly(Vinyl Chloride) (CPVC) Plastic Pipe andFittings
Primer* F 656* Primers for Use in Solvent Cement Jointsof Chlorinated Poly (Vinyl Chloride)(CPVC) Plastic Pipe and Fittings*
Plumber’s Installation Handbook PP
FA
13© 2003 PPFA. All rights reserved.
Water Service Piping – CuttingCutting PE, PEX & PE-AL-PEA plastic tubing cutter is recommended for asquare, clean cut. Many tool manufacturersnow feature inexpensive cutters specificallydesigned for cutting plastic piping. Do not usecutters previously used on metal piping.
Cutting PVC and CPVCA plastic pipe cutter or a power cut-off sawshould be used for a clean, square cut. If awheel type cutter is used, remove the ridgecreated by the wheel and provide a chamferwith a tool or a file. If other cutters are notavailable, cuts can be made with a handsawor hack saw. Use a miter box or scribe andcut to the mark for a square cut. Neverdepend on “eye-balling” for a square cut.
Joining PE, or PEX or PE-AL-PEPE piping is joined by heat fusion ormechanical fittings. PEX and PE-AL-PEpiping are generally joined with mechanicalfittings. However, none of this piping can bejoined by solvent cementing.
Connecting to a corporation stop or curb stopis simple and easy with flexible plastic piping.It can be done with compression fittings,insert fittings using clamps, or a stab-typefitting.
First, affirm that the fitting is recommendedby the manufacturer for connecting PE, PEXor PE-AL-PE water piping. Care must beused to match the sizing of the fittings to thepipe or tubing you are using. This is bestdone by matching the sizing on the pipe printline with the fitting’s label. In using insert orcompression fittings, consult the installationinstructions of the particular manufacturerwhose fittings you are using. Stab-typemechanical fittings designed for PE and PEXwater piping are of a one-piece design thatsimplifies installation.
Compression type mechanical connectorsinclude insert fittings with crimp or band-typerings, nut-follower style, flanged bolted andstab-type fittings. Insert fitting joints utilizeinsert fittings with male barbed ends. Insertcrimp/band type or nut-type mechanicalcouplings with rigidly positioned stiffenersthat extend beyond the clamp or coupling nutshould not be used unless provisions aremade to prevent the creation of a stress riserat the end of the stiffener.
Heat fusion uses a combination of heat andforce resulting in two melted surfaces flowingtogether to produce a joint. Commonlyavailable fusion machines provide the meansfor truing pipe ends, holding them in
Once the joint has cooled to ambienttemperature, it can be handled in the samemanner as the pipe.
Joining PVC or CPVCRigid, PVC and CPVC pipe and fittings forwater service lines are solvent cementedemploying the techniques described in theSolvent Cement Joining section of thisHandbook. All systems require care duringassembly to assure leak-free joints.
Plastic threaded fittings are only intended tobe attached to other plastic threaded fittings.Systems that involve transitions from metalto plastic require careful attention. Severalstyles of adapters have been speciallydeveloped to provide leak-free transitions tometal piping. Some of these include: plastic/metal unions, reinforced female threadedadapters, and flanges. When assemblingmetal and plastic threads, the preferredmethod is plastic male threads to metalfemale threads.
If transitions from metal to plastic areexposed to fluctuations in temperature, thencyclic heating and cooling may result indripping links. In this situation, do not useplastic male threads to metal femalethreads. Instead use plastic/metal unions,plastic to metal transition fittings, or plasticto metal flanges.
Before assuming that a fitting is appropriatefor use as a metal to plastic transition fitting,be sure to check with the specificmanufacturer for suitability. Once contacted,manufacturers can also give advice on howtheir transition products will behave underdifferent operating conditions (e.g., someproducts might be better suited to largeswings in temperature than others).
The recommended tightness for plastic pipethreads is two turns past finger-tight; overtightening may result in split fittings. Do notuse pipe wrenches or other tools, whichwould damage plastic pipe and fittings.When gauging plastic threads, they arewithin the permissible tolerance if not morethan 1-1/2 turns large or small.
When making threaded connections,conventional joint sealers such as solderflux, linseed oil based products, putty, andother unknown mixtures shall not be used.Use only Teflon® tape or recommendedthread sealants based on specificmanufacturers’ recommendations.
See the Solvent Cement Joining section on pages4-6 of this Handbook for specifics on joining andsafe handling of solvent cements, primers and
cleaners.alignment, heating them, and applying thecorrect force to produce a satisfactory joint.
Plumber’s Installation Handbook
PP
FA
14 © 2003 PPFA. All rights reserved.
Water Service Piping - installationGeneral installationThis section addresses the various methodsof installing plastic water service piping andshould be used in conjunction with the moredetailed, material specific guidelines below.Specific installation guides are available fromthe manufacturers of particular products.
Compression type mechanical connectorsmay have several internal parts and shouldbe used only as recommended by themanufacturer for plastic water pipingapplications. Compression type mechanicalconnectors include insert fittings with crimpor band-type rings, nut-follower style, flangedbolted and stab-type fittings. Crimp or nut-type mechanical couplings with rigidlypositioned stiffeners that extend beyond theclamp or coupling nut should not be usedunless provisions are made to prevent thecreation of a stress riser at the end of thestiffener. All stiffeners should be “nosed” orrounded at the end and all sharp edges orburrs must be removed. Bridging or supportsleeves are one method of preventing unduestresses on the plastic pipe at the end of thestiffener. Stab-type mechanical water fittingswith self-contained insert stiffeners aredesigned to mitigate any stress risers whenproperly installed on PE and PEX piping.
The installer should also make sure that thefitting and pipe are both based on the samedimensioning system, (i.e., Outside DiameterControl or Inside Diameter Control and IPS ortubing sizes). The best way to assure correctdimensioning is to match the print line on thepipe to the fitting label.
Full knowledge of installation procedures isimportant. For more details, see ASTM D2774, Standard Practice for UndergroundInstallation of Thermoplastic Pressure Pipe.Additional information regarding the design,installation, and operation of plastic piping isavailable from the Plastic Pipe and FittingsAssociation as well as other sources withinthe industry.
When installing or repairing water servicelines, cleanliness helps preventcontamination that must be corrected bydisinfection.
When disinfecting new or repaired watermains, services, and distribution systems, themethods and procedures found in ANSI/AWWA C 651 and the manufacturer’sinstructions are recommended. NOTE: Donot exceed the piping manufacturer’s
Installating PE, PEX and PE-AL-PEIn addition to the above general installationguidelines, the following guidelines arespecific to these Water Service Pipingproducts.
Piping should be installed on trench bottomsthat provide continuous support and areuniform and free from rocks, stones, or otherdebris. Initial backfill around the pipingshould be clean fill, and should be welltamped to provide adequate piping support.Ditches should be well tamped to preventsettling.
Ditches may be curved to avoid obstructions,but the radius of curvature should not besmaller than that recommended by themanufacturer to avoid pinching or crimpingthe piping.
Plastic water service piping expands andcontracts more than metal piping, so thepiping should never be pulled tight orstretched for connection. Allow an extra 6inches per 100 feet for expansion andcontraction by snaking the piping from side toside in the trench. This is easilyaccomplished with flexible piping.
CAUTION: Depth of burial should always beat least 12 inches below the local frost depthand in all cases at least 18 inches below thesurface to protect the piping from trafficloads. While PE and PEX plastic piping arenot as subject to damage by freezing asmetals, they are somewhat more difficult tothaw once they are frozen. Never use anopen flame to thaw plastic piping. Thawingcan be accomplished by using thermostaticcontrolled (160º F) electric heat tapes, byusing hot air, or by disconnecting the line and
disinfection instructions without consultingthe manufacturer.
flushing with hot water. This will usually clearthe stoppage.
Water Service Piping -helpful hints for PE,PEX and PE-AL-PEREMEMBER, you can avoid problems by:
1. Protecting the piping from damage beforeinstallation.2. Inspecting piping for cuts and damagebefore installation and rejecting damagedpiping.3. Never permitting rocks and sharp objects tobed against piping.4. Never “reverse bend” coiled piping.5.I nstalling piping without placing stress onfittings.6. Never permitting plastic piping to be kinkedor installed under strain at a metal fitting.7. Snaking the piping in the ditch to allow fortemperature differences.8. Flushing the line free of dirt before the finalconnection.
Plumber’s Installation Handbook PP
FA
15© 2003 PPFA. All rights reserved.
9. Filling the line with water and pressuretesting before back filling. Test to t hepressure required by the code or to 150% ofworking pressure.
Installing PVC and CPVCIn addition to the above general installationguidelines, the following guidelines arespecific to PVC and CPVC Water ServicePiping.Most of the trenching, testing, and freezeprotection procedures outlined in the previoussection on flexible plastic water servicematerials also apply to rigid piping.Snaking the line to provide for expansion andcontraction is somewhat more difficult thanwith flexible piping and requires a little moreeffort, but even rigid pipe has enough “yield” toaccomplish this.After the main portions of the line have beenrun and the “set” of the joints is assured,stakes can be placed along the pipingbetween the couplings to accomplish thedesired snaking. Never place a stake at acoupling. This may cause stress or strain thatcould damage the joint. After measuring andfitting the last piece of the line, the stakes canbe pulled up for reuse. Never run a plasticwater service line perfectly straight and tight.Damage or pull out could result whenexpansion or contraction takes place.The rigid piping should be laid on a trenchbottom free of rocks or sharp objects. Sincerigid piping will involve more joints that couldbe damaged, the service line should beinstalled in a protective “envelope” of fine soiland at least 6 inches of cover should beprovided before backfilling with mechanicalequipment.Leave line pressure in the service line whilebackfilling. If any leak occurs, it will be easy tofind. This will save the labor of digging outmore of the line. Should a leak occur, reviewyour joint assembly and installation practicescarefully. Allow the repaired joint to cure forthe required time period, or you may findyourself repairing it again.
Too often, careless backfilling results fromassigning the job to someone else.Remember that the responsibility for theservice line is yours. Supervise the installation
Water Service Piping - Helpful Hints forPVC and CPVCREMEMBER: You can avoid problems if you:
1.Wipe all parts clean and dry beforeassembly.
2. If required by code and/or manufacturer’sinstructions use a primer with PVC rigidpiping.
3. Use the proper cement for the type of pipeyou are joining.
4. Exercise care with each joint to reduce thepossibility of leaks.5. Allow sufficient drying or curing time beforetesting. This will depend on the weather, typeof material, humidity, pipe size, and type ofcement. Joint strength increases with time.Check manufacturer’s recommendations.6. Pressure test with water as required bycode or at 150% of the working pressure.Apply pressure long enough to detect leaksbut no longer than 24 hours. Do not test withcompressed air or gas.
until it is completed to your satisfaction.
Plumber’s Installation Handbook
PP
FA
16 © 2003 PPFA. All rights reserved.
Hot and Cold Water Distribution - GeneralA word of caution is essential: You mustcheck your local plumbing code to be surethat the product you have chosen is approvedby your code. Do not assume that every pipingproduct sold by a supplier has been locallyapproved.
Hot and Cold Water Distribution Piping –General PropertiesThe plastic industry offers three completesystems for hot and cold-water distributionsystems: CPVC (chlorinated polyvinylchloride), a rigid system; PEX (cross-linkedpolyethylene), a flexible system; and PEX-AL-PEX or PE-AL-PE (composite) flexiblesystems. They are approved by most model,state, or local codes. However, we dorecommend that the installer verify thisapproval and the code requirements beforebeginning installation. For clarity, thesesystems are dealt with separately.
Plastic water pipe and tube is more resistantto freezing than metal pipe. However, in theevent of freezing, blow torches or open flamesmust never be used for thawing. Use a lowtemperature hot air gun, circulate warm airwith a fan, or thaw by disconnecting the lineand flushing with warm water. Afterwards, testthe system with water at the pressure requiredby the code or at 150% of the workingpressure.
NOTE: Polybutylene (PB) piping is nolonger available in the USA for waterdistribution piping. There is a specialsection at the end of this chapter offeringpolybutylene-specific guide material.
CPVC PropertiesCPVC CTS (copper tube size) pipe andfittings, introduced in 1960, are manufacturedto conform to ASTM D 2846. CPVC solventcement conforming to ASTM F 493 is used tojoin the pipe and fittings. CPVC piping is tanin color, is made with the same OD as copperwater tubing and has proven its ability to do itsdesignated job. It resists corrosion, reducessweating, has adequate impact strength, has
PEX PropertiesPEX tubing can be used in potable water dis-tribution systems. PEX tubing is also widelyused for heat transfer applications – both low-temperature (radiant floor heating, snowremoval, and ice rinks), as well as distributionpiping for temperatures up to 200° F (hotwater baseboard, convectors, radiators, etc.).
PEX-AL-PEX or PE-AL-PE PropertiesComposite pipe has an aluminum tubelaminated between two layers of plastic-PEor PEX. It is made to tube dimensions and issold in coils. The PE-AL-PE (ASTM F 1282) isdark blue in color and is used for cold water.The PEX-AL-PEX (ASTM F 1281) is orange,light blue or black in color and is used forhydronic heating and hot water. The pipe issupplied with fittings and accessories thatcomplete the system.
Hot and Cold Water Distribution Piping -Storage and HandlingCPVC CTS piping is available in 10' or 20'lengths and 50' and 100' coils. It should bestored inside or under cover to prevent anaccumulation of dirt. Short-term exposure todirect sunlight (not to exceed 30 days totaltime) can be tolerated during construction.Pipe should be stored straight withcontinuous support over its entire length.Handle carefully to ensure that the pipe staysclean, ends are unchipped and square andabrasion is avoided.
PEX piping and composite piping (PE-AL-PEor PEX-AL-PEX) are normally shipped incoils that are in 100’ increments. Coils can bestacked up to ten high without crushing ordamaging. Coils should never be allowed tobe exposed to fire or excessive heat. Duringinstallation, do not drag the piping over roughterrain and avoid contact with sharp objectsthat could gouge or cut the piping.
Most plastic pipe should be stored inside orunder cover. However, some UV stabilizedpiping products do not require inside storage.See manufacturer’s instructions for details.
Hot and Cold Water Distribution Piping -Marking GeneralMarkings on plastic water pipe should complywith the requirements of the respectivestandard under which the particular piping ismanufactured. Generally, the standardsrequire that the pipe marking be spaced atintervals of not more than 24 inches on somepipes and 5 feet on other pipes. Water piping
Hot & Cold WaterDistribution Piping
smooth walls that give low flow resistance, islightweight, and is easy to install.
Cost considerations and corrosion problemswith metal systems have led many plumbingcontractors to turn to this field-proven product.They have found it to be excellent for domestichot and cold water distribution systems andfor circulating hot water systems.
standards require marking only on one sideof the pipe.
Plumber’s Installation Handbook PP
FA
17© 2003 PPFA. All rights reserved.
Marking CPVCIn addition to the general requirements,the following are CPVC specificrequirements.CPVC pipe is required by ASTM D 2846 to bepermanently marked on one side of the pipeat intervals not exceeding five feet.
This marking shall include the following:
1. Manufacturer’s name or trademark2. ASTM Designation D 28463. Material Designation Code (CPVC 4120) or234474. Pressure Rating – 100psi @ 180° F5. Nominal Size6. Standard Dimension Ratio-SDR 117. The seal or mark of the third party certifierthat evaluates the product for use in potablewater systems and for conformance with theD 2846 Standard. Fittings markings shouldinclude at least (1), (2), (3), and (7) of theabove information. Transition fittings must bemarked with (1), (3), and (7) of the aboveinformation.
Marking PEXIn addition to the general requirements, thefollowing are PEX specific requirements.
PEX tubing must be labeled as follows:
1. The manufacturer’s name or trademark.2. The standard to which it conforms (ASTM F876, F 877 or both).3. The tube size and CTS.4. Material designation code (PEX0006).5. Pressure/temperature rating(s).6. SDR97. If the tubing is for potable water, alaboratory seal or mark attesting to suitabilityfor potable water.8. ASTM Standard designation for the fittingsystem for which the tubing has been
Hot and Cold Water Distribution Piping -Cutting
Cutting CPVCA plastic pipe cutter or power cut-off sawshould be used for a clean, square cut. If awheel-type tubing cutter is used, remove theridge created by the wheel and provide achamfer with the appropriate tool or file. Ifother cutters are not available, cuts can bemade with a handsaw or hack saw. Use amiter box or scribe and cut to the mark for asquare cut. Never depend on “eye-balling” fora square cut.
Cutting PEX & PEX-AL-PEX or PE-AL-PEA plastic pipe cutter or a power cut-off sawshould be used for a clean, square cut. Ifneither is available, cut with a handsaw orhack saw. Use a miter box or scribe and cutto the mark for a square cut. Never dependon “eye-balling” for a square cut.
Hot and Cold Water Distribution Piping –Joining
Joining CPVCCPVC pipe and fittings are joined with CPVCcements. The solvent cement process canbe a one- or a two-step process. The one-step cement does not require the use of aprimer or cleaner; this cement is yellow incolor. The two-step process does require theuse of a primer or cleaner; this cement isorange in color. Both types of cements aremanufactured under the ASTMF 493Standard and will be marked with thatnumber. The label on the can will indicatecolor and whether a primer is required. Thelabel may also refer to D 2846.
See the Solvent Cement Joining section inthis Handbook on pages 4-6 for specificsolvent cementing instructions.
Use only CPVC cement and follow thecement manufacturer’s recommendations inselecting and using the primers and cements.All other conditions of cementing CPVC areidentical to those of PVC DWV and PVCwater piping, including safe handling ofsolvent cements, primers, and cleaners. Makesure that the local code allows the use of onestep cement before using it.
Joining PEXA full line of directional and transition fittingsis available. The joint can be formed byvarious methods including mechanicalcompression, insert fittings using a coppercrimp ring (ASTM F 1807), cold expansion
approved for use.
Marking PE-AL-PE or PEX-AL-PEXIn addition to the general requirements, thefollowing are composite pipe specificrequirements:
1. The manufacturer’s name or trademark2. The standard to which it conforms (ASTM F1281 or F 1282)3. The tube size in metric (mm) or inch sizes(1216 ~1/2"; 1620 ~ 5/8"; 2025 ~¾”; 2532~1”)4. The material designation (PEX-AL-PEX or(PE-AL-PE)5. Pressure temperature rating (PEX-AL-PEX)200 psi @ 73°F & 125 psi @ 180°F6. Pressure temperature rating (PE-AL-PE)200 psi @ 73° F & 160 psi @ 140° F7. A laboratory seal or mark attesting tosuitability for potable water and conformancewith the standard marked on the pipe.
Plumber’s Installation Handbook
PP
FA
18 © 2003 PPFA. All rights reserved.
fittings using a PEX reinforcing ring (ASTM F1960), and mechanical stab joints.
In manifold systems, one-piece PEX tubing isinstalled between the centrally locatedmanifold and the fixture connection, thus theonly joints are at the ends of the tube. Only afew additional joints are needed to completethe supply line to the header.
Joining PEX-AL-PEX or PE-AL-PEA full line of directional and transitionalfittings is available. Two types of joints areavailable, mechanical compression andcrimp ring. Metal fittings are the norm. Inmanifold systems, a single piece of the tubeis installed between the manifold and thefixture so the only joints are at these twoaccessible locations
Hot and Cold Water Distribution Piping –Installation
Installing CPVCThe installer is cautioned to:
1. Read and follow the manufacturer’srecommendations.2. Wipe joint surfaces clean and dry.3. Use a primer before cementing with orangecement. Alternatively, use the yellow cementwithout a primer if local plumbing codes
Common pipe wrenches will bite or scoreplastic fittings. Flat, smooth-surfacedadjustable wrenches, open-end wrenches, orsmooth pliers should be used to tightenfittings.
When connecting CPVC to inlets and outletsat the top of a gas water heater, provide atleast twelve (12) inches of metal nipple orappliance connector so that the CPVCcannot be damaged by the buildup ofexcessive radiant heat from the flue. CPVCpiping should not be in contact with, or closeto, heat-producing sources such as flues orsteam pipes. Some high-efficiency, direct-vent gas water heaters eliminate the radiantheat from the flue and the CPVC pipeconnections can be made with brassthreaded CPVC transition fittings.
Installing CPVC - SupportsFor 180° F service, CPVC should besupported at three feet maximum spacing forsizes one-inch and smaller, and at four feetmaximum spacing for larger sizes. For 73° Fservice, the support spacing can be increasedby 50 percent. It should be strapped or hungin a manner that will permit movement causedby expansion and contraction. Do not fastentightly to studs or joists. Hangers should havea smooth surface to prevent cutting orabrading the piping.
Installing CPVC - Expansion andContractionThe linear thermal expansion rate for CPVCis approximately 7/16 inch for each 10º Ftemperature change for each 100 feet of pipeor tubing. When installing long runs of pipingallow 1/16 to 3/32-inch longitudinal clearanceper foot of run to accommodate thermalexpansion. Proper design includes offsets of12 inches or more at intervals as required onvertical risers, if they are restrained byhorizontal branches. Piping should not beanchored rigidly to a support, but it should besecured with broad, smooth hangersproviding for a degree of movement. Referalso to manufacturer’s literature and the localplumbing code. CPVC is approved forunderslab installations, with joints, in allmodel-plumbing codes.
Installing CPVC - freezingLike other plastic water pipe and tube, CPVCis more resistant to damage by freezing thanare metals. However, in the event of freezing,blow torches or open flames must never beused for thawing. Use a low temperature hotair gun, circulate warm air with a fan, or thaw
permit.4. Use only CPVC solvent cement.5. Hold the pipe and fitting joint together for atleast 15 seconds after assembly.6. Never bind piping.7. Allow joints to cure, flush out the system,and pressure test with water as required bycode. A CPVC Hot & Cold Water Piping InstallationManual containing more information on theuse of CPVC, is available from PPFA.
Installing CPVC – metal connectionsAdapters (transition fittings) from metalpiping to CPVC are available. These fittingscome in the form of unions, compressionfittings, and reinforced male and femalethreaded adapters. When water temperaturesexceed 150° F, use brass threaded transitionfittings only. Use the manufacturer’srecommended fittings for transition to otherpiping materials and follow instructions forproper installation. When making threadedconnections with CPVC fittings, conventionaljoint sealers, solder flux, or other componentsshould never be used on plastic threads. Useonly recommended thread sealants orTeflon® tape. When threaded plastic fittingsare used, make sure they are not over-tightened.
Plumber’s Installation Handbook PP
FA
19© 2003 PPFA. All rights reserved.
by disconnecting the line and flushing withwarm or hot water. After flushing, test all sys-tems with water at the pressure required bythe code or at 150% of the working pressure.
Installing PEX or PEX-AL-PEXThe installer is cautioned to read themanufacturer’s installation instructions forproper installation practices. In all cases,normal workmanship is required if a long-term satisfactory installation is to beachieved. Do not use tubing that has beencut, severely scuffed, kinked, or crushed. Cutand replace damaged sections.
The tubing must be placed so that it will notbe exposed to sources of high heat. Keep thetubing at least 6-inches horizontally and 12-inches vertically from fluorescent and incan-descent light fixtures, heating appliances, andfurnace or water heater flue vents.
PEX tubing should not be directly connectedto gas or electric water heaters. Use aminimum of 18-inch length of metallic pipefor each connection. However the PEX-AL-PEX tube can be connected directly to bothtypes of water heaters.
When making transition fittings to copper orbrass pipe or fittings by soldering or brazing,do the soldering first, and allow the joint tocool before making the connection to thetubing. Do not expose the tubing to an openflame as damage can result.
Installing PEX – SupportsPEX tubing is usually supported on the faceof, or by holes through, joists or studs.Otherwise, support horizontal piping aboveground every 32 inches using hangers wideenough to avoid deforming the tubing at thepoint of support. Sharp edges must beavoided. Typical clevis hangers or one-hole ortwo-hole clamps ranging from about 3/8inches to 1 inch are usually suitable. Clamptubing firmly, but not so tightly that it cannotmove as it expands and contracts.
PEX piping run vertically should be supportedmid-story and at every floor level and againwhen making significant changes in direction.
Installing PE-AL-PE and PEX-AL-PEX-SupportsThis tubing comes in coils but when it isuncoiled there is no spring-back. The tubecan be bent by hand and the minimum radiusis 5 X Diameter. For 1” tube, use a bendingtool. Although the maximum support spacingfor this tubing is 8’ 2”, the plumbing code mayrequire closer support spacing. Plastics
Installing PEX – expansion andcontractionPEX piping will expand and contract about 1inch for every 100 feet of length for each 10°F change in temperature. For tubing sizes 1inch and smaller, this length change isaccommodated by snaking tubing aroundobstacles and by normal slack that is presentin laying flexible pipe. For those cases wheresignificant temperature variation is expected,piping dimensional change can beaccommodated at changes in direction orwith offsets or loops.
Installing PE-AL-PE and PEX-AL-PEX-expansion and contractionThis tubing has a coefficient of linearexpansion similar to copper tubing. Thereforeno special provisions are needed tocompensate for the temperature changesthat typically occur in hot and cold waterdistribution systems.
Installing PEX - freezingLike other plastic water pipe and tube, PEXis more resistant to damage by freezing thanare metals. However, in the event of freezing,blow torches or open flames must never beused for thawing. Use a low temperature hotair gun, circulate warm air with a fan, or thawby disconnecting the line and flushing withwarm or hot water. After flushing, test allsystems with water at the pressure requiredby the code or at 150% of the workingpressure.
PB (PolybutyleneGuidelinesPolybutylene (PB) is no longer offered for usein North America. The pipe was soldprimarily in coils from 1970-1995. You mayencounter some in structures built orremodeled during that time frame. Themajority of product would be gray in colorand be found in single-family structures,apartments, and mobile homes.
PB piping was made to the following ASTMStandards for these applications:
• ASTM D 3309 -Hot & Cold WaterDistribution- This was copper tubesize (CTS) piping mostly coiled butalso available in straight lengths. Itwas gray in color. This PB pipingwas also used for fire sprinklersystems, and for radiant slab heatingsystems. PB piping was used inmany mobile homes and in somepre-fabricated housing.
• ASTM D 2513 -Natural Gas- Thiswas CTS size PB piping (gold orblack) used for underground
clamps are recommended and clampsshould be provided at changes in directions.
Plumber’s Installation Handbook
PPFA
20 © 2003 PPFA. All rights reserved.
distribution or service lines and wasinstalled by some gas companies.
• ASTM D 2666 - Water Service Lines.This was CTS size PB piping (blackor blue) used for lines from the watermain to the meter and to the building.ASTM D 2662, ID controlled PB pipe,was also used for water service lines.
• ASTM D 2666 and D 2662 - Almostall PB water service lines were madeto the D 2666 specification, in blackor blue grades. They were used inmain to meter or meter to houseapplications.
Storm and SanitarySewers and Drains
Storm and Sanitary Sewers and Drains-GeneralA word of caution is essential: You mustcheck your local plumbing code to be surethat the product you have chosen is approvedby your code. Do not assume that everypiping product sold by a supplier has beenlocally approved.Storm and sanitary sewer pipes are coveredby ASTM standards D 2729, D 2751, D 3034,F 789 and F 891. While these products arenow acceptable in most areas, the user stillmust check the local code.
This section will deal with house and buildingsewers on private property, outside buildings.For the sake of brevity, only normal depth andinstallation will be discussed. In addition toplastic piping for sanitary sewers, the plasticindustry makes lighter wall piping suitable forclear water drainage and foundation drains.(Note: for storm water and roof drains withinthe building, most codes will also permit theuse of the approved DWV products).
For those who do septic tank work,perforated drainpipes made from SR (styrenerubber), PE (polyethylene), and PVC(polyvinyl chloride) are available. Again, wecaution the installer to refer to his localplumbing code to determine which materialsand which products are approved for use.
Each of the noted standards includes both thepipe and the fittings designed to be used inthe system. Mixing the pipe meeting onestandard with fittings meeting anotherstandard is not recommended. Note that DWVpiping and sewer/drain piping use differentoutside diameters for each pipe size. Checkthe markings on both pipe and fittings.
Storm and Sanitary Sewers and Drains -MarkingSewer and drain piping is identified in asimilar manner as DWV piping. See
DWV Piping - Marking section on page 8 ofthe Handbook, for typical markingrequirements.
Plumber’s Installation Handbook PPFA
21© 2003 PPFA. All rights reserved.
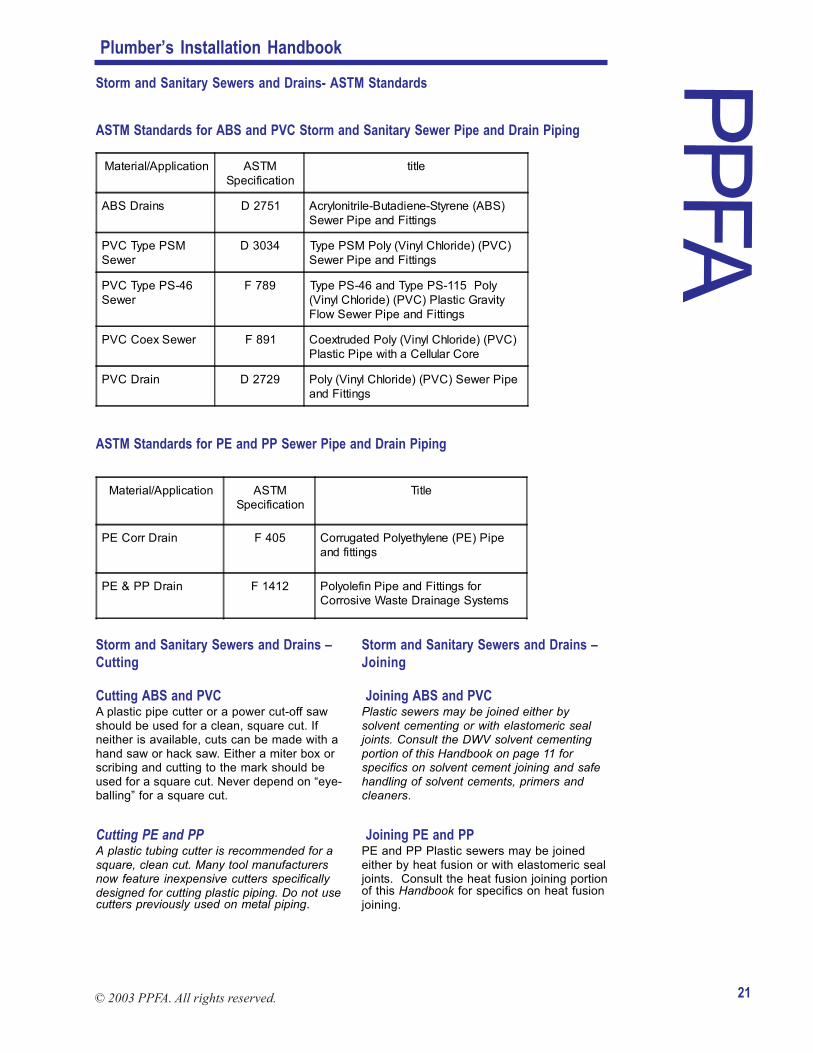
Storm and Sanitary Sewers and Drains- ASTM Standards
ASTM Standards for ABS and PVC Storm and Sanitary Sewer Pipe and Drain Piping
ASTM Standards for PE and PP Sewer Pipe and Drain Piping
Storm and Sanitary Sewers and Drains –Cutting
Cutting ABS and PVCA plastic pipe cutter or a power cut-off sawshould be used for a clean, square cut. Ifneither is available, cuts can be made with ahand saw or hack saw. Either a miter box orscribing and cutting to the mark should beused for a square cut. Never depend on “eye-balling” for a square cut.
Cutting PE and PPA plastic tubing cutter is recommended for asquare, clean cut. Many tool manufacturersnow feature inexpensive cutters specificallydesigned for cutting plastic piping. Do not usecutters previously used on metal piping.
Storm and Sanitary Sewers and Drains –Joining
Joining ABS and PVCPlastic sewers may be joined either bysolvent cementing or with elastomeric sealjoints. Consult the DWV solvent cementingportion of this Handbook on page 11 forspecifics on solvent cement joining and safehandling of solvent cements, primers andcleaners.
Joining PE and PPPE and PP Plastic sewers may be joinedeither by heat fusion or with elastomeric sealjoints. Consult the heat fusion joining portionof this Handbook for specifics on heat fusionjoining.
Material/Application ASTMSpecification
title
ABS Drains D 2751 Acrylonitrile-Butadiene-Styrene (ABS)Sewer Pipe and Fittings
PVC Type PSMSewer
D 3034 Type PSM Poly (Vinyl Chloride) (PVC)Sewer Pipe and Fittings
PVC Type PS-46Sewer
F 789 Type PS-46 and Type PS-115 Poly(Vinyl Chloride) (PVC) Plastic GravityFlow Sewer Pipe and Fittings
PVC Coex Sewer F 891 Coextruded Poly (Vinyl Chloride) (PVC)Plastic Pipe with a Cellular Core
PVC Drain D 2729 Poly (Vinyl Chloride) (PVC) Sewer Pipeand Fittings
Material/Application ASTMSpecification
Title
PE Corr Drain F 405 Corrugated Polyethylene (PE) Pipeand fittings
PE & PP Drain F 1412 Polyolefin Pipe and Fittings forCorrosive Waste Drainage Systems
Plumber’s Installation Handbook
PP
FA
22 © 2003 PPFA. All rights reserved.
Storm and Sanitary Sewers and Drains -InstallationAll the model-plumbing codes includesections on installing sewer piping. Consultyour local code and follow it. In the absenceof local code provisions, use the followingsteps. Excavate to the desired grade. Be suretrench is safe — shore sides when in doubt.Use a transit or level line to obtain propergrade. Cut down high spots, fill holes ordepressions, and tamp thoroughly. Removeall rocks or other sharp objects. If necessaryin rough soil conditions, excavate to a greaterdepth than required and then backfill withselect fill material to proper level and grade.
Where trenching conditions are difficult dueto rock, water, gumbo soil, or other unstableconditions, the sewer pipe must be supportedthroughout its full length using treated timber,concrete pad, sand, or properly selectedbackfill material. Lay the pipe in a straightline. Use a level or transit to set the pipe tograde. Use proper fittings for all turns. Do nottry to bend piping.
Be sure the pipe has full support. Encase thepipe in a protective “envelope” by filling alongthe sides with earth or fill free from largerocks. Tamp side fill material as it is placed.As with all underground installations, propertamping will minimize deflection, isconsistent with the pipe manufacturer’srecommendations, and the plumbing codes.
Cover the entire pipe with clean earth orbackfill to a depth of at least 12 inches,tamping along both sides but not over thepipe as you fill. The trench can now be filledeither by hand or mechanically. All sewerpipe fittings should be of the drainagepattern. All materials, regardless ofsmoothness, are subject to stoppage.Cleaning rods, whether manual or automatic,will not execute sharp or short radius turns.Avoid future problems by providing full radiusturns at every change in direction.
These are the fundamental requirements forevery sewer or drain trench.
Molded plastic adapters and rubber ringdoughnuts are available for connectionsduring the tests. A water exfiltration test canbe used making connections either size bysize or one material to another. Do not useconcrete cement or unauthorized joining
material for making plastic pipe sewer joints.Use the proper connections only.
While drains are not generally considered thesame as sewers, they also can encounterstoppage, flooding, and back flow due to poorinstallation. The same installation proceduresshould be followed when laying drains aswhen laying sewers.
Storm and Sanitary Sewers and Drains -Other Considerations
Storm and Sanitary Sewers and Drains -TestingWhere testing of the sewer service isrequired, it may be preferable to do it beforecovering the joints so that they can bechecked for leaks. Soil can be placed overthe pipe between the joints for protectionduring the tests. A water test isrecommended. These piping systems shallnot be tested with compressed air or othergases unless the procedure being used hasbeen clearly and specifically approved by themanufacturer(s) of the plastic piping to betested.
Note: By virtue of their compressibility,compressed air and gases contain largeamounts of stored energy which presentserious safety hazards should a pipingsystem rupture for any reason.
Note: Ground water infiltration has become amajor problem in sanitary sewer systems,because it overloads the sewer mains and thesewage treatment plant. In addition, leakingjoints allow root penetration that can result inblockage. Ensure a watertight installation.Plastic piping joints – both solvent cementedand gasketed – are easy to make and remainwatertight.