plug&share wireless router 54 mbps 802.11g 6800g
TRANSCRIPT
Copyright © 2003 Advanced American Telephones. All Rights Reserved. AT&T and the Globe Design are trademarks of AT&T Corp., licensed to Advanced American Telephones. All marks are trademarks of their respective corporations.
Plug&Share™
Wireless Router54 Mbps 802.11g
6800G
User Manual
Table of Contents
AT&T Plug&Share™ 54 Mbps Wireless Router 6800G 2
Table of Contents
GETTING STARTED ..................................................................4About your new wireless network router ........................4Package contents............................................................5System requirements ......................................................5Router controls, connections and indicator lights ..........6Router installation ..........................................................7
THE SETUP WIZARD ................................................................8Internet connection type..................................................8Dynamic IP address screen ............................................9PPPoE screen ................................................................9Static IP address screen ..............................................10Wireless LAN connection screen..................................10Setup completed ..........................................................10WEP encryption ............................................................11Security setup completed..............................................12Close Wizard ................................................................12
SYSTEM SETTINGS ................................................................13
BASIC SETTINGS ....................................................................14Basic Wizard screen ....................................................14Basic wireless settings..................................................15Basic ISP connection ....................................................17Basic DHCP settings ....................................................21
ADVANCED SETTINGS............................................................22Virtual server ................................................................22Multiple connection applications ..................................23Filters ............................................................................24Firewall rules ................................................................28DMZ ..............................................................................29Routing..........................................................................30Wireless network performance ....................................33
ADMINISTRATOR SETTINGS ..................................................34Set passwords ..............................................................34Router settings..............................................................35Backup settings ............................................................36Restore default settings ................................................36Other options ................................................................37
Table of Contents
AT&T Plug&Share™ 54 Mbps Wireless Router 6800G 3
STATUS SCREENS ..................................................................38Router information ........................................................38Activity logs ..................................................................39Traffic statistics..............................................................40Wireless client computers ............................................41
SHORTCUTS ............................................................................42Parental control ............................................................42Gaming applications ....................................................43Personal web site..........................................................44Personal FTP site ........................................................45Internet telephony ........................................................46
FIRMWARE UPGRADES ..........................................................47
CONFIGURING THE WIRELESS NETWORK..........................48Change network settings ..............................................48File & print sharing for Windows® XP............................49File & print sharing for Windows® 2000 ........................56File & print sharing for Windows® Me and 98 SE ........62
TROUBLESHOOTING ..............................................................68
GLOSSARY ..............................................................................71
TECHNICAL SPECIFICATIONS ..............................................76
IMPORTANT!Use only the AC power adapter provided with the product. Donot attempt to use any other AC power adapter. If you need areplacement, please call 1-877-800-5400.
AT&T offers a full line of data networking and broadband accessories.
Please visit us at
www.plugandshare.att.com
1-877-800-5400
Getting Started
AT&T Plug&Share™ 54 Mbps Wireless Router 6800G 4
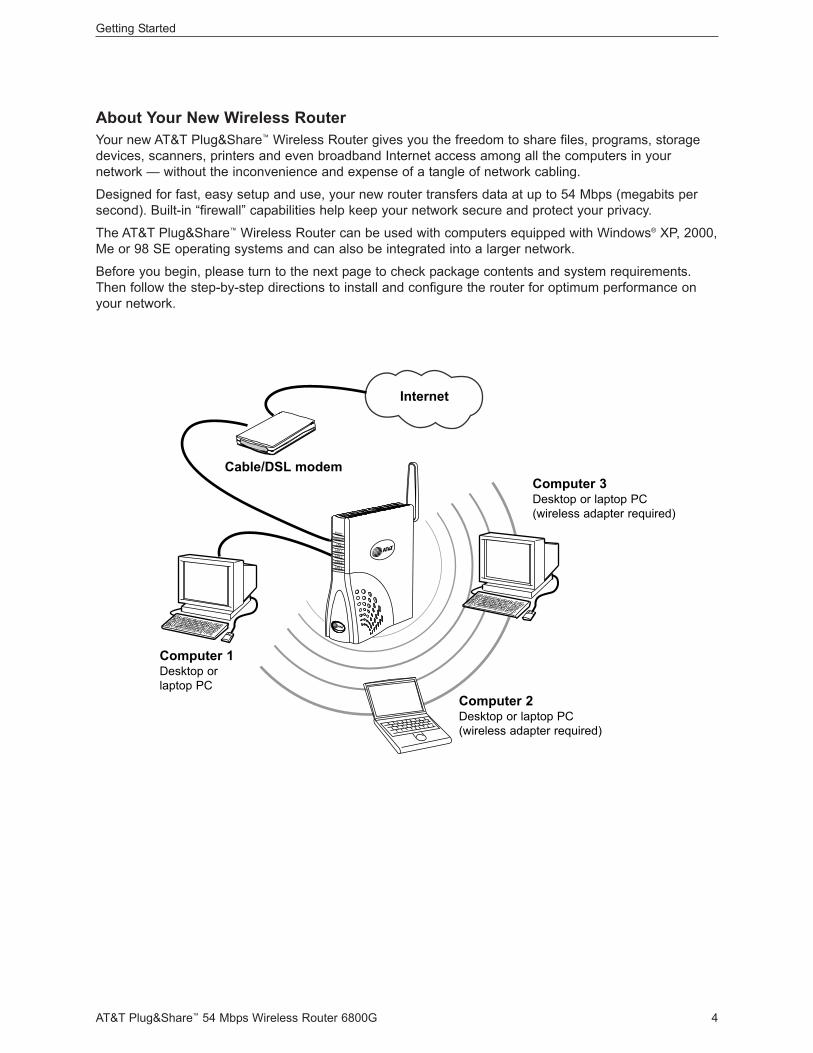
About Your New Wireless RouterYour new AT&T Plug&Share™ Wireless Router gives you the freedom to share files, programs, storagedevices, scanners, printers and even broadband Internet access among all the computers in your network — without the inconvenience and expense of a tangle of network cabling.
Designed for fast, easy setup and use, your new router transfers data at up to 54 Mbps (megabits persecond). Built-in “firewall” capabilities help keep your network secure and protect your privacy.
The AT&T Plug&Share™ Wireless Router can be used with computers equipped with Windows® XP, 2000,Me or 98 SE operating systems and can also be integrated into a larger network.
Before you begin, please turn to the next page to check package contents and system requirements.Then follow the step-by-step directions to install and configure the router for optimum performance onyour network.
Internet
Cable/DSL modem
Computer 1Desktop orlaptop PC
Computer 2Desktop or laptop PC(wireless adapter required)
Computer 3Desktop or laptop PC(wireless adapter required)
Getting Started
AT&T Plug&Share™ 54 Mbps Wireless Router 6800G 5
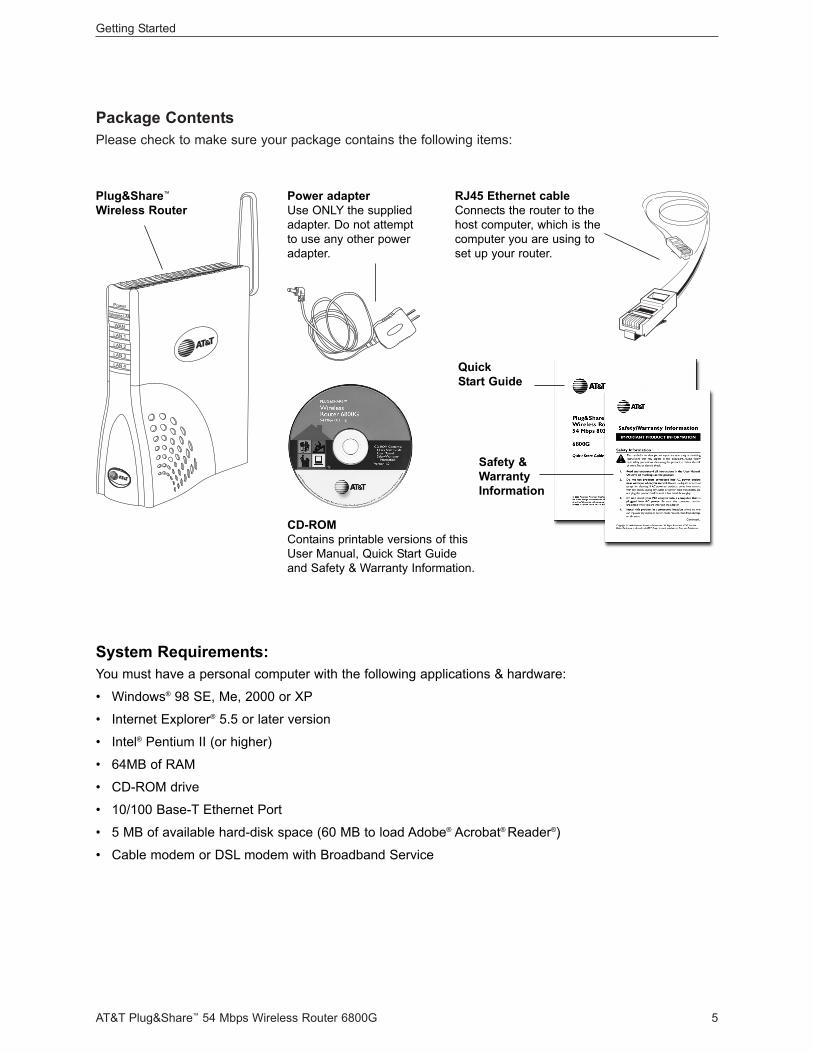
Package ContentsPlease check to make sure your package contains the following items:
Power
Wireless LAN
LAN 1
WAN
LAN 2
LAN 3
LAN 4
Plug&Share™
Wireless RouterPower adapterUse ONLY the suppliedadapter. Do not attemptto use any other poweradapter.
RJ45 Ethernet cable Connects the router to thehost computer, which is thecomputer you are using toset up your router.
CD-ROM Contains printable versions of thisUser Manual, Quick Start Guideand Safety & Warranty Information.
Quick Start Guide
Safety &WarrantyInformation
System Requirements:You must have a personal computer with the following applications & hardware:
• Windows® 98 SE, Me, 2000 or XP
• Internet Explorer® 5.5 or later version
• Intel® Pentium II (or higher)
• 64MB of RAM
• CD-ROM drive
• 10/100 Base-T Ethernet Port
• 5 MB of available hard-disk space (60 MB to load Adobe® Acrobat® Reader®)
• Cable modem or DSL modem with Broadband Service
Getting Started
AT&T Plug&Share™ 54 Mbps Wireless Router 6800G 6
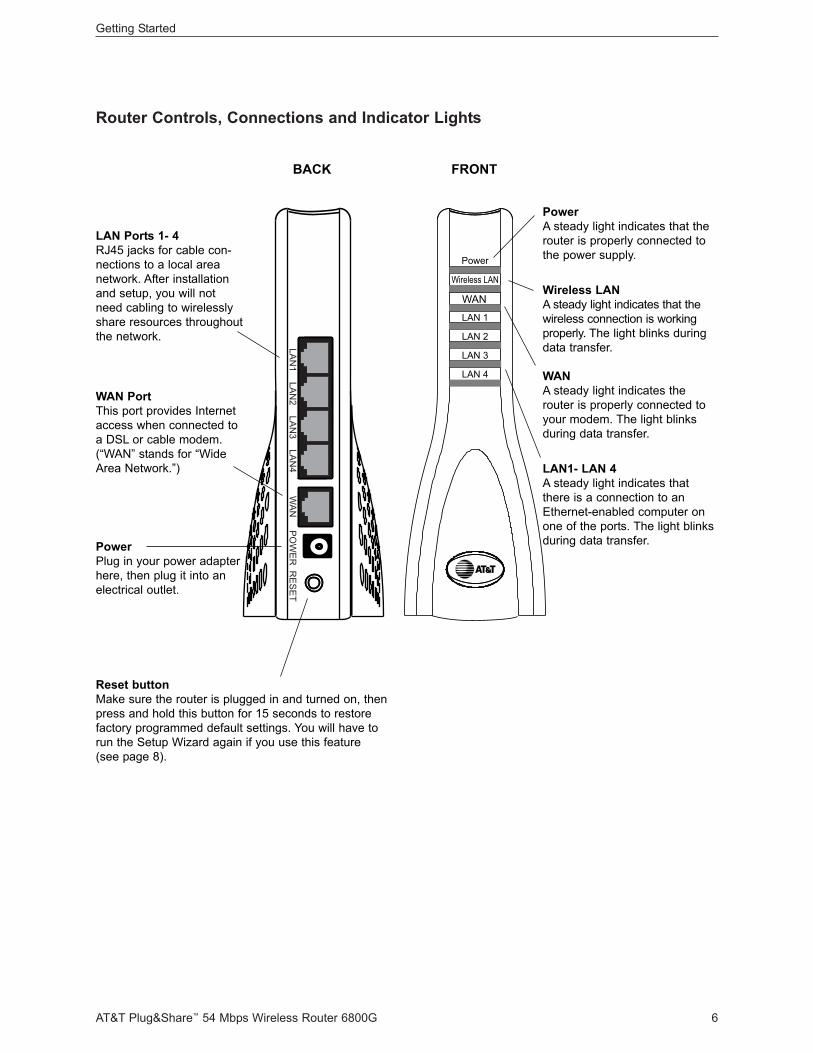
Router Controls, Connections and Indicator Lights
LAN Ports 1- 4RJ45 jacks for cable con-nections to a local areanetwork. After installationand setup, you will notneed cabling to wirelesslyshare resources throughoutthe network.
WAN PortThis port provides Internetaccess when connected toa DSL or cable modem.(“WAN” stands for “WideArea Network.”)
PowerPlug in your power adapterhere, then plug it into an electrical outlet.
Reset buttonMake sure the router is plugged in and turned on, thenpress and hold this button for 15 seconds to restorefactory programmed default settings. You will have torun the Setup Wizard again if you use this feature (see page 8).
PowerA steady light indicates that therouter is properly connected tothe power supply.
Wireless LANA steady light indicates that thewireless connection is workingproperly. The light blinks duringdata transfer.
WANA steady light indicates therouter is properly connected toyour modem. The light blinksduring data transfer.
LAN1- LAN 4A steady light indicates thatthere is a connection to anEthernet-enabled computer onone of the ports. The light blinksduring data transfer.
BACK FRONT
Getting Started
AT&T Plug&Share™ 54 Mbps Wireless Router 6800G 7
Modem
Computer
Power Adapter
Step 1: Make sure that you have Internet accessBefore you begin, launch your web browser to make sure you can connect to the Internet. If you canconnect to web sites as usual, proceed to Step 2, below. If you cannot connect to the Internet, checkyour modem connections, or consult the User Manual provided by your broadband/Internet service supplier. You must have Internet access before installing the router.
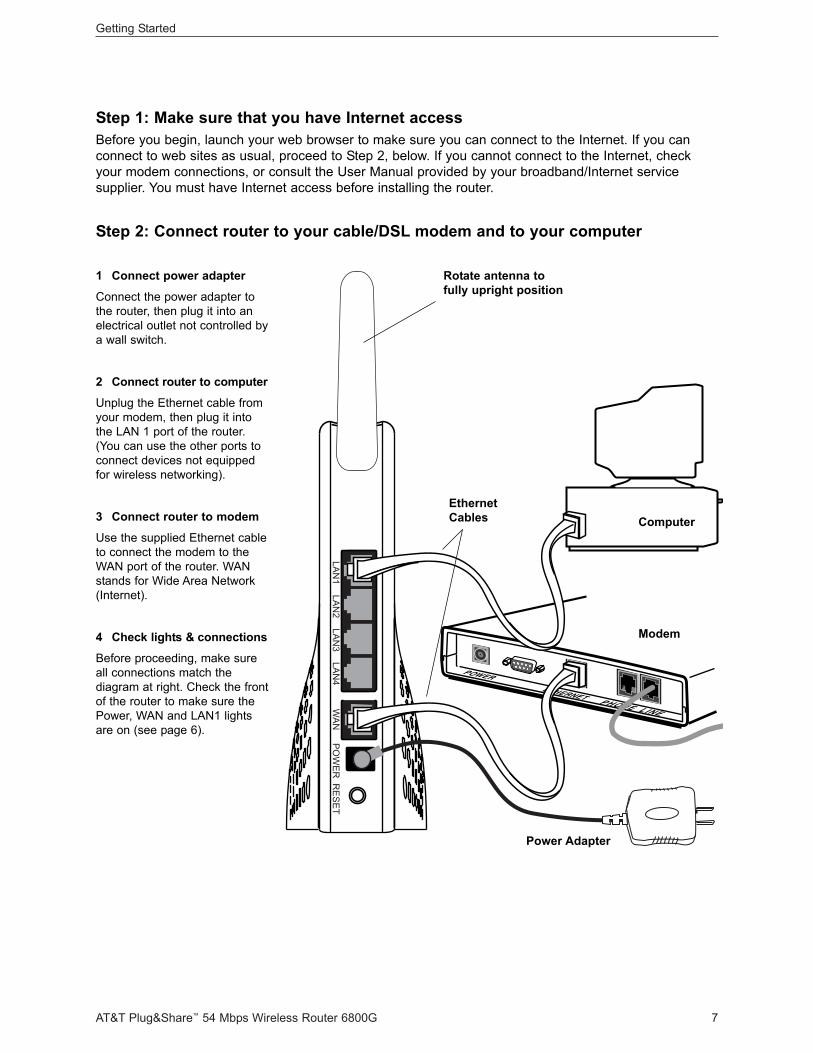
Step 2: Connect router to your cable/DSL modem and to your computer
1 Connect power adapter
Connect the power adapter tothe router, then plug it into anelectrical outlet not controlled bya wall switch.
2 Connect router to computer
Unplug the Ethernet cable fromyour modem, then plug it intothe LAN 1 port of the router.(You can use the other ports toconnect devices not equippedfor wireless networking).
3 Connect router to modem
Use the supplied Ethernet cableto connect the modem to theWAN port of the router. WANstands for Wide Area Network(Internet).
4 Check lights & connections
Before proceeding, make sureall connections match the diagram at right. Check the frontof the router to make sure thePower, WAN and LAN1 lightsare on (see page 6).
Rotate antenna tofully upright position
EthernetCables
Setup Wizard
AT&T Plug&Share™ 54 Mbps Wireless Router 6800G 8
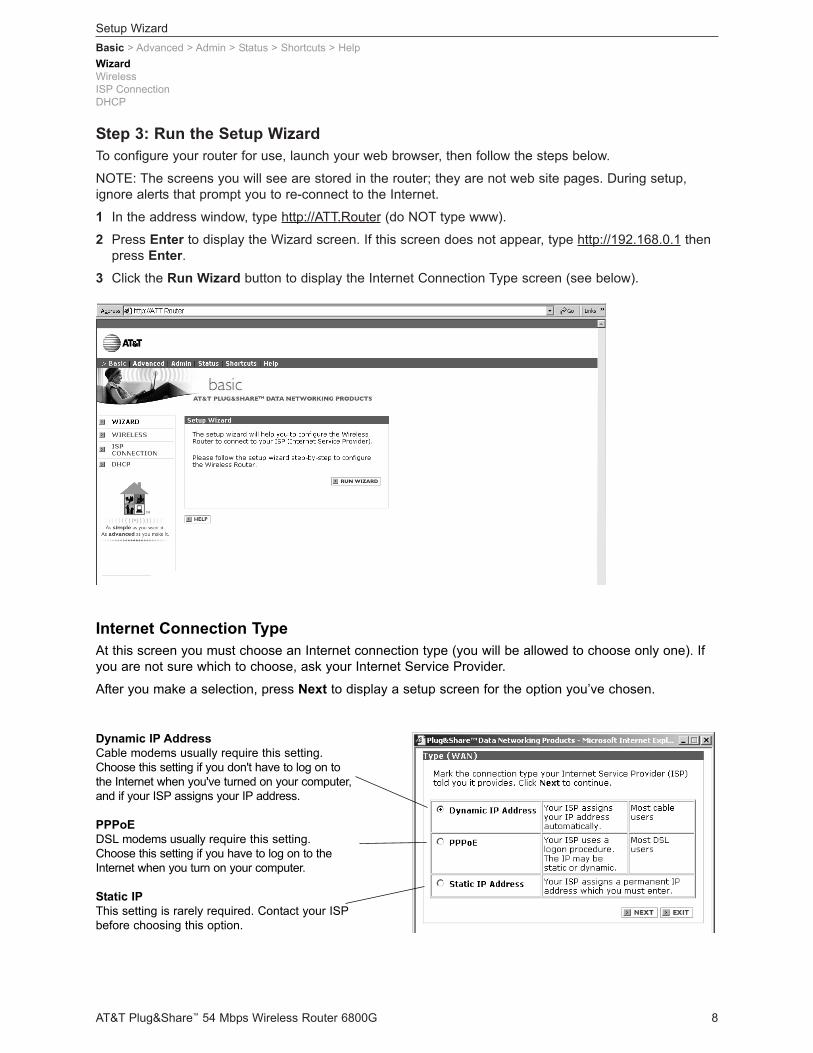
Step 3: Run the Setup WizardTo configure your router for use, launch your web browser, then follow the steps below.
NOTE: The screens you will see are stored in the router; they are not web site pages. During setup,ignore alerts that prompt you to re-connect to the Internet.
1 In the address window, type http://ATT.Router (do NOT type www).
2 Press Enter to display the Wizard screen. If this screen does not appear, type http://192.168.0.1 thenpress Enter.
3 Click the Run Wizard button to display the Internet Connection Type screen (see below).
Basic > Advanced > Admin > Status > Shortcuts > Help
Internet Connection Type At this screen you must choose an Internet connection type (you will be allowed to choose only one). Ifyou are not sure which to choose, ask your Internet Service Provider.
After you make a selection, press Next to display a setup screen for the option you’ve chosen.
Dynamic IP AddressCable modems usually require this setting.Choose this setting if you don't have to log on tothe Internet when you've turned on your computer,and if your ISP assigns your IP address.
PPPoEDSL modems usually require this setting.Choose this setting if you have to log on to theInternet when you turn on your computer.
Static IPThis setting is rarely required. Contact your ISPbefore choosing this option.
WizardWirelessISP ConnectionDHCP
Setup Wizard
AT&T Plug&Share™ 54 Mbps Wireless Router 6800G 9
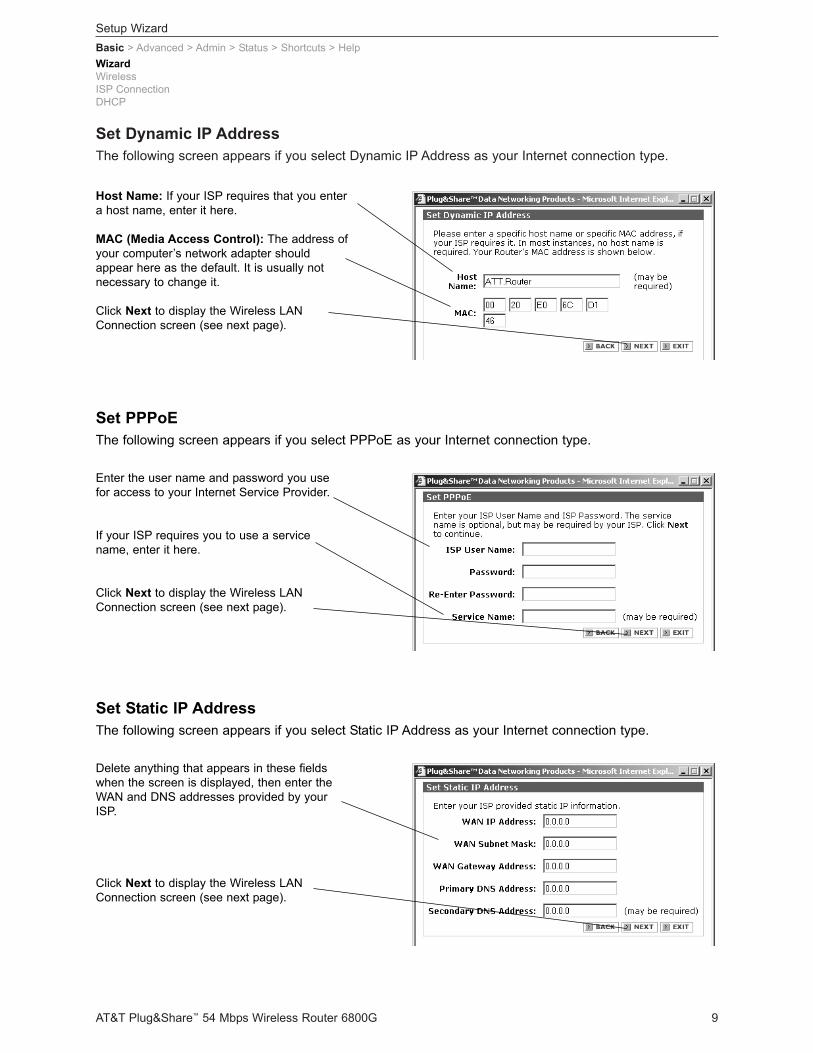
Set Dynamic IP AddressThe following screen appears if you select Dynamic IP Address as your Internet connection type.
Basic > Advanced > Admin > Status > Shortcuts > Help
Set PPPoEThe following screen appears if you select PPPoE as your Internet connection type.
Host Name: If your ISP requires that you entera host name, enter it here.
MAC (Media Access Control): The address ofyour computer’s network adapter shouldappear here as the default. It is usually not necessary to change it.
Click Next to display the Wireless LANConnection screen (see next page).
Enter the user name and password you usefor access to your Internet Service Provider.
If your ISP requires you to use a servicename, enter it here.
Click Next to display the Wireless LANConnection screen (see next page).
Set Static IP AddressThe following screen appears if you select Static IP Address as your Internet connection type.
Delete anything that appears in these fieldswhen the screen is displayed, then enter theWAN and DNS addresses provided by yourISP.
Click Next to display the Wireless LANConnection screen (see next page).
WizardWirelessISP ConnectionDHCP
Setup Wizard
AT&T Plug&Share™ 54 Mbps Wireless Router 6800G 10
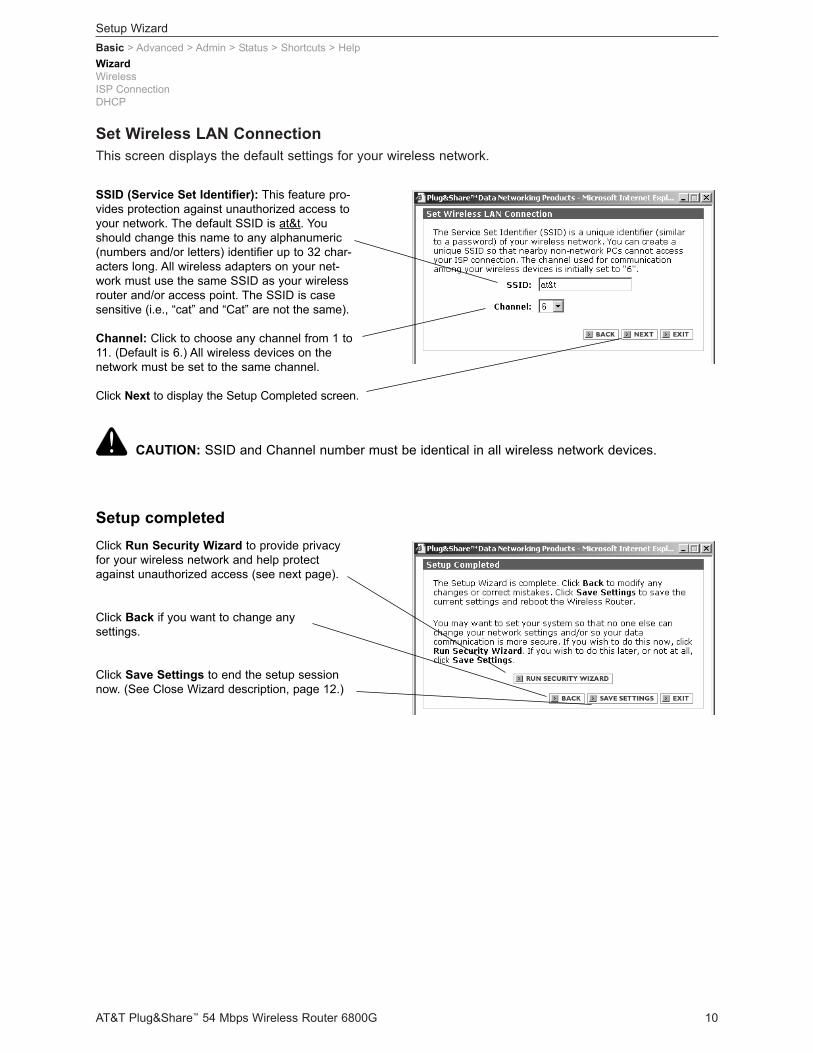
Set Wireless LAN ConnectionThis screen displays the default settings for your wireless network.
Basic > Advanced > Admin > Status > Shortcuts > Help
SSID (Service Set Identifier): This feature pro-vides protection against unauthorized access toyour network. The default SSID is at&t. Youshould change this name to any alphanumeric(numbers and/or letters) identifier up to 32 char-acters long. All wireless adapters on your net-work must use the same SSID as your wirelessrouter and/or access point. The SSID is casesensitive (i.e., “cat” and “Cat” are not the same).
Channel: Click to choose any channel from 1 to11. (Default is 6.) All wireless devices on the network must be set to the same channel.
Click Next to display the Setup Completed screen.
Setup completedClick Run Security Wizard to provide privacyfor your wireless network and help protectagainst unauthorized access (see next page).
Click Back if you want to change any settings.
Click Save Settings to end the setup sessionnow. (See Close Wizard description, page 12.)
WizardWirelessISP ConnectionDHCP
CAUTION: SSID and Channel number must be identical in all wireless network devices.
Setup Wizard
AT&T Plug&Share™ 54 Mbps Wireless Router 6800G 11
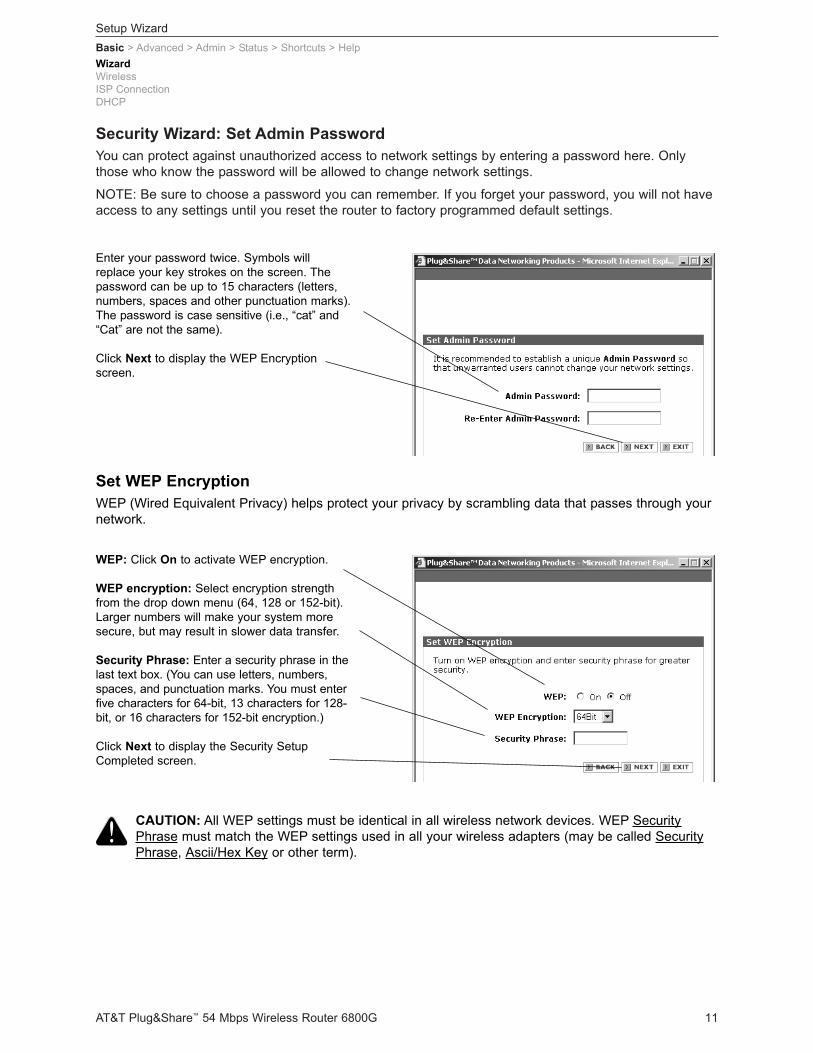
Security Wizard: Set Admin PasswordYou can protect against unauthorized access to network settings by entering a password here. Onlythose who know the password will be allowed to change network settings.
NOTE: Be sure to choose a password you can remember. If you forget your password, you will not haveaccess to any settings until you reset the router to factory programmed default settings.
Basic > Advanced > Admin > Status > Shortcuts > Help
Set WEP Encryption WEP (Wired Equivalent Privacy) helps protect your privacy by scrambling data that passes through yournetwork.
Enter your password twice. Symbols willreplace your key strokes on the screen. Thepassword can be up to 15 characters (letters,numbers, spaces and other punctuation marks).The password is case sensitive (i.e., “cat” and“Cat” are not the same).
Click Next to display the WEP Encryptionscreen.
WEP: Click On to activate WEP encryption.
WEP encryption: Select encryption strengthfrom the drop down menu (64, 128 or 152-bit).Larger numbers will make your system moresecure, but may result in slower data transfer.
Security Phrase: Enter a security phrase in thelast text box. (You can use letters, numbers,spaces, and punctuation marks. You must enterfive characters for 64-bit, 13 characters for 128-bit, or 16 characters for 152-bit encryption.)
Click Next to display the Security SetupCompleted screen.
WizardWirelessISP ConnectionDHCP
CAUTION: All WEP settings must be identical in all wireless network devices. WEP SecurityPhrase must match the WEP settings used in all your wireless adapters (may be called SecurityPhrase, Ascii/Hex Key or other term).
Setup Wizard
AT&T Plug&Share™ 54 Mbps Wireless Router 6800G 12
Test your connectionsClick on the icon for your web browser. Your designated home page should appear. If your home pagedoes not appear, try the following:
• Reboot your computer.
• Turn off or unplug your modem for a few seconds, then turn it back on.
• If you still have no Internet access, please turn to the Troubleshooting section (page 68).
Note: After your initial setup is complete you can use wireless adapters to connect other devices to yournetwork. The Ethernet cable is not necessary, and can be disconnected.
Basic > Advanced > Admin > Status > Shortcuts > Help
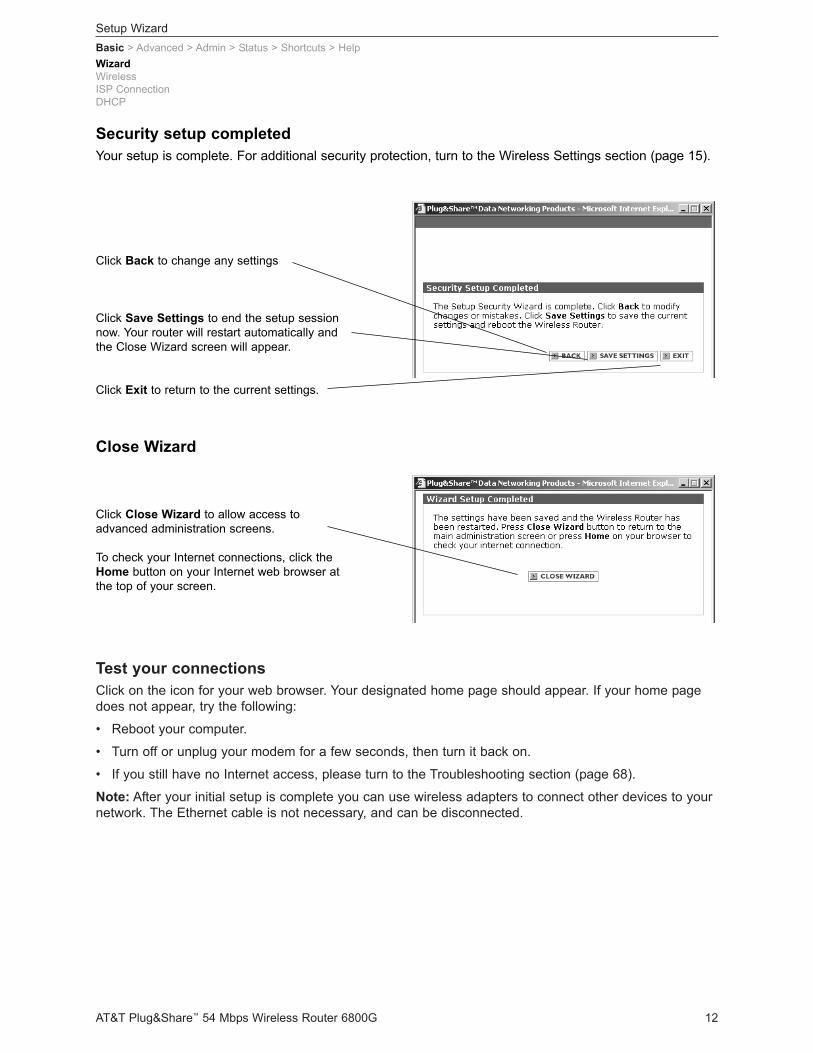
Security setup completedYour setup is complete. For additional security protection, turn to the Wireless Settings section (page 15).
Click Back to change any settings
Click Save Settings to end the setup sessionnow. Your router will restart automatically andthe Close Wizard screen will appear.
Click Exit to return to the current settings.
Close Wizard
Click Close Wizard to allow access toadvanced administration screens.
To check your Internet connections, click theHome button on your Internet web browser atthe top of your screen.
WizardWirelessISP ConnectionDHCP
Basic System Settings
AT&T Plug&Share™ 54 Mbps Wireless Router 6800G 13
System settingsTo change your network settings, launch your web browser, type http://ATT.Router in the address field,then press Enter. If the router page does not appear, type http://192.168.0.1 then press Enter.Click tabs in the blue menu bar at the top of the page to choose the type of settings you want to reviewor change. For more information, click the Help button at the bottom of each page.
Basic settings• Wizard (rerun the setup wizard)• Wireless (view or change wireless security settings)• ISP Connection (view or change the IP address and related information)• DHCP (view or change the settings that control communication within your network)
Advanced settingsDo not change these settings unless you have advanced knowledge of network technology.
• Virtual Server (view or change remote user access settings)• Multi-mode Applications (view or change settings for multiple connections, such as games)• Filters (view or change access filters to control Internet access)• Firewall (view or change settings to protect against unauthorized access to and from your network)• DMZ (view or change list of computers allowed full access to the Internet)• Routing (verify network addresses in the routing table)• Performance (view or change wireless performance features, speed and security)
Administrator settingsThese settings can help you protect against unauthorized access and manage your router firmware.
• Passwords (administer passwords and remote management)• Settings (set router system time, IP Address, DNS and Plug & Play settings)• Backup (save and restore system settings, or reboot router)• Other (send and block ping tests, and set VPN pass-through)
Status screensStatus screens display reports of network activity and traffic.
• Router Info (view current firmware version, LAN, WAN, and wireless status)• Activity (display and save the system activities)• Traffic (view traffic statistics)• WLAN (displays a list of wireless devices connected to the router)
ShortcutsThese mini-Wizards help you quickly set up basic functionality for several useful features.
• Parental Control (restrict access from certain computers)• Gaming (change settings for compatibility with Internet gaming)• Personal Web Site (use a computer on your network to host your web site)• Personal FTP Site (use a computer on your network to host your FTP site)• Internet Telephony (change settings for compatibility with Internet telephone services)
HelpChoose Help to find additional information about system settings, or to upload new router firmware.
• Firmware Upgrade (downloads new firmware if a more recent version is available)
Basic > Advanced > Admin > Status > Shortcuts > Help

Basic System Settings
AT&T Plug&Share™ 54 Mbps Wireless Router 6800G 14
Setup Wizard Click Run Wizard for a simple, step-by-step configuration of your router settings. (It is usually not neces-sary to do this after initial setup is complete.)
Basic > Advanced > Admin > Status > Shortcuts > HelpWizardWirelessISP ConnectionDHCP
Basic System Settings
AT&T Plug&Share™ 54 Mbps Wireless Router 6800G 15
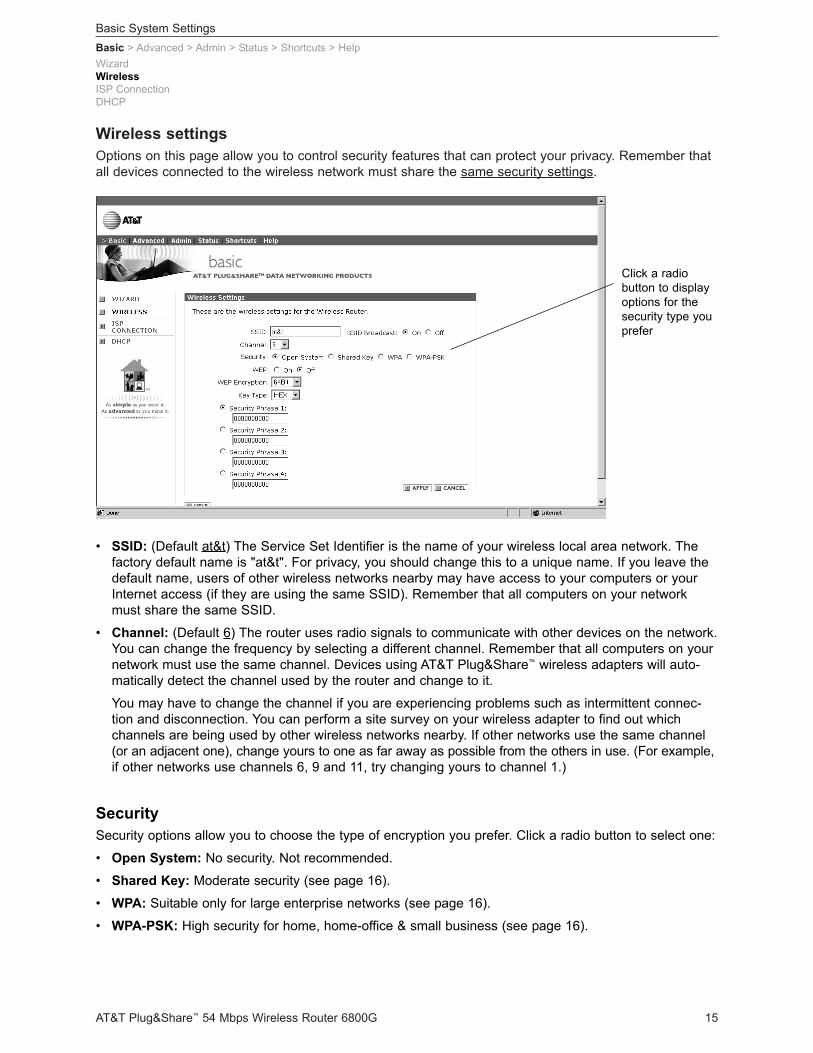
Wireless settings Options on this page allow you to control security features that can protect your privacy. Remember thatall devices connected to the wireless network must share the same security settings.
Basic > Advanced > Admin > Status > Shortcuts > Help
• SSID: (Default at&t) The Service Set Identifier is the name of your wireless local area network. Thefactory default name is "at&t". For privacy, you should change this to a unique name. If you leave thedefault name, users of other wireless networks nearby may have access to your computers or yourInternet access (if they are using the same SSID). Remember that all computers on your networkmust share the same SSID.
• Channel: (Default 6) The router uses radio signals to communicate with other devices on the network.You can change the frequency by selecting a different channel. Remember that all computers on yournetwork must use the same channel. Devices using AT&T Plug&Share™ wireless adapters will auto-matically detect the channel used by the router and change to it.
You may have to change the channel if you are experiencing problems such as intermittent connec-tion and disconnection. You can perform a site survey on your wireless adapter to find out whichchannels are being used by other wireless networks nearby. If other networks use the same channel(or an adjacent one), change yours to one as far away as possible from the others in use. (For example,if other networks use channels 6, 9 and 11, try changing yours to channel 1.)
SecuritySecurity options allow you to choose the type of encryption you prefer. Click a radio button to select one:
• Open System: No security. Not recommended.
• Shared Key: Moderate security (see page 16).
• WPA: Suitable only for large enterprise networks (see page 16).
• WPA-PSK: High security for home, home-office & small business (see page 16).
WizardWirelessISP ConnectionDHCP
Click a radio button to displayoptions for thesecurity type youprefer

Basic System Settings
AT&T Plug&Share™ 54 Mbps Wireless Router 6800G 16
Basic > Advanced > Admin > Status > Shortcuts > HelpWizardWirelessISP ConnectionDHCP
Shared Key Security (WEP: Wired Equivalent Privacy): Select this optionfor a moderate level of security.
Phrase/Key: Enter a security phrase. If you choosethe Hex Key Format (see below), you must use hexa-decimal digits (0-9, a-f). If you choose the ASCII KeyFormat you can use letters, numbers, spaces, andpunctuation marks. For the ASCII Key Format youmust enter five characters for 64-bit, 13 characters for128-bit or 16 characters for 152-bit encryption.Whichever format you use, the security phrase youenter must be shared by all wireless devices on thenetwork. You can create up to four different securityphrases, for different wireless networks. Rememberthat security phrases are case sensitive (i.e., “cat”and “Cat” are not the same).
Key Format: Choose ASCII or hexadecimal format. Ifyou choose ASCII, you can use names that you knowand can easily remember.
Length: Use the drop-down menu to choose a keylength (64, 128 or 152-bit). The higher the number,the slower but more secure your system will be.
If you change any setting above, click the Apply button.
WPA Enterprise Security (WiFi Protected Access) Select this option only if youare using your router in a large enterprise networkenvironment such as a company or school.
Consult your network administrator for advice beforeselecting this option.
WPA Personal Security (WiFi Protected Access, Preshared Key) Select thisoption for the highest level of security protection in ahome, home office or small business environment.
Passphrase: Enter a security phrase at least eightcharacters long. The phrase you enter must must beshared by all wireless devices on the network.Remember that security phrases are case sensitive(i.e., “cat” and “Cat” are not the same).
Enter your passphrase again to confirm, then clickthe Apply button to activate WPA-PSK encryption.
Basic System Settings
AT&T Plug&Share™ 54 Mbps Wireless Router 6800G 17
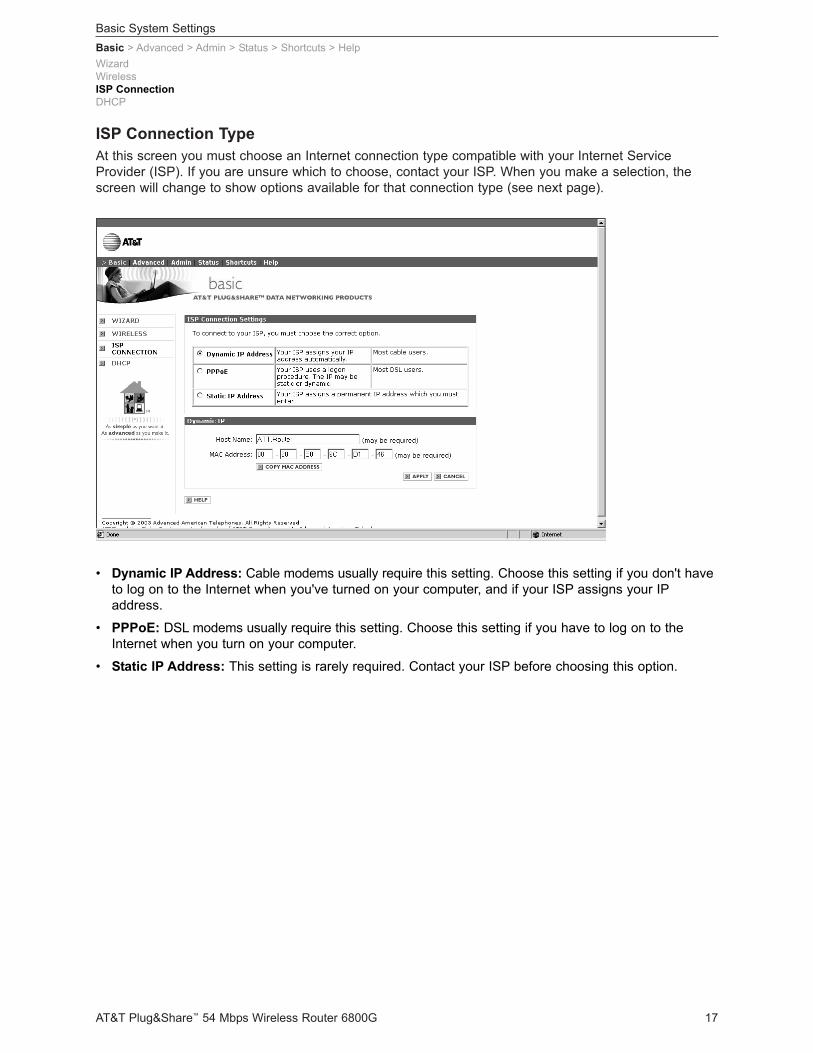
ISP Connection TypeAt this screen you must choose an Internet connection type compatible with your Internet ServiceProvider (ISP). If you are unsure which to choose, contact your ISP. When you make a selection, thescreen will change to show options available for that connection type (see next page).
Basic > Advanced > Admin > Status > Shortcuts > Help
• Dynamic IP Address: Cable modems usually require this setting. Choose this setting if you don't haveto log on to the Internet when you've turned on your computer, and if your ISP assigns your IPaddress.
• PPPoE: DSL modems usually require this setting. Choose this setting if you have to log on to theInternet when you turn on your computer.
• Static IP Address: This setting is rarely required. Contact your ISP before choosing this option.
WizardWirelessISP ConnectionDHCP
Basic System Settings
AT&T Plug&Share™ 54 Mbps Wireless Router 6800G 18
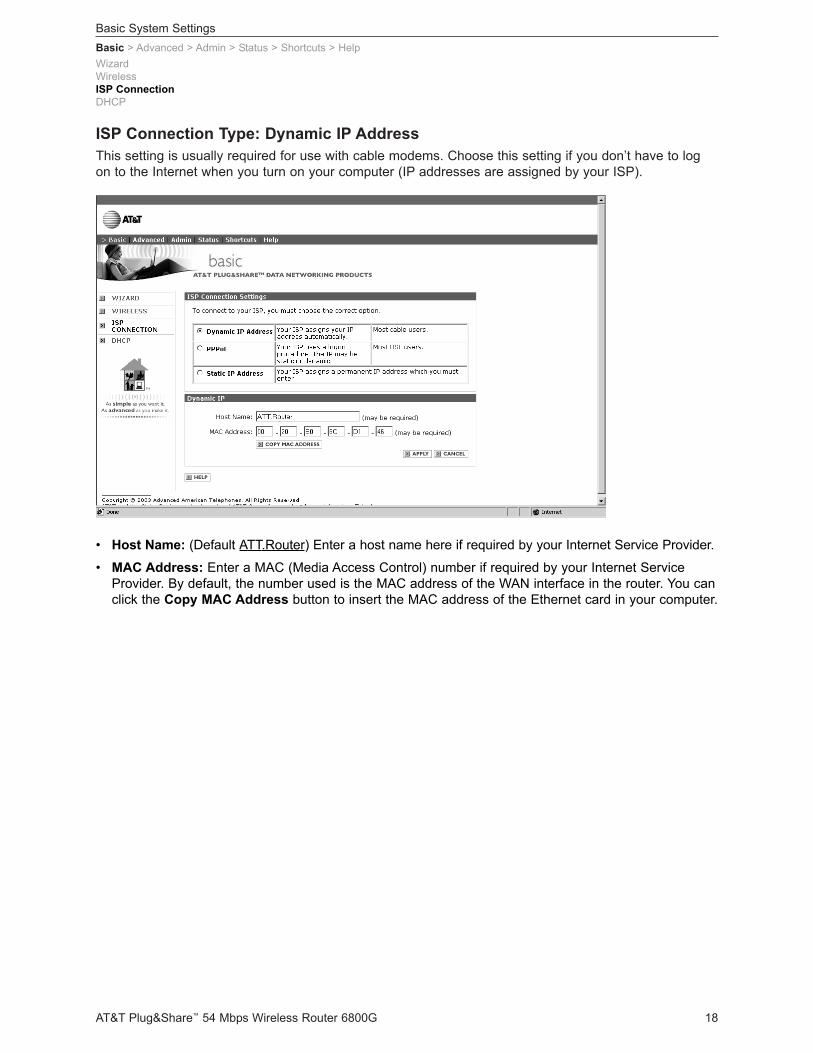
ISP Connection Type: Dynamic IP Address This setting is usually required for use with cable modems. Choose this setting if you don’t have to logon to the Internet when you turn on your computer (IP addresses are assigned by your ISP).
Basic > Advanced > Admin > Status > Shortcuts > Help
• Host Name: (Default ATT.Router) Enter a host name here if required by your Internet Service Provider.
• MAC Address: Enter a MAC (Media Access Control) number if required by your Internet ServiceProvider. By default, the number used is the MAC address of the WAN interface in the router. You canclick the Copy MAC Address button to insert the MAC address of the Ethernet card in your computer.
WizardWirelessISP ConnectionDHCP
Basic System Settings
AT&T Plug&Share™ 54 Mbps Wireless Router 6800G 19
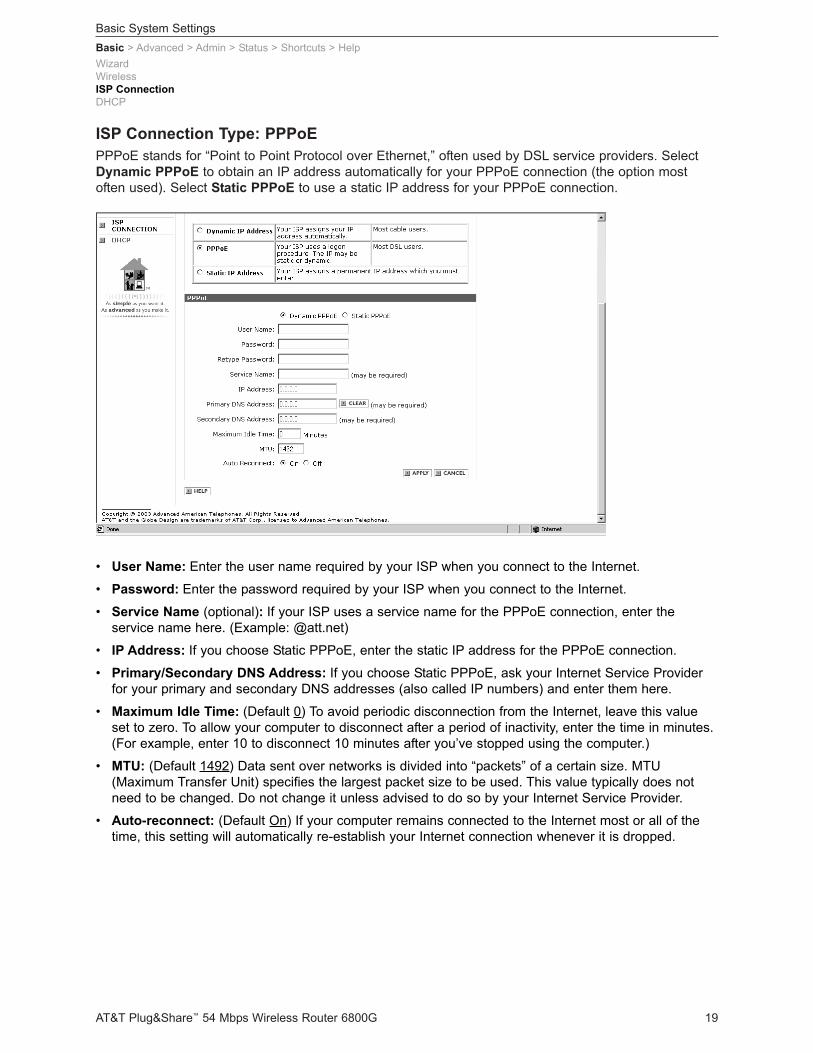
ISP Connection Type: PPPoE PPPoE stands for “Point to Point Protocol over Ethernet,” often used by DSL service providers. SelectDynamic PPPoE to obtain an IP address automatically for your PPPoE connection (the option mostoften used). Select Static PPPoE to use a static IP address for your PPPoE connection.
Basic > Advanced > Admin > Status > Shortcuts > Help
• User Name: Enter the user name required by your ISP when you connect to the Internet.
• Password: Enter the password required by your ISP when you connect to the Internet.
• Service Name (optional): If your ISP uses a service name for the PPPoE connection, enter the service name here. (Example: @att.net)
• IP Address: If you choose Static PPPoE, enter the static IP address for the PPPoE connection.
• Primary/Secondary DNS Address: If you choose Static PPPoE, ask your Internet Service Providerfor your primary and secondary DNS addresses (also called IP numbers) and enter them here.
• Maximum Idle Time: (Default 0) To avoid periodic disconnection from the Internet, leave this valueset to zero. To allow your computer to disconnect after a period of inactivity, enter the time in minutes.(For example, enter 10 to disconnect 10 minutes after you’ve stopped using the computer.)
• MTU: (Default 1492) Data sent over networks is divided into “packets” of a certain size. MTU(Maximum Transfer Unit) specifies the largest packet size to be used. This value typically does notneed to be changed. Do not change it unless advised to do so by your Internet Service Provider.
• Auto-reconnect: (Default On) If your computer remains connected to the Internet most or all of thetime, this setting will automatically re-establish your Internet connection whenever it is dropped.
WizardWirelessISP ConnectionDHCP
Basic System Settings
AT&T Plug&Share™ 54 Mbps Wireless Router 6800G 20
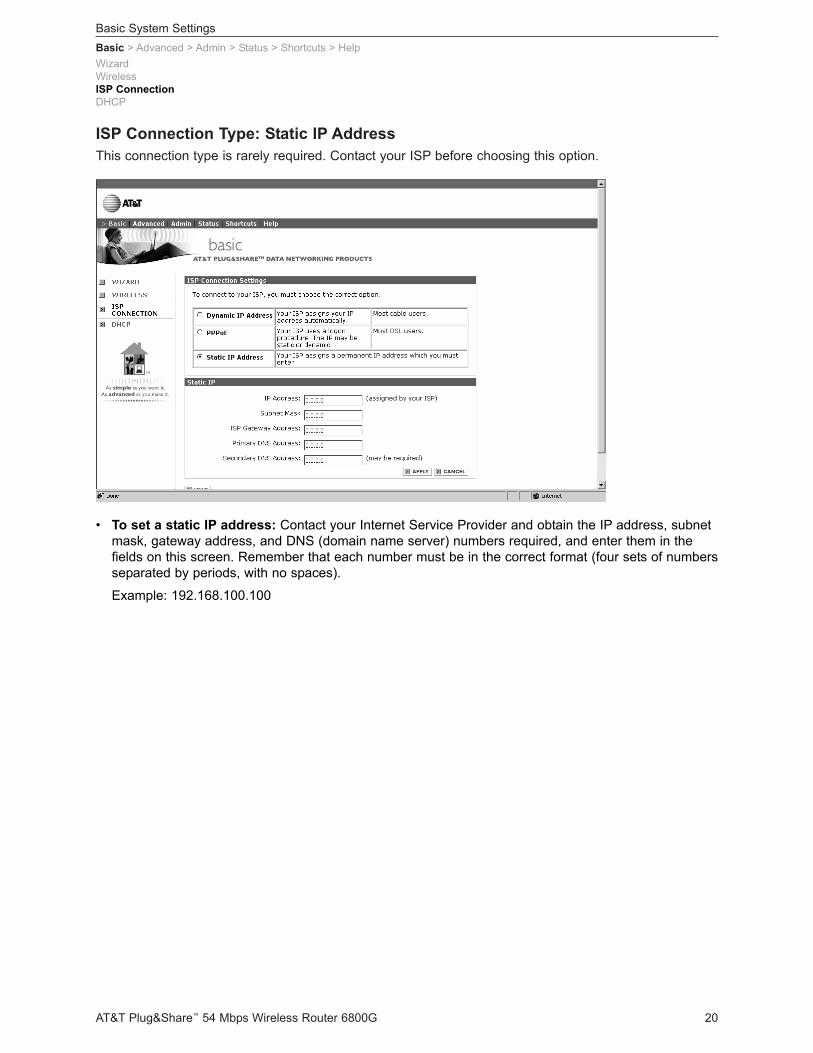
ISP Connection Type: Static IP Address This connection type is rarely required. Contact your ISP before choosing this option.
Basic > Advanced > Admin > Status > Shortcuts > Help
• To set a static IP address: Contact your Internet Service Provider and obtain the IP address, subnetmask, gateway address, and DNS (domain name server) numbers required, and enter them in thefields on this screen. Remember that each number must be in the correct format (four sets of numbersseparated by periods, with no spaces).
Example: 192.168.100.100
WizardWirelessISP ConnectionDHCP
Basic System Settings
AT&T Plug&Share™ 54 Mbps Wireless Router 6800G 21
Basic > Advanced > Admin > Status > Shortcuts > Help
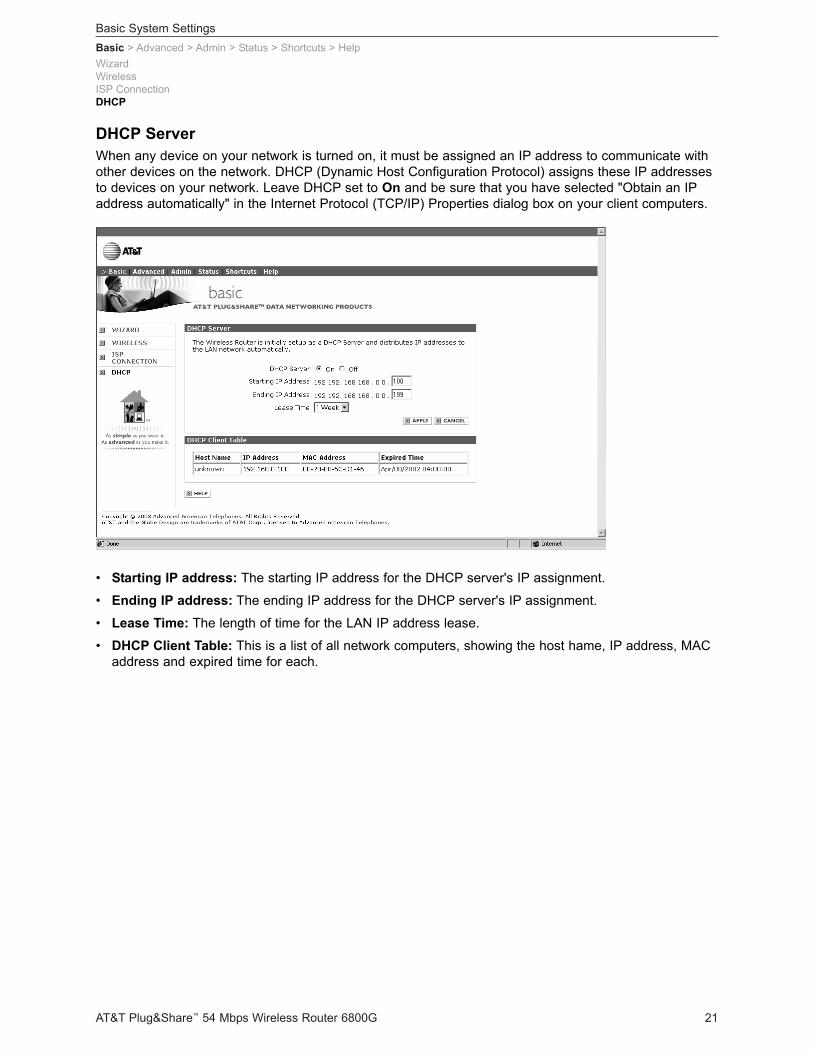
• Starting IP address: The starting IP address for the DHCP server's IP assignment.
• Ending IP address: The ending IP address for the DHCP server's IP assignment.
• Lease Time: The length of time for the LAN IP address lease.
• DHCP Client Table: This is a list of all network computers, showing the host hame, IP address, MACaddress and expired time for each.
WizardWirelessISP ConnectionDHCP
DHCP Server When any device on your network is turned on, it must be assigned an IP address to communicate withother devices on the network. DHCP (Dynamic Host Configuration Protocol) assigns these IP addressesto devices on your network. Leave DHCP set to On and be sure that you have selected "Obtain an IPaddress automatically" in the Internet Protocol (TCP/IP) Properties dialog box on your client computers.
Advanced System Settings
AT&T Plug&Share™ 54 Mbps Wireless Router 6800G 22
Basic > Advanced > Admin > Status > Shortcuts > Help
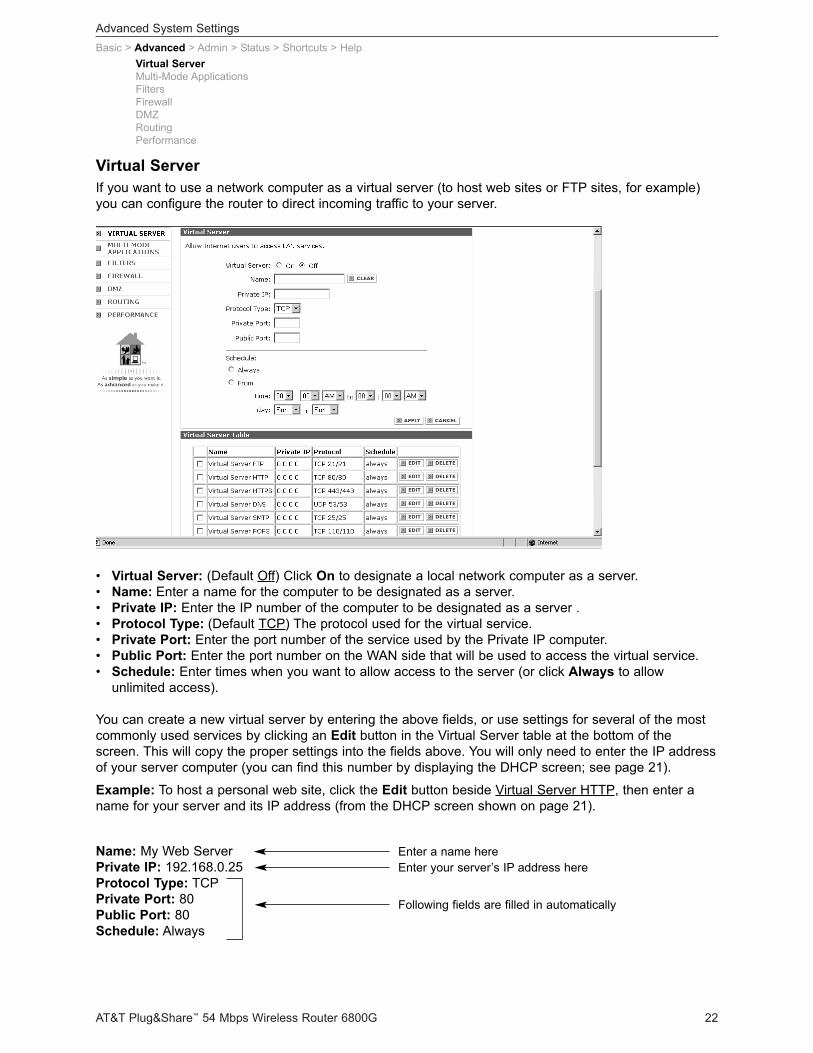
• Virtual Server: (Default Off) Click On to designate a local network computer as a server.• Name: Enter a name for the computer to be designated as a server.• Private IP: Enter the IP number of the computer to be designated as a server .• Protocol Type: (Default TCP) The protocol used for the virtual service.• Private Port: Enter the port number of the service used by the Private IP computer.• Public Port: Enter the port number on the WAN side that will be used to access the virtual service.• Schedule: Enter times when you want to allow access to the server (or click Always to allow
unlimited access).
You can create a new virtual server by entering the above fields, or use settings for several of the mostcommonly used services by clicking an Edit button in the Virtual Server table at the bottom of thescreen. This will copy the proper settings into the fields above. You will only need to enter the IP addressof your server computer (you can find this number by displaying the DHCP screen; see page 21).
Example: To host a personal web site, click the Edit button beside Virtual Server HTTP, then enter aname for your server and its IP address (from the DHCP screen shown on page 21).
Name: My Web ServerPrivate IP: 192.168.0.25 Protocol Type: TCPPrivate Port: 80 Public Port: 80 Schedule: Always
Virtual ServerMulti-Mode ApplicationsFiltersFirewallDMZRoutingPerformance
Virtual Server If you want to use a network computer as a virtual server (to host web sites or FTP sites, for example)you can configure the router to direct incoming traffic to your server.
Enter a name hereEnter your server’s IP address here
Following fields are filled in automatically
Advanced System Settings
AT&T Plug&Share™ 54 Mbps Wireless Router 6800G 23
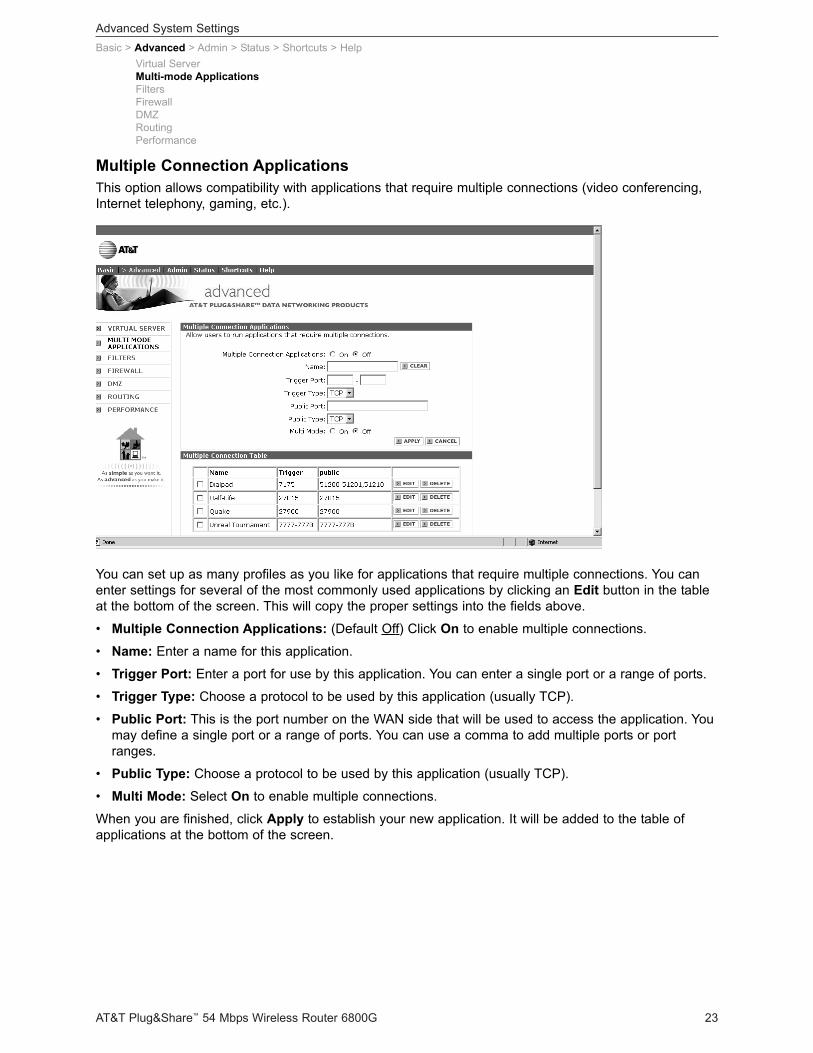
Basic > Advanced > Admin > Status > Shortcuts > Help
You can set up as many profiles as you like for applications that require multiple connections. You canenter settings for several of the most commonly used applications by clicking an Edit button in the tableat the bottom of the screen. This will copy the proper settings into the fields above.
• Multiple Connection Applications: (Default Off) Click On to enable multiple connections.
• Name: Enter a name for this application.
• Trigger Port: Enter a port for use by this application. You can enter a single port or a range of ports.
• Trigger Type: Choose a protocol to be used by this application (usually TCP).
• Public Port: This is the port number on the WAN side that will be used to access the application. Youmay define a single port or a range of ports. You can use a comma to add multiple ports or portranges.
• Public Type: Choose a protocol to be used by this application (usually TCP).
• Multi Mode: Select On to enable multiple connections.
When you are finished, click Apply to establish your new application. It will be added to the table ofapplications at the bottom of the screen.
Virtual ServerMulti-mode ApplicationsFiltersFirewallDMZRoutingPerformance
Multiple Connection Applications This option allows compatibility with applications that require multiple connections (video conferencing,Internet telephony, gaming, etc.).
Advanced System Settings
AT&T Plug&Share™ 54 Mbps Wireless Router 6800G 24
Basic > Advanced > Admin > Status > Shortcuts > Help
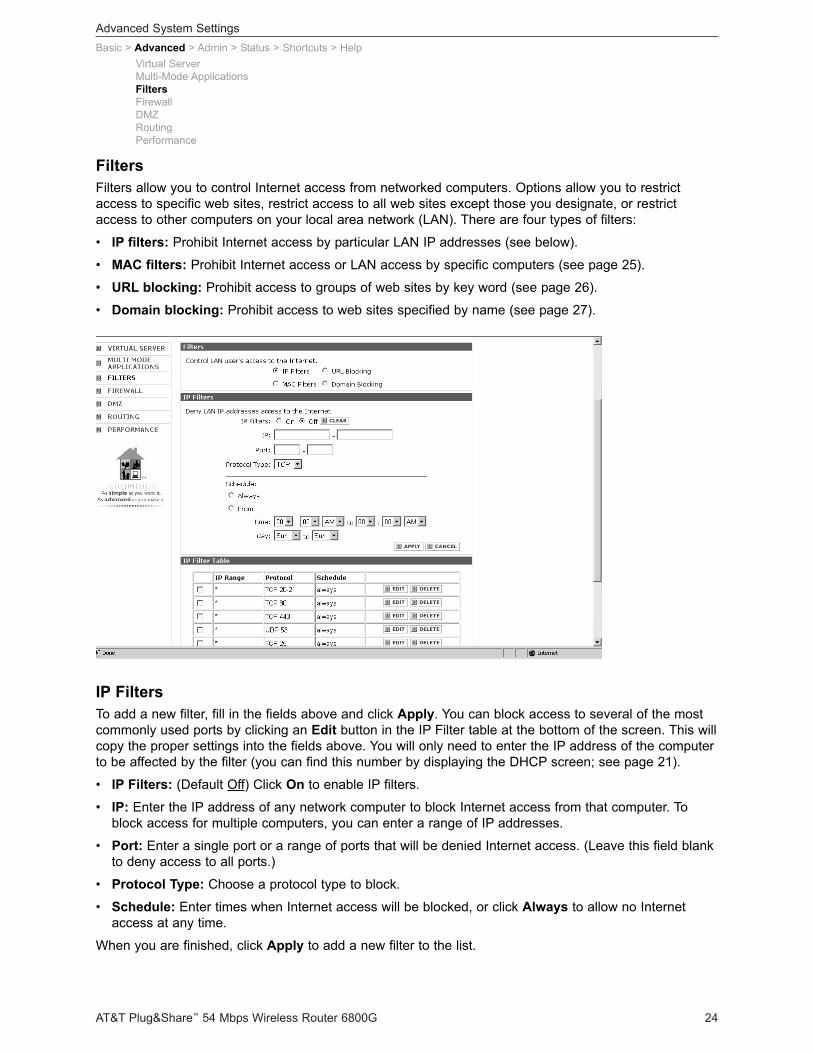
IP Filters To add a new filter, fill in the fields above and click Apply. You can block access to several of the mostcommonly used ports by clicking an Edit button in the IP Filter table at the bottom of the screen. This willcopy the proper settings into the fields above. You will only need to enter the IP address of the computerto be affected by the filter (you can find this number by displaying the DHCP screen; see page 21).
• IP Filters: (Default Off) Click On to enable IP filters.
• IP: Enter the IP address of any network computer to block Internet access from that computer. Toblock access for multiple computers, you can enter a range of IP addresses.
• Port: Enter a single port or a range of ports that will be denied Internet access. (Leave this field blankto deny access to all ports.)
• Protocol Type: Choose a protocol type to block.
• Schedule: Enter times when Internet access will be blocked, or click Always to allow no Internetaccess at any time.
When you are finished, click Apply to add a new filter to the list.
Virtual ServerMulti-Mode ApplicationsFiltersFirewallDMZRoutingPerformance
Filters Filters allow you to control Internet access from networked computers. Options allow you to restrictaccess to specific web sites, restrict access to all web sites except those you designate, or restrictaccess to other computers on your local area network (LAN). There are four types of filters:
• IP filters: Prohibit Internet access by particular LAN IP addresses (see below).
• MAC filters: Prohibit Internet access or LAN access by specific computers (see page 25).
• URL blocking: Prohibit access to groups of web sites by key word (see page 26).
• Domain blocking: Prohibit access to web sites specified by name (see page 27).
Advanced System Settings
AT&T Plug&Share™ 54 Mbps Wireless Router 6800G 25
Basic > Advanced > Admin > Status > Shortcuts > Help
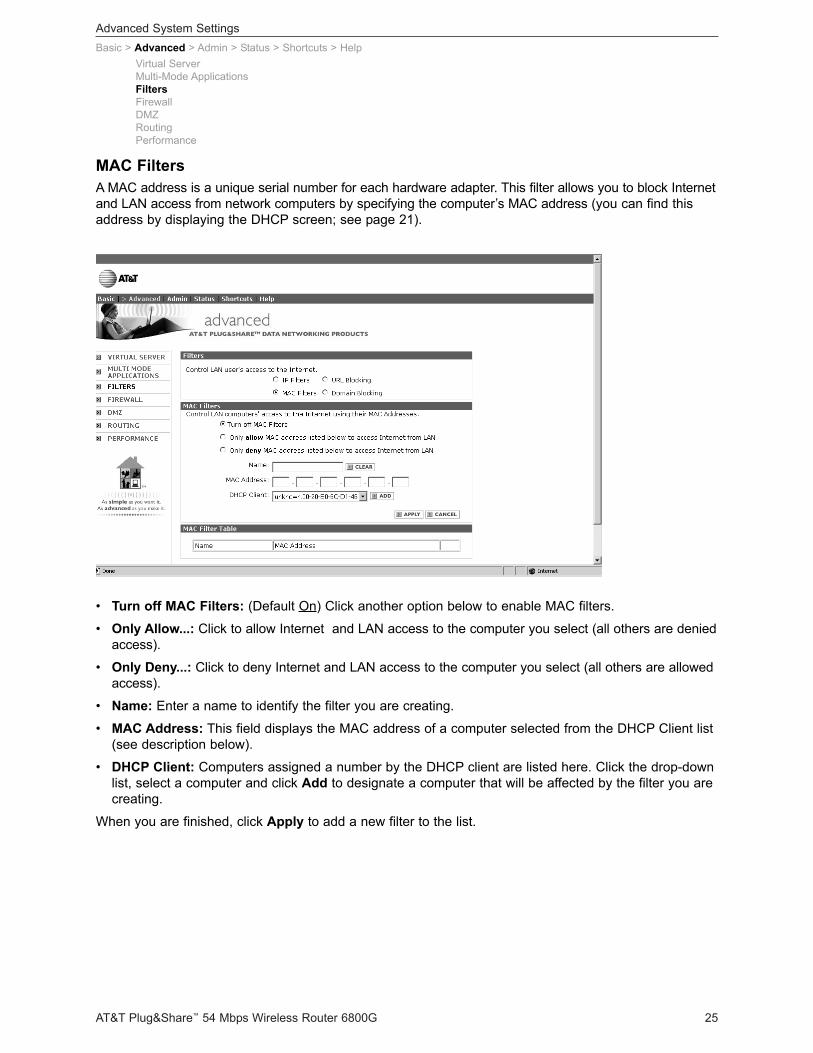
• Turn off MAC Filters: (Default On) Click another option below to enable MAC filters.
• Only Allow...: Click to allow Internet and LAN access to the computer you select (all others are deniedaccess).
• Only Deny...: Click to deny Internet and LAN access to the computer you select (all others are allowedaccess).
• Name: Enter a name to identify the filter you are creating.
• MAC Address: This field displays the MAC address of a computer selected from the DHCP Client list(see description below).
• DHCP Client: Computers assigned a number by the DHCP client are listed here. Click the drop-downlist, select a computer and click Add to designate a computer that will be affected by the filter you arecreating.
When you are finished, click Apply to add a new filter to the list.
Virtual ServerMulti-Mode ApplicationsFiltersFirewallDMZRoutingPerformance
MAC Filters A MAC address is a unique serial number for each hardware adapter. This filter allows you to block Internetand LAN access from network computers by specifying the computer’s MAC address (you can find thisaddress by displaying the DHCP screen; see page 21).
Advanced System Settings
AT&T Plug&Share™ 54 Mbps Wireless Router 6800G 26
Basic > Advanced > Admin > Status > Shortcuts > Help
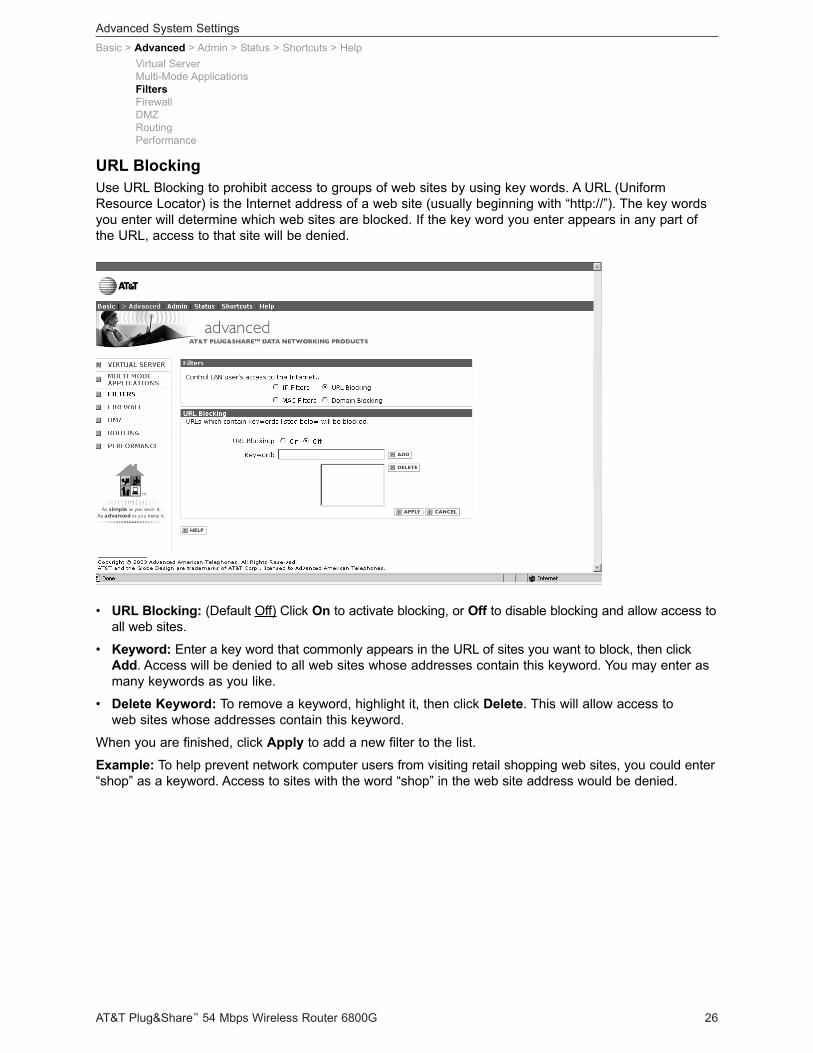
• URL Blocking: (Default Off) Click On to activate blocking, or Off to disable blocking and allow access toall web sites.
• Keyword: Enter a key word that commonly appears in the URL of sites you want to block, then clickAdd. Access will be denied to all web sites whose addresses contain this keyword. You may enter asmany keywords as you like.
• Delete Keyword: To remove a keyword, highlight it, then click Delete. This will allow access to web sites whose addresses contain this keyword.
When you are finished, click Apply to add a new filter to the list.
Example: To help prevent network computer users from visiting retail shopping web sites, you could enter“shop” as a keyword. Access to sites with the word “shop” in the web site address would be denied.
Virtual ServerMulti-Mode ApplicationsFiltersFirewallDMZRoutingPerformance
URL BlockingUse URL Blocking to prohibit access to groups of web sites by using key words. A URL (UniformResource Locator) is the Internet address of a web site (usually beginning with “http://”). The key wordsyou enter will determine which web sites are blocked. If the key word you enter appears in any part ofthe URL, access to that site will be denied.
Advanced System Settings
AT&T Plug&Share™ 54 Mbps Wireless Router 6800G 27
Basic > Advanced > Admin > Status > Shortcuts > Help
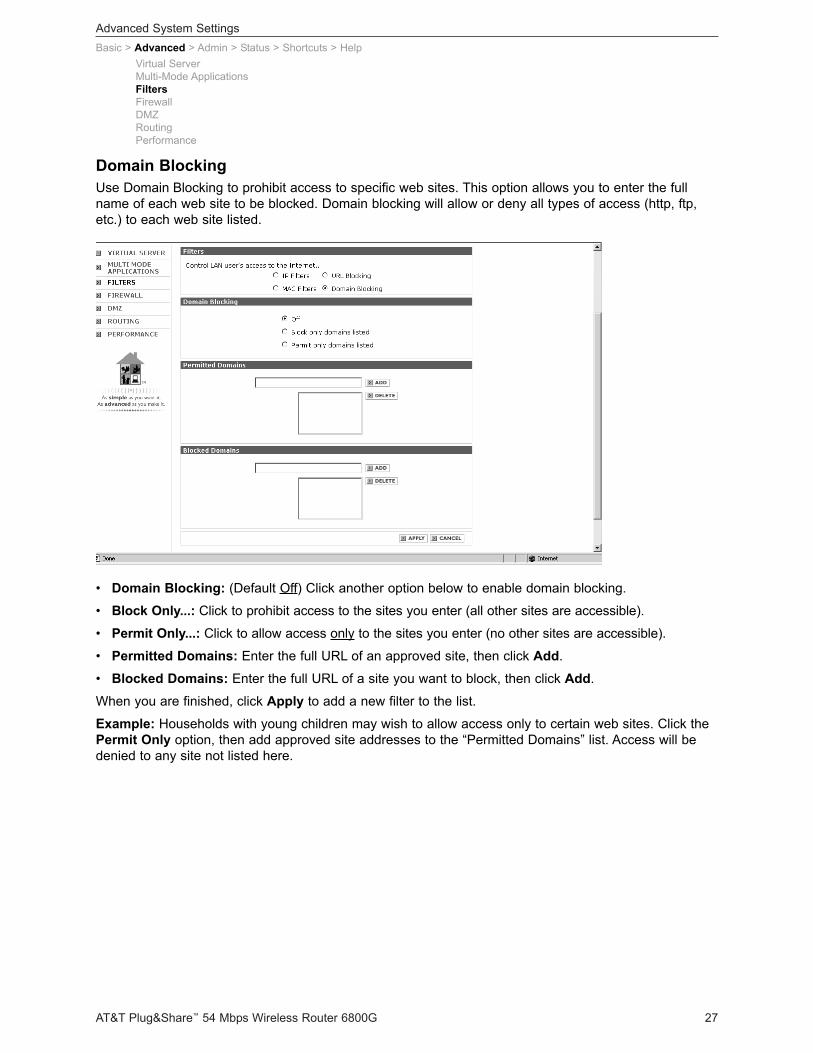
• Domain Blocking: (Default Off) Click another option below to enable domain blocking.
• Block Only...: Click to prohibit access to the sites you enter (all other sites are accessible).
• Permit Only...: Click to allow access only to the sites you enter (no other sites are accessible).
• Permitted Domains: Enter the full URL of an approved site, then click Add.
• Blocked Domains: Enter the full URL of a site you want to block, then click Add.
When you are finished, click Apply to add a new filter to the list.
Example: Households with young children may wish to allow access only to certain web sites. Click thePermit Only option, then add approved site addresses to the “Permitted Domains” list. Access will bedenied to any site not listed here.
Virtual ServerMulti-Mode ApplicationsFiltersFirewallDMZRoutingPerformance
Domain Blocking Use Domain Blocking to prohibit access to specific web sites. This option allows you to enter the fullname of each web site to be blocked. Domain blocking will allow or deny all types of access (http, ftp,etc.) to each web site listed.
Advanced System Settings
AT&T Plug&Share™ 54 Mbps Wireless Router 6800G 28
Basic > Advanced > Admin > Status > Shortcuts > Help
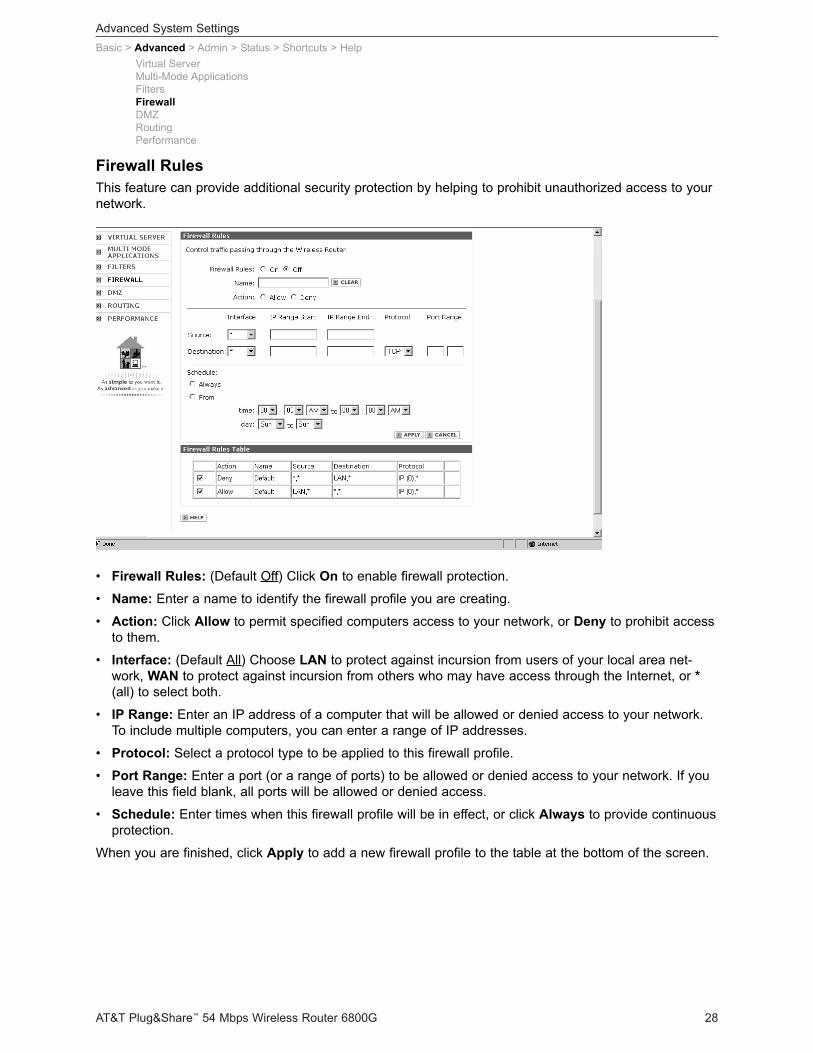
• Firewall Rules: (Default Off) Click On to enable firewall protection.
• Name: Enter a name to identify the firewall profile you are creating.
• Action: Click Allow to permit specified computers access to your network, or Deny to prohibit accessto them.
• Interface: (Default All) Choose LAN to protect against incursion from users of your local area net-work, WAN to protect against incursion from others who may have access through the Internet, or *(all) to select both.
• IP Range: Enter an IP address of a computer that will be allowed or denied access to your network.To include multiple computers, you can enter a range of IP addresses.
• Protocol: Select a protocol type to be applied to this firewall profile.
• Port Range: Enter a port (or a range of ports) to be allowed or denied access to your network. If youleave this field blank, all ports will be allowed or denied access.
• Schedule: Enter times when this firewall profile will be in effect, or click Always to provide continuousprotection.
When you are finished, click Apply to add a new firewall profile to the table at the bottom of the screen.
Virtual ServerMulti-Mode ApplicationsFiltersFirewallDMZRoutingPerformance
Firewall Rules This feature can provide additional security protection by helping to prohibit unauthorized access to yournetwork.
Advanced System Settings
AT&T Plug&Share™ 54 Mbps Wireless Router 6800G 29
Basic > Advanced > Admin > Status > Shortcuts > Help
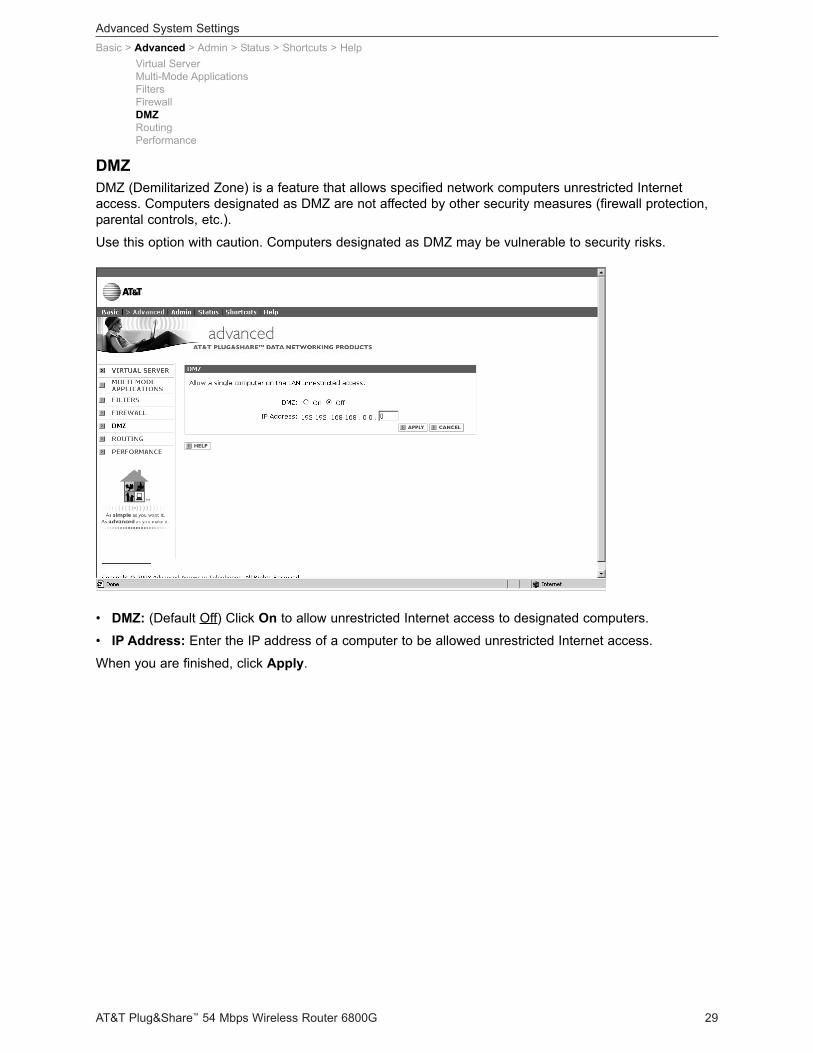
• DMZ: (Default Off) Click On to allow unrestricted Internet access to designated computers.
• IP Address: Enter the IP address of a computer to be allowed unrestricted Internet access.
When you are finished, click Apply.
Virtual ServerMulti-Mode ApplicationsFiltersFirewallDMZRoutingPerformance
DMZ DMZ (Demilitarized Zone) is a feature that allows specified network computers unrestricted Internetaccess. Computers designated as DMZ are not affected by other security measures (firewall protection,parental controls, etc.).
Use this option with caution. Computers designated as DMZ may be vulnerable to security risks.
Advanced System Settings
AT&T Plug&Share™ 54 Mbps Wireless Router 6800G 30
Basic > Advanced > Admin > Status > Shortcuts > Help
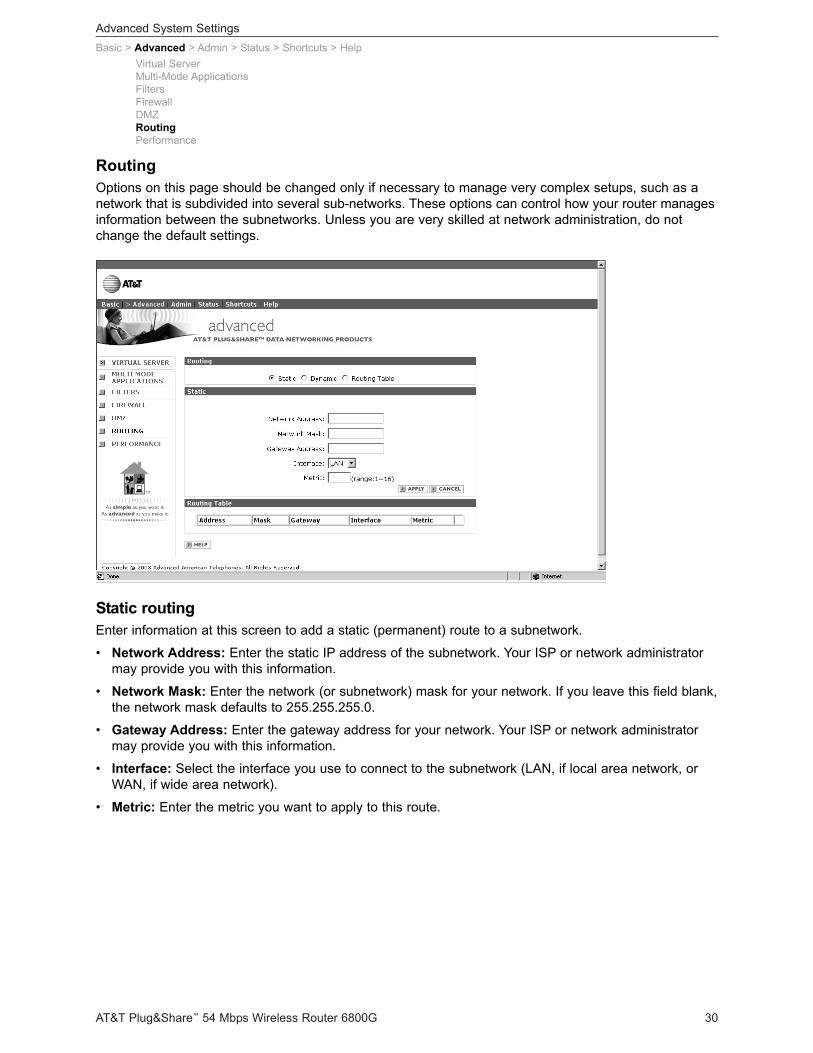
Static routingEnter information at this screen to add a static (permanent) route to a subnetwork.
• Network Address: Enter the static IP address of the subnetwork. Your ISP or network administratormay provide you with this information.
• Network Mask: Enter the network (or subnetwork) mask for your network. If you leave this field blank,the network mask defaults to 255.255.255.0.
• Gateway Address: Enter the gateway address for your network. Your ISP or network administratormay provide you with this information.
• Interface: Select the interface you use to connect to the subnetwork (LAN, if local area network, orWAN, if wide area network).
• Metric: Enter the metric you want to apply to this route.
Virtual ServerMulti-Mode ApplicationsFiltersFirewallDMZRoutingPerformance
RoutingOptions on this page should be changed only if necessary to manage very complex setups, such as anetwork that is subdivided into several sub-networks. These options can control how your router managesinformation between the subnetworks. Unless you are very skilled at network administration, do notchange the default settings.
Advanced System Settings
AT&T Plug&Share™ 54 Mbps Wireless Router 6800G 31
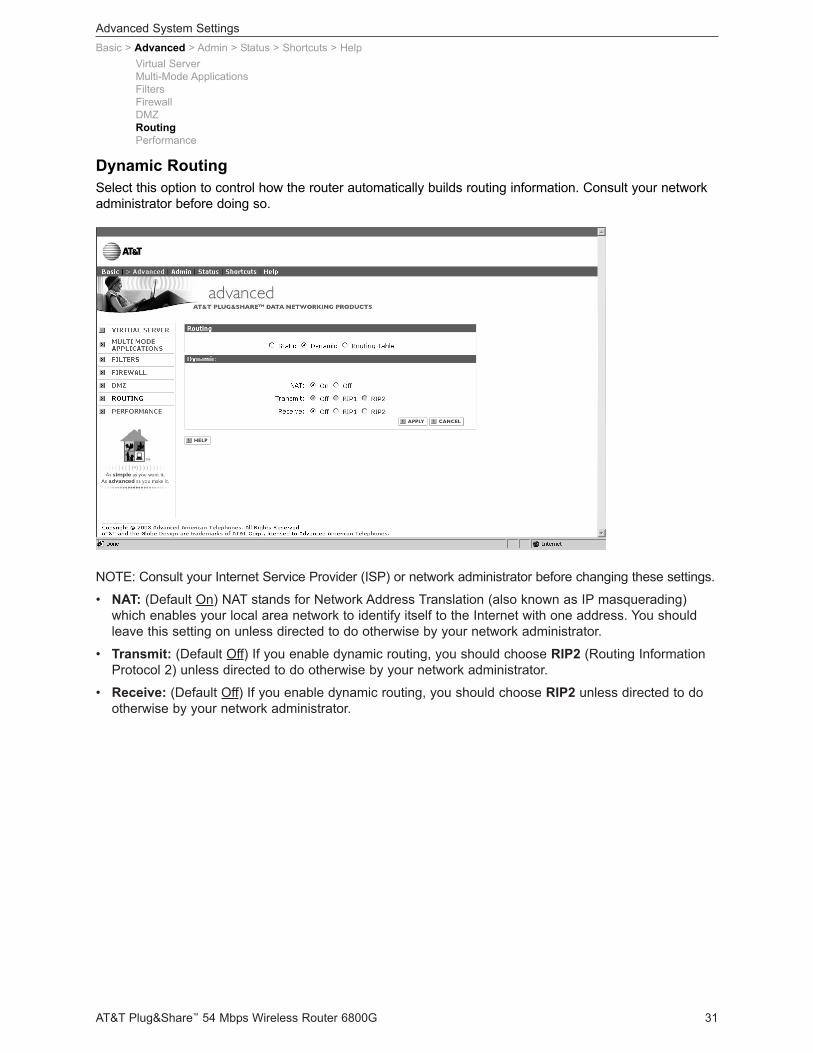
NOTE: Consult your Internet Service Provider (ISP) or network administrator before changing these settings.
• NAT: (Default On) NAT stands for Network Address Translation (also known as IP masquerading)which enables your local area network to identify itself to the Internet with one address. You shouldleave this setting on unless directed to do otherwise by your network administrator.
• Transmit: (Default Off) If you enable dynamic routing, you should choose RIP2 (Routing InformationProtocol 2) unless directed to do otherwise by your network administrator.
• Receive: (Default Off) If you enable dynamic routing, you should choose RIP2 unless directed to dootherwise by your network administrator.
Basic > Advanced > Admin > Status > Shortcuts > HelpVirtual ServerMulti-Mode ApplicationsFiltersFirewallDMZRoutingPerformance
Dynamic RoutingSelect this option to control how the router automatically builds routing information. Consult your networkadministrator before doing so.
Advanced System Settings
AT&T Plug&Share™ 54 Mbps Wireless Router 6800G 32
Basic > Advanced > Admin > Status > Shortcuts > Help
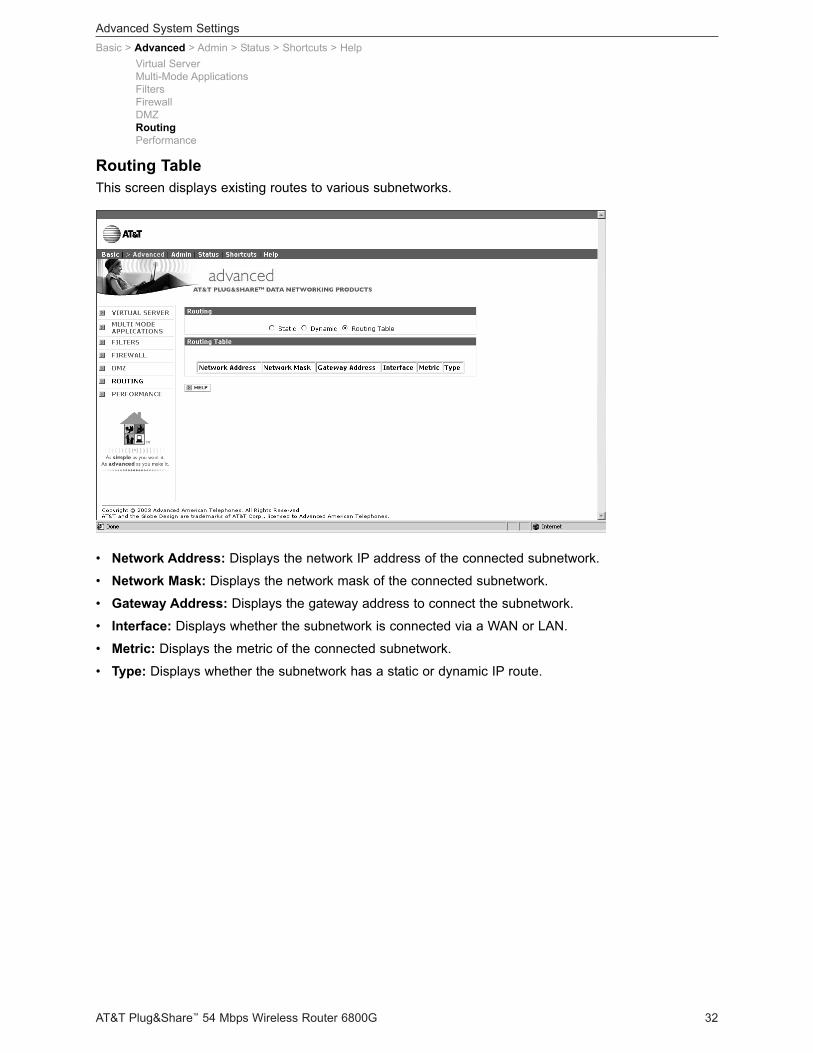
• Network Address: Displays the network IP address of the connected subnetwork.
• Network Mask: Displays the network mask of the connected subnetwork.
• Gateway Address: Displays the gateway address to connect the subnetwork.
• Interface: Displays whether the subnetwork is connected via a WAN or LAN.
• Metric: Displays the metric of the connected subnetwork.
• Type: Displays whether the subnetwork has a static or dynamic IP route.
Virtual ServerMulti-Mode ApplicationsFiltersFirewallDMZRoutingPerformance
Routing TableThis screen displays existing routes to various subnetworks.
Advanced System Settings
AT&T Plug&Share™ 54 Mbps Wireless Router 6800G 33
Basic > Advanced > Admin > Status > Shortcuts > Help
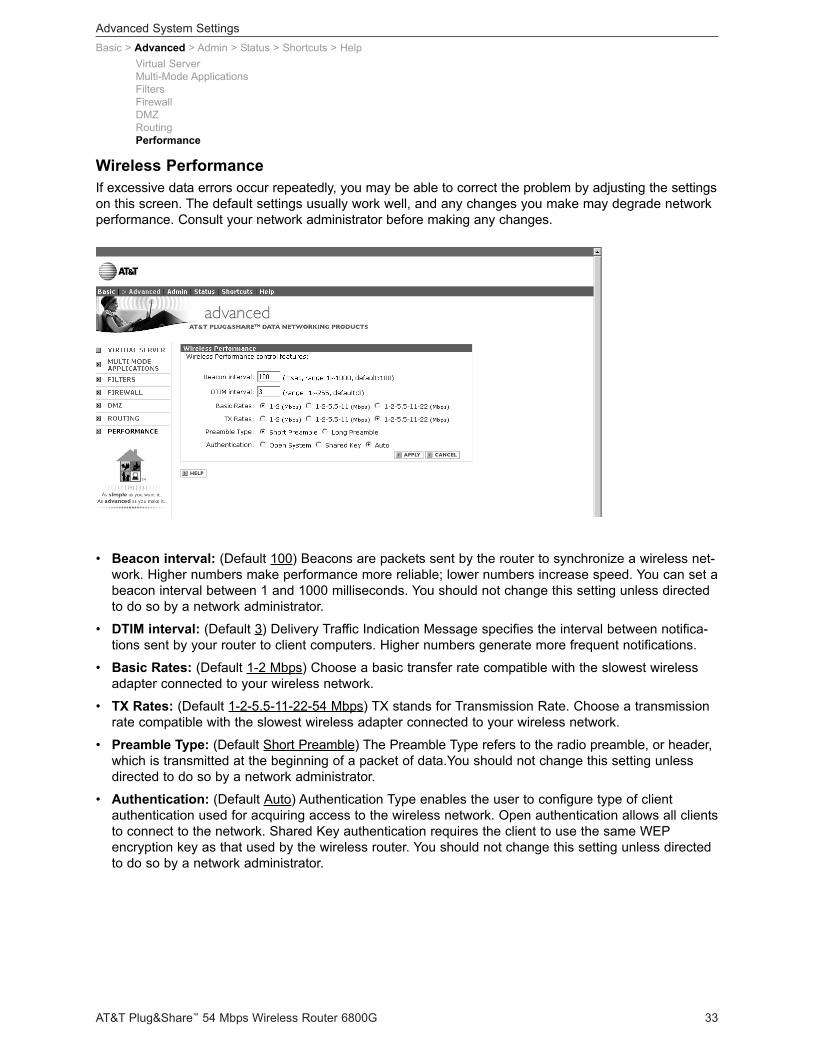
• Beacon interval: (Default 100) Beacons are packets sent by the router to synchronize a wireless net-work. Higher numbers make performance more reliable; lower numbers increase speed. You can set abeacon interval between 1 and 1000 milliseconds. You should not change this setting unless directedto do so by a network administrator.
• DTIM interval: (Default 3) Delivery Traffic Indication Message specifies the interval between notifica-tions sent by your router to client computers. Higher numbers generate more frequent notifications.
• Basic Rates: (Default 1-2 Mbps) Choose a basic transfer rate compatible with the slowest wirelessadapter connected to your wireless network.
• TX Rates: (Default 1-2-5.5-11-22-54 Mbps) TX stands for Transmission Rate. Choose a transmissionrate compatible with the slowest wireless adapter connected to your wireless network.
• Preamble Type: (Default Short Preamble) The Preamble Type refers to the radio preamble, or header,which is transmitted at the beginning of a packet of data.You should not change this setting unlessdirected to do so by a network administrator.
• Authentication: (Default Auto) Authentication Type enables the user to configure type of clientauthentication used for acquiring access to the wireless network. Open authentication allows all clientsto connect to the network. Shared Key authentication requires the client to use the same WEPencryption key as that used by the wireless router. You should not change this setting unless directedto do so by a network administrator.
Virtual ServerMulti-Mode ApplicationsFiltersFirewallDMZRoutingPerformance
Wireless Performance If excessive data errors occur repeatedly, you may be able to correct the problem by adjusting the settingson this screen. The default settings usually work well, and any changes you make may degrade networkperformance. Consult your network administrator before making any changes.
Administrator System Settings
AT&T Plug&Share™ 54 Mbps Wireless Router 6800G 34
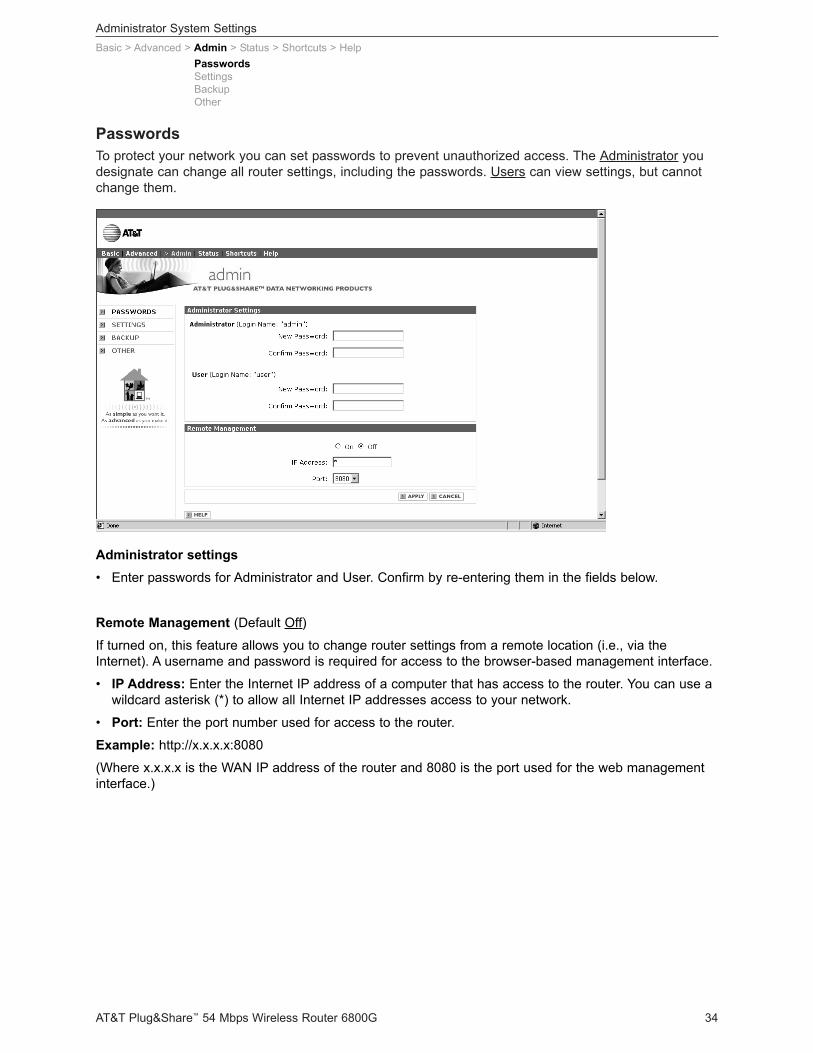
Passwords To protect your network you can set passwords to prevent unauthorized access. The Administrator youdesignate can change all router settings, including the passwords. Users can view settings, but cannotchange them.
Basic > Advanced > Admin > Status > Shortcuts > Help
Administrator settings• Enter passwords for Administrator and User. Confirm by re-entering them in the fields below.
Remote Management (Default Off)
If turned on, this feature allows you to change router settings from a remote location (i.e., via theInternet). A username and password is required for access to the browser-based management interface.
• IP Address: Enter the Internet IP address of a computer that has access to the router. You can use awildcard asterisk (*) to allow all Internet IP addresses access to your network.
• Port: Enter the port number used for access to the router.
Example: http://x.x.x.x:8080
(Where x.x.x.x is the WAN IP address of the router and 8080 is the port used for the web managementinterface.)
PasswordsSettingsBackupOther
Administrator System Settings
AT&T Plug&Share™ 54 Mbps Wireless Router 6800G 35
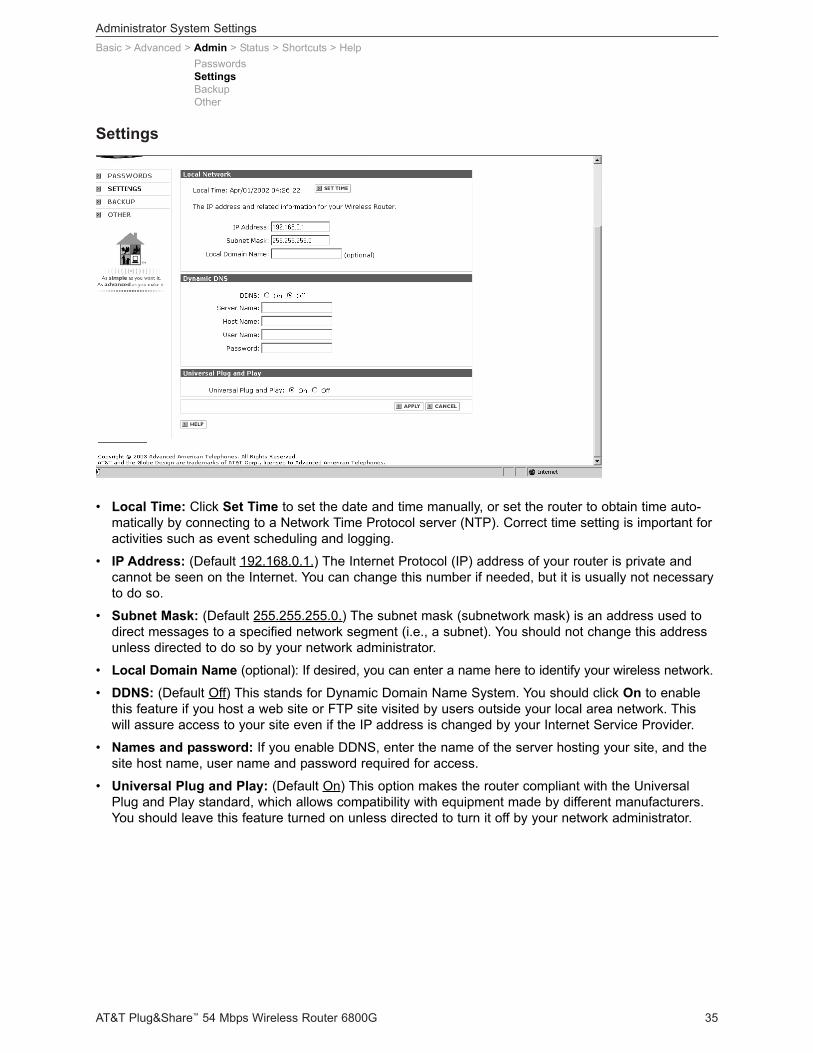
Settings
Basic > Advanced > Admin > Status > Shortcuts > Help
• Local Time: Click Set Time to set the date and time manually, or set the router to obtain time auto-matically by connecting to a Network Time Protocol server (NTP). Correct time setting is important foractivities such as event scheduling and logging.
• IP Address: (Default 192.168.0.1.) The Internet Protocol (IP) address of your router is private and cannot be seen on the Internet. You can change this number if needed, but it is usually not necessaryto do so.
• Subnet Mask: (Default 255.255.255.0.) The subnet mask (subnetwork mask) is an address used todirect messages to a specified network segment (i.e., a subnet). You should not change this addressunless directed to do so by your network administrator.
• Local Domain Name (optional): If desired, you can enter a name here to identify your wireless network.
• DDNS: (Default Off) This stands for Dynamic Domain Name System. You should click On to enablethis feature if you host a web site or FTP site visited by users outside your local area network. Thiswill assure access to your site even if the IP address is changed by your Internet Service Provider.
• Names and password: If you enable DDNS, enter the name of the server hosting your site, and thesite host name, user name and password required for access.
• Universal Plug and Play: (Default On) This option makes the router compliant with the UniversalPlug and Play standard, which allows compatibility with equipment made by different manufacturers.You should leave this feature turned on unless directed to turn it off by your network administrator.
PasswordsSettingsBackupOther
Administrator System Settings
AT&T Plug&Share™ 54 Mbps Wireless Router 6800G 36
Basic > Advanced > Admin > Status > Shortcuts > Help
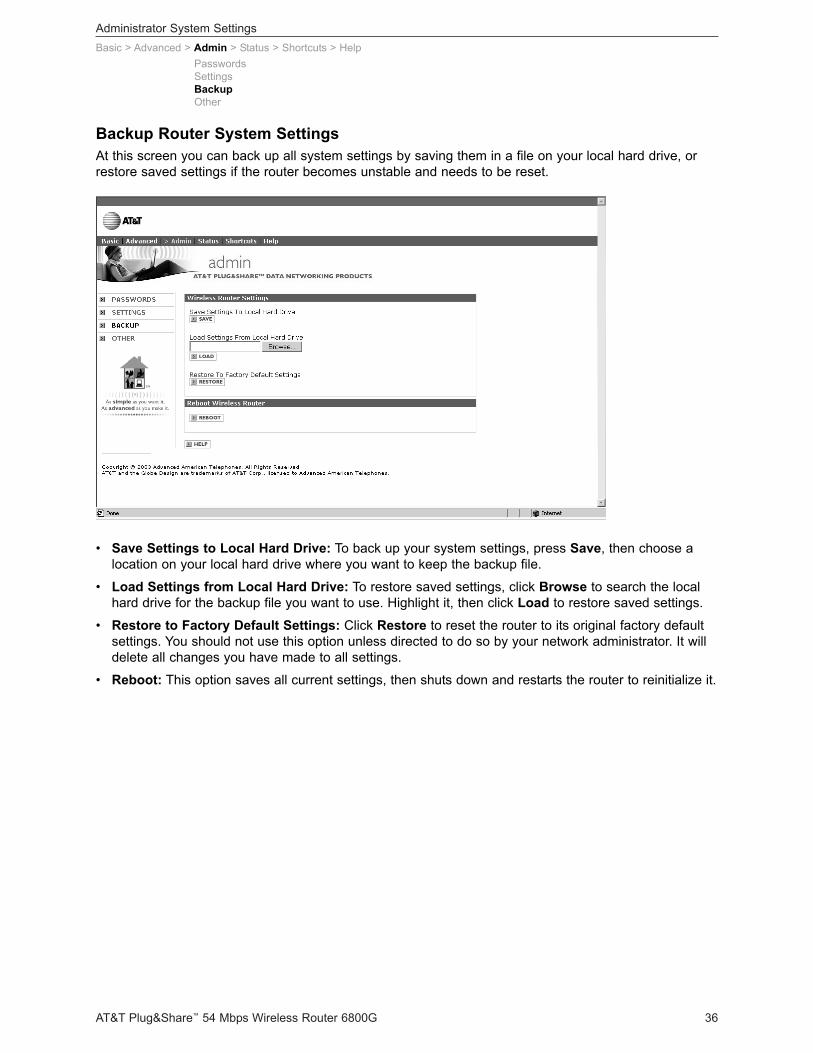
• Save Settings to Local Hard Drive: To back up your system settings, press Save, then choose alocation on your local hard drive where you want to keep the backup file.
• Load Settings from Local Hard Drive: To restore saved settings, click Browse to search the localhard drive for the backup file you want to use. Highlight it, then click Load to restore saved settings.
• Restore to Factory Default Settings: Click Restore to reset the router to its original factory defaultsettings. You should not use this option unless directed to do so by your network administrator. It willdelete all changes you have made to all settings.
• Reboot: This option saves all current settings, then shuts down and restarts the router to reinitialize it.
PasswordsSettingsBackupOther
Backup Router System Settings At this screen you can back up all system settings by saving them in a file on your local hard drive, orrestore saved settings if the router becomes unstable and needs to be reset.
Administrator System Settings
AT&T Plug&Share™ 54 Mbps Wireless Router 6800G 37
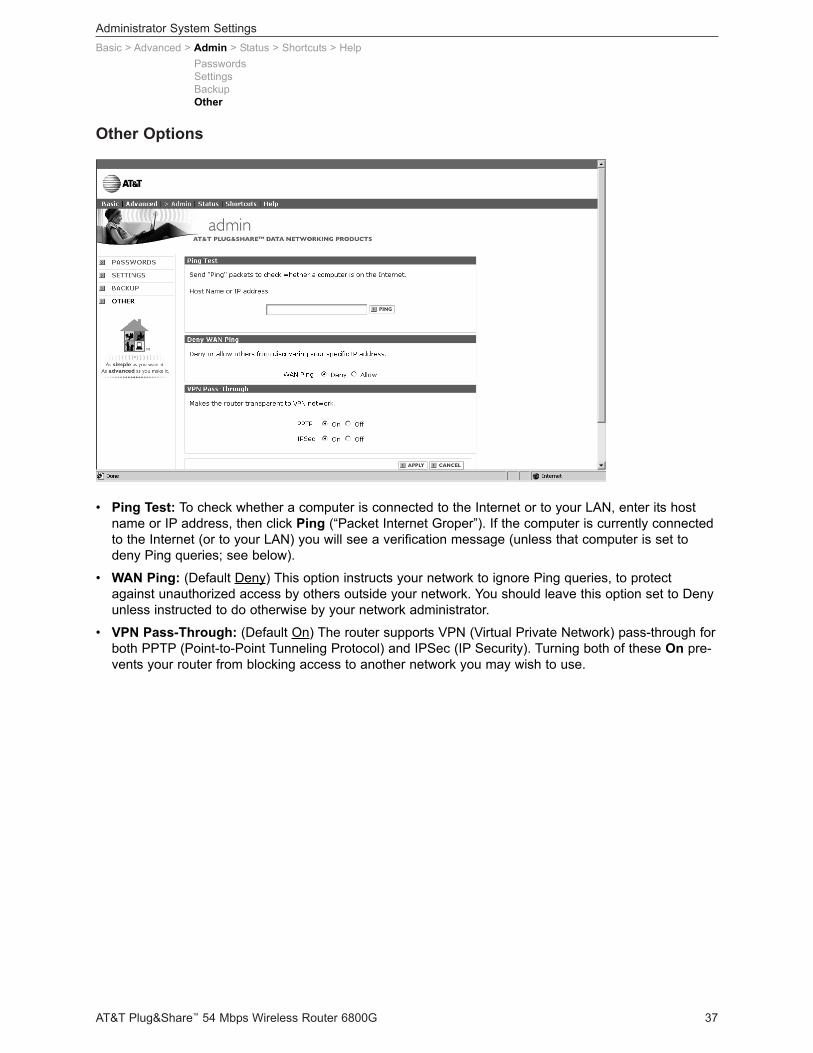
Other Options
Basic > Advanced > Admin > Status > Shortcuts > HelpPasswordsSettingsBackupOther
• Ping Test: To check whether a computer is connected to the Internet or to your LAN, enter its hostname or IP address, then click Ping (“Packet Internet Groper”). If the computer is currently connectedto the Internet (or to your LAN) you will see a verification message (unless that computer is set todeny Ping queries; see below).
• WAN Ping: (Default Deny) This option instructs your network to ignore Ping queries, to protectagainst unauthorized access by others outside your network. You should leave this option set to Denyunless instructed to do otherwise by your network administrator.
• VPN Pass-Through: (Default On) The router supports VPN (Virtual Private Network) pass-through forboth PPTP (Point-to-Point Tunneling Protocol) and IPSec (IP Security). Turning both of these On pre-vents your router from blocking access to another network you may wish to use.
Status Screens
AT&T Plug&Share™ 54 Mbps Wireless Router 6800G 38
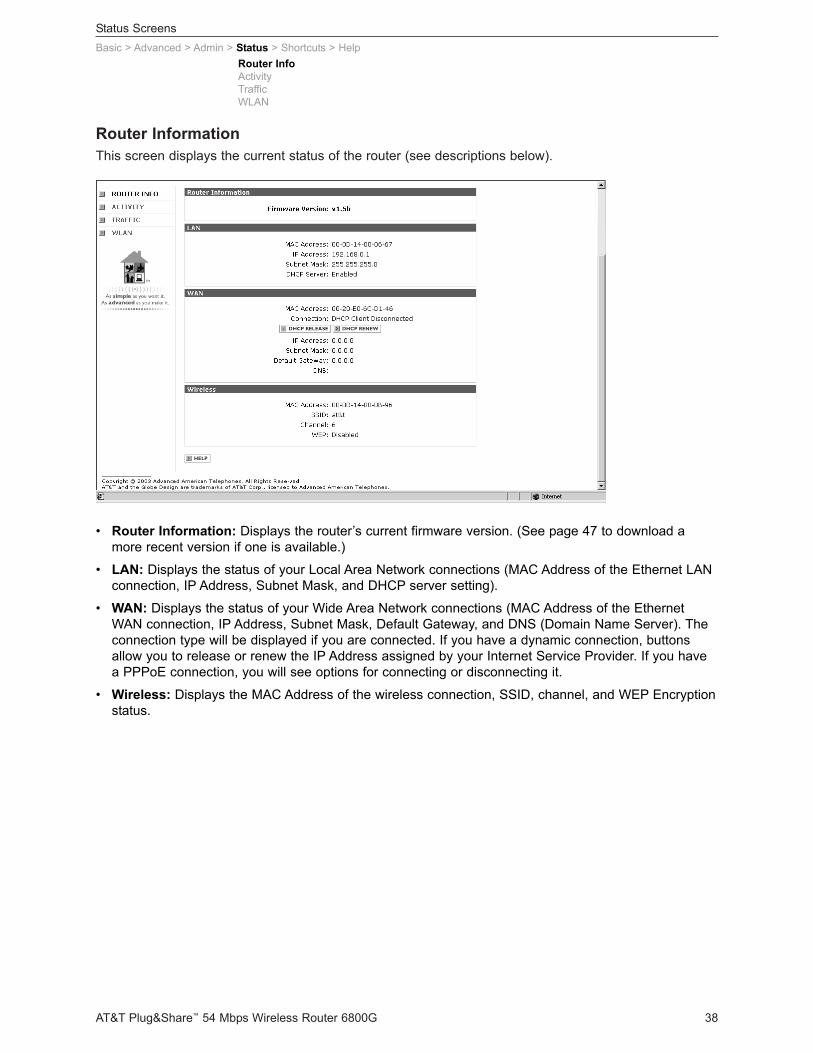
Router Information This screen displays the current status of the router (see descriptions below).
Basic > Advanced > Admin > Status > Shortcuts > HelpRouter InfoActivityTrafficWLAN
• Router Information: Displays the router’s current firmware version. (See page 47 to download amore recent version if one is available.)
• LAN: Displays the status of your Local Area Network connections (MAC Address of the Ethernet LANconnection, IP Address, Subnet Mask, and DHCP server setting).
• WAN: Displays the status of your Wide Area Network connections (MAC Address of the EthernetWAN connection, IP Address, Subnet Mask, Default Gateway, and DNS (Domain Name Server). Theconnection type will be displayed if you are connected. If you have a dynamic connection, buttonsallow you to release or renew the IP Address assigned by your Internet Service Provider. If you havea PPPoE connection, you will see options for connecting or disconnecting it.
• Wireless: Displays the MAC Address of the wireless connection, SSID, channel, and WEP Encryptionstatus.
Status Screens
AT&T Plug&Share™ 54 Mbps Wireless Router 6800G 39
Basic > Advanced > Admin > Status > Shortcuts > HelpRouter InfoActivityTrafficWLAN
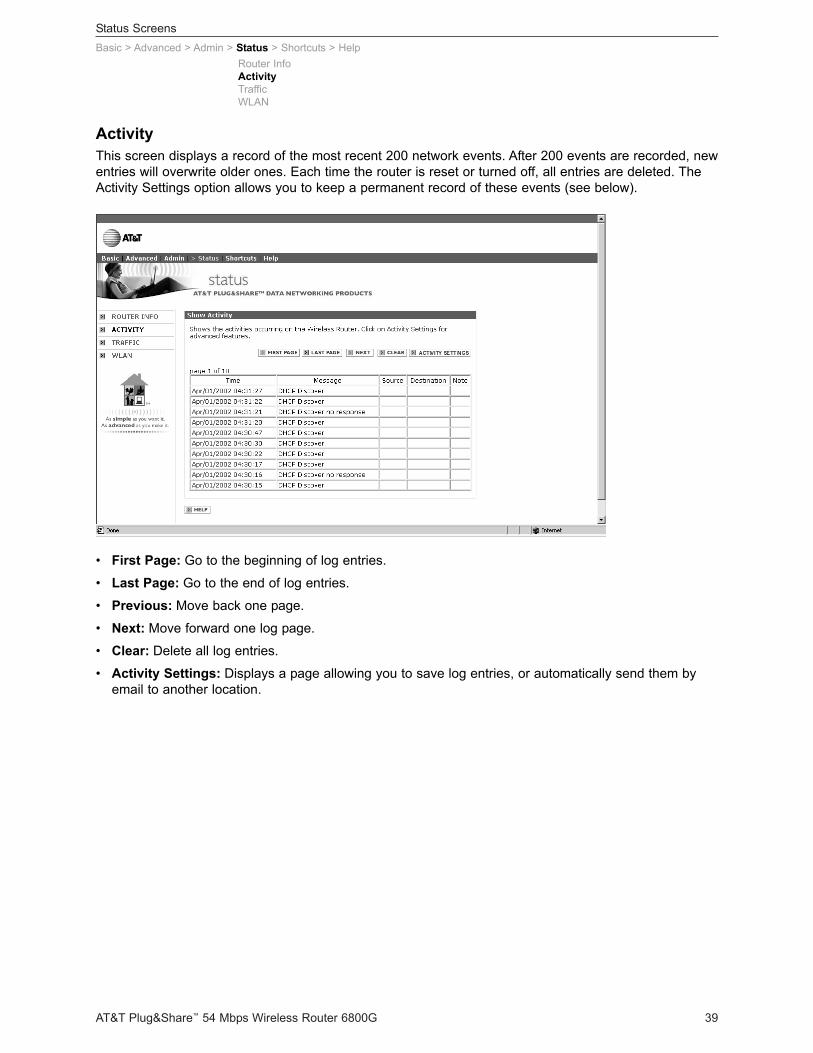
• First Page: Go to the beginning of log entries.
• Last Page: Go to the end of log entries.
• Previous: Move back one page.
• Next: Move forward one log page.
• Clear: Delete all log entries.
• Activity Settings: Displays a page allowing you to save log entries, or automatically send them byemail to another location.
ActivityThis screen displays a record of the most recent 200 network events. After 200 events are recorded, newentries will overwrite older ones. Each time the router is reset or turned off, all entries are deleted. TheActivity Settings option allows you to keep a permanent record of these events (see below).
Status Screens
AT&T Plug&Share™ 54 Mbps Wireless Router 6800G 40
Basic > Advanced > Admin > Status > Shortcuts > HelpRouter InfoActivityTrafficWLAN
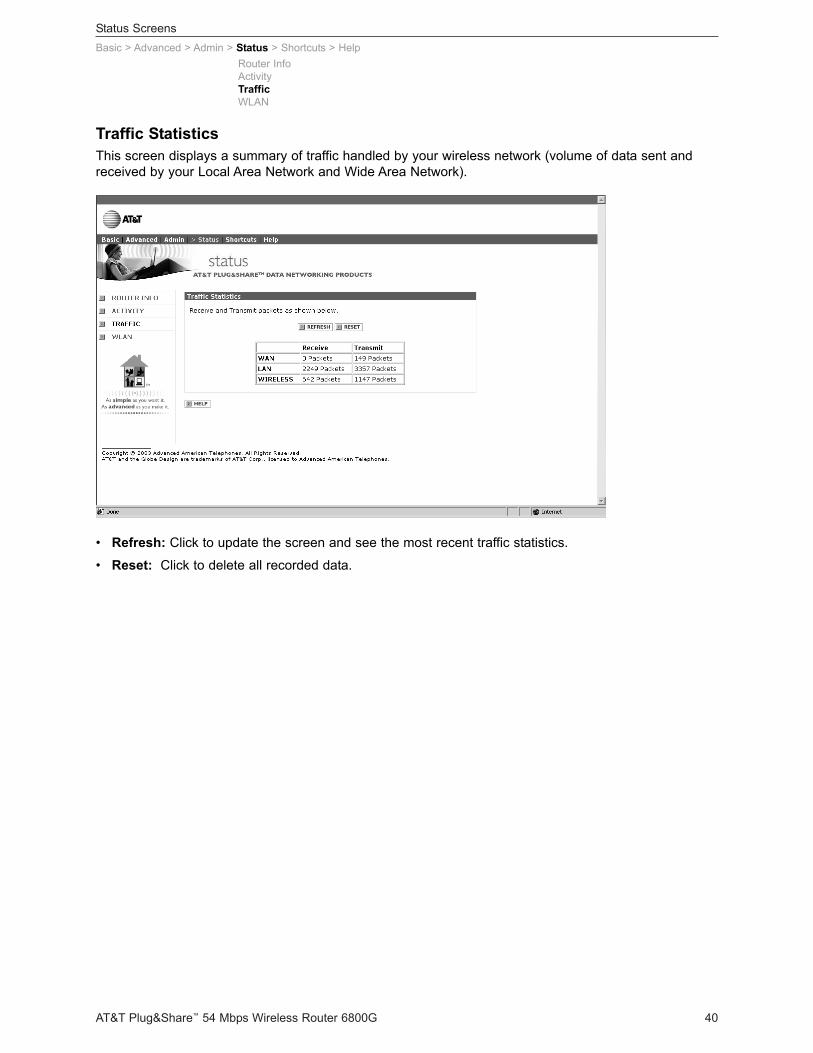
• Refresh: Click to update the screen and see the most recent traffic statistics.
• Reset: Click to delete all recorded data.
Traffic Statistics This screen displays a summary of traffic handled by your wireless network (volume of data sent andreceived by your Local Area Network and Wide Area Network).
Status Screens
AT&T Plug&Share™ 54 Mbps Wireless Router 6800G 41
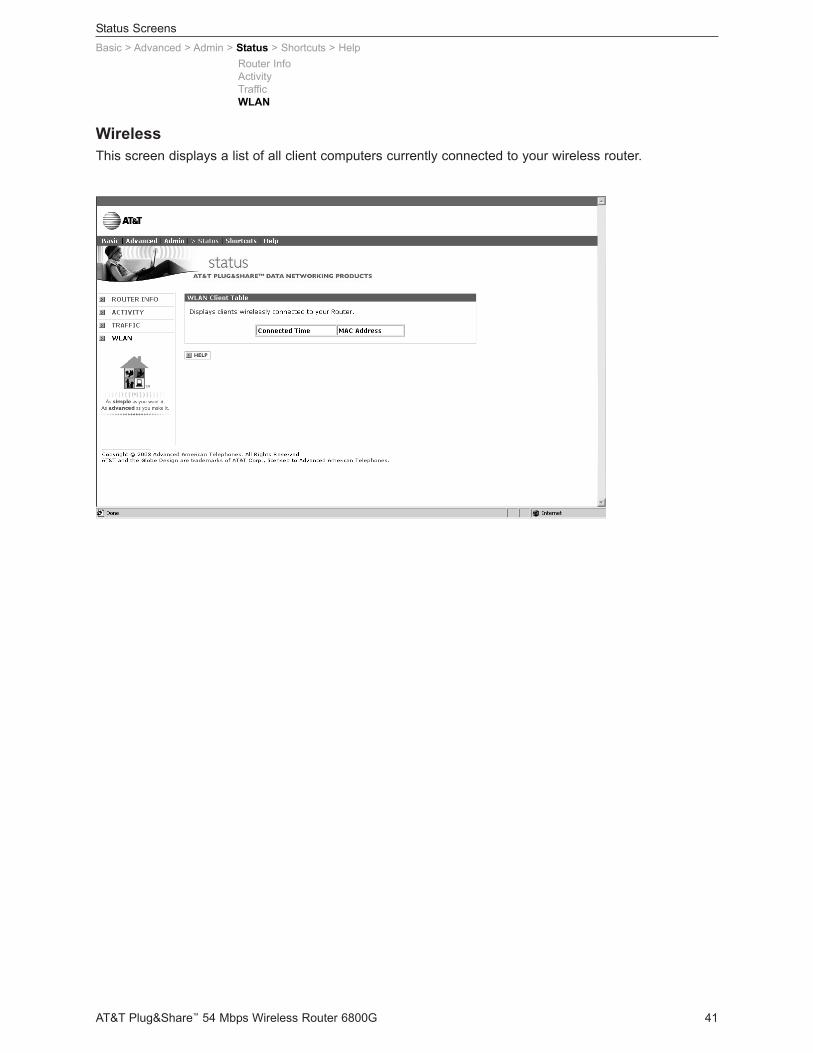
Wireless This screen displays a list of all client computers currently connected to your wireless router.
Basic > Advanced > Admin > Status > Shortcuts > HelpRouter InfoActivityTrafficWLAN

Shortcuts
AT&T Plug&Share™ 54 Mbps Wireless Router 6800G 42
Basic > Advanced > Admin > Status > Shortcuts > HelpParental ControlGamingPersonal Web SitePersonal FTP SiteInternet Telephony
• Parental Control: (Default Off) Click On to activate Parental Control for the selected computer. Toselect a computer, enter a computer name or MAC address, or click the drop-down menu to select acomputer from a list of DHCP Client computers. In the Name field, enter a name for this ParentalControl profile.
• Control Domains: Enter approved web site names here, then click the Add button after each entry.You many enter up to 5 web sites. Users of this computer will be denied access to any sites not listed.To remove a web site from the list, highlight it and click Delete. Click Apply when you are finishedmodifying the list.
NOTE: If you want to prohibit all Internet access from this computer, delete all names from the ControlDomains field (leaving it empty), then click Apply.
• Parental Controls: The parental control profiles you have created are listed in the table at the bottomof the page. To modify any existing profile, highlight the profile name and click the Edit button.
Parental ControlThis option allows you to restrict Internet access from networked computers. You can completely denyaccess to the Internet for a specific computer, or you can restrict access to a list of approved web sites(for example, you might enter "childs_school.com" , "reference.com" and similar web sites to allow yourchild to use the internet for homework).
Shortcuts
AT&T Plug&Share™ 54 Mbps Wireless Router 6800G 43
Basic > Advanced > Admin > Status > Shortcuts > HelpParental ControlGamingPersonal Web SitePersonal FTP SiteInternet Telephony
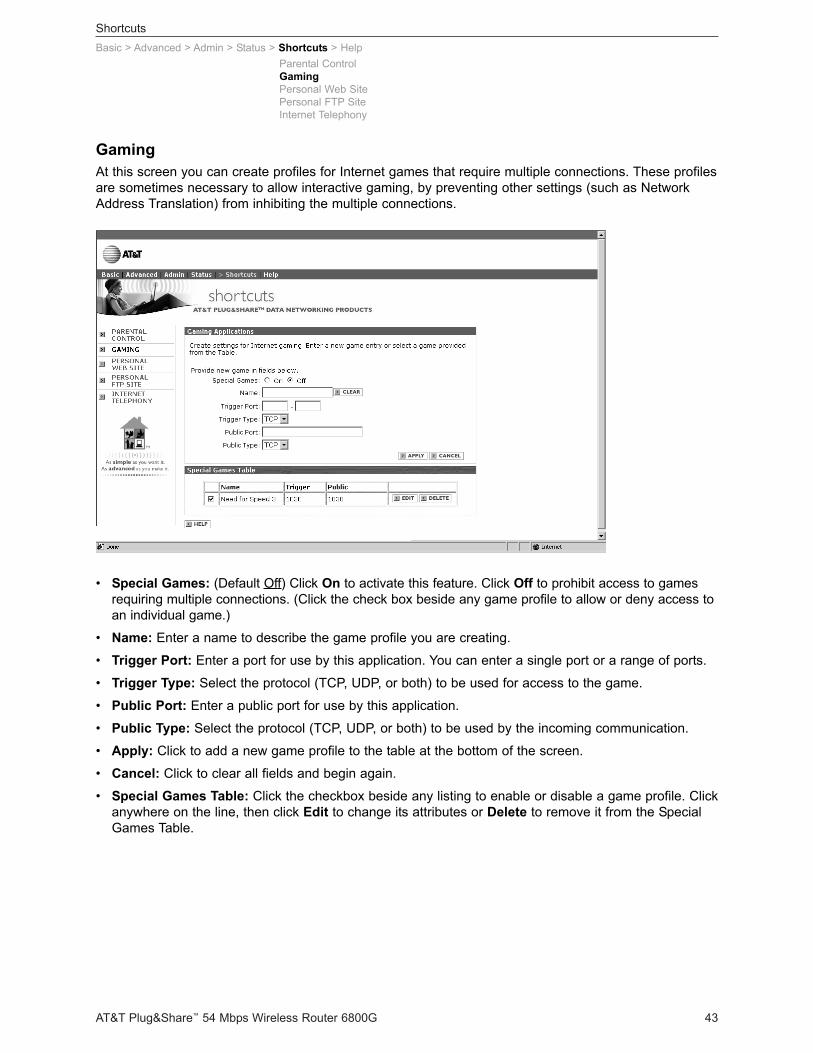
• Special Games: (Default Off) Click On to activate this feature. Click Off to prohibit access to gamesrequiring multiple connections. (Click the check box beside any game profile to allow or deny access toan individual game.)
• Name: Enter a name to describe the game profile you are creating.
• Trigger Port: Enter a port for use by this application. You can enter a single port or a range of ports.
• Trigger Type: Select the protocol (TCP, UDP, or both) to be used for access to the game.
• Public Port: Enter a public port for use by this application.
• Public Type: Select the protocol (TCP, UDP, or both) to be used by the incoming communication.
• Apply: Click to add a new game profile to the table at the bottom of the screen.
• Cancel: Click to clear all fields and begin again.
• Special Games Table: Click the checkbox beside any listing to enable or disable a game profile. Clickanywhere on the line, then click Edit to change its attributes or Delete to remove it from the SpecialGames Table.
GamingAt this screen you can create profiles for Internet games that require multiple connections. These profilesare sometimes necessary to allow interactive gaming, by preventing other settings (such as NetworkAddress Translation) from inhibiting the multiple connections.
Shortcuts
AT&T Plug&Share™ 54 Mbps Wireless Router 6800G 44
Basic > Advanced > Admin > Status > Shortcuts > HelpParental ControlGamingPersonal Web SitePersonal FTP SiteInternet Telephony
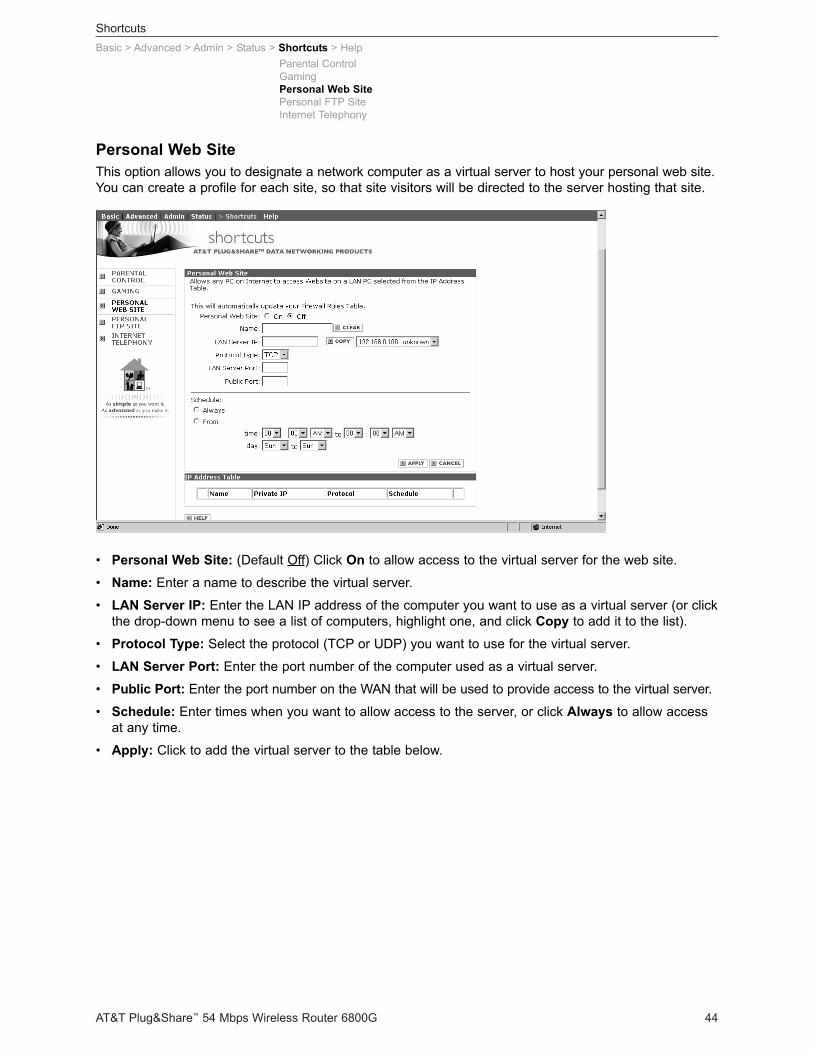
• Personal Web Site: (Default Off) Click On to allow access to the virtual server for the web site.
• Name: Enter a name to describe the virtual server.
• LAN Server IP: Enter the LAN IP address of the computer you want to use as a virtual server (or clickthe drop-down menu to see a list of computers, highlight one, and click Copy to add it to the list).
• Protocol Type: Select the protocol (TCP or UDP) you want to use for the virtual server.
• LAN Server Port: Enter the port number of the computer used as a virtual server.
• Public Port: Enter the port number on the WAN that will be used to provide access to the virtual server.
• Schedule: Enter times when you want to allow access to the server, or click Always to allow accessat any time.
• Apply: Click to add the virtual server to the table below.
Personal Web SiteThis option allows you to designate a network computer as a virtual server to host your personal web site.You can create a profile for each site, so that site visitors will be directed to the server hosting that site.
Shortcuts
AT&T Plug&Share™ 54 Mbps Wireless Router 6800G 45
Basic > Advanced > Admin > Status > Shortcuts > HelpParental ControlGamingPersonal Web SitePersonal FTP SiteInternet Telephony
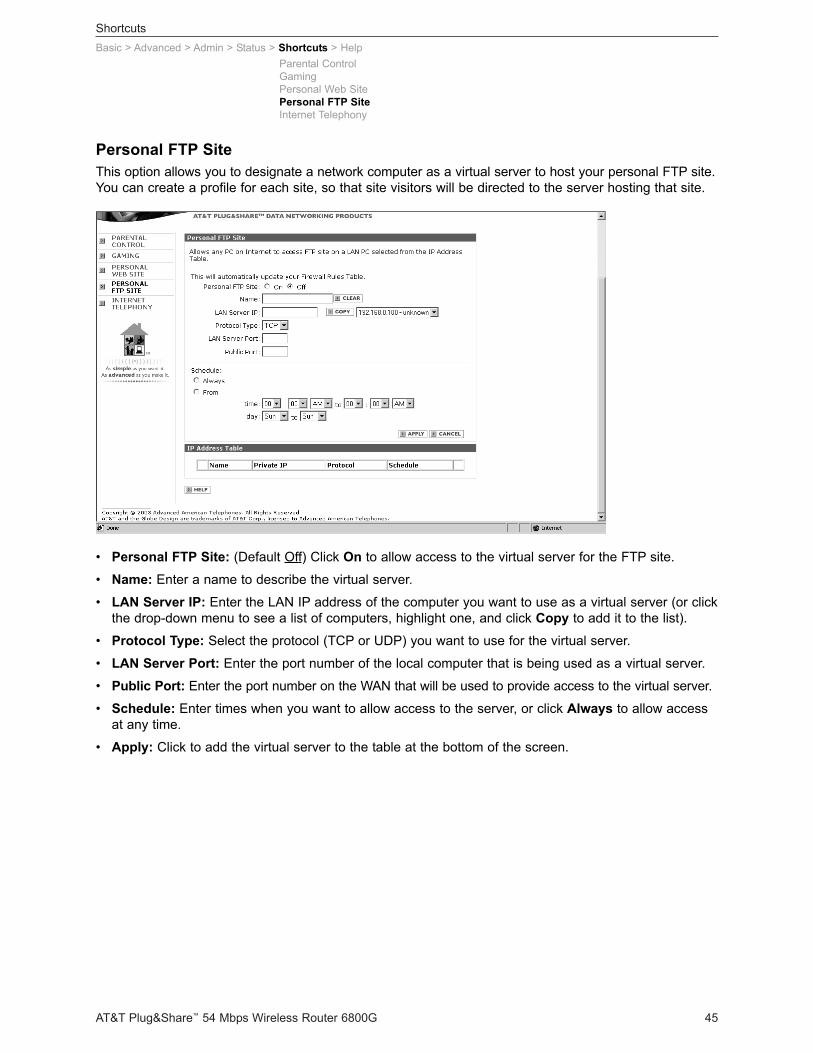
• Personal FTP Site: (Default Off) Click On to allow access to the virtual server for the FTP site.
• Name: Enter a name to describe the virtual server.
• LAN Server IP: Enter the LAN IP address of the computer you want to use as a virtual server (or clickthe drop-down menu to see a list of computers, highlight one, and click Copy to add it to the list).
• Protocol Type: Select the protocol (TCP or UDP) you want to use for the virtual server.
• LAN Server Port: Enter the port number of the local computer that is being used as a virtual server.
• Public Port: Enter the port number on the WAN that will be used to provide access to the virtual server.
• Schedule: Enter times when you want to allow access to the server, or click Always to allow accessat any time.
• Apply: Click to add the virtual server to the table at the bottom of the screen.
Personal FTP SiteThis option allows you to designate a network computer as a virtual server to host your personal FTP site.You can create a profile for each site, so that site visitors will be directed to the server hosting that site.
Shortcuts
AT&T Plug&Share™ 54 Mbps Wireless Router 6800G 46
Basic > Advanced > Admin > Status > Shortcuts > HelpParental ControlGamingPersonal Web SitePersonal FTP SiteInternet Telephony
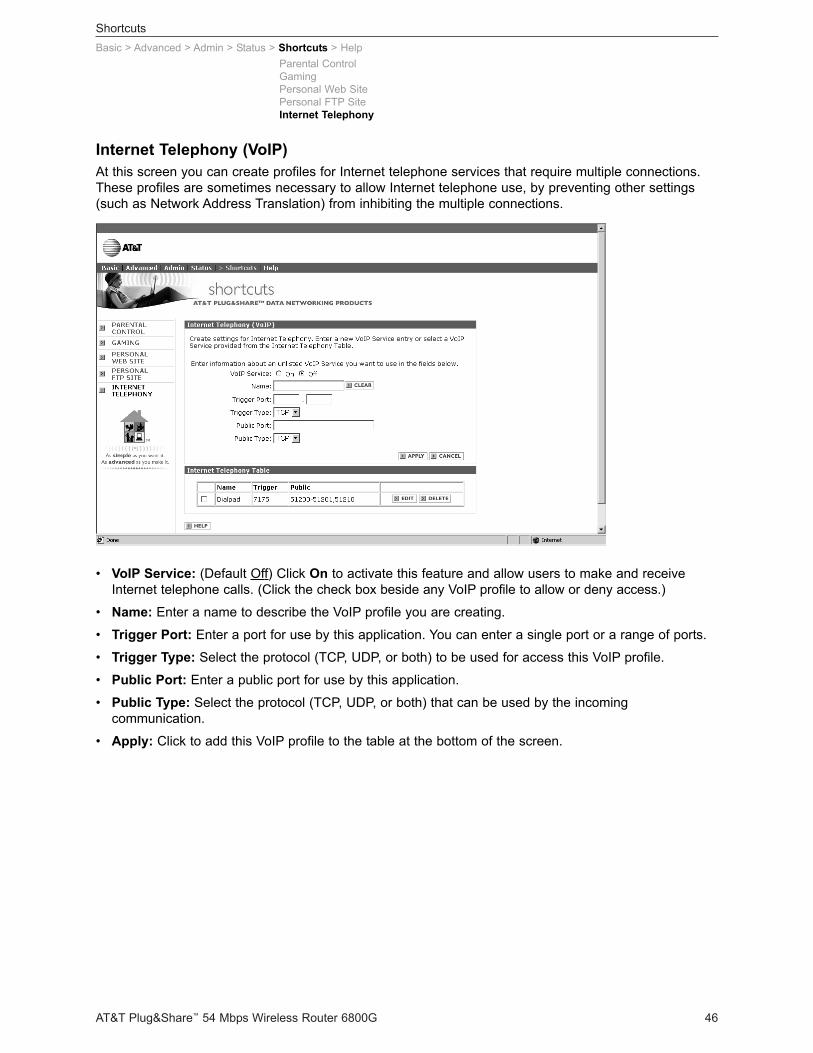
• VoIP Service: (Default Off) Click On to activate this feature and allow users to make and receiveInternet telephone calls. (Click the check box beside any VoIP profile to allow or deny access.)
• Name: Enter a name to describe the VoIP profile you are creating.
• Trigger Port: Enter a port for use by this application. You can enter a single port or a range of ports.
• Trigger Type: Select the protocol (TCP, UDP, or both) to be used for access this VoIP profile.
• Public Port: Enter a public port for use by this application.
• Public Type: Select the protocol (TCP, UDP, or both) that can be used by the incoming communication.
• Apply: Click to add this VoIP profile to the table at the bottom of the screen.
Internet Telephony (VoIP) At this screen you can create profiles for Internet telephone services that require multiple connections.These profiles are sometimes necessary to allow Internet telephone use, by preventing other settings(such as Network Address Translation) from inhibiting the multiple connections.
Upgrades
AT&T Plug&Share™ 54 Mbps Wireless Router 6800G 47
Basic > Advanced > Admin > Status > Shortcuts > Help
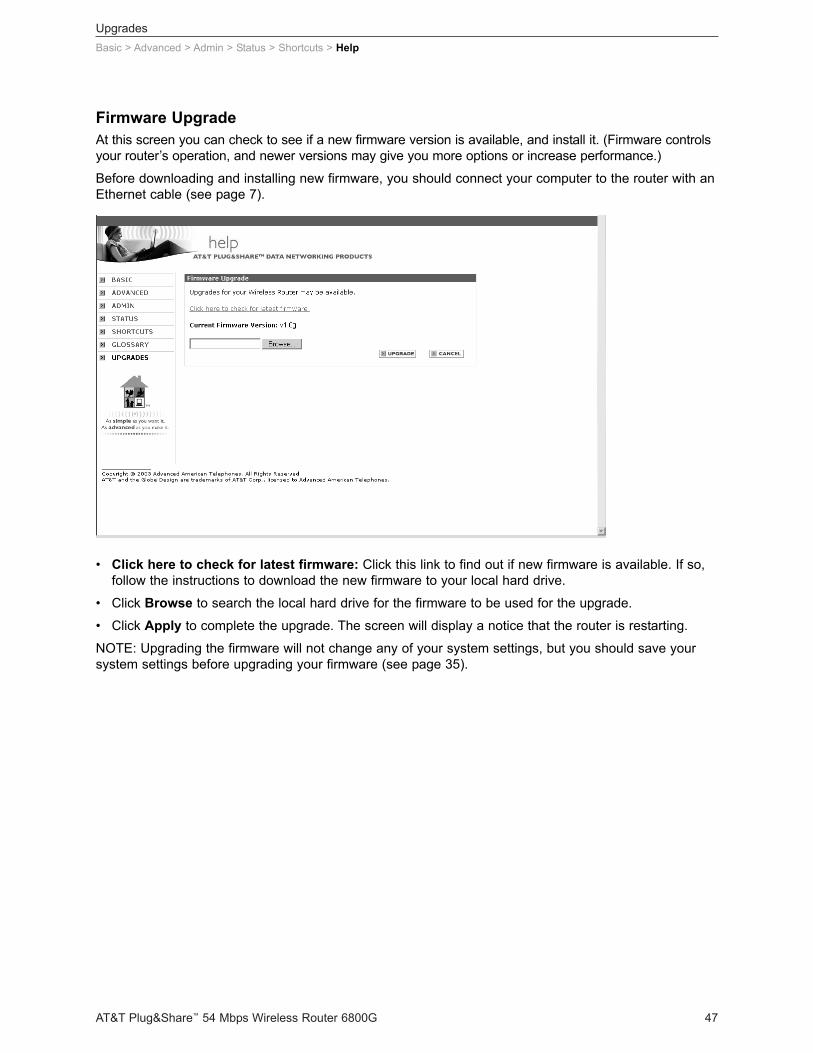
• Click here to check for latest firmware: Click this link to find out if new firmware is available. If so,follow the instructions to download the new firmware to your local hard drive.
• Click Browse to search the local hard drive for the firmware to be used for the upgrade.
• Click Apply to complete the upgrade. The screen will display a notice that the router is restarting.
NOTE: Upgrading the firmware will not change any of your system settings, but you should save yoursystem settings before upgrading your firmware (see page 35).
Firmware Upgrade At this screen you can check to see if a new firmware version is available, and install it. (Firmware controlsyour router’s operation, and newer versions may give you more options or increase performance.)
Before downloading and installing new firmware, you should connect your computer to the router with anEthernet cable (see page 7).
AT&T Plug&Share™ 54 Mbps Wireless Router 6800G 48
Configuring the Wireless Network
Change Network SettingsAfter your wireless network is installed you can view or change settings at any time. Launch yourInternet browser and enter http://ATT.Router in the URL (web address) field. If the router pagedoes not appear, enter http://192.168.0.1
Choose the types of settings you want to view or change. Use the horizontal tabs to displayappropriate vertical buttons and click on the vertical buttons on the left of your screen to displaythe desired screen.
Once you have changed settings on any screen, click Apply to apply the change to the router.
Configuring Windows® for File and Printer SharingSome configuration of Windows® is necessary to make full use of your wireless network. It willtake a few minutes, but it is a one-time process that you will not need to repeat.
Please turn to the pages listed for instructions on how to configure your operating system.
Windows® XP ............................Pages 49-55
Windows® 2000 ........................Pages 56-61
Windows® Me/98 SE ................Pages 62-67
CautionBefore making any changes to your networking settings, please review this section carefully.
Failure to follow these instructions precisely may result in the inability to log into your networkor computer.
If your computer is part of a work environment, please contact your IT professional before proceeding.
Configuring the Wireless Network — Windows® XP
AT&T Plug&Share™ 54 Mbps Wireless Router 6800G 49
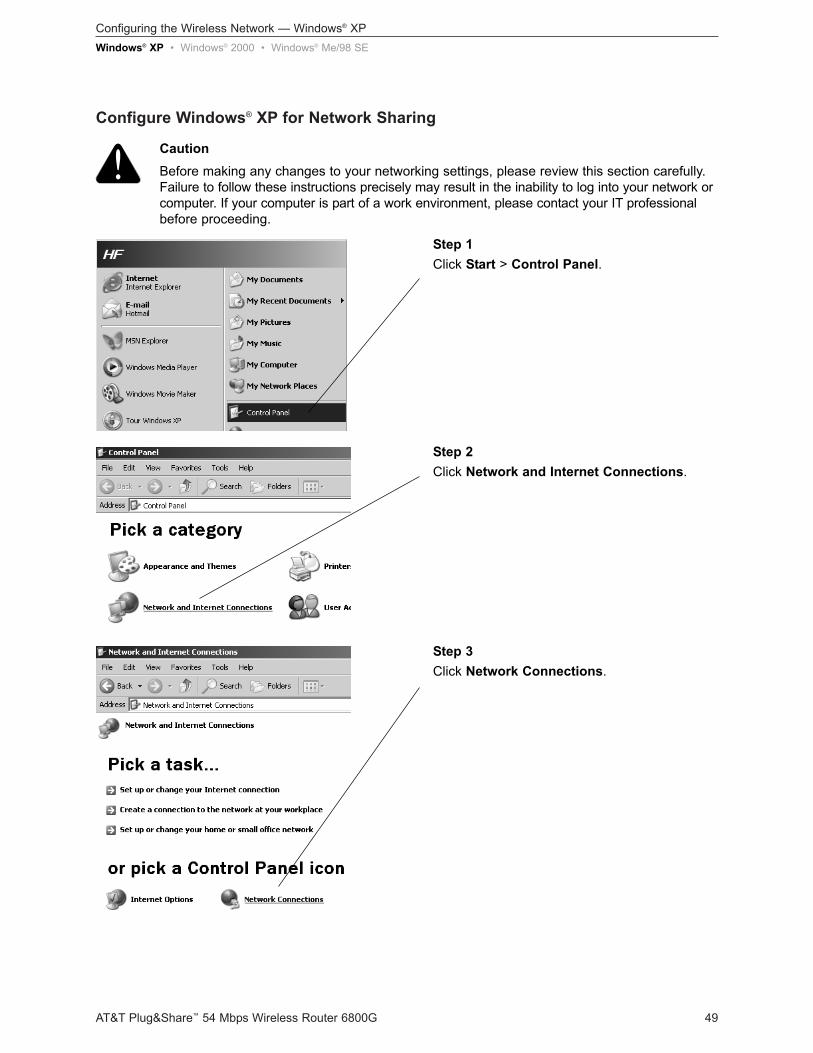
Configure Windows® XP for Network Sharing
Step 1Click Start > Control Panel.
Step 2Click Network and Internet Connections.
Step 3Click Network Connections.
Windows® XP • Windows® 2000 • Windows® Me/98 SE
CautionBefore making any changes to your networking settings, please review this section carefully.Failure to follow these instructions precisely may result in the inability to log into your network orcomputer. If your computer is part of a work environment, please contact your IT professionalbefore proceeding.

Configuring the Wireless Network — Windows® XP
AT&T Plug&Share™ 54 Mbps Wireless Router 6800G 50
Step 6Make sure File and Printer Sharing forMicrosoft Networks appears in this list, andcheck it if it is unchecked.
If you do not see it in the list, click the Installbutton and follow directions to install File andPrinter Sharing for Microsoft Networks.
Click OK when File and Printer Sharing isinstalled and checked.
Step 4Click Wireless Network Connection.
Step 5Click the Properties button.
Windows® XP • Windows® 2000 • Windows® Me/98 SE
Configuring the Wireless Network — Windows® XP
AT&T Plug&Share™ 54 Mbps Wireless Router 6800G 51
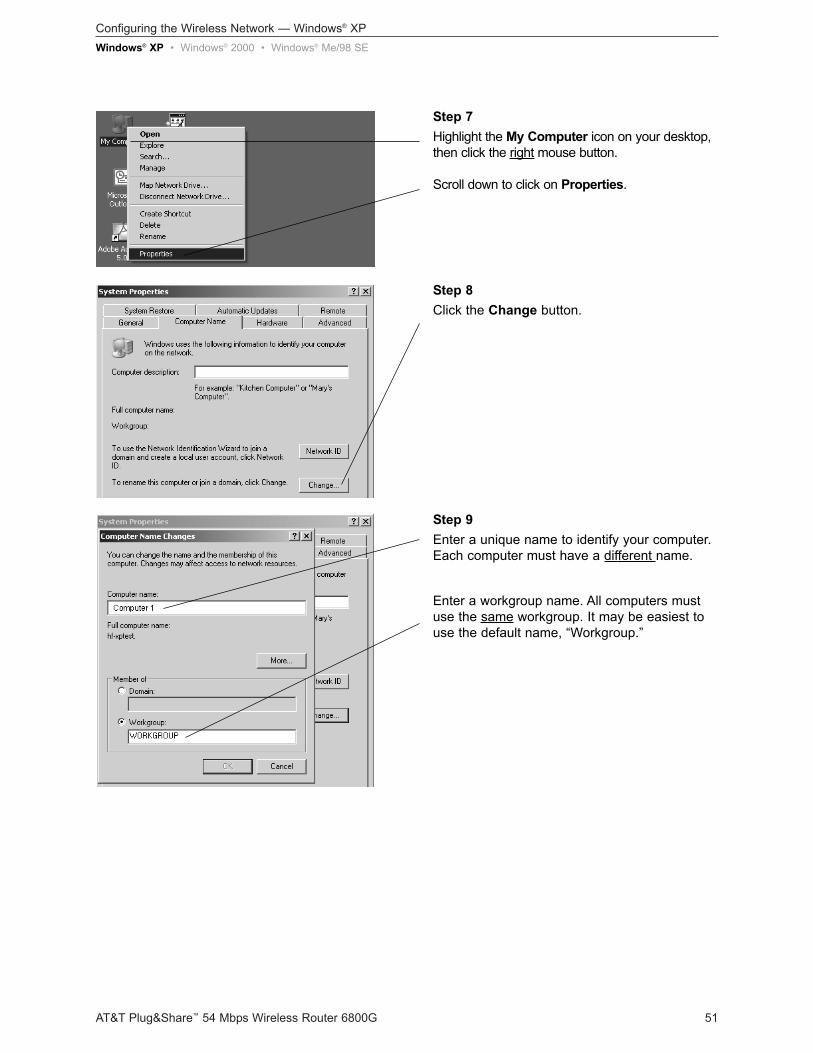
Step 7Highlight the My Computer icon on your desktop,then click the right mouse button.
Scroll down to click on Properties.
Step 8Click the Change button.
Step 9Enter a unique name to identify your computer.Each computer must have a different name.
Enter a workgroup name. All computers mustuse the same workgroup. It may be easiest touse the default name, “Workgroup.”
Windows® XP • Windows® 2000 • Windows® Me/98 SE
Configuring the Wireless Network — Windows® XP
AT&T Plug&Share™ 54 Mbps Wireless Router 6800G 52
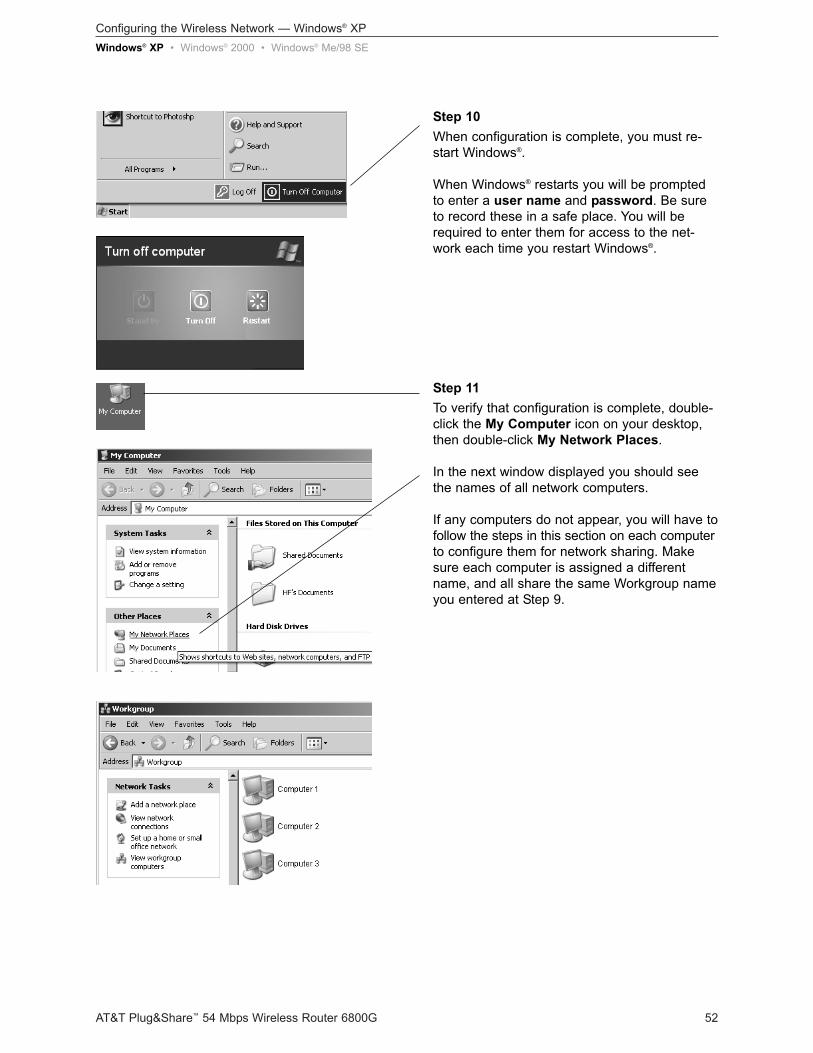
Step 10When configuration is complete, you must re-start Windows®.
When Windows® restarts you will be promptedto enter a user name and password. Be sureto record these in a safe place. You will berequired to enter them for access to the net-work each time you restart Windows®.
Step 11To verify that configuration is complete, double-click the My Computer icon on your desktop,then double-click My Network Places.
In the next window displayed you should seethe names of all network computers.
If any computers do not appear, you will have tofollow the steps in this section on each computerto configure them for network sharing. Makesure each computer is assigned a differentname, and all share the same Workgroup nameyou entered at Step 9.
Windows® XP • Windows® 2000 • Windows® Me/98 SE
Configuring the Wireless Network — Windows® XP
AT&T Plug&Share™ 54 Mbps Wireless Router 6800G 53
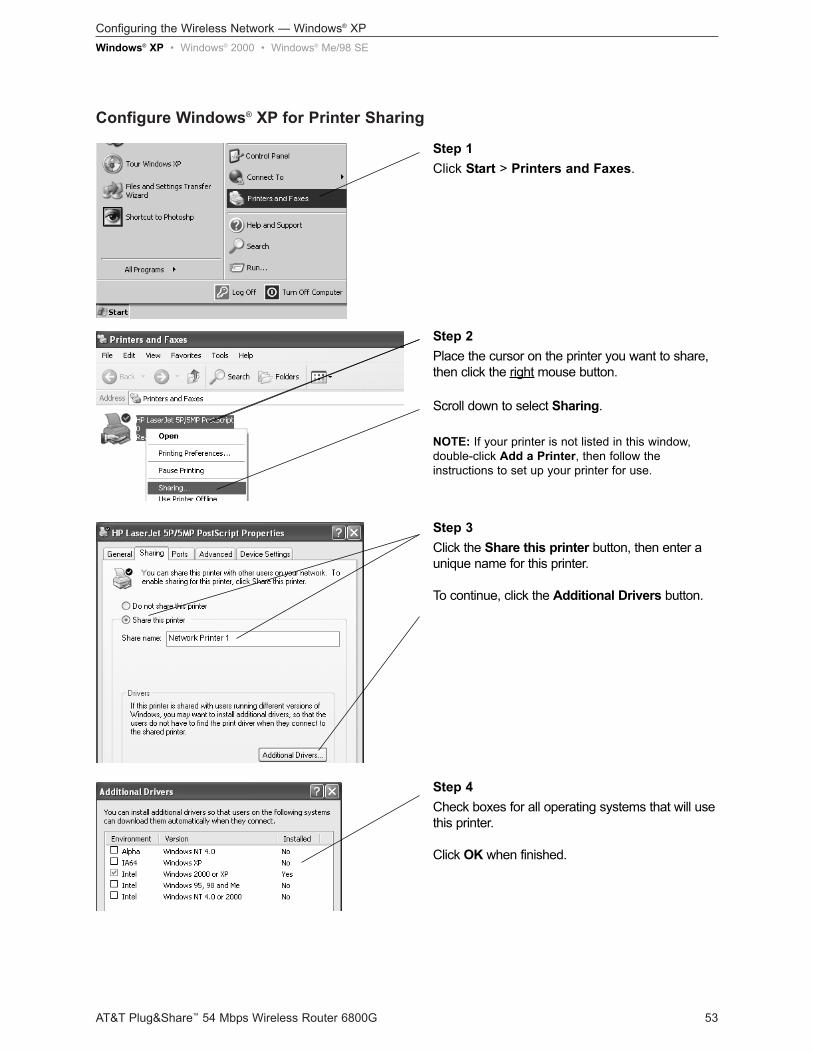
Configure Windows® XP for Printer Sharing
Step 1Click Start > Printers and Faxes.
Step 2Place the cursor on the printer you want to share,then click the right mouse button.
Scroll down to select Sharing.
NOTE: If your printer is not listed in this window,double-click Add a Printer, then follow the instructions to set up your printer for use.
Step 3Click the Share this printer button, then enter aunique name for this printer.
To continue, click the Additional Drivers button.
Step 4Check boxes for all operating systems that will usethis printer.
Click OK when finished.
Windows® XP • Windows® 2000 • Windows® Me/98 SE
Configuring the Wireless Network — Windows® XP
AT&T Plug&Share™ 54 Mbps Wireless Router 6800G 54
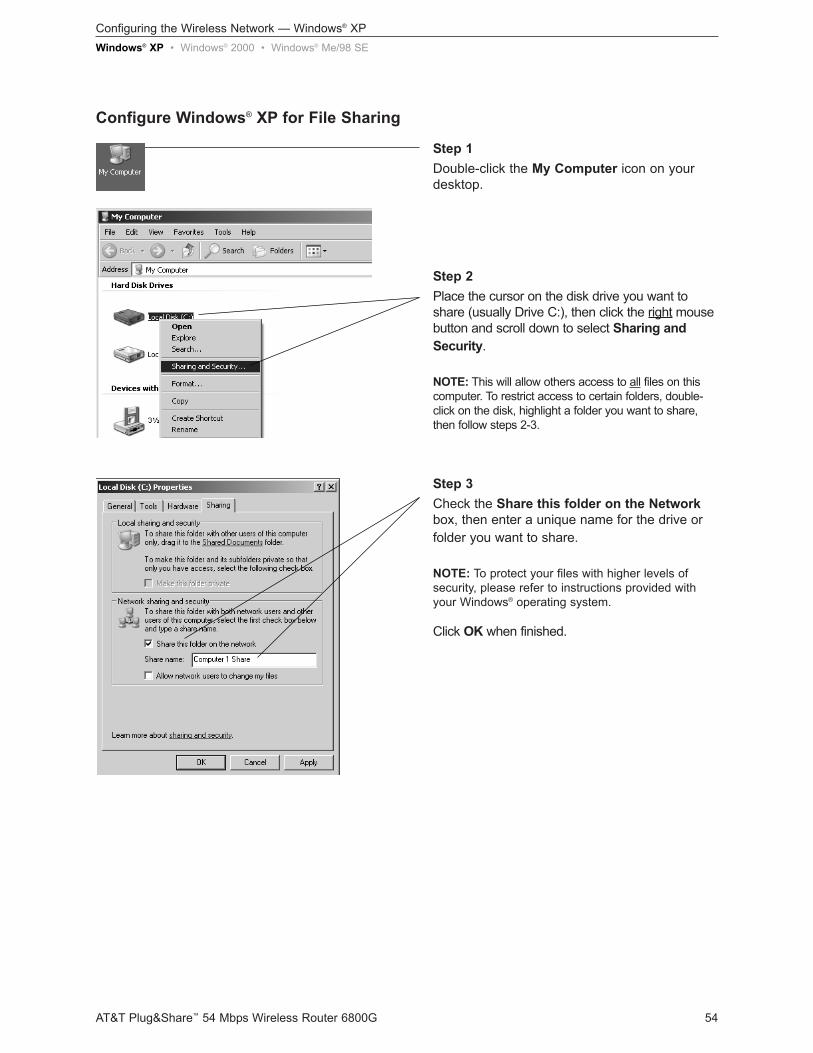
Configure Windows® XP for File Sharing
Step 1Double-click the My Computer icon on yourdesktop.
Step 2Place the cursor on the disk drive you want toshare (usually Drive C:), then click the right mousebutton and scroll down to select Sharing andSecurity.
NOTE: This will allow others access to all files on thiscomputer. To restrict access to certain folders, double-click on the disk, highlight a folder you want to share,then follow steps 2-3.
Step 3Check the Share this folder on the Networkbox, then enter a unique name for the drive orfolder you want to share.
NOTE: To protect your files with higher levels ofsecurity, please refer to instructions provided withyour Windows® operating system.
Click OK when finished.
Windows® XP • Windows® 2000 • Windows® Me/98 SE
Configuring the Wireless Network — Windows® XP
AT&T Plug&Share™ 54 Mbps Wireless Router 6800G 55
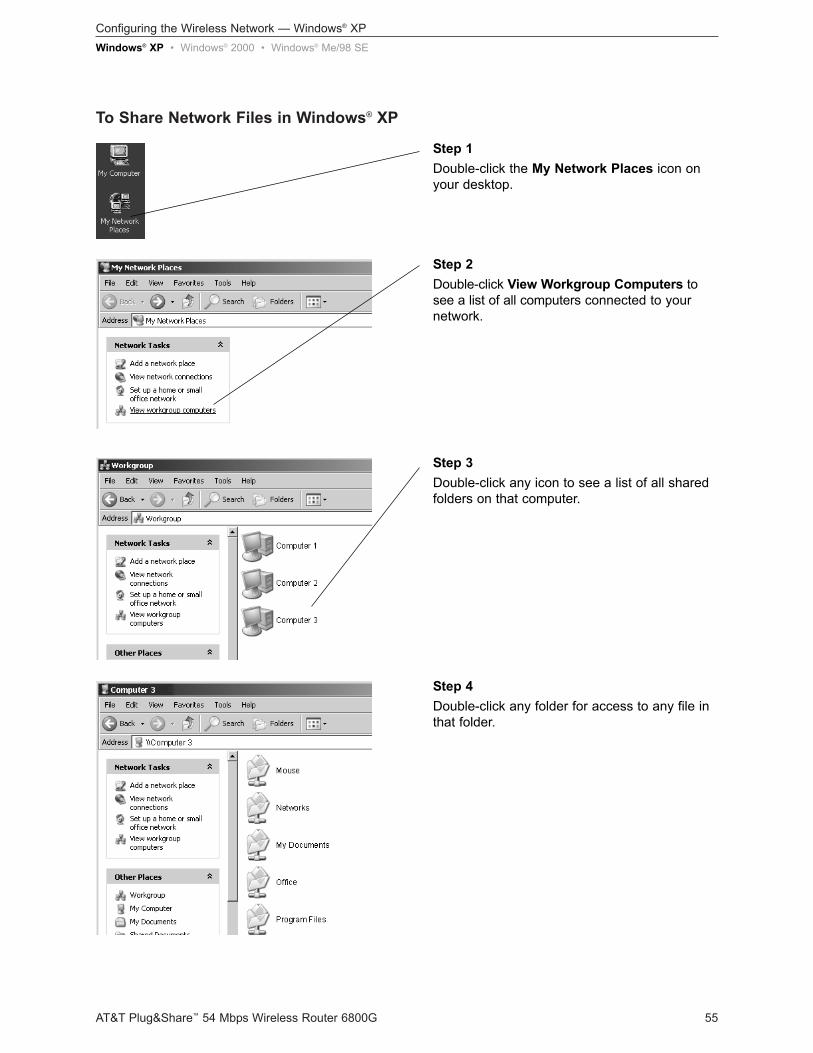
To Share Network Files in Windows® XP
Step 1Double-click the My Network Places icon onyour desktop.
Step 2Double-click View Workgroup Computers tosee a list of all computers connected to yournetwork.
Step 3Double-click any icon to see a list of all sharedfolders on that computer.
Step 4Double-click any folder for access to any file inthat folder.
Windows® XP • Windows® 2000 • Windows® Me/98 SE

Configuring the Wireless Network — Windows® 2000
AT&T Plug&Share™ 54 Mbps Wireless Router 6800G 56
Configure Windows® 2000 for Network Sharing
Step 1Click Start > Settings > Network and Dial-up Connections.
Step 2Double-click Local Area Connections.
Step 3Click the Properties button.
Step 4Make sure File and Printer Sharing forMicrosoft Networks appears in this list, andcheck it if it is unchecked.
If you do not see it in the list, click the Installbutton and follow directions to install File andPrinter Sharing for Microsoft Networks.
Click OK when File and Printer Sharing isinstalled and checked.
Windows® XP • Windows® 2000 • Windows® Me/98 SE
CautionBefore making any changes to your networking settings, please review this section carefully.Failure to follow these instructions precisely may result in the inability to log into your network orcomputer. If your computer is part of a work environment, please contact your IT professionalbefore proceeding.
Configuring the Wireless Network — Windows® 2000
AT&T Plug&Share™ 54 Mbps Wireless Router 6800G 57
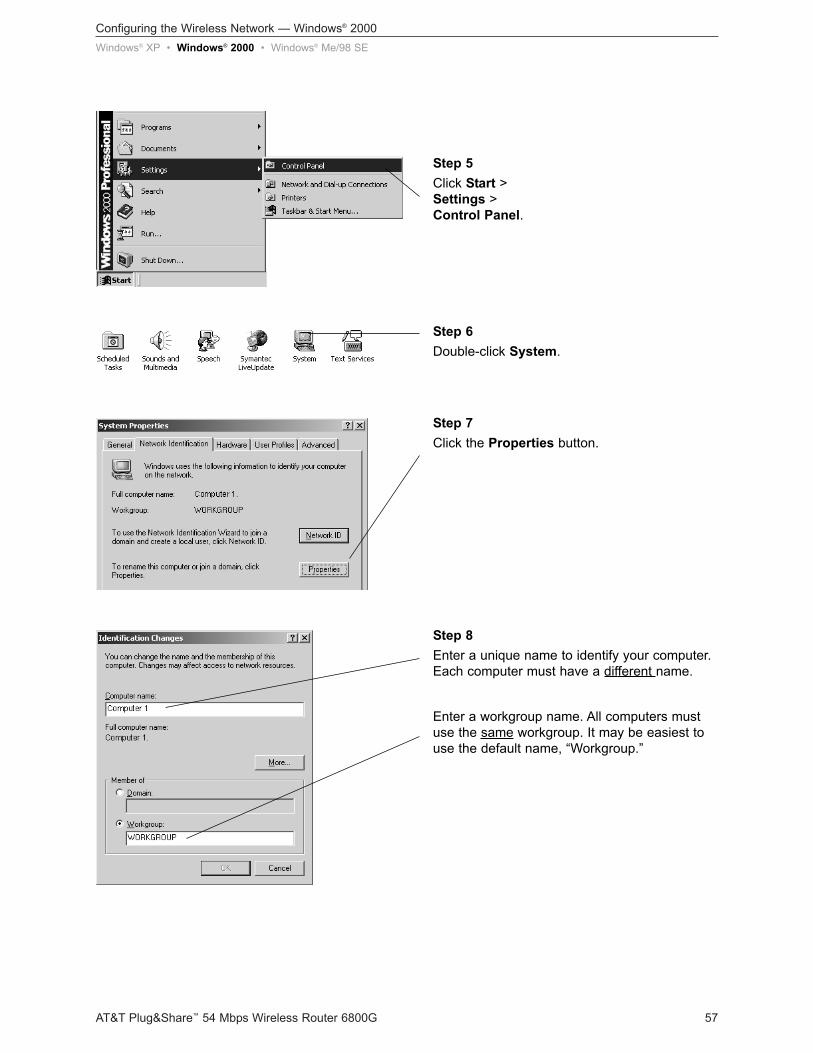
Step 5Click Start > Settings > Control Panel.
Step 6Double-click System.
Step 7Click the Properties button.
Step 8Enter a unique name to identify your computer.Each computer must have a different name.
Enter a workgroup name. All computers mustuse the same workgroup. It may be easiest touse the default name, “Workgroup.”
Windows® XP • Windows® 2000 • Windows® Me/98 SE
Configuring the Wireless Network — Windows® 2000
AT&T Plug&Share™ 54 Mbps Wireless Router 6800G 58
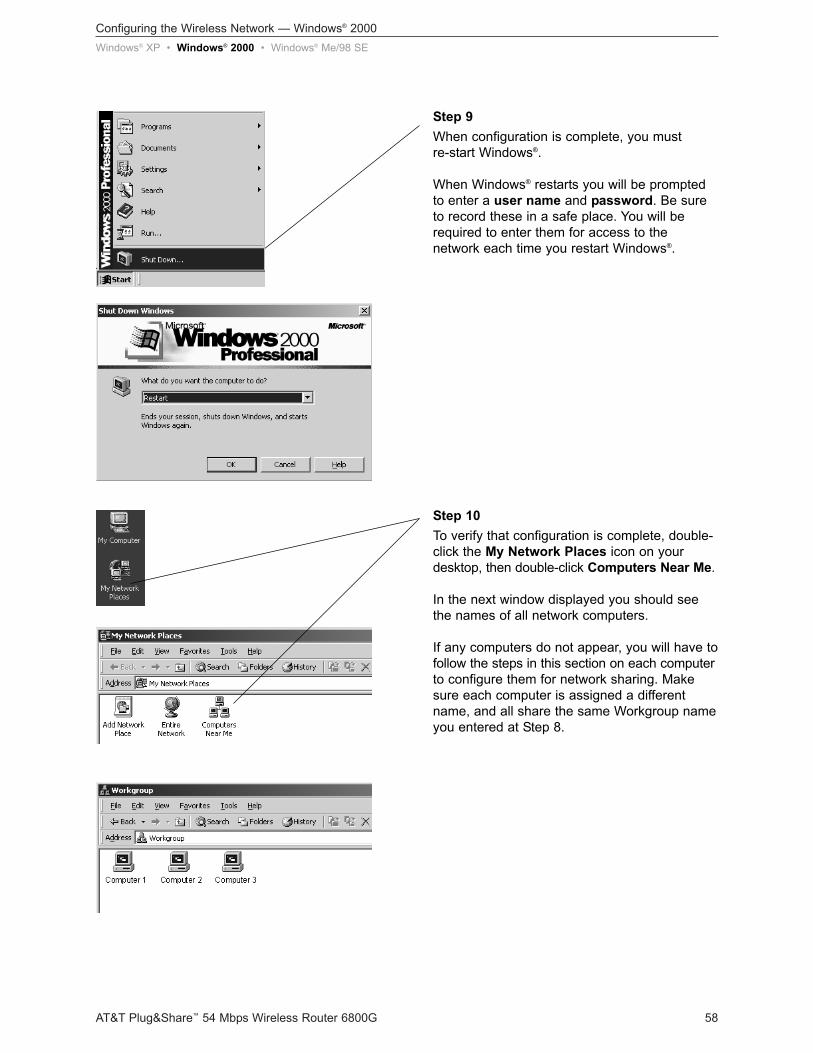
Step 9When configuration is complete, you must re-start Windows®.
When Windows® restarts you will be promptedto enter a user name and password. Be sureto record these in a safe place. You will berequired to enter them for access to the network each time you restart Windows®.
Step 10To verify that configuration is complete, double-click the My Network Places icon on yourdesktop, then double-click Computers Near Me.
In the next window displayed you should seethe names of all network computers.
If any computers do not appear, you will have tofollow the steps in this section on each computerto configure them for network sharing. Makesure each computer is assigned a differentname, and all share the same Workgroup nameyou entered at Step 8.
Windows® XP • Windows® 2000 • Windows® Me/98 SE
Configuring the Wireless Network — Windows® 2000
AT&T Plug&Share™ 54 Mbps Wireless Router 6800G 59
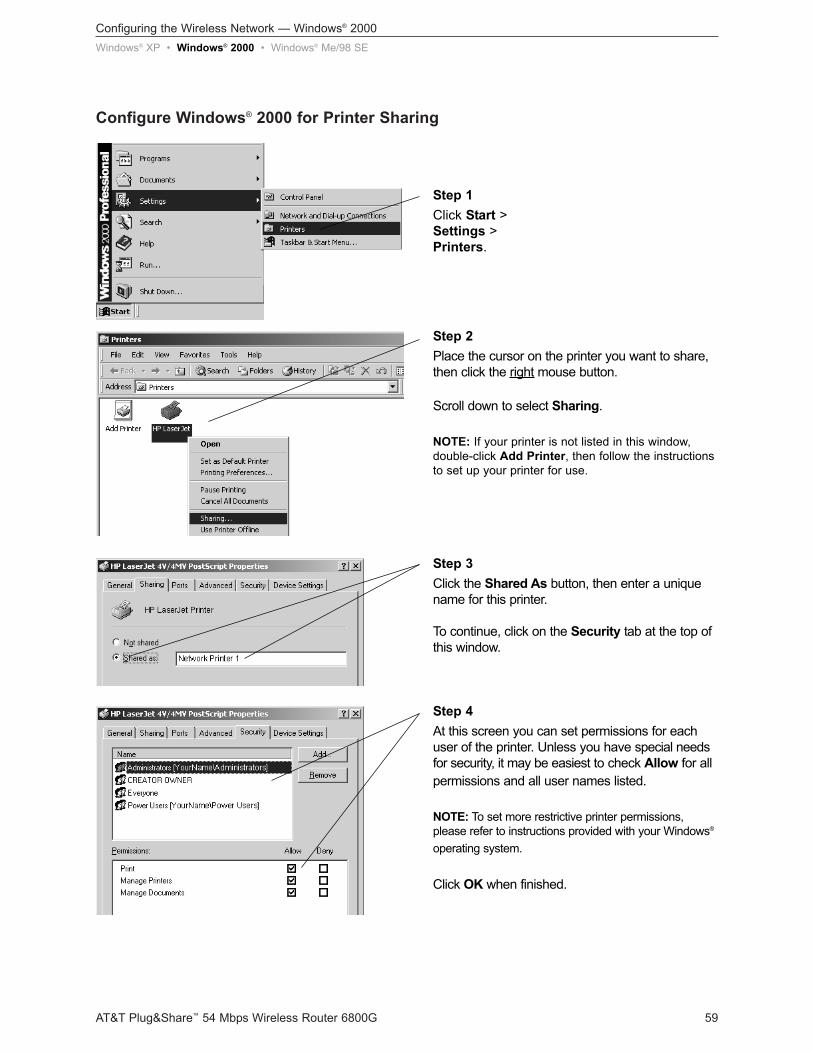
Configure Windows® 2000 for Printer Sharing
Step 1Click Start > Settings > Printers.
Step 2Place the cursor on the printer you want to share,then click the right mouse button.
Scroll down to select Sharing.
NOTE: If your printer is not listed in this window,double-click Add Printer, then follow the instructionsto set up your printer for use.
Step 3Click the Shared As button, then enter a uniquename for this printer.
To continue, click on the Security tab at the top ofthis window.
Step 4At this screen you can set permissions for eachuser of the printer. Unless you have special needsfor security, it may be easiest to check Allow for allpermissions and all user names listed.
NOTE: To set more restrictive printer permissions,please refer to instructions provided with your Windows®
operating system.
Click OK when finished.
Windows® XP • Windows® 2000 • Windows® Me/98 SE
Configuring the Wireless Network — Windows® 2000
AT&T Plug&Share™ 54 Mbps Wireless Router 6800G 60
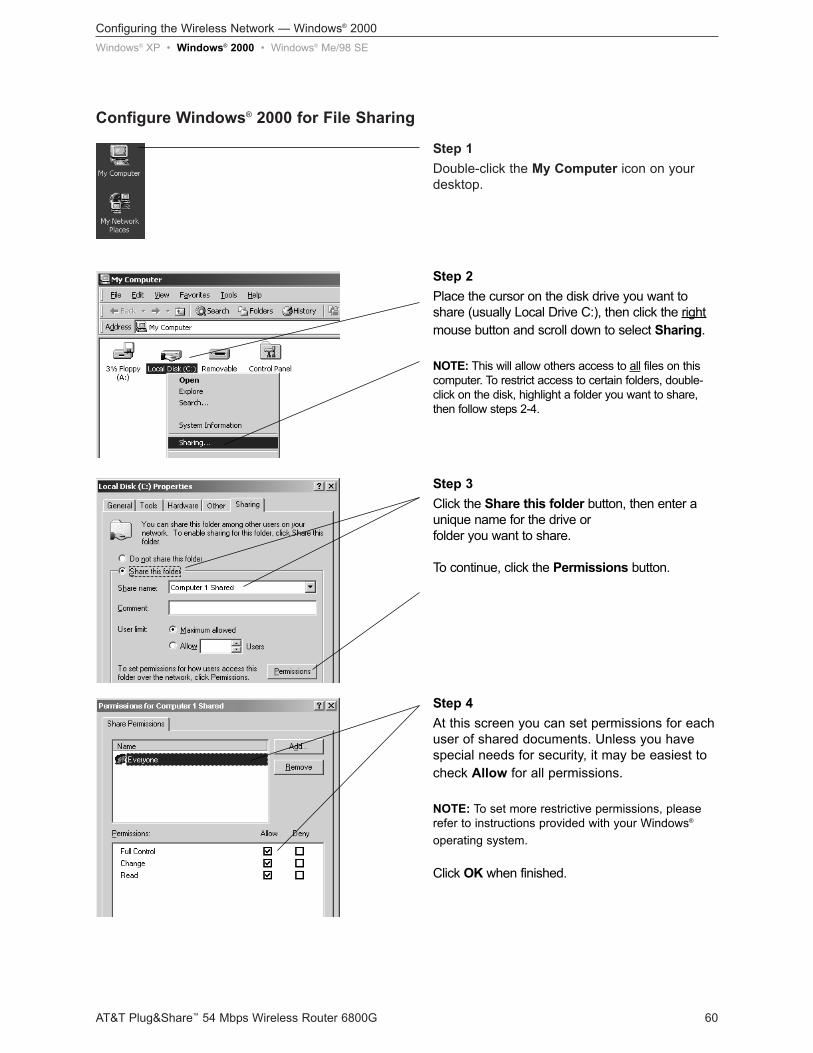
Configure Windows® 2000 for File Sharing
Step 1Double-click the My Computer icon on yourdesktop.
Step 2Place the cursor on the disk drive you want toshare (usually Local Drive C:), then click the rightmouse button and scroll down to select Sharing.
NOTE: This will allow others access to all files on thiscomputer. To restrict access to certain folders, double-click on the disk, highlight a folder you want to share,then follow steps 2-4.
Step 3Click the Share this folder button, then enter aunique name for the drive or folder you want to share.
To continue, click the Permissions button.
Step 4At this screen you can set permissions for eachuser of shared documents. Unless you havespecial needs for security, it may be easiest tocheck Allow for all permissions.
NOTE: To set more restrictive permissions, pleaserefer to instructions provided with your Windows®
operating system.
Click OK when finished.
Windows® XP • Windows® 2000 • Windows® Me/98 SE
Configuring the Wireless Network — Windows® 2000
AT&T Plug&Share™ 54 Mbps Wireless Router 6800G 61
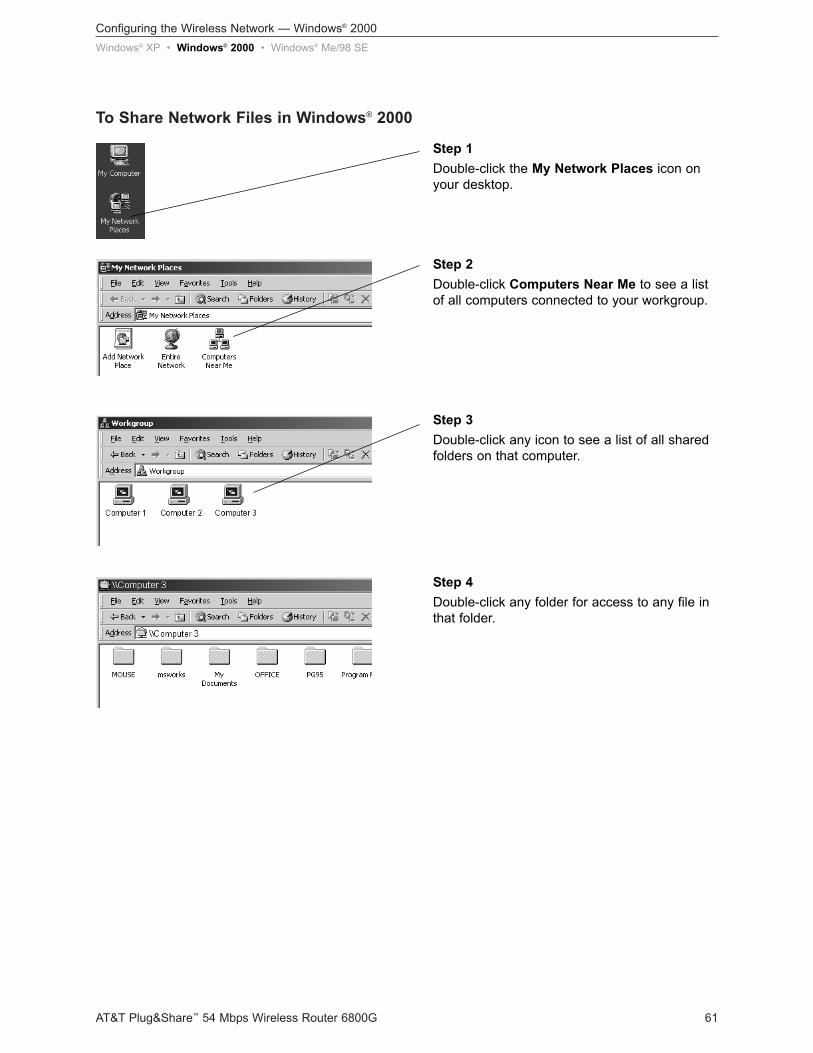
To Share Network Files in Windows® 2000
Step 1Double-click the My Network Places icon onyour desktop.
Step 2Double-click Computers Near Me to see a listof all computers connected to your workgroup.
Step 3Double-click any icon to see a list of all sharedfolders on that computer.
Step 4Double-click any folder for access to any file inthat folder.
Windows® XP • Windows® 2000 • Windows® Me/98 SE

Configuring the Wireless Network — Windows® 98 SE/Windows® Me
AT&T Plug&Share™ 54 Mbps Wireless Router 6800G 62
Configure Windows® 98/Me for Network Sharing
Step 1Click Start > Settings > Control Panel.
Step 2Double-click Network.
Step 3Scroll down to make sure File and PrinterSharing for Microsoft Networks appears in thislist.
If you do not see it in the list, click the Addbutton and follow directions to install File andPrinter Sharing for Microsoft Networks.
Step 4Click the Identification tab at the top of thisscreen, then enter a unique name to identify yourcomputer. Each computer must have a differentname.
Enter a workgroup name. All computers mustuse the same workgroup. It may be easiest touse the default name, “Workgroup.”
Windows® XP • Windows® 2000 • Windows® Me/98 SE
CautionBefore making any changes to your networking settings, please review this section carefully.Failure to follow these instructions precisely may result in the inability to log into your network orcomputer. If your computer is part of a work environment, please contact your IT professionalbefore proceeding.
Configuring the Wireless Network — Windows® 98 SE/Windows® Me
AT&T Plug&Share™ 54 Mbps Wireless Router 6800G 63
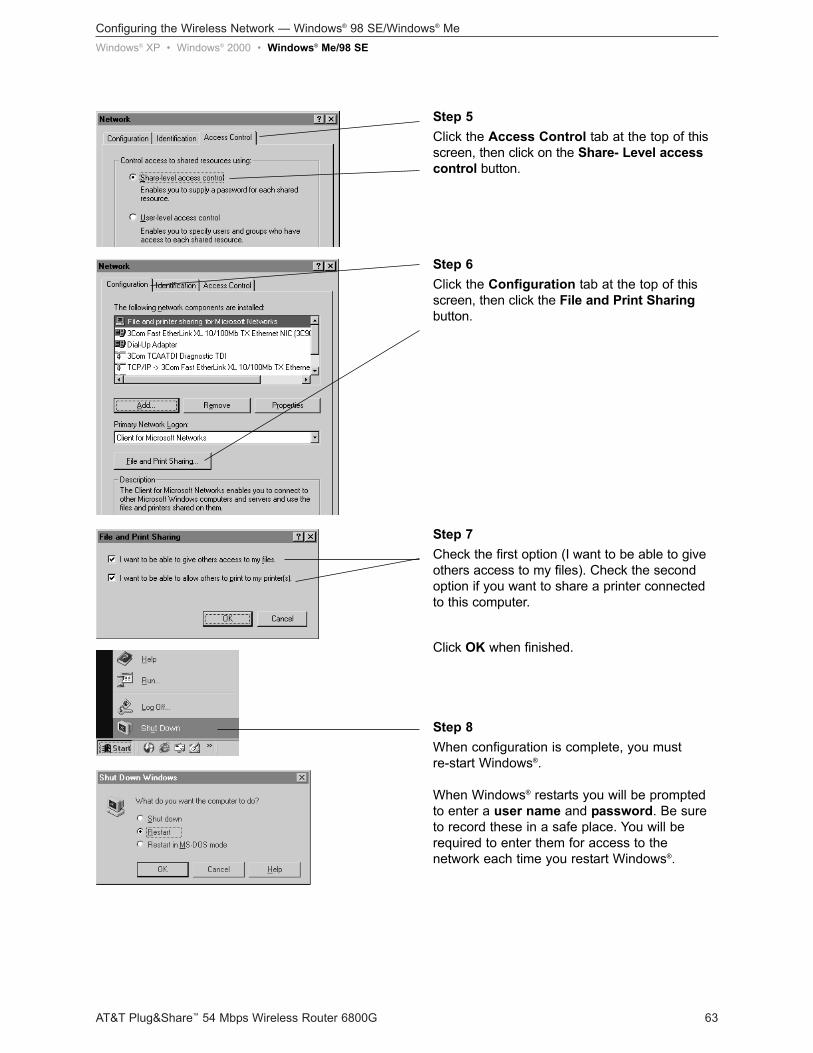
Step 5Click the Access Control tab at the top of thisscreen, then click on the Share- Level accesscontrol button.
Step 6Click the Configuration tab at the top of thisscreen, then click the File and Print Sharingbutton.
Step 7Check the first option (I want to be able to giveothers access to my files). Check the secondoption if you want to share a printer connectedto this computer.
Click OK when finished.
Step 8When configuration is complete, you must re-start Windows®.
When Windows® restarts you will be promptedto enter a user name and password. Be sureto record these in a safe place. You will berequired to enter them for access to the network each time you restart Windows®.
Windows® XP • Windows® 2000 • Windows® Me/98 SE
Configuring the Wireless Network — Windows® 98 SE/Windows® Me
AT&T Plug&Share™ 54 Mbps Wireless Router 6800G 64
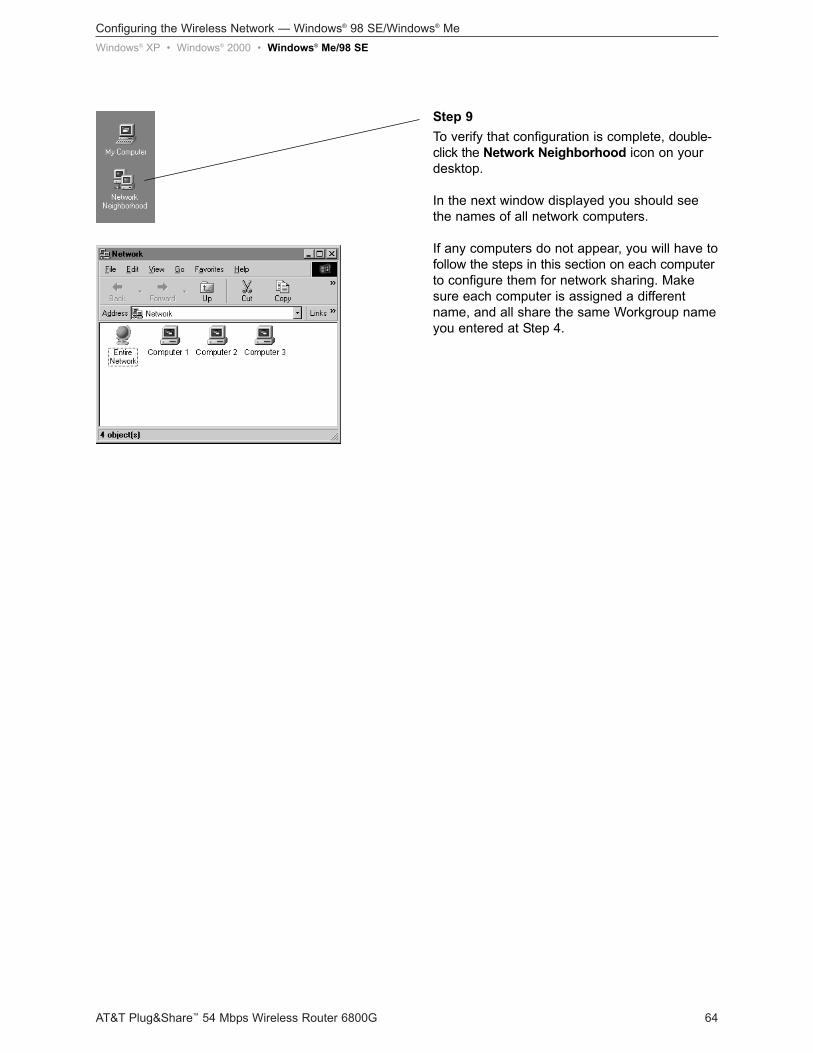
Step 9To verify that configuration is complete, double-click the Network Neighborhood icon on yourdesktop.
In the next window displayed you should seethe names of all network computers.
If any computers do not appear, you will have tofollow the steps in this section on each computerto configure them for network sharing. Makesure each computer is assigned a differentname, and all share the same Workgroup nameyou entered at Step 4.
Windows® XP • Windows® 2000 • Windows® Me/98 SE
Configuring the Wireless Network — Windows® 98 SE/Windows® Me
AT&T Plug&Share™ 54 Mbps Wireless Router 6800G 65
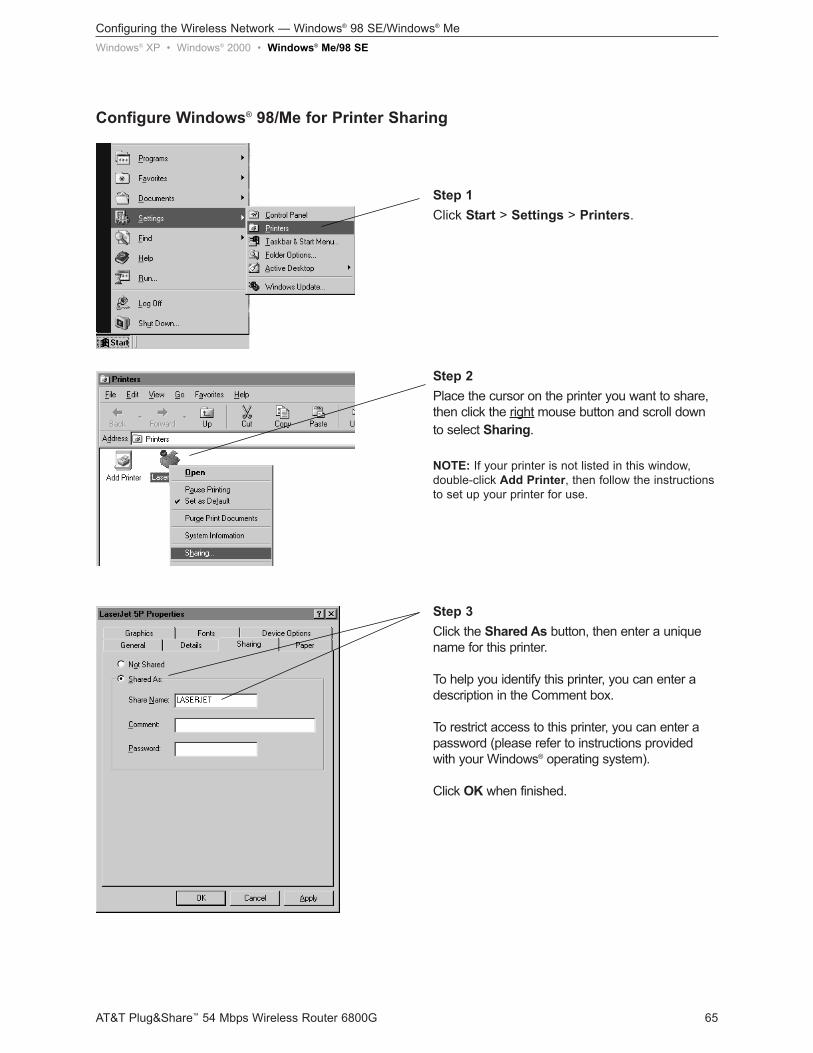
Configure Windows® 98/Me for Printer Sharing
Step 1Click Start > Settings > Printers.
Step 2Place the cursor on the printer you want to share,then click the right mouse button and scroll downto select Sharing.
NOTE: If your printer is not listed in this window,double-click Add Printer, then follow the instructionsto set up your printer for use.
Step 3Click the Shared As button, then enter a uniquename for this printer.
To help you identify this printer, you can enter adescription in the Comment box.
To restrict access to this printer, you can enter apassword (please refer to instructions providedwith your Windows® operating system).
Click OK when finished.
Windows® XP • Windows® 2000 • Windows® Me/98 SE
Configuring the Wireless Network — Windows® 98 SE/Windows® Me
AT&T Plug&Share™ 54 Mbps Wireless Router 6800G 66
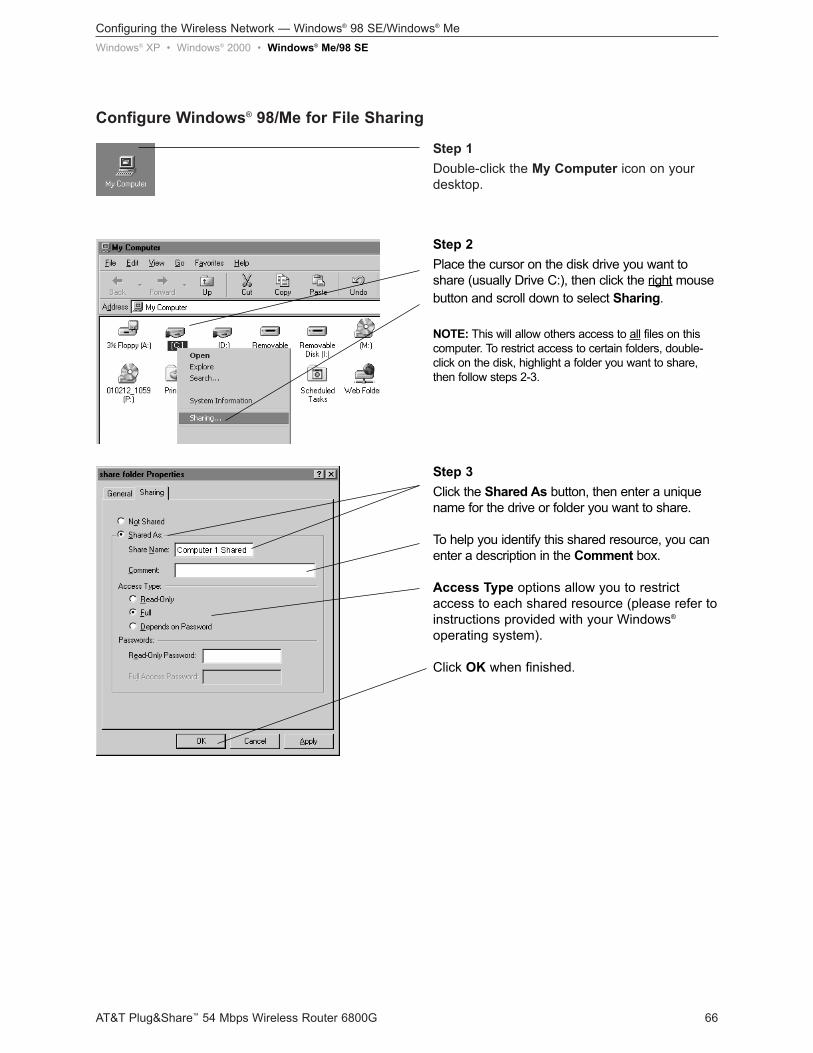
Configure Windows® 98/Me for File Sharing
Step 1Double-click the My Computer icon on yourdesktop.
Step 2Place the cursor on the disk drive you want toshare (usually Drive C:), then click the right mousebutton and scroll down to select Sharing.
NOTE: This will allow others access to all files on thiscomputer. To restrict access to certain folders, double-click on the disk, highlight a folder you want to share,then follow steps 2-3.
Step 3Click the Shared As button, then enter a uniquename for the drive or folder you want to share.
To help you identify this shared resource, you canenter a description in the Comment box.
Access Type options allow you to restrictaccess to each shared resource (please refer toinstructions provided with your Windows®
operating system).
Click OK when finished.
Windows® XP • Windows® 2000 • Windows® Me/98 SE
Configuring the Wireless Network — Windows® 98 SE/Windows® Me
AT&T Plug&Share™ 54 Mbps Wireless Router 6800G 67
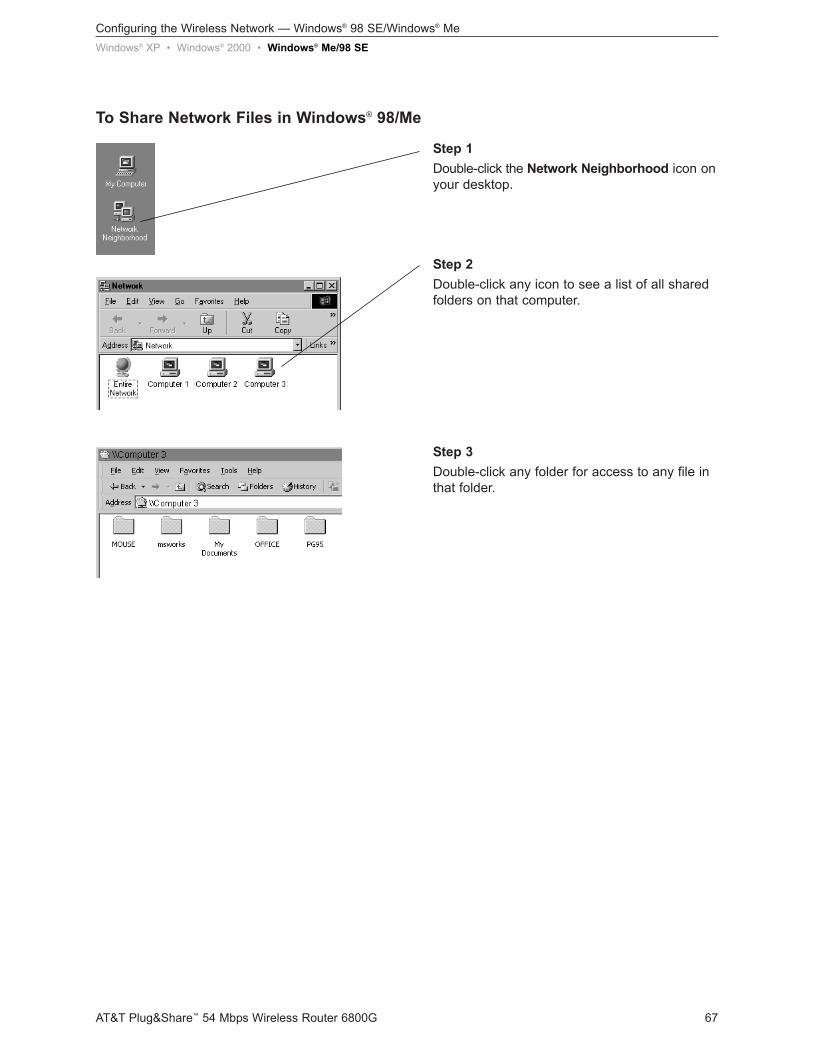
To Share Network Files in Windows® 98/Me
Step 1Double-click the Network Neighborhood icon onyour desktop.
Step 2Double-click any icon to see a list of all sharedfolders on that computer.
Step 3Double-click any folder for access to any file inthat folder.
Windows® XP • Windows® 2000 • Windows® Me/98 SE
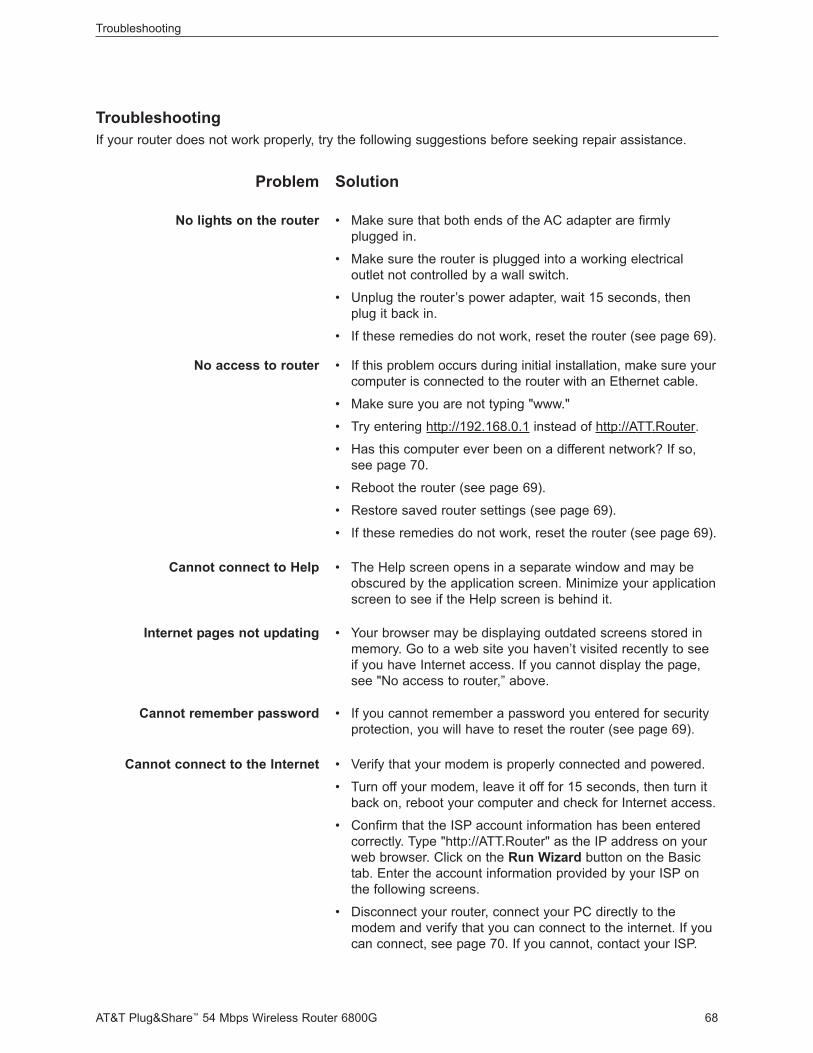
Troubleshooting
AT&T Plug&Share™ 54 Mbps Wireless Router 6800G 68
No lights on the router
Problem Solution
• Make sure that both ends of the AC adapter are firmlyplugged in.
• Make sure the router is plugged into a working electrical outlet not controlled by a wall switch.
• Unplug the router’s power adapter, wait 15 seconds, thenplug it back in.
• If these remedies do not work, reset the router (see page 69).
TroubleshootingIf your router does not work properly, try the following suggestions before seeking repair assistance.
No access to router • If this problem occurs during initial installation, make sure yourcomputer is connected to the router with an Ethernet cable.
• Make sure you are not typing "www."
• Try entering http://192.168.0.1 instead of http://ATT.Router.
• Has this computer ever been on a different network? If so,see page 70.
• Reboot the router (see page 69).
• Restore saved router settings (see page 69).
• If these remedies do not work, reset the router (see page 69).
Cannot connect to Help • The Help screen opens in a separate window and may beobscured by the application screen. Minimize your applicationscreen to see if the Help screen is behind it.
Internet pages not updating • Your browser may be displaying outdated screens stored inmemory. Go to a web site you haven’t visited recently to seeif you have Internet access. If you cannot display the page,see "No access to router,” above.
Cannot remember password • If you cannot remember a password you entered for securityprotection, you will have to reset the router (see page 69).
Cannot connect to the Internet • Verify that your modem is properly connected and powered.
• Turn off your modem, leave it off for 15 seconds, then turn itback on, reboot your computer and check for Internet access.
• Confirm that the ISP account information has been enteredcorrectly. Type "http://ATT.Router" as the IP address on yourweb browser. Click on the Run Wizard button on the Basictab. Enter the account information provided by your ISP onthe following screens.
• Disconnect your router, connect your PC directly to themodem and verify that you can connect to the internet. If youcan connect, see page 70. If you cannot, contact your ISP.
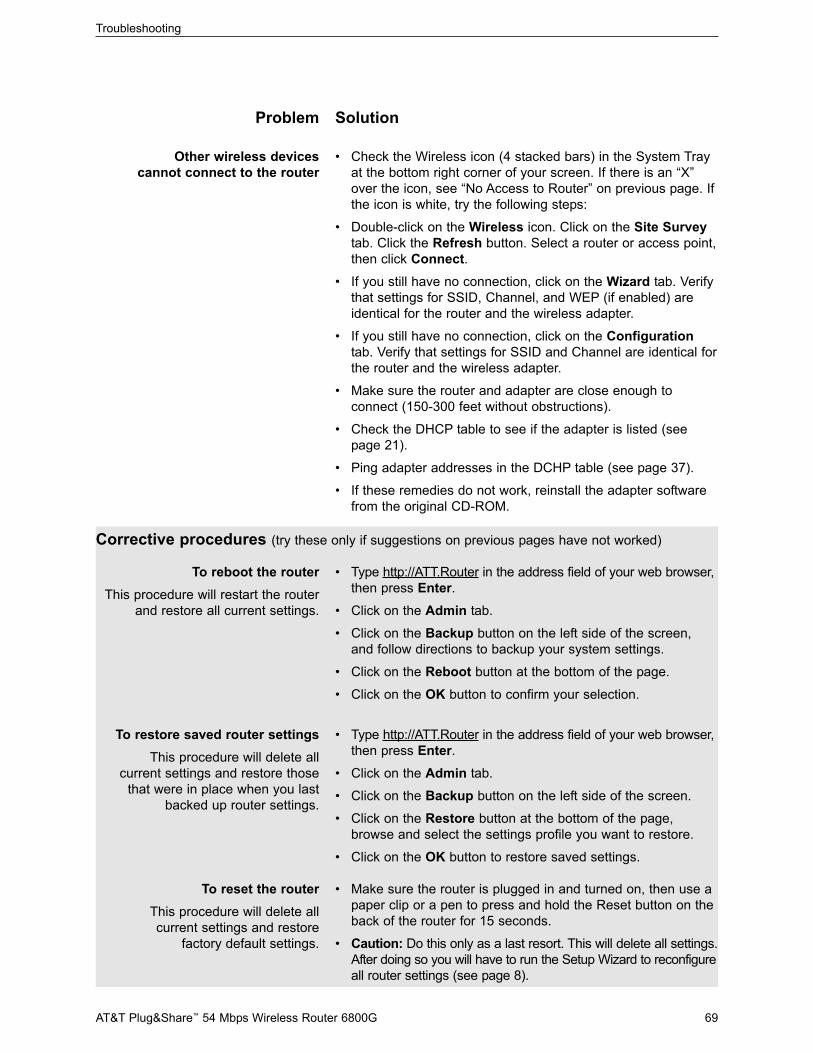
Troubleshooting
AT&T Plug&Share™ 54 Mbps Wireless Router 6800G 69
Problem Solution
Other wireless devices cannot connect to the router
• Check the Wireless icon (4 stacked bars) in the System Trayat the bottom right corner of your screen. If there is an “X”over the icon, see “No Access to Router” on previous page. Ifthe icon is white, try the following steps:
• Double-click on the Wireless icon. Click on the Site Surveytab. Click the Refresh button. Select a router or access point,then click Connect.
• If you still have no connection, click on the Wizard tab. Verifythat settings for SSID, Channel, and WEP (if enabled) areidentical for the router and the wireless adapter.
• If you still have no connection, click on the Configurationtab. Verify that settings for SSID and Channel are identical forthe router and the wireless adapter.
• Make sure the router and adapter are close enough to connect (150-300 feet without obstructions).
• Check the DHCP table to see if the adapter is listed (seepage 21).
• Ping adapter addresses in the DCHP table (see page 37).
• If these remedies do not work, reinstall the adapter softwarefrom the original CD-ROM.
Corrective procedures (try these only if suggestions on previous pages have not worked)
To reboot the routerThis procedure will restart the router
and restore all current settings.
• Type http://ATT.Router in the address field of your web browser,then press Enter.
• Click on the Admin tab.
• Click on the Backup button on the left side of the screen, and follow directions to backup your system settings.
• Click on the Reboot button at the bottom of the page.
• Click on the OK button to confirm your selection.
To restore saved router settingsThis procedure will delete all
current settings and restore thosethat were in place when you last
backed up router settings.
• Type http://ATT.Router in the address field of your web browser,then press Enter.
• Click on the Admin tab.
• Click on the Backup button on the left side of the screen.
• Click on the Restore button at the bottom of the page,browse and select the settings profile you want to restore.
• Click on the OK button to restore saved settings.
To reset the routerThis procedure will delete all current settings and restore
factory default settings.
• Make sure the router is plugged in and turned on, then use apaper clip or a pen to press and hold the Reset button on theback of the router for 15 seconds.
• Caution: Do this only as a last resort. This will delete all settings.After doing so you will have to run the Setup Wizard to reconfigureall router settings (see page 8).
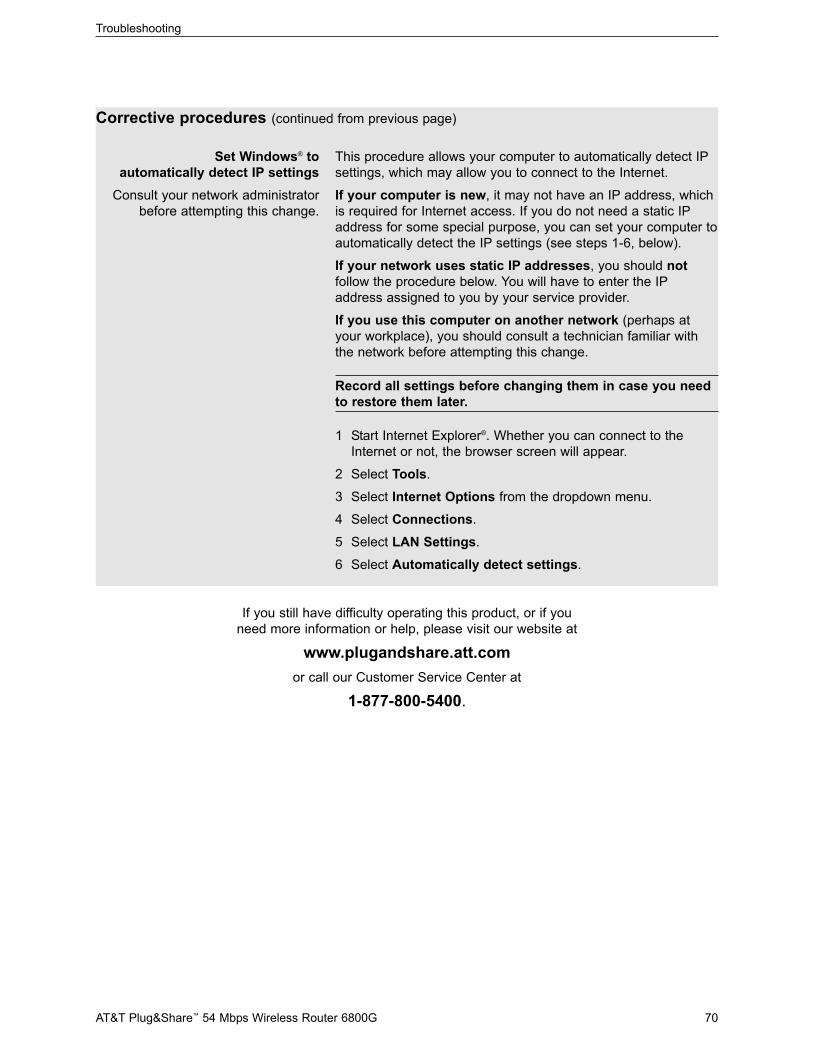
Troubleshooting
AT&T Plug&Share™ 54 Mbps Wireless Router 6800G 70
Set Windows® to automatically detect IP settings
Consult your network administratorbefore attempting this change.
This procedure allows your computer to automatically detect IPsettings, which may allow you to connect to the Internet.
If your computer is new, it may not have an IP address, whichis required for Internet access. If you do not need a static IPaddress for some special purpose, you can set your computer toautomatically detect the IP settings (see steps 1-6, below).
If your network uses static IP addresses, you should notfollow the procedure below. You will have to enter the IPaddress assigned to you by your service provider.
If you use this computer on another network (perhaps atyour workplace), you should consult a technician familiar withthe network before attempting this change.
Record all settings before changing them in case you needto restore them later.
1 Start Internet Explorer®. Whether you can connect to theInternet or not, the browser screen will appear.
2 Select Tools.
3 Select Internet Options from the dropdown menu.
4 Select Connections.
5 Select LAN Settings.
6 Select Automatically detect settings.
Corrective procedures (continued from previous page)
If you still have difficulty operating this product, or if youneed more information or help, please visit our website at
www.plugandshare.att.comor call our Customer Service Center at
1-877-800-5400.
Glossary
AT&T Plug&Share™ 54 Mbps Wireless Router 6800G 71
Access PointAccess points are the contact points (wirelessrouters and transmitters) in a wireless LAN thatare connected to an Ethernet hub or server.Users can roam within the range of access pointsand their wireless device connections are passedfrom one access point to the next.
AdministratorThe network administrator is the person whomanages the LAN. The administrator's tasksinclude ensuring network security, keeping soft-ware, hardware, and firmware up-to-date, andkeeping track of network activity. Your routerAdministrator is the person in control of access toyour router. The system starts out with all usersas administrators.
AuthenticationAuthentication refers to the verification of a transmitted message's integrity.
Beacon IntervalRefers to the interval between packets sent byrouters for the purposes of synchronizing wirelessLANs.
BroadbandUsually refers to Internet connections that providefaster data transfer than standard dial-up connections (cable modem, DSL, T-1, etc.)
DDNSDynamic DNS (Domain Name System).
DHCPDHCP (Dynamic Host Configuration Protocol) soft-ware automatically assigns IP addresses to clientstations logging onto a TCP/IP network, whicheliminates the need to manually assign permanentIP addresses.
DHCP ClientThe DHCP client list shows all of the computersattached to your local network. The list shows thehost name of the computer.
DMZDMZ (Demilitarized Zone) is a part of an networkthat is located between a secure LAN and aninsecure WAN. DMZs provide a way for someclients to have unrestricted access to the Internet.
DNSDNS stands for Domain Name System. DNS converts domain names to the IP addresses thatall machines on the Internet have. It translatesfrom name to address and from address to name.
Domain NameThe domain name is the "readable" version of anInternet site address. A typical domain name hasthe form "www.somedomainname.com" or"www.somedomainname.org", etc.
DTIMDTIM (Delivery Traffic Indication Message) pro-vides client stations with information on the nextopportunity to monitor for broadcast or multicastmessages.
FilterFilters only allow specified data to be transmittedor received. For example, the router can filterspecific IP addresses so that users cannot con-nect to those addresses.
FirewallFirewalls are methods used to keep networkssecure from intruders and unauthorized access.Firewalls use filters to prevent unwanted datafrom being transmitted to and/or from a local net-work. Firewalls are typically used to prevent out-siders from accessing your private dataresources and for controlling what outside (WAN)resources your users can access.
FirmwareFirmware refers to memory chips that retain theircontent without electrical power (for example,BIOS ROM). The router firmware stores all of therouter administration settings.
FragmentationRefers to the breaking up of data packets duringtransmission.
FTPFTP (File Transfer Protocol) is used to transferfiles over a TCP/IP network, and is typically usedfor transferring large files or uploading the HTMLpages for a web site to the web server.
Glossary
Glossary
AT&T Plug&Share™ 54 Mbps Wireless Router 6800G 72
GatewayGateways are computers that convert protocolsenabling different networks, applications, andoperating systems to exchange information.
Host NameThe name given to a computer or client stationthat acts as a source for information on the network.
HTTPHTTP (HyperText Transfer Protocol) is the com-munications protocol used to connect to serverson the World Wide Web. HTTP establishes aconnection with a web server and transmitsHTML pages to client browser (for exampleWindows® IE). HTTP addresses all begin with theprefix “http://” (for example, http://www.somedomainname.com).
ICMPICMP (Internet Control Message Protocol) is aTCP/IP protocol used to send error and controlmessages over the LAN (for example, it is usedby the router to notify a message sender that thedestination node is not available).
IPIP (Internet Protocol) is the protocol in the TCP/IPcommunications protocol suite that contains anetwork address and allows messages to berouted to a different network or subnet. However,IP does not ensure delivery of a complete message;TCP provides the function of ensuring delivery.
IP AddressThe IP (Internet Protocol) address refers to theaddress of a computer attached to a TCP/IP net-work. Every client and server station must have aunique IP address. Clients are assigned either apermanent address or have one dynamicallyassigned to them via DHCP. IP addresses arewritten as four sets of numbers separated byperiods (for example, 211.23.181.189).
ISPAn ISP (Internet Service Provider) is an organization providing Internet access service viamodems, ISDN (Integrated Services DigitalNetwork), private lines or other means.
LANLANs (Local Area Networks) are networks thatserve users within specific geographical areas,such as your home or in a company building.LANs consist of a group of computers and relateddevices that share a common communication link(wired and/or wireless). A LAN allows you toshare data and resources among the devices onthe LAN.
MAC AddressA MAC address is a unique serial number for hardware adapters, giving the adapter a uniqueidentification.
MetricA number that indicates how long a packet takesto get to its destination.
MTUMTU (Maximum Transmission/Transfer Unit) isthe largest packet size that can be sent over anetwork. Messages larger than the MTU aredivided into smaller packets.
NATNAT (Network Address Translation — also knownas IP masquerading) enables a LAN to presentitself to the Internet with one address. NAT con-verts the address of each LAN node into one IPaddress for the Internet (and vice versa). NAT alsoprovides a certain amount of security by acting asa firewall by keeping individual IP addresseshidden from the WAN.
Network AdministratorThe network administrator is the person who man-ages the LAN. The administrator's tasks includeensuring network security, keeping software, hard-ware, and firmware up-to-date, and keeping trackof network activity.
NTPNTP (Network Time Protocol) is used to synchro-nize the realtime clock in a computer. Internet pri-mary and secondary servers synchronize toCoordinated Universal Time (UTC).
Open SystemOpen authentication allows all clients to connectto the network. After accessing the network, theclient may encrypt data to prevent it from beingeasily seen by other users in the immediate area.
Glossary
AT&T Plug&Share™ 54 Mbps Wireless Router 6800G 73
PacketA packet is a portion of data that is transmitted innetwork communications. Packets are also sometimes called frames and datagrams.Packets contain not only data, but also the destination IP address.
PassphraseA Passphrase is used within the WPA-PSK modeto enable a client to initiate authentication with arouter. If the passphrase is identical to thepassphrase on the router, the router allows theclient to access the network. The passphrase canbe between 8 and 63 characters.
PingPing (Packet Internet Groper) is a utility used tofind out if a particular IP address is present online.
PortPorts are the physical and/or logical communica-tions pathways in and out of computers and net-work devices (routers and switches). Most PCshave serial and parallel ports, which are externalsockets for connecting devices such as printers,modems, and mice. All network adapters alsouse ports to connect to the LAN. Finally, applica-tions that communicate over the Internet alsohave ports; these are the endpoints of the appli-cation and are given a specific "port number."
PPPoEPPPoE (Point-to-Point Protocol Over Ethernet) isa protocol used to communicate between twocomputers using a serial interface, such as dial-up Internet connections, over an Ethernet link.
PreambleThe Preamble Type refers to the radio preamble,or header, which is transmitted at the beginningof a packet of data. The preamble contains infor-mation required for the access point andadapters to transmit information. Since thePreamble is attached to each packet of data, aShort Preamble improves data throughput, but itmay cause connection problems with early wire-less devices that only support long preambles.The Long Preamble option ensures compatibilitywith these early wireless devices.
ProtocolA protocol is a rule that governs the communica-tion of data.
Radius ServerRADIUS (Remote Authentication Dial-in UserService) Server must be configured to properlyauthenticate client devices for access to the net-work. The IP address and port number are basedon the configuration of the RADIUS server in yourenterprise network. The shared secret is a pass-word that is used to identify the client in aRADIUS authenticated network. The sharedsecret can be from 22 to 128 characters long.
RIPRIP (Routing Information Protocol) is a routingprotocol that is integrated in the TCP/IP protocol.RIP finds a route that is based on the smallestnumber of hops between the source of a packetand its destination.
RTSRTS (Request To Send) is a signal sent from thetransmitting station to the receiving stationrequesting permission to transmit data.
Security PhraseAt least 1 and up to 4 unique Security Phrasesmust be set when WEP is "On." The encryptiontypes for these Security Phrases may be eitherHexadecimal (HEX) or American Standard Codefor Information. Interchange (ASCII). ASCIISecurity Phrases are subject to the followingcharacter limitations: 64 Bit encryption: 5 charac-ters; 128 Bit encryption: 13 characters; 152 Bitencryption: 16 characters.
ServerServers are typically powerful and fast computersthat store programs and data. The programs anddata are shared by client computers (worksta-tions) on the network.
Shared KeyShared Key authentication requires the client touse the same WEP encryption key as that usedby the wireless router. When the client attemptsto connect to the network through the wirelessrouter the router sends a challenge text messageto the client to authenticate the client. The clientreturns the challenge text message encryptedusing the WEP encryption key. The wirelessrouter decrypts the message using it's WEP keyand if the decrypted message is the same as theoriginal challenge text message, then it isassumed that the client has the correct WEP keyand the client is allowed to access the network.
Glossary
AT&T Plug&Share™ 54 Mbps Wireless Router 6800G 74
SMTPSMTP (Simple Mail Transfer Protocol) is the stan-dard Internet e-mail protocol. SMTP is a TCP/IPprotocol defining message format and includes amessage transfer agent that stores and forwardsmail.
SNMPSNMP (Simple Network Management Protocol) isa widely used network monitoring and controlprotocol. SNMP hardware or software componentstransmit network device activity data to the work-station used to oversee the network.
SSIDSSID (Service Set Identifier) is the name desig-nated for a LAN. It serves as a simple securitymeasure used in Wireless LANs (WLANs). TheSSID is attached to packets sent over WLANs.This identifier acts as a password when a wire-less device attempts communication on theWLAN. Because an SSID distinguishes WLANSfrom each other, routers and wireless devices trying to connect to a WLAN must use the sameSSID.
Subnet MaskSubnet Masks (SUBNETwork masks) are usedby IP protocol to direct messages into a specified network segment (i.e., subnet). A subnet mask isstored in the client machine, server or router andis compared with an incoming IP address todetermine whether to accept or reject the packet.
SysLog ServerA SysLog server monitors incoming System logmessages and decodes the messages for loggingpurposes.
TCP(Transmission Control Protocol) is the transportprotocol in TCP/IP that ensures messages overthe network are transmitted accurately and completely.
TCP/IPTCP/IP (Transmission Control Protocol/InternetProtocol) is the main Internet communicationsprotocol suite. TCP ensures that data is com-pletely sent and received at the other end. The IPcomponent of TCP/IP provides data routability,meaning that data packets contain the destinationstation and network addresses, enabling TPC/IPmessages to be sent to multiple networks withinthe LAN or in the WAN.
TelnetTelnet is a terminal emulation protocol commonlyused on the Internet and TCP- or IP-based net-works. Telnet is used for connecting to remotedevices and running programs. Telnet is a highlevel application protocol that uses the TCP/IPcommunications protocol.
UDP(User Datagram Protocol) is a protocol withinTCP/IP that is used to transport information whenaccurate delivery isn't necessary (for example,realtime video and audio where packets can bedumped since there is no time for retransmittingthe data).
Virtual ServersVirtual servers are client servers (such as webservers) that share resources with other virtualservers (i.e., it is not a dedicated server).
VoIP(Voice Over Internet Protocol) is a method usedto deliver voice information over the Internet.VoIP services allow telephone calls using yourPC or LAN.
WEPWEP (Wired Equivalent Privacy) is the most com-mon security protocol for wireless LANs, provid-ing the "equivalent" security available in hard-wired networks.
Glossary
AT&T Plug&Share™ 54 Mbps Wireless Router 6800G 75
Wireless LAN (WLAN)Wireless LANs are local area networks that usewireless communications for transmitting data.Transmissions are usually in the 2.4 GHz band.WLAN devices do not need to be lined up for communications like infrared devices. WLANdevices use routers which are connected to thewired LAN and provide connectivity to the LAN.The radio frequency of WLAN devices is strongenough to be transmitted through non-metal wallsand objects, and can cover an area up to a thousand feet. Laptops and notebooks use wire-less LAN PCMCIA cards while PCs use plug-incards to access the WLAN.
WANWAN (Wide Area Network) is a communicationsnetwork that covers a wide geographic area suchas a country (contrasted with a LAN, which covers a small area such as a company building).
WPAWPA (WiFi Protected Access) is an enhancedsecurity specification to increase the level ofaccess control and data protection for wirelessdata networks. WPA authentication requires thatan authentication server authenticate all clientadapters before being allowed access to a wire-less network. This authentication mode isdesigned for enterprise applications requiringvery high levels of security.
WPA-PSKAuthentication mode enables the user to configure a type of client authentication used foracquiring access to the wireless network. TheWPA-PSK mode has been designed for thoseenvironments where high data security is desired,but there is no authentication server. The clientinitiates authentication by sending a passwordcalled a passphrase to the wireless router. If thepassphrase is identical to the passphrase on thewireless router, the wireless router allows theclient to access the network. The passphrase canbe between 8 and 63 characters.
Technical Specifications
AT&T Plug&Share™ 54 Mbps Wireless Router 6800G 76
Standards• IEEE 802.11• IEEE 802.11b• IEEE 802.11g • IEEE 802.3u• IEEE 802.3
Operating Systems• Windows® XP, 2000, Me, 98 SE
VPN Pass Through/Multi-Sessions• PPTP• L2TP• IPSec
Advanced Firewall Features• NAT with VPN Pass through• MAC filtering• IP filtering• URL Filtering• Domain Blocking• Scheduling
Device Management• Web-based (Internet Explorer® v5.5 or later)
Wireless Data RatesWith Automatic Fallback• 54 Mbps• 22 Mbps• 11 Mbps• 5.5 Mbps• 2 Mbps• 1 Mbps
Encryption• WEP 64/128/152-bit RC4
Media Access Control• CSMA/CA with ACK
Frequency Range• 2.4GHz to 2.472GHz
Operating Range• Indoors: Up to 300 feet (100m)• Outdoors: Up to 980 feet (300m)
Modulation Technology• DSSS: Direct Sequence Spread Spectrum
Modulation Techniques• Barker (1Mbps/0db) • Barker (2Mbps/3db) • CCK (5.5Mbps/5.5db) • PBCC (5.5 Mbps/1.5db) • CCK (11Mbps/8.5db) • PBCC (11Mbps/4.5db) • PBCC (22Mbps/8.5db)
Transmit Power• 15dBm ± 2dB
External Antenna Type• Integrated 360-degree omnidirectional
Ethernet Cable• RJ45 Ethernet cable
Operating Climate Range• Temperature: 32° to 131°F (0° to 55°C)• Humidity: 32% to 90% relative humidity
Storage Climate Range• Temperature: -40° to 140°F (-40° to 60°C)• Humidity: 15% to 90% relative humidity
Power Input• External Power Supply DC 5V, 2.4A
Safety & Emissions• FCC• UL
Technical Specifications

Copyright © 2003 Advanced American Telephones. All Rights Reserved. AT&T and the Globe Design are trademarks of AT&T Corp., licensed to Advanced American Telephones. All marks are trademarks of their respective corporations.Issue 1.3 AT&T 11/20/03
Questions?
Call 1-877-800-5400or visit
www.plugandshare.att.com