plexxi connect user guide release 2.2 equipment design or program components described in this...
TRANSCRIPT

Plexxi Connect User Guide
Release 2.2.0
February 23, 2017
100 Innovative Way - Suite 3322 Nashua, NH 03062 Tel. +1.888.630.PLEX (7539) www.plexxi.com

2 Plexxi Connect
Notices
The information contained herein is subject to change without notice. Plexxi and the Plexxi logo are trademarks of Plexxi, Inc. in the United States and other countries. Other product or service names may be trademarks or service marks of others. No part of this documentation may be reproduced in any form or by any means or used to make any derivative work (such as translation, transformation, or adaptation) without written permission from Plexxi, Inc. Plexxi, Inc. provides this documentation “AS IS,” without warranty, term, or condition of any kind, either implied or expressed, including, but not limited to, the implied warranties, terms, or conditions of merchantability, satisfactory quality, non-infringement and fitness for a particular purpose. Plexxi, Inc. reserves the right to make changes to equipment design or program components described in this documentation, as progress in engineering, manufacturing methods, or other circumstances may warrant. No responsibility is assumed for the use of Plexxi, Inc. software or hardware, all rights, obligations and remedies related to which are as set forth in the applicable sales and license agreements.
Plexxi, Inc.
100 Innovative Way - Suite 3322
Nashua, NH 03062
Tel: +1.888.630.PLEX (7539)
www.plexxi.com
Published February 23, 2017
Printed in United States of America. Copyright © 2016-2017 Plexxi, Inc. All rights reserved.

Table of Contents
Notices ................................................................................................................................................................... 2 Welcome ............................................................................................................................................................ 6 Related Documentation .................................................................................................................................... 6 Chapter 1 About Plexxi Connect ............................................................................................................... 7 About Plexxi Switches and Plexxi Control ............................................................................................................. 7 About Plexxi Connect .................................................................................................................................................... 7 About Packs ..................................................................................................................................................................... 8
Chapter 2 Installing Plexxi Connect ........................................................................................................ 9 Prerequisites ................................................................................................................................................................... 9 Required Plexxi Connect Software ........................................................................................................................... 9 VM Requirements .......................................................................................................................................................... 9 Required Linux Information ...................................................................................................................................... 9 Installing Plexxi Connect – ISO Install ................................................................................................................... 10 Installing Plexxi Connect – OVA Install ................................................................................................................. 13
Chapter 3 Other Initial Install Considerations ................................................................................. 18 Changing the Linux admin password .................................................................................................................... 18 Changing the Plexxi Connect Hostname ............................................................................................................... 18
Chapter 4 Upgrading Plexxi Connect ................................................................................................... 19 Chapter 5 Configuring the Plexxi Control Pack ................................................................................ 21 About the Plexxi Control Pack ................................................................................................................................. 21 Required Plexxi Control Information ................................................................................................................... 21 Configuring the Plexxi Control Pack ...................................................................................................................... 21
Chapter 6 Configuring the VMware vSphere Pack .......................................................................... 23 About Plexxi Connect and the VMware vSphere Environment .................................................................... 23 Required VMware vSphere Information .............................................................................................................. 24 Configuring VMware vSphere Packs ...................................................................................................................... 24 Automatic VLAN Provisioning ................................................................................................................................. 25
Chapter 7 Configuring the Nutanix Prism Pack ............................................................................... 27 Required Nutanix Prism Information ................................................................................................................... 27 Configuring Nutanix Prism Packs ........................................................................................................................... 27
Chapter 8 Using the Plexxi Connect UI ................................................................................................ 29 Opening the Plexxi Connect UI ................................................................................................................................ 30 Logging Out of the Plexxi Connect UI ..................................................................................................................... 31 Changing the Plexxi Connect admin User Password ........................................................................................ 31 Plexxi Connect Tour Help .......................................................................................................................................... 32 Support Information ................................................................................................................................................... 32 License Agreement ...................................................................................................................................................... 33 Managing the Plexxi Connect Certificate ............................................................................................................. 34 Replacing the Certificate ............................................................................................................................................................. 34
Managing Packs ............................................................................................................................................................ 35 Viewing Installed Packs ............................................................................................................................................................... 35 Viewing Pack Configurations .................................................................................................................................................... 35

4 Plexxi Connect
Adding the Plexxi Control Pack Configuration .................................................................................................................. 37 Adding VMware vSphere Pack Configurations ................................................................................................................. 38 Adding Nutanix Prism Pack Configurations ....................................................................................................................... 40 Validating a Pack Configuration .............................................................................................................................................. 41 Editing a Pack Configuration ..................................................................................................................................................... 41 Deleting a Pack Configuration .................................................................................................................................................. 41 Registering the Plexxi VMware vSphere Plugin with VMware vSphere Hosts .................................................... 42
Managing Device Maps ............................................................................................................................................... 43 Manually Adding Hosts and Host Interfaces to the Device Map ................................................................................ 43 Clearing All Mappings .................................................................................................................................................................. 44 Resetting Mappings ....................................................................................................................................................................... 44
Managing Plexxi Connect User Accounts ............................................................................................................. 44 Adding a Plexxi Connect User ................................................................................................................................................... 44 Editing a Plexxi Connect User ................................................................................................................................................... 45 Deleting a Plexxi Connect User ................................................................................................................................................. 46 Changing the Password for any Plexxi Connect User ..................................................................................................... 46 Changing the Password for the Current Plexxi Connect User ..................................................................................... 46
Managing VLAN Affinities .......................................................................................................................................... 47 Creating a New VLAN Affinity ................................................................................................................................................... 47 Editing a VLAN Affinity ................................................................................................................................................................ 48 Deleting a VLAN Affinity ............................................................................................................................................................. 49 Viewing a VLAN Affinity in the Plexxi Control ................................................................................................................... 49
Managing Support Bundles ...................................................................................................................................... 50 Creating a Support Bundle ......................................................................................................................................................... 50 Deleting a Support Bundle ......................................................................................................................................................... 50 Deleting All Support Bundles .................................................................................................................................................... 50 Downloading a Support Bundle ............................................................................................................................................... 50
Chapter 9 Using the Plexxi Connect vSphere Web Client Plugin ................................................ 51 Opening the Plexxi Connect vSphere Plugin ....................................................................................................... 52 Summary Tab ................................................................................................................................................................ 53 Configuring the vSphere Plugin After Connecting the First Time ............................................................... 54 Configuring Plexxi Connect Authentication ........................................................................................................................ 54
Managing Pack Configurations ................................................................................................................................ 55 Viewing Installed Packs ............................................................................................................................................................... 55 Viewing Pack Configurations .................................................................................................................................................... 56 Adding the Plexxi Control Pack Configuration .................................................................................................................. 57 Adding a VMware vSphere Pack Configuration ................................................................................................................ 59 Adding a Nutanix Prism Pack Configuration ...................................................................................................................... 61 Editing a Pack Configuration ..................................................................................................................................................... 62 Removing a Pack Configuration ............................................................................................................................................... 63 Verifying a Pack Configuration ................................................................................................................................................. 63
Managing Support Bundles ...................................................................................................................................... 64 Creating a Support Bundle ......................................................................................................................................................... 64 Downloading a Support Bundle ............................................................................................................................................... 64 Removing a Support Bundle ...................................................................................................................................................... 64
Managing Plexxi Connect Certificates ................................................................................................................... 65 Viewing a Plexxi Connect Certificate ..................................................................................................................................... 65

Plexxi Connect 5
Adding a Plexxi Connect Certificate ....................................................................................................................................... 65 Deleting a Plexxi Connect Certificate ..................................................................................................................................... 66
Managing Plexxi Connect Authentication and User Accounts ...................................................................... 67 Editing Plexxi Connect Credentials ........................................................................................................................................ 67 Changing the Plexxi Connect admin User Password ...................................................................................................... 68 Removing the Plexxi Connect Configuration from the vSphere Plugin .................................................................. 68 Adding a Plexxi Connect User Account ................................................................................................................................. 69 Editing a Plexxi Connect User Account ................................................................................................................................. 69 Removing a Plexxi Connect User Account ........................................................................................................................... 69
Viewing the Plexxi Connect Host ............................................................................................................................ 70 Viewing Plexxi Control Hosts, Fabrics and Switches ....................................................................................... 71 Viewing Plexxi Control Hosts .................................................................................................................................................... 71 Viewing Fabrics and Switches Associated with a Plexxi Control Host .................................................................... 71
Viewing Plexxi Fabrics ............................................................................................................................................... 73 Summary tab for a Plexxi fabric ............................................................................................................................................... 73 Related Objects tab lists all switches in a Plexxi fabric ................................................................................................. 74
Viewing Plexxi Switches ............................................................................................................................................ 74 Summary tab for a single Plexxi Switch ............................................................................................................................... 75 Monitoring Plexxi Switch Ports ................................................................................................................................................ 76 Plexxi Switch Related Objects ................................................................................................................................................... 77
Appendix A Viewing vHost Configurations in Plexxi Control ......................................................... 78 Virtualization Hosts ...................................................................................................................................................................... 78 vHost Details .................................................................................................................................................................................... 79 vHost Interfaces .............................................................................................................................................................................. 79 Virtual Machines on a selected vHost ................................................................................................................................... 80
Appendix B Viewing Nutanix Configurations in Plexxi Control ..................................................... 81 Nutanix Storage Hosts .................................................................................................................................................................. 82 Nutanix Storage Details ............................................................................................................................................................... 82 Nutanix Interfaces ......................................................................................................................................................................... 83
Appendix C Viewing Nutanix Affinities in Plexxi Control ................................................................ 84 Viewing Nutanix Affinities on the Affinities tab ................................................................................................ 84 Viewing Host Details from Affinity View ............................................................................................................................. 85
Viewing Nutanix Affinities on the Visualizer tab .............................................................................................. 86 Appendix D Viewing VLAN Affinities in Plexxi Control ..................................................................... 88 Creating the Example Storage VLAN Affinity from Plexxi Connect ............................................................. 88 Viewing a Plexxi Connect-‐‑Generated VLAN Affinity in Plexxi Control ....................................................... 88
Appendix E Assigning a Static IP Address to Plexxi Connect .......................................................... 91 Contacting Plexxi Care ................................................................................................................................... 92

6 Plexxi Connect
Welcome
This document describes Plexxi Connect – an open software platform providing integration services between Plexxi fabrics and 3rd party applications. It also describes packs that provide integration and automation functionality.
This guide is written for information technology professionals providing workflow automation and orchestration capabilities in the datacenter.
Related Documentation
The following documentation supports this release:
• Plexxi Software Compatibility Matrix, which identifies compatibility between the versions of Plexxi software and identifies software upgrade paths/compatibility.
• Plexxi Connect User Guide for Release 2.2.0 (this guide)
• Plexxi Connect Getting Started Guide for Release 2.2.0
• Plexxi Connect Release Notes for Release 2.2.0
This documentation is available on the Resources > Technical Publications page of http://www.plexxi.com.

Plexxi Connect 7
Chapter 1 About Plexxi Connect
About Plexxi Switches and Plexxi Control A datacenter powered by Plexxi technology comprises a set of Plexxi Switches interconnected to create an adaptive network fabric facilitating communication between a multitude of compute and storage devices. Plexxi Control provides centralized intelligence for those Plexxi Switches; it facilitates provisioning, monitoring and the distribution of forwarding rules that allow optimal use of the network fabric.
Plexxi Control provides an Application Programming Interface (API) implemented as a set of REST calls. This API allows the automation of all the functions provided by Plexxi Control; it is the same interface used by Plexxi UI – the browser based graphical user interface to Plexxi Control.
About Plexxi Connect As converged and hyperconverged infrastructure for virtualized datacenters evolve, there is a growing trend towards the automation of workflow and service deployment. Vendors such as VMware, Nutanix and others are providing their own APIs to support these automation efforts.
Plexxi Connect is a platform designed to integrate a Plexxi powered network with orchestration services provided by 3rd party compute and storage vendors. It bridges the gap between virtualized data center resources and the physical network by facilitating event driven fabric orchestration and provisioning based on the workflow or application needs.
Plexxi Connect is based on an open source workflow automation platform that integrates with vendor specific “packs”. Packs provide connectors to vendor operations and events; Plexxi provided packs use the vendor supplied APIs to harvest information about compute and storage elements and to register for events requiring network adaptation.
The following figure is a high level representation of Plexxi Connect, Plexxi Control and 3rd party application integration.

8 Plexxi Connect
About Packs Integration and automation functionality is delivered through packs. The Plexxi Connect 2.2.0 release provides the following packs:
• The Plexxi Control pack implements sensors, rules, policies, actions, and workflows for managing Plexxi networks through Plexxi Control.
• The VMware vSphere pack implements sensors, rules, actions, and workflows for managing VMware vSphere environments through one or more vCenter Servers.
• The Nutanix Prism pack implements a sensor for dispatching events for one or more Nutanix environments.

Plexxi Connect 9
Chapter 2 Installing Plexxi Connect
Prerequisites • Plexxi Control 2.4.x, 3.0.x, or 3.1.0 software installed.
• Either:
o vSphere 5.5/6.0/6.5
o Nutanix 5.0
IMPORTANT: For software version compatibility, refer to the Plexxi Software Compatibility Matrix document available on the Resources > Technical Publications page of http://www.plexxi.com.
Required Plexxi Connect Software • Plexxi Connect 2.2.0 installation file (ISO or OVA format).
IMPORTANT: For software version compatibility, refer to the Plexxi Software Compatibility Matrix document available on the Resources > Technical Publications page of http://www.plexxi.com.
VM Requirements The minimum VM requirements are:
• 2 CPUs
• 8 GB RAM
• 50 GB disk
Required Linux Information • A secure Linux administrator password.

10 Plexxi Connect
Installing Plexxi Connect – ISO Install In this section, you will be asked to provision a new VMware VM to host the Plexxi Connect software. Install Plexxi Connect as follows:
1. Open the VMware vSphere Web Client.
2. Upload the Plexxi Connect ISO file (PlexxiConnect-2.2.0-###.iso) to a datastore accessible from the ESXi server where Plexxi Connect will be deployed.
IMPORTANT: For software version compatibility, refer to the Plexxi Compatibility Matrix document available on the Resources > Technical Publications page of http://www.plexxi.com.
3. Create a new VM for Plexxi Connect. You will need to configure the following Plexxi-specific parameters:
• Select Guest OS Family = Linux.
• Select Guest OS Version = CentOS 4/5/6/7 (64-bit).
• In Customer Hardware, select CPU = minimum 2 CPUs.
• Set Memory = minimum 8 GB.
• Set New Hard Disk = minimum 50 GB.
• Select New CD/DVD Drive = Datastore ISO File.
• In Select File, select the Plexxi Connect ISO file in the datastore where it was uploaded.
• Select (check) the Connect At Power On checkbox.
• Finish creating the VM.
4. Open the Summary tab for the new VM.
5. Turn the new VM power ON.
6. Immediately open a console.
7. At the following prompt, select whether the Plexxi Connect IP address will be DHCP or a Static IP.
Note: The default IP address selection is DHCP. To avoid potential loss of access to Plexxi Connect, either select Install Plexxi Connect (Static) to create a static IP address, or for DHCP, reserve the IP address on the DHCP server.

Plexxi Connect 11
8. If Static IP was selected, in the following window for static IP, configure the IP address, Netmask, Gateway, Hostname and Nameservers as needed, then click OK.
9. When prompted, after reading the license agreement, tab to the Accept button and press Enter to accept the license agreement:
The installation begins.

12 Plexxi Connect
10. When the installation completes, as prompted, login using the following default credentials:
user: admin password: plexxi
11. Obtain the IP address of the Plexxi Connect VM. There are several ways you can obtain the IP address assigned to the Plexxi Connect VM, including:
• The IP address is available on the console of the VM without logging in.
• At the Linux prompt, enter either the ifconfig or the ip addr command.
• In vSphere, open the Summary tab for the new VM.
12. Optionally, type <ctrl>-d to logout from the Linux session.

Plexxi Connect 13
Installing Plexxi Connect – OVA Install Plexxi Connect can be distributed as an OVA file designed for rapid deployment on virtual hosts.
In this section, you will be asked to provision a new VMware VM to host the Plexxi Connect software.
Install Plexxi Connect as follows:
1. Open the VMware vSphere Web Client.
2. Select Deploy OVF Template.
3. In Select source, browse for the PlexxiConnect-2.2.x-###.ova file to download. Click Next.

14 Plexxi Connect
4. Verify the Plexxi Connect OVF template details. Click Next.
5. Read the agreement and click Accept to accept the agreement. Click Next.

Plexxi Connect 15
6. Enter a name and location for the Plexxi Connect VM. Click Next.
7. Select an ESXi server to run the deployed template. Click Next.

16 Plexxi Connect
8. Select the virtual disk format, VM Storage Policy (Datastore Default) and select the datastore for the VM. Click Next.
9. Select the source and destination networks. Click Next.

Plexxi Connect 17
10. In Customize template, either leave as is with IP address 0.0.0.0 for DHCP, or configure static IP for Plexxi Connect. To configure static IP, as needed, enter the Hostname, IP Address, Network Mask, Default Gateway, and DNS server(s). When finished, click Next.
Note: The default is to use DHCP. To avoid potential loss of access to Plexxi Connect, either create a static IP address, or for DHCP, reserve the IP address on the DHCP server.
11. In Ready to complete, verify the entered configuration settings. Click Finish.

18 Plexxi Connect
Chapter 3 Other Initial Install Considerations
During an initial Installation, the following should be addressed.
Changing the Linux admin password For security purposes, change the Linux admin password:
1. SSH to Plexxi Connect (by domain name or IP address) and login as user: admin and password: plexxi.
2. At the Linux prompt, change the password using the passwd command.
Changing the Plexxi Connect Hostname To change the Plexxi Connect hostname:
1. Log in to the Plexxi Connect console. The default username/password are admin/plexxi.
2. Enter the following command: The sudo password is plexxi.
sudo vi /etc/hosts
3. Append to the end of the file:
if using FQDN, use an alias as well. For example:
172.16.100.101 hostname.domain.com hostname
otherwise:
172.16.100.101 hostname
4. Enter the command:
sudo hostnamectl set-hostname <hostname>
5. Enter the command:
sudo /opt/plexxi/scripts/enable-network.sh
6. Reboot:
sudo reboot

Plexxi Connect 19
Chapter 4 Upgrading Plexxi Connect
To upgrade Plexxi Connect:
1. Download the file: PlexxiConnect_Upgrade-2.2.xxx.tar.gz
2. Upload the upgrade file to Plexxi Connect:
scp PlexxiConnect_Upgrade-2.2.xxx.tar.gz admin@<IP or Hostname>:~/
3. SSH to Plexxi Connect:
ssh admin@<IP or Hostname>
4. Create a tmp directory:
mkdir tmp
5. Extract the upgrade:
tar -xzf PlexxiConnect_Upgrade-2.2.xxx.tar.gz -C tmp/
6. Install the upgrade:
cd tmp && sudo ./upgrade-plexxiconnect.sh *.rpm
7. Accept the packages to be installed:

20 Plexxi Connect
8. Accept the End User License Agreement:
9. After the upgrade completes successfully, close any browsers connected to Plexxi Connect
10. At the Linux prompt, reboot the Plexxi Connect VM:
sudo reboot
11. Upon reboot, the VMware vSphere plugin will automatically update. If you are logged into the vSphere Web Client during the Plexxi Connect upgrade, logout of the vSphere Web Client and log back in using the account settings from the vSphere Pack Configuration that you used to register the plugin. This will complete the plug-in upgrade and allow you to continue.
Note: For vSphere web client plugin information, refer to Chapter 9, Using the Plexxi Connect vSphere Web Client Plugin.

Plexxi Connect 21
Chapter 5 Configuring the Plexxi Control Pack
About the Plexxi Control Pack The Plexxi Control pack enables Plexxi Connect to communicate with Plexxi Control by:
• Enabling Plexxi Control to provide event based notifications to Plexxi Connect about changes that have occurred.
• Enabling Plexxi Connect to configure Plexxi Control and Switches via the Plexxi Control API.
To enable access from Plexxi Connect to Plexxi Control, the Plexxi Control pack must be configured.
Required Plexxi Control Information • The fully qualified host name or IP address of Plexxi Control.
• Valid Plexxi Control credentials (Administrator or Operator username and password).
• Determine if SSL/TLS certificates should be validated when connecting to Plexxi Control.
• Determine if the configuration should be immediately enabled upon creation.
• Determine which range of VLANs Plexxi Connect can automatically provision based on the vSphere integration. The VLAN range specifies the VLANs which Plexxi Connect will act on. The default range is all user configurable VLANs (1-4000). Plexxi reserves VLANs 4001-4094 for internal use.
Configuring the Plexxi Control Pack Configure Plexxi Connect access to Plexxi Control by adding a single Plexxi Control configuration as follows:
1. Open the Plexxi Connect UI as described in the section, Opening the Plexxi Connect UI.
2. In Plexxi Connect, select Packs > Plexxi Control, then click the +Add button .

22 Plexxi Connect
3. In the Plexxi Control Configuration window, configure the following:
Host: Enter the fully qualified host name or IP address of Plexxi Control.
Username: Enter the username to connect to Plexxi Control. The user must be an Administrator or an Operator.
Password: Enter the password to connect to Plexxi Control.
Verify SSL: Check this box to enable validation of SSL/TLS certificate chains when connecting to Plexxi Control.
Enabled: Check this checkbox to enable the configuration.
VLAN Range: If needed, enter the VLAN range Plexxi Connect is allowed to modify as part of an integration.
Name: Enter a name for the configuration.
Description: Enter a description for the configuration.
4. (Recommended) Click Validate Host to validate the configuration and its connections. A Validation Successful popup should be returned.
5. Click Apply to save the configuration or Cancel to exit without saving.

Plexxi Connect 23
Chapter 6 Configuring the VMware vSphere Pack
About Plexxi Connect and the VMware vSphere Environment The VMware vSphere pack provided by Plexxi Connect connects to one or more configured vSphere installations to integrate objects and events with Plexxi Control.
The VMware vSphere pack:
• Queries vSphere to discover:
o ESXi servers and their NICs
o VMKernel Adapters
o VMs and their NICs
o Distributed vSwitches
o Standard vSwitches
o Port Groups
• Registers for events indicating the addition / removal / modification of the discovered instances above.
As vSphere objects are discovered, Plexxi Connect updates Plexxi Control's knowledge of attached network devices with additional context from vSphere including their relationships to each other. With additional information harvested by Plexxi Switches and sent to Plexxi Control, those objects are then tied to switches and physical ports providing a complete view of the virtualized infrastructure.

24 Plexxi Connect
Required VMware vSphere Information You will need the following information for each VMware vSphere configuration to be added:
• The fully qualified host name or IP address of VMware vSphere.
• Valid VMware vSphere credentials (username / password).
• Determine if SSL/TLS certificates are required when connecting to VMware vSphere.
• Determine if the configuration should be immediately enabled upon creation.
• Determine if a discovery protocol (LLDP or CDP) should be automatically enabled on vSwitches. For more information on discovery protocols, see Automatic VLAN Provisioning.
• Determine if CDP or LLDP should be used on Distributed vSwitches.
Configuring VMware vSphere Packs Configure Plexxi Connect access to VMware vSphere by adding one or more VMware vSphere configurations using the Plexxi Connect UI as follows:
1. Open and login to the Plexxi Connect UI as described in the section, Opening the Plexxi Connect UI.
2. In Plexxi Connect, select Packs > VMware vSphere, then click the +Add button .
The following window opens:

Plexxi Connect 25
3. In the VMware vSphere Configuration window, configure the following:
Host: Enter the fully qualified host name or IP address of VMware vSphere.
Username: Enter the username to connect to VMware vSphere. This needs to be a user with appropriate permissions to perform configuration or administrative tasks within VMware vSphere.
Password: Enter the password to connect to VMware vSphere.
Verify SSL: Check this box to enable validation of SSL/TLS certificate chains when connecting to VMware vSphere.
Enabled: Check this checkbox to enable the configuration.
Name: Enter a name for the configuration.
Description: Enter a description for the configuration.
Automatically enable discovery protocols: Select this parameter to automatically enable CDP or LLDP discovery protocol on all vSwitches and Distributed vSwitches.
Use CDP when automatically configuring Distributed vSwitches: If automatic discovery is enabled, checking this field automatically enables CDP on vSwitches and Distributed vSwitches. Leaving this field unchecked enables LLDP.
Note: LLDP is not supported by VMware on standard vSwitches.
4. (Recommended) Click Validate to validate the configuration and its connections. A Validation Successful popup should be returned.
5. Click Apply to save the configuration or Cancel to exit without saving.
6. Repeat the steps above to add additional VMware vSphere configurations. Up to 10 vSphere instances can be configured.
Automatic VLAN Provisioning Changes to the vSphere virtual network environment may require provisioning of VLANs in the Plexxi fabric. VLANs associated with vSwitch port groups must be assigned on the correct port of the correct switches. Plexxi Connect automates that assignment via the vSphere and Plexxi Control packs.
Hierarchically, a VM exists in the following environment:
1. The VM exists on a virtual host (vHost) compute resource
2. The vHost has one or more physical network interfaces (PNIC) connected to Plexxi Switches
3. The VM has one or more virtual network interfaces (VNIC)
4. VNICs are tied to PNICs via virtual switches (vSwitch) and port groups
When a VM is created, vSphere generates an event that the vSphere pack receives. By processing the event, the pack learns the VM name, the assigned VNICs and the VLAN to be used by the VM. With this information, the vSphere pack can follow the chain of objects and determine the PNICs that the VM will eventually use for network communication.
The final step is to determine which Plexxi Switches and ports these PNICs are attached to. Once known, the Plexxi Control pack uses the Plexxi Control API to assign the VLAN to the switch port.

26 Plexxi Connect
Automatic PNIC to Plexxi switch port mapping is available by enabling LLDP or CDP discovery:
LLDP or CDP Messages
Plexxi Switches implement a listener for LLDP and CDP on each access port of the switch. When enabled in vSphere, LLDP or CDP advertises the vHost and PNIC name for the physical interface. Upon receipt of a message, the Plexxi Switch sends a notification to Plexxi Control making the newly learned neighbor information available via the Plexxi Control REST API.
For this to work, the LLDP or CDP messages need to contain valid DNS information. You must make sure that the DNS name for the host can be resolved, and that it matches the name in vCenter. Plexxi recommends using lower case DNS host names only.
Manual Configuration
Manual configuration may be used in cases where neither LLDP nor CDP are used. Using manual configuration, all PNIC to Plexxi Switch port mappings are entered manually in the Plexxi Connect UI as described in the section, Managing Device Maps.
The VMware vSphere pack handles numerous events that impact VLAN provisioning, including changing a VLAN, removing a VLAN, configuring a vHost, configuring a NIC, configuring a vSwitch, or changing port groups. When an event occurs, the Plexxi Switch port is automatically updated. For example, if a VM is deleted, a corresponding event is processed and the VLAN is removed from the Plexxi Switch port if there are no other VMs connected to the Plexxi Switch port.

Plexxi Connect 27
Chapter 7 Configuring the Nutanix Prism Pack
The Nutanix Prism pack implements a sensor for dispatching events for one or more Nutanix environments.
Required Nutanix Prism Information You will need the following information for each Nutanix Prism configuration to be added:
• The fully qualified host name or IP address of Nutanix Prism.
• Valid Nutanix Prism credentials (username / password).
• Determine if SSL/TLS certificates are required when connecting to Nutanix Prism.
• Determine if the configuration should be immediately enabled upon creation.
• Determine the CVM fitting mode to use. The modes are described in the procedure that follows.
Configuring Nutanix Prism Packs Configure Plexxi Connect access to Nutanix Prism by adding one or more Prism configurations using the Plexxi Connect UI as follows:
1. Open the Plexxi Connect UI as described in the section, Opening the Plexxi Connect UI.
2. In Plexxi Connect, select Packs > Nutanix Prism, then click the +Add button .
The following window opens:

28 Plexxi Connect
3. In the Nutanix Prism Configuration window, configure the following:
Host: Enter the fully qualified host name or IP address of Nutanix Prism.
Username: Enter the username to connect to Nutanix Prism. This needs to be a user with appropriate permissions to perform configuration or administrative tasks.
Password: Enter the password to connect to Nutanix Prism.
Verify SSL: Check this box to enable validation of SSL/TLS certificate chains when connecting to Nutanix Prism.
Enabled: Check this checkbox to enable the configuration.
Name: Enter a name for the configuration.
Description: Enter a description for the configuration.
CVM Fitting: Plexxi Connect for Nutanix allows you to automatically influence how Nutanix CVM (Controller VM) traffic is handled across the Plexxi fabric. This allows you to ensure there is enough bandwidth available for the CVM traffic and that any interference CVM traffic has over user traffic is minimized. This is all done automatically without user intervention as your clusters expand and contract. Select from the following modes:
None - No CVM fitting.
Isolation - Builds a point to point, switch to switch 10Gbps mesh dedicated to CVM traffic and isolated from all other traffic.
Optimize – Carves out additional bandwidth on shared links for the placement of CVM traffic, which has the effect of reducing the percentage weight for placement of residual traffic on any link used by CVM.
Note: Plexxi recommends that Isolation is used as this provides the best network for both Nutanix CVM and user workload traffic alike.
4. (Recommended) Click Validate to validate the configuration and its connections. A Validation Successful popup should be returned.
5. Click Apply to save the configuration or Cancel to exit without saving.
6. Repeat the steps above to add additional Nutanix Prism configurations. As many as ten Nutanix Prism configurations can be added.

Plexxi Connect 29
Chapter 8 Using the Plexxi Connect UI
The Plexxi Connect UI enables you to manage packs, device maps for non-LLDP/CDP environments, user accounts, certificates, and support bundles.
This chapter contains the following main sections:
Section Description
Opening the Plexxi Connect UI Describes how to open the Plexxi Connect UI.
Logout Describes how to log out of the Plexxi Connect UI.
Changing the Plexxi Connect admin User Password
Describes how to change the admin user password which should be performed immediately after installing Plexxi Connect for the first time.
Plexxi Connect Tour Help Describes Plexxi Connect Tour Help.
Support Information Provides support Information.
License Agreement Provides a copy of the License Agreement.
Managing the Plexxi Connect Certificate
Describes how to manage the Plexxi Connect Certificate.
Managing Packs Describes how to manage packs and pack configurations. For the 2.2.x release, creating the following pack configurations is described in detail:
• Adding the Plexxi Control Pack Configuration
• Adding VMware vSphere Pack Configurations
• Adding Nutanix Prism Pack Configurations
Manually Managing Device Maps
Describes how to add host and host interface information to the Device Maps table for devices that do not support LLDP or CDP.
Managing VLAN Affinities Describes how to manage VLAN Affinities.
Managing Plexxi Connect User Accounts
Describes how to manage Plexxi Connect user accounts. The following section is of key importance since it should be performed immediately after installing Plexxi Connect:
• Changing the Plexxi Connect admin User Password
Managing Support Bundles Describes how to create, download and delete support bundles.

30 Plexxi Connect
Opening the Plexxi Connect UI The Plexxi Connect UI is accessed through a web browser.
1. In a web browser, enter the Plexxi Connect IP address
Note: If necessary, you can obtain the Plexxi Connect IP address from the VMware vSphere window on the Summary tab for the ESXi host..
2. Enter the username and secure password to login to Plexxi Connect.
Note: The default credentials: for the first-time login are: user: admin password: plexxi
Optionally, you can check the Remember Me checkbox to remember your username, which will be automatically entered into the username field next time you log in.
3. Click Login.
Note: If this is a first-time login, you should configure a secure password as described in the section, Changing the Plexxi Connect admin User Password.
Upon login, the following screen opens:
Plexxi Connect 31
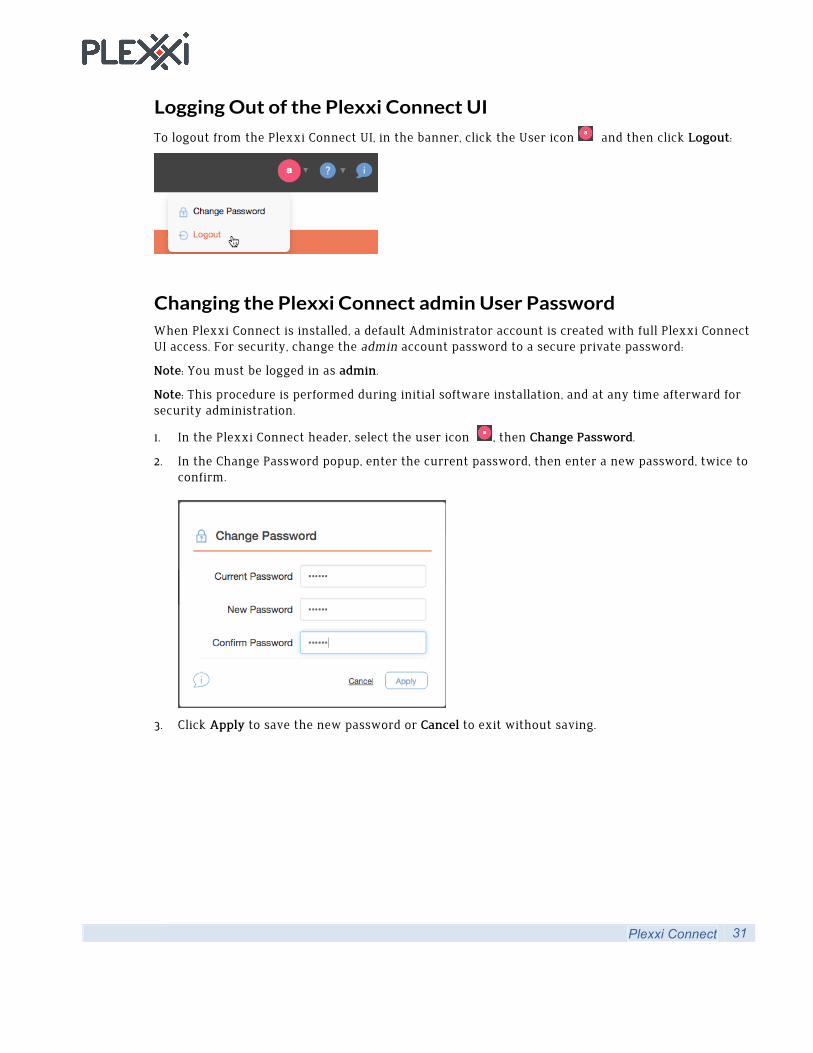
Logging Out of the Plexxi Connect UI
To logout from the Plexxi Connect UI, in the banner, click the User icon and then click Logout:
Changing the Plexxi Connect admin User Password When Plexxi Connect is installed, a default Administrator account is created with full Plexxi Connect UI access. For security, change the admin account password to a secure private password:
Note: You must be logged in as admin.
Note: This procedure is performed during initial software installation, and at any time afterward for security administration.
1. In the Plexxi Connect header, select the user icon , then Change Password.
2. In the Change Password popup, enter the current password, then enter a new password, twice to confirm.
3. Click Apply to save the new password or Cancel to exit without saving.

32 Plexxi Connect
Plexxi Connect Tour Help A tour help was added to Plexxi Connect, which works the same way as the tour help in Plexxi
Control. Click the Toggle Help Assistant icon to start and stop the tour. The tour walks through context sensitive help on the current screen.
Support Information
To view support information, in the banner, click the Support Information icon , then click Support.
The popup window displays the following information:
§ Plexxi Connect Version.
§ Plexxi Support phone numbers.
§ Plexxi Support Email address.
§ Plexxi Support website URL.
Click OK to exit.

Plexxi Connect 33
License Agreement
To view the license agreement, in the banner, click the Support Information icon , then click License Agreement.
In the popup window, you can read the license agreement and click OK to exit.

34 Plexxi Connect
Managing the Plexxi Connect Certificate This feature enables you to replace the current installed certificate with a new PEM encoded certificate and Private Key file. The following example shows the default self-signed certificate.
Replacing the Certificate
To replace the certificate:
1. In Plexxi Connect, select Configuration > Certificate.
2. In the Certificate field, click Replace Certificate.
3. In the Replace Certificate window, you can either drag-and-drop or perform a search to install the PEM encoded certificate and the Private Key file; both are needed.
4. Click Apply to save the new certificate or Cancel to exit without saving.

Plexxi Connect 35
Managing Packs Integration and automation functionality is delivered through packs. The Plexxi Connect 2.2.x release provides the following packs:
• The Plexxi Control pack implements sensors, rules, policies, actions, and workflows for managing Plexxi networks through Plexxi Control.
• The VMware vSphere pack implements sensors, rules, actions, and workflows for managing VMware vSphere environments through one or more vCenter Servers.
• The Nutanix Prism pack implements a sensor for dispatching events for one or more Nutanix environments.
Viewing Installed Packs
The Packs > Overview tab shows all installed packs,
Viewing Pack Configurations
To view pack configuration, select that pack in the left pane. All configurations of that pack are listed. From the pack configuration lists, you can add, edit and delete pack configurations,
Plexxi Control Pack Configuration
To view the Plexxi Control pack configuration, select Packs > Plexxi Control. For example:
From this window, you can Add, Edit and Delete a Plexxi Control configuration, You can have only one Plexxi Control pack configuration.

36 Plexxi Connect
VMware vSphere Pack Configurations
To view the VMware vSphere pack configurations for all configured vSphere hosts, select Packs > VMware vSphere. For example:
From this window, you can Add, Edit and Delete Plexxi vSphere configurations as well as register the VMware vSphere plugin configurations with the vSphere host,
Nutanix Prism Pack Configurations
To view the Nutanix Prism pack configurations, select Packs > Nutanix Prism. For example:
From this window, you can Add, Edit and Delete Nutanix Prism configurations,

Plexxi Connect 37
Adding the Plexxi Control Pack Configuration
Configure Plexxi Connect access to Plexxi Control by adding a single Plexxi Control configuration as follows:
1. In Plexxi Connect, select Packs > Plexxi Control, then click the +Add button .
2. In the Plexxi Control Configuration window, configure the following:
Host: Enter the fully qualified host name or IP address of Plexxi Control.
Username: Enter the username to connect to Plexxi Control. The user must be an Administrator or an Operator.
Password: Enter the password to connect to Plexxi Control.
Verify SSL: Check this box to enable validation of SSL/TLS certificate chains when connecting to Plexxi Control.
Enabled: Check this checkbox to enable the configuration.
VLAN Range: If needed, enter the VLAN range Plexxi Connect is allowed to modify as part of an integration.
Name: Enter a name for the configuration.
Description: Enter a description for the configuration.
3. (Recommended) Click Validate to validate the configuration and its connections. A Validation Successful popup should be returned.

38 Plexxi Connect
4. Click Apply to save the configuration or Cancel to exit without saving.
Adding VMware vSphere Pack Configurations
Configure Plexxi Connect access to VMware vSphere by adding one or more VMware vSphere configurations as follows:
1. In Plexxi Connect, select Packs > VMware vSphere, then click the +Add button .
The following window opens:
2. In the VMware vSphere Configuration window, configure the following:
Host: Enter the fully qualified host name or IP address of the VMware vSphere host.
Username: Enter the username to connect to the VMware vSphere host. This needs to be a user with appropriate permissions to perform configuration or administrative tasks within VMware vSphere.
Password: Enter the password to connect to VMware vSphere.
Verify SSL: Check this box to enable validation of SSL/TLS certificate chains when connecting to VMware vSphere.
Enabled: Check this checkbox to enable the configuration.
Name: Enter a name for the configuration.
Description: Enter a description for the configuration.

Plexxi Connect 39
Automatically enable discovery protocols: Select this parameter to automatically enable CDP or LLDP discovery protocol on all vSwitches and Distributed vSwitches.
Use CDP when automatically configuring Distributed vSwitches: If automatic discovery is enabled, checking this field automatically enables CDP on vSwitches and Distributed vSwitches. Leaving this field unchecked enables LLDP.
Note: LLDP is not supported by VMware on standard vSwitches.
3. (Recommended) Click Validate to validate the configuration and its connections. A Validation Successful popup should be returned.
4. Click Apply to save the configuration or Cancel to exit without saving.
5. Repeat the steps above to add additional VMware vSphere configurations. Up to 10 vSphere instances can be configured.

40 Plexxi Connect
Adding Nutanix Prism Pack Configurations
Configure Plexxi Connect access to Nutanix Prism hosts by adding one or more Nutanix Prism configurations as follows:
1. In Plexxi Connect, select Packs > Nutanix Prism, then click the +Add button .
The following window opens:
2. In the Nutanix Prism Configuration window, configure the following:
Host: Enter the fully qualified host name or IP address of the Nutanix Prism host.
Username: Enter the username to connect to the Nutanix Prism host.
Password: Enter the password to connect to the Nutanix Prism host.
Verify SSL: Check this box to enable validation of SSL/TLS certificate chains when connecting to the Nutanix Prism host.
Enabled: Check this checkbox to enable the configuration.
Name: Enter a name for the configuration.
Description: Enter a description for the configuration.
CVM Fitting: Plexxi Connect for Nutanix allows you to automatically influence how Nutanix CVM (Controller VM) traffic is handled across the Plexxi fabric. This allows you to ensure there is enough bandwidth available for the CVM traffic and that any interference CVM traffic has over user traffic is minimized. This is all done automatically without user intervention as your clusters expand and contract. Select from the following modes:

Plexxi Connect 41
None - No CVM fitting.
Isolation - Builds a point to point switch to switch 10Gbps mesh dedicated to CVM traffic and isolated from all other traffic
Optimize – Carves out additional bandwidth on shared links for the placement of CVM traffic, which has the effect of reducing the percentage weight for placement of residual traffic on any link used by CVM.
Note: Plexxi recommends that Isolation is used as this provides the best network for both Nutanix CVM and user workload traffic alike.
3. (Recommended) Click Validate to validate the configuration and its connections. A Validation Successful popup should be returned.
4. Click Apply to save the configuration or Cancel to exit without saving.
5. Repeat the steps above to add additional Nutanix Prism configurations. As many as ten Nutanix Prism configurations can be added.
Validating a Pack Configuration
When you create a new pack configuration or edit an existing pack configuration, before adding or applying the changes (or at any time as needed), you can validate that the pack configuration matches an actual connected virtual system.
Click Validate to validate the configuration and its connections. A Validation Successful popup should be returned.
Editing a Pack Configuration
You can edit a current configuration as follows:
1. In Plexxi Connect, select Packs. then in the left navigation pane, select the pack category.
2. Select the configuration, then click the Edit icon .
3. In the edit window, make all changes as needed.
4. (Recommended) Click Validate Host to validate the configuration and its connections.
5. Click Apply to save the configuration or Cancel to exit without saving.
Deleting a Pack Configuration
You can delete a configuration as follows:
Note: Deleting a vSphere pack configuration will result in the associated configuration in Plexxi Control being removed. This includes the deletion of vHost/Virtual Machines from the Network view and any VLANs provisioned for this vSphere instance.
Note: Deleting a Nutanix Prism pack configuration will result in the associated configuration in Plexxi Control being removed. This includes the deletion of Storage Servers from the Network View and their Affinity Groups and Links from the Affinities View.
1. In Plexxi Connect, select Packs. then in the left navigation pane, select the pack category.
2. Select the configuration, then click the Delete icon .
3. At the confirmation prompt, click Confirm to delete or Cancel to retain the configuration. If you confirm, the configuration is immediately deleted.

42 Plexxi Connect
Registering the Plexxi VMware vSphere Plugin with VMware vSphere Hosts
Plexxi Connect contains a VMware vSphere Plugin which must be registered with each VMware vSphere host before it can be used with the VMware vSphere hosts.
The VMWare vSphere Plugin, which you access through VMware vSphere, enables you to manage packs, support bundles and users without leaving VMware vSphere.
Register the VMware vSphere plugin with VMware vSphere as follows:
IMPORTANT: Bidirectional communication must be available between Plexxi Connect and VMware vSphere. Plexxi Connect must be able to reach vSphere, and vSphere must be able to reach Plexxi Connect. If this communication is not available, the plugin may be reported as successfully registered when it failed.
1. In the Plexxi Connect UI, select Packs > VMware vSphere.
2. To register a VMware vSphere plugin, to the right of that host configuration, click the Register
vSphere Plugin icon .
3. In the confirmation popup, verify the registration information and click OK to confirm. A popup will confirm successful registration.
4. If you are logged into the vSphere Web Client and if you just registered the Plexxi Plugin for VMware vSphere, logout of the vSphere Web Client and log back in using the account settings from the vSphere Pack Configuration that you just used to register the plugin. This will complete the plugin installation and allow setup to begin. For further information, refer to Chapter 9, Using the Plexxi Connect vSphere Web Client Plugin.
5. If multiple configurations of VMware vSphere are configured, repeat these steps to register the plugin with each VMware vSphere configuration.

Plexxi Connect 43
Managing Device Maps For VMs in environments where neither CDP nor LLDP is enabled on the associated vSwitch, new or changed ESXi hosts and ESXi host interfaces must be mapped to their associated Plexxi Switch access port through the Device Map in Plexxi Connect.
Manually Adding Hosts and Host Interfaces to the Device Map
To add or update ESXi Host interface connections to Plexxi switch access ports:
Note: The Plexxi Control pack must be configured before device maps can be configured.
1. In the Plexxi Connect UI, select Configuration > Device Map.
2. Complete the following fields as needed for each host/interface connection to a Plexxi switch port:
Plexxi Switch: Automatically populated - The Plexxi switch that handles packets from the ESXi host.
Port ID: Automatically populated - The port number on the Plexxi switch, i.e. 1, 4, or 35.
Port Name: Automatically populated - The name of the access port on the Plexxi switch, i.e. xp1, xp4, xp35, etc..
Host: If the host does not use either CDP or LLDP, you need to manually enter either the fully qualified host name or the IP address of the vHost connected to the Plexxi switch port. Enter an IP address only if the vHost was added to vSphere by IP address (instead of by hostname).
Host Interface: If the host does not use either CDP or LLDP, you need to manually enter the name of the vHost’s physical adapter (for example, vmnic1) connected to the Plexxi switch port.
3. Click Apply to save the entered connection(s).

44 Plexxi Connect
Clearing All Mappings
This button clears all saved and unsaved host/interface mappings from the table. You will be prompted to confirm the action. To clear all mappings, you must click Save to save the cleared mappings.
Resetting Mappings
During a data entry session, clicking Reset Mappings before saving the new mappings, resets all new or changed mappings to their pre-edit-session values.
Managing Plexxi Connect User Accounts An administrator can add, edit and delete Plexxi Connect user accounts.
Notes:
You must have Administrator access to create, modify or delete user accounts.
Users with Operator role can change their own password, but not add/update/delete any other user accounts.
Users with Viewer role can change their own password, but they cannot make any other changes within Plexxi Connect.
Adding a Plexxi Connect User
To add a Plexxi Connect user account:
Note: You must have Administrator access to add Plexxi Connect user accounts.
1. In Plexxi Connect, select the Configuration > Users.
2. Click the +Add button .
3. In the Add User window, configure the following:

Plexxi Connect 45
Username: Enter the Plexxi Connect user name.
Password: Enter the password for the user, then re-enter the password to confirm.
Role: Select the user role:
Administrator: A user with Administrator privileges has full read/write privileges. Administrator privilege is needed for any management operation. For example, to manage users, support bundles, vSphere/Plexxi pack configuration, and device mapping.
Operator: A user with Operator privileges can perform all operations that an administrator can perform, except an operator cannot create new users or modify existing users.
Viewer: A user with Viewer privileges has read-only access. A viewer can change their own password, however they cannot make any other changes.
4. Click Apply to save the new user or Cancel to exit without saving
Editing a Plexxi Connect User
To edit a Plexxi Connect user account:
Note: You must have Administrator access to edit Plexxi Connect user accounts.
1. In Plexxi Connect, select Configuration > Users.
2. Click the Edit icon next to the user to edit.
3. In the Edit User popup, make all edits as needed.
4. Click Apply to save the edits or Cancel to exit the user account without saving.

46 Plexxi Connect
Deleting a Plexxi Connect User
Note: You must have Administrator role access to delete a Plexxi Connect user account. You cannot delete the last account with Administrator role.
1. In Plexxi Connect, select Configuration > Users.
2. Next to the user to be deleted, click the Delete icon .
3. At the Confirm Deletion prompt, click Confirm to delete or Cancel to retain the user account.
Changing the Password for any Plexxi Connect User
To change the password for any Plexxi Connect user:
Note: You must have Administrator access to change passwords for other users.
1. In Plexxi Connect, select Configuration > Users.
2. In the row for the user you want to edit, then click the Edit icon .
3. In the Password field, enter a secure private password.
4. Click Confirm to save the edits or Cancel to exit without saving.
Changing the Password for the Current Plexxi Connect User
To change the password for the current logged-in Plexxi Connect user:
1. In the Plexxi Connect header, select the user logo, then Change Password.
2. In the Change Password popup, enter the current password, then enter a new password, twice to confirm.
3. Click Apply to save the new password or Cancel to exit without saving.

Plexxi Connect 47
Managing VLAN Affinities From Plexxi Connect, you can create and manage VLAN Affinities that will isolate traffic that uses a VLAN or set of VLAN's. For example, clustered storage traffic using a set of VLAN's can be isolated from all other traffic by creating a VLAN Affinity. Once configured with one or more VLAN Affinities. Plexxi Connect watches for changes in the end points communicating on that VLAN and automatically fits and renders the network.
This enables you to create isolated VLAN Affinities for storage traffic from multiple end points using common VLAN(s).
The following Plexxi Connect window is available by selecting Configuration > VLAN Affinities. It lists the VLAN Affinities,
Creating a New VLAN Affinity
To create a new VLAN Affinity:
1. In the Plexxi Connect UI, select Configuration > VLAN Affinities.
2. Click the +Add button.
3. In the Add VLAN Affinity window, complete the following fields:
Name - A name for the affinity.
VLANs - Specify a single VLAN, a range of VLANs, or non-adjacent VLANs (comma-separated). Examples include:
100 100, 200 10-12 10-12,20,21

48 Plexxi Connect
Fit Style: In the dropdown, select the type of fit that will be performed by Plexxi Control:
Incremental – Perform a partial fit. This fit will be only for new or changed affinities which may be only this new affinity.
Full – Perform a full fit.
Off - No fit will be performed by Plexxi Control. You will need to log into Plexxi Control and manually perform a fit.
4. Click Apply to save the VLAN Affinity.
Editing a VLAN Affinity
To edit an existing VLAN Affinity:
1. In the Plexxi Connect UI, select Configuration > VLAN Affinities.
2. In the row for the affinity to be edited, click the Edit Affinity button.
3. In the Edit VLAN Affinity window, update any of the following fields:
Name - A name for the affinity.
VLANs - Specify a single VLAN, a range of VLANs, or non-adjacent VLANs (comma-separated). Examples include:
100 100, 200 10-12 10-12,20,21
Fit Style: In the dropdown, select the type of fit that will be performed by Plexxi Control:
Incremental - Perform a partial fit. This fit will be only for new or changed affinities which may be only this new affinity
Full - Perform a full fit.
Off - No fit will be performed by Plexxi Control. You will need to log into Plexxi Control and manually perform a fit.
4. Click Apply to save the VLAN Affinity.

Plexxi Connect 49
Deleting a VLAN Affinity
To delete a VLAN Affinity:
1. In the Plexxi Connect UI, select Configuration > VLAN Affinities.
2. In the row for the VLAN Affinity to delete, click the Delete button.
3. At the Delete confirmation prompt, click OK to delete the affinity or Cancel to retain the affinity.
Viewing a VLAN Affinity in the Plexxi Control
In the Plexxi Control UI, to view a VLAN Affinity created by Plexxi Connect, refer to the Plexxi Control online help as well as in the following section within this document:
• Viewing a Plexxi Connect-Generated VLAN Affinity in Plexxi Control
50 Plexxi Connect
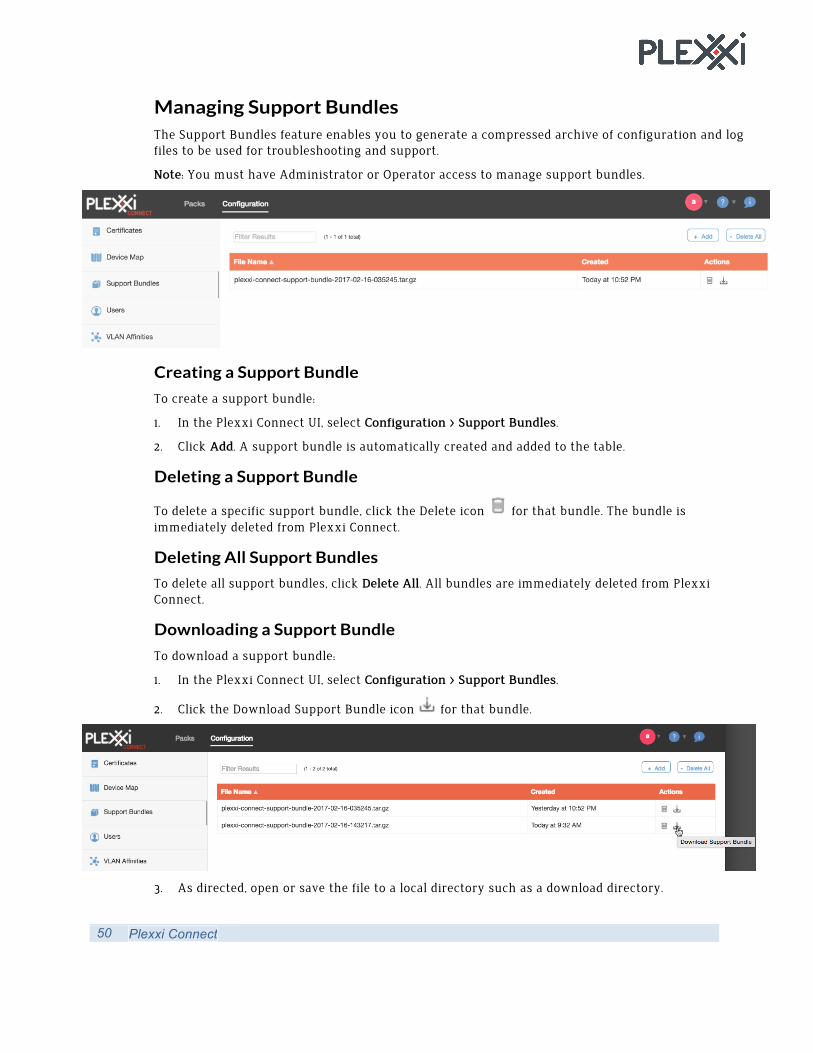
Managing Support Bundles The Support Bundles feature enables you to generate a compressed archive of configuration and log files to be used for troubleshooting and support.
Note: You must have Administrator or Operator access to manage support bundles.
Creating a Support Bundle
To create a support bundle:
1. In the Plexxi Connect UI, select Configuration > Support Bundles.
2. Click Add. A support bundle is automatically created and added to the table.
Deleting a Support Bundle
To delete a specific support bundle, click the Delete icon for that bundle. The bundle is immediately deleted from Plexxi Connect.
Deleting All Support Bundles
To delete all support bundles, click Delete All. All bundles are immediately deleted from Plexxi Connect.
Downloading a Support Bundle
To download a support bundle:
1. In the Plexxi Connect UI, select Configuration > Support Bundles.
2. Click the Download Support Bundle icon for that bundle.
3. As directed, open or save the file to a local directory such as a download directory.

Plexxi Connect 51
Chapter 9 Using the Plexxi Connect vSphere Web Client Plugin
Without leaving the VMware vSphere environment, you can use the vSphere plugin to manage packs, support bundles and users as well as to view connected Plexxi switches and monitor Plexxi switch/port connectivity.
IMPORTANT: Before you can access the Plexxi Connect vSphere plugin for the first time, you must first create a vSphere configuration as described in the section, Adding VMware vSphere Pack Configurations using the Plexxi Connect UI, then register the vSphere plugin with VMware as described in the section, Registering the Plexxi Plugin for VMware vSphere. This should be performed during installation.
IMPORTANT: If you are logged into the vSphere Web Client and if you just registered the Plexxi Plugin for VMware vSphere, logout of the vSphere Web Client and log back in using the account settings from the vSphere Pack Configuration that you just used to register the plugin. This will complete the plugin installation and allow setup to begin.
This chapter contains the following main sections:
Section Description
Opening the Plexxi Connect vSphere plugin
Describes how to open the Plexxi Connect vSphere Plugin.
Configuring the vSphere Plugin After Connecting the First Time
The first time the Plexxi Connect vSphere plugin is opened, Plexxi Connect authentication, which enables vSphere to access Plexxi Connect, must be configured, before you use the vSphere plugin to manage Plexxi Connect.
Managing Pack Configurations Describes how to manage packs and pack configurations, including:
• Adding a VMware vSphere Pack Configuration
• Adding the Plexxi Control Pack Configuration
• Adding a Nutanix Prism Pack Configuration
Managing Support Bundles Describes how to create, download and delete support bundles.
Managing Plexxi Connect Certificates
Describes how to manage Plexxi Connect certificates.
Managing Plexxi Connect Authentication and User Accounts
Describes how to manage Plexxi Connect authentication and user accounts.
Viewing the Plexxi Connect Host
Provides sample screens and instructions to view the Plexxi Connect host.

52 Plexxi Connect
Viewing Plexxi Control Hosts, Fabrics and Switches
Provides sample screens and instructions to view Plexxi Control hosts, fabrics and switches.
Viewing Plexxi Fabrics Provides additional ways to view Plexxi Control fabrics.
Viewing Plexxi Switches Provides additional ways to view Plexxi Control switches.
Opening the Plexxi Connect vSphere Plugin The Plexxi Connect plugin places no browser restrictions beyond browsers approved by VMware.
Open the Plexxi Connect vSphere web client plugin using one of the following methods:
• From the vSphere Navigator, select Plexxi Connect.
• From the Home Workspace, click the ‘Plexxi Connect for vSphere’ icon as shown below:
• From the Home Menu, select Plexxi Connect.
The Plexxi Connect Home page opens in the vSphere Workspace (content area).

Plexxi Connect 53
Summary Tab On the vSphere plugin Home page, the Summary tab provides the following Plexxi Connect information:
Network Fabrics – The total number of Plexxi fabrics.
Plexxi Switches – The total number of Plexxi switches in the fabric.
Installed Packs – The total number of installed packs.
Connect Version – The installed Plexxi Connect version.
Operational State – The operational state of the Plexxi fabric.

54 Plexxi Connect
Configuring the vSphere Plugin After Connecting the First Time After you connect to the vSphere plugin the first time, you must configure Plexxi Connect authentication as described in the section that follows.
Configuring Plexxi Connect Authentication
Plexxi Connect authentication must be configured to enable access to Plexxi Connect from vSphere. This must be configured before you can create any pack configurations from the vSphere plugin.
To configure Plexxi Connect authentication:
1. In the Plexxi Connect for vSphere plugin, select: Plexxi Connect Home > Manage > Settings > Authentication.
2. Click Edit. The following window opens:
3. In the Edit Plexxi Connect Credentials window, enter the login credentials that have been previously configured to login to Plexxi Connect. These credentials enable the Plexxi Connect Plugin to login to Plexxi Connect; they do not change the actual credentials. These credentials are:
Host: Enter the fully qualified host name or IP address of Plexxi Connect.
Username: Enter the username to connect to Plexxi Connect. The user of a Plexxi Connect account must be an administrator; the default administrator account is admin.
Password: Enter the password to connect to Plexxi Connect.
4. Click Save.

Plexxi Connect 55
Managing Pack Configurations You can view, create, edit and delete pack configurations.
IMPORTANT: Before you can manage vSphere pack configurations, you must have configured authentication between the vSphere plugin and Plexxi Connect as described in the section, Configuring Plexxi Connect Authentication.
Viewing Installed Packs
From vSphere, you can open this page as follows:
• From the Navigator: select Plexxi Connect Home > Manage tab > Installed Packs.
• From the Plexxi Connect Getting Started tab, select Configure Packs > Manage > Installed Packs
Installed packs are listed. For example:
Packs include:
vsphere – The VMware vSphere pack implements sensors, rules, actions, and workflows for managing VMware vSphere environments through one or more vCenter Servers.
plexxi – The Plexxi Control pack implements sensors, rules, policies, actions, and workflows for managing Plexxi networks through Plexxi Control.
nutanix – The Nutanix Prism pack implements a sensor for dispatching events for one or more Nutanix environments.

56 Plexxi Connect
Viewing Pack Configurations
From vSphere, you can open the following pages as follows:
• From the Navigator: select Plexxi Connect Home > Manage tab > Pack Configuration.
• From the Plexxi Connect Getting Started tab, select Configure Packs > Manage > Pack Configuration
In the dropdown, select the pack configurations to list. For example, Plexxi Control or VMware vSphere.
A sample Plexxi Control configuration is:
A sample VMware vSphere configuration is:
A sample Nutanix Prism configuration is:

Plexxi Connect 57
Adding the Plexxi Control Pack Configuration
This task should need to be performed only one time when the Plexxi Control software is installed.
To add the Plexxi Control pack configuration from the vSphere plugin:
1. In the Plexxi Connect for vSphere plugin, select Plexxi Connect Home > Manage > Pack Configuration.
2. In the dropdown, select Plexxi Control.
3. Click the ‘Add configuration’ icon .. The following window opens:
4. Complete the following fields:
Host: Enter the fully qualified host name or IP address of Plexxi Control.
Username: Enter the username to connect to Plexxi Control. The user must be an Administrator or an Operator.
Password: Enter the password to connect to Plexxi Control.
Verify SSL: Check this box to enable validation of SSL/TLS certificate chains when connecting to Plexxi Control.
Enabled: Check this checkbox to enable the configuration.
VLAN Range: If needed, enter the VLAN range Plexxi Connect is allowed to modify as part of an integration.
Name: Enter a name for the configuration.
Description: Enter a description for the configuration.

58 Plexxi Connect
5. (Recommended) Click Verify to validate the configuration and its connections. The following should be returned:
6. Click Save to save the configuration or Cancel to exit without saving.

Plexxi Connect 59
Adding a VMware vSphere Pack Configuration
From the vSphere plugin, you can add VMware vSphere pack configurations to enable integration between Plexxi Connect and vSphere hosts, as follows:
IMPORTANT: Before adding any vSphere pack configurations, you must have configured authentication between the vSphere plugin and Plexxi Connect as described in the section, Configuring Plexxi Connect Authentication.
1. In the Plexxi Connect for vSphere plugin, select Plexxi Connect Home > Manage > Pack Configuration.
2. In the dropdown, select VMware vSphere.
3. Click the ‘Add configuration’ icon ( ). The following window opens:
4. In the Create VMware vSphere Configuration window, configure the following:
Host: Enter the fully qualified host name or IP address of VMware vSphere.
Username: Enter the username to connect to VMware vSphere. This needs to be a user with appropriate permissions to perform configuration or administrative tasks within VMware vSphere.
Password: Enter the password to connect to VMware vSphere.
Verify SSL: Check this box to enable validation of SSL/TLS certificate chains when connecting to VMware vSphere.

60 Plexxi Connect
Enabled: Check this checkbox to enable the configuration.
Name: Enter a name for the configuration.
Description: Enter a description for the configuration.
Auto-enable Discovery Protocols: Select this parameter to automatically enable CDP or LLDP discovery protocols on all vSwitches and Distributed vSwitches.
Use CDP: Checking this field automatically enables CDP on Distributed vSwitches. If automatic discovery is checked, leaving this field unchecked (default) enables LLDP.
5. (Recommended) Click Verify to validate the configuration and its connections. The following should be returned:
6. Click Save to save the configuration or Cancel to exit without saving.

Plexxi Connect 61
Adding a Nutanix Prism Pack Configuration
From the vSphere plugin, you can add Nutanix Prism pack configurations as follows:
1. In the Plexxi Connect for vSphere plugin, select Plexxi Connect Home > Manage > Pack Configuration.
2. In the dropdown, select Nutanix Prism.
3. Click the ‘Add configuration’ icon ( ). The following window opens:
4. In the Create Nutanix Prism Configuration window, configure the following:
Host: Enter the fully qualified host name or IP address of Nutanix Prism.
Username: Enter the username to connect to Nutanix Prism. This needs to be a user with appropriate permissions to perform configuration or administrative tasks.
Password: Enter the password to connect to Nutanix Prism.
Verify SSL: Check this box to enable validation of SSL/TLS certificate chains when connecting to Nutanix Prism.
Enabled: Check this checkbox to enable the configuration.
Name: Enter a name for the configuration.
Description: Enter a description for the configuration.

62 Plexxi Connect
CVM Fitting: Plexxi Connect for Nutanix allows you to automatically influence how Nutanix CVM (Controller VM) traffic is handled across the Plexxi fabric. This allows you to ensure there is enough bandwidth available for the CVM traffic and that any interference CVM traffic has over user traffic is minimized. This is all done automatically without user intervention as your clusters expand and contract. Select from the following modes:
None - No CVM fitting.
Isolation - Builds a point to point, switch to switch 10Gbps mesh dedicated to CVM traffic and isolated from all other traffic
Optimize – Carves out additional bandwidth on shared links for the placement of CVM traffic, which has the effect of reducing the percentage weight for placement of residual traffic on any link used by CVM.
Note: Plexxi recommends that Isolation is used as this provides the best network for both Nutanix CVM and user workload traffic alike.
5. (Recommended) Click Verify to validate the configuration and its connections. The following should be returned:
6. Click Save to save the configuration or Cancel to exit without saving.
Editing a Pack Configuration
You can edit any pack configuration as follows:
1. In the Plexxi Connect for vSphere plugin, select Plexxi Connect Home > Manage > Pack Configuration.
2. In the dropdown, select the pack category. For example, VMware vSphere.
3. Select the pack configuration to edit and then click the ‘Edit configuration’ icon ( ).
4. In the edit window, make all changes as needed.
5. (Recommended) Click Verify to validate the configuration and its connections.
6. Click Update to save the configuration.
7. Click Confirm.
Also:
• Reset resets all entered values
• Cancel exits the window without saving.

Plexxi Connect 63
Removing a Pack Configuration
To remove a pack configuration:
1. In the Plexxi Connect for vSphere plugin, select Plexxi Connect Home > Manage > Pack Configuration.
2. In the dropdown, select the pack category. For example, VMware vSphere.
3. In the pack configuration list, select the configuration to remove.
4. Click the ‘Remove configuration’ icon ( ).
5. As prompted, confirm or deny the removal.
The configuration is removed.
Verifying a Pack Configuration
You can verify that a pack configuration contains the correct data and is able to connect to the related pack:
1. In the Plexxi Connect for vSphere plugin, select Plexxi Connect Home > Manage > Pack Configuration.
2. In the dropdown, select the pack category. For example, VMware vSphere.
3. In the pack configuration list, select the configuration to verify.
4. Click the ‘Verify configuration’ icon ( ).
5. As prompted, confirm or deny the verification.
6. You should receive a Success prompt. Click OK to acknowledge and close the prompt

64 Plexxi Connect
Managing Support Bundles The Support Bundles feature enables you to generate a compressed archive of configuration, action and log files to be used for troubleshooting and support.
Note: You must have Administrator or Operator access to manage support bundles.
Creating a Support Bundle
To create a support bundle:
1. In the Plexxi Connect for vSphere plugin, select Plexxi Connect Homes > Manage > Support.
2. Click the ‘Create support bundle’ icon ( ).
3. As prompted, click Yes to confirm that you want to create a support bundle.
A support bundle is automatically created and added to the table.
Downloading a Support Bundle
To download a specific support bundle to the system you are connected from, in the Plexxi Connect for vSphere plugin:
1. Select the Plexxi Connect Home > Manage > Support window
2. Select the support bundle.
3. Click the ‘Download Support Bundle’ icon ( ). The bundle is immediately downloaded to your local drive.
Removing a Support Bundle
To delete a support bundle:
1. In the Plexxi Connect for vSphere plugin in the select Plexxi Connect Homes > Manage > Support. window, select the support bundle to be deleted
2. Click the ‘Remove support bundle’ icon ( ).
3. As prompted, click Yes to confirm that you want to remove the support bundle.
The support bundle is deleted from the system.

Plexxi Connect 65
Managing Plexxi Connect Certificates You can add and delete Plexxi Connect certificates in the Plexxi Connect for vSphere plugin.
IMPORTANT: You must have Administrator privileges.
Viewing a Plexxi Connect Certificate
To view details of a Plexxi Connect certificate:
1. In the vSphere plugin, select: Plexxi Connect Home > Manage > Settings > Certificates.
2. Click on the certificate to view. The details display. For example:
Adding a Plexxi Connect Certificate
This function removes the Plexxi Connect certificate from the Plexxi Connect vSphere plugin. If you remove the certificate, you can then add a new certificate using the Edit selection. To remove the Plexxi Connect certificate:
1. In the vSphere plugin, select: Plexxi Connect Home > Manage > Settings > Certificates.
2. Click the Add icon .
3. In the Add Certificate popup, search for the certificate then click Save.
4. As prompted, confirm or deny the removal.

66 Plexxi Connect
Deleting a Plexxi Connect Certificate
This function removes the Plexxi Connect certificate from the Plexxi Connect vSphere plugin. If you remove the certificate, you can then add a new certificate using the Edit selection. To remove the Plexxi Connect certificate:
1. In the Plexxi Connect for vSphere plugin, select: Plexxi Connect Home > Manage > Settings > Certificates.
2. Click the Delete icon .
3. As prompted, confirm or deny the removal.

Plexxi Connect 67
Managing Plexxi Connect Authentication and User Accounts When Plexxi Connect is installed, a default Administrator account named admin is created with full Plexxi Connect UI access. You can add, edit and delete users.
Note: You must have Administrator access to manage Plexxi Connect user accounts.
Editing Plexxi Connect Credentials
This feature configures the login credentials used to connect to Plexxi Connect. It does not change the actual credentials needed to connect, it configures the credentials submitted by the plugin to connect to Plexxi Connect.
To edit Plexxi Connect credentials:
1. In the Plexxi Connect for vSphere plugin, select: Plexxi Connect Home > Manage > Settings > Authentication.
2. Click Edit. The following window opens:
3. Edit the credentials as needed.
4. Click Save.
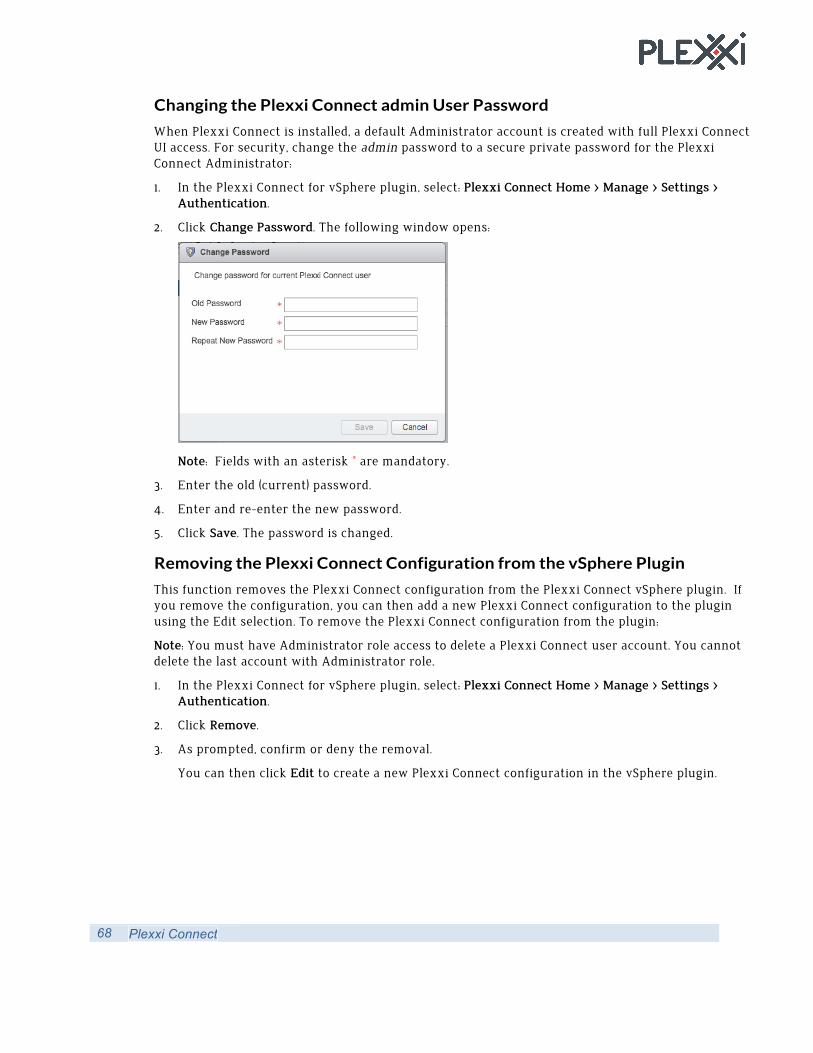
68 Plexxi Connect
Changing the Plexxi Connect admin User Password
When Plexxi Connect is installed, a default Administrator account is created with full Plexxi Connect UI access. For security, change the admin password to a secure private password for the Plexxi Connect Administrator:
1. In the Plexxi Connect for vSphere plugin, select: Plexxi Connect Home > Manage > Settings > Authentication.
2. Click Change Password. The following window opens:
Note: Fields with an asterisk * are mandatory.
3. Enter the old (current) password.
4. Enter and re-enter the new password.
5. Click Save. The password is changed.
Removing the Plexxi Connect Configuration from the vSphere Plugin
This function removes the Plexxi Connect configuration from the Plexxi Connect vSphere plugin. If you remove the configuration, you can then add a new Plexxi Connect configuration to the plugin using the Edit selection. To remove the Plexxi Connect configuration from the plugin:
Note: You must have Administrator role access to delete a Plexxi Connect user account. You cannot delete the last account with Administrator role.
1. In the Plexxi Connect for vSphere plugin, select: Plexxi Connect Home > Manage > Settings > Authentication.
2. Click Remove.
3. As prompted, confirm or deny the removal.
You can then click Edit to create a new Plexxi Connect configuration in the vSphere plugin.

Plexxi Connect 69
Adding a Plexxi Connect User Account
To add a Plexxi Connect user account:
1. In the Plexxi Connect for vSphere plugin, select: Plexxi Connect Home > Manage > Settings > Users.
2. Click the Add icon .
3. Configure the following:
Username: Enter the Plexxi Connect user name.
Password: Enter the password for the user, then re-enter the password to confirm.
Role: Select the user role:
Administrator: A user with Administrator privileges has full read/write privileges. Administrator privilege is needed for any management operation. For example, to manage users, support bundles, vSphere/Plexxi pack configuration, and device mapping.
Operator: A user with Operator privileges can perform all operations that an administrator can perform, except an operator cannot create new users or modify existing users.
Viewer: A user with Viewer privileges has read-only access. A viewer can change their own password, however they cannot make any other changes.
4. Click Save.
Editing a Plexxi Connect User Account
To edit a Plexxi Connect user account:
1. In the Plexxi Connect for vSphere plugin, select: Plexxi Connect Home > Manage > Settings > Users.
2. In the list, select the user to edit, then click the Edit icon ( ).
3. Make any edits as needed.
4. Click Save.
Removing a Plexxi Connect User Account
To delete a Plexxi Connect user account:
1. In the Plexxi Connect for vSphere plugin, select: Plexxi Connect Home > Manage > Settings > Users.
2. In the list, select the user to remove.
3. Click the Remove icon ( ).
4. As prompted, confirm or deny the removal.

70 Plexxi Connect
Viewing the Plexxi Connect Host The windows shown in this section are view-only and enable you to identify the Plexxi Connect host as well as related objects.
To identify the Plexxi Connect host, from Plexxi Connect Home, select Plexxi Connect. For example:
If you select the Plexxi Connect host, related objects are shown. In this case, the Plexxi Control host:

Plexxi Connect 71
Viewing Plexxi Control Hosts, Fabrics and Switches The windows shown in the following sections are view-only and enable you to identify the Plexxi Control host, Plexxi fabrics and Plexxi switches associated with the Plexxi Control host.
Viewing Plexxi Control Hosts
To identify the Plexxi Control host name and configured user name, from Plexxi Connect Home, select Plexxi Control.
Viewing Fabrics and Switches Associated with a Plexxi Control Host
Clicking on a Plexxi Control host name in the navigator column opens the Related Objects window, which contains two tabs: Plexxi Fabrics and Plexxi Switches.
The Plexxi Fabrics tab lists the fabrics associated with the Plexxi Control host. For example:

72 Plexxi Connect
The Plexxi Switches tab lists all switches associated with the Plexxi Control host. For example:

Plexxi Connect 73
Viewing Plexxi Fabrics The screens shown in the following sections are view-only and enable you to view Plexxi fabrics and Plexxi switches, and monitor the Plexxi switch ports.
From Plexxi Connect Home, selecting Plexxi Fabrics displays all Plexxi fabrics associated with the vSphere environment. The following example shows a single fabric.
Summary tab for a Plexxi fabric
From Plexxi Fabrics, clicking on a fabric displays the summary tab which provides configuration and health statistics for the selected fabric.

74 Plexxi Connect
Related Objects tab lists all switches in a Plexxi fabric
From a selected Plexxi fabric, clicking on the Related Objects tab lists the Plexxi switch objects within the fabric. For example:
Viewing Plexxi Switches The screens shown in the following sections are view-only and enable you to view the Plexxi switches and monitor the Plexxi switch ports.
From Plexxi Connect Home, selecting Plexxi Switches displays all Plexxi switches associated with the vSphere environment. For example:

Plexxi Connect 75
Summary tab for a single Plexxi Switch
The Summary tab for a selected Plexxi switch provides model, version, configuration and health information for that switch.
To open the Summary tab:
1. Select Plexxi Connect Home > Plexxi Switches.
2. Click on the switch.
3. If needed, click the Summary tab.
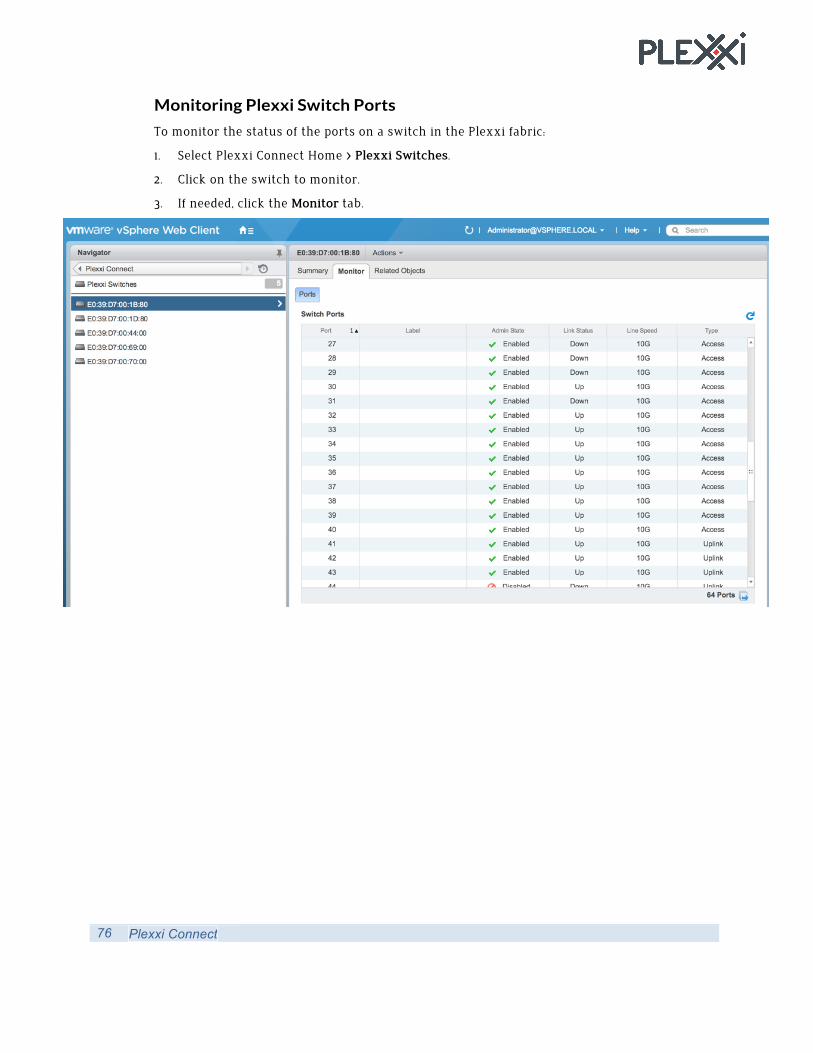
76 Plexxi Connect
Monitoring Plexxi Switch Ports
To monitor the status of the ports on a switch in the Plexxi fabric:
1. Select Plexxi Connect Home > Plexxi Switches.
2. Click on the switch to monitor.
3. If needed, click the Monitor tab.

Plexxi Connect 77
Plexxi Switch Related Objects
The Related Objects tab for a selected Plexxi switch identifies the Plexxi fabric that the switch is part of. For example:
1. Select Plexxi Connect Home > Plexxi Switches.
2. Click on the switch.
3. Click the Related Objects tab.
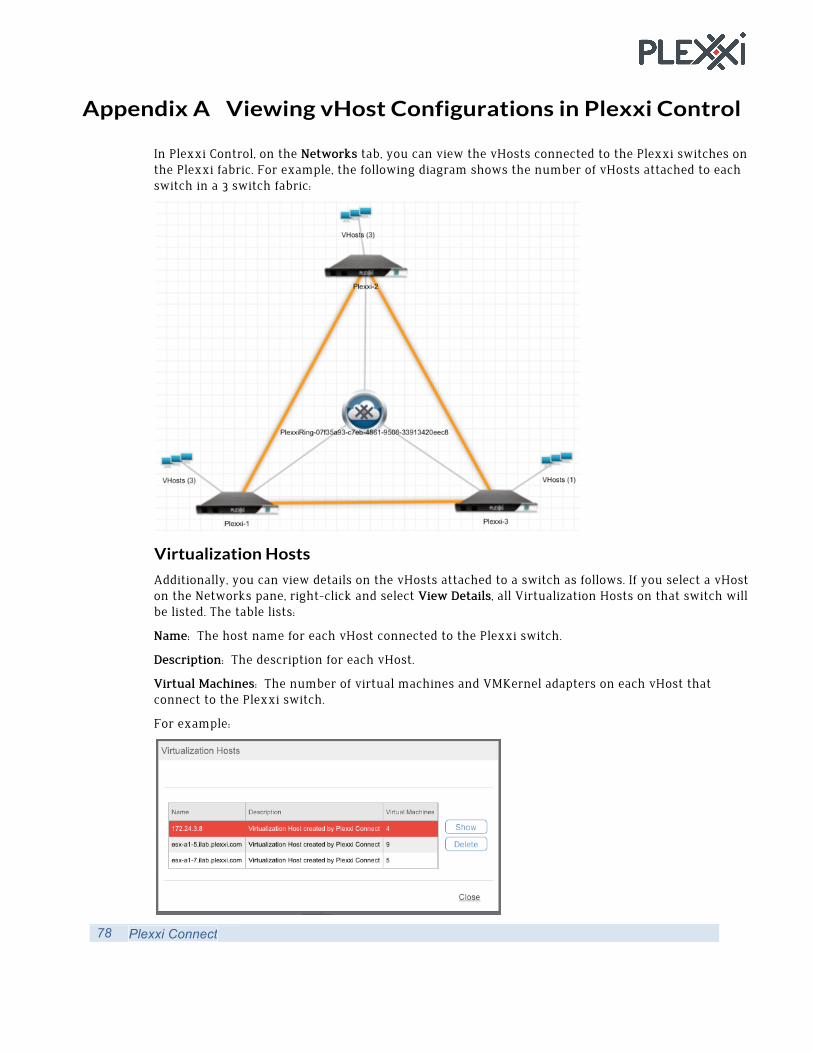
78 Plexxi Connect
Appendix A Viewing vHost Configurations in Plexxi Control
In Plexxi Control, on the Networks tab, you can view the vHosts connected to the Plexxi switches on the Plexxi fabric. For example, the following diagram shows the number of vHosts attached to each switch in a 3 switch fabric:
Virtualization Hosts
Additionally, you can view details on the vHosts attached to a switch as follows. If you select a vHost on the Networks pane, right-click and select View Details, all Virtualization Hosts on that switch will be listed. The table lists:
Name: The host name for each vHost connected to the Plexxi switch.
Description: The description for each vHost.
Virtual Machines: The number of virtual machines and VMKernel adapters on each vHost that connect to the Plexxi switch.
For example:

Plexxi Connect 79
vHost Details
If you select a vHost and click Show, a Details window opens and provides the following information about the selected vHost:
Name: The vHost name.
Description: The vHost description.
Plexxi Switch: The name of the Plexxi switch that the vHost is connected to (for this view).
For example:
vHost Interfaces
If you select the Interfaces tab, the following information is provided:
Interfaces: A list of the physical NICs on the vHost that connect to the Plexxi switch.
VLANs: Identifies the VLAN(s) on the selected physical NIC.
For example:

80 Plexxi Connect
Virtual Machines on a selected vHost
For a list of virtual machines and VMKernel Adapters, select the Virtual Machines tab. The following information is provided:
Name: a list of virtual machine names on the vHost.
NIC: a virtual NIC associated with a VM.
IP: Not used
MAC Address: the MAC address of the virtual NIC.
VLANs: VLANs associated with the virtual NIC.
Guest OS: Not used
Note: The Delete VM button should not be used.
For example:

Plexxi Connect 81
Appendix B Viewing Nutanix Configurations in Plexxi Control
Note: Refer to the Plexxi Control Online Help for additional Networks tab information.
In Plexxi Control, on the Networks tab, you can view the Nutanix storage servers connected to Plexxi switches on the Plexxi fabric. For example, the following diagram shows Nutanix storage servers attached to each switch in a four-switch fabric:

82 Plexxi Connect
Nutanix Storage Hosts
Additionally, you can view details of the Nutanix storage hosts attached to a switch as follows.
In the Networks pane, right-click on a Nutanix storage host and select View Details, All Nutanix hosts on that switch are listed. The table lists:
Name: The host name for each Nutanix storage host connected to the Plexxi switch.
Description: The description of each Nutanix storage host.
For example:
Nutanix Storage Details
If you select a Nutanix Storage device and click Show, a Details window opens and provides the following information about the selected vHost:
Name: The storage device name.
Description: The storage device description.
Plexxi Switch: The name of the Plexxi switch that the Nutanix storage device is connected to.
For example:

Plexxi Connect 83
Nutanix Interfaces
If you select the Interfaces tab, the following information is provided:
Interfaces: A list of the network adapters that connect the Nutanix storage to the Plexxi switch.
VLANs: Identifies the VLAN(s) on the selected network adapter.
For example:
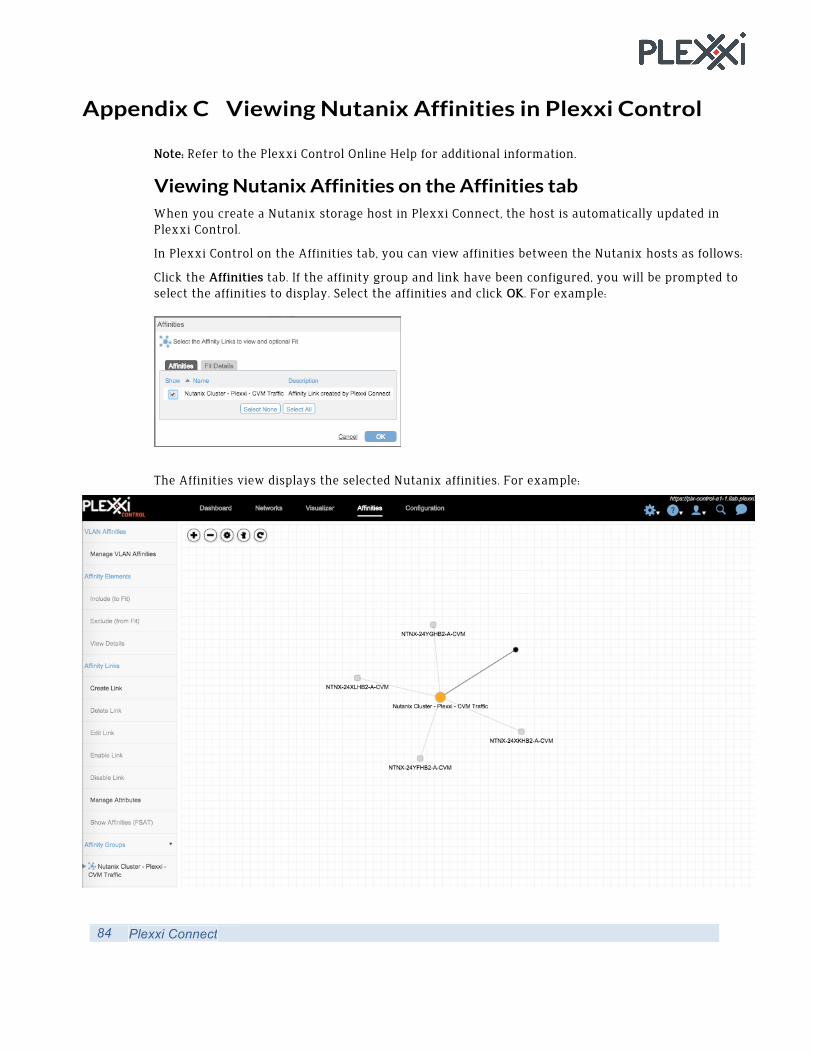
84 Plexxi Connect
Appendix C Viewing Nutanix Affinities in Plexxi Control
Note: Refer to the Plexxi Control Online Help for additional information.
Viewing Nutanix Affinities on the Affinities tab When you create a Nutanix storage host in Plexxi Connect, the host is automatically updated in Plexxi Control.
In Plexxi Control on the Affinities tab, you can view affinities between the Nutanix hosts as follows:
Click the Affinities tab. If the affinity group and link have been configured, you will be prompted to select the affinities to display. Select the affinities and click OK. For example:
The Affinities view displays the selected Nutanix affinities. For example:

Plexxi Connect 85
Viewing Host Details from Affinity View
For any node in the affinity group viewed on the Affinities tab, if you right-click on the node and select View Details, the details are displayed. For example:
Selecting the Interfaces tab shows interface details, as discovered by the Plexxi switch, for that Nutanix host. For example:

86 Plexxi Connect
Viewing Nutanix Affinities on the Visualizer tab In Plexxi Control, on the Visualizer tab, you can view the Nutanix affinities associated with Plexxi switches in the Plexxi fabric. For example, on the Visualizer tab, if you click Affinities, the following popup appears:
Select the Nutanix affinity group(s) then click OK. The Nutanix affinities appear:
Hovering over a port provides information specific to that port:

Plexxi Connect 87
Clicking on a port provides path information for that port. For example, the following Nutanix affinity paths:
Source: Path source switch.
Destination: Path destination switch.
Path: Path source and destination switches and ports.
Utilization: Indicates path usage/utilization in percent if utilization statistics is enabled.
Path Name: Indicates the path name, if one is assigned.
Affinity Flows: Indicates any affinities on the path; in this instance, Nutanix affinities.

88 Plexxi Connect
Appendix D Viewing VLAN Affinities in Plexxi Control
Note: Refer to the Plexxi Control Online Help for additional information about End-Point Affinity Groups.
Creating the Example Storage VLAN Affinity from Plexxi Connect For the examples in this section, the following VLAN Affinity is created in Plexxi Connect:
Viewing a Plexxi Connect-Generated VLAN Affinity in Plexxi Control VLAN Affinities in Plexxi Connect result in End-Point Affinities being created in Plexxi Control. In the example that follows, the following were created as a result of configuring a single VLAN Affinity in Plexxi Connect:
• 1 End-Point Affinity
• 4 Affinity Elements
• 1 Affinity Link

Plexxi Connect 89
The End-Point Affinity can be visualized by navigating to the Affinities view and selecting the End-Point Affinity group created by Plexxi Connect.
Creating a second VLAN Affinity in Plexxi Connect results in the following in Plexxi Control.

90 Plexxi Connect
In Plexxi Control, the following configuration can be seen if, on the Affinities tab, you click an affinity link and click Edit:

Plexxi Connect 91
Appendix E Assigning a Static IP Address to Plexxi Connect
If static IP needs to be configured for Plexxi Connect, post Plexxi Connect installation, it can be configured as follows:
1. Ensure that the network is connected to the Plexxi Connect VM.
2. Login to the Plexxi Connect console as admin. The default password is plexxi.
3. Using an edit utility with sudo, edit the /etc/sysconfig/network-scripts/ifcfg-eth0 file as follows: For example, if using VI:
sudo vi /etc/sysconfig/network-scripts/ifcfg-eth0
Remove the following lines:
PEERDNS=yes PEERROUTES=yes IPV4_FAILURE_FATAL=no IPV6INIT=yes IPV6_AUTOCONF=yes IPV6_DEFROUTE=yes IPV6_PEERDNS=yes IPV6_PEERROUTES=yes IPV6_FAILURE_FATAL=no DEFROUTE=yes
Change the BOOTPROTO and ONBOOT lines:
BOOTPROTO=static ONBOOT=yes
Add the following lines, substituting appropriate values:
IPADDR=10.0.1.100 NETMASK=255.255.255.0 GATEWAY=10.0.1.1
4. Run the following command (sudo password is plexxi):
sudo /opt/plexxi/scripts/enable-network.sh
5. After 2-3 minutes, execute the ip addr command to ensure that an IP address has been assigned.

92 Plexxi Connect
Contacting Plexxi Care
Plexxi Care technical support services are available to answer your questions and to make sure your software and hardware are operating properly at all times. Contact Plexxi Care using one of the following methods:
• 1.888.415.9809 (US/Canada toll-free)
• +1 603-782-0702 (US/International)
www.plexxi.com/support