pipetting techniques
TRANSCRIPT
More information available at www.gilson.com 12Guide to Pipetting11
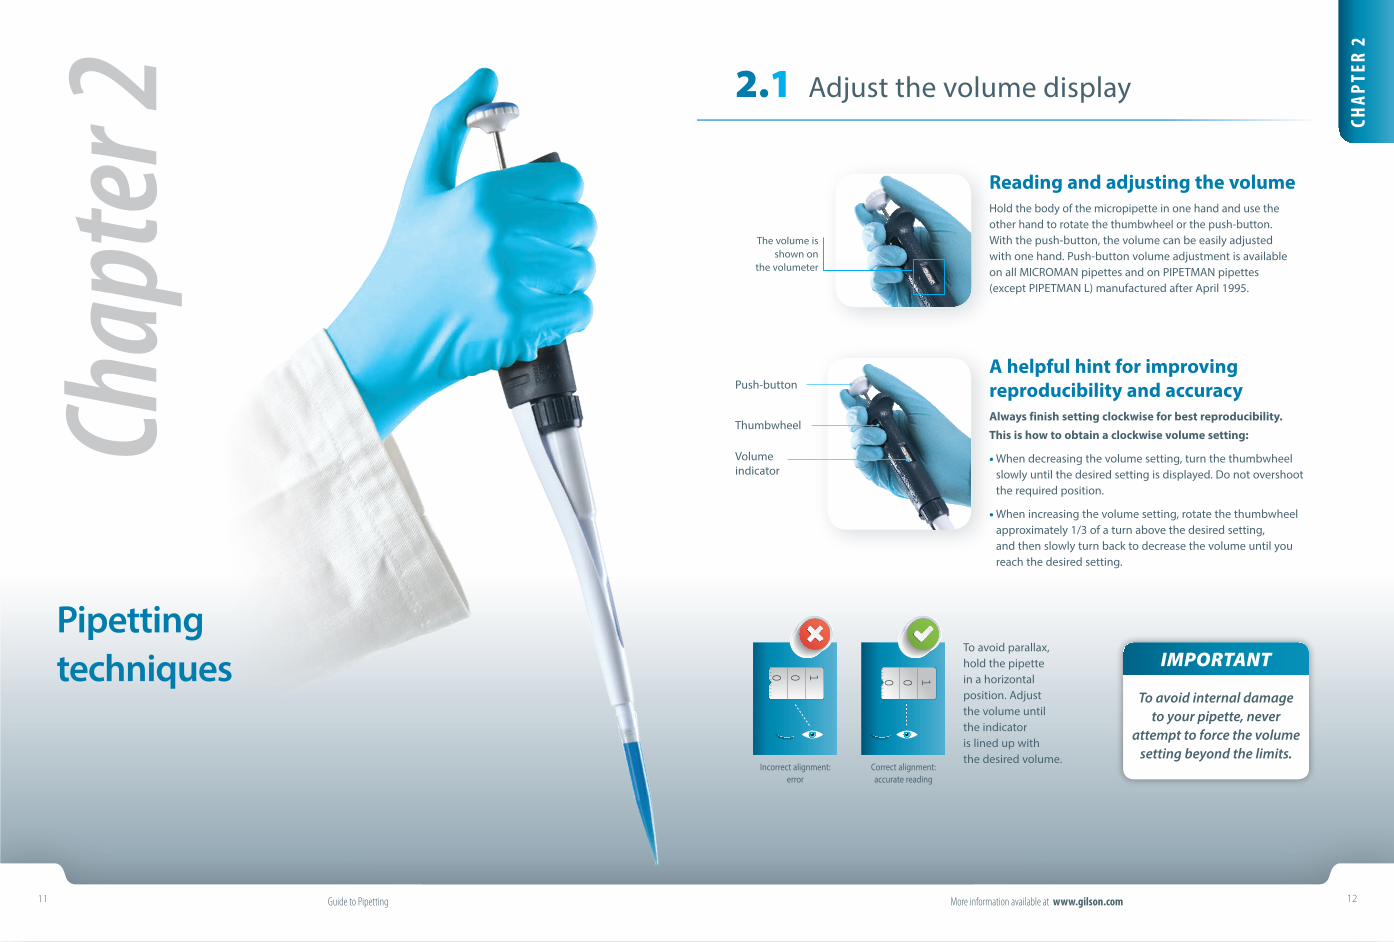
A helpful hint for improving reproducibility and accuracyAlways finish setting clockwise for best reproducibility.
This is how to obtain a clockwise volume setting:
• When decreasing the volume setting, turn the thumbwheel slowly until the desired setting is displayed. Do not overshoot the required position.
• When increasing the volume setting, rotate the thumbwheel approximately 1/3 of a turn above the desired setting, and then slowly turn back to decrease the volume until you reach the desired setting.
Incorrect alignment: error
Correct alignment: accurate reading
100 100 100 100Push-button
Thumbwheel
Volume indicator
IMPORTANT
To avoid internal damage to your pipette, never
attempt to force the volume setting beyond the limits.
The volume is shown on
the volumeter
To avoid parallax, hold the pipette in a horizontal position. Adjust the volume until the indicator is lined up with the desired volume.
CHAP
TER
2
Chap
ter 2
Pipetting techniques
Adjust the volume display2.1
Reading and adjusting the volumeHold the body of the micropipette in one hand and use the other hand to rotate the thumbwheel or the push-button. With the push-button, the volume can be easily adjusted with one hand. Push-button volume adjustment is available on all MICROMAN pipettes and on PIPETMAN pipettes (except PIPETMAN L) manufactured after April 1995.
Guide to Pipetting More information available at www.gilson.com13 14
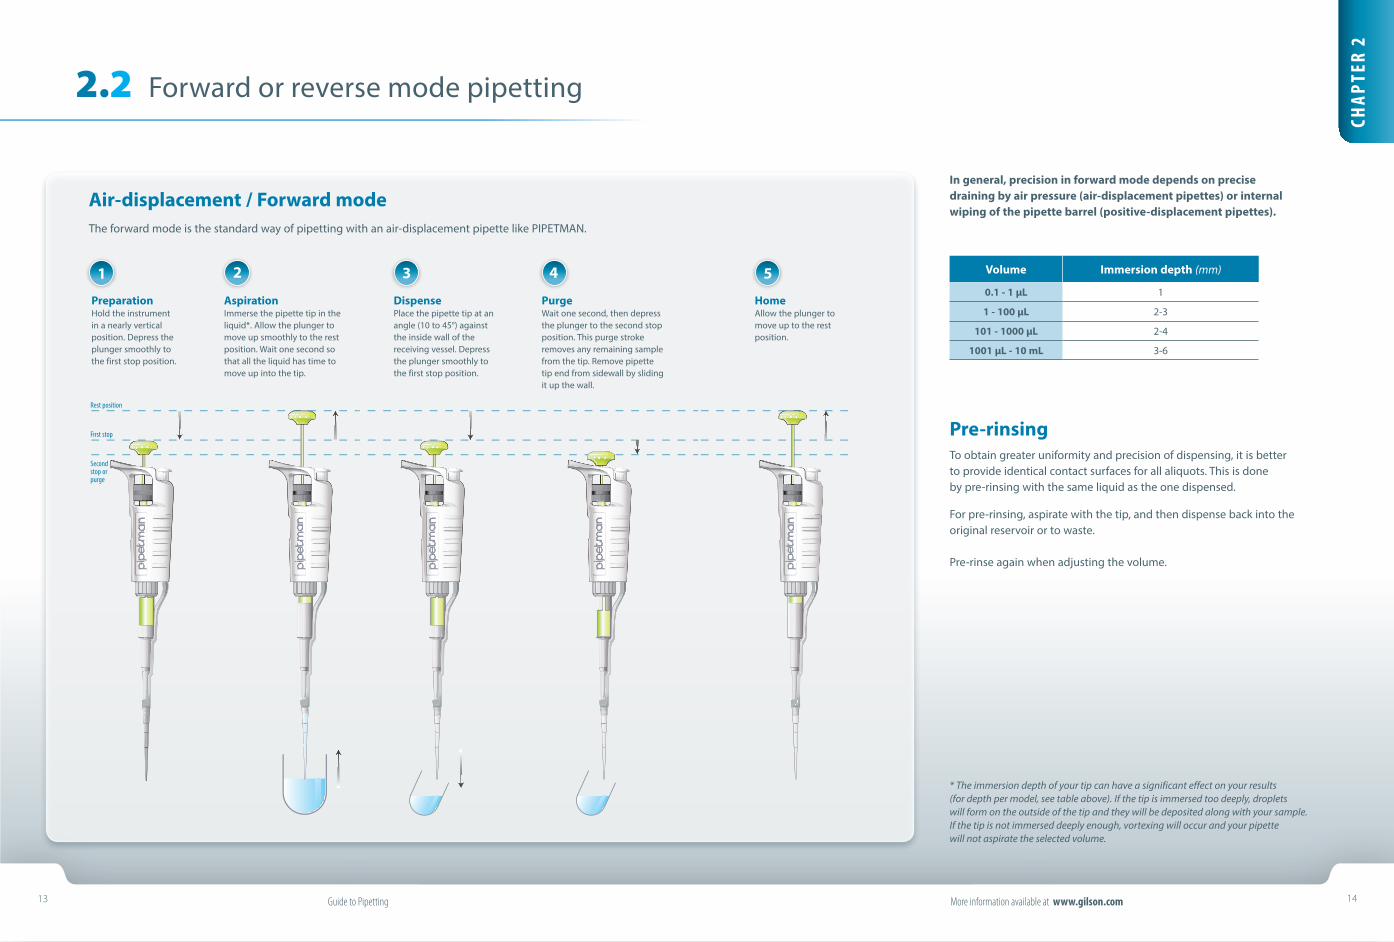
In general, precision in forward mode depends on precise draining by air pressure (air-displacement pipettes) or internal wiping of the pipette barrel (positive-displacement pipettes).
* The immersion depth of your tip can have a significant effect on your results (for depth per model, see table above). If the tip is immersed too deeply, droplets will form on the outside of the tip and they will be deposited along with your sample. If the tip is not immersed deeply enough, vortexing will occur and your pipette will not aspirate the selected volume.
Air-displacement / Forward modeThe forward mode is the standard way of pipetting with an air-displacement pipette like PIPETMAN.
HomeAllow the plunger to move up to the rest position.
PurgeWait one second, then depress the plunger to the second stop position. This purge stroke removes any remaining sample from the tip. Remove pipette tip end from sidewall by sliding it up the wall.
DispensePlace the pipette tip at an angle (10 to 45°) against the inside wall of the receiving vessel. Depress the plunger smoothly to the first stop position.
AspirationImmerse the pipette tip in the liquid*. Allow the plunger to move up smoothly to the rest position. Wait one second so that all the liquid has time to move up into the tip.
PreparationHold the instrument in a nearly vertical position. Depress the plunger smoothly to the first stop position.
Pre-rinsingTo obtain greater uniformity and precision of dispensing, it is better to provide identical contact surfaces for all aliquots. This is done by pre-rinsing with the same liquid as the one dispensed.
For pre-rinsing, aspirate with the tip, and then dispense back into the original reservoir or to waste.
Pre-rinse again when adjusting the volume.
CHAP
TER
2
Forward or reverse mode pipetting2.2
Rest position
Volume Immersion depth (mm)
0.1 - 1 µL 1
1 - 100 µL 2-3
101 - 1000 µL 2-4
1001 µL - 10 mL 3-6
First stop
Second stop or purge
Guide to Pipetting More information available at www.gilson.com15 16
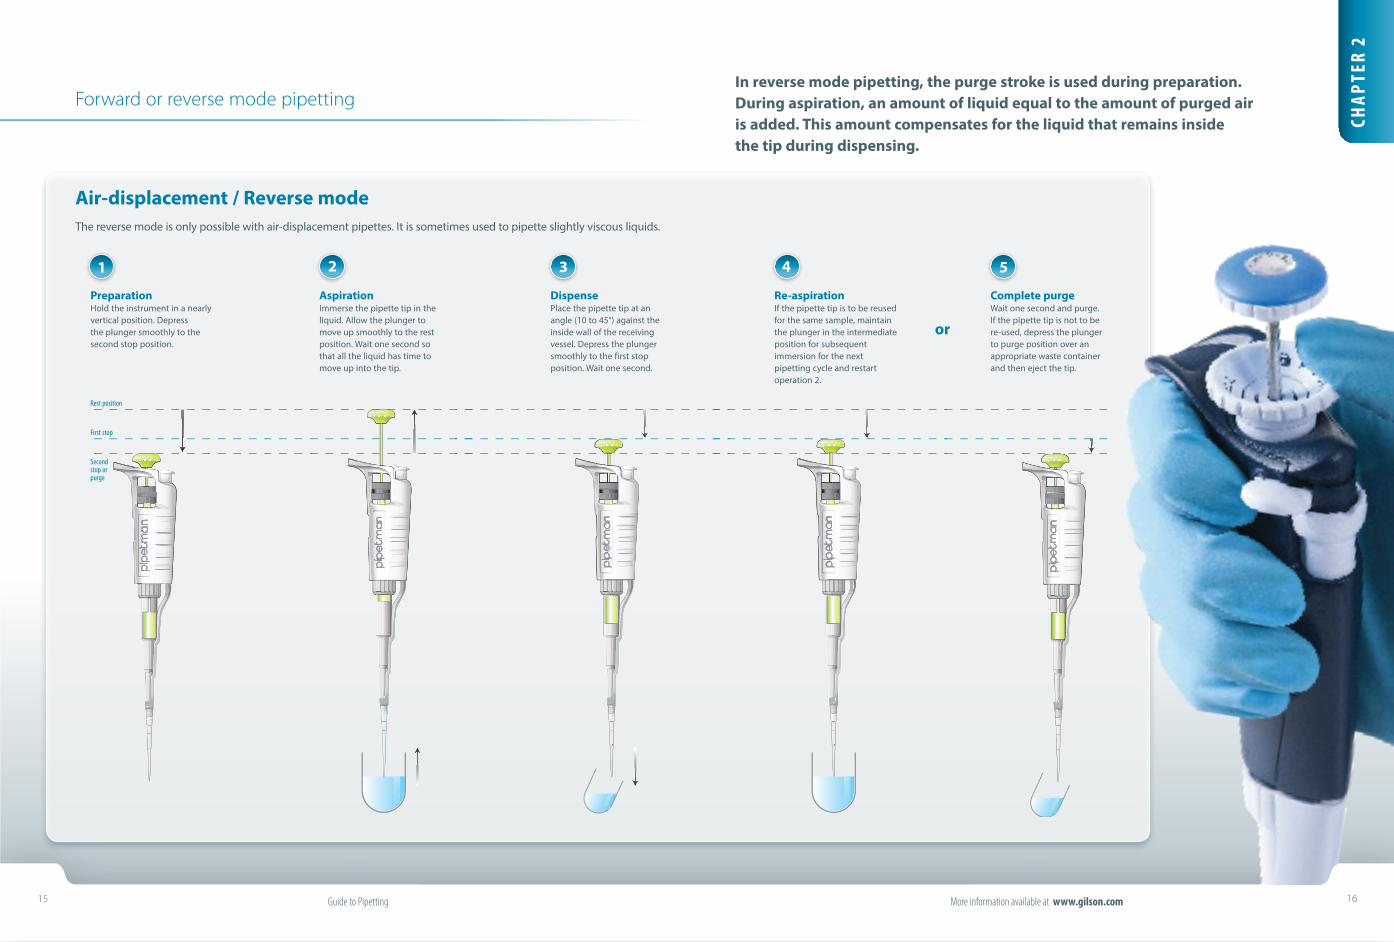
Air-displacement / Reverse modeThe reverse mode is only possible with air-displacement pipettes. It is sometimes used to pipette slightly viscous liquids.
Complete purgeWait one second and purge. If the pipette tip is not to be re-used, depress the plunger to purge position over an appropriate waste container and then eject the tip.
Re-aspirationIf the pipette tip is to be reused for the same sample, maintain the plunger in the intermediate position for subsequent immersion for the next pipetting cycle and restart operation 2.
DispensePlace the pipette tip at an angle (10 to 45°) against the inside wall of the receiving vessel. Depress the plunger smoothly to the first stop position. Wait one second.
AspirationImmerse the pipette tip in the liquid. Allow the plunger to move up smoothly to the rest position. Wait one second so that all the liquid has time to move up into the tip.
PreparationHold the instrument in a nearly vertical position. Depress the plunger smoothly to the second stop position.
CHAP
TER
2
Rest position
First stop
Second stop or purge
In reverse mode pipetting, the purge stroke is used during preparation. During aspiration, an amount of liquid equal to the amount of purged air is added. This amount compensates for the liquid that remains inside the tip during dispensing.
or
Forward or reverse mode pipetting
Guide to Pipetting More information available at www.gilson.com17 18
IMPORTANT
When working with high risk specimens, do not wipe the
disposable part. Make sure fluid depth penetration does not exceed
the recommended immersion depth.
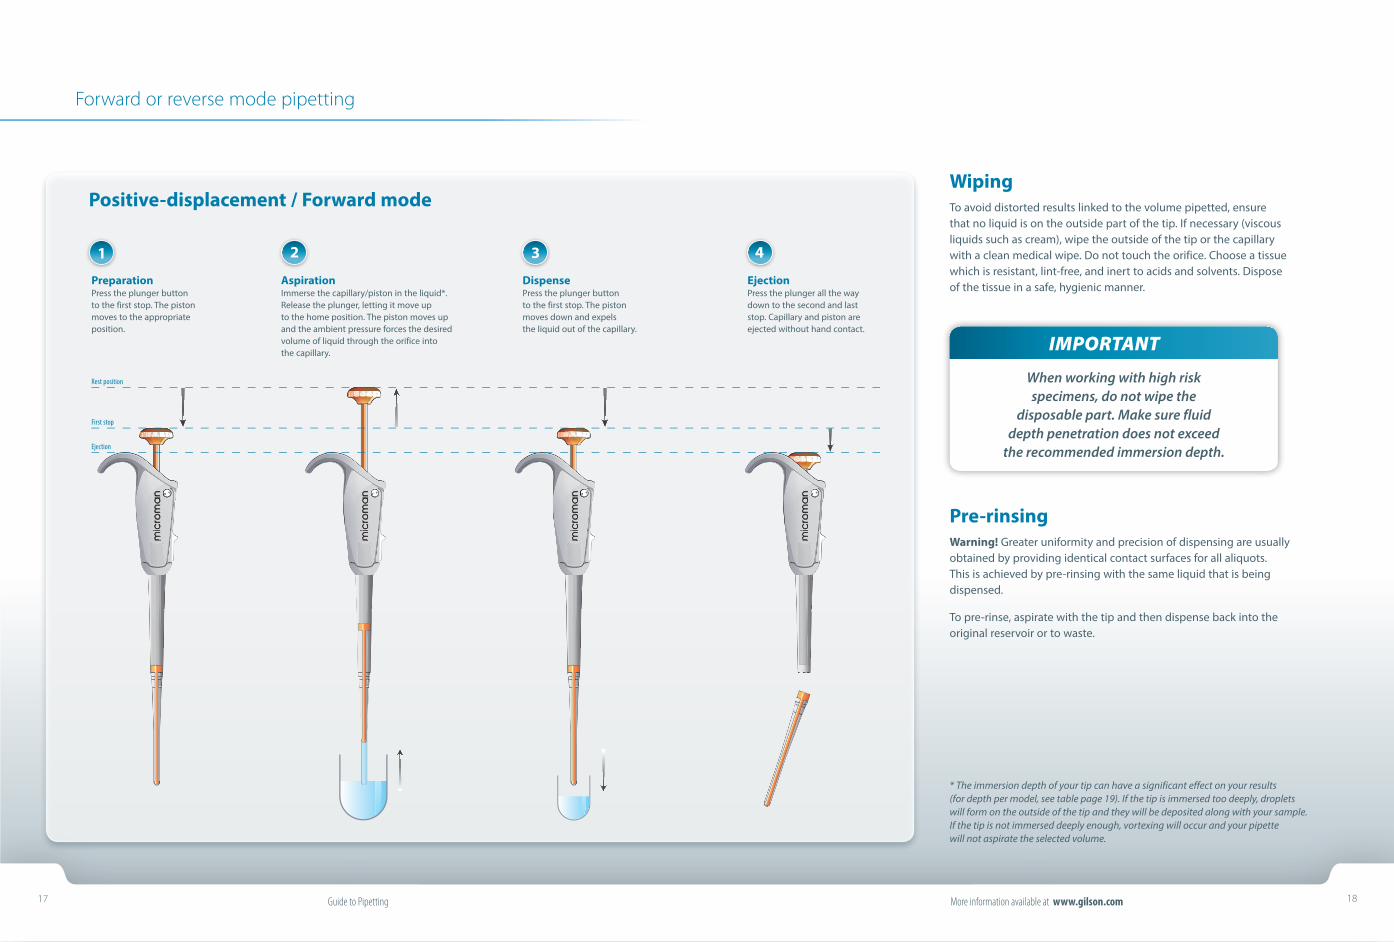
WipingTo avoid distorted results linked to the volume pipetted, ensure that no liquid is on the outside part of the tip. If necessary (viscous liquids such as cream), wipe the outside of the tip or the capillary with a clean medical wipe. Do not touch the orifice. Choose a tissue which is resistant, lint-free, and inert to acids and solvents. Dispose of the tissue in a safe, hygienic manner.
Pre-rinsingWarning! Greater uniformity and precision of dispensing are usually obtained by providing identical contact surfaces for all aliquots. This is achieved by pre-rinsing with the same liquid that is being dispensed.
To pre-rinse, aspirate with the tip and then dispense back into the original reservoir or to waste.
Positive-displacement / Forward mode
EjectionPress the plunger all the waydown to the second and laststop. Capillary and piston areejected without hand contact.
DispensePress the plunger buttonto the first stop. The pistonmoves down and expelsthe liquid out of the capillary.
AspirationImmerse the capillary/piston in the liquid*. Release the plunger, letting it move up to the home position. The piston moves upand the ambient pressure forces the desired volume of liquid through the orifice intothe capillary.
PreparationPress the plunger button to the first stop. The pistonmoves to the appropriateposition.
Rest position
First stop
Ejection
Forward or reverse mode pipetting
* The immersion depth of your tip can have a significant effect on your results (for depth per model, see table page 19). If the tip is immersed too deeply, droplets will form on the outside of the tip and they will be deposited along with your sample. If the tip is not immersed deeply enough, vortexing will occur and your pipette will not aspirate the selected volume.
Guide to Pipetting More information available at www.gilson.com19 20
Take a few minutes to get organized and ensure you have:
1 - An appropriate posture
2 - The right material Gilson offers various pipettes with forces adapted to user preferences. The forces of PIPETMAN L are some of the lowest.
3 - The appropriate gestures
4 - A good work organization
A good test is to see if you can rest your elbow comfortably on the work surface. If not, your receptacle may be too low or too high, find the right height.
Take time to relax1 - If possible, try to switch
periodically between different types of work.
2 - Keep an appropriate, unrushed working speed. Let go of the pipette from time to time and give your fingers/hand a (micro) break.
3 - Take frequent short breaks. Change your sitting position. Lean back and relax your shoulders and arms.
Special attention should be paid to smooth pipetting
1 - To facilitate uniform timing and motion, keep all necessary items within arm's reach.
2 - Place the most frequently used objects in front of you. The more rarely used items can be placed a little further away from you.
3 - The opening of the receptacle for used tips should be at the same height as the end of your pipette.
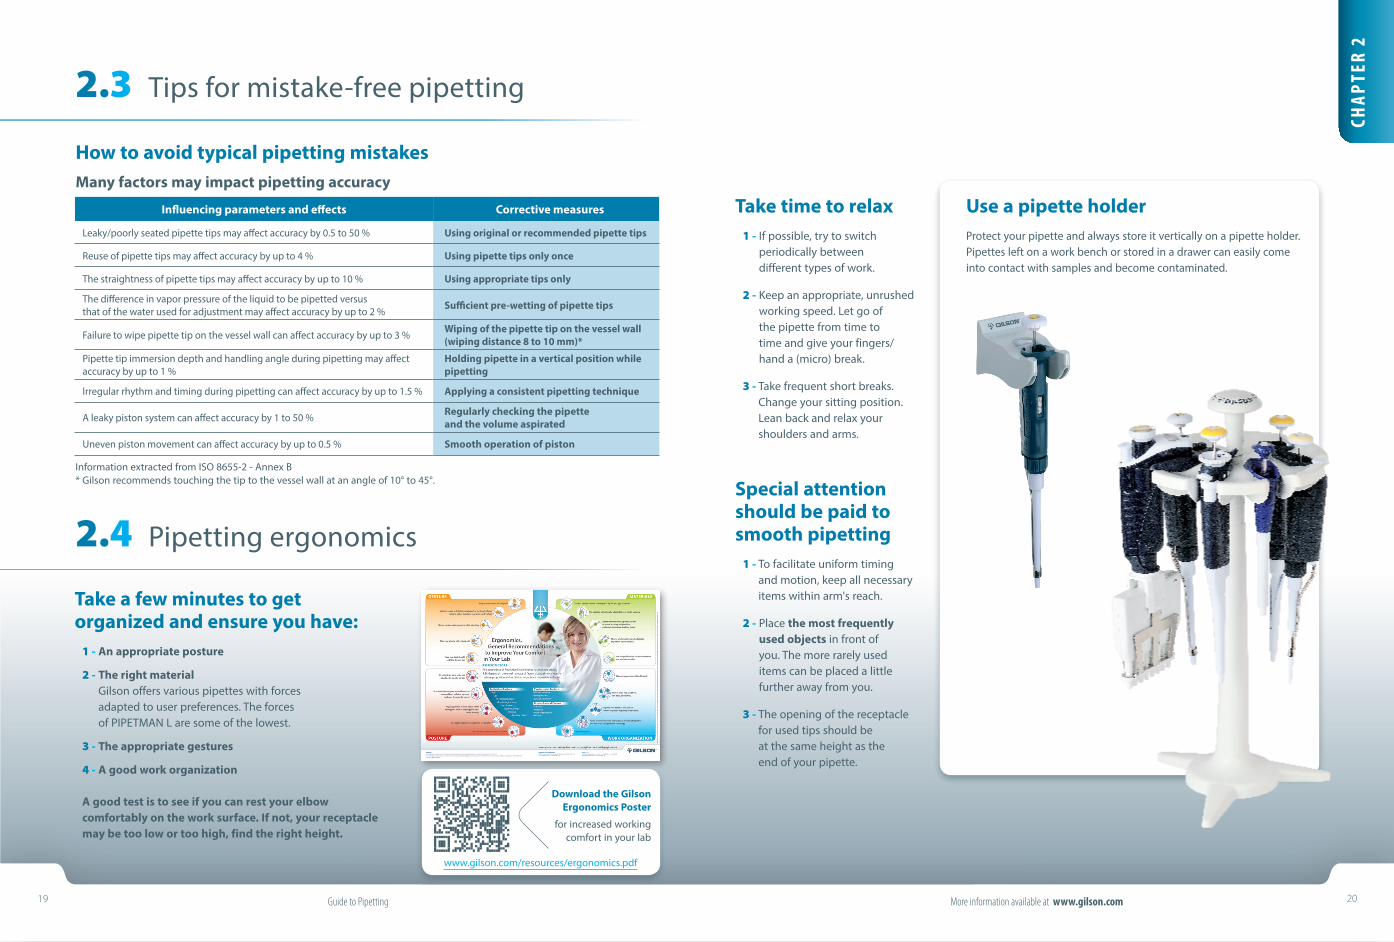
Use a pipette holderProtect your pipette and always store it vertically on a pipette holder. Pipettes left on a work bench or stored in a drawer can easily come into contact with samples and become contaminated.
How to avoid typical pipetting mistakesMany factors may impact pipetting accuracy
CHAP
TER
2
Tips for mistake-free pipetting
Pipetting ergonomics
2.3
2.4
Influencing parameters and effects Corrective measures
Leaky/poorly seated pipette tips may affect accuracy by 0.5 to 50 % Using original or recommended pipette tips
Reuse of pipette tips may affect accuracy by up to 4 % Using pipette tips only once
The straightness of pipette tips may affect accuracy by up to 10 % Using appropriate tips only
The difference in vapor pressure of the liquid to be pipetted versus that of the water used for adjustment may affect accuracy by up to 2 % Sufficient pre-wetting of pipette tips
Failure to wipe pipette tip on the vessel wall can affect accuracy by up to 3 % Wiping of the pipette tip on the vessel wall (wiping distance 8 to 10 mm)*
Pipette tip immersion depth and handling angle during pipetting may affect accuracy by up to 1 %
Holding pipette in a vertical position while pipetting
Irregular rhythm and timing during pipetting can affect accuracy by up to 1.5 % Applying a consistent pipetting technique
A leaky piston system can affect accuracy by 1 to 50 % Regularly checking the pipette and the volume aspirated
Uneven piston movement can affect accuracy by up to 0.5 % Smooth operation of piston
Information extracted from ISO 8655-2 - Annex B* Gilson recommends touching the tip to the vessel wall at an angle of 10° to 45°.
Download the Gilson Ergonomics Poster
for increased working comfort in your lab
www.gilson.com/resources/ergonomics.pdf