pinnacle studio for ipadcdn.pinnaclesys.com/supportfiles/pinnaclestudioapp/help.pdfchapter 1:...
TRANSCRIPT
Pinnacle Studio for iPad
USER GUIDE
Version 2.0
ii Pinnacle Studio for iPad
Legal Notices This guide is copyrighted © by Corel Corporation with all rights reserved. Under copyright laws, this guide may not be duplicated in whole or in part without the written consent of Corel Corporation.
Corel and Pinnacle are trademarks or registered trademarks of Corel Corporation. This product and user guide include intellectual property (including trademarks) owned, registered and/or licensed by/from respective third parties. Use of this product is subject to the acceptance of the license agreements included in this product.
Product features, specifications, system requirements and availability are subject to change without notice.
Documentation Author: Nick Sullivan / AHA! Text Services
Pinnacle 280 North Bernardo Avenue Mountain View, CA 94043, USA
For company and product information, visit us on the web at www.pinnaclesys.com
Technical Support (USA) Visit the Online Support Center at www.pinnaclesys.com/support or log into our support forum at www.forums.pinnaclesys.com/forums.
Contents iii
Contents CHAPTER 1: Getting acquainted 1
Meet Pinnacle Studio for iPad ............................................................................... 2
CHAPTER 2: The Projects Page 4Transferring projects from Avid Studio for iPad .................................................. 4Project management .............................................................................................. 5Other Projects Page functions ............................................................................... 6
CHAPTER 3: The Edit Page 7The Library ............................................................................................................ 8The Preview ........................................................................................................... 9The Movie Editor ................................................................................................. 10Movie Editor controls .......................................................................................... 12Other Movie Editor features ................................................................................ 13
CHAPTER 4: The Library 15Building the Library ............................................................................................ 15Adding Library content to your movie ................................................................ 16Inside the Library ................................................................................................. 16Pre-trimming media items ................................................................................... 19
CHAPTER 5: The Storyboard 21Dragging on the Storyboard ................................................................................ 22Rendering ............................................................................................................. 24
CHAPTER 6: The Timeline 25Trimming tools .................................................................................................... 25The Precision Trimmer ........................................................................................ 26The Playhead ....................................................................................................... 29The Timescale ...................................................................................................... 29
CHAPTER 7: Montages 31Customizing a Montage ....................................................................................... 32

iv Pinnacle Studio for iPad
CHAPTER 8: Transitions and Titles 34Transitions ........................................................................................................... 34Titles .................................................................................................................... 36
CHAPTER 9: Audio 38Library audio ....................................................................................................... 39
CHAPTER 10: Exporting 41
APPENDIX A: Touch-screen gestures 46
APPENDIX B: Importing with iTunes 49
Index 51
Chapter 1: Getting acquainted 1
CHAPTER 1:
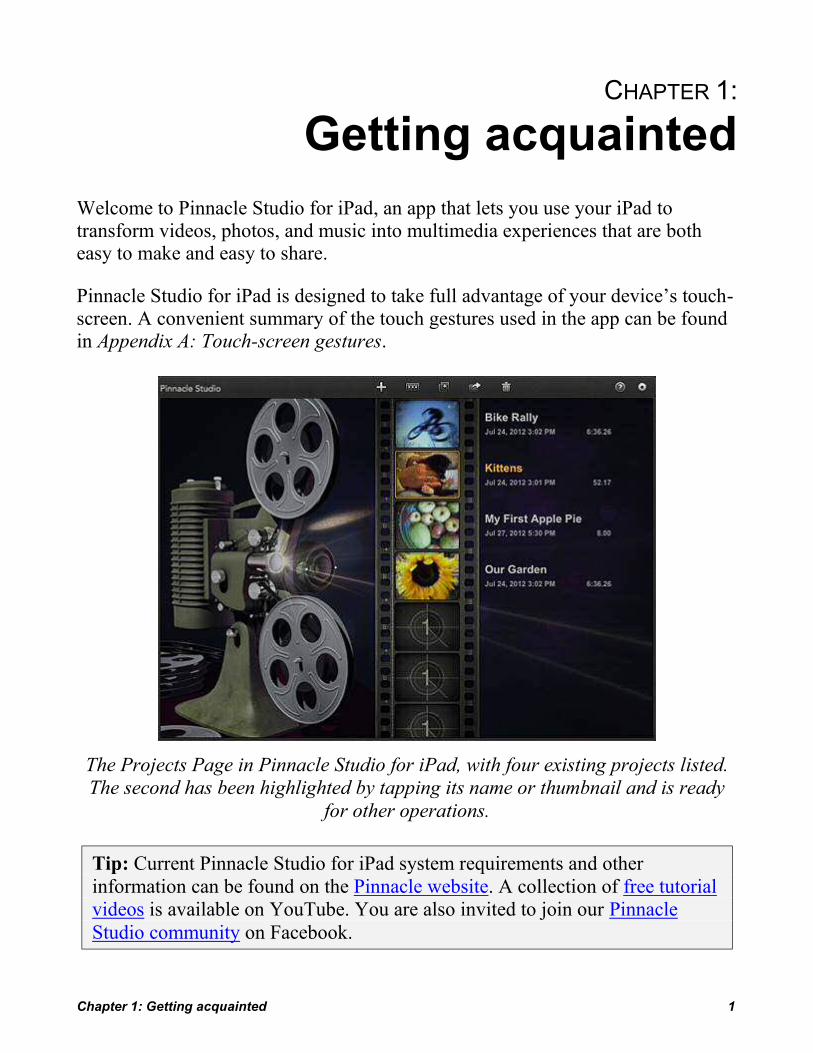
Getting acquainted Welcome to Pinnacle Studio for iPad, an app that lets you use your iPad to transform videos, photos, and music into multimedia experiences that are both easy to make and easy to share.
Pinnacle Studio for iPad is designed to take full advantage of your device’s touch-screen. A convenient summary of the touch gestures used in the app can be found in Appendix A: Touch-screen gestures.
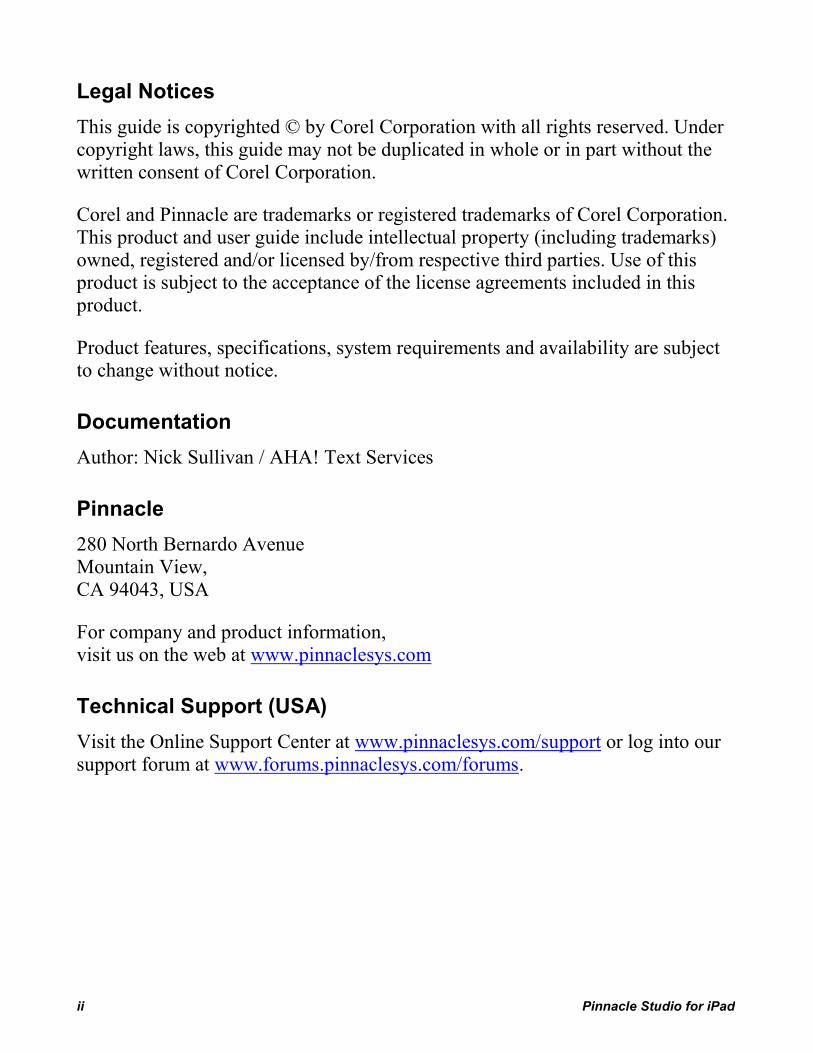
The Projects Page in Pinnacle Studio for iPad, with four existing projects listed. The second has been highlighted by tapping its name or thumbnail and is ready
for other operations.
Tip: Current Pinnacle Studio for iPad system requirements and other information can be found on the Pinnacle website. A collection of free tutorial videos is available on YouTube. You are also invited to join our Pinnacle Studio community on Facebook.

2 Pinnacle Studio for iPad
About this Guide The rest of this introductory chapter provides a very quick tour of Pinnacle Studio for iPad.
The later chapters cover the app area by area, starting with Chapter 2: The Projects Page. The core of the Guide is the sequence of editing chapters from Chapter 3: The Edit Page through Chapter 9: Audio. These cover every aspect of constructing your movie, from gathering the raw materials to adding Transitions, Titles, and other finishing touches. When you are ready to share the result, Chapter 10: Exporting explains how to make your work available to others.
Meet Pinnacle Studio for iPad
Pinnacle Studio for iPad divides its controls into two screens, or pages: the Projects Page, for starting and managing projects; and the Edit Page, where the creative action of movie-making takes place.
The Projects Page The primary role of the Projects Page is the creation and management of your movie projects.
Opening a project, existing or new, takes you to the Edit Page (introduced below), which is where you’ll spend most of your time with the app. However, you will need to return to the Projects Page in order to:
Start a new project; Switch to editing a different project; Rename or delete a project.
The Projects Page is also the location of several administrative functions, such as adjusting global settings, rebuilding the Library from your available media, and opening the documentation. See Chapter 2: The Projects Page for details.

Chapter 1: Getting acquainted 3
The Edit Page This is the page where you build, preview, and fine-tune your movies. The work area is laid out differently (see below) according to whether your iPad is in portrait view or landscape view, but always contains three zones:
The Library, in which production materials like video footage, photos, and effects, are contained;
The Movie Editor, which contains those Library materials you have chosen for your current production. Here you can freely trim, organize, and edit the media clips in your project without affecting the Library-based originals;
The Preview, a viewing area with transport controls. You can screen either the source material in the Library or the clips that you have created by adding Library materials to your movie.
Use the iPad in portrait view (left) for a more detailed preview, or in landscape view (right) to maximize the area available for editing.
The Movie Editor is the construction site where your movie will be built using the items in your Library as raw materials. Your production is presented for editing in two separate but complementary parts, called the Storyboard and the Timeline. Each visual item in your movie will appear both as a Storyboard thumbnail and as a clip on the Timeline’s video track. See Chapter 3: The Edit Page for detailed information, as well as the further coverage in Chapter 4: The Library, Chapter 5: The Storyboard, and Chapter 6: The Timeline.

4 Pinnacle Studio for iPad
CHAPTER 2:
The Projects Page Every Pinnacle Studio for iPad movie reflects the final state of a movie project. A project starts out as nothing but a name then grows into a unique personal creation as you bring together your source materials and apply the editing tools covered later in this Guide.
The Projects Page of the app provides simple tools for opening, renaming, deleting, and sharing existing projects (see “Project management” below). It also provides access to a handful of additional tools, including the Global Settingspanel (see “Other Projects Page functions” on page 6).
To create a new project:
1. Tap the new project icon in the header bar or any unused cell in the project filmstrip.
2. Enter a name for your project and tap OK. The Edit Page now opens, with your new project loaded and ready for editing.
To open a project for editing on the Edit Page, double-tap either the project’s filmstrip thumbnail or the neighboring title. On your future visits to the Projects Page, you will be able to reopen this project for further editing. Saving is automatic: your latest changes are always preserved just as you last saw them on the Edit Page.
Transferring projects from Avid Studio for iPad
Projects created with Avid Studio for iPad do not automatically appear on the Projects Page of Pinnacle Studio for iPad. To transfer projects from Avid Studio you will need to use a third-party transfer app, such as iExplorer. We’ve created a Frequently Asked Questions document to help you get started.

Chapter 2: The Projects Page 5
Project management
The main business of the Projects Page is to let you access and manage your projects. The tool buttons in the header bar of the page let you create, rename, share, or delete your project. They also provide access to help and master settings. The first tool button, which creates a new project, was described above.
Tools on the header bar of the Projects Page let you perform operations on the selected project.
The rename, delete, duplicate, and share tools work on the currently-selected project – the one highlighted in the projects list. To select a project, tap either its thumbnail or its name.
Rename: Tapping the rename icon in the header bar opens the iPad virtual keyboard so that you can enter a new name for the selected project. Tap OK to save.
Duplicate: Tap the duplicate icon to copy an existing project. Give the duplicate project a name, and tap OK to save.
Share: Tap the share icon when you are ready to send your movie out into the world. This opens the menu of options described in Chapter 10: Exporting. The share icon is also available on the Edit Page.
Delete: Tap the trash can icon to delete the selected project. This operation cannot be reversed, so you will also have to tap Yes in a pop-up confirmation window before it is carried out.

6 Pinnacle Studio for iPad
Other Projects Page functions
At the top right of the Projects Page are two icons that control global functions.
Help Tapping the help icon opens this Guide.
Global settings The neighboring gear icon opens the Global Settings panel, with several options that will apply from now on when you are editing any of your Pinnacle Studio for iPad projects, not just the one you are currently working on.
Here you can choose the durations assigned by default to photos, Titles, and Transitions when they are first added to a project (since these assets have no predetermined length). On installation the default durations are four seconds for both photos and Titles, and one second for Transitions.
Add Transitions automatically: If you would like Pinnacle Studio for iPad to automatically insert dissolveTransitions between your photos or video segments as you add them to the Movie Editor, turn on the Automatic Transitions setting. This is handy when you want to quickly throw together a slideshow or highlight reel.
Updating the Library: If you have added video, music, or photos to your iPad, you can make them accessible to the Library by allowing it to “rebuild.” Open the Global Settings panel using the gear icon as just described, then tap Rebuild Media Library at the bottom of the panel. Rebuilding may take up to several minutes if there is a wealth of new material.
Automatic checks for new media are performed when certain events occur, such as re-opening the app. You will be invited to approve a Library rebuild if any uncatalogued media are found. The manual Rebuild Media Library operation is provided so that you can update the Library at other times if required.

Chapter 3: The Edit Page 7
CHAPTER 3:
The Edit Page The Edit Page in Pinnacle Studio for iPad is dedicated to the creative process of assembling your movie project from the raw materials present in the Library.
Everything you will need is gathered in this one place. Browse your available media, bring together your video footage, photos, and soundtrack in the Movie Editor, then add finishing touches like Titles and Transitions.
Returning to the Projects Page: If you want to switch to the Projects Page to create, rename, or delete a project, or for one of its other functions, tap the home icon in the upper left corner of the Edit Page.
Previewing a project clip on the Edit Page.
When you leave the Edit Page, either by switching to the Projects Page or by closing Pinnacle Studio, the project you were working on is automatically saved. When you reopen the project on another occasion, you can pick up from exactly where you left off.

8 Pinnacle Studio for iPad
The Library
The Library is a storehouse for the media clips and other “assets” that are available for your productions. The first time you use Pinnacle Studio for iPad, the app will request permission to build the Library from the media already stored on your device. All the videos, photos, and music present on your iPad will become accessible through the Library as raw material for your movie projects.
Another method of bringing in new material is to make it yourself. You can use your iPad to record photos, video, and audio from within the Pinnacle Studio app by tapping the record button on the left side of the Library. Once recorded, new media items are immediately available for use.
For full coverage of the Library, please see Chapter 4: The Library. For information on using Apple’s iTunes to build your Library, please see Appendix B: Importing with iTunes.
Organization of the Library Materials in the Library are organized by type, with videos in one section, photos in another, and so on. Select which section to view by tapping one of the six media type buttons along the left edge of the Library. See “Inside the Library” on page 16 for a description of the purpose and use of each section.
Browsing the Video section of the Library.
Browse the Library sections for videos, photos, music, and any other items you wish to use in your movie. Tap the thumbnail of any Library item to display the

Chapter 3: The Edit Page 9
item in the Preview, where you can also pre-trim it if desired before bringing it into your project.
Touch-and-hold any Library thumbnail until it responds by highlighting; then drag it straight into the Movie Editor to become part of your production.
The Preview
The Preview occupies the top right of the screen in landscape view. In portrait view, it fills nearly the entire upper half of the screen.
Project video plays in the Preview (landscape view).
The Preview lets you screen material either from the Library or from your current project. In most cases, Pinnacle Studio for iPad automatically selects the appropriate source, but the source icons at the top left of the Preview not only indicate which source is being previewed but also let you switch between the Library and the project by tapping if required.
Library Preview: Tap any item in the Library to see or hear its content, and the Library’s source icon will highlight. The Preview for most kinds of material (all but photos) includes both a set of transport controls for navigating through the item, and a pre-trimming tool (see page 19) for paring away excess material prior to bringing the item into the Movie Editor.
Project Preview: With the Movie Editor as its source, the Preview always displays the video frame corresponding to the current position of the Timeline Playhead within your movie. Tap any clip in the Movie Editor to move the Playhead to the start of the clip and begin previewing. The provided transport controls let you navigate to any part of the movie, or use a

10 Pinnacle Studio for iPad
swipe gesture on the Timeline to scroll (“scrub”) through your project. To preview your project from the beginning, tap the first clip in the Storyboard.
Full-screen view The full-screen icon at the top right of the Preview temporarily enlarges it to the full size of the iPad display. Tap the icon again to restore the normal Edit Page view.
The Movie Editor
The Movie Editor offers two representations of your project simultaneously. In an upper strip called the Storyboard, each element on the main video track – each video clip, photo, Transition, Title, or Montage sequence – is represented by an icon of fixed size, regardless of its duration. The Storyboard is ideal for roughing out or reorganizing a project since each clip, however short or long, is clearly visible and easy to manipulate.
The Movie Editor: The horizontally-scrolling tray of thumbnails at the top is the Storyboard; below it, the Timeline presents your project on a video track and
three audio tracks, all synchronized to the Timescale (bottom).
The lower portion of the Movie Editor is called the Timeline. It shows all the elements of your movie, including the audio clips, but scales their widths to their durations. This provides a graphical overview of the production that lets you position and trim clips interactively relative to the Timescale. In addition to its main video track, the Timeline provides three tracks for the audio assets of your production: music, voice-overs, and sound effects.

Chapter 3: The Edit Page 11
The Storyboard The Storyboard shows a separate thumbnail for each video clip, photo, Title, or Montage theme in your movie. The thumbnails are all the same size, rather than being proportional in width to their durations as on the Timeline. The clip duration is displayed in hours, minutes, seconds, and frames in the bottom-right corner of each thumbnail.
Transitions – the animated effects often used in movie editing to bridge the passage from one clip to the next – are represented on the Storyboard as smaller thumbnails positioned between the main clips.
If a clip in your movie requires rendering to play smoothly, a gears icon will appear in the top-left corner of its Storyboard thumbnail. Other graphical hints tip you off to certain clip features. Title clips have a stylized T in the bottom-left corner, while Transition clips are smaller with a purple border.
The Storyboard shows the content of your movie.
For a detailed account of the Storyboard area, please see Chapter 5: The Storyboard.
The Timeline The Timeline consists of four parallel tracks positioned over an expandable ruler called the Timescale (use pinch gestures to control the ruler’s magnification level). The uppermost track is the video track, whose contents correspond exactly to those of the Storyboard. Whereas Storyboard thumbnails always have a fixed width, however, the position and size of Timeline clips is determined by their screen time in the movie as represented on the Timescale. If the video clip has a built-in audio track, that is indicated by a volume graph overlaid on the clip box.
The lower three tracks of the Timeline are for audio. Audio clips – music, sound effects, and voice-overs – can be positioned on any of these as desired.

12 Pinnacle Studio for iPad
The Timeline consists of four tracks, only the uppermost of which is for video. A graph of the clip volume is shown both on all-audio clips and on video clips
with integral audio.
The Playhead is a vertical orange line whose position on the Timescale specifies the current frame for the Movie Editor Preview. Dragging the Timeline past the Playhead allows you to scrub freely through your movie. Suitably adjusting both the expansion level of the Timescale and the speed with which you drag can help make scrubbing more efficient.
By giving you an interactive graphical representation of your project, the Timeline excels when it comes to positioning and trimming clips as precisely as your movie requires. Please see Chapter 6: The Timeline for detailed coverage of this topic.
Movie Editor controls
Some operations in the Pinnacle Studio for iPad Movie Editor are performed directly in the Storyboard or on the Timeline, but the controls in the header bar apply regardless of which area you are working in. They are:
Voice-over: This is the tool to use if you want to add a voice-over clip to any part of your movie. For more information, see “Voice-overs” on page 39.
Razor blade: This tool lets you split any video, photo, or audio clip on the Timeline or Storyboard except those that use the pan-and-zoom or picture-in-picture features. This tool is useful for quickly removing part of a clip, or for dividing a clip to insert other material.
To split a clip, scrub the Timeline until the Playhead reaches the location at which you want to make a cut, then tap the razor blade icon. When a single cut can potentially affect multiple tracks, the tool pops up a toolbar for selecting either a single track or All Tracks as the target of the cut. Buttons are provided only for those tracks with clips straddling the current position of the Playhead.

Chapter 3: The Edit Page 13
To cut only the video track, tap Video. Audio tracks are signified by a musical note and 1, 2, or 3. Tap the number of the track you want to cut. To cut all the
tracks at once, tap All Tracks.
Trash can: As usual, tapping the trash can icon deletes the selected clip. It does not ask for approval, and any editing changes you have made will be lost. The underlying Library material is not affected.
Gears: If your movie requires rendering, tap the gears icon. Rendering is covered at the end of Chapter 5: The Storyboard on page 24.
Undo and Redo: These icons let you step forward and back through your recent editing changes. To cancel recent edits, tap the undo icon on the right above the Storyboard one or more times. The redo icon lets you move forward again through your editing history after using undo.
Sharing your project: To export your project from the Edit Page, tap the share icon at the top right of the Preview and select one of the available options. See Chapter 10: Exporting for details on sharing your project.
Other Movie Editor features
Not all the features of the Movie Editor are accessed through tool buttons. The pan-and-zoom capability is accessed directly in the Preview when screening any photo, while a clip’s Properties panel is accessed by double-tapping the clip.
Pan-and-zoom: Tap any photo in the Storyboard or Timeline to open it for pan-and-zoom editing in the Preview. If at this point you simply tap the Pan And Zoom button at the top-right corner of the Preview, a default pan-and-zoom animation is applied, starting at full-frame then pushing in to a closer view as the clip plays. At the same time, new buttons labeled Start Position and End Position appear in the top corners of the Preview.

14 Pinnacle Studio for iPad
Tip: Now that your clip is using the pan-and-zoom feature, you will see (and can adjust) the Start Position and End Position buttons whenever the clip is selected during editing.
When you begin editing a custom pan-and-zoom, the Start Position button is highlighted. Use drag and pinch gestures to set the position (pan) and magnification (zoom) of your image as you want them for the beginning of the pan-and-zoom animation. The cross-hairs at the center of the green sizing frame indicate the center of the photo. Tap End Position and repeat the procedure to set up the final frame of your pan-and-zoom motion.
Editing a pan-and-zoom clip. The green sizing frame shows the start setting; the red frame shows the setting at the end of the clip.
Performing any pan-and-zoom edit means that the clip will need to be rendered before a smooth preview is possible. For information on rendering, please see page 24.
Properties: To access a pop-up panel of property settings for a clip, double-tap it in the Storyboard or Timeline. The set of properties displayed on the Properties panel depends on the media type. Video and photo clips let you choose from three methods of adjusting the aspect ratio of the source material to that of the movie: no change, stretch to fit, and fit to screen. Audio clips, and video clips with audio, provide a slider for adjusting the volume level of the clip, and a pair of sliders for increasing the Fade Inand Fade Out timing of the clip from its default of zero. Title clips have their own version of the Properties panel.

Chapter 4: The Library 15
CHAPTER 4:
The Library The Library contains all the videos, photographs, and music you have stored on your iPad. In addition to those media assets, the Library also includes a trove of supplied Transitions, Montage sequences, Titles, and sound effects to dramatically expand the creative possibilities at your fingertips.
Building the Library
Each time you launch Pinnacle Studio for iPad, it performs a check to determine whether any of the videos, photos, or music in your iPad have not yet been added to the Library catalog. If new media are found, you will be given the opportunity to “rebuild the Library.” The time required for this operation varies with the amount and type of material involved. A button to start a Library rebuild manually is provided on the Global Settings panel on the Projects Page.
When the iPad is in portrait view, the Library is displayed across the full width of the bottom of the screen.
To use media from other devices in Pinnacle Studio, you must import the files to your iPad and then rebuild the Library. See Appendix B: Importing with iTunes for details.
Media recording in Pinnacle Studio for iPad To create new media assets without disturbing your creative flow, and make them immediately available to the Library, record audio and video or take photos while working on the Edit Page.
16 Pinnacle Studio for iPad
To capture video and photos in Pinnacle Studio:
1. Tap the red record button on the left edge of the Library. The iPad camera opens, and the Studio display is replaced by the camera’s through-the-lens view.
2. Select the video or still camera on the camera in the same way as if you had launched it from outside Pinnacle Studio for iPad. Record or take a snapshot. You should ordinarily keep the iPad in its landscape orientation so that the recorded picture will fit the screen format of the Preview.
3. Once the video or photo capture is complete, select Use on the camera to open the newly-recorded media in the Camera Roll album of the Library.
Adding Library content to your movie
Each clip that you include in your project derives from an item in the Library. Tap any thumbnail in the Library to select the item for previewing.
A double-tap on any thumbnail adds it to the Movie Editor as a new clip. Clips with visual material will land on the Storyboard and the video track of the Timeline at the Playhead position. Audio clips are placed to the right of the Playhead on the uppermost audio track that has sufficient space.
Another way to bring an asset into your production from the Library is to touch-and-hold then drag the thumbnail to any desired location in the project. It is usually easiest to drop visual assets like video and photos onto the Storyboard. Audio clips can be placed arbitrarily on the audio tracks. If you want the start of the audio to be synchronized with the start of a particular visual clip, drop the audio onto that clip’s Storyboard thumbnail.
In some circumstances, such as when your movie requires only a short segment from a long source video, you can simplify your workflow by pre-trimming the clip before it arrives in the Movie Editor. This variation is described under “Pre-trimming media items” below.
Inside the Library
The Library can potentially hold thousands of individual items. Icons down its left side give you access to the six sections into which the assets have been grouped,

Chapter 4: The Library 17
while horizontal tabs give access to the special collections that some sections provide.
Videos: To access the Video section of the Library, tap the film icon. A scrollable page of thumbnails, one for each video on the iPad (assuming you have recently updated the Library), is displayed. Tapping a thumbnail selects the video for previewing.
If you have many videos, you can save a lot of time by dealing with them systematically. The Albums and Events tabs on the thumbnail page provide access to collections that are automatically updated when you import your videos via iTunes. Tap a tab to see the groupings it contains – user-defined Albums in the one case, iPhoto or Aperture Event categories in the other – then tap one of these to see its video thumbnail page.
To return to a higher level in the catalog, either swipe right on the thumbnails, or tap the return link at the top-left of the thumbnail page. These will take you back step by step to the root level of the Video section.
A page of photos in the Library. This shows the Events collection. Like the Faces collection, this is available via software such as iPhoto and Aperture and
can be imported to the iPad with iTunes.
18 Pinnacle Studio for iPad
Photos: The photo icon provides access to a scrollable page upon which thumbnails for all your iPad photos are displayed. As with the Video section just described, you can take advantage of various classification techniques for rapidly locating the right material. In addition to your iPad Albums, the Photos section also supports Events and Faces collections that draw upon those maintained by some Apple software products.
Music and sound effects: Tap the Library’s note icon to access the Songs section, which lists all the songs currently loaded on your iPad in alphabetical order by song title. The list may well be too long to manage easily, so various classification methods are supported, just as for your videos and photos. In this case, the Library breaks things down using three tabs:
Tap Artists to see an alphabetical list of the recording artists behind your music. Tap an artist’s name for a choice of available songs.
Tap Albums for an alphabetical list of all the albums represented in your song collection. Tap the alum title for a list of its songs.
Tap Playlists to see the playlists you have imported from iTunes. Tap a playlist to access its songs.
A fourth tab, Effects, contains a battery of supplied sound effects that you can use to enliven your soundtrack. Browse in such categories as “Animals”, “Classic Foley”, and “Instruments” to find the right sounds for your movie. Tap the name of the category to open it, then tap a listed item to select a sound effect.
For general coverage of audio in Pinnacle Studio for iPad, please see Chapter 9: Audio.
Transitions: A Transition is an animated segue between clips. Instead of an abrupt cut, your photo and video clips can dissolve into each other, fade from or to black, or slide onto and off the screen in various ways.
To access the Transitions section, tap the lightning icon. Thumbnails of the Transitions supplied by Pinnacle Studio will appear. As with other assets, just tap a thumbnail to select and preview.
Please see “Transitions” on page 34 for more information.

Chapter 4: The Library 19
A preview of a slide Transition, with the second clip (B) sliding in from the left over the first clip (A).
Montage: Montages are packaged animation templates that are designed to incorporate your own material. Some of the supplied Montages combine several photo or video clips in elaborate transition sequences; others serve as title animations for which you supply the captions. Tap the montage icon to access this section, then tap the individual thumbnails to select and preview. See Chapter 7: Montages for more details.
Titles: Tap the title icon to open this Library section of static and animated title layouts, which you can customize with your own text right on the Preview.
For further information, please see “Titles” on page 36.
Pre-trimming media items
Depending on your editing style, at times you may want to work with clips that are very short compared to the source footage. Since it is generally easier to trim and position small clips on the Timeline than large ones, you can often save time by making use of the Library’s pre-trimming tool before adding such an item to your movie.
To pre-trim a clip:
1. Select the item in the Library to load it into the Preview.
2. Touch-and-hold, then drag, the orange mark in and mark out handles to the left and right to set the trimmed boundaries of your clip. The set mark

20 Pinnacle Studio for iPad
buttons on either side of the play button will bring the appropriate handle to the current position of the scrubber.
3. When you are satisfied with the pre-trim, drag the clip directly from the Preview to its desired location in the Movie Editor.
Pre-trimming precisely with gestures. Swiping left with two fingers has added ten frames. The trim is confirmed by a pop-up ‘+10’ in the Preview.
To pre-trim more precisely, step through the clip frame-by-frame using gestures:
To scrub ahead, swipe left with one finger (1 frame) or two fingers (10 frames);
To scrub backward, swipe right rather than left.
Gestures can also be used to set a trim point at the current scrubber position:
Swipe down with one finger to set the mark-in point; Swipe up with one finger or down with two fingers to set the mark-out point.
For ease of manipulation, the pre-trimmer imposes a minimum screen distance between the mark-in and mark-out points. This feature controls how short the clip can be made in pre-trimming. It can be further edited once it is part of your movie.

Chapter 5: The Storyboard 21
CHAPTER 5:
The Storyboard The uppermost portion of the Movie Editor is a horizontal tray called the Storyboard, in which each visual element in your production is represented by a thumbnail frame. Unlike those in the Timeline, the thumbnails are identical in size and spacing. The clip duration is displayed in the bottom-right corner of the thumbnail. As noted on page 11, a Storyboard thumbnail may have other indicators that provide additional information about the clip.
Transitions on the Storyboard are represented as smaller icons between adjacent clips. Audio clips do not appear in the Storyboard.
Adding and organizing clips The Storyboard shines when it comes to adding and arranging the visual material of your movie by dragging thumbnails. For quickly organizing your project, it is generally easier to work in the Storyboard than the Timeline.
When you are ready to add an item from the Library to your movie, either double-tap it, or touch-and-hold then drag it onto the Storyboard. Double-tapping causes the clip to position itself at the Playhead; dragging lets you position it as you please. Once added, a Storyboard thumbnail can be freely dragged to a new position when you wish to change the ordering of clips.
Removing an item There are several ways to remove an item from the Storyboard:
Replace it by dragging another item on top of it (see “Dragging on the Storyboard” below);
Tap the thumbnail to highlight it, then tap the trash can icon; Touch-and-hold the item, then drag it out of the Movie Editor.
Removing an item from a project does not delete it from the Library.
22 Pinnacle Studio for iPad
Dragging on the Storyboard
One strength of the Storyboard is the ease with which you can move clips into and within your production by dragging. To rearrange the items on the Storyboard, touch-and-hold a thumbnail then drag it to the new location. The Storyboard will scroll horizontally as needed until the desired landing point comes into view. As you drag the thumbnail on the Storyboard, existing clips move apart to show where the new clip would be inserted.
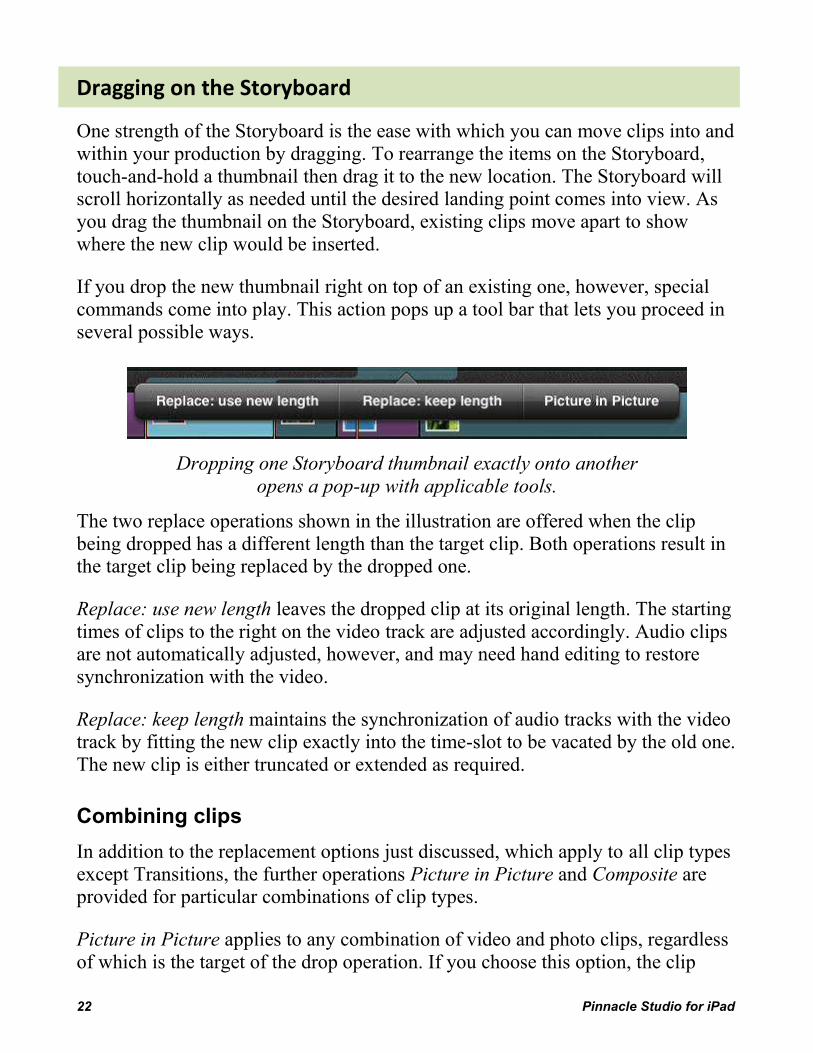
If you drop the new thumbnail right on top of an existing one, however, special commands come into play. This action pops up a tool bar that lets you proceed in several possible ways.
Dropping one Storyboard thumbnail exactly onto another opens a pop-up with applicable tools.
The two replace operations shown in the illustration are offered when the clip being dropped has a different length than the target clip. Both operations result in the target clip being replaced by the dropped one.
Replace: use new length leaves the dropped clip at its original length. The starting times of clips to the right on the video track are adjusted accordingly. Audio clips are not automatically adjusted, however, and may need hand editing to restore synchronization with the video.
Replace: keep length maintains the synchronization of audio tracks with the video track by fitting the new clip exactly into the time-slot to be vacated by the old one. The new clip is either truncated or extended as required.
Combining clips In addition to the replacement options just discussed, which apply to all clip types except Transitions, the further operations Picture in Picture and Composite are provided for particular combinations of clip types.
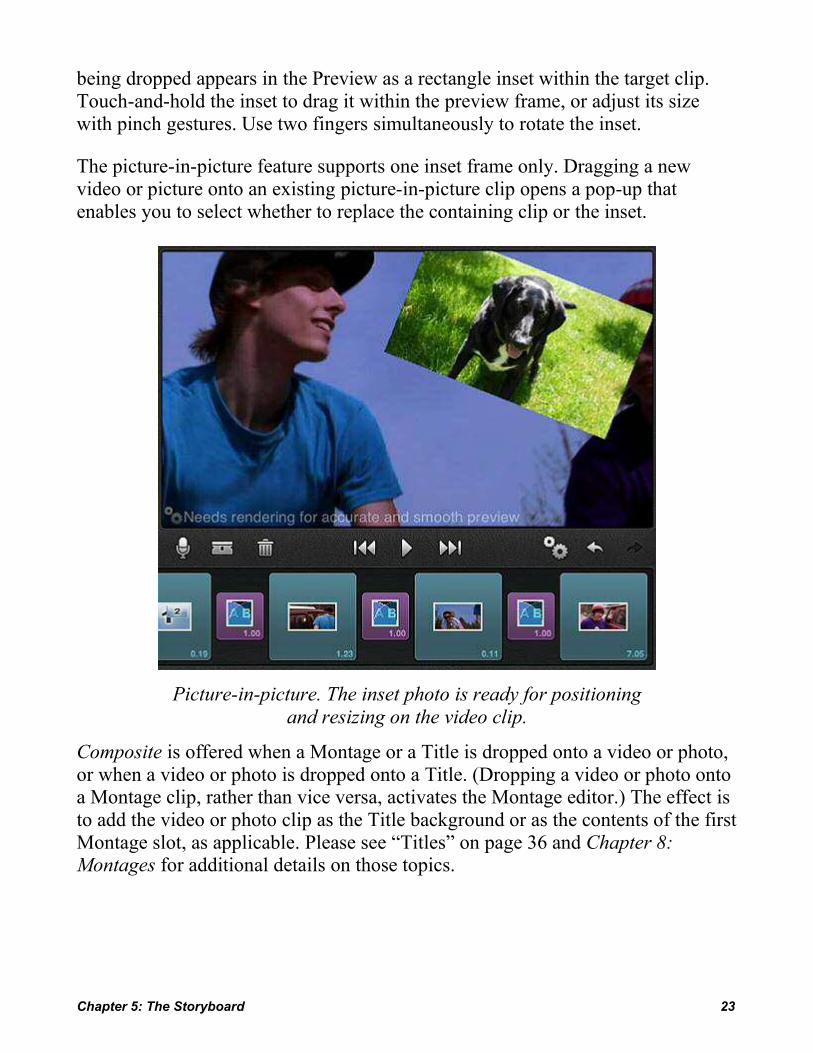
Picture in Picture applies to any combination of video and photo clips, regardless of which is the target of the drop operation. If you choose this option, the clip
Chapter 5: The Storyboard 23
being dropped appears in the Preview as a rectangle inset within the target clip. Touch-and-hold the inset to drag it within the preview frame, or adjust its size with pinch gestures. Use two fingers simultaneously to rotate the inset.
The picture-in-picture feature supports one inset frame only. Dragging a new video or picture onto an existing picture-in-picture clip opens a pop-up that enables you to select whether to replace the containing clip or the inset.
Picture-in-picture. The inset photo is ready for positioning and resizing on the video clip.
Composite is offered when a Montage or a Title is dropped onto a video or photo, or when a video or photo is dropped onto a Title. (Dropping a video or photo onto a Montage clip, rather than vice versa, activates the Montage editor.) The effect is to add the video or photo clip as the Title background or as the contents of the first Montage slot, as applicable. Please see “Titles” on page 36 and Chapter 8: Montages for additional details on those topics.

24 Pinnacle Studio for iPad
Rendering
Intensive computation is often required to generate the video frames needed to realize special effects like Transitions, Montages, and picture-in-picture. Smooth and accurate preview of clips that employ such effects will not be available until this “rendering” process has been completed. When a clip requires rendering, the gears icon will be highlighted in the control bar under the Preview; the same icon will also be displayed on the upper-left corner of the clip’s Storyboard thumbnail. The more clips there are in your movie that require rendering, the longer the rendering process will take.
Rendering takes time to complete, but it can be postponed as long as you are willing to put up with a jerky preview. Rather than respond immediately when the gears icon appears, you may sometimes prefer to hold off. If you want to do any precise trimming on a clip that requires rendering, it is advisable to complete the rendering process first.
When you are ready to initiate rendering, tap the gears icon.

Chapter 6: The Timeline 25
CHAPTER 6:
The Timeline No matter how great your photos and raw video footage may be, assembling them into an enjoyable viewing experience will almost certainly take some editing. In Pinnacle Studio for iPad, your main editing environment is the Movie Editor and especially the video track of the Timeline. (Please see Chapter 9: Audio for coverage of the Timeline audio tracks.)
In the Timeline’s video track, the length of the clipcorresponds to its duration in the movie.
The Storyboard and the video track both contain exactly the same sequence of clips. The position and length of a clip on the video track visually conveys its start time and duration in the movie relative to the Timescale. Expanding the Timescale makes it easier to work with the clip when you are adjusting its duration with the trimming tools.
Trimming tools
The source video you bring in from the Library can rarely be used exactly as-is. Even if you pre-trimmed the clip when adding it to your production, you may well choose to make further adjustments using the Timeline’s trimming tools as editing progresses. Keep in mind that any trimming you perform affects only the clips in your project: the source media in the Library are not changed.
The razor blade may be used to split a clip so that another clip can be inserted at that point on the video track. In Preview, the first clip would be seen in two parts
26 Pinnacle Studio for iPad
with the inserted clip between them. The razor blade can also be used to quickly shorten a clip.
Clips can be shortened and lengthened right on the Timeline using the trim handles as described below. Another tool, the Precision Trimmer, gives you frame-accurate trimming on both sides of a cut within one interface, and also provides roll-trim capability.
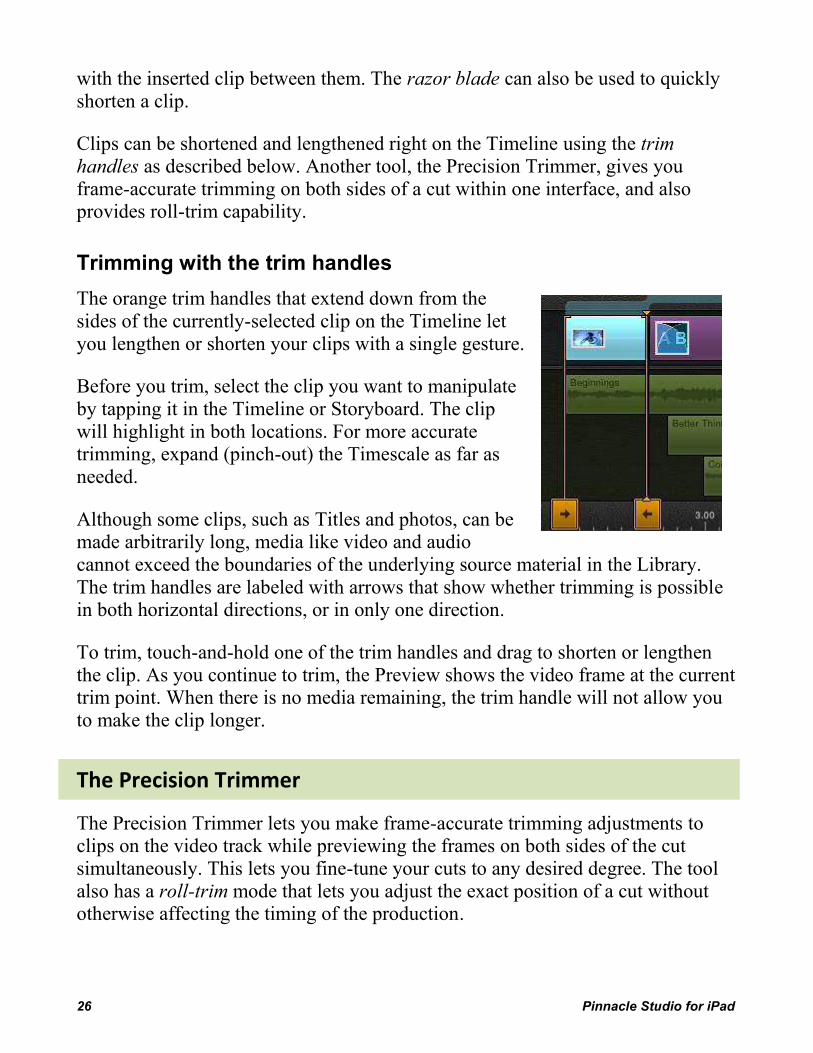
Trimming with the trim handles The orange trim handles that extend down from the sides of the currently-selected clip on the Timeline let you lengthen or shorten your clips with a single gesture.
Before you trim, select the clip you want to manipulate by tapping it in the Timeline or Storyboard. The clip will highlight in both locations. For more accurate trimming, expand (pinch-out) the Timescale as far as needed.
Although some clips, such as Titles and photos, can be made arbitrarily long, media like video and audio cannot exceed the boundaries of the underlying source material in the Library. The trim handles are labeled with arrows that show whether trimming is possible in both horizontal directions, or in only one direction.
To trim, touch-and-hold one of the trim handles and drag to shorten or lengthen the clip. As you continue to trim, the Preview shows the video frame at the current trim point. When there is no media remaining, the trim handle will not allow you to make the clip longer.
The Precision Trimmer
The Precision Trimmer lets you make frame-accurate trimming adjustments to clips on the video track while previewing the frames on both sides of the cut simultaneously. This lets you fine-tune your cuts to any desired degree. The tool also has a roll-trim mode that lets you adjust the exact position of a cut without otherwise affecting the timing of the production.

Chapter 6: The Timeline 27
The trimmer lets you adjust only one edge of either clip: the edge that is at the cut. When the left clip is selected, trimming will affect its out time; with the right clip, it is the in time. During a roll-trim, both are modified.
The Precision Trimmer. The clip on the left has been selected for trimming. Frames can be added or subtracted, 1 or 10 at a time, using swipe gestures on
the Preview or by tapping the trim buttons.
Using the Precision Trimmer
To launch the Precision Trimmer, either:
Double-tap a clip whose left edge you would like to adjust, then tap Trim in the pop-up Properties panel. The first frame of the clip (as currently trimmed) is displayed in the Precision Trimmer beside the final frame from its left-hand neighbor; or,
Select a clip, and tap either of its trim handles. The clip and its left-hand or right-hand neighbor – depending on which handle you tapped – open side-by-side in the Precision Trimmer.
The outgoing clip is displayed in the left-hand Preview, while the incoming clip appears on the right. (If either Preview is black, the corresponding clip may require rendering before it will show properly.)
Roll-trim: You can choose to trim just one of the clips at a time, by tapping its Preview; or both together, by tapping the roll-trim icon between the Preview panes. In a roll-trim, the total trimmed length of the two clips is held constant, so

28 Pinnacle Studio for iPad
that lengthening the left-hand clip shortens the one on the right by an exactly equal amount, and vice versa.
The Precision Trimmer controls showing the Roll-trim (top-right), Previous cut (left), and Loop (bottom-right) icons in addition to the central trimming group.
Trim buttons: The buttons that control the trim are located below the center of the trimmer. Use these to trim the edge of the selected clip (or clips) by 1 frame or 10 frames in either direction. As you trim, the number of frames by which you have moved the cut point is displayed briefly on the Preview. At the same time, the clip’s duration as displayed on its Storyboard thumbnail is updated, and the clip is shortened or lengthened in the Timeline to reflect the change.
Looping: To preview the cut at playback speed, tap the loop icon in the trimmer’s transport control group. A short segment around the trim point begins looping without pause. Tap the loop icon again to return to trimming.
Edit nearby cuts: When you are satisfied with the cut you have been working on, you can switch to a neighboring one by means of the previous cut and next cutbuttons at either end of the control bar below the Previews.
Tap Done or double-tap a blank spot in the Movie Editor to close the Precision Trimmer.
Note: The Storyboard and the Timeline are inactive while you are using the Precision Trimmer except that you can select either clip for trimming by tapping its Movie Editor thumbnail.
Chapter 6: The Timeline 29
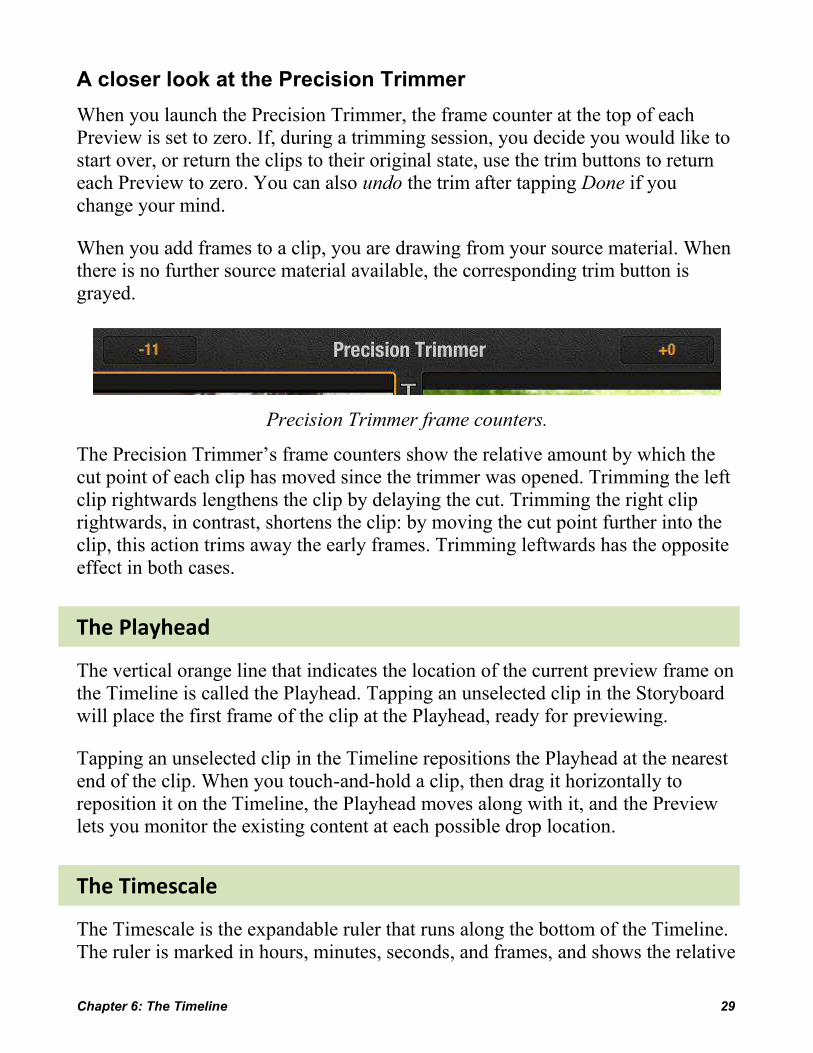
A closer look at the Precision Trimmer When you launch the Precision Trimmer, the frame counter at the top of each Preview is set to zero. If, during a trimming session, you decide you would like to start over, or return the clips to their original state, use the trim buttons to return each Preview to zero. You can also undo the trim after tapping Done if you change your mind.
When you add frames to a clip, you are drawing from your source material. When there is no further source material available, the corresponding trim button is grayed.
Precision Trimmer frame counters.
The Precision Trimmer’s frame counters show the relative amount by which the cut point of each clip has moved since the trimmer was opened. Trimming the left clip rightwards lengthens the clip by delaying the cut. Trimming the right clip rightwards, in contrast, shortens the clip: by moving the cut point further into the clip, this action trims away the early frames. Trimming leftwards has the opposite effect in both cases.
The Playhead
The vertical orange line that indicates the location of the current preview frame on the Timeline is called the Playhead. Tapping an unselected clip in the Storyboard will place the first frame of the clip at the Playhead, ready for previewing.
Tapping an unselected clip in the Timeline repositions the Playhead at the nearest end of the clip. When you touch-and-hold a clip, then drag it horizontally to reposition it on the Timeline, the Playhead moves along with it, and the Preview lets you monitor the existing content at each possible drop location.
The Timescale
The Timescale is the expandable ruler that runs along the bottom of the Timeline. The ruler is marked in hours, minutes, seconds, and frames, and shows the relative

30 Pinnacle Studio for iPad
timing of events from “00:00:00.00” at the start of your movie through to its total duration.
The position of the Playhead defines the current Preview location for the Movie Editor. During normal playback, the Timescale scrolls from right to left across the Playhead, whose location is also reflected in the timecode readout at the top of the screen to the right of the source icons.
Controlling the Timescale To close up or expand the Timescale, use horizontal pinch-in and pinch-out gestures, either on the Timescale itself or on blank areas of the Timeline. With a little persistence you can pinch-out the Timescale until individual frame numbers appear.
To get a bird’s-eye view of your project, double-tap the Timescale, or any vacant region of the Timeline. The Timeline zooms out to reveal your whole production on a single screen. Double-tapping again restores the Timeline to its prior zoom level.
Chapter 7: Montages 31
CHAPTER 7:
Montages Montages in Pinnacle Studio for iPad are supplied motion graphics templates with spaces provided for your own media. Think of using a Montage when you need an instant title sequence or a dramatic transition.
The Montages section of the Library offers a selection of Montages designed to serve a variety of purposes. The static thumbnails in the Library cannot show all facets of a Montage, so it is worth while to preview the different themes in full as you are getting to know the collection.
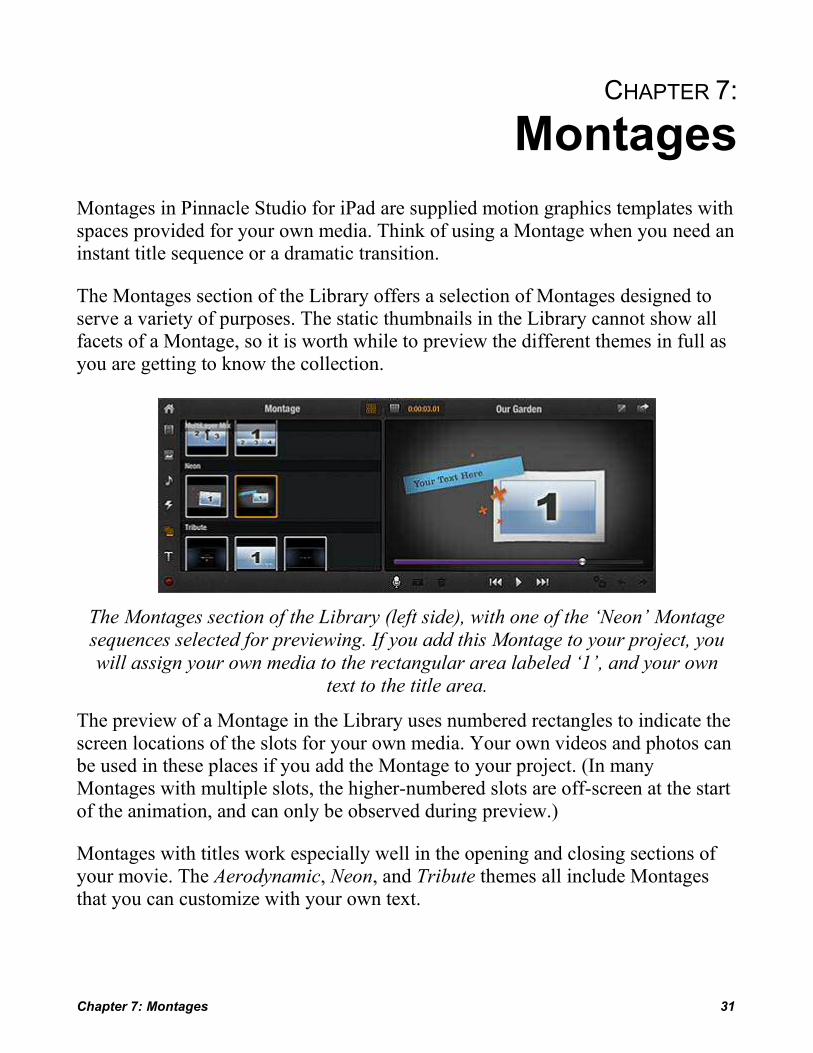
The Montages section of the Library (left side), with one of the ‘Neon’ Montage sequences selected for previewing. If you add this Montage to your project, you will assign your own media to the rectangular area labeled ‘1’, and your own
text to the title area.
The preview of a Montage in the Library uses numbered rectangles to indicate the screen locations of the slots for your own media. Your own videos and photos can be used in these places if you add the Montage to your project. (In many Montages with multiple slots, the higher-numbered slots are off-screen at the start of the animation, and can only be observed during preview.)
Montages with titles work especially well in the opening and closing sections of your movie. The Aerodynamic, Neon, and Tribute themes all include Montages that you can customize with your own text.

32 Pinnacle Studio for iPad
Customizing a Montage
After you have added a Montage clip to the Movie Editor, you are ready to furnish it with your own media as described below. If the Montage incorporates a Title, double-tap it on the Storyboard to bring up the Title’s Properties editor.
After a Montage has been added to the Storyboard, it can be filled in with visuals from the Library or from the Storyboard itself. Some Montages include a
title, and provide a special slot for entering the text.
One way to fill the customization slots in a Montage is to scrub through it in the Preview until a slot you want to fill appears on-screen. Then simply drag your video or photo from the Library or the Storyboard onto the slot in the Preview. Continue scrubbing through the Montage until you have filled all the slots.
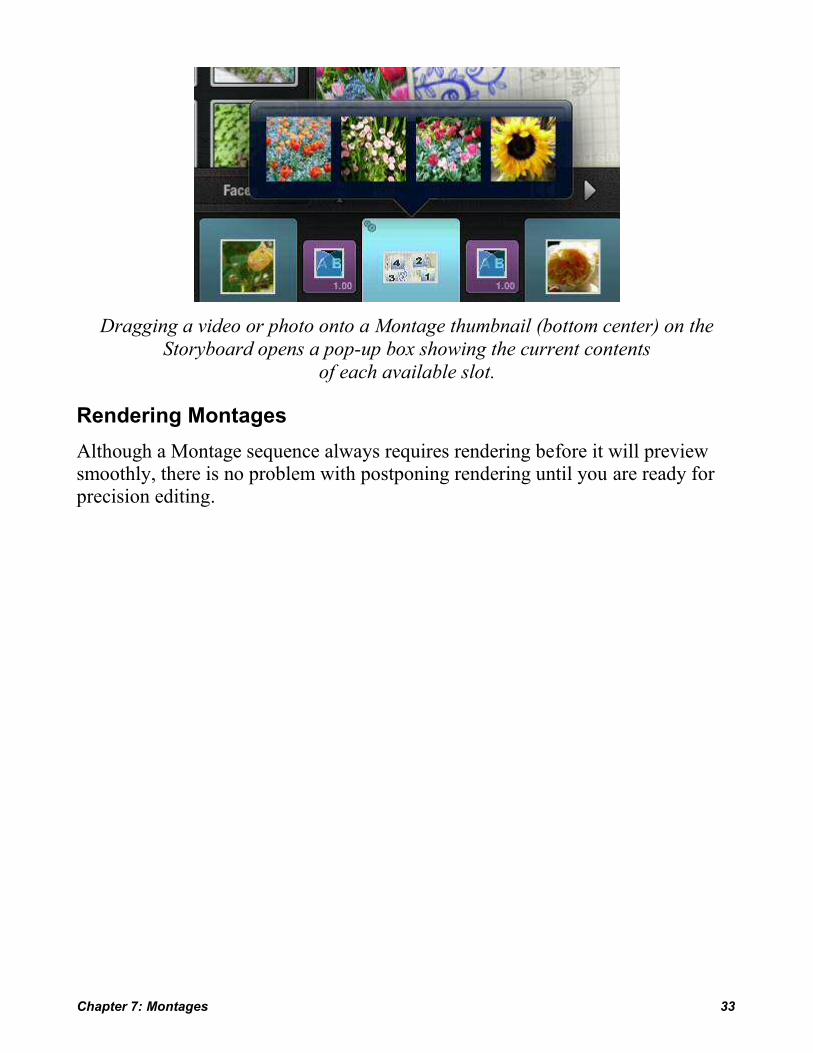
The other way to fill slots in a Montage sequence, especially one with which you are already familiar, is to drag a photograph or video onto the Montage thumbnail on the Storyboard. A pop-up box with numbers will appear over the Montage. Tap one of the numbers to place your video or photo into the corresponding slot.
Chapter 7: Montages 33
Dragging a video or photo onto a Montage thumbnail (bottom center) on the Storyboard opens a pop-up box showing the current contents
of each available slot.
Rendering Montages Although a Montage sequence always requires rendering before it will preview smoothly, there is no problem with postponing rendering until you are ready for precision editing.
34 Pinnacle Studio for iPad
CHAPTER 8:
Transitions and Titles The Library in Pinnacle Studio for iPad includes collections of Titles and Transitions. Both can be used to add polish to your movies and imprint them with your personal style.
Transitions have special traits that set them apart from other Library resources. For example, although you introduce Transitions into your production in the usual way – by double-tapping in the Library or by dragging from the Library into the Movie Editor – they do not then follow the standard pattern and become independent clips. Instead, a Transition is represented in the Storyboard as a smaller thumbnail sandwiched between any two clips of other types.
Titles in Pinnacle Studio for iPad aren’t just static title cards. The Library contains a set of pre-designed Titles, some of which (“motion titles”) also provide built-in animation. You can use any of these as the basis for the Titles in your production, then customize them in a variety of ways. For instance, the pop-up Title Properties editor provides text style, coloring, and other tools that you can apply to any Title, regardless of its original design.
Transitions
Transitions are animated effects that ease – or emphasize – the passage from one clip to another.
By default, clips on the Pinnacle Studio for iPad video track cut without ceremony from one to the next: the first frame of the incoming clip immediately follows the final frame of the outgoing one. A dramatic cut may make a bold statement of its own, but Transitions offer the variety and nuance you need to maintain audience interest.
The set of Transitions supplied in the Pinnacle Studio for iPad Library gives you access to many of the stock moves from the visual language of film. Whether we are aware of it or not, most of us already understand this language enough that a long dissolve seems natural to express the passage of time, and that a fast horizontal wipe can help convey to us a jump to a new location.

Chapter 8: Transitions and Titles 35
As with other editorial decisions, the way you use Transitions in your movie should reflect your subject-matter, your intended audience, and your personal style. Keeping all three of these in mind should guide you to effective choices. Remember that although you can smooth things out with a little Dissolve just about anywhere, the more dramatic Push and Slide types should usually be reserved for a specific need. Tap the thumbnail of any Transition in the Library to see it play in the Preview.
Adding Transitions: To add a Transition to your movie, touch-and-hold its thumbnail in the Library and then drag it to the desired location alongside any clip on the Storyboard. Dropping the thumbnail where there is an existing Transition replaces it.
In this downward push Transition, the incoming clip appears to push the outgoing clip out of the frame.
Duration of Transitions: To adjust the duration of a Transition, tap it to display its trim handles in the Timeline. Touch-and-hold a trim handle then drag to set the duration.
36 Pinnacle Studio for iPad
When creating a slide show or video highlight reel, you can save time by turning on Automatic Transitions in the Global Settings panel. Studio will automatically insert a dissolve transition between each pair of neighboring clips that you add from then on. While you are there, make sure that the default Transition time is less than the duration of your photos in the project.
Transitions and the Precision Trimmer The loop mode of the Precision Trimmer can be particularly helpful when a Transition is involved. Regardless of the length of the Transition, the preview loop will play from a few frames before the Transition begins to a few frames after it completes. The Precision Trimmer controls let you add or subtract frames from each of the participating clips to optimize the transition. For more on using the Precision Trimmer, please see page 26.
Titles
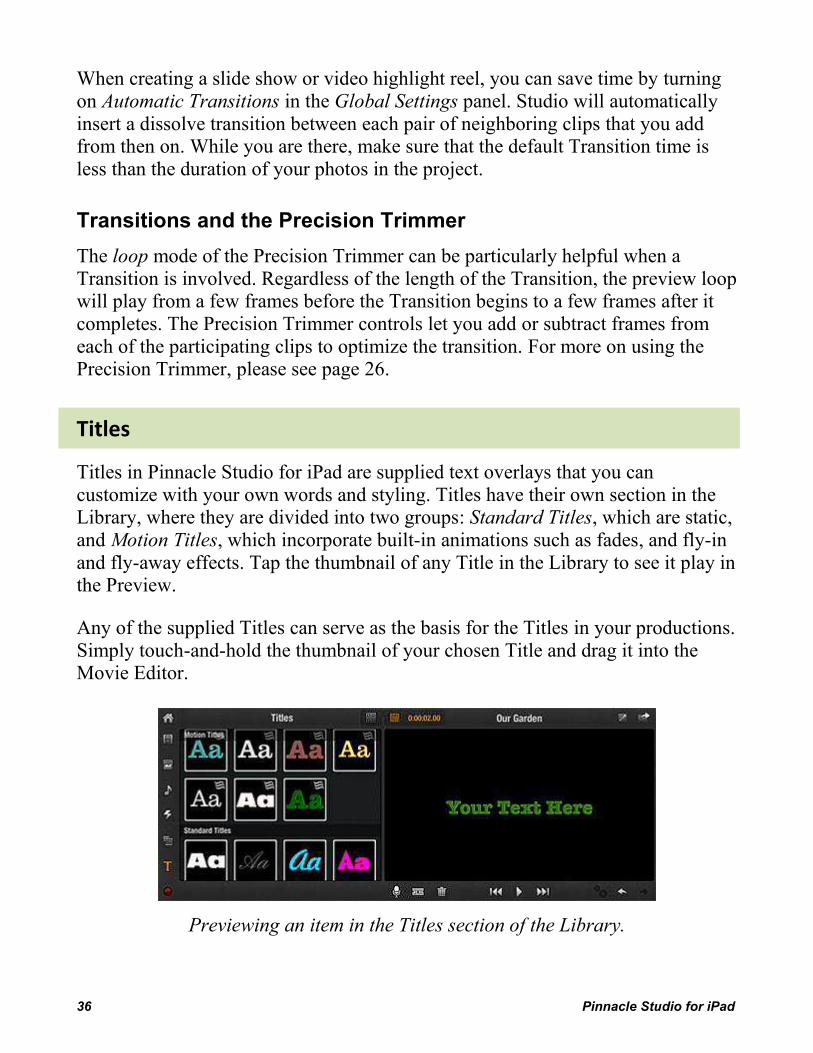
Titles in Pinnacle Studio for iPad are supplied text overlays that you can customize with your own words and styling. Titles have their own section in the Library, where they are divided into two groups: Standard Titles, which are static, and Motion Titles, which incorporate built-in animations such as fades, and fly-in and fly-away effects. Tap the thumbnail of any Title in the Library to see it play in the Preview.
Any of the supplied Titles can serve as the basis for the Titles in your productions. Simply touch-and-hold the thumbnail of your chosen Title and drag it into the Movie Editor.
Previewing an item in the Titles section of the Library.

Chapter 8: Transitions and Titles 37
You can drop a Title anywhere in your project that you think it will be effective, not only at the beginning or end. If you drop the Title thumbnail onto the Storyboard but not on an existing clip, the Title text will be displayed against a solid black background.
If you instead drop the Title upon a video or photo in your project, as though attempting to replace it, a pop-up will appear bearing a single option, Composite. Tap on it to create a composite clip in which the target video or photo appears as the Title’s background (tapping elsewhere cancels).
Once they have been combined, the media clip and the Title clip are treated as a single merged clip within your project. A stylized T on the Storyboard thumbnail signifies such a clip. If you wish to set a different background on the Title, drag the new media onto the Title, or vice versa, and confirm the Composite operation. This method can also be used to add a background to a Title that does not already have one.
Editing a Title: To customize the text of a Title in your project, either single-tap the Title’s text frame in the Preview, or double-tap the Title thumbnail on the Storyboard then tap inside the text box in the Title Properties pop-up. Use the iPad’s on-screen keyboard to enter your text, then tap the Keyboard key at the bottom right to dismiss it.
To change the styling of your text, double-tap the Title thumbnail on the Storyboard to bring up Title Properties. Enter your choices of font, size, and color using the provided controls. If necessary, choose one of the Fit options to best match the background video or photo to the screen size of your movie. Tap Donewhen you are satisfied with your changes.
After a Title has been added to your project or edited, the clip will require rendering before it can be previewed smoothly.

38 Pinnacle Studio for iPad
CHAPTER 9:
Audio The audio track of any video you use in your Pinnacle Studio for iPad movie projects provides a starting point for building up the soundtrack for your production. A palette of other possibilities, including musical performances, sound effects, and voice-over clips, can also be employed to design, build, and individualize the sonic side of your production.
As with most resources your movies might require, the Library is the place to look for audio media. You will find both the songs you have stored on your iPad and many supplied sound effects. Dragging an item of either type onto a vacant spot on one of the Timeline audio tracks will make it part of your movie’s soundtrack. A caption on the clip identifies the name of the Library asset from which it derives.
Clips for songs, voice-overs, and sound effects are represented in green on the Timeline audio tracks. The trim handles on the selected clip allow its length to
be adjusted arbitrarily within the limits of the source material.

Chapter 9: Audio 39
Voice-over clips are not to be found in your Library since they pertain only to the production in progress. Instead, you record a voice-over clip directly in the Movie Editor. For details, please see “Voice-overs” on page 39.
Unlike the video track, audio tracks do not have to be continuous. Audio clips can be freely placed on any audio track, even on top of other clips (in which case the dropped clip replaces the portions of any existing clips with which it would overlap).
Library audio
Along with any audio recorded with your movie’s video clips, the songs and sound effects in the Library form the basis for your project’s sound design. Audition a tune or sound effect by tapping it, and then tapping the Play button in Preview.
Touch-and-hold any asset you want to use, then drag it onto a blank area on any of the three audio tracks in the Timeline area of the Movie Editor. If you want the start of the audio to be synchronized with the beginning of a particular clip, drag the audio thumbnail onto the clip’s thumbnail on the Storyboard.
Sounds can also be pre-trimmed if necessary using the same interface as for visual clips. This can be very helpful when you require only a short sound bite from a much longer song or recorded speech. For details on pre-trimming, please see page 19.
To set the volume of an audio clip, or have it fade in or fade out, double-tap the clip on the Timeline, and use the Audio Properties panel. See “Properties” on page 14 for details.
Voice-overs Recording a voice-over is an easy way to add the ultimate personal touch of your own voice to the soundtrack of an Pinnacle Studio for iPad project. Of course, you are not limited to voice alone, but can use the voice-over feature to record any live sound you are able and willing to “perform” for your iPad microphone.
Unlike other types of audio you can use in a movie, voice-overs do not come from the Library. Instead, you use the voice-over tool in the Movie Editor to initiate recording.

40 Pinnacle Studio for iPad
To record a voice-over:
1. Scrub through your project until the Playhead is at the place where you want the voice-over to begin.
2. Tap the microphone icon to open the voice-over tool. The rest of the screen will dim until your recording is complete and the tool has been dismissed.
3. The arrow-shaped voice-over tool appears on the audio track that the voice-over will be assigned to. If there is not sufficient room on the default track for the material you want to record, touch-and-hold then drag the tool to another track, or tap the track selector at the end of the tool to cycle through the tracks. Once recording starts, the track cannot be changed.
4. Tap the red record button on the tool to start the three-second countdown to recording.
When you tap the record button, the Playhead jumps back three seconds to give you a moment to prepare. A red line appears on the Timescale at the point where the voice-over recording will begin.
Playback now commences. At the three-second mark, the voice-over tool and the Timescale turn red to indicate that recording is in progress. While you record your piece, the Preview lets you track the action unfolding on the screen.
To signal that you are finished recording, tap the record button again. Play, Keep, and Cancel buttons now appear on the voice-over tool.
To hear your recording, and check how it plays against your visual material, tap the Play button. If you are satisfied with the voice-over, tap Keep to use the recording in your movie. If you want to re-record, tap the record button again to start over. Tap Cancel to discard the recording and dismiss the voice-over tool.
Your voice-over clip appears on the selected audio track, labeled “Voiceover.” It does not appear in the Library.

Chapter 10: Exporting 41
CHAPTER 10:
Exporting When a movie project has been completed to your satisfaction, you need just one thing more: an audience. Whether you want to share the work with all the hordes of YouTube or just a few selected friends, Pinnacle Studio for iPad will get you there in just a few taps of the touch-screen.
To export your current project from the Edit Page, tap the share icon in the top-right corner. To export from the Projects Page, first select a project by tapping it, then tap the share icon in the center of the header bar.
Tapping share in either location opens a menu of export destinations:
Select whichever option best suits your purpose, then follow the on-screen directions provided.

42 Pinnacle Studio for iPad
Box This option uploads a video of your movie project to your Box account. Box is a cloud-based file storage and sharing service. Tap the Box button, and complete the registration to create an account. If you already have a Box account, enter your user name or email address and your password. You will then proceed to the upload panel, which is preconfigured with the project title, format, and file destination. (1080p is only available if your iPad supports this format.) You can override these manually if you wish before tapping the Upload button.
YouTube This option uploads a video of your movie project directly to your YouTube account. When you tap the button, a log-in panel pops up if required. Enter your YouTube user name and password to proceed to the upload panel, which is preconfigured with the project title of the movie and other defaults. You can override these manually if you wish before tapping the Start button.
After you tap Start, Pinnacle Studio for iPad handles the remaining work of generating and uploading your YouTube movie file.
Facebook Tap this option to upload a video of your movie to your Facebook page. (You will be offered the opportunity to create a new account if you do not already have one.) If this is your first upload to Facebook from Pinnacle Studio for iPad, you will be asked to authorize access to your basic Facebook account information so that uploads can be carried out.

Chapter 10: Exporting 43
Once you are logged in to Facebook, you can edit your movie’s title and description, and accept or modify other default settings. For instance, the default privacy setting is Public, but you may make the movie available only to your Friends, or even restrict it to personal viewing with Only me.
When you tap the Start button, Pinnacle Studio automatically generates and uploads your movie.
Video File This option outputs your movie project as a video file for viewing on your iPad. Several resolution options are available, including 1080p if your iPad supports it. The completed video file is placed in the iPad’s Camera Roll album, and can be viewed from the Photo app or from the Library.
Email This option generates a video file of your project, then creates an outgoing email with the file attached. The addressee and any text are added by you before you hit Send. You must have an email account set up on your device before you can share your movie by email.

44 Pinnacle Studio for iPad
Pinnacle Studio for PC Rather than the viewable movie file generated by the other output options, the Pinnacle Studio for PC button exports the project itself in a form that can be re-opened for further editing by the desktop version of Pinnacle Studio. The single self-contained project file that is created includes all the assets from Pinnacle Studio for iPad that are needed to continue the project on your PC.
You have the option to transfer the project using iTunes, Box, or iCloud.
To transfer the project with iTunes:
Connect your iPad to iTunes on the PC. In iTunes, select your device, then locate Apps among the buttons along the top. Click on Apps, which opens a page that includes the heading “File Sharing.” Among the sharing sources listed, you should see “Pinnacle Studio.” Click it for a list that should include the project you just exported, as a file with the extension axmp. Select this, then click Save to.
To transfer the project with Box:
Tap the Box button, and complete the registration to create an account. If you already have a Box account, enter your user name or email address and your password. You will then proceed to the upload panel, which is preconfigured with the project title and a file destination. You can override these manually if you wish before tapping the Start button.
After the transfer completes, the project archive will be available for importing in Pinnacle Studio on the PC by selecting Import Pinnacle Studio App Projects on the File menu.
To transfer the project with iCloud:
Tap the iCloud button. If you have an iCloud account, the transfer will begin automatically. If there’s a problem, make sure the iCloud setting called

Chapter 10: Exporting 45
Documents & Data is turned on in your iPad’s Settings app. Tap Settings, then iCloud, then Documents & Data.
After the transfer completes, the project archive will be available for importing in Pinnacle Studio on the PC by selecting Import Pinnacle Studio App Projects on the File menu.
Note: If you are using a version of Avid Studio for PC earlier than version 1.1, install the Avid Studio app extender on your PC to import your PinnacleStudio for iPad projects. For more about Pinnacle Studio for PC please visit the Pinnacle website at www.pinnaclesys.com.

46 Pinnacle Studio for iPad
APPENDIX A:
Touch-screen gestures The vocabulary of gestures you use to communicate with Pinnacle Studio for iPad may take a little getting used to if you are unfamiliar with touch-screen devices, but will quickly become second nature. Here’s a quick round-up of the gestures you’ll need to use.
Tap and double-tap A single tap selects an item for further operations, and may cause related tools, such as trim handles, to appear.
Double-tap opens the item, or performs its default action. In the case of Movie Editor clips, double-tapping opens a clip properties panel for the item. It can also be used to quickly add media from the Library to the Movie Editor.
Touch-and-hold, then drag To touch-and-hold a Library or Movie Editor thumbnail, put your finger on the item and pause a moment until it responds by “detaching” from the primary interface to become a floating icon under your finger. This begins the drag gesture, as you transfer the clip by sliding your finger across the screen then lifting off at the destination. Other interface items, such as trim handles, scrubbers, and sliders, also respond to this combination of gestures.
Appendix B: Touch-screen gestures 47
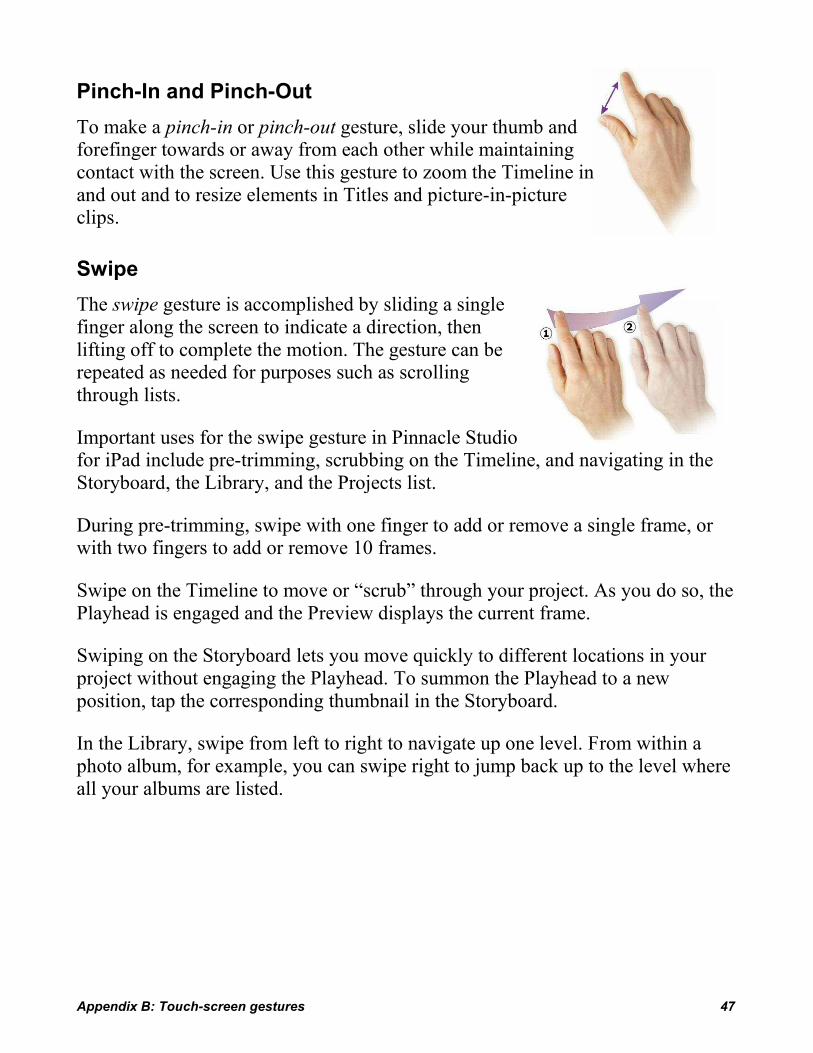
Pinch-In and Pinch-Out To make a pinch-in or pinch-out gesture, slide your thumb and forefinger towards or away from each other while maintaining contact with the screen. Use this gesture to zoom the Timeline in and out and to resize elements in Titles and picture-in-picture clips.
Swipe The swipe gesture is accomplished by sliding a single finger along the screen to indicate a direction, then lifting off to complete the motion. The gesture can be repeated as needed for purposes such as scrolling through lists.
Important uses for the swipe gesture in Pinnacle Studio for iPad include pre-trimming, scrubbing on the Timeline, and navigating in the Storyboard, the Library, and the Projects list.
During pre-trimming, swipe with one finger to add or remove a single frame, or with two fingers to add or remove 10 frames.
Swipe on the Timeline to move or “scrub” through your project. As you do so, the Playhead is engaged and the Preview displays the current frame.
Swiping on the Storyboard lets you move quickly to different locations in your project without engaging the Playhead. To summon the Playhead to a new position, tap the corresponding thumbnail in the Storyboard.
In the Library, swipe from left to right to navigate up one level. From within a photo album, for example, you can swipe right to jump back up to the level where all your albums are listed.

48 Pinnacle Studio for iPad
Rotate For rotate, hold your thumb and finger a constant distance apart and rotate your hand either clockwise or counterclockwise from the wrist while maintaining contact with the screen. This gesture can be used to rotate items in a Title or picture-in-picture composition.

Appendix B: Importing with iTunes 49
APPENDIX B:
Importing with iTunes The iTunes software running on your PC can be used to transfer media from the desktop computer to your iPad. You will need to configure your options in iTunes to transfer videos and photos along with your music. For other methods of importing media to the Pinnacle Studio for iPad Library, see “Building the Library” on page 15. You can also access media from external devices on your iPad via a Camera Connection Kit (sold separately).
To import media from the PC:
1. Connect the iPad to the computer via the iPad’s USB cable. Normally iTunes will start up on its own; launch it manually if it does not. You should see your iPad listed in the left-hand column of the iTunes window.
2. Click Photos at the top of the window.
3. Check the Include videos box (and any other options you would like to apply).
4. Click Music at the top of the iTunes window, and select the music you want to import, if any.
5. Click Apply.
Upon your Apply command iTunes will start the synchronize operation. Your videos will be transferred to the iPad along with any photo albums and music you have chosen.

50 Pinnacle Studio for iPad
The next time you start Pinnacle Studio for iPad, the Rebuild Library option will be offered. (See “Updating the Library” on page 6 for details.) When this happens, tap Yes to put your newly-imported media into the Library.

Index 51
Index About this Guide, 2 Adding Library content to movie, 19 Adding media to the Library, 7 App overview, 2 Audio, 42
Sync start with video, 43
Automatic Transitions setting, 7 Clip properties, 16 Clips
Organizing, 25 Pre-trimming, 23 Splitting, 29
Composite, 26 Durations, default, of photos, Titles and Transitions, 7 Edit Page
Overview, 9 Role in Pinnacle Studio, 3
Export Overview, 46 To Box, 47 To Facebook, 47 To Pinnacle Studio for PC, 49 To Video File, 48 To YouTube, 47 Via email, 48
Full-screen preview, 12 Gestures, 51 Getting acquainted, 1 Global settings, 7 Importing with iTunes, 54 Introduction, 1 iPad screen orientation, 3 iTunes, 54 Landscape view (iPad screen), 3 Library, 18
Adding content to movie, 19 Audio, 43 Building, 18 Capturing video and photos, 18 Organization of, 10 Rebuilding, 7 Role on Edit Page, 10 Sections, 20
Master settings, 7 Montages, 35
Customizing, 36
Movie Editor, 12 Adding Library content, 19 Clip properties, 16
Controls, 14 Pan-and-zoom, 16 Role in Edit Page, 3 Storyboard, 13 Storyboard vs. Timeline, 12 Timeline, 14
Overview of app, 2 Pan-and-zoom, 16 Picture-in-picture, 26 Playhead, 33 Portrait view (iPad screen), 3 Precision Trimmer, 30
Details, 33 Roll-trim, 32 Trimming Transitions, 40
Pre-trimming, 23 Gestures, 24
Preview Full-screen, 12 Overview, 11 Sources, 12
Projects Export to Pinnacle Studio for PC, 49 New, 5 Opening, renaming, deleting, 6 Sharing, 6
Projects Page Other functions, 7 Overview, 5 Role in Pinnacle Studio, 2
Razor blade (split clip) tool, 29 Rebuilding the Library, 7 Roll-trim, 32 Screen orientation, 3 Settings
Automatic Transitions, 7 Default durations, 7 Rebuild Library, 7
Sharing movies, 6, 46 Storyboard, 25
Adding clips, 25 Introduced, 13 vs. Timeline, 12
Timeline, 29 Introduced, 14 vs. Storyboard, 12
Timescale, 34 Titles, 40 Tools
Precision Trimmer, 30

52 Pinnacle Studio for iPad
Razor blade (split clip), 29 Trimming, 29
Touch-screen gestures, 51 Transferring projects
from Avid Studio for iPad, 5
Transitions, 38 Adding automatically, 7
And the Precision Trimmer, 40
Trimming Precision Trimmer, 30 Tools, 29 Trim handles, 30
Voice-overs, 43