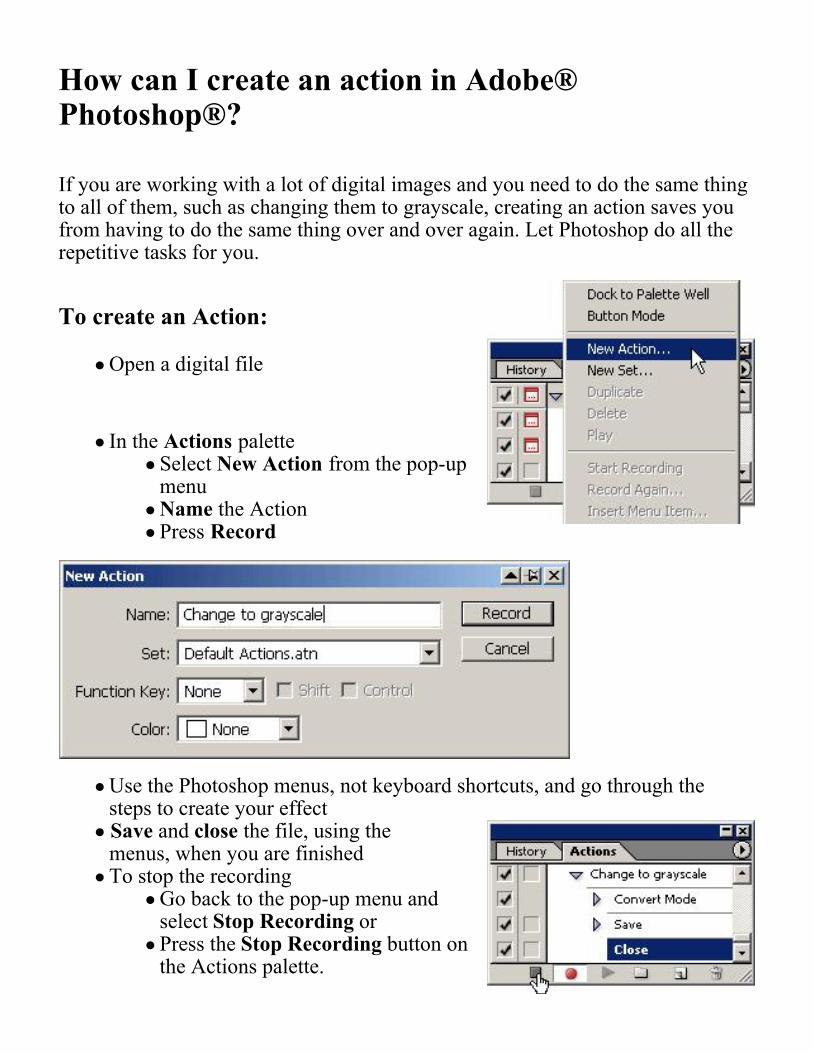
photoshop and illustrator handouts
DESCRIPTION
Photoshop and Illustrator helpful tipsTRANSCRIPT
KEYBOARD SHORTCUTS-PCPHOTOSHOP TIPS & TRICKS
CS4-CS508.2010.MAC
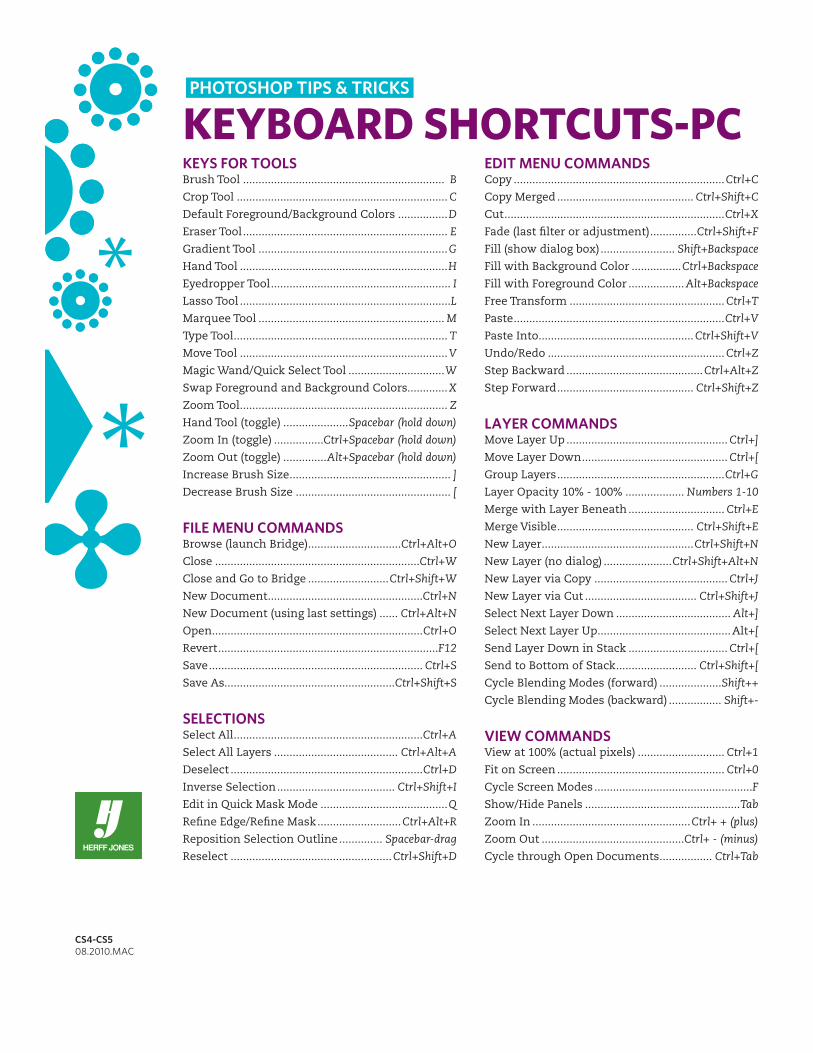
KEYS FOR TOOLSBrush Tool ................................................................. B
Crop Tool .................................................................... C
Default Foreground/Background Colors ................D
Eraser Tool .................................................................. E
Gradient Tool .............................................................G
Hand Tool ...................................................................H
Eyedropper Tool .......................................................... I
Lasso Tool ....................................................................L
Marquee Tool ............................................................ M
Type Tool ..................................................................... T
Move Tool ...................................................................V
Magic Wand/Quick Select Tool ...............................W
Swap Foreground and Background Colors.............X
Zoom Tool ................................................................... Z
Hand Tool (toggle) .....................Spacebar (hold down)
Zoom In (toggle) ................Ctrl+Spacebar (hold down)
Zoom Out (toggle) ..............Alt+Spacebar (hold down)
Increase Brush Size .................................................... ]
Decrease Brush Size .................................................. [
FILE MENU COMMANDSBrowse (launch Bridge) ..............................Ctrl+Alt+O
Close ..................................................................Ctrl+W
Close and Go to Bridge ..........................Ctrl+Shift+W
New Document ..................................................Ctrl+N
New Document (using last settings) ...... Ctrl+Alt+N
Open ....................................................................Ctrl+O
Revert .......................................................................F12
Save ..................................................................... Ctrl+S
Save As.......................................................Ctrl+Shift+S
SELECTIONSSelect All .............................................................Ctrl+A
Select All Layers ........................................ Ctrl+Alt+A
Deselect ..............................................................Ctrl+D
Inverse Selection ...................................... Ctrl+Shift+I
Edit in Quick Mask Mode .........................................Q
Refine Edge/Refine Mask ...........................Ctrl+Alt+R
Reposition Selection Outline .............. Spacebar-drag
Reselect ....................................................Ctrl+Shift+D
EDIT MENU COMMANDSCopy ....................................................................Ctrl+C
Copy Merged ............................................ Ctrl+Shift+C
Cut .......................................................................Ctrl+X
Fade (last filter or adjustment) ...............Ctrl+Shift+F
Fill (show dialog box) ........................ Shift+Backspace
Fill with Background Color ................Ctrl+Backspace
Fill with Foreground Color ..................Alt+Backspace
Free Transform .................................................. Ctrl+T
Paste ....................................................................Ctrl+V
Paste Into ..................................................Ctrl+Shift+V
Undo/Redo ......................................................... Ctrl+Z
Step Backward ............................................Ctrl+Alt+Z
Step Forward ............................................ Ctrl+Shift+Z
LAYER COMMANDSMove Layer Up .................................................... Ctrl+]
Move Layer Down ............................................... Ctrl+[
Group Layers ......................................................Ctrl+G
Layer Opacity 10% - 100% ................... Numbers 1-10
Merge with Layer Beneath ............................... Ctrl+E
Merge Visible ............................................ Ctrl+Shift+E
New Layer .................................................Ctrl+Shift+N
New Layer (no dialog) ......................Ctrl+Shift+Alt+N
New Layer via Copy ........................................... Ctrl+J
New Layer via Cut .................................... Ctrl+Shift+J
Select Next Layer Down ..................................... Alt+]
Select Next Layer Up ...........................................Alt+[
Send Layer Down in Stack ................................ Ctrl+[
Send to Bottom of Stack .......................... Ctrl+Shift+[
Cycle Blending Modes (forward) ....................Shift++
Cycle Blending Modes (backward) ................. Shift+-
VIEW COMMANDSView at 100% (actual pixels) ............................ Ctrl+1
Fit on Screen ...................................................... Ctrl+0
Cycle Screen Modes ...................................................F
Show/Hide Panels ..................................................Tab
Zoom In ...................................................Ctrl+ + (plus)
Zoom Out ..............................................Ctrl+ - (minus)
Cycle through Open Documents ................. Ctrl+Tab
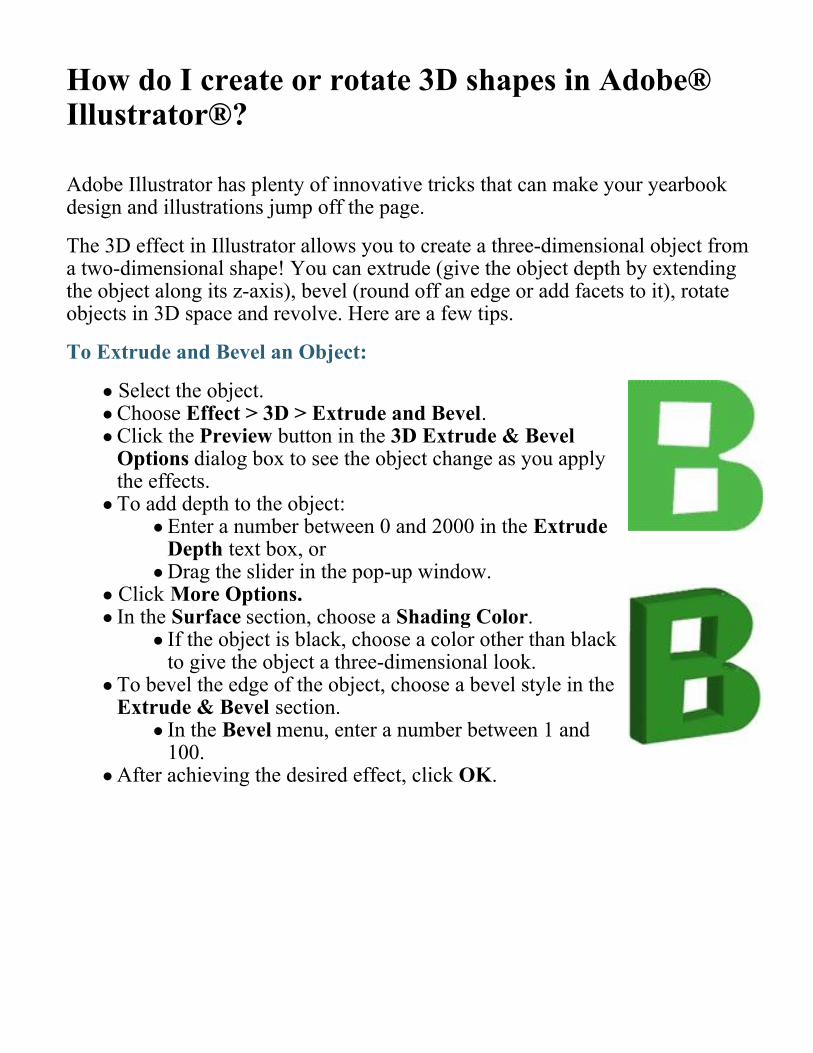
HEALING FEELINGWhether it is an unsightly pimple, wrinkles on the brow, or red eyes, we all can all use a little Adobe® Photoshop® healing from time to time. Let’s look at how to bring some Healing Feeling to your images.
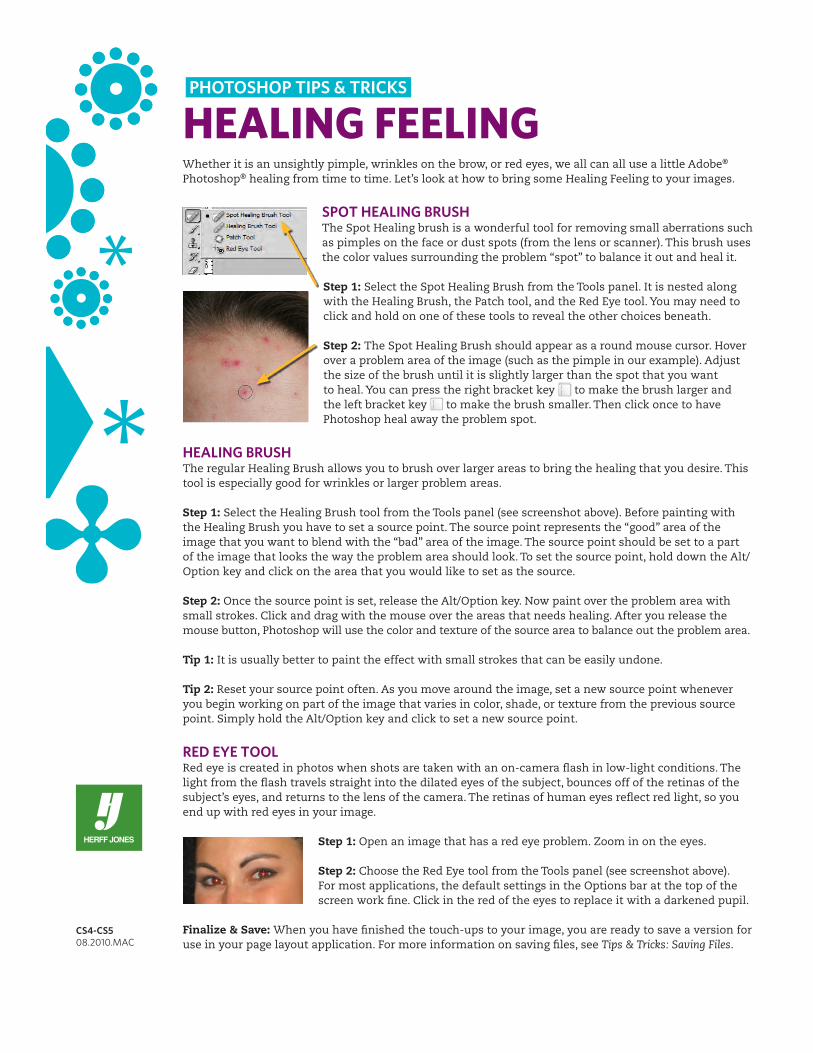
SPOT HEALING BRUSHThe Spot Healing brush is a wonderful tool for removing small aberrations such as pimples on the face or dust spots (from the lens or scanner). This brush uses the color values surrounding the problem “spot” to balance it out and heal it.
Step 1: Select the Spot Healing Brush from the Tools panel. It is nested along with the Healing Brush, the Patch tool, and the Red Eye tool. You may need to click and hold on one of these tools to reveal the other choices beneath.
Step 2: The Spot Healing Brush should appear as a round mouse cursor. Hover over a problem area of the image (such as the pimple in our example). Adjust the size of the brush until it is slightly larger than the spot that you want to heal. You can press the right bracket key to make the brush larger and the left bracket key to make the brush smaller. Then click once to have Photoshop heal away the problem spot.
HEALING BRUSHThe regular Healing Brush allows you to brush over larger areas to bring the healing that you desire. This tool is especially good for wrinkles or larger problem areas.
Step 1: Select the Healing Brush tool from the Tools panel (see screenshot above). Before painting with the Healing Brush you have to set a source point. The source point represents the “good” area of the image that you want to blend with the “bad” area of the image. The source point should be set to a part of the image that looks the way the problem area should look. To set the source point, hold down the Alt/Option key and click on the area that you would like to set as the source.
Step 2: Once the source point is set, release the Alt/Option key. Now paint over the problem area with small strokes. Click and drag with the mouse over the areas that needs healing. After you release the mouse button, Photoshop will use the color and texture of the source area to balance out the problem area.
Tip 1: It is usually better to paint the effect with small strokes that can be easily undone.
Tip 2: Reset your source point often. As you move around the image, set a new source point whenever you begin working on part of the image that varies in color, shade, or texture from the previous source point. Simply hold the Alt/Option key and click to set a new source point.
RED EYE TOOLRed eye is created in photos when shots are taken with an on-camera flash in low-light conditions. The light from the flash travels straight into the dilated eyes of the subject, bounces off of the retinas of the subject’s eyes, and returns to the lens of the camera. The retinas of human eyes reflect red light, so you end up with red eyes in your image.
Step 1: Open an image that has a red eye problem. Zoom in on the eyes.
Step 2: Choose the Red Eye tool from the Tools panel (see screenshot above). For most applications, the default settings in the Options bar at the top of the screen work fine. Click in the red of the eyes to replace it with a darkened pupil.
Finalize & Save: When you have finished the touch-ups to your image, you are ready to save a version for use in your page layout application. For more information on saving files, see Tips & Tricks: Saving Files.
PHOTOSHOP TIPS & TRICKS
CS4-CS508.2010.MAC
SAVING FILESYou worked hard on your image, and now you are ready to save it for use in your page layout application—InDesign or eDesign. This sheet explains what you need to know to achieve the results that you expect.
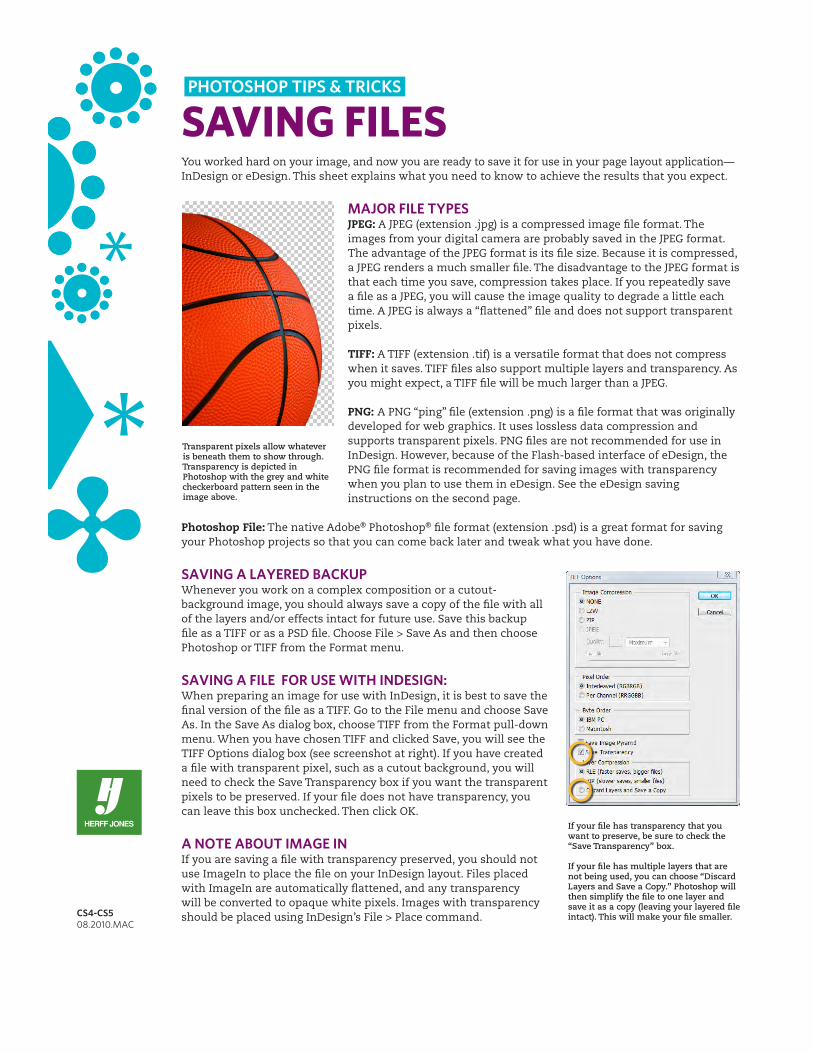
MAJOR FILE TYPESJPEG: A JPEG (extension .jpg) is a compressed image file format. The images from your digital camera are probably saved in the JPEG format. The advantage of the JPEG format is its file size. Because it is compressed, a JPEG renders a much smaller file. The disadvantage to the JPEG format is that each time you save, compression takes place. If you repeatedly save a file as a JPEG, you will cause the image quality to degrade a little each time. A JPEG is always a “flattened” file and does not support transparent pixels.
TIFF: A TIFF (extension .tif) is a versatile format that does not compress when it saves. TIFF files also support multiple layers and transparency. As you might expect, a TIFF file will be much larger than a JPEG.
PNG: A PNG “ping” file (extension .png) is a file format that was originally developed for web graphics. It uses lossless data compression and supports transparent pixels. PNG files are not recommended for use in InDesign. However, because of the Flash-based interface of eDesign, the PNG file format is recommended for saving images with transparency when you plan to use them in eDesign. See the eDesign saving instructions on the second page.
Photoshop File: The native Adobe® Photoshop® file format (extension .psd) is a great format for saving your Photoshop projects so that you can come back later and tweak what you have done.
SAVING A LAYERED BACKUPWhenever you work on a complex composition or a cutout-background image, you should always save a copy of the file with all of the layers and/or effects intact for future use. Save this backup file as a TIFF or as a PSD file. Choose File > Save As and then choose Photoshop or TIFF from the Format menu.
SAVING A FILE FOR USE WITH INDESIGN: When preparing an image for use with InDesign, it is best to save the final version of the file as a TIFF. Go to the File menu and choose Save As. In the Save As dialog box, choose TIFF from the Format pull-down menu. When you have chosen TIFF and clicked Save, you will see the TIFF Options dialog box (see screenshot at right). If you have created a file with transparent pixel, such as a cutout background, you will need to check the Save Transparency box if you want the transparent pixels to be preserved. If your file does not have transparency, you can leave this box unchecked. Then click OK.
A NOTE ABOUT IMAGE INIf you are saving a file with transparency preserved, you should not use ImageIn to place the file on your InDesign layout. Files placed with ImageIn are automatically flattened, and any transparency will be converted to opaque white pixels. Images with transparency should be placed using InDesign’s File > Place command.
PHOTOSHOP TIPS & TRICKS
CS4-CS508.2010.MAC
Transparent pixels allow whatever is beneath them to show through. Transparency is depicted in Photoshop with the grey and white checkerboard pattern seen in the image above.
If your file has transparency that you want to preserve, be sure to check the “Save Transparency” box.
If your file has multiple layers that are not being used, you can choose “Discard Layers and Save a Copy.” Photoshop will then simplify the file to one layer and save it as a copy (leaving your layered file intact). This will make your file smaller.

CS4-CS508.2010.MAC
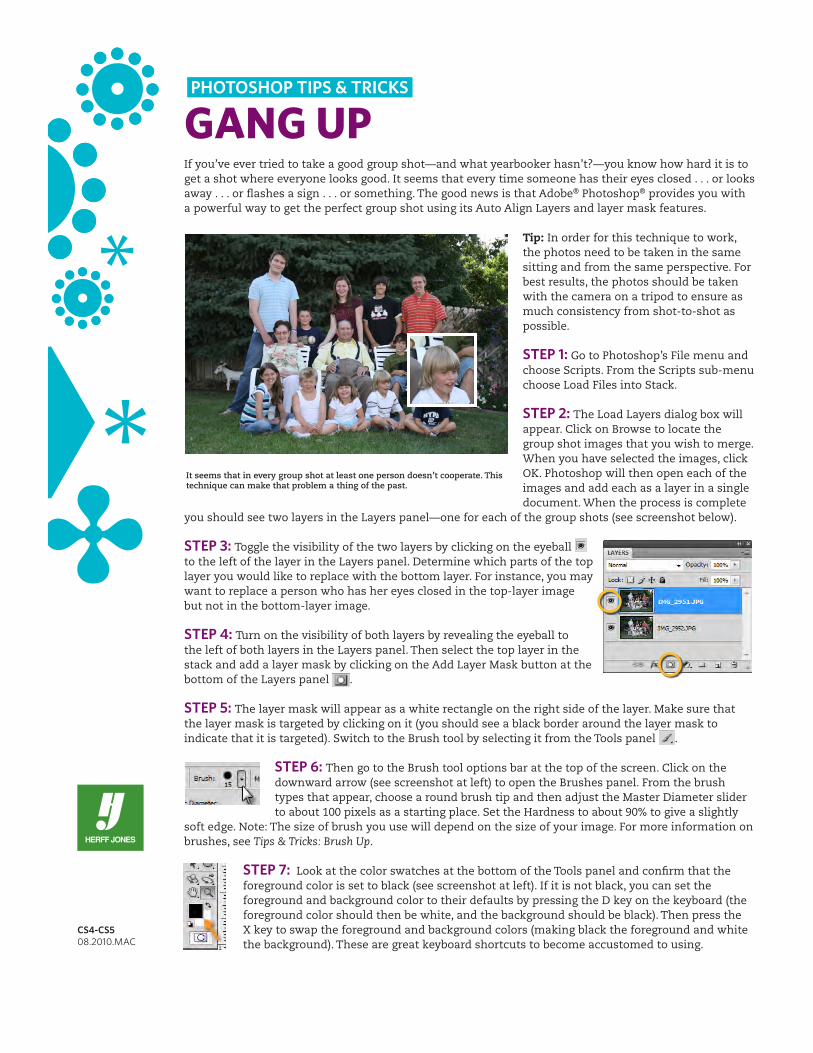
GANG UPIf you’ve ever tried to take a good group shot—and what yearbooker hasn’t?—you know how hard it is to get a shot where everyone looks good. It seems that every time someone has their eyes closed . . . or looks away . . . or flashes a sign . . . or something. The good news is that Adobe® Photoshop® provides you with a powerful way to get the perfect group shot using its Auto Align Layers and layer mask features.
Tip: In order for this technique to work, the photos need to be taken in the same sitting and from the same perspective. For best results, the photos should be taken with the camera on a tripod to ensure as much consistency from shot-to-shot as possible.
STEP 1: Go to Photoshop’s File menu and choose Scripts. From the Scripts sub-menu choose Load Files into Stack.
STEP 2: The Load Layers dialog box will appear. Click on Browse to locate the group shot images that you wish to merge. When you have selected the images, click OK. Photoshop will then open each of the images and add each as a layer in a single document. When the process is complete
you should see two layers in the Layers panel—one for each of the group shots (see screenshot below).
STEP 3: Toggle the visibility of the two layers by clicking on the eyeball to the left of the layer in the Layers panel. Determine which parts of the top layer you would like to replace with the bottom layer. For instance, you may want to replace a person who has her eyes closed in the top-layer image but not in the bottom-layer image.
STEP 4: Turn on the visibility of both layers by revealing the eyeball to the left of both layers in the Layers panel. Then select the top layer in the stack and add a layer mask by clicking on the Add Layer Mask button at the bottom of the Layers panel .
STEP 5: The layer mask will appear as a white rectangle on the right side of the layer. Make sure that the layer mask is targeted by clicking on it (you should see a black border around the layer mask to indicate that it is targeted). Switch to the Brush tool by selecting it from the Tools panel .
STEP 6: Then go to the Brush tool options bar at the top of the screen. Click on the downward arrow (see screenshot at left) to open the Brushes panel. From the brush types that appear, choose a round brush tip and then adjust the Master Diameter slider to about 100 pixels as a starting place. Set the Hardness to about 90% to give a slightly
soft edge. Note: The size of brush you use will depend on the size of your image. For more information on brushes, see Tips & Tricks: Brush Up.
STEP 7: Look at the color swatches at the bottom of the Tools panel and confirm that the foreground color is set to black (see screenshot at left). If it is not black, you can set the foreground and background color to their defaults by pressing the D key on the keyboard (the foreground color should then be white, and the background should be black). Then press the X key to swap the foreground and background colors (making black the foreground and white the background). These are great keyboard shortcuts to become accustomed to using.
PHOTOSHOP TIPS & TRICKS
It seems that in every group shot at least one person doesn’t cooperate. This technique can make that problem a thing of the past.
2012 5
Photoshop Tips and Tricks
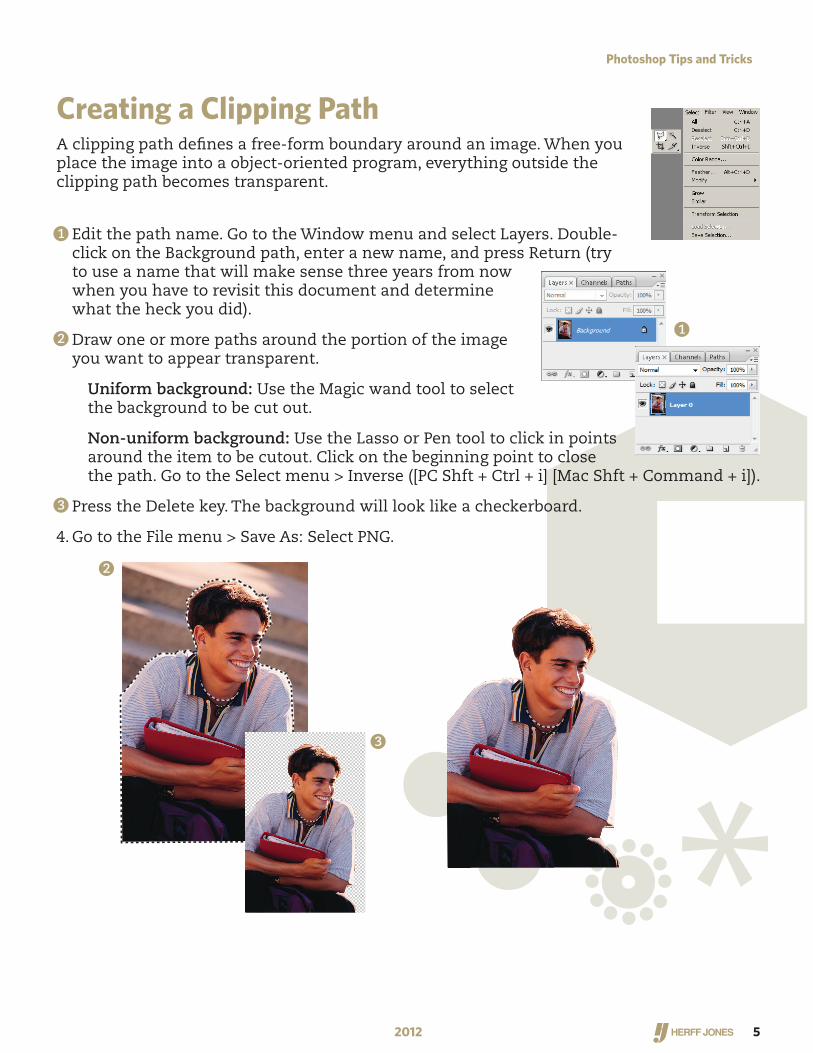
Creating a Clipping PathA clipping path de� nes a free-form boundary around an image. When you place the image into a object-oriented program, everything outside the clipping path becomes transparent.
1. Edit the path name. Go to the Window menu and select Layers. Double-click on the Background path, enter a new name, and press Return (try to use a name that will make sense three years from now when you have to revisit this document and determine what the heck you did).
2. Draw one or more paths around the portion of the image you want to appear transparent.
Uniform background: Use the Magic wand tool to select the background to be cut out.
Non-uniform background: Use the Lasso or Pen tool to click in points around the item to be cutout. Click on the beginning point to close the path. Go to the Select menu > Inverse ([PC Shft + Ctrl + i] [Mac Shft + Command + i]).
3. Press the Delete key. The background will look like a checkerboard.
4. Go to the File menu > Save As: Select PNG.
1
2
3
1
2
3
CS4-CS508.2010. MAC
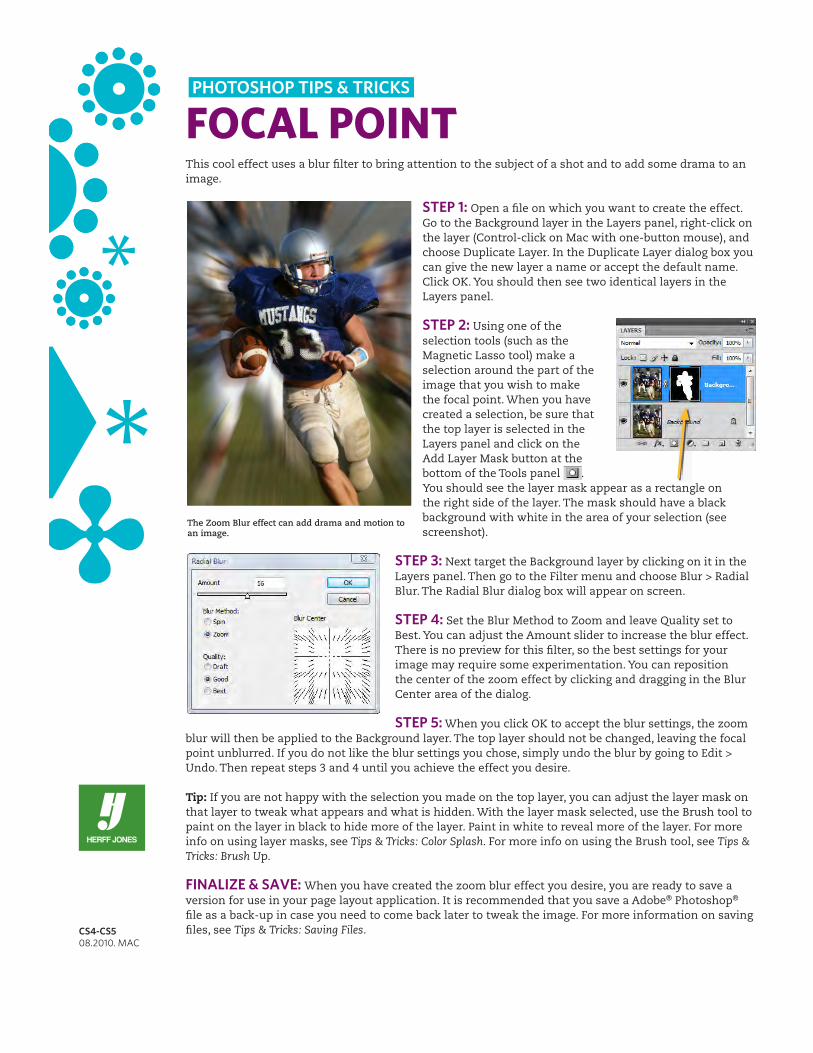
FOCAL POINTThis cool effect uses a blur �lter to bring attention to the subject of a shot and to add some drama to an image.
STEP 1: Open a �le on which you want to create the effect. Go to the Background layer in the Layers panel, right-click on the layer (Control-click on Mac with one-button mouse), and choose Duplicate Layer. In the Duplicate Layer dialog box you can give the new layer a name or accept the default name. Click OK. You should then see two identical layers in the Layers panel.
STEP 2: Using one of the selection tools (such as the Magnetic Lasso tool) make a selection around the part of the image that you wish to make the focal point. When you have created a selection, be sure that the top layer is selected in the Layers panel and click on the Add Layer Mask button at the bottom of the Tools panel . You should see the layer mask appear as a rectangle on the right side of the layer. The mask should have a black background with white in the area of your selection (see screenshot).
STEP 3: Next target the Background layer by clicking on it in the Layers panel. Then go to the Filter menu and choose Blur > Radial Blur. The Radial Blur dialog box will appear on screen.
STEP 4: Set the Blur Method to Zoom and leave Quality set to Best. You can adjust the Amount slider to increase the blur effect. There is no preview for this �lter, so the best settings for your image may require some experimentation. You can reposition the center of the zoom effect by clicking and dragging in the Blur Center area of the dialog.
STEP 5: When you click OK to accept the blur settings, the zoom blur will then be applied to the Background layer. The top layer should not be changed, leaving the focal point unblurred. If you do not like the blur settings you chose, simply undo the blur by going to Edit > Undo. Then repeat steps 3 and 4 until you achieve the effect you desire.
Tip: If you are not happy with the selection you made on the top layer, you can adjust the layer mask on that layer to tweak what appears and what is hidden. With the layer mask selected, use the Brush tool to paint on the layer in black to hide more of the layer. Paint in white to reveal more of the layer. For more info on using layer masks, see Tips & Tricks: Color Splash. For more info on using the Brush tool, see Tips & Tricks: Brush Up.
FINALIZE & SAVE: When you have created the zoom blur effect you desire, you are ready to save a version for use in your page layout application. It is recommended that you save a Adobe® Photoshop® �le as a back-up in case you need to come back later to tweak the image. For more information on saving �les, see Tips & Tricks: Saving Files.
PHOTOSHOP TIPS & TRICKS
The Zoom Blur effect can add drama and motion to an image.
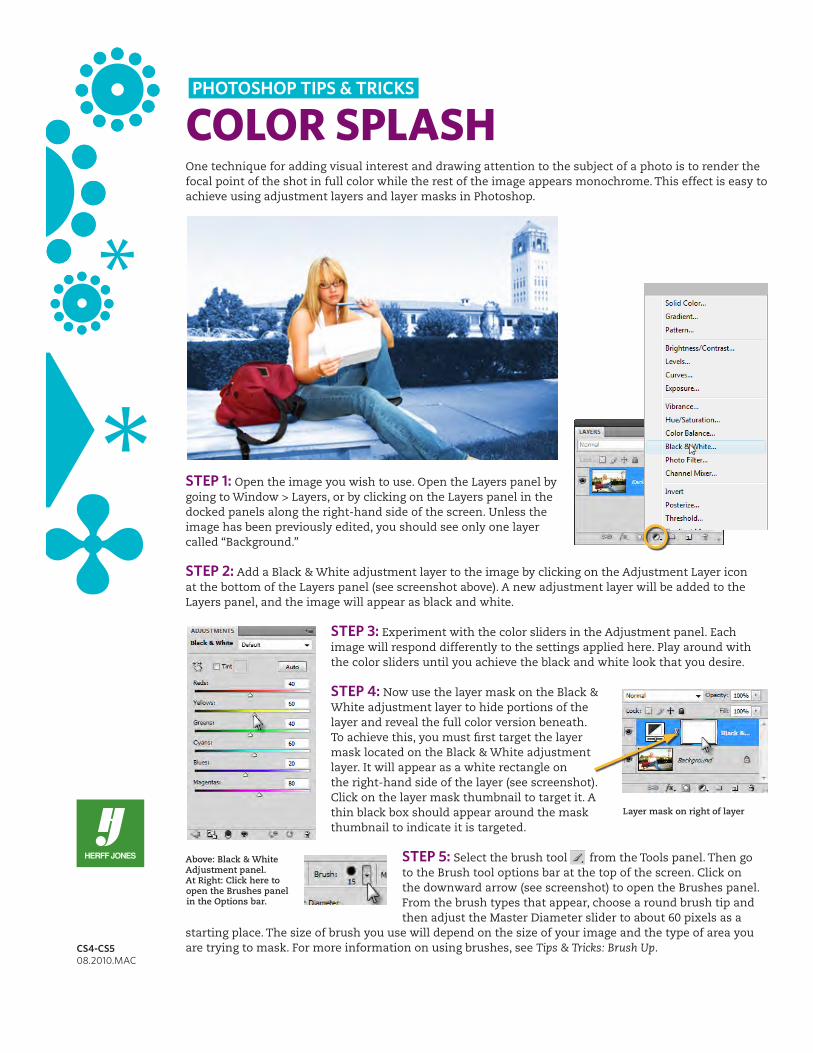
COLOR SPLASHOne technique for adding visual interest and drawing attention to the subject of a photo is to render the focal point of the shot in full color while the rest of the image appears monochrome. This effect is easy to achieve using adjustment layers and layer masks in Photoshop.
STEP 1: Open the image you wish to use. Open the Layers panel by going to Window > Layers, or by clicking on the Layers panel in the docked panels along the right-hand side of the screen. Unless the image has been previously edited, you should see only one layer called “Background.”
STEP 2: Add a Black & White adjustment layer to the image by clicking on the Adjustment Layer icon at the bottom of the Layers panel (see screenshot above). A new adjustment layer will be added to the Layers panel, and the image will appear as black and white.
STEP 3: Experiment with the color sliders in the Adjustment panel. Each image will respond differently to the settings applied here. Play around with the color sliders until you achieve the black and white look that you desire.
STEP 4: Now use the layer mask on the Black & White adjustment layer to hide portions of the layer and reveal the full color version beneath. To achieve this, you must first target the layer mask located on the Black & White adjustment layer. It will appear as a white rectangle on the right-hand side of the layer (see screenshot). Click on the layer mask thumbnail to target it. A thin black box should appear around the mask thumbnail to indicate it is targeted.
STEP 5: Select the brush tool from the Tools panel. Then go to the Brush tool options bar at the top of the screen. Click on the downward arrow (see screenshot) to open the Brushes panel. From the brush types that appear, choose a round brush tip and then adjust the Master Diameter slider to about 60 pixels as a
starting place. The size of brush you use will depend on the size of your image and the type of area you are trying to mask. For more information on using brushes, see Tips & Tricks: Brush Up.
PHOTOSHOP TIPS & TRICKS
CS4-CS508.2010.MAC
Layer mask on right of layer
Above: Black & White Adjustment panel. At Right: Click here to open the Brushes panel in the Options bar.
RESOURCE GUIDEPHOTOSHOP TIPS & TRICKS
CS4-CS508.2010.MAC
Photoshop CS4 Channels & Masks One-on-One by Deke McClelland. If you want to take your Photoshop skills to the next level, this is a great book for you. Coming to terms with alpha channels (or masks) is the sure-fire way to boost the quality of your work in Photoshop. If you like creating cut-out photos for your yearbook—and you want them to look great—then learning channels and masks is for you. Through step-by-step text lessons, DVD-video demonstrations and real-world projects, this book will teach you how to select and composite highlights, shadows, clouds, fabric, glass, flames, lightning, eyes, all varieties of hair, and then some. Available from www.amazon.com for $31.49.
Photoshop CS4 Down & Dirty Tricks by Scott Kelby. This is a fun book for learning cool techniques in Photoshop CS4. The focus of Down & Dirty Tricks is special effects and graphics. Each chapter takes a graphic effect lifted from real-world examples—an advertisement, a movie, a website—and then leads you step-by-step through the process of recreating that effect. It is written in Kelby’s signature jovial style, so it is both fun and informative. He focuses on the steps (the “recipe”) needed to achieve a particular look and deals primarily with what to do rather than with why to do it. Available from www.amazon.com for $29.69.
Photoshop CS5 One-on-One by Deke McClelland. Find out everything you need to know to be productive with Photoshop CS5 right away. With McClelland’s unique and effective learning system, you get 12 self-paced tutorials, hours of DVD-video demonstrations, and lots of hands-on projects to help you improve your knowledge and hone your skills. You can also read about a particular technique, and then watch the video to see how it’s done. Multiple-choice quizzes are included in each chapter. Available from www.amazon.com for $31.49.
Photoshop CS5: The Missing Manual by Lesa Snider King. Packed with information, Photoshop CS5: The Missing Manual has all the secrets to editing photos and creating great images and graphics in Adobe® Photoshop®. This title is a reference guide that covers all the major areas of the program. It is filled with great information and tips, but it is not a book you would buy to teach yourself the basics of Photoshop. It is appropriate for the intermediate or experienced user who wants more in-depth knowledge of the program and all its capabilities. Available from www.amazon.com for $31.49. Photoshop CS4: The Missing Manual is also available.
Photoshop CS5: Visual QuickStart Guide by Elaine Weinmann and Peter Lourekas. As with all the Visual QuickStart Guides, this book is organized by tasks/topics with step-by-step instructions. This title covers Photoshop as well as Adobe Bridge® and Adobe Camera Raw® (both of which are included with Photoshop). The pleasing layout and full-color graphics make the book very appealing and easy to use. Tasks are presented with clear, step-by-step instructions. Most of the photos appearing in the book are available for readers to download so they can follow along closely with the instructions. This is a great book for the new or experienced user. Available from www.amazon.com for $23.09. Photoshop CS4: Visual QuickStart Guide is also available.
The Adobe Photoshop CS5 Book for Digital Photographers by Scott Kelby. This book’s target audience is the professional or serious amateur digital photographer. If you are a devoted yearbooker, then you are probably a fairly serious photographer. There are tons of great tips and techniques in this title that have direct application to yearbook photography: using Bridge, processing raw images, HDR photography, creating cool black and white shots, color correction, cropping and much more. Available from www.amazon.com for $34.64. The Adobe Photoshop CS4 Book for Digital Photographers is also available.