photography bb 2
TRANSCRIPT
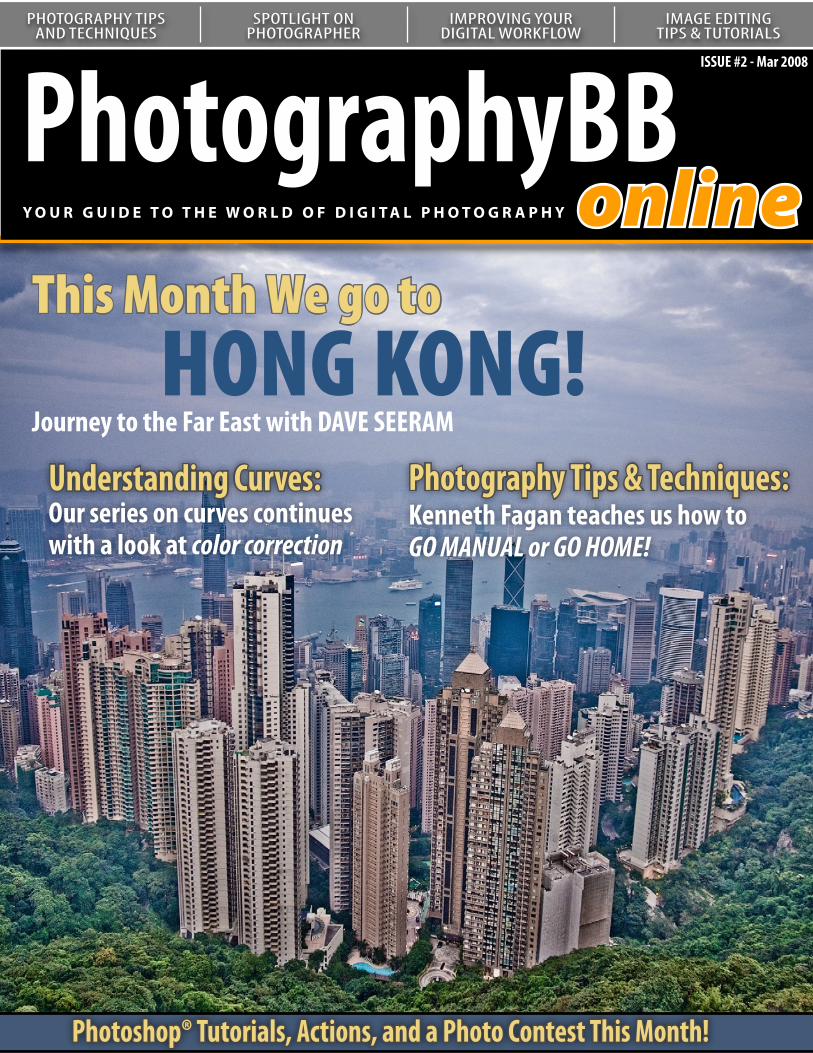
Understanding Curves: Our series on curves continueswith a look at color correction
Photoshop® Tutorials, Actions, and a Photo Contest This Month!
Y O U R G U I D E T O T H E W O R L D O F D I G I T A L P H O T O G R A P H Y
PhotographyBBonline
ISSUE #2 - Mar 2008
PHOTOGRAPHY TIPS AND TECHNIQUES
SPOTLIGHT ON
PHOTOGRAPHERIMPROVING YOUR
DIGITAL WORKFLOW IMAGE EDITING
TIPS & TUTORIALS
This Month We go to
HONG KONG!Journey to the Far East with DAVE SEERAM
Photography Tips & Techniques: Kenneth Fagan teaches us how toGO MANUAL or GO HOME!
Page
2
PhotographyBB Online Magazine
From The Editor’s Desk
Welcome to the second edition of the PhotographyBB Online Magazine!
Welcome back to the second edition of the PhotograpgyBB Online Magazine. We had a very successful launch of our debut issue in February, with several thousand downloads under our belt! I know we can top that with this second edition, so please
feel free to tell your friends and family about the new PhotographyBB Online Magazine!
So what’s been going on in the world of PhotographyBB since you last heard from us? Following the success of the first issue’s release, and building on that, I’ve been working feverishly (along with our dedicated contributing writers) to come up with more quality photography-related articles to teach and inspire. There have been a few enhancements to the PhotographyBB Website. We’ve added a blog section to the mainpage of our site, with news, videos, tutorials, announcements and plenty more goodies to keep you busy (but not while you’re at work - right?). The forums have also been growing with the posts and contributions from some new and active members. Visit the forums, introduce yourselves, and don’t be shy. If you have any questions, feel free to ask! Besides all of the fun stuff going on at the website, we’ve been working hard on getting this second issue ready for release!
What great things have we got in store for you this month? We have a photo-contest this month, and the theme is “Exposure.” There are also some Photoshop® tutorials for you once again, from both myself and Victoria Sargsyan. Victoria is also assisting with the photo contest this month. We’re also continuing the series on curves, with a look at color correction by means of the curves options. Last month, I mentioned the addition of Photoshop® Elements® tutorials, however, we are postponing the Elements® tutorials until next issue. Keep your eyes peeled because they’re coming, and we’ve got some great ones lined up!
This month, in our “Photography Around the World” column, I’m going to take you on a photographic journey to the far east. Although I’m originally from Vancouver, I recently took my first trip to Hong Kong, so I’ll be giving you a nice little tour and re-capping of my trip, with some photos and interesting tidbits of information to share.
Jon Ayres gives us a good look at ourselves as photographers in his article on “responsible photography.” Jon’s also put together a great little article on setting up your digital darkroom, using software that’s available for free! Thank you Jon, for your thought provoking articles.
Ken Fagan did a lot of “behind the scenes” work this month, in helping to get this issue complete. He gives us some tips on what to look for when purchasing a tripod, as well as getting the most out of manual mode on your DSLR. Ken is also our feature member in our “Member Under the Spotlight” this month. Thank you Ken for your hard work and dedication to this magazine.
Now, let’s get on with the fun. Grab a coffee and your camera, and enjoy issue number 2!
Dave SeeramEditor and Publisher
Dave Seeram is the Editor in Chief for PhotographyBB Online Magazine. As the administrator of the PhotographyBB Website and Forums, Dave is also an experienced author of several Photoshop® Actions and Tutorials which can be found on http://www.photographyBB.com.
Page
3
PhotographyBB Online Magazine
Y O U R G U I D E T O T H E W O R L D O F D I G I T A L P H O T O G R A P H Y
PhotographyBBonline
Contributing Authors CREDITS
EDITORIAL:
Dave Seeram, Editor in ChiefKenneth Fagan, Creative Concepts & ContentVictoria Sargsyan, Creative Concepts and Design
WEB TEAM:
Dave Seeram, Web Design & Publishing, AdminVictoria Sargsyan, Site ModeratorKenneth Fagan, Site ModeratorMike (aka “Venom”), Site Moderator
PUBLISHING:
Dave Seeram, Publisher & AuthorJon Ayres, Contributing WriterKenneth Fagan, Contributing WriterVictoria Sargsyan, Contributing Writer
ON THE COVER:
Dave Seeram, Cover Layout and DesignPriscilla Ko, Cover Design & ConsultationDave Seeram, Cover Photography
HOW TO CONTACT PHOTOGRAPHYBB ONLINE:
If you would like to contact PhotographyBB Online, please email: [email protected] or write:
PhotographyBB#331 - 6540 Hastings St.Burnaby, B.C. V5B 4Z5CANADA
ARTICLE SUBMISSION:To submit an article, or to request an article submission, please email [email protected] with your name, email address, and a brief description of your article and ideas. We look forward to hearing from you.
DAVE SEERAM is the creator of the PhotographyBB Online Website, and the Administrator of the PhotographyBB Forums. Dave is a 32-year old digital pho-tography enthusiast, and loves shooting landscapes and architecture in his spare time. Additionally, he has several years of formal training in both Adobe Photoshop® and Quark Xpress®.
KENNETH FAGAN is a 24 year old photographer extraordinaire based in Meath, in the Republic of Ire-land. Ken has traveled through Australia, Europe and lastly Canada where he graduated with a professional Diploma in Photography from the Focal Point School for Visual Arts in Vancouver, British Columbia. His speciali-ties are product and food photography, but he is also skilled in fashion, sports and landscapes. Ken works with many camera formats including, 35mm pro digital and film SLRS, Medium format and 4x5 large format. Outside of photography, he enjoys cycling, fishing & hiking and never goes without his camera.
JON AYRES is a digital photographer from the United States, now living in Moscow since August 2003. He enjoys photography, writing, history, and taking beau-tiful scenes of Moscow on his walking photo-tours. His informative posts and photo-tours on the forums are al-ways a treat. Jon has been involved in writing, digital art and photography for over thirty years and is a published author having several articles and photos published.
VICTORIA SARGSYAN is a professional graphic designer from Armenia, now living in the United States. She brings over 15 years of professional experience in graphic design, and her favorite software tool is Adobe Photoshop. Additionally, she is experienced in Illustrator, CorelDraw, Freehand, Lightroom, Adobe ImageReady, Flash,HTML, Dreamweaver, Motion Artist, Anime Studio, Poser. Victoria enjoys authoring tutorials and is a wizard at creating Photoshop brushes.
Page
4
PhotographyBB Online Magazine
Medium Format Photography can be defined as being an image that has been exposed on an area of film or digital sensor that is greater than
35mm format. To explain this properly, I am going to take a step back, and talk about film for a moment. The standard film used for medium format photography is 120 or 220 roll film. Typically, 120 roll film can expose up to 16 images, and 220 film can expose twice that amount. Unlike 35mm film, where each frame on the film are the same dimensions (apart from panoramic models), medium format film (depending on the type of camera used) has varying dimensions of frames on the film, starting with the smallest at 6x4.5cm, 6x6cm (square), 6x7cm, 6x8cm, 6x9cm, 6x12cm (panoramic), and 6x17 (panoramic).
The main benefit of Medium format (MF) cameras
is the size of the frame in comparison to 35mm. The 6x4.5cm format cameras, though the smallest of the medium formats, are still just a little under three times the area of a 35mm frame (24x36mm), so the differences are immediate: Colour tone, detail, and the ability to keep finer detail when printing larger images.
As advantageous as MF cameras are, they do have there downsides too; it is not just a matter of saying MF is better than 35mm. For some applications such as architecture, landscapes, portraits, still life etc, yes they do have quite an advantage over 35mm. For speed and efficiency, it lacks somewhat due to their chunky and heavy build. They can be slow and cumbersome to use, especially with the film versions where you are limited to sixteen frames at a time (on 120 roll), so if you are shooting continuously, it wont be long before you have to reload your camera. Here is where the benefits of 35mm outweigh that of MF: 35mm SLRs are fast - In comparison to MF, they are really fast. Continual shooting in a film SLR is much more convenient with a frame capacity over twice that of a 6x4.5 camera. So for speed and efficiency 35mm wins hands down. So don’t go throwing away your camera just yet.
Medium Format cameras come in many different shapes and sizes due to the various formats that are available. The internal structure is built similar to a 35mm SLR with a Mirror and a shutter, except to a bigger scale, so the noise level increases significantly (not a great help if you are trying to be discreet with your photography). Another type of MF Camera is the TLR (Twin Lens Reflex). A TLR consists of two vital parts, the focusing lens and the taking lens, where the focusing lens is placed over the taking lens with its own reflex mirror. It takes time to get acquainted with using these cameras as one has to be careful with the framing because what you see through the focusing lens is not entirely the image in the taking lens. TLRs use 6x6cm frames, so they are limited to 12 images per 120 roll.
In today’s digital age, Medium format did not get left in the dark. Most MF SLRs built today are both compatible with film and digital, due to the fact that the cameras have a detachable film back with a dark-slide (to protect the film). A digital back can be put in place
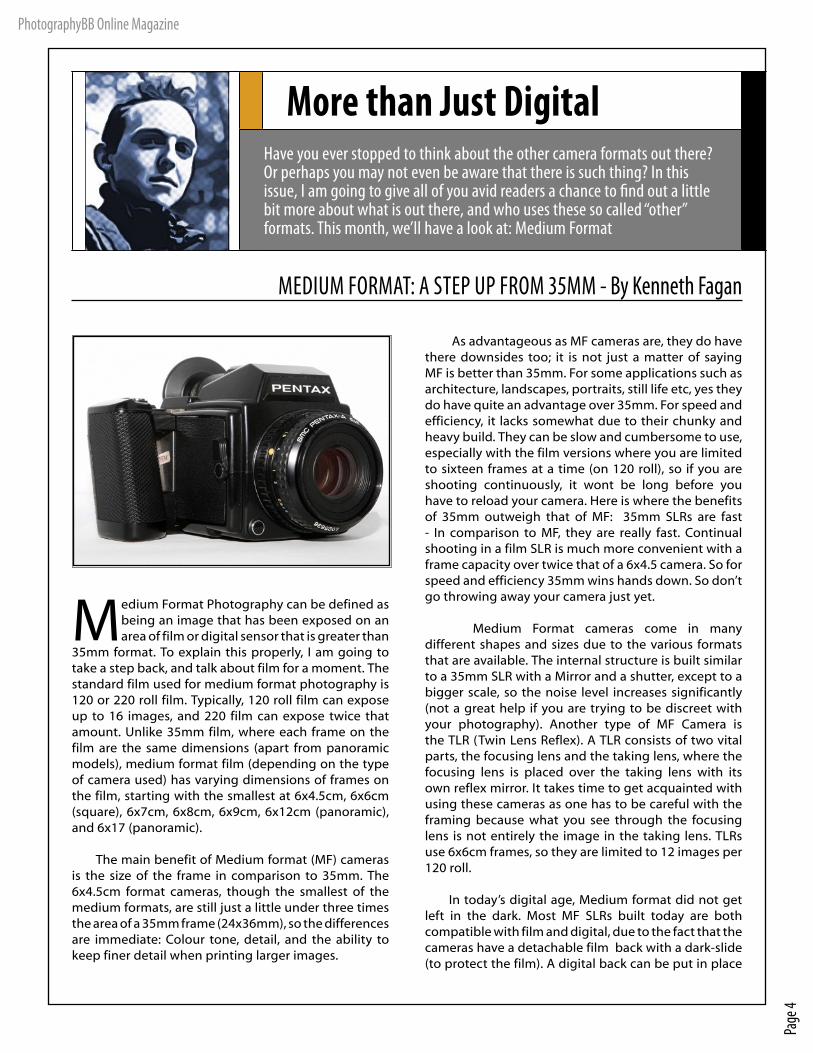
More than Just DigitalHave you ever stopped to think about the other camera formats out there? Or perhaps you may not even be aware that there is such thing? In this issue, I am going to give all of you avid readers a chance to find out a little bit more about what is out there, and who uses these so called “other” formats. This month, we’ll have a look at: Medium Format
MEDIUM FORMAT: A STEP UP FROM 35MM - By Kenneth Fagan
Page
5
PhotographyBB Online Magazine
of the film back onto the camera, delivering incredible megapixels, with equally incredible results, but they do come at a cost. A digital MF camera can cost up to and beyond $31000 US and that does not include the lens. The market leaders, Hasselblad produce cameras of the highest quality, delivering between 22 and 39 mega pixels, and these cameras are usually the choice of the professionals due to the high resolution output and outstanding build quality.
There are more, dare I say, affordable cameras on the market by Mamiya, Pentax etc. but are still well into the five digits. Unless you are a professional who demands higher resolution images than what your 35mm digital SLR can deliver, the chances of you wanting one is quite high, in reality though, the chances of you actually needing one is very slim. I for one am quite happy with my Pentax 645, which I got second hand for €400 euro with a lens, and its about twenty years old too.
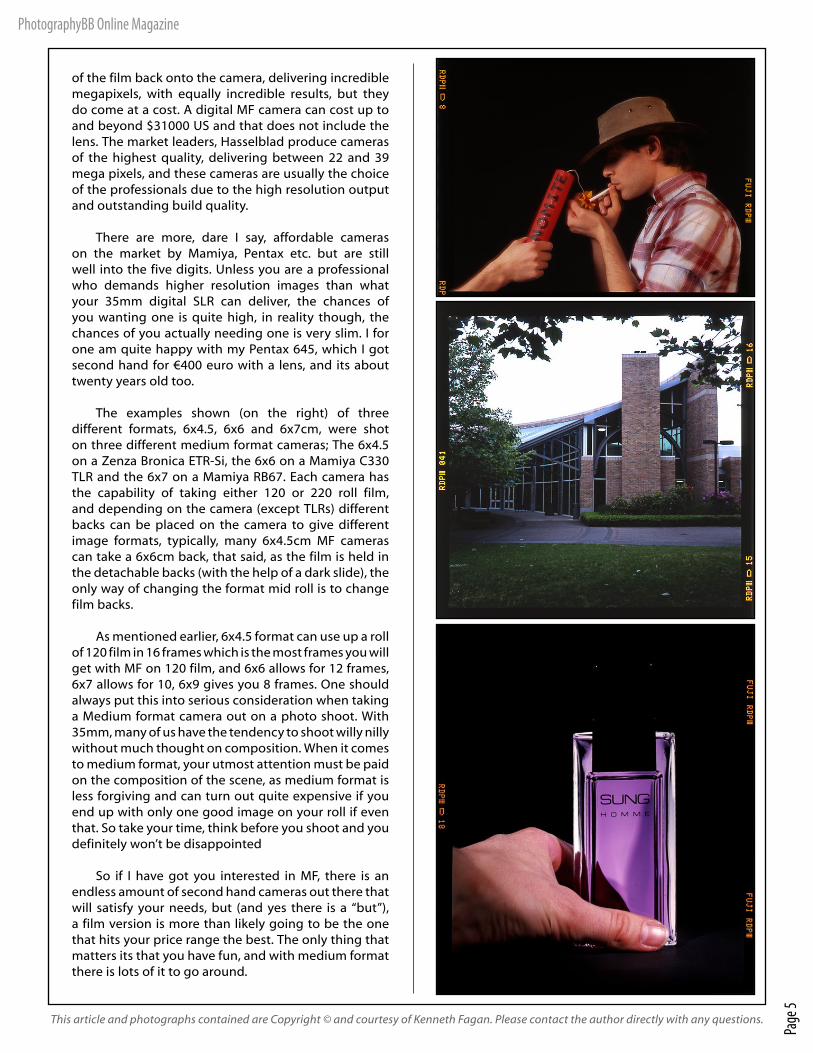
The examples shown (on the right) of three different formats, 6x4.5, 6x6 and 6x7cm, were shot on three different medium format cameras; The 6x4.5 on a Zenza Bronica ETR-Si, the 6x6 on a Mamiya C330 TLR and the 6x7 on a Mamiya RB67. Each camera has the capability of taking either 120 or 220 roll film, and depending on the camera (except TLRs) different backs can be placed on the camera to give different image formats, typically, many 6x4.5cm MF cameras can take a 6x6cm back, that said, as the film is held in the detachable backs (with the help of a dark slide), the only way of changing the format mid roll is to change film backs.
As mentioned earlier, 6x4.5 format can use up a roll of 120 film in 16 frames which is the most frames you will get with MF on 120 film, and 6x6 allows for 12 frames, 6x7 allows for 10, 6x9 gives you 8 frames. One should always put this into serious consideration when taking a Medium format camera out on a photo shoot. With 35mm, many of us have the tendency to shoot willy nilly without much thought on composition. When it comes to medium format, your utmost attention must be paid on the composition of the scene, as medium format is less forgiving and can turn out quite expensive if you end up with only one good image on your roll if even that. So take your time, think before you shoot and you definitely won’t be disappointed
So if I have got you interested in MF, there is an endless amount of second hand cameras out there that will satisfy your needs, but (and yes there is a “but”), a film version is more than likely going to be the one that hits your price range the best. The only thing that matters its that you have fun, and with medium format there is lots of it to go around.
This article and photographs contained are Copyright © and courtesy of Kenneth Fagan. Please contact the author directly with any questions.
Page
6
PhotographyBB Online Magazine
The following are only my views and some of what I have noticed, both on various photography forums and in real life. This is not an attack on anybody, only on the attitudes that some photographers have today. Some may find this article insulting, well if you have a reason to be insulted, then change and become a decent responsible photographer.
Jon D. Ayres
The Responsible PhotographerWhat Type of Photographer Are You?
I read many photography forums including a few professional photography forums and quite often the topic of photography ethics
comes up, generally when a photographer has been stopped by police from photographing a scene. As somebody who has both worked in law enforcement and who enjoys photography, I generally can see both sides of the issue. Maybe I should say “wanna-be professionals” who believe that they have the right to photograph anything they like in public. Just because you have the right to photograph something, doesn’t always make it right. In most cases you do have the right, but sometimes your right to photograph can interfere with another person’s rights. Not everybody cares to have their photo taken or their property photographed, and even though you may have the right to take photographs, yours do not take preference over another person’s rights which should be respected. Travelers sometimes forget that the rights they may have in their hometown or native country do not always apply in other cities in your own country, or in countries you are traveling in. I see it all the time in Moscow, the capital of the Russian Federation.
I’m from the US originally and have been living in Moscow, Russia for the last 5 years. As a photographer, I tend to watch and look over other photographers (don’t we all notice what equipment they are using!), and lately I have
been watching how these photographers act and conduct themselves. Sometimes I go to Alexander’s Garden during my breaks in between classes and sit on a bench, drinking a soda and watching the world go by. Most are teenagers photographing their friends acting like normal teenagers out having fun, and I sometimes see professional photographers, photographing a story or other things. Of course, there are millions of tourists, but some older adult tourist photographers really surprise me by how they act, just like children sometimes. A good example follows:
On the backside of the Kremlin wall is the Tomb of the Unknown Soldier next to Alexander’s Garden, one of the popular photography locations in Moscow. There is a low wall which becomes higher the further away it runs from the tomb up to
Page
7
PhotographyBB Online Magazine
waist high. It’s amazing how some baboon photographers jump up on that retaining wall to take photos during the changing of the guard. The commander of the guard walks ahead of the guards and has to make them get off the wall. Has education in the world today gotten so bad that people honestly do not know any better? The changing of the guard happens every hour on the hour 24 hours a day. At night I have seen the same “get that shot at all costs” baboon photographers snapping flashes off, sometimes right in the guard’s or militiaman’s (Russian police) face. Not exactly the smartest thing to do when the person you’re photographing is holding a SKS rifle with a bayonet or AK47. To blind a guard for a few seconds is not exactly smart and people wonder why just a couple of months ago, photographing at the Kremlin has almost become forbidden now.
Sometimes I enjoy going to the Bolshoi Theater or to the circus, photography is forbidden during performances, yet you always see the same ‘get that shot, to heck with everybody else’ camera flashes going off. It’s easy to see that these are not real photographers let alone real people because they would not be using the flash to begin with; being so far away that the flash does no good. Of course I have to admit that I take shots during the performance myself, but without using the flash and I do turn the sound off on my camera.
But seriously, do these people not care about the performer’s safety or the audience’s pleasure? Do these uneducated and inconsiderate “photographers” not realize that a ballerina could be surprised by a strong flash and miss a jump, breaking their leg and ending their career? A circus performer on the high wire with no safety rope or net could be surprised and get injured or worse. An elephant or lion frightened could hurt the tamer or audience, but do these so-called photographers even care? When photography is forbidden, there usually are good reasons for it - mainly ignorant photographers.
The first thing a photographer should do is take time to learn a little about where you are going. The internet makes this very easy, find out the various sites of where you are going to. Most tourist sites have their own web pages today, many which are in English. Do they allow photography, and if they do, will you have to buy a permit? Most permits cost less than $3.00 and there are only two museums in Moscow that I’m aware of that do not allow photography. One will not even allow you to bring a camera into the museum and that’s ‘The Diamond Fund.’ Take time to learn the customs of the place you’re visiting. For example, some groups of people such as members of certain religious groups do not like or allow photography inside their church. In Russia, Russian Orthodox Churches which are classified as museums allow photos to be taken inside, but churches still performing religious services generally do not allow photos to be taken inside. Most Russian Orthodox nuns do not like to be photographed with most Russian Orthodox Convents forbidding photography. Take time to learn what is acceptable and what is not and your photography trip will be enjoyable instead of one big let down. Learn what is allowed and what is not before you leave home!
As a responsible photographer, you’ll have to come to accept the fact that not everybody likes to be photographed or to have their property photographed. Sometimes it maybe because of security reasons and sometimes because some photographers act irresponsibly and act like jerks. You may have the right to photograph a street scene and most people will not object, but if somebody does, then you should try and respect their request. I see quiet often on a couple of pro photography forums I look at where a few so-called professional baboons say they have a right to take a photograph and nobody is going to stop them. I guess these people will never succeed so they think nobody else should either, and then they wonder why so many places are now getting tough with photography and
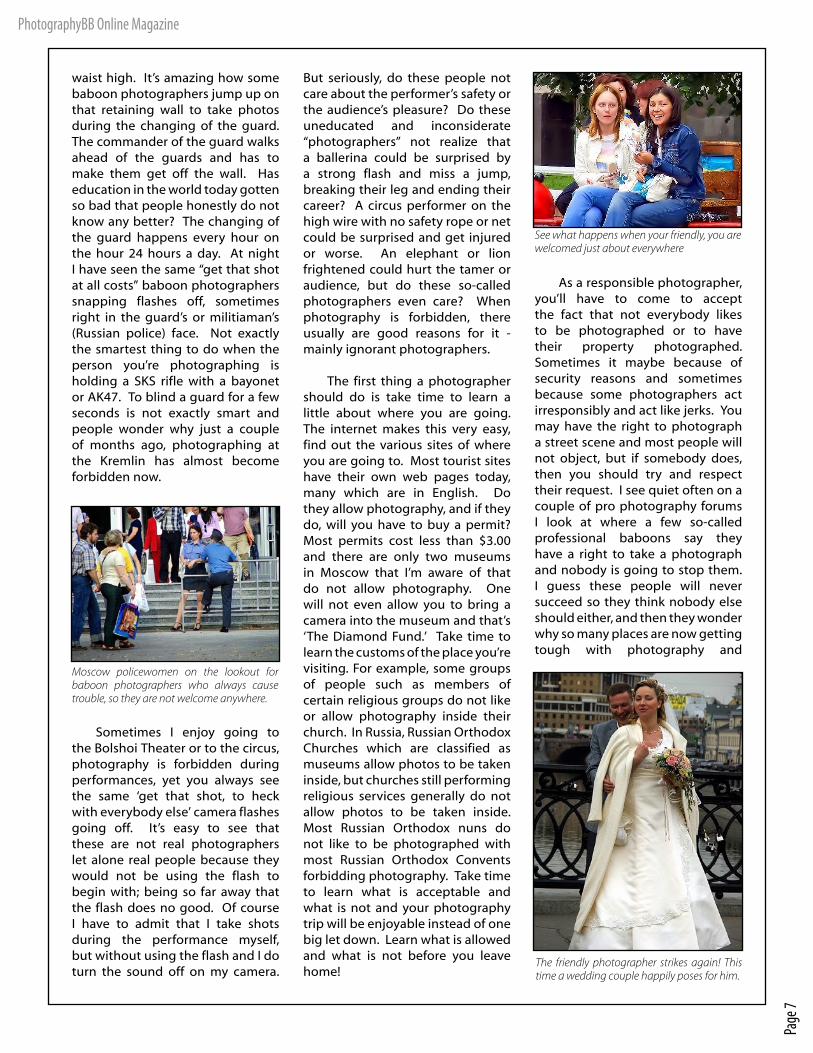
See what happens when your friendly, you are welcomed just about everywhere
The friendly photographer strikes again! This time a wedding couple happily poses for him.
Moscow policewomen on the lookout for baboon photographers who always cause trouble, so they are not welcome anywhere.
Page
8
PhotographyBB Online Magazine
photographers. ‘No Photography Allowed’ means just that. Of course we all may sneak a photo or two from time to time, but at least have the common courtesy to turn off the sound on your camera and do not use the flash unless you’re looking for trouble.
Be friendly, you’ll be surprised at how well it works. I enjoy shooting city and street landscapes, and people on the street sometimes frown when they notice my camera is pointed at them. Sometimes all it takes is a smile, wink, thumbs up, or a wave and many will smile, stop and even pose for me on occasion. Some of my favorite subjects to photograph are street artists. I will first walk up and comment on their work and talk a little with them, and they generally allow me to photograph them. Of course I will show the photos to them and if they tell me one is not good, I will delete it while they are looking. Being friendly works wonders, I’ve
even had Russian militia officers let me photograph them when I start telling them about when I worked as a GA. DNR officer. For those not aware, Russia has some very pretty female militia officers. Acting like “Its my right, I’m taking the photo no matter what you say or think,” gets you just what you deserve: No photo and sometimes your butt kicked. You can bet that pretty militia officers have black belts.
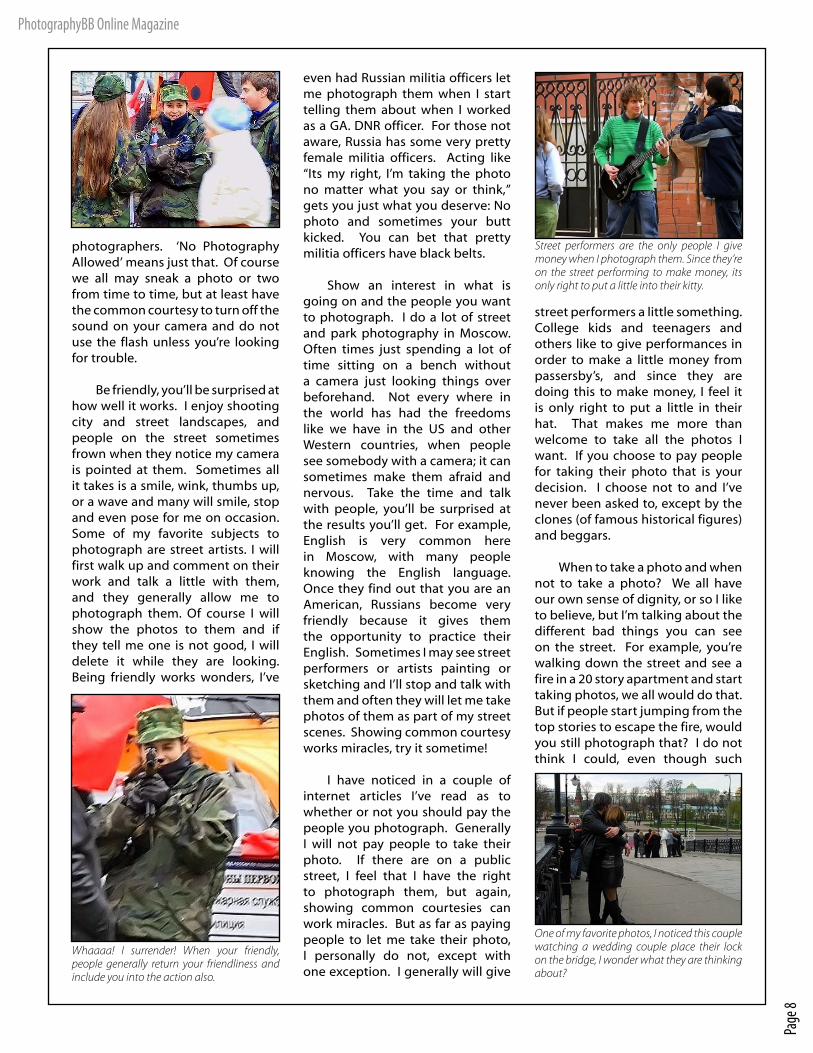
Show an interest in what is going on and the people you want to photograph. I do a lot of street and park photography in Moscow. Often times just spending a lot of time sitting on a bench without a camera just looking things over beforehand. Not every where in the world has had the freedoms like we have in the US and other Western countries, when people see somebody with a camera; it can sometimes make them afraid and nervous. Take the time and talk with people, you’ll be surprised at the results you’ll get. For example, English is very common here in Moscow, with many people knowing the English language. Once they find out that you are an American, Russians become very friendly because it gives them the opportunity to practice their English. Sometimes I may see street performers or artists painting or sketching and I’ll stop and talk with them and often they will let me take photos of them as part of my street scenes. Showing common courtesy works miracles, try it sometime!
I have noticed in a couple of internet articles I’ve read as to whether or not you should pay the people you photograph. Generally I will not pay people to take their photo. If there are on a public street, I feel that I have the right to photograph them, but again, showing common courtesies can work miracles. But as far as paying people to let me take their photo, I personally do not, except with one exception. I generally will give
street performers a little something. College kids and teenagers and others like to give performances in order to make a little money from passersby’s, and since they are doing this to make money, I feel it is only right to put a little in their hat. That makes me more than welcome to take all the photos I want. If you choose to pay people for taking their photo that is your decision. I choose not to and I’ve never been asked to, except by the clones (of famous historical figures) and beggars.
When to take a photo and when not to take a photo? We all have our own sense of dignity, or so I like to believe, but I’m talking about the different bad things you can see on the street. For example, you’re walking down the street and see a fire in a 20 story apartment and start taking photos, we all would do that. But if people start jumping from the top stories to escape the fire, would you still photograph that? I do not think I could, even though such
One of my favorite photos, I noticed this couple watching a wedding couple place their lock on the bridge, I wonder what they are thinking about?
Street performers are the only people I give money when I photograph them. Since they’re on the street performing to make money, its only right to put a little into their kitty.
Whaaaa! I surrender! When your friendly, people generally return your friendliness and include you into the action also.
Page
9
PhotographyBB Online Magazine
photos are news worthy and many newspapers and news magazines would pay a lot for such photos. The same with a body you may see on the street ‘DOA’, or beggars, and of other serious social ills. Of course this is a decision only you can make and there is nothing wrong with photographing these ills if you choose to. Photographing them can sometimes help bring good changes, however, I choose to respect people and part of my respect is not to photograph certain things. There really is no right and wrong answer for this, we all can or can not photograph these things, and I personally choose not to.
So, what type of photographer are you? A true professional photographer who tries to respect the rights and wishes of others, to work with others and show courtesies, concerns and politeness to others around you? A true professional never worries about missed shots; they always know there will be others. Are you a photographer who realizes that your wishes and rights do not take preference over another person’s rights and wishes and always are able to get the photos you want? Or are you somebody who only fancies themselves as a professional photographer because you bought this expensive camera and attempt to use Photoshop. Its kind of funny how these types of people always seem to blame everybody else, but themselves for not being able to get good photos, “its your fault I’m not a good photographer.” People need to realize that when you go out in public, especially when you travel to popular tourist destinations, you can not always have it your way; there are other people who have to be taken into consideration.
Take the time to think about how you act, and your beliefs before going on your next photo journey. If you do, then maybe photographers will be better accepted by every one again as it was when I was younger. We have to police ourselves and make changes in ourselves, and until we do, photography will only get harder and photographers less accepted. Act friendly, concerning, engaging and interesting; you’ll be surprise at how often you’ll be welcomed to take photos. Act aggressive, demanding, and arrogant and you’ll find the door shut in your face and people with sour faces. Friendliness is contagious, try it and you’ll find a warm welcome where ever you go, that is what a true professional photographer is. Being considerate, showing some respect and concern for others opens more doors to photographic opportunities. Often, people I’m photographing will tell me about things, even showing me new sites that otherwise I would never know about. It’s up to you to decide what kind of photographer you are, and what kind of photographer you want to be!
A Word From the Author:
My name is Jon D. Ayres and I’m originally from Albany, GA in the US. I first came to Moscow, Russia in August 2003 and fell in love with the city and I have been here ever since. I consider Moscow as much my hometown as I do Albany. Photography, writing and history are my hobbies along with shooting, hiking, camping, fishing, hunting and walking. I enjoy taking walks around Moscow and live next to a nature preserve in the southern part of Moscow where I enjoy taking walks and photos. In Moscow, I have taught English, business, history, literature among other things.
I have been involved in writing, digital art and photography for over thirty years and I am a published author having several articles and photos published. I have owned and used many cameras, including a Canon SLR, Polaroid and more digital cameras than I can remember. I’m a firm believer in post processing and have been using Photoshop since the first version came out. You can find examples of my digital art and photography at the following sites:
http://www.redbubble.com/people/bossman
http://www.featurepics.com/Authors/Images6269.aspx
http://www.eyeoftheart.com/JonAyres
http://s28.photobucket.com/albums/c226/wummis/
http://www.fotothing.com/JohnnyReb/
This article and all photographs contained are Copyright © and courtesy of Jon Ayres. Please contact the author directly with any questions.
Page
10
PhotographyBB Online Magazine
Photography 101Each issue of PhotographyBB Online Magazine will bring you helpful tips and tutorials on how to get the most of your digital camera and equipment. We’ll cover camera techniques, principals of photography, digital photography issues, and how to get the most from the dreaded manual-mode!
EXPOSURE CONTROL: AN INTRO TO MANUAL PHOTOGRAPHY - By Kenneth Fagan
Following my article in the February issue of the PhotographyBB Online Magazine on f-stops, it is now time to move onto manual exposure. Before
I begin, I would like to give a brief explanation of the Aperture priority and Shutter priority modes on your camera.
Aperture PriorityIn aperture priority mode, the camera automatically selects the shutter speed while you select the f-number, (remember from photography 101 in the last issue, the lower the f number i.e. f5.6 the larger the aperture, the higher the f number, i.e. f32 the smaller the aperture. And the smaller the aperture, the greater the depth of field.
Shutter PriorityIn shutter priority mode, it is opposite of aperture priority. Where aperture priority automatically selects the shutter speed and allows you to select the f number, conversely, shutter priority mode automatically selects the f number to suit the shutter speed you’ve chosen. A fast shutter speed will freeze motion where a slow shutter speed is useful for giving the effect of motion in a subject.
Manual mode is one of the most versatile control functions on your camera system, it allows you to have control over the exposure time as well as the aperture values (i.e. f-numbers). Once you make the move to manual mode, you will find that it makes it much easier to achieve the results you want; something that is not easily achieved in fully automatic mode. In this article, we are going to bid farewell to that little green square on your camera and say hello to stronger and more creative images using the dreaded manual mode.
Manual mode is usually identified by an ‘M’ symbol on the dial of your camera. Once you have your camera on this setting, you will be able to choose your shutter
speed (i.e. the length of the exposure, up to 30 seconds in most cameras) along with the f number (which controls the amount of light that enters the lens, and the depth of field) independently.
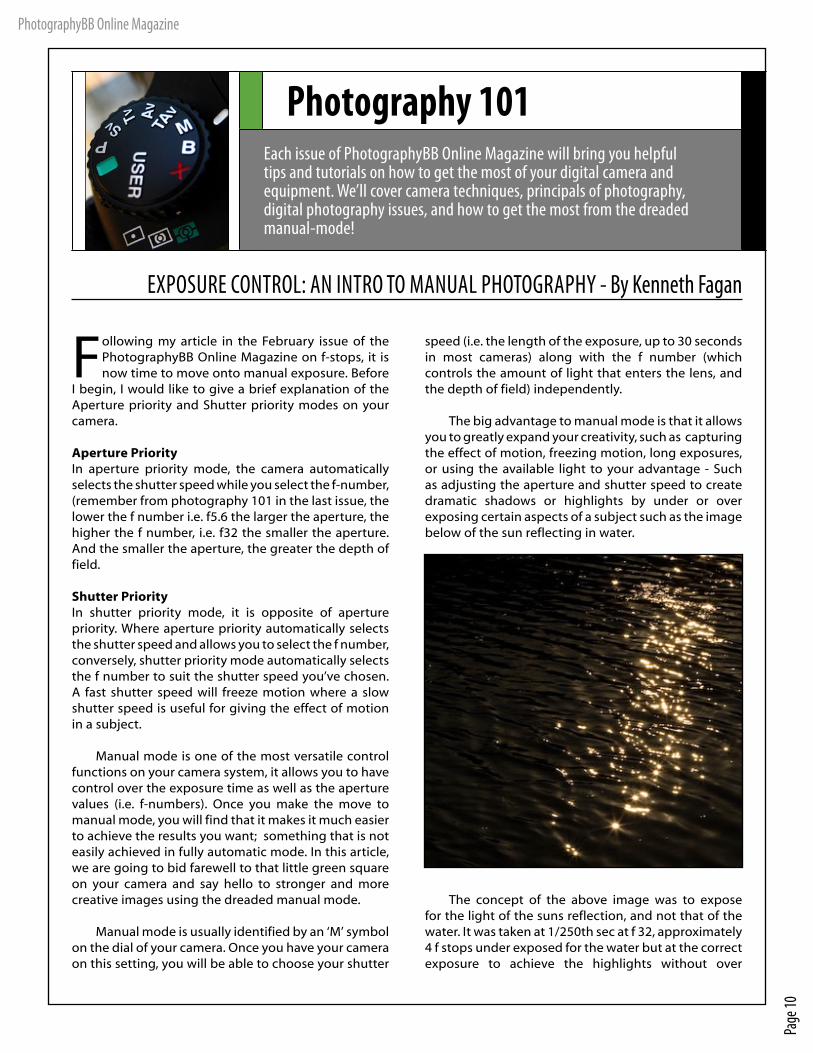
The big advantage to manual mode is that it allows you to greatly expand your creativity, such as capturing the effect of motion, freezing motion, long exposures, or using the available light to your advantage - Such as adjusting the aperture and shutter speed to create dramatic shadows or highlights by under or over exposing certain aspects of a subject such as the image below of the sun reflecting in water.
The concept of the above image was to expose for the light of the suns reflection, and not that of the water. It was taken at 1/250th sec at f 32, approximately 4 f stops under exposed for the water but at the correct exposure to achieve the highlights without over
Page
11
PhotographyBB Online Magazine
exposing them. I used the same method to photograph the church in the image below:
The sun had almost set and it was lighting up the church beautifully, so I exposed the for the light on the church, which was one f stop under the surrounding area. The camera’s built in light meter read the light on the church as f11 at 1/60th sec, while the surrounding area was reading f8 at 1/60th. Once you start using manual mode it is a good idea to experiment with under exposing or over exposing. Take more time to compose your image, bring around a notebook with you when you are out photographing, and take many images of the one subject at different exposure settings and making notes of them. Doing this will greatly improve your ability to create various different lighting effects, hence using the available light to your advantage. This is especially effective in the evenings when the sun is lower and has a warm glow about it.
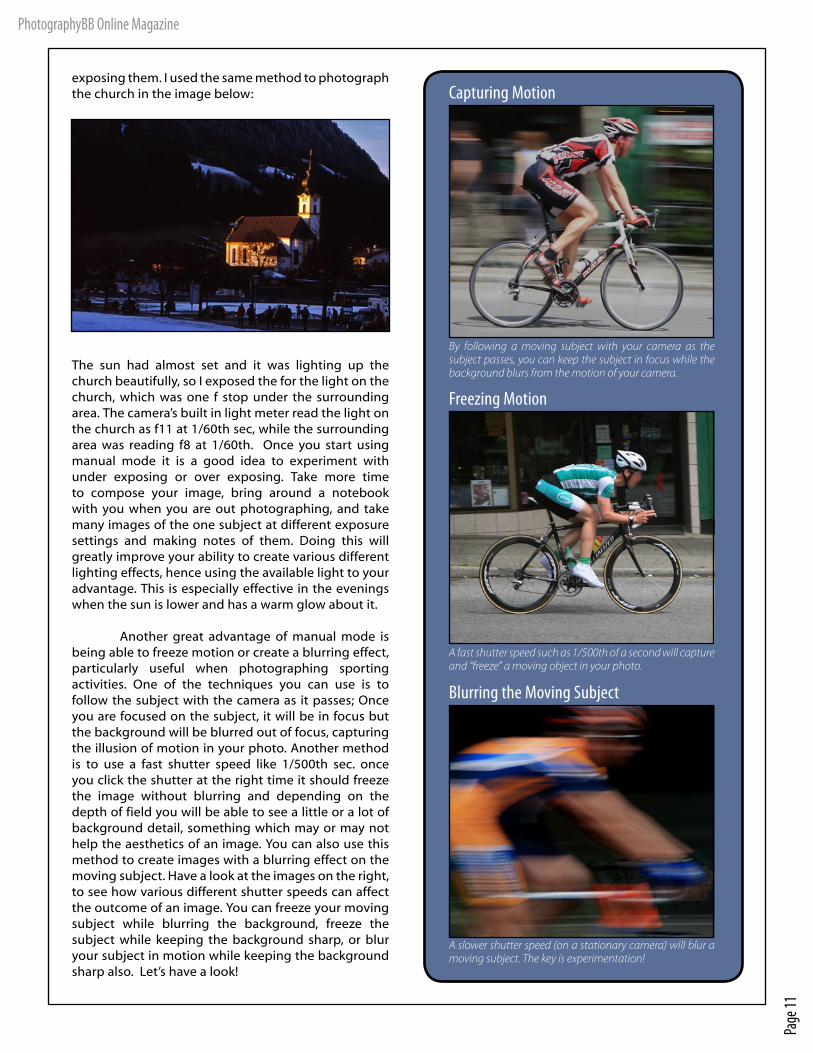
Another great advantage of manual mode is being able to freeze motion or create a blurring effect, particularly useful when photographing sporting activities. One of the techniques you can use is to follow the subject with the camera as it passes; Once you are focused on the subject, it will be in focus but the background will be blurred out of focus, capturing the illusion of motion in your photo. Another method is to use a fast shutter speed like 1/500th sec. once you click the shutter at the right time it should freeze the image without blurring and depending on the depth of field you will be able to see a little or a lot of background detail, something which may or may not help the aesthetics of an image. You can also use this method to create images with a blurring effect on the moving subject. Have a look at the images on the right, to see how various different shutter speeds can affect the outcome of an image. You can freeze your moving subject while blurring the background, freeze the subject while keeping the background sharp, or blur your subject in motion while keeping the background sharp also. Let’s have a look!
By following a moving subject with your camera as the subject passes, you can keep the subject in focus while the background blurs from the motion of your camera.
Capturing Motion
A fast shutter speed such as 1/500th of a second will capture and “freeze” a moving object in your photo.
Freezing Motion
A slower shutter speed (on a stationary camera) will blur a moving subject. The key is experimentation!
Blurring the Moving Subject
Page
12
PhotographyBB Online Magazine
When you use flash for shooting in manual mode, whether it be for motion or still life, the flash to work correctly, must be in sync with the shutter speed. This is known as sync speed.
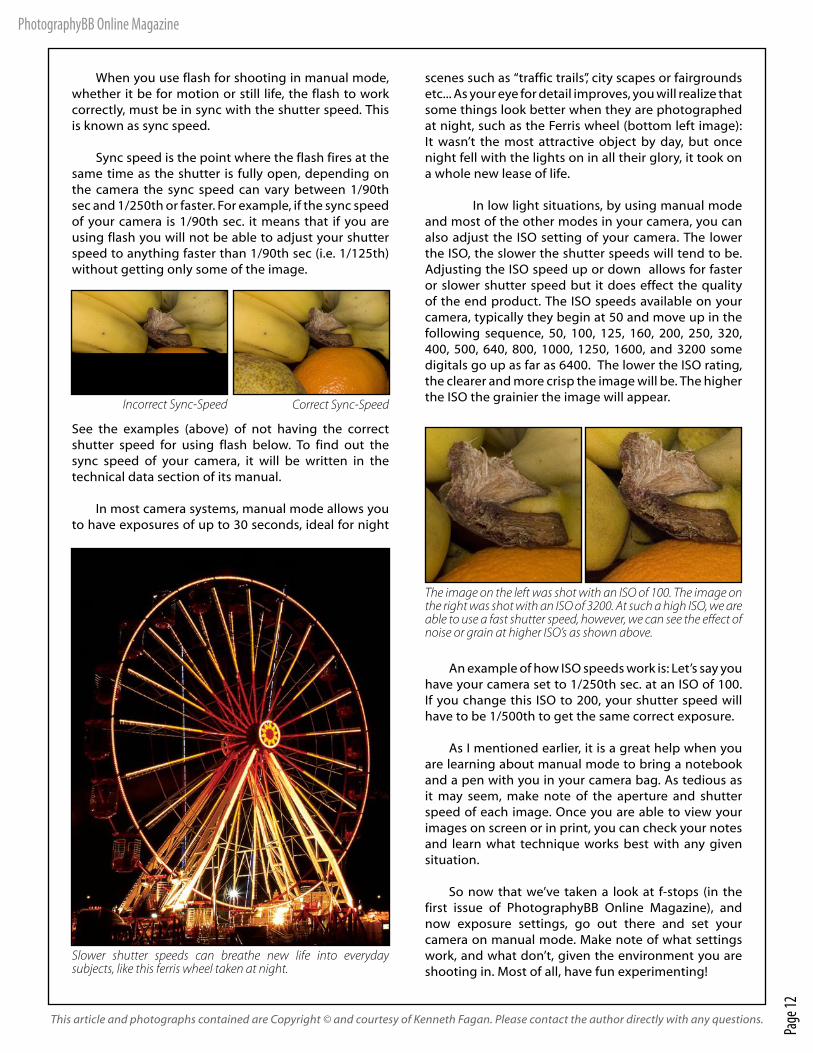
Sync speed is the point where the flash fires at the same time as the shutter is fully open, depending on the camera the sync speed can vary between 1/90th sec and 1/250th or faster. For example, if the sync speed of your camera is 1/90th sec. it means that if you are using flash you will not be able to adjust your shutter speed to anything faster than 1/90th sec (i.e. 1/125th) without getting only some of the image.
See the examples (above) of not having the correct shutter speed for using flash below. To find out the sync speed of your camera, it will be written in the technical data section of its manual.
In most camera systems, manual mode allows you to have exposures of up to 30 seconds, ideal for night
scenes such as “traffic trails”, city scapes or fairgrounds etc... As your eye for detail improves, you will realize that some things look better when they are photographed at night, such as the Ferris wheel (bottom left image): It wasn’t the most attractive object by day, but once night fell with the lights on in all their glory, it took on a whole new lease of life.
In low light situations, by using manual mode and most of the other modes in your camera, you can also adjust the ISO setting of your camera. The lower the ISO, the slower the shutter speeds will tend to be. Adjusting the ISO speed up or down allows for faster or slower shutter speed but it does effect the quality of the end product. The ISO speeds available on your camera, typically they begin at 50 and move up in the following sequence, 50, 100, 125, 160, 200, 250, 320, 400, 500, 640, 800, 1000, 1250, 1600, and 3200 some digitals go up as far as 6400. The lower the ISO rating, the clearer and more crisp the image will be. The higher the ISO the grainier the image will appear.
An example of how ISO speeds work is: Let’s say you have your camera set to 1/250th sec. at an ISO of 100. If you change this ISO to 200, your shutter speed will have to be 1/500th to get the same correct exposure.
As I mentioned earlier, it is a great help when you
are learning about manual mode to bring a notebook and a pen with you in your camera bag. As tedious as it may seem, make note of the aperture and shutter speed of each image. Once you are able to view your images on screen or in print, you can check your notes and learn what technique works best with any given situation.
So now that we’ve taken a look at f-stops (in the first issue of PhotographyBB Online Magazine), and now exposure settings, go out there and set your camera on manual mode. Make note of what settings work, and what don’t, given the environment you are shooting in. Most of all, have fun experimenting!
The image on the left was shot with an ISO of 100. The image on the right was shot with an ISO of 3200. At such a high ISO, we are able to use a fast shutter speed, however, we can see the effect of noise or grain at higher ISO’s as shown above.
Incorrect Sync-Speed Correct Sync-Speed
Slower shutter speeds can breathe new life into everyday subjects, like this ferris wheel taken at night.
This article and photographs contained are Copyright © and courtesy of Kenneth Fagan. Please contact the author directly with any questions.
Page
13
PhotographyBB Online Magazine
Photography Around the WorldPhotographyBB Online Magazine is pleased to launch our first issue with a fabulous and stunning photo-tour of one of the most fascinating cities in the world - Moscow. Jon Ayres takes us on a streetwalking tour of the city, with some interesting historical facts and of course, amazing photos!
Photography Around the WorldIn this second issue of the PhotographyBB Online Magazine, Dave Seeram takes us across the globe for a fascinating and historical look at Hong Kong. One of the world’s most enchanted cities, Hong Kong is a place with the perfect fusion with a blend of the old and the new.
A PHOTO TOUR OF EXOTIC AND BEAUTIFUL HONG KONG - By Dave Seeram
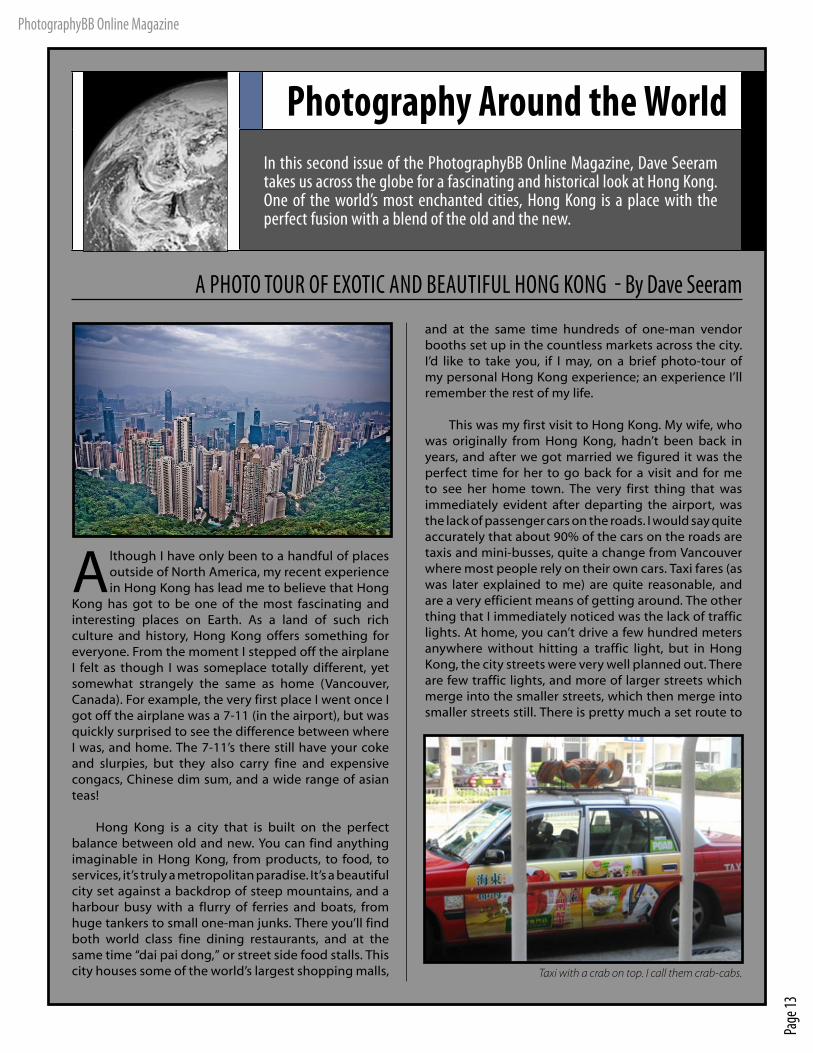
Although I have only been to a handful of places outside of North America, my recent experience in Hong Kong has lead me to believe that Hong
Kong has got to be one of the most fascinating and interesting places on Earth. As a land of such rich culture and history, Hong Kong offers something for everyone. From the moment I stepped off the airplane I felt as though I was someplace totally different, yet somewhat strangely the same as home (Vancouver, Canada). For example, the very first place I went once I got off the airplane was a 7-11 (in the airport), but was quickly surprised to see the difference between where I was, and home. The 7-11’s there still have your coke and slurpies, but they also carry fine and expensive congacs, Chinese dim sum, and a wide range of asian teas!
Hong Kong is a city that is built on the perfect balance between old and new. You can find anything imaginable in Hong Kong, from products, to food, to services, it’s truly a metropolitan paradise. It’s a beautiful city set against a backdrop of steep mountains, and a harbour busy with a flurry of ferries and boats, from huge tankers to small one-man junks. There you’ll find both world class fine dining restaurants, and at the same time “dai pai dong,” or street side food stalls. This city houses some of the world’s largest shopping malls,
and at the same time hundreds of one-man vendor booths set up in the countless markets across the city. I’d like to take you, if I may, on a brief photo-tour of my personal Hong Kong experience; an experience I’ll remember the rest of my life.
This was my first visit to Hong Kong. My wife, who was originally from Hong Kong, hadn’t been back in years, and after we got married we figured it was the perfect time for her to go back for a visit and for me to see her home town. The very first thing that was immediately evident after departing the airport, was the lack of passenger cars on the roads. I would say quite accurately that about 90% of the cars on the roads are taxis and mini-busses, quite a change from Vancouver where most people rely on their own cars. Taxi fares (as was later explained to me) are quite reasonable, and are a very efficient means of getting around. The other thing that I immediately noticed was the lack of traffic lights. At home, you can’t drive a few hundred meters anywhere without hitting a traffic light, but in Hong Kong, the city streets were very well planned out. There are few traffic lights, and more of larger streets which merge into the smaller streets, which then merge into smaller streets still. There is pretty much a set route to
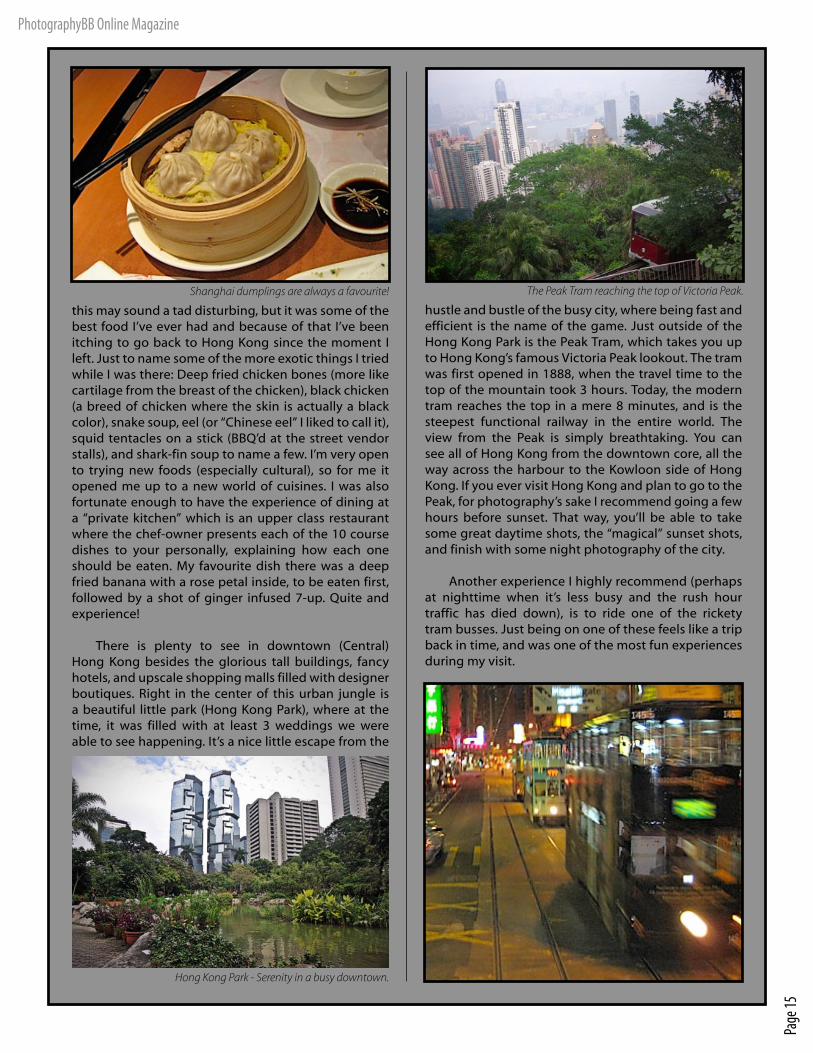
Taxi with a crab on top. I call them crab-cabs.

Page
14
PhotographyBB Online Magazine
get from point A to point B, and it seems to keep the busy traffic flowing quite nicely. Driving is an experience I would only recommend to those who have lived there before. There is no yielding or right of way. Basically any open area is fair game to any car on the road trying to navigate their way through a sea of endless traffic, yet at the same time, this is understood by everyone and accidents are quite minimal. It’s almost like there is a sense of order in the chaos, at least from an outsider’s perspective. The city also boasts one of the world’s most efficient transit systems called the MTR. The MTR was my main form of transportation during my 3-week stay, and it got me everywhere I needed to go, quite easily too I might add.
The next thing that became evident right away, is that the city is built straight up. There is not a whole lot of land available to build on, so there are some of the world’s tallest buildings all packed together into small city blocks. For those of us who have heard the stories about New Yorkers not being able to see the sun (downtown), now I truly understand. The jungle of skyscrapers makes for a beautiful skyline, and an interesting maze of sights to see for the visitor. With a population of nearly 7 million people living in a city you can pretty much drive across in less than 2 hours, everything has to be built upwards. From office skyscrapers to apartment towers, I’ve never seen so many tall buildings in all my life, and when you look up (or out at the apartments), it’s a canvas of air conditioners and clotheslines! For most of the working class people in Hong Kong, apartments are the standard of living,
with few houses belonging mostly to the ultra-wealthy with land being scarce.
Hong Kong is (evidently) rich with Chinese culture, from restaurants, street vendors, even to old men who take their birds out for walks in little cages. Yet, there is still a reminisce of the British influence (since their
handoff of Hong Kong back to China in 1997). You can see it in their school systems, free market economy, the double decker busses, English pubs, and even high tea in some of the restaurants and hotels. Interestingly enough, I was quite surprised at the American (or should I say “Western”) influence in Hong Kong. There are countless 7-11’s, Pizza Huts, KFC’s, American TV and movies, and of course my favourite, McDonald’s. It’s nice to see a blend between the cultures too though, for example, McDonald’s offers this “Chinese style” noodle in soup a breakfast time.
There are countless places for accommodation in Hong Kong, however, even though food and shopping are relatively inexpensive, lodging seems to be at a premium. For the first time visitor, if you have the option to stay with someone you know, I highly recommend it. Not only for the savings in lodging, but simply for the fact that having a guide your first time around in Hong Kong will make your trip that much more memorable. There are so many hidden gems in Hong Kong in the way of shopping and dining, that my experience would have been totally different if I stuck to just the “tourist” places. We were very lucky to be able to stay with my wife’s (and mine now) family. I would like to dedicate this article to my Aunt Winnie, Uncle William, cousin Vivian, and their charming cat “Fan-shu,” as a thank you for their hospitality, for making me feel so welcome as a first-timer in Hong Kong, and for showing us around the city - which made my trip one of the most memorable trips I’ve ever taken.
That being said, dining out was what made this trip so memorable for me. Thankfully we had family who was able to show us the best places to eat. In Hong Kong, there are restaurants and food vendors everywhere. As a Canadian, there was an overwhelming urge to stick with the familiar things (like McDonalds and some of the other western restaurant chains there), but thankfully I was broken out of that shell. For those of you who aren’t familiar with Asian cuisine, some of
The apartments are tall, and closely packed together!
Page
15
PhotographyBB Online Magazine
this may sound a tad disturbing, but it was some of the best food I’ve ever had and because of that I’ve been itching to go back to Hong Kong since the moment I left. Just to name some of the more exotic things I tried while I was there: Deep fried chicken bones (more like cartilage from the breast of the chicken), black chicken (a breed of chicken where the skin is actually a black color), snake soup, eel (or “Chinese eel” I liked to call it), squid tentacles on a stick (BBQ’d at the street vendor stalls), and shark-fin soup to name a few. I’m very open to trying new foods (especially cultural), so for me it opened me up to a new world of cuisines. I was also fortunate enough to have the experience of dining at a “private kitchen” which is an upper class restaurant where the chef-owner presents each of the 10 course dishes to your personally, explaining how each one should be eaten. My favourite dish there was a deep fried banana with a rose petal inside, to be eaten first, followed by a shot of ginger infused 7-up. Quite and experience!
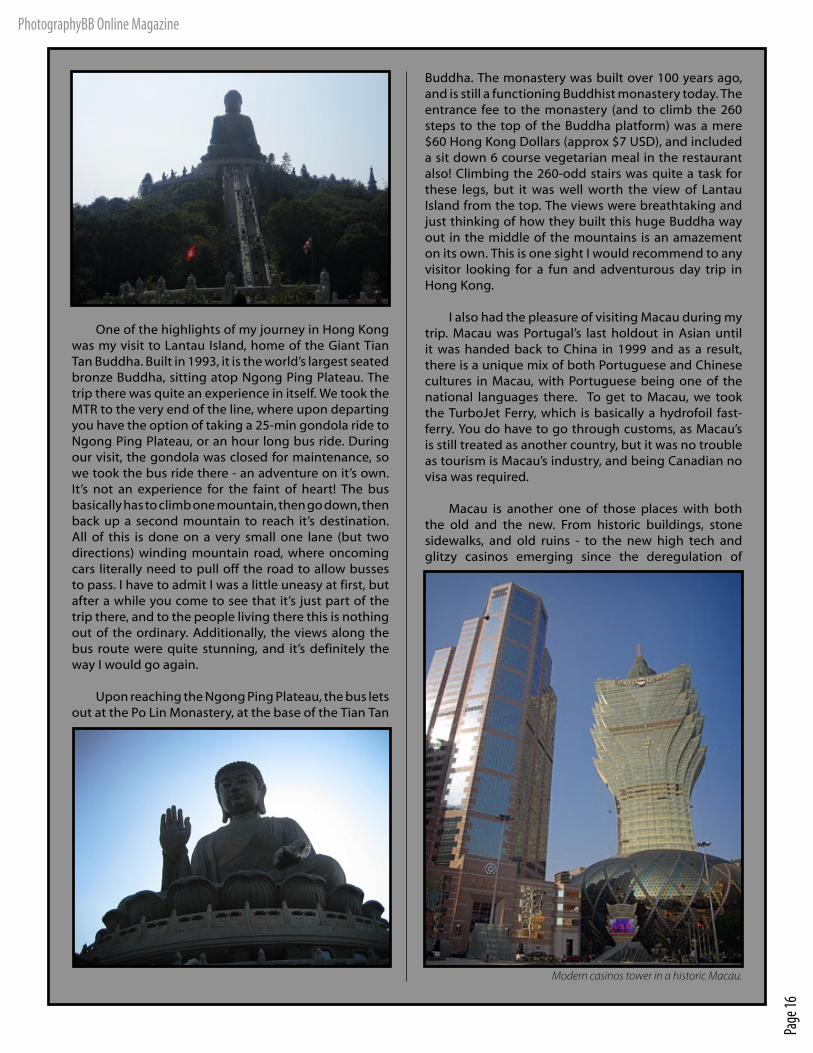
There is plenty to see in downtown (Central) Hong Kong besides the glorious tall buildings, fancy hotels, and upscale shopping malls filled with designer boutiques. Right in the center of this urban jungle is a beautiful little park (Hong Kong Park), where at the time, it was filled with at least 3 weddings we were able to see happening. It’s a nice little escape from the
hustle and bustle of the busy city, where being fast and efficient is the name of the game. Just outside of the Hong Kong Park is the Peak Tram, which takes you up to Hong Kong’s famous Victoria Peak lookout. The tram was first opened in 1888, when the travel time to the top of the mountain took 3 hours. Today, the modern tram reaches the top in a mere 8 minutes, and is the steepest functional railway in the entire world. The view from the Peak is simply breathtaking. You can see all of Hong Kong from the downtown core, all the way across the harbour to the Kowloon side of Hong Kong. If you ever visit Hong Kong and plan to go to the Peak, for photography’s sake I recommend going a few hours before sunset. That way, you’ll be able to take some great daytime shots, the “magical” sunset shots, and finish with some night photography of the city.
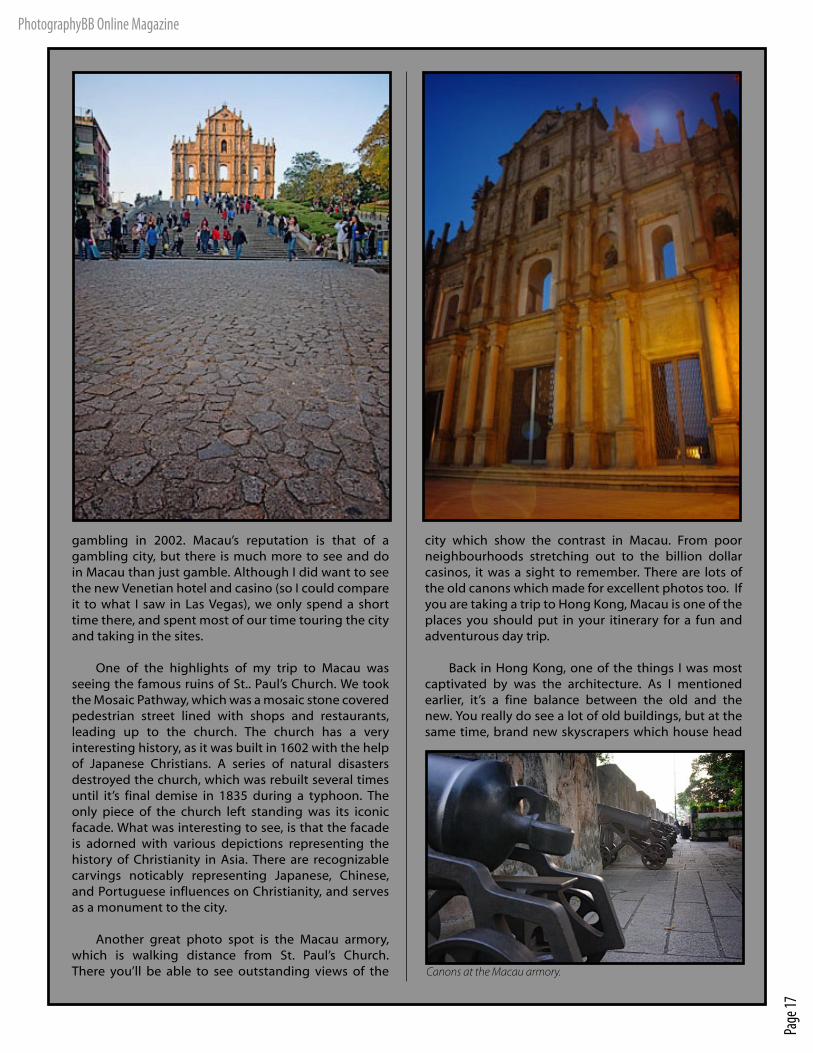
Another experience I highly recommend (perhaps at nighttime when it’s less busy and the rush hour traffic has died down), is to ride one of the rickety tram busses. Just being on one of these feels like a trip back in time, and was one of the most fun experiences during my visit.
The Peak Tram reaching the top of Victoria Peak.Shanghai dumplings are always a favourite!
Hong Kong Park - Serenity in a busy downtown.
Page
16
PhotographyBB Online Magazine
One of the highlights of my journey in Hong Kong was my visit to Lantau Island, home of the Giant Tian Tan Buddha. Built in 1993, it is the world’s largest seated bronze Buddha, sitting atop Ngong Ping Plateau. The trip there was quite an experience in itself. We took the MTR to the very end of the line, where upon departing you have the option of taking a 25-min gondola ride to Ngong Ping Plateau, or an hour long bus ride. During our visit, the gondola was closed for maintenance, so we took the bus ride there - an adventure on it’s own. It’s not an experience for the faint of heart! The bus basically has to climb one mountain, then go down, then back up a second mountain to reach it’s destination. All of this is done on a very small one lane (but two directions) winding mountain road, where oncoming cars literally need to pull off the road to allow busses to pass. I have to admit I was a little uneasy at first, but after a while you come to see that it’s just part of the trip there, and to the people living there this is nothing out of the ordinary. Additionally, the views along the bus route were quite stunning, and it’s definitely the way I would go again.
Upon reaching the Ngong Ping Plateau, the bus lets out at the Po Lin Monastery, at the base of the Tian Tan
Buddha. The monastery was built over 100 years ago, and is still a functioning Buddhist monastery today. The entrance fee to the monastery (and to climb the 260 steps to the top of the Buddha platform) was a mere $60 Hong Kong Dollars (approx $7 USD), and included a sit down 6 course vegetarian meal in the restaurant also! Climbing the 260-odd stairs was quite a task for these legs, but it was well worth the view of Lantau Island from the top. The views were breathtaking and just thinking of how they built this huge Buddha way out in the middle of the mountains is an amazement on its own. This is one sight I would recommend to any visitor looking for a fun and adventurous day trip in Hong Kong.
I also had the pleasure of visiting Macau during my trip. Macau was Portugal’s last holdout in Asian until it was handed back to China in 1999 and as a result, there is a unique mix of both Portuguese and Chinese cultures in Macau, with Portuguese being one of the national languages there. To get to Macau, we took the TurboJet Ferry, which is basically a hydrofoil fast-ferry. You do have to go through customs, as Macau’s is still treated as another country, but it was no trouble as tourism is Macau’s industry, and being Canadian no visa was required.
Macau is another one of those places with both the old and the new. From historic buildings, stone sidewalks, and old ruins - to the new high tech and glitzy casinos emerging since the deregulation of
Modern casinos tower in a historic Macau.
Page
17
PhotographyBB Online Magazine
gambling in 2002. Macau’s reputation is that of a gambling city, but there is much more to see and do in Macau than just gamble. Although I did want to see the new Venetian hotel and casino (so I could compare it to what I saw in Las Vegas), we only spend a short time there, and spent most of our time touring the city and taking in the sites.
One of the highlights of my trip to Macau was seeing the famous ruins of St.. Paul’s Church. We took the Mosaic Pathway, which was a mosaic stone covered pedestrian street lined with shops and restaurants, leading up to the church. The church has a very interesting history, as it was built in 1602 with the help of Japanese Christians. A series of natural disasters destroyed the church, which was rebuilt several times until it’s final demise in 1835 during a typhoon. The only piece of the church left standing was its iconic facade. What was interesting to see, is that the facade is adorned with various depictions representing the history of Christianity in Asia. There are recognizable carvings noticably representing Japanese, Chinese, and Portuguese influences on Christianity, and serves as a monument to the city.
Another great photo spot is the Macau armory, which is walking distance from St. Paul’s Church. There you’ll be able to see outstanding views of the
city which show the contrast in Macau. From poor neighbourhoods stretching out to the billion dollar casinos, it was a sight to remember. There are lots of the old canons which made for excellent photos too. If you are taking a trip to Hong Kong, Macau is one of the places you should put in your itinerary for a fun and adventurous day trip.
Back in Hong Kong, one of the things I was most captivated by was the architecture. As I mentioned earlier, it’s a fine balance between the old and the new. You really do see a lot of old buildings, but at the same time, brand new skyscrapers which house head
Canons at the Macau armory.
Page
18
PhotographyBB Online Magazine
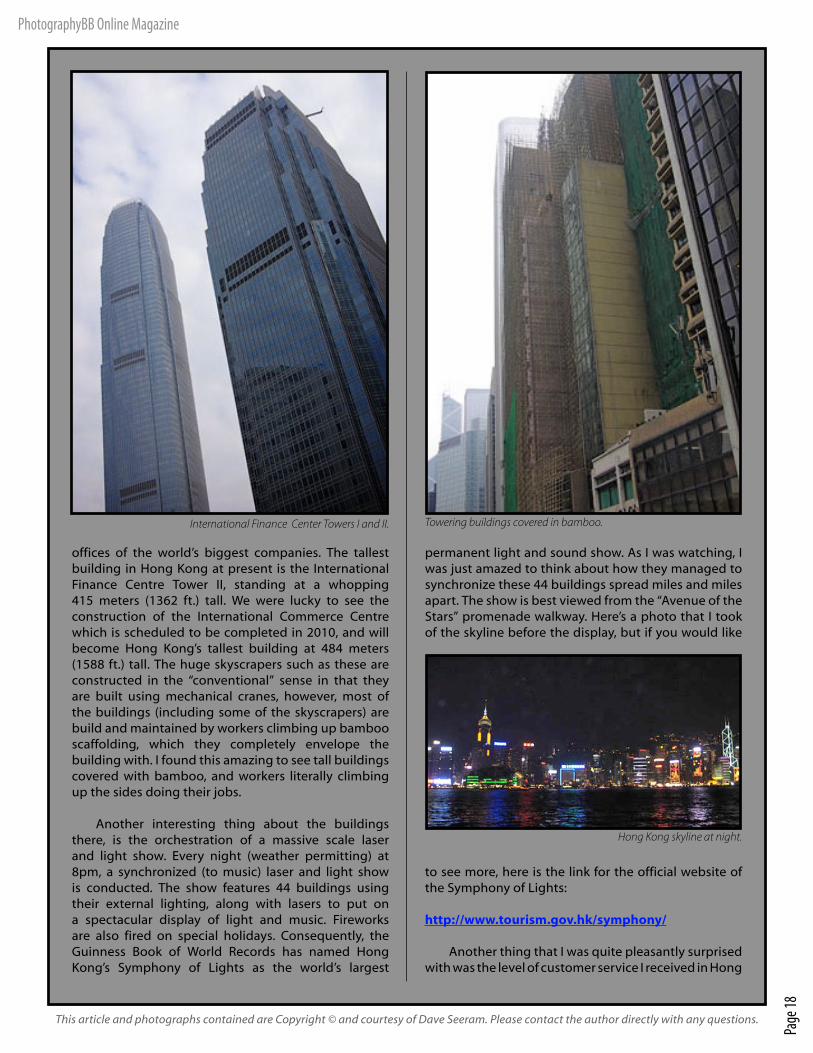
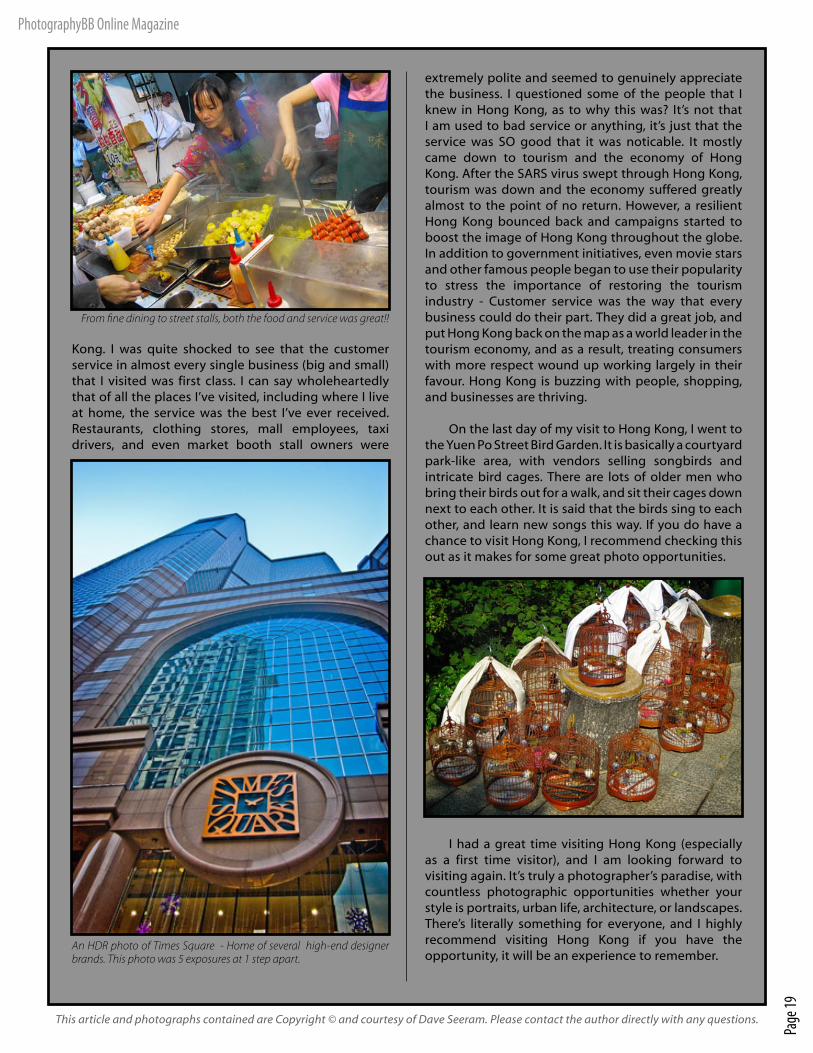
offices of the world’s biggest companies. The tallest building in Hong Kong at present is the International Finance Centre Tower II, standing at a whopping 415 meters (1362 ft.) tall. We were lucky to see the construction of the International Commerce Centre which is scheduled to be completed in 2010, and will become Hong Kong’s tallest building at 484 meters (1588 ft.) tall. The huge skyscrapers such as these are constructed in the “conventional” sense in that they are built using mechanical cranes, however, most of the buildings (including some of the skyscrapers) are build and maintained by workers climbing up bamboo scaffolding, which they completely envelope the building with. I found this amazing to see tall buildings covered with bamboo, and workers literally climbing up the sides doing their jobs.
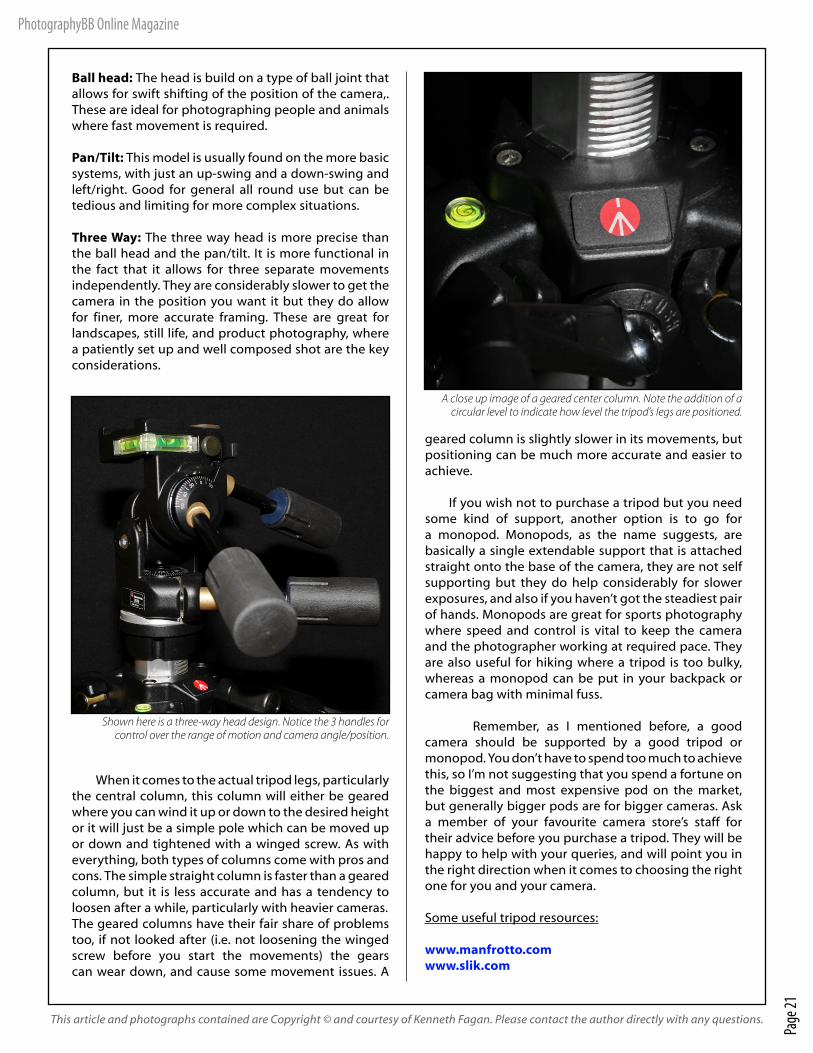
Another interesting thing about the buildings there, is the orchestration of a massive scale laser and light show. Every night (weather permitting) at 8pm, a synchronized (to music) laser and light show is conducted. The show features 44 buildings using their external lighting, along with lasers to put on a spectacular display of light and music. Fireworks are also fired on special holidays. Consequently, the Guinness Book of World Records has named Hong Kong’s Symphony of Lights as the world’s largest
permanent light and sound show. As I was watching, I was just amazed to think about how they managed to synchronize these 44 buildings spread miles and miles apart. The show is best viewed from the “Avenue of the Stars” promenade walkway. Here’s a photo that I took of the skyline before the display, but if you would like
to see more, here is the link for the official website of the Symphony of Lights:
http://www.tourism.gov.hk/symphony/
Another thing that I was quite pleasantly surprised with was the level of customer service I received in Hong
This article and photographs contained are Copyright © and courtesy of Dave Seeram. Please contact the author directly with any questions.
Towering buildings covered in bamboo.
Hong Kong skyline at night.
International Finance Center Towers I and II.
Page
19
PhotographyBB Online Magazine
Kong. I was quite shocked to see that the customer service in almost every single business (big and small) that I visited was first class. I can say wholeheartedly that of all the places I’ve visited, including where I live at home, the service was the best I’ve ever received. Restaurants, clothing stores, mall employees, taxi drivers, and even market booth stall owners were
extremely polite and seemed to genuinely appreciate the business. I questioned some of the people that I knew in Hong Kong, as to why this was? It’s not that I am used to bad service or anything, it’s just that the service was SO good that it was noticable. It mostly came down to tourism and the economy of Hong Kong. After the SARS virus swept through Hong Kong, tourism was down and the economy suffered greatly almost to the point of no return. However, a resilient Hong Kong bounced back and campaigns started to boost the image of Hong Kong throughout the globe. In addition to government initiatives, even movie stars and other famous people began to use their popularity to stress the importance of restoring the tourism industry - Customer service was the way that every business could do their part. They did a great job, and put Hong Kong back on the map as a world leader in the tourism economy, and as a result, treating consumers with more respect wound up working largely in their favour. Hong Kong is buzzing with people, shopping, and businesses are thriving.
On the last day of my visit to Hong Kong, I went to the Yuen Po Street Bird Garden. It is basically a courtyard park-like area, with vendors selling songbirds and intricate bird cages. There are lots of older men who bring their birds out for a walk, and sit their cages down next to each other. It is said that the birds sing to each other, and learn new songs this way. If you do have a chance to visit Hong Kong, I recommend checking this out as it makes for some great photo opportunities.
I had a great time visiting Hong Kong (especially as a first time visitor), and I am looking forward to visiting again. It’s truly a photographer’s paradise, with countless photographic opportunities whether your style is portraits, urban life, architecture, or landscapes. There’s literally something for everyone, and I highly recommend visiting Hong Kong if you have the opportunity, it will be an experience to remember.
From fine dining to street stalls, both the food and service was great!!
An HDR photo of Times Square - Home of several high-end designer brands. This photo was 5 exposures at 1 step apart.
This article and photographs contained are Copyright © and courtesy of Dave Seeram. Please contact the author directly with any questions.

Page
20
PhotographyBB Online Magazine
When you start getting serious about your photography, you will more than likely wish to upgrade your camera system with the urge
to achieve stronger, more impacting images. As your ability for creativity improves you will want to experiment with new ideas, such as long exposures, macro photography, motion and more.
As your increase your camera’s exposure time when taking photos, (depending on how steady you are), once it drops below 1/60th sec. it becomes more difficult to keep the camera still. You may not realize i t , but the blood pumping through your veins in your hands can be enough to blur an image significantly. Additionally, the mechanics in your camera, particularly in SLR’s, such as the mirror can also cause some problems. Depending on the make, some mirrors tend to slap the chamber of the camera harder than others.
Once you start to use your new found creativity a bit more, it is a good idea to invest in a decent tripod or monopod (I will explain monopods later). It is understandable to want to purchase a tripod that is cheap and ‘does the job’. This is perfectly okay for your compact point and shoot. However, when the time comes that you want to upgrade your equipment to a larger and more functional compact or SLR, with this comes a more expensive purchase cost and a heavier build. The tripod you already have, useful as it was for your point and shoot, may be the weak link between you and your new camera. The cheapest tripods tend to be mostly plastic and poorly built, and likely to fall apart if you ask too much of it. Just because you have a tripod doesn’t mean that you are no longer going to have camera shake.
It is possible that your camera will be actually heavier than the tripod, and this is when you should start to get worried about its welfare. After you place
your camera on the tripod the last thing you want is a gush of wind or your neighbor’s cat knocking your equipment over and breaking both your camera and your tripod to pieces.
It is not unusual that you may want to purchase a tripod that suits your budget, but at the same time it is equally as important to buy one that suits your needs and that of
your camera.
If you already invested heavily on a camera then why not go the extra mile and make an
investment on a suitable, sturdy tripod which will last for years with some care. I firmly believe that a quality tripod is a much cheaper and more sensible option in the long run.
Tripods generally consist of two parts, the legs with a central column and the head (which is attached to the central column. In the lower end of the market, the tripod can be purchased complete with a head, but once you hit mid range it is not unusual to have to purchase the legs and head separately. Surprisingly though, the head can cost almost as much as the legs in some cases. It is important that you choose a head that works with the structure of the tripod legs. Let’s have a closer look at what this means:
You will need to put into consideration
what you will be generally photographing when you choose a suitable head. There are many
different head designs, below is an explanation of the more common types.
Choosing the Right AccessoriesWith all of the photography gear on the market today, it’s difficult to determine which accessories are right for you, and what to look for once you decide on an accessory. In this ongoing segment, we’ll examine the things you should look for when choosing photography accessories, and help you to make an informed decision based on your photographic needs.
CAMERA SUPPORT: TRIPODS, AND MONOPODS - By Kenneth Fagan
Page
21
PhotographyBB Online Magazine
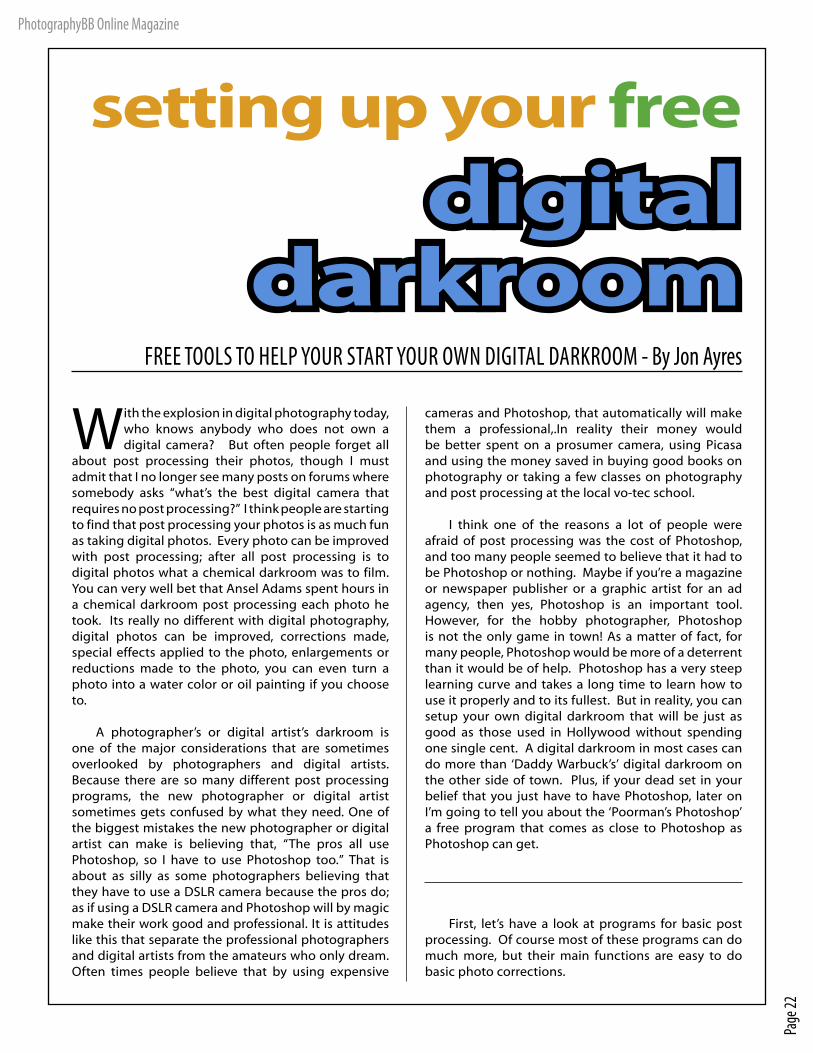
Ball head: The head is build on a type of ball joint that allows for swift shifting of the position of the camera,.These are ideal for photographing people and animals where fast movement is required.
Pan/Tilt: This model is usually found on the more basic systems, with just an up-swing and a down-swing and left/right. Good for general all round use but can be tedious and limiting for more complex situations.
Three Way: The three way head is more precise than the ball head and the pan/tilt. It is more functional in the fact that it allows for three separate movements independently. They are considerably slower to get the camera in the position you want it but they do allow for finer, more accurate framing. These are great for landscapes, still life, and product photography, where a patiently set up and well composed shot are the key considerations.
When it comes to the actual tripod legs, particularly the central column, this column will either be geared where you can wind it up or down to the desired height or it will just be a simple pole which can be moved up or down and tightened with a winged screw. As with everything, both types of columns come with pros and cons. The simple straight column is faster than a geared column, but it is less accurate and has a tendency to loosen after a while, particularly with heavier cameras. The geared columns have their fair share of problems too, if not looked after (i.e. not loosening the winged screw before you start the movements) the gears can wear down, and cause some movement issues. A
geared column is slightly slower in its movements, but positioning can be much more accurate and easier to achieve.
If you wish not to purchase a tripod but you need some kind of support, another option is to go for a monopod. Monopods, as the name suggests, are basically a single extendable support that is attached straight onto the base of the camera, they are not self supporting but they do help considerably for slower exposures, and also if you haven’t got the steadiest pair of hands. Monopods are great for sports photography where speed and control is vital to keep the camera and the photographer working at required pace. They are also useful for hiking where a tripod is too bulky, whereas a monopod can be put in your backpack or camera bag with minimal fuss.
Remember, as I mentioned before, a good camera should be supported by a good tripod or monopod. You don’t have to spend too much to achieve this, so I’m not suggesting that you spend a fortune on the biggest and most expensive pod on the market, but generally bigger pods are for bigger cameras. Ask a member of your favourite camera store’s staff for their advice before you purchase a tripod. They will be happy to help with your queries, and will point you in the right direction when it comes to choosing the right one for you and your camera.
Some useful tripod resources:
www.manfrotto.comwww.slik.com
Shown here is a three-way head design. Notice the 3 handles for control over the range of motion and camera angle/position.
A close up image of a geared center column. Note the addition of a circular level to indicate how level the tripod’s legs are positioned.
This article and photographs contained are Copyright © and courtesy of Kenneth Fagan. Please contact the author directly with any questions.
Page
22
PhotographyBB Online Magazine
setting up your free
digital darkroom
FREE TOOLS TO HELP YOUR START YOUR OWN DIGITAL DARKROOM - By Jon Ayres
With the explosion in digital photography today, who knows anybody who does not own a digital camera? But often people forget all
about post processing their photos, though I must admit that I no longer see many posts on forums where somebody asks “what’s the best digital camera that requires no post processing?” I think people are starting to find that post processing your photos is as much fun as taking digital photos. Every photo can be improved with post processing; after all post processing is to digital photos what a chemical darkroom was to film. You can very well bet that Ansel Adams spent hours in a chemical darkroom post processing each photo he took. Its really no different with digital photography, digital photos can be improved, corrections made, special effects applied to the photo, enlargements or reductions made to the photo, you can even turn a photo into a water color or oil painting if you choose to.
A photographer’s or digital artist’s darkroom is one of the major considerations that are sometimes overlooked by photographers and digital artists. Because there are so many different post processing programs, the new photographer or digital artist sometimes gets confused by what they need. One of the biggest mistakes the new photographer or digital artist can make is believing that, “The pros all use Photoshop, so I have to use Photoshop too.” That is about as silly as some photographers believing that they have to use a DSLR camera because the pros do; as if using a DSLR camera and Photoshop will by magic make their work good and professional. It is attitudes like this that separate the professional photographers and digital artists from the amateurs who only dream. Often times people believe that by using expensive
cameras and Photoshop, that automatically will make them a professional,.In reality their money would be better spent on a prosumer camera, using Picasa and using the money saved in buying good books on photography or taking a few classes on photography and post processing at the local vo-tec school.
I think one of the reasons a lot of people were afraid of post processing was the cost of Photoshop, and too many people seemed to believe that it had to be Photoshop or nothing. Maybe if you’re a magazine or newspaper publisher or a graphic artist for an ad agency, then yes, Photoshop is an important tool. However, for the hobby photographer, Photoshop is not the only game in town! As a matter of fact, for many people, Photoshop would be more of a deterrent than it would be of help. Photoshop has a very steep learning curve and takes a long time to learn how to use it properly and to its fullest. But in reality, you can setup your own digital darkroom that will be just as good as those used in Hollywood without spending one single cent. A digital darkroom in most cases can do more than ‘Daddy Warbuck’s’ digital darkroom on the other side of town. Plus, if your dead set in your belief that you just have to have Photoshop, later on I’m going to tell you about the ‘Poorman’s Photoshop’ a free program that comes as close to Photoshop as Photoshop can get.
First, let’s have a look at programs for basic post processing. Of course most of these programs can do much more, but their main functions are easy to do basic photo corrections.
Page
23
PhotographyBB Online Magazine
PicasaGoogle’s Picasa is probability one of the most popular post processing programs there is. Picasa can do most everything the hobby photographer will need or want to do, including locating and organizing all your photos that are on your computer. Edit and add effects to your photos with a few simple clicks and ease of use makes Picasa a favorite post processing program. Share your photos with others through email, prints and on the web using Picasa. Picasa’s Basic Fixes are easy to use buttons for fast cropping, red eye removal, fixing the contrast and color, and enhance your digital pictures, plus a few art effects and conversions. Picasa’s greatest strength is its user friendliness. http://picasa.google.com/
PhotoFiltrePhotoFiltre is a complete image retouching program. It allows you to do simple or advanced adjustments to an image and apply a vast range of filters on it. It is simple and intuitive to use, and has an easy learning curve. The toolbar, giving you access to the standard filters with just a few clicks, gives PhotoFiltre a robust look. This program has a lot of extras including the ability to use some Photoshop plugins which there are many nice free plugins for Photoshop. http://photofiltre.free.fr/frames_en.htm
virtualPhotographer Plug-invirtualPhotographer, “One of the best Photoshop plug-ins around...” and its free also. If this plugin works with Photofilter and I believe it does, giving you one powerful post processing setup for your digital darkroom. http://www.optikvervelabs.com/
GIMPGIMP is an acronym for GNU Image Manipulation Program. It is a freely distributed program for such tasks as photo retouching, image composition and image authoring. Gimp is considered one of the top post processing programs whether it is a free or a paid program. Gimp comes as close to Photoshop as Photoshop is with many features of Photoshop including use of same plugins. On Gimp’s download page, you’ll find almost 20 pages of free plugins to download. The only downside of Gimp is that it has a strong and steep learning curve, almost like Photoshop’s steep learning curve, but since Gimp is free you can afford to spend the money saved on a free books about Gimp to help you learn how to use it. Links to books about Gimp can
be found on its web page also.
Gimp has many capabilities including use as a simple paint program, an expert quality photo retouching program, an online batch processing system, a mass production image processor, an image format converter, etc... GIMP is also expandable and extensible. It is designed to be augmented with plug-ins and extensions to do just about anything. The advanced scripting interface allows everything from the simplest task to the most complex image manipulation procedures to be easily scripted.
Features and Capabilities:This is only a very quickly thrown together list of GIMP features. You can also have a look at the illustrated features overview.
Painting • Full suite of painting tools including Brush, Pencil, Airbrush, Clone, etc. • Sub-pixel sampling for all paint tools for high quality anti-aliasing • Extremely powerful gradient editor and blend tool • Supports custom brushes and patterns • Virtually unlimited number of images open at one time
Advanced Manipulation • Full alpha channel support • Layers and channels • Multiple Undo/Redo (limited only by diskspace) • Editable text layers • Transformation tools including rotate, scale, shear and flip • Familiar selection tools including rectangle, rounded rectangle, ellipse, free, fuzzy • Foreground extraction tool • Advanced path tool doing bezier and polygonal selections. • Transformable paths, transformable selections. • Quickmask to paint a selection.
Extensible • A Procedural Database for calling internal GIMP functions from external programs as in Script-fu • Advanced scripting capabilities (Scheme, Python, Perl) • Plug-ins which allow for the easy addition of new file formats and new effect filters • Over 100 plug-ins already available
Animation • Load and save animations in a convenient frame-as layer format • MNG support • Frame Navigator (in GAP, GIMP Animation Package)
Page
24
PhotographyBB Online Magazine
• Onion Skin (in GAP, the GIMP Animation Package) • Bluebox (in GAP, the GIMP Animation Package)
File Handling • File formats support include: bmp, gif, jpeg, mng, pcx, pdf, png, ps, psd, svg, tiff, tga, xpm, and more. • Load, display, convert, save to many file formats • SVG path import/exportMuch, much more! http://www.gimp.org
Raw ProcessorsWith more and more digital cameras now supporting raw photo format, a raw photo processor maybe something you will want to include in your digital darkroom. There are many different raw post processors, some only for certain camera raw formats an others for multi formats, here are three that I consider the best of the free raw processors.
Stepok’s Raw ImporterStepok’s Raw Importer is a free and easy-to-use raw importing and converting tool, compatible with most camera models on markets. With the help of this tool, you can convert camera RAW files into best quality JPEG or TIFF format step by step. It also supports batch converting!
• Wide compatibility with common cameras RAW formats include: Canon RAW CR2,CRW; Kodak RAW DCR; Adobe Digital Negative DNG; Konica Minolta MRW; Nikon NEF; Olympus ORF; Fujifilm RAF; Leica RAW, Contax RAW, Casio RAW; Sony SRF, among others.• Best quality result interpolated by AHD algorithm and full control of exposure, dynamic, color, white balance, focus, in 16bit channel space (48bit color).• Powerful batch convert RAW files• It is FREEhttp://www.stepok.net/eng/raw_importer.htm
Raw TherapeeRaw Therapee is also a nice free RAW converter and digital photo processing software. I have used it some and think it is one of the better free raw converters made today, handles most raw formats and does a pretty good job with the editing and conversions. http://www.rawtherapee.com/
SILKYPIX Developer Studio 3.0 Free VersionSILKYPIX Developer Studio 3.0 Free Version is another
very good raw converter worth trying out. This is the raw converts that Panasonic uses. SILKYPIX is an all-round RAW converter with feature rich functionalities that produces the best results for your images.http://www.isl.co.jp/SILKYPIX/english/download/
ArcSoft RAW Thumbnail Viewer™ArcSoft RAW Thumbnail Viewer™ is a free plug-in for Windows that allows you to preview your RAW photos when browsing through your files. In the “Thumbnails” view of Windows Explorer, RAW files appear as generic icons. With ArcSoft RAW Thumbnail Viewer™, you can now see a thumbnail version of your picture! No more endless searching, just easily locate the photo you want to edit or print. Double-click to launch your favorite photo editor! Displays RAW formats by these manufacturers:• Adobe (DNG) • Canon • Hasselblad • Kodak • Leica • Mamiya • Nikon • Olympus • Pentax• Ricoh • Samsung • Sigma • Sony http://www.arcsoft.com/products/rawviewer
Recovery SoftwareYou never can tell when you’ll have a memory card or copy your photos to a cd only to find out the cd is bad after you’ve deleted your photos, I know because I have saved my photos to cds only to find later on I can not read a single photo from the cd, so recovery software is an important part of a digital darkroom.
Digital Photo Recovery 3Free Art Plus Digital Photo Recovery tool can help you recover lost images from corrupted or accidentally formatted digital camera memory cards. • Works with ALL types of memory cards!• It’s able to recover images from formatted cards!• Reads corrupted cards (even if they’re not recognized by Windows)!• Recovers JPG, TIF and most of RAW files!This program should be able to read all memory cards currently available on the market and recover lost JPG, TIF and most of popular RAW file formats. While it’s not optimized for that task, this program can actually also read damaged floppys, CDs and DVDs.http://www.artplus.hr/adapps/eng/dpr.htm
There you have it! Now you can set up your digital darkroom for free! With these tools, and the many free plug-ins out there, you’ll be well on your way to professional quality processing in no time.
Page
25
PhotographyBB Online Magazine
Unleashing The Power of CurvesIn each issue of PhotographyBB Online Magazine, we’ll take an in depth look at a specific function which can be accomplished with curves. We’ll go through real-world examples and applications that will add to your knowledge and show all that can be accomplished with this “perfect” tool!
COLOR CORRECTION WITH CURVES - By Dave Seeram
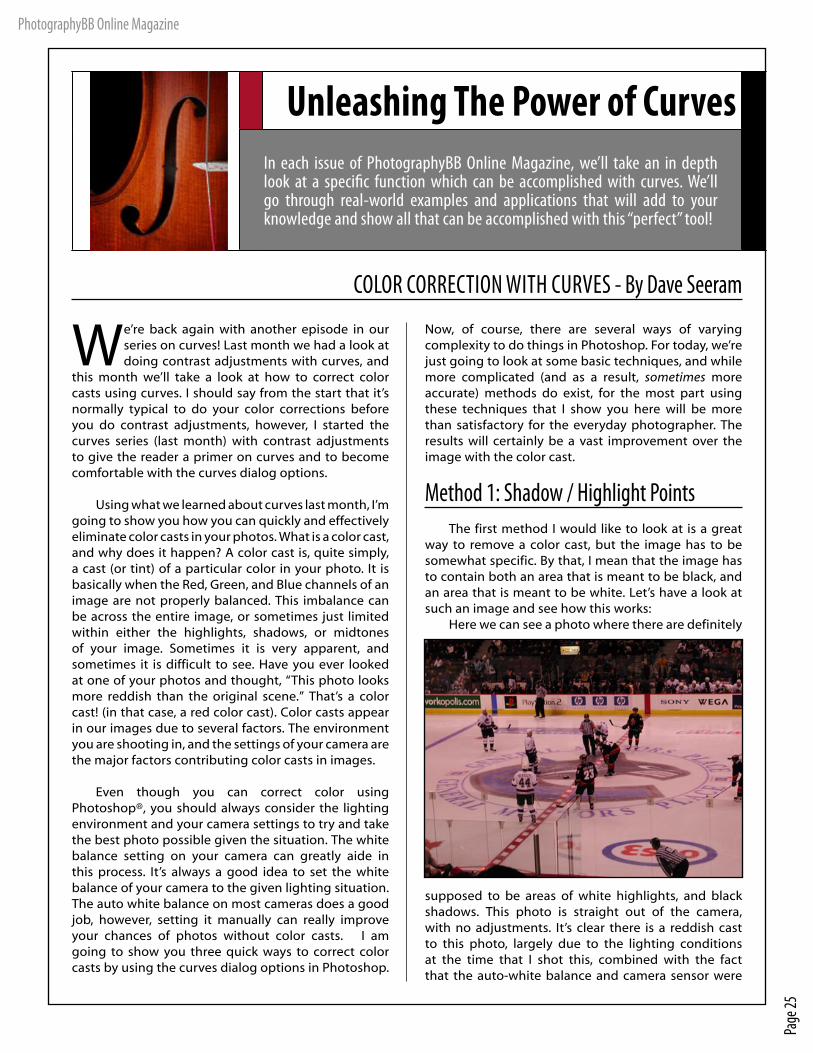
We’re back again with another episode in our series on curves! Last month we had a look at doing contrast adjustments with curves, and
this month we’ll take a look at how to correct color casts using curves. I should say from the start that it’s normally typical to do your color corrections before you do contrast adjustments, however, I started the curves series (last month) with contrast adjustments to give the reader a primer on curves and to become comfortable with the curves dialog options.
Using what we learned about curves last month, I’m going to show you how you can quickly and effectively eliminate color casts in your photos. What is a color cast, and why does it happen? A color cast is, quite simply, a cast (or tint) of a particular color in your photo. It is basically when the Red, Green, and Blue channels of an image are not properly balanced. This imbalance can be across the entire image, or sometimes just limited within either the highlights, shadows, or midtones of your image. Sometimes it is very apparent, and sometimes it is difficult to see. Have you ever looked at one of your photos and thought, “This photo looks more reddish than the original scene.” That’s a color cast! (in that case, a red color cast). Color casts appear in our images due to several factors. The environment you are shooting in, and the settings of your camera are the major factors contributing color casts in images.
Even though you can correct color using Photoshop®, you should always consider the lighting environment and your camera settings to try and take the best photo possible given the situation. The white balance setting on your camera can greatly aide in this process. It’s always a good idea to set the white balance of your camera to the given lighting situation. The auto white balance on most cameras does a good job, however, setting it manually can really improve your chances of photos without color casts. I am going to show you three quick ways to correct color casts by using the curves dialog options in Photoshop.
Now, of course, there are several ways of varying complexity to do things in Photoshop. For today, we’re just going to look at some basic techniques, and while more complicated (and as a result, sometimes more accurate) methods do exist, for the most part using these techniques that I show you here will be more than satisfactory for the everyday photographer. The results will certainly be a vast improvement over the image with the color cast.
Method 1: Shadow / Highlight PointsThe first method I would like to look at is a great
way to remove a color cast, but the image has to be somewhat specific. By that, I mean that the image has to contain both an area that is meant to be black, and an area that is meant to be white. Let’s have a look at such an image and see how this works:
Here we can see a photo where there are definitely
supposed to be areas of white highlights, and black shadows. This photo is straight out of the camera, with no adjustments. It’s clear there is a reddish cast to this photo, largely due to the lighting conditions at the time that I shot this, combined with the fact that the auto-white balance and camera sensor were
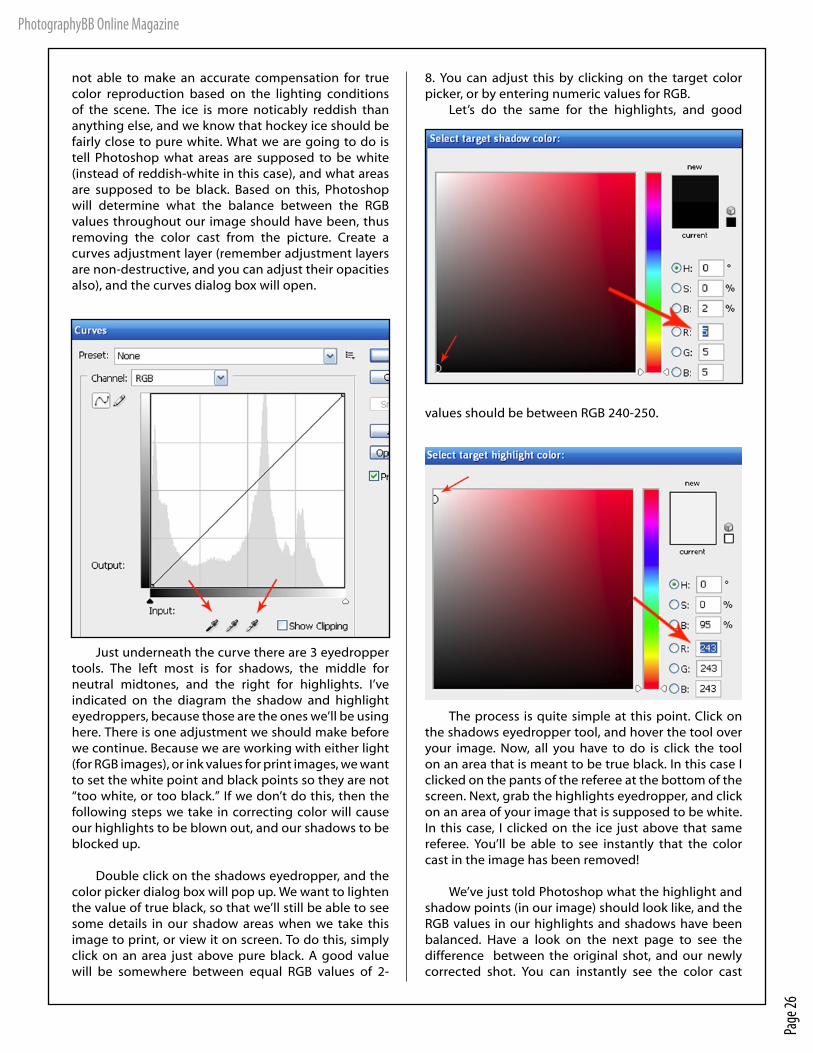
Page
26
PhotographyBB Online Magazine
not able to make an accurate compensation for true color reproduction based on the lighting conditions of the scene. The ice is more noticably reddish than anything else, and we know that hockey ice should be fairly close to pure white. What we are going to do is tell Photoshop what areas are supposed to be white (instead of reddish-white in this case), and what areas are supposed to be black. Based on this, Photoshop will determine what the balance between the RGB values throughout our image should have been, thus removing the color cast from the picture. Create a curves adjustment layer (remember adjustment layers are non-destructive, and you can adjust their opacities also), and the curves dialog box will open.
Just underneath the curve there are 3 eyedropper tools. The left most is for shadows, the middle for neutral midtones, and the right for highlights. I’ve indicated on the diagram the shadow and highlight eyedroppers, because those are the ones we’ll be using here. There is one adjustment we should make before we continue. Because we are working with either light (for RGB images), or ink values for print images, we want to set the white point and black points so they are not “too white, or too black.” If we don’t do this, then the following steps we take in correcting color will cause our highlights to be blown out, and our shadows to be blocked up.
Double click on the shadows eyedropper, and the color picker dialog box will pop up. We want to lighten the value of true black, so that we’ll still be able to see some details in our shadow areas when we take this image to print, or view it on screen. To do this, simply click on an area just above pure black. A good value will be somewhere between equal RGB values of 2-
8. You can adjust this by clicking on the target color picker, or by entering numeric values for RGB.
Let’s do the same for the highlights, and good
values should be between RGB 240-250.
The process is quite simple at this point. Click on the shadows eyedropper tool, and hover the tool over your image. Now, all you have to do is click the tool on an area that is meant to be true black. In this case I clicked on the pants of the referee at the bottom of the screen. Next, grab the highlights eyedropper, and click on an area of your image that is supposed to be white. In this case, I clicked on the ice just above that same referee. You’ll be able to see instantly that the color cast in the image has been removed!
We’ve just told Photoshop what the highlight and shadow points (in our image) should look like, and the RGB values in our highlights and shadows have been balanced. Have a look on the next page to see the difference between the original shot, and our newly corrected shot. You can instantly see the color cast
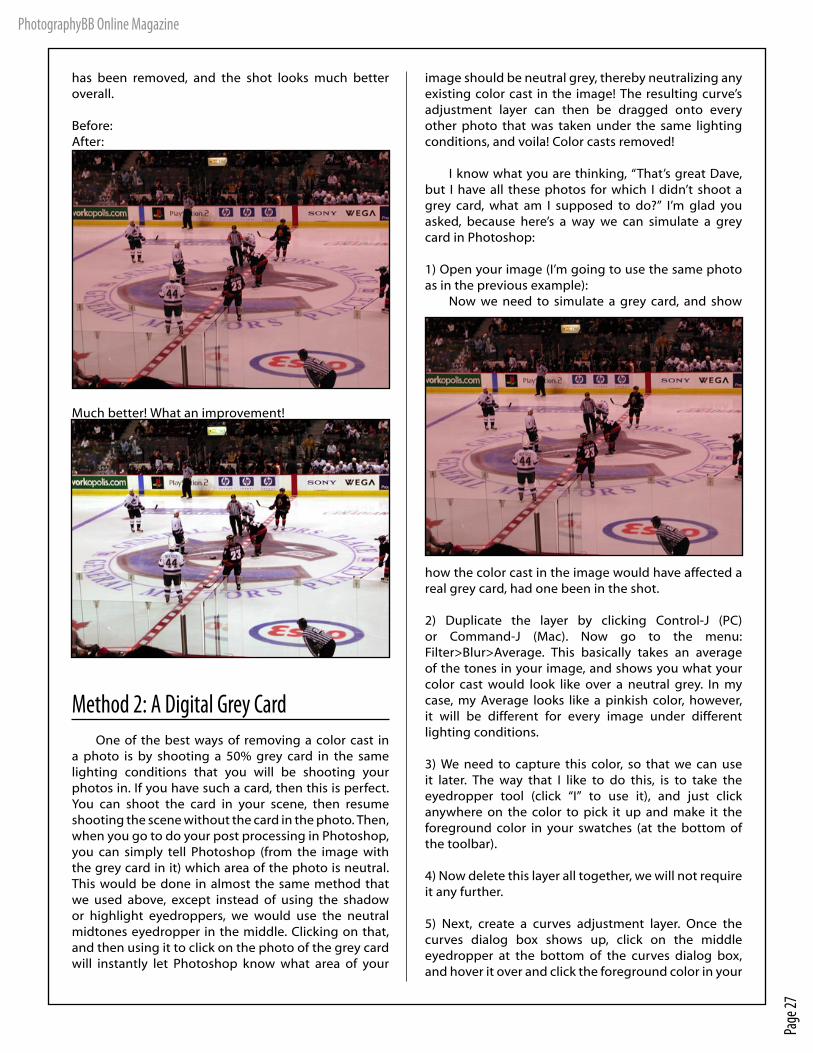
Page
27
PhotographyBB Online Magazine
has been removed, and the shot looks much better overall.
Before:After:
Much better! What an improvement!
Method 2: A Digital Grey CardOne of the best ways of removing a color cast in
a photo is by shooting a 50% grey card in the same lighting conditions that you will be shooting your photos in. If you have such a card, then this is perfect. You can shoot the card in your scene, then resume shooting the scene without the card in the photo. Then, when you go to do your post processing in Photoshop, you can simply tell Photoshop (from the image with the grey card in it) which area of the photo is neutral. This would be done in almost the same method that we used above, except instead of using the shadow or highlight eyedroppers, we would use the neutral midtones eyedropper in the middle. Clicking on that, and then using it to click on the photo of the grey card will instantly let Photoshop know what area of your
image should be neutral grey, thereby neutralizing any existing color cast in the image! The resulting curve’s adjustment layer can then be dragged onto every other photo that was taken under the same lighting conditions, and voila! Color casts removed!
I know what you are thinking, “That’s great Dave, but I have all these photos for which I didn’t shoot a grey card, what am I supposed to do?” I’m glad you asked, because here’s a way we can simulate a grey card in Photoshop:
1) Open your image (I’m going to use the same photo as in the previous example):
Now we need to simulate a grey card, and show
how the color cast in the image would have affected a real grey card, had one been in the shot.
2) Duplicate the layer by clicking Control-J (PC) or Command-J (Mac). Now go to the menu: Filter>Blur>Average. This basically takes an average of the tones in your image, and shows you what your color cast would look like over a neutral grey. In my case, my Average looks like a pinkish color, however, it will be different for every image under different lighting conditions.
3) We need to capture this color, so that we can use it later. The way that I like to do this, is to take the eyedropper tool (click “I” to use it), and just click anywhere on the color to pick it up and make it the foreground color in your swatches (at the bottom of the toolbar).
4) Now delete this layer all together, we will not require it any further.
5) Next, create a curves adjustment layer. Once the curves dialog box shows up, click on the middle eyedropper at the bottom of the curves dialog box, and hover it over and click the foreground color in your
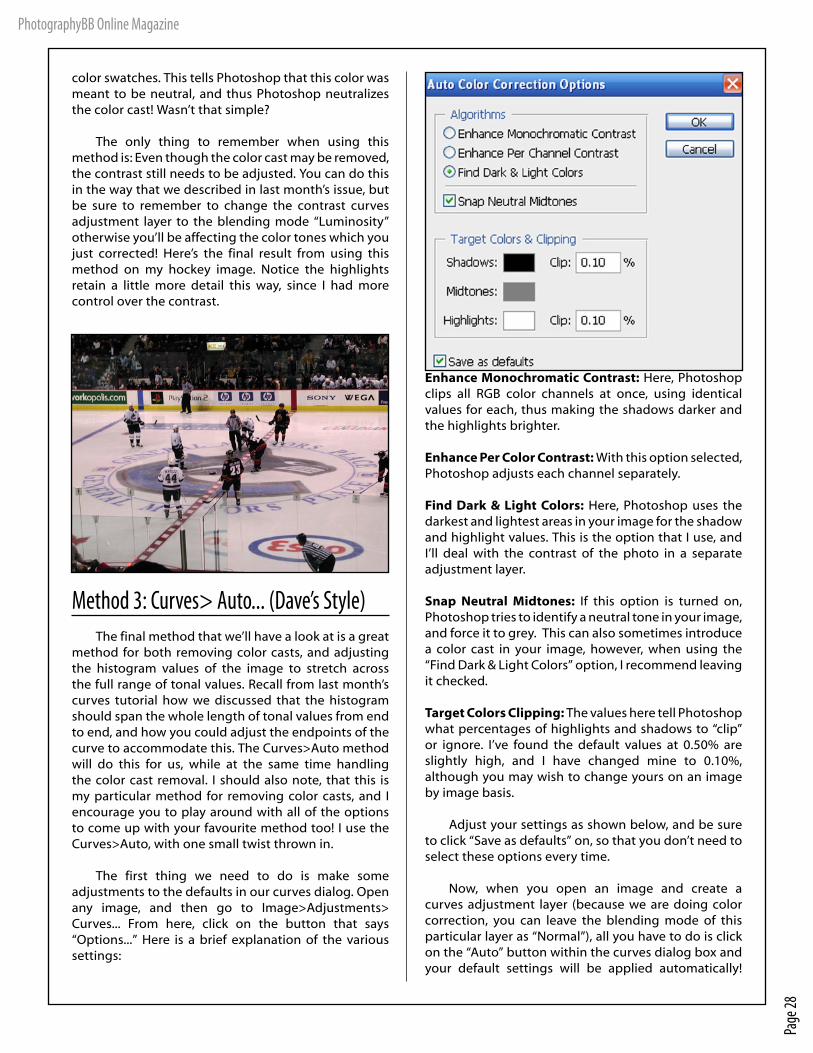
Page
28
PhotographyBB Online Magazine
color swatches. This tells Photoshop that this color was meant to be neutral, and thus Photoshop neutralizes the color cast! Wasn’t that simple?
The only thing to remember when using this method is: Even though the color cast may be removed, the contrast still needs to be adjusted. You can do this in the way that we described in last month’s issue, but be sure to remember to change the contrast curves adjustment layer to the blending mode “Luminosity” otherwise you’ll be affecting the color tones which you just corrected! Here’s the final result from using this method on my hockey image. Notice the highlights retain a little more detail this way, since I had more control over the contrast.
Method 3: Curves> Auto... (Dave’s Style)The final method that we’ll have a look at is a great
method for both removing color casts, and adjusting the histogram values of the image to stretch across the full range of tonal values. Recall from last month’s curves tutorial how we discussed that the histogram should span the whole length of tonal values from end to end, and how you could adjust the endpoints of the curve to accommodate this. The Curves>Auto method will do this for us, while at the same time handling the color cast removal. I should also note, that this is my particular method for removing color casts, and I encourage you to play around with all of the options to come up with your favourite method too! I use the Curves>Auto, with one small twist thrown in.
The first thing we need to do is make some adjustments to the defaults in our curves dialog. Open any image, and then go to Image>Adjustments> Curves... From here, click on the button that says “Options...” Here is a brief explanation of the various settings:
Enhance Monochromatic Contrast: Here, Photoshop clips all RGB color channels at once, using identical values for each, thus making the shadows darker and the highlights brighter.
Enhance Per Color Contrast: With this option selected, Photoshop adjusts each channel separately.
Find Dark & Light Colors: Here, Photoshop uses the darkest and lightest areas in your image for the shadow and highlight values. This is the option that I use, and I’ll deal with the contrast of the photo in a separate adjustment layer.
Snap Neutral Midtones: If this option is turned on, Photoshop tries to identify a neutral tone in your image, and force it to grey. This can also sometimes introduce a color cast in your image, however, when using the “Find Dark & Light Colors” option, I recommend leaving it checked.
Target Colors Clipping: The values here tell Photoshop what percentages of highlights and shadows to “clip” or ignore. I’ve found the default values at 0.50% are slightly high, and I have changed mine to 0.10%, although you may wish to change yours on an image by image basis.
Adjust your settings as shown below, and be sure to click “Save as defaults” on, so that you don’t need to select these options every time.
Now, when you open an image and create a curves adjustment layer (because we are doing color correction, you can leave the blending mode of this particular layer as “Normal”), all you have to do is click on the “Auto” button within the curves dialog box and your default settings will be applied automatically!
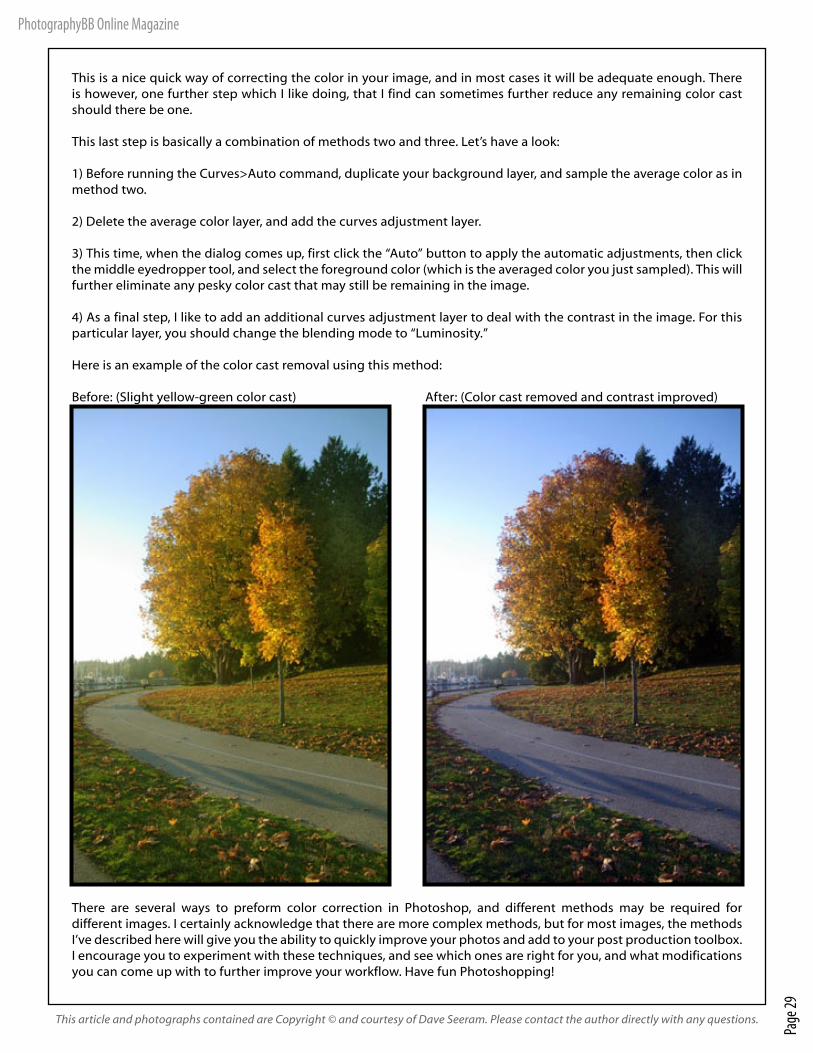
Page
29
PhotographyBB Online Magazine
This is a nice quick way of correcting the color in your image, and in most cases it will be adequate enough. There is however, one further step which I like doing, that I find can sometimes further reduce any remaining color cast should there be one.
This last step is basically a combination of methods two and three. Let’s have a look:
1) Before running the Curves>Auto command, duplicate your background layer, and sample the average color as in method two.
2) Delete the average color layer, and add the curves adjustment layer.
3) This time, when the dialog comes up, first click the “Auto” button to apply the automatic adjustments, then click the middle eyedropper tool, and select the foreground color (which is the averaged color you just sampled). This will further eliminate any pesky color cast that may still be remaining in the image.
4) As a final step, I like to add an additional curves adjustment layer to deal with the contrast in the image. For this particular layer, you should change the blending mode to “Luminosity.”
Here is an example of the color cast removal using this method:
Before: (Slight yellow-green color cast) After: (Color cast removed and contrast improved)
There are several ways to preform color correction in Photoshop, and different methods may be required for different images. I certainly acknowledge that there are more complex methods, but for most images, the methods I’ve described here will give you the ability to quickly improve your photos and add to your post production toolbox. I encourage you to experiment with these techniques, and see which ones are right for you, and what modifications you can come up with to further improve your workflow. Have fun Photoshopping!
This article and photographs contained are Copyright © and courtesy of Dave Seeram. Please contact the author directly with any questions.
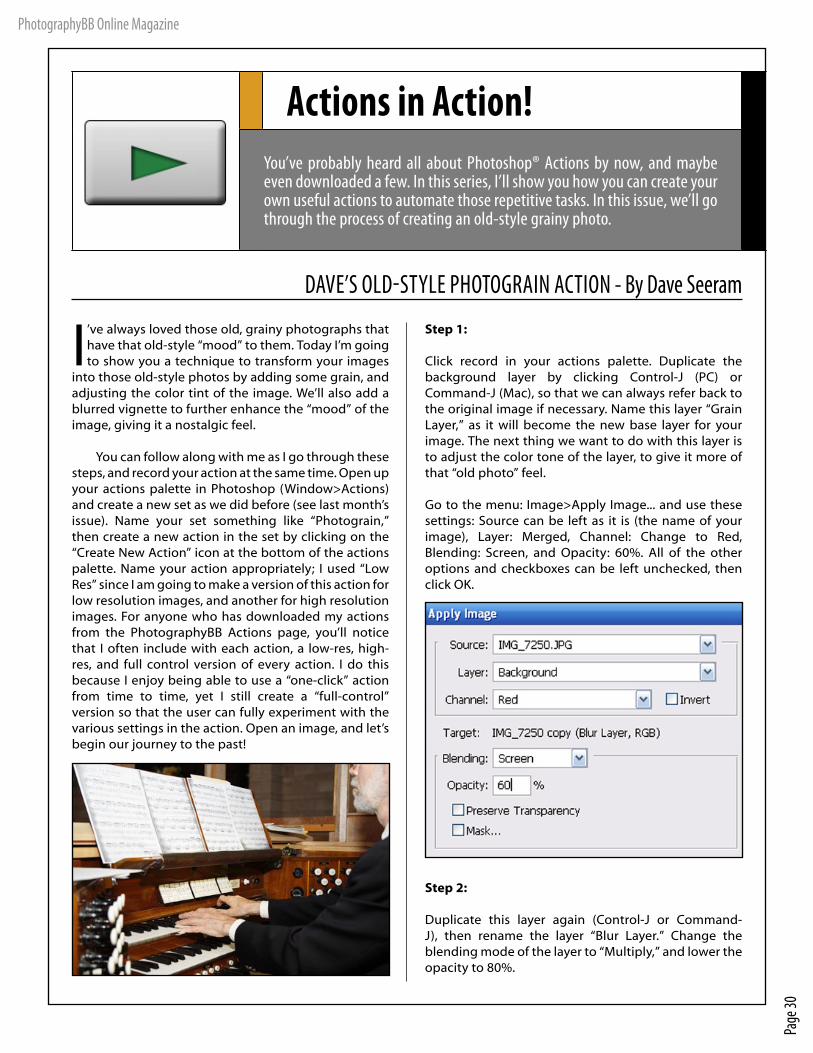
Page
30
PhotographyBB Online Magazine
Actions in Action!You’ve probably heard all about Photoshop® Actions by now, and maybe even downloaded a few. In this series, I’ll show you how you can create your own useful actions to automate those repetitive tasks. In this issue, we’ll go through the process of creating an old-style grainy photo.
DAVE’S OLD-STYLE PHOTOGRAIN ACTION - By Dave Seeram
I’ve always loved those old, grainy photographs that have that old-style “mood” to them. Today I’m going to show you a technique to transform your images
into those old-style photos by adding some grain, and adjusting the color tint of the image. We’ll also add a blurred vignette to further enhance the “mood” of the image, giving it a nostalgic feel.
You can follow along with me as I go through these steps, and record your action at the same time. Open up your actions palette in Photoshop (Window>Actions) and create a new set as we did before (see last month’s issue). Name your set something like “Photograin,” then create a new action in the set by clicking on the “Create New Action” icon at the bottom of the actions palette. Name your action appropriately; I used “Low Res” since I am going to make a version of this action for low resolution images, and another for high resolution images. For anyone who has downloaded my actions from the PhotographyBB Actions page, you’ll notice that I often include with each action, a low-res, high-res, and full control version of every action. I do this because I enjoy being able to use a “one-click” action from time to time, yet I still create a “full-control” version so that the user can fully experiment with the various settings in the action. Open an image, and let’s begin our journey to the past!
Step 1:
Click record in your actions palette. Duplicate the background layer by clicking Control-J (PC) or Command-J (Mac), so that we can always refer back to the original image if necessary. Name this layer “Grain Layer,” as it will become the new base layer for your image. The next thing we want to do with this layer is to adjust the color tone of the layer, to give it more of that “old photo” feel.
Go to the menu: Image>Apply Image... and use these settings: Source can be left as it is (the name of your image), Layer: Merged, Channel: Change to Red, Blending: Screen, and Opacity: 60%. All of the other options and checkboxes can be left unchecked, then click OK.
Step 2:
Duplicate this layer again (Control-J or Command-J), then rename the layer “Blur Layer.” Change the blending mode of the layer to “Multiply,” and lower the opacity to 80%.
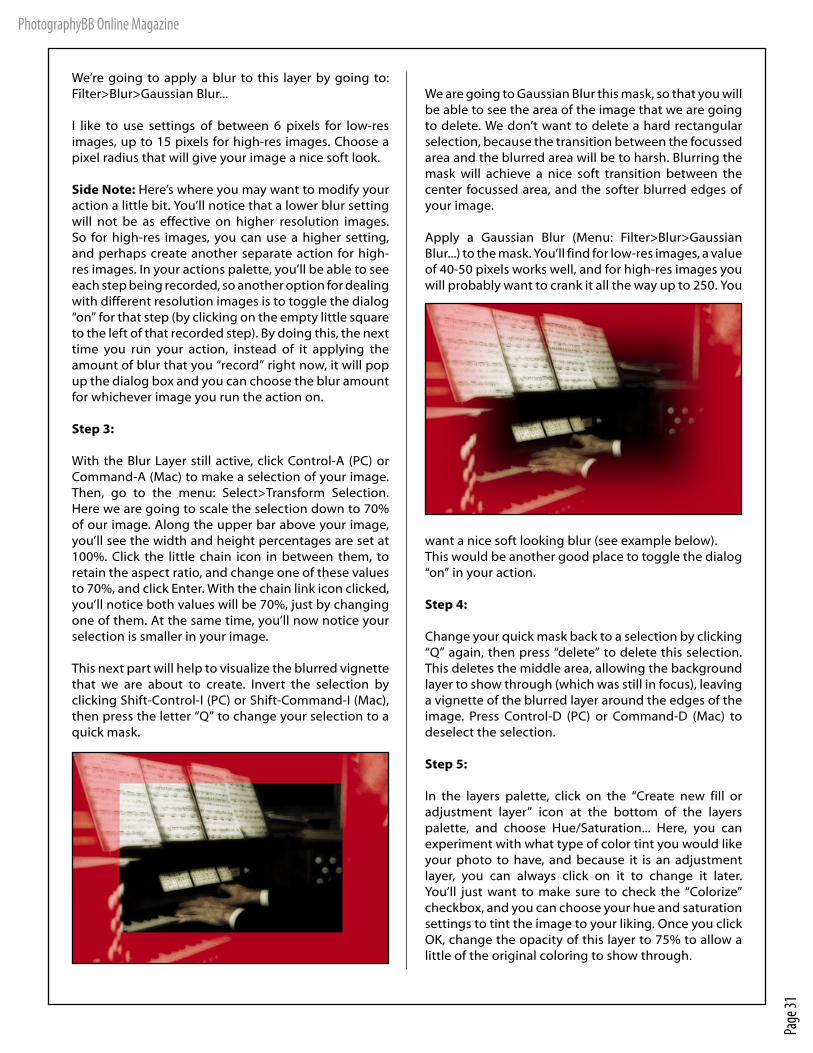
Page
31
PhotographyBB Online Magazine
We’re going to apply a blur to this layer by going to: Filter>Blur>Gaussian Blur...
I like to use settings of between 6 pixels for low-res images, up to 15 pixels for high-res images. Choose a pixel radius that will give your image a nice soft look.
Side Note: Here’s where you may want to modify your action a little bit. You’ll notice that a lower blur setting will not be as effective on higher resolution images. So for high-res images, you can use a higher setting, and perhaps create another separate action for high-res images. In your actions palette, you’ll be able to see each step being recorded, so another option for dealing with different resolution images is to toggle the dialog “on” for that step (by clicking on the empty little square to the left of that recorded step). By doing this, the next time you run your action, instead of it applying the amount of blur that you “record” right now, it will pop up the dialog box and you can choose the blur amount for whichever image you run the action on.
Step 3:
With the Blur Layer still active, click Control-A (PC) or Command-A (Mac) to make a selection of your image. Then, go to the menu: Select>Transform Selection. Here we are going to scale the selection down to 70% of our image. Along the upper bar above your image, you’ll see the width and height percentages are set at 100%. Click the little chain icon in between them, to retain the aspect ratio, and change one of these values to 70%, and click Enter. With the chain link icon clicked, you’ll notice both values will be 70%, just by changing one of them. At the same time, you’ll now notice your selection is smaller in your image.
This next part will help to visualize the blurred vignette that we are about to create. Invert the selection by clicking Shift-Control-I (PC) or Shift-Command-I (Mac), then press the letter “Q” to change your selection to a quick mask.
We are going to Gaussian Blur this mask, so that you will be able to see the area of the image that we are going to delete. We don’t want to delete a hard rectangular selection, because the transition between the focussed area and the blurred area will be to harsh. Blurring the mask will achieve a nice soft transition between the center focussed area, and the softer blurred edges of your image.
Apply a Gaussian Blur (Menu: Filter>Blur>Gaussian Blur...) to the mask. You’ll find for low-res images, a value of 40-50 pixels works well, and for high-res images you will probably want to crank it all the way up to 250. You
want a nice soft looking blur (see example below). This would be another good place to toggle the dialog “on” in your action.
Step 4:
Change your quick mask back to a selection by clicking “Q” again, then press “delete” to delete this selection. This deletes the middle area, allowing the background layer to show through (which was still in focus), leaving a vignette of the blurred layer around the edges of the image. Press Control-D (PC) or Command-D (Mac) to deselect the selection.
Step 5:
In the layers palette, click on the “Create new fill or adjustment layer” icon at the bottom of the layers palette, and choose Hue/Saturation... Here, you can experiment with what type of color tint you would like your photo to have, and because it is an adjustment layer, you can always click on it to change it later. You’ll just want to make sure to check the “Colorize” checkbox, and you can choose your hue and saturation settings to tint the image to your liking. Once you click OK, change the opacity of this layer to 75% to allow a little of the original coloring to show through.
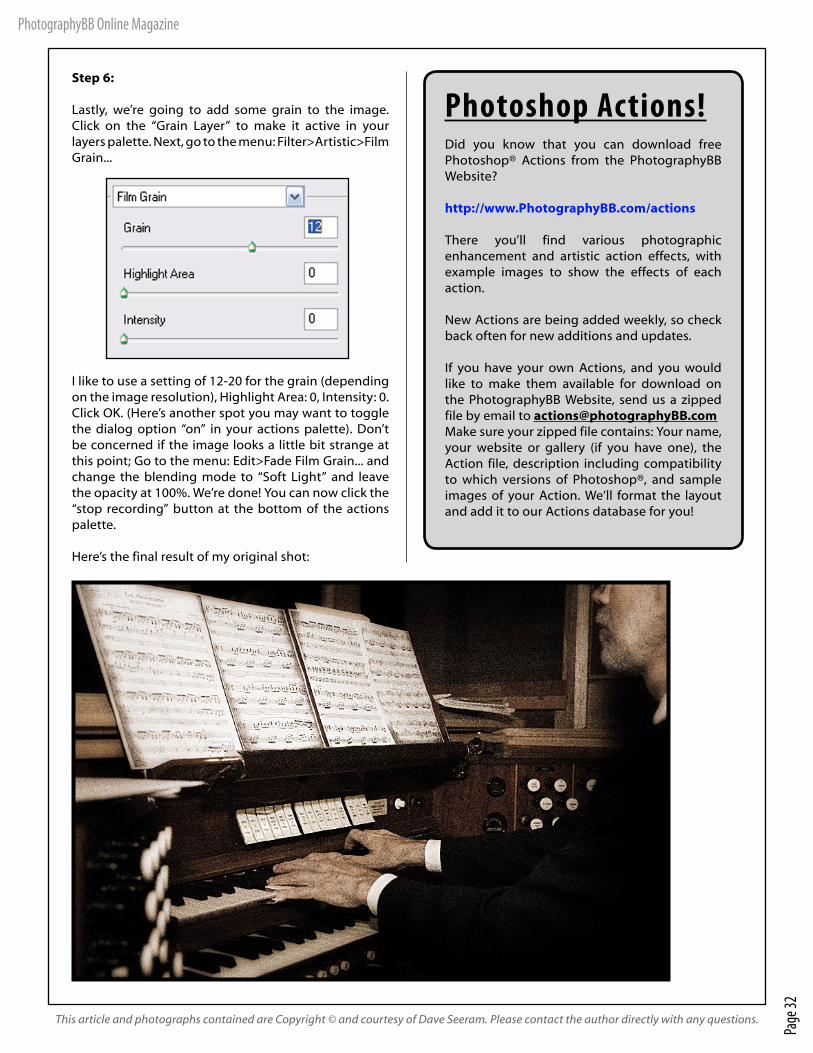
Page
32
PhotographyBB Online Magazine
Step 6:
Lastly, we’re going to add some grain to the image. Click on the “Grain Layer” to make it active in your layers palette. Next, go to the menu: Filter>Artistic>Film Grain...
I like to use a setting of 12-20 for the grain (depending on the image resolution), Highlight Area: 0, Intensity: 0. Click OK. (Here’s another spot you may want to toggle the dialog option “on” in your actions palette). Don’t be concerned if the image looks a little bit strange at this point; Go to the menu: Edit>Fade Film Grain... and change the blending mode to “Soft Light” and leave the opacity at 100%. We’re done! You can now click the “stop recording” button at the bottom of the actions palette.
Here’s the final result of my original shot:
Photoshop Actions!Did you know that you can download free Photoshop® Actions from the PhotographyBB Website?
http://www.PhotographyBB.com/actions
There you’ll find various photographic enhancement and artistic action effects, with example images to show the effects of each action.
New Actions are being added weekly, so check back often for new additions and updates.
If you have your own Actions, and you would like to make them available for download on the PhotographyBB Website, send us a zipped file by email to [email protected] sure your zipped file contains: Your name, your website or gallery (if you have one), the Action file, description including compatibility to which versions of Photoshop®, and sample images of your Action. We’ll format the layout and add it to our Actions database for you!
This article and photographs contained are Copyright © and courtesy of Dave Seeram. Please contact the author directly with any questions.

Page
33
PhotographyBB Online Magazine
Scrapbooking Tutorial SeriesOne of the best ways to showcase your digital photos or spruce up your web gallery is to build your own digital scrapbook. Our talented moderator, Victoria, begins this series by sharing some easy-to-use techniques in producing various effects and layouts for digital scrapbooking.
BABY’S FIRST BIRTHDAY! - By Victoria SargsyanStep 1:Create a new document in Photoshop. You can make the dimensions anything you like, but keep in mind that the resolution should be 72 pixels/inch for web viewing, or 300 pixels/inch for print. For this example, I used W:700, H:800, and 72 pixels/inch. Next, fill the document with any color you would like as your background color. I used a nice medium blue.
Step 2:Create a new layer in the layers palette, and using the rectangular marquee tool, select an area down the left side of your image from the top all the way to the bottom. Fill this area with the same color you used for the background. Next, go to the menu: Filter>Texture>Mosaic Tile... and adjust the settings to your taste. I used Title Size:13 Grout Width :8 , Lighten Grout: 9.
Step 3:Go to the menu: Layer>Layer Style>Drop Shadow... and change the angle to 180 degrees. You can also adjust the distance, spread, and size to your liking. Once you have applied the Drop Shadow, click Control-D (PC) or Command-D (Mac) to deselect the area.
Step 4:Create a new layer in the layers palette, and using the rectangular marquee tool, draw a rectangle, and fill the rectangle using a lighter shade of the color you used for the background. Click Control-D (PC) or Command-D (Mac) to deselect. Next, go to the menu: Filter>Distort>Ripple... and adjust the settings to your taste. I used Amount: 447% Size: Medium).
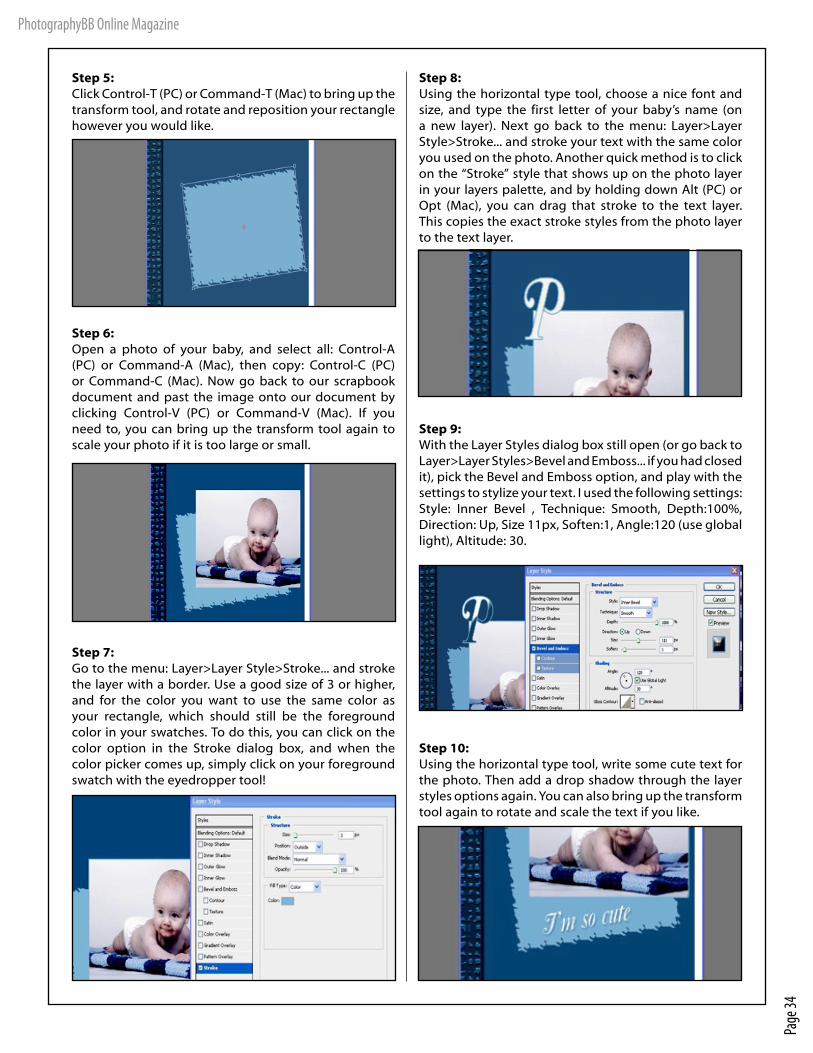
Page
34
PhotographyBB Online Magazine
Step 5:Click Control-T (PC) or Command-T (Mac) to bring up the transform tool, and rotate and reposition your rectangle however you would like.
Step 6:Open a photo of your baby, and select all: Control-A (PC) or Command-A (Mac), then copy: Control-C (PC) or Command-C (Mac). Now go back to our scrapbook document and past the image onto our document by clicking Control-V (PC) or Command-V (Mac). If you need to, you can bring up the transform tool again to scale your photo if it is too large or small.
Step 7:Go to the menu: Layer>Layer Style>Stroke... and stroke the layer with a border. Use a good size of 3 or higher, and for the color you want to use the same color as your rectangle, which should still be the foreground color in your swatches. To do this, you can click on the color option in the Stroke dialog box, and when the color picker comes up, simply click on your foreground swatch with the eyedropper tool!
Step 8:Using the horizontal type tool, choose a nice font and size, and type the first letter of your baby’s name (on a new layer). Next go back to the menu: Layer>Layer Style>Stroke... and stroke your text with the same color you used on the photo. Another quick method is to click on the “Stroke” style that shows up on the photo layer in your layers palette, and by holding down Alt (PC) or Opt (Mac), you can drag that stroke to the text layer. This copies the exact stroke styles from the photo layer to the text layer.
Step 9:With the Layer Styles dialog box still open (or go back to Layer>Layer Styles>Bevel and Emboss... if you had closed it), pick the Bevel and Emboss option, and play with the settings to stylize your text. I used the following settings: Style: Inner Bevel , Technique: Smooth, Depth:100%, Direction: Up, Size 11px, Soften:1, Angle:120 (use global light), Altitude: 30.
Step 10:Using the horizontal type tool, write some cute text for the photo. Then add a drop shadow through the layer styles options again. You can also bring up the transform tool again to rotate and scale the text if you like.

Page
35
PhotographyBB Online Magazine
Step 11:Create some additional shapes (I made 3 small rectangles) and color them appropriately. You’re finished!
About the Author: Victoria Sargsyan is a member of NAPP (National Association of Photoshop Professionals) and is a talented graphic artist and web designer with over 15 years professional experience. To see more from Victoria, visit her website where you can check out her galleries and additional tutorials at:http://www.viktoriyaimage.com
This article and all image contained are Copyright © are courtesy of Victoria Sargsyan. Please contact the author directly with any questions.
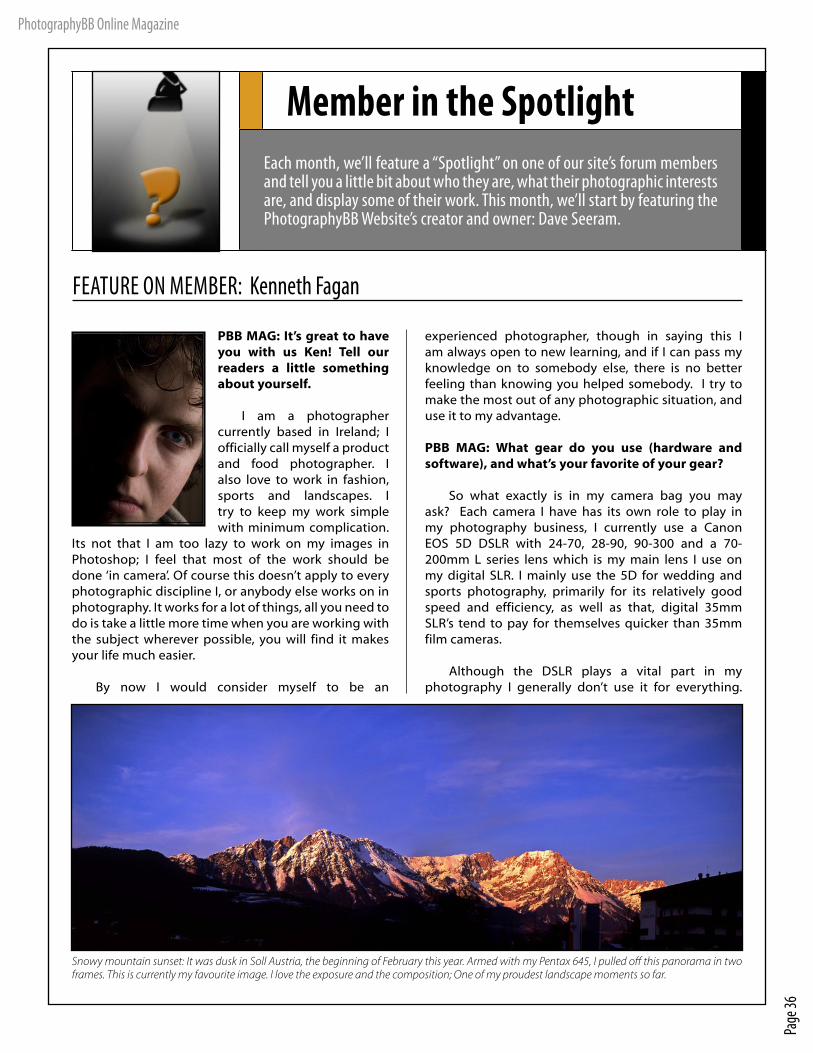
Page
36
PhotographyBB Online Magazine
Member in the SpotlightEach month, we’ll feature a “Spotlight” on one of our site’s forum members and tell you a little bit about who they are, what their photographic interests are, and display some of their work. This month, we’ll start by featuring the PhotographyBB Website’s creator and owner: Dave Seeram.
FEATURE ON MEMBER: Kenneth Fagan
PBB MAG: It’s great to have you with us Ken! Tell our readers a little something about yourself.
I am a photographer currently based in Ireland; I officially call myself a product and food photographer. I also love to work in fashion, sports and landscapes. I try to keep my work simple with minimum complication.
Its not that I am too lazy to work on my images in Photoshop; I feel that most of the work should be done ‘in camera’. Of course this doesn’t apply to every photographic discipline I, or anybody else works on in photography. It works for a lot of things, all you need to do is take a little more time when you are working with the subject wherever possible, you will find it makes your life much easier.
By now I would consider myself to be an
experienced photographer, though in saying this I am always open to new learning, and if I can pass my knowledge on to somebody else, there is no better feeling than knowing you helped somebody. I try to make the most out of any photographic situation, and use it to my advantage.
PBB MAG: What gear do you use (hardware and software), and what’s your favorite of your gear?
So what exactly is in my camera bag you may ask? Each camera I have has its own role to play in my photography business, I currently use a Canon EOS 5D DSLR with 24-70, 28-90, 90-300 and a 70-200mm L series lens which is my main lens I use on my digital SLR. I mainly use the 5D for wedding and sports photography, primarily for its relatively good speed and efficiency, as well as that, digital 35mm SLR’s tend to pay for themselves quicker than 35mm film cameras.
Although the DSLR plays a vital part in my photography I generally don’t use it for everything.
Snowy mountain sunset: It was dusk in Soll Austria, the beginning of February this year. Armed with my Pentax 645, I pulled off this panorama in two frames. This is currently my favourite image. I love the exposure and the composition; One of my proudest landscape moments so far.
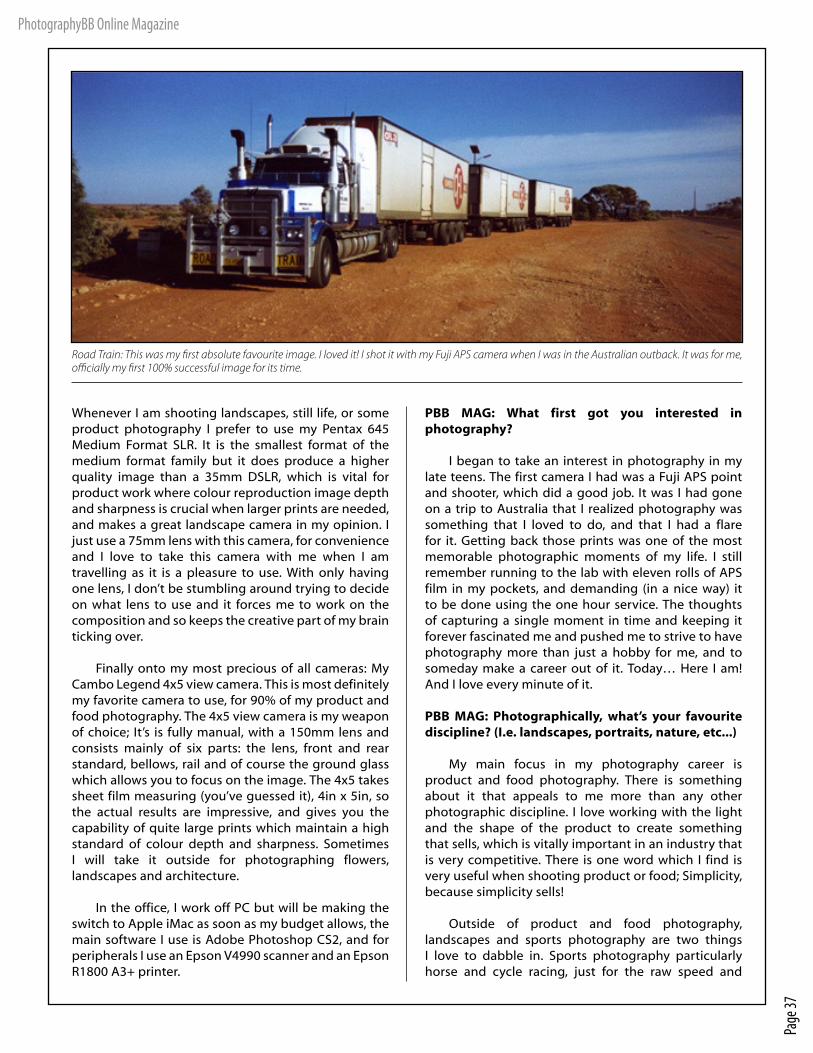
Page
37
PhotographyBB Online Magazine
Whenever I am shooting landscapes, still life, or some product photography I prefer to use my Pentax 645 Medium Format SLR. It is the smallest format of the medium format family but it does produce a higher quality image than a 35mm DSLR, which is vital for product work where colour reproduction image depth and sharpness is crucial when larger prints are needed, and makes a great landscape camera in my opinion. I just use a 75mm lens with this camera, for convenience and I love to take this camera with me when I am travelling as it is a pleasure to use. With only having one lens, I don’t be stumbling around trying to decide on what lens to use and it forces me to work on the composition and so keeps the creative part of my brain ticking over.
Finally onto my most precious of all cameras: My Cambo Legend 4x5 view camera. This is most definitely my favorite camera to use, for 90% of my product and food photography. The 4x5 view camera is my weapon of choice; It’s is fully manual, with a 150mm lens and consists mainly of six parts: the lens, front and rear standard, bellows, rail and of course the ground glass which allows you to focus on the image. The 4x5 takes sheet film measuring (you’ve guessed it), 4in x 5in, so the actual results are impressive, and gives you the capability of quite large prints which maintain a high standard of colour depth and sharpness. Sometimes I will take it outside for photographing flowers, landscapes and architecture.
In the office, I work off PC but will be making the switch to Apple iMac as soon as my budget allows, the main software I use is Adobe Photoshop CS2, and for peripherals I use an Epson V4990 scanner and an Epson R1800 A3+ printer.
PBB MAG: What first got you interested in photography?
I began to take an interest in photography in my late teens. The first camera I had was a Fuji APS point and shooter, which did a good job. It was I had gone on a trip to Australia that I realized photography was something that I loved to do, and that I had a flare for it. Getting back those prints was one of the most memorable photographic moments of my life. I still remember running to the lab with eleven rolls of APS film in my pockets, and demanding (in a nice way) it to be done using the one hour service. The thoughts of capturing a single moment in time and keeping it forever fascinated me and pushed me to strive to have photography more than just a hobby for me, and to someday make a career out of it. Today… Here I am! And I love every minute of it.
PBB MAG: Photographically, what’s your favourite discipline? (I.e. landscapes, portraits, nature, etc...)
My main focus in my photography career is product and food photography. There is something about it that appeals to me more than any other photographic discipline. I love working with the light and the shape of the product to create something that sells, which is vitally important in an industry that is very competitive. There is one word which I find is very useful when shooting product or food; Simplicity, because simplicity sells!
Outside of product and food photography, landscapes and sports photography are two things I love to dabble in. Sports photography particularly horse and cycle racing, just for the raw speed and
Road Train: This was my first absolute favourite image. I loved it! I shot it with my Fuji APS camera when I was in the Australian outback. It was for me, officially my first 100% successful image for its time.
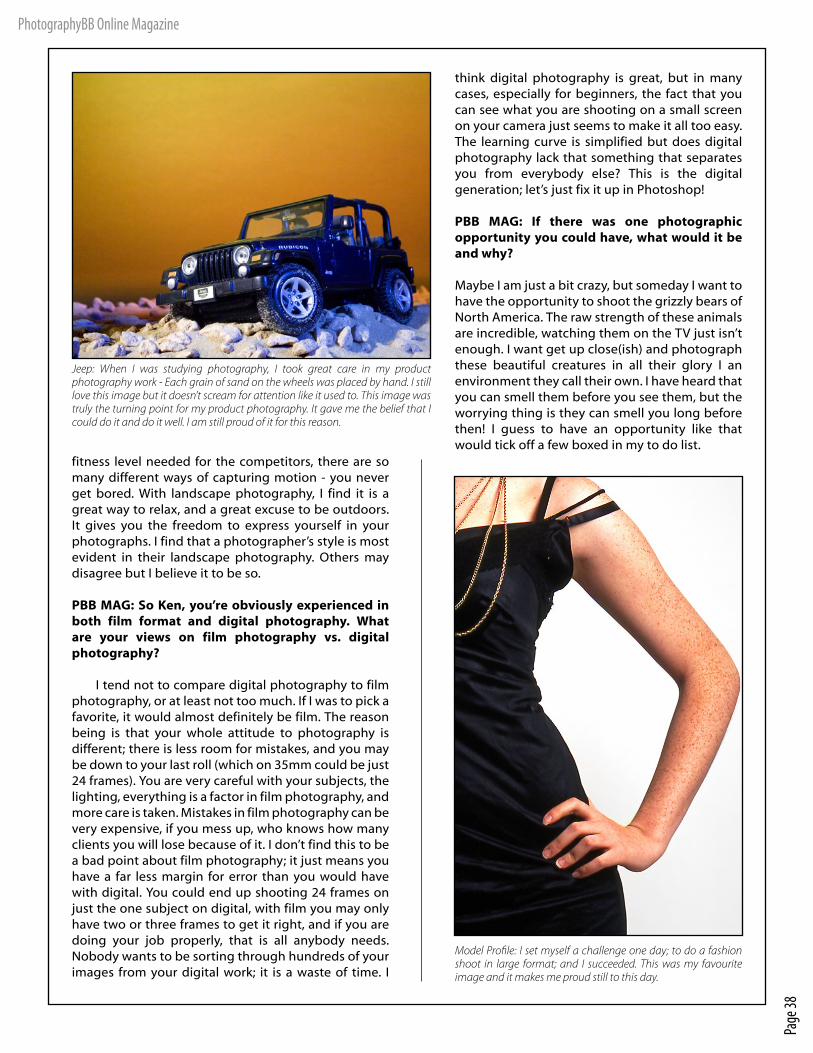
Page
38
PhotographyBB Online Magazine
fitness level needed for the competitors, there are so many different ways of capturing motion - you never get bored. With landscape photography, I find it is a great way to relax, and a great excuse to be outdoors. It gives you the freedom to express yourself in your photographs. I find that a photographer’s style is most evident in their landscape photography. Others may disagree but I believe it to be so.
PBB MAG: So Ken, you’re obviously experienced in both film format and digital photography. What are your views on film photography vs. digital photography?
I tend not to compare digital photography to film photography, or at least not too much. If I was to pick a favorite, it would almost definitely be film. The reason being is that your whole attitude to photography is different; there is less room for mistakes, and you may be down to your last roll (which on 35mm could be just 24 frames). You are very careful with your subjects, the lighting, everything is a factor in film photography, and more care is taken. Mistakes in film photography can be very expensive, if you mess up, who knows how many clients you will lose because of it. I don’t find this to be a bad point about film photography; it just means you have a far less margin for error than you would have with digital. You could end up shooting 24 frames on just the one subject on digital, with film you may only have two or three frames to get it right, and if you are doing your job properly, that is all anybody needs. Nobody wants to be sorting through hundreds of your images from your digital work; it is a waste of time. I
think digital photography is great, but in many cases, especially for beginners, the fact that you can see what you are shooting on a small screen on your camera just seems to make it all too easy. The learning curve is simplified but does digital photography lack that something that separates you from everybody else? This is the digital generation; let’s just fix it up in Photoshop!
PBB MAG: If there was one photographic opportunity you could have, what would it be and why?
Maybe I am just a bit crazy, but someday I want to have the opportunity to shoot the grizzly bears of North America. The raw strength of these animals are incredible, watching them on the TV just isn’t enough. I want get up close(ish) and photograph these beautiful creatures in all their glory I an environment they call their own. I have heard that you can smell them before you see them, but the worrying thing is they can smell you long before then! I guess to have an opportunity like that would tick off a few boxed in my to do list.
Jeep: When I was studying photography, I took great care in my product photography work - Each grain of sand on the wheels was placed by hand. I still love this image but it doesn’t scream for attention like it used to. This image was truly the turning point for my product photography. It gave me the belief that I could do it and do it well. I am still proud of it for this reason.
Model Profile: I set myself a challenge one day; to do a fashion shoot in large format; and I succeeded. This was my favourite image and it makes me proud still to this day.
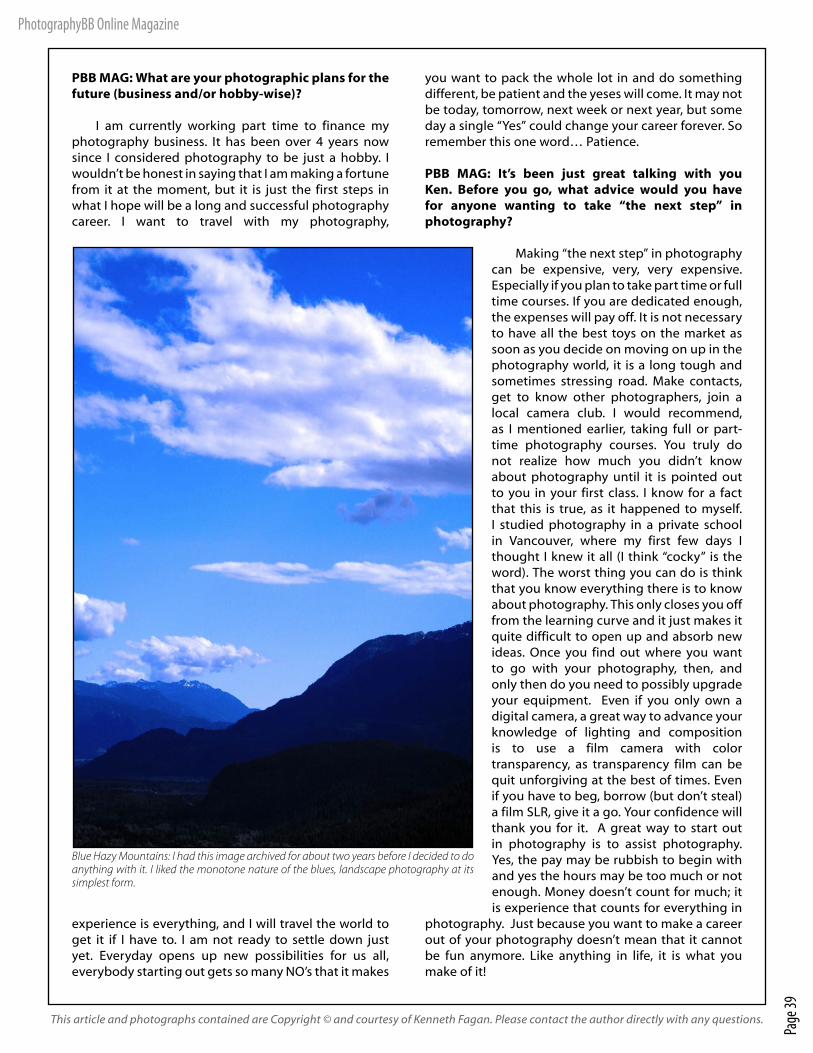
Page
39
PhotographyBB Online Magazine
PBB MAG: What are your photographic plans for the future (business and/or hobby-wise)?
I am currently working part time to finance my photography business. It has been over 4 years now since I considered photography to be just a hobby. I wouldn’t be honest in saying that I am making a fortune from it at the moment, but it is just the first steps in what I hope will be a long and successful photography career. I want to travel with my photography,
experience is everything, and I will travel the world to get it if I have to. I am not ready to settle down just yet. Everyday opens up new possibilities for us all, everybody starting out gets so many NO’s that it makes
you want to pack the whole lot in and do something different, be patient and the yeses will come. It may not be today, tomorrow, next week or next year, but some day a single “Yes” could change your career forever. So remember this one word… Patience.
PBB MAG: It’s been just great talking with you Ken. Before you go, what advice would you have for anyone wanting to take “the next step” in photography?
Making “the next step” in photography can be expensive, very, very expensive. Especially if you plan to take part time or full time courses. If you are dedicated enough, the expenses will pay off. It is not necessary to have all the best toys on the market as soon as you decide on moving on up in the photography world, it is a long tough and sometimes stressing road. Make contacts, get to know other photographers, join a local camera club. I would recommend, as I mentioned earlier, taking full or part-time photography courses. You truly do not realize how much you didn’t know about photography until it is pointed out to you in your first class. I know for a fact that this is true, as it happened to myself. I studied photography in a private school in Vancouver, where my first few days I thought I knew it all (I think “cocky” is the word). The worst thing you can do is think that you know everything there is to know about photography. This only closes you off from the learning curve and it just makes it quite difficult to open up and absorb new ideas. Once you find out where you want to go with your photography, then, and only then do you need to possibly upgrade your equipment. Even if you only own a digital camera, a great way to advance your knowledge of lighting and composition is to use a film camera with color transparency, as transparency film can be quit unforgiving at the best of times. Even if you have to beg, borrow (but don’t steal) a film SLR, give it a go. Your confidence will thank you for it. A great way to start out in photography is to assist photography. Yes, the pay may be rubbish to begin with and yes the hours may be too much or not enough. Money doesn’t count for much; it is experience that counts for everything in
photography. Just because you want to make a career out of your photography doesn’t mean that it cannot be fun anymore. Like anything in life, it is what you make of it!
Blue Hazy Mountains: I had this image archived for about two years before I decided to do anything with it. I liked the monotone nature of the blues, landscape photography at its simplest form.
This article and photographs contained are Copyright © and courtesy of Kenneth Fagan. Please contact the author directly with any questions.
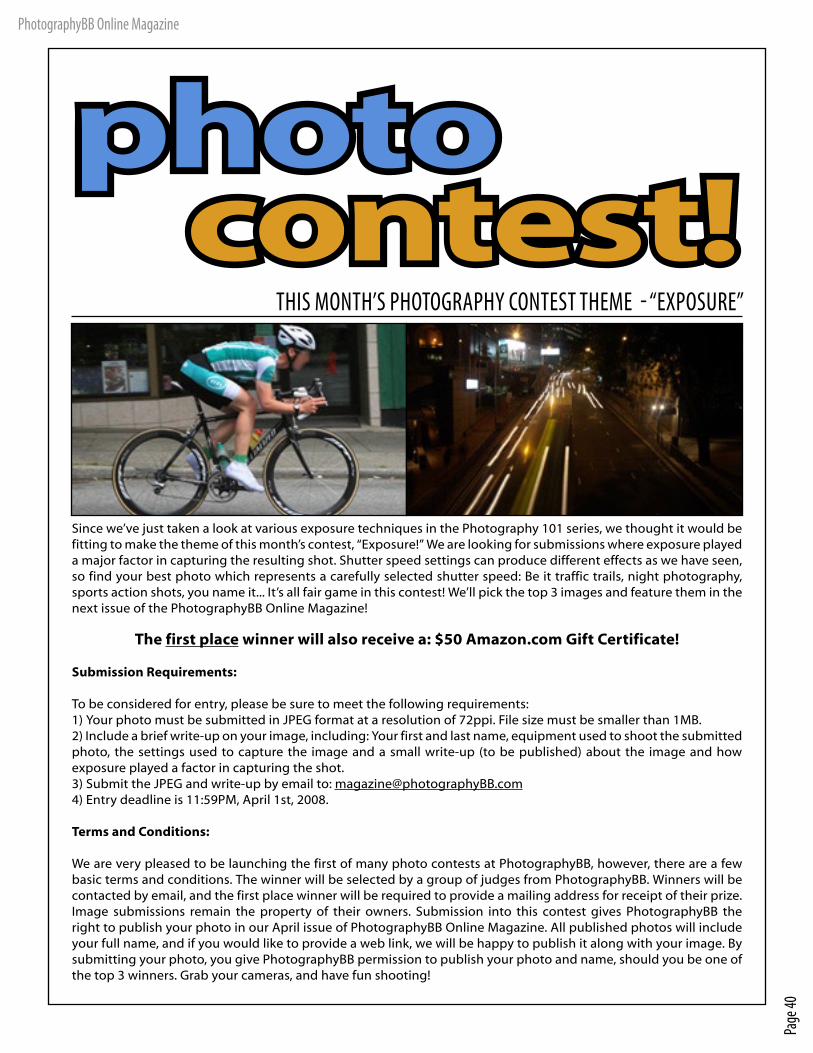
Page
40
PhotographyBB Online Magazine
Since we’ve just taken a look at various exposure techniques in the Photography 101 series, we thought it would be fitting to make the theme of this month’s contest, “Exposure!” We are looking for submissions where exposure played a major factor in capturing the resulting shot. Shutter speed settings can produce different effects as we have seen, so find your best photo which represents a carefully selected shutter speed: Be it traffic trails, night photography, sports action shots, you name it... It’s all fair game in this contest! We’ll pick the top 3 images and feature them in the next issue of the PhotographyBB Online Magazine!
The first place winner will also receive a: $50 Amazon.com Gift Certificate!
Submission Requirements:
To be considered for entry, please be sure to meet the following requirements:1) Your photo must be submitted in JPEG format at a resolution of 72ppi. File size must be smaller than 1MB.2) Include a brief write-up on your image, including: Your first and last name, equipment used to shoot the submitted photo, the settings used to capture the image and a small write-up (to be published) about the image and how exposure played a factor in capturing the shot.3) Submit the JPEG and write-up by email to: [email protected]) Entry deadline is 11:59PM, April 1st, 2008.
Terms and Conditions:
We are very pleased to be launching the first of many photo contests at PhotographyBB, however, there are a few basic terms and conditions. The winner will be selected by a group of judges from PhotographyBB. Winners will be contacted by email, and the first place winner will be required to provide a mailing address for receipt of their prize. Image submissions remain the property of their owners. Submission into this contest gives PhotographyBB the right to publish your photo in our April issue of PhotographyBB Online Magazine. All published photos will include your full name, and if you would like to provide a web link, we will be happy to publish it along with your image. By submitting your photo, you give PhotographyBB permission to publish your photo and name, should you be one of the top 3 winners. Grab your cameras, and have fun shooting!
photo contest!
THIS MONTH’S PHOTOGRAPHY CONTEST THEME - “EXPOSURE”
Page
41
PhotographyBB Online Magazine
Have a Great Idea for a
Photography Article?
We are looking for talented individuals
who would like to expand their portfolios
by volunteering to contribute articles to
this e-magazine! If you are interested, we’d
love to hear from you.
Topics of Interest are:
- Photography Techniques- Photography on Location- Photoshop Tutorials- Hardware / Software Reviews- Camera Equipment- Member Spotlight- Plus we’re open to new ideas!
To become either a regular contributing author, or even just for a one-time article, please email us at:
Introduce yourself, share your idea, and maybe we’ll see you in next month’s issue!
Step into the Spotlight!Would you like to be featured in the PhotographyBB Online Spotlight on Member section? If so, please let us know at: [email protected]
We’ll feature your photos, a small biography and write-up about you, as well as links to your web gallery or photography related business. We all love photography and image editing, so let’s get to know each other!
Next Month’s Issue:Next month, we’ll have some more great photographic techniques for you to learn. We’ll be continuing the series “Photography 101” to help you get the most out of your camera’s manual mode. We’ll also have a look at other camera accessories, and what factors to consider when buying them.
We’ll continue our popular series of “Photography Around the World” as we take you on a photographer’s view of far away and exotic places which just might make you feel like you are actually there!
Additionally, there will be some new editions to the magazine with articles on stock photography agencies, and a new series on Photoshop Elements tutorials. So with all this exciting stuff going on, stay tuned for next month’s issue of the PhotographyBB Online Magazine!
Discounts for Readers:Each month we will be featuring special discounts for various online offers, exclusively for readers of the PhotographyBB Online Magazine. This month, we’ll feature a discount on our Photoshop Actions, with a whopping 30% discount on any PhotographyBB Action! (Discount Code: PBBMAG30 - Valid until April 8th, 2008)
Thank you for reading the PhotographyBB Online Magazine. We hope you enjoyed it, and we’d love to see you again next month. If you have any questions or comments for us regarding this magazine, please feel free to email us at:
We would love to hear from you!