photo insights march '14
DESCRIPTION
An eMagazine devoted to inspiring photography and creative Photoshop techniques published by Jim ZuckermanTRANSCRIPT

1
P H O T O I N S I G H T SJim Zuckerman’s
March 2014
• Why photos are not sharp• Black velvet• Liquify craziness• Travel portraits• Student showcase• Photo tours

2
T a b l e o f C o n t e n t s
4. Sharpness issues9. Birds in flight14. Creating a starfield17. Creative blurs22. What’s w rong with this picture?24. Short and sweet26. Ask jim29. Student showcase33. Back issues
Table of Contents
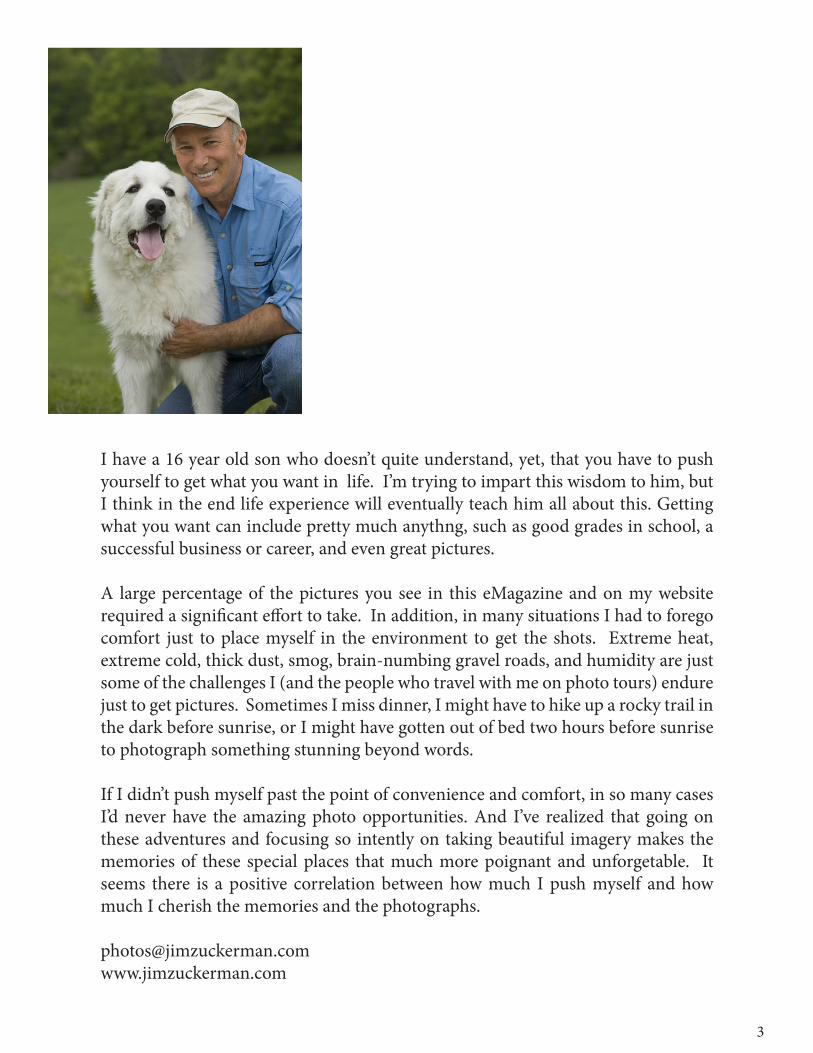
I have a 16 year old son who doesn’t quite understand, yet, that you have to push yourself to get what you want in life. I’m trying to impart this wisdom to him, but I think in the end life experience will eventually teach him all about this. Getting what you want can include pretty much anythng, such as good grades in school, a successful business or career, and even great pictures.
A large percentage of the pictures you see in this eMagazine and on my website required a significant effort to take. In addition, in many situations I had to forego comfort just to place myself in the environment to get the shots. Extreme heat, extreme cold, thick dust, smog, brain-numbing gravel roads, and humidity are just some of the challenges I (and the people who travel with me on photo tours) endure just to get pictures. Sometimes I miss dinner, I might have to hike up a rocky trail in the dark before sunrise, or I might have gotten out of bed two hours before sunrise to photograph something stunning beyond words.
If I didn’t push myself past the point of convenience and comfort, in so many cases I’d never have the amazing photo opportunities. And I’ve realized that going on these adventures and focusing so intently on taking beautiful imagery makes the memories of these special places that much more poignant and unforgetable. It seems there is a positive correlation between how much I push myself and how much I cherish the memories and the photographs.
3
Why Photos Are Not S H A R P
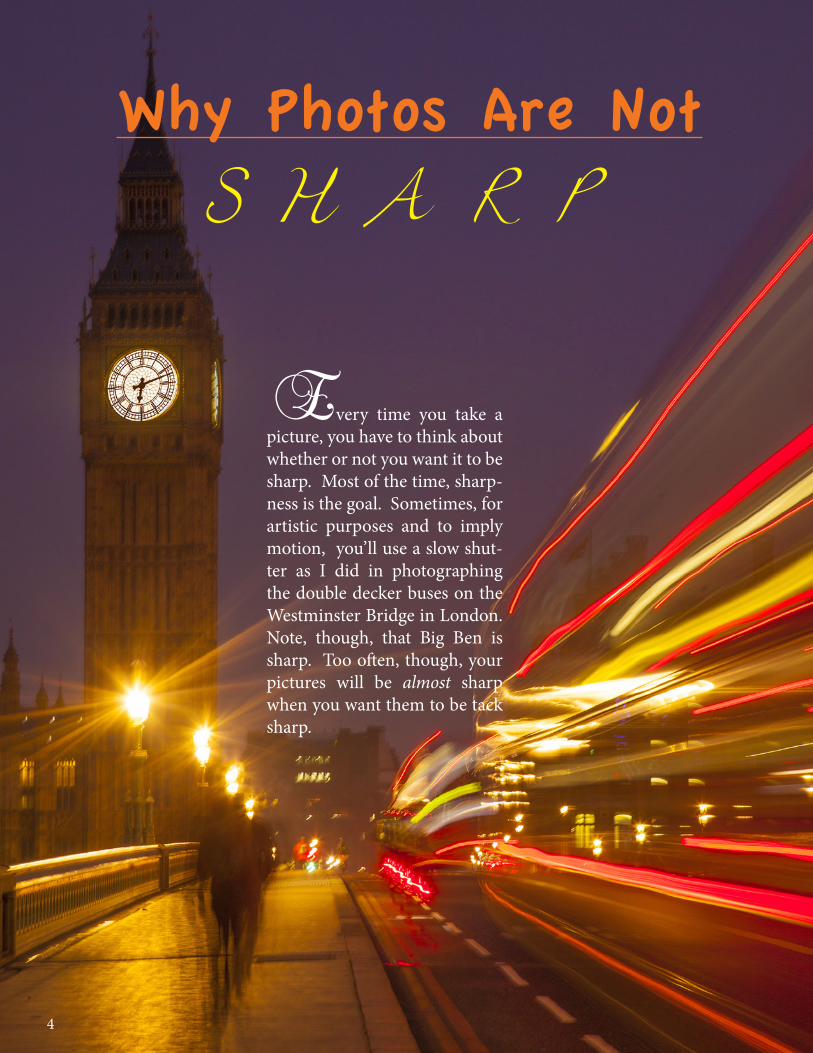
Every time you take a picture, you have to think about whether or not you want it to be sharp. Most of the time, sharp-ness is the goal. Sometimes, for artistic purposes and to imply motion, you’ll use a slow shut-ter as I did in photographing the double decker buses on the Westminster Bridge in London. Note, though, that Big Ben is sharp. Too often, though, your pictures will be almost sharp when you want them to be tack sharp.
4
5
There are many reasons why your pictures may be disappointedly unsharp. Here is a listing of these reasons and how you can ad-dress each one. Hopefully you will be able to increase the percentage of sharp pictures you take by keeping these in mind as you shoot.
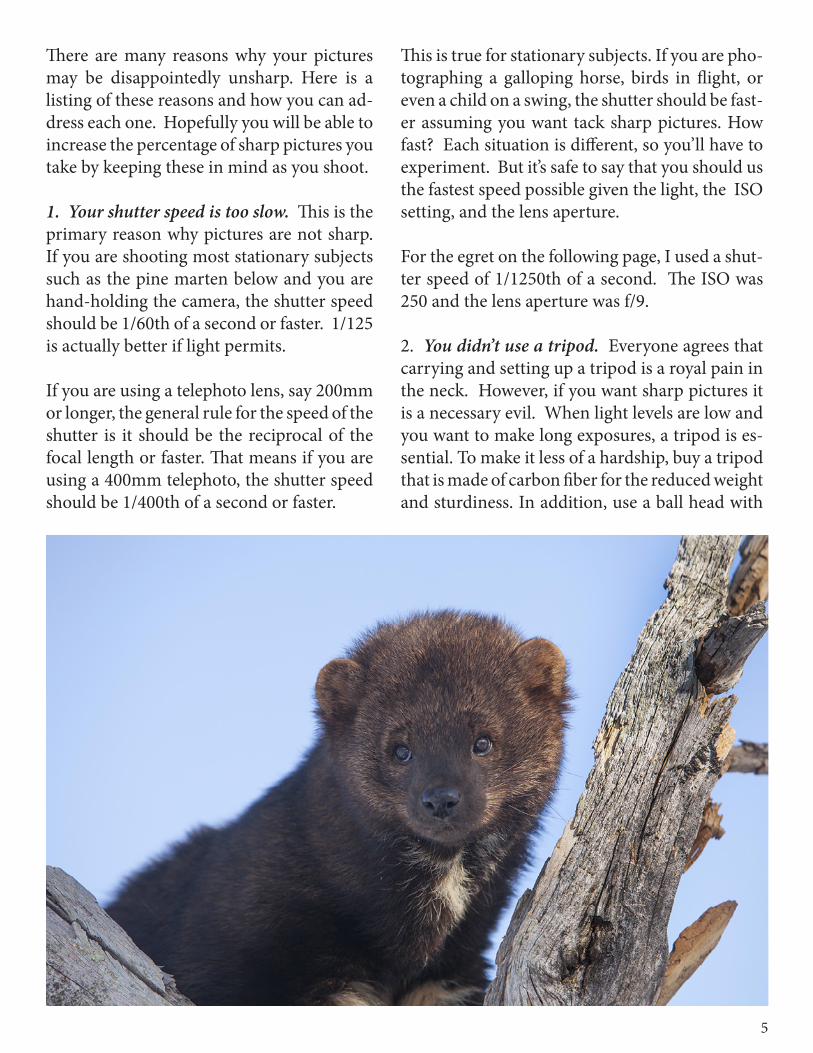
1. Your shutter speed is too slow. This is the primary reason why pictures are not sharp. If you are shooting most stationary subjects such as the pine marten below and you are hand-holding the camera, the shutter speed should be 1/60th of a second or faster. 1/125 is actually better if light permits.
If you are using a telephoto lens, say 200mm or longer, the general rule for the speed of the shutter is it should be the reciprocal of the focal length or faster. That means if you are using a 400mm telephoto, the shutter speed should be 1/400th of a second or faster.
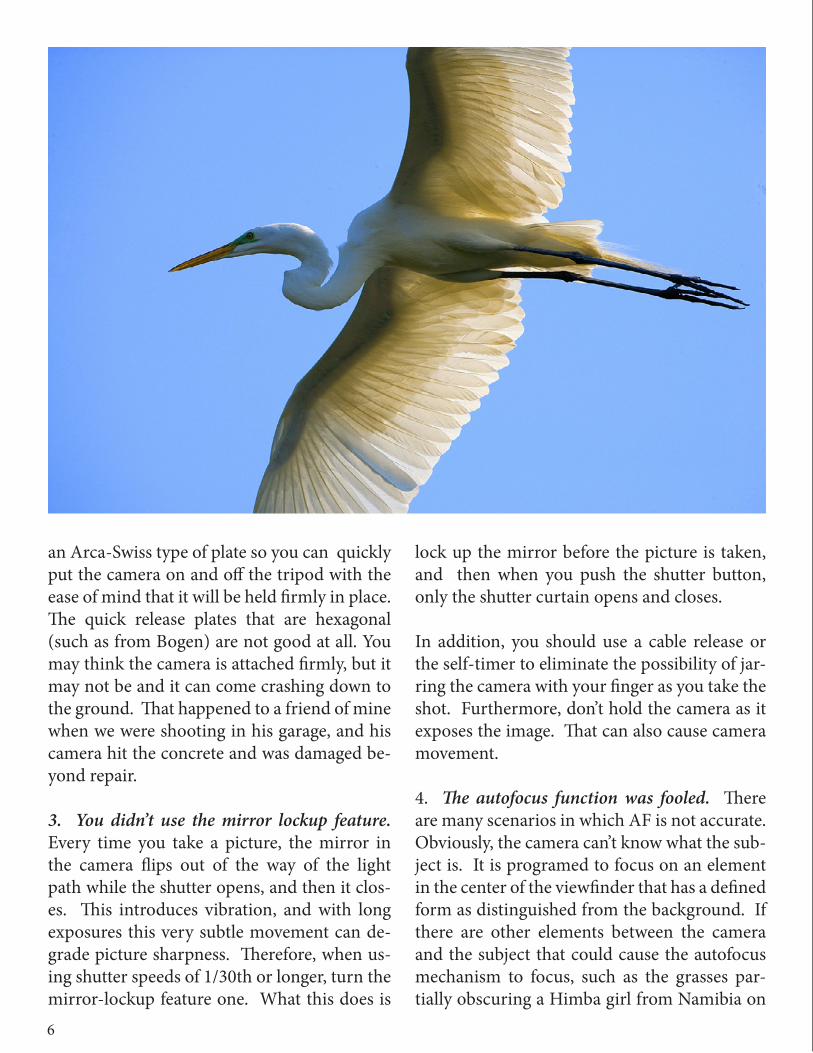
This is true for stationary subjects. If you are pho-tographing a galloping horse, birds in flight, or even a child on a swing, the shutter should be fast-er assuming you want tack sharp pictures. How fast? Each situation is different, so you’ll have to experiment. But it’s safe to say that you should us the fastest speed possible given the light, the ISO setting, and the lens aperture.
For the egret on the following page, I used a shut-ter speed of 1/1250th of a second. The ISO was 250 and the lens aperture was f/9.
2. You didn’t use a tripod. Everyone agrees that carrying and setting up a tripod is a royal pain in the neck. However, if you want sharp pictures it is a necessary evil. When light levels are low and you want to make long exposures, a tripod is es-sential. To make it less of a hardship, buy a tripod that is made of carbon fiber for the reduced weight and sturdiness. In addition, use a ball head with
6
an Arca-Swiss type of plate so you can quickly put the camera on and off the tripod with the ease of mind that it will be held firmly in place. The quick release plates that are hexagonal (such as from Bogen) are not good at all. You may think the camera is attached firmly, but it may not be and it can come crashing down to the ground. That happened to a friend of mine when we were shooting in his garage, and his camera hit the concrete and was damaged be-yond repair.
3. You didn’t use the mirror lockup feature. Every time you take a picture, the mirror in the camera flips out of the way of the light path while the shutter opens, and then it clos-es. This introduces vibration, and with long exposures this very subtle movement can de-grade picture sharpness. Therefore, when us-ing shutter speeds of 1/30th or longer, turn the mirror-lockup feature one. What this does is
lock up the mirror before the picture is taken, and then when you push the shutter button, only the shutter curtain opens and closes.
In addition, you should use a cable release or the self-timer to eliminate the possibility of jar-ring the camera with your finger as you take the shot. Furthermore, don’t hold the camera as it exposes the image. That can also cause camera movement.
4. The autofocus function was fooled. There are many scenarios in which AF is not accurate. Obviously, the camera can’t know what the sub-ject is. It is programed to focus on an element in the center of the viewfinder that has a defined form as distinguished from the background. If there are other elements between the camera and the subject that could cause the autofocus mechanism to focus, such as the grasses par-tially obscuring a Himba girl from Namibia on
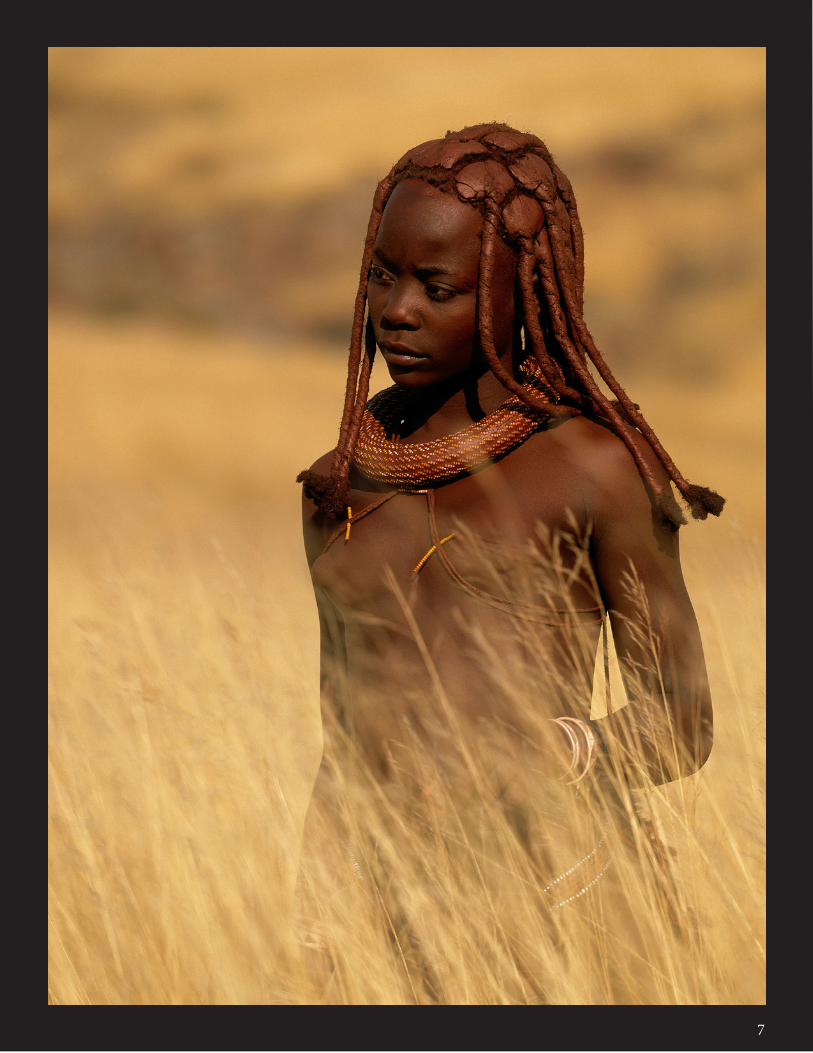
7 7
page seven, then there is a very good chance the subject won’t be sharp.
What is the solution? You have to focus the old fashion way -- manually. Alternatively, you could adjust the focus points in the camera so instead of focusing in the middle of the viewfinder, you can focus off-center on the location of the sub-ject in the composition. The problem with this, though, is that it takes time to set this up . In the meantime, you could lose the shot you want. I think the fastest way to deal with this issue is to manually focus the lens.
5. Don’t raise the center column. Even if you have to bend down to look in the viewfinder, which is not the most comfortable position from which to shoot, it’s better to keep the center column in the lowest position possible. Raising the center column introduces instability in the tripod, and
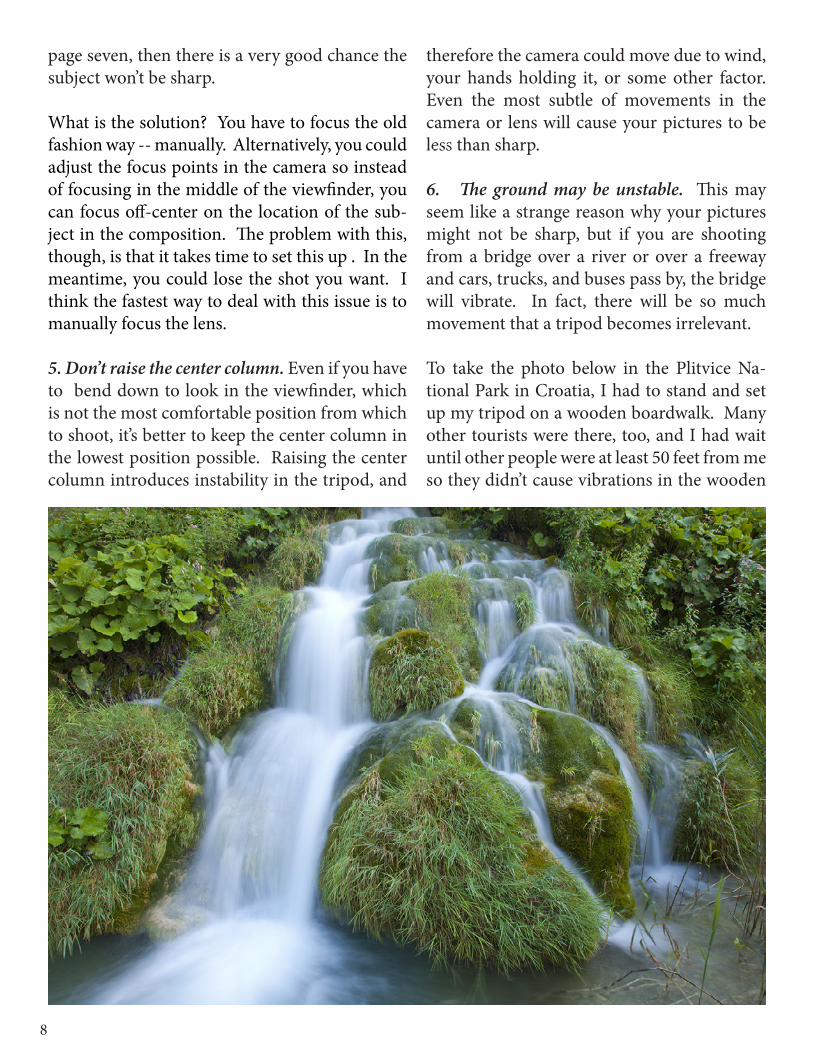
therefore the camera could move due to wind, your hands holding it, or some other factor. Even the most subtle of movements in the camera or lens will cause your pictures to be less than sharp.Arelatively ne6. The ground may be unstable. This may seem like a strange reason why your pictures might not be sharp, but if you are shooting from a bridge over a river or over a freeway and cars, trucks, and buses pass by, the bridge will vibrate. In fact, there will be so much movement that a tripod becomes irrelevant.
To take the photo below in the Plitvice Na-tional Park in Croatia, I had to stand and set up my tripod on a wooden boardwalk. Many other tourists were there, too, and I had wait until other people were at least 50 feet from me so they didn’t cause vibrations in the wooden
8
slats.
7. You didn’t turn off the image stabilization feature off. It is so easy to forget to do this, but it’s very important to remember. Every time you use a tripod, turn the IS or VR off. Although lens manufacturers state that some lenses can be used with this feature left on, chances are that your lens needs for this func-tion to be turned off. If you habitually leave the image stabilization feature turned on, I would re-think that. Leave it turned off un-til you need it (such as using a slow shutter speed in situations where you are forced to hand-hold the camera).
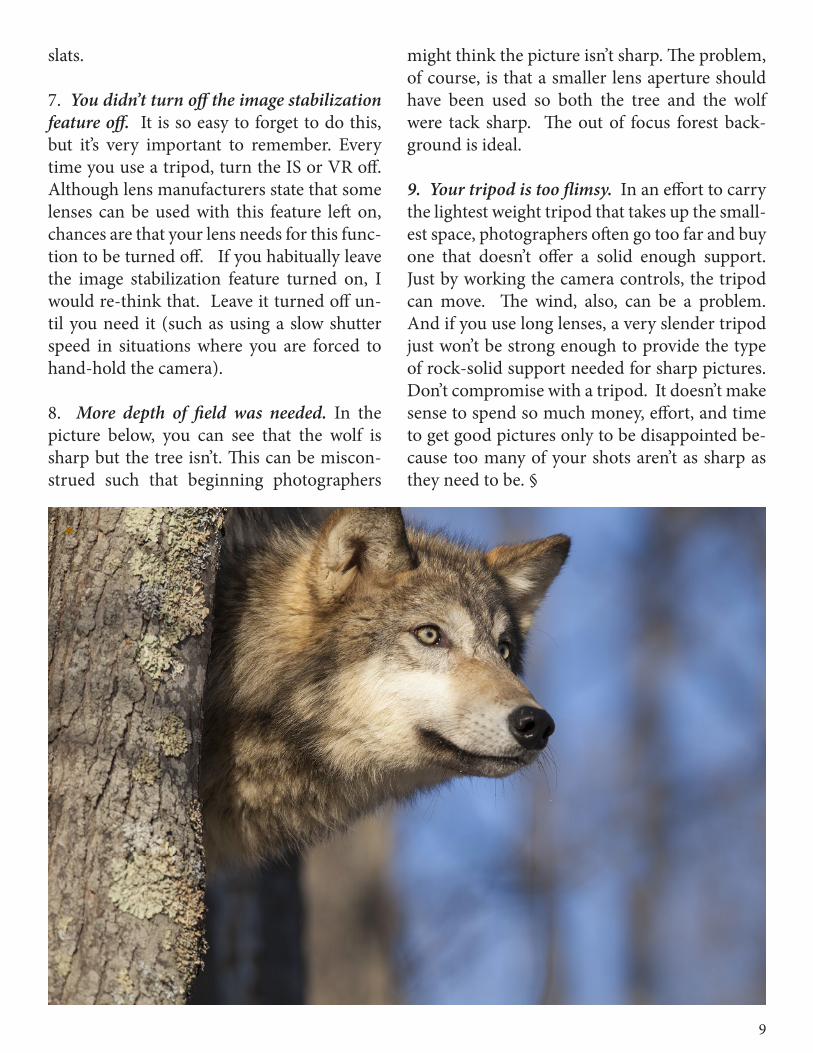
8. More depth of field was needed. In the picture below, you can see that the wolf is sharp but the tree isn’t. This can be miscon-strued such that beginning photographers
might think the picture isn’t sharp. The problem, of course, is that a smaller lens aperture should have been used so both the tree and the wolf were tack sharp. The out of focus forest back-ground is ideal.
9. Your tripod is too flimsy. In an effort to carry the lightest weight tripod that takes up the small-est space, photographers often go too far and buy one that doesn’t offer a solid enough support. Just by working the camera controls, the tripod can move. The wind, also, can be a problem. And if you use long lenses, a very slender tripod just won’t be strong enough to provide the type of rock-solid support needed for sharp pictures. Don’t compromise with a tripod. It doesn’t make sense to spend so much money, effort, and time to get good pictures only to be disappointed be-cause too many of your shots aren’t as sharp as they need to be. §
9
w
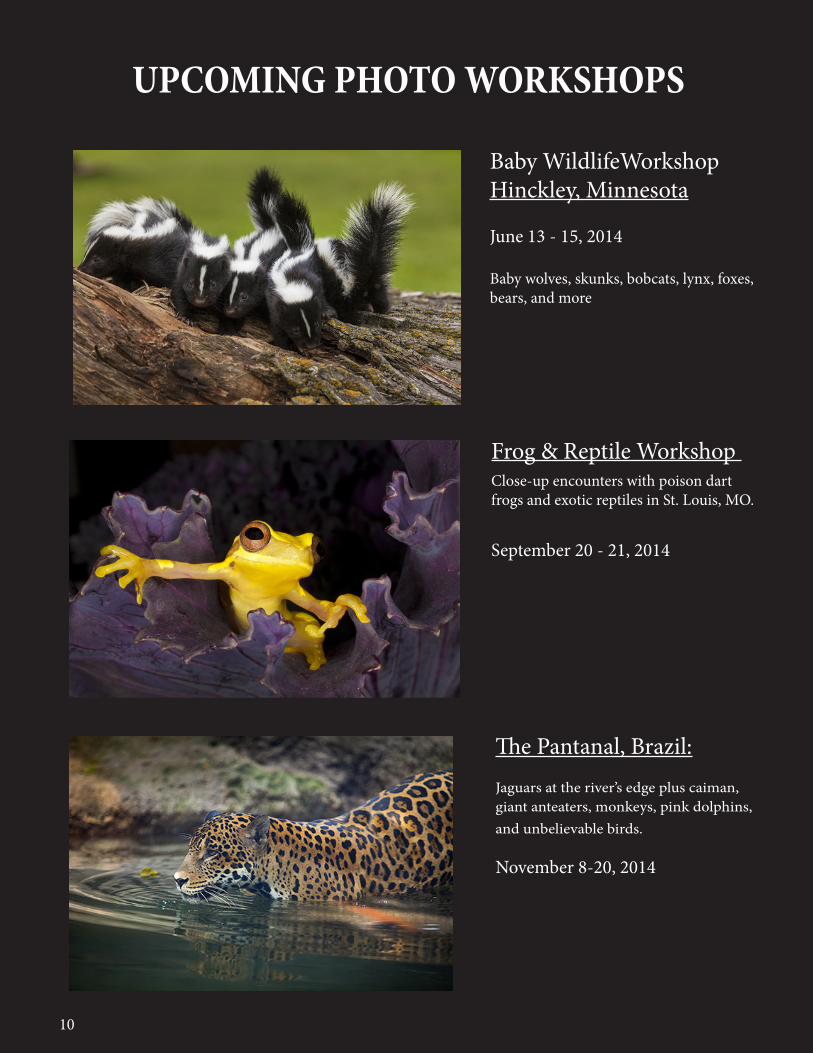
UPCOMING PHOTO WORKSHOPS
Baby WildlifeWorkshopHinckley, Minnesota
June 13 - 15, 2014
Baby wolves, skunks, bobcats, lynx, foxes,bears, and more
Frog & Reptile Workshop Close-up encounters with poison dart frogs and exotic reptiles in St. Louis, MO.
September 20 - 21, 2014
The Pantanal, Brazil:Jaguars at the river’s edge plus caiman, giant anteaters, monkeys, pink dolphins, and unbelievable birds.
November 8-20, 2014
10

Black velvet
11
10
You can’t make a subject look more dra-matic than if you photograph it against a black background. Every detail stands
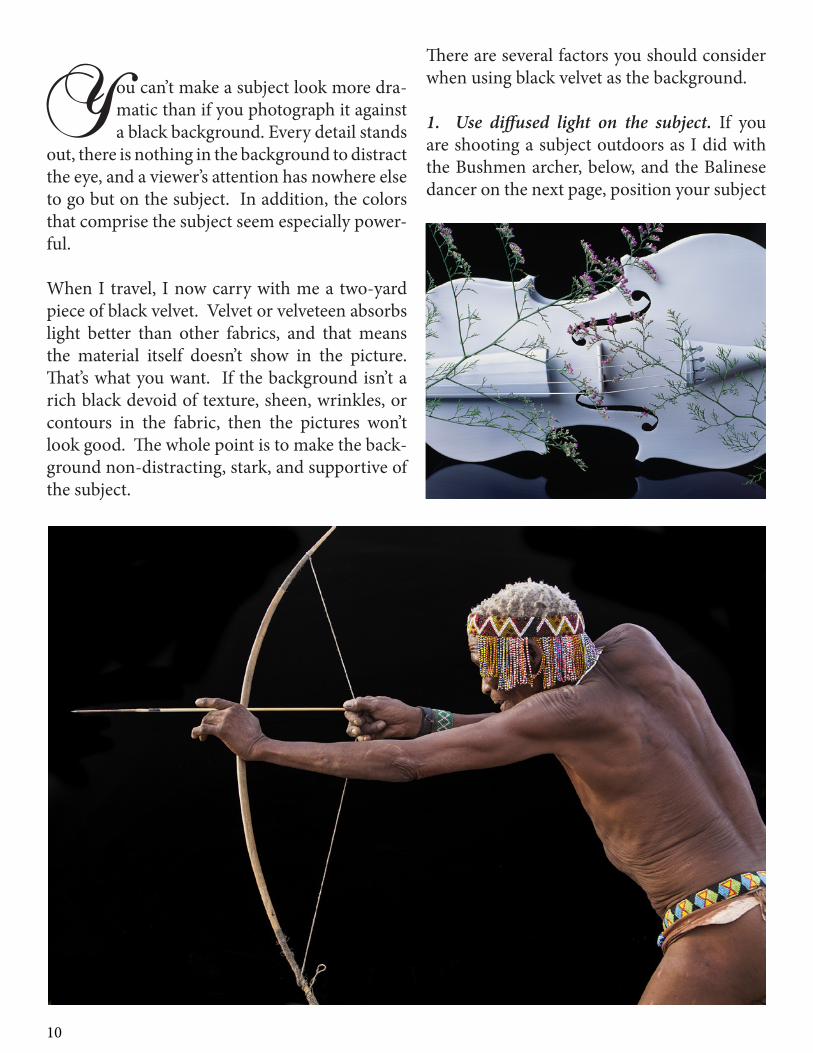
out, there is nothing in the background to distract the eye, and a viewer’s attention has nowhere else to go but on the subject. In addition, the colors that comprise the subject seem especially power-ful.
When I travel, I now carry with me a two-yard piece of black velvet. Velvet or velveteen absorbs light better than other fabrics, and that means the material itself doesn’t show in the picture. That’s what you want. If the background isn’t a rich black devoid of texture, sheen, wrinkles, or contours in the fabric, then the pictures won’t look good. The whole point is to make the back-ground non-distracting, stark, and supportive of the subject.
There are several factors you should consider when using black velvet as the background.
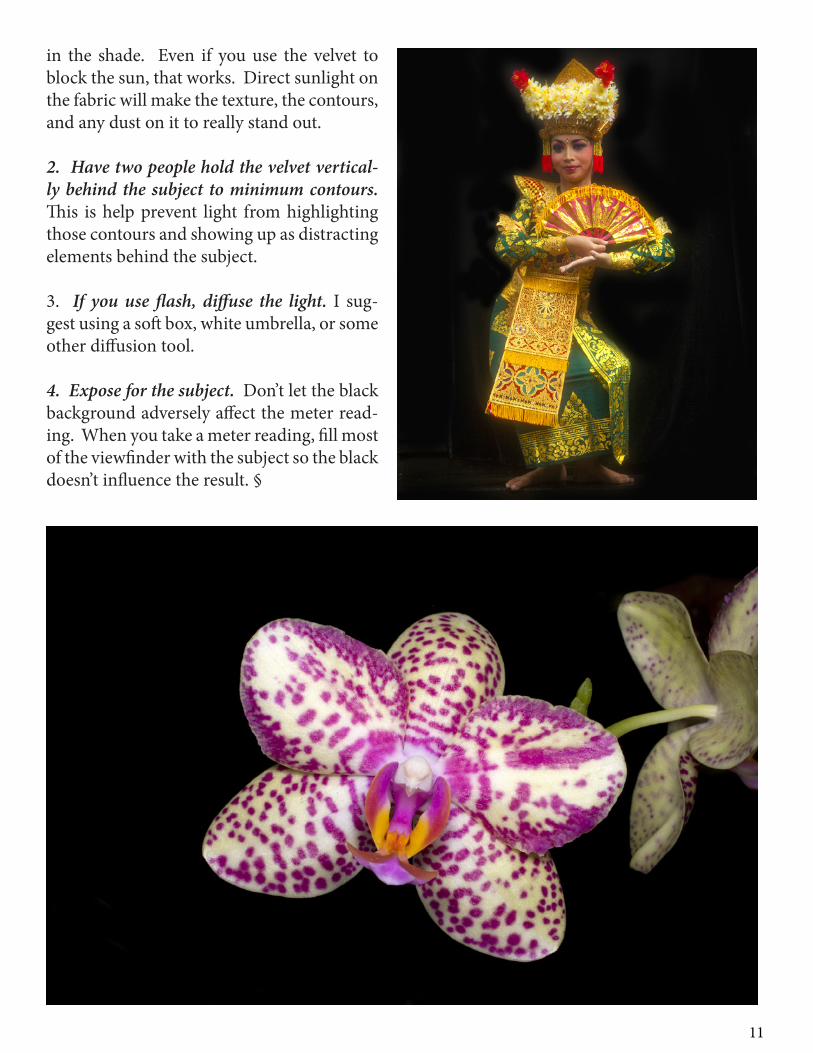
1. Use diffused light on the subject. If you are shooting a subject outdoors as I did with the Bushmen archer, below, and the Balinese dancer on the next page, position your subject
11
in the shade. Even if you use the velvet to block the sun, that works. Direct sunlight on the fabric will make the texture, the contours, and any dust on it to really stand out.
2. Have two people hold the velvet vertical-ly behind the subject to minimum contours. This is help prevent light from highlighting those contours and showing up as distracting elements behind the subject.
3. If you use flash, diffuse the light. I sug-gest using a soft box, white umbrella, or some other diffusion tool.
4. Expose for the subject. Don’t let the black background adversely affect the meter read-ing. When you take a meter reading, fill most of the viewfinder with the subject so the black doesn’t influence the result. §
12
Get a little crazy with L i q u i f y
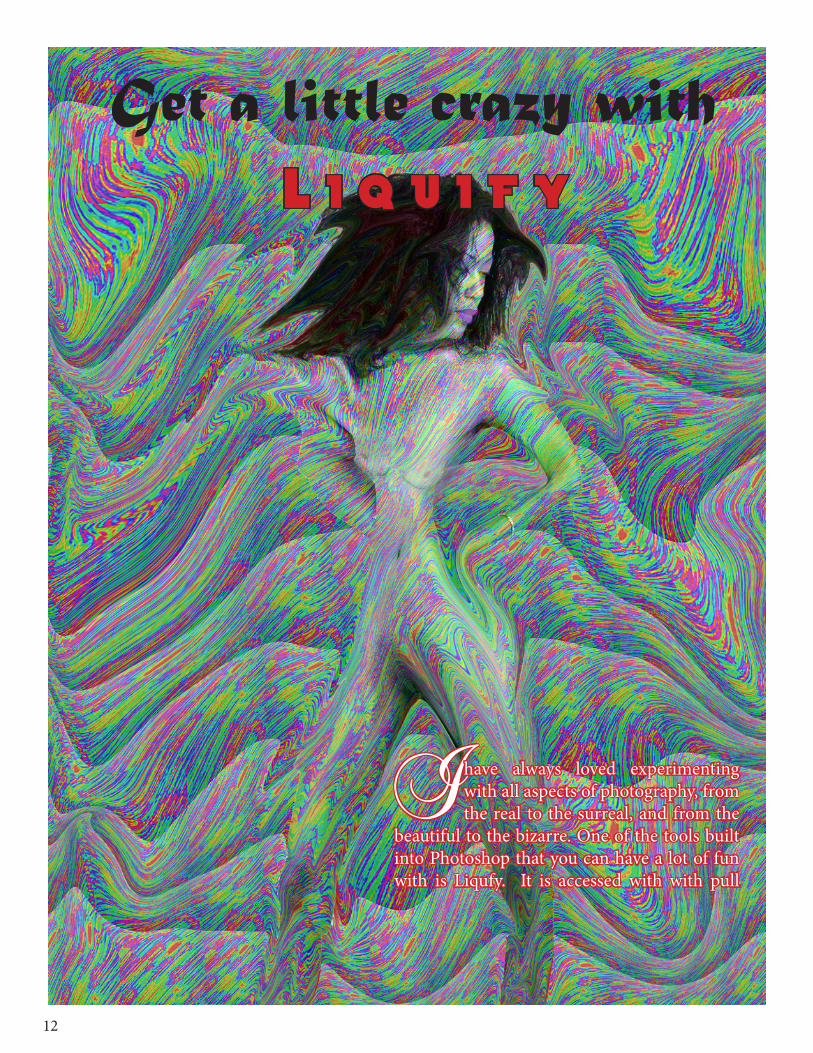
I have always loved experimenting with all aspects of photography, from the real to the surreal, and from the
beautiful to the bizarre. One of the tools built into Photoshop that you can have a lot of fun with is Liqufy. It is accessed with with pull
13
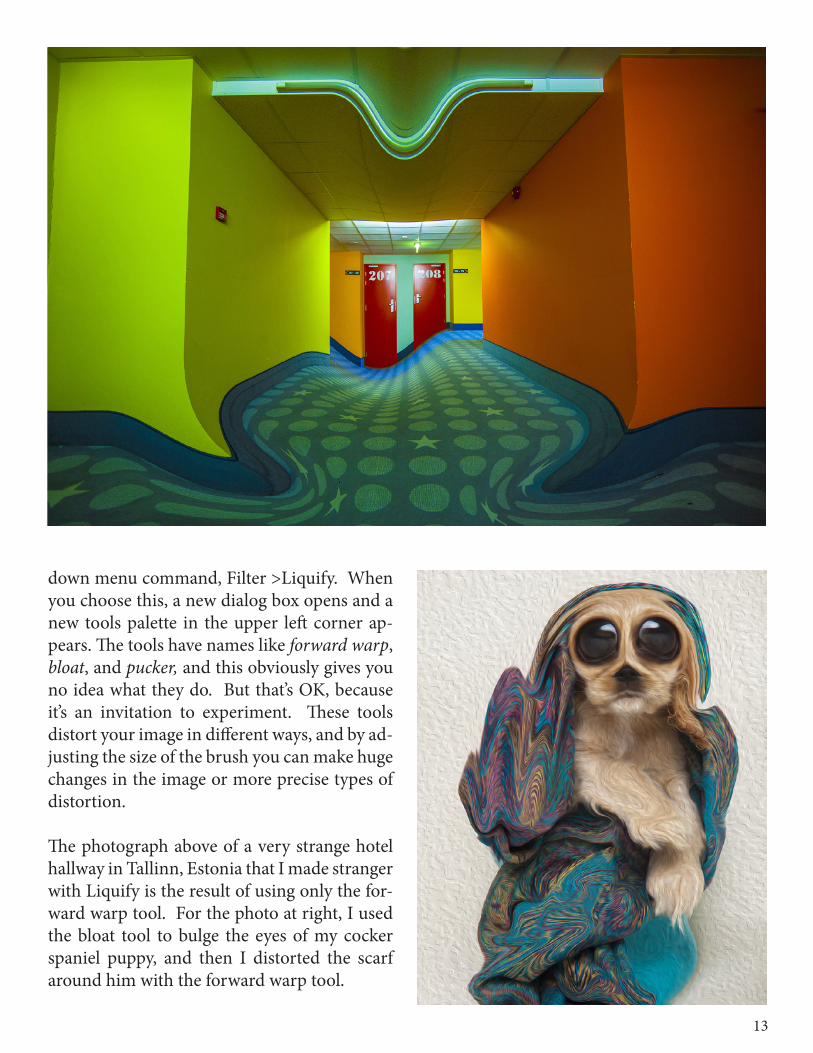
down menu command, Filter >Liquify. When you choose this, a new dialog box opens and a new tools palette in the upper left corner ap-pears. The tools have names like forward warp, bloat, and pucker, and this obviously gives you no idea what they do. But that’s OK, because it’s an invitation to experiment. These tools distort your image in different ways, and by ad-justing the size of the brush you can make huge changes in the image or more precise types of distortion.
The photograph above of a very strange hotel hallway in Tallinn, Estonia that I made stranger with Liquify is the result of using only the for-ward warp tool. For the photo at right, I used the bloat tool to bulge the eyes of my cocker spaniel puppy, and then I distorted the scarf around him with the forward warp tool.
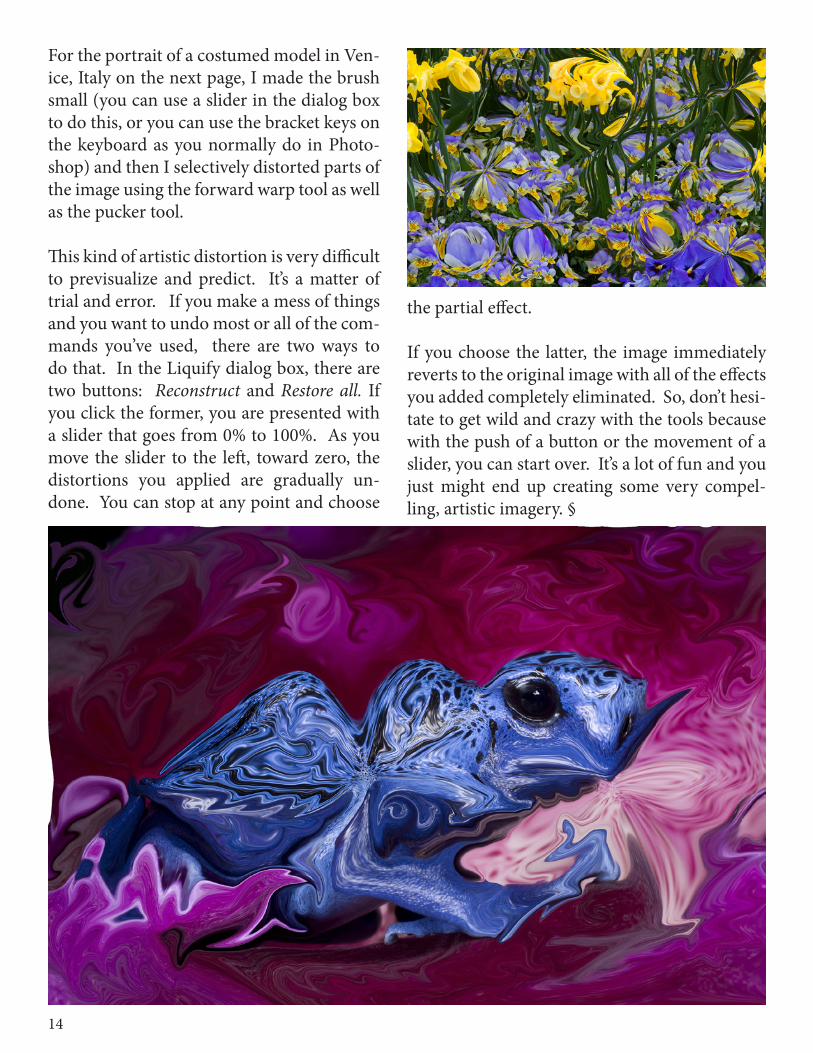
14
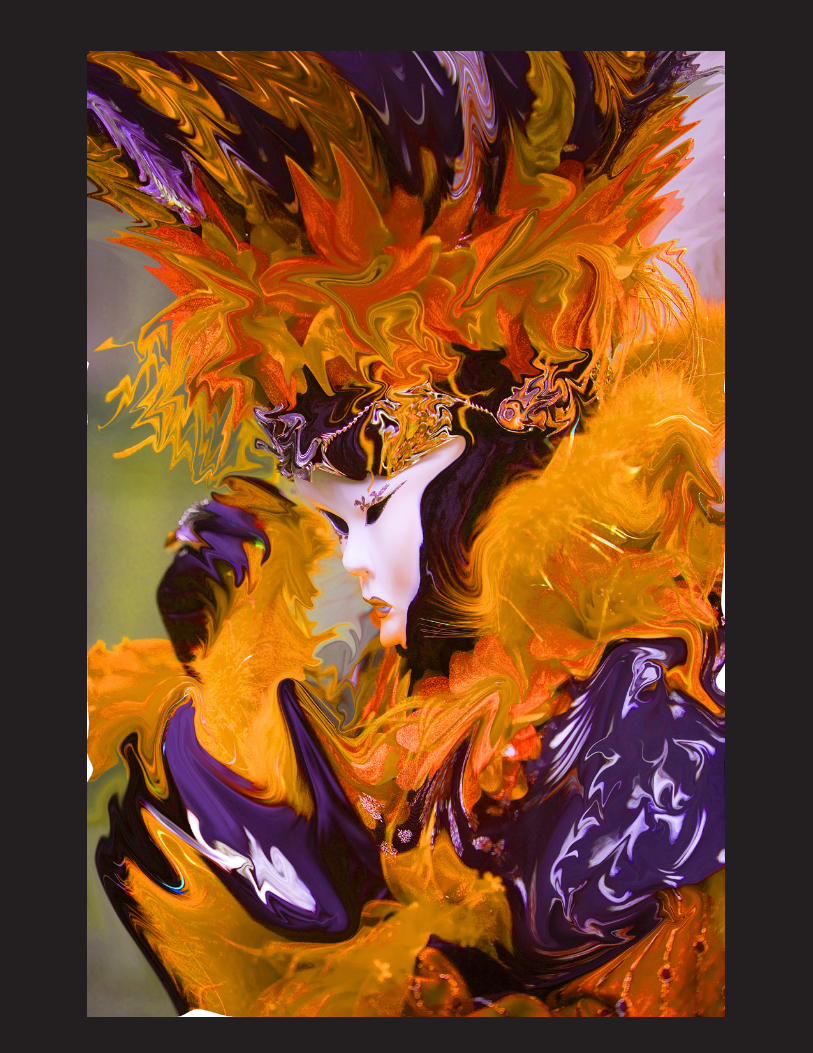
For the portrait of a costumed model in Ven-ice, Italy on the next page, I made the brush small (you can use a slider in the dialog box to do this, or you can use the bracket keys on the keyboard as you normally do in Photo-shop) and then I selectively distorted parts of the image using the forward warp tool as well as the pucker tool.
This kind of artistic distortion is very difficult to previsualize and predict. It’s a matter of trial and error. If you make a mess of things and you want to undo most or all of the com-mands you’ve used, there are two ways to do that. In the Liquify dialog box, there are two buttons: Reconstruct and Restore all. If you click the former, you are presented with a slider that goes from 0% to 100%. As you move the slider to the left, toward zero, the distortions you applied are gradually un-done. You can stop at any point and choose
the partial effect.
If you choose the latter, the image immediately reverts to the original image with all of the effects you added completely eliminated. So, don’t hesi-tate to get wild and crazy with the tools because with the push of a button or the movement of a slider, you can start over. It’s a lot of fun and you just might end up creating some very compel-ling, artistic imagery. §

15
A NEW eBOOK!Learn how to be creative right in your own kitchen with techniques that enable you to produce fine art imagery. Need inspiration for a rainy day? This ebook is perfect. Looking for new areas of photography to explore? You’ll love the cool ideas in this ebook. Click on it to see some sample pages.
16
More ebooks by Jim Zuckerman

1616
T r a ve l
P O R T R A I T S
Some photographers are uncomfortable photographing people when they travel. I think one of the ways to overcome this is to focus on the technical and artistic aspects of the shots, and this takes one’s mind off the potential awkwardness of the situation. Sure, it’s
not easy to approach strangers and ask for a picture, but I find that with a smile and a nod to the camera, everyone understands what you want and most of the time you’ll get a green light to go ahead and shoot.
Most of the portraiture I do in foreign countries follows a set of guidelines that have proven to be very effective. In art and photography, there are always exceptions to rules (or guidelines), but for the most part I adhere to the following.
1. Use soft and diffused light. Shade and overcast conditions are ideal for outdoor portraits because the soft light flatters any face and the subject isn’t squinting from direct sunlight. If you do shoot
17
18
in sunlight, the sun should ideally be very low to the horizon so it is weak. Then the light will be very soft, and the subject won’t squint.
2. Make the background the same tone as the subject or darker. In this way, background ele-ments won’t vie for attention because they are so bright. White or very light elements behind a darker subject always divert attention away from the subject itself.
3. Don’t ask for fake smiles. People in other countries usually don’t understand why an ar-tificial smile is requested, and to be honest, I don’t either. Fake smiles look fake. I would avoid them. If you can catch a genuine smile, great. If not, go for the comtemplative or seri-ous expression. It’s much more compelling.
4. Look for faces that are beautiful, interesting in some way, or that have character. Not all people make great photographic subjects. Your job as a photographer is to seek out the great subjects. 5. Avoid on-camera flash. This kind of light is
dimensionless, unflattering, and it looks repeti-tive if you use it for most or all of your portraits. Sometimes on-camera flash is unavoidable due to low light conditions, but avoid it if possible.
6. Eliminate graphic lines and shapes behind the subject. These will definitely be distract-ing. This could be a tree trunk, a horizon line (for example, a pronounced horizontal line that runs behind a person’s head), a fence post, a portion of a window frame, etc.
7. Use a focal length in the 100 - 200mm range. This flattens the nose nicely and gives you a good working distance from the subject.
8. Don’t use an extremely large aperture. I rec-ommend f/5.6 or f/8. You don’t want the eyes sharp but the tip of the nose to be soft. §
19
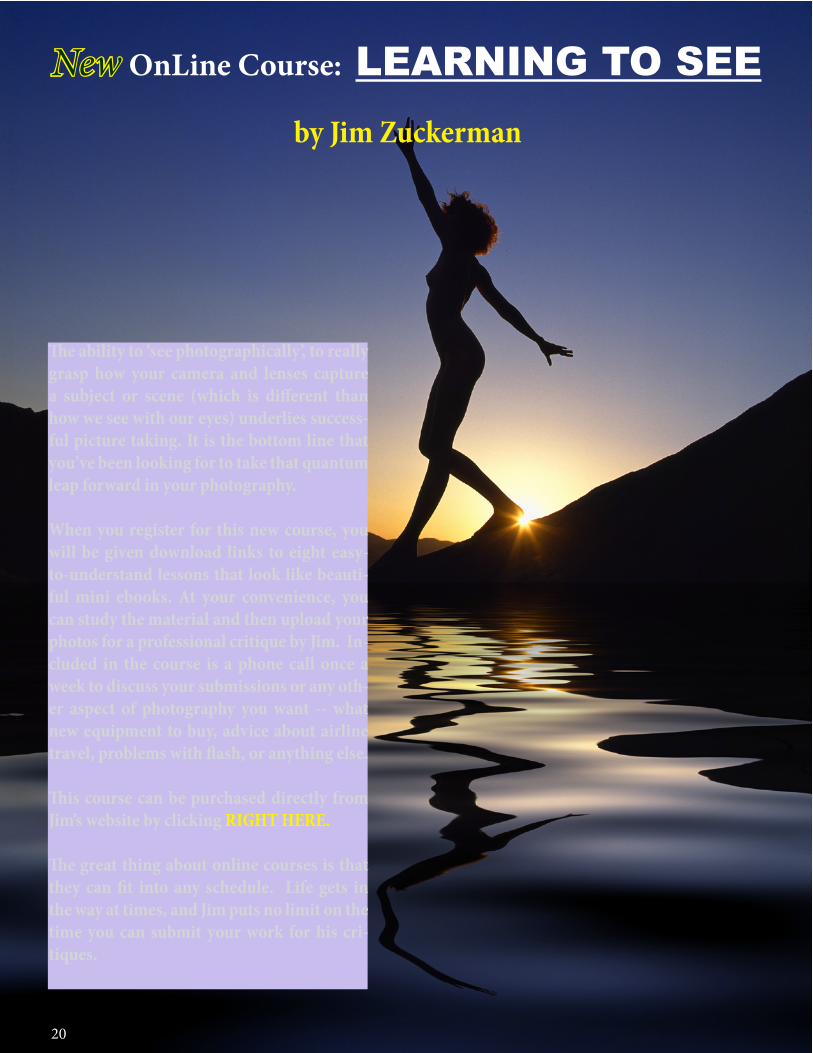
New OnLine Course: LEARNING TO SEE by Jim Zuckerman
20
The ability to ‘see photographically’, to really grasp how your camera and lenses capture a subject or scene (which is different than how we see with our eyes) underlies success-ful picture taking. It is the bottom line that you’ve been looking for to take that quantum leap forward in your photography.
When you register for this new course, you will be given download links to eight easy-to-understand lessons that look like beauti-ful mini ebooks. At your convenience, you can study the material and then upload your photos for a professional critique by Jim. In-cluded in the course is a phone call once a week to discuss your submissions or any oth-er aspect of photography you want -- what new equipment to buy, advice about airline travel, problems with flash, or anything else.
This course can be purchased directly from Jim’s website by clicking RIGHT HERE.
The great thing about online courses is that they can fit into any schedule. Life gets in the way at times, and Jim puts no limit on the time you can submit your work for his cri-tiques.
19
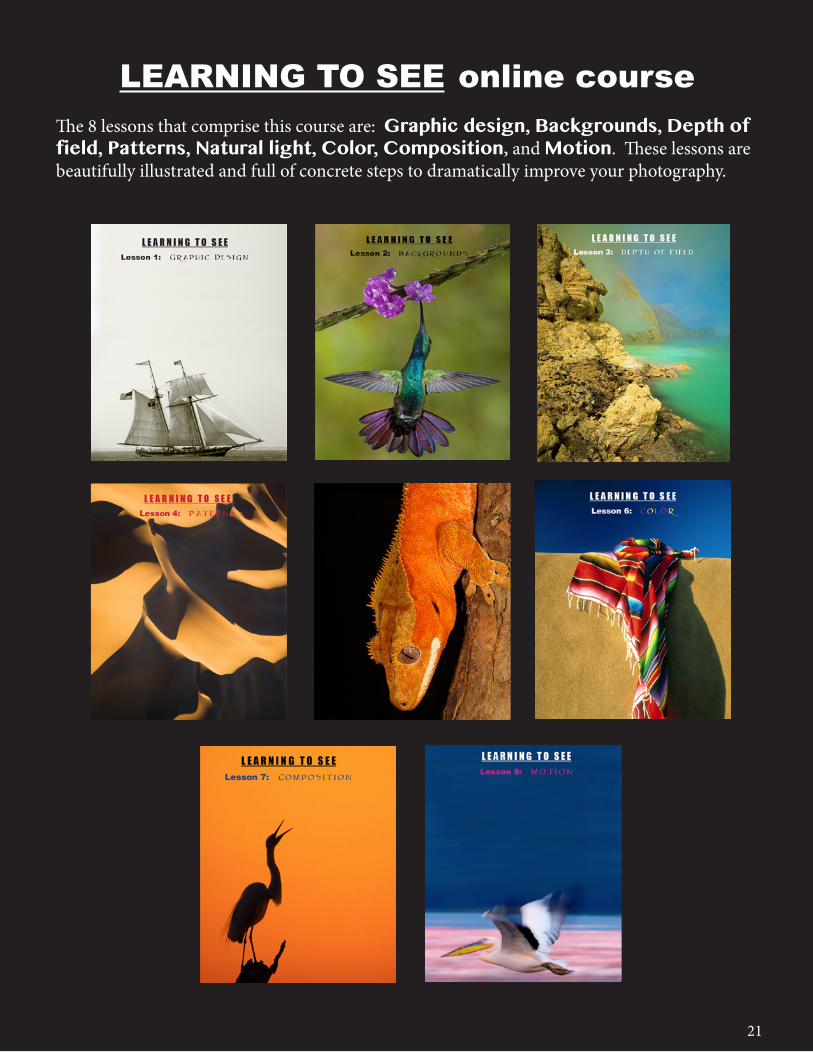
LEARNING TO SEE online courseThe 8 lessons that comprise this course are: Graphic design, Backgrounds, Depth of field, Patterns, Natural light, Color, Composition, and Motion. These lessons are beautifully illustrated and full of concrete steps to dramatically improve your photography.
21
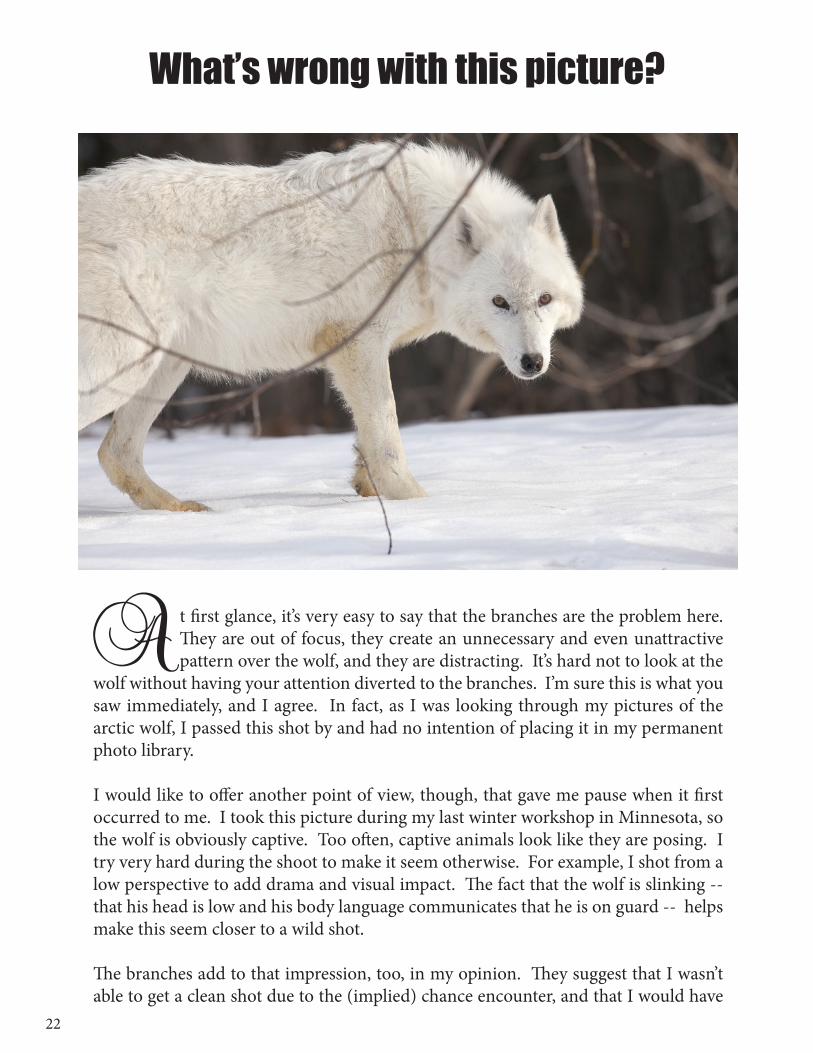
What’s wrong with this picture?
22
At first glance, it’s very easy to say that the branches are the problem here. They are out of focus, they create an unnecessary and even unattractive pattern over the wolf, and they are distracting. It’s hard not to look at the
wolf without having your attention diverted to the branches. I’m sure this is what you saw immediately, and I agree. In fact, as I was looking through my pictures of the arctic wolf, I passed this shot by and had no intention of placing it in my permanent photo library.
I would like to offer another point of view, though, that gave me pause when it first occurred to me. I took this picture during my last winter workshop in Minnesota, so the wolf is obviously captive. Too often, captive animals look like they are posing. I try very hard during the shoot to make it seem otherwise. For example, I shot from a low perspective to add drama and visual impact. The fact that the wolf is slinking -- that his head is low and his body language communicates that he is on guard -- helps make this seem closer to a wild shot.
The branches add to that impression, too, in my opinion. They suggest that I wasn’t able to get a clean shot due to the (implied) chance encounter, and that I would have
23
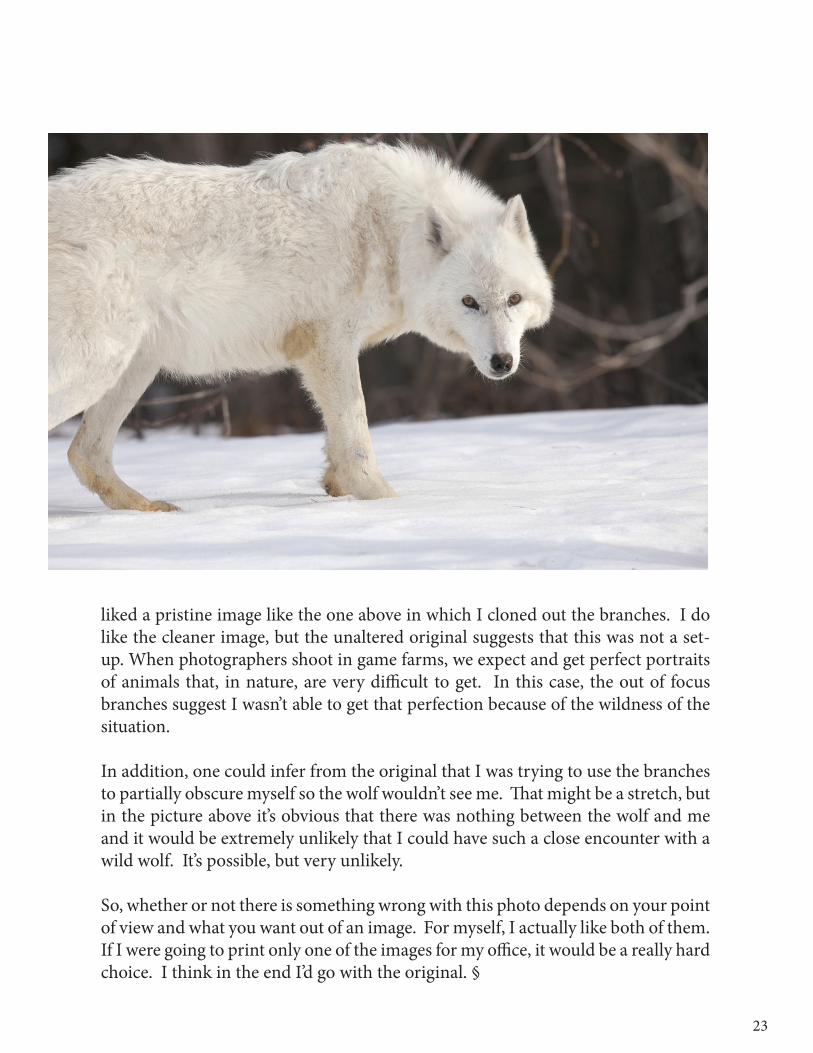
liked a pristine image like the one above in which I cloned out the branches. I do like the cleaner image, but the unaltered original suggests that this was not a set-up. When photographers shoot in game farms, we expect and get perfect portraits of animals that, in nature, are very difficult to get. In this case, the out of focus branches suggest I wasn’t able to get that perfection because of the wildness of the situation.
In addition, one could infer from the original that I was trying to use the branches to partially obscure myself so the wolf wouldn’t see me. That might be a stretch, but in the picture above it’s obvious that there was nothing between the wolf and me and it would be extremely unlikely that I could have such a close encounter with a wild wolf. It’s possible, but very unlikely.
So, whether or not there is something wrong with this photo depends on your point of view and what you want out of an image. For myself, I actually like both of them. If I were going to print only one of the images for my office, it would be a really hard choice. I think in the end I’d go with the original. §
SHORT AND SWEET
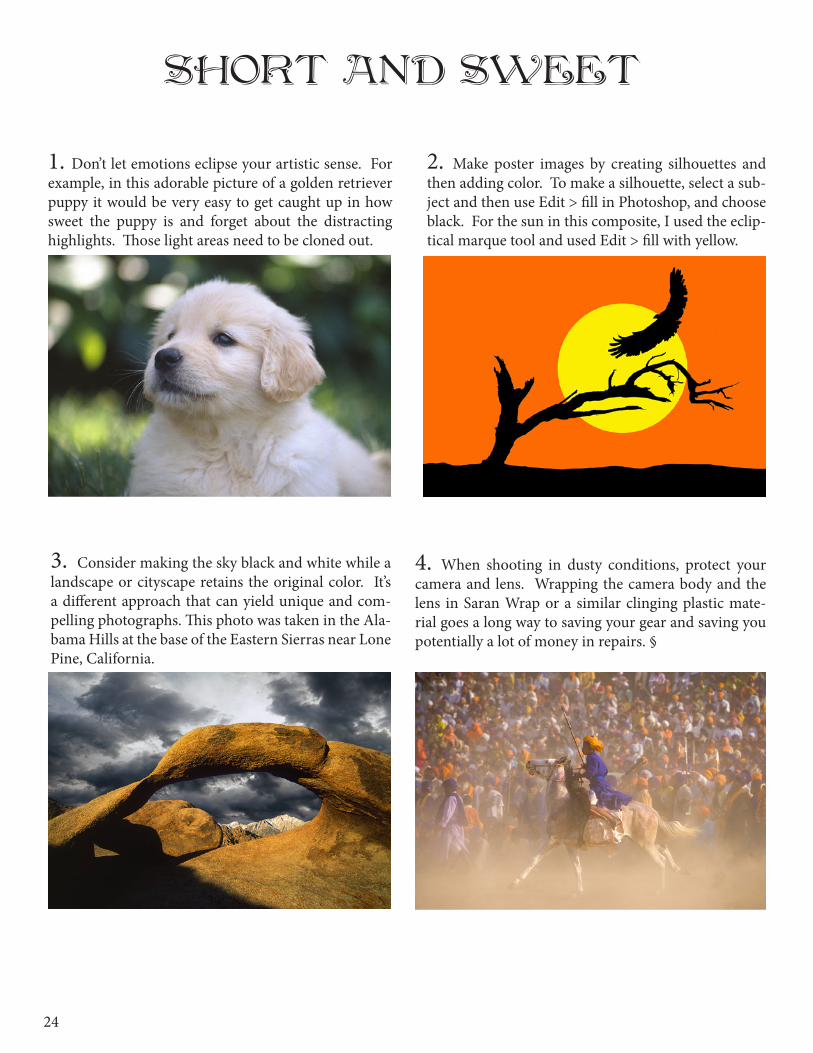
1. Don’t let emotions eclipse your artistic sense. For example, in this adorable picture of a golden retriever puppy it would be very easy to get caught up in how sweet the puppy is and forget about the distracting highlights. Those light areas need to be cloned out.
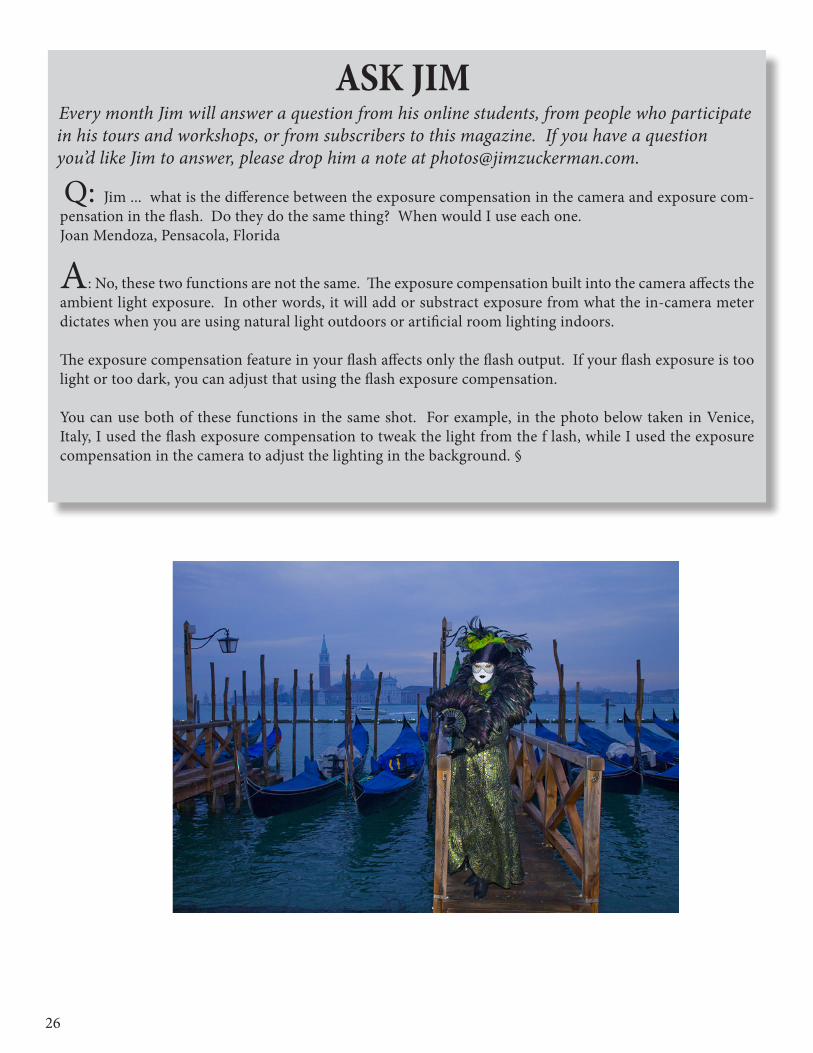
3. Consider making the sky black and white while a landscape or cityscape retains the original color. It’s a different approach that can yield unique and com-pelling photographs. This photo was taken in the Ala-bama Hills at the base of the Eastern Sierras near Lone Pine, California.
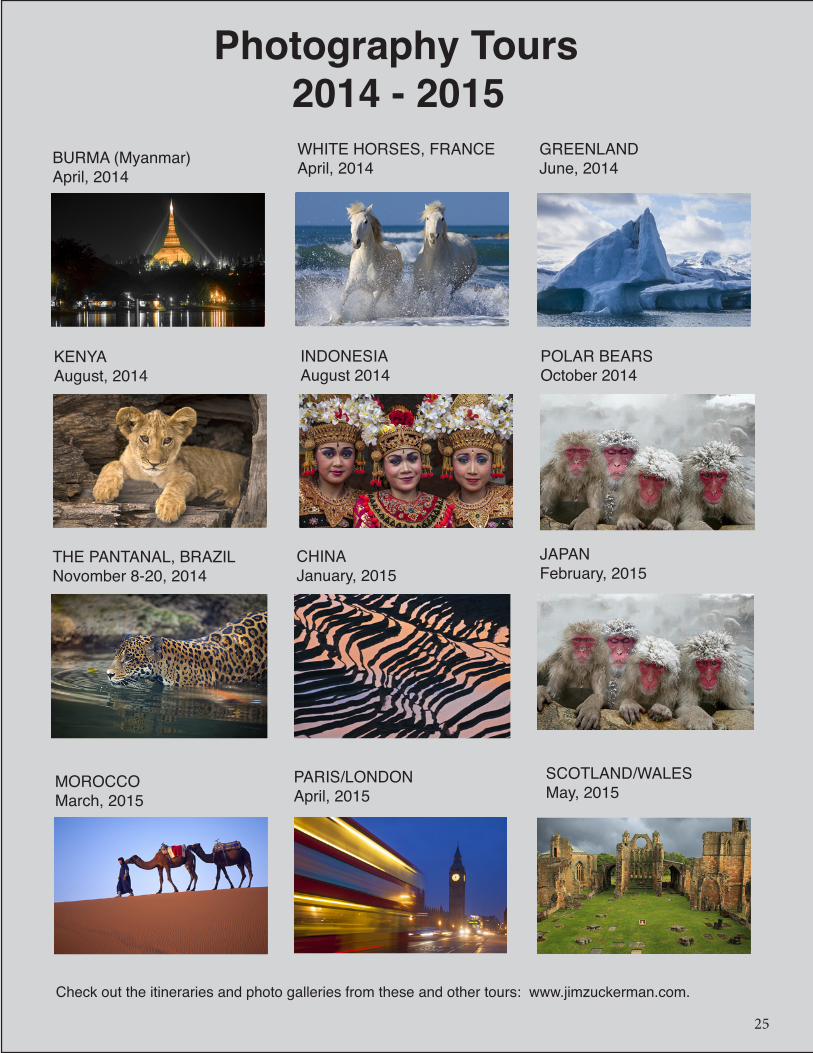
2. Make poster images by creating silhouettes and then adding color. To make a silhouette, select a sub-ject and then use Edit > fill in Photoshop, and choose black. For the sun in this composite, I used the eclip-tical marque tool and used Edit > fill with yellow.
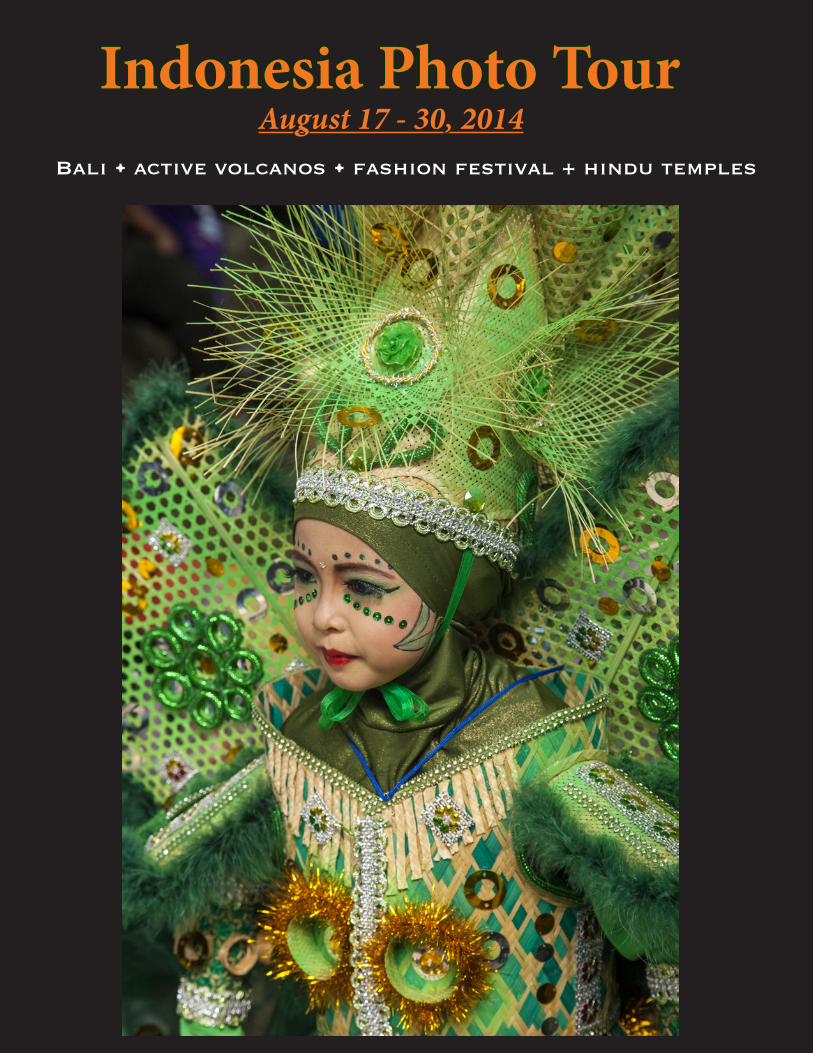
4. When shooting in dusty conditions, protect your camera and lens. Wrapping the camera body and the lens in Saran Wrap or a similar clinging plastic mate-rial goes a long way to saving your gear and saving you potentially a lot of money in repairs. §
24
27
Photography Tours 2014 - 2015
Check out the itineraries and photo galleries from these and other tours: www.jimzuckerman.com.
BURMA (Myanmar)April, 2014
INDONESIAAugust 2014
GREENLANDJune, 2014
WHITE HORSES, FRANCEApril, 2014
KENYAAugust, 2014
JAPAN February, 2015
POLAR BEARSOctober 2014
THE PANTANAL, BRAZILNovomber 8-20, 2014
MOROCCOMarch, 2015
PARIS/LONDONApril, 2015
25
CHINA January, 2015
SCOTLAND/WALESMay, 2015
26
ASK JIM Every month Jim will answer a question from his online students, from people who participate in his tours and workshops, or from subscribers to this magazine. If you have a question you’d like Jim to answer, please drop him a note at [email protected].
Q: Jim ... what is the difference between the exposure compensation in the camera and exposure com-pensation in the flash. Do they do the same thing? When would I use each one.Joan Mendoza, Pensacola, Florida
A: No, these two functions are not the same. The exposure compensation built into the camera affects the ambient light exposure. In other words, it will add or substract exposure from what the in-camera meter dictates when you are using natural light outdoors or artificial room lighting indoors.
The exposure compensation feature in your flash affects only the flash output. If your flash exposure is too light or too dark, you can adjust that using the flash exposure compensation.
You can use both of these functions in the same shot. For example, in the photo below taken in Venice, Italy, I used the flash exposure compensation to tweak the light from the f lash, while I used the exposure compensation in the camera to adjust the lighting in the background. §
27
Indonesia Photo TourBali • active volcanos • fashion festival + hindu temples
August 17 - 30, 2014

Get professional critiques of your work with Jim’s online courses
Betterphoto.com
20
Get professional critiques of your work with Jim’ss online courses
betterphoto.com Learn composition, exposure, Photoshop, beginning fundamentals, techniques
in low light photography, flash, making money in photography, and moreat your convenience and on your schedule.
28

31
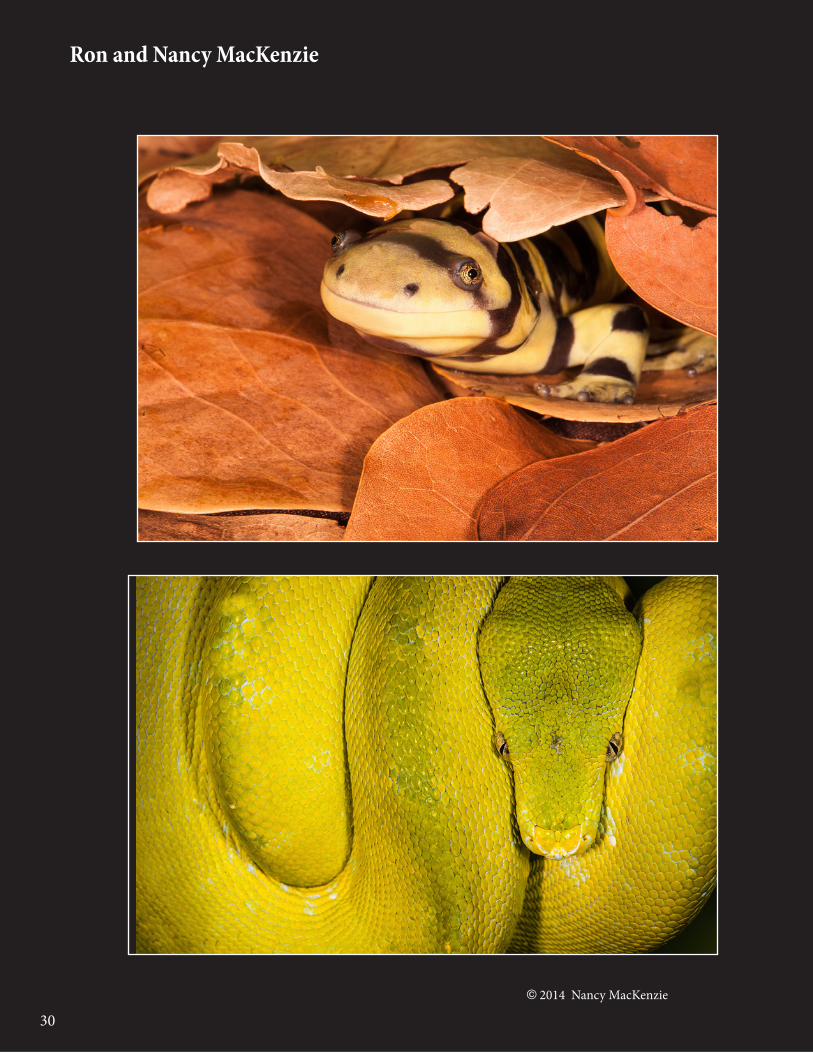
Student ShowcaseEach month, Jim features one student who took beautiful and inspiring images on one of his photography tours or workshops. It’s really fascinating how photographers see and compose such different images even though we may go to the same place. Everyone gets great images on my trips.
Ron and Nancy MacKenzie, Rochester, MinnesotaFrog and reptile workshop
29 © 2014 Nancy MacKenzie
3230
Ron and Nancy MacKenzie
© 2014 Nancy MacKenzie

31
Ron and Nancy MacKenzie
© 2014 Ron MacKenzie
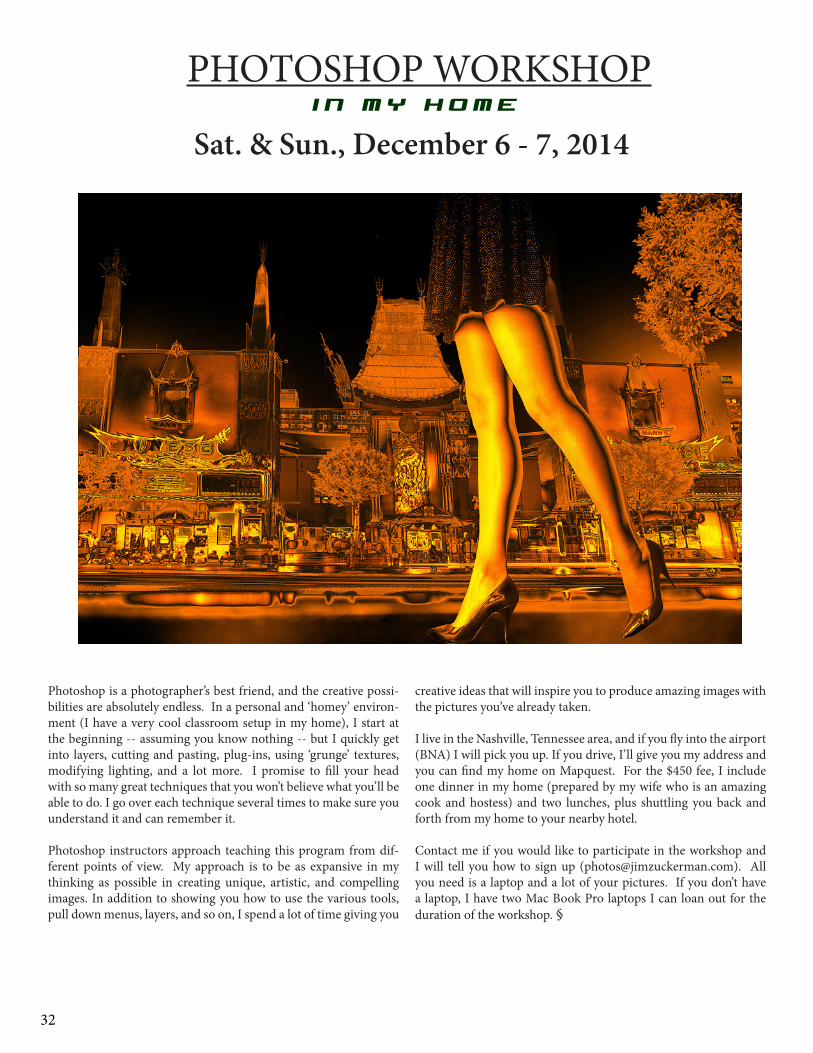
PHOTOSHOP WORKSHOP Sat. & Sun., December 6 - 7, 2014
Photoshop is a photographer’s best friend, and the creative possi-bilities are absolutely endless. In a personal and ‘homey’ environ-ment (I have a very cool classroom setup in my home), I start at the beginning -- assuming you know nothing -- but I quickly get into layers, cutting and pasting, plug-ins, using ‘grunge’ textures, modifying lighting, and a lot more. I promise to fill your head with so many great techniques that you won’t believe what you’ll be able to do. I go over each technique several times to make sure you understand it and can remember it.
Photoshop instructors approach teaching this program from dif-ferent points of view. My approach is to be as expansive in my thinking as possible in creating unique, artistic, and compelling images. In addition to showing you how to use the various tools, pull down menus, layers, and so on, I spend a lot of time giving you
creative ideas that will inspire you to produce amazing images with the pictures you’ve already taken.
I live in the Nashville, Tennessee area, and if you fly into the airport (BNA) I will pick you up. If you drive, I’ll give you my address and you can find my home on Mapquest. For the $450 fee, I include one dinner in my home (prepared by my wife who is an amazing cook and hostess) and two lunches, plus shuttling you back and forth from my home to your nearby hotel.
Contact me if you would like to participate in the workshop and I will tell you how to sign up ([email protected]). All you need is a laptop and a lot of your pictures. If you don’t have a laptop, I have two Mac Book Pro laptops I can loan out for the duration of the workshop. §
i n m y h o m e
32

Nov. ‘12 Dec. ‘12 Jan. ‘13
Click on the past issues of P H O T O I N S I G H T S
you would like to read.
Feb. ‘13
33
Mar. ‘13
Apr. ‘13 May. ‘13 June ‘13 July‘13 Aug. ‘13
Sept. ‘13 Oct. ‘13 Nov. ‘13 Dec. ‘13 Jan. ‘14
Feb. ‘14 Mar. ‘14

34
PHOTO INSIGHTS®published by Jim Zuckerman, all rights reserved
© Jim Zuckerman 2014 email: [email protected]
snail mail address: P.O. Box 7, Arrington, TN 37014