peyote stitch projects from beading daily · resources: check your local bead store. wildfire:...
TRANSCRIPT

Peyote Stitch Projects from Beading Daily:
7 Free Peyote Stitch Projects plus Bonus Guide to Reading
a Peyote Stitch Pattern

Contents
Pirate’s Plunder D u s t i n W e d e k i n d
52 beadworkmagazine.com
Use a mixture of seed-bead soup to brick-stitch an arched window that forms the clasp for a skull-faced lampworked
button to peek through. Connect the window and button with a spine of accent beads and surround them with
textured strands for a choker worthy of Jack Sparrow.
techniques >> brick stitch • peyote stitch • ladder stitch (see pages 118–119 for how-tos)
proj
ect
BW Pirates Plunder 8/9/07 10:33 AM Page 52
08092007103444
Copyright Interweave Press LLC. Not to be reprinted. All rights reserved.
page 1
projectlibraryRRRRRRRRRRRRRRRRRRRRRRR
publishers of Beadwork Magazine…join the online beading community at BeadingDaily.com
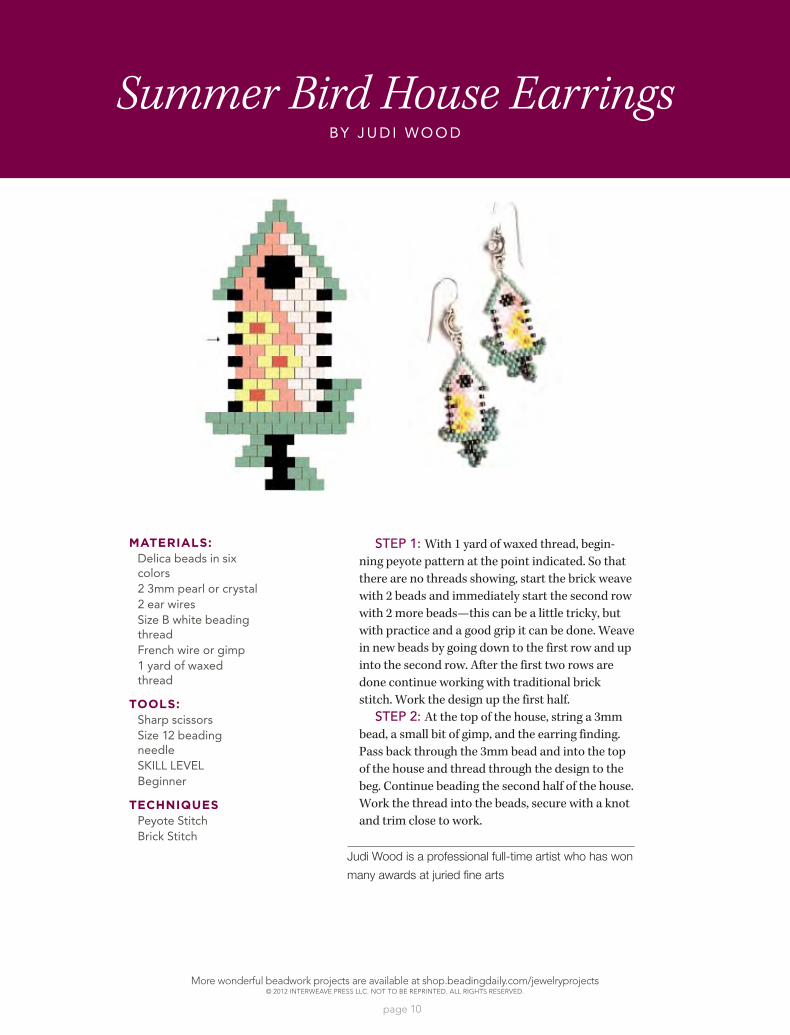
Summer Bird House Earringsby Judi Wood
MATERIALS:Delica beads in six colors2 3mm pearl or crystal2 ear wiresSize B white beading threadFrench wire or gimp1 yard of waxed thread
TOOLS: Sharp scissors Size 12 beading needle
SKILL LEVELBeginner
TECHNIQUESPeyote StitchBrick Stitch
Step 1
Step 2
With 1 yard of waxed thread, beginning peyote pattern at the point indicated. So that there are no threads showing, start the brick weave with 2 beads and immediately start the second row with 2 more beads—this can be a little tricky, but with practice and a good grip it can be done. Weave in new beads by going down to the first row and up into the second row. After the first two rows are done continue working with traditional brick stitch. Work the design up the first half.
At the top of the house, string a 3mm bead, a small bit of gimp, and the earring finding. Pass back through the 3mm bead and into the top of the house and thread through the design to the beg. Continue beading the second half of the house.Work the thread into the beads, secure with a knot and trim close to work.
Judi Wood is a professional full-time artist who has won many awards at juried fine arts shows along the east coast. See more of her work online at www.judiwood.com.
FinGeR Food!
PlayFul Peyote toGGle ClaSPS
PiRate'S PlundeR
ConFetti SPiRal
SummeR BiRd houSe eaRRinGS
how to Read a Peyote StitCh PatteRn:
PeaRly moSaiC deSiGn
dRaGonFly GinkGo neCklaCe
how to maRk youR PlaCe in a Peyote StitCh PatteRn
by LESLIE ROGALSKI, EDITOR IN CHIEF p. 1
by mELINDA bARTA p. 7
by DuSTIN wEDEKINDp. 14
by mARILyN T. ARONSON p. 3
by juDI wOOD p. 10
by jENNIFER VANbENSCHOTEN p. 17
by LISA KAN p 5
by bARbARA ELLIS p. 11
by jENNIFER VANbENSCHOTEN p. 18
ii
Peyote Stitch Projects from Beading Daily: 7 Free Peyote Stitch Projects plus Bonus Guide to Reading a Peyote Stitch Pattern

Peyote Stitch Projects from Beading Daily: editor, beadingdaily JENNIFER VANBENSCHOTEN
photography JOE COCA, ANN SWANSON
Projects and information are for inspiration and personal use only. BeadingDaily, Beadwork, and Stringing do not recommend, approve, or endorse any of the advertisers, products, services, or views advertised in this publication. Nor do BeadingDaily, Beadwork, or Stringing evaluate the advertisers’ claims in any way. You should, therefore, use your own judgment in evaluating the advertisers, products, services, and views advertised in BeadingDaily, Beadwork, and Stringing.
iii
Jennifer VanBenschoten, Beading Daily editor
Peyote stitch was not the easiest beading stitch for me to learn. After somehow making my first peyote stitch amulet bag using flat, even-count peyote stitch, I suddenly found myself completely bewildered as to how I actually worked the stitch. I spent several years trying to master peyote stitch, until a wonderful teacher showed me an easy way to work tubular peyote stitch. Once I got the hang of it, I was hooked!
Apparently, I’m not alone. There are so many peyote stitch beading designs out there, it seems like we’ll never run out of ways to change up peyote stitch and create amazing bead-work with this popular beading stitch.
We’ve assembled a new collection –– and included a few old favorites – of peyote stitch patterns just for our Beading Daily readers that shows off the versatility of peyote stitch, and how cre-ative you can get with this age-old off-loom beadweaving stitch.
•A simple band of peyote stitch doesn’t have to be simple at all when you add a striking, graphic pattern and your favorite colors, like in Leslie Rogalski’s Finger Food peyote stitched rings. These work up so fast that you’ll be making them in every color to match your favorite outfits!
•Tubular peyote stitch gets fancy when you change up the beads in each round. Marilyn T. Aronson’s Confetti Spi-ral looks like you made lots of complicated increases and decreases throughout this colorful peyote rope, but just using different sizes of seed beads is what creates the ins and outs of this peyote stitch bracelet.
•Circular peyote stitch is another basic peyote stitch technique that gets the royal treatment in Lisa Kan’s Pearly Mosaic necklace. You’ll find yourself loving the soothing rhythm of flat, circular peyote stitch as you work up a series of components with your favorite seed beads to assemble into a stunning peyote stitch necklace.
•Enjoy the best of both tubular and circular peyote stitch with Melinda Barta’s Playful Peyote Clasps. These easy-to-make
clasps let you create a whole range of beaded jewelry design pos-sibilities, including options for those with sensitivities to metals.
•Try your hand at some shaped peyote stitch with a pair of Judi Wood’s Summer Bird House Earrings. These delicate little earrings work up fast while teaching you how to achieve lines and shapes when working in flat peyote stitch.
•For a more challenging shaped peyote stitch project, make Bar-bara Ellis’ Dragonfly Gingko Necklace. Combine a striking shaped peyote stitch pendant with other favorite beading stitches to create a piece of artistic beaded jewelry for any occasion!
•Once you’re confident with your peyote stitch skills, free form peyote stitch comes together easily, so stitch up one of Dustin Wedekind’s Pirate’s Plunder necklaces. Use your favorite skull beads and a treasure trove of your favorite seed beads to make a stunning peyote stitched neck adornment!
Finally, if you’ve ever been frustrated in trying to read and follow a charted peyote stitch pattern, you’re not alone. So we’ve included a couple of our favorite Beading Daily blogs all about ways to mark your place in a peyote stitch pattern and how to interpret those peyote stitch patterns for making beautiful beaded jewelry!
So, think of this eBook as a way to expand your peyote stitch skills, learn some new bead stitching tricks, and come away with a whole wardrobe of beautiful beaded jewelry. After making a few of these free beading projects, we think you’ll understand why beaders around the world love peyote stitch!
Bead Happy,
Peyote Stitch Projects from Beading Daily: 7 Free Peyote Stitch Projects plus Bonus Guide to Reading a Peyote Stitch Pattern
More wonderful beadwork projects are available at shop.beadingdaily.com/jewelryprojects© 2012 Interweave Press LLC. not to be rePrInted. aLL rIghts reserved.
page 1
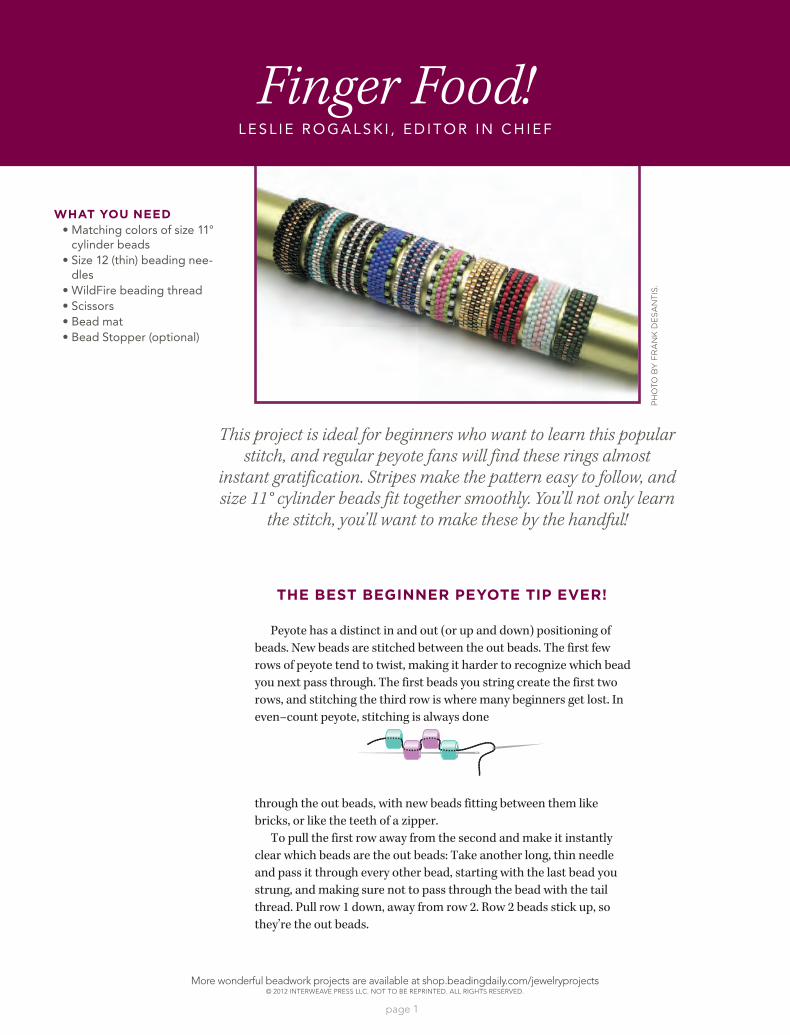
This project is ideal for beginners who want to learn this popular stitch, and regular peyote fans will find these rings almost
instant gratification. Stripes make the pattern easy to follow, and size 11° cylinder beads fit together smoothly. You’ll not only learn
the stitch, you’ll want to make these by the handful!
Peyote has a distinct in and out (or up and down) positioning of beads. New beads are stitched between the out beads. The first few rows of peyote tend to twist, making it harder to recognize which bead you next pass through. The first beads you string create the first two rows, and stitching the third row is where many beginners get lost. In even–count peyote, stitching is always done
through the out beads, with new beads fitting between them like bricks, or like the teeth of a zipper.
To pull the first row away from the second and make it instantly clear which beads are the out beads: Take another long, thin needle and pass it through every other bead, starting with the last bead you strung, and making sure not to pass through the bead with the tail thread. Pull row 1 down, away from row 2. Row 2 beads stick up, so they’re the out beads.
Figure 1 Figure 2 Figure 3
Figure 4 Figure 5
Figure 6
The besT beginner peyoTe Tip ever!
Finger Food!L E S L I E R O G A L S K I , E D I T O R I N C H I E F
Ph
oto
by
Fr
an
k D
eS
an
tiS
.
WhAT yoU neeD• Matching colors of size 11°
cylinder beads • Size 12 (thin) beading nee-
dles• WildFire beading thread• Scissors• Bead mat• Bead Stopper (optional)
More wonderful beadwork projects are available at shop.beadingdaily.com/jewelryprojects© 2012 Interweave Press LLC. not to be rePrInted. aLL rIghts reserved.
page 2
each other as you stitch. You can see the stripes forming (Figure 4).
Step 8: Continue working in peyote until the band is long enough to fit comfortably over your finger. To “zip” together the ends, you do not string any new beads, but sew through the in and out beads so they interlock. Look at the ends of an edge stripe. One end bead must be an in bead, the other an out bead, to interlock properly. Add or remove a row of beads to suit your desired fit.
Step 9: Bring the ends together in a ring. Notice how the in and out beads will fit together. Pass through beadwork to exit an end border bead. Depending on your ring length, you may be exiting either an in or an out bead. If you’re exiting an out bor-der bead, you will pass through a B bead on the other side. If your bor-der exit bead is an in bead, you will pass through the border out bead on the other side. Continue to sew back and forth through the out beads in a zigzag fashion and snug the thread to pull your ring together (Figure 5).
Step 10: Try on your ring. If you’re satisfied with the fit, tie a dis-crete, secure square knot with the tail and working threads, keeping the knot close to the beadwork. Weave any remaining threads into the beadwork along existing thread paths as if working in peyote.
Step 11: Thread the tail on the needle and repeat to weave in this thread as in Step 9.
resoUrCes: Check your local bead store. wildFire: beadalon, www.beadalon.com. bead stopper, www.beadstopper.com,
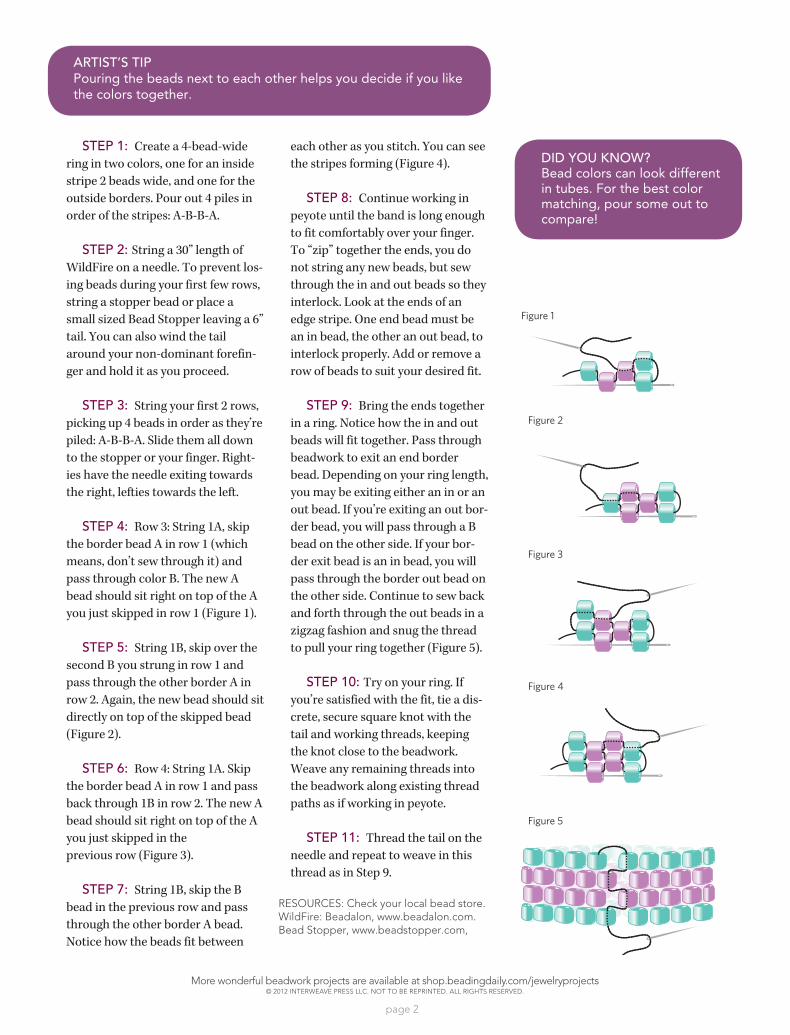
Step 1: Create a 4-bead-wide ring in two colors, one for an inside stripe 2 beads wide, and one for the outside borders. Pour out 4 piles in order of the stripes: A-B-B-A.
Step 2: String a 30” length of WildFire on a needle. To prevent los-ing beads during your first few rows, string a stopper bead or place a small sized Bead Stopper leaving a 6” tail. You can also wind the tail around your non-dominant forefin-ger and hold it as you proceed.
Step 3: String your first 2 rows, picking up 4 beads in order as they’re piled: A-B-B-A. Slide them all down to the stopper or your finger. Right-ies have the needle exiting towards the right, lefties towards the left.
Step 4: Row 3: String 1A, skip the border bead A in row 1 (which means, don’t sew through it) and pass through color B. The new A bead should sit right on top of the A you just skipped in row 1 (Figure 1).
Step 5: String 1B, skip over the second B you strung in row 1 and pass through the other border A in row 2. Again, the new bead should sit directly on top of the skipped bead (Figure 2).
Step 6: Row 4: String 1A. Skip the border bead A in row 1 and pass back through 1B in row 2. The new A bead should sit right on top of the A you just skipped in the previous row (Figure 3).
Step 7: String 1B, skip the B bead in the previous row and pass through the other border A bead. Notice how the beads fit between
Figure 1 Figure 2 Figure 3
Figure 4 Figure 5
Figure 6
Figure 1 Figure 2 Figure 3
Figure 4 Figure 5
Figure 6
Figure 1 Figure 2 Figure 3
Figure 4 Figure 5
Figure 6
Figure 1 Figure 2 Figure 3
Figure 4 Figure 5
Figure 6
Figure 1 Figure 2 Figure 3
Figure 4 Figure 5
Figure 6
ArtiSt’S tipPouring the beads next to each other helps you decide if you like the colors together.
Figure 1
Figure 2
Figure 3
Figure 4
Figure 5
DiD you know?Bead colors can look different in tubes. For the best color matching, pour some out to compare!

More wonderful beadwork projects are available at shop.beadingdaily.com/jewelryprojects© 2012 Interweave Press LLC. not to be rePrInted. aLL rIghts reserved.
page 3
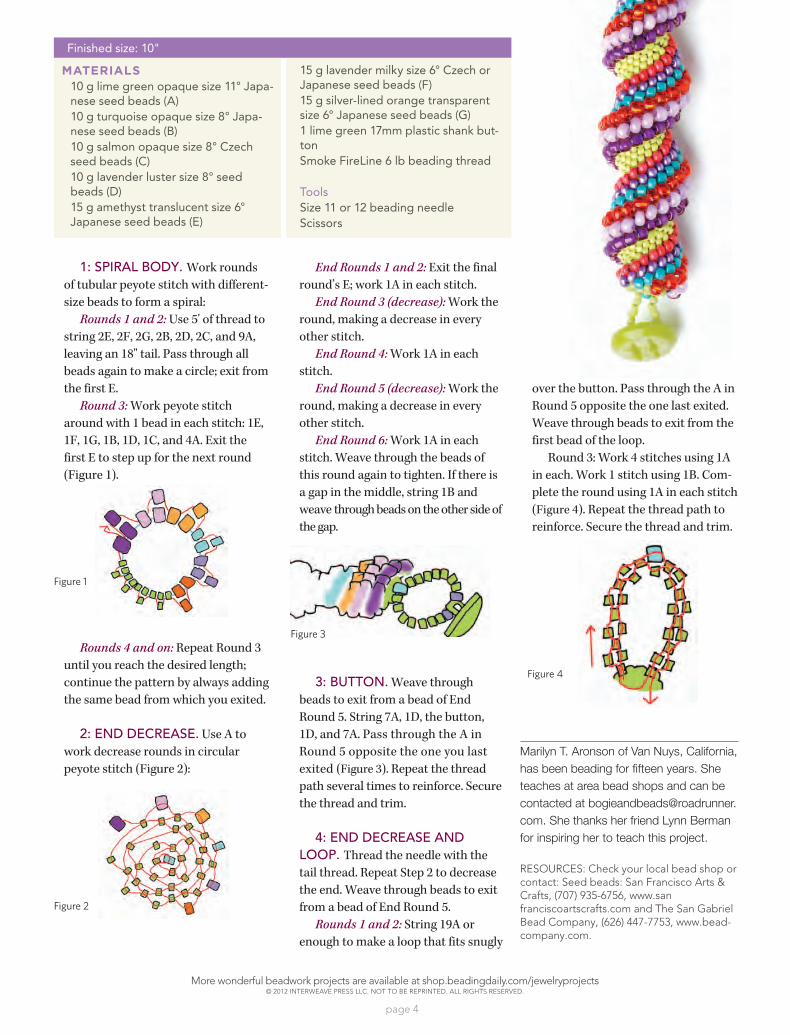
Create your own fiesta using vivid, bold colors in a Dutch spiral, where simply changing bead sizes in tubular peyote creates a
dynamic twist effect. Once you get the hang of the spiraling stitches, you’ll have a samba on your wrist in no time!
Confetti Spiral B y M a r i l y n T . a r o n S o n
More wonderful beadwork projects are available at shop.beadingdaily.com/jewelryprojects© 2012 Interweave Press LLC. not to be rePrInted. aLL rIghts reserved.
page 4
over the button. Pass through the A in Round 5 opposite the one last exited. Weave through beads to exit from the first bead of the loop.
Round 3: Work 4 stitches using 1A in each. Work 1 stitch using 1B. Com-plete the round using 1A in each stitch (Figure 4). Repeat the thread path to reinforce. Secure the thread and trim.
Marilyn T. Aronson of Van Nuys, California, has been beading for fifteen years. She teaches at area bead shops and can be contacted at [email protected]. She thanks her friend Lynn Berman for inspiring her to teach this project.
resoUrCes: Check your local bead shop or contact: seed beads: san Francisco arts & Crafts, (707) 935-6756, www.san franciscoartscrafts.com and the san gabriel bead Company, (626) 447-7753, www.bead-company.com.
End Rounds 1 and 2: Exit the final round’s E; work 1A in each stitch.
End Round 3 (decrease): Work the round, making a decrease in every other stitch.
End Round 4: Work 1A in each stitch.
End Round 5 (decrease): Work the round, making a decrease in every other stitch.
End Round 6: Work 1A in each stitch. Weave through the beads of this round again to tighten. If there is a gap in the middle, string 1B and weave through beads on the other side of the gap.
3: Button. Weave through beads to exit from a bead of End Round 5. String 7A, 1D, the button, 1D, and 7A. Pass through the A in Round 5 opposite the one you last exited (Figure 3). Repeat the thread path several times to reinforce. Secure the thread and trim.
4: enD DecreASe AnD loop. Thread the needle with the tail thread. Repeat Step 2 to decrease the end. Weave through beads to exit from a bead of End Round 5.
Rounds 1 and 2: String 19A or enough to make a loop that fits snugly
1: SpirAl BoDy. Work rounds of tubular peyote stitch with different-size beads to form a spiral:
Rounds 1 and 2: Use 5' of thread to string 2E, 2F, 2G, 2B, 2D, 2C, and 9A, leaving an 18" tail. Pass through all beads again to make a circle; exit from the first E.
Round 3: Work peyote stitch around with 1 bead in each stitch: 1E, 1F, 1G, 1B, 1D, 1C, and 4A. Exit the first E to step up for the next round (Figure 1).
Rounds 4 and on: Repeat Round 3 until you reach the desired length; continue the pattern by always adding the same bead from which you exited.
2: enD DecreASe. Use A to work decrease rounds in circular peyote stitch (Figure 2):
MATeriAls10 g lime green opaque size 11° Japa-nese seed beads (a)10 g turquoise opaque size 8° Japa-nese seed beads (B)10 g salmon opaque size 8° Czech seed beads (C)10 g lavender luster size 8° seed beads (D)15 g amethyst translucent size 6° Japanese seed beads (E)
15 g lavender milky size 6° Czech or Japanese seed beads (F)15 g silver-lined orange transparent size 6° Japanese seed beads (G)1 lime green 17mm plastic shank but-tonSmoke Fireline 6 lb beading thread
ToolsSize 11 or 12 beading needleScissors
Figure 1
Figure 2
Figure 4
Finished size: 10"
Figure 3
More wonderful beadwork projects are available at shop.beadingdaily.com/jewelryprojects© 2012 Interweave Press LLC. not to be rePrInted. aLL rIghts reserved.
page 5
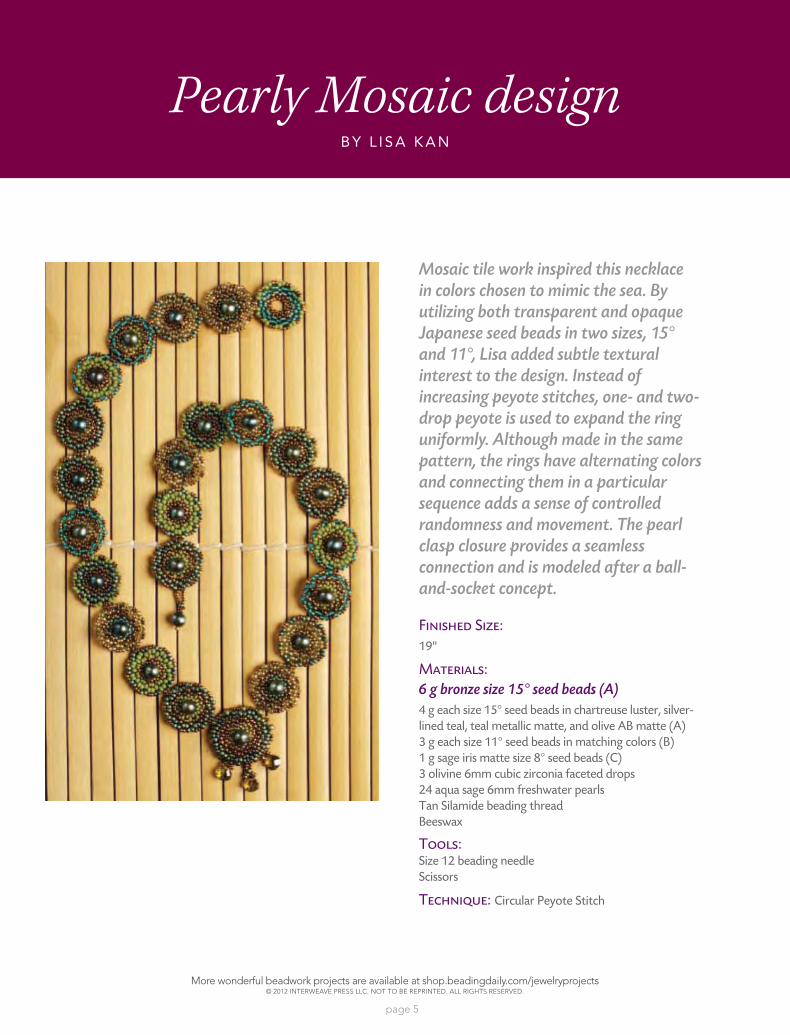
Pearly Mosaic design B y l i S a K a n
Peyote Stitch Projects from beadingdaily: 7 free Peyote Stitch Patterns© Interweave Press • Not to be reprinted • All rights reserved • www.beadingdaily.com
Pearly Mosaicdesign by lisa Kan
originally published in Beadwork, June/July 2007
Joe
Coc
a
Mosaic tile work inspired this necklace in colors chosen to mimic the sea. By utilizing both transparent and opaque Japanese seed beads in two sizes, 15° and 11°, Lisa added subtle textural interest to the design. Instead of increasing peyote stitches, one- and two-drop peyote is used to expand the ring uniformly. Although made in the same pattern, the rings have alternating colors and connecting them in a particular sequence adds a sense of controlled randomness and movement. The pearl clasp closure provides a seamless connection and is modeled after a ball-and-socket concept.
Finished size: 19"
Materials: 6 g bronze size 15° seed beads (A)4 g each size 15° seed beads in chartreuse luster, silver-lined teal, teal metallic matte, and olive AB matte (A)3 g each size 11° seed beads in matching colors (B)1 g sage iris matte size 8° seed beads (C)3 olivine 6mm cubic zirconia faceted drops24 aqua sage 6mm freshwater pearlsTan Silamide beading threadBeeswax
tools: Size 12 beading needle Scissors
technique: Circular Peyote Stitch
More wonderful beadwork projects are available at shop.beadingdaily.com/jewelryprojects© 2012 Interweave Press LLC. not to be rePrInted. aLL rIghts reserved.
page 6
presented by beadingdaily 4Lisa Kan's Pearly Mosaic
Peyote Stitch Projects from beadingdaily: 7 free peyote stitch patterns
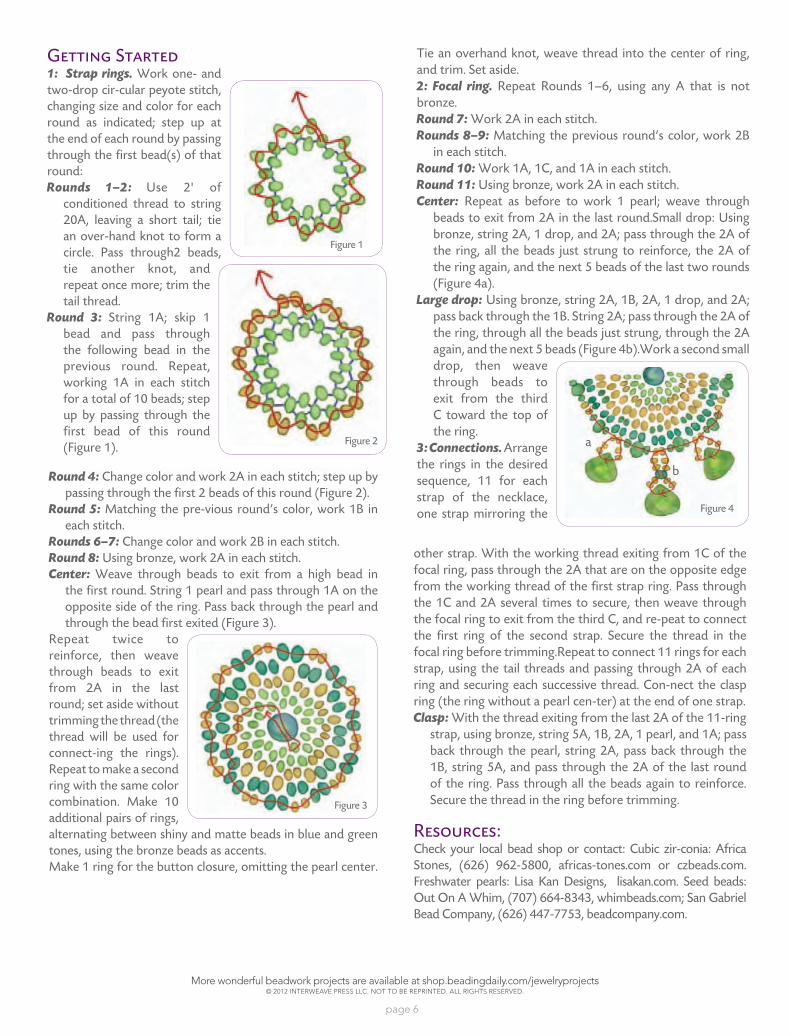
Getting started 1: Strap rings. Work one- and two-drop cir-cular peyote stitch, changing size and color for each round as indicated; step up at the end of each round by passing through the first bead(s) of that round:Rounds 1–2: Use 2' of
conditioned thread to string 20A, leaving a short tail; tie an over-hand knot to form a circle. Pass through2 beads, tie another knot, and repeat once more; trim the tail thread.
Round 3: String 1A; skip 1 bead and pass through the following bead in the previous round. Repeat, working 1A in each stitch for a total of 10 beads; step up by passing through the first bead of this round (Figure 1).
Round 4: Change color and work 2A in each stitch; step up by passing through the first 2 beads of this round (Figure 2).
Round 5: Matching the pre-vious round’s color, work 1B in each stitch.
Rounds 6–7: Change color and work 2B in each stitch.Round 8: Using bronze, work 2A in each stitch.Center: Weave through beads to exit from a high bead in
the first round. String 1 pearl and pass through 1A on the opposite side of the ring. Pass back through the pearl and through the bead first exited (Figure 3).
Repeat twice to reinforce, then weave through beads to exit from 2A in the last round; set aside without trimming the thread (the thread will be used for connect-ing the rings).Repeat to make a second ring with the same color combination. Make 10 additional pairs of rings, alternating between shiny and matte beads in blue and green tones, using the bronze beads as accents.Make 1 ring for the button closure, omitting the pearl center. Figure 2
Figure 1
Figure 3
presented by beadingdaily 4Lisa Kan's Pearly Mosaic
Peyote Stitch Projects from beadingdaily: 7 free peyote stitch patterns
Getting started 1: Strap rings. Work one- and two-drop cir-cular peyote stitch, changing size and color for each round as indicated; step up at the end of each round by passing through the first bead(s) of that round:Rounds 1–2: Use 2' of
conditioned thread to string 20A, leaving a short tail; tie an over-hand knot to form a circle. Pass through2 beads, tie another knot, and repeat once more; trim the tail thread.
Round 3: String 1A; skip 1 bead and pass through the following bead in the previous round. Repeat, working 1A in each stitch for a total of 10 beads; step up by passing through the first bead of this round (Figure 1).
Round 4: Change color and work 2A in each stitch; step up by passing through the first 2 beads of this round (Figure 2).
Round 5: Matching the pre-vious round’s color, work 1B in each stitch.
Rounds 6–7: Change color and work 2B in each stitch.Round 8: Using bronze, work 2A in each stitch.Center: Weave through beads to exit from a high bead in
the first round. String 1 pearl and pass through 1A on the opposite side of the ring. Pass back through the pearl and through the bead first exited (Figure 3).
Repeat twice to reinforce, then weave through beads to exit from 2A in the last round; set aside without trimming the thread (the thread will be used for connect-ing the rings).Repeat to make a second ring with the same color combination. Make 10 additional pairs of rings, alternating between shiny and matte beads in blue and green tones, using the bronze beads as accents.Make 1 ring for the button closure, omitting the pearl center. Figure 2
Figure 1
Figure 3
presented by beadingdaily 5Lisa Kan's Pearly Mosaic
Peyote Stitch Projects from beadingdaily: 7 free peyote stitch patterns
Tie an overhand knot, weave thread into the center of ring, and trim. Set aside.2: Focal ring. Repeat Rounds 1–6, using any A that is not bronze.Round 7: Work 2A in each stitch.Rounds 8–9: Matching the previous round’s color, work 2B
in each stitch.Round 10: Work 1A, 1C, and 1A in each stitch.Round 11: Using bronze, work 2A in each stitch.Center: Repeat as before to work 1 pearl; weave through
beads to exit from 2A in the last round.Small drop: Using bronze, string 2A, 1 drop, and 2A; pass through the 2A of the ring, all the beads just strung to reinforce, the 2A of the ring again, and the next 5 beads of the last two rounds (Figure 4a).
Large drop: Using bronze, string 2A, 1B, 2A, 1 drop, and 2A; pass back through the 1B. String 2A; pass through the 2A of the ring, through all the beads just strung, through the 2A again, and the next 5 beads (Figure 4b).Work a second small drop, then weave through beads to exit from the third C toward the top of the ring.
3: Connections. Arrange the rings in the desired sequence, 11 for each strap of the necklace, one strap mirroring the
other strap. With the working thread exiting from 1C of the focal ring, pass through the 2A that are on the opposite edge from the working thread of the first strap ring. Pass through the 1C and 2A several times to secure, then weave through the focal ring to exit from the third C, and re-peat to connect the first ring of the second strap. Secure the thread in the focal ring before trimming.Repeat to connect 11 rings for each strap, using the tail threads and passing through 2A of each ring and securing each successive thread. Con-nect the clasp ring (the ring without a pearl cen-ter) at the end of one strap.Clasp: With the thread exiting from the last 2A of the 11-ring
strap, using bronze, string 5A, 1B, 2A, 1 pearl, and 1A; pass back through the pearl, string 2A, pass back through the 1B, string 5A, and pass through the 2A of the last round of the ring. Pass through all the beads again to reinforce. Secure the thread in the ring before trimming.
resources:Check your local bead shop or contact: Cubic zir-conia: Africa Stones, (626) 962-5800, africas-tones.com or czbeads.com. Freshwater pearls: Lisa Kan Designs, lisakan.com. Seed beads: Out On A Whim, (707) 664-8343, whimbeads.com; San Gabriel Bead Company, (626) 447-7753, beadcompany.com.
Figure 4
a
b
More wonderful beadwork projects are available at shop.beadingdaily.com/jewelryprojects© 2012 Interweave Press LLC. not to be rePrInted. aLL rIghts reserved.
page 7
Finish your next project with this easily customizable toggle clasp. Not only are the gold collars fun to
play with because they slide around the toggle ring, but they also help hold the
toggle bar in place when worn.
Playful Peyote Toggle ClaspsB y M E l i n D a B a r T a
ArtiSt’S tipattach your design to this clasp any num-ber of ways: For beadwoven designs, stitch the ends of your bracelet or neck-lace directly into the b beads of the ring and bar. For designs strung on beading wire, string 1 crimp tube, enough seed beads to cover the wire, and the ring; pass back through the tube and crimp. For the bar, attach 2 collars 1 bead space apart in step 3 and attach the beading wire as before, allowing the wire to nestle between the collars.
MATeriAls24k gold–electroplated size 15° seed beads for collars (a)Size 15° seed beads for toggle ring (B)Size 11° seed beads for toggle ring and bar (C)Glass 3×4mm dropsnylon or 4 lb braided beading thread in color to match beads
ToolsScissorsSize 10 beading needle
Finished size: 1" (ring)
circular and flat peyote stitchSee p. 94 for helpful technique information.
TechniqUe
More wonderful beadwork projects are available at shop.beadingdaily.com/jewelryprojects© 2012 Interweave Press LLC. not to be rePrInted. aLL rIghts reserved.
page 8
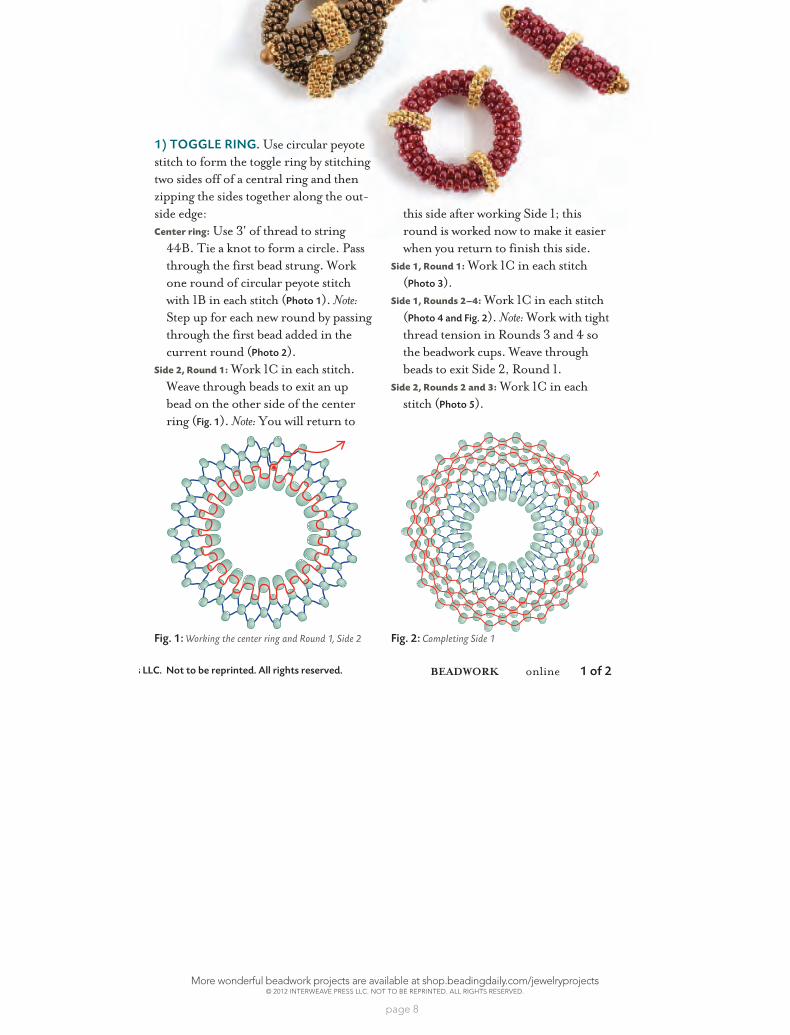
this side after working Side 1; this round is worked now to make it easier when you return to finish this side.
Side 1, Round 1: Work 1C in each stitch (Photo 3).
Side 1, Rounds 2–4: Work 1C in each stitch (Photo 4 and Fig. 2). Note: Work with tight thread tension in Rounds 3 and 4 so the beadwork cups. Weave through beads to exit Side 2, Round 1.
Side 2, Rounds 2 and 3: Work 1C in each stitch (Photo 5).
Copyright Beadwork® magazine, Interweave Press LLC. Not to be reprinted. All rights reserved. Beadwork online 1 of 2
In this expanded online
version of Custom Cool,
you’ll be able to make the
ring half of the clasps
following both step-by-
step photographs and
illustrations.
p e r s o n a l i z e y o u r j e w e l r y c o m p o n e n t s !
custom cool Melinda Barta
Finish your next project with this easily customizable toggle clasp. Not only are the gold collars fun to play with because they slide around the toggle ring, but they also help hold the toggle bar in place when worn.
playful peyote toggle clasps
a r t i s t ’ s t i pAttach your design to this clasp any number of ways: For beadwoven de-signs, stitch the ends of your bracelet or necklace directly into the B beads of the ring and bar. For designs strung on beading wire, string 1 crimp tube, enough seed beads to cover the wire, and the ring; pass back through the tube and crimp. For the bar, attach 2 collars 1 bead space apart in Step 3 and attach the beading wire as before, allowing the wire to nestle between the collars.
Materials24k gold–electroplated size 15° seed
beads for collars (a)size 15° seed beads for toggle ring (B)size 11° seed beads for toggle ring and bar (c)Glass 3×4mm dropsnylon or 4 lb braided beading thread in color
to match beads
toolsscissorssize 10 beading needle
Finished size: 1" (ring)
f:: circular and flat
peyote stitch
technique
1) ToggLe rINg. Use circular peyote stitch to form the toggle ring by stitching two sides off of a central ring and then zipping the sides together along the out-side edge:Center ring: Use 3' of thread to string
44B. Tie a knot to form a circle. Pass through the first bead strung. Work one round of circular peyote stitch with 1B in each stitch (Photo 1). Note: Step up for each new round by passing through the first bead added in the current round (Photo 2).
Side 2, Round 1: Work 1C in each stitch. Weave through beads to exit an up bead on the other side of the center ring (Fig. 1). Note: You will return to
Fig. 2: Completing Side 1
online
Fig. 1: Working the center ring and Round 1, Side 2

More wonderful beadwork projects are available at shop.beadingdaily.com/jewelryprojects© 2012 Interweave Press LLC. not to be rePrInted. aLL rIghts reserved.
page 9
Beadwork online 2 of 2
Zipping: Fold the sides up toward each other so that Side 1, Round 4 meets Side 2, Round 3. Zip the edges together (Photo 6 and
Fig. 3). Repeat the thread path to rein-force. Secure the thread and trim.
2) ToggLe bAr. Use flat peyote stitch to work the bar half of the clasp:Bar: Use 3' of thread to work a strip of flat
peyote 16C wide and 12 rows long. Zip the edges together as before to form a tube.
Ends: Weave through beads to exit from an end bead, away from the beadwork. String 1A, 1 drop, and 1A (Fig. 4a). Pass down through 1B at the opposite side of the opening in the tube. String 1A, pass
through the drop, and string 1A. Pass down through 1B adjacent to the first one exited and pass up through the next (Fig. 4b). String 1A, pass through the drop, string 1A, and pass down through the 1B on the opposite side of the opening in the tube. Repeat the thread paths to reinforce. Weave through beads to exit the other end of the tube and repeat embellishments.
3) goLd CoLLArs. Embellish the ring and bar as desired:Ring: Use 2' of thread and flat peyote
stitch to work a strip 2A or 4A wide and long enough to wrap around the ring (about 26 rows). Pass one end of
the strip through the ring and zip it closed (Fig. 5). Secure the thread and trim.
Bar: Use 2' of thread and flat peyote stitch to work a strip 2A wide and long enough to wrap around the bar (about 28 rows). Wrap the strip around the center of the bar and zip it closed. Weave in and out through some of the C of the bar and A of the collar to secure the collar. Secure the thread and trim. ✦
MeLINdA bArTA is editor of Beadwork magazine. she is the author of Custom Cool Jewelry: Create 200+ Personalized Pendants, Charms, and Clasps (interweave, 2008) and Hip to Stitch (interweave, 2005) and coauthor of the new book Mixed Metals: Creating Contemporary Jewelry with Silver, Gold, Copper, Brass & More (interweave, 2009). Visit www.melindabarta.com.
resourCesCheck your local bead shop or contact: one-G nylon and Fireline braided beading threads and beads: Beyond Beadery, (800) 840-5548, www.beyondbeadery.com.
Fig. 3: Zipping Side 1, Round 4 to Side 2, Round 3
Fig. 5: Zipping together the ends of a collar
a
b
Fig. 4: Embel-lishing an end of the toggle bar
Photo 1: Stitching the center ring
Photo 4: Stitching Side 1, Round 3
Photo 2: Stepping up for Side 2, Round 1
Photo 5: Beginning Side 2, Round 3
Photo 3: Stitching Side 1, Round 1
Photo 6: Zipping Side 1, Round 4 to Side 2, Round 3
More wonderful beadwork projects are available at shop.beadingdaily.com/jewelryprojects© 2012 Interweave Press LLC. not to be rePrInted. aLL rIghts reserved.
page 10
Summer Bird House EarringsBy J u D i Wo o D
Step 1: With 1 yard of waxed thread, begin-ning peyote pattern at the point indicated. So that there are no threads showing, start the brick weave with 2 beads and immediately start the second row with 2 more beads—this can be a little tricky, but with practice and a good grip it can be done. Weave in new beads by going down to the first row and up into the second row. After the first two rows are done continue working with traditional brick stitch. Work the design up the first half.
Step 2: At the top of the house, string a 3mm bead, a small bit of gimp, and the earring finding. Pass back through the 3mm bead and into the top of the house and thread through the design to the beg. Continue beading the second half of the house.Work the thread into the beads, secure with a knot and trim close to work.
Judi Wood is a professional full-time artist who has won
many awards at juried fine arts
MATeriAls:Delica beads in six colors2 3mm pearl or crystal2 ear wiresSize B white beading threadFrench wire or gimp1 yard of waxed thread
Tools:Sharp scissorsSize 12 beading needleSKILL LEVELBeginner
TechniqUesPeyote StitchBrick Stitch
Copyright Interweave Press LLC. Not to be reprinted. All rights reserved.
page 1
projectlibraryRRRRRRRRRRRRRRRRRRRRRRR
publishers of Beadwork Magazine…join the online beading community at BeadingDaily.com
Summer Bird House Earringsby Judi Wood
MATERIALS:Delica beads in six colors2 3mm pearl or crystal2 ear wiresSize B white beading threadFrench wire or gimp1 yard of waxed thread
TOOLS: Sharp scissors Size 12 beading needle
SKILL LEVELBeginner
TECHNIQUESPeyote StitchBrick Stitch
Step 1
Step 2
With 1 yard of waxed thread, beginning peyote pattern at the point indicated. So that there are no threads showing, start the brick weave with 2 beads and immediately start the second row with 2 more beads—this can be a little tricky, but with practice and a good grip it can be done. Weave in new beads by going down to the first row and up into the second row. After the first two rows are done continue working with traditional brick stitch. Work the design up the first half.
At the top of the house, string a 3mm bead, a small bit of gimp, and the earring finding. Pass back through the 3mm bead and into the top of the house and thread through the design to the beg. Continue beading the second half of the house.Work the thread into the beads, secure with a knot and trim close to work.
Judi Wood is a professional full-time artist who has won many awards at juried fine arts shows along the east coast. See more of her work online at www.judiwood.com.
More wonderful beadwork projects are available at shop.beadingdaily.com/jewelryprojects© 2012 Interweave Press LLC. not to be rePrInted. aLL rIghts reserved.
page 11
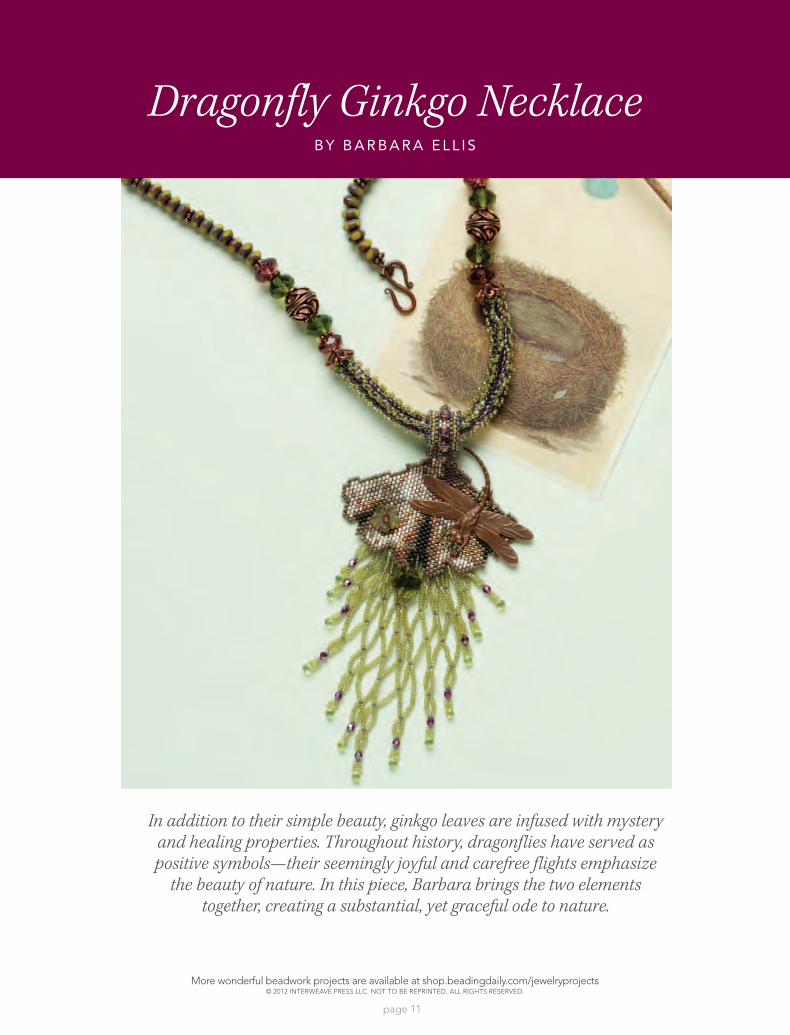
Dragonfly Ginkgo Necklace B y B a r B a r a E l l i S
In addition to their simple beauty, ginkgo leaves are infused with mystery and healing properties. Throughout history, dragonflies have served as positive symbols—their seemingly joyful and carefree flights emphasize
the beauty of nature. In this piece, Barbara brings the two elements together, creating a substantial, yet graceful ode to nature.
More wonderful beadwork projects are available at shop.beadingdaily.com/jewelryprojects© 2012 Interweave Press LLC. not to be rePrInted. aLL rIghts reserved.
page 12
the leaf. Position the dragonfly on the right side at an angle with the tail hanging off of the leaf and stitch in place, stringing loops of 2 or 3 size 15°s before making the stitches so the thread doesn’t show. Make 4 or more connections to secure the dragonfly, always weaving through the leaf beads to hide the thread as you move from
point to point.
3: BAil. Secure 4' of nylon thread and exit from a bead along one edge of the stem, about 5 rows up from the leaf.
Picot edge: String 1A, 1B, and 1A; *pass the needle underneath the loop of thread between the next 2 rows and up through the last 1A strung. String 1A and 1B and repeat from * for the
length of the stem (Figure 2). Repeat to add picots along the other edge of the stem. Secure the thread and trim.
Finishing: Exit from a bead at the center of the stem near the leaf. String 1 lilac 4×2mm rondelle and 1B; pass back through the rondelle. Weave through the beads to exit 7 rows up the stem and repeat to add a total of 8 embellish-
ments. Bend the stem so the end touches the
back of the leaf near the last decrease row. Make sure the rondelles sit on the
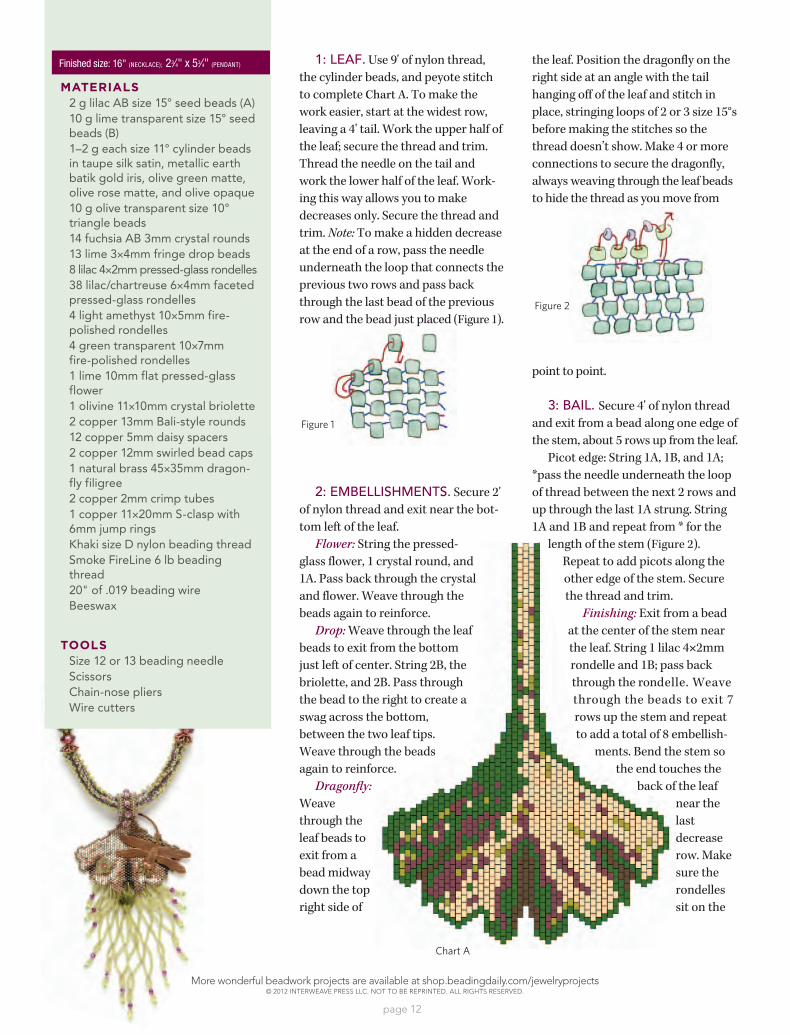
1: leAf. Use 9' of nylon thread, the cylinder beads, and peyote stitch to complete Chart A. To make the work easier, start at the widest row, leaving a 4' tail. Work the upper half of the leaf; secure the thread and trim. Thread the needle on the tail and work the lower half of the leaf. Work-ing this way allows you to make decreases only. Secure the thread and trim. Note: To make a hidden decrease at the end of a row, pass the needle underneath the loop that connects the previous two rows and pass back through the last bead of the previous row and the bead just placed (Figure 1).
2: emBelliShmentS. Secure 2' of nylon thread and exit near the bot-tom left of the leaf.
Flower: String the pressed-glass flower, 1 crystal round, and 1A. Pass back through the crystal and flower. Weave through the beads again to reinforce.
Drop: Weave through the leaf beads to exit from the bottom just left of center. String 2B, the briolette, and 2B. Pass through the bead to the right to create a swag across the bottom, between the two leaf tips. Weave through the beads again to reinforce.
Dragonfly: Weave through the leaf beads to exit from a bead midway down the top right side of
Figure 1
Figure 2
MATeriAls2 g lilac aB size 15° seed beads (a)10 g lime transparent size 15° seed beads (B)1–2 g each size 11° cylinder beads in taupe silk satin, metallic earth batik gold iris, olive green matte, olive rose matte, and olive opaque10 g olive transparent size 10° triangle beads14 fuchsia aB 3mm crystal rounds13 lime 3×4mm fringe drop beads8 lilac 4×2mm pressed-glass rondelles38 lilac/chartreuse 6×4mm faceted pressed-glass rondelles4 light amethyst 10×5mm fire-polished rondelles4 green transparent 10×7mm fire-polished rondelles1 lime 10mm flat pressed-glass flower1 olivine 11×10mm crystal briolette2 copper 13mm Bali-style rounds12 copper 5mm daisy spacers2 copper 12mm swirled bead caps1 natural brass 45×35mm dragon-fly filigree2 copper 2mm crimp tubes1 copper 11×20mm S-clasp with 6mm jump ringsKhaki size D nylon beading threadSmoke Fireline 6 lb beading thread20" of .019 beading wireBeeswax
ToolsSize 12 or 13 beading needleScissorsChain-nose pliersWire cutters
Chart A
Finished size: 16" (necklace); 23⁄4" x 53⁄4" (pendant)
More wonderful beadwork projects are available at shop.beadingdaily.com/jewelryprojects© 2012 Interweave Press LLC. not to be rePrInted. aLL rIghts reserved.
page 13
outside of the loop. Sew the stem to itself, zipping the leaf beads and the last row together. Secure the thread and trim.
4: netteD fringe. Secure 6' of nylon thread and exit from the back of the leaf, 11 rows from the bottom and 5 beads from the right. Work legs of netted fringe straight across Row 11 on the back of the leaf (Figure 3):
Fringe 1: String 1A, 9B, 1A, 1 crystal round, 1A, 3B, 1 fringe drop, and 3B; pass back through the last 1A, crystal, and 1A. String 9B, pass back through the first 1A, and exit the cylinder bead to the right on the same row to set up for the next fringe.
Fringe 2: String 1A, 9B, 1A, 7B, 1A, 1 crystal round, 1A, 3B, 1 fringe drop, and 3B; pass back through the last 1A, crystal, and 1A. String 7B and pass back through the next 1A. String 9B
and pass back through the first 1A and the next leaf bead.
Fringe 3: String 1A, 19B, 1A, 7B, 1A, 1 crystal round, 1A, 3B, 1 fringe drop, and 3B; pass back through the 1A, crystal, and 1A. String 7B and pass back through the next 1A. String 9B, 1A, and 9B; pass back through the first 1A and the next leaf bead.
Fringe 4: String 1A and 9B; pass back through the last 1A in the previ-ous fringe. String 9B, 1A, 19B, 1A, 7B, 1A, 1 crystal round, 1A, 3B, 1 fringe drop, and 3B; pass back through the 1A, crystal, and 1A. String 7B and pass back through the next 1A. String 9B, 1A, and 9B; pass back through the next 1A. String 9B, 1A, and 9B; pass back through the first 1A and the next leaf bead.
Fringes 5–7: Continue increasing each fringe in this manner as shown in Figure 3.
Fringes 8–13: Repeat Fringes 6–1 in that order. Secure the thread and trim. Set the pendant aside.
5: herringBone tuBe. Use 9' of FireLine and triangles to lad-der-stitch a strip 6 beads long and 2 beads high, leaving a 6" tail. Pass down through the first column of beads and up through the last col-umn of beads to make a tight foun-dation ring (Figure 4).
Base tube: Use triangles to work 41⁄2" of tubular herringbone stitch off the ring. Weave through the beads on the ends again to reinforce. Secure the thread and trim.
Ridges: Secure 9' of FireLine and exit from a triangle of the tube’s first round, away from the tube. Stitching along the same column of beads, string 3B, skip 1 triangle, and pass through the next one. Repeat for the
length of the tube, then for all the columns, alternating the 3B place-ment from column to column to stagger the embellishment (Figure 5). Secure the thread and trim close to the work. Set the tube aside.
6: ASSemBly. Use the wire to string 1 crimp bead and one of the clasp’s rings, leaving a 2" tail; pass back through the crimp bead and flatten using the chain-nose pliers.
String 1 spacer, 7 chartreuse rondelles, 1 spacer, 5 chartreuse rondelles, 1 spacer, 7 chartreuse rondelles, 1 spacer, 1 amethyst rondelle, 1 spacer, 1 green rondelle, 1 copper round, 1 green rondelle, 1 spacer, 1 amethyst rondelle, and 1 bead cap from outside to inside. String the herringbone-stitched tube. Repeat entire step reversing the stringing sequence and using the other half of the clasp. Slide the pendant’s bail on the strand. F
Barbara Ellis is a bead teacher, project designer, and an artist who has exhibited her work extensively throughout Florida. Barbara’s patterns can be purchased at www.bead-patterns.com, and she can be contacted at [email protected].
resoUrCes:Check your local bead shop or contact: Cylinder, seed, and triangle beads: Caravan beads, (800) 230-8941, www.caravanbeads.com. swarovski crystal rounds: Jane’s Fiber and beads, (888) 497-2665, www.janesfiberandbeads.com. Flat pressed-glass flower: naples bead shop, (239) 254-1895, www.naplesbeadshop.com. vintaj dragonfly: antelope beads, (303) 885-4903, www.antelopebeads.com. drops and lilac 4×2mm rondelles: York novelty Imports, (800) 223-6676, www.yorkbeads.com. all other rondelles and swarovski crystal briolette: the bead boutique of naples, (239) 774-3466. s-clasp and daisy spacers: Crystal Creations bead Institute, (561) 649-9909, www.beadsgonewild.com.
Figure 3
Figure 4
Figure 5

More wonderful beadwork projects are available at shop.beadingdaily.com/jewelryprojects© 2012 Interweave Press LLC. not to be rePrInted. aLL rIghts reserved.
page 14
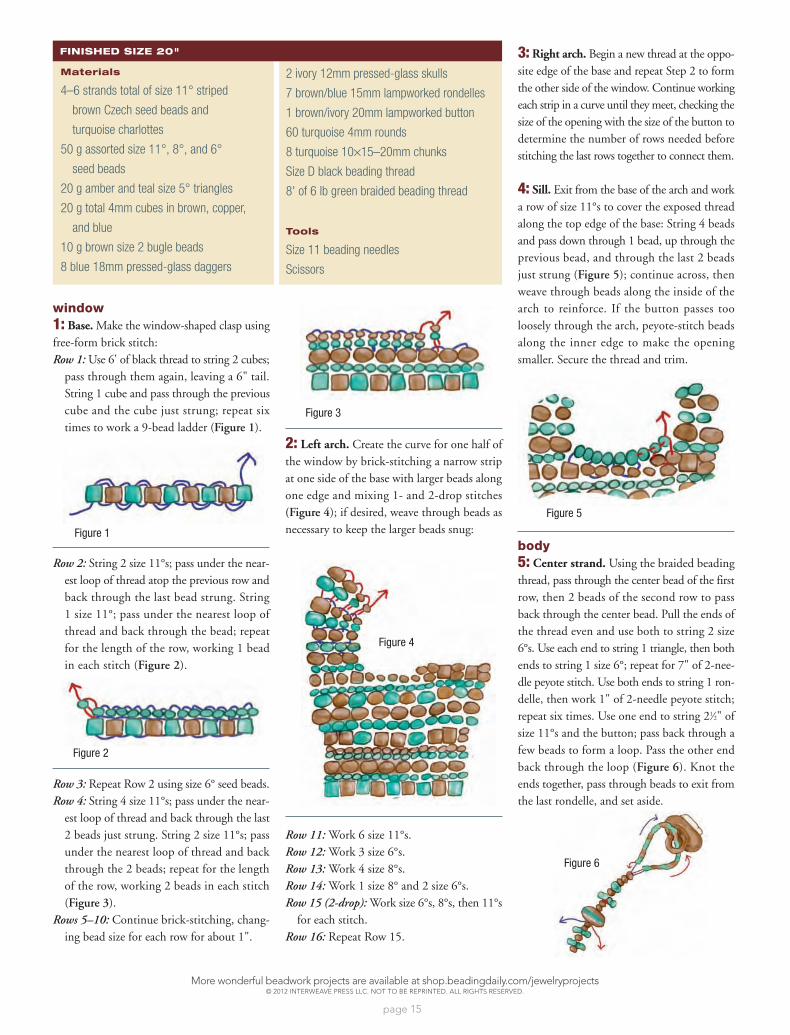
Pirate’s Plunder By DuSTin WEDEKinD
Use a mixture of seed-bead soup to brick-stitch an arched window that forms the clasp for a skull-faced lampworked button to peek through.
Connect the window and button with a spine of accent beads and surround them with textured strands for a choker worthy of Jack Sparrow.
More wonderful beadwork projects are available at shop.beadingdaily.com/jewelryprojects© 2012 Interweave Press LLC. not to be rePrInted. aLL rIghts reserved.
page 15
window1: Base. Make the window-shaped clasp usingfree-form brick stitch:Row 1: Use 6' of black thread to string 2 cubes;
pass through them again, leaving a 6" tail.String 1 cube and pass through the previouscube and the cube just strung; repeat sixtimes to work a 9-bead ladder (Figure 1).
Row 2: String 2 size 11°s; pass under the near-est loop of thread atop the previous row andback through the last bead strung. String1 size 11°; pass under the nearest loop ofthread and back through the bead; repeatfor the length of the row, working 1 beadin each stitch (Figure 2).
Row 3: Repeat Row 2 using size 6° seed beads.Row 4: String 4 size 11°s; pass under the near-
est loop of thread and back through the last2 beads just strung. String 2 size 11°s; passunder the nearest loop of thread and backthrough the 2 beads; repeat for the lengthof the row, working 2 beads in each stitch(Figure 3).
Rows 5–10: Continue brick-stitching, chang-ing bead size for each row for about 1".
2: Left arch. Create the curve for one half ofthe window by brick-stitching a narrow stripat one side of the base with larger beads alongone edge and mixing 1- and 2-drop stitches(Figure 4); if desired, weave through beads asnecessary to keep the larger beads snug:
Row 11: Work 6 size 11°s.Row 12: Work 3 size 6°s.Row 13: Work 4 size 8°s.Row 14: Work 1 size 8° and 2 size 6°s.Row 15 (2-drop): Work size 6°s, 8°s, then 11°s
for each stitch.Row 16: Repeat Row 15.
3: Right arch. Begin a new thread at the oppo-site edge of the base and repeat Step 2 to formthe other side of the window. Continue workingeach strip in a curve until they meet, checking thesize of the opening with the size of the button todetermine the number of rows needed beforestitching the last rows together to connect them.
4: Sill. Exit from the base of the arch and worka row of size 11°s to cover the exposed threadalong the top edge of the base: String 4 beadsand pass down through 1 bead, up through theprevious bead, and through the last 2 beadsjust strung (Figure 5); continue across, thenweave through beads along the inside of thearch to reinforce. If the button passes tooloosely through the arch, peyote-stitch beadsalong the inner edge to make the openingsmaller. Secure the thread and trim.
body5: Center strand. Using the braided beadingthread, pass through the center bead of the firstrow, then 2 beads of the second row to passback through the center bead. Pull the ends ofthe thread even and use both to string 2 size6°s. Use each end to string 1 triangle, then bothends to string 1 size 6°; repeat for 7" of 2-nee-dle peyote stitch. Use both ends to string 1 ron-delle, then work 1" of 2-needle peyote stitch;repeat six times. Use one end to string 21⁄2" ofsize 11°s and the button; pass back through afew beads to form a loop. Pass the other endback through the loop (Figure 6). Knot theends together, pass through beads to exit fromthe last rondelle, and set aside.
Materials
4–6 strands total of size 11° striped
brown Czech seed beads and
turquoise charlottes
50 g assorted size 11°, 8°, and 6°
seed beads
20 g amber and teal size 5° triangles
20 g total 4mm cubes in brown, copper,
and blue
10 g brown size 2 bugle beads
8 blue 18mm pressed-glass daggers
2 ivory 12mm pressed-glass skulls
7 brown/blue 15mm lampworked rondelles
1 brown/ivory 20mm lampworked button
60 turquoise 4mm rounds
8 turquoise 10×15–20mm chunks
Size D black beading thread
8' of 6 lb green braided beading thread
Tools
Size 11 beading needles
Scissors
Figure 1
Figure 2
Figure 3
Figure 4
Figure 5
Figure 6
techniques >> brick stitch • peyote stitch • ladder stitch (see pages 118–119 for how-tos) FINISHED SIZE 20"
BEADWORK October/November 2007 53
BW Pirates Plunder 8/9/07 10:33 AM Page 53
08092007103445
More wonderful beadwork projects are available at shop.beadingdaily.com/jewelryprojects© 2012 Interweave Press LLC. not to be rePrInted. aLL rIghts reserved.
page 16
6: Seed bead strands. Secure a very longthread to exit next to the base of the centerstrand. String a 9" strand of striped brown seedbeads; pass through a triangle in the centerstrand and back through the adjacent triangle.String another 9" strand of beads and securein the base on the opposite side of the centerstrand. Pass back through both new seed beadstrands to reinforce. Exit from the next basebead and repeat, stringing 12" strands ofturquoise seed beads. Repeat again at the edgeof the base, stringing 141⁄2" of brown beads.
7: Accent strands. Using one of the threadends from Step 5, string bugle beads with a size8°, turquoise round, and size 8° between eachone back toward the base; include 1 glass skulland 1 turquoise chunk every few inches. Repeatwith the other thread end. Secure the threadsin the base and trim.
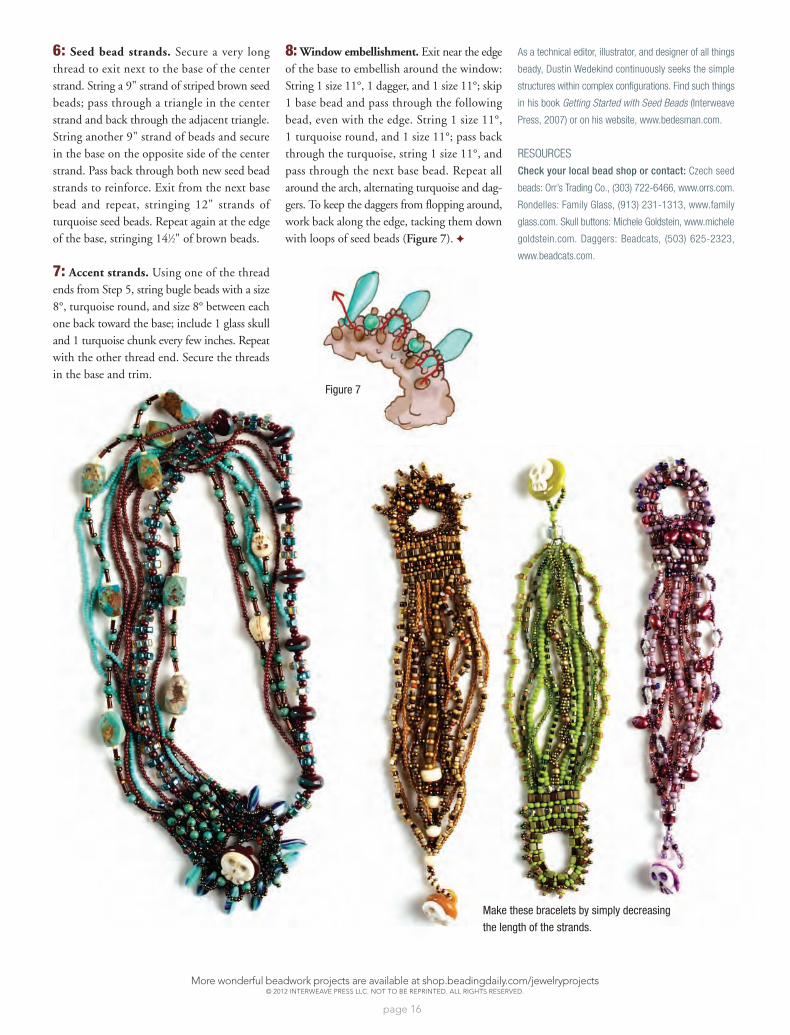
8: Window embellishment. Exit near the edgeof the base to embellish around the window:String 1 size 11°, 1 dagger, and 1 size 11°; skip1 base bead and pass through the followingbead, even with the edge. String 1 size 11°,1 turquoise round, and 1 size 11°; pass backthrough the turquoise, string 1 size 11°, andpass through the next base bead. Repeat allaround the arch, alternating turquoise and dag-gers. To keep the daggers from flopping around,work back along the edge, tacking them downwith loops of seed beads (Figure 7). �
As a technical editor, illustrator, and designer of all things
beady, Dustin Wedekind continuously seeks the simple
structures within complex configurations. Find such things
in his book Getting Started with Seed Beads (Interweave
Press, 2007) or on his website, www.bedesman.com.
RESOURCESCheck your local bead shop or contact: Czech seed
beads: Orr’s Trading Co., (303) 722-6466, www.orrs.com.
Rondelles: Family Glass, (913) 231-1313, www.family
glass.com. Skull buttons: Michele Goldstein, www.michele
goldstein.com. Daggers: Beadcats, (503) 625-2323,
www.beadcats.com.
54 beadworkmagazine.com
Figure 7
Make these bracelets by simply decreasing
the length of the strands.
BW Pirates Plunder 8/9/07 10:33 AM Page 54
08092007103445
More wonderful beadwork projects are available at shop.beadingdaily.com/jewelryprojects© 2012 Interweave Press LLC. not to be rePrInted. aLL rIghts reserved.
page 17
Do you love those gorgeous peyote stitch patterns for flat peyote but find yourself confused when it comes to actually reading them and stitching them up? You're not alone - when I asked a question on the Beading Daily Facebook page recently about how beaders keep track of where they are in a peyote stitch pattern, I found more and more comments from bead-ers who were struggling with how to read those peyote stitch patterns in the first place!
One of the reasons why I learned how to do beadwork was because I wanted to learn how to make peyote stitch amulet bags. (Remember those?!) And some of my favorite amu-let bag patterns used a peyote stitch pattern or graph. Once I learned how to do flat peyote stitch, learning how to read those charted patterns was a whole new learning experience, and
How to Read a Peyote Stitch Pattern: It's Easier Than You Think!
B y J E n n i F E r V a n B E n S C h o T E n
one that I find many beaders struggle with when they get started with pey-ote stitch.
Before You Get Started: Know Your Peyote Stitch Thread Path
I think the key to being able to read a peyote stitch graph is that you have to be very familiar with the mechanics of peyote stitch. Know the ins and outs of flat peyote in all its various forms before you try reading a peyote stitch pattern. If you are comfortable with and understand the thread path for flat peyote stitch, you can use that to make reading a peyote stitch pat-tern that much easier.
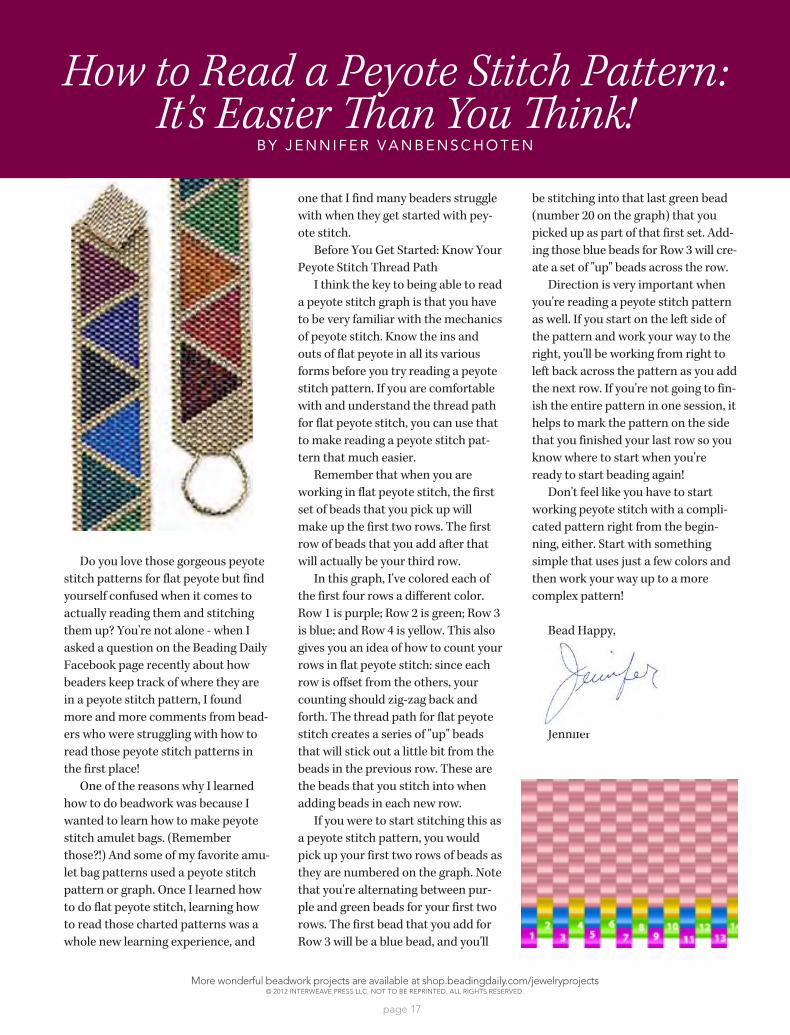
Remember that when you are working in flat peyote stitch, the first set of beads that you pick up will make up the first two rows. The first row of beads that you add after that will actually be your third row.
In this graph, I've colored each of the first four rows a different color. Row 1 is purple; Row 2 is green; Row 3 is blue; and Row 4 is yellow. This also gives you an idea of how to count your rows in flat peyote stitch: since each row is offset from the others, your counting should zig-zag back and forth. The thread path for flat peyote stitch creates a series of "up" beads that will stick out a little bit from the beads in the previous row. These are the beads that you stitch into when adding beads in each new row.
If you were to start stitching this as a peyote stitch pattern, you would pick up your first two rows of beads as they are numbered on the graph. Note that you're alternating between pur-ple and green beads for your first two rows. The first bead that you add for Row 3 will be a blue bead, and you'll
be stitching into that last green bead (number 20 on the graph) that you picked up as part of that first set. Add-ing those blue beads for Row 3 will cre-ate a set of "up" beads across the row.
Direction is very important when you're reading a peyote stitch pattern as well. If you start on the left side of the pattern and work your way to the right, you'll be working from right to left back across the pattern as you add the next row. If you're not going to fin-ish the entire pattern in one session, it helps to mark the pattern on the side that you finished your last row so you know where to start when you're ready to start beading again!
Don't feel like you have to start working peyote stitch with a compli-cated pattern right from the begin-ning, either. Start with something simple that uses just a few colors and then work your way up to a more complex pattern!
Bead Happy,
Jennifer
More wonderful beadwork projects are available at shop.beadingdaily.com/jewelryprojects© 2012 Interweave Press LLC. not to be rePrInted. aLL rIghts reserved.
page 18
How to Mark Your Place in a Peyote Stitch Pattern
B y J E n n i F E r V a n B E n S C h o T E n
Last time I was talking to you
about peyote-stitch patterns, we were talking about the best way to learn how to read a peyote-stitch pattern. Reading a peyote-stitch pattern can be made so much easier if you have a firm understanding of the basic mechanics of the stitch, including the thread path and why the beads line up the way they do when working in peyote stitch.
Now it's time to talk about all the ways in which we can mark our places when working from a peyote-stitch pattern! If you love working from intricate peyote patterns (or even some of the not-so-intricate patterns), it's important to have a system in place so that you can set your bead-work down and pick it up again and know where you left off. There are a
lot of different ways to do this, so let's jump right in.
Sticky Notes. Probably my all-time favorite way of marking my place in a peyote-stitch pattern is to use sticky notes. Back when I worked in non-profit community development and management, I went to a lot of confer-ences where they gave out tons of sticky notes. Since my desk at work was literally overflowing with these things, I brought them home and started using them for something much more enjoyable: marking my place in my peyote-stitch patterns! The advantage of using sticky notes is that they are easy to pick up and move along your peyote-stitch pat-tern, and you can even write yourself little notes to remind yourself where you left off when you stop beading. One disadvantage is that some of them can leave a sticky film on your page or pattern, so you might want to consider putting your pattern inside a plastic sheet protector to prevent it from getting worn out.
Page Protectors. In addition to pro-tecting your peyote-stitch pattern from spills and tears, a plastic page protector can be great for marking your place. Secure your pattern in the page protector with a little bit of tape over the opening at the top (be careful not to get any on the pattern if you want to reuse it) and use a marker to draw a dot on the first bead of each
row as you begin. You can also use this to mark your place if you decide to quit mid-row.
Magnet Board. Magnet boards are another great option for marking your place in a peyote-stitch pattern. These are sold in most sewing and craft sup-ply stores and consist of a metal board that comes with a large magnet that fits across the board. As you move through your pattern, you just slide the magnet so that it sits under your current row. Some of these magnet boards also have optional magnifiers attached to the magnetic strips to help you see your pattern easier.
Bead Happy,
Jennifer