petra v4 introduction v4 introduction contents february 20, 2013 v migrating private projects to v4...
TRANSCRIPT

©2012 IHS, All Rights Reserved. All trademarks belong to IHS or its affiliated and subsidiary companies, all rights reserved.
www.ihs.com
IHS > Decision Support Tool
Petra v4 Introduction Training Class Workbook
February 20, 2013 v.1.4
February 20, 2013 ii
Petra v4 Introduction
February 20, 2013
© 2007-2013, IHS and its affiliated and subsidiary companies, all rights reserved. All other
trademarks are the property of IHS and its affiliated and subsidiary companies.
This product, including software, data and documentation are licensed to the user for its internal
business purposes only and may not be disclosed, disseminated, sold, licensed, copied,
reproduced, translated or transferred to any third party.
IHS
15 Inverness Way East
Englewood, Colorado 80112
303-736-3000
February 20, 2013 iii
Contents Introduction ..................................................................................................................................................1
Class Objective .........................................................................................................................................1 Using the Manual ......................................................................................................................................1 Technical Assistance.................................................................................................................................2
Part 1: Petra’s Database .............................................................................................................................3
Database Structure ......................................................................................................................................5
Petra v3 File Architecture ..........................................................................................................................5 Petra v4 File Architecture ..........................................................................................................................6
Database Server ...................................................................................................................................6 Project Public & Project Private Folders ...............................................................................................8
Petra’s Database Structure Summary.................................................................................................... 10
Planning for Petra v4 ................................................................................................................................ 11
Hardware Requirements ........................................................................................................................ 11 License Updates ..................................................................................................................................... 11 Project Preparation ................................................................................................................................. 11 Prioritizing Project Migration .................................................................................................................. 12 Simultaneous Petra v3 and Petra v4 Installations ................................................................................. 12 Planning for Petra v4 Summary ............................................................................................................. 13
Part 2: Petra In Shared Mode .................................................................................................................. 15
Shared Mode Quick Start Guide .............................................................................................................. 17
Installing the Database Server ................................................................................................................ 19
Windows Server Specifications .............................................................................................................. 19 Installing the Database Server Example ............................................................................................ 20
Accessing the Database Server ............................................................................................................. 23 The Project Databases Folder ............................................................................................................... 23 Installing the Database Server Summary ............................................................................................... 24
Installing Petra v4 ..................................................................................................................................... 25
Installation Options ................................................................................................................................. 25 Upgrading Petra v4 Standalone ............................................................................................................. 26
Upgrading Petra v4 Standalone Example .......................................................................................... 26 Upgrading Petra v4 Client/Server .......................................................................................................... 28
Upgrading the Petra Server Example ................................................................................................ 28 Upgrading the Petra Client Example ................................................................................................. 29
Config.EXE ............................................................................................................................................. 32 Installing Petra v4 Summary .................................................................................................................. 33
Migrating Shared Projects to Petra v4 ................................................................................................... 35
Using the Project Migration Tool ............................................................................................................ 35 Migrating Shared Projects to v4 Example .......................................................................................... 37
Migrating Shared Projects to v4 Summary............................................................................................. 41
Managing Database Servers .................................................................................................................... 43
Contents Petra v4 Introduction
iv February 20, 2013
Petra Server Admin Tool ........................................................................................................................ 43 Adding Database Servers to the Petra DB Server List .......................................................................... 44
Petra DB Server List .......................................................................................................................... 45 Private DB Server List ........................................................................................................................ 45 Adding Database Servers to the DB Server List Example ................................................................ 45
Connecting to the Database Server ....................................................................................................... 49 Connecting to the Database Server Example .................................................................................... 49 Connecting to Multiple Database Servers ......................................................................................... 50
User Management Tab ........................................................................................................................... 51 All Users List ...................................................................................................................................... 51 Roles List ........................................................................................................................................... 52 Adding Users & Roles Example ......................................................................................................... 54
Server Management Tab........................................................................................................................ 60 User Sync ........................................................................................................................................... 60 Role Sync ........................................................................................................................................... 61
Project Management Tab ....................................................................................................................... 62 Project Information Tab ...................................................................................................................... 62 DB Maintenance Tab ......................................................................................................................... 64 Full Project Backup Tab ..................................................................................................................... 69
Restore Project Tab ............................................................................................................................... 70 Session Management Tab ..................................................................................................................... 71 Logs Tab................................................................................................................................................. 72
Petra Logs Tab .................................................................................................................................. 72 Server Log Tab .................................................................................................................................. 73
Jobs Tab ................................................................................................................................................. 74 Adding and Modifying Jobs ................................................................................................................ 74
EDB Server Maintenance ....................................................................................................................... 77 Services ............................................................................................................................................. 78 Open INI File ...................................................................................................................................... 78
Managing Project Databases Summary ................................................................................................. 79
Opening and Using Petra v4 Shared Projects ....................................................................................... 81
Logging in to a Database Server Example ........................................................................................ 81 Opening a Shared Project ...................................................................................................................... 82 Private Parameters in Shared Projects .................................................................................................. 84
Migrating Private Parameters from a v3 Project Example ................................................................. 84 Creating a New Private Parameters Directory Example .................................................................... 86
Creating a New Shared Project .............................................................................................................. 89 Creating a New Shared Project Example .......................................................................................... 89
Opening and Using Petra v4 Shared Projects Summary ....................................................................... 92
Part 3: Petra v4 in Private Mode .............................................................................................................. 93
Private Mode Quick Start Guide .............................................................................................................. 95
Upgrading Petra v4 for Private Mode ..................................................................................................... 97
Installation Options ................................................................................................................................. 97 Upgrading Petra v4 Standalone Example .......................................................................................... 98
Upgrading Petra v4 for Private Mode Summary .................................................................................... 99
Migrating Private Projects to Petra v4 .................................................................................................. 101
Using the Project Migration Tool .......................................................................................................... 102 Migrating Private Projects to v4 Example ........................................................................................ 103
Petra v4 Introduction Contents
February 20, 2013 v
Migrating Private Projects to v4 Summary ........................................................................................... 106
Opening and Using Private v4 Projects ............................................................................................... 107
Opening a Migrated Private Project ..................................................................................................... 107 Opening a Migrated Private Project Example .................................................................................. 109
Creating a New Private Project ............................................................................................................ 111 Creating a New Project Example ..................................................................................................... 111
Opening and Using Petra v4 Projects Summary ................................................................................. 113
Managing Private Projects ..................................................................................................................... 115
Project Management Tab ..................................................................................................................... 115 Project Information Tab .................................................................................................................... 116 DB Maintenance Tab ....................................................................................................................... 118 Full Project Backup Tab ................................................................................................................... 122
Restore Project Tab ............................................................................................................................. 123 Session Management Tab ................................................................................................................... 124 Logs Tab .............................................................................................................................................. 125
Petra Logs Tab ................................................................................................................................ 125 Server Log Tab ................................................................................................................................ 126
Managing Private Project Databases Summary .................................................................................. 127
Appendix ................................................................................................................................................. 129
Appendix A: IHS Petra v4.0 Hardware Specifications ......................................................................... 129 Non-Shared Projects Stored Locally ................................................................................................ 129 Shared Projects Stored on a Networked Drive ................................................................................ 129
Appendix B: Preparing Petra v3 Projects for Migration ....................................................................... 130 Forcing Users Out of a Project ........................................................................................................ 130 ReIndexing ....................................................................................................................................... 131 PetraPack.EXE ................................................................................................................................ 134 Optimizing ........................................................................................................................................ 135
Appendix C: Sample Project Migration Times ..................................................................................... 138 Appendix D: Concurrent v3 and v4 Installations .................................................................................. 141
Overview .......................................................................................................................................... 141 Installing Petra v4 Standalone Concurrently with v3 ....................................................................... 142 Installing Petra v4 Client/Server Concurrently with v3 ..................................................................... 147 Uninstalling Petra v3 ........................................................................................................................ 158
Appendix E: In-House and Field Projects ........................................................................................... 160 Taking a Shared or Private Project into the Field Example ............................................................ 160 Moving Private Project Data Back into a Shared Environment ...................................................... 164
Appendix F: Reinstalling the Petra Database Server ........................................................................... 165 Uninstalling the EDB Server ............................................................................................................ 165 Reinstalling the EDB Server ............................................................................................................ 166
Appendix G: Using Active Directory .................................................................................................... 169 Configuring the Petra Database Server with edbsrvr.INI ................................................................. 169 Working with Service Provider Names (SPN).................................................................................. 170 Mapping AD Groups to Petra Database Server Roles .................................................................... 171 Configuring the Petra Installation with Petra.INI .............................................................................. 172 Active Directory FAQs ...................................................................................................................... 172
Appendix H: Petra v4 FAQs ................................................................................................................. 173 Document Revision History .................................................................................................................. 177

February 20, 2013 1
Introduction
Welcome to the Petra® v4 Introduction Class. This class is designed to be a half-day overview
of Petra v4. The course includes group discussion of both the abstract background and practical
details involved in upgrading to this version, and class exercises providing practical experience
in using Petra v4. The target audience is primarily administrators, but the class is also useful to
individuals who normally update Petra. It is recommended that participants have completed the
Petra Introductory Training Class or are reasonably proficient in using Petra.
Class Objective
This class is designed to discuss the changes that v4 makes to Petra’s file architecture and
database, with a specific focus on practical applications and administrative tools. The class is
applicable to Petra installed as a standalone application or in a client/server configuration.
Upon completion of the course, students should have:
Gained knowledge of the new database structure, installation process, and use of the
database server
Developed basic skills in working with the database server via the Petra Server Admin
Tool, migrating projects to the new database, and working with newly migrated projects.
Developed an understanding of how to implement the process in their particular work
environment.
Using the Manual The manual is designed to serve as both a training and reference manual. The documentation is
divided into three main parts:
Petra’s Database: This section compares v3 and v4 file architecture, describes the new
dedicated Windows Database Server, and provides planning guidelines for upgrading to
v4.
Shared Mode: This section describes the workflow and tasks for upgrading to v4 when
working with shared projects.
Private Mode: This section describes the workflow and tasks for upgrading to v4 when
working with non-shared projects.
Introduction Petra v4 Introduction
2 February 20, 2013
The Shared and Private Mode sections contain general directions for the required installations,
migration of v3 projects to v4, working with the database server, and use of v4 projects. These
examples serve as a guide since every Petra environment is unique.
In the training class, all topics in the manual are discussed; many are supplemented with class
exercises, which provide practical experience with the various tasks required in upgrading to
Petra v4. The exercises are provided in a separate handout.
As a reference manual, use those sections that pertain to your work environment. For example,
those who only work with non-shared projects should review the material in the Private Mode
section rather than the Shared Mode section.
Technical Assistance
If you need additional assistance with Petra v4 following this workshop, please contact the
Customer Care team either by telephone at 1-800 – IHS – CARE (1-800-447-2273), or email at
February 20, 2013 3
Part 1: Petra’s Database
Petra’s Database Server coordinates how users read and write to the project tables. This upgrade
can greatly improve overall performance, as well as prevent database errors and increase
stability. The database server also greatly simplifies establishing backups, repairing projects,
and routine project maintenance.
This section covers:
A general comparison of how Petra v3 and v4 store data
Petra v4’s database server
How Petra v4 stores external files
General tips on planning your company’s upgrade to Petra v4

February 20, 2013 5
Database Structure
Petra v3 and Petra v4 store project data in a series of tables, and use external folders for public
and private parameters. Petra v4 adds a dedicated Windows database server that mediates how
users read and write to the database tables.
Petra v3 File Architecture
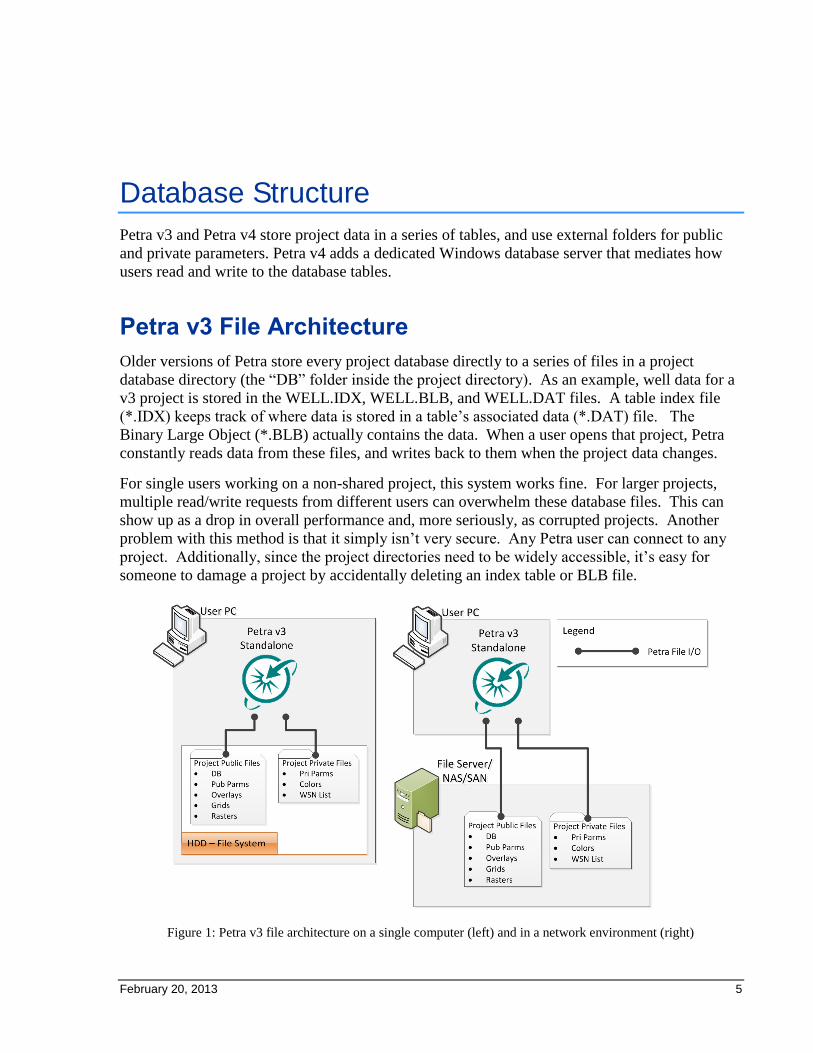
Older versions of Petra store every project database directly to a series of files in a project
database directory (the “DB” folder inside the project directory). As an example, well data for a
v3 project is stored in the WELL.IDX, WELL.BLB, and WELL.DAT files. A table index file
(*.IDX) keeps track of where data is stored in a table’s associated data (*.DAT) file. The
Binary Large Object (*.BLB) actually contains the data. When a user opens that project, Petra
constantly reads data from these files, and writes back to them when the project data changes.
For single users working on a non-shared project, this system works fine. For larger projects,
multiple read/write requests from different users can overwhelm these database files. This can
show up as a drop in overall performance and, more seriously, as corrupted projects. Another
problem with this method is that it simply isn’t very secure. Any Petra user can connect to any
project. Additionally, since the project directories need to be widely accessible, it’s easy for
someone to damage a project by accidentally deleting an index table or BLB file.
Figure 1: Petra v3 file architecture on a single computer (left) and in a network environment (right)
Database Structure Petra v4 Introduction
6 February 20, 2013
Petra v4 File Architecture
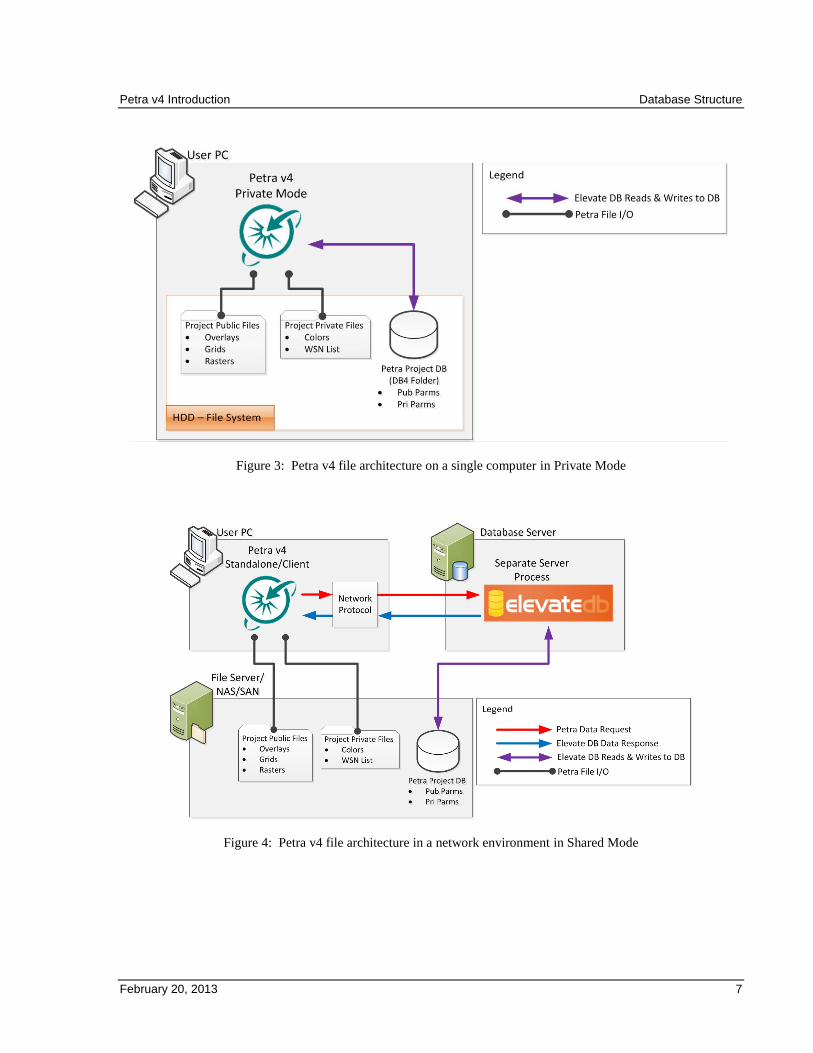
The biggest change is that each copy of Petra now talks to a dedicated Windows database server.
This single database server directly manages all data requests and changes to each project’s
database, performs project repairs and maintenance, establishes users and permissions (“roles”),
and delivers user settings. In Shared Mode, Petra v4 uses an external database server. In Private
Mode, Petra v4 uses an internal database server built into Petra’s Main Module.
Database Server
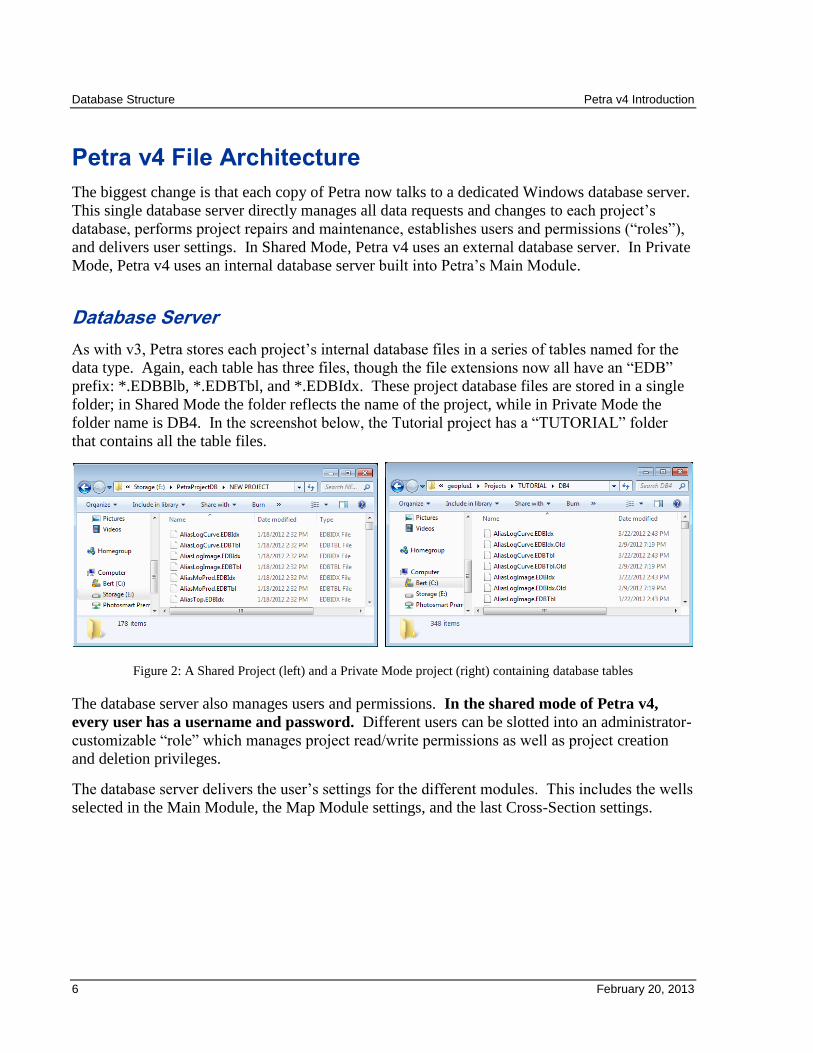
As with v3, Petra stores each project’s internal database files in a series of tables named for the
data type. Again, each table has three files, though the file extensions now all have an “EDB”
prefix: *.EDBBlb, *.EDBTbl, and *.EDBIdx. These project database files are stored in a single
folder; in Shared Mode the folder reflects the name of the project, while in Private Mode the
folder name is DB4. In the screenshot below, the Tutorial project has a “TUTORIAL” folder
that contains all the table files.
Figure 2: A Shared Project (left) and a Private Mode project (right) containing database tables
The database server also manages users and permissions. In the shared mode of Petra v4,
every user has a username and password. Different users can be slotted into an administrator-
customizable “role” which manages project read/write permissions as well as project creation
and deletion privileges.
The database server delivers the user’s settings for the different modules. This includes the wells
selected in the Main Module, the Map Module settings, and the last Cross-Section settings.
Petra v4 Introduction Database Structure
February 20, 2013 7
Figure 3: Petra v4 file architecture on a single computer in Private Mode
Figure 4: Petra v4 file architecture in a network environment in Shared Mode

Database Structure Petra v4 Introduction
8 February 20, 2013
Project Public & Project Private Folders
Petra uses a variety of external files that aren’t included in the project database. This includes
raster logs, grids, and module setting files. Petra’s file structure distinguishes between “Public”
and “Private” files.
Project Public Folders
Public files are often shared between users and are a common part of a project. Related public
files share a single folder for a project; overlay files in a project, for example, often share a single
OVERLAY folder for that project.
For clarity of terminology, Petra (by default) stores public files (like grids and raster logs) in a
set of “public folders.” Each project has a single master folder called the “Project Folder.” This
project folder is always named after the project. The network location of the project folder is the
“public path.”
The Public Project folder takes the name of the project, and contains several folders including
GRIDS, IMAGES, OVERLAY, and PARMS. The GRIDS folder is the default location of all
contour grids created in the Map Module. The IMAGES folder is the default location for raster
images and their associated *.LIC files. The OVERLAY folder is the default location for Map
Module overlay files. Importantly, the GRIDS, IMAGES, OVERLAY, and SHAPES
folders are optional; it’s perfectly reasonable to establish alternate locations for this data.
Figure 5: A Private Mode project folder
In addition, Petra creates the REPORTS and SHAPES folders when a relevant task is performed
in the project. More specifically, Petra creates a SHAPES folder when a user opens the Import
Petra v4 Introduction Database Structure
February 20, 2013 9
Shapefiles tool in the Map Module. Petra creates the REPORTS folder when a user creates a
report, such as during a LAS import.
For projects migrated from earlier versions of Petra, the Project Public File directory will remain
the same. For new projects created in Petra v4, the default directory is in the PROJECTS folder
inside the Petra installation folder.
Project Private Folders
Private files, on the other hand, are external files created by an individual user that customizes
Petra’s behavior and appearance. This includes *.MAP and *.CSP files, import templates, color
bars, and WSN lists.
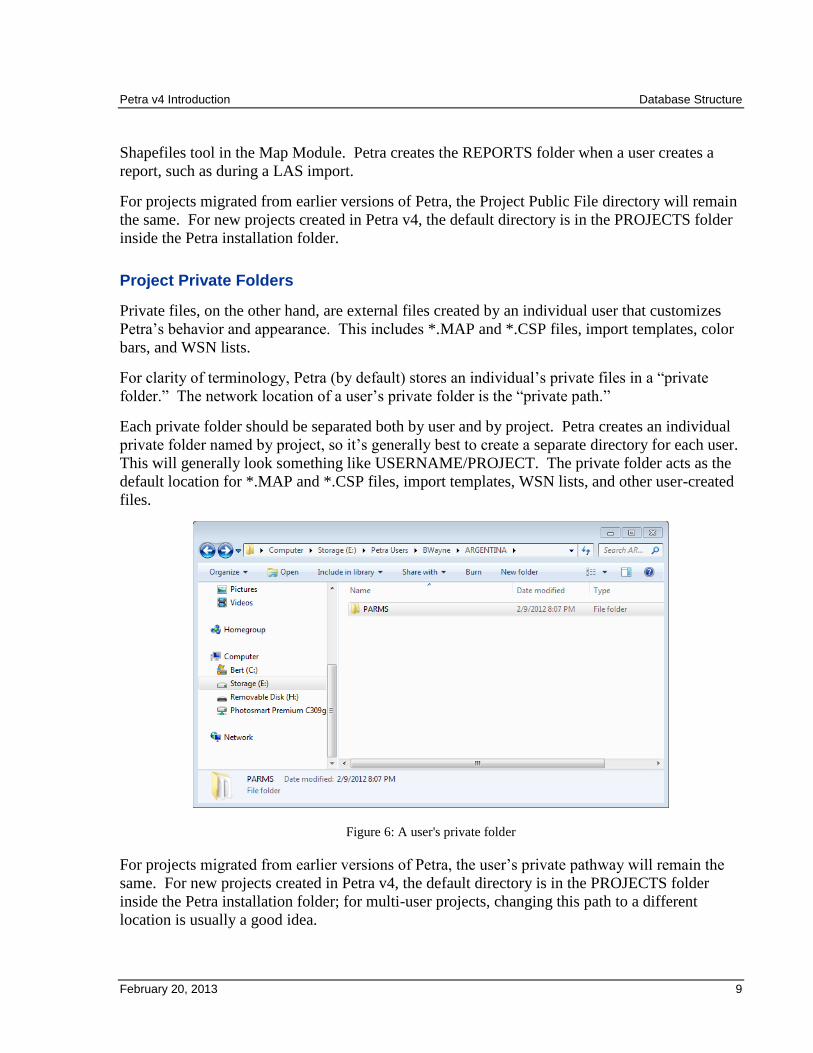
For clarity of terminology, Petra (by default) stores an individual’s private files in a “private
folder.” The network location of a user’s private folder is the “private path.”
Each private folder should be separated both by user and by project. Petra creates an individual
private folder named by project, so it’s generally best to create a separate directory for each user.
This will generally look something like USERNAME/PROJECT. The private folder acts as the
default location for *.MAP and *.CSP files, import templates, WSN lists, and other user-created
files.
Figure 6: A user's private folder
For projects migrated from earlier versions of Petra, the user’s private pathway will remain the
same. For new projects created in Petra v4, the default directory is in the PROJECTS folder
inside the Petra installation folder; for multi-user projects, changing this path to a different
location is usually a good idea.

Database Structure Petra v4 Introduction
10 February 20, 2013
Petra’s Database Structure Summary
Every copy of Petra v4 communicates with a database server that manages the project
tables. This server also delivers individual user settings.
In Shared Mode, Petra uses an external database server, while in Private Mode, Petra uses
an internal local database server.
Public files are external files not stored inside a project database. Public files are often
shared between users and are a common part of a project. These include grids, raster
images, and overlay files.
Though Petra creates public folders automatically (GRIDS, IMAGES, OVERLAY, etc.),
actually using these folders is optional.
Private files are external files not stored inside a project database. Private files are often
user-created files (like WSN lists, import templates, or settings files) that customize
Petra’s appearance and behavior. Each private folder should be separated both by user
and by project.
February 20, 2013 11
Planning for Petra v4
Though Petra v3 will still be supported in the near future, it’s a good idea to develop a plan to
ease your company’s transition. Although every Petra environment is unique, there are several
factors to consider regarding the transition to Petra v4.
Hardware Requirements
Petra v4 uses a dedicated database server to improve how users share data and write to a central
database. The number of users simultaneously sharing project data is the single biggest
factor in assessing your need for new hardware.
Companies with single Petra licenses generally won’t need new hardware.
Multi-license installations with shared projects will need a Windows Server 2008
application server. Larger numbers of users will require higher-performance hardware
with more CPU cores and more RAM.
Upgrading to Petra v4 may increase your need for storage. After migration, a Petra v4
project will occupy 1.5 to 2 times more hard drive space than the original v3 project.
For more detailed information, see Appendix A on Hardware Specifications.
License Updates
While Petra v3 used a geoplus.LIC file to handle licensing, Petra v4 uses IHS.LIC instead.
Before the upgrade to v4 will work, you’ll need a new copy from IHS at
[email protected]. For concurrent installations, you will need both geoplus.LIC for
Petra v3 and IHS.LIC for Petra v4.
Those using FlexLM licenses should review the material in the new LmAdmin Tools manual,
supplied during the 4.0 Introduction training class, or available for download from the Online
User Forum. Importantly, LMTools and LmAdmin Tools cannot be used on the same server.
Project Preparation
As part of the upgrade process, older projects need to migrate to the upgraded v4 database. IHS
highly recommends performing some project maintenance before migration. This
maintenance fixes the database table relationships, eliminates empty spaces in the database, and
removes “orphan” entries that correspond to deleted project data. This maintenance decreases
Planning for Petra v4 Petra v4 Introduction
12 February 20, 2013
the overall size of the project and reduces extraneous records, which increases the speed of the
migration process.
Create good backups of all v3 projects before doing anything.
Run a full repair, reindex, pack, and optimize on all projects before migrating to v4. See
Appendix B on running these repair tools.
Check projects for invalid names. Project names in v4 are limited to 40 characters and
must begin with a letter. Invalid project names can be changed before migration with the
copyproj.exe utility; other options are available on the project migration screen.
For archived projects, it’s a good idea to check the project name and perform a full repair, pack,
and optimize, even if these projects won’t be migrated. This can save time later if these projects
are brought out of storage.
Prioritizing Project Migration
Project migration can be time-consuming. The time to migrate a project is affected by database
size, local hardware, and (when run remotely) network bandwidth. It’s a good idea to prioritize
projects based on database table size, relative importance, and the number of users affected by a
project’s migration.
The most obvious indicator of a project’s migration time is the size of project’s “DB” folder –
projects with large numbers of records (especially monthly production and zone data) will take
longer to migrate than projects with fewer records. Though it’s difficult to predict how long a
migration will take for every circumstance, Appendix C lists some general examples of project
size vs. migration time from beta testing. Depending on the individual situation, it might be a
good idea to have phased or staggered migration of projects.
Simultaneous Petra v3 and Petra v4 Installations IHS recommends a total upgrade to v4 rather than running simultaneous v3 and v4 Petra
installations. Though it is possible, it adds more complexity to the v4 upgrade process. It also
introduces the potential for lost data; changes (such as picked tops) made in v3 projects do not
automatically propagate to v4 projects, and vice versa. This option is discussed in detail in
Appendix D.
Warning: Concurrent Petra v3 and v4 installations are not recommended.
Petra v4 Introduction Planning for Petra v4
February 20, 2013 13
Planning for Petra v4 Summary
Networked installations will require a Windows 2008 server. Single-seat licenses won’t
require any new hardware.
Petrav4 uses a new licensing file, IHS.LIC. This file can be acquired from
Using Petra’s maintenance programs to repair, pack, and optimize the v3 projects can
decrease the downtime from migration.
New project name requirements in Petra v4 may result in current projects with invalid
names. Updating these names before migration can streamline the overall workflow.
Migration can be time-consuming, so give some thought as to how you prioritize which
projects migrate first. This can include factors like the size of the project’s DB folder, the
relative importance, and the number of users affected by the project downtime.

Part 2: Petra In Shared Mode Petra v4 Introduction
14 February 20, 2013
Petra v4 Introduction Part 2: Petra In Shared Mode
February 20, 2013 15
Part 2: Petra In Shared Mode
Petra v4 can run in two separate modes: Shared and Private. Petra’s Shared Mode is designed
for networked projects used by multiple simultaneous users. This mode uses an external Petra
Database Server to coordinate how users read and write to the same project database. Shared
mode is the best choice for multi-user environments.
This section covers:
Installing the Petra Database Server
Installing Petra v4
Migrating Petra projects to v4
Using the Petra Server Admin Tool
Opening existing projects, and creating new projects

February 20, 2013 17
Shared Mode Quick Start Guide
Install the Database Server
Run PetraEDBServer_X_Y.EXE (EDB Version = X.Y)
Set database installation and database storage paths
Set logon information for Elevate DB Service (only if storing projects on a network
drive)
Install Petra v4
For standalone installations, run PetraStandalone.EXE
For server/client installations run PetraServer.EXE on the desired server, and run
PetraClient.EXE on all client computers
Use Config.EXE to set up licensing and networking
Migrate Projects to v4 (ElevDBMigrator.EXE)
Make good backups of projects before migrating
Run a database repair, reindex, pack, and optimize on the desired projects
Select the desired projects in the old Petra Project Directory
Set the server address, port, and logon to the new database server
Setup the Database Server (PetraServerAdminTool.EXE)
Set up database server list
Connect to the database server
Add users and roles
Open and Use v4 Projects
Log on to the database server
Migrate the private parameters, or create new private parameters
Select a location for the private folder

February 20, 2013 19
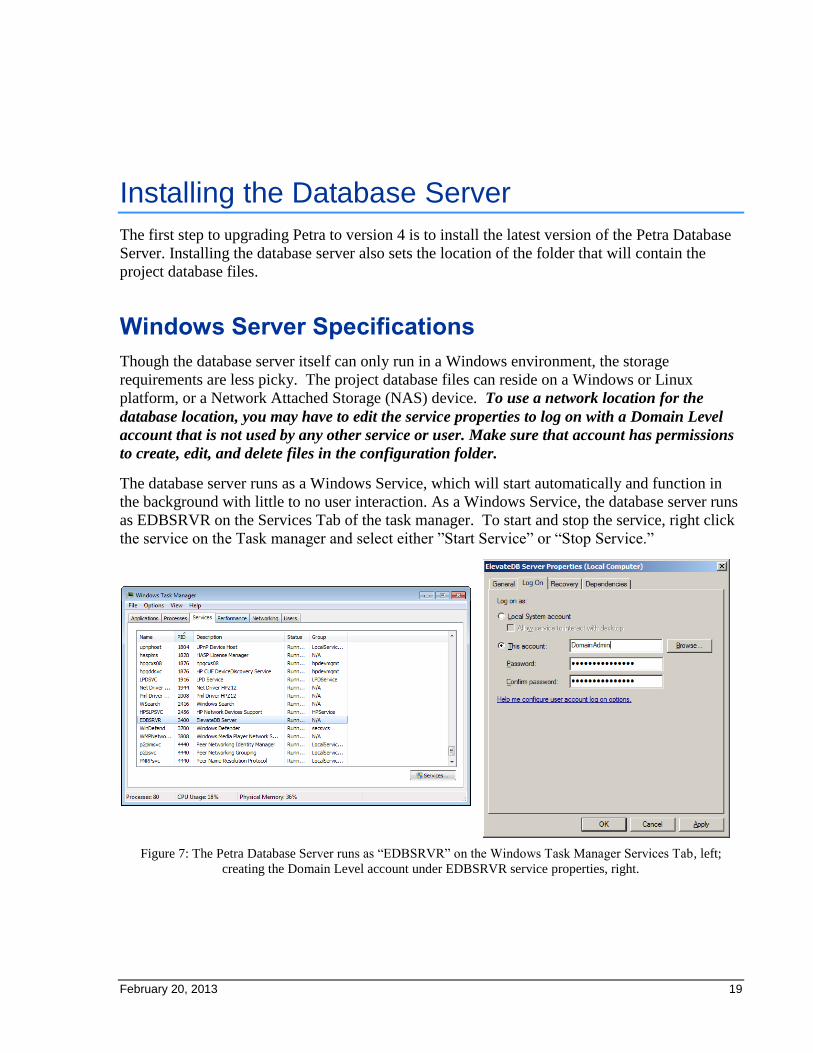
Installing the Database Server
The first step to upgrading Petra to version 4 is to install the latest version of the Petra Database
Server. Installing the database server also sets the location of the folder that will contain the
project database files.
Windows Server Specifications
Though the database server itself can only run in a Windows environment, the storage
requirements are less picky. The project database files can reside on a Windows or Linux
platform, or a Network Attached Storage (NAS) device. To use a network location for the
database location, you may have to edit the service properties to log on with a Domain Level
account that is not used by any other service or user. Make sure that account has permissions
to create, edit, and delete files in the configuration folder.
The database server runs as a Windows Service, which will start automatically and function in
the background with little to no user interaction. As a Windows Service, the database server runs
as EDBSRVR on the Services Tab of the task manager. To start and stop the service, right click
the service on the Task manager and select either ”Start Service” or “Stop Service.”
Figure 7: The Petra Database Server runs as “EDBSRVR” on the Windows Task Manager Services Tab, left;
creating the Domain Level account under EDBSRVR service properties, right.
Installing the Database Server Petra v4 Introduction
20 February 20, 2013
Installing the Database Server Example
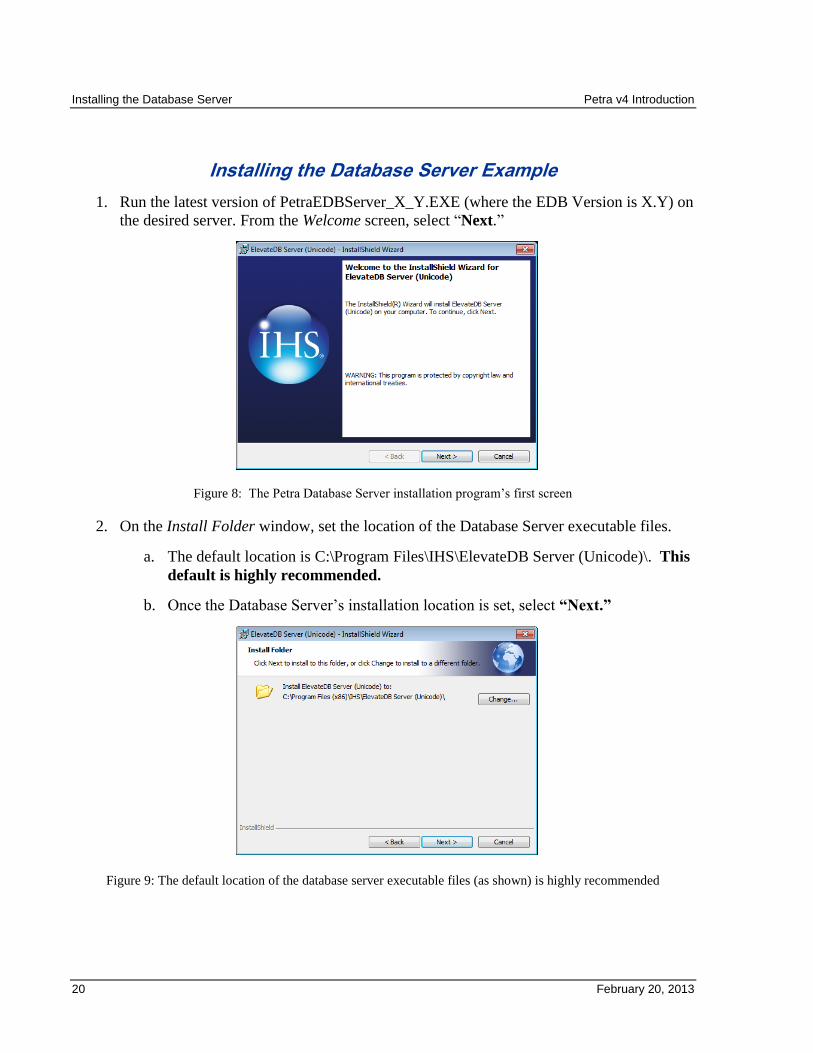
1. Run the latest version of PetraEDBServer_X_Y.EXE (where the EDB Version is X.Y) on
the desired server. From the Welcome screen, select “Next.”
Figure 8: The Petra Database Server installation program’s first screen
2. On the Install Folder window, set the location of the Database Server executable files.
a. The default location is C:\Program Files\IHS\ElevateDB Server (Unicode)\. This
default is highly recommended.
b. Once the Database Server’s installation location is set, select “Next.”
Figure 9: The default location of the database server executable files (as shown) is highly recommended
Petra v4 Introduction Installing the Database Server
February 20, 2013 21
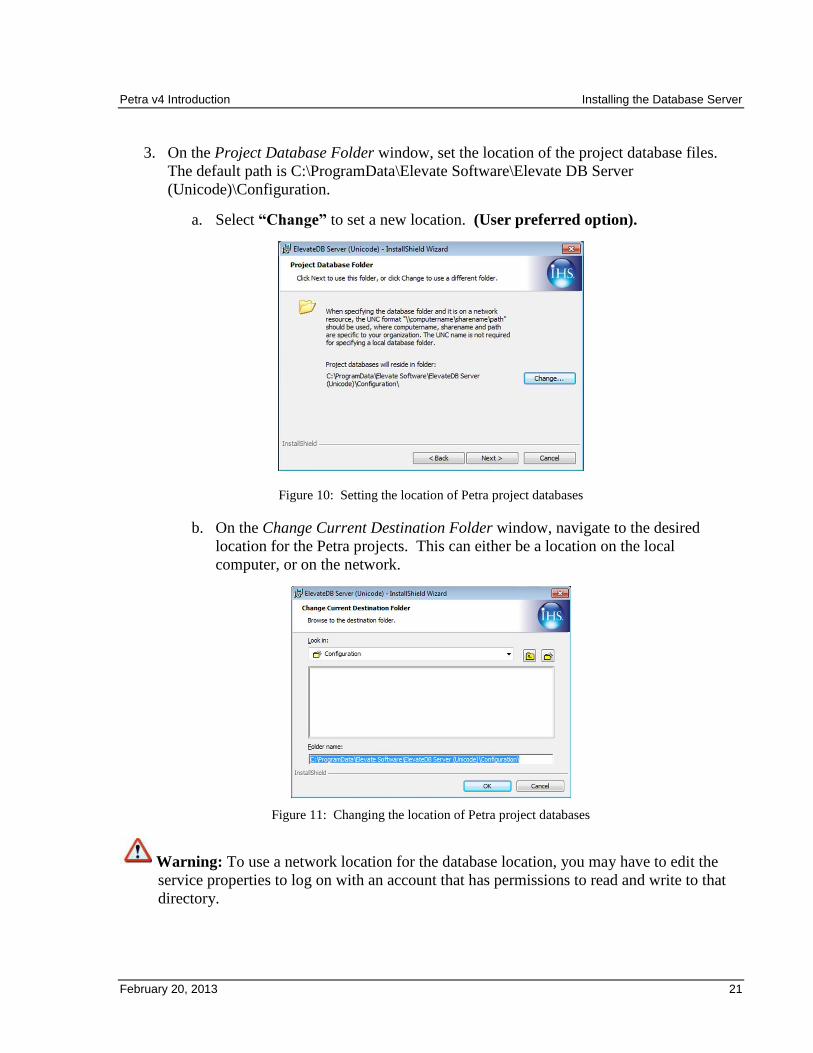
3. On the Project Database Folder window, set the location of the project database files.
The default path is C:\ProgramData\Elevate Software\Elevate DB Server
(Unicode)\Configuration.
a. Select “Change” to set a new location. (User preferred option).
Figure 10: Setting the location of Petra project databases
b. On the Change Current Destination Folder window, navigate to the desired
location for the Petra projects. This can either be a location on the local
computer, or on the network.
Figure 11: Changing the location of Petra project databases
Warning: To use a network location for the database location, you may have to edit the
service properties to log on with an account that has permissions to read and write to that
directory.
Installing the Database Server Petra v4 Introduction
22 February 20, 2013
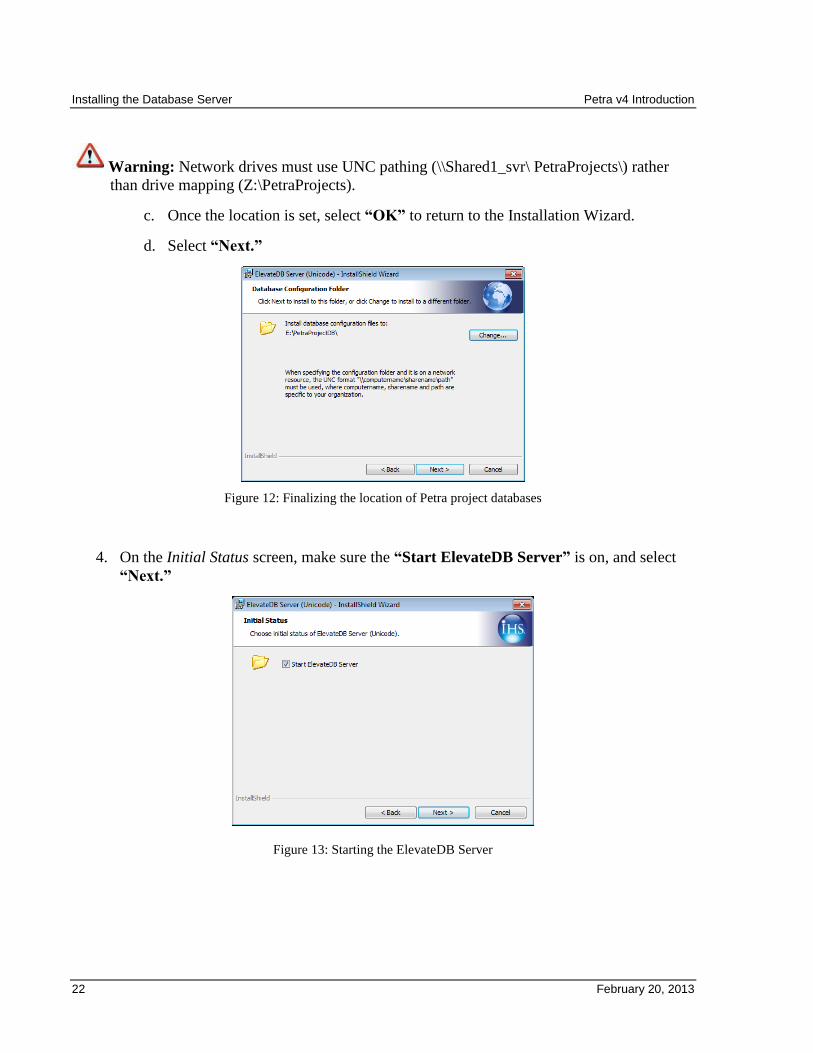
Warning: Network drives must use UNC pathing (\\Shared1_svr\ PetraProjects\) rather
than drive mapping (Z:\PetraProjects).
c. Once the location is set, select “OK” to return to the Installation Wizard.
d. Select “Next.”
Figure 12: Finalizing the location of Petra project databases
4. On the Initial Status screen, make sure the “Start ElevateDB Server” is on, and select
“Next.”
Figure 13: Starting the ElevateDB Server
Petra v4 Introduction Installing the Database Server
February 20, 2013 23
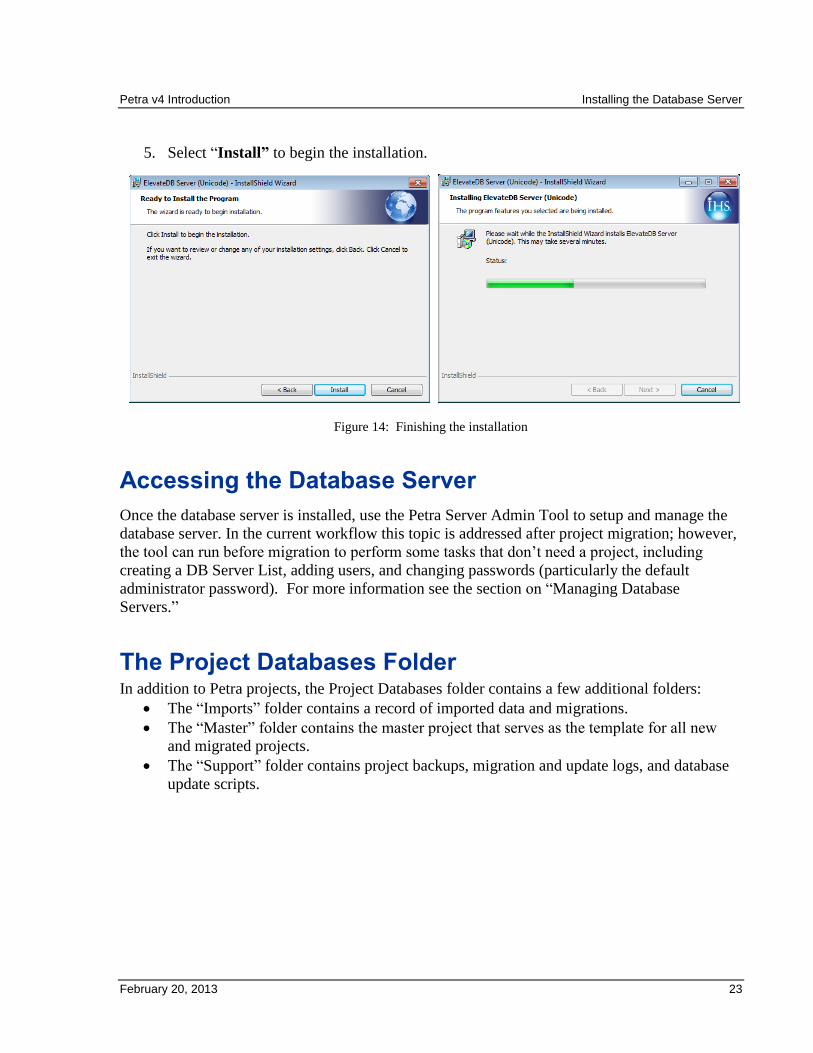
5. Select “Install” to begin the installation.
Figure 14: Finishing the installation
Accessing the Database Server
Once the database server is installed, use the Petra Server Admin Tool to setup and manage the
database server. In the current workflow this topic is addressed after project migration; however,
the tool can run before migration to perform some tasks that don’t need a project, including
creating a DB Server List, adding users, and changing passwords (particularly the default
administrator password). For more information see the section on “Managing Database
Servers.”
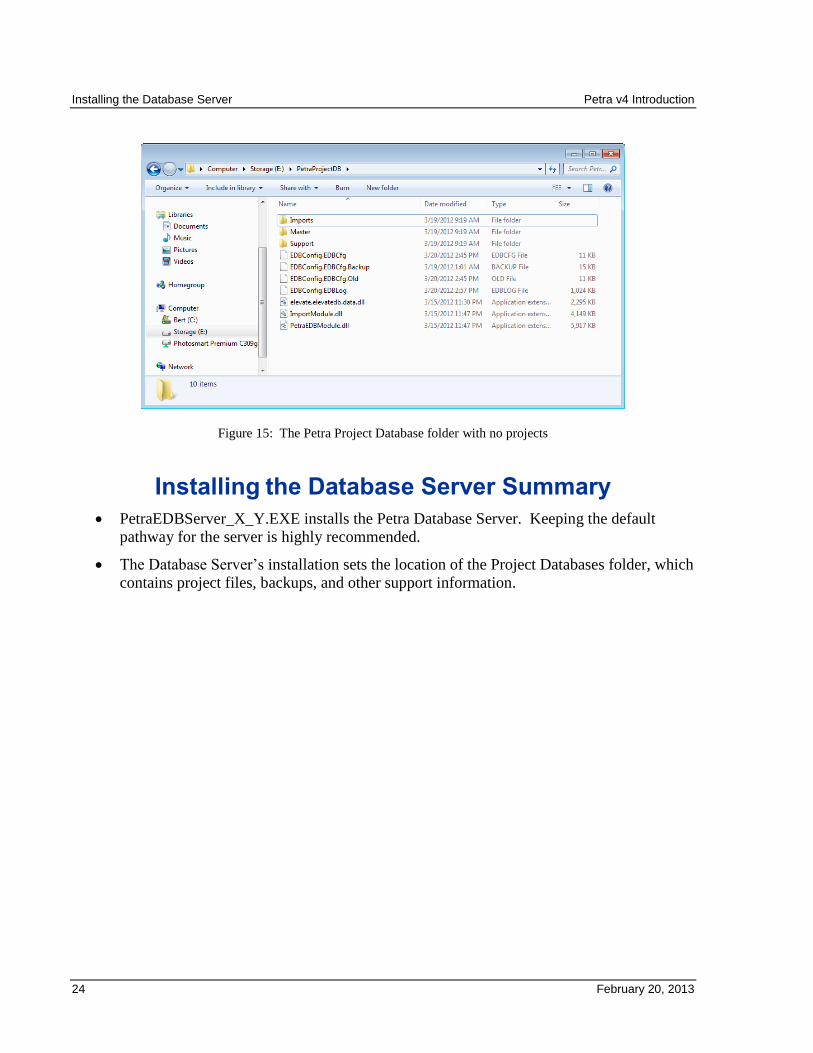
The Project Databases Folder In addition to Petra projects, the Project Databases folder contains a few additional folders:
The “Imports” folder contains a record of imported data and migrations.
The “Master” folder contains the master project that serves as the template for all new
and migrated projects.
The “Support” folder contains project backups, migration and update logs, and database
update scripts.
Installing the Database Server Petra v4 Introduction
24 February 20, 2013
Figure 15: The Petra Project Database folder with no projects
Installing the Database Server Summary
PetraEDBServer_X_Y.EXE installs the Petra Database Server. Keeping the default
pathway for the server is highly recommended.
The Database Server’s installation sets the location of the Project Databases folder, which
contains project files, backups, and other support information.
February 20, 2013 25
Installing Petra v4
With the database server installed, the next task is to install the latest version of Petra. Though
the details of Petra installations can vary tremendously, installations break down into two basic
types: Standalone and Client/Server. Standalone installations store Petra’s executable files on a
local machine, while Client/Server installations store Petra’s executable files on a single
networked computer.
Note: The installation type does not affect how users share projects. Several Petra
Standalone users can share projects just as well as a Client/Server installation.
Installation Options
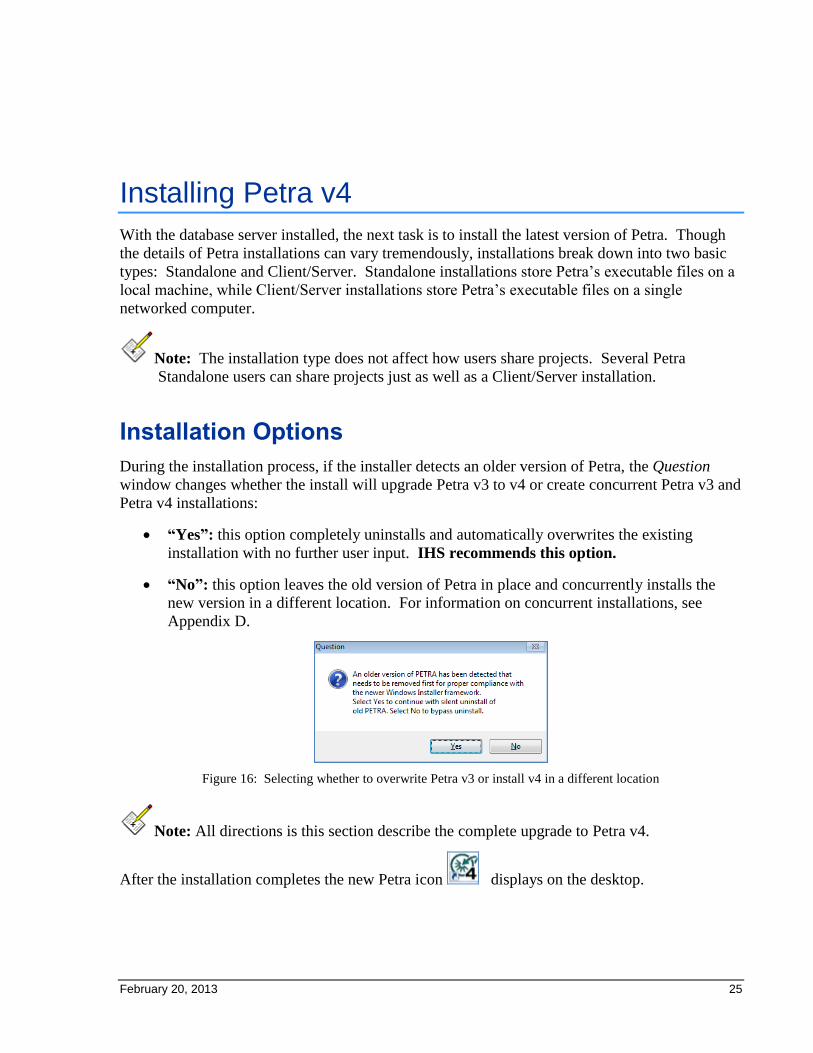
During the installation process, if the installer detects an older version of Petra, the Question
window changes whether the install will upgrade Petra v3 to v4 or create concurrent Petra v3 and
Petra v4 installations:
“Yes”: this option completely uninstalls and automatically overwrites the existing
installation with no further user input. IHS recommends this option.
“No”: this option leaves the old version of Petra in place and concurrently installs the
new version in a different location. For information on concurrent installations, see
Appendix D.
Figure 16: Selecting whether to overwrite Petra v3 or install v4 in a different location
Note: All directions is this section describe the complete upgrade to Petra v4.
After the installation completes the new Petra icon displays on the desktop.
Installing Petra v4 Petra v4 Introduction
26 February 20, 2013
Upgrading Petra v4 Standalone
Make sure to install the Petra Database Server before installing Petra Standalone v4.
In a standalone installation, Petra’s executable files are installed on a local drive. The chief
advantage of this setup is the ease of installation and portability. Standalone installations can
share projects just like network projects.
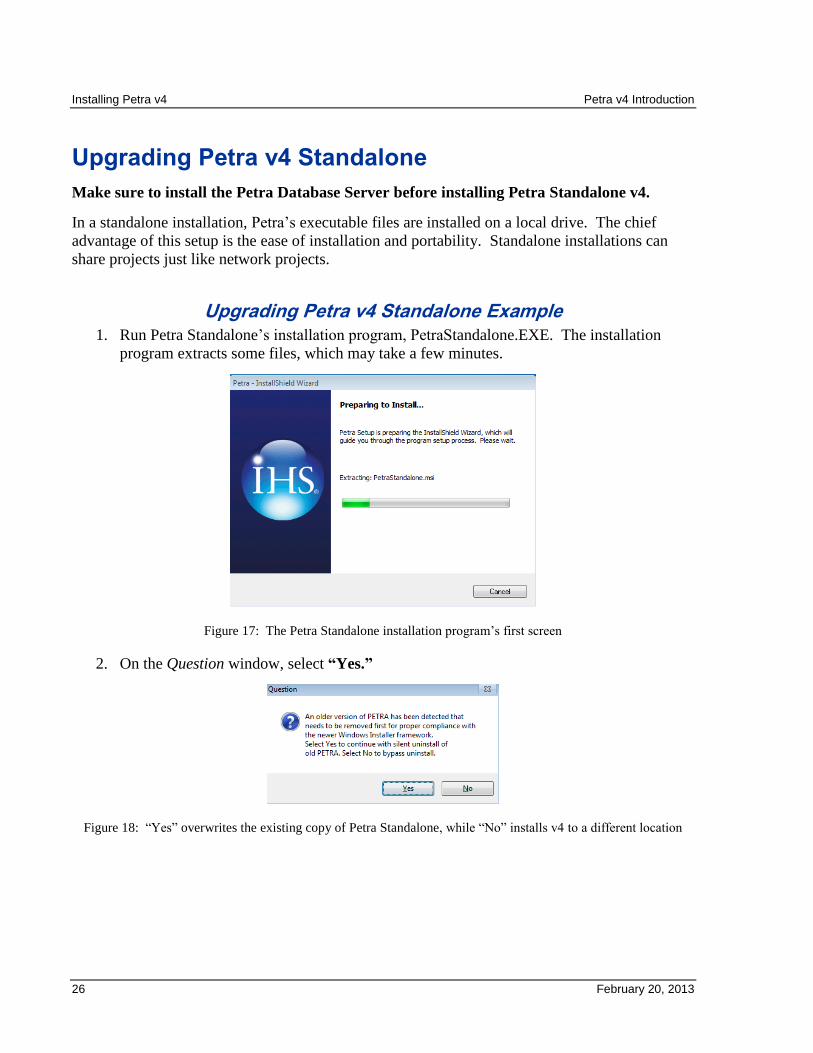
Upgrading Petra v4 Standalone Example 1. Run Petra Standalone’s installation program, PetraStandalone.EXE. The installation
program extracts some files, which may take a few minutes.
Figure 17: The Petra Standalone installation program’s first screen
2. On the Question window, select “Yes.”
Figure 18: “Yes” overwrites the existing copy of Petra Standalone, while “No” installs v4 to a different location
Petra v4 Introduction Installing Petra v4
February 20, 2013 27
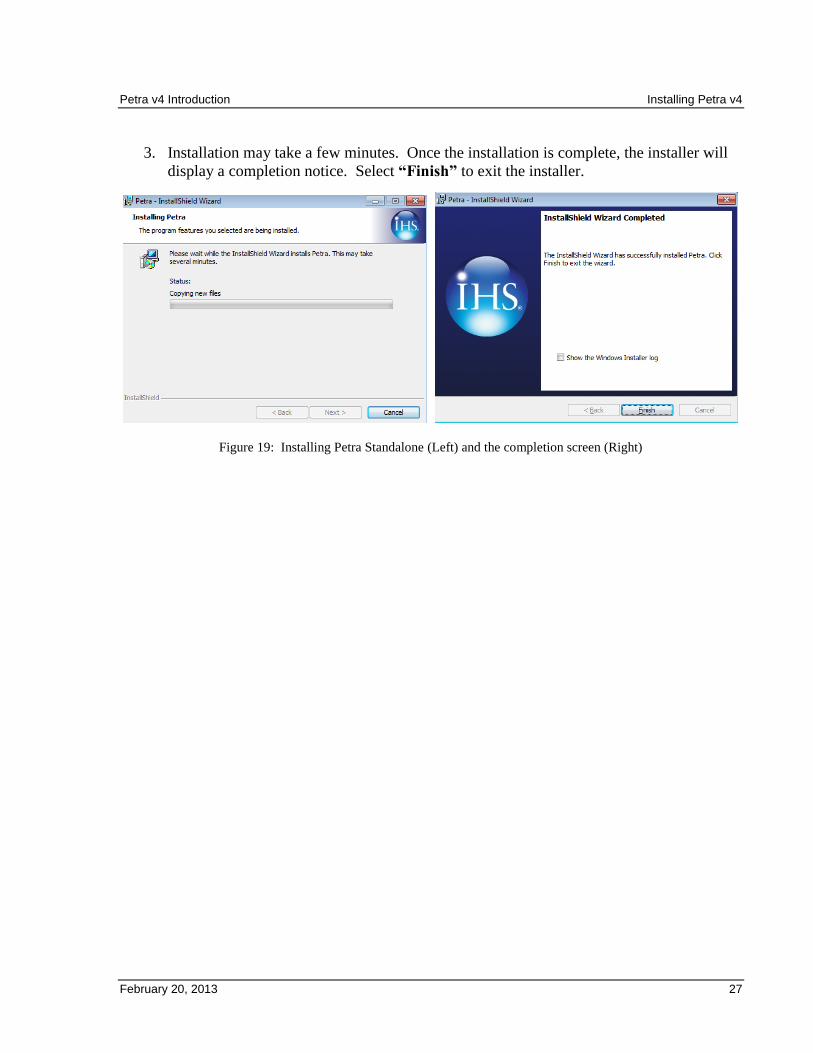
3. Installation may take a few minutes. Once the installation is complete, the installer will
display a completion notice. Select “Finish” to exit the installer.
Figure 19: Installing Petra Standalone (Left) and the completion screen (Right)

Installing Petra v4 Petra v4 Introduction
28 February 20, 2013
Upgrading Petra v4 Client/Server
Make sure to install the Petra Database Server before installing Petra v4.
In a client/server Petra installation, Petra’s executable files are installed on a network server. A
client installed on each user’s computer points to this installation server. The key advantage of
this configuration is the ease of program updates. Petra’s client software rarely needs updating;
just updating the Petra Server (and not dozens of individual computers) delivers the latest version
of Petra to every workstation.
Upgrading the Petra Server Example 1. Run Petra’s server installation program, PetraServer.EXE. The installation program
extracts some files, which may take a few minutes.
Figure 20: The Petra Server installation program’s first screen
2. On the Question window, select “Yes.”
Figure 21: “Yes” installs over the existing copy of the Petra Server, while “No” installs v4 to a different location
Petra v4 Introduction Installing Petra v4
February 20, 2013 29
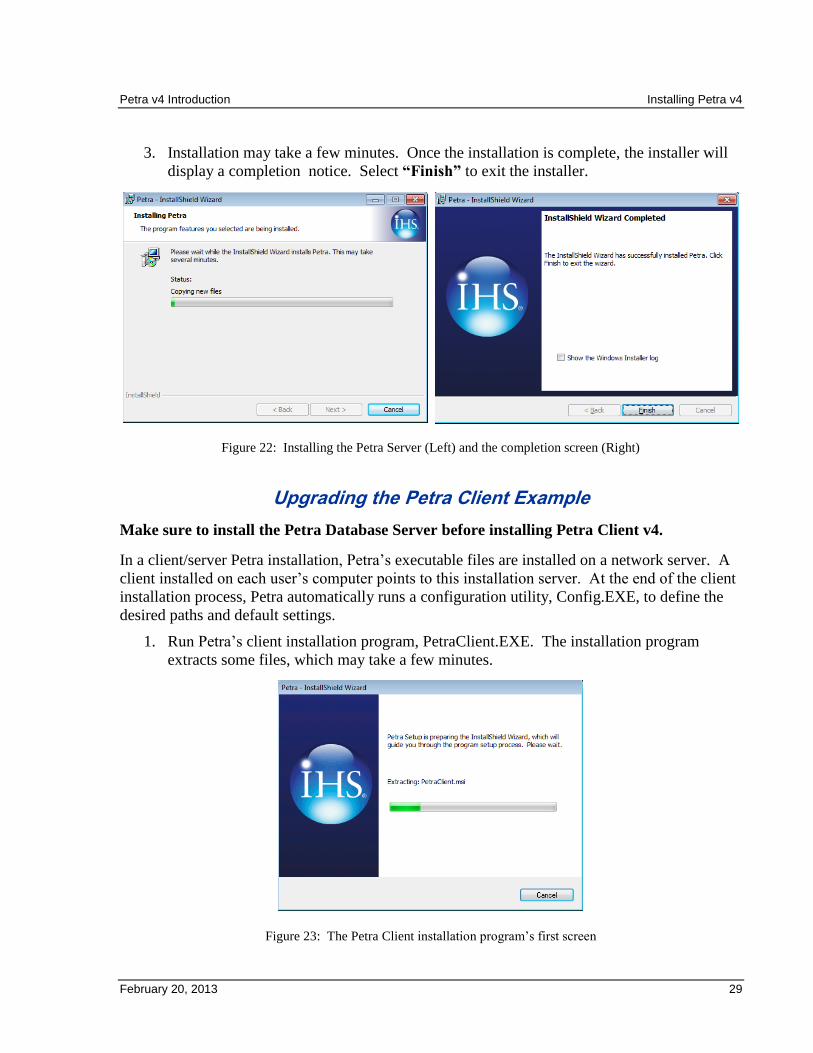
3. Installation may take a few minutes. Once the installation is complete, the installer will
display a completion notice. Select “Finish” to exit the installer.
Figure 22: Installing the Petra Server (Left) and the completion screen (Right)
Upgrading the Petra Client Example
Make sure to install the Petra Database Server before installing Petra Client v4.
In a client/server Petra installation, Petra’s executable files are installed on a network server. A
client installed on each user’s computer points to this installation server. At the end of the client
installation process, Petra automatically runs a configuration utility, Config.EXE, to define the
desired paths and default settings.
1. Run Petra’s client installation program, PetraClient.EXE. The installation program
extracts some files, which may take a few minutes.
Figure 23: The Petra Client installation program’s first screen
Installing Petra v4 Petra v4 Introduction
30 February 20, 2013
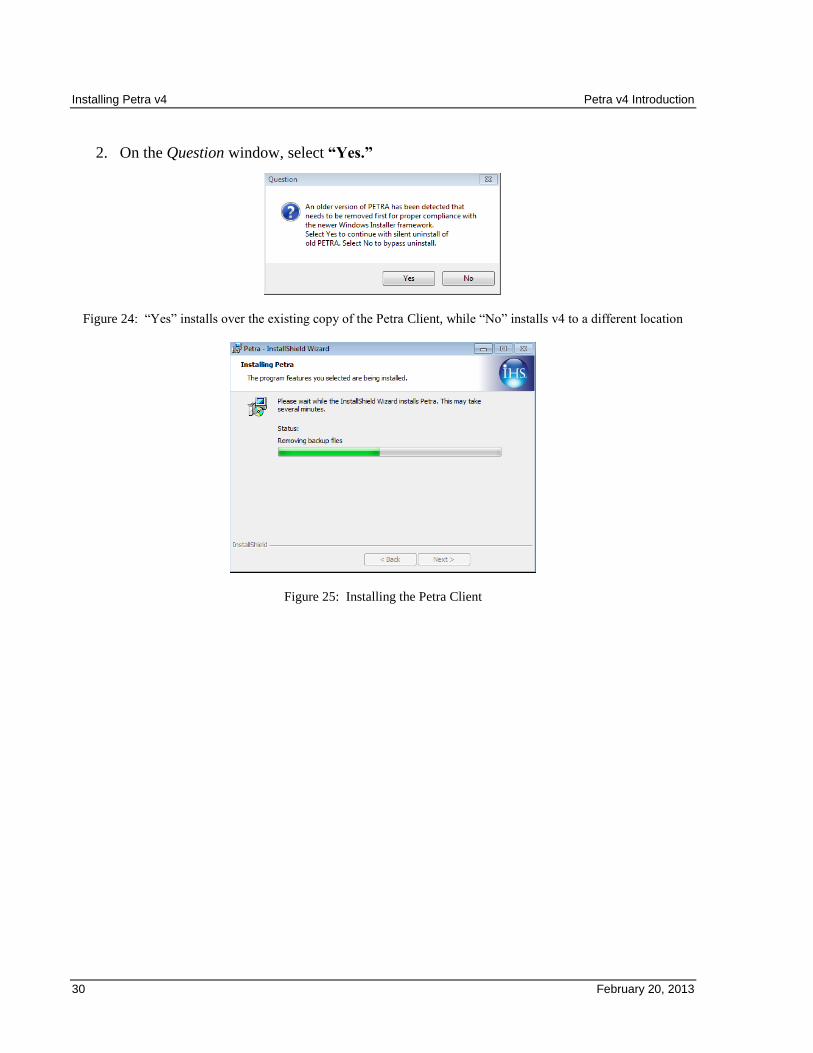
2. On the Question window, select “Yes.”
Figure 24: “Yes” installs over the existing copy of the Petra Client, while “No” installs v4 to a different location
Figure 25: Installing the Petra Client
Petra v4 Introduction Installing Petra v4
February 20, 2013 31
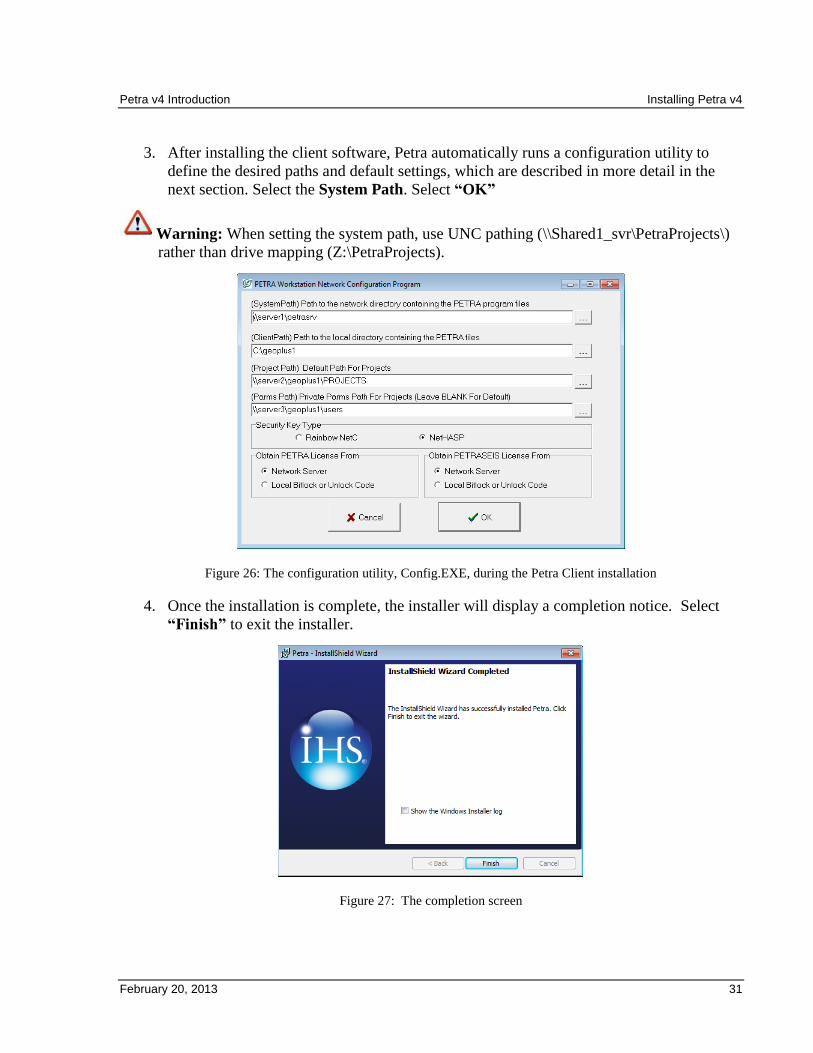
3. After installing the client software, Petra automatically runs a configuration utility to
define the desired paths and default settings, which are described in more detail in the
next section. Select the System Path. Select “OK”
Warning: When setting the system path, use UNC pathing (\\Shared1_svr\PetraProjects\)
rather than drive mapping (Z:\PetraProjects).
Figure 26: The configuration utility, Config.EXE, during the Petra Client installation
4. Once the installation is complete, the installer will display a completion notice. Select
“Finish” to exit the installer.
Figure 27: The completion screen
Installing Petra v4 Petra v4 Introduction
32 February 20, 2013
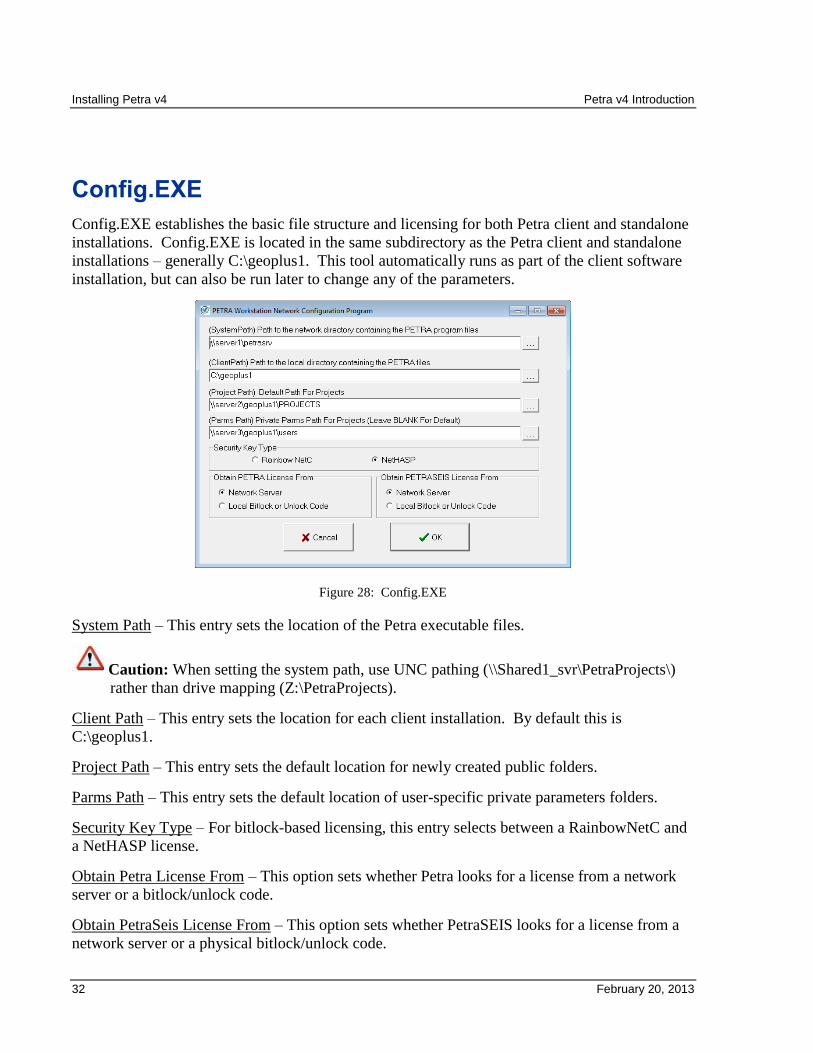
Config.EXE
Config.EXE establishes the basic file structure and licensing for both Petra client and standalone
installations. Config.EXE is located in the same subdirectory as the Petra client and standalone
installations – generally C:\geoplus1. This tool automatically runs as part of the client software
installation, but can also be run later to change any of the parameters.
Figure 28: Config.EXE
System Path – This entry sets the location of the Petra executable files.
Caution: When setting the system path, use UNC pathing (\\Shared1_svr\PetraProjects\)
rather than drive mapping (Z:\PetraProjects).
Client Path – This entry sets the location for each client installation. By default this is
C:\geoplus1.
Project Path – This entry sets the default location for newly created public folders.
Parms Path – This entry sets the default location of user-specific private parameters folders.
Security Key Type – For bitlock-based licensing, this entry selects between a RainbowNetC and
a NetHASP license.
Obtain Petra License From – This option sets whether Petra looks for a license from a network
server or a bitlock/unlock code.
Obtain PetraSeis License From – This option sets whether PetraSEIS looks for a license from a
network server or a physical bitlock/unlock code.
Petra v4 Introduction Installing Petra v4
February 20, 2013 33
Installing Petra v4 Summary
Standalone installations keep the Petra executable files on the local computer rather than
on a network server. Standalone installations can share projects just like Client/Server
installations.
Client/Server installations keep the Petra executable files on a network server. Individual
workstations use a client that maintains a link with the executable on the server.
Config.exe sets many of the parameters controlling how Petra runs, including the location
of installations, projects, and licensing. This tool automatically runs as part of the
installation process.


February 20, 2013 35
Migrating Shared Projects to Petra v4
Petra v4 uses a fundamentally different database, so older Petra project database tables need to
be upgraded or “migrated” with the Project Migration tool. This utility automatically installs
with the Petra v4 installation. A project only needs to be migrated once. Migration does not
erase any data from the original v3 project, and leaves it intact. The migration process only
applies to the database tables. External files, such as overlays and grids, are not affected.
Before migrating projects, make sure to have a good backup of the entire project. IHS also
recommends performing a full repair, reindex, pack, and optimize before migrating a
v3 project to v4. For more information on maintenance of v3 projects, see Appendix B. For
large project migrations, turn off your computer’s sleep/hibernate function.
Warning: Projects migrated in Shared mode cannot be opened in Private mode.
Using the Project Migration Tool
There are a few different ways to open the Project Migration Tool.
On the Windows Start Menu, select IHS>Petra>Project Migration Tool.
Select the “DB Migrator” button on the Select Project to Open window within Petra
(See the Opening and Using Petra Projects section of this manual)
With no active project, select Project>Launch DB Migrator on the Menu Bar at the top
of the Main Module.
The Project Migration Tool is a standalone application, ElevDB Migrator.EXE. This
executable file is located inside the ElevateDB Migrator folder in the Petra Database
Server path, as well as in the Petra Standalone and Petra Server path.
Figure 29: The Migration Tool’s in a Database Server directory (Left) and in a Petra Standalone directory (Right)
Migrating Shared Projects to Petra v4 Petra v4 Introduction
36 February 20, 2013
Note: The Project Migration Tool can be installed and run on any computer as a
standalone application with Petra_4X_Migrator.EXE (with the PetraVersion = 4.X).
Note: Though this tool can remotely migrate projects on any server connected to the
network, it’s generally best to run the migration process on the computer where the
ElevateDB Server is installed.
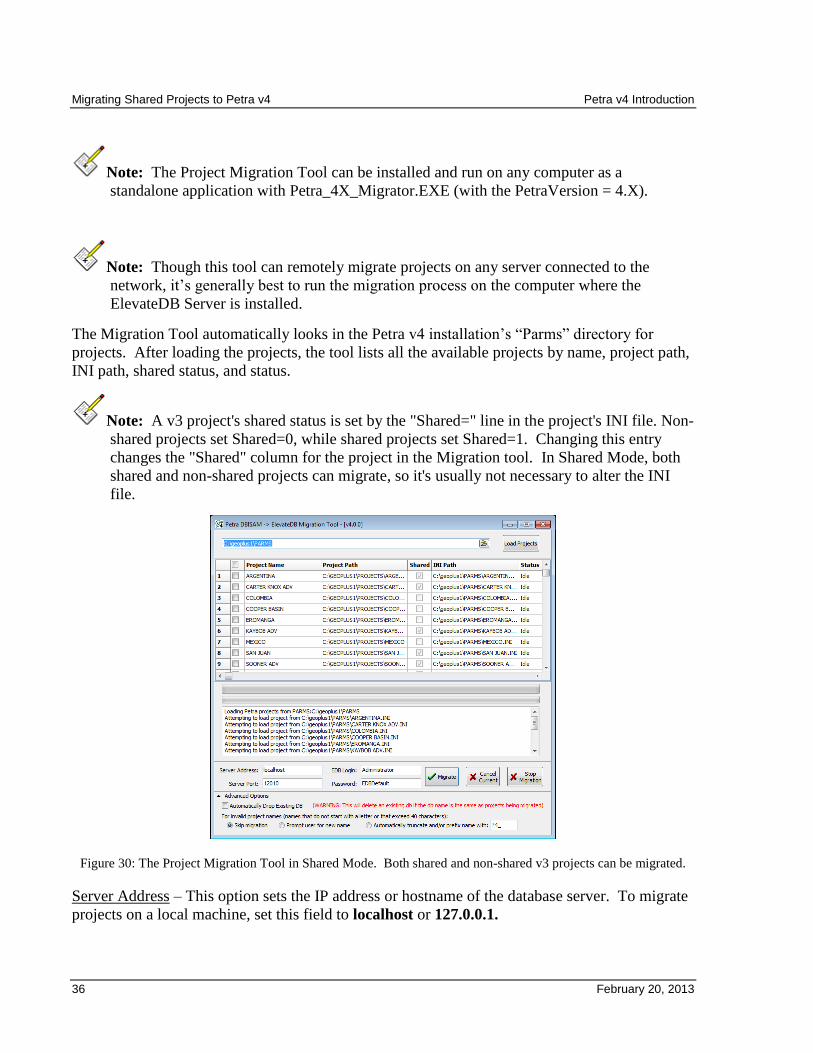
The Migration Tool automatically looks in the Petra v4 installation’s “Parms” directory for
projects. After loading the projects, the tool lists all the available projects by name, project path,
INI path, shared status, and status.
Note: A v3 project's shared status is set by the "Shared=" line in the project's INI file. Non-
shared projects set Shared=0, while shared projects set Shared=1. Changing this entry
changes the "Shared" column for the project in the Migration tool. In Shared Mode, both
shared and non-shared projects can migrate, so it's usually not necessary to alter the INI
file.
Figure 30: The Project Migration Tool in Shared Mode. Both shared and non-shared v3 projects can be migrated.
Server Address – This option sets the IP address or hostname of the database server. To migrate
projects on a local machine, set this field to localhost or 127.0.0.1.
Petra v4 Introduction Migrating Shared Projects to Petra v4
February 20, 2013 37
Server Port – This option sets the port of the database server. To migrate projects on a local
machine, set the port to 12010.
EDB Login – This option sets the username.
Password – This option sets the password.
Note: The username and password will need the appropriate permission. Brand new DB
servers will only have a single administrator user at first. EDBLogin: Administrator;
Password: EDBDefault
Auto-Drop Existing DBs – This option automatically replaces projects with the same name
already on the Database Server.
For Invalid Project Names – This option determines how the Migration Tool handles projects
with names that start with a number or exceed the 40 character limit.
The “Skip Migration” option completely skips the migration.
The “Prompt user for new name” requests a new name for the project.
The “Automatically truncate and/or prefix name with:” both truncates characters beyond
the 40 character limit and/or adds a prefix for project names that start with a number.
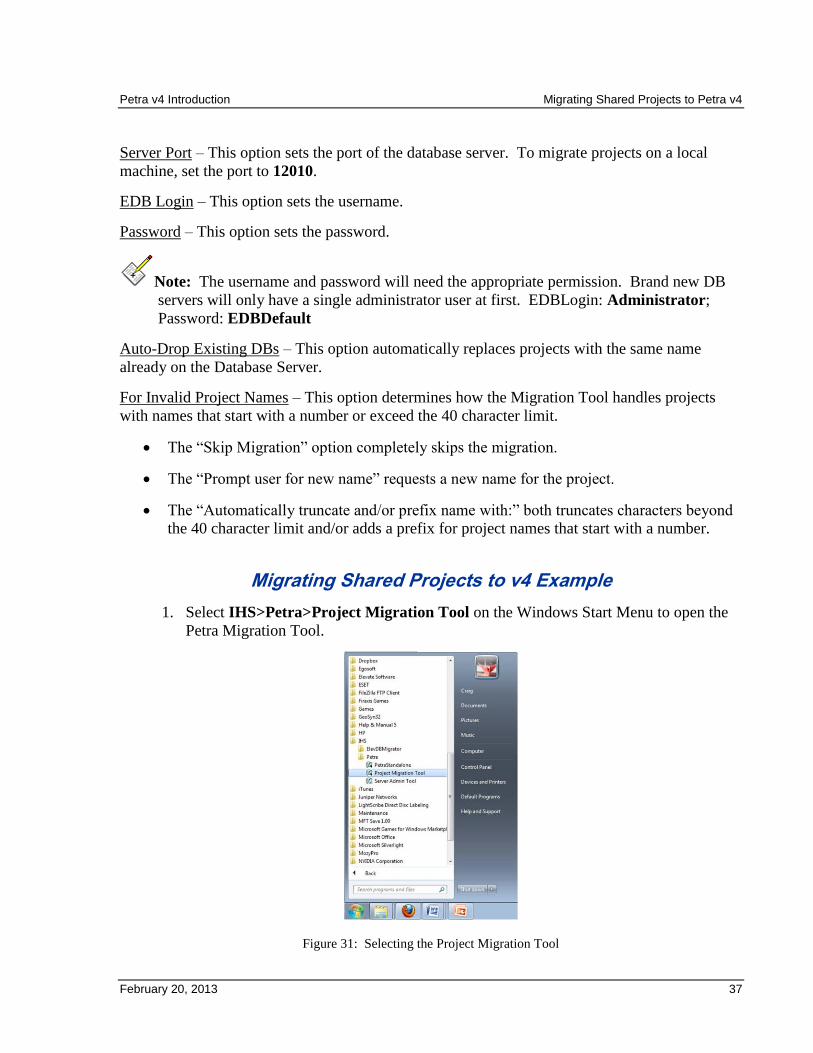
Migrating Shared Projects to v4 Example
1. Select IHS>Petra>Project Migration Tool on the Windows Start Menu to open the
Petra Migration Tool.
Figure 31: Selecting the Project Migration Tool
Migrating Shared Projects to Petra v4 Petra v4 Introduction
38 February 20, 2013
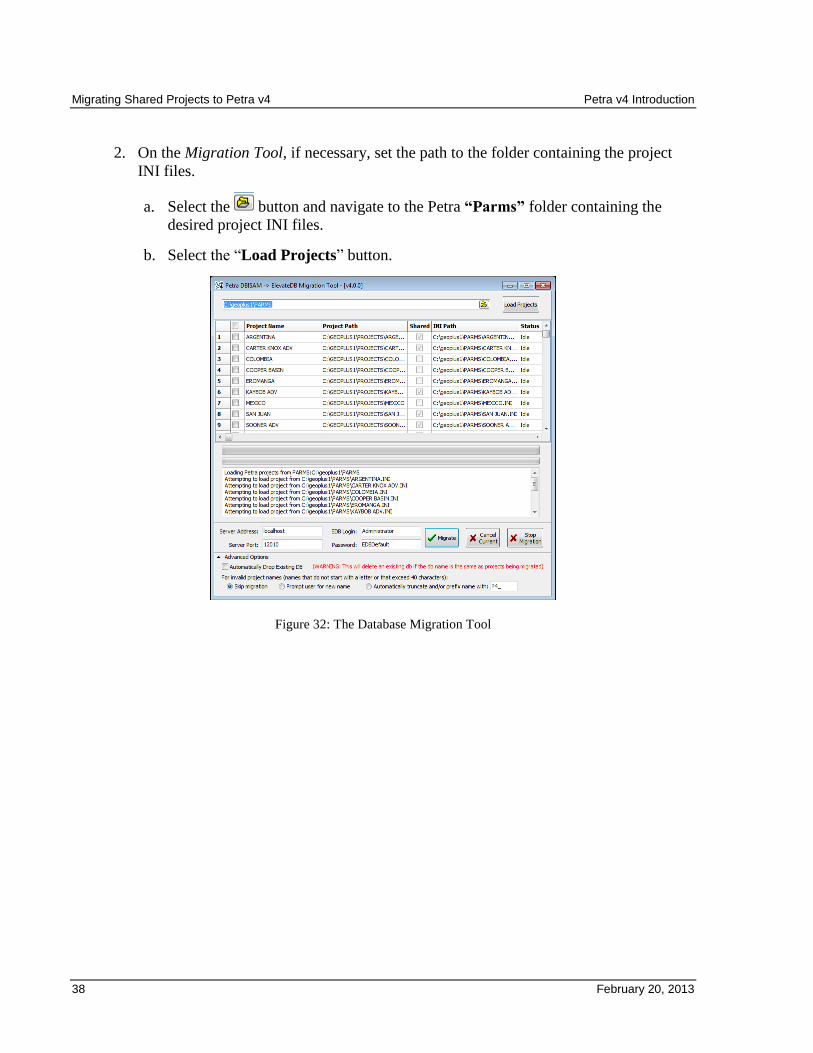
2. On the Migration Tool, if necessary, set the path to the folder containing the project
INI files.
a. Select the button and navigate to the Petra “Parms” folder containing the
desired project INI files.
b. Select the “Load Projects” button.
Figure 32: The Database Migration Tool
Petra v4 Introduction Migrating Shared Projects to Petra v4
February 20, 2013 39
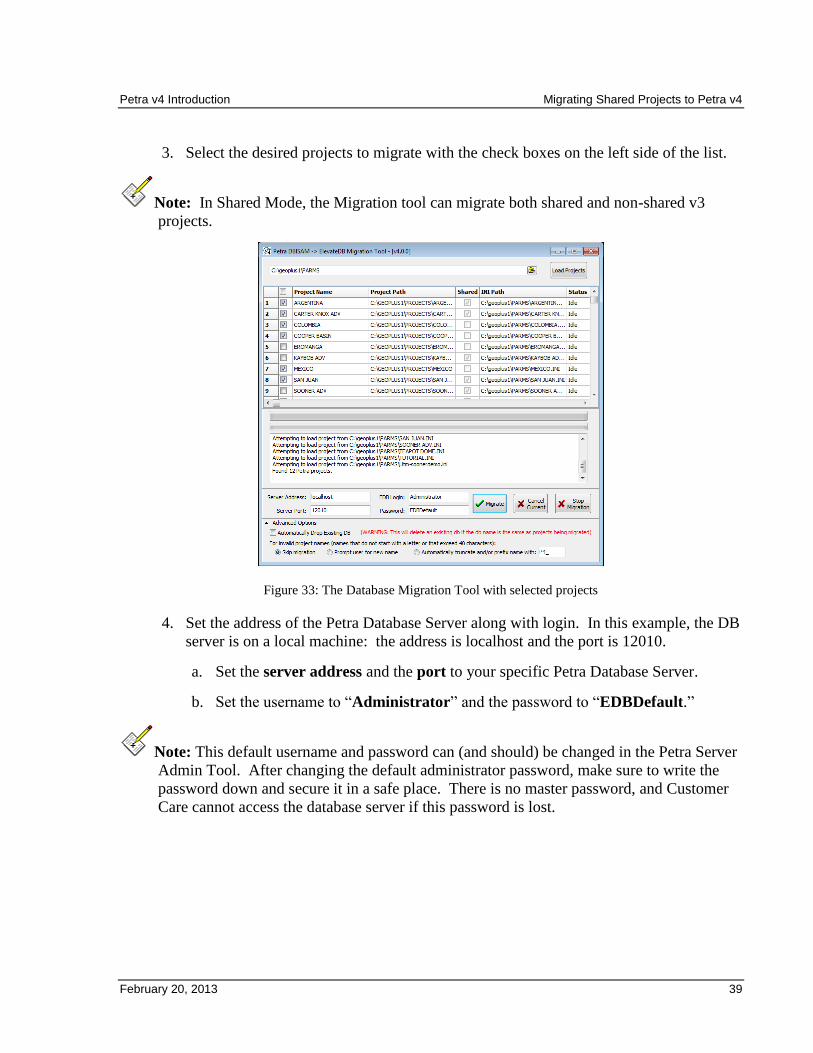
3. Select the desired projects to migrate with the check boxes on the left side of the list.
Note: In Shared Mode, the Migration tool can migrate both shared and non-shared v3
projects.
Figure 33: The Database Migration Tool with selected projects
4. Set the address of the Petra Database Server along with login. In this example, the DB
server is on a local machine: the address is localhost and the port is 12010.
a. Set the server address and the port to your specific Petra Database Server.
b. Set the username to “Administrator” and the password to “EDBDefault.”
Note: This default username and password can (and should) be changed in the Petra Server
Admin Tool. After changing the default administrator password, make sure to write the
password down and secure it in a safe place. There is no master password, and Customer
Care cannot access the database server if this password is lost.
Migrating Shared Projects to Petra v4 Petra v4 Introduction
40 February 20, 2013
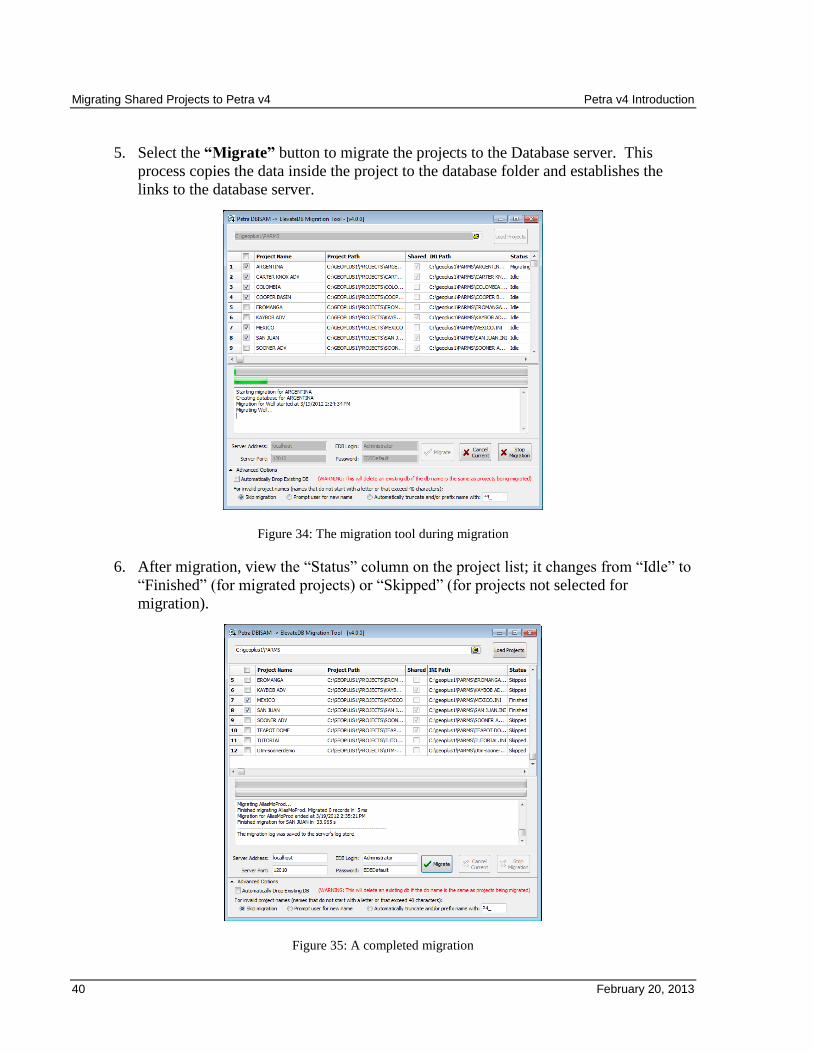
5. Select the “Migrate” button to migrate the projects to the Database server. This
process copies the data inside the project to the database folder and establishes the
links to the database server.
Figure 34: The migration tool during migration
6. After migration, view the “Status” column on the project list; it changes from “Idle” to
“Finished” (for migrated projects) or “Skipped” (for projects not selected for
migration).
Figure 35: A completed migration
Petra v4 Introduction Migrating Shared Projects to Petra v4
February 20, 2013 41
Migrating Shared Projects to v4 Summary
Petra v4 works with projects in a fundamentally different way than older versions. The
Migration Tool upgrades older projects to work with the latest version of Petra.
All projects should have a good backup before initiating project migration.
Performing a full repair, reindex, pack, and optimize on the v3 project will speed up
migration.
It’s generally best to run the migration tool on the computer where the ElevateDB Server
is installed.

February 20, 2013 43
Managing Database Servers
The Petra Server Admin Tool performs some database setup and most routine maintenance. This
includes creating server lists, managing users and roles, backing up and restoring projects, and
controlling individual Petra connections to the database server or “sessions.”
Petra Server Admin Tool
The Petra Server Admin Tool can be used at any time after installation. Run before migration to
perform some tasks that don’t need a project, including creating a DB Server List, adding users,
and changing passwords (particularly the default administrator password).
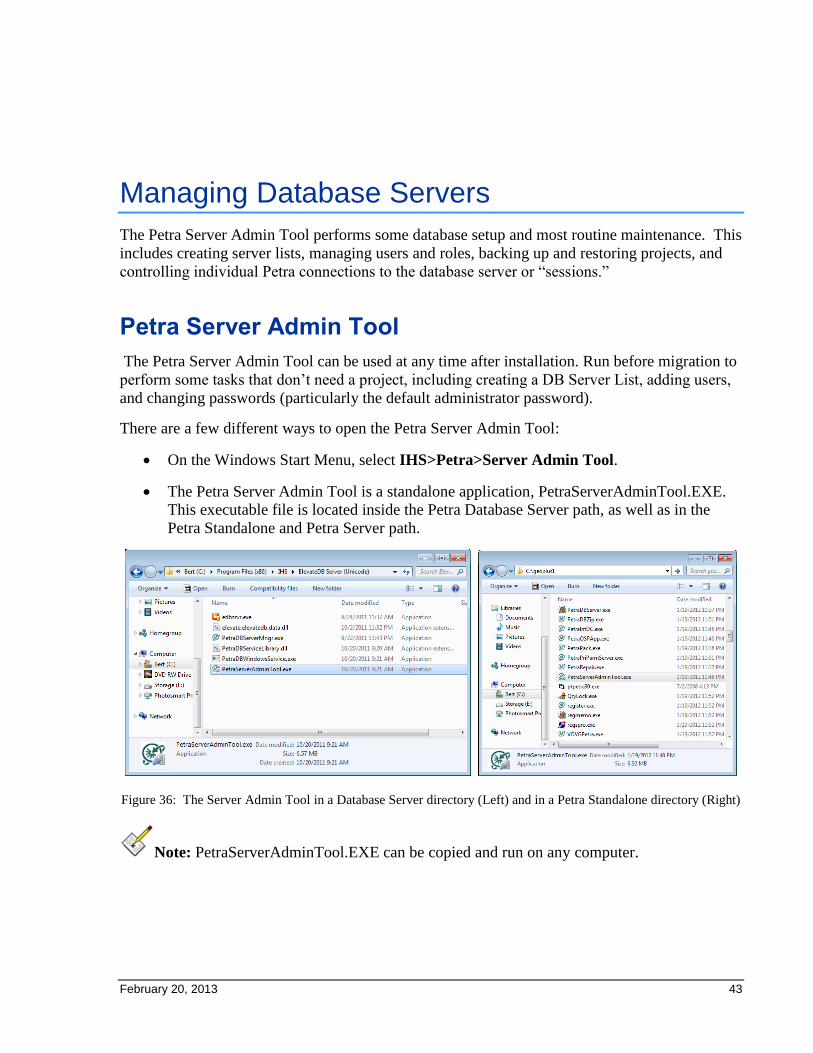
There are a few different ways to open the Petra Server Admin Tool:
On the Windows Start Menu, select IHS>Petra>Server Admin Tool.
The Petra Server Admin Tool is a standalone application, PetraServerAdminTool.EXE.
This executable file is located inside the Petra Database Server path, as well as in the
Petra Standalone and Petra Server path.
Figure 36: The Server Admin Tool in a Database Server directory (Left) and in a Petra Standalone directory (Right)
Note: PetraServerAdminTool.EXE can be copied and run on any computer.
Managing Database Servers Petra v4 Introduction
44 February 20, 2013
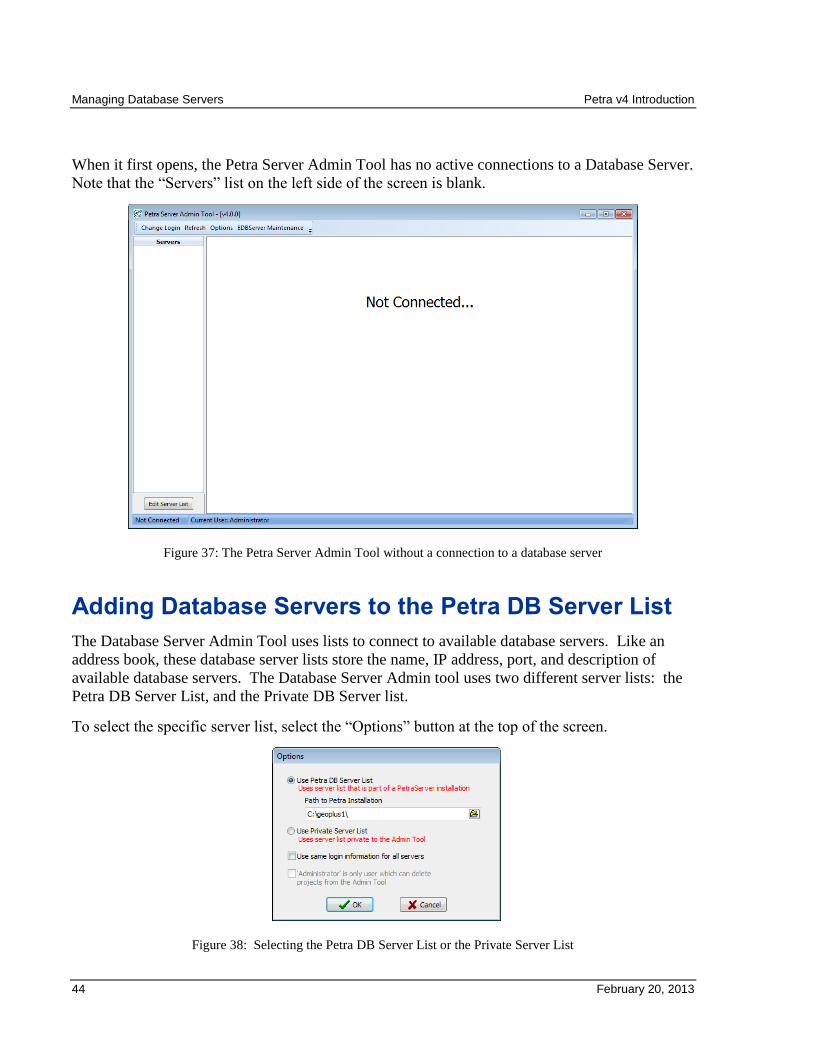
When it first opens, the Petra Server Admin Tool has no active connections to a Database Server.
Note that the “Servers” list on the left side of the screen is blank.
Figure 37: The Petra Server Admin Tool without a connection to a database server
Adding Database Servers to the Petra DB Server List
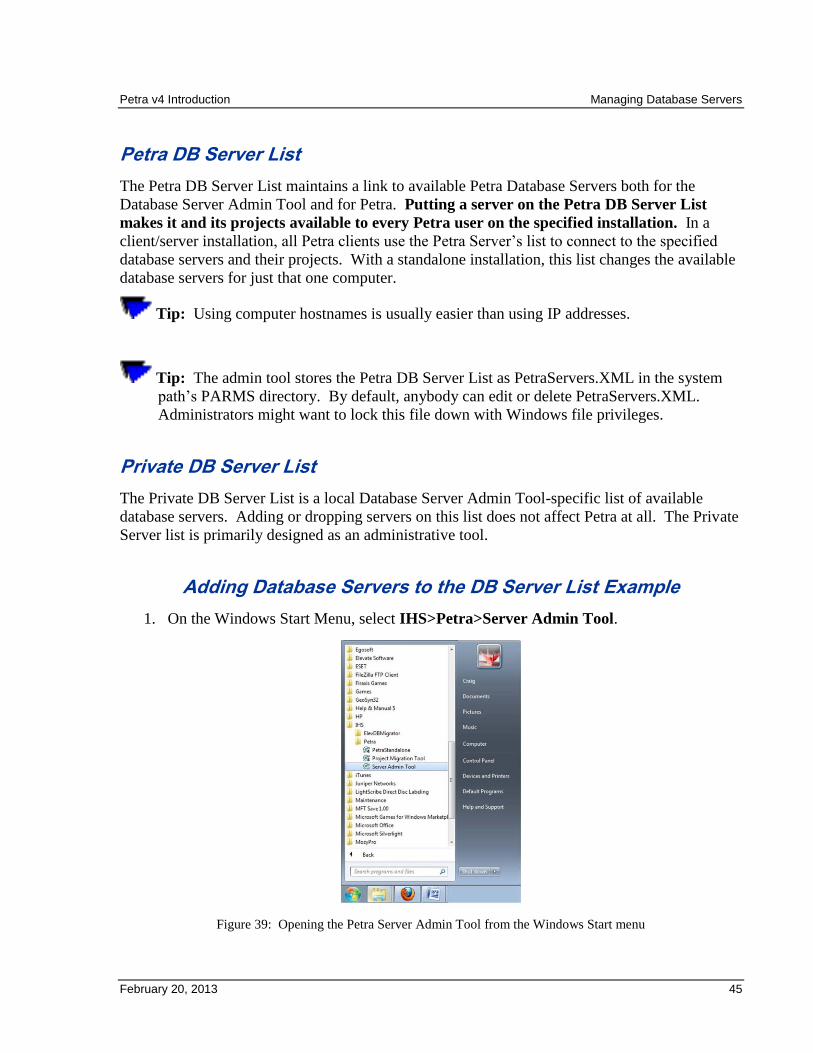
The Database Server Admin Tool uses lists to connect to available database servers. Like an
address book, these database server lists store the name, IP address, port, and description of
available database servers. The Database Server Admin tool uses two different server lists: the
Petra DB Server List, and the Private DB Server list.
To select the specific server list, select the “Options” button at the top of the screen.
Figure 38: Selecting the Petra DB Server List or the Private Server List
Petra v4 Introduction Managing Database Servers
February 20, 2013 45
Petra DB Server List
The Petra DB Server List maintains a link to available Petra Database Servers both for the
Database Server Admin Tool and for Petra. Putting a server on the Petra DB Server List
makes it and its projects available to every Petra user on the specified installation. In a
client/server installation, all Petra clients use the Petra Server’s list to connect to the specified
database servers and their projects. With a standalone installation, this list changes the available
database servers for just that one computer.
Tip: Using computer hostnames is usually easier than using IP addresses.
Tip: The admin tool stores the Petra DB Server List as PetraServers.XML in the system
path’s PARMS directory. By default, anybody can edit or delete PetraServers.XML.
Administrators might want to lock this file down with Windows file privileges.
Private DB Server List
The Private DB Server List is a local Database Server Admin Tool-specific list of available
database servers. Adding or dropping servers on this list does not affect Petra at all. The Private
Server list is primarily designed as an administrative tool.
Adding Database Servers to the DB Server List Example
1. On the Windows Start Menu, select IHS>Petra>Server Admin Tool.
Figure 39: Opening the Petra Server Admin Tool from the Windows Start menu
Managing Database Servers Petra v4 Introduction
46 February 20, 2013
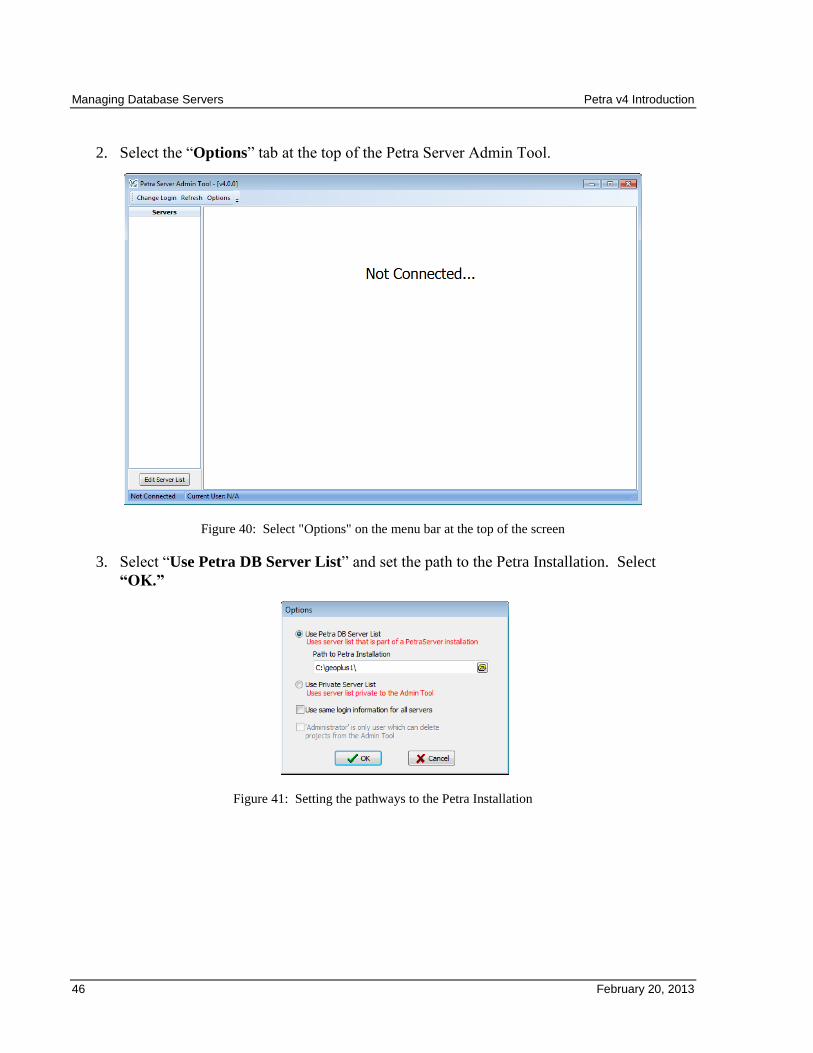
2. Select the “Options” tab at the top of the Petra Server Admin Tool.
Figure 40: Select "Options" on the menu bar at the top of the screen
3. Select “Use Petra DB Server List” and set the path to the Petra Installation. Select
“OK.”
Figure 41: Setting the pathways to the Petra Installation
Petra v4 Introduction Managing Database Servers
February 20, 2013 47
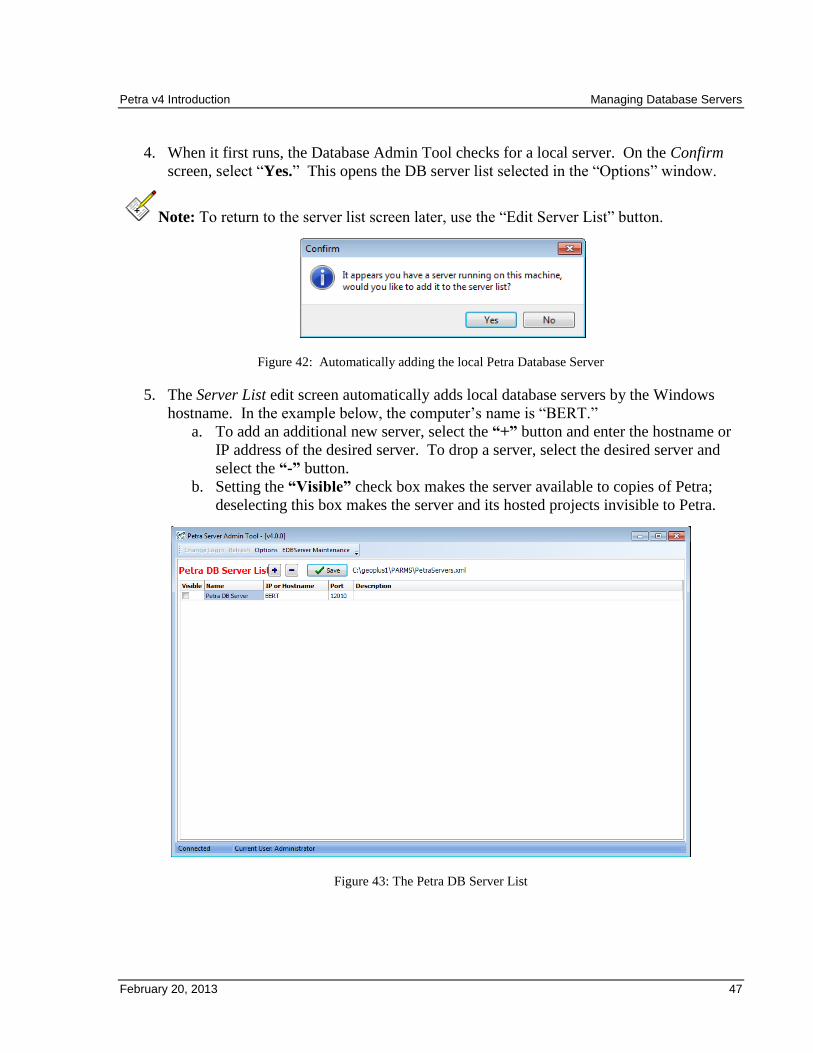
4. When it first runs, the Database Admin Tool checks for a local server. On the Confirm
screen, select “Yes.” This opens the DB server list selected in the “Options” window.
Note: To return to the server list screen later, use the “Edit Server List” button.
Figure 42: Automatically adding the local Petra Database Server
5. The Server List edit screen automatically adds local database servers by the Windows
hostname. In the example below, the computer’s name is “BERT.”
a. To add an additional new server, select the “+” button and enter the hostname or
IP address of the desired server. To drop a server, select the desired server and
select the “-” button.
b. Setting the “Visible” check box makes the server available to copies of Petra;
deselecting this box makes the server and its hosted projects invisible to Petra.
Figure 43: The Petra DB Server List
Managing Database Servers Petra v4 Introduction
48 February 20, 2013
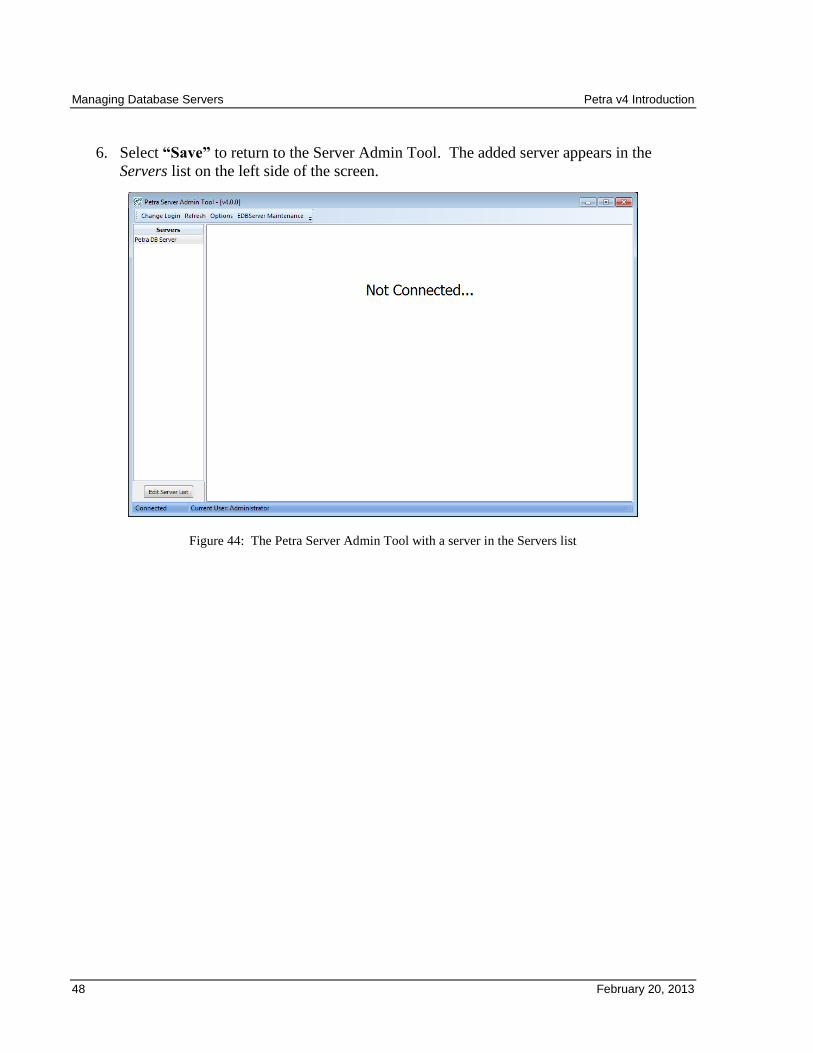
6. Select “Save” to return to the Server Admin Tool. The added server appears in the
Servers list on the left side of the screen.
Figure 44: The Petra Server Admin Tool with a server in the Servers list
Petra v4 Introduction Managing Database Servers
February 20, 2013 49
Connecting to the Database Server
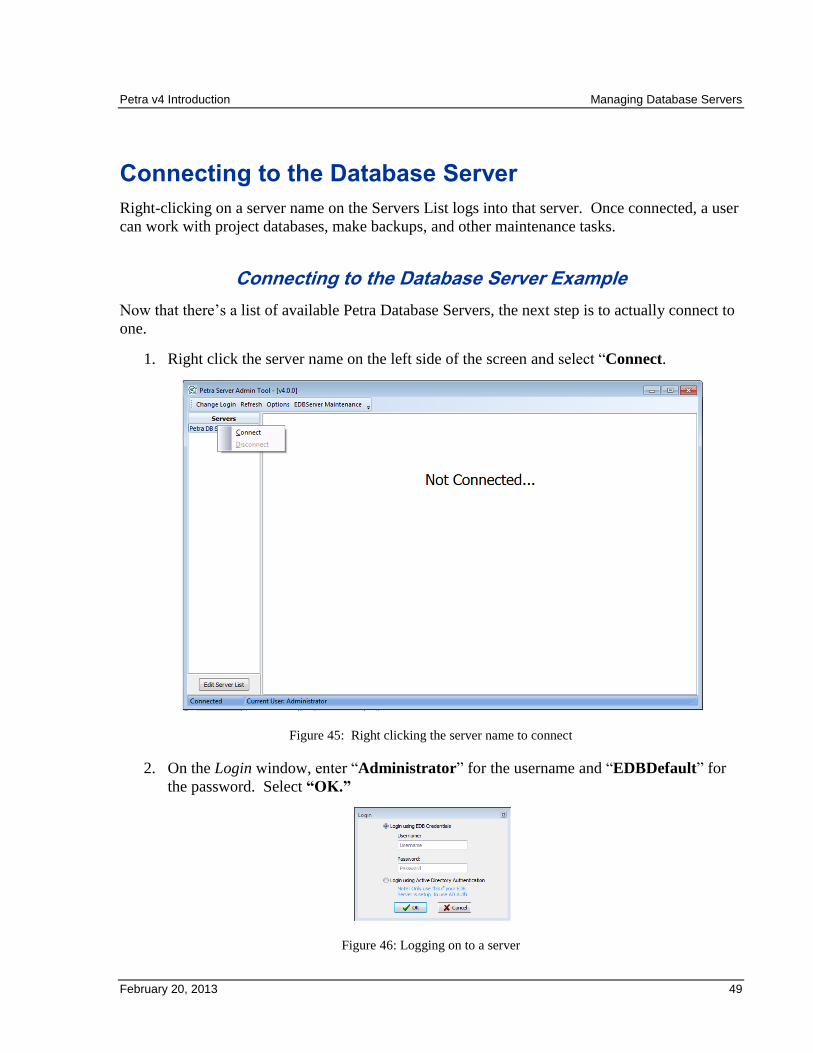
Right-clicking on a server name on the Servers List logs into that server. Once connected, a user
can work with project databases, make backups, and other maintenance tasks.
Connecting to the Database Server Example
Now that there’s a list of available Petra Database Servers, the next step is to actually connect to
one.
1. Right click the server name on the left side of the screen and select “Connect.
Figure 45: Right clicking the server name to connect
2. On the Login window, enter “Administrator” for the username and “EDBDefault” for
the password. Select “OK.”
Figure 46: Logging on to a server
Managing Database Servers Petra v4 Introduction
50 February 20, 2013
Connecting to Multiple Database Servers
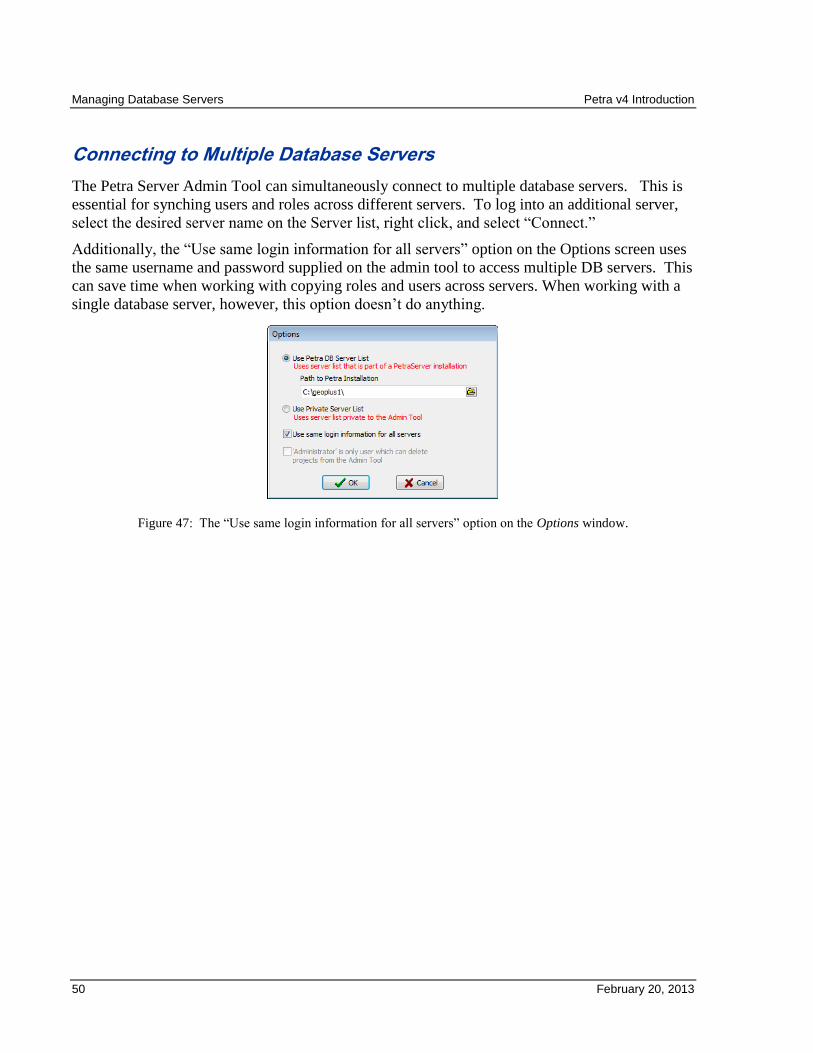
The Petra Server Admin Tool can simultaneously connect to multiple database servers. This is
essential for synching users and roles across different servers. To log into an additional server,
select the desired server name on the Server list, right click, and select “Connect.”
Additionally, the “Use same login information for all servers” option on the Options screen uses
the same username and password supplied on the admin tool to access multiple DB servers. This
can save time when working with copying roles and users across servers. When working with a
single database server, however, this option doesn’t do anything.
Figure 47: The “Use same login information for all servers” option on the Options window.
Petra v4 Introduction Managing Database Servers
February 20, 2013 51
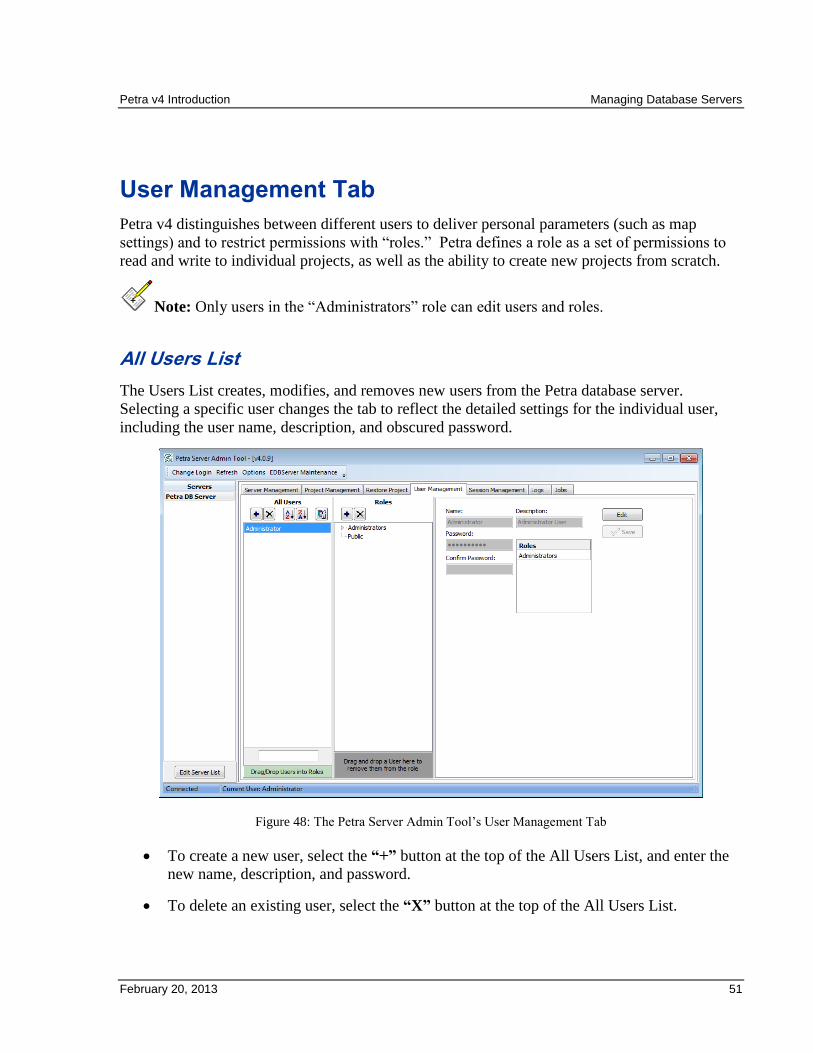
User Management Tab
Petra v4 distinguishes between different users to deliver personal parameters (such as map
settings) and to restrict permissions with “roles.” Petra defines a role as a set of permissions to
read and write to individual projects, as well as the ability to create new projects from scratch.
Note: Only users in the “Administrators” role can edit users and roles.
All Users List
The Users List creates, modifies, and removes new users from the Petra database server.
Selecting a specific user changes the tab to reflect the detailed settings for the individual user,
including the user name, description, and obscured password.
Figure 48: The Petra Server Admin Tool’s User Management Tab
To create a new user, select the “+” button at the top of the All Users List, and enter the
new name, description, and password.
To delete an existing user, select the “X” button at the top of the All Users List.
Managing Database Servers Petra v4 Introduction
52 February 20, 2013
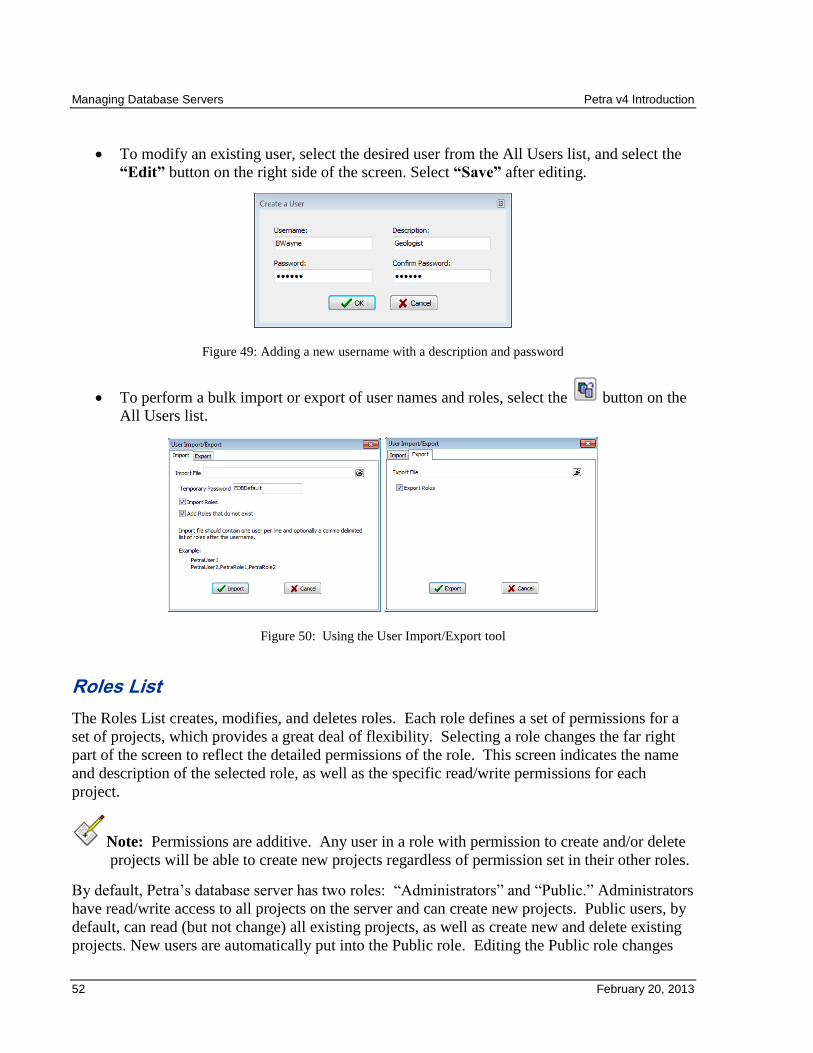
To modify an existing user, select the desired user from the All Users list, and select the
“Edit” button on the right side of the screen. Select “Save” after editing.
Figure 49: Adding a new username with a description and password
To perform a bulk import or export of user names and roles, select the button on the
All Users list.
Figure 50: Using the User Import/Export tool
Roles List
The Roles List creates, modifies, and deletes roles. Each role defines a set of permissions for a
set of projects, which provides a great deal of flexibility. Selecting a role changes the far right
part of the screen to reflect the detailed permissions of the role. This screen indicates the name
and description of the selected role, as well as the specific read/write permissions for each
project.
Note: Permissions are additive. Any user in a role with permission to create and/or delete
projects will be able to create new projects regardless of permission set in their other roles.
By default, Petra’s database server has two roles: “Administrators” and “Public.” Administrators
have read/write access to all projects on the server and can create new projects. Public users, by
default, can read (but not change) all existing projects, as well as create new and delete existing
projects. New users are automatically put into the Public role. Editing the Public role changes
Petra v4 Introduction Managing Database Servers
February 20, 2013 53
the default permissions for all users. Changing the “New Project Defaults” in the Public role
changes the default read and write permissions for new projects.
Note: Users can’t be dropped from the Public role. To restrict users creating and deleting
projects, remove that functionality from the Public role and create another dedicated role
with the create new projects/delete existing projects options enabled.
Figure 51: The Petra Server Admin Tool’s User Management Tab with the “Public” role selected
To add a new role, select the “+” button at the top of the Roles list and enter a name and
description.
To delete an existing role, select the “X” button at the top of the Roles List.
To edit the selected role, select the “Edit” button, make the desired changes, and select
the “Save” button.
The Roles List also contains the usernames associated with each role. Selecting the triangle or
plus to the left of the role name expands the tree to display all users in that role.
To add a new user to a role, drag the selected user from the All Users List into the desired
role.
To remove a user from a role, drag the user inside the Roles List back into the All Users
List, or to the box at the bottom of the Roles List.
Managing Database Servers Petra v4 Introduction
54 February 20, 2013
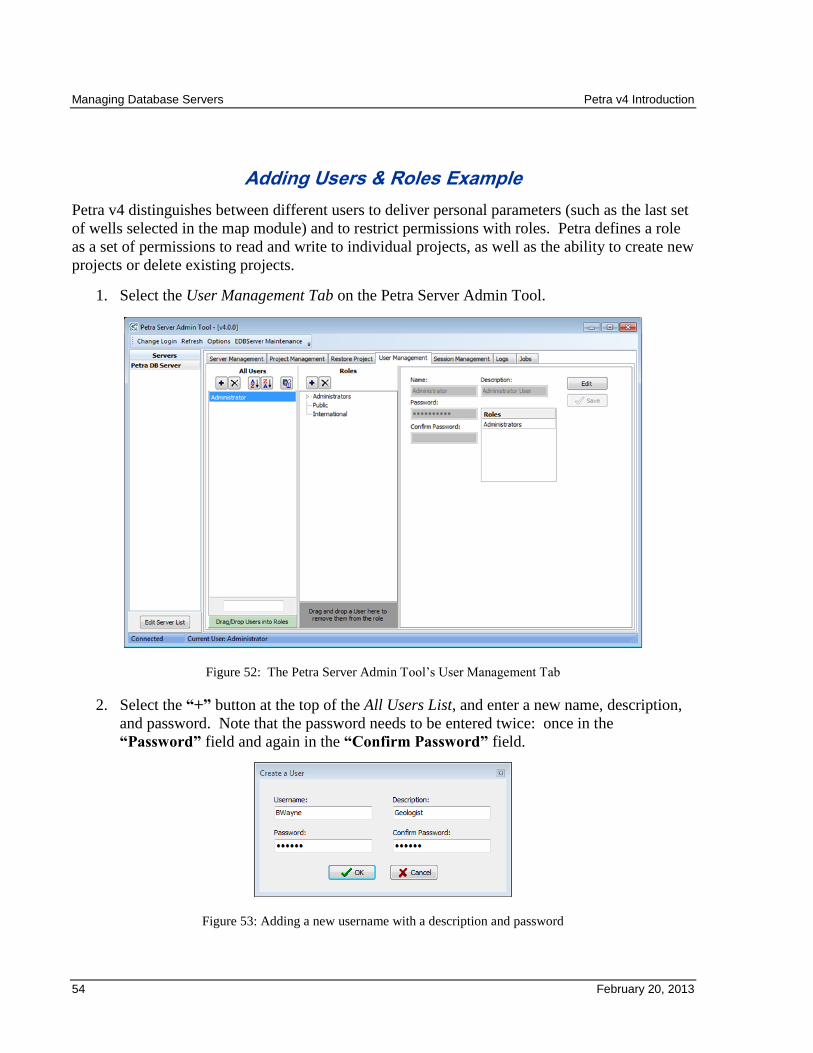
Adding Users & Roles Example
Petra v4 distinguishes between different users to deliver personal parameters (such as the last set
of wells selected in the map module) and to restrict permissions with roles. Petra defines a role
as a set of permissions to read and write to individual projects, as well as the ability to create new
projects or delete existing projects.
1. Select the User Management Tab on the Petra Server Admin Tool.
Figure 52: The Petra Server Admin Tool’s User Management Tab
2. Select the “+” button at the top of the All Users List, and enter a new name, description,
and password. Note that the password needs to be entered twice: once in the
“Password” field and again in the “Confirm Password” field.
Figure 53: Adding a new username with a description and password
Petra v4 Introduction Managing Database Servers
February 20, 2013 55
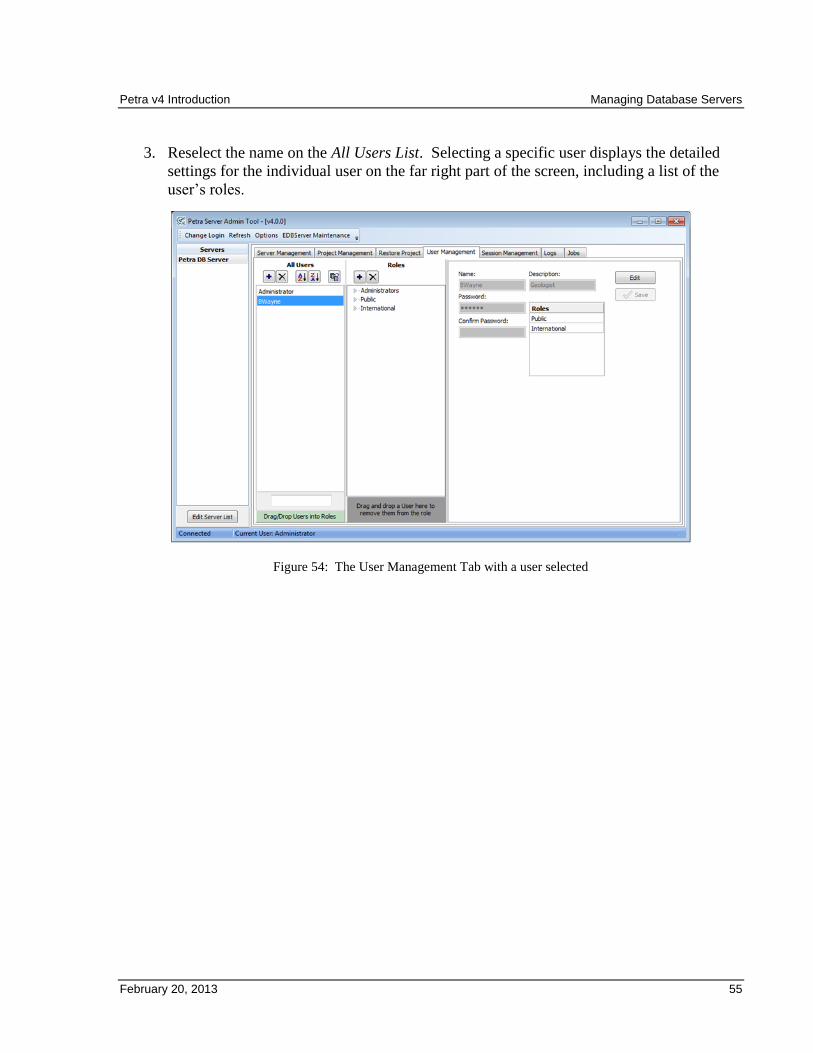
3. Reselect the name on the All Users List. Selecting a specific user displays the detailed
settings for the individual user on the far right part of the screen, including a list of the
user’s roles.
Figure 54: The User Management Tab with a user selected
Managing Database Servers Petra v4 Introduction
56 February 20, 2013
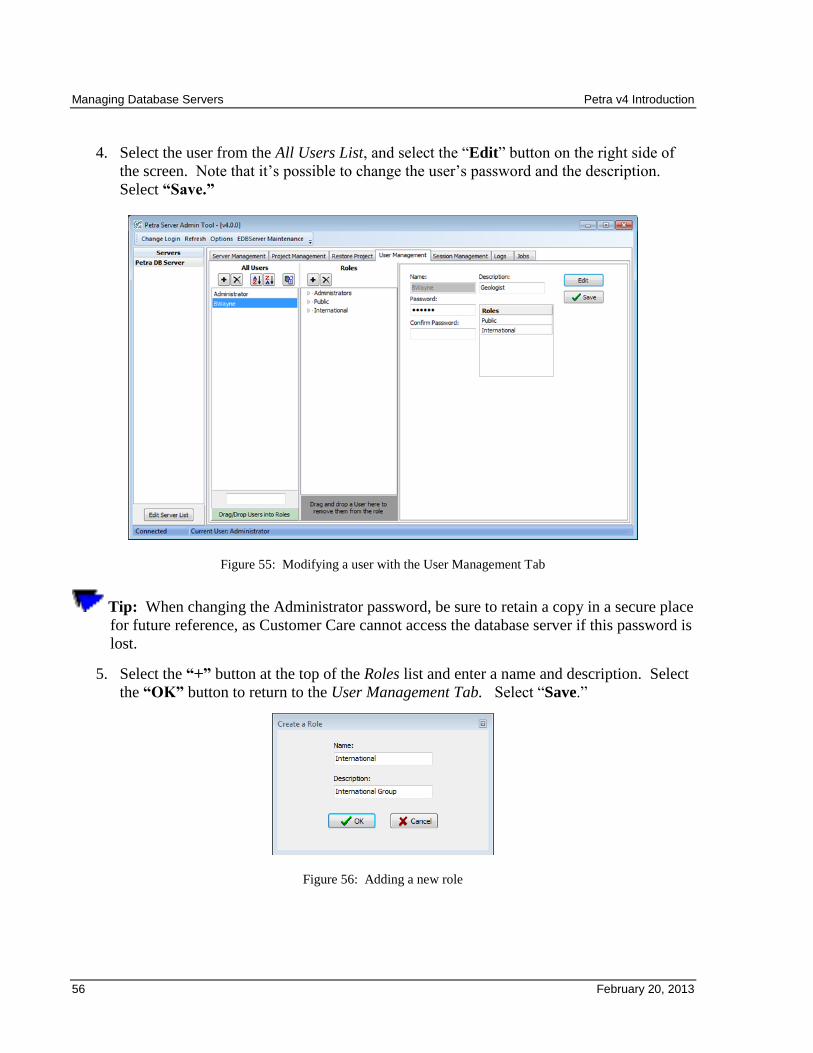
4. Select the user from the All Users List, and select the “Edit” button on the right side of
the screen. Note that it’s possible to change the user’s password and the description.
Select “Save.”
Figure 55: Modifying a user with the User Management Tab
Tip: When changing the Administrator password, be sure to retain a copy in a secure place
for future reference, as Customer Care cannot access the database server if this password is
lost.
5. Select the “+” button at the top of the Roles list and enter a name and description. Select
the “OK” button to return to the User Management Tab. Select “Save.”
Figure 56: Adding a new role
Petra v4 Introduction Managing Database Servers
February 20, 2013 57
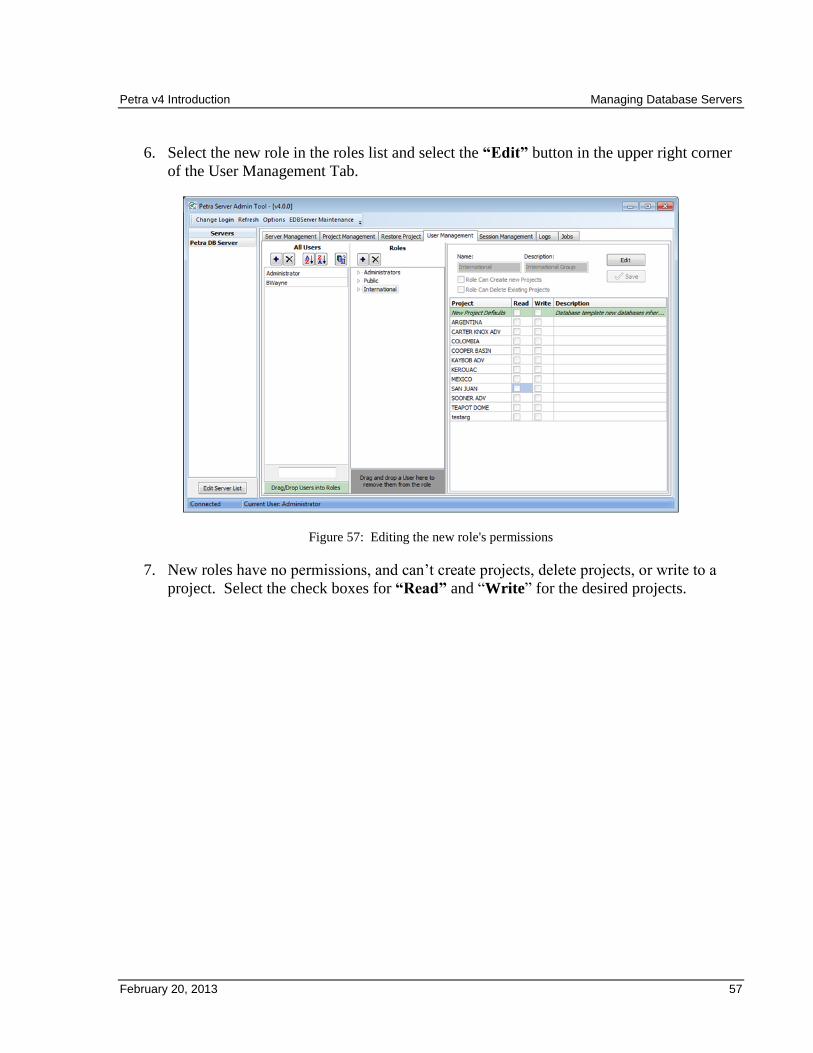
6. Select the new role in the roles list and select the “Edit” button in the upper right corner
of the User Management Tab.
Figure 57: Editing the new role's permissions
7. New roles have no permissions, and can’t create projects, delete projects, or write to a
project. Select the check boxes for “Read” and “Write” for the desired projects.
Managing Database Servers Petra v4 Introduction
58 February 20, 2013
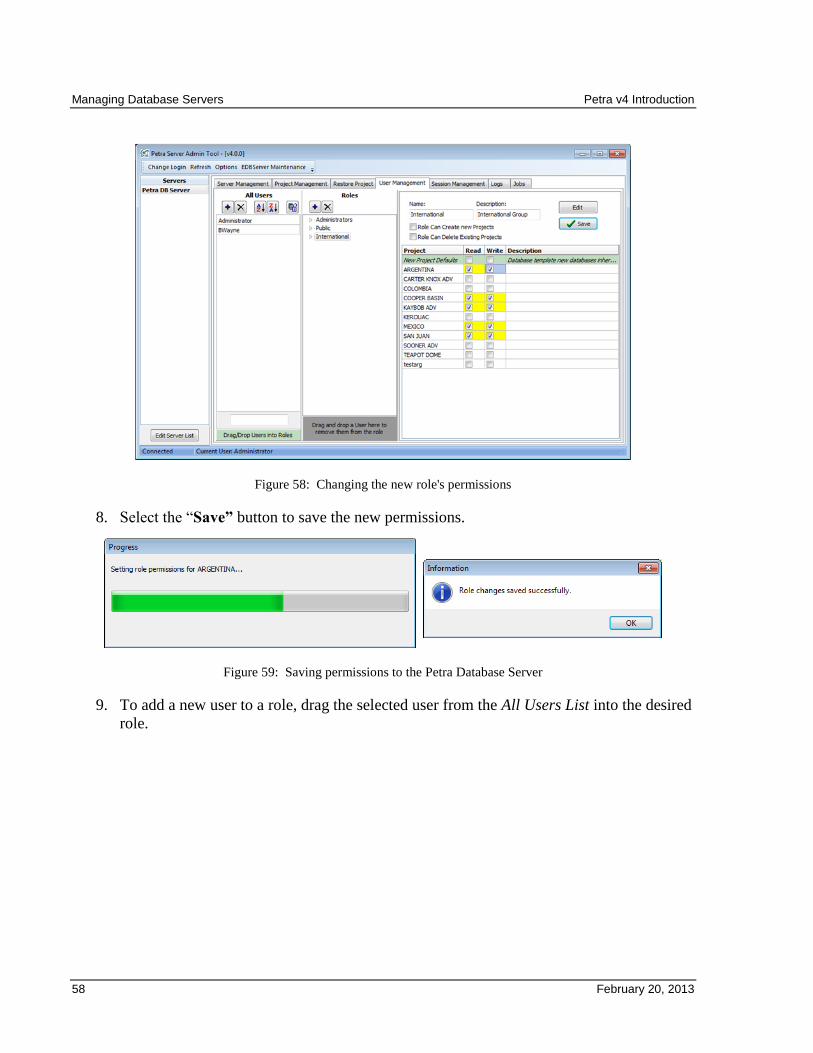
Figure 58: Changing the new role's permissions
8. Select the “Save” button to save the new permissions.
Figure 59: Saving permissions to the Petra Database Server
9. To add a new user to a role, drag the selected user from the All Users List into the desired
role.
Petra v4 Introduction Managing Database Servers
February 20, 2013 59
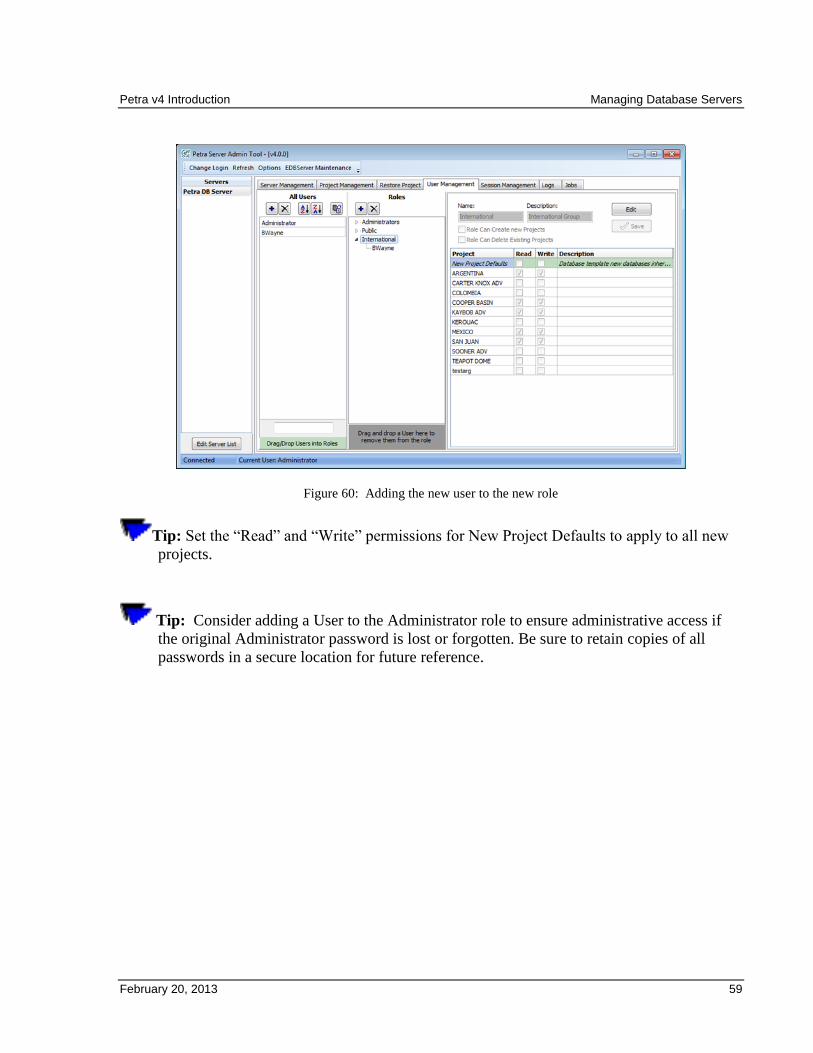
Figure 60: Adding the new user to the new role
Tip: Set the “Read” and “Write” permissions for New Project Defaults to apply to all new
projects.
Tip: Consider adding a User to the Administrator role to ensure administrative access if
the original Administrator password is lost or forgotten. Be sure to retain copies of all
passwords in a secure location for future reference.
Managing Database Servers Petra v4 Introduction
60 February 20, 2013
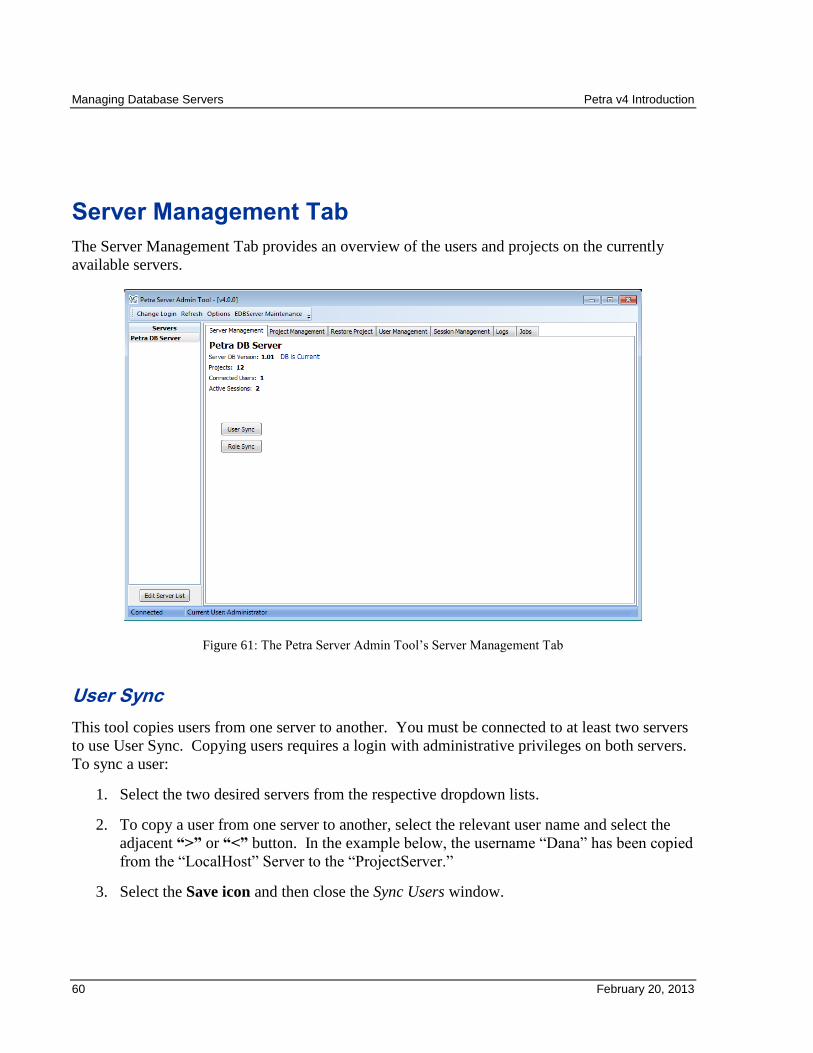
Server Management Tab
The Server Management Tab provides an overview of the users and projects on the currently
available servers.
Figure 61: The Petra Server Admin Tool’s Server Management Tab
User Sync
This tool copies users from one server to another. You must be connected to at least two servers
to use User Sync. Copying users requires a login with administrative privileges on both servers.
To sync a user:
1. Select the two desired servers from the respective dropdown lists.
2. To copy a user from one server to another, select the relevant user name and select the
adjacent “>” or “<” button. In the example below, the username “Dana” has been copied
from the “LocalHost” Server to the “ProjectServer.”
3. Select the Save icon and then close the Sync Users window.
Petra v4 Introduction Managing Database Servers
February 20, 2013 61
Figure 62: Syncing users between two servers
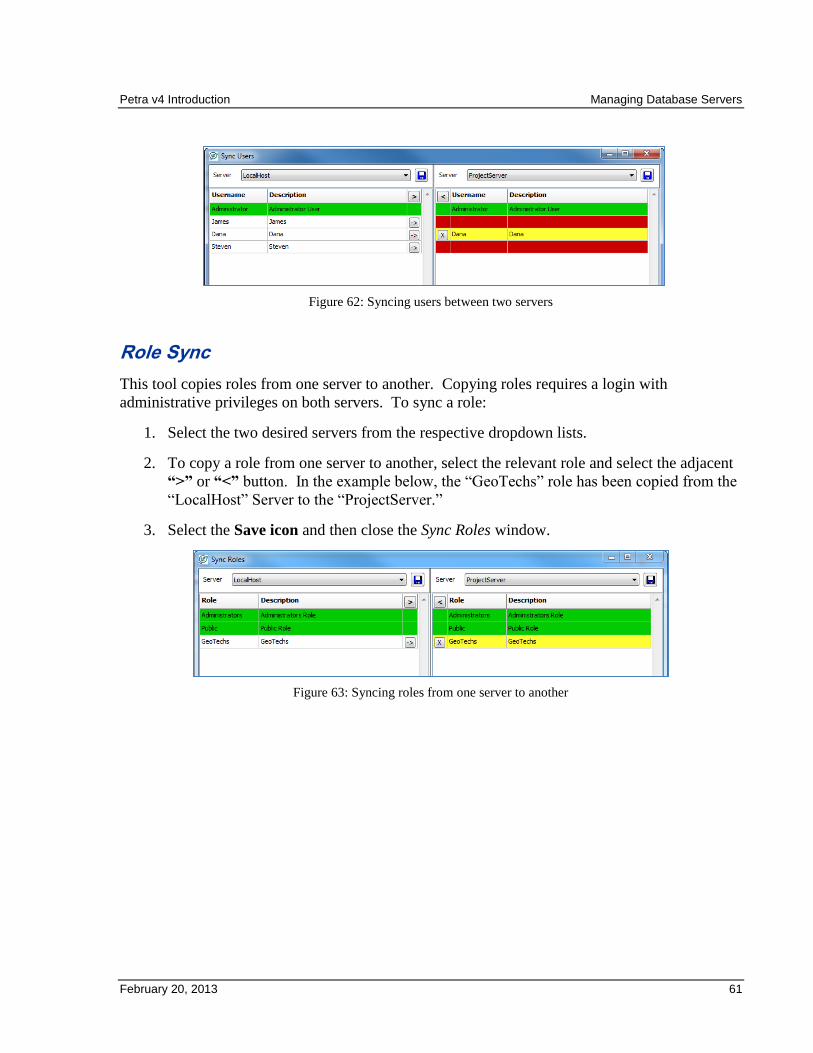
Role Sync
This tool copies roles from one server to another. Copying roles requires a login with
administrative privileges on both servers. To sync a role:
1. Select the two desired servers from the respective dropdown lists.
2. To copy a role from one server to another, select the relevant role and select the adjacent
“>” or “<” button. In the example below, the “GeoTechs” role has been copied from the
“LocalHost” Server to the “ProjectServer.”
3. Select the Save icon and then close the Sync Roles window.
Figure 63: Syncing roles from one server to another
Managing Database Servers Petra v4 Introduction
62 February 20, 2013
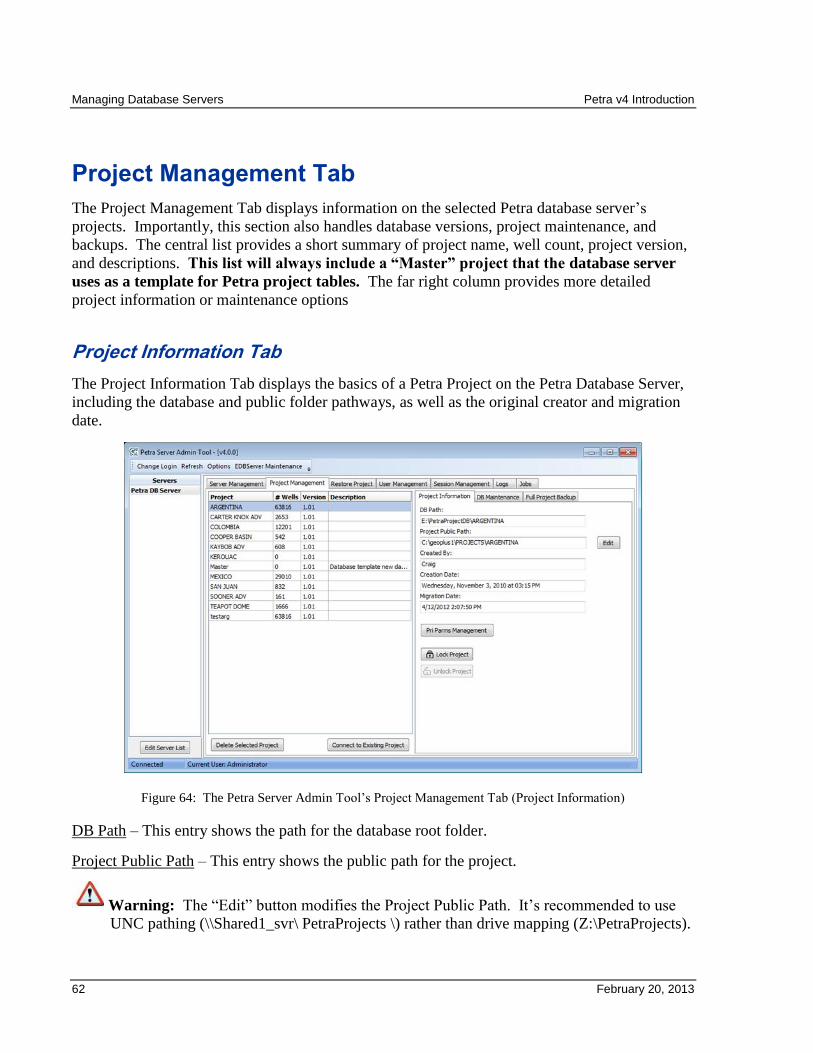
Project Management Tab
The Project Management Tab displays information on the selected Petra database server’s
projects. Importantly, this section also handles database versions, project maintenance, and
backups. The central list provides a short summary of project name, well count, project version,
and descriptions. This list will always include a “Master” project that the database server
uses as a template for Petra project tables. The far right column provides more detailed
project information or maintenance options
Project Information Tab
The Project Information Tab displays the basics of a Petra Project on the Petra Database Server,
including the database and public folder pathways, as well as the original creator and migration
date.
Figure 64: The Petra Server Admin Tool’s Project Management Tab (Project Information)
DB Path – This entry shows the path for the database root folder.
Project Public Path – This entry shows the public path for the project.
Warning: The “Edit” button modifies the Project Public Path. It’s recommended to use
UNC pathing (\\Shared1_svr\ PetraProjects \) rather than drive mapping (Z:\PetraProjects).
Petra v4 Introduction Managing Database Servers
February 20, 2013 63
Created By – This entry shows the project creator.
Creation Date –This entry shows the project’s creation date.
Migration Date – This entry shows the project’s migration date.
Pri Parms Management
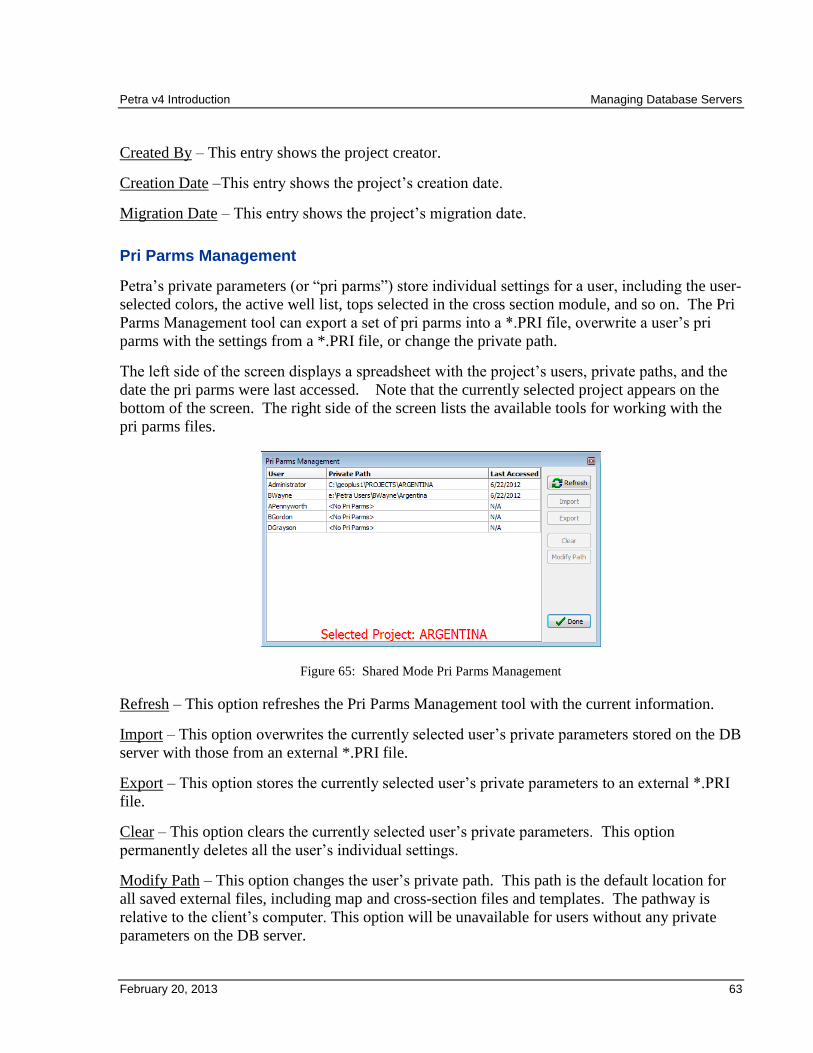
Petra’s private parameters (or “pri parms”) store individual settings for a user, including the user-
selected colors, the active well list, tops selected in the cross section module, and so on. The Pri
Parms Management tool can export a set of pri parms into a *.PRI file, overwrite a user’s pri
parms with the settings from a *.PRI file, or change the private path.
The left side of the screen displays a spreadsheet with the project’s users, private paths, and the
date the pri parms were last accessed. Note that the currently selected project appears on the
bottom of the screen. The right side of the screen lists the available tools for working with the
pri parms files.
Figure 65: Shared Mode Pri Parms Management
Refresh – This option refreshes the Pri Parms Management tool with the current information.
Import – This option overwrites the currently selected user’s private parameters stored on the DB
server with those from an external *.PRI file.
Export – This option stores the currently selected user’s private parameters to an external *.PRI
file.
Clear – This option clears the currently selected user’s private parameters. This option
permanently deletes all the user’s individual settings.
Modify Path – This option changes the user’s private path. This path is the default location for
all saved external files, including map and cross-section files and templates. The pathway is
relative to the client’s computer. This option will be unavailable for users without any private
parameters on the DB server.
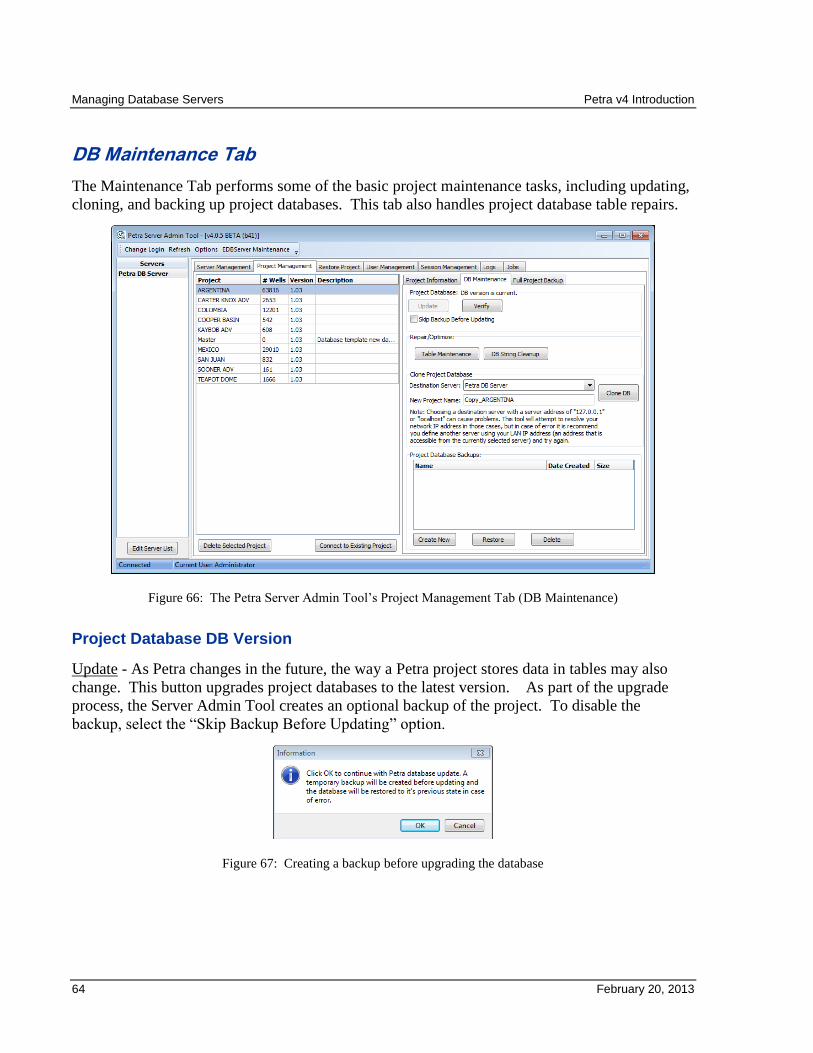
Managing Database Servers Petra v4 Introduction
64 February 20, 2013
DB Maintenance Tab
The Maintenance Tab performs some of the basic project maintenance tasks, including updating,
cloning, and backing up project databases. This tab also handles project database table repairs.
Figure 66: The Petra Server Admin Tool’s Project Management Tab (DB Maintenance)
Project Database DB Version
Update - As Petra changes in the future, the way a Petra project stores data in tables may also
change. This button upgrades project databases to the latest version. As part of the upgrade
process, the Server Admin Tool creates an optional backup of the project. To disable the
backup, select the “Skip Backup Before Updating” option.
Figure 67: Creating a backup before upgrading the database
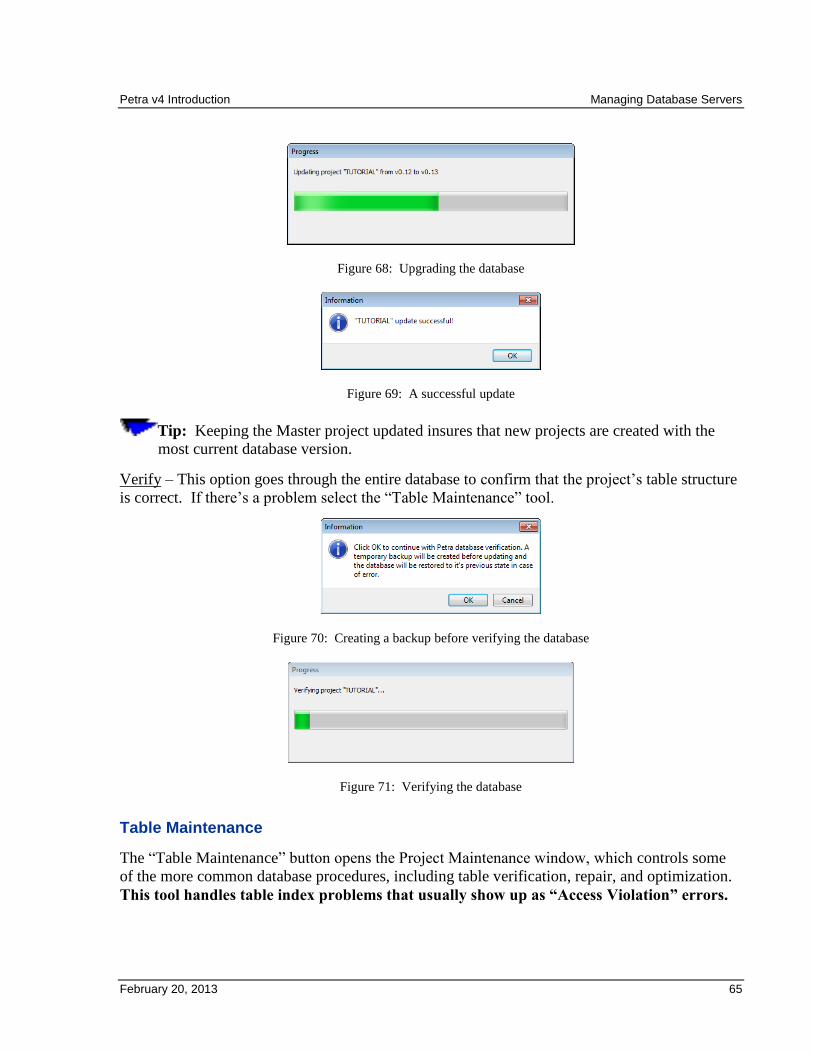
Petra v4 Introduction Managing Database Servers
February 20, 2013 65
Figure 68: Upgrading the database
Figure 69: A successful update
Tip: Keeping the Master project updated insures that new projects are created with the
most current database version.
Verify – This option goes through the entire database to confirm that the project’s table structure
is correct. If there’s a problem select the “Table Maintenance” tool.
Figure 70: Creating a backup before verifying the database
Figure 71: Verifying the database
Table Maintenance
The “Table Maintenance” button opens the Project Maintenance window, which controls some
of the more common database procedures, including table verification, repair, and optimization.
This tool handles table index problems that usually show up as “Access Violation” errors.
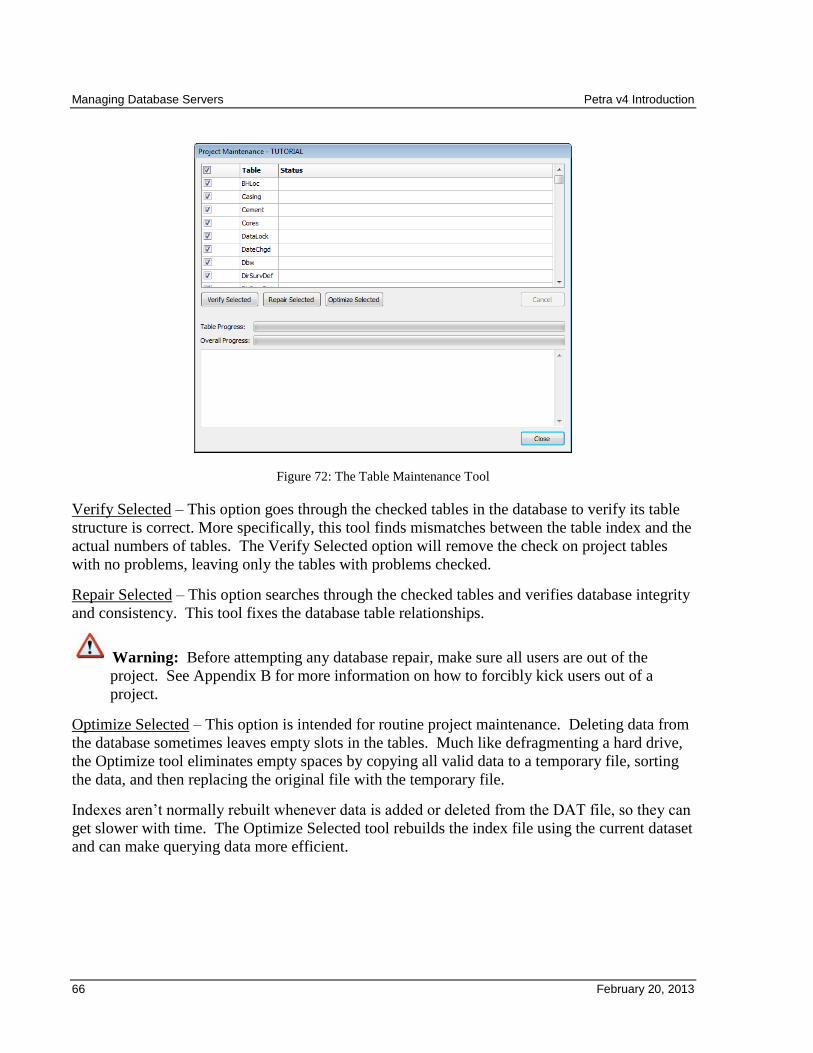
Managing Database Servers Petra v4 Introduction
66 February 20, 2013
Figure 72: The Table Maintenance Tool
Verify Selected – This option goes through the checked tables in the database to verify its table
structure is correct. More specifically, this tool finds mismatches between the table index and the
actual numbers of tables. The Verify Selected option will remove the check on project tables
with no problems, leaving only the tables with problems checked.
Repair Selected – This option searches through the checked tables and verifies database integrity
and consistency. This tool fixes the database table relationships.
Warning: Before attempting any database repair, make sure all users are out of the
project. See Appendix B for more information on how to forcibly kick users out of a
project.
Optimize Selected – This option is intended for routine project maintenance. Deleting data from
the database sometimes leaves empty slots in the tables. Much like defragmenting a hard drive,
the Optimize tool eliminates empty spaces by copying all valid data to a temporary file, sorting
the data, and then replacing the original file with the temporary file.
Indexes aren’t normally rebuilt whenever data is added or deleted from the DAT file, so they can
get slower with time. The Optimize Selected tool rebuilds the index file using the current dataset
and can make querying data more efficient.
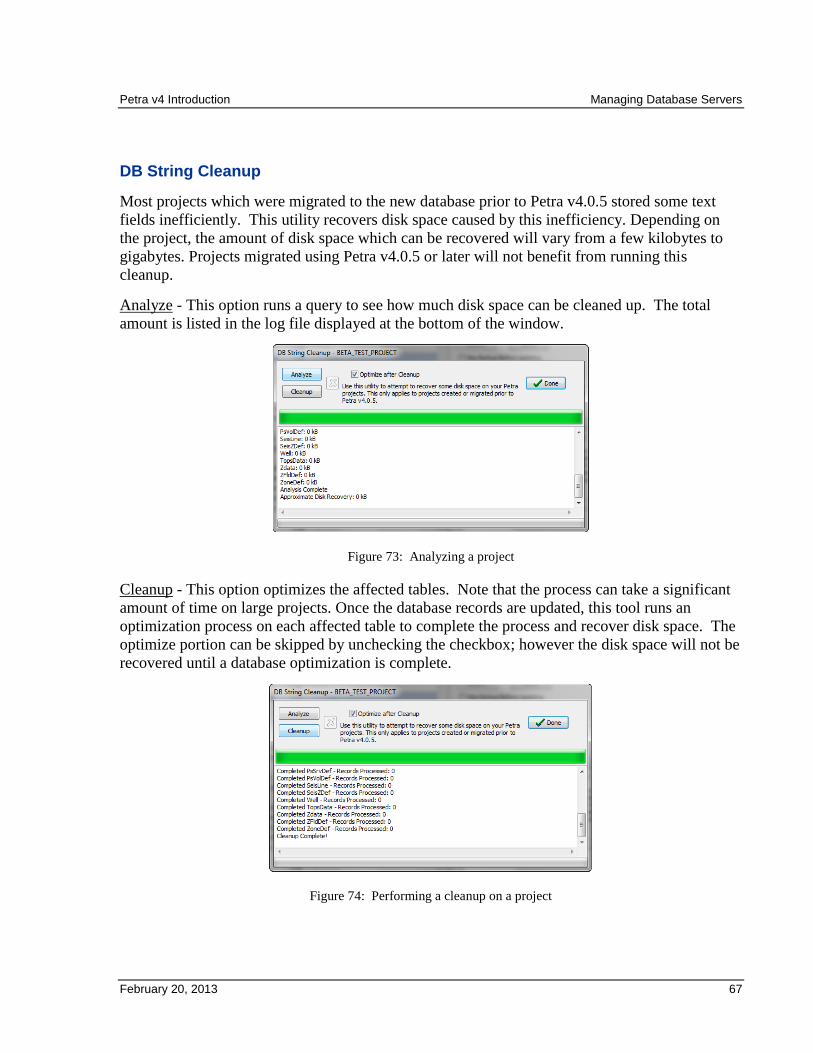
Petra v4 Introduction Managing Database Servers
February 20, 2013 67
DB String Cleanup
Most projects which were migrated to the new database prior to Petra v4.0.5 stored some text
fields inefficiently. This utility recovers disk space caused by this inefficiency. Depending on
the project, the amount of disk space which can be recovered will vary from a few kilobytes to
gigabytes. Projects migrated using Petra v4.0.5 or later will not benefit from running this
cleanup.
Analyze - This option runs a query to see how much disk space can be cleaned up. The total
amount is listed in the log file displayed at the bottom of the window.
Figure 73: Analyzing a project
Cleanup - This option optimizes the affected tables. Note that the process can take a significant
amount of time on large projects. Once the database records are updated, this tool runs an
optimization process on each affected table to complete the process and recover disk space. The
optimize portion can be skipped by unchecking the checkbox; however the disk space will not be
recovered until a database optimization is complete.
Figure 74: Performing a cleanup on a project
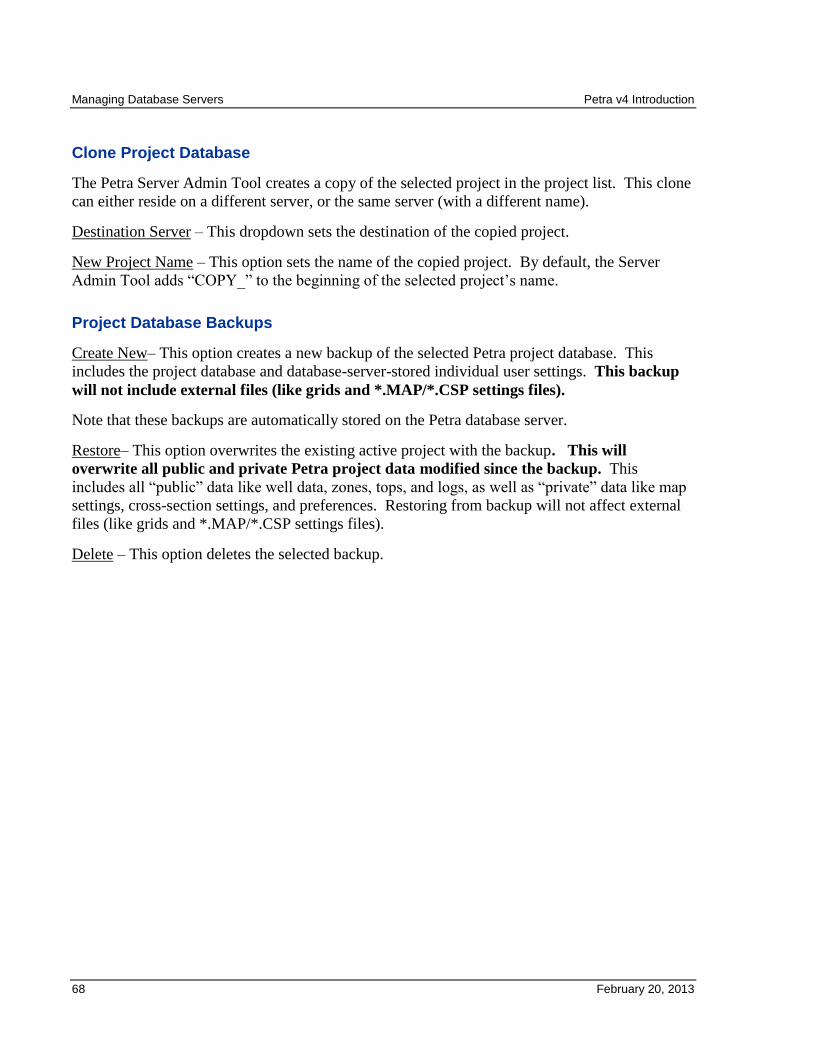
Managing Database Servers Petra v4 Introduction
68 February 20, 2013
Clone Project Database
The Petra Server Admin Tool creates a copy of the selected project in the project list. This clone
can either reside on a different server, or the same server (with a different name).
Destination Server – This dropdown sets the destination of the copied project.
New Project Name – This option sets the name of the copied project. By default, the Server
Admin Tool adds “COPY_” to the beginning of the selected project’s name.
Project Database Backups
Create New– This option creates a new backup of the selected Petra project database. This
includes the project database and database-server-stored individual user settings. This backup
will not include external files (like grids and *.MAP/*.CSP settings files).
Note that these backups are automatically stored on the Petra database server.
Restore– This option overwrites the existing active project with the backup. This will
overwrite all public and private Petra project data modified since the backup. This
includes all “public” data like well data, zones, tops, and logs, as well as “private” data like map
settings, cross-section settings, and preferences. Restoring from backup will not affect external
files (like grids and *.MAP/*.CSP settings files).
Delete – This option deletes the selected backup.
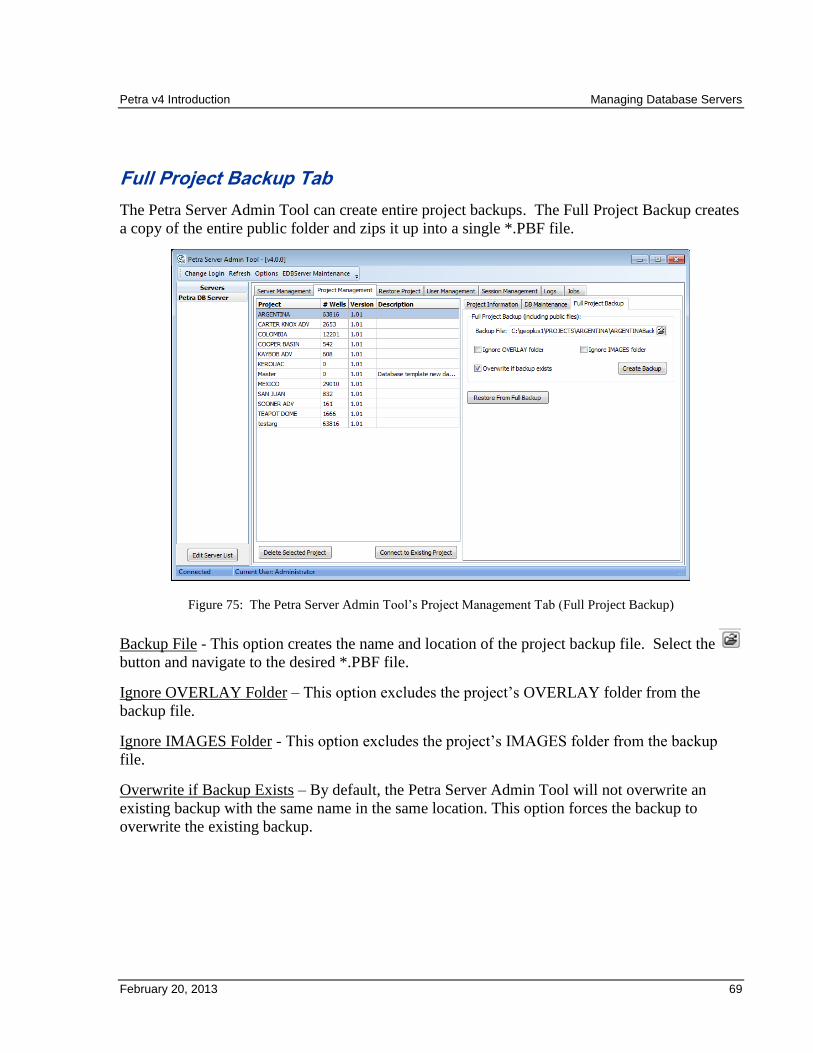
Petra v4 Introduction Managing Database Servers
February 20, 2013 69
Full Project Backup Tab
The Petra Server Admin Tool can create entire project backups. The Full Project Backup creates
a copy of the entire public folder and zips it up into a single *.PBF file.
Figure 75: The Petra Server Admin Tool’s Project Management Tab (Full Project Backup)
Backup File - This option creates the name and location of the project backup file. Select the
button and navigate to the desired *.PBF file.
Ignore OVERLAY Folder – This option excludes the project’s OVERLAY folder from the
backup file.
Ignore IMAGES Folder - This option excludes the project’s IMAGES folder from the backup
file.
Overwrite if Backup Exists – By default, the Petra Server Admin Tool will not overwrite an
existing backup with the same name in the same location. This option forces the backup to
overwrite the existing backup.
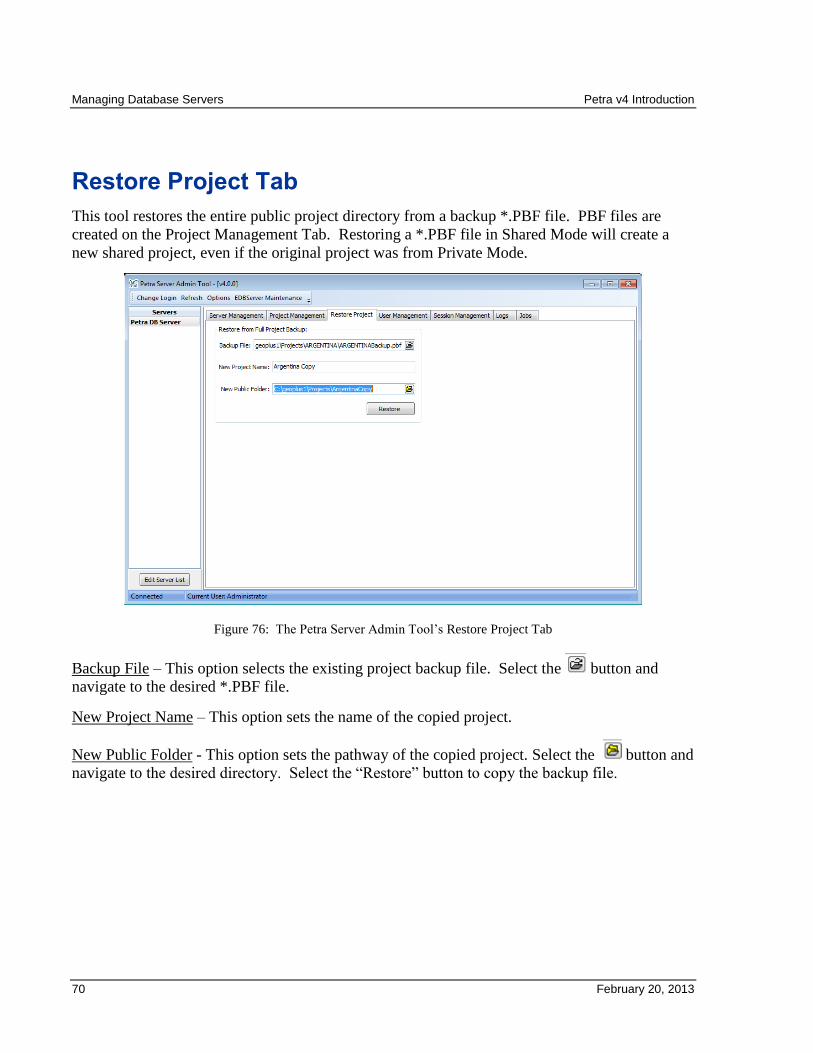
Managing Database Servers Petra v4 Introduction
70 February 20, 2013
Restore Project Tab
This tool restores the entire public project directory from a backup *.PBF file. PBF files are
created on the Project Management Tab. Restoring a *.PBF file in Shared Mode will create a
new shared project, even if the original project was from Private Mode.
Figure 76: The Petra Server Admin Tool’s Restore Project Tab
Backup File – This option selects the existing project backup file. Select the button and
navigate to the desired *.PBF file.
New Project Name – This option sets the name of the copied project.
New Public Folder - This option sets the pathway of the copied project. Select the button and
navigate to the desired directory. Select the “Restore” button to copy the backup file.
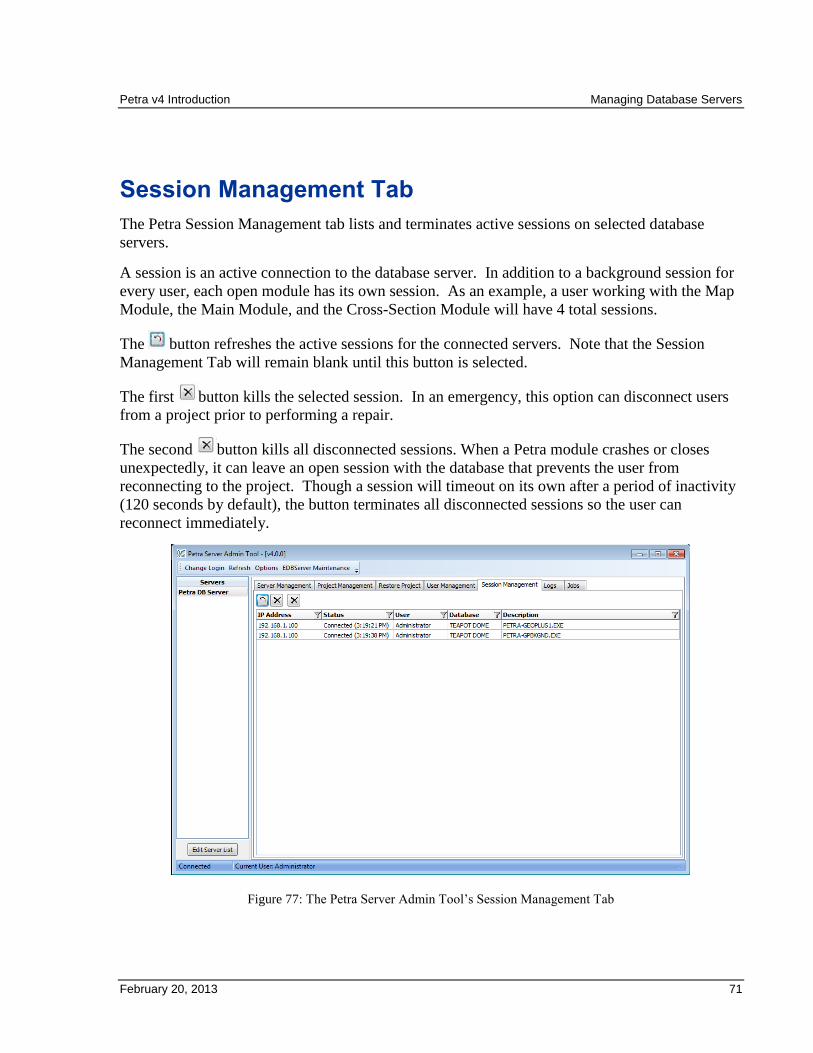
Petra v4 Introduction Managing Database Servers
February 20, 2013 71
Session Management Tab
The Petra Session Management tab lists and terminates active sessions on selected database
servers.
A session is an active connection to the database server. In addition to a background session for
every user, each open module has its own session. As an example, a user working with the Map
Module, the Main Module, and the Cross-Section Module will have 4 total sessions.
The button refreshes the active sessions for the connected servers. Note that the Session
Management Tab will remain blank until this button is selected.
The first button kills the selected session. In an emergency, this option can disconnect users
from a project prior to performing a repair.
The second button kills all disconnected sessions. When a Petra module crashes or closes
unexpectedly, it can leave an open session with the database that prevents the user from
reconnecting to the project. Though a session will timeout on its own after a period of inactivity
(120 seconds by default), the button terminates all disconnected sessions so the user can
reconnect immediately.
Figure 77: The Petra Server Admin Tool’s Session Management Tab
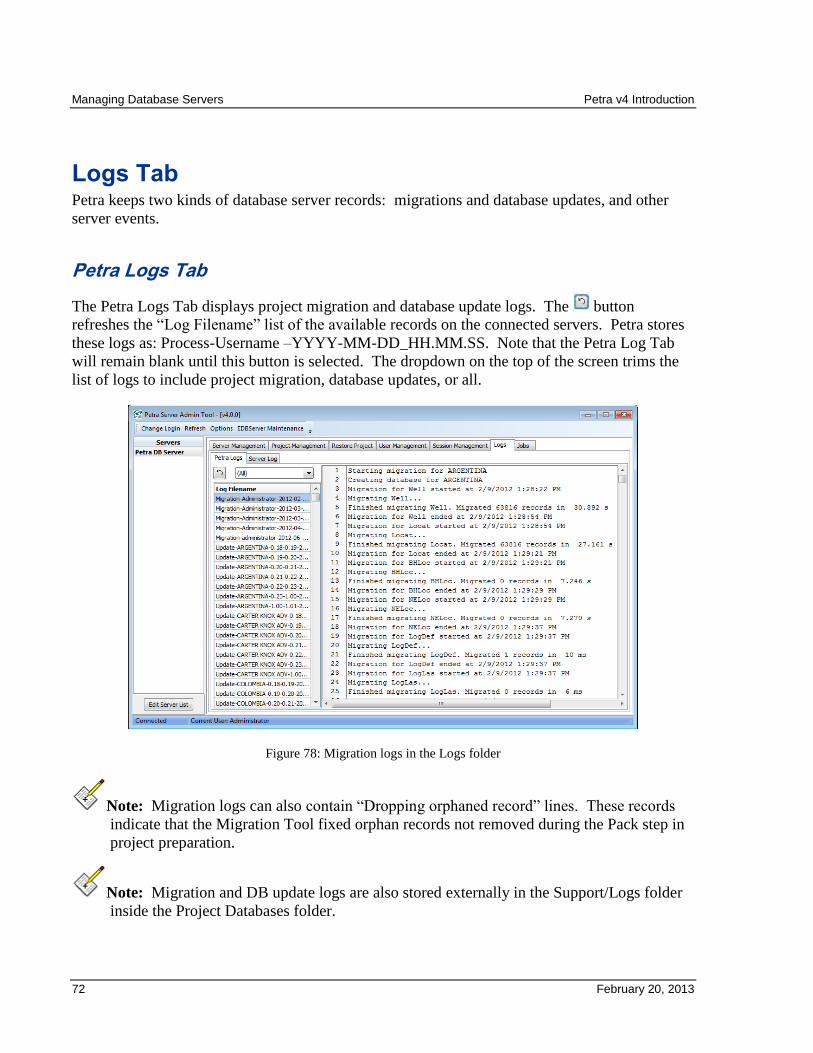
Managing Database Servers Petra v4 Introduction
72 February 20, 2013
Logs Tab Petra keeps two kinds of database server records: migrations and database updates, and other
server events.
Petra Logs Tab
The Petra Logs Tab displays project migration and database update logs. The button
refreshes the “Log Filename” list of the available records on the connected servers. Petra stores
these logs as: Process-Username –YYYY-MM-DD_HH.MM.SS. Note that the Petra Log Tab
will remain blank until this button is selected. The dropdown on the top of the screen trims the
list of logs to include project migration, database updates, or all.
Figure 78: Migration logs in the Logs folder
Note: Migration logs can also contain “Dropping orphaned record” lines. These records
indicate that the Migration Tool fixed orphan records not removed during the Pack step in
project preparation.
Note: Migration and DB update logs are also stored externally in the Support/Logs folder
inside the Project Databases folder.
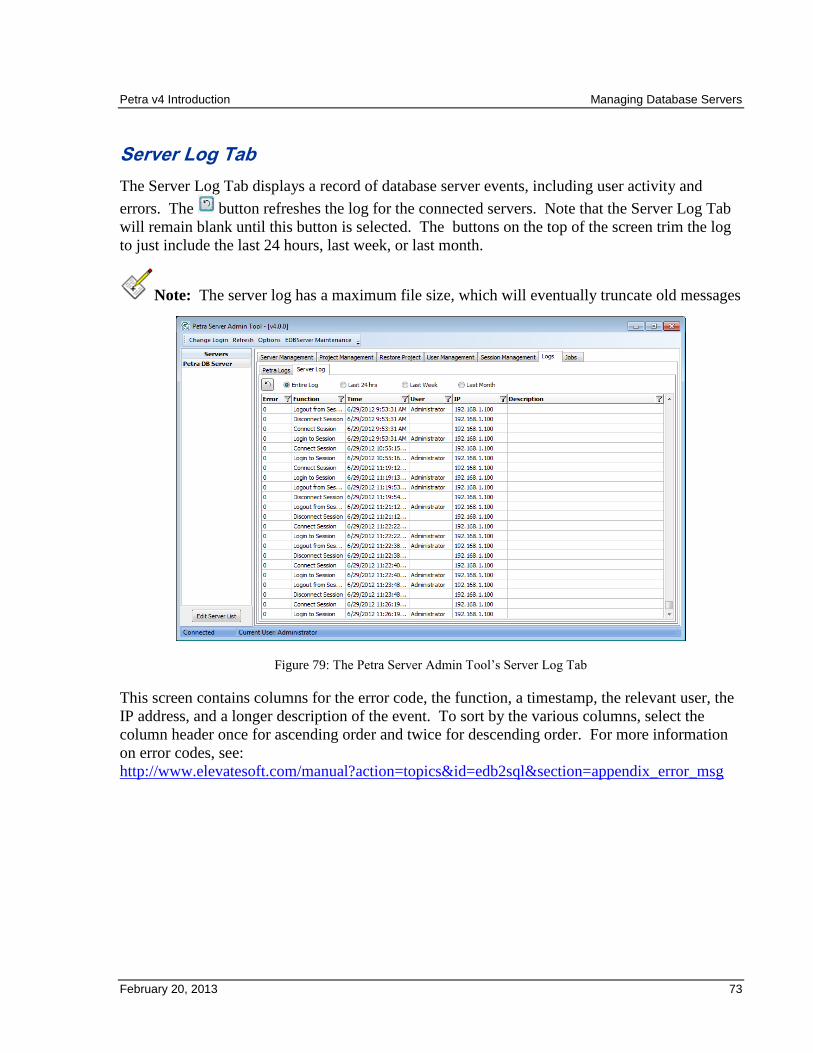
Petra v4 Introduction Managing Database Servers
February 20, 2013 73
Server Log Tab
The Server Log Tab displays a record of database server events, including user activity and
errors. The button refreshes the log for the connected servers. Note that the Server Log Tab
will remain blank until this button is selected. The buttons on the top of the screen trim the log
to just include the last 24 hours, last week, or last month.
Note: The server log has a maximum file size, which will eventually truncate old messages
Figure 79: The Petra Server Admin Tool’s Server Log Tab
This screen contains columns for the error code, the function, a timestamp, the relevant user, the
IP address, and a longer description of the event. To sort by the various columns, select the
column header once for ascending order and twice for descending order. For more information
on error codes, see:
http://www.elevatesoft.com/manual?action=topics&id=edb2sql§ion=appendix_error_msg
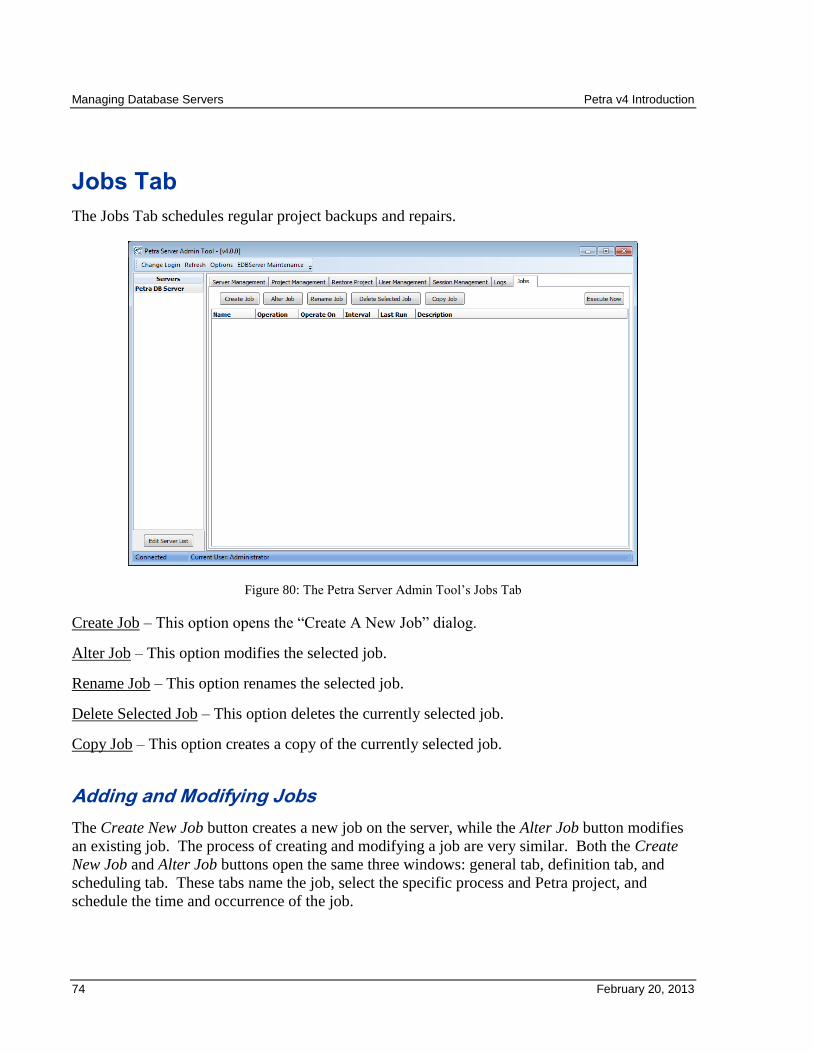
Managing Database Servers Petra v4 Introduction
74 February 20, 2013
Jobs Tab
The Jobs Tab schedules regular project backups and repairs.
Figure 80: The Petra Server Admin Tool’s Jobs Tab
Create Job – This option opens the “Create A New Job” dialog.
Alter Job – This option modifies the selected job.
Rename Job – This option renames the selected job.
Delete Selected Job – This option deletes the currently selected job.
Copy Job – This option creates a copy of the currently selected job.
Adding and Modifying Jobs
The Create New Job button creates a new job on the server, while the Alter Job button modifies
an existing job. The process of creating and modifying a job are very similar. Both the Create
New Job and Alter Job buttons open the same three windows: general tab, definition tab, and
scheduling tab. These tabs name the job, select the specific process and Petra project, and
schedule the time and occurrence of the job.
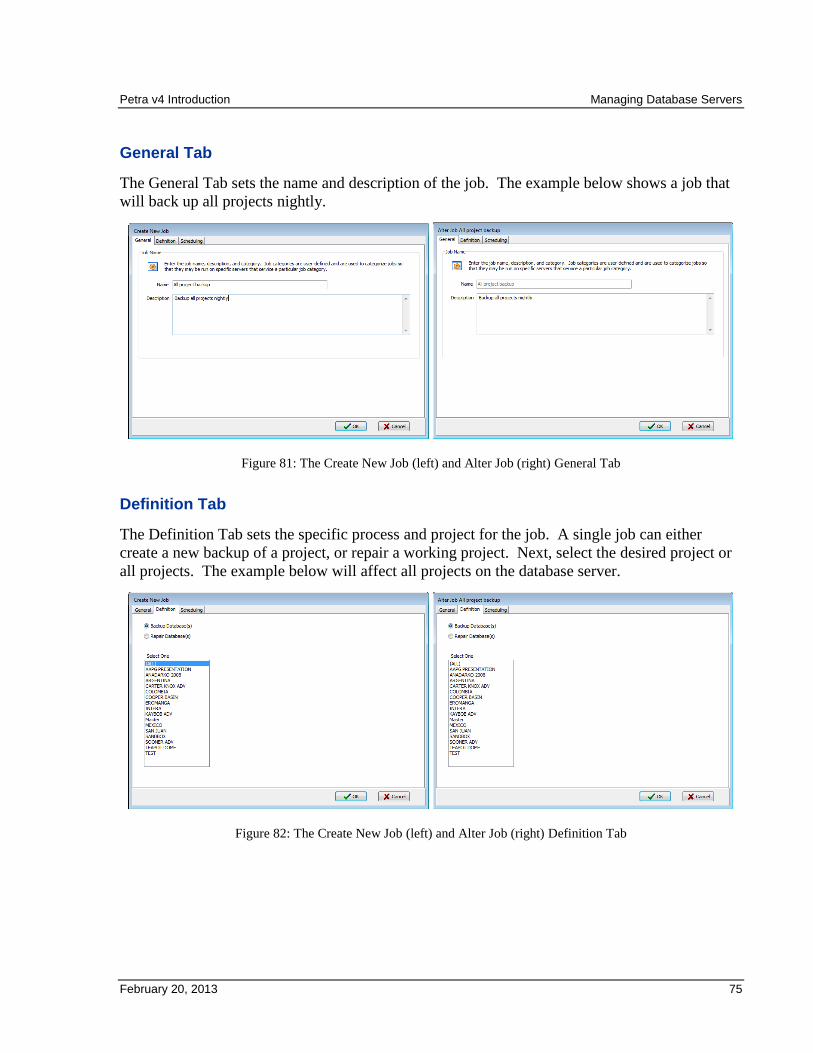
Petra v4 Introduction Managing Database Servers
February 20, 2013 75
General Tab
The General Tab sets the name and description of the job. The example below shows a job that
will back up all projects nightly.
Figure 81: The Create New Job (left) and Alter Job (right) General Tab
Definition Tab
The Definition Tab sets the specific process and project for the job. A single job can either
create a new backup of a project, or repair a working project. Next, select the desired project or
all projects. The example below will affect all projects on the database server.
Figure 82: The Create New Job (left) and Alter Job (right) Definition Tab
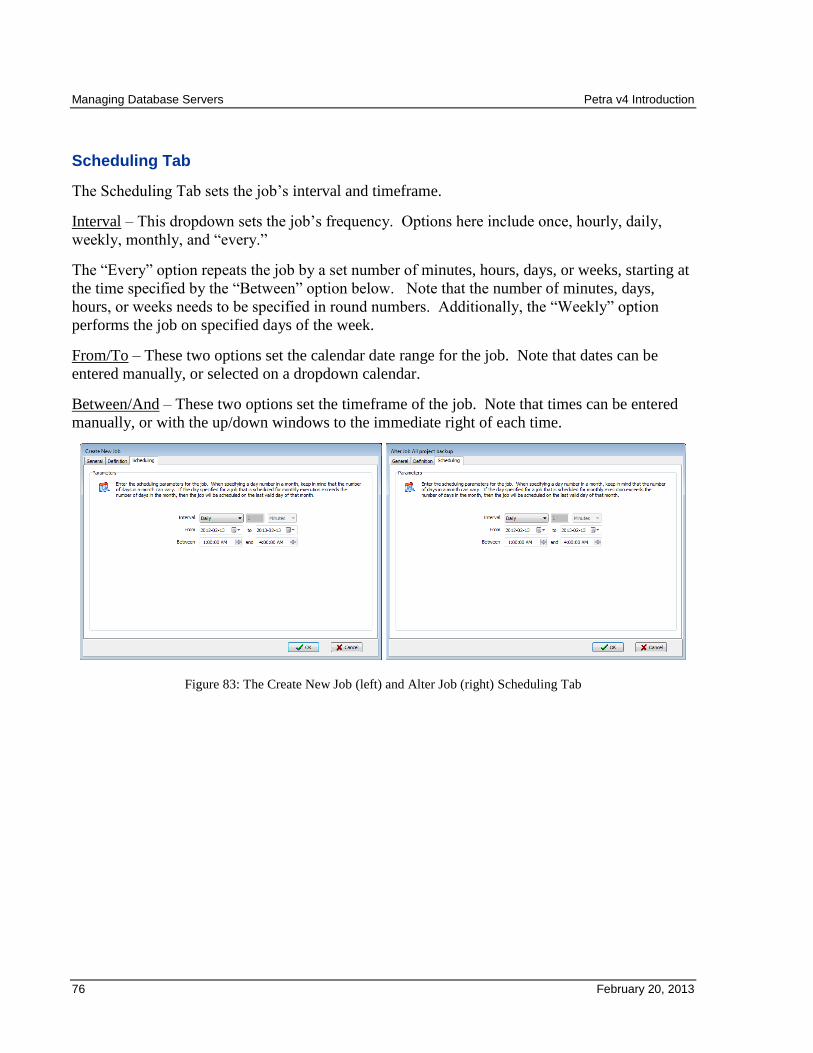
Managing Database Servers Petra v4 Introduction
76 February 20, 2013
Scheduling Tab
The Scheduling Tab sets the job’s interval and timeframe.
Interval – This dropdown sets the job’s frequency. Options here include once, hourly, daily,
weekly, monthly, and “every.”
The “Every” option repeats the job by a set number of minutes, hours, days, or weeks, starting at
the time specified by the “Between” option below. Note that the number of minutes, days,
hours, or weeks needs to be specified in round numbers. Additionally, the “Weekly” option
performs the job on specified days of the week.
From/To – These two options set the calendar date range for the job. Note that dates can be
entered manually, or selected on a dropdown calendar.
Between/And – These two options set the timeframe of the job. Note that times can be entered
manually, or with the up/down windows to the immediate right of each time.
Figure 83: The Create New Job (left) and Alter Job (right) Scheduling Tab
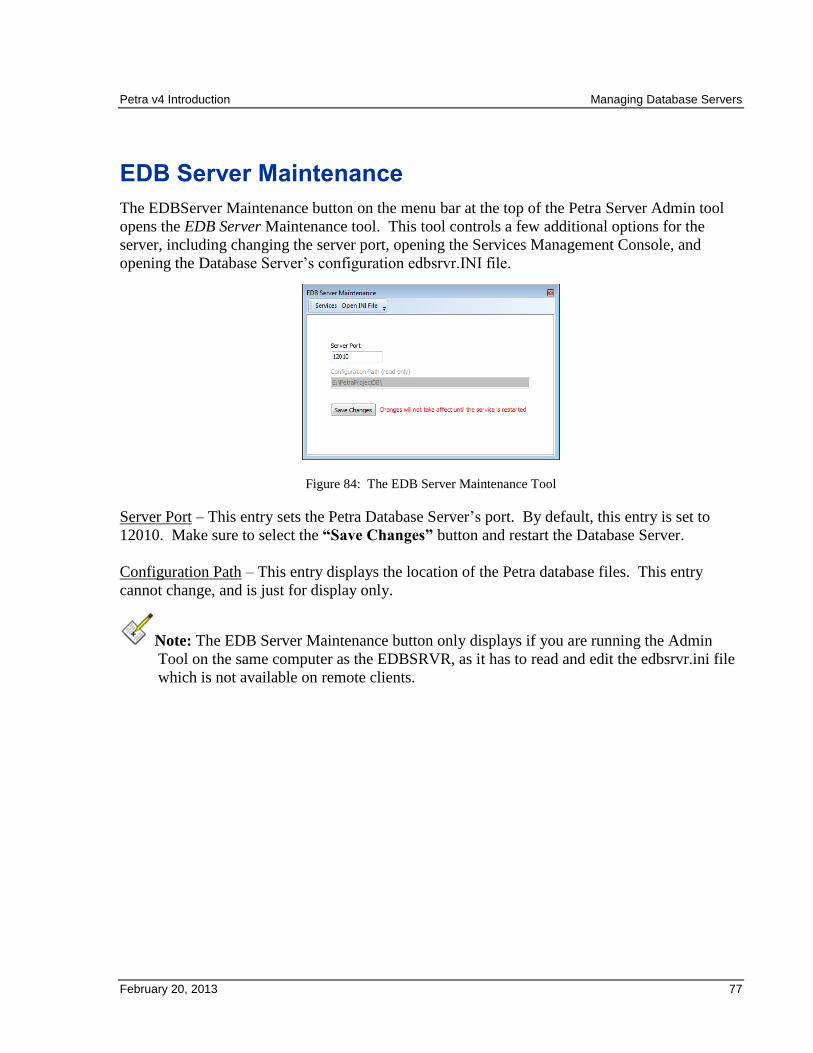
Petra v4 Introduction Managing Database Servers
February 20, 2013 77
EDB Server Maintenance
The EDBServer Maintenance button on the menu bar at the top of the Petra Server Admin tool
opens the EDB Server Maintenance tool. This tool controls a few additional options for the
server, including changing the server port, opening the Services Management Console, and
opening the Database Server’s configuration edbsrvr.INI file.
Figure 84: The EDB Server Maintenance Tool
Server Port – This entry sets the Petra Database Server’s port. By default, this entry is set to
12010. Make sure to select the “Save Changes” button and restart the Database Server.
Configuration Path – This entry displays the location of the Petra database files. This entry
cannot change, and is just for display only.
Note: The EDB Server Maintenance button only displays if you are running the Admin
Tool on the same computer as the EDBSRVR, as it has to read and edit the edbsrvr.ini file
which is not available on remote clients.
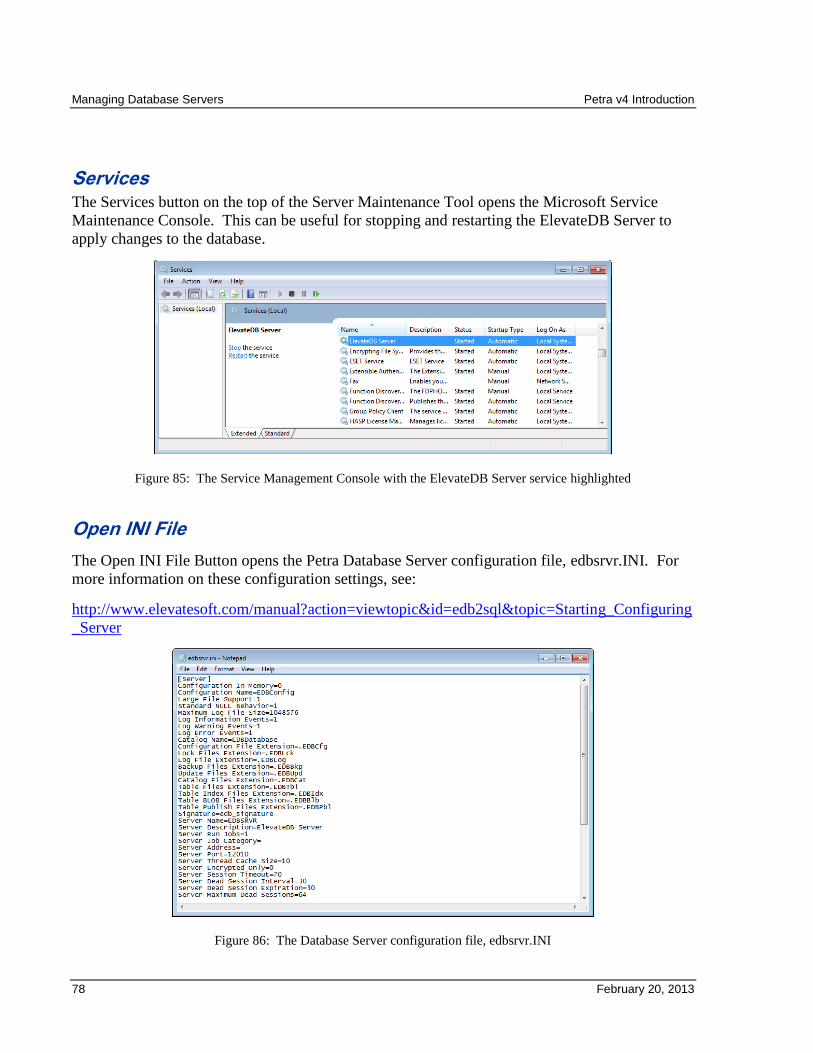
Managing Database Servers Petra v4 Introduction
78 February 20, 2013
Services The Services button on the top of the Server Maintenance Tool opens the Microsoft Service
Maintenance Console. This can be useful for stopping and restarting the ElevateDB Server to
apply changes to the database.
Figure 85: The Service Management Console with the ElevateDB Server service highlighted
Open INI File
The Open INI File Button opens the Petra Database Server configuration file, edbsrvr.INI. For
more information on these configuration settings, see:
http://www.elevatesoft.com/manual?action=viewtopic&id=edb2sql&topic=Starting_Configuring
_Server
Figure 86: The Database Server configuration file, edbsrvr.INI
Petra v4 Introduction Managing Database Servers
February 20, 2013 79
Managing Project Databases Summary
The Petra Server Admin Tool handles database server configuration and settings.
The Petra DB Server List creates a list of available Petra Database Servers both for the
Database Server Admin Tool and for Petra. Putting a server on the Petra DB Server
List makes it and its projects available to every Petra user on the specified
installation. In a client/server installation, all Petra clients use the Petra Server’s list to
connect to the specified database servers and their projects. With a standalone
installation, this list changes the available database servers for just that one computer.
The database server separates users into roles. The database server starts with only one
user (Administrator) and only two roles (administrator and public). It’s necessary to add
usernames and passwords for every Petra user. Each role is a set of permissions to read
and/or write to an individual project, as well as the more general ability to delete existing
projects and/or create new projects.
The tables that store Petra projects and users may change with time. The Server Admin
Tool upgrades older v4 projects to use the latest table architecture.
Project tables need maintenance and occasional repairs. “Verify Selected” simply looks
for problems in each database table. “Repair Selected” attempts to fix database
relationships in checked tables. “Optimize Selected” is a general maintenance process
that adds speed and decreases file size of projects.
The Server Admin tool copies project databases, creates project backups, and restores
projects from backups.
The Server Admin tool identifies and kills individual connections to the project
databases, known as sessions.
“Jobs” can regularly repair or back up projects on a server.
The EDB Server Maintenance tool changes the server port, starts and stops the Database
Server service, and opens the Database Server’s configuration edbsrvr.INI file.

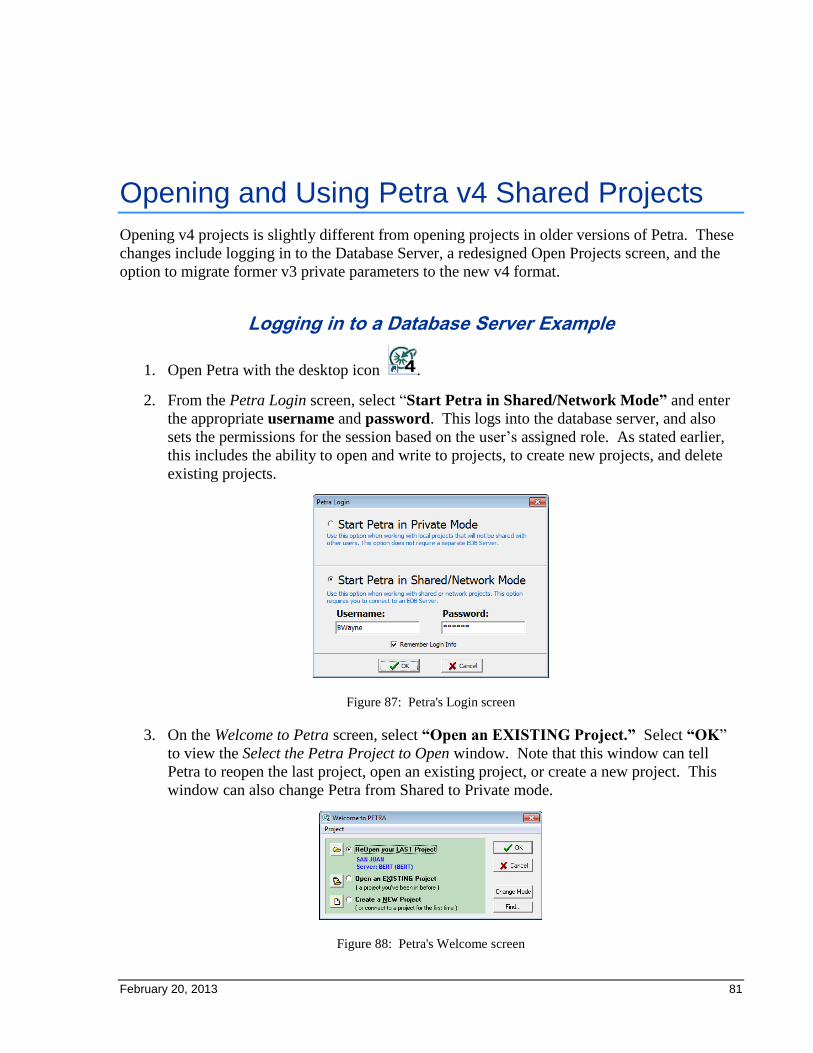
February 20, 2013 81
Opening and Using Petra v4 Shared Projects
Opening v4 projects is slightly different from opening projects in older versions of Petra. These
changes include logging in to the Database Server, a redesigned Open Projects screen, and the
option to migrate former v3 private parameters to the new v4 format.
Logging in to a Database Server Example
1. Open Petra with the desktop icon .
2. From the Petra Login screen, select “Start Petra in Shared/Network Mode” and enter
the appropriate username and password. This logs into the database server, and also
sets the permissions for the session based on the user’s assigned role. As stated earlier,
this includes the ability to open and write to projects, to create new projects, and delete
existing projects.
Figure 87: Petra's Login screen
3. On the Welcome to Petra screen, select “Open an EXISTING Project.” Select “OK”
to view the Select the Petra Project to Open window. Note that this window can tell
Petra to reopen the last project, open an existing project, or create a new project. This
window can also change Petra from Shared to Private mode.
Figure 88: Petra's Welcome screen
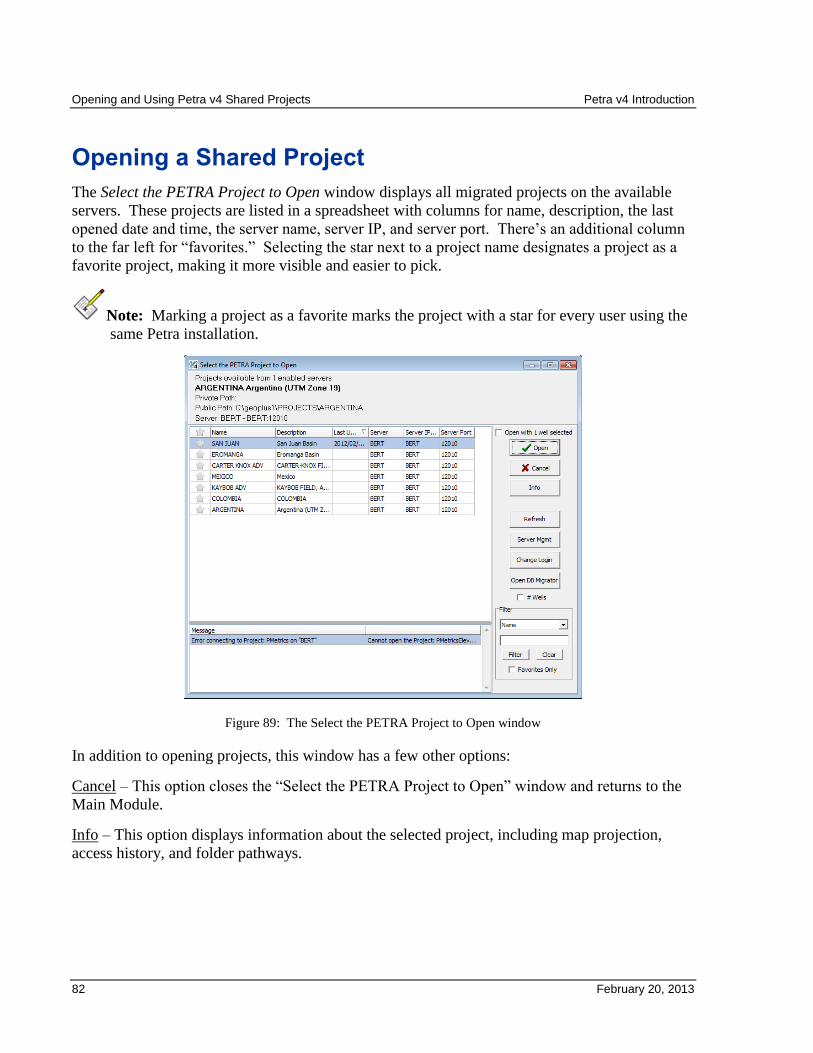
Opening and Using Petra v4 Shared Projects Petra v4 Introduction
82 February 20, 2013
Opening a Shared Project
The Select the PETRA Project to Open window displays all migrated projects on the available
servers. These projects are listed in a spreadsheet with columns for name, description, the last
opened date and time, the server name, server IP, and server port. There’s an additional column
to the far left for “favorites.” Selecting the star next to a project name designates a project as a
favorite project, making it more visible and easier to pick.
Note: Marking a project as a favorite marks the project with a star for every user using the
same Petra installation.
Figure 89: The Select the PETRA Project to Open window
In addition to opening projects, this window has a few other options:
Cancel – This option closes the “Select the PETRA Project to Open” window and returns to the
Main Module.
Info – This option displays information about the selected project, including map projection,
access history, and folder pathways.
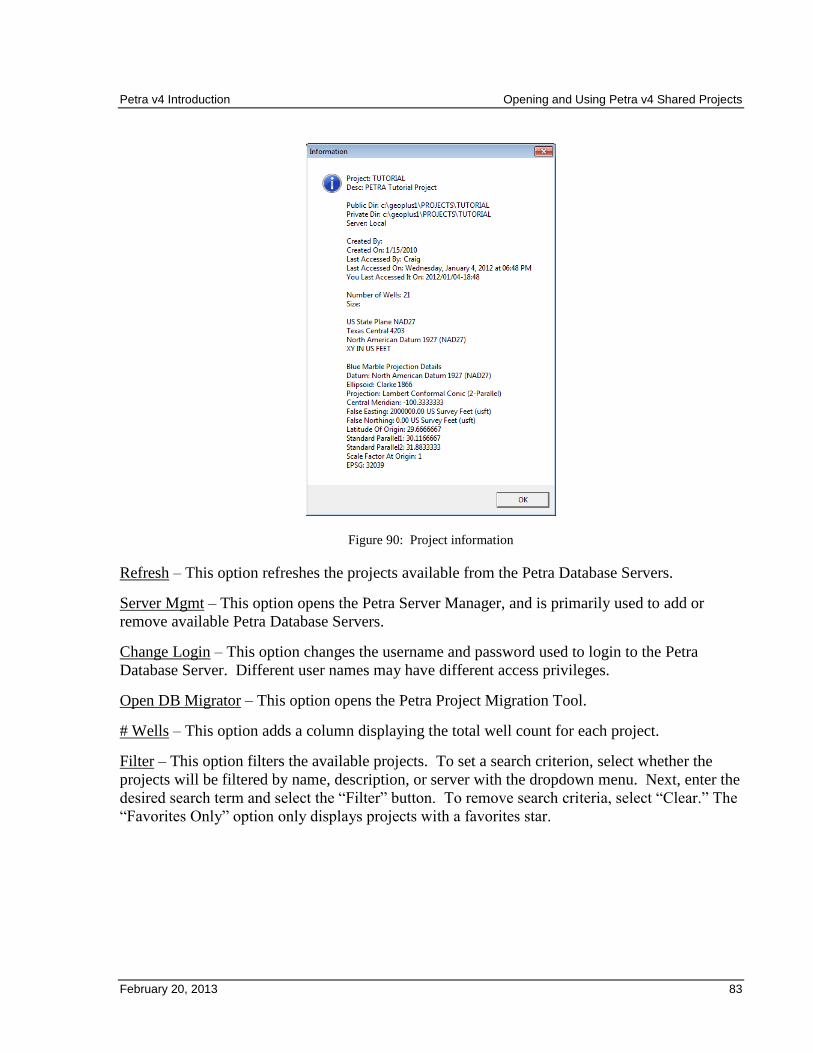
Petra v4 Introduction Opening and Using Petra v4 Shared Projects
February 20, 2013 83
Figure 90: Project information
Refresh – This option refreshes the projects available from the Petra Database Servers.
Server Mgmt – This option opens the Petra Server Manager, and is primarily used to add or
remove available Petra Database Servers.
Change Login – This option changes the username and password used to login to the Petra
Database Server. Different user names may have different access privileges.
Open DB Migrator – This option opens the Petra Project Migration Tool.
# Wells – This option adds a column displaying the total well count for each project.
Filter – This option filters the available projects. To set a search criterion, select whether the
projects will be filtered by name, description, or server with the dropdown menu. Next, enter the
desired search term and select the “Filter” button. To remove search criteria, select “Clear.” The
“Favorites Only” option only displays projects with a favorites star.

Opening and Using Petra v4 Shared Projects Petra v4 Introduction
84 February 20, 2013
Private Parameters in Shared Projects In addition to raw project data like wells and zones, the database server also delivers every user’s
customized settings for the different modules. When a user opens a migrated project for the first
time, the database server attempts to bring over their old settings from the original v3 project.
Users can either migrate their settings from the Petra v3 project, or create a new private directory
from scratch.
Users who worked on the older v3 project should select “Yes” to migrate their old
private parameters
To create a new private parameters folder from scratch with no settings, select “No” to
create a new private directory.
Figure 91: The USER PRIPARMS are Missing for this Project window
Migrating Private Parameters from a v3 Project Example This only needs to happen once for each user who worked on the v3 project. Here, Petra will use
the user’s private parameters directory from the old v3 project.
1. On the Project to Open screen, select the desired project and select the “Open” button.
Figure 92: The Select the PETRA Project to Open window
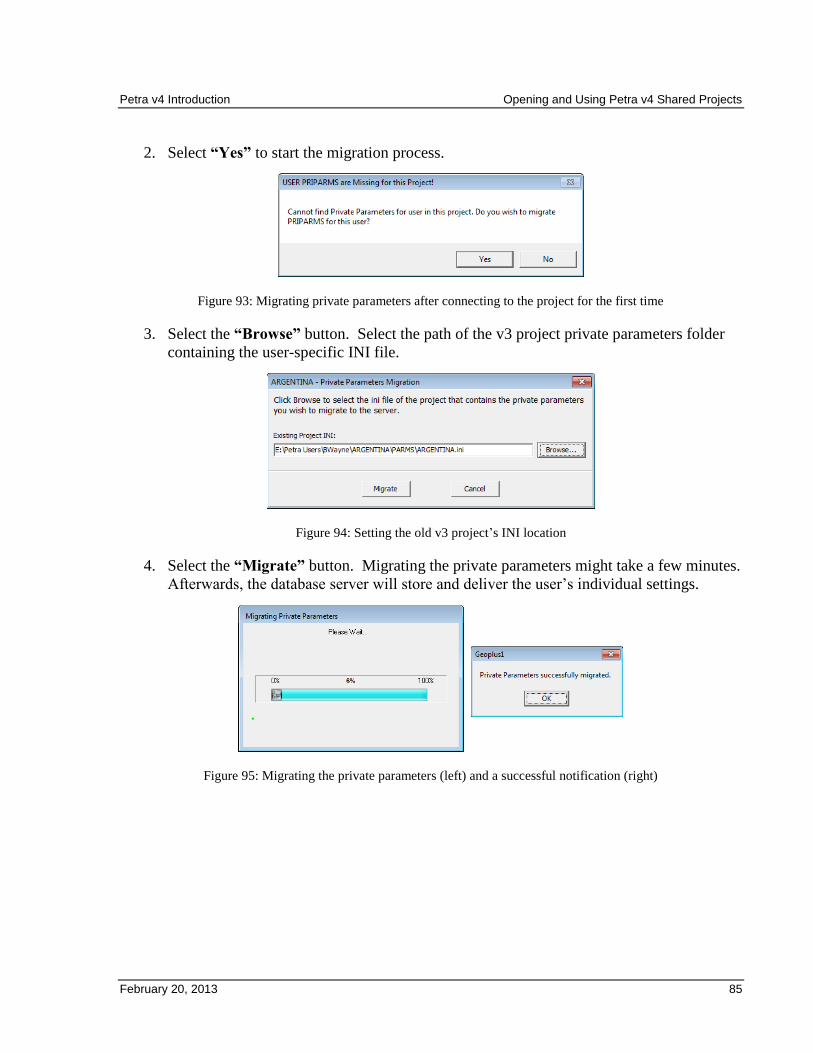
Petra v4 Introduction Opening and Using Petra v4 Shared Projects
February 20, 2013 85
2. Select “Yes” to start the migration process.
Figure 93: Migrating private parameters after connecting to the project for the first time
3. Select the “Browse” button. Select the path of the v3 project private parameters folder
containing the user-specific INI file.
Figure 94: Setting the old v3 project’s INI location
4. Select the “Migrate” button. Migrating the private parameters might take a few minutes.
Afterwards, the database server will store and deliver the user’s individual settings.
Figure 95: Migrating the private parameters (left) and a successful notification (right)
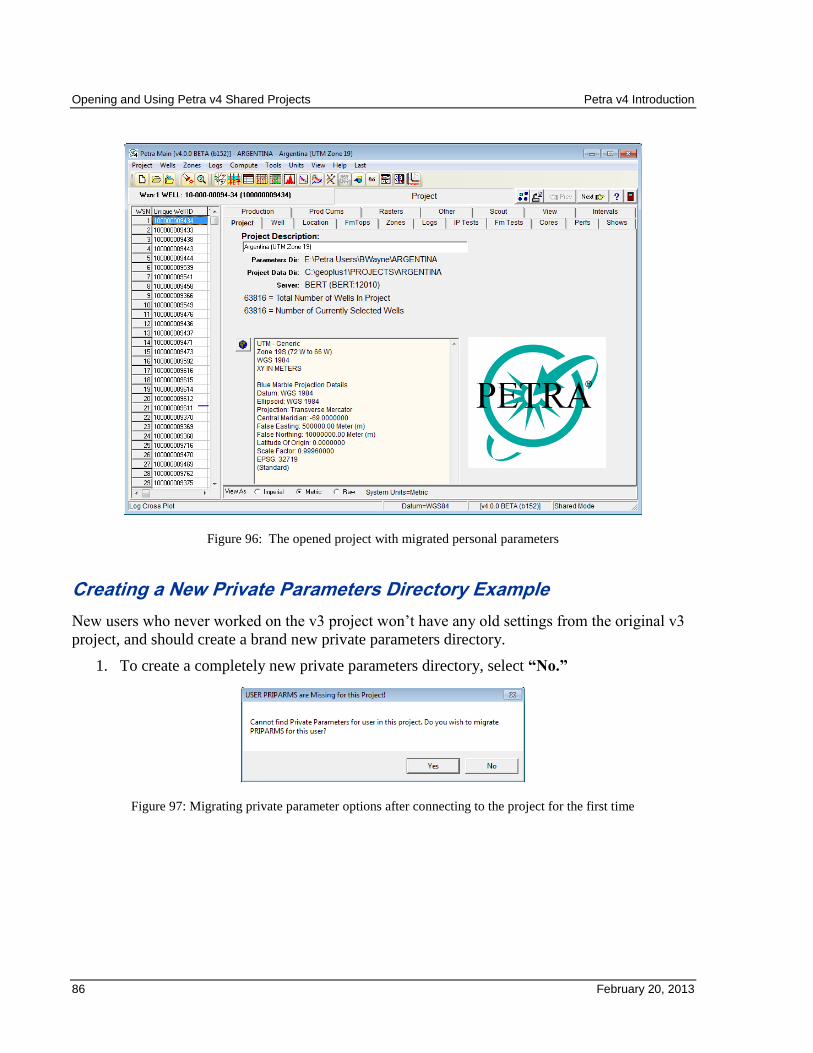
Opening and Using Petra v4 Shared Projects Petra v4 Introduction
86 February 20, 2013
Figure 96: The opened project with migrated personal parameters
Creating a New Private Parameters Directory Example
New users who never worked on the v3 project won’t have any old settings from the original v3
project, and should create a brand new private parameters directory.
1. To create a completely new private parameters directory, select “No.”
Figure 97: Migrating private parameter options after connecting to the project for the first time
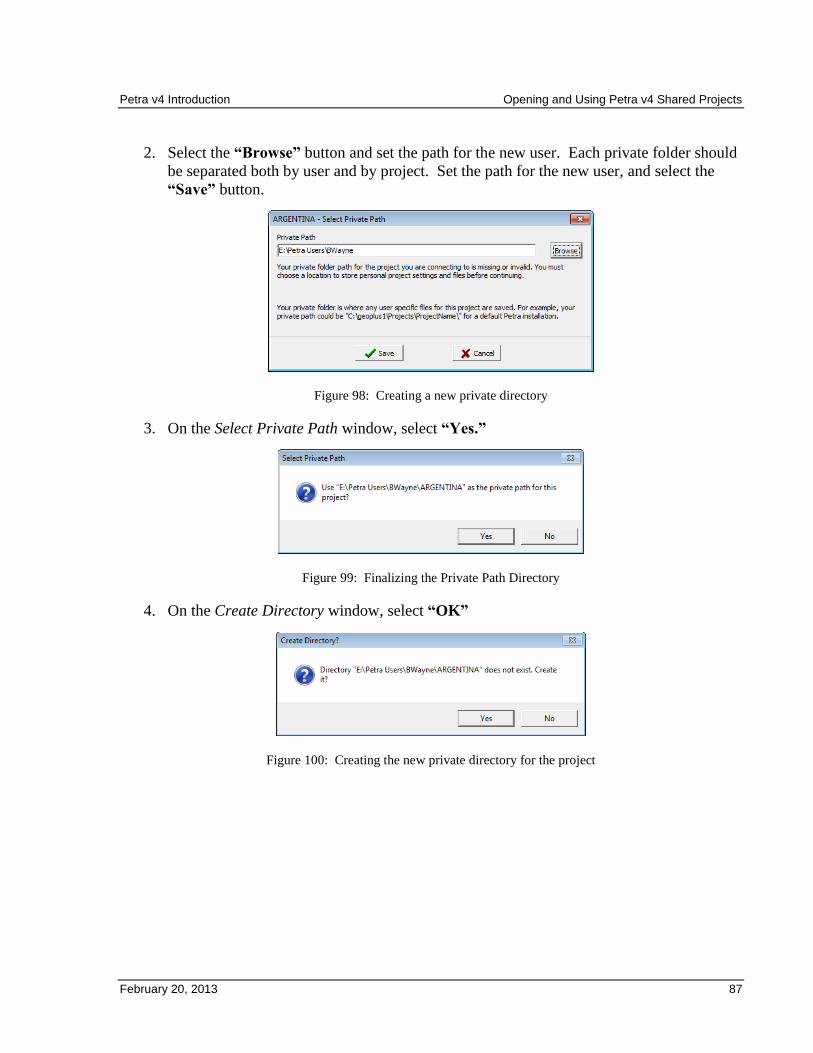
Petra v4 Introduction Opening and Using Petra v4 Shared Projects
February 20, 2013 87
2. Select the “Browse” button and set the path for the new user. Each private folder should
be separated both by user and by project. Set the path for the new user, and select the
“Save” button.
Figure 98: Creating a new private directory
3. On the Select Private Path window, select “Yes.”
Figure 99: Finalizing the Private Path Directory
4. On the Create Directory window, select “OK”
Figure 100: Creating the new private directory for the project
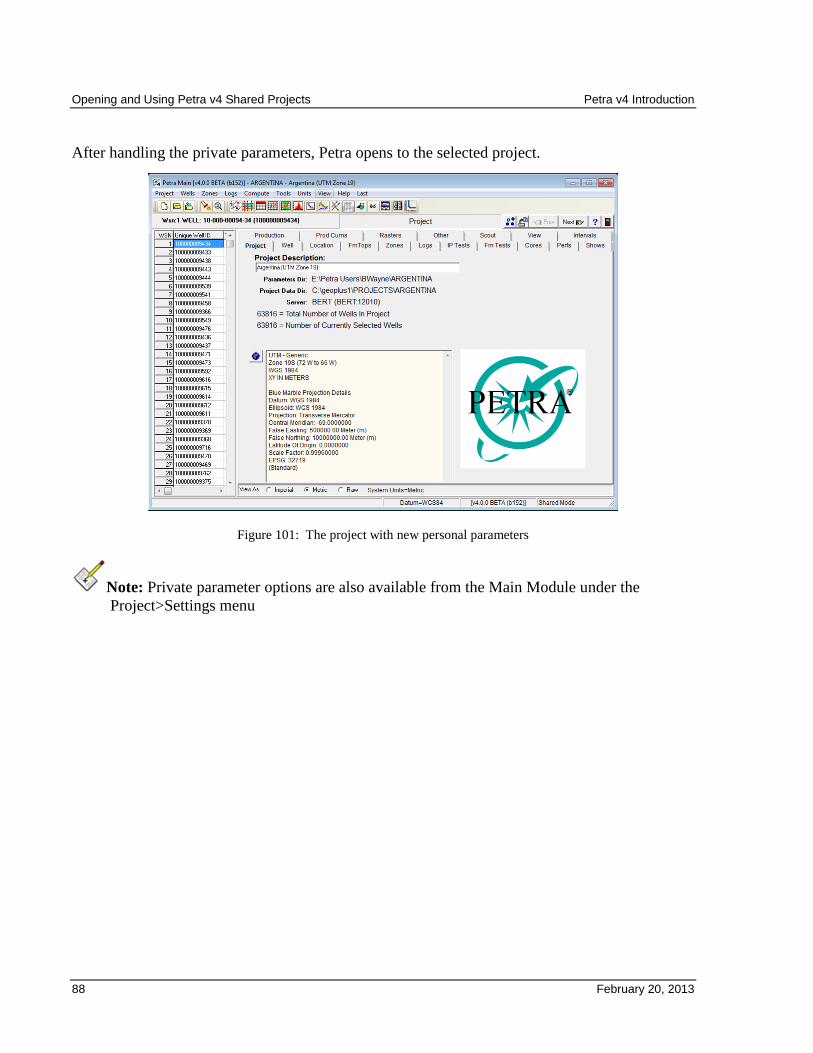
Opening and Using Petra v4 Shared Projects Petra v4 Introduction
88 February 20, 2013
After handling the private parameters, Petra opens to the selected project.
Figure 101: The project with new personal parameters
Note: Private parameter options are also available from the Main Module under the
Project>Settings menu
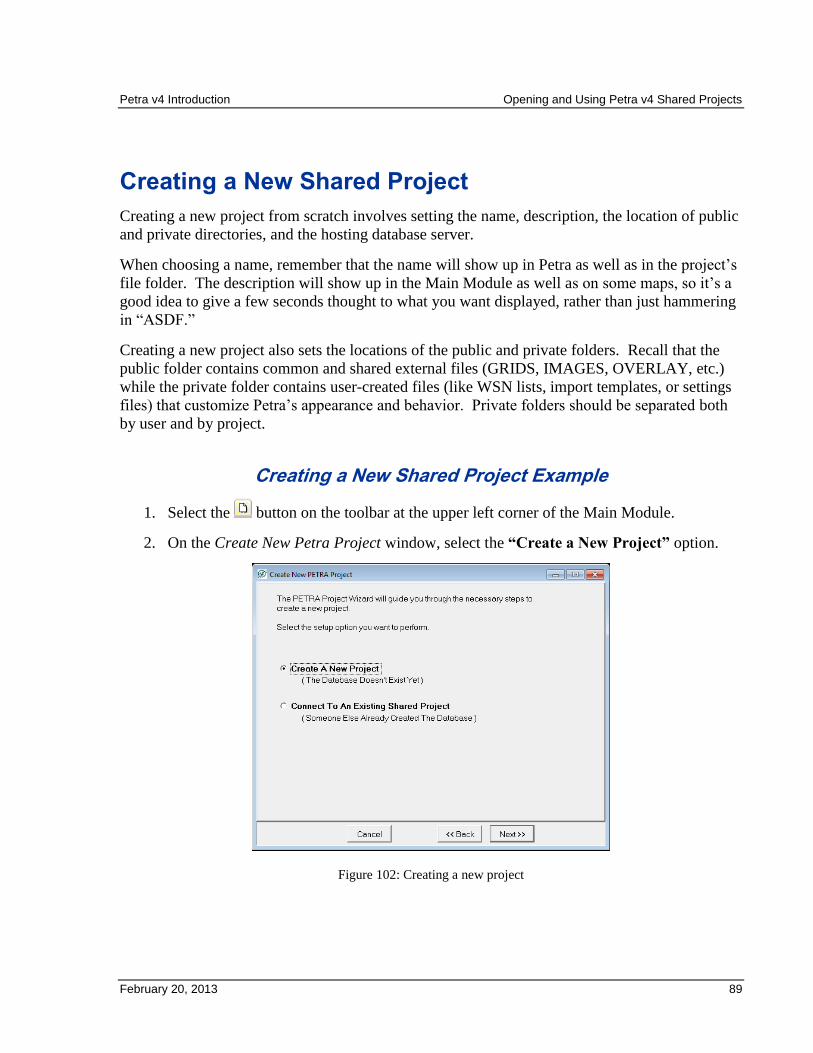
Petra v4 Introduction Opening and Using Petra v4 Shared Projects
February 20, 2013 89
Creating a New Shared Project
Creating a new project from scratch involves setting the name, description, the location of public
and private directories, and the hosting database server.
When choosing a name, remember that the name will show up in Petra as well as in the project’s
file folder. The description will show up in the Main Module as well as on some maps, so it’s a
good idea to give a few seconds thought to what you want displayed, rather than just hammering
in “ASDF.”
Creating a new project also sets the locations of the public and private folders. Recall that the
public folder contains common and shared external files (GRIDS, IMAGES, OVERLAY, etc.)
while the private folder contains user-created files (like WSN lists, import templates, or settings
files) that customize Petra’s appearance and behavior. Private folders should be separated both
by user and by project.
Creating a New Shared Project Example
1. Select the button on the toolbar at the upper left corner of the Main Module.
2. On the Create New Petra Project window, select the “Create a New Project” option.
Figure 102: Creating a new project
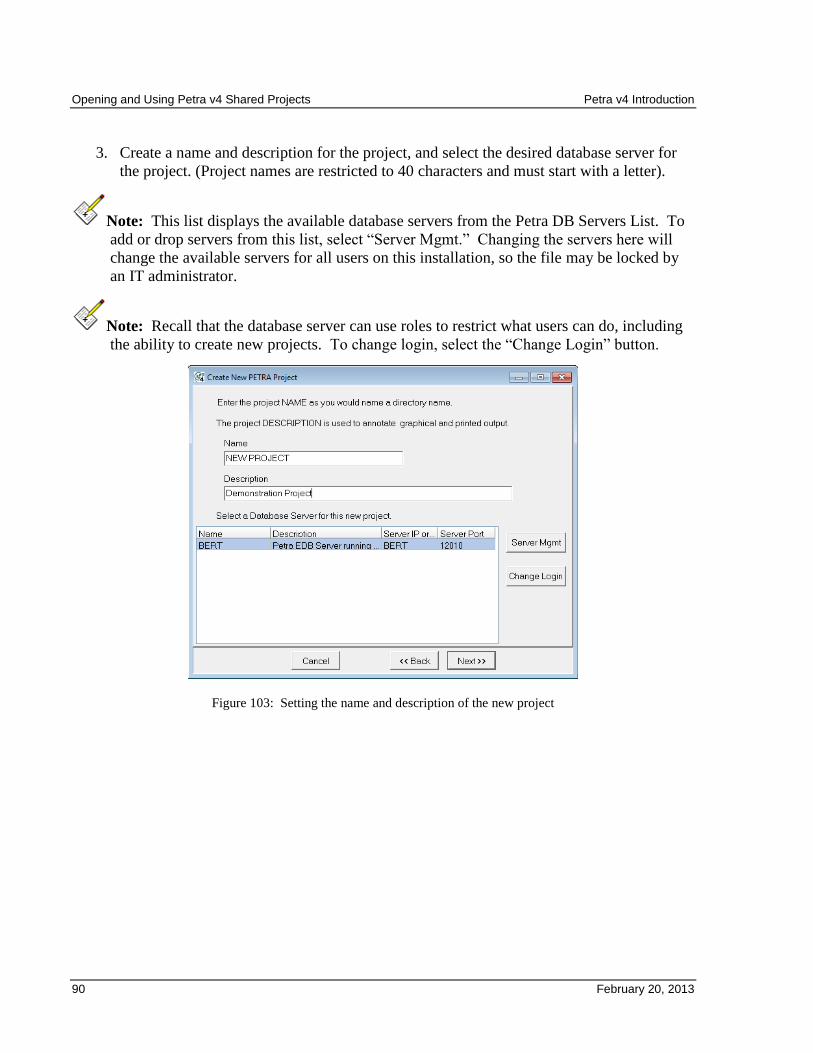
Opening and Using Petra v4 Shared Projects Petra v4 Introduction
90 February 20, 2013
3. Create a name and description for the project, and select the desired database server for
the project. (Project names are restricted to 40 characters and must start with a letter).
Note: This list displays the available database servers from the Petra DB Servers List. To
add or drop servers from this list, select “Server Mgmt.” Changing the servers here will
change the available servers for all users on this installation, so the file may be locked by
an IT administrator.
Note: Recall that the database server can use roles to restrict what users can do, including
the ability to create new projects. To change login, select the “Change Login” button.
Figure 103: Setting the name and description of the new project
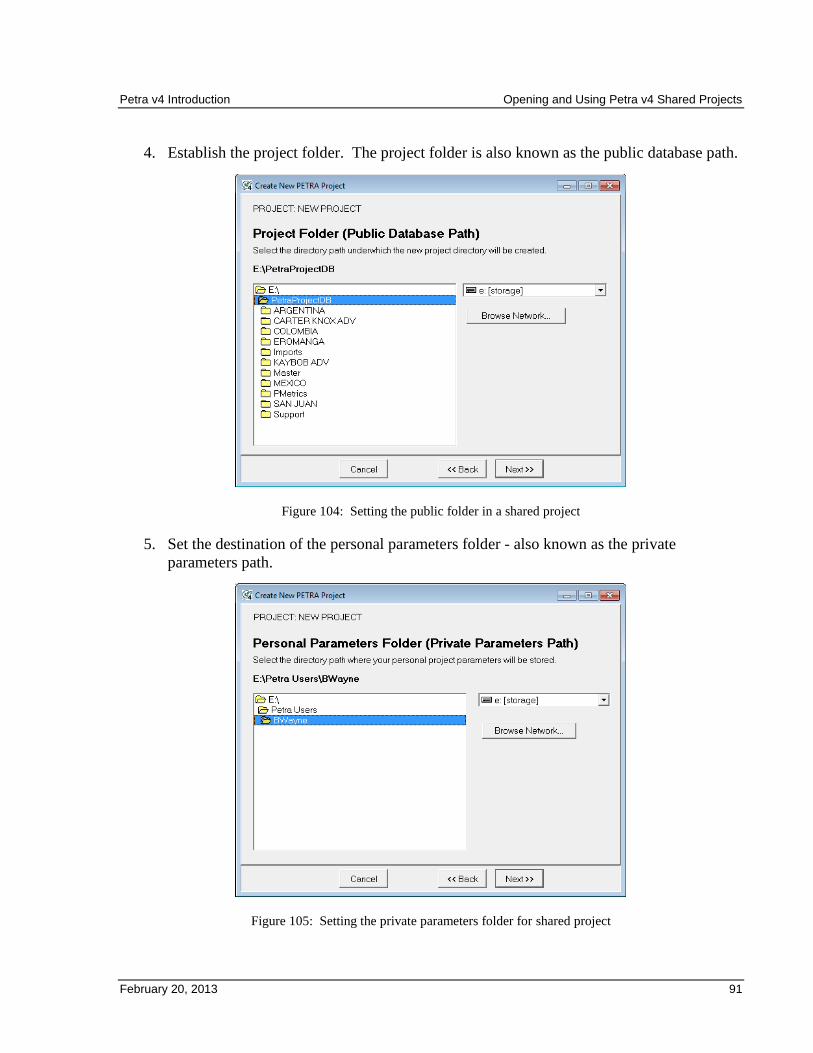
Petra v4 Introduction Opening and Using Petra v4 Shared Projects
February 20, 2013 91
4. Establish the project folder. The project folder is also known as the public database path.
Figure 104: Setting the public folder in a shared project
5. Set the destination of the personal parameters folder - also known as the private
parameters path.
Figure 105: Setting the private parameters folder for shared project
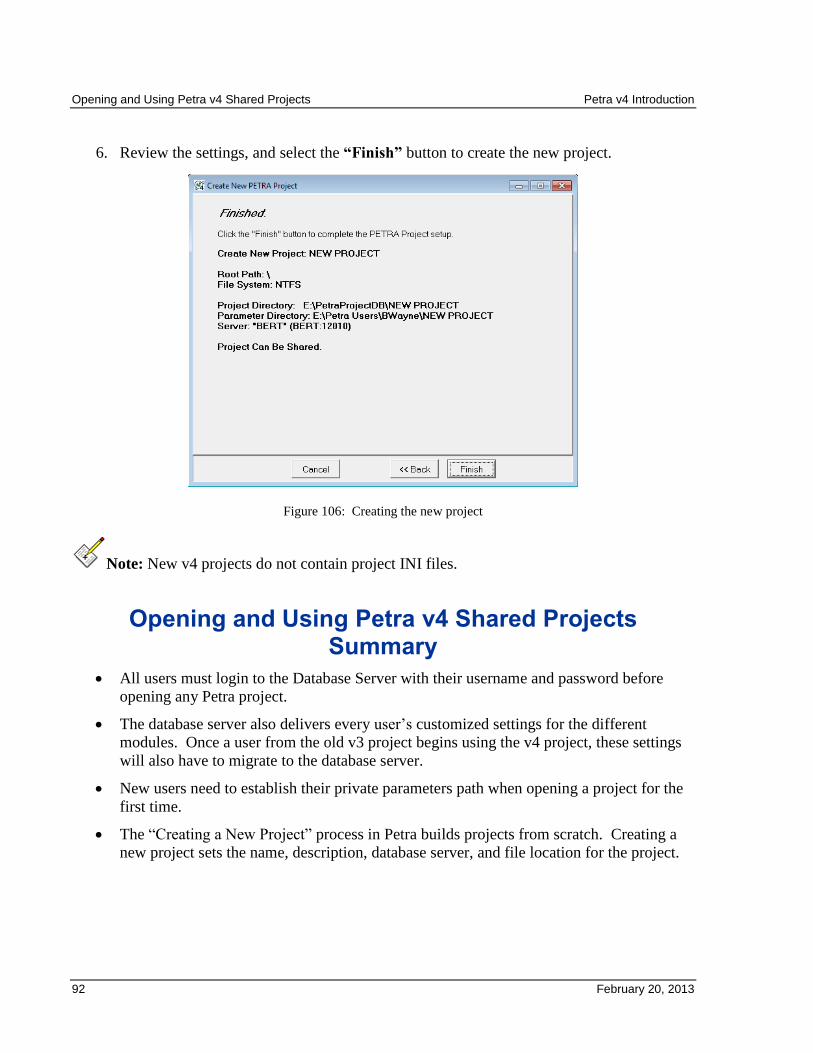
Opening and Using Petra v4 Shared Projects Petra v4 Introduction
92 February 20, 2013
6. Review the settings, and select the “Finish” button to create the new project.
Figure 106: Creating the new project
Note: New v4 projects do not contain project INI files.
Opening and Using Petra v4 Shared Projects Summary
All users must login to the Database Server with their username and password before
opening any Petra project.
The database server also delivers every user’s customized settings for the different
modules. Once a user from the old v3 project begins using the v4 project, these settings
will also have to migrate to the database server.
New users need to establish their private parameters path when opening a project for the
first time.
The “Creating a New Project” process in Petra builds projects from scratch. Creating a
new project sets the name, description, database server, and file location for the project.
February 20, 2013 93
Part 3: Petra v4 in Private Mode
Petra v4’s Private Mode is designed for projects that won’t be shared. For smaller shops, the
Private Mode trades the ability to share projects between multiple simultaneous users for an
easier setup and maintenance. In a large multi-user environment, Private Mode can be useful for
creating temporary “sandbox” projects for testing imports or working with data without affecting
a primary production project.
Petra v4 in Private mode works very similarly to Petra v3. Though Petra v4 still has a database
server, it is built into the Main Module and does not need to be separately installed.
Additionally, this mode always stores projects locally on the host computer.
To disable Petra’s Private Mode, in the [GENERAL] section of the installation’s copy of
Petra.INI, add:
AllowPrivateMode=No
This section will cover:
Installing Petra v4
Migrating Petra projects to v4
Opening existing projects, and creating new projects
General project maintenance with the Petra Database Admin Tool


February 20, 2013 95
Private Mode Quick Start Guide
Install Petra v4
For standalone installations, run PetraStandalone.EXE
Use Config.EXE to set up licensing and file structure.
Migrate Projects to v4 using the Private Mode Migration Tool within Petra
Be sure to have good backups of projects before migrating
Run a database repair, pack, and optimize on the desired projects
Select the desired projects in the old Petra Project Directory
Open and Use v4 Projects
After migrating, refresh the project list and select the project to open.

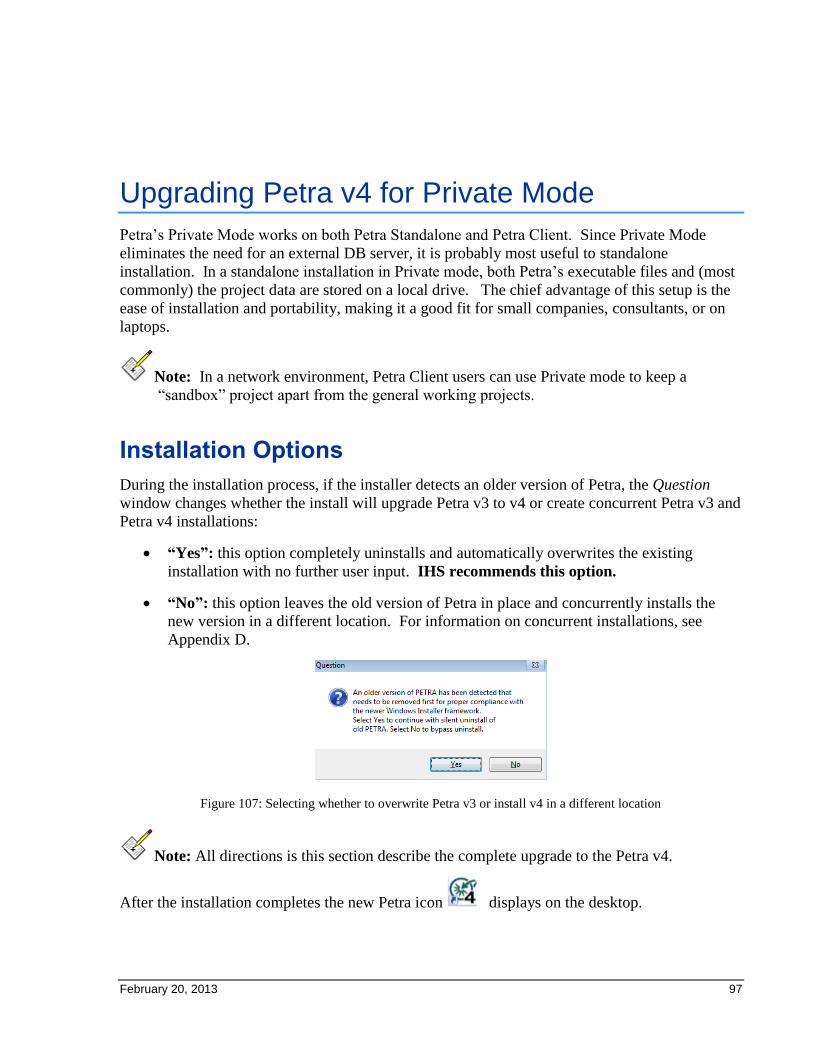
February 20, 2013 97
Upgrading Petra v4 for Private Mode
Petra’s Private Mode works on both Petra Standalone and Petra Client. Since Private Mode
eliminates the need for an external DB server, it is probably most useful to standalone
installation. In a standalone installation in Private mode, both Petra’s executable files and (most
commonly) the project data are stored on a local drive. The chief advantage of this setup is the
ease of installation and portability, making it a good fit for small companies, consultants, or on
laptops.
Note: In a network environment, Petra Client users can use Private mode to keep a
“sandbox” project apart from the general working projects.
Installation Options
During the installation process, if the installer detects an older version of Petra, the Question
window changes whether the install will upgrade Petra v3 to v4 or create concurrent Petra v3 and
Petra v4 installations:
“Yes”: this option completely uninstalls and automatically overwrites the existing
installation with no further user input. IHS recommends this option.
“No”: this option leaves the old version of Petra in place and concurrently installs the
new version in a different location. For information on concurrent installations, see
Appendix D.
Figure 107: Selecting whether to overwrite Petra v3 or install v4 in a different location
Note: All directions is this section describe the complete upgrade to the Petra v4.
After the installation completes the new Petra icon displays on the desktop.
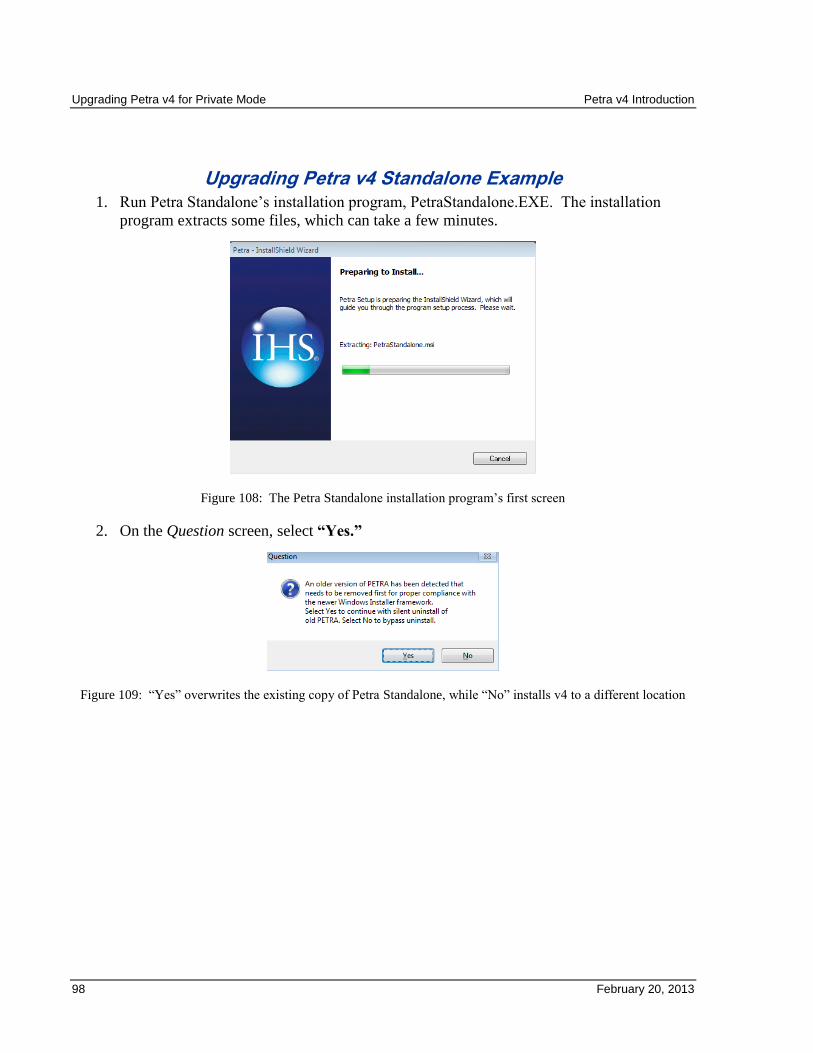
Upgrading Petra v4 for Private Mode Petra v4 Introduction
98 February 20, 2013
Upgrading Petra v4 Standalone Example 1. Run Petra Standalone’s installation program, PetraStandalone.EXE. The installation
program extracts some files, which can take a few minutes.
Figure 108: The Petra Standalone installation program’s first screen
2. On the Question screen, select “Yes.”
Figure 109: “Yes” overwrites the existing copy of Petra Standalone, while “No” installs v4 to a different location
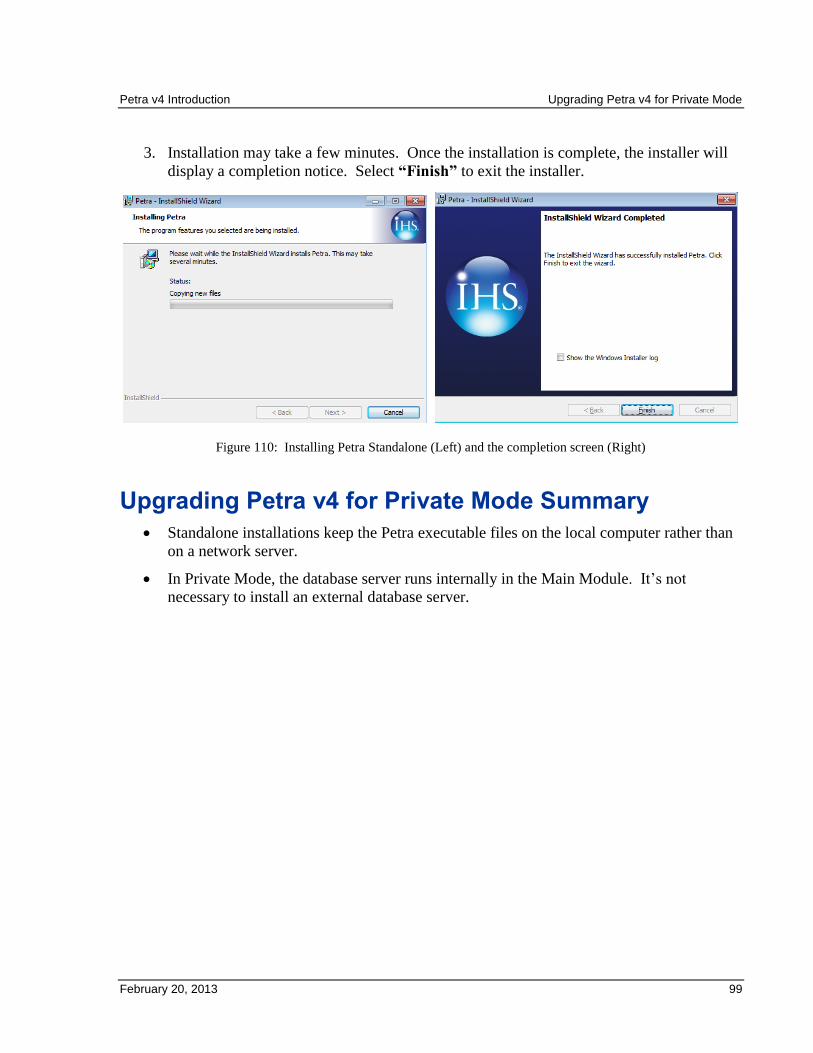
Petra v4 Introduction Upgrading Petra v4 for Private Mode
February 20, 2013 99
3. Installation may take a few minutes. Once the installation is complete, the installer will
display a completion notice. Select “Finish” to exit the installer.
Figure 110: Installing Petra Standalone (Left) and the completion screen (Right)
Upgrading Petra v4 for Private Mode Summary
Standalone installations keep the Petra executable files on the local computer rather than
on a network server.
In Private Mode, the database server runs internally in the Main Module. It’s not
necessary to install an external database server.

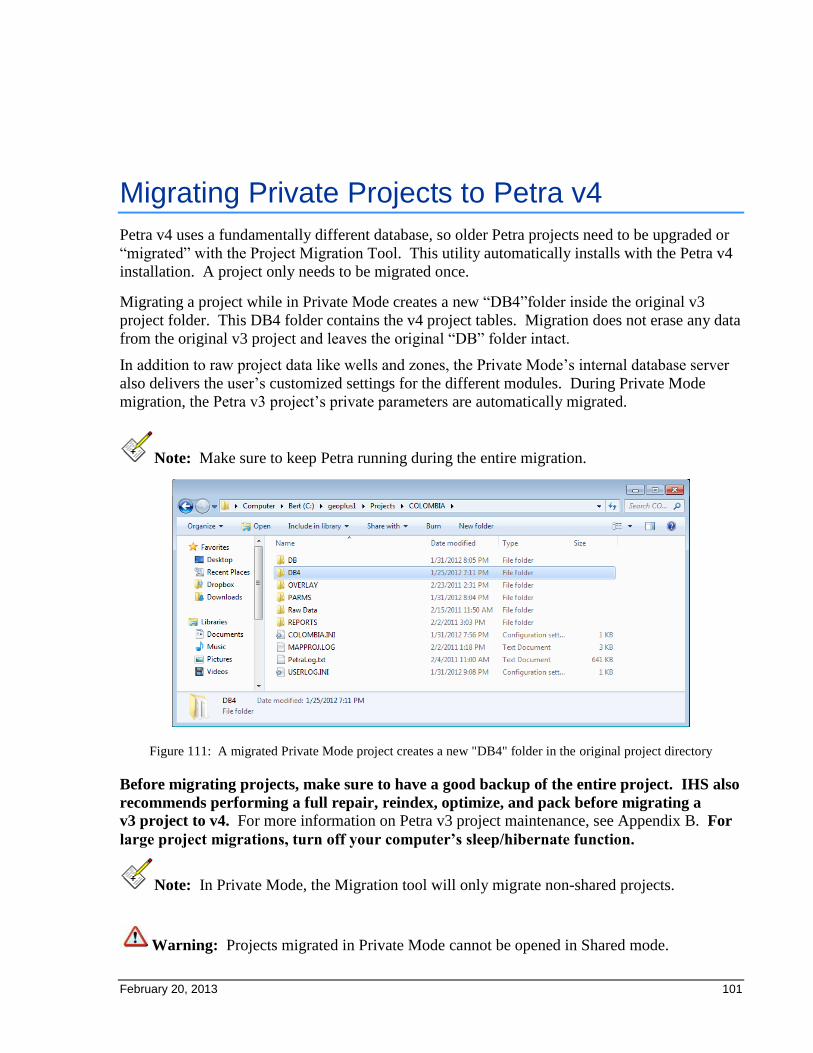
February 20, 2013 101
Migrating Private Projects to Petra v4
Petra v4 uses a fundamentally different database, so older Petra projects need to be upgraded or
“migrated” with the Project Migration Tool. This utility automatically installs with the Petra v4
installation. A project only needs to be migrated once.
Migrating a project while in Private Mode creates a new “DB4”folder inside the original v3
project folder. This DB4 folder contains the v4 project tables. Migration does not erase any data
from the original v3 project and leaves the original “DB” folder intact.
In addition to raw project data like wells and zones, the Private Mode’s internal database server
also delivers the user’s customized settings for the different modules. During Private Mode
migration, the Petra v3 project’s private parameters are automatically migrated.
Note: Make sure to keep Petra running during the entire migration.
Figure 111: A migrated Private Mode project creates a new "DB4" folder in the original project directory
Before migrating projects, make sure to have a good backup of the entire project. IHS also
recommends performing a full repair, reindex, optimize, and pack before migrating a
v3 project to v4. For more information on Petra v3 project maintenance, see Appendix B. For
large project migrations, turn off your computer’s sleep/hibernate function.
Note: In Private Mode, the Migration tool will only migrate non-shared projects.
Warning: Projects migrated in Private Mode cannot be opened in Shared mode.
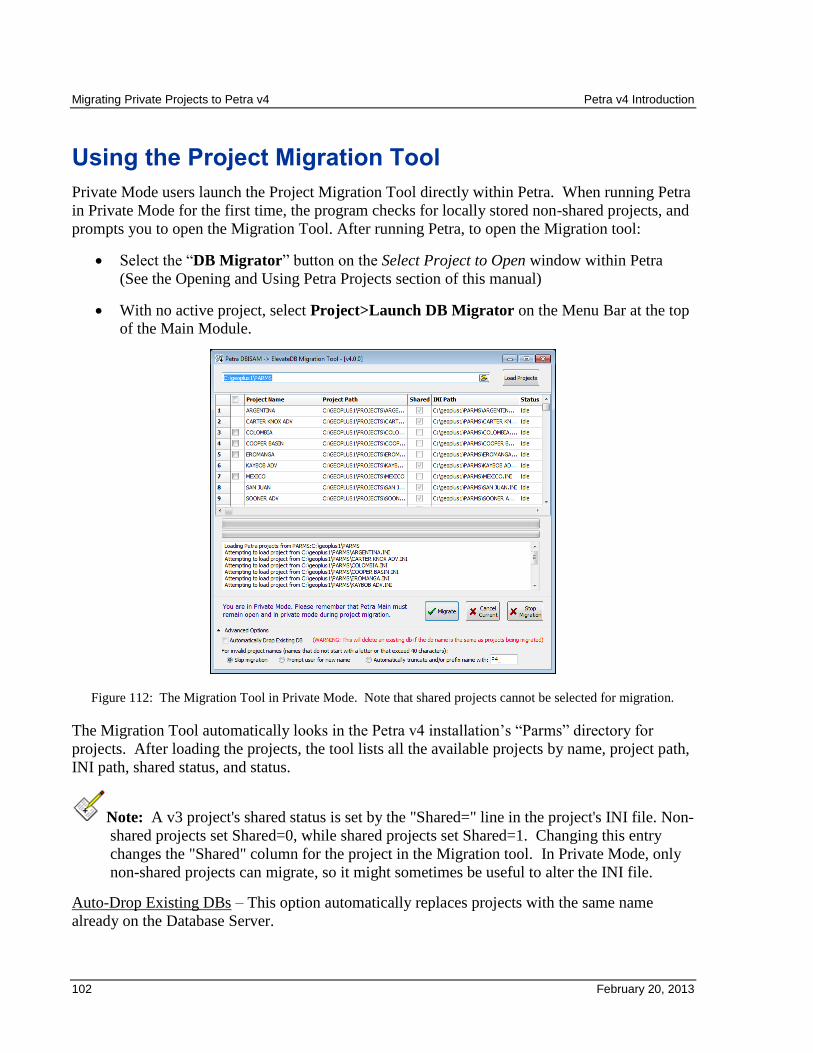
Migrating Private Projects to Petra v4 Petra v4 Introduction
102 February 20, 2013
Using the Project Migration Tool
Private Mode users launch the Project Migration Tool directly within Petra. When running Petra
in Private Mode for the first time, the program checks for locally stored non-shared projects, and
prompts you to open the Migration Tool. After running Petra, to open the Migration tool:
Select the “DB Migrator” button on the Select Project to Open window within Petra
(See the Opening and Using Petra Projects section of this manual)
With no active project, select Project>Launch DB Migrator on the Menu Bar at the top
of the Main Module.
Figure 112: The Migration Tool in Private Mode. Note that shared projects cannot be selected for migration.
The Migration Tool automatically looks in the Petra v4 installation’s “Parms” directory for
projects. After loading the projects, the tool lists all the available projects by name, project path,
INI path, shared status, and status.
Note: A v3 project's shared status is set by the "Shared=" line in the project's INI file. Non-
shared projects set Shared=0, while shared projects set Shared=1. Changing this entry
changes the "Shared" column for the project in the Migration tool. In Private Mode, only
non-shared projects can migrate, so it might sometimes be useful to alter the INI file.
Auto-Drop Existing DBs – This option automatically replaces projects with the same name
already on the Database Server.
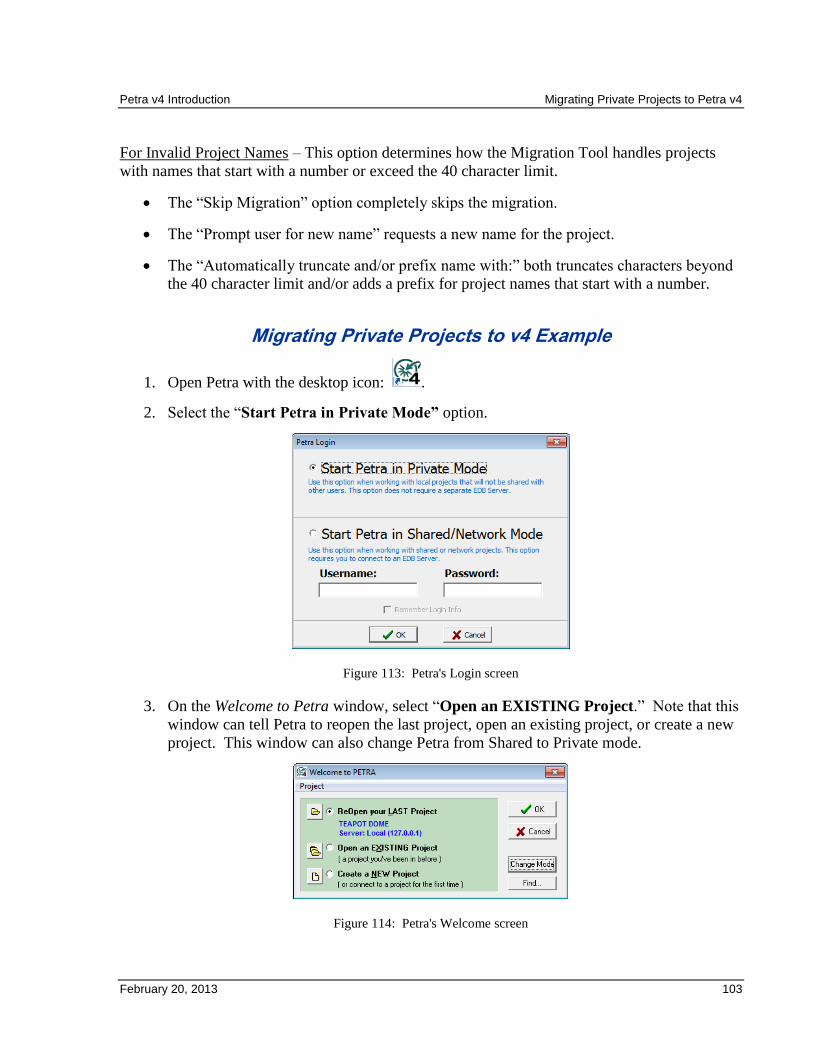
Petra v4 Introduction Migrating Private Projects to Petra v4
February 20, 2013 103
For Invalid Project Names – This option determines how the Migration Tool handles projects
with names that start with a number or exceed the 40 character limit.
The “Skip Migration” option completely skips the migration.
The “Prompt user for new name” requests a new name for the project.
The “Automatically truncate and/or prefix name with:” both truncates characters beyond
the 40 character limit and/or adds a prefix for project names that start with a number.
Migrating Private Projects to v4 Example
1. Open Petra with the desktop icon: .
2. Select the “Start Petra in Private Mode” option.
Figure 113: Petra's Login screen
3. On the Welcome to Petra window, select “Open an EXISTING Project.” Note that this
window can tell Petra to reopen the last project, open an existing project, or create a new
project. This window can also change Petra from Shared to Private mode.
Figure 114: Petra's Welcome screen
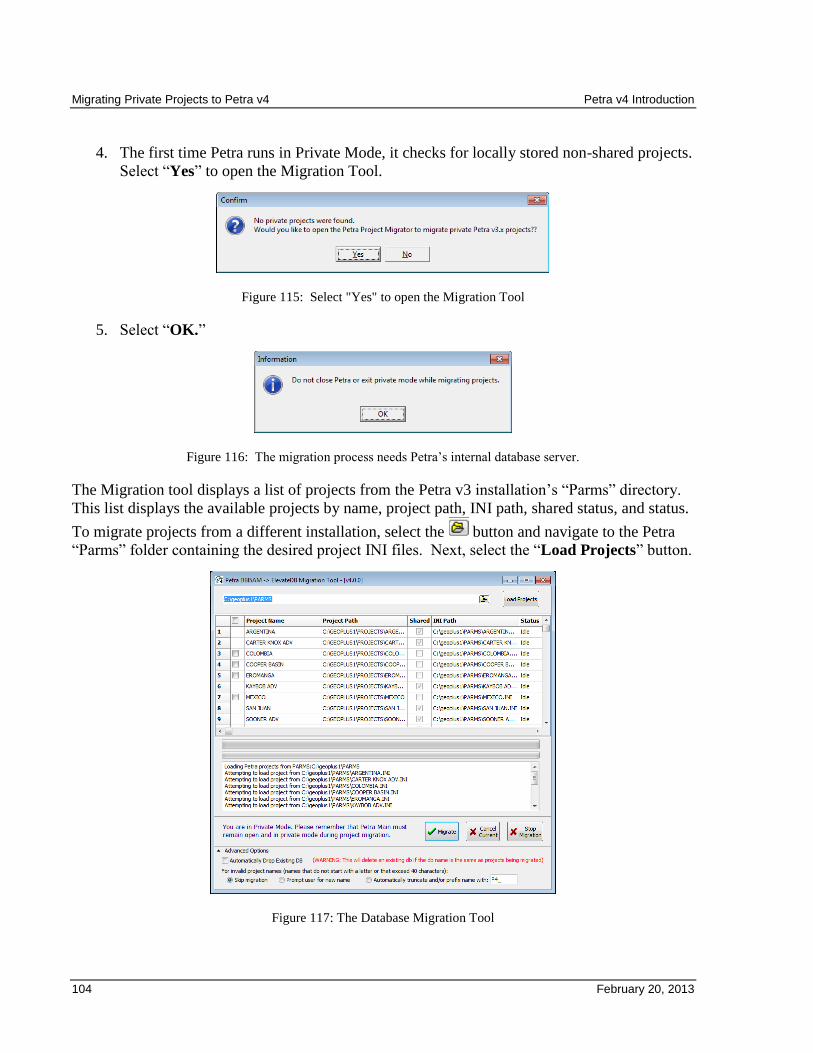
Migrating Private Projects to Petra v4 Petra v4 Introduction
104 February 20, 2013
4. The first time Petra runs in Private Mode, it checks for locally stored non-shared projects.
Select “Yes” to open the Migration Tool.
Figure 115: Select "Yes" to open the Migration Tool
5. Select “OK.”
Figure 116: The migration process needs Petra’s internal database server.
The Migration tool displays a list of projects from the Petra v3 installation’s “Parms” directory.
This list displays the available projects by name, project path, INI path, shared status, and status.
To migrate projects from a different installation, select the button and navigate to the Petra
“Parms” folder containing the desired project INI files. Next, select the “Load Projects” button.
Figure 117: The Database Migration Tool
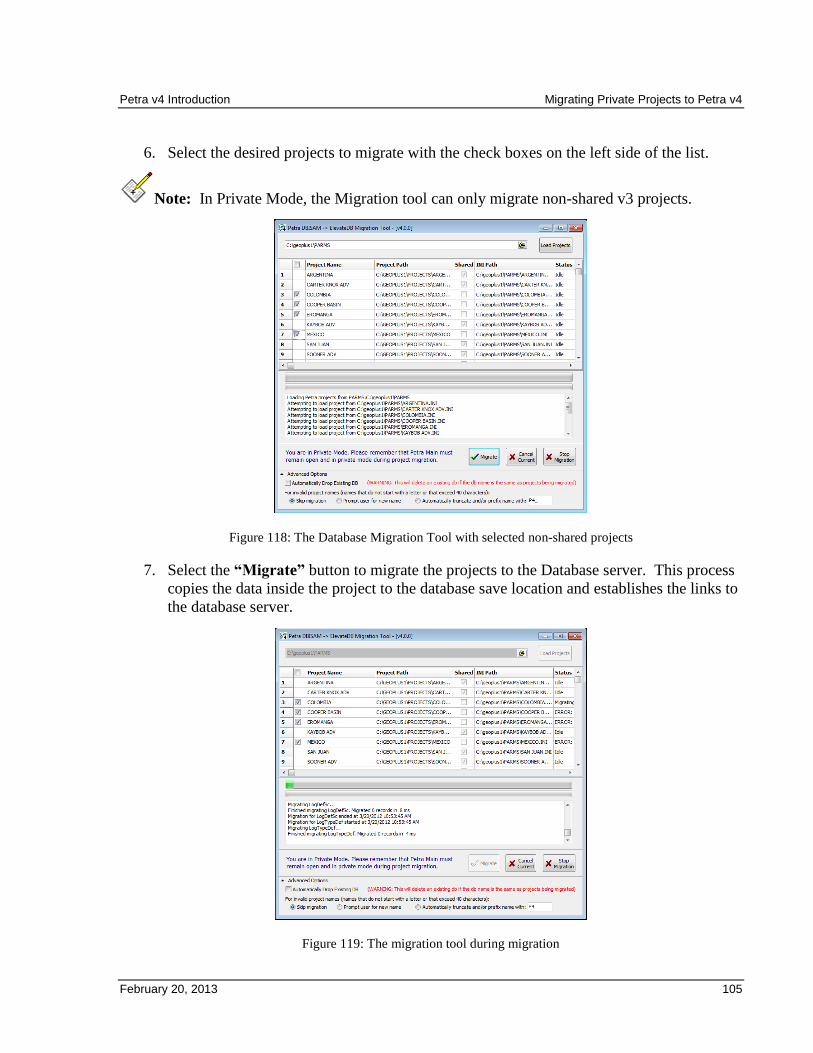
Petra v4 Introduction Migrating Private Projects to Petra v4
February 20, 2013 105
6. Select the desired projects to migrate with the check boxes on the left side of the list.
Note: In Private Mode, the Migration tool can only migrate non-shared v3 projects.
Figure 118: The Database Migration Tool with selected non-shared projects
7. Select the “Migrate” button to migrate the projects to the Database server. This process
copies the data inside the project to the database save location and establishes the links to
the database server.
Figure 119: The migration tool during migration

Migrating Private Projects to Petra v4 Petra v4 Introduction
106 February 20, 2013
7. After migration, the “Status” column on the project list changes from “Idle” to
“Finished!” (for migrated projects) or “Skipped” (for projects not selected for
migration).
Figure 120: A completed migration
Migrating Private Projects to v4 Summary
Petra v4 works with projects in a fundamentally different way than older versions. The
Migration Tool upgrades older projects to work with the latest version of Petra.
All projects should have a good backup before initiating project migration.
Don’t close Petra while migrating a project.
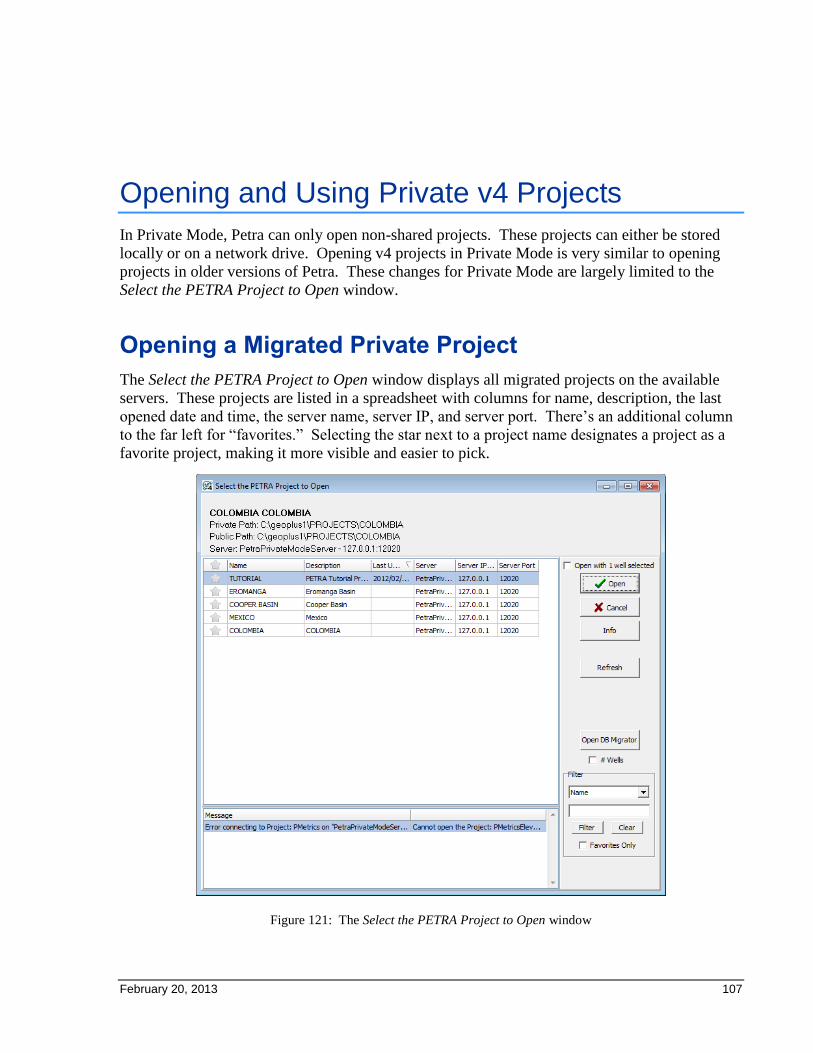
February 20, 2013 107
Opening and Using Private v4 Projects
In Private Mode, Petra can only open non-shared projects. These projects can either be stored
locally or on a network drive. Opening v4 projects in Private Mode is very similar to opening
projects in older versions of Petra. These changes for Private Mode are largely limited to the
Select the PETRA Project to Open window.
Opening a Migrated Private Project
The Select the PETRA Project to Open window displays all migrated projects on the available
servers. These projects are listed in a spreadsheet with columns for name, description, the last
opened date and time, the server name, server IP, and server port. There’s an additional column
to the far left for “favorites.” Selecting the star next to a project name designates a project as a
favorite project, making it more visible and easier to pick.
Figure 121: The Select the PETRA Project to Open window
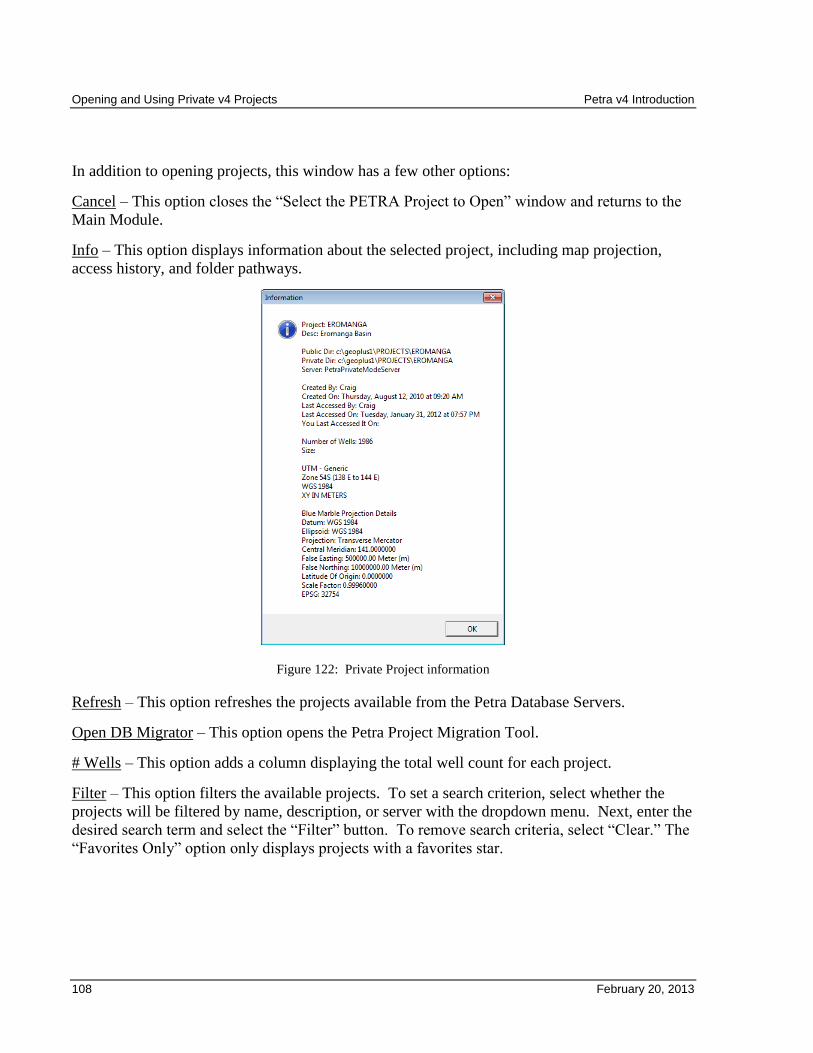
Opening and Using Private v4 Projects Petra v4 Introduction
108 February 20, 2013
In addition to opening projects, this window has a few other options:
Cancel – This option closes the “Select the PETRA Project to Open” window and returns to the
Main Module.
Info – This option displays information about the selected project, including map projection,
access history, and folder pathways.
Figure 122: Private Project information
Refresh – This option refreshes the projects available from the Petra Database Servers.
Open DB Migrator – This option opens the Petra Project Migration Tool.
# Wells – This option adds a column displaying the total well count for each project.
Filter – This option filters the available projects. To set a search criterion, select whether the
projects will be filtered by name, description, or server with the dropdown menu. Next, enter the
desired search term and select the “Filter” button. To remove search criteria, select “Clear.” The
“Favorites Only” option only displays projects with a favorites star.

Petra v4 Introduction Opening and Using Private v4 Projects
February 20, 2013 109
Opening a Migrated Private Project Example
1. Close the Migration Tool screen. When the Select Petra Project to Open screen displays,
select the “Refresh” button.
Figure 123: Selecting a project to open
2. Here, select the desired project and select the “Open” button.
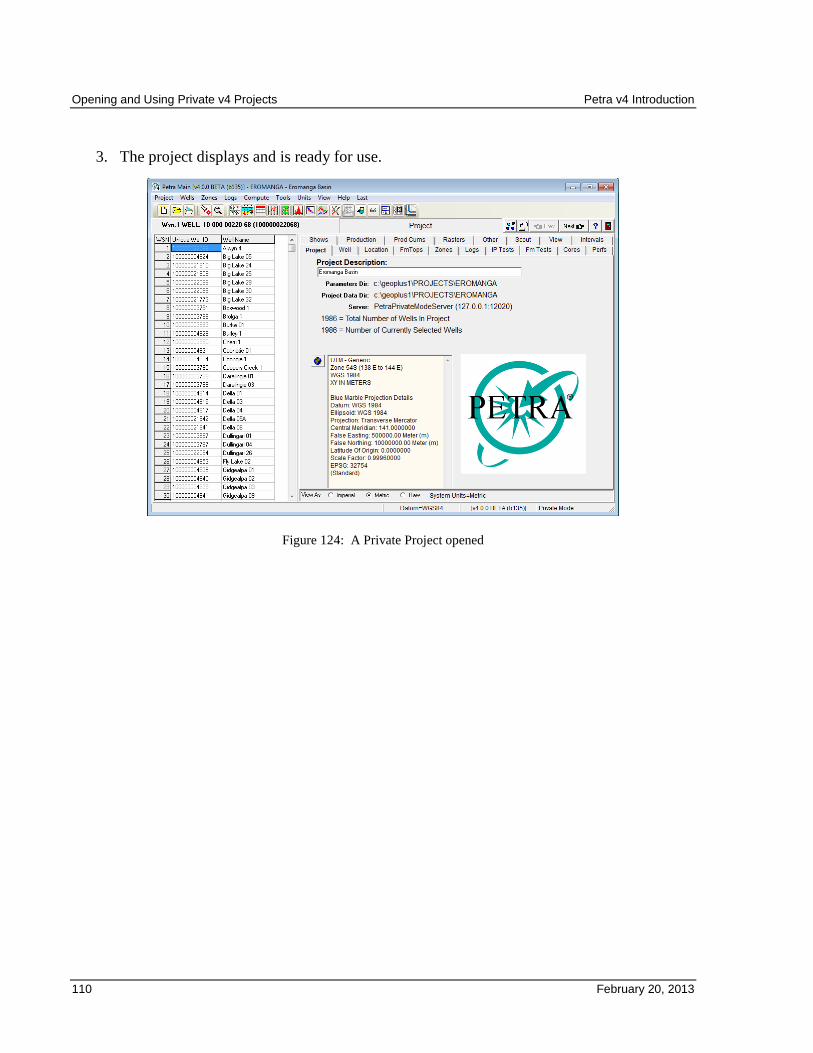
Opening and Using Private v4 Projects Petra v4 Introduction
110 February 20, 2013
3. The project displays and is ready for use.
Figure 124: A Private Project opened
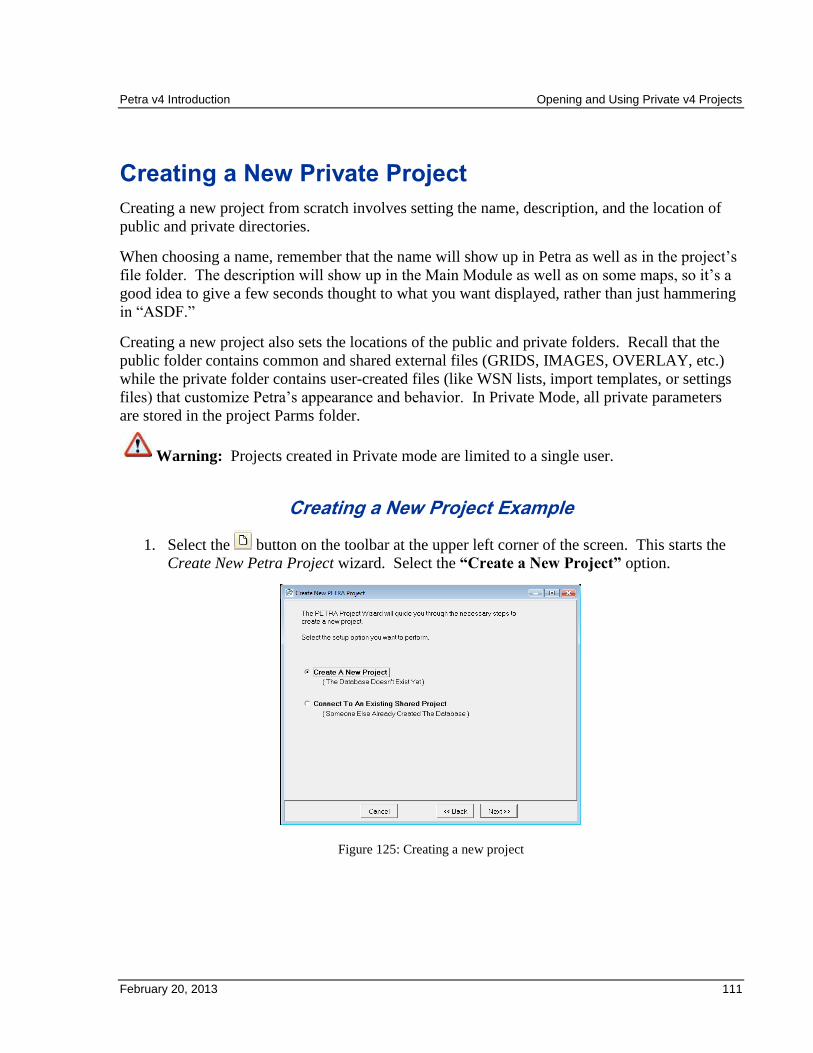
Petra v4 Introduction Opening and Using Private v4 Projects
February 20, 2013 111
Creating a New Private Project
Creating a new project from scratch involves setting the name, description, and the location of
public and private directories.
When choosing a name, remember that the name will show up in Petra as well as in the project’s
file folder. The description will show up in the Main Module as well as on some maps, so it’s a
good idea to give a few seconds thought to what you want displayed, rather than just hammering
in “ASDF.”
Creating a new project also sets the locations of the public and private folders. Recall that the
public folder contains common and shared external files (GRIDS, IMAGES, OVERLAY, etc.)
while the private folder contains user-created files (like WSN lists, import templates, or settings
files) that customize Petra’s appearance and behavior. In Private Mode, all private parameters
are stored in the project Parms folder.
Warning: Projects created in Private mode are limited to a single user.
Creating a New Project Example
1. Select the button on the toolbar at the upper left corner of the screen. This starts the
Create New Petra Project wizard. Select the “Create a New Project” option.
Figure 125: Creating a new project
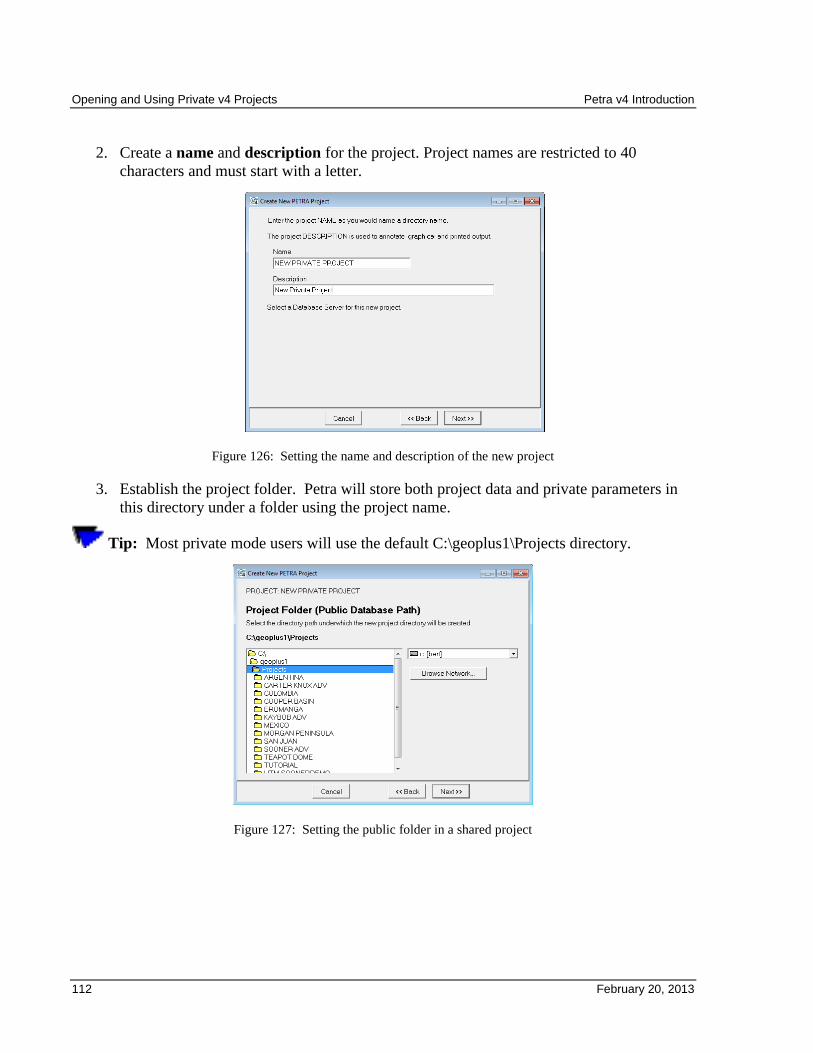
Opening and Using Private v4 Projects Petra v4 Introduction
112 February 20, 2013
2. Create a name and description for the project. Project names are restricted to 40
characters and must start with a letter.
Figure 126: Setting the name and description of the new project
3. Establish the project folder. Petra will store both project data and private parameters in
this directory under a folder using the project name.
Tip: Most private mode users will use the default C:\geoplus1\Projects directory.
Figure 127: Setting the public folder in a shared project
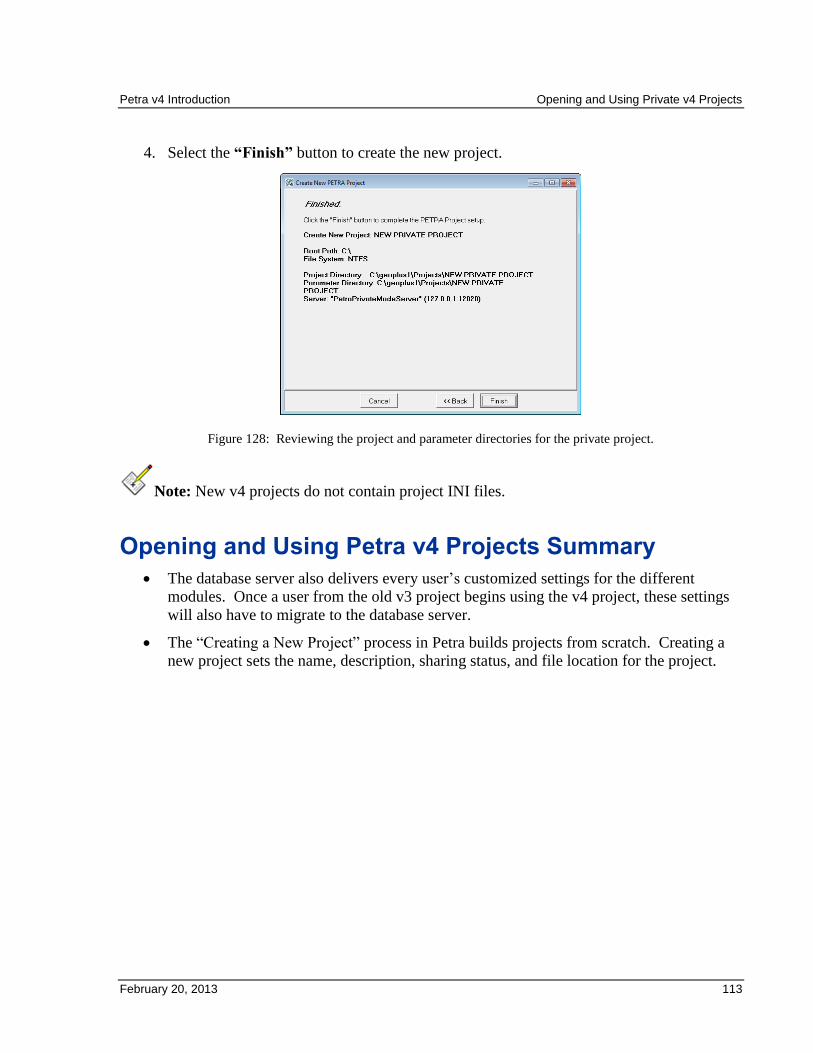
Petra v4 Introduction Opening and Using Private v4 Projects
February 20, 2013 113
4. Select the “Finish” button to create the new project.
Figure 128: Reviewing the project and parameter directories for the private project.
Note: New v4 projects do not contain project INI files.
Opening and Using Petra v4 Projects Summary
The database server also delivers every user’s customized settings for the different
modules. Once a user from the old v3 project begins using the v4 project, these settings
will also have to migrate to the database server.
The “Creating a New Project” process in Petra builds projects from scratch. Creating a
new project sets the name, description, sharing status, and file location for the project.

February 20, 2013 115
Managing Private Projects
Private projects sometimes need routine maintenance. Petra’s Private mode uses a simplified
version of the Database Server Admin Tool to back up and restore projects, update project
databases, and perform table maintenance. To open the Private Mode’s Petra Server Admin
Tool, select Project>Launch DB Admin Tool.
Project Management Tab
The Project Management Tab displays information on the migrated Petra projects. Importantly,
this section also handles database versions, project maintenance, and backups. The central list
provides a short summary of project name, well count, project version, and descriptions. This
list will always include a “Master” project that the database server uses as a template for
Petra project tables. The far right column provides more detailed project information or
maintenance options.
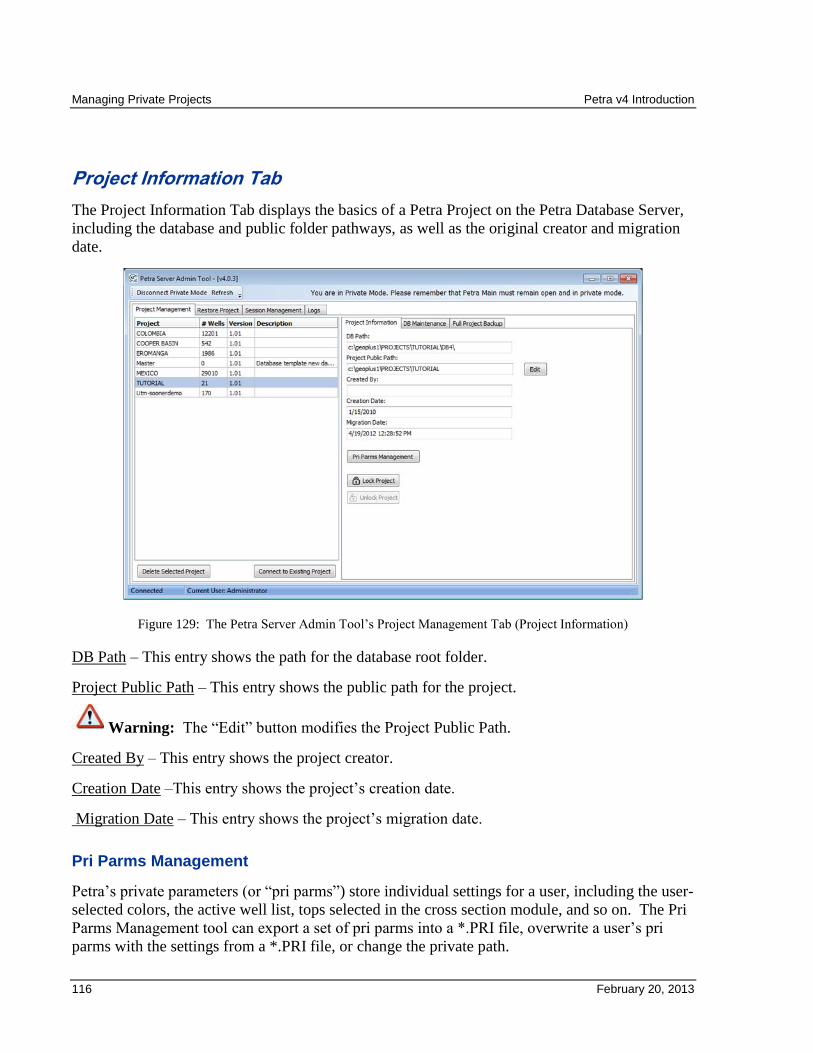
Managing Private Projects Petra v4 Introduction
116 February 20, 2013
Project Information Tab
The Project Information Tab displays the basics of a Petra Project on the Petra Database Server,
including the database and public folder pathways, as well as the original creator and migration
date.
Figure 129: The Petra Server Admin Tool’s Project Management Tab (Project Information)
DB Path – This entry shows the path for the database root folder.
Project Public Path – This entry shows the public path for the project.
Warning: The “Edit” button modifies the Project Public Path.
Created By – This entry shows the project creator.
Creation Date –This entry shows the project’s creation date.
Migration Date – This entry shows the project’s migration date.
Pri Parms Management
Petra’s private parameters (or “pri parms”) store individual settings for a user, including the user-
selected colors, the active well list, tops selected in the cross section module, and so on. The Pri
Parms Management tool can export a set of pri parms into a *.PRI file, overwrite a user’s pri
parms with the settings from a *.PRI file, or change the private path.
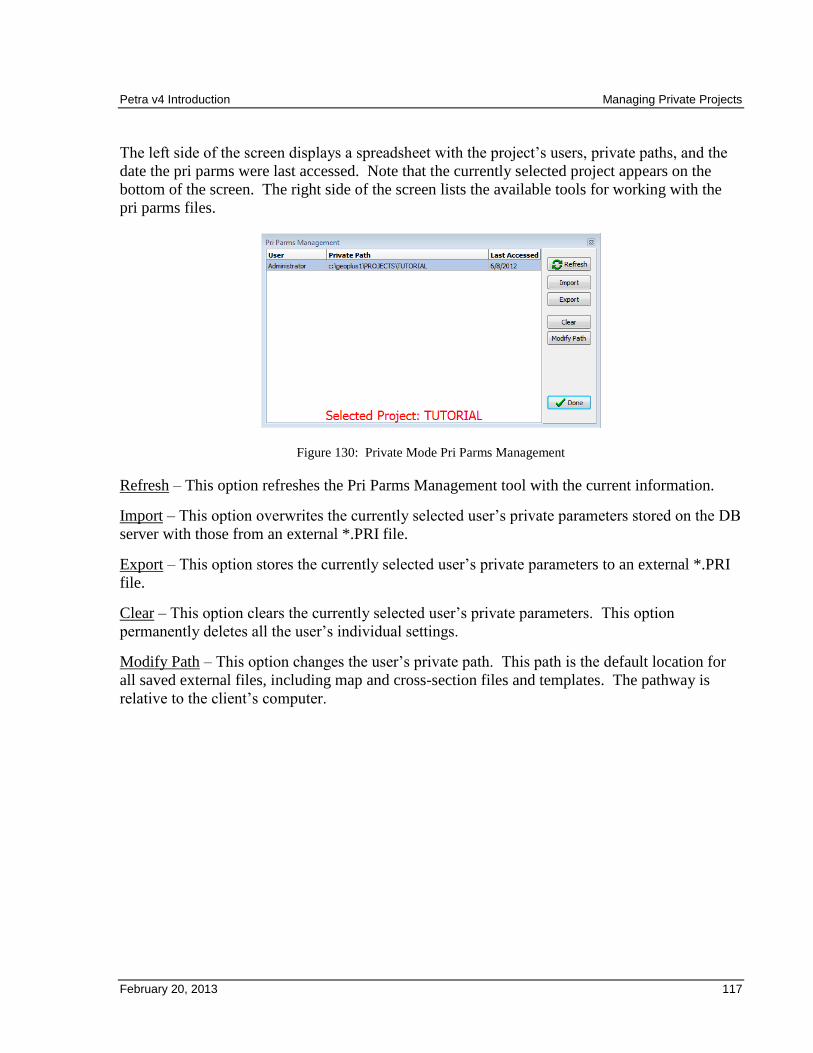
Petra v4 Introduction Managing Private Projects
February 20, 2013 117
The left side of the screen displays a spreadsheet with the project’s users, private paths, and the
date the pri parms were last accessed. Note that the currently selected project appears on the
bottom of the screen. The right side of the screen lists the available tools for working with the
pri parms files.
Figure 130: Private Mode Pri Parms Management
Refresh – This option refreshes the Pri Parms Management tool with the current information.
Import – This option overwrites the currently selected user’s private parameters stored on the DB
server with those from an external *.PRI file.
Export – This option stores the currently selected user’s private parameters to an external *.PRI
file.
Clear – This option clears the currently selected user’s private parameters. This option
permanently deletes all the user’s individual settings.
Modify Path – This option changes the user’s private path. This path is the default location for
all saved external files, including map and cross-section files and templates. The pathway is
relative to the client’s computer.
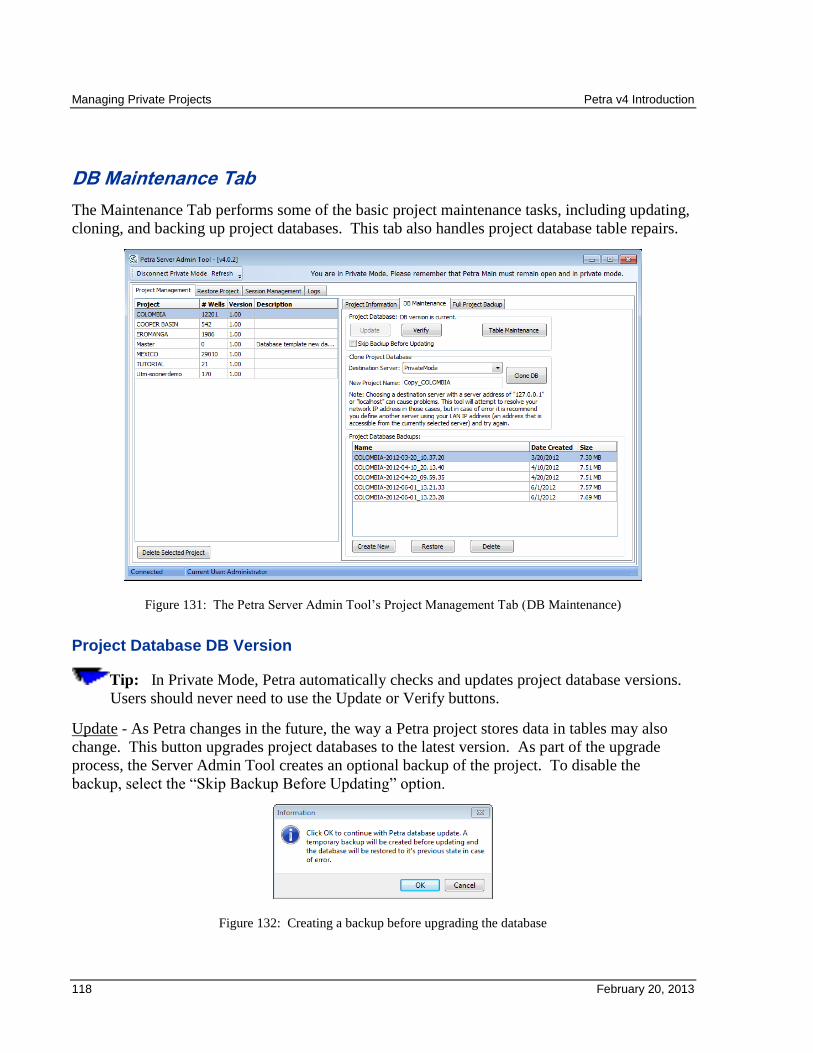
Managing Private Projects Petra v4 Introduction
118 February 20, 2013
DB Maintenance Tab
The Maintenance Tab performs some of the basic project maintenance tasks, including updating,
cloning, and backing up project databases. This tab also handles project database table repairs.
Figure 131: The Petra Server Admin Tool’s Project Management Tab (DB Maintenance)
Project Database DB Version
Tip: In Private Mode, Petra automatically checks and updates project database versions.
Users should never need to use the Update or Verify buttons.
Update - As Petra changes in the future, the way a Petra project stores data in tables may also
change. This button upgrades project databases to the latest version. As part of the upgrade
process, the Server Admin Tool creates an optional backup of the project. To disable the
backup, select the “Skip Backup Before Updating” option.
Figure 132: Creating a backup before upgrading the database
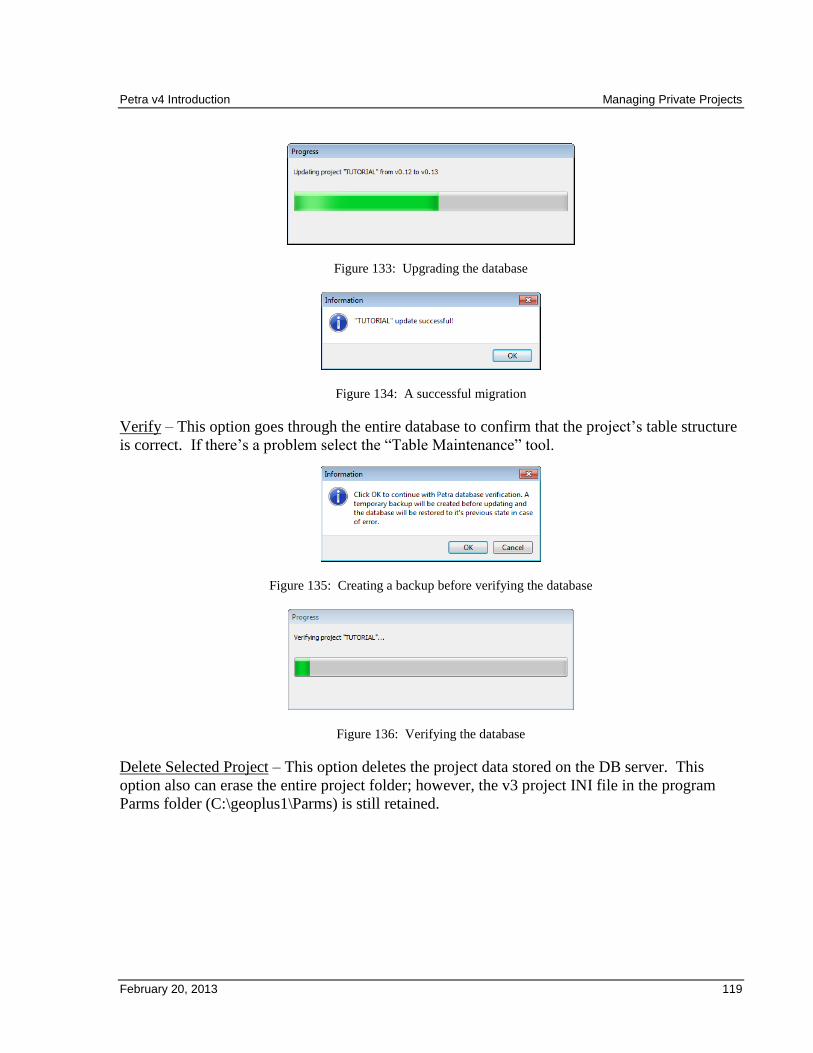
Petra v4 Introduction Managing Private Projects
February 20, 2013 119
Figure 133: Upgrading the database
Figure 134: A successful migration
Verify – This option goes through the entire database to confirm that the project’s table structure
is correct. If there’s a problem select the “Table Maintenance” tool.
Figure 135: Creating a backup before verifying the database
Figure 136: Verifying the database
Delete Selected Project – This option deletes the project data stored on the DB server. This
option also can erase the entire project folder; however, the v3 project INI file in the program
Parms folder (C:\geoplus1\Parms) is still retained.
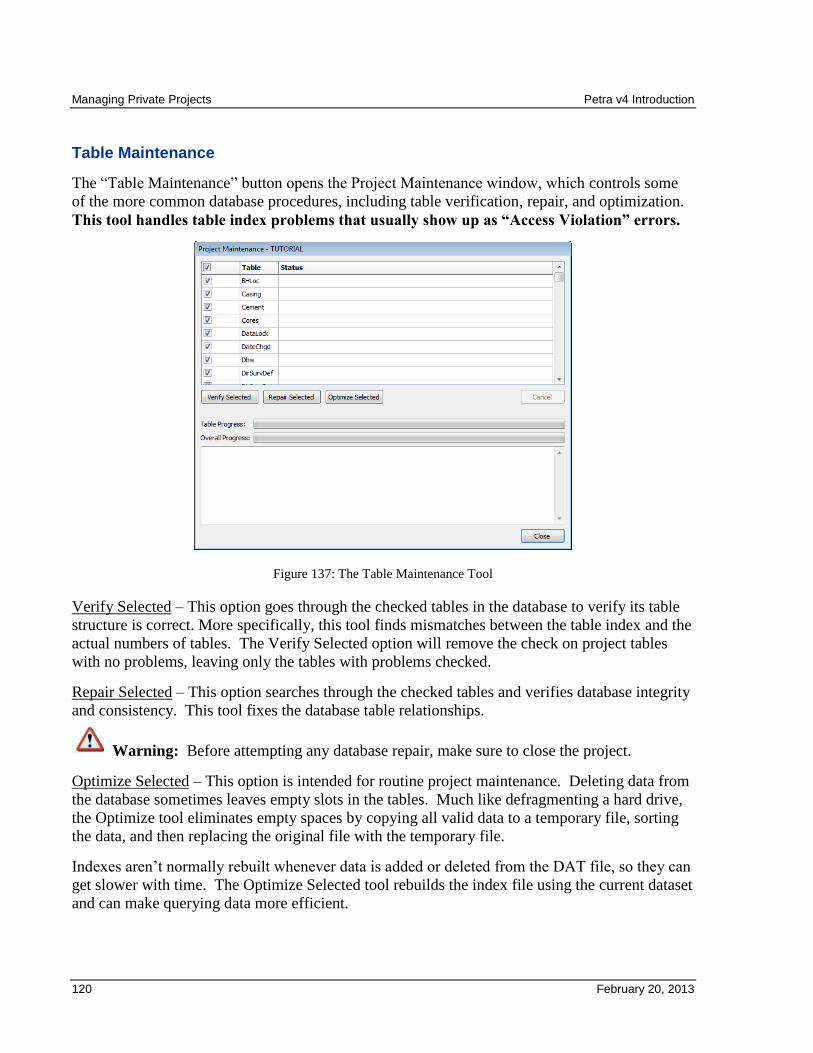
Managing Private Projects Petra v4 Introduction
120 February 20, 2013
Table Maintenance
The “Table Maintenance” button opens the Project Maintenance window, which controls some
of the more common database procedures, including table verification, repair, and optimization.
This tool handles table index problems that usually show up as “Access Violation” errors.
Figure 137: The Table Maintenance Tool
Verify Selected – This option goes through the checked tables in the database to verify its table
structure is correct. More specifically, this tool finds mismatches between the table index and the
actual numbers of tables. The Verify Selected option will remove the check on project tables
with no problems, leaving only the tables with problems checked.
Repair Selected – This option searches through the checked tables and verifies database integrity
and consistency. This tool fixes the database table relationships.
Warning: Before attempting any database repair, make sure to close the project.
Optimize Selected – This option is intended for routine project maintenance. Deleting data from
the database sometimes leaves empty slots in the tables. Much like defragmenting a hard drive,
the Optimize tool eliminates empty spaces by copying all valid data to a temporary file, sorting
the data, and then replacing the original file with the temporary file.
Indexes aren’t normally rebuilt whenever data is added or deleted from the DAT file, so they can
get slower with time. The Optimize Selected tool rebuilds the index file using the current dataset
and can make querying data more efficient.
Petra v4 Introduction Managing Private Projects
February 20, 2013 121
Clone Project Database
The Petra Server Admin Tool creates a copy of the selected project in the project list. This clone
can either reside on a different server, or the same server (with a different name).
Destination Server – This dropdown sets the destination of the copied project. In Private Mode,
this dropdown will always read “PrivateMode.”
New Project Name – This option sets the name of the copied project. By default, the Server
Admin Tool adds “COPY_” to the beginning of the selected project’s name.
Project Database Backups
Create New – This option creates a new backup of the selected Petra project database. This
includes the project database and database-server-stored individual user settings. This backup
will not include external files (like grids and *.MAP/*.CSP settings files).
Note that these backups are automatically stored on the Petra database server.
Restore – This option overwrites the existing active project with the backup. This will
overwrite all public and private Petra project data modified since the backup. This
includes all “public” data like well data, zones, tops, and logs, as well as “private” data like map
settings, cross-section settings, and preferences. Restoring from backup will not affect external
files (like grids and *.MAP/*.CSP settings files).
Delete – This option deletes the selected backup.
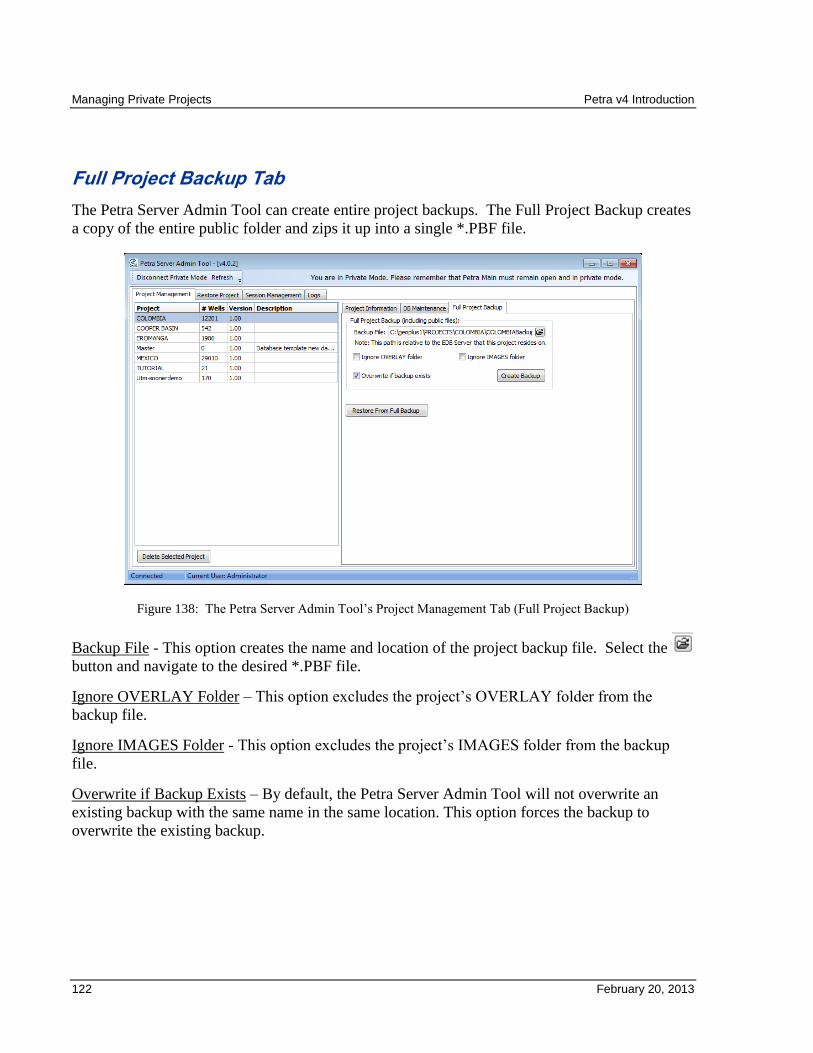
Managing Private Projects Petra v4 Introduction
122 February 20, 2013
Full Project Backup Tab
The Petra Server Admin Tool can create entire project backups. The Full Project Backup creates
a copy of the entire public folder and zips it up into a single *.PBF file.
Figure 138: The Petra Server Admin Tool’s Project Management Tab (Full Project Backup)
Backup File - This option creates the name and location of the project backup file. Select the
button and navigate to the desired *.PBF file.
Ignore OVERLAY Folder – This option excludes the project’s OVERLAY folder from the
backup file.
Ignore IMAGES Folder - This option excludes the project’s IMAGES folder from the backup
file.
Overwrite if Backup Exists – By default, the Petra Server Admin Tool will not overwrite an
existing backup with the same name in the same location. This option forces the backup to
overwrite the existing backup.
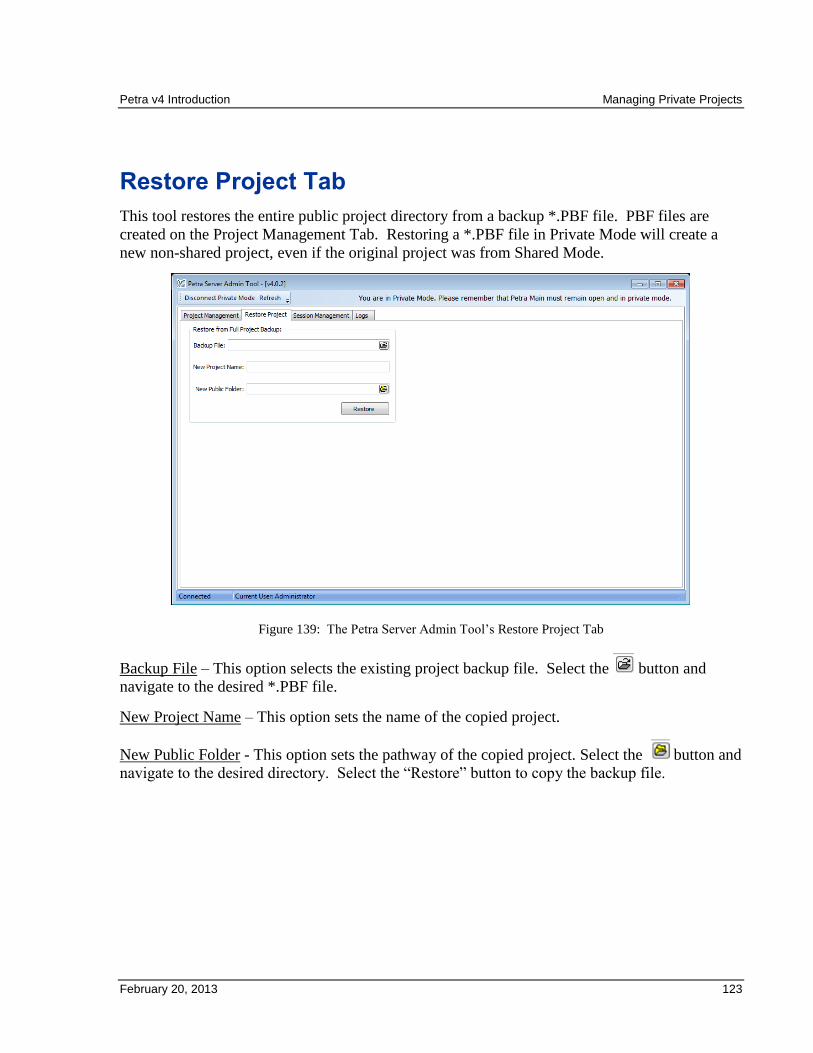
Petra v4 Introduction Managing Private Projects
February 20, 2013 123
Restore Project Tab
This tool restores the entire public project directory from a backup *.PBF file. PBF files are
created on the Project Management Tab. Restoring a *.PBF file in Private Mode will create a
new non-shared project, even if the original project was from Shared Mode.
Figure 139: The Petra Server Admin Tool’s Restore Project Tab
Backup File – This option selects the existing project backup file. Select the button and
navigate to the desired *.PBF file.
New Project Name – This option sets the name of the copied project.
New Public Folder - This option sets the pathway of the copied project. Select the button and
navigate to the desired directory. Select the “Restore” button to copy the backup file.
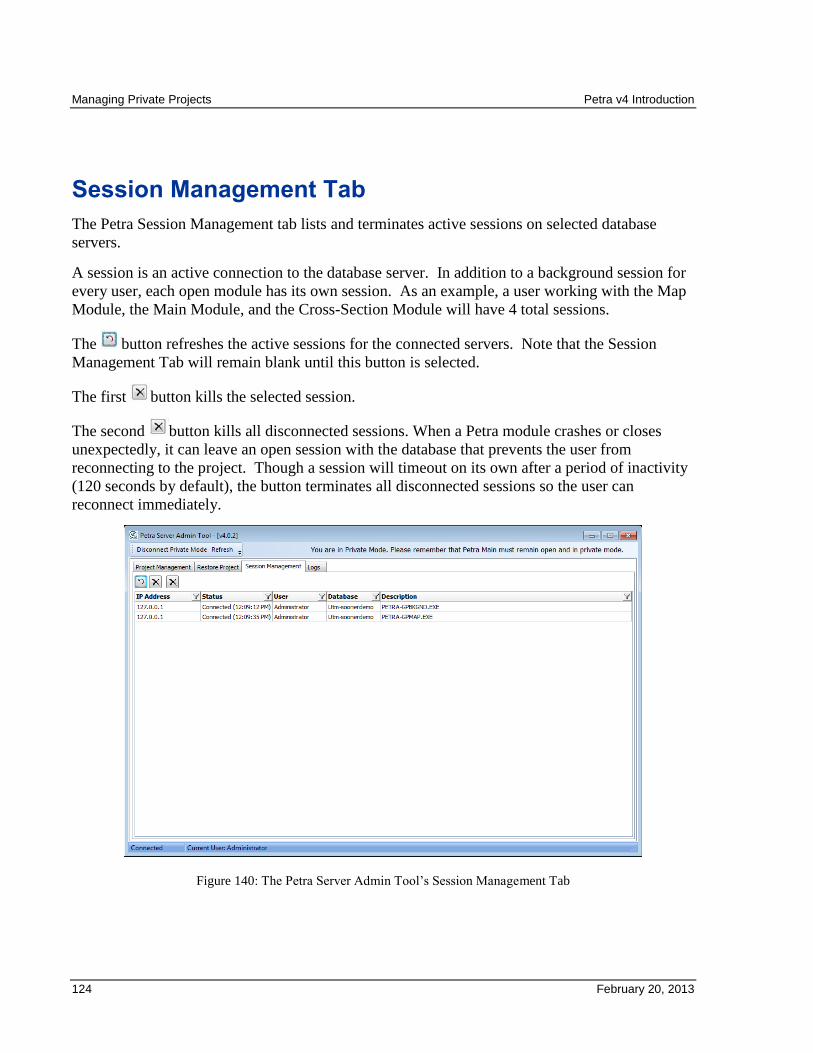
Managing Private Projects Petra v4 Introduction
124 February 20, 2013
Session Management Tab
The Petra Session Management tab lists and terminates active sessions on selected database
servers.
A session is an active connection to the database server. In addition to a background session for
every user, each open module has its own session. As an example, a user working with the Map
Module, the Main Module, and the Cross-Section Module will have 4 total sessions.
The button refreshes the active sessions for the connected servers. Note that the Session
Management Tab will remain blank until this button is selected.
The first button kills the selected session.
The second button kills all disconnected sessions. When a Petra module crashes or closes
unexpectedly, it can leave an open session with the database that prevents the user from
reconnecting to the project. Though a session will timeout on its own after a period of inactivity
(120 seconds by default), the button terminates all disconnected sessions so the user can
reconnect immediately.
Figure 140: The Petra Server Admin Tool’s Session Management Tab
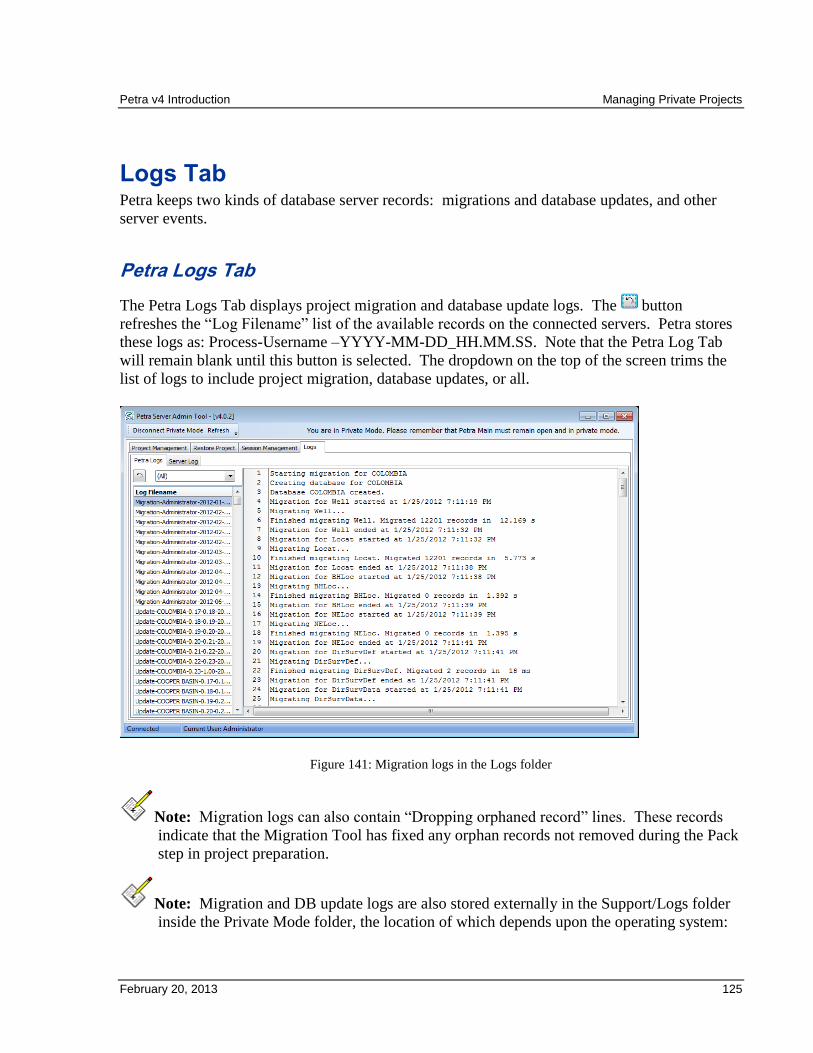
Petra v4 Introduction Managing Private Projects
February 20, 2013 125
Logs Tab Petra keeps two kinds of database server records: migrations and database updates, and other
server events.
Petra Logs Tab
The Petra Logs Tab displays project migration and database update logs. The button
refreshes the “Log Filename” list of the available records on the connected servers. Petra stores
these logs as: Process-Username –YYYY-MM-DD_HH.MM.SS. Note that the Petra Log Tab
will remain blank until this button is selected. The dropdown on the top of the screen trims the
list of logs to include project migration, database updates, or all.
Figure 141: Migration logs in the Logs folder
Note: Migration logs can also contain “Dropping orphaned record” lines. These records
indicate that the Migration Tool has fixed any orphan records not removed during the Pack
step in project preparation.
Note: Migration and DB update logs are also stored externally in the Support/Logs folder
inside the Private Mode folder, the location of which depends upon the operating system:
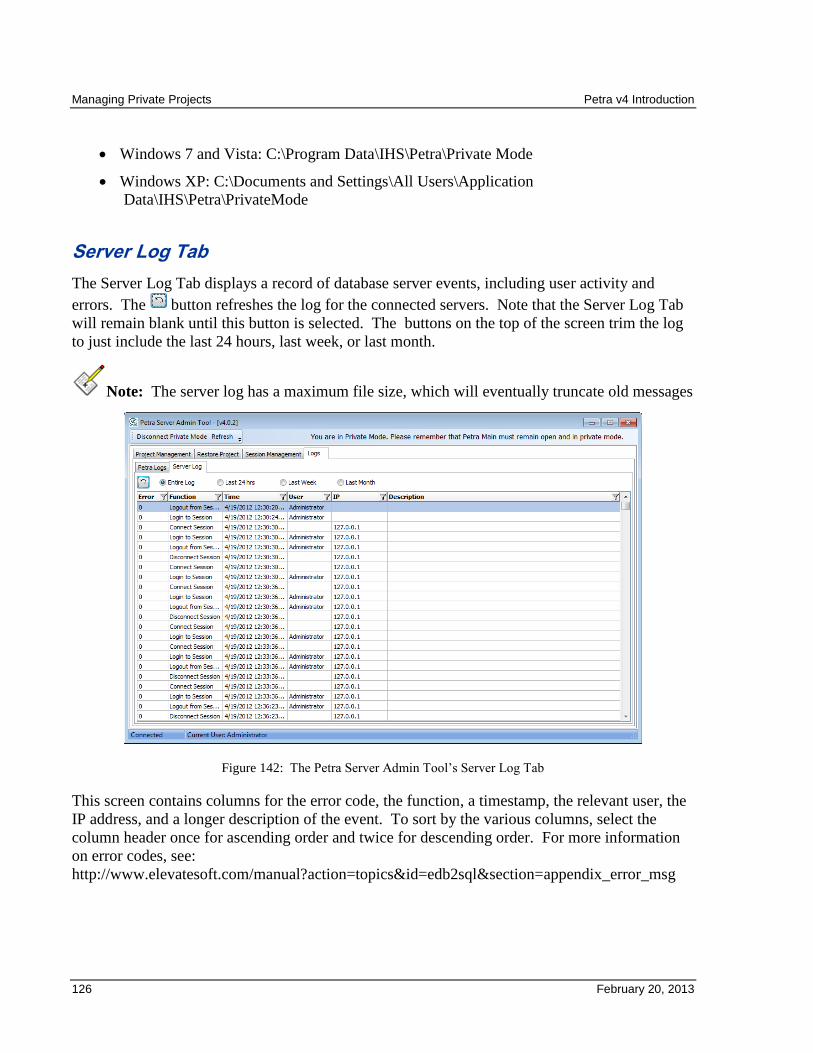
Managing Private Projects Petra v4 Introduction
126 February 20, 2013
Windows 7 and Vista: C:\Program Data\IHS\Petra\Private Mode
Windows XP: C:\Documents and Settings\All Users\Application
Data\IHS\Petra\PrivateMode
Server Log Tab
The Server Log Tab displays a record of database server events, including user activity and
errors. The button refreshes the log for the connected servers. Note that the Server Log Tab
will remain blank until this button is selected. The buttons on the top of the screen trim the log
to just include the last 24 hours, last week, or last month.
Note: The server log has a maximum file size, which will eventually truncate old messages
Figure 142: The Petra Server Admin Tool’s Server Log Tab
This screen contains columns for the error code, the function, a timestamp, the relevant user, the
IP address, and a longer description of the event. To sort by the various columns, select the
column header once for ascending order and twice for descending order. For more information
on error codes, see:
http://www.elevatesoft.com/manual?action=topics&id=edb2sql§ion=appendix_error_msg
Petra v4 Introduction Managing Private Projects
February 20, 2013 127
Managing Private Project Databases Summary
The tables that store Petra projects may change with time. The Server Admin Tool
upgrades older v4 projects to use the latest table architecture.
Project tables need maintenance and occasional repairs. “Verify Selected” simply looks
for problems in each database table. “Repair Selected” attempts to fix database
relationships in checked tables. “Optimize Selected” is a general maintenance process
that adds speed and decreases file size of projects.
The Server Admin tool copies project databases, creates project backups, and restores
projects from backups.
The Server Admin tool identifies and kills individual connections to the project
databases, known as sessions.

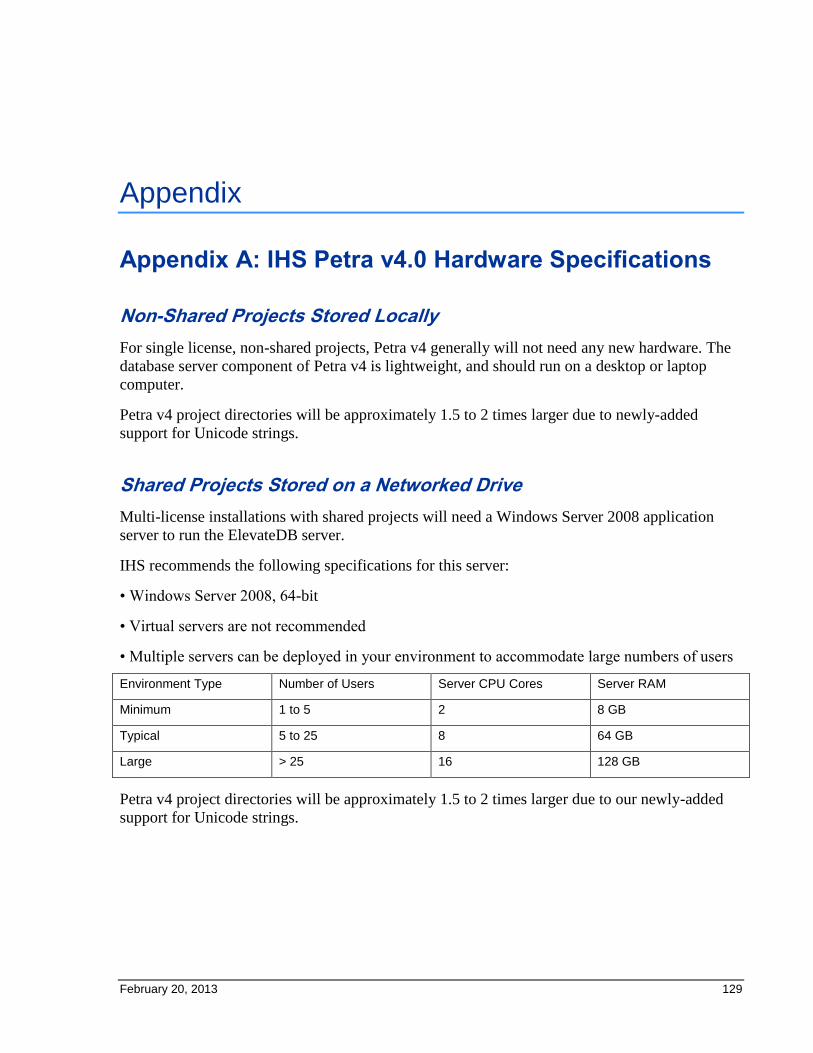
February 20, 2013 129
Appendix
Appendix A: IHS Petra v4.0 Hardware Specifications
Non-Shared Projects Stored Locally
For single license, non-shared projects, Petra v4 generally will not need any new hardware. The
database server component of Petra v4 is lightweight, and should run on a desktop or laptop
computer.
Petra v4 project directories will be approximately 1.5 to 2 times larger due to newly-added
support for Unicode strings.
Shared Projects Stored on a Networked Drive
Multi-license installations with shared projects will need a Windows Server 2008 application
server to run the ElevateDB server.
IHS recommends the following specifications for this server:
• Windows Server 2008, 64-bit
• Virtual servers are not recommended
• Multiple servers can be deployed in your environment to accommodate large numbers of users
Environment Type Number of Users Server CPU Cores Server RAM
Minimum 1 to 5 2 8 GB
Typical 5 to 25 8 64 GB
Large > 25 16 128 GB
Petra v4 project directories will be approximately 1.5 to 2 times larger due to our newly-added
support for Unicode strings.
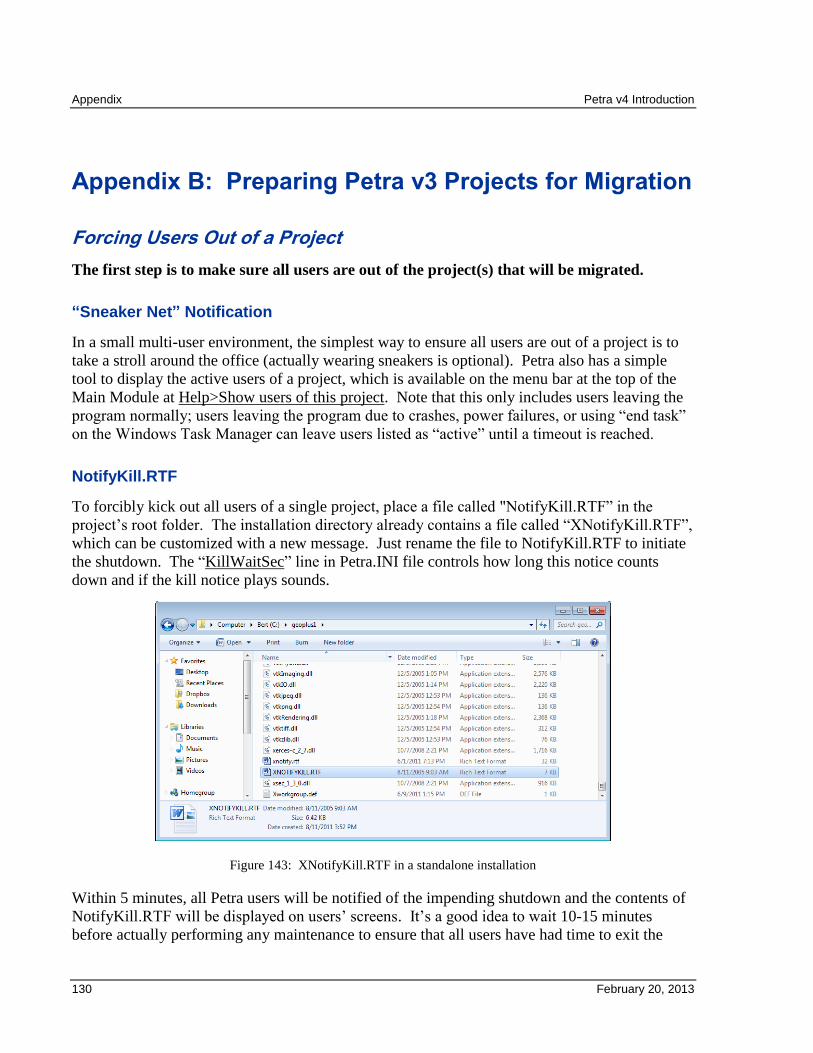
Appendix Petra v4 Introduction
130 February 20, 2013
Appendix B: Preparing Petra v3 Projects for Migration
Forcing Users Out of a Project
The first step is to make sure all users are out of the project(s) that will be migrated.
“Sneaker Net” Notification
In a small multi-user environment, the simplest way to ensure all users are out of a project is to
take a stroll around the office (actually wearing sneakers is optional). Petra also has a simple
tool to display the active users of a project, which is available on the menu bar at the top of the
Main Module at Help>Show users of this project. Note that this only includes users leaving the
program normally; users leaving the program due to crashes, power failures, or using “end task”
on the Windows Task Manager can leave users listed as “active” until a timeout is reached.
NotifyKill.RTF
To forcibly kick out all users of a single project, place a file called "NotifyKill.RTF” in the
project’s root folder. The installation directory already contains a file called “XNotifyKill.RTF”,
which can be customized with a new message. Just rename the file to NotifyKill.RTF to initiate
the shutdown. The “KillWaitSec” line in Petra.INI file controls how long this notice counts
down and if the kill notice plays sounds.
Figure 143: XNotifyKill.RTF in a standalone installation
Within 5 minutes, all Petra users will be notified of the impending shutdown and the contents of
NotifyKill.RTF will be displayed on users’ screens. It’s a good idea to wait 10-15 minutes
before actually performing any maintenance to ensure that all users have had time to exit the
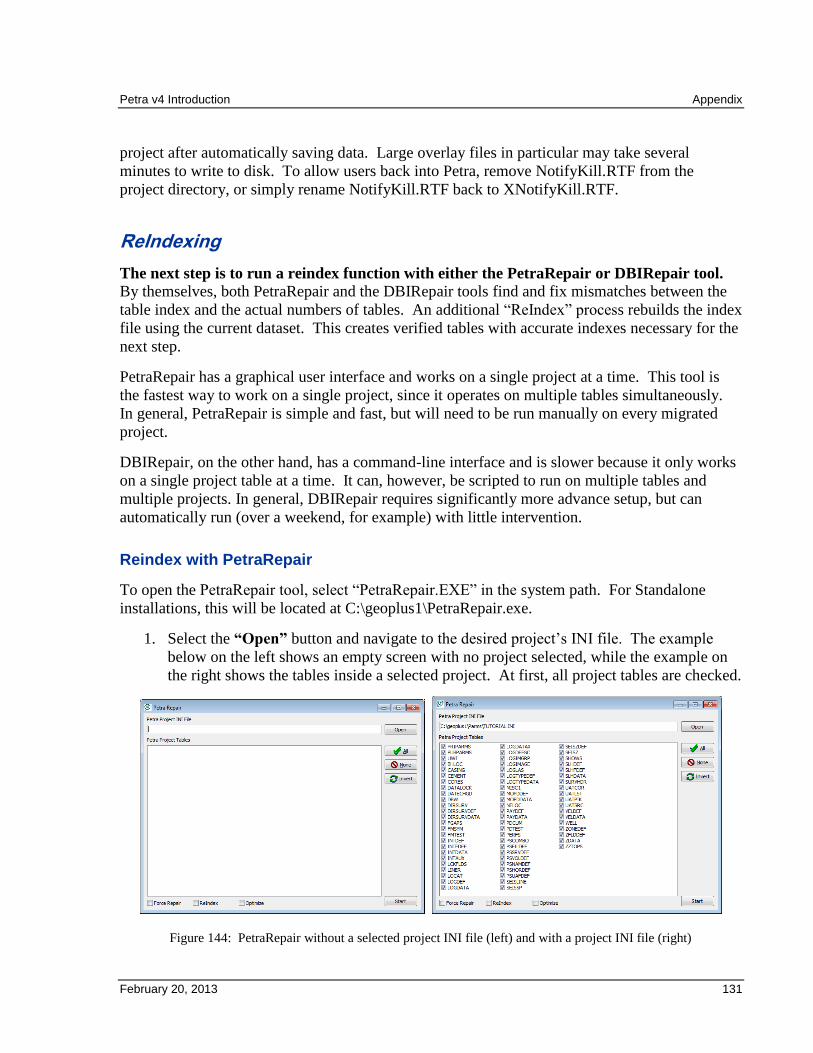
Petra v4 Introduction Appendix
February 20, 2013 131
project after automatically saving data. Large overlay files in particular may take several
minutes to write to disk. To allow users back into Petra, remove NotifyKill.RTF from the
project directory, or simply rename NotifyKill.RTF back to XNotifyKill.RTF.
ReIndexing
The next step is to run a reindex function with either the PetraRepair or DBIRepair tool.
By themselves, both PetraRepair and the DBIRepair tools find and fix mismatches between the
table index and the actual numbers of tables. An additional “ReIndex” process rebuilds the index
file using the current dataset. This creates verified tables with accurate indexes necessary for the
next step.
PetraRepair has a graphical user interface and works on a single project at a time. This tool is
the fastest way to work on a single project, since it operates on multiple tables simultaneously.
In general, PetraRepair is simple and fast, but will need to be run manually on every migrated
project.
DBIRepair, on the other hand, has a command-line interface and is slower because it only works
on a single project table at a time. It can, however, be scripted to run on multiple tables and
multiple projects. In general, DBIRepair requires significantly more advance setup, but can
automatically run (over a weekend, for example) with little intervention.
Reindex with PetraRepair
To open the PetraRepair tool, select “PetraRepair.EXE” in the system path. For Standalone
installations, this will be located at C:\geoplus1\PetraRepair.exe.
1. Select the “Open” button and navigate to the desired project’s INI file. The example
below on the left shows an empty screen with no project selected, while the example on
the right shows the tables inside a selected project. At first, all project tables are checked.
Figure 144: PetraRepair without a selected project INI file (left) and with a project INI file (right)
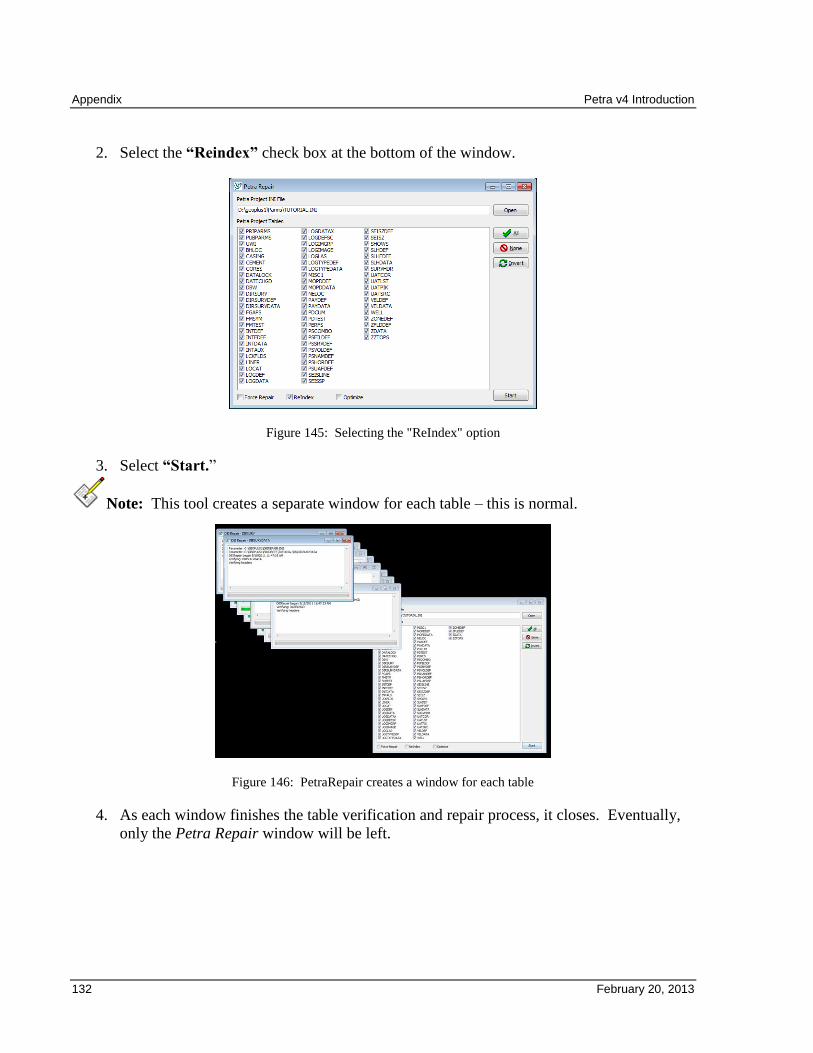
Appendix Petra v4 Introduction
132 February 20, 2013
2. Select the “Reindex” check box at the bottom of the window.
Figure 145: Selecting the "ReIndex" option
3. Select “Start.”
Note: This tool creates a separate window for each table – this is normal.
Figure 146: PetraRepair creates a window for each table
4. As each window finishes the table verification and repair process, it closes. Eventually,
only the Petra Repair window will be left.
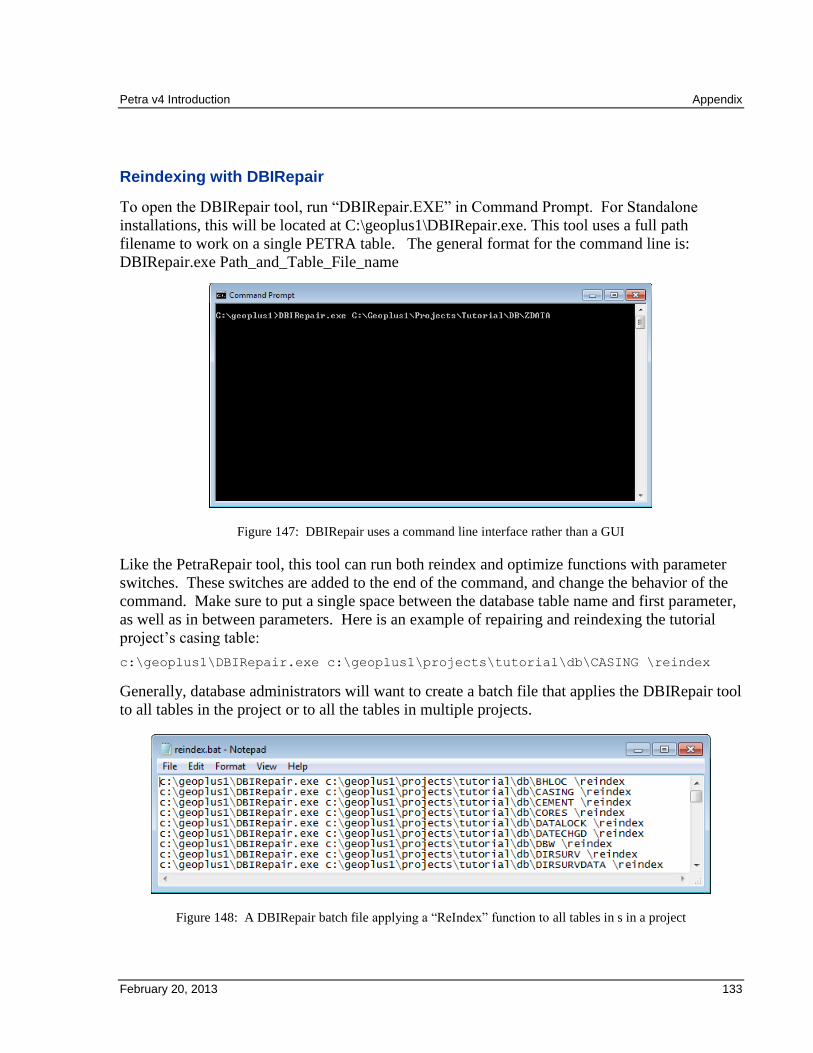
Petra v4 Introduction Appendix
February 20, 2013 133
Reindexing with DBIRepair
To open the DBIRepair tool, run “DBIRepair.EXE” in Command Prompt. For Standalone
installations, this will be located at C:\geoplus1\DBIRepair.exe. This tool uses a full path
filename to work on a single PETRA table. The general format for the command line is:
DBIRepair.exe Path_and_Table_File_name
Figure 147: DBIRepair uses a command line interface rather than a GUI
Like the PetraRepair tool, this tool can run both reindex and optimize functions with parameter
switches. These switches are added to the end of the command, and change the behavior of the
command. Make sure to put a single space between the database table name and first parameter,
as well as in between parameters. Here is an example of repairing and reindexing the tutorial
project’s casing table:
c:\geoplus1\DBIRepair.exe c:\geoplus1\projects\tutorial\db\CASING \reindex
Generally, database administrators will want to create a batch file that applies the DBIRepair tool
to all tables in the project or to all the tables in multiple projects.
Figure 148: A DBIRepair batch file applying a “ReIndex” function to all tables in s in a project

Appendix Petra v4 Introduction
134 February 20, 2013
PetraPack.EXE
The next step is to run PetraPack on the reindexed projects. PetraPack is a standalone utility
that checks tables to ensure that each piece of valid data is still referenced in an index. Entries
that are no longer indexed by anything (known as “orphaned entries”) are erased, which shrinks
the overall size of the project and increases performance. As a pre-migration step, removing the
orphaned records can accelerate the migration process. Unlike the database index tools,
PetraPack can run while other users are still in the project. It’s perfectly reasonable to run
PetraPack on an unused PC while other users continue to work normally.
To open the PetraPack tool, select “PetraPack.EXE” in the system path. For Standalone
installations, this will be located at C:\geoplus1\PetraPack.EXE.
1. Running PetraPack automatically opens the Select Petra Project INI file window. Select
the desired project’s INI file and select “Open.”
Figure 149: Selecting a project INI file
2. PetraPack automatically opens the project and attempts to clean out empty entries. Once
the process is finished, close the window.
Figure 150: Running the Petra Pack Utility
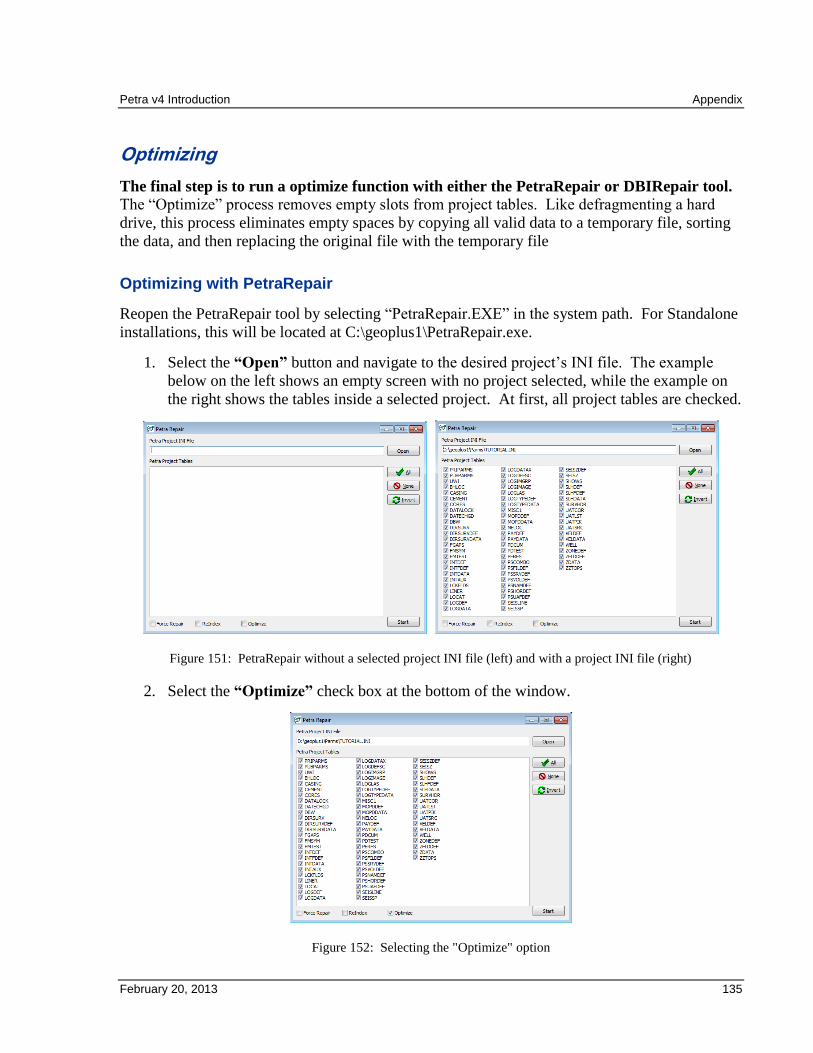
Petra v4 Introduction Appendix
February 20, 2013 135
Optimizing
The final step is to run a optimize function with either the PetraRepair or DBIRepair tool.
The “Optimize” process removes empty slots from project tables. Like defragmenting a hard
drive, this process eliminates empty spaces by copying all valid data to a temporary file, sorting
the data, and then replacing the original file with the temporary file
Optimizing with PetraRepair
Reopen the PetraRepair tool by selecting “PetraRepair.EXE” in the system path. For Standalone
installations, this will be located at C:\geoplus1\PetraRepair.exe.
1. Select the “Open” button and navigate to the desired project’s INI file. The example
below on the left shows an empty screen with no project selected, while the example on
the right shows the tables inside a selected project. At first, all project tables are checked.
Figure 151: PetraRepair without a selected project INI file (left) and with a project INI file (right)
2. Select the “Optimize” check box at the bottom of the window.
Figure 152: Selecting the "Optimize" option
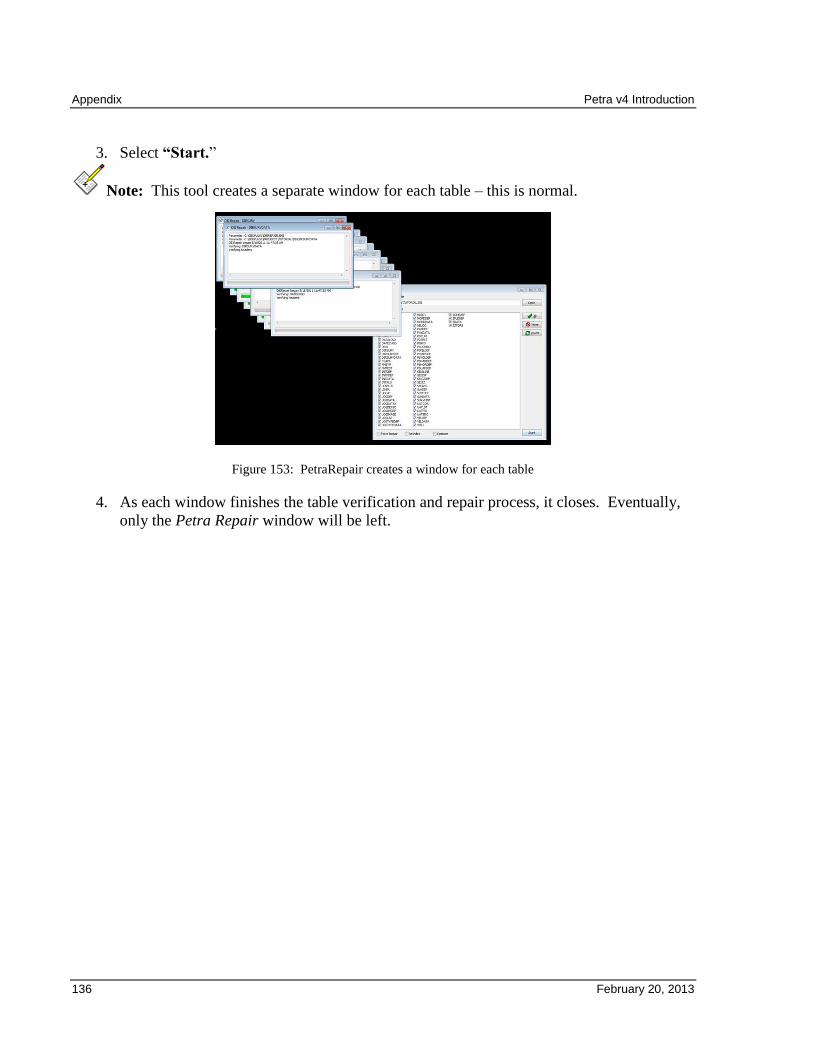
Appendix Petra v4 Introduction
136 February 20, 2013
3. Select “Start.”
Note: This tool creates a separate window for each table – this is normal.
Figure 153: PetraRepair creates a window for each table
4. As each window finishes the table verification and repair process, it closes. Eventually,
only the Petra Repair window will be left.
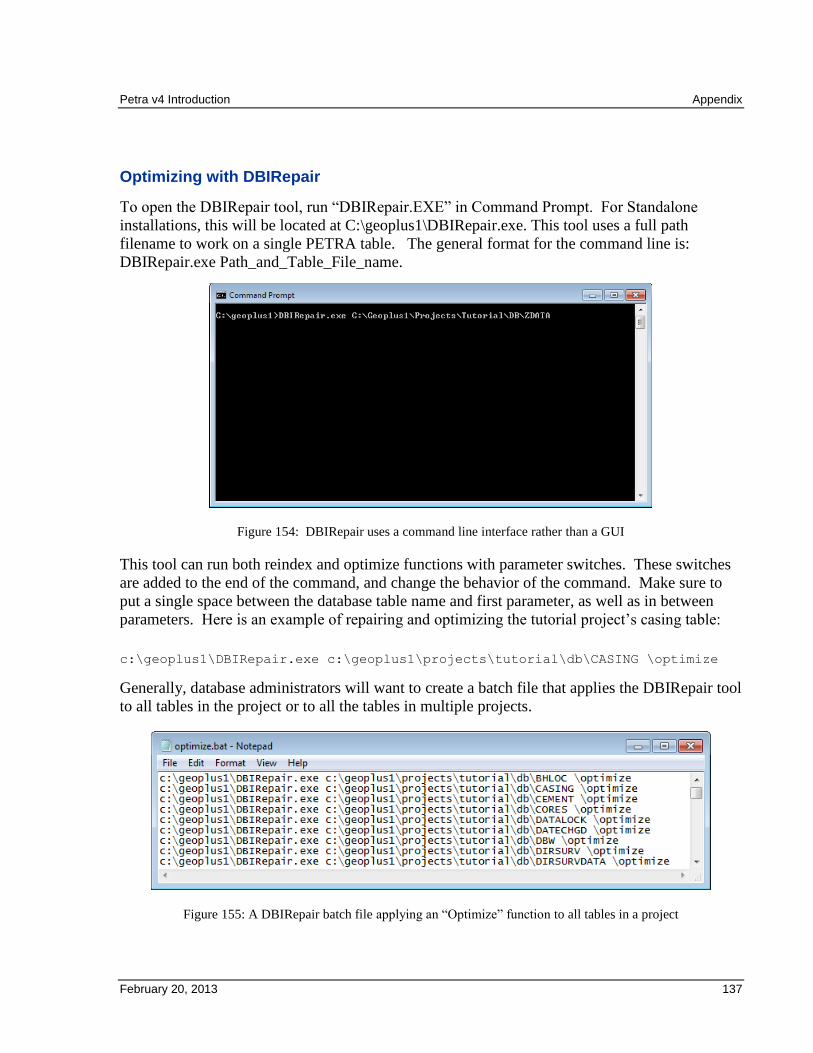
Petra v4 Introduction Appendix
February 20, 2013 137
Optimizing with DBIRepair
To open the DBIRepair tool, run “DBIRepair.EXE” in Command Prompt. For Standalone
installations, this will be located at C:\geoplus1\DBIRepair.exe. This tool uses a full path
filename to work on a single PETRA table. The general format for the command line is:
DBIRepair.exe Path_and_Table_File_name.
Figure 154: DBIRepair uses a command line interface rather than a GUI
This tool can run both reindex and optimize functions with parameter switches. These switches
are added to the end of the command, and change the behavior of the command. Make sure to
put a single space between the database table name and first parameter, as well as in between
parameters. Here is an example of repairing and optimizing the tutorial project’s casing table:
c:\geoplus1\DBIRepair.exe c:\geoplus1\projects\tutorial\db\CASING \optimize
Generally, database administrators will want to create a batch file that applies the DBIRepair tool
to all tables in the project or to all the tables in multiple projects.
Figure 155: A DBIRepair batch file applying an “Optimize” function to all tables in a project
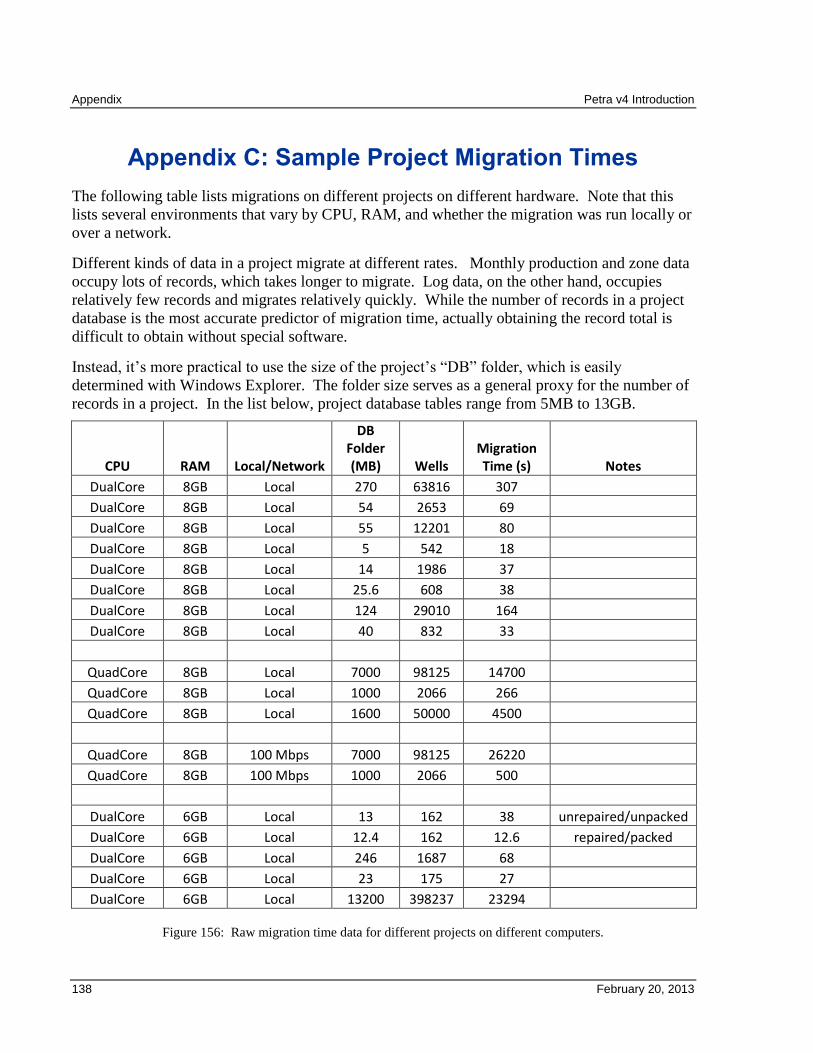
Appendix Petra v4 Introduction
138 February 20, 2013
Appendix C: Sample Project Migration Times
The following table lists migrations on different projects on different hardware. Note that this
lists several environments that vary by CPU, RAM, and whether the migration was run locally or
over a network.
Different kinds of data in a project migrate at different rates. Monthly production and zone data
occupy lots of records, which takes longer to migrate. Log data, on the other hand, occupies
relatively few records and migrates relatively quickly. While the number of records in a project
database is the most accurate predictor of migration time, actually obtaining the record total is
difficult to obtain without special software.
Instead, it’s more practical to use the size of the project’s “DB” folder, which is easily
determined with Windows Explorer. The folder size serves as a general proxy for the number of
records in a project. In the list below, project database tables range from 5MB to 13GB.
CPU RAM Local/Network
DB Folder (MB) Wells
Migration Time (s) Notes
DualCore 8GB Local 270 63816 307
DualCore 8GB Local 54 2653 69
DualCore 8GB Local 55 12201 80
DualCore 8GB Local 5 542 18
DualCore 8GB Local 14 1986 37
DualCore 8GB Local 25.6 608 38
DualCore 8GB Local 124 29010 164
DualCore 8GB Local 40 832 33
QuadCore 8GB Local 7000 98125 14700
QuadCore 8GB Local 1000 2066 266
QuadCore 8GB Local 1600 50000 4500
QuadCore 8GB 100 Mbps 7000 98125 26220
QuadCore 8GB 100 Mbps 1000 2066 500
DualCore 6GB Local 13 162 38 unrepaired/unpacked
DualCore 6GB Local 12.4 162 12.6 repaired/packed
DualCore 6GB Local 246 1687 68
DualCore 6GB Local 23 175 27
DualCore 6GB Local 13200 398237 23294
Figure 156: Raw migration time data for different projects on different computers.
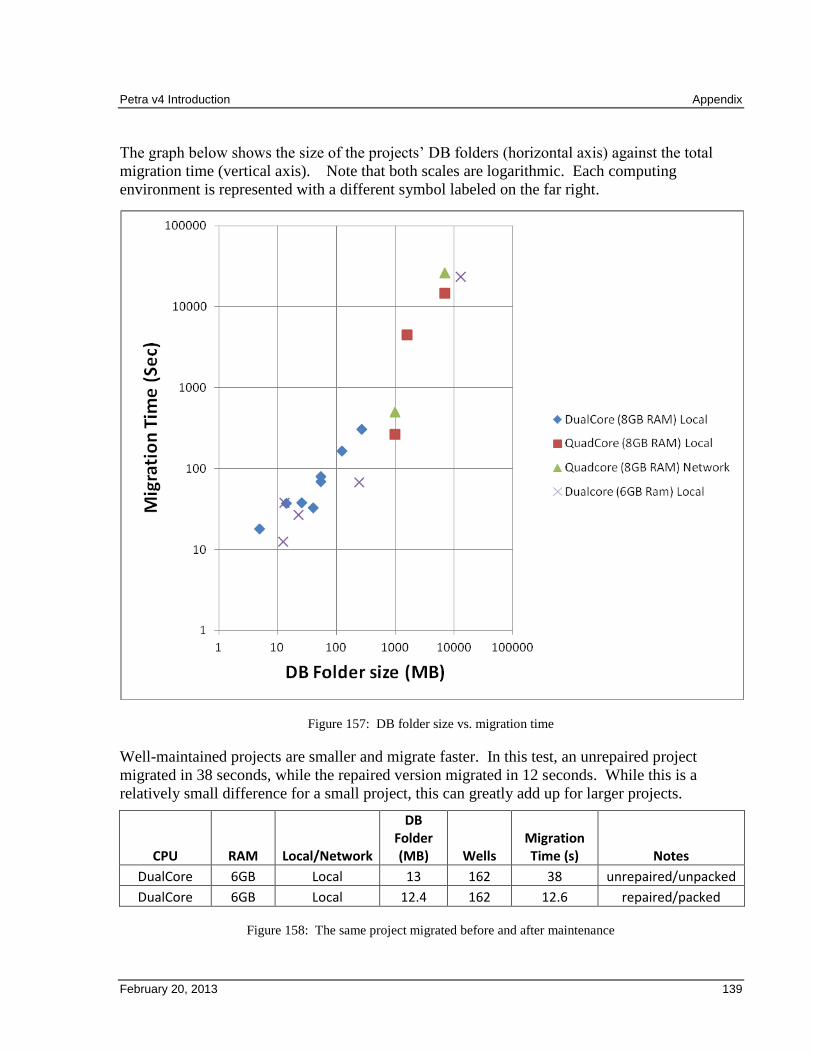
Petra v4 Introduction Appendix
February 20, 2013 139
The graph below shows the size of the projects’ DB folders (horizontal axis) against the total
migration time (vertical axis). Note that both scales are logarithmic. Each computing
environment is represented with a different symbol labeled on the far right.
Figure 157: DB folder size vs. migration time
Well-maintained projects are smaller and migrate faster. In this test, an unrepaired project
migrated in 38 seconds, while the repaired version migrated in 12 seconds. While this is a
relatively small difference for a small project, this can greatly add up for larger projects.
CPU RAM Local/Network
DB Folder (MB) Wells
Migration Time (s) Notes
DualCore 6GB Local 13 162 38 unrepaired/unpacked
DualCore 6GB Local 12.4 162 12.6 repaired/packed
Figure 158: The same project migrated before and after maintenance
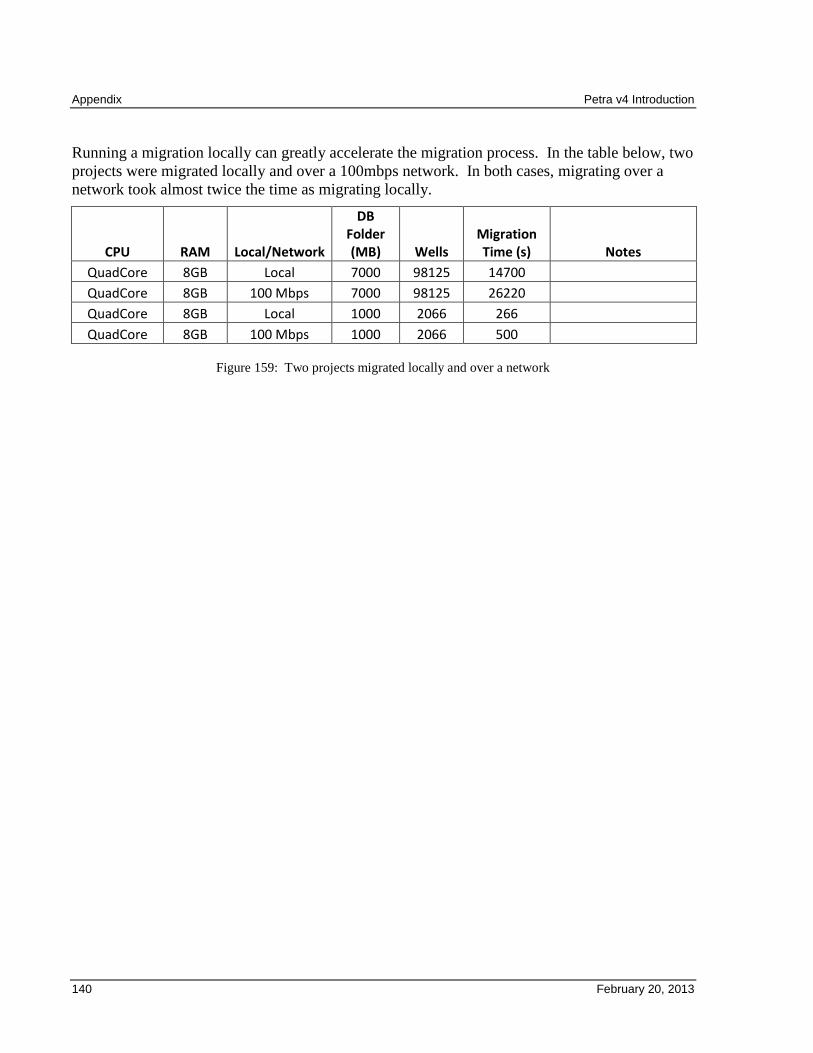
Appendix Petra v4 Introduction
140 February 20, 2013
Running a migration locally can greatly accelerate the migration process. In the table below, two
projects were migrated locally and over a 100mbps network. In both cases, migrating over a
network took almost twice the time as migrating locally.
CPU RAM Local/Network
DB Folder (MB) Wells
Migration Time (s) Notes
QuadCore 8GB Local 7000 98125 14700
QuadCore 8GB 100 Mbps 7000 98125 26220
QuadCore 8GB Local 1000 2066 266
QuadCore 8GB 100 Mbps 1000 2066 500
Figure 159: Two projects migrated locally and over a network
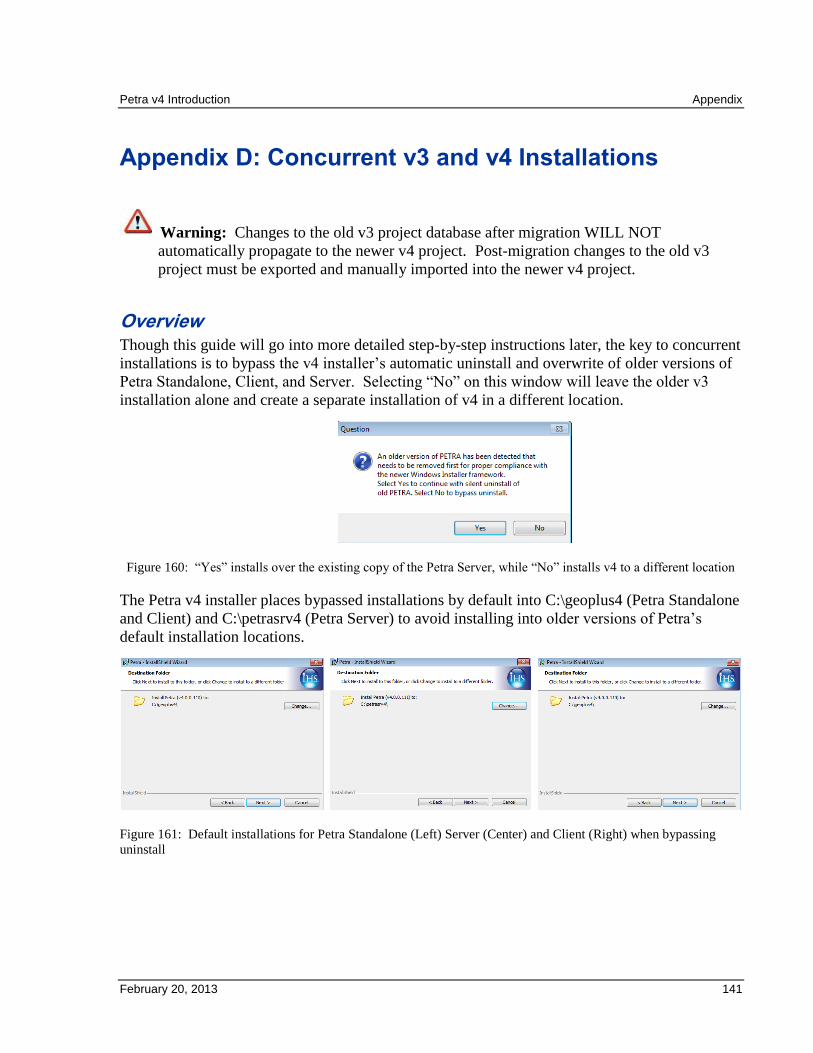
Petra v4 Introduction Appendix
February 20, 2013 141
Appendix D: Concurrent v3 and v4 Installations
Warning: Changes to the old v3 project database after migration WILL NOT
automatically propagate to the newer v4 project. Post-migration changes to the old v3
project must be exported and manually imported into the newer v4 project.
Overview Though this guide will go into more detailed step-by-step instructions later, the key to concurrent
installations is to bypass the v4 installer’s automatic uninstall and overwrite of older versions of
Petra Standalone, Client, and Server. Selecting “No” on this window will leave the older v3
installation alone and create a separate installation of v4 in a different location.
Figure 160: “Yes” installs over the existing copy of the Petra Server, while “No” installs v4 to a different location
The Petra v4 installer places bypassed installations by default into C:\geoplus4 (Petra Standalone
and Client) and C:\petrasrv4 (Petra Server) to avoid installing into older versions of Petra’s
default installation locations.
Figure 161: Default installations for Petra Standalone (Left) Server (Center) and Client (Right) when bypassing
uninstall
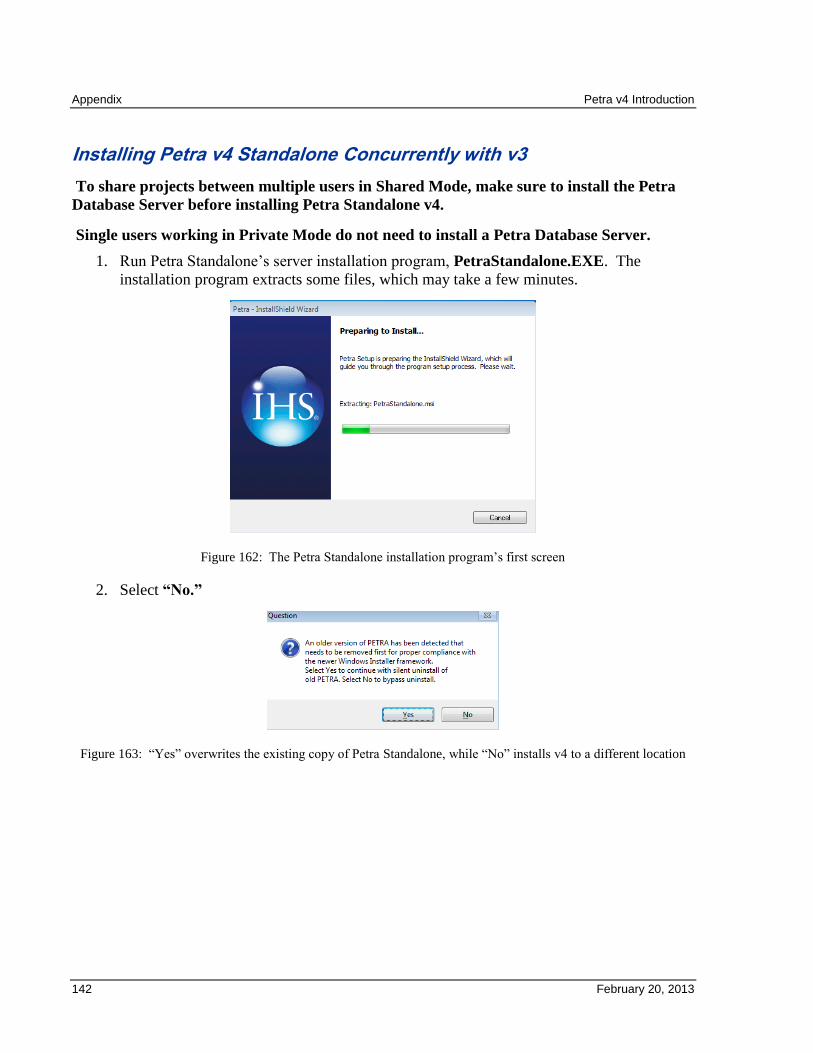
Appendix Petra v4 Introduction
142 February 20, 2013
Installing Petra v4 Standalone Concurrently with v3
To share projects between multiple users in Shared Mode, make sure to install the Petra
Database Server before installing Petra Standalone v4.
Single users working in Private Mode do not need to install a Petra Database Server.
1. Run Petra Standalone’s server installation program, PetraStandalone.EXE. The
installation program extracts some files, which may take a few minutes.
Figure 162: The Petra Standalone installation program’s first screen
2. Select “No.”
Figure 163: “Yes” overwrites the existing copy of Petra Standalone, while “No” installs v4 to a different location

Petra v4 Introduction Appendix
February 20, 2013 143
3. This screen displays the version of the Petra Standalone installer. Here, select “Next.”
Figure 164: The installer’s version number
4. This screen displays the license agreement. Select “I accept the terms in the license
agreement” and then “Next.”
Figure 165: The license agreement
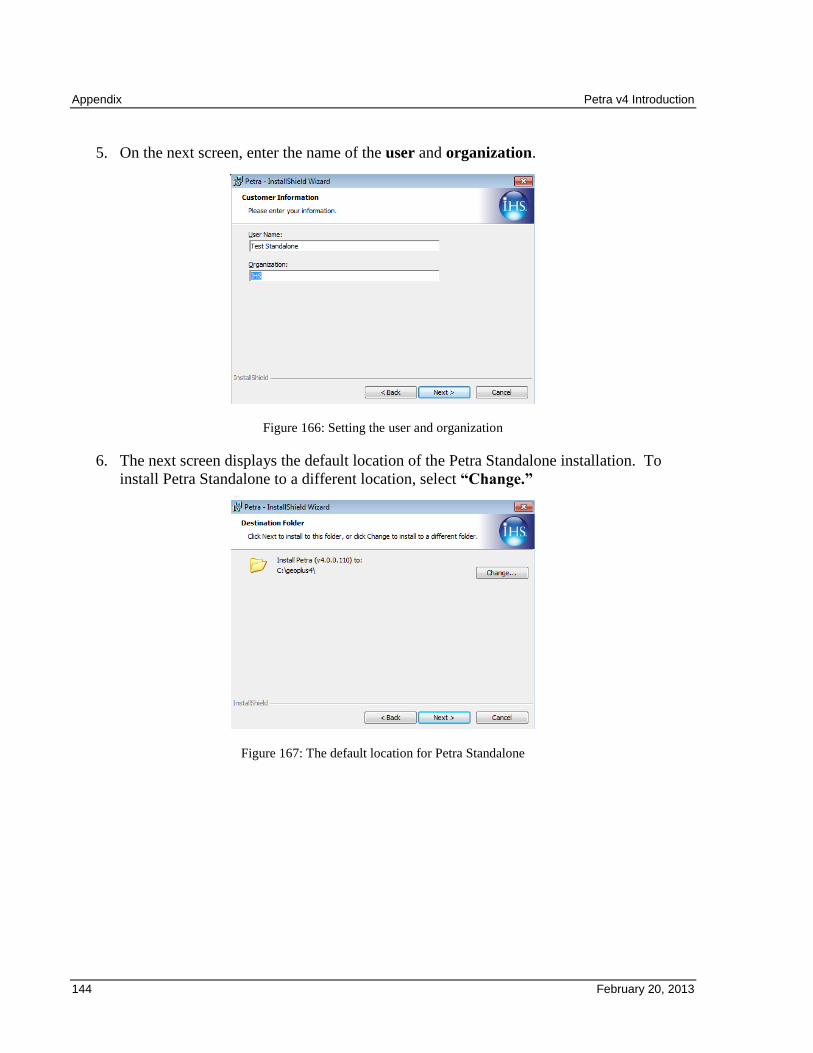
Appendix Petra v4 Introduction
144 February 20, 2013
5. On the next screen, enter the name of the user and organization.
Figure 166: Setting the user and organization
6. The next screen displays the default location of the Petra Standalone installation. To
install Petra Standalone to a different location, select “Change.”
Figure 167: The default location for Petra Standalone
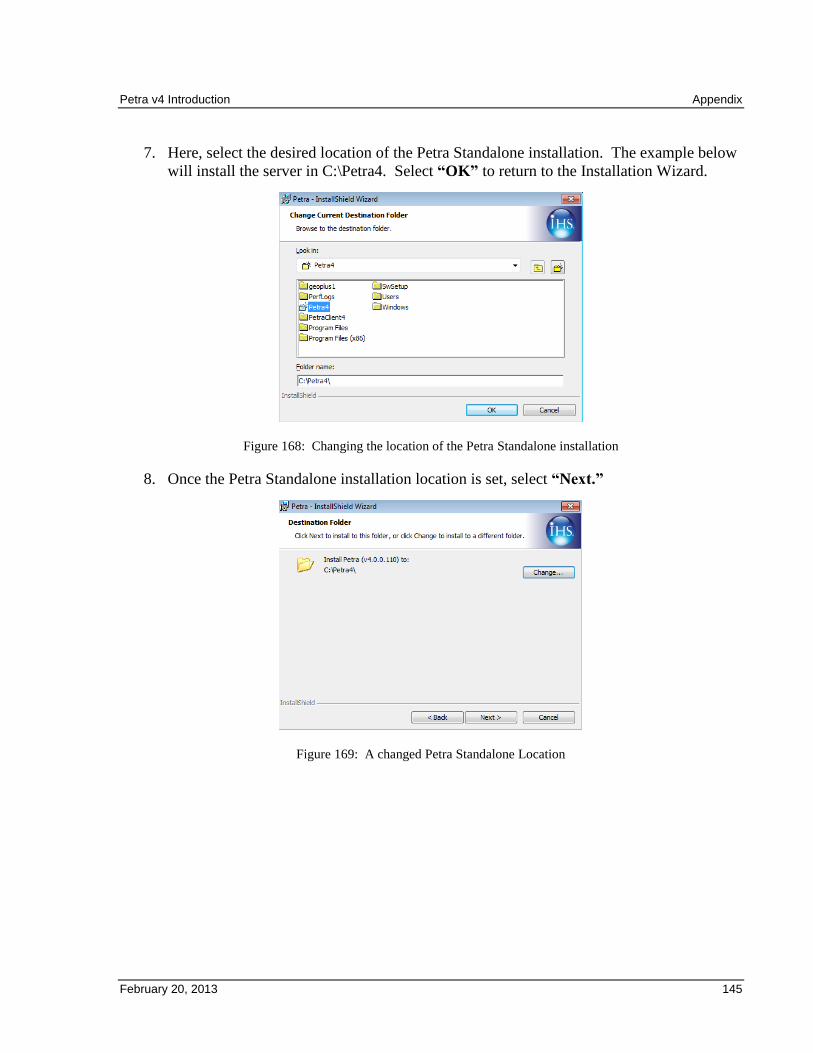
Petra v4 Introduction Appendix
February 20, 2013 145
7. Here, select the desired location of the Petra Standalone installation. The example below
will install the server in C:\Petra4. Select “OK” to return to the Installation Wizard.
Figure 168: Changing the location of the Petra Standalone installation
8. Once the Petra Standalone installation location is set, select “Next.”
Figure 169: A changed Petra Standalone Location
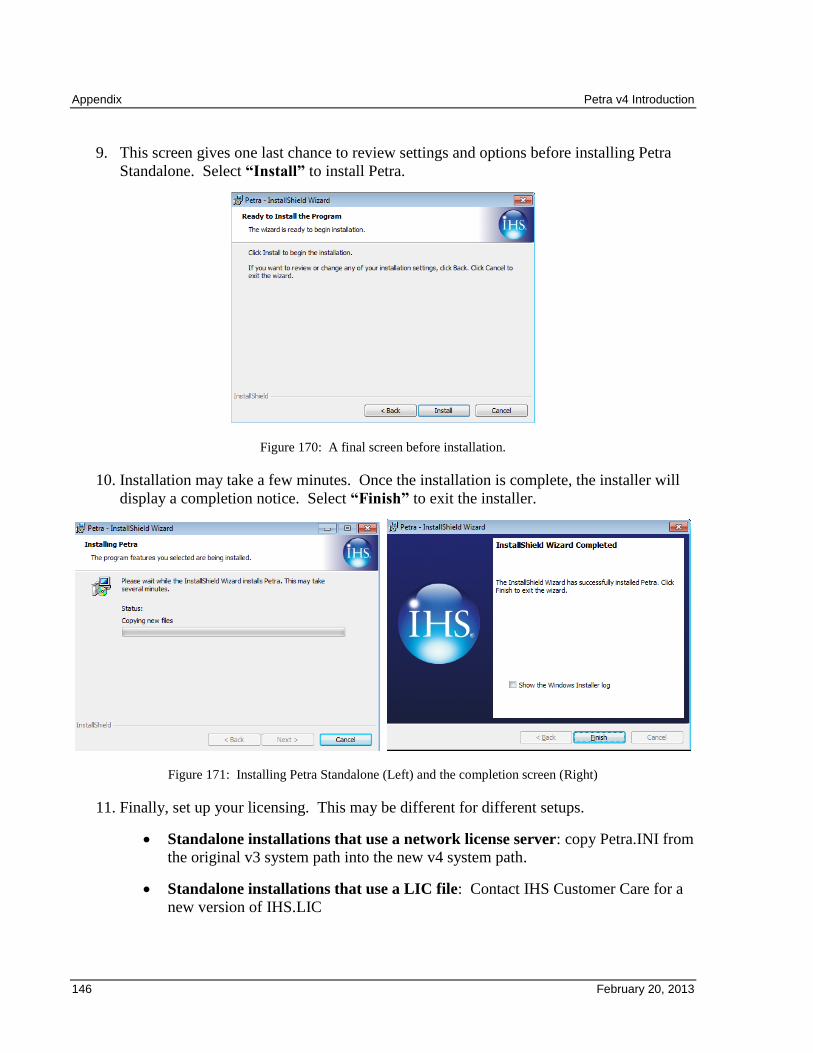
Appendix Petra v4 Introduction
146 February 20, 2013
9. This screen gives one last chance to review settings and options before installing Petra
Standalone. Select “Install” to install Petra.
Figure 170: A final screen before installation.
10. Installation may take a few minutes. Once the installation is complete, the installer will
display a completion notice. Select “Finish” to exit the installer.
Figure 171: Installing Petra Standalone (Left) and the completion screen (Right)
11. Finally, set up your licensing. This may be different for different setups.
Standalone installations that use a network license server: copy Petra.INI from
the original v3 system path into the new v4 system path.
Standalone installations that use a LIC file: Contact IHS Customer Care for a
new version of IHS.LIC
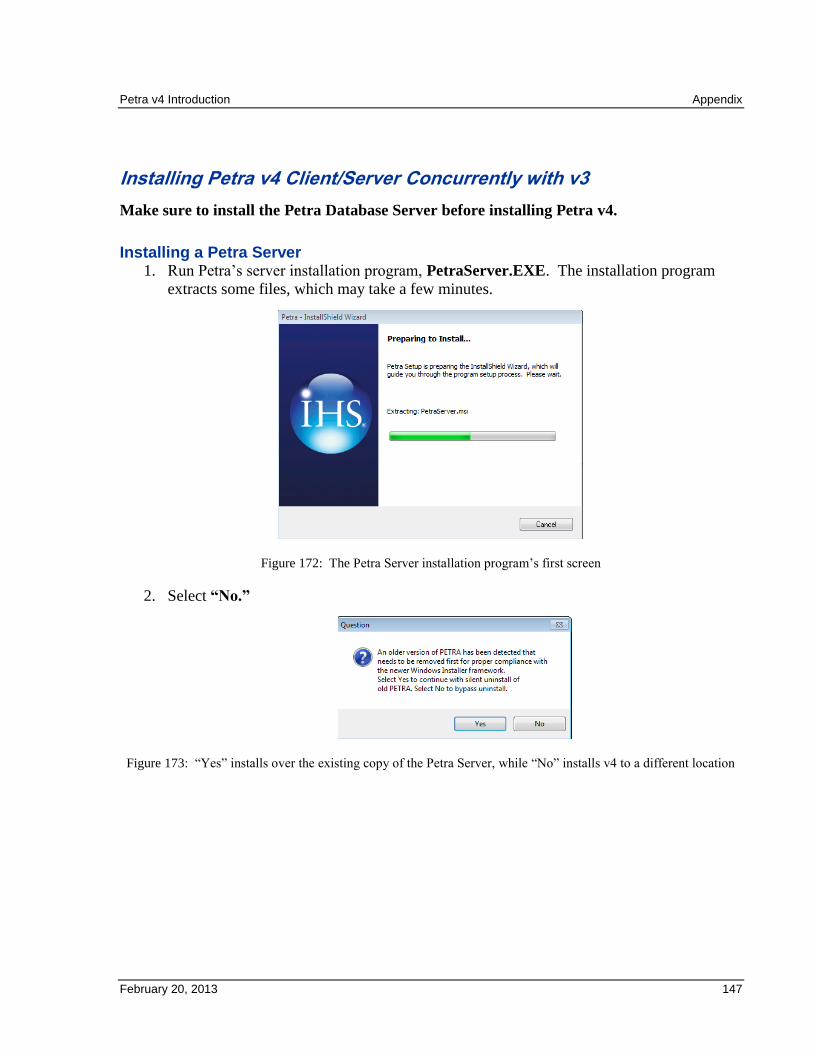
Petra v4 Introduction Appendix
February 20, 2013 147
Installing Petra v4 Client/Server Concurrently with v3
Make sure to install the Petra Database Server before installing Petra v4.
Installing a Petra Server 1. Run Petra’s server installation program, PetraServer.EXE. The installation program
extracts some files, which may take a few minutes.
Figure 172: The Petra Server installation program’s first screen
2. Select “No.”
Figure 173: “Yes” installs over the existing copy of the Petra Server, while “No” installs v4 to a different location
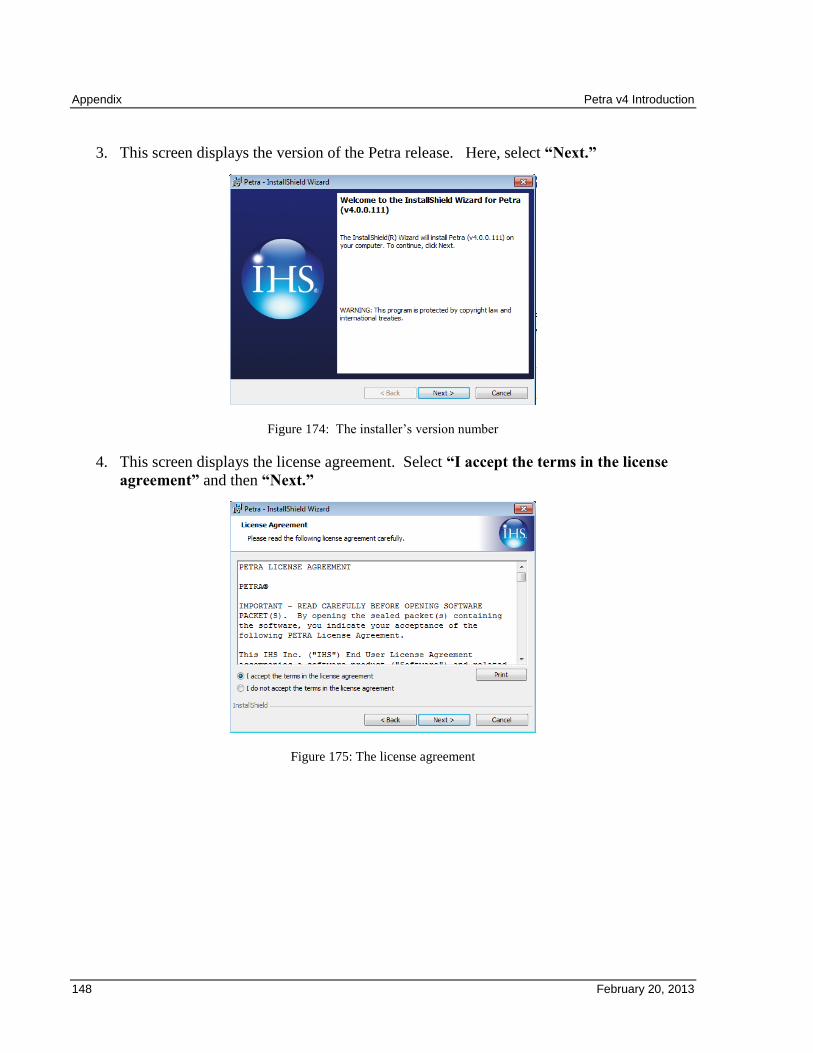
Appendix Petra v4 Introduction
148 February 20, 2013
3. This screen displays the version of the Petra release. Here, select “Next.”
Figure 174: The installer’s version number
4. This screen displays the license agreement. Select “I accept the terms in the license
agreement” and then “Next.”
Figure 175: The license agreement
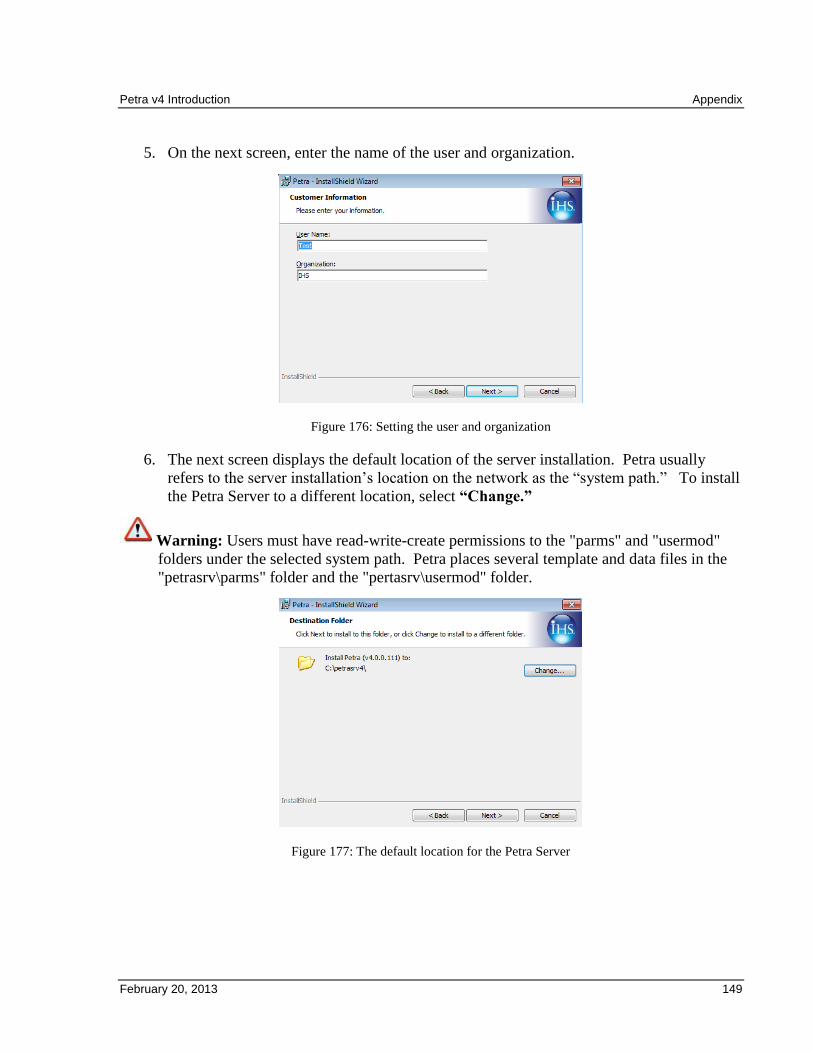
Petra v4 Introduction Appendix
February 20, 2013 149
5. On the next screen, enter the name of the user and organization.
Figure 176: Setting the user and organization
6. The next screen displays the default location of the server installation. Petra usually
refers to the server installation’s location on the network as the “system path.” To install
the Petra Server to a different location, select “Change.”
Warning: Users must have read-write-create permissions to the "parms" and "usermod"
folders under the selected system path. Petra places several template and data files in the
"petrasrv\parms" folder and the "pertasrv\usermod" folder.
Figure 177: The default location for the Petra Server
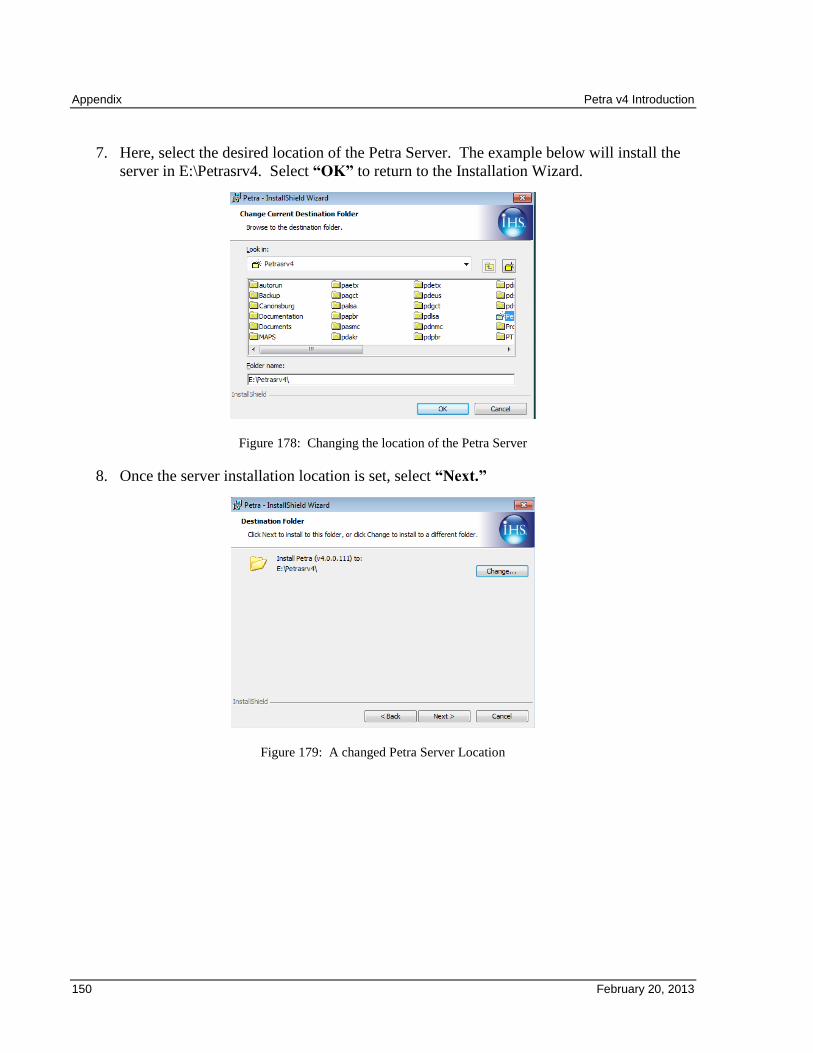
Appendix Petra v4 Introduction
150 February 20, 2013
7. Here, select the desired location of the Petra Server. The example below will install the
server in E:\Petrasrv4. Select “OK” to return to the Installation Wizard.
Figure 178: Changing the location of the Petra Server
8. Once the server installation location is set, select “Next.”
Figure 179: A changed Petra Server Location
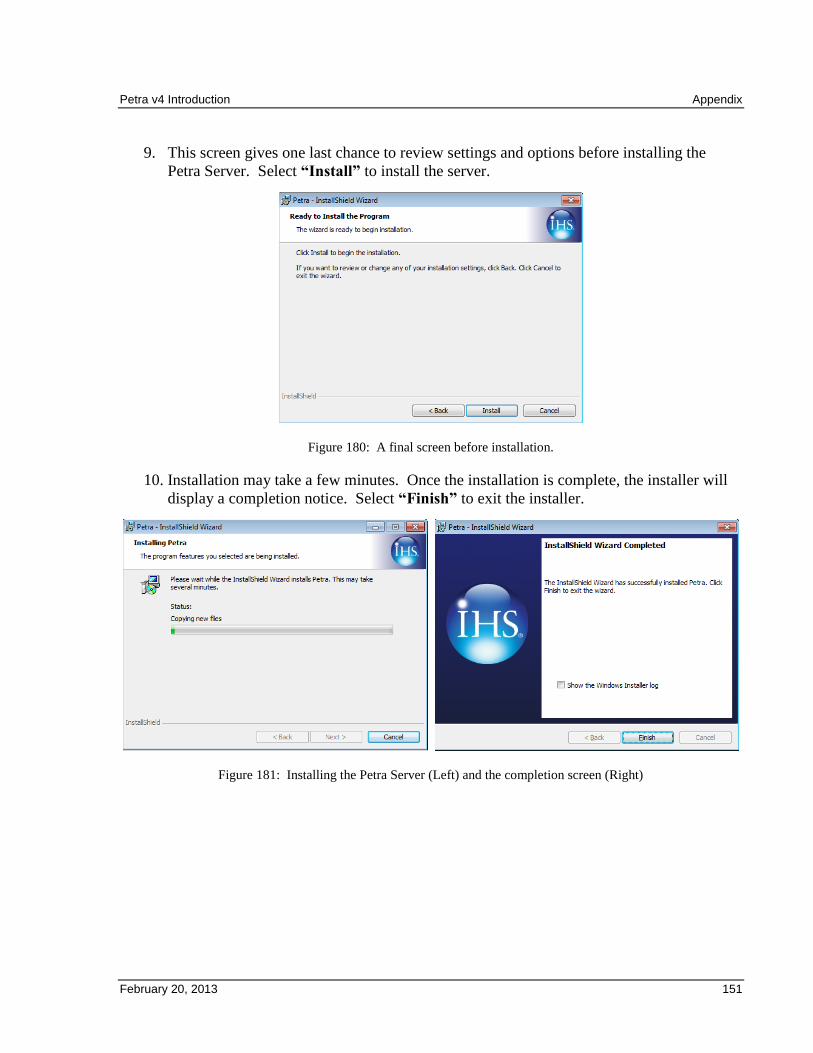
Petra v4 Introduction Appendix
February 20, 2013 151
9. This screen gives one last chance to review settings and options before installing the
Petra Server. Select “Install” to install the server.
Figure 180: A final screen before installation.
10. Installation may take a few minutes. Once the installation is complete, the installer will
display a completion notice. Select “Finish” to exit the installer.
Figure 181: Installing the Petra Server (Left) and the completion screen (Right)
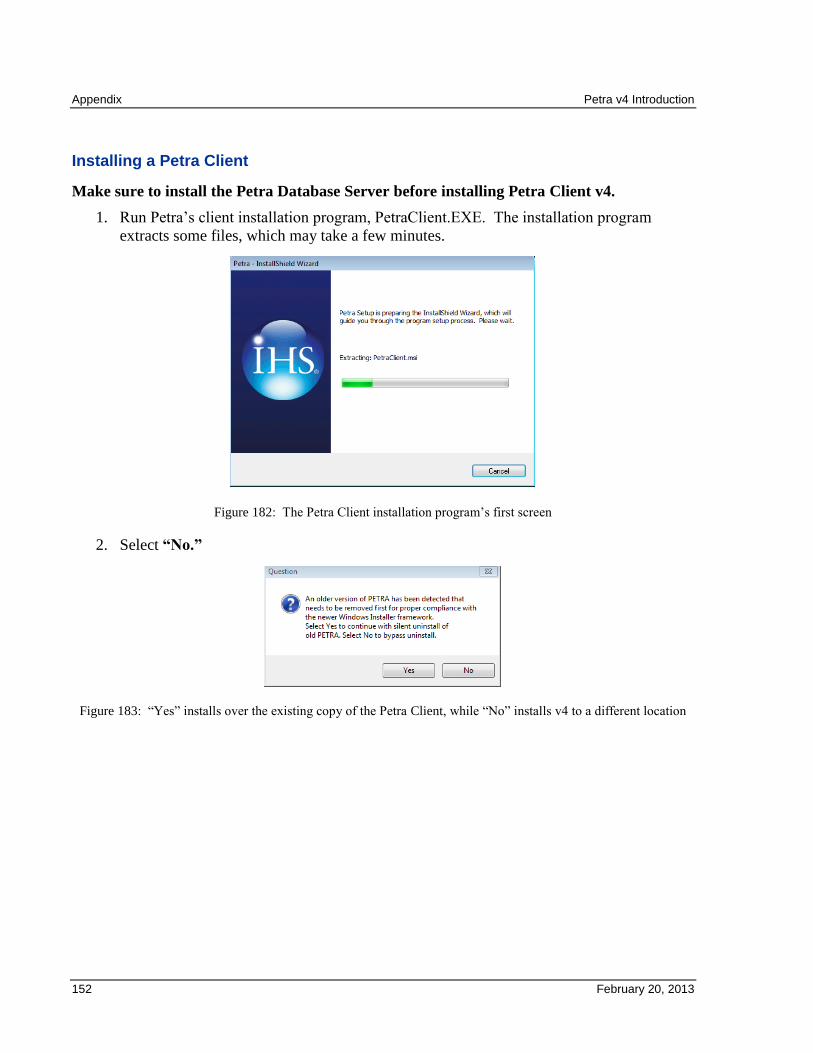
Appendix Petra v4 Introduction
152 February 20, 2013
Installing a Petra Client
Make sure to install the Petra Database Server before installing Petra Client v4.
1. Run Petra’s client installation program, PetraClient.EXE. The installation program
extracts some files, which may take a few minutes.
Figure 182: The Petra Client installation program’s first screen
2. Select “No.”
Figure 183: “Yes” installs over the existing copy of the Petra Client, while “No” installs v4 to a different location
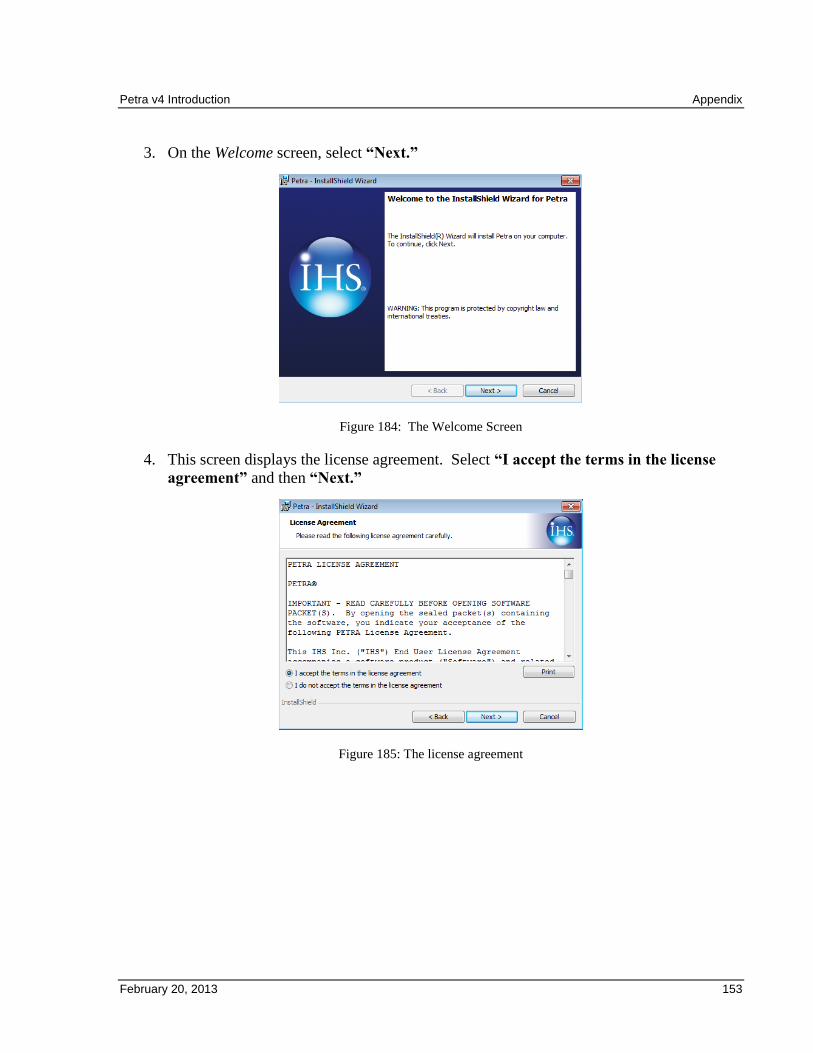
Petra v4 Introduction Appendix
February 20, 2013 153
3. On the Welcome screen, select “Next.”
Figure 184: The Welcome Screen
4. This screen displays the license agreement. Select “I accept the terms in the license
agreement” and then “Next.”
Figure 185: The license agreement
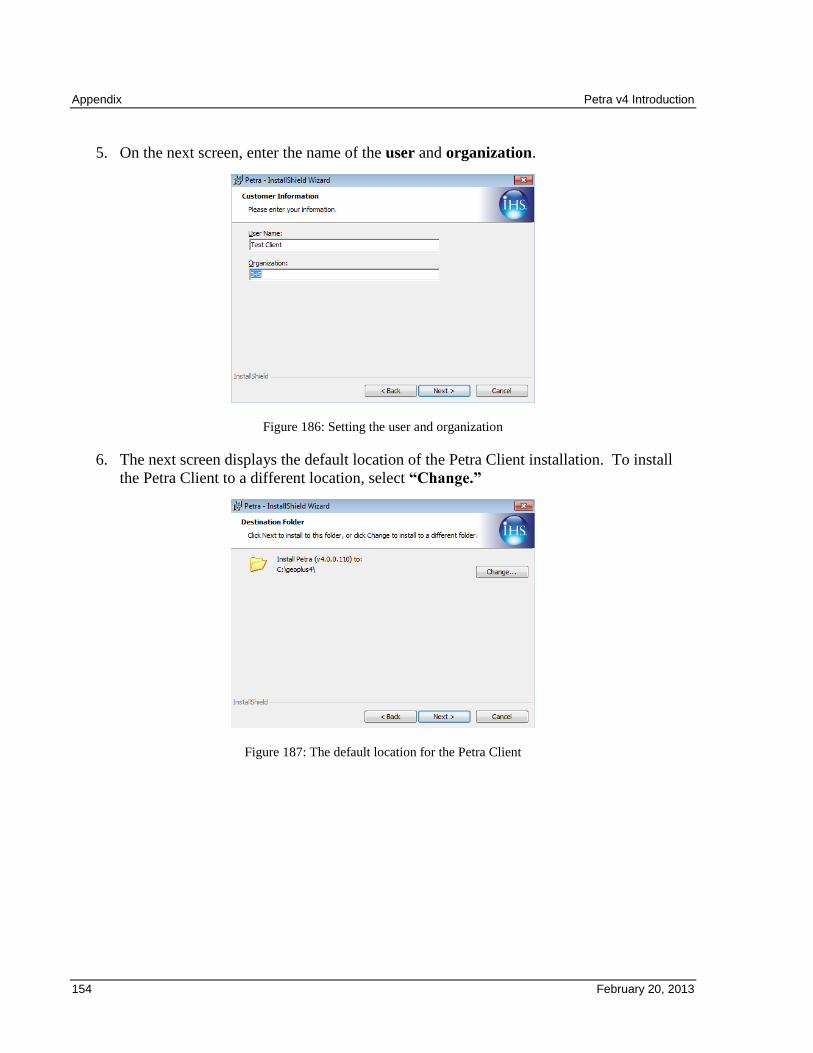
Appendix Petra v4 Introduction
154 February 20, 2013
5. On the next screen, enter the name of the user and organization.
Figure 186: Setting the user and organization
6. The next screen displays the default location of the Petra Client installation. To install
the Petra Client to a different location, select “Change.”
Figure 187: The default location for the Petra Client
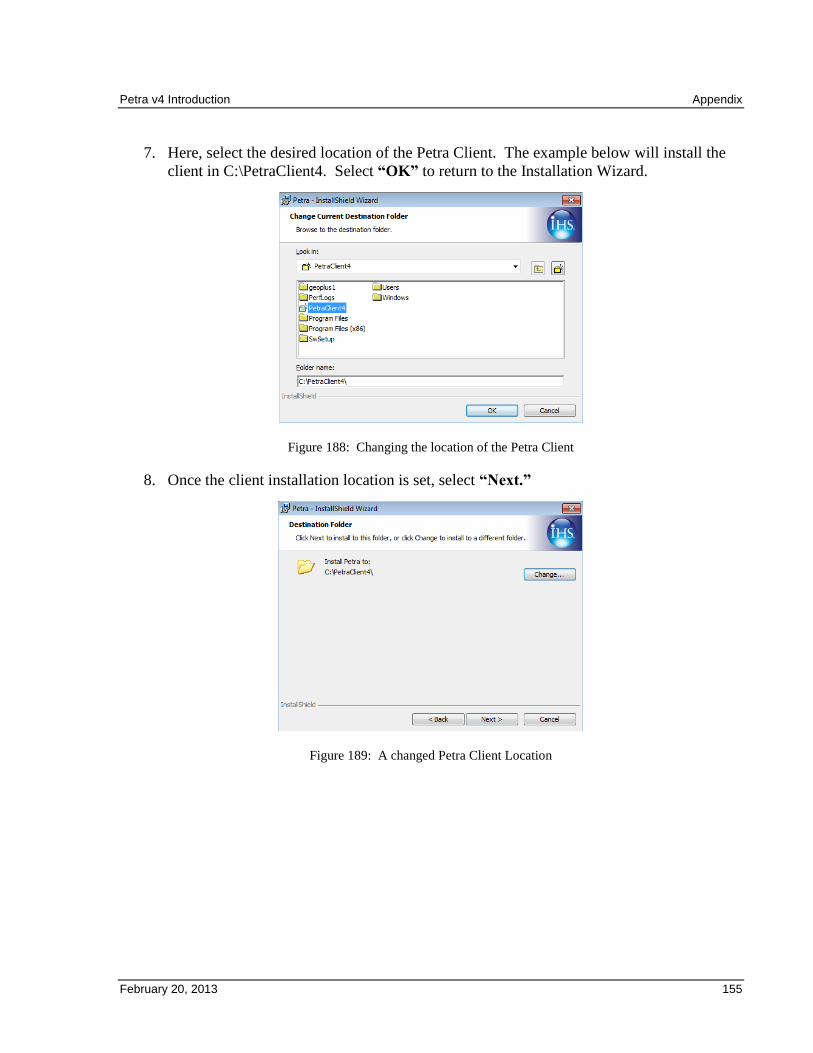
Petra v4 Introduction Appendix
February 20, 2013 155
7. Here, select the desired location of the Petra Client. The example below will install the
client in C:\PetraClient4. Select “OK” to return to the Installation Wizard.
Figure 188: Changing the location of the Petra Client
8. Once the client installation location is set, select “Next.”
Figure 189: A changed Petra Client Location
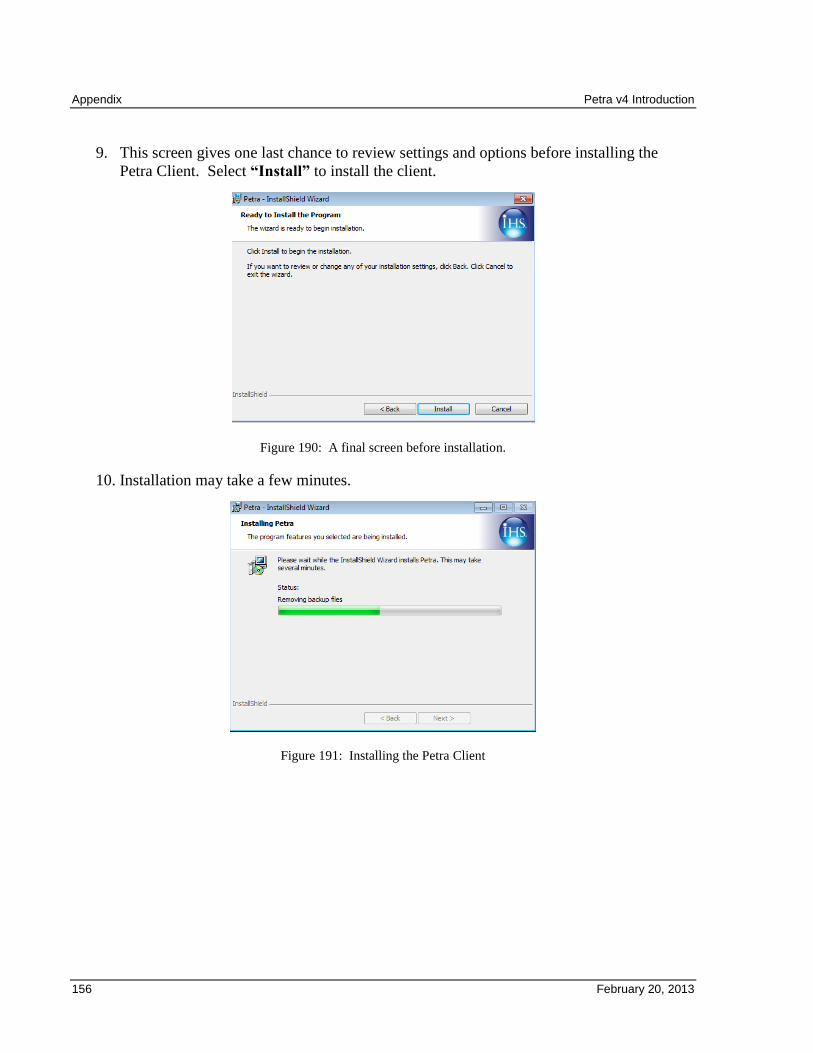
Appendix Petra v4 Introduction
156 February 20, 2013
9. This screen gives one last chance to review settings and options before installing the
Petra Client. Select “Install” to install the client.
Figure 190: A final screen before installation.
10. Installation may take a few minutes.
Figure 191: Installing the Petra Client
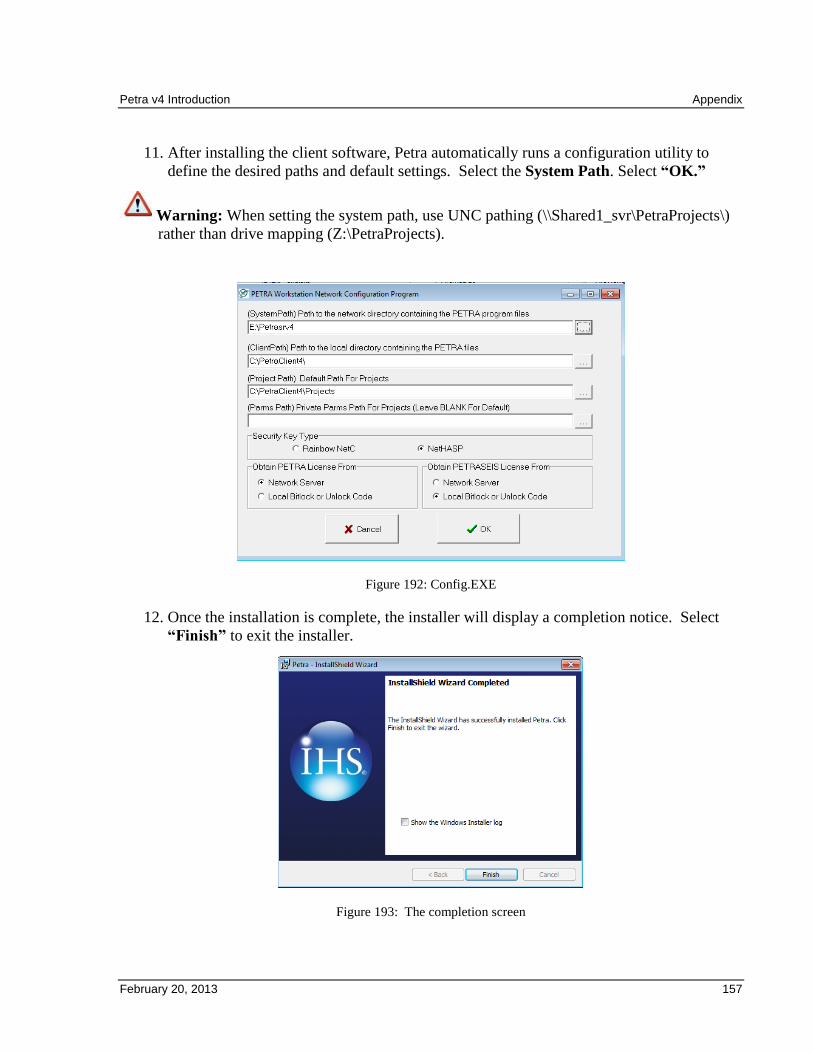
Petra v4 Introduction Appendix
February 20, 2013 157
11. After installing the client software, Petra automatically runs a configuration utility to
define the desired paths and default settings. Select the System Path. Select “OK.”
Warning: When setting the system path, use UNC pathing (\\Shared1_svr\PetraProjects\)
rather than drive mapping (Z:\PetraProjects).
Figure 192: Config.EXE
12. Once the installation is complete, the installer will display a completion notice. Select
“Finish” to exit the installer.
Figure 193: The completion screen
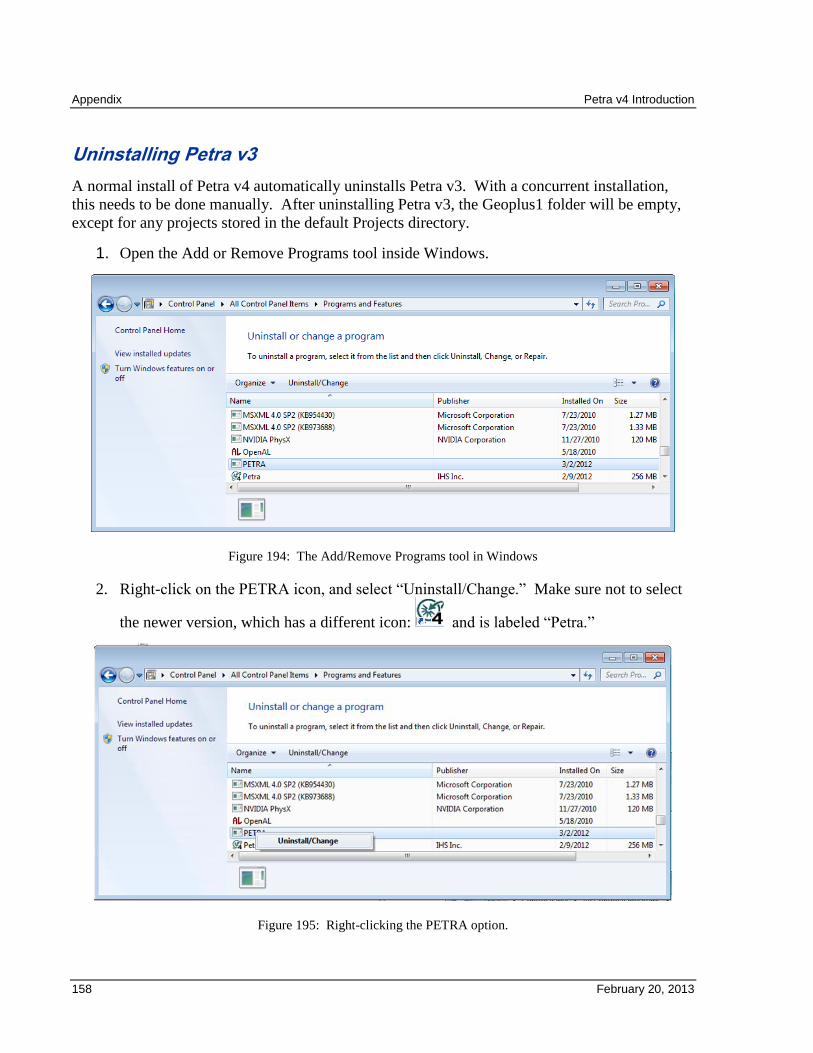
Appendix Petra v4 Introduction
158 February 20, 2013
Uninstalling Petra v3
A normal install of Petra v4 automatically uninstalls Petra v3. With a concurrent installation,
this needs to be done manually. After uninstalling Petra v3, the Geoplus1 folder will be empty,
except for any projects stored in the default Projects directory.
1. Open the Add or Remove Programs tool inside Windows.
Figure 194: The Add/Remove Programs tool in Windows
2. Right-click on the PETRA icon, and select “Uninstall/Change.” Make sure not to select
the newer version, which has a different icon: and is labeled “Petra.”
Figure 195: Right-clicking the PETRA option.
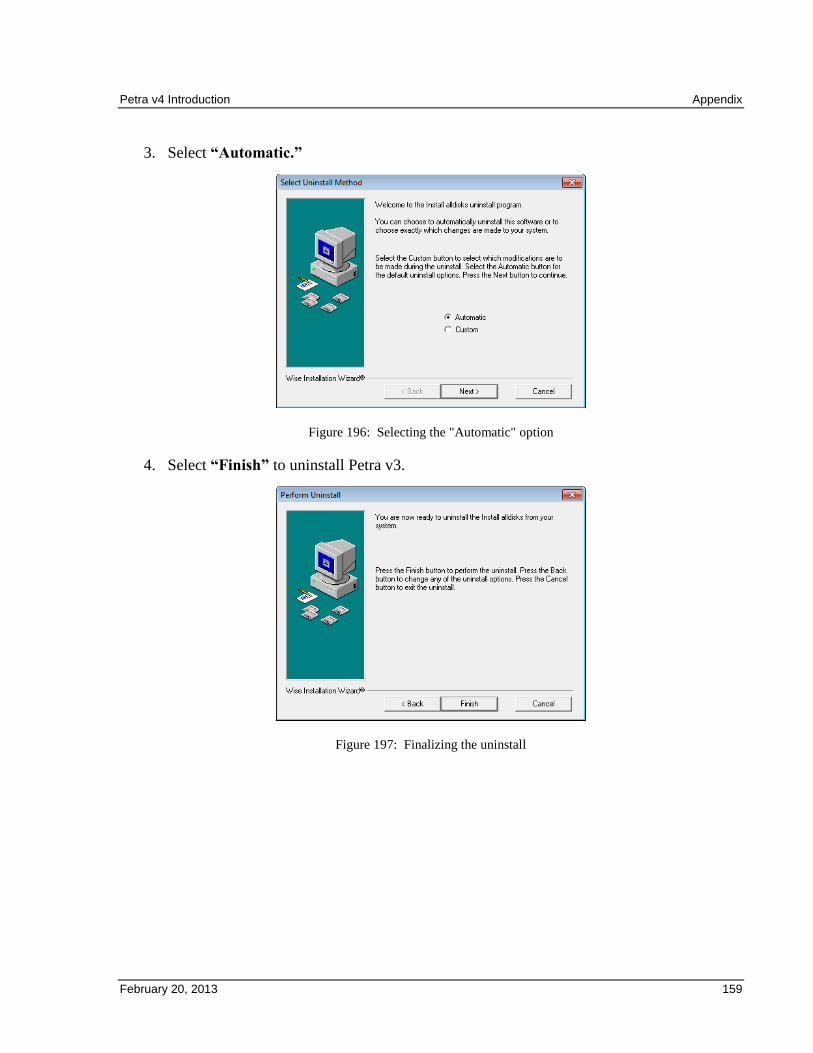
Petra v4 Introduction Appendix
February 20, 2013 159
3. Select “Automatic.”
Figure 196: Selecting the "Automatic" option
4. Select “Finish” to uninstall Petra v3.
Figure 197: Finalizing the uninstall
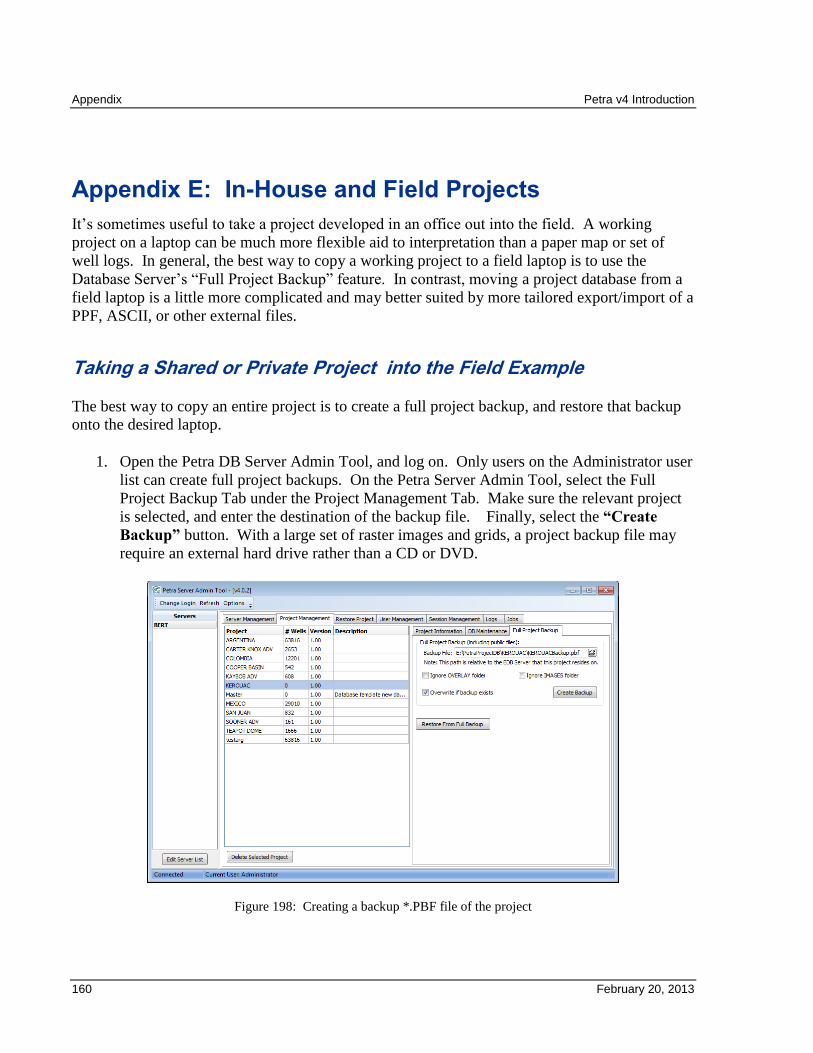
Appendix Petra v4 Introduction
160 February 20, 2013
Appendix E: In-House and Field Projects
It’s sometimes useful to take a project developed in an office out into the field. A working
project on a laptop can be much more flexible aid to interpretation than a paper map or set of
well logs. In general, the best way to copy a working project to a field laptop is to use the
Database Server’s “Full Project Backup” feature. In contrast, moving a project database from a
field laptop is a little more complicated and may better suited by more tailored export/import of a
PPF, ASCII, or other external files.
Taking a Shared or Private Project into the Field Example
The best way to copy an entire project is to create a full project backup, and restore that backup
onto the desired laptop.
1. Open the Petra DB Server Admin Tool, and log on. Only users on the Administrator user
list can create full project backups. On the Petra Server Admin Tool, select the Full
Project Backup Tab under the Project Management Tab. Make sure the relevant project
is selected, and enter the destination of the backup file. Finally, select the “Create
Backup” button. With a large set of raster images and grids, a project backup file may
require an external hard drive rather than a CD or DVD.
Figure 198: Creating a backup *.PBF file of the project
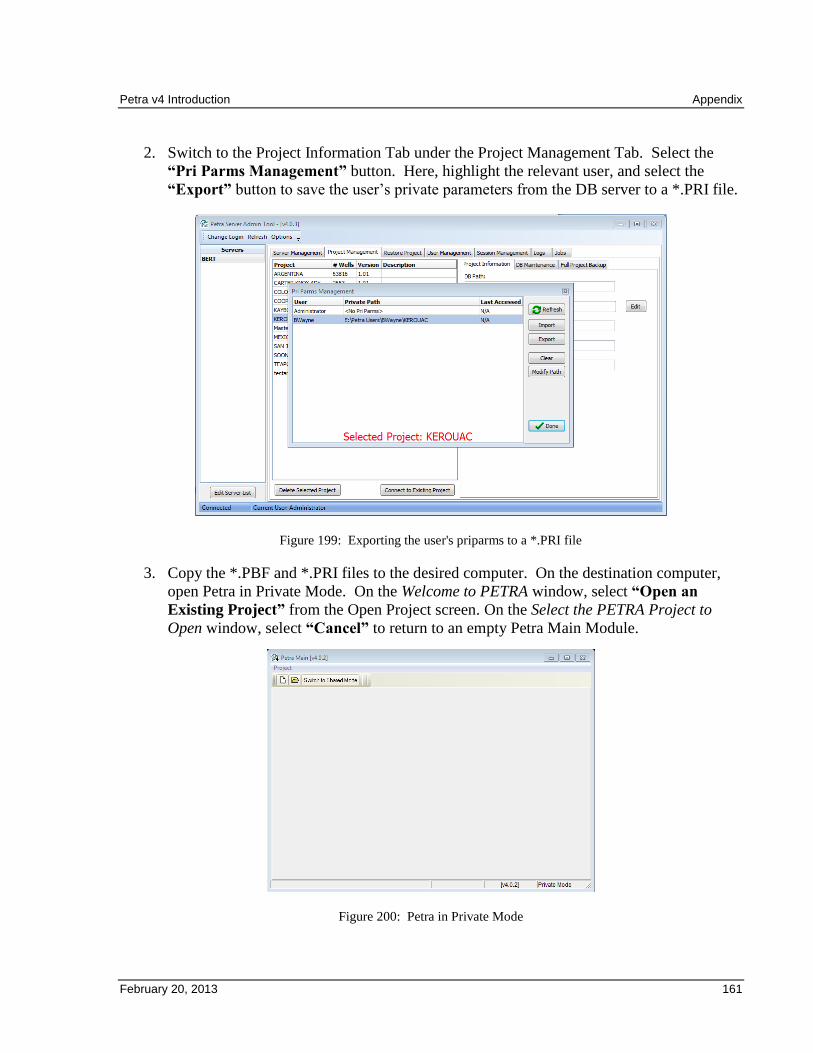
Petra v4 Introduction Appendix
February 20, 2013 161
2. Switch to the Project Information Tab under the Project Management Tab. Select the
“Pri Parms Management” button. Here, highlight the relevant user, and select the
“Export” button to save the user’s private parameters from the DB server to a *.PRI file.
Figure 199: Exporting the user's priparms to a *.PRI file
3. Copy the *.PBF and *.PRI files to the desired computer. On the destination computer,
open Petra in Private Mode. On the Welcome to PETRA window, select “Open an
Existing Project” from the Open Project screen. On the Select the PETRA Project to
Open window, select “Cancel” to return to an empty Petra Main Module.
Figure 200: Petra in Private Mode
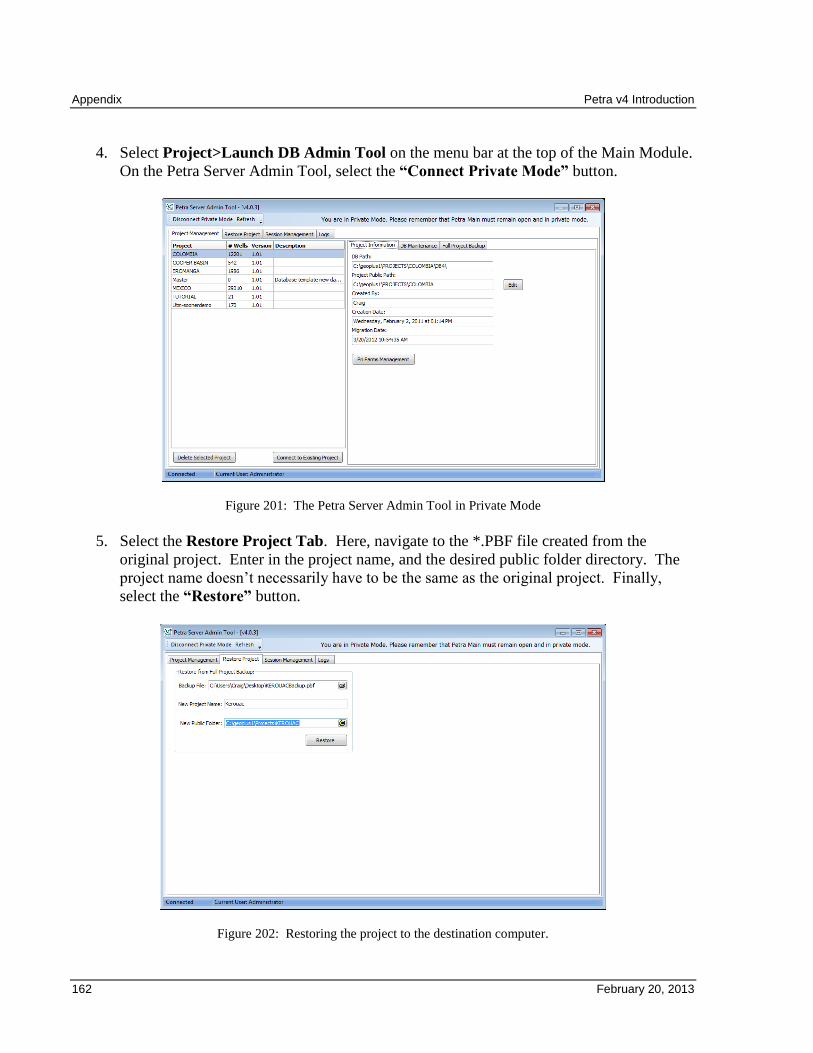
Appendix Petra v4 Introduction
162 February 20, 2013
4. Select Project>Launch DB Admin Tool on the menu bar at the top of the Main Module.
On the Petra Server Admin Tool, select the “Connect Private Mode” button.
Figure 201: The Petra Server Admin Tool in Private Mode
5. Select the Restore Project Tab. Here, navigate to the *.PBF file created from the
original project. Enter in the project name, and the desired public folder directory. The
project name doesn’t necessarily have to be the same as the original project. Finally,
select the “Restore” button.
Figure 202: Restoring the project to the destination computer.
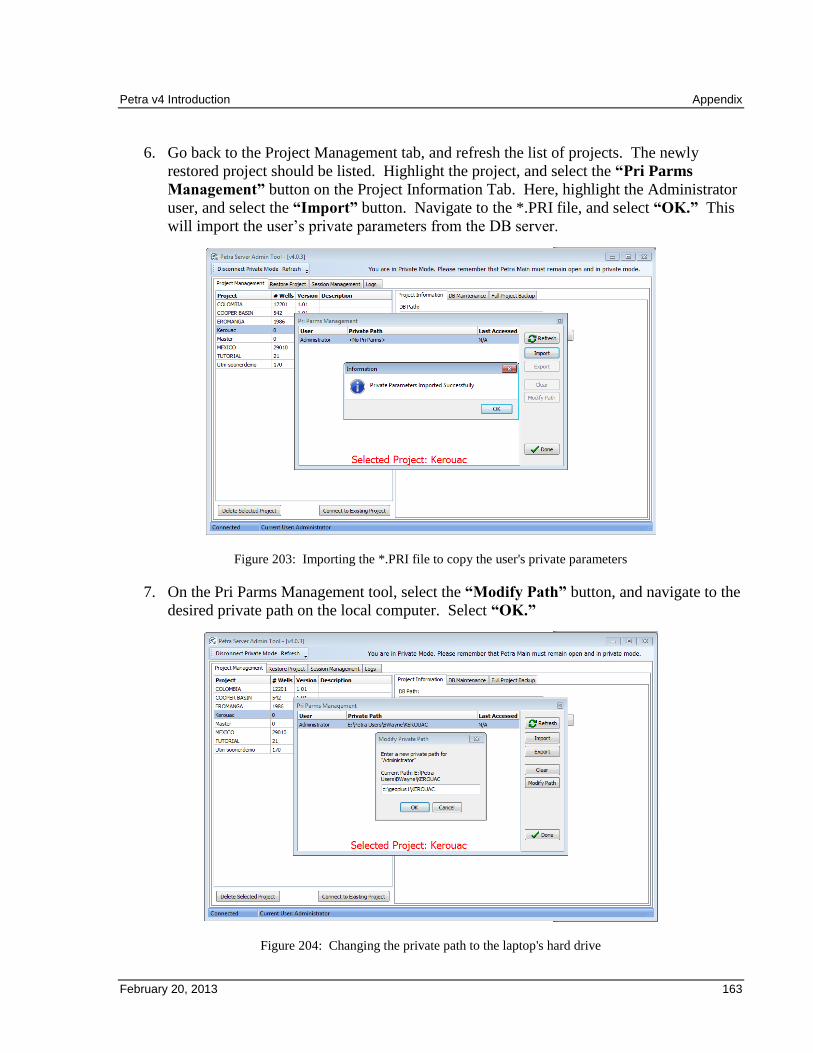
Petra v4 Introduction Appendix
February 20, 2013 163
6. Go back to the Project Management tab, and refresh the list of projects. The newly
restored project should be listed. Highlight the project, and select the “Pri Parms
Management” button on the Project Information Tab. Here, highlight the Administrator
user, and select the “Import” button. Navigate to the *.PRI file, and select “OK.” This
will import the user’s private parameters from the DB server.
Figure 203: Importing the *.PRI file to copy the user's private parameters
7. On the Pri Parms Management tool, select the “Modify Path” button, and navigate to the
desired private path on the local computer. Select “OK.”
Figure 204: Changing the private path to the laptop's hard drive
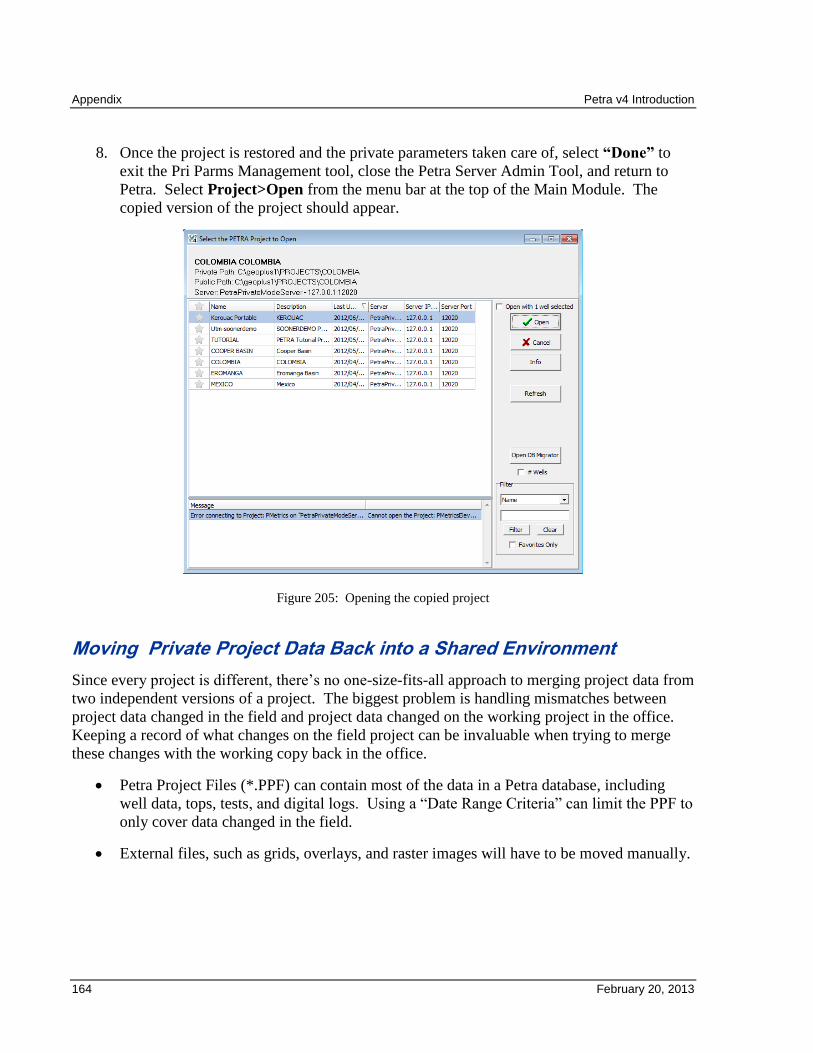
Appendix Petra v4 Introduction
164 February 20, 2013
8. Once the project is restored and the private parameters taken care of, select “Done” to
exit the Pri Parms Management tool, close the Petra Server Admin Tool, and return to
Petra. Select Project>Open from the menu bar at the top of the Main Module. The
copied version of the project should appear.
Figure 205: Opening the copied project
Moving Private Project Data Back into a Shared Environment
Since every project is different, there’s no one-size-fits-all approach to merging project data from
two independent versions of a project. The biggest problem is handling mismatches between
project data changed in the field and project data changed on the working project in the office.
Keeping a record of what changes on the field project can be invaluable when trying to merge
these changes with the working copy back in the office.
Petra Project Files (*.PPF) can contain most of the data in a Petra database, including
well data, tops, tests, and digital logs. Using a “Date Range Criteria” can limit the PPF to
only cover data changed in the field.
External files, such as grids, overlays, and raster images will have to be moved manually.
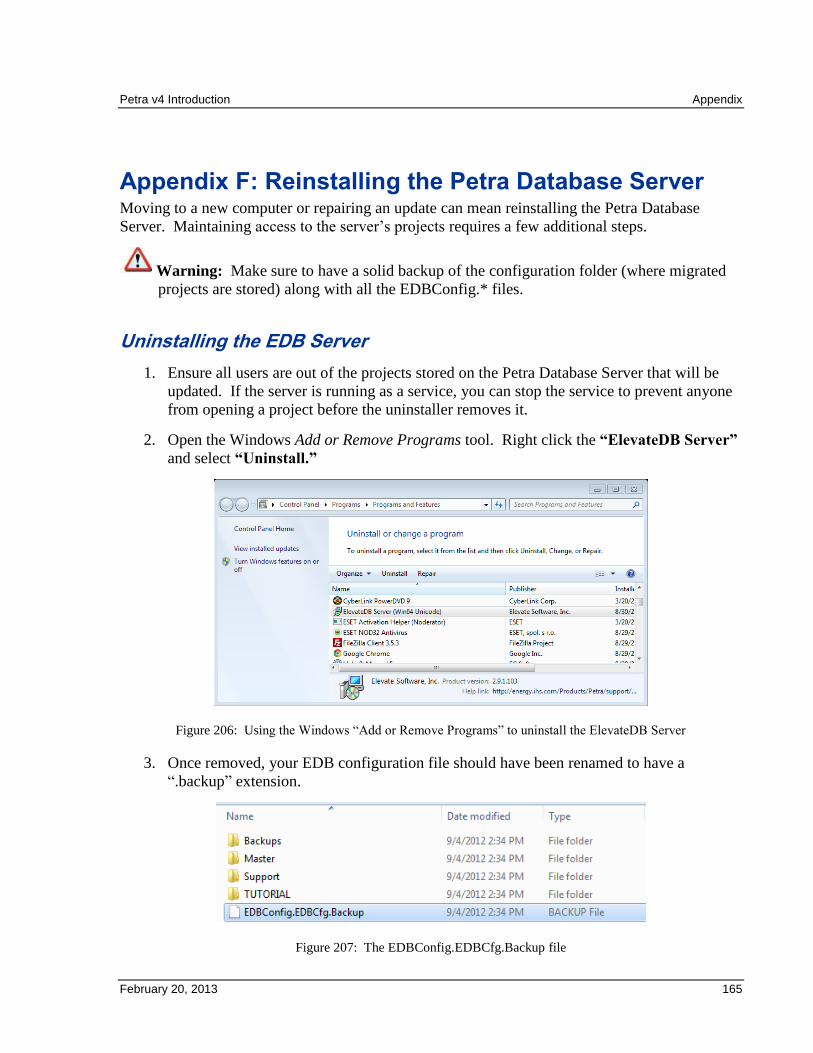
Petra v4 Introduction Appendix
February 20, 2013 165
Appendix F: Reinstalling the Petra Database Server Moving to a new computer or repairing an update can mean reinstalling the Petra Database
Server. Maintaining access to the server’s projects requires a few additional steps.
Warning: Make sure to have a solid backup of the configuration folder (where migrated
projects are stored) along with all the EDBConfig.* files.
Uninstalling the EDB Server
1. Ensure all users are out of the projects stored on the Petra Database Server that will be
updated. If the server is running as a service, you can stop the service to prevent anyone
from opening a project before the uninstaller removes it.
2. Open the Windows Add or Remove Programs tool. Right click the “ElevateDB Server”
and select “Uninstall.”
Figure 206: Using the Windows “Add or Remove Programs” to uninstall the ElevateDB Server
3. Once removed, your EDB configuration file should have been renamed to have a
“.backup” extension.
Figure 207: The EDBConfig.EDBCfg.Backup file
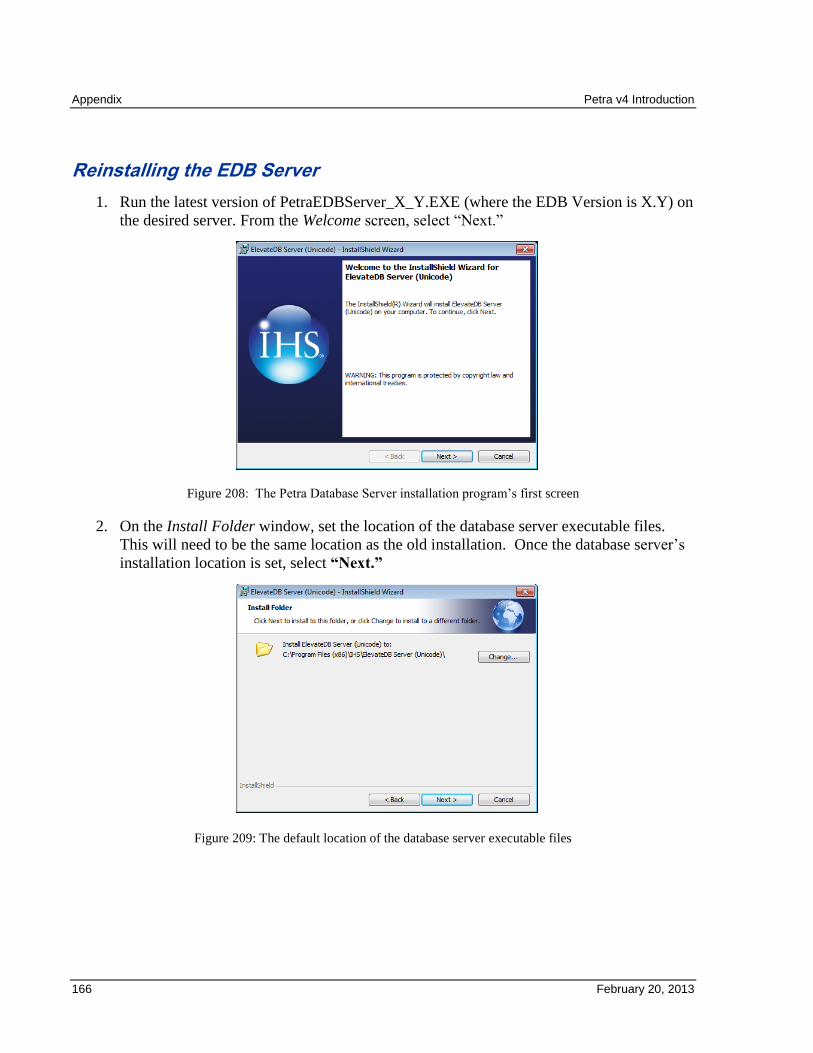
Appendix Petra v4 Introduction
166 February 20, 2013
Reinstalling the EDB Server
1. Run the latest version of PetraEDBServer_X_Y.EXE (where the EDB Version is X.Y) on
the desired server. From the Welcome screen, select “Next.”
Figure 208: The Petra Database Server installation program’s first screen
2. On the Install Folder window, set the location of the database server executable files.
This will need to be the same location as the old installation. Once the database server’s
installation location is set, select “Next.”
Figure 209: The default location of the database server executable files
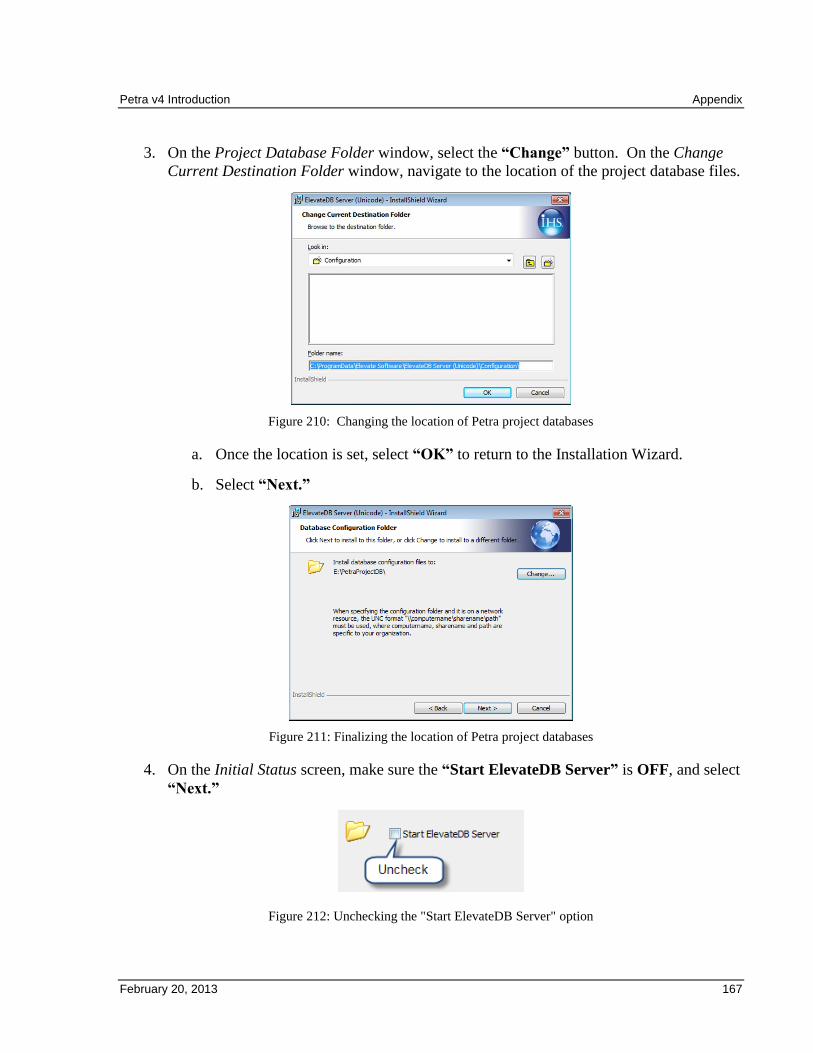
Petra v4 Introduction Appendix
February 20, 2013 167
3. On the Project Database Folder window, select the “Change” button. On the Change
Current Destination Folder window, navigate to the location of the project database files.
Figure 210: Changing the location of Petra project databases
a. Once the location is set, select “OK” to return to the Installation Wizard.
b. Select “Next.”
Figure 211: Finalizing the location of Petra project databases
4. On the Initial Status screen, make sure the “Start ElevateDB Server” is OFF, and select
“Next.”
Figure 212: Unchecking the "Start ElevateDB Server" option
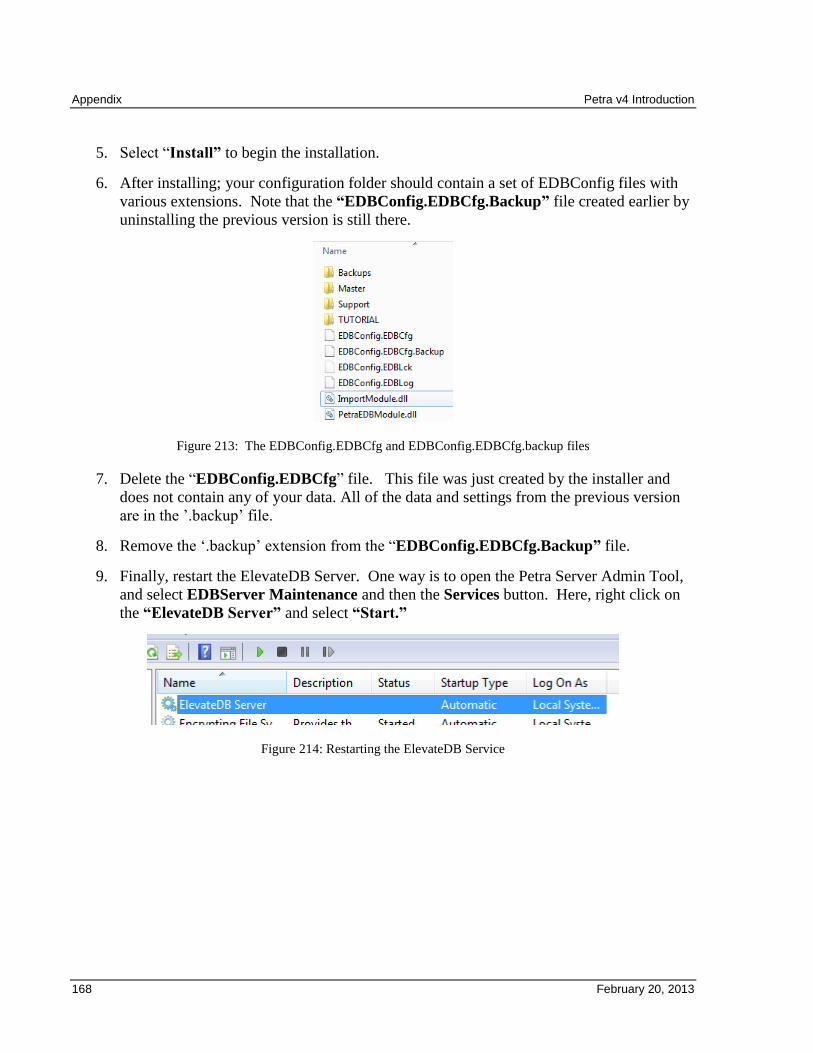
Appendix Petra v4 Introduction
168 February 20, 2013
5. Select “Install” to begin the installation.
6. After installing; your configuration folder should contain a set of EDBConfig files with
various extensions. Note that the “EDBConfig.EDBCfg.Backup” file created earlier by
uninstalling the previous version is still there.
Figure 213: The EDBConfig.EDBCfg and EDBConfig.EDBCfg.backup files
7. Delete the “EDBConfig.EDBCfg” file. This file was just created by the installer and
does not contain any of your data. All of the data and settings from the previous version
are in the ’.backup’ file.
8. Remove the ‘.backup’ extension from the “EDBConfig.EDBCfg.Backup” file.
9. Finally, restart the ElevateDB Server. One way is to open the Petra Server Admin Tool,
and select EDBServer Maintenance and then the Services button. Here, right click on
the “ElevateDB Server” and select “Start.”
Figure 214: Restarting the ElevateDB Service
Petra v4 Introduction Appendix
February 20, 2013 169
Appendix G: Using Active Directory
Petra can use the Active Directory (AD) directory service to establish and maintain Petra
Database Server users and roles. When using AD, the database server automatically creates
Petra users from AD usernames and assigns roles from AD groups. This method can use
Kerberos authentication for additional security. From a user’s perspective, Petra automatically
logs in with the user’s AD credentials, which translates to one fewer username/password to
manage. Petra installations with AD enabled in the Petra.ini file can ONLY connect to
Petra Database Servers with AD enabled.
Active Directory requires Petra v4.0.6 or higher, PetraEDBServer v1.03 or higher, and a domain
using Active Directory.
Configuring the Petra Database Server with edbsrvr.INI
Enabling AD on the database server requires a few modifications to the server’s edbsrvr.INI file.
With a default installation, this file is in the “C:\ProgramData\Elevate Software\...” folder, and
can be edited in any basic text editor. Alternatively, use the Petra Server Admin Tool’s EDB
Server Maintenance tool and select “open ini file.”
Note: The following entries should be in the [Server] section of the edbsrvr.INI file.
Active Directory Enabled=1 – This line enables and disables AD on the server. Set this to “1” to
enable Active Directory, and “0” to disable Active Directory.
Active Directory SPN=host/computer_name - See the “SPN” subsection below for more
information on how to set this up.
Active Directory Override Users=Administrator,EDBProc,Billy – This line creates a list of users
that can access the Petra Database Server without using AD authentication. At a minimum, this
line should include the “Admin User” mentioned below and the “Proc_Username” user (see
Petra.INI section).
Admin User=Administrator – The database server needs administrative rights in order to copy
and modify users from the AD groups. This line simply lists a user in the “Administrators” role.
This user must be listed in the “Active Directory Override Users” list mentioned above.
Admin Password=EDBDefault – This entry sets the password for the administrator user.
Warning: IHS recommends creating another administrative account for this edbsrvr.INI
file, or at least changing the default password. The edbsrvr.INI file stores an administrator
username and password in plain text, so consider taking extra precautions when assigning
read/write permissions to this file.
Appendix Petra v4 Introduction
170 February 20, 2013
Working with Service Provider Names (SPN)
MSDN Information: http://msdn.microsoft.com/en-us/library/ms191153.aspx
Petra does not automatically register SPN’s with AD. Instead, Petra uses the SPN listed in the
edbsrvr.INI file’s “Active Directory SPN” line. This line can be set up in a couple of different
ways:
The EDBSrvr service is set to “Log On As” local system
In this scenario, the edbsrvr.INI setting should simply be set to “host/computer_name”, where
computer_name is the name of the computer running the Petra Database Server. This SPN is
registered by default for any AD computer and there is no need to register it manually.
The EDBSrvr service is set to “Log On As” a specific user account
This scenario requires a SPN registered for the specified specific user account. By default, AD
does not register any SPN’s for User Accounts. IHS recommends registering the SPN the
following way: “PetraKrbHost/user_name”, where user_name is the user the SPN is registered to
and is the same user as the EDBSrvr service is using.
Registering an SPN
Please see MSDN documentation (link above) for information on registering an SPN, however
below is a quick tutorial on viewing, registering, and deleting SPN’s on your domain.
Note: Perform these commands from the command prompt with an account with AD
Admin access
// lists all SPN’s registered to a given User
setspn –L UserName
// lists all SPN’s registered to a given Computer
setspn –L ComputerName
// Adds the SPN “PetraKrbHost/UserName” to the given User
// after verifying no duplicates exist
setspn –S PetraKrbHost/UserName UserName
// delete the SPN “PetraKrbHost/UserName” from the given User
setspn –D PetraKrbHost/UserName UserName
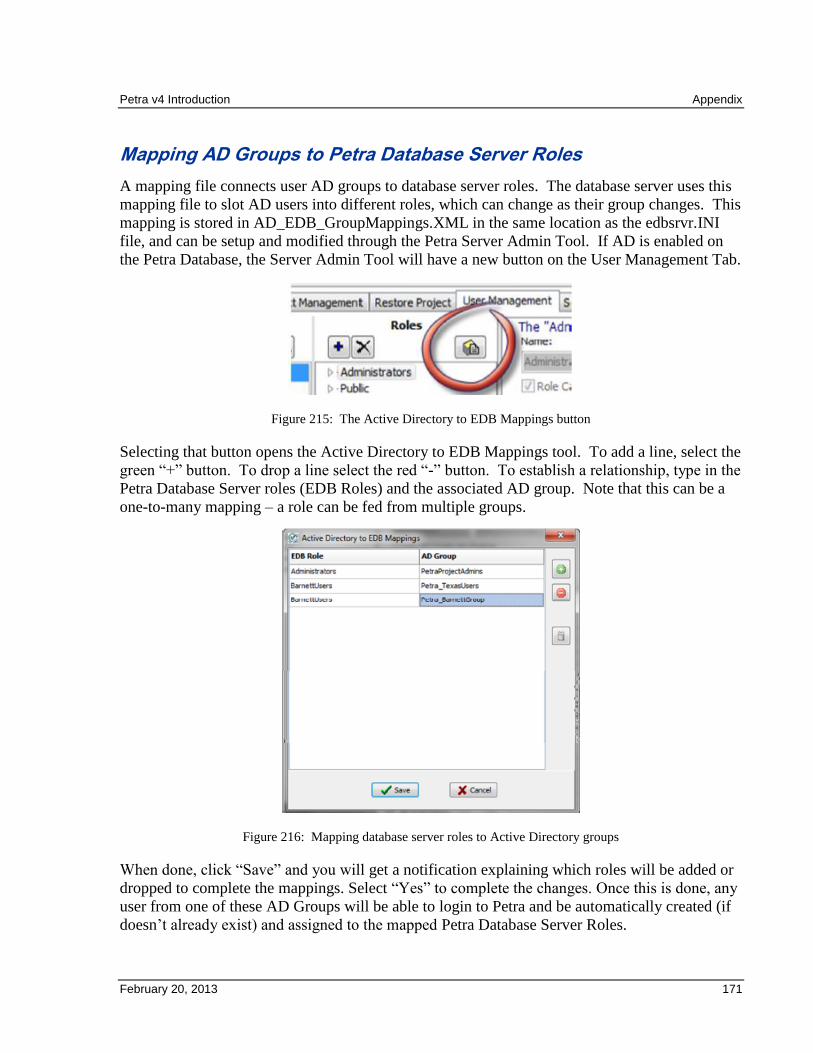
Petra v4 Introduction Appendix
February 20, 2013 171
Mapping AD Groups to Petra Database Server Roles
A mapping file connects user AD groups to database server roles. The database server uses this
mapping file to slot AD users into different roles, which can change as their group changes. This
mapping is stored in AD_EDB_GroupMappings.XML in the same location as the edbsrvr.INI
file, and can be setup and modified through the Petra Server Admin Tool. If AD is enabled on
the Petra Database, the Server Admin Tool will have a new button on the User Management Tab.
Figure 215: The Active Directory to EDB Mappings button
Selecting that button opens the Active Directory to EDB Mappings tool. To add a line, select the
green “+” button. To drop a line select the red “-” button. To establish a relationship, type in the
Petra Database Server roles (EDB Roles) and the associated AD group. Note that this can be a
one-to-many mapping – a role can be fed from multiple groups.
Figure 216: Mapping database server roles to Active Directory groups
When done, click “Save” and you will get a notification explaining which roles will be added or
dropped to complete the mappings. Select “Yes” to complete the changes. Once this is done, any
user from one of these AD Groups will be able to login to Petra and be automatically created (if
doesn’t already exist) and assigned to the mapped Petra Database Server Roles.
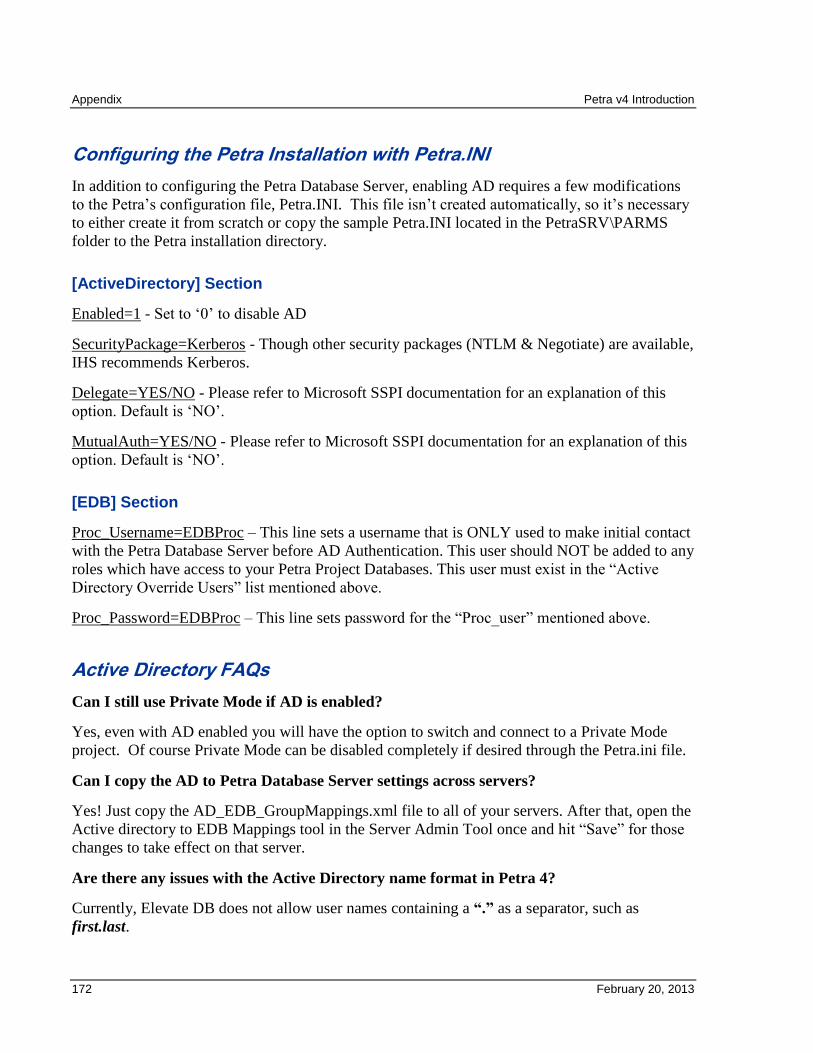
Appendix Petra v4 Introduction
172 February 20, 2013
Configuring the Petra Installation with Petra.INI
In addition to configuring the Petra Database Server, enabling AD requires a few modifications
to the Petra’s configuration file, Petra.INI. This file isn’t created automatically, so it’s necessary
to either create it from scratch or copy the sample Petra.INI located in the PetraSRV\PARMS
folder to the Petra installation directory.
[ActiveDirectory] Section
Enabled=1 - Set to ‘0’ to disable AD
SecurityPackage=Kerberos - Though other security packages (NTLM & Negotiate) are available,
IHS recommends Kerberos.
Delegate=YES/NO - Please refer to Microsoft SSPI documentation for an explanation of this
option. Default is ‘NO’.
MutualAuth=YES/NO - Please refer to Microsoft SSPI documentation for an explanation of this
option. Default is ‘NO’.
[EDB] Section
Proc_Username=EDBProc – This line sets a username that is ONLY used to make initial contact
with the Petra Database Server before AD Authentication. This user should NOT be added to any
roles which have access to your Petra Project Databases. This user must exist in the “Active
Directory Override Users” list mentioned above.
Proc_Password=EDBProc – This line sets password for the “Proc_user” mentioned above.
Active Directory FAQs
Can I still use Private Mode if AD is enabled?
Yes, even with AD enabled you will have the option to switch and connect to a Private Mode
project. Of course Private Mode can be disabled completely if desired through the Petra.ini file.
Can I copy the AD to Petra Database Server settings across servers?
Yes! Just copy the AD_EDB_GroupMappings.xml file to all of your servers. After that, open the
Active directory to EDB Mappings tool in the Server Admin Tool once and hit “Save” for those
changes to take effect on that server.
Are there any issues with the Active Directory name format in Petra 4?
Currently, Elevate DB does not allow user names containing a “.” as a separator, such as
first.last.
Petra v4 Introduction Appendix
February 20, 2013 173
Appendix H: Petra v4 FAQs
How can I convince my users that upgrading to Petra v4 is worthwhile?
Beyond logging in, most of the changes that Petra v4 makes are largely invisible to end users.
The process for importing data, picking tops, making maps, and so on remains exactly the same.
Most users should notice better Petra project performance, particularly in large multi-user
projects. Users will also experience fewer frustrating “table access violation” problems, as well.
I’m running a single license of Petra. Do I need a database server?
If you’re only running Private mode, you won’t need to install a separate, external Petra
Database Server. With Private Mode, Petra v4 uses a database server that’s built into the Main
Module. In short, you’ll need to upgrade Petra to v4 and migrate your projects once, but you
won’t need to install a separate database server.
What’s wrong with using a virtual server?
Virtual servers can suffer from poor I/O performance if they aren’t configured correctly. Some
clients have successfully used a virtual server with no problems, but IHS doesn’t recommend it.
Is it possible to use a different port to connect to the database server?
Yes. In the Petra Server Admin Tool, select the “EDBServer Maintenance” button. Here, edit
the “Server Port” entry to the desired port, and select “Save Changes.” Next, select the
“Services” button to open the Services Management Console. Stop and then restart the
“ElevateDB Server” service.
Is the Petra Database Server “VSS Aware”?
ElevateDB, the proprietary database engine that the Petra Database Server uses, is not VSS
aware. Use the Server Admin Tool’s backup function to back up a database to a file on disk, and
then that backup file can be included in the normal VSS processing.
What’s wrong with concurrent Petra v3 and v4 installations?
Running Petra v3 and Petra v4 at the same time generally makes things more difficult.
Installation of Petra v4 alongside v3 is significantly more complicated. Additionally, changes
made in a v3 project don’t automatically propagate to the corresponding v4 project – untangling
the changes made by two different sets of users can be a real headache.
Appendix Petra v4 Introduction
174 February 20, 2013
Can I return to a v3 project?
Yes! Migrating a project to v4 leaves the v3 project intact. Just open the old v3 project with
Petra v3. Any changes made to the v4 project database won’t show up in the v3 project. This
will include wells, zones, intervals, logs.
I installed Petra v3 and v4 concurrently. How do I phase out Petra v3?
Once all the projects are either migrated or archived, just uninstall Petra v3. The project’s old
“DB” folder can either be moved (to free up disk space) or renamed (to just prevent users from
opening the v3 project)
Why should I run repair, reindex, optimize, and pack on my v3 projects before migration?
These maintenance operations shrink the size of project tables. In general, smaller databases
migrate faster than larger databases.
Should I use hostnames or IP addresses on the Petra Server Admin Tool?
Hostnames make server lists work both locally and on external computers. To connect to a local
database server, you’d need to use an IP address of 127.0.0.1, which wouldn’t work for every
other computer on the network (since every computer would look for a local database server).
What is the default Administrator login information for the DB Server?
The default username is “Administrator” and password is “EDBDefault.” While the
“Administrator” user cannot be removed, the password can easily be changed with the Petra
Server Admin Tool.
Can I retrieve the Administrator password after it’s been changed?
No. In order to protect your company’s proprietary data, there is no master password or
backdoor. Make sure to write the password down, and secure it in a safe place.
Can I remove the “Administrator” role?
No.
I have a large installation on a network. Should I keep Private Mode enabled?
Private mode gives your users the ability to build local “sandbox” projects to test ideas and
imports without affecting larger working projects. On the other hand, disabling Private Mode
prevents users from creating projects that are invisible to database administrators and are
stranded on a local hard drive.
To disable Petra’s Private Mode, in the [GENERAL] section of the installation’s copy of
Petra.INI, add:
AllowPrivateMode=No
Petra v4 Introduction Appendix
February 20, 2013 175
Is it possible to convert a Shared Mode project to Private Mode or vice versa?
The best way is to create a full project backup with the Petra Server Admin Tool, and restore this
file to a brand new project in the desired mode.
Can I open a non-shared project located somewhere on a network drive in Private Mode?
Private mode works with all non-shared projects. These projects can be stored locally or on a
network drive.
Are there any changes with Petra v4’s licensing?
You may have to setup the Petra.ini file or run Config.EXE. Companies using FlexLM will need
to contact IHS for a new IHS.LIC file.
How is PetraSeis affected by the v4 upgrade?
Migrating a project also migrates the data used by PetraSeis. PetraSeis will also have to be
upgraded to the latest version.
Why don’t I see any Projects on the “Open Project” window?
Click on the “Server Mgmt” button and ensure that the desired server is listed on the Petra Server
List, and is marked as “visible.”
Why can’t I see a project that I know is on the DB Server?
You may not have “Read” privileges to that project’s database. Have one of your administrators
check your roles using the Petra Server Admin Tool.
One of Petra’s features is a lot slower in v4 than it used to be. What happened?
IHS has spent over 6 months optimizing the new database to be as fast as possible. With the
large feature list, it’s inevitable to miss some function. If you run across something that you
believe was noticeably faster in Petra v3 in the same project, please report this to IHS Customer
Care with a detailed description of your workflow.
Are there any issues or concerns with anti-virus scanning and the new Petra 4 database?
If your anti-virus scanner is checking all files, which is a typical default, then it will significantly
slow access to large, shared projects. To speed response time, change the scanner to prevent it
from scanning the following file types: *.EDBBlb, *.EDBTbl, *.EDBIdx, *.EDBCfg,
*.EDBLck, *.EDBLog, and *.EDBCat, which are used by the Petra database engine. (Additional
information on anti-virus scanning is available in the Petra Usage in Large, Multiuser
Environment manual).
Appendix Petra v4 Introduction
176 February 20, 2013
Does Petra 4 support the Workgroup definitions as existing in 3.8?
Petra 4 currently does not fully support workgroups as they exist in 3.8. We recommend you try
to use the roles and permissions available in the Admin Tool. If additional functionality is
required, you may contact our product manager.
When scheduling repairs, does the scheduler automatically invoke the NOTIFYKILL file?
The scheduler does not automatically invoke the NOTIFYKILL file; that task is still performed
by the Administrator.
What are the main concerns when using the Admin Tool database backup/restore options?
All users must be out of the project to restore, but not to backup. You can only restore the
backup through the Server Admin Tool. The tool does not automatically delete the oldest
backup; that task is performed by the Administrator.
Can a traditional backup of the project DB folder be restore to the original location
without reattaching it?
You would have to back up the DB4 folder, but yes, this should work. Be sure that everyone is
out of the project before backing-up/restoring in this manner. Recall that in Shared Mode, the
DB4 folder is not located in the Public Path of the project, but in the project database folder on
the server.
Petra v4 Introduction Appendix
February 20, 2013 177
Document Revision History
June 13, 2012 – Revised Server Admin Tool tabs to reflect UI changes, Appendix E for taking
projects on the road.
June 22, 2012 – Revised Server Admin Tool to add Pri Parms Management
June 29, 2012 - Revised Server Admin Tool to add EDB Server Management Tool
July 3, 2012 – Removed exercises for separate doc.
Sept 11, 2012 – added install/reinstall Petra Database Server in Appendix
Sept 13, 2012 – Active Directory in Appendix
Jan 8, 2013 – Revised Appendix B to separate ReIndex and Optimize steps
Jan 22, 2013 – Revised server admin tool screenshots with All User List changes
Feb 20, 2013 – Additions to main FAQ and Active Directory FAQ; screenshot on setting up
Domain Level account for EDBServer on Networks; note related to EDBSRVR maintenance
button