peripherally inserted central venous catheters (piccs)...peripherally inserted central venous...
TRANSCRIPT

MEDICAL
Peripherally inserted central venous catheters (PICCs)
Use, care, and management

2
The reference for this pocket guide is the 2016 Infusion Therapy Standards of Practice.1
This pocket guide addresses the following topics:
• Flushing
• Blood sampling
• Site assessment
• Dressing changes and securement
• Needleless connectors
• Potential complications
Note: The following information is intended to serve as a quick reference tool. For complete instructions and guidelines on the use, care, and management of peripherally inserted central venous catheters (PICCs), please consult your facility’s policy documentation, the device’s Instructions for Use (IFU), and the appropriate guiding organizations and societies.

3

4
Key points for flushing*
• Flush and aspirate for a blood return prior to each infusion.
• Flush after each infusion in order to clear medications and/or nutrients from the line and flush them into the bloodstream.
• Flush with preservative-free 0.9% sodium chloride using a 10 mL syringe with a minimum volume equal to twice the internal volume of the catheter system.
• Flush using a pulsatile technique to completely clear the catheter of any residue.
• Never forcibly flush a PICC. Resistance to flushing may indicate partial or complete occlusion.
• Discard the flushing syringe after a single use.
Flushing
*Verbatim instructions from pages S77-78 of the 2016 Infusion Therapy Standards of Practice.

5
Key steps for flushing
1. Follow appropriate hand hygiene and personal protective equipment (PPE) protocols.
2. Perform a vigorous mechanical scrub of the needleless connector, using a disinfecting agent that aligns with your facility’s policy, for a minimum of 15 seconds to disinfect it prior to each PICC access.
3. Aspirate the PICC for a positive blood return.
4. Prior to each Luer attachment, repeat the scrub of the needleless connector, and allow it to dry.
5. Flush with preservative-free 0.9% sodium chloride to clear the catheter of all blood residues.
6. Repeat the scrub of the needleless connector, and allow it to dry.
7. Reinitiate infusion therapy as prescribed.
Flushing

Blood sampling
Key steps for blood sampling
1. Verify the patient’s identity using two identifiers. Mark the blood collection vials with patient-specific information.
2. Follow appropriate hand hygiene and PPE protocols.
3. Stop all infusions.
4. Perform a vigorous mechanical scrub of the needleless connector, using a disinfecting agent that aligns with your facility’s policy, for a minimum of 15 seconds to disinfect it prior to each PICC access, and allow it to dry. Note: When drawing blood, use either a syringe or a vacuum vial container system. Follow the procedure for the vacuum vial system according to the manufacturer’s instructions, flushing when necessary, and proceed to step 9 after you have obtained samples.
5. If you are using a syringe, flush briskly using a pulsatile technique. Leave the syringe attached. Clamp and unclamp the catheter as needed to access the fluid path while preventing air intake.
6. Withdraw 5 mL of blood, detach the syringe, and discard the initial 5 mL of blood. For multilumen PICCs, use the largest lumen; for PICCs with staggered lumen exit sites, use the lumen that is farthest from the patient’s heart.2 Note: Do not discard the initial 5 mL of blood when obtaining blood for culture.
6

7Blood sampling
7. Disinfect the needleless connector as directed in step 4, and allow it to dry. Attach an empty, volume- appropriate syringe.
8. Using the empty syringe, slowly withdraw the required amount of blood for the number of vacuum vials for your specimens. Then disconnect the syringe from the catheter, attach a transfer device to the syringe, and fill the vacuum vials. Gently invert the vial contents and blood. Discard the used syringe and transfer device as one unit. Note: Never remove the rubber stopper from the vials as a method to decrease the risk of blood exposure, accidental needle stick injury, or error in sample analysis.
9. Disinfect the needleless connector as directed in step 4, and allow it to dry.
10. Attach a new flushing syringe, and flush with 10-20 mL of preservative-free 0.9% sodium chloride, until all blood is cleared from the catheter.
11. If the original connector was removed or has visible blood, attach a new, sterile, and primed needleless connector, and flush.
12. If necessary, restart the infusions that were stopped in step 3.

Site assessment
Key steps for performing a site assessment
1. Follow appropriate hand hygiene and PPE protocols.
2. Assess the dressing to make sure that it is clean, dry, and intact. Change the dressing as needed, and label it with either the date that the dressing change was performed or should be repeated, based on your facility’s policy.
3. Assess the PICC catheter- skin junction site and surrounding area for redness, tenderness, swelling, and drainage by visual inspection and palpation through the intact dressing.
4. Assess the external length of the PICC and compare the length to the previous measurement. If the length has changed, the PICC may not be safe to use until the tip position has been confirmed.
8

9Site assessment
5. Measure the circumference of the arm in a consistent location. Identify and record the location and other characteristics, such as pitting or nonpitting. Compare this to the baseline measurement of the circumference of the arm in order to detect possible catheter-associated venous thrombosis.
6. Check that the catheter is working properly. If blood return or flushing is inhibited, see the “Potential complications” section at the end of this guide.
7. Check the needleless connector for the presence of blood. If residual blood remains after flushing, replace the needleless connector.
See the “Needleless connectors” section on pages 14-17 for the steps for changing the needleless connector.

Infusion system assessment checklist
In addition to performing a site assessment, inspect the infusion system for the following:
Correct infusate
Clarity of the infusate
Integrity of the system
Prescribed flow rate
Expiration dates of the infusate and the administration set
10

11Site assessment
PICC necessity checklist
The CDC, INS, SHEA, and IHI recommend the immediate removal of a PICC after it is no longer necessary.1,2,3,5
To decide whether or not a PICC is still necessary, the INS proposes asking these four questions:
Have any intravenous medications been administered within the last 24 hours? Were these pain medications only?
Are there alternative therapies that could be used, or can the patient be switched to oral medications to eliminate the need for the PICC?
Does the patient require frequent blood draws?
Is the patient eating and drinking adequate amounts?
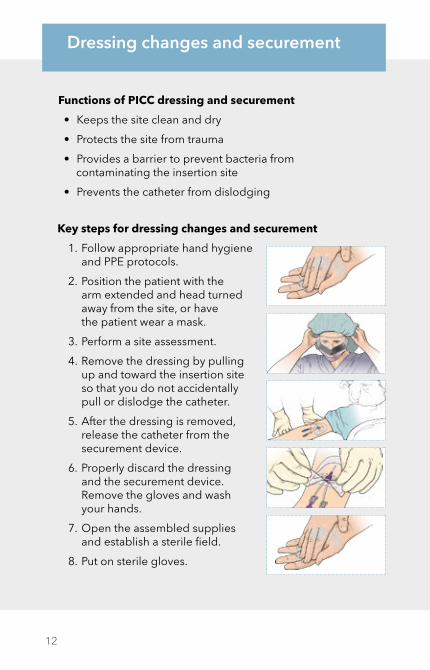
Key steps for dressing changes and securement
1. Follow appropriate hand hygiene and PPE protocols.
2. Position the patient with the arm extended and head turned away from the site, or have the patient wear a mask.
3. Perform a site assessment.
4. Remove the dressing by pulling up and toward the insertion site so that you do not accidentally pull or dislodge the catheter.
5. After the dressing is removed, release the catheter from the securement device.
6. Properly discard the dressing and the securement device. Remove the gloves and wash your hands.
7. Open the assembled supplies and establish a sterile field.
8. Put on sterile gloves.
Functions of PICC dressing and securement
• Keeps the site clean and dry
• Protects the site from trauma
• Provides a barrier to prevent bacteria from contaminating the insertion site
• Prevents the catheter from dislodging
12
Dressing changes and securement

13Dressing changes and securement
9. Cleanse the insertion site. Follow your facility’s policy when you select the disinfecting agent.
10. Apply the sterile, sutureless securement device to secure the catheter, and apply a new dressing to cover the entire area around the insertion site, including the securement device. Use gauze if needed.
11. Measure the external length of the catheter, and compare the length to the previous measurement. If the length has changed, the PICC may not be safe to use until the tip position has been confirmed.
12. Change the needleless connector, and flush the lumen(s), assessing for blood return and function in accordance with your facility’s policy.
See the “Needleless connectors” section on pages 14-17 for the steps to change the needleless connector.
13. Document the dressing change, including the steps taken in the site assessment.

Key points for needleless connectors
• Disinfect needleless connectors before and after each entry into the device per the manufacturer’s IFU and your facility’s policy.
• Use an aseptic, no-touch technique to change the needleless connector.
• Only access needleless connectors with a sterile device.
• Avoid using a needleless connector when rapid flow of infusate is required.
• Follow the manufacturer’s IFU for the appropriate sequence of catheter clamping and final syringe disconnection in order to reduce the amount of blood reflux into the PICC lumen.
14
Needleless connectors

15Needleless connectors
• Perform a vigorous mechanical scrub of the needleless connector, using a disinfecting agent that aligns with your facility’s policy, for a minimum of 15 seconds to disinfect it prior to each PICC access, and allow it to dry.
Note: At the time of this publication, the INS and the CDC have not yet specified a required time for disinfection; however, evidence suggests that a scrub of at least 15 seconds is effective in reducing microbial contamination.4
• Standardizing the type of needleless connector within your facility may reduce the risk for confusion about these steps and improve outcomes.

16
Key steps for accessing needleless connectors
1. Follow appropriate hand hygiene and PPE protocols.
2. Open a disinfectant prep pad.
3. Grasp the hub of the PICC in your nondominant hand.
4. Use your dominant hand to vigorously scrub the needleless connector, using a twisting motion, for a minimum of 15 seconds.
5. Allow the needleless connector to dry.
6. Access the needleless connector with the syringe or IV tubing, opening the clamp, if necessary.
7. Wash your hands again when you are done.
Key steps for changing needleless connectors
The reference for this content is the CDC’s Basic Infection Control and Prevention Plan for Outpatient Oncology Settings.5
1. Follow appropriate hand hygiene and PPE protocols.
2. Perform a vigorous mechanical scrub of the needleless connector, using a disinfecting agent that aligns with your facility’s policy, for a minimum of 15 seconds to disinfect it prior to each PICC access, and allow it to dry.
3. Remove and discard the old needleless connector.
4. Attach the new, flushed needleless connector to the catheter hub by using aseptic technique.
5. Wash your hands again when you are done.
Needleless connectors

17Needleless connectors
Additional reasons to change the needleless connector
• If the needleless connector is removed for any reason
• If blood or debris is within the needleless connector
• Prior to drawing laboratory blood culture samples from the catheter
• If the needleless connector becomes contaminated
• Per your facility’s policy
• According to the manufacturer’s IFU
Note: The needleless connector must be thoroughly disinfected before every access.

Sign or symptom Potential complication(s) Possible action
The catheter can’t be flushed, resists infusion, flushes slowly, or is not able to be aspirated.
The catheter may be partially or totally occluded.
Never try to force an infusion or a flush. If possible, aspirate for blood return. Attempt to determine whether the occlusion is thrombotic or mechanical. Check for kinks or clamps in the line. The physician may consider instillation of a thrombolytic, or further diagnostic evaluation.
The patient is short of breath, is coughing, has chest pain, experiences air hunger, exhibits pallor, has an increased heart rate, has decreased blood pressure, has cyanosis, experiences anxiety, experiences disorientation, or loses consciousness.
Air may have entered the bloodstream.
If you suspect an air embolism, place the patient on their left side with the head down; check the clamp and the entire system for leaks. Notify the physician. Consider initiating oxygen therapy.
Blood is leaking from the catheter.The catheter may have a break or cut in it.
Clamp the catheter immediately to reduce blood loss. Contact the physician.Correct the catheter problem through repair, exchange, or replacement.
The needleless connector has blood in it, or blood is dripping from the hub area of the catheter.
The needleless injection cap may have disconnected.
Clamp the catheter immediately. Replace the needleless connector with a new needleless connector. Scrub the hub prior to connecting a new cap. Flush the catheter by using preservative-free 0.9% sodium chloride or a suitable solution. Follow your facility’s policy for the disinfecting agent selection.
The patient complains of excessive pain or has a fever. The insertion site is red, swollen, or draining.
An infection may be becoming systemic.
Notify the physician immediately. Check for other possible infection sites. The physician may consider catheter and/or peripheral blood cultures.
The patient has swelling around the hand, arm, or neck.
Phlebitis or thrombosis may be present.
Notify the physician immediately. Identify the cause and rule out thrombosis using ultrasound. If thrombosis is the cause, the physician may consider using anticoagulants or a thrombolytic.
The patient has a small area of redness surrounding the insertion site and may also have tenderness, low-grade fever, and/or swelling along the catheter track.
Phlebitis or a local site infection may be present.
Notify the physician immediately. Evaluate the site for signs of infection. Rule out thrombosis by using ultrasound. The physician may consider catheter management (i.e., salvage, removal, or replacement) and/or initiation of oral antibiotics.
These events require prompt attention. Always follow your facility’s policies and procedures; this guide is not meant to replace existing protocols.
18
Potential complications

19Potential complications
Sign or symptom Potential complication(s) Possible action
The catheter can’t be flushed, resists infusion, flushes slowly, or is not able to be aspirated.
The catheter may be partially or totally occluded.
Never try to force an infusion or a flush. If possible, aspirate for blood return. Attempt to determine whether the occlusion is thrombotic or mechanical. Check for kinks or clamps in the line. The physician may consider instillation of a thrombolytic, or further diagnostic evaluation.
The patient is short of breath, is coughing, has chest pain, experiences air hunger, exhibits pallor, has an increased heart rate, has decreased blood pressure, has cyanosis, experiences anxiety, experiences disorientation, or loses consciousness.
Air may have entered the bloodstream.
If you suspect an air embolism, place the patient on their left side with the head down; check the clamp and the entire system for leaks. Notify the physician. Consider initiating oxygen therapy.
Blood is leaking from the catheter.The catheter may have a break or cut in it.
Clamp the catheter immediately to reduce blood loss. Contact the physician.Correct the catheter problem through repair, exchange, or replacement.
The needleless connector has blood in it, or blood is dripping from the hub area of the catheter.
The needleless injection cap may have disconnected.
Clamp the catheter immediately. Replace the needleless connector with a new needleless connector. Scrub the hub prior to connecting a new cap. Flush the catheter by using preservative-free 0.9% sodium chloride or a suitable solution. Follow your facility’s policy for the disinfecting agent selection.
The patient complains of excessive pain or has a fever. The insertion site is red, swollen, or draining.
An infection may be becoming systemic.
Notify the physician immediately. Check for other possible infection sites. The physician may consider catheter and/or peripheral blood cultures.
The patient has swelling around the hand, arm, or neck.
Phlebitis or thrombosis may be present.
Notify the physician immediately. Identify the cause and rule out thrombosis using ultrasound. If thrombosis is the cause, the physician may consider using anticoagulants or a thrombolytic.
The patient has a small area of redness surrounding the insertion site and may also have tenderness, low-grade fever, and/or swelling along the catheter track.
Phlebitis or a local site infection may be present.
Notify the physician immediately. Evaluate the site for signs of infection. Rule out thrombosis by using ultrasound. The physician may consider catheter management (i.e., salvage, removal, or replacement) and/or initiation of oral antibiotics.

MEDICAL
© COOK 02/2018 CC-D40786-EN-F
1. Infusion therapy standards of practice. J of Infus Nurs. 2016;39(1S).
2. Marschall J, Mermel L, Fakih M, et al. Strategies to prevent central line-associated bloodstream infections in acute care hospitals: 2014 update. Infect Control Hosp Epidemiol. 2014;35(7).
3. How-to guide: prevent central line-associated bloodstream infections. Institute for Healthcare Improvement. 2012.
4. Hadaway L. Needleless connectors: improving practice, reducing risks. J Assoc of Vas Acc. 2011;16:(1).
5. Basic infection control and prevention plan for outpatient oncology settings. Centers for Disease Control and Prevention. 2011.
References