voip-500 series phone avaya ip office integration … series phone avaya ip office integration guide...
TRANSCRIPT

VOIP-500 Series Phone
Avaya IP Office Integration Guide
Page 1 of 8 Rev. 7/12/12
Copyright 2012 Talk-A-Phone Co. • 7530 North Natchez Avenue • Niles, Illinois 60714 • Phone 773.539.1100 • [email protected] • www.talkaphone.com.
All prices and specifications are subject to change without notice. Talk-A-Phone, Scream Alert, WEBS and WEBS Contact are registered trademarks of Talk-A-Phone Co. All rights reserved.
Avaya, Avaya IP Office R7 and Avaya IP Office Manager Version 9 are registered trademarks of Avaya Inc.
I. Introduction
This Avaya IP Office Integration Guide provides general instructions for integration of the VOIP-500 Series Phone with an IP Office installation. It is recommended to read this instruction set completely before starting any installation. For detailed VOIP-500 setup instructions, please consult the VOIP-500 Series Phone Manual.
II. Prerequisites
Avaya IP Office Manager Version 9 pre-installed
SIP Device Licensing for 3rd Party IP Endpoints
Network access to the IP Office Manager, VOIP-500 Series Phones and all network services (SIP, HTTP, FTP, RTP/SRTP)
III. IP Office Manager Basic Configuration
Basic instructions for integrating a VOIP-500 Series Phone with an Avaya IP Office R7 Manager are included. Advanced setup of IP Office Manager features is outside the scope of this document.
1. Using IP Office R7 Manager, connect to the IP Office Control Unit.
VOIP-500 Series Phone
Avaya IP Office Integration Guide
Page 2 of 8 Rev. 7/12/12
Copyright 2012 Talk-A-Phone Co. • 7530 North Natchez Avenue • Niles, Illinois 60714 • Phone 773.539.1100 • [email protected] • www.talkaphone.com.
All prices and specifications are subject to change without notice. Talk-A-Phone, Scream Alert, WEBS and WEBS Contact are registered trademarks of Talk-A-Phone Co. All rights reserved.
Avaya, Avaya IP Office R7 and Avaya IP Office Manager Version 9 are registered trademarks of Avaya Inc.
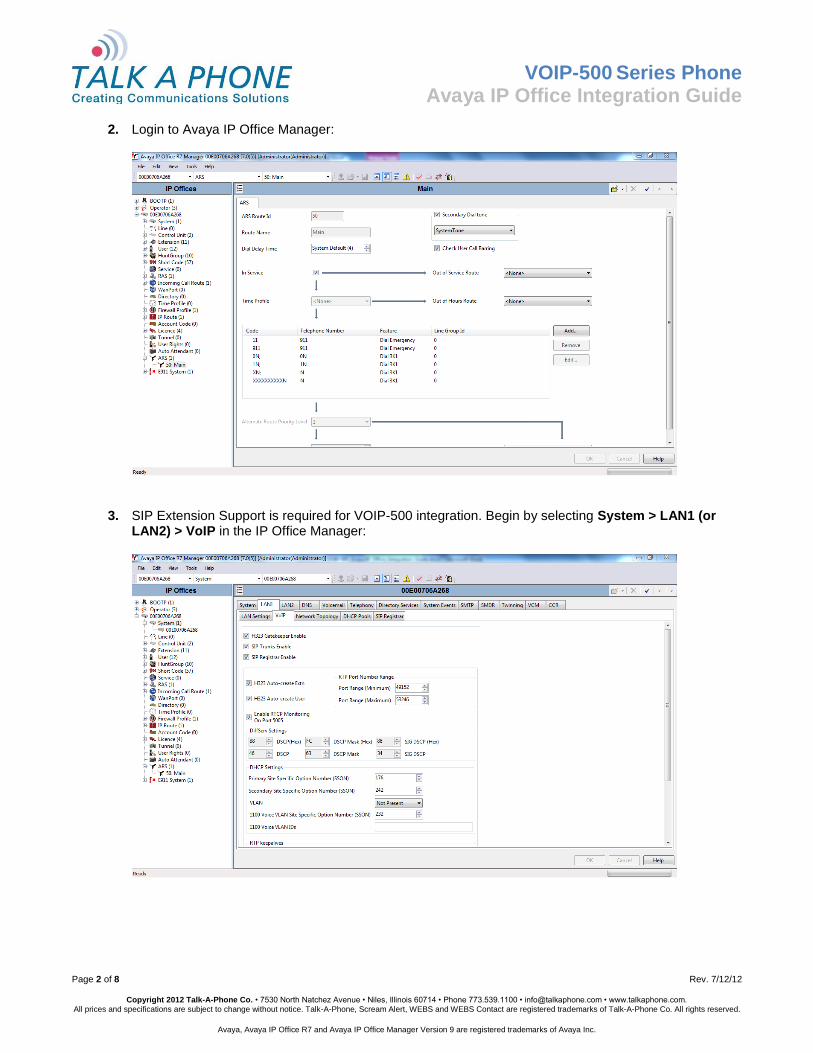
2. Login to Avaya IP Office Manager:
3. SIP Extension Support is required for VOIP-500 integration. Begin by selecting System > LAN1 (or LAN2) > VoIP in the IP Office Manager:
VOIP-500 Series Phone
Avaya IP Office Integration Guide
Page 3 of 8 Rev. 7/12/12
Copyright 2012 Talk-A-Phone Co. • 7530 North Natchez Avenue • Niles, Illinois 60714 • Phone 773.539.1100 • [email protected] • www.talkaphone.com.
All prices and specifications are subject to change without notice. Talk-A-Phone, Scream Alert, WEBS and WEBS Contact are registered trademarks of Talk-A-Phone Co. All rights reserved.
Avaya, Avaya IP Office R7 and Avaya IP Office Manager Version 9 are registered trademarks of Avaya Inc.
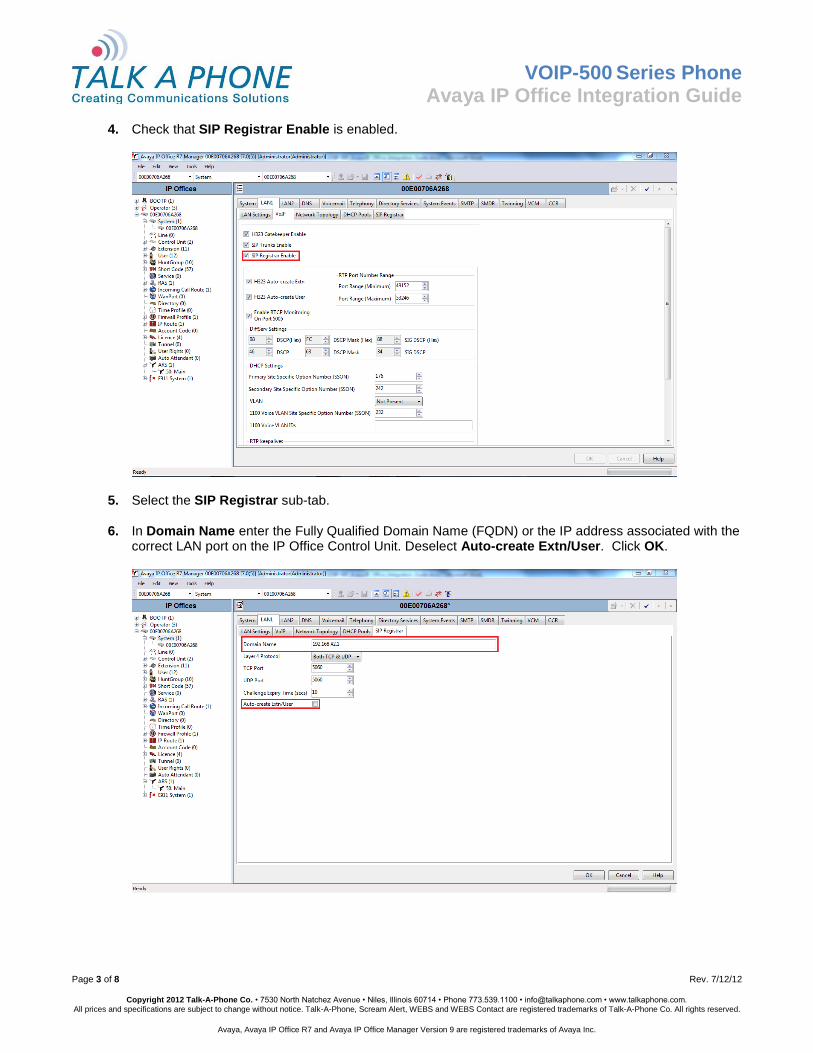
4. Check that SIP Registrar Enable is enabled.
5. Select the SIP Registrar sub-tab.
6. In Domain Name enter the Fully Qualified Domain Name (FQDN) or the IP address associated with the correct LAN port on the IP Office Control Unit. Deselect Auto-create Extn/User. Click OK.
VOIP-500 Series Phone
Avaya IP Office Integration Guide
Page 4 of 8 Rev. 7/12/12
Copyright 2012 Talk-A-Phone Co. • 7530 North Natchez Avenue • Niles, Illinois 60714 • Phone 773.539.1100 • [email protected] • www.talkaphone.com.
All prices and specifications are subject to change without notice. Talk-A-Phone, Scream Alert, WEBS and WEBS Contact are registered trademarks of Talk-A-Phone Co. All rights reserved.
Avaya, Avaya IP Office R7 and Avaya IP Office Manager Version 9 are registered trademarks of Avaya Inc.
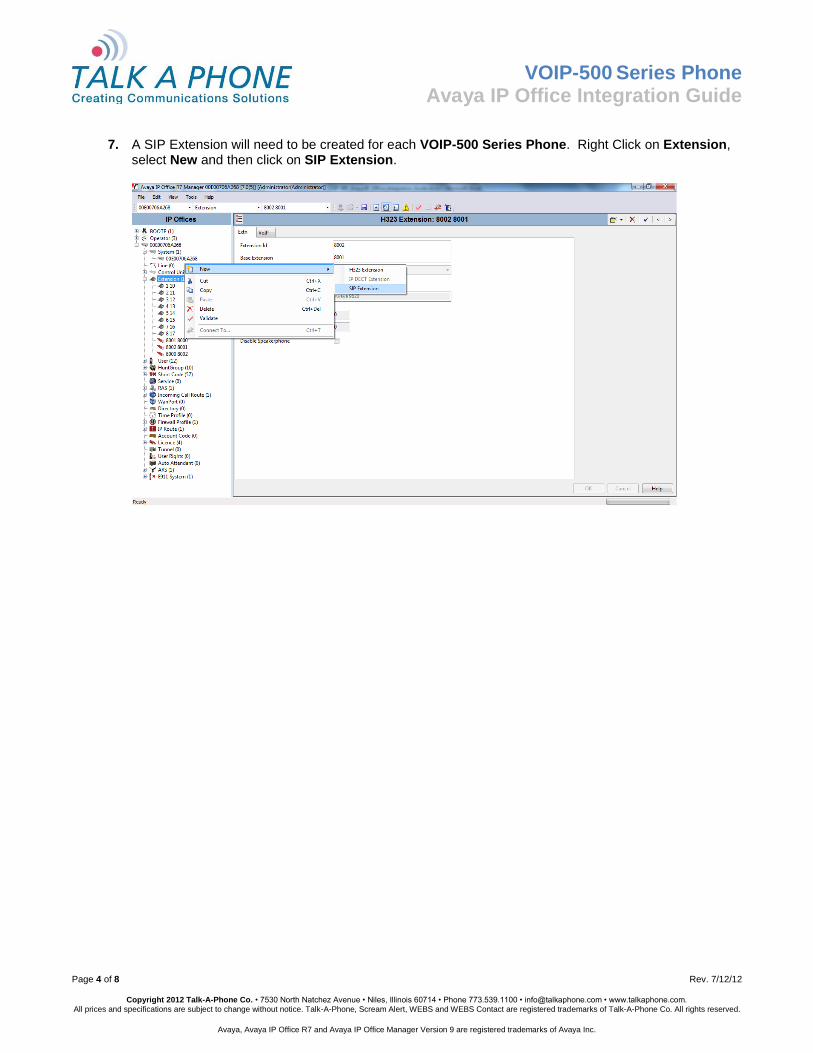
7. A SIP Extension will need to be created for each VOIP-500 Series Phone. Right Click on Extension,
select New and then click on SIP Extension.
VOIP-500 Series Phone
Avaya IP Office Integration Guide
Page 5 of 8 Rev. 7/12/12
Copyright 2012 Talk-A-Phone Co. • 7530 North Natchez Avenue • Niles, Illinois 60714 • Phone 773.539.1100 • [email protected] • www.talkaphone.com.
All prices and specifications are subject to change without notice. Talk-A-Phone, Scream Alert, WEBS and WEBS Contact are registered trademarks of Talk-A-Phone Co. All rights reserved.
Avaya, Avaya IP Office R7 and Avaya IP Office Manager Version 9 are registered trademarks of Avaya Inc.
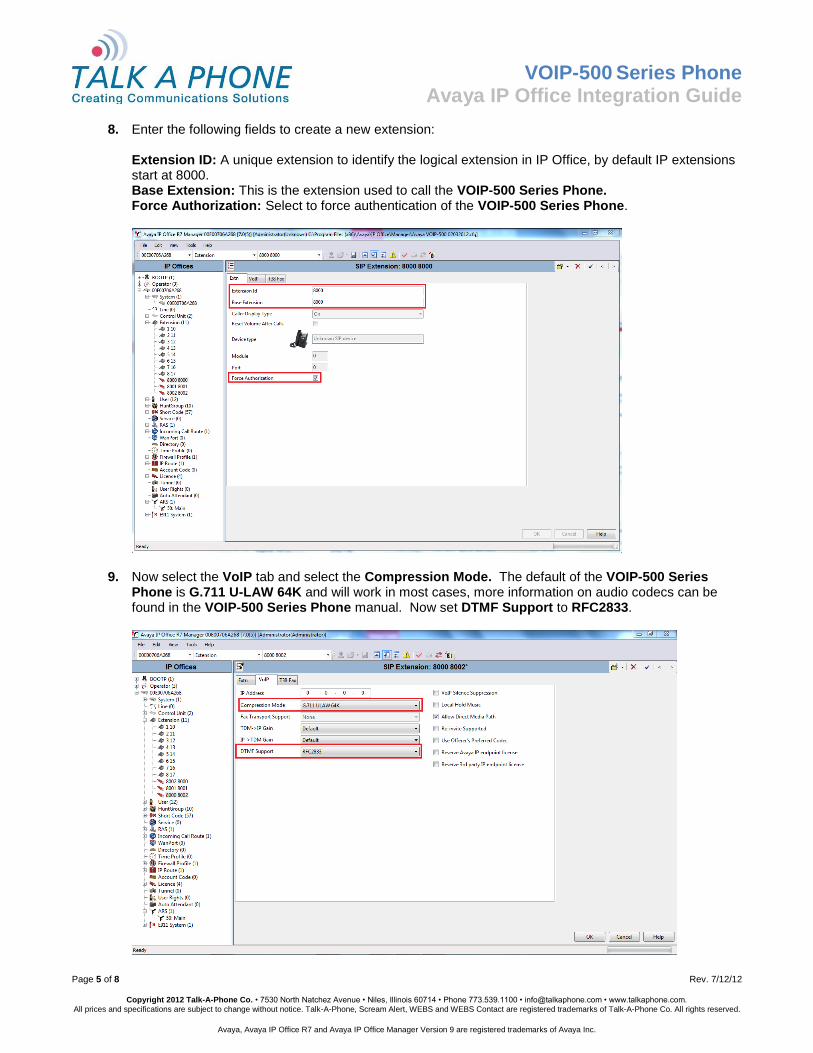
8. Enter the following fields to create a new extension: Extension ID: A unique extension to identify the logical extension in IP Office, by default IP extensions start at 8000. Base Extension: This is the extension used to call the VOIP-500 Series Phone. Force Authorization: Select to force authentication of the VOIP-500 Series Phone.
9. Now select the VoIP tab and select the Compression Mode. The default of the VOIP-500 Series Phone is G.711 U-LAW 64K and will work in most cases, more information on audio codecs can be found in the VOIP-500 Series Phone manual. Now set DTMF Support to RFC2833.
VOIP-500 Series Phone
Avaya IP Office Integration Guide
Page 6 of 8 Rev. 7/12/12
Copyright 2012 Talk-A-Phone Co. • 7530 North Natchez Avenue • Niles, Illinois 60714 • Phone 773.539.1100 • [email protected] • www.talkaphone.com.
All prices and specifications are subject to change without notice. Talk-A-Phone, Scream Alert, WEBS and WEBS Contact are registered trademarks of Talk-A-Phone Co. All rights reserved.
Avaya, Avaya IP Office R7 and Avaya IP Office Manager Version 9 are registered trademarks of Avaya Inc.
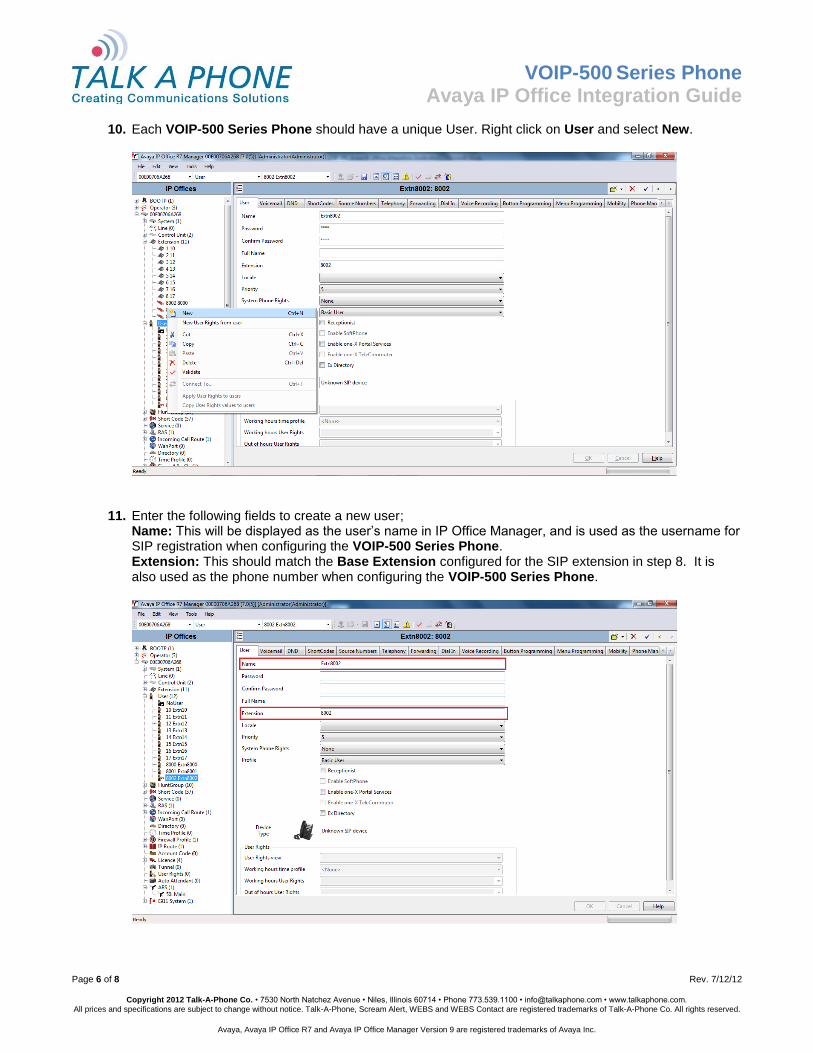
10. Each VOIP-500 Series Phone should have a unique User. Right click on User and select New.
11. Enter the following fields to create a new user;
Name: This will be displayed as the user’s name in IP Office Manager, and is used as the username for SIP registration when configuring the VOIP-500 Series Phone. Extension: This should match the Base Extension configured for the SIP extension in step 8. It is also used as the phone number when configuring the VOIP-500 Series Phone.
VOIP-500 Series Phone
Avaya IP Office Integration Guide
Page 7 of 8 Rev. 7/12/12
Copyright 2012 Talk-A-Phone Co. • 7530 North Natchez Avenue • Niles, Illinois 60714 • Phone 773.539.1100 • [email protected] • www.talkaphone.com.
All prices and specifications are subject to change without notice. Talk-A-Phone, Scream Alert, WEBS and WEBS Contact are registered trademarks of Talk-A-Phone Co. All rights reserved.
Avaya, Avaya IP Office R7 and Avaya IP Office Manager Version 9 are registered trademarks of Avaya Inc.
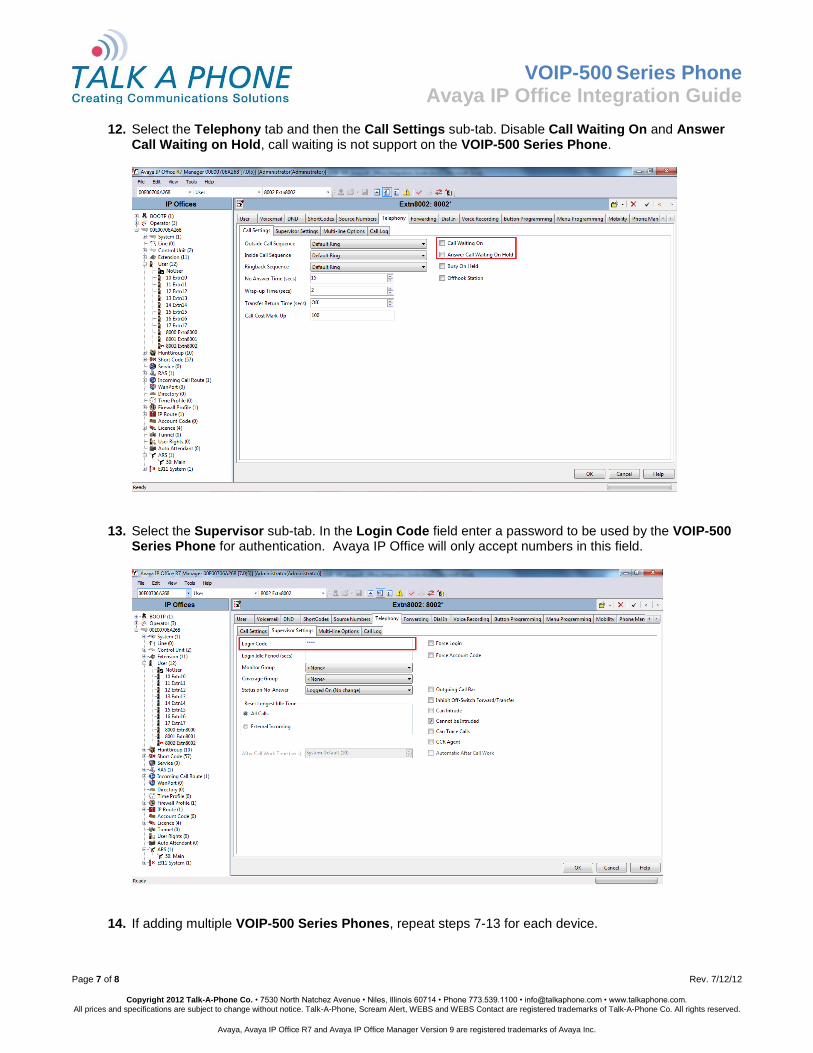
12. Select the Telephony tab and then the Call Settings sub-tab. Disable Call Waiting On and Answer Call Waiting on Hold, call waiting is not support on the VOIP-500 Series Phone.
13. Select the Supervisor sub-tab. In the Login Code field enter a password to be used by the VOIP-500 Series Phone for authentication. Avaya IP Office will only accept numbers in this field.
14. If adding multiple VOIP-500 Series Phones, repeat steps 7-13 for each device.
VOIP-500 Series Phone
Avaya IP Office Integration Guide
Page 8 of 8 Rev. 7/12/12
Copyright 2012 Talk-A-Phone Co. • 7530 North Natchez Avenue • Niles, Illinois 60714 • Phone 773.539.1100 • [email protected] • www.talkaphone.com.
All prices and specifications are subject to change without notice. Talk-A-Phone, Scream Alert, WEBS and WEBS Contact are registered trademarks of Talk-A-Phone Co. All rights reserved.
Avaya, Avaya IP Office R7 and Avaya IP Office Manager Version 9 are registered trademarks of Avaya Inc.
IV. VOIP-500 Series Phone Configuration
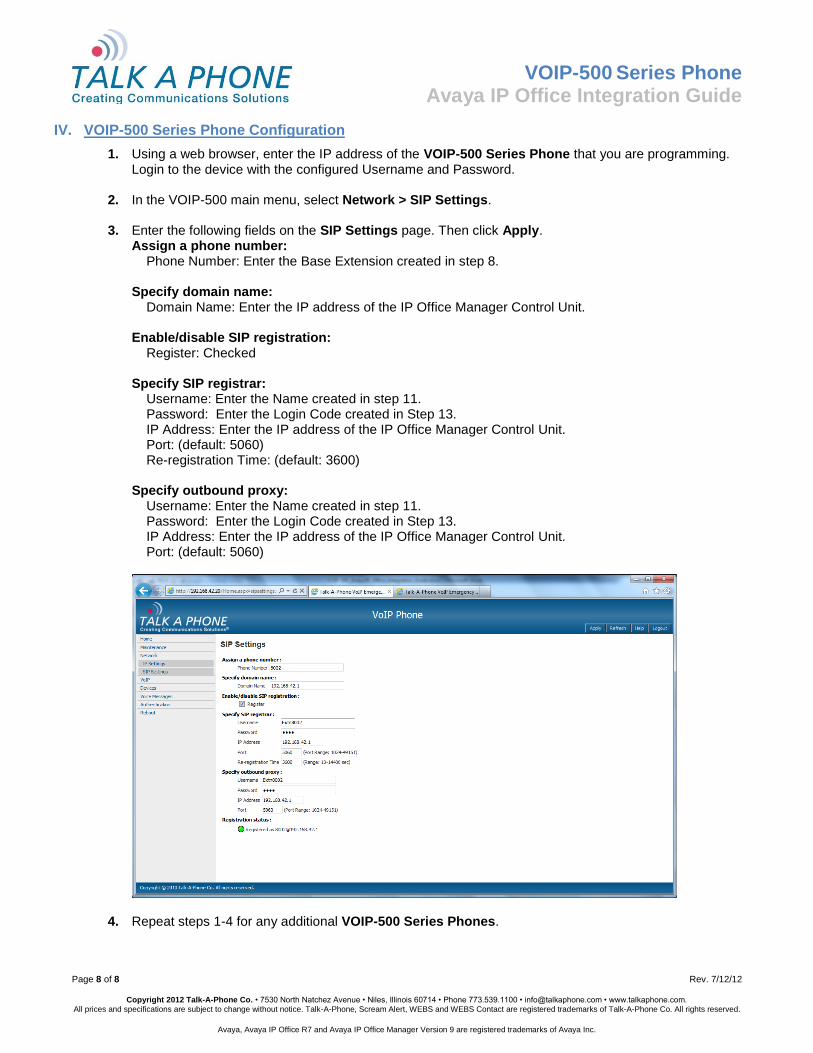
1. Using a web browser, enter the IP address of the VOIP-500 Series Phone that you are programming. Login to the device with the configured Username and Password.
2. In the VOIP-500 main menu, select Network > SIP Settings.
3. Enter the following fields on the SIP Settings page. Then click Apply.
Assign a phone number: Phone Number: Enter the Base Extension created in step 8. Specify domain name: Domain Name: Enter the IP address of the IP Office Manager Control Unit. Enable/disable SIP registration: Register: Checked Specify SIP registrar: Username: Enter the Name created in step 11. Password: Enter the Login Code created in Step 13. IP Address: Enter the IP address of the IP Office Manager Control Unit. Port: (default: 5060) Re-registration Time: (default: 3600) Specify outbound proxy: Username: Enter the Name created in step 11. Password: Enter the Login Code created in Step 13. IP Address: Enter the IP address of the IP Office Manager Control Unit. Port: (default: 5060)
4. Repeat steps 1-4 for any additional VOIP-500 Series Phones.