pc advance course
DESCRIPTION
PC Advance CourseTRANSCRIPT

Computer Advance Course
What is a computer?
Computer is an electronic device that executes the instructions in a program.Computer has four functions:
1) accepts Input2) processes Processing3) produces output/result Output4) stores data Storage
The Parts of Your Computer System
Desktop PC
Laptop
| - 1 -
Product OutputProcess InformationInput Device(s)
System Unit
LCD Monitor
Keyboard
Mouse
Speaker
Computer Advance Course
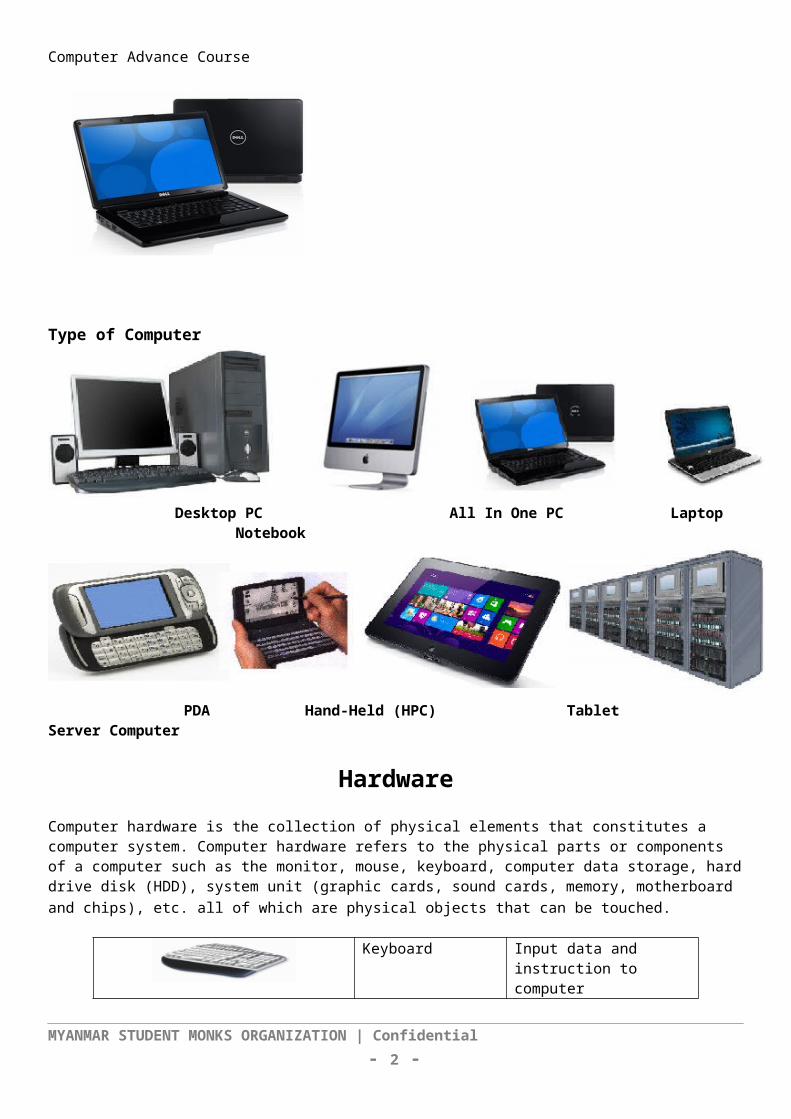
Type of Computer
Desktop PC All In One PC Laptop Notebook
PDA Hand-Held (HPC) Tablet Server Computer
Hardware
Computer hardware is the collection of physical elements that constitutes a computer system. Computer hardware refers to the physical parts or components of a computer such as the monitor, mouse, keyboard, computer data storage, hard drive disk (HDD), system unit (graphic cards, sound cards, memory, motherboard and chips), etc. all of which are physical objects that can be touched.
Keyboard Input data and instruction to computer
Mouse Give instruction, drawing, pointing
Monitor Display information
Central Processing Unit (CPU)
Interpret instruction and process data
Memory Temporary storage(volatile)
Backing Store Permanent storageHard Disk, CD, DVD, USB Pen,Drive……and so on.
| - 2 -

Computer Advance Course
TYPICAL DESKOP PC CONNECTIONS
1. Color coded PURPLE – This is for the keyboard.2. Color coded GREEN – This is for the mouse, (if it has a small round connector on it).3. Color coded BLUE – This is where you will plug in the monitor/computer screen.4. These four places are called USB ports. You can plug in a USB device into anyone of
these ports such as a USB mouse, keyboard, printer, digital camera, etc.5. This is called a firewire port. Even though it is not as fast as a USB port, it functions
in the same manner. If you have a device that uses firewire, you will notice the type of plug on the end.
6. This is called an Ethernet port. This is where you plug in a cat5 cable, (from a DSL/Cable Modem), for high-speed Internet.
7. This area is for connecting your speakers to. The Green port, is where you would plugin your speakers. The color coding is for different speakers such as center channel, surround right/left and for left and right woofers.
8. There may be other components in this area. These components, can be a dial-up modem, a new Ethernet card, video, (graphics card), sound card or even an extra USB five (5) port card.
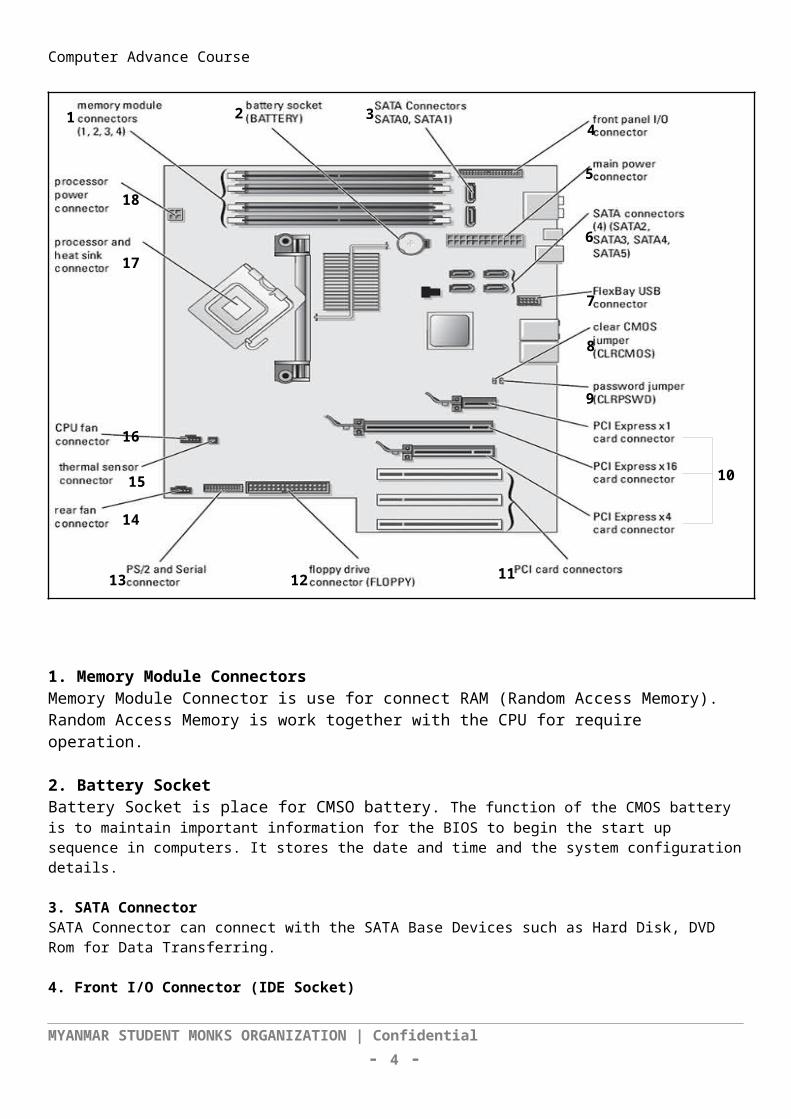
General Motherboard Layout
1. Memory Module Connectors | - 3 -
1. 2. 3.4.
5.
6.
7.
8.
9.
10
11.12.13.
14
15
16
17
18
Computer Advance Course
Memory Module Connector is use for connect RAM (Random Access Memory). Random Access Memory is work together with the CPU for require operation.
2. Battery SocketBattery Socket is place for CMSO battery. The function of the CMOS battery is to maintain important information for the BIOS to begin the start up sequence in computers. It stores the date and time and the system configuration details.
3. SATA ConnectorSATA Connector can connect with the SATA Base Devices such as Hard Disk, DVD Rom for Data Transferring.
4. Front I/O Connector (IDE Socket)IDE Socket can connect with the IDE Base Devices such as Hard Disk, DVD Rom for Data Transferring like as SATA Connector.
5. Main Power ConnectorMain Power Connector is use for the require electric of the computer.
6. SATA Connectors SATA Connectors is too same with SATA Connector.
7. FlexBay USB ConnectorFlexBay USB Connector is use for connect with the casing of the USB Cable.
8. CMOS JumperCMOS Jumper is store the BIOS Configuration Data. When want to reset the BIOS setting, remove the CMOS JumperAnd remove the CMOS Battery.
9. Password JumperPassword Jumper is store the computer of BIOS Password.
10. PCL Express Connector (x1, x16, x4)PCL Express Connector can connect as media extension port such as graphic card, sound card and others.
11. PCL Card ConnectorsPCL Card connector in can connect network card for connection to internet or intranet network.
12. Floppy Drive ConnectorFloppy Drive Connector is only use for Floppy Drive.
13. PS/2 and Serial ConnectorPS/2 Connector can connect for keyboard and mouse.
14. Rear Fan ConnectorRear Fan Connector is only use for connect with the casing of the fan.
15. Thermal Sensor ConnectorThermal Sensor Connector can connect with the Temperature Sensor.
16. CPU Fan ConnectorCPU Fan Connector is only use for CPU Fan Power.
17. Processor and Head Sink Connector
| - 4 -

Computer Advance Course
It is the socket for connect Processor (CPU) an Heat Sink.
18. Processor Power ConnectorFor working Processor (CPU), this port produce the require power for the CPU.
Software
Software is the programs (Instructions) that tell the computer what to do. Different kind of software performs different kind of tasks.
System Software
System Software is software that basically allows the parts of a computer to work together. Without the system software the computer cannot operate as a single unit. Systems Software refers to the Operation System and all utilityprograms that manage computer resources at a low level.eg. Windows XP, Windows Vista, Windows 7, Mac OS
Application Software
Include programs that do real work for user. For example, word processors, spreadsheets, and database management systems fall under the category of applications software.eg. Microsoft Word, PowerPoint, Adobe Photoshop
Personalizing the Desktop Background
| - 5 -

Computer Advance Course
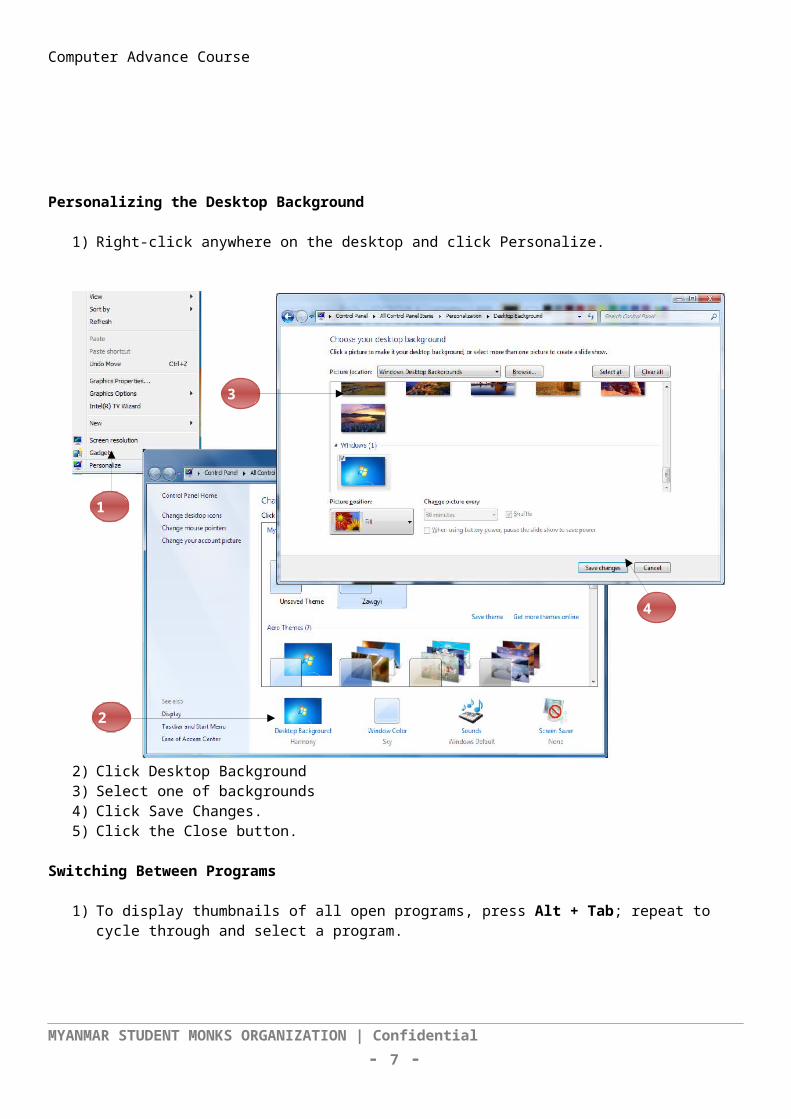
1) Right-click anywhere on the desktop and click Personalize.
2) Click Desktop Background3) Select one of backgrounds4) Click Save Changes.5) Click the Close button.
Switching Between Programs
1) To display thumbnails of all open programs, press Alt + Tab; repeat to cycle through and select a program.
2) To switch to an open document from the taskbar, hover over the icon for that item and then click the thumbnail.
Managing the Windows Taskbar
| - 6 -
3
4
1
2
Computer Advance Course
1) To open an application from the taskbar, click the application’s icon.2) To add an application icon to the taskbar, click Start menu, click Microsoft Office, and then right-click on
PowerPoint and click Pin to Taskbar.
Using a Screensaver
1) Right-click anywhere on the desktop and click Personalize.
2) Click Screen Saver3) Select a screensaver from the Screen Saver drop-down list.4) Click OK.5) Click the Close button.
Changing Date and Time
| - 7 -
3
1
2
4

Computer Advance Course
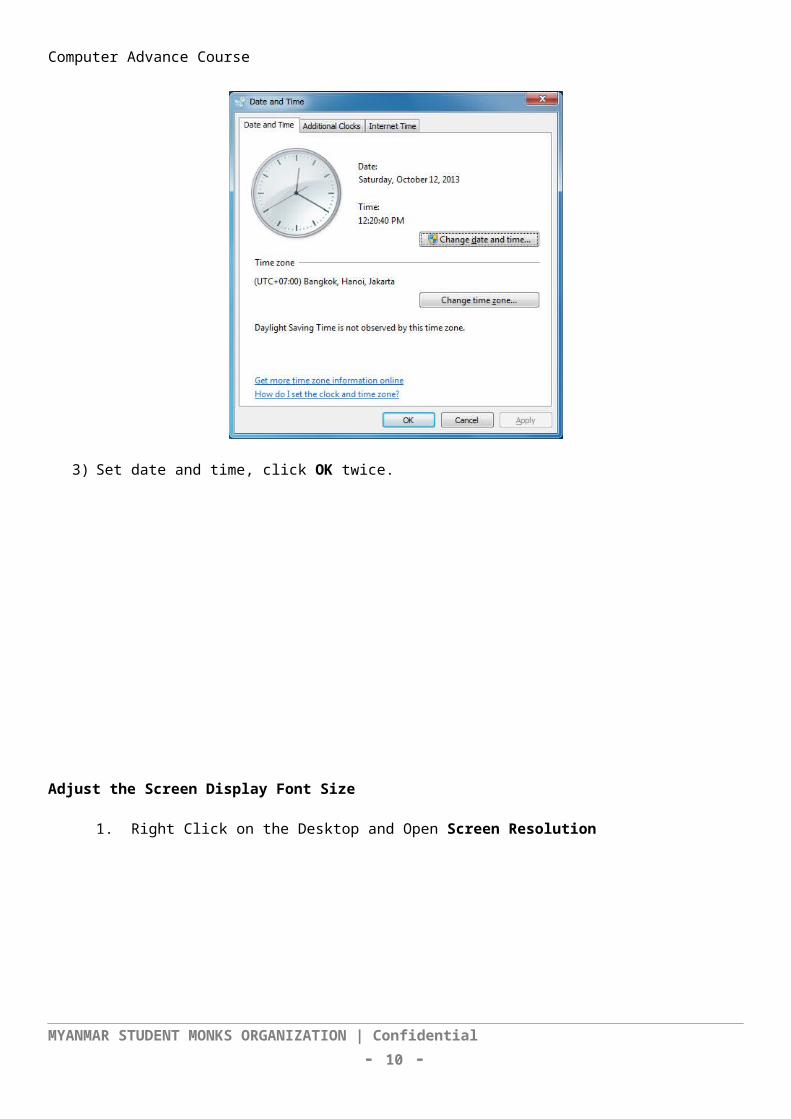
1) Click on clock far right of taskbar.
2) Click change date and time setting, and then click change date and time button.
3) Set date and time, click OK twice.
Adjust the Screen Display Font Size
| - 8 -

Computer Advance Course
1. Right Click on the Desktop and Open Screen Resolution
2. Click Make text and other items larger or smaller
3. And then choose the font size Smaller, Medium or any.
| - 9 -
Computer Advance Course
4. Click Apply and Click Log Off
5. Re login your window account. Font Size will be changed.
| - 10 -

Computer Advance Course
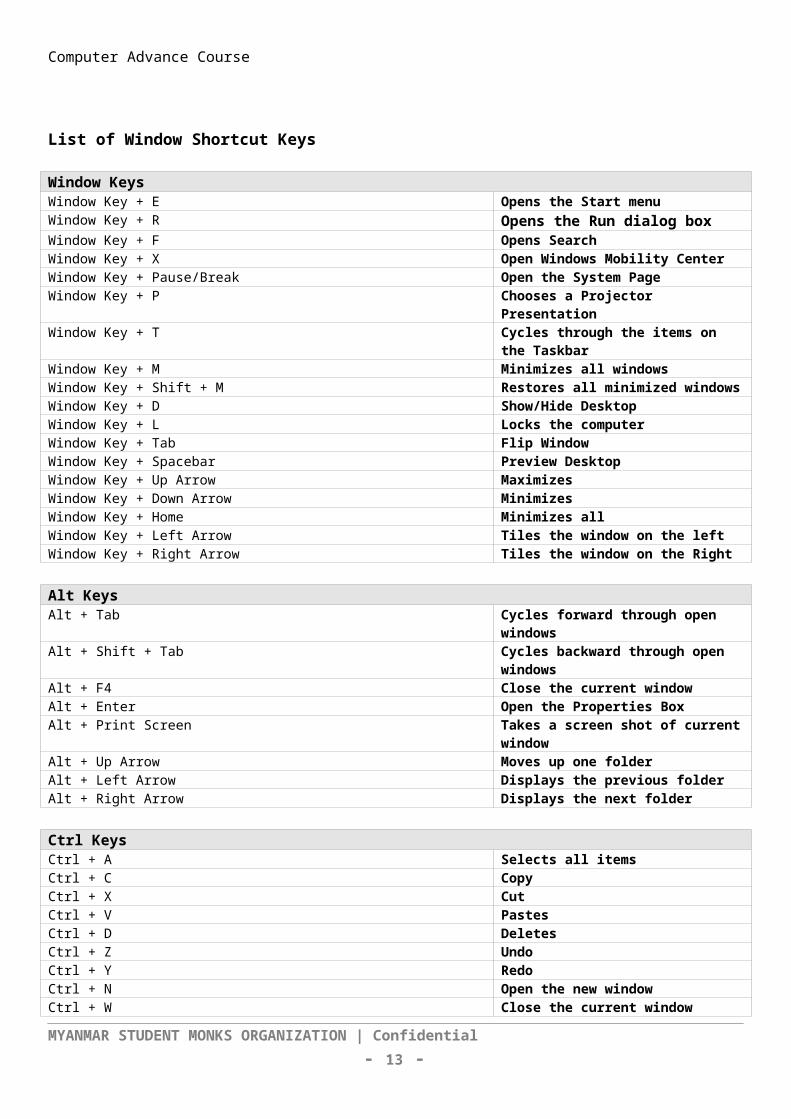
List of Window Shortcut Keys
Window KeysWindow Key + E Opens the Start menuWindow Key + R Opens the Run dialog boxWindow Key + F Opens SearchWindow Key + X Open Windows Mobility CenterWindow Key + Pause/Break Open the System PageWindow Key + P Chooses a Projector PresentationWindow Key + T Cycles through the items on the TaskbarWindow Key + M Minimizes all windowsWindow Key + Shift + M Restores all minimized windowsWindow Key + D Show/Hide DesktopWindow Key + L Locks the computerWindow Key + Tab Flip WindowWindow Key + Spacebar Preview DesktopWindow Key + Up Arrow MaximizesWindow Key + Down Arrow MinimizesWindow Key + Home Minimizes allWindow Key + Left Arrow Tiles the window on the leftWindow Key + Right Arrow Tiles the window on the Right
Alt KeysAlt + Tab Cycles forward through open windowsAlt + Shift + Tab Cycles backward through open windowsAlt + F4 Close the current windowAlt + Enter Open the Properties BoxAlt + Print Screen Takes a screen shot of current windowAlt + Up Arrow Moves up one folderAlt + Left Arrow Displays the previous folderAlt + Right Arrow Displays the next folder
Ctrl KeysCtrl + A Selects all itemsCtrl + C CopyCtrl + X CutCtrl + V PastesCtrl + D DeletesCtrl + Z UndoCtrl + Y RedoCtrl + N Open the new windowCtrl + W Close the current windowCtrl + F Selects the Search BoxCtrl + Shift + N Creates the new folderCtrl + Shift + Esc Open the Task ManagerCtrl + Alt + Delete Windows Security ScreenCtrl + Mouse Wheel Changes the Icon Size on the DesktopCtrl + Y RedoCtrl + N Open the new window
| - 11 -

Computer Advance Course
List of Run Commands for Windows
First open the Run Box with (Window + R)
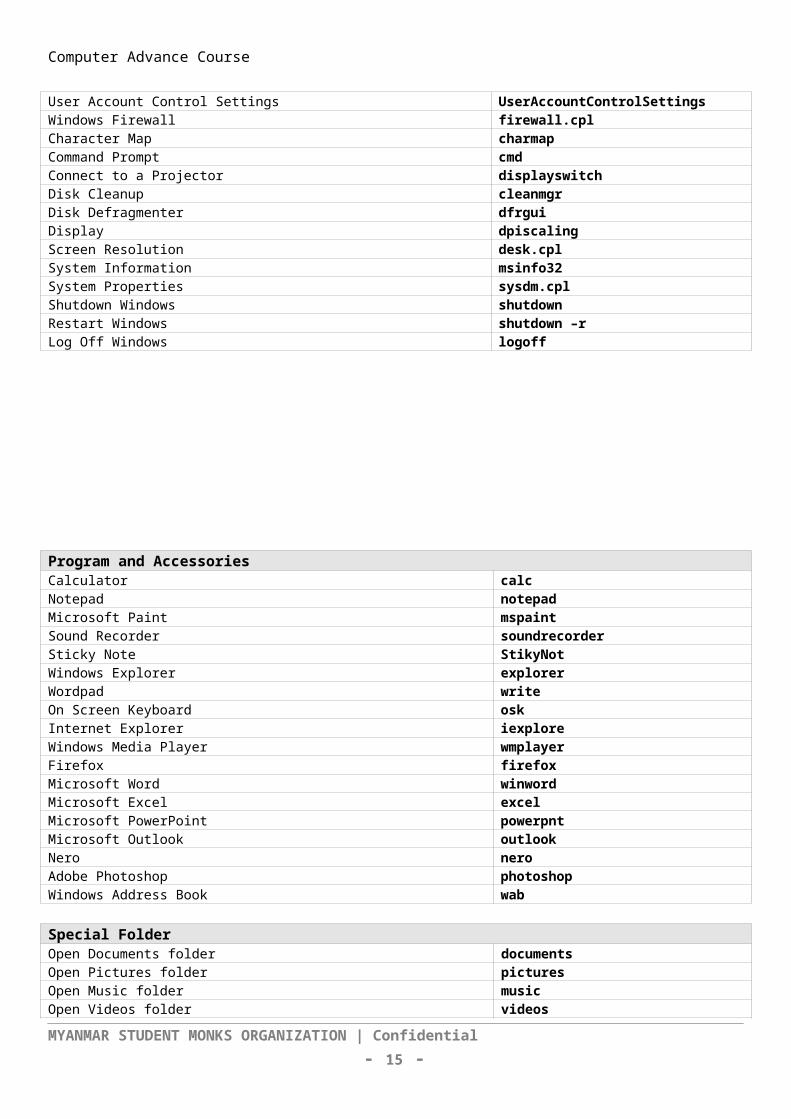
Computer ManagemntAdministrative Tools control admintoolsDirect X Troubleshooter dxdiagGroup Policy Editor gpedit.mscDevice Manager hdwwiz.cpl or devmgmt.mscRegistry Editor regedit or regedt32System Configuration Utility msconfigTask Manager taskmgrWindows Version winverComputer Management compmgmt.msc or CompMgmtLauncherDisk Management diskmgmt.mscServices services.mscControl Panel controlAction Center wscui.cplColor Management colorcplDate and Time Properties timedate.cplDevices and Printers control printersDisplay dpiscalingScreen Resolution desk.cplFolders Options control foldersFonts control fontsInternet Properties inetcpl.cplNetwork Connections ncpa.cplPersonalization control desktopWindows Color and Appearance control colorPrograms and Features appwiz.cpl or control appwiz.cplRegional and Language intl.cplVolume Mixer sndvolUser Account Control Settings UserAccountControlSettingsWindows Firewall firewall.cplCharacter Map charmapCommand Prompt cmdConnect to a Projector displayswitchDisk Cleanup cleanmgrDisk Defragmenter dfrguiDisplay dpiscalingScreen Resolution desk.cplSystem Information msinfo32System Properties sysdm.cplShutdown Windows shutdownRestart Windows shutdown –rLog Off Windows logoff
| - 12 -
Computer Advance Course
Program and AccessoriesCalculator calcNotepad notepadMicrosoft Paint mspaintSound Recorder soundrecorderSticky Note StikyNotWindows Explorer explorerWordpad writeOn Screen Keyboard oskInternet Explorer iexploreWindows Media Player wmplayerFirefox firefoxMicrosoft Word winwordMicrosoft Excel excelMicrosoft PowerPoint powerpntMicrosoft Outlook outlookNero neroAdobe Photoshop photoshopWindows Address Book wab
Special FolderOpen Documents folder documentsOpen Pictures folder picturesOpen Music folder musicOpen Videos folder videosOpen Downloads folder downloadsOpen Favorites folder favoritesOpen Recent folder (can clean) recentPrefetch folder (can clean) prefetchOpen Temporary File folder (can clean) %Temp%
| - 13 -

Computer Advance Course
Window 7 Installation Guide
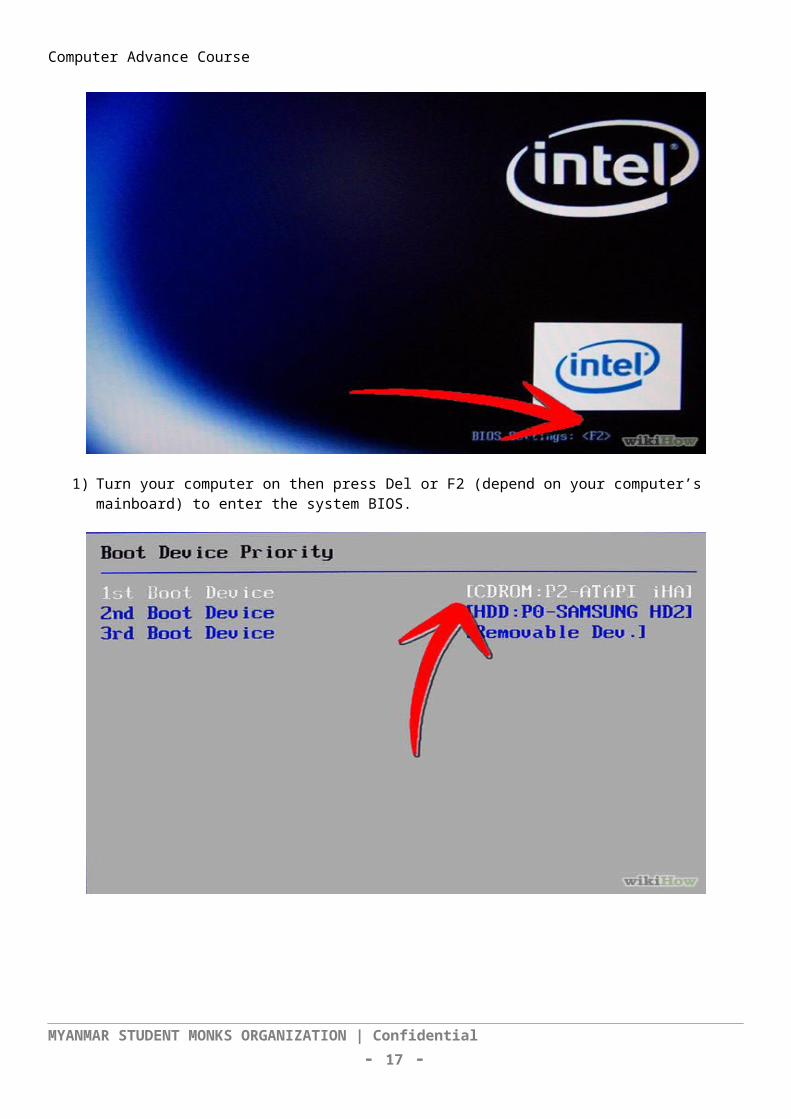
1) Turn your computer on then press Del or F2 (depend on your computer’s mainboard) to enter the system BIOS.
| - 14 -
Computer Advance Course
2) Go to Boot menu and choose Boot from CD/DVD.
3) Press F10 to save the configuration and exit BIOS then reset your computer.
| - 15 -

Computer Advance Course
4) Insert Windows 7 DVD into your DVD drive then start up your computer, Windows 7 will be loading files.
5) The next screen is a more graphical progress bar indicating Windows 7 is still working in the background.
| - 16 -
Computer Advance Course
6) The first options you will come across are selections for Language, Time and currency format, and Keyboard layout. Make your selections by using the pull down menus and press the Next button.
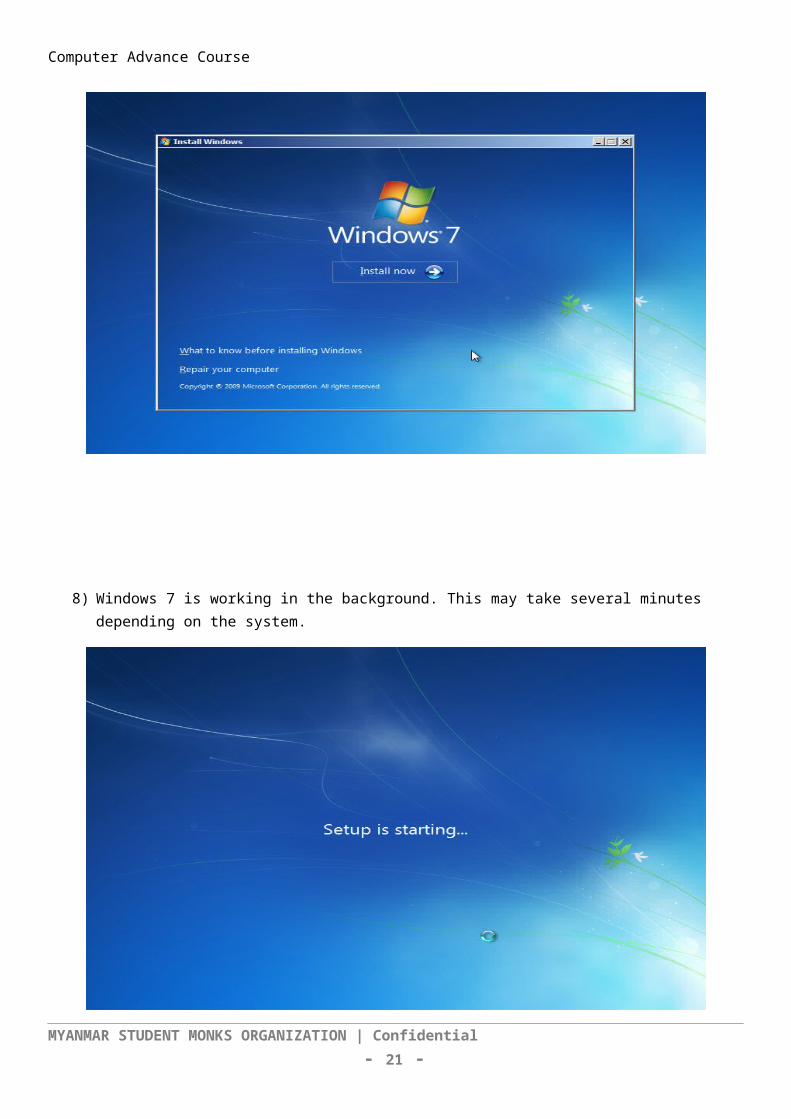
7) Click the “Install Now” button to continue to the next screen.
| - 17 -

Computer Advance Course
8) Windows 7 is working in the background. This may take several minutes depending on the system.
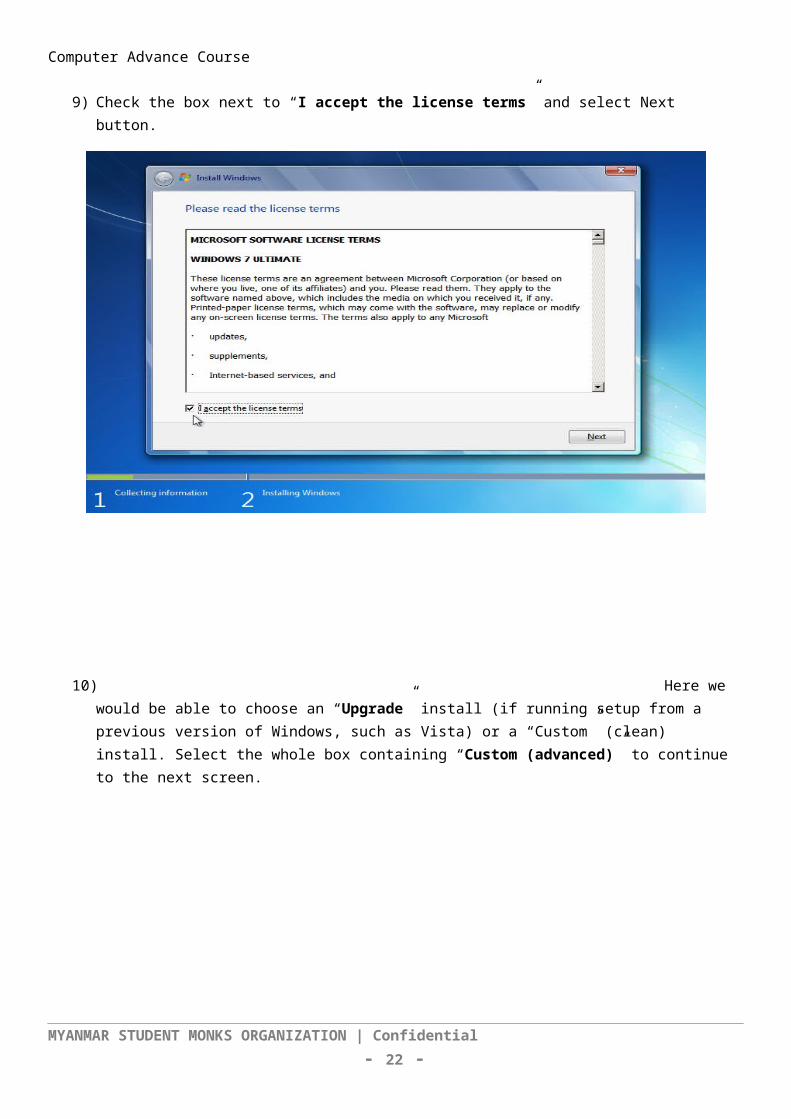
9) Check the box next to “I accept the license terms” and select Next button.
| - 18 -

Computer Advance Course
10) Here we would be able to choose an “Upgrade” install (if running setup from a previous version of Windows, such as Vista) or a “Custom” (clean) install. Select the whole box containing “Custom (advanced)” to continue to the next screen.
11) This is where you can select which hard drive/partition to install Windows 7 on. Since this system only has one hard drive, only one place Windows 7 can go. Advanced options are shown in the next screen shot.
| - 19 -

Computer Advance Course
12) The advanced options allow creation of multiple partitions and the option of formatting existing partitions.After finishing your particular partition configuration that you desire, select the Next button.
13) Here is where Windows 7 installs major components of the OS. This process can take 10 to 60 minutes depending on the system.
| - 20 -
Computer Advance Course
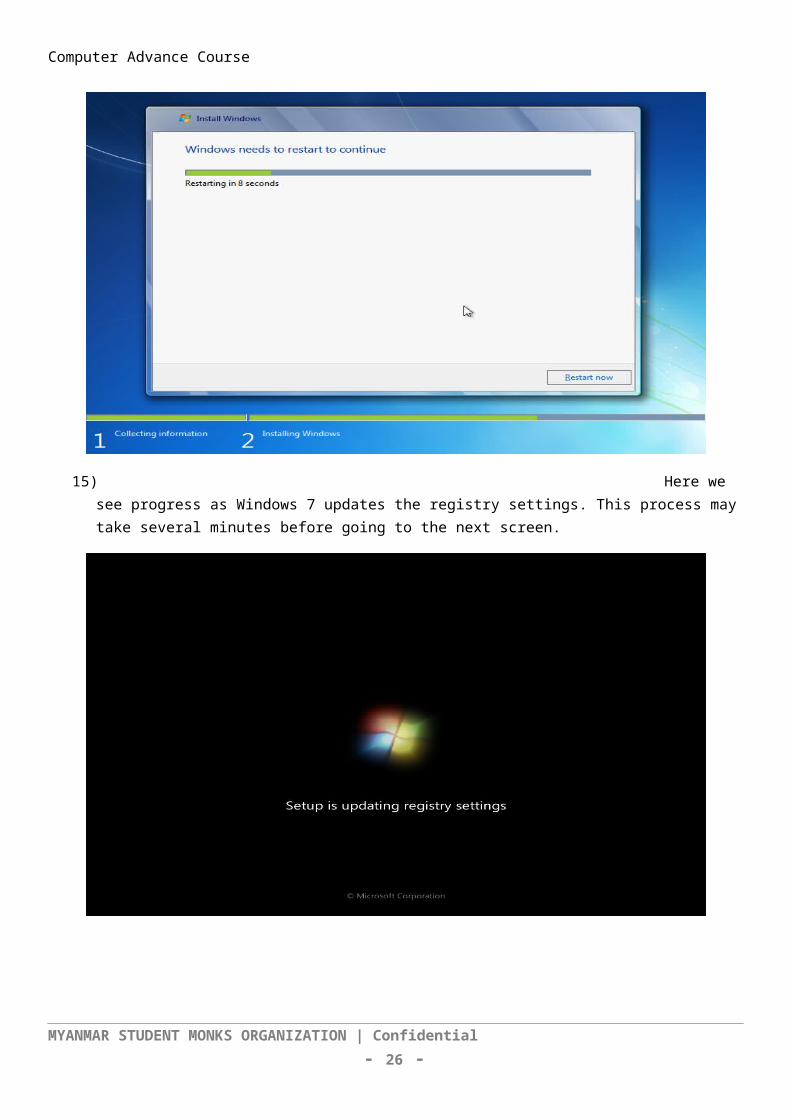
14) Here we see the system needing to reboot to continue installation tasks.You can hit the Restart Now button or just allow the reboot to happen automatically after several seconds.
15) Here we see progress as Windows 7 updates the registry settings. This process may take several minutes before going to the next screen.
| - 21 -
Computer Advance Course
16) Windows 7 starts up required services at this point in the setup process.
17) Windows 7 continues to install at this screen.
| - 22 -

Computer Advance Course
18) After initial setup is complete, another reboot is required with no user input.
19) This is the screen you will be greeted with upon each boot. Windows 7 is starting up!
| - 23 -

Computer Advance Course
20) Here is where the initial account creation happens. This user will have full administrator privileges and automatically be logged in after setup is completed.Enter in your user name and computer name as you would like it to be identified on the network and then select the Next button.
21) This screen prompts you to enter a password for the account that you just created.After this information is entered, select the Next button.
| - 24 -

Computer Advance Course
22) Uncheck the “Automatically activate” and Click the Next button.
23) Select “Ask me later”.
| - 25 -
Computer Advance Course
24) Choose the current Time Zone and click the Next button.
25) Here, you can select the “general” security measures put in place for your particular network. Most people will want to use “Home network” for desktop installations or “Public network” for a portable system, like a laptop.
| - 26 -

Computer Advance Course
26) Windows 7 is finally… finalizing settings. This should only take a few moments to complete.
27) Not much to say here. Just wait some more.
| - 27 -

Computer Advance Course
Window 7 Installation is finished.
| - 28 -