patterns from stitched sewing organizers · fold-up sewing folio cover pattern to make complete...
TRANSCRIPT
Copyright © 2017 C&T Publishing Stitched Sewing Organizers
Patterns from
Stitched Sewing Organizers
Stitched Sewing Organizers Download
Copyright © 2017 by C&T Publishing, Inc.
ISBN 978-1-61745-511-7
Published by C&T Publishing, Inc., PO Box 1456, Lafayette, CA 94549. www.ctpub.com
All rights reserved. No part of this work covered by the copyright hereon may be used in any form or reproduced by any means—graphic, electronic, or mechanical, including photocopying, recording, taping, or information storage and retrieval systems—without written permission from the Publisher.
Acceptable uses of this ELECTRONIC PRODUCT:
1. Purchaser is entitled to print out as many copies of this ELECTRONIC PRODUCT as they wish for personal use. Photocopying, digitizing, and all other forms of copying to “share” or “distribute” the ELECTRONIC PRODUCT, whether for profit or not, is strictly prohibited.
2. Purchaser may not transfer the ELECTRONIC PRODUCT to any other person, via the Internet, email, on disk, in electronic or printed form or any other form without the written permission of C&T Publishing. Purchaser may not make the ELECTRONIC PRODUCT available over a network where it could be used by multiple computers at the same time.
3. Purchaser may not rent, lease, transfer, lend, or share the ELECTRONIC PRODUCT.
Limited Warranty: Limited Warranty on this ELECTRONIC PRODUCT. C&T Publishing, Inc. warrants the ELECTRONIC PRODUCT will be delivered by C&T Publishing, Inc. free from defects in materials and workmanship under normal use for a period of ninety (90) days from the date of original purchase. C&T Publishing, Inc. will not replace the ELECTRONIC PRODUCT due to Purchaser changing computers or accidentally deleting ELECTRONIC PRODUCT or for any other loss of the file that is considered out of the control of C&T Publishing, Inc. Your exclusive remedy under this Section shall be, at C&T Publishing, Inc.’s option, a refund of the purchase price of the ELECTRONIC PRODUCT.
Contact us at 800-284-1114 or www.ctpub.com for more information about the C&T Teachers Program.
We take great care to ensure that the information included in our products is accurate and presented in good faith, but no warranty is provided nor are results guaranteed. Having no control over the choices of materials or procedures used, neither the author nor C&T Publishing, Inc., shall have any liability to any person or entity with respect to any loss or damage caused directly or indirectly by the information contained in this book. For your convenience, we post an up-to-date listing of corrections on our website (www.ctpub.com). If a correction is not already noted, please contact our customer service department at [email protected] or at P.O. Box 1456, Lafayette, CA 94549.
Trademark (™) and registered trademark (®) names are used throughout this ELECTRONIC PRODUCT. Rather than use the symbols with every occurrence of a trademark or registered trademark name, we are using the names only in the editorial fashion and to the benefit of the owner, with no intention of infringement.
Pattern Note: This digital file contains patterns that may not print true to size and may require sizing adjustments (inchmarks are included on patterns for reference). Depending on your viewing application or device, printing desired page may result in multiple printed pages.

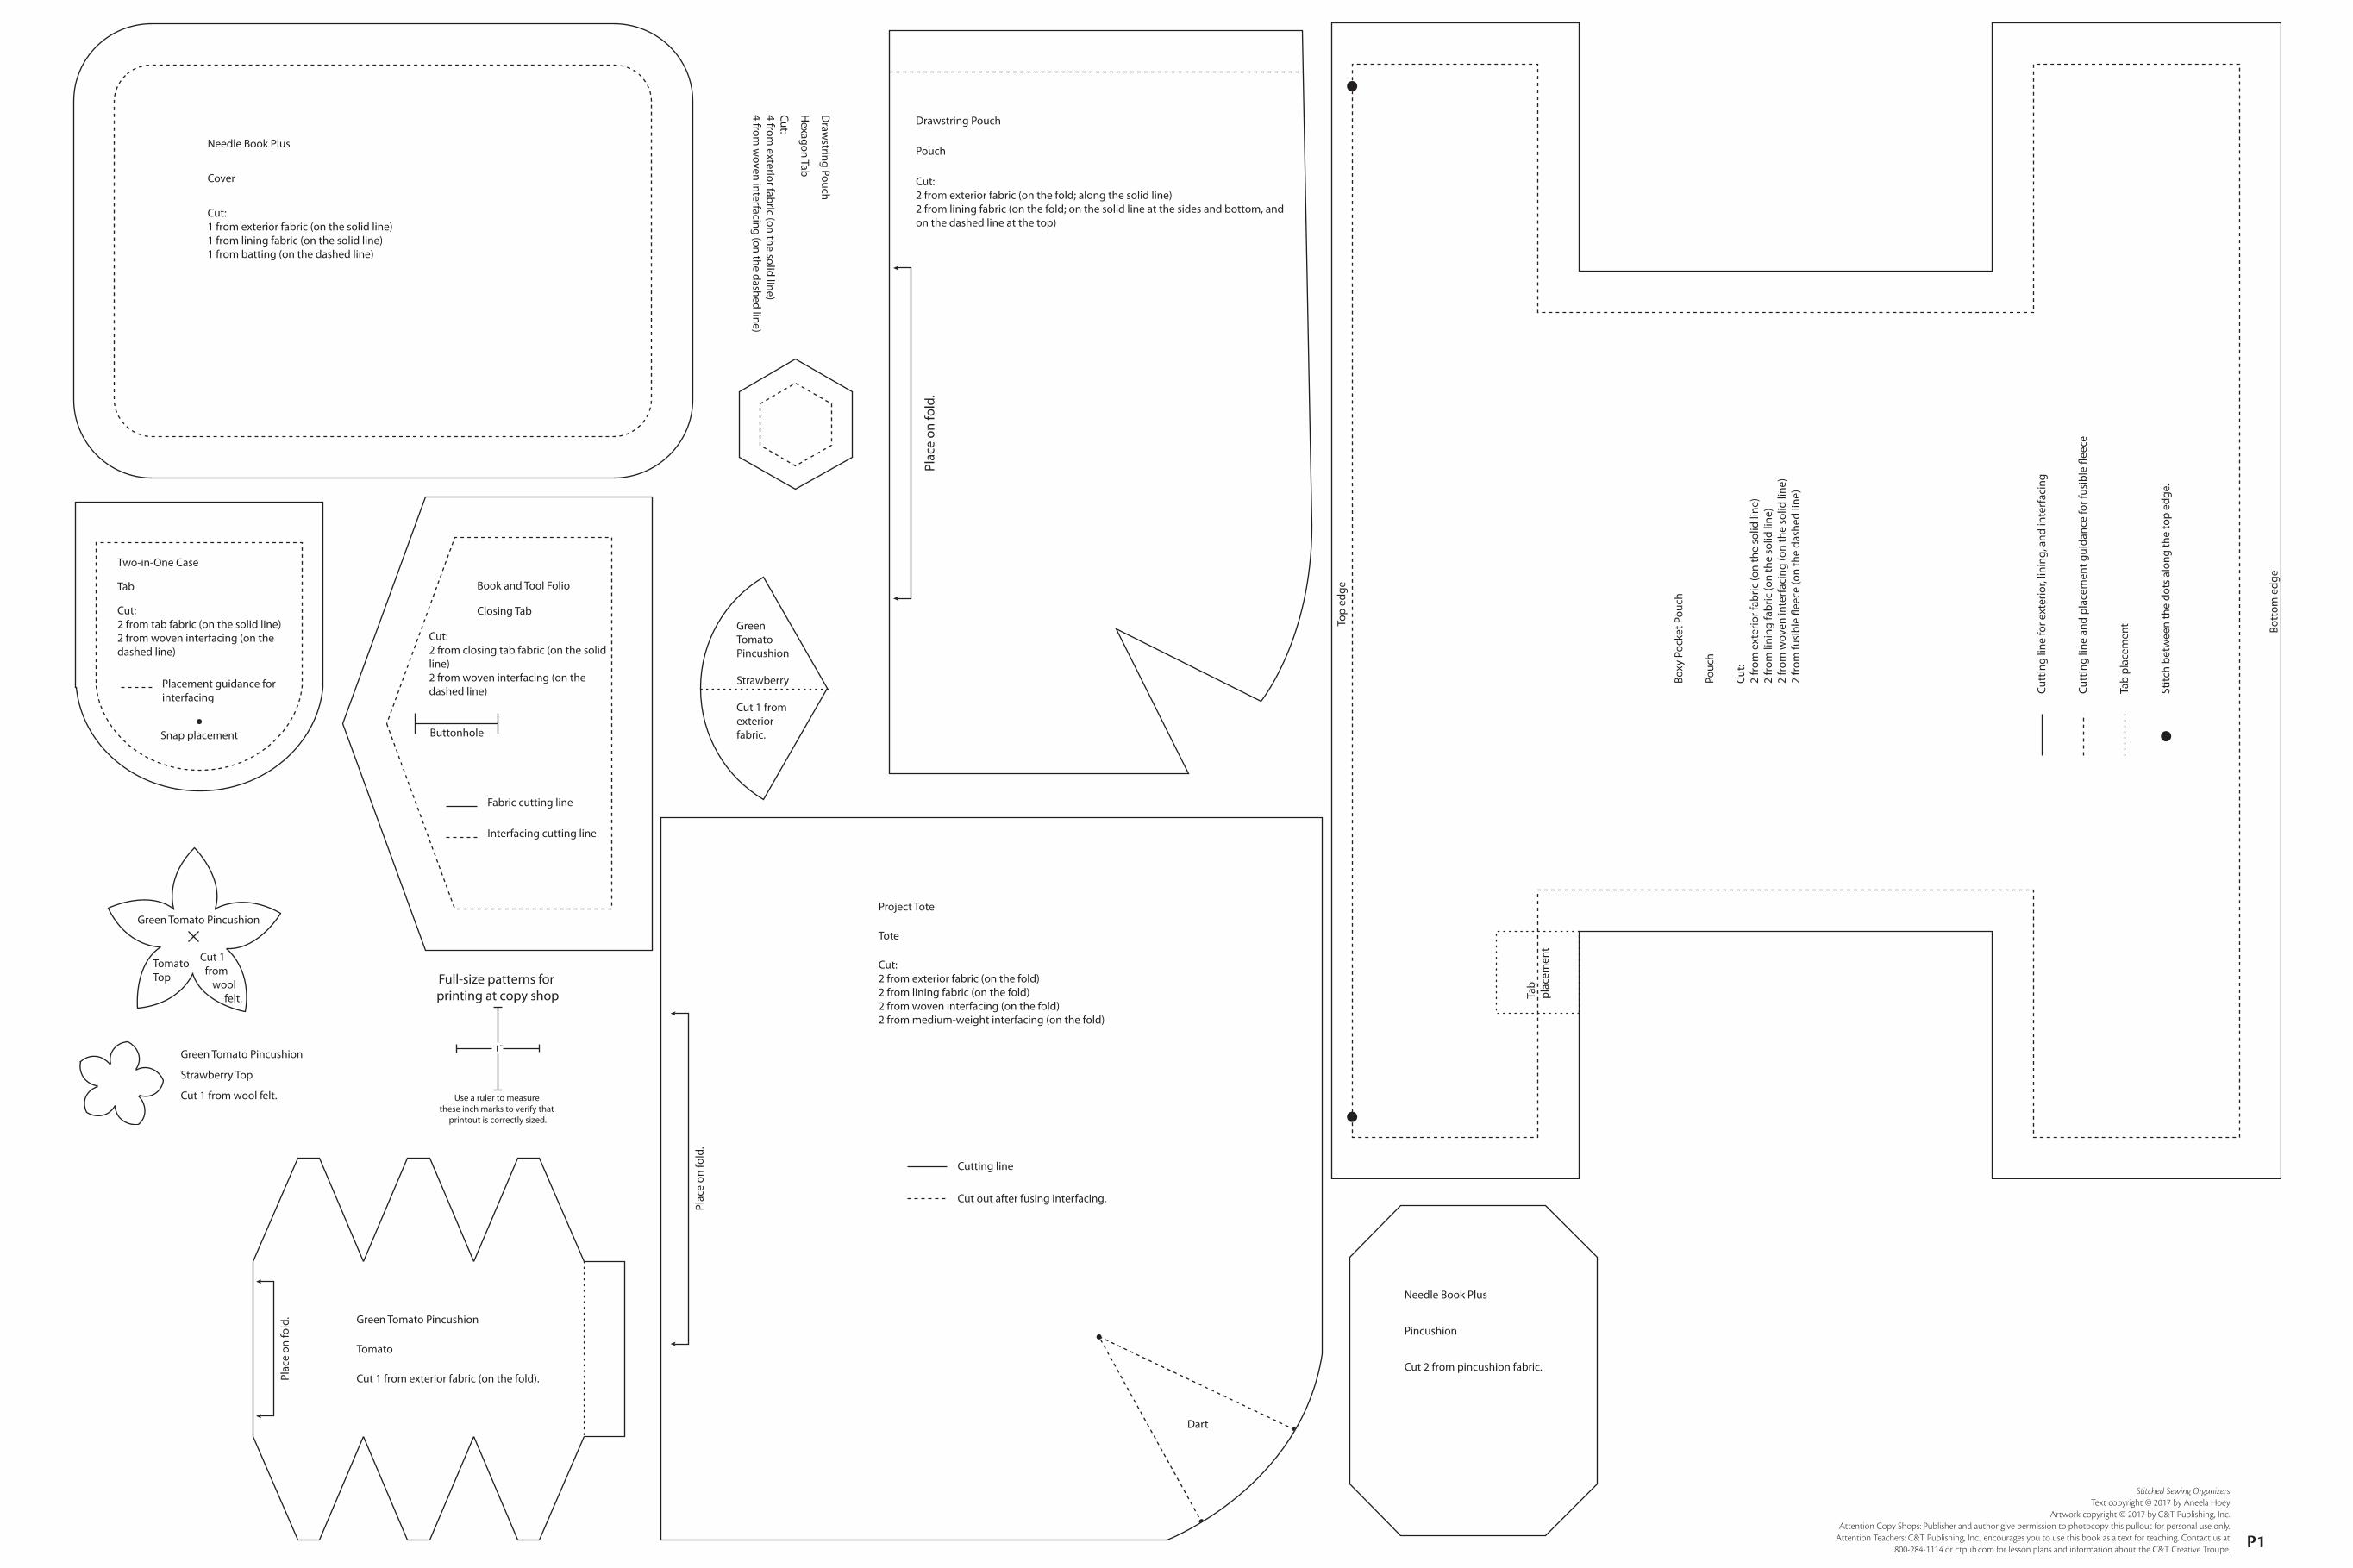
Needle Book Plus Pincushion and Cover Patterns
Use a ruler to measure these inch marks to verify that
printout is correctly sized.
1˝
Needle Book Plus
Cover
Cut:1 from exterior fabric (on the solid line)1 from lining fabric (on the solid line)1 from batting (on the dashed line)
Needle Book Plus
Pincushion
Cut 2 from pincushion fabric.

Handy Fold-Up Pouch Large Pouch Pattern
Use a ruler to measure these inch marks to verify that
printout is correctly sized.
1˝
To make complete pattern, join the following pages, following the diagram for reference.
Strip placement
Fold line
Exterior fabric Lining fabric
Template placement for directional fabric
Handy Fold-Up Pouch
Large Pouch
Cut:1 from exterior fabric1 from lining fabric1 from woven interfacing
Strip placement
Fold line
Exterior fabric Lining fabric
Template placement for directional fabric
Handy Fold-Up Pouch
Large Pouch
Cut:1 from exterior fabric1 from lining fabric1 from woven interfacing

Handy Fold-Up Pouch Large Pouch Pattern
1”
To make complete pattern, join the following pages, following the diagram for reference.
Strip placement
Fold line
Exterior fabric Lining fabric
Template placement for directional fabric
Handy Fold-Up Pouch
Large Pouch
Cut:1 from exterior fabric1 from lining fabric1 from woven interfacing
Strip placement
Fold line
Exterior fabric Lining fabric
Template placement for directional fabric
Handy Fold-Up Pouch
Large Pouch
Cut:1 from exterior fabric1 from lining fabric1 from woven interfacing

Handy Fold-Up Pouch Small Pouch Pattern
Use a ruler to measure these inch marks to verify that
printout is correctly sized.
1˝ Strip placement
Fold line
Exterior fabric Lining fabric
Template placement for directional fabric
Handy Fold-Up Pouch
Small Pouch
Cut:1 from exterior fabric1 from lining fabric1 from woven interfacing
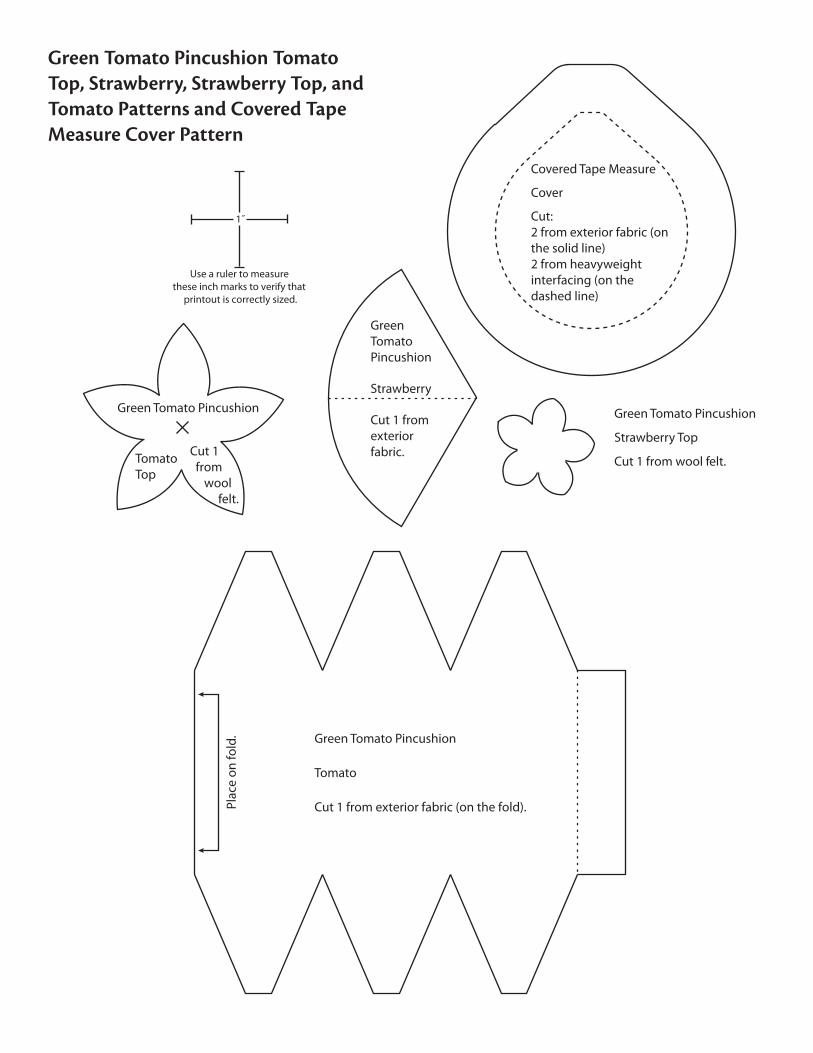
Green Tomato Pincushion Tomato Top, Strawberry, Strawberry Top, and Tomato Patterns and Covered Tape Measure Cover Pattern
Use a ruler to measure these inch marks to verify that
printout is correctly sized.
1˝
Covered Tape Measure
Cut:2 from exterior fabric (on the solid line)2 from heavyweight interfacing (on the dashed line)
Cover
Plac
e on
fold
. Green Tomato Pincushion
Tomato
Cut 1 from exterior fabric (on the fold).
GreenTomatoPincushion
Strawberry
Cut 1 from exterior fabric.
Green Tomato Pincushion
Tomato Top
Cut 1 from wool felt.
Green Tomato Pincushion
Strawberry Top
Cut 1 from wool felt.
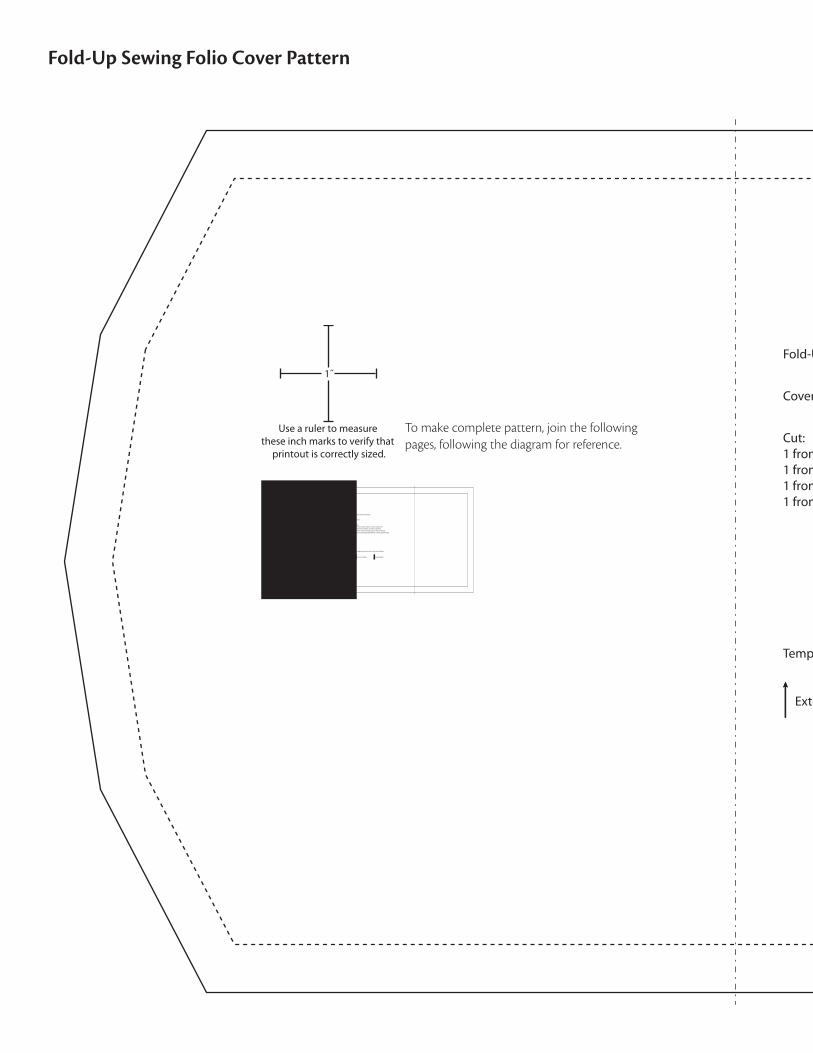
Fold-Up Sewing Folio
Cover
Exterior fabric Lining fabric
Template placement for directional fabric
Cut:1 from exterior fabric (on the solid line)1 from lining fabric (on the solid line)1 from woven interfacing (on the solid line)1 from batting/fusible �eece (on the dashed line)
Fold-Up Sewing Folio Cover Pattern
To make complete pattern, join the following pages, following the diagram for reference.
Use a ruler to measure these inch marks to verify that
printout is correctly sized.
1˝
Fold-Up Sewing Folio
Cover
Exterior fabric Lining fabric
Template placement for directional fabric
Cut:1 from exterior fabric (on the solid line)1 from lining fabric (on the solid line)1 from woven interfacing (on the solid line)1 from batting/fusible �eece (on the dashed line)

Fold-Up Sewing Folio
Cover
Exterior fabric Lining fabric
Template placement for directional fabric
Cut:1 from exterior fabric (on the solid line)1 from lining fabric (on the solid line)1 from woven interfacing (on the solid line)1 from batting/fusible �eece (on the dashed line)
Fold-Up Sewing Folio Cover Pattern
To make complete pattern, join the following pages, following the diagram for reference.
Fold-Up Sewing Folio
Cover
Exterior fabric Lining fabric
Template placement for directional fabric
Cut:1 from exterior fabric (on the solid line)1 from lining fabric (on the solid line)1 from woven interfacing (on the solid line)1 from batting/fusible �eece (on the dashed line) 1”

Fold-Up Sewing Folio
Cover
Exterior fabric Lining fabric
Template placement for directional fabric
Cut:1 from exterior fabric (on the solid line)1 from lining fabric (on the solid line)1 from woven interfacing (on the solid line)1 from batting/fusible �eece (on the dashed line)
Fold-Up Sewing Folio Cover Pattern
To make complete pattern, join the following pages, following the diagram for reference.
Fold-Up Sewing Folio
Cover
Exterior fabric Lining fabric
Template placement for directional fabric
Cut:1 from exterior fabric (on the solid line)1 from lining fabric (on the solid line)1 from woven interfacing (on the solid line)1 from batting/fusible �eece (on the dashed line)
1”
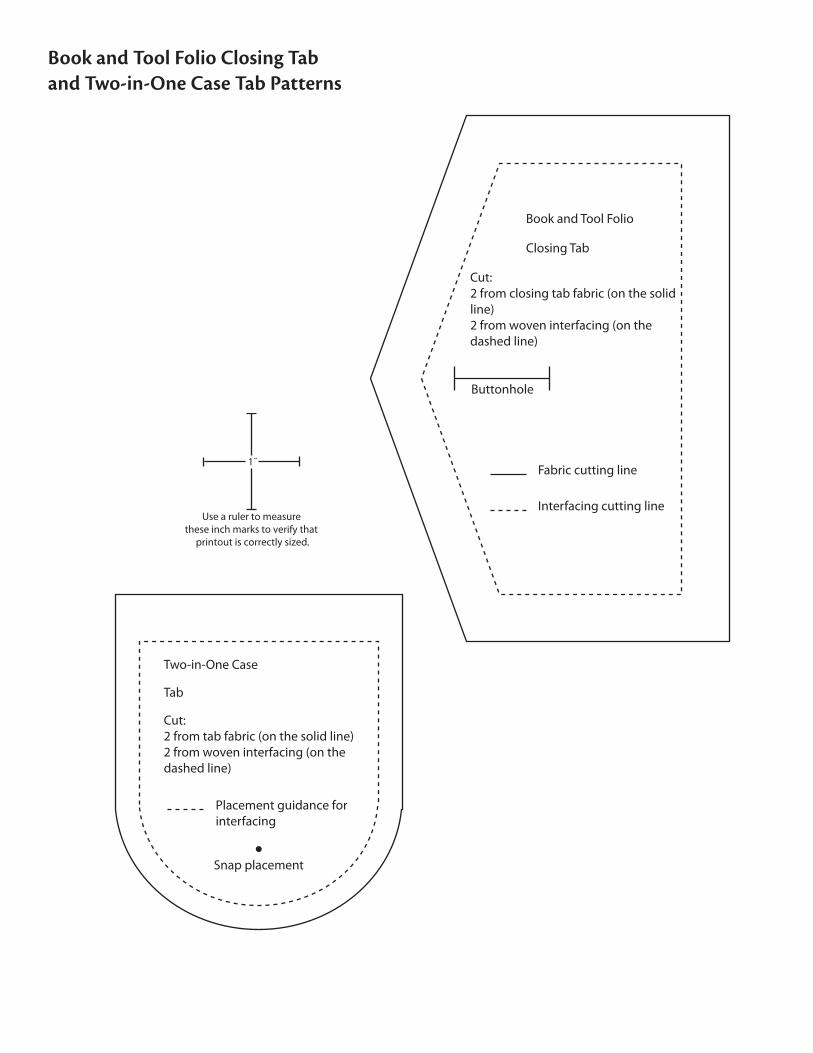
Book and Tool Folio Closing Tab and Two-in-One Case Tab Patterns
Use a ruler to measure these inch marks to verify that
printout is correctly sized.
1˝
Snap placement
Placement guidance for interfacing
Two-in-One Case
Tab
Cut:2 from tab fabric (on the solid line)2 from woven interfacing (on the dashed line)
Book and Tool Folio
Closing Tab
Buttonhole
Fabric cutting line
Interfacing cutting line
Cut:2 from closing tab fabric (on the solid line)2 from woven interfacing (on the dashed line)

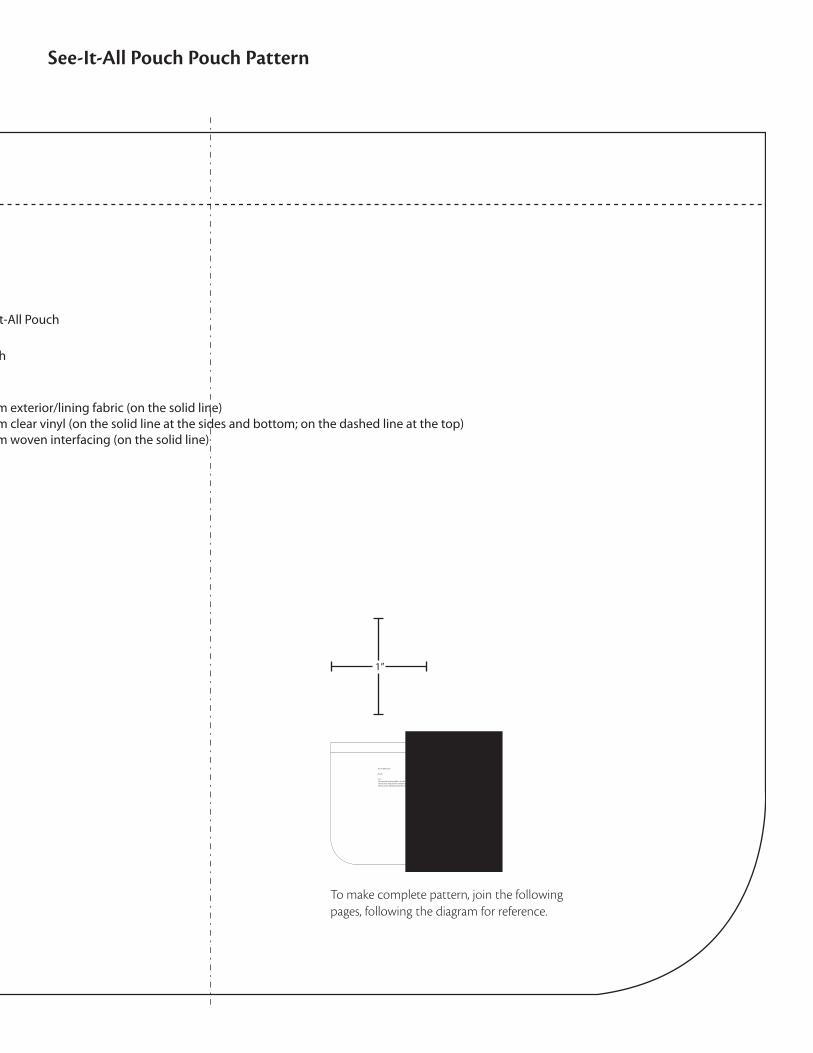
See-It-All Pouch
Pouch
Cut:2 from exterior/lining fabric (on the solid line)1 from clear vinyl (on the solid line at the sides and bottom; on the dashed line at the top)2 from woven interfacing (on the solid line)
See-It-All Pouch Pouch Pattern
To make complete pattern, join the following pages, following the diagram for reference.
Use a ruler to measure these inch marks to verify that
printout is correctly sized.
1˝
See-It-All Pouch
Pouch
Cut:2 from exterior/lining fabric (on the solid line)1 from clear vinyl (on the solid line at the sides and bottom; on the dashed line at the top)2 from woven interfacing (on the solid line)
See-It-All Pouch
Pouch
Cut:2 from exterior/lining fabric (on the solid line)1 from clear vinyl (on the solid line at the sides and bottom; on the dashed line at the top)2 from woven interfacing (on the solid line)
See-It-All Pouch Pouch Pattern
To make complete pattern, join the following pages, following the diagram for reference.
See-It-All Pouch
Pouch
Cut:2 from exterior/lining fabric (on the solid line)1 from clear vinyl (on the solid line at the sides and bottom; on the dashed line at the top)2 from woven interfacing (on the solid line)
1”

Drawstring Pouch Hexagon Tab and Pouch Patterns
Use a ruler to measure these inch marks to verify that
printout is correctly sized.
1˝
Drawstring Pouch
Pouch
Cut:2 from exterior fabric (on the fold; along the solid line)2 from lining fabric (on the fold; on the solid line at the sides and bottom, and on the dashed line at the top)
Plac
e on
fold
.
Dra
wst
ring
Pouc
h
Hex
agon
Tab
Cut:
4 fr
om e
xter
ior f
abric
(on
the
solid
line
)4
from
wov
en in
terf
acin
g (o
n th
e da
shed
line
)
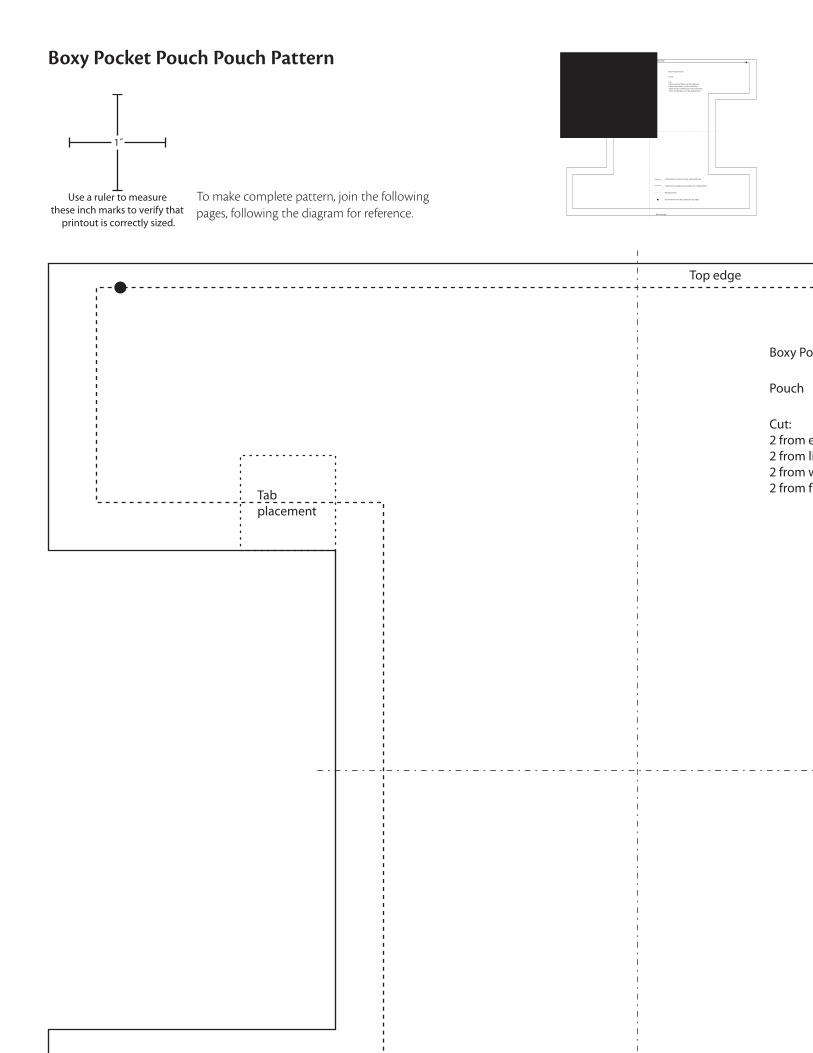
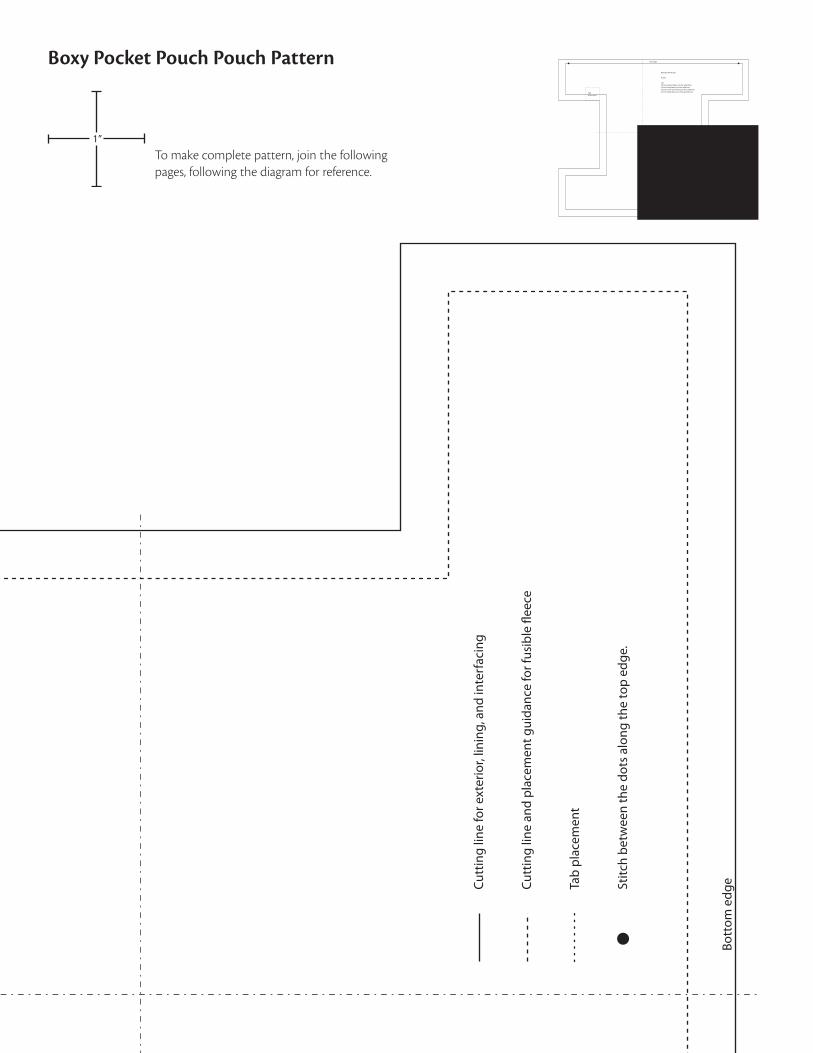
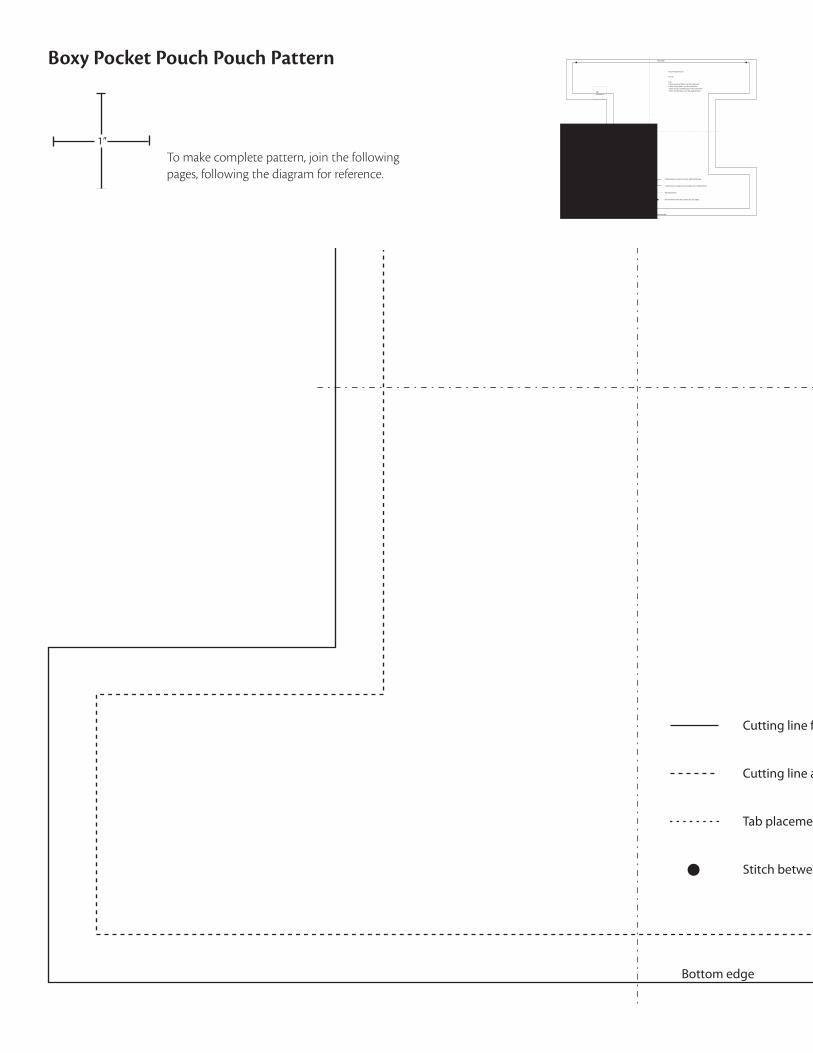
Boxy Pocket Pouch Pouch Pattern
To make complete pattern, join the following pages, following the diagram for reference.
Use a ruler to measure these inch marks to verify that
printout is correctly sized.
1˝
Top edge
Bottom edge
Boxy Pocket Pouch
Pouch
Cutting line for exterior, lining, and interfacing
Cutting line and placement guidance for fusible �eece
Tabplacement
Tab placement
Cut:2 from exterior fabric (on the solid line)2 from lining fabric (on the solid line)2 from woven interfacing (on the solid line)2 from fusible �eece (on the dashed line)
Stitch between the dots along the top edge.

Boxy Pocket Pouch Pouch Pattern
To make complete pattern, join the following pages, following the diagram for reference.
Top edge
Bottom edge
Boxy Pocket Pouch
Pouch
Cutting line for exterior, lining, and interfacing
Cutting line and placement guidance for fusible �eece
Tabplacement
Tab placement
Cut:2 from exterior fabric (on the solid line)2 from lining fabric (on the solid line)2 from woven interfacing (on the solid line)2 from fusible �eece (on the dashed line)
Stitch between the dots along the top edge.
1”
Top
edge
Bott
om e
dge
Boxy
Poc
ket P
ouch
Pouc
h
Cutt
ing
line
for e
xter
ior,
linin
g, a
nd in
terf
acin
g
Cutt
ing
line
and
plac
emen
t gui
danc
e fo
r fus
ible
�ee
ce
Tab
plac
emen
t
Tab
plac
emen
t
Cut:
2 fr
om e
xter
ior f
abric
(on
the
solid
line
)2
from
lini
ng fa
bric
(on
the
solid
line
)2
from
wov
en in
terf
acin
g (o
n th
e so
lid li
ne)
2 fr
om fu
sibl
e �e
ece
(on
the
dash
ed li
ne)
Stitc
h be
twee
n th
e do
ts a
long
the
top
edge
.
Boxy Pocket Pouch Pouch Pattern
To make complete pattern, join the following pages, following the diagram for reference.
Top edge
Bottom edge
Boxy Pocket Pouch
Pouch
Cutting line for exterior, lining, and interfacing
Cutting line and placement guidance for fusible �eece
Tabplacement
Tab placement
Cut:2 from exterior fabric (on the solid line)2 from lining fabric (on the solid line)2 from woven interfacing (on the solid line)2 from fusible �eece (on the dashed line)
Stitch between the dots along the top edge.
1”
Top edge
Bottom edge
Boxy Pocket Pouch
Pouch
Cutting line for exterior, lining, and interfacing
Cutting line and placement guidance for fusible �eece
Tabplacement
Tab placement
Cut:2 from exterior fabric (on the solid line)2 from lining fabric (on the solid line)2 from woven interfacing (on the solid line)2 from fusible �eece (on the dashed line)
Stitch between the dots along the top edge.
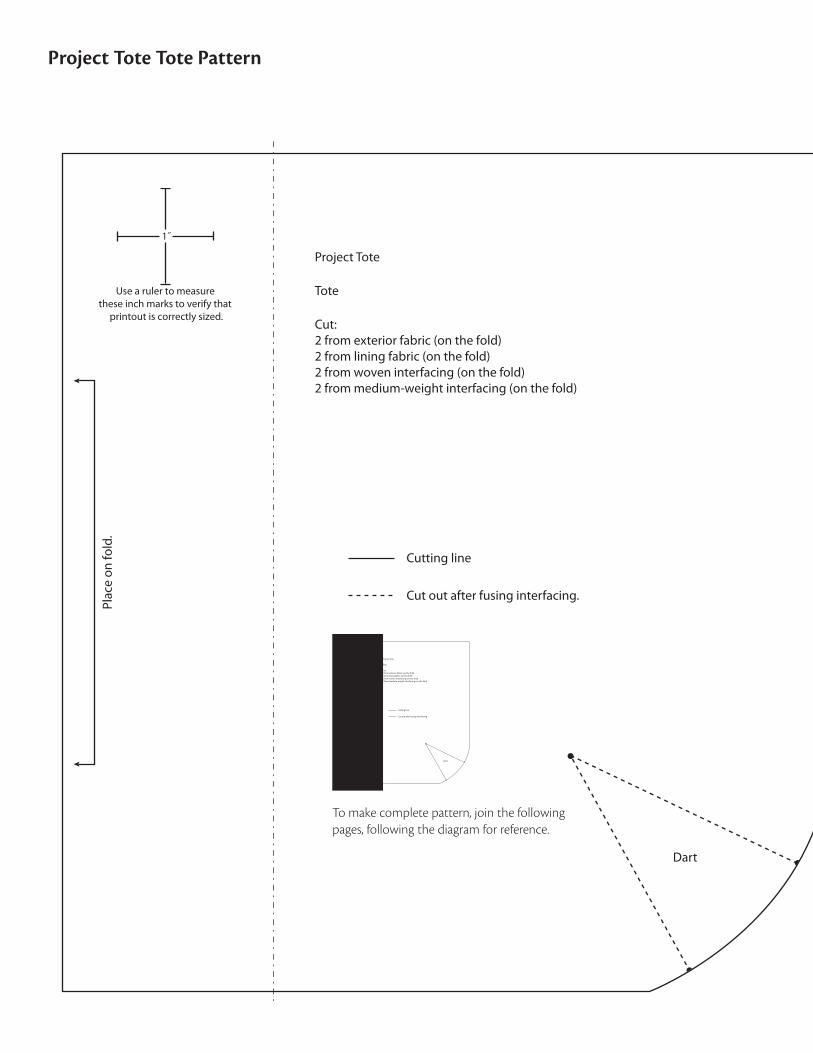
Project Tote Tote Pattern
Cutting line
Dart
Plac
e on
fold
.
Cut out after fusing interfacing.
Project Tote
Tote
Cut:2 from exterior fabric (on the fold)2 from lining fabric (on the fold)2 from woven interfacing (on the fold)2 from medium-weight interfacing (on the fold)
Use a ruler to measure these inch marks to verify that
printout is correctly sized.
1˝
Cutting line
Dart
Plac
e on
fold
.
Cut out after fusing interfacing.
Project Tote
Tote
Cut:2 from exterior fabric (on the fold)2 from lining fabric (on the fold)2 from woven interfacing (on the fold)2 from medium-weight interfacing (on the fold)
To make complete pattern, join the following pages, following the diagram for reference.
Cutting line
Dart
Plac
e on
fold
.
Cut out after fusing interfacing.
Project Tote
Tote
Cut:2 from exterior fabric (on the fold)2 from lining fabric (on the fold)2 from woven interfacing (on the fold)2 from medium-weight interfacing (on the fold)
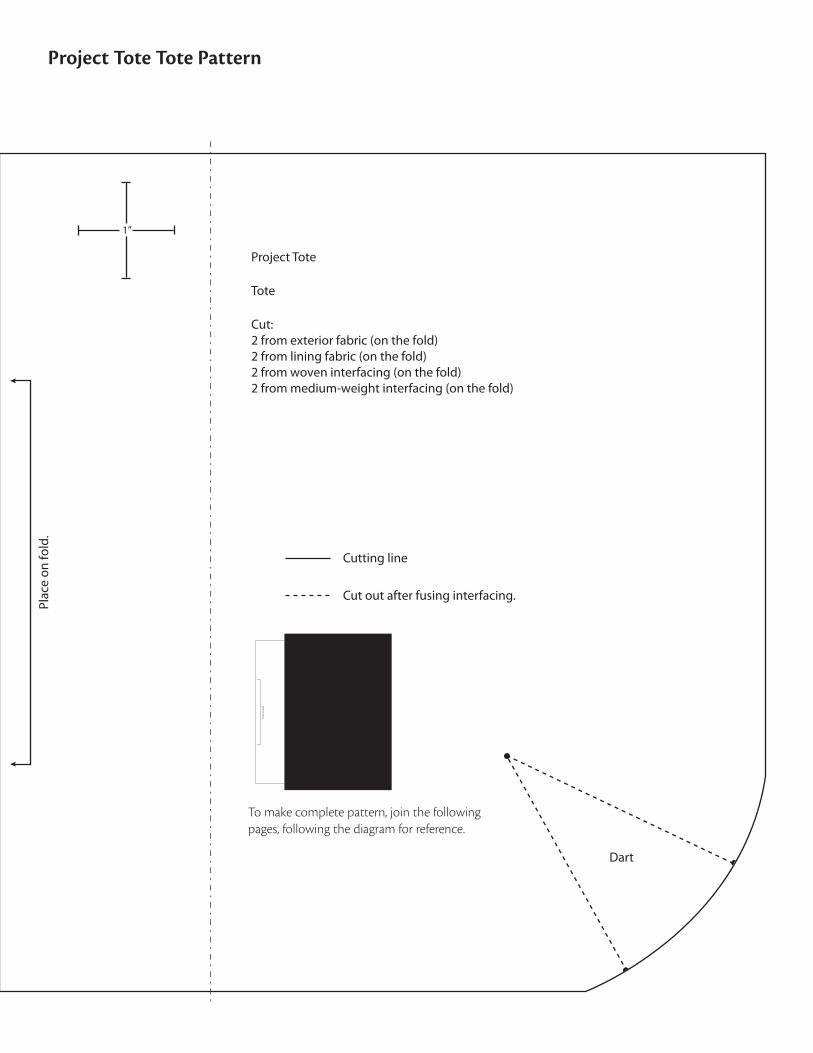
Project Tote Tote Pattern
1”
Cutting line
Dart
Plac
e on
fold
.
Cut out after fusing interfacing.
Project Tote
Tote
Cut:2 from exterior fabric (on the fold)2 from lining fabric (on the fold)2 from woven interfacing (on the fold)2 from medium-weight interfacing (on the fold)
To make complete pattern, join the following pages, following the diagram for reference.
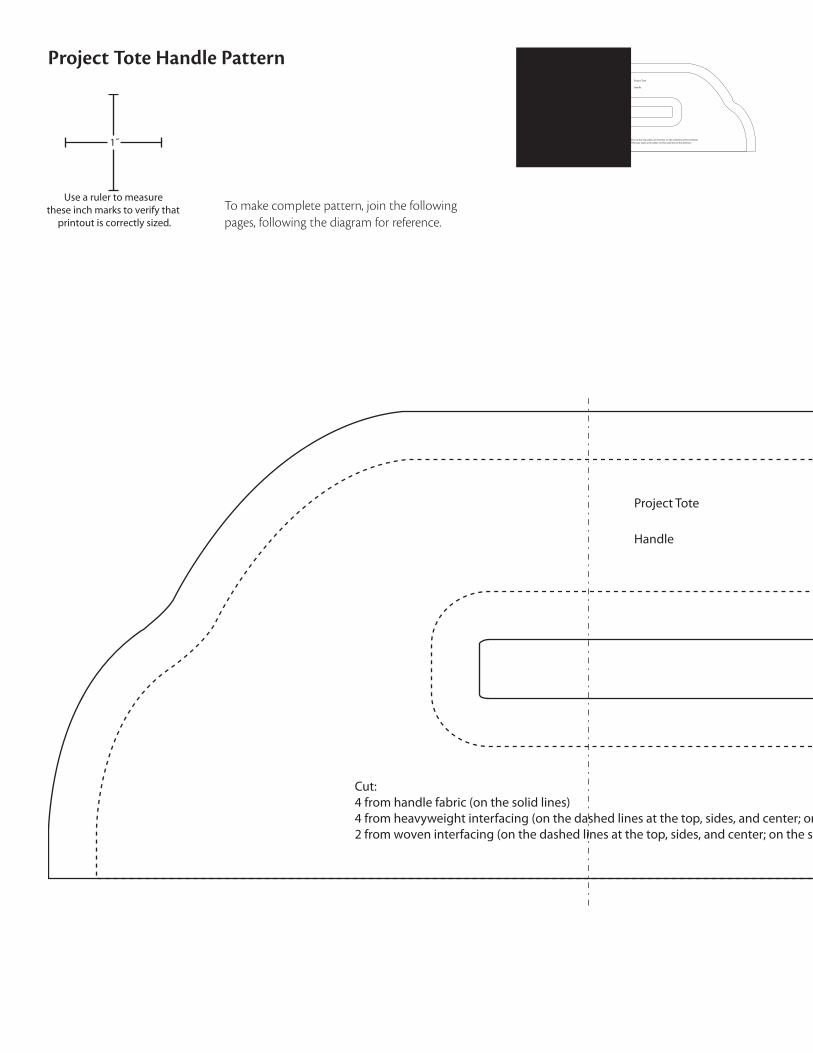
Project Tote Handle Pattern
To make complete pattern, join the following pages, following the diagram for reference.
Use a ruler to measure these inch marks to verify that
printout is correctly sized.
1˝
Project Tote
Handle
Cut:4 from handle fabric (on the solid lines)4 from heavyweight interfacing (on the dashed lines at the top, sides, and center; on the solid line at the bottom)2 from woven interfacing (on the dashed lines at the top, sides, and center; on the solid line at the bottom)
Project Tote
Handle
Cut:4 from handle fabric (on the solid lines)4 from heavyweight interfacing (on the dashed lines at the top, sides, and center; on the solid line at the bottom)2 from woven interfacing (on the dashed lines at the top, sides, and center; on the solid line at the bottom)

Project Tote Handle Pattern
To make complete pattern, join the following pages, following the diagram for reference.
Project Tote
Handle
Cut:4 from handle fabric (on the solid lines)4 from heavyweight interfacing (on the dashed lines at the top, sides, and center; on the solid line at the bottom)2 from woven interfacing (on the dashed lines at the top, sides, and center; on the solid line at the bottom)1”
Project Tote
Handle
Cut:4 from handle fabric (on the solid lines)4 from heavyweight interfacing (on the dashed lines at the top, sides, and center; on the solid line at the bottom)2 from woven interfacing (on the dashed lines at the top, sides, and center; on the solid line at the bottom)
Stitched Sewing OrganizersText copyright © 2017 by Aneela Hoey
Artwork copyright © 2017 by C&T Publishing, Inc.Attention Copy Shops: Publisher and author give permission to photocopy this pullout for personal use only.
Attention Teachers: C&T Publishing, Inc., encourages you to use this book as a text for teaching. Contact us at 800-284-1114 or ctpub.com for lesson plans and information about the C&T Creative Troupe. P1
Needle Book Plus
Cover
Cut:1 from exterior fabric (on the solid line)1 from lining fabric (on the solid line)1 from batting (on the dashed line)
Needle Book Plus
Pincushion
Cut 2 from pincushion fabric.
GreenTomatoPincushion
Strawberry
Cut 1 from exterior fabric.Snap placement
Placement guidance for interfacing
Two-in-One Case
Tab
Cut:2 from tab fabric (on the solid line)2 from woven interfacing (on the dashed line)
Book and Tool Folio
Closing Tab
Buttonhole
Fabric cutting line
Interfacing cutting line
Cut:2 from closing tab fabric (on the solid line)2 from woven interfacing (on the dashed line)
Green Tomato Pincushion
Tomato Top
Cut 1 from wool felt.
Green Tomato Pincushion
Strawberry Top
Cut 1 from wool felt.
Top
edge
Bott
om e
dge
Boxy
Poc
ket P
ouch
Pouc
h
Cutt
ing
line
for e
xter
ior,
linin
g, a
nd in
terf
acin
g
Cutt
ing
line
and
plac
emen
t gui
danc
e fo
r fus
ible
�ee
ce
Tab
plac
emen
t
Tab
plac
emen
t
Cut:
2 fr
om e
xter
ior f
abric
(on
the
solid
line
)2
from
lini
ng fa
bric
(on
the
solid
line
)2
from
wov
en in
terf
acin
g (o
n th
e so
lid li
ne)
2 fr
om fu
sibl
e �e
ece
(on
the
dash
ed li
ne)
Stitc
h be
twee
n th
e do
ts a
long
the
top
edge
.
Cutting line
Dart
Plac
e on
fold
.
Cut out after fusing interfacing.
Project Tote
Tote
Cut:2 from exterior fabric (on the fold)2 from lining fabric (on the fold)2 from woven interfacing (on the fold)2 from medium-weight interfacing (on the fold)
Draw
string Pouch
Hexagon Tab
Cut:4 from
exterior fabric (on the solid line)4 from
woven interfacing (on the dashed line)
Drawstring Pouch
Pouch
Cut:2 from exterior fabric (on the fold; along the solid line)2 from lining fabric (on the fold; on the solid line at the sides and bottom, and on the dashed line at the top)
Plac
e on
fold
.
Plac
e on
fold
. Green Tomato Pincushion
Tomato
Cut 1 from exterior fabric (on the fold).
Use a ruler to measure these inch marks to verify that
printout is correctly sized.
1˝
Full-size patterns for printing at copy shop

Stitched Sewing OrganizersText copyright © 2017 by Aneela HoeyArtwork copyright © 2017 by C&T Publishing, Inc.Attention Copy Shops: Publisher and author give permission to photocopy this pullout for personal use only.Attention Teachers: C&T Publishing, Inc., encourages you to use this book as a text for teaching. Contact us at 800-284-1114 or ctpub.com for lesson plans and information about the C&T Creative Troupe.P2
Fold-Up Sewing Folio
Cover
Exterior fabric Lining fabric
Template placement for directional fabric
Cut:1 from exterior fabric (on the solid line)1 from lining fabric (on the solid line)1 from woven interfacing (on the solid line)1 from batting/fusible �eece (on the dashed line)
See-It-All Pouch
Pouch
Cut:2 from
exterior/lining fabric (on the solid line)1 from
clear vinyl (on the solid line at the sides and bottom; on the dashed line at the top)
2 from w
oven interfacing (on the solid line)
Project Tote
Handle
Cut:4 from handle fabric (on the solid lines)4 from heavyweight interfacing (on the dashed lines at the top, sides, and center; on the solid line at the bottom)2 from woven interfacing (on the dashed lines at the top, sides, and center; on the solid line at the bottom)
Strip placement
Fold line
Exterior fabricLining fabric
Template placem
ent for directional fabric
Handy Fold-U
p Pouch
Large Pouch
Cut:1 from
exterior fabric1 from
lining fabric1 from
woven interfacing
Strip placement
Fold line
Exterior fabricLining fabric
Template placem
ent for directional fabric
Handy Fold-U
p Pouch
Small Pouch
Cut:1 from
exterior fabric1 from
lining fabric1 from
woven interfacing
Covered Tape Measure
Cut:2 from exterior fabric (on the solid line)2 from heavyweight interfacing (on the dashed line)
Cover
Use a ruler to measure these inch marks to verify that
printout is correctly sized.
1˝
Full-size patterns for printing at copy shop