part smart program installation instructions for pos...
TRANSCRIPT
Part Smart Program Installation Instructions
For POS Linker Business System Users A. Installation on Windows Systems
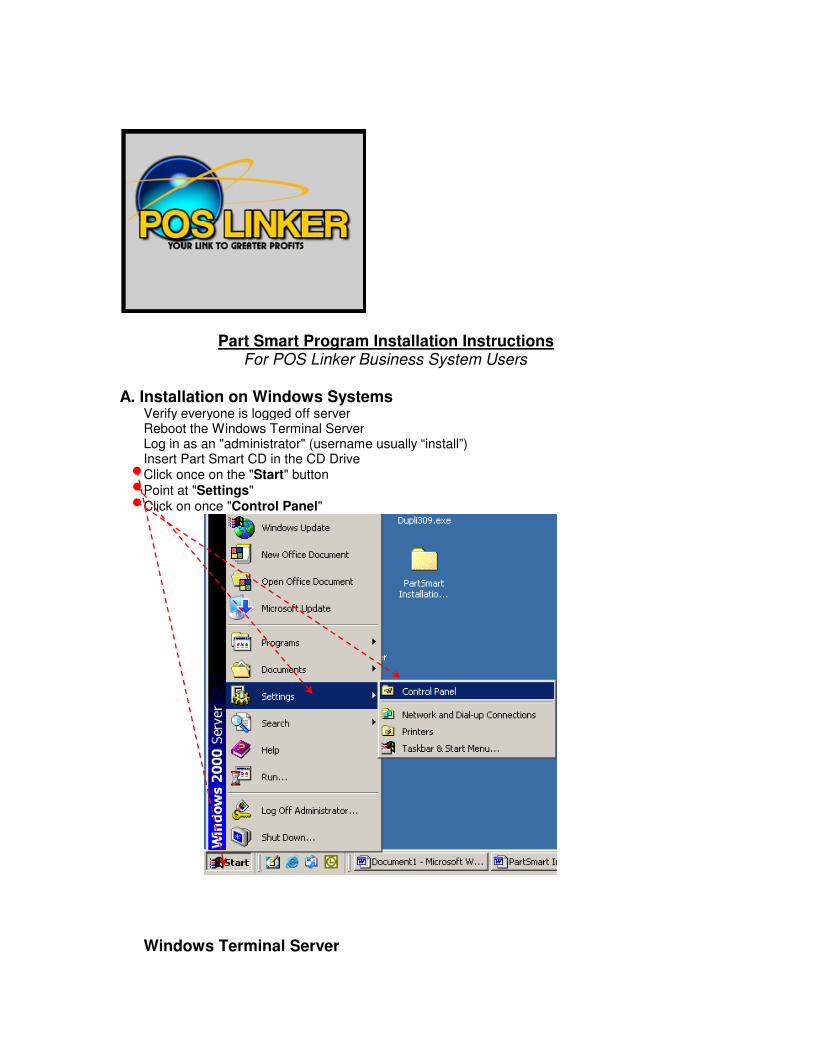
Verify everyone is logged off server Reboot the Windows Terminal Server Log in as an "administrator" (username usually “install”) Insert Part Smart CD in the CD Drive Click once on the "Start" button Point at "Settings" Click on once "Control Panel"
Windows Terminal Server

Click on “Start” Then click on “Control Panel”
Double Click "Add/Remove Programs" Click on “Add new Programs” Click once on “CD or Floppy”
Or on earlier systems click “Install” once you are in the Add/Remove Programs window.

Click on the "Next" button
Wait a couple of seconds for Windows to search the floppy drive and CD-ROM drive(s) for the
setup.exe program. When it finds the setup.exe the command line on the screen will look similar to "R:\SETUP.EXE". (Though the “R” could be a different letter.)
Click on the "Next" button to begin the setup program.
*Follow PartSmart's on screen instructions:

(New Part Smart Setup Program Version) At Choose Language (English) - Click on the "OK" button
When prompted to view install instruction click “No”
At Welcome - Click on "Next"

At License agreement click “Yes”
When Prompted to choose installation type click on your first choice “Stand Alone install”

At the Installation location screen, the blank should say “C:\Parts\” if not click on the blank and enter it in. Then click “Next”
At the Select Program folder window it should read “Parts Lookup” under program folders. Then click “Next”
When prompted to choose languages to install English should be checked. If not click to mark Then click “Next”

It should then start Installation.
If there is more than one Manufacturer a window will pop-up prompting you to select manufactures. Check all manufacturers you have a verification code for, then click “Next”

At the Part Smart Hard drive copy window select “Skip copy”
A window will pop-up asking if you want another chance to copy choose “Cancel”

At Thank You - Click on "Next"
At Setup Complete - Click on "Finish"

*Now you may launch Part Smart program by double clicking the desktop shortcut. Type in the verification codes where necessary. Exit the Part Smart program. After Installation is complete click on Add/Remove Programs on the taskbar For Terminal Server only At "After Installation" Click on the "Next" button.
At "Finish Admin Install" Click on the "Finish" button
You can then close out of Add/Remove Programs See the instructions on the next page for copying the data.
Part Smart Data Installation Instructions

For POS Linker Business System Users B. Copying CD Data on Windows Systems for Part Smart Server only. Follow the instructions listed below to copy the data from the CD to the hard drive. Some of the manufacturers datasets are very large and take a while to copy, so don't do this if you are In a hurry to use the computer. The amount of time it takes also depends on the speed of your Hardware. You can start the process and let it copy while you're away if you have adequate Equipment protection and feel comfortable with leaving your equipment on. To get to the D:\UTIL> Double click on desktop short cut MS-DOS prompt, or on the desktop
short cut “DOS Prompt” If no desktop shortcut exists, click on Start, go to Programs, then Accessories, and then click on
Command Prompt or MS-DOS *(If you want a desktop shortcut for Command Prompt/MS-DOS prompt right click and select
Create Shortcut.) Be sure the CD you want to copy is in the CD drive. Type in the following command line – ** (Type only what is in bold font) *note: MS-DOS is not case sensitive
C:\Documents and Settings\Administrator>D: then press “enter” (Which will bring up the D: drive)
D:\>CD\Util then press “enter” (Witch will bring up D:\Util>)

D:\Util>pscopy space then (POS Linker's two letter mfr. designation) then press “enter” Here is a typical example: D:\UTIL>pscopy tr
It will then ask (First __ CD. Old data will be erased. Proceed?) Type Y and wait.

When copying is finished, repeat steps above for each manufacturer's dataset that you have a subscription for and wish to copy
This will copy Tecumseh from the Part Smart CD to the hard drive When Part Smart copy (pscopy) is done, put the CD(s) back into the sleeve that came with it and store it as a backup copy. To get rid of the "DOS box", type exit and press enter **See special notes on the next page for Honda and for Toro if you are copying the Toro Landscape Contractor Equipment (Pro-Line) or the Toro Consumer Equipment (Toro/ Wheel Horse) datasets.
Instructions for Installing Part Smart on the POS Linker Business System

B. Copying CD Data (continued) Special notes on Toro: 1) When copying Toro Landscape Contractor Equipment (Pro-Line) use pl for the Manufacturer designation.
Special note for Honda: When copying the Honda P/N CD use HP. Use HO on the Honda Code CD.