pacificsport testing protocols - cycling canada national... · peak power test (6 second sprint ......
TRANSCRIPT

CCA Testing Protocols
Version 4.5
Canadian Cycling Association
January 2010
by:
Ben C. Sporer Ph.D. – Canadian Sport Centre Pacific
Andrea Wooles, M.Sc. – Canadian Cycling Association
Contributions to portions of this manual include:
Wendy Pethick, M.Sc.
Guy Thibault, Ph.D.

Contents
Introduction .................................................................................................................................................. 4
Purpose of testing ..................................................................................................................................... 4
Equipment Used ........................................................................................................................................ 4
Pre-Testing Procedures ................................................................................................................................. 5
Athlete Eligibility ....................................................................................................................................... 5
Pre-testing Instructions ............................................................................................................................. 5
Medical Clearance and Informed Consent ............................................................................................... 6
Bike Measurement and Ergometer Setup ................................................................................................ 6
Athlete/Facility Preparation ...................................................................................................................... 7
Testing Procedures ....................................................................................................................................... 8
Blood Work (at Athlete’s or Coach’s request only) .................................................................................. 8
Anthropometry ......................................................................................................................................... 8
Weight ................................................................................................................................................... 8
Height .................................................................................................................................................... 8
Skinfolds ................................................................................................................................................ 8
Lung Function .......................................................................................................................................... 10
ENDURANCE ATHLETE TESTING PROTOCOLS ......................................................................................... 11
Peak Power Test (6 second sprint) ...................................................................................................... 11
Modified CCA MAP Test – Three minute step test (lactate threshold) A ........................................... 12
Ramp Test for Maximum Minute Power (MMP) ................................................................................ 13
Submaximal exercise test ................................................................................................................... 14
SPRINT ATHLETE TESTING PROTOCOLS .................................................................................................. 15
Peak Power Test (6 second sprint) ...................................................................................................... 15
High Cadence Power Endurance Test (15 seconds @ 160rpm) .......................................................... 15
Low Cadence Strength Endurance Test (10 seconds @ 50rpm) ......................................................... 16
Post-Testing Procedures ............................................................................................................................. 17
Conclusion of Testing Session ................................................................................................................. 17
Interpretation of Results ......................................................................................................................... 17
Appendices .................................................................................................................................................. 18

Pre-Testing Instruction Sheet .................................................................... Error! Bookmark not defined.
Endurance Testing Data Sheet ................................................................................................................ 19
Sprint Testing Data Sheet........................................................................................................................ 21
Contact List for Canadian Cycling Coaches ............................................................................................. 23

Introduction
Purpose of testing
Testing is conducted to monitor changes in fitness and health throughout the season to provide information to athletes and coaches about the effect of training. Consistent and reliable tests that are available in a number of locations across Canada will provide coaches with the information they need to create individualized training programs regardless of the location of the athlete, and will also help us improve our understanding of the strengths of each of the team members. The purpose of this manual is to outline a set of standardized tests that can be performed in locations across the country, to help us ensure a consistent data set for all of our current and aspiring National Team riders.
Equipment Used
Test station:
SRM erg with torque option Computer Tool kit Tape measure Power Bar/Extension cord Data sheets Bleach Spray bottle Bucket/ soapy water/ rag HR monitor Fan Towel
Blood Station
Blood Cart Lancets (2) Alcohol Swabs (box) Lactate Analyzer Lancet Tips (box) Gauze (pkg) Lactate Strips Dilute Bleach/Beaker Band-Aids (box) Calibration Strips Bleach Spray Bottle Biohazard Bag Gloves (box) Sharps Container Garbage Can
Anthropometry
Weigh scale Permanent stadiometer Steel anthro tape Calipers Set square Landmarking pen Data sheets Calculator
Pre-Testing Procedures
Athlete Eligibility
Athletes must meet the following criteria in order to be eligible for testing through the National Team:
1. Be on the current CCA National Team list, and/or 2. Be registered with a Canadian Sport Centre at any National level (Podium, Canadian Elite, or
Provincial Elite) 3. Be applying to be part of any CCA Team
Other coaches, such as Provincial Team coaches, are encouraged to use the same testing protocols with their athletes, as we can increase the value of the results through being able to compare them with current and past National Team athletes. This will also help National Team Coaches build a more complete picture of the physiology of up and coming Canadian riders. At the Provincial or Talent Identification level, running these test protocols on different types of equipment (such as Computrainers, Velotrons, Lode ergs, etc) would be a good way of expanding test availability to younger riders.
Pre-testing Instructions
For any physiological testing it is imperative that athletes follow the same preparation plan to ensure test results are valid and comparable. The following are general guidelines that must be followed for ALL testing sessions. Specific tests may have additional guidelines.
Preceding 24 hours:
No intense or long duration exhausting exercise Consume a standard meal plan used for all testing sessions No alcohol
Day of testing:
No caffeine 4 hours prior Last meal 3 hours prior Small snack up to 1 hour prior is ok
*** NOTE: athlete preparation should be recorded so that the same can be completed prior to each test.

Medical Clearance and Informed Consent
All athletes are required to complete a health questionnaire and consent form prior to commencing any activity. This includes a section for consenting to the sharing of test results or any medical information that is discussed during the testing session. It is important to point out to the rider that they can withdraw consent at any time. If the athlete is ill, or has an injury that may be aggravated by the tests, or answers “yes” to any question on the PAR-Q, rebook the test for a later date. The athlete’s long-term health is more important than a test result. If the athlete has any injury, ensure that they are referred to the appropriate professional (only if the athlete consents).
It is important to be aware of the legal requirements regarding Data Protection, which are particularly relevant given the sensitive personal information that is collected and stored. All test subjects need to be aware of the information that is being collected and need to be informed of their right to confidentiality.
Bike Measurement and Ergometer Setup
Athletes should bring their road bikes to the testing session, so that the measurements may be copied as closely as possible to the ergometer. They also need to bring the pedals they would like to use for the test.
The bike should be on a level surface for measuring process. Five measurements are required, as follows:
1) Setback: From the centre of the bottom bracket to the tip of the saddle along level planes. 2) Saddle height: Using a flexible measuring tape, measure from the centre of the bottom bracket
to the centre of the saddle at a point 120mm from the rear of the saddle. If there is a “bite” out of the saddle, place a straight edge against the rear of the saddle and measure from that.
3) Reach: From the tip of the saddle to the centre of the handlebars along level planes. 4) Drop: From the bottom of the spirit level to the top of the handlebars, when the spirit level is
resting on the saddle. 5) Crank length: As stated on the crank by the manufacturer, or as measured from the centre of
the bottom bracket to the centre of the pedal axle.

These measurements can then be transferred to the SRM ergometer. Ensure that all of the quick-release levers are adequately tightened to prevent slipping during the tests, but do not overtighten.
Once the correct position has been set on the ergometer, attach the athlete’s pedals.
Check the zero-torque offset by turning the cranks backwards for 3 rotations, and then pressing the Mode and Set buttons on the PowerControl. Once the number on the right side of the display has stabilized, press the Set button to accept that number as the zero-torque offset. Record this number in the lab book. Recheck this number after the test to ensure that it has not changed by more than +/-15 Hz.
In the SRM software, go to PowerControl Setup and clear the memory. Double-check that the date, time, slope and zero offset are correct, and that the tire circumference is set to 1000mm. The interval of storage should be set to 0.5 seconds.
Athlete/Facility Preparation
a. coming to a lab or testing for a National program for the first time can be an unnerving experience so do all possible to make the situation comfortable for the athlete
b. explain location of washrooms and other key locations of the facility c. explain the protocols clearly to the athlete and ask if they have any questions d. explain that the test results are being used to identify strengths and weaknesses in further
helping them reach their potential e. enter athletes name, age, sex, coaches name, and discipline on the appropriate data sheet –
make sure to print this clearly f. record any previous participation in endurance sports including sport, age, and length of
time (voluntary but not mandatory) g. ask all unnecessary personnel to leave the testing area prior to beginning the test process –
*** all results collected by MUST be treated in a confidential manner.

Testing Procedures
Blood Work (at Athlete’s or Coach’s request only)
Blood work consists of a standard blood cell profile along with ferritin count. Depending on needs of the athlete, additional measures can be taken as needed and requested by the physician. To maximize the usefulness of blood measures a standardized method of obtaining the blood sample is required as follows.
Blood samples should be obtained in the morning, after voiding and prior to coffee, breakfast and any exercise.
The previous training day should be light
Athletes should be well hydrated (clear urine)
Posture should be controlled in a standardized fashion for at least 20 minutes (sitting is fine).
Anthropometry
Anthropometric measures are taken to enable a more comprehensive interpretation of any changes in fitness observed in the ergometric tests. It is vital that care be taken to ensure that these measures are as accurate and reproducible as possible. Skinfold and girth measurements are to be done according to ACSM guidlines. If the athlete is less than 18 years old, ensure that there is another adult present during the measurement procedures.
Weight Record the athlete’s body weight in kilograms. Athletes should be dressed in minimal clothing (i.e. shorts/t-shirt) WITHOUT shoes and weight is recorded to the nearest decimal place.
Height Have the athlete stand against a wall WITHOUT shoes on. Be sure that heels, buttocks, shoulders and back of the head are all in contact with the wall. Place a set square at a right angle with the wall and in contact with the apex (highest point) of the head. The athlete should then take a big breath in and then step away from the wall while height is recorded. (Height is measured in centimeters to nearest 0.5cm e.g.: 165.5cm).
Skinfolds - all measurements are made on the right side of the body with subject standing upright - caliper placed directly on skin surface, 1cm away from the thumb & forefinger,
perpendicular to the skinfold & halfway between the crest & the base of the fold

- maintain pinch while reading caliper - wait 2 seconds then take reading - complete 1 full set of skinfolds & then repeat – a 3rd measure will be needed if duplicate
measures are not within 0.2mm (Harpenden calipers - preference) or 0.5mm (with Slimguide calipers)
- use a tape measure & pen to landmark – recheck landmarks the 2nd time through - pinch at landmark & caliper 1cm below (usually)
Triceps*
vertical fold on the posterior midline of the upper arm, halfway between the acromion & the olecranon processes, with arm held freely at side palm facing the body. Skinfold taken 1 cm below
Biceps*
vertical fold on the anterior aspect of the arm – bring landmark from the tricep around to the bicep. Hand is supinated. Skinfold taken 1 cm below
Subscapular*
diagonal fold (at 45-degree angle) 1 cm below the inferior angle of the scapula. Skinfold taken 1cm laterally from landmark
Suprailiac*
Subject places hand on shoulder & raises the elbow so it is horizontal with the shoulder. Locate the top of the iliac crest & landmark 3cm above crest along the mid-axillary line. The fold is taken at a 45-degree angle slightly anterior to the mid-axillary line & calipers are placed 1cm anterior to the fold.
Medial Calf*
Place unweighted right foot on a chair (or sit in a chair) so that knee is a 90-degree angle. Skinfold raised on the medial aspect of the calf at the maximum girth - the fold runs vertically along the midline. Calipers placed 1 cm below.
Abdominal**
vertical fold 2cm to the right side of the umbilicus. Skinfold taken 1cm below pinch.
Thigh**
With subject sitting & knee bent 90-degrees, take the vertical fold on the anterior midline of the thigh midway between the proximal border of the patella & the hip crease. Skinfold taken 1cm below (away from hip towards patella).
Mid Thigh

A vertical skinfold raised on the anterior aspect of the thigh halfway between the trochanterion and the tibiale. The subject stands with the right leg unweighted and a slight bend in knee.
Patella Skinfold
A vertical skinfold in the midsaggital plane raised 2cm above the proximal edge of the patella. The subject stands with a slight bend in the right knee.
Proximal Thigh Length
Distance from the trochanterion to the physically measured midpoint between the trochanterion and tibiale laterale.
Distal Thigh Length
Distance from the midpoint between the trochanterion - tibiale and tibiale laterale.
Subgluteal Girth
The girth is taken on an angle over the gluteal muscle and laterally approximately 2 cm below the trochanterion. The subject stands with the feet slightly apart and weight evenly distributed.
Mid Thigh Girth
The girth is taken halfway between the trochanterion and tibiale laterale. The subject stands with heels about 10 cm apart and the weight evenly distributed between both feet.
Knee Girth
The girth is taken at the horizontal level over tibiale laterale. The subject stands with heels about 10 cm apart and the weight evenly distributed between both feet.
Lung Function
Lung function tests are done to provide baseline information that can be used to help identify any respiratory issues that the athlete may have. If any suspicious results are found, refer the athlete to their Sports Medicine doctor or GP with a copy of the test results.
Basic spirometry should be performed, ensuring that the spirometer is calibrated immediately before use. Record the FVC, FEV1, FVC/FEV1, Peak Flow, FEF50, and FEF25-75 and percentages of predicted values for each of these variables. Repeat the testing procedure 10 minutes after the end of the ramp test to obtain post-exercise values.

ENDURANCE ATHLETE TESTING PROTOCOLS
Use this set of tests for road cyclists, mountain bikers, and track endurance riders.
Standard Testing Session to include:
Anthropometry
Lung function
Peak Power Test (6 second sprint)
Modified CCA MAP Test – 3 minute step test
Post-test lung function
Other tests can be requested by the coach in order to assess different aspects of performance, either in addition to (on a different day) or instead of the MAP test, including:
Ramp test (Maximum Minute Power)
Submaximal test
Peak Power Test (6 second sprint)
The purpose of this test is to get an indication of peak muscle power, for endurance and sprint riders. The data reported from this test should ideally be the peak power from one crank revolution, but if the SRM ergometer running the test does not have the ‘torque’ option, a 0.10 second or 0.5 second power directly from the SRM file is acceptable.
Two trials should be done, with at least 2 minutes of active recovery between them. They should be done after the warm-up, and before the MAP test (after another 10 minutes of active recovery, minimum).
a. Explain to the rider that they will be accelerating as fast and as hard as they can from a seated position. They should start in their strongest position on the bike. All riders should perform the test in a gear that allows them to reach their peak cadence in the first 2 or 3 seconds, so that they rev out well before the end of the test. Generally, this is between gear 3 (smaller endurance riders) and gear 5 (sprinters) (these numbers are dependant on the gearing system on the ergometer). The gear can be changed after the first trial, simply record the change on the data sheet.
b. Select “Open Ended Test” in the ergometer software, and hit any key to start recording. c. Ask the rider to stop pedalling, and allow the flywheel to stop completely. d. On another computer (running in DOS mode), run PTMESS.EXE once the parallel port
connector has been plugged into the powercontrol. Type: srm\ptmess filename samplingtime port# sampling rate (Example: For an athlete named John Doe’s first trial, your would type “Srm\ptmess doj1 7 1 5” – note that the “7” is there instead of a “6” because the athlete doesn’t always start at the exact moment you tell them to), and hit return once to confirm entry is correct. Recording will commence when return is hit again.

e. Tell the rider when to start the effort (count down from 5, hit return to start recording with PTMESS), and when to stop (6 seconds later).
f. Allow the rider 2 minutes of active recovery, and then repeat the test. Report the better of the two tests.
g. For Sprint athletes, convert the .pt1 file from the test into a .res file using SDC.EXE. The 2nd column is average power per revolution. Report the highest of those, along with the cadence at which it occurred (3rd column). Graph the power and the cadence using a scatterplot, with the cadence on the x axis, and add a trendline (polynomial, 2), ticking the “report equation on graph” and “report R2 value on graph” options. Differentiate the equation to solve for optimum cadence.
Modified CCA MAP Test – Three minute step test (lactate threshold) A
This is the standard endurance cyclists testing protocol, to be used unless requested otherwise.
a. warm-up, starting loads, and increments are according to age and gender as noted in table 1 (water can be consumed during the warm-up AND during the test)
b. all stages are 3 minutes – for each stage record power output, average heart rate in last 30 seconds, and blood lactate value if measured
c. blood lactate is taken in last 15 seconds of each stage including warm-up** d. athlete can ride at whatever cadence is comfortable for them (recommend between 80-
110rpm). Cadence can change gradually during the test if desired. e. as soon as an athlete is unable to maintain cadence at a given power output make a
note of this in the comments, but allow them to continue the test until they either grind to a halt or decide to stop, regardless of cadence ( as they don’t stop a race when their cadence falls). The test ends when they reach maximal volitional fatigue.
f. record last completed actual 3 minute workload (from SRM file) as maximal 3 minute power output
g. record length of time in last incomplete stage h. record peak heart rate attained i. reduce power output immediately to appropriate recovery wattage and have athlete
maintain a cadence of 80 rpm @ appropriate wattage (Table 1) for 5 minutes - record HR at 1, 3, and 5 min of recovery
j. Save SRM test file and include athlete’s name in the properties section k. make note of any unique details of the test environment, performance, or athlete
concerns in the comments section of the data sheet
Table 1
Gender Age Warm-up Starting Load Increment Recovery
Male Senior 5 min at 120 watts 150 watts 30 watts 150
Junior 5 min at 100 watts 125 watts 25 watts 125
Female Senior 5 min at 100 watts 125 watts 25 watts 125
Junior 5 min at 80 watts 100 watts 20 watts 100

A – the 3 minute step test should be performed on an SRM ergometer, and the power meter should have a calibration check every 6 months. If an SRM ergometer isn’t available, the next best option is a Velotron ergometer, with and SRM Training System installed to collect the power data.
** Blood lactate measures are optional for developmental and identification tests, and should only be done when requested. If they are done, proper blood sampling and biohazard measures need to be followed by trained personnel. All samples must be analyzed using either the Lactate Pro or a lab based YSI or similar system after appropriate calibration procedures have been done.
Ramp Test for Maximum Minute Power (MMP)
This test can be done on request, when an athlete and their coach would like more sensitive information about their top-end power.
Allow the athlete a 10-15 minute warm-up prior to starting the ramp test. The can ride the test at whatever cadence is comfortable to them, and can gradually increase their cadence if they wish during the test to help them produce the higher powers. The test ends when they either (a) stop pedaling or (b) grind to a halt, there is no “cut-off” cadence.
1.) Before starting, explain the test to the athlete. Tell them what ramp protocol they are on, and ensure that you tell them to stop if they feel any abnormal pain.
2.) Select the correct program for the athlete’s weight and team, using the “Stress Test Determination” option in the main menu. Press the space bar to start the test when the athlete is ready (rolling start), and ESC to end the test and take off resistance when the test is over.
3.) Athlete cool-down. Monitor during this time to make sure they are okay.
4.) Save test on desktop computer in case PowerControl malfunctions. Erase file later.
5.) Download data from powercontrol (using srm\srmwin.exe) and analyse. Enter results into the SID database. Check zero frequency and record.
6.) Follow post-testing procedures.
Suggested Ramp protocol start powers:
Males: Ramp rate = 20 W/min Weight (kg) Junior Espoir Senior <50 120 140 160 50-59 140 160 180 60-69 160 180 200 70-79 180 200 220 80+ 200 220 240
Females: Ramp rate = 15 W/min Weight (kg) Junior Espoir Senior <45 80 95 110 45-49 95 110 125 50-54 110 125 140

55-59 125 140 155 60-64 140 155 170 65+ 155 170 185
Submaximal exercise test
This test can be used on a more regular basis than the maximal exercise test, if a coach is interested in closely monitoring changes in a rider’s ability to sustain submaximal intensities.
1. Create a new test within the SRM ergometer software. Use second increments for the file. a. Begin the test file with the equivalent of 35% of the rider’s most recent (or estimated)
maximum minute power. b. Calculate how many Watts to ramp up every 20 seconds in order to reach 70% of
maximum minute power at 5 minutes, and then enter the increments into the test file. c. Set the file to maintain 70% of maximum minute power for 10 minutes.
2. Start the test once the rider is comfortable on the ergometer. Do not allow for a warm-up prior to starting the test file, as the 5 minute ramp portion is intended as a warm-up.
3. Record heart rate at the end of each minute for the entire session, and ventilation rate during the last minute of the ramp, the 5th minute of the 70%MMP, and the last minute of the 10 minutes at 70% MMP.

SPRINT ATHLETE TESTING PROTOCOLS
Use this set of tests for track sprint athletes and BMX riders. Standard pre-testing procedures should be completed, as should the standard athropometric and lung function assessments.
The rider should then be allowed to warm up for approximately 10 minutes at their own pace before the ergometer tests begin.
Standard Sprint Testing Session:
Anthropometry
Lung function (baseline)
Peak Power Test (6 second sprint)
High Cadence Power Endurance Test
Low Cadence Strength Endurance Test
Peak Power Test (6 second sprint)
Use the protocols for this test that are outlined in the Endurance Athlete Testing Protocols section. Ensure that the gear is hard enough for the rider to get good traction for the first few seconds, but that they spin out well before the end of the test. The athlete is the best person to choose a gear for this test. Let them experiment with gearing during the warm-up, and allow them to change the gear after the first trial if they choose to, and record the change.
High Cadence Power Endurance Test (15 seconds @ 160rpm)
a. Set the ergo to the lowest (easiest) gear b. Instruct the rider to stop pedalling, and wait for the flywheel to stop. c. Select the test file from the test selection menu in the SRM Win software. d. On another computer (running in DOS mode), run PTMESS.EXE (the parallel port
connector needs to be plugged into the powercontrol). Enter srm\ptmess filename 16 1 5. Hit return once to confirm.
e. Start the isokinetic program by pressing the space bar on the computer that is running SRM Win.
f. Instruct the athlete to start after you count down from 5 (hit return on the DOS computer to start recording with PTMESS when the rider starts), and to pedal unpaced and seated for 15 seconds until you instruct them to stop. Count out the last 10 seconds of the effort.
g. After the testing session is complete, convert the .pt1 file from the test to a .res file using SDC.EXE. In Excel, open the .res file and cut and paste the first 39 rows into the SprintTest.xls file. Report the average power (15 seconds), peak power (average within rev), and fatigue slope (via linear regression analysis). Calculate the fitness index based on the peak power, as well as the power to weight ratio.

Allow the rider a minimum of 10 minutes of active rest before the next test.
Low Cadence Strength Endurance Test (10 seconds @ 50rpm)
a. Set the ergo to the highest gear. b. Select the test file from SRM Win test selection menu. c. Restart PTMESS.EXE on the other computer. Set it to save 11 seconds at 5ms sampling
rate (i.e. srm\ptmess filename 11 1 5, and press return once to confirm. Do not hit return again until the athlete begins the effort.
d. Start the isokinetic program by pressing the space bar on the main computer. Allow the athlete to get accustomed to the isokinetic mode at 50rpm by instructing them to pedal gently.
e. After approximately 10 seconds, ask the athlete to count down from 5 as their preferred starting foot passes their preferred starting position. Press return on the PTMESS computer when they reach ‘go’. The athlete should exert as much force as possible against the resistance once the test starts. Count out the last 5 seconds of the effort, and instruct the athlete to stop (after 10 seconds).
f. Repeat after 10 minutes of active recovery. g. Analyse the data using the .pt1 file with SDC.EXE. Report average power, peak power,
and fatigue rate (linear regression). Include the graph in the report.
Follow post-testing procedures. Lung function testing does not need to be repeated post-exercise, unless there is reason to suspect that the results will be different from the pre-exercise test. Usually this is not the case after these types of efforts.
Post-Testing Procedures
Conclusion of Testing Session
a. Answer any questions or concerns that the athlete might have b. Ensure data in datasheet are correct, and transfer data to the SID database (once available)
while athlete showers and gets dressed c. Double check data in database to ensure no data transfer errors occurred d. Provide athlete with the results of their tests, explain that all information has been entered
into the online SID database, and that they will be able to access their data online e. Email notification of new results in the SID database to the athlete, their personal coach,
and the National Team Coach for their sport, as well as the CCA IST Coordinator. Attached all associated SRM files from the testing session.
f. Secure paper data copy for record keeping
Interpretation of Results
Interpretation of results is best done together with the athlete and their coach, however if the coach is not present the athlete should still have their results explained to them. Care should be taken to put the results into context compared to other (anonymous) riders using historical data that will be provided by the CCA (separate document), in an honest and non-judgemental manner.
If the person conducting the test does not a have a lot of cycling-specific knowledge, a simple explanation of the results is better than attempting to make recommendations. If this is the case, copy the results to Ben Sporer at CSC-Pacific, who will work together with the tester to determine if any further interpretation is possible.
DO NOT MAKE RECOMMENDATIONS ABOUT BODY WEIGHT OR BODY FAT DIRECTLY TO AN ATHLETE. If there are recommendations you’d like to make on these topics, make them after the testing session to their coach, who can follow up with the appropriate professionals if needed.
The role of the Physiologist is to be an impartial assessor, an extra set of eyes for the athlete and coach. Advice on suggested training programs or methods is appreciated when discussed with the coach.

Appendices
Pre-Testing Instructions
This test has been requested in order to obtain information about your current condition, so that we
can:
Assess your physiological strengths and areas for improvement
Assess the effect of your previous training programme
Provide individualized data to help you and your coach design your future programme
It is important that you are well rested, well nourished, and well hydrated for the test, to make sure that
the results are valid and reflective of your fitness. Following these recommendations will help with this:
Arrive 10 minutes ahead of your scheduled test time
Do not train on the day of the test
Do no more than one hour of recovery oriented training on the day prior to the test
Do not race for 2 days before the test
Do not change your normal dietary programme in any way in the days before the test
Have a normal meal 2 or 3 hours before the test
Do not eat or take ‘energy’ or caffeine drinks (coffee, coke) for the 2 hours before the test
A small snack an hour before the test is ok
If you have been ill or injured in the week prior to the test, please contact the staff member who
booked your test, since your illness/injury may prevent you from completing the tests. We will rebook
your test for a more suitable time. If, at the last moment, you are unable to make your appointment,
please contact the person booked to perform your test.
The test will be completed on an SRM or Velotron ergometer. Please bring the following items with you
in order to set the ergo up correctly, as well as to help you have a comfortable test:
Bike. If you cannot bring your bike, bring these 5 measurements: saddle setback, saddle height, reach, handlebar drop, and crank length. Please also record how the measurements were taken.
Pedals and shoes
Cycling clothes
Shorts and a t-shirt (for body composition measurements)
Heart rate monitor (if you have one)
Towel and water bottle
Toiletries (a shower is available after the test).
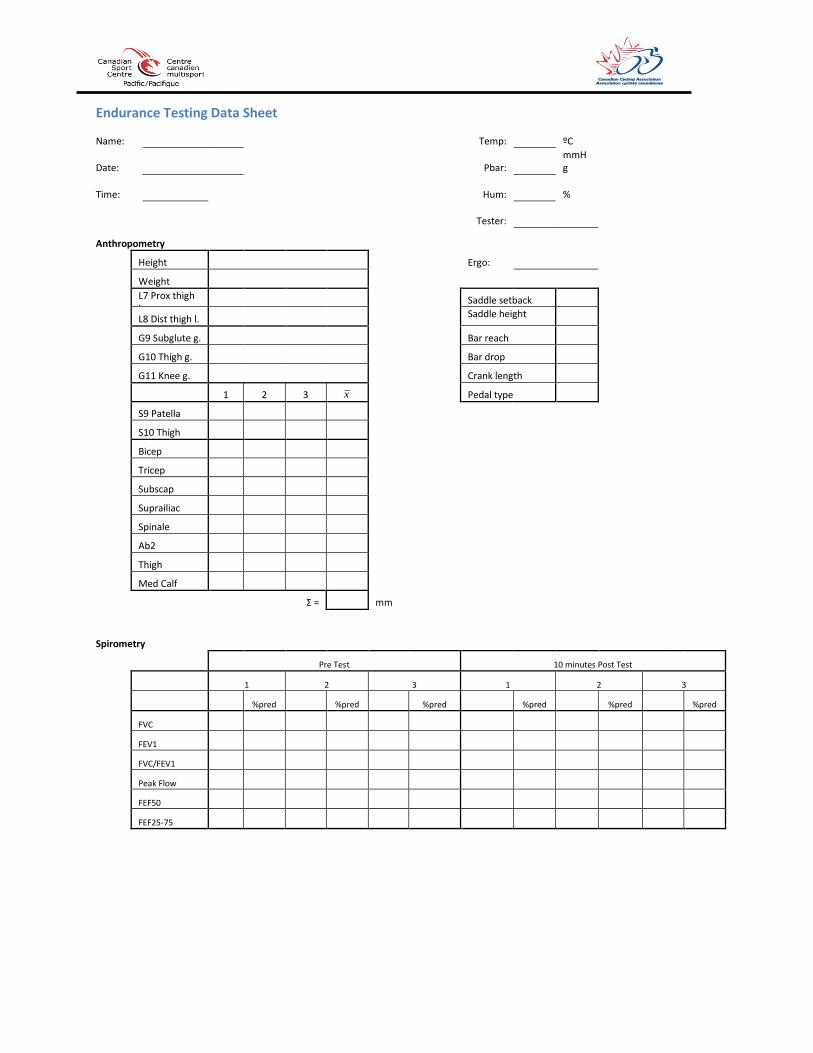
Endurance Testing Data Sheet
Name:
Temp: ºC
Date:
Pbar: mmHg
Time:
Hum: %
Tester:
Anthropometry
Height
Ergo:
Weight
L7 Prox thigh l.
Saddle setback
L8 Dist thigh l.
Saddle height
G9 Subglute g.
Bar reach
G10 Thigh g.
Bar drop
G11 Knee g.
Crank length
1 2 3
Pedal type
S9 Patella
S10 Thigh
Bicep
Tricep
Subscap
Suprailiac
Spinale
Ab2
Thigh
Med Calf
Σ = mm
Spirometry
Pre Test 10 minutes Post Test
1 2 3 1 2 3
%pred %pred %pred %pred %pred %pred
FVC
FEV1
FVC/FEV1
Peak Flow
FEF50
FEF25-75
x

Peak Power Test (6 second sprint) (>2 min active recovery between trials, 10 min recovery before MAP)
Trial Zero offset Collection Method Gear Peak Power Cadence
Torque / PowerCont (avg/rev) @ PP
1
2
Modified CCA MAP Test - Three Minute Step Test (lactate threshold)
Cadence: self-selected (recommend 80-110rpm)
Rest Bla: (mM)
Time (min)
Load (W)
HR (bpm)
BLa (mM)
1
SRM Info
2
SRM Slope
3
SRM Cal Date
4
Storage Interval
5
6
Zero Offset
7
Pre MAP
8
Post MAP
9
10
11
Warm Up
12
Time Load (W) HR
13
1
14
2
15
3
16
4
17
5
18
19
Cool Down - 80 rpm
20
Time Load (W) HR
21
1 100
22
2 100
23
3 100
24
4 100
25
5 100
26
27
28
Summary
29
Last complete
30
3 min stage
31
Time in last
32
incomplete stage
33 Actual Max 3 min
max power (W)
34
*Continue on blank
35 sheet if Peak HR
36* needed

Sprint Testing Data Sheet
Name:
Temp: ºC
Date:
Pbar: mmHg
Time:
Hum: %
Tester:
Anthropometry
Height
Ergo:
Weight
L7 Prox thigh l.
Saddle setback
L8 Dist thigh l.
Saddle height
G9 Subglute g.
Bar reach
G10 Thigh g.
Bar drop
G11 Knee g.
Crank length
1 2 3
Pedal type
S9 Patella
S10 Thigh
Bicep
SRM Info
Tricep
SRM Slope
Subscap
SRM Cal Date
Suprailiac
Storage Interval
Spinale
Ab2
Thigh
Med Calf
Σ = mm
Spirometry
Pre Test
1 2 3
%pred %pred %pred
FVC
FEV1
FVC/FEV1
Peak Flow
FEF50
FEF25-75
Peak Power Test (6 second sprint) (>2 min active recovery between trials)
Trial Zero offset Collection Method Gear Peak Power Cadence Optimum Torque data / PowerCont (avg/rev) @ PP Cadence (rpm)
1
2
x

High Cadence Power Endurance Profile:
160rpm for 15 seconds, from a seated maximal acceleration from rest
Trial Zero offset Gear Peak Power Average Power Fatigue Slope R2 Optimum Cadence
(avg W/rev) (W) (W/rev) (rpm)
1
Notes:
Low Cadence Strength Endurance Profile:
(>10 minute active recovery between trials)
50rpm for 10 seconds, from a rolling start
Trial Zero offset Gear Peak Power Average Power Fatigue Slope R2
(avg W/rev) (W) (W/rev)
1
2
Notes:

Contact List for Canadian Cycling Coaches
Mountain Bike National Coach: Dan Proulx [email protected]
Track Cycling National Coach: Richard Wooles [email protected]
Road Cycling National Coach: Vincent Jourdain [email protected]
Para Cycling National Coach: Eric Van den Eynde [email protected]
BMX National Coach: Adam Muys [email protected]
IST Coordinator: Andrea Wooles [email protected]