owner’s manual – uc machine gun uc manual - draft 27.pdf · 1 owner’s manual – uc machine...
TRANSCRIPT
1
OWNER’S MANUAL – UC MACHINE GUN Carefully read this entire manual, practicing and learning all operating
procedures before loading and firing this firearm.
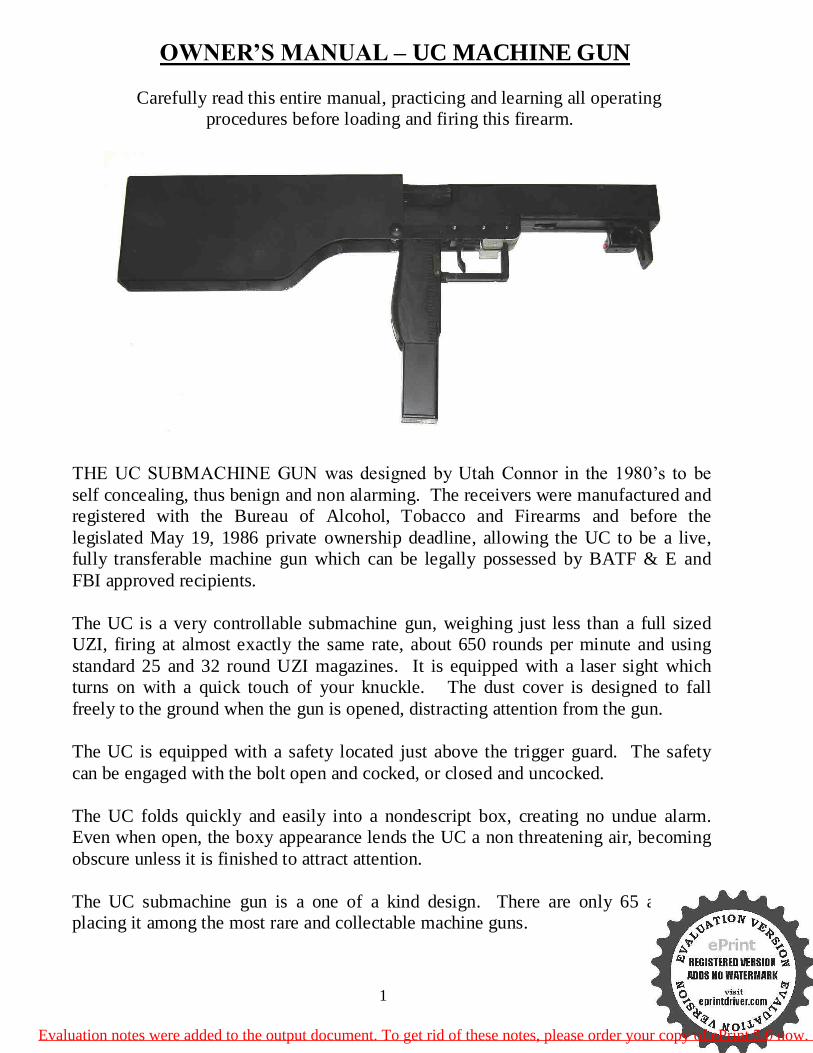
THE UC SUBMACHINE GUN was designed by Utah Connor in the 1980’s to be self concealing, thus benign and non alarming. The receivers were manufactured and registered with the Bureau of Alcohol, Tobacco and Firearms and before the legislated May 19, 1986 private ownership deadline, allowing the UC to be a live, fully transferable machine gun which can be legally possessed by BATF & E and FBI approved recipients.
The UC is a very controllable submachine gun, weighing just less than a full sized UZI, firing at almost exactly the same rate, about 650 rounds per minute and using standard 25 and 32 round UZI magazines. It is equipped with a laser sight which turns on with a quick touch of your knuckle. The dust cover is designed to fall freely to the ground when the gun is opened, distracting attention from the gun.
The UC is equipped with a safety located just above the trigger guard. The safety can be engaged with the bolt open and cocked, or closed and uncocked.
The UC folds quickly and easily into a nondescript box, creating no undue alarm. Even when open, the boxy appearance lends the UC a non threatening air, becoming obscure unless it is finished to attract attention.
The UC submachine gun is a one of a kind design. There are only 65 available, placing it among the most rare and collectable machine guns.
Evaluation notes were added to the output document. To get rid of these notes, please order your copy of ePrint 5.0 now.
2
TABLE OF CONTENTS
Section 1) Before Loading and Firing The UC pg. 3 Section 2) Your Owners Manual pg. 4 Section 3) Firearm Safety is Critical pg. 5 Section 4) Storing Firearms Safely pg. 5
Section 5) UC Parts Terminology pg. 6 Section 6) Operation of the UC Submachine Gun pg. 6 Section 7) Ammunition pg. 17 Section 8) Rules for Safe Use pg. 18 Section 9) Loading and Unloading pg. 20 Section 10) Firing pg. 25 Section 11) Pausing or Discontinuing Firing With
Ammunition Remaining in the Magazine pg. 27 Section 12) Operating System pg. 27 Section 13) Maintenance / Cleaning /Disassembly / Reassembly pg. 28
Section 14) Laser Sight Maintenance and Operation pg. 33
Section 15) Storage pg. 36 Section 16) Troubleshooting pg. 36
Evaluation notes were added to the output document. To get rid of these notes, please order your copy of ePrint 5.0 now.
3
Section 1 – Before Loading And Firing The UC
The UC is a machine gun. It self-loads and will continue firing after each shot until the trigger is released or the ammunition supply is exhausted. This machine gun is not unloaded until you remove the magazine and manually clear the chamber.
Before you open and close the UC, be aware of the following instructions to avoid causing personal injury or damaging the UC.
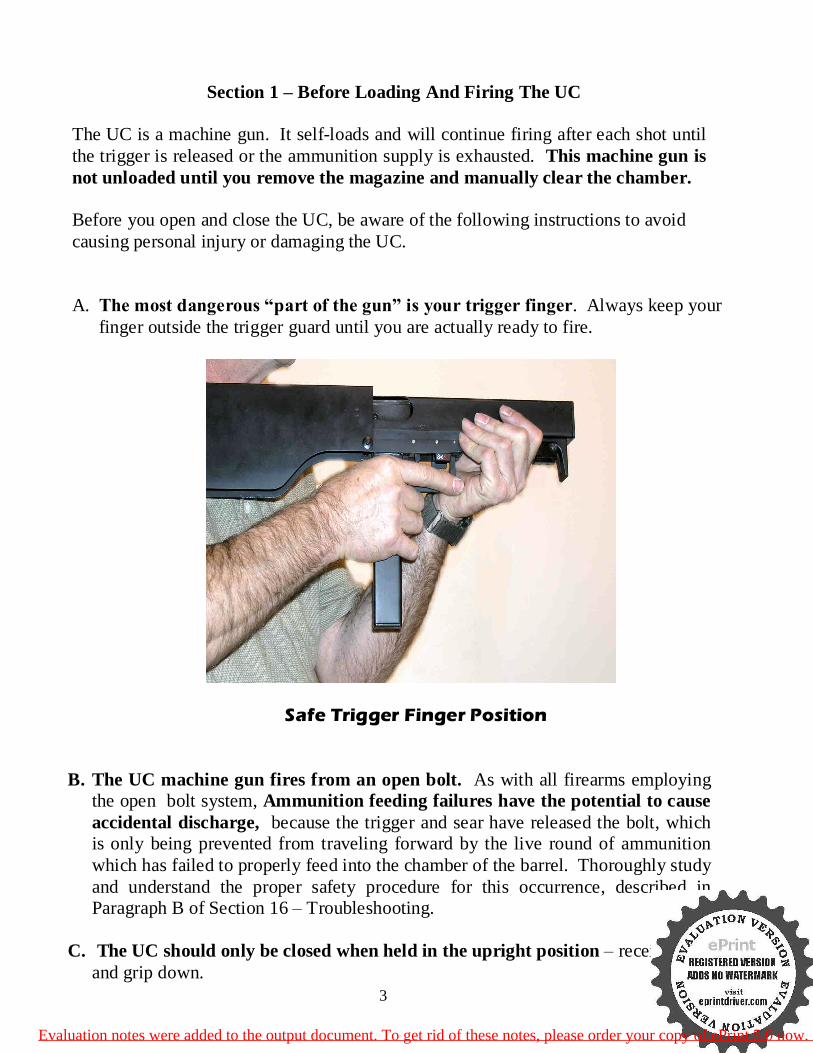
A. The most dangerous “part of the gun” is your trigger finger. Always keep your finger outside the trigger guard until you are actually ready to fire.
Safe Trigger Finger Position
B. The UC machine gun fires from an open bolt. As with all firearms employing the open bolt system, Ammunition feeding failures have the potential to cause accidental discharge, because the trigger and sear have released the bolt, which is only being prevented from traveling forward by the live round of ammunition which has failed to properly feed into the chamber of the barrel. Thoroughly study and understand the proper safety procedure for this occurrence, described in Paragraph B of Section 16 – Troubleshooting.
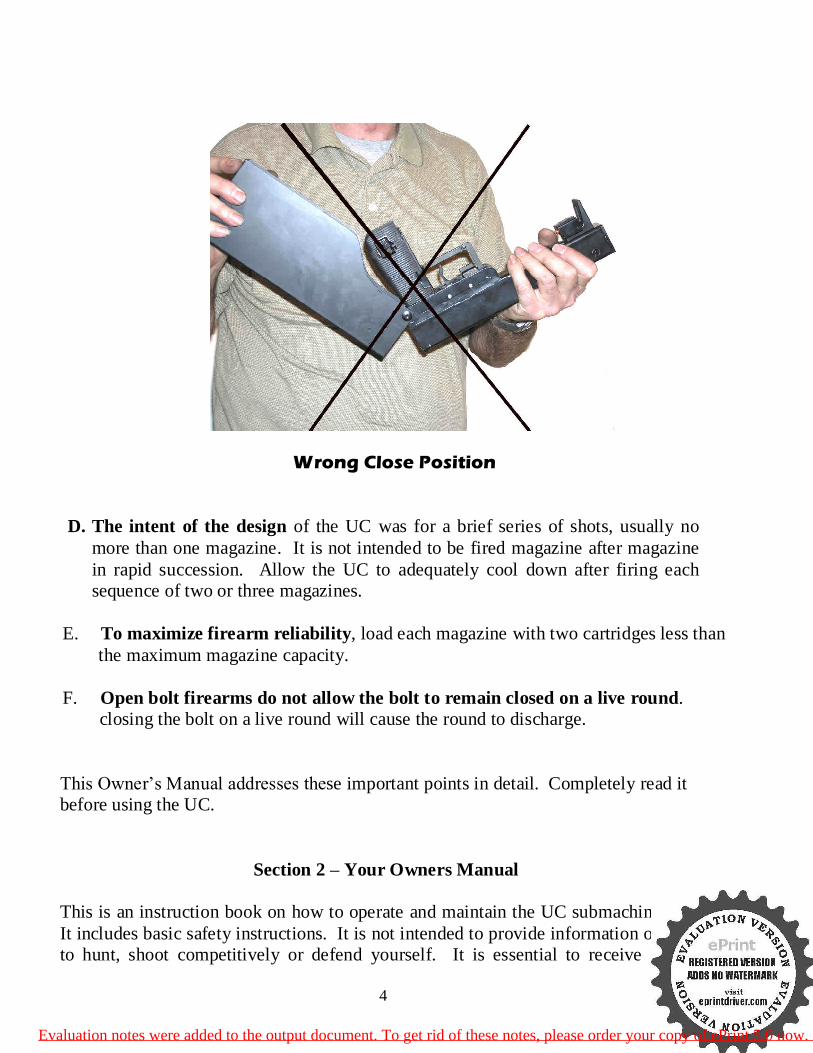
C. The UC should only be closed when held in the upright position – receiver up
and grip down.
Evaluation notes were added to the output document. To get rid of these notes, please order your copy of ePrint 5.0 now.
4
Wrong Close Position
D. The intent of the design of the UC was for a brief series of shots, usually no more than one magazine. It is not intended to be fired magazine after magazine in rapid succession. Allow the UC to adequately cool down after firing each sequence of two or three magazines.
E. To maximize firearm reliability, load each magazine with two cartridges less than
the maximum magazine capacity.
F. Open bolt firearms do not allow the bolt to remain closed on a live round. closing the bolt on a live round will cause the round to discharge.
This Owner’s Manual addresses these important points in detail. Completely read it before using the UC.
Section 2 – Your Owners Manual
This is an instruction book on how to operate and maintain the UC submachine gun. It includes basic safety instructions. It is not intended to provide information on how to hunt, shoot competitively or defend yourself. It is essential to receive proper
Evaluation notes were added to the output document. To get rid of these notes, please order your copy of ePrint 5.0 now.
5
instruction from a competent instructor before attempting any activities using the UC. Local or State authorities, the National Rifle Association or your local firearms dealers may be able to assist you in finding instructors or shooting courses specifically for machine guns. Using any firearm for self defense is a very delicate situation involving complex legal risks and dangers for which you must be properly educated. The UC is a novelty firearm and is not intended for self defense.
Section 3 – Firearm Safety Is Critical
There is an old saying in the military – “Safety rules are written in blood.” Read and understand all safety rules and carefully consider why each is important to your safety and the safety of those around you.
It is strongly suggested that every firearm owner receive proper instruction from a qualified and properly trained instructor before handling this or any other firearm. Know and obey all firearms laws. This is the responsibility of the owner of this firearm and is particularly critical in owning a machine gun.
Section 4 – Storing Firearms Safely
Store this and all other firearms unloaded, uncocked and locked in a secured storage area. Obey State and Local firearm storage laws. Firearms and ammunition should be stored separately. Because your spouse or children may be exposed to unsafely stored firearms in other homes where firearms are present, prepare them by showing them the Eddie Eagle video, which is available from the National Rifle Association by calling (703) 267-1000
Evaluation notes were added to the output document. To get rid of these notes, please order your copy of ePrint 5.0 now.
6
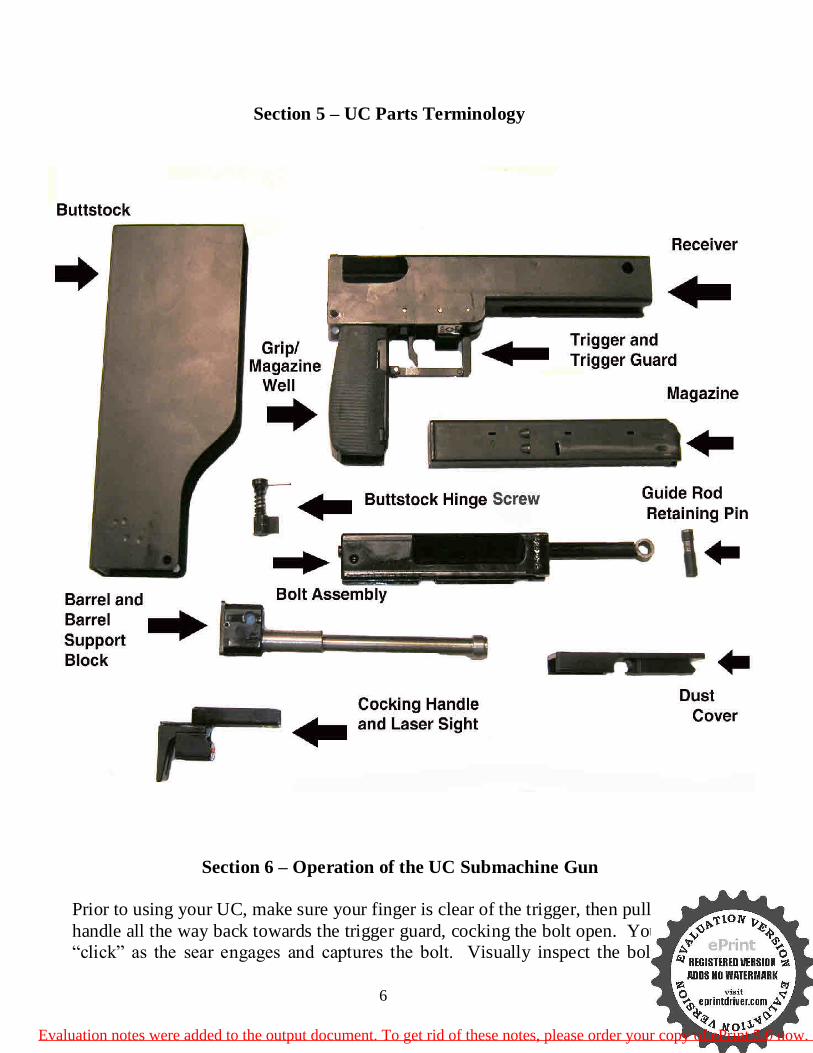
Section 5 – UC Parts Terminology
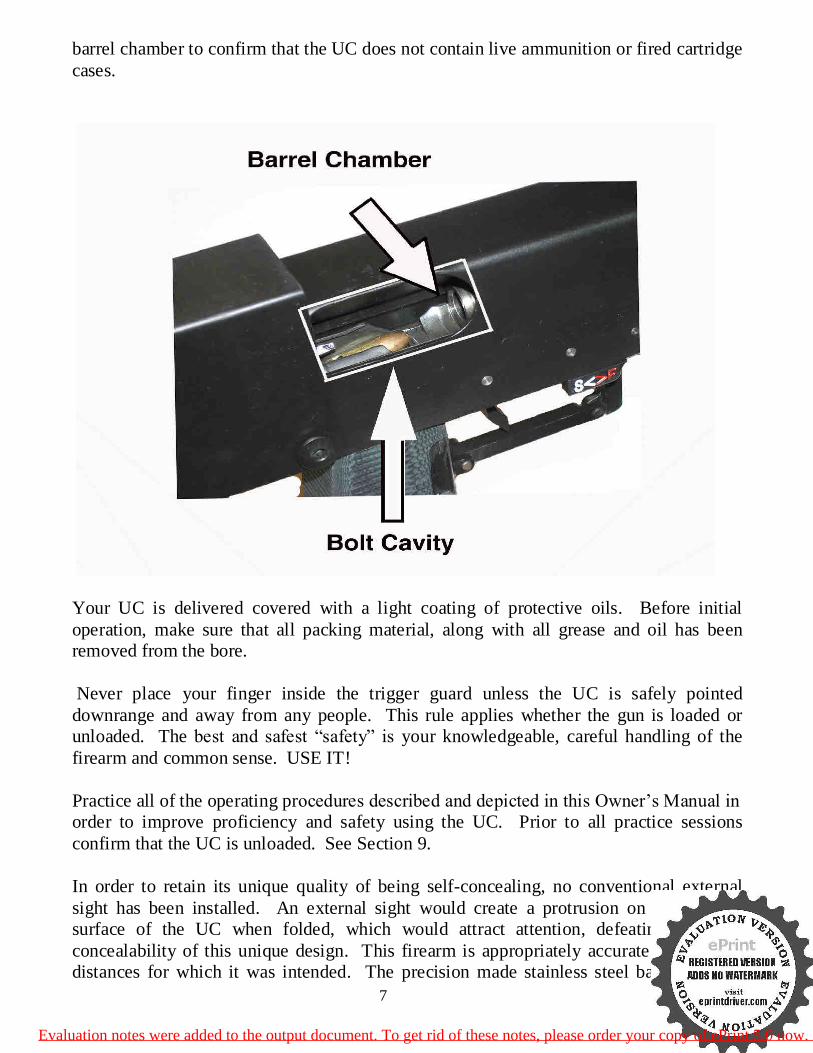
Section 6 – Operation of the UC Submachine Gun Prior to using your UC, make sure your finger is clear of the trigger, then pull the cocking handle all the way back towards the trigger guard, cocking the bolt open. You will hear a “click” as the sear engages and captures the bolt. Visually inspect the bolt cavity and
Evaluation notes were added to the output document. To get rid of these notes, please order your copy of ePrint 5.0 now.
7
barrel chamber to confirm that the UC does not contain live ammunition or fired cartridge cases.
Your UC is delivered covered with a light coating of protective oils. Before initial operation, make sure that all packing material, along with all grease and oil has been removed from the bore. Never place your finger inside the trigger guard unless the UC is safely pointed downrange and away from any people. This rule applies whether the gun is loaded or unloaded. The best and safest “safety” is your knowledgeable, careful handling of the firearm and common sense. USE IT! Practice all of the operating procedures described and depicted in this Owner’s Manual in order to improve proficiency and safety using the UC. Prior to all practice sessions confirm that the UC is unloaded. See Section 9. In order to retain its unique quality of being self-concealing, no conventional external sight has been installed. An external sight would create a protrusion on the exterior surface of the UC when folded, which would attract attention, defeating the self-concealability of this unique design. This firearm is appropriately accurate at the short distances for which it was intended. The precision made stainless steel barrel in your
Evaluation notes were added to the output document. To get rid of these notes, please order your copy of ePrint 5.0 now.
8
firearm has been found to be very accurate. After reasonable practice, the shooter will develop his own sight picture, achieving proficiency in obtaining small 3-round groups at 10 yards using point-firing techniques while shooting the UC from the shoulder. The UC is equipped with a laser sight which works well under diminished light conditions. It is not intended for use in sunlight. A. To unfold and open the UC, right handed shooters should grasp the UC with their
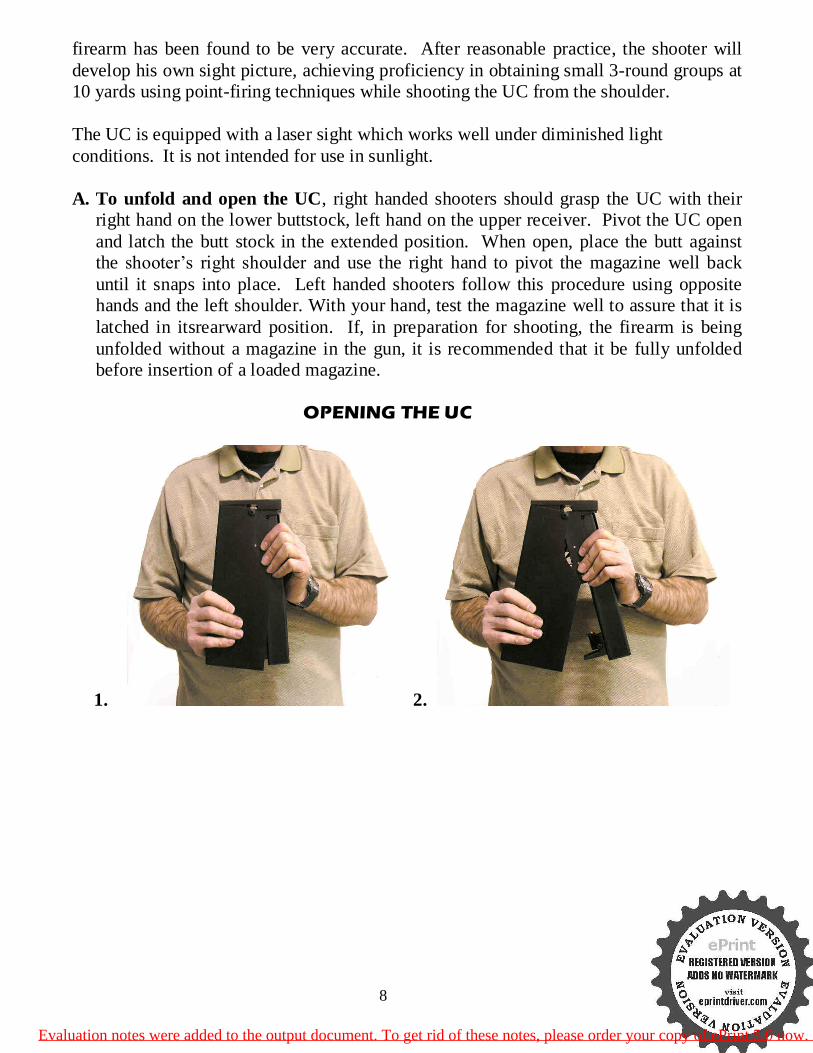
right hand on the lower buttstock, left hand on the upper receiver. Pivot the UC open and latch the butt stock in the extended position. When open, place the butt against the shooter’s right shoulder and use the right hand to pivot the magazine well back until it snaps into place. Left handed shooters follow this procedure using opposite hands and the left shoulder. With your hand, test the magazine well to assure that it is latched in itsrearward position. If, in preparation for shooting, the firearm is being unfolded without a magazine in the gun, it is recommended that it be fully unfolded before insertion of a loaded magazine.
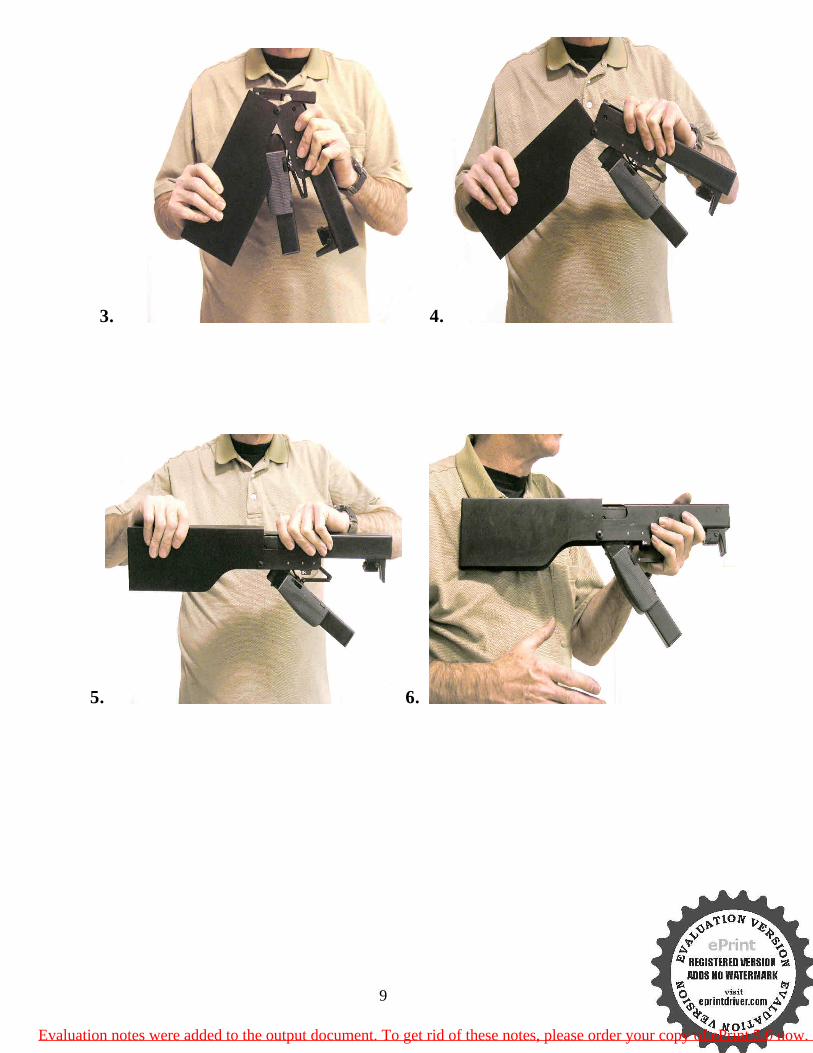
OPENING THE UC
1. 2.
Evaluation notes were added to the output document. To get rid of these notes, please order your copy of ePrint 5.0 now.
9
3. 4.
5. 6.
Evaluation notes were added to the output document. To get rid of these notes, please order your copy of ePrint 5.0 now.

10
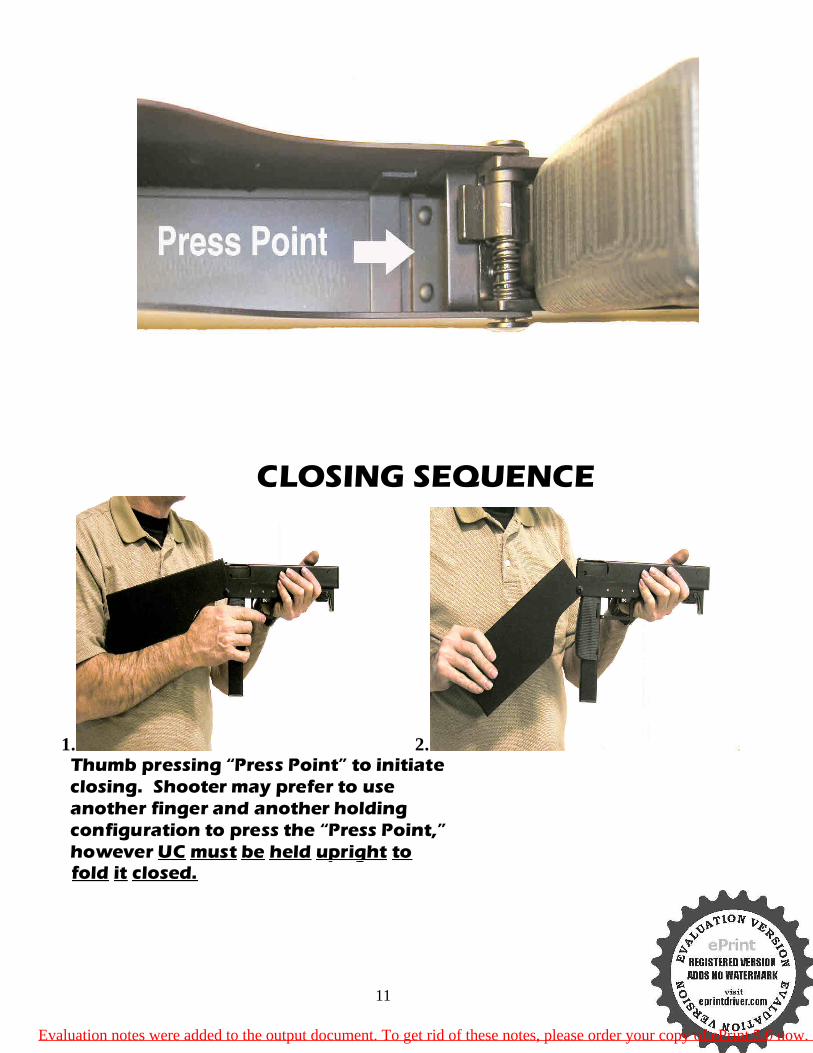
7. 8. B. To fold and close the UC into its self-concealing mode, invert the UC. Insert your
thumb or finger into the butstock just behind the bolt and firmly press exactly between the two rivets on the latch spring. This is the “Press Point.” As the latch opens, turn the UC right side up (receiver up and grip/magazine well down) and gently fold the receiver and buttstock together. In doing so, the grip assembly and magazine will also fold into the butt.
NOTE: The UC must be in the upright position when folded closed to avoid damaging the firearm.
Evaluation notes were added to the output document. To get rid of these notes, please order your copy of ePrint 5.0 now.
11
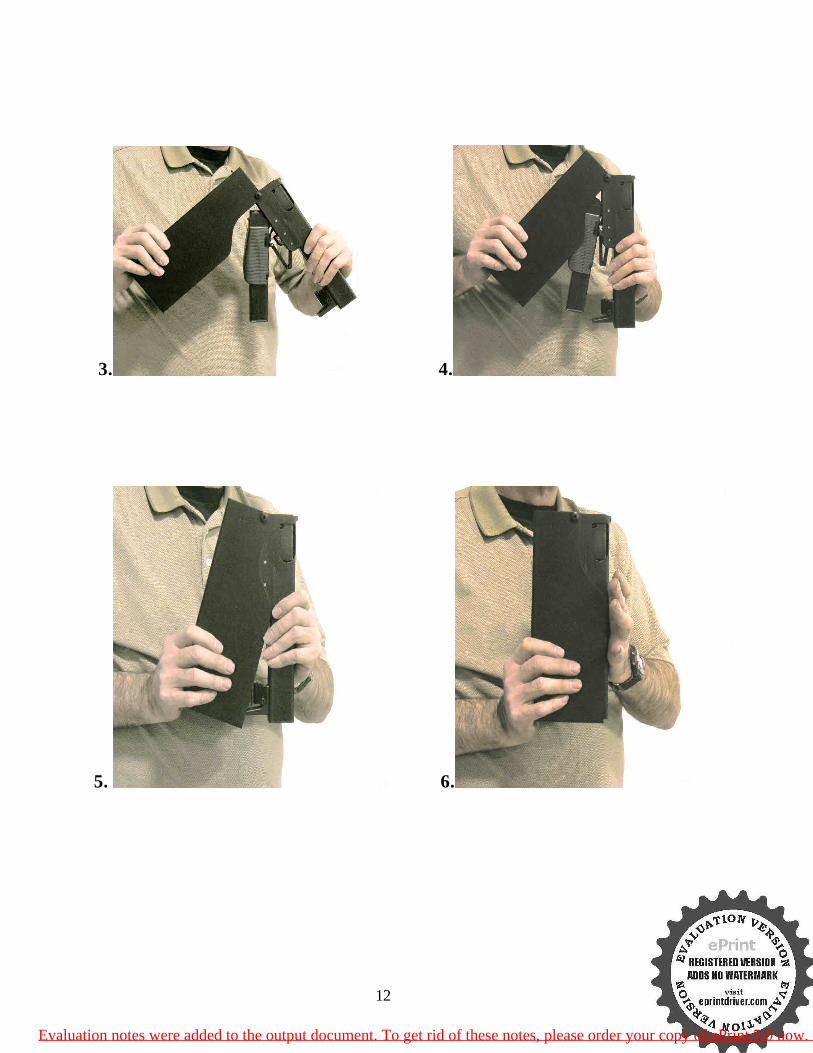
CLOSING SEQUENCE
1. 2. Thumb pressing “Press Point” to initiate closing. Shooter may prefer to use another finger and another holding configuration to press the “Press Point,” however UC must be held upright to fold it closed.
Evaluation notes were added to the output document. To get rid of these notes, please order your copy of ePrint 5.0 now.
12
3. 4.
5. 6.
Evaluation notes were added to the output document. To get rid of these notes, please order your copy of ePrint 5.0 now.
13
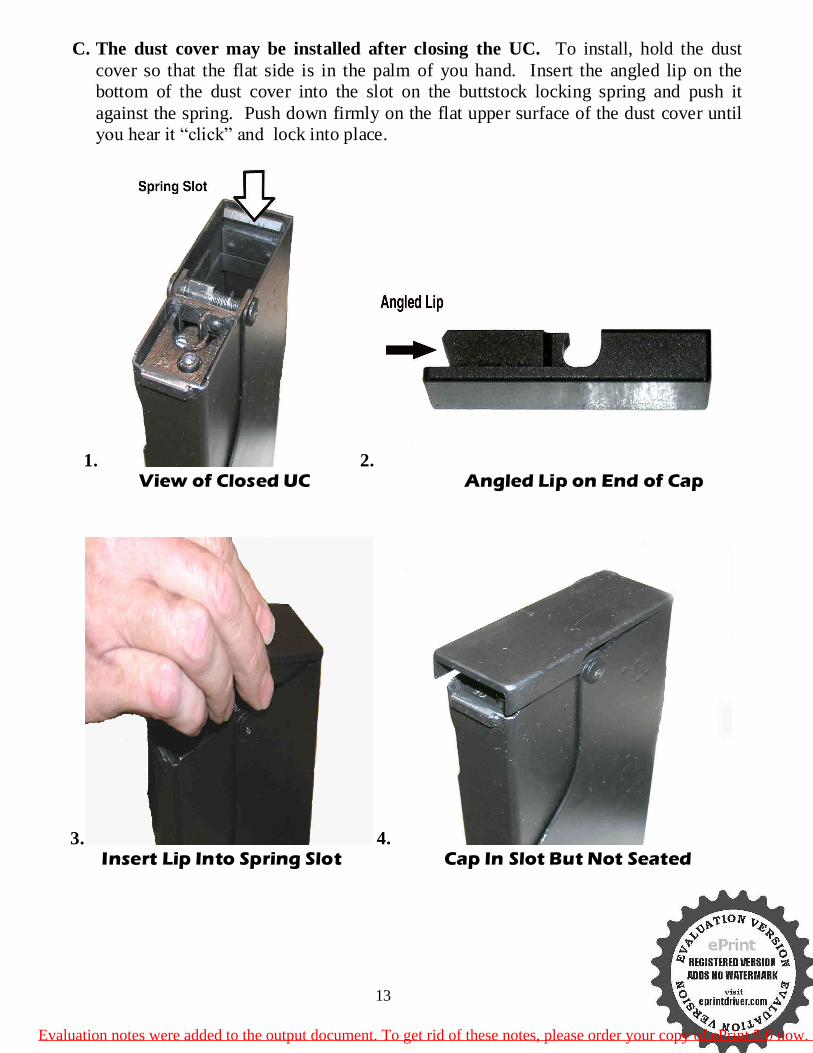
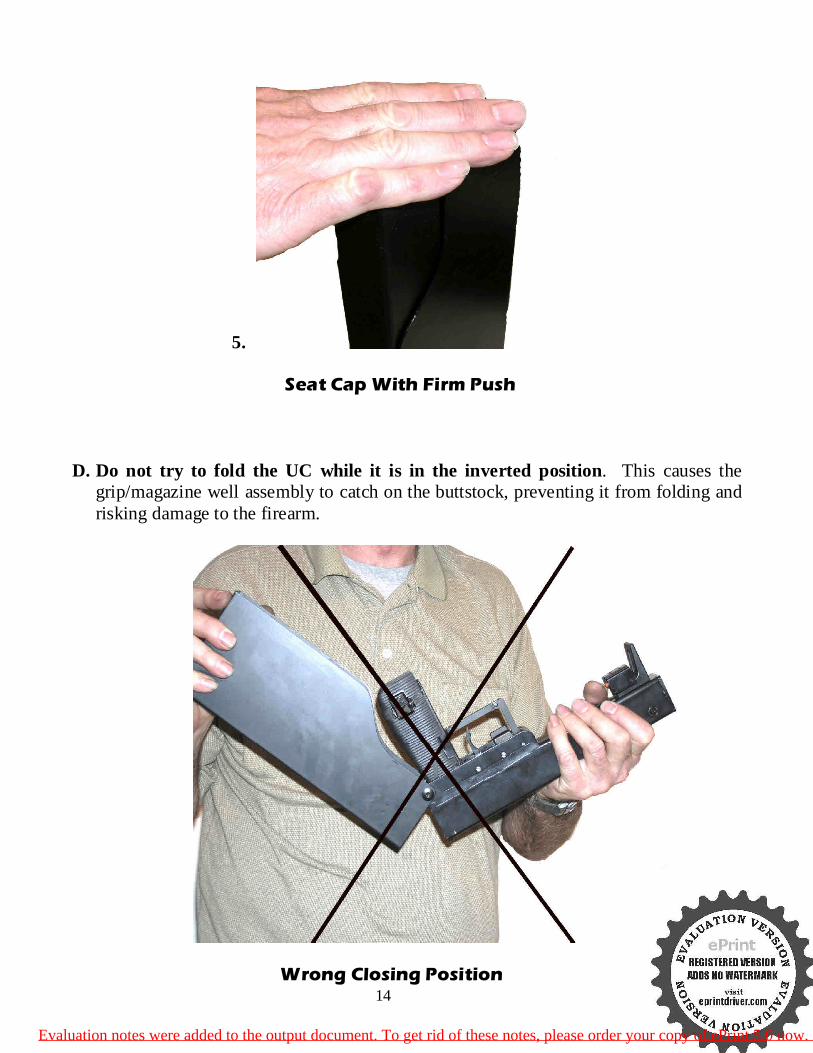
C. The dust cover may be installed after closing the UC. To install, hold the dust cover so that the flat side is in the palm of you hand. Insert the angled lip on the bottom of the dust cover into the slot on the buttstock locking spring and push it against the spring. Push down firmly on the flat upper surface of the dust cover until you hear it “click” and lock into place.
1. 2. View of Closed UC Angled Lip on End of Cap
3. 4. Insert Lip Into Spring Slot Cap In Slot But Not Seated
Evaluation notes were added to the output document. To get rid of these notes, please order your copy of ePrint 5.0 now.
14
5. Seat Cap With Firm Push
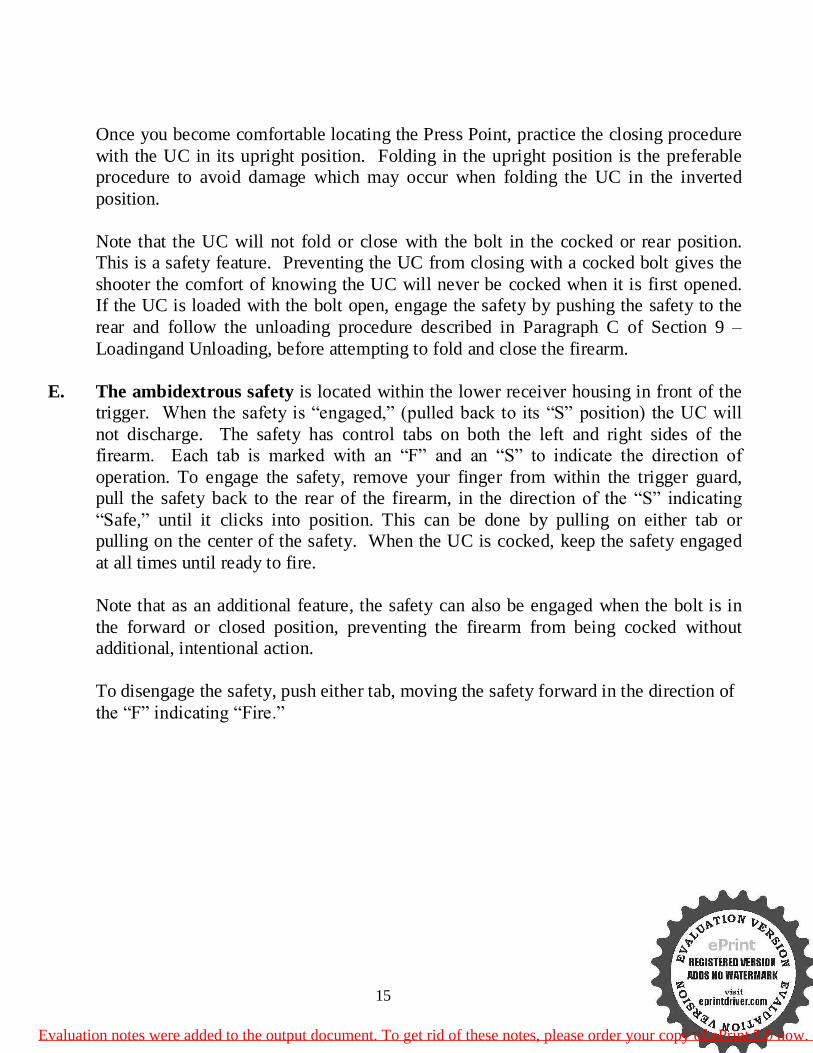
D. Do not try to fold the UC while it is in the inverted position. This causes the
grip/magazine well assembly to catch on the buttstock, preventing it from folding and risking damage to the firearm.
Wrong Closing Position
Evaluation notes were added to the output document. To get rid of these notes, please order your copy of ePrint 5.0 now.
15
Once you become comfortable locating the Press Point, practice the closing procedure with the UC in its upright position. Folding in the upright position is the preferable procedure to avoid damage which may occur when folding the UC in the inverted position. Note that the UC will not fold or close with the bolt in the cocked or rear position. This is a safety feature. Preventing the UC from closing with a cocked bolt gives the shooter the comfort of knowing the UC will never be cocked when it is first opened. If the UC is loaded with the bolt open, engage the safety by pushing the safety to the rear and follow the unloading procedure described in Paragraph C of Section 9 – Loadingand Unloading, before attempting to fold and close the firearm.
E. The ambidextrous safety is located within the lower receiver housing in front of the
trigger. When the safety is “engaged,” (pulled back to its “S” position) the UC will not discharge. The safety has control tabs on both the left and right sides of the firearm. Each tab is marked with an “F” and an “S” to indicate the direction of operation. To engage the safety, remove your finger from within the trigger guard, pull the safety back to the rear of the firearm, in the direction of the “S” indicating “Safe,” until it clicks into position. This can be done by pulling on either tab or pulling on the center of the safety. When the UC is cocked, keep the safety engaged at all times until ready to fire.
Note that as an additional feature, the safety can also be engaged when the bolt is in the forward or closed position, preventing the firearm from being cocked without additional, intentional action. To disengage the safety, push either tab, moving the safety forward in the direction of the “F” indicating “Fire.”
Evaluation notes were added to the output document. To get rid of these notes, please order your copy of ePrint 5.0 now.
16
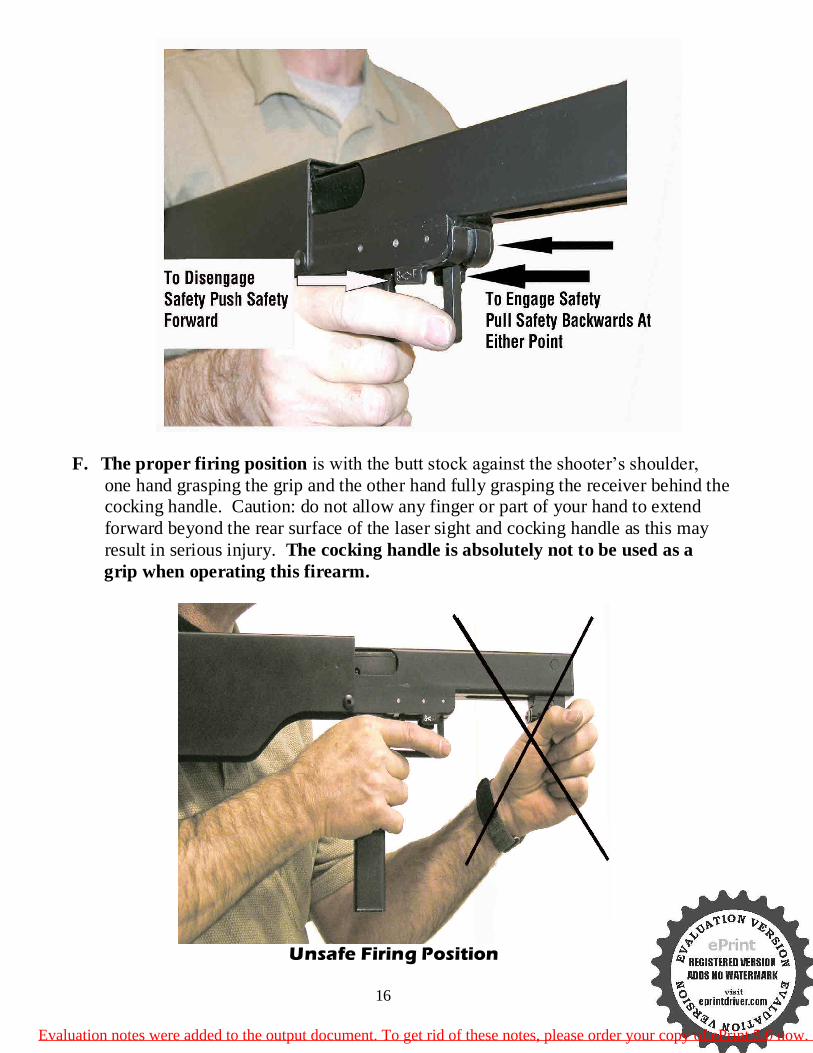
F. The proper firing position is with the butt stock against the shooter’s shoulder, one hand grasping the grip and the other hand fully grasping the receiver behind the cocking handle. Caution: do not allow any finger or part of your hand to extend forward beyond the rear surface of the laser sight and cocking handle as this may result in serious injury. The cocking handle is absolutely not to be used as a grip when operating this firearm.
Unsafe Firing Position
Evaluation notes were added to the output document. To get rid of these notes, please order your copy of ePrint 5.0 now.
17
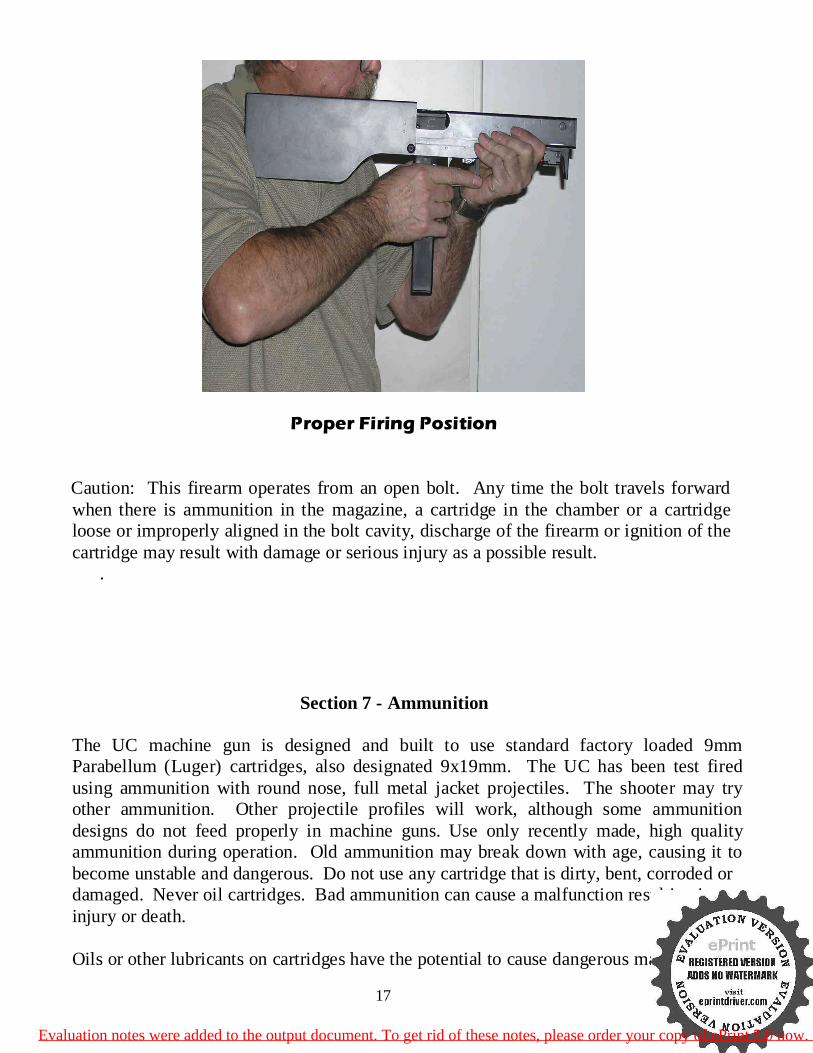
Proper Firing Position
Caution: This firearm operates from an open bolt. Any time the bolt travels forward
when there is ammunition in the magazine, a cartridge in the chamber or a cartridge loose or improperly aligned in the bolt cavity, discharge of the firearm or ignition of the cartridge may result with damage or serious injury as a possible result. . Section 7 - Ammunition The UC machine gun is designed and built to use standard factory loaded 9mm Parabellum (Luger) cartridges, also designated 9x19mm. The UC has been test fired using ammunition with round nose, full metal jacket projectiles. The shooter may try other ammunition. Other projectile profiles will work, although some ammunition designs do not feed properly in machine guns. Use only recently made, high quality ammunition during operation. Old ammunition may break down with age, causing it to become unstable and dangerous. Do not use any cartridge that is dirty, bent, corroded or damaged. Never oil cartridges. Bad ammunition can cause a malfunction resulting in injury or death. Oils or other lubricants on cartridges have the potential to cause dangerous malfunctions.
Evaluation notes were added to the output document. To get rid of these notes, please order your copy of ePrint 5.0 now.
18
Store ammunition in a cool and dry location to prevent premature aging and possible component breakdown. Use only 9mm Parabellum (Luger) ammunition, which is also designated 9x19 mm. Never attempt to use ammunition of any other caliber. Higher pressure ammunition such as 9x21mm and 9x25mm should never be used in this firearm. Likewise, less powerful 9x18mm, 9mm Kurtz or .380 ACP ammunition should never be used. Damaged, defective or improper ammunition can create extreme chamber pressure, resulting in an explosion that can damage or destroy the firearm and cause injury or death to you or those nearby. You assume the responsibility for using proper and safe ammunition. Never under any circumstances use old or reloaded ammunition purchased at gun shows, estate sales, auctions or of unknown origin. Use of reloaded, remanufactured or other non-standard ammunition is not approved. Severe damage to the firearm and injury to the shooter may result from the use of this ammunition. It may function erratically or possibly even explode. All UC firearms were developed and tested with Federal American Eagle 115g 9mm Full Metal Jacket ammunition. If at any time:
The UC has difficulty chambering a cartridge - A cartridge misfires (does not go off) – The bolt fails to extract a fired cartridge case – Unburned grains of powder are discovered in the mechanism – A shot sounds weak or abnormally quiet –
Immediately cease fire, unload the UC and insert a cleaning rod into the barrel to confirm that it is not obstructed. If an obstruction is found, the UC should be serviced by a competent gunsmith.
In all such cases it is possible that a bullet is lodged at some point in the barrel. Firing another round into a blocked barrel can destroy the UC and cause serious injury or death to the shooter or bystanders.
Section 8 – Rules For Safe Use A. Always keep the muzzle of the firearm pointed in a safe direction. B. Keep your finger off the trigger and outside the trigger guard until you are actually aiming at an appropriate target and intending to shoot.
C. At all times when the bolt is cocked, keep the safety engaged until ready to fire the UC.
Evaluation notes were added to the output document. To get rid of these notes, please order your copy of ePrint 5.0 now.
19
D. Treat this and every firearm as if it is loaded all the time.
E. Be sure of the target and objects in the background before you shoot. Bullets can travelover a mile, so be certain of what lies behind your target. F. Do Not Drop Your Firearm – Firearms have been known to discharge from impact. If it is dropped, it may also be damaged, creating an unsafe condition for further use.
G. Never put your fingers or hand over the muzzle or ejection port when operating the UC. H. Be sure the barrel is clear of blockages before you shoot. Unload the UC, insert a cleaning rod into the barrel and confirm that it is not obstructed. If an obstruction is found, the UC should be serviced by a competent gunsmith before resuming shooting. Obstructed barrels can burst and cause injury or death. I. Never let water or any other foreign material enter the barrel.
J. Never climb a tree or cross a fence with a loaded firearm. K. Firearms and alcohol or drugs do not mix. Never use a firearm while intoxicated or with impaired judgement or perception. If in doubt, don’t use your firearm. Your life and the lives of others are too valuable to risk. L. Always keep and carry the UC with the bolt closed on an empty chamber until
you intend to shoot. M. The firearm should be completely unloaded when not actually in use. This
Includes removing the magazine, engaging the safety and clearing the bolt cavity and barrel chamber.
N. Before cleaning or lubricating, be certain that the UC is unloaded, the safety is engaged and the barrel chamber and the bolt cavity are clear. O. Store firearms and ammunition separately. Be absolutely certain both firearms and ammunition are completely inaccessible to children. P. The shooter and bystanders should always wear protective eyewear and hearing protection when shooting and when in the proximity of someone shooting.
Q. Do not alter or modify your UC. Inspect its condition regularly.
Evaluation notes were added to the output document. To get rid of these notes, please order your copy of ePrint 5.0 now.
20
R. Do not attempt to alter the trigger pull of the UC. This can result in change of
the sear engagement and may cause accidental discharge. S. Avoid accidental discharge when pulling the cocking handle rearward to cock
the bolt into the open position. Retain a firm grasp of the cocking handle until the sear has engaged the bolt, which captures and secures the bolt in its fully cocked position. Releasing the cocking handle while cocking the firearm and before the sear engages the bolt can cause the bolt to travel forward unintentionally chambering and firing a round of ammunition.
T. In the event of malfunction, immediately cease using your UC and unload it. Have it serviced by a competent gunsmith before resuming use.
U. Know and obey all laws of firearm use and ownership.
Section 9 – Loading and Unloading
Make sure that the muzzle is safely pointed away from people or animals and is safely pointed downrange before loading or unloading the UC.
A. Loading the UC may be completed with the bolt closed or with the bolt open.
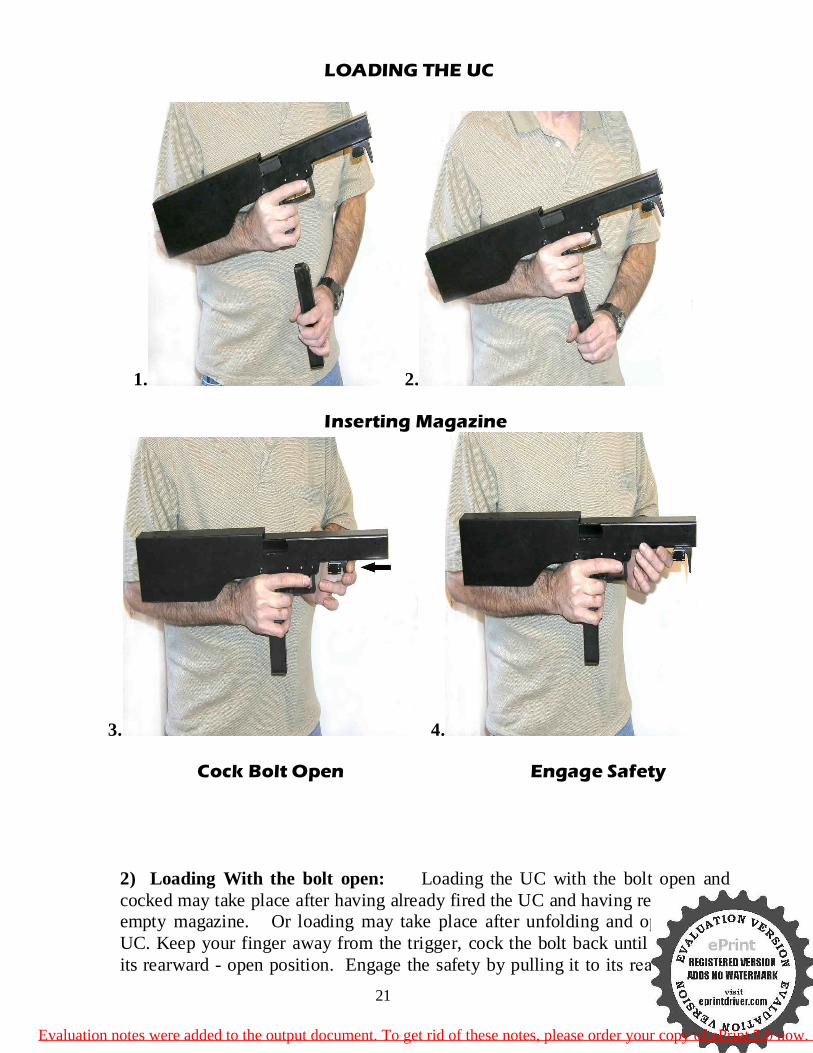
1) Loading with the bolt closed: The safest procedure to load the UC is with the bolt closed, so first make sure that the barrel chamber is empty and the bolt is in the forward - closed position. Insert a magazine into the magazine well and push the magazine upwards until it clicks, engaging the magazine catch and locking the magazine into place. At this point the UC can be folded up and closed with a loaded magazine installed. If the intention is to shoot the UC, make sure your finger is clear of the trigger, cock the bolt open by pulling the cocking handle all the way back towards the trigger guard until the shooter hears a “click” as the sear engages and captures the bolt. The cocking handle will return automatically when released. You may then fire the weapon. Pull the safety rearward to its “S” Safe position and keep the safety engaged until actually firing the UC.
Evaluation notes were added to the output document. To get rid of these notes, please order your copy of ePrint 5.0 now.
21
LOADING THE UC
1. 2. Inserting Magazine
3. 4.
Cock Bolt Open Engage Safety
2) Loading With the bolt open: Loading the UC with the bolt open and cocked may take place after having already fired the UC and having removed the empty magazine. Or loading may take place after unfolding and opening the UC. Keep your finger away from the trigger, cock the bolt back until it locks in its rearward - open position. Engage the safety by pulling it to its rear “S” Safe
Evaluation notes were added to the output document. To get rid of these notes, please order your copy of ePrint 5.0 now.
22
position. Insert the loaded magazine and firmly tap the bottom of the magazine, assuring engagement of the magazine catch. A click will be heard when it is properly engaged. At this point the gun is ready to fire once the safety is disengaged by pushing it forward to its “F” Fire position. As an additional safety feature, note that the buttstock can not be folded closed when the UC is in the cocked and open-bolt condition.
B. When preparing to shoot, should a loaded magazine already be inserted into the magazine well once the UC is unfolded and open, cock the firearm by sliding the cocking handle to the rear until the sear engages the bolt in its open-bolt condition. Release the cocking handle, allowing the cocking handle to return to its forward position. Engage the safety by pulling it to its rear “S” Safe position. At this point, the firearm is ready to fire once the safety is disengaged by pushing it to its forward “F” Fire position. As an additional safety feature, the buttstock can not be folded when the UC is in the cocked and open bolt condition.
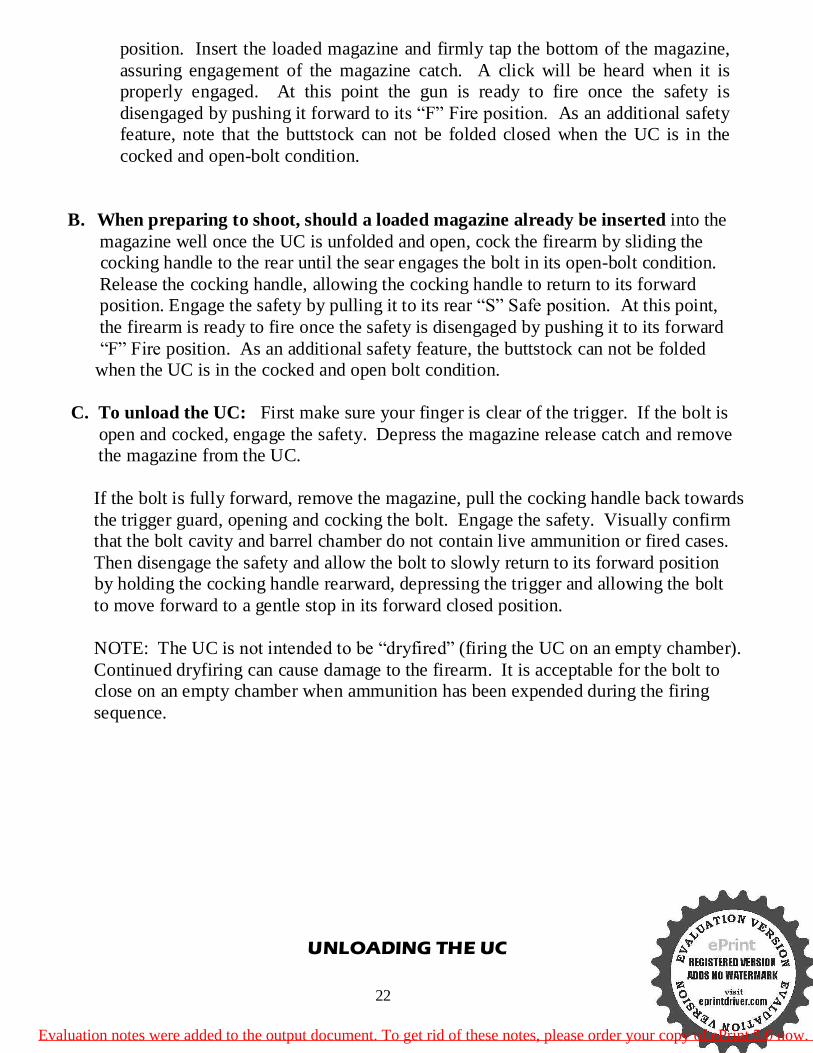
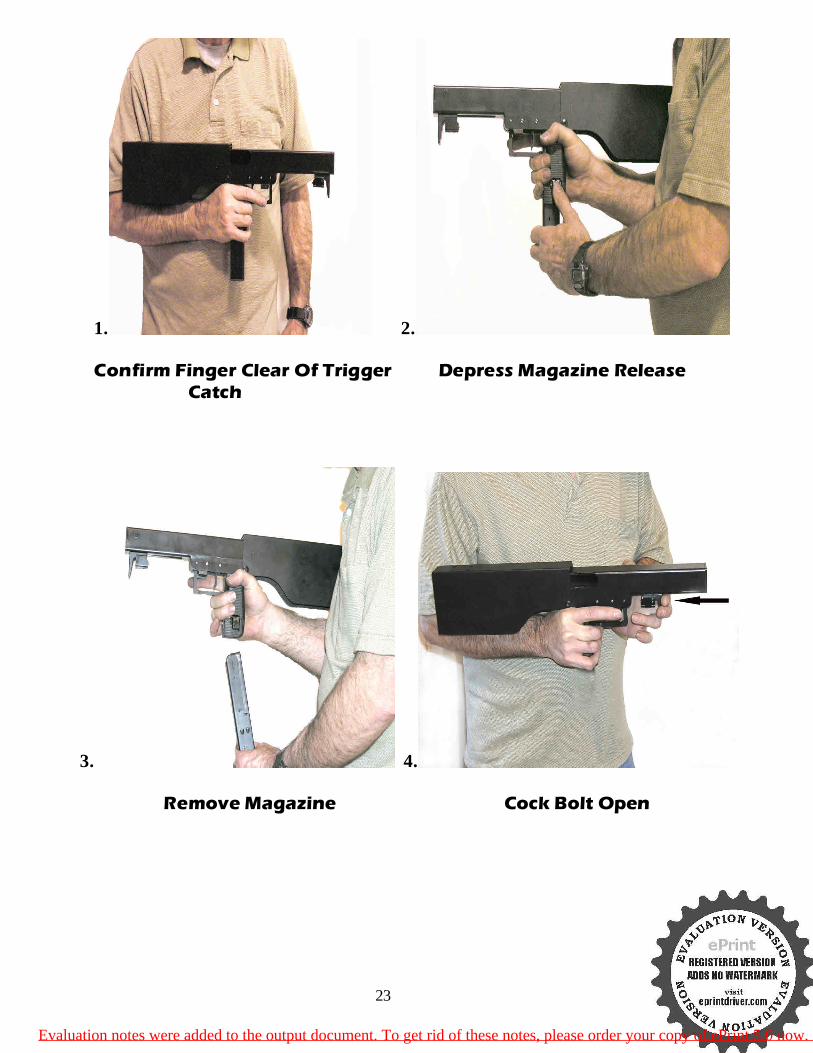
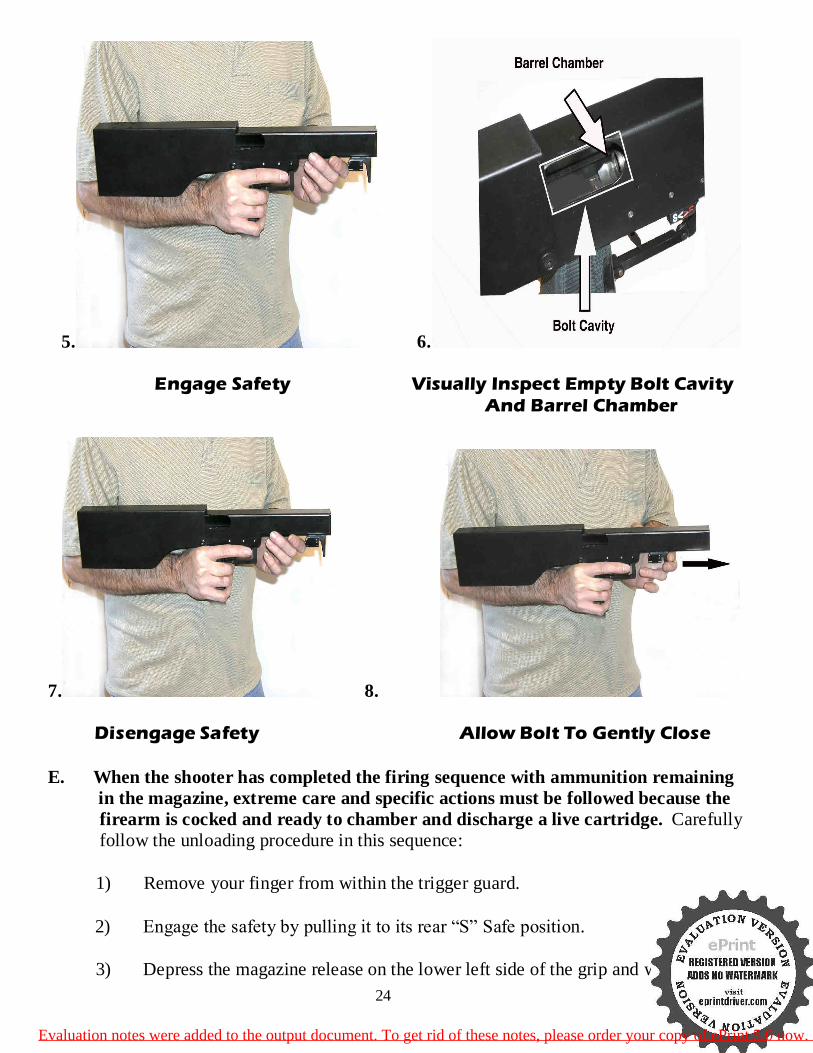
C. To unload the UC: First make sure your finger is clear of the trigger. If the bolt is open and cocked, engage the safety. Depress the magazine release catch and remove the magazine from the UC. If the bolt is fully forward, remove the magazine, pull the cocking handle back towards the trigger guard, opening and cocking the bolt. Engage the safety. Visually confirm that the bolt cavity and barrel chamber do not contain live ammunition or fired cases. Then disengage the safety and allow the bolt to slowly return to its forward position by holding the cocking handle rearward, depressing the trigger and allowing the bolt to move forward to a gentle stop in its forward closed position. NOTE: The UC is not intended to be “dryfired” (firing the UC on an empty chamber). Continued dryfiring can cause damage to the firearm. It is acceptable for the bolt to close on an empty chamber when ammunition has been expended during the firing sequence. UNLOADING THE UC
Evaluation notes were added to the output document. To get rid of these notes, please order your copy of ePrint 5.0 now.
23
1. 2. Confirm Finger Clear Of Trigger Depress Magazine Release Catch
3. 4. Remove Magazine Cock Bolt Open
Evaluation notes were added to the output document. To get rid of these notes, please order your copy of ePrint 5.0 now.
24
5. 6. Engage Safety Visually Inspect Empty Bolt Cavity And Barrel Chamber
7. 8. Disengage Safety Allow Bolt To Gently Close
E. When the shooter has completed the firing sequence with ammunition remaining in the magazine, extreme care and specific actions must be followed because the
firearm is cocked and ready to chamber and discharge a live cartridge. Carefully follow the unloading procedure in this sequence: 1) Remove your finger from within the trigger guard. 2) Engage the safety by pulling it to its rear “S” Safe position.
3) Depress the magazine release on the lower left side of the grip and withdraw
Evaluation notes were added to the output document. To get rid of these notes, please order your copy of ePrint 5.0 now.
25
the magazine. After the magazine has been removed, look through the ejection port into the bolt cavity area to assure there is no ammunition loose in the bolt cavity or in the barrel chamber. Disengage the safety by pushing it forward into its “F” Fire position. Then retract the cocking handle, firmly retaining hold of it to allow the bolt to move forward slowly while depressing the trigger. The bolt is now closed on an empty barrel chamber and the gun is now safe.
4) Now that the bolt is in the forward, closed position, a new magazine may be inserted in the magazine well. If discontinuing firing, insert an empty magazine. If continuing firing, insert a loaded magazine. This may require a stronger tap to engage the magazine latch. Remember, to minimize magazine malfunctions, load the magazine with two cartridges less than the magazine capacity.
5) The UC can now be folded closed.
6) If firing is to be resumed, with the trigger finger outside the trigger guard, you may cock the UC by sliding the cocking handle fully to the rear until the sear engages the bolt, and then releasing the cocking handle, allowing the cocking handle to return to its forward position. At this point, with a loaded magazine the UC is ready to fire.
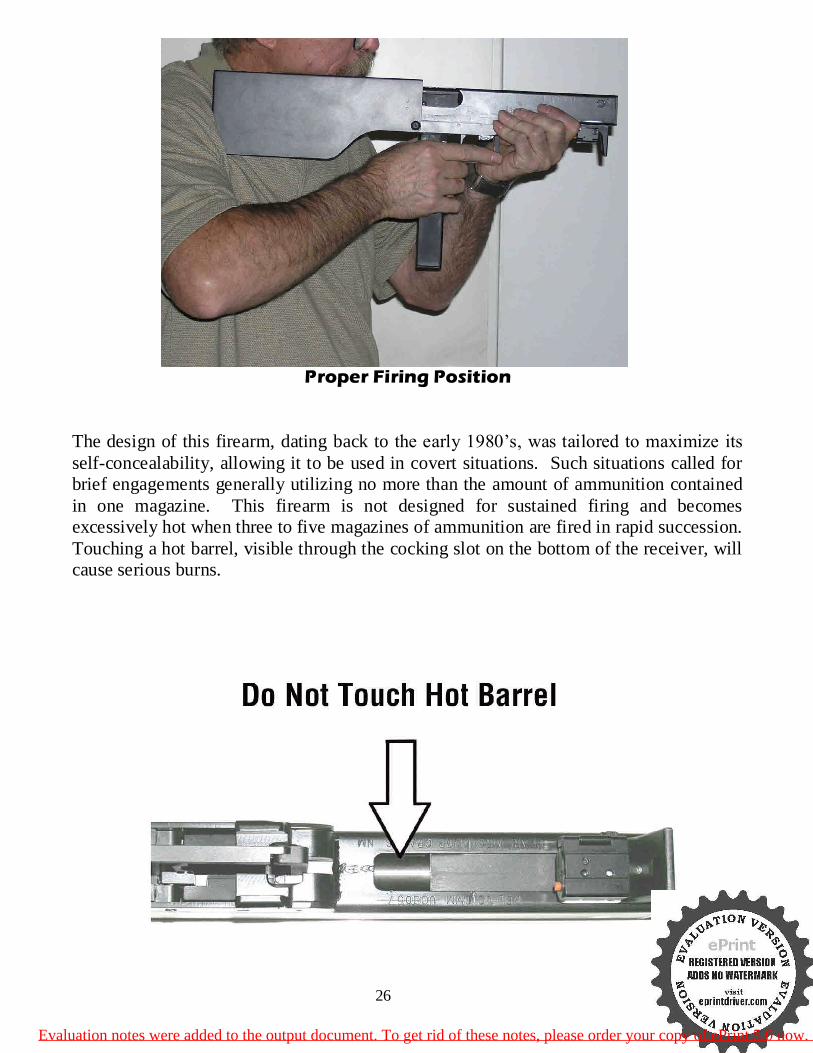
Section 10 – Firing Make sure that the muzzle is safely pointed away from people or animals and is safely pointed downrange. Disengage the safety. Position the UC with the butt of the stock firmly against the shooter’s shoulder, one hand firmly grasping the grip and the other firmly grasping the receiver behind the cocking handle and laser sight. Confirm that no finger or any part of the shooter’s hand is extended further forward than the laser sight and the rear surface of the cocking handle. The shooter may then place their trigger finger on the trigger and squeeze. Expect the gun to fire loudly and be prepared for some recoil. As long as the trigger remains depressed, the UC will chamber and discharge another round automatically after each shot until the magazine is empty. Then follow the unloading procedure or insert another magazine and resume firing.
Evaluation notes were added to the output document. To get rid of these notes, please order your copy of ePrint 5.0 now.
26
Proper Firing Position The design of this firearm, dating back to the early 1980’s, was tailored to maximize its self-concealability, allowing it to be used in covert situations. Such situations called for brief engagements generally utilizing no more than the amount of ammunition contained in one magazine. This firearm is not designed for sustained firing and becomes excessively hot when three to five magazines of ammunition are fired in rapid succession. Touching a hot barrel, visible through the cocking slot on the bottom of the receiver, will cause serious burns.
Evaluation notes were added to the output document. To get rid of these notes, please order your copy of ePrint 5.0 now.

27
Section 11 – Pausing or Discontinuing Firing With Ammunition Remaining In The Magazine
Due to the fact that this firearm operates from an open bolt, extreme care and specific action must be taken when the shooter has completed the firing sequence with ammunition remaining in the magazine. At this point, the firearm is cocked and ready to chamber and discharge a live cartridge. Follow this procedure in this sequence:
A. Remove your finger from within the trigger guard. B. Engage the safety by pulling it to its rear “S” Safe position.
C. Depress the magazine release on the lower left side of the grip, and withdraw the magazine. After the magazine has been removed, look through the ejection port into the bolt cavity area to assure there is no ammunition loose in the bolt cavity or in the barrel chamber. Disengage the safety by pushing it forward into its “F” Fire position. Then withdraw the cocking handle, firmly retaining hold of it to allow the bolt to move forward slowly while depressing the trigger. The bolt is now closed on an empty barrel chamber and the gun is now safe.
D. Now that the bolt is in the forward, closed position, a new magazine may be inserted in the magazine well. If discontinuing firing, insert an empty magazine. If continuing firing, insert a loaded magazine. This may require a stronger tap to engage the magazine latch. Remember, to minimize magazine malfunctions, load the magazine with two cartridges less than the magazine capacity.
E. The UC can now be folded closed.
G. If firing is to be resumed, with the trigger finger outside the trigger guard, you may cock the UC by sliding the cocking handle fully to the rear until the sear engages the bolt, and then releasing the cocking handle, allowing the cocking handle to return to its forward position. At this point, with a loaded magazine the UC is ready to fire.
Section 12 – Operating System
The UC submachine gun operates using the open-bolt blowback method of operation. As
Evaluation notes were added to the output document. To get rid of these notes, please order your copy of ePrint 5.0 now.

28
each round is fired, the explosive impulse of the cartridge drives the bolt rearwards, ejecting the empty cartridge case and compressing the recoil spring. The bolt then moves forward under spring power, stripping another round of ammunition from the magazine, directing it into the chamber and firing the UC. Firing only stops when the trigger is released or the magazines become empty. In any open bolt system, any time the trigger is pulled, causing the bolt to travel forward when there is ammunition in the magazine, a cartridge in the barrel chamber or a round of ammunition loose or improperly aligned in the bolt cavity, discharge of the firearm or ignition of the cartridge can result in damage or serious injury as a possible consequence. Open bolt firearms do not allow the bolt to remain closed on a live cartridge. Closing the bolt on a live round will cause the cartridge to discharge.
Section 13 – Maintenance, Cleaning, Disassembly and Reassembly
The grips to this firearm are permanently attached and not removable from the magazine housing. Do not try to remove them.
Loctite® Thread Sealant #242 (blue) has been used to secure the three cocking handle screws, the trigger guard upper retaining screw, sear pivot screw, magazine well hinge screw, buttstock hinge screws and guide rod retaining nut. Loctite #242 does not require heat to release the thread seal. However, the removal of these parts is discouraged. If they are removed, Loctite Thread Sealant #242 (blue) should be used in their reassembly. This product is available at most automotive parts suppliers. It is a “medium” strength low temperature thread sealant. Note that Loctite Thread Sealant #242 (blue) may come in a red container. Do not accidentally use Loctite Thread Sealant #271 (Red)
Evaluation notes were added to the output document. To get rid of these notes, please order your copy of ePrint 5.0 now.
29
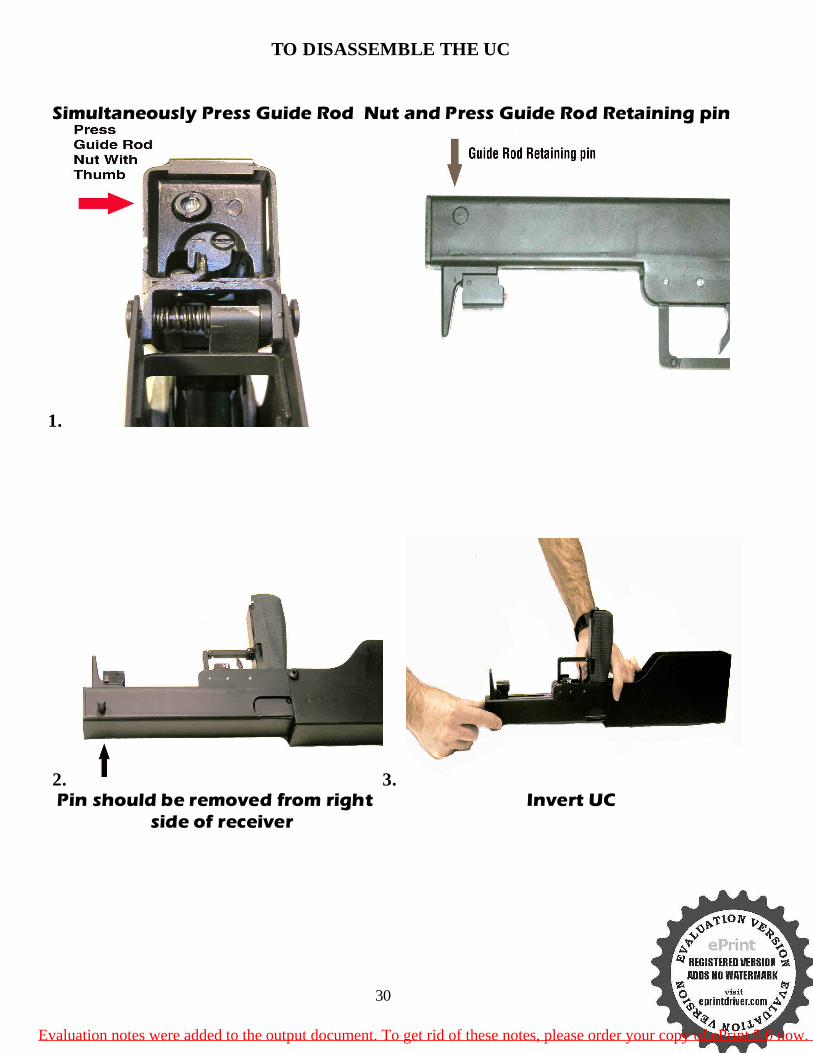
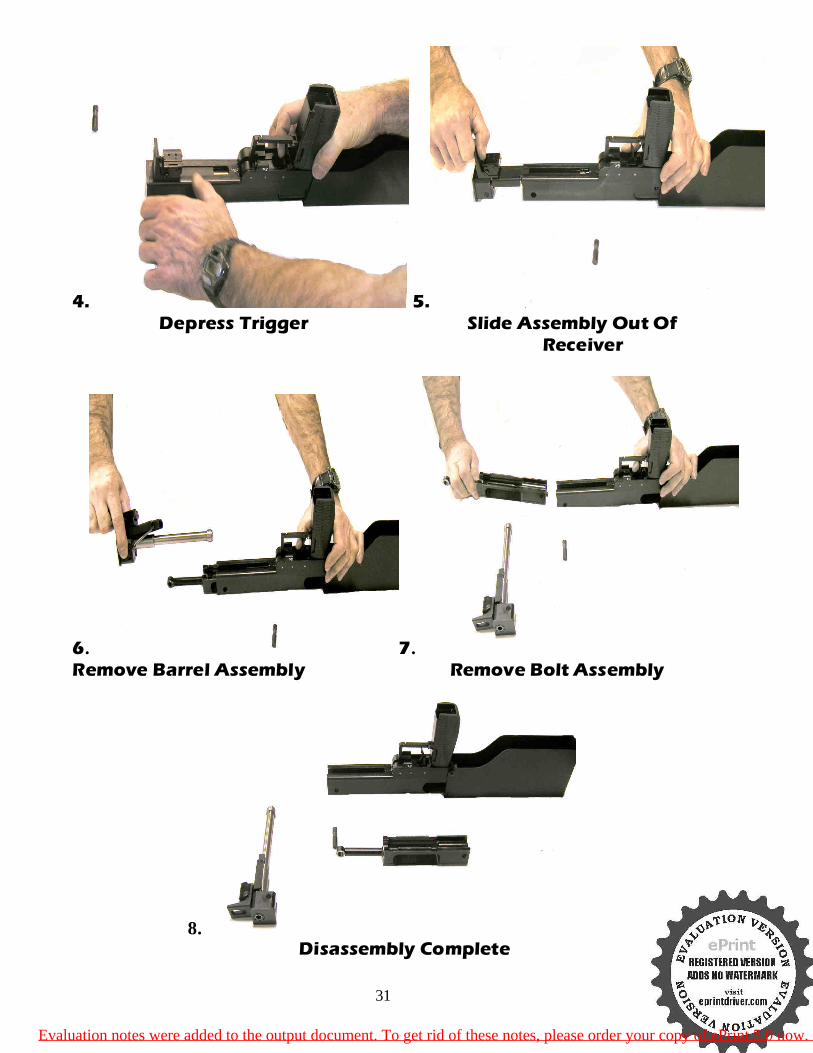
The barrel nut at the forward end of the barrel has been torqued, thread sealed with high temperature thread sealant and permanently secured with a non-removable roll pin. Do not attempt to remove the barrel nut or the barrel from the barrel support block. To disassemble the firearm for cleaning or to remove the bolt, follow this sequence: Make sure your finger is clear of the trigger guard. Depress the magazine release catch and remove the magazine from the firearm. Pull the cocking handle back towards the trigger guard, opening and cocking the bolt. Engage the safety. Visually confirm that there is no ammunition or fired cases in the bolt cavity and the barrel chamber is empty. Disengage the safety and then allow the bolt to gently return to its forward position by holding the cocking handle rearward, depressing the trigger and allowing the bolt to move forward to a gentle stop in its forward position. With the butt stock open and latched, press the round guide rod nut (located at the rear of the bolt) while pressing the left (non ejection port)side of the guide rod retaining pin located near the forward end of the receiver. (Movement of the guide rod nut will be felt). This releases the guide rod retaining pin so it can be removed. The guide rod retaining pin can most easily be removed by pushing it from its left side towards the right side of the receiver (the side with the ejection port). After removal of the guide rod retaining pin, invert the firearm and depress the trigger with one finger. Then grasp the cocking handle at the forward portion of the receiver with the other hand and slide the barrel/bolt and cocking handle assembly forward, out of the receiver. At this point, all cleaning surfaces are exposed, allowing access to all areas that require cleaning or lubrication. Further disassembly of the UC is not recommended.
Evaluation notes were added to the output document. To get rid of these notes, please order your copy of ePrint 5.0 now.
30
TO DISASSEMBLE THE UC Simultaneously Press Guide Rod Nut and Press Guide Rod Retaining pin
1.
2. 3. Pin should be removed from right Invert UC side of receiver
Evaluation notes were added to the output document. To get rid of these notes, please order your copy of ePrint 5.0 now.
31
4. 5. Depress Trigger Slide Assembly Out Of Receiver
6. 7. Remove Barrel Assembly Remove Bolt Assembly
8. Disassembly Complete
Evaluation notes were added to the output document. To get rid of these notes, please order your copy of ePrint 5.0 now.
32
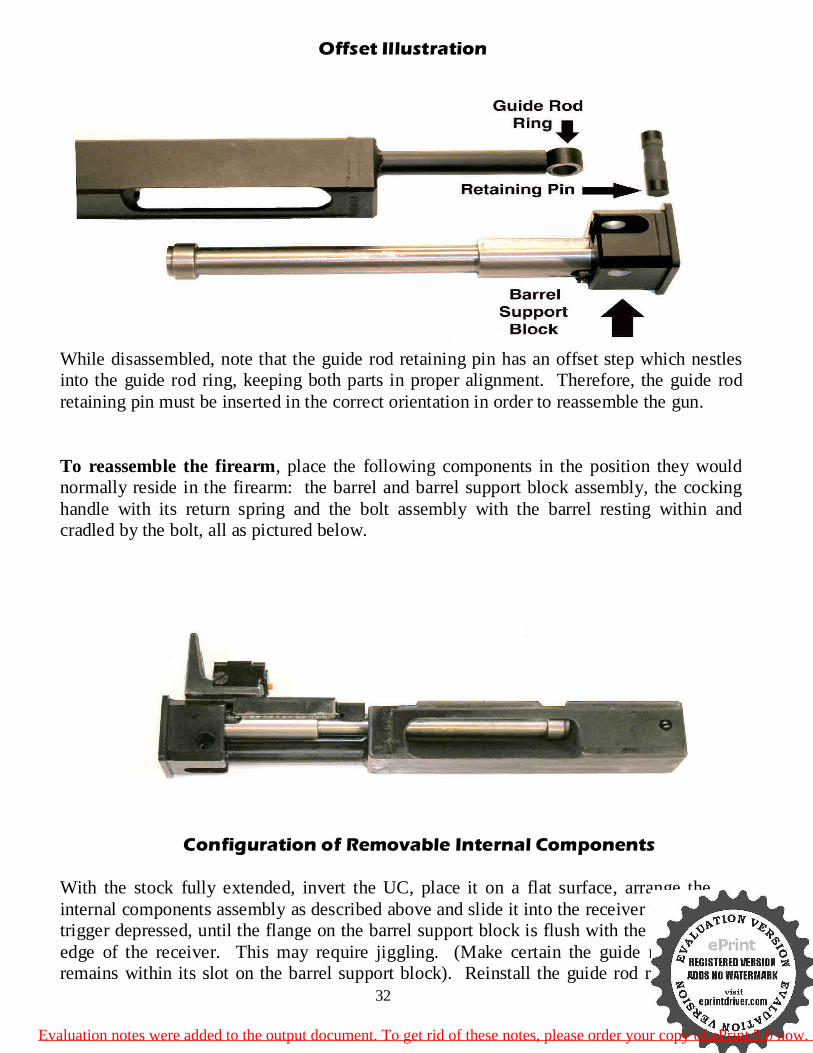
Offset Illustration
While disassembled, note that the guide rod retaining pin has an offset step which nestles into the guide rod ring, keeping both parts in proper alignment. Therefore, the guide rod retaining pin must be inserted in the correct orientation in order to reassemble the gun. To reassemble the firearm, place the following components in the position they would normally reside in the firearm: the barrel and barrel support block assembly, the cocking handle with its return spring and the bolt assembly with the barrel resting within and cradled by the bolt, all as pictured below.
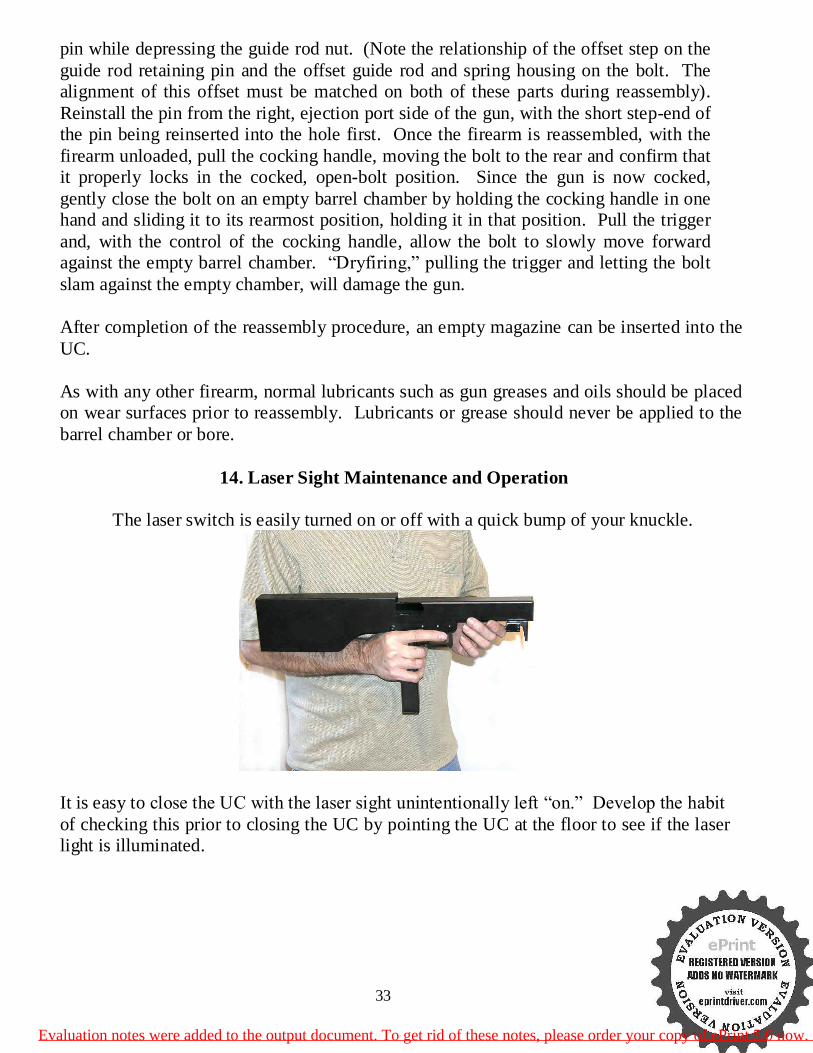
Configuration of Removable Internal Components
With the stock fully extended, invert the UC, place it on a flat surface, arrange the internal components assembly as described above and slide it into the receiver with the trigger depressed, until the flange on the barrel support block is flush with the forward edge of the receiver. This may require jiggling. (Make certain the guide rod ring remains within its slot on the barrel support block). Reinstall the guide rod retaining
Evaluation notes were added to the output document. To get rid of these notes, please order your copy of ePrint 5.0 now.
33
pin while depressing the guide rod nut. (Note the relationship of the offset step on the guide rod retaining pin and the offset guide rod and spring housing on the bolt. The alignment of this offset must be matched on both of these parts during reassembly). Reinstall the pin from the right, ejection port side of the gun, with the short step-end of the pin being reinserted into the hole first. Once the firearm is reassembled, with the firearm unloaded, pull the cocking handle, moving the bolt to the rear and confirm that it properly locks in the cocked, open-bolt position. Since the gun is now cocked, gently close the bolt on an empty barrel chamber by holding the cocking handle in one hand and sliding it to its rearmost position, holding it in that position. Pull the trigger and, with the control of the cocking handle, allow the bolt to slowly move forward against the empty barrel chamber. “Dryfiring,” pulling the trigger and letting the bolt slam against the empty chamber, will damage the gun.
After completion of the reassembly procedure, an empty magazine can be inserted into the UC.
As with any other firearm, normal lubricants such as gun greases and oils should be placed on wear surfaces prior to reassembly. Lubricants or grease should never be applied to the barrel chamber or bore.
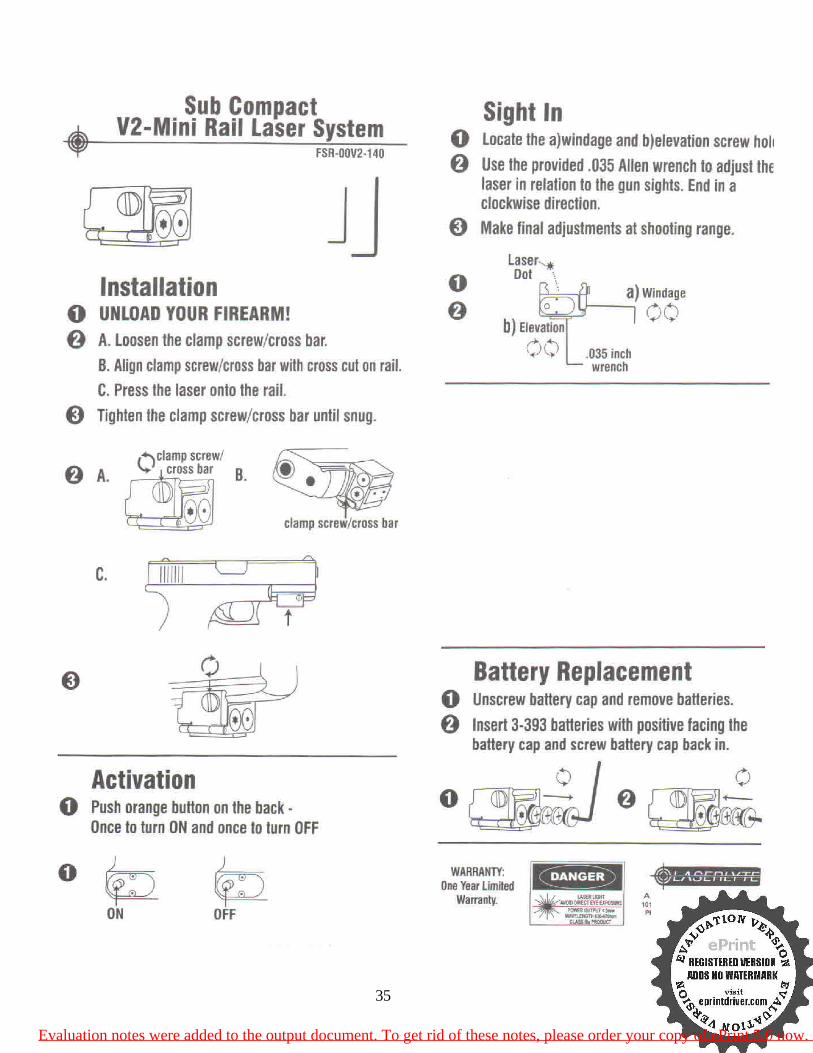
14. Laser Sight Maintenance and Operation The laser switch is easily turned on or off with a quick bump of your knuckle.
It is easy to close the UC with the laser sight unintentionally left “on.” Develop the habit of checking this prior to closing the UC by pointing the UC at the floor to see if the laser light is illuminated.
Evaluation notes were added to the output document. To get rid of these notes, please order your copy of ePrint 5.0 now.
34
Evaluation notes were added to the output document. To get rid of these notes, please order your copy of ePrint 5.0 now.
35
Evaluation notes were added to the output document. To get rid of these notes, please order your copy of ePrint 5.0 now.
36
Section 15 – Storage
Safety is the foremost issue in gun storage. The UC should be stored unloaded with the bolt in the forward - closed position. This prevents spring fatigue. A very light coating of high quality gun oil should be applied to all surfaces to prevent corrosion. Periodic inspection of the weapon is suggested, especially in high humidity environments. Store the UC in a vault or secure storage area.
Section 16 - Troubleshooting A. UZI magazines have historically caused ammunition feeding problems. In part,
this is because of the many magazine manufacturers utilizing slightly different dimensions and tolerances. It is entirely possible to experience a feed problem or even a magazine insertion problem that can be corrected by using a different magazine. If an ammunition feeding problem is experienced, this is the simplest possible solution and should always be checked before following any alternative solutions to the problem. Some suggestions are provided to help insure magazine reliability:
1) Always load a magazine two rounds less than its maximum capacity. A 32-round
magazine should only be loaded with 30 rounds and a 25-round magazine should only be loaded with 23 rounds. Combat veterans learned this a long time ago. This practice minimizes first round feed problems and eases loaded magazine insertion against a closed bolt.
2) Most 25-round magazines have been manufactured by Israeli Military Industries
and are stamped “IMI”. These magazines have proved to be the most reliable. If you are experiencing a feeding problem, try a 25 round magazine. Some 32-round magazines that have been marketed as Israeli magazines have been manufactured by other contractors with varying tolerances, causing insertion problems or malfunctions.
B. Ammunition feeding failures have the potential to cause accidental discharge, because the trigger and sear have already released the bolt, which is being prevented from traveling forward by the live round of ammunition which has failed to properly feed into the chamber of the barrel.
Extreme care must be employed when this happens. Carefully
Evaluation notes were added to the output document. To get rid of these notes, please order your copy of ePrint 5.0 now.

37
follow this sequence when, after pulling the trigger, the firearm failed to discharge a live cartridge: 1) Remove your finger from the trigger guard. 2) Point the firearm downward or in another safe direction.
3) Holding the firearm securely by the grip with one hand, carefully and slowly
move your other hand up to the cocking handle, making certain not to allow your fingers or hand to be positioned in front of the barrel.
4) Slowly and firmly cock the bolt completely open, making certain the sear has
engaged and captured the bolt in its cocked and open position before releasing the cocking handle.
5) Then immediately engage the safety.
6) Depress the magazine catch and remove the magazine.
7) Look into ejection port to visually confirm that the bolt cavity and barrel chamber do not contain live ammunition or a fired cartridge case. If one is present, remove it.
The UC machine gun employs the open bolt firing system. The open bolt firing system has significant safety advantages. To properly operate a firearm using the open bolt firing system, the shooter must first become thoroughly familiar with its correct and safe operating procedures. Becoming knowledgeable on the procedure to handle an ammunition feeding failure is an important part of the knowledgeable operation of open bolt firing systems.
Only handle this firearm, practice or operate its features after properly confirming it is completely unloaded!
v-24
Evaluation notes were added to the output document. To get rid of these notes, please order your copy of ePrint 5.0 now.