osx yosemite survival skills
DESCRIPTION
Recognized as the latest version of Macintosh Operating System, OS X Yosemite comes with a brilliant revamped appearance and several new features, such as Continuity and iCloud Drive. The Operating System was released to the general public in October this year, and made available immediately for every Mac user for free. The announcement became so grand that you were lulled to explore its amazing features. In this chapter, you will learn more about OS X Yosemite.TRANSCRIPT


OSX Yosemite:Survival Skills Guide
By Jeff Graber
Foreword
Mac users were positively electrified with the recent launch of OS X Yosemite version 10.10. Thiswas the 11th major release of the hugely popular OS X: the server and desktop Operating System forMacintosh computers of Apple Inc.
The new Operating System was announced and released to several developers during the WWDC2014 on the 2nd day of June 2014, and launched to the general beta testers on July 24th, 2014. Itsfabulous and exciting new features, along with a breathtaking new design interface receivedaffirmative recognition from both developers and consumers alike.
Then things became a little rocky.
Within days of the general public release on October 16, 2014 our phones began ringing off thehook. Customers began flooding into The Mac Support Store with technical catastrophes directlyafter installing Yosemite. If you are among these users, don’t despair: throughout this book I willclearly and concisely guide you through workable solutions to deal with the more common issuesfaced by many users, including installation and use of the Yosemite.
Let’s begin our climb back to the top of the mountain.
Jeff Graber
Tues, Jan 6th, 2015

TABLE OF CONTENTS
Chapter 1
In Depth Exploration of OS X Yosemite
Chapter 2
Fixing Horrible Battery Life Problems
Chapter 3
Making the Most of Performance
Chapter 4
WiFi & Bluetooth Problems
Chapter 5
Black Screen Problems
Chapter 6
Boot Problems
Chapter 7
Email Problems
Chapter 8
Shutting Down Problems and Forgetting about OS X Password
Chapter 9
Logitech Problems
Chapter 10
Sound Problems
Chapter 1
In Depth Exploration of OS X Yosemite
Recognized as the latest version of Macintosh Operating System, OS X Yosemite comes with abrilliant revamped appearance and several new features, such as Continuity and iCloud Drive. TheOperating System was released to the general public in October this year, and made availableimmediately for every Mac user for free. The announcement became so grand that you were lulledto explore its amazing features. In this chapter, you will learn more about OS X Yosemite.
Knowing What OS X Yosemite Is
It was on October 16th 2014 when Apple released OS X Yosemite to the public, after the media eventthat witnessed the uncovering of new iPads, the fresh Mac Mini, and the fresh Retina iMac. The newOperating System can be downloaded from the Mac App Store, and potential users will require 2Gigabyte of RAM as well as 8 Gigabyte of storage space, together with Snow Leopard at anaffordable price since Mac App Store is needed.
Yosemite was unveiled originally during the Worldwide Developers Conference of Apple on the 2nd
day of June 2014. It went through a couple of months on beta testing prior to seeing its publicintroduction. Also, Apple introduced the public beta for Operating System X Yosemite for the veryfirst time, enabling more than one million users to test the software prior to its release.
Yosemite introduced a couple of visual changes, which include a more modern, flatter look thathighlights streamlined tool bars, smarter controls, and translucency. In addition, the new OperatingSystem comes with several improved features, including the “Today” view within the NotificationCenter, which provides you with a more extensive range of information. This includes integrationwith 3rd party apps and an enhanced Spotlight search with advanced data sources, allowing it tofunction more like a search engine through bringing in data from Maps, Wikipedia, news, movies,and more.
Also, Apple improved several core OS X applications in Yosemite, including Safari. This app features astreamlined toolbar, which is a new “Favorites” display for bookmarks as well as normally visitedsites. The new Tab View also makes it simpler for you to manage several open tabs all acrossdifferent websites while a more durable Spotlight functionality carries more power to the search barof Safari.
When it comes to Mail, there are also a few improvements that will help you, these include: theadvanced Mail Drop feature that enables users to perfectly send and receive attachments of up to 5Gigabyte using iCloud, by going around the usual much smaller size limits of attachment of severalemail providers. The innovative Markup feature also enables you to make footnotes into images aswell as other documents directly from the inside of Mail.
Mac messages have acquired the capability to deal with SMS messages that allow you to keep allyour conversations synced across Mac and iOS devices. Now, messages may be utilized for sendingvideo and audio clips, and it has even become possible to view your friends’ physical location.
Continuity is the major theme of OS X Yosemite, and this guarantees that you can move perfectlybetween devices. Through iOS 8 and Yosemite, you should be able to utilize an advanced Handofffeature, which can change devices, and get them right back on the place where they left off. Youcan also make and receive phone calls directly from your Mac using iPhone integration; and if youare using an out of range WiFi network, you should be able to start Instant Hotspots on your phonewith a simple click on your Mac.
Spotlight
Spotlight does not only receive similar translucency treatment to several of the Yosemiteapplications, it has also been improved to fit in the extra data source. Now, Spotlight searching willdeliver information from Bing, news, Wikipedia, movies, Maps, and more.
For instance, if you key in the term “national park,” Spotlight will offer a snippet of the Wiki article. Ifyou search for a movie, you will be provided with both reviews and show times from RottenTomatoes. This new feature even comes with useful unit and currency conversion tools, whichenable you to make instant conversions such as meters to feet, euros to dollars, and more.
Safari
A lot of default applications which come preinstalled with the new Operating System, have anexcellent new look and new abilities. For instance, Safari now has a slimmed down toolbar with a“smart search” feature, providing you access to your preferred websites, which is similar to the iOS 7Safari. Search offers you Spotlight suggestions that come from sources such as iTunes, Wikipedia,news, Maps, Bing and more, together with typical search results.
The revamped Tab View displays all open tabs within the tiled arrangement, and has tabs fromsimilar websites arranged together. Based on Apple, Yosemite’s Safari comes with a better NitroJavaScript engine, which makes it quicker than ever before. Also, it is more energy effective, offeringyou functions such as two additional battery life hours when viewing Netflix.
Features at a Glance:
• Overall redesign with a “flatter look”
• File storage in iCloud Drive
• Broaden Notification Centers with included widgets
• Messages and Mail enhancements
• Safari streamlined design
OS X Yosemite has boasted about a lot of innovations. However, once they start to use them, usersare faced with issues on its functionality and performance, and this is something you should beaware of when you are looking to make a change on your operating system. In the followingchapters, you will be able to understand these problems and what you can do to survive them.
Chapter 2
Fixing the Battery Life Problems
Battery life is very important for the functionality of any battery-‐operated device. Without thiscomponent, your device is just a big paperweight. Sadly, it is just one of the common problems thatmany users face upon their upgrade to the new Apple’s OS X Yosemite. So, if you are facing the sameproblem, you will learn how you can deal with it in this chapter.
Maximize Your Device’s Battery Life
Right after the release of OS Y Yosemite, complaints about its battery life problems started comingin. For some users, the battery life of Mac drained a lot quicker as compared to normal. The cause isprobably because of the spotlight indexing following the update. But you will be please to know thatthis will normally resolve itself after one or two days.
As compared to its existing application with Yosemite, Mac’s battery life has been significantlyreduced with the new OS. Any prospective hardware issues aside, including malfunctioning cellswithin the battery, changes the battery life for standard use, and is normally the direct outcome ofthe driver problem in the Operating System itself and/or the application of software, which mightnot be optimized for Yosemite.
If you have battery problems which continue, there is one thing you can do: simultaneously pressthe command and space and key in the Activity Monitor in order to access the integrated systemmonitor. Hit on Energy to check if there are some particular applications that consume too muchpower. Doing this should help you locate any badly behaving applications.
Make sure that your Mac is utilizing the most recent version of OS X, and that the entire softwareapplications are updated to their newest versions, as this code has normally been optimized forapplication with the newest OS X version.
As mentioned earlier, a great technique you can use to figure out any offending applications, isfound in the Activity Monitor app in Yosemite. A listing of all apps presently running on your devicewill be displayed together with the Energy Impact, as well as the standard Energy Impact, asidentified by utilization over a time period. In addition to this, with specific applications such asSafari, plugins are also included if you chose the arrow for expanding and displaying these services,as well as their individual impact on the system’s power consumption.
Any offenders that you see displayed here may be indefinite to software developers. Furthermore,you might be able to submit the bug report on the website of the developer clearing up the issuesfor them to rework or provide a solution to the code in the future update.
Chapter 3
Making the Most of Performance
OS X Yosemite enthralled a lot of users with its new features and displays, but others had a less thanstellar experience. So, if you have struggled, the following chapter should help you boost up yourMac’s performance.
Boosting Performance
Even though OS X Yosemite may run on older Macs as far back as 2007, it does not necessarily meanthat it will run adequately. As previously mentioned, a number of problems are affecting users whohave the Operating System installed, and they are now having an awful time with it. Its boot-‐upperiod can be terrible, the apps can run slowly, and the overall performance can be totallyinsufficient. To improve them, the following ideas should be considered.
Moderate the Visual Effects
All those things that make the Operating System look attractive could well be just decreasing theperformance level of your Mac, and you can easily disallow most of it. To do this, do the following:
1. Open up “System Preferences”.
2. Hit on “Accessibility”.
3. Put the check mark following the “Reduce Transparency”.
As you go there, you may place the check mark beside the Increase Contract to make the windowsand folders simpler to view. A lot of users have experienced success through simply disallowing thetransparency feature. You will be delighted to see that the total performance boosts, while thespeed on which Finder windows and open apps becomes much quicker.
Avoid Using Google Chrome
Just like all other OS X versions, Google Chrome simply does not function effectively with OS XYosemite. If you use it, you drain the battery quicker while using up resources, so it is unnecessary.Yes, it is an excellent web browser, yet if you want to make the most of your Mac’s performance, it isprobably a much better idea if you go for Safari on OS X: it is much quicker than Chrome, and it doesnot control resources or drain the battery life.

Disallow Notification Widgets
The advanced widgets added in the Notification Center are great, but are a feature that you willnever utilize. It is a better idea to simply carry on and disallow all the widgets to prevent them fromcontinuously using up the resources, particularly when you will not use them.
Aside from these suggestions, there are many others you can use to make the most of your Mac’sperformance with OS X Yosemite. They are the basic and most common ones you will find.
Chapter 4
Wi-‐Fi & Bluetooth Problems
Since the launch of OS X Yosemite, there have been some users who have complained about failingto connect to Wi-‐FI hotspots. Threats regarding Wi-‐Fi problems have spread all over the Internet,and on the support communities of Apple, showing that countless users experience certain Wi-‐Ficonnection problems after installing the new OS.
According to those who actually encountered the issues, Wi-‐Fi connections are at times very slow,which results in longer loading times, and even worse, there are cases in which their devices lose astable connection within minutes of being connected. These issues seem to influence a large varietyof MacBooks, different users, and routers in various locations.
A number of fixes were suggested on different forums, yet it does not appear that any solution willwork and help everyone. It means that there could be a problem with this new OS that needs to beaddressed and resolved in the future update. There are users who have tried different solutions suchas: disabling Bluetooth, creating new network locations, turning off Handoff, performing a neatYosemite install, setting the router to G-‐mode only, along with many other remedies put forward byvarious users.
On one hand, some users were not capable of solving their Wi-‐Fi issues at all, even after trying all ofthe listed solutions. Switching to a 2.4Ghz band, on the other hand, worked for a large number ofusers. The representatives of Apple support have supplied all users with a number of solutions,which have included: the removal of excess chosen networks within the Network department ofSystem preferences, and resetting the controller of the system management.
Fixing Wi-‐Fi connectivity issues involving OS X Yosemite involves various steps such as: deleting thepreference files, creating and producing customized DNS settings, as well as refreshing thediscovered service; yet for those who cannot get a fix, the suggestion is to downgrade to OS XMavericks, and wait until such time that Yosemite is already updated.
If you try any of the technical fixes, you must make a time machine backup before anything else, anduse some precautionary measures when deleting any of the system files. So far, there is no word on
when these updates in Yosemite may come, as at the moment, Apple does not launch any betas todevelopers.
Fixing OS X Yosemite Wi-‐Fi Connection Issues
Wi-‐Fi connection issues involving OS X Yosemite are the most common problem encountered byusers. There are a lot of possible fixes for these issues, but there is no specific fix, and unfortunately,for certain users, there is no fix available right now. The OS X Yosemite 10.10.1 update wouldspecifically address and resolve some of the Wi-‐Fi bugs. But until it comes, you may try these do-‐it-‐yourself fixes for OS X Yosemite Wi-‐Fi problems and bugs. They are listed in sequence starting fromthe easiest one to the most complicated one. Hence, you may have to try some to get your Wi-‐Fiworking efficiently:
• Connect to a 2.4GHz network – this solution will work for some users.
• Power off Bluetooth – strangely, it will repair some problems.
• Alter the router settings – reset the router and then try to set the channel into 50-‐120.
If none of these solutions work, you must attempt to reset PRAM and SMC. You can use the guidesfrom Apple to perform the tasks on your chosen model. Fortunately, these solutions have proven tobe effective by most users. Just do the right thing to get successful results.
After you update your OS to OS X Yosemite, you may find you encounter trouble in getting your Macto reconnect to your Wi-‐Fi connection, especially after you wake your device from sleep. Regretfully,it is difficult to offer a single fix to Wi-‐Fi issues involving the upgrade to OS X Yosemite, but at leastyou can slowly and systematically follow the guidelines listed here.
Remember that you must begin a Time Machine backup before trying to follow these steps:
Removing Bluetooth
1. You go to the Finder à Click the File Menu and choose New Finder Window. Click the Macicon.
2. Launch Macintosh HD and open the library. Hit Preferences and look for the file named“com.apple.bluetooth.plist”.
3. Move this to the desktop of your device. Take it away from the folder named “Preferences”by dragging it to Trash. Mac would tell you that Finder would like to make some changes.You should enter your password so that it is permitted.
Forceful Removal of Those Files Associated with Network Configuration
1. From your OS X Finder, press the keys Command, Shift and “G” all together and enter:/Library/Preferences/SystemConfiguration/.
2. Inside this folder, choose the following files:
-‐ com.apple.network.identification.plist
-‐ com.apple.airport.preferences.plist
-‐ NetworkInterfaces.plist
-‐ com.apple.wifi.message-‐tracer.plist
-‐ Preferences.plist
3. Back up the folder named “SystemConfiguration” by copying this on the desktop.
4. Delete the folder while it sits in the /Library/Preferences.
Changing the Router Settings or Reset the Router
1. Try to enable factory resetting, or else power on and off your router again.
2. Or, you can access your router’s administration panel then follow these steps: modifying thenetwork frequency to 2.5Ghz or 5Ghz if it is from 2.4Ghz. Otherwise, change this into 2.4Ghzor 2.5 Ghz if it is from 5Ghz. In general, you should set the frequency of your Wi-‐Ficonnection to a different one to what you currently have, setting a form of Wi-‐Fi mode like“Only B”, “Only G” and “Only N” rather than “B/N” or “B/G”. You may also try changing theWi-‐Fi SSID name and/or the Wi-‐Fi Key or Wi-‐Fi security.
Chapter 5
Black Screen Problems
OS X Yosemite blank and dim screens are also common issues that are encountered after theinstallation of the upgrade. If you see a dark screen do not panic! In this chapter I will show you whatto do.
When you see a dark screen as you open the cover of the notebook, try closing the lid and waitingfor at least 30 to 60 seconds before opening it again. Following these options will certainly help youa lot with these issues. It is temporary, yet it may stop you from holding the on/off button to forcerestart your Mac.
A black screen will show up when waking the system of your Mac. Closing the lid for a few seconds isa temporary fix to the issue. If you want another way to get rid of the problem, you can type the firstletter of your account name and then enter the password. You then wait for an update screen. It willnot solve the problem, but it will help you get into your account.
Though these solutions are not permanent remedies, you can still see the benefits they offer you.They may not permanently stop the problem happening, but do they really work.
Chapter 6
Boot Problems
When you are using Mac at work, and it is part of the domain, it might not be able to boot up whenconnected to the Internet. When this occurs, the bar will only load halfway, instead of fully as itshould.
The best temporary relief to this problem is to unplug the Ethernet cable, and then let the Mac boot.Hopefully, there will be a permanent remedy to this problem very soon!
Always Booting into Safe Mode
After upgrading OS Yosemite, your computer may seem to always boot in Safe Mode, which is amaintenance boot condition wherein the OS X will only load minimal as well as crucial systemservices, aside from running some system checking practices. In general, this particular mode hasbeen invoked purposefully through holding the Shift Key at boot, but there are some instanceswherein the system would be triggered automatically into this mode. When you suspect the latter ishappening, there are a number of things you should consider:
Resetting the PRAM
If you hold the Shift tab to boot into Safe Mode, then you are passing a booth that is variable to OSX. Your Mac may also store this particular variable in the hardware storage chip known as PRAM,that way the Shift key does not need to be held down. If this is occurring, you could try fixing theproblem by resetting your own PRAM.
To perform this, reboot your device then hold down the Option-‐Command-‐P-‐R keys all together soyou hear the boot chimes. After that, wait for the system to reset on its own while it sounds theboot chimes again. The keys will then be released and allow it to boot in the normal way.
Fixing or Formatting Your Hard Drive
Another probable reason why your computer boots into Safe Mode is that there are severeformatting issues encountered by your boot drive. If your OS X detected these problems, it might bespurred into that mode after you boot. Try to restart your Mac into the Recovery Mode.
Do this by holding the Command-‐R keys once you hear the sound of the boot. In the OS X toolsmenu, you should choose Disk Utility and then use it to run the First aid verification on the bootvolume, as well as on your disk device. It checks the partition scheme including the drive formatting.When you detect any problems you can use Disk Utility, that way you can fix them and then restartthe Mac to determine if the problem has been resolved.
If your Mac continues to boot in this way, you could consider formatting your hard drive and thenrestore the system from the Time Machine Backup. To do this, make sure that you have the fullbackup of the system then restart into the Recovery Mode. Here, you can use the Disk Utility so that
you can choose your preferred hard drive gadget, and then make use of the partition tab: it appearsto partition and then you format the drive. To perform this function, pick “1 Partition” from thedrop-‐down menu and then under this, hit the button for Options. Check that GUID is set as thepartition form, and then hit OK. Next, you have to give a name to the drive, and choose Mac OSextended, as the right format type. You can now proceed with the process of formatting. Once done,you can quit Disk Utility, and then use the choice in restoring your Mac from the Time MachineBackup to restore the system.
Chapter 7
Email Problems
Email problems may arise with your upgraded your iOS device to the OS X Yosemite. Some issuesinclude a hard time opening your mail and sending mail over SMTP. If your Mail tells you that theupgrade failed to successfully download the full version of your Mail app, and the index is broken, itis a good idea to move the inbox of your Mail to the desktop and then try to import it.
If you do not know how to fix these email problems, do not worry! You will not have to hire aprofessional to give you a solution, because you can fix it yourself. It only takes a couple of clicks andturns to get your desired email fixed. Do you want to know how to fix various email problems onyour iOS device? If so, here is a simple solution provided just for you:
1. Launch Finder and hold Option. Click Go. Select Library.2. Move to Mail. Go to the Mailboxes and then copy the filename.mbox to the desktop.3. Launch Mail. After it starts, you can import and choose Apple Mail.
Cannot Send Email Messages but Can Receive and Read Them
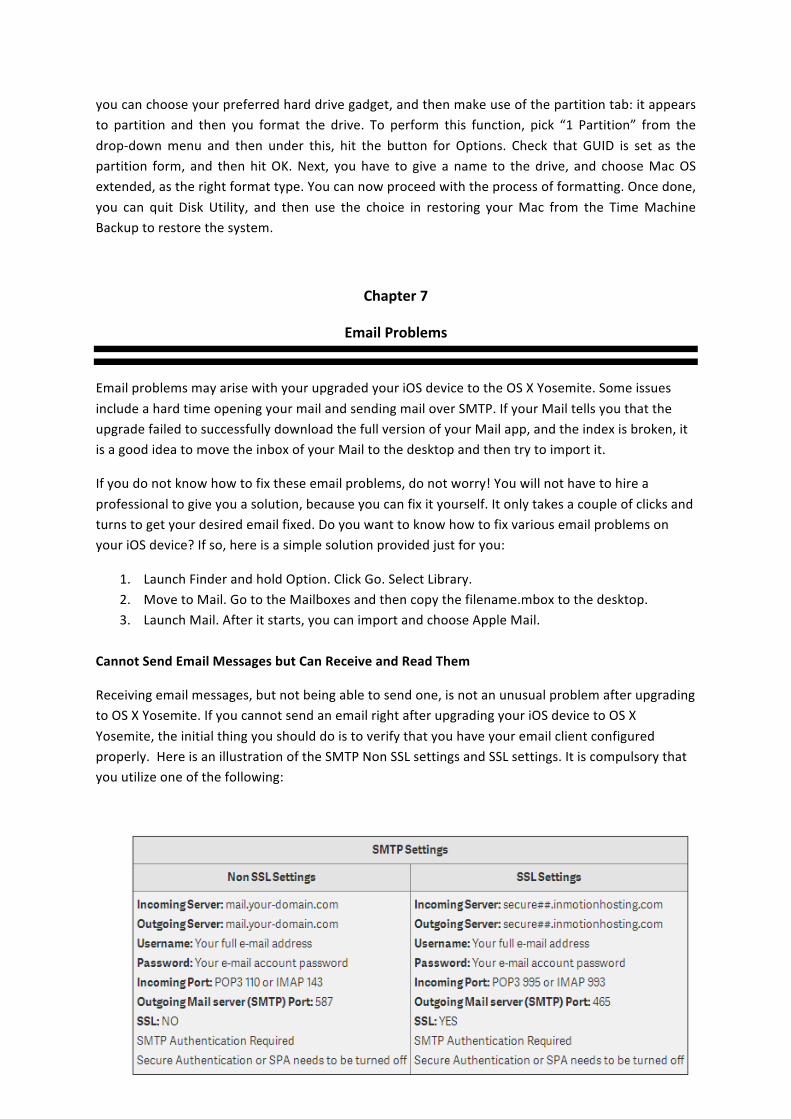
Receiving email messages, but not being able to send one, is not an unusual problem after upgradingto OS X Yosemite. If you cannot send an email right after upgrading your iOS device to OS XYosemite, the initial thing you should do is to verify that you have your email client configuredproperly. Here is an illustration of the SMTP Non SSL settings and SSL settings. It is compulsory thatyou utilize one of the following:
After using one of the above, follow these steps:
1. Launch Mail and select Preferences from your Mail menu2. In the Preferences window, press Accounts3. Choose the account which would not send emails4. Press the Account Information pane. Make sure that the pop-‐up menu for “Outgoing Mail
Server” is never set to “None.” If it is, choose your server from the pop-‐up menu for“Outgoing Mail Server” when it appears.
Receiving the Welcome to Mail Message Chronically
If the Welcome to Mail message constantly appears every time you launch your Mail app, it is veryfrustrating, right? Of course it is! So you do not want to have it any longer. To eliminate thisscenario, follow this quick solution so that you can finally clear it.
1. The first thing that you must do is to launch Mail, and then press Continue when a pop-‐upmessage signifying the welcome message appears.
2. In the Preferences of the Mail app, a new window will pop up. Press on Accounts.
3. Deselect the check box for “Enable this account” in each account that comes out in theAccount Information tab.
4. Exit Mail and then open it again. Follow a similar process to enable all the accounts youmade and set up with your Mail app.
You can use all these simple and very useful tips to maximize the helpful and valuable purpose ofyour email. For sure, your email messages are very important to you. Hence, do not ignore any emailproblems, because they are not going to fix themselves! Try these provided solutions as soon as youcatch sight of a problem. If you have followed these instructions and your Mail app is still unfixed,you may now consult your iOS dealer.
Chapter 8
Shutting Down Problems and Forgetting about OS X Password
Some users report that their MacBook Air and MacBook Pro does not shut down right afterupgrading their OS to OS X Yosemite. Most probably, this is due to the FileVault encryption. TheMacBook Pro and MacBook Air will not restart until this encryption is finally complete, and thisprocess may take two days.
If your Apple device happens to experience this right after upgrading to OS X Yosemite, keep calmand just wait for it to restart itself. If you think that there might be something wrong with theupgrade, or that your Mac is damaged, stop thinking about it now. The good news is that it will onlytake a short time before the device fixes the problem by itself and finally comes back to life.
Forgetting About your OS X Password
It is so frustrating not to be able to use your OS X device if you forget your password, isn't it?Passwords are utilized to protect the personal files and records in your device. Moreover, with itsability to reliably secure your data, it really makes you happy and satisfied. However, in times likethis when you have forgotten your password, you cannot help wish that it is not secured, and hasjust vanished, right?
If you have ever forgotten your OS X password and you cannot use your device, you must utilize anew Recovery. Do this by simply following these steps:
1. Reboot into the Recovery Drive through selecting the menu for “Apple” and restart, hold the“R” and the same time the “command” keys on your keyboard in boot, then hold these keysup until the icon for Apple comes out in the open. Eventually, when the machine boots, youwill notice that the window for OS X Utilities appears.
2. Navigate to the Utilities and then choose Terminal.
3. In the terminal prompt, type in: “resetpassword.” After doing so, hit enter.
Once you have followed these three simple steps, you can reset your password and finally continueusing your OS X Yosemite device.
Chapter 9
Logitech Problems
Since it is a new release, OS X Yosemite cannot support older models of third party software andhardware. For instance, the software for Logitech mice and keyboards is not yet wholly supported byOS X Yosemite. However, you could get it to work for the best, if and only if, you knew how!
The Logitech software for Mac comes in a form called Control Center. This is a utility that configuresyour Logitech keyboards and mice. Given that Logitech is one of the most common accessorymanufacturers today, there is a big possibility that a huge percentage of OS X Yosemite users areexpecting to utilize Logitech equipment, but they will soon find out that the Control Center does notinstall on Yosemite. Here is the key to repairing the problem:
After downloading and installing the Logitech software called the Control Center, you may face aproblem, which states that the software is not compatible with OS X Yosemite, which is why it failedto install. However, this case only comes up occasionally. Most of the time, you are allowed tosuccessfully install this Logitech software on your device with OS X Yosemite without a singleproblem.
Hence, right after upgrading to the OS X Yosemite and you face Logitech problems with your iOSdevice, you do not have to worry, for there is no work that you need to do to fix this problem!Simply download the newest OS X Logitech Control Center, and it will automatically repair theLogitech problems for you. This will permit you to configure and wholly utilize Logitech software onOS X Yosemite.
Adding a Third-‐Party Keyboard Right after Upgrading to OS X Yosemite
A third-‐party keyboard can be a useful and satisfying new feature for you. If you want to add a third-‐party keyboard on your iOS device, simply go to the Settings—General—Keyboard—Keyboards andthen choose “Add New Keyboard.” Whenever you want to use various keyboards, you could changebetween them by pressing the globe icon on each keyboard you use.
Slow or Frozen Keyboard/ Touch Screen after Upgrading to OS X Yosemite
If your keyboard freezes or is unresponsive, the best thing to do is a reset by holding down thebutton for Home and Sleep/Wake right until your device restarts, and the Apple logo appears.Alternatively, you can tap the button for Home two times, and make certain that you swipe in orderto exit everything you do not need to open and run. For specific solutions, carefully take note of thefollowing:
• Slow Touch Screen. Typically, in most cases, devices start to slow down as their internalstorage becomes full. If you have lots of unnecessary old photos and unused apps on yourdesktop, you must move or delete them from your OS X Yosemite device.
• Unresponsive or Frozen Screen. Once your device has fully locked up, press and hold theHome key as well as the power button, until the Apple logo appears. This reboots thedevice. Furthermore, you can disable the parallax wallpaper as this may also contribute tothe unresponsiveness of your device.
• Slow Keyboard.With the largest keyboard alterations over the years, the prediction for textchoices and selecting auto correct alternatives has been made possible. There are alsoadditional features, which support the whole keyboard customization including theinstallation of third-‐party keyboards such as Swipe. These customized keyboards could wellbe the root of the slowing down, so make sure that your device has a great internal storageto accommodate these customized keyboards and prevent its slowness.
Chapter 10
Sound Problems
Sound problems can come about due to the upgrade of your iOS to OS X Yosemite, and this preventsyou from pleasantly listening to audio over your headphones or speakers. Fortunately, it is not acommon problem with the upgrade. If you want to fix it right away and eliminate yourself fromlistening to music deprivation, here is a solution for you. Simply follow these steps and have you canhave a happy music jam!
1. Reset PRAM and SMC. After that, proceed to the sound settings.2. On the sound settings, choose sound effects.3. Play sound effects by choosing “Internal speakers” then return this back to “selected sound
output device”.Using this simple solution, you can repair your stubborn sound problems associated with the OS XYosemite.
Problematic Input and Output Audio on a Mac Computer
If you still have issues with the audio input and output, tailor the sound settings of your computer,or just degrade the operating system of your Mac. Here is a provided solution that can solve theinput and output sound problem of your Mac computer.
1. With your Mac, select “Applications.” After that, choose “Utilities.”2. Launch the application for “Audio MIDI Setup.” Select the tab for “Audio Devices.”3. Make sure that you have selected “Built-‐in Output” which is the next field after the labeled
“Properties For.”4. Go to the section of “Audio Output” which is situated in the bottom-‐right section of the
window.5. On the drop-‐down menu list of “Format,” choose the “44100.0 Hz.”6. Close the setup for Audio MIDI. Now, you can sure hear the sound playing on your Mac
computer while utilizing third-‐party audio applications!
Music Playing on the CD/DVD Would not Eject on your Mac Computer
Finally, you have fixed your sound problems! Now, at last you can relax and enjoy listening to yourfavorite songs and singers. However, after listening to some feel good music on the CD or DVDinserted on your Mac computer ROM drive, the item does not eject! What will you do? If ever theeject button is not working, do not panic, as it might only be a slight problem. To solve this problemright away, follow this solution:
1. Click Command-‐E in order to eject.2. Restart your computer and then hold down the button of the left mouse up until the disk
ejects.3. On your “Utilities” folder, open the terminal and then enter this: usr/bin/durtil eject.
ITunes stuck on the “Connect to iTunes” logo
Have you encounter the stuck up logo “Connect to iTunes?” If yes, then this must be one of theeffects of upgrading your iOS device to OS X Yosemite. To bring back the effectively of your iTunes,consider following this guide:
1. To perform a firm reset, click and hold the Sleep button, which is situated on the top portionof your device and the Home Menu button, which is located on the bottom middle of thedevice, for about ten seconds.
2. After the screen goes back, let go of both keys. If ever you see the Apple’s white logo priorto releasing the keys that you have gripped for too long, you need to begin the process ofresetting once again.
3. The next screens that you should see after the blacked screens are: the logo screen for Appleseconded by focal screen.
Follow these steps and for sure, it will bring back the normal efficiency of your iTunes app. Be awarethat OS X Yosemite may have enormous upsides, but at the same time, there are downsides in whichyou should be knowledgeable.
Conclusion
It is understandable that you were easily drawn to OS X Yosemite without looking at it on a biggerand broader perspective. Its new features are indeed very enticing and exciting to try, there’s nodoubt about that. However, you must always pause and weigh the significance of how you use yourMac in every aspect of decision-‐making. Sometimes, one wrong click is all it takes to send youhurtling over the cliff.