order entry: using counterpoint entering orders · order entry: using counterpoint - entering...
TRANSCRIPT

1
Order Entry: Using CounterPoint
Entering Orders Overview
Order Entry / Orders / Enter allows you to enter numerous types of transactions, including O-orders (for two-step invoicing), I-orders (for one-step invoicing), credit memos, quotes, RMA’s, and backorders.
This document explains how to enter orders and how to import orders from Point of Sale.
There are many options available when entering documents in Order Entry, but the basic process follows these steps:
1. Enter header information, including customer and shipping information.
2. Enter line items (individual items being ordered or returned).
3. Enter totals information (including miscellaneous charges, tax, commissions, and payment information).
Where options are available during the basic order entry process, each option is mentioned along with a reference pointing you to where in the documentation you can obtain more information about the option.
You can print an Order Edit List that shows the existing orders using Order Entry / Orders / Edit list. (See “Printing the Order Edit List” in Order Entry Reports for more information.)
Order types Order Entry supports five different document types:
Orders (two-step orders, called O-orders)
Invoices (one-step invoices, called I-orders)
Credit memos
Quotes
RMA’s
In this documentation, the word “order” refers to all of these document types.
Orders O-orders are used for a two-step entry process. The order is entered in the first step. In the second step, items from the order are selected for invoicing. An invoice can be printed for selected lines.
Serial numbers, lot number, and color/size information are not required when entering O-orders; however, this information must be specified before the relevant line(s) can be selected for invoicing. (Oversize pricing will be correctly priced only when color/size information is specified.)
Order Entry: Using CounterPoint - Entering Orders 2
O-orders affect unposted customer balances if you specified in Setup / Point of Sale / Control that orders affect unposted customer balances.
Inventory is committed for the quantity to be shipped as each line item is entered on an O-order. Commitments are also updated for any serial and lot numbers entered.
Invoices I-orders are used for a one-step entry process. When the order is entered, all lines are automatically selected for invoicing. An invoice can be printed for any I-order.
Serial number, lot number, and color/size information is required when entering I-orders.
I-orders affect unposted customer balances if you specified in Setup / Point of Sale / Control that orders affect unposted customer balances.
Inventory is committed for the quantity to be shipped as each line item is entered on an I-order. Commitments are also updated for any serial and lot numbers entered.
Credit memos Credit memos are entered in a one-step entry process similar to I-orders, where all lines are selected for invoicing at the time of entry. An “invoice” (credit memo form) can be printed for any credit memo.
Serial numbers and lot number are required when entering credit memos for any serialized or lot-controlled items that are returned to inventory. Color/size information is always required when entering credit memos.
Credit memos affect unposted customer balances if you specified in Setup / Point of Sale / Control that orders affect unposted customer balances.
Inventory is reverse-committed for the quantity being returned to inventory as each line item is entered on a credit memo. Commitments are also updated for any serial and lot numbers entered.
Quotes Quotes are entered just like O-orders. However, serial number, lot numbers, deposits, and final payments are not allowed on quotes.
Color/size information is not required when entering quotes; however, oversize pricing will be correctly quoted only if color/size information is specified.
Inventory is not committed for quotes.
Quotes do not affect unposted customer balances, regardless of whether you specified in Setup / Point of Sale / Control that orders affect unposted customer balances.
Quotes must be converted to O-orders or I-orders before they can be selected for invoicing.
RMA’s RMA’s are entered just like credit memos. However, refund entry is not allowed on RMA’s.
Serial numbers and lot number are required when entering RMA’s for any serialized or lot-controlled items that are returned to inventory. Color/size information is always required when entering RMA’s.

Order Entry: Using CounterPoint - Entering Orders 3
Inventory is committed as each line item is entered on an RMA. Commitments are also updated for any serial and lot numbers entered.
RMA’s affect unposted customer balances if you specified in Setup / Point of Sale / Control that orders affect unposted customer balances.
RMA’s must be converted to credit memos before they can be invoiced.
Entering order header information Select Order Entry / Orders / Enter.
The Order Entry / Orders / Enter menu selection consists of three screens: header, line item, and totals.
Most of the fields on each screen can be skipped for a new order if you specified in Setup / Order Entry / Control to use default values.
This menu selection can be used to enter new orders or to edit existing orders.
NOTE: The order entry screen records the orders as entered by the current system user.
1. Order # This field displays as Order # while in ORDER mode, as Quote # while in QUOTE mode, and as RMA # while in RMA mode.
Enter the number for this order.
Order Entry: Using CounterPoint - Entering Orders 4
Press: F1 To scan through the existing orders. F2 To use the next system-assigned order number. F5 To import an existing Point of Sale order. (See “Importing Point of Sale orders”
in Additional Order Entry Options for more information.) F7 To change the order mode in order to enter a different order type. (See
“Changing the order mode” in Additional Order Entry Options for more information.)
When an existing order is displayed, press: F3 To delete this order. (See “Deleting an order” in Additional Order Entry
Options for more information.)
F4 To print this order. (See the Printing the order section on page 26 for more information.)
F5 To enter or view order notes. (See Using Notes for more information.) F6 To view the Customer zoom window for this customer. (See “Zooming on a
customer” in Additional Order Entry Options for more information.) F7 To convert this order. (See “Converting an order” in Additional Order Entry
Options for more information.) F8 To place this order on hold (or remove the hold, if one exists). (See “Placing
an order on hold” in Additional Order Entry Options for more information.)
You can’t edit existing O-orders (Order type orders) that have been selected for invoicing. To access a selected O-order on this screen, you must first unselect the order using Order Entry / Invoices / Select orders.
NOTE: If you use a system-assigned order number and abort the order, this order number can be “lost” if:
You abort this order from the totals (third) screen
Another user issues an order with a system-assigned order number between the time you start the order and abort it from the header (first) screen
When an existing order is displayed, * You have new mail * displays if you have mail waiting, and *** Order has notes *** displays if the order has existing notes.
2. Order type Entry is allowed only when the order is in ORDER mode. In QUOTE mode, this field displays Quote and cannot be changed. In RMA mode, this field displays RMA and cannot be changed. While in ORDER mode, after you have entered at least one order, this field defaults to the last type entered.
Select: Order To enter an O-order. Credit memo To enter a credit memo. Invoice To enter an I-order.
Order Entry: Using CounterPoint - Entering Orders 5
3. Order date The current system date displays as the default for the first order entered during a single session. After at least one order has been entered during a session, the last order date entered displays as the default.
Enter the order date.
For an existing order that has already had a picking ticket printed, when positioned at this field, press F1 to clear the date picked.
4. Customer # Enter the customer number and customer address information for this order. Press: F2 To add a new customer. (See “Adding a new customer” in Additional Order
Entry Options for more information.)
F4 To use the last customer for which an order was entered during this session.
The address in this field is used as the billing address.
The customer number can’t be changed on existing orders.
Address information can always be changed for Misc cash customers. In addition, you can change the address information for other customers if you specified in Setup / Order Entry / Control to enter name/address information for non-miscellaneous customers.
For O-orders and I-orders, a warning message appears if the customer’s current balance exceeds their credit limit, if the customer’s account is overdue, or if a credit hold has been placed on this customer. (See Defining Customers for more information.) For existing orders, CounterPoint checks the credit limit only if the dollar amount changes. (See the Credit limit checking section on page 11 for more information.)
If a note exists for this customer with an ID that matches the default customer note ID specified in Setup / Customers / Control, that note automatically appears.
Credit hold status is “No orders” - Continue ? This message appears if you enter a customer whose credit hold specifies No orders (See Defining Customers for more information.)
Specify whether to allow this order.
NOTE: You must have authorization to override credit limits in order to allow the order when this message displays. A security override is available. (See Conventions for more information.)
Customer not on file, press F2 to add This message appears if you enter a customer number that doesn’t exist in the Customer file.
Press: F2 To add the customer on-the-fly. (See “Adding a new customer” in Additional
Order Entry Options for more information.) Enter To enter a different customer number.
Only users who are authorized to add customers on-the-fly can add a customer from this screen. A security override is available. (See Conventions for more information.)
Order Entry: Using CounterPoint - Entering Orders 6
[First line of bill-to address] Entry of the bill-to address is always allowed for Misc cash customers. For other customers, entry is allowed only if you specified in Setup / Order Entry / Control to allow entry of name/address info for non-miscellaneous customers. Make any required changes to the bill-to address for this order. Press: F2 To make permanent changes to the customer record that will also affect this
order. (See “Changing customer information” in Additional Order Entry Options for more information.)
F6 To view the Customer zoom window for this customer. (See “Zooming on a customer” in Additional Order Entry Options for more information.)
[Second line of bill-to address] Make any required changes to the bill-to address for this order, if allowed.
Press F6 to view the Customer zoom window for this customer. (See “Zooming on a customer” in Additional Order Entry Options for more information.)
[City field of bill-to address] Make any required changes to the bill-to address for this order, if allowed.
Press F2 to enter a zip code instead of a city.
If you press F2 and enter a zip code, City/State information is filled in from the first customer with a matching zip code.
5. Ship-to Enter the ship-to address number for this order, if any.
Press Enter to use this customer’s default ship-to address (if a Default ship-to address doesn’t exist for this customer, to use the billing address).
Press: F1 To use the billing address. F2 To manually enter a shipping address (which will not be saved for future use).
F3 To skip the shipping address. F4 To add a new shipping address (which will be saved for future use). (See
“Defining ship-to addresses” in Defining Customers for more information.) F5 If you are using registries, to use the ship-to address associated with a registry
event. F6 To view the Customer zoom window for this customer. (See “Zooming on a
customer” in Additional Order Entry Options for more information.)
If you press F3 to skip the ship-to address, no ship-to information will print on the order.
NOTE: Changing the ship-to address from Field number to change ? doesn’t change the existing tax code, ship-via, or shipping zone for the order.
Order Entry: Using CounterPoint - Entering Orders 7
Ship-to address not on file, press F2 to add This message appears if you enter a ship-to address number that doesn’t exist for this customer. Press: F2 To add this ship-to address on-the-fly. (See “Defining ship-to addresses” in
Defining Customers for more information.) Enter To enter a different ship-to address number.
8. Sales rep (Not applicable) displays if you specified in Setup / System / Company that you do not use sales reps. Otherwise, the sales rep associated with this customer displays as the default. Change is not allowed if you specified in Setup / Point of Sale / Stores / Configuration options not to use sales reps for this store.
Enter the sales rep for this order.
Press: F1 To enter the current user as the sales rep (if the current user is a sales rep). F2 To enter split commissions. (See “Entering split commissions” in Additional Order
Entry Options for more information.)
9. P.O.# (Not applicable) displays if this store doesn’t use P.O. numbers, as specified in Setup / Point of Sale / Stores / Configuration options.
Enter the customer’s P.O. number for this order, if any.
Leave <blank> to skip this field.
If you specified in Setup / Point of Sale / Stores / Configuration options to require P.O. numbers for certain customer categories, you are required to enter a P.O. number for customers belonging to one of the specified categories.
The P.O. number prints on invoices. For A/R charge customers, the P.O. number is included on any open items created by this order and is posted to ticket history. A warning is issued if a P.O. number is specified for an Order Entry order and the customer has an open Order Entry order on file with the same P.O. number.
10. Ship date Enter the ship date for this order.
Press: F2 Or leave <blank> for ASAP. F3 To enter ship days (to ship a specific number of days from the current date).
When entering line items, you can press F1 to use this date as the line item ship date.
Order Entry: Using CounterPoint - Entering Orders 8
10. Ship days This field appears as Ship days if you press F3 at Ship date. Enter the number of days from the current date. Press: F2 Or leave <blank> for ASAP. F3 To enter a specific ship date.
11. Ship-via The ship-via code associated with this ship-to address (or customer) displays as the default.
Enter the ship-via code for this order.
Press F2 to toggle between entering a ship-via code and a ship-via description.
12. Ship zone The shipping zone associated with this ship-to address (or customer) displays as the default.
Enter the shipping zone for this order.
13. Terms (Not applicable) displays for Cash and Misc cash customers. For A/R charge customers, the terms code associated with this customer displays as the default.
Enter the terms code for this order.
14. Tax code The tax code associated with this ship-to address (or customer) displays as the default.
Enter the tax code to use when calculating sales tax for this order.
NOTE: This field may not be changed for existing orders that contain taxable line items.
15. Location If you aren’t using multi-location (as specified in Setup / Inventory / Control), this field defaults to the location specified as the Main location in Setup / Inventory / Control, and cannot be changed.
Enter the default location from which items on this order will be shipped.
If you specified in Setup / Point of Sale / Stores / Configuration options to allow location by line, you can change the location for individual line items on the order.
NOTE: Changing the location for an existing order does not change the location for existing line items on that order.
Order Entry: Using CounterPoint - Entering Orders 9
16. Pft ctr (Not applicable) displays if you specified a sub-account number size of 0 in Setup / System / Company. Otherwise, the profit center specified for this store in Setup / Point of Sale / Stores / Stores displays as the default. Enter the profit center to use for this order. If you specified in Setup / Point of Sale / Stores / Configuration options to allow profit center by line, you can change the profit center for individual line items on the order.
NOTE: Changing the profit center for an existing order doesn’t change the profit center for existing line items.
The actual profit center for each line item on the order is determined by the account code assigned to each item, as follows:
Sub-acct method specified in the account code
Profit center used:
Account code Specified in the account code (field 17 of Setup / Inventory / Account codes)
Document Profit center for order as specified on order header screen (or for each line, if allowing profit center by line)
Location Default profit center for the location from which items are shipped (specified using Setup / Inventory / Locations)
The profit center entered on the order header screen is always used for distributions for the different tender types used to pay the order.
17. Apply-to This field is valid only for credit memos. (Not applicable) displays for all other order types.
Enter the apply-to number.
Leave <blank> for Open. The apply-to number entered here doesn’t have to match an existing open item; however, a document with this number should be entered eventually so the customer account will age properly.
18. [User-defined prompt] The names of these fields are the user-defined prompts defined for the Order Entry store in Setup / Point of Sale / Stores / Configuration options.
Enter information as requested.
Order Entry: Using CounterPoint - Entering Orders 10
Status This display-only field shows the order status for O-orders, I-orders, and credit memos.
Status Description
Open This O-order has not been selected for invoicing. Selected For O-orders, this order has been selected for invoicing using
Order Entry / Invoices / Select orders. This is the default status for I-order and credit memos.
Invoiced An invoice has been printed for this order using Order Entry / Invoices / Print.
Cancelled This order has been cancelled. Held This order is on hold.
Picked This display-only field appears only for existing orders and shows the date on which the last picking ticket was printed for O-orders, I-orders, and credit memos.
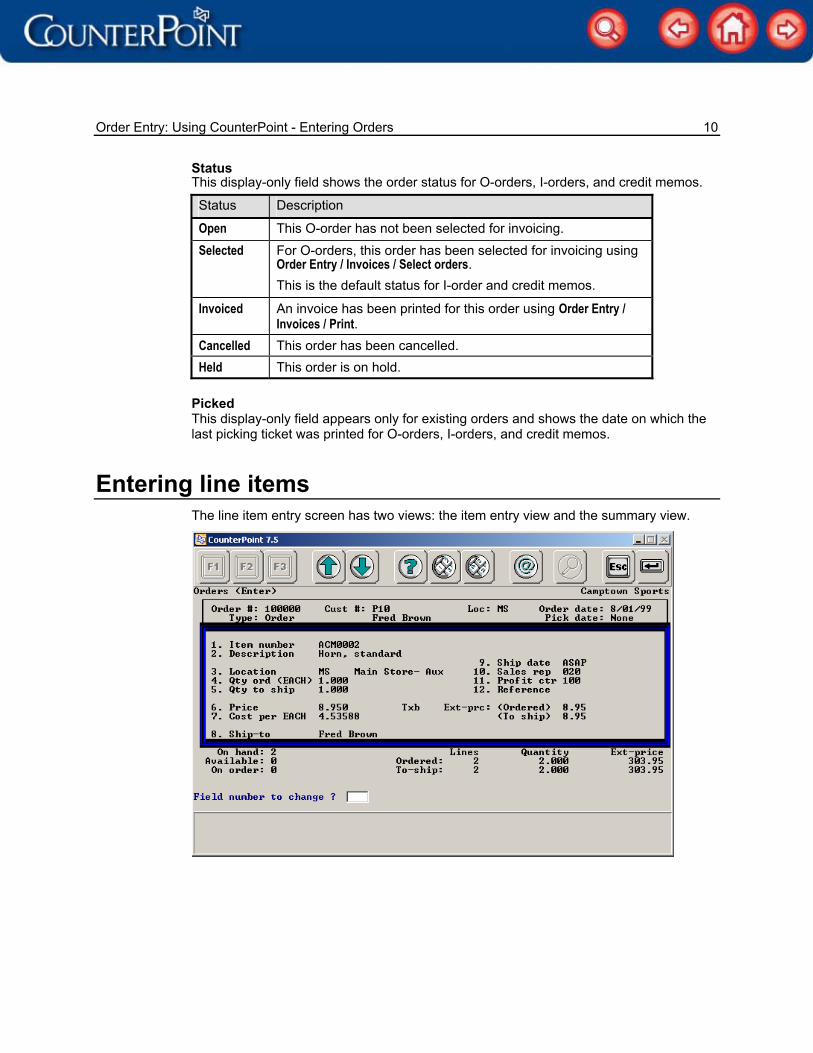
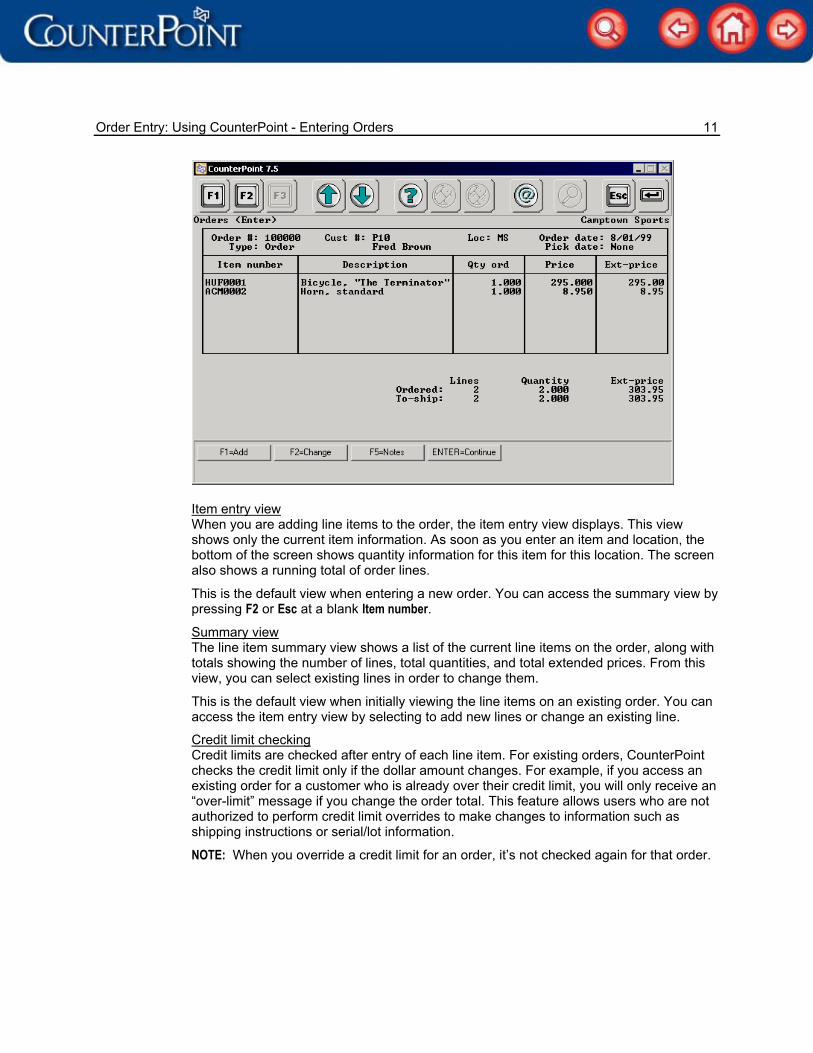
Entering line items The line item entry screen has two views: the item entry view and the summary view.
Order Entry: Using CounterPoint - Entering Orders 11
Item entry view When you are adding line items to the order, the item entry view displays. This view shows only the current item information. As soon as you enter an item and location, the bottom of the screen shows quantity information for this item for this location. The screen also shows a running total of order lines.
This is the default view when entering a new order. You can access the summary view by pressing F2 or Esc at a blank Item number. Summary view The line item summary view shows a list of the current line items on the order, along with totals showing the number of lines, total quantities, and total extended prices. From this view, you can select existing lines in order to change them.
This is the default view when initially viewing the line items on an existing order. You can access the item entry view by selecting to add new lines or change an existing line.
Credit limit checking Credit limits are checked after entry of each line item. For existing orders, CounterPoint checks the credit limit only if the dollar amount changes. For example, if you access an existing order for a customer who is already over their credit limit, you will only receive an “over-limit” message if you change the order total. This feature allows users who are not authorized to perform credit limit overrides to make changes to information such as shipping instructions or serial/lot information.
NOTE: When you override a credit limit for an order, it’s not checked again for that order.
Order Entry: Using CounterPoint - Entering Orders 12
1. Item number Enter the item number or item barcode or the vendor’s product number, if vendor item keywords are enabled in Inventory Control. Press: F4 If you are using registries, to select an event to record against which to record
the purchase of this item. (See “Selling an item for an event” in Working with Registries for more information.)
F5 To enter input text (comments). (See “Entering input text” in Additional Order Entry Options for more information.)
F7 To change the entry mode. (See “Changing the line item entry mode” in Additional Order Entry Options for more information.)
F8 If you are using the line item import feature, to import line items. (See Importing Line Items for more information.)
Esc When you are through entering line items (See the Completing the line item screen section on page 19 for more information.)
If other line items exist for this order, press F2 to change existing line items. (See “Changing line item information” in Additional Order Entry Options for more information.)
NOTE: You can’t enter gift certificate items on an order.
Item not on file, press F2 to add This message appears if you enter an item number that doesn’t exist in the Item file.
Press: F2 To add the item on-the-fly. (See “Adding a new item” in Additional Order Entry
Options for more information.) Enter To enter a different item number.
Only users who are authorized to add items on-the-fly can add an item from this screen. A security override is available. (See Conventions for more information.)
2. Description This field displays the description lines from the Item file for this item.
Make any change to the item description, if applicable and allowed. You may change the description if: The item is a miscellaneous item (item type of Non-inventory, Service, or Discount) The item is a non-miscellaneous item (item type of Inventory, Consignment, or Text),
and you specified in Setup / Point of Sale / Stores / Configuration options to allow entry of non-miscellaneous descriptions
Changes made to the item description are for this order only and don’t affect the description in the Item file. Item description changes are retained in ticket history when the invoice is posted.
Order Entry: Using CounterPoint - Entering Orders 13
[Color/Size] This field appears as the second description line for gridded items. Enter the specific color and size for this item in the format COLOR/SIZE. Press:
F5 To select the color and size from menus of available colors and sizes. F6 To enter quantities in grid format (the total of the grid quantities then
appears for Qty ordered). (See “Entering quantities in a grid” in Additional Ticket Entry Options for more information.)
Color/size information is required on I-orders, credit memos, and RMA’s.
This field displays *********/***** if quantities have been entered in grid format.
Entry is optional on O-orders, but any oversize pricing will not be applied until color/size information is entered. Color/size information must be entered on O-orders before they can be selected for invoicing.
3. Location If you aren’t using multi-location (as specified in Setup / Inventory / Control), this field defaults to the location specified as the Main location in Setup / Inventory / Control, and cannot be changed. If you are using multi-location, but you specified in Setup / Point of Sale / Stores / Configuration options that you don’t allow location by line, this field defaults to the location for this order and cannot be changed. This field defaults to the last location specified during this session.
Enter the location for this item.
You can’t change the location for an existing line item.
4. Qty ordered/ credited This field appears as Qty ordered for O-orders, I-orders, and quotes and as Qty credited for credit memos and RMA’s. If this is a gridded item and you entered quantities in grid format, this field defaults to total quantity entered in the grid and cannot be changed. Once an item has been specified, the name of this field changes to indicate the current selling unit.
Enter the ordered (or credited) quantity for this item (for returned items, this is the quantity for which the customer should receive credit).
Press: F6 To view the Item zoom window for this item. (See “Zooming on an item” in
Additional Order Entry Options for more information.) F7 To change the entry mode for this item. (See “Changing the line item entry
mode” in Additional Order Entry Options for more information.)
If alternate units exist for this item, press F4 to enter the quantity in terms of an alternate unit.
For O-orders, I-orders, and quotes, if you specified in Setup / Point of Sale / Stores / Configuration options to allow drop-ships, press F2 to drop-ship this item. (See “Drop-shipping an item” in Additional Order Entry Options for more information.)
D/S appears next to this field for drop-shipped items.
Order Entry: Using CounterPoint - Entering Orders 14
Quantities may be entered with three decimal places if you specified to use three-decimal quantities in Setup / Inventory / Control. Decimal quantities are not allowed for serialized or gridded items.
For returned items on O-orders, I-orders, or quotes, enter a negative quantity.
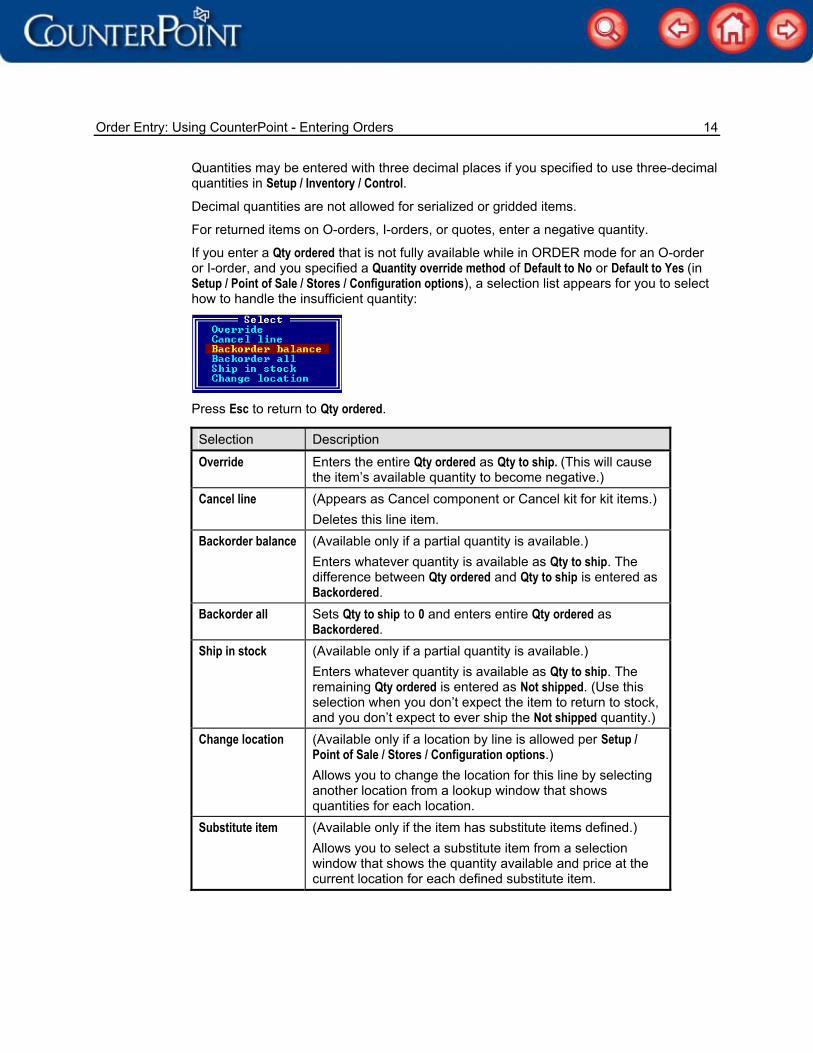
If you enter a Qty ordered that is not fully available while in ORDER mode for an O-order or I-order, and you specified a Quantity override method of Default to No or Default to Yes (in Setup / Point of Sale / Stores / Configuration options), a selection list appears for you to select how to handle the insufficient quantity:
Press Esc to return to Qty ordered. Selection Description Override Enters the entire Qty ordered as Qty to ship. (This will cause
the item’s available quantity to become negative.) Cancel line (Appears as Cancel component or Cancel kit for kit items.)
Deletes this line item. Backorder balance (Available only if a partial quantity is available.)
Enters whatever quantity is available as Qty to ship. The difference between Qty ordered and Qty to ship is entered as Backordered.
Backorder all Sets Qty to ship to 0 and enters entire Qty ordered as Backordered.
Ship in stock (Available only if a partial quantity is available.) Enters whatever quantity is available as Qty to ship. The remaining Qty ordered is entered as Not shipped. (Use this selection when you don’t expect the item to return to stock, and you don’t expect to ever ship the Not shipped quantity.)
Change location (Available only if a location by line is allowed per Setup / Point of Sale / Stores / Configuration options.) Allows you to change the location for this line by selecting another location from a lookup window that shows quantities for each location.
Substitute item (Available only if the item has substitute items defined.) Allows you to select a substitute item from a selection window that shows the quantity available and price at the current location for each defined substitute item.

Order Entry: Using CounterPoint - Entering Orders 15
5. Qty to ship This field appears as Qty to ship for O-orders, I-orders, and quotes. This field is calculated automatically and skipped. For normal orders and backorders, you can return to this field to make changes by pressing Up Arrow. This field cannot be changed for special orders. Enter the quantity of this item to ship. If you enter a quantity less than the quantity ordered, and you specified in Setup / Point of Sale / Stores / Configuration options to allow backorders, the following selection list appears for you to choose how to handle the remaining quantity:
Selection Description Backorder balance The difference between the Qty ordered and the Qty to ship
is entered as Backordered. Ship in stock The difference between the Qty ordered and the Qty to ship
is entered as Not shipped. (Use this selection when you don’t expect the item to return to stock, and you don’t expect to ever ship the Not shipped quantity.)
5. Qty returned This field displays as Qty returned for credit memos and RMA’s or for returned items (items for which you enter a negative quantity at Qty ordered) on O-orders, I-orders, and quotes.
Enter the quantity of the item that is being physically returned to inventory.
The quantity entered here will be added to your inventory quantity on hand. Don’t include items in this quantity that were not physically returned or that are not in good enough condition to resell.
Scrap account This field appears when you enter a Qty returned that doesn’t equal the quantity being credited.
Enter the scrap account to use for distributions created for the merchandise not returned to inventory.
Press F1 to use the default scrap account defined in Setup / Order Entry / Control.
Backordered This display-only field appears if you specify to backorder any of the order quantity. It shows the quantity backordered. To change this field, you must return to Qty ordered or Qty to ship and change the quantity ordered (or select another method of handling any insufficient quantities).
Not shipped This display-only field appears if you select to ship the in-stock quantities for an item that doesn’t have sufficient quantity available. It shows the quantity that is not being shipped. Not shipped quantities are not considered as still on order. These quantities are not filled when you fill backorders, and they disappear when you post the order that contains them.

Order Entry: Using CounterPoint - Entering Orders 16
6. Price If this item has alternate units defined, the name of this field indicates the current selling unit. (Not applicable) displays for miscellaneous kit components.
Enter the price for this item.
Press: F1 To use the default price (See “Determining item prices” in Prices for a description
of how default prices are determined). F2 To enter a discount percent (See “Entering price as a discount percent” in
Additional Order Entry Options for more information).
If you specified in Setup / Point of Sale / Stores / Configuration options to allow item tax code changes, press F4 to change the tax code.
If you specified in Setup / Point of Sale / Stores / Configuration options to allow item taxable status changes, press F5 to change the taxable status of this line item.
If you specified in Setup / Point of Sale / Stores / Configuration options to search history for price overrides, press F6 to use the historical search feature. (See “Performing an historical price search” in Additional Order Entry Options for more information.)
Only users who are authorized to override prices can change the displayed default price. A security override is available. (See Conventions for more information.)
Only users who are authorized for below minimum prices can enter a price that causes the line item’s profit percent to fall below the minimum profit percent specified in Setup / Point of Sale / Stores / Configuration options. A security override is available.
If no minimum profit percent is specified in Setup / Point of Sale / Stores / Configuration options, only users who are authorized for below minimum prices can enter a price that is below unit cost. A security override is available.
An asterisk displays next to the price if you enter a price override.
If you specified in Setup / Point of Sale / Stores / Configuration options to display taxable status changes, Ntx or Txb may display to the right of this field to indicate the taxable status of this item. Tax status may be changed only by users authorized to override taxes. A security override is available. (See Conventions for more information.)
7. Cost This field displays as Reserved if you are not authorized to view costs. Entry is allowed in this field only when entering a credit memo, a return, a Non-inventory item (if allowed by Setup / Point of Sale / Stores / Configuration options), or a drop-shipped item (if allowed by Setup / Point of Sale / Stores / Configuration options). If entry is not allowed, the cost that displays depends on the inventory valuation method specified in Setup / Inventory / Control. Enter the cost for this item.
Press F1 to use the default cost (which depends on the inventory valuation method specified in Setup / Inventory / Control).
You will receive a warning message if you enter 0 for the cost.
Order Entry: Using CounterPoint - Entering Orders 17
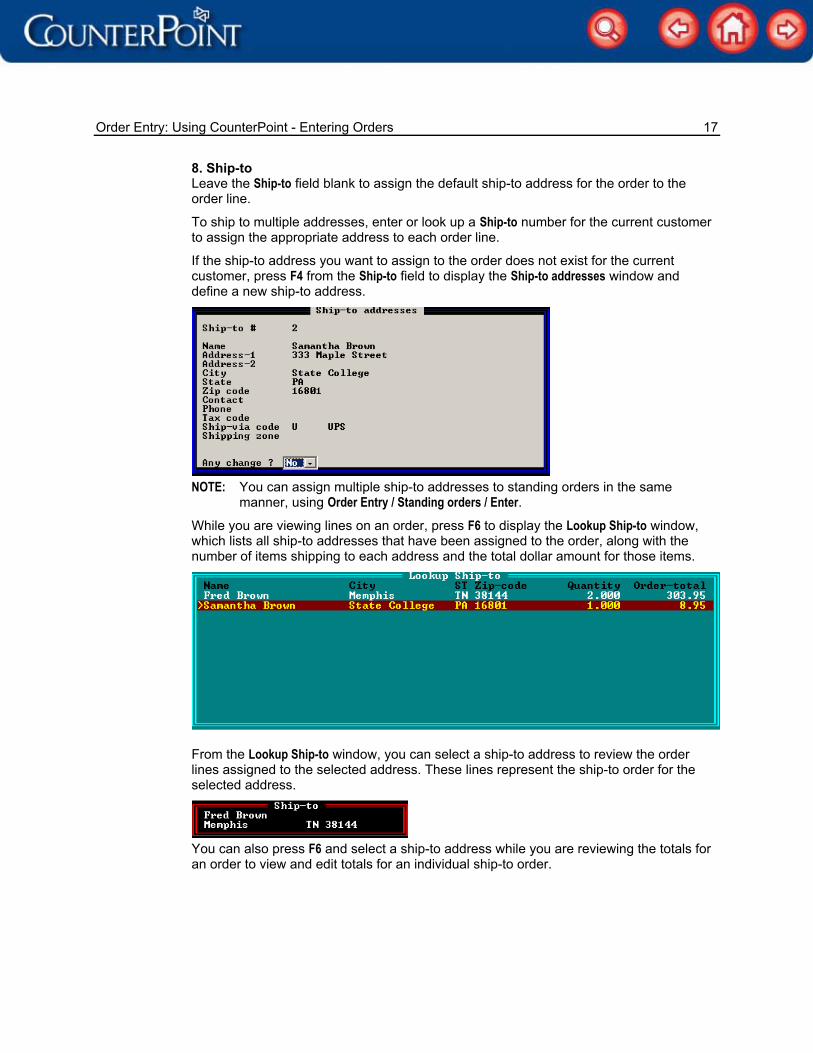
8. Ship-to Leave the Ship-to field blank to assign the default ship-to address for the order to the order line.
To ship to multiple addresses, enter or look up a Ship-to number for the current customer to assign the appropriate address to each order line.
If the ship-to address you want to assign to the order does not exist for the current customer, press F4 from the Ship-to field to display the Ship-to addresses window and define a new ship-to address.
NOTE: You can assign multiple ship-to addresses to standing orders in the same manner, using Order Entry / Standing orders / Enter.
While you are viewing lines on an order, press F6 to display the Lookup Ship-to window, which lists all ship-to addresses that have been assigned to the order, along with the number of items shipping to each address and the total dollar amount for those items.
From the Lookup Ship-to window, you can select a ship-to address to review the order lines assigned to the selected address. These lines represent the ship-to order for the selected address.
You can also press F6 and select a ship-to address while you are reviewing the totals for an order to view and edit totals for an individual ship-to order.

Order Entry: Using CounterPoint - Entering Orders 18
9. Ship date (Not applicable) displays for miscellaneous kit components.
Enter the ship date for this item.
Press: F1 To use the order ship date. F3 To enter ship days (to ship a specific number of days from the current date).
Leave <blank> for ASAP.
9. Ship days This field appears as Ship days if you press F3 at Ship date.
Enter the number of days from the current date to determine the ship date.
Press: F1 To use the order ship date. F3 To enter a specific ship date. Leave <blank> for ASAP.
10. Sales rep This field displays as Reserved if you specified in Setup / System / Company that you don’t use sales reps. (Not applicable) displays for miscellaneous kit components. Otherwise, the sales rep entered on the order header screen displays as the default. Entry is allowed only if you specified to allow sales rep by line in Setup / Point of Sale / Stores / Configuration options.
Enter the sales rep for this item.
11. Profit ctr This field displays as Reserved if you specified a sub-account number size of 0 in Setup / System / Company. (Not applicable) displays for miscellaneous kit components. Otherwise, the profit center specified for this order displays as the default. Entry is allowed only if you specified to allow profit center by line in Setup / Point of Sale / Stores / Configuration options.
Enter the profit center for this item.
WARNING: If the item’s account code specifies that the profit center is by account code or location, any changes you make to the profit center here will be used during posting if the item’s account code indicates a sub-account method of ‘Document’, even if the customer’s category has a profit center specified.

Order Entry: Using CounterPoint - Entering Orders 19
12. Reference Enter any reference text for this item. WARNING: The reference field serves as the connection between Order Entry and
Purchasing. If line items have been created on a P.O. by copying lines from an Order Entry order, the reference field for each of these lines shows the P.O. number in the format PO#XXXXXXXXXXXX. If the items have been received in Purchasing, the reference entry changes to po#XXXXXXXXXXXX (letters po in lower case). You should not edit these reference entries if you want to maintain the link between Order Entry and Purchasing.
Ser-#: This field appears in a pop-up Serial numbers window if this line item has a tracking method of Always serialized or Sometimes serialized and if this is an I-order, O-order, credit memo, or RMA.
Enter serial number information for this item. (See “Entering serial numbers” in Additional Order Entry Options for more information.)
Lot-#: This field appears in a pop-up Lot numbers window if this line item has a tracking method of Lot detail or Lot balance and if this is an I-order, O-order, credit memo, or RMA.
Enter lot number information for this item (See “Entering lot numbers” in Additional Order Entry Options for more information.)
Completing the line item screen
1. Item number (line item screen) Press Esc when you are through entering line items, to view the line item summary screen.
After you press Esc, the screen shows a list of the line items entered for this order, press:
F1 To add items to the order. F2 To change any existing items on the order. (See “Changing line item information”
in Additional Order Entry Options for more information.) F5 To enter or view order notes. (See Using Notes for more information.) Enter To continue to the totals screen.
You can’t abort this order from the line item summary screen. If you want to abort the order, press Enter to continue, then press Esc at the totals screen.

Order Entry: Using CounterPoint - Entering Orders 20
Entering order totals information
This screen displays the following order totals information at the bottom of the screen: Lines, Quantity, Ext-price, Cost, and Weight. Weight shows the sum of the extended weights for all “shipping” lines and does not include weights for any returned or credited lines.
1. Freight Enter the freight amount.
Press F2 to toggle between entering freight as an amount and as a percent of the order subtotal.
If you enter the freight amount as a percent of the order subtotal, the freight amount is calculated automatically and displayed in this field.
2. [Misc charge] If you didn’t define a miscellaneous charge in Setup / Order Entry / Control, this field displays Reserved and entry is not allowed. Otherwise, the name of this field depends on the miscellaneous charge definition.
Enter the miscellaneous charge amount.
Press F2 to toggle between entering the miscellaneous charge as an amount and as a percent of the order subtotal.
If you enter the miscellaneous charge amount as a percent of the order subtotal, the actual amount is calculated automatically and displayed in this field.
Order Entry: Using CounterPoint - Entering Orders 21
3. Disc % Enter the discount percent for this order. Press: F1 To enter a discount amount. F2 To enter a package price.
The discount percent you enter here is multiplied by the eligible portion of the order subtotal, and the resulting discount displays in this field along with the discount percent. The portion of the order that is eligible depends on the setting for Apply ticket discounts to in Setup / Point of Sale / Stores / Configuration options.
Only users who are authorized to override prices can change the discount amount. A security override is available. (See Conventions for more information.)
Only users who are authorized for below minimum prices can enter a discount that causes the order’s profit percent to fall below the minimum profit percent specified in Setup / Point of Sale / Stores / Configuration options. A security override is available.
If no minimum profit percent is defined in Setup / Point of Sale / Stores / Configuration options, only users who are authorized for below minimum prices can enter a discount percent that causes the order subtotal to fall below the total order cost. A security override is available.
3. Discount amt This field displays as Discount amt if you press F1 at Disc %.
Enter the discount amount for this order.
Press F2 to enter a discount percent.
The discount percent is calculated automatically and displays along with the discount amount.
3. Package price This field displays as Package price if you press F2 at Disc %.
Enter the package price for this order.
Press F2 to enter a discount percent.
When you enter a package price, the discount percent and discount amount are calculated automatically, and the field displays only the discount information, not the package price.
Only users who are authorized for below minimum prices can enter a package price that causes the order’s profit percent to fall below the minimum profit percent specified in Setup / Point of Sale / Stores / Configuration options. A security override is available. (See Conventions for more information.)
If no minimum profit percent is defined in Setup / Point of Sale / Stores / Configuration options, only users who are authorized for below minimum prices can enter a package price that causes the order subtotal to fall below the total order cost. A security override is available.

Order Entry: Using CounterPoint - Entering Orders 22
4. Tax Enter the tax amount. Press F1 to use the default system-calculated tax for this order. Only users who are authorized to override taxes can change the tax amount. A security override is available. (See Conventions for more information.)
Invoice total Deposit applied Amount due These display-only fields appear for O-orders, I-orders, and quotes. They show the current order totals, including any deposits that have been applied against this order.
CR-memo total Deposit applied Amt credited These display-only fields appear for credit memos and RMA’s. They show the current order totals, including any refunds that have been applied against this credit memo or RMA.
5. # ship labels Enter the number of shipping labels to print for this order.
This quantity of labels will print if you select to print shipping labels from the order using Labels / Print / Labels. (See Printing Labels for more information.)
If you enter 0 for this field, you can still print shipping labels for this order by entering a specific label quantity when using Labels / Print / Labels.
6. # COD labels Enter the number of COD labels to print for this order.
This quantity of labels will print if you select to print COD labels from the order using Labels / Print / Labels. (See Printing Labels for more information.)
If you enter 0 for this field, you can still print shipping labels for this order by entering a specific label quantity when using Labels / Print / Labels.
7. Commission Enter the commission amount for this order.
Press F2 to toggle between entering a commission amount and a commission percent.
The system-calculated commission amount (and percent) displays at the bottom of the screen.
If the order contains an item that has a commission code assigned and that also has ascending prices (i.e., Price-2 is higher than Price-1, etc.), the commission for that item is calculated using either the commission rate for Price-1 (if the item price is Price-1 or greater) or the commission rate associated with below price levels (if the item price is below Price-1).

Order Entry: Using CounterPoint - Entering Orders 23
Additional information on commission calculation: See Commissions for more information.
Only users who are authorized to override commissions can change this amount. A security override is available. (See Conventions for more information.)
*Override* displays below this field if the commission amount is changed.
You can enter an amount in this field regardless of whether you are using sales reps per Setup / System / Company, because item commission codes can still cause commissions to be calculated even when sales reps are not used (although commissions calculated in this way are not posted anywhere).
8. Deposit Pay-code Entry in this field is not allowed for credit memos, quotes, or RMA’s.
Enter the pay code to use for any order deposit.
The pay codes defined for this store display at the bottom of the screen.
Food stamp, store credit, and gift certificate pay codes are not allowed as order deposits. A/R charge pay codes are allowed for A/R charge customers only if you answered Yes to Allow AR charges for deposits ? in Setup / Point of Sale / Stores / Configuration options.
Deposit Amount Enter the amount of this order deposit.
For existing orders, if deposits have already been posted for the order, you can enter a negative amount in order to create a refund.
If you specified a Multi-currency pay code, the amount due in that currency displays on the screen. Enter the amount in terms of this currency.
NOTE: If you specified in Setup / Point of Sale / Control that orders affect customer unposted balances, any unposted Order Entry deposits or refunds for A/R charge customers will be reflected in the customer’s unposted balance.
Any deposits or refunds entered on this screen may be edited using either Order Entry / Orders / Enter or Order Entry / Deposits and refunds / Enter. Deposits may not be edited after they have been posted with Order Entry / Deposits and refunds / Post, but they may be refunded.
NOTE: Other than a modem, Point of Sale devices are not supported in Order Entry. Only one unposted deposit or refund can exist at a time for each order. To enter additional deposits or refunds, you must first post the existing deposit/refund using Order Entry / Deposits and refunds / Post.
[Validation information] Validation fields appear if you specify a pay code that requires validation information (as specified in Setup / Point of Sale / Stores / Stores).
Enter any required validation information.
For credit cards, if the customer’s credit card number is on file, press F1 to use the credit card number and expiration date on file for this customer.

Order Entry: Using CounterPoint - Entering Orders 24
9. Final pmt For A/R charge customers, this field defaults to the first A/R charge pay code defined for the Order Entry store number. Entry in this field is not allowed for quotes.
Enter the pay code to use for final payment of this order.
The pay codes defined for this store display at the bottom of the screen.
Final payment information is required for I-orders and credit memos and must be entered in Order Entry / Orders / Enter. Final payment information for O-orders can be entered either in Order Entry / Orders / Enter or in Order Entry / Invoices / Select orders when selecting orders for invoicing.
Food stamp, store credit, and gift certificate pay codes are not allowed for final payments.
The amount remaining due for the order displays automatically as the amount of the final payment. If you specified a Multi-currency pay code, the amount displays in terms of that currency.
Any final payments made using a credit card pay code must be authorized using Order Entry / Invoices / Authorize before the invoice can be printed or posted.
Final payments are posted by Order Entry / Invoices / Post. NOTE: Other than a modem, Point of Sale devices are not supported in Order Entry.
[Validation information] Validation fields appear if you specify a pay code that requires validation information (as specified in Setup / Point of Sale / Stores / Stores).
Enter any required validation information.
Ordered: To-ship: These display-only fields contain multiple columns that show the following totals for ordered and to-ship merchandise: Lines, Quantity, Ext-Price, Cost, and Weight. Cost displays only for users who are authorized to view costs.
Field number to change ? Press: Enter To complete this order. F1 To display Totals of what is ready to ship vs what has been ordered. F4 To enter up to 24 shipment tracking numbers for this order. (See “Entering
tracking numbers” in Additional Order Entry Options for more information.) F5 To enter notes for this order. (See Using Notes for more information.) F8 To place this order on hold (or remove it from hold). (See “Placing an order on
hold” in Additional Order Entry Options for more information.)
For new orders, press Esc to cancel this order.
Order Entry: Using CounterPoint - Entering Orders 25
When you press Enter at Field number to change ?, the following tasks are performed automatically:
The Order Header file is updated with the final ticket information (the Order Line file was updated as each line item was entered)
The customer’s unposted balance is updated for any A/R Charge payments (if the Receivables Option is registered)
If you specified in Setup / Point of Sale / Control information that orders affect customer balances, the customer’s unposted balance is updated for the total amount of an order less any deposit made (quotes do not affect customer unposted balances)
Authorize credit card now ? This question appears if you selected Yes at Immediate authorization ? in Setup / Order Entry / Control. Select:
Yes To begin the authorization process. No To save the order without authorizing the deposit.
If the authorization is successful, the order is saved with the authorized deposit, which you can edit using Order Entry / Deposits and refunds / Enter and post using Order Entry / Deposits and refunds / Post. The actual EDC transaction is created when you post using Order Entry / Deposits and refunds / Post. If the authorization is unsuccessful, you may retry the authorization, save the order without authorizing the deposit, or abort the order.
NOTE: If you edit card information or increase the deposit amount for an authorized deposit before you post it, you must re-authorize the deposit. When you choose an order with an authorized deposit, you are prompted to confirm your selection. Then, when you make your changes, you are prompted to clear the previous authorization within CounterPoint (the unsettle authorization will be cleared at the processor automatically after a period of time). Finally, when you save your changes, the Authorize credit card now ? prompt appears, allowing you to re-authorize the deposit.
Do you wish to cancel this order ? This question appears if you press Esc at any field on the totals screen when entering a new order.
Specify whether to cancel this order.
If you cancel an order with a system-assigned order number, the order number will not be re-used.
Customer is over credit limit - Continue ? This question appears if the total unpaid portion of this order (including any payments made with an A/R charge pay code) will put the customer over their credit limit.
Specify whether to complete this order.
If you answer No, you are returned to the totals screen, where you can enter additional deposit information or cancel the order.

Order Entry: Using CounterPoint - Entering Orders 26
Printing the order When you press Enter at Field number to change ?, a window appear for you to print the order if Setup / Order Entry / Control specifies to print a form after entry for this order type. (See Order Entry Control for more information.) For existing orders, you can also access this window by pressing F4 when the order’s header screen is displayed.
The form ID specified for orders in Setup / Order Entry / Control displays as the default form ID.
Press F2 to change the form ID.
Print form ? Specify whether to print this order on the specified form.
Importing Point of Sale orders Select Order Entry / Orders / Import PS orders to import several orders at once.
You can also import individual Point of Sale orders using F5 in Order Entry / Orders / Enter. (See “Importing Point of Sale orders” in Additional Order Entry Options for more information.)
Order Entry: Using CounterPoint - Entering Orders 27
1. Order range Enter the range of Point of Sale order numbers to import.
Leave <blank> at the second field, if you entered a specific order number for the first field, to default to the same number.
Press F1 for the First (or Last) existing Point of Sale order number.
8. Line status Select: Normal lines To import only normal order lines from the specified Point of Sale orders. Backorders To import only backordered lines from the specified Point of Sale orders. Special orders To import only special ordered lines from the specified Point of Sale
orders. Press F1 for All, to import all lines from the specified Point of Sale orders.
Importing notes If you specified in Setup / Order Entry / Control to use the imported Point of Sale order
number, the Order Entry orders created by this import will retain the Point of Sale order number. If this order number already exists, or if you specified not to use the Point of Sale order number, the next order number from Setup / Order Entry / Control is assigned automatically to the imported order.
Any existing serial number, lot numbers, and color/size information on the Point of Sale orders are imported.
Orders imported from Point of Sale display an additional field on the header screen (From PS order #:) that indicates the original Point of Sale order number.
Commission overrides and package prices are imported.
When the import is complete, all lines on the original Point of Sale orders are removed. A single input text line is added to each Point of Sale order indicating the new Order Entry order number, and each imported Point of Sale order is marked as cancelled.
Order Entry forms can be defined to print the original Point of Sale order number for imported orders. The pre-defined forms supplied with CounterPoint don’t print this information.