oracle® preventive controls governor...1-2 oracle preventive controls governor user guide have some...
TRANSCRIPT

Oracle® Preventive Controls Governor
User Guide
Release 7.3
December 2008

Oracle Preventive Controls Governor User Guide
Copyright © 2007, 2008 Oracle Corporation and/or its affiliates. All rights reserved.
Primary Author: David Christie
The Programs (which include both the software and the documentation) contain proprietary information; they are provided under a license agreement containing restrictions on use and disclosure and are also protected by copyright, patent, and other intellectual and industrial property laws. Reverse engineering, disassembly, or decompilation of the Programs, except to the extent required to obtain interoperability with other independently created software or as specified by law, is prohibited.
The information contained in this document is subject to change without notice. If you find any problems in the documentation, please report them to us in writing. This document is not warranted to be error-free. Except as may be expressly permitted in your license agreement for these Programs, no part of these Programs may be reproduced or transmitted in any form or by any means, electronic or mechanical, for any purpose.
If the Programs are delivered to the United States Government or anyone licensing or using the Programs on behalf of the United States Government, the following notice is applicable.
U.S. GOVERNMENT RIGHTS
Programs, software, databases, and related documentation and technical data delivered to U.S. Government customers are “commercial computer software” or “commercial technical data” pursuant to the applicable Federal Acquisition Regulation and agency-specific supplemental regulations. As such, use, duplication, disclosure, modification, and adaptation of the Programs, including documentation and technical data, shall be subject to the licensing restrictions set forth in the applicable Oracle license agreement, and, to the extent applicable, the additional rights set forth in FAR 52.227-19, Commercial Computer Software—Restricted Rights (June 1987). Oracle Corporation, 500 Oracle Parkway, Redwood City, CA 94065.
The Programs are not intended for use in any nuclear, aviation, mass transit, medical or other inherently dangerous applications. It shall be the licensee’s responsibility to take all appropriate fail-safe, backup, redundancy and other measures to ensure the safe use of such applications if the Programs are used for such purposes, and we disclaim liability for any damages caused by such use of the Programs.
The Programs may provide links to Web sites and access to content, products, and services from third parties. Oracle is not responsible for the availability of, or any content provided on, third-party Web sites. You bear all risks associated with the use of such content. If you choose to purchase any products or services from a third party, the relationship is directly between you and the third party. Oracle is not responsible for: (a) the quality of third-party products or services; or (b) fulfilling any of the terms of the agreement with the third party, including delivery of products or services and warranty obligations related to purchased products or services. Oracle is not responsible for any loss or damage of any sort that you may incur from dealing with any third party.
Oracle is a registered trademark of Oracle Corporation and/or its affiliates. Other names may be trademarks of their respective owners.
The license for this program includes a limited use license for the Internal Control Manager program. Such limited use license means that the Internal Controls program shall only be used for financial compliance or IT governance related operations.

Contents iii
Contents
1 Introduction
Prerequisites ................................................................................... 1-1
Starting Preventive Controls Governor ............................................ 1-2
2 Creating Form Rules
Creating a Form Rule and Its Elements........................................... 2-1
Creating a Rule ......................................................................... 2-2
Beginning to Create a Rule Element......................................... 2-2
Using the Event Tracker............................................................ 2-3
Completing the Rule Element Definition.................................... 2-4
Configuring Rule Element Details.................................................... 2-6
Setting Security......................................................................... 2-6
Setting Navigation Paths........................................................... 2-9
Creating Messages ................................................................. 2-11
Setting Default Values ............................................................ 2-12
Creating and Modifying Lists of Values................................... 2-13
Setting Field Attributes............................................................ 2-16
Creating SQL Procedures....................................................... 2-19
Running Flow Rules Processes .............................................. 2-20
Saving Rule Element Details................................................... 2-22
Using the Form Extensions Tool.................................................... 2-22
Creating a New Form.............................................................. 2-22
Linking a New Form to an Existing Form ................................ 2-23
Creating LOVs for an Extension Form .................................... 2-24

iv Oracle Preventive Controls Governor User Guide
3 Creating Flow Rules
Creating a Process Rule .................................................................. 3-1
Using the Process Rule Details Panel ....................................... 3-2
Using the Primary Keys Panel................................................... 3-3
Using the Display Table/View Columns Panel........................... 3-3
Using the Effectivity Dates Panel............................................... 3-4
Configuring Launch Criteria ............................................................. 3-5
Beginning to Configure Criteria ................................................. 3-5
Setting a Trigger........................................................................ 3-5
Setting a Schedule .................................................................... 3-7
Configuring Elements Called by Rules............................................. 3-7
Using the Advanced Rules Wizard ............................................ 3-7
Creating a Notification Function............................................... 3-13
Creating an Approval Group.................................................... 3-15
Creating a Workflow Role........................................................ 3-16
Creating Process Flows ................................................................. 3-17
Starting a Process Flow........................................................... 3-17
Configuring Constraint Rules................................................... 3-19
Configuring Concurrent Program Rules................................... 3-20
Configuring Approval and Notification Rules ........................... 3-22
Configuring Exception Rules ................................................... 3-23
Configuring SQL Rules............................................................ 3-25
Configuring Processes Flows .................................................. 3-25
Configuring Workflow/Event Rules .......................................... 3-26
Adding Conditions to Process Flows ....................................... 3-27
Testing Process Rules ................................................................... 3-28
4 Creating Audit Rules
Audit Rules and Change Control...................................................... 4-1
Creating Audit Groups...................................................................... 4-2
Defining a Group ....................................................................... 4-2
Setting Security ......................................................................... 4-3

Contents v
Saving the Group ...................................................................... 4-4
Querying an Audit Group .......................................................... 4-4
Defining Audit Columns and Translation Data................................. 4-5
Selecting Columns .................................................................... 4-6
Adding to Column Definitions.................................................... 4-7
Setting Up Translations............................................................. 4-7
Saving Your Work ..................................................................... 4-8
Activating the Audit.......................................................................... 4-8
The Online Audit Form .................................................................... 4-9
Creating the Form Rule........................................................... 4-10
Parameter Values ................................................................... 4-11
Adding Online Audit to a Responsibility .................................. 4-12
Viewing the Online Audit ......................................................... 4-13
Security................................................................................... 4-14
5 Creating Change Control Rules
Creating Control Rules Manually ..................................................... 5-2
Finding Control Rules ............................................................... 5-2
Creating Reason Codes............................................................ 5-3
Creating Control Rules.............................................................. 5-4
Applying Changes to Controlled Fields............................................ 5-8
Audit.......................................................................................... 5-8
Reason Code or Approval......................................................... 5-8
6 Creating Subscribers
Defining a Subscriber ...................................................................... 6-1
Filter Type Considerations ........................................................ 6-2
More Subscriber Fields ............................................................. 6-3
Subscriber Lists ............................................................................... 6-3
Using the SQL Wizard ..................................................................... 6-5
Profiles and Data Subscribers ......................................................... 6-6
7 Reporting
GRC Controls Form Rules Report ................................................... 7-2
GRC Controls Flow Rules Report.................................................... 7-3

vi Oracle Preventive Controls Governor User Guide
GRC Controls Oracle Audit Report .................................................. 7-3
GRC Controls Control Listing Report ............................................... 7-4
GRC Controls Change History Report ............................................. 7-5
GRC Controls Approver Performance Report .................................. 7-5
8 Migration
Preparing for Form, Flow, or Audit Rule Migration ........................... 8-1
Dependencies .................................................................................. 8-2
Migrating, Exporting, or Copying Rules............................................ 8-3
Importing a File ................................................................................ 8-6
Uploading or Migrating Change Control Rules................................. 8-7
Uploading Rules from a Content Spreadsheet .......................... 8-7
Migrating Control Rules ............................................................. 8-8
9 Utilities
Collecting Rules in Libraries............................................................. 9-1
Creating a Library ...................................................................... 9-2
Adding to Value Sets ................................................................. 9-3
Using the Mass Associate Utility ...................................................... 9-4
Rules Caching.................................................................................. 9-5
Adding Custom Events..................................................................... 9-6
Gathering Debug Data ..................................................................... 9-7
Monitoring Constraint Processes ..................................................... 9-8
Monitoring Concurrent Programs ..................................................... 9-8

Introduction 1-1
1
Introduction
Preventive Controls Governor is a set of applications that run within Oracle E-Business Suite as a component of the Governance, Risk, and Compliance Controls Suite. Preventive Controls Governor applications include:
• Form Rules, which modifies the security, navigation, field, and data properties of Oracle EBS forms.
• Flow Rules, which defines and implements business processes.
• Audit Rules, which tracks changes to the values of fields in database tables that underlie Oracle EBS.
• Change Control, which regulates changes to the values of fields in Oracle EBS forms. It can monitor change, require a reason for a change, or require approval for a change.
Moreover, each application generates reports of its results, and utility programs pro-vide a variety of supporting features, including the following:
• Form Rules includes a Form Extensions tool, which enables users to create forms that open from (and so extend the capabilities of) existing Oracle E-Business Suite forms.
• Form rules and change-control rules may specify “subscribers,” which define circumstances under which the rule is enforced. For example, a rule may apply to a specified set of users or responsibilities.
• Rules of any type may be migrated from one Oracle EBS instance to another.
• Form rules and flow rules may be gathered into “libraries,” which may be mi-grated from one Oracle EBS instance to another.
Prerequisites You are assumed to have a basic understanding of the Oracle EBS modules for which your organization is deploying Preventive Controls Governor. Although the creation of rules does not require a knowledge of programming languages, Preven-tive Controls Governor tools permit the direct manipulation of structured query lan-guage (SQL) code, so a knowledge of SQL is helpful. Moreover, you are expected to

1-2 Oracle Preventive Controls Governor User Guide
have some knowledge of the relationships among tables and views (and their primary keys) in your Oracle database.
Starting Preventive Controls Governor
To open Preventive Controls Governor:
1. Log on to Oracle E-Business Suite.
2. Select GRC Controls in your list of responsibilities. (Ensure first that the GRC Controls responsibility is available to you.)
3. Select the application with which you want to work — Form Rules, Flow Rules, Audit Rules, or Change Control — under the Preventive Controls Governor heading.
If you selected Form Rules, Flow Rules, or Audit Rules, a form called “GRC Controls — Oracle Rules” opens. It displays three tabs, one for each of the Form, Flow, and Audit components; the one you chose in step 3 is active. From any one of these, you can select the tab for (and so use) either of the other two.
The Change Control component opens in its own form — the Change Control Wizard.
If you close either the Oracle Rules form or the Change Control Wizard, you can reopen any of the applications:
1. In the GRC Controls Navigator, expand the Preventive Controls Governor option (double-click on its plus sign).
2. Under the expanded option, double-click on Form Rules, Flow Rules, Audit Rules, or Change Control. Or single-click on one of these options, and then on the Open button.

Creating Form Rules 2-1
2
Creating Form Rules
The Form Rules application enables users to write rules that modify the security, navigation, field, and data properties of Oracle E-Business Suite forms. To use the Form Rules application, ensure that its tab is selected in the GRC Controls — Oracle Rules form (see page 1-2).
Each form rule consists of subordinate rules, called “rule elements.” Each element targets a form, a block within a form, or a field within a block. Each also specifies an “event” that triggers processing — for example, the act of opening a target form or navigating to a target block or field. Finally, each element defines customizations to the target form, or to its blocks, fields, tabs, or other components. Rule elements can do the following:
• Set security attributes. These can mandate that data entry be required; that up-dates, insertions, or deletions be prevented; or that items be hidden from view.
• Establish navigation paths from a target form to other Oracle EBS forms, or to forms created through use of a tool called Form Extensions.
• Display messages.
• Define default values for fields, compile lists of values to be selected from fields, or set other field attributes.
• Run structured query language (SQL) statements.
• Execute processes defined in the Flow Rules application.
Each form rule may specify “subscribers,” which designate users, responsibilities, or other entities to which the rule applies. If no subscriber is defined for a rule, it applies universally. (For more on subscribers, see Chapter 6). Form Rules also provides a tool for “migrating” rules from one Oracle E-Business Suite instance to another (see Chapter 8).
Creating a Form Rule and Its Elements To work with Form Rules, begin by naming a rule and providing basic information for one or more elements — for each, a target and an event that initiates processing.
As the target for an element, select, at minimum, an Oracle E- Business Suite form. Depending on the event you intend to call, you may also specify a block or a field on

2-2 Oracle Preventive Controls Governor User Guide
the form. If, for example, you choose a When New Form event (which triggers the rule element to run when a user opens a specified form), you designate only the form as a target. If, among several other events, you choose When New Item (which triggers the rule element to run each time a user navigates to a field), you typically designate a form, a block within the form, and finally a target field within the block.
To select a block or a field, you may first use a specialized event — the Event Tracker — to “capture” the blocks and fields that belong to a form.
Creating a Rule
When Form Rules starts, the following form opens. Use it to create or review form rules.
To create a new rule:
1. Type a name for the rule in the Rule Name field.
2. In the Description field, briefly explain the purpose of the rule.
3. Select the Debug text box to cause Form Rules to display messages as the rule is being run. Or clear the text box to prevent the display of such messages.
4. Select the Active check box to make the rule active, or clear the text box to hold the rule in reserve.
The Subscribers Exist check box is read-only, selected if you have defined at least one subscriber for the rule (or any of its elements), or cleared if you have not.
Beginning to Create a Rule Element
Once the rule itself is named and described, you can create rule elements, one per row in the Rule Elements grid:
1. In the Seq field, type a number.

Creating Form Rules 2-3
2. In the Element Name field, type a name for the element.
3. Specify the form that either is itself the target of the element, or contains a block or field that is to be the target. Do this in either of two ways:
• In the Form Name field, select the internal name for the form. Form Rules then supplies a corresponding value in the User Form Name field.
• In the User Form Name field, select the “user friendly,” display name for the form. Form Rules then supplies a corresponding value in the Form Name field.
Form Rules does not recognize blocks, fields, or other items on a form until you run the Event Tracker. If the target of an element is to be a block or field, or if you expect to cite specific items as you define how an element modifies its target, use the frag-ment of the element you have created so far as a vehicle to run the Event Tracker.
Using the Event Tracker
Use the Event Tracker to “capture” blocks and fields for either of two purposes: for selection in the Block Name and Field Name fields of the home Form Rules form as you set the target of a rule element, or for selection later as you define how the element modifies a target form or items on it. Moreover, as you run the Event Tracker, you can set some security attributes for the target form.
Capturing Items from a Form
To capture blocks, fields, or other form items, complete these steps:
1. Fill in the Seq, Element Name, and Form Name fields in a row of the Rule Ele-ments grid (as described in “Beginning to Create a Rule Element,” page 2-2).
2. In the Event list of values, select the value Event Tracker.
3. Save the rule: click on File in the menu bar, then on Save in the file menu.
4. Respond to two messages that appear as a result of your having selected the Event Tracker:
• The first provides brief instructions on the use of the Event Tracker. After reading the message, click its OK button to close it.
• In the second, click the Append button to add items to an existing collection of “metadata” (items already captured) for the form you have chosen. Or select the Replace button to discard older metadata and begin a new collection.
5. Open the Oracle EBS application that contains the form you have chosen. Navigate to the form and, in it, navigate to each block and field you may want to select as you work with Form Rules rule elements. Create or update a record and save your work.
By doing so, you capture a reference to each item you touch, as well as to “un-documented” events associated with the form. The items you capture become available in Form Rules in any rule element that targets the form, not only in the element from which you launched the Event Tracker.

2-4 Oracle Preventive Controls Governor User Guide
Using the Event Tracker to Set Security
When you open an Oracle EBS form for which you are running the Event Tracker, an Oracle Rules Actions menu provides options for setting security properties on the form. (If you set security properties from within Form Rules, though, you have a wider selection of options. See “Setting Security,” page 2-6.) To use the menu:
1. Create a rule element, select the Event Tracker, and open the Oracle EBS form that is the target of the element (as described in “Capturing Items from a Form,” page 2-3). The Oracle Rules Actions menu appears with the Oracle EBS form only if it is the target of a rule element for which the Event Tracker has been selected.
2. Click on a field for which you want to set security, or one that exists in a block or tab for which you want to set security.
3. Click on Oracle Rules Actions in the menu bar, and then on any of the following options.
• Prevent Update to Block: Prevent an existing value from being changed for any field in the block where the cursor is located.
• Prevent Insert to Block: Prevent an original value from being entered for any empty field in the block where the cursor is located.
• Prevent Update to Field: Prevent an existing value from being changed for the selected field.
• Hide Field: Remove the selected field from the form.
• Make This Field Required: Prevent a user from selecting a new record or closing a form if no value has been saved in the selected field.
• Enforce Uppercase on This Field: Require that data entered in the selected field be all upper case.
• Hide This Tab: Remove the tab that contains the selected field, and all the fields associated with it, from the form.
• Get Field Properties: Capture the properties of the selected field. (This is essentially the same as simply navigating to the field with the Event Tracker running.)
4. A message informs you that a rule is created. Click on the OK button to close the message.
The security attributes you configure through use of the Event Tracker take effect when you complete the definition of the Rule Element from which you are running the Event Tracker. (See the next section.)
Completing the Rule Element Definition
To complete the rule element, open Form Rules (if you’ve closed it to apply the Event Tracker to an Oracle EBS form) and select the rule with which you want to work. If you’ve created a fragmentary element for the purpose of running the Event Tracker, select that element. If you’re creating a new element from scratch, perform steps 1–3 in “Beginning to Create a Rule Element” (page 2-2). Then:

Creating Form Rules 2-5
1. In the Event field, select (or replace the value Event Tracker with) an event that determines the circumstances under which the rule element is to be evaluated. Choose among the following:
• When New Form: The element fires when a user opens its target form. If you select this event, you cannot enter values in the Block Name and Field Name fields.
• When New Block: The element fires when a user navigates from one block to another in the target form. Or, if you select a value in the Block Name field (which is recommended), the element fires when a user navigates to the specified block.
• When New Item: The element fires when a user navigates from one field to another in the target form. Or, if you select a value in each of the Block Name and Field Name fields (which is recommended), the element fires when a user navigates to the specified field.
• When New Record: The element fires when a user navigates from one record (new or existing) to another. You may select a block name if you want to restrict the firing to the selection of a record within the specified block.
• When Validate Record: The element fires whenever a user saves a record. You may select a block name if you want to restrict the firing to the saving of a record while the cursor is located in the specified block.
• Zoom Special: This special event makes a zoom regardless of subscribers. It ignores the subscribers until the moment the zoom is pressed. So it enables conditional use of the zoom to navigate to different entities. In essence the zoom shows up regardless of the subscribers, but does not function when a user tries to zoom and the subscriber evaluates as false.
• Undocumented events: Undocumented events associated with the target form appear in the Event list of values if they have been captured by the Event Tracker.
You can also capture undocumented events manually (see page 6-6). No matter how such events are captured, however, Oracle does not support them and the installation of a patch may cause them to disappear.
• Audit: The Audit event is no longer supported. Do not select it.
2. If you want the element to target a block or a field, and you’ve selected an event that allows it to do so, select the block in the Block Name field, which offers a selection of values captured by the Event Tracker.
3. If you want the element to target a field, and you’ve selected an event that allows it to do so, select the field in the Field Name field, which offers a selection of values that have been captured by the Event Tracker and that exist in the block you selected in step 2.
4. Select the Debug text box to cause Form Rules to display messages as the rule element is being run. Or clear the text box to prevent the display of such messages.
5. Select the Active check box to make the element active, or clear the text box to hold the element in reserve.
6. Save the rule. Click on File in the menu bar, then on Save in the File menu.

2-6 Oracle Preventive Controls Governor User Guide
Configuring Rule Element Details
When you have created a rule element — selected its target form, block, or field, and chosen the event that triggers its use — you need to define what the element does.
To do so, click on the element in the Rule Elements grid of the home Form Rules form, and then click on the Details button. A Business Rule Details form then appears. Click on its tabs to expose panels in which you can assign security attrib-utes; set navigation paths; create messages; define default values, lists of values, or other field attributes; run SQL statements; and run processes defined in the Flow Rules application.
First, however, note that certain fields are already completed. The values on display reflect the selections you made for the rule element in the home Form Rules form. These include the Form Name, Element Description, Event, Block Name, and Field Name fields near the top of the form. You can alter these values only indirectly, by changing rule-element values in the home Form Rules form.
Setting Security
You can assign security attributes to forms, blocks, tabs, fields, and descriptive flexfields (DFF). Attributes are available to each of these components in varying combinations. You can restrict the ability to update, insert, or delete data; require that data be entered or that text entries be in upper or lower case; or hide screen items.
To set these security attributes, use the Security panel, which is selected by default when you open the Business Rule Details form. If you navigate to another panel in the Business Rule Details form, you can return to the Security panel by clicking on the Security tab.

Creating Form Rules 2-7
If you have used the Event Tracker (page 2-4) to set security attributes, each setting occupies a row in the Security panel. To set security attributes for field instances, use the Field Attributes panel (page 2-16), not the security panel.
Selecting Components
In each row of the security grid, select a component whose attributes you want to set:
1. In the Type list box, choose whether you want to set security attributes for the target Form, or for a Block, Tab, Field, or DFF on the form.
2. In the Block/Tab and Field Name fields, select the component whose type you identified in step 1:
• If you selected the Form type, leave both fields blank.
• If you selected the Block, Tab, or DFF type, choose a value in the Block/ Tab field and leave the Field Name field blank.
• If you selected the Field type, choose values in both fields.
If you intend to set security for a number of fields, you can select them all at once:
1. Click on Tools in the menu bar, and then on Oracle Rules Form Elements in the Tools menu. The following Form Elements form appears:
This form displays a selection of fields that depends on the choices you made as you created the rule element in the home Form Rules form:
• If you left the Block Name and Field Name fields blank as you created the rule element in the home Form Rules form, the Form Elements form shows all fields captured by the Event Tracker, from all blocks on the target form.
• If you selected a Block Name but not a Field Name as you created the rule element in the home Form Rules form, the Form Elements form shows all the fields from the selected block that were captured by the Event Tracker.
• If you selected a Block Name and a Field Name as you created the rule element in the home Form Rules form, the Form Elements form shows only the selected field.
2. For each field you want, click on the Include Flag check box. Or, to select all fields, click on the Select All button. (The De-Select All button removes check marks from all check boxes.)

2-8 Oracle Preventive Controls Governor User Guide
3. When you are satisfied with your selection, click on the Accept button. The Form Elements form closes, and the fields you chose appear in the Security grid of the Business Rule Details form. (You can click on the Close button to close the Form Elements form without accepting any selected fields.)
Assigning Security Attributes
For each of the components you’ve selected, assign security attributes. For the most part, these are controlled by the Case field and the check boxes, which are available to the component types marked by the × symbol in the following table:
Available to
Attribute Description Field DFF Block Form Tab
Case Field values must be entered in upper case (Upper), lower case
(Lower), or mixed case (blank).
×
Required If the check box is selected, a field value must be entered.
×
No Update If the check box is selected, an existing value cannot be
changed.
× × × ×
No Insert If the check box is selected, a new value cannot be entered.
× × ×
No Delete If the check box is selected, existing values cannot be
deleted.
× ×
Hide If the check box is selected, the screen component is
hidden from the user’s view.
× × ×
Active If the check box is selected, the attributes selected in the
Case field and the check boxes become active.
× × × × ×
For the Block component type, you can also enter values in two text boxes that appear only when that type is selected:
• Default Where: Enter a SQL “where” statement that creates a filter — the block can display only records for which a field is set to a value specified in the SQL statement. For example, where vendor_type_disp = 'Employee'
• Order By: A block may present multiple records. For example, a query may re-turn records for which a field value matches a search value, then load records in the form one-by-one for display. Or, a block may present data in a grid, with each column corresponding to a field, and each row containing related values for a set of fields — a record.
For such occasions, you can order the data records. Choose a field, and its values are arranged in alphanumeric order (and values for other fields are arranged so that records remain intact). Choose a second field to determine the sort order for records in which values for the first field are identical. Continue specifying any number of fields. Use the following syntax: Order by field_1, field_2, ... field_x

Creating Form Rules 2-9
Setting Navigation Paths
You can create entries in the Tools, Actions, or Reports menu of a target form, each of which, when clicked, opens another form (or, in a special case, executes a Form Rules rule element). You can also create “zooms” — similar links that are activated when a user clicks on the Zoom button in the tool bar.
Typically, such a link becomes active when a form is first opened, and so you would create such links for rule elements that use the When New Form event. Moreover, a navigational link works only if the source and destination forms are both available within a single responsibility. If a user does not have access to a form, a naviga-tional link created in Form Rules will not take him there.
To create navigation links, click the Navigation tab in the Business Rule Details form:
Creating Menu Links
To add a navigation link to a menu in the target form, complete a row in the Menus section:
1. In the Sequence field, select a sequence number prefixed by the name of the menu to which you want to add the link. (The higher the number you select, the more remote is the possibility of overwriting an existing menu option.)
2. In the Label field, type a name for the link. This name will appear as an option in the menu you selected in step 1.
3. In the To Function list of values, select the user function name that corresponds to the form to which you are creating a link. To ascertain the user function name:
a Determine the internal name for the form to which you are creating a link.
b Switch to the Application Developer responsibility and select the Application > Form option. Using the form name you determined in step a, query on the Form field and note the corresponding value in the User Form Name field. (To query, press the F11 key. Type the value for which you are querying in the appropriate field, and then press Ctrl+F11.)
2-10 Oracle Preventive Controls Governor User Guide
c Still in the Application Developer responsibility, select the Application > Function option. In the Form field of its Form tab, query on the user form name value you determined in step 3b. Then click on the Description tab and make a note of the value in the User Function Name field.
4. If your function takes parameters, the Parameters field displays a template indi-cating what those parameters are. Replace the placeholders (the text surrounded by angle brackets) with actual values. If the Parameters field remains blank after you select a function, you need not supply parameters; you can, however, enter QUERY_ONLY="YES" to make the destination form open in query-only mode.
5. In the Icon Name field, accept the default value.
6. Ensure that the Active check box is selected.
Special Cases
Two checkboxes enable you to adapt navigation links to specialized purposes. First, a Disable Menu option turns off an existing menu item, even one supplied in a standard Oracle menu:
1. Ensure that you are working with a rule element that targets the form whose menu option you want to disable, and that it uses the When New Form event.
2. In the Sequence field, select the value assigned to the menu option you want to disable. (You can determine the appropriate number by opening the menu in question and observing the position of the option.)
3. In the Label field, type the label assigned to the menu option you want to disable.
4. In the To Function field, select the user function name that corresponds to the form whose menu option you want to disable. (See step 3 in the procedure just before this one.)
5. Select the Disable Menu check box. (Make sure also that the Active check box is selected.)
Second, you can create a link to a Form Rules rule element — for example, one that runs a SQL script — so that users can click on a menu option to run that rule element:
1. Ensure that you are working with a rule element that targets the form from which you want the menu option to appear, and that it uses the When New Form event.
2. In the Sequence and Label fields, select a sequence number prefixed by the name of the menu to which you want to add the option, and the label for the option, as normal.
3. Leave the To Function, Parameters, and Icon Name fields blank.
4. Select the Formrules Special check box. (Make sure also that the Active check box is selected.)
5. Return to the home Form Rules form to create a new rule element. You will discover that the selection of events available to that element includes the value Special, followed by the sequence number you selected in step 2. Choose that event, and leave the Block Name and Field Name fields blank. Use the Business Rule Details form to define what you want that rule element to do.
When that process is complete, a user can click on the menu item you created to execute the rule element you created in step 5.

Creating Form Rules 2-11
Creating Zooms
A Zoom enables a user to move from a block to another form by clicking on the Zoom button in the Oracle EBS tool bar. You can create only one zoom per block. To do so, use the Zooms section of the Navigation panel:
1. In the From Block list of values, select the block from which you want to enable the zoom. The LOV presents all of the blocks for the target form that you have captured through use of the Event Tracker.
2. In the To Function list of values, select the user function name that corresponds to the form for which you are creating a link. (Once again, you can use Appli-cation Developer features to determine the correct value, as described in step 3 of “Creating Menu Links” on page 2-9.)
3. If the function takes parameters, the Parameters field displays a template indi-cating what those parameters are. If so, replace the placeholders (text surrounded by angle brackets) with actual values. If the Parameters field remains blank after you select a function, you need not supply parameters; you can, however, of entering QUERY_ONLY="YES" to make the destination form open in query-only mode.
4. Ensure that the Active check box is selected.
Creating Messages
You can write messages that appear when a user performs an action corresponding to the event you have chosen for a rule element — for example, opening a form, navigating to a field, or saving a record. Click on the Messages tab in the Business Rule Details form:
To create a message:
1. In the Sequence field, enter a number that reflects the order in which you want this message to appear in relation to other messages you may create in other rows.
2-12 Oracle Preventive Controls Governor User Guide
2. In the Description field, briefly explain the purpose of the message.
3. In the Message Type list box, select one of the following:
• Note: The message appears, but the user is able to continue working.
• Error: The message appears, and the user is prevented from saving a record. As a result, select this type for messages associated with rule elements that use the When Validate Record event.
4. Write the message in the Message text box. A message can contain not only text, but also field names. Use this syntax: #:BLOCK.FIELD_NAME#. At run time, the field names are replaced by values associated with the currently selected record.
A message can be made to appear only when certain data conditions are met — for example, a promotional message may appear when a user enters a certain item on an order. To make this happen:
1. Create the message for a rule element based on the When New Item event.
2. Create an element subscriber with a Data filter type so that the message appears only when the correct data is entered. (See Chapter 4 for information on creating subscribers.)
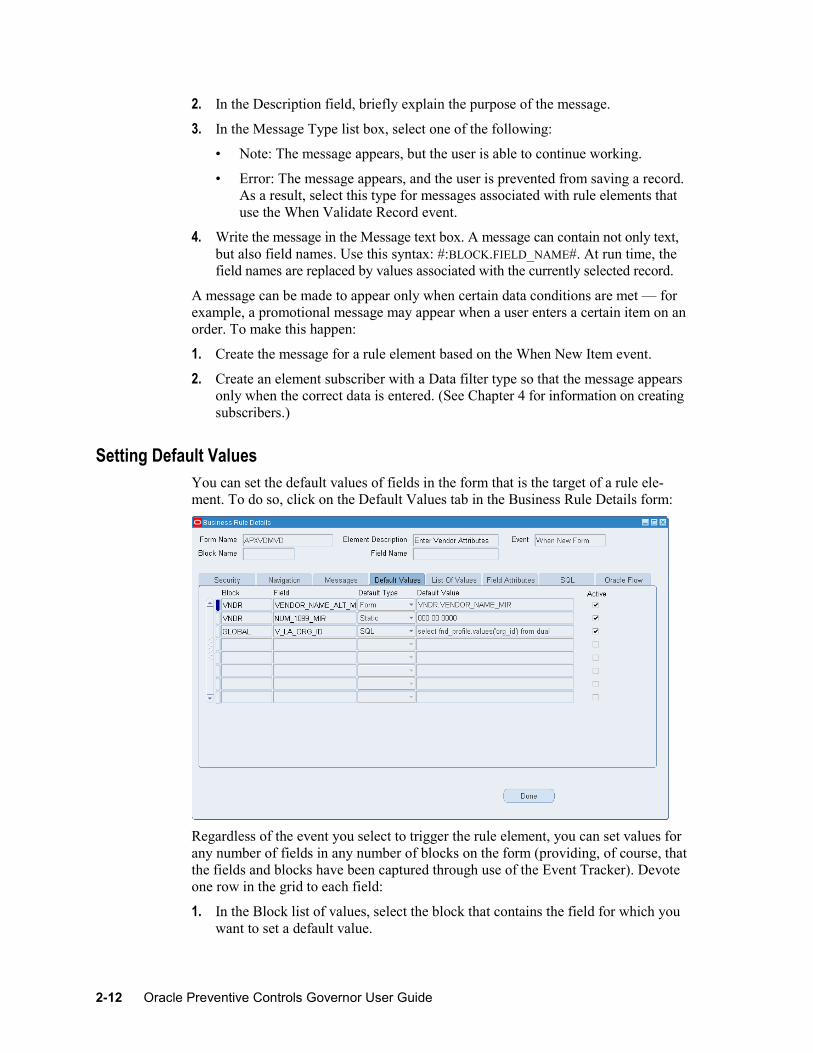
Setting Default Values
You can set the default values of fields in the form that is the target of a rule ele-ment. To do so, click on the Default Values tab in the Business Rule Details form:
Regardless of the event you select to trigger the rule element, you can set values for any number of fields in any number of blocks on the form (providing, of course, that the fields and blocks have been captured through use of the Event Tracker). Devote one row in the grid to each field:
1. In the Block list of values, select the block that contains the field for which you want to set a default value.

Creating Form Rules 2-13
2. In the Field list of values, select the field for which you want to set a default value.
3. In the Default Type list box, select one of these values:
• Static. The default value is a constant.
• Form. The default value is a copy of the value entered for another field on the form.
• SQL. The default is a value returned by a SQL statement.
4. In the Default Value field, type an entry appropriate for the selection you made in the Default Type list box:
• If you selected Static, type the value that serves as the default.
• If you selected Form, identify the field that returns a default value. Use the format BLOCK_NAME.FIELD_NAME — the internal names for the block that contains the field and the field itself.
• If you selected SQL, type a SQL statement that returns values for use as defaults.
5. Ensure that the Active check box is selected.
Creating and Modifying Lists of Values
You can both alter existing lists of values or create new LOVs. Before you do so, you must run the Event Tracker (see page 2-3) on fields for which you want to create or modify LOVs.
Altering an Existing LOV
To alter an existing LOV is to select the field and then modify the SQL statement that compiles the values displayed in the field. You cannot, however, modify the “select” portion of the SQL statement, which identifies the database columns that return values to the LOV. You can alter only the “where” and “sort by” portions of the statement, which specify the conditions under which records are selected to be returned, and the order in which they are arranged.
1. In Form Rules, ensure that you have created a rule and rule element that you want to use to modify the LOV. The element must select, as a target, the form on which the LOV exists. (It’s often the case that this element would use When New Form as an event; if so, the form is all you need select as a target. If you choose an event that requires you to do so, however, also choose a block and/or a field.)
2. Navigate to the form that contains the LOV you want to change, and click in the LOV.
3. Run a trace file:
a Click on Help in the menu bar, then Diagnostics in the Help menu, and then Trace in the Diagnostics submenu. Select the Regular Trace radio button. (If you have not already used a Diagnostics option, an Enable Diagnostics dialog prompts you for your Oracle password. Enter it, and click on the OK button to clear the dialog. A note informs you that tracing is activated and

2-14 Oracle Preventive Controls Governor User Guide
provides the path and name of a trace file. Click on the OK button to clear the note.)
b In the LOV you want to change, select any value.
c Click on Help in the menu bar, then Diagnostics in the Help menu, and then Trace in the Diagnostics submenu. Select the No Trace radio button. (Another message informs you that tracing is deactivated and provides the path and name of a trace file. Click on the OK button to clear the note.)
4. Open Form Rules and use a utility called TKProf to examine your trace file:
a Click on GRC Controls Utilities in the menu bar, and then on Oracle Rules TKProf Utility in the Utilities menu.
b A concurrent request runs, and a message informs you of its identification number. Make a note of the number and click on the OK button to close the message.
c Click on View in the menu bar, and then on Requests in the View menu.
d A Find Requests form opens. Click on the Specific Requests radio button and, in the Request ID field, enter the ID number for your request. Click on the Find button.
e A Requests form appears; its grid contains an entry for your request. When its status is Completed (you may need to click the Refresh Data button), click on the View Log button.
f In the log file, search for the SQL statement that generates values for the LOV. (Typically, it begins, "select displayed_field,description,lookup_code from".) Leave the log file open.
5. In Form Rules, select the rule and element you want to use to modify the LOV. Click on the Details button and, in the Business Rule Details form, click on the List of Values tab.

Creating Form Rules 2-15
6. In the Block Name field, select the block where the LOV exists; in the Field Name field, select the field where the LOV exists. Accept default values in the Record Group and LOV Name fields, and be sure the Active check box is selected.
7. In the log file, copy the SQL statement for your LOV (highlight it and press Ctrl+C). In the Form Rules Business Rule Details form, click on the SQL Text area of the List of Values panel. Press Ctrl+V to paste the SQL statement there.
8. Close the log file (click on the × symbol in its upper right corner). In the Form Rules List of Values panel, edit the SQL statement as you desire. Remember that you can modify only the “where” and “sort by” clauses. If bind variables exist in the statement (they may appear as :1 or :5), you may have to open the form to identify the actual SQL that is being executed.
Creating a New LOV
To create a new LOV is to convert an existing text-entry field for use as a list of values. The process involves identifying the field (after first having used the Event Tracker to capture it) and creating a SQL statement that compiles values the field is to display.
1. Ensure that you have created a Form Rules rule and rule element that you want to use to create the LOV. The rule element must specify, as a target, the field you intend to make into a list of values (and therefore, of course, the block and form that contain the field), and it must use the When New Item event.
2. In Form Rules, select the rule and element, click on the Details button and, in the Business Rule Details form, click on the List of Values tab.
3. In the Block field, select the block where the LOV exists; in the Field Name field, select the field where the LOV exists. The Record Group field defaults to a value that begins with “LA_” and the LOV Name field defaults to “APPCORE_ ZOOM”; accept these values. Be sure the Active check box is selected.

2-16 Oracle Preventive Controls Governor User Guide
4. The SQL Text field displays a “stub” SQL statement. You may edit it or replace it entirely, to create either a static list or one that returns values determined at runtime. Keep the following in mind:
• The SQL statement can specify only two return columns, with the aliases NAME and VALUE.
• The template constitutes one line of a SQL statement that returns one value. To create multiple values in a static LOV, use the UNION statement. For example, the following SQL statement returns the values High, Medium, and Low:
SELECT 'High' NAME, 'High' VALUE FROM DUAL UNION SELECT 'Medium' NAME, 'Medium' VALUE FROM DUAL UNION SELECT 'Low' NAME, 'Low' VALUE FROM DUAL
• In the template, the value DUAL is a placeholder for a table name. To cre-ate a static list of values, leave it as is; to create a list of values determined at runtime, replace it with the name of the table that supplies values.
Setting Field Attributes
You can designate the display properties of blocks and fields, such as the position-ing, color, size, and weight of items. You can also set security properties for field instances. To do so, click on the Field Attributes tab in the Business Rule Details form:
Set an attribute for one block, field, or field instance in each row of the grid:
1. In the Seq field, type a number that reflects the order in which you want this attribute to be set with respect to other attributes listed in the grid.
2. In the Type list box, choose whether you want to set an attribute for a block, field, or field instance.

Creating Form Rules 2-17
3. Select the component whose type you identified in step 2. If you selected the Block type, choose a value in the Block Name list of values and leave the Field Name list of values blank. If you selected the Field or Field Instance type, choose values in both the Block Name and Field Name LOVs. (The LOVs display blocks and fields you have captured through use of the Event Tracker.)
A “field” is a set of like values, while a “field instance” is an individual value for a field. For example, when a form presents a grid, a “field” is an entire column in the grid, and a “field instance” is an individual cell in the column. Field attributes apply no matter what the value of a field is. If you create field-instance attributes, you need to define the instances to which the attributes apply. To do this, create a data subscriber that targets the field you selected in step 3; the attributes you create would take effect when the subscriber definition evaluates to true. Take care that field-instance security attributes defined here do not conflict with field security attributes defined in the Security panel.
4. In the Property list box, select an attribute you want to set for the component you have identified. Attributes vary by component type; for descriptions, see the lists following step 6 of this procedure.
5. In the Value field, type or select the value that sets the attribute. For example, if you selected Background Color in the Property field, you would select a specific color — for example, red — in the value field.
6. Select the Enabled Flag check box to activate the attribute, or clear the check box to deactivate the attribute.
Block Attributes
You can set the following block attributes:
• Blockscrollbar X Pos: Sets the horizontal starting point for the scroll bar, from the left of the block. Type a number of pixels.
• Blockscrollbar Y Pos: Sets the vertical starting point for the scroll bar, from the top of the block. Type a number of pixels.
• Current Row Background Color: For the row on which the cursor is focused, sets the color of the space surrounding field entries. Select from six colors.
• Current Row Font Size: Sets the type size for entries in the row on which the cursor is focused. Select a number from 1 to 18 points.
• Current Row Font Weight: Sets the thickness of type for entries in the row on which the cursor is focused. Select from nine weights.
• Current Row Foreground Color: For the row on which the cursor is focused, sets the color of field entries. Select from six colors.
• Next Navigation Block: Sets the block to which the cursor moves if a user presses the Tab key from the last field in the current block. Type a block name.
• Previous Navigation Block: Sets the block to which the cursor moves if a user presses Shift+Tab from the first field in the current block. Type a block name.
• Query Allowed: Determines whether a user can query fields in the block — search for records with a field set to a value that matches a search value. Select TRUE or FALSE.

2-18 Oracle Preventive Controls Governor User Guide
• Query Data Source Name: Sets the database table or view searched for records in response to a query. Type the name of a database table or view.
Field Attributes
You can set the following field attributes:
• Background Color: Sets the color of space surrounding field entries. (For a field instance in a selected row, the Current Row Background Color setting for the block takes precedence.) Select from six colors.
• Conceal Data: Presents asterisks rather than actual entries for a field. Enter TRUE; to set the value to FALSE, do not select this attribute.
• Font Size: Sets the type size for field entries. (For a field instance in a selected row, the Current Row Font Size setting for the block takes precedence.) Select a number from 1 to 18 points.
• Font Weight: Sets the thickness of type for field entries. (For a field instance in a selected row, the Current Row Font Weight setting for the block takes precedence.) Select from nine weights.
• Foreground Color: Sets the color of field entries. For a field instance in a selected row, the Current Row Foreground Color setting for the block takes precedence.) Select from six colors.
• Format Mask: Imposes formatting on numeric or date fields:
999"-"99"-"999 Social Security Number
$999,999,999.99 Monetary value, US currency up to $1 billion
999,999,999.9999 Numeric with thousand separators, up to four decimals
999,999,999.99 Numeric with thousand separators, up to two decimals
L99G999D99 Local currency with thousand separators, two decimals
0999 Number, up to four digits, with leading zeros
DD-MONTH-YYYY Date, with month spelled out
DD-MON-YYYY HH24:MI:SS Date and time, with month abbreviated
• Height: Sets the vertical dimension of the field. Type a number of pixels.
• Hint Text: Creates a message that provides information about the field in a status bar at the bottom of the screen. Type the message of up to 30 characters.
• Next Navigation Item: Sets the field to which the cursor moves if the user presses the tab key. Select from a list of field names.
• Previous Navigation Item: Sets the field to which the cursor moves if the user presses Shift+Tab. Select from a list of field names.
• Prompt Text: Creates a display name that identifies the field on screen. Type the label of up to 30 characters.
• Width: Sets the horizontal dimension of the field. Type a number of pixels.

Creating Form Rules 2-19
• X Pos: Sets the horizontal starting point for the field, from the left of its block. Type a number of pixels.
• Y Pos: Sets the vertical starting point for the field, from the top of its block. Type a number of pixels.
Field Instance Attributes
You can set the following field instance attributes:
• Insert Allowed: Determines whether a user may enter data if the field instance is blank. Select TRUE or FALSE.
• Navigable: Determines whether a user may select the field instance. Select TRUE or FALSE.
• Required: Determines whether a user must enter data in a field instance. Select TRUE or FALSE.
• Update Allowed: Determines whether a user may alter existing data in a field instance. Select TRUE or FALSE.
Creating SQL Procedures
You can create SQL statements that are executed when a user performs an action corresponding to the event you have chosen for a rule element. To do so, click on the SQL tab in the Business Rule Details form. Create any number of statements, one per row in the grid.
1. In the Sequence Num field, type a number that reflects the order in which you want this SQL statement to be executed in relation to other statements you may create in other rows.
2. In the Procedure Name field, type a name for the SQL statement.
3. Ensure that the Active check box is selected to use the statement, or clear the check box to hold the statement in reserve.

2-20 Oracle Preventive Controls Governor User Guide
4. The SQL Text field displays a template. Substitute actual values for placeholder values in the template, or replace the template entirely with a statement of your own.
• You may not reference form bind variables directly.
• To reference a field, you must use the “name_in” function.
• Declare variables before the BEGIN keyword. Do not use the word Declare in the SQL text.
5. Click on the Compile All Active SQL Rules button. (Or, as an alternative, click on Tools in the menu bar and then on Oracle Rules Compile All Active SQL Rules in the Tools menu.) This has two effects:
• A concurrent request runs to compile the code. A message informs you of its identification number. Make a note of the number and click on the OK button to close the message.
• A validation procedure determines whether the SQL is syntactically correct.
6. Review the concurrent program log for errors.
a Click on View in the menu bar, and then on Requests in the View menu.
b A Find Requests form opens. Click on the Specific Requests radio button and, in the Request ID field, enter the ID number for your request. Click on the Find button.
c A Requests form appears; its grid contains an entry for your request. When its status is Completed (you may need to click the Refresh Data button), click on the View Log button.
7. If successful, exit Oracle EBS and log back in. SQL rules are implemented via the custom library, which may be cached when you log in. To test recently compiled rules, log out and log in to the application.
Running Flow Rules Processes
The Flow Rules application defines and implements business processes (see Chapter 3). A Flow Rules process may be configured to run in response to a “triggering” event, typically the insertion or updating of a record in a specified database table. For such a process, a Form Rules rule may instead define the event that triggers the Flow Rules process to run. (A Flow Rules process may be configured to run on a regular schedule rather than in response to a trigger; if so, the process cannot be run from within Form Rules.)
To prepare a Flow Rules process to be called from a Form Rules rule:
• Among your entries in the Process Rule Details panel of the home Flow Rules form, select Trigger in the Event/Periodic field. In the Primary Keys panel, select the table with which the process is linked, and its primary keys. In the Display Table/View Columns panel, choose the appropriate table and display column settings. Set start and end dates in the Effectivity Dates panel. (For details, see “Creating a Process Rule,” page 3-1.)

Creating Form Rules 2-21
• Leave launch criteria unconfigured.
• Create “process flows” to define the actions that the process sets in motion. (See “Configuring Elements Called by Rules” on page 3-7 and “Creating Process Flows” on page 3-17.)
Then, in Form Rules, create the rule element that is to launch the process. The form that you select as the target of this element must correspond to the table with which the Flow Rules process is linked. (That is, the table must be the one that stores the data accepted or displayed by the form.)
In the Business Rule Details form, click on the Flow Rules tab. Complete one row of the grid for each Flow Rules process you want to run. As you do, you will not only identify the process, but also specify one or two primary-key values to be passed to the Flow Rules process. (These serve to identify a record from the table with which the process is linked, and upon which the process acts.)
1. In the Sequence field, type a number that reflects the order in which you want this process to run with respect to other processes listed in the grid.
2. In the Process list of values, select the process you want to run.
3. In the Type list box, select Form if you intend to have primary-key values supplied by fields from the form that is the target of the rule element. Select Static if you intend set constants as primary-key values.
4. If you selected Form in step 3, use the Disposition Id1 field to provide the name of the form field that corresponds to the first primary key in the table with which the Flow Rules process is linked. If the table has a second primary key, provide the name of its corresponding form field in the Disposition Id2 field. Use the format BLOCK_NAME.FIELD_NAME.
If you selected Static in step 3, type a constant value in the Disposition Id1 field; if the Flow Rules process is linked with a table that has two primary keys, enter a second constant in the Disposition Id2 field. In each case, make sure the value is of the data type defined for its corresponding primary key column.

2-22 Oracle Preventive Controls Governor User Guide
5. Ensure that the Active check box is selected to run the process. Or clear the check box to prevent the process from being run.
Saving Rule Element Details
When you are finished configuring details for a rule element, click on the Done button to close the Business Rule Details form. Then save your work: Click on File in the menu bar and then on Save in the File menu.
Using the Form Extensions Tool
A Form Extensions tool enables you to create forms, each of which can contain text-entry, list-of-values, or date fields. Having created a form, you would then create a navigation rule to make the new form accessible from an existing Oracle EBS form.
Creating a New Form
To create a form, ensure that the Form Rules tab is selected in the GRC Controls — Oracle Rules form. Click on Tools in the menu bar, and then Form Extensions in the Tools menu. The following form appears:
In the unlabeled grid at the top, use one row for each form you create:
1. Type a name in the Extension field. This is the display name, which appears in the title bar of the form you are creating. It is also a value you will use as you create the navigation rule that links your form to an existing Oracle EBS form.
2. Optionally, in the Description field, briefly explain the purpose of the form.
For the currently selected row in the top of the Form Extensions form, use the Ex-tension Elements grid to define the fields your form is to contain, one field per row:
1. In the Attribute list box, select a value labeled Attribute or Date, followed by a number. Selecting Attribute creates a text-entry or LOV field, while selecting Date creates a date field, on the form. The number sets the order in which the field is listed with respect to others; the lower the number, the higher the posi-tion. Attribute fields appear before date fields on the form.
2. In the Label field, type a display name, which identifies the field on the form.

Creating Form Rules 2-23
3. Select the Enabled check box to place the field on the form (or clear the check box to remove the field from the form).
4. Select the Required check box if you want to require that data be entered into the field, or clear the check box if you want to make data-entry optional.
5. Click the Enable LOV check box if you want the field to display a list of values. If you select this check box, you must use Form Rules to create an LOV for the field. If you chose a Date value in the Attribute field, you cannot select the Enable LOV check box.
6. When you finish adding fields to the form, save your work: Click on File in the menu bar, and then on Save in the File menu. Close the Form Extensions form: Click on the × symbol in its upper right corner.
Linking a New Form to an Existing Form
To provide access to the new form, create a navigation rule element that makes it available as a menu option on an existing Oracle EBS form. See “Setting Naviga-tion Paths” (page 2-9) for detailed information. As you create this rule element, use the following values:
• Use the When New Form event.
• In the To Function field on the Navigation panel of the Business Rule Details form, select Oracle Form Extend Value Form.
• When you navigate to the Parameters field, it presents the following statement:
EXTENSION_TYPE="<EXTENSION NAME HERE>" DISPOSITION_ID= "#<BLOCK.FIELD1>#" S_DISPOSITION_ID="#<BLOCK.FIELD2>#"
In this statement, replace placeholder values (those enclosed in angle brackets, and the angle brackets themselves) with the following values.
– <EXTENSION NAME HERE>: Type the extension name you created for your form in the upper grid of the Form Extensions form.
– <BLOCK.FIELD1>: Type the internal names for the block and field on the existing form that correspond to the first primary key of the database table that supports the form.
– <BLOCK.FIELD2>: If that table has a second primary key, type the internal names for the block and field on the existing form that correspond to that second key. If the table does not have a second primary key, delete the entire parameter (S_DISPOSITION_ID="#<BLOCK.FIELD2>#") pertaining to that key.
For example, suppose that the extension name for the new form is Vendor Extension Values, and you intend to navigate to it from the Enter Vendor form. The table that supports the Enter Vendor form has only one primary key, and it corresponds to a block and field named VNDR.VENDOR_ID. The appropriate parameters would be:
EXTENSION_TYPE="Vendor Extension Values" DISPOSITION_ID= "#VNDR.VENDOR_ID#"
• Accept the default for Icon Name.

2-24 Oracle Preventive Controls Governor User Guide
Creating LOVs for an Extension Form
If, as you created an extension form, you selected the Enable LOV check box for any of its fields, you must create an LOV for each of those fields. To do so, create a rule element that generates the list of values. Creating this rule element involves:
• Running the Event Tracker on the new form.
• Creating a rule element subscriber (without which, the LOV would be attached to all extension forms).
• Setting the rule element details.
In the Rule Elements grid on the home Form Rules form, create the element, using the value LAAEELM in the Form Name field and selecting the Event Tracker in the Event field. Then save the rule, open the new form (by opening the Oracle EBS form to which it is linked and clicking on the menu option you created for it), and run the Event Tracker (see page 2-3).
Next, reopen Form Rules and select the rule element with which you are working. In the Rule Elements grid of the home form, retain LAAEELM as the form name and insert these values:
• In the Event field, When New Item.
• In the Block Name field, LA_EXTENSION_VALUES.
• In the Field Name field, the Attribute value you selected for the field in the extension form. This would be the word Attribute followed by a number.
Then, create an element subscriber of the data filter type. See “Creating Subscrib-ers” (page 6-1) for detailed information. As you create the subscriber, use these values:
• In the Filter Type field, Data.
• In the Filter Name field, PARAMETER.EXTENSION_TYPE.
• In the Operator field, Equal.
• In the Dependent Value field, the Attribute value you selected for the field in the extension form. This would be the word Attribute followed by a number.
• In other fields, retain the default values.
Finally, configure the rule-element details. See “Creating a New LOV” (page 2-15) for detailed information. As you configure the details in the List of Values tab of the Business Rule Details form, use these values:
• In the Block Name field, LA_EXTENSION_VALUES.
• In the Field Name field, the Attribute value you selected for the field in the extension form. This would be the word Attribute followed by a number.
• In the Record Group and LOV Name fields, accept default values.
• In the SQL Text field, create the SQL statement that selects the values you want the LOV to display.

Creating Flow Rules 3-1
3
Creating Flow Rules
The Flow Rules application defines and implements business processes — sets of actions to be completed in specified sequences. To use the Flow Rules application, ensure that its tab is selected in the GRC Controls — Oracle Rules form (see page 1-2).
A single “process rule” defines an entire process. The rule consists of subordinate rules, called “process flows,” each of which constitutes a step in the process. Each flow is assigned a “rule type” that determines what it does. A process flow can:
• Notify, or request approval of, designated persons when some action has been completed.
• Alert designated persons to errors or other exceptional conditions.
• Implement a “constraint,” which alerts designated persons if necessary conditions have not been met, and pauses the process pending a response.
• Run a concurrent program, or monitor one as it runs.
• Run structured query language (SQL) scripts.
• Link the current process to other processes.
• Run separately defined workflows or events within a process.
Users can choose whether a process rule is to be triggered by an event or evaluated on a regular schedule, and can configure “launch criteria” — either define the trig-gering event or set the schedule.
Moreover, process rules may call elements required for a process to be completed — for example, an approval group if a process flow requires an action to be approved or rejected. Flow Rules provides an “Advanced Rules Wizard” and other tools for use in configuring notification text, SQL scripts, approval groups, workflow roles, and other elements called by process rules. It also provides a tool for “migrating” process rules from one Oracle E-Business Suite instance to another.
Creating a Process Rule
The first step in creating a process is to set up the process rule itself. Subsequently, you will define launch criteria and process flows for the rule. The form in which you define (or view) a process rule consists of four panels, each accessible from a tab.

3-2 Oracle Preventive Controls Governor User Guide
Using the Process Rule Details Panel
To create a new process, ensure that the Process Rule Details tab is selected:
In this panel, complete the following steps:
1. Activate a row in the grid. Use any of these methods:
• If the grid contains any empty rows, click in the first one.
• Click on the New button, which is first on the left in the tool bar.
• Click on File in the menu bar, then on New in the File menu.
2. In the Process Name field, type a unique name for the process rule. Do not include a leading or trailing space in the name; otherwise, the process cannot be exported.
3. In the Event/Periodic list of values, select a “subscription type,” which deter-mines what causes a process rule to be run. Choose one of the following:
• Trigger: The process rule runs when some action occurs, and so a record is created or updated in a specified database table. (For example, a new cus-tomer may be created in a table that stores information about customers.)
• Periodic: The process rule is evaluated on a regular schedule.
4. In the Process Status list of values, specify whether the rule is under develop-ment or deployed in a production environment: Select either of the following:
• Development: When status is set at this level, workflow communications — such as notifications, approval requests, and emails -are sent only to a user identified as a “parent process owner.”
• Production: When status is set at this level, workflow communications are sent to the actual users or groups defined in process flows.
5. In the Parent Process Owner list of values, select the person who is to receive workflow communications if the process status is set to Development.
6. In the Description field, briefly explain the purpose of the process rule. (The use of this field is optional.)

Creating Flow Rules 3-3
Using the Primary Keys Panel
If you selected the Trigger subscription type, specify the table or view upon which rule firing depends. To do this, click on the Primary Keys tab:
In this panel:
1. The Process Name field contains a copy of the value entered in the Process Rules Details panel. Do not change it.
2. In the Table Name list of values, select the table or view in which the creation or updating of a record causes the rule to fire.
3. As you navigate to the Primary Key 1 and Primary Key 2 fields, the form displays the primary keys defined for the table you selected in step 2. Do not change them.
The Primary Keys panel does not apply, and accepts no input, if you selected Periodic in the Event/Periodic field of the Process Rules Details panel.
Using the Display Table/View Columns Panel
If you selected the Trigger subscription type, specify one or two “display columns.” These contain values to be included in the subject lines of communications sent by Constraint process flows. To do so, click on the Display Table/View Columns tab:

3-4 Oracle Preventive Controls Governor User Guide
In this panel:
1. The Process Name field contains a copy of the value you entered in the Process Rules Details panel. Do not change it.
2. The Display View field contains, by default, the table or view you selected in the Primary Keys panel. You can change the value to any related view.
3. In the Display Column 1 list of values, select a column containing information that identifies records within the table — for example, a customer-name column in a table that contains information about customers.
4. In the Display Col 1 Title field, type a label that describes the information from the column you selected in step 3 — for example, “Customer Name.”
5. In the Display Column 2 and Display Col2 Title fields, you may select a second column to supply information to the subject line of Constraint-flow communica-tions. (The second column is optional; the first is required.)
The Display Table/View Columns panel does not apply, and accepts no input, if you selected Periodic in the Event/Periodic field in the Process Rules Details panel.
Using the Effectivity Dates Panel
Finally, click on the Effectivity Dates tab to specify when the rule is to be active:
In this panel:
1. The Process Name field is once again contains a copy of the value you entered in the Process Rules Details panel. Don’t change it.
2. Specify start and end dates.
The Start Date field defaults to the date on which you create the rule. Accept the default, or change it to a future date on which you want the rule to take effect.
The End Date field is blank by default. Insert the date on which you want the rule to expire, or leave the box blank to allow the rule to remain in effect indefi-nitely. An end date earlier than a start date prompts an error message.
In either case, you can select a date in the pop-up calendar that appears when you click on the list-of-values icon. Or type a date in the format configured for your instance of Oracle EBS.

Creating Flow Rules 3-5
Configuring Launch Criteria To define circumstances under which the process defined by a rule is set in motion, select (click on) the rule in the home Flow Rules form, and then click on the Launch Criteria button. A Launch Criteria form opens.
Beginning to Configure Criteria
No matter what subscription type you chose in the Event/Periodic field of the Proc-ess Rule Details panel on the home Flow Rules form, complete a row in the grid at the top of the Launch Criteria form to begin configuring launch criteria:
1. In the Sequence field, enter a number that reflects the order in which you want this row to be processed with respect to any other rows that contain content. (Enter a number even if no other rows contain content.)
2. In the Description field, type a brief explanation of the launch criteria you are configuring. (The use of this field is optional.)
3. In the Subscription Type field, Flow Rules copies the value that was selected in the Event/Periodic field of the Process Rule Details panel on the home Flow Rules form — Trigger or Periodic. You cannot change this value.
4. The Active Flag check box is selected by default. Leave it selected for the launch criteria you are configuring to remain active, or clear the check box to define launch criteria but hold them in reserve.
For each row you complete in this upper grid, you can select a new set of values that define a trigger or periodic schedule (as appropriate). If you complete more than one row in this upper grid, the rows have an AND relationship — the launch criteria defined for all active rows must evaluate to true for the process rule to fire.
Setting a Trigger
If you chose the Trigger subscription type (in the Event/Periodic field of the Process Rule Details panel on the home Flow Rules form), enter values in the Triggering

3-6 Oracle Preventive Controls Governor User Guide
Events section of the Launch Criteria form. (In this case, the Schedule section of the form is inapplicable and its fields do not accept input.)
1. In the Table Name field, specify the name of a table in which the creation or updating of a record causes the rule to fire.
You have already specified such a table (or view) in the Primary Keys panel of the home Flow Rules form. The selection you make here is related to the selec-tion you made there. In the home Flow Rules form, you had the option of select-ing a table or view. Here, however, you can select only a table. Therefore:
• If the Table Name field on the Primary Keys panel of the home Flow Rules form displays a table, select the same table here.
• If the Table Name field on the Primary Keys panel of the home Flow Rules form displays a view, select a table associated with that view here.
2. In the Relation Key 1 list of values, select a table column that identifies individ-ual records in the table — typically, the first primary key.
3. In the Relation Key 2 list of values, select a second table column that identifies individual records in the table — typically, the second primary key — if one exists.
4. Select either or both of the Insert and Update check boxes to trigger the process rule to fire if a table record is created or updated, respectively. (Click on a check box to select or clear it; a box is selected when a check mark appears.)
You may define additional conditions that must be met for the rule to fire. To do so, use the grid in the lower portion of the Triggering Events section of the form. A condition is, in effect, a logical statement specifying a value (or values) that table cells may hold; the rule would be triggered if the logical statement evaluates to true.
1. In the Column list of values, select a column from the table you selected in the Table Name field.
2. In the Condition field, select a logical operator — Is Updated, Is Null, Not Null, Equals, or Not Equals.
If you selected Is Updated, Is Null, or Not Null, the condition is complete (and a third field in the grid, Value, does not accept input). For example, if you select Is Null, the condition would evaluate to true (and so the process rule would fire) for records whose cells within the specified column contain no content.
3. If you select Equals or Not Equals as the operator, enter a value in the Value field. (If the value is alphabetic, enclose it in single quotation marks.) The condition evaluates to true for values in cells from the column you selected in step 1 that either do or do not match the constant you enter here (depending on the operator you chose).
You may elect not to define conditions. Or, you may define as many conditions as you like, one in each row of the grid. If you define more than one, the conditions have an AND relationship — all must be true for the process rule to fire.
When you finish defining triggering criteria, click on the Compile button. A message displays status — either reports errors or announces that the trigger has been compiled correctly. Click on the OK button to clear the message.
Creating Flow Rules 3-7
Setting a Schedule
If you chose the Periodic subscription type (in the Event/Periodic field of the Proc-ess Rule Details panel on the home Flow Rules form), the Schedule section of the Launch Criteria form is active, while the Triggering Events section is inapplicable and its fields do not accept input. To create a schedule on which the process rule runs:
1. In the Schedule Type box, select Hourly, Minutes, Days, or Monthly to designate the unit of time you use to define an interval at which the process rule is to run.
2. In the Frequency box, type a number that expresses the interval at which the process rule is to run. For example, if you type 5 here and select Hourly in the Schedule Type box, the process rule is evaluated every five hours.
3. In the Start Date and End Date boxes, type or select dates and times that mark the beginning and end of the period in which the process rule should be run. Use the format configured for your instance of Oracle EBS. (If you want the process rule to remain in effect indefinitely, leave the End Date box blank.)
4. Save your changes: Click on File in the menu bar, then on Save in the File menu. (If you do not save the changes, you are prompted to do so when you close the Launch Criteria form.)
Configuring Elements Called by Rules
A process rule consists of process flows, and each flow calls “elements” needed for the process to be implemented. An element may be a message that notifies (or requests approval of) designated reviewers when an action has been completed; a list of peo-ple (approval group, workflow role, or both) who receive such messages; a constraint to be met before a process can continue; a SQL script to be executed; or other items.
Such elements must exist to be called from process flows, so you should create the elements you need before you configure process flows. Use the Advanced Rules Wizard for most of these elements; the exceptions are approval groups and workflow roles, for which you use tools available from the Flow Rules menu.
Using the Advanced Rules Wizard
In an Advanced Rules Wizard form, you can create subordinate rules that define elements called by process flows. Each of these rules is implemented (at least in part) as a SQL SELECT statement, and in most cases the Advanced Rules Wizard generates SQL code automatically from values entered into a user interface.
Depending on the type of element you are creating (and therefore on a “rule type” you choose as you create that element), the Advanced Rules Wizard may consist of up to four panels, each accessible from a tab. These panels include:
• Definition, in which you select a “driving table” and may select other tables re-lated or joined to it. An advanced rule is based on the driving table, which pro-vides information needed for an element to be configured. (It and tables joined to it might, for example, provide data to be included in a notification message.)
• Return Columns, in which you select columns from the driving table and any joined tables. These columns supply information to the element being configured.

3-8 Oracle Preventive Controls Governor User Guide
• SQL, in which you can generate SQL code automatically from the values you selected in the Definition and Return Columns panels. In the SQL panel, you can also edit code manually and verify it.
• Notification, in which you write the text for notification or approval messages. This panel enables you to insert into these messages the names of columns selected by your SQL code; the resulting messages contain case-specific values returned by the SQL.
Starting an Advanced Rule
To use the Advanced Rules Wizard to create an element for use in a process rule:
1. With Flow Rules running, click on GRC Controls Utilities in the menu bar, and then on Advanced Rules Wizard in the Utilities menu. The Advanced Rules Wizard opens with the Definition panel active. (See the illustration on page 3-9.)
2. In the Rule Name field, type a unique name for the element you are creating.
3. In the Description field, type a brief explanation of the element you are creating.
4. In the Rule Type list box, select the type of element you are creating:
• Constraint/Condition: This element specifies values that may be held in one or more columns of a driving table (or related tables), and evaluates to true for records that either do or do not contain the specified values.
It may be the basis of a Check Constraints process flow — one that deter-mines whether appropriate data has been provided before allowing a process to continue. Or it may be added to any type of process flow as a way of fil-tering records that are subject to the flow.
• Exception: This element defines an error or exceptional condition that must be addressed.
• Sql Statement: This rule type creates a SQL statement that is to be run as part of a process. (One use for a Sql Statement element is to create a “resub-mission program” that selects data to resolve an exception; see page 3-23.)
• Notification Body: This element specifies the text (and column values) to be included in messages that notify or request approval of designated reviewers when some action has been completed.
• Runtime Functional Owner Sql: This element constructs a SQL statement to select, at run time, the “functional owner” for a process flow. This is the per-son (or role) who receives communications generated by a process flow and, when appropriate, responds to them. The Runtime Functional Owner SQL must return a value that corresponds to a RESPONSIBILITY_ID or USER_ID key.
• Runtime Timeout Hours: This rule type constructs a SQL statement to define, at run time, a period in which a response must be given for a process flow that requests approval of reviewers when some action has been completed.
• TimeOut Sql: This rule type constructs a SQL statement to be executed when an approval times out.
• Reject Sql: This element constructs a SQL statement to be executed if a reviewer rejects an approval request in an Approvals process flow.

Creating Flow Rules 3-9
• Runtime Approval Group Sql: This element constructs a SQL statement to select, at run time, a group of reviewers for Approvals process flows. It must return a value corresponding to an APPROVAL_GROUP_ID defined under the Define Approval Groups option of the Flow Rules menu (see page 3-15).
• Single Return Function: This element returns a value that may be used in place of a Reject Sql or Runtime Approval Group Sql element, or as a run-time parameter for a concurrent program (see page 3-20).
• Runtime Responsibility: This rule type selects, at run time, a responsibility from which a concurrent program may be run in a Concurrent Programs process flow.
• Runtime User : This rule type selects, at run time, a user who can run a concurrent program in a Concurrent Programs process flow.
• AppsRules SQL: This element is not used in Flow Rules.
Using the Definition Panel
The Definition panel is available for most rule types. Use it to select tables from which an advanced rule is to draw information:
Always select a driving table and values related to it:
1. In the Driving Table field, select a table upon which the advanced rule is based.
If you are creating an element to be called by a process flow that belongs to a process rule with a Trigger subscription type, the driving table (or view) must be the same as the table or view you selected for the process rule in the Primary Keys panel of the home Flow Rules form. If the subscription type is Periodic, you can select any table or view.
2. In the Table Alias field, create an alias for the table.
3. Optionally, in the Disposition ID 1 and 2 fields, enter the names of columns that distinguish a given record in the table from others (typically the primary keys).

3-10 Oracle Preventive Controls Governor User Guide
If the rule is to use information stored in a table related to the driving table, select appropriate values in the Related Tables and Table Joins grids:
1. Devote one row of the Related Tables grid to each table you want to specify: Select its name from the Table Name list of values, create an alias in the Table Alias field, and optionally provide a description in the Description field.
2. For each row in the Related Tables grid, enter values in a corresponding row of the Table Joins grid. These values specify how each of the related tables is joined to the driving table or one of the other tables. Select the names and aliases of the two joined tables as well as the column in each that contains join values.
In the Additional Conditions grid, you may construct logical statements specifying values that table cells may hold. Such statements establish criteria by which some records in the driving table (or related tables) are distinguished from others — they either contain the specified values, or they don’t.
Conditional statements are appropriate for rule types whose purpose is to select records that meet certain criteria. For example, a conditional statement defines the constraint that is the reason for creating a Constraint/Condition rule, or the excep-tion that is the purpose of an Exception rule. You are expected to create at least one condition for any such rule type (even though conditions are technically “optional”).
Conversely, conditional statements are inappropriate for rule types that do not filter records. For example, the Notification Body rule type designates columns that supply information to notification messages; it may be applied to any record in the driving (or related) tables. You are expected not to create conditions for any such rule type.
To create a condition:
1. In the Table and Alias fields, select values for the driving table or a related table.
2. In the Column list of values, select a column from the table.
3. In the Condition field, select a logical operator — Equal, Not Equal, Greater, Lesser, Is Null, or Is Not Null.
Either of the Is Null or Is Not Null entries completes a logical statement (so if you select either, a third field, Value, does not accept input). For example, if you select Is Null, the condition evaluates to true for records whose cells within the specified column contain no content.
4. If you selected the Equal, Not Equal, Greater, or Lesser operator, specify a value to be compared with values contained in the column you selected in step 2.
• To specify a constant value, select Static in the Value Type list box and type the constant value in the Value field.
• To specify the value of a field in an Oracle EBS form, select Form Field in the Value Type list box and the name of the field in the Value field.
For example, if you select the Greater operator, the Static value type, and the number 15 in the Value field, the condition evaluates to true for records whose cells within the specified column contain a number greater than 15.
5. Enter a number in the Group field. All rows with the same number are grouped together (enclosed in parentheses in the SQL statement).
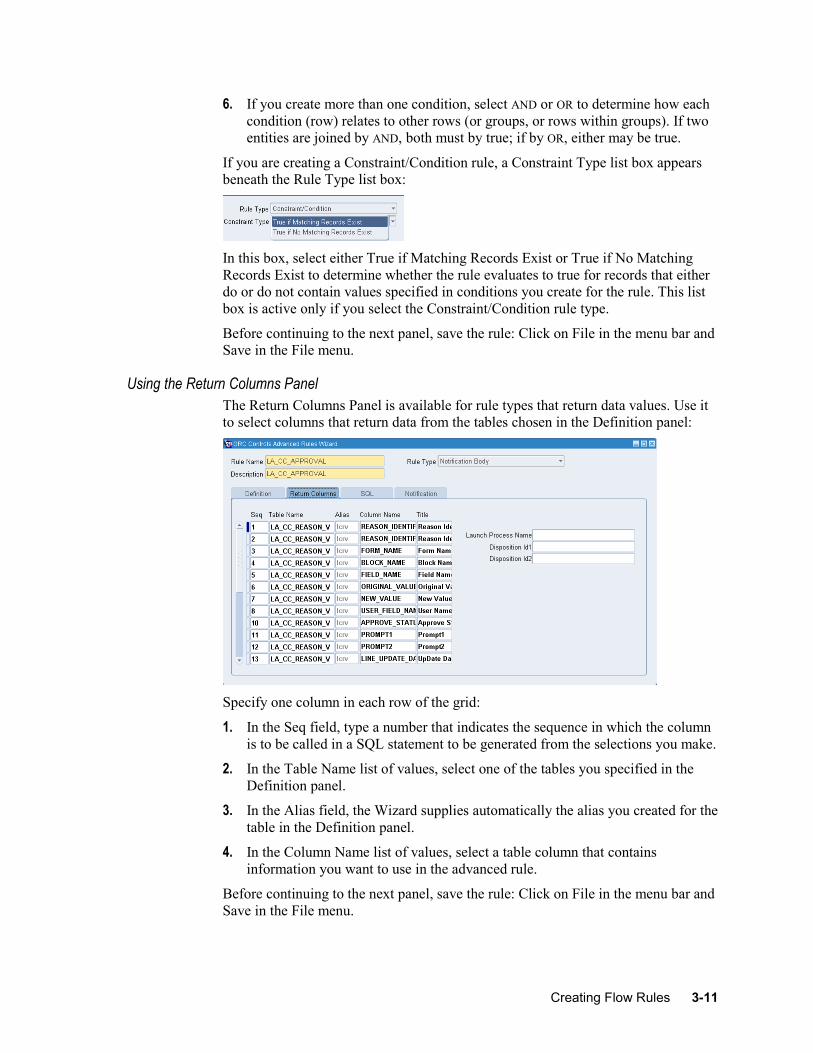
Creating Flow Rules 3-11
6. If you create more than one condition, select AND or OR to determine how each condition (row) relates to other rows (or groups, or rows within groups). If two entities are joined by AND, both must by true; if by OR, either may be true.
If you are creating a Constraint/Condition rule, a Constraint Type list box appears beneath the Rule Type list box:
In this box, select either True if Matching Records Exist or True if No Matching Records Exist to determine whether the rule evaluates to true for records that either do or do not contain values specified in conditions you create for the rule. This list box is active only if you select the Constraint/Condition rule type.
Before continuing to the next panel, save the rule: Click on File in the menu bar and Save in the File menu.
Using the Return Columns Panel
The Return Columns Panel is available for rule types that return data values. Use it to select columns that return data from the tables chosen in the Definition panel:
Specify one column in each row of the grid:
1. In the Seq field, type a number that indicates the sequence in which the column is to be called in a SQL statement to be generated from the selections you make.
2. In the Table Name list of values, select one of the tables you specified in the Definition panel.
3. In the Alias field, the Wizard supplies automatically the alias you created for the table in the Definition panel.
4. In the Column Name list of values, select a table column that contains information you want to use in the advanced rule.
Before continuing to the next panel, save the rule: Click on File in the menu bar and Save in the File menu.

3-12 Oracle Preventive Controls Governor User Guide
Using the SQL Panel
The SQL panel is available no matter what rule type you select. Use it to generate a SQL SELECT statement automatically from the values you chose in the Definition and Return Columns panels, or to write or edit SQL statements directly:
In this panel:
1. Create a SQL SELECT statement:
• If you have made selections in the Definition and Return Columns panels (or the Definition panel alone), click on the Generate SQL button. A SELECT statement appears.
• If you have not made Definition or Return Columns selections, type a SQL SELECT statement directly in the SQL panel.
• In either case, edit the SELECT statement as you see fit.
2. Click on the Verify SQL button. A pop-up message either informs you that the SQL statement is valid or explains any errors it contains.
The SQL statement incorporates the aliases you created in the Definition panel. If you generate and save a SQL statement, then change an alias in the Definition panel, the alias is not automatically updated in the SQL panel. You must update it manually.
Before continuing to the next panel, save the rule: Click on File in the menu bar and Save in the File menu.
Using the Notification Panel
The Notification Panel (shown at the top of the next page) is available only if you select the Notification Body rule type. Use this panel to compose the text that is to appear in the subject line, header, and body of messages associated with notification and approval process flows. A message can incorporate not only text, but also the columns selected by the SQL statement generated in the SQL panel. At run time, these column names are replaced by values from those columns that are associated with the specific record about which a notification or approval is being sent.

Creating Flow Rules 3-13
To enter text, click in the Subject, Header, or Body text box and type whatever text you want.
To insert a column name into the text:
1. In the grid on the right, click on the name of the column you want to insert.
2. Click on the Sub, Head, or Body button to insert the correctly formatted column name in the Subject, Header, or Body text box, respectively.
When you insert a column name, it goes at the end of whatever text you have already entered in the text box. You can then type additional text either before or after the column name.
Click on the Layout Type list box to select Table (text is presented in a tabular format with visible borders), Form (text is presented in tabular format without visible borders), or no value (text is presented in free form).
Save the rule: Click on File in the menu bar and Save in the File menu.
Creating a Notification Function
As an alternative to creating a Notification Body element in the Advanced Rules Wizard, you can create a database function that provides text to a notification or approval process flow.
To do so, use the CREATE FUNCTION or CREATE OR REPLACE FUNCTION command available in SQL. Consult a SQL reference for detailed information about the use of these commands. However, the following conditions apply to a notification function intended for use with Flow Rules:
• The function can pass in only one argument, and that argument must be of the varchar2 data type.
• The notification function will be used with a flow rule that is based on a database table; the function’s argument passes in primary-key values from this table. (Both table and primary keys are selected in the Primary Keys panel of

3-14 Oracle Preventive Controls Governor User Guide
the Flow Rules application; see page 3-3). The primary-key values are those appropriate for a database record which, by being inserted or updated in the table, has triggered the flow rule to run (see “Setting a Trigger” on page 3-5).
A notification function can therefore be used only with flow rules of the Trigger subscription type. Because a Periodic rule (one that runs on a schedule) is not associated with a specific table, primary-key values are not returned for it.
• If the table has two primary keys, the format of the argument is key1::key2. If the table has only one, the format is key1 (the two delimiting colons are not retained).
• You may configure the function so that, while composing text, it uses primary-key values to select information specific to the record that has triggered the flow rule to run. If so, and if the argument contains two key values, you must parse them. (In the following example, the two blocks after the BEGIN line use substr and instr to return portions of the argument, arg1, that precede the first delimit-ing colon and follow the second, and place them into variables.) If the argument contains only one key value, of if you configure the function to ignore the argument and provide static text, parsing is not necessary.
• The function may contain SELECT statements, but otherwise must not contain data manipulation language (DML) statements.
For example, the following code creates a function called ItemNumNotify. It is intended for use with a flow rule based on the mtl_system_items_b table, for which the primary keys are inventory_item_id and organization_id. It returns the statement “This notification applies to item number value,” in which value is replaced by a number contained in a SEGMENT1 column of the mtl_system_items_b table.
CREATE FUNCTION ItemNumNotify (arg1 in varchar2) RETURN varchar2 AS
v_item varchar2(100); v_header varchar2(250); p_item_id number; p_org_id number;
BEGIN select substr(arg1,1,instr(arg1,':')-1) into p_item_id from dual;
select substr(arg1,instr(arg1,':')+2) into p_org_id from dual;
SELECT SEGMENT1 INTO v_item FROM mtl_system_items_b WHERE inventory_item_id=TO_NUMBER(p_item_id) AND organization_id=TO_NUMBER(p_org_id);
v_header := 'This notification applies to item number' || v_item;
RETURN(v_header);
END;

Creating Flow Rules 3-15
Creating an Approval Group
As one step in creating a Notification or Approvals process flow, a Flow Rules user would select an approval group — a set of people who may receive notification that an action has occurred, or who may be authorized to approve or reject such an action.
An approval group consists of workflow roles, which in turn comprise Oracle EBS users. So you may want to create workflow roles (see page 3-16) before approval groups. But Flow Rules recognizes each Oracle EBS user as a workflow role, so you can create approval groups without first creating workflow roles if you wish.
To create an approval group:
1. With Flow Rules running, click on Flow Rules in the menu bar, and then on Define Approval Groups in the Flow Rules menu. An Approval Groups form opens:
2. In the Approval Group field, type a unique name for the group.
3. In the Description field, briefly explain the purpose of the approval group.
4. Set start and end dates for the group as a whole:
The Start Date Active field defaults to the date on which you create the group. Accept the default or modify it to specify a future date on which you want the group to begin receiving notifications.
The End Date Active field is blank by default. You may insert a date on which you want the group to expire, or you may leave the field blank to allow the group to remain active indefinitely. An end date earlier than a start date prompts an error message.
In either case, you can select a date in the pop-up calendar that appears when you click on the list of values icon. Or type a date in the format configured for you instance of Oracle EBS.
Next, add as many workflow roles as you like to the approval group, one in each row of the grid:
1. In the Seq field, type a sequence number. The sequence effects an “approval hierarchy”: each workflow role receives approval requests after they have been approved by roles with lower sequence numbers and before they are sent to roles with higher sequence numbers. Moreover, a workflow role does not receive a request if it is rejected by a role with a lower number.
2. In the Role list of values, select a workflow role (which may consist of more than one user).

3-16 Oracle Preventive Controls Governor User Guide
3. In the Description field, type a brief explanation of what part the workflow role plays in the approval group.
4. In the Vote Percent field, type a number that expresses the percentage of workflow role members who must endorse a request before it moves to its next stage — consideration by the next workflow role in the approval group or actual approval. For example, if a workflow role comprises ten people and the Vote Percent field is set to 50, then five members must approve the request; otherwise it is rejected. Note the following:
• Set the Vote Percent field to 100 if a workflow role consists of one person.
• Change the Vote Percent field from its default value of 100 only if the Approval Type field is set to Wait for Approval (see step 5).
5. In the Approval Type field, select one of the following values:
• First Approval: Only one member of a workflow role need approve a request for it to move to its next stage. (If you select this value, select 100 in the Vote Percent field.)
• Wait For Approval: More than one person in a workflow role must approve a request for it to move to its next stage. (The number of required approvers is determined by the value in the Vote Percent field.)
• No Approval Required: Members of the workflow role receive notification that an action has occurred, but do not have the opportunity to approve or reject it. (This is the appropriate selection for all workflow roles in a group created for “Notification” process flows.)
6. In the Start Date Active and End Date Active fields, set start and end dates for the participation of the workflow role in the approval group. (Use the same con-ventions as you did when specifying start and end dates for the group as a whole.)
When you finish configuring an approval group, save it: click on File in the menu bar and Save in the File menu. When you finish working in the Approval Group form, click the Done button to close it.
Creating a Workflow Role
A workflow role is a set of one or more Oracle EBS users, and serves as a building block for approval groups. You can also select a workflow role as the functional owner of a process flow. To create a workflow role:
1. With Flow Rules running, click on Flow Rules in the menu bar, and then on Define Roles in the Flow Rules menu. An Approval Roles form opens (as shown at the top of the next page).
2. In the Role field, type a unique name for the role.
3. In the Description field, type a brief explanation for the purpose of the role.
4. In the Display Name field, create an easily recognizable name for the role. Flow Rules uses this name to identify the role to users as they add it to approval groups or select it as the functional owner of process flows.

Creating Flow Rules 3-17
5. In the Status list box, select Active to place the role into use or Inactive to remove it from use. Once you inactivate a role, you cannot reactivate it.
6. In the Notification list of values, select the format in which members of the role will receive notifications.
7. In the Expiration Date field, enter a date on which the role expires, or leave the field blank to allow the role to exist indefinitely. Select a date in the pop-up calendar that appears when you click on the list-of-values icon. Or type a date in the format configured for your instance of Oracle EBS.
8. In the User list, select users, responsibilities, or other roles to be included in this role.
When you finish configuring a workflow role, save it: click on File in the menu bar and Save in the File menu. When you finish working in the Approval Roles form, click the Done button to close it.
Creating Process Flows To define the flows that combine to make up a process, first select the process to which the flows are to belong — click on the process rule in the grid on the home Flow Rules form. Then click the Process Flows button in that form; a Process Flows form opens.
Starting a Process Flow
Each process flow is assigned a “rule type” that determines what it does. The con-tent of the Process Flows form varies according to rule type. No matter what rule type you select, however, the upper portion of the Process Flows form contains this grid:

3-18 Oracle Preventive Controls Governor User Guide
Enter values in one row of this grid for each process flow you want to create:
1. In the Seq field, enter a number that reflects the order in which you want this flow rule to be processed with respect to other flow rules listed in the grid. Two or more rows may share a sequence number; if so, the rules they define are processed in parallel. (Enter a number even if only one row contains entries.)
2. In the Rule field, type a unique name for the flow rule.
3. In the Rule Type field, select a rule type from among the following options:
• Check Constraint: Determines whether appropriate data has been provided before allowing a process to continue. It uses a Constraint/Condition element created in the Advanced Rules Wizard.
• Concurrent Programs: Runs one or more concurrent programs. It may incor-porate Runtime Responsibility or Runtime User elements created in the Ad-vanced Rules Wizard.
• Approvals: Sends approval requests to users authorized to approve or reject them. It may incorporate any of several elements created in the Advanced Rules Wizard (chief among them a Notification Body) as well as an approval group created in the Approval Groups form.
• Exceptions: Alerts designated persons to errors or other exceptional condi-tions. It uses an Exception element created in the Advanced Rules Wizard.
• SQL: Runs SQL scripts, and may incorporate a Sql Statement element created in the Advanced Rules Wizard.
• Notification: Notifies designated persons that actions have been completed. It may use any of several elements created in the Advanced Rules Wizard (chief among them a Notification Body) as well as an approval group cre-ated in the Approval Groups form.
• Processes: Specifies another Flow Rules process to be run from within the process you are configuring.
• Workflow/Event: Calls Oracle workflow components.
4. In the Functional Owner list of values, select a workflow role that “owns” this process flow. In other fields, you may designate users responsible for receiving communications generated by the process flow; in an Approval rule, for exam-ple, you may specify an approval group. If no such users are designated, how-ever, the functional owner assumes the responsibility.
5. In the Runtime Functional Owner list of values, you may choose a SQL statement that selects a functional owner at runtime. The LOV displays Runtime Functional Owner Sql elements configured in the Advanced Rules Wizard. A selection here supersedes the selection in the Functional Owner field; if you leave the Runtime Functional Owner field blank, the Functional Owner selection takes effect.
6. The Time Out fields become active only if you have selected the Approvals rule type. In them, you can designate an amount of time in which designated approvers are to respond to approval requests:
• To set a fixed amount of time, select Fixed in the Type list box and type a number of hours in the Hours field. Select the Include Weekends check box if you wish the time period to include Saturdays and Sundays.

Creating Flow Rules 3-19
• To set an amount of time that may vary according to circumstances, select Runtime in the Type list box. You would then need to specify a Runtime Timeout Sql element configured in the Advanced Rules Wizard. (You would do so elsewhere than in this grid.) Leave the Hours field blank. Once again, select the Include Weekends check box if you wish the time period to include Saturdays and Sundays.
• To allow an unlimited time for approval responses, leave both the Type and Hours fields blank, and clear the Include Weekends check box.
7. Select the Active Flag check box to activate the process-flow rule or clear the check box to deactivate the rule.
8. In the Description field, type a brief explanation of the process flow you are configuring
9. In the Notification Subject box, type text that may appear in the subject line of a notification sent to designated reviewers when this process-flow rule fires. This text is used if no other subject-line text is specified. For example, a Notification rule may call a Notification Body element in which subject text has been config-ured; in that case the subject text from the Notification Body element would be used, and the subject text from this Notification Subject field would be ignored.
Configuring Constraint Rules
A Check Constraint rule determines whether appropriate data has been provided before allowing a process to continue; if not, it notifies a user who can obtain and enter that data.
For example, a company’s database may contain a table that stores records of items that it purchases. The company may require that a buyer be assigned for each new item added to the table, and each record may contain a field that holds the ID of the assigned buyer. In the Advanced Rules Wizard, a Constraint/Condition element may have been created to test whether that buyer ID field is null. Now, a Check Constraint process flow would call that element; whenever it evaluates to true, the process flow would send a notification to the functional owner of the flow. In response, the owner would be expected assign a buyer and enter the buyer’s ID in the appropriate field. The Check Constraint flow then verifies that the ID is correctly entered, resending the notification if not.
If you select the Check Constraint rule type, the Process Flows form displays a panel labeled Constraints:

3-20 Oracle Preventive Controls Governor User Guide
To complete these fields:
1. In the Sequence field, enter a number reflecting the order in which you want this constraint to be processed with respect to others listed in the grid. Two or more rows may share the same sequence number; if so, the constraints they define are processed in parallel. (Enter a number even if only one row contains entries.)
2. In the Constraint list of values, select one of the constraints previously config-ured in the Advanced Rules Wizard. The Description field automatically dis-plays the description configured for the constraint in the Advanced Rules Wizard.
3. Select the Allow Override check box if you want to enable the functional owner to override the constraint — allow the process to continue without supplying the requested data. Clear the Allow Override check box if you want to require the functional owner to supply the requested data.
4. Select the Active check box to place the constraint in use, or clear the check box to remove the constraint from use.
5. In the Notification Subject box, type text that appears in the notification sent to the functional owner. Note that the header of the notification contains identify-ing values and labels selected in the Display Table/View Columns panel (see page 3-3). Text entered in the Notification Subject box in the top half of the Process Flows form (see step 9 on page 3-19) is ignored.
Configuring Concurrent Program Rules
A Concurrent Program rule runs one or more concurrent programs. For each pro-gram, the rule can specify static parameter values or execute SQL that determines parameter values at runtime. The rule can notify a user (or workflow role) when each program finishes running. For programs that produce output files, you can specify a printer to which output files should be sent and a number of copies to be printed.
When you select the Concurrent Program rule type, the Process Flows form displays a panel labeled Programs:
To complete these fields:
1. In the Seq field, enter a number that reflects the order in which you want this concurrent program to be run with respect to other programs listed in the grid. Two or more rows may share a sequence number; if so, the programs they call are processed in parallel. (Enter a number even if only one row contains entries.)

Creating Flow Rules 3-21
2. In the next three fields, select the following values in any order:
• User Name: Select a user associated with the running of the concurrent program. The list of values displays both workflow roles and Runtime User elements created in the Advanced Rules Wizard.
• Responsibility: Select a responsibility from which the concurrent program can be run. The list of values displays both responsibility names and Runtime Responsibility elements created in the Advanced Rules Wizard.
• Program Name: Select the concurrent program you want to run.
You must select a responsibility from which the program can be run and a user who has been assigned that responsibility. As you make a selection in any of the fields, selections in the remaining fields are narrowed accordingly.
3. When you select a program, one or more pop-up windows prompt you to select parameters for the program. When you finish making selections in these windows, the parameters you’ve selected appear in the Parameters field.
4. If you select the M.Org check box, a Multiorg Program Setup tab appears. Click on the tab to reveal a panel in which you can select additional users to run the program, as well as a responsibility and individual set of program parameters for each. (Typically, you would leave the M.Org check box cleared.)
5. In the Description box, briefly explain why the program is being run.
6. Select the Wait for Flow check box to pause the process defined by this process rule until the concurrent program has finished running. Clear the check box to en-able the process to continue running while the concurrent program also runs.
7. Select the Active check box to activate the concurrent program configuration, or clear the check box to suspend it.
You may enter values in any number of rows to run any number of concurrent pro-grams. For each, you can click on a Runtime Parameters/Completion Options button to substitute a set of parameters to be determined at runtime for the static parameters you’ve already chosen, or to select notification or printing options that take effect once the program finishes running.
If you click the Runtime Parameters/Completion Options button, this form appears:

3-22 Oracle Preventive Controls Governor User Guide
In the Completion Details section of the form, you may do the following:
• In the Notify list of values, choose a user to be notified when the program finishes running. Select any combination of Completion check boxes to set the circumstances under which the user is notified: when the program finishes normally, with an error, or with a warning.
• In the Printer list of values, select a printer to which the concurrent program would print its output file (if it produces one). In the Copies field, type the number of copies to be printed.
The Runtime Parameters section of the form should present, in the Parameter column, a list of the parameters that apply to the program you are running. For each, you may do either of the following:
• Select Constant in the Value Type field. In the Value field, type a constant value.
• Select SQL in the Value Type field. Then, in the Value field, provide a SQL statement that sets a parameter value. You may type a SQL statement directly in the field, or you may select a Sql Statement element or Single Return Function element that has been created in the Advanced Rules Wizard.
In either case, any parameter values you select here supersede those you selected in the Parameters field under the Programs tab (see step 3 on page 3-21).
When you finish creating the rule, save it: Click on File in the menu bar and Save in the file menu.
Configuring Approval and Notification Rules
A Notification rule sends an information-only message to designated users when a specified action has been completed, and an Approval rule sends a message requir-ing that designated users respond with an approval or rejection of the newly com-pleted action. Configuration of the two rule types is very similar.
When you select either rule type, the Process Flows form displays a panel labeled Approvals:
In this panel, you may do the following. (Note that, as always, yellow fields require input, white fields are optional, and gray fields do not accept input.)
• Designate users who are to receive notifications generated by the rule:
– In the Approval Group list of values, you may select among approval groups configured in the Approval Groups form.

Creating Flow Rules 3-23
– In the Runtime Approval Group list of values, you may select among Runtime Approval Group Sql elements configured in the Advanced Rules Wizard.
Typically you would choose one or the other. If you choose one of each, the Runtime Approval Group selection supersedes the Approval Group selection. If you choose neither, the functional owner of the rule receives its notifications.
• Select the content of the notification message. Do one of the following:
– In the Notification Body list of values, select among Notification Body ele-ments configured in the Advanced Rules Wizard. If you do, the subject line configured for that message is used, and any text entered in the Notification Subject box in the top half of the Process Flows form is ignored.
– In the Notification Function field, enter the name of a database function that generates notification content. For information on configuring such a function, see “Creating a Notification Function” on page 3-13.
• In the Document Link field, create a link to a form in which a message recipient would enter data in response to the message. Enter the name of the appropriate form function in this field.
• Make timeout selections (which apply only if you are configuring an Approvals rule, not a Notification rule).
– If you selected Runtime in the Time Out Type list box, you have chosen to set an amount of time in which users must respond to a request generated by an Approvals rule, and you have chosen to designate a SQL statement that defines the period at runtime. In the Runtime Timeout list of values, select that statement by choosing among Runtime Timeout Sql elements config-ured in the Advanced Rules Wizard. (If you chose to create a fixed timeout or no timeout, this field does not accept input.)
– In the Timeout Sql list of values, select a SQL statement that determines what happens if a timeout period (fixed or runtime) expires. The LOV dis-plays TimeOut Sql elements created in the Advanced Rules Wizard. (If you chose not to establish a timeout period, this field does not accept input.)
• In the Reject Sql list of values, select a Reject Sql element configured in the Advanced Rules Wizard. This element executes a SQL statement if a designated reviewer rejects an approval request in an Approvals process flow.
• In the Number of Resubmits Allowed field, type the number of times an ap-proval request may be reconsidered after being rejected. If rejections exceed this number, the process with which the request is associated comes to an end.
When you finish creating the rule, save it: Click on File in the menu bar and Save in the file menu.
Configuring Exception Rules
An Exception rule tests whether an error or some other exceptional condition exists. You can specify the exception and a “resubmission program” that may be run to resolve the exception. You can also write a message to notify users of the exception, determine whether it must be resolved, and specify an interval at which Flow Rules tests to determine whether the exception has been resolved.

3-24 Oracle Preventive Controls Governor User Guide
When you select the Exception rule type, the Process Flows form displays a panel labeled Exceptions:
To complete these fields:
1. In the Sequence field, enter a number reflecting the order in which you want this exception to be tested with respect to other exceptions listed in the grid. Two or more rows may share a sequence number; if so, the exceptions they call are processed in parallel. (Enter a number even if only one row contains entries.)
2. In the Exceptions/Interfaces list of values, select the exception for which you want to test. The LOV displays Exception elements created in the Advanced Rules Wizard.
3. In the Resubmission Program list of values, select a SQL statement that pro-vides data to resolve the exception. The LOV displays Sql Statement elements defined in the Advanced Rules Wizard.
The notification message generated by an Exception rule automatically contains a Reprocess button, and the resubmission program is run when the recipient of the notification message clicks on its Reprocess button.
4. Define an interval at which the system reruns the Exception element (selected in step 2):
• In the Wait Type list box, designate the unit of time you use to define the interval: Minutes, Hours, or Days. (Or select the blank entry to prevent retesting for the exception.)
• In the Wait Time field, type a number that expresses the interval. For example, if you type 15 here and select Minutes in the Wait Time field, the exception is evaluated every 15 minutes.
5. Select the Needs to be Clear check box to require that the exception be resolved in order for the process of which it is a part to continue. Or, clear the check box to allow the process to continue even if the exception is not resolved.
6. Select the Active check box to place the exception in use, or clear the check box to remove the exception from use.
7. In the Notification Text box, type a message notifying users that the exception exists. The recipient of this message is the functional owner of the Exception rule. The message also includes a subject line created in the Notification Subject box in the top half of the Process Flows form (see step 9 on page 3-19).
You may test for any number of exceptions, one per row in the grid. Each time you select a new row, the Notification Text box clears so that you can enter a new text wording for each exception. When you finish creating the rule, save it: Click on File in the menu bar and Save in the file menu.

Creating Flow Rules 3-25
Configuring SQL Rules
A SQL rule executes one or more Sql Statement elements created in the Advanced Rules Wizard. Each element contains free-form SQL, so you can use SQL rules to execute any database procedure or SQL statement that must be run as part of a process.
When you select the SQL rule type, the Process Flows form displays a SQL panel:
To complete these fields:
1. In the Sequence field, enter a number that reflects the order in which you want this SQL statement to be run with respect to other statements listed in the grid. Two or more rows may share a sequence number; if so, their SQL statements are processed in parallel. (Enter a number even if only one row contains entries.)
2. In the SQL Statement list of values, select the SQL statement you want to run. The LOV displays Sql Statement elements created in the Advanced Rules Wizard.
3. The Description field displays a description associated with the Sql Statement element when it was configured. You cannot enter a value directly in this field.
4. Click the Active check box to cause the SQL statement to be run; clear the check box include the statement in the rule without actually running it.
You may include any number of SQL statements in the rule, one per row in the grid. When you finish creating the rule, save it: Click on File in the menu bar and Save in the file menu.
Configuring Processes Flows
A Processes flow runs one or more process rules (that is, one or more full processes configured in Form Rules) from within the current process rule. When you select the Processes rule type, the Process Flows form displays a panel labeled Processes:

3-26 Oracle Preventive Controls Governor User Guide
To complete these fields:
1. In the Sequence field, enter a number that reflects the order in which you want this process to be run with respect to other processes listed in the grid. Two or more rows may share a sequence number; if so, the processes they call are run in parallel. (Enter a number even if only one row contains entries.)
2. In the Linked Process Name list of values, select a process rule. The LOV displays process rules created in the home Flow Rules form.
3. The Description field displays a description associated with the process rule (if any) when it was configured. You cannot enter a value directly in this field.
4. Select the Wait For Flow check box to cause the current process to be paused until the called process finishes running. Clear the Wait For Flow check box to allow the two processes to run simultaneously.
5. Select or clear the Active Flag check box to activate or deactivate the row.
Include any number of process rules in this flow, one per row in the grid. When you finish, save the flow: Click on File in the menu bar and Save in the file menu.
Configuring Workflow/Event Rules
A Workflow/Event rule calls workflow or business-event components configured for the Oracle workflow system, to be run from within the Flow Rules process. (See Ora-cle EBS documentation for information on these components.) When you select the Workflow/Event rule type, the Process Flows form displays a Workflow/Event panel:
To complete these fields, begin in the Workflow block:
1. In the Seq field, enter a number that reflects the order in which you want this component to be run with respect to other components listed in the grid.
2. In the Type list box, select Workflow or Business Event.
3. In the Event/Workflow list of values, select a workflow or a business event, depending on the selection you made in step 2.
4. In the Process list of values, select a process (in the Oracle workflow sense) associated with the workflow you selected in step 3. If you selected a business event in step 3, a process does not apply and the Process field accepts no input.
5. Select the Wait Flow check box to cause the process rule to pause until the workflow or business event finishes running. Or clear the check box to allow the process rule and the workflow or business event to run simultaneously.

Creating Flow Rules 3-27
6. Select the Active check box to activate the row, or clear the box to deactivate the row.
You may call any number of workflow or business event components, one per row. For each row, you may also set the input-data values provided to the workflow or business event as attributes. To do so, work in the Attributes block of the form:
1. Select attributes, one in each row, in the Attribute Name column.
2. In the Type column, select the format in which you will provide a value for the attribute: Constant, Sql, Current Date, or Profile.
3. In the Value column, enter a value appropriate for the type you have selected.
Adding Conditions to Process Flows
As noted earlier, a Constraint/Condition element (created in the Advanced Rules Wizard) specifies values that may be held in one or more columns of a table, and it evaluates to true for records that either do or do not contain the specified values. It can be added to any process flow as a filter — the process flow would apply only to those records for which the Constraint/ Condition element evaluates to true.
No matter what rule type you select as you create process flows, a Conditions panel enables you to add conditions to the process flow:
1. In the bottom half of the Process Flows form, click on the Conditions tab. A conditions panel appears:
2. In the Seq field, enter a number that reflects the order in which you want this condition to be evaluated with respect to other conditions listed in the grid.
3. In the Condition list of values, select a condition you want to use to select records that are subject to the process flow you are creating. The LOV displays Constraint/Condition elements created in the Advanced Rules Wizard.
4. The Description field displays a description associated with the Constraint/ Condition element when it was configured. You cannot enter a value directly in this field.
5. Select the Active Flag check box to activate the condition, or clear the check box to hold the condition in reserve.
You may list any number of conditions, one per row in the grid.

3-28 Oracle Preventive Controls Governor User Guide
Testing Process Rules Once you have created and saved a process rule, you can launch it to test whether it works as you intend.
When launched, the process performs the actions it is configured to perform, such as sending notifications or running concurrent programs. If the Process Status field of the Process Details panel is set to Development (see page 3-2), notifications go only to the user identified as the parent process owner. But if the Process Status field is set to Production, notifications go to the users actually configured to receive them.
To launch a process for testing:
1. Select (click on) the process rule you want to test in the Process Details panel of the home Flow Rules form.
2. Click on Flow Rules in the menu bar, then on Launch Flow in the Flow Rules menu.
3. If you selected a rule with the Periodic subscription type, the process is launched; skip to step 4. If you selected a rule with a Trigger subscription type, the follow-ing dialog box appears:
In the two fields, enter actual values for the disposition fields chosen as the process was configured: primary keys for the table on which the process is based (selected in the Primary Keys panel), relation keys specified in the Launch Criteria form, or disposition IDs selected for an advanced rule element to be called by the process.
Use any record from the table containing these fields, but choose an appropriate one. For example, if the process includes a Check Constraint flow rule that tests for missing data, select a record from which that data item is in fact missing.
When you have entered disposition values, click the Launch button.
4. A message informs you of a workflow item key associated with the launching of the process. Make a note of the number it displays, and click the OK button to close the message.
Once the process has been launched, you can look in email, Oracle work list, or other media for notifications you would expect the process to have sent, use the View Requests feature to determine whether concurrent programs have been run, and so on.
If expected events do not take place, you can use the Status Monitor in the Oracle Workflow system to review how the process ran and check for errors. Search for the workflow item key generated when you launched the process. (As you do so, select LAAF Header as the workflow type.)

Creating Audit Rules 4-1
4
Creating Audit Rules
The Audit Rules application enables users to track changes to the values of fields in database tables. To use the Audit Rules application, ensure that its tab is selected in the GRC Controls — Oracle Rules form (see page 1-2).
You select the tables you want to include in an audit by assigning them to a group. You refine the audit further by selecting columns from the tables that belong to the group. You can also link audited columns to translations — meaningful values that correspond to the values held in audited tables. For example, a person’s actual name might be the translation value when an audited table column holds a numeric ID for the person.
Audit Rules can display changes in reports (see Chapter 7), or in an Online Audit form. Each field on an Oracle form corresponds to a database-table column; for fields on any given Oracle form, the Online Audit form can be configured to display changes to the underlying database columns. The Online Audit form opens from a menu op-tion in the Oracle form.
Audit Rules also provides a tool for “migrating” rules from one Oracle E-Business Suite instance to another (see Chapter 8).
Audit Rules and Change Control
The Change Control application, a distinct component of Preventive Controls Gov-ernor, monitors and regulates changes to fields in Oracle EBS forms (see Chapter 5). Its users create rules — one for each form field — that apply any of three “control types.” These subject field-value changes to increasing degrees of review.
An Audit control type, as its name suggests, tracks field-value changes. The two others — Reason Code and Approval — do more, but also audit changes to the fields they govern. To carry out its auditing requirements, the Change Control application uses Audit Rules. Every form field corresponds to a database column; for each form field subject to a change-control rule, the Audit Rules application monitors the cor-responding database column.
As a result, the Change Control application creates audit groups in Audit Rules for its own use. Although you can work with these groups in Audit Rules, there are limits to what you can do. Specifically, when you create your own audit groups you can add database columns to them. Within Audit Rules, you cannot add columns

4-2 Oracle Preventive Controls Governor User Guide
directly for groups created by Preventive Controls Governor. You can add columns only indirectly by modifying change-control rules.
Creating Audit Groups
To be audited, a table must belong to an audit group. Creating an audit group involves the following:
• Giving the group a name.
• Selecting the database tables that are to belong to the group. Once you add a table to a group (and save the addition), it cannot be removed.
• Engaging security by determining the Oracle responsibilities that are allowed to view audit results in Oracle-based reports and the Online Audit form.
• Saving the group.
For a table to belong to a group, its entire schema must be defined as audit-enabled. Audit Rules performs this setup step automatically as you add tables to a group. Also, Be sure the AuditTrail:Activate profile option has been set to Yes.
After a group is defined and saved, you need to select columns for auditing from each of the group’s tables. This process is competed in a distinct form (see Chapter 3).
Defining a Group
To set up an audit group, ensure that the Audit Groups tab is selected. This is the default when you start Audit Rules:
An Application Name field includes the entry GRC Controls Custom. This is the name of a “container” for the audit groups you create. You cannot change this value. (Other containers exist for “seeded” audit groups, and you can use Applica-tion Name values as parameters to search for those groups. See “Querying an Audit Group,” page 4-4.)
Enter the following values in the Audit Groups form:
1. In the Group Name field, type the name you want to assign to the group. This field accepts uppercase letters and numerals; it does not accept lowercase letters.

Creating Audit Rules 4-3
2. The State list box defaults to the value Enable Requested. Retain this value.
(This list box is a vestige of earlier versions, and is no longer used. No matter how this field is set, an audit group is enabled once it has been created and a Create Audit Rules Objects option has been run. See “Activating the Audit” on page 4-8.)
3. In the Description text box, type a description of the audit group. For example, briefly state its organizing principle (what its tables have in common that would cause them to be grouped together).
4. In each row of the grid in the lower half of the Audit Groups form, use the Table Name list of values to select a database table you want to include in the audit group. When you select a table, Audit Rules automatically supplies appropriate values for the remaining fields and check box in the row:
• Application: Audit Rules provides the name of the Oracle EBS application that stores data in the selected table. You cannot change this value.
• Description: Audit Rules displays a description of the database table. You can modify the description if you wish.
• Schema: Audit Rules supplies the name of the schema (database organizational structure) of which this table forms a part. You cannot change this value.
• Schema Audit Enabled: Audit Rules checks this box if the schema is audit-enabled. If you select a table whose schema is not audit-enabled, Audit Rules displays a Decision dialog in which you can select Yes to enable the schema for auditing or No to leave the schema as it is. If you select No, however, Audit Rules does not accept the table into the audit group. As a result, the Schema Audit Enabled box is checked for every table you add to the group.
Setting Security
To specify users who are permitted to run Oracle-based audit reports or view the Online Audit form for the tables in this group:
1. Click on the Responsibility Security button. An Audit Group Responsibilities form appears:

4-4 Oracle Preventive Controls Governor User Guide
2. Select any number of responsibilities (one in each field). To run an audit report, or view the Online Audit form, a user must be assigned one of the responsibili-ties you’ve selected.
3. Click on the Close button.
If you choose not to select responsibilities in the Audit Group Responsibilities form, any user can run audit reports or view the Online Audit form for the tables in this group.
A table can belong to more than one group. If you limit the responsibilities that have access to a group, and one of its tables exists in other groups, then the same limits apply to the other groups as well.
Saving the Group
When you have finished setting up the group, save it:
1. Click on File in the Oracle EBS menu bar, then on Save in the File menu.
2. As you save the group, a message informs you that primary keys have been added, but that you need to requery the group to view the primary keys. Click on the OK button to clear the message.
To requery the group, first clear it from the Audit Groups form — position the cursor in the Group Name field, and then click on Edit in the menu bar, Clear in the Edit menu, and Record in the submenu that appears. Then use the Find feature (see the next section) to reload the group you are creating. (Audit Rules displays the primary keys in the form that’s accessible from the Audit Columns tab).
Querying an Audit Group
To find an audit group, use the Audit Rules Find form:
1. Click on View in the menu bar, then on Find in the View menu. Or click on the Find button, which is located second from the left in the tool bar and looks like a flashlight. The following form appears:
2. From the lists of values, select any combination of the following values:
• Application Name: The name of the application that contains a group you want to locate. (Remember that in this context, application means a virtual

Creating Audit Rules 4-5
“container” that holds a selection of audit groups.) All of the groups you create belong to a GRC Controls Custom application, but you may have access to others that contain “seeded” audit groups, which would be configured by Oracle and provided with Audit Rules.
• Group Name: The name of the group you want to locate.
• Table Name: The name of a table within a group you want to locate.
3. Click on the Find button.
Depending on the parameters you specify, the search may uncover more than one group. For example, if you provide only the name of a table, and the table belongs to more than one group, the search returns all the groups to which the table belongs. In such a case, ensure that the cursor is positioned in the Group Name field of the Audit Groups form (this is the default after you use the Find tool). Then scroll through the groups: press the up- or down-arrow button to move from one group to another.
The Find form also contains a New button. If you click on it rather than the Find button, any values entered in the Audit Groups form are cleared and you can create a new group.
Defining Audit Columns and Translation Data
After you specify the tables that belong to a group, you need to select columns from each table. For a given column in an audit table, you can also specify a translation value — a corresponding column in a lookup table. This lookup column would con-tain meaningful values that match up with values in the audited tables, such as a person’s actual name in place of a numeric identifier.
A table can belong to more than one audit group, and the selection of columns for a table is identical in all the groups to which it belongs. If you add columns for a table in one group, the same columns are added for that table in its other groups. If you add a table to a group, any column selections made earlier in other groups apply in the new group by default. Translation-value settings configured for a table in one group apply in all the groups to which the table belongs. Once you add columns for a table (and save the addition), the columns cannot be deleted.
You select columns and specify translation values in the form available when you click the Audit Columns tab in Audit Rules. First, though, click on the Audit Groups tab and ensure the following:
• You have saved the audit group with which you want to work, and then reloaded it. (See “Saving the Group” and Querying an Audit Group,” both on page 4-4).
• You have selected the table whose columns you want to prepare for auditing. (In the grid that lists tables, click on the small rectangle to the extreme left of a table row. Doing so turns the rectangle blue, an indicator that the table is selected.)

4-6 Oracle Preventive Controls Governor User Guide
Selecting Columns
Click on the Audit Columns tab. The Audit Columns form appears. It displays the names of the audit group and audit table that you selected in the Audit Groups form.
If the audit-group name begins with LA_CC, the group has been created in support of change-control rules. The Audit Columns form lists database columns; each corresponds to an Oracle EBS form field subject to a change-control rule. You cannot add columns; the Column Name LOVs accept no input and the Import Columns button is inactive.
If, however, the audit group has been created directly in Audit Rules, the Audit Columns form displays, at minimum, values for the following columns from the table you selected:
• If the table has never before been included in a group, the form displays values for the table’s primary-key columns.
• If the table belongs to other groups, the form shows values for the columns selected in those groups.
You can add columns, one by one, by selecting each in the next available list-of-values box under Column Name. Alternatively, you can select a number of columns at once. To do so, complete these steps:
1. Click on the Import Columns button. The Audit Columns form appears (as shown at the top of the next page), listing columns in the table you’ve selected.
2. Click the Include Flag checkbox for each of the columns you want to audit. Or, click on the Select All button to include all columns. (You can also click on a selected check box to clear it, or the De-Select All button to clear all check boxes.)
3. Click on the Accept button.
Once columns have been selected and the group has been saved, the columns cannot be deleted from the group definition.
For key information to be used, tables must be registered to the Applications. Oracle seeds this information for its E-Business Suite tables. Mappings that use custom database tables should be registered, through the use of Oracle APIs.

Creating Audit Rules 4-7
Adding to Column Definitions
Regardless how you select columns, Audit Rules fills in a description for each column and selects No Lookup in the Translation Type field by default. To modify the description for a column (if you wish), type a new value in its Description field.
Moreover, if a column is a primary key, Audit Rules has already selected the Primary Key check box; you need not alter the default selections for this check box.
For each column (regardless of whether the audit group supports change-control rules), select or clear a Reporting Key check box:
• Select the Reporting Key check box if you want information about fields in the column to appear in reports even if field values have not changed.
• Clear the Reporting Key check box if you want information about column fields to appear in reports only for field values that have changed.
Setting Up Translations
If you want audit reports to display actual values from an audited column, select No Lookup in its Translation Type list of values.

4-8 Oracle Preventive Controls Governor User Guide
If, however, you want audit reports to display a translation value for an audited col-umn, join it to a corresponding column in a lookup table. (You can do this regardless of whether the audit group supports change-control rules.) Typically, you would specify a linkage among three columns:
• The first is the column that contains an audited value. In the example illustrated above, this is CREATED_BY in the GL_JE_BATCHES table.
• The second is a lookup-table column that contains an identifying value — the same value as in the audited table. In the example illustrated above, this is USER_ID in the FND_USR table.
• The last is a column in the lookup table that contains the translation value. In the example illustrated above, this is USER_NAME in the FND_USR table.
To create this linkage:
1. In the Translation Type list of values, select Table Lookup.
2. In the Lookup Table list of values, select the name of the lookup table you want.
3. In the Lookup Value list of values, select the name of the lookup-table column that contains translation values for the audited column.
4. Move to the lower grid and, in the Translation Table Column list of values, select the lookup-table column that contains the identifying value.
5. In the Type list of values, select the value Column.
6. In the Audit Table Column list of values, select once again the column from the audited table that contains the audited value.
In the lower grid, you can complete as many rows as you like to create a translation value as complex as you like. Rows have an AND relationship — all must be true for a value to be returned.
To change translation values (once they’ve been saved), you must delete the existing values and then save the audit group before selecting new values.
Saving Your Work
Once you’ve finished selecting columns and defining translation values, save the new configuration: click on File in the menu bar, then on Save in the File menu. Or, click on the Save icon, located first on the left in the toolbar.
Activating the Audit
To enable Audit Rules to begin auditing the group you have defined, click on GRC Controls Utilities in the menu bar, then on Create Audit Rules Objects in the GRC Controls Utilities menu.
At this point, a concurrent program runs. Called “Audit Rules — Update Audit Ob-jects,” it updates any changes made to existing audit groups and creates new audit objects required by new audit groups. It also optimizes triggers to include When clauses for the selected columns

Creating Audit Rules 4-9
You must select the Create Audit Rules Objects menu option if:
• You have created a new group.
• You have added a table to an existing group.
• You have added a column (or changed the setting of the Enabled check box for a column) in an existing group.
You need not select the Create Audit Rules Objects menu option if:
• You have added or changed a lookup table or a lookup value.
• You have added or changed lookup join information.
• You have changed a description.
Moreover, when you wish to view audit results, either in a report or in the Online Audit form, first run a concurrent-request program called Audit: Dequeue Process. This updates audit results; if the program has not been run recently, you will miss audit data reflecting changes to database values made since the last time it was run.
Typically, this concurrent request is scheduled during installation to be run periodi-cally. However, you may wish to run the request before viewing reports or viewing results in the Online Audit form, to ensure that those results are as current as can be.
To run the Audit: Dequeue Process concurrent request:
1. With the Audit Rules application running (or from any Preventive Controls application), click on View in the menu bar, and Requests in the View menu. A Find Requests form opens.
2. Click on the Submit a New Request button. A Submit a New Request dialog opens. In it, select Single Request and click on the OK button.
3. A Submit Request form opens. In it, select Audit: Dequeue Process in the Name field. The program takes no parameters.
4. In the Submit Request form, click on the Submit button.
The Online Audit Form An Online Audit form can display audit data about a record currently selected in an Oracle EBS form. To use it, complete two tasks:
• Using Form Rules, create a rule that establishes a navigation link from the form you are auditing to the Online Audit form.
• Add a GRC Controls Online Audit function to the menu structure of the respon-sibility that is to have access to the Online Audit form.
To complete the process, you need the following information:
• The name of the form you are auditing and the application in which it runs.
This information is available in the Form Functions form of the System Administrator responsibility: the form name you want is in the Function field (no matter what tab you’ve selected) and the application name is in the Application field on the Form tab. For example, if you query on the Enter Vendor user form name (in the Form field, Form tab), you obtain the values APXVDMVD in the Function field and Payables in the Application field.

4-10 Oracle Preventive Controls Governor User Guide
• The name of the responsibility that both has access to the applications and is assigned to a user who needs to view the Online Audit form.
This information is available in the Responsibilities form of the System Admin-istrator responsibility. You can use the application value (for example, Payables) to query on the Application field and obtain the responsibilities with access to that application. (One of them, for instance, is Payables Manager.)
• The name of the menu associated with the responsibility. When the responsibil-ity is loaded in the Responsibilities form, the menu name is displayed in the Menu field on that form — for example, AP_NAVIGATE_GUI12 for Payables Manager.
• The name of the database table that supports the form, and its primary keys. A way to obtain the table name is to open the form in question, query a record, select Record History from the Help tool, and view the name in the About This Record dialog. If the dialog provides the name of a database view (if the name ends in _V), you’ll need to obtain the database name elsewhere. For the APXVDMVD form, the database table is PO_VENDORS and the primary key is VENDOR_ID.
• The application ID for the application that runs the audited form. (For example, the ID for the Payables application is 201.) To find the value, run this SQL query:
SELECT APPLICATION_ID FROM FND_TABLES WHERE TABLE_NAME = 'table name'
Creating the Form Rule
Open Form Rules to create a link from the audited form to the Online Audit form. (For detailed information on using Form Rules, see Chapter 2.)

Creating Audit Rules 4-11
After entering a name and description for the rule, enter the following in the Rule Elements block:
• Sequence: Enter a number that reflects the order in which you want this element to be performed with respect to any other elements.
• Element Name: Type a name for the rule element.
• Form Name: From the list of values, select the name of the form you are auditing — for example, APXVDMVD if you are auditing the Enter Vendor form.
• User Form Name: Accept the value supplied by Form Rules.
• Event: Select the value When New Form.
Once these values are selected, click on the Details button and, in the Business Rule Details form, click on the Navigation tab. Then enter these values:
• Sequence: Select a sequence number with a Tools prefix to place the link on the Tools menu. (Select a high value to avoid the possibility of overwriting existing Tools-menu options.)
• Label: Type a name for the link. This name will appear as an option on the Tools menu.
• To Function: Select the value GRC Controls Online Audit from the list of values.
• Parameters: Supply the name of the database table that supports the audited form; the names of its primary key columns and, for each, the corresponding block and field in the audited form; and the application ID for the application that runs the audited form. Optionally, specify a number of days of audited data to display, or select columns for display. See the following discussion for more on these values.
Parameter Values
When you select GRC Controls Online Audit as the To Function, the following template appears automatically in the Parameters field:
P_TABLE_NAME=<AUDIT TABLENAME> P_PRIMARY_KEYS=!*!<KEY_COLUMN1>=#<BLOCK.FIELD1>#!~!<KEY_COLUMN2>= #<BLOCK.FIELD2>#!~!!*! P_APPLICATION_ID=<APPLICATION_ID>
If the table has one primary key, delete this block from the template:
<KEY_COLUMN2>= #<BLOCK.FIELD2>#!~!
If the table has two primary keys, leave the template as it is; if the table has three or more primary keys, add in a new block for each key. In any case, replace the place-holder names — the text enclosed by angle brackets (and the angle brackets them-selves) — with appropriate values.
For example, the parameter statement for the Enter Vendors form (whose appropriate values are discussed above) would be:
P_TABLE_NAME=PO_VENDORS P_PRIMARY_KEYS=!*!VENDOR_ID= #VNDR.VENDOR_ID#!~!!*! P_APPLICATION_ID=201

4-12 Oracle Preventive Controls Governor User Guide
If the primary-key value is of the varchar data type or includes spaces, enclose the entire primary-key value in double quotation marks and the block and field name value in an additional pair of single quotation marks, as shown:
P_TABLE_NAME=<Audit_Tablename> P_PRIMARY_KEYS="!*!<Primary Key Name>='#<Block.Field Name>#'!~!!*!" P_APPLICATION_ID=<Application_ID>
You can add parameters that specify the number of days worth of audit data to present and select columns about which to display data. These optional parameters take the following form, and follow the application ID parameter:
P_AUDIT_COLUMNS=!*!<Audit_Column>!*!<Audit_Column> P_NUM_OF_DAYS= <Number_of_days>
Adding Online Audit to a Responsibility
To add the GRC Controls Online Audit function to the menu structure of the responsibility that is to have access to the Online Audit form, complete these steps:
1. Determine the responsibility whose menu structure is to be altered. Assuming you know the name of the application that runs the form that is to be audited:
• Open the Responsibilities form in the System Administrator responsibility.
• Query on the Application field — press F11, type the application name in the Application field, and press Ctrl+F11.
• The form loads all the responsibilities from which the application can be run. Press the up- or down-arrow button to scroll through them.
• Stop at the appropriate responsibility — one assigned to a user (or users) who need to view the Online Audit form.
2. In the Responsibilities form, note the name of the menu associated with the responsibility you’ve selected — for example, AP_NAVIGATE_GUI12 for the Payables Manager responsibility.

Creating Audit Rules 4-13
3. Close the Responsibilities form and open the Menus form. Query for the menu whose name you’ve just identified:
4. Add a row to the grid (click on File in the menu bar, then on New in the File menu). Add a sequence number in the Seq field, and select GRC Controls Online Audit in the Function list of values. (Do not enter a value for Prompt or Submenu.)
5. Click on File in the menu bar, then on Save in the File menu.
Viewing the Online Audit
Ensure that the table supporting the form for which you’ve created the link is included in an audit group. Run the Audit: Dequeue Process concurrent request to make certain that results are current (see page 4-9). Then navigate to the form and click on the Tools menu. It should include the link you’ve created.
Click on the link to open the GRC Controls Online Audit form:

4-14 Oracle Preventive Controls Governor User Guide
Primary key values include the following:
• Primary Key Name: Primary key of the table associated with the block and form from which Online Audit is run.
• Primary Key Value: Value of primary key for the record selected in the form being audited, or translated value if defined.
Values in the lower grid include the following:
• Column Name: Column (form field) being audited.
• Column Value: Value of the column (form field) for the record selected in the form being audited.
• Time Stamp: Time data was audited.
• User Name: Name of the user who changed the data.
• Transaction Type: Whether a new value updates a previously entered value or fills a field that had previously been empty.
Find criteria include the following:
• Column Name: Search for audited data by column name. Wild cards (%) may be used. For example, to show only the Description column, enter Desc% in the Column Name field and click the Refresh button.
• Column Value: Search for audited data by column value. Wild cards (%) may be used. For example, to show audited data where value is like INV, enter INV% in the Column Value field and click the Refresh button.
• Number of Days: The value 1 indicates audited data with the current date for an audit timestamp; the value 2 indicates audited data from the current and previous days; and so on. The default number is 30.
Note that translated values are displayed if they have been defined in the Audit setup.
Security
The Online Audit form opens only if the user is currently in a responsibility to which the audited table has been restricted through use of the Audit Group Responsibilities feature (see page 4-3). The following message appears if the current responsibility does not have access to view audited data for the table:
If a table exists in more than one group, all secured responsibilities are considered. The Online Audit form shows data only if the user is currently in one of the responsibilities for which security has been configured.

Creating Change Control Rules 5-1
5
Creating Change Control Rules
The Change Control application applies change control to Oracle E-Business Suite form fields. Rules — one for each field — implement these controls. You can use a form called the Change Control Wizard to view these rules or to create them manu-ally (see “Starting Preventive Controls Governor” on page 1-2).
Each rule applies one of three “control types,” which subject field-value changes to increasing degrees of review:
• Audit: Changes to fields are tracked, and a history of those changes is presented in reports. This control type allows users to make changes freely.
• Reason Code: Field changes are once again tracked, and their history presented in reports. Moreover, a user who changes the value of a field must enter a reason code, and a second user may receive notification of the change (if the rule speci-fies a recipient of the notification). Approval is not required for the change to be made.
• Approval: Field changes are once again tracked, and their history presented in reports. When a user changes the value of a field, she must once again give a reason for the change, but her action also sends a request for approval to a speci-fied person or role. The change must be approved or rejected, and the requesting user must acknowledge an approval. A change is implemented only when it is approved and acknowledged.
In addition, each change-control rule may specify “subscribers,” which designate users, responsibilities, or other entities to which the rule applies. If no subscriber is defined for a rule, its control applies universally. (For more on subscribers, see Chapter 6).
As an alternative to creating individual rules, you can upload already-created rules from a “content spreadsheet,” and then use the Wizard to confirm that they have been uploaded correctly. See Chapter 8, “Migration,” for more on this.
Before you set up change control, make sure you have done the following:
• In Form Rules, use the Event Tracker to capture information about forms, blocks, and fields you want to control. This enables the Change Control Wizard to pre-sent the information for selection as you configure control rules. (See page 2-3.)
• In Flow Rules, define workflow roles to be used for notifications and approvals of field-value changes. (See page 3-16.)

5-2 Oracle Preventive Controls Governor User Guide
Creating Control Rules Manually
The Change Control Wizard enables you to create new control rules. As an alterna-tive, you can upload already-created rules from a “content spreadsheet” (see Chap-ter 8, “Migration”). In the Wizard, you can also view existing rules, either to modify them or to confirm that content-spreadsheet rules have been uploaded correctly. In either case, begin by opening the Change Control Wizard (see “Starting Preventive Controls Governor” on page 1-2). Both the Change Control Wizard and a Change Control Find form appear on screen, with the Find form initially active.
Finding Control Rules
When you start the Change Control Wizard, a Find form is initially active:
If you intend to create new control rules, you can simply click on its New button. In this case, the Wizard becomes the active form but displays no rule data.
You can also use the Find form to load existing control rules into the Change Con-trol Wizard. To search for all rules, simply click on the Find button. Or, to search for a selection of rules, supply values in any combination of the filtering fields:
• Application Name: From the list, select an Oracle EBS application containing fields for which you want to view control rules. Or, leave the box blank to select all applications.
• User Form Name: This box presents a list of the form names that are visible to the user of an Oracle EBS application. Choose one containing fields for which you want to view control rules. Or, leave the list box blank to select all forms.
• Form Name: This box presents a list of the form names that are used internally by the system. If you’ve made a selection in the User Form Name box, the cor-responding internal form name automatically fills this box. If you make a selec-tion in this box, it overrides the value in the User Form Name box — the Change Control Wizard will display rules governing fields from the form identified by the internal form name. You can leave this box blank to select all forms.
• Block Name: From the list, select a form block containing fields for which you want to view control rules. Or, leave the box empty to select all blocks in a form (if you selected one in the Form Name or User Form Name box), or all blocks in all forms (if you made no form-name selection), or all blocks in all applica-tions (if you made no application selection).
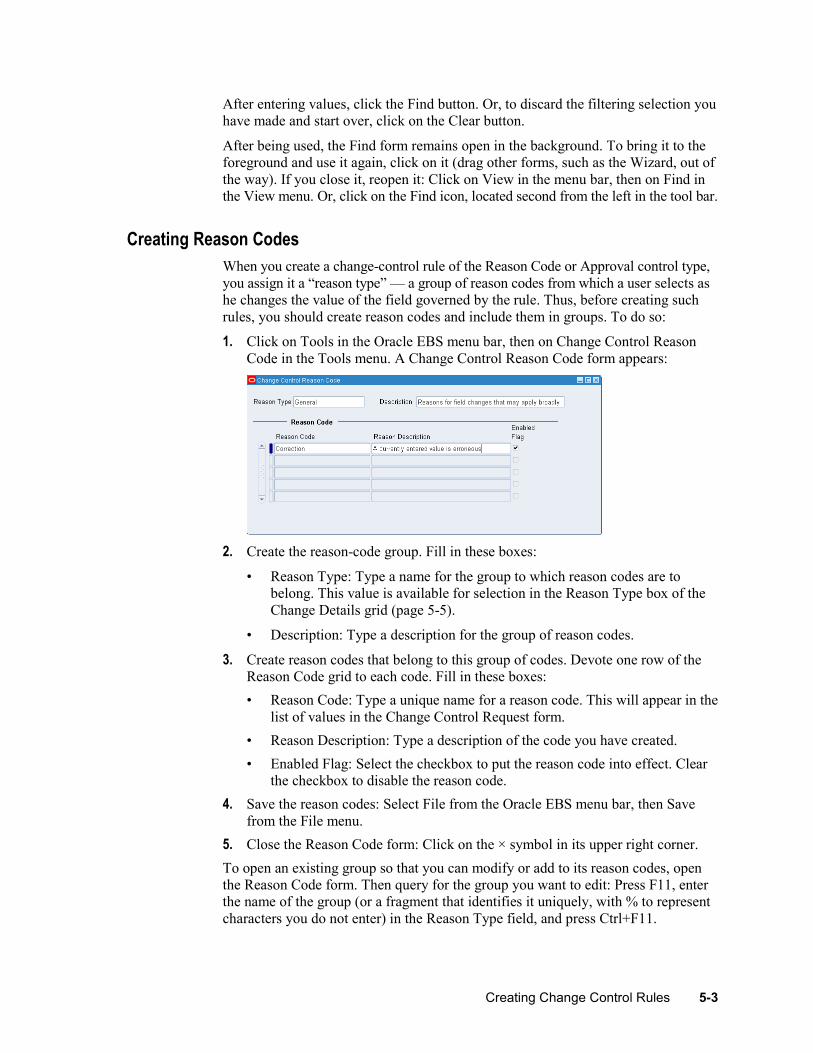
Creating Change Control Rules 5-3
After entering values, click the Find button. Or, to discard the filtering selection you have made and start over, click on the Clear button.
After being used, the Find form remains open in the background. To bring it to the foreground and use it again, click on it (drag other forms, such as the Wizard, out of the way). If you close it, reopen it: Click on View in the menu bar, then on Find in the View menu. Or, click on the Find icon, located second from the left in the tool bar.
Creating Reason Codes
When you create a change-control rule of the Reason Code or Approval control type, you assign it a “reason type” — a group of reason codes from which a user selects as he changes the value of the field governed by the rule. Thus, before creating such rules, you should create reason codes and include them in groups. To do so:
1. Click on Tools in the Oracle EBS menu bar, then on Change Control Reason Code in the Tools menu. A Change Control Reason Code form appears:
2. Create the reason-code group. Fill in these boxes:
• Reason Type: Type a name for the group to which reason codes are to belong. This value is available for selection in the Reason Type box of the Change Details grid (page 5-5).
• Description: Type a description for the group of reason codes.
3. Create reason codes that belong to this group of codes. Devote one row of the Reason Code grid to each code. Fill in these boxes:
• Reason Code: Type a unique name for a reason code. This will appear in the list of values in the Change Control Request form.
• Reason Description: Type a description of the code you have created.
• Enabled Flag: Select the checkbox to put the reason code into effect. Clear the checkbox to disable the reason code.
4. Save the reason codes: Select File from the Oracle EBS menu bar, then Save from the File menu.
5. Close the Reason Code form: Click on the × symbol in its upper right corner.
To open an existing group so that you can modify or add to its reason codes, open the Reason Code form. Then query for the group you want to edit: Press F11, enter the name of the group (or a fragment that identifies it uniquely, with % to represent characters you do not enter) in the Reason Type field, and press Ctrl+F11.

5-4 Oracle Preventive Controls Governor User Guide
Creating Control Rules
Create control rules in the Change Control Wizard:
To begin, ensure the Change Element tab is selected, and create an empty row in its upper grid. If you clicked the New button in the Find form, this is already done. Other-wise, click in the first empty row, if the grid contains any; click on the New button (first on the left in the tool bar); or click File > New in the Oracle EBS menu bar.
Selecting a Block of Controllable Fields
In the row you’ve created (in the upper grid under the Change Element tab), specify a block of fields in an Oracle EBS form. Enter these values:
• Form Name: This box accepts internal form names. Select one containing fields for which you want to create control rules. When you make a selection, corre-sponding entries appear in the User Form Name and Application Name boxes.
• User Form Name: This box accepts display form names (those visible to the user of an Oracle EBS application). If you selected a Form Name, the User Form Name appeared here automatically. If you select a User Form Name first, a corresponding value appears for Form Name, but not Application Name.
• Application Name: This box accepts the name of the Oracle EBS application that uses the form you specified in the previous two boxes. If you began by making a selection in the Form Name box, the Application Name appeared here automatically. Otherwise, type an application name here. Or, click in the Form Name box, then in any other box in the row to generate the appropriate value.
• Block Name: This box accepts the names of field blocks that appear in the form you have selected. Choose the block that contains fields for which you want to create control rules. You must use the Event Tracker (see page 2-3) before per-forming this step; otherwise, no block values appear in the Block Name box.
• WVR Enabled: Select the check box if you have chosen a form (in the Form Name field) associated with a When Validate Record event. Clear the check box if not. Generally, the Change Control Wizard selects or clears the box appropri-ately for the chosen form, and you should accept the default setting.

Creating Change Control Rules 5-5
If a form is associated with a When Validate Record event and the check box is selected, the control rules take effect when a user attempts to save changes to any controlled fields on the form.
If the form is not associated with a When Validate Record event and the check box is cleared, then the fields for which you create Reason Code or Approval control rules are write-protected. The user can modify each field value in the Oracle Change Control Request form (see page 5-10).
Creating Control Rules for Fields in the Selected Block
In the lower grid of the Change Control Wizard, select individual fields and enter control-rule values for them. In each row of this grid, you can select values for one of the fields in the block you specified in the upper grid.
1. Ensure that the Change Details tab is selected.
2. Enter these values:
• Field Name: Enter the name by which the underlying code calls the field you want to control. Select from the list (items are available if you have used the Event Tracker to capture them; see page 2-3), or type a value.
• User Field Name: The Change Control Wizard selects a display field name (the label visible to the user of an Oracle EBS application) corresponding to the Field Name in the previous box. You can replace it with another value. This name appears in the Change Control Request form and in notifications.
• Control Type: Select the level of control you want to apply to the field — Audit, Reason Code, or Approval. For control-type definitions, see page 5-1.
• WorkFlow Role: Select the person or role who reviews changes made to the field. For the Approval control type, you must enter a WorkFlow Role value; it designates the person who approves changes. For the Reason Code control type, you may enter a WorkFlow Role value to designate a person notified of the change. WorkFlow Role does not apply for the Audit control type.
• Reason Type: Select the name for a group of reason codes (see “Creating Reason Codes” on page 5-3). A user who changes the Oracle EBS field can apply any reason code belonging to the group you select here. You must select a reason type if you selected the Approval or Reason Code control type; a Reason Type selection does not apply if you selected the Audit control type.
• Enable: To set a change-control rule to be active once it has been generated, select the Enable check box to the right of its row. Clear the check box (and respond to a confirmation message) to turn off the rule. Or, select or clear the All check box (at the upper right of the Change Details panel, in the En-able column) to enable or disable all rules currently displayed in the panel.

5-6 Oracle Preventive Controls Governor User Guide
• Enable Visual Attributes: Select the check box to cause the controlled field to appear in yellow on its Oracle EBS form. Clear the check box to allow the field to remain visually undistinguished from other fields. This option applies only to fields controlled by Reason Code or Approval rules.
• Comments: Explain the business risk addressed by the rule you are creating.
3. Click on the Column Translations tab.
4. Enter these values:
• Under User Field Name, the Change Control Wizard supplies the display name of the field you want to control (it’s a copy of the value in the User Field Name box of the Change Details tab). You cannot change this value.
• Under Column Name, select the name of the database column that corresponds to the value entered in User Field Name — the column that stores data entered in the field.
Using the Translations Tab to Set Record Identifiers
In the Translations tab, you associate change-controlled fields with other fields that identify the individual record to which changes apply. The values you select here are valid for any fields in the block you selected under the Change Element tab. For example, if you were to apply change control to a field that provides information about vendors, you would use the Translations tab to specify a field or fields that identify a vendor whose record has changed.

Creating Change Control Rules 5-7
Click on the Translations tab and fill in the following values:
• Display Prompt: Type a name for the record-identifying field. When a user changes a controlled field, he may (depending on the control type applied to the field) complete a Change Control Request form. The Display Prompt value appears as a label in that form. (In the illustration on page 5-9, it’s the label Vendor Name near the top of the Change Control Request form.)
• Display Column (Block.Field): Select the name of the field you want to use for record identification. Use the format BLOCK.FIELD, in which BLOCK is the name by which underlying code recognizes the form block that contains the field you want to use, and FIELD is the name by which underlying code calls the field you want. The block does not have to match the block you specified under the Change Element tab.
• Table Name: Select the name of the database table that corresponds to the block you specified under the Change Element tab.
• Primary Keys: Click on the Import Primary Keys button. Under the label Primary Key Columns, the Change Control Wizard lists primary keys for the table you selected in the Table Name box. You cannot change these values.
• Form Field: For each database column name entered under the Primary Key Columns label, type the name of the corresponding form field. Once again, use the format BLOCK.FIELD, in which BLOCK is the name by which underlying code recognizes the form block that contains the field, and FIELD is the name by which underlying code calls the field you want.
Finishing the Control-Rule Generation
When you complete the foregoing configuration tasks for any number of fields, you can generate rules that implement your work:
1. Click on the Change Details tab in the bottom grid of the Change Element form.
2. Select the Generate check box for each of the rows for which you want to generate rules. Or, select the All check box (at the upper right of the Change Details panel, in the Generate column) to choose all rows displayed in the panel.
3. Click on the Generate Selected Rules button.
4. Click on the Yes button in each of two pop-up messages. (One confirms that you want to create the selected rules, and the other informs you that all existing rules will be deleted and then re-created.)
5. Click on Tools in the Oracle menu bar, then on Create Audit Rules Objects in the Tools menu. Verify that the process has run successfully under View/Requests.

5-8 Oracle Preventive Controls Governor User Guide
6. Click on the Rules tab to review information about the rules you have generated:
This information varies by control type:
• The Rule Name field displays a name for the rule, but is populated only for the Reason Code and Approval control types.
• The Process Name field identifies the workflow process that sends change notification to a reviewer. It’s populated for an Approval rule, or for a Rea-son Code rule only if a value for that rule is entered in the WorkFlow Role field of the Change Details tab. It’s never populated for an Audit rule.
• The Audit field displays the name of the audit group that applies to the con-trolled field. (Audit Rules performs auditing at the database level. The con-trolled field corresponds to a database column; the column exists in a data-base table; and for changes to columns in a table to be tracked, the table is placed in an audit group.) This field is populated for all three control types.
Applying Changes to Controlled Fields
When you enter or modify data in an Oracle EBS field that is subject to change control, your process depends on the control type assigned to the field.
Audit
If a field is under Audit control, any change you make is captured and available for reporting. However, you need not select a reason code or obtain an approval, so there is no change to your ordinary procedure. Fields under Audit change control are not distinguished visually from fields that are not subject to change control.
Reason Code or Approval
Depending on your visual-attributes selections (see page 5-6), a field subject to Reason Code or Approval change control may appear in bright yellow on its Oracle EBS form. Regardless of coloration, users may change the values of these fields in either of two ways, depending on whether the fields exist on a form associated with a When Validate Record event, and therefore whether the WVR Enabled check box in the Change Control Wizard is selected for each block of the form (see page 5-4).
• If so, the user makes changes to the fields, but controls are imposed when the user attempts to save the changes. The user would open a Change Control Re-quest form to offer reasons, and if appropriate to begin the approval process, for all the changed fields at once.

Creating Change Control Rules 5-9
• If not, the controlled fields are write-protected, and a user cannot make changes to them directly. For each field, the user would instead open the Change Control Request form and enter the new field value there — as well as offer a reason for the change and, if appropriate, initiate the approval process. In this case, the user can modify only one field at a time in the Change Control Request form.
Change Control with WVR Enabled
To change the values of controlled fields on a form associated with the When Validate Record event:
1. Enter new values in any number of controlled fields as you ordinarily would.
2. Save the changes: Click on file in the menu bar, and then Save in the File menu. Or, click on the Save button.
3. The following message appears. Click on the OK button to clear it.
4. Click on Actions in the Oracle EBS menu bar, then on Oracle Change Control Request in the Actions menu. The following form appears:
The form devotes a row to each change you are making (and, in other rows, displays information on prior changes). In each new-change row, most of the fields provide information but do not accept input. These include User Field Name, Original Value, New Value, Request Date, Requested By, and Status.
5. In each row that applies to a new change, click in the Reason field to select a reason from a list of those configured for the field.
6. In the Comments text box, you may add any comments you deem appropriate. These comments appear on the Change History Report (see page 7-5). The Comments text box displays information specific to whatever row you’ve selected in the grid — it presents an already-recorded comment for an old change or, for a new change, it clears so that a new comment may be entered.
7. Click on the Done button.

5-10 Oracle Preventive Controls Governor User Guide
Change Control with WVR Disabled
To change the values of controlled fields on a form that is not associated with the When Validate Record event:
1. Select (click on) a controlled field whose value you want to change. Note that if you try to enter a value in the field, the status bar near the bottom of the screen displays the message “Field is protected against update.”
2. With the field selected, click on Actions in the menu bar, and then on Oracle Change Control Request in the Actions menu.
• If you are attempting to modify a list of values, its Find form opens, presenting a selection of entries appropriate for the field. Click on one and on the OK button. The Change Control Request form then opens and displays your selection in the New Value field.
• If you are attempting to modify a data-entry field, the Change Control Request form opens immediately, and the New Value field is blank. Type the value you want in the New Value field.
In either case, the User Field Name, Original Value, Request Date, Requested By, and Status fields provide information but do not accept input.
3. Click in the Reason field to select a reason from a list of those configured for the field.
4. In the Comments text box, you may add any comment you deem appropriate.
5. Click on the Done button.
6. Repeat this process for each controlled field you want to change. When you finish making changes, save your work: Click on file in the menu bar, and then Save in the File menu. Or, click on the Save button, located fourth from the left in the tool bar (it looks like a disk).
Completing the Approval Process
If you are working with a field assigned the Reason Code control type, the process of changing the field value is complete. (You can undo such a change: reopen the Change Request form, select the row that represents the change, and click on the Reject button.)
If, however, the field was assigned the Approval control type, the status of the change remains pending (as shown in the Status column of the Change Control Request form), and you cannot make further changes to the field until the pending change is approved or rejected. An approval decision involves the following additional steps:
1. When you close the Change Control Request form, a pop-up message informs you that the approval workflow process has begun. Click on its OK button to clear it.
2. The individual (or workflow role) assigned to approve the change receives a notification that the change is pending.
3. The user clicks on the notification to open it. He reviews the information and optionally adds a comment:

Creating Change Control Rules 5-11
4. The user also clicks one of the following buttons:
• Approve: A notification of the approval is sent to the original requester, who must acknowledge the acceptance.
• Reject: The change cannot be made.
• Reassign: The decision to approve or reject is reassigned to another user.
In the case of approval, the field-value change is not made until the original requester acknowledges the approval. This user opens the form on which the field appears, selects the field, and receives a dialog box offering the option to update the field. If the requester clicks on the Yes button, the field is updated. If the user selects the No button, the change is postponed, but not cancelled. Eventually the requester must select the Yes button because the change has been approved.

5-12 Oracle Preventive Controls Governor User Guide

Creating Subscribers 6-1
6
Creating Subscribers
A form rule, form-rule element, or change-control rule may be fired selectively — it may produce results in some circumstances but not in others. A “subscriber” to a rule defines those circumstances; it is a filter that that selects the users, responsibilities, or other entities to which a rule (or element) applies.
To define a subscriber, you work from within a selected rule or element, and so focus that rule or element on the subscriber you define. You can create a rule without con-figuring a subscriber for it; in that case, the rule applies universally. Similarly, you can create a form-rule element without a subscriber; if so, the element applies to all of the rule’s subscribers.
Defining a Subscriber
To define a subscriber:
• For a form rule, select the rule in the upper grid of the home Form Rules form (see page 2-2) and click on the Rule Subscribers button.
• For a form-rule element, select the element in lower grid of the home Form Rules form (see page 2-2) and click on the Element Subscribers button.
• For a change-control rule, select the rule: In the upper grid of the Change Details form, click on the row corresponding to the block that contains the controlled field. In the lower grid, select the Rules tab and click on the row corresponding to the field itself. Then, in the Rules-tab panel, click on the Subscribers button (see pages 5-4 and 5-8).
In any of these cases, the following form appears:

6-2 Oracle Preventive Controls Governor User Guide
To define the subscriber:
1. Complete at least one row in the Subscribers form. Select a filter type, an opera-tor, and a value. A rule (or element) applies whenever a logical statement defined by those three entities evaluates to true — for example when a user’s responsi-bility (filter type) equals (operator) Purchasing Super User (value). However, the process you follow to complete this step depends on the filter type you select; see “Filter Type Considerations” (below).
2. Optionally, complete additional rows in the Subscribers form to create a sub-scriber definition that consists of several criteria. If you do, make appropriate selections in the And/Or and Group fields, and in any case, use additional con-trols to complete the subscriber definition. See “More Subscriber Fields” (on page 6-3).
Filter Type Considerations
Among the filter types you can select are Responsibility, Profile, Operating Unit, Inventory Organization, User, and Subscriber List. (The last of these is a set of filter values; see page 6-3). To use one of these, make up to three selections:
1. Select the type you want to use from the Filter Type list of values. (If you select Profile, select a specific profile in the Filter Name field. For the other types, the Filter Name field does not accept input).
2. Select an operator from the Operator list of values. Your options are Equal, Not Equal, Is Null, Is Not Null, Greater Than, and Less Than.
3. If you choose the Equal, Not Equal, Greater Than, or Less Than operator, select an appropriate value from the Value LOV. (For the Profile type, this is a setting for the profile you selected in the Filter Name field.)
For example, you might select Responsibility, Equal, and Purchasing Super User to make a rule apply only to users logged on with the Purchasing Super User responsi-bility. Or you might select User, Not Equal, and WMays to have a rule apply to all users other than WMays.
Other filter types include Data, Function, or SQL. If you choose one of these, you need to make a different set of selections. (Note that the Function and SQL filters are available only for form-rule element subscribers.)
1. Select the type you want to use from the Filter Type list of values.
2. Depending on the selection you made in step 1, choose a block and field, a database function, or a SQL statement in the Filter Name list of values. (The SQL statement may be one prepared through use of the SQL Wizard; see page 6-5.)
3. Select the operator you want from the Operator list of values. If you select Is Null or Is Not Null, you’re finished. If you select Equal, Not Equal, Greater Than, or Less Than, continue.
4. Choose a data type — VarChar, Number, Date, DateTime, or Boolean — in the Data Type list of values. The type should match the type stored in, or returned by, the item you selected in the Filter Name list of values (step 2).

Creating Subscribers 6-3
5. In the Field Type list box, select Static if you are constructing a logical statement that compares a constant value to values stored in, or returned by, the item you selected in the Filter Name list of values (step 2). Or select Form Field if you want to compare these values to other values returned by an Oracle E-Business Suite field.
6. Depending on the selection you made in step 5, type a constant value in the Dependent Value field, or select a field name.
For example, you might select the Data filter type and an Oracle EBS block and field in the Filter Name list of values. You might also select the Is Null operator, in which case the rule would apply whenever the field you selected contains no value. Or, you might select the Equal operator, the Static Field Type, and a constant value as the Dependent Value; if so, the rule would apply whenever the value in the field is the specified constant.
More Subscriber Fields
You can complete multiple rows in the Subscribers form to create a subscriber definition that consists of several criteria. If so, values in the And/Or and Group fields come into play. (Note, however, that you need to complete these fields even if your subscriber definition consists only of a single row; in that case, you would typically accept default values.)
• Group: Enter a number that reflects the sequence in which a row is to be evalu-ated with respect to other rows. You can enter the same number in more than one row. If you do, the rows are grouped together — enclosed in parentheses in a SQL statement that is generated from the values you enter.
• And/Or: Select a value that determines whether a row has an AND (both must be true) or OR (either may be true) relationship with the next row (or group, or row within a group).
In addition, you may use the following controls:
• Allow Reversals: If this check box is not selected when a rule has been enforced, the rule continues in force even if the next record does not meet the subscriber criteria.
• View Statement: Open a window that displays the SQL statement generated from the selections you make in the Subscribers form. (To close this window, click on its Close button.)
• Done: Click on this button to close the Subscribers form. Save the subscriber before closing the form: Click on File in the menu bar and Save in the File menu.
Subscriber Lists
Among the filters you can select as you create subscribers is Subscriber List, which is itself a selection of users, responsibilities, or other entities. As you create a sub-scriber, for example, you might select Subscriber List as the filter, Equal as the operator, and List1 as the value. The rule (or element) would then apply to all the members of a subscriber list called “List1.”

6-4 Oracle Preventive Controls Governor User Guide
To create a subscriber list, click on Tools in the menu bar, and then Oracle Rules Subscriber Lists in the Tools menu. The following form appears:
In the grid at the top of the form, create a new subscriber list in each row.
1. Create a name for the list in the Subscriber List Name field.
2. Optionally, provide a brief explanation for the purpose of the list in the Description field.
3. In the Start Date field, select a date on which the list is to take effect.
4. In the End Date field, select a date on which the list is to expire. Or, leave the field blank to allow the list to remain in effect indefinitely.
In the Subscribers Details area, enter values that define the members of whatever list is currently selected in the upper grid. In each row:
1. In the When field, select a filter: Responsibility, Profile, Operating Unit, Inventory Organization, or User. (Select a value in the Profile field only if you select Profile as a filter.)
2. In the Condition field, select an operator: Equal or Not Equal.
3. In the Value field, select a constant that completes a logical statement. For example, if you select Responsibility in the When field, Equal in the Condition field, and Purchasing in the Value field, users who log on in the Purchasing responsibility are members of the subscriber list (subject to refinements in other rows).
In a special case, if you have selected the value Profile in the When field and identified a specific profile in the Profile field, include a valid setting for the profile in the Value field. For example, the Profile field might hold the value AuditTrail:Activate, the Condition field Equal, and the Value field Yes.
4. In the Grouping field, enter a number that reflects the sequence in which a row is to be evaluated with respect to other rows. You can enter the same number in more than one row. If you do, the rows are grouped together — enclosed in parentheses in a SQL statement that is generated from the values you enter.

Creating Subscribers 6-5
5. In the And/Or field, select a value that determines whether a row has an AND
(both must be true) or OR (either may be true) relationship with the next row (or group, or row within a group).
6. When you finish making entries in rows, save the subscriber list: Click on File in the menu bar and Save in the File men.
You can click on the View Statement button to open a window that displays the SQL statement generated from your selections. (You would then click on the Close button in that window to close it). Click on the Done button to close the Subscriber List form.
Using the SQL Wizard
When you select SQL as a filter type for a form-rule element subscriber, the Filter Name field lists (and so you can select) SQL statements created in a tool called the SQL Wizard. Because the SQL filter type is available only to subscribers created for form-rule elements, the SQL Wizard is available from the Form Rules application, but not from the Change Control application.
Suppose, for example, you create a subscriber that applies a rule element to vendors with more than two open purchase orders. You would first use the SQL Wizard to create a SQL statement — named, let’s say, Open POs — that counts vendors’ open purchase orders. You would then use the Subscribers form to define a subscriber that uses this SQL Statement, setting the Filter Type field to SQL, Filter Name to Open POs, Operator to Greater Than, Data Type to Number, Field Type to Static, and finally Dependent Value to 2.
To use the SQL Wizard to create a SQL statement:
1. With Form Rules running, click on GRC Controls Utilities in the menu bar, and then on Advanced Rules Wizard in the GRC Controls Utilities menu. The SQL Wizard opens with the Definition panel active.
2. In the Rule Name field, type a unique name for the statement you are creating.
3. In the Description field, type a brief explanation of the statement you are creating.
Then, provide appropriate entries in up to three panels, each accessible from a tab. These include:
• Definition, in which you select a “driving table” and may select other tables related or joined to it. The driving table provides information needed for the SQL statement to be configured. (It and tables joined to it might, for example, provide filtering criteria or a return value.)
In the Definition panel, you can also create conditional statements, which are appropriate for SQL statements whose purpose is to select records that meet cer-tain criteria. For example, a SQL statement may be created for a subscriber to a rule element that targets the Enter Vendor form; and PO_HEADERS_ALL, the driv-ing table, stores purchase-order information. The first of two conditions might cause the SQL statement to select PO_HEADERS_ALL records whose vendor IDs match IDs loaded in the Enter Vendor form. A second condition might select records of open POs.

6-6 Oracle Preventive Controls Governor User Guide
• Return Columns, in which you select a column from the driving table or a joined table. This column supplies a value that the SQL statement returns to the subscriber. (You can select only one such column.)
• SQL, in which you can generate SQL code automatically from the values you selected in the Definition and Return Columns panels. In the SQL panel, you can also edit code manually and verify it.
These panels work in the same way as identically named panels of the Advanced Rules Wizard in the Flow Rules application. See pages 3-7 et sequens for more information.
Profiles and Data Subscribers
Within the System Administrator responsibility, a System Profile Values form en-ables users to configure profiles, each at several levels: site, application, responsi-bility, user, server, or organization. Each of these levels constitutes a “field” (and the value entered for an individual profile is a “field instance”), so that a rule cre-ated in the Change Control application to control profile-value changes at any of these level affects all profiles at that level.
If you need to control changes to the values of individual profiles (while leaving others uncontrolled) create a control rule for the appropriate field (for example, PROFILE_VALUES.SITES_VISIBLE_VALUE for site-level profiles). Then create a sub-scriber; add a row to the Subscriber form for each individual profile you want to control. In each row:
• For Filter Type, select Data.
• For Filter Name, select the name of the field that holds profile names — PROFILE_VALUES.USER_PROFILE_OPTION_NAME.
• For the Operator, select Equal.
• For the Dependent Value, select the name of the profile you want to control.

Reporting 7-1
7
Reporting
Preventive Controls Governor generates reports that display:
• Summary or detailed records of rules configured in the Form Rules and Flow Rules applications.
• Database changes recorded by the Audit Rules application.
• Records of rules configured in the Change Control application, changes made to the fields those rules control, and the resolution of changes that require approval.
Each report runs as a concurrent request. Use standard Oracle EBS procedures either to generate a single instance of a report or to schedule it to be run repeatedly. In broad terms:
1. Open the Submit Request form, in either of two ways:
• Select the Requests: Run option from the GRC Controls Navigator.
• Select the Requests option from the View menu in any of the Preventive Controls Governor applications. A Find Requests form opens; in it, click on the Submit a New Request button.
2. Select the report you want to run in the Name LOV of the Submit Request form. A Parameters window opens; in it, set parameters for the report. The reports you can run, and the parameters that apply to them, are described below.
3. Optionally, set a schedule in the At These Times block of the Submit Request form. By default, the report is scheduled to run once, as soon as possible.
4. Click on the Submit button to run the report. A Decision pop-up window displays a Request ID number; make a note of it. Then click the Yes button to submit another request or the No button to exit the Submit Request form.
To view the reports you’ve generated:
1. Open the Find Requests form: once again, select the Requests option from the View menu in any of the PCG applications.
2. Select one of the radio buttons at the top of the form to search for all requests, completed requests, those that remain in progress, or a specific request. If you choose to search for a specific request, enter its ID in the Request ID field.
3. Click on the Find button.

7-2 Oracle Preventive Controls Governor User Guide
4. A Requests form opens; in it, select the row representing your report (and iden-tified by its request ID number).
5. Click on the View Output button. The report opens in .pdf format.
You can generate the following reports. As you enter parameter values for any of them, bear in mind that most parameter fields display an asterisk by default:
• If you accept an asterisk (by itself), the report will include information about all possible values appropriate for the parameter (for example, all form rules if you accept the asterisk for the Rule Name parameter in the Form Rules Report).
• If you enter a full, exact value appropriate for a parameter, or a fragment that matches only one possible value, the report will include information only about the item you specify (for example, a specific form rule if you type its exact name, or a text fragment that excludes all other names, for the Rule Name parameter in the Form Rules Report).
• If you enter a text fragment that matches several values, a pop-up window lists those values and you can select among them. If the text fragment matches no values, the pop-up window displays all possible values for the parameter. You can select only one value (or the asterisk, indicating all values).
GRC Controls Form Rules Report The Form Rules Report provides information about a selection of form rules and, for each rule, its subscribers and elements. You can run a summary or detailed ver-sion of the report.
• A summary report displays the name and description of each rule, whether it is active, and the filtering values that define each of its subscribers (if any). For each element of a rule, the report provides the sequence number and name, the name and display name of the form it targets, the block and field that it targets (if any), the event that triggers it, whether it is active, and the filtering values that define each of its subscribers (if any).
Essentially, this is information entered on the home form and the Subscribers form in the Form Rules application.
• A detailed report provides the same summary information, but for each rule, it adds configuration details for each of its elements — the values that effect secu-rity, navigation, message, default-value, list-of-values, or field-attribute modifi-cations to the target Oracle form, or cause it to run SQL statements or Flow Rules processes. The report devotes a table to each set of values for each rule element.
Essentially, this is information entered on the Details form in the Form Rules application.
As you run the report, you can set values for the following parameters:
• Rule Name: Select a rule for which you want the report to return results.
• User Form Name: Select the name of an Oracle form affected by Form Rules, for which you want the report to return results. The selection is limited to forms affected by the rule you selected in the Rule Name parameter.
• Report Type: Enter DETAIL to generate the detailed version of the report, or SUMMARY to generate the summary version.

Reporting 7-3
GRC Controls Flow Rules Report
The Flow Rules Report displays information about a selection of flow rules. You can run a summary or detailed version of the report.
• A summary report displays the name and description of each rule, its “process type” (whether it is launched by a trigger or runs on a schedule), its start and end dates, its “process status” (whether it is in development or production), and its “parent process owner” (a person who receives communications sent by a process in development status).
It also displays information that applies only to rules launched by triggers: the name of a database table in which the creation or updating of a record causes the rule to fire, and its primary keys; a “display table” and columns, which contain information to be included in the subject lines of communications associated with Constraint process flows, and the configured launch criteria.
Essentially, this is information entered on the home and Launch Criteria forms in the Flow Rules application.
• A detailed report provides the same summary information, but for each process (flow rule), it adds information about each of the process flows that make up the process: the values that configure notifications or approval requests, constraints, or alerts to errors or exceptions, or that run concurrent programs or SQL scripts.
Essentially this is information entered on the Process Flows form of the Flow Rules application.
As you run the report, you can set values for the following parameters:
• Process Name: Select a flow rule for which you want the report to return results.
• Process Type: Choose whether you want the report to return information about processes launched by triggers or schedules.
• Process Status: Choose whether you want the report to return information about processes at the development or production status.
• Process Owner: Select a user to see results for process rules that name those users as Parent Process Owners.
• Table Name: Select a table to see results for process rules that use the table in their trigger definitions.
• Report Type: Enter DETAIL to generate the detailed version of the report, or SUMMARY to generate the summary version.
GRC Controls Oracle Audit Report The Audit Report consists of a series of sections that document changes to database field values. The heading for each section displays an audit group name, the name of a database table within that group, and its configured description and primary keys. Each row documents a change to a value held in a column of the table, and displays these values: the column name and its display name, the old and new data values, the transaction type (insert, update, or delete), the username of the user who made the change, and the date on which the change was made.

7-4 Oracle Preventive Controls Governor User Guide
As you run the report, you can set values for the following parameters:
• Group Name: Select the name of an audit group about which you want the report to return results.
• Table Name: Select the name of a database table about which you want the report to return results. You are able to select only among tables belonging to groups you chose in the Group Name parameter.
• Column Name: Select the name of a database table column about which you want the report to return results. You are able to select only a column belonging to tables you chose in the Table Name parameter.
• User Name: Select the Oracle username of a user to focus the report on database value changes made by that user.
• Role: Select an Oracle workflow role to focus the report on database value changes made by users at that role.
• From Date: Enter the earliest date for which the report should return results. Use the date format configured for your instance of Oracle EBS.
• To Date: Enter the latest date for which the report should return results. Use the date format configured for your instance of Oracle EBS.
GRC Controls Control Listing Report
The Control Listing Report displays data about Oracle form fields for which rules have been written in the Change Control application. It contains an entry for each controlled field from a specified set of forms, organizing the entries by form. Each entry identifies the name of a field, the control type and status of the change-control rule, and (if applicable) the workflow role designated to review changes to the field.
As you generate the report, you can select the following parameters:
• Application Name: Select an application name for the report to list controlled fields that apply to the application you choose.
• Change Type: Select Audit, Reason Code, or Approval to focus the report on fields that are subject to rules of the control type you select.
• User Form Name: Select a form name to have the report list controlled fields that appear in the form.
• Workflow Role: Select a workflow roles to have the report list fields subject to Approval or Reason Code rules that name the selected roles as a reviewer.
• Active Rules: Enter ACTIVE to have the report display information only about rules for which the Enable check box is selected in the Change Details tab of the Change Control Wizard (see page 5-5). Enter INACTIVE to have the report dis-play information about rules for which the Enable check box is cleared.
• Graph: The report can display data not only textually, but also graphically. Select YES to include, or NO to exclude, graphs in a report.

Reporting 7-5
GRC Controls Change History Report
The Change History Report displays the old and new values for changes made to Oracle form fields that are subject to change control. For each change, it also shows the user who made the change and, if applicable, the user who approved it; the dates of the change and the approval; the control type and, if applicable, reason code of the change-control rule; the change status; and any comments. As you generate the report, you can select the following parameters:
• Operating Unit: Select an operating unit to view field changes pertaining to the operating unit you select.
• Sets of Books: Select a set of books to view field changes pertaining to the set of books you select.
• Application Name: Select an application name for the report to list changes to fields accessible from the application you choose.
• User Form Name: Select a form name to have the report list changes to fields that appear in the form you choose. You can select only among forms available in the applications you selected in the previous parameter.
• User Field Name: Select a field name to have the report list changes to the field you choose. You can select only among fields available in the forms you chose in the previous parameter.
• Record Identifier 1 and Record Identifier 2: Select record identifiers (see page 5-6) to view changes associated with the identified records.
• Change Type: Select Audit, Reason Code, or Approval to view changes to fields that are subject to rules of the control type you select.
• Requested By: Select a user name to view changes made by that user.
• Approved By: Select a user name to view changes for which the user is the approver (for fields subject to Approval rules) or the recipient of notifications (for fields subject to Reason Code rules).
• Request Date From: Enter the earliest date for which the report should return results. Use the date format configured for your instance of Oracle EBS.
• Request Date To: Enter the latest date for which the report should return results. Use the date format configured for your instance of Oracle EBS.
• Inventory Organization: Select an inventory organization to view field changes pertaining to the organization you select.
GRC Controls Approver Performance Report
The Approver Performance Report provides statistics about the numbers of field-value change requests that individual approvers have approved, rejected, and left pending, as well as the amount of time that requests have spent in the system. As you generate the report, you can select the following parameters:
• Application Name: Select an application, and the report lists changes to fields accessible from the application you choose.

7-6 Oracle Preventive Controls Governor User Guide
• Approver: Select a workflow role, and the report lists controlled fields subject to judgment by users at that role. You can select only roles named in rules that apply to the fields accessible from the application you chose in the previous parameter.
• Graph: The report can display data not only textually, but also graphically. Select YES to include, or NO to exclude, graphs in a report.
• From Date: Enter the earliest date for which the report should return results. Use the date format configured for your instance of Oracle EBS.
• To Date: Enter the latest date for which the report should return results. Use the date format configured for your instance of Oracle EBS.

Migration 8-1
8
Migration
Once you have created form rules (or elements), flow rules, or audit rules, you can “migrate” them — copy rules or elements from one Oracle E-Business Suite instance to another. Or, you can export individual rules or elements to, or import them from, XML files, or copy them under new or modified names on the source instance. You can also perform these operations on libraries — collections of form or flow rules. (See “Collecting Rules in Libraries” on page 9-1.)
Moreover, you can upload change-control rules from a “content spreadsheet” — a set of more than 1,500 fully configured change-control rules. You can also migrate change-control rules through use of import and export utilities.
Preparing for Form, Flow, or Audit Rule Migration Before you can migrate form rules (or elements), flow rules, or audit rules, you need to specify connection information in the environments to and from which you plan to transmit data. You need the host name, instance SID, and database instance port for each environment. This information is found in the TNSNAMES.ora file, which is located in ORACLE_HOME/network/admin.
Once you’ve gathered this information, use the GRC Controls Migration Utility to perform the connectivity configuration:
1. With Form Rules open, click on GRC Controls Utilities in the menu bar, then on Migration Setup in the Utilities menu. A Migration Utility form appears.
2. Ensure that the Setup Host Names tab is selected.

8-2 Oracle Preventive Controls Governor User Guide
3. In the Host Name column, enter the host name (machine name) for each of the machines hosting the database and involved in the migration.
4. In the Description column, you may enter a description for each host name. (This step is optional.)
5. Click on the Setup Instances tab. The following form appears:
6. In the Host Name column, select the host name for each of the machines from the list of values. (The entries are those defined in the Setup Host Names tab.)
7. In the Instance and Port Name columns, type the instance name and port number that corresponds to each host name.
8. Under User Name, type the value apps for each entry. Under Password, enter the password for the apps user.
9. Click on File in the menu bar and Save in the File menu. When the configuration is saved, the system automatically generates and displays a connection string.
10. Close the Migration Utility. Click on the × symbol in the upper right corner of the form.
Dependencies
The following conditions apply to migration, export, and import operations:
• You can migrate an entire form rule; if so, its elements move with the rule to the target instance or XML file. You can migrate a form-rule element; if so, it moves to the destination instance without its “parent” rule.
• You can migrate an entire flow rule; if so, its process flows and the components called by those flows — advanced rules, approval groups, and workflow roles — move with the rule to the target instance or XML file. You can migrate a process flow; if so, the elements called by it do not move to the target instance or XML file.
• For a form-rule element or a process flow to be migrated, an instance of the rule that contains it must already exist on the destination instance.
• You can migrate audit groups or audited tables. For a table to be migrated, an instance of its audit group must already exist on the destination instance.
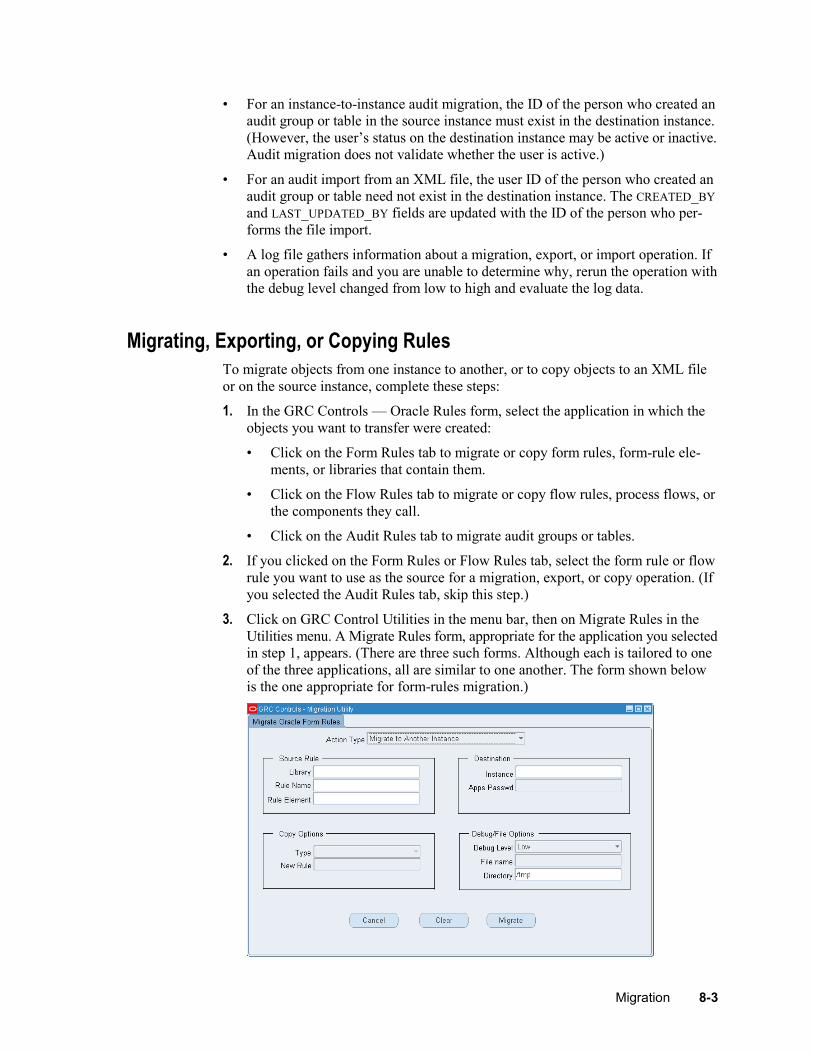
Migration 8-3
• For an instance-to-instance audit migration, the ID of the person who created an audit group or table in the source instance must exist in the destination instance. (However, the user’s status on the destination instance may be active or inactive. Audit migration does not validate whether the user is active.)
• For an audit import from an XML file, the user ID of the person who created an audit group or table need not exist in the destination instance. The CREATED_BY and LAST_UPDATED_BY fields are updated with the ID of the person who per-forms the file import.
• A log file gathers information about a migration, export, or import operation. If an operation fails and you are unable to determine why, rerun the operation with the debug level changed from low to high and evaluate the log data.
Migrating, Exporting, or Copying Rules
To migrate objects from one instance to another, or to copy objects to an XML file or on the source instance, complete these steps:
1. In the GRC Controls — Oracle Rules form, select the application in which the objects you want to transfer were created:
• Click on the Form Rules tab to migrate or copy form rules, form-rule ele-ments, or libraries that contain them.
• Click on the Flow Rules tab to migrate or copy flow rules, process flows, or the components they call.
• Click on the Audit Rules tab to migrate audit groups or tables.
2. If you clicked on the Form Rules or Flow Rules tab, select the form rule or flow rule you want to use as the source for a migration, export, or copy operation. (If you selected the Audit Rules tab, skip this step.)
3. Click on GRC Control Utilities in the menu bar, then on Migrate Rules in the Utilities menu. A Migrate Rules form, appropriate for the application you selected in step 1, appears. (There are three such forms. Although each is tailored to one of the three applications, all are similar to one another. The form shown below is the one appropriate for form-rules migration.)

8-4 Oracle Preventive Controls Governor User Guide
4. In the Action Type list box, select the operation you want to perform:
• Migrate to Another Instance if you want to migrate objects (a form rule, element, or library; a flow rule or process flow; or an audit group or table).
• Export to File if you want to export objects to an XML file.
• Copy within the Same Instance if you want to copy an object under a new or modified name on the source instance. (This option is not available if you selected the Audit Rules tab in step 1.)
5. In the Source block, identify an item to be migrated, exported, or copied. The fields available in this block, and your options for using them, vary according to the application you selected in step 1.
If you selected Form Rules in step 1, the block is titled “Source Rule:”
• The Rule Name list of values displays the rule you selected in step 2. Retain the entry to work with that rule (or its elements); or, select another. Or, delete the Rule Name entry in order to select a library. (If the Rule Name field con-tains an entry, the Library field does not accept input.)
• If you retain an entry in the Rule Name field, do one of the following in the Rule Element list of values:
Leave the field blank to migrate, export, or copy the full rule you selected in the Rule Name field. This includes the rule and all its elements.
Select the value All Elements to migrate, export, or copy all the elements that belong to the rule, but not the rule itself.
Select a single element belonging to the rule to migrate, export, or copy that element, but not the rule itself.
• Alternatively, select a library rather than a rule or element. Delete the default entry in the Rule Name field, then click in any other active field. The library field becomes active; in it, select the library you want to migrate, export, or copy. (When the Library field contains an entry, the Rule Name and Rule Element fields do not accept input.)
If you selected Flow Rules in step 1, the block is titled “Source Process”:
• The Process Name list of values displays the process rule you selected in step 2. Retain the entry to work with that process (or flows within that process); or, select another.
• In the Process Flows list of values, do one of the following:
Leave the field blank to migrate, export, or copy the full process rule you selected in the Process Name field. This includes the process, all its process flows, and all the elements called by those flows.
Select the value All Process Flows to migrate, export, or copy all the flows that belong to the process rule, but not the process rule itself or the elements called by the process flows.
Select a single flow belonging to the process to migrate, export, or copy that flow, but not the process rule itself or elements called by the process flow.

Migration 8-5
If you selected Audit Rules in step 1, the block is titled “Source Audit Rule”:
• In the Audit Group list of values, select the group you want to migrate or export. (If a group has been opened in the Audit Groups form, that group appears here by default when you open the Migrate form.)
• If you want to migrate or export the group you’ve selected, leave the Audit Table list of values blank. If you want to migrate or export a table from that group, select the table in the Audit Table list of values. (If a group has been opened in the Audit Groups form and the cursor is focused on a table listed in its Table Name column, that table appears here by default when you open the Migrate form.)
6. If you are performing a migration, make entries in the Destination block.
• In the Instance list of values, select a destination instance for the migration.
• In the Apps Passwd text box, type the apps password for the destination instance if you are prompted to do so. (This prompt appears if the XXLAAPPS: Enable for Migration Security profile option is set to Yes on the source instance. If the option is set to No, the prompt does not appear and a password need not be entered.)
If you are performing a file export or copying to the source instance, fields in the Destination block do not apply and do not accept input.
7. If you are copying to the source instance, make entries in the Copy Options block.
• If you are copying “child” objects (an element or all elements in Form Rules, or a process flow or all process flows in Flow Rules), the Type field defaults to an “Add to Existing” value and cannot be changed. In the second field, select (as appropriate) an existing form rule into which you want to copy elements, or an existing flow rule into which you want to copy process flows.
• If you are copying an entire form or flow rule, select one of three values in the Type field: “Copy as a New [Rule/Process]” if you want to assign a new name to the copy, or “Add a Prefix” or “Add a Suffix” to use a modified ver-sion of the original name for the copy. In the second field, type the text you want to use as a new name, or as a prefix or suffix to the original name.
If you selected Audit Rules in step 1, the Copy Options block is inapplicable and does not appear on the form. If you are performing a migration or file export in Form Rules or Flow Rules, fields in the Copy Options block do not apply and do not accept input.
8. Make selections in the Debug/File Options block:
• In the Debug Level list box, select a level of detail for error reporting to a log. Ordinarily, select Low; select High instead if you need to uncover the cause of a failed migration, export, or copy.
• In the Directory text box, type the path that designates a temporary staging file location for XML files to be generated and, in the case of migration, copied to the destination instance.
• The File Name field does not accept input.

8-6 Oracle Preventive Controls Governor User Guide
9. Click on a button that launches the process. Its label varies depending on your selection in step 4: Migrate if you chose Migrate to Another Instance, Export if you chose Export to File, or Copy if you chose Copy within the Same Instance.
10. Review several messages:
• To implement the migration, export, or copy, the system launches at least one concurrent request (two in some cases involving Audit Rules). For each concurrent request, a message provides an ID number. Click on the OK but-ton to clear each message.
• If you have performed a file export, a message displays the name of the export file you have generated. (In some cases involving Audit Rules, there are two files.) In each file name, the term xmlout designates XLM output; a number uniquely identifies the export operation; the term form, flow, or audit identifies the application involved in the export, and final phrases (such as UserFlow or AllProcessFlows) identify the export items. Make a note of the file name and location, and then click on the OK button.
• Finally, a dialog prompts you to perform another migration. Click Yes to do so or No to close the Migration form.
Importing a File
To import an XML file containing Form Rules, Flow Rules, or Audit Rules objects:
1. Transmit the exported file via FTP to the destination OS for import.
2. In the GRC Controls — Oracle Rules form, select the tab for the application into which you want to import objects.
3. Click on GRC Controls Utilities in the menu bar, then on Import from File in the Utilities menu. An Import From File form appears:
4. In the Directory box, type the path to the folder that contains the import file.
5. In the File Name box, type the name of the file you want to import. This is a name displayed by a message at the culmination of a file export (see step 10, above).
6. Select a value for Debug Level. Ordinarily, select Low; select High instead if you need to uncover the cause of a failed import.

Migration 8-7
7. Click on the Import button. A concurrent request message displays the ID number of the concurrent request that implements the import. Click on the OK button to clear the message.
8. If you need to import more than one file, click the Clear button to remove current settings and repeat this process as necessary.
Uploading or Migrating Change Control Rules A “content spreadsheet” contains more than 1,500 fully configured change-control rules. It is located in the content directory on the Governance, Risk, and Compliance Controls Suite Disk 1 of your Oracle media pack.
Whether you upload rules from a content spreadsheet or create them individually in the Change Control Wizard, you can “migrate” them — copy them from one Oracle EBS instance to another.
In either case, you make use of concurrent requests run from the Requests option of the View menu in the GRC Controls responsibility in Oracle E-Business Suite.
Uploading Rules from a Content Spreadsheet
To upload rules from a content spreadsheet, first review and prepare them:
1. Review the spreadsheet. Select the rules that target fields for which you want to implement controls. Type the letter Y in the Upload column for each of these rules.
2. Create a flat file containing the rules you’ve selected: From the Tools menu in Excel, select the Create CSV for Change Control option. Specify the destination for the CSV file and select the Save button.
The Create CSV for Change Control option appears in the Excel Tools menu only if the macro security level for Excel is set to low. Click on Tools in the Excel menu bar, then Options in the Tools menu. In the Options window, click on the Security tab. In the Security panel, click on the Macro Security button. A Security window opens; in its Security Level panel, click on the Low radio button. Then close the Security and Options windows — click on the OK button in each.
3. A control total message displays the number of rules written. To verify the com-pleteness of your upload file, compare this with the number of rows you selected.
To upload the file you’ve prepared:
1. FTP the CSV file to the /usr/tmp directory of the instance in which the rules are to be used.
2. Run the Data Governor Content Load concurrent request. Supply the following parameters:
• File Name: Type in the name of the CSV file. This parameter is mandatory.
• File Location: Type in the path to the CSV file. This parameter is mandatory.
• Debug Mode: Select Yes to enable debug functionality for the load, or No to disable the functionality.
• Load Data: Select Yes if the data is to be loaded into the Preventive Con-trols Governor rule repository. Select No if this is a data validation run only.

8-8 Oracle Preventive Controls Governor User Guide
3. Open the Change Control Wizard (page 1-2). Click on Tools in the menu bar, then on Create Audit Rules Objects in the Tools menu. A pop-up note displays a concurrent request ID number. Click on the OK button to clear the message.
Migrating Control Rules
The method you use to copy control rules from one instance to another depends upon whether you have modified them in the source instance:
• If you have uploaded rules from a content spreadsheet to a source instance and have neither changed them nor added rules to them, simply upload the same rules from the content spreadsheet to the destination instance.
• If you have used the Change Control Wizard either to create rules or to modify rules uploaded from a content spreadsheet, run a concurrent request called Data Governor Content Export. This request takes the following parameters:
– File Location: Type in the path to the export file you are creating. This parameter is mandatory.
– File Name: Type a name for the export file you are creating. This parameter is mandatory.
– Application: Select one Oracle EBS application to export rules associated with that application, or leave the parameter blank to export rules associated with all applications.
– Form: This parameter is available only if you have made a selection for the Application parameter. Select a form used by the application to export only control rules associated with that form, or leave the parameter blank to export rules associated with all forms.
– Block: This parameter is available only if you have made a selection for the Form parameter. Choose a block that belongs to the selected form to export only control rules associated with that block, or leave the parameter blank to export rules associated with all blocks.
– Table: This parameter becomes available only if you have made a selection for the Block parameter. Choose the database table that corresponds to the selected block, or leave the parameter blank.
– Field: This parameter is available if you have made a selection for the Table parameter. Choose a form field belonging to the selected block (and for which data is stored in the selected table) to export only the control rule for that field, or leave the parameter blank to export control rules for all fields on the block.
– Control Type: Select one of the three control types to export only rules of that type, or leave the parameter blank to export all types of rules.
– Enabled Flag: Select Yes to export only those rules for which the Enabled Flag check box (see page 5-5) is checked; Select No to export only those rules for which the Enabled Flag check box is cleared; or leave the parameter blank to export rules configured in both ways.
Then, use the file you create to run the Data Governor Content Load concurrent request on the destination instance. (Follow the procedure described in “Uploading Rules from a Content Spreadsheet,” page 8-7.)

Utilities 9-1
9
Utilities
In addition to features described elsewhere in this manual, the Form Rules and Flow Rules applications provide several utility features. From either application, you can:
• Gather any combination of form rules, extension forms, and flow rules into libraries.
• Associate GRC Controls form functions with menus or responsibilities.
When the Form Rules tab is selected in the GRC Controls — Oracle Rules form, you can:
• Display version information, and refresh a cache of rule and form data.
• Add custom events.
When the Flow Rules tab is selected in the GRC Controls — Oracle Rules form, you can:
• Generate and display debug data for use in resolving problems with processes created in Flow Rules.
• Launch a background program that monitors the status of constraint processes.
• Monitor concurrent programs and managers.
Collecting Rules in Libraries
You can gather form rules and extension forms, as well as process rules created in Flow Rules, into libraries.
As you do, you can characterize the contents of each library by assigning it a theme, category, or module. You have the opportunity to define each class of values in any way you choose. For example, a theme might be a broadly defined set of items (such as rules that implement Sarbanes Oxley controls), a category might be a more nar-rowly defined set of those items (such as form rules that set security attributes to limit access to forms and so prevent SOD violations), and a module might be a class of applications to which the library items apply. You can also assign each of the items you place in a library to a user. To create themes, categories, or modules, or to identify users to whom library items can be assigned, you would add values to “value sets” that have been created for use with libraries.

9-2 Oracle Preventive Controls Governor User Guide
Creating a Library
To create a library, select either the Form Rules or Flow Rules tab. Click on GRC Controls Utilities in the menu bar, and then on Oracle Rules Library in the Utilities menu. A GRC Controls Libraries form appears:
1. Select a row in the upper grid. Use any of these methods:
• If the grid contains any empty rows, click in the first one.
• Click on the New button, which is first on the left in the tool bar.
• Click on File in the menu bar, then on New in the File menu.
2. In the Library Name field, type a unique name.
3. In the Description field, type a description of the library.
4. In the Version field, type a version number. Note that it can, but need not, reflect the version number of the software whose components you are collecting in a library.
5. In the Theme, Category, and Module lists of values, select among values you have defined for characterizing the contents of the library (see “Adding to Value Sets,” page 9-3). Or, if you have not defined values, ALL is the only value avail-able to you; select it.
To add items to the library, use the Library Elements grid:
1. In the Seq field, type a sequence number.
2. In the Type list box, select Oracle Form Rules to add a form rule to the library, Oracle Form Extensions to add an extension form to the library, or Oracle Flow Rules to add a flow rule to the library.
3. In one of the next three fields, select the item you wish to include in the library. The field you use depends on the Type you selected in step 2: Rule Name for a form rule, Process Name for a flow rule, or Form Extension for an extension form. Then slide the scroll bar to the right to reveal additional fields.
4. In the Complexity list box, select Low, Medium, or High to assess the relative intricacy of the item you are adding. (Your site should develop its own defini-tions of low, medium, and high complexity.)

Utilities 9-3
5. In the Assigned To list of values, select a user from a set of users to whom a library might be assigned (see “Adding to Value Sets,” below). If you have not identified such users, the field does not accept any entry; in that case, leave the field blank.
6. Optionally, record the state of the library item by selecting appropriate check boxes: Developed, Documented, Tested, QA, or Completed.
7. Optionally, type a brief explanation of this library item in the Description field.
8. Repeat these steps to add as many additional rules or forms to the library as you like, one per row.
9. Save the library: Click on File in the menu bar and then Save in the File menu.
Adding to Value Sets
To define themes, categories, or modules that classify the contents of libraries, or to identify users to whom library items can be assigned, add entries to value sets that have been created for use with libraries:
1. With the GRC Controls Libraries form open, click on Tools in the menu bar, and then on Value Sets in the Tools menu. A pair of forms open, with a Find Value Set form initially active.
2. In the Find Values By area, ensure that the Value Set radio button is selected. Then type the string la% in the Name box and click on the Find button.
3. A Flexfield Value Sets window opens. In it, click on an entry for the type of values you want to create:
• LAAR_LIBRARY_THEME corresponds to the Theme field in the Libraries form.
• LAAR_LIBRARY_CATEGORY corresponds to the Category field
• LAAR_LIBRARY_MODULES corresponds to the Modules field
• LAAR_LIBRARY_ ASSIGNED_TO corresponds to the Assigned To field.
Then click on the OK button.

9-4 Oracle Preventive Controls Governor User Guide
4. A Segment Values form becomes active:
In the Effective Values panel, complete one row for each value you want to create.
• In the Value field, type the name of the value you are creating — for example, the name of a theme if you selected LAAR_LIBRARY_THEME as you opened the form. The Translated Value field defaults to the same entry; you can’t change it.
• In the Description field, type a brief explanation of the value.
• Ensure that the Enabled check box is selected for the value to take effect.
• To define a limited period for the value to remain in effect, enter starting and ending dates in the From and To fields. For each, select a date in the pop-up calendar that appears when you click on the list-of-values icon, or type a date in the format configured for your instance of Oracle EBS. Or, to allow the value to remain in effect immediately and indefinitely, leave the From and To fields blank.
5. When you finish entering values, save your work: Click on File in the menu bar, and then Save in the File menu.
Using the Mass Associate Utility
A Mass Associate utility enables you to add form functions to Oracle Navigator menus or to responsibilities with which they are not already associated:
1. Select either the Form Rules or Flow Rules tab. Click on GRC Controls Utilities in the menu bar, and then on Mass Associate Function in the Utilities menu. A Mass Associate Function form appears (as shown at the top of the next page).
2. Click on the Menu or Responsibility radio button (to determine which type of item you will associate with a function).
3. In the Function Name field, select a form function. The Associate Function list then displays all the menus or responsibilities (depending on your radio-button choice) not already associated with this function.

Utilities 9-5
4. Select the Include radio button for each menu or responsibility you want to associate with the function you’ve selected. By default, the Include radio button is selected for all items in the Associate Function list. You can:
• Deselect or select all menus or responsibilities. Click on the Select All check box so that it changes to read “Deselect All.” Then click on it again; this selects all the Exclude radio buttons and clears all the Include radio buttons, and it changes the check box label back to “Select All.” Click on it once again; this selects all the Include radio buttons and clears all the Exclude radio buttons, and it changes the check box label back to “Deselect All.”
• Deselect individual included menus or responsibilities by clicking on the Exclude radio button for each.
• Select individual excluded menus or responsibilities by clicking on the Include radio button for each.
5. Click on the Submit button. Users with access to the newly associated menus or responsibilities then have access to the function.
Rules Caching
Rather than re-evaluate a form rule each time a form affected by the rule is opened, Form Rules maintains a cache of rule-evaluation data.
• A table called LA_BR_CONFIGURATIONS maintains a record comprising the names of all forms against which form rules have been written. The table is updated when a user closes the Oracle Rules form, and is read so that memory is updated when a user opens an Oracle form associated with a rule.
• Similarly, a table called AL_BR_FORM_RULE stores a record for each form-rule element. The table is updated when a user closes the Oracle Rules form, and is read so that memory is updated when a user opens an Oracle form associated with a configured rule detail.
You must refresh the cache when you test form rules. The preferred way is to is to close the GRC Controls — Oracle Rules form after having created a rule you want

9-6 Oracle Preventive Controls Governor User Guide
to test, and then navigate to the Oracle EBS form against which you have written the rule. You should not keep the Oracle Rules form open at the same time that you open a target Oracle EBS form, as this may cause inconsistencies in caching.
However, you can refresh the cache manually. Moreover, you need to do so when you migrate rules to a target instance. To refresh the cache manually:
1. Select the Form Rules tab. Click on Tools in the menu bar, and then Oracle Rules Configuration in the Tools menu. The following Oracle Rules Configurations window opens.
2. Click on the Refresh Cache button. Note that the window also provides information about the versions of components you are running.
3. Click on the Done button to close the window.
Because of caching, there is a limit of 500 forms to which rules can be attached.
Adding Custom Events
As you use the Event Tracker (page 2-3) to capture blocks, fields, and other components for use in form rules, you may also capture “undocumented” events, which you may then associate with a rule element to trigger its being processed. An alternative procedure enables you to capture such events for use as you create a rule element. You need to know the name of the event, and the form must call the event.
1. Select the Form Rules tab and, in the home Form Rules form, click on the rule element with which you want to use the event.
2. Click on Tools in the menu bar, and then on Add Custom Events in the Tools menu.
3. A note appears, informing you that using the Event Tracker is the recommended way to capture both standard and custom events. Click on the OK button to clear the note.
4. An Add Custom Events form appears:

Utilities 9-7
5. Select the form that uses the event. Do this in either of two ways:
• In the User Form Name list of values, select the “user friendly” display name for the form. The Form Name field then displays a corresponding value automatically.
• In the Form Name list of values, select the name by which internal program code recognizes the form. The User Form Name field then displays a corre-sponding value automatically.
6. In the Custom Event field, type the name of the undocumented event.
7. Click on the Insert button.
Gathering Debug Data
To generate data about errors that occur in the execution of process rules, ensure that the Form Rules tab is selected in the GRC Controls — Oracle Rules form. Click on Flow Rules in the menu bar, then on Configurations in the Flow Rules menu. The following Configurations form appears:
In it, select the Debug Flag check box and type a number of days in the Days to Keep Debug Data field. (The form also provides the software revision number.) Then save the changes (click on File in the menu bar, then Save in the File menu) and click on the Done button to close the form.
To review the debug data you generate, click on Flow Rules in the menu bar, then on Debug Data in the Flow Rules menu. The following form appears:
Each row displays information about errors that have occurred in the running of process rules. Note that you can use values from the Item Type and Item Key

9-8 Oracle Preventive Controls Governor User Guide
columns as search parameters to gather more information in the Status Monitor of the Oracle Workflow system.
Click on the Reset Debug Table button to clear old data from the form. Click on the Done button to close the form.
Monitoring Constraint Processes
Within Flow Rules, a background program monitors processes that contain Check Constraint flows, checking every 30 minutes for any Constraint/Condition element that has been resolved, even though no user has “completed” the notification sent by the Check Constraint rule that called the Constraint/Condition element. The program completes the Check Constraint flow and moves its process to the next flow rule. Once started, the program runs until the instance is bounced.
To start the program, ensure that the Form Rules tab is selected in the GRC Controls — Oracle Rules form. Click on Flow Rules in the menu bar, then on Launch Back-ground Program in the Flow Rules menu.
Monitoring Concurrent Programs
Within Flow Rules, a Watch Processes feature helps to track concurrent request processing and provides a mechanism for distributing reports via workflow notifi-cations:
1. Ensure that the Form Rules tab is selected in the GRC Controls — Oracle Rules form. Select Flow Rules in the menu bar, then Monitor Conc Programs from the Flow Rules menu. A Watch Processes form appears:
2. In the Prog/Set list box, select Program or Report Set. Depending on this setting, select a program in the Program field or a report set in the Report Set field.

Utilities 9-9
3. Go to the Parameters field; pop-up windows prompt for program parameters. When you finish making selections, they appear in the Parameters field.
Or, select Ignore Parameters in the Tools menu; in the Ignore Parameters form, click the Ignore check box for each parameter you wish to ignore.
4. Optionally, select an operating unit in the Operating Unit field, a responsibility in the Responsibility field, or both. Only when the request is run from the unit and responsibility specified would the notification get sent.
5. In the User list of values, select the ID of the user who is to be notified. Select the Same User Only check box to generate notifications only when the specified user runs the program.
6. Click the Active check box to activate the row.
7. Click on the Email Content tab and select or clear the Report and Log check boxes. When either is selected, the email notification includes the component that is checked: a report or a log generated by the program.
8. Click on the Filters tab to create additional filters:

9-10 Oracle Preventive Controls Governor User Guide
In this form:
• In the Max Runtime Alert field, set a number of minutes. If the program runs longer than this time, a notification is sent.
• Select the Verify if Scheduled check box if the program runs on a schedule. If it misses its schedule, a notification is sent.
• In the Verify if Run During Last field, type a number of hours. If the program is not run within that interval, a notification is sent.
• Select any combination of the Normal, Error, or Warning check boxes to receive notification when the program finishes running in any of these states.
9. Click on the Processes tab to specify process rules to be executed when the concurrent program finishes running. You may choose up to three processes, one each to be run when the program ends in normal, warning, and error states.
10. Click on the Conc Managers tab to specify concurrent managers that need to be monitored, and who must be notified if managers go down or are backed up.

Utilities 9-11
In this form:
• In the Manager list of values, select a manager to be monitored. Select the Monitor check box.
• Enter values for the maximum number of jobs that can be in the queue, the maximum amount of wait time permitted, and the maximum runtime permitted. Alerts are sent when any of these values is exceeded.
• In the Email field, type the email address to which alerts are to be sent, or in the Distribution List field, select a distribution list. (These are configured in a panel that appears when you click on the Distribution List tab.)
11. Click on the Distribution list tab to create the email distribution lists you can select in the Conc Mangers panel. Within the Distribution panel, click on the Distributions tab to name and describe the distribution list, then click on the Subscribers tab to select its members — for each (one per row) a user ID, email address, and start and end dates:
12. Click on the History tab to display records of all monitored concurrent managers and programs. Entries in this history log are purged after the number of days entered in the Retain Log (Days) field.

9-12 Oracle Preventive Controls Governor User Guide