oracle® fusion middleware...the oracle fusion middleware application adapte r best practices guide...
TRANSCRIPT

Oracle® Fusion Middleware Application Adapter Best Practices Guide for Oracle WebLogic Server
11g Release 1 (11.1.1.7.0)
E17059-07
March 2013

Oracle Fusion Middleware Application Adapter Best Practices Guide for Oracle WebLogic Server, 11g Release 1 (11.1.1.7.0)
E17059-07
Copyright © 2009, 2013, Oracle and/or its affiliates. All rights reserved.
Primary Author: Stefan Kostial
Contributing Authors: Sunil Gopal, Marian Jones, Vikas Anand, Sunil Wadhwa, Vishal Saxena, Vimmika Dinesh
This software and related documentation are provided under a license agreement containing restrictions on use and disclosure and are protected by intellectual property laws. Except as expressly permitted in your license agreement or allowed by law, you may not use, copy, reproduce, translate, broadcast, modify, license, transmit, distribute, exhibit, perform, publish, or display any part, in any form, or by any means. Reverse engineering, disassembly, or decompilation of this software, unless required by law for interoperability, is prohibited.
The information contained herein is subject to change without notice and is not warranted to be error-free. If you find any errors, please report them to us in writing.
If this software or related documentation is delivered to the U.S. Government or anyone licensing it on behalf of the U.S. Government, the following notice is applicable:
U.S. GOVERNMENT RIGHTS Programs, software, databases, and related documentation and technical data delivered to U.S. Government customers are "commercial computer software" or "commercial technical data" pursuant to the applicable Federal Acquisition Regulation and agency-specific supplemental regulations. As such, the use, duplication, disclosure, modification, and adaptation shall be subject to the restrictions and license terms set forth in the applicable Government contract, and, to the extent applicable by the terms of the Government contract, the additional rights set forth in FAR 52.227-19, Commercial Computer Software License (December 2007). Oracle USA, Inc., 500 Oracle Parkway, Redwood City, CA 94065.
This software is developed for general use in a variety of information management applications. It is not developed or intended for use in any inherently dangerous applications, including applications which may create a risk of personal injury. If you use this software in dangerous applications, then you shall be responsible to take all appropriate fail-safe, backup, redundancy, and other measures to ensure the safe use of this software. Oracle Corporation and its affiliates disclaim any liability for any damages caused by use of this software in dangerous applications.
Oracle is a registered trademark of Oracle Corporation and/or its affiliates. Other names may be trademarks of their respective owners.
This software and documentation may provide access to or information on content, products, and services from third parties. Oracle Corporation and its affiliates are not responsible for and expressly disclaim all warranties of any kind with respect to third-party content, products, and services. Oracle Corporation and its affiliates will not be responsible for any loss, costs, or damages incurred due to your access to or use of third-party content, products, or services.


v
Contents
Preface ................................................................................................................................................................ vii
Audience...................................................................................................................................................... viiDocumentation Accessibility .................................................................................................................... viiRelated Documents ................................................................................................................................... viiiConventions ............................................................................................................................................... viii
1 General Best Practices
Understanding Managed Connections ................................................................................................ 1-1Configuring Oracle Application Adapters in a High Availability Cluster Environment for SOA and BPM ..................................................................................................................................................... 1-3
Key Points to Consider...................................................................................................................... 1-4Prerequisites........................................................................................................................................ 1-4Deploying the J2CA Connector Application to a Clustered Environment................................ 1-5Configuring the High Availability (HA) File Adapter for an Outbound Process ................. 1-11Configuring the Outbound Process.............................................................................................. 1-17Configuring Connection Settings for the Inbound Process ...................................................... 1-18Configuring the Inbound Process................................................................................................. 1-19Singleton Testing............................................................................................................................. 1-20
Configuring Oracle Application Adapters in a High Availability Cluster Environment for Oracle Service Bus................................................................................................................................. 1-21
Key Points to Consider................................................................................................................... 1-21Configuring and Deploying J2CA ................................................................................................ 1-21
Configuring the J2CA Connector Application .................................................................... 1-22Deploying the J2CA Connector Application using the OSB Administration Console.. 1-22
Deploying the J2CA Installation Verification Program (IVP)................................................... 1-24Deploying the J2CA Installation Verification Program (IVP) Using the OSB Administration Console 1-24
Configuring and Deploying BSE .................................................................................................. 1-26Prerequisites ............................................................................................................................. 1-26Creating a Domain Using the HTTP Proxy.......................................................................... 1-27Propagating the Domain Configuration With Pack and Unpack Utilities ...................... 1-37Configuring a BSE Configuration in Application Explorer............................................... 1-39Configuring and Deploying BSE to the HTTP Server ........................................................ 1-41
Configuring the Oracle HTTP Server for Inbound Processing ................................................ 1-43Preferred Repository Type................................................................................................................... 1-43Generating Input XML Documents ................................................................................................... 1-44

vi
Prerequisites..................................................................................................................................... 1-44Creating a WSDL Document Using Application Explorer ....................................................... 1-44Generating an Input XML File From a Request Schema ........................................................... 1-45Using the Generated Input XML File in the Oracle Enterprise Manager Console ................ 1-48
Migrating a Database Repository....................................................................................................... 1-60
2 Oracle Application Adapter for SAP R/3 Best Practices
Understanding Connection Pools ......................................................................................................... 2-1Security....................................................................................................................................................... 2-2Load Balancing.......................................................................................................................................... 2-2Encoding..................................................................................................................................................... 2-3
3 Oracle Application Adapter for Siebel Best Practices
Best Practices for Siebel .......................................................................................................................... 3-1Configuring Connection Pooling for Siebel ....................................................................................... 3-2
4 Oracle Application Adapter for PeopleSoft Best Practices
PeopleSoft Events (Inbound Processing) ............................................................................................ 4-1
5 Oracle Application Adapter for J.D. Edwards OneWorld Best Practices
Connection Pooling and Load Balancing ............................................................................................ 5-1Security....................................................................................................................................................... 5-2Multiple Connections and Multiple Users ......................................................................................... 5-2Unicode Support....................................................................................................................................... 5-2Delivery Confirmation and Error Messages ....................................................................................... 5-2
Index

vii
Preface
Oracle Fusion Middleware Application Adapter Best Practices Guide for Oracle WebLogic Server describes general best practices that are common to all Oracle Application Adapters for Oracle WebLogic Server.
AudienceThe Oracle Fusion Middleware Application Adapter Best Practices Guide for Oracle WebLogic Server is intended for system administrators and application developers who are using Oracle Application Adapters for Oracle WebLogic Server.
Documentation AccessibilityOur goal is to make Oracle products, services, and supporting documentation accessible to all users, including users that are disabled. To that end, our documentation includes features that make information available to users of assistive technology. This documentation is available in HTML format, and contains markup to facilitate access by the disabled community. Accessibility standards will continue to evolve over time, and Oracle is actively engaged with other market-leading technology vendors to address technical obstacles so that our documentation can be accessible to all of our customers. For more information, visit the Oracle Accessibility Program Web site at http://www.oracle.com/accessibility/.
Accessibility of Code Examples in DocumentationScreen readers may not always correctly read the code examples in this document. The conventions for writing code require that closing braces should appear on an otherwise empty line; however, some screen readers may not always read a line of text that consists solely of a bracket or brace.
Accessibility of Links to External Web Sites in DocumentationThis documentation may contain links to Web sites of other companies or organizations that Oracle does not own or control. Oracle neither evaluates nor makes any representations regarding the accessibility of these Web sites.
Access to Oracle SupportOracle customers have access to electronic support through My Oracle Support. For information, visit http://www.oracle.com/support/contact.html or visit http://www.oracle.com/accessibility/support.html if you are hearing impaired.

viii
Related DocumentsFor more information, see the following documents in the Oracle Enterprise Repository 11g Release 1 (11.1.1.6.0) documentation set:
■ Oracle Fusion Middleware Application Adapters Installation Guide for Oracle WebLogic Server
■ Oracle Fusion Middleware Application Adapter Upgrade Guide for Oracle WebLogic Server
■ Oracle Fusion Middleware Application Adapter for SAP R/3 (SAP JCo 3.0) User's Guide for Oracle WebLogic Server
■ Oracle Fusion Middleware Application Adapter for Siebel User's Guide for Oracle WebLogic Server
■ Oracle Fusion Middleware Application Adapter for PeopleSoft User's Guide for Oracle WebLogic Server
■ Oracle Fusion Middleware Application Adapter for J.D. Edwards OneWorld User's Guide for Oracle WebLogic Server
■ Oracle's Unified Method (OUM)
A wealth of additional Governance information can be found within Oracle's Unified Method (OUM). OUM can be used by Oracle employees, Oracle Partner Network Certified Partners or Certified Advantage Partners, and Clients who either participate in the OUM Customer Program or are engaged on projects where Oracle provides consulting services. OUM is a web-deployed toolkit for planning, executing and controlling software development and implementation projects.
For more information about OUM, see the OUM FAQ at
http://my.oracle.com/portal/page/myo/ROOTCORNER/KNOWLEDGEAREAS1/BUSINESS_PRACTICE/Methods/Learn_about_OUM.html
ConventionsThe following text conventions are used in this document:
Convention Meaning
boldface Boldface type indicates graphical user interface elements associated with an action, or terms defined in text or the glossary.
italic Italic type indicates book titles, emphasis, or placeholder variables for which you supply particular values.
monospace Monospace type indicates commands within a paragraph, URLs, code in examples, text that appears on the screen, or text that you enter.

1
General Best Practices 1-1
1 General Best Practices
This chapter lists and describes general best practices that are common to all Oracle Application Adapters for Oracle WebLogic Server. It contains the following sections:
■ Section 1.1, "Understanding Managed Connections"
■ Section 1.2, "Configuring Oracle Application Adapters in a High Availability Cluster Environment for SOA and BPM"
■ Section 1.3, "Configuring Oracle Application Adapters in a High Availability Cluster Environment for Oracle Service Bus"
■ Section 1.4, "Preferred Repository Type"
■ Section 1.5, "Generating Input XML Documents"
■ Section 1.6, "Migrating a Database Repository"
1.1 Understanding Managed ConnectionsOracle WebLogic Server (WLS) creates and maintains a pool of connections to the iWay J2CA resource adapter. These are called "managed connections". Each managed connection maintains a distinct set of connections to a back-end Enterprise Information System (EIS) systems (exposed as an adapter target). The set is initially empty and becomes populated only as specific adapter target connections are requested by an executing SOA process that is using the managed connection.
A managed connection maintains only a single connection to any given adapter target and reuses it each time a connection to that target is requested. When WLS destroys a managed connection, the managed connection closes all its internal EIS connections.
By way of illustration, the following steps detail a scenario in which a SOA process containing references to multiple iWay adapter targets is used.
1. SOA process requests a managed connection to the iWay resource adapter ("eis/OracleJCAAdapter/DefaultConnection") and receives a new, empty, managed connection called "Managed1".
2. SOA process invokes a service with adapter target MySAP/SAP1 using Managed1.
3. Managed1 creates a new MySAP adapter instance, activates it for target SAP1, and adds it to its internal EIS connection set.
4. Service is invoked, response returned, and SOA process continues.
5. SOA process invokes a service with adapter target MySAP/SAP2 using Managed1.

Understanding Managed Connections
1-2 Oracle Fusion Middleware Application Adapter Best Practices Guide for Oracle WebLogic Server
6. Managed1 creates a new MySAP adapter instance, activates it for target SAP2, and adds it to its internal EIS connection set.
7. Service is invoked, response returned, and SOA process continues.
8. SOA process invokes a service with adapter target JDEdwards/JDE1 using Managed1.
9. Managed1 creates a new JDEdwards adapter instance, activates it for target JDE1, and adds it to its internal EIS connection set.
10. SOA process terminates. WLS returns Managed1 to the connection pool.
After termination of the SOA process, Managed1 is available to be used by some other SOA process. Its internal EIS connections (SAP1, SAP2, JDE1) remain open. They are reused the next time a process requests connections to those targets from Managed1. They are closed only when WLS destroys Managed1.
You can monitor the managed connection pool in the WLS admin console, as shown in Figure 1–1.
Figure 1–1 Outbound Connection Pools Tab
The "current connections" column is the number of managed connections that are currently in use, presumably by executing SOA processes. This number should go up when a SOA process is started and should go down after a period of inactivity.
When a SOA process needs a managed connection, it tries to retrieve one from the connection pool. If a managed connection is not available, and the number of current connections does not yet exceed the maximum size of the pool, then it creates a new one. If the maximum size of the pool has been reached and no free connection is available, then a resource availability error is generated. When a process is finished, the connection is returned to the pool.
It is important to remember that these numbers represent connections to the iWay resource adapter and not to any specific EIS. A single iWay managed connection may contain any number of EIS connections depending upon its usage history. Consequently, there is no way to introspect the number of EIS connections in use by the iWay resource adapter.
The maximum size of the managed connection pool, the minimum size, and other pool parameters can be set in the weblogic-ra.xml file and viewed in the admin console, as shown in Figure 1–2.

Configuring Oracle Application Adapters in a High Availability Cluster Environment for SOA and BPM
General Best Practices 1-3
Figure 1–2 Connection Pool Tab
There are many pool parameters, but because they control the pool of connections to the iWay resource adapter and not any specific EIS many of these are immaterial. Setting an initial pool size, for example, accomplishes nothing except creating a set of empty resource adapter connections. There is no reason to do this. For similar reasons, the "capacity increment" parameter is also not particularly useful.
You have to set the initial capacity to zero always to work with the iWay adapters.
Some settings have implicit effects for all adapter targets. For example, setting a maximum size for the managed connection pool implicitly establishes the maximum number of connections that can be made to any single target since each managed connection can hold at most one connection to a unique adapter target. Similarly, defining the lifetime of a managed connection implicitly defines the lifetime for all EIS connections created by the connection. However, there is no way to control connection pooling for specific EIS targets using the iWay "universal" resource adapter.
1.2 Configuring Oracle Application Adapters in a High Availability Cluster Environment for SOA and BPM
Application adapters integrate Oracle WebLogic Server with various packaged applications, such as SAP R/3 and Siebel. These adapters include Oracle Application Adapter for PeopleSoft, Oracle Application Adapter for SAP R/3, Oracle Application Adapter for Siebel, and Oracle Application Adapter for J.D. Edwards OneWorld.
This section describes the steps required to successfully deploy the 11g Release 1 (11.1.1.6.0) Oracle Application Adapters in a cluster environment (in all available SOA nodes, which in this case is two systems) and working with inbound and outbound processes.
Note: You cannot set anything other than the value of zero.

Configuring Oracle Application Adapters in a High Availability Cluster Environment for SOA and BPM
1-4 Oracle Fusion Middleware Application Adapter Best Practices Guide for Oracle WebLogic Server
This section includes the following topics:
■ Section 1.2.1, "Key Points to Consider"
■ Section 1.2.2, "Prerequisites"
■ Section 1.2.3, "Deploying the J2CA Connector Application to a Clustered Environment"
■ Section 1.2.4, "Configuring the High Availability (HA) File Adapter for an Outbound Process"
■ Section 1.2.5, "Configuring the Outbound Process"
■ Section 1.2.6, "Configuring Connection Settings for the Inbound Process"
■ Section 1.2.7, "Configuring the Inbound Process"
■ Section 1.2.8, "Singleton Testing"
1.2.1 Key Points to ConsiderAn Oracle HTTP server should be installed as part of the SOA cluster configuration. For more information, see point 1 in Section 1.2.2, "Prerequisites".
The outbound process configuration is identical for all Oracle Application Adapters for Oracle WebLogic Server (SAP R/3, Siebel, PeopleSoft, and J.D. Edwards). For more information, see Section 1.2.4, "Configuring the High Availability (HA) File Adapter for an Outbound Process" and Section 1.2.5, "Configuring the Outbound Process".
For inbound processing, the steps that are described in Section 1.2.6, "Configuring Connection Settings for the Inbound Process" must be followed only for Siebel, PeopleSoft, and J.D. Edwards adapters, and not for the SAP R/3 adapter.
For PeopleSoft and J.D. E adapters, only the HTTP listener must be used in High Availability (HA) environments. The TCP listener should not be used.
1.2.2 PrerequisitesBefore continuing, ensure that the following prerequisites are available:
1. Two systems with the High Availability (HA) cluster configuration completed successfully. For more information about configuring the High Availability (HA) cluster, see:
http://download.oracle.com/docs/cd/E12839_01/core.1111/e10106/ha_soa.htm#CHDDAHEC
2. Upgrade from 11g Release 1 (11.1.1.3.0) to 11g Release 1 (11.1.1.6.0).
3. Pack/unpack the domain configuration from system1 to the second system (system2).
Note: All of the nodes in the cluster environment use the same database. As a result, the database repository must be configured for the specific database and all of the nodes must point to this database. For more information on how to configure BSE and J2CA database repository settings, see the Oracle Fusion Middleware Application Adapters Installation Guide for Oracle WebLogic Server (Section 2.7.4, "Configuring the Oracle Database Repository" or Section 2.7.5, "Configuring the DB2 Database Repository").

Configuring Oracle Application Adapters in a High Availability Cluster Environment for SOA and BPM
General Best Practices 1-5
4. Install Oracle Application Adapters 11g Release 1 (11.1.1.6.0) on both systems.
5. Configure a J2CA configuration as a database repository on both systems.
6. Perform the required changes to the ra.xml and weblogic-ra.xml files before deployment.
1.2.3 Deploying the J2CA Connector Application to a Clustered EnvironmentTo deploy the J2CA Connector Application:
1. Start the Oracle WebLogic Server for the Oracle WebLogic Server domain that has been configured.
2. Start the SOA_Server1 and SOA_Server2 for both systems.
3. Open the Oracle WebLogic Server Administration Console in a Web browser by entering the following URL:
http://host name:port/console
Where host name is the name of the system where Oracle WebLogic Server is running and port is the port number for the domain you are using.
The Oracle WebLogic Server Administration Console logon page is displayed, as shown in Figure 1–3.
Figure 1–3 Oracle WebLogic Server Administration Console Logon Page
4. Log in to the Oracle WebLogic Server Administrative Console using an account that has administrator privileges.
The Oracle WebLogic Server Administration Console home page is displayed, as shown in Figure 1–4.

Configuring Oracle Application Adapters in a High Availability Cluster Environment for SOA and BPM
1-6 Oracle Fusion Middleware Application Adapter Best Practices Guide for Oracle WebLogic Server
Figure 1–4 Oracle WebLogic Server Administration Console Home Page
5. In the Domain Structure section in the left pane, click Deployments.
The Deployments page is displayed, as shown in Figure 1–5.
Figure 1–5 Deployments Page
6. Click Lock & Edit in the Change Center.
7. Click Install.
The Install Application Assistant page is displayed, as shown in Figure 1–6.

Configuring Oracle Application Adapters in a High Availability Cluster Environment for SOA and BPM
General Best Practices 1-7
Figure 1–6 Install Application Assistant
8. Browse to the following directory:
C:\oracle\product\fmw\soa\soa\thirdparty\ApplicationAdapters\iwafjca.rar
9. Select the option next to iwafjca.rar and click Next, as shown in Figure 1–7.
Figure 1–7 Next Button In the Install Application Assistant Page
The Choose Targeting Style page is displayed, as shown in Figure 1–8.

Configuring Oracle Application Adapters in a High Availability Cluster Environment for SOA and BPM
1-8 Oracle Fusion Middleware Application Adapter Best Practices Guide for Oracle WebLogic Server
Figure 1–8 Choose Targeting Style Page
10. Accept the default selection (Install this deployment as an application) and click Next.
The Select Deployment Target page is displayed, as shown in Figure 1–9.
Figure 1–9 Select Deployment Target Page
11. In the Clusters section, select SOA_Cluster followed by All servers in the cluster.
12. Click Next.
The Optional Settings page is displayed, as shown in Figure 1–10.

Configuring Oracle Application Adapters in a High Availability Cluster Environment for SOA and BPM
General Best Practices 1-9
Figure 1–10 Optional Settings Page
13. Accept the default values and click Next.
The Summary page is displayed, as shown in Figure 1–11.
Figure 1–11 Summary Page
14. Click Finish.

Configuring Oracle Application Adapters in a High Availability Cluster Environment for SOA and BPM
1-10 Oracle Fusion Middleware Application Adapter Best Practices Guide for Oracle WebLogic Server
15. In the displayed Settings page for the J2CA (iwafjca) Connector Application, click Save.
16. In the Domain Structure section in the left pane, click Deployments and navigate through the table that lists all the deployed applications and find the J2CA (iwafjca) connector application.
17. Select the check box next to iwafjca, as shown in Figure 1–12.
Figure 1–12 Deployments Page
18. Click the Start submenu (down arrow) and select Servicing all requests.
The Start Application Assistant page is displayed, as shown in Figure 1–13.
Figure 1–13 Start Application Assistant Page
19. Click Yes.
20. Verify that the application has successfully started in the Deployments page, as shown in Figure 1–14.

Configuring Oracle Application Adapters in a High Availability Cluster Environment for SOA and BPM
General Best Practices 1-11
Figure 1–14 Deployments Page
21. Similarly, repeat steps 5 through 20 for the iwafjca.war deployment.
1.2.4 Configuring the High Availability (HA) File Adapter for an Outbound ProcessThe following configuration steps must be performed in the Oracle WebLogic Server Administration Console to work with the outbound process:
1. Open the Oracle WebLogic Server Administration Console in a Web browser by entering the following URL:
http://host name:port/console
Where host name is the name of the system where Oracle WebLogic Server is running and port is the port number for the domain you are using.
The Oracle WebLogic Server Administration Console logon page is displayed, as shown in Figure 1–15.

Configuring Oracle Application Adapters in a High Availability Cluster Environment for SOA and BPM
1-12 Oracle Fusion Middleware Application Adapter Best Practices Guide for Oracle WebLogic Server
Figure 1–15 Oracle WebLogic Server Administration Console Logon Page
2. Log in to the Oracle WebLogic Server Administrative Console using an account that has administrator privileges.
The Oracle WebLogic Server Administration Console home page is displayed, as shown in Figure 1–16.
Figure 1–16 Oracle WebLogic Server Administration Console Home Page
3. In the Domain Structure section in the left pane, click Deployments.
The Deployments page is displayed, as shown in Figure 1–17.

Configuring Oracle Application Adapters in a High Availability Cluster Environment for SOA and BPM
General Best Practices 1-13
Figure 1–17 Deployments Page
4. Click FileAdapter.
The Settings for FileAdapter page is displayed, as shown in Figure 1–18.
Figure 1–18 Settings for File Adapter Page
5. Click the Configuration tab followed by the Outbound Connection Pools tab.
The Outbound Connection Pool Configuration Table page is displayed, as shown in Figure 1–19.

Configuring Oracle Application Adapters in a High Availability Cluster Environment for SOA and BPM
1-14 Oracle Fusion Middleware Application Adapter Best Practices Guide for Oracle WebLogic Server
Figure 1–19 Outbound Connection Pool Configuration Table Page
6. Expand javax.resource.cci.ConnectionFactory and click eis/HAFileAdapter.
The settings for javax.resource.cci.ConnectionFactory page is displayed, as shown in Figure 1–20.
Figure 1–20 Javax.resource.cci.ConnectionFactory Page
7. Click the Properties tab.
8. Provide a valid location for the controlDir property and click Save.
9. Check if the success message is displayed, as shown below in Figure 1–21.

Configuring Oracle Application Adapters in a High Availability Cluster Environment for SOA and BPM
General Best Practices 1-15
Figure 1–21 Deployment Plan Success Message
10. In the Domain Structure section in the left pane, click Deployments, as shown in Figure 1–22.
Figure 1–22 Deployments Page
11. Select FileAdapter from the deployments list and click Update.
The Update Application Assistant page is displayed, as shown in Figure 1–23.

Configuring Oracle Application Adapters in a High Availability Cluster Environment for SOA and BPM
1-16 Oracle Fusion Middleware Application Adapter Best Practices Guide for Oracle WebLogic Server
Figure 1–23 Update Application Assistant Page
12. Select Update this application in place with new deployment plan changes and click Next.
The Summary page is displayed, as shown in Figure 1–24.
Figure 1–24 Summary Page
13. Click Finish.
14. Check if the success message is displayed, as shown in Figure 1–25.

Configuring Oracle Application Adapters in a High Availability Cluster Environment for SOA and BPM
General Best Practices 1-17
Figure 1–25 Deployment Success Message
15. Copy the generated plan.xml file from the first system (first node in the cluster configuration) to the same location (Oracle_Home\Middleware\Oracle_SOA1\soa) in the second system (second node in the cluster configuration).
16. Restart the servers (Admin_Server, SOA_Server1, SOA_Server2).
17. Create a shared input location that is accessible by both systems.
For example, if the inputs are pasted in this location, they can be consumed by system1 and system2.
1.2.5 Configuring the Outbound ProcessTo configure the outbound process:
1. Create a target using Application Explorer on the first system.
2. Connect to the target (on the first system) and create an outbound WSDL for the Oracle Application Adapter for SAP R/3 (MySAP node).
3. On the second system, create a target using Application Explorer with the same name as specified on the first system.
4. Restart the Admin Server and the soa_servers on both systems.
5. As shown below in Figure 1–26, create an outbound Mediator process using Oracle JDeveloper with the following configuration:
Figure 1–26 Outbound Mediator Process in Oracle JDeveloper

Configuring Oracle Application Adapters in a High Availability Cluster Environment for SOA and BPM
1-18 Oracle Fusion Middleware Application Adapter Best Practices Guide for Oracle WebLogic Server
6. Select the Read_file_adapter.jca file and make the following changes:
a. Change <connection-factory location="eis/FileAdapter" UIincludeWildcard="*.xml" adapterRef=""/> to <connection-factory location="eis/HAFileAdapter" UIincludeWildcard="*.xml" adapterRef=""/>
b. Add the value <property name="MaxRaiseSize" value="5"/> to the end, as shown in Figure 1–27.
Figure 1–27 JCA Properties Source
7. Save the process and deploy the process to both SOA servers.
8. Provide the input files in the input location configured in the Read file adapter and check if the outputs are shared and placed in the output location (in two systems) configured in the Write file adapter.
1.2.6 Configuring Connection Settings for the Inbound ProcessThe following configuration steps must be completed (for PeopleSoft, Siebel, and J.D. Edwards OneWorld Application Adapters) before executing an inbound process:
1. Navigate to the following location:
Oracle_Home\product\11.1.0\ohs_1\Oracle_WT1\instances\instance1\config\OHS\ohs1
2. Open the mod_wl_ohs.conf file.
3. Add the IP address and port number (port number configured while creating the channel for the adapter) for both systems in the mod_wl_ohs.conf file.
For example (for the PeopleSoft adapter):
<Location /name>SetHandler weblogic-handlerWebLogicCluster system1_ip:port, system2_ip:portWLLogFile c:\tmp\psft.log </Location>
Where:
■ name - Is any appropriate name.
■ system1_ip and system2_ip - Are the system IP addresses where SOA_Server1 and SOA_Server2 are configured.
■ port - The port number that is configured in the channel configuration for system1 and system2.

Configuring Oracle Application Adapters in a High Availability Cluster Environment for SOA and BPM
General Best Practices 1-19
4. Open a command prompt and navigate to:
Oracle_Home\product\11.1.0\ohs_1\Oracle_WT1\instances\instance1\bin
5. Restart the Oracle HTTP server using the following command:
opmnctl restartproc ias-component=ohs1
6. When providing the URL in the back end for the adapters (PeopleSoft, Siebel, JDEdwards) the URL must be in the following format:
http://ohsserver_ip:7777/name
Where ohsserver_ip is the IP address of the system where the Oracle HTTP server is installed and name is the name of the Location configured in the mod_wl_ohs.conf file.
1.2.7 Configuring the Inbound ProcessTo configure the inbound process:
1. Create a target and channel using Application Explorer on the first system.
2. Connect to the target (on the first system) and create an inbound WSDL for the Oracle Application Adapter for SAP R/3 (MySAP node).
3. On the second system, create a target and channel using Application Explorer with the same name as specified on the first system.
4. Restart the Admin Server and the soa_servers on both systems.
5. As shown in Figure 1–28, create an inbound Mediator process using Oracle JDeveloper with the following configuration:
Figure 1–28 Inbound Mediator Process in Oracle JDeveloper
6. Save the process and deploy the process (to both SOA servers).
7. Trigger from the back end or use HTTP publisher and check if the output is shared and placed in the output locations (in both systems) that are configured in the Write File adapter.

Configuring Oracle Application Adapters in a High Availability Cluster Environment for SOA and BPM
1-20 Oracle Fusion Middleware Application Adapter Best Practices Guide for Oracle WebLogic Server
1.2.8 Singleton TestingTo perform Singleton testing:
1. On the first system, create a target and channel using Application Explorer.
2. Connect to the target (on the first system) and create an inbound WSDL for the Oracle Application Adapter for SAP R/3 (MySAP node).
3. On the second system, create a target and channel using Application Explorer with the same name as specified on the first system.
4. Restart the Admin Server and the soa_servers on both systems.
5. As shown in Figure 1–29, create an inbound Mediator process using Oracle JDeveloper with the following configuration:
Figure 1–29 Inbound Mediator Process in Oracle JDeveloper
6. For singleton testing, open the composite.xml file (source view) and add the following property in the Service section:
<property name="singleton">true</property>
For example:
<service name="Service1" ui:wsdlLocation="MATMAS01_receive_cluster.wsdl"><interface.wsdlinterface="http://xmlns.oracle.com/pcbpel/iWay/wsdl/MySAP/isdsrv2_cluster/MATMAS01#wsdl.interface(MATMAS01PortType)"/><binding.jca config="MATMAS01_receive_cluster_3P.jca"/><property name="singleton">true</property> </service>
7. Save the inbound Mediator process and deploy the process to both SOA servers.
8. Trigger from the back end or use HTTP publisher and check if the messages are received by any system in the output location.
9. Stop the soa_server of the system that is receiving the messages.
10. Check whether the messages are being received by the second system.

Configuring Oracle Application Adapters in a High Availability Cluster Environment for Oracle Service Bus
General Best Practices 1-21
When you are using the Singleton testing feature with Oracle Application Adapter for SAP R/3, there are some loss of messages (messages are dumped in the SAP GUI). This is caused because the end-point activation of the second system is in progress after the first system is down.
To retrieve the lost messages, perform the following steps:
1. Login to the SAP GUI.
2. Enter the /sm58 transaction and navigate to the dumped messages.
3. Right-click a dumped message, and then select Execute LUW.
4. Repeat step 3 for all the dumped messages.
All the lost messages are received in the Oracle Enterprise Manager console.
1.3 Configuring Oracle Application Adapters in a High Availability Cluster Environment for Oracle Service Bus
This section describes the steps required to successfully deploy the 11g Release 1 (11.1.1.6.0) Oracle Application Adapters in a cluster environment for Oracle Service Bus (OSB) and configuring for inbound processes.
This section includes the following topics:
■ Section 1.3.1, "Key Points to Consider"
■ Section 1.3.2, "Configuring and Deploying J2CA"
■ Section 1.3.3, "Deploying the J2CA Installation Verification Program (IVP)"
■ Section 1.3.4, "Configuring and Deploying BSE"
■ Section 1.3.5, "Configuring the Oracle HTTP Server for Inbound Processing"
1.3.1 Key Points to ConsiderFor inbound processing, the steps that are described in Section 1.3.5, "Configuring the Oracle HTTP Server for Inbound Processing" must be followed only for Siebel, PeopleSoft, and J.D. Edwards adapters, and not for the SAP R/3 adapter.
For PeopleSoft and J.D. E adapters, only the HTTP listener must be used in High Availability (HA) environments. The TCP listener should not be used.
1.3.2 Configuring and Deploying J2CAThis section describes how to configure and deploy J2EE Connector Architecture (J2CA). It includes the following topics:
Note: All of the nodes in the cluster environment use the same database. As a result, the database repository must be configured for the specific database and all of the nodes must point to this database. For more information on how to configure BSE and J2CA database repository settings, see the Oracle Fusion Middleware Application Adapters Installation Guide for Oracle WebLogic Server (Section 2.7.4, "Configuring the Oracle Database Repository" or Section 2.7.5, "Configuring the DB2 Database Repository").

Configuring Oracle Application Adapters in a High Availability Cluster Environment for Oracle Service Bus
1-22 Oracle Fusion Middleware Application Adapter Best Practices Guide for Oracle WebLogic Server
■ Section 1.3.2.1, "Configuring the J2CA Connector Application"
■ Section 1.3.2.2, "Deploying the J2CA Connector Application using the OSB Administration Console"
1.3.2.1 Configuring the J2CA Connector ApplicationTo configure settings for the J2CA Connector Application:
1. Locate the ra.xml file, which is located in the following directory:
<OSB_HOME>\Oracle_OSB1\3rdparty\ApplicationAdapters\iwafjca.rar\META-INF\ra.xml
2. Open the ra.xml file in an editor.
3. Enter a value for the IWayHome property. This is the folder where the Oracle Application Adapters are installed. For example:
<config-property> <config-property-name>IWayHome</config-property-name> <config-property-type>java.lang.String</config-property-type> <config-property-value> OSB_Home\Oracle_OSB1\3rdparty\ApplicationAdapters </config-property-value></config-property>
4. Enter a value for the IWayConfig property. This is the value that you specified when you created a new J2CA configuration using Application Explorer. For example:
config-property> <config-property-name>IWayConfig</config-property-name> <config-property-type>java.lang.String</config-property-type> <config-property-value>J2CA_SampleConfig</config-property-value></config-property>
5. Enter a value for the Loglevel property. This property can be set to DEBUG, INFO, or ERROR. For example:
<config-property> <config-property-name>LogLevel</config-property-name> <config-property-type>java.lang.String</config-property-type> <config-property-value>DEBUG</config-property-value></config-property>
6. Save the ra.xml file and exit from the editor.
1.3.2.2 Deploying the J2CA Connector Application using the OSB Administration ConsoleTo deploy the J2CA Connector Application:
1. Open the Oracle Service Bus Administration Console in a Web browser by entering the following URL:
http://host name:port/sbconsole
Where host name is the name of the system where Oracle WebLogic Server is running and port is the port for the domain you are using. The port for the default domain is 7001.
The Oracle Service Bus Administration Console is displayed, as shown in Figure 1–30.

Configuring Oracle Application Adapters in a High Availability Cluster Environment for Oracle Service Bus
General Best Practices 1-23
Figure 1–30 Oracle Service Bus Administration Console
2. Click Oracle WLS Console located on the menu bar.
The Oracle WebLogic Server Administration Console is displayed, as shown in Figure 1–31.
Figure 1–31 Oracle WebLogic Server Administration Console
3. In the Domain Structure section in the left pane, click Deployments.
The Deployments page is displayed.
4. Click Install.
The Install Application Assistant page is displayed.
5. Browse to the following directory:
<OSB_HOME>\Oracle_OSB1\3rdparty\ApplicationAdapters\
6. Select the option next to iwafjca.rar and click Next.
The Choose Targeting Style page is displayed.
7. Leave the default option selected (Install this deployment as an application) and click Next.
The Optional Settings page is displayed.
8. Leave the default options selected and click Next.
The Select deployment targets page is displayed, as shown in Figure 1–32.

Configuring Oracle Application Adapters in a High Availability Cluster Environment for Oracle Service Bus
1-24 Oracle Fusion Middleware Application Adapter Best Practices Guide for Oracle WebLogic Server
Figure 1–32 Select Deployment Targets Page
9. Select AdminServer from the Servers section and OSB_Cluster_1 from the Clusters section.
10. Click Next.
The Summary page is displayed.
11. Click Finish.
The Settings page for the J2CA (iwafjca) Connector Application is displayed.
12. Click Save.
Verify that a success message is displayed.
1.3.3 Deploying the J2CA Installation Verification Program (IVP)This section describes how to deploy the J2CA Installation Verification Program (IVP). It includes the following topic:
■ Section 1.3.3.1, "Deploying the J2CA Installation Verification Program (IVP) Using the OSB Administration Console"
1.3.3.1 Deploying the J2CA Installation Verification Program (IVP) Using the OSB Administration ConsoleTo deploy the J2CA Installation Verification Program (IVP):
1. Open the Oracle Service Bus Administration Console in a Web browser by entering the following URL:
http://host name:port/sbconsole
Where host name is the name of the system where Oracle WebLogic Server is running and port is the port for the domain you are using. The port for the default domain is 7001.

Configuring Oracle Application Adapters in a High Availability Cluster Environment for Oracle Service Bus
General Best Practices 1-25
The Oracle Service Bus Administration Console is displayed, as shown in Figure 1–33.
Figure 1–33 Oracle Service Bus Administration Console
2. Click Oracle WLS Console located on the menu bar.
The Oracle WebLogic Server Administration Console is displayed, as shown in Figure 1–34.
Figure 1–34 Oracle WebLogic Server Administration Console
3. In the Domain Structure section in the left pane, click Deployments.
The Deployments page is displayed.
4. Click Install.
The Install Application Assistant page is displayed.
5. Browse to the following directory:
<OSB_HOME>\Oracle_OSB1\3rdparty\ApplicationAdapters\
6. Select the option next to iwafjca.war and click Next.
The Choose Targeting Style page is displayed.
7. Leave the default option selected (Install this deployment as an application) and click Next.
The Optional Settings page is displayed.
8. In the Name field, enter iwafjcatest.
9. Leave the remaining default options selected and click Next.
The Select deployment targets page is displayed, as shown in Figure 1–35.

Configuring Oracle Application Adapters in a High Availability Cluster Environment for Oracle Service Bus
1-26 Oracle Fusion Middleware Application Adapter Best Practices Guide for Oracle WebLogic Server
Figure 1–35 Select Deployment Targets Page
10. Select AdminServer from the Servers section and OSB_Cluster_1 from the Clusters section.
11. Click Next.
The Summary page is displayed.
12. Click Finish.
The Settings page for the J2CA IVP is displayed.
13. Click Save.
Verify that a success message is displayed.
1.3.4 Configuring and Deploying BSEThis section describes how to configure and deploy Oracle Adapter Business Services Engine (BSE). It contains the following topics:
■ Section 1.3.4.1, "Prerequisites"
■ Section 1.3.4.2, "Creating a Domain Using the HTTP Proxy"
■ Section 1.3.4.3, "Propagating the Domain Configuration With Pack and Unpack Utilities"
■ Section 1.3.4.4, "Configuring a BSE Configuration in Application Explorer"
■ Section 1.3.4.5, "Configuring and Deploying BSE to the HTTP Server"
1.3.4.1 PrerequisitesEnsure that the following prerequisites are met before configuring and deploying Oracle Adapter Business Services Engine (BSE).
■ Installation of Oracle 11g database (on system 1).
■ Configuration of schema (using RCU on system 1).

Configuring Oracle Application Adapters in a High Availability Cluster Environment for Oracle Service Bus
General Best Practices 1-27
■ Installation of Oracle WebLogic Server (on both systems in the cluster).
■ Installation of Oracle Service Bus (on both systems).
■ Installation of Oracle Application Adapters (on both systems).
1.3.4.2 Creating a Domain Using the HTTP ProxyPerform the following steps to create a domain using the HTTP proxy:
1. Navigate to Oracle_Home\wlserver_10.3\common\bin, as shown in Figure 1–36.
Figure 1–36 Oracle_Home Directory
2. Execute config.exe (on Windows platforms) or config.sh (on UNIX platforms).
The Fusion Middleware Configuration Wizard is displayed.
3. Select Create a new WebLogic domain and click Next, as shown in Figure 1–37.
Figure 1–37 Fusion Middleware Configuration Wizard
4. In the Select Domain Source pane that is displayed, ensure Oracle Service Bus - xx.x.x.x (Oracle_OSB1), WebLogic Advanced Web Services for JAX-RPC Extension - xx.x.x.x (wlserver_10.3), and Oracle JRF - xx.x.x.x (oracle_common) are selected, and then click Next, as shown in Figure 1–38.

Configuring Oracle Application Adapters in a High Availability Cluster Environment for Oracle Service Bus
1-28 Oracle Fusion Middleware Application Adapter Best Practices Guide for Oracle WebLogic Server
Figure 1–38 Select Domain Source Pane
The Specify Domain Name and Location pane is displayed.
5. Provide an appropriate name for the domain, and click Next, as shown in Figure 1–39.
Figure 1–39 Specify Domain Name and Location Pane
The Configure Administrator User Name and Password pane is displayed.
6. Provide an appropriate name and password for the domain and click Next, as shown in Figure 1–40.

Configuring Oracle Application Adapters in a High Availability Cluster Environment for Oracle Service Bus
General Best Practices 1-29
Figure 1–40 Configure Administrator User Name and Password Pane
The Configure Server Start Mode and JDK pane is displayed.
7. Select Production Mode, an appropriate JDK from Available JDKs, and then click Next, as shown in Figure 1–41.
Figure 1–41 Configure Server Start Mode and JDK Pane
The Configure JDBC Component Schema pane is displayed.
8. Select the displayed component schema and provide the values as listed and described in the following table.

Configuring Oracle Application Adapters in a High Availability Cluster Environment for Oracle Service Bus
1-30 Oracle Fusion Middleware Application Adapter Best Practices Guide for Oracle WebLogic Server
9. Click Next, as shown in Figure 1–42.
Figure 1–42 Configure JDBC Component Schema Pane
The Test JDBC Component Schema pane is displayed.
10. Check that the Test Successful! message is displayed and click Next, as shown in Figure 1–43.
Value Description
Vendor Oracle (select from the list).
Driver *Driver of Oracle (Thin) for service connections, Version 9.0.1 and later.
Schema Owner Leave the default value displayed.
Schema Password Provide the appropriate password (provided when creating the schema using RCU).
DBMS/Service Appropriate service name.
Host Name Appropriate host name where db is installed.
Port Appropriate port.
Note: The service name, host name, and port can be obtained from the tnsnames.ora file in the DB_Home//network/admin directory.

Configuring Oracle Application Adapters in a High Availability Cluster Environment for Oracle Service Bus
General Best Practices 1-31
Figure 1–43 Test JDBC Component Schema Pane
The Select Optional Configuration pane is displayed.
11. Select Managed Servers, Clusters and Machines, and then click Next, as shown in Figure 1–44.
Figure 1–44 Select Optional Configuration Pane
The Configure Managed Servers pane is displayed.
12. Create three servers using the Add option as shown in the following table, and click Next, as shown in Figure 1–45.

Configuring Oracle Application Adapters in a High Availability Cluster Environment for Oracle Service Bus
1-32 Oracle Fusion Middleware Application Adapter Best Practices Guide for Oracle WebLogic Server
Figure 1–45 Configure Managed Servers Pane
The Configure Clusters pane is displayed.
13. Create a new cluster using the Add option as shown in the following table, and click Next, as shown in Figure 1–46.
Name Listener Address Listener Port
osb_server1 IP address of system 1 8011
osb_server2 IP address of system 2 8011
http_server IP address of system 1 8022
Name Appropriate Name
Cluster messaging node Multicast (select from the list).
Multicast address Leave the default value.
Multicast port Leave the default value.
Cluster address Add managed server 1, managed server 2, IP address, and port.
For example, 172.19.23.26:8011, 172.19.23.32:8011

Configuring Oracle Application Adapters in a High Availability Cluster Environment for Oracle Service Bus
General Best Practices 1-33
Figure 1–46 Configure Clusters Pane
The Assign Servers to Clusters pane is displayed.
14. Assign the managed servers to the created cluster by selecting the listed managed server and clicking on the right arrow button, as shown in Figure 1–47.
Figure 1–47 Assign Servers to Clusters Pane
15. Click Next, as shown in Figure 1–48.
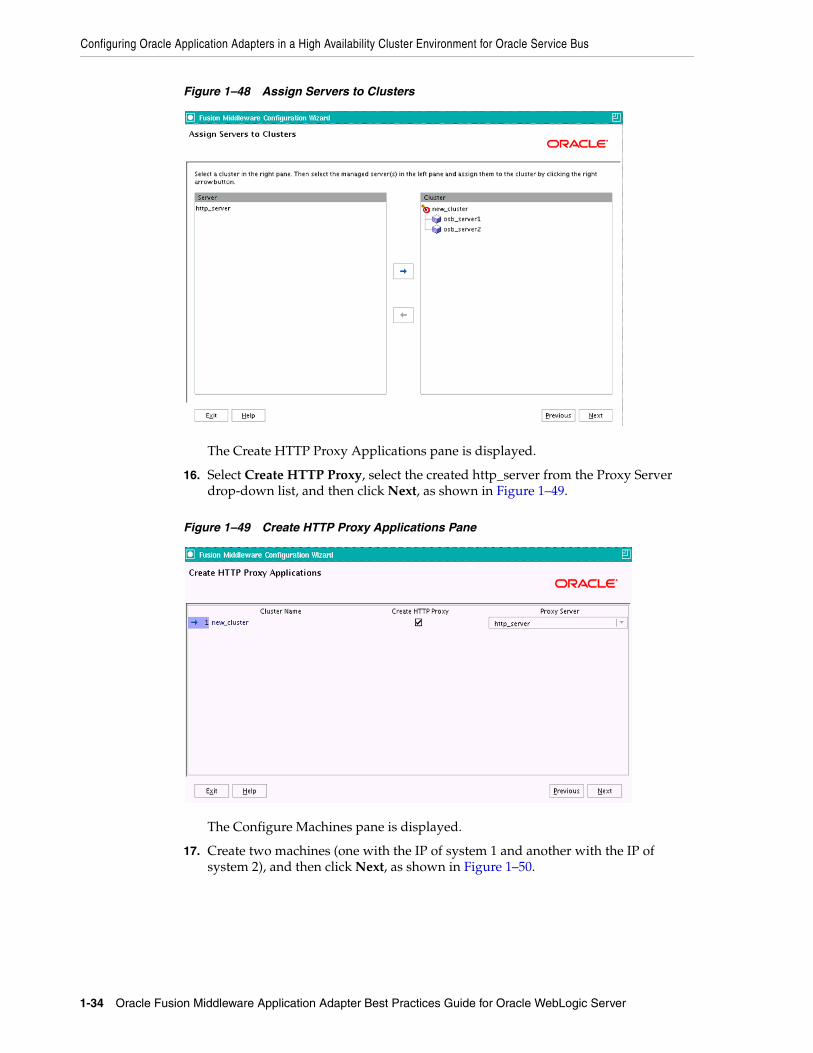
Configuring Oracle Application Adapters in a High Availability Cluster Environment for Oracle Service Bus
1-34 Oracle Fusion Middleware Application Adapter Best Practices Guide for Oracle WebLogic Server
Figure 1–48 Assign Servers to Clusters
The Create HTTP Proxy Applications pane is displayed.
16. Select Create HTTP Proxy, select the created http_server from the Proxy Server drop-down list, and then click Next, as shown in Figure 1–49.
Figure 1–49 Create HTTP Proxy Applications Pane
The Configure Machines pane is displayed.
17. Create two machines (one with the IP of system 1 and another with the IP of system 2), and then click Next, as shown in Figure 1–50.

Configuring Oracle Application Adapters in a High Availability Cluster Environment for Oracle Service Bus
General Best Practices 1-35
Figure 1–50 Configure Machines Pane
The Assign Servers to Machines pane is displayed, as shown in Figure 1–51.
Figure 1–51 Assign Servers to Machines Pane
18. Assign AdminServer, http_server, and osb_server1 to MS1, and osb_server2 to MS2, and then click Next, as shown in Figure 1–52.

Configuring Oracle Application Adapters in a High Availability Cluster Environment for Oracle Service Bus
1-36 Oracle Fusion Middleware Application Adapter Best Practices Guide for Oracle WebLogic Server
Figure 1–52 Assign Servers to Machines Pane
19. Verify the details in the displayed Configuration Summary pane, and click Create, as shown in Figure 1–53.
Figure 1–53 Configuration Summary Pane
20. After successful creation of the domain, click Done, as shown in Figure 1–54.

Configuring Oracle Application Adapters in a High Availability Cluster Environment for Oracle Service Bus
General Best Practices 1-37
Figure 1–54 Creating Domain Pane
1.3.4.3 Propagating the Domain Configuration With Pack and Unpack UtilitiesPerform the following steps to propagate the domain configuration with pack and unpack utilities:
1. Navigate to the OSB_Home\wlserver_10.3\common\bin directory in OSB_Machine1 and run the following pack command to create a template pack, as shown in Figure 1–55:
C:\OSB_cluster1\wlserver_10.3\common\bin>pack.cmd -domain= C:\OSB_cluster1\user_projects\domains\cluster_domain -template= C:\OSB_cluster1\user_projects\domains\cluster_domain\cluster_ms2.jar -template_name="cluster_ms2" -managed=true
Figure 1–55 Pack Command
The template pack result is shown in Figure 1–56.

Configuring Oracle Application Adapters in a High Availability Cluster Environment for Oracle Service Bus
1-38 Oracle Fusion Middleware Application Adapter Best Practices Guide for Oracle WebLogic Server
Figure 1–56 Template Pack Result
2. After the template is created, copy the template file to OSB_Machine2, as shown in Figure 1–57.
Figure 1–57 Template File
3. Run the following unpack command on OSB_Machine2 to unpack the propagated template, as shown in Figure 1–58.
C:\OSB_cluster1\wlserver_10.3\common\bin>unpack.cmd -template= C:\OSB_cluster1\ cluster_ms2.jar -domain= C:\OSB_cluster1\user_projects\domains\cluster_domain
Figure 1–58 Unpack Command
The resulting propagated template is shown in Figure 1–59.
Figure 1–59 Propagated Template Result

Configuring Oracle Application Adapters in a High Availability Cluster Environment for Oracle Service Bus
General Best Practices 1-39
1.3.4.4 Configuring a BSE Configuration in Application ExplorerPerform the following steps to configure a BSE configuration in Application Explorer.
1. Open a terminal and navigate to the Oracle_Home\user_projects\domains\created_cluster_domain\bin directory and execute either setDomainEnv.sh (on UNIX platforms) or setDomainEnv.cmd (on Windows platforms), as shown in Figure 1–60.
Figure 1–60 Command Prompt
2. In the same terminal, navigate to the Adapter_Home\tools\iwae\bin directory and execute ae.exe (on Windows platforms) or iwae.sh (on UNIX platforms), as shown in Figure 1–61.
Figure 1–61 Command Prompt
3. Right-click Configurations and select New, as shown in Figure 1–62.

Configuring Oracle Application Adapters in a High Availability Cluster Environment for Oracle Service Bus
1-40 Oracle Fusion Middleware Application Adapter Best Practices Guide for Oracle WebLogic Server
Figure 1–62 New Configuration
The New Configuration dialog is displayed.
4. Enter a name for the new configuration (for example, iBSE) and then click OK, as shown in Figure 1–63.
Figure 1–63 New Configuration Dialog
5. From the Service Provider list, select iBSE.
6. In the iBSE URL field, accept the default URL or replace it with a different URL with the following format:
http://host name:port/ibse/IBSEServlet
where:
■ host name - Is the system where the HTTP server resides.
■ port - Is the HTTP port number where the HTTP server is listening.
7. Click OK, as shown in Figure 1–64.
Figure 1–64 New Configuration
A node representing the new configuration is displayed beneath the root Configurations node, as shown in Figure 1–65.
Note: The name of the BSE configuration that is specified here is used during the BSE deployment process.

Configuring Oracle Application Adapters in a High Availability Cluster Environment for Oracle Service Bus
General Best Practices 1-41
Figure 1–65 New Configuration Node
1.3.4.5 Configuring and Deploying BSE to the HTTP ServerThis section describes how to configure and deploy BSE to the HTTP server.
1. Navigate to the web.xml file, which is located in the Adapters_Home\ ibse.war\WEB-INF directory.
2. Open the web.xml file in an editor.
3. Enter a value for the ibseroot property, as shown in the following example:
<context-param><param-name>ibseroot</param-name><param-value>Adapters_Home/ibse.war</param-value><description>ibse root directory</description></context-param>
4. Enter a value for the iway.home property, as shown in the following example.
<context-param><param-name>iway.home</param-name><param-value> Adapters_Home </param-value><description>license file location</description></context-param>
5. Enter a value for the iway.config property, as shown in the following example:
<context-param><param-name>iway.config</param-name><param-value>iBSE</param-value><description>Base Configuration</description></context-param>
This is the value that was specified when creating a new BSE configuration using Application Explorer.
6. Save the web.xml file and exit the editor.
7. Start the Admin Server, http_server, and managed server 1 in system 1, and managed server 2 in system 2.
8. Open the Oracle Service Bus Administration Console in a Web browser by entering the following URL:
http://host name:port/sbconsole
Note: These changes must be made in both sections of the cluster.
Note: : These changes must be made in both the sections in the cluster.

Configuring Oracle Application Adapters in a High Availability Cluster Environment for Oracle Service Bus
1-42 Oracle Fusion Middleware Application Adapter Best Practices Guide for Oracle WebLogic Server
where:
■ host name - Is the name of the system where Oracle WebLogic Server is running.
■ port - Is the port for the domain you are using. The port for the default domain is 7001.
9. Click the Oracle WLS Console link at the top of the page.
The Oracle Weblogic Administration Console page is displayed.
10. In the Domain Structure section in the left pane, click Deployments.
The Deployments page is displayed.
11. Click Install.
The Install Application Assistant page is displayed.
12. Browse to the adapters home directory, as shown in the following example:
OSB_Home\Oracle_OSB1\3rdparty\ApplicationAdapters\
13. Select the radio button next to ibse.war and click Next.
The Choose Targeting Style page is displayed.
14. Leave the default option selected, Install this deployment as an application, and click Next.
The Optional Settings page is displayed.
15. Click Next again, leaving the default values.
16. In next screen, select http_server (created http server) from Servers section, and click Next, as shown in Figure 1–66.
Figure 1–66 http_server Option
The Summary page is displayed.
17. Click Finish.
The Settings page for BSE opens.
18. Click Save, and then check for a success message.

Preferred Repository Type
General Best Practices 1-43
1.3.5 Configuring the Oracle HTTP Server for Inbound ProcessingBefore executing an inbound process, the following configuration steps must be completed for the PeopleSoft, Siebel, and J.D. Edwards Oracle Application Adapters:
1. Navigate to the following location:
<Oracle_Home>\Oracle_WT1\instances\instance1\config\OHS\ohs1
2. Open the mod_wl_ohs.conf file in an editor.
3. Add the IP address and port number for both systems.
For example (PeopleSoft Adapter):
<Location /name>SetHandler weblogic-handlerWebLogicCluster system1_ip:port, system2_ip:portWLLogFile c:\tmp\psft.log</Location>
Where name is any appropriate name, system1_ip and system2_ip are the system IP addresses where the SOA_Server1 and SOA_Server2 are configured, and port are the numbers that are configured in the channel configuration for both systems.
4. Save the mod_wl_ohs.conf file.
5. Perform the following steps to restart the Oracle HTTP server:
a. Open a command prompt and navigate to the following location:
C:\oracle\product\11.1.0\ohs_1\Oracle_WT1\instances\instance1\bin
b. Execute the following command:
opmnctl restartproc ias-component=ohs1
6. Use the following format when providing the URL for the PeopleSoft, Siebel, and J.D. Edwards Oracle Application Adapters:
http://ohsserver_ip:7777/name
Where ohsserver_ip is the IP address of the system where the Oracle HTTP server is installed and name is the name that was specified in the <Location> element in the mod_wl_ohs.conf file.
1.4 Preferred Repository TypeAs a best practice, it is recommended to use only a database repository (for example, Oracle) for adapters in development, test, and production environments. Do not use the File repository, which is provided by default only for initial startup purposes. The File repository is not supported for troubleshooting any issues.
Note: All other process creations and executions remain the same.
Note: The port number refers to the value that was specified while creating the channel for the Oracle Application Adapter using Application Explorer.

Generating Input XML Documents
1-44 Oracle Fusion Middleware Application Adapter Best Practices Guide for Oracle WebLogic Server
1.5 Generating Input XML DocumentsThis section describes how to generate input XML documents that can be used as payloads for outbound BPEL and Mediator processes. It includes the following topics:
■ Section 1.5.1, "Prerequisites"
■ Section 1.5.2, "Creating a WSDL Document Using Application Explorer"
■ Section 1.5.3, "Generating an Input XML File From a Request Schema"
■ Section 1.5.4, "Using the Generated Input XML File in the Oracle Enterprise Manager Console"
1.5.1 PrerequisitesBefore continuing, ensure that the following components and applications are available:
■ Outbound WSDL document created using Application Explorer.
■ XML editor (for example, Oracle JDeveloper or Altova XML Spy, which is used as an example in this section).
■ Oracle WebLogic Server 11g Release 1 (11.1.1.6.0) with Oracle JDeveloper Studio.
1.5.2 Creating a WSDL Document Using Application ExplorerTo create a WSDL document using Application Explorer:
1. Ensure that Oracle WebLogic Server is started, which is where Application Explorer is deployed.
2. Open a command prompt window and navigate to the following directory:
<WLS_Home>\user_projects\domains\base_domain\bin
3. Run setDomainEnv.cmd (Windows) or ../setDomainEnv.sh (UNIX/Linux).
The setDomainEnv command sets the class path and other environment variables for Application Explorer in the Oracle WebLogic Server environment.
4. Do not close the command prompt window.
5. Navigate to the following directory:
For Oracle SOA Suite:
<Oracle_Home>\Oracle_SOA1\soa\thirdparty\ApplicationAdapters\tools\iwae\bin
In this example, <ORACLE_HOME> is the location where Oracle SOA Suite is installed.
For OSB:
<OSB_HOME>\Oracle_OSB1\3rdparty\ApplicationAdapters\tools\iwae\bin\ae.bat
In this example, <OSB_HOME> is the location where Oracle Service Bus is installed.
<OSB_Home>\3rdparty\ApplicationAdapters\tools\iwae\bin
6. Run ae.bat (Windows) or iwae.sh (UNIX/Linux) to start Application Explorer.
7. Select an available J2CA configuration.
8. Select an appropriate adapter (for example, MySAP).

Generating Input XML Documents
General Best Practices 1-45
9. Create a new target or connect to an existing target.
10. Expand the created target adapter and select the appropriate object.
11. Right-click the object and select Create Outbound JCA Service(Request/Response).
The Export WSDL dialog is displayed.
12. Accept the default location in the Name field and click OK to export the WSDL document to the default location.
You can also click Browse to provide a different location and then click OK, which exports the WSDL document to your defined location.
13. Navigate to the location where the WSDL document was exported and verify that the WSDL, JCA, Request, and Response schema files are exported and available.
1.5.3 Generating an Input XML File From a Request SchemaTo generate an input XML file from a request schema:
1. Open an XML editor, as shown in Figure 1–67 (for example, Altova XML Spy, which is used as an example in this section).
Figure 1–67 The Open Option
2. Click File, and then select Open.
The Open dialog is displayed, as shown in Figure 1–68.

Generating Input XML Documents
1-46 Oracle Fusion Middleware Application Adapter Best Practices Guide for Oracle WebLogic Server
Figure 1–68 The Open Dialog
3. Navigate to the location on your file system where the XML request schema is exported, select the schema file and click Open.
The XML request schema file is opened and displayed in Altova XML Spy, as shown in Figure 1–69.
Figure 1–69 XML Request Schema File Displayed in Altova XML Spy
4. Check if the schema is well formed by clicking Check well-formedness or pressing F7, as shown in Figure 1–70.

Generating Input XML Documents
General Best Practices 1-47
Figure 1–70 Check well-formedness Icon
5. Validate the schema by clicking Validate or pressing F8, as shown in Figure 1–71.
Figure 1–71 The Validate Icon
6. Once you have confirmed that the schema is well-formed and valid, click DTD/Schema, and then select Generate Sample XML File, as shown in Figure 1–72.
Figure 1–72 Generate Sample XML File Option
As shown in Figure 1–73, the Generate Sample XML File dialog is displayed.

Generating Input XML Documents
1-48 Oracle Fusion Middleware Application Adapter Best Practices Guide for Oracle WebLogic Server
Figure 1–73 Generate Sample XML File Dialog
7. Select the appropriate parameters for your sample XML file and click OK when you are ready.
As shown in Figure 1–74, the sample XML file is generated in Altova XML Spy.
Figure 1–74 Sample XML File Generated in Altova XML Spy
8. Verify that the generated input XML file is well-formed and valid.
You can use the generated input XML file to invoke a BPM, BPEL, or Mediator process after providing the required values in the file.
1.5.4 Using the Generated Input XML File in the Oracle Enterprise Manager ConsoleBefore you can use the generated input XML file in the Oracle Enterprise Manager console, verify that the following prerequisites are available:
■ BPM Outbound process created in JDeveloper and deployed in SOA_Server1
■ Mediator Outbound process created in JDeveloper and deployed in SOA_Server1
■ BPEL Outbound process created in JDeveloper and deployed in SOA_Server1

Generating Input XML Documents
General Best Practices 1-49
Mediator Outbound Process
Perform the following steps to use the input XML file in an outbound Mediator process:
1. Log in to the Oracle Enterprise Manager console by using the following URL:
http://localhost:7001/em
2. Expand your domain in the left pane followed by the SOA folder, as shown in Figure 1–75.
Figure 1–75 Oracle Enterprise Manager Console
3. As shown in Figure 1–76, select an outbound Mediator project (for example, MySAP_JCA_Test_BusinessArea_GetDetail_OB_Mediator).

Generating Input XML Documents
1-50 Oracle Fusion Middleware Application Adapter Best Practices Guide for Oracle WebLogic Server
Figure 1–76 Outbound Mediator Project Example
4. Click the Test button on the top right-hand corner of the console, as shown in Figure 1–77.
Figure 1–77 Test Button
5. In the Input Arguments section, select XML View from the list and verify that the input XML is displayed, as shown in Figure 1–78.

Generating Input XML Documents
General Best Practices 1-51
Figure 1–78 XML View Option in Input Arguments Section
6. The displayed XML in the Oracle Enterprise Manager console can be altered and used as follows:
XML Displayed in the Oracle Enterprise Manager Console
<soap:Envelope xmlns:soap="http://schemas.xmlsoap.org/soap/envelope/"><soap:Body xmlns:ns1="urn:sap-com:document:sap:business"><ns1:BusinessArea.GetDetail> </ns1:BusinessArea.GetDetail> </soap:Body></soap:Envelope>
Altered XML
<soap:Envelope xmlns:soap="http://schemas.xmlsoap.org/soap/envelope/"><soap:Body xmlns:ns1="urn:sap-com:document:sap:business"><ns1:BusinessArea.GetDetail BusinessAreaId="1000"></ns1:BusinessArea.GetDetail> </soap:Body> </soap:Envelope>
7. The sample input XML that was generated using Altova XML Spy can be used after making the following required modifications:
a. Remove XML headers.
b. Add necessary inputs.
c. Add the soap headers as displayed in the Oracle Enterprise Manager console.
d. Modify the namespaces to match the namespaces in the input XML.
XML Generated Using Altova XML Spy
<?xml version="1.0" encoding="UTF-8"?> <!--Sample XML file generated by XMLSpyv2008 rel. 2 sp2 (http://www.altova.com)--> <bapi:BusinessArea.GetDetailBusinessAreaId="aaaa" xsi:schemaLocation="urn:sap-com:document:sap:businessmysap_jca_BA_GetDetail_invoke_jan20_request.xsd"xmlns:xsi="http://www.w3.org/2001/XMLSchema-instance"
Note: For Mediator processes, it is mandatory for the input XML to be used with a namespace.

Generating Input XML Documents
1-52 Oracle Fusion Middleware Application Adapter Best Practices Guide for Oracle WebLogic Server
xmlns:bapi="urn:sap-com:document:sap:business"><bapi:LANGUAGE>a</bapi:LANGUAGE> <bapi:LANGUAGE_ISO>aa</bapi:LANGUAGE_ISO></bapi:BusinessArea.GetDetail>
Altered XML
<soap:Envelope xmlns:soap="http://schemas.xmlsoap.org/soap/envelope/"><soap:Body xmlns:ns1="urn:sap-com:document:sap:business"><ns1:BusinessArea.GetDetail BusinessAreaId="1000"> <ns1:LANGUAGE>D</ns1:LANGUAGE> < ns1:LANGUAGE_ISO>EN</ ns1:LANGUAGE_ISO></ns1:BusinessArea.GetDetail> </soap:Body> </soap:Envelope>
8. Click Test Web Service after providing the input XML, as shown in Figure 1–79.
Figure 1–79 Test Web Service Button
The output is displayed in the Response tab.
BPEL Outbound Process
Perform the following steps to use the input XML file in an outbound BPEL process:
1. Log in to the Oracle Enterprise Manager console by using the following URL:
http://localhost:7001/em
2. As shown in Figure 1–80, expand your domain in the left pane followed by the SOA folder.

Generating Input XML Documents
General Best Practices 1-53
Figure 1–80 Oracle Enterprise Manager Console
3. As shown in Figure 1–81, select an outbound BPEL project (for example, MySAP_JCA_Test_BusinessArea_GetDetail_OB_BPEL).
Figure 1–81 Outbound BPEL Project in Oracle Enterprise Manager Console
4. Click the Test button on the top right-hand corner of the console, as shown in Figure 1–82.

Generating Input XML Documents
1-54 Oracle Fusion Middleware Application Adapter Best Practices Guide for Oracle WebLogic Server
Figure 1–82 Test Button
5. In the Input Arguments section, select XML View from the list and verify that the input XML is displayed, as shown in Figure 1–83.
Figure 1–83 Input XML Document Inside Input Arguments Section
6. The displayed XML in the Oracle Enterprise Manager console can be altered and used as follows:
XML Displayed in the Oracle Enterprise Manager Console
<soap:Envelope xmlns:soap="http://schemas.xmlsoap.org/soap/envelope/"><soap:Body xmlns:ns1="urn:sap-com:document:sap:business"><ns1:BusinessArea.GetDetail> </ns1:BusinessArea.GetDetail> </soap:Body></soap:Envelope>
Altered XML With Namespace
<soap:Envelope xmlns:soap="http://schemas.xmlsoap.org/soap/envelope/">
Note: For BPEL processes, it is not mandatory for the input XML to be used with a namespace.

Generating Input XML Documents
General Best Practices 1-55
<soap:Body xmlns:ns1="urn:sap-com:document:sap:business"><ns1:BusinessArea.GetDetail BusinessAreaId="1000"> </ns1:BusinessArea.GetDetail> </soap:Body></soap:Envelope>
Altered XML Without Namespace
<soap:Envelope xmlns:soap="http://schemas.xmlsoap.org/soap/envelope/"><soap:Body xmlns="urn:sap-com:document:sap:business"><BusinessArea.GetDetail BusinessAreaId="1000"></BusinessArea.GetDetail> </soap:Body> </soap:Envelope>
7. The sample input XML that was generated using Altova XML Spy can be used after making the following required modifications:
a. Remove XML headers.
b. Add necessary inputs.
c. Add the soap headers as displayed in the Oracle Enterprise Manager console.
d. Modify or remove the namespaces.
XML Displayed in XML View in the Oracle Enterprise Manager Console
<?xml version="1.0" encoding="UTF-8"?> <!--Sample XML file generated by XMLSpyv2008 rel. 2 sp2 (http://www.altova.com)--> <bapi:BusinessArea.GetDetailBusinessAreaId="aaaa" xsi:schemaLocation="urn:sap-com:document:sap:businessmysap_jca_BA_GetDetail_invoke_jan20_request.xsd"xmlns:xsi="http://www.w3.org/2001/XMLSchema-instance"xmlns:bapi="urn:sap-com:document:sap:business"><bapi:LANGUAGE>a</bapi:LANGUAGE> <bapi:LANGUAGE_ISO>aa</bapi:LANGUAGE_ISO></bapi:BusinessArea.GetDetail>
Altered XML With Namespace
<soap:Envelope xmlns:soap="http://schemas.xmlsoap.org/soap/envelope/"><soap:Body xmlns:ns1="urn:sap-com:document:sap:business"><ns1:BusinessArea.GetDetail BusinessAreaId="1000"> <ns1:LANGUAGE>D</ns1:LANGUAGE> < ns1:LANGUAGE_ISO>EN</ ns1:LANGUAGE_ISO></ns1:BusinessArea.GetDetail> </soap:Body> </soap:Envelope>
Altered XML Without Namespace
<soap:Envelope xmlns:soap="http://schemas.xmlsoap.org/soap/envelope/"><soap:Body xmlns="urn:sap-com:document:sap:business"> <BusinessArea.GetDetailBusinessAreaId="1000"> <LANGUAGE>D</ LANGUAGE> < LANGUAGE_ISO>EN</ LANGUAGE_ISO> </BusinessArea.GetDetail> </soap:Body> </soap:Envelope>
8. Click Test Web Service after providing the input XML with or without a namespace.
The output is displayed in the Response tab, as shown in Figure 1–84.
Input XML With Namespace

Generating Input XML Documents
1-56 Oracle Fusion Middleware Application Adapter Best Practices Guide for Oracle WebLogic Server
Figure 1–84 Input XML Document With Namespace
Response
Figure 1–85 Response Tab
Input XML Without Namespace
Figure 1–86 Input XML Document Without Namespace

Generating Input XML Documents
General Best Practices 1-57
Response
Figure 1–87 XML Response Document Being Returned
Using the Input XML File in an Outbound BPM ProcessPerform the following steps to use the input XML file in an outbound BPM process:
1. Log in to the Oracle Enterprise Manager Console by using the following URL:
http://localhost:7001/em
2. Expand your partition under soa-infra (soa_server1) in the left pane followed by the SOA folder, as shown in Figure 1–88.
Figure 1–88 Partition Expanded Under soa-infra
3. As shown in Figure 1–89, select an outbound BPM project (for example, SAP2_isdsrv2_BA_GD_jca_ob).

Generating Input XML Documents
1-58 Oracle Fusion Middleware Application Adapter Best Practices Guide for Oracle WebLogic Server
Figure 1–89 Outbound BPM Project Selected
4. Click Test on the top right-hand corner of the console, as shown in Figure 1–90.
Figure 1–90 Test Button
5. In the Input Arguments section, select XML View from the list and verify that the input XML is displayed, as shown in Figure 1–91.

Generating Input XML Documents
General Best Practices 1-59
Figure 1–91 XML View Option Selected in the Input Arguments Section
6. The displayed XML in the Oracle Enterprise Manager console can be altered and used as follows:
XML Displayed in the Oracle Enterprise Manager Console
<soap:Envelope xmlns:soap="http://schemas.xmlsoap.org/soap/envelope/"> <soap:Body xmlns:ns1="http://xmlns.oracle.com/bpmn/bpmnProcess/Process"> <ns1:operation xmlns:ns2="urn:sap-com:document:sap:business"> <ns2:BusinessArea.GetDetail/> </ns1:operation> </soap:Body></soap:Envelope>
Altered XML
<soap:Envelope xmlns:soap="http://schemas.xmlsoap.org/soap/envelope/"> <soap:Body xmlns:ns1="http://xmlns.oracle.com/bpmn/bpmnProcess/Process"> <ns1:operation xmlns:bapi="urn:sap-com:document:sap:business"> <bapi:BusinessArea.GetDetail BusinessAreaId="0001"> <bapi:LANGUAGE>D</bapi:LANGUAGE> <bapi:LANGUAGE_ISO>DE</bapi:LANGUAGE_ISO> </bapi:BusinessArea.GetDetail> </ns1:operation> </soap:Body></soap:Envelope>
7. The sample input XML that was generated using Altova XML Spy can be used after making the following required modifications:
a. Remove the XML headers.
b. Add the necessary inputs.
c. Add the SOAP headers as displayed in the Oracle Enterprise Manager Console.
Note: For BPM processes, it is required for the input XML to be used with a namespace.

Migrating a Database Repository
1-60 Oracle Fusion Middleware Application Adapter Best Practices Guide for Oracle WebLogic Server
d. Modify the namespaces to match the namespaces in the input XML.
XML Generated Using Altova XML Spy
<?xml version="1.0" encoding="UTF-8"?> <!--Sample XML file generated by XMLSpyv2008 rel. 2 sp2 (http://www.altova.com)--> <bapi:BusinessArea.GetDetail BusinessAreaId="aaaa" xsi:schemaLocation="urn:sap-com:document:sap:business mysap_jca_BA_GetDetail_invoke_jan20_request.xsd" xmlns:xsi="http://www.w3.org/2001/XMLSchema-instance" xmlns:bapi="urn:sap-com:document:sap:business"> <bapi:LANGUAGE>a</bapi:LANGUAGE> <bapi:LANGUAGE_ISO>aa</bapi:LANGUAGE_ISO></bapi:BusinessArea.GetDetail>
Altered XML
<soap:Envelope xmlns:soap="http://schemas.xmlsoap.org/soap/envelope/"> <soap:Body xmlns:ns1="http://xmlns.oracle.com/bpmn/bpmnProcess/Process"> <ns1:operation xmlns:bapi="urn:sap-com:document:sap:business"> <bapi:BusinessArea.GetDetail BusinessAreaId="0001"> <bapi:LANGUAGE>D</bapi:LANGUAGE> <bapi:LANGUAGE_ISO>DE</bapi:LANGUAGE_ISO> </bapi:BusinessArea.GetDetail> </ns1:operation> </soap:Body></soap:Envelope>
8. Click Test Web Service after providing the input XML, as shown in Figure 1–92.
Figure 1–92 Input XML
The output is received in the destination folder.
1.6 Migrating a Database RepositoryThis section summarizes the steps that can be used to migrate a database repository between development, test, and production environments.
1. In the development environment, create the BPEL, Mediator, OSB, and BPM projects using WSDL files that are generated by Oracle Fusion Middleware Application Adapters.
2. In the test or production environment, install and configure the Oracle Fusion Middleware Application Adapters.

Migrating a Database Repository
General Best Practices 1-61
For more information on installing the adapters, see the Oracle Fusion Middleware Application Adapters Installation Guide for Oracle WebLogic Server.
For more information on configuring the adapters, see the user’s guide for the required Oracle Fusion Middleware Application Adapter.
3. Start Application Explorer and create the required adapter targets and channels.
4. Ensure that the names specified for the new adapter targets and channels exactly match those that are already created in the development environment.
If the exact adapter target and channel names specified in the development environment are used in the test and production environments, then the BPEL, Mediator, OSB, and BPM projects from the development environment function properly in the test and production environments.
If the adapter target or channel names are different or misspelled, then the BPEL, Mediator, OSB, and BPM projects from the development environment do not function properly in the test and production environments.
5. After the adapter targets and channels are created using the correct names, restart the Oracle WebLogic Server.
6. Deploy the BPEL, Mediator, OSB, and BPM projects from the development environment to the required test or production environment.
For more information on deploying the projects, see the user’s guide for the required Oracle Fusion Middleware Application Adapter.

Migrating a Database Repository
1-62 Oracle Fusion Middleware Application Adapter Best Practices Guide for Oracle WebLogic Server

2
Oracle Application Adapter for SAP R/3 Best Practices 2-1
2 Oracle Application Adapter for SAP R/3 BestPractices
This chapter lists and describes best practices that are specific to the Oracle Application Adapter for SAP R/3 (using SAP JCo 2.1.x and 3.x). It contains the following topics:
■ Section 2.1, "Understanding Connection Pools"
■ Section 2.2, "Security"
■ Section 2.3, "Load Balancing"
■ Section 2.4, "Encoding"
2.1 Understanding Connection PoolsA connection pool is a set of client-connections to a certain destination. The pool may automatically create new connections to the specified remote system or return an existing connection. It also provides methods to return a connection back to the pool when it is no longer needed. The following list describes several key points:
■ The maximum number of connections specified can never be increased while the application is running. As a best practice, you must choose a number that is large enough for your application.
■ A connection pool can have any name. Since a connection pool is global within the Java Virtual Machine (JVM), it is recommended that different applications running in the same JVM follow a naming convention standard to avoid any issues.
■ If multiple users share a connection pool, then they share the SAP authorization permissions of the underlying user ID that created the connection pool.
■ When a target is created using Application Explorer during design time, the specified connection parameters are used during run time for all objects created using the target. Ensure that the connection properties are capable of supporting your environment.
■ The general parameters for calculating a connection pool size are: TIME=(SAP Application Server execution time for called function) + (size of document) + (network lag). It is recommended to check with a SAP Gateway administrator about the maximum size of allowed connection pools for a particular landscape.
■ Larger documents or long running transactions need a larger value for the Connection Timeout parameter. Extremely long running documents should not be run in the foreground. It is recommended to check with a system administrator

Security
2-2 Oracle Fusion Middleware Application Adapter Best Practices Guide for Oracle WebLogic Server
about establishing a batch job that can be called by the Oracle Application Adapter for SAP R/3.
■ By default, SAP Java Connector (SAP JCo) opens one initial connection for a connection pool. If that initial connection is busy when another request arrives, then SAP JCo opens an additional connection, leading up to the maximum pool size. When the maximum pool size is reached, the Connection Wait Time parameter is called, which determines how long SAP JCo must wait for a free connection without aborting the task.
To monitor the number of connections that are being made to SAP from the Oracle Application Adapter for SAP R/3, you can use the SMGW transaction from your SAP GUI.
Optimizing a connection pool effectively requires knowledge about the application and its users. The following questions should be discussed:
■ How much time does it normally take to execute this function?
■ How much data is returned by this function?
■ How many users are going to use this function?
It is not unreasonable to configure multiple connection targets with different connection pools for different functions. For example, a sales order inquiry that checks if an item exists may execute quickly, it does not need maximum resources. However, a sales order creation that creates a header and line items that is executed by many people may require a greater execution time, so configuring a larger connection pool is recommended.
2.2 SecurityThe following list describes several key points regarding security best practices:
■ The SAP Java Connector (SAP JCo) default is plain text. If the SAP JCo communication has an insecure network path, then it is recommended that the RFC communication is encrypted.
■ Restrict the ability of users to monitor or access the SAP Gateway and its functions. Ensure that the run time user ID for SAP JCo communications is not an SAP dialog user but a communications type user.
■ As a best practice, consider using the SAP router mechanism for communications between systems that are behind firewalls.
2.3 Load BalancingThere are two types of load balancing mechanisms that are available (logon load balancing and load balancing for registered programs). Logon load balancing logs users to SAP using an SAP Message Server. The Message Server distributes logons to Application Servers and can even distribute logons by specific application groups. Oracle Application Adapter for SAP R/3 supports connections to SAP using Message Servers. Load balancing for registered programs is a technique employed when sending a large amount of data out from SAP to remote destinations. As a best practice, only an SAP Gateway administrator should attempt to change the named parameters in the SAP Gateway that affect load balancing.
Since iWay registered servers (channels) connect to a SAP Gateway and not to specific application servers, they are enabled for load balancing by default through the SAP

Encoding
Oracle Application Adapter for SAP R/3 Best Practices 2-3
Java Connector (SAP JCo). The mechanism for message delivery depends on how the SAP Gateway in enabled by the administrator, but it is generally the following forms:
■ 0: No load balancing, the first free registered program is used.
■ 1: The program with the lowest counter is used. Every time a registered program is assigned a request, the counter is increased by one.
■ 2: The program with the least load is used, which is determined by SAP.
When there is a one-to-one relationship between a SAP Gateway server and an instance of the iWay channel, the singleton is in a non load balanced scenario. The types of messages that are sent to the server are determined by the Interface document style and the RFC destination. The RFC destination is used to hold the program ID inside SAP, and is used to route all messages to the iWay channel. For this reason, it is recommended that the SM59 transaction that controls the RFC destination is locked to hide the IP address of the remote server inside SAP. Inside SAP, RFC function modules are routed to the iWay channel by specifying the DESTINATION parameter in the CALL FUNCTION invocation, passing the RFC destination that holds the iWay server. For example:
CALL FUNCTION ‘RFC_GET_SYSTEM_INFO DESTINATION ‘ DESTINATION ‘MYDEST’
Where MYDEST is defined as a remote TCP (T) destination in the SM59 transaction and holds a Registered Server Program as one its parameters.
The iWay channel connects to the SAP Gateway and exposes the same Program ID to the SAP Gateway. At this point, one or more servers accept the connection.
SAP IDocs need additional configuration to define the sending and receiving systems. They are contained in a SAP Logical System. All IDocs routed through Message Control use the Logical System linked to a RFC destination to process through the channel. BAPI objects have no outbound form, to use a BAPI outbound object from SAP, use the RFC function form of the BAPI. For example, you can replace Company.GetDetail with BAPI COMPANY_GETDETAIL.
All messages sent to a Program ID arrive at a channel configured to listen to a SAP Gateway and Program ID. Any final destinations configured to receive messages from the channel receive all messages from the channel. This may have important implications in configuring business processes. Consider using different Program IDs for different messages, message filters or message splitters as coding techniques to route messages based on type or content.
When multiple channels or servers are configured with the same Program ID, messages can be duplicated or never arrive, depending if load balancing is enabled on the SAP system. Use caution when deploying and using Program IDs and assign them in a logical and coordinated manner (for example, by department or by message type).
2.4 EncodingiWay channels on Unicode systems work only in Unicode mode. In the SM59 transaction, ensure that the RFC Destination Parameter, Unicode, is selected when creating the destination in SAP GUI.
The RFC components of SAP Java Connector (SAP JCo) automatically determine the target code page of the sending (client) and adjust the code page translation between the client and server accordingly. The only way to modify this is to change the target system code page, in Windows using Regional and Language Options in the Control Panel. For other systems, it is recommended to consult the administrator. In general, a system must have a code page and a language pack. Encoding is used to map one code

Encoding
2-4 Oracle Fusion Middleware Application Adapter Best Practices Guide for Oracle WebLogic Server
page to another. This is straightforward in Unicode systems, but can be difficult or not possible on non-Unicode systems. As a general rule, in non-Unicode systems, you are limited to the code page and language pack you have on the system for the display of data. However, because of the Java language Unicode support, transmission can occur correctly if the remote system has the correct configuration.
Receiving document from SAP, especially IDocs, can have segments containing multiple languages. It is usually not possible to get all languages correct. For example, setting the Java encoding variable to ISO-8859-2 correctly sends German umlauts, but distorts Japanese Kanjii. The only solution for this situation is multiple sends of the text segments and combining them into one result.

3
Oracle Application Adapter for Siebel Best Practices 3-1
3 Oracle Application Adapter for Siebel BestPractices
This chapter lists and describes best practices that are specific to the Oracle Application Adapter for Siebel. It contains the following topics:
■ Section 3.1, "Best Practices for Siebel"
■ Section 3.2, "Configuring Connection Pooling for Siebel"
3.1 Best Practices for SiebelThis section lists and describes best practices for the Oracle Application Adapter for Siebel.
■ If you are using the native Siebel Java Data Bean (JDB) API to connect with a Siebel system, then integration should be performed using Siebel Business Objects and Business Services. If the HTTP protocol is required, then you must use HTTP. As a best practice, it is recommended to use the Siebel JDB API for connectivity when possible.
■ If large amounts of transaction volumes need processing, then as a best practice, it is recommended to use connection pooling by configuring the siebel.properties file. For more information, see "Configuring Connection Pooling for Siebel" on page 3-2.
■ For secure connectivity during outbound (services) processing only, it is recommended to enable RSA encryption using Application Explorer during the adapter target configuration stage.
■ As a best practice, it is recommended to use XML schemas (.xsd) files that are generated through Siebel for Integration Objects and Business Services nodes.
■ If any changes to the Siebel repository (.srf file) are made, then it is a best practice to recompile the .srf file and restart Siebel services to reflect the changes in the adapter.
■ Even though Siebel Versions 6.2 and lower (using COM connectivity) are still supported, as a best practice, it is recommended that your integration project use Siebel 6.3 or higher with the Siebel JDB API.
■ When sending an Insert, Update, or Query request, it is a best practice to include only the elements in the payload that has data to be inserted, updated, or retrieved. Any blank elements should be removed.
■ As a best practice, do not include any special characters in the name when creating an Integration Object or Business Services node.

Configuring Connection Pooling for Siebel
3-2 Oracle Fusion Middleware Application Adapter Best Practices Guide for Oracle WebLogic Server
3.2 Configuring Connection Pooling for SiebelTo configure connection pooling for Siebel, you must create a siebel.properties file for use with the Oracle Application Adapter for Siebel. You can use this file to provide default parameters for applications connecting to Siebel using the Java Data Bean (JDB) API. The siebel.properties file must be added to your system classpath.
The following table lists and describes the property values that can be added in the siebel.properties file.
Property Type Property Description
Request Timeout siebel.conmgr.txtimeout Indicates the transaction timeout in seconds on the server side.
The default is 2700 seconds.
Poolsize siebel.conmgr.poolsize Indicates the connection pool size. Connection pool maintains a set of connections to a specific server process.
The default is 2 with a maximum of 500.
Session Timeout siebel.conmgr.sesstimeout Indicates the transaction timeout in seconds on the client side.
The default is 600 seconds.
Encryption siebel.conmgr.jce Indicates the usage of Java Cryptography Extension (JCE).
Setting a value of 1 enables JCE and setting a value of 0 disables JCE.
Boolean siebel.user.encrypted Specifies whether the user name and the password is encrypted with com.siebel.extra.MangleString.

4
Oracle Application Adapter for PeopleSoft Best Practices 4-1
4 Oracle Application Adapter for PeopleSoftBest Practices
This chapter lists and describes best practices that are specific to the Oracle Application Adapter for PeopleSoft.
4.1 PeopleSoft Events (Inbound Processing)For Release 8.4, iWay Software recommends using the TCP/IP and HTTP target connectors that are delivered by PeopleSoft for the PeopleTools 8.4 series. Do not use the target connectors that are supplied by iWay Software for the PeopleTools 8.1 series. They are only packaged by iWay Software for the PeopleTools 8.4 series to assist existing users who are migrating from Release 8.1 to Release 8.4.

PeopleSoft Events (Inbound Processing)
4-2 Oracle Fusion Middleware Application Adapter Best Practices Guide for Oracle WebLogic Server

5
Oracle Application Adapter for J.D. Edwards OneWorld Best Practices 5-1
5 Oracle Application Adapter for J.D. EdwardsOneWorld Best Practices
This chapter lists and describes best practices that are specific to the Oracle Application Adapter for J.D. Edwards OneWorld. It contains the following topics:
■ Section 5.1, "Connection Pooling and Load Balancing"
■ Section 5.2, "Security"
■ Section 5.3, "Multiple Connections and Multiple Users"
■ Section 5.4, "Unicode Support"
■ Section 5.5, "Delivery Confirmation and Error Messages"
5.1 Connection Pooling and Load BalancingConnection pooling is established for a session by setting the session attribute of the standard jdeRequest element. When the session attribute is an empty string, a new session is started. On the server, the SessionManager singleton class creates a new instance of a session object given the user name, password, and environment name. The session can be reused before it expires to avoid the overhead of session initialization. You can specify the session ID in the session attribute for an established session in an earlier request.
Session expiration is addressed by the sessionidle attribute of the standard jdeRequest element. This attribute, when given on a session creation request, specifies the amount of time in seconds that a session is allowed to be idle. If the SessionManager determines that a session has not had any requests processed in this amount of time, then it terminates the session and frees all associated resources. For more information, see the J.D. Edwards OneWorld Interoperability Guide.
Run time settings in the jde.ini file on the server control the load balancing configuration. These settings are in the [JDENET] and applicable [JDENET_KERNEL_DEFx] sections. All relevant settings are listed and described in the preceding section. You can control two types of processes:
■ Network jobs (JDENET_n)
■ Dedicated kernel process jobs (JDENET_k)
For more information, see the J.D. Edwards OneWorld System Administration Guide.

Security
5-2 Oracle Fusion Middleware Application Adapter Best Practices Guide for Oracle WebLogic Server
5.2 SecurityThe Oracle Application Adapter for J.D. Edwards OneWorld supports standard JDE security.Security is managed by user profiles defined in the system. For more information, see the J.D. Edwards OneWorld Server and Workstation Administration Guide.
5.3 Multiple Connections and Multiple UsersMultiple connections and multiple users depends on the user profiles that are defined in J.D. Edwards OneWorld. For more information, see the J.D. Edwards OneWorld Server and Workstation Administration Guide.
5.4 Unicode SupportThe J.D. Edwards XML solution supports well-formed XML documents. It also supports UTF8 and UTF16 Unicode standards for inbound processing and UTF8 standards for outbound processing.
5.5 Delivery Confirmation and Error MessagesEach transaction is assigned session ID by J.D. Edwards OneWorld. As a best practice, use application P92002 to investigate server-side error messages.

Glossary-1
Glossary
adapter
Provides universal connectivity by enabling an electronic interface to be accommodated (without loss of function) to another electronic interface.
agent
Supports service protocols in listeners and documents.
business service
Also known as a Web service. A Web service is a self-contained, modularized function that can be published and accessed across a network using open standards. It is the implementation of an interface by a component and is an executable entity.
channel
Represents configured connections to particular instances of back-end systems. A channel binds one or more event ports to a particular listener managed by an adapter.
listener
A component that accepts requests from client applications.
port
Associates a particular business object exposed by the adapter with a particular disposition. A disposition is a URL that defines the protocol and location of the event data. The port defines the end point of the event consumption.

port
Glossary-2

Index-1
Index
Bbest practices
general, 1-1Oracle Application Adapter for J.D. Edwards
OneWorld, 5-1Oracle Application Adapter for PeopleSoft, 4-1Oracle Application Adapter for SAP R/3, 2-1Oracle Application Adapter for Siebel, 3-1
Ccluster environment
configuring, 1-3
Ggeneral best practices, 1-1
Hhigh availability cluster environment, 1-3
Iinput XML documents
generating, 1-44
Mmanaged connections, 1-1
OOracle Application Adapter for Siebel
connection pooling, 3-2Oracle's Unified Method (OUM), viii

Index-2