oracle fusion middleware · oracle® fusion middleware creating weblogic domains using the...
TRANSCRIPT

Oracle® Fusion MiddlewareCreating WebLogic Domains Using the Configuration Wizard
12c (12.2.1.2)
E77883-01
October 2016
Documentation for administrators that describes how to usethe Configuration Wizard to create, update, and extendWebLogic domains.

Oracle Fusion Middleware Creating WebLogic Domains Using the Configuration Wizard, 12c (12.2.1.2)
E77883-01
Copyright © 2015, 2016, Oracle and/or its affiliates. All rights reserved.
Primary Authors: Geetha Savithriamma,
This software and related documentation are provided under a license agreement containing restrictions onuse and disclosure and are protected by intellectual property laws. Except as expressly permitted in yourlicense agreement or allowed by law, you may not use, copy, reproduce, translate, broadcast, modify, license,transmit, distribute, exhibit, perform, publish, or display any part, in any form, or by any means. Reverseengineering, disassembly, or decompilation of this software, unless required by law for interoperability, isprohibited.
The information contained herein is subject to change without notice and is not warranted to be error-free. Ifyou find any errors, please report them to us in writing.
If this is software or related documentation that is delivered to the U.S. Government or anyone licensing it onbehalf of the U.S. Government, then the following notice is applicable:
U.S. GOVERNMENT END USERS: Oracle programs, including any operating system, integrated software,any programs installed on the hardware, and/or documentation, delivered to U.S. Government end users are"commercial computer software" pursuant to the applicable Federal Acquisition Regulation and agency-specific supplemental regulations. As such, use, duplication, disclosure, modification, and adaptation of theprograms, including any operating system, integrated software, any programs installed on the hardware,and/or documentation, shall be subject to license terms and license restrictions applicable to the programs.No other rights are granted to the U.S. Government.
This software or hardware is developed for general use in a variety of information management applications.It is not developed or intended for use in any inherently dangerous applications, including applications thatmay create a risk of personal injury. If you use this software or hardware in dangerous applications, then youshall be responsible to take all appropriate fail-safe, backup, redundancy, and other measures to ensure itssafe use. Oracle Corporation and its affiliates disclaim any liability for any damages caused by use of thissoftware or hardware in dangerous applications.
Oracle and Java are registered trademarks of Oracle and/or its affiliates. Other names may be trademarks oftheir respective owners.
Intel and Intel Xeon are trademarks or registered trademarks of Intel Corporation. All SPARC trademarks areused under license and are trademarks or registered trademarks of SPARC International, Inc. AMD, Opteron,the AMD logo, and the AMD Opteron logo are trademarks or registered trademarks of Advanced MicroDevices. UNIX is a registered trademark of The Open Group.
This software or hardware and documentation may provide access to or information about content, products,and services from third parties. Oracle Corporation and its affiliates are not responsible for and expresslydisclaim all warranties of any kind with respect to third-party content, products, and services unlessotherwise set forth in an applicable agreement between you and Oracle. Oracle Corporation and its affiliateswill not be responsible for any loss, costs, or damages incurred due to your access to or use of third-partycontent, products, or services, except as set forth in an applicable agreement between you and Oracle.
Contents
Preface ............................................................................................................................................................... vii
Intended Audience ..................................................................................................................................... vii
Documentation Accessibility .................................................................................................................... vii
Related Documents..................................................................................................................................... vii
Conventions................................................................................................................................................ viii
1 Introduction
1.1 Introduction to WebLogic Domains.............................................................................................. 1-1
1.2 Overview of the Configuration Wizard ....................................................................................... 1-4
1.2.1 Modes of Operation ............................................................................................................. 1-6
1.2.2 Quick Start Configuration Wizard..................................................................................... 1-6
1.2.3 Output of the Configuration Wizard................................................................................. 1-7
1.3 About Templates.............................................................................................................................. 1-9
1.4 Additional Tools for Creating, Extending, and Managing WebLogic Domains.................. 1-10
2 Creating a WebLogic Domain
2.1 Setting the CONFIG_JVM_ARGS Environment Variable ......................................................... 2-2
2.2 Domain Creation Process ............................................................................................................... 2-2
2.3 Domain Version Restrictions ......................................................................................................... 2-2
2.4 Starting the Configuration Wizard................................................................................................ 2-3
2.5 Creating a WebLogic Domain in the Graphical Mode............................................................... 2-4
2.5.1 Configuring Data Sources ................................................................................................... 2-6
2.5.2 Advanced Configuration..................................................................................................... 2-7
2.6 Starting the Administration Server ............................................................................................. 2-11
2.7 Running the Quick Start Configuration Wizard ....................................................................... 2-11
2.7.1 Using Quick Start to Create the WebLogic Sample Domains...................................... 2-12
3 Updating WebLogic Domains
3.1 Before You Begin.............................................................................................................................. 3-2
3.2 Domain Update Process.................................................................................................................. 3-2
3.3 Updating a WebLogic Domain in Graphical Mode.................................................................... 3-2
3.4 Updating Startup Scripts on Remote Servers .............................................................................. 3-7
iii
4 Configuring Fusion Middleware Domains
4.1 Creating a WebLogic Domain for Fusion Middleware Products ............................................. 4-1
4.1.1 Configuring Schemas........................................................................................................... 4-8
4.1.2 Configuring Data Sources ................................................................................................. 4-10
4.2 Updating a WebLogic Domain That Includes Fusion Middleware Products ...................... 4-11
5 Configuration Wizard Screens
5.1 Configuration Type ......................................................................................................................... 5-5
5.1.1 Configuration Type - No Profiles....................................................................................... 5-5
5.1.2 Configuration Type - Profiles ............................................................................................. 5-6
5.2 Configuration ................................................................................................................................... 5-7
5.3 Templates .......................................................................................................................................... 5-9
5.4 Application Location..................................................................................................................... 5-11
5.5 Administrator Account ................................................................................................................. 5-11
5.6 Domain Mode and JDK................................................................................................................. 5-12
5.7 Database Configuration Type ...................................................................................................... 5-14
5.8 JDBC Component Schema............................................................................................................ 5-16
5.9 GridLink Oracle RAC Component Schema ............................................................................... 5-17
5.10 Oracle RAC Multi Data Source Component Schema ............................................................. 5-19
5.11 JDBC Component Schema Test.................................................................................................. 5-20
5.12 JDBC Data Sources....................................................................................................................... 5-21
5.13 GridLink Oracle RAC Data Sources.......................................................................................... 5-22
5.14 Oracle RAC Multi Data Sources ................................................................................................ 5-24
5.15 JDBC Data Sources Test .............................................................................................................. 5-25
5.16 Database Scripts ........................................................................................................................... 5-25
5.17 Credentials .................................................................................................................................... 5-26
5.18 Keystore......................................................................................................................................... 5-26
5.19 Java Keystore Info........................................................................................................................ 5-27
5.20 Advanced Configuration ............................................................................................................ 5-28
5.21 Administration Server................................................................................................................. 5-29
5.21.1 Specifying the Listen Address ........................................................................................ 5-31
5.21.2 Specifying the Listen Port ............................................................................................... 5-32
5.22 Node Manager.............................................................................................................................. 5-32
5.23 Managed Servers.......................................................................................................................... 5-33
5.24 Clusters.......................................................................................................................................... 5-35
5.25 Server Templates.......................................................................................................................... 5-37
5.26 Dynamic Servers .......................................................................................................................... 5-37
5.27 Assign Servers to Clusters .......................................................................................................... 5-39
5.28 HTTP Proxy Applications .......................................................................................................... 5-40
5.29 Coherence Clusters ...................................................................................................................... 5-40
5.30 Machines ....................................................................................................................................... 5-41
5.31 Assign Servers to Machines........................................................................................................ 5-43
iv

5.32 Virtual Targets.............................................................................................................................. 5-43
5.33 Partitions ....................................................................................................................................... 5-44
5.34 Assign Virtual Targets to Partitions.......................................................................................... 5-45
5.35 Domain Frontend Host ............................................................................................................... 5-45
5.36 System Components.................................................................................................................... 5-46
5.37 OHS Server ................................................................................................................................... 5-47
5.38 ODI Server Configuration .......................................................................................................... 5-47
5.39 Assign System Components to Machines ................................................................................ 5-48
5.40 Deployments Targeting .............................................................................................................. 5-49
5.41 Services Targeting........................................................................................................................ 5-50
5.42 File Stores ...................................................................................................................................... 5-51
5.43 Configuration Summary............................................................................................................. 5-52
5.44 Configuration Progress ............................................................................................................... 5-52
5.45 Configuration Success................................................................................................................. 5-52
v

vi
Preface
This preface describes the document accessibility features and conventions used in thisguide - Oracle Fusion Middleware Creating WebLogic Domains Using the ConfigurationWizard.
Intended Audience
Documentation Accessibility
Related Documents
Conventions
Intended AudienceThis guide is intended for Oracle Fusion Middleware administrators.
Documentation AccessibilityFor information about Oracle's commitment to accessibility, visit the OracleAccessibility Program website at http://www.oracle.com/pls/topic/lookup?ctx=acc&id=docacc.
Access to Oracle Support
Oracle customers that have purchased support have access to electronic supportthrough My Oracle Support. For information, visit http://www.oracle.com/pls/topic/lookup?ctx=acc&id=info or visit http://www.oracle.com/pls/topic/lookup?ctx=acc&id=trs if you are hearing impaired.
Related DocumentsYou can access the documents referenced in this guide on Oracle Technology Networkat http://www.oracle.com/technology:
• Oracle Fusion Middleware Installing and Configuring Oracle WebLogic Server andCoherence
• Oracle Fusion Middleware Administering Node Manager for Oracle WebLogic Server
• Oracle Fusion Middleware Deploying Applications to Oracle WebLogic Server
• Oracle Fusion Middleware Administering Server Startup and Shutdown for OracleWebLogic Server
vii

• Oracle Fusion Middleware WLST Command Reference for WebLogic Server
ConventionsThe following text conventions are used in this document:
Convention Meaning
boldface Boldface type indicates graphical user interface elements associatedwith an action, or terms defined in text or the glossary.
italic Italic type indicates book titles, emphasis, or placeholder variables forwhich you supply particular values.
monospace Monospace type indicates commands within a paragraph, URLs, codein examples, text that appears on the screen, or text that you enter.
viii
1Introduction
A WebLogic domain consists of several infrastructure components. You can create andextend a WebLogic domain by using the Configuration Wizard. Additional tools arealso available to create, extend, and manage domains.
This chapter includes the following sections:
Introduction to WebLogic DomainsA WebLogic domain is the basic administrative unit of WebLogic Server.It consists of one or more WebLogic Server instances, and logicallyrelated resources and services that are managed collectively as one unit.
Overview of the Configuration WizardThe Configuration Wizard helps create and update a WebLogic domain.The Configuration Wizard supports different GUI modes. Wheninstalling a standalone WebLogic Server, use the Quick StartConfiguration Wizard to configure the WebLogic Server sampledomains.
About TemplatesIn the context of the Configuration Wizard, the term template refers to aJava Archive (JAR) file, which contains the files and scripts required tocreate or extend a WebLogic domain. A WebLogic Server productinstallation includes a set of predefined domain and extension templates.
Additional Tools for Creating, Extending, and Managing WebLogic DomainsIn addition to the Configuration Wizard, different tools are available tocreate, extend, and manage domains. You can also perform run-timeconfiguration by using the consoles of the product components (forexample, the WebLogic Server Administration Console).
1.1 Introduction to WebLogic DomainsA WebLogic domain is the basic administrative unit of WebLogic Server. It consists ofone or more WebLogic Server instances, and logically related resources and servicesthat are managed collectively as one unit.
Introduction 1-1
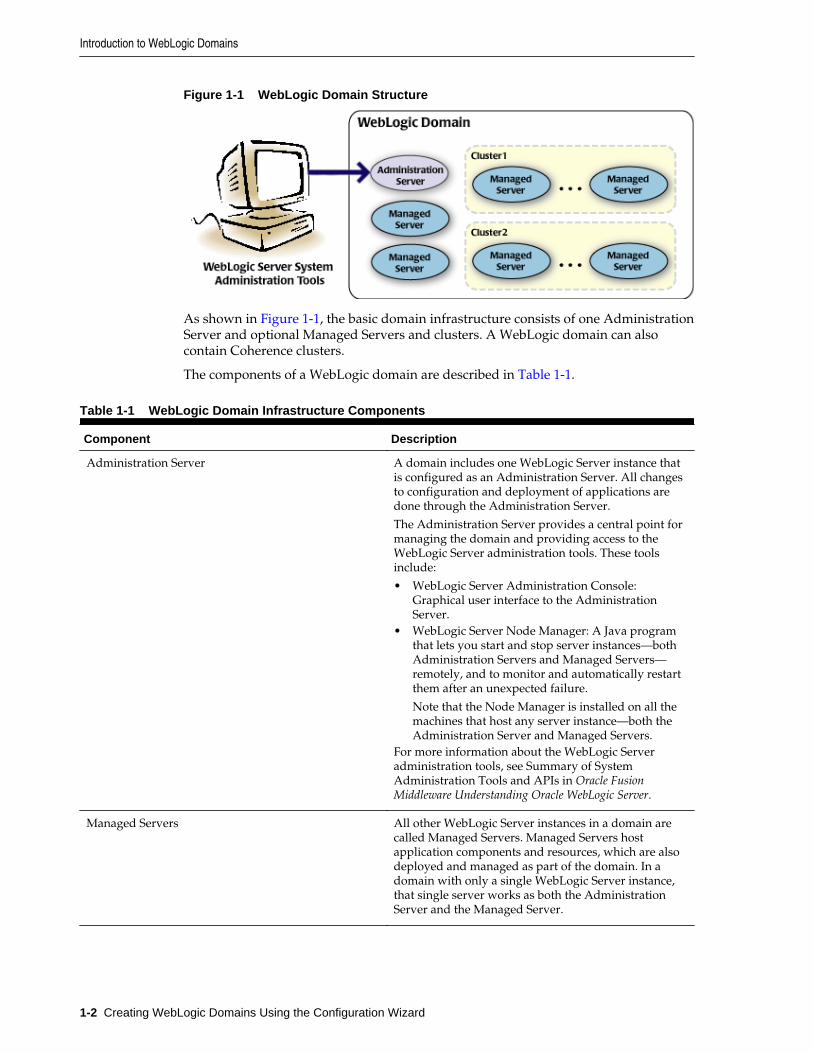
Figure 1-1 WebLogic Domain Structure
As shown in Figure 1-1, the basic domain infrastructure consists of one AdministrationServer and optional Managed Servers and clusters. A WebLogic domain can alsocontain Coherence clusters.
The components of a WebLogic domain are described in Table 1-1.
Table 1-1 WebLogic Domain Infrastructure Components
Component Description
Administration Server A domain includes one WebLogic Server instance thatis configured as an Administration Server. All changesto configuration and deployment of applications aredone through the Administration Server.
The Administration Server provides a central point formanaging the domain and providing access to theWebLogic Server administration tools. These toolsinclude:
• WebLogic Server Administration Console:Graphical user interface to the AdministrationServer.
• WebLogic Server Node Manager: A Java programthat lets you start and stop server instances—bothAdministration Servers and Managed Servers—remotely, and to monitor and automatically restartthem after an unexpected failure.
Note that the Node Manager is installed on all themachines that host any server instance—both theAdministration Server and Managed Servers.
For more information about the WebLogic Serveradministration tools, see Summary of SystemAdministration Tools and APIs in Oracle FusionMiddleware Understanding Oracle WebLogic Server.
Managed Servers All other WebLogic Server instances in a domain arecalled Managed Servers. Managed Servers hostapplication components and resources, which are alsodeployed and managed as part of the domain. In adomain with only a single WebLogic Server instance,that single server works as both the AdministrationServer and the Managed Server.
Introduction to WebLogic Domains
1-2 Creating WebLogic Domains Using the Configuration Wizard
Table 1-1 (Cont.) WebLogic Domain Infrastructure Components
Component Description
Clusters A domain may also include WebLogic Server clusters,which are groups of Managed Server instances thatwork together to provide scalability and highavailability for applications. Clusters can improveperformance and provide failover when a serverinstance becomes unavailable. The servers within acluster can either run on the same machine or reside indifferent machines. To the client, a cluster appears as asingle WebLogic Server instance.
Coherence clusters A domain may also include Coherence clusters. ACoherence cluster is a group of cluster nodes that sharea group address, which allows the cluster nodes tocommunicate. For more information on Coherenceclusters, see Clustering in Coherence in Oracle FusionMiddleware Developing Applications with OracleCoherence.
Managed Coherence servers A domain may also include managed Coherenceservers. A managed Coherence server is any WebLogicManaged Server that is assigned to a Coherence cluster.For more information on managed Coherence servers,see Configuring Managed Coherence Servers in OracleFusion Middleware Administering Clusters for OracleWebLogic Server.
Note:
All Managed Servers in a domain must run the same version of WebLogicServer. The Administration Server can run either the same version as theManaged Servers in the domain, or a later patch set.
In addition to infrastructure components, a domain defines the basic networkconfiguration for the server instances that it contains. Specifically, a domain definesapplication deployments, supported application services (such as database andmessaging services), security options, and physical host machines.
Domain configuration information is stored in the configuration directories under thedomain directory.
Common WebLogic Domain Configurations
You might find it useful to configure multiple WebLogic Domains based on specificcriteria, such as system administrator responsibilities, the logical classification ofapplications, the geographical locations of servers, or size. The following table outlinesthe most common domain configurations.
Introduction to WebLogic Domains
Introduction 1-3
Table 1-2 Common WebLogic Domain Configurations
Configuration Description
Domain with Managed Servers In typical production environments, several ManagedServers can host applications, and an AdministrationServer performs management operations.
Domain with Managed Servers and clusters In production environments that require increasedperformance, throughput, or availability for anapplication, several Managed Servers might begrouped in a cluster.
In such a case, the WebLogic domain consists of one ormore clusters with the applications they host,additional Managed Servers (if necessary), and anAdministration Server to perform managementoperations.
Standalone server domain In development or test environments, a singleapplication server might be deployed independentlywithout Managed Servers. In such a case, you can havea WebLogic domain consisting of a singleAdministration Server that also hosts the applicationsyou want to test or develop.
Although a single server domain is typically used fordevelopment and test environments, this domain typeis fully supported for production use and may beappropriate for light-load applications.
Note:
In production environments, Oracle recommends that you deploy applicationsonly on Managed Servers, and that you reserve the Administration Server formanagement tasks.
For more information about WebLogic domains, see Understanding Oracle WebLogicServer Domains in Oracle Fusion Middleware Understanding Domain Configuration forOracle WebLogic Server.
1.2 Overview of the Configuration WizardThe Configuration Wizard helps create and update a WebLogic domain. TheConfiguration Wizard supports different GUI modes. When installing a standaloneWebLogic Server, use the Quick Start Configuration Wizard to configure theWebLogic Server sample domains.
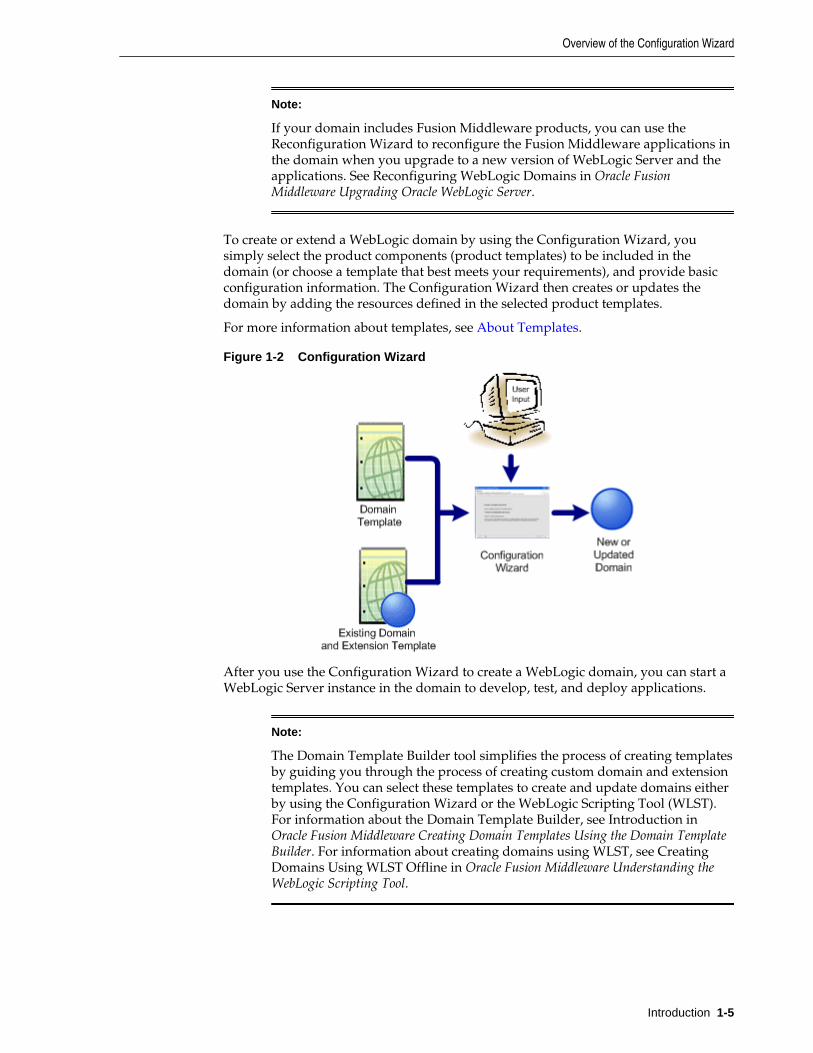
Before you can develop and run an application on a WebLogic domain, you must firstcreate the WebLogic domain. The Configuration Wizard (illustrated in Figure 1-2),simplifies the process of creating and updating a domain.
Overview of the Configuration Wizard
1-4 Creating WebLogic Domains Using the Configuration Wizard
Note:
If your domain includes Fusion Middleware products, you can use theReconfiguration Wizard to reconfigure the Fusion Middleware applications inthe domain when you upgrade to a new version of WebLogic Server and theapplications. See Reconfiguring WebLogic Domains in Oracle FusionMiddleware Upgrading Oracle WebLogic Server.
To create or extend a WebLogic domain by using the Configuration Wizard, yousimply select the product components (product templates) to be included in thedomain (or choose a template that best meets your requirements), and provide basicconfiguration information. The Configuration Wizard then creates or updates thedomain by adding the resources defined in the selected product templates.
For more information about templates, see About Templates.
Figure 1-2 Configuration Wizard
After you use the Configuration Wizard to create a WebLogic domain, you can start aWebLogic Server instance in the domain to develop, test, and deploy applications.
Note:
The Domain Template Builder tool simplifies the process of creating templatesby guiding you through the process of creating custom domain and extensiontemplates. You can select these templates to create and update domains eitherby using the Configuration Wizard or the WebLogic Scripting Tool (WLST).For information about the Domain Template Builder, see Introduction inOracle Fusion Middleware Creating Domain Templates Using the Domain TemplateBuilder. For information about creating domains using WLST, see CreatingDomains Using WLST Offline in Oracle Fusion Middleware Understanding theWebLogic Scripting Tool.
Overview of the Configuration Wizard
Introduction 1-5
Modes of OperationThe Configuration Wizard supports three modes of operation, namelyNormal GUI mode, Quick Start mode, and Reconfiguration mode. Youcan use the Configuration Wizard only when there is no server running.
Quick Start Configuration WizardThe Quick Start Configuration Wizard helps you configure the sampledomains that you when you install a standalone WebLogic Server. Youcan also run the Quick Start Wizard manually to create the sampledomains.
Output of the Configuration WizardA set of directories is automatically created when you create a WebLogicdomain by using the Configuration Wizard. Each directory containsspecific information about the domain that is created.
1.2.1 Modes of OperationThe Configuration Wizard supports three modes of operation, namely Normal GUImode, Quick Start mode, and Reconfiguration mode. You can use the ConfigurationWizard only when there is no server running.
• Normal GUI mode, which displays all of the applicable screens for configuring orextending your domain. See Starting the Configuration Wizard, for informationabout how to start the wizard in this mode.
• Quick Start mode, which displays a small subset of configuration screens fromwhich you can specify the critical settings for the WebLogic Server samplesdomains. See Running the Quick Start Configuration Wizard.
• Reconfiguration mode, which is used to upgrade your WebLogic domain afterinstalling a new WebLogic Server version and, if applicable, any installed FusionMiddleware applications to be compatible with a newly installed WebLogic Serverversion. For more information on this mode, see Reconfiguring a WebLogicDomain in Graphical Mode in Oracle Fusion Middleware Upgrading Oracle WebLogicServer.
Note:
For a scripted, silent-mode method, you can use WLST. For more information,see Using the WebLogic Scripting Tool in Oracle Fusion MiddlewareUnderstanding the WebLogic Scripting Tool.
1.2.2 Quick Start Configuration WizardThe Quick Start Configuration Wizard helps you configure the sample domains thatyou when you install a standalone WebLogic Server. You can also run the Quick StartWizard manually to create the sample domains.
When installing WebLogic Server (standalone), if you included the samples, an optionis provided on the Installation Complete screen to run the Quick Start ConfigurationWizard to configure the WebLogic Server sample domains. If you select this option,the Quick Start Configuration Wizard starts after the installer completes. In this mode,you are presented with one screen, Configuration, from which you specify thefollowing critical settings for the samples domains:
Overview of the Configuration Wizard
1-6 Creating WebLogic Domains Using the Configuration Wizard
• Administration Server username and password
• Domain parent directory
• Application parent directory
• Administration Server listen address and listen port
• SSL listen port
• Coherence listen port (if applicable)
The following Administration Server settings are enabled by default for the samplesdomains and cannot be changed:
• SSL
• Coherence
• Coherence storage
Note:
You can also run the Quick Start Wizard manually to create the sampledomains. See Running the Quick Start Configuration Wizard.
1.2.3 Output of the Configuration WizardA set of directories is automatically created when you create a WebLogic domain byusing the Configuration Wizard. Each directory contains specific information aboutthe domain that is created.
Directory Description
autodeploy This directory provides a location from which you candeploy applications quickly on a development server.When the WebLogic Server instance is running indevelopment mode, it automatically deploys anyapplications or modules that you place in thisdirectory.
bin This directory contains scripts to start and stop theAdministration Server, and, optionally, ManagedServers.
Overview of the Configuration Wizard
Introduction 1-7
Directory Description
config This directory contains:
• A domain-specific configuration file, config.xml,which specifies the name of the WebLogic domainand the configuration parameter settings for eachserver instance, cluster, resource, and service in thedomain.
• Subdirectories that contain the configuration forvarious system modules: coherence,configCache, deployments, diagnostics,jdbc, jms, lib, nodemanager, security, andstartup. These subdirectories containconfiguration files that are incorporated, byreference, into the config.xml file.
Note: Depending on your configuration, somesubdirectories may not exist.
console-ext This directory contains console extensions used by theAdministration Server.
init-info This directory contains files used by the ConfigurationWizard to support creation and extension of theWebLogic domain.
lib This directory contains the domain library. When theserver starts, any jar files that you place in thisdirectory are dynamically added to the end of theserver classpath.
nodemanager This directory contains Node Manager configurationfiles.
security This directory contains common security files for all theservers in the domain.
servers This directory contains a subdirectory for each server inthe domain. These server subdirectories, in turn,contain subdirectories that hold directories and filesspecific to each server in a WebLogic domain, such asbin, cache, data, logs, security, and tmp.
user_staged_config If the domain is configured to be user-staged, that is,the administrator is responsible for staging (copying)the configuration information to the Managed Servers,this directory provides an alternative to the configdirectory.
If the template used to create a WebLogic domain includes applications, theapplication files are located, by default, in ORACLE_HOME/user_projects/applications/domain_name, unless you specified another location.
Note:
Oracle recommends that you create your domains outside of the Oracle Homedirectory. This makes it easier for you to upgrade to a newer version ofWebLogic Server without having to recreate your domains and applications.
Overview of the Configuration Wizard
1-8 Creating WebLogic Domains Using the Configuration Wizard
For more information, see Domain Configuration Files in Oracle Fusion MiddlewareUnderstanding Domain Configuration for Oracle WebLogic Server
1.3 About TemplatesIn the context of the Configuration Wizard, the term template refers to a Java Archive(JAR) file, which contains the files and scripts required to create or extend a WebLogicdomain. A WebLogic Server product installation includes a set of predefined domainand extension templates.
The types of templates that the Configuration Wizard uses to create or updateWebLogic domains include:
• Domain template: This type of template defines the full set of resources within aWebLogic domain, including infrastructure components, applications, services,security options, and general environment and operating system options. You cancreate this type of template from an existing WebLogic domain by using theDomain Template Builder tool or the pack command. Subsequently, you cancreate a WebLogic domain based on the template by using the ConfigurationWizard.
The product distribution includes a base WebLogic domain template. A domaintemplate defines the core set of resources within a domain, including
– An Administration Server and basic configuration information
– Infrastructure components
– General environment and operating system requirements.
The domain templates provided by Oracle do not include sample applications,although domain templates that were created using the pack command maycontain sample applications if they were installed in the domain that was packed.You can use a domain template to create a basic WebLogic domain, which you canthen extend with applications and services, or additional product components.
• Extension template: Whereas a domain template can create a self-sufficientWebLogic domain, you use an extension template to add functionality to anexisting domain. In the Configuration Wizard, before selecting the extensiontemplate to use, you must select the WebLogic domain you want to extend.
• Reconfiguration template: Reconfiguration templates are provided by Oracle tomake it easier for you to update a domain that contains Fusion Middlewareproducts. These templates are automatically applied, and your Fusion Middlewareapplications are automatically updated, when you use the Reconfiguration Wizardas part of the process for upgrading to a new version of WebLogic Server andFusion Middleware products. The Reconfiguration Wizard detects which FusionMiddleware products are installed, and, if a reconfiguration template is availablefor a given product, automatically applies it. For more information, see Reconfiguring WebLogic Domains in Oracle Fusion Middleware Upgrading OracleWebLogic Server.
• Managed Server template: This type of template defines the subset of resourceswithin a WebLogic domain that are required to create a Managed Server domainon a remote machine. You can create this type of template by using the packcommand.
The WebLogic Server product installation includes the base WebLogic domaintemplate and various extension templates that allow you to add component features
About Templates
Introduction 1-9
and samples to the base domain. For more information about these templates and howthey relate to each other, see WebLogic Server Templates in Oracle Fusion MiddlewareDomain Template Reference.
1.4 Additional Tools for Creating, Extending, and Managing WebLogicDomains
In addition to the Configuration Wizard, different tools are available to create, extend,and manage domains. You can also perform run-time configuration by using theconsoles of the product components (for example, the WebLogic ServerAdministration Console).
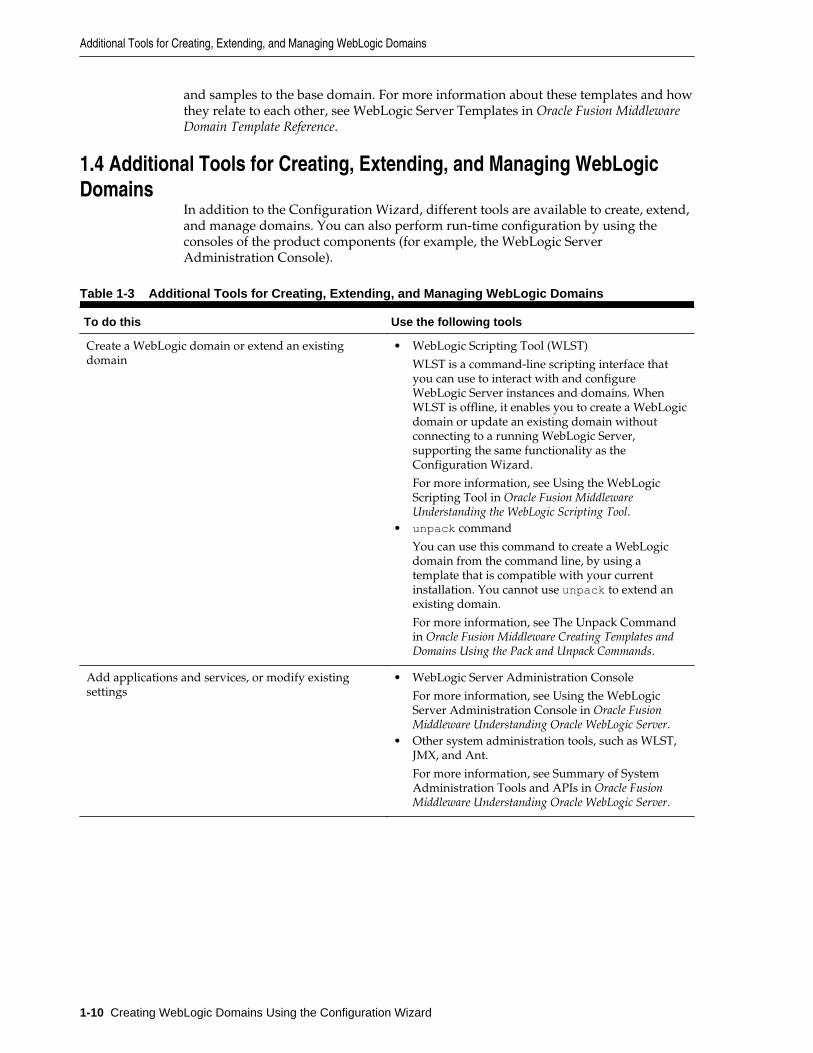
Table 1-3 Additional Tools for Creating, Extending, and Managing WebLogic Domains
To do this Use the following tools
Create a WebLogic domain or extend an existingdomain
• WebLogic Scripting Tool (WLST)
WLST is a command-line scripting interface thatyou can use to interact with and configureWebLogic Server instances and domains. WhenWLST is offline, it enables you to create a WebLogicdomain or update an existing domain withoutconnecting to a running WebLogic Server,supporting the same functionality as theConfiguration Wizard.
For more information, see Using the WebLogicScripting Tool in Oracle Fusion MiddlewareUnderstanding the WebLogic Scripting Tool.
• unpack command
You can use this command to create a WebLogicdomain from the command line, by using atemplate that is compatible with your currentinstallation. You cannot use unpack to extend anexisting domain.
For more information, see The Unpack Commandin Oracle Fusion Middleware Creating Templates andDomains Using the Pack and Unpack Commands.
Add applications and services, or modify existingsettings
• WebLogic Server Administration Console
For more information, see Using the WebLogicServer Administration Console in Oracle FusionMiddleware Understanding Oracle WebLogic Server.
• Other system administration tools, such as WLST,JMX, and Ant.
For more information, see Summary of SystemAdministration Tools and APIs in Oracle FusionMiddleware Understanding Oracle WebLogic Server.
Additional Tools for Creating, Extending, and Managing WebLogic Domains
1-10 Creating WebLogic Domains Using the Configuration Wizard

Table 1-3 (Cont.) Additional Tools for Creating, Extending, and Managing WebLogic Domains
To do this Use the following tools
Manage and monitor the health and status of thedomain
• WebLogic Diagnostics Framework (WLDF)
For more information, see Using the Built-inDiagnostic System Modules in Oracle FusionMiddleware Configuring and Using the DiagnosticsFramework for Oracle WebLogic Server.
• WebLogic Server Administration Console
For more information, see About the WebLogicServer Administration Console in Oracle FusionMiddleware Understanding Oracle WebLogic Server.
• WebLogic Server Node Manager
For more information, see Starting anAdministration Server Using WLST and NodeManager in Oracle Fusion Middleware AdministeringServer Startup and Shutdown for Oracle WebLogicServer and Introduction in Oracle Fusion MiddlewareAdministering Node Manager for Oracle WebLogicServer.
Additional Tools for Creating, Extending, and Managing WebLogic Domains
Introduction 1-11

Additional Tools for Creating, Extending, and Managing WebLogic Domains
1-12 Creating WebLogic Domains Using the Configuration Wizard
2Creating a WebLogic Domain
You can create a new WebLogic domain by using the Configuration Wizard in thegraphical mode. Depending on your domain requirements and customizations, theConfiguration Wizard takes you through a series of screens during the domaincreation process.
This chapter includes the following sections:
Setting the CONFIG_JVM_ARGS Environment VariableBefore starting the Configuration Wizard, you must set a value for theCONFIG_JVM_ARGS environment variable. Setting the appropriate valuefor the variable enables you to specify the type of domain you want tocreate, whether expanded or compact.
Domain Creation ProcessYou can use the Configuration Wizard to create a WebLogic domain, byselecting either the product components to include in your domain orthe template JAR files. If necessary, you can also customize the domainto suit your environment.
Domain Version RestrictionsYou must be aware of the restrictions when you use a custom templateto create a domain. This awareness will help you create or upgrade tothe required version of the WebLogic domain.
Starting the Configuration WizardYou can start the Configuration Wizard in the graphical mode eitherfrom the Windows Start menu or from the command line. The consolefor the machine on which the product installation resides must supportJava-based GUIs.
Creating a WebLogic Domain in the Graphical ModeUse the Configuration Wizard in graphical mode to create a WebLogicdomain. The Configuration Wizard takes you through a series of screensthat help you create a WebLogic Server domain. Additional screensappear depending on the components that you add for the domain, andother factors.
Starting the Administration ServerYou can start the Administration Server after you finish creating thedomain. You can start the server by using either the WebLogic ServerAdministration Console or the command line.
Running the Quick Start Configuration WizardThe Quick Start Configuration Wizard helps you configure the sampledomains and the Fusion Middleware product domains that use theDerby (JavaDB) database driver. You can run the wizard automatically
Creating a WebLogic Domain 2-1
or manually depending on the domain type (sample or product) youwant to configure.
2.1 Setting the CONFIG_JVM_ARGS Environment VariableBefore starting the Configuration Wizard, you must set a value for theCONFIG_JVM_ARGS environment variable. Setting the appropriate value for thevariable enables you to specify the type of domain you want to create, whetherexpanded or compact.
Set the value to -Djava.security.egd=file:/dev/./urandom to reduce thetime the Configuration Wizard takes to create or update a domain.
In addition, if you want to create a compact domain on either Windows or Linux, set -Dcom.oracle.cie.config.showProfile=true in CONFIG_JVM_ARGS.
This causes domain profile selections (compact and expanded) to be displayed on the Configuration Type screen of the Configuration Wizard. For more information ondomain profiles, see Domain Topology Profiles in Oracle Fusion Middleware DomainTemplate Reference.
2.2 Domain Creation ProcessYou can use the Configuration Wizard to create a WebLogic domain, by selectingeither the product components to include in your domain or the template JAR files. Ifnecessary, you can also customize the domain to suit your environment.
Table 2-1 shows the sequence of screens that are presented by the ConfigurationWizard. The screens that you see depend on your domain requirements and whetheror not you need to customize your domain.
You may want to customize your domain in the following circumstances:
• To create a multi-server or clustered domain when using the default settings. Allthe predefined WebLogic Server templates (those delivered with WebLogic Server)create single-server domains.
• To use a database that is different from the default database in the domain orextension template. In this case, you must customize the JDBC settings to point tothe appropriate database.
• To customize the listen port and the SSL port.
• To create a test environment by using a domain template that you received, and tomodify the domain configuration to work in the test environment based on yourrequirements.
2.3 Domain Version RestrictionsYou must be aware of the restrictions when you use a custom template to create adomain. This awareness will help you create or upgrade to the required version of theWebLogic domain.
You can use a custom template by using either WLST or the Create Domain UsingCustom Template option on the Templates screen of the Configuration Wizard.
• The versions of the WebLogic Server templates that were used to create the customdomain and custom domain template must be the same version as the WebLogicServer installation in which the domain will be used. For example, if you created aWebLogic domain using the WebLogic Server Base Domain 10.3.6 template, and
Setting the CONFIG_JVM_ARGS Environment Variable
2-2 Creating WebLogic Domains Using the Configuration Wizard
then created a custom domain template from that domain, you cannot use thecustom domain template to create a domain in a WebLogic Server 12.2.1installation.
• If you want to create a custom domain template that was created from a domainfrom a previous version of WebLogic Server, you must first upgrade that domainto the WebLogic Server version in which you want to use the domain. You canupgrade the domain using either WLST or the Fusion Middleware ReconfigurationWizard as described in Reconfiguration Wizard Screens in Oracle Fusion MiddlewareUpgrading Oracle WebLogic Server.
For more information about domain version restrictions, see Domain Restrictions inOracle Fusion Middleware Understanding Domain Configuration for Oracle WebLogic Server.
2.4 Starting the Configuration WizardYou can start the Configuration Wizard in the graphical mode either from theWindows Start menu or from the command line. The console for the machine onwhich the product installation resides must support Java-based GUIs.
• To start the Configuration Wizard in graphical mode on a Windows platform,choose Start > All Programs > Oracle > Oracle Home > WebLogic Server version> Tools > Configuration Wizard.
• To start the Configuration Wizard in graphical mode from a Windows commandprompt or on UNIX systems:
1. Log in to the system on which the product is installed.
2. Open an MS-DOS command prompt window (on Windows) or a commandshell (on UNIX).
3. Go to the following directory:
On Windows: ORACLE_HOME/oracle_common/common/bin
On UNIX: ORACLE_HOME/oracle_common/common/bin
Replace ORACLE_HOME with the Oracle Home directory that was specified atinstallation.
4. Execute the following command:
On Windows: config.cmd
On UNIX: sh config.sh
Starting the Configuration Wizard
Creating a WebLogic Domain 2-3
Note:
When you run the config.cmd or config.sh command, the following errormessage might be displayed to indicate that the default cache directory is notvalid:
*sys-package-mgr*: can't create package cache dir
You can change the cache directory by including the -Dpython.cachedir=valid_directory option in the command line.
To create a log file of the Configuration Wizard session, include the -log=config.log -log_priority=debug parameter in the command.You can specify any file name for the log file, such as config_today.log.The log file is stored in the logs directory of the Oracle Home directory.Other valid values for log_priority are OFF, SEVERE, WARNING, INFO,CONFIG, FINE, FINER, FINEST, and ALL.
The Configuration Type screen is displayed.
2.5 Creating a WebLogic Domain in the Graphical ModeUse the Configuration Wizard in graphical mode to create a WebLogic domain. TheConfiguration Wizard takes you through a series of screens that help you create aWebLogic Server domain. Additional screens appear depending on the componentsthat you add for the domain, and other factors.
Start the Configuration Wizard as described in Starting the Configuration Wizard.
Note:
In situations where you cannot run the Configuration Wizard in GUI mode,Oracle recommends that you use a WLST script to create or extend a domain.For more information, see Creating and Using a Domain Template (Offline) inOracle Fusion Middleware Understanding the WebLogic Scripting Tool.
If your installation includes Fusion Middleware products, refer to ConfiguringFusion Middleware Domains, for instructions. Fusion Middleware productconfiguration includes additional Configuration Wizard screens that are notincluded in the workflow in this chapter.
The Configuration Wizard displays a sequence of screens, in the order listed in Configuring Screens for Creating a New WebLogic Domain. For more information oneach screen, refer to the related section in Configuration Wizard Screens, or click thelink in the Screen column.
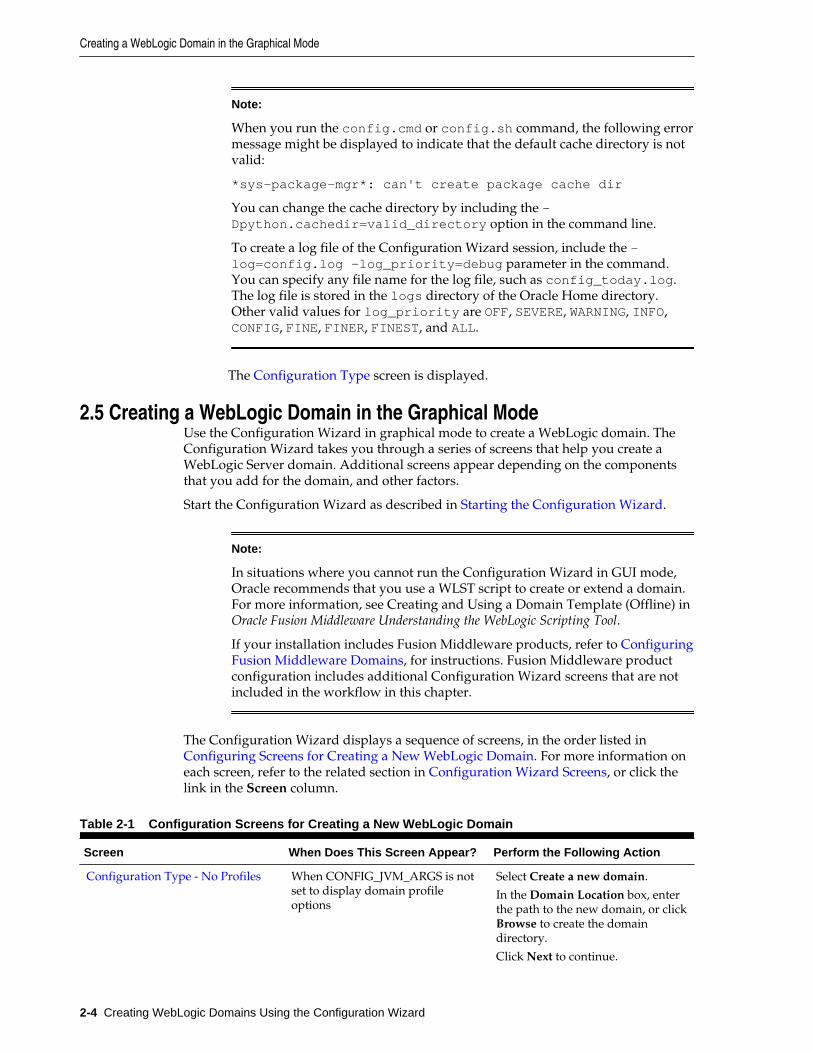
Table 2-1 Configuration Screens for Creating a New WebLogic Domain
Screen When Does This Screen Appear? Perform the Following Action
Configuration Type - No Profiles When CONFIG_JVM_ARGS is notset to display domain profileoptions
Select Create a new domain.
In the Domain Location box, enterthe path to the new domain, or clickBrowse to create the domaindirectory.
Click Next to continue.
Creating a WebLogic Domain in the Graphical Mode
2-4 Creating WebLogic Domains Using the Configuration Wizard
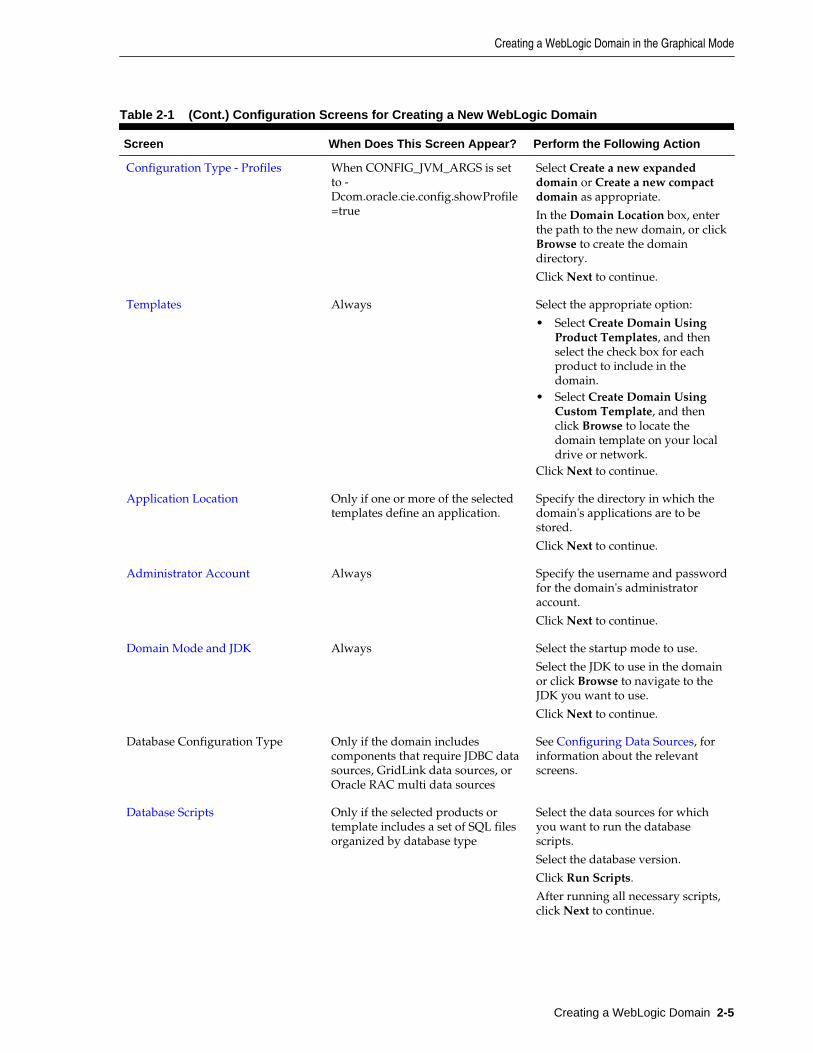
Table 2-1 (Cont.) Configuration Screens for Creating a New WebLogic Domain
Screen When Does This Screen Appear? Perform the Following Action
Configuration Type - Profiles When CONFIG_JVM_ARGS is setto -Dcom.oracle.cie.config.showProfile=true
Select Create a new expandeddomain or Create a new compactdomain as appropriate.
In the Domain Location box, enterthe path to the new domain, or clickBrowse to create the domaindirectory.
Click Next to continue.
Templates Always Select the appropriate option:
• Select Create Domain UsingProduct Templates, and thenselect the check box for eachproduct to include in thedomain.
• Select Create Domain UsingCustom Template, and thenclick Browse to locate thedomain template on your localdrive or network.
Click Next to continue.
Application Location Only if one or more of the selectedtemplates define an application.
Specify the directory in which thedomain's applications are to bestored.
Click Next to continue.
Administrator Account Always Specify the username and passwordfor the domain's administratoraccount.
Click Next to continue.
Domain Mode and JDK Always Select the startup mode to use.
Select the JDK to use in the domainor click Browse to navigate to theJDK you want to use.
Click Next to continue.
Database Configuration Type Only if the domain includescomponents that require JDBC datasources, GridLink data sources, orOracle RAC multi data sources
See Configuring Data Sources, forinformation about the relevantscreens.
Database Scripts Only if the selected products ortemplate includes a set of SQL filesorganized by database type
Select the data sources for whichyou want to run the databasescripts.
Select the database version.
Click Run Scripts.
After running all necessary scripts,click Next to continue.
Creating a WebLogic Domain in the Graphical Mode
Creating a WebLogic Domain 2-5
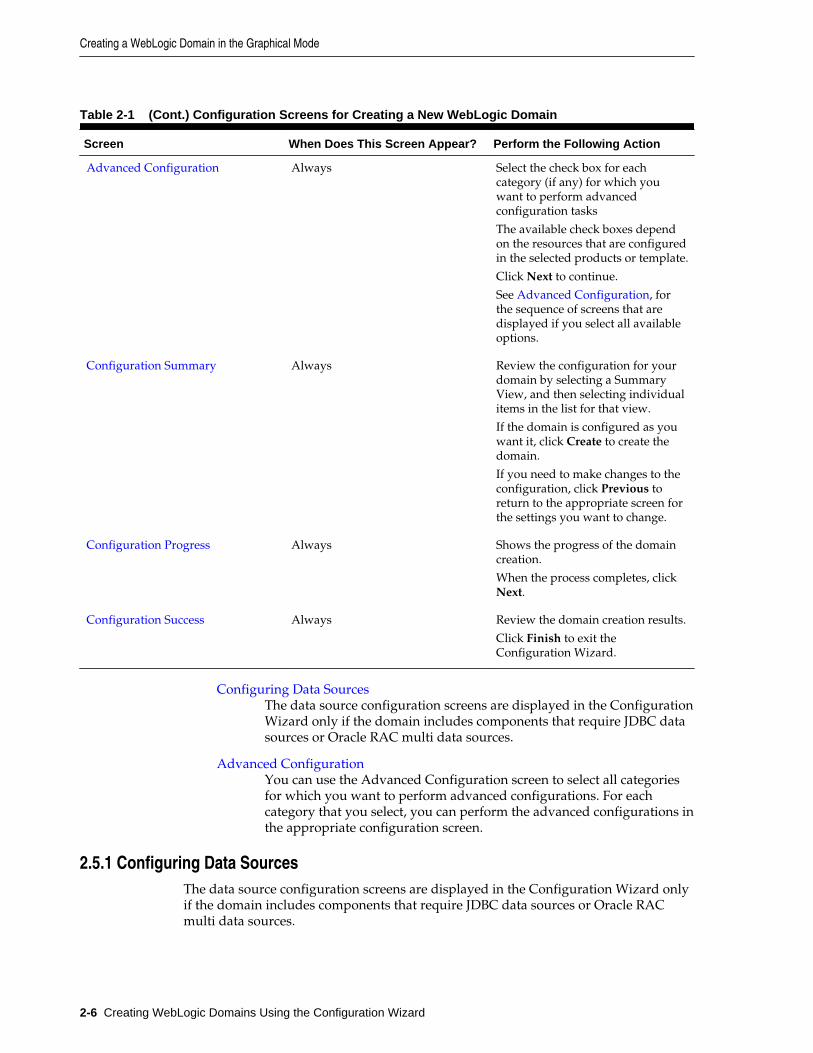
Table 2-1 (Cont.) Configuration Screens for Creating a New WebLogic Domain
Screen When Does This Screen Appear? Perform the Following Action
Advanced Configuration Always Select the check box for eachcategory (if any) for which youwant to perform advancedconfiguration tasks
The available check boxes dependon the resources that are configuredin the selected products or template.
Click Next to continue.
See Advanced Configuration, forthe sequence of screens that aredisplayed if you select all availableoptions.
Configuration Summary Always Review the configuration for yourdomain by selecting a SummaryView, and then selecting individualitems in the list for that view.
If the domain is configured as youwant it, click Create to create thedomain.
If you need to make changes to theconfiguration, click Previous toreturn to the appropriate screen forthe settings you want to change.
Configuration Progress Always Shows the progress of the domaincreation.
When the process completes, clickNext.
Configuration Success Always Review the domain creation results.
Click Finish to exit theConfiguration Wizard.
Configuring Data SourcesThe data source configuration screens are displayed in the ConfigurationWizard only if the domain includes components that require JDBC datasources or Oracle RAC multi data sources.
Advanced ConfigurationYou can use the Advanced Configuration screen to select all categoriesfor which you want to perform advanced configurations. For eachcategory that you select, you can perform the advanced configurations inthe appropriate configuration screen.
2.5.1 Configuring Data SourcesThe data source configuration screens are displayed in the Configuration Wizard onlyif the domain includes components that require JDBC data sources or Oracle RACmulti data sources.
Creating a WebLogic Domain in the Graphical Mode
2-6 Creating WebLogic Domains Using the Configuration Wizard
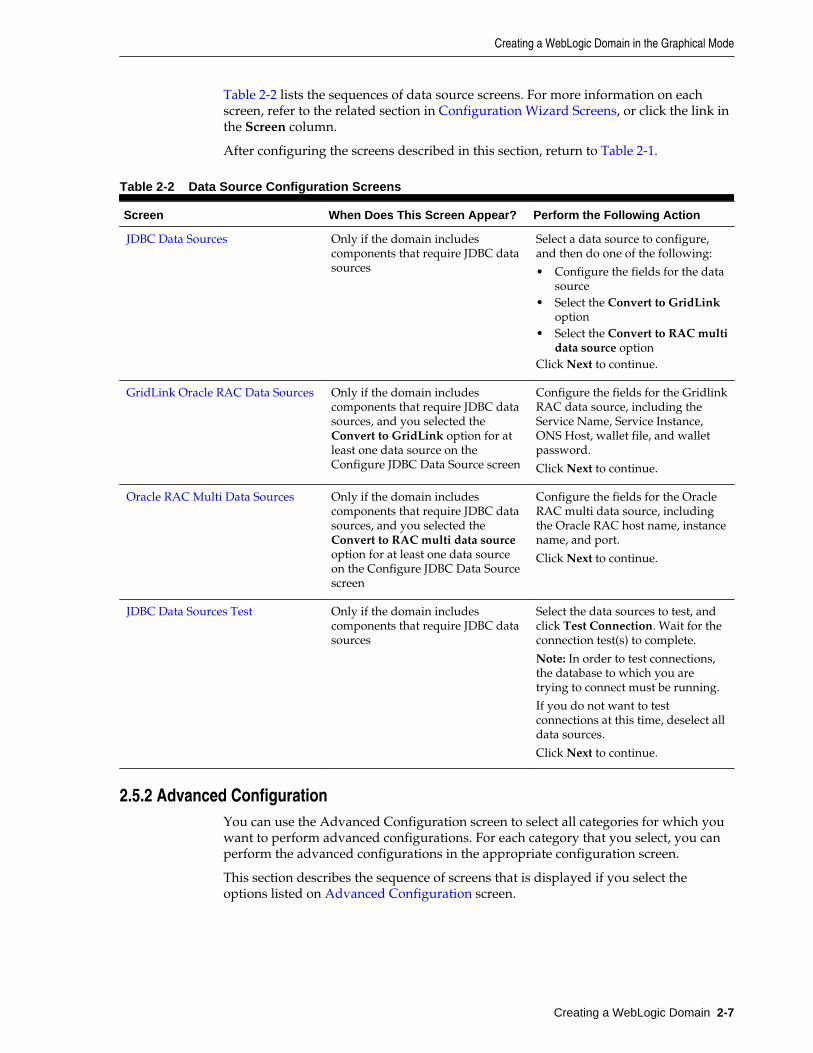
Table 2-2 lists the sequences of data source screens. For more information on eachscreen, refer to the related section in Configuration Wizard Screens, or click the link inthe Screen column.
After configuring the screens described in this section, return to Table 2-1.
Table 2-2 Data Source Configuration Screens
Screen When Does This Screen Appear? Perform the Following Action
JDBC Data Sources Only if the domain includescomponents that require JDBC datasources
Select a data source to configure,and then do one of the following:
• Configure the fields for the datasource
• Select the Convert to GridLinkoption
• Select the Convert to RAC multidata source option
Click Next to continue.
GridLink Oracle RAC Data Sources Only if the domain includescomponents that require JDBC datasources, and you selected theConvert to GridLink option for atleast one data source on theConfigure JDBC Data Source screen
Configure the fields for the GridlinkRAC data source, including theService Name, Service Instance,ONS Host, wallet file, and walletpassword.
Click Next to continue.
Oracle RAC Multi Data Sources Only if the domain includescomponents that require JDBC datasources, and you selected theConvert to RAC multi data sourceoption for at least one data sourceon the Configure JDBC Data Sourcescreen
Configure the fields for the OracleRAC multi data source, includingthe Oracle RAC host name, instancename, and port.
Click Next to continue.
JDBC Data Sources Test Only if the domain includescomponents that require JDBC datasources
Select the data sources to test, andclick Test Connection. Wait for theconnection test(s) to complete.
Note: In order to test connections,the database to which you aretrying to connect must be running.
If you do not want to testconnections at this time, deselect alldata sources.
Click Next to continue.
2.5.2 Advanced ConfigurationYou can use the Advanced Configuration screen to select all categories for which youwant to perform advanced configurations. For each category that you select, you canperform the advanced configurations in the appropriate configuration screen.
This section describes the sequence of screens that is displayed if you select theoptions listed on Advanced Configuration screen.
Creating a WebLogic Domain in the Graphical Mode
Creating a WebLogic Domain 2-7
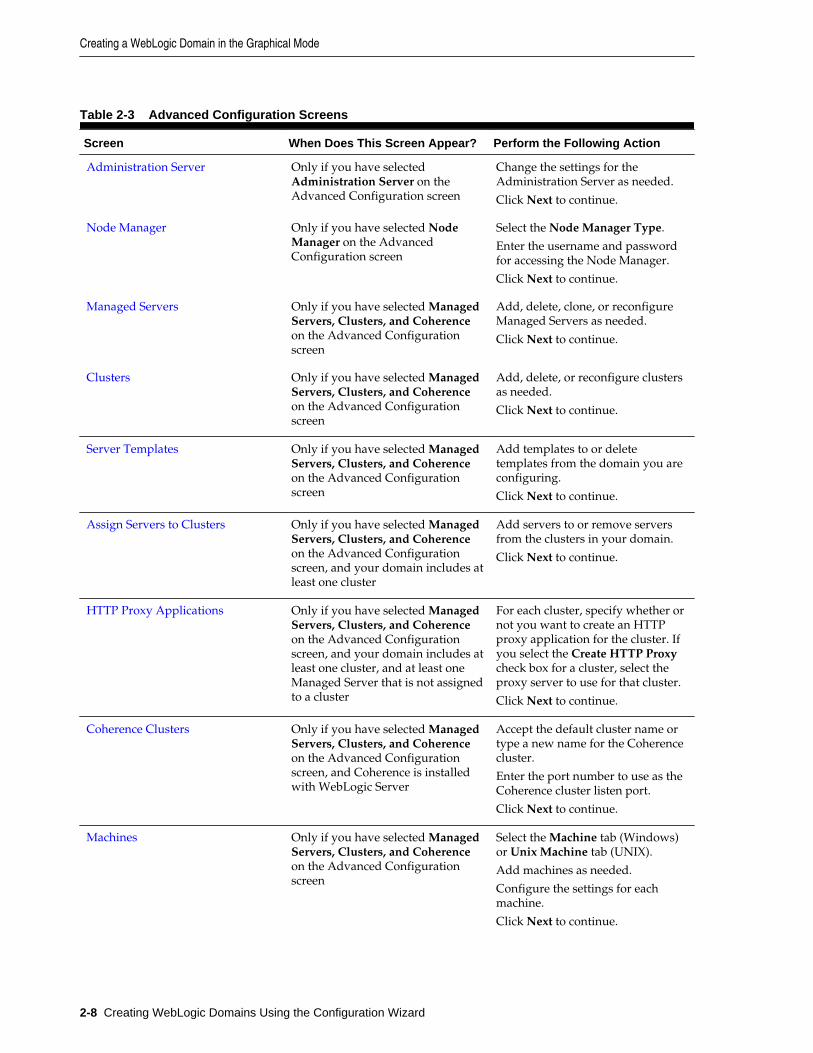
Table 2-3 Advanced Configuration Screens
Screen When Does This Screen Appear? Perform the Following Action
Administration Server Only if you have selectedAdministration Server on theAdvanced Configuration screen
Change the settings for theAdministration Server as needed.
Click Next to continue.
Node Manager Only if you have selected NodeManager on the AdvancedConfiguration screen
Select the Node Manager Type.
Enter the username and passwordfor accessing the Node Manager.
Click Next to continue.
Managed Servers Only if you have selected ManagedServers, Clusters, and Coherenceon the Advanced Configurationscreen
Add, delete, clone, or reconfigureManaged Servers as needed.
Click Next to continue.
Clusters Only if you have selected ManagedServers, Clusters, and Coherenceon the Advanced Configurationscreen
Add, delete, or reconfigure clustersas needed.
Click Next to continue.
Server Templates Only if you have selected ManagedServers, Clusters, and Coherenceon the Advanced Configurationscreen
Add templates to or deletetemplates from the domain you areconfiguring.
Click Next to continue.
Assign Servers to Clusters Only if you have selected ManagedServers, Clusters, and Coherenceon the Advanced Configurationscreen, and your domain includes atleast one cluster
Add servers to or remove serversfrom the clusters in your domain.
Click Next to continue.
HTTP Proxy Applications Only if you have selected ManagedServers, Clusters, and Coherenceon the Advanced Configurationscreen, and your domain includes atleast one cluster, and at least oneManaged Server that is not assignedto a cluster
For each cluster, specify whether ornot you want to create an HTTPproxy application for the cluster. Ifyou select the Create HTTP Proxycheck box for a cluster, select theproxy server to use for that cluster.
Click Next to continue.
Coherence Clusters Only if you have selected ManagedServers, Clusters, and Coherenceon the Advanced Configurationscreen, and Coherence is installedwith WebLogic Server
Accept the default cluster name ortype a new name for the Coherencecluster.
Enter the port number to use as theCoherence cluster listen port.
Click Next to continue.
Machines Only if you have selected ManagedServers, Clusters, and Coherenceon the Advanced Configurationscreen
Select the Machine tab (Windows)or Unix Machine tab (UNIX).
Add machines as needed.
Configure the settings for eachmachine.
Click Next to continue.
Creating a WebLogic Domain in the Graphical Mode
2-8 Creating WebLogic Domains Using the Configuration Wizard
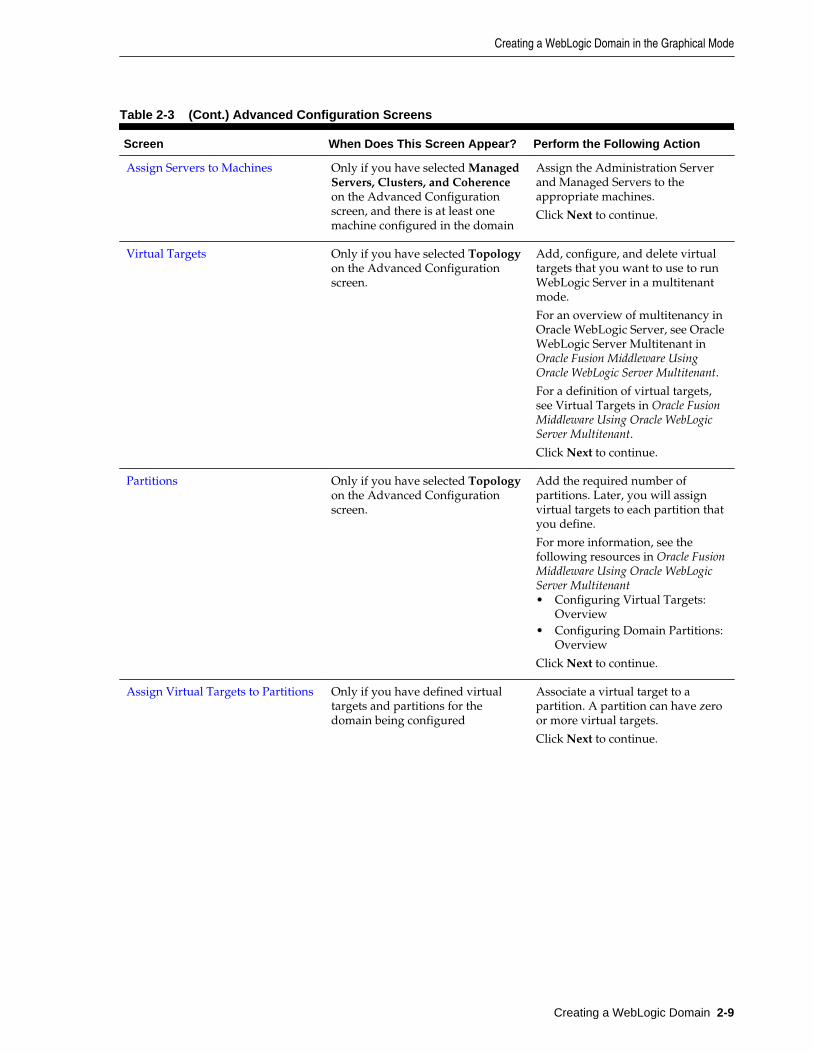
Table 2-3 (Cont.) Advanced Configuration Screens
Screen When Does This Screen Appear? Perform the Following Action
Assign Servers to Machines Only if you have selected ManagedServers, Clusters, and Coherenceon the Advanced Configurationscreen, and there is at least onemachine configured in the domain
Assign the Administration Serverand Managed Servers to theappropriate machines.
Click Next to continue.
Virtual Targets Only if you have selected Topologyon the Advanced Configurationscreen.
Add, configure, and delete virtualtargets that you want to use to runWebLogic Server in a multitenantmode.
For an overview of multitenancy inOracle WebLogic Server, see OracleWebLogic Server Multitenant inOracle Fusion Middleware UsingOracle WebLogic Server Multitenant.
For a definition of virtual targets,see Virtual Targets in Oracle FusionMiddleware Using Oracle WebLogicServer Multitenant.
Click Next to continue.
Partitions Only if you have selected Topologyon the Advanced Configurationscreen.
Add the required number ofpartitions. Later, you will assignvirtual targets to each partition thatyou define.
For more information, see thefollowing resources in Oracle FusionMiddleware Using Oracle WebLogicServer Multitenant• Configuring Virtual Targets:
Overview• Configuring Domain Partitions:
Overview
Click Next to continue.
Assign Virtual Targets to Partitions Only if you have defined virtualtargets and partitions for thedomain being configured
Associate a virtual target to apartition. A partition can have zeroor more virtual targets.
Click Next to continue.
Creating a WebLogic Domain in the Graphical Mode
Creating a WebLogic Domain 2-9
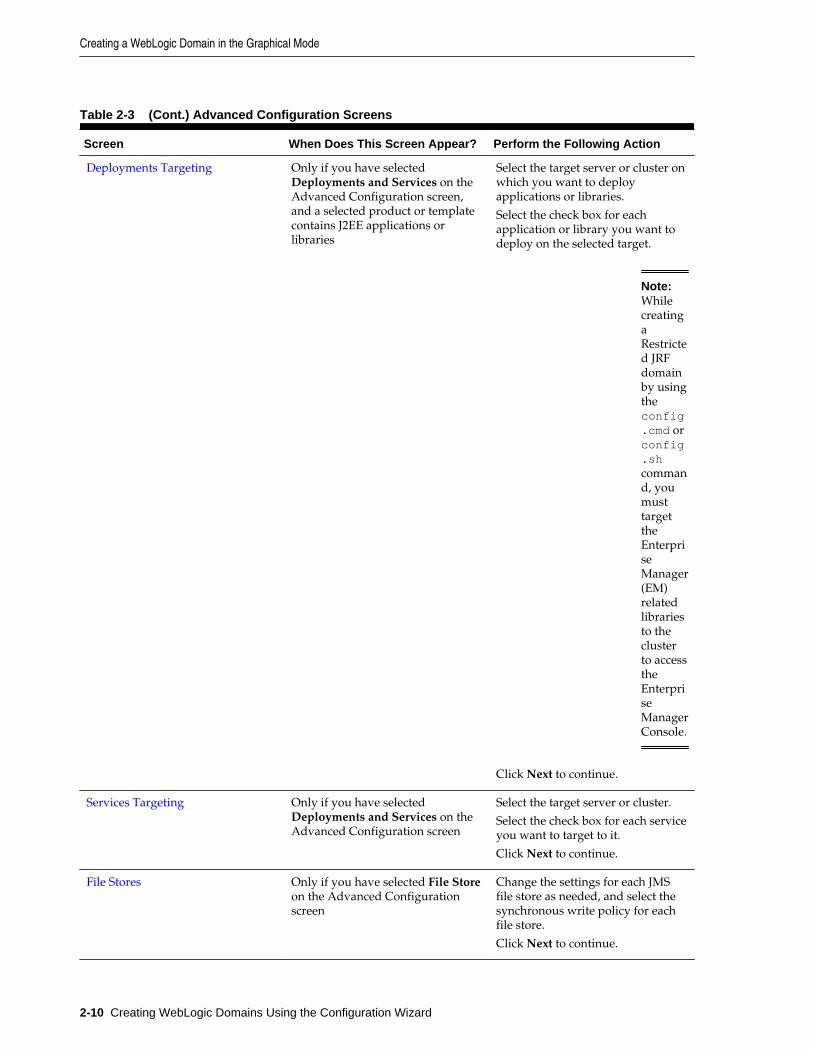
Table 2-3 (Cont.) Advanced Configuration Screens
Screen When Does This Screen Appear? Perform the Following Action
Deployments Targeting Only if you have selectedDeployments and Services on theAdvanced Configuration screen,and a selected product or templatecontains J2EE applications orlibraries
Select the target server or cluster onwhich you want to deployapplications or libraries.
Select the check box for eachapplication or library you want todeploy on the selected target.
Note: WhilecreatingaRestricted JRFdomainby usingtheconfig.cmd orconfig.shcommand, youmusttargettheEnterpriseManager(EM)relatedlibrariesto theclusterto accesstheEnterpriseManagerConsole.
Click Next to continue.
Services Targeting Only if you have selectedDeployments and Services on theAdvanced Configuration screen
Select the target server or cluster.
Select the check box for each serviceyou want to target to it.
Click Next to continue.
File Stores Only if you have selected File Storeon the Advanced Configurationscreen
Change the settings for each JMSfile store as needed, and select thesynchronous write policy for eachfile store.
Click Next to continue.
Creating a WebLogic Domain in the Graphical Mode
2-10 Creating WebLogic Domains Using the Configuration Wizard
2.6 Starting the Administration ServerYou can start the Administration Server after you finish creating the domain. You canstart the server by using either the WebLogic Server Administration Console or thecommand line.
For more information on the various methods you can use to start the AdministrationServer, see Starting and Stopping Servers in Oracle Fusion Middleware AdministeringServer Startup and Shutdown for Oracle WebLogic Server.
2.7 Running the Quick Start Configuration WizardThe Quick Start Configuration Wizard helps you configure the sample domains andthe Fusion Middleware product domains that use the Derby (JavaDB) database driver.You can run the wizard automatically or manually depending on the domain type(sample or product) you want to configure.
• To configure the various sample domains, such as MedRec and the ExamplesServer, in your WebLogic Server installation, run the wizard by selecting theAutomatically Launch Quick Start Configuration Wizard option on theInstallation Complete screen of the WebLogic Server installer.
• To configure Fusion Middleware product domains, run the wizard manually asdescribed in this section. Schema JARs that are provided with the product will beused to populate a domain_home/common/db directory.
Note:
The Quick Start Configuration Wizard supports only the Derby (JavaDB)database driver. If you are using another database, you cannot use the QuickStart Configuration Wizard to create your domain.
Prior to manually running the Configuration Wizard in Quick Start mode, you mustset the CONFIG_JVM_ARGS environment variable to specify the full path and JAR filename for each template that you want to use for the domain. For the location andfilename of templates provided by Oracle for WebLogic Server and other FusionMiddleware products, see the following resources in Oracle Fusion Middleware DomainTemplate Reference.
• WebLogic Server Templates
• Fusion Middleware Product Templates
Windows
To set CONFIG_JVM_ARGS on a Windows system:
set CONFIG_JVM_ARGS="-DuserTemplates=template1,template2,template3, ..., templaten"
The following example uses the WebLogic Server base domain template and the WebServices JAX-WS template to create the domain:
set CONFIG_JVM_ARGS="-DuserTemplates=C:/Oracle/Middleware/wlserver/common/templates/wls/wls.jar,C:/Oracle/Middleware/wlserver/common/templates/wls/wls_webservice_jaxws.jar"
Starting the Administration Server
Creating a WebLogic Domain 2-11
To run the Configuration Wizard in Quick Start mode on Windows systems, enter thefollowing commands, where ORACLE_HOME is your Oracle home directory:
cd ORACLE_HOME/oracle_common/common/binconfig.cmd -target=config-oneclick
UNIX
To set CONFIG_JVM_ARGS on a UNIX or Linux system:
export CONFIG_JVM_ARGS="-DuserTemplates=template1,template2,template3, ..., templaten"
The following example uses the WebLogic Server base domain template and the WebServices JAX-WS template to create the domain:
export CONFIG_JVM_ARGS="-DuserTemplates=/Oracle/Middleware/wlserver/common/templates/wls/wls.jar,/Oracle/Middleware/wlserver/common/templates/wls/wls_webservice_jaxws.jar"
To run the Configuration Wizard in Quick Start mode on UNIX systems, enter thefollowing commands, where ORACLE_HOME is your Oracle home directory:
cd ORACLE_HOME/oracle_common/common/binconfig.sh -target=config-oneclick
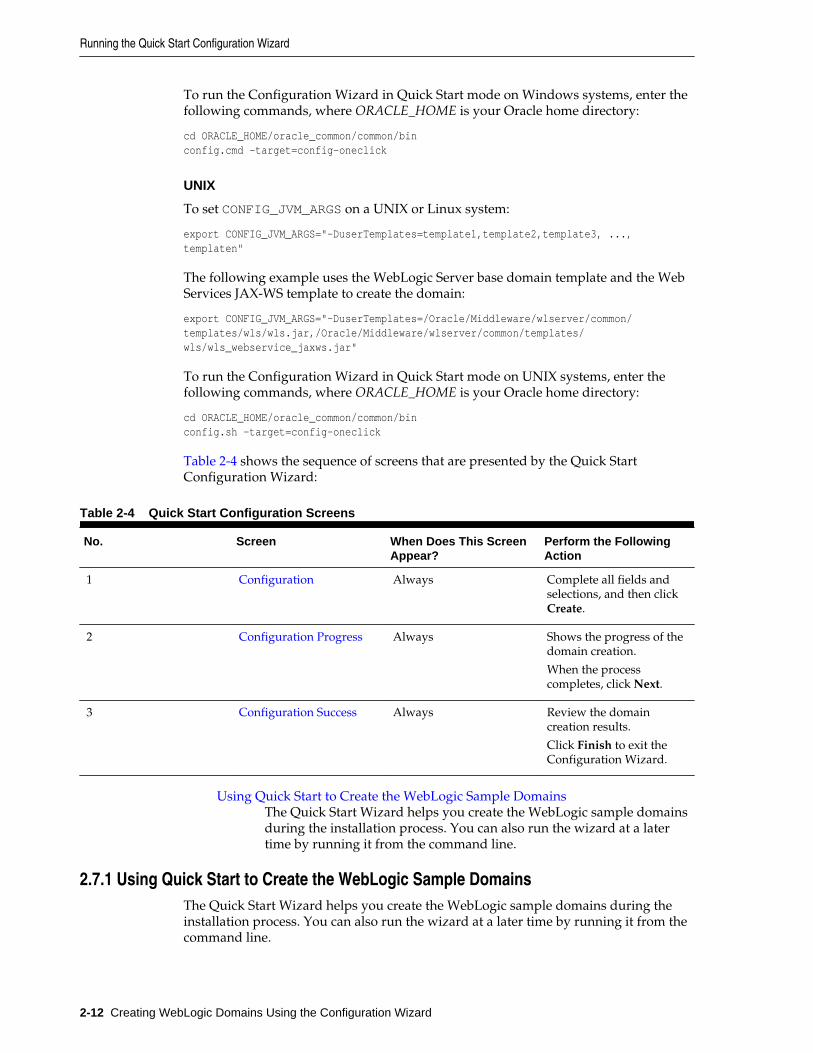
Table 2-4 shows the sequence of screens that are presented by the Quick StartConfiguration Wizard:
Table 2-4 Quick Start Configuration Screens
No. Screen When Does This ScreenAppear?
Perform the FollowingAction
1 Configuration Always Complete all fields andselections, and then clickCreate.
2 Configuration Progress Always Shows the progress of thedomain creation.
When the processcompletes, click Next.
3 Configuration Success Always Review the domaincreation results.
Click Finish to exit theConfiguration Wizard.
Using Quick Start to Create the WebLogic Sample DomainsThe Quick Start Wizard helps you create the WebLogic sample domainsduring the installation process. You can also run the wizard at a latertime by running it from the command line.
2.7.1 Using Quick Start to Create the WebLogic Sample DomainsThe Quick Start Wizard helps you create the WebLogic sample domains during theinstallation process. You can also run the wizard at a later time by running it from thecommand line.
Running the Quick Start Configuration Wizard
2-12 Creating WebLogic Domains Using the Configuration Wizard

If you are running the wizard from the command line, you must create the sampledomains one at a time. This requires you to run the Quick Start Wizard three times tocreate all three domains.
Refer to Table 2-5 for the templates that you must include in the CONFIG_JVM_ARGSvariable to create each domain. For example, to create the WebLogic Server Examplesdomain, enter the following commands, substituting your WebLogic Server homedirectory for WL_HOME:
set CONFIG_JVM_ARGS="-DuserTemplates=WL_HOME/common/templates/wls/wls.jar,WL_HOME/common/templates/wls/wls_default.jar,WL_HOME/common/templates/wls/wls_examples_jaxws.jar"
cd ORACLE_HOME/oracle_common/common/binconfig.sh -target=config-oneclick
Table 2-5 Templates Required for WebLogic Sample Domains
To create this domain ... Include these templates ...
MedRec (Avitek Medical Records Sample Domain) WL_HOME/common/templates/wls/wls.jar
WL_HOME/common/templates/wls/medrec.jar
MedRec Spring (Avitek Medical Records SampleDomain for Spring)
WL_HOME/common/templates/wls/wls.jar
WL_HOME/common/templates/wls/medrec_spring.jar
WebLogic Server Examples WL_HOME/common/templates/wls/wls.jar
WL_HOME/common/templates/wls/wls_examples.jar
Running the Quick Start Configuration Wizard
Creating a WebLogic Domain 2-13

Running the Quick Start Configuration Wizard
2-14 Creating WebLogic Domains Using the Configuration Wizard
3Updating WebLogic Domains
The update process enables you to add product component functionality or additionalapplications and services to an existing WebLogic domain. You can update a domainby using the Configuration Wizard.
Note:
To update a WebLogic domain that includes other Fusion Middlewareproducts in addition to WebLogic Server, see Updating a WebLogic DomainThat Includes Fusion Middleware Products.
For example, if you created a base WebLogic domain and you want to add AdvancedWeb Services for JAX-WS, you can select the WebLogic Advanced Web Services forJAX-WS Extension template on the Templates screen. You can also use theConfiguration Wizard to change your domain configuration without addingadditional applications. For example, you may want to add additional ManagedServers and clusters, or you may want to change service targeting or migratable targetsettings.
Note:
You can only update a domain that was created by the same WebLogic Serverinstallation from which you run the Configuration Wizard. That is, thedomain you are updating must be registered in the domain-registry.xmlfile of your WebLogic Server installation. You cannot update a domain thatwas created by another WebLogic Server installation.
Prior to updating a domain that was created with an earlier release ofWebLogic Server, you must use the Reconfiguration Wizard to reconfigure thedomain. Doing so updates the domain to be compatible with the currentWebLogic Server release, and registers the domain in your current WebLogicServer installation. For more information, see Reconfiguring WebLogicDomains in Oracle Fusion Middleware Upgrading Oracle WebLogic Server.
The Configuration Wizard simplifies the task of updating an existing WebLogicdomain by using extension templates. Oracle provides various sample extensiontemplates, as well as extension templates for various Fusion Middleware products.You can also create your own extension templates using WLST or the unpackcommand.
For information about extension templates provided by Oracle, see Types ofTemplates in Oracle Fusion Middleware Domain Template Reference.
This chapter includes the following sections:
Updating WebLogic Domains 3-1

Before You BeginSet the value of the environment variable CONFIG_JVM_ARGS to reducethe time it takes for the Configuration Wizard to create or update adomain.
Domain Update ProcessYou can update a domain by adding additional product components tothe domain or by specifying an extension template JAR file.
Updating a WebLogic Domain in Graphical ModeUse the Configuration Wizard in graphical mode to update a WebLogicDomain. The Configuration Wizard takes you through a series of screensthat help you update a WebLogic Server domain.
Updating Startup Scripts on Remote ServersWhen you update a WebLogic domain in which the Managed Serversare distributed (by using the pack and unpack commands) to remotemachines, the startup scripts on the remote machines are not updatedautomatically. You must update them manually.
3.1 Before You BeginSet the value of the environment variable CONFIG_JVM_ARGS to reduce the time ittakes for the Configuration Wizard to create or update a domain.
Prior to running the Configuration Wizard to update a domain on a UNIX or Linuxoperating system, if you have not already done so, set the CONFIG_JVM_ARGSenvironment variable to the following value:
-Djava.security.egd=file:/dev/./urandom
3.2 Domain Update ProcessYou can update a domain by adding additional product components to the domain orby specifying an extension template JAR file.
To update a WebLogic domain, select the domain to update and, if you want to addadditional products to the domain, select one or more additional product componentson the Templates screen. Alternatively, you can update an existing domain byspecifying an extension template JAR file that includes additional applications andservices, or defines additional components (such as Managed Servers and clusters).You can also customize the JDBC connections and change the JMS file store. TheConfiguration Wizard uses your input to update the configuration files, such asconfig.xml, and all other generated components in the domain directory, asrequired.
3.3 Updating a WebLogic Domain in Graphical ModeUse the Configuration Wizard in graphical mode to update a WebLogic Domain. TheConfiguration Wizard takes you through a series of screens that help you update aWebLogic Server domain.
To update a new WebLogic Domain by using the Configuration Wizard in graphicalmode, start the Configuration Wizard as described in Starting the ConfigurationWizard.
Before You Begin
3-2 Creating WebLogic Domains Using the Configuration Wizard
Note:
In situations where you cannot run the Configuration Wizard in GUI mode,Oracle recommends that you use a WLST script to create or update a domain.For more information, see Creating and Using a Domain Template (Offline) inOracle Fusion Middleware Understanding the WebLogic Scripting Tool.
If your installation includes Fusion Middleware products, refer to ConfiguringFusion Middleware Domains, for instructions. Fusion Middleware productconfiguration includes additional Configuration Wizard screens that are notincluded in the workflow in this chapter.
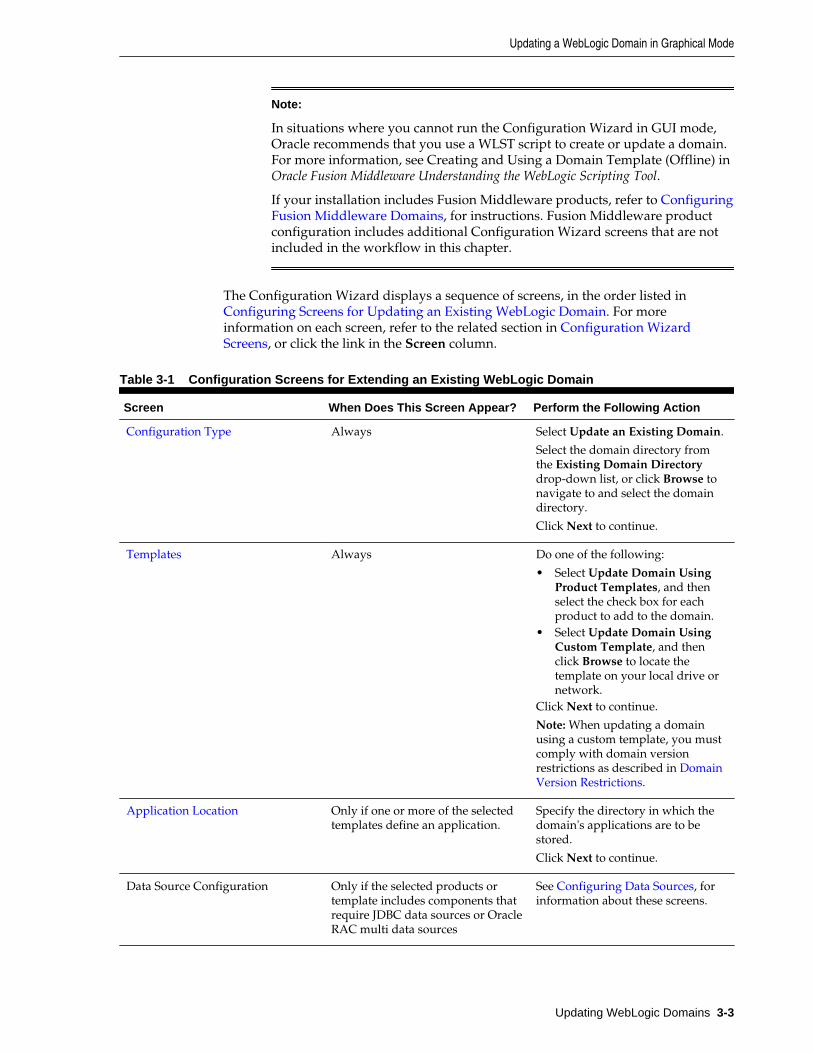
The Configuration Wizard displays a sequence of screens, in the order listed in Configuring Screens for Updating an Existing WebLogic Domain. For moreinformation on each screen, refer to the related section in Configuration WizardScreens, or click the link in the Screen column.
Table 3-1 Configuration Screens for Extending an Existing WebLogic Domain
Screen When Does This Screen Appear? Perform the Following Action
Configuration Type Always Select Update an Existing Domain.
Select the domain directory fromthe Existing Domain Directorydrop-down list, or click Browse tonavigate to and select the domaindirectory.
Click Next to continue.
Templates Always Do one of the following:
• Select Update Domain UsingProduct Templates, and thenselect the check box for eachproduct to add to the domain.
• Select Update Domain UsingCustom Template, and thenclick Browse to locate thetemplate on your local drive ornetwork.
Click Next to continue.
Note: When updating a domainusing a custom template, you mustcomply with domain versionrestrictions as described in DomainVersion Restrictions.
Application Location Only if one or more of the selectedtemplates define an application.
Specify the directory in which thedomain's applications are to bestored.
Click Next to continue.
Data Source Configuration Only if the selected products ortemplate includes components thatrequire JDBC data sources or OracleRAC multi data sources
See Configuring Data Sources, forinformation about these screens.
Updating a WebLogic Domain in Graphical Mode
Updating WebLogic Domains 3-3
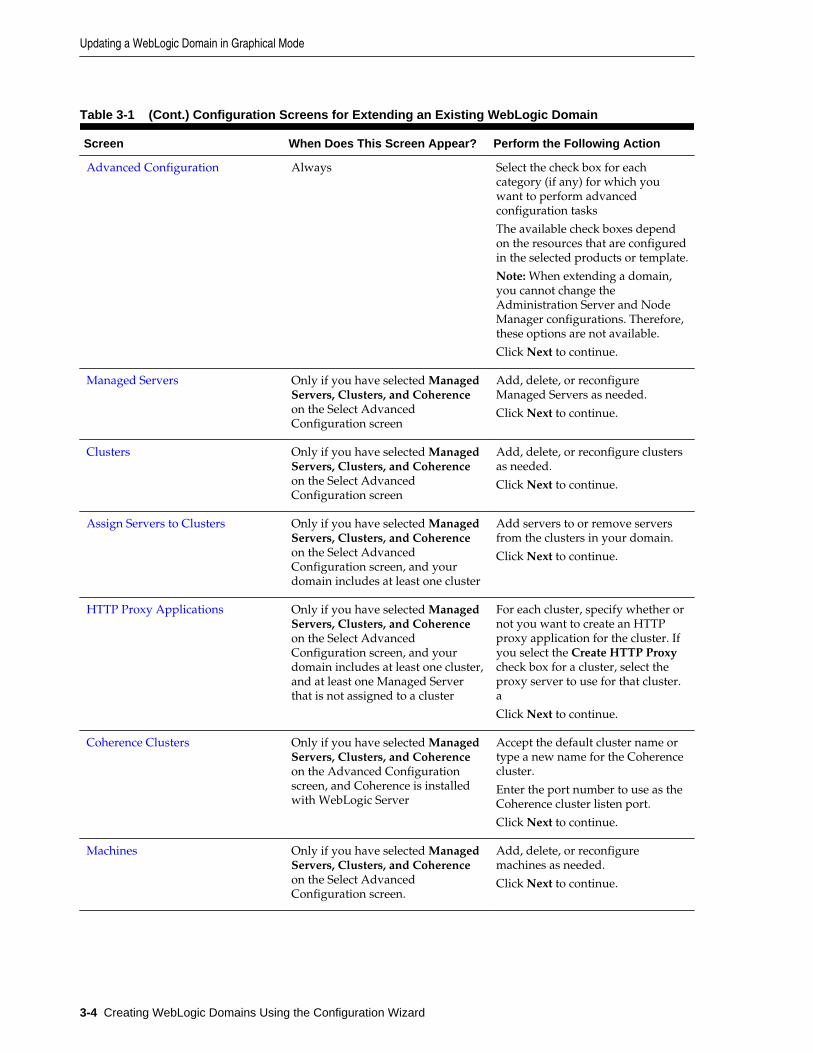
Table 3-1 (Cont.) Configuration Screens for Extending an Existing WebLogic Domain
Screen When Does This Screen Appear? Perform the Following Action
Advanced Configuration Always Select the check box for eachcategory (if any) for which youwant to perform advancedconfiguration tasks
The available check boxes dependon the resources that are configuredin the selected products or template.
Note: When extending a domain,you cannot change theAdministration Server and NodeManager configurations. Therefore,these options are not available.
Click Next to continue.
Managed Servers Only if you have selected ManagedServers, Clusters, and Coherenceon the Select AdvancedConfiguration screen
Add, delete, or reconfigureManaged Servers as needed.
Click Next to continue.
Clusters Only if you have selected ManagedServers, Clusters, and Coherenceon the Select AdvancedConfiguration screen
Add, delete, or reconfigure clustersas needed.
Click Next to continue.
Assign Servers to Clusters Only if you have selected ManagedServers, Clusters, and Coherenceon the Select AdvancedConfiguration screen, and yourdomain includes at least one cluster
Add servers to or remove serversfrom the clusters in your domain.
Click Next to continue.
HTTP Proxy Applications Only if you have selected ManagedServers, Clusters, and Coherenceon the Select AdvancedConfiguration screen, and yourdomain includes at least one cluster,and at least one Managed Serverthat is not assigned to a cluster
For each cluster, specify whether ornot you want to create an HTTPproxy application for the cluster. Ifyou select the Create HTTP Proxycheck box for a cluster, select theproxy server to use for that cluster.a
Click Next to continue.
Coherence Clusters Only if you have selected ManagedServers, Clusters, and Coherenceon the Advanced Configurationscreen, and Coherence is installedwith WebLogic Server
Accept the default cluster name ortype a new name for the Coherencecluster.
Enter the port number to use as theCoherence cluster listen port.
Click Next to continue.
Machines Only if you have selected ManagedServers, Clusters, and Coherenceon the Select AdvancedConfiguration screen.
Add, delete, or reconfiguremachines as needed.
Click Next to continue.
Updating a WebLogic Domain in Graphical Mode
3-4 Creating WebLogic Domains Using the Configuration Wizard
Table 3-1 (Cont.) Configuration Screens for Extending an Existing WebLogic Domain
Screen When Does This Screen Appear? Perform the Following Action
Assign Servers to Machines Only if you have selected ManagedServers, Clusters, and Coherenceon the Select AdvancedConfiguration screen, and there is atleast on machine configured in thedomain
Assign the Administration Serverand Managed Servers to theappropriate machines.
Click Next to continue.
Virtual Targets Only if you have selected Topologyon the Advanced Configurationscreen.
Add, configure, and delete virtualtargets that you want to use to runWebLogic Server in a multitenantmode.
For an overview of multitenancy inOracle WebLogic Server, see OracleWebLogic Server Multitenant inOracle Fusion Middleware UsingOracle WebLogic Server Multitenant.
For a definition of virtual targets,see Virtual Targets in Oracle FusionMiddleware Using Oracle WebLogicServer Multitenant.
Click Next to continue.
Partitions Only if you have selected Topologyon the Advanced Configurationscreen.
Add the required number ofpartitions. Later, you will assignvirtual targets to each partition thatyou define.
For more information, see thefollowing resources in Oracle FusionMiddleware Using Oracle WebLogicServer Multitenant• Configuring Virtual Targets:
Overview• Configuring Domain Partitions:
Overview
Click Next to continue.
Assign Virtual Targets to Partitions Only if you have defined virtualtargets and partitions for thedomain being configured
Associate a virtual target to apartition. A partition can have zeroor more virtual targets.
Click Next to continue.
Updating a WebLogic Domain in Graphical Mode
Updating WebLogic Domains 3-5

Table 3-1 (Cont.) Configuration Screens for Extending an Existing WebLogic Domain
Screen When Does This Screen Appear? Perform the Following Action
Deployments Targeting Only if you have selectedDeployments and Services on theSelect Advanced Configurationscreen, and a selected product ortemplate contains J2EE applicationsor libraries
Select the target server or cluster onwhich you want to deployapplications or libraries.
Select the check box for eachapplication or library you want todeploy on the selected target.
Note: WhilecreatingaRestricted JRFdomainby usingtheconfig.cmd orconfig.shcommand, youmusttargettheEnterpriseManager(EM)relatedlibrariesto theclusterto accesstheEnterpriseManagerConsole.
Click Next to continue.
Services Targeting Only if you have selectedDeployments and Services on theSelect Advanced Configurationscreen
Select the target server or cluster.
Select the check box for each serviceyou want to target to it.
Click Next to continue.
File Store Only if you have selected File Storeon the Select AdvancedConfiguration screen
Change the settings for each JMSfile store as needed, and select thesynchronous write policy for eachfile store.
Click Next to continue.
Updating a WebLogic Domain in Graphical Mode
3-6 Creating WebLogic Domains Using the Configuration Wizard
Table 3-1 (Cont.) Configuration Screens for Extending an Existing WebLogic Domain
Screen When Does This Screen Appear? Perform the Following Action
Configuration Summary Always Review the configuration for yourdomain by selecting a SummaryView, and then selecting individualitems in the list for that view.
If the domain is configured as youwant it, click Update to extend thedomain.
If you need to make changes to theconfiguration, click Previous toreturn to the appropriate screen forthe settings you want to change.
Configuration Progress Always Shows the progress of the domaincreation.
When the process completes, clickNext.
Configuration Success Always Click Finish to exit theConfiguration Wizard.
3.4 Updating Startup Scripts on Remote ServersWhen you update a WebLogic domain in which the Managed Servers are distributed(by using the pack and unpack commands) to remote machines, the startup scriptson the remote machines are not updated automatically. You must update themmanually.
To ensure that startup scripts on the remote machines are updated:
1. Delete the Managed Server directories on the remote machines.
2. Create a Managed Server template from the updated domain by using the packcommand with the -managed=true option.
3. Create Managed Servers on the remote machines by using the unpack commandto unpack the Managed Server template.
For more information about the pack and unpack commands, see Overview of thePack and Unpack Commands in Oracle Fusion Middleware Creating Templates andDomains Using the Pack and Unpack Commands.
Updating Startup Scripts on Remote Servers
Updating WebLogic Domains 3-7

Updating Startup Scripts on Remote Servers
3-8 Creating WebLogic Domains Using the Configuration Wizard
4Configuring Fusion Middleware Domains
The Configuration Wizard helps you install and configure the WebLogic Server inwhich other Fusion Middleware products are also installed in the same Oracle home.
This chapter includes the following sections:
Creating a WebLogic Domain for Fusion Middleware ProductsUse the Configuration Wizard in graphical mode to create a WebLogicdomain for Fusion Middleware products. The Configuration Wizardtakes you through a series of screens that help you create a WebLogicServer domain. Additional screens appear depending on thecomponents that you add for the domain, and other factors.
Updating a WebLogic Domain That Includes Fusion Middleware ProductsUse the Configuration Wizard in graphical mode to update a WebLogicDomain with Fusion Middleware products. The Configuration Wizardtakes you through a series of screens that help you update the domain.
4.1 Creating a WebLogic Domain for Fusion Middleware ProductsUse the Configuration Wizard in graphical mode to create a WebLogic domain forFusion Middleware products. The Configuration Wizard takes you through a series ofscreens that help you create a WebLogic Server domain. Additional screens appeardepending on the components that you add for the domain, and other factors.
To create a new WebLogic domain which includes Fusion Middleware productsinstalled with WebLogic Server, start the Configuration Wizard as described in Starting the Configuration Wizard.
Note:
In situations where you cannot run the Configuration Wizard in GUI mode,Oracle recommends that you use a WLST script to create or extend a domain.For more information, see Creating and Using a Domain Template (Offline) inOracle Fusion Middleware Understanding the WebLogic Scripting Tool.
The Configuration Wizard displays a sequence of screens, in the order listed in Configuring Screens for Creating a New WebLogic Domain. For more information oneach screen, refer to the related section in Configuration Wizard Screens, or click thelink in the Screen column.
Configuring Fusion Middleware Domains 4-1
Table 4-1 Configuration Screens for Creating a New WebLogic Domain
Screen When Does This Screen Appear? Perform the Following Action
Configuration Type - No Profiles When CONFIG_JVM_ARGS is notset to display domain profileoptions
Select Create a new domain.
In the Domain Location box, enterthe path to the new domain, or clickBrowse to create the domaindirectory.
Click Next to continue.
Configuration Type - Profiles When CONFIG_JVM_ARGS is setto -Dcom.oracle.cie.config.showProfile=true
Select Create a new expandeddomain or Create a new compactdomain as appropriate.
In the Domain Location box, enterthe path to the new domain, or clickBrowse to create the domaindirectory.
Click Next to continue.
Templates Always Do one of the following:
• Select Create Domain UsingProduct Templates, and thenselect the check box for eachproduct to include in thedomain.
• Select Create Domain UsingCustom Template, and thenclick Browse to locate thetemplate on your local drive ornetwork.
Click Next to continue.
Application Location Only if one or more of the selectedtemplates define an application.
Specify the directory in which thedomain's applications are to bestored.
Click Next to continue.
Administrator Account Always Specify the username and passwordfor the domain's administratoraccount.
Click Next to continue.
Domain Mode and JDK Always Select the startup mode to use.
Select the JDK to use in the domainor click Browse to navigate to theJDK you want to use.
Click Next to continue.
Database Configuration Type Only if the domain includescomponents that require the use ofthe Oracle Fusion MiddlewareRepository Creation Utility (RCU)to load database schemas
Select whether you want to useRCU parameters for schemaconfiguration, or you want tomanually configure the schemas.
If you elect to use RCU parameters,complete the fields on the screenand click Get RCU Configuration.
Click Next to continue.
Creating a WebLogic Domain for Fusion Middleware Products
4-2 Creating WebLogic Domains Using the Configuration Wizard
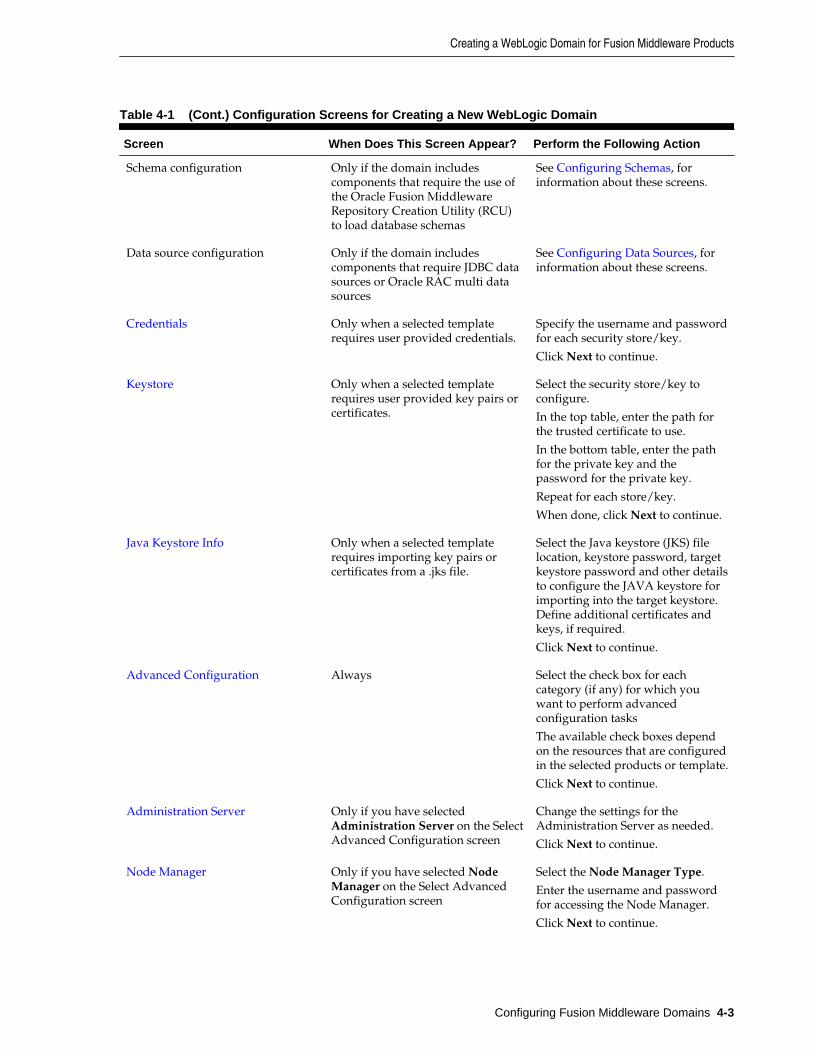
Table 4-1 (Cont.) Configuration Screens for Creating a New WebLogic Domain
Screen When Does This Screen Appear? Perform the Following Action
Schema configuration Only if the domain includescomponents that require the use ofthe Oracle Fusion MiddlewareRepository Creation Utility (RCU)to load database schemas
See Configuring Schemas, forinformation about these screens.
Data source configuration Only if the domain includescomponents that require JDBC datasources or Oracle RAC multi datasources
See Configuring Data Sources, forinformation about these screens.
Credentials Only when a selected templaterequires user provided credentials.
Specify the username and passwordfor each security store/key.
Click Next to continue.
Keystore Only when a selected templaterequires user provided key pairs orcertificates.
Select the security store/key toconfigure.
In the top table, enter the path forthe trusted certificate to use.
In the bottom table, enter the pathfor the private key and thepassword for the private key.
Repeat for each store/key.
When done, click Next to continue.
Java Keystore Info Only when a selected templaterequires importing key pairs orcertificates from a .jks file.
Select the Java keystore (JKS) filelocation, keystore password, targetkeystore password and other detailsto configure the JAVA keystore forimporting into the target keystore.Define additional certificates andkeys, if required.
Click Next to continue.
Advanced Configuration Always Select the check box for eachcategory (if any) for which youwant to perform advancedconfiguration tasks
The available check boxes dependon the resources that are configuredin the selected products or template.
Click Next to continue.
Administration Server Only if you have selectedAdministration Server on the SelectAdvanced Configuration screen
Change the settings for theAdministration Server as needed.
Click Next to continue.
Node Manager Only if you have selected NodeManager on the Select AdvancedConfiguration screen
Select the Node Manager Type.
Enter the username and passwordfor accessing the Node Manager.
Click Next to continue.
Creating a WebLogic Domain for Fusion Middleware Products
Configuring Fusion Middleware Domains 4-3
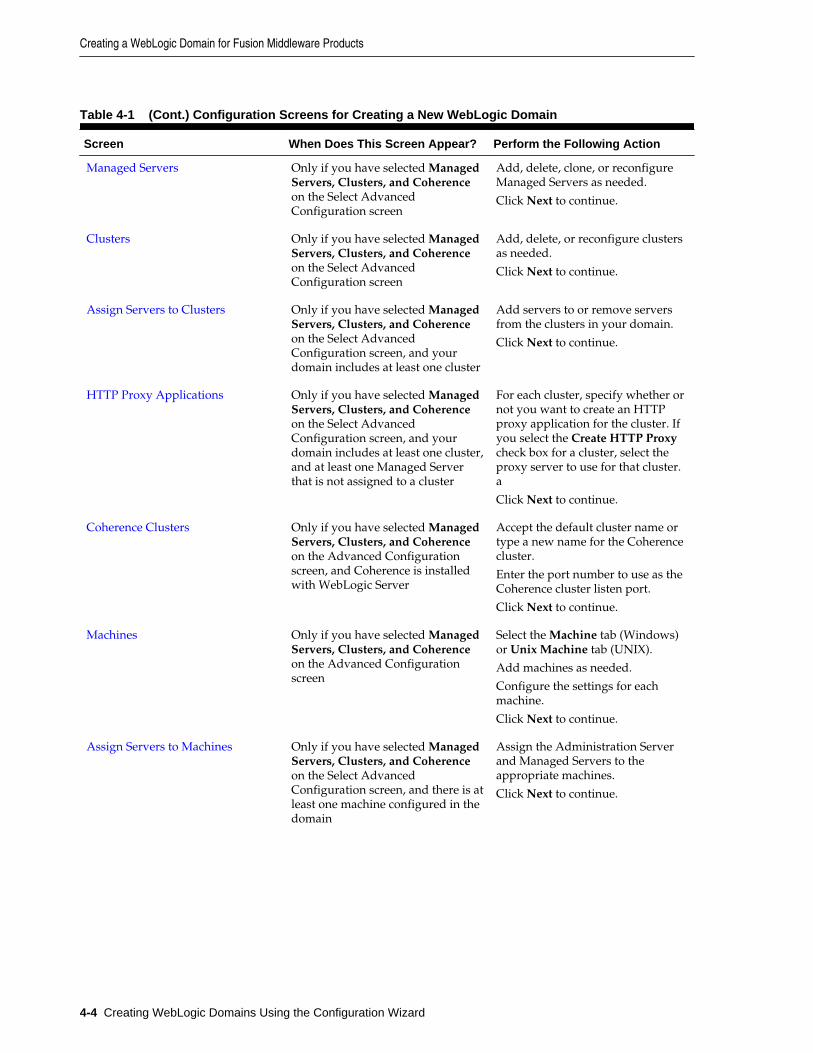
Table 4-1 (Cont.) Configuration Screens for Creating a New WebLogic Domain
Screen When Does This Screen Appear? Perform the Following Action
Managed Servers Only if you have selected ManagedServers, Clusters, and Coherenceon the Select AdvancedConfiguration screen
Add, delete, clone, or reconfigureManaged Servers as needed.
Click Next to continue.
Clusters Only if you have selected ManagedServers, Clusters, and Coherenceon the Select AdvancedConfiguration screen
Add, delete, or reconfigure clustersas needed.
Click Next to continue.
Assign Servers to Clusters Only if you have selected ManagedServers, Clusters, and Coherenceon the Select AdvancedConfiguration screen, and yourdomain includes at least one cluster
Add servers to or remove serversfrom the clusters in your domain.
Click Next to continue.
HTTP Proxy Applications Only if you have selected ManagedServers, Clusters, and Coherenceon the Select AdvancedConfiguration screen, and yourdomain includes at least one cluster,and at least one Managed Serverthat is not assigned to a cluster
For each cluster, specify whether ornot you want to create an HTTPproxy application for the cluster. Ifyou select the Create HTTP Proxycheck box for a cluster, select theproxy server to use for that cluster.a
Click Next to continue.
Coherence Clusters Only if you have selected ManagedServers, Clusters, and Coherenceon the Advanced Configurationscreen, and Coherence is installedwith WebLogic Server
Accept the default cluster name ortype a new name for the Coherencecluster.
Enter the port number to use as theCoherence cluster listen port.
Click Next to continue.
Machines Only if you have selected ManagedServers, Clusters, and Coherenceon the Advanced Configurationscreen
Select the Machine tab (Windows)or Unix Machine tab (UNIX).
Add machines as needed.
Configure the settings for eachmachine.
Click Next to continue.
Assign Servers to Machines Only if you have selected ManagedServers, Clusters, and Coherenceon the Select AdvancedConfiguration screen, and there is atleast one machine configured in thedomain
Assign the Administration Serverand Managed Servers to theappropriate machines.
Click Next to continue.
Creating a WebLogic Domain for Fusion Middleware Products
4-4 Creating WebLogic Domains Using the Configuration Wizard
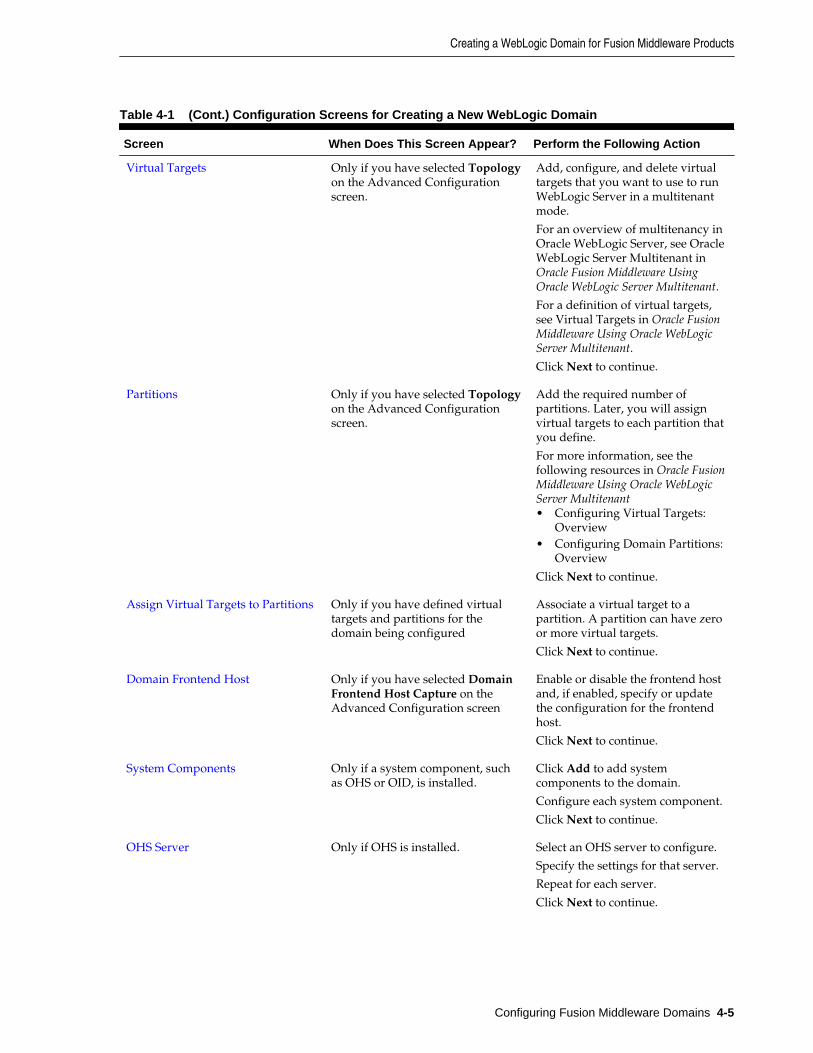
Table 4-1 (Cont.) Configuration Screens for Creating a New WebLogic Domain
Screen When Does This Screen Appear? Perform the Following Action
Virtual Targets Only if you have selected Topologyon the Advanced Configurationscreen.
Add, configure, and delete virtualtargets that you want to use to runWebLogic Server in a multitenantmode.
For an overview of multitenancy inOracle WebLogic Server, see OracleWebLogic Server Multitenant inOracle Fusion Middleware UsingOracle WebLogic Server Multitenant.
For a definition of virtual targets,see Virtual Targets in Oracle FusionMiddleware Using Oracle WebLogicServer Multitenant.
Click Next to continue.
Partitions Only if you have selected Topologyon the Advanced Configurationscreen.
Add the required number ofpartitions. Later, you will assignvirtual targets to each partition thatyou define.
For more information, see thefollowing resources in Oracle FusionMiddleware Using Oracle WebLogicServer Multitenant• Configuring Virtual Targets:
Overview• Configuring Domain Partitions:
Overview
Click Next to continue.
Assign Virtual Targets to Partitions Only if you have defined virtualtargets and partitions for thedomain being configured
Associate a virtual target to apartition. A partition can have zeroor more virtual targets.
Click Next to continue.
Domain Frontend Host Only if you have selected DomainFrontend Host Capture on theAdvanced Configuration screen
Enable or disable the frontend hostand, if enabled, specify or updatethe configuration for the frontendhost.
Click Next to continue.
System Components Only if a system component, suchas OHS or OID, is installed.
Click Add to add systemcomponents to the domain.
Configure each system component.
Click Next to continue.
OHS Server Only if OHS is installed. Select an OHS server to configure.
Specify the settings for that server.
Repeat for each server.
Click Next to continue.
Creating a WebLogic Domain for Fusion Middleware Products
Configuring Fusion Middleware Domains 4-5
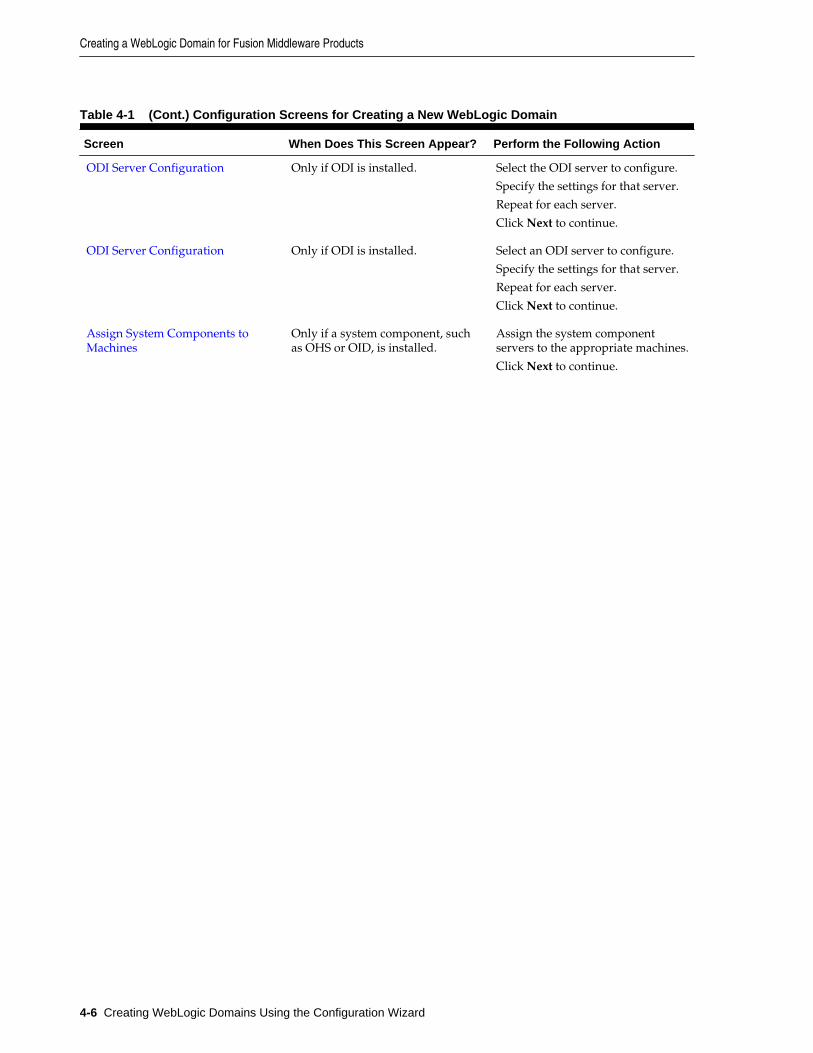
Table 4-1 (Cont.) Configuration Screens for Creating a New WebLogic Domain
Screen When Does This Screen Appear? Perform the Following Action
ODI Server Configuration Only if ODI is installed. Select the ODI server to configure.
Specify the settings for that server.
Repeat for each server.
Click Next to continue.
ODI Server Configuration Only if ODI is installed. Select an ODI server to configure.
Specify the settings for that server.
Repeat for each server.
Click Next to continue.
Assign System Components toMachines
Only if a system component, suchas OHS or OID, is installed.
Assign the system componentservers to the appropriate machines.
Click Next to continue.
Creating a WebLogic Domain for Fusion Middleware Products
4-6 Creating WebLogic Domains Using the Configuration Wizard
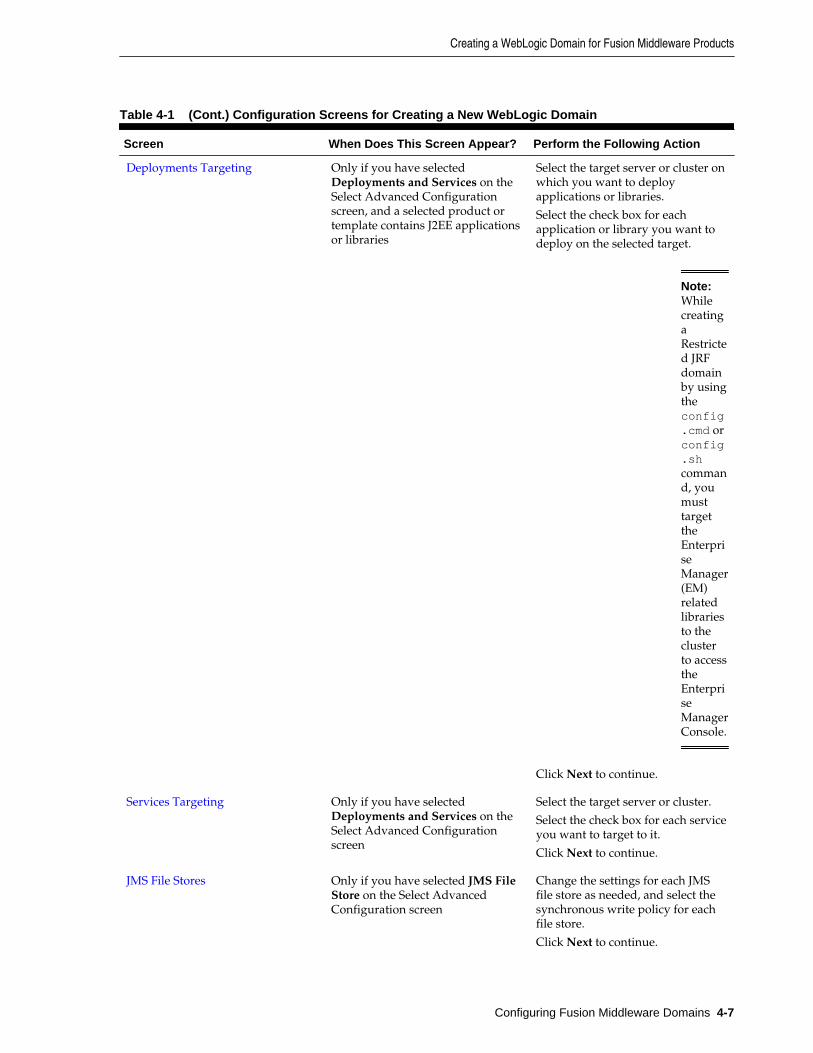
Table 4-1 (Cont.) Configuration Screens for Creating a New WebLogic Domain
Screen When Does This Screen Appear? Perform the Following Action
Deployments Targeting Only if you have selectedDeployments and Services on theSelect Advanced Configurationscreen, and a selected product ortemplate contains J2EE applicationsor libraries
Select the target server or cluster onwhich you want to deployapplications or libraries.
Select the check box for eachapplication or library you want todeploy on the selected target.
Note: WhilecreatingaRestricted JRFdomainby usingtheconfig.cmd orconfig.shcommand, youmusttargettheEnterpriseManager(EM)relatedlibrariesto theclusterto accesstheEnterpriseManagerConsole.
Click Next to continue.
Services Targeting Only if you have selectedDeployments and Services on theSelect Advanced Configurationscreen
Select the target server or cluster.
Select the check box for each serviceyou want to target to it.
Click Next to continue.
JMS File Stores Only if you have selected JMS FileStore on the Select AdvancedConfiguration screen
Change the settings for each JMSfile store as needed, and select thesynchronous write policy for eachfile store.
Click Next to continue.
Creating a WebLogic Domain for Fusion Middleware Products
Configuring Fusion Middleware Domains 4-7
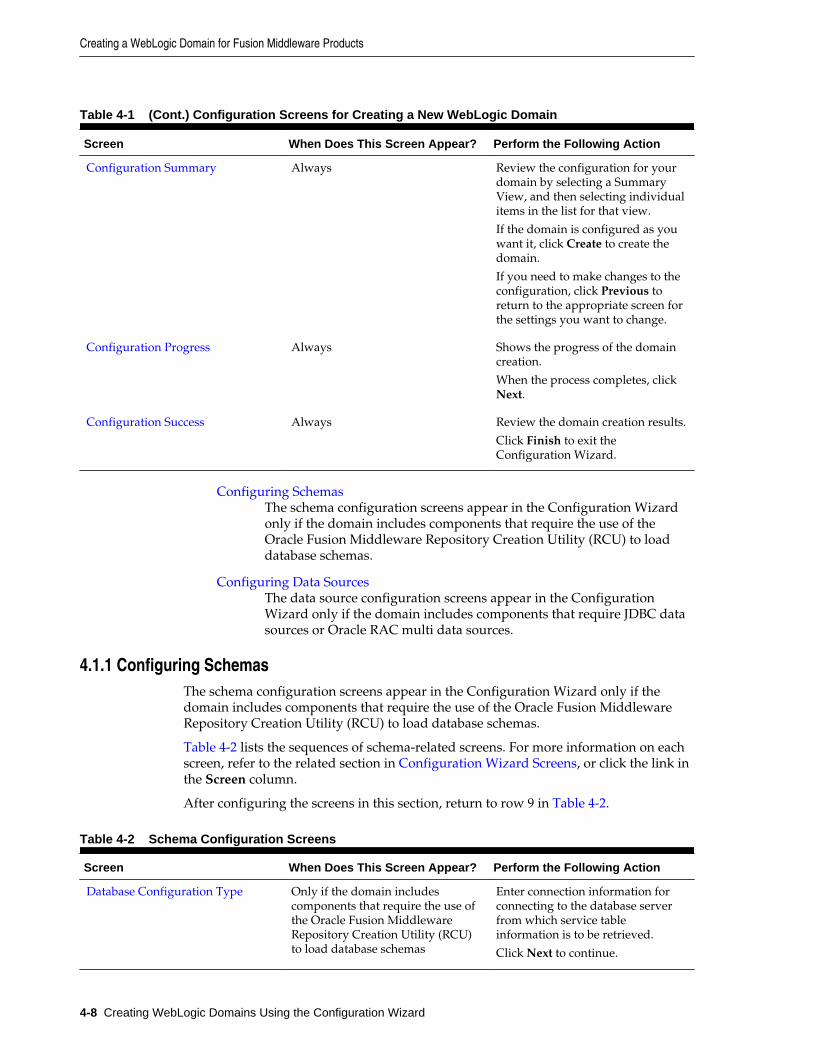
Table 4-1 (Cont.) Configuration Screens for Creating a New WebLogic Domain
Screen When Does This Screen Appear? Perform the Following Action
Configuration Summary Always Review the configuration for yourdomain by selecting a SummaryView, and then selecting individualitems in the list for that view.
If the domain is configured as youwant it, click Create to create thedomain.
If you need to make changes to theconfiguration, click Previous toreturn to the appropriate screen forthe settings you want to change.
Configuration Progress Always Shows the progress of the domaincreation.
When the process completes, clickNext.
Configuration Success Always Review the domain creation results.
Click Finish to exit theConfiguration Wizard.
Configuring SchemasThe schema configuration screens appear in the Configuration Wizardonly if the domain includes components that require the use of theOracle Fusion Middleware Repository Creation Utility (RCU) to loaddatabase schemas.
Configuring Data SourcesThe data source configuration screens appear in the ConfigurationWizard only if the domain includes components that require JDBC datasources or Oracle RAC multi data sources.
4.1.1 Configuring SchemasThe schema configuration screens appear in the Configuration Wizard only if thedomain includes components that require the use of the Oracle Fusion MiddlewareRepository Creation Utility (RCU) to load database schemas.
Table 4-2 lists the sequences of schema-related screens. For more information on eachscreen, refer to the related section in Configuration Wizard Screens, or click the link inthe Screen column.
After configuring the screens in this section, return to row 9 in Table 4-2.
Table 4-2 Schema Configuration Screens
Screen When Does This Screen Appear? Perform the Following Action
Database Configuration Type Only if the domain includescomponents that require the use ofthe Oracle Fusion MiddlewareRepository Creation Utility (RCU)to load database schemas
Enter connection information forconnecting to the database serverfrom which service tableinformation is to be retrieved.
Click Next to continue.
Creating a WebLogic Domain for Fusion Middleware Products
4-8 Creating WebLogic Domains Using the Configuration Wizard
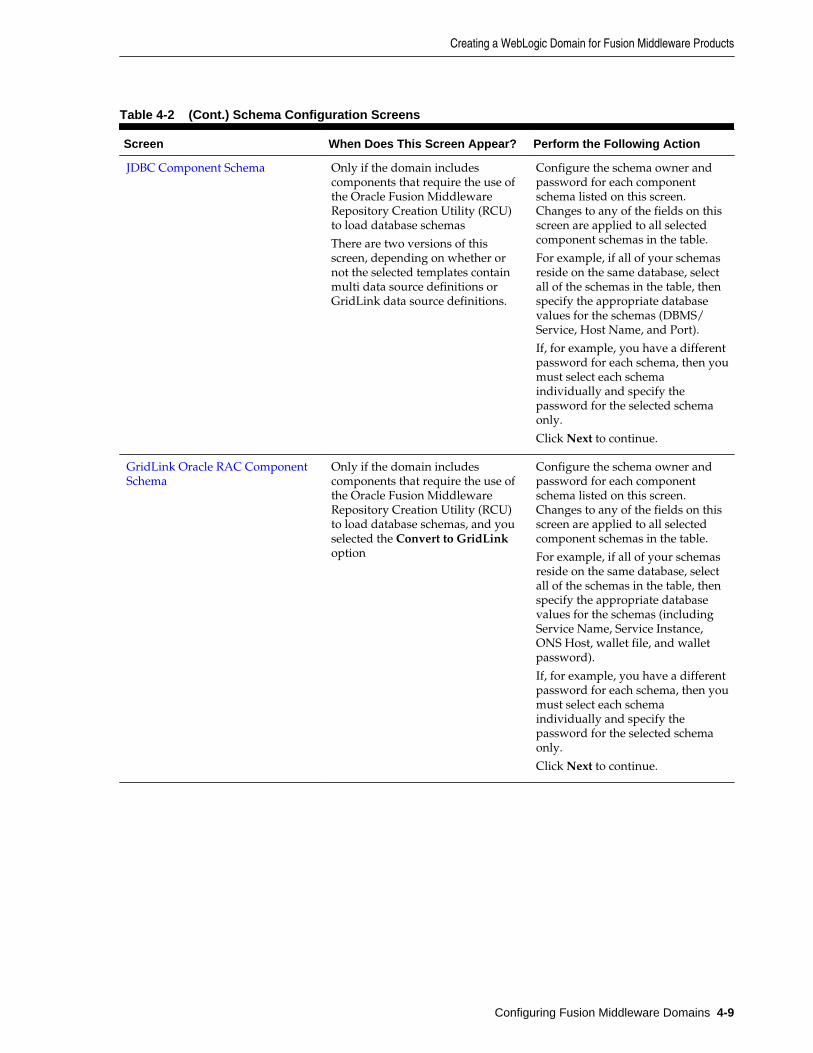
Table 4-2 (Cont.) Schema Configuration Screens
Screen When Does This Screen Appear? Perform the Following Action
JDBC Component Schema Only if the domain includescomponents that require the use ofthe Oracle Fusion MiddlewareRepository Creation Utility (RCU)to load database schemas
There are two versions of thisscreen, depending on whether ornot the selected templates containmulti data source definitions orGridLink data source definitions.
Configure the schema owner andpassword for each componentschema listed on this screen.Changes to any of the fields on thisscreen are applied to all selectedcomponent schemas in the table.
For example, if all of your schemasreside on the same database, selectall of the schemas in the table, thenspecify the appropriate databasevalues for the schemas (DBMS/Service, Host Name, and Port).
If, for example, you have a differentpassword for each schema, then youmust select each schemaindividually and specify thepassword for the selected schemaonly.
Click Next to continue.
GridLink Oracle RAC ComponentSchema
Only if the domain includescomponents that require the use ofthe Oracle Fusion MiddlewareRepository Creation Utility (RCU)to load database schemas, and youselected the Convert to GridLinkoption
Configure the schema owner andpassword for each componentschema listed on this screen.Changes to any of the fields on thisscreen are applied to all selectedcomponent schemas in the table.
For example, if all of your schemasreside on the same database, selectall of the schemas in the table, thenspecify the appropriate databasevalues for the schemas (includingService Name, Service Instance,ONS Host, wallet file, and walletpassword).
If, for example, you have a differentpassword for each schema, then youmust select each schemaindividually and specify thepassword for the selected schemaonly.
Click Next to continue.
Creating a WebLogic Domain for Fusion Middleware Products
Configuring Fusion Middleware Domains 4-9
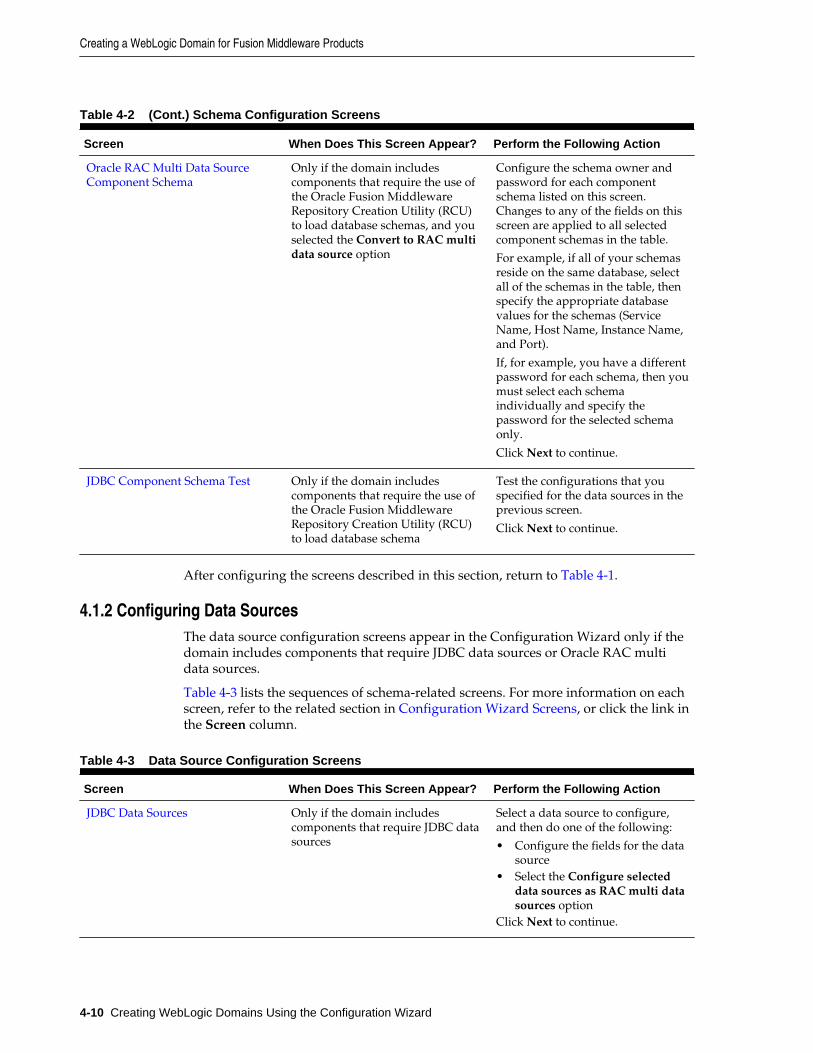
Table 4-2 (Cont.) Schema Configuration Screens
Screen When Does This Screen Appear? Perform the Following Action
Oracle RAC Multi Data SourceComponent Schema
Only if the domain includescomponents that require the use ofthe Oracle Fusion MiddlewareRepository Creation Utility (RCU)to load database schemas, and youselected the Convert to RAC multidata source option
Configure the schema owner andpassword for each componentschema listed on this screen.Changes to any of the fields on thisscreen are applied to all selectedcomponent schemas in the table.
For example, if all of your schemasreside on the same database, selectall of the schemas in the table, thenspecify the appropriate databasevalues for the schemas (ServiceName, Host Name, Instance Name,and Port).
If, for example, you have a differentpassword for each schema, then youmust select each schemaindividually and specify thepassword for the selected schemaonly.
Click Next to continue.
JDBC Component Schema Test Only if the domain includescomponents that require the use ofthe Oracle Fusion MiddlewareRepository Creation Utility (RCU)to load database schema
Test the configurations that youspecified for the data sources in theprevious screen.
Click Next to continue.
After configuring the screens described in this section, return to Table 4-1.
4.1.2 Configuring Data SourcesThe data source configuration screens appear in the Configuration Wizard only if thedomain includes components that require JDBC data sources or Oracle RAC multidata sources.
Table 4-3 lists the sequences of schema-related screens. For more information on eachscreen, refer to the related section in Configuration Wizard Screens, or click the link inthe Screen column.
Table 4-3 Data Source Configuration Screens
Screen When Does This Screen Appear? Perform the Following Action
JDBC Data Sources Only if the domain includescomponents that require JDBC datasources
Select a data source to configure,and then do one of the following:
• Configure the fields for the datasource
• Select the Configure selecteddata sources as RAC multi datasources option
Click Next to continue.
Creating a WebLogic Domain for Fusion Middleware Products
4-10 Creating WebLogic Domains Using the Configuration Wizard
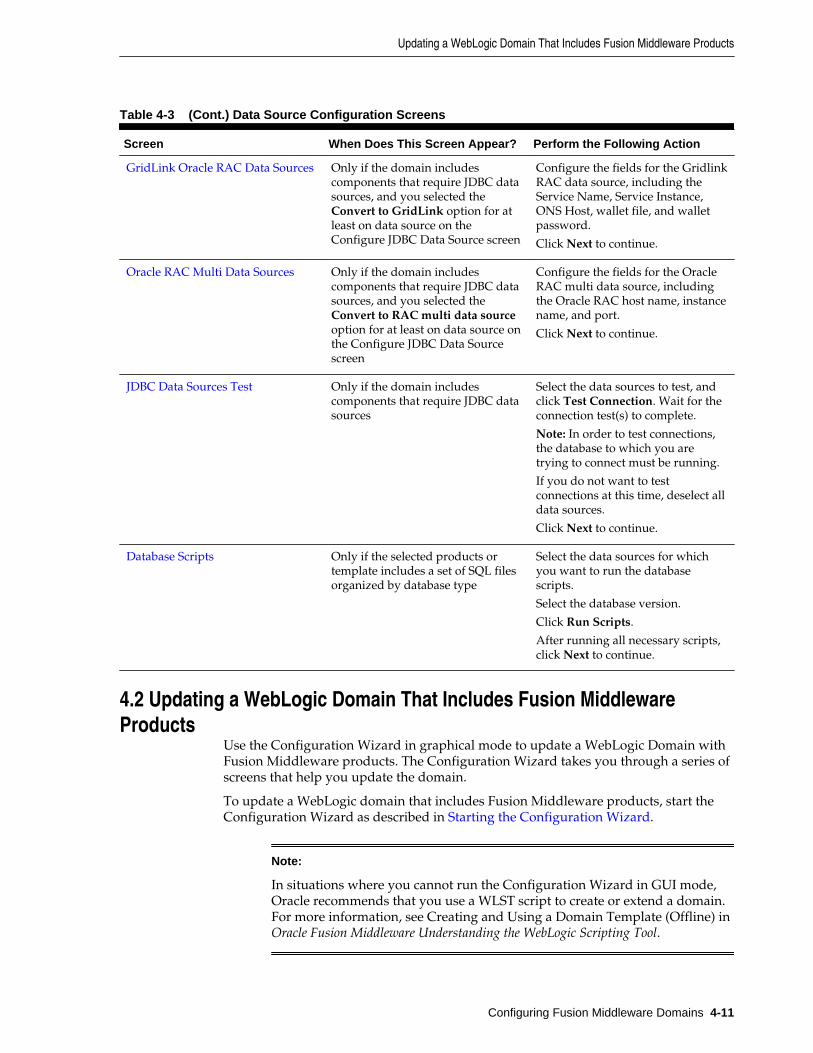
Table 4-3 (Cont.) Data Source Configuration Screens
Screen When Does This Screen Appear? Perform the Following Action
GridLink Oracle RAC Data Sources Only if the domain includescomponents that require JDBC datasources, and you selected theConvert to GridLink option for atleast on data source on theConfigure JDBC Data Source screen
Configure the fields for the GridlinkRAC data source, including theService Name, Service Instance,ONS Host, wallet file, and walletpassword.
Click Next to continue.
Oracle RAC Multi Data Sources Only if the domain includescomponents that require JDBC datasources, and you selected theConvert to RAC multi data sourceoption for at least on data source onthe Configure JDBC Data Sourcescreen
Configure the fields for the OracleRAC multi data source, includingthe Oracle RAC host name, instancename, and port.
Click Next to continue.
JDBC Data Sources Test Only if the domain includescomponents that require JDBC datasources
Select the data sources to test, andclick Test Connection. Wait for theconnection test(s) to complete.
Note: In order to test connections,the database to which you aretrying to connect must be running.
If you do not want to testconnections at this time, deselect alldata sources.
Click Next to continue.
Database Scripts Only if the selected products ortemplate includes a set of SQL filesorganized by database type
Select the data sources for whichyou want to run the databasescripts.
Select the database version.
Click Run Scripts.
After running all necessary scripts,click Next to continue.
4.2 Updating a WebLogic Domain That Includes Fusion MiddlewareProducts
Use the Configuration Wizard in graphical mode to update a WebLogic Domain withFusion Middleware products. The Configuration Wizard takes you through a series ofscreens that help you update the domain.
To update a WebLogic domain that includes Fusion Middleware products, start theConfiguration Wizard as described in Starting the Configuration Wizard.
Note:
In situations where you cannot run the Configuration Wizard in GUI mode,Oracle recommends that you use a WLST script to create or extend a domain.For more information, see Creating and Using a Domain Template (Offline) inOracle Fusion Middleware Understanding the WebLogic Scripting Tool.
Updating a WebLogic Domain That Includes Fusion Middleware Products
Configuring Fusion Middleware Domains 4-11
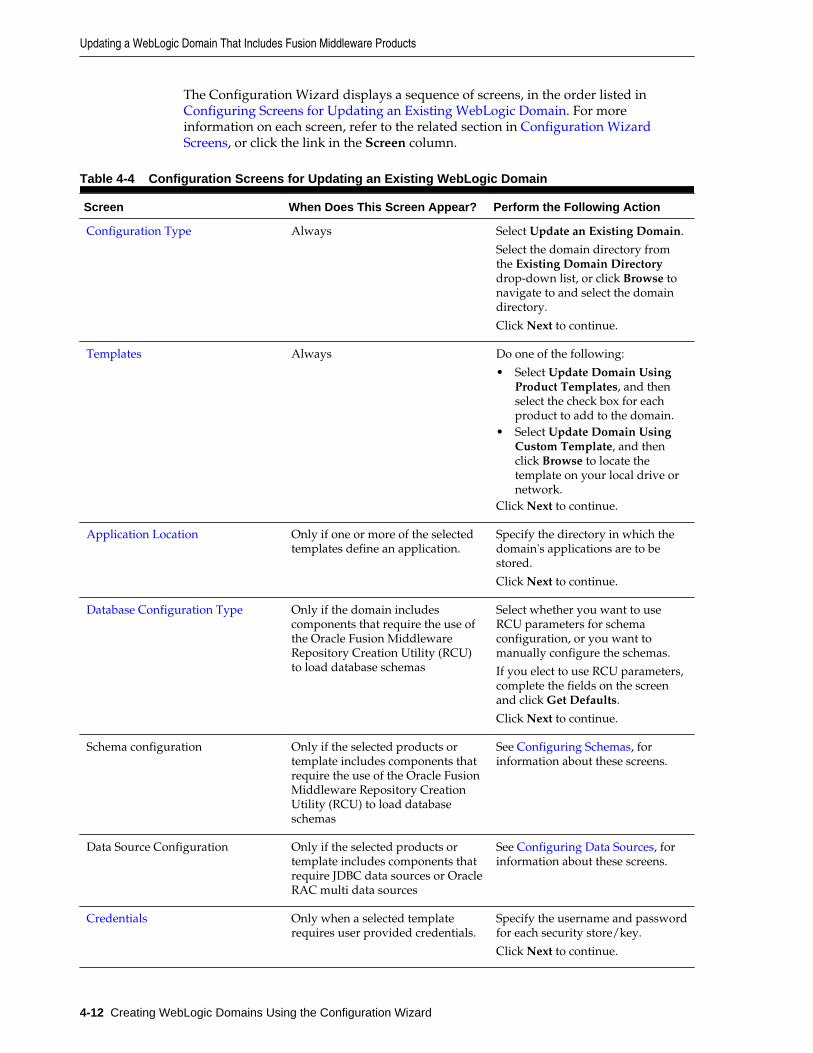
The Configuration Wizard displays a sequence of screens, in the order listed in Configuring Screens for Updating an Existing WebLogic Domain. For moreinformation on each screen, refer to the related section in Configuration WizardScreens, or click the link in the Screen column.
Table 4-4 Configuration Screens for Updating an Existing WebLogic Domain
Screen When Does This Screen Appear? Perform the Following Action
Configuration Type Always Select Update an Existing Domain.
Select the domain directory fromthe Existing Domain Directorydrop-down list, or click Browse tonavigate to and select the domaindirectory.
Click Next to continue.
Templates Always Do one of the following:
• Select Update Domain UsingProduct Templates, and thenselect the check box for eachproduct to add to the domain.
• Select Update Domain UsingCustom Template, and thenclick Browse to locate thetemplate on your local drive ornetwork.
Click Next to continue.
Application Location Only if one or more of the selectedtemplates define an application.
Specify the directory in which thedomain's applications are to bestored.
Click Next to continue.
Database Configuration Type Only if the domain includescomponents that require the use ofthe Oracle Fusion MiddlewareRepository Creation Utility (RCU)to load database schemas
Select whether you want to useRCU parameters for schemaconfiguration, or you want tomanually configure the schemas.
If you elect to use RCU parameters,complete the fields on the screenand click Get Defaults.
Click Next to continue.
Schema configuration Only if the selected products ortemplate includes components thatrequire the use of the Oracle FusionMiddleware Repository CreationUtility (RCU) to load databaseschemas
See Configuring Schemas, forinformation about these screens.
Data Source Configuration Only if the selected products ortemplate includes components thatrequire JDBC data sources or OracleRAC multi data sources
See Configuring Data Sources, forinformation about these screens.
Credentials Only when a selected templaterequires user provided credentials.
Specify the username and passwordfor each security store/key.
Click Next to continue.
Updating a WebLogic Domain That Includes Fusion Middleware Products
4-12 Creating WebLogic Domains Using the Configuration Wizard
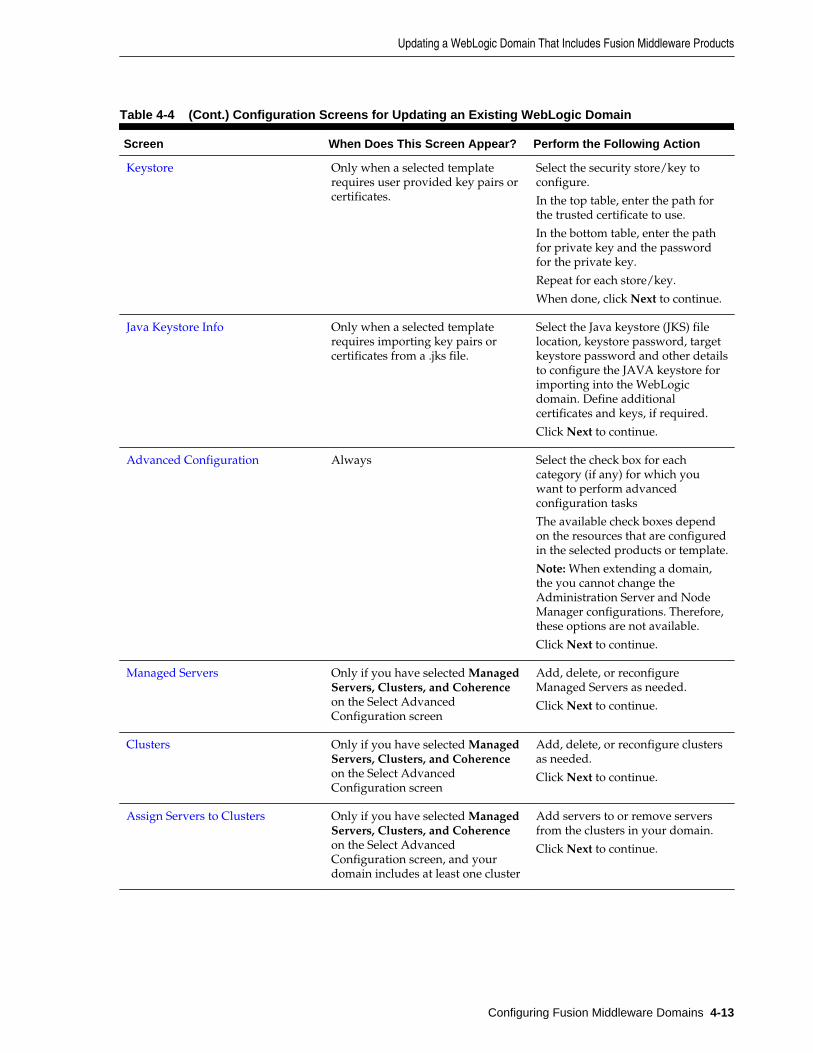
Table 4-4 (Cont.) Configuration Screens for Updating an Existing WebLogic Domain
Screen When Does This Screen Appear? Perform the Following Action
Keystore Only when a selected templaterequires user provided key pairs orcertificates.
Select the security store/key toconfigure.
In the top table, enter the path forthe trusted certificate to use.
In the bottom table, enter the pathfor private key and the passwordfor the private key.
Repeat for each store/key.
When done, click Next to continue.
Java Keystore Info Only when a selected templaterequires importing key pairs orcertificates from a .jks file.
Select the Java keystore (JKS) filelocation, keystore password, targetkeystore password and other detailsto configure the JAVA keystore forimporting into the WebLogicdomain. Define additionalcertificates and keys, if required.
Click Next to continue.
Advanced Configuration Always Select the check box for eachcategory (if any) for which youwant to perform advancedconfiguration tasks
The available check boxes dependon the resources that are configuredin the selected products or template.
Note: When extending a domain,the you cannot change theAdministration Server and NodeManager configurations. Therefore,these options are not available.
Click Next to continue.
Managed Servers Only if you have selected ManagedServers, Clusters, and Coherenceon the Select AdvancedConfiguration screen
Add, delete, or reconfigureManaged Servers as needed.
Click Next to continue.
Clusters Only if you have selected ManagedServers, Clusters, and Coherenceon the Select AdvancedConfiguration screen
Add, delete, or reconfigure clustersas needed.
Click Next to continue.
Assign Servers to Clusters Only if you have selected ManagedServers, Clusters, and Coherenceon the Select AdvancedConfiguration screen, and yourdomain includes at least one cluster
Add servers to or remove serversfrom the clusters in your domain.
Click Next to continue.
Updating a WebLogic Domain That Includes Fusion Middleware Products
Configuring Fusion Middleware Domains 4-13
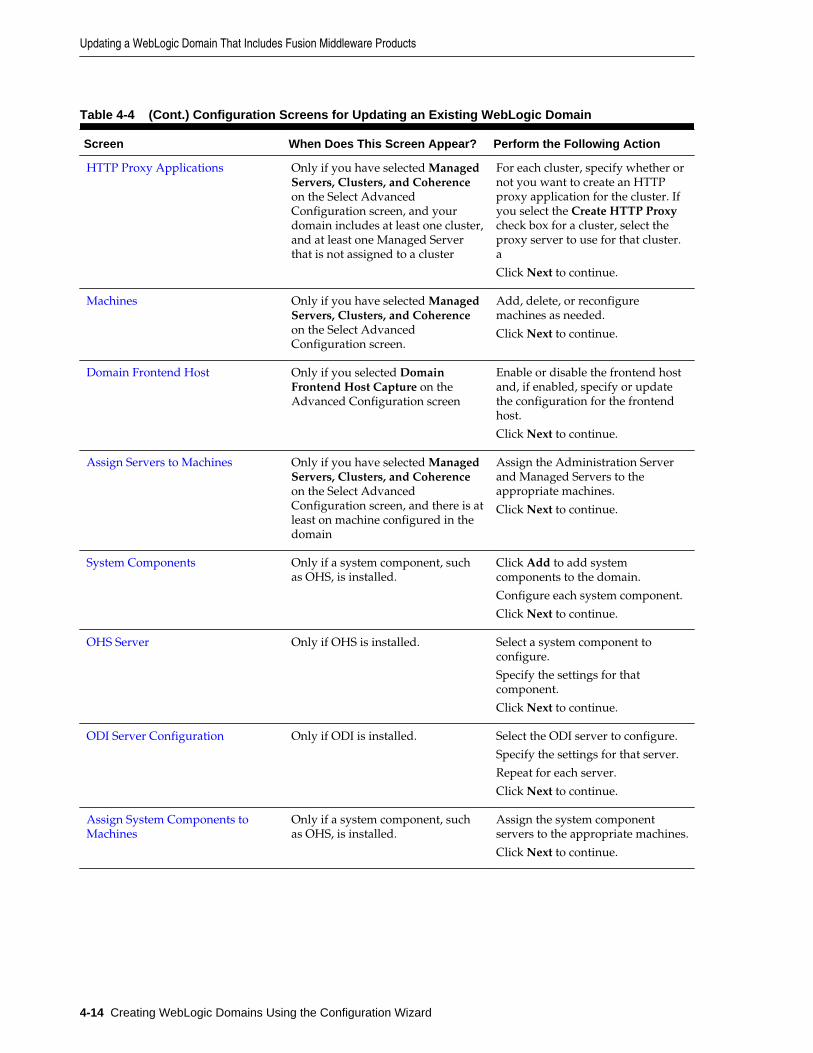
Table 4-4 (Cont.) Configuration Screens for Updating an Existing WebLogic Domain
Screen When Does This Screen Appear? Perform the Following Action
HTTP Proxy Applications Only if you have selected ManagedServers, Clusters, and Coherenceon the Select AdvancedConfiguration screen, and yourdomain includes at least one cluster,and at least one Managed Serverthat is not assigned to a cluster
For each cluster, specify whether ornot you want to create an HTTPproxy application for the cluster. Ifyou select the Create HTTP Proxycheck box for a cluster, select theproxy server to use for that cluster.a
Click Next to continue.
Machines Only if you have selected ManagedServers, Clusters, and Coherenceon the Select AdvancedConfiguration screen.
Add, delete, or reconfiguremachines as needed.
Click Next to continue.
Domain Frontend Host Only if you selected DomainFrontend Host Capture on theAdvanced Configuration screen
Enable or disable the frontend hostand, if enabled, specify or updatethe configuration for the frontendhost.
Click Next to continue.
Assign Servers to Machines Only if you have selected ManagedServers, Clusters, and Coherenceon the Select AdvancedConfiguration screen, and there is atleast on machine configured in thedomain
Assign the Administration Serverand Managed Servers to theappropriate machines.
Click Next to continue.
System Components Only if a system component, suchas OHS, is installed.
Click Add to add systemcomponents to the domain.
Configure each system component.
Click Next to continue.
OHS Server Only if OHS is installed. Select a system component toconfigure.
Specify the settings for thatcomponent.
Click Next to continue.
ODI Server Configuration Only if ODI is installed. Select the ODI server to configure.
Specify the settings for that server.
Repeat for each server.
Click Next to continue.
Assign System Components toMachines
Only if a system component, suchas OHS, is installed.
Assign the system componentservers to the appropriate machines.
Click Next to continue.
Updating a WebLogic Domain That Includes Fusion Middleware Products
4-14 Creating WebLogic Domains Using the Configuration Wizard
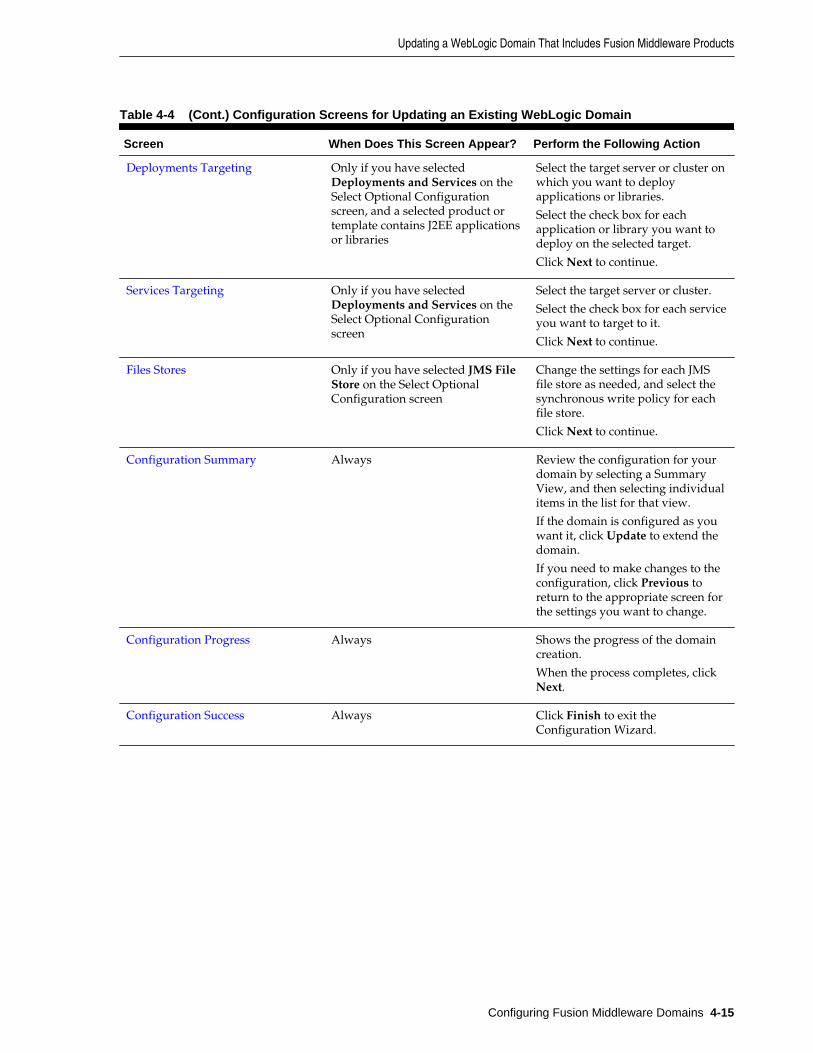
Table 4-4 (Cont.) Configuration Screens for Updating an Existing WebLogic Domain
Screen When Does This Screen Appear? Perform the Following Action
Deployments Targeting Only if you have selectedDeployments and Services on theSelect Optional Configurationscreen, and a selected product ortemplate contains J2EE applicationsor libraries
Select the target server or cluster onwhich you want to deployapplications or libraries.
Select the check box for eachapplication or library you want todeploy on the selected target.
Click Next to continue.
Services Targeting Only if you have selectedDeployments and Services on theSelect Optional Configurationscreen
Select the target server or cluster.
Select the check box for each serviceyou want to target to it.
Click Next to continue.
Files Stores Only if you have selected JMS FileStore on the Select OptionalConfiguration screen
Change the settings for each JMSfile store as needed, and select thesynchronous write policy for eachfile store.
Click Next to continue.
Configuration Summary Always Review the configuration for yourdomain by selecting a SummaryView, and then selecting individualitems in the list for that view.
If the domain is configured as youwant it, click Update to extend thedomain.
If you need to make changes to theconfiguration, click Previous toreturn to the appropriate screen forthe settings you want to change.
Configuration Progress Always Shows the progress of the domaincreation.
When the process completes, clickNext.
Configuration Success Always Click Finish to exit theConfiguration Wizard.
Updating a WebLogic Domain That Includes Fusion Middleware Products
Configuring Fusion Middleware Domains 4-15

Updating a WebLogic Domain That Includes Fusion Middleware Products
4-16 Creating WebLogic Domains Using the Configuration Wizard
5Configuration Wizard Screens
The Configuration Wizard helps you create and update a WebLogic domain. Duringthe process, it takes you through a sequence of screens depending on your domainrequirements and your customization needs.
This chapter includes the following sections:
Configuration TypeWhen creating a new domain, you can select the domain profile typedepending on whether or not you have set the CONFIG_JVM_ARGSenvironment variable. If the variable is set, you can create an expandedor a compact domain. If the variable is not set, the profile options are notavailable.
ConfigurationThe Configuration screen helps you configure the WebLogic Serversample domains. This screen appears only if you run the Quick StartConfiguration Wizard at the end of the WebLogic Server installationprocess or if you run the wizard from the command line.
TemplatesYou can use this screen to create or extend a domain that is configuredautomatically to support selected products, or to create or extend adomain based on an existing domain or application template.
Application LocationIn this screen, you must specify the full path to the directory in whichyou want to store the applications that are associated with the domain.
Administrator AccountUse this screen to define the default WebLogic Administrator accountfor the domain. This account is used to boot and connect to the domain'sAdministration Server.
Domain Mode and JDKYou have the option to specify whether you want to run WebLogic in theProduction mode or in the Development mode. You can then specify theJDK for the domain.
Database Configuration TypeThis screen and the subsequent schema configuration screens aredisplayed only for WebLogic Server installations that include the FusionMiddleware infrastructure components.
JDBC Component SchemaFor some Fusion Middleware components, the JDBC data sources maybe defined as part of the component's database schema. These data
Configuration Wizard Screens 5-1
sources are loaded during installation of the component by using theRepository Creation Utility (RCU).
GridLink Oracle RAC Component SchemaUse this screen to configure the component schemas that are included inyour WebLogic domain as GridLink RAC data sources. A GridLink datasource is a single data source that represents a service that responds toFast Application Notification (FAN) events.
Oracle RAC Multi Data Source Component SchemaIn this screen, you can configure the component schemas that areincluded in the WebLogic domain as Oracle RAC multi data sources.
JDBC Component Schema TestUse this screen to test the configurations that you specified for the datasources in the Oracle RAC Multi Data Source Component Schemascreen.
JDBC Data SourcesA JDBC data source contains a pool of database connections that arecreated when the data source instance is created — when it is deployedor targeted, or at server startup.
GridLink Oracle RAC Data SourcesA GridLink data source is a single data source that represents a servicethat responds to the Fast Application Notification (FAN) events. Use thisscreen to configure the data sources that are included in the WebLogicdomain, as GridLink Oracle RAC data sources.
Oracle RAC Multi Data SourcesUse this screen to configure the data sources that are included in thedomain as Oracle RAC data sources.
JDBC Data Sources TestYou can use this screen to test the data source connections that youconfigured in the JDBC Data Sources and the Oracle RAC Multi DataSources screens.
Database ScriptsA domain template may contain a set of SQL files organized by databasetype. If the domain template contains SQL files, you can use theDatabase Scripts screen to run these files while creating a WebLogicdomain.
CredentialsYou can use this screen to provide credentials for each key in theWebLogic domain. If you have included the Oracle RAS Session Servicetemplate in the domain, the default key and the RAS store,oracle.rdbms.ras, are listed.
KeystoreYou can use this screen to specify the path to the trusted certificate foreach keystore and the path to each keystore's private key, its password,and the path to the Identity Certificate of the private key.
Java Keystore InfoYou can use this screen to import key pairs and certificates from anexisting Java Keystore (.jks) file into Oracle Platform Security Services
5-2 Creating WebLogic Domains Using the Configuration Wizard
(for WebLogic). A Java Keystore contains authorization certificates andkey pairs that are used for authentication and encryption purposes.
Advanced ConfigurationYou can use this screen to perform advanced configurations for thecategories you select from the available list. You can select all thecategories, if required.
Administration ServerThe Administration Server is the central point from which you manageyour domain. You can use this screen to configure or change theAdministration Server settings.
Node ManagerYou can use this screen to select the Node Manager configurationsapplicable for the domain. You can also skip this step to create the NodeManager manually at a later point.
Managed ServersYou can use this screen to add, delete, or clone Managed Servers, andassign a user-expandable server group (if available) to a ManagedServer. You can also change the settings for an existing Managed Server.
ClustersA cluster is a group of WebLogic Server instances that work together toprovide scalability and high-availability for applications. Use this screento add or delete clusters, or to change the settings for an existing cluster.
Server TemplatesYou can use the Server Templates screen to define one or more servertemplates for the domain. A server template contains common, non-default settings and attributes that you can apply to a set of serverinstances, which then inherit the template configuration.
Dynamic ServersThis screen lists each of the clusters that you have created in the currentconfiguration session. You can designate one or more of these clusters tobe a dynamic cluster.
Assign Servers to ClustersYou can use this screen to assign Managed Servers to clusters. OnlyManaged Servers are displayed in the Server list box. TheAdministration Server is not listed because it cannot be assigned to acluster.
HTTP Proxy ApplicationsAn HTTP proxy application acts as an intermediary for HTTP requests.Use this screen to create an HTTP proxy application for each cluster, andspecify the Managed Server on which the proxy application must bedeployed.
Coherence ClustersThis screen is displayed only if you have included Coherence in theWebLogic Server installation. It lists the Coherence clusters that areautomatically added to the domain.
MachinesIn a WebLogic domain, the machine definitions identify physical units ofhardware and are associated with the WebLogic Server instances or
Configuration Wizard Screens 5-3
system components (such as OHS servers) that they host. Use this screento add or delete machines, or to modify the settings for an existingmachine.
Assign Servers to MachinesYou can use this screen to assign the WebLogic Server instances to eachof the machines you defined in the Machines screen of theConfiguration Wizard.
Virtual TargetsVirtual targets define the locations where a partition or resource groupruns. You can use this screen to add or delete Virtual Targets for use in aWebLogic Server Multitenant (MT) environment.
PartitionsA domain partition is a portion of a WebLogic Server domain that isdedicated to running application instances and related resources.Youcan use this screen to add partitions in a WebLogic domain.
Assign Virtual Targets to PartitionsYou can assign one or more existing virtual targets to a domainpartition. You can use a virtual target with only one partition.
Domain Frontend HostWhen creating a new domain, you can use this screen to enable thefrontend host, specify both the plain and secure URLs for the frontendhost, and select the default frontend host URL.
System ComponentsYou can use this screen to add or delete system components such as forOracle HTTP Server (OHS) and Oracle Data Integrator (ODI).
OHS ServerYou can use this screen to configure the Oracle HTTP Server (OHS) inthe WebLogic domain. Prior to configuring OHS, you must add OHS asa system component by using the System Component screen.
ODI Server ConfigurationYou can use this screen to configure the co-located ODI agents in theWebLogic domain. Prior to configuring ODI, you must add ODI as asystem component by using the System Component screen.
Assign System Components to MachinesAfter you configure the system components such as OHS and ODI, youcan use this screen to assign these components to the machines that youhave defined in the Machines screen.
Deployments TargetingApplications associated with the product for which you are configuringthe domain are targeted automatically to the Managed Server that iscreated for that product, or to the cluster to which that Managed Serveris assigned. In this screen, you can target applications to additionalservers and clusters.
Services TargetingServices that are associated with the product for which you areconfiguring the domain are targeted automatically to the ManagedServer created for that product, or to the cluster to which that Managed
5-4 Creating WebLogic Domains Using the Configuration Wizard
Server is assigned. In this screen, you can target services to additionalservers and clusters.
File StoresA JMS file store is a disk-based file in which persistent messages can besaved. You can use this screen to modify the JMS file stores that areconfigured in the WebLogic domain.
Configuration SummaryThis screen provides a summary of the configuration settings for theWebLogic domain. Review the details before you proceed.
Configuration ProgressIf you are creating a domain, this screen shows the progress of thedomain creation. If you are updating (extending) a domain, this screenshows the progress of the domain update.
Configuration SuccessDepending on whether you run the full Configuration Wizard or theQuick Start Configuration Wizard, the appropriate configuration successmessage appears on this screen.
5.1 Configuration TypeWhen creating a new domain, you can select the domain profile type depending onwhether or not you have set the CONFIG_JVM_ARGS environment variable. If thevariable is set, you can create an expanded or a compact domain. If the variable is notset, the profile options are not available.
There are two versions of this screen:
Configuration Type - No Profiles
Configuration Type - Profiles
5.1.1 Configuration Type - No ProfilesThis screen helps you create a domain or update an existing domain.
Option/Field Description
Create a new domain Select this option if you want to create a new domain.Typically, the new domain will be based on theWebLogic Server Basic Domain, which includes anAdministration Server and the default security realmmyrealm. You may, however, choose to use your owndomain template to create the domain; your domaintemplate must contain at least an AdministrationServer.
Update an existing domain Select this option if you already have a WebLogicdomain, and you want to add resources to that domain.
Note: You can only update domains that were createdor reconfigured using the WebLogic Server installationfrom which you ran the Configuration Wizard. Youcannot update domains that were created using otherinstallations of WebLogic Server. If you specify adomain that was not created with the currentinstallation, an error is displayed when you click Next.
Configuration Type
Configuration Wizard Screens 5-5
Option/Field Description
Domain Location If you selected a Create option, enter the full path forthe domain or use the Browse button to navigate to thedirectory in which your domains are located. If you doso, you must enter a unique directory name for the newdomain at the end of the path.
Note: Oracle recommends that you create your domaindirectories outside of the Oracle home directory.
If you selected the Update option, use the Browsebutton to navigate to the domain that you want toupdate. If multiple domains exit in this installation, thisfield contains a drop-down list of the domains, and youcan select the domain that you want to update.
5.1.2 Configuration Type - ProfilesFrom this screen, you can select whether to create a domain (expanded or compact) orupdate an existing domain. When creating a domain, the selection you make ispermanent and cannot be changed later. The default is an expanded domain. Compactdomains, if defined in a product template, are typically used only for developmentenvironments with limited hardware resources, but may also be used for some FusionMiddleware product domains such as OHS domains.
Note:
If you are creating a domain that will not include Fusion Middlewarecomponents installed with WebLogic Server, always create an expandeddomain. Compact domain profiles are defined only for some FusionMiddleware components.
Compact domains are not available for all WebLogic domains that include FusionMiddleware components. If these domain types are defined in the templates you areusing to create the domain, your selection determines the server groups that areavailable for your Managed Servers and the applications and services that are mappedto those server groups. When you are creating your domain, some of the templatesyou select may have expanded and compact profiles defined, while others may not.
For more information on domain profiles and server groups, see Domain Profile Typesin Oracle Fusion Middleware Domain Template Reference
Configuration Type
5-6 Creating WebLogic Domains Using the Configuration Wizard
Option/Field Description
Create new expanded domain Select this option for production environments to createa new expanded domain which includes clusters andManaged Servers. Typically, the new domain will bebased on the WebLogic Server Basic Domain, whichincludes an Administration Server and the defaultsecurity realm myrealm. You may, however, choose touse your own domain template to create the domain;your domain template must contain at least anAdministration Server.
You can add as many clusters and Managed Servers toan expanded domain as needed.
Create new compact domain Select this option if you want to create a new compactdomain. Compact domains contain only a single serverinstance (the Administration Server) and cannot beexpanded to include clusters and Managed Servers.
Some Fusion Middleware templates define a compactdomain topology profile. If used to create a compactdomain, some or all of the application service groupsdefined in the template are targeted to theAdministration Server.
Update existing domain Select this option if you already have a WebLogicdomain, and you want to add resources to that domain.
Note: You can only update domains that were createdor reconfigured using the WebLogic Server installationfrom which you ran the Configuration Wizard. Youcannot update domains that were created using otherinstallations of WebLogic Server. If you specify adomain that was not created with the currentinstallation, an error is displayed when you click Next.
Domain Location If you selected a Create option, enter the full path forthe domain, or use the Browse button to navigate to thedirectory in which your domains are located. If you doso, you must enter a unique directory name for the newdomain at the end of the path.
Note: Oracle recommends that you create your domaindirectories outside of the Oracle home directory.
If you selected the Update option, use the Browsebutton to navigate to the domain that you want toupdate. If multiple domains exit in this installation, thisfield contains a drop-down list of the domains, and youcan select the domain that you want to update.
5.2 ConfigurationThe Configuration screen helps you configure the WebLogic Server sample domains.This screen appears only if you run the Quick Start Configuration Wizard at the end ofthe WebLogic Server installation process or if you run the wizard from the commandline.
. Configure the following fields for the sample domains.
Configuration
Configuration Wizard Screens 5-7
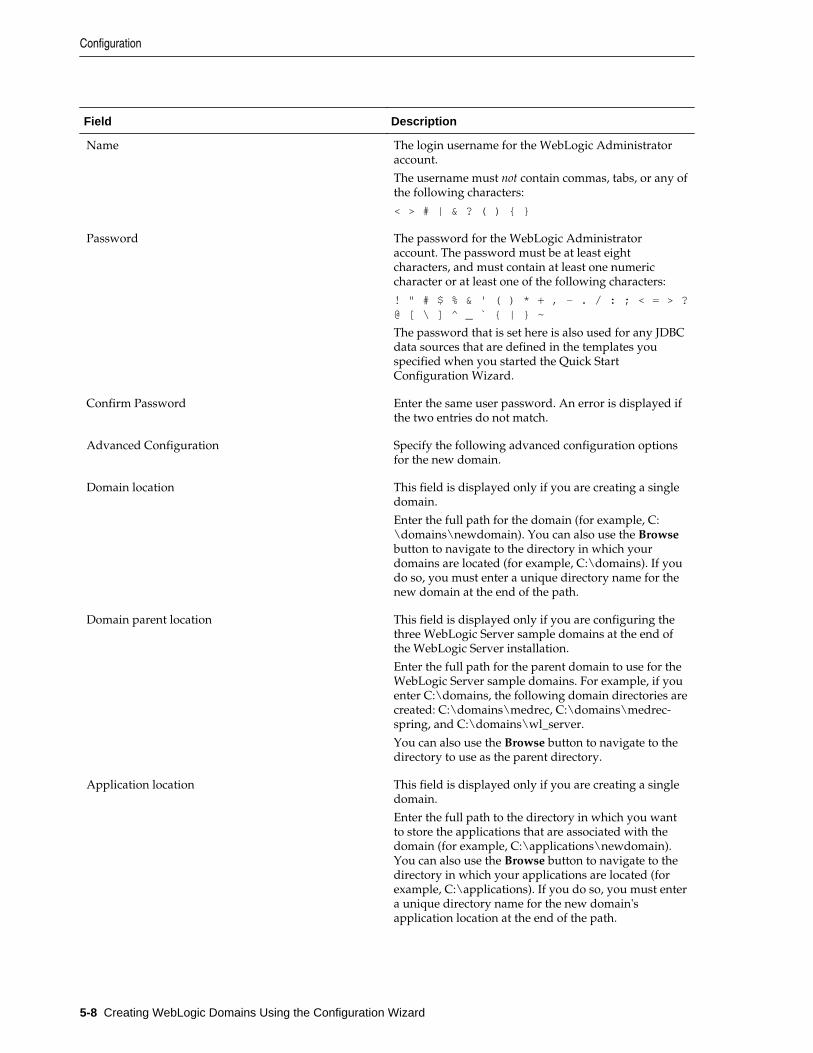
Field Description
Name The login username for the WebLogic Administratoraccount.
The username must not contain commas, tabs, or any ofthe following characters:
< > # | & ? ( ) { }
Password The password for the WebLogic Administratoraccount. The password must be at least eightcharacters, and must contain at least one numericcharacter or at least one of the following characters:
! " # $ % & ' ( ) * + , - . / : ; < = > ?@ [ \ ] ^ _ ` { | } ~
The password that is set here is also used for any JDBCdata sources that are defined in the templates youspecified when you started the Quick StartConfiguration Wizard.
Confirm Password Enter the same user password. An error is displayed ifthe two entries do not match.
Advanced Configuration Specify the following advanced configuration optionsfor the new domain.
Domain location This field is displayed only if you are creating a singledomain.
Enter the full path for the domain (for example, C:\domains\newdomain). You can also use the Browsebutton to navigate to the directory in which yourdomains are located (for example, C:\domains). If youdo so, you must enter a unique directory name for thenew domain at the end of the path.
Domain parent location This field is displayed only if you are configuring thethree WebLogic Server sample domains at the end ofthe WebLogic Server installation.
Enter the full path for the parent domain to use for theWebLogic Server sample domains. For example, if youenter C:\domains, the following domain directories arecreated: C:\domains\medrec, C:\domains\medrec-spring, and C:\domains\wl_server.
You can also use the Browse button to navigate to thedirectory to use as the parent directory.
Application location This field is displayed only if you are creating a singledomain.
Enter the full path to the directory in which you wantto store the applications that are associated with thedomain (for example, C:\applications\newdomain).You can also use the Browse button to navigate to thedirectory in which your applications are located (forexample, C:\applications). If you do so, you must entera unique directory name for the new domain'sapplication location at the end of the path.
Configuration
5-8 Creating WebLogic Domains Using the Configuration Wizard
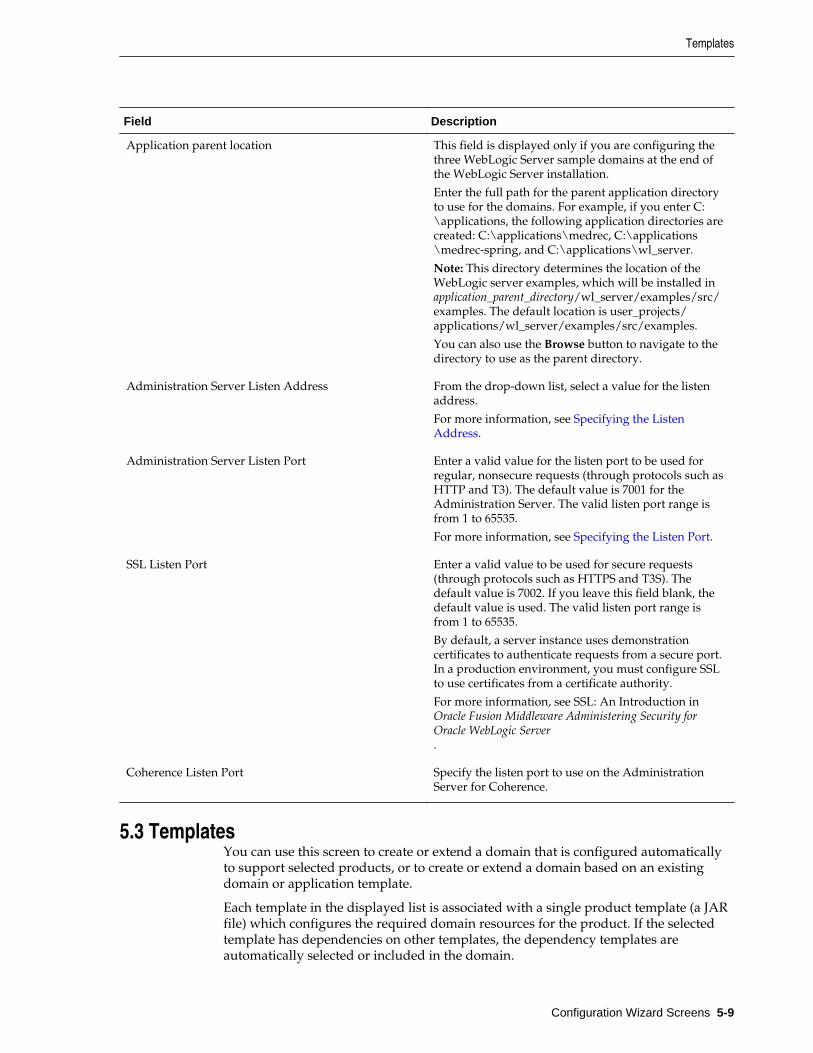
Field Description
Application parent location This field is displayed only if you are configuring thethree WebLogic Server sample domains at the end ofthe WebLogic Server installation.
Enter the full path for the parent application directoryto use for the domains. For example, if you enter C:\applications, the following application directories arecreated: C:\applications\medrec, C:\applications\medrec-spring, and C:\applications\wl_server.
Note: This directory determines the location of theWebLogic server examples, which will be installed inapplication_parent_directory/wl_server/examples/src/examples. The default location is user_projects/applications/wl_server/examples/src/examples.
You can also use the Browse button to navigate to thedirectory to use as the parent directory.
Administration Server Listen Address From the drop-down list, select a value for the listenaddress.
For more information, see Specifying the ListenAddress.
Administration Server Listen Port Enter a valid value for the listen port to be used forregular, nonsecure requests (through protocols such asHTTP and T3). The default value is 7001 for theAdministration Server. The valid listen port range isfrom 1 to 65535.
For more information, see Specifying the Listen Port.
SSL Listen Port Enter a valid value to be used for secure requests(through protocols such as HTTPS and T3S). Thedefault value is 7002. If you leave this field blank, thedefault value is used. The valid listen port range isfrom 1 to 65535.
By default, a server instance uses demonstrationcertificates to authenticate requests from a secure port.In a production environment, you must configure SSLto use certificates from a certificate authority.
For more information, see SSL: An Introduction inOracle Fusion Middleware Administering Security forOracle WebLogic Server.
Coherence Listen Port Specify the listen port to use on the AdministrationServer for Coherence.
5.3 TemplatesYou can use this screen to create or extend a domain that is configured automaticallyto support selected products, or to create or extend a domain based on an existingdomain or application template.
Each template in the displayed list is associated with a single product template (a JARfile) which configures the required domain resources for the product. If the selectedtemplate has dependencies on other templates, the dependency templates areautomatically selected or included in the domain.
Templates
Configuration Wizard Screens 5-9
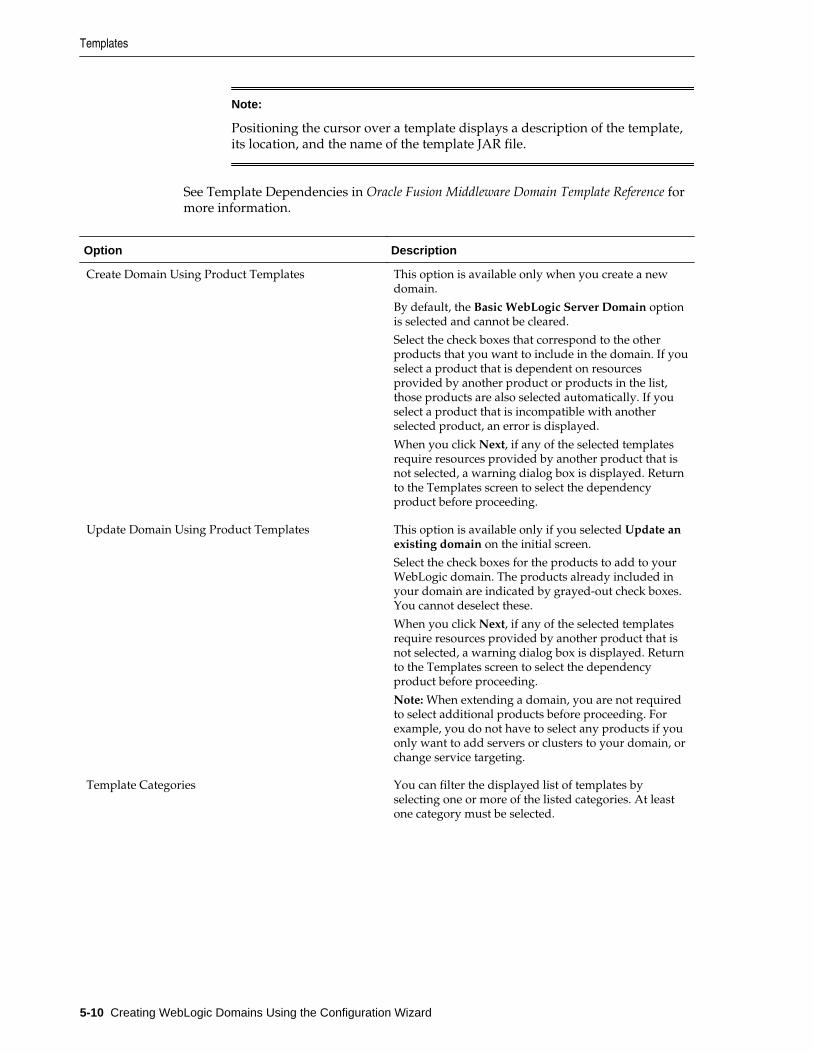
Note:
Positioning the cursor over a template displays a description of the template,its location, and the name of the template JAR file.
See Template Dependencies in Oracle Fusion Middleware Domain Template Reference formore information.
Option Description
Create Domain Using Product Templates This option is available only when you create a newdomain.
By default, the Basic WebLogic Server Domain optionis selected and cannot be cleared.
Select the check boxes that correspond to the otherproducts that you want to include in the domain. If youselect a product that is dependent on resourcesprovided by another product or products in the list,those products are also selected automatically. If youselect a product that is incompatible with anotherselected product, an error is displayed.
When you click Next, if any of the selected templatesrequire resources provided by another product that isnot selected, a warning dialog box is displayed. Returnto the Templates screen to select the dependencyproduct before proceeding.
Update Domain Using Product Templates This option is available only if you selected Update anexisting domain on the initial screen.
Select the check boxes for the products to add to yourWebLogic domain. The products already included inyour domain are indicated by grayed-out check boxes.You cannot deselect these.
When you click Next, if any of the selected templatesrequire resources provided by another product that isnot selected, a warning dialog box is displayed. Returnto the Templates screen to select the dependencyproduct before proceeding.
Note: When extending a domain, you are not requiredto select additional products before proceeding. Forexample, you do not have to select any products if youonly want to add servers or clusters to your domain, orchange service targeting.
Template Categories You can filter the displayed list of templates byselecting one or more of the listed categories. At leastone category must be selected.
Templates
5-10 Creating WebLogic Domains Using the Configuration Wizard
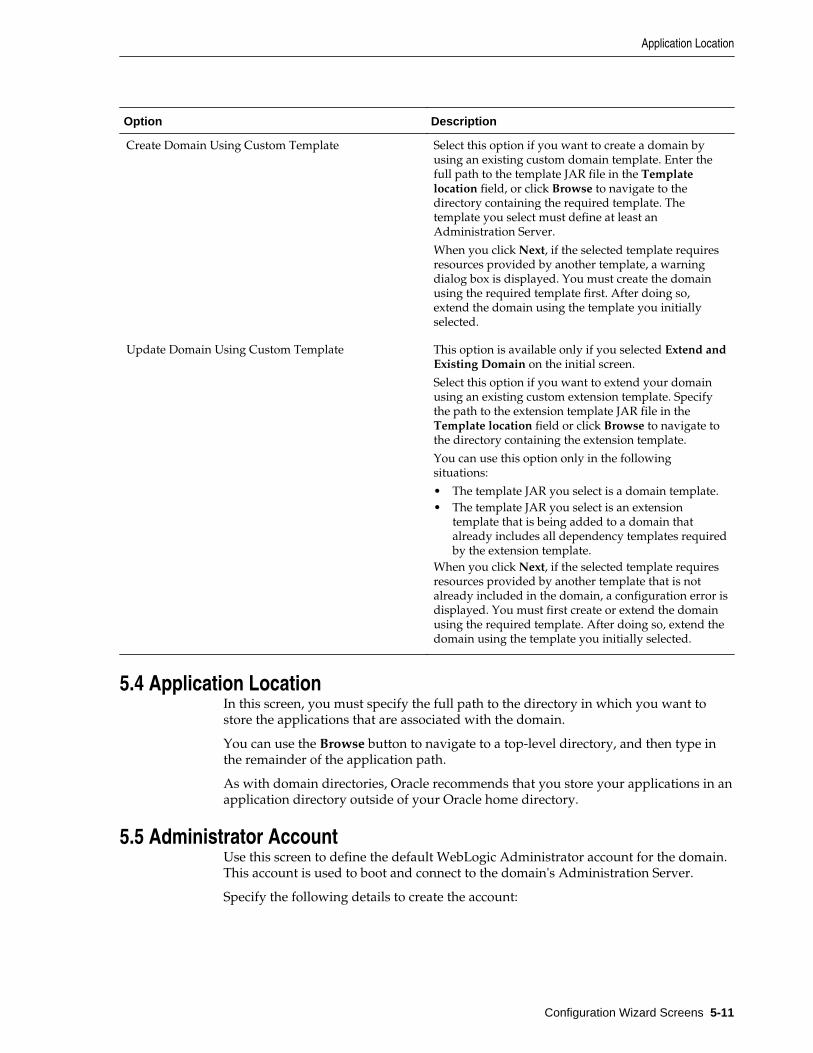
Option Description
Create Domain Using Custom Template Select this option if you want to create a domain byusing an existing custom domain template. Enter thefull path to the template JAR file in the Templatelocation field, or click Browse to navigate to thedirectory containing the required template. Thetemplate you select must define at least anAdministration Server.
When you click Next, if the selected template requiresresources provided by another template, a warningdialog box is displayed. You must create the domainusing the required template first. After doing so,extend the domain using the template you initiallyselected.
Update Domain Using Custom Template This option is available only if you selected Extend andExisting Domain on the initial screen.
Select this option if you want to extend your domainusing an existing custom extension template. Specifythe path to the extension template JAR file in theTemplate location field or click Browse to navigate tothe directory containing the extension template.
You can use this option only in the followingsituations:
• The template JAR you select is a domain template.• The template JAR you select is an extension
template that is being added to a domain thatalready includes all dependency templates requiredby the extension template.
When you click Next, if the selected template requiresresources provided by another template that is notalready included in the domain, a configuration error isdisplayed. You must first create or extend the domainusing the required template. After doing so, extend thedomain using the template you initially selected.
5.4 Application LocationIn this screen, you must specify the full path to the directory in which you want tostore the applications that are associated with the domain.
You can use the Browse button to navigate to a top-level directory, and then type inthe remainder of the application path.
As with domain directories, Oracle recommends that you store your applications in anapplication directory outside of your Oracle home directory.
5.5 Administrator AccountUse this screen to define the default WebLogic Administrator account for the domain.This account is used to boot and connect to the domain's Administration Server.
Specify the following details to create the account:
Application Location
Configuration Wizard Screens 5-11
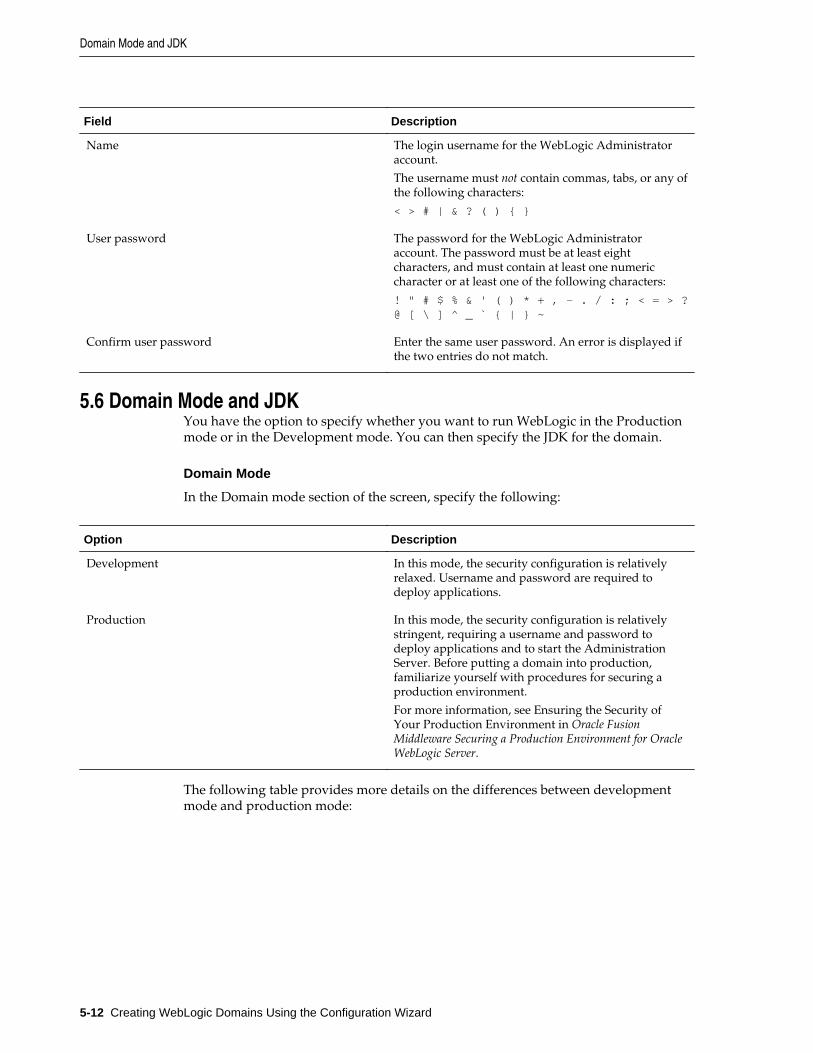
Field Description
Name The login username for the WebLogic Administratoraccount.
The username must not contain commas, tabs, or any ofthe following characters:
< > # | & ? ( ) { }
User password The password for the WebLogic Administratoraccount. The password must be at least eightcharacters, and must contain at least one numericcharacter or at least one of the following characters:
! " # $ % & ' ( ) * + , - . / : ; < = > ?@ [ \ ] ^ _ ` { | } ~
Confirm user password Enter the same user password. An error is displayed ifthe two entries do not match.
5.6 Domain Mode and JDKYou have the option to specify whether you want to run WebLogic in the Productionmode or in the Development mode. You can then specify the JDK for the domain.
Domain Mode
In the Domain mode section of the screen, specify the following:
Option Description
Development In this mode, the security configuration is relativelyrelaxed. Username and password are required todeploy applications.
Production In this mode, the security configuration is relativelystringent, requiring a username and password todeploy applications and to start the AdministrationServer. Before putting a domain into production,familiarize yourself with procedures for securing aproduction environment.
For more information, see Ensuring the Security ofYour Production Environment in Oracle FusionMiddleware Securing a Production Environment for OracleWebLogic Server.
The following table provides more details on the differences between developmentmode and production mode:
Domain Mode and JDK
5-12 Creating WebLogic Domains Using the Configuration Wizard
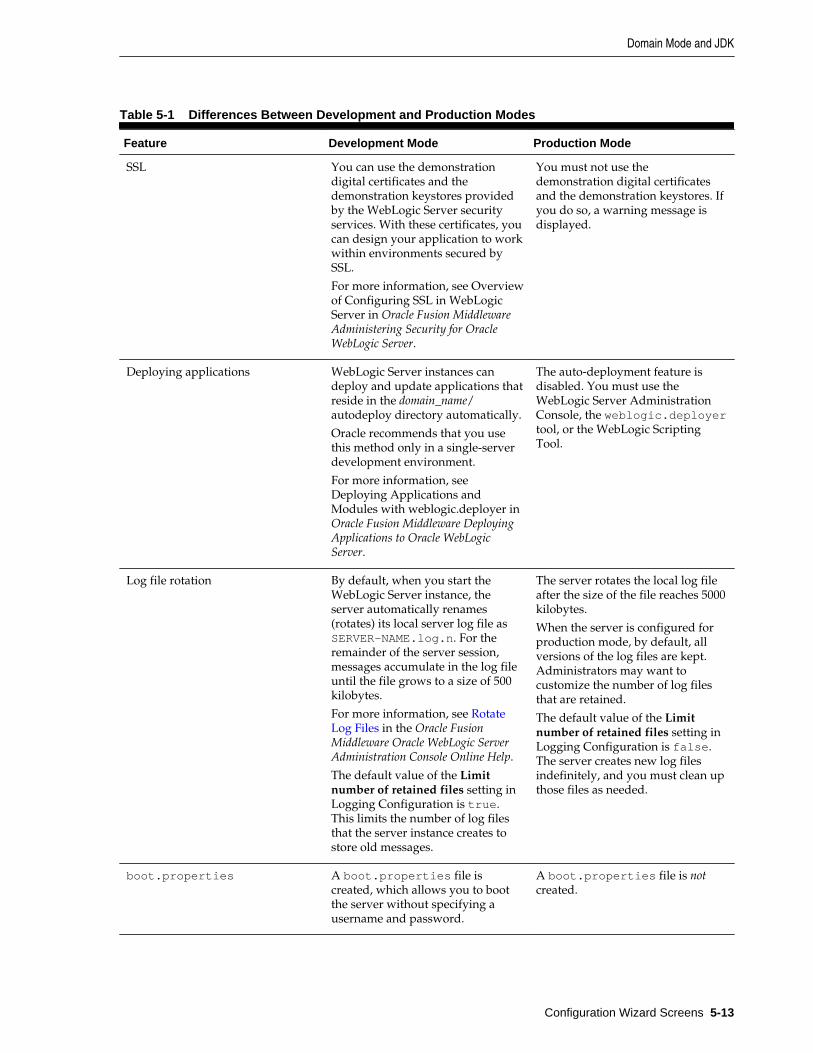
Table 5-1 Differences Between Development and Production Modes
Feature Development Mode Production Mode
SSL You can use the demonstrationdigital certificates and thedemonstration keystores providedby the WebLogic Server securityservices. With these certificates, youcan design your application to workwithin environments secured bySSL.
For more information, see Overviewof Configuring SSL in WebLogicServer in Oracle Fusion MiddlewareAdministering Security for OracleWebLogic Server.
You must not use thedemonstration digital certificatesand the demonstration keystores. Ifyou do so, a warning message isdisplayed.
Deploying applications WebLogic Server instances candeploy and update applications thatreside in the domain_name/autodeploy directory automatically.
Oracle recommends that you usethis method only in a single-serverdevelopment environment.
For more information, see Deploying Applications andModules with weblogic.deployer inOracle Fusion Middleware DeployingApplications to Oracle WebLogicServer.
The auto-deployment feature isdisabled. You must use theWebLogic Server AdministrationConsole, the weblogic.deployertool, or the WebLogic ScriptingTool.
Log file rotation By default, when you start theWebLogic Server instance, theserver automatically renames(rotates) its local server log file asSERVER-NAME.log.n. For theremainder of the server session,messages accumulate in the log fileuntil the file grows to a size of 500kilobytes.
For more information, see RotateLog Files in the Oracle FusionMiddleware Oracle WebLogic ServerAdministration Console Online Help.
The default value of the Limitnumber of retained files setting inLogging Configuration is true.This limits the number of log filesthat the server instance creates tostore old messages.
The server rotates the local log fileafter the size of the file reaches 5000kilobytes.
When the server is configured forproduction mode, by default, allversions of the log files are kept.Administrators may want tocustomize the number of log filesthat are retained.
The default value of the Limitnumber of retained files setting inLogging Configuration is false.The server creates new log filesindefinitely, and you must clean upthose files as needed.
boot.properties A boot.properties file iscreated, which allows you to bootthe server without specifying ausername and password.
A boot.properties file is notcreated.
Domain Mode and JDK
Configuration Wizard Screens 5-13
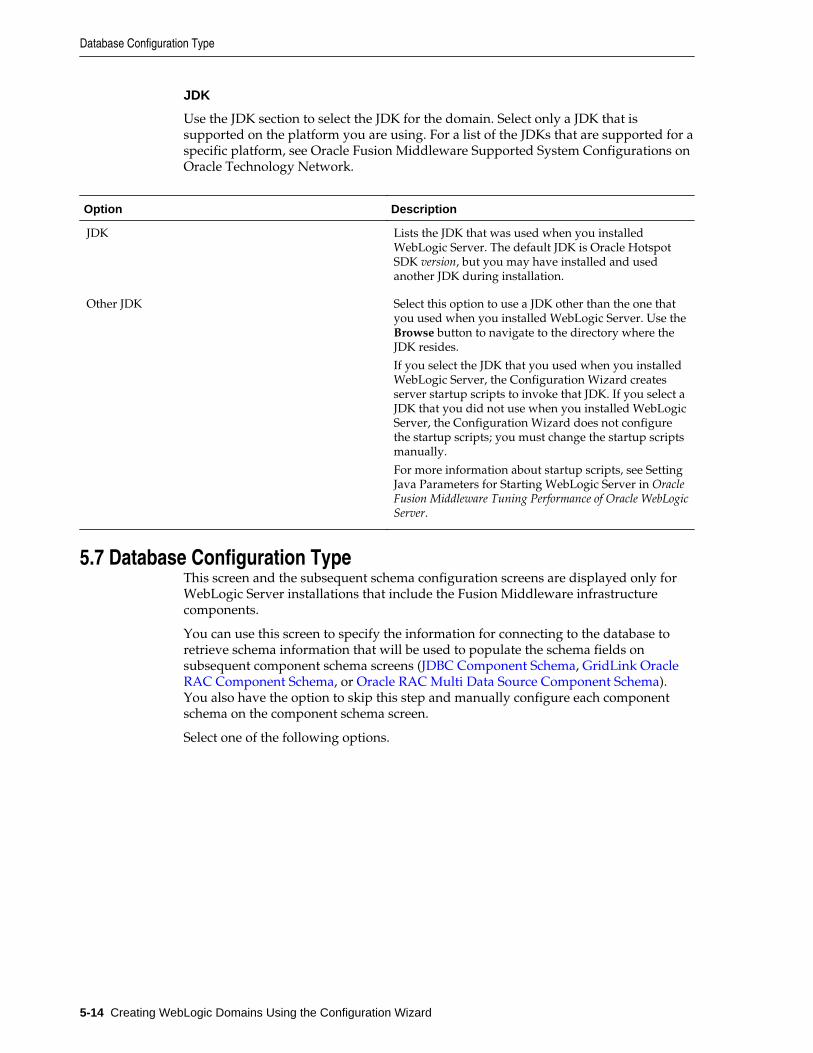
JDK
Use the JDK section to select the JDK for the domain. Select only a JDK that issupported on the platform you are using. For a list of the JDKs that are supported for aspecific platform, see Oracle Fusion Middleware Supported System Configurations onOracle Technology Network.
Option Description
JDK Lists the JDK that was used when you installedWebLogic Server. The default JDK is Oracle HotspotSDK version, but you may have installed and usedanother JDK during installation.
Other JDK Select this option to use a JDK other than the one thatyou used when you installed WebLogic Server. Use theBrowse button to navigate to the directory where theJDK resides.
If you select the JDK that you used when you installedWebLogic Server, the Configuration Wizard createsserver startup scripts to invoke that JDK. If you select aJDK that you did not use when you installed WebLogicServer, the Configuration Wizard does not configurethe startup scripts; you must change the startup scriptsmanually.
For more information about startup scripts, see SettingJava Parameters for Starting WebLogic Server in OracleFusion Middleware Tuning Performance of Oracle WebLogicServer.
5.7 Database Configuration TypeThis screen and the subsequent schema configuration screens are displayed only forWebLogic Server installations that include the Fusion Middleware infrastructurecomponents.
You can use this screen to specify the information for connecting to the database toretrieve schema information that will be used to populate the schema fields onsubsequent component schema screens (JDBC Component Schema, GridLink OracleRAC Component Schema, or Oracle RAC Multi Data Source Component Schema).You also have the option to skip this step and manually configure each componentschema on the component schema screen.
Select one of the following options.
Database Configuration Type
5-14 Creating WebLogic Domains Using the Configuration Wizard
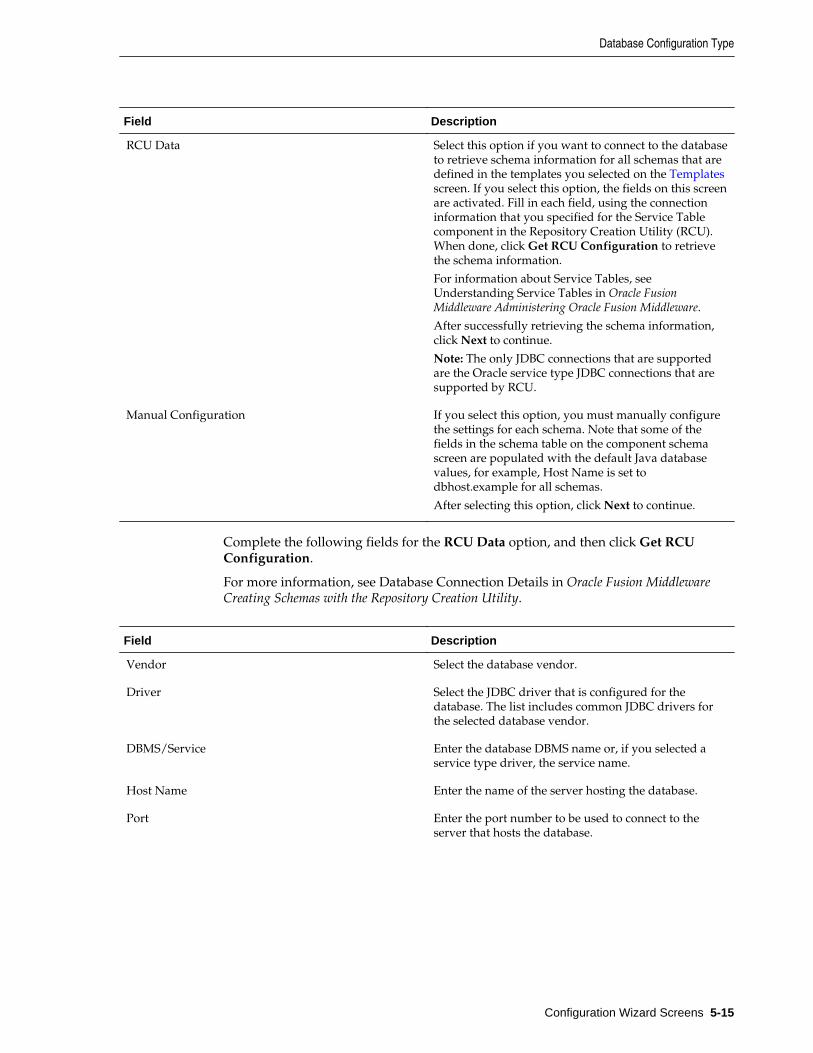
Field Description
RCU Data Select this option if you want to connect to the databaseto retrieve schema information for all schemas that aredefined in the templates you selected on the Templatesscreen. If you select this option, the fields on this screenare activated. Fill in each field, using the connectioninformation that you specified for the Service Tablecomponent in the Repository Creation Utility (RCU).When done, click Get RCU Configuration to retrievethe schema information.
For information about Service Tables, see Understanding Service Tables in Oracle FusionMiddleware Administering Oracle Fusion Middleware.
After successfully retrieving the schema information,click Next to continue.
Note: The only JDBC connections that are supportedare the Oracle service type JDBC connections that aresupported by RCU.
Manual Configuration If you select this option, you must manually configurethe settings for each schema. Note that some of thefields in the schema table on the component schemascreen are populated with the default Java databasevalues, for example, Host Name is set todbhost.example for all schemas.
After selecting this option, click Next to continue.
Complete the following fields for the RCU Data option, and then click Get RCUConfiguration.
For more information, see Database Connection Details in Oracle Fusion MiddlewareCreating Schemas with the Repository Creation Utility.
Field Description
Vendor Select the database vendor.
Driver Select the JDBC driver that is configured for thedatabase. The list includes common JDBC drivers forthe selected database vendor.
DBMS/Service Enter the database DBMS name or, if you selected aservice type driver, the service name.
Host Name Enter the name of the server hosting the database.
Port Enter the port number to be used to connect to theserver that hosts the database.
Database Configuration Type
Configuration Wizard Screens 5-15
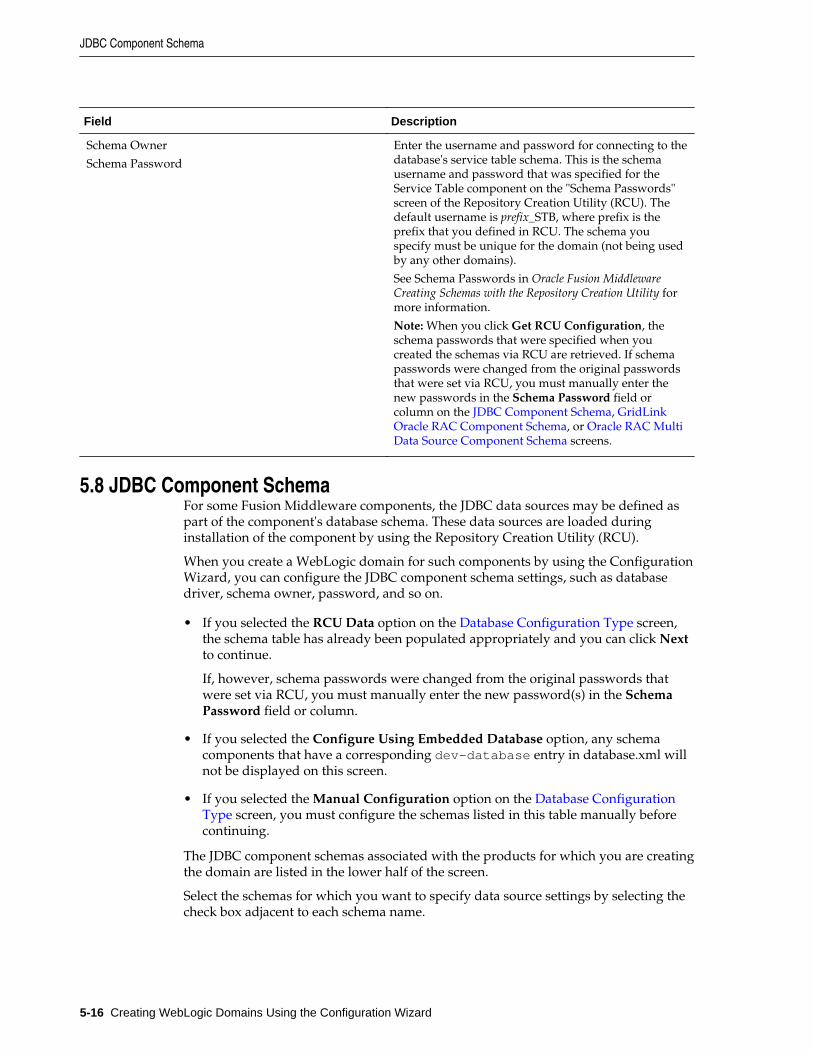
Field Description
Schema Owner
Schema Password
Enter the username and password for connecting to thedatabase's service table schema. This is the schemausername and password that was specified for theService Table component on the "Schema Passwords"screen of the Repository Creation Utility (RCU). Thedefault username is prefix_STB, where prefix is theprefix that you defined in RCU. The schema youspecify must be unique for the domain (not being usedby any other domains).
See Schema Passwords in Oracle Fusion MiddlewareCreating Schemas with the Repository Creation Utility formore information.
Note: When you click Get RCU Configuration, theschema passwords that were specified when youcreated the schemas via RCU are retrieved. If schemapasswords were changed from the original passwordsthat were set via RCU, you must manually enter thenew passwords in the Schema Password field orcolumn on the JDBC Component Schema, GridLinkOracle RAC Component Schema, or Oracle RAC MultiData Source Component Schema screens.
5.8 JDBC Component SchemaFor some Fusion Middleware components, the JDBC data sources may be defined aspart of the component's database schema. These data sources are loaded duringinstallation of the component by using the Repository Creation Utility (RCU).
When you create a WebLogic domain for such components by using the ConfigurationWizard, you can configure the JDBC component schema settings, such as databasedriver, schema owner, password, and so on.
• If you selected the RCU Data option on the Database Configuration Type screen,the schema table has already been populated appropriately and you can click Nextto continue.
If, however, schema passwords were changed from the original passwords thatwere set via RCU, you must manually enter the new password(s) in the SchemaPassword field or column.
• If you selected the Configure Using Embedded Database option, any schemacomponents that have a corresponding dev-database entry in database.xml willnot be displayed on this screen.
• If you selected the Manual Configuration option on the Database ConfigurationType screen, you must configure the schemas listed in this table manually beforecontinuing.
The JDBC component schemas associated with the products for which you are creatingthe domain are listed in the lower half of the screen.
Select the schemas for which you want to specify data source settings by selecting thecheck box adjacent to each schema name.
JDBC Component Schema
5-16 Creating WebLogic Domains Using the Configuration Wizard
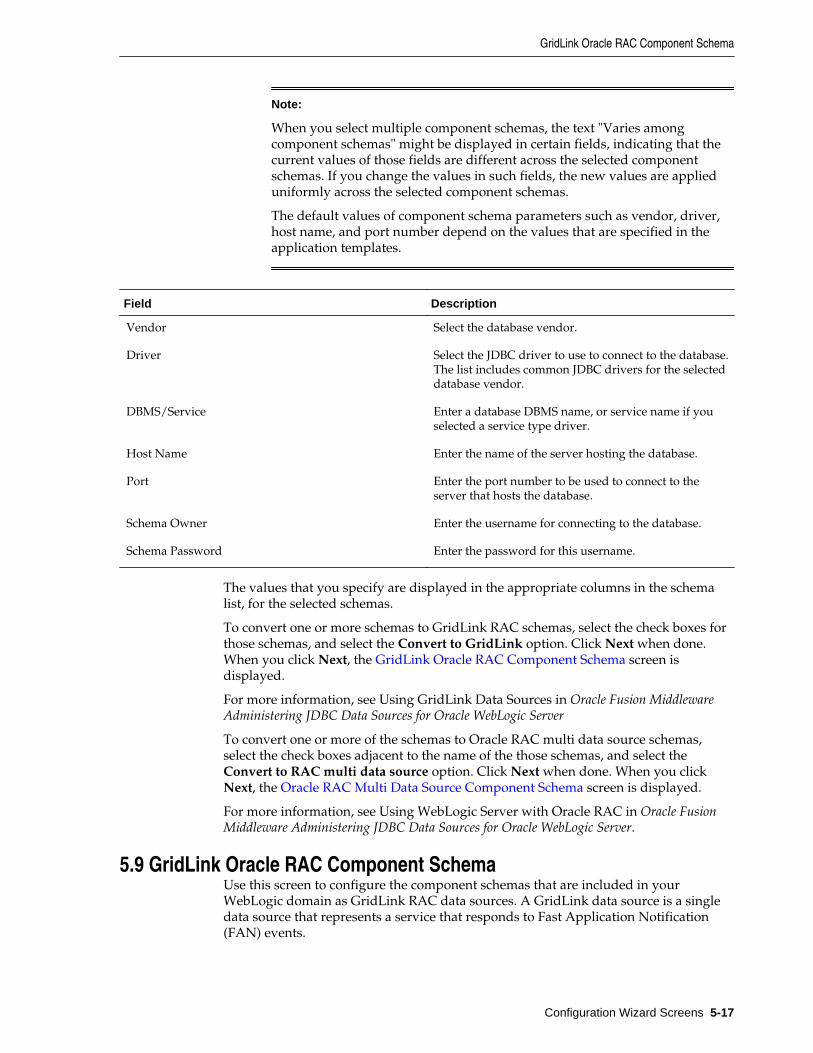
Note:
When you select multiple component schemas, the text "Varies amongcomponent schemas" might be displayed in certain fields, indicating that thecurrent values of those fields are different across the selected componentschemas. If you change the values in such fields, the new values are applieduniformly across the selected component schemas.
The default values of component schema parameters such as vendor, driver,host name, and port number depend on the values that are specified in theapplication templates.
Field Description
Vendor Select the database vendor.
Driver Select the JDBC driver to use to connect to the database.The list includes common JDBC drivers for the selecteddatabase vendor.
DBMS/Service Enter a database DBMS name, or service name if youselected a service type driver.
Host Name Enter the name of the server hosting the database.
Port Enter the port number to be used to connect to theserver that hosts the database.
Schema Owner Enter the username for connecting to the database.
Schema Password Enter the password for this username.
The values that you specify are displayed in the appropriate columns in the schemalist, for the selected schemas.
To convert one or more schemas to GridLink RAC schemas, select the check boxes forthose schemas, and select the Convert to GridLink option. Click Next when done.When you click Next, the GridLink Oracle RAC Component Schema screen isdisplayed.
For more information, see Using GridLink Data Sources in Oracle Fusion MiddlewareAdministering JDBC Data Sources for Oracle WebLogic Server
To convert one or more of the schemas to Oracle RAC multi data source schemas,select the check boxes adjacent to the name of the those schemas, and select theConvert to RAC multi data source option. Click Next when done. When you clickNext, the Oracle RAC Multi Data Source Component Schema screen is displayed.
For more information, see Using WebLogic Server with Oracle RAC in Oracle FusionMiddleware Administering JDBC Data Sources for Oracle WebLogic Server.
5.9 GridLink Oracle RAC Component SchemaUse this screen to configure the component schemas that are included in yourWebLogic domain as GridLink RAC data sources. A GridLink data source is a singledata source that represents a service that responds to Fast Application Notification(FAN) events.
GridLink Oracle RAC Component Schema
Configuration Wizard Screens 5-17
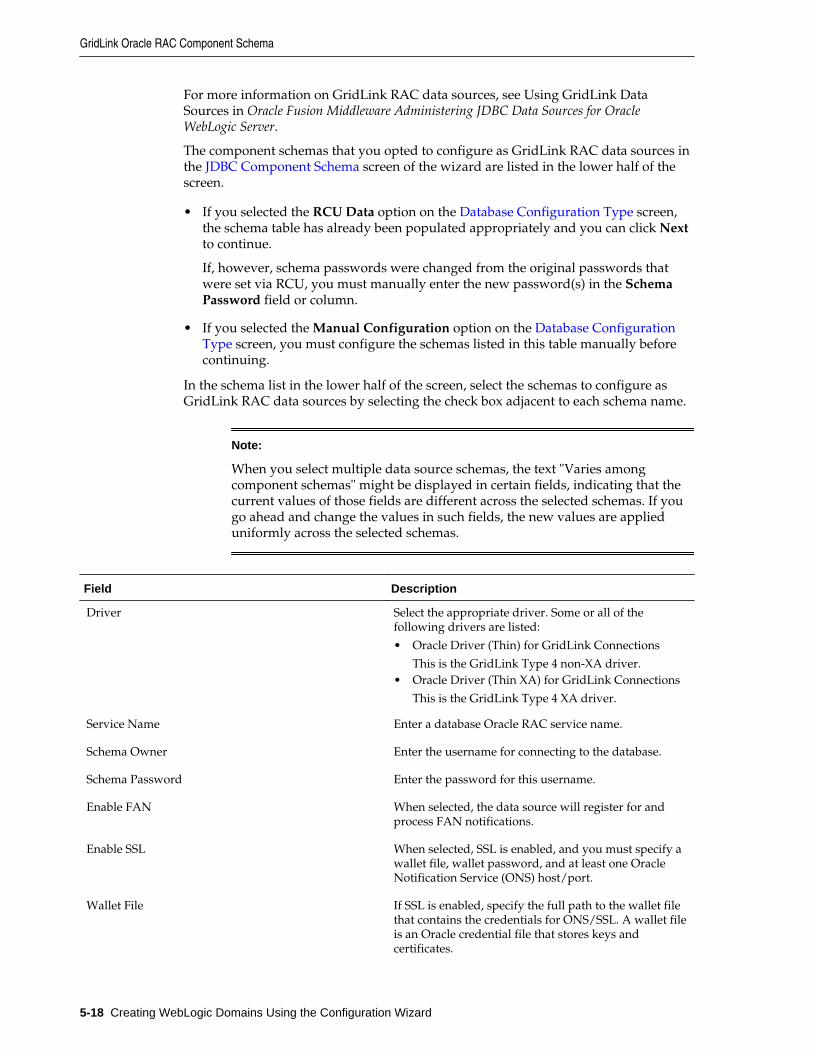
For more information on GridLink RAC data sources, see Using GridLink DataSources in Oracle Fusion Middleware Administering JDBC Data Sources for OracleWebLogic Server.
The component schemas that you opted to configure as GridLink RAC data sources inthe JDBC Component Schema screen of the wizard are listed in the lower half of thescreen.
• If you selected the RCU Data option on the Database Configuration Type screen,the schema table has already been populated appropriately and you can click Nextto continue.
If, however, schema passwords were changed from the original passwords thatwere set via RCU, you must manually enter the new password(s) in the SchemaPassword field or column.
• If you selected the Manual Configuration option on the Database ConfigurationType screen, you must configure the schemas listed in this table manually beforecontinuing.
In the schema list in the lower half of the screen, select the schemas to configure asGridLink RAC data sources by selecting the check box adjacent to each schema name.
Note:
When you select multiple data source schemas, the text "Varies amongcomponent schemas" might be displayed in certain fields, indicating that thecurrent values of those fields are different across the selected schemas. If yougo ahead and change the values in such fields, the new values are applieduniformly across the selected schemas.
Field Description
Driver Select the appropriate driver. Some or all of thefollowing drivers are listed:
• Oracle Driver (Thin) for GridLink Connections
This is the GridLink Type 4 non-XA driver.• Oracle Driver (Thin XA) for GridLink Connections
This is the GridLink Type 4 XA driver.
Service Name Enter a database Oracle RAC service name.
Schema Owner Enter the username for connecting to the database.
Schema Password Enter the password for this username.
Enable FAN When selected, the data source will register for andprocess FAN notifications.
Enable SSL When selected, SSL is enabled, and you must specify awallet file, wallet password, and at least one OracleNotification Service (ONS) host/port.
Wallet File If SSL is enabled, specify the full path to the wallet filethat contains the credentials for ONS/SSL. A wallet fileis an Oracle credential file that stores keys andcertificates.
GridLink Oracle RAC Component Schema
5-18 Creating WebLogic Domains Using the Configuration Wizard
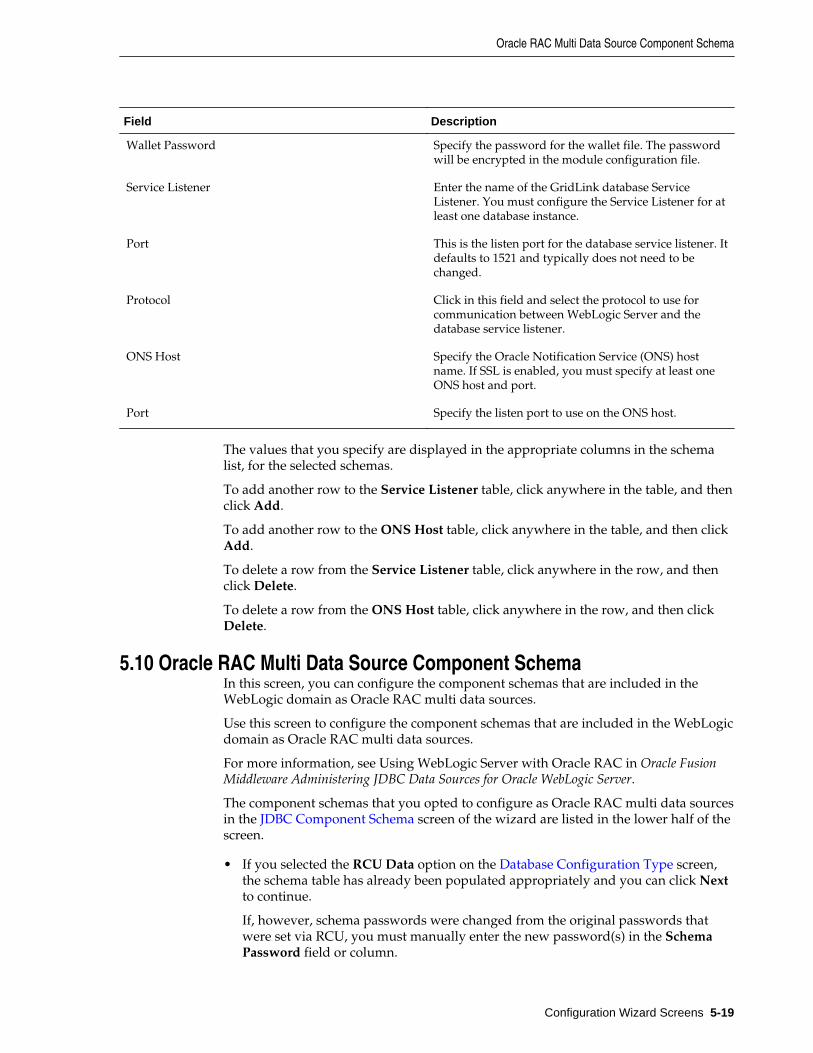
Field Description
Wallet Password Specify the password for the wallet file. The passwordwill be encrypted in the module configuration file.
Service Listener Enter the name of the GridLink database ServiceListener. You must configure the Service Listener for atleast one database instance.
Port This is the listen port for the database service listener. Itdefaults to 1521 and typically does not need to bechanged.
Protocol Click in this field and select the protocol to use forcommunication between WebLogic Server and thedatabase service listener.
ONS Host Specify the Oracle Notification Service (ONS) hostname. If SSL is enabled, you must specify at least oneONS host and port.
Port Specify the listen port to use on the ONS host.
The values that you specify are displayed in the appropriate columns in the schemalist, for the selected schemas.
To add another row to the Service Listener table, click anywhere in the table, and thenclick Add.
To add another row to the ONS Host table, click anywhere in the table, and then clickAdd.
To delete a row from the Service Listener table, click anywhere in the row, and thenclick Delete.
To delete a row from the ONS Host table, click anywhere in the row, and then clickDelete.
5.10 Oracle RAC Multi Data Source Component SchemaIn this screen, you can configure the component schemas that are included in theWebLogic domain as Oracle RAC multi data sources.
Use this screen to configure the component schemas that are included in the WebLogicdomain as Oracle RAC multi data sources.
For more information, see Using WebLogic Server with Oracle RAC in Oracle FusionMiddleware Administering JDBC Data Sources for Oracle WebLogic Server.
The component schemas that you opted to configure as Oracle RAC multi data sourcesin the JDBC Component Schema screen of the wizard are listed in the lower half of thescreen.
• If you selected the RCU Data option on the Database Configuration Type screen,the schema table has already been populated appropriately and you can click Nextto continue.
If, however, schema passwords were changed from the original passwords thatwere set via RCU, you must manually enter the new password(s) in the SchemaPassword field or column.
Oracle RAC Multi Data Source Component Schema
Configuration Wizard Screens 5-19
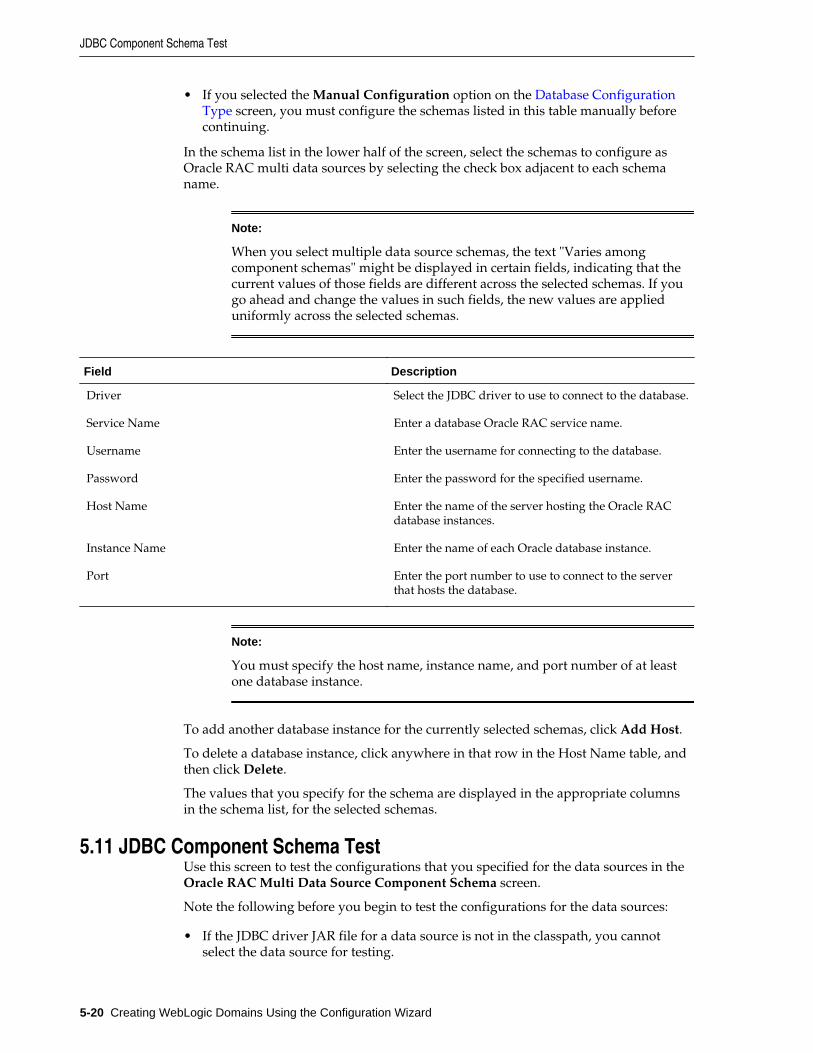
• If you selected the Manual Configuration option on the Database ConfigurationType screen, you must configure the schemas listed in this table manually beforecontinuing.
In the schema list in the lower half of the screen, select the schemas to configure asOracle RAC multi data sources by selecting the check box adjacent to each schemaname.
Note:
When you select multiple data source schemas, the text "Varies amongcomponent schemas" might be displayed in certain fields, indicating that thecurrent values of those fields are different across the selected schemas. If yougo ahead and change the values in such fields, the new values are applieduniformly across the selected schemas.
Field Description
Driver Select the JDBC driver to use to connect to the database.
Service Name Enter a database Oracle RAC service name.
Username Enter the username for connecting to the database.
Password Enter the password for the specified username.
Host Name Enter the name of the server hosting the Oracle RACdatabase instances.
Instance Name Enter the name of each Oracle database instance.
Port Enter the port number to use to connect to the serverthat hosts the database.
Note:
You must specify the host name, instance name, and port number of at leastone database instance.
To add another database instance for the currently selected schemas, click Add Host.
To delete a database instance, click anywhere in that row in the Host Name table, andthen click Delete.
The values that you specify for the schema are displayed in the appropriate columnsin the schema list, for the selected schemas.
5.11 JDBC Component Schema TestUse this screen to test the configurations that you specified for the data sources in theOracle RAC Multi Data Source Component Schema screen.
Note the following before you begin to test the configurations for the data sources:
• If the JDBC driver JAR file for a data source is not in the classpath, you cannotselect the data source for testing.
JDBC Component Schema Test
5-20 Creating WebLogic Domains Using the Configuration Wizard
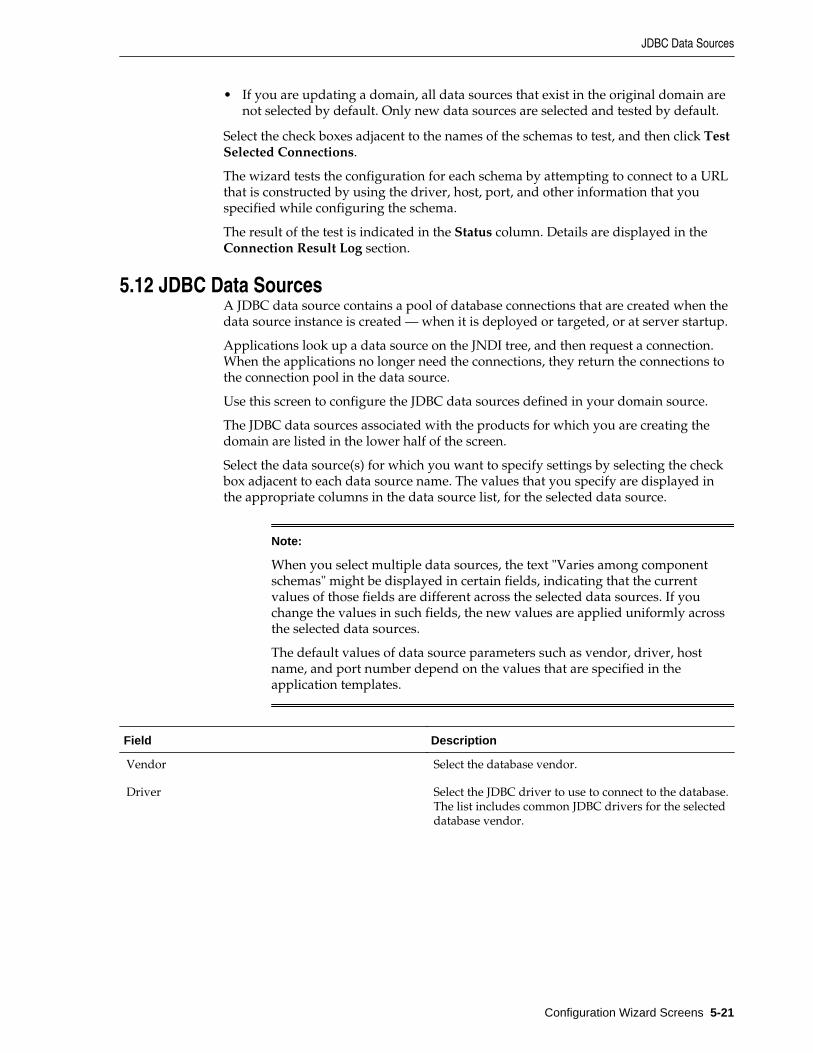
• If you are updating a domain, all data sources that exist in the original domain arenot selected by default. Only new data sources are selected and tested by default.
Select the check boxes adjacent to the names of the schemas to test, and then click TestSelected Connections.
The wizard tests the configuration for each schema by attempting to connect to a URLthat is constructed by using the driver, host, port, and other information that youspecified while configuring the schema.
The result of the test is indicated in the Status column. Details are displayed in theConnection Result Log section.
5.12 JDBC Data SourcesA JDBC data source contains a pool of database connections that are created when thedata source instance is created — when it is deployed or targeted, or at server startup.
Applications look up a data source on the JNDI tree, and then request a connection.When the applications no longer need the connections, they return the connections tothe connection pool in the data source.
Use this screen to configure the JDBC data sources defined in your domain source.
The JDBC data sources associated with the products for which you are creating thedomain are listed in the lower half of the screen.
Select the data source(s) for which you want to specify settings by selecting the checkbox adjacent to each data source name. The values that you specify are displayed inthe appropriate columns in the data source list, for the selected data source.
Note:
When you select multiple data sources, the text "Varies among componentschemas" might be displayed in certain fields, indicating that the currentvalues of those fields are different across the selected data sources. If youchange the values in such fields, the new values are applied uniformly acrossthe selected data sources.
The default values of data source parameters such as vendor, driver, hostname, and port number depend on the values that are specified in theapplication templates.
Field Description
Vendor Select the database vendor.
Driver Select the JDBC driver to use to connect to the database.The list includes common JDBC drivers for the selecteddatabase vendor.
JDBC Data Sources
Configuration Wizard Screens 5-21
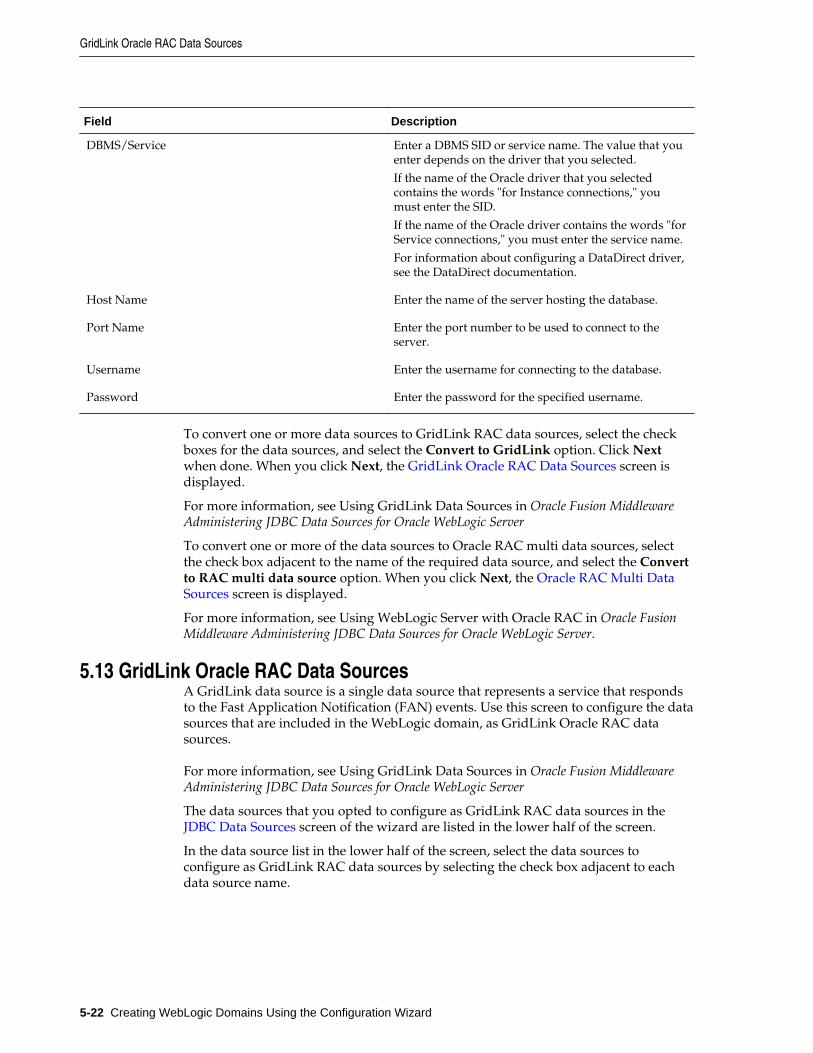
Field Description
DBMS/Service Enter a DBMS SID or service name. The value that youenter depends on the driver that you selected.
If the name of the Oracle driver that you selectedcontains the words "for Instance connections," youmust enter the SID.
If the name of the Oracle driver contains the words "forService connections," you must enter the service name.
For information about configuring a DataDirect driver,see the DataDirect documentation.
Host Name Enter the name of the server hosting the database.
Port Name Enter the port number to be used to connect to theserver.
Username Enter the username for connecting to the database.
Password Enter the password for the specified username.
To convert one or more data sources to GridLink RAC data sources, select the checkboxes for the data sources, and select the Convert to GridLink option. Click Nextwhen done. When you click Next, the GridLink Oracle RAC Data Sources screen isdisplayed.
For more information, see Using GridLink Data Sources in Oracle Fusion MiddlewareAdministering JDBC Data Sources for Oracle WebLogic Server
To convert one or more of the data sources to Oracle RAC multi data sources, selectthe check box adjacent to the name of the required data source, and select the Convertto RAC multi data source option. When you click Next, the Oracle RAC Multi DataSources screen is displayed.
For more information, see Using WebLogic Server with Oracle RAC in Oracle FusionMiddleware Administering JDBC Data Sources for Oracle WebLogic Server.
5.13 GridLink Oracle RAC Data SourcesA GridLink data source is a single data source that represents a service that respondsto the Fast Application Notification (FAN) events. Use this screen to configure the datasources that are included in the WebLogic domain, as GridLink Oracle RAC datasources.
For more information, see Using GridLink Data Sources in Oracle Fusion MiddlewareAdministering JDBC Data Sources for Oracle WebLogic Server
The data sources that you opted to configure as GridLink RAC data sources in the JDBC Data Sources screen of the wizard are listed in the lower half of the screen.
In the data source list in the lower half of the screen, select the data sources toconfigure as GridLink RAC data sources by selecting the check box adjacent to eachdata source name.
GridLink Oracle RAC Data Sources
5-22 Creating WebLogic Domains Using the Configuration Wizard
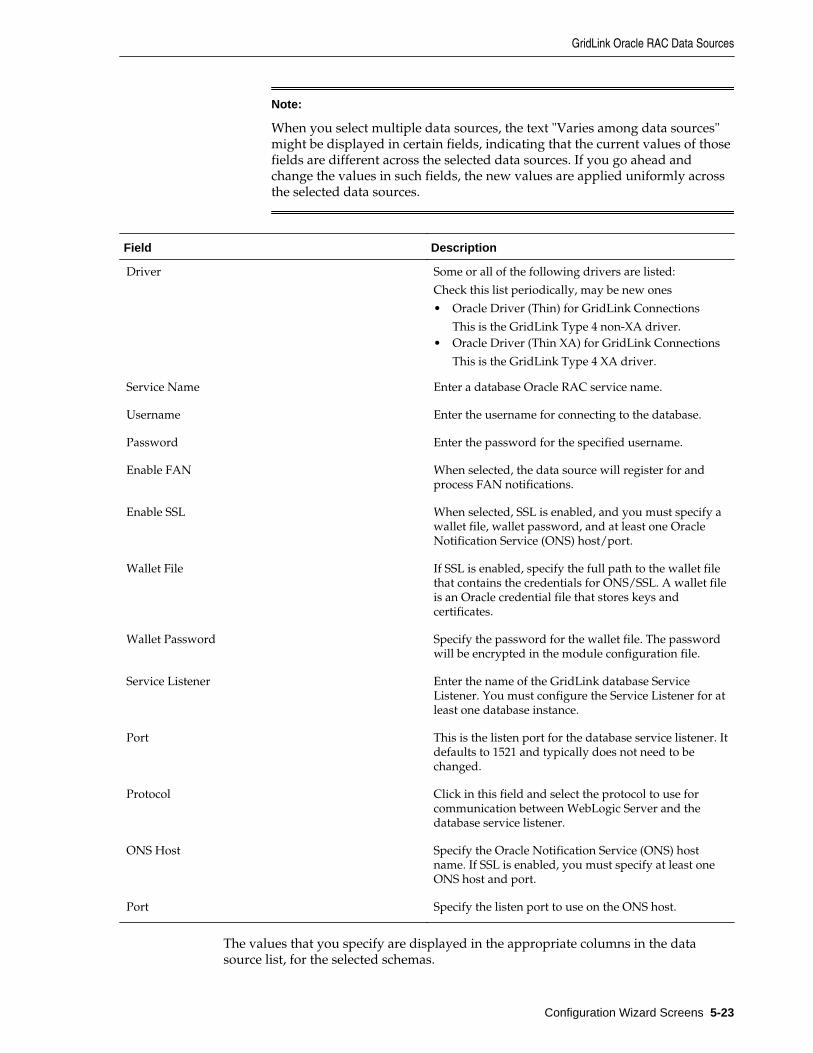
Note:
When you select multiple data sources, the text "Varies among data sources"might be displayed in certain fields, indicating that the current values of thosefields are different across the selected data sources. If you go ahead andchange the values in such fields, the new values are applied uniformly acrossthe selected data sources.
Field Description
Driver Some or all of the following drivers are listed:
Check this list periodically, may be new ones
• Oracle Driver (Thin) for GridLink Connections
This is the GridLink Type 4 non-XA driver.• Oracle Driver (Thin XA) for GridLink Connections
This is the GridLink Type 4 XA driver.
Service Name Enter a database Oracle RAC service name.
Username Enter the username for connecting to the database.
Password Enter the password for the specified username.
Enable FAN When selected, the data source will register for andprocess FAN notifications.
Enable SSL When selected, SSL is enabled, and you must specify awallet file, wallet password, and at least one OracleNotification Service (ONS) host/port.
Wallet File If SSL is enabled, specify the full path to the wallet filethat contains the credentials for ONS/SSL. A wallet fileis an Oracle credential file that stores keys andcertificates.
Wallet Password Specify the password for the wallet file. The passwordwill be encrypted in the module configuration file.
Service Listener Enter the name of the GridLink database ServiceListener. You must configure the Service Listener for atleast one database instance.
Port This is the listen port for the database service listener. Itdefaults to 1521 and typically does not need to bechanged.
Protocol Click in this field and select the protocol to use forcommunication between WebLogic Server and thedatabase service listener.
ONS Host Specify the Oracle Notification Service (ONS) hostname. If SSL is enabled, you must specify at least oneONS host and port.
Port Specify the listen port to use on the ONS host.
The values that you specify are displayed in the appropriate columns in the datasource list, for the selected schemas.
GridLink Oracle RAC Data Sources
Configuration Wizard Screens 5-23
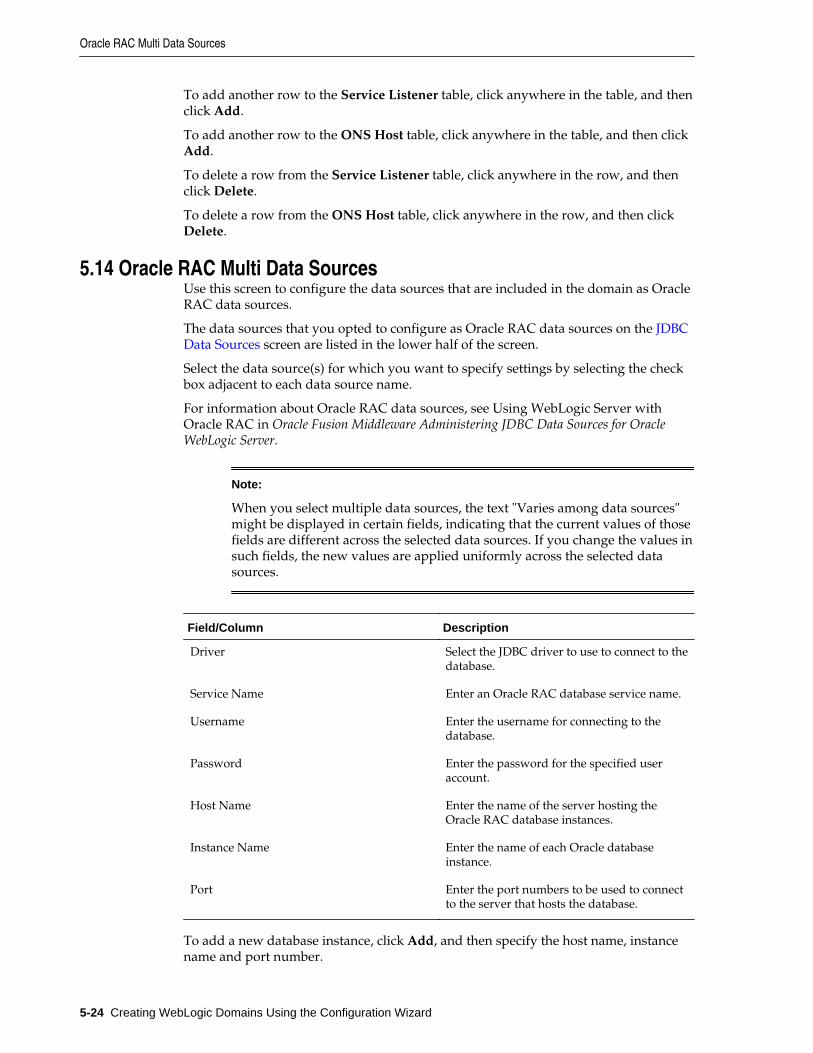
To add another row to the Service Listener table, click anywhere in the table, and thenclick Add.
To add another row to the ONS Host table, click anywhere in the table, and then clickAdd.
To delete a row from the Service Listener table, click anywhere in the row, and thenclick Delete.
To delete a row from the ONS Host table, click anywhere in the row, and then clickDelete.
5.14 Oracle RAC Multi Data SourcesUse this screen to configure the data sources that are included in the domain as OracleRAC data sources.
The data sources that you opted to configure as Oracle RAC data sources on the JDBCData Sources screen are listed in the lower half of the screen.
Select the data source(s) for which you want to specify settings by selecting the checkbox adjacent to each data source name.
For information about Oracle RAC data sources, see Using WebLogic Server withOracle RAC in Oracle Fusion Middleware Administering JDBC Data Sources for OracleWebLogic Server.
Note:
When you select multiple data sources, the text "Varies among data sources"might be displayed in certain fields, indicating that the current values of thosefields are different across the selected data sources. If you change the values insuch fields, the new values are applied uniformly across the selected datasources.
Field/Column Description
Driver Select the JDBC driver to use to connect to thedatabase.
Service Name Enter an Oracle RAC database service name.
Username Enter the username for connecting to thedatabase.
Password Enter the password for the specified useraccount.
Host Name Enter the name of the server hosting theOracle RAC database instances.
Instance Name Enter the name of each Oracle databaseinstance.
Port Enter the port numbers to be used to connectto the server that hosts the database.
To add a new database instance, click Add, and then specify the host name, instancename and port number.
Oracle RAC Multi Data Sources
5-24 Creating WebLogic Domains Using the Configuration Wizard
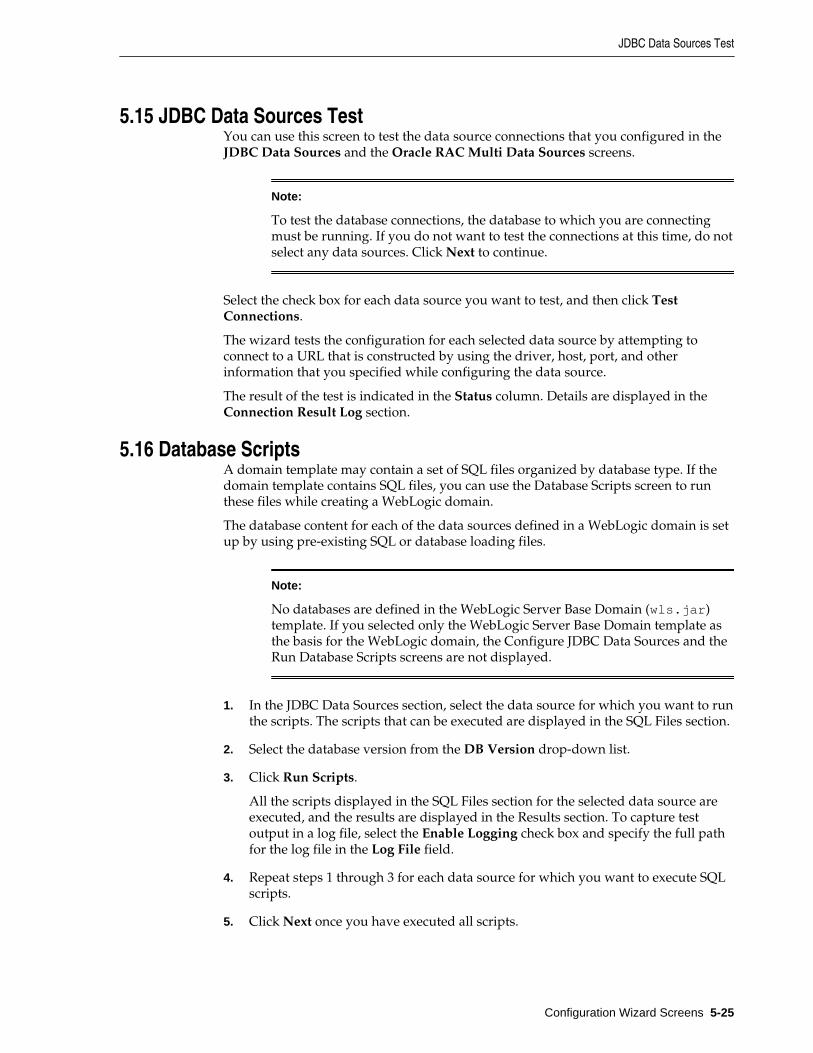
5.15 JDBC Data Sources TestYou can use this screen to test the data source connections that you configured in theJDBC Data Sources and the Oracle RAC Multi Data Sources screens.
Note:
To test the database connections, the database to which you are connectingmust be running. If you do not want to test the connections at this time, do notselect any data sources. Click Next to continue.
Select the check box for each data source you want to test, and then click TestConnections.
The wizard tests the configuration for each selected data source by attempting toconnect to a URL that is constructed by using the driver, host, port, and otherinformation that you specified while configuring the data source.
The result of the test is indicated in the Status column. Details are displayed in theConnection Result Log section.
5.16 Database ScriptsA domain template may contain a set of SQL files organized by database type. If thedomain template contains SQL files, you can use the Database Scripts screen to runthese files while creating a WebLogic domain.
The database content for each of the data sources defined in a WebLogic domain is setup by using pre-existing SQL or database loading files.
Note:
No databases are defined in the WebLogic Server Base Domain (wls.jar)template. If you selected only the WebLogic Server Base Domain template asthe basis for the WebLogic domain, the Configure JDBC Data Sources and theRun Database Scripts screens are not displayed.
1. In the JDBC Data Sources section, select the data source for which you want to runthe scripts. The scripts that can be executed are displayed in the SQL Files section.
2. Select the database version from the DB Version drop-down list.
3. Click Run Scripts.
All the scripts displayed in the SQL Files section for the selected data source areexecuted, and the results are displayed in the Results section. To capture testoutput in a log file, select the Enable Logging check box and specify the full pathfor the log file in the Log File field.
4. Repeat steps 1 through 3 for each data source for which you want to execute SQLscripts.
5. Click Next once you have executed all scripts.
JDBC Data Sources Test
Configuration Wizard Screens 5-25
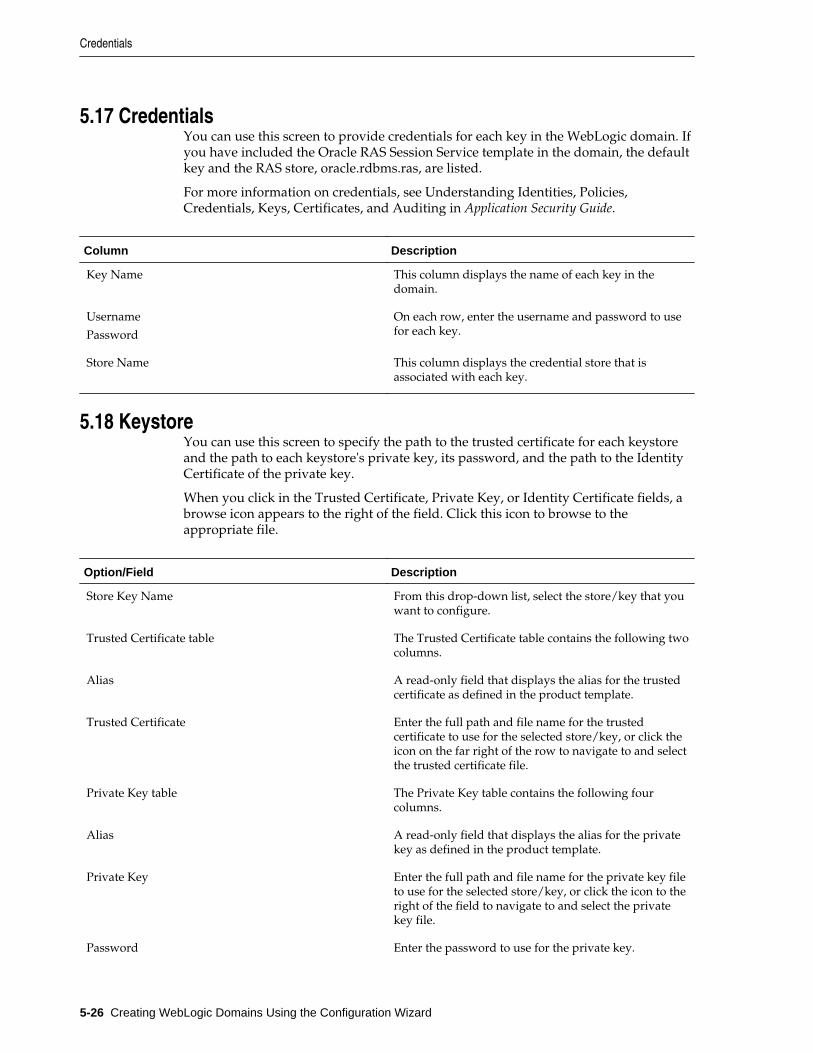
5.17 CredentialsYou can use this screen to provide credentials for each key in the WebLogic domain. Ifyou have included the Oracle RAS Session Service template in the domain, the defaultkey and the RAS store, oracle.rdbms.ras, are listed.
For more information on credentials, see Understanding Identities, Policies,Credentials, Keys, Certificates, and Auditing in Application Security Guide.
Column Description
Key Name This column displays the name of each key in thedomain.
Username
Password
On each row, enter the username and password to usefor each key.
Store Name This column displays the credential store that isassociated with each key.
5.18 KeystoreYou can use this screen to specify the path to the trusted certificate for each keystoreand the path to each keystore's private key, its password, and the path to the IdentityCertificate of the private key.
When you click in the Trusted Certificate, Private Key, or Identity Certificate fields, abrowse icon appears to the right of the field. Click this icon to browse to theappropriate file.
Option/Field Description
Store Key Name From this drop-down list, select the store/key that youwant to configure.
Trusted Certificate table The Trusted Certificate table contains the following twocolumns.
Alias A read-only field that displays the alias for the trustedcertificate as defined in the product template.
Trusted Certificate Enter the full path and file name for the trustedcertificate to use for the selected store/key, or click theicon on the far right of the row to navigate to and selectthe trusted certificate file.
Private Key table The Private Key table contains the following fourcolumns.
Alias A read-only field that displays the alias for the privatekey as defined in the product template.
Private Key Enter the full path and file name for the private key fileto use for the selected store/key, or click the icon to theright of the field to navigate to and select the privatekey file.
Password Enter the password to use for the private key.
Credentials
5-26 Creating WebLogic Domains Using the Configuration Wizard

Option/Field Description
Identity Certificate Enter the full path and file name for the identitycertificate to associate with the private key, or click theicon to the right of the field to navigate to and select theidentity certificate file.
5.19 Java Keystore InfoYou can use this screen to import key pairs and certificates from an existing JavaKeystore (.jks) file into Oracle Platform Security Services (for WebLogic). A JavaKeystore contains authorization certificates and key pairs that are used forauthentication and encryption purposes.
For more information about securing applications with Oracle Platform SecurityServices (OPSS), see Introduction to Oracle Platform Security Services in Oracle FusionMiddleware Securing Applications with Oracle Platform Security Services.
Option/Field Description
Target Keystore Name From the drop-down list, select the name of the targetkeystore (available in the OPSS Keystore Service) thatyou want to configure.
JKS File Location Specify the location of the .jks file from which you wantto import the key pairs and certificates into the targetkeystore.
Keystore Password Specify the password that is required to import the .jksfile. This is the password that is defined at the time ofcreating the .jks file. An error appears if the passworddoes not match.
Permission Protected The target keystore that you select can be eitherpassword protected or permission protected. If youenable permission protected, the access to the targetkeystore is determined by Java code-based policygrants. In this case, the password you define for thetarget keystore is ignored.
Target Keystore Password Specify the password for the target keystore. The targetkeystore is created with this password.
Alias Name Each key pair and certificate that is stored in the targetkeystore is referred by a unique alias. If you want toinclude additional keys and certificates from the .jksfile, specify the appropriate alias name. An errorappears if the alias name is not available in thekeystore.
Java Keystore Info
Configuration Wizard Screens 5-27
Option/Field Description
Password Each alias that is stored in the target keystore has aunique password. Specify the appropriate password.An error appears if the password is not valid for thealias name that you select.
Note: A password is requiredonly if you are importingkey pairs; it is optional forcertificates.
5.20 Advanced ConfigurationYou can use this screen to perform advanced configurations for the categories youselect from the available list. You can select all the categories, if required.
If you do not select any items on this screen, the Configuration Summary screen isdisplayed next.
Note:
The categories that are listed on this screen depend on the resources defined inthe templates you have selected for the domain.
The Administration Server option is not available when you are extending adomain.
Option Description
Administration Server Select this option to modify Administration Serversettings such as server name, listen address, listen port,and SSL settings.
See Administration Server.
Node Manager Select this option to change the Node Manager type,Node Manager username and password, and NodeManager location.
See Node Manager.
Advanced Configuration
5-28 Creating WebLogic Domains Using the Configuration Wizard
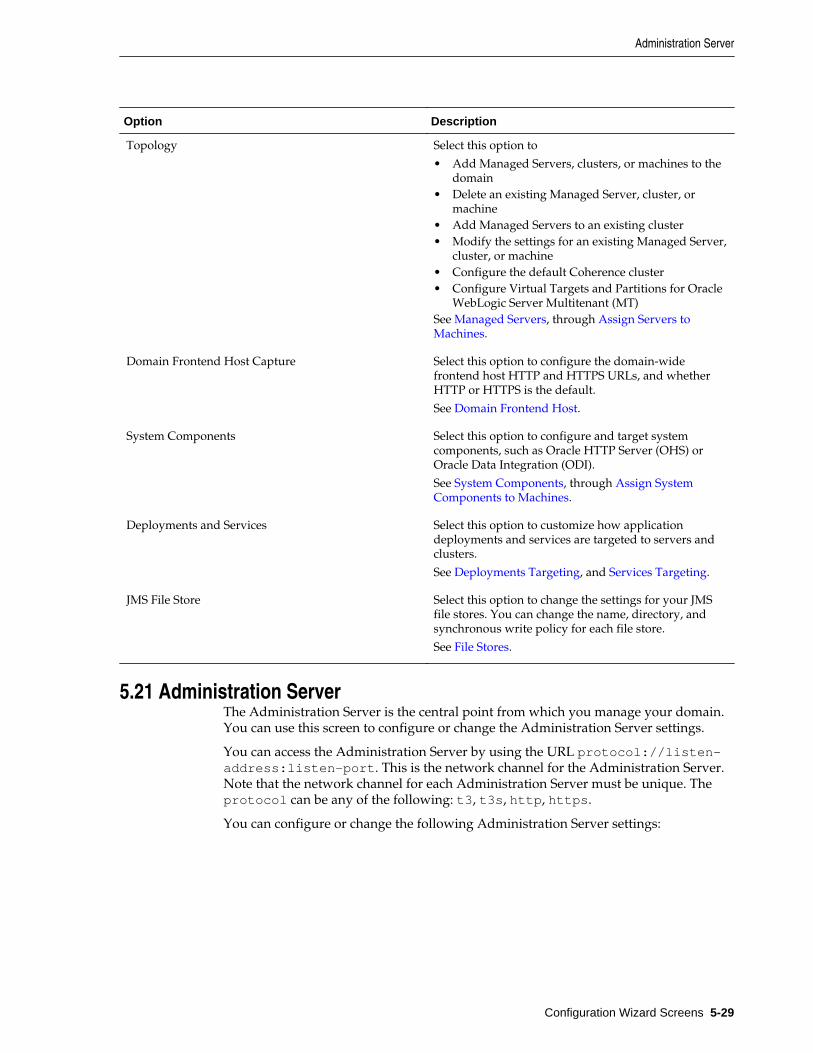
Option Description
Topology Select this option to
• Add Managed Servers, clusters, or machines to thedomain
• Delete an existing Managed Server, cluster, ormachine
• Add Managed Servers to an existing cluster• Modify the settings for an existing Managed Server,
cluster, or machine• Configure the default Coherence cluster• Configure Virtual Targets and Partitions for Oracle
WebLogic Server Multitenant (MT)See Managed Servers, through Assign Servers toMachines.
Domain Frontend Host Capture Select this option to configure the domain-widefrontend host HTTP and HTTPS URLs, and whetherHTTP or HTTPS is the default.
See Domain Frontend Host.
System Components Select this option to configure and target systemcomponents, such as Oracle HTTP Server (OHS) orOracle Data Integration (ODI).
See System Components, through Assign SystemComponents to Machines.
Deployments and Services Select this option to customize how applicationdeployments and services are targeted to servers andclusters.
See Deployments Targeting, and Services Targeting.
JMS File Store Select this option to change the settings for your JMSfile stores. You can change the name, directory, andsynchronous write policy for each file store.
See File Stores.
5.21 Administration ServerThe Administration Server is the central point from which you manage your domain.You can use this screen to configure or change the Administration Server settings.
You can access the Administration Server by using the URL protocol://listen-address:listen-port. This is the network channel for the Administration Server.Note that the network channel for each Administration Server must be unique. Theprotocol can be any of the following: t3, t3s, http, https.
You can configure or change the following Administration Server settings:
Administration Server
Configuration Wizard Screens 5-29
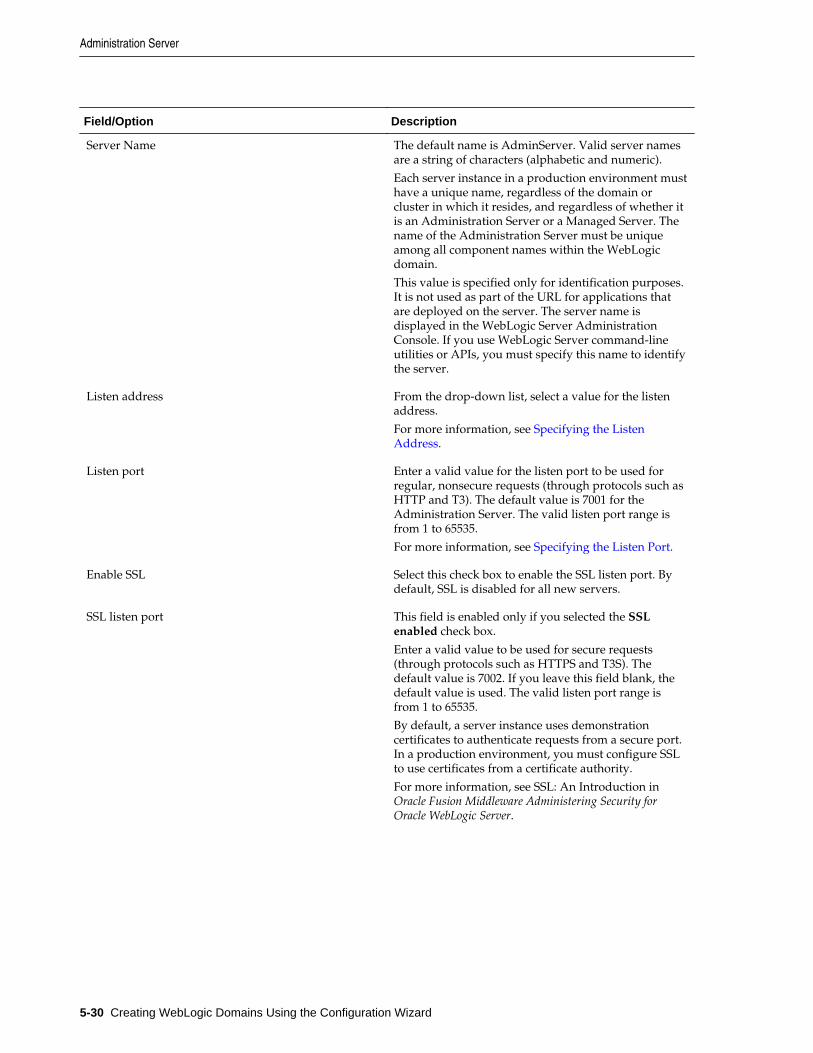
Field/Option Description
Server Name The default name is AdminServer. Valid server namesare a string of characters (alphabetic and numeric).
Each server instance in a production environment musthave a unique name, regardless of the domain orcluster in which it resides, and regardless of whether itis an Administration Server or a Managed Server. Thename of the Administration Server must be uniqueamong all component names within the WebLogicdomain.
This value is specified only for identification purposes.It is not used as part of the URL for applications thatare deployed on the server. The server name isdisplayed in the WebLogic Server AdministrationConsole. If you use WebLogic Server command-lineutilities or APIs, you must specify this name to identifythe server.
Listen address From the drop-down list, select a value for the listenaddress.
For more information, see Specifying the ListenAddress.
Listen port Enter a valid value for the listen port to be used forregular, nonsecure requests (through protocols such asHTTP and T3). The default value is 7001 for theAdministration Server. The valid listen port range isfrom 1 to 65535.
For more information, see Specifying the Listen Port.
Enable SSL Select this check box to enable the SSL listen port. Bydefault, SSL is disabled for all new servers.
SSL listen port This field is enabled only if you selected the SSLenabled check box.
Enter a valid value to be used for secure requests(through protocols such as HTTPS and T3S). Thedefault value is 7002. If you leave this field blank, thedefault value is used. The valid listen port range isfrom 1 to 65535.
By default, a server instance uses demonstrationcertificates to authenticate requests from a secure port.In a production environment, you must configure SSLto use certificates from a certificate authority.
For more information, see SSL: An Introduction inOracle Fusion Middleware Administering Security forOracle WebLogic Server.
Administration Server
5-30 Creating WebLogic Domains Using the Configuration Wizard
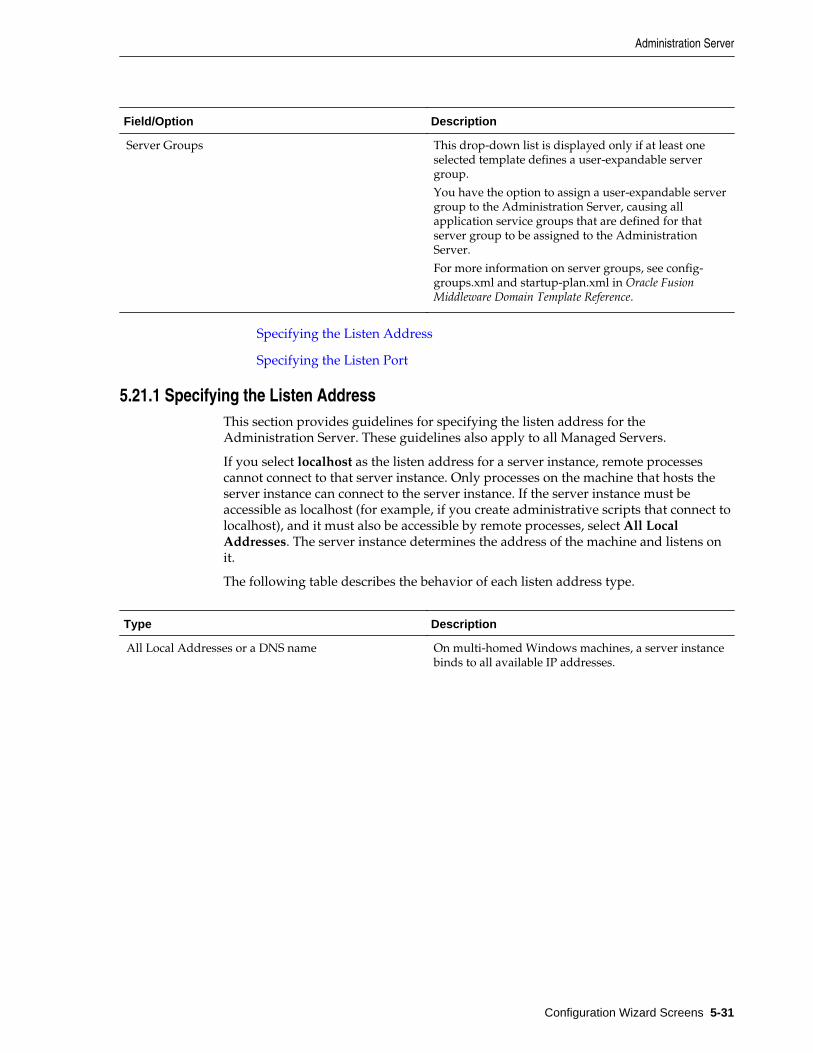
Field/Option Description
Server Groups This drop-down list is displayed only if at least oneselected template defines a user-expandable servergroup.
You have the option to assign a user-expandable servergroup to the Administration Server, causing allapplication service groups that are defined for thatserver group to be assigned to the AdministrationServer.
For more information on server groups, see config-groups.xml and startup-plan.xml in Oracle FusionMiddleware Domain Template Reference.
Specifying the Listen Address
Specifying the Listen Port
5.21.1 Specifying the Listen AddressThis section provides guidelines for specifying the listen address for theAdministration Server. These guidelines also apply to all Managed Servers.
If you select localhost as the listen address for a server instance, remote processescannot connect to that server instance. Only processes on the machine that hosts theserver instance can connect to the server instance. If the server instance must beaccessible as localhost (for example, if you create administrative scripts that connect tolocalhost), and it must also be accessible by remote processes, select All LocalAddresses. The server instance determines the address of the machine and listens onit.
The following table describes the behavior of each listen address type.
Type Description
All Local Addresses or a DNS name On multi-homed Windows machines, a server instancebinds to all available IP addresses.
Administration Server
Configuration Wizard Screens 5-31
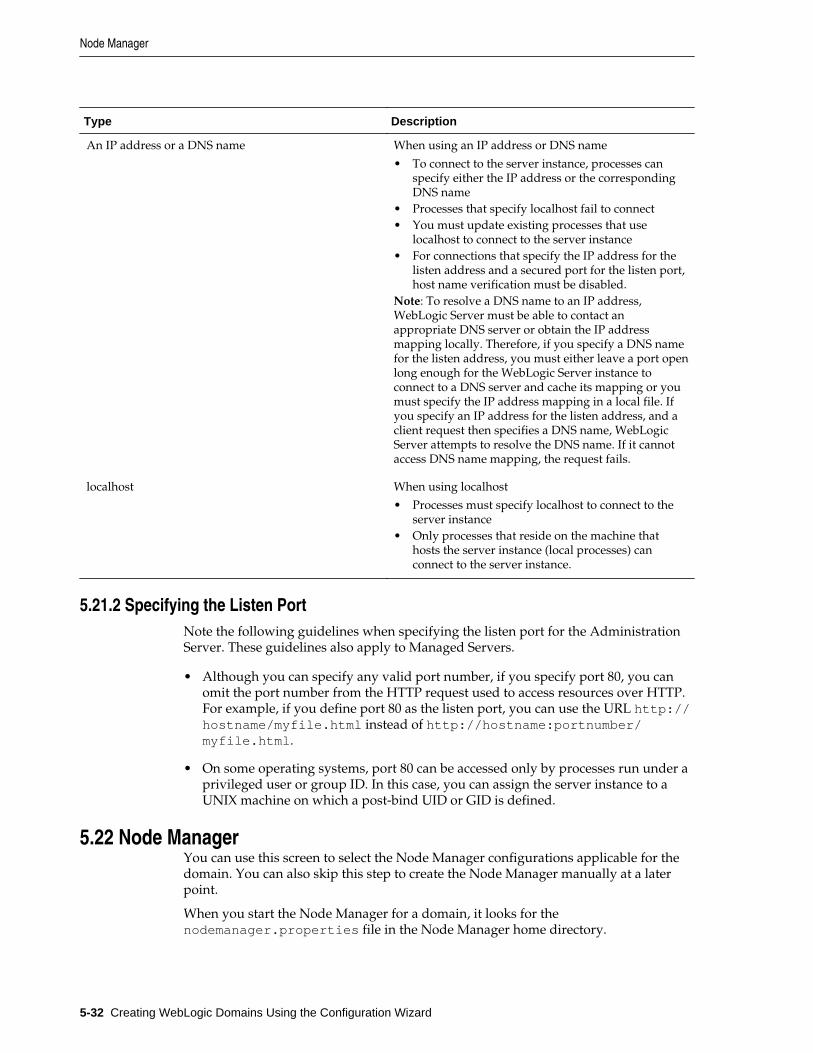
Type Description
An IP address or a DNS name When using an IP address or DNS name
• To connect to the server instance, processes canspecify either the IP address or the correspondingDNS name
• Processes that specify localhost fail to connect• You must update existing processes that use
localhost to connect to the server instance• For connections that specify the IP address for the
listen address and a secured port for the listen port,host name verification must be disabled.
Note: To resolve a DNS name to an IP address,WebLogic Server must be able to contact anappropriate DNS server or obtain the IP addressmapping locally. Therefore, if you specify a DNS namefor the listen address, you must either leave a port openlong enough for the WebLogic Server instance toconnect to a DNS server and cache its mapping or youmust specify the IP address mapping in a local file. Ifyou specify an IP address for the listen address, and aclient request then specifies a DNS name, WebLogicServer attempts to resolve the DNS name. If it cannotaccess DNS name mapping, the request fails.
localhost When using localhost
• Processes must specify localhost to connect to theserver instance
• Only processes that reside on the machine thathosts the server instance (local processes) canconnect to the server instance.
5.21.2 Specifying the Listen PortNote the following guidelines when specifying the listen port for the AdministrationServer. These guidelines also apply to Managed Servers.
• Although you can specify any valid port number, if you specify port 80, you canomit the port number from the HTTP request used to access resources over HTTP.For example, if you define port 80 as the listen port, you can use the URL http://hostname/myfile.html instead of http://hostname:portnumber/myfile.html.
• On some operating systems, port 80 can be accessed only by processes run under aprivileged user or group ID. In this case, you can assign the server instance to aUNIX machine on which a post-bind UID or GID is defined.
5.22 Node ManagerYou can use this screen to select the Node Manager configurations applicable for thedomain. You can also skip this step to create the Node Manager manually at a laterpoint.
When you start the Node Manager for a domain, it looks for thenodemanager.properties file in the Node Manager home directory.
Node Manager
5-32 Creating WebLogic Domains Using the Configuration Wizard

Option/Field Description
Node Manager Type Select one of the following Node Manager types.
Per Domain Default Location If you select this option, the Node Manager home ispredefined within the domain as <domain_name>/nodemanager and you cannot edit the Node Managerhome. The Node Manager for each domain can have adifferent configuration, as determined by the files inthis directory.
Per Domain Custom Location Select this option if you want the Node Managerconfiguration files to be created in a specific locationfor this domain. Specify the directory in the NodeManager Home field, or click Browse to navigate to thelocation. The specified directory must be empty. Thenodemanager.properties andnodemanager.domains files will be created in thisdirectory.
Manual Node Manager Setup If you select this option, creation of the Node Managerconfiguration for the domain is skipped, and you mustmanually create and update the Node Managerconfiguration for the domain.
You should also select this option if you do not want touse Node Manager in the domain.
Note: When creating standalone domains for OHS andODI, do not select this option. A per domain NodeManager configuration is required for systemcomponent standalone domains.
For more information about Node Managerconfiguration, see Oracle Fusion MiddlewareAdministering Node Manager for Oracle WebLogic Server.
Username
Password
Confirm Password
The username and password that is used to start thespecified Node Manager.
Node Manager Home If you selected the Per Domain Custom Locationoption, click Browse and navigate to the directorylocation of the Node Manager that you want to use.
5.23 Managed ServersYou can use this screen to add, delete, or clone Managed Servers, and assign a user-expandable server group (if available) to a Managed Server. You can also change thesettings for an existing Managed Server.
You can create Managed Servers on remote machines by using the pack and unpackcommands.
For more information, see Creating and Starting a Managed Server on a RemoteMachine in Oracle Fusion Middleware Creating Templates and Domains Using the Pack andUnpack Commands.
Managed Servers
Configuration Wizard Screens 5-33
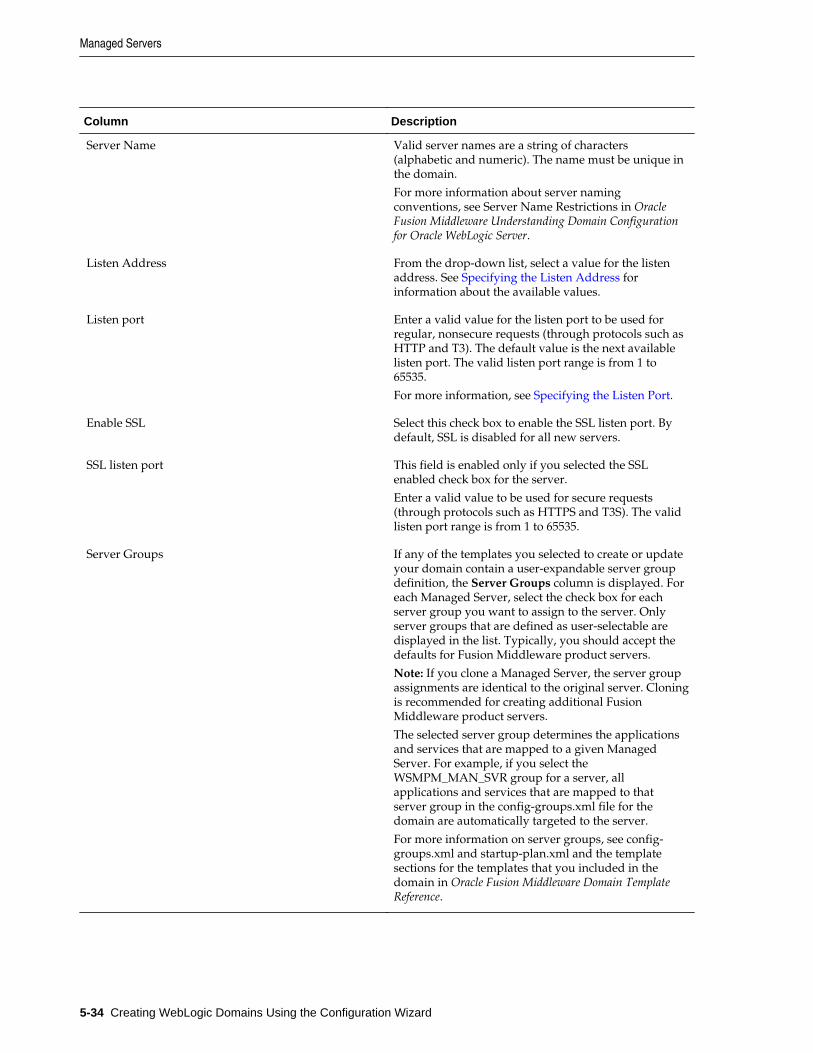
Column Description
Server Name Valid server names are a string of characters(alphabetic and numeric). The name must be unique inthe domain.
For more information about server namingconventions, see Server Name Restrictions in OracleFusion Middleware Understanding Domain Configurationfor Oracle WebLogic Server.
Listen Address From the drop-down list, select a value for the listenaddress. See Specifying the Listen Address forinformation about the available values.
Listen port Enter a valid value for the listen port to be used forregular, nonsecure requests (through protocols such asHTTP and T3). The default value is the next availablelisten port. The valid listen port range is from 1 to65535.
For more information, see Specifying the Listen Port.
Enable SSL Select this check box to enable the SSL listen port. Bydefault, SSL is disabled for all new servers.
SSL listen port This field is enabled only if you selected the SSLenabled check box for the server.
Enter a valid value to be used for secure requests(through protocols such as HTTPS and T3S). The validlisten port range is from 1 to 65535.
Server Groups If any of the templates you selected to create or updateyour domain contain a user-expandable server groupdefinition, the Server Groups column is displayed. Foreach Managed Server, select the check box for eachserver group you want to assign to the server. Onlyserver groups that are defined as user-selectable aredisplayed in the list. Typically, you should accept thedefaults for Fusion Middleware product servers.
Note: If you clone a Managed Server, the server groupassignments are identical to the original server. Cloningis recommended for creating additional FusionMiddleware product servers.
The selected server group determines the applicationsand services that are mapped to a given ManagedServer. For example, if you select theWSMPM_MAN_SVR group for a server, allapplications and services that are mapped to thatserver group in the config-groups.xml file for thedomain are automatically targeted to the server.
For more information on server groups, see config-groups.xml and startup-plan.xml and the templatesections for the templates that you included in thedomain in Oracle Fusion Middleware Domain TemplateReference.
Managed Servers
5-34 Creating WebLogic Domains Using the Configuration Wizard
To add a server, click Add and configure the settings for the new server. The defaultname for a new server is new_ManagedServer_n, where n starts at 1 and incrementsfor each new server you add.
To clone a server, click in the row for the server you want to clone, and then clickClone. The default name for the new clone is original_server_name_clonen,where n starts at 1 and increments for each new server that you clone from that server.When you create a Managed Server that is a clone of an existing Managed Server, allapplications and libraries that are targeted to the source server are also deployed tothe clone. The cloned server is also assigned to all server groups to which the sourceserver is assigned (if any). In addition, any of the following services that are targetedto the source server are automatically targeted to the clone:
• connectionFactory
• queueConnectionFactory
• topicConnection
• Queue
• Topic
• activationSpec
• Data source
• URLProvider
• workManager
• busMember
• customService
• resourceAdapter
To delete a server, select the server and click Delete. You can delete only one server ata time.
5.24 ClustersA cluster is a group of WebLogic Server instances that work together to providescalability and high-availability for applications. Use this screen to add or deleteclusters, or to change the settings for an existing cluster.
By creating clusters, you can group Managed Servers such that they operate as a singleunit for hosting applications and resources.
Column Description
Cluster Name Specify a valid name. The name of the clustermust be unique among all component nameswithin the WebLogic domain.
Clusters
Configuration Wizard Screens 5-35
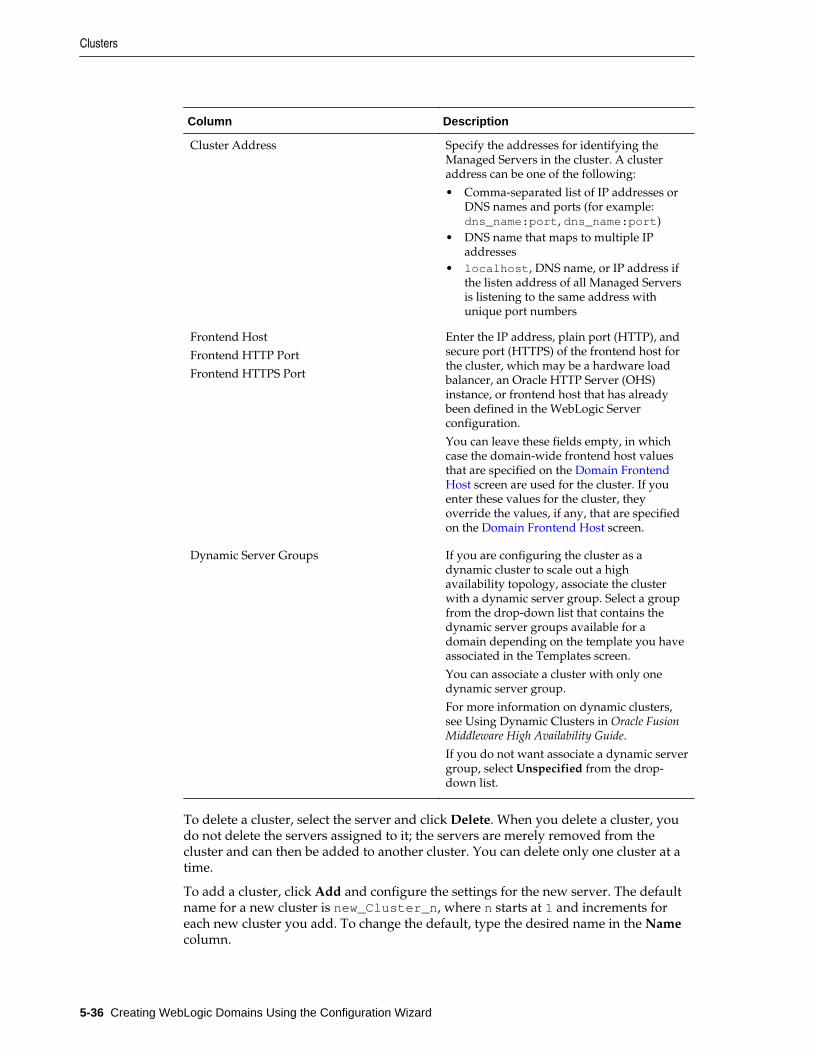
Column Description
Cluster Address Specify the addresses for identifying theManaged Servers in the cluster. A clusteraddress can be one of the following:
• Comma-separated list of IP addresses orDNS names and ports (for example:dns_name:port, dns_name:port)
• DNS name that maps to multiple IPaddresses
• localhost, DNS name, or IP address ifthe listen address of all Managed Serversis listening to the same address withunique port numbers
Frontend Host
Frontend HTTP Port
Frontend HTTPS Port
Enter the IP address, plain port (HTTP), andsecure port (HTTPS) of the frontend host forthe cluster, which may be a hardware loadbalancer, an Oracle HTTP Server (OHS)instance, or frontend host that has alreadybeen defined in the WebLogic Serverconfiguration.
You can leave these fields empty, in whichcase the domain-wide frontend host valuesthat are specified on the Domain FrontendHost screen are used for the cluster. If youenter these values for the cluster, theyoverride the values, if any, that are specifiedon the Domain Frontend Host screen.
Dynamic Server Groups If you are configuring the cluster as adynamic cluster to scale out a highavailability topology, associate the clusterwith a dynamic server group. Select a groupfrom the drop-down list that contains thedynamic server groups available for adomain depending on the template you haveassociated in the Templates screen.
You can associate a cluster with only onedynamic server group.
For more information on dynamic clusters,see Using Dynamic Clusters in Oracle FusionMiddleware High Availability Guide.
If you do not want associate a dynamic servergroup, select Unspecified from the drop-down list.
To delete a cluster, select the server and click Delete. When you delete a cluster, youdo not delete the servers assigned to it; the servers are merely removed from thecluster and can then be added to another cluster. You can delete only one cluster at atime.
To add a cluster, click Add and configure the settings for the new server. The defaultname for a new cluster is new_Cluster_n, where n starts at 1 and increments foreach new cluster you add. To change the default, type the desired name in the Namecolumn.
Clusters
5-36 Creating WebLogic Domains Using the Configuration Wizard
For more information about clusters, see Setting Up WebLogic Clusters in OracleFusion Middleware Administering Clusters for Oracle WebLogic Server.
5.25 Server TemplatesYou can use the Server Templates screen to define one or more server templates forthe domain. A server template contains common, non-default settings and attributesthat you can apply to a set of server instances, which then inherit the templateconfiguration.
For more information, see Server Templates in Oracle Fusion Middleware UnderstandingDomain Configuration for Oracle WebLogic Server.
Server templates can be used to create dynamic clusters. Dynamic clusters consist ofserver instances that can be dynamically scaled up to meet the resource needs of yourapplication. For more information, see Dynamic Clusters in Oracle Fusion MiddlewareAdministering Clusters for Oracle WebLogic Server.
Column Description
Name The list of server templates will be populated eitherbased on the dynamic server group that you haveassociated with the cluster in the Clusters screen or thetemplates that already exist in the domain. You canmodify or define new server templates, if required.
Listen Port The default TCP port that the server uses to listen forregular (non-SSL) incoming connections.
Administrators must have the right privileges beforebinding to a port or else this operation will not besuccessful and it will render the console un-reachable.
If this port is disabled, the SSL port must be enabled.Additional ports can be configured using networkchannels. The cluster (multicast) port is configuredseparately.
SSL Listen Port The port that the server uses to listen for secure (SSL)incoming connections.
Cluster You have to associate each server template with theappropriate cluster that you have created in theClusters screen. From the drop-down menu, select thecluster to which a server template belongs. Thedynamic server instances that are generated from thecluster is based on the selected server template.
For more information on dynamic clusters, see UsingDynamic Clusters in Oracle Fusion Middleware HighAvailability Guide.
5.26 Dynamic ServersThis screen lists each of the clusters that you have created in the current configurationsession. You can designate one or more of these clusters to be a dynamic cluster.
For each cluster in the table, use the Dynamic Cluster check box to indicate that thecluster will be a dynamic cluster.
Server Templates
Configuration Wizard Screens 5-37
When you indicate that a cluster will be a dynamic cluster, you can then definespecific properties for each cluster that control how WebLogic Server will create thedynamic servers.
For more information, see Dynamic Clusters in Oracle Fusion Middleware AdministeringClusters for Oracle WebLogic Server.
Column Description
Cluster Name By default, the names of the clusters that you created inthe Clusters screen are listed here. You can change thename, if required.
Server Name Prefix The server name prefix to use when creating thedynamic server names. By default, the prefix of thedynamic server group that you associate with thecluster in the Clusters screen is used.
Note: Applicable only if youdesignate the cluster as adynamic cluster.
Server Template The drop-down list displays only those servertemplates that you have associated with the selectedcluster, in the Server Templates screen. Associate eachcluster with the appropriate server template.
Note: Applicable only if youdesignate the cluster as adynamic cluster.
Maximum Dynamic Server Count The maximum number of server instances allowed tobe created.
This value should be set to the number of serversexpected to be in the cluster. The specified number ofservers are dynamically added to the configuration atruntime.
Note: Applicable only if youdesignate the cluster as adynamic cluster.
Dynamic Servers
5-38 Creating WebLogic Domains Using the Configuration Wizard
Column Description
Machine Name Match Expression The machine name expression to use when selectingmachine names.
Note: Applicable only if youdesignate the cluster as adynamic cluster.
Calculated Machine Names Specifies whether machine names are calculated.
Note: Applicable only if youdesignate the cluster as adynamic cluster.
Calculated Listen Ports Specifies whether listen ports for the server arecalculated.
Note: Applicable only if youdesignate the cluster as adynamic cluster.
Dynamic Cluster Select this check box to indicate that the selected clusteris a dynamic cluster.
For more information on dynamic clusters, see UsingDynamic Clusters in Oracle Fusion Middleware HighAvailability Guide.
For more information about using calculated server names, listen ports, or machinenames, see Calculating Server-Specific Attributes in Oracle Fusion MiddlewareAdministering Clusters for Oracle WebLogic Server.
5.27 Assign Servers to ClustersYou can use this screen to assign Managed Servers to clusters. Only Managed Serversare displayed in the Server list box. The Administration Server is not listed because itcannot be assigned to a cluster.
To assign one or more servers to a cluster:
1. In the Clusters list box, select the cluster to which you want to assign a ManagedServer.
2. Assign Managed Servers to the selected cluster in one of the following ways:
• Double-click the name of the Managed Server in the Servers list box.
• Select the Managed Server and click the right arrow.
Assign Servers to Clusters
Configuration Wizard Screens 5-39
• Shift+click to select multiple Managed Servers; then, click the right arrow.
The name of the Managed Server is removed from the Servers list box and addedbelow the name of the target cluster in the Clusters list box.
3. Repeat steps 1 and 2 for each Managed Server to assign to a cluster.
4. Review the cluster assignments.
If necessary, you can remove a Managed Server from a cluster in one of thefollowing ways:
• Double-click the name of the Managed Server in the Clusters list box.
• Select the Managed Server and click the left arrow.
The name of the Managed Server is removed from the Clusters list box andrestored to the Servers list box.
5.28 HTTP Proxy ApplicationsAn HTTP proxy application acts as an intermediary for HTTP requests. Use this screento create an HTTP proxy application for each cluster, and specify the Managed Serveron which the proxy application must be deployed.
This screen is displayed only if both of the following statements are true:
• At least one Managed Server is assigned to a cluster.
• At least one Managed Server is not assigned to any cluster.
Column Description
Cluster Name This column lists each cluster in the domain.
Create HTTP Proxy Select this check box for each cluster on which youwant to deploy the HTTP proxy application.
Proxy Server This drop-down list contains all Managed Servers thatare not assigned to a cluster. Select the Managed Serveron which to deploy the proxy application.
A proxy application namedOracleProxy4_clustername_servername iscreated and deployed on the Managed Server.
5.29 Coherence ClustersThis screen is displayed only if you have included Coherence in the WebLogic Serverinstallation. It lists the Coherence clusters that are automatically added to the domain.
Specify the following details for the Coherence cluster:
HTTP Proxy Applications
5-40 Creating WebLogic Domains Using the Configuration Wizard
Column Description
Name Accept the default cluster name or type a new name forthe Coherence cluster.
When updating a domain, if you have addedadditional Coherence clusters to the domain via WLSTor the WebLogic Server Administration Console, theyare also listed here.
Unicast Listen Port Enter the port number to use as the Coherence clusterunicast listen port.
When including a Coherence cluster in a domain, note the following:
• All Managed Servers and clusters that you configure in the domain during futureConfiguration Wizard sessions are automatically added to the Coherence cluster.
• Servers and clusters that already exist in the domain before you add a Coherencecluster to the domain are not automatically assigned to the Coherence cluster. Ifdesired, you can manually assign them to the Coherence cluster via a WLST scriptor the WebLogic Server Administration Console.
• When creating a domain via the Configuration Wizard, if the domain contains onlyan Administration Server and no Managed Servers, the Administration Server isautomatically assigned to the Coherence cluster. If, however, at least one ManagedServer is added to the domain during domain creation, the Administration Serveris not assigned to the Coherence cluster.
• If there are multiple Coherence clusters in the domain (for example, you added asecond Coherence cluster via WLST or the WebLogic Server AdministrationConsole), any servers or clusters that you subsequently add to the domain via theConfiguration Wizard are automatically assigned to the first Coherence cluster thatis listed on the Coherence Clusters screen.
5.30 MachinesIn a WebLogic domain, the machine definitions identify physical units of hardwareand are associated with the WebLogic Server instances or system components (such asOHS servers) that they host. Use this screen to add or delete machines, or to modifythe settings for an existing machine.
Each machine has the following configuration settings.
Select the Machine tab (for Windows) or the UNIX Machine tab (for UNIX).
Column Description
Name Enter a valid machine name. The machine name is usedto identify the machine within the WebLogic domain; itdoes not have to match the network name for themachine. The name must be unique among allcomponent names within the domain.
Enable Post Bind GID (UNIX machines only) Select this check box to enable aserver running on this machine to bind to a UNIXgroup ID (GID) after it finishes all privileged startupactions. By default, this check box is not selected.
Machines
Configuration Wizard Screens 5-41
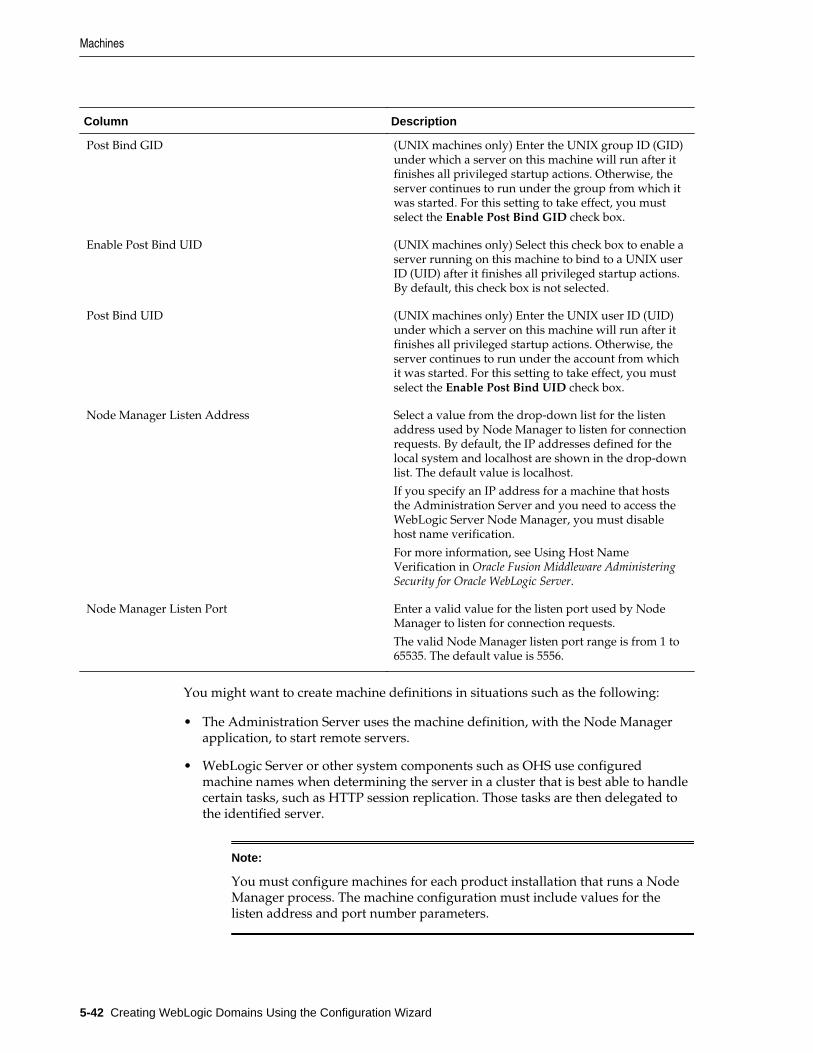
Column Description
Post Bind GID (UNIX machines only) Enter the UNIX group ID (GID)under which a server on this machine will run after itfinishes all privileged startup actions. Otherwise, theserver continues to run under the group from which itwas started. For this setting to take effect, you mustselect the Enable Post Bind GID check box.
Enable Post Bind UID (UNIX machines only) Select this check box to enable aserver running on this machine to bind to a UNIX userID (UID) after it finishes all privileged startup actions.By default, this check box is not selected.
Post Bind UID (UNIX machines only) Enter the UNIX user ID (UID)under which a server on this machine will run after itfinishes all privileged startup actions. Otherwise, theserver continues to run under the account from whichit was started. For this setting to take effect, you mustselect the Enable Post Bind UID check box.
Node Manager Listen Address Select a value from the drop-down list for the listenaddress used by Node Manager to listen for connectionrequests. By default, the IP addresses defined for thelocal system and localhost are shown in the drop-downlist. The default value is localhost.
If you specify an IP address for a machine that hoststhe Administration Server and you need to access theWebLogic Server Node Manager, you must disablehost name verification.
For more information, see Using Host NameVerification in Oracle Fusion Middleware AdministeringSecurity for Oracle WebLogic Server.
Node Manager Listen Port Enter a valid value for the listen port used by NodeManager to listen for connection requests.
The valid Node Manager listen port range is from 1 to65535. The default value is 5556.
You might want to create machine definitions in situations such as the following:
• The Administration Server uses the machine definition, with the Node Managerapplication, to start remote servers.
• WebLogic Server or other system components such as OHS use configuredmachine names when determining the server in a cluster that is best able to handlecertain tasks, such as HTTP session replication. Those tasks are then delegated tothe identified server.
Note:
You must configure machines for each product installation that runs a NodeManager process. The machine configuration must include values for thelisten address and port number parameters.
Machines
5-42 Creating WebLogic Domains Using the Configuration Wizard
Click Add to add a new machine. The default name for a new machine isnew_[Unix]Machine_n, where n starts at 1 and increments by 1 for each machinethat you add.
Click Delete to delete an existing machine.
5.31 Assign Servers to MachinesYou can use this screen to assign the WebLogic Server instances to each of themachines you defined in the Machines screen of the Configuration Wizard.
To assign a WebLogic Server instance to a machine you have defined:
1. In the Machine list box, select the Windows or UNIX machine to which you wantto assign a WebLogic Server instance.
2. Assign a WebLogic Server instance to the selected machine in one of the followingways:
• Double-click the WebLogic Server instance in the Server list box.
• Select the appropriate WebLogic Server instance in the Server list box and clickthe right arrow.
• Shift+click to select multiple servers in the Server list box; then, click the rightarrow.
The name of the WebLogic Server instance is removed from the Server list box andadded, below the name of the target machine, in the Machine list box.
3. Repeat steps 1 and 2 for each WebLogic Server instance to assign to a machine.
4. Review the machine assignments.
If necessary, you can remove a WebLogic Server instance from a machine in one ofthe following ways:
• Double-click the name of the appropriate WebLogic Server instance in theMachine list box.
• Select the appropriate WebLogic Server instance in the Machine list box andclick the left arrow.
The name of the WebLogic Server instance is removed from the Machine list boxand restored to the Server list box.
5.32 Virtual TargetsVirtual targets define the locations where a partition or resource group runs. You canuse this screen to add or delete Virtual Targets for use in a WebLogic ServerMultitenant (MT) environment.
Virtual Targets also provide instructions on how to route traffic, including addresses,protocol settings, and targeting. Request routing is determined by the host name andoptional URI.
For more information, see the following resources in Oracle Fusion Middleware UsingOracle WebLogic Server Multitenant:
• Virtual Targets
Assign Servers to Machines
Configuration Wizard Screens 5-43
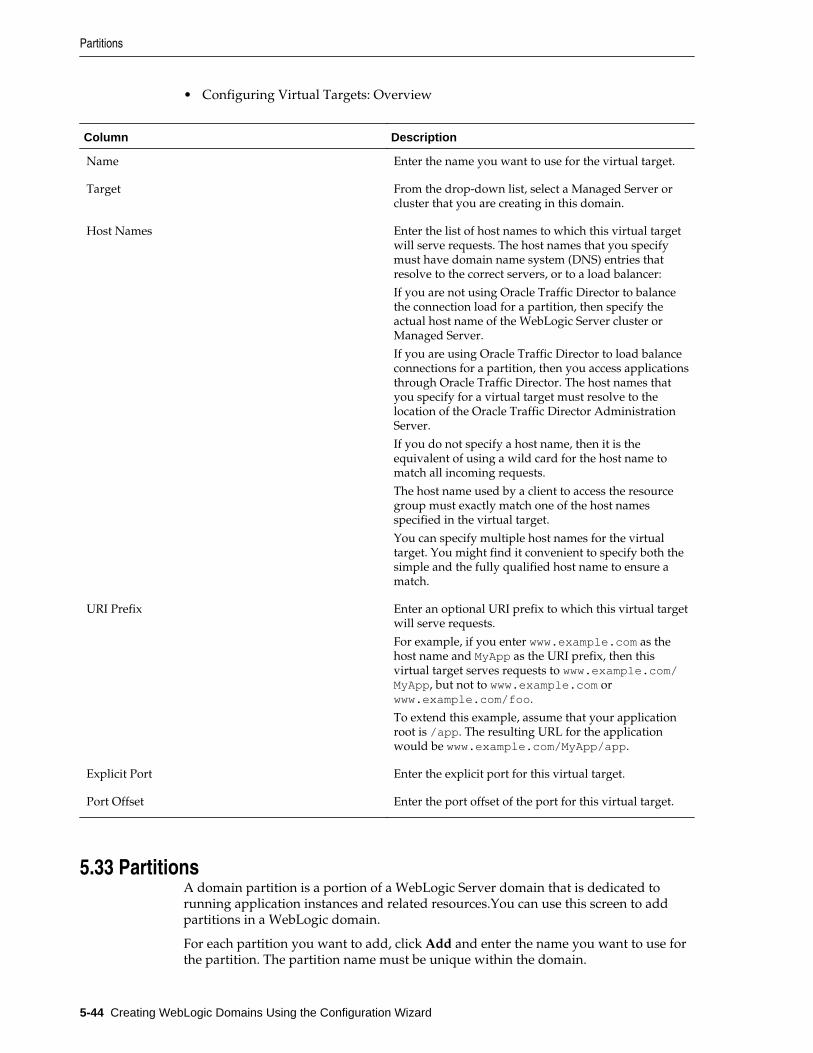
• Configuring Virtual Targets: Overview
Column Description
Name Enter the name you want to use for the virtual target.
Target From the drop-down list, select a Managed Server orcluster that you are creating in this domain.
Host Names Enter the list of host names to which this virtual targetwill serve requests. The host names that you specifymust have domain name system (DNS) entries thatresolve to the correct servers, or to a load balancer:
If you are not using Oracle Traffic Director to balancethe connection load for a partition, then specify theactual host name of the WebLogic Server cluster orManaged Server.
If you are using Oracle Traffic Director to load balanceconnections for a partition, then you access applicationsthrough Oracle Traffic Director. The host names thatyou specify for a virtual target must resolve to thelocation of the Oracle Traffic Director AdministrationServer.
If you do not specify a host name, then it is theequivalent of using a wild card for the host name tomatch all incoming requests.
The host name used by a client to access the resourcegroup must exactly match one of the host namesspecified in the virtual target.
You can specify multiple host names for the virtualtarget. You might find it convenient to specify both thesimple and the fully qualified host name to ensure amatch.
URI Prefix Enter an optional URI prefix to which this virtual targetwill serve requests.
For example, if you enter www.example.com as thehost name and MyApp as the URI prefix, then thisvirtual target serves requests to www.example.com/MyApp, but not to www.example.com orwww.example.com/foo.
To extend this example, assume that your applicationroot is /app. The resulting URL for the applicationwould be www.example.com/MyApp/app.
Explicit Port Enter the explicit port for this virtual target.
Port Offset Enter the port offset of the port for this virtual target.
5.33 PartitionsA domain partition is a portion of a WebLogic Server domain that is dedicated torunning application instances and related resources.You can use this screen to addpartitions in a WebLogic domain.
For each partition you want to add, click Add and enter the name you want to use forthe partition. The partition name must be unique within the domain.
Partitions
5-44 Creating WebLogic Domains Using the Configuration Wizard
For more information, see Configuring Domain Partitions in Oracle Fusion MiddlewareUsing Oracle WebLogic Server Multitenant.
5.34 Assign Virtual Targets to PartitionsYou can assign one or more existing virtual targets to a domain partition. You can usea virtual target with only one partition.
To assign Virtual Targets to a partition:
1. In the Partitions list box, select the partition to which you want to assign a VirtualTarget.
2. Assign virtual targets to the selected partition in one of the following ways:
• Double-click the target in the Virtual Targets list box.
• Select the appropriate target in the Virtual Targets list box and click the rightarrow.
• Shift+click to select multiple targets in the Virtual Targets list box; then, clickthe right arrow.
The name of the virtual target is removed from the Virtual Targets list box andadded, below the name of the target partition, in the Partitions list box.
3. Repeat steps 1 and 2 for each virtual target you want to assign to a machine.
4. Review the partition assignments.
If necessary, you can remove a virtual target from a partition in one of thefollowing ways:
• Double-click the name of the appropriate virtual target instance in thePartitions list box.
• Select the appropriate virtual target in the Partitions list box and click the leftarrow.
The name of the virtual target is removed from the Partitions list box and restoredto the Virtual Targets list box.
5.35 Domain Frontend HostWhen creating a new domain, you can use this screen to enable the frontend host,specify both the plain and secure URLs for the frontend host, and select the defaultfrontend host URL.
This screen is displayed only if you have selected the Domain Frontend Host Captureoption on the Advanced Configuration screen.
If there are one or more OHS instances configured in the domain, the Plain and SSLfields are automatically populated with the appropriate values from the first OHSinstance in the domain. Otherwise, you must configure the values. The settings arethen saved to a service table.
When updating a domain, the values are populated based on the values in the servicetable (if any). If the service table values are null and there are no OHS instancesconfigured, the Configure Domain Frontend Host check box is deselected
Assign Virtual Targets to Partitions
Configuration Wizard Screens 5-45
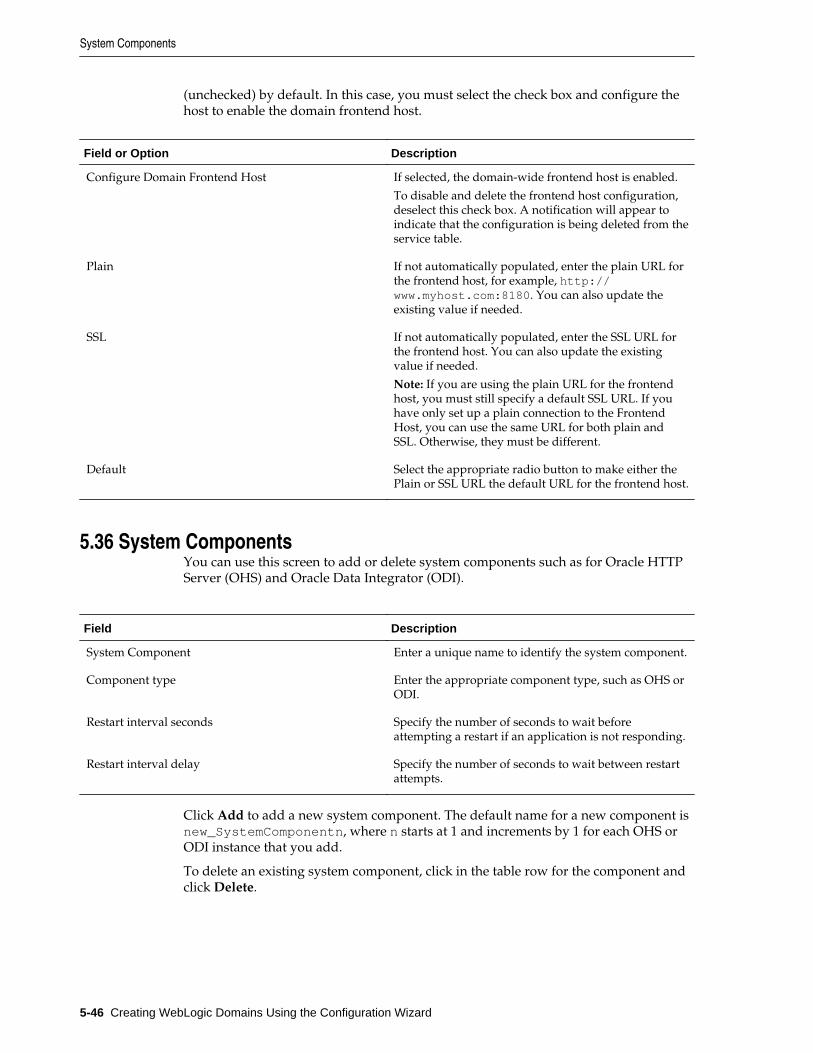
(unchecked) by default. In this case, you must select the check box and configure thehost to enable the domain frontend host.
Field or Option Description
Configure Domain Frontend Host If selected, the domain-wide frontend host is enabled.
To disable and delete the frontend host configuration,deselect this check box. A notification will appear toindicate that the configuration is being deleted from theservice table.
Plain If not automatically populated, enter the plain URL forthe frontend host, for example, http://www.myhost.com:8180. You can also update theexisting value if needed.
SSL If not automatically populated, enter the SSL URL forthe frontend host. You can also update the existingvalue if needed.
Note: If you are using the plain URL for the frontendhost, you must still specify a default SSL URL. If youhave only set up a plain connection to the FrontendHost, you can use the same URL for both plain andSSL. Otherwise, they must be different.
Default Select the appropriate radio button to make either thePlain or SSL URL the default URL for the frontend host.
5.36 System ComponentsYou can use this screen to add or delete system components such as for Oracle HTTPServer (OHS) and Oracle Data Integrator (ODI).
Field Description
System Component Enter a unique name to identify the system component.
Component type Enter the appropriate component type, such as OHS orODI.
Restart interval seconds Specify the number of seconds to wait beforeattempting a restart if an application is not responding.
Restart interval delay Specify the number of seconds to wait between restartattempts.
Click Add to add a new system component. The default name for a new component isnew_SystemComponentn, where n starts at 1 and increments by 1 for each OHS orODI instance that you add.
To delete an existing system component, click in the table row for the component andclick Delete.
System Components
5-46 Creating WebLogic Domains Using the Configuration Wizard
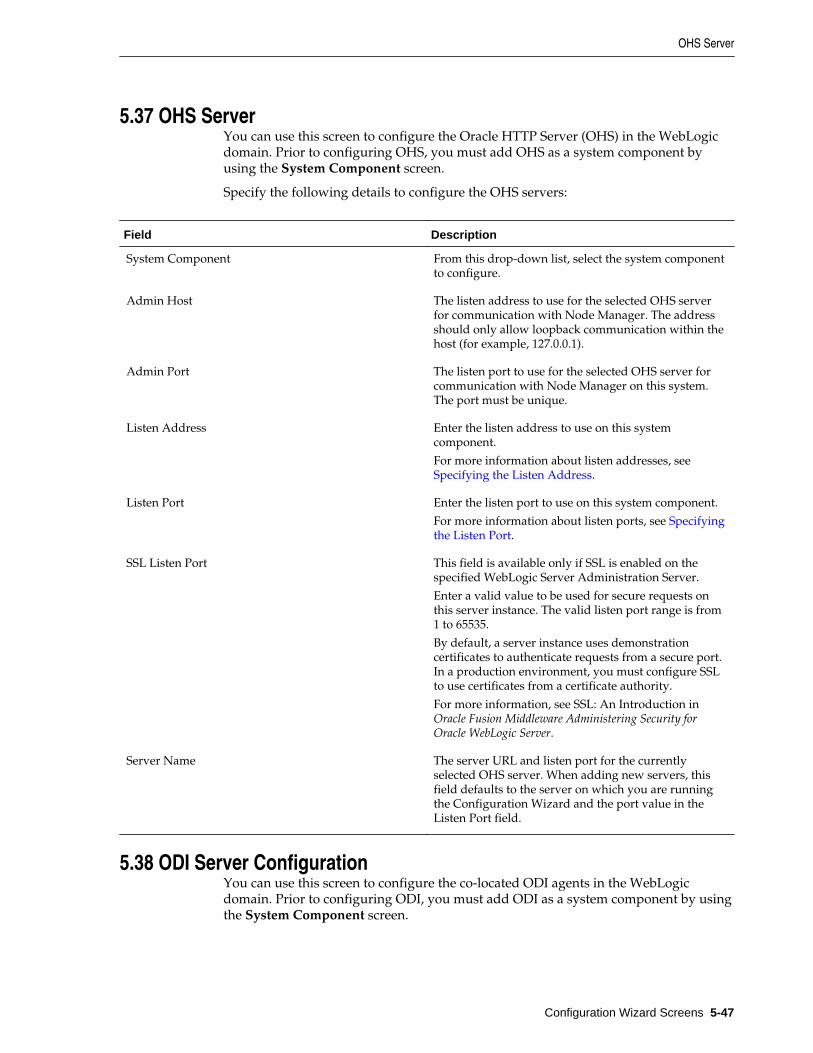
5.37 OHS ServerYou can use this screen to configure the Oracle HTTP Server (OHS) in the WebLogicdomain. Prior to configuring OHS, you must add OHS as a system component byusing the System Component screen.
Specify the following details to configure the OHS servers:
Field Description
System Component From this drop-down list, select the system componentto configure.
Admin Host The listen address to use for the selected OHS serverfor communication with Node Manager. The addressshould only allow loopback communication within thehost (for example, 127.0.0.1).
Admin Port The listen port to use for the selected OHS server forcommunication with Node Manager on this system.The port must be unique.
Listen Address Enter the listen address to use on this systemcomponent.
For more information about listen addresses, see Specifying the Listen Address.
Listen Port Enter the listen port to use on this system component.
For more information about listen ports, see Specifyingthe Listen Port.
SSL Listen Port This field is available only if SSL is enabled on thespecified WebLogic Server Administration Server.
Enter a valid value to be used for secure requests onthis server instance. The valid listen port range is from1 to 65535.
By default, a server instance uses demonstrationcertificates to authenticate requests from a secure port.In a production environment, you must configure SSLto use certificates from a certificate authority.
For more information, see SSL: An Introduction inOracle Fusion Middleware Administering Security forOracle WebLogic Server.
Server Name The server URL and listen port for the currentlyselected OHS server. When adding new servers, thisfield defaults to the server on which you are runningthe Configuration Wizard and the port value in theListen Port field.
5.38 ODI Server ConfigurationYou can use this screen to configure the co-located ODI agents in the WebLogicdomain. Prior to configuring ODI, you must add ODI as a system component by usingthe System Component screen.
OHS Server
Configuration Wizard Screens 5-47
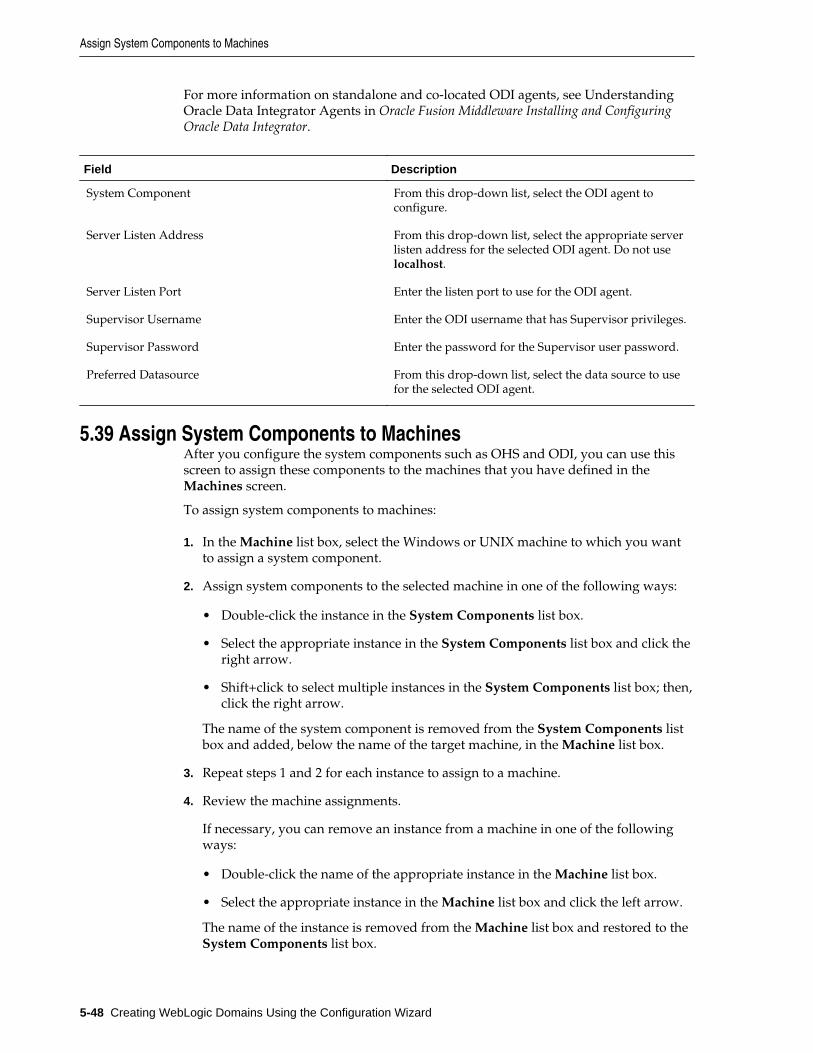
For more information on standalone and co-located ODI agents, see UnderstandingOracle Data Integrator Agents in Oracle Fusion Middleware Installing and ConfiguringOracle Data Integrator.
Field Description
System Component From this drop-down list, select the ODI agent toconfigure.
Server Listen Address From this drop-down list, select the appropriate serverlisten address for the selected ODI agent. Do not uselocalhost.
Server Listen Port Enter the listen port to use for the ODI agent.
Supervisor Username Enter the ODI username that has Supervisor privileges.
Supervisor Password Enter the password for the Supervisor user password.
Preferred Datasource From this drop-down list, select the data source to usefor the selected ODI agent.
5.39 Assign System Components to MachinesAfter you configure the system components such as OHS and ODI, you can use thisscreen to assign these components to the machines that you have defined in theMachines screen.
To assign system components to machines:
1. In the Machine list box, select the Windows or UNIX machine to which you wantto assign a system component.
2. Assign system components to the selected machine in one of the following ways:
• Double-click the instance in the System Components list box.
• Select the appropriate instance in the System Components list box and click theright arrow.
• Shift+click to select multiple instances in the System Components list box; then,click the right arrow.
The name of the system component is removed from the System Components listbox and added, below the name of the target machine, in the Machine list box.
3. Repeat steps 1 and 2 for each instance to assign to a machine.
4. Review the machine assignments.
If necessary, you can remove an instance from a machine in one of the followingways:
• Double-click the name of the appropriate instance in the Machine list box.
• Select the appropriate instance in the Machine list box and click the left arrow.
The name of the instance is removed from the Machine list box and restored to theSystem Components list box.
Assign System Components to Machines
5-48 Creating WebLogic Domains Using the Configuration Wizard

5.40 Deployments TargetingApplications associated with the product for which you are configuring the domainare targeted automatically to the Managed Server that is created for that product, or tothe cluster to which that Managed Server is assigned. In this screen, you can targetapplications to additional servers and clusters.
To target an application deployment to a cluster or server:
1. In the Target list box, select the cluster or server on which you want to deployapplications.
The name of the selected target is displayed as the title of the list box on the right.
2. In the target_name list box, select the check boxes corresponding to the applicationsto deploy on the selected target.
The applications displayed here vary, depending on the products that you selectedin the Select Domain Source screen, earlier in the wizard.
Note:
When you select a Managed Server in the Target list box, some of the checkboxes in the target_name list box might be disabled, indicating applicationsthat are already targeted at the cluster that contains the selected ManagedServer.
After you select applications, the names of the targeted clusters and servers aredisplayed in the Target column in the target_name list box.
3. Repeat steps 1 and 2 for the other clusters and servers, as required.
4. After making the required selections, click Next.
When you extend a domain, if you delete a Managed Server or cluster to whichapplications are currently targeted, the Configuration Wizard automatically retargetsthose applications as follows:
• If the applications were originally targeted solely to the Managed Server or clusterthat you are now deleting (that is, after you delete the Managed Server or cluster,the applications would become untargeted in the modified domain), then theConfiguration Wizard automatically retargets the applications to all eligible targets.
An eligible target is any cluster or Managed Server that is not defined in theconfiguration groups specification (config-groups.xml file) of an includedtemplate. Servers or clusters that are specified in config-groups.xml areessentially owned by the template and, therefore, are not eligible for automatictargeting.
• If the applications were originally targeted to multiple targets (including ManagedServers, clusters, and the Administration Server), and one of the targeted ManagedServers or clusters is deleted, then, in the extended domain, the ConfigurationWizard leaves the remaining target associations intact and does not attempt toretarget the applications.
Deployments Targeting
Configuration Wizard Screens 5-49
5.41 Services TargetingServices that are associated with the product for which you are configuring thedomain are targeted automatically to the Managed Server created for that product, orto the cluster to which that Managed Server is assigned. In this screen, you can targetservices to additional servers and clusters.
To target services to Managed Servers or clusters:
1. In the Target list box, select the cluster or server on which you want to deployservices.
The name of the selected target is displayed as the title of the list box on the right.
2. In the target_name list box, select the check boxes corresponding to the services todeploy on the selected target.
The services displayed here vary, depending on the products that you selected inthe Select Domain Source screen earlier in the wizard.
Note:
When you select a Managed Server in the Target list box, some of the checkboxes in the target_name list box might be disabled, indicating services that arealready targeted at the cluster that contains the selected Managed Server.
After you select services, the names of the targeted clusters and servers aredisplayed in the Target column in the target_name list box.
3. Repeat steps 1 and 2 for the other clusters and servers, as required.
4. After making the required selections, click Next.
When you extend a domain, if you delete a Managed Server or cluster to whichservices are currently targeted, the Configuration Wizard automatically retargets thoseservices as follows:
• If the services were originally targeted solely to the Managed Server or cluster thatyou are now deleting (that is, after you delete the Managed Server or cluster, theservices would become untargeted in the modified domain), then theConfiguration Wizard automatically retargets the services to all eligible targets.
An eligible target is any cluster or Managed Server that is not defined in theconfiguration groups specification (config-groups.xml file) of an includedtemplate. Servers or clusters that are specified in config-groups.xml areessentially owned by the template and, therefore, are not eligible for automatictargeting.
• If the services were originally targeted to multiple targets (including ManagedServers, clusters, and the Administration Server), and one of the targeted ManagedServers or clusters is deleted, then, in the extended domain, the ConfigurationWizard leaves the remaining target associations intact and does not attempt toretarget the services.
Services Targeting
5-50 Creating WebLogic Domains Using the Configuration Wizard
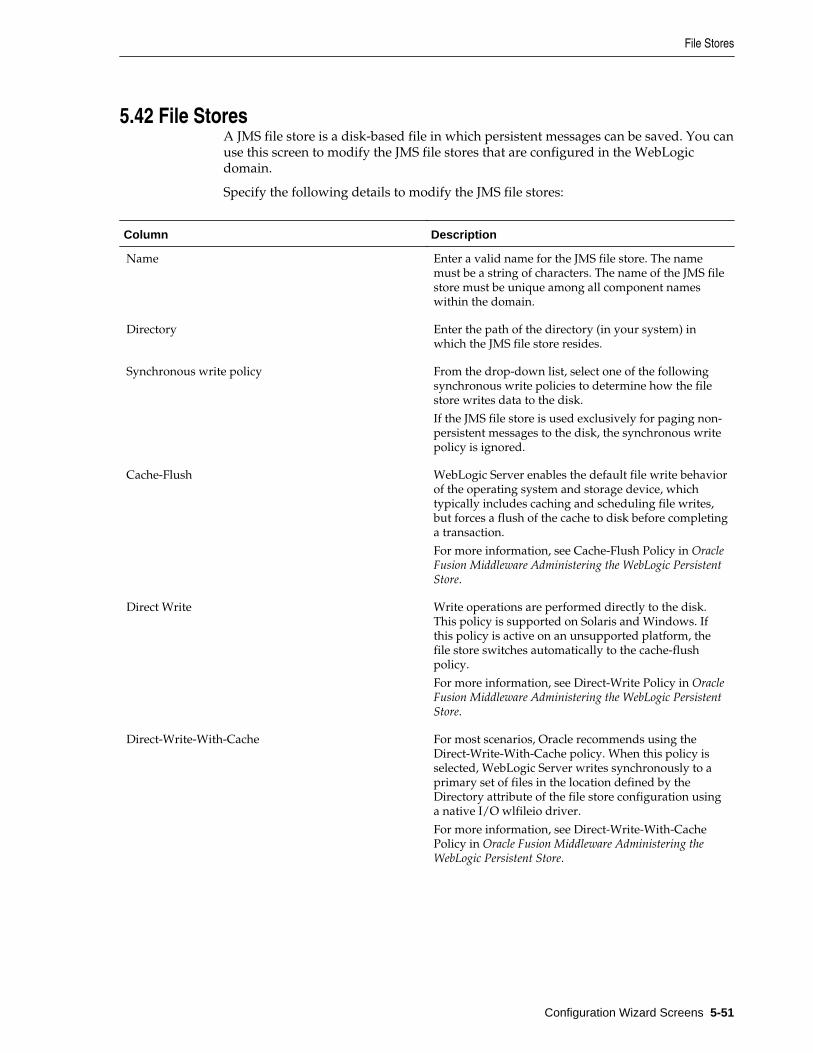
5.42 File StoresA JMS file store is a disk-based file in which persistent messages can be saved. You canuse this screen to modify the JMS file stores that are configured in the WebLogicdomain.
Specify the following details to modify the JMS file stores:
Column Description
Name Enter a valid name for the JMS file store. The namemust be a string of characters. The name of the JMS filestore must be unique among all component nameswithin the domain.
Directory Enter the path of the directory (in your system) inwhich the JMS file store resides.
Synchronous write policy From the drop-down list, select one of the followingsynchronous write policies to determine how the filestore writes data to the disk.
If the JMS file store is used exclusively for paging non-persistent messages to the disk, the synchronous writepolicy is ignored.
Cache-Flush WebLogic Server enables the default file write behaviorof the operating system and storage device, whichtypically includes caching and scheduling file writes,but forces a flush of the cache to disk before completinga transaction.
For more information, see Cache-Flush Policy in OracleFusion Middleware Administering the WebLogic PersistentStore.
Direct Write Write operations are performed directly to the disk.This policy is supported on Solaris and Windows. Ifthis policy is active on an unsupported platform, thefile store switches automatically to the cache-flushpolicy.
For more information, see Direct-Write Policy in OracleFusion Middleware Administering the WebLogic PersistentStore.
Direct-Write-With-Cache For most scenarios, Oracle recommends using theDirect-Write-With-Cache policy. When this policy isselected, WebLogic Server writes synchronously to aprimary set of files in the location defined by theDirectory attribute of the file store configuration usinga native I/O wlfileio driver.
For more information, see Direct-Write-With-CachePolicy in Oracle Fusion Middleware Administering theWebLogic Persistent Store.
File Stores
Configuration Wizard Screens 5-51
Column Description
Disabled Transactions are complete as soon as the writes arecached in memory. When this policy is active,completion of transactions does not depend on waitingfor writes to reach the disk. This setting affectsperformance, scalability, and reliability.
For more information, see Disabled Policy in OracleFusion Middleware Administering the WebLogic PersistentStore.
5.43 Configuration SummaryThis screen provides a summary of the configuration settings for the WebLogicdomain. Review the details before you proceed.
In the Domain Summary pane, select an item to display details about that item in theDetails pane on the right.
You can limit the items that are displayed in the Domain Summary pane by selectinga filter option from the Summary View drop-down list.
If you need to change the configuration, click Back to return to the appropriate screen.
When done, click Create to create the domain.
5.44 Configuration ProgressIf you are creating a domain, this screen shows the progress of the domain creation. Ifyou are updating (extending) a domain, this screen shows the progress of the domainupdate.
If you are creating a domain using templates that were selected in the Templatesscreen, detailed messages are displayed as the domain is being created.
If you are configuring the WebLogic Server samples domains at the end of WebLogicServer installation, the following messages are displayed for each domain:
Generating domain domain_name
---------------------------------------------
Successfully generated domain: domain_name
When the domain creation process completes, click Next or Finish to continue. Notethat in some situations, the Finish button is not available and you must click Next.
5.45 Configuration SuccessDepending on whether you run the full Configuration Wizard or the Quick StartConfiguration Wizard, the appropriate configuration success message appears on thisscreen.
Single Domain
The message "New Domain domain_name Created" is displayed, and the domainlocation is provided along with the Administration Server URL to use for the domain.
On Windows systems, if you want to start the Administration Server after closing theConfiguration Wizard, select the Start Admin Server check box. This check box is notavailable on UNIX systems.
Configuration Summary
5-52 Creating WebLogic Domains Using the Configuration Wizard
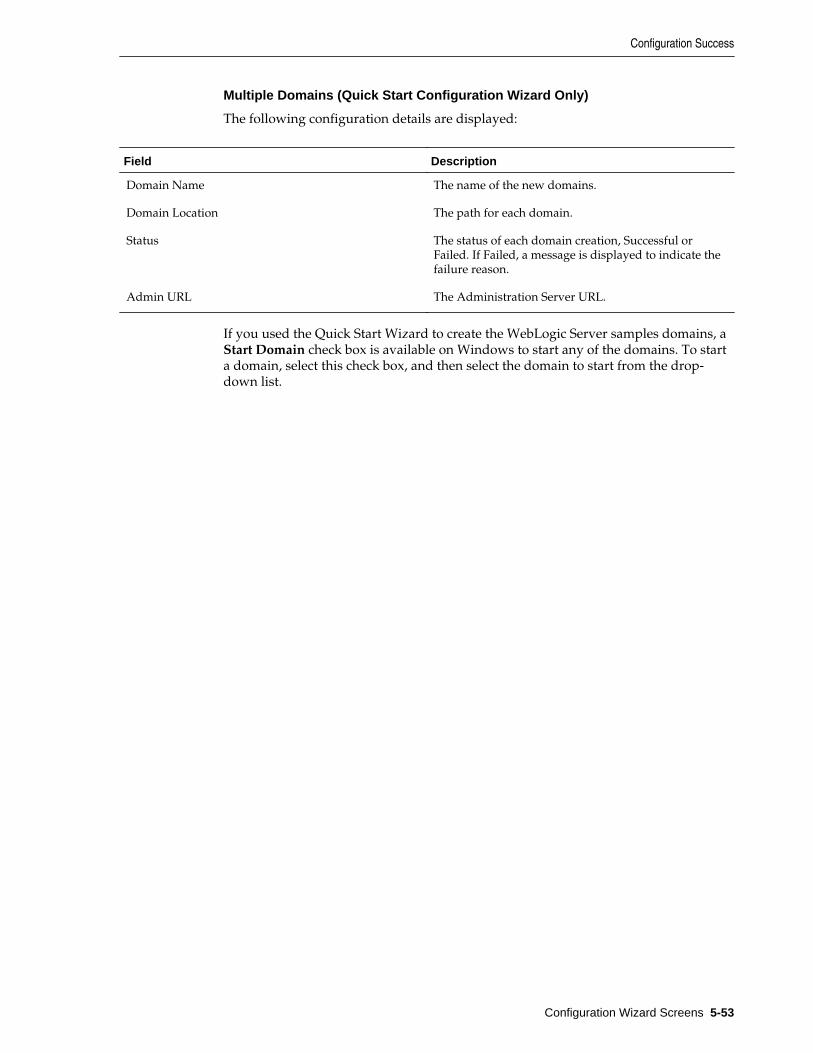
Multiple Domains (Quick Start Configuration Wizard Only)
The following configuration details are displayed:
Field Description
Domain Name The name of the new domains.
Domain Location The path for each domain.
Status The status of each domain creation, Successful orFailed. If Failed, a message is displayed to indicate thefailure reason.
Admin URL The Administration Server URL.
If you used the Quick Start Wizard to create the WebLogic Server samples domains, aStart Domain check box is available on Windows to start any of the domains. To starta domain, select this check box, and then select the domain to start from the drop-down list.
Configuration Success
Configuration Wizard Screens 5-53

Configuration Success
5-54 Creating WebLogic Domains Using the Configuration Wizard