oracle® application server portal fileoracle® application server portal installation and upgrade...
TRANSCRIPT
Oracle® Application Server Portal Installation and Upgrade Guide
10g Release 2 (10.1.4)
B19135-01
October 2005
Oracle Application Server Portal Installation and Upgrade Guide, 10g Release 2 (10.1.4)
B19135-01
Copyright © 2005, Oracle. All rights reserved.
Primary Author: Lalithashree Rajesh
Contributors: Balakrishnan Jagdeesan, Chandrahasa Peddamallu, Gayathri Balachandran, Jaya Chaudhary, Jeni Ferns, John Bellemore, Lei Oh, Liz Hanks, Mark Cann, Nachiketa Shukla, Nick Greenhalgh, Nidhi Shrotriya, Paul Encarnacion, Peter Henty, Peter Lubbers, Rangarajan Eechampadi, Ravishankar Ramanathan, Ross Clewley, Sachin Parashar, Sanjay Khanna, Sarah Maslin, Stephen Thornhill, Tim Harkness, Vandana Deep, Victoria Chun, Yueh-Hong Lin.
The Programs (which include both the software and documentation) contain proprietary information; they are provided under a license agreement containing restrictions on use and disclosure and are also protected by copyright, patent, and other intellectual and industrial property laws. Reverse engineering, disassembly, or decompilation of the Programs, except to the extent required to obtain interoperability with other independently created software or as specified by law, is prohibited.
The information contained in this document is subject to change without notice. If you find any problems in the documentation, please report them to us in writing. This document is not warranted to be error-free. Except as may be expressly permitted in your license agreement for these Programs, no part of these Programs may be reproduced or transmitted in any form or by any means, electronic or mechanical, for any purpose.
If the Programs are delivered to the United States Government or anyone licensing or using the Programs on behalf of the United States Government, the following notice is applicable:
U.S. GOVERNMENT RIGHTS Programs, software, databases, and related documentation and technical data delivered to U.S. Government customers are "commercial computer software" or "commercial technical data" pursuant to the applicable Federal Acquisition Regulation and agency-specific supplemental regulations. As such, use, duplication, disclosure, modification, and adaptation of the Programs, including documentation and technical data, shall be subject to the licensing restrictions set forth in the applicable Oracle license agreement, and, to the extent applicable, the additional rights set forth in FAR 52.227-19, Commercial Computer Software—Restricted Rights (June 1987). Oracle Corporation, 500 Oracle Parkway, Redwood City, CA 94065
The Programs are not intended for use in any nuclear, aviation, mass transit, medical, or other inherently dangerous applications. It shall be the licensee's responsibility to take all appropriate fail-safe, backup, redundancy and other measures to ensure the safe use of such applications if the Programs are used for such purposes, and we disclaim liability for any damages caused by such use of the Programs.
Oracle, JD Edwards, PeopleSoft, and Retek are registered trademarks of Oracle Corporation and/or its affiliates. Other names may be trademarks of their respective owners.
The Programs may provide links to Web sites and access to content, products, and services from third parties. Oracle is not responsible for the availability of, or any content provided on, third-party Web sites. You bear all risks associated with the use of such content. If you choose to purchase any products or services from a third party, the relationship is directly between you and the third party. Oracle is not responsible for: (a) the quality of third-party products or services; or (b) fulfilling any of the terms of the agreement with the third party, including delivery of products or services and warranty obligations related to purchased products or services. Oracle is not responsible for any loss or damage of any sort that you may incur from dealing with any third party.
iii
Contents
Preface ................................................................................................................................................................ vii
Audience...................................................................................................................................................... viiDocumentation Accessibility ................................................................................................................... viiiRelated Documents ................................................................................................................................... viiiConventions ................................................................................................................................................. ix
Part I Installation
1 Installing OracleAS Portal Release 10.1.4
1.1 Installing Oracle Application Server Release 10.1.2.0.2......................................................... 1-11.2 Upgrading to OracleAS Portal Release 10.1.4 from a Fresh Installation ............................ 1-21.2.1 Performing Pre-Upgrade Tasks ......................................................................................... 1-21.2.1.1 Stopping All Middle-Tier Instances........................................................................... 1-21.2.1.2 Ensuring That Oracle Internet Directory and Database Processes Are Running 1-31.2.2 Upgrading OracleAS Portal ............................................................................................... 1-31.2.2.1 Performing the upgrade .............................................................................................. 1-41.2.2.2 Reviewing the Upgrade Log File................................................................................ 1-61.2.2.3 Starting All Middle Tiers............................................................................................. 1-81.2.2.4 Accessing the Upgraded OracleAS Portal ............................................................... 1-81.2.3 Components That Require Post-Upgrade Tasks............................................................. 1-9
Part II Upgrade
2 Preparing to Upgrade
2.1 Understanding Oracle Application Server Portal Upgrade ................................................. 2-12.2 Verifying System Requirements ............................................................................................... 2-12.2.1 Supported Upgrade Paths .................................................................................................. 2-22.2.2 Supported Database Releases ............................................................................................ 2-22.3 Performing Pre-Upgrade Tasks ................................................................................................ 2-22.3.1 Backing Up the Database.................................................................................................... 2-22.3.2 Stopping All Middle-Tier Instances .................................................................................. 2-32.3.3 Ensuring That Oracle Internet Directory and Database Processes Are Running....... 2-32.3.4 Assessing the Impact of an OracleAS Portal Upgrade................................................... 2-4
iv
3 Upgrading to OracleAS Portal Release 10.1.4
3.1 Performing the Upgrade ............................................................................................................ 3-13.1.1 Upgrading the Portal Schema in an OracleAS Metadata Repository .......................... 3-13.1.2 Upgrading the Portal Schema in a Customer Database................................................. 3-43.2 Reviewing the Upgrade Log File .............................................................................................. 3-63.3 Backing Up the Database That Contains the Upgraded Portal Schema ............................. 3-93.4 Starting All Middle Tiers ........................................................................................................... 3-93.5 Accessing the Upgraded OracleAS Portal .............................................................................. 3-9
4 Performing Post-Upgrade Tasks
4.1 Required Tasks ............................................................................................................................ 4-14.1.1 Updating to the New URL Format and Correcting Invalid Links ............................... 4-14.1.2 Removing Obsolete Substitution Tags in HTML Page Skins ........................................ 4-54.1.3 Reregistering OracleAS Portal as a Content Source in Oracle Ultra Search ............... 4-54.1.3.1 Deleting the Old OracleAS Portal Content Source .................................................. 4-54.1.3.2 Registering the Upgraded Portal Instance as an Oracle Ultra Search Content
Source ............................................................................................................................. 4-64.1.4 Scheduling a Full Recrawl Using Oracle Ultra Search ................................................... 4-64.1.5 Updating the OracleAS Portal URL in the OracleAS Wireless Service Definition .... 4-64.1.6 Reenabling Portal Export and Import............................................................................... 4-74.1.6.1 Reviewing the Log Files............................................................................................... 4-94.1.7 Updating Performance Reporting ..................................................................................... 4-94.1.8 Changing the Category and Perspective Names ............................................................ 4-94.1.9 Enabling Time Monitoring of Queue Messages........................................................... 4-104.2 Optional Tasks.......................................................................................................................... 4-104.2.1 Moving the Portlet Repository to the New Format ..................................................... 4-104.2.2 Deleting the Community News Portlet ......................................................................... 4-114.2.3 Configuring Oracle Text Indexes to Synchronize on Commit ................................... 4-11
5 Obsolete Features and Usage Changes
5.1 Obsolete Features in OracleAS Portal Release 10.1.4............................................................. 5-15.1.1 URL Portlet and XML Portlet ............................................................................................ 5-15.1.2 User Interface Templates .................................................................................................... 5-15.1.3 Obsolete Substitution Tags for HTML Templates .......................................................... 5-15.2 Usage Changes in OracleAS Portal Release 10.1.4 ................................................................. 5-25.2.1 Introduction of the HTML Output Compatibility Mode Switch.................................. 5-25.2.2 URL Changes........................................................................................................................ 5-35.2.2.1 GUID Displayed in URLs for Text and PL/SQL Items........................................... 5-35.2.3 Changes in Caching............................................................................................................. 5-45.2.4 Change in Portal Service Monitoring Link ...................................................................... 5-4
Part III Appendix
A OracleAS Portal Upgrade Error Messages
A.1 Numbered Error Messages (WWU-00001 to WWU-24999 and WWU-26004 to WWU-26007)...................................................................................................................................................... A-1
v
A.2 Numbered Warning Messages (WWU-25000 to WWU-26001)........................................... A-7A.3 Unnumbered Error Messages .................................................................................................. A-8
Index
vi
List of Tables
1–1 Summary of the Required Upgrade Command-Line Arguments...................................... 1-41–2 Generated Files........................................................................................................................... 1-81–3 OracleAS Portal Access URL Parameters............................................................................... 1-83–1 Summary of the Required Upgrade Command-Line Arguments...................................... 3-23–2 Generated Files........................................................................................................................... 3-83–3 Commands Used for Shutting Down the Database.............................................................. 3-93–4 OracleAS Portal Access URL Parameters............................................................................ 3-104–1 Changes to Path-Based URLs................................................................................................... 4-4
vii
Preface
This guide describes how to install a new Oracle Application Server Portal 10g Release 2 (10.1.4) instance and how to upgrade an existing OracleAS Portal repository to release 10.1.4.
This guide is classified into two parts and depending on whether you are installing OracleAS Portal for the first time, or, are upgrading from an earlier release of OracleAS Portal, refer to the relevant part in the guide as follows:
■ Part I, "Installation"
Refer to this part in the guide if you are installing an OracleAS Portal instance for the first time.
■ Part II, "Upgrade"
Refer to this part in the guide if you are upgrading from an earlier release of OracleAS Portal.
You will find the Oracle Application Server Portal Installation and Upgrade Guide on the Oracle Portal documentation page of the Oracle Technology Network:
http://www.oracle.com/technology/products/ias/portal/documentation.html
AudienceThis guide is for portal administrators who are responsible for installing, maintaining, and upgrading OracleAS Portal instances. It is assumed that the readers of this guide have knowledge of OracleAS Portal system administration and configuration.
Caution: Ensure that you are referring to the appropriate part in the guide. If you perform an upgrade by following instructions that are not relevant to your setup, then the upgrade may not complete successfully.
Note: For the portable document format (PDF) version of this manual, when a URL breaks onto two lines, the full URL data is not sent to the browser when you click it. To get to the correct target of any URL included in the PDF, copy and paste the URL into your browser’s address field. In the HTML version of this manual, you can click a link to directly display its target in your browser.
viii
Documentation AccessibilityOur goal is to make Oracle products, services, and supporting documentation accessible, with good usability, to the disabled community. To that end, our documentation includes features that make information available to users of assistive technology. This documentation is available in HTML format, and contains markup to facilitate access by the disabled community. Accessibility standards will continue to evolve over time, and Oracle is actively engaged with other market-leading technology vendors to address technical obstacles so that our documentation can be accessible to all of our customers. For more information, visit the Oracle Accessibility Program Web site at
http://www.oracle.com/accessibility/
Accessibility of Code Examples in DocumentationScreen readers may not always correctly read the code examples in this document. The conventions for writing code require that closing braces should appear on an otherwise empty line; however, some screen readers may not always read a line of text that consists solely of a bracket or brace.
Accessibility of Links to External Web Sites in DocumentationThis documentation may contain links to Web sites of other companies or organizations that Oracle does not own or control. Oracle neither evaluates nor makes any representations regarding the accessibility of these Web sites.
TTY Access to Oracle Support ServicesOracle provides dedicated Text Telephone (TTY) access to Oracle Support Services within the United States of America 24 hours a day, seven days a week. For TTY support, call 800.446.2398.
Related DocumentsFor more information, refer to the following manuals in the OracleAS Portal documentation set:
■ Oracle Application Server Portal Release Notes
■ Oracle Application Server Portal Configuration Guide
■ Oracle Application Server Portal User's Guide
■ Oracle Application Server Portal Developer's Guide
You can find all documentation related to OracleAS Portal, including the release notes, on the OracleAS Portal documentation page of the Oracle Technology Network (OTN):
http://www.oracle.com/technology/products/ias/portal/documentation.html
Note: A complete glossary of OracleAS Portal-related terminology can be found in the Oracle Application Server Portal User's Guide.
See Also: Oracle Application Server Upgrade and Compatibility Guide in the release 10.1.2 documentation library for your platform on OTN, http://www.oracle.com/technology/.
ix
ConventionsThe following text conventions are used in this document:
Convention Meaning
boldface Boldface type indicates graphical user interface elements associated with an action, or terms defined in text or the glossary.
italic Italic type indicates book titles, emphasis, or placeholder variables for which you supply particular values.
monospace Monospace type indicates commands within a paragraph, URLs, code in examples, text that appears on the screen, or text that you enter.
IDENTITY_MANAGEMENT_ORACLE_HOME
The Oracle Identity Management home directory. It will be same as OracleAS Metadata Repository home in case of a colocated OracleAS Metadata Repository and Oracle Identity Management setup.
METADATA_REP_ORACLE_HOME
The OracleAS Metadata Repository home directory.
MID_TIER_ORACLE_HOME
The Oracle Application Server middle tier home directory.
CD_ROOT The directory where the Oracle Application Server Portal Upgrade CD-ROM is mounted.

x
Part IInstallation
Refer to this part in the guide if you are installing OracleAS Portal for the first time and want to install OracleAS Portal release 10.1.4.
Part I contains the following chapter:
■ Chapter 1, "Installing OracleAS Portal Release 10.1.4"
Note: Do not perform the tasks described in Part II, "Upgrade" if you are following the procedures described in this part to install OracleAS Portal release 10.1.4.

Installing OracleAS Portal Release 10.1.4 1-1
1Installing OracleAS Portal Release 10.1.4
This chapter is different from the upgrade chapters discussed later in this guide because it makes the assumption that you are working with a fresh installation and therefore, can skip some steps. Follow this chapter only if you are completing a fresh installation.
This chapter provides instructions to install Oracle Application Server Portal 10g Release 2 (10.1.4).
The Oracle Application Server Portal Upgrade CD-ROM, which is shipped with Oracle Application Server 10g Release 2 (10.1.2.0.2), enables you to only upgrade the portal repository from release 10.1.2.0.2 to release 10.1.4. Therefore, if you are installing an Oracle Application Server Portal and Wireless instance for the first time and want to leverage the features in OracleAS Portal release 10.1.4, you must first install Oracle Application Server 10g Release 2 (10.1.2.0.2), and then upgrade the portal repository to release 10.1.4.
This chapter contains the following sections:
■ Section 1.1, "Installing Oracle Application Server Release 10.1.2.0.2"
■ Section 1.2, "Upgrading to OracleAS Portal Release 10.1.4 from a Fresh Installation"
1.1 Installing Oracle Application Server Release 10.1.2.0.2To install Oracle Application Server release 10.1.2.0.2, refer to the Oracle Application Server Quick Installation Guide in the Oracle Application Server release 10.1.2 documentation library for your platform on Oracle Technology Network (OTN). To view this guide, perform the following steps:
1. Access the following URL:
http://www.oracle.com/technology/documentation/appserver1012.html
Note: The installation procedure for OracleAS Portal release 10.1.4 is different from the installation procedure in earlier releases of Oracle Application Server, for example, release 10.1.2.0.2. This is because a direct installation of Oracle Application Server Portal 10g Release 2 (10.1.4) is not possible.
Upgrading to OracleAS Portal Release 10.1.4 from a Fresh Installation
1-2 Oracle Application Server Portal Installation and Upgrade Guide
2. Under the section, Oracle Application Server 10g Release 2 (10.1.2) Release Notes, Installation, and Upgrade Documentation, click View Library specific to the platform that you are using.
3. The Quick Installation Guide is available on the resulting Oracle Application Server Documentation Library page.
The Oracle Application Server Quick Installation Guide provides instructions to install an OracleAS Infrastructure and a Portal and Wireless middle tier. Refer to the chapter titled "Installing Portal and Wireless or Business Intelligence and Forms Developer Topology (includes OracleAS Infrastructure)" in this guide.
If you have installed an Oracle Application Server Metadata Repository in an existing Oracle Database, and want to upgrade the portal schema to release 10.1.4, then follow the standard upgrade instructions described in Part II, "Upgrade" later in this guide.
1.2 Upgrading to OracleAS Portal Release 10.1.4 from a Fresh InstallationTo upgrade the portal schema to release 10.1.4, you must perform the following tasks:
■ Section 1.2.1, "Performing Pre-Upgrade Tasks"
■ Section 1.2.2, "Upgrading OracleAS Portal"
■ Section 1.2.3, "Components That Require Post-Upgrade Tasks"
1.2.1 Performing Pre-Upgrade TasksTo ensure a successful upgrade to release 10.1.4, you must perform certain pre-upgrade tasks, which include the following:
■ Section 1.2.1.1, "Stopping All Middle-Tier Instances"
■ Section 1.2.1.2, "Ensuring That Oracle Internet Directory and Database Processes Are Running"
1.2.1.1 Stopping All Middle-Tier InstancesBefore you perform the upgrade, you must stop all processes associated with each middle tier that uses the portal schema being upgraded. There are two ways to view all the Oracle Application Server instances that use the portal schema:
■ Display the Farm page in the Application Server Control Console.
■ Use the following Distributed Configuration Management command in the Oracle home of any middle-tier or Oracle Identity Management instance that belongs to the farm:
MID_TIER_ORACLE_HOME/dcm/bin/dcmctl listinstances
To stop all the middle-tier processes, perform the following tasks:
Note: In many of the OTN pages and guides, 10.1.2 is listed as the release number instead of 10.1.2.0.2. This can be ignored.
See Also: "Introduction to Administration Tools" in the Oracle Application Server Administrator's Guide for more information about the Application Server Control Console Farm page.
Upgrading to OracleAS Portal Release 10.1.4 from a Fresh Installation
Installing OracleAS Portal Release 10.1.4 1-3
1. Click Stop All on the Application Server Control Console home page for each instance, or use the following Oracle Process Manager and Notification Server (OPMN) command within the Oracle home of each instance:
MID_TIER_ORACLE_HOME/opmn/bin/opmnctl stopall
2. Stop the Application Server Control Console by using the following command:
MID_TIER_ORACLE_HOME/bin/emctl stop iasconsole
On Windows, also referred to as Windows, you can also stop OPMN and its managed processes and the Application Server Control Console from the Services control panel.
1.2.1.2 Ensuring That Oracle Internet Directory and Database Processes Are RunningBefore you perform the upgrade, you must ensure that the following processes are running:
■ The OracleAS Metadata Repository database that hosts the portal schema.
■ The listener for the OracleAS Metadata Repository database.
■ The Oracle Internet Directory instance where the portal schema is registered.
Log in to the Application Server Control Console of the Oracle Identity Management instance to verify that the necessary processes are running and that the required components are configured properly. For example, you can use the Application Server Control Console to verify that the Farm page is displayed correctly and that the Oracle Internet Directory and OracleAS Single Sign-On components are up and running.
When you log in to the Application Server Control Console of the Oracle Identity Management instance, the Application Server home page is displayed. On this page, click Ports to view a list of the ports currently used by the Oracle Application Server instance and to verify that the components are configured properly.
1.2.2 Upgrading OracleAS PortalThis section explains the procedure to upgrade OracleAS Portal to release 10.1.4. To upgrade the portal schema, perform the following steps:
■ Section 1.2.2.1, "Performing the upgrade"
■ Section 1.2.2.2, "Reviewing the Upgrade Log File"
■ Section 1.2.2.3, "Starting All Middle Tiers"
■ Section 1.2.2.4, "Accessing the Upgraded OracleAS Portal"
See Also:
■ The Distributed Configuration Management Administrator's Guide for more information about dcmctl commands.
■ "Starting and Stopping the Application Server" in the Oracle Application Server Administrator's Guide for information about stopping all the processes in a release 10.1.2.0.2 middle tier.
See Also: "Introduction to Administration Tools" in the Oracle Application Server Administrator's Guide for more information about the Application Server Control Console Farm page.
Upgrading to OracleAS Portal Release 10.1.4 from a Fresh Installation
1-4 Oracle Application Server Portal Installation and Upgrade Guide
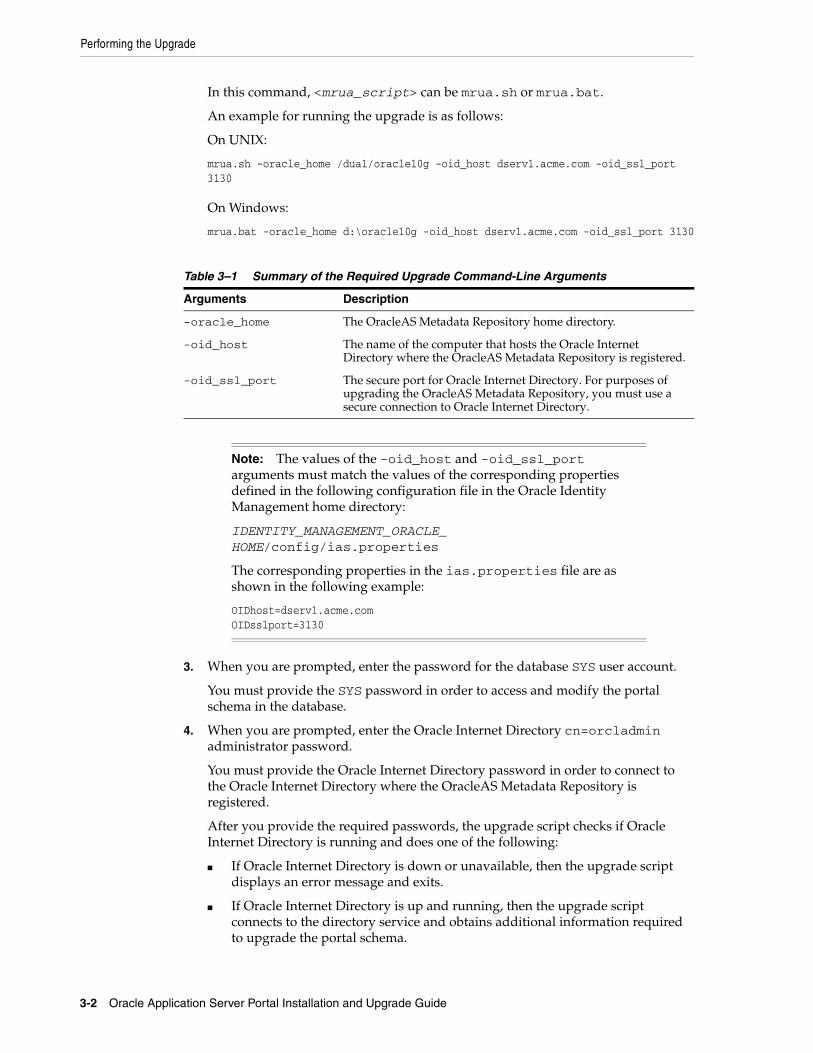
1.2.2.1 Performing the upgradeAfter performing the tasks described in Section 1.2.1, "Performing Pre-Upgrade Tasks", you can use the Oracle Application Server Portal Upgrade CD-ROM to upgrade the portal schema in an OracleAS Metadata Repository. To perform an upgrade, you must run the mrua.bat (Windows) or mrua.sh (UNIX) script.
To run the upgrade, perform the following steps:
1. Mount the Oracle Application Server Portal Upgrade CD–ROM.
2. Start the upgrade by using the following command with the required arguments, which are described in Table 1–1:
CD_ROOT/mrua/<mrua_script>-oracle_home <metadata_repository_oracle_home>-oid_host <oracle_internet_directory_host>-oid_ssl_port <oracle_internet_directory_ssl_port>
In this command, <mrua_script> can be mrua.sh or mrua.bat.
An example for running the upgrade is as follows:
On UNIX:
mrua.sh -oracle_home /dua1/oracle10g -oid_host dserv1.acme.com -oid_ssl_port 3130
On Windows:
mrua.bat -oracle_home d:\oracle10g -oid_host dserv1.acme.com -oid_ssl_port 3130
Note: You must run the upgrade on the computer that hosts the portal schema that you are about to upgrade.
Table 1–1 Summary of the Required Upgrade Command-Line Arguments
Arguments Description
-oracle_home The OracleAS Metadata Repository home directory.
-oid_host The name of the computer that hosts the Oracle Internet Directory where the OracleAS Metadata Repository is registered.
-oid_ssl_port The secure port for Oracle Internet Directory. For purposes of upgrading the OracleAS Metadata Repository, you must use a secure connection to Oracle Internet Directory.
Note: The values of the -oid_host and -oid_ssl_port arguments must match the values of the corresponding properties defined in the following configuration file in the Oracle Identity Management home directory:
IDENTITY_MANAGEMENT_ORACLE_HOME/config/ias.properties
The corresponding properties in the ias.properties file are as shown in the following example:
OIDhost=dserv1.acme.comOIDsslport=3130
Upgrading to OracleAS Portal Release 10.1.4 from a Fresh Installation
Installing OracleAS Portal Release 10.1.4 1-5
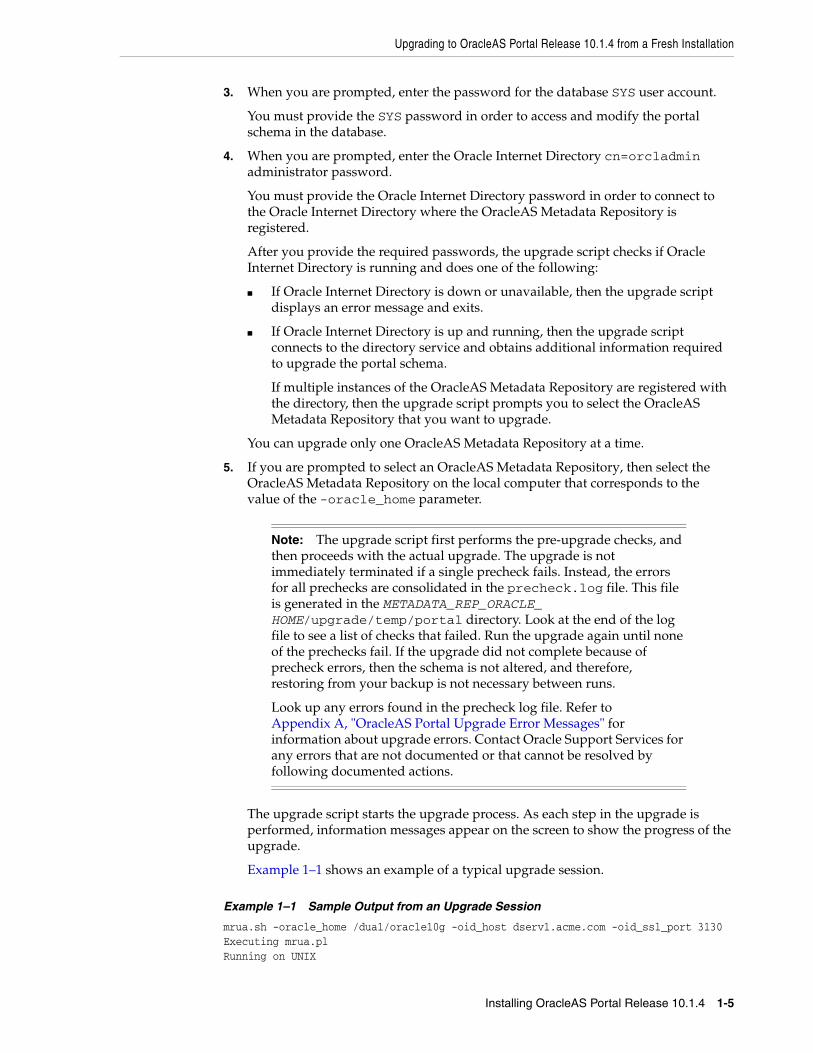
3. When you are prompted, enter the password for the database SYS user account.
You must provide the SYS password in order to access and modify the portal schema in the database.
4. When you are prompted, enter the Oracle Internet Directory cn=orcladmin administrator password.
You must provide the Oracle Internet Directory password in order to connect to the Oracle Internet Directory where the OracleAS Metadata Repository is registered.
After you provide the required passwords, the upgrade script checks if Oracle Internet Directory is running and does one of the following:
■ If Oracle Internet Directory is down or unavailable, then the upgrade script displays an error message and exits.
■ If Oracle Internet Directory is up and running, then the upgrade script connects to the directory service and obtains additional information required to upgrade the portal schema.
If multiple instances of the OracleAS Metadata Repository are registered with the directory, then the upgrade script prompts you to select the OracleAS Metadata Repository that you want to upgrade.
You can upgrade only one OracleAS Metadata Repository at a time.
5. If you are prompted to select an OracleAS Metadata Repository, then select the OracleAS Metadata Repository on the local computer that corresponds to the value of the -oracle_home parameter.
The upgrade script starts the upgrade process. As each step in the upgrade is performed, information messages appear on the screen to show the progress of the upgrade.
Example 1–1 shows an example of a typical upgrade session.
Example 1–1 Sample Output from an Upgrade Session
mrua.sh -oracle_home /dua1/oracle10g -oid_host dserv1.acme.com -oid_ssl_port 3130Executing mrua.plRunning on UNIX
Note: The upgrade script first performs the pre-upgrade checks, and then proceeds with the actual upgrade. The upgrade is not immediately terminated if a single precheck fails. Instead, the errors for all prechecks are consolidated in the precheck.log file. This file is generated in the METADATA_REP_ORACLE_HOME/upgrade/temp/portal directory. Look at the end of the log file to see a list of checks that failed. Run the upgrade again until none of the prechecks fail. If the upgrade did not complete because of precheck errors, then the schema is not altered, and therefore, restoring from your backup is not necessary between runs.
Look up any errors found in the precheck log file. Refer to Appendix A, "OracleAS Portal Upgrade Error Messages" for information about upgrade errors. Contact Oracle Support Services for any errors that are not documented or that cannot be resolved by following documented actions.
Upgrading to OracleAS Portal Release 10.1.4 from a Fresh Installation
1-6 Oracle Application Server Portal Installation and Upgrade Guide
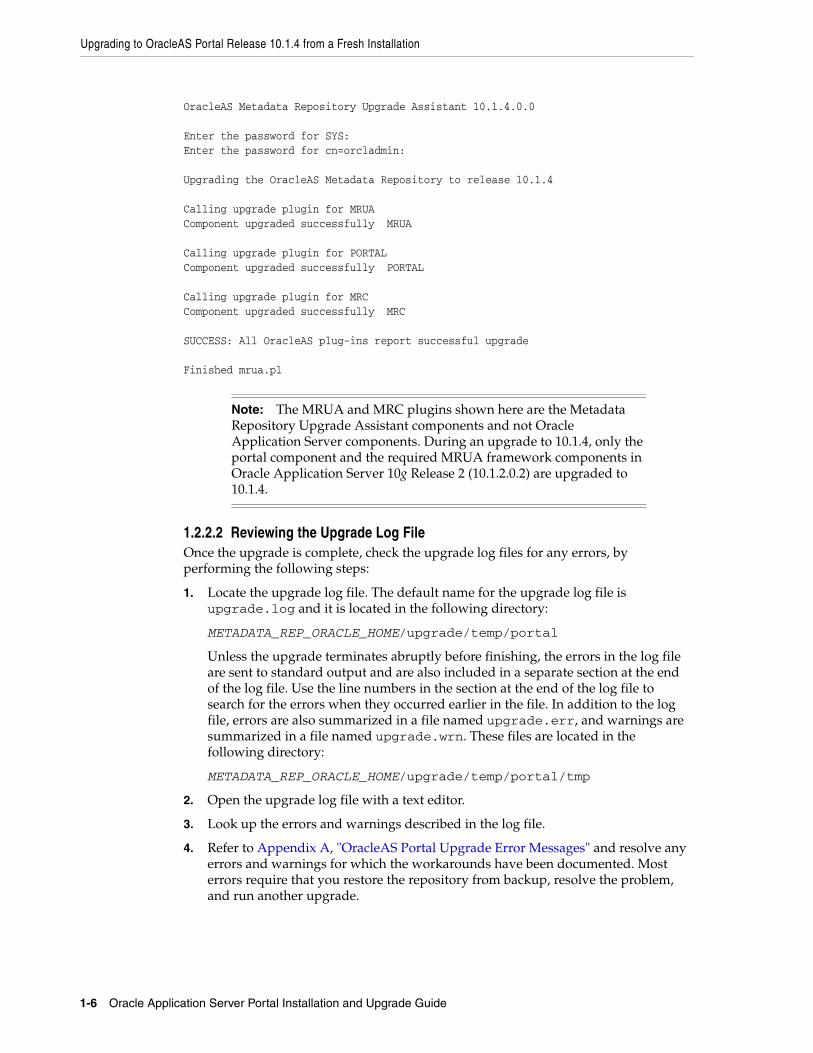
OracleAS Metadata Repository Upgrade Assistant 10.1.4.0.0
Enter the password for SYS:Enter the password for cn=orcladmin:
Upgrading the OracleAS Metadata Repository to release 10.1.4
Calling upgrade plugin for MRUAComponent upgraded successfully MRUA
Calling upgrade plugin for PORTALComponent upgraded successfully PORTAL
Calling upgrade plugin for MRCComponent upgraded successfully MRC
SUCCESS: All OracleAS plug-ins report successful upgrade
Finished mrua.pl
1.2.2.2 Reviewing the Upgrade Log FileOnce the upgrade is complete, check the upgrade log files for any errors, by performing the following steps:
1. Locate the upgrade log file. The default name for the upgrade log file is upgrade.log and it is located in the following directory:
METADATA_REP_ORACLE_HOME/upgrade/temp/portal
Unless the upgrade terminates abruptly before finishing, the errors in the log file are sent to standard output and are also included in a separate section at the end of the log file. Use the line numbers in the section at the end of the log file to search for the errors when they occurred earlier in the file. In addition to the log file, errors are also summarized in a file named upgrade.err, and warnings are summarized in a file named upgrade.wrn. These files are located in the following directory:
METADATA_REP_ORACLE_HOME/upgrade/temp/portal/tmp
2. Open the upgrade log file with a text editor.
3. Look up the errors and warnings described in the log file.
4. Refer to Appendix A, "OracleAS Portal Upgrade Error Messages" and resolve any errors and warnings for which the workarounds have been documented. Most errors require that you restore the repository from backup, resolve the problem, and run another upgrade.
Note: The MRUA and MRC plugins shown here are the Metadata Repository Upgrade Assistant components and not Oracle Application Server components. During an upgrade to 10.1.4, only the portal component and the required MRUA framework components in Oracle Application Server 10g Release 2 (10.1.2.0.2) are upgraded to 10.1.4.
Upgrading to OracleAS Portal Release 10.1.4 from a Fresh Installation
Installing OracleAS Portal Release 10.1.4 1-7
5. Contact Oracle Support Services for any errors that are not documented.
6. Continue this process until all errors are resolved.
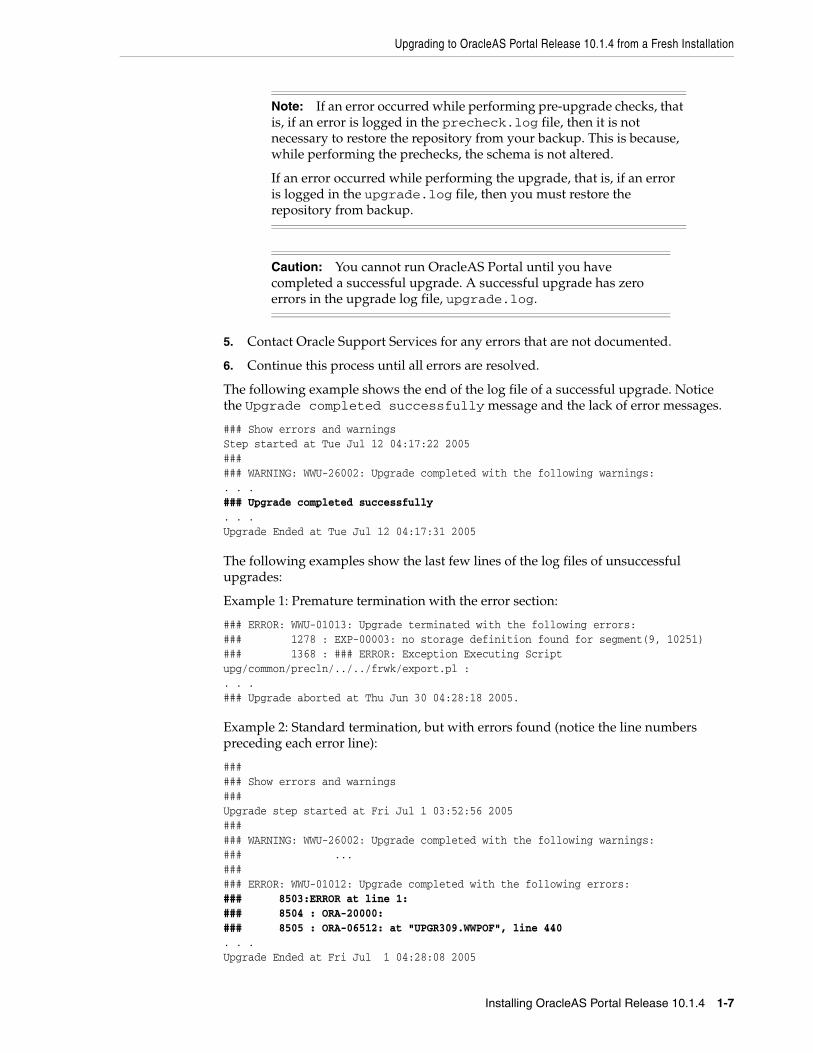
The following example shows the end of the log file of a successful upgrade. Notice the Upgrade completed successfully message and the lack of error messages.
### Show errors and warnings Step started at Tue Jul 12 04:17:22 2005 ### ### WARNING: WWU-26002: Upgrade completed with the following warnings:. . . ### Upgrade completed successfully . . . Upgrade Ended at Tue Jul 12 04:17:31 2005
The following examples show the last few lines of the log files of unsuccessful upgrades:
Example 1: Premature termination with the error section:
### ERROR: WWU-01013: Upgrade terminated with the following errors:### 1278 : EXP-00003: no storage definition found for segment(9, 10251)### 1368 : ### ERROR: Exception Executing Script upg/common/precln/../../frwk/export.pl :. . . ### Upgrade aborted at Thu Jun 30 04:28:18 2005.
Example 2: Standard termination, but with errors found (notice the line numbers preceding each error line):
### ### Show errors and warnings ###Upgrade step started at Fri Jul 1 03:52:56 2005###### WARNING: WWU-26002: Upgrade completed with the following warnings:### ...###### ERROR: WWU-01012: Upgrade completed with the following errors:### 8503:ERROR at line 1: ### 8504 : ORA-20000:### 8505 : ORA-06512: at "UPGR309.WWPOF", line 440. . .Upgrade Ended at Fri Jul 1 04:28:08 2005
Note: If an error occurred while performing pre-upgrade checks, that is, if an error is logged in the precheck.log file, then it is not necessary to restore the repository from your backup. This is because, while performing the prechecks, the schema is not altered.
If an error occurred while performing the upgrade, that is, if an error is logged in the upgrade.log file, then you must restore the repository from backup.
Caution: You cannot run OracleAS Portal until you have completed a successful upgrade. A successful upgrade has zero errors in the upgrade log file, upgrade.log.
Upgrading to OracleAS Portal Release 10.1.4 from a Fresh Installation
1-8 Oracle Application Server Portal Installation and Upgrade Guide
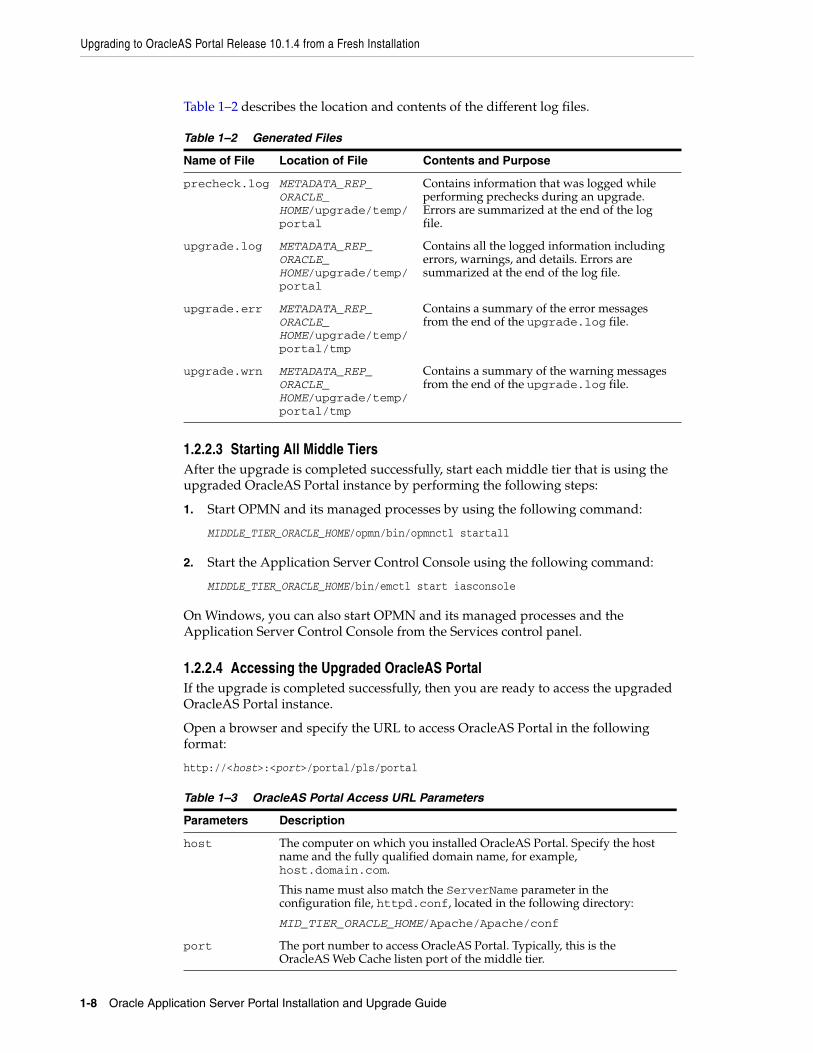
Table 1–2 describes the location and contents of the different log files.
1.2.2.3 Starting All Middle TiersAfter the upgrade is completed successfully, start each middle tier that is using the upgraded OracleAS Portal instance by performing the following steps:
1. Start OPMN and its managed processes by using the following command:
MIDDLE_TIER_ORACLE_HOME/opmn/bin/opmnctl startall
2. Start the Application Server Control Console using the following command:
MIDDLE_TIER_ORACLE_HOME/bin/emctl start iasconsole
On Windows, you can also start OPMN and its managed processes and the Application Server Control Console from the Services control panel.
1.2.2.4 Accessing the Upgraded OracleAS Portal If the upgrade is completed successfully, then you are ready to access the upgraded OracleAS Portal instance.
Open a browser and specify the URL to access OracleAS Portal in the following format:
http://<host>:<port>/portal/pls/portal
Table 1–2 Generated Files
Name of File Location of File Contents and Purpose
precheck.log METADATA_REP_ORACLE_HOME/upgrade/temp/portal
Contains information that was logged while performing prechecks during an upgrade. Errors are summarized at the end of the log file.
upgrade.log METADATA_REP_ORACLE_HOME/upgrade/temp/portal
Contains all the logged information including errors, warnings, and details. Errors are summarized at the end of the log file.
upgrade.err METADATA_REP_ORACLE_HOME/upgrade/temp/portal/tmp
Contains a summary of the error messages from the end of the upgrade.log file.
upgrade.wrn METADATA_REP_ORACLE_HOME/upgrade/temp/portal/tmp
Contains a summary of the warning messages from the end of the upgrade.log file.
Table 1–3 OracleAS Portal Access URL Parameters
Parameters Description
host The computer on which you installed OracleAS Portal. Specify the host name and the fully qualified domain name, for example, host.domain.com.
This name must also match the ServerName parameter in the configuration file, httpd.conf, located in the following directory:
MID_TIER_ORACLE_HOME/Apache/Apache/conf
port The port number to access OracleAS Portal. Typically, this is the OracleAS Web Cache listen port of the middle tier.
Upgrading to OracleAS Portal Release 10.1.4 from a Fresh Installation
Installing OracleAS Portal Release 10.1.4 1-9
1.2.3 Components That Require Post-Upgrade TasksAfter performing the upgrade, if you plan to use Oracle Application Server Wireless and Oracle Ultra Search along with OracleAS Portal, then you must perform some configuration tasks before you can use these components. Refer to the following documentation for the tasks to be performed:
■ Section titled "Registering OracleAS Portal as a Content Source" in the Oracle Application Server Portal Configuration Guide for information about configuring OracleAS Portal with Oracle Ultra Search.
■ Section titled "Configuring Mobile Support in OracleAS Portal" in the Oracle Application Server Portal Configuration Guide for information about configuring OracleAS Portal with OracleAS Wireless.

Upgrading to OracleAS Portal Release 10.1.4 from a Fresh Installation
1-10 Oracle Application Server Portal Installation and Upgrade Guide
Part IIUpgrade
Refer to this part in the guide if you are upgrading from an earlier release of OracleAS Portal to release 10.1.4.
Part II contains the following chapters:
■ Chapter 2, "Preparing to Upgrade"
■ Chapter 3, "Upgrading to OracleAS Portal Release 10.1.4"
■ Chapter 4, "Performing Post-Upgrade Tasks"
■ Chapter 5, "Obsolete Features and Usage Changes"

Preparing to Upgrade 2-1
2Preparing to Upgrade
This chapter gives a brief introduction to Oracle Application Server Portal Upgrade 10g Release 2 (10.1.4), describes the prerequisites for upgrading, and includes instructions to prepare your system for a successful upgrade.
The following topics are discussed in this chapter:
■ Section 2.1, "Understanding Oracle Application Server Portal Upgrade"
■ Section 2.2, "Verifying System Requirements"
■ Section 2.3, "Performing Pre-Upgrade Tasks"
2.1 Understanding Oracle Application Server Portal UpgradeThe Oracle Application Server Portal Upgrade can be applied to Oracle Application Server 10g Enterprise Edition, Oracle Application Server 10g Standard Edition, and Oracle Application Server 10g Standard Edition One.
Oracle Application Server Portal Upgrade is a portal repository only upgrade and can be applied when the portal schema resides either in the OracleAS Metadata Repository, or in a customer database configuration outside the OracleAS Metadata Repository.
In earlier releases of Oracle Application Server, the Metadata Repository Upgrade Assistant (MRUA) was used to upgrade the Oracle Application Server component schemas in the OracleAS Metadata Repository. Oracle Application Server Portal Upgrade uses the MRUA technology, but when applied to the OracleAS Metadata Repository, the software upgrades just the portal component and the required MRUA framework components.
Oracle Application Server Portal Upgrade 10g Release 2 (10.1.4) is shipped as a separate CD-ROM.
By applying the software, the portal component is upgraded to release 10.1.4.
2.2 Verifying System RequirementsVerify that your system meets the requirements discussed in the following sections.
Note: If the OracleAS Portal instance was originally installed as release 3.0.9 or earlier, or if it was installed using the ptlasst utility, then the portal schema resides in a customer database configuration outside the OracleAS Metadata Repository.
Performing Pre-Upgrade Tasks
2-2 Oracle Application Server Portal Installation and Upgrade Guide
2.2.1 Supported Upgrade PathsThe Oracle Application Server Portal Upgrade 10g Release 2 (10.1.4) can be applied to the following:
■ Oracle Application Server 10g Release 2 (10.1.2.0.2)
■ Oracle Application Server 10g Release 2 (10.1.2.1.0)
2.2.2 Supported Database ReleasesThe portal schema may be residing in an OracleAS Metadata Repository, or in a customer database. The database in which the portal schema resides must be one of the following supported releases:
■ Oracle Database 10g (10.1.0.4.2) or later
■ Oracle9i Database Release 2 (9.2.0.7) or later
2.3 Performing Pre-Upgrade TasksTo ensure a successful upgrade to release 10.1.4, you must perform certain pre-upgrade tasks, which include the following:
■ Section 2.3.1, "Backing Up the Database"
■ Section 2.3.2, "Stopping All Middle-Tier Instances"
■ Section 2.3.3, "Ensuring That Oracle Internet Directory and Database Processes Are Running"
■ Section 2.3.4, "Assessing the Impact of an OracleAS Portal Upgrade"
2.3.1 Backing Up the DatabaseBack up the database that hosts the OracleAS Metadata Repository before and after upgrading OracleAS Portal. If OracleAS Portal was installed on a customer database and not in the OracleAS Metadata Repository, then back up the database that hosts the portal schema.
During an upgrade, only the portal schema is changed. Application components, that is the database providers, are generated in their own schemas. Therefore, ensure that you back up the portal instance that you are upgrading. This backup will allow you to restore the database to its original state, if necessary. The OracleAS Portal-specific schemas are as follows:
■ OracleAS Portal Schema (for example, PORTAL)
■ OracleAS Portal Demo Schema (for example, PORTAL_DEMO)
■ OracleAS Portal Public Schema (for example, PORTAL_PUBLIC)
Note: If you are running Oracle Application Server 10g Release 2 (10.1.2.0.0) or Oracle Application Server 10g Release 2 (10.1.2.0.1) Standard Edition One, then apply the Oracle Application Server 10.1.2.1 patch before applying Oracle Application Server Portal Upgrade.
Check OracleMetalink for availability of the Oracle Application Server 10.1.2.1 patch for your platform at
http://metalink.oracle.com
Performing Pre-Upgrade Tasks
Preparing to Upgrade 2-3
■ OracleAS Portal JSP Access (for example, PORTAL_APP)
There are several ways to perform a backup. Consult an experienced database administrator, or refer to Oracle Database documentation for further information about the backup and recovery procedures for the database.
2.3.2 Stopping All Middle-Tier InstancesBefore you perform the upgrade, you must stop all processes associated with each middle tier that uses the portal schema being upgraded. Note that at this point in the upgrade process, as a prerequisite for running the portal upgrade, all the middle tier instances must either be at release 10.1.2.0.2 or release 10.1.2.1.0. There are two ways to view all the Oracle Application Server instances that use the portal schema:
■ Display the Farm page in the Application Server Control Console.
■ Use the following Distributed Configuration Management command in the Oracle home of any middle-tier or Oracle Identity Management instance that belongs to the farm:
MID_TIER_ORACLE_HOME/dcm/bin/dcmctl listinstances
To stop all the middle-tier processes, perform the following tasks:
1. Click Stop All on the Application Server Control Console home page for each instance, or use the following Oracle Process Manager and Notification Server (OPMN) command within the Oracle home of each instance:
MID_TIER_ORACLE_HOME/opmn/bin/opmnctl stopall
2. Stop the Application Server Control Console by using the following command:
MID_TIER_ORACLE_HOME/bin/emctl stop iasconsole
On Windows, you can also stop OPMN and its managed processes and the Application Server Control Console from the Services control panel.
2.3.3 Ensuring That Oracle Internet Directory and Database Processes Are RunningBefore you perform the upgrade, you must ensure that the following processes are running:
See Also: The Oracle Database Backup and Recovery Basics manual in the Oracle Database documentation library for release, for information and guidelines about backing up Oracle Database.
See Also: "Introduction to Administration Tools" in the Oracle Application Server Administrator's Guide for more information about the Application Server Control Console Farm page.
See Also:
■ The Distributed Configuration Management Administrator's Guide for more information about dcmctl commands.
■ "Starting and Stopping the Application Server" in the Oracle Application Server Administrator's Guide for information about stopping all the processes in a release 10.1.2.0.2 or release 10.1.2.1.0 middle tier.
Performing Pre-Upgrade Tasks
2-4 Oracle Application Server Portal Installation and Upgrade Guide
■ The database that hosts the portal schema. This can be an OracleAS Metadata Repository database or a customer database.
■ The listener for the OracleAS Metadata Repository database or customer database.
■ The Oracle Internet Directory instance where the portal schema is registered.
Log in to the Application Server Control Console of the Oracle Identity Management instance to verify that the necessary processes are running and that the required components are configured properly. For example, you can use the Application Server Control Console to verify that the Farm page is displayed correctly and that the Oracle Internet Directory and OracleAS Single Sign-On components are up and running.
When you log in to the Application Server Control Console of the Oracle Identity Management instance, the Application Server home page is displayed. On this page, click Ports to view a list of the ports currently used by the Oracle Application Server instance and to verify that the components are configured properly.
2.3.4 Assessing the Impact of an OracleAS Portal UpgradeBefore you perform an upgrade to release 10.1.4, consider the impact of the upgrade on your system. An upgrade to OracleAS Portal release 10.1.4 includes the following tasks:
■ Creating the upgrade framework objects and installing the Schema Validation Utility.
■ Exporting a subset of the OracleAS Portal tables, which are available before an upgrade, to a dump file.
■ Displaying all invalid objects before the upgrade proceeds. You can use this for troubleshooting purposes because all OracleAS Portal packages must be valid at this stage.
■ Disabling the directory provisioning profile. This disables event notifications from Oracle Internet Directory to which the portal has subscribed.
■ Disabling triggers in the portal schema. These triggers will be reenabled at the end of the upgrade.
■ Disabling the Database Management System (DBMS) jobs in the portal schema. These jobs will be reenabled at the end of the upgrade.
■ Dropping statistics gathered on all tables in the portal schema. The statistics supported by OracleAS Portal will then be gathered toward the end of the upgrade.
■ Upgrading OWA packages if necessary.
■ Dropping and reloading all Java objects in the portal schema. If there were any Java objects not belonging to OracleAS Portal but residing in the portal schema, then they will have to be reinstalled manually after the upgrade.
■ Dropping and reloading all product messages in all languages in the portal schema. If any product messages were manually altered before the upgrade, then these changes will have to be manually reapplied.
■ Changing the schema and compiling new OracleAS Portal packages.
■ Exporting temporary tables created during the upgrade.
See Also: "Introduction to Administration Tools" in the Oracle Application Server Administrator's Guide for more information about the Application Server Control Console Farm page.
Performing Pre-Upgrade Tasks
Preparing to Upgrade 2-5
■ Creating the jobs for gathering the statistics on portal tables.
■ Enabling triggers and DBMS jobs in the portal schema.
■ Recompiling any invalid non-OracleAS Portal objects. Warnings will be displayed if any invalid non-OracleAS Portal objects remain after this step.
■ Updating the OracleAS Portal release if there are no fatal compilation errors.
■ Enabling the directory provisioning profile.
■ Searching for errors and warnings in the upgrade log file and displaying a summary of the ones encountered. If no errors are found, then a success message is displayed.
Performing Pre-Upgrade Tasks
2-6 Oracle Application Server Portal Installation and Upgrade Guide

Upgrading to OracleAS Portal Release 10.1.4 3-1
3Upgrading to OracleAS Portal Release 10.1.4
This chapter explains the procedure to upgrade OracleAS Portal to release 10.1.4. You can upgrade to OracleAS Portal release 10.1.4 by performing the following steps:
■ Section 3.1, "Performing the Upgrade"
■ Section 3.2, "Reviewing the Upgrade Log File"
■ Section 3.3, "Backing Up the Database That Contains the Upgraded Portal Schema"
■ Section 3.4, "Starting All Middle Tiers"
■ Section 3.5, "Accessing the Upgraded OracleAS Portal"
3.1 Performing the UpgradeDepending on whether the portal schema was installed in the Oracle Application Server Metadata Repository or in a customer database, you can use either of the following procedures to perform an upgrade:
■ Section 3.1.1, "Upgrading the Portal Schema in an OracleAS Metadata Repository"
■ Section 3.1.2, "Upgrading the Portal Schema in a Customer Database"
3.1.1 Upgrading the Portal Schema in an OracleAS Metadata RepositoryAfter performing the tasks described in Section 2.3, "Performing Pre-Upgrade Tasks", you can use the Oracle Application Server Portal Upgrade CD-ROM to upgrade the portal schema in an OracleAS Metadata Repository. To perform an upgrade, you must run the mrua.bat (Windows) or mrua.sh (UNIX) script.
To run the upgrade, perform the following steps:
1. Mount the Oracle Application Server Portal Upgrade CD–ROM.
2. Start the upgrade by using the following command with the required arguments, which are described in Table 3–1:
CD_ROOT/mrua/<mrua_script>-oracle_home <metadata_repository_oracle_home>-oid_host <oracle_internet_directory_host>-oid_ssl_port <oracle_internet_directory_SSL_port>
Note: You must run the upgrade on the computer that hosts the portal schema that you are about to upgrade.
Performing the Upgrade
3-2 Oracle Application Server Portal Installation and Upgrade Guide
In this command, <mrua_script> can be mrua.sh or mrua.bat.
An example for running the upgrade is as follows:
On UNIX:
mrua.sh -oracle_home /dua1/oracle10g -oid_host dserv1.acme.com -oid_ssl_port 3130
On Windows:
mrua.bat -oracle_home d:\oracle10g -oid_host dserv1.acme.com -oid_ssl_port 3130
3. When you are prompted, enter the password for the database SYS user account.
You must provide the SYS password in order to access and modify the portal schema in the database.
4. When you are prompted, enter the Oracle Internet Directory cn=orcladmin administrator password.
You must provide the Oracle Internet Directory password in order to connect to the Oracle Internet Directory where the OracleAS Metadata Repository is registered.
After you provide the required passwords, the upgrade script checks if Oracle Internet Directory is running and does one of the following:
■ If Oracle Internet Directory is down or unavailable, then the upgrade script displays an error message and exits.
■ If Oracle Internet Directory is up and running, then the upgrade script connects to the directory service and obtains additional information required to upgrade the portal schema.
Table 3–1 Summary of the Required Upgrade Command-Line Arguments
Arguments Description
-oracle_home The OracleAS Metadata Repository home directory.
-oid_host The name of the computer that hosts the Oracle Internet Directory where the OracleAS Metadata Repository is registered.
-oid_ssl_port The secure port for Oracle Internet Directory. For purposes of upgrading the OracleAS Metadata Repository, you must use a secure connection to Oracle Internet Directory.
Note: The values of the -oid_host and -oid_ssl_port arguments must match the values of the corresponding properties defined in the following configuration file in the Oracle Identity Management home directory:
IDENTITY_MANAGEMENT_ORACLE_HOME/config/ias.properties
The corresponding properties in the ias.properties file are as shown in the following example:
OIDhost=dserv1.acme.comOIDsslport=3130

Performing the Upgrade
Upgrading to OracleAS Portal Release 10.1.4 3-3
If multiple instances of the OracleAS Metadata Repository are registered with the directory, then the upgrade script prompts you to select the OracleAS Metadata Repository that you want to upgrade.
You can upgrade only one OracleAS Metadata Repository at a time.
5. If you are prompted to select an OracleAS Metadata Repository, then select the OracleAS Metadata Repository on the local computer that corresponds to the value of the -oracle_home parameter.
The upgrade script starts the upgrade process. As each step in the upgrade is performed, information messages appear on the screen to show the progress of the upgrade.
Example 3–1 shows an example of a typical upgrade session.
Example 3–1 Sample Output from an Upgrade Session
mrua.sh -oracle_home /dua1/oracle10g -oid_host dserv1.acme.com -oid_ssl_port 3130Executing mrua.plRunning on UNIX
OracleAS Metadata Repository Upgrade Assistant 10.1.4.0.0
Enter the password for SYS:Enter the password for cn=orcladmin:
Upgrading the OracleAS Metadata Repository to release 10.1.4
Calling upgrade plugin for MRUAComponent upgraded successfully MRUA
Calling upgrade plugin for PORTALComponent upgraded successfully PORTAL
Calling upgrade plugin for MRCComponent upgraded successfully MRC
SUCCESS: All OracleAS plug-ins report successful upgrade
Finished mrua.pl
Note: The upgrade script first performs the pre-upgrade checks, and then proceeds with the actual upgrade. The upgrade is not immediately terminated if a single precheck fails. Instead, the errors for all prechecks are consolidated in the precheck.log file. This file is generated in the METADATA_REP_ORACLE_HOME/upgrade/temp/portal directory. Look at the end of the log file to see a list of checks that failed. Run the upgrade again until none of the prechecks fail. If the upgrade did not complete because of precheck errors, then the schema is not altered, and therefore, restoring from your backup is not necessary between runs.
Look up any errors found in the precheck log file. Refer to Appendix A, "OracleAS Portal Upgrade Error Messages" for information about upgrade errors. Contact Oracle Support Services for any errors that are not documented or that cannot be resolved by following documented actions.
Performing the Upgrade
3-4 Oracle Application Server Portal Installation and Upgrade Guide
3.1.2 Upgrading the Portal Schema in a Customer DatabaseThis section details the steps for upgrading a portal schema residing in a customer database configuration outside the OracleAS Metadata Repository.
To upgrade the portal schema residing in a customer database, you must use the upgrade.bat (Windows) or upgrade (UNIX) script. Perform the following steps to upgrade the portal schema residing in a customer database:
1. Set the ORACLE_HOME environment variable to the Oracle home of the database that contains the portal schema.
2. Mount the Oracle Application Server Portal Upgrade CD–ROM.
3. Verify if you can connect to the portal schema in the database Oracle home by specifying the schema password and the Transparent Network Services (TNS) name using SQL*Plus.
For example:
sqlplus portal/portal@orcl
4. Change the directory to a location where you have write permissions. The upgrade script will create a set of log files and temporary directories in this location.
5. Stop all Oracle Application Server services in the middle-tier Oracle homes that are associated with the portal schema being upgraded. For the procedure to do this, refer to Section 2.3.2, "Stopping All Middle-Tier Instances".
6. Verify that the Oracle Internet Directory associated with the portal schema is up and running. For the procedure to do this, refer to Section 2.3.3, "Ensuring That Oracle Internet Directory and Database Processes Are Running".
7. Run the upgrade script in precheck mode until there are no errors found.
On UNIX, run the script as follows:
CD_ROOT/portal/admin/plsql/upgrade -precheck
On Windows, run the script as follows:
CD_ROOT\portal\admin\plsql\upgrade.bat -precheck
When -precheck is specified, only the pre-upgrade checks are done and the upgrade exits after that. In this mode, the upgrade is not immediately terminated
Note: The MRUA and MRC plugins shown here are the Metadata Repository Upgrade Assistant components and not Oracle Application Server components. During an upgrade to 10.1.4, only the portal component and the required MRUA framework components in Oracle Application Server 10g Release 2 (10.1.2.0.2) are upgraded to 10.1.4.
Note: If the OracleAS Portal instance was originally installed in release 3.0.9 or earlier, or if it was installed using the ptlasst utility, then the portal schema resides in a customer database configuration outside the OracleAS Metadata Repository and needs to be upgraded using the steps in this section.
Performing the Upgrade
Upgrading to OracleAS Portal Release 10.1.4 3-5
if a precheck fails. Instead, the errors for all prechecks are consolidated in the precheck.log file. This file is generated in the METADATA_REP_ORACLE_HOME/upgrade/temp/portal directory. Look at the end of the log file to see a list of checks that failed. Run the upgrade in this mode until none of the prechecks fails. In this mode, the schema is not altered, so restoring from your backup is not necessary between runs.
Look up any errors found in the precheck log file. Refer to Appendix A, "OracleAS Portal Upgrade Error Messages" for information about upgrade errors. Contact Oracle Support Services for any errors that are not documented or that cannot be resolved by following documented actions.
8. After resolving all warnings and errors from the precheck.log file, run the upgrade script without any parameters.
On UNIX, run the script as follows:
CD_ROOT/portal/admin/plsql/upgrade
On Windows, run the script as follows:
CD_ROOT\portal\admin\plsql\upgrade.bat
The script prompts you for information about the system setup. Your answers are echoed for verification at the end of the script. However, if you discover that you have entered incorrect information before the end of the script, then you can exit before any changes are made by answering n to the last script inquiry.
The following are the questions from the script. Default answers to the questions are given in brackets.
■ Have you backed up your database (y|n)? [y]:
If you have not backed up the database, then answer n, back up the database, and restart the script. If you have backed up the database, then answer y.
■ Enter the name of the schema you would like to upgrade [portal]:
If the schema name is different from the default OracleAS Infrastructure 10g installation schema name of portal, then enter the schema name.
■ Enter the password of the schema you would like to upgrade [portal]:
If the password is not the same as the schema name, then enter the portal schema password.
■ Enter the password for the SYS user of your database [change_on_install]:
If the password is not change_on_install, then enter the database SYS password.
■ Enter the TNS connect string to connect to the database [orcl]:
Provide the TNS connect string. This can be found in the ORACLE_HOME/network/admin/tnsnames.ora file.
9. When the script is complete, examine the upgrade log files in the current directory to make sure there are no errors reported at the end.
Reviewing the Upgrade Log File
3-6 Oracle Application Server Portal Installation and Upgrade Guide
3.2 Reviewing the Upgrade Log FileOnce the upgrade is complete, check the upgrade log files for any errors, by performing the following steps:
1. Locate the upgrade log file. The default name for the upgrade log file is upgrade.log and it is located in the following directory:
■ If you upgraded the portal schema in the OracleAS Metadata Repository, then the log file is generated in the METADATA_REP_ORACLE_HOME/upgrade/temp/portal directory.
■ If you upgraded the portal schema in a customer database, then the log file is generated in the same directory, <upgrade_directory>, in which you ran the upgrade script.
Unless the upgrade terminates abruptly before finishing, the errors in the log file are sent to standard output and are also included in a separate section at the end of the log file. Use the line numbers in the section at the end of the log file to search for the errors when they occurred earlier in the file. In addition to the log file, errors are also summarized in a file named upgrade.err, and warnings are summarized in a file named upgrade.wrn. These files are located in the following directory:
■ If you upgraded the portal schema in the OracleAS Metadata Repository, then the error and warning files are generated in the METADATA_REP_ORACLE_HOME/upgrade/temp/portal/tmp directory.
■ If you upgraded the portal schema in a customer database, then the error and warning files are generated in the <upgrade_directory>/tmp directory.
2. Open the upgrade log file with a text editor.
3. Look up the errors and warnings described in the log file.
4. Refer to Appendix A, "OracleAS Portal Upgrade Error Messages" and resolve any errors and warnings for which the workarounds have been documented. Most errors require that you restore the repository from backup, resolve the problem, and run another upgrade.
Caution: You cannot run OracleAS Portal until you have completed a successful upgrade. A successful upgrade has zero errors.
When undocumented errors are found, do not attempt to run the upgrade again, run any further steps, alter any files, modify the portal schema, or access the OracleAS Portal instance in your browser. Contact Oracle Support Services for help.
Note: If an error occurred while performing pre-upgrade checks, that is, if an error is logged in the precheck.log file, then it is not necessary to restore the repository from your backup. This is because, while performing the prechecks, the schema is not altered.
If an error occurred while performing the upgrade, that is, if an error is logged in the upgrade.log file, then you must restore the repository from backup.
Reviewing the Upgrade Log File
Upgrading to OracleAS Portal Release 10.1.4 3-7
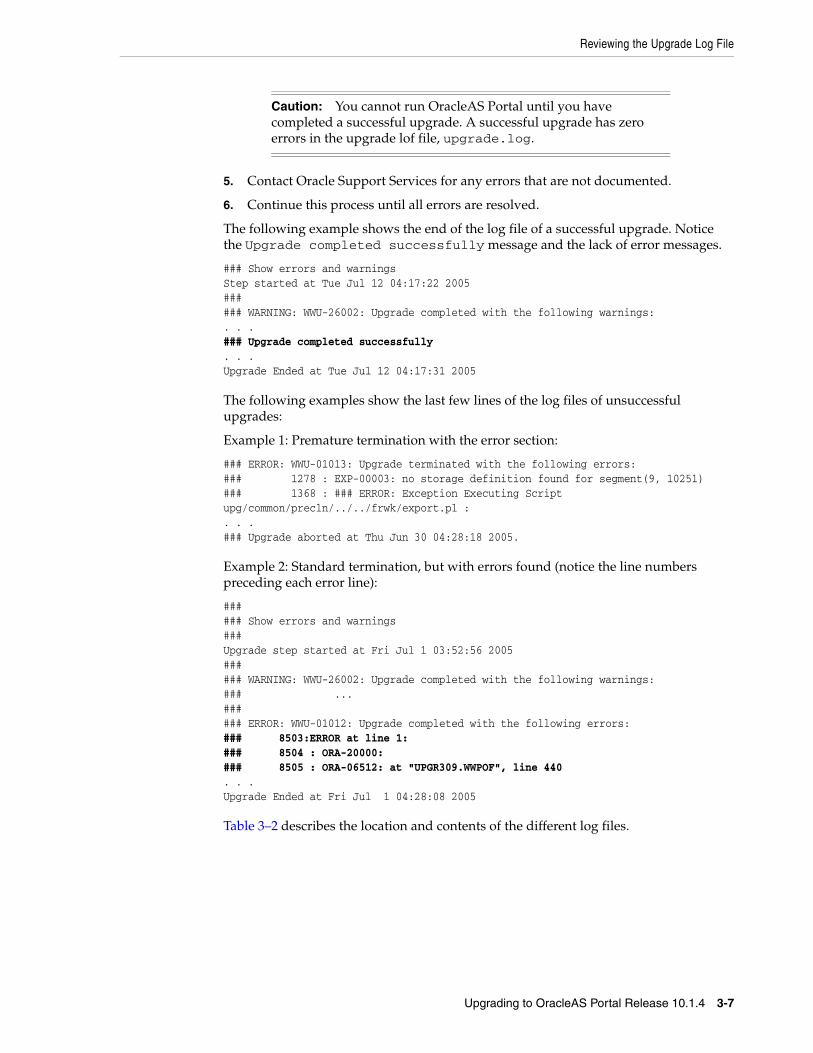
5. Contact Oracle Support Services for any errors that are not documented.
6. Continue this process until all errors are resolved.
The following example shows the end of the log file of a successful upgrade. Notice the Upgrade completed successfully message and the lack of error messages.
### Show errors and warnings Step started at Tue Jul 12 04:17:22 2005 ### ### WARNING: WWU-26002: Upgrade completed with the following warnings:. . . ### Upgrade completed successfully . . . Upgrade Ended at Tue Jul 12 04:17:31 2005
The following examples show the last few lines of the log files of unsuccessful upgrades:
Example 1: Premature termination with the error section:
### ERROR: WWU-01013: Upgrade terminated with the following errors:### 1278 : EXP-00003: no storage definition found for segment(9, 10251)### 1368 : ### ERROR: Exception Executing Script upg/common/precln/../../frwk/export.pl :. . . ### Upgrade aborted at Thu Jun 30 04:28:18 2005.
Example 2: Standard termination, but with errors found (notice the line numbers preceding each error line):
### ### Show errors and warnings ###Upgrade step started at Fri Jul 1 03:52:56 2005###### WARNING: WWU-26002: Upgrade completed with the following warnings:### ...###### ERROR: WWU-01012: Upgrade completed with the following errors:### 8503:ERROR at line 1: ### 8504 : ORA-20000:### 8505 : ORA-06512: at "UPGR309.WWPOF", line 440. . .Upgrade Ended at Fri Jul 1 04:28:08 2005
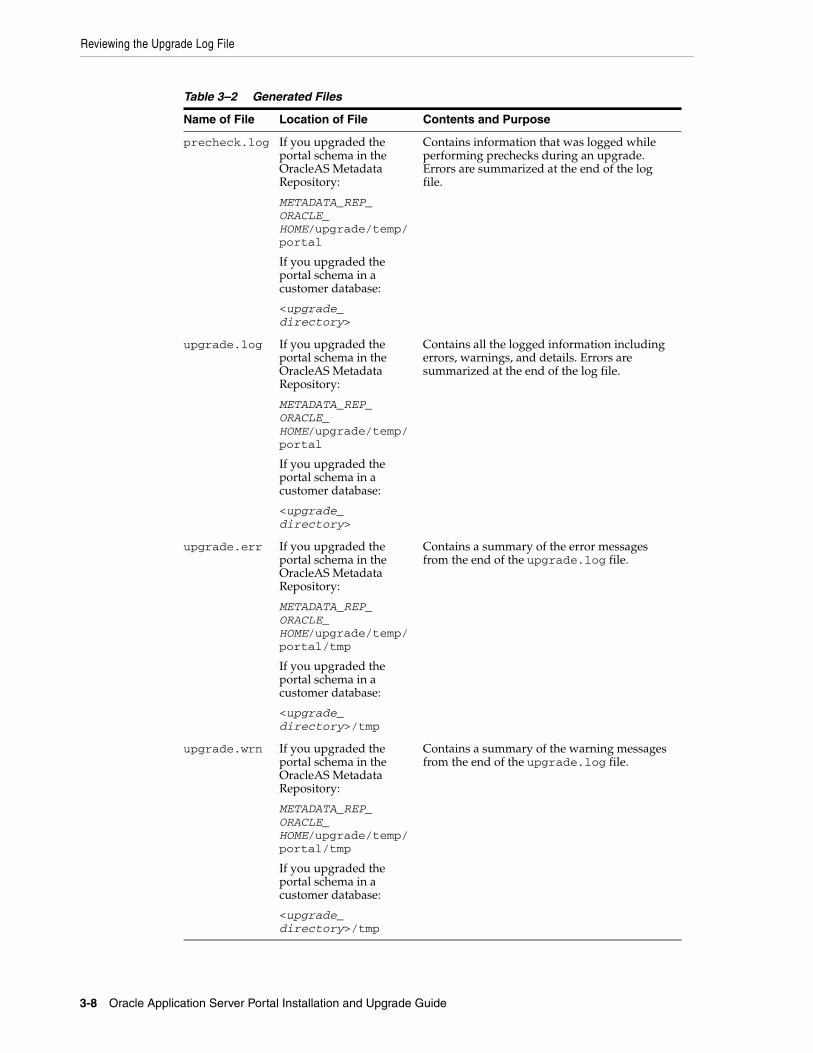
Table 3–2 describes the location and contents of the different log files.
Caution: You cannot run OracleAS Portal until you have completed a successful upgrade. A successful upgrade has zero errors in the upgrade lof file, upgrade.log.
Reviewing the Upgrade Log File
3-8 Oracle Application Server Portal Installation and Upgrade Guide
Table 3–2 Generated Files
Name of File Location of File Contents and Purpose
precheck.log If you upgraded the portal schema in the OracleAS Metadata Repository:
METADATA_REP_ORACLE_HOME/upgrade/temp/portal
If you upgraded the portal schema in a customer database:
<upgrade_directory>
Contains information that was logged while performing prechecks during an upgrade. Errors are summarized at the end of the log file.
upgrade.log If you upgraded the portal schema in the OracleAS Metadata Repository:
METADATA_REP_ORACLE_HOME/upgrade/temp/portal
If you upgraded the portal schema in a customer database:
<upgrade_directory>
Contains all the logged information including errors, warnings, and details. Errors are summarized at the end of the log file.
upgrade.err If you upgraded the portal schema in the OracleAS Metadata Repository:
METADATA_REP_ORACLE_HOME/upgrade/temp/portal/tmp
If you upgraded the portal schema in a customer database:
<upgrade_directory>/tmp
Contains a summary of the error messages from the end of the upgrade.log file.
upgrade.wrn If you upgraded the portal schema in the OracleAS Metadata Repository:
METADATA_REP_ORACLE_HOME/upgrade/temp/portal/tmp
If you upgraded the portal schema in a customer database:
<upgrade_directory>/tmp
Contains a summary of the warning messages from the end of the upgrade.log file.
Accessing the Upgraded OracleAS Portal
Upgrading to OracleAS Portal Release 10.1.4 3-9
3.3 Backing Up the Database That Contains the Upgraded Portal SchemaAfter performing the upgrade, you must back up the database that contains the upgraded portal schema. To do this, you must shut down the database, perform a backup, and then start the database.
There are several ways to perform a backup. Consult an experienced database administrator, or refer to Oracle Database documentation for further information about the backup and recovery procedures for the database.
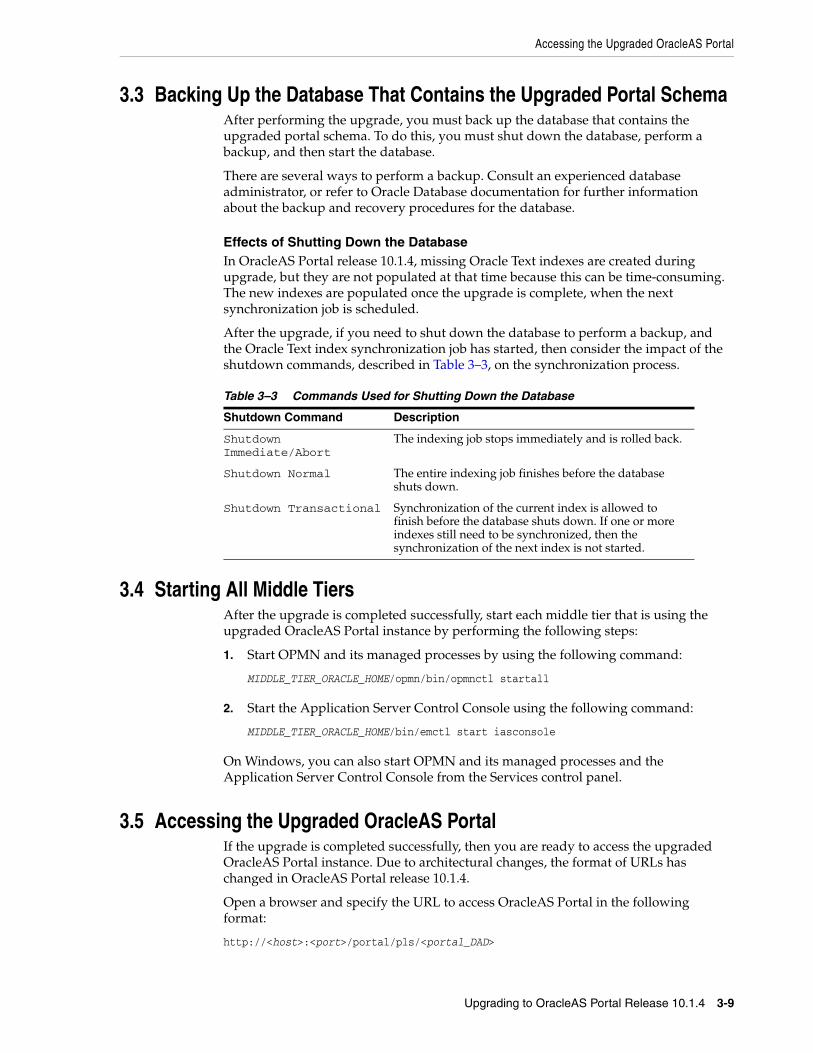
Effects of Shutting Down the DatabaseIn OracleAS Portal release 10.1.4, missing Oracle Text indexes are created during upgrade, but they are not populated at that time because this can be time-consuming. The new indexes are populated once the upgrade is complete, when the next synchronization job is scheduled.
After the upgrade, if you need to shut down the database to perform a backup, and the Oracle Text index synchronization job has started, then consider the impact of the shutdown commands, described in Table 3–3, on the synchronization process.
3.4 Starting All Middle TiersAfter the upgrade is completed successfully, start each middle tier that is using the upgraded OracleAS Portal instance by performing the following steps:
1. Start OPMN and its managed processes by using the following command:
MIDDLE_TIER_ORACLE_HOME/opmn/bin/opmnctl startall
2. Start the Application Server Control Console using the following command:
MIDDLE_TIER_ORACLE_HOME/bin/emctl start iasconsole
On Windows, you can also start OPMN and its managed processes and the Application Server Control Console from the Services control panel.
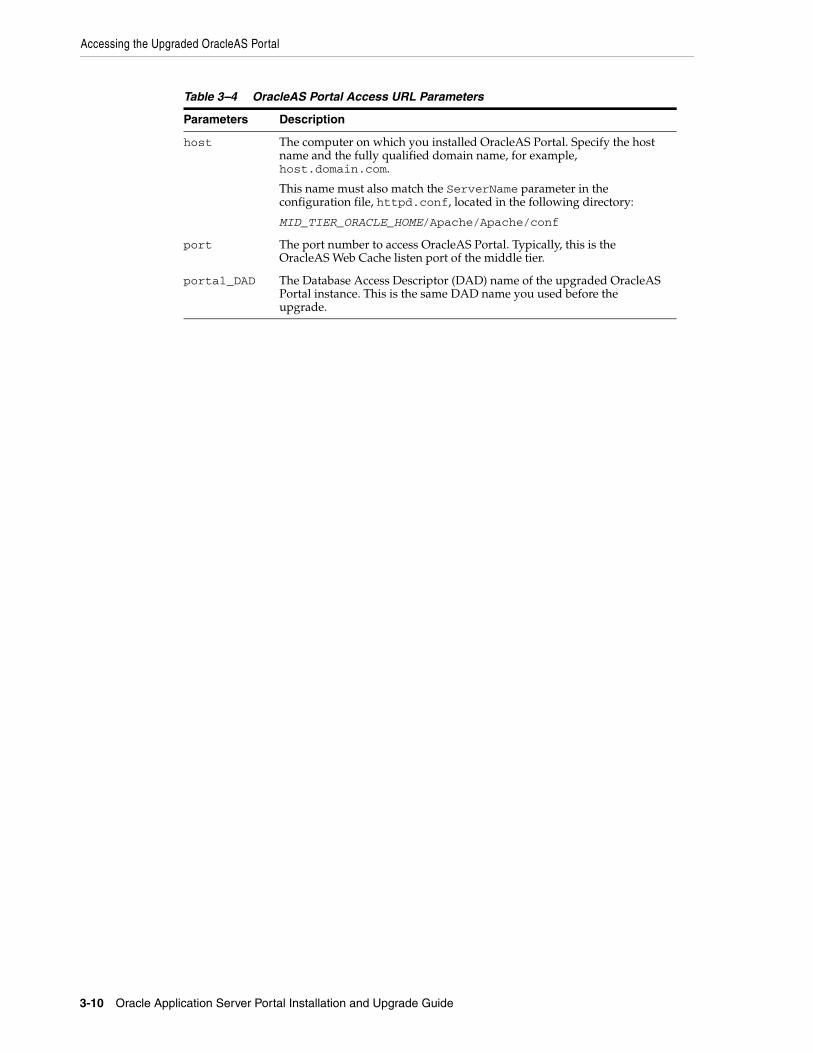
3.5 Accessing the Upgraded OracleAS Portal If the upgrade is completed successfully, then you are ready to access the upgraded OracleAS Portal instance. Due to architectural changes, the format of URLs has changed in OracleAS Portal release 10.1.4.
Open a browser and specify the URL to access OracleAS Portal in the following format:
http://<host>:<port>/portal/pls/<portal_DAD>
Table 3–3 Commands Used for Shutting Down the Database
Shutdown Command Description
Shutdown Immediate/Abort
The indexing job stops immediately and is rolled back.
Shutdown Normal The entire indexing job finishes before the database shuts down.
Shutdown Transactional Synchronization of the current index is allowed to finish before the database shuts down. If one or more indexes still need to be synchronized, then the synchronization of the next index is not started.
Accessing the Upgraded OracleAS Portal
3-10 Oracle Application Server Portal Installation and Upgrade Guide
Table 3–4 OracleAS Portal Access URL Parameters
Parameters Description
host The computer on which you installed OracleAS Portal. Specify the host name and the fully qualified domain name, for example, host.domain.com.
This name must also match the ServerName parameter in the configuration file, httpd.conf, located in the following directory:
MID_TIER_ORACLE_HOME/Apache/Apache/conf
port The port number to access OracleAS Portal. Typically, this is the OracleAS Web Cache listen port of the middle tier.
portal_DAD The Database Access Descriptor (DAD) name of the upgraded OracleAS Portal instance. This is the same DAD name you used before the upgrade.

Performing Post-Upgrade Tasks 4-1
4Performing Post-Upgrade Tasks
This chapter describes the tasks that you must perform after a successful upgrade.
Perform the following actions after the upgrade script has completed successfully and you have made a backup of the upgraded OracleAS Portal release 10.1.4 instance. You must perform a backup because several of the post-upgrade actions can negatively affect the repository if not applied correctly.
Post-upgrade tasks are divided into the following two categories:
■ Section 4.1, "Required Tasks"
■ Section 4.2, "Optional Tasks"
4.1 Required TasksTo ensure that you can use an upgraded OracleAS Portal instance without problems, you must perform the following post-upgrade tasks:
■ Section 4.1.1, "Updating to the New URL Format and Correcting Invalid Links"
■ Section 4.1.2, "Removing Obsolete Substitution Tags in HTML Page Skins"
■ Section 4.1.3, "Reregistering OracleAS Portal as a Content Source in Oracle Ultra Search"
■ Section 4.1.4, "Scheduling a Full Recrawl Using Oracle Ultra Search"
■ Section 4.1.5, "Updating the OracleAS Portal URL in the OracleAS Wireless Service Definition"
■ Section 4.1.6, "Reenabling Portal Export and Import"
■ Section 4.1.7, "Updating Performance Reporting"
■ Section 4.1.8, "Changing the Category and Perspective Names"
■ Section 4.1.9, "Enabling Time Monitoring of Queue Messages"
4.1.1 Updating to the New URL Format and Correcting Invalid LinksDue to architectural changes, the format of URLs has changed in OracleAS Portal release 10.1.4. If you try to access portal objects in an upgraded OracleAS Portal instance using the old URL format, then you will be presented with a redirection screen that shows the old URL you are accessing, along with a new URL. This screen will automatically redirect you to the new URL format.
Required Tasks
4-2 Oracle Application Server Portal Installation and Upgrade Guide
Displaying a URL Redirection ScreenYou can choose whether to display a URL redirection screen or not. The URL redirection screen displays both the new and old URLs to assist in correcting bookmarks, and so on.
When you access an old URL, the URL redirection screen is displayed by default. To alter the default behavior, you can use the pobredir.sql script. It is located in the portal/admin/plsql/wws directory in the upgrade CD-ROM. The script takes one parameter. Run this script as the portal schema owner.
The following is an example for running the script to enable seamless redirection to the new URL:
SQL> @pobredir.sql 1
■ A value of 1 seamlessly redirects the user to the new URL and does not produce the redirection screen.
■ A value of 0, which is the default value, produces the redirection page.
To run the pobredir.sql script, you must log in to the OracleAS Metadata Repository database as the portal schema user from SQL*Plus. If OracleAS Portal was installed on a customer database, then log in to the database that hosts the portal schema.
Viewing Portal Schema Password Using Oracle Directory Manager To log in to the OracleAS Metadata Repository database as the portal schema user, you must know the portal schema password. If the portal schema resides in the OracleAS Metadata Repository, then the portal schema password is stored in Oracle Internet Directory. You can get the portal schema password from Oracle Internet Directory using Oracle Directory Manager.
To view the portal schema password, perform the following steps:
1. Start Oracle Directory Manager:
■ On UNIX, use the following command:
METADATA_REP_ORACLE_HOME/bin/oidadmin
■ On Windows, click Start, Programs, Oracle Application Server <ias_instance_name>, Integrated Management Tools, and Oracle Directory Manager.
2. Log in to Oracle Directory Manager as the orcladmin user.
3. In the System Objects frame, expand Entry Management, cn=OracleContext, cn=Products, cn=IAS, cn=IAS Infrastructure Databases, and then orclReferenceName=<Infrastructure Database name> for the OracleAS Metadata Repository.
Note: Update any references and bookmarks that include old URLs. The old format will not be supported in future releases.
Note: If you choose a value of 1, then the seamless redirection will work only for this release. After future upgrades, these URLs may be broken. For this reason, turn off the seamless redirection at some point, and fix any URLs that are causing redirection.
Required Tasks
Performing Post-Upgrade Tasks 4-3
4. Select the OrclResourceName=PORTAL entry to view the portal schema password.
5. In the Properties tab, you can view the password in the orclpasswordattribute field.
Durable URLsA durable URL is formed by using a GUID. The format for a durable URL is as follows:
http://<host>:<port>/portal/page/<portal_DAD>[/lang-<language>][/ver-<version>]/<item_guid>
For example, to access a document, mydocument.htm, which has an ID A47D41ECA23648A9E030007F0100118A, the URL is as follows:
http://mymachine.mycompany.com:5000/portal/page/mydad/lang-en/A47D41ECA23648A9E030007F0100118A
The format of a durable URL to render a page is as follows:
http://<host>:<port>/portal/page/<portal_DAD>/<page_guid>
Because the GUID of an object never changes, the URL will continue to be valid even if the object name changes. Durable URLs are generated by OracleAS Portal for item types such as Page Path, Page Links, List of Objects, and so on.
Updating Direct-Access URLsDirect-access URLs that were used in earlier releases of OracleAS Portal are now referred to as path-based URLs. A path-based URL is formed by identifying the path taken through the portal to get to a particular object. In earlier releases, a path alias like doc, url, and page was used in the URL to denote the type of portal object being accessed. The format of direct-access URLs has changed in this release and does not contain the path alias any more. Following this release, direct-access URL formats will be obsolete.
For backward compatibility, direct-access URL formats are supported in this release of OracleAS Portal. These URL formats invoke a redirection screen that redirects users to the correct target. Avoid using direct-access URL formats going forward, and consider fixing legacy uses of these formats.The syntax for the obsolete URL format is as follows:
http://<host>:<port>/pls/<portal_DAD>/<path_alias>/PAGE/<page_path>
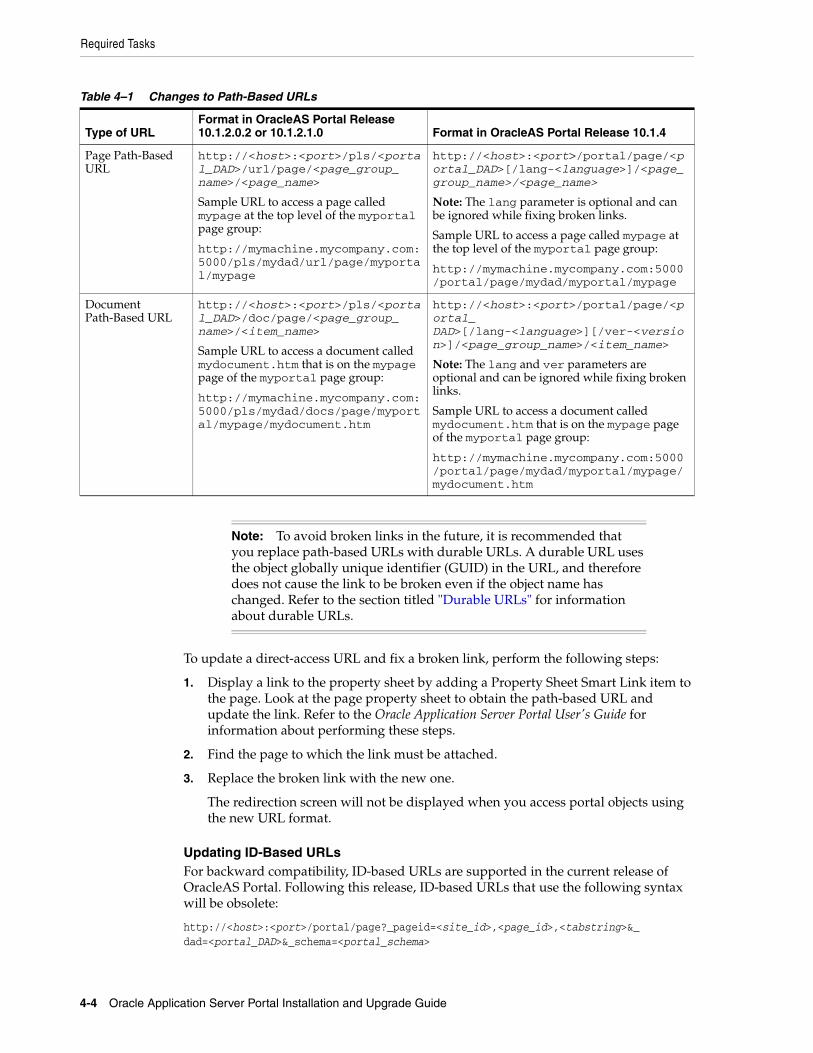
Table 4–1 describes the format of path-based URLs in OracleAS Portal release 10.1.2.0.2 or 10.1.2.1.0, and release 10.1.4.
Note: Only the first tab in a path alias of path-based URLs is preserved when redirecting to the new URL format. The other tabbed regions on the page default to the first available tab in the region.
Required Tasks
4-4 Oracle Application Server Portal Installation and Upgrade Guide
To update a direct-access URL and fix a broken link, perform the following steps:
1. Display a link to the property sheet by adding a Property Sheet Smart Link item to the page. Look at the page property sheet to obtain the path-based URL and update the link. Refer to the Oracle Application Server Portal User's Guide for information about performing these steps.
2. Find the page to which the link must be attached.
3. Replace the broken link with the new one.
The redirection screen will not be displayed when you access portal objects using the new URL format.
Updating ID-Based URLsFor backward compatibility, ID-based URLs are supported in the current release of OracleAS Portal. Following this release, ID-based URLs that use the following syntax will be obsolete:
http://<host>:<port>/portal/page?_pageid=<site_id>,<page_id>,<tabstring>&_dad=<portal_DAD>&_schema=<portal_schema>
Table 4–1 Changes to Path-Based URLs
Type of URLFormat in OracleAS Portal Release 10.1.2.0.2 or 10.1.2.1.0 Format in OracleAS Portal Release 10.1.4
Page Path-Based URL
http://<host>:<port>/pls/<portal_DAD>/url/page/<page_group_name>/<page_name>
Sample URL to access a page called mypage at the top level of the myportal page group:
http://mymachine.mycompany.com:5000/pls/mydad/url/page/myportal/mypage
http://<host>:<port>/portal/page/<portal_DAD>[/lang-<language>]/<page_group_name>/<page_name>
Note: The lang parameter is optional and can be ignored while fixing broken links.
Sample URL to access a page called mypage at the top level of the myportal page group:
http://mymachine.mycompany.com:5000/portal/page/mydad/myportal/mypage
Document Path-Based URL
http://<host>:<port>/pls/<portal_DAD>/doc/page/<page_group_name>/<item_name>
Sample URL to access a document called mydocument.htm that is on the mypage page of the myportal page group:
http://mymachine.mycompany.com:5000/pls/mydad/docs/page/myportal/mypage/mydocument.htm
http://<host>:<port>/portal/page/<portal_DAD>[/lang-<language>][/ver-<version>]/<page_group_name>/<item_name>
Note: The lang and ver parameters are optional and can be ignored while fixing broken links.
Sample URL to access a document called mydocument.htm that is on the mypage page of the myportal page group:
http://mymachine.mycompany.com:5000/portal/page/mydad/myportal/mypage/mydocument.htm
Note: To avoid broken links in the future, it is recommended that you replace path-based URLs with durable URLs. A durable URL uses the object globally unique identifier (GUID) in the URL, and therefore does not cause the link to be broken even if the object name has changed. Refer to the section titled "Durable URLs" for information about durable URLs.
Required Tasks
Performing Post-Upgrade Tasks 4-5
For the current release, ID-based URL formats invoke a redirection screen that redirects users to the correct target. Avoid using ID-based URL formats in the future, and consider fixing legacy uses of these formats.
Note the newly formed URL that is displayed on the redirection screen and correct the link. After you update URLs to the new format, a redirection screen will not be displayed when you access portal objects.
4.1.2 Removing Obsolete Substitution Tags in HTML Page SkinsIn earlier releases, unstructured user interface (UI) templates governed what was displayed on the page. From release 10.1.4 onward, HTML page skins replace the functions of unstructured UI templates. Some of the substitution tags that were used in these templates are now obsolete. After upgrading to OracleAS Portal release 10.1.4, to ensure that portal pages are rendered without errors, do not use obsolete substitution tags in HTML page skins. To ensure that you are not using obsolete substitution tags, perform the following steps:
1. Open the HTML page skin template in edit mode.
2. Check the template for obsolete substitution tags. For a list of obsolete substitution tags, refer to Section 5.1.3, "Obsolete Substitution Tags for HTML Templates".
3. If you find obsolete substitution tags, then replace them with valid substitution tags, or remove them from the template. For a list of substitution tags that are supported, refer to the Oracle Application Server Portal User's Guide.
4.1.3 Reregistering OracleAS Portal as a Content Source in Oracle Ultra SearchPerform this step only if you are using Oracle Ultra Search, and have registered OracleAS Portal as a content source.
As the URL format has changed in OracleAS Portal release 10.1.4, after performing the upgrade, you must reregister OracleAS Portal as an Oracle Ultra Search content source by deleting the existing OracleAS Portal content source and creating a new one. Perform the steps in the following sections to delete the existing OracleAS Portal content source, and register the upgraded portal instance as a new content source:
■ Section 4.1.3.1, "Deleting the Old OracleAS Portal Content Source"
■ Section 4.1.3.2, "Registering the Upgraded Portal Instance as an Oracle Ultra Search Content Source"
4.1.3.1 Deleting the Old OracleAS Portal Content SourceTo delete the portal instance, which was registered as an Oracle Ultra Search content source before performing the upgrade, perform the following steps:
1. Click Ultra Search Administration in the Services portlet to access the Oracle Ultra Search administration tool.
By default, the Services portlet is on the Portal subtab of the Administer tab on the Portal Builder page.
See Also: The Oracle Application Server Portal User's Guide for information about the types of URLs supported in OracleAS Portal release 10.1.4.
See Also: Oracle Ultra Search Administrator's Guide
Required Tasks
4-6 Oracle Application Server Portal Installation and Upgrade Guide
2. On the Instances tab, click Apply to set the instance.
If you have more than one instance, then ensure that you select the instance you want to update first.
3. Click the Sources tab, and then click the Oracle Sources subtab.
4. Select the old OracleAS Portal content source, and then click Delete.
4.1.3.2 Registering the Upgraded Portal Instance as an Oracle Ultra Search Content SourceTo register the upgraded portal instance as an Oracle Ultra Search content source by specifying the new URL, refer to the section titled "Registering OracleAS Portal As a Content Source" in the Oracle Application Server Portal Configuration Guide.
Once you have registered OracleAS Portal as an Oracle Ultra Search content source, you can register the Ultra Search provider with OracleAS Portal.
4.1.4 Scheduling a Full Recrawl Using Oracle Ultra SearchPerform this step if you have created custom file attributes for items and pages, and are displaying these attributes through the Oracle Ultra Search content repository.
In OracleAS Portal release 10.1.4, the format of the URL for custom file attributes has changed. Because of this, the Oracle Ultra Search content repository must be updated. Oracle Ultra Search identifies changes by looking at the date on which the items were updated. In this case, the date has not changed, and therefore the Oracle Ultra Search content repository will not be updated. To update this content repository, you must schedule a full recrawl of OracleAS Portal using Oracle Ultra Search.
For details about scheduling a full recrawl of OracleAS Portal, refer to Section "Schedule-Related APIs" in Chapter 11 in the Oracle Ultra Search Administrator's Guide.
4.1.5 Updating the OracleAS Portal URL in the OracleAS Wireless Service DefinitionPerform this task only if you are accessing OracleAS Portal using a wireless device.
Wireless devices access OracleAS Portal by using the portal home page URL that is stored in the Oracle Application Server Wireless server service definition. Because the OracleAS Portal URL format has changed in release 10.1.4, this change must be reflected in the OracleAS Wireless server service definition.
Note: If you started with OracleAS Portal release 9.0.2 or earlier, then you will not be able to log in to the Oracle Ultra Search Administration tool as a portal administrator.
To access the Oracle Ultra Search Administration tool, you must perform the following tasks:
1. Log in to the Oracle Ultra Search Administration tool as an Oracle Application Server administrator, such as orcladmin. (The password is set during installation, but can be changed with the User Manager.)
2. Grant ADMIN privileges to the PORTAL user. Refer to the Oracle Ultra Search Administrator's Guide for details.
3. Log out.
4. Log in to the Oracle Ultra Search Administration tool as the PORTAL user.
Required Tasks
Performing Post-Upgrade Tasks 4-7
To update the OracleAS Portal home page URL in the OracleAS Wireless server service definition, perform the following tasks:
1. Log in to OracleAS Wireless Tools by using the following URL:
http://<host>:<port>/webtool/login.uix
2. Log in as an Oracle Application Server administrator, such as orcladmin. (The password is set during installation, but can be changed with the User Manager.)
3. Click the Contents tab.
4. In the Content Manager, select the portal service, and click Edit.
5. Click Input Parameters on the left-hand side of the screen.
6. In the Input Parameters screen, change the existing URL to the following:
http://<host>:<port>/portal/pls/<portal_DAD>/<portal_schema>.home
For example:
http://myserver.abc.com:7778/portal/pls/portal/portal.home
7. Click Apply to save the changes.
8. Log out of the Content Manager.
4.1.6 Reenabling Portal Export and ImportPerform this task only if you are using the OracleAS Portal Export and Import feature.
If you have two portal instances, one source and one target, where you migrate page groups between these two instances using the OracleAS Portal Export and Import functions, then after an upgrade, if you try to export and import content between the two portal instances, it will fail. This happens because the upgrade process assigns new GUIDs to page groups, pages, categories, and perspectives, which are unique for each upgraded portal instance. As the GUIDs of the objects in the two portal instances no longer match after the upgrade, the precheck for these objects will fail during the import.
In such cases, you must run the guidmasg.sql script located in the portal/admin/plsql/wwu directory in the upgrade CD-ROM. Do this before performing an export and import operation. Running this script synchronizes the GUIDs of objects between the upgraded source and target portal instances, and also ensures that any future export and import of page groups is not affected by GUID mismatch.
To run the guidmasg.sql script, perform the following steps:
1. Back up the source and target portal instances if you have not already done so.
2. Change the directory to a location where you have write permissions. The guidmasg.sql script will create a set of log files in this location.
3. Using SQL*Plus, connect to the target portal instance.
Note: If you do not perform this task, then every time you try to access OracleAS Portal using a wireless device, a redirection screen is displayed with a link to the new URL.
Required Tasks
4-8 Oracle Application Server Portal Installation and Upgrade Guide
4. Create a database link to the source portal schema, as follows:
create database link <database_link_name> connect to <source_portal_schema> identified by <source_portal_password> using <database_connect_info>;
5. Verify that you are able to connect to the source portal instance using the prior database link, as follows:
select version from wwc_version$@<database_link_name>;
6. Log in to the OracleAS Metadata Repository database on the target portal instance as the portal schema user from SQL*Plus. If OracleAS Portal was installed on a customer database, then log in to the database that hosts the portal schema.
7. Run the guidmasg.sql script and pass the database link name as the input parameter by using the following command:
@CD_ROOT/portal/admin/plsql/wwu/guidmasg.sql <database_link_name>
8. Review the guidmasg.log file, generated in the current directory, for any errors. Refer to Section 4.1.6.1, "Reviewing the Log Files" for more information.
9. You can now export and import the page groups between the source and target portal instances.
Note: If the portal schema resides in the OracleAS Metadata Repository, and if you do not know the portal schema password, then refer to "Viewing Portal Schema Password Using Oracle Directory Manager" in Section 4.1.1 to find out the password.
See Also: The Oracle Database Administrator's Guide in the Oracle Database documentation library, for information about creating database links.
Note: If the portal schema resides in the OracleAS Metadata Repository, and if you do not know the portal schema password, then refer to "Viewing Portal Schema Password Using Oracle Directory Manager" in Section 4.1.1 to find out the password.
Note: If you have more then two portal instances between which the Export and Import operations must be performed, then you must perform the preceding steps multiple times until all portal instances are synchronized. For example, if you have development, test, stage, and production portals, named Portal A, Portal B, Portal C, and Portal D respectively, then you must run the script in the following manner:
1. Run the guidmasg.sql script from B, when connected to A as the source.
2. Run the guidmasg.sql script from C, when connected to B as the source.
3. Run the guidmasg.sql script from D, when connected to C as the source.
Required Tasks
Performing Post-Upgrade Tasks 4-9
4.1.6.1 Reviewing the Log FilesTo review the output of the guidmasg.log file and to ensure that there are no errors, perform the following checks:
1. Ensure that the number of page groups listed in the log file as updated includes all the page groups that were migrated before the upgrade to release 10.1.4.
2. For each page group, verify that the number of pages, perspectives, and categories on both the source and target instances are correct. If there are a greater number of pages and perspectives and categories on the source, then it indicates that the objects are not yet present in the target, which is expected. If there are a greater number of pages on the target, then the additional target pages may be an issue if pages with the same name are created in the upgraded source instance and an attempt is made to import them to the target instance at a later date.
3. The errors in the log file are sent to standard output and are also included in a separate section at the end of the log file. Use the line numbers in the section at the end of the log file to search for the errors when they occurred earlier in the file.
4.1.7 Updating Performance ReportingPerform this task only if you are already using the performance reporting scripts.
To generate performance reports for OracleAS Portal, you must use a set of SQL scripts. The scripts are located in the following directory:
CD_ROOT/portal/admin/plsql/perf
By running these scripts, OracleAS Portal log files are loaded into a database table and reports can be generated based on the information in the log files.
If you are already using the performance reporting scripts, then after upgrading the OracleAS Portal repository to release 10.1.4, you must run the new copy of the CD_ROOT/portal/admin/plsql/perf/install/update.sql file. This is to accommodate the new URL format for repository requests and to enable collection of new data. If this is not done, then the scripts will not work.
For details about how you can use the scripts to monitor OracleAS Portal performance, refer to the README.html file in the scripts subdirectory:
CD_ROOT/portal/admin/plsql/perf/scripts/README.html
4.1.8 Changing the Category and Perspective NamesPerform this task only if you started with OracleAS Portal release 3.0.9.
You may find that you are not able to access category and perspective pages by using path-based URLs with their pre-upgrade names. This is because, after upgrade, the page ID and page group ID are appended to the category or perspective name. Therefore, the category or perspective name that you specified in the URL is not valid. For example, if you had a category named GENERAL in release 3.0.9, then on moving to release 10.1.2.0.2 or 10.1.2.1.0, and then to release 10.1.4, the name of this category may be GENERAL_12345_0, where 12345 is the page ID and 0 is the page group ID.
Caution: It is highly recommended that you do not store this data in the same database as the portal repository because this may affect performance.
Optional Tasks
4-10 Oracle Application Server Portal Installation and Upgrade Guide
As a workaround to this problem, perform either of the two tasks:
■ Change the category or perspective name to the pre-upgrade name by removing the ID that is appended to the name.
■ Specify a new name. If there is an existing category or perspective with the name you specified, then you are prompted for a different name.
4.1.9 Enabling Time Monitoring of Queue MessagesPerform this task only if the database that contains the portal schema was upgraded to Oracle Database 10g from an earlier release.
Oracle Streams Advanced Queuing time manager processes are controlled by the database initialization parameter, AQ_TM_PROCESSES. This parameter must be set to a nonzero value. This enables time monitoring on queue messages and processes messages with delay and expiration properties specified.
For details about updating a database initialization parameter file, refer to the section, "Managing Initialization Parameters Using a Server Parameter File", in the Oracle Database Administrator's Guide in the Oracle Database 10g documentation library.
4.2 Optional TasksThe following sections describe post-upgrade steps that are optional:
■ Section 4.2.1, "Moving the Portlet Repository to the New Format"
■ Section 4.2.2, "Deleting the Community News Portlet"
■ Section 4.2.3, "Configuring Oracle Text Indexes to Synchronize on Commit"
4.2.1 Moving the Portlet Repository to the New FormatBy default, the portlet repository is upgraded in-place in the OracleAS Portal schema. The existing pages, templates, items, and so on, in the portlet repository are upgraded, and the new portlets are added into the repository. As the old settings are preserved, the pages look very similar to the way they did before the upgrade was run.
If you want the repository to have the appearance of a newly installed instance, then the prrplc.sql script is available to re-create the upgraded portlet repository. This script removes the existing portlet repository and re-creates it. Use the script only if you do not wish to preserve customizations, settings, styles, banners, and so on in the portlet repository.
To re-create the portlet repository, perform the following steps:
Note: The title of the category will remain unchanged.
Note: If you started with Oracle9iAS Portal release 9.0.2 and you had rendered the Portlet Repository as grouped by Provider names, then after the upgrade, the folders in the repository will be grouped by the category, because the Group by Provider Name option has been deprecated since Oracle Application Server 10g (9.0.4).
To create a similar organization, assign the portlet names to categories that represent the Provider names.

Optional Tasks
Performing Post-Upgrade Tasks 4-11
1. Perform a backup of the database, as the script overwrites the repository and is not reversible.
2. Follow the steps described in Section 3.4, "Starting All Middle Tiers" to start the middle-tier instances.
3. Navigate to the following directory on the Oracle Application Server Portal Upgrade CD–ROM, which contains the prrplc.sql script:
CD_ROOT/portal/admin/plsql/upg/frwk
4. Log in to the OracleAS Metadata Repository database as the portal schema user from SQL*Plus. If OracleAS Portal was installed on a customer database, then log in to the database that hosts the portal schema.
5. Run the prrplc.sql script with no arguments.
4.2.2 Deleting the Community News PortletFrom OracleAS Portal release 10.1.4 onward, the Community News portlet is obsolete. But this portlet is still available on portal pages. When you try to edit this portlet, a blank page is displayed. To avoid confusion, you can manually delete the Community News portlet from portal pages. To delete this portlet from a page, perform the following steps:
1. Log in to OracleAS Portal.
2. Navigate to the page from which you want to delete the portlet.
3. Click Edit at the top of the page to switch to Edit mode.
4. Click Actions next to the Community News portlet.
5. Click Delete.
6. On the confirmation page, click Yes to delete the portlet and return to the page.
4.2.3 Configuring Oracle Text Indexes to Synchronize on CommitIf you are using Oracle Database 10g or later, Oracle Text indexes can be configured to synchronize immediately after data is committed to your portal. This is a new feature in OracleAS Portal release 10.1.4 but it does not apply to databases earlier than Oracle Database 10g.
On upgrade, Oracle Text indexes are not updated to make use of this new feature. This means that all the Oracle Text indexes are configured to synchronize manually using wwv_context.sync procedure. If you want to take advantage of the on commit feature introduced in Oracle Database 10g, then use the procedure wwv_context.commit_sync to reconfigure Oracle Text indexes. For more information, refer to the section titled "Configuring Oracle Text Indexes to Synchronize On Commit" in the Oracle Application Server Portal Configuration Guide.
Note: If the portal schema resides in the OracleAS Metadata Repository, and if you do not know the portal schema password, then refer to "Viewing Portal Schema Password Using Oracle Directory Manager" in Section 4.1.1 to find out the password.
Optional Tasks
4-12 Oracle Application Server Portal Installation and Upgrade Guide
Obsolete Features and Usage Changes 5-1
5Obsolete Features and Usage Changes
This chapter describes features in OracleAS Portal that were supported in earlier releases, but are not supported in release 10.1.4. This chapter also describes the changes you may find in an upgraded OracleAS Portal instance.
The following topics are discussed in this chapter:
■ Section 5.1, "Obsolete Features in OracleAS Portal Release 10.1.4"
■ Section 5.2, "Usage Changes in OracleAS Portal Release 10.1.4"
5.1 Obsolete Features in OracleAS Portal Release 10.1.4The following sections describe the features that have been deprecated and will not be available after you upgrade to OracleAS Portal release 10.1.4:
■ Section 5.1.1, "URL Portlet and XML Portlet"
■ Section 5.1.2, "User Interface Templates"
■ Section 5.1.3, "Obsolete Substitution Tags for HTML Templates"
5.1.1 URL Portlet and XML Portlet The URL Portlet and XML Portlet features, that were used to create new portlets in earlier releases of OracleAS Portal, are now deprecated. The Web Clipping and OmniPortlet features replace the functions of URL Portlet and XML Portlet respectively. You can create new portlets by using Web Clipping or OmniPortlet from the Portlet Builder folder in the portlet repository. Existing URL Portlet and XML Portlet instances on your pages will continue to function as in previous releases.
5.1.2 User Interface TemplatesIn earlier releases, unstructured UI templates governed what was displayed around the page. From release 10.1.4 onward, HTML page skins replace the functions of unstructured UI templates. After an upgrade, unstructured UI templates that were created before release 10.1.4 will be available for use as HTML page skins in the Shared Objects page group.
5.1.3 Obsolete Substitution Tags for HTML TemplatesThe following substitution tags for HTML templates are obsolete from OracleAS Portal release 10.1.4 onward:
■ PAGE.STYLE.URL
Usage Changes in OracleAS Portal Release 10.1.4
5-2 Oracle Application Server Portal Installation and Upgrade Guide
■ PAGE.BGIMAGE
■ PAGE.BGCOLOR
■ PAGE.SUBPAGELINKS
It is recommended that you delete these obsolete substitution tags if they are still available in HTML templates. For information about deleting these tags, refer to Section 4.1.2, "Removing Obsolete Substitution Tags in HTML Page Skins".
5.2 Usage Changes in OracleAS Portal Release 10.1.4This section details the following changes in usage after upgrading to OracleAS Portal release 10.1.4:
■ Section 5.2.1, "Introduction of the HTML Output Compatibility Mode Switch"
■ Section 5.2.2, "URL Changes"
■ Section 5.2.3, "Changes in Caching"
■ Section 5.2.4, "Change in Portal Service Monitoring Link"
5.2.1 Introduction of the HTML Output Compatibility Mode SwitchMany of the elements on a portal page are defined by text attributes, entered either by the page designer or the user. Along with text, it is also possible to enter HTML tags and expect them to be rendered on the page.
For example, you can enter the following in the page title:
<b>OracleAS 10<i>g</i> Collateral</b>
And expect it to be rendered as follows:
OracleAS 10g Collateral
However, this poses a security risk as anything can be entered into the element, including JavaScript.
For pages and portlets generated by using PL/SQL, OracleAS Portal release 10.1.4 introduces a compatibility mode that lets you choose whether elements with HTML tags are rendered in the browser, or the HTML tags are filtered out and displayed as text on the page thereby eliminating the security risk.
Some fields are purposely intended to contain arbitrary HTML provided by the end user, as this data cannot be filtered without compromising the usefulness of the feature itself. These components are not affected by the compatibility mode and are therefore never filtered. Components of this type include HTML Portlet, Rich Text Item, and HTML Page Skins.
However, if required, it is also possible to switch off the use of the HTML Portlet by deleting it from the portlet repository. The use of the Rich Text Editor to edit text items can be turned off at the page group level so that users can enter only plain text in text items. And, to restrict the access to HTML Page Skins, developer privileges can be granted to a small set of users only.
When upgrading a portal instance, the compatibility mode is disabled by default after the upgrade. This means that HTML tags are filtered out. Therefore, after upgrade, on systems that have leveraged HTML tags, you will find that the appearance of some pages has changed. This is because the HTML tags are displayed as text. To remedy this situation, you can either remove the HTML tags, reverting to the default portal
Usage Changes in OracleAS Portal Release 10.1.4
Obsolete Features and Usage Changes 5-3
functionality, or enable the compatibility mode by performing the tasks described in the following sections.
For any pages and portlets generated by using PL/SQL coding, the compatibility mode switch includes two packages, cfgcmyes.pkb and cfgcmno.pkb, to turn compatibility mode on and off respectively.
Running the cfgcmyes.pkb package turns compatibility mode on. As a result of this, HTML tags are not filtered but are allowed to be rendered by the browser. This is equivalent to the behavior in prior releases.
Running the cfgcmno.pkb package turns compatibility mode off. As a result of this, HTML tags are filtered out and appear as text.
To enable compatibility mode:
1. Navigate to the CD_ROOT/portal/admin/plsql/wwc directory.
2. Log in to SQL*Plus with the appropriate user name and password for the portal schema. For example:
sqlplus portal/SE3bJg@orcl123
3. Enter the following command:
SQL> @cfgcmyes.pkb
To disable compatibility mode, perform the same steps 1 through 3, but in step 3, enter the following command:
SQL> @cfgcmno.pkb
5.2.2 URL ChangesPath-based URLs and durable URLs are the two distinct types of URLs used for accessing objects in OracleAS Portal release 10.1.4. In analyzing links and bookmarks to pages on your site, determine the appropriate format for all future manually created links to OracleAS Portal pages.
Due to architectural changes in OracleAS Portal release 10.1.4, many URLs are formatted differently now.
5.2.2.1 GUID Displayed in URLs for Text and PL/SQL ItemsWhen editing a page type or item type, you can use certain base attributes to store information about the page or item. In OracleAS Portal release 10.1.4, there is a new base attribute called Name. This attribute contains a name for the item, which is used internally only. For further information about this attribute, refer to the Oracle Application Server Portal User's Guide.
Note: Enabling compatibility mode, that is, rendering HTML tags in the browser, provides the desired output but it is not secure. Therefore, you must bear in mind the security vulnerability when you enable the compatibility mode.
See Also: The Oracle Application Server Portal User's Guide for information about the types of URLs supported in OracleAS Portal release 10.1.4.

Usage Changes in OracleAS Portal Release 10.1.4
5-4 Oracle Application Server Portal Installation and Upgrade Guide
After upgrading to OracleAS Portal release 10.1.4, the Name attribute for a PL/SQL or text item will be populated with the globally unique identifier (GUID) of the item. As a result of this, the URL to access the PL/SQL or text item will also reflect the GUID.
5.2.3 Changes in CachingIn this release, substantial architectural changes were made in caching in order to improve performance and scalability. There is now more granular caching of components of a page that enables variations of caching options for each component. In particular, tab headings, subpage regions, page portlets, and navigation page portlets are now cached separately from the rest of the page definition. This flexibility allows more components to be cached at system level. This was not feasible in earlier releases.
This also allows more fine-grained invalidation, which increases the cache hit ratio and reduces the time to regenerate invalidated content. For example, adding a subpage to a page with a subpage region no longer invalidates the whole page. Instead, it invalidates just the content for the subpage region. Regenerating this content is less expensive than regenerating the whole page.
In general, these caching changes do not result in any functional change. The exception is for pages that contain tabs or subpage regions where the page definition only is cached at system level. In earlier releases, the tabs and subpage display items were cached as part of the page definition, and therefore, they were cached at the system level. As system level caching results in only one cached copy for all users, all users must see the same content. As a result, in system cached pages, all tabs and subpages were displayed to all users viewing the page, regardless of privileges on the tabs or subpages. The security check was applied when the user accessed the tab or subpage. In release 10.1.4, the tab headings and subpage regions are cached at the user level, separate from the page definition, which is cached at system level. Therefore, a page where the page definition only is cached at system level will now display only the tabs and subpages to which the user has access.
While the caching changes in release 10.1.4 allow performance and scalability to be improved by increased use of system level caching, this is not available automatically on upgrade. To ensure improved performance and scalability, the caching options for pages and portlet instances must be manually updated to their optimal settings.
5.2.4 Change in Portal Service Monitoring LinkIn earlier releases, the Portal Service Monitoring link would take you directly to the OracleAS Portal Monitoring page in the Application Server Control Console. From release 10.1.4 onward, this link takes you to the highest level Application Server Control Console Farm page. To access the OracleAS Portal Monitoring page, select the Application Server that is servicing the portal instance you want to monitor, and then select the portal target within.
See Also: The Oracle Application Server Portal User's Guide for more information about caching in OracleAS Portal release 10.1.4.
Part IIIAppendix
Part III contains the following appendix:
■ Appendix A, "OracleAS Portal Upgrade Error Messages"

OracleAS Portal Upgrade Error Messages A-1
AOracleAS Portal Upgrade Error Messages
This chapter provides information about the error and warning messages that you may encounter when upgrading to OracleAS Portal 10g Release 2 (10.1.4). The messages are grouped into the following sections:
■ Numbered Error Messages (WWU-00001 to WWU-24999 and WWU-26004 to WWU-26007)
■ Numbered Warning Messages (WWU-25000 to WWU-26001)
■ Unnumbered Error Messages
A.1 Numbered Error Messages (WWU-00001 to WWU-24999 and WWU-26004 to WWU-26007)
This section describes the numbered error messages, their causes, and suggested actions that you may encounter while upgrading to OracleAS Portal 10g Release 2 (10.1.4).
WWU-00001: An unexpected exception was raised during the upgrade prechecks.Cause: An unexpected error caused the upgrade to terminate.
Action: Based on the details in the message, correct the problem, and run the upgrade again.
WWU-00002: The value of the shared_pool_size database parameter is not high enough for the upgrade.Cause: The value of the shared_pool_size database parameter is too low.
Action: Increase the value of the shared_pool_size database parameter to 20 MB or more. Run the upgrade again.
WWU-00003: The value of the java_pool_size database parameter is not high enough for the upgrade.Cause: The value of the java_pool_size database parameter is too low.
Action: Increase the value of the java_pool_size database parameter to 20 MB or more. Run the upgrade again.
WWU-00004: The optimizer_mode database parameter should not be set to RULE.Cause: The optimizer_mode database parameter is incorrectly set to RULE.
Action: Change the optimizer_mode database parameter to CHOOSE. Run the upgrade again.
WWU-00005: There is not enough free space in the default tablespace.
Numbered Error Messages (WWU-00001 to WWU-24999 and WWU-26004 to WWU-26007)
A-2 Oracle Application Server Portal Installation and Upgrade Guide
Cause: There is less than 20 MB of free default tablespace.
Action: Create at least 20 MB of free default tablespace. Run the upgrade again.
WWU-00006: There is not enough free space in the temporary tablespace.Cause: There is less than 10 MB of free temporary tablespace.
Action: Create at least 10 MB of free temporary tablespace. Run the upgrade again.
WWU-00007: The _system_trig_enabled database parameter is set to FALSE.Cause: The _system_trig_enabled database parameter is incorrectly set to FALSE.
Action: Set the value for the _system_trig_enabled database parameter to TRUE, or do not set it. Run the upgrade again.
WWU-00008: There were jobs running in the DBMS jobs queue during the upgrade.Cause: The upgrade cannot progress because there are DBMS jobs running.
Action: Either kill the DBMS jobs or wait for them to finish before restarting the upgrade.
WWU-00009: The DBMS job queue is disabled. There were jobs that would have run immediately if it were enabled.Cause: Jobs submitted for the current repository may not run properly under the upgraded version.
Action: Either:
1. Remove the jobs from the queue, or
2. Re-enable the job queue by raising the job_queue_processes database parameter to a value greater than 0, and allow the jobs to complete.
WWU-00010: Some jobs in the DBMS job queue were incorrectly configured.Cause: There are OracleAS Portal jobs in the DBMS job queue that were either incorrectly submitted as another user or submitted as the OracleAS Portal user with another default schema or default privilege.
Action: Remove these jobs from the job queue. The upgrade will resubmit any jobs that are missing.
WWU-00011: There are concurrent sessions running for the schema you are upgrading.Cause: There are other sessions running on the OracleAS Portal schema.
Action: Make sure the Oracle Application Server 10g middle tier is shut down and there are no other connections to the schema being upgraded. Look under Open Sessions in the upgrade log for a list of open sessions for the schema.
WWU-00012: Not all components of the JVM installation are present in the database or valid.Cause: SYS Java objects are not present in the database or are invalid.
Action: Recompile the invalid Java objects in SYS. If this fails, reinstall the JVM in the database following the instructions found in the Oracle database documentation.
WWU-00013: Tables with UPG_ prefix were found in the OracleAS Portal schema.Cause: The upgrade is terminated when UPG_ prefix tables are present in the OracleAS Portal schema.
Numbered Error Messages (WWU-00001 to WWU-24999 and WWU-26004 to WWU-26007)
OracleAS Portal Upgrade Error Messages A-3
Action: Back up all tables with the UPG_ prefix, then delete them from the OracleAS Portal schema. The script %0 can be used for this purpose.
WWU-00014: Obtaining Oracle Text information failed.Cause: An error occurred during the attempt to retrieve information about the Oracle Text installation.
Action: Ensure that the Oracle Text component is correctly installed. If necessary, reinstall the Oracle Text component. For installation instructions, refer to the Oracle Application Server Portal Configuration Guide.
WWU-00015: Oracle Text schema, CTXSYS, does not exist.Cause: The database does not contain the CTXSYS schema, which indicates that Oracle Text is not installed.
Action: Install the Oracle Text component in the database. For installation instructions, refer to the Oracle Application Server Portal Configuration Guide.
WWU-00016: Oracle Text indextype is invalid or does not exist.Cause: The Oracle Text context indextype is not valid or does not exist. This may indicate a problem with the Oracle Text installation.
Action: Ensure the Oracle Text context indextype is present and valid. If necessary, reinstall the Oracle Text component. For installation instructions, refer to the Oracle Application Server Portal Configuration Guide.
WWU-00017: Some Oracle Text packages are invalid.Cause: Packages in the Oracle Text schema, CTXSYS, that begin with DRI or CTX_ are invalid.
Action: Revalidate the Oracle Text invalid packages. If necessary, reinstall the Oracle Text component. For installation instructions, refer to the Oracle Application Server Portal Configuration Guide.
WWU-00018: Oracle Text version does not match the database version.Cause: The version of the database is more recent than the Oracle Text component. This may indicate that the Oracle Text component upgrade was not successful. The manual steps to upgrade Oracle Text may have failed or been omitted. On some platforms, this error may also indicate that patch 2658339 was not applied.
Action: Depending on the situation, either rerun the Oracle Text upgrade or download and apply the patch.
WWU-00019: Could not find the schema or schemas on which Portlet Builder/Web View applications are based.Cause: The schema on which the Portlet Builder application is based is missing.
Action: There are two ways to fix this issue:
1. Drop the applications that are using the schema.
2. Re-create the missing schema and all objects in it.
WWU-00020: One or more one-off patches with schema changes have been applied.Cause: One or more one-off patches that include schema changes have been applied to the OracleAS Portal schema. The upgrade cannot proceed because these changes have not been tested with this release of the upgrade scripts.
Numbered Error Messages (WWU-00001 to WWU-24999 and WWU-26004 to WWU-26007)
A-4 Oracle Application Server Portal Installation and Upgrade Guide
Action: See if a version of the upgrade based on the next patchset has been released on Metalink. If so, download and run the new version. If not, wait until it is released.
WWU-00021: The following mandatory objects are missing or invalid:Cause: Mandatory objects that OracleAS Portal relies on are invalid or are not present in the database. If they are missing due to a faulty upgrade of the database, this could also cause failures in the OracleAS Portal upgrade.
Action: Review the database installation and upgrade procedures. If the object is present but invalid, run the rdbms/admin/utlrp.sql script under the database Oracle home to recompile all invalid objects.
WWU-00022: Version %0 of Oracle Portal/WebDB is not supported for upgrade.Cause: The OracleAS Portal version being upgraded is not supported by this upgrade.
Action: Run the upgrade on a supported version of OracleAS Portal.
WWU-00023: Version %0 of Oracle Database is not supported for upgrade.Cause: The version of the database against which the upgrade was run is not supported for this upgrade.
Action: Upgrade to the minimum database version of Oracle9i Database 9.0.1.5 Enterprise or Standard Edition.
WWU-00024: The compatible database parameter is less than 9.0.0.Cause: The compatible database parameter is set to less than 9.0.0.
Action: Set the value of the compatible database parameter to 9.0.0 or later.
WWU-00025: VPD has not been installed properly.Cause: One of the VPD checks has failed.
Action: This error is followed by a detailed message. Resolve the issue by examining the information provided in the message.
WWU-00026: VPD context value is not set.Cause: The OracleAS Portal login trigger that sets the VPD context is disabled or is not installed.
Action: Verify that the OracleAS Portal login trigger was installed and enabled on the database. If you need to install the trigger, run the wwhost/logintrg.sql script from SQL*Plus while logged in as SYS user. You will find this script under the upgrade directory.
WWU-00027: VPD context value is incorrect.Cause: The login triggers are not setting the correct context.
Action: Verify that the login trigger is correctly installed. To install the trigger, run the wwhost/logintrg.sql script from SQL*Plus while logged in as SYS user. You will find this script under the upgrade directory.
WWU-00028: Portal schema user is not set up to use VPD.Cause: The OracleAS Portal schema user has the EXEMPT ACCESS POLICY system privilege.
Action: Revoke the EXEMPT ACCESS POLICY privilege from the OracleAS Portal schema user by running the following SQL command in SQL*Plus: "REVOKE EXEMPT ACCESS POLICY FROM PORTAL_SCHEMA_NAME;". In this command, replace PORTAL_SCHEMA_NAME with the actual OracleAS
Numbered Error Messages (WWU-00001 to WWU-24999 and WWU-26004 to WWU-26007)
OracleAS Portal Upgrade Error Messages A-5
Portal schema name. Also verify that the OracleAS Portal schema user does not inherit the EXEMPT ACCESS POLICY privilege from any of its assigned roles.
WWU-00029: VPD is not being enforced in the database.Cause: A problem occurred in the database that caused the VPD check to fail.
Action: Consult the database documentation to find possible actions.
WWU-00031: %0 Unable to connect to the Oracle Internet Directory server.Cause: An error was encountered while connecting to the Oracle Internet Directory server.
Action: The error message above may provide more information about the cause. Make sure that the Oracle Internet Directory server is up and running on host %1 and port %2 and OracleAS Portal has been wired correctly against it.
WWU-00032: The aq_tm_processes database parameter must be greater than zero.Cause: The aq_tm_processes database parameter needs to be set to 1 or more to allow correct management of database queues.
Action: Change the aq_tm_processes database parameter to a value greater than zero. Run the upgrade again.
WWU-01000: Back up the database before running the upgrade.Cause: You have answered n, or no, when asked if the schema has been backed up.
Action: Back up the database and restart the upgrade.
WWU-01001: Connection to the Portal repository failed.Cause: Incorrect OracleAS Portal schema, password, or connect string.
Action: Supply the correct OracleAS Portal schema, password, and connect string.
WWU-01002: Connection as SYS to the Portal repository failed.Cause: An invalid SYS password was supplied, or the orapw file is missing.
Action: Supply the correct SYS password. If the password is correct, verify that you can connect remotely to SYS as SYSDBA using an orapwSID file. Refer to the Oracle database documentation for instructions on creating an orapw file.
WWU-01003: An unexpected exception was raised.Cause: An unexpected error caused the upgrade to terminate.
Action: Based on the details in the message, correct the problem, restore the database from backup, and run the upgrade again.
WWU-01004: Missing strings reported in %0 file.Cause: The sqlldr utility encountered issues when trying to load message translation data.
Action: Look for specific issues in the .bad file and the corresponding .log file in the upgrade tmp directory. Give these to Oracle Support Services along with the upgrade logs.
WWU-01005: Version not updated, fatal errors found in upgrade log.Cause: This message indicates that the earlier version of OracleAS Portal will not be updated to the new version. Errors have occurred in the upgrade that will prevent OracleAS Portal from functioning properly. A summary of the errors is listed at the end of the upgrade log.
Numbered Error Messages (WWU-00001 to WWU-24999 and WWU-26004 to WWU-26007)
A-6 Oracle Application Server Portal Installation and Upgrade Guide
Action: Search through the errors in the log and apply any fixes mentioned. Then restore the database from backup and run another upgrade. If this fails, or if unexpected errors are encountered, contact Oracle Support Services.
WWU-01007: Unable to create directory %0.Cause: You do not have the required permissions to create the directory.
Action: If possible, change the permissions on the parent directory. Or, contact the administrator to change the permissions on this directory.
WWU-01008: Write permission not available for directory %0.Cause: You do not have the required permissions to write to the directory.
Action: Change the permissions on the directory, specify a different temporary directory, or ask the administrator the change the permissions on the directory. Then, run the upgrade again.
WWU-01009: Unable to create %0. Check permissions on the directory.Cause: The permissions on the temporary directory do not allow the creation of a login.sql script for the user profile.
Action: If possible, change the permissions on the temporary directory, or ask the administrator to change the permissions on the directory. Then, run the upgrade again.
WWU-01010: SQL*Plus version %0 not supported for upgrade.Cause: The version of SQL*Plus you are trying to execute is not supported for this upgrade.
Action: Verify that the version of bin/sqlplus under the Oracle home is 9.0.1 or later.
WWU-01011: Restart the upgrade.Cause: You have answered n, or no, when asked if input details are correct.
Action: Correct the input details and restart the upgrade.
WWU-02200: Cannot grant execute privilege on PL/SQL package %1 to the Portal database provider schema %2 due to the following error: %3.Cause: A database issue has prevented execute privileges from being successfully granted.
Action: Fix the reported issue on a restored database and rerun the upgrade.
WWU-26004: Unable to create EXTERNAL_SEARCH_ENGINES group entry in Oracle Internet Directory.Cause: The seeded portal user does not have sufficient privileges to perform this action.
Action: Run ptlconfig -dad <portal_dad_name> -oid to ensure that the EXTERNAL_SEARCH_ENGINES group is created in Oracle Internet Directory.
WWU-26005: Unable to add PORTAL_ADMINISTRATOR group as an owner to EXTERNAL_SEARCH_ENGINES group.Cause: The seeded portal user does not have sufficient privileges to perform this action.
Action: Run ptlconfig -dad <portal_dad_name> -oid to ensure that the PORTAL_ADMINISTRATOR is added as an owner to the EXTERNAL_SEARCH_ENGINES group.
Numbered Warning Messages (WWU-25000 to WWU-26001)
OracleAS Portal Upgrade Error Messages A-7
WWU-26006: Unable to add ultrasearch_ese user as a member to the EXTERNAL_SEARCH_ENGINES group.Cause: The seeded portal user does not have sufficient privileges to perform this action.
Action: Run ptlconfig -dad <portal_dad_name> -oid to ensure that the ultrasearch_ese user is added as a member to the EXTERNAL_SEARCH_ENGINES group.
WWU-26007: Could not update GUID for %0.Cause: The names of the Report Server Objects were changed by end user.
Action: Change these objects back to their original names and apply the ARU 6870580 patch.
A.2 Numbered Warning Messages (WWU-25000 to WWU-26001)This section describes the numbered warning messages, their causes, and suggested actions, that you may encounter while upgrading to OracleAS Portal 10g Release 2 (10.1.4).
WWU-25000: Removed session cleanup job: %0 from the SYS schema.Cause: The session cleanup job usually exists in the OracleAS Portal schema. However, an earlier operation, such as the database upgrade, has resulted in removing this job as a part of the upgrade.
Action: If the database instance where the upgrade is being performed does not contain another OracleAS Portal schema, then no action is required because the session clean-up job is created in the OracleAS Portal schema during upgrade. However, if another OracleAS Portal schema exists in the database, then verify that the schema contains a session clean-up job. To do so, run the script wwc/ctxjget.sql under the upgrade directory from SQL*Plus in the OracleAS Portal schema. If this job is missing, you can create it by running the script wwc/ctxjsub.sql in that schema from SQL*Plus.
WWU-25001: VPD check found some issues.Cause: One of the VPD checks has failed.
Action: This warning is followed by a detailed message. Resolve the issue by examining the information provided in the message.
WWU-25003: Portlet Builder/WebView components have unknown issues.Cause: The Portlet Builder components or packages are invalid.
Action: Try resolving the cause of the errors when compiling the packages that are listed in the log. For example, if a report is based on a table that has been dropped, the report is no longer valid. In this case, you could drop the report.
WWU-25004: Only %0% of the components in the wwv_modules$ table are production components.Cause: This informational message indicates that there is a relatively large number of archive versions of Portlet Builder components, formerly WebView. This may be because in Oracle9iAS Portal 3.0.9, a new version of a component was created each time the component was edited and saved.
Action: Delete as many of the archive versions of components as possible. This reduces the size of the tables where attributes for all the archive versions are stored.
Unnumbered Error Messages
A-8 Oracle Application Server Portal Installation and Upgrade Guide
WWU-25005: Table without VPD policy: %0.Cause: The VPD policy on the table indicated in the message was not installed properly in the OracleAS Portal schema.
Action: If the table indicated in the message is not part of the OracleAS Portal product, it is safe to ignore the warning.
WWU-26000: Component %0 has errors. Check that all the objects it is based on are present.Cause: The component is based on one or more missing objects. For example, a Query By Example report was based on table MY_TABLE, then MY_TABLE was dropped.
Action: Supply the missing object. If the component is no longer being used, delete it using the OracleAS Portal Navigator.
WWU-26001: Non-OracleAS Portal objects have errors. See %0 for details.Cause: Non-OracleAS Portal objects in the OracleAS Portal schema cannot be compiled and have errors.
Action: Examine %0, or nonportal.log, to determine the objects and the errors generated on compilation of each object. Fix these errors and recompile the object.
A.3 Unnumbered Error MessagesThis section describes the unnumbered error messages, their causes, and suggested actions, that you may encounter while upgrading to OracleAS Portal 10g Release 2 (10.1.4).
Environment variable ORACLE_HOME is not set.Cause: The ORACLE_HOME environment variable is not set.
Action: Review your environment and set the ORACLE_HOME environment variable.
GUID and/or DN are not available for %string% subscriber. Cause: Could not get the globally unique identifier and/or the distinguished name for the named identity management realm from the Portal repository.
Action: Make sure that the identity management realm has been configured properly.
OracleAS Portal 10.1.4 upgrade precheck failed. See <precheck-log-file> for details. Cause: Errors were encountered during the precheck run of the 10.1.4 upgrade.
Action: Search through the errors in the log file and apply any fixes mentioned. Then run the upgrade again
OracleAS Portal 10.1.4 upgrade completed with errors. See <upgrade-log-file> for details. Cause: Errors were encountered in the 10.1.4 upgrade.
Action: Search through the errors in the log file and make a note of any fixes mentioned. Then restore the database from backup, apply the fixes, and run the upgrade again.
SQL Error: %string% LDAP Error: %string%. Unexpected Error occured while connecting to the Oracle Internet Directory as Application entry
Unnumbered Error Messages
OracleAS Portal Upgrade Error Messages A-9
Cause: An attempt was made to connect to the Oracle Internet Directory using the application credentials stored in the OracleAS Portal repository. However, this attempt failed. Some possible reasons for this failure are as follows:
■ OracleAS Portal has not been configured correctly for the Oracle Internet Directory.
■ Oracle Internet Directory server is not running.
■ An unexpected error was encountered.
Action: Make sure that the Oracle Internet Directory is up and running. Reconfigure OracleAS Portal for the Oracle Internet Directory. Also review the message logged before this error message and take appropriate action.
Unable to bind as the application. LDAP Error: %string%Cause: An error was encountered while connecting to the Oracle Internet Directory Server.
Action: The line following the error may provide more information about the cause. Make sure that the Oracle Internet Directory Server is up and running and the Portal has been wired correctly against it.
Unable to get the application GUID. LDAP Error: %string%Cause: Could not get the globally unique identifier for the application entry stored in the Oracle Internet Directory.
Action: The line following the error may provide more information about the cause. Make sure that the Oracle Internet Directory Server is up and running and the Portal has been wired correctly against it.
Unable to unbind. LDAP Error: %string%Cause: An error was encountered while closing the connection with the Oracle Internet Directory.
Action: The line following the error may provide more information about the cause. Take corrective action as appropriate.
Updating provisioning profile: %string%Cause: An error was encountered while updating the provisioning profile.
Action: The string may provide more information about the cause of error. Take appropriate action to resolve the error.
Unnumbered Error Messages
A-10 Oracle Application Server Portal Installation and Upgrade Guide
Index-1
Index
Aaccessing the upgraded portal instance, 1-8, 3-9assessing upgrade impact, 2-4
Bbacking up databases
after upgrade, 3-9before upgrade, 2-2
Cchanging category and perspective names, 4-9community news portlet
deleting, 4-11correcting invalid links, 4-1customer databases, 3-4
Ddatabase releases supported, 2-2databases
backing up after upgrade, 3-9backing up before upgrade, 2-2
deletingcommunity news portlet, 4-11obsolete HTML substitution tags, 4-5
direct-access URLs, 4-3durable URLs
updating, 4-5
Eenabling time monitoring of queue messages, 4-10
Gguidmasg.sql script, 4-7
HHTML compatibility mode switch
for PL/SQL generated pages and portlets, 5-3HTML page skins, 4-5
Iinstalling Oracle Application Server release
10.1.2.0.2, 1-1installing OracleAS Portal release 10.1.4, 1-1
Llog files, 1-8, 3-7
reviewing, 1-6, 3-6
Mmiddle tiers
stopping, 1-2, 2-3mrua.bat script, 1-4, 3-1mrua.sh script, 1-4, 3-1
Oobsolete features, 5-1OPMN
starting, 1-8, 3-9stopping, 1-3, 2-3
Oracle Text Indexesconfiguring to synchronize on commit, 4-11
Oracle Ultra Search, 4-5OracleAS Portal release 10.1.4
obsolete features, 5-1usage changes, 5-2
OracleAS Wireless, 4-6
Ppage skins
HTML, 4-5path-based URLs
updating to, 4-3performance reporting, 4-9performance reporting scripts, 4-9Portal Service Monitoring link, 5-4portal upgrade
about, 2-1portlet repository
moving to the new format, 4-10re-creating, 4-10
post-upgrade tasks, 4-1

Index-2
changing category and perspective names, 4-9configuring Oracle Text Indexes to synchronize on
commit, 4-11correcting invalid links, 4-1deleting the community news portlet, 4-11enabling time monitoring of queue
messages, 4-10moving portlet repository to the new format, 4-10recrawling using Oracle Ultra Search, 4-6reenabling export and import, 4-7removing obsolete HTML substitution tags, 4-5updating Oracle Ultra Search, 4-5updating OracleAS Wireless definition, 4-6updating performance reporting, 4-9updating URL format, 4-1
precheck option, 1-5, 3-3, 3-4pre-upgrade tasks, 1-2, 2-2
assessing upgrade impact, 2-4backing up databases, 2-2stopping all middle tiers, 1-2, 2-3
prrplc.sql script, 4-10
Rrecrawling OracleAS Portal using Oracle Ultra
Search, 4-6redirection screen, 4-2reenabling OracleAS Portal export and import, 4-7removing obsolete HTML substitution tags, 4-5reregistering Portal in Oracle Ultra Search, 4-5reviewing upgrade log files, 1-6, 3-6running upgrade
precheck mode, 1-5, 3-3, 3-4
Sscheduling a recrawl, 4-6starting middle tiers, 1-8, 3-9
after upgrade, 1-8, 3-9stopping all middle tiers, 1-2, 2-3supported database releases, 2-2supported upgrade paths, 2-2
Ttasks for upgrading
post-upgrade, 4-1pre-upgrade, 1-2, 2-2
templatesHTML page skins, 4-5unstructured UI, 4-5
Uunstructured UI templates, 4-5update.sql script, 4-9updating direct-access URLs, 4-3updating durable URLs, 4-5updating portal URL in OracleAS Wireless
definition, 4-6updating to the new URL format, 4-1
direct-access URLs, 4-3durable URLs, 4-3
upgradelog files, 1-8, 3-7
upgrade impactassessing, 2-4
upgrade log filesreviewing, 1-6, 3-6
upgrade paths supported, 2-2upgrade script, 3-4upgrade.bat script, 3-4upgraded portal schema
backing up databases, 3-9upgrade.err file, 1-6, 3-6upgrade.log file, 1-6, 3-6upgrade.wrn file, 1-6, 3-6upgrading portal schema
in a customer database, 3-4in OracleAS Metadata Repository, 3-1
upgrading portal schema in a customer database, 3-4
upgrading portal schema in OracleAS Metadata Repository, 3-1
upgrading to OracleAS Portal release 10.1.4, 1-4, 3-1usage changes
changes in caching, 5-4new HTML compatibility mode switch, 5-2Portal Service Monitoring link, 5-4URL changes, 5-3
usage changes in OracleAS Portal release 10.1.4, 5-2