operating instructions - amazon simple storage...
TRANSCRIPT

Searchpoint Optima Plus including HART® version
Operating Instructions

MAN0905_Issue 3_07/12 Searchpoint Optima Plus including HART® versionOperating Instructions
2108M0550
2
1. Safety Warnings and Information
WARNINGS1. Installation must be in accordance with the recognized standards of the appropriate authority in the country concerned. For Europe see EN60079-14, EN60079-29-2, and EN61241-14. For installations in North America, the National Electrical Code (NFPA 70) should be strictly observed. Elsewhere the appropriate local or national regulations should be used.
2. Searchpoint Optima Plus is designed for installation and use in Zone 1 or 2 hazardous areas (International) and for Class 1 Division 1 or 2 area applications (North America).
3. Donotmodifyoraltertheconstructionoftheproductasessentialsafetyandcertification requirements may be invalidated.
4. In order to maintain electrical safety, the product must not be operated in atmospheres with more than 21% oxygen.
CautionsDuring usage, as some test gases may be hazardous, outlets from gassing accessories should exhaust to a safe area.
UseoftheSearchpointOptimaPlusoutsideofthespecifiedrangeofoperatingconditionswillinvalidatecertificationandproductapproval.
CSA performance approval only covers the gas detection function.
Special Conditions of UseInordertocomplywiththeATEXCertification,thefollowingspecialconditionsofusemustbeadheredto:-
1. The integral supply cables must be mechanically protected and terminated in a suitable terminal or junction facility.
2. ThecoverfixingscrewsshallbestainlesssteelgradeA4-80minimum(onlyuseHoneywellsupplied screws).

MAN0905_Issue 3_07/12 Searchpoint Optima Plus including HART® versionOperating Instructions
2108M0550
3
Contents
Section Page 1. SAFETY WARNINGS AND INFORMATION 2
1.1 HOWTOUSETHISMANUAL 7
1.2 BATTERIES 8
1.3 DISPOSAL 8
1.3.1 SearchpointOptimaPlus 8
1.3.2 Packaging 8
1.4 INFORMATION 9
2 INTRODUCTION 9
2.1 SEARCHPOINTOPTIMAPLUS 10
2.2 SEARCHPOINTOPTIMAPLUSOPTIONS 11
2.3 TERMINATION UNIT OPTIONS 12
2.4 COMMISSIONINGANDMAINTENANCETOOLS 13
2.5 WEATHERPROTECTIONACCESSORIES 13
2.6 GASSING ACCESSORIES 14
2.7 MOUNTING ACCESSORIES 15
3 MECHANICALINSTALLATION 17
3.1 SITING 17
3.2 INSTALLATION 17
3.2.1 StandardInstallation 18
3.2.2 Installationwithaflowhousing(samplingsystem) 19
3.2.3 Sampling system using Remote Gassing Cell (RGC) 20
3.2.4 Installation in a duct 20
3.2.5 Installation of gassing pipes for Remote Gassing Cell 23
4 ELECTRICALINSTALLATION 24
4.1 POWERSUPPLY 24
4.2 CABLINGRECOMMENDATIONS 25
4.3 EARTHREGIMES 25
4.4 CONNECTIONS 27
5 OPERATION 29
5.1 DEFAULTCONFIGURATION 29
5.2 HART®OPERATIONDURINGFAULT 29
6 COMMISSIONING 30
6.1 FIRSTTIMESWITCHON 30
7 MAINTENANCE 31
7.1 INTRODUCTION 31
7.2 INSPECTION 31
7.3 INSPECTIONOFAUNITFITTEDWITHAFLOWHOUSING 31
7.4 BUMPTEST(GASCHALLENGE) 32
7.5 BUMPTEST(GASCHALLENGE)WITHREMOTEGASSINGCELL(RGC) 33
MAN0905_Issue 3_07/12 Searchpoint Optima Plus including HART® versionOperating Instructions
2108M0550
4
8 USEOFTHESHC1HANDHELDINTERROGATOR 34
8.1 INTRODUCTION 34
8.2 SHC1CONNECTION 34
8.3 SHC1OPERATION 36
8.4 STATUS INDICATION 37
8.5 SHC1BATTERYREPLACEMENT 37
9 COMMISSIONINGUSINGSHC1HANDHELDINTERROGATOR 38
9.1 INTRODUCTION 38
9.2 FIRSTTIMESWITCHON 38
9.3 CLEARFAULTSORWARNINGS 39
9.4 FIXTHE4-20MAOUTPUT 39
9.5 TEST4-20MALOOPINTEGRITY 40
10 MAINTENANCEUSINGSHC1HANDHELDINTERROGATOR 41
10.1 INTRODUCTION 41
10.2 INSPECTION 41
10.3 INSPECTIONOFAUNITFITTEDWITHAFLOWHOUSING 42
10.4 BUMPTEST(GASCHALLENGE) 43
10.5 BUMPTEST(GASCHALLENGE)WITHREMOTEGASSINGCELL(RGC) 43
10.6 RE-ZEROSEARCHPOINTOPTIMAPLUS 44
10.7 CALIBRATION 45
10.8 INVESTIGATIONOFFAULTSORWARNINGS 46
11 USEOFTHEHART® COMMUNICATIONS 47
11.1 GENERAL 47
11.2 CONNECTION 47
11.3 SEARCHPOINTOPTIMAPLUS USER INTERFACE 47
11.3.1 AccessLevelsandPasswordProtection 47
11.3.2 MenuStructure 48
11.3.3 Menu Navigation 50
11.3.4 Error Reporting 50
12 COMMISSIONINGUSINGHART® COMMUNICATIONS 51
12.1 INTRODUCTION 51
12.2 FIRSTTIMESWITCHON 52
12.3 USER CONFIGURATION 52
12.3.1 Change the Password 52
12.3.2 ConfigureHART® Operation during Fault 53
12.3.3 Set the Time and Date 53
12.3.4 ConfigureWarning,InhibitandOverrangeSignalLevels 54
12.4 CONFIGURE DEVICE IDENTIFICATION INFORMATION 54
12.5 FIXTHE4-20MAOUTPUT 55
12.6 TEST4-20MALOOPINTEGRITY 56
12.7 CALIBRATETHE4-20MALOOP 56 12.8 CONFIGUREINTERNALALARMTHRESHOLD 57
12.9 SIMULATION 57
12.10 CLEARFAULTSORWARNINGS 58
Contents

MAN0905_Issue 3_07/12 Searchpoint Optima Plus including HART® versionOperating Instructions
2108M0550
5
13 MAINTENANCEUSINGHART® COMMUNICATIONS 60
13.1 INTRODUCTION 60
13.2 INSPECTION 60
13.3 INSPECTIONOFAUNITFITTEDWITHAFLOWHOUSING 61
13.4 BUMPTEST(GASCHALLENGE) 62
13.5 BUMPTEST(GASCHALLENGE)WITHREMOTEGASSINGCELL(RGC) 63
13.6 RE-ZEROSEARCHPOINTOPTIMAPLUS 64
13.7 CALIBRATION 64
13.8 STORECALIBRATIONINFORMATION 65
13.9 INVESTIGATIONOFFAULTSORWARNINGS 66
14 PROBLEMSOLVING 67
14.1 TROUBLESHOOTING 67
14.2 WARNINGANDFAULTMESSAGES 71
14.3 FURTHERASSISTANCE 72
15 SPECIFICATIONS 73
15.1 SPECIFICATIONS 73
15.2 AVAILABLEGASCALIBRATIONS 74
15.2.1 HydrocarbonversionofSearchpointOptimaPlus 74
15.2.2 Ethylene version of Searchpoint Optima Plus 77
15.3 CROSSINTERFERENCETOOTHERGASESANDVAPOURS 78
16 ORDERING INFORMATION 79
17 WARRANTY SUMMARY 82
18 CERTIFICATIONANDAPPROVALS 83
18.1 ECDECLARATIONOFCONFORMITY 83
18.2 HAZARDOUSAREACERTIFICATION 83
18.2.1 ATEX 83
18.2.2 UL 83
18.2.3 InMetro(Brazil) 83
18.2.4 CSA 83
18.2.5 FM 84
18.2.6 GOST-R(Russia) 84
18.2.7 CCCF(China) 84
18.2.8 IECEx 84
18.3 PERFORMANCEAPPROVALS 18.4 SHC1HANDHELDINTERROGATORHAZARDOUSAREACERTIFICATION 85
19 APPENDIX1–SHC1ADDITIONALFUNCTIONS 86
19.1 CHANGINGTHETARGETGAS 86
19.2 SELFTEST 87
20 APPENDIX2–HART®ADDITIONALFUNCTIONS 88
20.1 CHANGINGTHETARGETGAS 88
20.2 SETHART®LOOPCURRENTMODE 90
21 APPENDIX3–SPECIALNOTESFORHONEYWELLMCTOOLKITUSERS 91
22 APPENDIX4–ENDOFLIFEBATTERYREMOVAL 92
23 APPENDIX5-HART® COMMANDS USED 93
Contents

MAN0905_Issue 3_07/12 Searchpoint Optima Plus including HART® versionOperating Instructions
2108M0550
6
23.1 UNIVERSALCOMMANDS 93
23.2 COMMON-PRACTICE COMMANDS 93
23.2.1 Supported Commands 93
23.2.2 Burst Mode 93
23.2.3 Catch Device Variable 93
23.3 DEVICE-SPECIFIC COMMANDS 94
Contents

MAN0905_Issue 3_07/12 Searchpoint Optima Plus including HART® versionOperating Instructions
2108M0550
7
1.1 How to use this manualThis manual contains three sets of instructions for Searchpoint Optima Plus - as a stand alone unit, when usingtheSHC1HandheldInterrogatorandwhenusingtheHART® communications. Use the guide below to findtherelevantchapters:-
Stand alone unit Chapters 1-5 Introduction, Installation and Operation
Chapters 6-7 Commissioning and Maintenance
Chapters14-16 ProblemSolving,SpecificationandCertification
With SHC1 Handheld Interrogator Chapters 1-5 Introduction, Installation and Operation
Chapters8-10 UseofSHC1,CommissioningandMaintenance
Chapters14-16 ProblemSolving,SpecificationandCertification
Appendix 1 Additional Functions
With HART® communications Chapters 1-5 Introduction, Installation and Operation
Chapters11-13 UseofHART®, Commissioning and Maintenance
Chapters14-16 ProblemSolving,SpecificationandCertification
Appendix 2 Additional Functions
Searchpoint Optima Plus with XNX Universal TransmitterWhen using Searchpoint Optima Plus with the XNX Universal Transmitter, this manual and the XNXUniversalTransmittermanualarerequired.Therelevantchaptersofthismanualare:-
Chapters 1-4 Introduction and Installation
Chapter 7 Maintenance
Chapters14-16 ProblemSolving,SpecificationandCertification
For Commissioning and Operation please use the XNX Universal Transmitter manual (part number 1998M0738).
TheXNXUniversalTransmitterhasitsownintegralHART® communications and will not re-transmit the Searchpoint Optima Plus communications. Please refer to the XNX Universal Transmitter manual for the appropriateHART® commands and menu structure.
Note: This manual is for use with Searchpoint Optima Plus units of mod state 9 and above.
Note: Translations of this manual in various languages are available, either on the CD accompanying the product or at our website. Navigate to www.honeywellanalytics.com and use the Document Download utility. It may be necessary to register to view all of the available documents.
1. Safety Warnings and Information
MAN0905_Issue 3_07/12 Searchpoint Optima Plus including HART® versionOperating Instructions
2108M0550
8
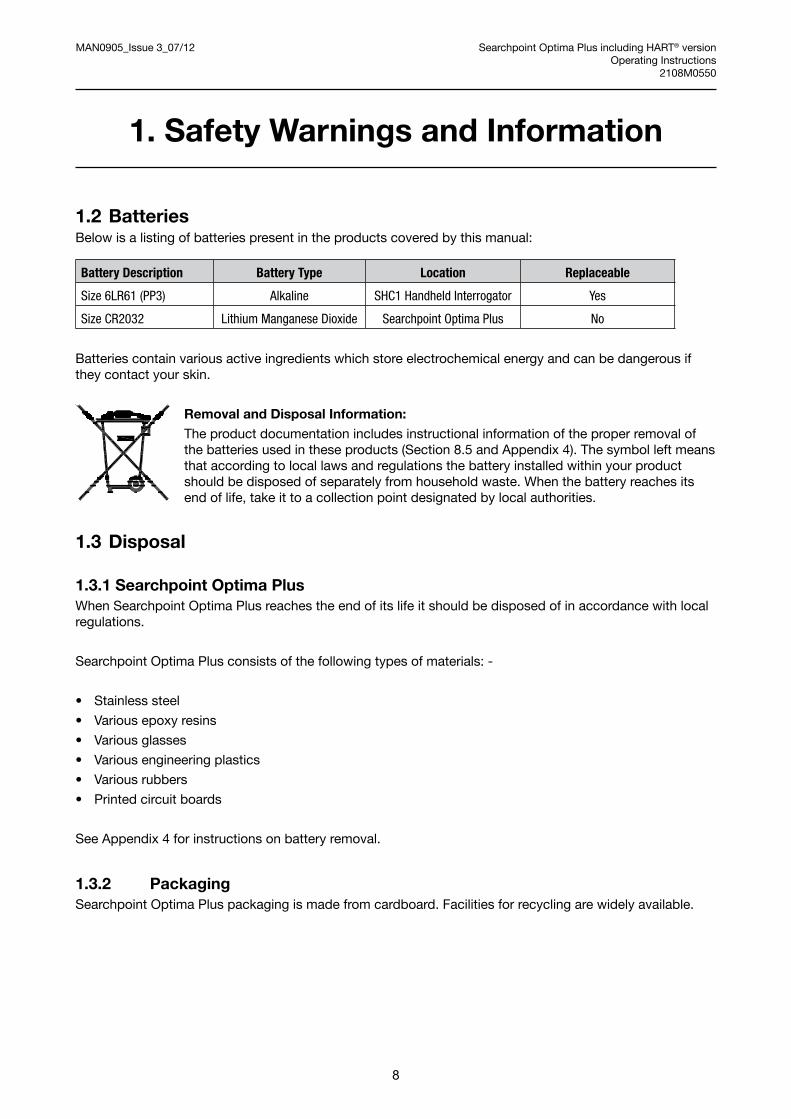
1.2 BatteriesBelowisalistingofbatteriespresentintheproductscoveredbythismanual:
Battery Description Battery Type Location Replaceable
Size 6LR61 (PP3) Alkaline SHC1 Handheld Interrogator Yes
Size CR2032 Lithium Manganese Dioxide Searchpoint Optima Plus No
Batteries contain various active ingredients which store electrochemical energy and can be dangerous if they contact your skin.
Removal and Disposal Information:The product documentation includes instructional information of the proper removal of thebatteriesusedintheseproducts(Section8.5andAppendix4).Thesymbolleftmeansthat according to local laws and regulations the battery installed within your product should be disposed of separately from household waste. When the battery reaches its end of life, take it to a collection point designated by local authorities.
1.3 Disposal
1.3.1 Searchpoint Optima PlusWhen Searchpoint Optima Plus reaches the end of its life it should be disposed of in accordance with local regulations.
SearchpointOptimaPlusconsistsofthefollowingtypesofmaterials:-
• Stainlesssteel
• Variousepoxyresins
• Variousglasses
• Variousengineeringplastics
• Variousrubbers
• Printedcircuitboards
See Appendix 4 for instructions on battery removal.
1.3.2 PackagingSearchpoint Optima Plus packaging is made from cardboard. Facilities for recycling are widely available.
1. Safety Warnings and Information
MAN0905_Issue 3_07/12 Searchpoint Optima Plus including HART® versionOperating Instructions
2108M0550
9
1.4 InformationThis manual is for use with Searchpoint Optima Plus, Searchpoint Optima X and Searchpoint Optima Z units of mod state 9 and above. For Searchpoint Optima X and Searchpoint Optima Z please also refer to the supplementary information sent with the product.
HoneywellAnalyticscantakenoresponsibilityforinstallationand/oruseofitsequipmentifnotdoneinaccordancewiththeappropriateissueand/oramendmentoftheOperatingManual.
The reader of this Operating Manual should ensure that it is appropriate in all details for the exact equipmenttobeinstalledand/oroperated.Ifindoubt,contactHoneywellAnalyticsforadvice.
ThefollowingtypesofnoticesareusedthroughoutthisOperatingManual:
WARNINGIdentifiesahazardousorunsafepracticewhichcouldresultinsevereinjuryordeathtopersonnel.
Caution: Identifies a hazardous or unsafe practice which could result in minor injury to personnel, or product or property damage.
Note: Identifies useful/additional information.
Everyefforthasbeenmadetoensuretheaccuracyofthisdocument,however,HoneywellAnalyticscanassume no responsibility for any errors or omissions in this document or their consequences.
HoneywellAnalyticswouldgreatlyappreciatebeinginformedofanyerrorsoromissionsthatmaybefoundin the content of this document.
Forinformationnotcoveredinthisdocument,orifthereisarequirementtosendcomments/correctionsaboutthisdocument,pleasecontactHoneywellAnalyticsusingthecontactdetailsgivenonthebackpage.
Honeywell Analytics reserve the right to change or revise the information supplied in this document without notice and without obligation to notify any person or organization of such revision or change. If information is required that does not appear in this document, contact the local distributor/agent or Honeywell Analytics.
1. Safety Warnings and Information

MAN0905_Issue 3_07/12 Searchpoint Optima Plus including HART® versionOperating Instructions
2108M0550
10
2. Introduction
2.1 Searchpoint Optima Plus
Searchpoint Optima Plus is an infrared hydrocarbon gas detector suitable for use in hazardous areas. It has worldwidecertificationapprovalsincludingIECEx,ATEX,ULandCSA.
It uses the principle of infrared absorption to detect hydrocarbon gases and vapours in various concentration ranges.
Standard weather protection
Certification label
Gas measuring path
Inlet / outlet for remote gassing cell
Optional remote gassing cell (use for gas testing or % v/v monitoring)
Mounting thread (M25 or ¾ NPT)
Searchpoint Optima Plus has a robust stainless steel enclosure with an ingress protection level of IP66 and IP67. Dependingonthecertificationoption,ithas an M25 or ¾ NPT mounting thread.
Searchpoint Optima Plus has a 4-20 mA signal output that corresponds to 0-100 %FSD. Output values below 4 mA indicate fault, warning and inhibit.
Searchpoint Optima Plus is supplied calibratedandlinearisedforaspecifictarget gas. A wide selection of gases isavailablein0–100%LELrange,aswell as some ppm range options. The range0–100%v/vmethaneisavailableexclusively for use in sampling systems.
SearchpointOptimaPluscancommunicatewiththeSHC1HandheldInterrogator,whichcanbeusedtoaccesscomprehensivediagnosticinformation,andtocarryoutcalibrationandconfiguration.Asanoption,HART®communicationsareavailabletoperformthesamefunctionseitherusingaHART® handheld device or from a central control room.
Note: Searchpoint Optima Plus can be installed, commissioned and functionally tested using only the 4-20 mA output. However, configuration, calibration and fault diagnosis require either the SHC1 Handheld Interrogator, HART® communications or the XNX Universal Transmitter.

MAN0905_Issue 3_07/12 Searchpoint Optima Plus including HART® versionOperating Instructions
2108M0550
11
2. Introduction
2.2 Searchpoint Optima Plus Options
Searchpoint Optima Plus is available in an ethylene version which is optimised for the detection of certain solvents.
Searchpoint Optima X is a variant of Searchpoint Optima Plus exclusively for use in sampling systems. A fast speed of response is made possible by minimising the volume of the sample cell. Please contact HoneywellAnalyticsforfurtherdetailsofthisvariant.
Searchpoint Optima Z is a variant of Searchpoint Optima Plus optimised for the detection of the solvents ethanolandethylacetate.Itisexclusivelyforuseinsamplingsystems.PleasecontactHoneywellAnalyticsfor further details of this variant.
AllversionsofSearchpointOptimaPluscanbesuppliedwithHART® over 4-20 mA communications.
MAN0905_Issue 3_07/12 Searchpoint Optima Plus including HART® versionOperating Instructions
2108M0550
12
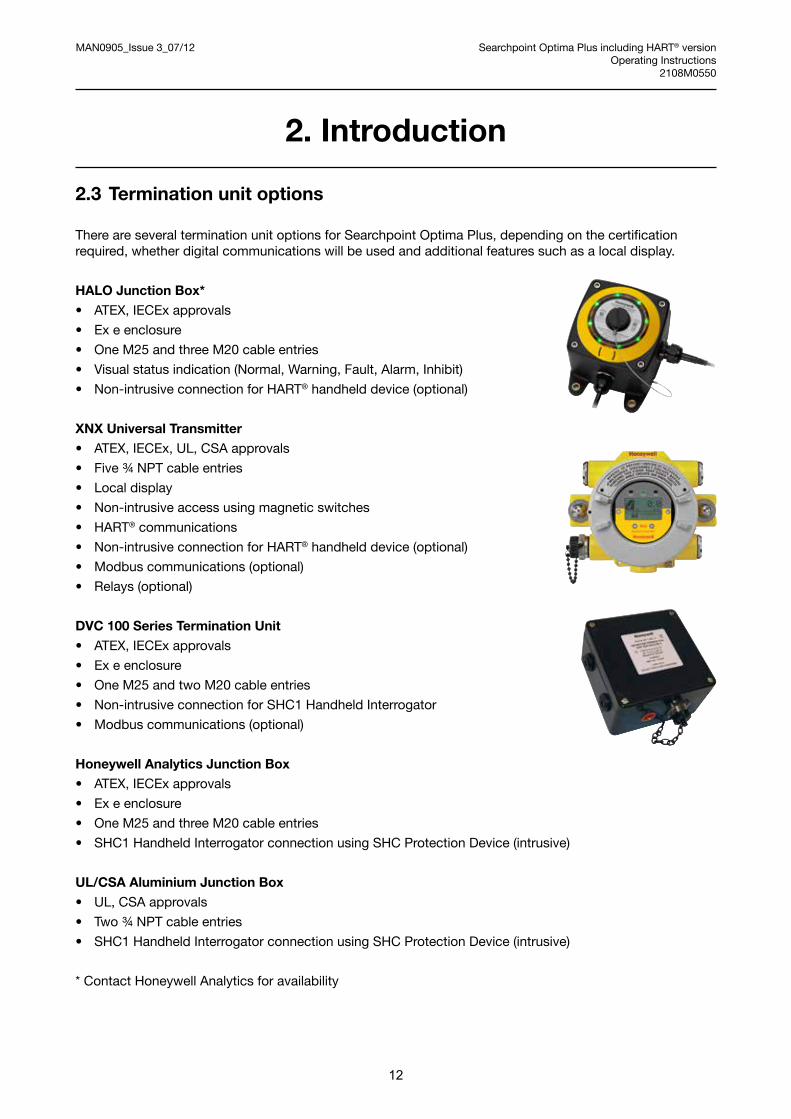
2.3 Termination unit options
ThereareseveralterminationunitoptionsforSearchpointOptimaPlus,dependingonthecertificationrequired, whether digital communications will be used and additional features such as a local display.
HALO Junction Box*• ATEX,IECExapprovals
• Exeenclosure
• OneM25andthreeM20cableentries
• Visualstatusindication(Normal,Warning,Fault,Alarm,Inhibit)
• Non-intrusiveconnectionforHART® handheld device (optional)
XNX Universal Transmitter • ATEX,IECEx,UL,CSAapprovals
• Five¾NPTcableentries
• Localdisplay
• Non-intrusiveaccessusingmagneticswitches
• HART® communications
• Non-intrusiveconnectionforHART® handheld device (optional)
• Modbuscommunications(optional)
• Relays(optional)
DVC 100 Series Termination Unit • ATEX,IECExapprovals
• Exeenclosure
• OneM25andtwoM20cableentries
• Non-intrusiveconnectionforSHC1HandheldInterrogator
• Modbuscommunications(optional)
Honeywell Analytics Junction Box• ATEX,IECExapprovals
• Exeenclosure
• OneM25andthreeM20cableentries
• SHC1HandheldInterrogatorconnectionusingSHCProtectionDevice(intrusive)
UL/CSA Aluminium Junction Box• UL,CSAapprovals
• Two¾NPTcableentries
• SHC1HandheldInterrogatorconnectionusingSHCProtectionDevice(intrusive)
*ContactHoneywellAnalyticsforavailability
2. Introduction

MAN0905_Issue 3_07/12 Searchpoint Optima Plus including HART® versionOperating Instructions
2108M0550
13
2. Introduction
2.4 Commissioning and Maintenance Tools
SHC1 Handheld Interrogator TheSHC1HandheldInterrogatorisacommissioningandmaintenancetoolwhichcommunicateswithSearchpoint Optima Plus. It can be connected directly to a DVC100 series termination unit (non-intrusive), orusedwithothertypesofjunctionboxprovidedtheSHCProtectionDeviceisused(hotworkpermitrequired).
• Useforconfiguration,commissioning,testandmaintenance
• Portable
• Intrinsicallysafe
• DedicatedcommunicationdeviceforHoneywellAnalyticsopticaldetectors
HART® communication optionSearchpointOptimaPluscanbesuppliedwithHART® over 4-20 mA communication.
• Useforconfiguration,commissioning,testandmaintenance
• CommunicateswithlocalHART®handhelddeviceorremoteHART® host
• Conformstoversion7oftheHART® protocol
2.5 Weather protection accessories
Searchpoint Optima Plus has a range of weather protection accessories designed to protect the optical surfacesfromenvironmentalconditionswithoutcompromisingperformance.PleasecontactHoneywellAnalytics to discuss the most suitable weather protection for a particular application.
As standard, Searchpoint Optima Plus is supplied with Standard Weather Protection, Dust Barrier and Sunshade/DelugeProtection.
Standard Weather Protection Sunshade/Deluge Protection (2108B0276) (2108D0275)
Provides the best compromise between response time and protection. Suitable for indoor, outdoor and duct mounting applications
Provides additional protection against heavy rainfall, wash downs and direct sunlight.

MAN0905_Issue 3_07/12 Searchpoint Optima Plus including HART® versionOperating Instructions
2108M0550
14
2. Introduction
Storm Baffle(2108B0280) Dust Barrier(2108B0259)
Provides increased protection against torrential rain and driven sea-spray. Recommended for exposed installations in maritime locations or areas where monsoon or tropical rain conditions are experienced. Also provides protection against steam and can be used in unfilteredducts.
This accessory will increase the detector’s response time.
Used to achieve accurate calibration of Searchpoint Optima Plus. Requires all weather protection to be removed except dust barrier.
Used to apply gas to Searchpoint OptimaPlusinthefield.Suitableforfunctional checking. Fits over the standard weather protection. (For calibration, use the Calibration Cap).
Prevents the ingress of dust or oil mist and protects the optics in very wet or exposed locations. Fits under the Standard Weather Protection.
This accessory will increase the detector’s response time.
2.6 Gassing Accessories
Searchpoint Optima Plus has a range of accessories designed to assist with gas testing.
Calibration Cap(2108B0272) Gassing Cover(2108D0258)
Caution: The Calibration Cap and the Gassing Cover must be removed after use.
Inlet
Outlet

MAN0905_Issue 3_07/12 Searchpoint Optima Plus including HART® versionOperating Instructions
2108M0550
15
2. Introduction
Flow Housing(2108B0282)Remote Gassing Cell(2108B0240)
Inlet
Outlet
For use in sampling system applications. Material:solventresistantanodisedaluminium, with stainless steel nozzles, outside diameter 6 mm. Searchpoint OptimaZisonlysuppliedwithaflowhousing.
Enableshigh%v/vconcentrationgasto be applied remotely for performing bump tests. Useful for units installed in ducts or inaccessible areas. Required for 0–100%v/vmethanerange(samplingsystem only). Searchpoint Optima X has a special version of the RGC.
The RGC is a factory fitted option.
2.7 Mounting Accessories
Junction Box Adaptor Plate (04200-A-1040)
The Junction Box Adaptor Plate enables low gland clearance junction boxes to be used without the Searchpoint Optima Plus fouling on the wall /mountingsurface,forexampletheHoneywellAnalyticsJunctionBox(00780-A-0100).Italsohas mounting points for the DVC100 and DVC100 MK2terminationunits.

MAN0905_Issue 3_07/12 Searchpoint Optima Plus including HART® versionOperating Instructions
2108M0550
16
2. Introduction
European Duct Mounting Kit – Metric Threads (2104B0349)
US Duct Mounting Kit – NPT Threads (2442-0016)
This kit enables M25 versions of Searchpoint Optima Plus to be conveniently mounted inside a duct. Electrical connections are made to the detector via a junction box which is mounted outside of the duct. Test gas can be applied to the detector via the gassing points provided.
Note: the detector must have the Remote Gassing Cell option factory fitted.
This kit enables ¾ NPT versions of Searchpoint Optima Plus to be conveniently mounted inside a duct. Electrical connections are made to the detector via a junction box which is mounted outside of the duct. Test gas can be applied to the detector via the gassing points provided.
Note: the detector must have the Remote Gassing Cell option factory fitted.
GassingPoints
SearchpointOptima
DuctMounting
Plate
JunctionBox
Bracket
JunctionBox

MAN0905_Issue 3_07/12 Searchpoint Optima Plus including HART® versionOperating Instructions
2108M0550
17
3. Mechanical Installation
WARNINGInstallation must be in accordance with the recognized standards of the appropriate authority in the country concerned. For Europe see EN60079-14, EN60079-29-2, and EN61241-14. For installations in North America, the National Electrical Code (NFPA 70) should be strictly observed. Elsewhere the
appropriate local or national regulations should be used.
3.1 Siting
The placement of gas detectors should be determined following the advice of experts having specialist knowledge of gas dispersion, experts having knowledge of the process plant system and equipment involved, safety personnel and engineering personnel. The agreement reached on the location of detectors should be recorded.
Guidance on the positioning of gas detectors to provide the best detection coverage is contained in IEC/EN60079-29-2andothernationalCodesofPractice.Itisrecommendedthattheinstallationdesignerconsults these Codes of Practice when determining where detectors are to be located.
Inaddition,considerthefollowingpoints:-
1. Searchpoint Optima Plus must be mounted horizontally to reduce the risk of contamination building up on the optical surfaces.
2. SearchpointOptimaPlusiscertifiedandspecifiedforoperationinambienttemperaturesfrom-40°C to+65°C.Operationoftheunitoutsideofthistemperaturerangeinvalidatesthecertificationandthe warranty.
3. SearchpointOptimaPlusisspecifiedforoperationinenvironmentswheretherateofchangeofunit temperatureislessthan3°C/minute.Exceedingthisrateofchangeoftemperaturewillcausetheunit to report a fault and may cause permanent damage.
4. SearchpointOptimaPlushasbeenvibrationtestedtothelevelsspecifiedinEN60079-29-1.Donot install units in locations where the vibration exceeds this level.
5. Wherepossible,locatedetectorsawayfromsourcesofairbornecontaminantsandsteam/ condensation, which could build up on the optical surfaces.
6. In extreme environmental conditions, consider the use of additional weather protection options (see Introduction, Weather Protection Accessories).
PleasecontactHoneywellAnalyticsforfurtheradviceifrequired.
3.2 Installation
Note: Searchpoint Optima Plus must be mounted horizontally to reduce the risk of contamination building up on the optical surfaces.
The Standard Installation section describes general mounting and installation. Additional information is provided for using Searchpoint Optima Plus in a sampling system or a duct, and for the use of the Remote Gassing Cell.
MAN0905_Issue 3_07/12 Searchpoint Optima Plus including HART® versionOperating Instructions
2108M0550
18
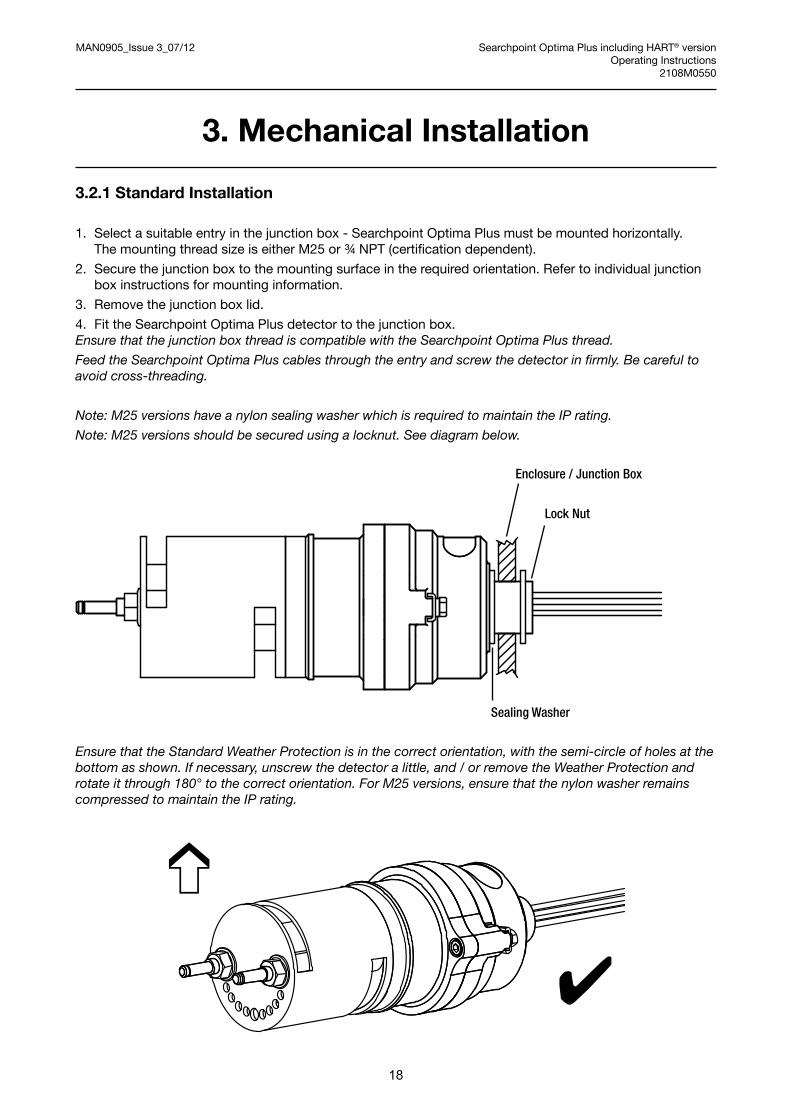
3.2.1 Standard Installation
1. Select a suitable entry in the junction box - Searchpoint Optima Plus must be mounted horizontally. ThemountingthreadsizeiseitherM25or¾NPT(certificationdependent).
2. Secure the junction box to the mounting surface in the required orientation. Refer to individual junction box instructions for mounting information.
3. Remove the junction box lid.
4. Fit the Searchpoint Optima Plus detector to the junction box. Ensure that the junction box thread is compatible with the Searchpoint Optima Plus thread.
Feed the Searchpoint Optima Plus cables through the entry and screw the detector in firmly. Be careful to avoid cross-threading.
Note: M25 versions have a nylon sealing washer which is required to maintain the IP rating.
Note: M25 versions should be secured using a locknut. See diagram below.
Enclosure / Junction Box
Lock Nut
Sealing Washer
Ensure that the Standard Weather Protection is in the correct orientation, with the semi-circle of holes at the bottom as shown. If necessary, unscrew the detector a little, and / or remove the Weather Protection and rotate it through 180° to the correct orientation. For M25 versions, ensure that the nylon washer remains compressed to maintain the IP rating.
✔
➩3. Mechanical Installation

MAN0905_Issue 3_07/12 Searchpoint Optima Plus including HART® versionOperating Instructions
2108M0550
19
5. FittheSunshade/Delugeprotection.
The Sunshade/Deluge protection should be clamped around the base of the Standard Weather Protection with the longer overhang extending beyond the Standard Weather Protection. Ensure the clamp does not cover the gas venting slot of the Standard Weather Protection.
6. Fitapprovedcableglandstothejunctionboxcableentriesasrequiredtomaintainthecertificationand IP rating.
7. Fit approved blanking plugs to the unused junction box cable entries as required to maintain the certificationandIPrating.
8. Fittheexternalfieldwiringthroughthecableglandsandsecure.
9. TerminatethegasdetectorandfieldwiringinaccordancewithChapter4(ElectricalInstallation).
10. Replace the junction box lid.
3.2.2 Installation with a flow housing (sampling system)
6mm o/d
Outlet
Inlet
Sampling systems should be designed to comply with the Searchpoint Optima Plus operating conditions, for example, sample temperature, cleanliness, water content, dust content etc.
Inaddition,considerthefollowingpoints:-
1. Flow rate should be between 0.7 litres per minute and 2 litres per minute.
2. Aflowfailureindicatorshouldbeincludedinthesystem.
3. If possible, use negative pressure to avoid the risk of pressurisation affecting the gas reading.
4. The choice of sampling lines should be appropriate to the application.
3. Mechanical Installation

MAN0905_Issue 3_07/12 Searchpoint Optima Plus including HART® versionOperating Instructions
2108M0550
20
3. Mechanical Installation
3.2.3 Sampling system using Remote Gassing Cell (RGC)
Thegasranges0–100%v/vmethane,0–600,000ppmpropaneand0–400,000ppmpropaneareexclusively for use with the Remote Gassing Cell (RGC) in sampling systems.
6mm o/d
Sampling systems should be designed to comply with the Searchpoint Optima Plus operating conditions, for example, sample temperature, cleanliness, water content, dust content etc.
The RGC has inlet and outlet gassing pipes with outer diameter 6 mm. The cell is not directional so either pipe can be used as the inlet.
Note: The Searchpoint Optima Plus will often be supplied with a Flow Housing fitted. Ensure that the correct gassing pipes are used. The gassing pipes for the RGC are the ones which support the retaining nuts for the Weather Protection or the Flow Housing.
Inaddition,considerthefollowingpoints:-
1. Maximumflowrateshouldbe0.3litresperminute.
2. Aflowfailureindicatorshouldbeincludedinthesystem.
3. If possible, use negative pressure to avoid the risk of pressurisation affecting the gas reading.
4. The choice of sampling lines should be appropriate to the application.
3.2.4 Installation in a duct
European Duct Mounting Kit – Metric Threads
Caution: Take note of the requirements on earthing given in Chapter 4. Earth loops should be avoided.
GassingPoints
SearchpointOptima
DuctMounting
Plate
JunctionBox
Bracket
JunctionBox
Note: In order to make use of the gassing points provided, the Searchpoint Optima Plus unit must be factory fitted with the Remote Gassing Cell (2108B0240).
MAN0905_Issue 3_07/12 Searchpoint Optima Plus including HART® versionOperating Instructions
2108M0550
21
3. Mechanical Installation
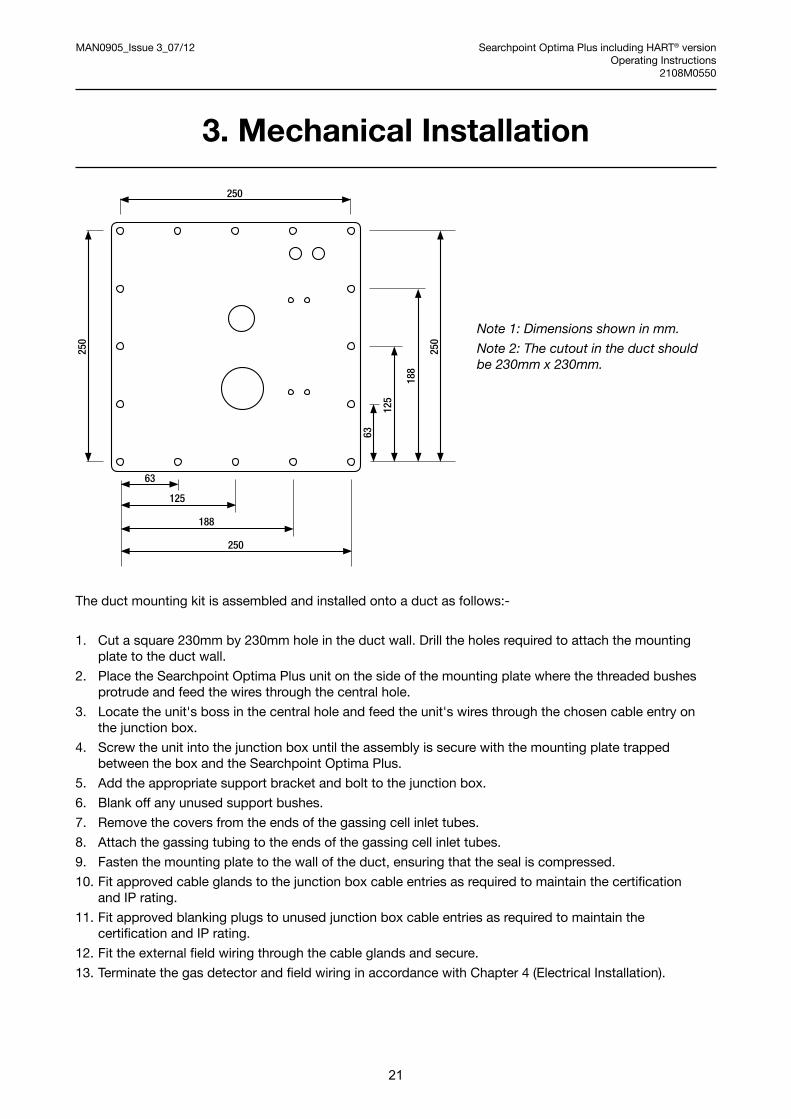
Note 1: Dimensions shown in mm.
Note 2: The cutout in the duct should be 230mm x 230mm.
250
250
250
188
125
63
250
188
125
63
Theductmountingkitisassembledandinstalledontoaductasfollows:-
1. Cut a square 230mm by 230mm hole in the duct wall. Drill the holes required to attach the mounting plate to the duct wall.
2. Place the Searchpoint Optima Plus unit on the side of the mounting plate where the threaded bushes protrude and feed the wires through the central hole.
3. Locatetheunit'sbossinthecentralholeandfeedtheunit'swiresthroughthechosencableentryon the junction box.
4. Screw the unit into the junction box until the assembly is secure with the mounting plate trapped between the box and the Searchpoint Optima Plus.
5. Add the appropriate support bracket and bolt to the junction box.
6. Blank off any unused support bushes.
7. Remove the covers from the ends of the gassing cell inlet tubes.
8. Attachthegassingtubingtotheendsofthegassingcellinlettubes.
9. Fasten the mounting plate to the wall of the duct, ensuring that the seal is compressed.
10.Fitapprovedcableglandstothejunctionboxcableentriesasrequiredtomaintainthecertification and IP rating.
11. Fit approved blanking plugs to unused junction box cable entries as required to maintain the certificationandIPrating.
12.Fittheexternalfieldwiringthroughthecableglandsandsecure.
13.TerminatethegasdetectorandfieldwiringinaccordancewithChapter4(ElectricalInstallation).

MAN0905_Issue 3_07/12 Searchpoint Optima Plus including HART® versionOperating Instructions
2108M0550
22
US Duct Mounting Kit – NPT Threads
Note: In order to make use of the gassing points provided, the Searchpoint Optima Plus unit must be factory fitted with the Remote Gassing Cell (2108B0240).
Note: CSA approval only applies for duct flow rates less than 5m/s.
Theductmountingkitisassembledandinstalledontoaductasbelow:-
1. Cut a square 6” by 6” hole in the duct wall. Drill the holes required to attach the mounting plate to the duct wall.
2. Place the Searchpoint Optima Plus unit on the side of the mounting plate where the threaded bushes protrude and feed the wires through the central hole.
3. Locatetheunit’sbossinthecentralholeandfeedtheunit’swiresthroughthechosencableentryon the junction box.
3. Mechanical Installation
Note: Dimensions shown in inches.

MAN0905_Issue 3_07/12 Searchpoint Optima Plus including HART® versionOperating Instructions
2108M0550
23
4. Screw the unit into the junction box until the assembly is secure with the mounting plate trapped between the box and the Searchpoint Optima Plus.
5. Remove the covers from the ends of the gassing cell inlet tubes.
6. Attach the gassing tubing to the ends of the gassing cell inlet tubes.
7. Fasten the mounting plate to the wall of the duct, ensuring that the seal is compressed.
8. Fitapprovedcableglandstothejunctionboxcableentriesasrequiredtomaintainthecertification and IP rating.
9. Fitapprovedblankingplugstounusedjunctionboxcableentriesasrequiredtomaintainthecertification and IP rating.
10.Fittheexternalfieldwiringthroughthecableglandsandsecure.
11.TerminatethegasdetectorandfieldwiringinaccordancewithChapter4(ElectricalInstallation).
3.2.5 Installation of gassing pipes for Remote Gassing Cell
Remote Gassing CellHigh Concentration(v/v cell) Nozzles
The Remote Gassing Cell (RGC) is used for functional response checking (bump testing) when the SearchpointOptimaPlusisinstalledinaninaccessiblelocation.TheRGCshouldbefittedwithgassingaccessoriesasfollows:-
1. Useaninletpipefittedwithaninlineparticlefilter.
2. Useanexhaustpipefittedwithaone-wayvalve.
3. Ensure that the exhaust vents well away from the Searchpoint Optima Plus to avoid affecting the gas reading. 4. HighconcentrationgaswillbeusedintheRGC.Ensurethattheexhaustventssafely.
3. Mechanical Installation

MAN0905_Issue 3_07/12 Searchpoint Optima Plus including HART® versionOperating Instructions
2108M0550
24
4. Electrical Installation
4.1 Power supply
TheSearchpointOptimaPlusrequiresavoltagesupplyfromthecontrollerofbetween18Vdcand32Vdc.The maximum power consumption is 5 W. The maximum loop resistance is 600 Ω. The minimum loop resistanceforHART® operation is 230 Ω.
Note: In current source mode, for supply voltages of 18 to 20 Vdc the maximum loop resistance is 500 Ω.
The table below gives the total power consumption for Searchpoint Optima Plus with some common junction box options.
Termination unit Total power consumption including Searchpoint Optima Plus
HALO** 6 W
XNX 10 W
DVC100 series 6 W
Honeywell Analytics Junction Box 5 W
Ensurethataminimumsupplyvoltageof18VdcismeasuredattheSearchpointOptimaPlus,takingintoaccount the voltage drop due to cable resistance.
Themaximumresistanceinthefieldcableiscalculatedasfollows:
R loop = (V controller – V detector min) / I detector
Example:
The controller is supplying a nominal 24 Vdc (V controller), the detector minimum allowable voltage is 18 Vdc (V detector min), therefore the maximum allowable voltage drop between the controller and detector is 6Vdc; this means a voltage drop of 3 V in each core (+ve core and -ve core).
Power consumption of the detector is 5.0 W. The current required to drive the detector at the minimum voltage is (I = P / V), 5.0 / 18 = 278 mA (I detector).
So, the maximum field cable loop resistance (R loop) = 6 / 0.278 = 22 Ω, or 11 Ω per core, (allowing for component variations, losses, etc.).
The following tables show the maximum cable distances between the controller and Searchpoint Optima Plus for a 1.5 mm2 (16 AWG*) core cable, for different termination unit options, assuming a voltage drop of 3 V in each core. The tables are examples only and actual cable parameters and source power supply voltage for the application should be used to calculate the maximum cable distance allowed at the installation site.
Termination unit
Total power consumption
Max Cable Length for 1.5 mm2 (16 AWG*) core (Cable resistance 12.7 Ω/km (20.4 Ω/mile))
Metres Feet
HALO** 6 W 709 2326
XNX 10 W 433 1421
DVC100 series 6 W 709 2326
Honeywell Analytics Junction Box 5 W 866 2841
*nearest equivalent
Note: Sufficient operational margins should be allowed
**ContactHoneywellAnalyticsforavailability

MAN0905_Issue 3_07/12 Searchpoint Optima Plus including HART® versionOperating Instructions
2108M0550
25
4.2 Cabling recommendations
Theuseofindustrialgrade,suitablyarmouredfieldcableisrecommended.
For example, three core copper cable, with screen (90% coverage) and suitable mechanical protection (e.g. steel wire armour or conduit).
WhenusingHART® communications, there are some additional considerations. In particular, low capacitancecableshouldbeused.FurtherdetailedinformationcanbefoundattheHART® Communication Foundation’swebsitewww.hartcomm.org.
4.3 Earth regimes
Any earthing regime employed must avoid earth loops.
ThefollowinginformationisprovidedtoassistwithproperearthingofSearchpointOptimaPlus:-
• SearchpointOptimaPlushasanearthwire(greenandyellow)forconnectiontoprotectiveearth. This is connected to the enclosure and isolated from the other wires. Maximum voltage between earth and the other wires is 500 V.
• ThereisanearthingpointontheoutsideoftheSearchpointOptimaPlusenclosureforconnectionto protective earth. Alternatively, an earth connection can be made via the mounting thread, e.g. to conduit, a metal junction box, or a continuity plate in a plastic junction box.
• SearchpointOptimaPlusdoesnotrequireaninstrumentearthconnection.
4. Electrical Installation
Circuitry Searchpoint Optima Plus Enclosure
Power, Signal and Communications Wires
Earth Wire (Green / Yellow)
RFI Protection Filters
Protective Earth
Three options to connect to protective earth:-1. Green / Yellow Earth wire2. External Earth point3. Mounting Thread

MAN0905_Issue 3_07/12 Searchpoint Optima Plus including HART® versionOperating Instructions
2108M0550
26
Inaddition,considerthefollowingpoints:-
General recommendations1. In general, correctly engineered star earthing arrangements minimise earth current crosstalk and noise, improving the reliability and performance of instrumentation.
2. Theuseofasingle,screened/shieldedcableforeachfielddeviceensuresgoodscreening/shielding and reduces crosstalk.
3. Lownoiseinstrumentearthshouldonlybeconnectedtoprotectiveearthatasinglepointonasite/ installation. This connection should be made in such a manner that it does not introduce noise onto the instrument earth.
Field Cabling1. Theentirelengthofthefieldcablingconnectedtoaunitshouldbescreened/shielded.Thescreen/ shield should be connected to a low noise instrument earth at one end.
2. Thescreens/shieldsoffieldcablingmustnotbeconnectedinamannerthatcreatesearthloopsorthat willresultinthescreens/shieldscarryinglargecurrentsfromheavyplantorequipment.
3. If armoured cable is being used it is necessary to prevent the armour becoming connected to the screen /shield.
4. Forinstallationswherethefieldcableconductorsrunthroughconduitorarmourconnectedtoprotective earth,theconduitorarmourshouldnotbeconsideredasasufficientscreen/shield.Aseparatecable screen/shield,connectedtoalownoiseinstrumentearthshouldbeemployed.
Maximum voltages1. Anyearthingarrangementemployedshouldensurethatthemaximumpeakvoltagebetweentheunit’s caseearthandanyfieldcableconductorislessthan500V.Thisincludesconditionswheretransient surge voltages are generated by lightning or the switching of heavy electrical plant. Earthing arrangementsthatemploymultipleprotectiveearthsorearthgridssignificantlyincreasethelikelihoodof largetransientsurgevoltagesbeinggeneratedbetweenaunit’scaseearthandthefieldcable conductors.Ifitissuspectedthatvoltagesbetweentheunit’scaseearthandanyfieldcableconductor may exceed 500 V it is strongly recommended that surge suppression devices be installed close to the unit.
Note: Suitable, certified surge suppression devices include MTL’s TP-48-I-NDI and Pepperl & Fuchs’ FN-LB-1. Surge suppression devices should be checked regularly and replaced if necessary.
Interference and noise1. For installations in Europe, all electrical equipment connected to the system should comply with EN50270. For non-European installations, electrical equipment connected to the system should comply with applicable national or international EMC standards.
2. Any electrical interference induced onto the conductors of a 4 – 20 mA loop by the installation must be kept below the levels necessary to comply with the requirements of EN60079-29-1 or other applicable gasdetectorperformancerequirements/standards.Inpractice,thismeansthatpeaknoisecurrents induced on the current loop should be no greater than ±0.25 mA.
3. The0Vrailofthecontrolcard/controlsystemisoftendirectlyconnectedtoonesideofthe4-20mA current sensing resistor. Electrical noise on this rail is therefore directly connected to the 4-20 mA input. In order to avoid additional noise being induced on the 0 V rail, it should not be commoned with the protective earth, which frequently carries a high level of electrical noise.
4. Ideally,the24Vsupplyreachingunitsshouldbefreefromlargetransients,fluctuationsorhighfrequency noise.
4. Electrical Installation
MAN0905_Issue 3_07/12 Searchpoint Optima Plus including HART® versionOperating Instructions
2108M0550
27
5. In order to reduce the likelihood of radio frequency interference affecting the operation of units it is recommended that neither units nor their cabling are installed in close proximity to the antennae of high powered radio, radar or satellite communication equipment.
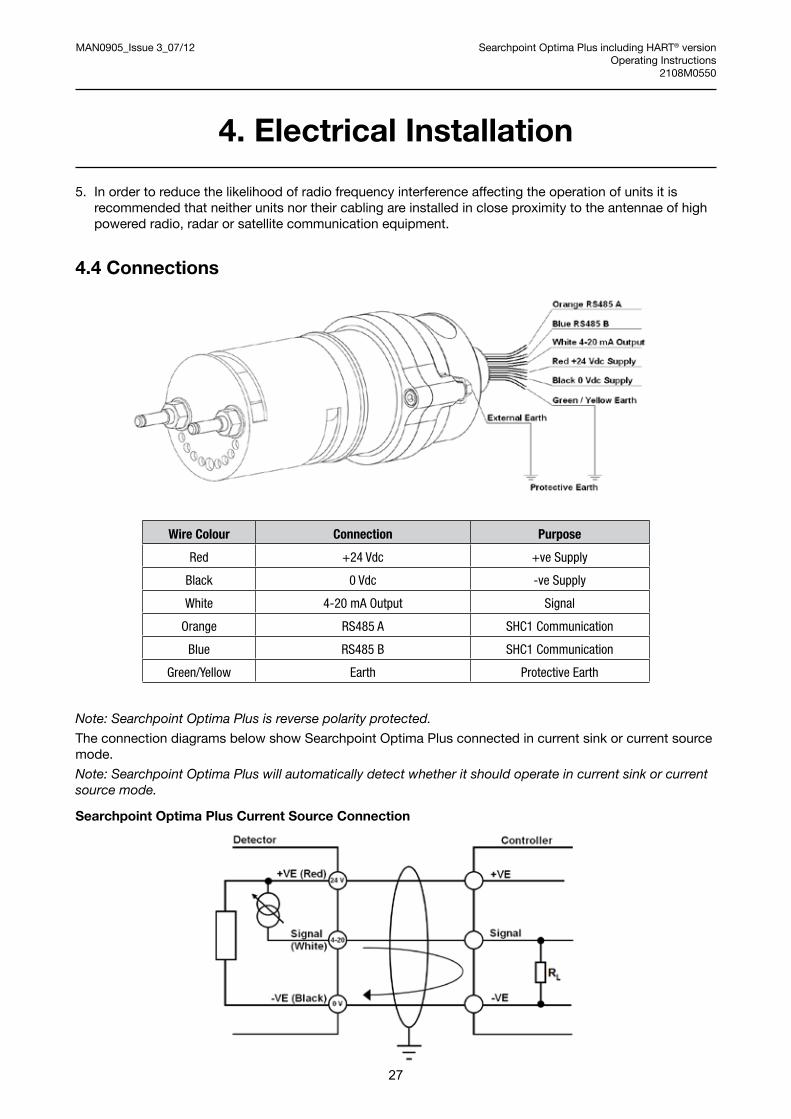
4.4 Connections
Wire Colour Connection Purpose
Red +24 Vdc +ve Supply
Black 0 Vdc -ve Supply
White 4-20 mA Output Signal
Orange RS485 A SHC1 Communication
Blue RS485 B SHC1 Communication
Green/Yellow Earth Protective Earth
Note: Searchpoint Optima Plus is reverse polarity protected.
The connection diagrams below show Searchpoint Optima Plus connected in current sink or current source mode.
Note: Searchpoint Optima Plus will automatically detect whether it should operate in current sink or current source mode.
Searchpoint Optima Plus Current Source Connection
4. Electrical Installation

MAN0905_Issue 3_07/12 Searchpoint Optima Plus including HART® versionOperating Instructions
2108M0550
28
4. Electrical Installation
Searchpoint Optima Plus Current Sink Connection

MAN0905_Issue 3_07/12 Searchpoint Optima Plus including HART® versionOperating Instructions
2108M0550
29
5. Operation
During normal operation, the 4-20 mA output represents 0-100 %FSD. The output is linear.
Analogue output below 4 mA represents diagnostic information. If the Searchpoint Optima Plus measures a negative gas reading, the analogue output will remain at 4 mA until the negative gas warning threshold is reached (-3 %FSD to -6 %FSD depending on the gas being measured) at which point it will signal a Warning.
5.1 Default Configuration
Status Current output
Fault < 1 mA
Warning 3 mA
Gas Reading 4 – 20 mA
Overrange 21 mA
Inhibit 2 mA
The tolerance on the nominal current output value is ± 0.2 mA.
During Warning status, the Searchpoint Optima Plus will continue to monitor gas, and will revert to Gas Reading status if a gas reading is detected.
If a Warning is indicated, schedule maintenance to investigate and rectify the cause. If left unattended, the unitislikelytoenterFaultstatus,whenitwillbeoffline.
TheWarning,InhibitandOverrangesignallevelscanbeconfiguredusingtheHART® communications, or by aHoneywellAnalyticsFieldServiceEngineerasfollows:-
Parameter Range
Warning* 0 mA to 6 mA
Inhibit 1 mA to 3 mA
Overrange 20 mA to 21.6 mA
* For ATEX compliance, the warning value should not be set > 3 and < 5 mA. If the warning value is set higherthan4mA,theoutputsignalwilltogglebetweenthewarningvaluefor8sandthecurrentgas
readingfor8s.
5.2 HART® Operation during Fault
HART®communicationrequires>1mAcurrentoutputfortransmission,thereforeiftheHART® version of theSearchpointOptimaPlusgoesintoFaulttheHART® communications will not work.
ItispossibletoconfiguretheFaultoutputlevelofaSearchpointOptimaPlusunitwithHART® to be 1 mA. Thiscanbedoneduringcommissioning(seeCommissioningusingHART®Communications,ConfigureHART® Operation during Fault).
MAN0905_Issue 3_07/12 Searchpoint Optima Plus including HART® versionOperating Instructions
2108M0550
30
6. Commissioning
Read this chapter if the SHC1 Handheld Interrogator or the HART® communications are not being used.
6.1 First Time Switch On
Note:SearchpointOptimaPlusissuppliedcalibratedandreadyforuse.Itdoesnotrequirecalibrationduring commissioning.
Note: During commissioning the 4-20 mA output can be monitored either at the control room or locally with a multimeter. When connecting or disconnecting a multimeter, power off the Searchpoint Optima Plus, otherwise the unit will indicate a latched warning that the 4-20 mA loop was broken. If this occurs it can be cleared by re-cycling the power.
1. Beforeapplyingpowertotheunit,ensurethatthefieldwiringiscorrectandallelectricalconnections are in accordance with Section 4.
2. Applypower.CheckthatthesupplyvoltagetotheSearchpointOptimaPlusisbetween18and32V.
3. Monitorthe4-20mAoutputduringthestartupsequence,whichshouldbeasfollows:-
Current output Duration
< 1 mA < 5 s
2 ± 0.2 mA < 60 s
4 ± 0.2 mA ongoing
Note: If gas is present, the unit will indicate a gas reading.
Note: If the output reverts to 3 mA or < 1 mA, an active or latched Warning or Fault may be present. If this happens re-cycle the power. If the Warning or Fault persists, please refer to Chapter 14 Troubleshooting.
Searchpoint Optima Plus is factory calibrated and it is not necessary to calibrate or gas test it during commissioning.Howeveriflocalregulationsorsitepracticesrequirethatagastestisdonetocheckthatthe unit is functioning, please see Chapter 7 Maintenance, Bump Test for instructions.

MAN0905_Issue 3_07/12 Searchpoint Optima Plus including HART® versionOperating Instructions
2108M0550
31
7. Maintenance
Read this chapter if the SHC1 Handheld Interrogator or the HART® communications are not being used.
7.1 Introduction
Thischapterexplainshowtoperformcommonmaintenanceoperations.PleaserefertoIEC/EN60079-29-2or other local or national regulations for guidance on establishing an appropriate maintenance routine.
Inspection How to check and clean the unit
Inspection of a unit fitted with a Flow Housing How to check and clean a unit fitted with a flow housing
Bump Test (Gas Challenge) How to carry out a gas test using the Gassing Cover
Bump Test (Gas Challenge) with RGC How to carry out a gas test using the Remote Gassing Cell
7.2 Inspection
Searchpoint Optima Plus should be inspected periodically and cleaned if necessary. The required frequency of inspection will depend on local site conditions and will need to be established through experience.
Caution: Gas readings may be generated during this procedure. Take appropriate action at the control and monitoring system to inhibit signals.
1. Inspect the Searchpoint Optima Plus unit, its junction box and cabling for any signs of physical damage.
2. Usinga½inch/13mmA/Fopenendedspanner,unscrewthetworetainingnutsandremovethe Standard Weather Protection.
3. InspecttheStandardWeatherProtectionfordamageorbuildupofdebris/contaminants.Ifrequired, clean or replace weather protection.
4. Inspect the Dust Barrier and clean or replace if required.
5. Remove the Dust Barrier and inspect the optics.
6. Clean any dust or contaminants from the optics using mild detergent and a soft cloth or cotton bud. Do not use solvents or abrasive cleaners.
7. Replace the Dust Barrier and Standard Weather Protection.
8. Cyclethepowertoclearanyfaultsorwarningsthatmayhavebeengeneratedbycleaning.
7.3 Inspection of a unit fitted with a Flow Housing
Searchpoint Optima Plus should be inspected periodically and cleaned if necessary. The required frequency of inspection will depend on local site conditions and will need to be established through experience.
Caution: Gas readings may be generated during this procedure. Take appropriate action at the control and monitoring system to inhibit signals.
1. Inspect the Searchpoint Optima Plus unit, its junction box and cabling for any signs of physical damage.
2. Disconnectanypipeworkattachedtotheflowhousing.

MAN0905_Issue 3_07/12 Searchpoint Optima Plus including HART® versionOperating Instructions
2108M0550
32
7. Maintenance
3. Usinga½inch/13mmA/Fopenendedspanner,removethetwoblacknutswhichretaintheflow housing. KeeptheO-ringsealswhicharebelowtheretainingnuts.
4. SlidetheflowhousingofftheSearchpointOptimaPlus.Thismayrequiresomeforceduetothefriction of the O-ring.
5. Clean any dust or contaminants from the optics using mild detergent and a soft cloth or cotton bud. Do not use solvents or abrasive cleaners.
6. EnsurethatthelargesealingO-ringinthebodyoftheflowhousing,andthetwosmallO-ringswhich go below the retaining nuts, are clean and in good condition. Replace if in doubt.
7. SlidetheflowhousingovertheendoftheSearchpointOptimaPlusandpushuntiltheflowhousingis firmlyseated.
8. Re-fittheo-ringsandretainingnuts.
9. Cycle the power to clear any faults or warnings that may have been generated by cleaning.
7.4 Bump Test (Gas Challenge)
Searchpoint Optima Plus can be functionally checked using an appropriate test gas.
Caution: Gas readings will be generated during this procedure. Take appropriate action at the control and monitoring system to inhibit signals.
Note: The unit should be powered up for 1 hour before a gas test is done.
Note: During testing the 4-20 mA output can be monitored either at the control room or locally with a multimeter. When connecting or disconnecting a multimeter, power off the Searchpoint Optima Plus, otherwise the unit will indicate a latched warning that the 4-20 mA loop was broken. If this occurs it can be cleared by re-cycling the power.
1. Fit a Gassing Cover to the Searchpoint Optima Plus.
2. Apply an appropriate test gas at a rate of 1 – 1.5 litres per minute for ~ 30 - 60 s.
3. Check that the Searchpoint Optima Plus responds to the test gas. The reading should be within ±20 % of the target.
Note: If the gas reading is not acceptable for the application, re-zero the Searchpoint Optima Plus and repeat the test. The SHC1 Handheld Interrogator, the HART® communication or the XNX Universal Transmitter is required to re-zero the Searchpoint Optima Plus. Factors to consider when evaluating the gas response include: -
• Test gas and concentration
• Tolerance of the test gas concentration
• Atmospheric pressure
• Ambient temperature
• Wind speed
4. Remove the Gassing Cover and wait for the test gas to clear (~ 30 s). Ensure that the gas reading has returned to zero.
MAN0905_Issue 3_07/12 Searchpoint Optima Plus including HART® versionOperating Instructions
2108M0550
33
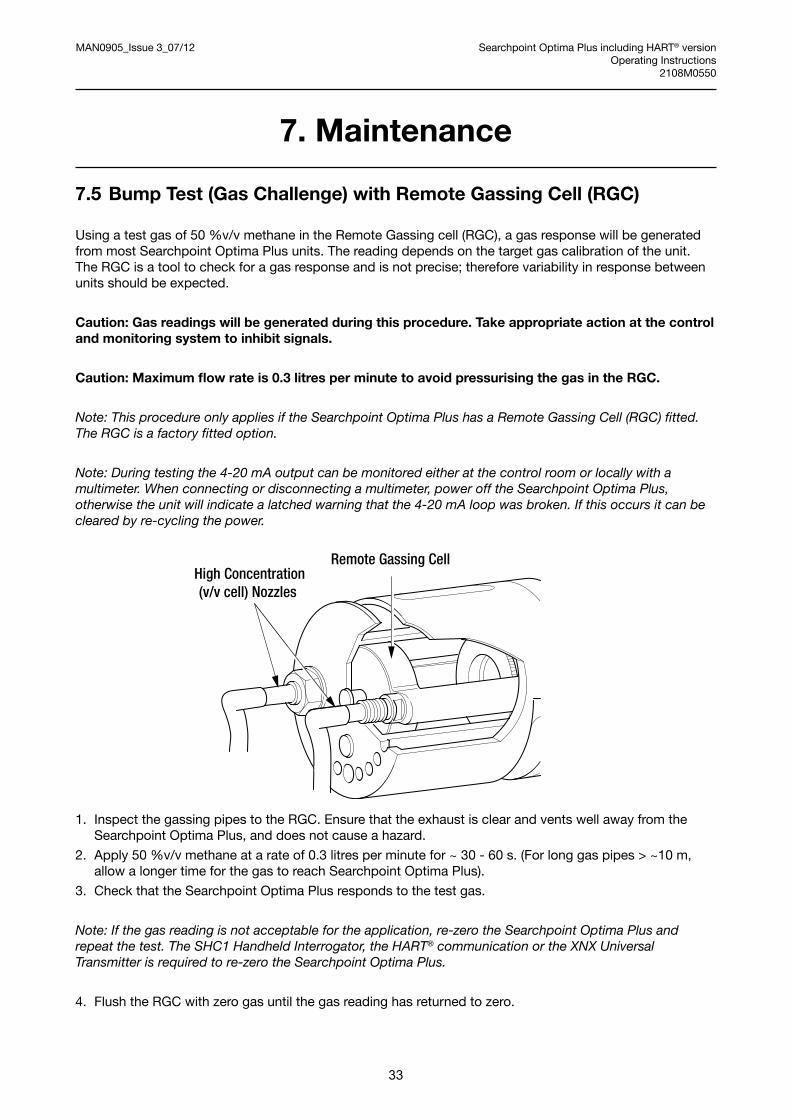
7.5 Bump Test (Gas Challenge) with Remote Gassing Cell (RGC)
Usingatestgasof50%v/vmethaneintheRemoteGassingcell(RGC),agasresponsewillbegeneratedfrom most Searchpoint Optima Plus units. The reading depends on the target gas calibration of the unit. The RGC is a tool to check for a gas response and is not precise; therefore variability in response between units should be expected.
Caution: Gas readings will be generated during this procedure. Take appropriate action at the control and monitoring system to inhibit signals.
Caution: Maximum flow rate is 0.3 litres per minute to avoid pressurising the gas in the RGC.
Note: This procedure only applies if the Searchpoint Optima Plus has a Remote Gassing Cell (RGC) fitted. The RGC is a factory fitted option.
Note: During testing the 4-20 mA output can be monitored either at the control room or locally with a multimeter. When connecting or disconnecting a multimeter, power off the Searchpoint Optima Plus, otherwise the unit will indicate a latched warning that the 4-20 mA loop was broken. If this occurs it can be cleared by re-cycling the power.
Remote Gassing CellHigh Concentration(v/v cell) Nozzles
1. Inspect the gassing pipes to the RGC. Ensure that the exhaust is clear and vents well away from the Searchpoint Optima Plus, and does not cause a hazard.
2. Apply50%v/vmethaneatarateof0.3litresperminutefor~30-60s.(Forlonggaspipes>~10m, allow a longer time for the gas to reach Searchpoint Optima Plus).
3. Check that the Searchpoint Optima Plus responds to the test gas.
Note: If the gas reading is not acceptable for the application, re-zero the Searchpoint Optima Plus and repeat the test. The SHC1 Handheld Interrogator, the HART® communication or the XNX Universal Transmitter is required to re-zero the Searchpoint Optima Plus.
4. Flush the RGC with zero gas until the gas reading has returned to zero.
7. Maintenance
MAN0905_Issue 3_07/12 Searchpoint Optima Plus including HART® versionOperating Instructions
2108M0550
34
8. Use of the SHC1 Handheld Interrogator
Read this chapter if the SHC1 Handheld Interrogator is being used to communicate with Searchpoint Optima Plus.
8.1 Introduction
ThischapterexplainshowtoconnecttheSHC1HandheldInterrogatortotheSearchpointOptimaPlusandhow to operate it. It also provides the menu structure for use with Searchpoint Optima Plus.
TheSHC1HandheldInterrogatorisaportable,intrinsicallysafedevicewhichcanbeusedtocalibrate,testandcommissionallofHoneywellAnalyticsSearchpointandSearchlineopticalgasdetectionproducts. TheSHC1HandheldInterrogatorusesthedetector’scommunicationslink.
Note: The SHC1 Handheld Interrogator does not read the HART® communications.
Note: The HART® communication takes precedence over the RS485 communication used by the SHC1 Handheld Interrogator. If the Searchpoint Optima Plus is being polled simultaneously by a HART® host, temporary communication errors may be experienced by the SHC1 Handheld Interrogator.
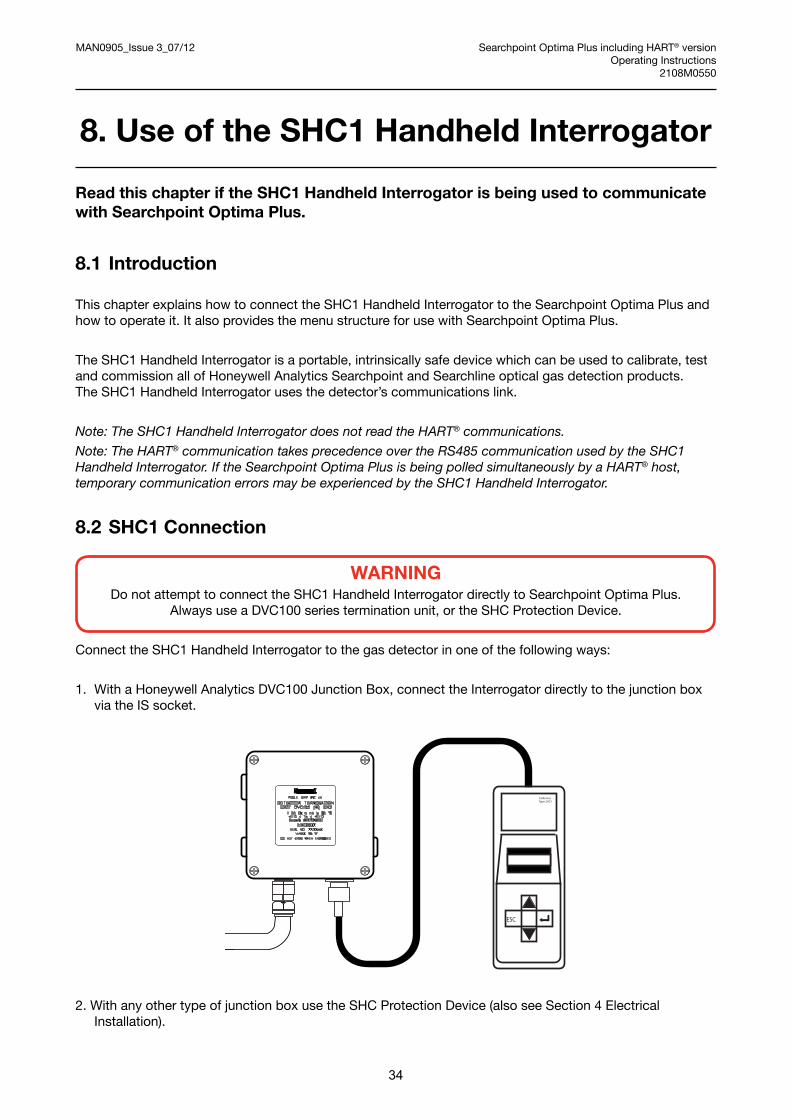
8.2 SHC1 Connection
WARNINGDonotattempttoconnecttheSHC1HandheldInterrogatordirectlytoSearchpointOptimaPlus.
AlwaysuseaDVC100seriesterminationunit,ortheSHCProtectionDevice.
ConnecttheSHC1HandheldInterrogatortothegasdetectorinoneofthefollowingways:
1. WithaHoneywellAnalyticsDVC100JunctionBox,connecttheInterrogatordirectlytothejunctionbox via the IS socket.
ESC
CalibratorType SHC1
2.WithanyothertypeofjunctionboxusetheSHCProtectionDevice(alsoseeSection4Electrical Installation).

MAN0905_Issue 3_07/12 Searchpoint Optima Plus including HART® versionOperating Instructions
2108M0550
35
8. Use of the SHC1 Handheld Interrogator
Flying LeadIS Connector
Note: The protection device must always be used for this type of connection. A hot work permit may be required for this procedure.
Carryoutthefollowingproceduretoconnectusingtheprotectiondevice.:
1. Isolate all power supplies.
2. Remove the cover of the junction box.
3.HardwiretheflyingleadoftheSHCProtectionDevicetothecommunicationslinkterminalsinthebox asshown:
Junction Box
SHC Protection Device Flying Lead
Blue RS485 B BlueBrownOrange RS485 A
Black 0V
White 4-20mA
Red +24V
Green/Yellow GND
4.ConnecttheInterrogatortotheISconnectorontheendoftheSHCProtectionDevice.

MAN0905_Issue 3_07/12 Searchpoint Optima Plus including HART® versionOperating Instructions
2108M0550
36
8. Use of the SHC1 Handheld Interrogator
8.3 SHC1 Operation
ESC
Z - SHC1 EXCELInterrogator
CalibratorType SHC1
ThediagrambelowshowstheSHC1menustructure.
• Usethe▲ and ▼ keys to scroll through the menu options.
• PressEnter ( ) to select an option and Escape (esc) to exit.
Main
Power Off
Main
Diagnose
Diagnose
Active Faults
Diagnose
Active Warns
Diagnose
Self Test
Diagnose
Soft Reset
Main
Calibrate
Calibrate
Display
Calibrate
Cal Sensor
Calibrate
Force 4-20
Calibrate
Normal 4-20
Z- SHC1 Optima +Interrogator XvX
Main
Display
Main
Configure
Main
Change Mode
Main
Gas Tables
Gas Tables
Show Gas
Gas Tables
Show Library
Gas Tables
Select Gas
LCD Display
Push Buttons
Press and hold for three seconds to switch on.
Press and esc together and hold to switch off.
Unit powers down automatically after 10 minutes to prolong battery life.
MAN0905_Issue 3_07/12 Searchpoint Optima Plus including HART® versionOperating Instructions
2108M0550
37
WhentheSHC1isswitchedon,checkthatitdisplaysOptima+ontheinitialscreen.IfitshowsOptimaorExcel,orreports“CommsError99”,changetheoperatingmodeasfollows:-
1. Select Change Mode.
2. Use the ▲ and ▼ keys to scroll through the options until Optima+ is highlighted.
3. Press Enter to select.
TheSHC1returnstothemainmenu.
Note: The instructions that follow in this manual assume that the SHC1 is switched on, in Optima+ mode, in the Main Menu.
8.4 Status indication
When Display is selected, the screen includes a status character which indicates the Searchpoint Optima Plusstatus(warning,faultetc.)asfollows:-
/ A spinning line shows the system is operating normally i.e. in a fully active state
| A stationery line shows the system is in inhibit
W Active Warning
F Active Fault
A Alarm
Press Enter to view the software version of Searchpoint Optima Plus.
8.5 SHC1 Battery Replacement
ToreplacethebatteryintheSHC1HandheldInterrogatorproceedasfollows:
Note: To comply with certification, only use DURACELL MN1604 Type 6LR61
1. Remove the Interrogator from its protective pouch.
2. Using a 2.5mm allen hexagonal key, loosen the four screws on the rear cover of the Interrogator.
3. CarefullyliftthefronthalfoftheInterrogatorawayfromtherearcover,ensuringtheflexibleconnector connecting the key pad to the electronics module is not damaged.
4. Uncliptheoldbatteryandfitthenewbatteryinposition.Re-usetheprotectivesleeve.
5. CarefullyreplacethefronthalfoftheInterrogatorbackintotherearcover,ensuringtheflexible connectorliesflat.
6. Using a 2.5mm allen hexagonal key, tighten the four screws on the rear cover of the Interrogator.
When the battery reaches end of life, take it to a collection point designated by local authorities.
8. Use of the SHC1 Handheld Interrogator

MAN0905_Issue 3_07/12 Searchpoint Optima Plus including HART® versionOperating Instructions
2108M0550
38
9. Commissioning using SHC1 Handheld Interrogator
Read this chapter if the SHC1 Handheld Interrogator is being used to communicate with Searchpoint Optima Plus.
Note: The instructions that follow assume that the SHC1 is switched on, in Optima+ mode, in the Main Menu. See Chapter 8 “Use of the SHC1 Handheld Interrogator” for details.
9.1 Introduction
This chapter explains several operations that may be required during commissioning. Only First Time Switch Onismandatory;Test4-20mALoopIntegrityisrecommended.TheinstructionsassumethattheSHC1isswitchedon,inOptima+mode,intheMainMenu.SeeChapter8“UseoftheSHC1HandheldInterrogator”for details.
First Time Switch On Checks that are required on first power up
Clear Faults or Warnings How to clear faults or warnings that may be generated during commissioning
Fix the 4-20 mA Output How to force the mA output to set levels in order to calibrate the controller or to test the system
Test 4-20 mA Loop Integrity Check that there is sufficient compliance in the loop to signal alarm and overrange
Caution: After changing any parameter, poll the Searchpoint Optima Plus and verify that the received value is correct.
9.2 First Time Switch On
Note: Searchpoint Optima Plus is supplied calibrated and ready for use. It does not require calibration during commissioning.
Note: During commissioning the 4-20 mA output can be monitored either at the control room or locally with a multimeter. When connecting or disconnecting a multimeter, power off the Searchpoint Optima Plus, otherwise the unit will indicate a latched warning that the 4-20 mA loop was broken. If this occurs it can be cleared using the SHC1 Handheld Interrogator.
1. Beforeapplyingpowertotheunit,ensurethatthefieldwiringiscorrectandallelectricalconnections are in accordance with Section 4.
2. Applypower.CheckthatthesupplyvoltagetotheSearchpointOptimaPlusisbetween18and32V.
3. Monitorthe4-20mAoutputduringthestartupsequence,whichshouldbeasfollows:-
Current output Duration
<1 mA < 5 s
2 ± 0.2 mA < 60 s
4 ± 0.2 mA ongoing
Note: If gas is present, the unit will indicate a gas reading.

MAN0905_Issue 3_07/12 Searchpoint Optima Plus including HART® versionOperating Instructions
2108M0550
39
Note: If the output reverts to 3 mA or < 1 mA, a Warning or Fault is present. Follow the instructions below to investigate and clear a warning or fault (see Clear Faults or Warnings).
Searchpoint Optima Plus is factory calibrated and it is not necessary to calibrate or gas test it during commissioning.Howeveriflocalregulationsorsitepracticesrequirethatagastestisdonetocheckthatthe unit is functioning, please see Chapter 10 Maintenance, Bump Test for instructions.
9.3 Clear Faults or Warnings
During commissioning, faults or warnings may be generated. This will be indicated by the 4-20 mA output signal. Use the procedure below to clear them.
1. Select Diagnose then Active Faults, or Diagnose then Active Warnings to view any faults or warnings.
Note: If no active faults or warnings are present, the 4-20 mA output signal may have latched due to an earlier fault or warning that has now cleared. Proceed to step 3 to clear latched faults or warnings.
2. Use the Problem Solving section of this manual to rectify the issue.
3. Select Diagnose then Soft Reset to clear any latched warnings or faults.
Note: If any configuration changes have been made, wait 15 seconds before doing a soft reset or cycling the power.
4. Press Escape to return to the main menu.
9.4 Fix the 4-20 mA Output
The4-20mAoutputcanbesettoafixedvaluebetween1mAand21mA,whichcanbeusedtocalibratethe controller or to test the system.
Note: This function will timeout after 10 minutes of inactivity.
Note: When connecting or disconnecting a multimeter, power off the Searchpoint Optima Plus, otherwise the unit will indicate a latched warning that the 4-20 mA loop was broken. If this occurs it can be cleared using the SHC1 Handheld Interrogator. See Clear Faults or Warnings.
1. Select Calibrate then Force 4-20.
2. Use ▲ and ▼ to set the required mA value and press Enter.
Searchpoint Optima Plus will now output the set mA value.
3. When calibration is complete, press Enter.4. Press Enter to release the 4-20 mA output signal.
5. Press Escape to return to the main menu.
9. Commissioning using SHC1 Handheld Interrogator

MAN0905_Issue 3_07/12 Searchpoint Optima Plus including HART® versionOperating Instructions
2108M0550
40
9.5 Test 4-20 mA Loop Integrity
It is recommended that the 4-20 mA loop integrity is tested by setting the Searchpoint Optima Plus to outputanoverrangecurrent.Thiswillconfirmthattherearenofaultsinthesystemthatwouldcauseacurrent limit.
Note: This function will timeout after 10 minutes of inactivity.
Note: When connecting or disconnecting a multimeter, power off the Searchpoint Optima Plus, otherwise the unit will indicate a latched warning that the 4-20 mA loop was broken. If this occurs it can be cleared using the SHC1 Handheld Interrogator. See Clear Faults or Warnings.
1. Select Calibrate then Force 4-20.
2. Use ▲ and ▼ to set the mA value to 21 mA and press Enter.
Searchpoint Optima Plus will now output 21 mA.
3. Check that the signal at the controller is > 20 mA, then press Enter.4. Press Enter to release the 4-20 mA output signal.
5. Press Escape to return to the main menu.
Note: If the current at the controller is not correct, check the 4-20 mA loop connections and cabling, and check that the loop resistance is less than 600 Ω. In current source mode, for supply voltages of 18 to 20 Vdc the maximum loop resistance is 500 Ω.
9. Commissioning using SHC1 Handheld Interrogator

MAN0905_Issue 3_07/12 Searchpoint Optima Plus including HART® versionOperating Instructions
2108M0550
41
10. Maintenance using SHC1 Handheld Interrogator
Read this chapter if the SHC1 Handheld Interrogator is being used to communicate with Searchpoint Optima Plus.
Note: The instructions that follow assume that the SHC1 is switched on, in Optima+ mode, in the Main Menu. See Chapter 8 “Use of the SHC1 Handheld Interrogator” for details.
10.1 Introduction
Thischapterexplainshowtoperformcommonmaintenanceoperations.PleaserefertoIEC/EN60079-29-2 or other local or national regulations for guidance on establishing an appropriate maintenance routine. TheinstructionsassumethattheSHC1isswitchedon,inOptima+mode,intheMainMenu.SeeChapter8“UseoftheSHC1HandheldInterrogator”fordetails.
Inspection How to check and clean the unit
Inspection of a unit fitted with a Flow Housing How to check and clean a unit fitted with a flow housing
Bump Test (Gas Challenge) How to carry out a gas test using the Gassing Cover
Bump Test (Gas Challenge) with RGC How to carry out a gas test using the Remote Gassing Cell
Re-zero Searchpoint Optima Plus How to re-zero if gas test results are unacceptable
Calibration How to calibrate the zero (and span if required)
View and Clear Faults or Warnings How to view Faults and Warnings
Caution: After changing any parameter, poll the Searchpoint Optima Plus and verify that the received value is correct.
Note: When connecting or disconnecting a multimeter, power off the Searchpoint Optima Plus, otherwise the unit will indicate a latched warning that the 4-20 mA loop was broken. If this occurs it can be cleared using the SHC1 Handheld Interrogator. See Clear Faults or Warnings.
10.2 Inspection
Searchpoint Optima Plus should be inspected periodically and cleaned if necessary. The required frequency of inspection will depend on local site conditions and will need to be established through experience.
Caution: Gas readings may be generated during this procedure.
1. Select Calibrate then Display to inhibit the 4-20 mA output signal.
2. Inspect the Searchpoint Optima Plus unit, its junction box and cabling for any signs of physical damage.
3. Usinga½inch/13mmA/Fopenendedspanner,unscrewthetworetainingnutsandremovethe Standard Weather Protection.
4. InspecttheStandardWeatherProtectionfordamageorbuildupofdebris/contaminants.Ifrequired, clean or replace weather protection.
5. Inspect the Dust Barrier and clean or replace if required.
6. Remove the Dust Barrier and inspect the optics.
7. Clean any dust or contaminants from the optics using mild detergent and a soft cloth or cotton bud. Do not use solvents or abrasive cleaners.

MAN0905_Issue 3_07/12 Searchpoint Optima Plus including HART® versionOperating Instructions
2108M0550
42
8. ReplacetheDustBarrierandStandardWeatherProtection.
9. Press Escape then Enter to release the 4-20 mA output signal.
10. Press Escape to return to the main menu.
11. Select Diagnose then Soft Reset to clear any faults or warnings that may have been generated by cleaning.
Note: If any configuration changes have been made, wait 15 seconds before doing a soft reset or cycling the power.
12. Press Escape to return to the main menu.
10.3 Inspection of a unit fitted with a Flow Housing
Searchpoint Optima Plus should be inspected periodically and cleaned if necessary. The required frequency of inspection will depend on local site conditions and will need to be established through experience.
Caution: Gas readings may be generated during this procedure.
1. Select Calibrate then Display to inhibit the 4-20 mA output signal.
2. Inspect the Searchpoint Optima Plus unit, its junction box and cabling for any signs of physical damage.
3. Disconnectanypipeworkattachedtotheflowhousing.
4. Usinga½inch/13mmA/Fopenendedspanner,removethetwoblacknutswhichretaintheflow housing.KeeptheO-ringsealswhicharebelowtheretainingnuts.
5. SlidetheflowhousingofftheSearchpointOptimaPlus.Thismayrequiresomeforceduetothefriction of the O-ring.
6. Clean any dust or contaminants from the optics using mild detergent and a soft cloth or cotton bud. Do not use solvents or abrasive cleaners.
7. EnsurethatthelargesealingO-ringinthebodyoftheflowhousing,andthetwosmallO-ringswhichgo below the retaining nuts, are clean and in good condition. Replace if in doubt.
8. SlidetheflowhousingovertheendoftheSearchpointOptimaPlusandpushuntiltheflowhousingis firmlyseated.
9. Re-fittheo-ringsandretainingnuts.
10. Press Escape then Enter to release the 4-20 mA output signal.
11. Press Escape to return to the main menu.
12. Select Diagnose then Soft Reset to clear any faults or warnings that may have been generated by cleaning.
Note: If any configuration changes have been made, wait 15 seconds before doing a soft reset or cycling the power.
13. Press Escape to return to the main menu.
10. Maintenance using SHC1 Handheld Interrogator

MAN0905_Issue 3_07/12 Searchpoint Optima Plus including HART® versionOperating Instructions
2108M0550
43
10.4 Bump Test (Gas Challenge)
Searchpoint Optima Plus can be functionally checked using an appropriate test gas.
Caution: Gas readings will be generated during this procedure.
Note: The unit should be powered up for 1 hour before a gas test is done.
1. Select Calibrate then Display. (This will inhibit the 4-20 mA output signal).
2. Fit a Gassing Cover to the Searchpoint Optima Plus, if not already in place.
3. Apply an appropriate test gas at a rate of 1 – 1.5 litres per minute for ~ 30 - 60 s.
4. Check that the Searchpoint Optima Plus responds to the test gas. The reading should be within ±20 % of target.
Note: If the gas reading is not acceptable for the application, re-zero the Searchpoint Optima Plus and repeat the test. Factors to consider when evaluating the gas response include: -
• Test gas and concentration
• Tolerance of the test gas concentration
• Atmospheric pressure
• Ambient temperature
• Wind speed
5. Remove the Gassing Cover and wait for the test gas to clear (~ 30 s). Ensure that the gas reading has returned to zero.
6. Press Escape then Enter to release the 4-20 mA output signal.
7. Press Escape to return to the main menu.
10.5 Bump Test (Gas Challenge) with Remote Gassing Cell (RGC)
Usingatestgasof50%v/vmethaneintheRemoteGassingcell(RGC),agasresponsewillbegeneratedfrom most Searchpoint Optima Plus units. The reading depends on the target gas calibration of the unit. The RGC is a tool to check for a gas response and is not precise; therefore variability in response between units should be expected.
Caution: Gas readings will be generated during this procedure.
Caution: Maximum flow rate is 0.3 litres per minute to avoid pressurising the gas in the RGC.
Note: This procedure only applies if the Searchpoint Optima Plus has a Remote Gassing Cell (RGC) fitted. The RGC is a factory fitted option.
10. Maintenance using SHC1 Handheld Interrogator

MAN0905_Issue 3_07/12 Searchpoint Optima Plus including HART® versionOperating Instructions
2108M0550
44
10. Maintenance using SHC1 Handheld Interrogator
Remote Gassing CellHigh Concentration(v/v cell) Nozzles
1. Inspect the gassing pipes to the RGC. Ensure that the exhaust is clear and vents well away from the Searchpoint Optima Plus, and does not cause a hazard.
2. Select Calibrate then Display. (This will inhibit the 4-20 mA output signal).
3. Apply50%v/vmethaneatarateof0.3litresperminutefor~30-60s.(Forlonggaspipes > ~10 m, allow a longer time for the gas to reach Searchpoint Optima Plus).
4. Check that the Searchpoint Optima Plus responds to the test gas.
Note: If the gas reading is not acceptable for the application, re-zero the Searchpoint Optima Plus and repeat the test.
5. Flush the RGC with zero gas until the gas reading has returned to zero.
6. Press Escape then Enter to release the 4-20 mA output signal.
7. Press Escape to return to the main menu.
10.6 Re-zero Searchpoint Optima Plus
Re-zero Searchpoint Optima Plus if it has given an unexpected response to a gas test. In most cases a re-zero will restore accuracy and a full span calibration is not required.
1. Select Calibrate then CalSensor. (This will inhibit the 4-20 mA output signal).
2. EnsurethatthereiszerogaspresentinthevicinityoftheSearchpointOptimaPlus.Ifnecessary,fit a Gassing Cover and apply zero gas.
3. Press Enter.
When the process is complete the display will state Zero Calibrated. It will then show options to continue to a span calibration, or to exit calibration.
4. Press Escape to exit calibration.
5. Press Enter to release the 4-20 mA output signal.
6. Press Escape to return to the main menu.
Note: If the option to Calibrate Span is selected in error, press Escape.

MAN0905_Issue 3_07/12 Searchpoint Optima Plus including HART® versionOperating Instructions
2108M0550
45
10.7 Calibration
Searchpoint Optima Plus is factory calibrated and does not require routine calibration. In most cases, a re-zero will correct any inaccuracy in the gas reading. It is strongly recommended that a span calibration is not carried out.
In the unlikely event that a span calibration is required, use a cylinder of the target gas, of approximately 50 %FSD, with an accuracy of at least ± 2 %.
Note: Searchpoint Optima Plus will accept a span calibration gas concentration of between 30 %FSD and 125 %FSD, however this facility is reserved for use in specialist applications.
Do not calibrate Searchpoint Optima Plus during periods of very high or low atmospheric pressure, very strong winds or storms.
Caution: Gas readings will be generated during this procedure.
Note: The unit should be powered up for 1 hour before a calibration is done.
1. Usinga½inch/13mmA/Fopenendedspanner,unscrewthetworetainingnutsandremovethe Standard Weather Protection.
2. Fit a Calibration Cap to the Searchpoint Optima Plus. Ensure it is pushed on fully.
3. Select Calibrate then CalSensor. (This will inhibit the 4-20 mA output signal).
4. Ensure that there is zero gas present in the vicinity of the Searchpoint Optima Plus. If necessary, apply zero gas at a rate of 1 – 1.5 litres per minute.
5. Press Enter.
When the process is complete the display will state Zero Calibrated. It will then show options to continue to a span calibration, or to exit calibration.
6. Press Enter to begin span calibration.
7. Press Enter.8. Use▲ and ▼ to set the concentration of the calibration gas. When it is correct, press Enter.9. Apply calibration gas at a rate of 1 – 1.5 litres per minute. Wait for the gas reading to stabilise (~ 30 - 60 s).
10. Press Enter.
When the process is complete the display will show Span Calibrated. It will then show an instruction to remove gas.
11. Remove the Calibration Cap and wait for the test gas to clear (~ 30 s). Ensure that the gas reading has returned to zero.
12. Press Enter.13.RefittheStandardWeatherProtectionandthetworetainingnuts.
14. Press Enter to release the 4-20 mA output signal.
15. Press Escape to return to the main menu.
10. Maintenance using SHC1 Handheld Interrogator
MAN0905_Issue 3_07/12 Searchpoint Optima Plus including HART® versionOperating Instructions
2108M0550
46
10.8 Investigation of Faults or Warnings
If the unit is signalling Fault or Warning on the 4-20 mA output, the problem should be investigated and remedied as soon as possible. Some types of faults and warnings are latching and will need to be cleared by a Reset.
1. Select Diagnose then Active Faults, or Diagnose then Active Warnings to view any faults or warnings.
Note: If no active faults or warnings are present, the 4-20 mA output signal may be due to a latched fault or warning. Proceed to step 3.
2. Use the Problem Solving section of this manual (Chapter 14) to rectify the issue.
3. Select Diagnose then Soft Reset to clear any latched warnings or faults.
Note: If any configuration changes have been made, wait 15 seconds before doing a soft reset or cycling the power.
4. Press Escape to return to the main menu.
10. Maintenance using SHC1 Handheld Interrogator

MAN0905_Issue 3_07/12 Searchpoint Optima Plus including HART® versionOperating Instructions
2108M0550
47
11. Use of the HART® Communications
Read this chapter if HART® communications are being used to communicate with Searchpoint Optima Plus.
11.1 General
TheHART®versionoftheSearchpointOptimaPluscancommunicateusingtheHART®protocol.HART® devices provide digital communications superimposed on the standard analogue output. Detailed informationabouttheHART®protocolcanbefoundattheHART®CommunicationFoundation’swebsitewww.hartcomm.org.
HART® is a master-slave protocol, i.e. the Searchpoint Optima Plus does not continually transmit data but will respond on request.
SearchpointOptimaPlushasaHART®DeviceDescription(DD)file,whichisprovidedontheCDsuppliedwiththeproduct,oravailabletodownloadfromHoneywellAnalyticswebsitewww.honeywellanalytics.comortheHART® Foundation website www.hartcomm.org.
TheDDfileiswrittenusingHART®version7,andiscompatiblewithHART®DDTokenizerversions6and8.TheDDfileissuppliedin.fm6,.fm8,.hhdand.hddversions.Itiscompatiblewithawiderangeofindustrystandard products.
TousetheHART®communications,loadtheSearchpointOptimaPlusDDfileintoasuitableHART® host (seemanufacturer’sinstructions).
11.2 Connection
ItisbesttouseadedicatedHART®interfacepoint(forexampletheHALO*junctionbox)toconnectaHART® handheld device.
Ifsuchaninterfaceisnotavailable,itispossibletoconnecttotheHART® signal across a load resistor in the current loop. For example, provided there is the minimum resistance of 230 Ω in the 4-20 mA loop, the HART® handheld device can be connected across the terminals in the junction box.
*ContactHoneywellAnalyticsforavailability
11.3 Searchpoint Optima Plus User Interface
11.3.1 Access Levels and Password Protection
TheSearchpointOptimaPlususerinterfacehasthreeaccesslevels.DefaultandLevel1areavailabletotheuser,whileLevel2accessisrestrictedtoHoneywellFieldServicepersonnel.
TheDefaultlevelisread-onlyanddisplaysinformationaboutthecurrentgasreading,configurationandunitstatus, including active warnings and faults.
Level1accessisrequiredtotestandcalibratetheunit,andtomakechangestothedefaultconfiguration.Level1accessispasswordprotected.Thepasswordis8digitalphanumeric(casesensitive),anditisrecommended that the user sets this to a password of their choosing. To avoid potential compatibility issuesbetweendifferentHART®hostdevices,ensurethatafull8digitpasswordisused.

MAN0905_Issue 3_07/12 Searchpoint Optima Plus including HART® versionOperating Instructions
2108M0550
48
TheLevel1passwordisfactorysetto00000000(eightzeroes).InstructionstochangethepasswordareincludedinChapter12Commissioning,UserConfiguration.
Note: Some HART® handheld devices will retain the previous login until switched off, even if the Searchpoint Optima Plus is disconnected. Ensure that Level 1 access is protected from unauthorised use by logging off when appropriate.
11.3.2 Menu Structure
The welcome screen displays current information about the Searchpoint Optima Plus.
WELCOME SCREEN
Example Data
1 Device Setup
2 Gas Concentration 0 %LEL
4 PV Loop current 4 mA
5 Active Gas Table Methane
6 Operating Mode Healthy
7 Loop Current Mode Point to Point HART Mode
8 Time (24-hour) 15:47
9 Date (dd/mm/yyyy) 16/07/2010
Selecting Device Setup leads to the further menu options, depending on the access level of the user.
Themenustructuresaregivenbelow(xxxxrepresentsinformation,??representsausertextfield):-
DEVICE SETUP MENU – DEFAULT ACCESS LEVEL
1 Device Setup 1 User Default2 User Login3 Unit Status
DefaultLevel 1Level 2
1 Device Setup 1 User Default2 User Login3 Unit Status
1 Operating Mode xxxx2 Active Warnings3 Active Faults
11. Use of the HART® Communications

MAN0905_Issue 3_07/12 Searchpoint Optima Plus including HART® versionOperating Instructions
2108M0550
49
DEVICE SETUP MENU – LEVEL 1 ACCESS
1 Device Setup 1 User Level 12 User Login3 Unit Status4 Gas Configuration5 Test6 Calibrate7 User Configuration8 Assembly Details 9 Device Info
DefaultLevel 1Level 2
1 Device Setup 1 User Level 12 User Login3 Unit Status4 Gas Configuration5 Test6 Calibrate7 User Configuration8 Assembly Details 9 Device Info
1 Operating Mode xxxx2 Active Warnings3 Active Faults4 Event History
1 Device Setup 1 User Level 12 User Login3 Unit Status4 Gas Configuration5 Test6 Calibrate7 User Configuration8 Assembly Details 9 Device Info
1 Alarm Threshold Configuration2 Gas Selection
1 Device Setup 1 User Level 12 User Login3 Unit Status4 Gas Configuration5 Test6 Calibrate7 User Configuration8 Assembly Details 9 Device Info
1 Inhibit2 mA loop test3 Self test4 Device reset5 Simulate Alarm Fault
1 Device Setup 1 User Level 12 User Login3 Unit Status4 Gas Configuration5 Test6 Calibrate7 User Configuration8 Assembly Details 9 Device Info
1 Inhibit2 Bump Test3 Gas Concentration xxxx4 mA Loop Calibration5 Gas Calibration6 Calibration Info ??
11. Use of the HART® Communications

MAN0905_Issue 3_07/12 Searchpoint Optima Plus including HART® versionOperating Instructions
2108M0550
50
1 Device Setup 1 User Level 12 User Login3 Unit Status4 Gas Configuration5 Test6 Calibrate7 User Configuration8 Assembly Details 9 Device Info
1 HART During Fault xxxx2 Inhibit Current xxxx3 Warning Current xxxx4 Overrange Current xxxx5 Set Time (24 hour)6 Set Date (dd/mm/yyyy)7 Change Password
1 Device Setup 1 User Level 12 User Login3 Unit Status4 Gas Configuration5 Test6 Calibrate7 User Configuration8 Assembly Details 9 Device Info
1 Config Revision xxxx2 HART Address xxxx3 Description ??4 Assembly Date ??5 Assembly Number ??6 Device Tag ??7 Transmitter ID
1 Device Setup 1 User Level 12 User Login3 Unit Status4 Gas Configuration5 Test6 Calibrate7 User Configuration8 Assembly Details 9 Device Info
1 Loop Current Mode xxxx2 Num req preams xxxx 3 Num resp preams xxxx4 Dev id xxxx5 Universal rev xxxx6 Fld dev rev xxxx7 Software rev xxxx8 Hardware rev xxxx
11.3.3 Menu Navigation
Menu options can be selected by highlighting the option and pressing Enter, by pressing the number of the option, or by double clicking on the option. For more information on how to select menu options please see theinstructionsfortheHART® host device being used.
11.3.4 Error Reporting
SearchpointOptimaPlusimplementsHART®protocolCommand48,meaningthatifanyeventisdetectedintheunitwhileaHART® host is connected, it will be reported immediately. Therefore warning messages may pop up during other operations.
11. Use of the HART® Communications

MAN0905_Issue 3_07/12 Searchpoint Optima Plus including HART® versionOperating Instructions
2108M0550
51
12. Commissioning using HART® Communications
Read this chapter if HART® communications are being used to communicate with Searchpoint Optima Plus.
Note: The instructions that follow assume that a suitable HART® host (handheld or PC) is connected to the Searchpoint Optima Plus and that the user is logged in with Level 1 access privileges. See Chapter 11 “Use of the HART® Communications” for details.
12.1 Introduction
This chapter explains several operations that may be required during commissioning. The user should work throughFirstTimeSwitchOn,UserConfigurationandConfigureDeviceIdentificationInformation,beforeselectingfurtheroperationsasrequiredbythespecificinstallation.
First Time Switch On Checks that are required on first power up
User Configuration How to change settings from the default values: -Change the Password – How to change the password for Level 1 accessConfigure HART® Operation during Fault - How to change the Fault output level to 1 mA so that HART® will operate during FaultSet the Time and Date - How to adjust the real time clock to local timeConfigure Warning, Inhibit and Overrange Signal Levels - How to change the signal levels from the default settings
Configure Device Identification Information How to set text fields that may be useful for device identification
Fix the 4-20 mA Output How to force the mA output to set levels in order to calibrate the controller or test the system
Test 4-20 mA Loop Integrity How to check that there is sufficient compliance in the loop to signal alarm and overrange
Calibrate the 4-20 mA Loop How to calibrate the current output (note this is not a gas calibration)
Configure Internal Alarm Threshold How to change the internal threshold used to simulate Alarm and log gas events
Simulation How to test the system by simulating Alarm, Warning and Fault conditions
Clear Faults or Warnings How to clear faults or warnings that may be generated during commissioning
Caution: After changing any parameter, poll the Searchpoint Optima Plus and verify that the received value is correct.
Note: The instructions that follow assume that a suitable HART® host (handheld or PC) is connected to the Searchpoint Optima Plus and that the user is logged in with Level 1 access privileges. See Chapter 11 “Use of the HART® Communications” for details.

MAN0905_Issue 3_07/12 Searchpoint Optima Plus including HART® versionOperating Instructions
2108M0550
52
12.2 First Time Switch On
Note: Searchpoint Optima Plus is supplied calibrated and ready for use. It does not require calibration during commissioning.
Note: During commissioning the 4-20 mA output can be monitored either at the control room or locally with a multimeter. When connecting or disconnecting a multimeter, power off the Searchpoint Optima Plus, otherwise the unit will indicate a latched warning that the 4-20 mA loop was broken. If this occurs it can be cleared using the HART® communications.
1. Beforeapplyingpowertotheunit,ensurethatthefieldwiringiscorrectandallelectricalconnections are in accordance with Section 4.
2. Applypower.CheckthatthesupplyvoltagetotheSearchpointOptimaPlusisbetween18and32V.
3. Monitorthe4-20mAoutputduringthestartupsequence,whichshouldbeasfollows:-
Current output Duration
< 1 mA < 5 s
2 ± 0.2 mA < 60 s
4 ± 0.2 mA ongoing
Note: If gas is present, the unit will indicate a gas reading
Note: If the output reverts to 3 mA or < 1 mA, a Warning or Fault is present. Follow the instructions below to investigate and clear a warning or fault (see Clear Faults or Warnings).
Searchpoint Optima Plus is factory calibrated and it is not necessary to calibrate or gas test it during commissioning.Howeveriflocalregulationsorsitepracticesrequirethatagastestisdonetocheckthatthe unit is functioning, please see Chapter 13 Maintenance, Bump Test for instructions.
12.3 User Configuration
12.3.1 Change the Password
ItisrecommendedthatthepasswordforLevel1accessshouldbechangedfromthedefaultsetting. Thepasswordis8digitalphanumeric(casesensitive).Afull8digitpasswordshouldbeused.
1. Select Device Setup.
2. Select User Login.
3. Select Level 1.
4. Enter the password 00000000 (eight zeroes) and press Enter.5. Thedisplayshowsaconfirmationmessage,pressOK.
6. Select User Configuration.
7. Select Change Password.
8. Thedisplayshowsaconfirmationmessage,pressOK.
12. Commissioning using HART® Communications
MAN0905_Issue 3_07/12 Searchpoint Optima Plus including HART® versionOperating Instructions
2108M0550
53
9. Type in the new password and press Enter.
Note: Some HART® handheld devices contain a default password or hold a previously used password. Ensure that the desired password is typed in before pressing Enter.
10.Thedisplayshowsaconfirmationmessage,pressOK.
11.ProceedtoConfigureHART® Operation during Fault, step 3, or press Back to return to the Device Setup menu.
12.3.2 Configure HART® Operation during Fault
Searchpoint Optima Plus is shipped with the Fault output current level set to < 1 mA. If the unit enters aFaultcondition,theHART®communicationswillnotwork(HART® communications require > 1 mA to operate).TheFaultoutputcurrentlevelcanbechangedto1mAsothatHART® communications remain active during a Fault condition.
1. Select Device Setup.
2. Select User Configuration.
3. Select HART During Fault.4. Select HART ACTIVE and press Enter.5. Press Send to send the information to Searchpoint Optima Plus.
6. Proceed to Set the Time and Date, step 3, or press Back to return to the Device Setup menu.
12.3.3 Set the Time and Date
SearchpointOptimaPlushasarealtimeclock,whichisfactorysettoUKtime.Itcanbeadjustedtolocaltime.
1. Select Device Setup.
2. Select User Configuration.
3. Select Set Time.
4. Enter the correct time (24 hour format) and press Enter.5. Thedisplayshowsaconfirmationmessage,pressOK.
6. Select Set Date.
7. Enterthecorrectdate(dd/mm/yyyyformat)andpressEnter.8. Thedisplayshowsaconfirmationmessage,pressOK.
9. ProceedtoConfigureWarning,InhibitandOverrangeSignalLevels,step3,orpressBack to return to the Device Setup menu.
12. Commissioning using HART® Communications
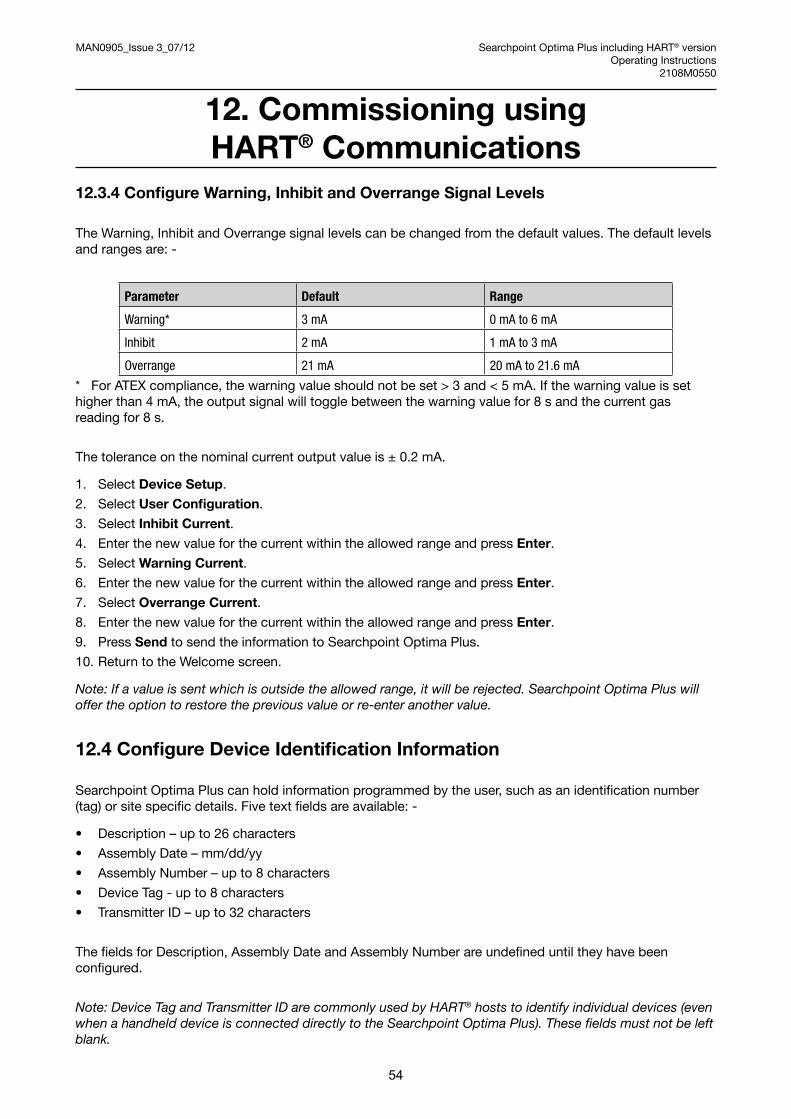
MAN0905_Issue 3_07/12 Searchpoint Optima Plus including HART® versionOperating Instructions
2108M0550
54
12.3.4 Configure Warning, Inhibit and Overrange Signal Levels
The Warning, Inhibit and Overrange signal levels can be changed from the default values. The default levels andrangesare:-
Parameter Default Range
Warning* 3 mA 0 mA to 6 mA
Inhibit 2 mA 1 mA to 3 mA
Overrange 21 mA 20 mA to 21.6 mA
* For ATEX compliance, the warning value should not be set > 3 and < 5 mA. If the warning value is set higherthan4mA,theoutputsignalwilltogglebetweenthewarningvaluefor8sandthecurrentgasreadingfor8s.
The tolerance on the nominal current output value is ± 0.2 mA.
1. Select Device Setup.
2. Select User Configuration.
3. Select Inhibit Current.4. Enter the new value for the current within the allowed range and press Enter.5. Select Warning Current.6. Enter the new value for the current within the allowed range and press Enter.7. Select Overrange Current.8. EnterthenewvalueforthecurrentwithintheallowedrangeandpressEnter.9. Press Send to send the information to Searchpoint Optima Plus.
10. Return to the Welcome screen.
Note: If a value is sent which is outside the allowed range, it will be rejected. Searchpoint Optima Plus will offer the option to restore the previous value or re-enter another value.
12.4 Configure Device Identification Information
SearchpointOptimaPluscanholdinformationprogrammedbytheuser,suchasanidentificationnumber(tag)orsitespecificdetails.Fivetextfieldsareavailable:-
• Description–upto26characters
• AssemblyDate–mm/dd/yy
• AssemblyNumber–upto8characters
• DeviceTag-upto8characters
• TransmitterID–upto32characters
ThefieldsforDescription,AssemblyDateandAssemblyNumberareundefineduntiltheyhavebeenconfigured.
Note: Device Tag and Transmitter ID are commonly used by HART® hosts to identify individual devices (even when a handheld device is connected directly to the Searchpoint Optima Plus). These fields must not be left blank.
12. Commissioning using HART® Communications

MAN0905_Issue 3_07/12 Searchpoint Optima Plus including HART® versionOperating Instructions
2108M0550
55
1. Select Device Setup.
2. Select Assembly Details.
3. Select Description.
4. Enter required information up to 26 characters (for example the device type) and press Enter.5. Select Assembly Date.
6. Enterrequiredinformationintheformatmm/dd/yy(forexamplethedateofinstallation)andpressEnter.7. Select Assembly Number.8. Enterrequiredinformationupto8characters(forexampleanumberrelatedtotheinstallation)and press Enter.9. Select Device Tag.
10.Enterrequiredinformationupto8characters(forexampleauniquedeviceidentificationnumber) and press Enter.11. Select Transmitter ID.
12. Enter required information up to 32 characters (for example the device location) and press Enter.13. Press Send to send the information to Searchpoint Optima Plus.
14. Return to the Welcome screen.
12.5 Fix the 4-20 mA Output
The4-20mAoutputcanbesettoafixedvaluebetween1mAand21mA,whichcanbeusedtocalibratethe controller, or to test the system.
Note: This function will timeout after 10 minutes of inactivity.
Note: When connecting or disconnecting a multimeter, power off the Searchpoint Optima Plus, otherwise the unit will indicate a latched warning that the 4-20 mA loop was broken. If this occurs, it can be cleared using the HART® communications. See Clear Faults or Warnings.
1. Select Device Setup.
2. Select Test3. Select mA Loop Test4. The display shows a warning message, press OK.
5. Select required analogue output level and press Enter.
Searchpoint Optima Plus will now output the set mA value.
6. When ready, press OK7. Repeat steps 4 and 5 with another value if required, or select End.
8. ThedisplayshowsanotethattheSearchpointOptimaPluswillreturntonormaloperation,pressOK.
9. Thedisplayshowsaconfirmationmessage,returntotheWelcomescreen.
12. Commissioning using HART® Communications
MAN0905_Issue 3_07/12 Searchpoint Optima Plus including HART® versionOperating Instructions
2108M0550
56
12.6 Test 4-20 mA Loop Integrity
It is recommended that the 4-20 mA loop integrity is tested by setting the Searchpoint Optima Plus to outputanoverrangecurrent.Thiswillconfirmthattherearenofaultsinthesystemthatwouldcauseacurrent limit.
Note: This function will timeout after 10 minutes of inactivity.
Note: When connecting or disconnecting a multimeter, power off the Searchpoint Optima Plus, otherwise the unit will indicate a latched warning that the 4-20 mA loop was broken. If this occurs, it can be cleared using the HART® communications. See Clear Faults or Warnings.
1. Select Device Setup.
2. Select Test3. Select mA Loop Test4. The display shows a warning message, press OK.
5. Select Other.6. Input 21 and press Enter
Searchpoint Optima Plus will now output 21 mA.
7. Check that the signal at the controller is > 20 mA, then press OK8. SelectEnd.
9. The display shows a note that the Searchpoint Optima Plus will return to normal operation, press OK.
10.Thedisplayshowsaconfirmationmessage,returntotheWelcomescreen.
Note: If the current at the controller is not correct, check the 4-20 mA loop connections and cabling, and check that the loop resistance is less than 600 Ω. In current source mode, for supply voltages of 18 to 20 Vdc the maximum loop resistance is 500 Ω.
12.7 Calibrate the 4-20 mA Loop
If required, the 4 – 20 mA current output can be trimmed to match the controller. This is not a gas calibration.
Note: When connecting or disconnecting a multimeter, power off the Searchpoint Optima Plus, otherwise the unit will indicate a latched warning that the 4-20 mA loop was broken. If this occurs, it can be cleared using the HART® communications. See Clear Faults or Warnings.
Note: If this process is aborted at any time, it may be necessary to wait 10 minutes before attempting the calibration again. See Chapter 14, Troubleshooting.
12. Commissioning using HART® Communications
MAN0905_Issue 3_07/12 Searchpoint Optima Plus including HART® versionOperating Instructions
2108M0550
57
Note: Different time delays may be observed for low and high calibration.
1. Select Device Setup.
2. Select Calibrate.
3. Select mA Loop Calibration.
4. The display tells you to connect a reference meter, press OK.
5. The analogue output value will be set to 4 mA, press OKtoconfirm.
6. Enter the actual reading of the analogue output value (from reference meter or from the controller) and press Enter.
The Searchpoint Optima Plus will collect data and perform the low calibration.
7. When complete, the display shows a message that the unit is ready to perform the high calibration, press OK.
8. Theanalogueoutputvaluewillbesetto20mA,pressOKtoconfirm.
9. Enter the actual reading of the analogue output value (from reference meter or from the controller) and press Enter.
The Searchpoint Optima Plus will collect data and perform the high calibration.
10.Thedisplayshowsaconfirmationmessage,pressOK11. The display shows a note that the Searchpoint Optima Plus will return to normal operation, press OK.
12. Return to the Welcome screen.
12.8 Configure Internal Alarm Threshold
The internal alarm threshold is used to log events when the gas reading exceeded the threshold. It is also used as the value to simulate Alarm. The default value is 20 %FSD.
1. Select Device Setup.
2. Select Gas Configuration.
3. Select Alarm Threshold Configuration.
4. Select Alarm Threshold.
5. Enter the new value between 10 %FSD and 65 %FSD, and press Enter.6. Press Send to send the information to Searchpoint Optima Plus.
7. Return to the Welcome screen.
12.9 Simulation
Searchpoint Optima Plus can simulate Alarm, Fault and Warning conditions. This can be used to test the response of the overall system. Simulated Alarms, Faults and Warnings will not be recorded in the Event History.
12. Commissioning using HART® Communications
MAN0905_Issue 3_07/12 Searchpoint Optima Plus including HART® versionOperating Instructions
2108M0550
58
Note: HART During Fault must be configured to HART ACTIVE before simulating a Fault, to avoid losing communication with the Searchpoint Optima Plus. See Configure HART® Operation during Fault.
Note: When connecting or disconnecting a multimeter, power off the Searchpoint Optima Plus, otherwise the unit will indicate a latched warning that the 4-20 mA loop was broken. If this occurs, it can be cleared using the HART® communications. See Clear Faults or Warnings.
Note: This function will time out after 10 minutes of inactivity.
1. Select Device Setup.
2. Select Test.3. Select Simulate Alarm Fault.4. Select the required function to simulate and press Enter.
Searchpoint Optima Plus will output the appropriate mA value, and check for any errors.
5. Ifthesimulationissuccessful,thedisplaywillshowthemessage“Nospecificerror”,pressOK.
6. Repeat steps 4 and 5 to simulate different functions.
7. When test is complete select End Simulation and press Enter.8. Thedisplaywillshowthemessage“Nospecificerror”,pressOK.
9. The display shows a note that the Searchpoint Optima Plus will return to normal operation, press OK.
10. Return to the Welcome screen.
12.10 Clear Faults or Warnings
During commissioning, faults or warnings may be generated. This will be indicated by the 4-20 mA output signal. Use the procedure below to clear them.
1. Select Device Setup.
2. Select Unit Status3. Select Active Faults or Active Warnings to check for any faults or warnings.
4. Select View, then First, Next or Previous to display the fault or warning.
Note: First displays the active fault or warning that occurred earliest in time. “End of list” means that the last fault or warning has been reached.
5. Press OK and Back to return to the Unit Status menu.
Note: If no active faults or warnings are present, the 4-20 mA output signal may have latched due to an earlier fault or warning that has now cleared. Proceed to step 7 to clear latched faults or warnings.
6. Use the Problem Solving section of this manual to rectify the issue.
7. Press Back to return to the Device Setup menu.
8. SelectTest.
12. Commissioning using HART® Communications

MAN0905_Issue 3_07/12 Searchpoint Optima Plus including HART® versionOperating Instructions
2108M0550
59
9. Select Device Reset.10. Press OK to initiate a Device Reset, which will clear any latched faults or warnings.
Note: If any configuration changes have been made, wait 15 seconds before doing a soft reset or cycling the power.
11.Thedisplayshowsaconfirmationmessage.PressOK.
12. The display shows a note that the Searchpoint Optima Plus will return to normal operation, press OK.
13. Return to the Welcome screen.
12. Commissioning using HART® Communications
MAN0905_Issue 3_07/12 Searchpoint Optima Plus including HART® versionOperating Instructions
2108M0550
60
13. Maintenance using HART® Communications
Read this chapter if HART® communications are being used to communicate with Searchpoint Optima Plus.
Note: The instructions that follow assume that a suitable HART® host (handheld or PC) is connected to the Searchpoint Optima Plus and that the user is logged in with Level 1 access privileges.
13.1 Introduction
Thischapterexplainshowtoperformcommonmaintenanceoperations.PleaserefertoIEC/EN60079-29-2or other local or national regulations for guidance on establishing an appropriate maintenance routine.
Inspection How to check and clean the unit
Inspection of a unit fitted with a Flow Housing How to check and clean a unit fitted with a flow housing
Bump Test (Gas Challenge) How to carry out a gas test using the Gassing Cover
Bump Test (Gas Challenge) with RGC How to carry out a gas test using the Remote Gassing Cell (if fitted)
Re-zero Searchpoint Optima Plus How to re-zero if gas test results are unacceptable
Calibration How to calibrate the zero (and span if required)
Store Calibration Information There is a text field available to the user to store useful information related to gas testing and calibration
Investigation of Faults or Warnings How to view Faults and Warnings
Caution: After changing any parameter, poll the Searchpoint Optima Plus and verify that the received value is correct.
Note: When connecting or disconnecting a multimeter, power off the Searchpoint Optima Plus, otherwise the unit will indicate a latched warning that the 4-20 mA loop was broken. If this occurs, it can be cleared using the HART® communications. See Clear Faults or Warnings.
13.2 Inspection
Searchpoint Optima Plus should be inspected periodically and cleaned if necessary. The required frequency of inspection will depend on local site conditions and will need to be established through experience.
Caution: Gas readings may be generated during this procedure. Follow the steps to inhibit the 4-20 mA output. Ensure that the unit is not left in Inhibit mode.
1. Select Device Setup.
2. Select Test.3. Select Inhibit.4. Select Start Inhibit and press Enter.5. Thedisplayshowsaconfirmationmessage.PressOK. The 4-20 mA output is now inhibited.
6. Inspect the Searchpoint Optima Plus unit, its junction box and cabling for any signs of physical damage.

MAN0905_Issue 3_07/12 Searchpoint Optima Plus including HART® versionOperating Instructions
2108M0550
61
7. Usinga½inch/13mmA/Fopenendedspanner,unscrewthetworetainingnutsandremovethe Standard Weather Protection.
8. InspecttheStandardWeatherProtectionfordamageorbuildupofdebris/contaminants.Ifrequired, clean or replace weather protection.
9. Inspect the Dust Barrier and clean or replace if required.
10. Remove the Dust Barrier and inspect the optics.
11. Clean any dust or contaminants from the optics using mild detergent and a soft cloth or cotton bud. Do not use solvents or abrasive cleaners.
12. Replace the Dust Barrier and Standard Weather Protection.
13. Select Device Reset to clear any faults or warnings that may have been generated by cleaning.
14. Press OK to initiate a Device Reset.
Note: If any configuration changes have been made, wait 15 seconds before doing a soft reset or cycling the power.
15.Thedisplayshowsaconfirmationmessage.PressOK.
16. The display shows a note that the Searchpoint Optima Plus will return to normal operation, press OK.
17. Select Inhibit.18.SelectEnd Inhibit and press Enter.19.Thedisplayshowsaconfirmationmessage.PressOK to release the 4-20 mA output.
20. Return to the Welcome screen.
13.3 Inspection of a unit fitted with a Flow Housing
Searchpoint Optima Plus should be inspected periodically and cleaned if necessary. The required frequency of inspection will depend on local site conditions and will need to be established through experience.
Caution: Gas readings may be generated during this procedure. Follow the steps to inhibit the 4-20 mA output. Ensure that the unit is not left in Inhibit mode.
1. Select Device Setup.
2. Select Test.3. Select Inhibit.4. Select Start Inhibit and press Enter.5. Thedisplayshowsaconfirmationmessage.PressOK. The 4-20 mA output is now inhibited.
6. Inspect the Searchpoint Optima Plus unit, its junction box and cabling for any signs of physical damage.
7. Disconnectanypipeworkattachedtotheflowhousing.
8. Usinga½inch/13mmA/Fopenendedspanner,removethetwoblacknutswhichretaintheflow housing.KeeptheO-ringsealswhicharebelowtheretainingnuts.
9. SlidetheflowhousingofftheSearchpointOptimaPlus.Thismayrequiresomeforceduetothefriction of the O-ring.
10. Clean any dust or contaminants from the optics using mild detergent and a soft cloth or cotton bud. Do not use solvents or abrasive cleaners.
13. Maintenance using HART® Communications
MAN0905_Issue 3_07/12 Searchpoint Optima Plus including HART® versionOperating Instructions
2108M0550
62
11.EnsurethatthelargesealingO-ringinthebodyoftheflowhousing,andthetwosmallO-ringswhich go below the retaining nuts, are clean and in good condition. Replace if in doubt.
12.SlidetheflowhousingovertheendoftheSearchpointOptimaPlusandpushuntiltheflowhousingis firmlyseated.
13.Re-fittheo-ringsandretainingnuts.
14. Select Device Reset to clear any faults or warnings that may have been generated by cleaning.
15. Press OK to initiate a Device Reset.
Note: If any configuration changes have been made, wait 15 seconds before doing a soft reset or cycling the power.
16.Thedisplayshowsaconfirmationmessage.PressOK.
17. The display shows a note that the Searchpoint Optima Plus will return to normal operation, press OK.
18.SelectInhibit.19. Select End Inhibit and press Enter.20.Thedisplayshowsaconfirmationmessage.PressOK to release the 4-20 mA output.
21. Return to the Welcome screen.
13.4 Bump Test (Gas Challenge)
Searchpoint Optima Plus can be functionally checked using an appropriate test gas.
Caution: Gas readings will be generated during this procedure. The 4-20 mA output will be inhibited automatically. If the procedure is aborted, ensure that the unit is not left in Inhibit mode.
Note: The unit should be powered up for 1 hour before a gas test is done.
1. Select Device Setup.
2. Select Calibrate.
3. Select Bump Test.4. Select Start Bump Test and press Enter.5. Thedisplayshowsaconfirmationmessage,pressOK. The 4-20 mA output is now inhibited.
6. Fit a Gassing Cover to the Searchpoint Optima Plus.
7. Apply an appropriate test gas at a rate of 1 – 1.5 litres per minute for ~ 30 - 60 s.
8. CheckthattheSearchpointOptimaPlusrespondstothetestgas.Thelivegasconcentration is shown on the screen. The reading should be within ±20 % of target. When ready to continue press OK.
Note: If the gas reading is not acceptable for the application, re-zero the Searchpoint Optima Plus and repeat the test. Factors to consider when evaluating the gas response include: -
• Test gas and concentration
• Tolerance of the test gas concentration
• Atmospheric pressure
• Ambient temperature
• Wind speed
13. Maintenance using HART® Communications
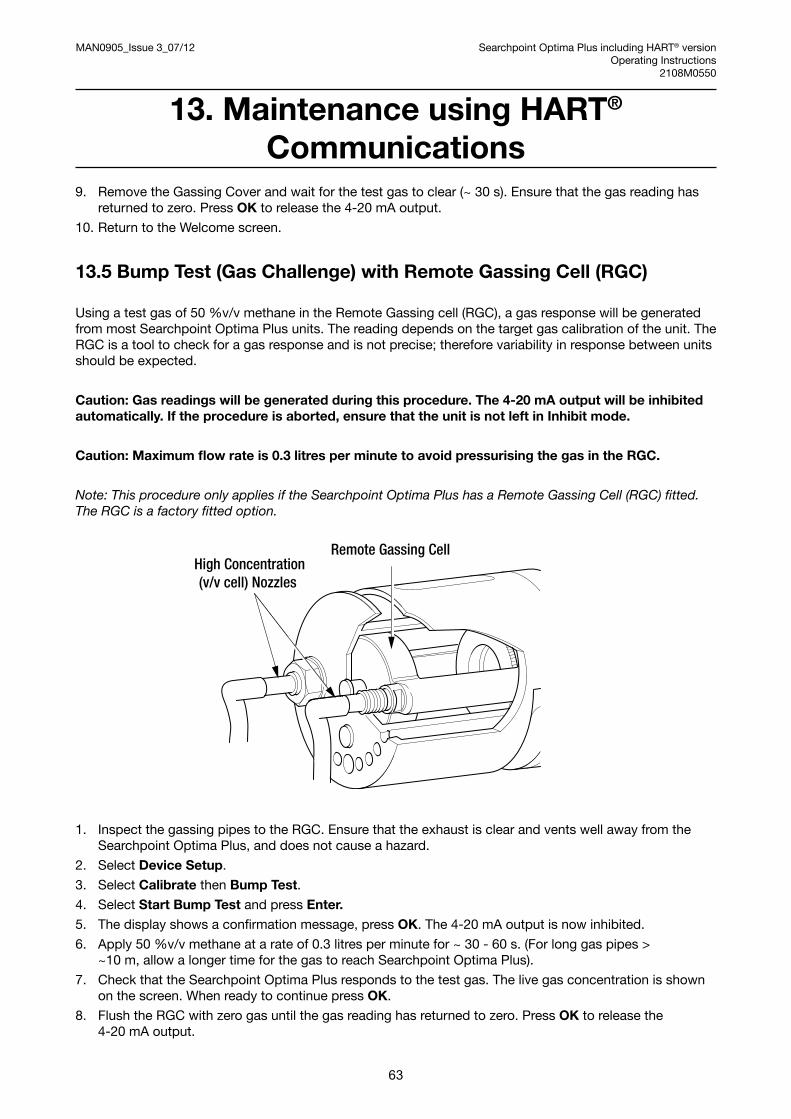
MAN0905_Issue 3_07/12 Searchpoint Optima Plus including HART® versionOperating Instructions
2108M0550
63
9. Remove the Gassing Cover and wait for the test gas to clear (~ 30 s). Ensure that the gas reading has returned to zero. Press OK to release the 4-20 mA output.
10. Return to the Welcome screen.
13.5 Bump Test (Gas Challenge) with Remote Gassing Cell (RGC)
Usingatestgasof50%v/vmethaneintheRemoteGassingcell(RGC),agasresponsewillbegeneratedfrom most Searchpoint Optima Plus units. The reading depends on the target gas calibration of the unit. The RGC is a tool to check for a gas response and is not precise; therefore variability in response between units should be expected.
Caution: Gas readings will be generated during this procedure. The 4-20 mA output will be inhibited automatically. If the procedure is aborted, ensure that the unit is not left in Inhibit mode.
Caution: Maximum flow rate is 0.3 litres per minute to avoid pressurising the gas in the RGC.
Note: This procedure only applies if the Searchpoint Optima Plus has a Remote Gassing Cell (RGC) fitted. The RGC is a factory fitted option.
Remote Gassing CellHigh Concentration(v/v cell) Nozzles
1. Inspect the gassing pipes to the RGC. Ensure that the exhaust is clear and vents well away from the Searchpoint Optima Plus, and does not cause a hazard.
2. Select Device Setup.
3. Select Calibrate then Bump Test.4. Select Start Bump Test and press Enter.5. Thedisplayshowsaconfirmationmessage,pressOK. The 4-20 mA output is now inhibited.
6. Apply50%v/vmethaneatarateof0.3litresperminutefor~30-60s.(Forlonggaspipes> ~10 m, allow a longer time for the gas to reach Searchpoint Optima Plus).
7. Check that the Searchpoint Optima Plus responds to the test gas. The live gas concentration is shown on the screen. When ready to continue press OK.
8. FlushtheRGCwithzerogasuntilthegasreadinghasreturnedtozero.PressOK to release the 4-20 mA output.
13. Maintenance using HART® Communications

MAN0905_Issue 3_07/12 Searchpoint Optima Plus including HART® versionOperating Instructions
2108M0550
64
9. Return to the Welcome screen.
Note: If the gas reading is not acceptable for the application, re-zero the Searchpoint Optima Plus and repeat the test.
13.6 Re-zero Searchpoint Optima Plus
Re-zero Searchpoint Optima Plus if it has given an unexpected response to a gas test. In most cases a re-zero will restore accuracy and a full span calibration is not required.
Caution: During this procedure the 4-20 mA output will be inhibited automatically. If the procedure is aborted, ensure that the unit is not left in Inhibit mode.
1. Select Device Setup.
2. Select Calibrate.
3. Select Gas Calibration.
4. The display shows a warning message, press OK.
5. EnsurethatthereiszerogaspresentinthevicinityoftheSearchpointOptimaPlus.Ifnecessary,fita Gassing Cover and apply zero gas.
6. WhenthegasreadingonthedisplayisstablepressOKtoinitiatetheZeroCalibrationandthenwaitfor approximately 15 s. The 4-20 mA output will be inhibited automatically at this time.
7. The display shows a message that the Zero Calibration was successful and offers to exit without a Span Calibration. Select Yes and press Enter.8. ThedisplayshowsanotethattheSearchpointOptimaPluswillreturntonormaloperation, press OK.
9. Return to the Welcome screen.
13.7 Calibration
Searchpoint Optima Plus is factory calibrated and does not require routine calibration. In most cases, a re-zero will correct any inaccuracy in the gas reading. It is strongly recommended that a span calibration is not carried out.
In the unlikely event that a span calibration is required, use a cylinder of the target gas, of approximately 50 %FSD, with an accuracy of at least ± 2 %.
Note: Searchpoint Optima Plus will accept a span calibration gas concentration of between 30 %FSD and 125 %FSD, however this facility is reserved for use in specialist applications.
Do not calibrate Searchpoint Optima Plus during periods of very high or low atmospheric pressure, very strong winds or storms.
Caution: Gas readings will be generated during this procedure. The 4-20 mA output will be inhibited automatically. If the procedure is aborted, ensure that the unit is not left in Inhibit mode.
Note: The unit should be powered up for 1 hour before a calibration is done.
13. Maintenance using HART® Communications

MAN0905_Issue 3_07/12 Searchpoint Optima Plus including HART® versionOperating Instructions
2108M0550
65
1. Usinga½inch/13mmA/Fopenendedspanner,unscrewthetworetainingnutsandremovethe Standard Weather Protection from the Searchpoint Optima Plus.
2. Fit a Calibration Cap to the Searchpoint Optima Plus. Ensure it is pushed on fully.
3. Select Device Setup.
4. Select Calibrate.
5. Select Gas Calibration.
6. The display shows a warning message, press OK.
7. Ensure that there is zero gas present in the vicinity of the Searchpoint Optima Plus. If necessary, apply zero gas at a rate of 1 – 1.5 litres per minute.
8. WhenthegasreadingonthedisplayisstablepressOK to initiate the Zero Calibration and then wait for approximately 15 s. The 4-20 mA output will be inhibited automatically at this time.
9. The display shows a message that the Zero Calibration was successful and offers to exit without a Span Calibration. Select No and press Enter.10. Enter the concentration of the span calibration gas and press Enter.11. Apply calibration gas at a rate of 1 – 1.5 litres per minute. Wait for the gas reading to stabilise (~ 30 - 60 s).
12. Press OK to initiate the Span Calibration and then wait for approximately 15 s.
13. The display shows a message that the Span Calibration was successful. Remove the Calibration Cap and wait for the test gas to clear (~ 30 s).
14.Ensurethatthegasreadinghasreturnedtozero.PressOKtoreleasethe4-20mAoutput.
15. The display shows a note that the Searchpoint Optima Plus will return to normal operation, press OK.
16. Return to the Welcome screen.
17.RefittheStandardWeatherProtectionandthetworetainingnuts.
13.8 Store Calibration Information
Ifrequired,informationprogrammedbytheusercanbestoredundertheCalibratemenuinatextfieldcalled Calibration Info. For example, the date of the last bump test could be recorded.
1. Select Device Setup.
2. Select Calibrate.
3. Select Calibration Info.
4. Enter required information up to 32 characters and press Enter.5. Press Send to send the information to Searchpoint Optima Plus.
6. Return to the Welcome screen.
13. Maintenance using HART® Communications
MAN0905_Issue 3_07/12 Searchpoint Optima Plus including HART® versionOperating Instructions
2108M0550
66
13.9 Investigation of Faults or Warnings
If the unit is signalling Fault or Warning on the 4-20 mA output, the problem should be investigated and remedied as soon as possible. Some types of faults and warnings will latch the 4-20 mA output and need to be cleared by a Reset.
1. Select Device Setup.
2. Select Unit Status3. Select Active Faults or Active Warnings to check for any current faults or warnings.
4. Select View, then First, Next or Previous to display the fault or warning.
Note: First displays the fault or warning that occurred earliest in time.
5. Select Back then Event History to investigate a series of events in more detail.
6. Select Filter, then Warnings or Faults to display the events of interest.
7. Select View, then Latest Log, Older Log or Newer Log to navigate through the table of reported events.
8. PressBack to return to the Unit Status menu.
9. Use the Problem Solving section of this manual (Chapter 14) to rectify the issue.
10. Press Back to return to the Device Setup menu.
11. Select Test.12. Select Device Reset.13. Press OK to initiate a Device Reset, which will clear any latched faults or warnings.
Note: If any configuration changes have been made, wait 15 seconds before doing a soft reset or cycling the power.
14.Thedisplayshowsaconfirmationmessage.PressOK.
15. The display shows a note that the Searchpoint Optima Plus will return to normal operation, press OK.
16. Return to the Welcome screen.
13. Maintenance using HART® Communications
MAN0905_Issue 3_07/12 Searchpoint Optima Plus including HART® versionOperating Instructions
2108M0550
67
The Troubleshooting section explains how to deal with problems that may be encountered when using Searchpoint Optima Plus.
The Warnings and Faults section explains the meaning of diagnostic messages and the best course of action to deal with the problem.
Some types of faults and warnings will latch the 4-20 mA output and need to be cleared by a Reset.
Note: If any configuration changes have been made, wait 15 seconds before doing a soft reset or cycling the power.
Note: When connecting or disconnecting a multimeter, power off the Searchpoint Optima Plus, otherwise the unit will indicate a latched warning that the 4-20 mA loop was broken. If this occurs, it can be cleared using the SHC1 Handheld Interrogator or the HART® communications. See Clear Faults or Warnings.
Note: Searchpoint Optima Plus continues to function as a gas detector while indicating Warning, although aspects of its performance may be reduced.
IfaproblempersistspleasecontactHoneywellAnalyticsforadvice,usingthecontactdetailsgivenontheback page.
14.1 Troubleshooting
Fault / Problem Possible Cause Remedial Action
No analogue output Electrical installation problem 1. Check that the +24 V supply is reaching the unit. Voltage at the unit should be between +18 V and +32 V.2. Check cables and connections to the unit, especially the 4-20 mA loop connections
Output is < 1 mA or 1 mA Unit is in Fault condition 1. Connect the SHC1 Handheld Interrogator to the unit or use the HART® communications to ascertain the reason for the Fault report (see Maintenance). 2. Diagnose the problem using the table of Warning and Fault messages below.
Output is 2 ± 0.2 mA (or other configured Inhibit level)
Unit is in Inhibit 1. The Inhibit mode has no time out. A procedure may have been aborted while the unit was in Inhibit.2. Connect to the HART® communications and select Device Setup, Test, Inhibit then End InhibitorConnect the SHC1 Handheld Interrogator and select Calibrate then Normal 4-20.
Output is 3 ± 0.2 mA (or other configured Warning level)
Unit is indicating a WarningNote: Unit will still function as a gas detector
1. Connect the SHC1 Handheld Interrogator to the unit or use the HART® communications to ascertain the reason for the Warning report (see Maintenance). 2. Diagnose the problem using the table of Warning and Fault messages below.
14. Problem Solving

MAN0905_Issue 3_07/12 Searchpoint Optima Plus including HART® versionOperating Instructions
2108M0550
68
Unit does not respond as expected to test gas
Zero offset 1. Re-zero Searchpoint Optima Plus before repeating the test (see Maintenance, Bump Test).
Dirty optics 1. Check that the optics are clean and dry. If necessary clean optics and carry out a soft reset (see Maintenance, Inspection).
High or low atmospheric pressure 1. Searchpoint Optima Plus does not compensate for the effects of atmospheric pressure, which can change the gas reading (see Specification).
Incorrect test gas 1. Check which gas and measuring range the Searchpoint Optima Plus is calibrated for.2. Check that the correct test gas and concentration with an appropriate tolerance are being used.3. Check that the gas cylinder is not empty.4. Check that any gas tubing or inlet pipes are not broken or blocked.5. Check that the correct flow rates and stabilisation times are being used (see Maintenance, Bump Test).
Unit is in HART® multi-drop mode 1. A unit which is set to HART® multi-drop mode will output a constant 4 mA.
Unit requires calibration 1. If all of the above checks have been done without correcting the problem, carry out a full calibration.
Output appears to be drifting Correct response to low level gas concentration
1. Check the gas concentration where the Searchpoint Optima Plus is installed using a sensitive portable gas detector.
Build-up of contamination on optics, e.g. oil mist, exhaust fumes, solvents etc.
1. Clean the Searchpoint Optima Plus and carry out a Reset (see Maintenance, Inspection).2. If possible, identify and minimise potential sources of contamination. Contamination can be carried by steam.
Output appears to be unstable Electrical interference being induced on 4-20 mA cabling
1. Check for earth loops. Confirm that the screen is earthed correctly (see Electrical Installation, Earth Regimes).2. Look for noise on the signal using an oscilloscope. This may give some insight into the potential source.3. For noisy installations, consider using filtering and signal processing at the control card.
Poor contacts 1. Check the terminal connections in the junction box.2. If necessary tighten the connectors.3. Excessive vibration can loosen connections. If possible identify and minimise potential sources of vibration.
14. Problem Solving

MAN0905_Issue 3_07/12 Searchpoint Optima Plus including HART® versionOperating Instructions
2108M0550
69
Unit fails to respond to SHC1 Handheld Interrogator
Incorrect connection (may display Comms Error 100)
1. Check that the SHC1 Handheld Interrogator is correctly plugged into the DVC100 or that the SHC Protection device is connected correctly (see Use of the SHC1 Handheld Interrogator).
Incorrect software 1. Searchpoint Optima Plus only works with SHC1 Handheld Interrogator software version 3v0 and above. Check software version.2. If incorrect, contact Honeywell Analytics for the latest version of SHC1 Handheld Interrogator software.
Incorrect mode (may display Comms Error 99)
1. Switch on the SHC1 Handheld Interrogator and check the display. It should show Optima+ (not Optima or Excel).2. If incorrect, change the operating mode to Optima+ (see Use of the SHC1 Handheld Interrogator).
Battery failed 1. Check the battery in the SHC1 Handheld Interrogator.2. If necessary, replace the battery (see Use of the SHC1 Handheld Interrogator).
Interference from HART® communication
The HART® communication takes precedence over the RS485 communication used by the SHC1 Handheld Interrogator. If the Searchpoint Optima Plus is being polled simultaneously by a HART® host, temporary communication errors may be experienced.
Unit fails to respond to HART® communications
HART® option not fitted 1. Check that the unit has the optional HART® communications fitted (part number ends in H)
Incorrect Device Description file 1. Check that the correct Device Description file is loaded and selected.
Problem with receiving the 4 – 20 mA signal
1. Check cables and connections to the unit, especially the 4-20 mA loop connections. 2. Check the 4 – 20 mA loop for noise
Unit is in FAULT condition and the output is less than 1 mA
1. HART® communications will not function when the output current is less than 1 mA. 2. Configure the unit to output 1 mA when in Fault (see Commissioning, Configure HART® Operation during Fault)Note: It may be necessary to re-cycle the power to the unit, and change the setting during the 60 s warm up period while the unit is in Inhibit.
HART® host is polling for a value that is not set
1. HART® hosts typically poll Device Address, Device Tag, Transmitter ID or Unique Device ID to locate a field device.2. Change the setting to use Device Address (this is always set in the unit).
14. Problem Solving

MAN0905_Issue 3_07/12 Searchpoint Optima Plus including HART® versionOperating Instructions
2108M0550
70
Unit fails to respond to HART® handheld device
Incorrect connection 1. Check that the HART® handheld device is connected properly.
Incorrect Device Description file 1. Check that the correct Device Description file is loaded and selected.
HART® option not fitted 1. Check that the unit has the optional HART® communications fitted (part number ends in H)
Battery failed 1. Check the battery in the HART® handheld device.2. If necessary replace the battery (see manufacturer’s instructions)
Unit is in FAULT condition and the output is less than 1 mA
1. HART® communications will not function when the output current is less than 1 mA. 2. Configure the unit to output 1 mA when in Fault (see Commissioning, Configure HART® Operation during Fault)Note: It may be necessary to re-cycle the power to the unit, and change the setting during the 60 s warm up period while the unit is in Inhibit.
HART® handheld device is polling for a value that is not set
1. HART® hosts typically poll Device Address, Device Tag, Transmitter ID or Unique Device ID to locate a field device.2. Change the setting to use Device Address (this is always set in the unit).
4-20 mA Loop Calibration was aborted, now stuck in a timeout (HART® units)
There is a timeout of 10 minutes before the calibration can be re-started
1. To work around the timeout delay, select mA Loop Test from the Test menu.2. Set the 4-20 mA to 4 mA.3. Select End.4. The mA Loop Calibration can now be re-started.
Password for Level 1 access has been lost (HART® units)
Some handheld devices hold a default password, which could be set in error
1. Re-start the handheld device. 2. From the Device Setup menu, select User Login and Level 1.3. At the password entry screen, do not type anything, and press Enter immediately (use the default password from the handheld device).4. If successful, select User Configuration and Change Password to set the password to a known value.5. If the above was not successful, please contact Honeywell Analytics.
14. Problem Solving
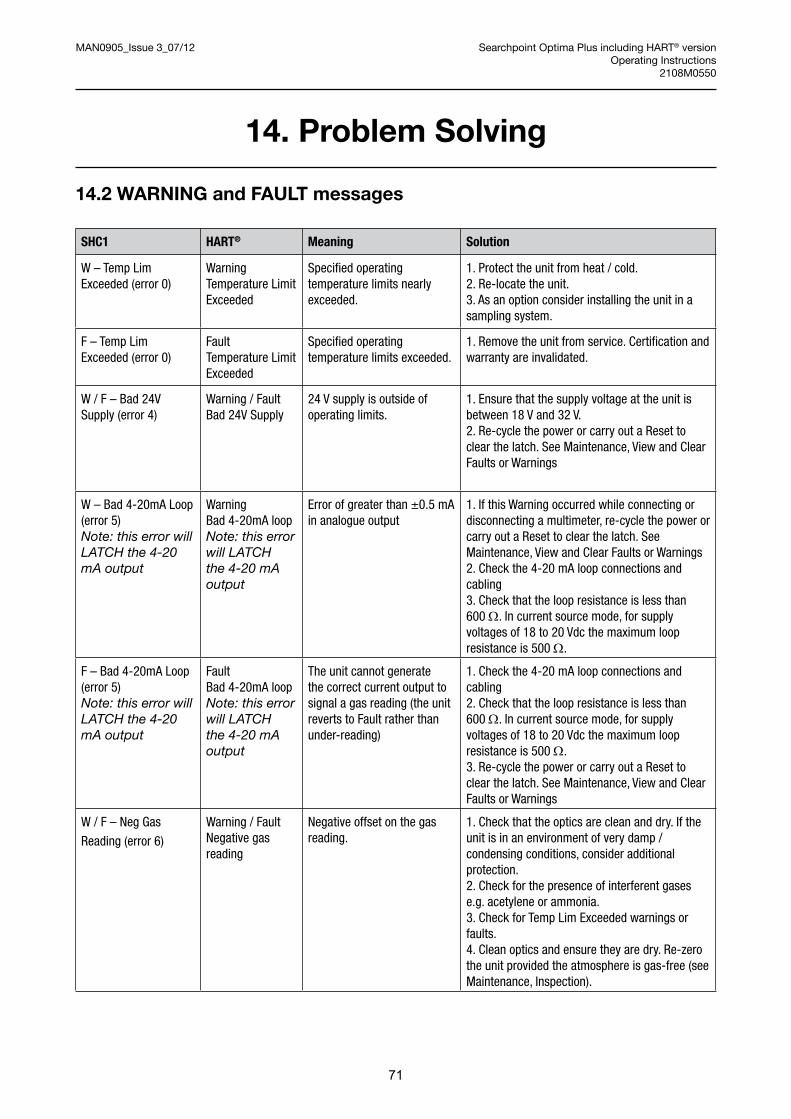
MAN0905_Issue 3_07/12 Searchpoint Optima Plus including HART® versionOperating Instructions
2108M0550
71
14. Problem Solving
14.2 WARNING and FAULT messages
SHC1 HART® Meaning Solution
W – Temp Lim Exceeded (error 0)
Warning Temperature Limit Exceeded
Specified operatingtemperature limits nearly exceeded.
1. Protect the unit from heat / cold.2. Re-locate the unit.3. As an option consider installing the unit in a sampling system.
F – Temp Lim Exceeded (error 0)
Fault Temperature Limit Exceeded
Specified operatingtemperature limits exceeded.
1. Remove the unit from service. Certification and warranty are invalidated.
W / F – Bad 24V Supply (error 4)
Warning / FaultBad 24V Supply
24 V supply is outside of operating limits.
1. Ensure that the supply voltage at the unit is between 18 V and 32 V.2. Re-cycle the power or carry out a Reset to clear the latch. See Maintenance, View and Clear Faults or Warnings
W – Bad 4-20mA Loop (error 5)Note: this error will LATCH the 4-20 mA output
Warning Bad 4-20mA loop Note: this error will LATCH the 4-20 mA output
Error of greater than ±0.5 mA in analogue output
1. If this Warning occurred while connecting or disconnecting a multimeter, re-cycle the power or carry out a Reset to clear the latch. See Maintenance, View and Clear Faults or Warnings2. Check the 4-20 mA loop connections and cabling3. Check that the loop resistance is less than 600 Ω. In current source mode, for supply voltages of 18 to 20 Vdc the maximum loop resistance is 500 Ω.
F – Bad 4-20mA Loop(error 5)Note: this error will LATCH the 4-20 mA output
Fault Bad 4-20mA loopNote: this error will LATCH the 4-20 mA output
The unit cannot generate the correct current output to signal a gas reading (the unit reverts to Fault rather than under-reading)
1. Check the 4-20 mA loop connections and cabling2. Check that the loop resistance is less than 600 Ω. In current source mode, for supply voltages of 18 to 20 Vdc the maximum loop resistance is 500 Ω.3. Re-cycle the power or carry out a Reset to clear the latch. See Maintenance, View and Clear Faults or Warnings
W / F – Neg Gas
Reading (error 6)
Warning / Fault Negative gas reading
Negative offset on the gas reading.
1. Check that the optics are clean and dry. If the unit is in an environment of very damp / condensing conditions, consider additional protection.2. Check for the presence of interferent gases e.g. acetylene or ammonia.3. Check for Temp Lim Exceeded warnings or faults.4. Clean optics and ensure they are dry. Re-zero the unit provided the atmosphere is gas-free (see Maintenance, Inspection).

MAN0905_Issue 3_07/12 Searchpoint Optima Plus including HART® versionOperating Instructions
2108M0550
72
W / F – Obscured
Optics (error 8)
Warning / Fault Obscured optics
Contamination in the optical path.
1. Remove the weather protection and dust barrier. Replace the dust barrier if required.2. Clean optics and carry out a Soft Reset (see Maintenance, Inspection).
F – Signal Quality
(error 16)
Fault Poor signal quality
Optical signal is low, noisy or unstable
1. Remove the weather protection and dust barrier. Replace the dust barrier if required.2. Clean optics and carry out a Soft Reset (see Maintenance, Inspection).
W / F– Lamp Output(error 11)
Warning / Fault Lamp output
Lamp signal is low. 1. Clean optics and carry out a Soft Reset (see Maintenance, Inspection).2. If the Fault / Warning does not clear, return unit for repair.
W / F – Internal Failure(error 22)Note: this error will LATCH the 4-20 mA output
Warning / Fault Hardware failureNote: this error will LATCH the 4-20 mA output
Internal hardware fault 1. Cycle the power or carry out a Reset to restart the unit. See Maintenance, View and Clear Faults or Warnings2. If the fault persists return the unit for repair.
F - Hardware Fault
(error 13)
FaultHardware Fault
The latched faults or warnings flag has been set
1. This error may occur following Self Test.2. Check for any active Faults or Warnings.3. If none present, cycle the power or carry out a Reset to restart the unit. See Maintenance, View and Clear Faults or Warnings.4. Repeat Self Test to confirm that the Fault has cleared.5. If the Fault does not clear, return unit for repair.
14.3 Further Assistance
Iftheproblemisstillunresolved,pleasecontactHoneywellAnalyticstechnicalsupportusingthecontactdetails on the back page of this manual.
Pleasehavethefollowinginformationtohand:-
• Adescriptionoftheproblem,includingthestepstakentotrytoresolveit
• TheserialnumberoftheSearchpointOptimaPlus
ForSearchpointOptimaPlusunitswithHART®, please also locate the following information by selecting
DeviceInfofromtheDeviceSetupmenu:-
• Devid(uniqueSearchpointOptimaPlusidentificationnumber)
• Flddevrev(revisionnumberoftheHART®DDfile)
• Softwarerev(SearchpointOptimaPlussoftwarerevisionnumber)
• Hardwarerev(SearchpointOptimaPlushardwarerevisionnumber)
14. Problem Solving

MAN0905_Issue 3_07/12 Searchpoint Optima Plus including HART® versionOperating Instructions
2108M0550
73
15. Specifications
15.1 Specifications
Environmental
Operational and Certified Temperature Range - 40 °C to + 65 °C
Pressure Range 80 to 120 kPa (non-compensated)
Operating Humidity 0 to 99 %RH (non-condensing)
Storage Conditions for Searchpoint Optima Plus and accessories
- 40 °C to + 65 °C, 80 to 120 kPa, 0 to 99 %RH (non- condensing)
Ingress Protection IP 66 / 67
Performance
Repeatability < ± 2 %FSD at 50 %FSD
Linearity < ± 5 %FSD
Accuracy Baseline < ± 1 %FSD (Ethylene < ± 2 %FSD)50 %FSD < ± 2 %FSD (Ethylene < ± 3 %FSD)
Long Term Stability (as defined in EN 60079-29-1)
Baseline Methane 100 %LEL Range: ≤ ± 2 %FSDEthylene 100 %LEL Range: ≤ ± 4 %FSD
50 %FSD Methane 100 %LEL Range: ≤ ± 4 %FSDEthylene 100 %LEL Range: ≤ ± 5 %FSD
Drift Over Temperature Range (-40 °C to 65 °C)
Baseline ≤ ± 2 %FSD
50 %FSD Methane 100 %LEL Range: ≤ ± 0.131 %FSD per °CEthylene 100 %LEL Range: ≤ ± 0.078 %FSD per °C
Pressure Coefficient 1 % of reading per kPa
Response Time
Response Time
Complies with EN60079-29-1 (ATEX Performance Standard)T50 < 3 seconds, T90 < 4 seconds (for methane, no accessories)T50 = 6 seconds, T90 = 18 seconds (for methane, as supplied, fitted with Standard Weather Protection and Dust Filter)
Note: For gas calibrations other than the standard hydrocarbon gases (methane, ethane, propane, butane), the response time may be slower than specified.
Operation
Power Supply 18 to 32 Vdc (24 Vdc nominal)
Power Consumption < 5 W
Maximum 4-20 mA Loop Resistance 600 Ω
Minimum 4-20 mA Loop Resistance to main-tain HART® communications
230 Ω
Retention of battery backed up data* 3 years unpowered
4-20 mA Output Refresh Rate 250 ms
Note: In current source mode, for supply voltages of 18 to 20 Vdc the maximum loop resistance is 500 Ω.* Searchpoint Optima Plus contains a backup battery which maintains the real time clock and event logs

MAN0905_Issue 3_07/12 Searchpoint Optima Plus including HART® versionOperating Instructions
2108M0550
74
Output Signals
Measuring Range 4-20 mA (0-100 %FSD), auto sensing sink or source
Inhibit 1 to 3 mA (Default 2 mA)
Warning 0 to 6 mA (Default 3 mA*)
Fault < 1 mA
Overrange 20 to 21.6 mA (Default 21 mA)
*Note: For ATEX compliance the Warning value should not be set > 3 and < 5 mA.
Digital Outputs HART® over 4-20 mAProprietary RS485 communications
Dimensions
Length 165 mm
Diameter 73 mm
Weight 1.6 kg
Material 316 stainless steel
Compliance to Standards
Please refer to the EC Declaration of Conformity
15.2 Available Gas Calibrations
15.2.1 Hydrocarbon version of Searchpoint Optima Plus
Calibrated against EN50054 LEL levels
Table Number Table Name CAS Number Full Scale LEL (%V/V) ATEX Performance Approved
Standard Gases
D3001 Methane 74-82-8 100%LEL 5 Y
D3002 Ethane 74-84-0 100%LEL 3
D3004 Propane 74-98-6 100%LEL 2 Y
D3005 Butane 106-97-8 100%LEL 1.5 Y
Special Gases
D3006 Propene 115-07-1 100%LEL 2
D3012 Acetone 67-64-1 100%LEL 2.15
D3018 Butan-1-ol 71-36-3 100%LEL 1.4
D3020 Butyl acetate 123-86-4 100%LEL 1.2
D3022 Butanone 78-93-3 100%LEL 1.8
D3024 Cyclohexane 110-82-7 100%LEL 1.2
D3026 Cyclohexanone 108-94-1 100%LEL 1.3
D3028 Ethanol 64-17-5 100%LEL 3.3
D3030 Ethyl acetate 141-78-6 100%LEL 2.1
15. Specifications

MAN0905_Issue 3_07/12 Searchpoint Optima Plus including HART® versionOperating Instructions
2108M0550
75
D3032 Heptane 142-82-5 100%LEL 1.1
D3034 Hexane 110-54-3 100%LEL 1.2
D3040 Methanol 67-56-1 100%LEL 5.5
D3042 Toluene 108-88-3 100%LEL 1.2
D3044 o-Xylene 95-47-6 100%LEL 1
D3048 Diethyl ether 60-29-7 100%LEL 1.7
D3054 p-Xylene 106-42-3 100%LEL 1
D3056 Pentane 109-66-0 100%LEL 1.4
D3059 Dimethyl ether 115-10-6 100%LEL 3
D3064 N,N-Dimethyl formamide(DMF)
68-12-2 100%LEL 2.2
D3073 Propane 74-98-6 100%LEL 2.0 Y
Calibrated against EN60079-20-1:2010 LEL levels
Table Number Table Name CAS Number Full Scale LEL (%V/V) ATEX Performance Approved
Standard Gases
D3170 Methane 74-82-8 100%LEL 4.4 Y
D3172 Propane 74-98-6 100%LEL 1.7 Y
D3173 Butane 106-97-8 100%LEL 1.4 Y
Special Gases
D3013 Acetone 67-64-1 100%LEL 2.5 Y
D3021 Butyl acetate 123-86-4 100%LEL 1.3 Y
D3029 Ethanol 64-17-5 100%LEL 3.1 Y
D3035 Hexane 110-54-3 100%LEL 1 Y
D3037 Propan-2-ol 67-63-0 100%LEL 2 Y
D3045 o-Xylene 95-47-6 100%LEL 1 Y
D3062 Octane 111-65-9 100%LEL 0.8
D3070 Isobutane 75-28-5 100%LEL 1.3
D3084 Chloroethane 75-00-3 100%LEL 3.6
D3090 1,2-Dichloroethane 107-06-2 100%LEL 6.2
D3098 Dimethyl ether 115-10-6 100%LEL 2.7 Y
D3174 Propene 115-07-1 100%LEL 2 Y
Calibrated against EN61779 LEL levels
Table Number Table Name CAS Number Full Scale LEL (%V/V) ATEX Performance Approved
Standard Gases
D3171 Ethane 74-84-0 100%LEL 2.5
Special Gases
D3019 Butan-1-ol 71-36-3 100%LEL 1.7 Y
D3023 Butanone 78-93-3 100%LEL 1.8 Y
15. Specifications

MAN0905_Issue 3_07/12 Searchpoint Optima Plus including HART® versionOperating Instructions
2108M0550
76
D3025 Cyclohexane 110-82-7 100%LEL 1.2
D3027 Cyclohexanone 108-94-1 100%LEL 1 Y
D3031 Ethyl acetate 141-78-6 100%LEL 2.2 Y
D3033 Heptane 142-82-5 100%LEL 1.1 Y
D3039 Propyl acetate 109-60-4 100%LEL 1.7
D3041 Methanol 67-56-1 100%LEL 5.5 Y
D3043 Toluene 108-88-3 100%LEL 1.1 Y
D3049 Diethyl ether 60-29-7 100%LEL 1.7
D3055 p-Xylene 106-42-3 100%LEL 1 Y
D3056 Pentane 109-66-0 100%LEL 1.4
D3078 i-Propyl Acetate 108-21-4 100%LEL 1.8
D3085 Propan-1-ol 71-23-8 100%LEL 2.2
Additional ranges offered
Table Number Table Name CAS Number Full Scale LEL (%V/V) ATEX Performance Approved
Special Gases
D3017 Hexamethyldisilox-ane (HMDS)
107-46-0 100%LEL 1.3
D3036 Propan-2-ol 67-63-0 100%LEL 2
D3038 Propyl acetate 109-60-4 100%LEL 1.8
D3047 Benzin60/95 Mixture 100%LEL 1 Y
D3050 Methane V/V 74-82-8 100%V/V NA
D3058 AVTUR JP8 Mixture 100%LEL 0.8
D3060 Decamethyltetrasi-loxane (DCMTS)
141-62-8 100%LEL 0.9
D3061 Octane 111-65-9 100%LEL 1
D3063 Octamethyltrisilox-ane (OMTS)
107-51-7 100%LEL 0.9
D3067 JP1 Mixture 100%LEL 0.6
D3068 Methyl isobutyl Ketone (MIBK)
108-10-1 100%LEL 1.4
D3069 Isobutane 75-28-5 100%LEL 1.8
D3077 1-Pentene 109-67-1 100%LEL 1.4
D3081 1-Octene 111-66-0 100%LEL 0.7
D3083 1-Hexene 592-41-6 100%LEL 1.2
D3087 Methane 100k 74-82-8 100k ppm NA
D3088 Ethylene 100k 74-85-1 100k ppm NA
D3089 Propane 100k 74-98-6 100k ppm NA
D3092 Propene 50k 115-07-1 50k ppm NA
D3093 1-Methoxy-2- Propanol
107-98-2 100%LEL 1.8 Y
D3094 3-Ethoxy-1- Propanol
111-35-3 100%LEL 1.3
D3095 Benzin 80/110 Mixture 100%LEL 0.9 Y
15. Specifications

MAN0905_Issue 3_07/12 Searchpoint Optima Plus including HART® versionOperating Instructions
2108M0550
77
D3096 Propane 10k 74-98-6 10k ppm NA Y
D3097 Propane 5k 74-98-6 5k ppm NA Y
D3100 Propane 400k 74-98-6 400k ppm NA
D3101 Propylene Glycol Methyl Ether Acetate (PGMEA)
108-65-6 100%LEL 1.3
D3102 Propane 600k 74-98-6 600k ppm NA
D3105 Propane 20k 74-98-6 20k ppm NA
D3107 Butane 18k 106-97-8 18k ppm NA
D3108 Methy isoamyl Ketone (MIAK)
110-12-3 100%LEL 1.3
D3111 1-Ethoxy-2- Propanol
1569-02-4 100%LEL 1.3 Y
D3150 Band A n/a 100%LEL NA
D3151 Band B n/a 100%LEL NA
D3152 Band C n/a 100%LEL NA
D3153 Band D n/a 100%LEL NA
D3175 Propane 5k 74-98-6 5k ppm NA Y
15.2.2 Ethylene version of Searchpoint Optima Plus
Calibrated against EN50054 LEL levels
Table Number Table Name CAS Number Full Scale LEL (%V/V) ATEX Performance Approved
Standard Gases
D3225 Ethylene 74-85-1 100%LEL 2.7 Y
Special Gases
D3227 Benzene 71-43-2 100%LEL 1.2
D3228 Styrene 100-42-5 100%LEL 1.1
D3229 Buta-1,3-diene 106-99-0 100%LEL 1.4
Calibrated against EN60079-20-1:2010 LEL levels
Table Number Table Name CAS Number Full Scale LEL (%V/V) ATEX Performance Approved
Standard Gases
D3240 Ethylene 74-85-1 100%LEL 2.3 Y
Special Gases
D3227 Benzene 71-43-2 100%LEL 1.2
D3229 Buta-1,3-diene 106-99-0 100%LEL 1.4
15. Specifications

MAN0905_Issue 3_07/12 Searchpoint Optima Plus including HART® versionOperating Instructions
2108M0550
78
15. Specifications
Calibrated against EN61779 LEL levels
Table Number Table Name CAS Number Full Scale LEL (%V/V) ATEX Performance Approved
Standard Gases
D3228 Styrene 100-42-5 100%LEL 1.1
Note: For other gases, solvents and vapours, contact Honeywell Analytics.
Note: The choice of LEL value should be in accordance with local regulations.
15.3 Cross Interference to Other Gases and Vapours
Searchpoint Optima Plus is supplied pre-calibrated and ready for installation. The signal output configuration,gasandrangeforwhichtheunitiscalibratedareindicatedonalabelattachedtothemainhousing.
Note: The following information is only applicable when detecting Hydrocarbons.
A Searchpoint Optima Plus calibrated for a particular hydrocarbon will have a response to most other hydrocarbongases.Thecross-sensitivityfiguresbelowareapproximateandareforguidanceonly.
Theapproximateamountofgasrequiredtogiveanoutputequalto50%LELmethane,onSearchpointOptimaPluscalibratedfor100%LEL(LEL=5%v/v)methaneis:-.
Methane 2.5 %v/v
Propane 0.3 %v/v
Butane 0.2 %v/v
Hexane 0.3 %v/v
Heptane 0.3 %v/v
Propylene 0.8 %v/v
ThefollowinggasesareknowntoproduceanegativeresponsefromSearchpointOptimaPlus:-
• Ammonia• Acetylene• Propyne(MethylAcetylene)
As a guide, the approximate concentrations that will create a Fault condition in a Searchpoint Optima Plus calibratedformethaneare:-
Ammonia ~ 5500 ppm
Acetylene ~ 1000 ppm
Propyne (Methyl Acetylene) ~ 1000 ppm
MAN0905_Issue 3_07/12 Searchpoint Optima Plus including HART® versionOperating Instructions
2108M0550
79
16. Ordering Information
Part Number Description
Searchpoint Optima Plus: (add H to part number for HART® option, e.g. 2108N4000H, add N to part number for non-HART® option, e.g. 2108N4000N)
Certified ATEX
2108N4000 Hydrocarbon calibration, with dust barrier, weather housing, deluge/heat shade
2108N4001 Ethylene calibration, with dust barrier, weather housing, deluge/heat shade
2108N4010 Hydrocarbon calibration, with dust barrier, weather housing, deluge/heat shade including remote gassing cell
2108N4011 Ethylene calibration with dust barrier, weather housing, deluge/heat shade including remote gassing cell
2108N5000 Hydrocarbon calibration, for use in remote sampling systems complete with flow housing
2108N5001 Ethylene calibration, for use in remote sampling systems complete with flow housing
2108N5010 Hydrocarbon calibration, for use in remote sampling systems for gas ranges 0–100 %v/v methane, 0–600,000 ppm propane and 0–400,000 ppm propane, fitted with remote gassing cell and flow housing
Certified UL
2108N4100 Hydrocarbon calibration, with dust barrier, weather housing, deluge/heat shade
2108N4101 Ethylene calibration, with dust barrier, weather housing, deluge/heat shade
2108N4110 Hydrocarbon calibration, with dust barrier, weather housing, deluge/heat shade including remote gassing cell
2108N4111 Ethylene calibration with dust barrier, weather housing, deluge/heat shade including remote gassing cell
2108N5100 Hydrocarbon calibration, for use in remote sampling systems, includes flow housing
2108N5101 Ethylene calibration, for use in remote sampling systems, includes flow housing
2108N5110 Hydrocarbon calibration, for use in remote sampling systems for gas ranges 0–100 %v/v methane, 0–600,000 ppm propane and 0–400,000 ppm propane, fitted with remote gassing cell and flow housing
Certified FM/CSA
2108N4200 Hydrocarbon calibration, with dust barrier, weather housing, deluge/heat shade
2108N4201 Ethylene calibration, with dust barrier, weather housing, deluge/heat shade
2108N4210 Hydrocarbon calibration, with dust barrier, weather housing, deluge/heat shade including remote gassing cell
2108N4211 Ethylene calibration with dust barrier, weather housing, deluge/heat shade including remote gassing cell
2108N5200 Hydrocarbon calibration, for use in remote sampling systems, includes flow housing
2108N5201 Ethylene calibration, for use in remote sampling systems, includes flow housing
Certified Inmetro
2108N4900 Hydrocarbon calibration, with dust barrier, weather housing, deluge/heat shade
2108N4901 Ethylene calibration, with dust barrier, weather housing, deluge/heat shade
2108N4910 Hydrocarbon calibration, with dust barrier, weather housing, deluge/heat shade, including remote gassing cell
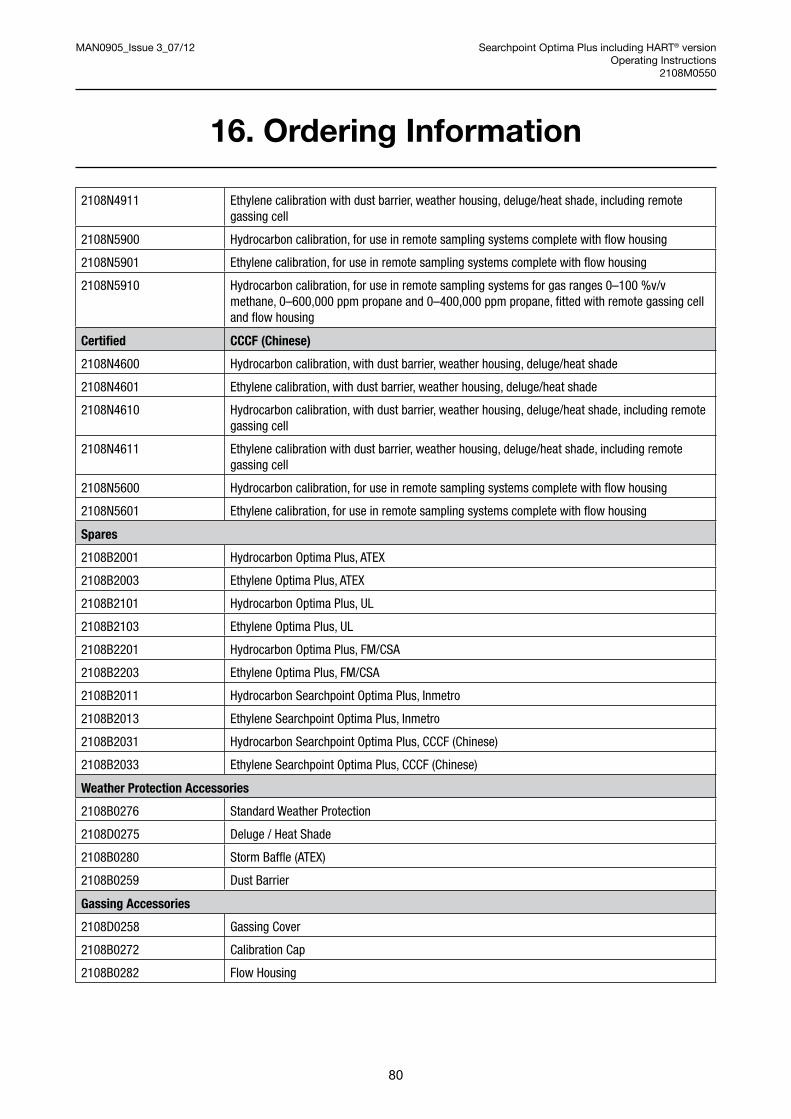
MAN0905_Issue 3_07/12 Searchpoint Optima Plus including HART® versionOperating Instructions
2108M0550
80
2108N4911 Ethylene calibration with dust barrier, weather housing, deluge/heat shade, including remote gassing cell
2108N5900 Hydrocarbon calibration, for use in remote sampling systems complete with flow housing
2108N5901 Ethylene calibration, for use in remote sampling systems complete with flow housing
2108N5910 Hydrocarbon calibration, for use in remote sampling systems for gas ranges 0–100 %v/v methane, 0–600,000 ppm propane and 0–400,000 ppm propane, fitted with remote gassing cell and flow housing
Certified CCCF (Chinese)
2108N4600 Hydrocarbon calibration, with dust barrier, weather housing, deluge/heat shade
2108N4601 Ethylene calibration, with dust barrier, weather housing, deluge/heat shade
2108N4610 Hydrocarbon calibration, with dust barrier, weather housing, deluge/heat shade, including remote gassing cell
2108N4611 Ethylene calibration with dust barrier, weather housing, deluge/heat shade, including remote gassing cell
2108N5600 Hydrocarbon calibration, for use in remote sampling systems complete with flow housing
2108N5601 Ethylene calibration, for use in remote sampling systems complete with flow housing
Spares
2108B2001 Hydrocarbon Optima Plus, ATEX
2108B2003 Ethylene Optima Plus, ATEX
2108B2101 Hydrocarbon Optima Plus, UL
2108B2103 Ethylene Optima Plus, UL
2108B2201 Hydrocarbon Optima Plus, FM/CSA
2108B2203 Ethylene Optima Plus, FM/CSA
2108B2011 Hydrocarbon Searchpoint Optima Plus, Inmetro
2108B2013 Ethylene Searchpoint Optima Plus, Inmetro
2108B2031 Hydrocarbon Searchpoint Optima Plus, CCCF (Chinese)
2108B2033 Ethylene Searchpoint Optima Plus, CCCF (Chinese)
Weather Protection Accessories
2108B0276 Standard Weather Protection
2108D0275 Deluge / Heat Shade
2108B0280 Storm Baffle (ATEX)
2108B0259 Dust Barrier
Gassing Accessories
2108D0258 Gassing Cover
2108B0272 Calibration Cap
2108B0282 Flow Housing
16. Ordering Information

MAN0905_Issue 3_07/12 Searchpoint Optima Plus including HART® versionOperating Instructions
2108M0550
81
Mounting Accessories
04200-A-1040 Junction Box Adaptor Plate
2308B0930 HALO Retrofit Adaptor Plate Kit*
2308B0923 HALO Pipe Mounting Bracket Kit*
2308B0934 HALO Sunshade Kit*
2104B0349 European Duct Mounting Kit – Metric Threads
2442-0016 US Duct Mounting Kit – NPT Threads
Termination Units
2308B0900 HALO junction box with HART® connection*
2308B0903 HALO junction box*
2104B6211 DVC100(I) MK2 Termination Unit ATEX / IECEx
2104B6212 DVC100(M) MK2 Termination Unit ATEX / IECEx with MODBUS capability
00780-A-0100 Term Hsg-Bartec DE1155 With Continuity Plate 1x25mm- 3x20mm Entries (ATEX certified)
2441-0022 6 wire Junction Box (UL certified)
Commissioning and Maintenance Accessories
04230-A-1001 SHC1 Handheld Interrogator ATEX / IECEx Certified (4V0 software) for Optima, Optima Plus and Excel
2104B2351 SHC1 Handheld Interrogator UL Certified (4V0 software) for Optima, Optima Plus and Excel
2104B2354 SHC1 Handheld Interrogator CSA Certified (4V1 software) for Optima, Optima Plus and Excel
04230-A-1025 SHC Protection Device module and lead
2104B6250 SHC Calibrator Connector System 10m
2108B1455 SHC1 Handheld Interrogator EEPROM upgrade (4V0)
TBA Spare set of O-rings for Flow Housing
Manuals (Hard Copy)
2108M0550 Searchpoint Optima Plus Operating Instructions (English)
*ContactHoneywellAnalyticsforavailability
Additional copies of this manual, in English and various other languages, may be downloaded from our website. Navigate to www.honeywellanalytics.com and select Technical Services & Support, then Technical Library.
16. Ordering Information

MAN0905_Issue 3_07/12 Searchpoint Optima Plus including HART® versionOperating Instructions
2108M0550
82
17. Warranty Summary
HoneywellAnalyticswarrantstheSearchpointOptimaPlusagainstdefectivepartsandworkmanshipandwill repair or (at its option) replace any instruments which are or may become defective under proper use within36monthsfromdateofshipmentfromHoneywellAnalytics.
This warranty does not cover consumable items, normal wear and tear or damage caused by accident, abuse, improper installation, poisons, contaminants or abnormal operating conditions. Under no circumstancesshallHoneywellAnalyticsliabilityexceedtheoriginalpurchasepricepaidbythebuyerforthe product.
AnyclaimundertheHoneywellAnalyticsProductWarrantymustbemadewithinthewarrantyperiodandas soon as reasonably possible after a defect is discovered. In the event of a warranty claim please contact yourlocalHoneywellAnalyticsServicerepresentative.
Thisisasummary,forfullwarrantytermspleaserefertotheHoneywellAnalytics“GeneralStatementofLimitedProductWarranty”availableuponrequest.

MAN0905_Issue 3_07/12 Searchpoint Optima Plus including HART® versionOperating Instructions
2108M0550
83
18. Certification and Approvals
18.1 EC Declaration of Conformity
A full EC declaration of conformity is available at our website. This document lists the European Standards with which the Searchpoint Optima Plus complies. Navigate to www.honeywellanalytics.com and select TechnicalServices&Support,thenTechnicalLibrary.UsetheFindYourDocumentfacility,selecting“ECDeclaration” as the document type.
18.2 Hazardous Area Certification
18.2.1 ATEX
CertificateNumber: BAS99ATEX2259X II 2 GD Ex d IIC Gb Ex tb IIIC Db T96°C(Tamb-40°Cto+65°C) T86°C(Tamb-40°Cto+55°C) IP66/67 Vmax=32VdcPmax=8W
Manufacturer'sTrademark &
Address
Serial Number &Year of
Manufacture
CE Mark - Conforms toall applicable
European Directives
Ident Number ofATEX Notified Body
Test House Trade MarkCertification
NumberWarningMOD State
ProductName
Certification CodeExplosion ProtectionMark & Equipment
Group Category
Certified AmbientTemperature Range
18.2.2 UL
FileNumber: E91044–Vol.1 Class I, Groups B, C and D (Amb-40°Cto+65°C) Vmax=32VdcPmax=8W
18.2.3 InMetro (Brazil)
CertificateNumber: AEX-12868-X BR-ExdIICT5IP66/67(-40°C≤ Ta ≤+55°C) BR-ExdIICT4IP66/67(-40°C≤ Ta ≤+65°C) Umax=32Vcc Pmax=8W

MAN0905_Issue 3_07/12 Searchpoint Optima Plus including HART® versionOperating Instructions
2108M0550
84
18.2.4 CSA Certificatenumber: 1139164 ClassI,Div1,GroupsB,CandDTamb-40°Cto+65°C Vmax=32VdcPmax=8W
18.2.5 FM
ProjectIDnumber: 3015165/3042230 Class I, Division 1, Groups B, C and D
18.2.6 GOST-R (Russia) Certificatenumber: PPC00-40696 1 Ex d IIC T135°CA21ExtDIP66/67(Tamb-60°Cto+65°C) T100°CA21ExtDIP66/67(Tamb-60°Cto+55°C) 18.2.7 CCCF (China)
CertificateNumber: CE031155 ExdIICT4/T5
18.2.8 IECEx
CertificateNumber: IECExTSA10.0027X
18.3 Performance Approvals
18.3.1 ATEX
CertificateNumber: BVS03ATEXG016X
18.3.2 FM
ProjectIDnumber:3015165/3042230
This Approval does not include or imply Approval of apparatus to which the subject instrumentation may be connected. In order to maintain an FM Approved system, the apparatus to which this instrument is connected must also be Approved by FM Approvals.
AspartofthisApproval,itwasverifiedthatoptionalcommunicationfunctionsofthisgasdetectioninstrument while operating at the maximum transaction rate do not adversely affect the gas detection operation and functions of the instrument. This Approval, however, does not include or imply Approval of the communications protocol or functions provided by the software of this instrument or of the communications apparatus or software connected to this instrument.
18. Certification and Approvals

MAN0905_Issue 3_07/12 Searchpoint Optima Plus including HART® versionOperating Instructions
2108M0550
85
18.4 SHC1 Handheld Interrogator Hazardous Area Certification
dtL scitylanA llewyenoHKU ZR0 71HB elooP
MANuFACTuRER'S TRADEMARk
CE MARk AND IDENTIFICATION MARk OF ATEX NOTIFIED BODY
CERTIFICATION CODES
MOD STATE
CERTIFIED AMBIENT TEMPERATuRE
YEAR OF MANuFACTuRE AND SERIAL NO.
CERTIFICATE NO.
PRODuCT NAME
EXPLOSIVE ATMOSPHERES MARk AND ATEX CATEGORY CODES
18. Certification and Approvals

MAN0905_Issue 3_07/12 Searchpoint Optima Plus including HART® versionOperating Instructions
2108M0550
86
19. Appendix 1 – SHC1 Additional Functions
Note: The instructions that follow assume that the SHC1 is switched on, in Optima+ mode, in the Main Menu. See Chapter 8 “Use of the SHC1 Handheld Interrogator” for details.
Caution: After changing any parameter, poll the Searchpoint Optima Plus and verify that the received value is correct.
19.1 Changing the Target Gas
Searchpoint Optima Plus is supplied with look-up tables for several different gases. If required, the gas table can be changed to a different target gas.
WARNINGIf a new gas table is selected, the Searchpoint Optima Plus MUST be re-calibrated using the
target gas.
Searchpoint Optima Plus stores a number of gas tables up to a maximum of 10. These include the Standard Gases(Methane,Ethane,Propane,ButaneforHydrocarbonunits,EthyleneforEthyleneunits)plusanySpecialGasesthathavebeenspecifiedwhentheunitwasordered.(ForafulllistofgasesavailabletoorderpleaseseeSpecification).
Caution: Searchpoint Optima Plus units contain a gas table called Linear 20R which is a factory setting. DO NOT select this gas table.
1. Select Gas Tables then Show Library to view the gas tables available for the unit. 2. Press Escape.3. Select Select Gas.4. Scrollthroughtheavailableoptionstofindthegasrequired.5. Press Enter. 6. Display will read “Gas Selection OK”7. Press Enter to release the 4-20mA output8. PressEscape to return to the main menu. 9. Usinga½inch/13mmA/Fopenendedspanner,unscrewthetworetainingnutsandremovethe Standard Weather Protection. 10. Fit a Calibration Cap to the Searchpoint Optima Plus. Ensure it is pushed on fully.11. Select Calibrate then CalSensor. (This will inhibit the 4-20 mA output signal). 12. Ensure that there is zero gas present in the vicinity of the Searchpoint Optima Plus. If necessary, apply zero gas at a rate of 1 – 1.5 litres per minute.13. Press Enter.
When the process is complete the display will state Zero Calibrated. It will then show options to continue to a span calibration, or to exit calibration.
14. Press Enter to begin span calibration.15. Press Enter.16. Use ▲ and ▼ to set the concentration of the calibration gas. When it is correct, press Enter.17. Apply test gas at a rate of 1 – 1.5 litres per minute. Wait for the gas reading to stabilise (~ 30 - 60 s). 18.PressEnter.
When the process is complete the display will show Span Calibrated. It will then show an instruction to remove gas.19. Remove the Calibration Cap and wait for the test gas to clear (~ 30 s). Ensure that the gas reading has returned to zero.
MAN0905_Issue 3_07/12 Searchpoint Optima Plus including HART® versionOperating Instructions
2108M0550
87
20. Press Enter.21.RefittheStandardWeatherProtectionandthetworetainingnuts.22. Press Enter to release the 4-20 mA output signal.23. Press Escape to return to the main menu.
19.2 Self Test
If there are any latched faults or warnings set in the unit, Self Test will report the generic error code “HardwareFaultError13”.CarryoutaSoftResettoclearthelatchesandremovethiserror.
1. Select Diagnose then Soft Reset.2. Press Escape to return to the main menu.
19. Appendix 1 – SHC1 Additional Functions

MAN0905_Issue 3_07/12 Searchpoint Optima Plus including HART® versionOperating Instructions
2108M0550
88
20. Appendix 2 – HART® Additional Functions
Note: The instructions that follow assume that a suitable HART® host (handheld or PC) is connected to the Searchpoint Optima Plus and that the user is logged in with Level 1 access privileges.
Caution: After changing any parameter, poll the Searchpoint Optima Plus and verify that the received value is correct.
20.1 Changing the Target Gas
Searchpoint Optima Plus is supplied with look-up tables for several different gases. If required, the gas table can be changed to a different target gas.
WARNINGIf a new gas table is selected, the Searchpoint Optima Plus MUST be re-calibrated using
the target gas.
1. Select Device Setup.2. Select Gas Configuration then Gas Selection.3. Select Choose Gas.
Searchpoint Optima Plus stores a number of gas tables up to a maximum of 10. These include the Standard Gases(Methane,Ethane,Propane,ButaneforHydrocarbonunits,EthyleneforEthyleneunits)plusanySpecialGasesthathavebeenspecifiedwhentheunitwasordered.(ForafulllistofgasesavailabletoorderpleaseseeSpecification).
Caution: Searchpoint Optima Plus units contain a gas table called Linear 20R which is a factory setting. DO NOT select this gas table.
ThenewgasischosenbyselectingFirstGas,LastGas,NextGasorPreviousGas.Toassistinnavigatingtofindtherequirednewgas,pleaseseethetablebelow:-
Location Hydrocarbon Units Ethylene Units
1 Methane Ethylene
2 Ethane Special Gases
3 Propane Special Gases
4 Butane Special Gases
5 Special Gases Special Gases
6 Special Gases Special Gases
7 Special Gases Special Gases
8 Special Gases Special Gases
9 Special Gases Special Gases
10 Linear 20R (DO NOT USE) Linear 20R (DO NOT USE)
Forexample,iftheunitiscurrentlyconfiguredforpropane,tochangetomethaneselectFirstGas.Ifitisconfiguredforbutane,tochangetopropaneselectPreviousGas.
4. Select the required navigation, for example Next Gas and press Enter.

MAN0905_Issue 3_07/12 Searchpoint Optima Plus including HART® versionOperating Instructions
2108M0550
89
5. Thedisplaywillshowaconfirmationmessage,pressOK.
6. The display will show the message “Checking availability of chosen gas”, press OK.
7. Thedisplaywillshowthemessage“Nospecificerror”,pressOK.
8. Thedisplaynowshowsthecurrentgasandthenewgas.Repeatsteps4to6untilthecorrectnewgas is found.
9. ToconfirmthechangetothenewgasselectAccept Choose Gas.
10.HighlightAccept Selection and press Enter. (Alternatively, to keep the current gas, select Abort Selection and press Enter).11.Thedisplaywillshowaconfirmationmessage,pressOK.
12.Thedisplaywillshowthemessage“Nospecificerror”,pressOK.
13. Press Back twice to return to the Device Setup menu.
The Searchpoint Optima Plus must now be calibrated using the new target gas. Use a cylinder of the target gas, of approximately 50 %FSD, with an accuracy of at least ± 2 %.
Do not calibrate Searchpoint Optima Plus during periods of very high or low atmospheric pressure, very strong winds or storms.
Caution: Gas readings will be generated during this procedure. The 4-20 mA output will be inhibited automatically. If the procedure is aborted, ensure that the unit is not left in Inhibit mode.
Note: The unit should be powered up for 1 hour before a calibration is done.
Note: The calibration routine will timeout after 2 minutes of inactivity.
14.Usinga½inch/13mmA/Fopenendedspanner,unscrewthetworetainingnutsandremovethe Standard Weather Protection from the Searchpoint Optima Plus.
15. Fit a Calibration Cap to the Searchpoint Optima Plus. Ensure it is pushed on fully.
16. Select Calibrate17. Select Gas Calibration.
18.Thedisplayshowsawarningmessage,press OK.
19. Ensure that there is zero gas present in the vicinity of the Searchpoint Optima Plus. If necessary, apply zero gas at a rate of 1 – 1.5 litres per minute.
20. When the gas reading on the display is stable press OK to initiate the Zero Calibration and then wait for approximately 15 s. The 4-20 mA output will be inhibited automatically at this time.
21. The display shows a message that the Zero Calibration was successful and offers to exit without a Span Calibration. Select No and press Enter.22. Enter the concentration of the span calibration gas and press Enter.23. Apply calibration gas at a rate of 1 – 1.5 litres per minute. Wait for the gas reading to stabilise (~ 30 - 60 s), then press OK to initiate the Span Calibration and then wait for approximately 15 s.
24. The display shows a message that the Span Calibration was successful. Remove the Calibration Cap and wait for the test gas to clear (~ 30 s).
25. Ensure that the gas reading has returned to zero. Press OK to release the 4-20 mA output.
26. The display shows a note that the Searchpoint Optima Plus will return to normal operation, press OK.
27. Return to the Welcome screen.
28.RefittheStandardWeatherProtectionandthetworetainingnuts.
20. Appendix 2 – HART® Additional Functions
MAN0905_Issue 3_07/12 Searchpoint Optima Plus including HART® versionOperating Instructions
2108M0550
90
20.2 Set HART® Loop Current Mode
SearchpointOptimaPlussupportsPoint-to-PointHART®andHART®Multi-Dropconfigurations.
WARNINGHART®Multi-DropModeisnotfailsafe.SearchpointOptimaPlusinHART® Multi-Drop
ModeisnotSIL-2compliant.SearchpointOptimaPlusinHART® Multi-Drop Mode is outside the scope of any performance approvals.
Caution: In Multi-Drop mode, the current loop should be AC coupled
Note: When Searchpoint Optima Plus is set in Multi-Drop Mode, the 4-20 mA loop cannot be calibrated and any functions that force the 4-20 mA output to a set value are unavailable.
1. Select Device Setup.
2. Select Device Info.
3. Select Loop Current Mode.
4. Select the required option and press Enter.5. Press Send to send the information to Searchpoint Optima Plus.
6. The display shows a warning message. Press OK.
7. The communication mode is set and the display shows another warning message. Press OK.
8. Checkthatthedisplaynowshowsthecorrectcommunicationmode.
9. Press Back to return to Device Setup menu.
ForuseinMulti-DropModetheHART®addressmustalsobeconfiguredbetween1and63.
10. Select Assembly Details.
11. Select HART® Address.
12.EntertherequiredHART® address and press Enter.
13. Press Send to send the information to Searchpoint Optima Plus.
14. Return to the Welcome screen.
20. Appendix 2 – HART® Additional Functions
MAN0905_Issue 3_07/12 Searchpoint Optima Plus including HART® versionOperating Instructions
2108M0550
91
Read these notes if the Honeywell MC Toolkit is being used to communicate with Searchpoint Optima Plus.
Please be aware that in some cases the MC Toolkit will not display messages as detailed in these instructions.
Severalspecificinstancesaregivenbelow:-
1. Insection12.7,“Calibratethe4-20mALoop”theMCToolkitwillnotdisplayamessagethatdata is being collected between steps 6 and 7, and between steps 9 and 10.
2. In section 13.6 “Re-zero Searchpoint Optima Plus” the MC Toolkit will not display a message that data is being collected during step 6.
3. In section 13.7 “Calibration” the MC Toolkit will not display a message that data is being collected duringsteps8and12.
The MC Toolkit will not display any punctuation in the software version, e.g. version 5.2 will be displayed as version 52.
21. Appendix 3 – Special Notes for Honeywell MC Toolkit Users
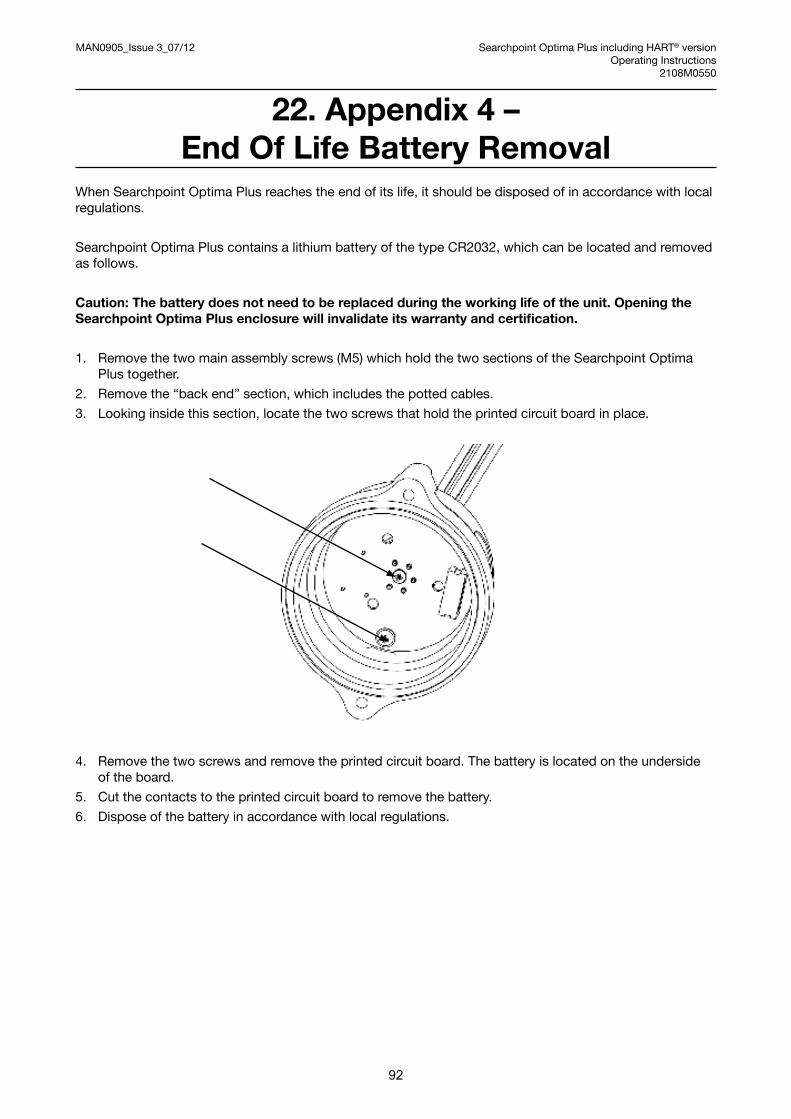
MAN0905_Issue 3_07/12 Searchpoint Optima Plus including HART® versionOperating Instructions
2108M0550
92
22. Appendix 4 – End Of Life Battery Removal
When Searchpoint Optima Plus reaches the end of its life, it should be disposed of in accordance with local regulations.
Searchpoint Optima Plus contains a lithium battery of the type CR2032, which can be located and removed as follows.
Caution: The battery does not need to be replaced during the working life of the unit. Opening the Searchpoint Optima Plus enclosure will invalidate its warranty and certification.
1. Remove the two main assembly screws (M5) which hold the two sections of the Searchpoint Optima Plus together.
2. Remove the “back end” section, which includes the potted cables.
3. Lookinginsidethissection,locatethetwoscrewsthatholdtheprintedcircuitboardinplace.
4. Remove the two screws and remove the printed circuit board. The battery is located on the underside of the board.
5. Cut the contacts to the printed circuit board to remove the battery.
6. Dispose of the battery in accordance with local regulations.
MAN0905_Issue 3_07/12 Searchpoint Optima Plus including HART® versionOperating Instructions
2108M0550
93
23. Appendix 5 – HART® Commands Used
23.1 Universal Commands
Searchpoint Optima Plus responds to the Universal Commands. One Dynamic Variable is implemented – Gas Concentration.
Additional comments: -
• Command#3returnsloopcurrentandPV.
• Command#14:Unitsforsensorlimitsandminimumspanarefixed.Sensorserialnumberisnotused, and returns 0
• Command#38:Reset“ConfigurationChanged”Flag
• Command#48:ReadAdditionalDeviceStatus
23.2 Common-Practice Commands
23.2.1 Supported Commands
Thefollowingcommon-practicecommandsareimplemented:
Command Number Description
40 Enter/Exit Fixed Current Mode
41 Perform Device Self-Test
42 Perform Master Reset
45 Trim DAC Zero
46 Trim DAC Gain
23.2.2 Burst Mode
Searchpoint Optima Plus does not support Burst Mode.
23.2.3 Catch Device Variable
Searchpoint Optima Plus does not support Catch Device Variable.

MAN0905_Issue 3_07/12 Searchpoint Optima Plus including HART® versionOperating Instructions
2108M0550
94
23.3 Device-Specific Commands
Thefollowingdevice-specificcommandsareimplemented:
Command Number Description
128 Read Gas Table Name
129 Read available Gas Table Name
130 Write Gas Table Index
132 Read Event Log history
133 Read Diagnostics (Warnings or faults)
135 Simulate Alarm or Warning or Fault
138 Write Alarm1 threshold
139 Read Alarm1 threshold
140 User Authentication
142 Password change
143 Enter/Exit Inhibit mode
146 Bump Test
147 Read Field Data
149 Read Real Time Clock
150 Write Real Time Clock
151 Read HART communication status during device fault
152 Write HART communication status during device fault
153 Read Inhibit current
154 Write Inhibit current
155 Read Warning current
156 Write Warning current
157 Read Over range current
158 Write Over range current
159 Clear latched faults and logged faults (partial or full)
160 Read Current operating mode
23. Appendix 5 – HART® Commands Used
12831
Issue3_07/2012H_MAN0905_EMEAI 2108M0550_ECOA03799©2012HoneywellAnalytics
Please Note:While every effort has been made to ensure accuracy in this publication, no responsibility can be accepted for errors or omissions. Data may change, as well as legislation and you are strongly advised to obtain copies of the most recently issued regulations, standards and guidelines. This publication is not intended to form the basis of a contract.
Contact Honeywell Analytics:
Find out more
www.honeywellanalytics.com
Europe, Middle East, Africa, IndiaLife Safety Distribution AGJavastrasse 28604 HegnauSwitzerlandTel: +41 (0)44 943 4300Fax: +41 (0)44 943 4398India Tel: +91 124 [email protected]
AmericasHoneywell Analytics Inc. 405 Barclay Blvd.Lincolnshire, IL 60069USATel: +1 847 955 8200 Toll free: +1 800 538 0363 Fax: +1 847 955 [email protected]
www.honeywell.com
Technical ServicesEMEAI: [email protected]: [email protected]: [email protected]
Asia Pacific Honeywell Analytics Asia Pacific #508, Kolon Science Valley (I) 187-10 Guro-Dong, Guro-Gu Seoul, 152-050 Korea Tel: +82 (0)2 6909 0300Fax: +82 (0)2 2025 [email protected]