online textbook adoptions ncsu bookstores last revised – february 12, 2008
Post on 18-Dec-2015
218 views
TRANSCRIPT

Online Textbook Adoptions
NCSU BookstoresLast revised – February 12, 2008

Why so early??
• Thank you for taking the time to send us your textbook adoption for next semester.
• Sending us your adoption early allows us to better serve your students. With this information, we are able to buyback more books from current students. This creates more USED books for future students, which helps them save money. The bookstore is able to save money due to no shipping costs, which allows us to keep our costs down. Everyone wins when this happens!
• Getting your textbook requests in early allows us to order used copies from wholesalers earlier, giving us the best chance to get your students used copies.
• Please be aware of bundles, custom editions and pricing when ordering your textbooks. Do not hesitate to find us with any questions of if we can help in any way. If you have questions, contact Isaac Pomper at 515-3915 or send him an e-mail at [email protected]

Click the following link or type it into your browser navigation bar to get started: http://ncsu.collegestoreonline.com/ePOS?store=432&form=faculty.html
Please remember to bookmark this page for future semesters.
Click here if you are creating a new account.
Click here if you already have an account.

Click on CREATE NEW ACCOUNT.
Getting Started

To create an account, you will need your 9-digit ID as shown in the sample image. You will need to put all 9 digits into the field to create a new account. While it does say student on the example card and on the website, all faculty and staff also have a 9-digit number in the same spot.

Account Creation DetailsFill in all of the fields with arrows by them.
For Billing Address please enter your campus contact information.
Ignore the fields for credit card information and shipping address.
When done, you can hit any button that says “Save Changes” to finish creating your account.

Account Creation SuccessfulOnce you create your account, your screen will look like this. Click on the link that
says FACULTY to begin placing your textbook requests.

The Basics of Requesting Textbooks

Getting Started
You are now signed in. When you have just created your account, you have two options – change password and create a new requisition.
I will now walk you through a sample new textbook requisition. Hit the “Create Requisition” button to start.

Please verify contact information, then click NEXT.
If you are placing the submission for someone else, please change the information to the contact information for whomever should be contacted if there are problems.

First, you will select the term you are requesting books for from the drop down menu.
Once you have selected the term, hit the “Save Changes” button.

Now you will select your department. Open the drop-down menu and scroll down until you find the department the class is listed under.
Once you have selected your department, hit the “Save Changes” button.

Now you will select the course that you are requesting books for. If you do not see the course you are looking for, select the “Add Course” option. That will be covered in detail later.
Once you have selected your course, hit the “Save Changes” button.

Now select the section from the drop down menu. If you do not see the section you are looking for or if you are submitting a request for multiple sections, select “Add Section”. That will be covered in detail later.
Once you have selected your section, hit “Save Changes”.

Adding Courses and Sections
• If your course number or section is not listed, you will need to add it.
• First, select Add Course/Add Section from the drop-down list. Then click save changes.
• If you are adding a course, then 2 text boxes will appear, one for course number, the other for section number. If you are just adding a section, then a text box will appear for the section number.
• If you are making a submission for multiple sections, then put all the section numbers in the section text box, e.g. 001-007; 001, 002, 005. If the same book is being used for all sections, you can put “all” in as the section number.

Now you will need to put in the enrollment for the course. Please put in the maximum enrollment, not the number of students you expect to enroll. If you wish to use the same books from a previous semester, click this link. Hit next when ready to continue.

This page is the main page for textbook requisitions. You will add books to the requisition, search for books used in the past, and let us know if no books are required – all from this page. I will show you how to do each of these.

Not using Textbooks?
We still need a textbook requisition so we can put that in our database and let your students know when they come in to buy books. And with the new system, there is a simple way to let us
know that. Just click the button for “No Books”.

Once you click that button, this is what will display. From here, you will just need to click on Review Requisition and on the screen after that Submit
Requisition. And you’re done for those courses without textbooks.

You can manually add books to requisitions by filling out the information requested. The field called “New Ed. Pending” can always be ignored. If you are using a coursepack or Sir Speedy please click here for how to put that information in.
Manual Book Input

This is what the form looks like filled out. For the status, you will need to let us know if the book is required, recommended, optional, or choice. For edition, use a number. If you want the latest edition or are unsure of the edition, then leave the edition field blank and put a note in saying you want the latest edition. Once all fields are filled out, hit “Add This Title”.

Status Descriptions
• Required – Book is required for the course; students must have book.
• Recommended – Book is not required, but professor believes book would be VERY helpful.
• Optional – Book is not required, but may be used by some students for optional projects or extra study.
• Choice – Use when two versions or editions of the book are available and either is acceptable for use in class.

This is what the page will look like after you add a title. All the titles will be listed at the bottom of the page. At any time you can click edit on a title if you made an error or you can click delete to remove the title from the requisition. Next I will show you how to add a title by searching for it.

Add title by searching• You can add titles by searching for them in the system. You can search by title,
author, or ISBN number.• ISBN searches are simple and use the 13-digit ISBN with no dashes. It will start
with “978”; you can generally get the number by looking under the barcode on the book. If you can only find an 10-digit ISBN, search that ISBN on Amazon.com and the publication info section will show both the 10 and 13 digit ISBNs.
• Author searches are by last name only.• For title searches, leave off any leading articles (a, an, the).

Here, I searched for the word “manage” and it pulled up all the titles that start with the letters “manage”. This image cuts off the results list, which show ten items per page. You will notice that for publisher it has a 3- or 4-digit code. That is an internal code in our system which you can just leave. From the results, click “select this title” for the book you want to add to your request. Make sure to verify the ISBN number on the result with the one on your book.

The “select this title” link fills out the fields in the manual entry section. You don’t have to fill out anything else, or you can put in the edition and copyright year if you wish. Put in any comments and hit “Add This Title”.

Adding titles from other courses.
The third way to add books to your requisition is by searching for something used in a previous semester. To do this, click on the button “Search Other Courses”.

Your first screen will look like this. It defaults to the current semester and department.

You can then use the drop down menus to choose the semester, department, course number, and section from which you want to choose books. Again, each time you change something in a drop-down menu, you will need to hit
save changes.

Once you hit “save changes” after selecting the section, you will get a list of books that were adopted for that section. It shows all the information it pulls from our database. If you want to add edition numbers, copyright years, or even change
the ISBN because of a new edition, that is okay.
You can also choose not to use a particular book or any of the books displayed by unchecking the box next to “Add to Requisition?” Any prices you see are
subject to change. Once you are done, hit “Add These Books”.

Finished Adding BooksYou have now seen the three ways to add books to your requisition. When you finish
adding books, you’ll be back at the main page but the bottom of the page will look like below. Once you are done adding books, click the “Review Requisition” button.

Review RequisitionOn this page, you will see a review of what you have selected. You should verify the course and contact information and double-check your ISBNs. You can also delete items off of the requisition if you change your mind. If everything is good, then go ahead and click “Submit Requisition”.

Requisition SubmittedYour requisition has now been submitted. From here, you can either start a new requisition, go back to the main page to review those requisitions you have submitted, or open a window with a printable copy. While the system does save all of your submitted requisitions, it is still strongly suggested your print out a copy for your records. You will also receive an e-mail confirmation.

This is a sample of the email you will receive from the bookstore to confirm we have received your textbook requisition.

Advanced Usage

The information hereafter are tips, tricks, and suggestions to help you get your requests in as quickly and painlessly as possible.
First, I will show you what your login screen will look like after you have submitted a few requests.
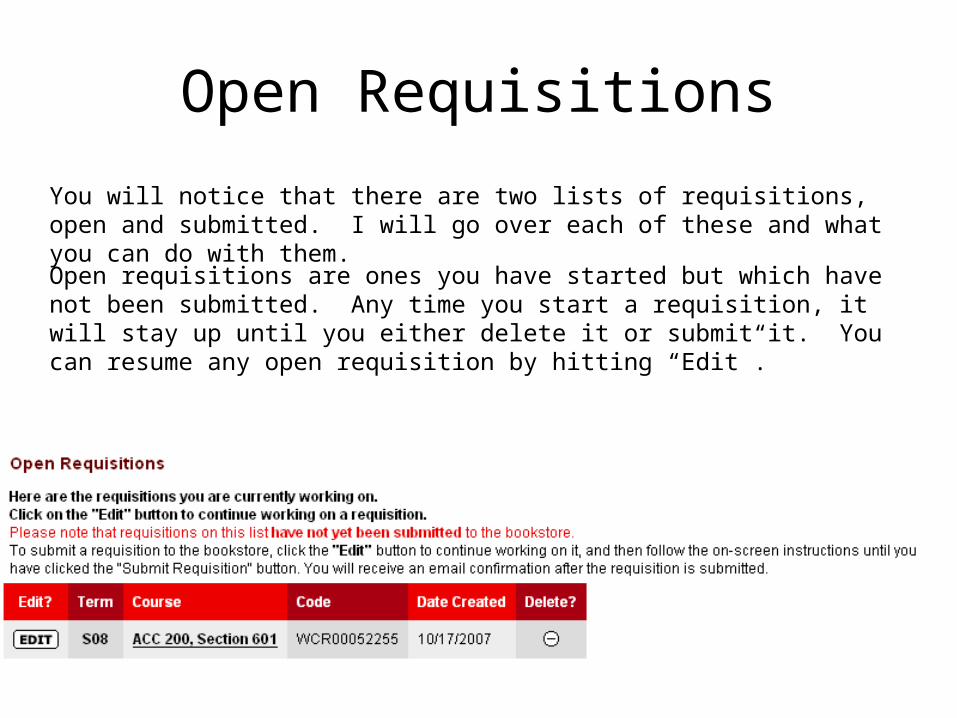
You will notice that there are two lists of requisitions, open and submitted. I will go over each of these and what you can do with them.
Open requisitions are ones you have started but which have not been submitted. Any time you start a requisition, it will stay up until you either delete it or submit it. You can resume any open requisition by hitting “Edit”.
Open Requisitions

Once you hit “Edit”, it will take you back to the main requisition editing page. Notice that there is a button which says Save Requisition for Later. You can hit either this button or the button to return to the main page and your requisition will be saved at whatever point you are at. At this point, you can go on adding books or review the
requisition in preparation for submission.

Submitted RequisitionsSubmitted Requisitions have multiple uses. You can use them to print out paper copies for records and you can re-use requisitions in future semesters, which will
make using the same books much quicker.
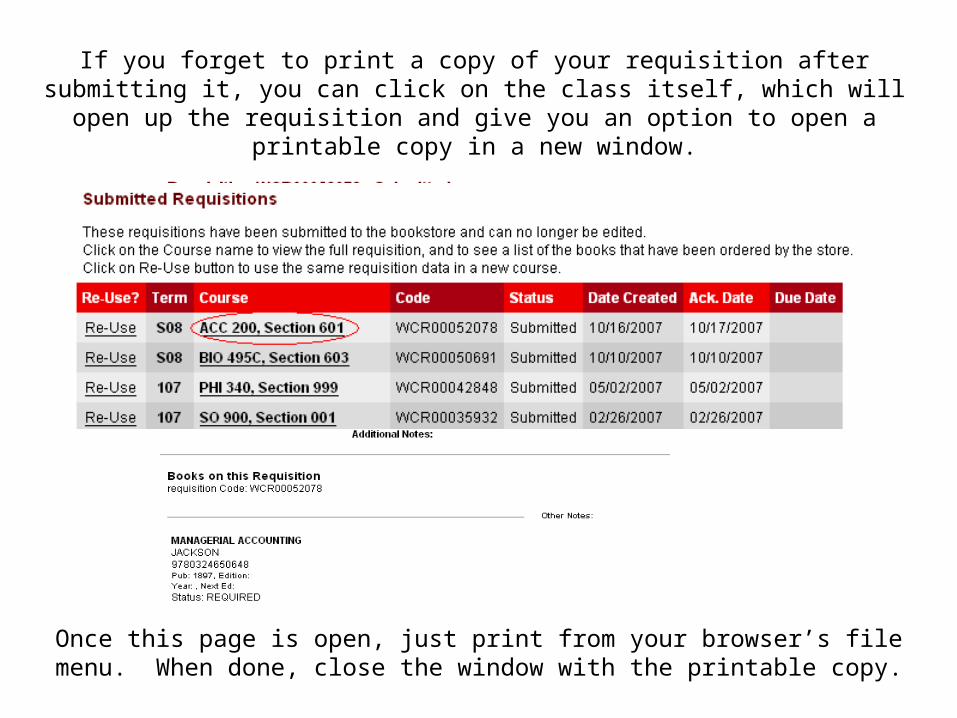
If you forget to print a copy of your requisition after submitting it, you can click on the class itself, which will open up the requisition and give you an option to open a
printable copy in a new window.
Once this page is open, just print from your browser’s file menu. When done, close the window with the printable copy.

The most useful thing about submitted requests is that you can use them to re-order books for subsequent semesters. You can do this either from the list
of submitted requisitions or from within an open, submitted requisition.

Clicking this link opens up the following screen.
Notice that this screen combines both the contact information and the class information screens from before. You’ll need to select the correct term you are requesting for and then you need to manually change the department, course number, section number, and enrollment as needed. Once all that information
is in order, click “Next”.

At this point, you will be back at the main requisition screen. You’ll see the fields to add books and when you scroll down you’ll see the books you had on the previous requisition will already be added to your new requisition. You’ll want to verify the information already provided and then you can add more books to the requisition or delete books that are on it that you no longer want to use.
Once you have added the books you want to use and removed any you don’t, just follow the same steps for reviewing your requisition and submitting it.

Using the same books in a new requisition.
Earlier, when you were creating a new requisition, I said to skip the part about using books from a previous semester. I will now explain how to use this feature.

If you do not have a requisition already in for a class but have taught the class before or want to use the same book a previous instructor used for that class and section, then select the check box and the semester the whose books you want to use. This will only work if you taught the same course number and section number during the selected semester.
Hit “Next” when done.

This brings up a screen similar to the one you see when you search by course for books. You’ll see a list of books which were previously used in that section of the class. They will already be checked to add to requisition, so any that you do not want to use you will need to uncheck. Once you add these to your requisitions,
you’ll follow the same steps as already outlined to finish the requisition.

Coursepacks• For professors that use coursepacks, we must get a textbook requisition
before we can order your coursepack from the printer. Here is how to add a coursepack to your requisition.
• If you are reusing a coursepack from a previous semester, search under your last name as the author or the course abbreviation and number under title; ex PE 105 or MA 105.
• In the additional notes field, please say “no revisions” if you are not revising anything inside the cover of the coursepack or “being revised” if anything content is changing. If the coursepack is brand new, please make note of that as well. Not putting this information in can delay getting your request processed.
• If you are using a completely new coursepack, fill-in the the fields manually as shown here. For the ISBN, just put in a string of zeros.
• If you are having notes printed at Sir Speedy, please submit a request with the title Notes at Sir Speedy and author Sir Speedy. You can leave all the rest of the fields blank and just add the title.

Tips and Suggestions
• Make sure to get the 13-digit ISBN. If your book does not have one easily visible, you should put the one you do have into Amazon.com and search it. That will bring up the book and when you scroll down to the publication information, the 13-digit form of the ISBN will be there. If you can not find any ISBN at all, then please put in thirteen zeroes.
• If you are teaching multiple sections, you can use the “add section” from the section drop menu. Once you “save changes” a text box will open and you can put in “001-005” or “011, 012, 013” or “all”.
• If you have notes at Sir Speedy, please do a search for ISBN 9780840000057. Select that “book” to add to your request. This is how we let your students know that you have notes available at Sir Speedy.

Tips and Suggestions 2
• If you are teaching a class that has both an undergraduate and graduate version and they are using the same books, please re-use the submission for the first class and on the first page put in the correct information for the other class. We need separate requisitions for each class please.
• If you are teaching a class that is crosslisted between two departments, please just re-use the submission for one and change the department and enrollment for the second class. We need separate requisitions for each class please.