omniengine gettingstarted
TRANSCRIPT

5/12/2018 Omniengine Gettingstarted - slidepdf.com
http://slidepdf.com/reader/full/omniengine-gettingstarted-55a35b29d7914 1/50
5/12/2018 Omniengine Gettingstarted - slidepdf.com
http://slidepdf.com/reader/full/omniengine-gettingstarted-55a35b29d7914 2/50
ii
Copyright © 2009, WildPackets, Inc. All rights reserved. Information in this document is subject to change without
notice. No part of this document may be reproduced or transmitted in any form, or by any means, electronic or
mechanical, including photocopying, for any purpose, without the express written permission of WildPackets, Inc.
AiroPeek SE, AiroPeek NX, AiroPeek VX, EtherPeek SE, EtherPeek NX, EtherPeek VX, Gigabit Analyzer Card,GigaPeek NX, iNetTools, NAX, NetDoppler, NetSense, Network Calculator, Omni³, Omni Capture Engine, Omni
Desktop Engine, Omni DNX Engine, OmniAdapter, OmniAdapter 10G, OmniEngine Desktop, OmniEngine
Enterprise, OmniEngine Manager, OmniEngine Workgroup, Omni Management Console, Omni PacketGrabber,
Omni Virtual Network Service, OmniPeek, OmniPeek Basic, OmniPeek Connect, OmniPeek Enterprise, OmniPeek
Enterprise Connect, OmniPeek Personal, OmniPeek Professional, OmniPeek Workgroup, OmniPeek Workgroup Pro,
OmniPeek Personal, Omnipliance, Omnipliance Core, Omnipliance Edge, Omnipliance Portable, Omnipliance
SuperCore, OmniSpectrum, OmniVirtual, OmniWatch, PacketGrabber, Peek DNX, ProConvert, ProtoSpecs,
RFGrabber, RMONGrabber, WAN Analyzer Card, WANPeek NX, WatchPoint, WildPackets, WildPackets Academy,
and WildPackets OmniAnalysis Platform are trademarks of WildPackets, Inc. All other trademarks are the property of
their respective holders.
WildPackets, Inc. reserves the right to make changes in the product design without reservation and without
notification to its users.
Contacting WildPackets
Mailing Address
WildPackets, Inc.
1340 Treat Blvd., Suite 500
Walnut Creek, CA 94597
Voice/Fax
8 AM - 5 PM (PST)
(925) 937-3200
(800) 466-2447 (US only)
Fax: (925) 937-3211
Sales
Web
http://www.wildpackets.com
Technical Support
http://www.wildpackets.com/support
Resources See http://www.wildpackets.com/support/additional_resources/white_papers for white papers, tutorials, technical
briefs and more.
5/12/2018 Omniengine Gettingstarted - slidepdf.com
http://slidepdf.com/reader/full/omniengine-gettingstarted-55a35b29d7914 3/50
iii
Professional Services
WildPackets offers a full spectrum of professional services, available onsite or remote, to help customers make the
most of their network infrastructure investment. The WildPackets Professional Services team stands ready to partner
with you to maximize our network performance and to minimize your network downtime. WildPackets technicalinstructors, network systems engineers, and custom software developers can help you design, build, manage, and
secure a better network for your business.
See http://www.wildpackets.com/services for course catalog, current public course scheduling, web-delivered courses,
and consulting services.
WildPackets Academy
(800) 466-2447
Product Support and Maintenance
WildPackets Maintenance Programs ensure that you grow along with our products as new features and enhancements
are added and that your usage is fully supported by our Technical Services staff. Enhanced support services are
available with remote or onsite consulting. Developer support is also available for customers adding custom
enhancements to WildPackets products. All Maintenance inquiries and purchases can be accommodated by
contacting [email protected].
Developer Community
To join the WildPackets Developer Network and gain access to product plugins, plugin wizards, and APIdocumentation, please visit http://mypeek.wildpackets.com.
About WildPackets, Inc.
WildPackets delivers software and hardware solutions that drive network performance, enabling organizations of all
sizes to actively monitor, analyze, troubleshoot, optimize, and secure their wired and wireless networks. WildPackets
products are sold in over 60 countries and deployed in all industrial sectors, including 80 percent of the Fortune 1000.
WildPackets is a Cisco Technical Development Partner. For further information, please visit www.wildpackets.com.
20090220-E-OE60a

5/12/2018 Omniengine Gettingstarted - slidepdf.com
http://slidepdf.com/reader/full/omniengine-gettingstarted-55a35b29d7914 4/50
5/12/2018 Omniengine Gettingstarted - slidepdf.com
http://slidepdf.com/reader/full/omniengine-gettingstarted-55a35b29d7914 5/50
v
OmniEngines . . . . . . . . . . . . . . . . . . . . . . . . . . . . . . . . . . . . 1About OmniEngines. . . . . . . . . . . . . . . . . . . . . . . . . . . . . . . . . . . . . . . . . . . . . . . . . . . . . . 1
System requirements. . . . . . . . . . . . . . . . . . . . . . . . . . . . . . . . . . . . . . . . . . . . . . . . . . . . . . 1
Supported adapters. . . . . . . . . . . . . . . . . . . . . . . . . . . . . . . . . . . . . . . . . . . . . . . . . . . . . . . 2
Installing an OmniEngine . . . . . . . . . . . . . . . . . . . . . . . . . . . . . . . . . . . . . . . . . . . . . . . . . 2
Disable guest network logins . . . . . . . . . . . . . . . . . . . . . . . . . . . . . . . . . . . . . . . . . . .4Windows firewall settings . . . . . . . . . . . . . . . . . . . . . . . . . . . . . . . . . . . . . . . . . . . . . .5
Disable Windows Vista UAC . . . . . . . . . . . . . . . . . . . . . . . . . . . . . . . . . . . . . . . . . . .5
Using the OmniEngine Manager . . . . . . . . . . . . . . . . . . . . . . . . . . . . . . . . . . . . . . . . . . . 5
Navigating the OmniEngine Manager window . . . . . . . . . . . . . . . . . . . . . . . . . . .6
Creating new engine groups. . . . . . . . . . . . . . . . . . . . . . . . . . . . . . . . . . . . . . . . . . . .8
Connecting to an OmniEngine . . . . . . . . . . . . . . . . . . . . . . . . . . . . . . . . . . . . . . . . .9
OmniEngine details windows . . . . . . . . . . . . . . . . . . . . . . . . . . . . . . . . . . . . . . . . 11
Discover OmniEngines . . . . . . . . . . . . . . . . . . . . . . . . . . . . . . . . . . . . . . . . . . . . . . 13Reconnect button . . . . . . . . . . . . . . . . . . . . . . . . . . . . . . . . . . . . . . . . . . . . . . . . . . . 14
Configuring an OmniEngine . . . . . . . . . . . . . . . . . . . . . . . . . . . . . . . . . . . . . . . . . . . . . 14
Engine Configuration—General. . . . . . . . . . . . . . . . . . . . . . . . . . . . . . . . . . . . . . 15
Engine Configuration—Security. . . . . . . . . . . . . . . . . . . . . . . . . . . . . . . . . . . . . . 17
Engine Configuration—Edit Access Control . . . . . . . . . . . . . . . . . . . . . . . . . . . 18
Updating OmniEngine software. . . . . . . . . . . . . . . . . . . . . . . . . . . . . . . . . . . . . . . . . . . 22
Updating OmniEngine settings . . . . . . . . . . . . . . . . . . . . . . . . . . . . . . . . . . . . . . . . . . . 25
Updating OmniEngine ACL settings. . . . . . . . . . . . . . . . . . . . . . . . . . . . . . . . . . . . . . . 28Credentials dialog. . . . . . . . . . . . . . . . . . . . . . . . . . . . . . . . . . . . . . . . . . . . . . . . . . . 32
Using OmniEngines with OmniPeek . . . . . . . . . . . . . . . . . . . . . . . . . . . . . . . . . . . . . . 33
Connecting to an OmniEngine from OmniPeek. . . . . . . . . . . . . . . . . . . . . . . . 33
Capturing from an OmniEngine. . . . . . . . . . . . . . . . . . . . . . . . . . . . . . . . . . . . . . 37
Third-party authentication with OmniEngines . . . . . . . . . . . . . . . . . . . . . . . . . . . . . 38
OmniEngine Windows . . . . . . . . . . . . . . . . . . . . . . . . . . . . . . . . . . . . . . . . . . . . . . 39
OmniEngine Linux. . . . . . . . . . . . . . . . . . . . . . . . . . . . . . . . . . . . . . . . . . . . . . . . . . 40
Contents

5/12/2018 Omniengine Gettingstarted - slidepdf.com
http://slidepdf.com/reader/full/omniengine-gettingstarted-55a35b29d7914 6/50
5/12/2018 Omniengine Gettingstarted - slidepdf.com
http://slidepdf.com/reader/full/omniengine-gettingstarted-55a35b29d7914 7/50
1
OmniEngines
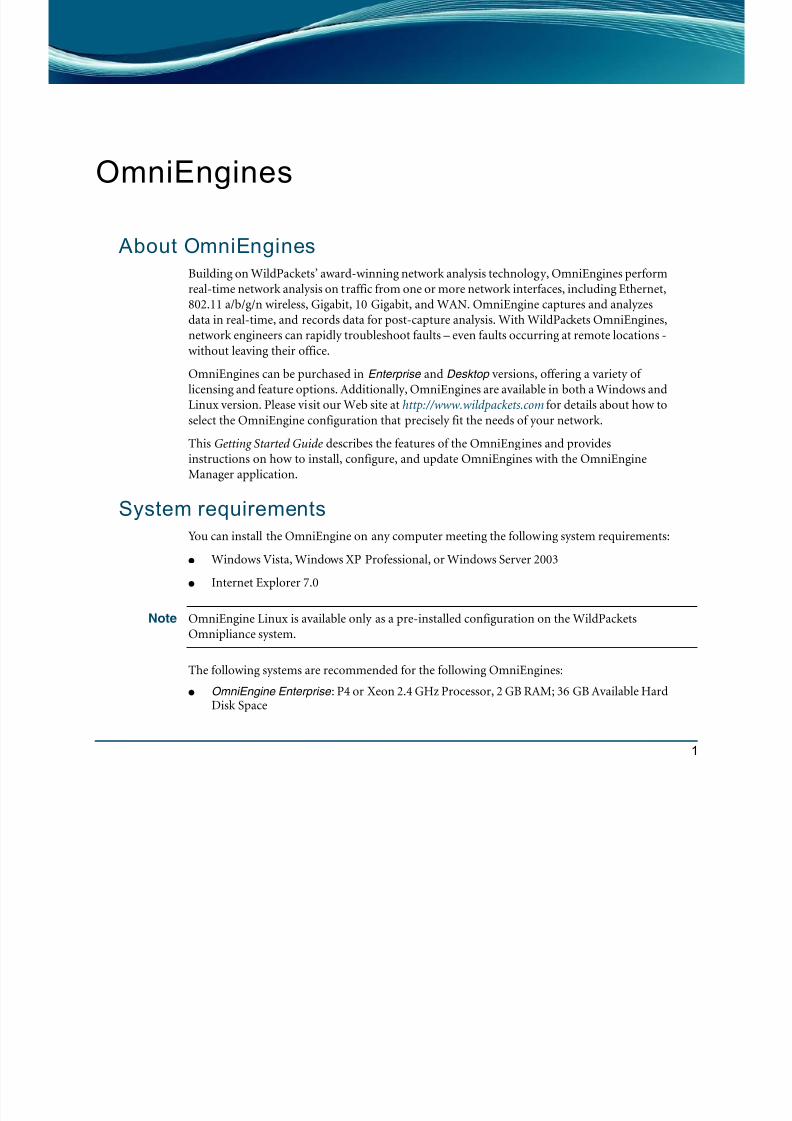
About OmniEnginesBuilding on WildPackets’ award-winning network analysis technology, OmniEngines perform
real-time network analysis on traffic from one or more network interfaces, including Ethernet,
802.11 a/b/g/n wireless, Gigabit, 10 Gigabit, and WAN. OmniEngine captures and analyzes
data in real-time, and records data for post-capture analysis. With WildPackets OmniEngines,
network engineers can rapidly troubleshoot faults – even faults occurring at remote locations -
without leaving their office.
OmniEngines can be purchased in Enterprise and Desktop versions, offering a variety of
licensing and feature options. Additionally, OmniEngines are available in both a Windows and
Linux version. Please visit our Web site at http://www.wildpackets.com for details about how to
select the OmniEngine configuration that precisely fit the needs of your network.
This Getting Started Guide describes the features of the OmniEngines and provides
instructions on how to install, configure, and update OmniEngines with the OmniEngine
Manager application.
System requirementsYou can install the OmniEngine on any computer meeting the following system requirements:
● Windows Vista, Windows XP Professional, or Windows Server 2003
● Internet Explorer 7.0
Note OmniEngine Linux is available only as a pre-installed configuration on the WildPackets
Omnipliance system.
The following systems are recommended for the following OmniEngines:
● OmniEngine Enterprise : P4 or Xeon 2.4 GHz Processor, 2 GB RAM; 36 GB Available HardDisk Space
5/12/2018 Omniengine Gettingstarted - slidepdf.com
http://slidepdf.com/reader/full/omniengine-gettingstarted-55a35b29d7914 8/50
OmniEngine Getting Started Guide
2 Supported adapters
● OmniEngine Desktop: P4 or Xeon 1.2 GHz Processor; 256 MB RAM
Supported adaptersTo capture or monitor packets, you will need one or more of the following network adapters
installed on the computer where you install the OmniEngine:
● Ethernet: For packet capture on a 10/100/1000 Ethernet network, an NDIS 3 or higher
compatible Ethernet, Fast Ethernet, or Gigabit promiscuous mode network adapter is
required. For more information, see the Readme file located in the Drivers folder in the
program directory or visit http://www.wildpackets.com/support/omni/overview.
● Full-Duplex Gigabit: For packet capture on a Gigabit Ethernet network at full-duplexmode, a WildPackets Gigabit analyzer card (OmniAdapter) is required. For information
on installing and configuring OmniAdapters, please see the documentation that ships
with the product or visit http://www.wildpackets.com/products/analysis_cards/
omniadapters.
● Full-Duplex 10 Gigabit: WildPackets offers 10GbE adapter cards (OmniAdapter 10G) to
capture and analyze high-speed, full-duplex 10 Gigabit networks. For more information,
please visit http://www.wildpackets.com/products/analysis_cards/10GbE.
● WAN (OmniEngine Windows only): For packet capture on a WAN network, a
WildPackets WAN Analyzer Card (WAC) is required. For information on installing and
configuring a WAN Analyzer Card, please see the documentation that ships with the
product.
● Wireless (WLAN) (OmniEngine Windows only): For wireless packet capture on a WLAN
network, a supported WLAN adapter that has the special NDIS driver installed is
required. WildPackets has tested Atheros, Intel Centrino 3945, Marvell, and Ralink cardsfor wireless capture. For more information and to download other compatible wireless
drivers, please visit http://www.wildpackets.com/support/downloads/drivers.
Installing an OmniEngineYou will need Administrator level privileges to install and configure an OmniEngine. Please
note the IP address of the computer where you are installing the OmniEngine. You will need
the IP address to configure and connect to the OmniEngine.
Note OmniEngine Linux is available only as a pre-installed configuration on the WildPackets
Omnipliance system. You can proceed to Using the OmniEngine Manager on page 5 to
configure the OmniEngine Linux.
5/12/2018 Omniengine Gettingstarted - slidepdf.com
http://slidepdf.com/reader/full/omniengine-gettingstarted-55a35b29d7914 9/50
Installing an OmniEngine 3
OmniEngine Getting Started Guide
To install an OmniEngine:
1. Uninstall any earlier version of the OmniEngine.
If you are upgrading from a previous version of an OmniEngine, you must use theOmniEngine installer to migrate your settings from the OmniEngine. If you remove the
previous OmniEngine via Add/Remove Programs in the Control Panel, your settings will
be lost.
2. Insert the OmniEngine Installer CD into your CD or DVD drive.
3. Follow the installation instructions that appear on the screen.
During installation you are asked to enter a valid Activation Key. You can select Automatic
or Manual:
● Automatic: The installer uses your Internet connection to send an encrypted message
to an activation server, which retrieves and displays your Activation Key. Please write
down the Activation Key for future reference.
● Manual: The installer allows you to enter the Activation Key manually. You can
obtain an Activation Key in the following ways: Go to a computer with an Internet
connection and web browser and complete the request form, or call WildPackets
Technical Support.
For more information about the product activation process, please see our Web site
at http://www.wildpackets.com/activation.
4. You can choose to start the Remote Update Service when prompted to during
installation. When enabled, this service lets you use the OmniEngine Manager to schedule
and run remote software updates for the OmniEngine.
5. When the Installer has finished installing the program files to your hard disk, you canchoose to view the Readme or launch the OmniEngine Configuration Wizard of the
OmniEngine Manager to configure settings for the OmniEngine. Make sure Launch
OmniEngine Configuration Wizard is selected and then click Next.
Important! The OmniEngine Manager is installed by default when you install OmniPeek (the
OmniEngine Configuration Wizard of the OmniEngine Manager is installed by default when
you install an OmniEngine other than OmniEngine Linux). The OmniEngine Manager is used
to configure the OmniEngine as well as update software and settings on multiple
OmniEngines. If you do not launch the OmniEngine Configuration Wizard here, you can
access the wizard as described in Configuring an OmniEngine on page 14.
6. Click Yes when prompted to stop the OmniEngine. Once the engine is stopped, the
General view of OmniEngine Configuration Wizard appears.
5/12/2018 Omniengine Gettingstarted - slidepdf.com
http://slidepdf.com/reader/full/omniengine-gettingstarted-55a35b29d7914 10/50
OmniEngine Getting Started Guide
4 Installing an OmniEngine
7. Configure the settings in the General view and then click Next (see Engine
Configuration—General on page 15 for information on the settings).
8. Configure the settings in the Security view and then click Next (see Engine
Configuration—Security on page 17 for information on the settings).
9. Configure the settings in the Edit Access Control view and then click Next (see Engine
Configuration—Edit Access Control on page 18 for information on the settings).
10. To start the engine so that it runs in the background, select Start the engine and then click
Finish.
Note Some users may want to install both an OmniPeek console and an OmniEngine on the samecomputer. The only console that was designed to work simultaneously with an OmniEngine is
the OmniPeek Connect console.
Disable guest network logins
OmniEngines support authentication using Windows authentication services. In order to
allow remote users to connect to an OmniEngine, the system administrator must disable guestnetwork logins on the OmniEngine computer.
By default, a network login will give each user “guest” credentials. This must be changed so
that network logins will provide credentials based on the user’s identity. If your network used a
domain to control access, you must disable the Guest account on the domain server.
Important! Users allowed to use the OmniEngine are NOT required to have Administrative privileges and
we recommend restricting their rights to minimize potential security risks, especially if theOmniEngine is accessed from outside of a firewall.
To disable guest network logins for Windows Vista/Windows XP/Windows Server 2003:
1. Open the Local Security Policy editor by choosing Start > Control Panel >
Administrative Tools.
2. Click Security Options under the Local Policies heading.
3. Verify that the following Policies are set:
● Accounts: Guest Account Status is disabled
● Network Access: Sharing and security model for local accounts is set to Classic - local
users authenticate as themselves
5/12/2018 Omniengine Gettingstarted - slidepdf.com
http://slidepdf.com/reader/full/omniengine-gettingstarted-55a35b29d7914 11/50
Windows firewall settings 5
OmniEngine Getting Started Guide
Windows firewall settings
If you have firewall settings enabled on the OmniEngine computer, you must open Port 6367
and 6369 through the Windows firewall, or disable the Windows firewall completely.To manage Windows firewall settings:
1. Open the Windows Security Center editor by choosing Start > Control Panel >
Security Center.
2. Click Windows Firewall .
Disable Windows Vista UACOmniEngine is not compatible with User Account Control (UAC) under Windows Vista. You
must disable UAC in order to run OmniEngine under Windows Vista.
To disable UAC in Windows Vista:
1. Open the User Accounts editor by choosing Start > Control Panel > User Accounts.
2. Click User Accounts .
3. Click Turn User Account Control On or Off .
4. Clear the Use User Account Control (UAC) to help protect your computer check box.
5. Click OK and restart the computer.
Using the OmniEngine ManagerThe OmniEngine Manager is installed by default when you install OmniPeek (the
OmniEngine Configuration Wizard of the OmniEngine Manager is installed by default when
you install an OmniEngine other than OmniEngine Linux). You can run the OmniEngine
Manager from the OmniPeek computer to do the following:
● Configure OmniEngines
● Schedule and run remote software updates for multiple OmniEngines (OmniEngine
Windows only)
● Distribute settings for filters, alarms, and graphs templates across multiple OmniEngines
● Distribute Access Control Lists (ACLs) to multiple OmniEngines in a single Domain
(OmniEngine Windows only)

5/12/2018 Omniengine Gettingstarted - slidepdf.com
http://slidepdf.com/reader/full/omniengine-gettingstarted-55a35b29d7914 12/50
OmniEngine Getting Started Guide
6 Using the OmniEngine Manager
Navigating the OmniEngine Manager window
To start the OmniEngine Manager from the OmniPeek computer:
● Choose Start > All Programs > WildPackets OmniEngine Manager. The OmniEngineManager window appears.
The parts of the OmniEngine Manager window are described below.
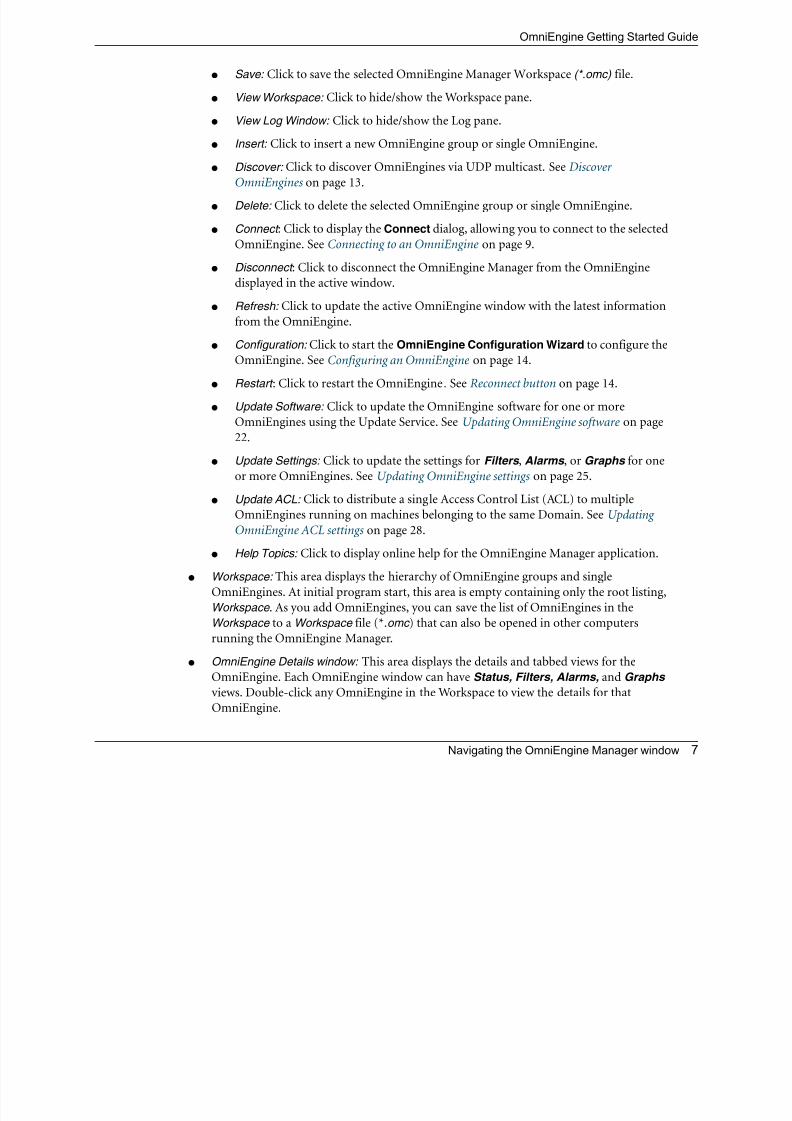
● Toolbar: The toolbar allows you to control the following program functions:
● Open: Click to open an OmniEngine Manager Workspace (*.omc) file.
Toolbar
Workspace
OmniEngine
Details
Window
Log
Status Bar
Open
Save
View Workspace
View Log Window
Insert
Restart
Delete
Connect
Disconnect
Configuration
Refresh
Update Software
Update ACL
Update Settings
Help Topics
Discover
5/12/2018 Omniengine Gettingstarted - slidepdf.com
http://slidepdf.com/reader/full/omniengine-gettingstarted-55a35b29d7914 13/50
Navigating the OmniEngine Manager window 7
OmniEngine Getting Started Guide
● Save: Click to save the selected OmniEngine Manager Workspace (*.omc) file.
● View Workspace: Click to hide/show the Workspace pane.
●
View Log Window: Click to hide/show the Log pane.● Insert: Click to insert a new OmniEngine group or single OmniEngine.
● Discover: Click to discover OmniEngines via UDP multicast. See Discover
OmniEngines on page 13.
● Delete: Click to delete the selected OmniEngine group or single OmniEngine.
● Connect : Click to display the Connect dialog, allowing you to connect to the selected
OmniEngine. See Connecting to an OmniEngine on page 9.● Disconnect : Click to disconnect the OmniEngine Manager from the OmniEngine
displayed in the active window.
● Refresh: Click to update the active OmniEngine window with the latest information
from the OmniEngine.
● Configuration: Click to start the OmniEngine Configuration Wizard to configure the
OmniEngine. See Configuring an OmniEngine on page 14.
● Restart : Click to restart the OmniEngine. See Reconnect button on page 14.
● Update Software: Click to update the OmniEngine software for one or more
OmniEngines using the Update Service. See Updating OmniEngine software on page
22.
● Update Settings: Click to update the settings for Filters , Alarms , or Graphs for one
or more OmniEngines. See Updating OmniEngine settings on page 25.
● Update ACL: Click to distribute a single Access Control List (ACL) to multiple
OmniEngines running on machines belonging to the same Domain. See Updating
OmniEngine ACL settings on page 28.
● Help Topics: Click to display online help for the OmniEngine Manager application.
● Workspace: This area displays the hierarchy of OmniEngine groups and single
OmniEngines. At initial program start, this area is empty containing only the root listing,Workspace
. As you add OmniEngines, you can save the list of OmniEngines in theWorkspace to a Workspace file (*.omc ) that can also be opened in other computers
running the OmniEngine Manager.
● OmniEngine Details window: This area displays the details and tabbed views for the
OmniEngine. Each OmniEngine window can have Status, Filters, Alarms, and Graphs
views. Double-click any OmniEngine in the Workspace to view the details for that
OmniEngine.
5/12/2018 Omniengine Gettingstarted - slidepdf.com
http://slidepdf.com/reader/full/omniengine-gettingstarted-55a35b29d7914 14/50
OmniEngine Getting Started Guide
8 Using the OmniEngine Manager
● Log: This area shows the messages sent to the Log file, including program start and the
status of update tasks.
● You can right-click to Copy, Clear, or Save the contents of the Log file.
● Choose File > Save log to save the Log file as a text file.
● Status Bar: The status bar displays the status of the program and the full path and file
name of the current Workspace file.
Tip You can float the Workspace and Log panes, or drag either to dock it in a different location. To
toggle between floating and docking, double-click the title bar of the window.
Creating new engine groups
You can organize OmniEngines in groups or add single OmniEngines one at a time to the
Workspace.
To create a new group in the Workspace:
1. Select the location in the Workspace under which the new group should appear.2. Click the arrow beside the Insert icon in the toolbar and choose Insert Group .
The new group appears with its default name (New Group ) ready to edit.
Tip To change the name of a group in a Workspace file, right-click and choose Rename.
5/12/2018 Omniengine Gettingstarted - slidepdf.com
http://slidepdf.com/reader/full/omniengine-gettingstarted-55a35b29d7914 15/50
Connecting to an OmniEngine 9
OmniEngine Getting Started Guide
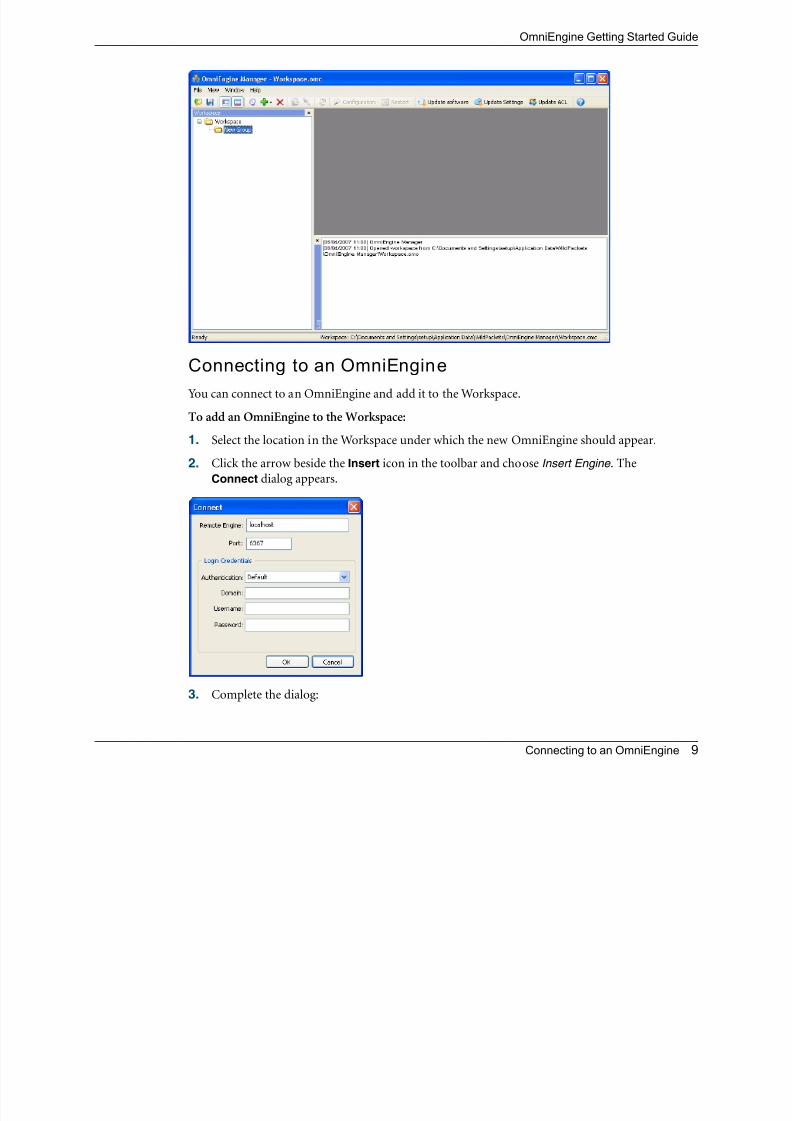
Connecting to an OmniEngineYou can connect to an OmniEngine and add it to the Workspace.
To add an OmniEngine to the Workspace:
1. Select the location in the Workspace under which the new OmniEngine should appear.
2. Click the arrow beside the Insert icon in the toolbar and choose Insert Engine . The
Connect dialog appears.
3. Complete the dialog:
5/12/2018 Omniengine Gettingstarted - slidepdf.com
http://slidepdf.com/reader/full/omniengine-gettingstarted-55a35b29d7914 16/50
OmniEngine Getting Started Guide
10 Using the OmniEngine Manager
● Remote Engine: Enter the IP address of the OmniEngine that you want to connect to.
● Port: Enter the TCP/IP Port used for communications. The default port for the
WildPackets DNX protocol is 6367.
● Authentication: Select the method used to authenticate the user. Typically, you would
select Default if you don’t use a third-party authentication server.
Note For OmniEngine Linux, select Third Party authentication.
● Domain: Type the Domain for login to the OmniEngine. If the OmniEngine is not a
member of any Domain, leave this field blank.
● Username: Type the Username for login to the OmniEngine.
● Password: Type the Password for login to the OmniEngine.
Note If you leave the Username and Password fields blank, the OmniEngine Manager attempts to
log in using the current Windows login credentials.
4. Click Connect. The OmniEngine is added to the Workspace and its OmniEngine windowis displayed showing details for that OmniEngine. See OmniEngine details windows on
page 11.
5/12/2018 Omniengine Gettingstarted - slidepdf.com
http://slidepdf.com/reader/full/omniengine-gettingstarted-55a35b29d7914 17/50
OmniEngine details windows 11
OmniEngine Getting Started Guide
Note When you close the OmniEngine Manager window, you are automatically disconnected from
any OmniEngine displayed in the OmniEngine Manager. When you start the OmniEngineManager again, all OmniEngines are in a disconnected state. You will need to reconnect to any
OmniEngine that you want to configure or update.
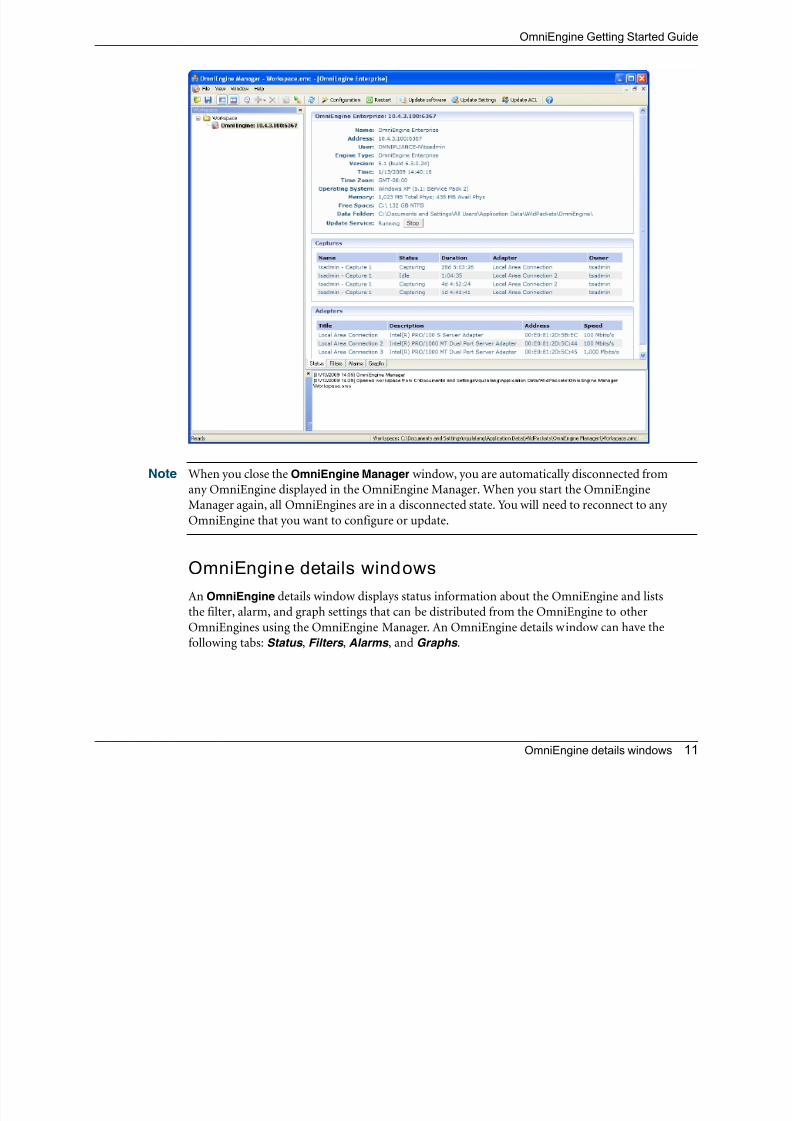
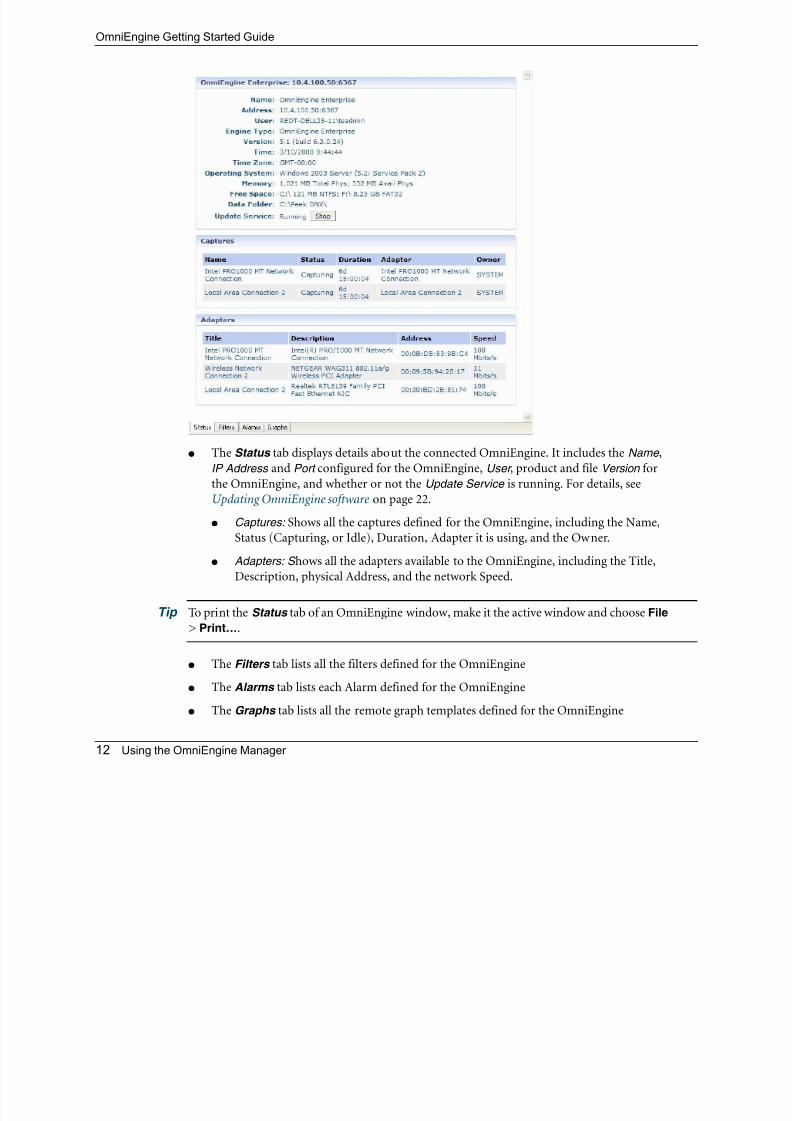
OmniEngine details windows
An OmniEngine details window displays status information about the OmniEngine and lists
the filter, alarm, and graph settings that can be distributed from the OmniEngine to otherOmniEngines using the OmniEngine Manager. An OmniEngine details window can have the
following tabs: Status , Filters , Alarms , and Graphs .
5/12/2018 Omniengine Gettingstarted - slidepdf.com
http://slidepdf.com/reader/full/omniengine-gettingstarted-55a35b29d7914 18/50
OmniEngine Getting Started Guide
12 Using the OmniEngine Manager
● The Status tab displays details about the connected OmniEngine. It includes the Name ,
IP Address and Port configured for the OmniEngine, User , product and file Version for
the OmniEngine, and whether or not the Update Service is running. For details, see
Updating OmniEngine software on page 22.
● Captures: Shows all the captures defined for the OmniEngine, including the Name,
Status (Capturing, or Idle), Duration, Adapter it is using, and the Owner.
● Adapters: S hows all the adapters available to the OmniEngine, including the Title,
Description, physical Address, and the network Speed.
Tip To print the Status tab of an OmniEngine window, make it the active window and choose File > Print….
● The Filters tab lists all the filters defined for the OmniEngine
● The Alarms tab lists each Alarm defined for the OmniEngine
● The Graphs tab lists all the remote graph templates defined for the OmniEngine
O iE i G tti St t d G id
5/12/2018 Omniengine Gettingstarted - slidepdf.com
http://slidepdf.com/reader/full/omniengine-gettingstarted-55a35b29d7914 19/50
Discover OmniEngines 13
OmniEngine Getting Started Guide
You can distribute settings from the Filters , Alarms , and Graphs tabs to other OmniEngines.
For details, see Updating OmniEngine settings on page 25.
Important! When you close an OmniEngine window, you are automatically disconnected from thatOmniEngine. In order to connect or reconnect to an OmniEngine, you must first select its
name in the OmniEngine Manager Workspace to re-open its OmniEngine window.
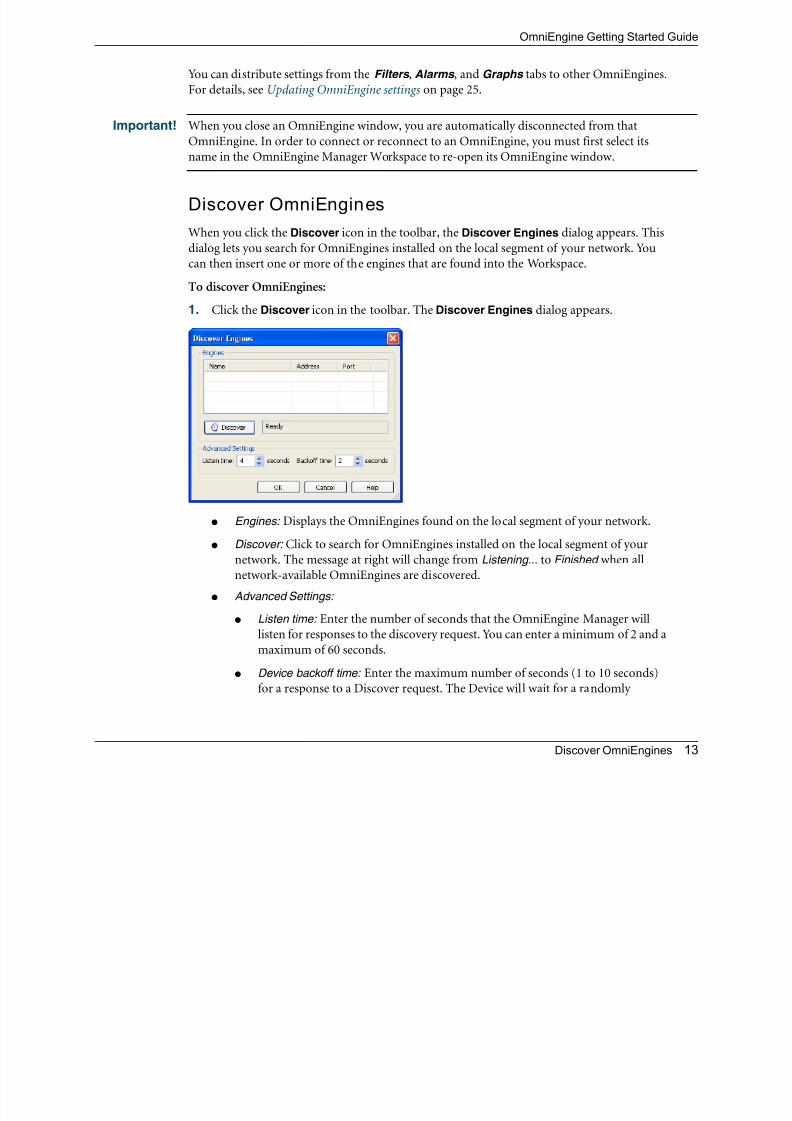
Discover OmniEngines
When you click the Discover icon in the toolbar, the Discover Engines dialog appears. This
dialog lets you search for OmniEngines installed on the local segment of your network. Youcan then insert one or more of the engines that are found into the Workspace.
To discover OmniEngines:
1. Click the Discover icon in the toolbar. The Discover Engines dialog appears.
● Engines: Displays the OmniEngines found on the local segment of your network.
● Discover: Click to search for OmniEngines installed on the local segment of your
network. The message at right will change from Listening... to Finished when all
network-available OmniEngines are discovered.
● Advanced Settings:
● Listen time: Enter the number of seconds that the OmniEngine Manager willlisten for responses to the discovery request. You can enter a minimum of 2 and a
maximum of 60 seconds.
● Device backoff time: Enter the maximum number of seconds (1 to 10 seconds)
for a response to a Discover request. The Device will wait for a randomly
OmniEngine Getting Started Guide

5/12/2018 Omniengine Gettingstarted - slidepdf.com
http://slidepdf.com/reader/full/omniengine-gettingstarted-55a35b29d7914 20/50
OmniEngine Getting Started Guide
14 Configuring an OmniEngine
generated amount of time between 0 and the maximum number of seconds. This
allows the listener to receive responses sequentially and not all at once.
2. Click the Discover button on the dialog. All OmniEngines found on the local segment of
your network are displayed in the Engines list.
3. Select the check box of the OmniEngines that you want to add to the Workspace and click
OK. The selected OmniEngines are added to the Workspace.
Tip Right-click in the Engines pane of the Discover Engines dialog and select Uncheck all to
deselect all engines.
Reconnect button
To reconnect to an OmniEngine listed in the Workspace:
1. Open the Status tab of the OmniEngine window for the desired OmniEngine.
2. Click the Reconnect button.
When you click Reconnect, the OmniEngine Manager applies the most recently used login
information for the selected OmniEngine.
Note If you wish to log in under a different Username , or if the configuration for the IP address
and/or port have changed since your last login in the same session, you must use the Connect
dialog directly. See Connecting to an OmniEngine on page 9.
Configuring an OmniEngineTo configure an OmniEngine, you must use the OmniEngine Configuration Wizard of the
OmniEngine Manager. The OmniEngine Configuration Wizard of the OmniEngine Manager
OmniEngine Getting Started Guide
5/12/2018 Omniengine Gettingstarted - slidepdf.com
http://slidepdf.com/reader/full/omniengine-gettingstarted-55a35b29d7914 21/50
Engine Configuration—General 15
OmniEngine Getting Started Guide
first appears when you install an OmniEngine and are prompted to configure it. See Installing
an OmniEngine on page 2.
Note To configure OmniEngine Linux, you must configure it from the OmniPeek computer asdescribed below.
To configure an OmniEngine from the OmniEngine computer:
1. Choose Start > Programs > WildPackets OmniEngine Wizard. The OmniEngine
Configuration Wizard appears.
2. Click Next.
3. Click Yes when prompted to stop the OmniEngine. Once the engine is stopped, the
General view of OmniEngine Configuration Wizard appears.
4. Configure the settings in the General , Security , and Edit Access Control views. See
Engine Configuration—General on page 15; Engine Configuration—Security on page 17;
and Engine Configuration—Edit Access Control on page 18.
5. When prompted, click Yes to send the configuration changes to the engine. The
configuration changes won’t take effect until the OmniEngine is restarted.
To configure an OmniEngine from the OmniPeek computer:
1. Choose Start > Programs > WildPackets OmniEngine Manager. The OmniEngine
Manager window appears.
2. Connect to an OmniEngine in the Workspace (see Connecting to an OmniEngine on page
9) and click the Configuration icon in the toolbar. The OmniEngine Configuration
Wizard appears.
3. Click Next. The General view of the OmniEngine Configuration Wizard appears.
4. Configure the settings in the General , Security , and Edit Access Control views. See
Engine Configuration—General on page 15; Engine Configuration—Security on page 17;
and Engine Configuration—Edit Access Control on page 18.
5. When prompted, click Yes to send the configuration changes to the engine. The
configuration changes won’t take effect until the OmniEngine is restarted.
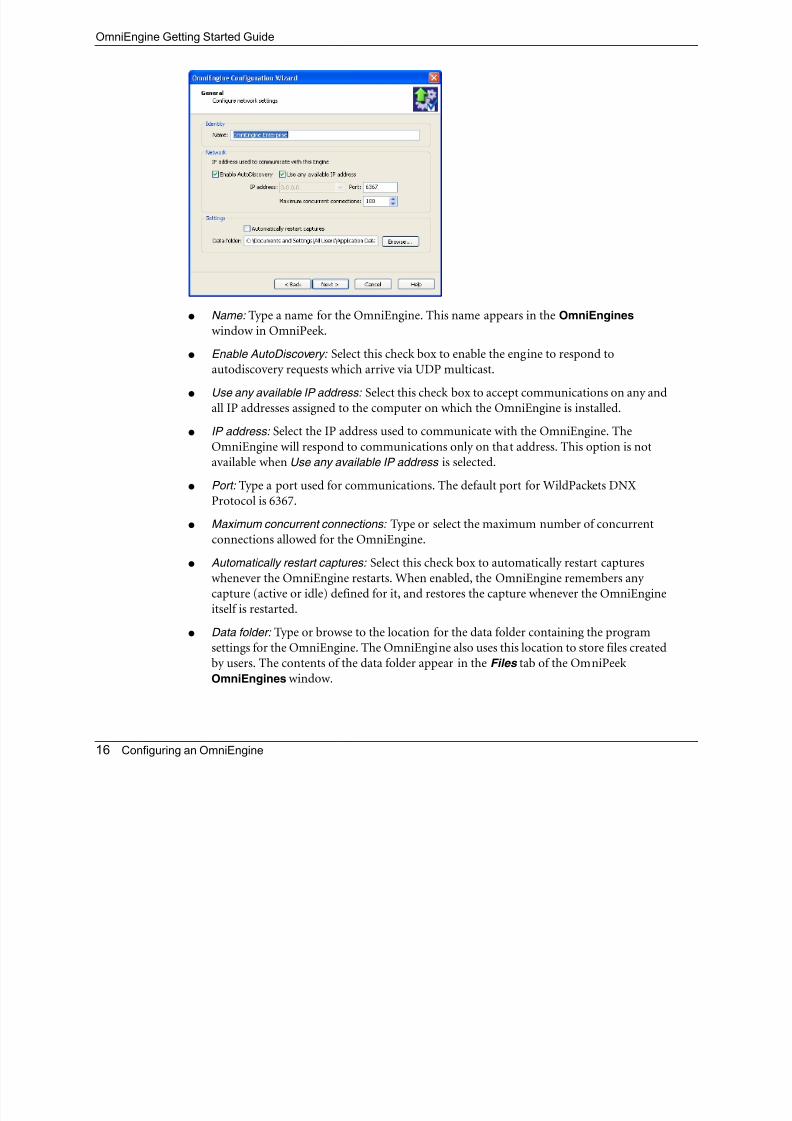
Engine Configuration—General
The General view of the OmniEngine Configuration Wizard lets you set the name, address,
capture restart, and local disk use settings.
OmniEngine Getting Started Guide
5/12/2018 Omniengine Gettingstarted - slidepdf.com
http://slidepdf.com/reader/full/omniengine-gettingstarted-55a35b29d7914 22/50
OmniEngine Getting Started Guide
16 Configuring an OmniEngine
● Name: Type a name for the OmniEngine. This name appears in the OmniEngines
window in OmniPeek.
● Enable AutoDiscovery: Select this check box to enable the engine to respond to
autodiscovery requests which arrive via UDP multicast.● Use any available IP address: Select this check box to accept communications on any and
all IP addresses assigned to the computer on which the OmniEngine is installed.
● IP address: Select the IP address used to communicate with the OmniEngine. The
OmniEngine will respond to communications only on that address. This option is not
available when Use any available IP address is selected.
● Port: Type a port used for communications. The default port for WildPackets DNX
Protocol is 6367.
● Maximum concurrent connections: Type or select the maximum number of concurrent
connections allowed for the OmniEngine.
● Automatically restart captures: Select this check box to automatically restart captures
whenever the OmniEngine restarts. When enabled, the OmniEngine remembers any
capture (active or idle) defined for it, and restores the capture whenever the OmniEngine
itself is restarted.
● Data folder: Type or browse to the location for the data folder containing the program
settings for the OmniEngine. The OmniEngine also uses this location to store files created
by users. The contents of the data folder appear in the Files tab of the OmniPeek
OmniEngines window.
OmniEngine Getting Started Guide
5/12/2018 Omniengine Gettingstarted - slidepdf.com
http://slidepdf.com/reader/full/omniengine-gettingstarted-55a35b29d7914 23/50
Engine Configuration—Security 17
g g
Important! Whether you accept the default location or choose a new location, the directory you choose as
the Data folder must be accessible by all users of this OmniEngine.
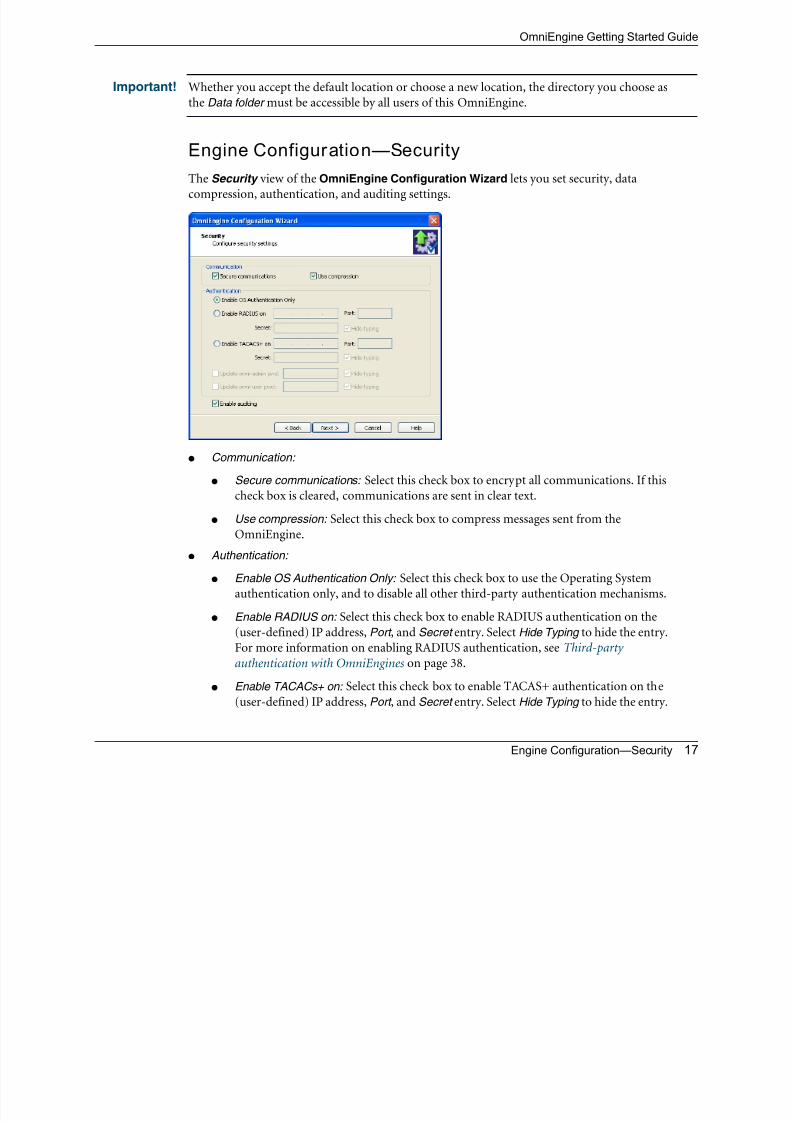
Engine Configuration—Security
The Security view of the OmniEngine Configuration Wizard lets you set security, data
compression, authentication, and auditing settings.
● Communication:
● Secure communications: Select this check box to encrypt all communications. If this
check box is cleared, communications are sent in clear text.
● Use compression: Select this check box to compress messages sent from the
OmniEngine.
● Authentication:
● Enable OS Authentication Only: Select this check box to use the Operating System
authentication only, and to disable all other third-party authentication mechanisms.
● Enable RADIUS on: Select this check box to enable RADIUS authentication on the(user-defined) IP address, Port , and Secret entry. Select Hide Typing to hide the entry.
For more information on enabling RADIUS authentication, see Third-party
authentication with OmniEngines on page 38.
● Enable TACACs+ on: Select this check box to enable TACAS+ authentication on the
(user-defined) IP address, Port , and Secret entry. Select Hide Typing to hide the entry.
OmniEngine Getting Started Guide
5/12/2018 Omniengine Gettingstarted - slidepdf.com
http://slidepdf.com/reader/full/omniengine-gettingstarted-55a35b29d7914 24/50
18 Configuring an OmniEngine
For more information on enabling TACACs+ authentication, see Third-party
authentication with OmniEngines on page 38.
● Update omni-admin pwd (OmniEngine Windows only): Select this check box and
enter a new password for the administrator. Select Hide Typing to hide the entry.
● Update omni-user pwd (OmniEngine Windows only): Select this check box and enter
a new password for the user. Select Hide Typing to hide the entry.
● Enable auditing: Select this check box to create a log of user actions on the
OmniEngine. In a default installation of OmniEngine Windows, the log file is stored
at C:\Program Files\WildPackets\OmniEngine\OmniEngineAuditLog.txt; for
OmniEngine Linux, the log file is stored at /var/log/omniaudit.log.
Note The OmniEngine operates within the security environment configured in the operating
system. The OmniEngine itself can be set to a more restrictive or less restrictive access model.
It is important that the operating system security settings be compatible with those of the
OmniEngine. Refer to your operating system documentation for instructions on configuring
security settings for your operating system.
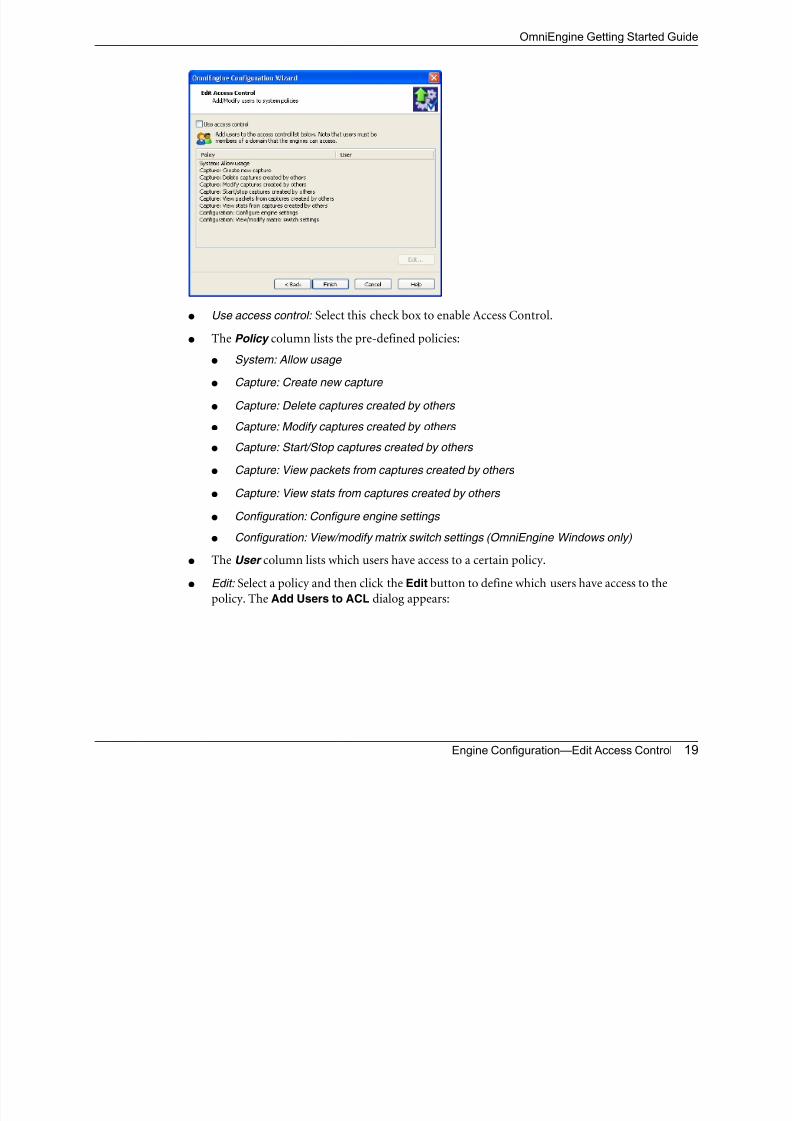
Engine Configuration—Edit Access Control
The Edit Access Control view of the OmniEngine Configuration Wizard lets you define
which users have access to an OmniEngine and which classes of actions (policies) each user is
allowed to perform.
Note There are several ways to create a new user in your operating system. Refer to your operating
system documentation for instructions on creating new user profiles.
OmniEngine Getting Started Guide
5/12/2018 Omniengine Gettingstarted - slidepdf.com
http://slidepdf.com/reader/full/omniengine-gettingstarted-55a35b29d7914 25/50
Engine Configuration—Edit Access Control 19
● Use access control: Select this check box to enable Access Control.
● The Policy column lists the pre-defined policies:
● System: Allow usage
● Capture: Create new capture
● Capture: Delete captures created by others
● Capture: Modify captures created by others
● Capture: Start/Stop captures created by others
● Capture: View packets from captures created by others
● Capture: View stats from captures created by others
● Configuration: Configure engine settings
● Configuration: View/modify matrix switch settings (OmniEngine Windows only)
● The User column lists which users have access to a certain policy.
● Edit: Select a policy and then click the Edit button to define which users have access to the
policy. The Add Users to ACL dialog appears:
OmniEngine Getting Started Guide
5/12/2018 Omniengine Gettingstarted - slidepdf.com
http://slidepdf.com/reader/full/omniengine-gettingstarted-55a35b29d7914 26/50
20 Configuring an OmniEngine
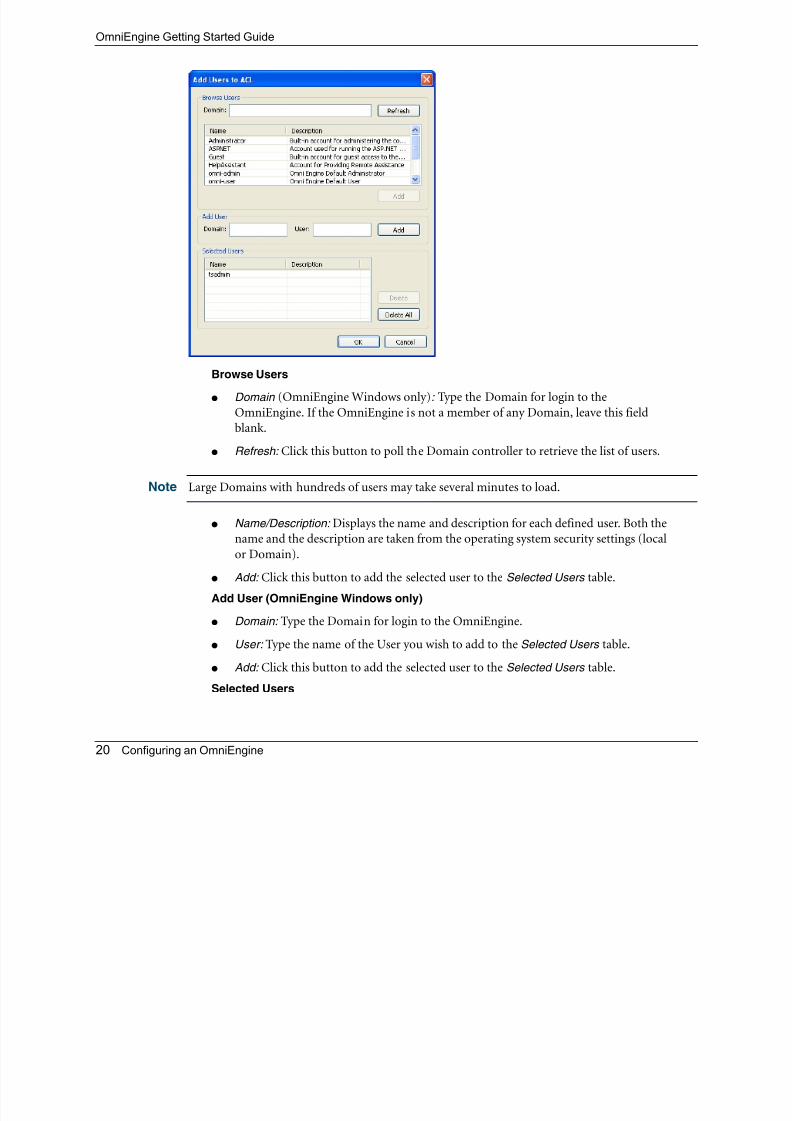
Browse Users
● Domain (OmniEngine Windows only): Type the Domain for login to the
OmniEngine. If the OmniEngine is not a member of any Domain, leave this field
blank.
● Refresh: Click this button to poll the Domain controller to retrieve the list of users.
Note Large Domains with hundreds of users may take several minutes to load.
● Name/Description: Displays the name and description for each defined user. Both the
name and the description are taken from the operating system security settings (local
or Domain).
● Add: Click this button to add the selected user to the Selected Users table.
Add User (OmniEngine Windows only)
● Domain: Type the Domain for login to the OmniEngine.
● User: Type the name of the User you wish to add to the Selected Users table.
● Add: Click this button to add the selected user to the Selected Users table.
Selected Users
OmniEngine Getting Started Guide
5/12/2018 Omniengine Gettingstarted - slidepdf.com
http://slidepdf.com/reader/full/omniengine-gettingstarted-55a35b29d7914 27/50
Engine Configuration—Edit Access Control 21
● Name/Description: Displays the name and description of users allowed to perform
the selected policy.
● Delete: Click this button to remove the selected user from the Selected Users table.
● Delete all: Click this button to remove all users from the Selected Users table.
Tip A Policy that has no users associated with it is effectively reserved for users with Administrator
or root level privileges.
Note It is possible to set the OmniEngine properties in such a way that users do not need
Administrator level privileges in order to use any of its features. Users do require the networklogin privilege in order to connect to the OmniEngine, and read/write access to the directory
selected as the Data folder.
Considerations when configuring Access Control
Please note the following when configuring Access Control:
● Users with Administrator or root level privileges always have access to all features of theOmniEngine.
● If the OmniEngine is installed on a machine under local control, the local user with
Administrator or root level privileges (and equivalents) has access to the OmniEngine
regardless of the settings in the Edit Access Control view.
● If the OmniEngine is installed on a machine under Domain control, the Domain
Administrator always has access regardless of the settings in the Edit Access Control
view.
● When Use access control is selected and no other users are added to the Edit Access
Control view (the initial default settings), then only the user with Administrator (local or
Domain, depending on the computer setup) or root level privileges has access to the
OmniEngine.
Considerations when disabling Access Control
When access control is disabled, the only restrictions on the use of the OmniEngine are those
imposed by the operating system security settings. Examples of relevant permissions
controlled by operating system security settings include:
● Login privilege: A user must be able to log in to the machine on which the OmniEngine is
running in order to use the program.
OmniEngine Getting Started Guide
5/12/2018 Omniengine Gettingstarted - slidepdf.com
http://slidepdf.com/reader/full/omniengine-gettingstarted-55a35b29d7914 28/50
22 Updating OmniEngine software
● Read/write access: The OmniEngine saves configuration information and the packet files
created by the remote capture Save to Disk options to a directory called the Data folder .
The location is defined in the OmniEngine configuration. A user must have read/write
access to the Data folder in order to configure the program, use the Save to Disk options,
or access the resulting packet files.
● Start/Stop service: A user must have sufficient privileges to start, stop, and restart the
OmniEngine service in order to use the OmniEngine Configuration Wizard or to have
configuration changes take effect when they are made from the OmniEngine Manager.
Updating OmniEngine software
The OmniEngine Manager lets you distribute OmniEngine software updates simultaneously to one or more OmniEngines.
Note Updating OmniEngine software is not supported in OmniEngine Linux.
Before distributing updates, make sure that:
● The Update Service is running on each OmniEngine you are updating. The current state
of the Update Service is shown as Running or Stopped in the Properties section of theStatus tab of the OmniEngines window. To change the state, click the Stop / Start
button.
● You have Administrator level privileges (local or Domain) on each OmniEngine
computer you are updating.
To update the software for one or more OmniEngines:
1. Click the Update Software icon in the toolbar. The Start view of the OmniEngineUpdate Software Wizard appears.
2. Click Next. The List of Engines view appears.
OmniEngine Getting Started Guide
5/12/2018 Omniengine Gettingstarted - slidepdf.com
http://slidepdf.com/reader/full/omniengine-gettingstarted-55a35b29d7914 29/50
Updating OmniEngine software 23
3. Click the Add or Import button to add the IP Address and port of the OmniEngines you
are updating to the list of engines:
● Add: Click to add an OmniEngine to the list one at a time. You must enter the IP
address for the OmniEngine. Accept the default value of 6369 for the port.● Import: Click to add a tab-delimited text file (*.txt) containing the IP address and
port values for multiple OmniEngines
Note You can click the Credentials button to enter the login credentials that can be used to connect
to multiple OmniEngines when distributing software updates or new settings. See Credentials
dialog on page 32.
4. Click Next to open the Update Installer view of the OmniEngine Update Software
Wizard.
OmniEngine Getting Started Guide
5/12/2018 Omniengine Gettingstarted - slidepdf.com
http://slidepdf.com/reader/full/omniengine-gettingstarted-55a35b29d7914 30/50
24 Updating OmniEngine software
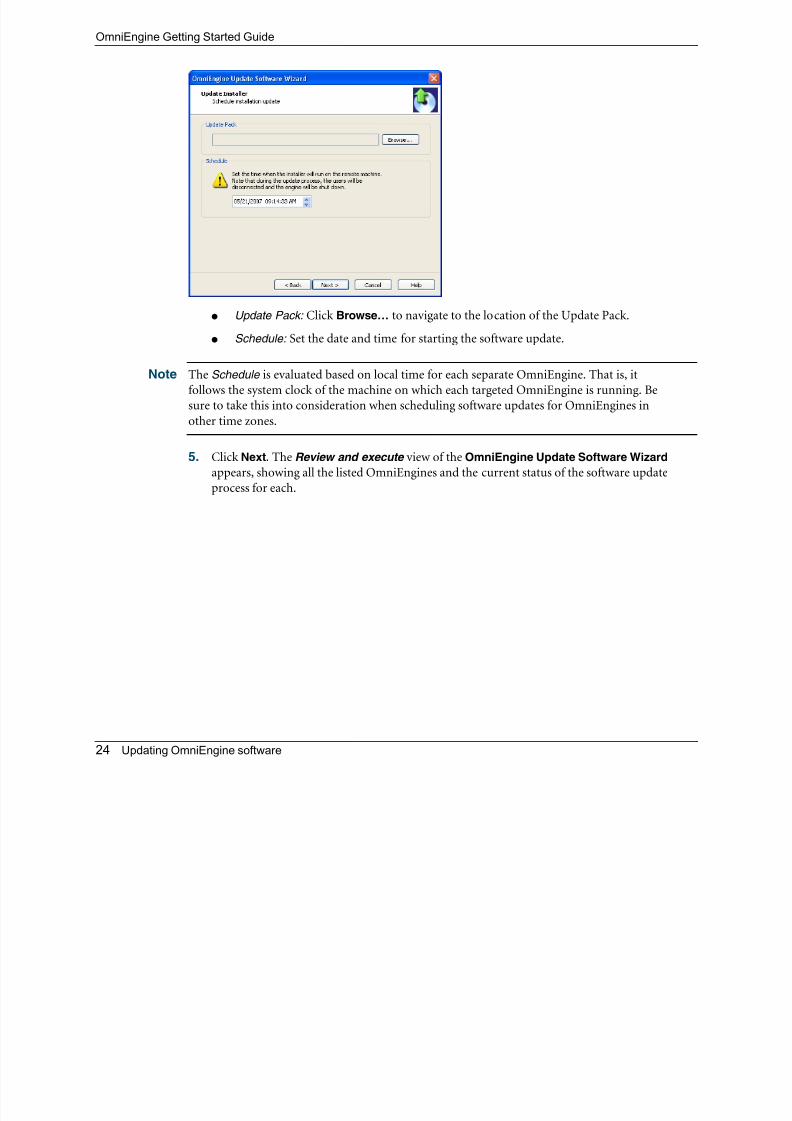
● Update Pack: Click Browse… to navigate to the location of the Update Pack.
● Schedule: Set the date and time for starting the software update.
Note The Schedule is evaluated based on local time for each separate OmniEngine. That is, itfollows the system clock of the machine on which each targeted OmniEngine is running. Be
sure to take this into consideration when scheduling software updates for OmniEngines in
other time zones.
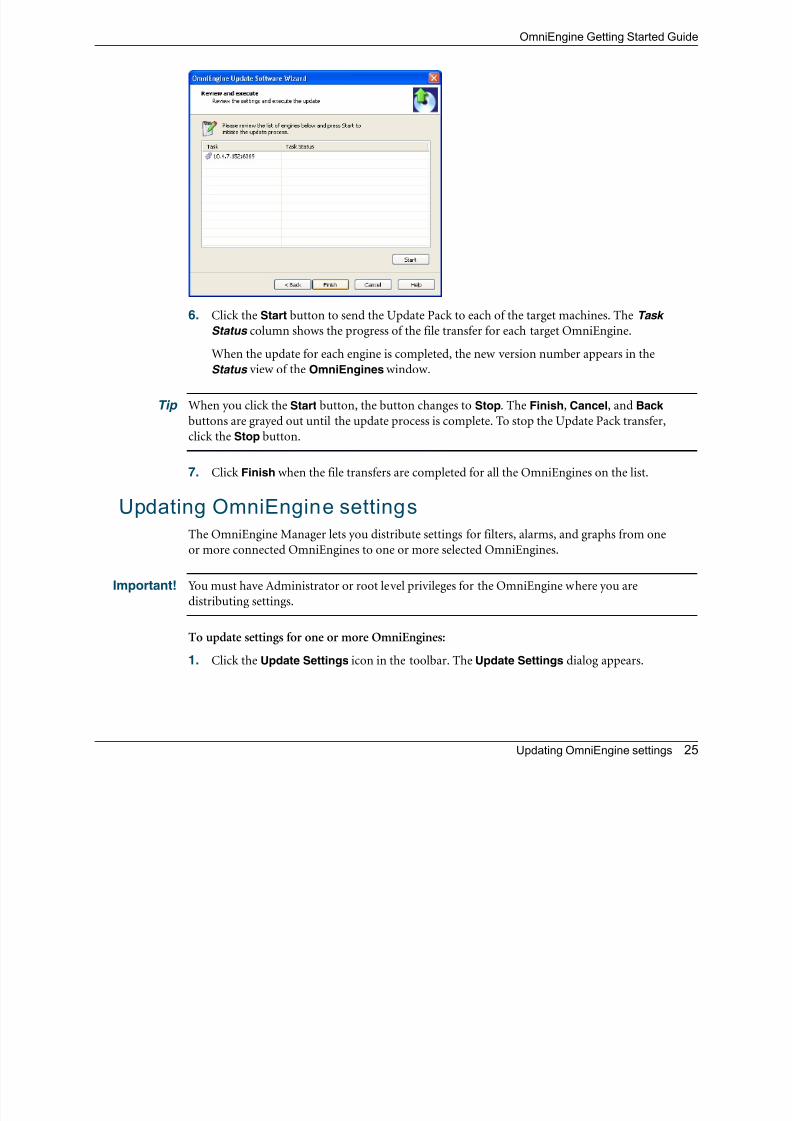
5. Click Next. The Review and execute view of the OmniEngine Update Software Wizard
appears, showing all the listed OmniEngines and the current status of the software update
process for each.
OmniEngine Getting Started Guide
5/12/2018 Omniengine Gettingstarted - slidepdf.com
http://slidepdf.com/reader/full/omniengine-gettingstarted-55a35b29d7914 31/50
Updating OmniEngine settings 25
6. Click the Start button to send the Update Pack to each of the target machines. The Task
Status column shows the progress of the file transfer for each target OmniEngine.
When the update for each engine is completed, the new version number appears in the
Status view of the OmniEngines window.
Tip When you click the Start button, the button changes to Stop. The Finish, Cancel, and Back
buttons are grayed out until the update process is complete. To stop the Update Pack transfer,
click the Stop button.
7. Click Finish when the file transfers are completed for all the OmniEngines on the list.
Updating OmniEngine settingsThe OmniEngine Manager lets you distribute settings for filters, alarms, and graphs from one
or more connected OmniEngines to one or more selected OmniEngines.
Important! You must have Administrator or root level privileges for the OmniEngine where you are
distributing settings.
To update settings for one or more OmniEngines:
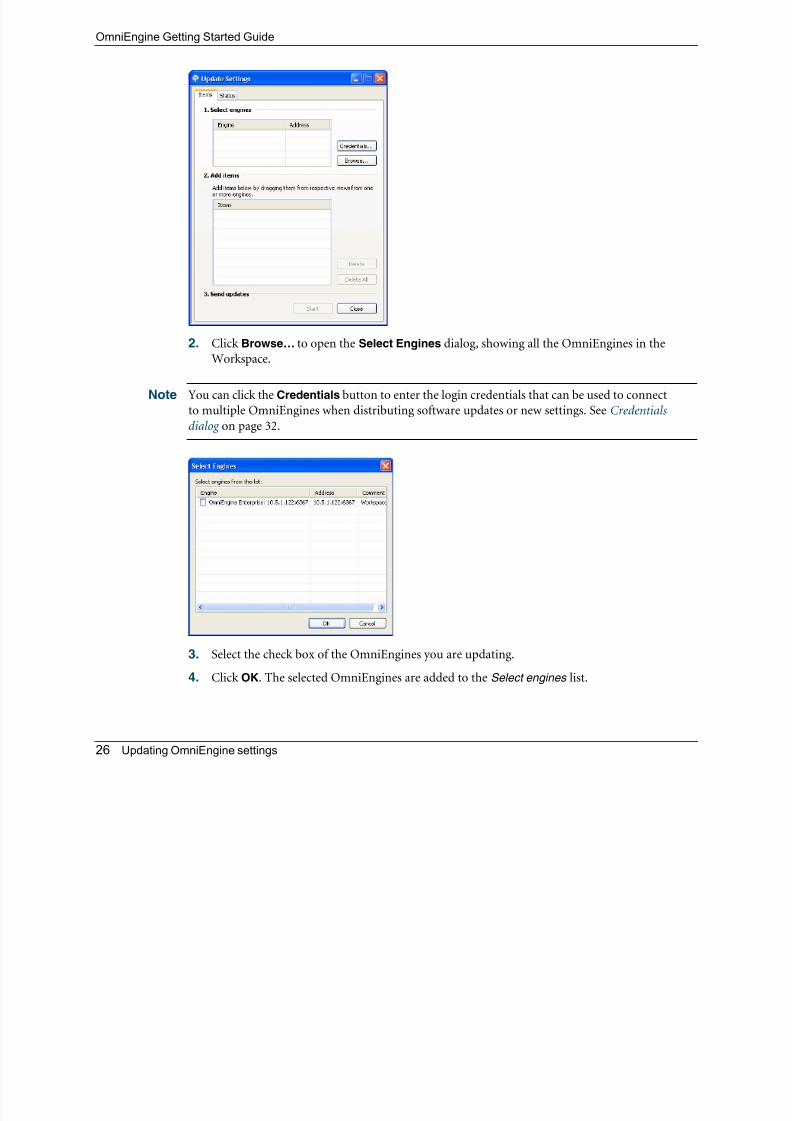
1. Click the Update Settings icon in the toolbar. The Update Settings dialog appears.
OmniEngine Getting Started Guide
5/12/2018 Omniengine Gettingstarted - slidepdf.com
http://slidepdf.com/reader/full/omniengine-gettingstarted-55a35b29d7914 32/50
26 Updating OmniEngine settings
2. Click Browse… to open the Select Engines dialog, showing all the OmniEngines in the
Workspace.
Note You can click the Credentials button to enter the login credentials that can be used to connect
to multiple OmniEngines when distributing software updates or new settings. See Credentials
dialog on page 32.
3. Select the check box of the OmniEngines you are updating.
4. Click OK. The selected OmniEngines are added to the Select engines list.
OmniEngine Getting Started Guide

5/12/2018 Omniengine Gettingstarted - slidepdf.com
http://slidepdf.com/reader/full/omniengine-gettingstarted-55a35b29d7914 33/50
Updating OmniEngine settings 27
To remove an OmniEngine from the list, click Browse… again and clear the check box of
the OmniEngine in the Select Engines dialog. Click OK. The Select engines list is
updated.
5. Open the OmniEngine window of any connected OmniEngine in the Workspace andselect one of the tabs (Filters , Alarms , or Graphs ).
6. Drag-and-drop any item in one of the tabs to the Add items section of the Update
Settings dialog. You can add any combination of filters, alarms, or graphs settings.
7. Click the Start button to send the settings to the OmniEngines in the Select engines list.
8. Click the Status tab to see the current status of all configuration updates for each target
OmniEngine.
Note To update the settings for a target OmniEngine that has Use access control enabled, you must
log in either as a user associated with the System: Allow usage policy or as a user with
Administrator or root level privileges (local or Domain) for the host machine. If the target
OmniEngine does not have Use access control enabled, any user with read/write privileges to
the Data folder directory of the target OmniEngine can use the Update Settings dialog.
OmniEngine Getting Started Guide
5/12/2018 Omniengine Gettingstarted - slidepdf.com
http://slidepdf.com/reader/full/omniengine-gettingstarted-55a35b29d7914 34/50
28 Updating OmniEngine ACL settings
Updating OmniEngine ACL settingsThe Access Control List (ACL) limits access to an OmniEngine by associating Users (defined in
the operating system) with classes of tasks on the OmniEngine, called Policies. These
associations are set in the configuration of each OmniEngine.
Note Updating OmniEngine ACL settings to multiple OmniEngines is not supported in
OmniEngine Linux.
The OmniEngine Manager also lets you add the same Domain username and Policy
associations to the ACLs of multiple OmniEngines, all of which are operating under the same
Domain control.
Important! The OmniEngine Manager must be able to log in to each target OmniEngine as a user with the
correct permissions to update the ACL on that engine, as described above. For detailed login
information, see Credentials dialog on page 32.
NoteTo make use of the
OmniEngine Update ACL Wizard, you must present the correct logincredentials for each target machine. For an OmniEngine with Use access control enabled, any
user associated with both the System: Allow usage and Configuration: Configure engine
settings policies can configure the OmniEngine. Any user with Administrator privileges (local
or Domain) on the target machine can configure the OmniEngine, regardless of any settings in
its ACL.
To distribute an ACL update to multiple OmniEngines in a single domain:
1. Open a Workspace file that contains all the OmniEngines whose ACLs you wish to
update.
2. Click Update ACL in the toolbar. The Start view of the OmniEngine Update ACL
Wizard appears.
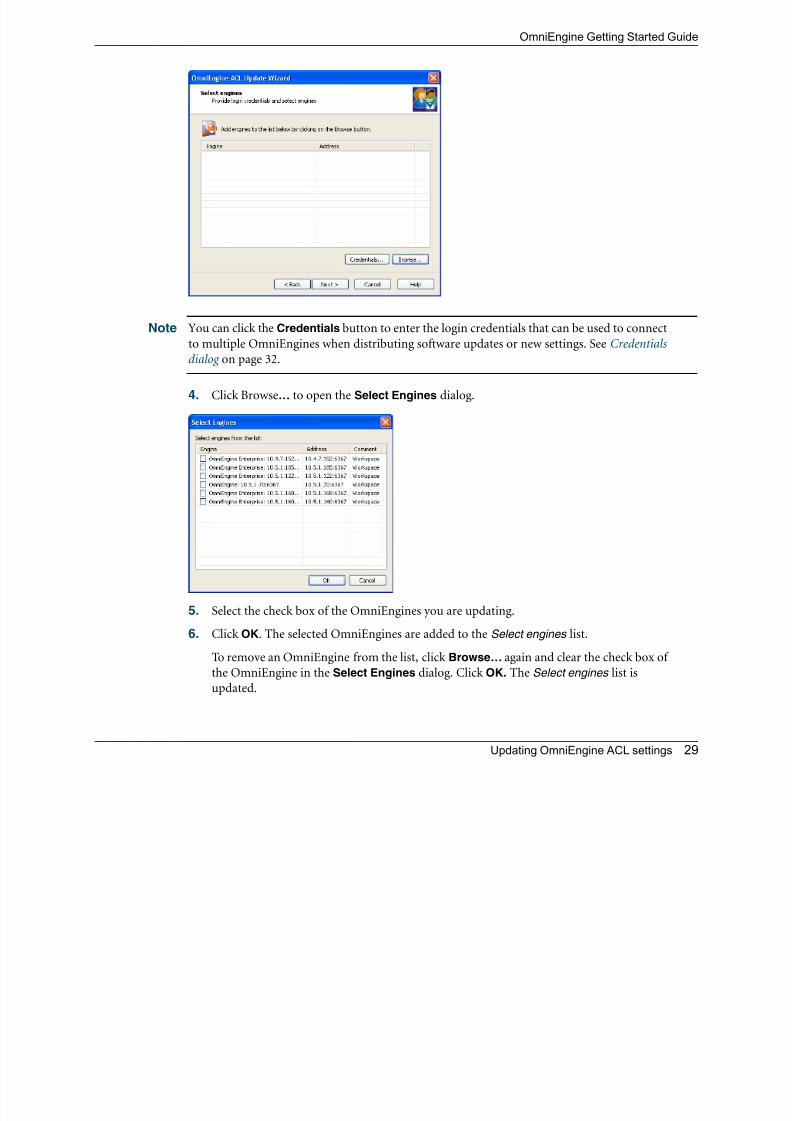
3. Click Next to open the Select engines view of the OmniEngine Update ACL Wizard, in
which you can specify all the OmniEngines to which you would like to distribute the ACL
update.
OmniEngine Getting Started Guide
5/12/2018 Omniengine Gettingstarted - slidepdf.com
http://slidepdf.com/reader/full/omniengine-gettingstarted-55a35b29d7914 35/50
Updating OmniEngine ACL settings 29
Note You can click the Credentials button to enter the login credentials that can be used to connect
to multiple OmniEngines when distributing software updates or new settings. See Credentials
dialog on page 32.
4. Click Browse… to open the Select Engines dialog.
5. Select the check box of the OmniEngines you are updating.
6. Click OK. The selected OmniEngines are added to the Select engines list.
To remove an OmniEngine from the list, click Browse… again and clear the check box of
the OmniEngine in the Select Engines dialog. Click OK. The Select engines list is
updated.
OmniEngine Getting Started Guide
5/12/2018 Omniengine Gettingstarted - slidepdf.com
http://slidepdf.com/reader/full/omniengine-gettingstarted-55a35b29d7914 36/50
30 Updating OmniEngine ACL settings
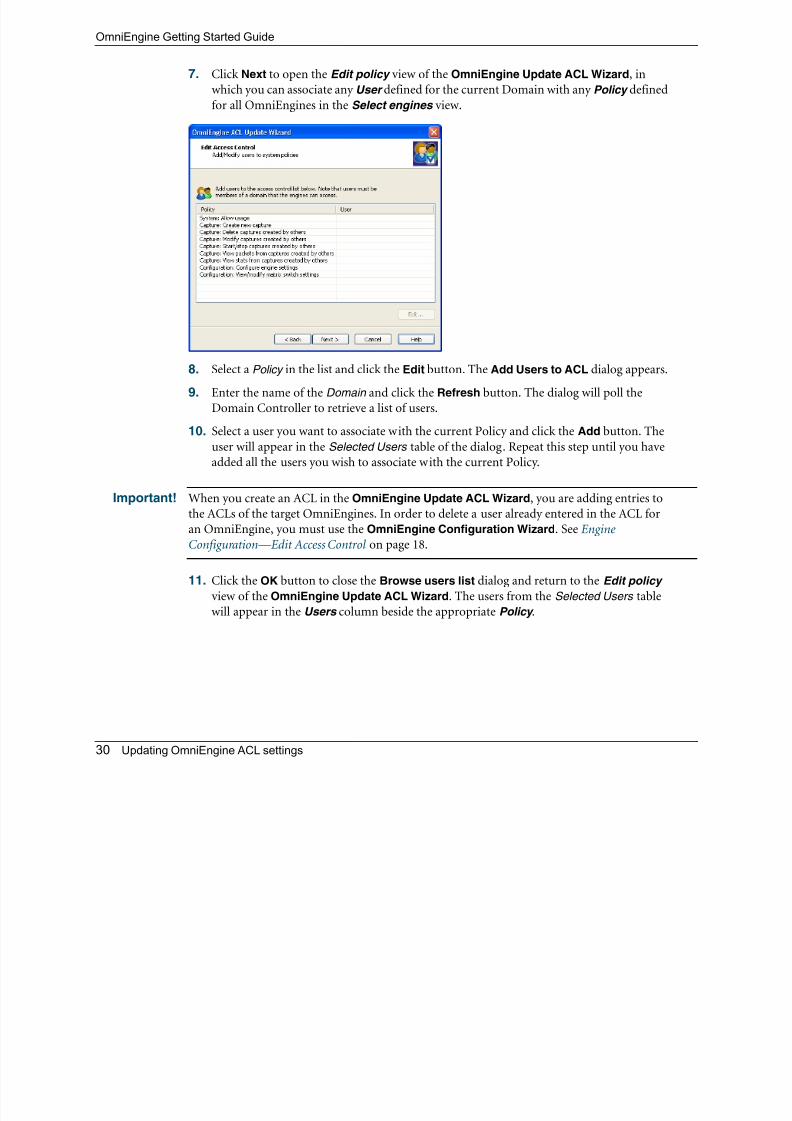
7. Click Next to open the Edit policy view of the OmniEngine Update ACL Wizard, in
which you can associate any User defined for the current Domain with any Policy defined
for all OmniEngines in the Select engines view.
8. Select a Policy in the list and click the Edit button. The Add Users to ACL dialog appears.
9. Enter the name of the Domain and click the Refresh button. The dialog will poll the
Domain Controller to retrieve a list of users.
10. Select a user you want to associate with the current Policy and click the Add button. The
user will appear in the Selected Users table of the dialog. Repeat this step until you have
added all the users you wish to associate with the current Policy.
Important! When you create an ACL in the OmniEngine Update ACL Wizard, you are adding entries tothe ACLs of the target OmniEngines. In order to delete a user already entered in the ACL for
an OmniEngine, you must use the OmniEngine Configuration Wizard. See Engine
Configuration—Edit Access Control on page 18.
11. Click the OK button to close the Browse users list dialog and return to the Edit policy
view of the OmniEngine Update ACL Wizard. The users from the Selected Users table
will appear in the Users column beside the appropriate Policy .
OmniEngine Getting Started Guide
5/12/2018 Omniengine Gettingstarted - slidepdf.com
http://slidepdf.com/reader/full/omniengine-gettingstarted-55a35b29d7914 37/50
Updating OmniEngine ACL settings 31
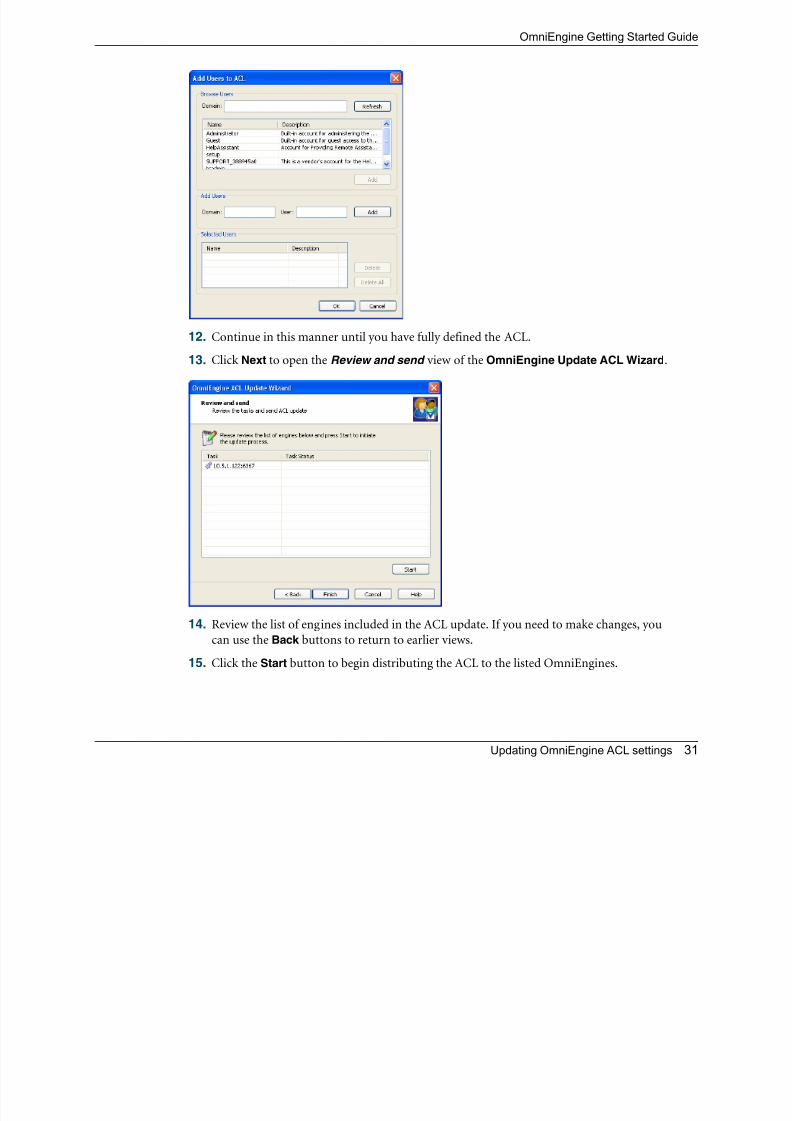
12. Continue in this manner until you have fully defined the ACL.
13. Click Next to open the Review and send view of the OmniEngine Update ACL Wizard.
14. Review the list of engines included in the ACL update. If you need to make changes, youcan use the Back buttons to return to earlier views.
15. Click the Start button to begin distributing the ACL to the listed OmniEngines.
OmniEngine Getting Started Guide
5/12/2018 Omniengine Gettingstarted - slidepdf.com
http://slidepdf.com/reader/full/omniengine-gettingstarted-55a35b29d7914 38/50
32 Updating OmniEngine ACL settings
Note In order to be able to retrieve the list of Domain users, you must be logged on as a user with
Administrator privileges (local or Domain). Additionally, you must have logged on to a
computer under the Domain control of the target Domain during the current session of
Windows. Your Domain login can have been as a Domain user of any kind, Administrator orotherwise. If you are not logged in as a Domain user on the computer on which the
OmniEngine Manager is running, you can accomplish this in a different way. For example,
you can connect to a network drive on any computer that is under the control of the target
Domain, and supply the Domain username and password at the prompt.
16. Click Finish to close the OmniEngine Update ACL Wizard.
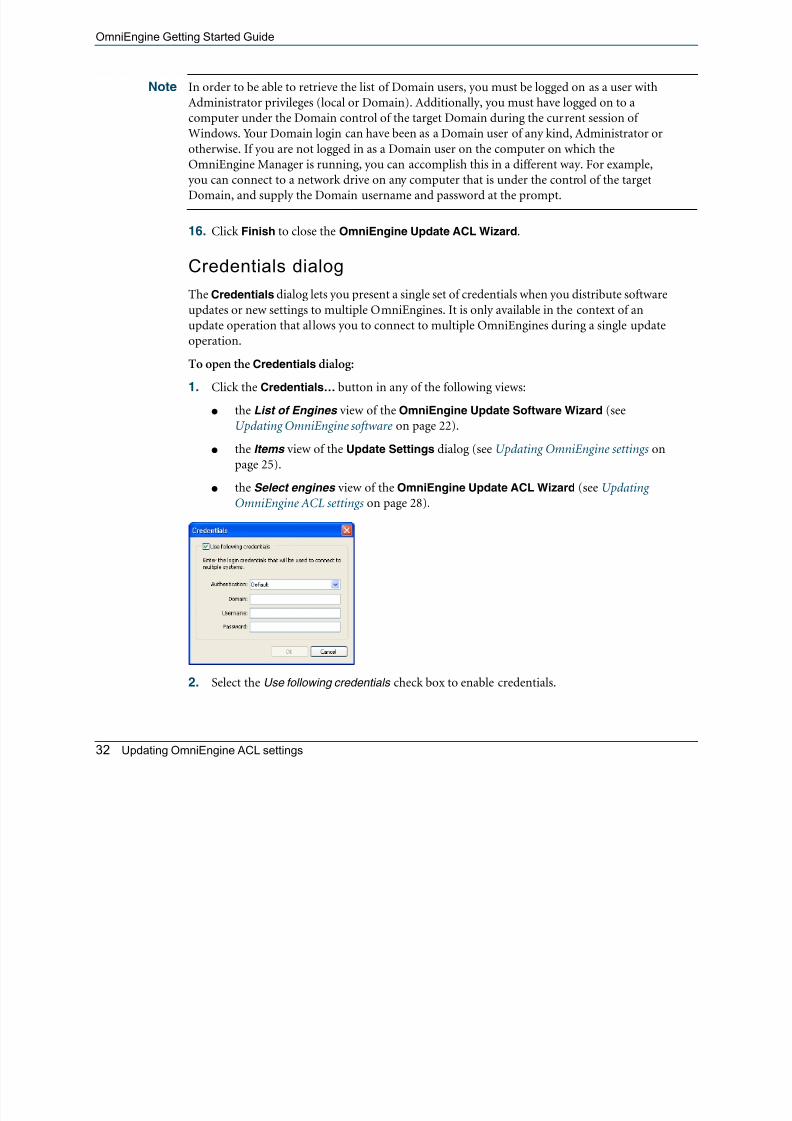
Credentials dialog
The Credentials dialog lets you present a single set of credentials when you distribute software
updates or new settings to multiple OmniEngines. It is only available in the context of an
update operation that allows you to connect to multiple OmniEngines during a single update
operation.
To open the Credentials dialog:
1. Click the Credentials… button in any of the following views:
● the List of Engines view of the OmniEngine Update Software Wizard (see
Updating OmniEngine software on page 22).
● the Items view of the Update Settings dialog (see Updating OmniEngine settings on
page 25).
● the Select engines view of the OmniEngine Update ACL Wizard (see Updating
OmniEngine ACL settings on page 28).
2. Select the Use following credentials check box to enable credentials.
OmniEngine Getting Started Guide
3 Complete credential information for Authentication Domain Username and Password
5/12/2018 Omniengine Gettingstarted - slidepdf.com
http://slidepdf.com/reader/full/omniengine-gettingstarted-55a35b29d7914 39/50
Using OmniEngines with OmniPeek 33
3. Complete credential information for Authentication , Domain , Username , and Password .
See Connecting to an OmniEngine on page 9 for details.
4. Click OK to accept your changes.
Updating multiple OmniEngines
When updating multiple OmniEngines, you may need to present multiple sets of credentials.
The available credentials are presented in the following order:
● Existing connection: For any OmniEngine to which you are already connected, the
Update functions will attempt the update using the credentials you used to log on to that
OmniEngine.
● Credentials dialog: If the check box beside Use following credentials is selected, the
Update function will present the Domain , Username , and Password found in the
Credentials dialog to any OmniEngine to which you are not already connected.
● Local machine login: If you do not use the Credentials dialog (Use following credentials is
not selected) the Update function will present the credentials you used to log in to the
computer on which the OmniEngine Manager is running as your login credentials for any
OmniEngine to which you are not already connected.
Note When using the OmniEngine Update Software Wizard, your login is supplied to the Update
Service, not to the OmniEngine. In this case, only the latter two choices are relevant.
By taking advantage of the order in which the OmniEngine Manager presents credentials, you
can update any set of network accessible OmniEngines (for which you have the correct
permissions) in a single operation.
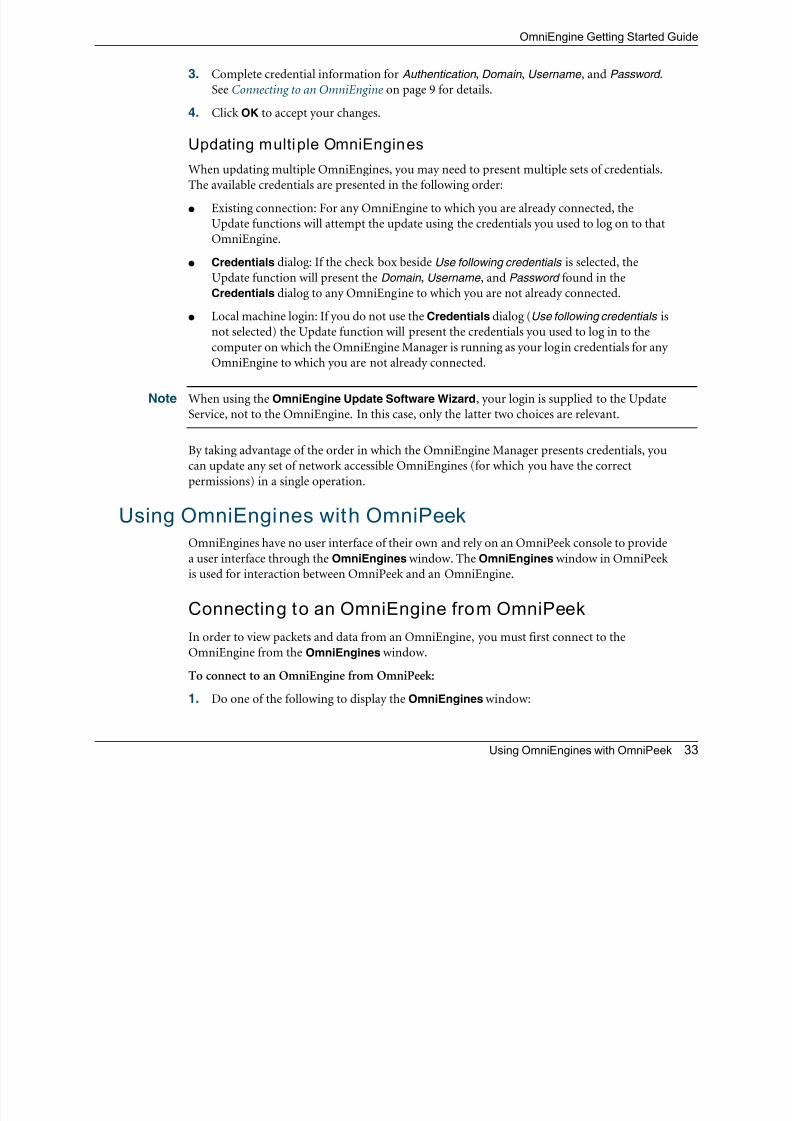
Using OmniEngines with OmniPeekOmniEngines have no user interface of their own and rely on an OmniPeek console to provide
a user interface through the OmniEngines window. The OmniEngines window in OmniPeek
is used for interaction between OmniPeek and an OmniEngine.
Connecting to an OmniEngine from OmniPeek
In order to view packets and data from an OmniEngine, you must first connect to the
OmniEngine from the OmniEngines window.
To connect to an OmniEngine from OmniPeek:
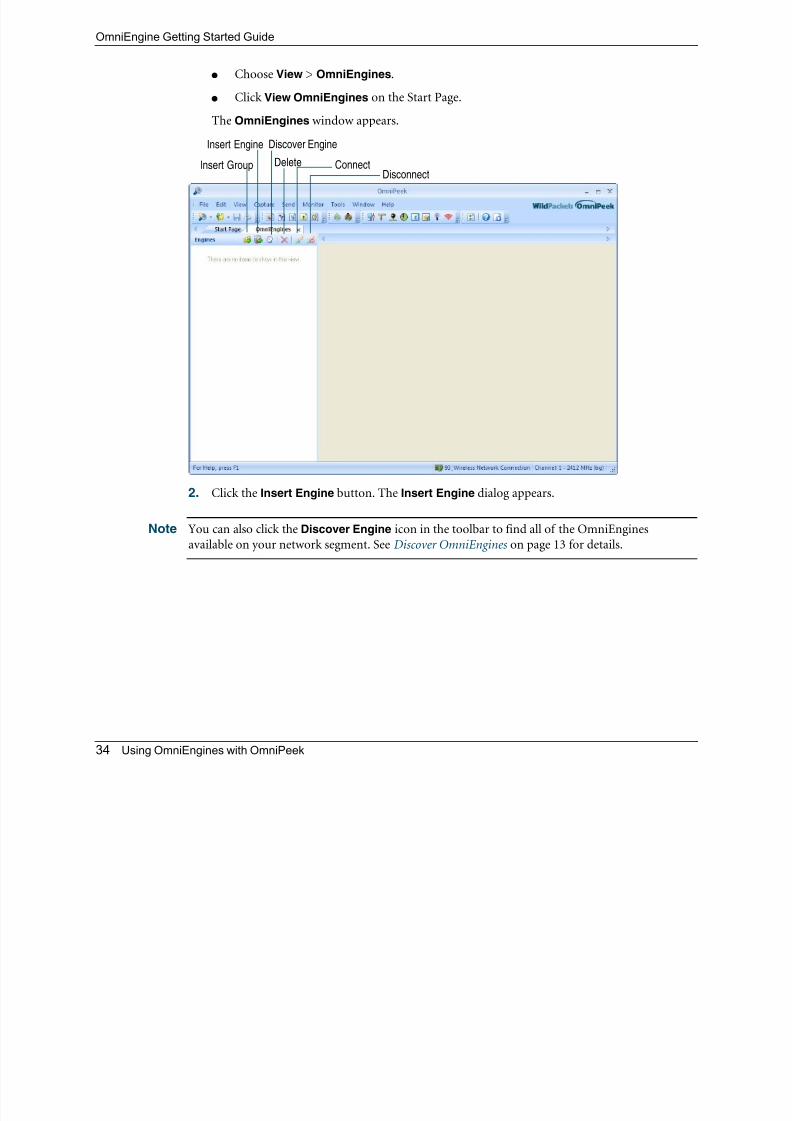
1. Do one of the following to display the OmniEngines window:
OmniEngine Getting Started Guide
● Choose View > OmniEngines
5/12/2018 Omniengine Gettingstarted - slidepdf.com
http://slidepdf.com/reader/full/omniengine-gettingstarted-55a35b29d7914 40/50
34 Using OmniEngines with OmniPeek
● Choose View > OmniEngines.
● Click View OmniEngines on the Start Page.
The OmniEngines window appears.
2. Click the Insert Engine button. The Insert Engine dialog appears.
Note You can also click the Discover Engine icon in the toolbar to find all of the OmniEngines
available on your network segment. See Discover OmniEngines on page 13 for details.
Insert Group Delete Connect
Insert Engine Discover Engine
Disconnect
OmniEngine Getting Started Guide

5/12/2018 Omniengine Gettingstarted - slidepdf.com
http://slidepdf.com/reader/full/omniengine-gettingstarted-55a35b29d7914 41/50
Connecting to an OmniEngine from OmniPeek 35
3. Complete the dialog:
● Host: Enter the IP address of the OmniEngine that you want to connect to.
● Port: Enter the TCP/IP Port used for communications. The default port of for the
WildPackets DNX protocol is 6367.
● Authentication: Select the method used to authenticate the user. Typically, you would
select Default if you don’t use a third-party authentication server.
Note For OmniEngine Linux, you must select Third Party authentication.
● Domain: Type the Domain for login to the OmniEngine. If the OmniEngine is not a
member of any Domain, leave this field blank.
● Username: Type the Username for login to the OmniEngine.
● Password: Type the Password for login to the OmniEngine.
4. Click Connect. When the connection is established, the OmniEngine appears in the
OmniEngines window.
OmniEngine Getting Started Guide
5/12/2018 Omniengine Gettingstarted - slidepdf.com
http://slidepdf.com/reader/full/omniengine-gettingstarted-55a35b29d7914 42/50
36 Using OmniEngines with OmniPeek
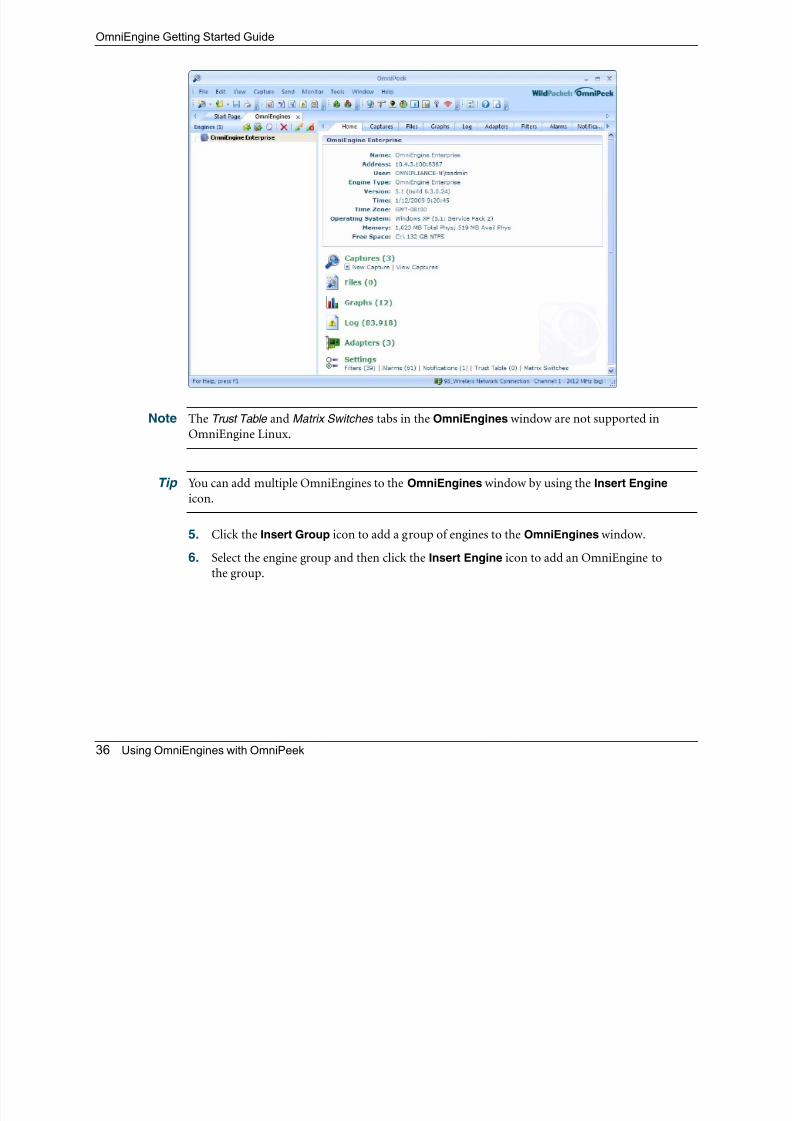
Note The Trust Table and Matrix Switches tabs in the OmniEngines window are not supported in
OmniEngine Linux.
Tip You can add multiple OmniEngines to the OmniEngines window by using the Insert Engine
icon.
5. Click the Insert Group icon to add a group of engines to the OmniEngines window.
6. Select the engine group and then click the Insert Engine icon to add an OmniEngine to
the group.
OmniEngine Getting Started Guide
5/12/2018 Omniengine Gettingstarted - slidepdf.com
http://slidepdf.com/reader/full/omniengine-gettingstarted-55a35b29d7914 43/50
Capturing from an OmniEngine 37
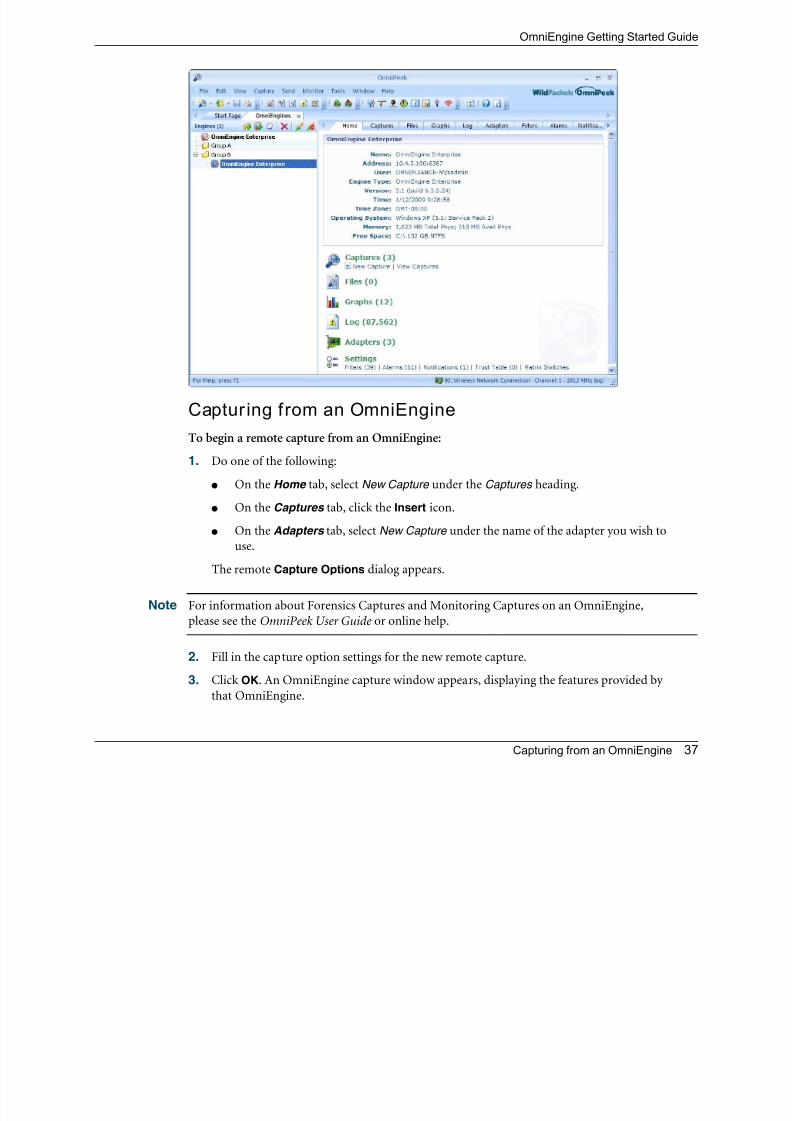
Capturing from an OmniEngine
To begin a remote capture from an OmniEngine:
1. Do one of the following:
● On the Home tab, select New Capture under the Captures heading.
● On the Captures tab, click the Insert icon.
● On the Adapters tab, select New Capture under the name of the adapter you wish to
use.
The remote Capture Options dialog appears.
Note For information about Forensics Captures and Monitoring Captures on an OmniEngine,
please see the OmniPeek User Guide or online help.
2. Fill in the capture option settings for the new remote capture.
3. Click OK. An OmniEngine capture window appears, displaying the features provided by
that OmniEngine.
OmniEngine Getting Started Guide
N t Th i h il bl i O iE i i d d d h f
5/12/2018 Omniengine Gettingstarted - slidepdf.com
http://slidepdf.com/reader/full/omniengine-gettingstarted-55a35b29d7914 44/50
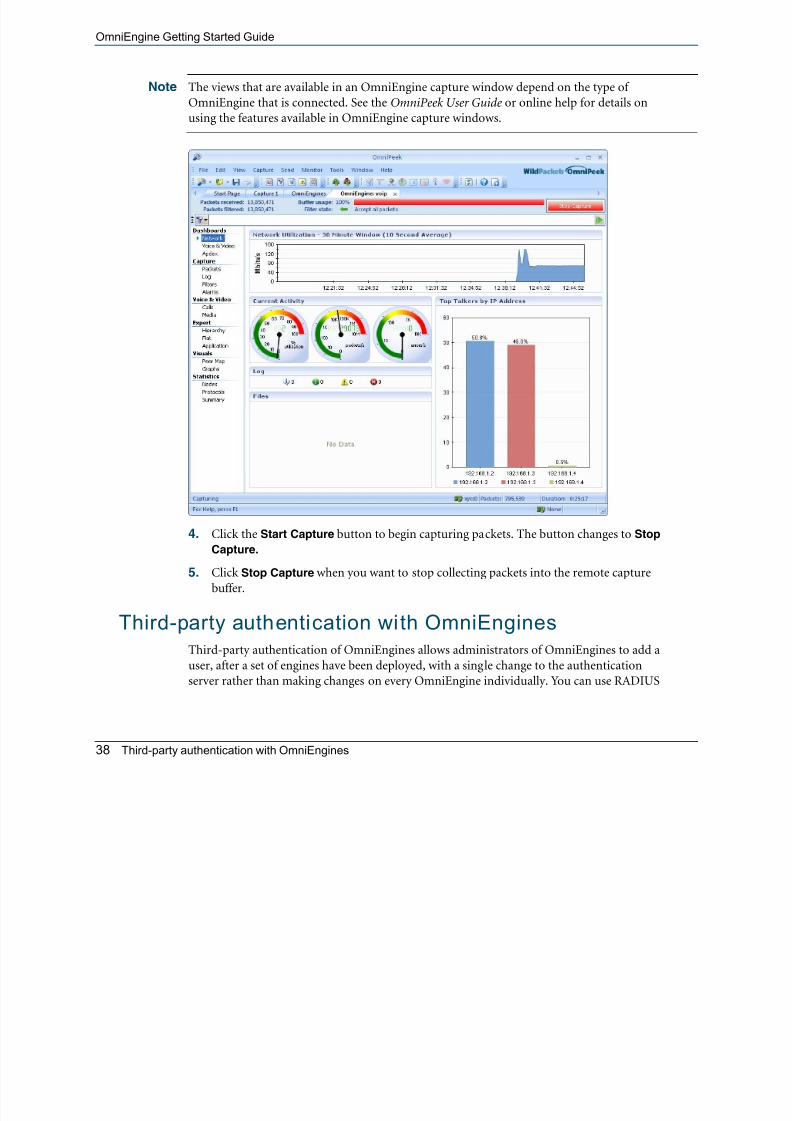
38 Third-party authentication with OmniEngines
Note The views that are available in an OmniEngine capture window depend on the type of
OmniEngine that is connected. See the OmniPeek User Guide or online help for details on
using the features available in OmniEngine capture windows.
4. Click the Start Capture button to begin capturing packets. The button changes to Stop
Capture.
5. Click Stop Capture when you want to stop collecting packets into the remote capture
buffer.
Third-party authentication with OmniEnginesThird-party authentication of OmniEngines allows administrators of OmniEngines to add a
user, after a set of engines have been deployed, with a single change to the authentication
server rather than making changes on every OmniEngine individually. You can use RADIUS
OmniEngine Getting Started Guide
and TACACS+ as well as Windows domain spaces (OmniEngine Windows only) to maintain
l d i l

5/12/2018 Omniengine Gettingstarted - slidepdf.com
http://slidepdf.com/reader/full/omniengine-gettingstarted-55a35b29d7914 45/50
OmniEngine Windows 39
logon credentials.
Administrators and users can also sign on to every OmniEngine with one set of credentials
without requiring the same account on every OmniEngine computer.
OmniEngine Windows
Setting up third-party authentication with OmniEngine Windows is a three-step process
taking place on the OmniEngine computer, the Authentication Server, and on the OmniPeek
console computer.
To configure third-party authentication the OmniEngine computer:
1. The administrator creates two new user accounts on the OmniEngine computer:
● omni-admin (in the Administrators group)
● omni-user (in the Users group)
2. Install the OmniEngine and run the OmniEngine Configuration Wizard. The
OmniEngine Configuration Wizard can be launched at the end of the OmniEngine
installation. See Configuring an OmniEngine on page 14.
3. When OmniEngine Configuration Wizard appears, click Next twice. The Security view
of the Wizard appears. See Engine Configuration—Security on page 17.
The Security view of the OmniEngine Configuration Wizard contains all of the fields
necessary for the OmniEngine to communicate with the authentication servers and to
impersonate the omni-admin or omni-user account. The administrator fills in the
information, updating the OmniEngine’s knowledge of the omni-admin/omni-user
passwords.
The administrator can also set up ACL privileges for omni-admin/omni-user accounts to
limit the OmniEngine functionality to the RADIUS/TACACS+ users. See Engine
Configuration—Edit Access Control on page 18.
To configure third-party authentication on the Authentication Server:
1. From the OmniEngine Manager, the administrator adds the Authentication Server IP
address that is used to authenticate users, making sure that the secret that the engine is
given is the same as the secret in this entry in the computer list. See EngineConfiguration—Security on page 17
2. The administrator confirms the access privileges granted to users and allowed by the
RADIUS/TACACS+ server are configured correctly. See Engine Configuration—Edit Access
Control on page 18.
OmniEngine Getting Started Guide
● For RADIUS, the OmniEngine will ask for user authentication and authorization
l l
5/12/2018 Omniengine Gettingstarted - slidepdf.com
http://slidepdf.com/reader/full/omniengine-gettingstarted-55a35b29d7914 46/50
40 Third-party authentication with OmniEngines
level:
● Service-Type of Login (1) will allow the user to log on as omni-user .
● Service-Type of Administrative (6) will allow the user to log on as omni-admin .
● For TACACS+, the OmniEngine will ask for user authentication while specifying
authorization level:
● it will first ask for the level TAC_PLUS_PRIV_LVL_ROOT (15) for omni-admin .
● if that is denied, it will ask for level TAC_PLUS_PRIV_LVL_USER (1) for omni-
user .
To configure third-party authentication on the OmniPeek computer:
1. Click Insert Engine in the OmniEngines window. The Insert Engine dialog appears. See
Connecting to an OmniEngine from OmniPeek on page 33.
2. To logon using RADIUS or TACACS+, choose Third Party instead of Default.
3. Click Connect. The OmniPeek console sends the user’s supplied username/password/
authentication type to the OmniEngine over an encrypted channel.
The engine decrypts those arguments and sends a request to the specific authenticationserver:
● A negative response will prompt the OmniEngine to send an error message back to
the console (Access Denied).
● An affirmative response lets the OmniEngine go on to try to impersonate one of the
two default user accounts on the engine. (OmniEngines use impersonation for
Windows account users in order to limit their abilities to create or modify files.)
● If the impersonation is successful (depending on the supplied password from the
OmniEngine Configuration Wizard), the engine logs in the RADIUS/TACACS+
user.
● If the impersonation is unsuccessful, the engine will send an Access Denied
message.
OmniEngine LinuxSetting up third-party authentication with OmniEngines Linux is a two-step process taking
place on the Authentication Server and on the OmniPeek console computer.
OmniEngine Getting Started Guide
To configure third-party authentication on the Authentication Server:
5/12/2018 Omniengine Gettingstarted - slidepdf.com
http://slidepdf.com/reader/full/omniengine-gettingstarted-55a35b29d7914 47/50
OmniEngine Linux 41
1. From the OmniEngine Manager, the administrator adds the Authentication Server IP
address that is used to authenticate users, making sure that the secret that the engine is
given is the same as the secret in this entry in the computer list. See Engine
Configuration—Security on page 17
2. The administrator confirms the access privileges granted to users and allowed by the
RADIUS/TACACS+ server are configured correctly. See Engine Configuration—Edit Access
Control on page 18.
To configure third-party authentication on the OmniPeek console:
1. Click Insert Engine in the OmniEngines window. The Insert Engine dialog appears. See
Connecting to an OmniEngine from OmniPeek on page 33.
2. To logon using RADIUS or TACACS+, choose Third Party instead of Default.
3. Click Connect. The OmniPeek console sends the user’s supplied username/password/
authentication type to the OmniEngine over an encrypted channel.
The engine decrypts those arguments and sends a request to the specific authentication
server:
● A negative response will prompt the OmniEngine to send an error message back tothe console (Access Denied).
● An affirmative response allows the user to log on.
OmniEngine Getting Started Guide

5/12/2018 Omniengine Gettingstarted - slidepdf.com
http://slidepdf.com/reader/full/omniengine-gettingstarted-55a35b29d7914 48/50
42 Third-party authentication with OmniEngines

5/12/2018 Omniengine Gettingstarted - slidepdf.com
http://slidepdf.com/reader/full/omniengine-gettingstarted-55a35b29d7914 49/50
43
Numerics 10 Gigabit 2
802.11 wireless 2
Aabout OmniEngines 1
access control
18,
19,
21,
28accounts 4
ACL 5, 18, 19, 21
activation key 3
adapters 2, 12
add users to ACL 19
alarms tab 11, 12, 25
audit log 18
auditing 18
authentication 10, 17, 35
automatically restart captures 16
C captures 12, 37
capturing from an OmniEngine 37
configuration 7
configure OmniEngine 5, 14connect dialog 9
connecting to an OmniEngine 9, 33
create a new user 18
credentials 4, 23, 26, 32
D data folder 16, 17, 21
device backoff time 13discover engines 7
discover OmniEngines 13
distribute ACLs 5
distribute settings 5
domain 10, 20, 35
domain control 21
E edit policy 19
edit policy view 30
enable auditing
18enable AutoDiscovery 16
engine configuration wizard 3, 14, 15, 17, 18, 22
engine group 8
Ethernet 2
F files view 16
filters tab
11,
12,
25G
general view 15
Gigabit Ethernet 2
graphs tab 11, 12, 25
groups 8
guest network login 4
H host 10, 35
I insert engine dialog 34
insert remote engine 9, 34
installing an OmniEngine 2
IP address 2, 16
Llisten time 13
local security policy editor 4
log 7, 8
log file 18
login privilege 21
Index
OmniEngine Getting Started Guide
M maximum concurrent connections 16
start/stop service 22
status bar 8
5/12/2018 Omniengine Gettingstarted - slidepdf.com
http://slidepdf.com/reader/full/omniengine-gettingstarted-55a35b29d7914 50/50
44
N NDIS 2
network access 4
network login privilege 21
O OmniAdapter 2
OmniEngine Manager 3, 5
OmniEngine window 6, 7, 11
OmniEngines, defined 1
OmniPeek 33
P password 10, 35
policies 28
policy 4, 18, 19, 21
port 10, 16, 35
pre-defined policies 19
promiscuous mode 2
R RADIUS 17, 38
read/write access 22
reconnect 7, 14
refresh 7, 20
Remote Engines window 16, 33
remote update service 3restart 7, 14
review and execute view 24
review and send view 31
S secure communications 17
security view 17
select engines dialog 26, 29select engines view 28
settings 5
software updates 5
status tab 11, 12
supported adapters 2
system requirements 1
T TACACS+ 17, 39
third-party authentication 38
toolbar 6
U UDP multicast 7
update ACL 7
update ACL wizard
browse users list dialog 30
edit policy view 30
review and send view 31
select engines dialog 29
select engines view 28
start button
31to add a user 30
update installer 23
update service 22
update settings 7, 25
update software 7, 22
update software wizard 22, 23, 24, 33
updating software 5
use any available IP address 16
use compression 17
username 10, 35
W WAC 2
WAN 2
WAN Analyzer Card 2
wireless 2
WLAN 2
workspace 7, 8, 9, 13