november block - media.rainpos.com made with november blocks and one june block sample made with...
TRANSCRIPT

November Squedge Block www.phillipsfiberart.com
© 2013 Cheryl Phillips This pattern is NOT for resalePage 1
Tool PreparationApply adhesive non-slip rings to both the back and front side of the tool.
You need to have these on both sides as you'll be cutting pieces with the tool flipped over.
On the back side of the tool place a strip of pink glow tape on the 30 degree line as shown.
Place a strip of yellow tape on the opposite 30 degree line. Using this tape has helped me keep the cuts straight. We'll continue to use
these markings on the next few month's blocks. You can find the glow tape at many quilt shops and online stores, including mine.
November BlockNovember is the 9th month of our Striped Sampler Project. Stripes will work nicely for this project, but aren't an absolute necessity.
Following in the same fashion as the June block it’s almost an 8 point star, but this variation adds rays to the bottom. I see it as a sunburst over the horizon. It will mix well with the March and June blocks.
SRB
star & ray
ray
background
Fabric Number of Strips Strip WidthS (star) two 3̎ x 44̎S (ray) one 2 ½̎ x 44̎
R one 3̎ x 44̎B two 4̎ x 44̎
Finished block:16 ½̎ square
Fabric Exact Amount
Suggested Yardage
for a stripe running perpendicular to the selvage or an all over
design
Suggested Yardage
for a stripe running parallel to the selvage
S 11̎ ½ yd* 1 ¼ ydR 3̎ ¼ yd 1 ¼ ydB 8̎ ⅜ yd 1 ¼ yd
* May require more fabric depending on design repeats
Notice the little slots in the tool? This is how you'll know where to cut the shorter Squedge pieces. Use a mechanical pencil to mark a line in each slot onto the fabric. Cut around the other sides of the tool, then remove the tool. Using a straight edge (or the outside edge of this tool) connect the marked lines and cut across the bottom of the Squedge piece.
To get exact matches with your striped points, be sure you cut identical strips from the striped fabric.
center line

November Squedge Block www.phillipsfiberart.com
© 2013 Cheryl Phillips This pattern is NOT for resalePage 2
Place the tool on the strip set so the pink 30 degree line is aligned with the seam.
The words on the tool are UP.
Cut the full tool shape.
Place the tool on the strip set so the pink 30 degree line is aligned with the seam.
The words on the tool are DOWN.
Cut the full tool shape.
Place the tool on the strip set so the yellow 30 degree line is aligned with the seam.
The words on the tool are DOWN.
Mark lines in the little slots.
Cut a partial tool shape.
Place the tool on the strip set so the yellow 30 degree line is aligned with the seam.
The words on the tool are UP.
Mark lines in the little slots.
Cut a partial tool shape.
3̎ S
3̎ S
3̎ S
3̎ S
4̎ B
4̎ B
4̎ B
4̎ B
Cut 3
Cut 3
Cut 3
Cut 3
Yes the tool does extend beyond the strip--Remember you're cutting it at the slotted lines.
Indent S strip 3 ̎
Indent B strip 3 ̎
Indent B strip 3 ̎
Set 1
Set 2
Set 3
Set 4
Helpful labels for the strip sets are found on page 6.
Use remaining fabric from Set 1
Use remaining fabric from Set 2
All pieces come from two strip sets
November Squedge Block www.phillipsfiberart.com
© 2013 Cheryl Phillips This pattern is NOT for resalePage 3
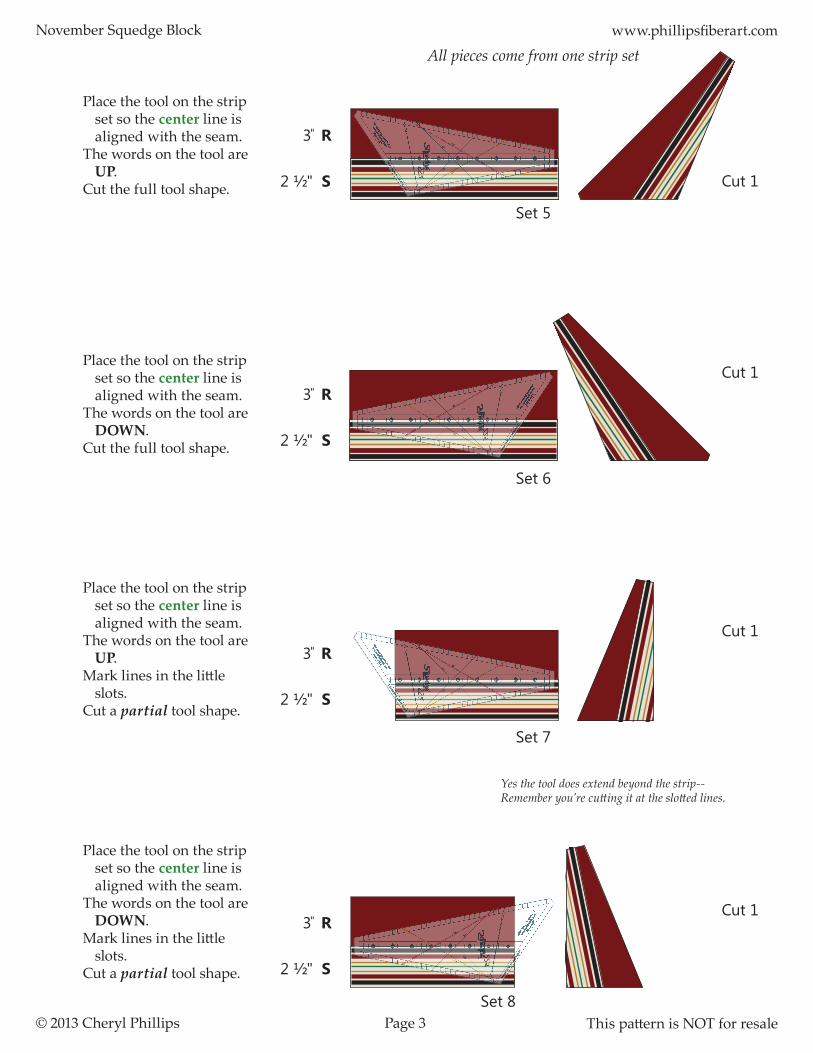
Place the tool on the strip set so the center line is aligned with the seam.
The words on the tool are UP.
Cut the full tool shape.
Place the tool on the strip set so the center line is aligned with the seam.
The words on the tool are DOWN.
Cut the full tool shape.
Place the tool on the strip set so the center line is aligned with the seam.
The words on the tool are DOWN.
Mark lines in the little slots.
Cut a partial tool shape.
Place the tool on the strip set so the center line is aligned with the seam.
The words on the tool are UP.
Mark lines in the little slots.
Cut a partial tool shape.
3̎ R
3̎ R
3̎ R
3̎ R
2 ½" S
2 ½" S
2 ½" S
2 ½" S
Cut 1
Cut 1
Cut 1
Cut 1
Yes the tool does extend beyond the strip--Remember you're cutting it at the slotted lines.
Set 5
Set 6
Set 7
Set 8
All pieces come from one strip set

November Squedge Block www.phillipsfiberart.com
© 2013 Cheryl Phillips This pattern is NOT for resalePage 4
Arrange the pieces as shown. Sew four together to make a quarter square.Sew the four quarter squares together to make the block.
Iron a square of freezer paper to the back of the project to stabilize the center opening.Trace a circle onto freezer paper. Iron the freezer paper onto a scrap of fabric you've chosen for your center applique. Cut the fabric, allowing ¼" for turning under. Applique the circle to the center opening.
Fabric Waste?You may notice you had quite a bit of strip set left after cutting the four pieces. For these Sampler projects, you can• Set these extra strip sets aside for next month's blocks • Make more of the same blocks

November Squedge Block www.phillipsfiberart.com
© 2013 Cheryl Phillips This pattern is NOT for resalePage 5
Options For Finishing it NowAlthough the plan is to make a sampler, you can also use just this block for a great table runner or baby quilt. Simply make more blocks!
Samplers made with November blocks and one June Block
Sample made with November blocks Table Runner

November Squedge Block www.phillipsfiberart.com
© 2013 Cheryl Phillips This pattern is NOT for resalePage 6
Set #5 Label
Use Center linewith words facing UP
Cut 1 Full wedge
2 ½̎ S 3̎ R
Set #6 Label
Use Center linewith words facing DOWN
Cut 1 Full wedge
Set #7 Label
Use Center linewith words facing UP
Cut 1 Partial wedge
Set #8 Label
Use Center linewith words facing DOWN
Cut 1 Partial wedge
2 ½̎ S 3̎ R
2 ½̎ ̎ S 3̎ R
2 ½̎ S 3̎ R
Set #1 Label
Use pink 30 degree linewith words facing UP
Cut 3 Full wedges
3̎ S 4̎ B
Set #2 Label
Use pink 30 degree linewith words facing DOWN
Cut 3 Full wedges
Set #3 Label
Use yellow 30 degree linewith words facing UP
Cut 3 Partial wedge
Set #4 Label
Use yellow 30 degree linewith words facing DOWN
Cut 3 Partial wedge
3̎ S 4̎ B
3̎ S 4̎ B
3̎ S 4̎ B