northern lights xt fire pit assembly instructions › landmanndownloads › pdf… · northern...
TRANSCRIPT
• FOR OUTDOOR USE ONLY!• USE ONLY ON BRICK, CONCRETE, STONE OR OTHER MASONRY SURFACES!• DO NOT USE ON LAWNS, WOODEN DECKS OR ASPHALT!• KEEP THE NORTHERN LIGHTS AWAY FROM BUILDINGS, FLAMMABLE ITEMS AND VEHICLES.• THE NORTHERN LIGHTS FIRE PIT IS FOR ADULT USE ONLY. • DO NOT LEAVE UNATTENDED AT ANY TIME WHILE IN USE.• DO NOT PLACE ANY OBJECT HEAVIER THAN 20 LBS. ON SIDE SHELF.• KEEP ALL OBJECTS A SAFE DISTANCE FROM THE SPARK GUARD AND FIRE.• KEEP SPARK GUARD ON NORTHERN LIGHTS WHILE IN USE.• DO NOT USE IN WINDY CONDITIONS!• DO NOT OVERLOAD OR USE FOR BURNING GARBAGE.• NEVER USE GASOLINE, ALCOHOL OR VOLATILE FLUIDS TO START FIRES.• NEVER USE UNDER LOW HANGING TREE BRANCHES, TRELLIS, OVERHANGS OF ANY KIND INCLUDING COVERED PORCHES.• USE CAUTION WHEN TENDING THE FIRE, AS SURFACES WILL BE HOT WHILE IN USE.• BEFORE EACH USE MAKE SURE NORTHERN LIGHTS IS IN GOOD WORKING CONDITION.• USE CAUTION AFTER THE FIRE HAS BEEN EXTINGUISHED, SURFACES WILL REMAIN HOT FOR SOME TIME.
PAGE 1
PLEASE READ ALL RULES FOR SAFE OPERATION BEFORE ASSEMBLY AND HELPFUL HINTS BEFORE USE.
READ FIRST! RULES FOR SAFE OPERATION
PARA TENER UNA OPERACIÓN SEGURA, POR FAVOR DE LEER TODAS LAS REGLAS ANTES DE MONTAR Y LAS DIRECTAS PROVECHOSAS ANTES DE USAR.
ASSEMBLY INSTRUCTIONSNORTHERN LIGHTS XT FIRE PIT
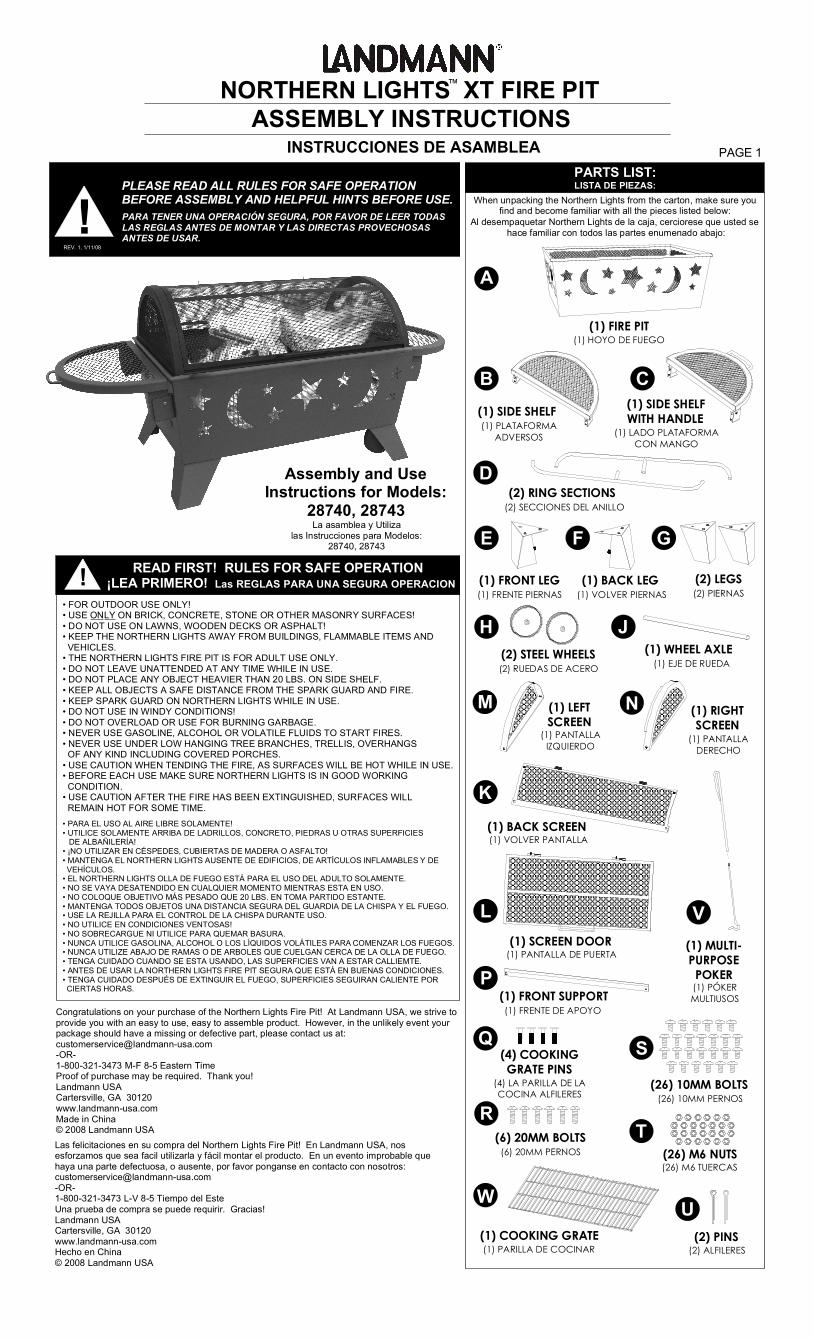
PARTS LIST:LISTA DE PIEZAS:
INSTRUCCIONES DE ASAMBLEA
Al desempaquetar Northern Lights de la caja, cerciorese que usted se hace familiar con todos las partes enumenado abajo:
™
When unpacking the Northern Lights from the carton, make sure you find and become familiar with all the pieces listed below:
¡LEA PRIMERO! Las REGLAS PARA UNA SEGURA OPERACION
• PARA EL USO AL AIRE LIBRE SOLAMENTE! • UTILICE SOLAMENTE ARRIBA DE LADRILLOS, CONCRETO, PIEDRAS U OTRAS SUPERFICIES DE ALBAÑILERÍA! • ¡NO UTILIZAR EN CÉSPEDES, CUBIERTAS DE MADERA O ASFALTO! • MANTENGA EL NORTHERN LIGHTS AUSENTE DE EDIFICIOS, DE ARTÍCULOS INFLAMABLES Y DE VEHÍCULOS. • EL NORTHERN LIGHTS OLLA DE FUEGO ESTÁ PARA EL USO DEL ADULTO SOLAMENTE. • NO SE VAYA DESATENDIDO EN CUALQUIER MOMENTO MIENTRAS ESTA EN USO. • NO COLOQUE OBJETIVO MÁS PESADO QUE 20 LBS. EN TOMA PARTIDO ESTANTE. • MANTENGA TODOS OBJETOS UNA DISTANCIA SEGURA DEL GUARDIA DE LA CHISPA Y EL FUEGO. • USE LA REJILLA PARA EL CONTROL DE LA CHISPA DURANTE USO.• NO UTILICE EN CONDICIONES VENTOSAS! • NO SOBRECARGUE NI UTILICE PARA QUEMAR BASURA. • NUNCA UTILICE GASOLINA, ALCOHOL O LOS LÍQUIDOS VOLÁTILES PARA COMENZAR LOS FUEGOS. • NUNCA UTILIZE ABAJO DE RAMAS O DE ARBOLES QUE CUELGAN CERCA DE LA OLLA DE FUEGO.• TENGA CUIDADO CUANDO SE ESTA USANDO, LAS SUPERFICIES VAN A ESTAR CALLIEMTE. • ANTES DE USAR LA NORTHERN LIGHTS FIRE PIT SEGURA QUE ESTÁ EN BUENAS CONDICIONES. • TENGA CUIDADO DESPUÉS DE EXTINGUIR EL FUEGO, SUPERFICIES SEGUIRAN CALIENTE POR CIERTAS HORAS.
REV. 1, 1/11/08
(2) RING SECTIONS(2) SECCIONES DEL ANILLO
!
!A
B
D
(2) LEGS(2) PIERNAS
E
(1) SIDE SHELF(1) PLATAFORMA
ADVERSOS
(1) FIRE PIT(1) HOYO DE FUEGO
Congratulations on your purchase of the Northern Lights Fire Pit! At Landmann USA, we strive to provide you with an easy to use, easy to assemble product. However, in the unlikely event your package should have a missing or defective part, please contact us at: [email protected] 1-800-321-3473 M-F 8-5 Eastern TimeProof of purchase may be required. Thank you!Landmann USACartersville, GA 30120www.landmann-usa.comMade in China© 2008 Landmann USALas felicitaciones en su compra del Northern Lights Fire Pit! En Landmann USA, nos esforzamos que sea facil utilizarla y fácil montar el producto. En un evento improbable que haya una parte defectuosa, o ausente, por favor ponganse en contacto con nosotros: [email protected] L-V 8-5 Tiempo del EsteUna prueba de compra se puede requirir. Gracias! Landmann USACartersville, GA 30120www.landmann-usa.comHecho en China© 2008 Landmann USA
Q
C(1) SIDE SHELFWITH HANDLE
(1) LADO PLATAFORMACON MANGO
(1) FRONT LEG(1) FRENTE PIERNAS
(1) BACK LEG(1) VOLVER PIERNAS
F G
H(2) STEEL WHEELS(2) RUEDAS DE ACERO
J(1) WHEEL AXLE
(1) EJE DE RUEDA
S
(26) 10MM BOLTS(26) 10MM PERNOS
(6) 20MM BOLTS(6) 20MM PERNOS
R
(4) COOKINGGRATE PINS
(4) LA PARILLA DE LA COCINA ALFILERES
(1) PÓKER MULTIUSOS
(1) MULTI-PURPOSEPOKER
V
(2) PINS(2) ALFILERES
U
K(1) BACK SCREEN(1) VOLVER PANTALLA
(1) LEFTSCREEN
(1) PANTALLAIZQUIERDO
N (1) RIGHTSCREEN
(1) PANTALLADERECHO
M
W
(1) COOKING GRATE(1) PARILLA DE COCINAR
(26) M6 NUTS(26) M6 TUERCAS
T
P(1) FRONT SUPPORT(1) FRENTE DE APOYO
L(1) SCREEN DOOR
(1) PANTALLA DE PUERTA
Assembly and Use Instructions for Models:
28740, 28743La asamblea y Utiliza
las Instrucciones para Modelos: 28740, 28743
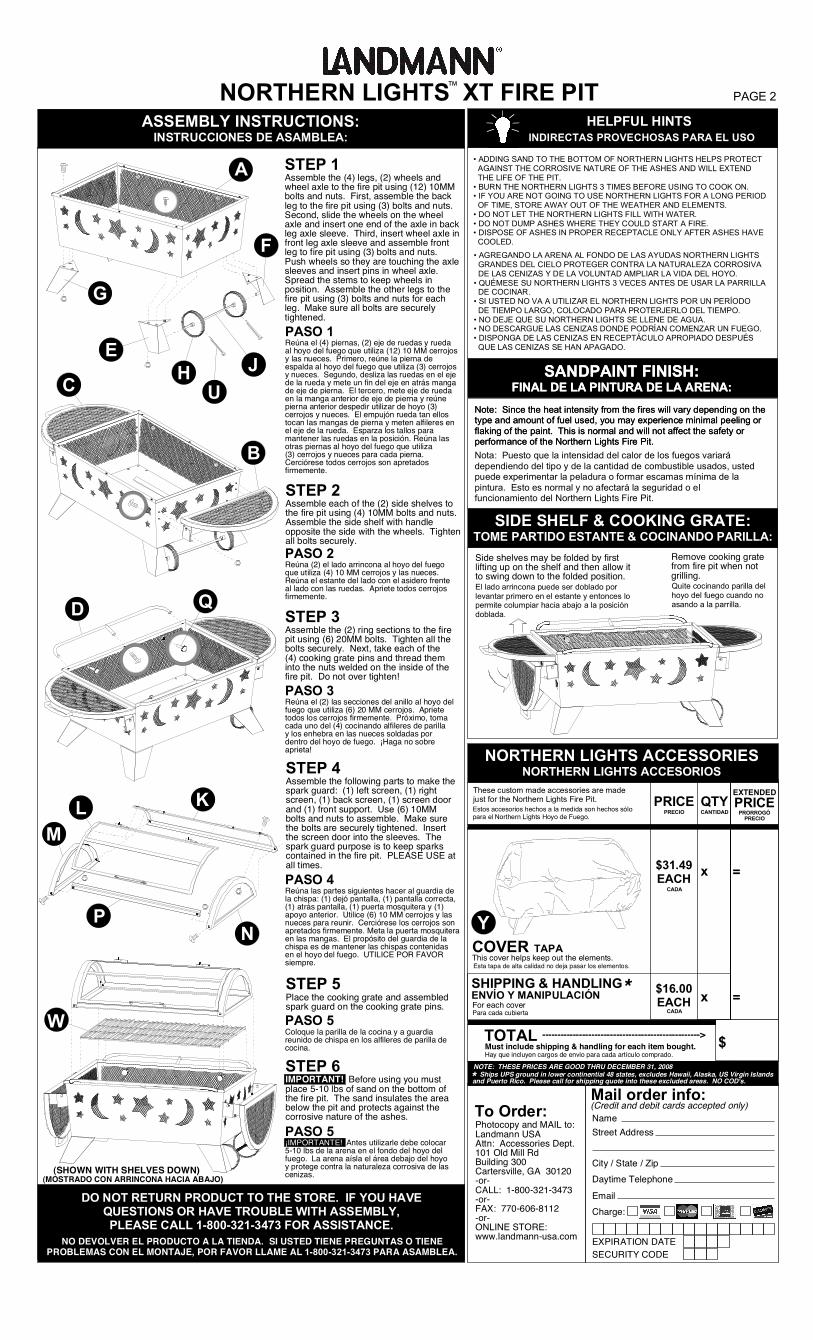
STEP 1Assemble the (4) legs, (2) wheels and wheel axle to the fire pit using (12) 10MM bolts and nuts. First, assemble the back leg to the fire pit using (3) bolts and nuts. Second, slide the wheels on the wheel axle and insert one end of the axle in back leg axle sleeve. Third, insert wheel axle in front leg axle sleeve and assemble front leg to fire pit using (3) bolts and nuts. Push wheels so they are touching the axle sleeves and insert pins in wheel axle. Spread the stems to keep wheels in position. Assemble the other legs to the fire pit using (3) bolts and nuts for each leg. Make sure all bolts are securely tightened.
• ADDING SAND TO THE BOTTOM OF NORTHERN LIGHTS HELPS PROTECT AGAINST THE CORROSIVE NATURE OF THE ASHES AND WILL EXTEND THE LIFE OF THE PIT.• BURN THE NORTHERN LIGHTS 3 TIMES BEFORE USING TO COOK ON.• IF YOU ARE NOT GOING TO USE NORTHERN LIGHTS FOR A LONG PERIOD OF TIME, STORE AWAY OUT OF THE WEATHER AND ELEMENTS.• DO NOT LET THE NORTHERN LIGHTS FILL WITH WATER.• DO NOT DUMP ASHES WHERE THEY COULD START A FIRE.• DISPOSE OF ASHES IN PROPER RECEPTACLE ONLY AFTER ASHES HAVE COOLED.
HELPFUL HINTSASSEMBLY INSTRUCTIONS:INSTRUCCIONES DE ASAMBLEA:
PASO 1Reúna el (4) piernas, (2) eje de ruedas y rueda al hoyo del fuego que utiliza (12) 10 MM cerrojos y las nueces. Primero, reúne la pierna de espalda al hoyo del fuego que utiliza (3) cerrojosy nueces. Segundo, desliza las ruedas en el eje de la rueda y mete un fin del eje en atrás manga de eje de pierna. El tercero, mete eje de rueda en la manga anterior de eje de pierna y reúne pierna anterior despedir utilizar de hoyo (3) cerrojos y nueces. El empujón rueda tan ellos tocan las mangas de pierna y meten alfileres en el eje de la rueda. Esparza los tallos para mantener las ruedas en la posición. Reúna las otras piernas al hoyo del fuego que utiliza (3) cerrojos y nueces para cada pierna. Cerciórese todos cerrojos son apretados firmemente.
• AGREGANDO LA ARENA AL FONDO DE LAS AYUDAS NORTHERN LIGHTS GRANDES DEL CIELO PROTEGER CONTRA LA NATURALEZA CORROSIVA DE LAS CENIZAS Y DE LA VOLUNTAD AMPLIAR LA VIDA DEL HOYO. • QUÉMESE SU NORTHERN LIGHTS 3 VECES ANTES DE USAR LA PARRILLA DE COCINAR. • SI USTED NO VA A UTILIZAR EL NORTHERN LIGHTS POR UN PERÍODO DE TIEMPO LARGO, COLOCADO PARA PROTERJERLO DEL TIEMPO.• NO DEJE QUE SU NORTHERN LIGHTS SE LLENE DE AGUA. • NO DESCARGUE LAS CENIZAS DONDE PODRÍAN COMENZAR UN FUEGO. • DISPONGA DE LAS CENIZAS EN RECEPTÁCULO APROPIADO DESPUÉS QUE LAS CENIZAS SE HAN APAGADO.
INDIRECTAS PROVECHOSAS PARA EL USO
PAGE 2
STEP 6IMPORTANT! Before using you must place 5-10 lbs of sand on the bottom of the fire pit. The sand insulates the area below the pit and protects against the corrosive nature of the ashes.
STEP 2Assemble each of the (2) side shelves to the fire pit using (4) 10MM bolts and nuts. Assemble the side shelf with handle opposite the side with the wheels. Tighten all bolts securely.
STEP 3Assemble the (2) ring sections to the firepit using (6) 20MM bolts. Tighten all thebolts securely. Next, take each of the (4) cooking grate pins and thread theminto the nuts welded on the inside of the fire pit. Do not over tighten!
NORTHERN LIGHTS XT FIRE PIT™
Note: Since the heat intensity from the fires will vary depending on the type and amount of fuel used, you may experience minimal peeling or flaking of the paint. This is normal and will not affect the safety or performance of the Northern Lights Fire Pit.
SANDPAINT FINISH:FINAL DE LA PINTURA DE LA ARENA:
Nota: Puesto que la intensidad del calor de los fuegos variará dependiendo del tipo y de la cantidad de combustible usados, usted puede experimentar la peladura o formar escamas mínima de la pintura. Esto es normal y no afectará la seguridad o el funcionamiento del Northern Lights Fire Pit.
These custom made accessories are made just for the Northern Lights Fire Pit.
NORTHERN LIGHTS ACCESSORIESNORTHERN LIGHTS ACCESORIOS
Estos accesorios hechos a la medida son hechos sólo para el Northern Lights Hoyo de Fuego.
PRICE QTY
$31.49EACH
COVER
TOTAL --------------------------------------------------->
To Order:Photocopy and MAIL to:Landmann USAAttn: Accessories Dept.101 Old Mill RdBuilding 300Cartersville, GA 30120-or-CALL: 1-800-321-3473-or-FAX: 770-606-8112 -or-ONLINE STORE:www.landmann-usa.com
Mail order info:NameStreet Address
City / State / ZipDaytime TelephoneEmail
(Credit and debit cards accepted only)
Charge:
EXPIRATION DATE
PRECIO CANTIDAD
CADA
TAPA
Y
STEP 4Assemble the following parts to make the spark guard: (1) left screen, (1) right screen, (1) back screen, (1) screen door and (1) front support. Use (6) 10MM bolts and nuts to assemble. Make sure the bolts are securely tightened. Insert the screen door into the sleeves. The spark guard purpose is to keep sparks contained in the fire pit. PLEASE USE at all times.
PRICEPRORROGÓ
EXTENDED
SHIPPING & HANDLING $16.00EACH
CADA
This cover helps keep out the elements.Esta tapa de alta calidad no deja pasar los elementos.
x =
x =For each cover
Hay que incluyen cargos de envio para cada artículo comprado.Must include shipping & handling for each item bought.
ENVÍO Y MANIPULACIÓNPara cada cubierta
NOTE: THESE PRICES ARE GOOD THRU DECEMBER 31, 2008
PRECIO
SECURITY CODE
Ships UPS ground in lower continential 48 states, excludes Hawaii, Alaska, US Virgin Islands and Puerto Rico. Please call for shipping quote into these excluded areas. NO COD's.*
*
A
DO NOT RETURN PRODUCT TO THE STORE. IF YOU HAVE QUESTIONS OR HAVE TROUBLE WITH ASSEMBLY, PLEASE CALL 1-800-321-3473 FOR ASSISTANCE.
NO DEVOLVER EL PRODUCTO A LA TIENDA. SI USTED TIENE PREGUNTAS O TIENEPROBLEMAS CON EL MONTAJE, POR FAVOR LLAME AL 1-800-321-3473 PARA ASAMBLEA.
G
E
F
JHC
B
QD
ML K
NP
STEP 5Place the cooking grate and assembled spark guard on the cooking grate pins.
W
(SHOWN WITH SHELVES DOWN)
Note: Since the heat intensity from the fires will vary depending on the type and amount of fuel used, you may experience minimal peeling or flaking of the paint. This is normal and will not affect the safety or performance of the Northern Lights Fire Pit.
SANDPAINT FINISH:FINAL DE LA PINTURA DE LA ARENA:
SIDE SHELF & COOKING GRATE:TOME PARTIDO ESTANTE & COCINANDO PARILLA:
U
PASO 2Reúna (2) el lado arrincona al hoyo del fuego que utiliza (4) 10 MM cerrojos y las nueces. Reúna el estante del lado con el asidero frente al lado con las ruedas. Apriete todos cerrojos firmemente.
PASO 3Reúna el (2) las secciones del anillo al hoyo del fuego que utiliza (6) 20 MM cerrojos. Apriete todos los cerrojos firmemente. Próximo, toma cada uno del (4) cocinando alfileres de parilla y los enhebra en las nueces soldadas por dentro del hoyo de fuego. ¡Haga no sobre aprieta!
PASO 4Reúna las partes siguientes hacer al guardia de la chispa: (1) dejó pantalla, (1) pantalla correcta, (1) atrás pantalla, (1) puerta mosquitera y (1) apoyo anterior. Utilice (6) 10 MM cerrojos y las nueces para reunir. Cerciórese los cerrojos son apretados firmemente. Meta la puerta mosquitera en las mangas. El propósito del guardia de la chispa es de mantener las chispas contenidas en el hoyo del fuego. UTILICE POR FAVOR siempre.
PASO 5Coloque la parilla de la cocina y a guardia reunido de chispa en los alfileres de parilla de cocina.
PASO 5¡IMPORTANTE! Antes utilizarle debe colocar5-10 lbs de la arena en el fondo del hoyo del fuego. La arena aísla el área debajo del hoyo y protege contra la naturaleza corrosiva de las cenizas. (MOSTRADO CON ARRINCONA HACIA ABAJO)
$
Remove cooking grate from fire pit when not grilling.
Side shelves may be folded by first lifting up on the shelf and then allow it to swing down to the folded position.
Quite cocinando parilla del hoyo del fuego cuando no asando a la parrilla.
El lado arrincona puede ser doblado por levantar primero en el estante y entonces lo permite columpiar hacia abajo a la posición doblada.