northern lights and solar sprites - nasa · nasa eg-2000-xx-xxx-gsfc northern lights and solar...
TRANSCRIPT

NASA EG-2000-XX-XXX-GSFC Northern Lights and Solar Sprites 1
�������������� ������ ��������Exploring Solar Storms and Space Science
An Educator Guide with Activities in Space Science
Educational Product
Educators& Students
GradesK-6
EG-2000-XX-XXX-GSFC
National Aeronautics andSpace Administration
NASA EG-2000-XX-XXX-GSFC Northern Lights and Solar Sprites 2
�������������� ������ ����������� � � �����
�������������� ����������������� ������������������
����������������������������������� �����������������
��������������� ��� �����������
������������ ����� �������� ��������������� ������
��������� ������� � ����
NASA EG-2000-XX-XXX-GSFC Northern Lights and Solar Sprites 3
�������������� ������ ��������Exploring Solar Storms and Space Science
An Educator Guide with Activities in Space Science
EG-2000-XX-XXX-GSFCNational Aeronautics andSpace Administration
This publication is in the public domain and is not protected by copyright. Permission is not required for duplication.
NASA EG-2000-XX-XXX-GSFC Northern Lights and Solar Sprites 4
Dr. James Burch
IMAGE Principal InvestigatorSouthwest Research Institute
Dr. William Taylor
Dr. Sten Odenwald
IMAGE Education and Public OutreachRaytheon ITS and NASA Goddard SFC
IMAGE Education and Public OutreachRaytheon ITS and NASA Goddard SFC
Ms. Annie DiMarco
Greenwood Elementary SchoolBrookville, Maryland
Cover Artwork:
Ms. Carol HallLigonier Elementary SchoolLigonier, Indiana
This resource was developed bythe NASA Imager for
Magnetopause-to-Auroral GlobalExploration (IMAGE)
Information about the IMAGEMission is available at:
http://image.gsfc.nasa.govhttp://pluto.space.swri.edu/IMAGE
Resources for teachers andstudents are available at:
http://image.gsfc.nasa.gov/poetry
This product has benefited from many teachers andstudents who have provided us with bothencouragement and many constructive comments.
We especially thank Ms. Sue Higley (Cherry HillMiddle School; Maryland Teacher of the Year for2000), Mr. William Pine (Chaffey High School) andMr. Tom Smith (Briggs Chaney Middle School) fortheir careful reading of this booklet and manyvaluable comments.
We would also like to thank the students at the HolyRedeemer School, and Greenwood ElementarySchool for making the activities both fun to do, andstudent-friendly under real world conditions in theclassroom!
National Aeronautics andSpace Administration
Goddard Space Flight Center
���������������
NASA EG-2000-XX-XXX-GSFC Northern Lights and Solar Sprites 5
������! ��������" ������
������# $������%����&���'��� ����� ������(
������) *������ �� ������������� ���
������+ �������$ � ������ �� �������, ������*������
������- .� ��%�������$���������.�����%�������
������/ 0� ����.���" �������
������1 23�������" ������4�����
������5 ��� ��������� ���2������
������6 �� ��������2��������������������������2 ���
������!7 23�����������2 ���� �� �" �����
������!! ��������� �������8� ���9�8������ ��� ��������� ����
������!# ����:��� ������8� ���9������� ���� ��������
������!) ����' ���0� �� �8� ��� �; ������ ���������������
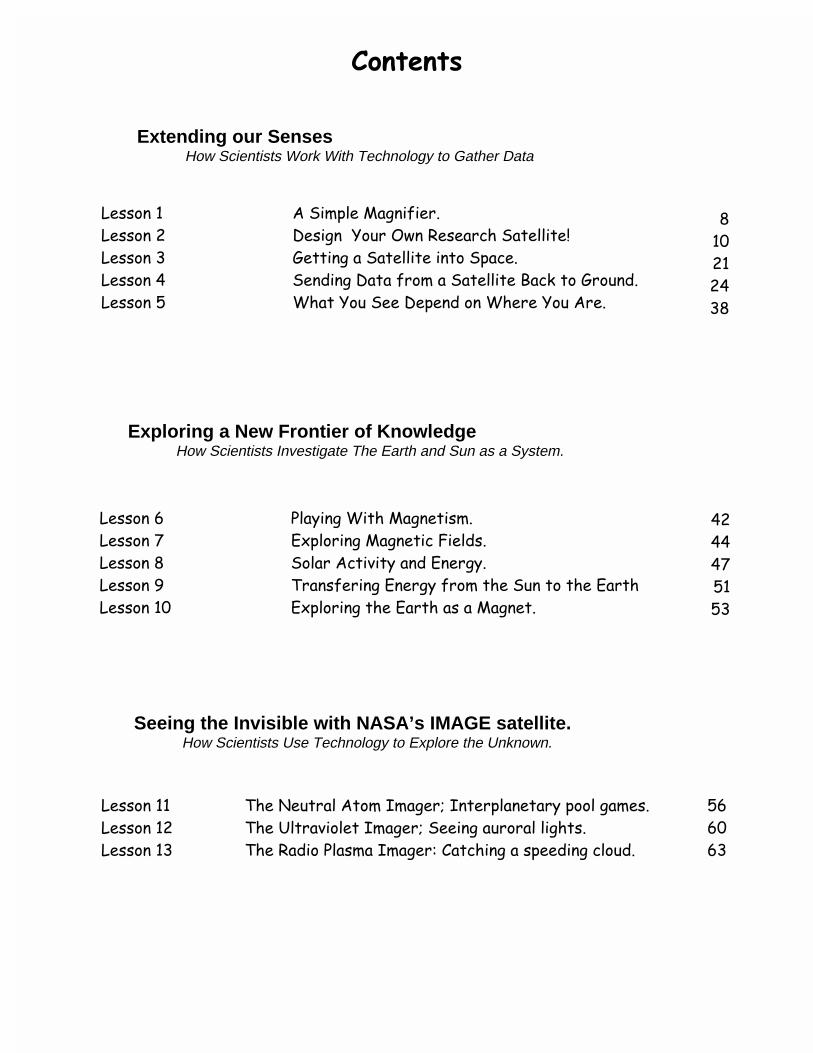
Extending our SensesHow Scientists Work With Technology to Gather Data
Exploring a New Frontier of KnowledgeHow Scientists Investigate The Earth and Sun as a System.
Seeing the Invisible with NASA’s IMAGE satellite.How Scientists Use Technology to Explore the Unknown.
5
!7
#!
#+
)5
+#
++
+1
-!
-)
-/
/7
/)
��������
NASA EG-2000-XX-XXX-GSFC Northern Lights and Solar Sprites 6
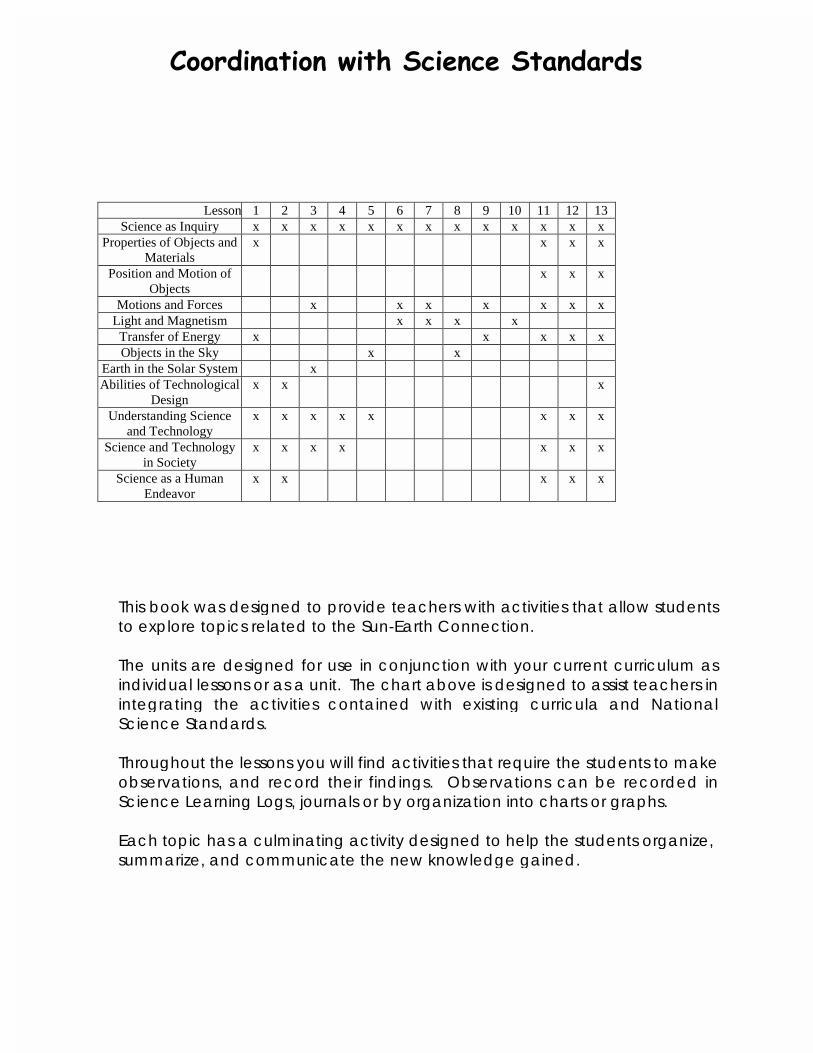
Lesson 1 2 3 4 5 6 7 8 9 10 11 12 13Science as Inquiry x x x x x x x x x x x x x
Properties of Objects andMaterials
x x x x
Position and Motion ofObjects
x x x
Motions and Forces x x x x x x xLight and Magnetism x x x x
Transfer of Energy x x x x xObjects in the Sky x x
Earth in the Solar System xAbilities of Technological
Designx x x
Understanding Scienceand Technology
x x x x x x x x
Science and Technologyin Society
x x x x x x x
Science as a HumanEndeavor
x x x x x
������ ����������������� �� ���
This book was designed to provide teachers with activities that allow studentsto explore topics related to the Sun-Earth Connection.
The units are designed for use in conjunction with your current curriculum asindividual lessons or as a unit. The chart above is designed to assist teachers inintegrating the activities contained with existing curricula and NationalScience Standards.
Throughout the lessons you will find activities that require the students to makeobservations, and record their findings. Observations can be recorded inScience Learning Logs, journals or by organization into charts or graphs.
Each topic has a culminating activity designed to help the students organize,summarize, and communicate the new knowledge gained.
NASA EG-2000-XX-XXX-GSFC Northern Lights and Solar Sprites 7
�����������
"Students should be actively engaged in learning to view the world scientifically. They should be encouraged to ask questions about nature and to seek answer, collect things, count
and measure things, make qualitative observations, organize collections and observationsand discuss findings."
(American Association for the Advancement of Science; Benchmarks for Science)
Scientists and young children share an active curiosity about the world. A truescientist maintains that inquisitive quality and continues to question, explore andinvestigate.
In developing this book, there is an attempt to stimulate an active curiosityabout the Sun-Earth Connection. Scientists have been learning more about spacescience, and technology makes this information readily available to those who areinterested. Activities in this book use images and data from satellites that wereunheard of forty years ago.
"When students observe differences in the way things behave or get different results in repeated investigations, they should suspect that something differs from trial to trial, and try to find out what." (AAAS ‘Benchmarks for Science Literacy, 1999)
Each lesson focuses upon a particular aspect of studying the Sun and theEarth as a system, and how scientists make the observations. Included in theprocedure sections are questions that will further encourage scientific inquiry.
Each lesson begins with a description of the activities in which the students willparticipate, and provides general background information. The Objectives sectionshighlight the science process skills the students will develop while completing theactivities. The Procedures sections are general, and can be adapted to meet theknowledge and developmental levels of the students.
Many lessons have extension activities designed to have the students applythe new knowledge in grade appropriate activities. Key terms are included tofurther enhance the teacher's comfort level with the material.

NASA EG-2000-XX-XXX-GSFC Northern Lights and Solar Sprites 8
������������� ������
�����������
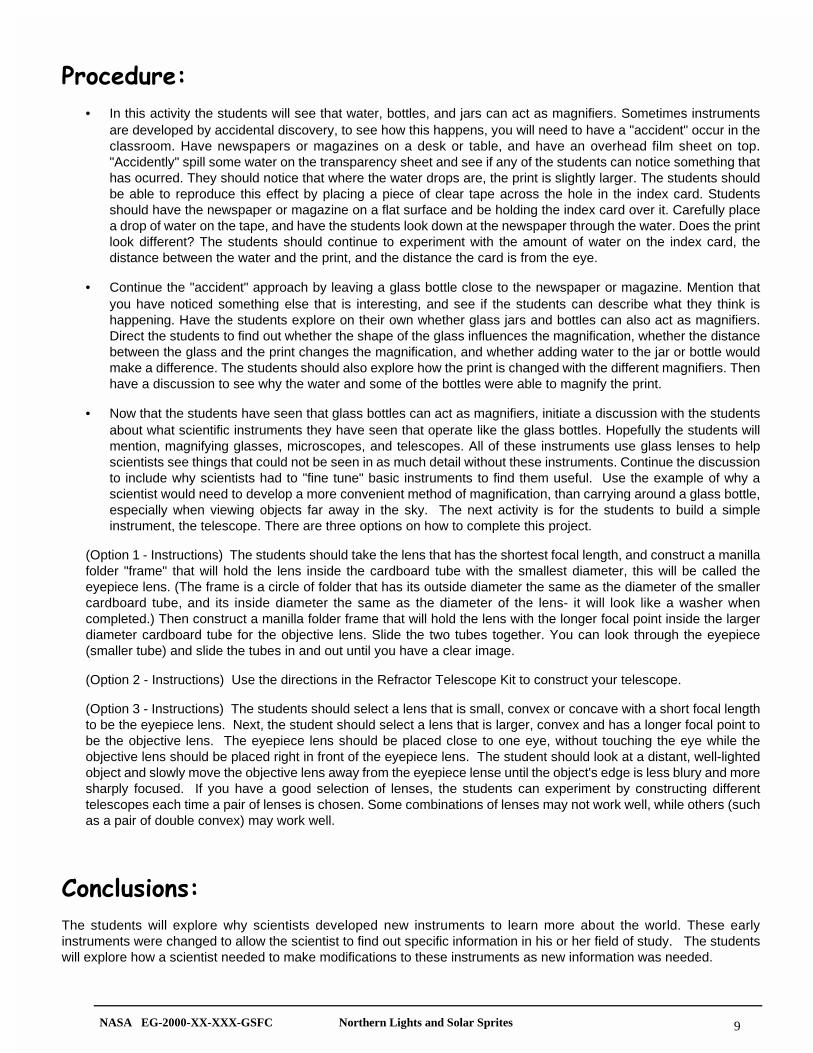
Why do scientists use instruments? To helpstudents understand the world around them,scientists use instruments. These instruments areextensions of human tool-making abilities to extendour senses and often to greatly amplify them. Amagnfiying glass is one simple instrument. High-tech satellites often contain more complex ones.Specific instruments are "fine tuned" by scientists tocommunicate only the information that is needed.This lesson will focus on why scientists needed todevelop instruments through hands-on experiencesmaking some basic scientific instruments.Throughout this unit the students will be completingactivities that will provide models for the scientificinstruments currently in use on the IMAGE satellitethat was launched March 25, 2000.
!"������
• The students will explore how a scientistdevelops tools in order to learn more aboutthe world.
• The students will use hands on experiencesto make scientific instruments and to alterthem to "fine tune" what information theinstrument can communicate.
� ��� ��3 x 5 index card with 1 inch hole cut out
Clear tape
Water
Clear glass bottles and jars
Old magazines or newspapers
#���������� ��� ���$
Option 1: Two convex lenses- 38mm dia./(twodifferent FL) DCX Lens work well (EdmundScientific http://www.edsci.com)
Two mailing tubes (different diameters)
Manilla folder
Scissors
Option 2 Edmund Scientific has a RefractorTelescope Kit that includes lenses, tubes andeverything else needed for $16.95 - if you orderonline, there is a discount for multiple items
Option 3 The Astronomical Society of the Pacific(1-800-335-2624) has a kit with 10 telescopes for$64.95 (KT 103) with all of the necessary parts forconstructing simple refractors.
NASA EG-2000-XX-XXX-GSFC Northern Lights and Solar Sprites 9
%���������
• In this activity the students will see that water, bottles, and jars can act as magnifiers. Sometimes instrumentsare developed by accidental discovery, to see how this happens, you will need to have a "accident" occur in theclassroom. Have newspapers or magazines on a desk or table, and have an overhead film sheet on top."Accidently" spill some water on the transparency sheet and see if any of the students can notice something thathas ocurred. They should notice that where the water drops are, the print is slightly larger. The students shouldbe able to reproduce this effect by placing a piece of clear tape across the hole in the index card. Studentsshould have the newspaper or magazine on a flat surface and be holding the index card over it. Carefully placea drop of water on the tape, and have the students look down at the newspaper through the water. Does the printlook different? The students should continue to experiment with the amount of water on the index card, thedistance between the water and the print, and the distance the card is from the eye.
• Continue the "accident" approach by leaving a glass bottle close to the newspaper or magazine. Mention thatyou have noticed something else that is interesting, and see if the students can describe what they think ishappening. Have the students explore on their own whether glass jars and bottles can also act as magnifiers.Direct the students to find out whether the shape of the glass influences the magnification, whether the distancebetween the glass and the print changes the magnification, and whether adding water to the jar or bottle wouldmake a difference. The students should also explore how the print is changed with the different magnifiers. Thenhave a discussion to see why the water and some of the bottles were able to magnify the print.
• Now that the students have seen that glass bottles can act as magnifiers, initiate a discussion with the studentsabout what scientific instruments they have seen that operate like the glass bottles. Hopefully the students willmention, magnifying glasses, microscopes, and telescopes. All of these instruments use glass lenses to helpscientists see things that could not be seen in as much detail without these instruments. Continue the discussionto include why scientists had to "fine tune" basic instruments to find them useful. Use the example of why ascientist would need to develop a more convenient method of magnification, than carrying around a glass bottle,especially when viewing objects far away in the sky. The next activity is for the students to build a simpleinstrument, the telescope. There are three options on how to complete this project.
(Option 1 - Instructions) The students should take the lens that has the shortest focal length, and construct a manillafolder "frame" that will hold the lens inside the cardboard tube with the smallest diameter, this will be called theeyepiece lens. (The frame is a circle of folder that has its outside diameter the same as the diameter of the smallercardboard tube, and its inside diameter the same as the diameter of the lens- it will look like a washer whencompleted.) Then construct a manilla folder frame that will hold the lens with the longer focal point inside the largerdiameter cardboard tube for the objective lens. Slide the two tubes together. You can look through the eyepiece(smaller tube) and slide the tubes in and out until you have a clear image.
(Option 2 - Instructions) Use the directions in the Refractor Telescope Kit to construct your telescope.
(Option 3 - Instructions) The students should select a lens that is small, convex or concave with a short focal lengthto be the eyepiece lens. Next, the student should select a lens that is larger, convex and has a longer focal point tobe the objective lens. The eyepiece lens should be placed close to one eye, without touching the eye while theobjective lens should be placed right in front of the eyepiece lens. The student should look at a distant, well-lightedobject and slowly move the objective lens away from the eyepiece lense until the object's edge is less blury and moresharply focused. If you have a good selection of lenses, the students can experiment by constructing differenttelescopes each time a pair of lenses is chosen. Some combinations of lenses may not work well, while others (suchas a pair of double convex) may work well.
�����������
The students will explore why scientists developed new instruments to learn more about the world. These earlyinstruments were changed to allow the scientist to find out specific information in his or her field of study. The studentswill explore how a scientist needed to make modifications to these instruments as new information was needed.
NASA EG-2000-XX-XXX-GSFC Northern Lights and Solar Sprites 10
�����&�����'���� ���(��� ����� ������)
������������
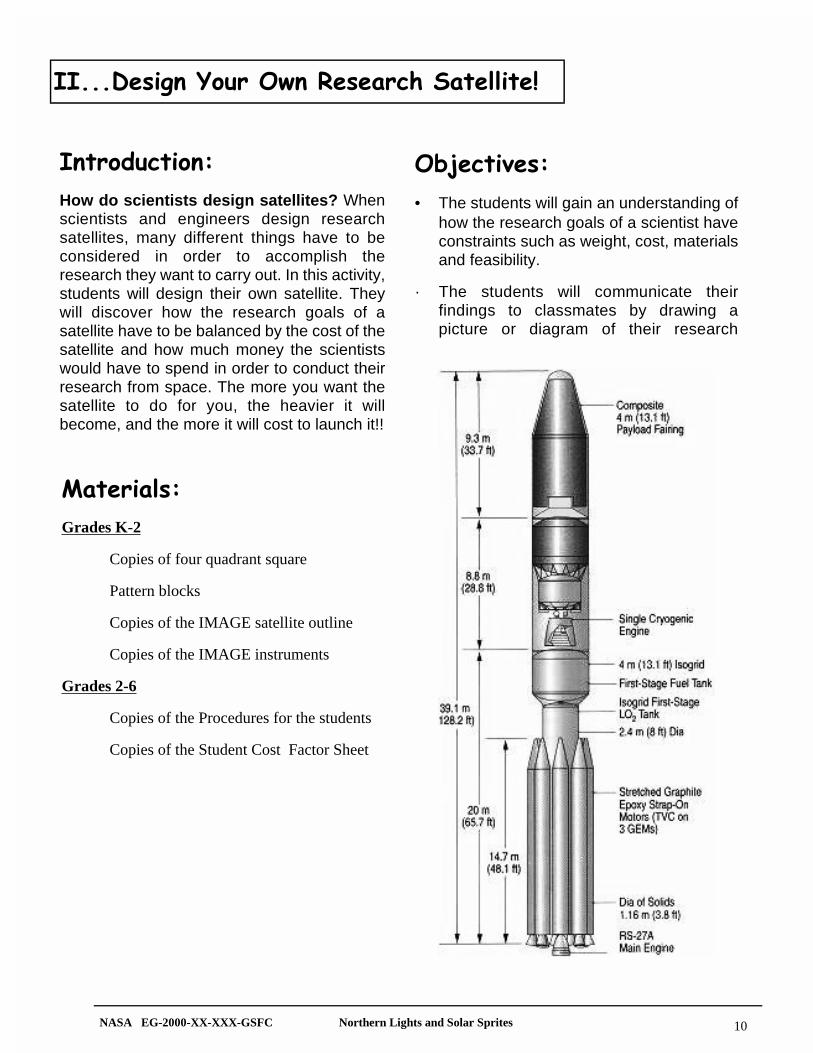
How do scientists design satellites? Whenscientists and engineers design researchsatellites, many different things have to beconsidered in order to accomplish theresearch they want to carry out. In this activity,students will design their own satellite. Theywill discover how the research goals of asatellite have to be balanced by the cost of thesatellite and how much money the scientistswould have to spend in order to conduct theirresearch from space. The more you want thesatellite to do for you, the heavier it willbecome, and the more it will cost to launch it!!
!"�������
• The students will gain an understanding ofhow the research goals of a scientist haveconstraints such as weight, cost, materialsand feasibility.
· The students will communicate theirfindings to classmates by drawing apicture or diagram of their research
� ��� ���
Grades K-2
Copies of four quadrant square
Pattern blocks
Copies of the IMAGE satellite outline
Copies of the IMAGE instruments
Grades 2-6
Copies of the Procedures for the students
Copies of the Student Cost Factor Sheet
NASA EG-2000-XX-XXX-GSFC Northern Lights and Solar Sprites 11
%�����������*� ����+$,
• The students are going to design their own satellite that is shaped like a square. The studentswill have to think like a scientist by making sure that each of the four quadrants has an equalamount of weight in it. In this activity, pattern blocks will be used to represent weights, and thehexagon shape will represent 100 pounds. Give each student a copy of the four quadrantsquare and a supply of pattern blocks. (This activity can easily be completed in groups also).Allow the students time to explore the pattern blocks. Direct the students to find a yellowhexagon. Then ask the students to find the ways to make the hexagon shape using otherpattern block pieces. Some of the younger students may need to "build" on top of the yellowhexagon in order to find all the possiblities. When the students finish, direct them to considereach "hexagon" shape to be equal to an instrument that weighs 100 pounds. As scientists, thestudents will need to make 100 pound "instruments" in each of the four quadrants. There aremany different combinations of pattern blocks that the students can use. When the studentshave completed all four of their instruments, they can record the shapes used in chart form orby drawing or stamping them onto the four quadrant square.
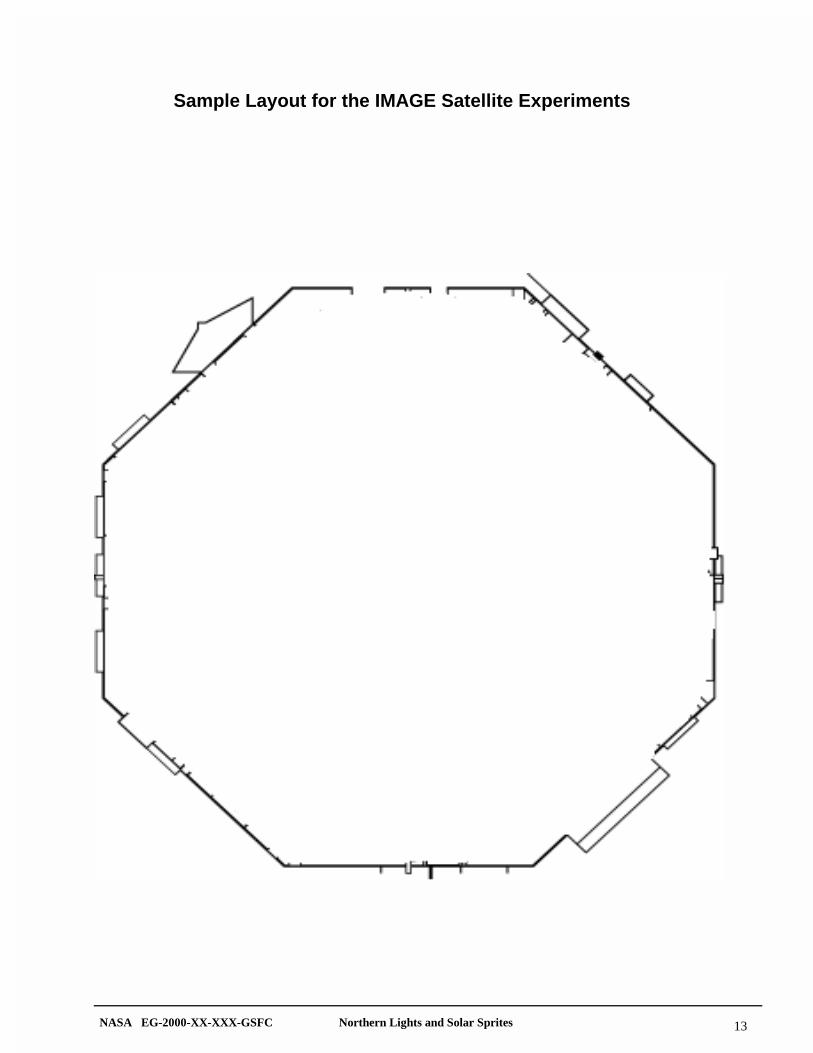
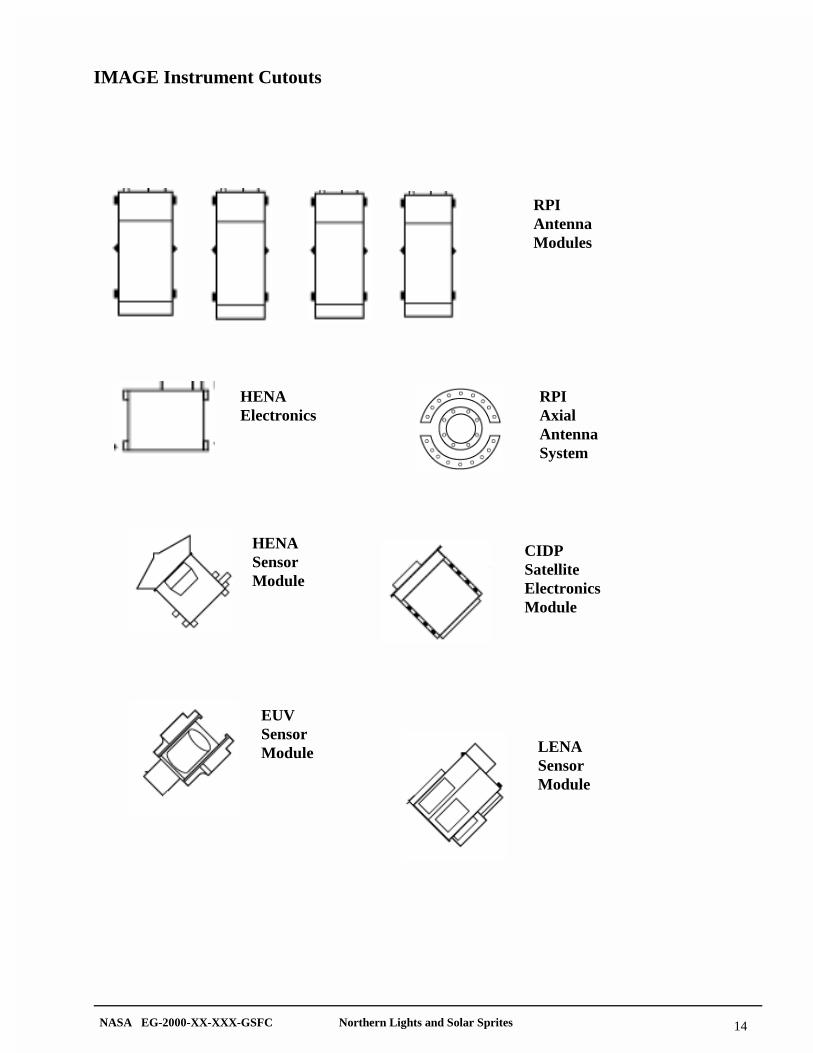
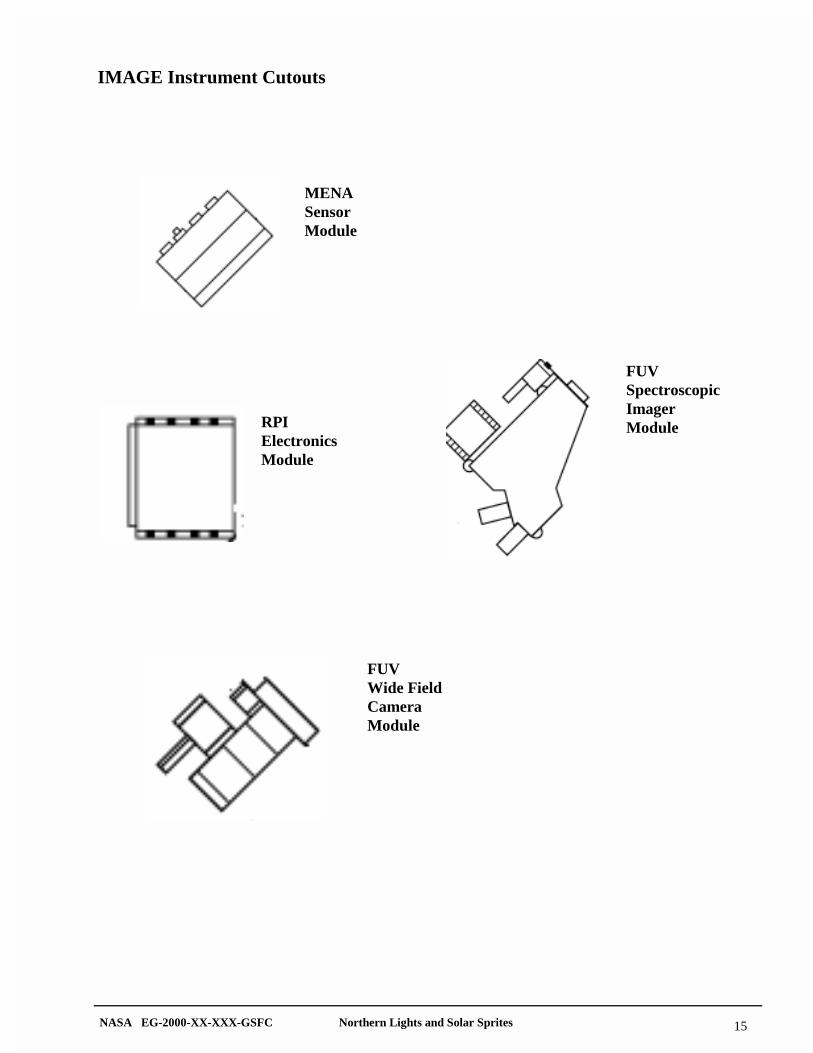
• The students will be given an outline of the IMAGE satellite and its instruments. The studentswill need to place the instruments on the outline of the satellite to meet certain criteria that youwill read to the students. Each instrument should touch the outside edge so that theinstrument's name can be read from the inside out. Begin by giving each student a copy of theoutline and the instruments. With the exception of the "deployers" (in this case, where theantenea are released from the satellite) all of the instrument names are acronyms, so you canjust call out the letters for the students to find the correct instrument or if your students are notrecognizing all their letters, write them on the board or put them on the overhead. Start todiscuss the shape of the satellite, how many sides does it have? Review with the students whathappens on a seesaw both ends do not have the same amount of weight on them. Whenplacing the instruments on the outline, the students will have to remember to balance theinstruments on each side so that the weight is evenly spread out.
Criteria for the instruments on the IMAGE satellite:
1. The four "deployers" must each be centered along the edge on different sides and no otherinstruments can be placed on the same side. They are the heaviest items on the satellite,remind the students that they have to be evenly distributed around the edge.
2. All of the instruments that have FUV (there are three- FUV-SI, FUV-GEO, and FUV-WIC) asa part of their name go along the same side of the satellite. No other instruments can go onthis side of the satellite.
3. Have the students count how many sides do not have any instruments on them. Thereshould be three sides left at this point that do not have instruments. The HENA, MENA, andLENA instruments each need to go on different sides.
4. Each of the remaining instruments, the RPI, CIDP, and EUV, can go on the same side as theHENA, MENA, and LENA. No instrument can be placed on top of or touching anotherinstrument, so the students may need to do some rearranging as necessary. When you andthe students feel that their satellite is "balanced" the instruments can be glued.

NASA EG-2000-XX-XXX-GSFC Northern Lights and Solar Sprites 12
�����������
The students will gain an understanding of the decision making process that scientists use when designing asatellite. This process is not always completed by one individual, but often by teams of scientists working inmany locations. The students should be aware of the constraints on designing an instrument or researchsatellite.
Grade K-2: Satellite Design. Four Quadrant Square
NASA EG-2000-XX-XXX-GSFC Northern Lights and Solar Sprites 13
Sample Layout for the IMAGE Satellite Experiments
NASA EG-2000-XX-XXX-GSFC Northern Lights and Solar Sprites 14
IMAGE Instrument Cutouts
RPIAntennaModules
HENAElectronics
RPIAxialAntennaSystem
HENASensorModule
CIDPSatelliteElectronicsModule
EUVSensorModule LENA
SensorModule
NASA EG-2000-XX-XXX-GSFC Northern Lights and Solar Sprites 15
IMAGE Instrument Cutouts
MENASensorModule
FUVSpectroscopicImagerModuleRPI
ElectronicsModule
FUVWide FieldCameraModule
NASA EG-2000-XX-XXX-GSFC Northern Lights and Solar Sprites 16
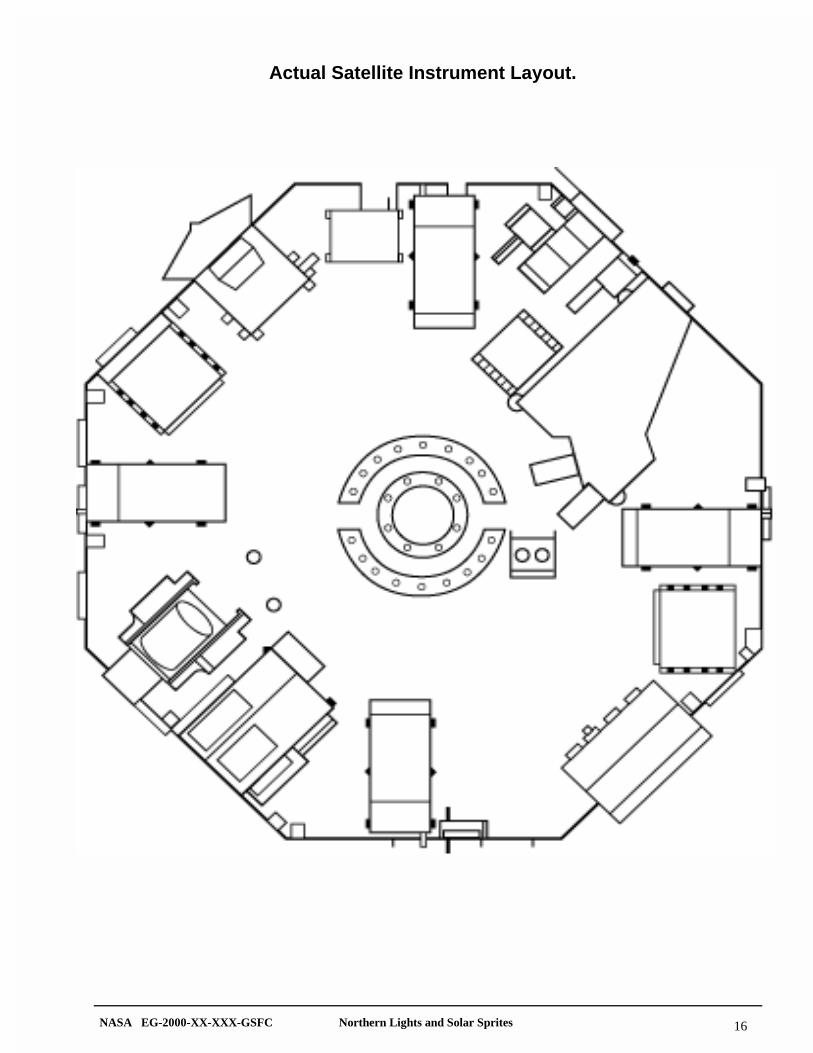
Actual Satellite Instrument Layout.
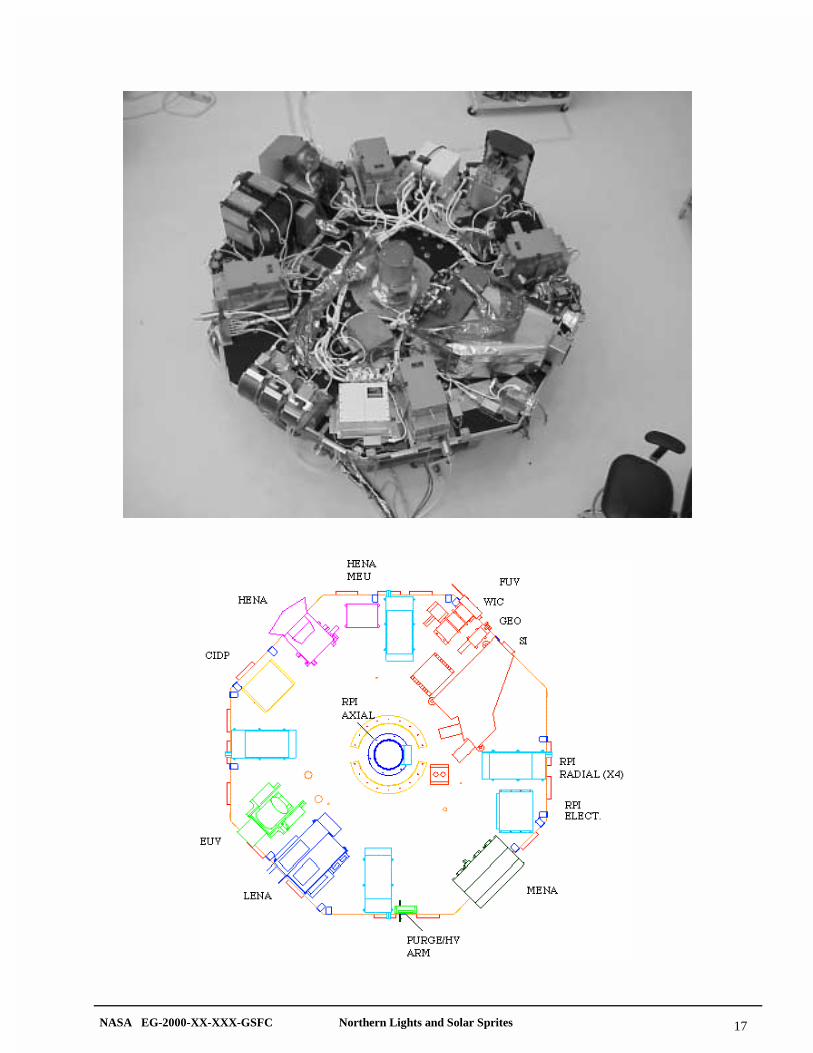
NASA EG-2000-XX-XXX-GSFC Northern Lights and Solar Sprites 17
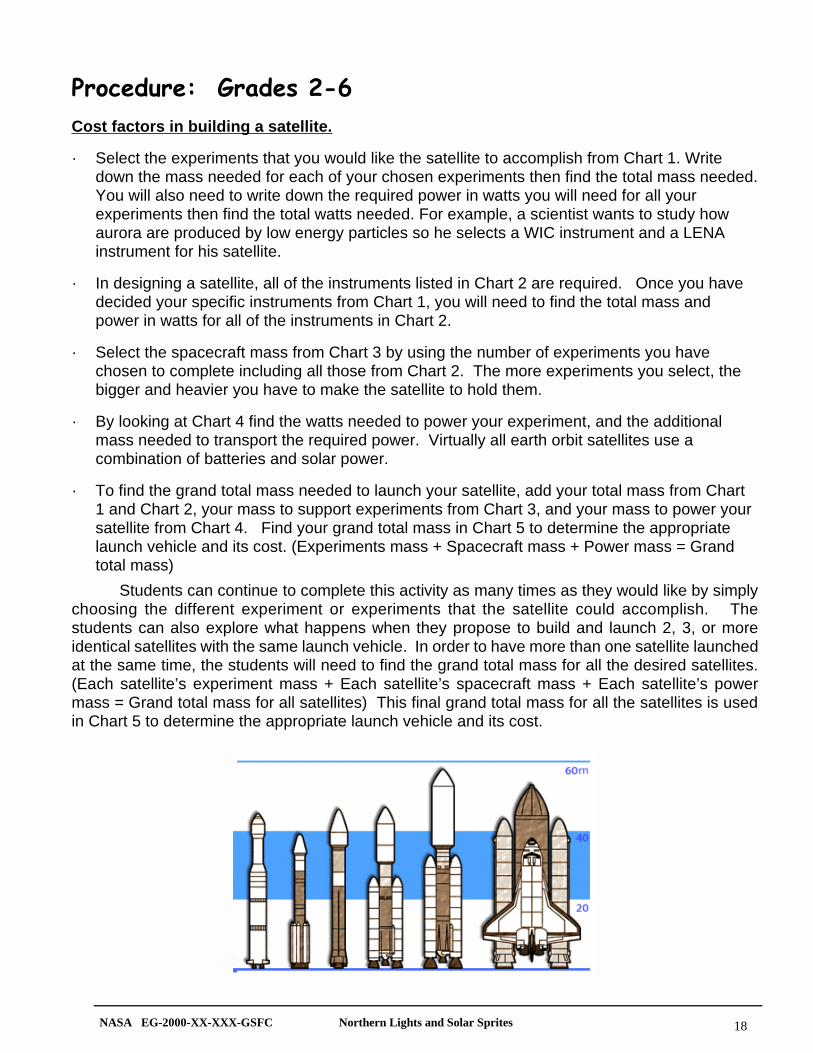
NASA EG-2000-XX-XXX-GSFC Northern Lights and Solar Sprites 18
%�����������*� ����,$-
Cost factors in building a satellite.
· Select the experiments that you would like the satellite to accomplish from Chart 1. Writedown the mass needed for each of your chosen experiments then find the total mass needed.You will also need to write down the required power in watts you will need for all yourexperiments then find the total watts needed. For example, a scientist wants to study howaurora are produced by low energy particles so he selects a WIC instrument and a LENAinstrument for his satellite.
· In designing a satellite, all of the instruments listed in Chart 2 are required. Once you havedecided your specific instruments from Chart 1, you will need to find the total mass andpower in watts for all of the instruments in Chart 2.
· Select the spacecraft mass from Chart 3 by using the number of experiments you havechosen to complete including all those from Chart 2. The more experiments you select, thebigger and heavier you have to make the satellite to hold them.
· By looking at Chart 4 find the watts needed to power your experiment, and the additionalmass needed to transport the required power. Virtually all earth orbit satellites use acombination of batteries and solar power.
· To find the grand total mass needed to launch your satellite, add your total mass from Chart1 and Chart 2, your mass to support experiments from Chart 3, and your mass to power yoursatellite from Chart 4. Find your grand total mass in Chart 5 to determine the appropriatelaunch vehicle and its cost. (Experiments mass + Spacecraft mass + Power mass = Grandtotal mass)
Students can continue to complete this activity as many times as they would like by simplychoosing the different experiment or experiments that the satellite could accomplish. Thestudents can also explore what happens when they propose to build and launch 2, 3, or moreidentical satellites with the same launch vehicle. In order to have more than one satellite launchedat the same time, the students will need to find the grand total mass for all the desired satellites.(Each satellite’s experiment mass + Each satellite’s spacecraft mass + Each satellite’s powermass = Grand total mass for all satellites) This final grand total mass for all the satellites is usedin Chart 5 to determine the appropriate launch vehicle and its cost.

NASA EG-2000-XX-XXX-GSFC Northern Lights and Solar Sprites 19
Instrument Mass (kg) Power(watts)
Experiment Function
High -Energy Neutral AtomImager
(HENA)
8.0 12.0 -detects and maps high-energyatoms in ring current, innerplasma sheet and substorm
boundaryMedium- Energy Neutral Atom
Imager(MENA)
7.0 7.0 -detects and maps medium-energy atoms in ring current,near-Earth plasma sheet and
the nightside boundaryLow-Energy Neutral Atom
Imager(LENA)
8.0 5.3 -detects and maps low-energyatoms from the polar ionsphere
Extreme Ultraviolet Camera(EUV)
15.6 15.5 - detects solar EUV photons inthe Earth's plasmasphere
Spectrographic Imager(SI)
8.7 6.0 -identifies and producesimages of the proton and
electrons in auroraWideband Imaging Camera
(WIC)1.9 3.0 -produces images of auroral
currentsGeocorona Photometers
(GEO)2.6 3.0 -detects light and produced
images produced by hydrogenin atmosphere
Radio Plasma Imager(RPI)
49.8 30.8 -characterizes plasma cloudsaround earth using radio
frequenciesMagnetometer 2.5 2.4 -measures direction strength of
local magnetic field nearspacecraft
Electrical Field and Wave Sensor 15.5 8 -measures change in localelectron fields within theplasma surrounding the
spacecraftSolar Wind Plasma Analyzer 12.2 18 -composition of solar wind
charged particles
�� ���.���������������/���������0���� ���������)
- detects light produced byhydrogen atoms.
Electric Field and WaveSensor
-Measures electric fields nearthe spacecraft and detectstheir changes in time.
NASA EG-2000-XX-XXX-GSFC Northern Lights and Solar Sprites 20
Instrument Mass (kg) Power
(watts)Experiment Function
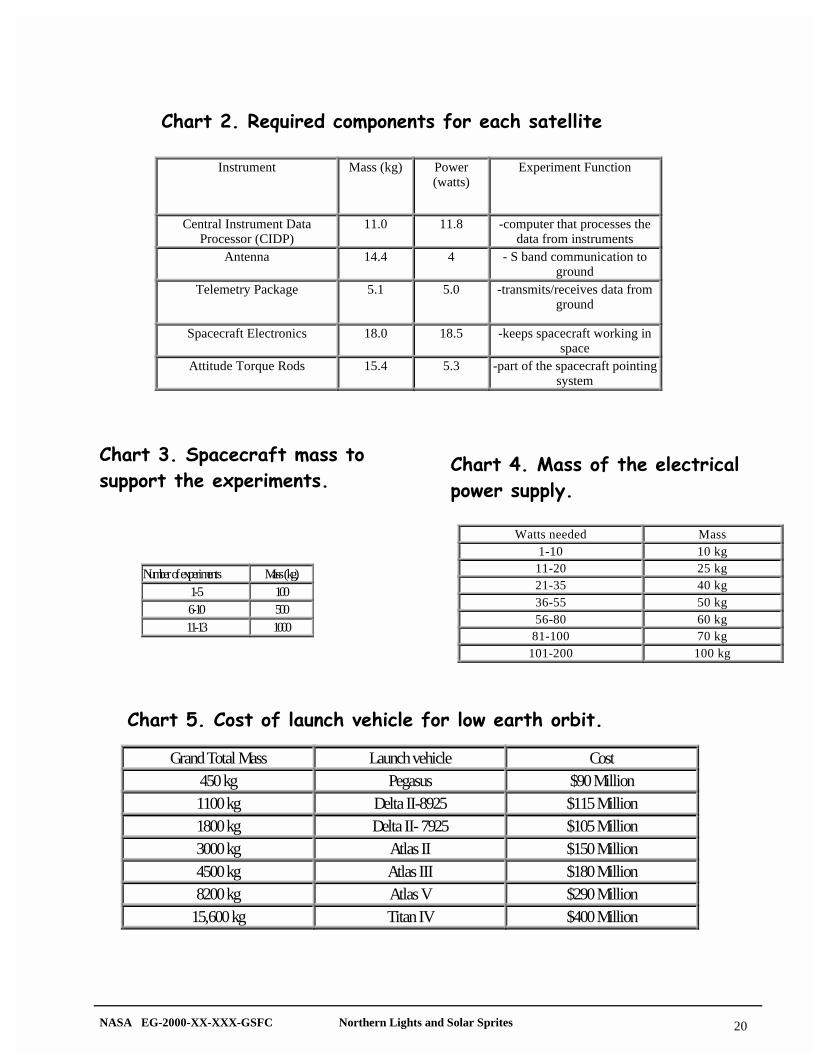
Central Instrument DataProcessor (CIDP)
11.0 11.8 -computer that processes thedata from instruments
Antenna 14.4 4 - S band communication toground
Telemetry Package 5.1 5.0 -transmits/receives data fromground
Spacecraft Electronics 18.0 18.5 -keeps spacecraft working inspace
Attitude Torque Rods 15.4 5.3 -part of the spacecraft pointingsystem
Watts needed Mass1-10 10 kg
11-20 25 kg21-35 40 kg36-55 50 kg56-80 60 kg
81-100 70 kg101-200 100 kg
Number of experiments Mass (kg)1-5 1006-10 50011-13 1000
Grand Total Mass Launch vehicle Cost450 kg Pegasus $90 Million1100 kg Delta II-8925 $115 Million1800 kg Delta II- 7925 $105 Million3000 kg Atlas II $150 Million4500 kg Atlas III $180 Million8200 kg Atlas V $290 Million
15,600 kg Titan IV $400 Million
�� ���,��(�1��������������������� ���� ������
�� ���2���� ���� ���� �����
�������������/����������� ���3��� ����������������� �
�����������0�
�� ���4����������� ��������������������� ������!��
NASA EG-2000-XX-XXX-GSFC Northern Lights and Solar Sprites 21
������*������ �� �������������� ��
������������
How does a satellite get into space? Moststudents will know that to get something intospace, you need a rocket, but they may notrealize that rockets do not have to "push off"of the atmosphere to get into space. Also,you do not have to keep pushing a satelliteto keep it moving in space because there isno friction in space to cause things to slowdown. In this activity, students will learn howNewton’s Laws of Motion can be applied tothe launching of rockets: "Every action hasan equal and opposite reaction." Studentswill explore how a satellite is placed in orbit.The students will explore how a satelliteremains in orbit.
!"�������
· Students will explore Newton’sLaws of Motion and theirapplication to rocket launching.
· Students will explore Newton’sLaws of Motion and theirapplication to satellite orbits.
· Students will develop anunderstanding of the decisionsthat a scientist makes whendesigning a satellite.
� ��� ���
Balloon (any size or style)
Glitter
Skateboard (optional)
Outdoor swing set
BooksBall –tennis with a length of string attached
( a yo-yo works well too)Several Balloons
(3 inches by 12-24 inches long)
Drinking straws
Tape
Nylon fishing line
Stopwatch or timer
+�0�#�����
Newton’s First Law of Motion - if anobject is at rest, it takesunbalanced forces to make it move.Conversely, if an object is moving ittakes an unbalanced force to makeit change its direction or speed. Itis a common misconception amongstudents and adults that you haveto keep exerting a force on a bodyto maintain its speed. This is onlytrue when friction is important.
Newton’s Third Law of Motion – forevery action there is an oppositeand equal reaction. The exhaustgases are expelled and cause anopposite force which moves therocket forward in the oppositedirection.
NASA EG-2000-XX-XXX-GSFC Northern Lights and Solar Sprites 22
%���������
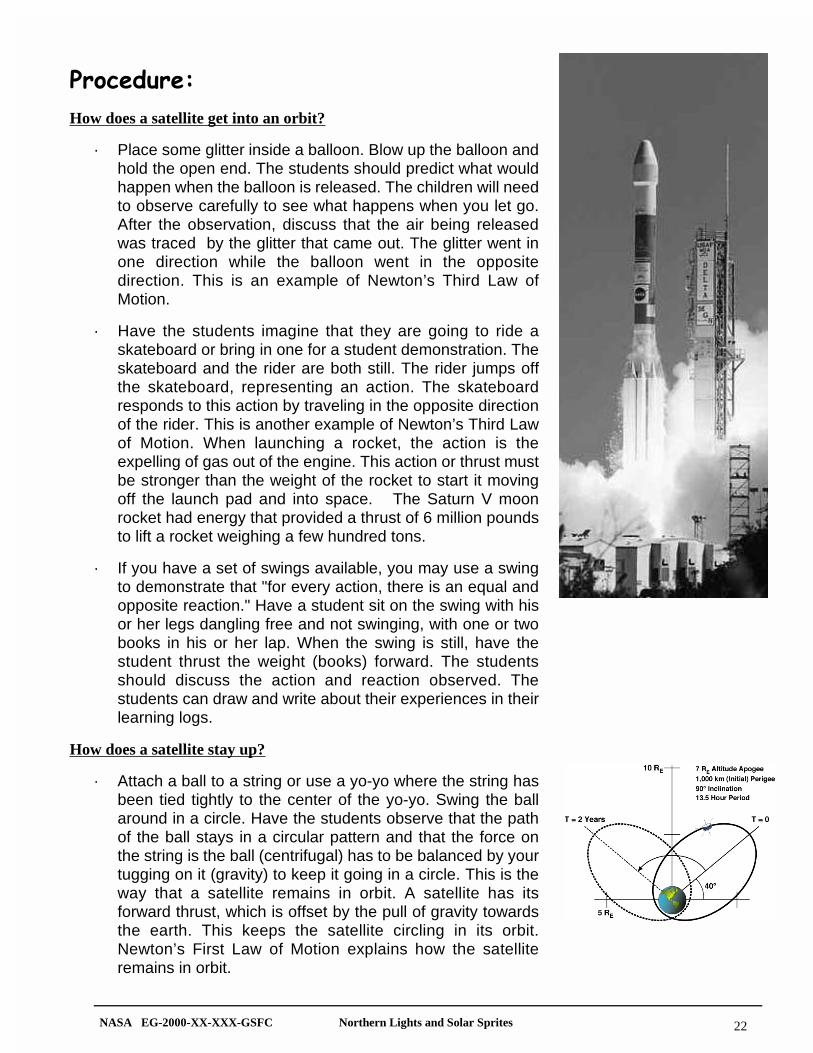
How does a satellite get into an orbit?
· Place some glitter inside a balloon. Blow up the balloon andhold the open end. The students should predict what wouldhappen when the balloon is released. The children will needto observe carefully to see what happens when you let go.After the observation, discuss that the air being releasedwas traced by the glitter that came out. The glitter went inone direction while the balloon went in the oppositedirection. This is an example of Newton’s Third Law ofMotion.
· Have the students imagine that they are going to ride askateboard or bring in one for a student demonstration. Theskateboard and the rider are both still. The rider jumps offthe skateboard, representing an action. The skateboardresponds to this action by traveling in the opposite directionof the rider. This is another example of Newton’s Third Lawof Motion. When launching a rocket, the action is theexpelling of gas out of the engine. This action or thrust mustbe stronger than the weight of the rocket to start it movingoff the launch pad and into space. The Saturn V moonrocket had energy that provided a thrust of 6 million poundsto lift a rocket weighing a few hundred tons.
· If you have a set of swings available, you may use a swingto demonstrate that "for every action, there is an equal andopposite reaction." Have a student sit on the swing with hisor her legs dangling free and not swinging, with one or twobooks in his or her lap. When the swing is still, have thestudent thrust the weight (books) forward. The studentsshould discuss the action and reaction observed. Thestudents can draw and write about their experiences in theirlearning logs.
How does a satellite stay up?
· Attach a ball to a string or use a yo-yo where the string hasbeen tied tightly to the center of the yo-yo. Swing the ballaround in a circle. Have the students observe that the pathof the ball stays in a circular pattern and that the force onthe string is the ball (centrifugal) has to be balanced by yourtugging on it (gravity) to keep it going in a circle. This is theway that a satellite remains in orbit. A satellite has itsforward thrust, which is offset by the pull of gravity towardsthe earth. This keeps the satellite circling in its orbit.Newton’s First Law of Motion explains how the satelliteremains in orbit.
NASA EG-2000-XX-XXX-GSFC Northern Lights and Solar Sprites 23
Which Law of Motion is Being Applied?
· The students should begin by tying one end of the nylon string to an anchored objectin the room that is approximately four to five feet off the ground. Then a plastic strawshould be threaded onto the string. Blow up the balloon 1/3 full of air, twist the endwithout tying it and carefully tape it to the straw so that the long side of the balloon isparallel to the straw and its head is pointed toward the anchored end of the string. Astudent will need to hold the other end of the string up so that it is taunt and at an evenheight across its length. Before the balloon is released, have a stopwatch ready torecord the time and a meterstick ready to measure the distance traveled. Students canrepeat the activity two more times so that an average time and distance can beobtained.
· The students should then inflate the balloon 2/3 full and repeat the activity three timesto get the average time and distance. Then the students should inflate the ballooncompletely and repeat the activity three times to get the average time and distance.
· Have a class discussion about the data collected. Which balloon went the farthest andwhy? Why did the balloons stop moving? If there were no friction between the strawand the string and no wall in the way, how would the students expect the balloon tobehave? If there were no friction between the straw and the string, no wall in the wayand no air resistance against the deflating balloon how would the balloon behave whenit ran out of fuel? Which Law(s) of Motion explains the results and why do the studentsfeel this way?
�����������
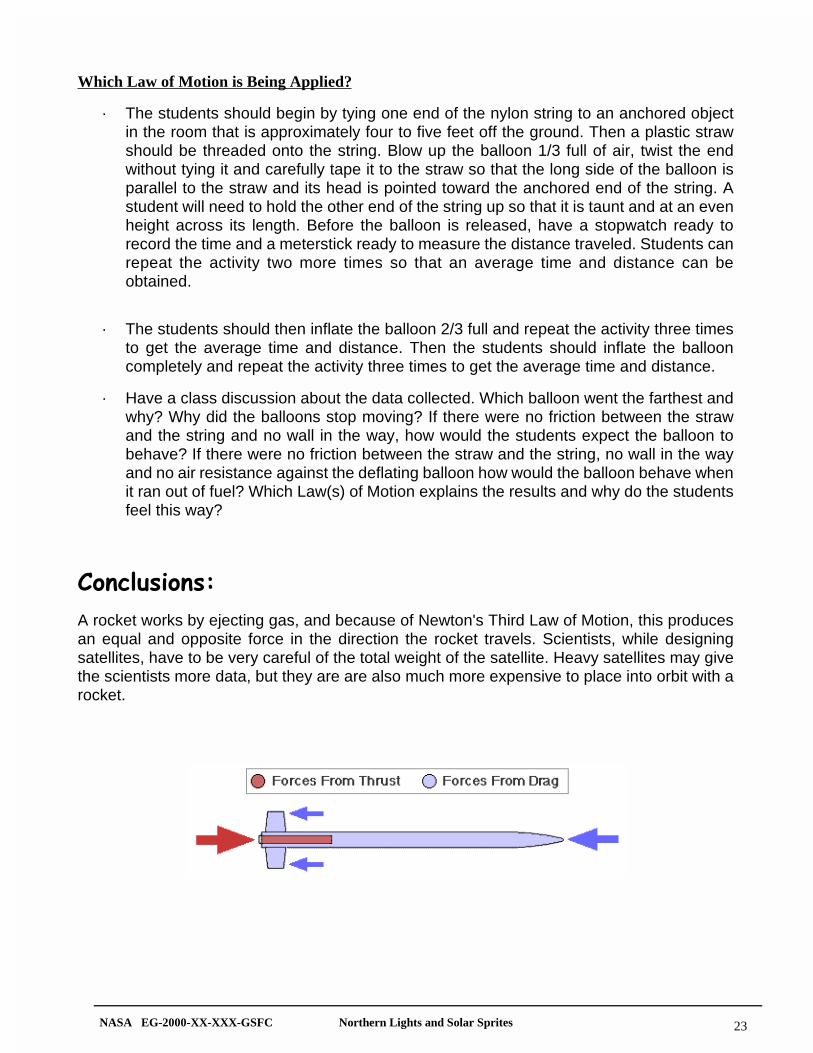
A rocket works by ejecting gas, and because of Newton's Third Law of Motion, this producesan equal and opposite force in the direction the rocket travels. Scientists, while designingsatellites, have to be very careful of the total weight of the satellite. Heavy satellites may givethe scientists more data, but they are are also much more expensive to place into orbit with arocket.
NASA EG-2000-XX-XXX-GSFC Northern Lights and Solar Sprites 24
�5����������& � ������ �� �������6 ������*�����
������������
How does a satellite communicate with the Earth?Some military "spy" satellites take pictures withactual film. The film canisters are ejected back toearth and caught mid-air by waiting aircraft.Scientific research and weather satellites send theirinformation back to earth in long strings of numbers.These numbers provide information about thebrightness of millions of image "pixels" taken bysatellite-borne, electronic cameras. In order forsatellites to truly "communicate" information has tobe sucessfully transmitted and received without anyerrors. The received information must also be clearlyunderstood. In this activity, students will have handson experiences in the communication processes ofsatellites.
!"�������
• Students will learn that satellitesuse a transmitter and receiversystem of sending information.
• Students will learn thatcommunication requires thatinformation be transmitted,received and understood or it isnot considered communication.
• Students will learn how a satellitecommunicates the information ithas gathered.
� ��� ���
• Flashlight
• Mirror
• Appropriate grade level grids
• Appropriate list of coordinates
NASA EG-2000-XX-XXX-GSFC Northern Lights and Solar Sprites 25
%���������
• Darken the room, and shine the flashlight at the mirror. Have the students observe the pathof the light. A satellite "sends" its data by reflecting it off mirrors and directing it to the satellitedish on the earth’s surface at a distant point.
• Students should play the "gossip" game, where a message is repeated from student tostudent. The student is the "transmitter" when saying the message to a classmate, and is the"receiver" when hearing the message from a classmate. Start with small groups of childrenand increase the group size. Discuss with the students the success or "noncommunication"of information as the groups get larger. While some students are being the transmitters, makesome background noise. Compare this to satellite interference which leads to"noncommunication" of information.
• When a satellite is communicating it does not speak in words, but in numbers. Thesenumbers correspond to a location on the grid system. In many instances, the transmission ofthese numbers is done three times, once from each of the cameras. Each set of numberstransmitted refers to a color filter. When the completed filters are place on top of each other,the true colors in the image are seen. Some of the activities below use this grid system totransmit information from one student to another. For some other satellite transmissions, theinformation at each location refers to the number of times the corresponding location was hitby charged particles. Some of the activities below use this type of grid system to transmitinformation to the students.
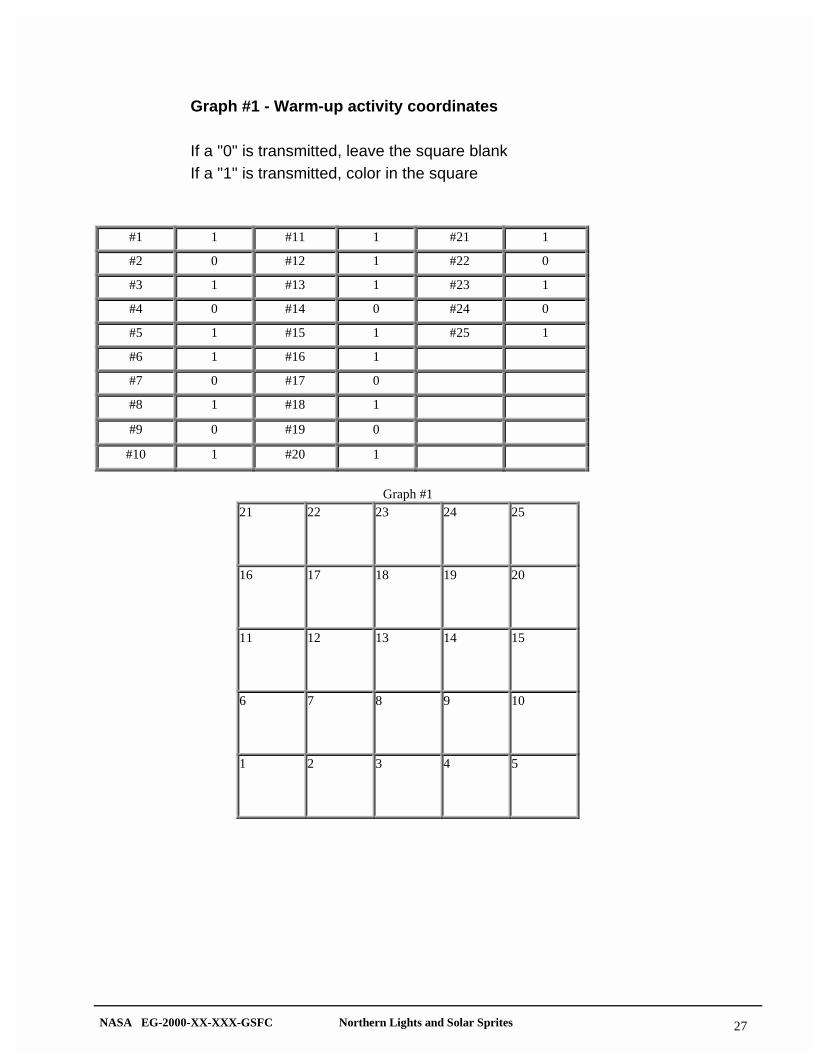
Grade K -6 warm-up activity (Graph #1)
• The students will be "read" a set of numbers that correspond to a square on the grid. If anumber one is "read" for a square, then the students should color in the correspondingsquare. If a number zero is "read" for a square, then the students should leave the squarealone. When complete the grid should display a message.
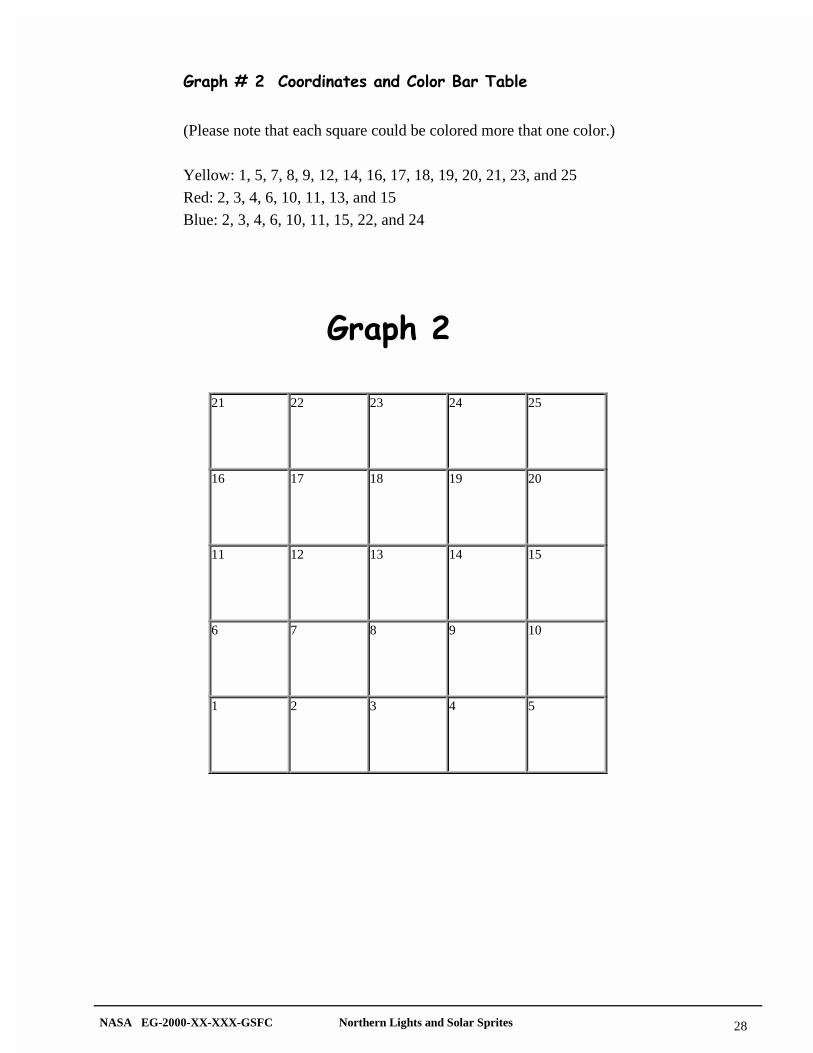
Grades K-2 (Graph #2)
• The students will be "read" a set of numbers that correspond to the location on the grid. Onestudent reading the information to the other student can accomplish this, or the teacher canread it to the class. The square at that location will be colored in the corresponding color. Thestudents will be read three lists. The areas that are colored in will model the way a satellitecreates an image when it transmits data.
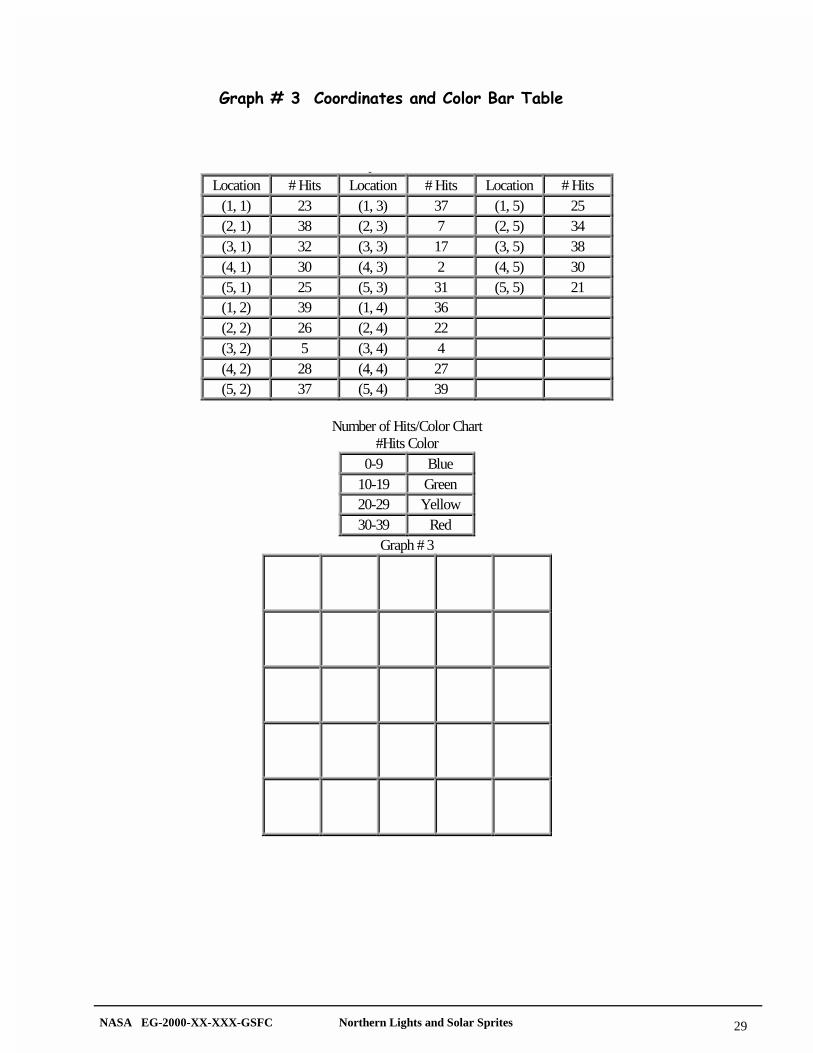
Grades 1-3 (Graph #3)
• The students will "read" a pair of coordinates for a location on the coordinate graph and thenumber of hits that correspond to that location. The students will use the range of hits chartto color the square its corresponding color. After all the coordinants have been completed,the colors will form an image as a satellite does when it transmits data.
NASA EG-2000-XX-XXX-GSFC Northern Lights and Solar Sprites 26
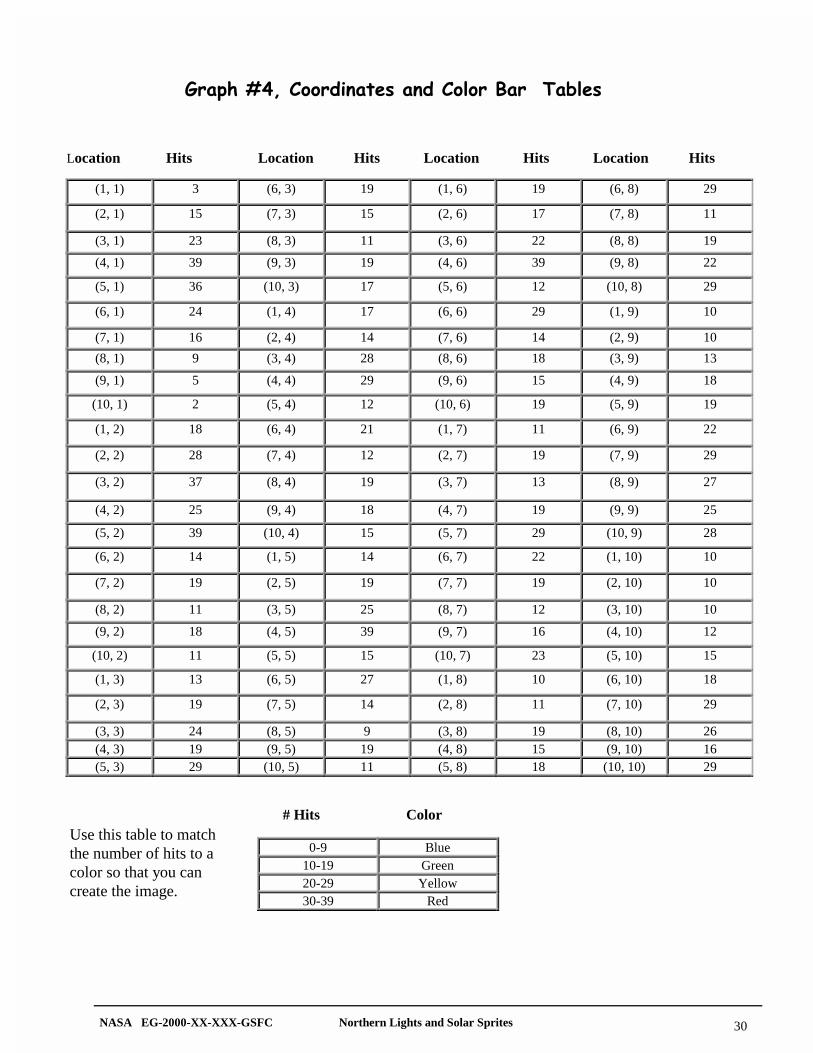
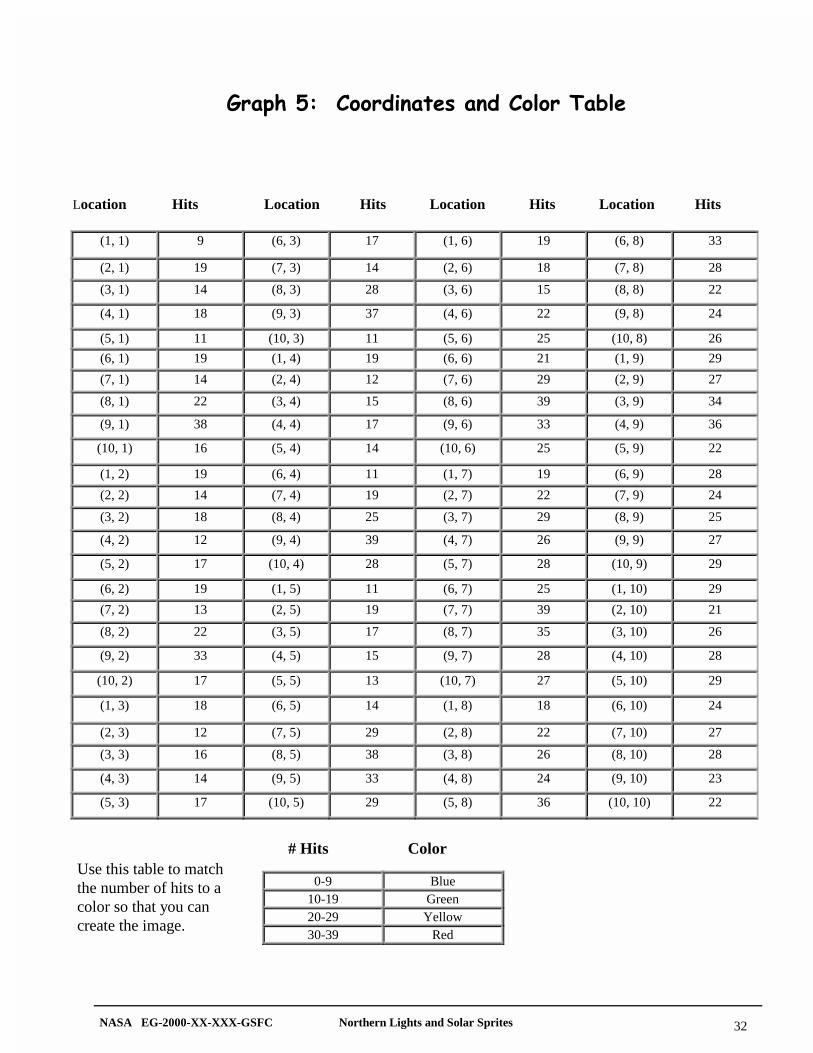
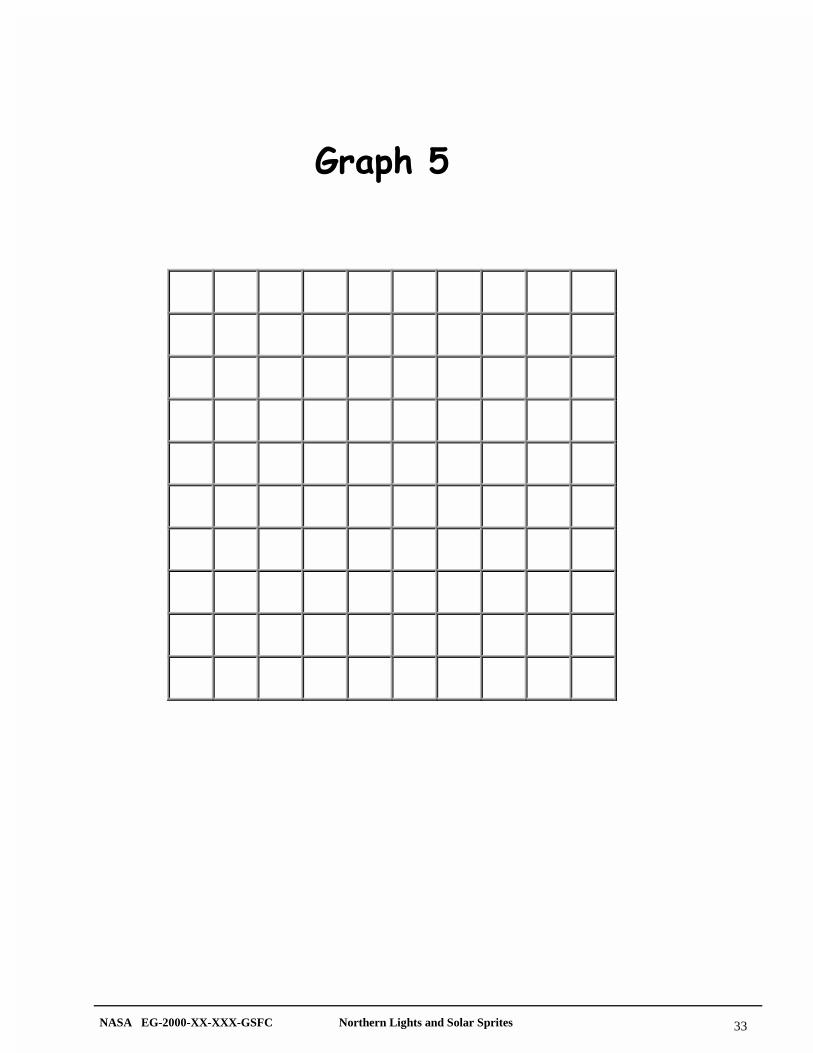
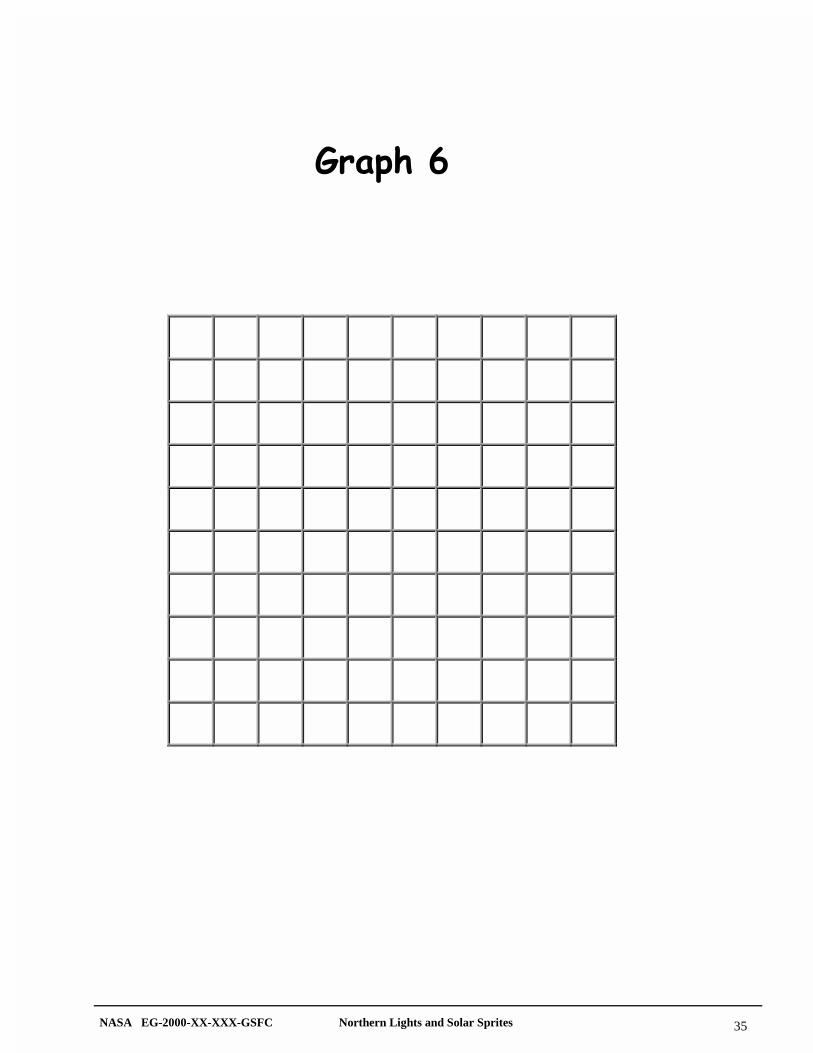
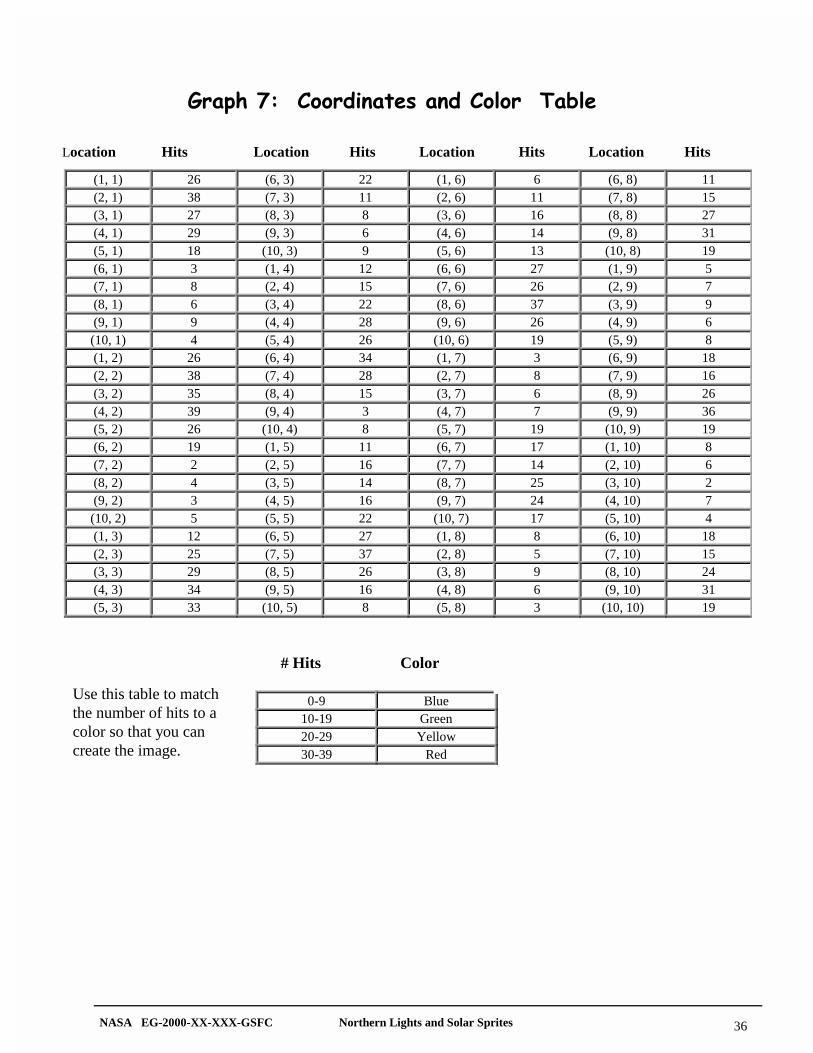
Grades 4-6 (Graphs #4 - 7)
• To prepare for this activity, make enough transparencies of graphs #4 - 7 for each studentto have one. The students should work in groups of four for each of the graphs. Eachstudent will be assigned a color for the graph that they are working on, and will "read" apair of coordinates for a location on the coordinate graph and the number of hits thatcorrespond to that location. Please note that the coordinate graph for these students is a10 x 10 grid. The students will use the range of hits chart to color the correspondingsquares for the assigned color. After all the coordinates have been completed, the fourstudents should place their transparencies on top of each other so that the colors will forman image as a satellite does when it transmits data. When all students are finished, theywill see that the four groups' grids will be put together at the end of the activity to form alarge image. (Each of the four graphs will have four transparencies in a pile to show thelayers of data that go into producing a single image.)
• The students will be comparing the completed four panel image with actual data from theIMAGE satellite's FUV instrument. This image may be found athttp://image.gsfc.nasa.gov/poetry, find the link for live data for the most recentinformation.
�����������
The students will learn how a satellite communicates information to the earth. Studentswill gain experience in two ways that data is transmitted, received and understood. Thestudents will use "color" filters, and information based on the number of hits a locationreceived to produce an image that models the way information, as images, is sent from asatellite
7/��������
Grades 1 to 3 Students should draw a set of pictures with captions to show the sequenceof data transmission from a satellite. They could make it in a sequence frame format or instory format.
Grades 4 to 6 Students should develop their "own" pictures to be transmitted via theirclassmates. They should write the coordinates keeping in mind that the three primarycolors could be mixed to form other colors. They could then make a sequence frame toshow the steps involved in satellite transmission.
����� ���������0������ ��������
Working in cooperative groups the students will complete a "life cycle" of a satellite inmural form. For the older students who designed a research satellite, the cycle beginswith the decision process. For the younger students, the cycle begins with the launch ofthe satellite on the rocket. Each group's mural should include pictures and captions ofhow a satellite gets into and remains in orbit, and how a satellite communicatesinformation. Students can use a long roll of paper or smaller papers attached together.
NASA EG-2000-XX-XXX-GSFC Northern Lights and Solar Sprites 27
Graph #1 - Warm-up activity coordinates
If a "0" is transmitted, leave the square blankIf a "1" is transmitted, color in the square
#1 1 #11 1 #21 1
#2 0 #12 1 #22 0
#3 1 #13 1 #23 1
#4 0 #14 0 #24 0
#5 1 #15 1 #25 1
#6 1 #16 1
#7 0 #17 0
#8 1 #18 1
#9 0 #19 0
#10 1 #20 1
Graph #1
21 22 23 24 25
16 17 18 19 20
11 12 13 14 15
6 7 8 9 10
1 2 3 4 5
NASA EG-2000-XX-XXX-GSFC Northern Lights and Solar Sprites 28
*� ���8�,�������� ���� ���������6 ��# !��
(Please note that each square could be colored more that one color.)
Yellow: 1, 5, 7, 8, 9, 12, 14, 16, 17, 18, 19, 20, 21, 23, and 25
Red: 2, 3, 4, 6, 10, 11, 13, and 15
Blue: 2, 3, 4, 6, 10, 11, 15, 22, and 24
21 22 23 24 25
16 17 18 19 20
11 12 13 14 15
6 7 8 9 10
1 2 3 4 5
*� ���,
NASA EG-2000-XX-XXX-GSFC Northern Lights and Solar Sprites 29
Graph #3 CoordinatesLocation # Hits Location # Hits Location # Hits
(1, 1) 23 (1, 3) 37 (1, 5) 25(2, 1) 38 (2, 3) 7 (2, 5) 34(3, 1) 32 (3, 3) 17 (3, 5) 38(4, 1) 30 (4, 3) 2 (4, 5) 30(5, 1) 25 (5, 3) 31 (5, 5) 21(1, 2) 39 (1, 4) 36 (2, 2) 26 (2, 4) 22 (3, 2) 5 (3, 4) 4 (4, 2) 28 (4, 4) 27 (5, 2) 37 (5, 4) 39
Number of Hits/Color Chart
#Hits Color0-9 Blue
10-19 Green20-29 Yellow30-39 Red
Graph # 3
*� ���8�2�������� ���� ���������6 ��# !��
NASA EG-2000-XX-XXX-GSFC Northern Lights and Solar Sprites 30
(1, 1) 3 (6, 3) 19 (1, 6) 19 (6, 8) 29
(2, 1) 15 (7, 3) 15 (2, 6) 17 (7, 8) 11
(3, 1) 23 (8, 3) 11 (3, 6) 22 (8, 8) 19
(4, 1) 39 (9, 3) 19 (4, 6) 39 (9, 8) 22
(5, 1) 36 (10, 3) 17 (5, 6) 12 (10, 8) 29
(6, 1) 24 (1, 4) 17 (6, 6) 29 (1, 9) 10
(7, 1) 16 (2, 4) 14 (7, 6) 14 (2, 9) 10
(8, 1) 9 (3, 4) 28 (8, 6) 18 (3, 9) 13
(9, 1) 5 (4, 4) 29 (9, 6) 15 (4, 9) 18
(10, 1) 2 (5, 4) 12 (10, 6) 19 (5, 9) 19
(1, 2) 18 (6, 4) 21 (1, 7) 11 (6, 9) 22
(2, 2) 28 (7, 4) 12 (2, 7) 19 (7, 9) 29
(3, 2) 37 (8, 4) 19 (3, 7) 13 (8, 9) 27
(4, 2) 25 (9, 4) 18 (4, 7) 19 (9, 9) 25
(5, 2) 39 (10, 4) 15 (5, 7) 29 (10, 9) 28
(6, 2) 14 (1, 5) 14 (6, 7) 22 (1, 10) 10
(7, 2) 19 (2, 5) 19 (7, 7) 19 (2, 10) 10
(8, 2) 11 (3, 5) 25 (8, 7) 12 (3, 10) 10
(9, 2) 18 (4, 5) 39 (9, 7) 16 (4, 10) 12
(10, 2) 11 (5, 5) 15 (10, 7) 23 (5, 10) 15
(1, 3) 13 (6, 5) 27 (1, 8) 10 (6, 10) 18
(2, 3) 19 (7, 5) 14 (2, 8) 11 (7, 10) 29
(3, 3) 24 (8, 5) 9 (3, 8) 19 (8, 10) 26(4, 3) 19 (9, 5) 19 (4, 8) 15 (9, 10) 16(5, 3) 29 (10, 5) 11 (5, 8) 18 (10, 10) 29
Chart of Hits / Color# Hits Color
0-9 Blue10-19 Green20-29 Yellow30-39 Red
*� ���839������� ���� ���������6 ���# !���
# Hits ColorUse this table to matchthe number of hits to acolor so that you cancreate the image.
Location Hits Location Hits Location Hits Location Hits

NASA EG-2000-XX-XXX-GSFC Northern Lights and Solar Sprites 31
*� ���3
NASA EG-2000-XX-XXX-GSFC Northern Lights and Solar Sprites 32
(1, 1) 9 (6, 3) 17 (1, 6) 19 (6, 8) 33
(2, 1) 19 (7, 3) 14 (2, 6) 18 (7, 8) 28
(3, 1) 14 (8, 3) 28 (3, 6) 15 (8, 8) 22
(4, 1) 18 (9, 3) 37 (4, 6) 22 (9, 8) 24
(5, 1) 11 (10, 3) 11 (5, 6) 25 (10, 8) 26
(6, 1) 19 (1, 4) 19 (6, 6) 21 (1, 9) 29
(7, 1) 14 (2, 4) 12 (7, 6) 29 (2, 9) 27
(8, 1) 22 (3, 4) 15 (8, 6) 39 (3, 9) 34
(9, 1) 38 (4, 4) 17 (9, 6) 33 (4, 9) 36
(10, 1) 16 (5, 4) 14 (10, 6) 25 (5, 9) 22
(1, 2) 19 (6, 4) 11 (1, 7) 19 (6, 9) 28
(2, 2) 14 (7, 4) 19 (2, 7) 22 (7, 9) 24
(3, 2) 18 (8, 4) 25 (3, 7) 29 (8, 9) 25
(4, 2) 12 (9, 4) 39 (4, 7) 26 (9, 9) 27
(5, 2) 17 (10, 4) 28 (5, 7) 28 (10, 9) 29
(6, 2) 19 (1, 5) 11 (6, 7) 25 (1, 10) 29
(7, 2) 13 (2, 5) 19 (7, 7) 39 (2, 10) 21
(8, 2) 22 (3, 5) 17 (8, 7) 35 (3, 10) 26
(9, 2) 33 (4, 5) 15 (9, 7) 28 (4, 10) 28
(10, 2) 17 (5, 5) 13 (10, 7) 27 (5, 10) 29
(1, 3) 18 (6, 5) 14 (1, 8) 18 (6, 10) 24
(2, 3) 12 (7, 5) 29 (2, 8) 22 (7, 10) 27
(3, 3) 16 (8, 5) 38 (3, 8) 26 (8, 10) 28
(4, 3) 14 (9, 5) 33 (4, 8) 24 (9, 10) 23
(5, 3) 17 (10, 5) 29 (5, 8) 36 (10, 10) 22
Chart of Hits/ Color
# Hits Color0-9 Blue
10-19 Green20-29 Yellow30-39 Red
*� ���4��������� ���� ���������# !��
Location Hits Location Hits Location Hits Location Hits
# Hits ColorUse this table to matchthe number of hits to acolor so that you cancreate the image.
NASA EG-2000-XX-XXX-GSFC Northern Lights and Solar Sprites 33
*� ���4

NASA EG-2000-XX-XXX-GSFC Northern Lights and Solar Sprites 34
(1, 1) 15 (6, 3) 29 (1, 6) 3 (6, 8) 25(2, 1) 9 (7, 3) 17 (2, 6) 14 (7, 8) 18(3, 1) 5 (8, 3) 14 (3, 6) 24 (8, 8) 4(4, 1) 3 (9, 3) 16 (4, 6) 16 (9, 8) 9(5, 1) 7 (10, 3) 15 (5, 6) 14 (10, 8) 3(6, 1) 18 (1, 4) 9 (6, 6) 27 (1, 9) 7(7, 1) 22 (2, 4) 4 (7, 6) 19 (2, 9) 17(8, 1) 25 (3, 4) 8 (8, 6) 2 (3, 9) 26(9, 1) 28 (4, 4) 11 (9, 6) 6 (4, 9) 24(10, 1) 23 (5, 4) 21 (10, 6) 4 (5, 9) 28(1, 2) 9 (6, 4) 28 (1, 7) 9 (6, 9) 25(2, 2) 14 (7, 4) 25 (2, 7) 7 (7, 9) 19(3, 2) 3 (8, 4) 19 (3, 7) 16 (8, 9) 4(4, 2) 7 (9, 4) 17 (4, 7) 27 (9, 9) 7(5, 2) 14 (10, 4) 11 (5, 7) 15 (10, 9) 3(6, 2) 28 (1, 5) 3 (6, 7) 19 (1, 10) 9(7, 2) 24 (2, 5) 6 (7, 7) 28 (2, 10) 18(8, 2) 26 (3, 5) 18 (8, 7) 2 (3, 10) 26(9, 2) 17 (4, 5) 25 (9, 7) 5 (4, 10) 31(10, 2) 12 (5, 5) 19 (10, 7) 4 (5, 10) 27(1, 3) 2 (6, 5) 28 (1, 8) 9 (6, 10) 18(2, 3) 1 (7, 5) 18 (2, 8) 19 (7, 10) 8(3, 3) 9 (8, 5) 9 (3, 8) 24 (8, 10) 3(4, 3) 19 (9, 5) 11 (4, 8) 27 (9, 10) 9
(5, 3) 29 (10, 5) 19 (5, 8) 16 (10, 10) 2
Chart of Hits/ Color# Hits Color
0-9 Blue10-19 Green20-29 Yellow30-39 Red
*� ���-��������� ���� ���������# !��
Location Hits Location Hits Location Hits Location Hits
Use this table to matchthe number of hits to acolor so that you cancreate the image.
# Hits Color
NASA EG-2000-XX-XXX-GSFC Northern Lights and Solar Sprites 35
*� ���-
NASA EG-2000-XX-XXX-GSFC Northern Lights and Solar Sprites 36
(1, 1) 26 (6, 3) 22 (1, 6) 6 (6, 8) 11(2, 1) 38 (7, 3) 11 (2, 6) 11 (7, 8) 15(3, 1) 27 (8, 3) 8 (3, 6) 16 (8, 8) 27(4, 1) 29 (9, 3) 6 (4, 6) 14 (9, 8) 31(5, 1) 18 (10, 3) 9 (5, 6) 13 (10, 8) 19(6, 1) 3 (1, 4) 12 (6, 6) 27 (1, 9) 5(7, 1) 8 (2, 4) 15 (7, 6) 26 (2, 9) 7(8, 1) 6 (3, 4) 22 (8, 6) 37 (3, 9) 9(9, 1) 9 (4, 4) 28 (9, 6) 26 (4, 9) 6(10, 1) 4 (5, 4) 26 (10, 6) 19 (5, 9) 8(1, 2) 26 (6, 4) 34 (1, 7) 3 (6, 9) 18(2, 2) 38 (7, 4) 28 (2, 7) 8 (7, 9) 16(3, 2) 35 (8, 4) 15 (3, 7) 6 (8, 9) 26(4, 2) 39 (9, 4) 3 (4, 7) 7 (9, 9) 36(5, 2) 26 (10, 4) 8 (5, 7) 19 (10, 9) 19(6, 2) 19 (1, 5) 11 (6, 7) 17 (1, 10) 8(7, 2) 2 (2, 5) 16 (7, 7) 14 (2, 10) 6(8, 2) 4 (3, 5) 14 (8, 7) 25 (3, 10) 2(9, 2) 3 (4, 5) 16 (9, 7) 24 (4, 10) 7(10, 2) 5 (5, 5) 22 (10, 7) 17 (5, 10) 4(1, 3) 12 (6, 5) 27 (1, 8) 8 (6, 10) 18(2, 3) 25 (7, 5) 37 (2, 8) 5 (7, 10) 15(3, 3) 29 (8, 5) 26 (3, 8) 9 (8, 10) 24(4, 3) 34 (9, 5) 16 (4, 8) 6 (9, 10) 31(5, 3) 33 (10, 5) 8 (5, 8) 3 (10, 10) 19
Chart of Hits/ Color# Hits Color
0-9 Blue10-19 Green20-29 Yellow30-39 Red
*� ���:��������� ���� ����������# !��
Location Hits Location Hits Location Hits Location Hits
Use this table to matchthe number of hits to acolor so that you cancreate the image.
# Hits Color

NASA EG-2000-XX-XXX-GSFC Northern Lights and Solar Sprites 37
*� ���:

NASA EG-2000-XX-XXX-GSFC Northern Lights and Solar Sprites 38
5���;���'������ ������ �����<� ��'������
������������
How does your location change what yousee? Students will use hands onexperiences to develop an understanding ofhow the distance and location of the observerchanges the appearance of a star and otherobjects in the sky. Although no two stars areexactly as powerful, it is still true that thefarther away stars are, the fainter they will be.This follows a precise law called the InverseSquare Law, which the students will beexploring. The students will also explore howthe observer’s location changes theperception of what is seen by looking atauroras from two different perspectives; fromspace and from the ground.
!"�������
• Students will make predictionsabout the influence distance hason appearance of an object.
• Students will explore the InverseSquare Law.
• Students will investigate thedistance-perception relationship.
• Students will communicateobservations to classmates.
� ��� ���
Seven Mini-Maglite flashlights (theseflashlights were chosen specifically becausethe reflector mechanism may be removedeasily by unscrewing the top of the flashlightoff, making the flashlight work more like acandle without the dangers of flames) - orGlow-in-the-Dark stars of the same color(available at many stores)
Dark room or area - the darker the better!
Cartoon copied onto colored paper
One Mini- Maglite flashlight (extensionactivity)
Index cards
Scissors
Graph paper with 1/2 inch squares (a stiffpad or clipboard is helpful)
Pencil
+�0�#�����
Inverse Square Law – states that for twoidentical lamps, the one that is twice as farfrom the observer will appear 1/4 as bright.
Aurora seen with IMAGE satellite
NASA EG-2000-XX-XXX-GSFC Northern Lights and Solar Sprites 39
%���������
• Have three students stand approximately 10, 20 and 30 feet from the rest of the class,each holding a flashlight (with the reflector mechanism removed) or a Glow-in-the-Darkstar. Darken the room and have the students turn on the flashlights or hold up the stars.Then have the rest of the class observe which light appears to be brighter. The classshould discuss how this demonstration is related to the varying levels of brightness ofthe stars that we see. The darker the room/area, the more the students will have to lookat the magnitude of the lights instead of where the flashlights are located.
• Have a student stand at the end of the hallway holding the cartoon with caption. Therest of the students should try to guess what that student is holding and if it has color.Have the student come toward the class slowly until the class can determine what isbeing held. The class can discuss how this demonstration is related to how distancechanges the appearance of objects.
• Have seven students stand in a line with the Mini-Maglite flashlights (with the reflectormechanism removed) or the Glow-in-the-Dark stars. When the room is darkened, thestudents should turn on the flashlights or hold up the stars. Then the students shouldarrange themselves to look like a constellation such as the Big Dipper. Once they arearranged, assign them each a star number. (Some students could be sitting or kneelingon the floor). The rest of the class should walk around and observe the arrangement ofstudent stars. Then ask the students who are star #1 and #6 to take four steps straightback. Student stars #3 and #7 should take 2 steps forward. Student star #2 should takeone step back. Have the rest of the class walk around the newly arranged stars, andobserve the changes. Discuss their observations. Does it still look like the Big Dipperfrom all sides? Compare this to observing the stars from different locations in space.The students should write about their observations in their learning logs.
• The students will need to have access to the internet to review sites that show imagesof auroras from the ground and from a satellite. Both images can be viewed at thesame time if you go to: http://www.windows.umich.edu/spaceweather/sun_earth8.htmlA second site of interest can be found at http://www-istp.gsfc.nasa.gov/istp/outreach/coolpics.html This site has various images of aurorasfrom the ground and from space as well as other information.
• Have the students discuss the differences in the appearance of the aurora. Thestudents should record their observations in their learning logs. They should be ableto conclude that although an aurora is actually a big circle (called an oval) small partsof it from the ground will look very different.
NASA EG-2000-XX-XXX-GSFC Northern Lights and Solar Sprites 40
*� ����,$-
In this activity the students are going to explore the Inverse Square Law.
%���������
• The reflector mechanism needs to be removed from the flashlight. The students should cuta 1/2 inch by 1/2 inch square in the index card and attach it to the work surface one inchaway from the modified Mini-Maglite. The students should place the graph paper against theindex card, which means it is one inch away from the light source. Then the students shouldmark the number of squares that are illuminated on the graph paper and record the distancethe graph paper was from the light source. The students should also note the intensity of thelight on the graph paper.
• Now the students should move the graph paper to 2 inches away from the light source,illuminating a different area on the paper. Mark the squares that are illuminated, record thedistance from light source and note the intensity of the light on the graph paper. Continue tomove the graph paper away from the light source in inch increments, continue recording thedistance from light source, the number of squares illuminated and the intensity of the light.
• The students should see a pattern of squares in the number of squares illuminated and theintensity of the light on the graph paper. When the graph paper was two inches away, thereshould have been four squares illuminated. When the graph paper was three inches away,there should have been nine squares illuminated.
• Discuss the students’ observations and have the students record their observations in theirscience learning logs.
�����������The students will explore how the observer’s location will change the appearance of stars
and other objects in the sky. The students will learn that the distance between an observer and theobject will change the object's appearance in size and brightness.
NASA EG-2000-XX-XXX-GSFC Northern Lights and Solar Sprites 41
7/��������
Grades 2- 3
· Students can predict whether all three children with flashlights would have to beexactly the same distance from the observers to have the lights appear to have thesame brightness level. The students should design experiments to explore thisfurther. Initiate a discussion about how stars in space are different distances from ourview on earth.
Summary: The Inverse Square Law says that for two identical lamps, the one that is twiceas far from the observer will appear 1/4 as bright.
Grades 4-6
· Students can predict the distance that the student holding the cartoon would have tomove so that the observers could determine what was being held. The studentsshould design a method for recording the distance the observer needs to be from theobject being observed. Initiate a discussion about how stars in space are differentdistances from our view on earth. As the students saw from the demonstration withthe cartoon, distance changes our perception of the stars.
Summary: The farther away an object is, the less detail the observer can see.
· To have students explore how the power of a star changes the distance – brightnessrelationship, students could use 25-watt & a 100-watt bulbs in lamps. As in the firstactivity listed here, the students should stand in different places in the hallway withthe lamps. The students are exploring how a star that appears faint could actually becloser than a higher-powered star that is farther away.
NASA EG-2000-XX-XXX-GSFC Northern Lights and Solar Sprites 42
5����%� 0�������� ������
������������
What is magnetism? We have all had theexperience of using simple magnets to holdnotes on surfaces such as refridgeratordoors. Magnetism is the force produced bymagnets which does all of the "holding".Magnetism is also a very important force innature which can move hot gases in stars,and in the space around the earth. Thestudents will investigate magnetism andmagnetic forces. The students will explorethe attracting and repelling properties ofmagnets through hands on experiences.
!"�������
• The students will investigate thatmagnets are attracted to items,which contain metals such as iron.
• The students will experience that amagnetic force is an invisible force.
• The students will explore amagnet’s attracting and repellingproperties.
� ��� ���
Magnets – enough for class
Paper clips
String
Books
Ruler
+�0�#�����
Magnet - a metal that can attract certainother metals.
Magnetic Properties - refers to an itemwhich can attract or repel items as amagnet does.
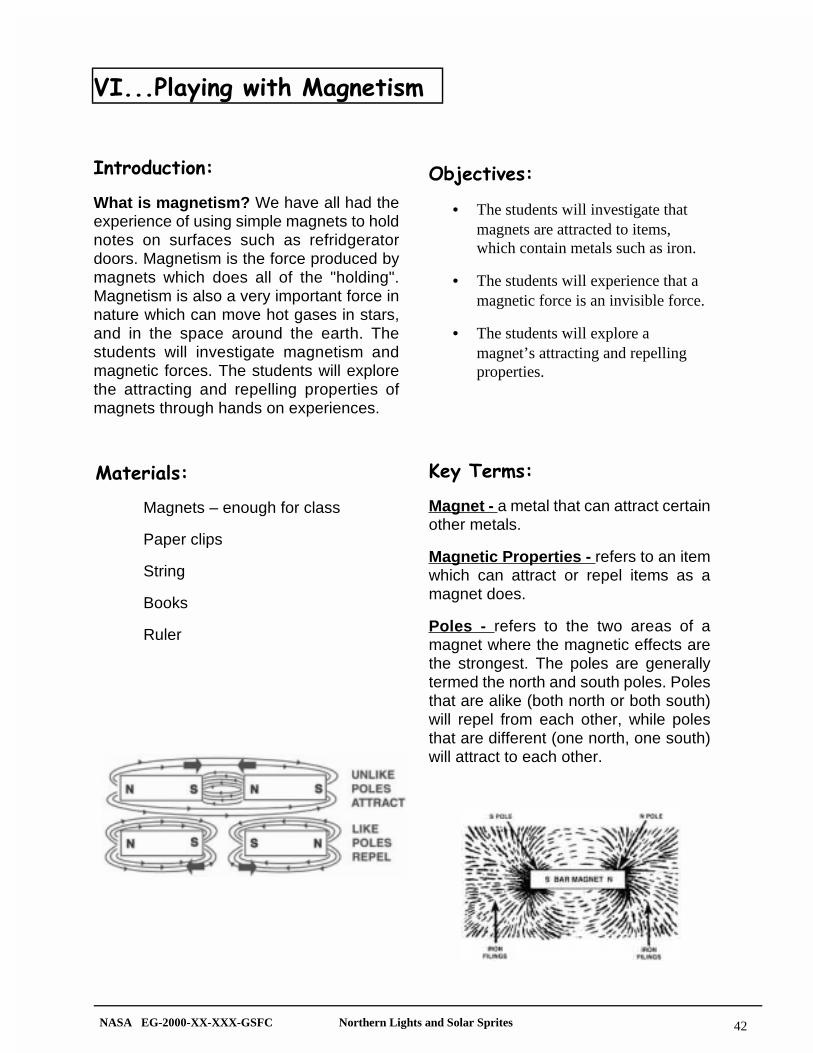
Poles - refers to the two areas of amagnet where the magnetic effects arethe strongest. The poles are generallytermed the north and south poles. Polesthat are alike (both north or both south)will repel from each other, while polesthat are different (one north, one south)will attract to each other.
NASA EG-2000-XX-XXX-GSFC Northern Lights and Solar Sprites 43
%���������
• Give each student a magnet. Have the students explore the objects that the magnetwould be attracted to. The students should look at the objects and find commoncharacteristics. The students should record their findings in a learning log.
• Tape one end of a piece of string to a desk; tie the other end onto a paper clip. Take asecond piece of string and suspend the magnet from a ruler anchored with books.Adjust the level of books so that the distance between the magnet and the paper clipallows the clip to stand up without touching the magnet. The students should see thata magnetic force could be invisible. You can place pieces of paper or cloth between theclip and the magnet to show the strength of the magnetic force. Can the students findmaterials that block magnetic forces?
• With the string still attached, have the students try to raise the paper clip from the deskwith a magnet. They should try to accomplish this without letting the magnet and paperclip touch. The students should keep a log of how they were able to accomplish this;what methods and strategies were used.
• Allow the students time to explore the attracting and repelling properties of magnets.They should be able to demonstrate that a magnet has two ends or poles that willattract or repel from other poles. Have the students observe what happens when twomagnets are repelling from each other. The students should find a partner and discusswhat they have seen and whether their classmate was able to discover the sameproperties.
�����������
The students will learn the characteristics of magnetism. The students will demonstrate theattracting and repelling properties of magnets.
NASA EG-2000-XX-XXX-GSFC Northern Lights and Solar Sprites 44
5�����7/�������� ������=����
������������
What are magnetic fields? In physicalscience, a "field of force " is a region orspace in which an object can cause a pushor pull. This field extends infinitely in alldirections but gets weaker as you get fartherfrom the source of the field. Magnetic lines offorce show the strength and direction of thisfield. The students will explore the lines offorce of magnets and compare them to thelines of force on the sun and the earth.
When the students are using the ironfilings to define the magnetic lines offorce, it is important to stress that theprocedure must be done slowly andcarefully to have the best effects.
!"�������
• The students will explore themagnetic field lines of amagnet.
• The students will investigatethe magnetic field linesbetween two attracting and tworepelling magnetic poles.
• The students will learn that theearth and the sun havemagnetic properties.
� ��� ���
Strong Magnets- enough for class or small groups
Plastic wrap
Iron filings
Plastic teaspoon
Paper- white
Plastic tray
Compass
Photograph of sunspot/magnetic loops on the sun
Also available through the TRACE satellite site at
http://vestige.lmsal.com/TRACE/
NASA EG-2000-XX-XXX-GSFC Northern Lights and Solar Sprites 45
%����������
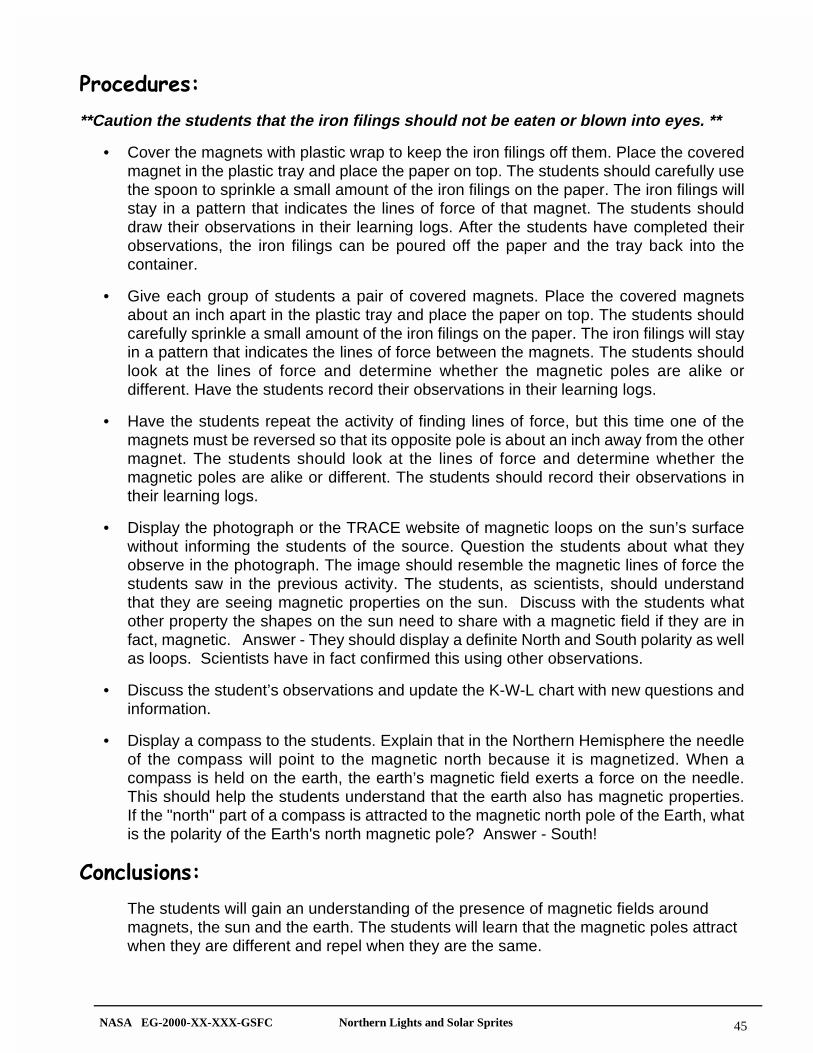
**Caution the students that the iron filings should not be eaten or blown into eyes. **
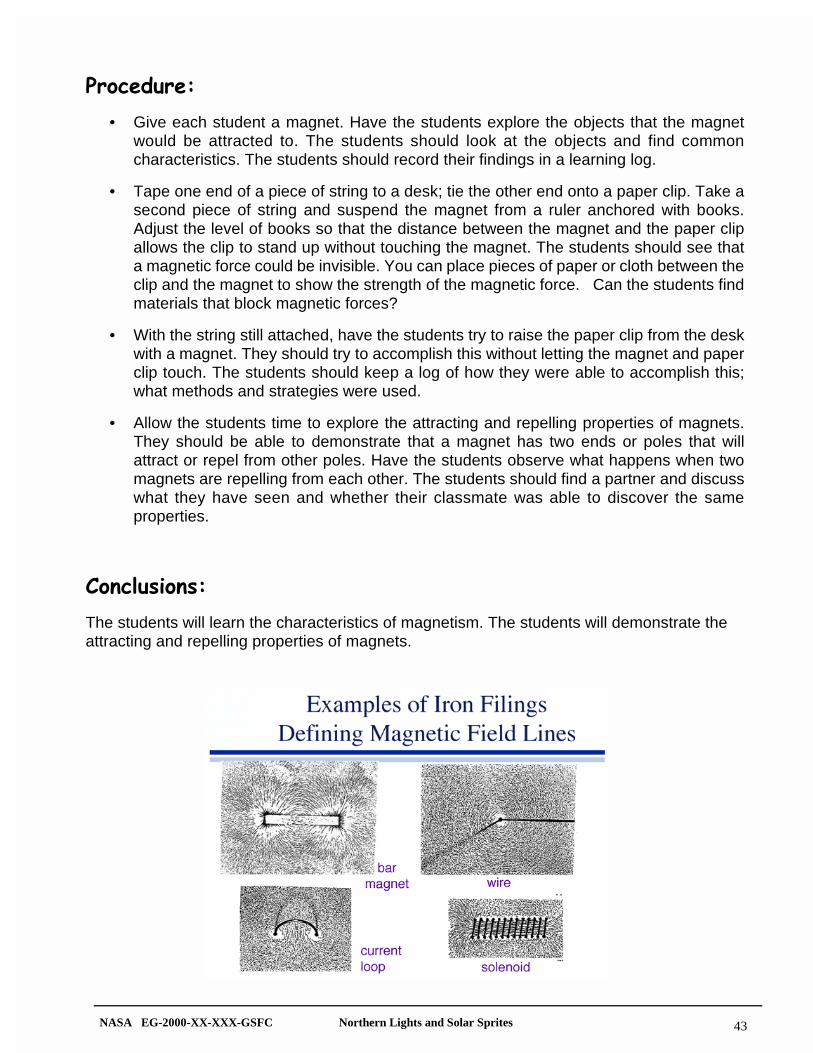
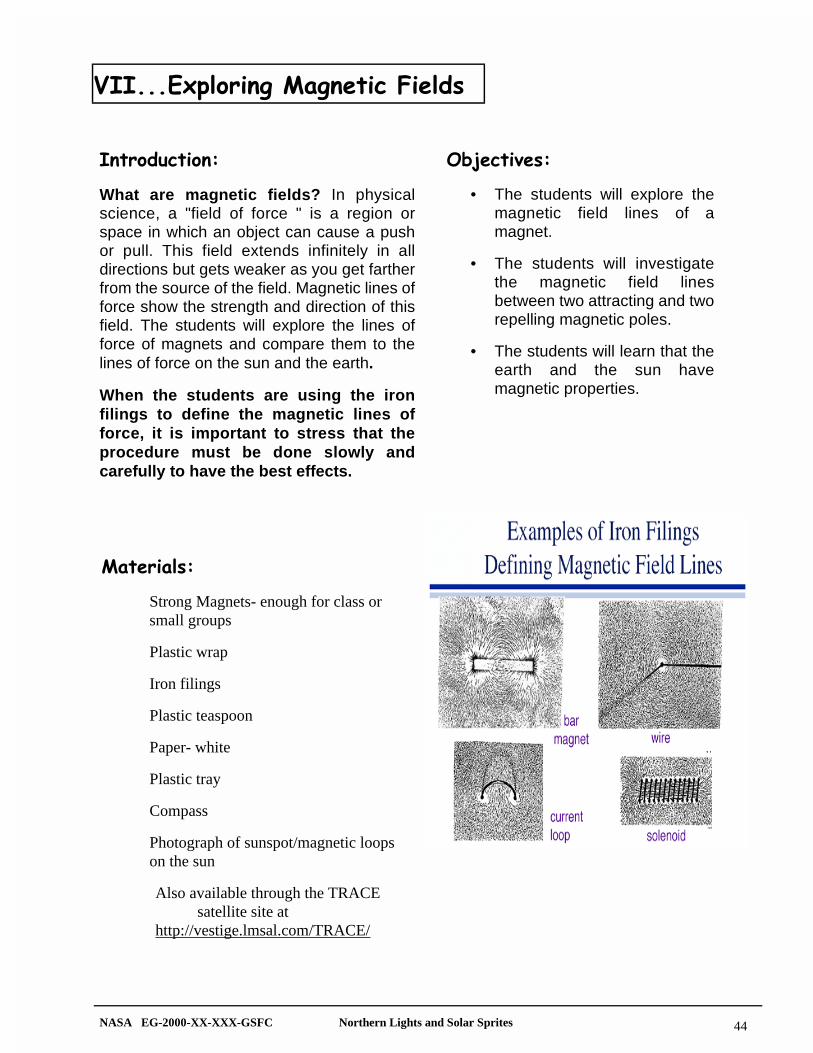
• Cover the magnets with plastic wrap to keep the iron filings off them. Place the coveredmagnet in the plastic tray and place the paper on top. The students should carefully usethe spoon to sprinkle a small amount of the iron filings on the paper. The iron filings willstay in a pattern that indicates the lines of force of that magnet. The students shoulddraw their observations in their learning logs. After the students have completed theirobservations, the iron filings can be poured off the paper and the tray back into thecontainer.
• Give each group of students a pair of covered magnets. Place the covered magnetsabout an inch apart in the plastic tray and place the paper on top. The students shouldcarefully sprinkle a small amount of the iron filings on the paper. The iron filings will stayin a pattern that indicates the lines of force between the magnets. The students shouldlook at the lines of force and determine whether the magnetic poles are alike ordifferent. Have the students record their observations in their learning logs.
• Have the students repeat the activity of finding lines of force, but this time one of themagnets must be reversed so that its opposite pole is about an inch away from the othermagnet. The students should look at the lines of force and determine whether themagnetic poles are alike or different. The students should record their observations intheir learning logs.
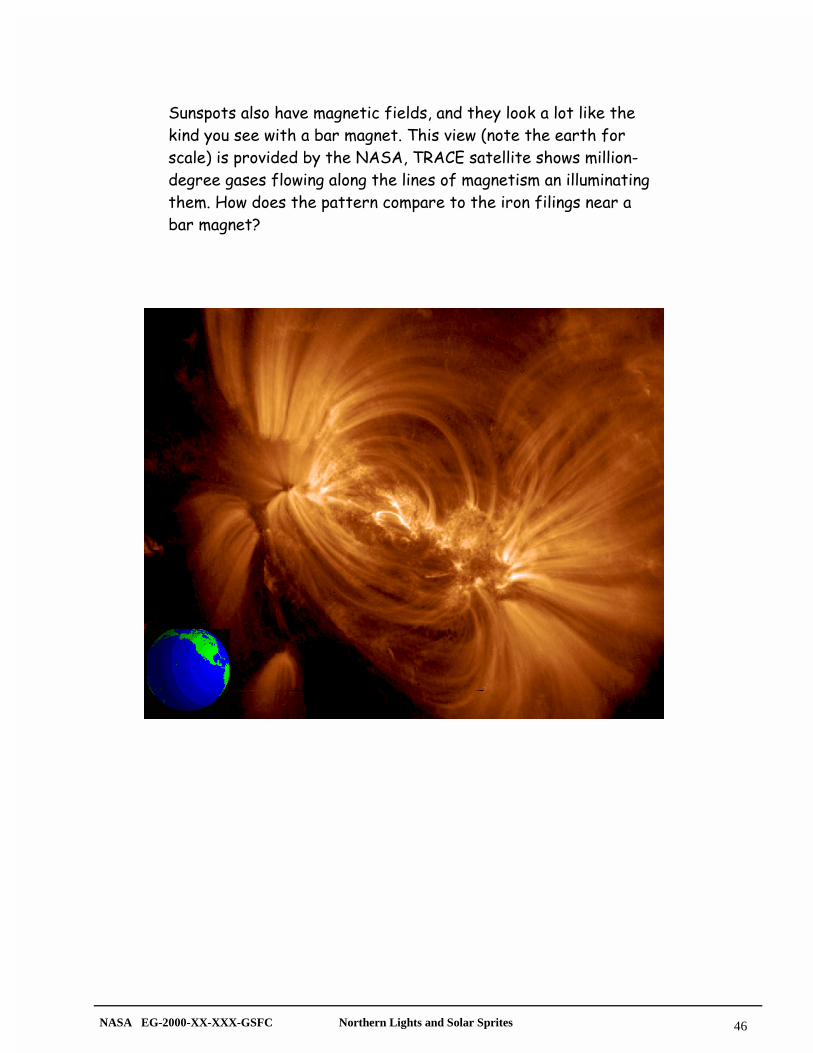
• Display the photograph or the TRACE website of magnetic loops on the sun’s surfacewithout informing the students of the source. Question the students about what theyobserve in the photograph. The image should resemble the magnetic lines of force thestudents saw in the previous activity. The students, as scientists, should understandthat they are seeing magnetic properties on the sun. Discuss with the students whatother property the shapes on the sun need to share with a magnetic field if they are infact, magnetic. Answer - They should display a definite North and South polarity as wellas loops. Scientists have in fact confirmed this using other observations.
• Discuss the student’s observations and update the K-W-L chart with new questions andinformation.
• Display a compass to the students. Explain that in the Northern Hemisphere the needleof the compass will point to the magnetic north because it is magnetized. When acompass is held on the earth, the earth’s magnetic field exerts a force on the needle.This should help the students understand that the earth also has magnetic properties.If the "north" part of a compass is attracted to the magnetic north pole of the Earth, whatis the polarity of the Earth's north magnetic pole? Answer - South!
�����������
The students will gain an understanding of the presence of magnetic fields aroundmagnets, the sun and the earth. The students will learn that the magnetic poles attractwhen they are different and repel when they are the same.
NASA EG-2000-XX-XXX-GSFC Northern Lights and Solar Sprites 46
��������� ����� ���� �����������<� ������������� ������������
���������������� �� ��� ��������������=���������� �������
�� ��>����������������������<��'�;2�� �������������������
�������� ����������� ������������������ ������� ������� ���
������?������������� ���������� ���������������������� ��
� ��� ����@
NASA EG-2000-XX-XXX-GSFC Northern Lights and Solar Sprites 47
5��������� �������0� ���7����0
������������
Why is the surface of the Sun so stormy?Most of the activity we see on the sun iscaused by magnetic fields getting tangled-upand pulled into complex shapes. Enormousamounts of energy can be release whenmagnetic fields "un-kink". The students willuse various activities to model the magneticfields around the sun. The students will seehow changes in this magnetic field causephenomena like coronal mass ejections,filaments, sunspots, and magnetic loops onthe sun. Students will use photographs ofcoronal mass ejections and magnetic loopsto determine the speed of this phenomenon.
!"�������
• The students will use a modelto demonstrate therestructuring of the magneticfields on the sun’s surface.
• The students will use a modelto demonstrate how magneticfield restructuring can causephenomena like coronal massejection, filaments, sunspots,and magnetic loops.
• The students will usephotographs of the sun’ssurface to determine the speedof the phenomena.
� ��� ���
String - precut into 2 foot lengths
Students
Balloons
Glitter
Photographs of phenomena on the sun Images can be found at SOHO Satellite site's gallery
http://sohowww.nascom.nasa.gov/gallery/bestofsoho/
or TRACE Satellite site's gallery
http://vestige.lmsal.com/TRACE/Public/Gallery/Images/
+�0�#�����
Coronal Mass Ejection – a blast ofparticles from the sun that occurswhen the magnetic forces on the sunrestructure and break.
Magnetic Loop – eruptions of theplasma of the sun that occur when themagnetic fields are twisted.
Solar Prominence- An arch-likefilament of gas that extends high upfrom the surface and looks like ahorseshoe.
Sunspots – a cooler area of the sun’splasma that occurs when there is aconcentration of the sun’s magneticfield lines.
Filament- small eruption on the sun’ssurface that occurs when themagnetic field is twisted.
NASA EG-2000-XX-XXX-GSFC Northern Lights and Solar Sprites 48
%���������
• In this activity the students will use string as a model for the magnetic fields on the surfaceof the sun. They will see how these magnetic fields undergo restructuring over time. Havethe students pair up and form a line across the room, all facing the same way. Give eachpair of students a piece of the precut string, with each person holding an end. Every otherpair should tie the ends of their string to both of their neighbor’s and then step away fromthe line. The remaining students should hold on to the longer strands of string. Now, haveevery other remaining pair attach tie their ends to both of their neighbors and step away.Continue to repeat the activity until there are just a few students left holding the string. Dothe students think that the resulting magnetic fields are going to be stronger or weaker?Do the students think the resulting magnetic fields will take up the same amount of areaon the sun? Have the students discuss the changes in the magnetic field and recordobservations in their learning logs.
• In this activity the students will become the sun’s magnetic field. The students shouldgather randomly in an open space in the classroom with about an arm’s length betweenthem. Each student will become an active part of the magnetic field, their left arm will havenorth polarity and their right arm will have south polarity. Use Post-it notes with N or S onthem, or of different colors, to provide a visual aid for younger students. When thestudents are ready they should raise their arms to the side. You will be asking them to"attract" or "repel" to the other student’s poles that are the closest. The students shouldnot move their feet, but simply become the magnetic force with their arms. For example, iftwo same "poles" were closest together, the students’ arms would move away from each.If two different "poles" were closest together, the students’ arms would attach to eachother at the wrists. Both of the student’s "poles" can be attached to different "poles". Havethe students look at what student configurations were formed.
The following list is meant to be a guideline to describe to the students what the studentconfigurations could model.
• If a circular group of about eight students formed, they could be considered a candidatefor Coronal Mass Ejection. A CME is formed when the magnetic field has been stretchedand breaks away from the sun’s surface.
• If a loop of about five students formed, they could be considered a candidate for aMagnetic Loop. A Magnetic Loop stretches away from the sun’s surface, but remainsattached at its ends. These might represent solar prominences.
• If a string of about three students formed, they could be considered a candidate for aFilament. A Filament is a short magnetic cloud that sticks out from the sun’s surface.
• If a group of two students form a closed figure, they could be considered a candidate fora sunspot. A sunspot is an area on the sun’s surface where the magnetic field is moreconcentrated, and can cause solar flares to form.
You can repeat the activity as many times as you would like, the students will make many newconfigurations with each repetition. Stress to the students that these new magnetic fieldconfigurations occur repeatedly on the surface of the sun. Scientists are just now studying theseconfigurations to see if there are patterns in where they occur, how often they occur and theramifications of the occurrences.
NASA EG-2000-XX-XXX-GSFC Northern Lights and Solar Sprites 49
• To demonstrate the force of a CME, place some glitter in a balloon. Begin to blow up the balloon,reminding the students to observe the stretching of the balloon. The outside of the balloon modelsthe magnetic forces of the sun that are being stretched. When the balloon is fully stretched, move itaway from your face and pop it. This demonstration shows the students that the magnetic field onthe sun will break away when it becomes stretched too far. The glitter represents the charged plasmathat shoots away from the sun’s surface when the magnetic fields break up.
• Discuss the students’ observations and update the K-W-L chart with the new information.
�����������The students will gain an understanding of how the restructuring of the magnetic field of the sun can causea variety of seemingly unrelated shapes and phenomena. Scientists have been able to learn more about thesun’s surface as new information is received from satellites that have been launched in recent years.
7/��������
Grades 1-6
• Students could make a flipbook of a phenomenon of the sun as it moves. Included in theworkbook are some photographs of CMEs and magnetic loops to help the studentsvisualize what they look like. Give each student 10 sheets of 3 x 3 inch paper (a post- it –pad works well for this). The students should draw the sequence of the phenomenon onestep at a time on each piece of paper. When all the steps are drawn, the papers should beplaced in order and stapled together at one edge. The student holds the stapled edge inone hand and "flips" the other pages to make the image move.
Grades 4 - 6
• Students will look at photographs of a CME and of a magnetic loop and determine thespeed using the formula below.
��������������
&�� ����#� ������!0�����=� ����
#������#� ���=
NASA EG-2000-XX-XXX-GSFC Northern Lights and Solar Sprites 50
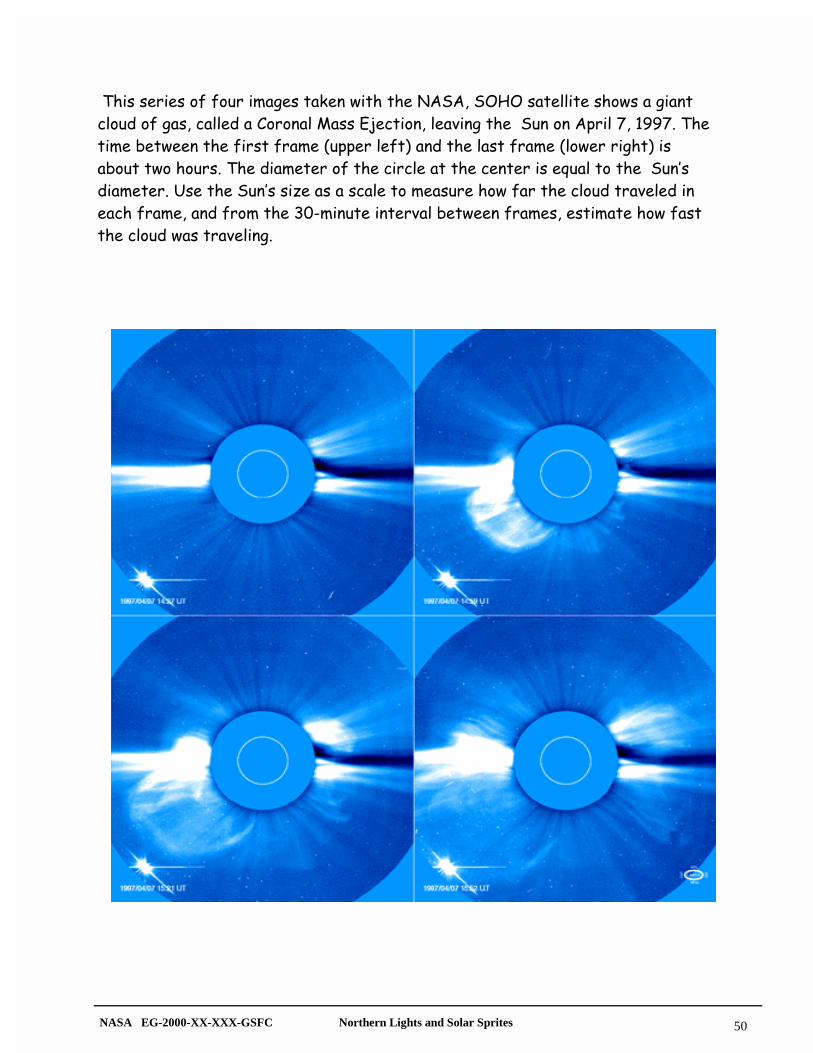
�������������������� ����� ����������������<��&?&�� ������������� �� ��
���������� �<�� ����� �;���� ��" ���2A�����<��� ���������������������1<�!661�����
����������������������� ���=����������>� �������� ����� ���=����������>��
��������������������� ������������������� ����������������B� ���������������
� �������:��������������C�� �� ��� �������� ���������� �������������� �������
� ����� ��<� ������������)7������������ ������������ ���<����� �������� ��
����������� ���� ������
NASA EG-2000-XX-XXX-GSFC Northern Lights and Solar Sprites 51
�>���#� ��������7����0���������������������7 ���
������������
What is the solar wind? Because the surfaceof the sun is very active, gases are constantlybeing ejected into space. This "wind" rushes outfrom the surface at nearly a million miles perhour and travels to the orbit of Pluto andbeyond. The amount of gas expelled in thiswind is so small that fewer than 30 atoms percubic inch are present as it speeds out from thesolar surface and crosses the orbit of the Earth.Yet, this wind is more than enough to affect thetails of comets and to upset the magnetic fieldof the earth causing powerful storms in spaceand aurora. Students will make a model of thesolar wind. They will use both individual andgroup activities to explore the solar wind.
!"�������
• The students will explore amodel of the solar wind.
• The students will communicatetheir findings to classmates.
� ��� ���
Puffed rice cereal
Students
Large non-windy area
There are many visual aids for theSolar Wind at The University ofMichigan's "Windows to the Universe"Site - (access basic facts from this site)
http://windows.engin.umich.edu/spaceweather/
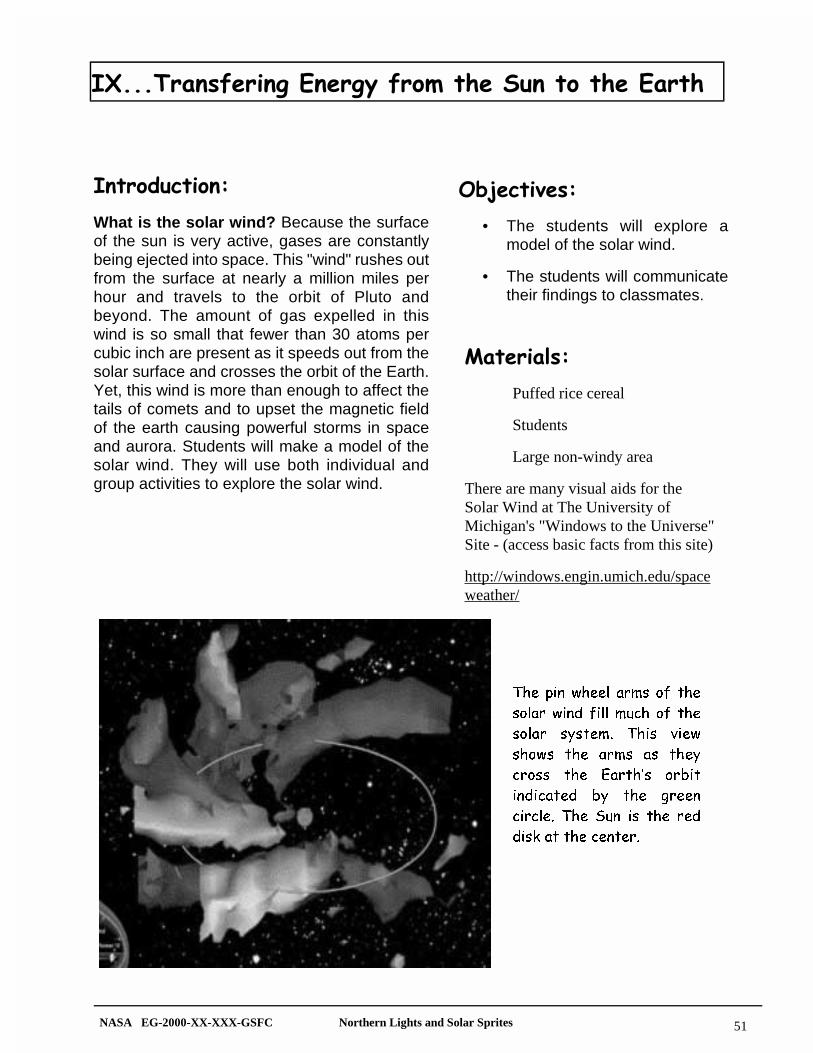
7KH SLQ ZKHHO DUPV RI WKH
VRODU ZLQG ILOO PXFK RI WKH
VRODU V\VWHP� 7KLV YLHZ
VKRZV WKH DUPV DV WKH\
FURVV WKH (DUWK·V RUELW
LQGLFDWHG E\ WKH JUHHQ
FLUFOH� 7KH 6XQ LV WKH UHG
GLVN DW WKH FHQWHU�
NASA EG-2000-XX-XXX-GSFC Northern Lights and Solar Sprites 52
%���������
• The surface of the sun is very active and "boils" like a pot of water as heat rises fromdeep inside to the surface. This activity causes a flow of gas, containing chargedparticles, into space called the solar wind. Each student will become a convection cellon the sun’s surface. Each student should blow the puffed rice cereal off their hand andobserve what happens. This represents what happens when one convection cell burstsat the surface of the sun.
• Students will need to form concentric circles facing out. Children will blow the puffedrice cereal off their hands at the same time. They should observe that some of thecereal will join into larger concentrations and that there is a much stronger flow. Thisexample represents what happens when many convection cells burst at the surface ofthe sun.
• Discuss the student’s observations about the solar wind and update the K-W-L chart.
�����������
The students will gain an understanding of how the solar wind is formed. The constantexplosive activity on the Sun’s surface ejects gas into space. This activity is driven bythe powerful, and ever-changing, magnetic fields on its surface which short-circuit andheat the gases to millions of degrees. Not even the Sun, with its powerful gravity canhold onto these hot gases for very long.
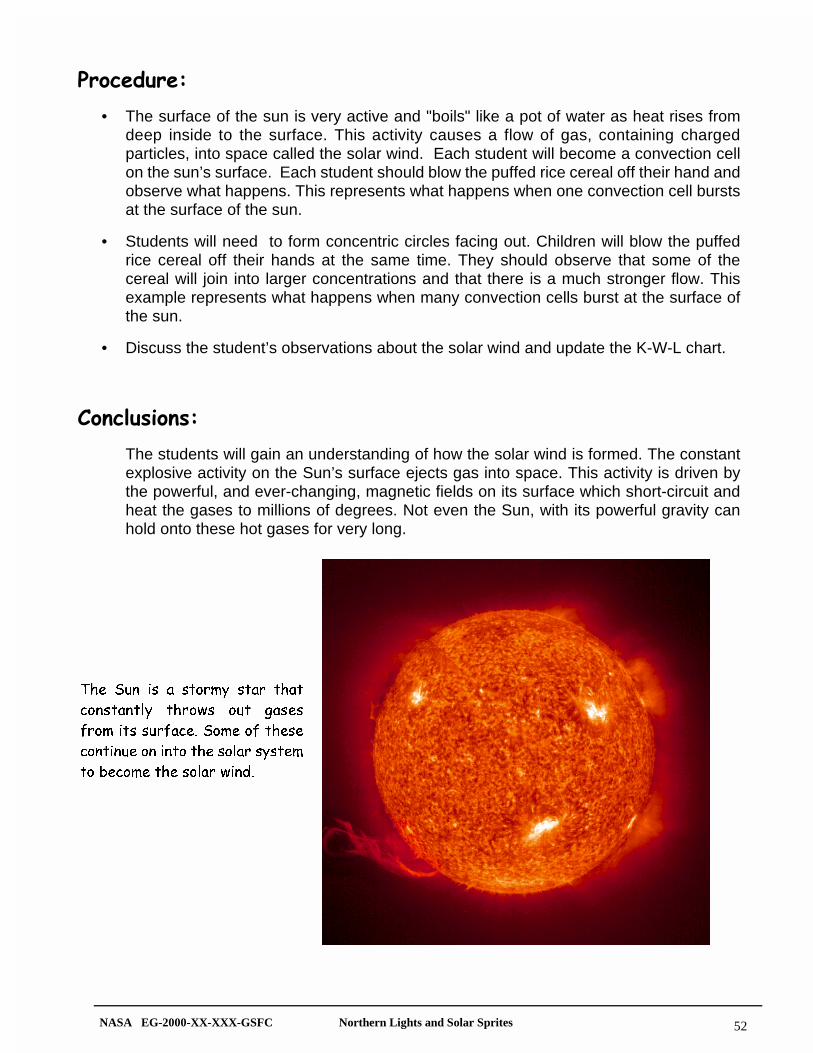
7KH 6XQ LV D VWRUP\ VWDU WKDW
FRQVWDQWO\ WKURZV RXW JDVHV
IURP LWV VXUIDFH� 6RPH RI WKHVH
FRQWLQXH RQ LQWR WKH VRODU V\VWHP
WR EHFRPH WKH VRODU ZLQG�
NASA EG-2000-XX-XXX-GSFC Northern Lights and Solar Sprites 53
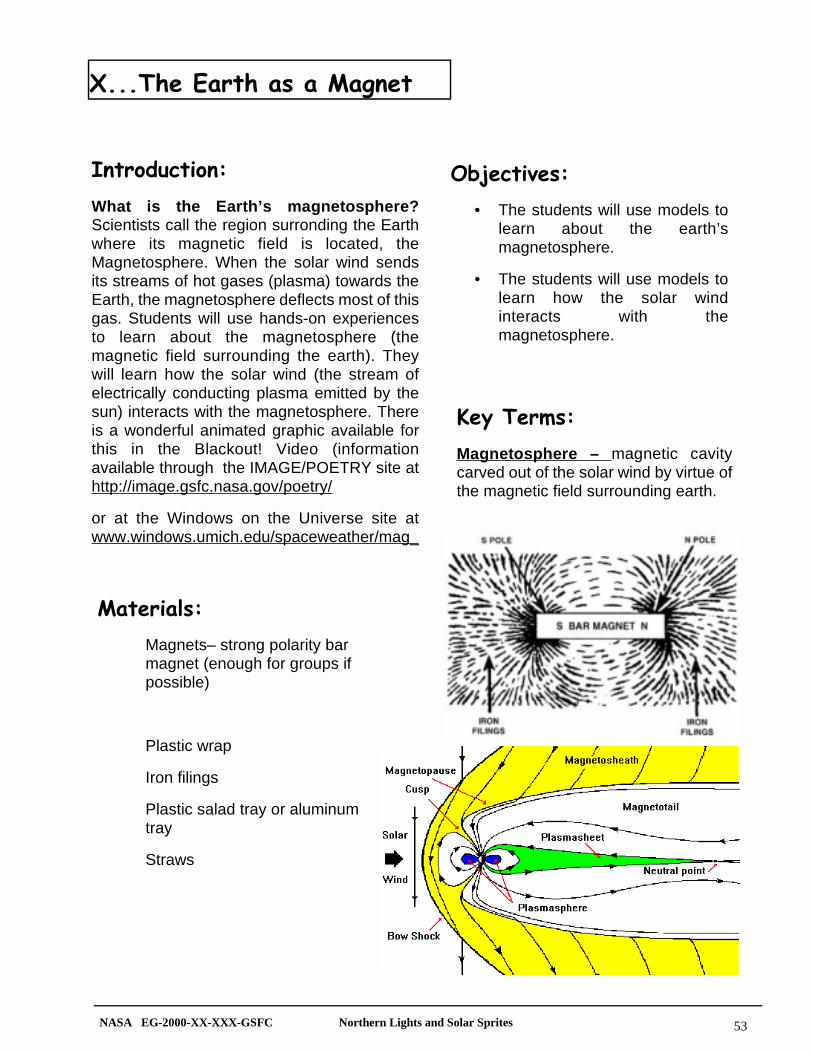
>���#���7 ���� �� �� ����
������������
What is the Earth’s magnetosphere?Scientists call the region surronding the Earthwhere its magnetic field is located, theMagnetosphere. When the solar wind sendsits streams of hot gases (plasma) towards theEarth, the magnetosphere deflects most of thisgas. Students will use hands-on experiencesto learn about the magnetosphere (themagnetic field surrounding the earth). Theywill learn how the solar wind (the stream ofelectrically conducting plasma emitted by thesun) interacts with the magnetosphere. Thereis a wonderful animated graphic available forthis in the Blackout! Video (informationavailable through the IMAGE/POETRY site athttp://image.gsfc.nasa.gov/poetry/
or at the Windows on the Universe site atwww.windows.umich.edu/spaceweather/mag_
!"�������
• The students will use models tolearn about the earth’smagnetosphere.
• The students will use models tolearn how the solar windinteracts with themagnetosphere.
� ��� ���
Magnets– strong polarity bar magnet (enough for groups if possible)
Plastic wrap
Iron filings
Plastic salad tray or aluminum tray
Straws
+�0�#�����
Magnetosphere – magnetic cavitycarved out of the solar wind by virtue ofthe magnetic field surrounding earth.
NASA EG-2000-XX-XXX-GSFC Northern Lights and Solar Sprites 54
%���������
What protects the earth?
• The earth has a protective cover called the magnetosphere. It works as skin does onyour body to keep out harmful things. Students can observe a model of themagnetosphere using magnets and iron filings. To keep your bar magnet clean, wrapit in plastic wrap with tape around it, or put contact paper around it. Place a bar magnetunder a plastic salad tray or aluminum tray. Sprinkle some iron filings onto the trayfrom a distance of about 10 inches. Observe the pattern made by the iron filings heldin place by the forces between the opposite poles of the magnets. The earth’smagnetosphere can be modeled by blowing softly through a straw towards themagnetic field lines. A squishing of the field lines on one side of the model shows howthe earth’s magnetosphere looks. Have the students draw the model of the earth’smagnetosphere in their learning logs.
What happens when the solar wind approaches the earth’s magnetosphere?
• Students can observe the way water flows around a stone as a pattern of the solarwind as it flows around the earth.
• Place the bar magnet under a plastic tray or aluminum tray. Place a small buttondirectly above the center of the magnet to model the earth. Sprinkle the iron filingsalong the edge of one side of the tray covering the magnet. Softly blow the filingstoward the button through a straw. Caution the students to blow carefully so that noiron filings get into eyes or mouth! Depending on the force used in blowing, the filingswill be trapped in the magnetic lines of force. Compare this to the trapping of the solarparticles by the Earth’s magnetosphere. Have the students draw the model of theeffects of the solar wind on the earth’s magnetosphere.
�����������
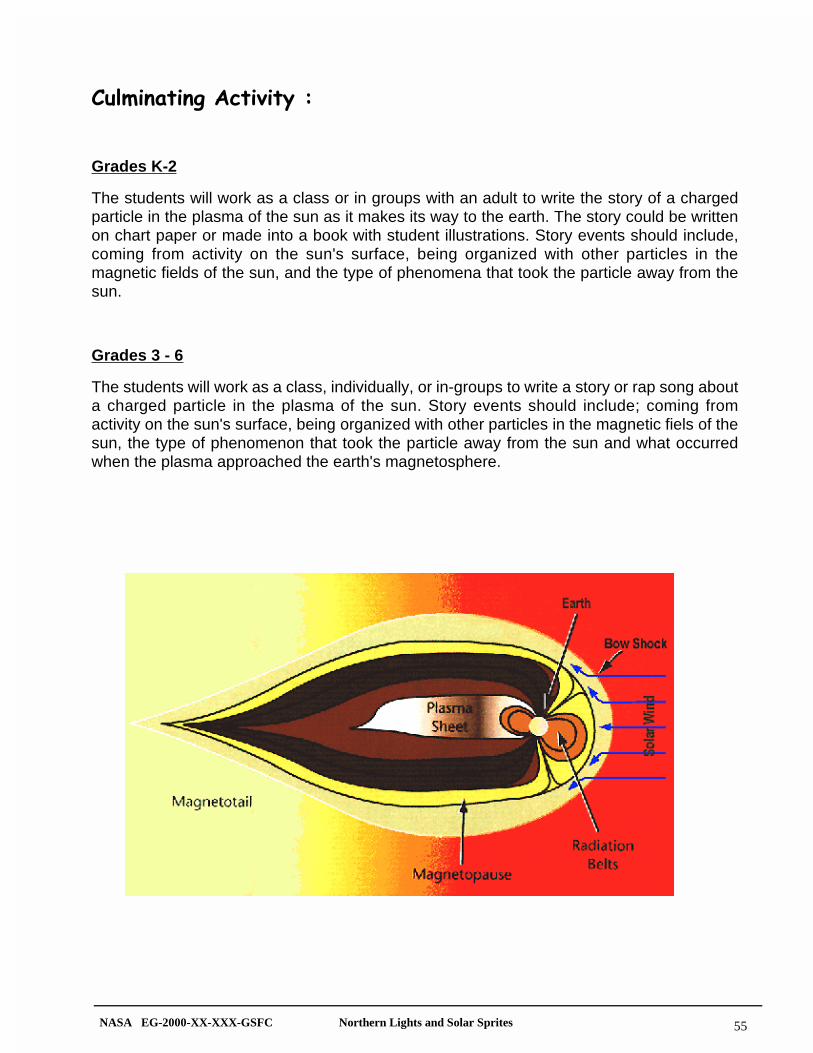
The students will gain an understanding of the earth’s protective region, called themagnetosphere. The students will gain an understanding of how the earth’smagnetosphere interacts with the charged plasma sent from the sun in solar wind andCMEs.
NASA EG-2000-XX-XXX-GSFC Northern Lights and Solar Sprites 55
����� ���������0��
Grades K-2
The students will work as a class or in groups with an adult to write the story of a chargedparticle in the plasma of the sun as it makes its way to the earth. The story could be writtenon chart paper or made into a book with student illustrations. Story events should include,coming from activity on the sun's surface, being organized with other particles in themagnetic fields of the sun, and the type of phenomena that took the particle away from thesun.
Grades 3 - 6
The students will work as a class, individually, or in-groups to write a story or rap song abouta charged particle in the plasma of the sun. Story events should include; coming fromactivity on the sun's surface, being organized with other particles in the magnetic fiels of thesun, the type of phenomenon that took the particle away from the sun and what occurredwhen the plasma approached the earth's magnetosphere.
NASA EG-2000-XX-XXX-GSFC Northern Lights and Solar Sprites 56
>����������� ��� �0�%����* ���
������������
What does the Neutral Atom Imager on theIMAGE satellite do? The Neutral Atom Imageron the IMAGE satellite uses remote sensing tofind out more information about the clouds ofcharged particles (plasma) that surround theEarth. When some of the particles in theplasma are collected by the Neutral AtomImager, they are measured. Scientists candetermine the composition of these particles,their energy, and from what direction theycame. Once all this information has beencollected, the scientists can make pictures ofwhere in space the particles came from. Thestudents will make a simple "collector" ofinformation, in this case, film similar to thatused in a camera. Then the students willexplore a model of how the Neutral AtomImager collects and measures (counts) theseparticles.
!"�������
• The students will explore howa scientist uses an instrumentas a collector of information.
• The students will explore howa scientist measures (counts)and records the informationcollected.
• The students will explore amodel to see how the NeutralAtom Imager collects andmeasures particles in theplasma surrounding the Earth.
� ��� ���
Sun sensitive paper - Two possible brands availableare listed below (there are others)
Nature Print Paper - available at hobby stores or fromInsectlore athttp://www.insectlore.com/activitykits.html
Sunprint Paper - available at hobby stores or fromQuincy Arts and Crafts athttp://www.quincyshop.com/craftkits/html
(1-800-231-0874)
Cardboard or clipboards for groups
Index cards (size is dependant of the size of your printpaper)
Tape
Access to water (sink or tray full)
Balls
Grades K-6 -
• You need four different colors of thesame types of balls - for example if youwere using foam balls, you would needfive blue, two red, four green and sixpurple. The number of each color ofballs can be different - it’s the differentcolors that are important.
Grades 5-6- (Extension activity)
• You need four different colored balls,but three different types of balls foreach color -for example, blue foamballs, blue tennis balls, and bluelacrosse balls.
NASA EG-2000-XX-XXX-GSFC Northern Lights and Solar Sprites 57
%���������
• Scientists use remote sensing to collect information about things that are not always visible.Take for example, the sun. Scientists and teachers know that we can not see the sun's lightenergy on Earth. We can see the results of the sun's light energy in a sunburn we receive,or when we touch a hot car that has been sitting in the sun. The students will use paperthat is similar to film in a camera to collect the sun's light energy. Place one sheet ofNatureprint or Sunprint paper outside the classroom with a leaf on it. The paper will absorbor "collect" the sun's light energy by changing the color of the paper except in the areawhere the leaf sat, when developed in water. Scientists use instruments with moresensitive collection mechanisms on satellites.
• The students will now use the Natureprint or Sunprint paper to make an exposure framethat will measure how much of the sun's light energy was absorbed. Each student groupwill need a piece of cardboard or a clipboard, an index card slightly larger than the printpaper, a piece of print paper and of course, sun! The students should tape just the cornersof the print paper onto the cardboard or clipboard. Then the students should cut the indexcard almost all the way across four times. The result should be a hinged flap sheet. Labelthe flaps with 1, 2, 3 and 4 minutes, which will represent the exposure time for each portionof the print paper. The flap sheet should be placed on top of the print paper prior to goingoutside. Have the students place the print paper and flap sheet in a sunny area closeby tothe timer. The students should lift flap one for a timed one minute interval, then place theflap back over it. Next, flap two should be lifted for a two minute interval, and covered afterits exposure. Continue this way for flaps three and four. Take the exposure frame inside,but do not develop it with water. The students should be able to see varying shades of coloron the print paper. If you go back and look at your print paper later, you will notice that therewill no longer be varying shades of color because the print paper will continue to absorblight energy, even inside. The NAI uses a more complex method of measuring energy.
• How does the Neutral Atom Imager (NAI) collect and measure (count) the particles in theplasma? Let's use the game of baseball as an example; the catcher can model thecollector, the field can model the plasma surrounding the Earth, and the balls thrown intothe catcher can model the charged particles that the NAI collects, which are mainlyhydrogen, nitrogen and oxygen. The field is going to be divided into four quadrants whichare familiar to those who play the game. These will be left outfield, right outfield, left infieldand right infield with the infield ending on the dirt area on the outside of the bases. Each ofthe quadrants will have a specific color ball assigned to it that will be thrown to the"collector", for example all balls from the left outfield would be blue. Send one student intoeach of the four quadrants with the assigned bucket of balls and one to be the catcher (witha mitt of course!) The NAI is now ready for operation. Have the students begin to throwtheir balls into the catcher, who will place all the balls into one big bucket. When all the ballshave been thrown, the students will be constructing a scattergram by counting and plottingthe balls by color on the attached graph. A scattergram is a graphic that displays how manytimes something occurred within a specific area. You may have seen these duringbroadcasts of football and baseball. In football, they are used to show where thequarterback has thrown to his receivers. In baseball they are used to show where a playerhas hit the ball or where the pitcher has placed each pitch in relation to homeplate. TheNAI collects the particles and records the direction they were received from.
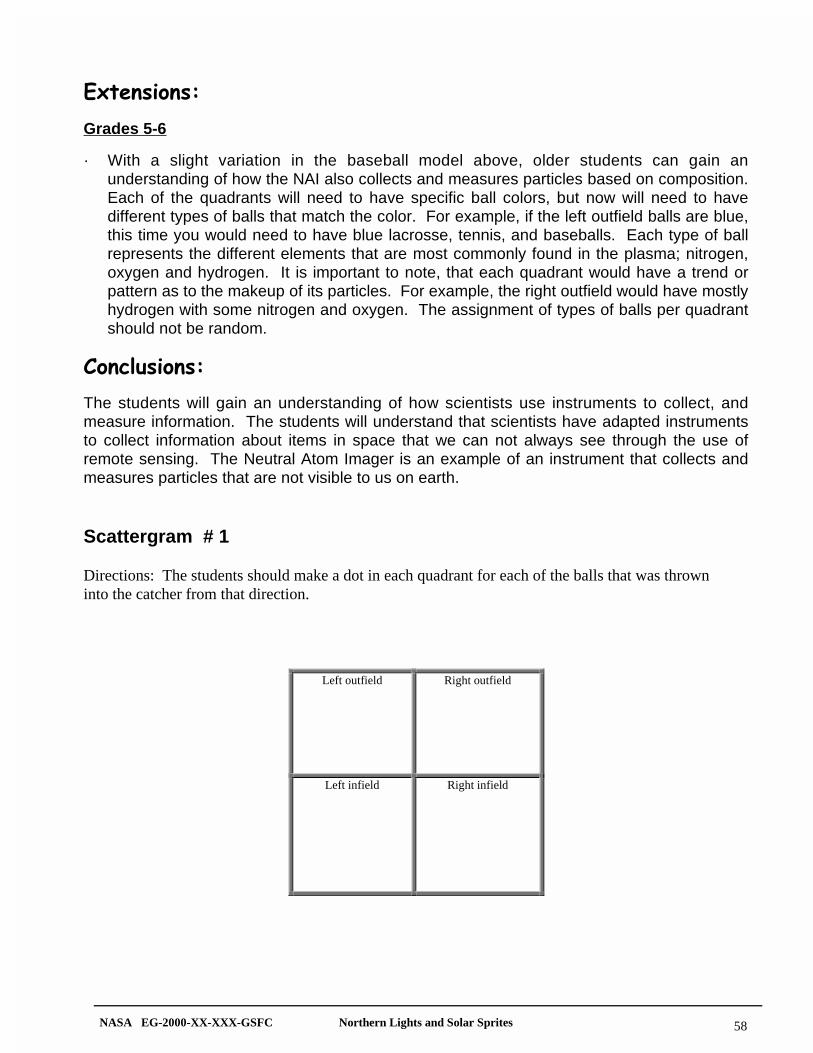
NASA EG-2000-XX-XXX-GSFC Northern Lights and Solar Sprites 58
7/��������
Grades 5-6
· With a slight variation in the baseball model above, older students can gain anunderstanding of how the NAI also collects and measures particles based on composition.Each of the quadrants will need to have specific ball colors, but now will need to havedifferent types of balls that match the color. For example, if the left outfield balls are blue,this time you would need to have blue lacrosse, tennis, and baseballs. Each type of ballrepresents the different elements that are most commonly found in the plasma; nitrogen,oxygen and hydrogen. It is important to note, that each quadrant would have a trend orpattern as to the makeup of its particles. For example, the right outfield would have mostlyhydrogen with some nitrogen and oxygen. The assignment of types of balls per quadrantshould not be random.
�����������
The students will gain an understanding of how scientists use instruments to collect, andmeasure information. The students will understand that scientists have adapted instrumentsto collect information about items in space that we can not always see through the use ofremote sensing. The Neutral Atom Imager is an example of an instrument that collects andmeasures particles that are not visible to us on earth.
Scattergram # 1
Directions: The students should make a dot in each quadrant for each of the balls that was throwninto the catcher from that direction.
Left outfield Right outfield
Left infield Right infield
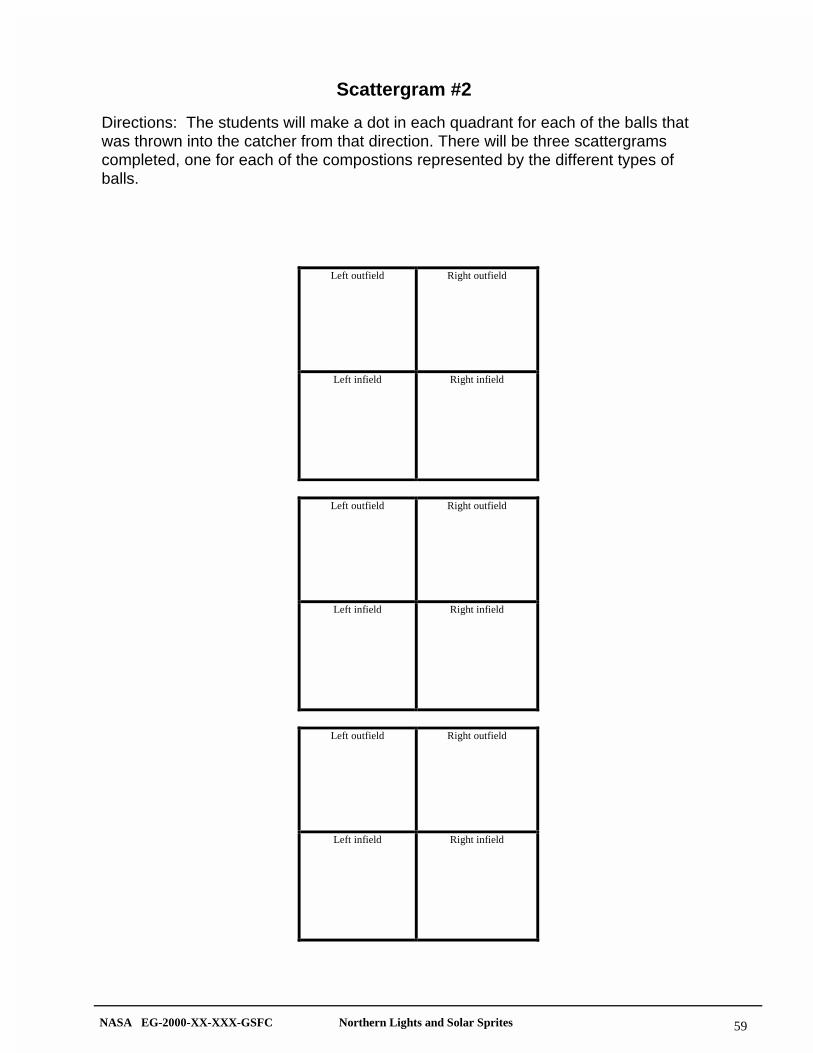
NASA EG-2000-XX-XXX-GSFC Northern Lights and Solar Sprites 59
Scattergram #2
Directions: The students will make a dot in each quadrant for each of the balls thatwas thrown into the catcher from that direction. There will be three scattergramscompleted, one for each of the compostions represented by the different types ofballs.
Left outfield Right outfield
Left infield Right infield
Left outfield Right outfield
Left infield Right infield
Left outfield Right outfield
Left infield Right infield
NASA EG-2000-XX-XXX-GSFC Northern Lights and Solar Sprites 60
>���������������� �������������� ��
������������
What does the Ultraviolet Imager on the IMAGEsatellite do? Do you remember using a "magicdecoder " to find hidden messages? Thesedecoders worked by having you look through acolored filter to reveal the hidden message. Yourdecoder absorbed the parts of the picture in yourcolor and only the other colors were visible. Inthese lessons, the students will experiment withusing color filters. Then the students will see howthe sun's light can be broken into many colorsthrough the use of a spectrograph. The studentswill learn that some light is not visible to our eyes,but could be ultraviolet. It is ultraviolet light that isused in satellites to make images of things we cannot normally see. The Extreme Ultraviolet Imager(EUV) and the Far Ultraviolet Imager (FUV) areboth highly specialized cameras that filter outextraneous light, recording images only throughspecific light energy.
!"�������
• The students will explore how theuse of filters can change what yousee.
• The students will explore thatvisible light can be divided into aspectrum of colors.
• The students will explore that not alllight is visible, for exampleultraviolet.
• The students will explore thatinstruments like the FUV and EUVuse ultraviolet light to make imagesof items in space.
� ��� ���
Crayola crayonsPaper- whiteRed Cellophane- Available at Michael's Craftstores (store locations athttp://www.michaels.com/craft/online/home) orBen Franklin Craft Stores (store locations athttp://www.benfranklinstores.com/newpage/bfcrafts.htm)
Diffraction grating - (can be ordered from ArborScientific - use lens of Rainbow glasses; orEdmund Scientific (1-800-728-6999 orhttp://www.edsci.com )
Shoe box with lidIndex cards (3x5)ScissorsTapeRubber bands
Prism - Equilateral (can be orderedfrom Arbor Scientific)
UV Beads - these are beads thatchange color in the presence of UltraViolet light and are available fromArbor Scientific at (1-800-367-6695 orhttp://www.arborsci.com/catalog.htm)
- bag of 200 beads for $5.95
NASA EG-2000-XX-XXX-GSFC Northern Lights and Solar Sprites 61
%���������
• The students will be creating their own magic decoders. Each student will need to write amessage in blue or purple crayon very lightly on a 3x5 index card. Then each student willneed to color over the message using red, orange and yellow crayons to hide theirmessage. Have the students exchange messages and give them a decoder (redcellophane) to find the message on their new paper. If the hidden messages are donecarefully, the messages should be hard to decode without the filter. The FUV and EUVinstruments use this same filtering mechanism when collecting information in space.
• What does a spectroscope do? A spectroscope demonstrates white light split into itscomponent colors. The students will need to cut an opening at each end of the box thesame size as the rainbow glass lens or the diffraction grating. Next, cut an index card inhalf, and tape the two halves over one cut opening creating a vertical slit (about 3/16"wide). Cover the other opening by taping the lens of the rainbow glasses or the diffractiongrating on. (The students may find that they need to rotate the diffraction grating so thatthe spectrum extends in both directions from the slit.) Place the lid on the box and userubber bands to hold the lid on. The students will need to point the box at a light source(never the sun!) and look through the diffraction grating to see the spectrum of colors,which should be displayed on the side of the box. Can the students see seven separatecolors or do some blend together? Have the students draw and label the colors of thespectrum observed, in the center of a piece of white paper. Then students can hold theirspectroscopes up to other light sources, draw the observed spectrum, and compare theresults.
• How does the visible light split into colors? To demonstrate this, you will be modifying thespectrograph made in the previous activity. Carefully remove the rainbow glasses ordiffraction grating, this opening will now become the viewing opening. Move one of theindex cards at the other end to widen the slit for the sun's light to enter. This next part getstricky and takes a lot of adjustments, but it makes it easier for group demonstrations andlongevity of the equipment. Locate the approximate mid-point of the inside of the lid, andusing long pieces of tape suspend the prism so that it hangs down low enough to be visiblethrough the slit in the side. You made need to put the lid on the box and make adjustmentsto the location and rotation of the prism several times until the spectrum is visible on theinside of the lid, close to the viewing opening. Once you have the prism set, add extratape to hold it securely. This instrument operates by pointing the side of the box with theslit (or the lens) toward the sun, looking through the viewing opening toward the lid and bymaking simple changes in the angle of the box toward the sun until you see the spectrum.
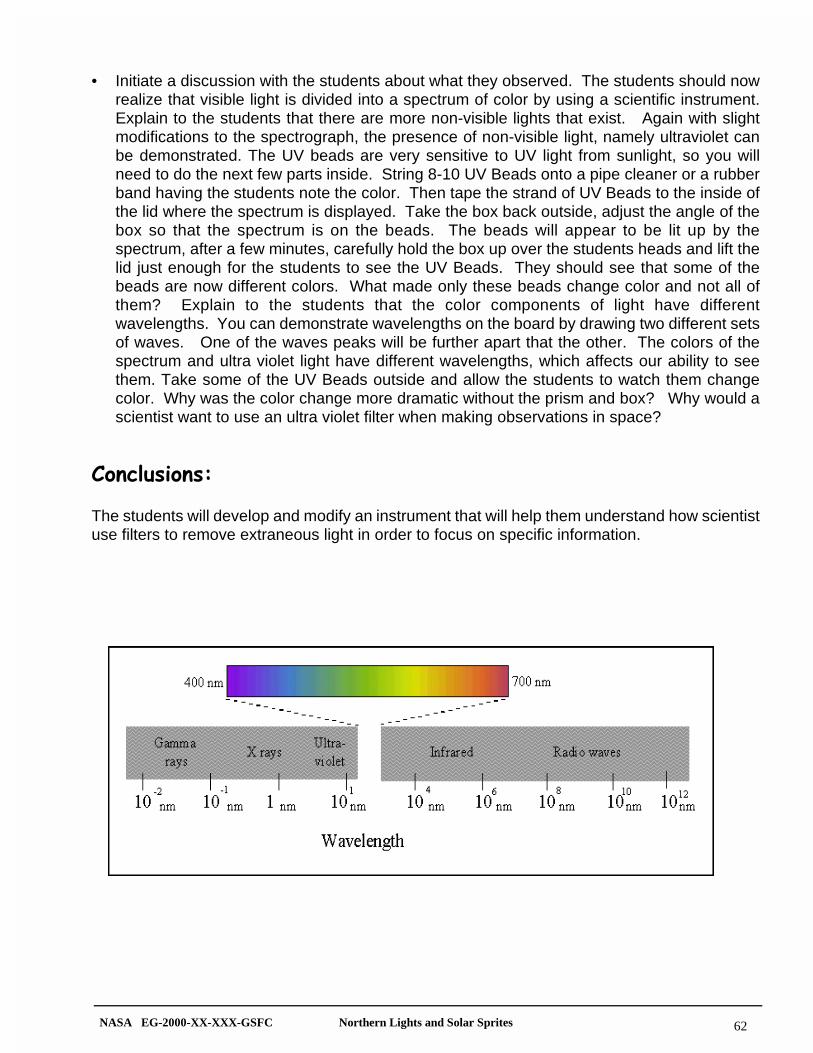
NASA EG-2000-XX-XXX-GSFC Northern Lights and Solar Sprites 62
• Initiate a discussion with the students about what they observed. The students should nowrealize that visible light is divided into a spectrum of color by using a scientific instrument.Explain to the students that there are more non-visible lights that exist. Again with slightmodifications to the spectrograph, the presence of non-visible light, namely ultraviolet canbe demonstrated. The UV beads are very sensitive to UV light from sunlight, so you willneed to do the next few parts inside. String 8-10 UV Beads onto a pipe cleaner or a rubberband having the students note the color. Then tape the strand of UV Beads to the inside ofthe lid where the spectrum is displayed. Take the box back outside, adjust the angle of thebox so that the spectrum is on the beads. The beads will appear to be lit up by thespectrum, after a few minutes, carefully hold the box up over the students heads and lift thelid just enough for the students to see the UV Beads. They should see that some of thebeads are now different colors. What made only these beads change color and not all ofthem? Explain to the students that the color components of light have differentwavelengths. You can demonstrate wavelengths on the board by drawing two different setsof waves. One of the waves peaks will be further apart that the other. The colors of thespectrum and ultra violet light have different wavelengths, which affects our ability to seethem. Take some of the UV Beads outside and allow the students to watch them changecolor. Why was the color change more dramatic without the prism and box? Why would ascientist want to use an ultra violet filter when making observations in space?
�����������
The students will develop and modify an instrument that will help them understand how scientistuse filters to remove extraneous light in order to focus on specific information.
NASA EG-2000-XX-XXX-GSFC Northern Lights and Solar Sprites 63
>������;������� ���� ������������������� ��
������������
What does the Radio Plasma Imager on theIMAGE satellite do? Scientists can not go into allareas of space to collect information, so a processcalled remote sensing is used. Remote sensing isdefined as collecting information about an objectwithout touching that object. Remote sensing is alsoused frequently here on Earth. When a traffic officerwants to determine the speed of a car, a radar gun isaimed at the vehicle. The radar sends radio waves tothe car, which are reflected off the metal in the car,and sent back to the radar gun's receiver. The radargun then figures out the distance the car has traveledand the speed of the car. The IMAGE satellite'sRadio Plasma Imager (RPI) calculates the distanceand velocity of electrically charged clouds (calledplasmas) and their densities (how many particles) inmuch the same way. The activities below begin toexplore how radar works through echoes, wavepatterns, and finally how the data is collected andorganized to form images.
!"�������
• The students will explore howwaves move away from, and thenbounce back to the source, in theform of echoes.
• The students will explore how theelapsed time of the echo waves canbe used to determine distance.
• The students will explore howscientists use this information toproduce images that represent thedistances of things in space.
� ��� ���Slinky - (two of the same size)StopwatchMeter stick or measuring tapeClear dish or plastic bowlWaterClayBB, ball bearing or rockHot plate or overhead projectorStudents
+�0�#�����Magnetopause- The boundary of aregion surrounding the Earth wherethe pressure from the solar wind isjust as strong as the pressure of theEarth’s magnetic field.
Plasmapause- The boundary of aregion surrounding the Earth in theshape of a donut with the Earth in thecenter. This region contains fastmoving atoms trapped in the Earth’smagnetic field, that rotate with theEarth every 24 hours.
Note to Teacher:
Always make it very clear to students that sound waves and light waves are not physically the same.Sound waves are created by pressure changes in a gas and travel at the speed of sound. Light wavesand radio are caused by changes in electric and magnetic fields and travel at the speed of light. It isvery common for students and adults to think of these as the same phenomena.
NASA EG-2000-XX-XXX-GSFC Northern Lights and Solar Sprites 64
%����������
• The students are going to participate in a game where the use of echoes will help themdetermine another child's location. Choose one student to be the "bat" and the rest of thestudents will be the "insects". Set up a perimeter boundary to limit the distance the batand the insects will be from each other. Place a blindfold on the bat and have the insectsselect a spot within the boundaries to stand still. The bat will begin to "chirp" and theinsects will "buzz". Each time the bat makes its chirping noise, the insects must respondby buzzing. Direct the bat to find his meal of an insect by moving in the direction of a buzz.The students should be discouraged from harming each other. Allow several students tobe the bats, saving time for discussion at the end. How were the bats able to find theinsects without seeing them? The students should be able to explain how they followedthe sounds they heard to the location of the "insects".
• To further the students experiences with echolocation and remote sensing go to the "Echothe Bat" site at http://imagers.gsfc.nasa.gov//index.html . This site offers a story of a batthat uses echolocation to find his food. This site also has the students go on an interactivejourney to find Echo, who can not find the cave with the rest of his family. During thejourney to find the cave, the students use radar images of the ground and learn to identifygeographic features from these satellite pictures.
• How do the sounds get from one place to another? Have two students kneel on theground facing each other. It is best if it is a bare floor - no carpeting. (The distance willdepend on the length of the slinky that you are using.) The slinky should be stretched outon the floor between the two students, but not so taunt that it doesn't have flexibility. Haveone student gently start to move his arm back and forth parallel to the floor creating wavesin the slinky. Help the students see that this "wave" motion represents how sound movesfrom one place to another. When the students were playing the bat and insect game, theywere able to hear the insects because the sound traveled in waves to the bat. Since thesound waves traveled in a straight path, the bat could determine what direction theinsects' sounds were coming from and move toward the food. As a further example ofwaves moving in straight lines, place some water in a clear glass or plastic dish. Placethe dish on an overhead projector, allowing the water to become calm. Drop a BB or rockinto the water, and have the students observe the path of the waves. How do the wavesmove? What is the path that they take?
• When scientists are using remote sensing to explore areas in space, they need to "finetune" the use of echolocation to include speed, distance and elapsed time. The studentswill use the slinky to determine how the elapsed time in which a wave travels gives someinformation about the distance the wave has traveled. Once again, the two students willneed to kneel apart, keeping the slinky taunt. One student will need to begin a singlewave that can travel across the slinky, bounce off the other student and return to theoriginating student. This time the students will need to time how long it takes for the waveto travel from one student to the other and back to the originating student. What wouldthe students' predictions be if the ends of the slinky were farther apart or closer together?The students should be made to see that the distance is covered in half the round triptime.
NASA EG-2000-XX-XXX-GSFC Northern Lights and Solar Sprites 65
• So how does the Radio Plasma Imager really use this echolocation to study distantlocations within the Earth's magnetosphere? The students will use the slinky in the sameway again. This time, have a student grab the slinky (without picking it up) at midpointand allow the wave to bounce back from that point to the originating student. Thestudents should record the time it takes for the wave to bounce back to the originatingstudent. Did this take more or less time than having the wave move across the length ofthe slinky? Have the students repeat this part of the activity creating a new "object" forthe wave to bounce off of by grabbing the slinky at different places. The students shouldstill be recording the elapsed time. Initiate a discussion with the children about what theyhave seen; what would happen if there were no "object" where the wave was sent, wouldthere be an echo? The students should gain an understanding that the closer the objectis, the quicker the echo wave can return. Conversely if an object were further away, theecho wave would need more time to reach you. The satellite knows how fast the radarsignal travels in space, so if we time how long takes for the signal to return, we can figureout how far it traveled and use this information to get a image of the object. The RPIinstrument is constantly sending out waves and receiving echoes. From the return of theechoes, it can determine where specific clouds of particles are located in themagnetosphere and how many particles are in a certain area.
• When the RPI is sending out its waves, the waves are sent in all directions. Sometimes,there may be multiple boundaries of particles that will send echoes back from twodifferent directions. Both of the waves will bounce back in straight lines, to the originaltransmitter. This can be demonstrated by using a clear glass or plastic dish, overhead,BB's, clay and water. Set up the dish with water in it, but place two clumps of clay thatwill remain stationary. Drop the ball bearing into the water so that it is not equidistant fromboth clumps of clay, and have the students carefully watch the first wave to move out.The waves circling out from the BB's will bounce off the clay and move back to thesource, but they will not reach it at the same time.
• Students should report their findings in their Science Learning Logs. The students mayfind it helpful to draw pictures of what they observed.
7/����������?*� ����2$-@
• When the RPI instrument sends out waves, it looks at location plots as well as thenumber of particles within an area (density). Have four students each grab an end of aslinky. Then have the students stretch the slinkys out to two different lengths, each groupmaking waves at the same time and compare the apparent speeds of the wave. Themore stretched out slinky can represent a less dense area of plasma, while the lessstretched out area can represent a more dense area of plasma. Radio waves travel atslower speeds through dense plasmas than through less dense ones.
NASA EG-2000-XX-XXX-GSFC Northern Lights and Solar Sprites 66
• In order to demonstrate to the students how the RPI makes use of multiple echoes, thestudents will pretend they are the boundaries of a plasma cloud, the RPI instrument andits waves. Have the students form two ovals one inside the other, facing each other.Assign one student to become the RPI instrument, and to stand between the two ovals,but not centered between the two groups. Two more students will need to be the wavesthat will be sent out from the RPI. The waves should stand on either side of the RPI, andwhen the instrument is ready, the waves should move away from the RPI and toward theother students. Since waves move in straight lines, the student waves should onlybounce back if there is a student there to bounce off of. Allow the rest of the class towitness that when the RPI's wave hits an object that is close-by, the echo will returnsooner than the echo that bounced off the student who was further away.
• By plotting the echoes you can build up a map of what is around you. A student can playthe role of the RPI instrument by standing in the middle of a coordinate graph. You willneed to make a coordinate graph using cardinal directions on the floor with masking tape(or purchase a shower curtain liner, make your coordinate graph on it with tape - fold upand save when done!) The student standing at the center of the graph will receive theechoes as listed in the attached chart. Then the student plots the echo points on thecoordinate graph using objects that are placed on the coordinate graph. When all theechoes have been recorded, a string or yarn can be wrapped around objects to show theboundaries of the area being studied.
What does the RPI's data tell us?• When the RPI is sending out sound waves, there would only be a returning echo if there
were something in that part of space to bounce the wave back. In this next activity, thestudents will be using two different models of the Earth, its magnetopause and itsplasmapause to demonstrate how the RPI's data would reflect the effects of a solar storm.We are going to suppose that the orbit of the IMAGE satellite will be slightly altered for thepurposes of this demonstration. Display the normal model of the earth on the overhead.Have students pretend to become the boundaries for the magnetopause and theplasmapause as shown on the model (remind the students to stay where they wereplaced). Three students will pretend to be the IMAGE satellite at its three locations onthe orbit. Select six students to be the sound waves that will be sent from the satellite ateach location on its orbit. Begin with location A, have the sound waves move away fromthe satellite and move toward the boundaries, and carefully bounce back to the satellite.The students should notice that one wave returned to the satellite in a shorter amount oftime. Have the wave that returned first hold up a colored sheet of paper. All three of thestudents need to stay in their locations while the other waves are sent from the othersatellite locations. Repeat the activity for the other two satellite locations. The studentsmust remain in their locations for the second half of the activity.
• Align a second group of students to show the boundaries of the magnetopause and theplasmapause. This time, the teacher will become the solar wind and "reshape" theboundaries as shown in the "storm" model. Have the students repeat the wave and echodirections for the three satellite locations in the new model, noting which wave arrivedback at the satellite first. Keep the students in their spots while you discuss what theyhave seen. Show the amplitude/time charts and have the students discuss how theinformation in these charts was modeled by the students.
NASA EG-2000-XX-XXX-GSFC Northern Lights and Solar Sprites 67
*� ����3$-
• Go back and look at the amplitude/time plot charts with the students, are they able to notice apattern? Why does the order of the waves fom the magnetopause or plasmapause change oroverlap? How can the elapsed time of the echo wave be used to determine the distance of theboundary? If given other amplitude/time plot charts could the students predict the boundaries of themagnetopause and the plasmapause?
�����������The students will use hands-on experiences to determine how radio waves and echoes can be used tocalculate distances. Students will then see how a scientist uses this information to produce an imagethat represents what is seen through remote sensing.
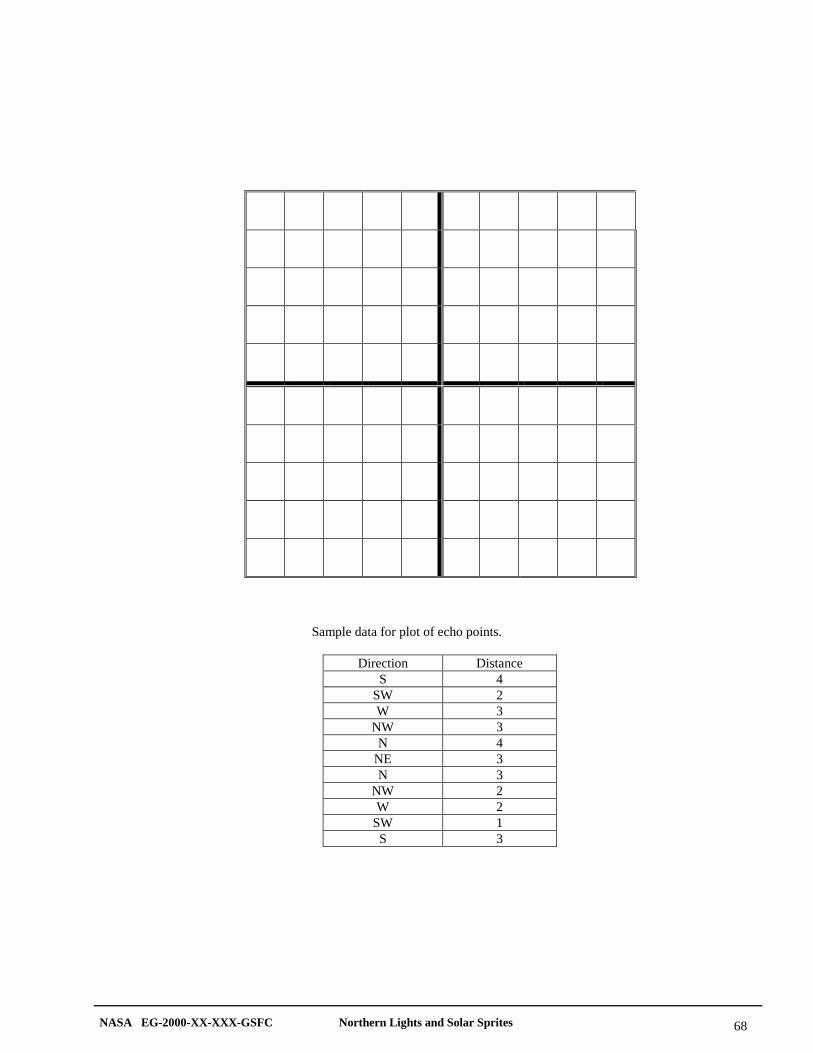
NASA EG-2000-XX-XXX-GSFC Northern Lights and Solar Sprites 68
Sample data for plot of echo points.
Direction DistanceS 4
SW 2W 3
NW 3N 4
NE 3N 3
NW 2W 2
SW 1S 3